1 1
1:1
K
A
1
2
4
6
3
5
1
2
4
6
3
5
B
C
D
E
F
G
H
A
B
C
D
E
F
G
H
技术要求(版本号:B,2023-06)
2.该说明书的幅面大小为: A5 ,未注直线尺寸公差应符合GB/T1804-v;
4.说明书警语及认证标志应满足CE/UL标准,CE:警语部分大写字母高度不低于3mm,CE标志不低于5mm,WEEE标志不低于7mm;
UL:大写字母字高不小于1/12”(2.11mm),小写字母字高不小于1/16”(1.6mm),“IMPORTANT SAFEGUARDS”,“SAVE
THESE INSTRUCTIONS”等词,其字高不小于3/16”(4.8mm),IMPORTANT SAFEGUARDS 必须在最前面。
5.产品应符合QMG-J53.021《产品说明书技术条件》的有关要求。
6.有ROHS指令要求的物料应符合美的企业标准QML-J11.006《产品中限制使用有害物质的技术标准》。
1.文字图案印刷颜色为: 黑色 ,印刷字体需清晰可见,文字不能粘到一起;
广东美的生活电器制造有限公司
会 签
郭迁强 李艳
古广君
古广君
2024-07-12
制 图
设 计
校 对
审 核
标准化
审 定
日 期
标记
处数 更改文件号 签 字 日 期
电暖器
说明书
重点
校对项
1.物料编码
2.版面尺寸
3.材质标注
4.颜色标注
5.客户型号
6.产品名称
7.产品参数
8.电压功率
-----
-----
9.单位符号
10.认证标志
16.商标LOGO
11.回型标志
15.目录及
页码
12.ROHS标志
13.警语警语
及字高
14.控制面板
及功能
3.该说明书的装订方式为: 钉装 ;[70P以下为钉装,70P以上为胶装(特殊要求除外)]
PELONIS-NY1507-24PR(PSHO07JR4AGB)-0501
16161000A26732
材料: 80g双胶纸
认证图标
单位表述
产地表述
变更要求
000000
0000000
UL只有C+US或无ETL有C或US或C+US大于5mm
说明书、保修卡类
交流电: 频率: 功率: 容量: 电流: 压强:V~
MADE IN CHINA Made in China Made in P.R.C
Hz W mL/L A Pa/kPa/MPa 长度:mm/cm/m 时间:s/min/h重量:kg直流电:
大于5mm 大于5mm 大于5mm 大于7mm GS图标无高度要求,印刷可见即可
标准元素核对表(此表仅用于印刷品制作过程核对标准内容,非印刷内容)
PAP
22
图纸变更需要核实变更内容点以及涉及的物料和MO单,尤其关注92的在途MO单
A/更新保修页地址/李艳/2024.7.15
B.1/客户更新/郭迁强/20248-29
User Manual
Oil Filled Heater
MODEL: PSHO07JR4AGB
Please read this manual carefully and keep it for future reference.

Thanks for Choosing
PELONIS!
Your support is pivotal and
we hope you enjoy it!

Contents
Important Safeguards
Product Overview
Quick Start Guide
Operating Instructions
01
04
05
06
1 2
1 3
1 1
Troubleshooting
Cleaning And Maintenance
Specifications

01
Important Safeguards
When using electrical appliances, basic precautions should always be
followed to reduce the risk of fire, electric shock, and injury to persons, and
hyperthermia, including the following:
PLEASE READ AND SAVE THESE
IMPORTANT SAFETY
INSTRUCTIONS
Read all instructions before using this heater.
This appliance is not intended for use by persons (including children) with
reduced physical, sensory or mental capabilities, or lack of experience and
knowledge, unless they have been given supervision or instruction
concerning use of the appliance by a person responsible for their safety.
Children should be supervised to ensure that they do not play with the
appliance.
CAUTION: Some parts of this product can become very hot and cause burns.
Particular attention has to begiven where children and vulnerable people are
present.
CAUTION-Risk of fire-Do Not Operate without Legs (Base) Attached.
1.
2.
3.
4.
5.
CAUTION

Do not operate any heater with a damaged cord or plug or after the heater
malfunctions, has been dropped or damaged in any manner. Discard heater,
or return to authorized service facility for examination and/or repair.
This heater is hot when in use. To avoid burns, do not let bare skin touch hot
surfaces. If provided, use handles when moving this heater. Keep electrical
cords, furnishings and any other combustible materials, such as furniture,
pillows, bedding, papers, clothes, and curtains at least 3 feet (0.9 m) from the
front of the heater and keep them away from the sides and rear.
Do not use outdoors.
This heater is not intended for use in bathrooms, laundry areas and similar
indoor locations. Never locate heater where it may fall into a bathtub or other
water container.
A heater has hot and arcing or sparking parts inside. Do not use it in areas
where gasoline, paint, or flammable liquids are used or stored.
Extreme caution is necessary when any heater is used by or near children or
invalids and whenever the heater is left operating and unattended.
Always unplug heater when not in use.
Do not run cord under carpeting. Do not cover cord with throw rugs, runners,
or similar coverings. Do not route cord under furniture or appliances. Arrange
cord away from trac area and where it will not be tripped over.
To disconnect heater, press the button to off, then remove plug from outlet.
Do not insert or allow foreign objects to enter any ventilation or exhaust
opening as this may cause an electric shock or fire, or damage the heater.
The heater must not locate immediately below a socket-outlet.
WARNING: Do not use this heater in small rooms when they are occupied by
persons not capable of leaving the room on their own, unless constant
supervision is provided.
This heater is filled with a precise quantity of special oil. Repairs requiring
opening of oil-container are only to be made by the manufacturer or his
service agent who should be contacted if there is an oil leak. When scrapping
the heater, follow the regulations concerning the disposal of oil.
1.
2.
3.
4.
5.
6.
7.
8.
9.
10.
11.
12.
13.
WARNING
02

To prevent a possible fire, do not block air intakes or exhaust in any manner.
Do not use on soft surfaces, like a bed, where openings may become
blocked.
Use this heater only as described in this manual. Any other use not
recommended by the manufacturer may cause fire, electric shock, or injury
to persons.
Always plug heaters directly into a wall outlet/receptacle. Never use with an
extension cord or relocatable power tap.
Hyperthermia can result in death. Symptoms of hyperthermia include high
body temperature, headache, nausea, vomiting, tiredness, dizziness, fainting,
and rapid pulse. If you begin to experience symptoms related to
hyperthermia, turn off the heater and seek medical attention.
To avoid excessive room temperatures which can cause hyperthermia: DO
NOT leave product running unattended in a confined space around infants, or
individuals with reduced physical, sensory, or mental capabilities.
This appliance has a polarized plug (one blade is wider than the other).
To reduce the risk of electric shock, this plug is intended to fit into a polarized
outlet only one way. If the plug does not fit fully into the outlet, reverse the
plug. If it still does not fit, contact a qualified electrician. DO NOT attempt to
defeat this safety feature.
14.
15.
16.
17.
18.
19.
03
SAVE THESE INSTRUCTIONS
04
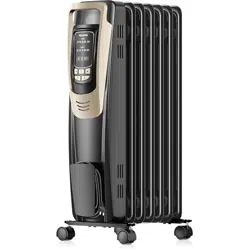
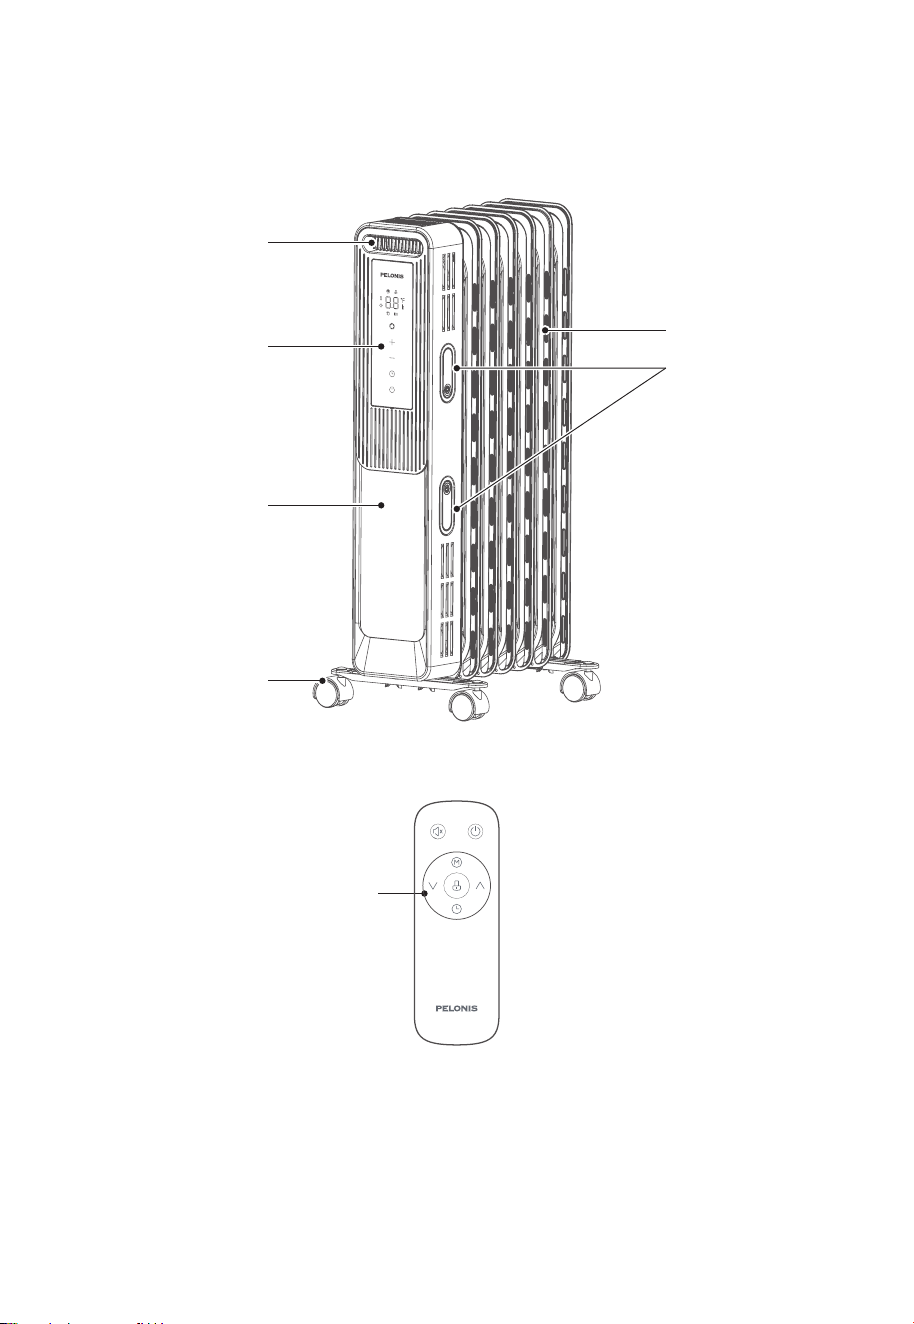
Product Overview
Accessories
Handle
Control Panel
Control Box
Caster Assembly
Cord Wrap
Fin
[Note]
A
ll the pictures in this manual are for explanation purpose only. Any discrepancy between the
real object and the illustration in the drawing shall be subject to the real object.
Remote
Control
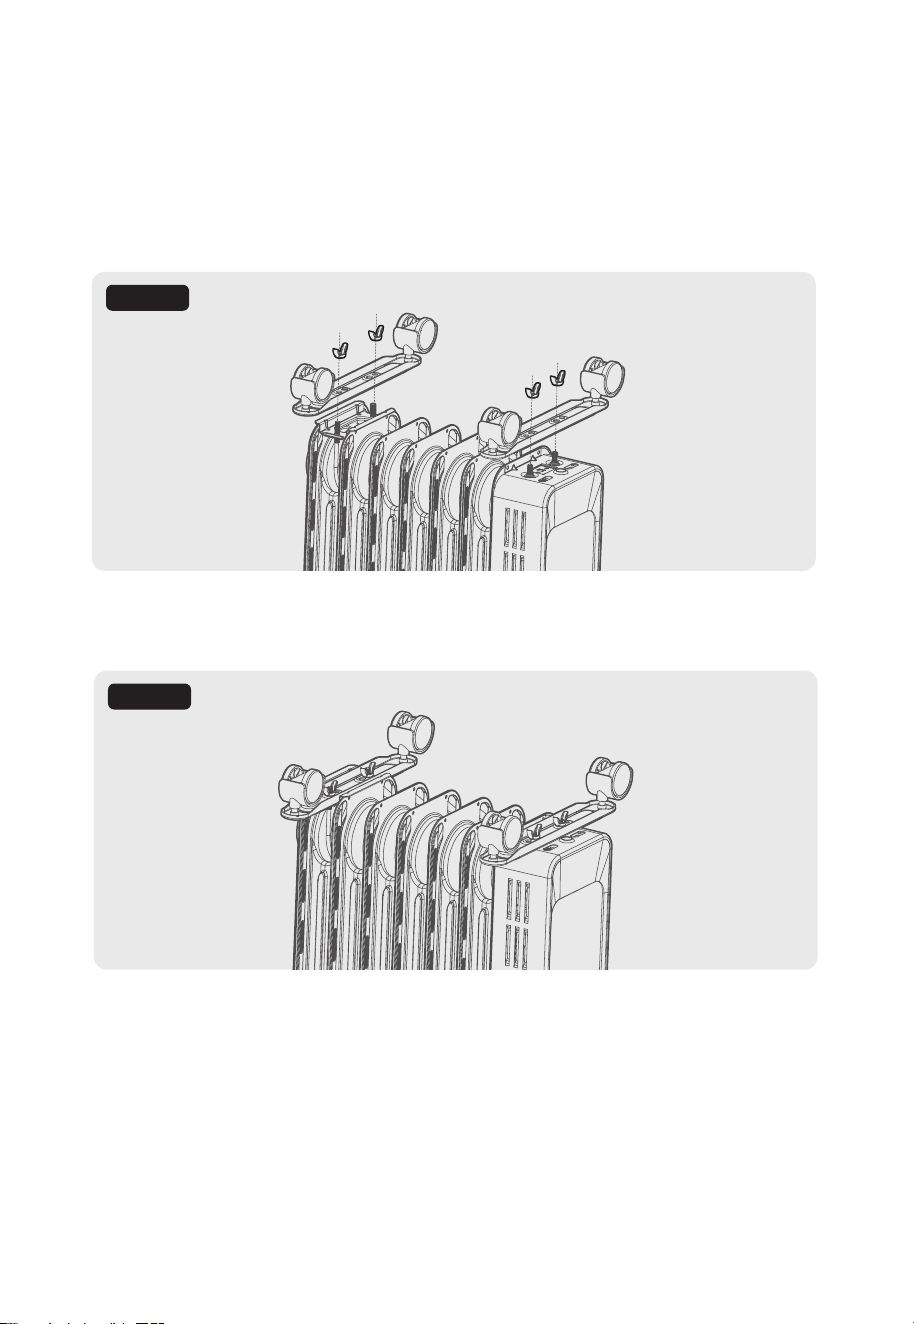
Figure 1
05
Quick Start Guide
Installation of the caster plate assemblies
Place the heater
body inversely with the bottom upward.
Tighten two caster plate assemblies to the body with wing nuts as shown in Figure 1:
1.
2.
Figure 2
P
lace the heater upright after installing the caster plate assemblies.
Note: Wheels should be touching the ground.
3.
06
1.
2.
Operating Instructions
Inspect Before Use
The power cord shall not be damaged or fractured.
Please verify the rated current of the receptacle is in line with the requirements in the
table above and is equipped with a safety grounding device before use; otherwise,
replace the receptacle.
[Note]
To use the machine for the first time or to re-insert the plug, please pay attention to check
whether the plug is firmly inserted into the receptacle.
Inspection Method
Insert the power plug into the socket and power on the unit; after approx 30 mins, turn
off and pull out the plug. Check whether the plug pins are hot; replace the receptacle if
so (more than about 122°F) to avoid burning the plug or even causing a fire caused by
overheating of the receptacle due to poor contact.
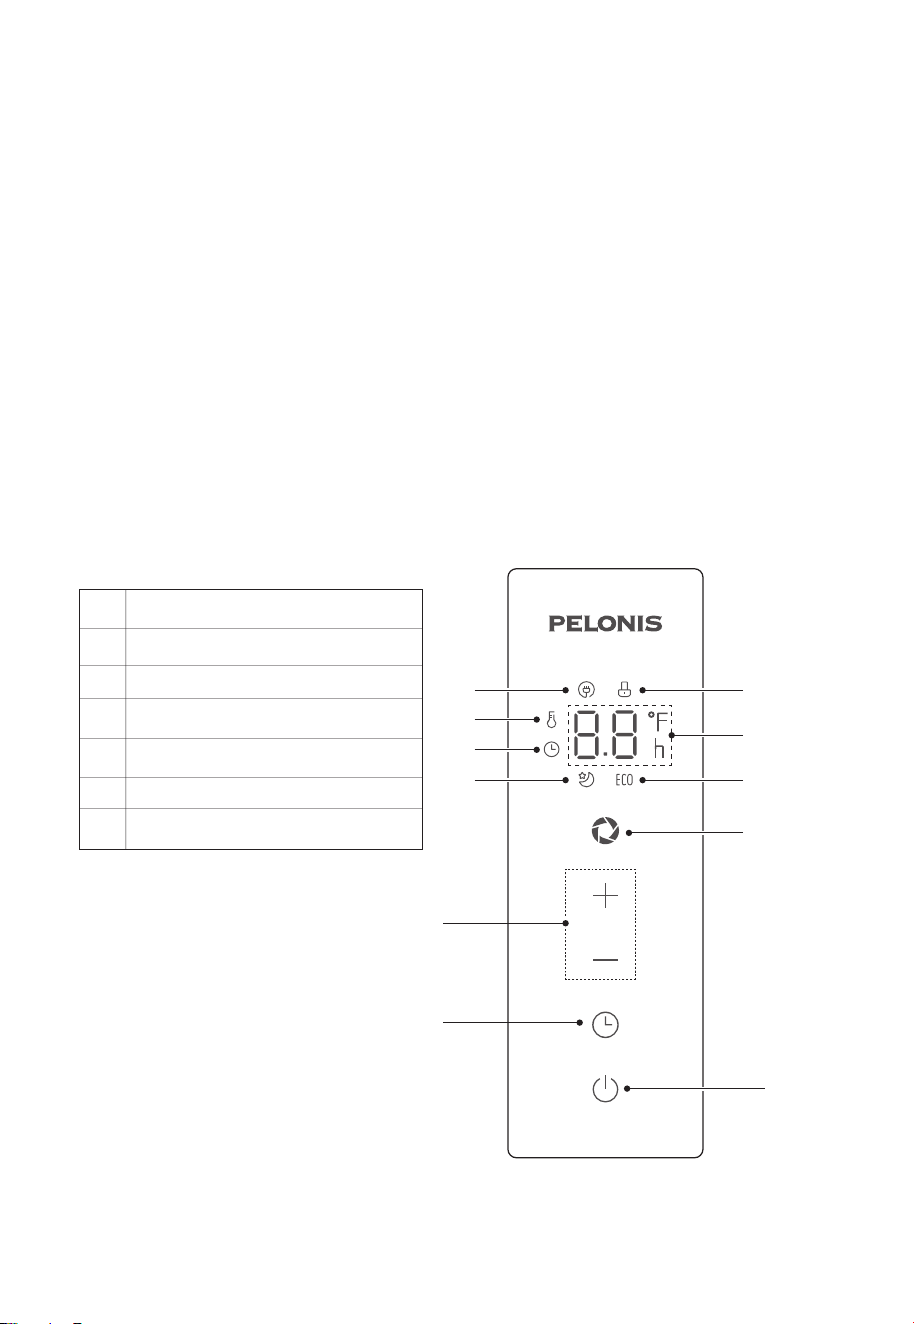
Temp/
Time Adjustment
Timer
ON/OFF
Mode
Power indicator light
1
H
eating indicator light
2
T
imer indicator light
3
Sleep mode indicator light 4
Children lock indicator light5
D
isplay temperature and timing
6
EC
O mode light
7
1
2
3
4
5
6
7
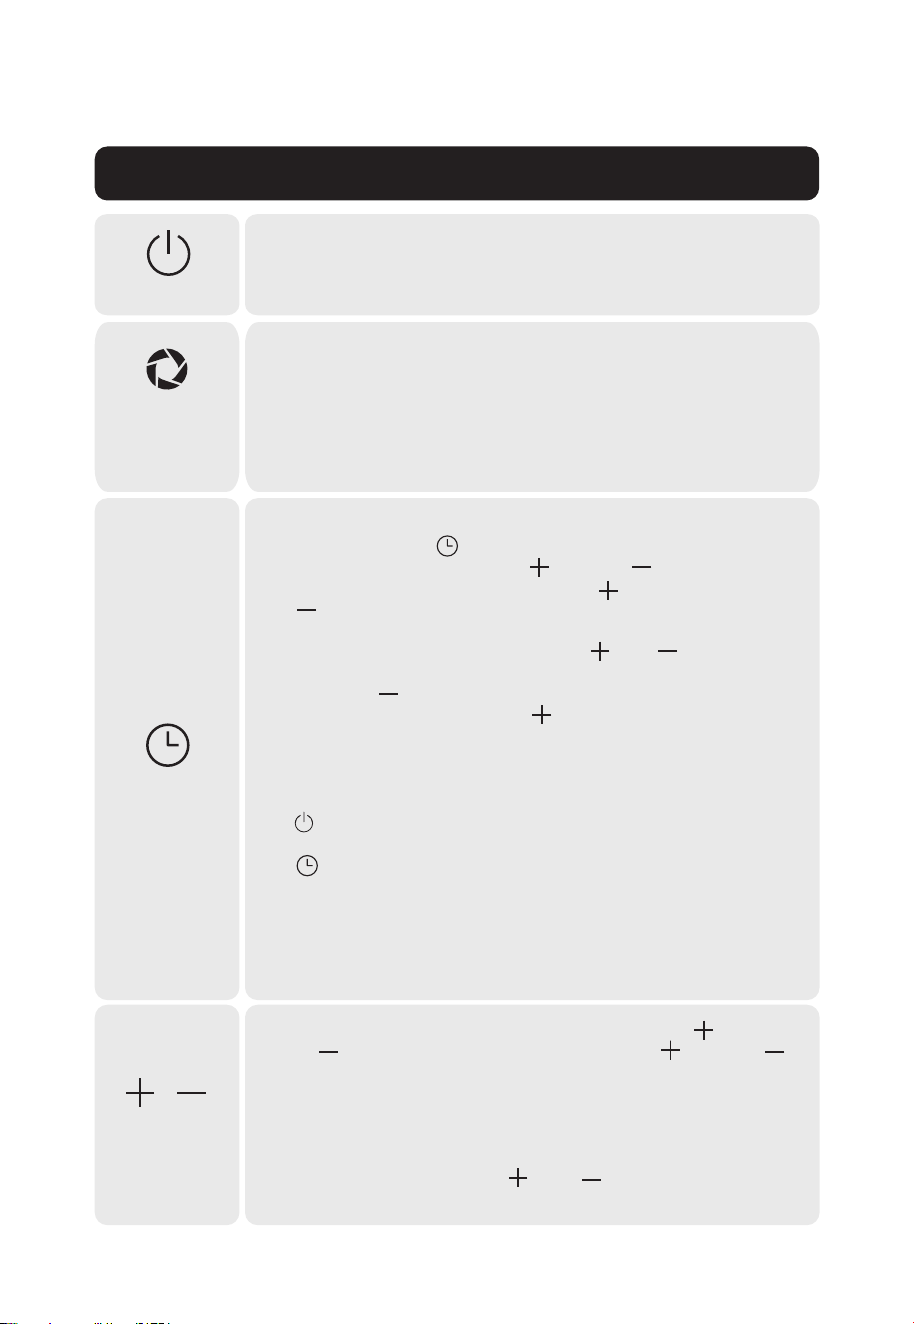
• Pr
e
ss "On/OFF icon" to turn the unit on/off.
• After turning the unit off
it is recommended to unplug the
heater.
ON/OFF
• Repeatedly press "insert
Mode icon" to cycle through the
different modes:
H1 - Low Heat
H2 - Medium Heat
H3 - High Heat
ECO
Sleep
Mode
• Temperature setting: For work status, press on “ ” Key
or “ ” Key to set temperature; long press “ ” Key or “ ”
key to set the temperature rapidly;
Heater runs based on factory settings when memory
information is deleted for the first utilization or
self-inspection of the whole body; for factory settings,
high-gear temperature is set to be 95°F.
• Timing setting: Press the “ ” or “ ” button to increase or
decrease the set time duration for the timer on the heater.
Increase
Decrease
Timer
• Turn off at a set time
Press timing key “ ” gently to enter the interface to set
turn-off at a set time. Press “ ” key or “ ” key to set
timing alarm for turn-off; long press “ ” key or
“ ” key to rapidly set timing for turn-off; timing is up, the
apparatus is closed down.
A: Timing range is 0~24h; pressing “ ” or “ ” each time
means an additional or decreased 1 hour. If the set value is
0H, press “ ” key, and the setting time is changed to 24h;
if the set value is 24h, press “ ” key, and setting time is
changed to 0h. If the set value is 0h, timing is cancelled; if
such value is not 0h, timing is started. Exit the setting state
after 5 seconds of inactivity on the timer.
B: If the timing time is set well, press on-off key
“ ” for direct power off, with timing cancel.
C: After booting the timing, press the timing key
“ ” to check remaining timing duration at any time and
reset the timing. Within the timing range, if the heater stops
or is restarted under the temperature control status, the
timing is normal for timekeeping all the time. It is not
affected by stopping or restarting. In the case of shutdown
or power-off within timing range, the timing is reset.
Button Function Description
07

08
Safety protection function
If the indoor temperature (Th) exceeds 122°F, all output commands are terminated, the
buzzer gives off an urgent sound for 10 times and digital screen displays “FF”, with 75s
for 1Hz, whether standby or power-on. Even if the environmental temperature is less
than 122°F, the running or operation cannot be recovered, as long as the protection
exists; the only thing is to unplug the power cable, and then power up for operation.
Movement of the heater
To move the heater, turn it off first, and pull out the power plug; then push the body to
make the four casters below the body to roll.
Mute Function
Children Lock Function
It is effective in power on and standby mode. Press and hold the “ ” key and the
“ ” key for 3 seconds to activate or deactivate the children lock function of the
button. Alternatively, you can press the “ ” key on the remote control to activate or
deactivate the children lock function of the button. Remarks: When the child lock is
activated, you can click the “ ” button to turn off the heater; however, when the child
lock is active, you cannot turn on the heater and must first deactivate the child lock
before turning it on.
This mode is effective when turned on or in standby mode.
Long press the “ ” button on the control panel for 2 seconds to activate or
deactivate the mute function of the button.
Press the “ ” button on the remote control to activate or deactivate the mute
function of the button.
09
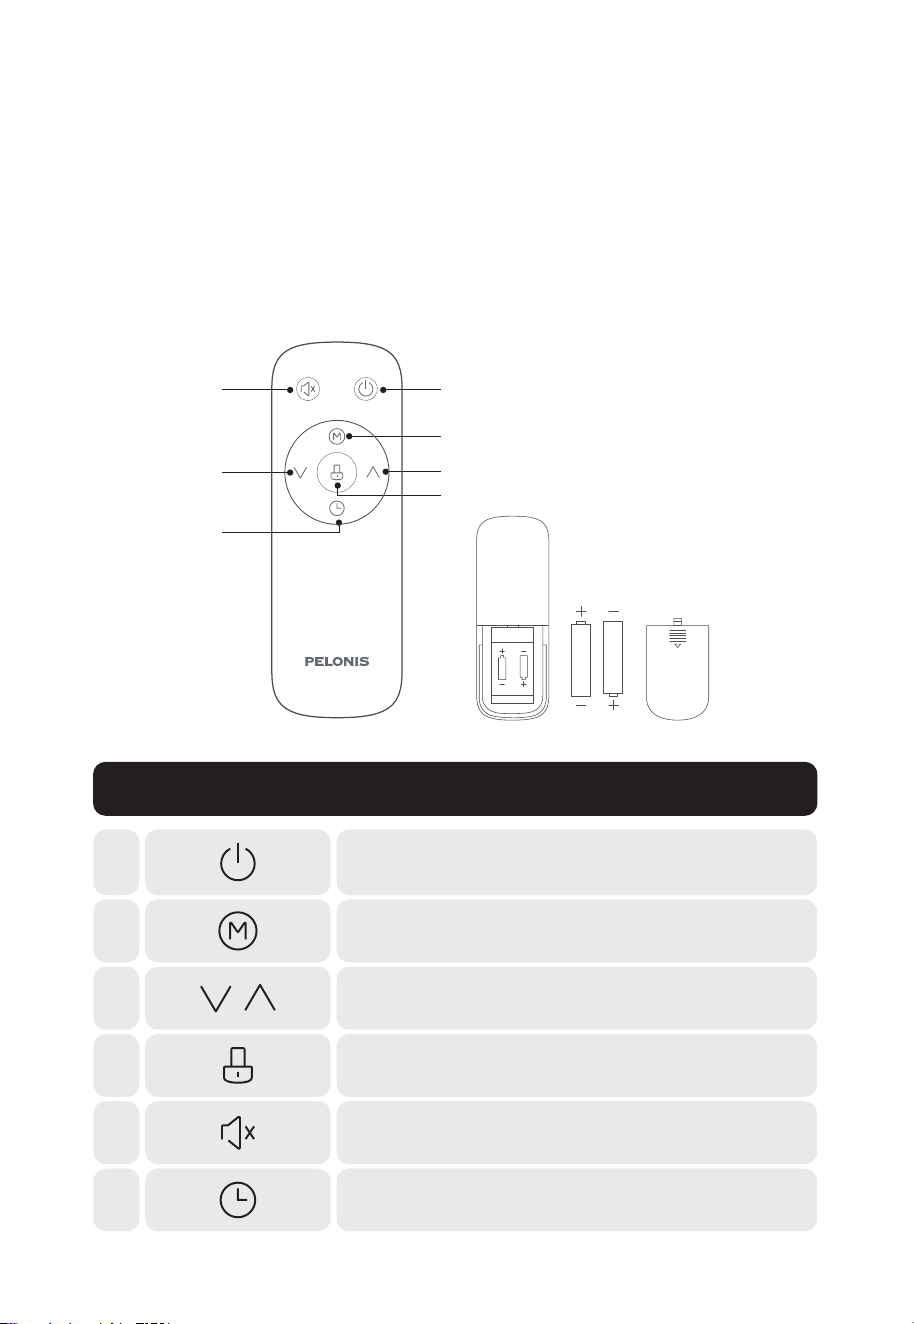
Remote Control Operation
• Point the remote control at the control panel of the heater and press the desired
button. The remote control will wok at distances of up to 15 ft. and at an angle of 30
deg. to the right/left of the control panel.
• The remote control does not support long button or combination button operations.
• Properly dispose/recycle old batteries per your local agency.
AAA Battery. 1.5V
Battery
1
2
3
4
5
6
3
KeyNo Function Description
• Child Lock ON/OFF
4
• Mute/Unmute
5
1
• ON/OFF
2
• Mode
3
•
U
se the symbols as depicted instead of the bullets
• Timer
6

10
Batteries (included)
[Note]
• Use manganese or alkaline batteries of type “AAA”. DO not use rechargeable batteries.
• Do not dispose of batteries in fire, batteries may explode or leak.
• Do not mix old and new batteries.
• Do not mix alkaline, standard (carbon-zinc) or rechargeable (nickel-cadmium) batteries.
• Slide to open the battery compartment cover.
• Insert the batteries, and make sure that batteries are placed as shown in Fig. 1:
• Slide the battery compartment cover into position as show in Fig. 2:
Fig.
1
Fig. 2

11
Troubleshooting
Operation of your appliance can lead to errors and malfunctions. The following table
contains
possible causes and notes for resolving an error message or malfunction. It is
recommended to read the below table carefully when experiencing an error or
malfunction. If the issue can't be resolved from the table please contact your local
service center.
Fault symptoms
The power indicator light does
not turn on and the device does
not work after connecting to the
power source.
The pl
ug is not inserted properly.
Please check if the plug is correctly
inserted into the receptacle.
The device suddenly stops
heating during operation.
The temperature has exceeded the
threshold of the limit switch. Please wait
for the device to cool down before using
it again.
The plug overheats or ignites.
T
he current overload of the receptacle or the
aging of the receptacle causes the contacts to
loosen. Please use receptacles that meet the
requirements and standards of their respective
countries or regions.
Burnt odor and inability to operate
(caused by the accumulation of
dust inside).
The machine is used in an environment with
a lot of dust or hair. Recommended to place
the machine in a clean and
well-ventilated area.
The temperature sensor is
not accurate.
The space heater is a local heating product,
and it is normal to have inconsistent
temperatures in different areas of the room
when in use.
Fault description

12
Cleaning And Maintenance
Always remove the plug from the receptacle and allow heater to cool.
Wipe heater with a soft, damp cloth. Do not use detergents and abrasives.
If the heater is not in use for an extended period of time, wind the cable around the
holder and store it in a dry place.
In case of a malfunction, do not try to repair the heater by yourself. It may result in a
fire hazard or electric shock.
1.
2.
3.

Specifications
Model
PSHO07JR4AGB
Power Supply
120V~, 60Hz
Rated Power
1500W
13

14
DATE OF PURCHASE:
PLACE OF PURCHASE:
(STAPLE SALES RECEIPT HERE)
NOTE: PROOF OF PURCHASE
IS REQUIRED FOR ALL WARRANTY CLAIMS
PRINTED IN CHINA
In the event of a warranty claim, questions, comments or if service is required for this
product, please contact us at the following:
For your records, staple your sales receipt to this manual and record the following:
SERVICE AND SUPPORT
Midea America Corp.
Parsippany, NJ 07054
Toll Free: 1-866-646-4332
Email us at: [email protected]

15
• Please read all instructions before attempting to use this product.
• Misuse, negligence, physical damage or accidents.
• Lack of maintenance (see instructions for proper maintenance).
• Repair by any unauthorized party during the warranty period.
• Damage caused by connection to an improper input voltage (see specification label on
your heater).
PELONIS warrants as limited herein to the original purchaser of retail that each new Pelonis
Product, shall be free of defects in material and workmanship for a period of one (1) year from
the date of original purchase. This one (1) year warranty is limited to the heating elements,
motor, and electric control circuit board.
In the event of malfunctions or failure of your Pelonis Product, simply deliver or send the
heater, postage prepaid along with PROOF OF PURCHASE, within the warranty period of one
(1) year, to PELONIS.PELONIS reserves the right to inspect the claimed defective part or parts
to determine if the defect or malfunction complaint is covered by this warranty. PELONIS
shall, within sixty (60) days after receipt of the product, at its option, repair and/or replace
the defective part or parts free of charge. This warranty shall only cover defects arising from
normal usage. PELONIS assumes no responsibility whatsoever if Product should fail during
the warranty period by reason of:
PELONIS makes no further warranties or representations, express or implied except those
contained herein. No representative or dealer is authorized to assume any other liability
regarding the Product. The duration of the implied warranty granted under State law,
including warranties of merchantability and fitness for particular purpose are limited in
duration should the duration of the express warranty grant it hereunder. PELONIS shall in no
event be liable for direct, indirect, special or consequential damages.
Some states do not allow limitations on how long an implied warranty lasts, and/or the above
limitations or exclusion may not apply to you. This warranty gives you specific legal rights
and you may have other rights which vary from state to state.
ONE (1) YEAR LIMITED WARRANTY