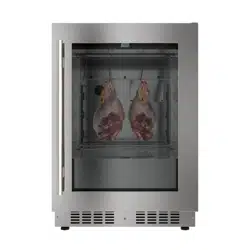
Undercounter Built-In / Freestanding
Dry Ager Refrigerator
Models: KM-DAR-34SS
USER MANUAL
Stay informed with the latest information for your
KoolMore Reserve Appliance.
Scan the QR code above to access the most recent user manual
on our website, which is constantly being updated and improved.
If you need any assistance or have questions, our customer support
team is here to help.
P- 718-576-6342 E- Suppor[email protected]
Please write down the model number and serial number below for future reference. Both numbers are located on the
rating label on the back of your unit or inside of the unit and are needed to obtain warranty service. You may also want to
staple your receipt to this manual as it is the proof of your purchase and may also be needed for service under warranty.
Model Number: ______________________________________
Serial Number: _______________________________________
Date of Purchase: ____________________________________
To better serve you, please do the following before contacting customer service:
If you received a damaged product, immediately contact the retailer or dealer that sold you the product.
Read and follow this instruction manual carefully to help you install, use, and maintain your unit.
Refer to the Troubleshooting section of this manual as it will help you diagnose and solve many common issues.

Contents
Safety ................................................................................ 4
Product Features ................................................................ 8
Installation ....................................................................... 10
Operation ....................................................................... 16
Maintanence ...................................................................... 24
Troubleshooting ................................................................ 27
Warranty ......................................................................... 29
4
GENERAL SAFETY
To reduce the risk of re, electrical shock or injury when using the appliance, follow basic precautions,
including the following:
WARNING:
• If you receive a damaged product, immediately contact your dealer or builder. Do not install or use
a damaged appliance.
• Do not install the appliance outdoors or in wet locations. This appliance is not designed for out-
door use or installation in a recreational vehicle, boat, or any other mobile application.
• Do not store or use gasoline or other ammable vapors and liquids in the vicinity of this or any oth-
er appliance.
• Keep packaging materials away from children. Packaging material can be dangerous for children.
• Connect this appliance to a 115 V, 15 A, 60 Hz, properly grounded circuit protected by a dedicated
circuit breaker or time-delay fuse.
• Do not kink or pinch the power supply cord.
• Always grip the plug rmly and pull straight out from the outlet to avoid electrical shock. Do not
unplug by pulling on the cord.
• To avoid electrical shock, do not use an extension cord or an adapter plug. Do not use the appli-
ance if the power cord is damaged; it must be replaced by the manufacturer, its service agent or a
similarly qualied person to avoid a hazard.
WARNING:
This appliance is not intended for use by persons (including children) with reduced
physical, sensory or mental capabilities, or lack of experience and knowledge, unless
they have been given supervision or instruction concerning use of the appliance by a
person responsible for their safety. Children should be supervised to ensure that they
do not play with the appliance.
Never allow anyone, including children, to sit, stand, climb on any part of the appli-
ance. Doing so may cause damage, serious injury, or death.
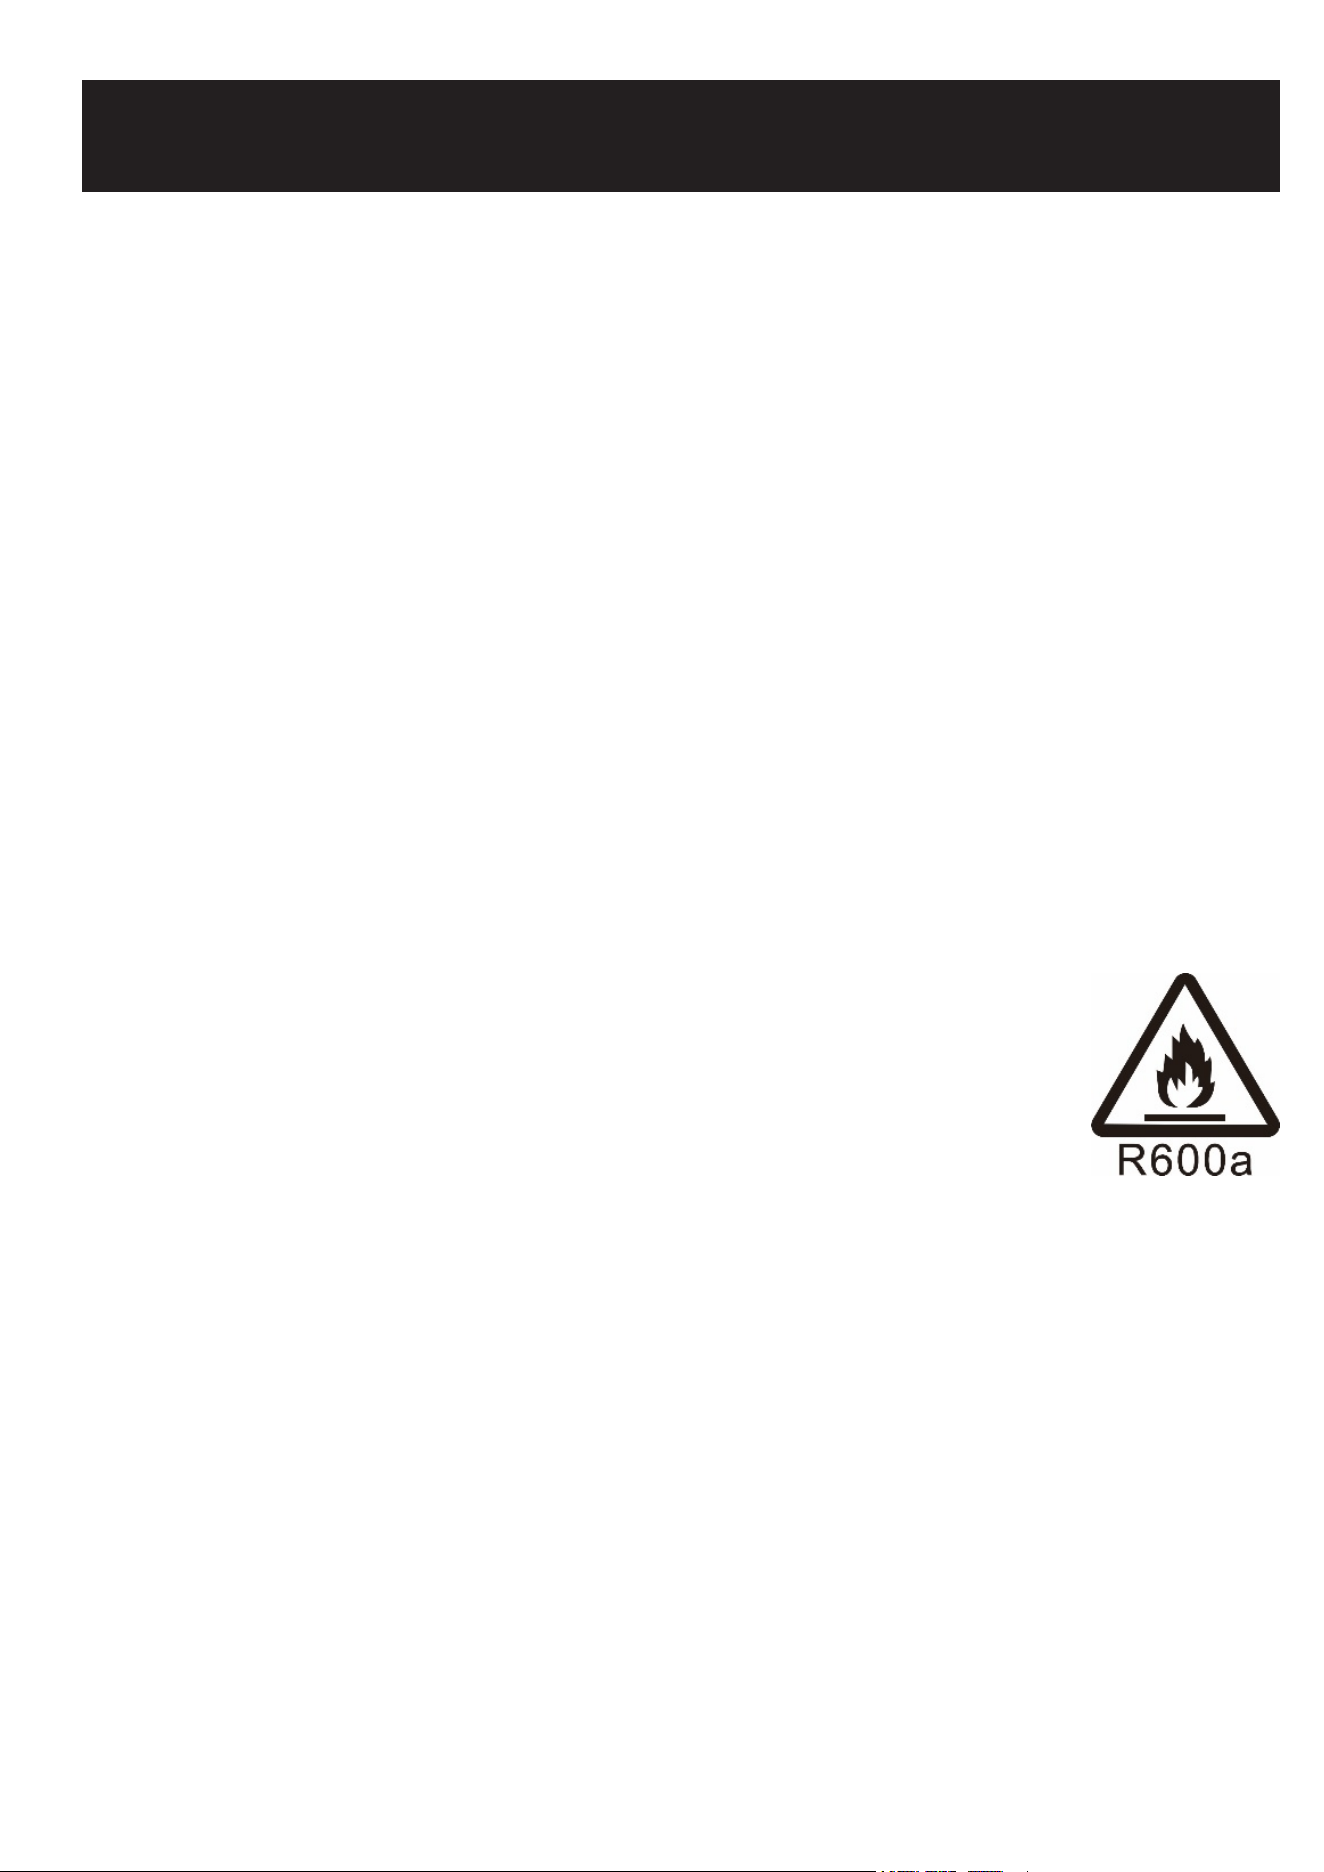
Warning: Risk of Fire/ Flammable Material
This appliance uses R600a refrigerant which is environmentally friendly but ammable. Care must be
taken during transportation and setting up of the appliance to ensure that the cooling unit is not dam-
aged. Leaking coolant can ignite and may damage the eyes. In the event of any damage,
avoid open ames and anything which creates a spark.
Disconnect the power cord from the electrical outlet.
clear the room in which the appliance is located for several minutes and contact the Customer Ser-
vice for advice.
WARNING!
• The room where the appliance is installed must be at least 35 Cubic Ft. per 8 grams of refrigerant.
If the danger of combustible gases building up is present, additional ventilation must be provided.
• This appliance is heavy and care must be taken when handling, moving, or using it to avoid in-
creasing the risk of a leak. Keep ventilation openings in the appliance enclosure or in the built-in
Safety

5
structure clear of obstruction.
• Do not use mechanical devices or other means to accelerate the defrosting process, other
than those recommended by the manufacturer.
• Do not damage the refrigerant circuit. This appliance contains a small quantity of R600a refrig-
erant which is ammable.
• Do not use electrical appliances inside the food storage compartments of the appliance, un-
less they are of the type recommended by the manufacturer.
• Do not store explosive substances such as aerosol cans with a ammable propellant in this
appliance.
• If the supply cord is damaged, it must be replaced by the manufacturer, its service agent or
similarly qualied persons to avoid a hazard due to instability of the appliance.
• Danger of injury! LED lamp: If the cover is defective, do not look directly into the illumination
with optical lenses from close proximity. The eyes can be injured.
WARNING
• Do not locate multiple portable socket-outlets or portable power supplies at the rear of the
appliance. Danger of injury from broken glass! If installed at altitudes above 1500 meters, the
glass shelves could break because of changes in air pressure. Shards of glass can cause se-
vere injury. Do not use if parts are damaged. Replace only with parts that are recommended by
the manufacturer.
• Opening the door for long periods can cause a signicant increase of the temperature in the
compartments of the appliance.
• Clean regularly surfaces that can come in contact with food.
• Clean water tanks if they have not been used for 48 hours; ush the water system if water has
not been drawn for 5 days.
• Store raw meat and sh in suitable containers in the refrigerator, so that it is not in contact with
or drip onto other food.
• Two-star frozen-food compartments are suitable for storing pre-frozen food, storing or making
ice-cream, and making ice cubes.
• One-, two- and three-star compartments are not suitable for the freezing of fresh food.
• If the refrigerating appliance is left empty for long periods, switch off, defrost, clean, dry, and
leave the door open to prevent mould developing within the appliance.
CAUTION
• Keep ngers out of the ‘pinch point’ areas. Clearances between the doors and between the
doors and cabinet are necessarily small. Be careful closing doors when children are in the
area.
• Do not cover shelves with aluminum foil or any other shelf material which may prevent air cir-
culation.
• In the event of a power outage, minimize opening the door.
• Never clean appliance parts with ammable uids. These fumes can create a re hazard or ex-
plosion. And do not store or use gasoline or other ammable vapors and liquids in the vicinity
of this or any other appliance. The fumes can create a re hazard or explosion.
• Do not use solvent-based cleaning agents or abrasives on the interior. These cleaners may
damage or discolor the interior.
• Please keep the products away from the re or similar glowing substances before you dispose
the appliance.
• Regarding the information pertaining to the use of the appliance, thanks to refer to the below

6
paragraph of the manual.
• Regarding the method for replacing illuminating lamps (if the lamps can be replaced by the
user), thanks to refer to the below paragraph of the manual.
• This appliance is intended to be used in:
• household and similar applications such as staff kitchen areas in shops, oces and other
working environments;
• farm houses and by clients in hotels, motels and other residential type environments;
• bed and breakfast type environments;
• catering and similar non-retail applications.
• If you have a lockable appliance, do not keep the key near the appliance or within reach of chil-
dren.
• It is recommended that a separate circuit, serving only your appliance, be provided. Use recep-
tacles that cannot be turned off by a switch or pull chain.
Disposal of your appliance packaging
Ensure that any plastic wrappings, bags etc. are disposed of safely and kept out of the reach of
babies and young children.
Refrigeration equipment must be properly disposed of.
Please contact your local regulations and laws which govern the disposal of appliances in your
area. This ensures that the refrigerant and the oil do not end up in the environment, thus protecting
it. This appliance contains R600a refrigerant which is environmentally safe but ammable. Please
ensure that old appliances are stored or kept safely before they are disposed of.
WARNING: Please ensure that old appliances with snap or latch doors are made safe by removing
the door or destroying any snap fastenings or bolts. You will thus prevent children from locking
themselves in the appliance and endangering their lives in any other way. DO NOT dispose of
the appliance in landll as the insulation in these appliances are ammable (R600a contained in
them).
Disposal instructions
The appliance must not be disposed of in the household rubbish.
The coolant circuit, particularly the heat exchanger at the back/bottom of the unit must not be
damaged.
The appliance is not to be handled as normal household waste but must be taken to a recycling
collection point for electrical and electronic equipment.
By correctly disposing of this product you are contributing to the protection of the environment
and preventing potential negative consequences for the environment and human health which
could result from improper disposal. Further information about the recycling of the product may be
obtained from your local authority or the store where you purchased the product.
IMPORTANT: Risk of child entrapment!
Before you throw away your old refrigerator or freezer:
1. Take off the doors.
2. Leave the shelves in place so that children may not easily climb inside.
3. Cut the prongs off the power plug and discard it separately from the old appliance.

7
WARNING
Do not store or use gasoline or other ammable vapors and liquids in the vicinity of this or any
other appliance.
WARNING
IMPORTANT: This appliance is equipped with a protection against electrical shock.
1. This appliance must be plugged into a dedicated, grounded outlet. The electrical outlet must
have only two prongs (no ground prong).
2. Do not cut or remove the third (grounding) prong from the power cord.
3. Do not use a power cord that is frayed or damaged.
4. Do not use extension cords.
5. Keep the power cord away from heated surfaces.
NOTE: Use of an electrical outlet with a ground fault interrupter (GFI) is not recommended.
State of California Proposition 65 Warnings:
WARNING: This product may contain one or more chemicals known to the State of California to
cause cancer.
WARNING: This product may contain one or more chemicals known to the State of California to
cause birth defects or other reproductive harm.
8
• Built-in or Free-standing installation dryer that can be used to produce the best taste meat at
home.
• Control with digital display - Swiss timer touch input.
• Temperature range from 36°F to 54°F (2°C to 12°C), with relative humidity level setting from
50% to 90%.
• Dynamic compressor type cooling to ensure interior and humidity with even distribution of tem-
perature control.
• Soft LED Interior Light with ON/OFF switch - Adjustable display brightness and interior lighting
brightness.
• Automatic humidity, UVC disinfection, water shortage and open-door warning system.
• Automatic switch-off system to remain off during power outages or when the door is open.
• Temperature memory function - if power is lost, the unit will automatically go back to the set
temperature when power is restored.
• Double safety glass door with child lock and UV protection.
• Reversible tempered double glazed smoked glass door creates an attractive display with mini-
mal heat loss.
• Stainless steel interior with a robust and easy to clean design.
• Stainless steel exterior frame and stainless steel interior.
• Robust and durable design.
• 2 adjustable stainless steel shelves for exibility.
• Environmental friendly refrigerant and foaming agent gas.
• Child safety lock system with keys.
• Energy ecient.
Please note: Specications are subject to change without notice.
Dry Aging
Dry aging produces a very good meat quality by concentrating natural avors and bringing out the
best taste of the meat in the unit, you can produce the best tasting meat in the world at home.
The meat is literally a whole bouquet of aromas. The meat is characterized by a pleasant, rm tex-
ture and a more intense color.
When roasting or grilling the meat, the moisture-lled meat escapes and the tastefully spicy taste
develops in the marbled meat.
The meat is perfectly tenderized with a rich, intense avor.
Benets
The best results in terms of taste are achieved when maturing on the bone and in large pieces.
Age and gender, as well as breed and husbandry conditions, inuence the meat's quality. The meat
of a young female cattle is considered the best for dry aging, as its meat becomes tender and
avorful with age.
Dry aging has been around for a long time. They have animals that have enough fat content to
grow. For good dry aged meat, it's important to choose the right meat, because species-appropri-
ate manner is the better choice because happy animals give better meat quality.
PRODUCT FEATURES

9
It is always recommended to let meat back, strands of meat hang for at least 21 days after slaugh-
tering, under controlled conditions at a temperature of about 2°C (35.6°F), which is the maximum
tenderness of the meat is reached. After the aging process, only the taste will develop further.
Please note: A maturing period of 10 to 16 weeks is possible. Always ensure that the meat is
handled hygienically during the aging process to avoid bacterial contamination. After the maturing
process is complete, the dark red dry aging crust must be removed completely.

10
BEFORE USING YOUR APPLIANCE
• Remove all exterior and interior packing. Clean the interior surface with lukewarm water using a
soft cloth. The unit may have residual odors at rst, they will disappear as the unit cools.
• Before connecting the appliance to the power source, let it stand upright for at least 24 hours.
This will reduce the possibility of a malfunction in the cooling system caused by handling
during transportation to ensure that oil ows back into the compressor. During this time we
recommend that you leave the door open to clear any residual odors.
• The door on this appliance can be opened from either the left or the right side. The unit is de-
livered with the door opening on the left side. Should you wish to open the door from the right,
follow the instructions ‘Reversing the door hinge’.
• Install the handle on the door if necessary.
INSTALLATION OF YOUR APPLIANCE
• The appliances are designed to be built-in or recessed or freestanding installation depending
on your model. For the freestanding installation only models, it is not intended to be used as a
built-in appliance.
• WARNING: Do not store or install the appliance outdoors. The unit is for indoor use only.
• WARNING: Do no install the appliance in the laundry. Avoid locating the unit in damp areas.
• Place your appliance on a oor/surface that is strong enough to support it when it is fully load-
ed. To level your unit, adjust the front leveling leg at the bottom of the unit.
• For freestanding installation, 100mm of space between the back and sides of the unit are
suggested, which allows the proper air circulation to cool the compressor and condenser for
energy saving. Even with built-in installation, it is a must to keep 5mm space on each side and
at the top to ensure proper service access and ventilation. Take care that the air vent at the
front of the appliance must never be covered or blocked in any way.
• Locate the unit away from direct sunlight and sources of heat (stove, heater, radiator, etc.). Di-
rect sunlight may affect the acrylic coating and heat sources may increase electrical consump-
tion. Extreme cold ambient temperatures may also cause the unit not to perform properly.
• Plug the unit into an exclusive, easily accessible plug socket. Any questions concerning power
and/or grounding should be directed towards a qualied electrician or an authorized products
service center.
• The appliance must be installed to all electrical, plumbing, water and drain connections in ac-
cordance with state and local codes.
IMPORTANT: HIGH HUMIDITY CLIMATE. During periods of high humidity, some condensation
may appear on outside surface of glass door. This condensation will disappear when humidity
levels drop. For prevention, it is advisable to install the appliance with sucient ventilation in a dry
and/or an air-conditioned place.
NOTE: The appliance must be positioned so that the plug is accessible.
INSTALLATION
11
BUILT-UNDER INSTRUCTIONS
Make sure your installation does not block the front ventilation grille. The unit is designed to t into
a space with the following dimensions: Width A, Height B, Depth C, and Width D (all measurements
in mm as per the diagram provided).
When built under, ensure that there is at least 20mm space between the top of the unit and any
overhanging surface to allow for ventilation. Tighten the screws to lock the unit in position.
Ensure there is no damage to the water, gas, or electrical supply when installing the unit. Avoid
using an extension cord or adapter plug; if the power cord is damaged, it must be replaced by the
manufacturer, its service agent, or a similarly qualied person to avoid a hazard. Obtain an appli-
ance that has to work harder, resulting in an increase in electricity consumption.
NOTE: When pushing the appliance into the niche, make sure that the mains cable does not get
trapped.
A
(in)
B
(in)
C
(in)
23.6”
Wide
23.4 24.0 20.5
12
BUILT-IN CABINETRY INSTRUCTIONS
Make sure your installation does not block the front ventilation grill. And be sure the door will open
and close properly in the chosen location.
ELECTRICAL CONNECTION
WARNING: Improper use of the grounded plug can result in the risk of electrical shock. If the pow-
er cord is damaged, have it replaced by a qualied electrician or an authorized service center.
All electrical work should be carried out by a suitably qualied and competent person in accor-
dance with local and national safety regulations.
Check that the voltage marked on the product corresponds with your supply voltage.
Connect this appliance to a separate at least 13A circuit. Connection should be made via a suit-
able switched socket which is easily accessible. For extra safety it is advisable to install a residual
current device (RCD) with a trip current of 30mA.
Have the receptacle and the circuit checked by a qualied electrician to ensure that the socket is
grounded correctly.
a (inches) b (inches)c (inches)
100 58.19 22.64 23.43
125 69.61 22.64 23.43
125S 71.65 22.64 23.43
A
(in)
B
(in)
C
(in)
23.6”
Wide
23.4 24.0 20.5
13
Note: In locations where there is frequent lightning, it is advisable to use surge protectors.
Do not connect the appliance to the mains electricity supply via an extension lead. Extension leads
do not guarantee the required safety of the appliance (e.g., danger of overheating).
The appliance must not be connected to an inverter and must not be used with a plug adapter as
these can cause damage to the appliance's electronic unit.
The cord must rest securely behind the appliance and not be allowed to lie or hang unprotected.
WARNING: THIS APPLIANCE MUST BE GROUNDED.
INSTALLING THE HANDLE
IMPORTANT: Do not overtighten the screws & do not use power tools to install the handle.
DESIGN 1 -
Locate the handle (1) over the mounting stubs (3) of the door and x the handle by grub screws (2)
with an Allen key to secure.
DESIGN 2 -
Remove the door gasket (2) on the side you wish to install the handle from, exposing the two des-
ignated holes for handle installation as shown above with two screws (1) and fasteners (3) provid-
ed.
Replace the door gasket.
REVERSING THE DOOR HINGE
It is possible to reverse the door on this appliance, if required. Follow the steps below:
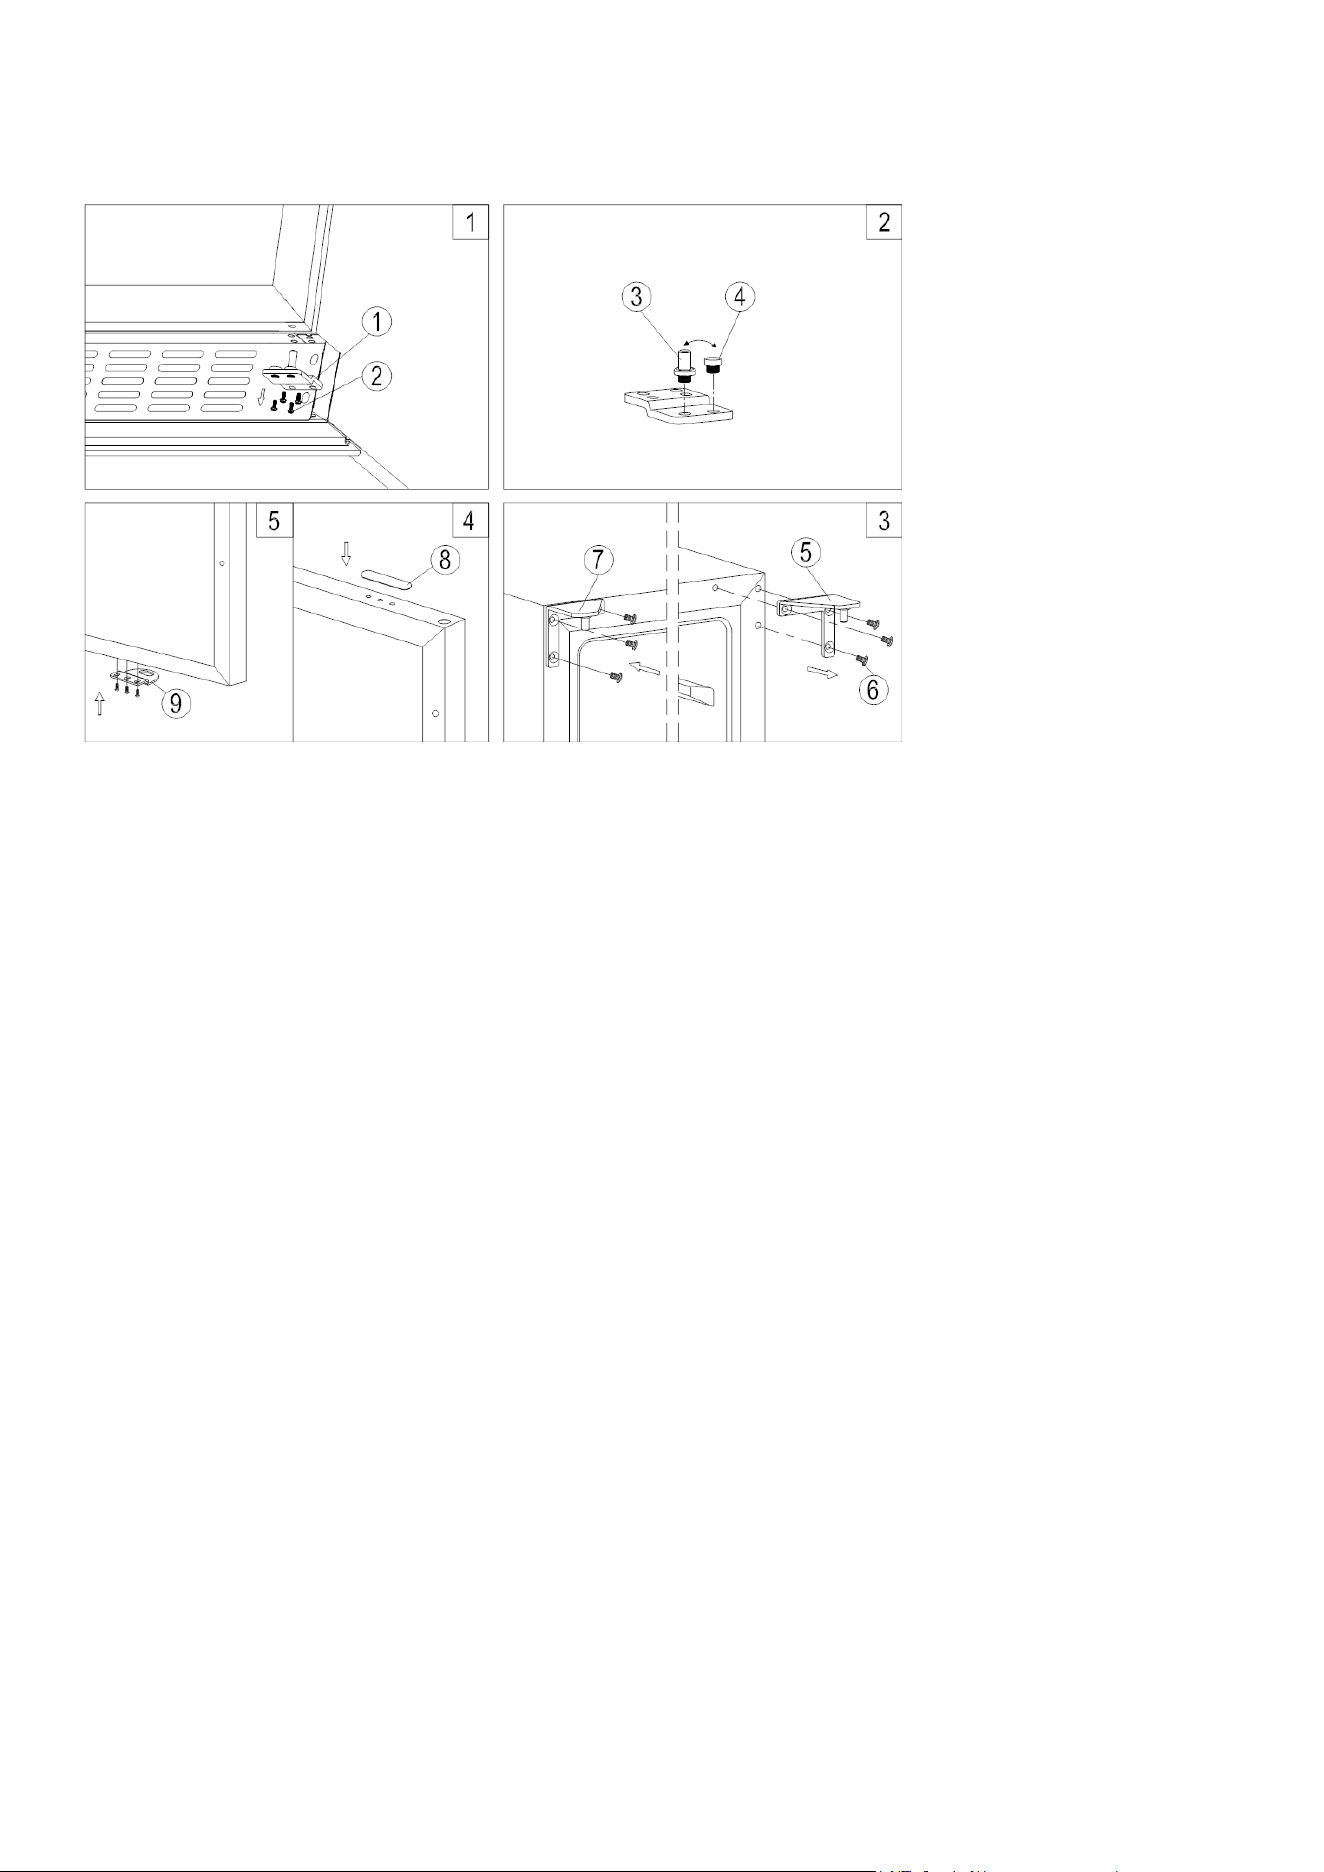
14
Note: All parts removed must be saved to do the reinstallation of door.
DESIGN 1 - For built-under models
1. Remove the bottom hinge (1) by unscrewing the four lock screws (2). Be careful to hold the
glass door rmly after removing the screws. (Fig. 1)
2. Gently pull down to remove the glass door from the right top hinge and place it on a padded
surface to avoid the risk of damage. Then remove the right top hinge (5). (Fig. 3)
3. Unscrew and transfer hinge pin (3) and/or door stopper (4) of the bottom hinge to the op-
po¬site side. (Fig. 2)
4. Pop out the cover caps on the left side of cabinet and use them to cover the screw holes on the
right hand side.
5. Screw the alternative left top hinge (7), included in the ttings, on the left hand side of cabinet.
(Fig. 3)
6. Unscrew and transfer the holes cover (8) and lock catch (9) to the oppo¬site side of glass door.
(Only for models with lock on the ventilation grille) (Fig. 4)
7. Rotate the door 180° (No need for models with lock on the door) and relocate the door to the
designated position. Then screw the bottom hinge assembly on the left designated position
and tighten it after the door is leveled.
DESIGN 2 – For high models
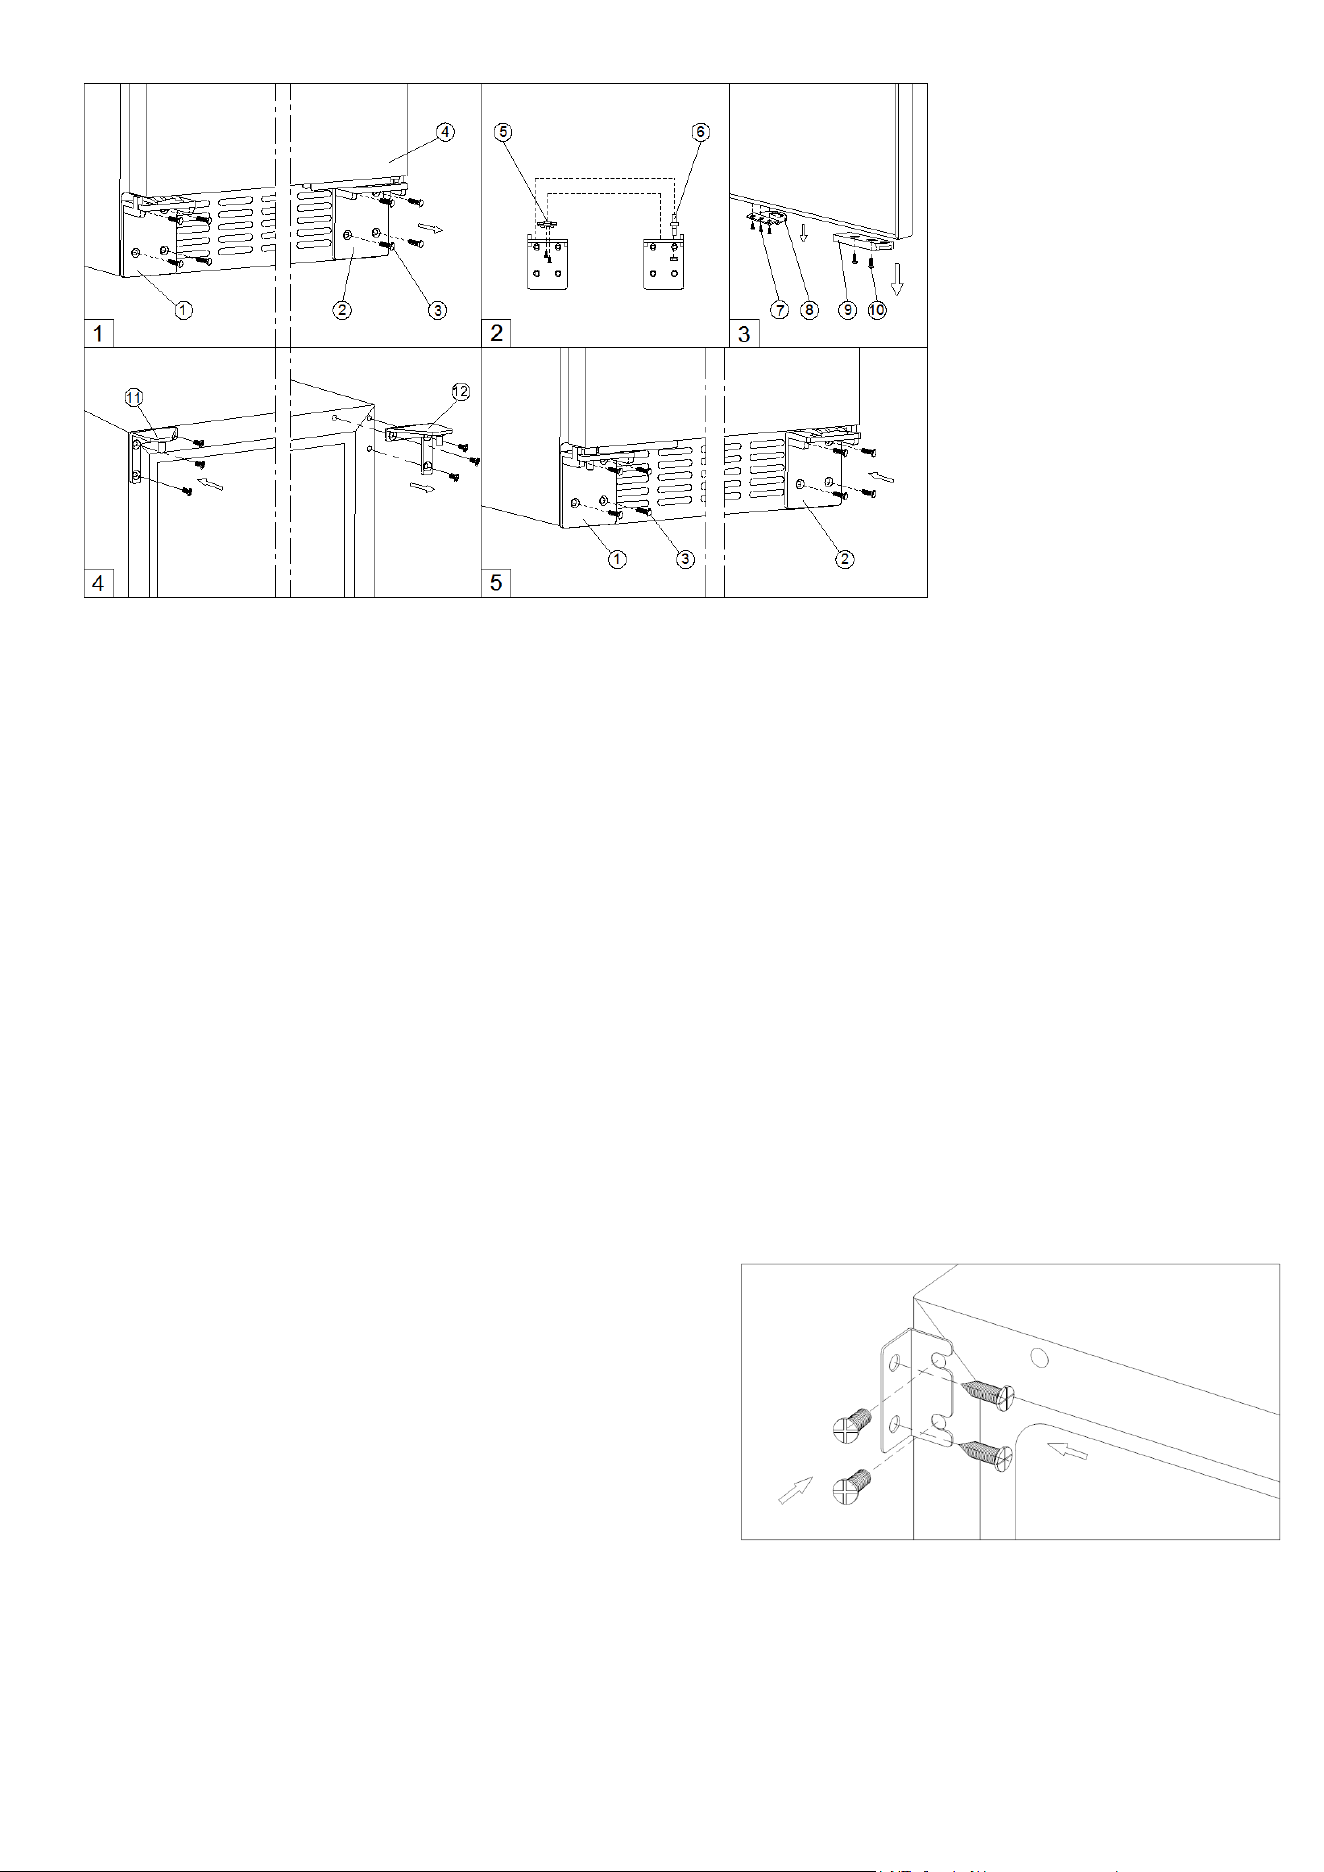
15
1. Remove the right bottom hinge (2) and/or left bottom hinge (1) by unscrewing the eight lock
screws (3). Be careful to hold the door (4) rmly after removing the screws. (Fig. 1)
2. Gently pull down to remove the door from the right top hinge and place it on a padded surface
to avoid the risk of damage. Then remove the right top hinge (12). (Fig. 4)
3. Pop out the cover caps on the left side of cabinet and use them to cover the screw holes on the
right hand side.
4. Screw the alternative left top hinge (11), included in the ttings, on the left hand side of cabinet.
(Fig. 4)
5. Unscrew and transfer hinge pin (6) and/or door supporter (5) to the opposite bottom hinge.
(Fig. 2)
6. Unscrew and transfer the door adapter (9) and/or lock catch (8) to the top designated positions
of the door. (Fig. 3)
7. Rotate the door 180° and relocate it to the designated position. Then screw the bottom hinges
on the designated positions and tighten them. (Fig. 5)
8. Recheck and adjust the door alignment by loosening the screws (10) and moving the door
adapter (9). Tighten the screws (10) after the door is levelled. (Fig. 5)
SECURING THE APPLIANCE
Pop out the two cover caps on the opposite side of hinge and secure the appliance in the niche by
tightening the screws through the attachment bracket if the unit is provided with an attachment
bracket.
16
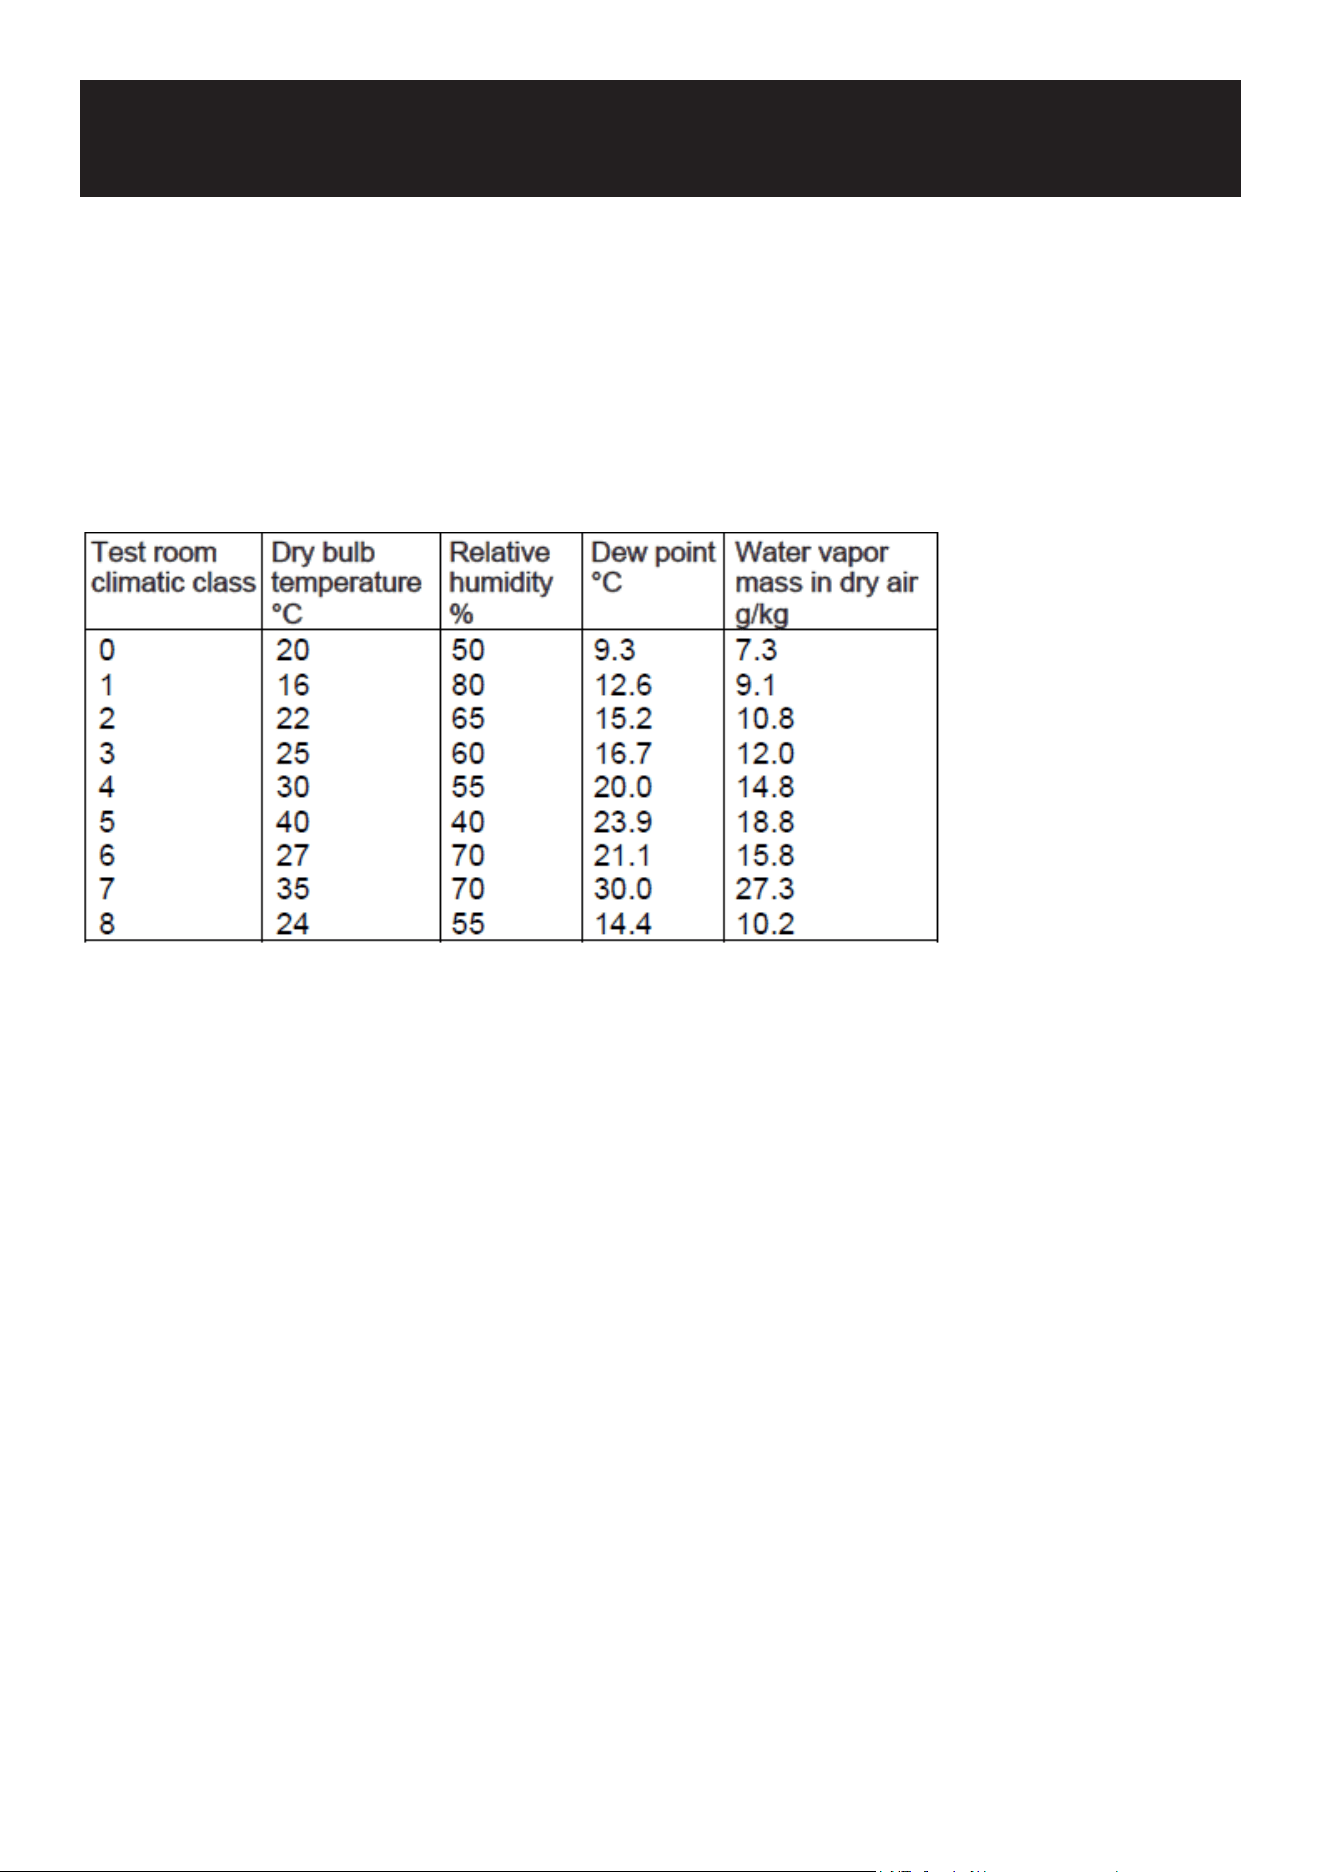
This appliance is designed for operation at certain ambient temperatures. The climatic class is
specied on the rating plate.
The appliance may not work properly if it is left for a long period at a temperature outside the spec-
ied range. For example, placing your unit in extreme cold or hot conditions may cause interior
temperatures to uctuate. The range between 36°F and 54°F (2°C and 12°C) may not be reached.
NOTE: A unit with no heater will not raise its internal temperature if the ambient temperature where
the unit is located is lower than the set temperature.
NOTE: When you use the appliance for the rst time or restart the appliance after having been shut
off for a long time, there could be a few degrees variance between the temperature you select and
the one indicated on the LCD readout. This is normal and it is due to the length of the activation
time. Once the unit is running for a few hours everything will be back to normal.
If the unit is unplugged, has lost power, or is turned off, you must wait 3 to 5 minutes before re-
starting the unit. If you attempt to restart before this time delay, the unit will not start.
OPERATION
17
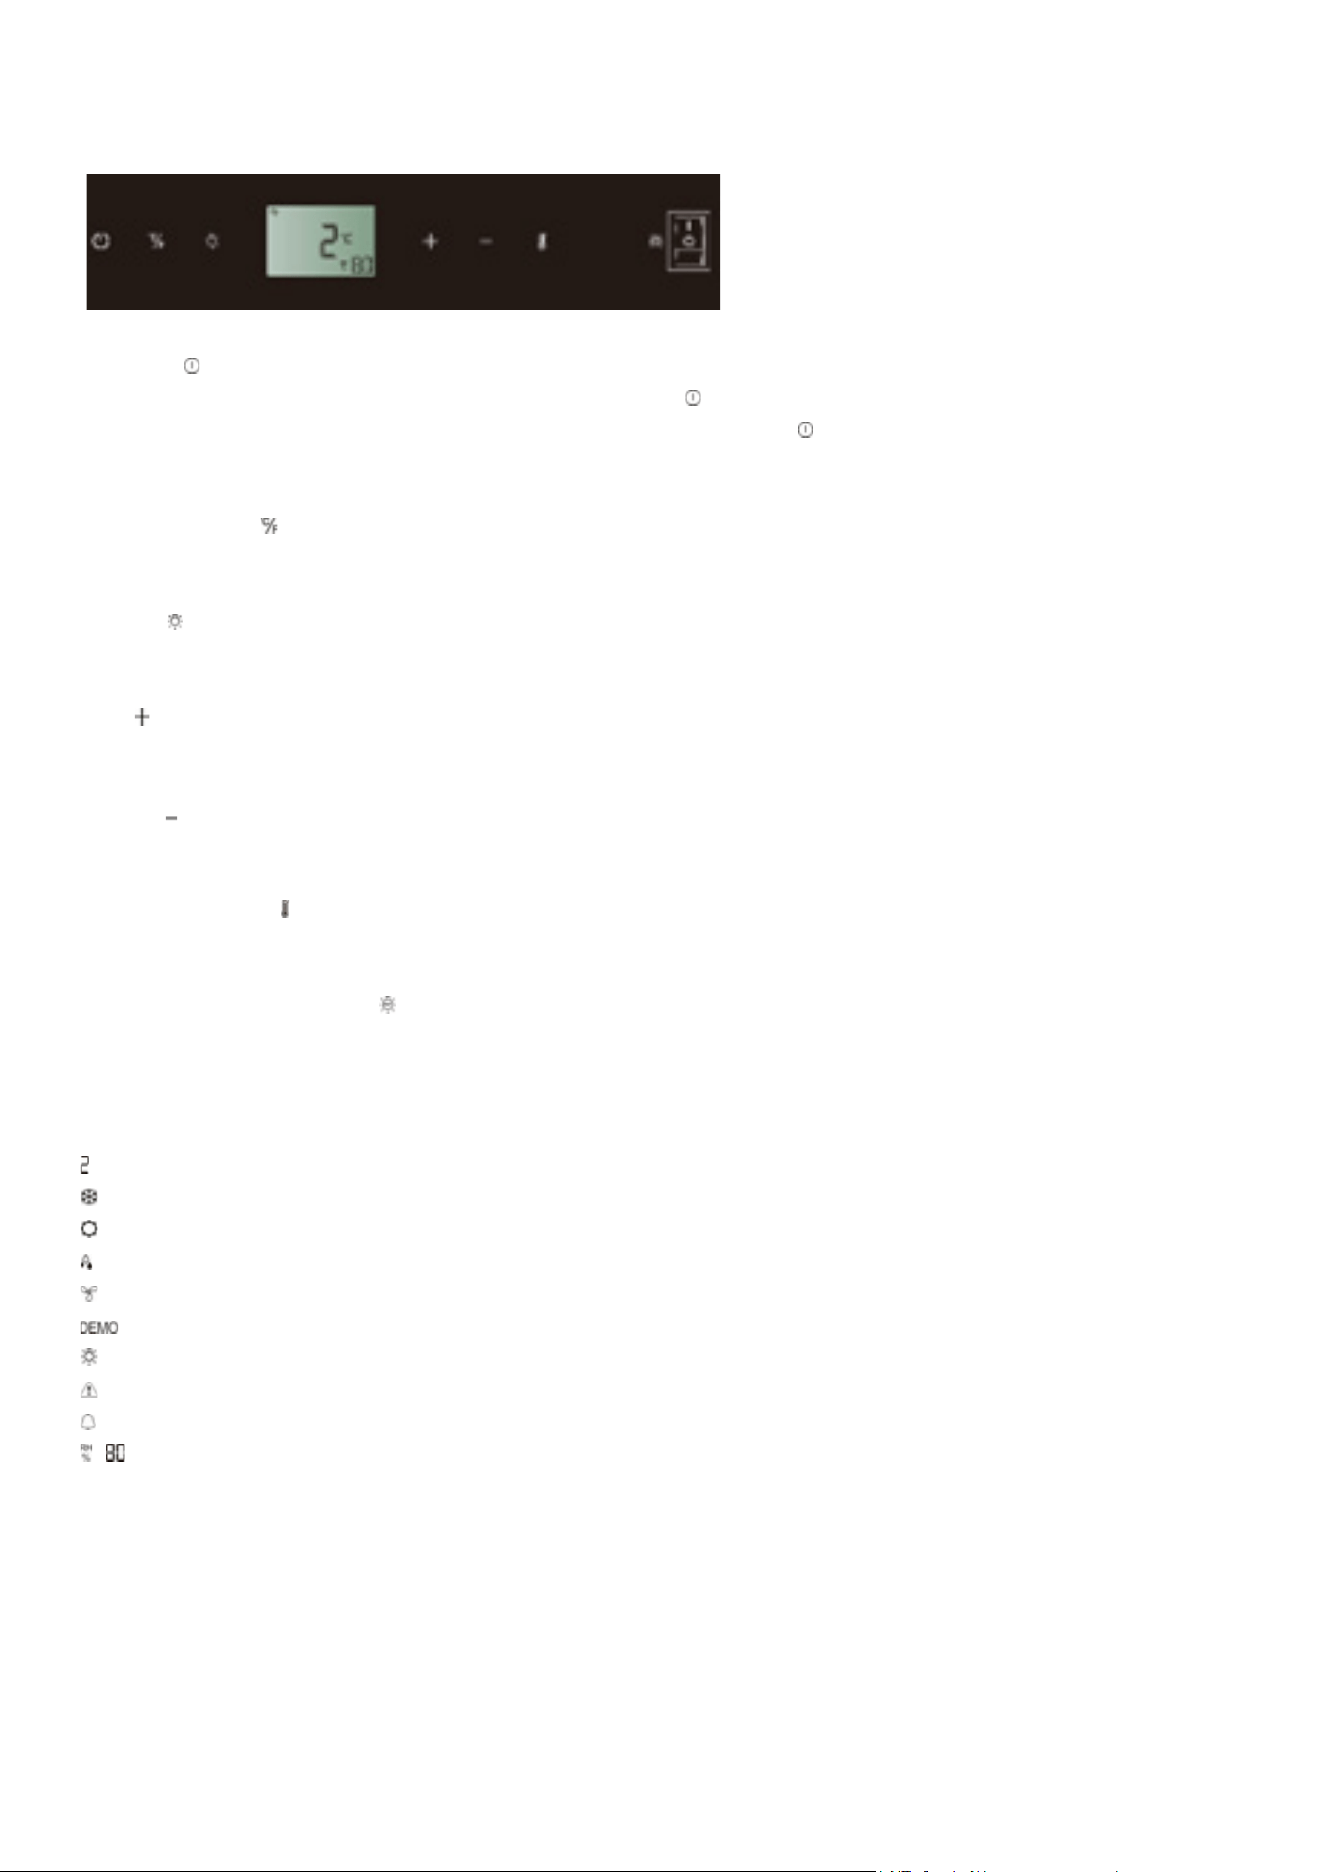
USE AND CONTROL
The Controls of Your Unit
POWER
To turn the appliance off, lightly touch and hold the key for 5 seconds until temperature display
goes out. To turn the appliance on, lightly touch and hold the key for 1 second until temperature
display lights up.
°F/°C Selector
Set the temperature to be displayed in degree Fahrenheit or degree Celsius.
LIGHT
To turn the interior light on/off, lightly touch and hold the key for 5 seconds.
UP
Used to increase (warm) the set temperature by 1°C/1°F.
DOWN
Used to decrease (cool) the set temperature by 1°C/1°F.
Setting Selector
Select the temperature and humidity you want to set.
UVC Disinfection Switch
Used to turn the UVC disinfection on/off. I is ON and O is OFF. Turn on the UVC disinfection for at
least 2 hours to disinfect the interior before placing the content into the unit.
Symbols in the Display
Temperature or Error code display
Compressor is ON.
Heater is ON.
Defrosting mode.
DynaClima mode.
Eco Demo mode.
The interior light is in Showcase mode.
Warning
Audible tones signal
Relative humidity display
Multi-key Function
To perform the multi-key function, lightly touch and hold the rst key, then touch the rest key for at
least 5 seconds and then release all the keys.
Setting the Temperature Control
The unit has an adjustable temperature compartment. The temperature can be set between 36°F

18
and 54°F (2°C and 12°C).
When the unit is plugged in for the rst time, the unit will power up automatically to the preset de-
fault. The temperature preset at the factory is 36°F (2°C) (ideal beef and pork aging temperature).
Touch the Setting Selector until the temperature you want to set is ashing. Then you can use the
UP and DOWN keys to set the internal temperature as required. When you touch either key at the
rst time, the display will show the last temperature set previously.
The temperature will increase 1°C/1°F if you touch the UP key once, or the temperature will de-
crease 1°C/1°F if you touch the DOWN key once. The display ashes while you make the setting.
The set temperature will temporarily ash in the display for 5 seconds after the temperature has
been set. Then the display shows the current inner temperature again.
To view the set temperature at any time, touch the Setting Selector key, the set temperature will
temporarily ash in the display for 5 seconds. Then the display shows the current inner tempera-
ture again.
Setting the Humidity Control
• The appliance is equipped with a system for maintaining the correct level of humidity. Before
starting to use, ll the water tank at the bottom of interior compartment with drinking water.
Check the water level regularly and rell as necessary.
• Touch the Setting Selector until the humidity display is ashing. Now you can use the UP and
DOWN key to select the relative humidity setting from 50% to 90% and 00%. The set humidity
will temporarily ash in the display for 5 seconds. Then the display shows the current inner
humidity again. The humidity preset at the factory is 80% (ideal beef and pork aging humidity).
• When 00% is selected, the humidity control system will be switched off.
SETTINGS MODE
Certain settings on the unit can only be selected in Settings mode.
Touch and hold the UP key for 5 seconds to enter and leave Settings mode. The appliance will
leave Settings mode automatically after approximately one minute.
ºF/ºC Selection
1. Lightly touch and hold the UP key for 5 seconds to enter Settings mode.
2. Use the UP and DOWN keys to select the temperature display setting in Fahrenheit or Celsius
degree.
3. Touch and hold the UP key for 5 seconds to conrm the selection.
Display Brightness
Lightly touch and hold the UP key for 5 seconds to enter Settings mode and then touch the POWER
key once.
Use the UP and DOWN keys to select the brightness of the display when the door is close.
d0: off
d1: dimmest setting (default)
d2: medium setting
d3: brightest setting (same level as when door is opened)
3. Touch and hold the UP key for 5 seconds to conrm the selection.

19
Interior Lighting Brightness
1. Lightly touch and hold the UP key for 5 seconds to enter Settings mode and then touch the
POWER key twice.
2. Use the UP and DOWN keys to select the brightness of the interior lighting when the door is
close.
L0: off when the door is close or open
L1: dimmest setting
L2: medium setting
L3: brightest setting (default) (same level as when door is opened)
3. Touch and hold the UP key for 5 seconds to conrm the selection.
Fan Mode (Pls don’t change the fan mode for dry ager! The dry ager must work in the DynaClima
mode with full time.)
1. Lightly touch and hold the UP key for 5 seconds to enter Settings mode and then touch the
POWER key three (3) times.
2. Use the UP and DOWN keys to select the fan mode.
F0: Silent mode - Energy saving mode
F1: DynaClima mode - half time
F2: DynaClima mode - full time (default)
3. Touch and hold the UP key for 5 seconds to conrm the selection.
Audible Tones
1. Lightly touch and hold the UP key for 5 seconds to enter Settings mode and then touch the
POWER key four (4) times.
2. Use the UP and DOWN keys to select the audible tones.
S0: keypad tone ON, alarm tone OFF
S1: keypad tone ON, alarm tone ON (default)
S2: keypad tone OFF, alarm tone OFF
S3: keypad tone OFF, alarm tone ON
3. Touch and hold the UP key for 5 seconds to conrm the selection.
IMPORTANT INFORMATION FOR DRY AGING
Select the food.
Have a butcher/expert whom you trust inform you about dry aging. Only use meat which is suit-
able for renement.
IMPORTANT: Only use food with a maintained cold chain that was handled under good hygienic
conditions.
Use fresh meat on the bone at maximum 5 days after slaughtering or max. 2 weeks vacuum ma-
tured meat (remove foil for dry aging).
Dry age individual cuts (about 2 - 4 kg) or half saddles of meat on the bone.

20
To minimize the weight loss during dry aging, use meat with a thick enough protective layer of fat.
Recommendation for dry aging beef: saddle from a heifer with good fat cover and marbling.
If ordered: unpack the salt blocks and remove the foil. Put the salt blocks in the stainless steel col-
lecting tray and place the tray in the middle at the bottom of the compartment. Please check every
2 - 3 days if there is any remaining water on the salt blocks, if so, please remove the water.
The dry aging is an expensive process and requires time and ideal conditions. Only hang / place
the meat in the unit when the desired temperature has been reached and the UVC disinfection has
been switched on for at least 2 hours.
The recommended temperature and humidity settings are 2°C and 80% RH for dry aging beef and
pork; 8°C and 75% RH for post-maturing ham and salami.
Avoid to open the door much in order not to affect the temperature and humidity of the air inside
the unit.
Hang the full saddle on the hanger of your unit or put the individual cuts on the shelves.
When using frozen meat, defrost before putting inside the appliance.
Wear clean protection cloth (gloves, etc.) when handling food. Do not touch the meat without
wearing protective gloves! A hazard of dry aging is wild fungi that can spoil the meat and cause
toxic and allergic reactions. For this reason, make sure that you maintain impeccable standards
of hygiene when handling the meat and the equipment and have a butcher/expert whom you trust
provide you with comprehensive information about it. If you notice a sours smell, this may be an
indication of wild fungi.
For optimal dry aging conditions, air circulation around the food is necessary: prevent mutual con-
tact and contact with the interior liner.
Consider aging time.
The optimal aging time depends on many parameters. Typical aging times, which can be consid-
ered as a rough reference, are as follows:
Fresh meat of beef: ~ 21-28 days
Fresh meat of pork: ~ 14-21 days
Vacuum packed meat (remove foil before aging): up to ~ 14-18 days
Ideal dry aging times are 21 - 28 days, but a dry aging period of more than 4 weeks is also possi-
ble, which makes the meat taste even more intense and stronger aroma.
Check regularly dry aging food. If you observe mold, an unusual smell (e.g. pungent, putrid) or
other potential contamination of the food, dispose it in accordance with your local rules and regu-
lations. Then clean the appliance thoroughly.
Once the aging process has been completed, dark and dry patches of meat must be generously
removed.
The active charcoal air lter and the UVC bulb must be replaced semi-annually.
Disclaimer: The manufacturer will not assume any liability for damage to aging food, not even in
the event of a fault in the equipment during the warranty period. The manufacturer will also not
accept liability for injury to individuals caused by improperly stored goods which are subsequently
consumed.
TEMPERATURE DISPLAY

21
During normal operation, the temperature display on the control panel shows the temperature
inside the appliance. The temperature display will ash if
• A different temperature is being set,
• The temperature in the zone deviates by more than 5°C (9°F) from the set temperature.
The temperature display ashing ensures that the temperature cannot rise or fall unnoticed and
impair the food.
TEMPERATURE MEMORY FUNCTION
In the event of a power interruption (power surge, breaker switch, etc.), the unit remembers the pre-
vious temperature settings. When the power is recovered, the cabinet temperature will go back the
same setting temperature as before the power interruption.
TEMPERATURE ALARM
An audible alarm will sound if the temperature rises or falls outside the temperature range. The
relevant temperature display will ash at the same time. Also the symbols & will light up in the
display.
The temperature the appliance is set at determines the temperature the appliance recognizes as
being too warm or too cool.
The audible alarm will sound and the temperature display will ash:
- When you switch the appliance on, if the temperature inside the appliance is very different
from the temperature set.
- When there has been a lengthy interruption to the power supply.
- When too many items have been put into the unit at one time. Or too much ambient air
owed in when rearranging and removing storage items.
- When the door is not been closed tightly.
- The appliance is faulty.
The audible alarm will be automatically silenced, the temperature display stops ashing and the
symbols & will go out when the set temperature is reached again. However, if the noise disturbs
you, you can switch the audible alarm off before this if you wish by touching any key once. The
alarm will stop. The relevant temperature display continues to ash and the symbols & will con-
tinue to be lit up until the set temperature has been reached. The display then lights up constantly,
the symbols & will go out and the alarm system is fully active again.
HUMIDITY ALARM
A humidity audible alarm will sound if the humidity inside the unit rises or falls outside the humid-
ity range. The relevant humidity display will ash at the same time and the symbol will light up.
The ash of LL and indicates too low humidity level and the ash of HH and indicates too high
humidity level.
The audible alarm will be automatically silenced, the humidity display stops ashing and the sym-
bols & will go out when the set humidity range is reached again. However, if the noise disturbs
you, you can switch the audible alarm off before this if you wish by touching any key once. The
alarm will stop. The relevant humidity display continues to ash and the symbols & will continue

22
to be lit up until the set humidity has been reached. The display then lights up constantly, the sym-
bols & will go out, and the alarm system is fully active again.
UVC DISINFECTION ALARM
The audible alarm “B, B, B” will sound continuously if the UVC disinfection is faulty. The audible
alarm can’t be switched off until the UVC disinfection fault has been corrected.
WATER LEVEL ALARM
The alarm will be activated when the water level is too low. The water level indicator will ash in
red and the audible alarm “B, B” will sound 10 seconds every 3 minutes if,
- The water tank is short of water
- The water level switch is failure
The alarm can’t be switched off until the water has been relled or the water level switch fault has
been corrected.
DOOR ALARM
If the door has been left open for more than 60 seconds, the audible alarm will sound and the sym-
bol will light up. Closing the door or touching any key once can switch off the audible alarm.
INTERIOR LIGHT / TriColor LIGHTING
The interior lighting makes it easy to view your content. Touching and holding the LIGHT key for 5
seconds toggles between 2 modes of operation for the interior lights: functional (default) mode
and showcase mode. If you are in functional (default) mode, the lights will turn on only when the
door is open. The interior light will go out approx. 5 seconds after the door is closed. If you are in
showcase mode, the lights will be on whether or not the door is open and the symbol will light up.
The unit is equipped with the LED type lights and they are designed for extremely long life. Thanks
to the LED lighting, the meat will not be adversely affected by heat or UV light. But they are not user
serviceable. To change them pls contact the service department.
NOTE: Please use only the original LED light ttings provided by the manufacturer.
If your model is provided a TriColor lighting, you can select the color of interior light - amber, white
and blue by touching the LIGHT key. Touching the LIGHT key toggles between single color mode
and dynamic color mode. In the dynamic color mode the interior light will start to cycle through the
3 available colors. Touching the LIGHT key once when the desired color is on, your interior light will
be changed to that color. To change back to the dynamic color mode, touch the LIGHT key again.
ECO DEMO MODE
Eco Demo mode can be activated by presenting the appliance at exhibitions or in salesrooms. In
Eco Demo mode, the compressor and all fan motors are switched OFF. Also it is perfect as a clean-
ing mode. The refrigeration switches off while the lights stay on.
By touching and holding the “UP”&“DOWN” and “LIGHT” keys simultaneously for at least 5 sec-
onds, the symbol will light up to conrm the selection and the unit will operate in Eco Demo
mode. Eco Demo mode can be canceled by repeating the above process and the symbol will go
out.
OPERATING NOISES

23
The unit is cooled by a compressor (refrigeration aggregate). The compressor pumps coolant
through the cooling system, producing operating noise. Even when the compressor cuts out,
noises caused by changes in temperature and pressure are unavoidable. Operating noise will be
most audible immediately after the compressor cuts in. It becomes quieter as the operating period
continues.
The following noises are normal and occur from time to time:
- Gurgling sound, caused by the refrigerant owing through the appliance’s coils,
- Humming noise made by the motor compressor. This noise can get louder for brief periods
when the motor is switching on.
- Crackling/popping sounds, resulting from the materials contraction and expansion due to
temperature variations,
- Fan operating sound, to circulate the air within the wine cabinet.
Unusual noise is normally the result of improper installation. Under no circumstances must tubing
come into contact with a wall, other furniture or with other tubing.
Where the unit is installed in an open-plan kitchen or in partition walls, the level of operating noise
will be heard more acutely. However, this is due to the surrounding architecture and not to the unit.
An individual’s perception of noise is directly linked to the environment in which the unit is located,
as well as the specic type of model. Our appliances are in line with international standards for
such appliances and in line with the latest technical developments. But please remember that the
noise of the compressor and the coolant circulating in the system is unavoidable.
DEFROSTING
Your unit is designed with an automatic defrost system. During the “Off-cycle” the evaporator
behind the rear wall of the unit defrosts automatically. The condensate collects in the drain trough
behind the rear wall of the unit, and part of it ows through the drainage hole into the drip tray by/
above the compressor. The heat is transferred from the discharge pipe or compressor and evapo-
rates any condensation that has collected in the tray.
NOTE: Frost may be accumulated on the evaporator if the unit is repeatedly opened in a high heat
or high humidity location. If this frost pattern does not clear within 24 hours, your unit will require
manual defrosting.
24
WARNING Failure to unplug the appliance during service and cleaning could result in electrical
shock or other personal injury.
HUMIDITY CONTROL
The appliance is equipped with a system for maintaining the correct level of humidity by adding
the water to the built-in drawer.
NOTE: Make sure to pull out and push inward the water drawer gently otherwise the water inside
the tank is easily to come out.
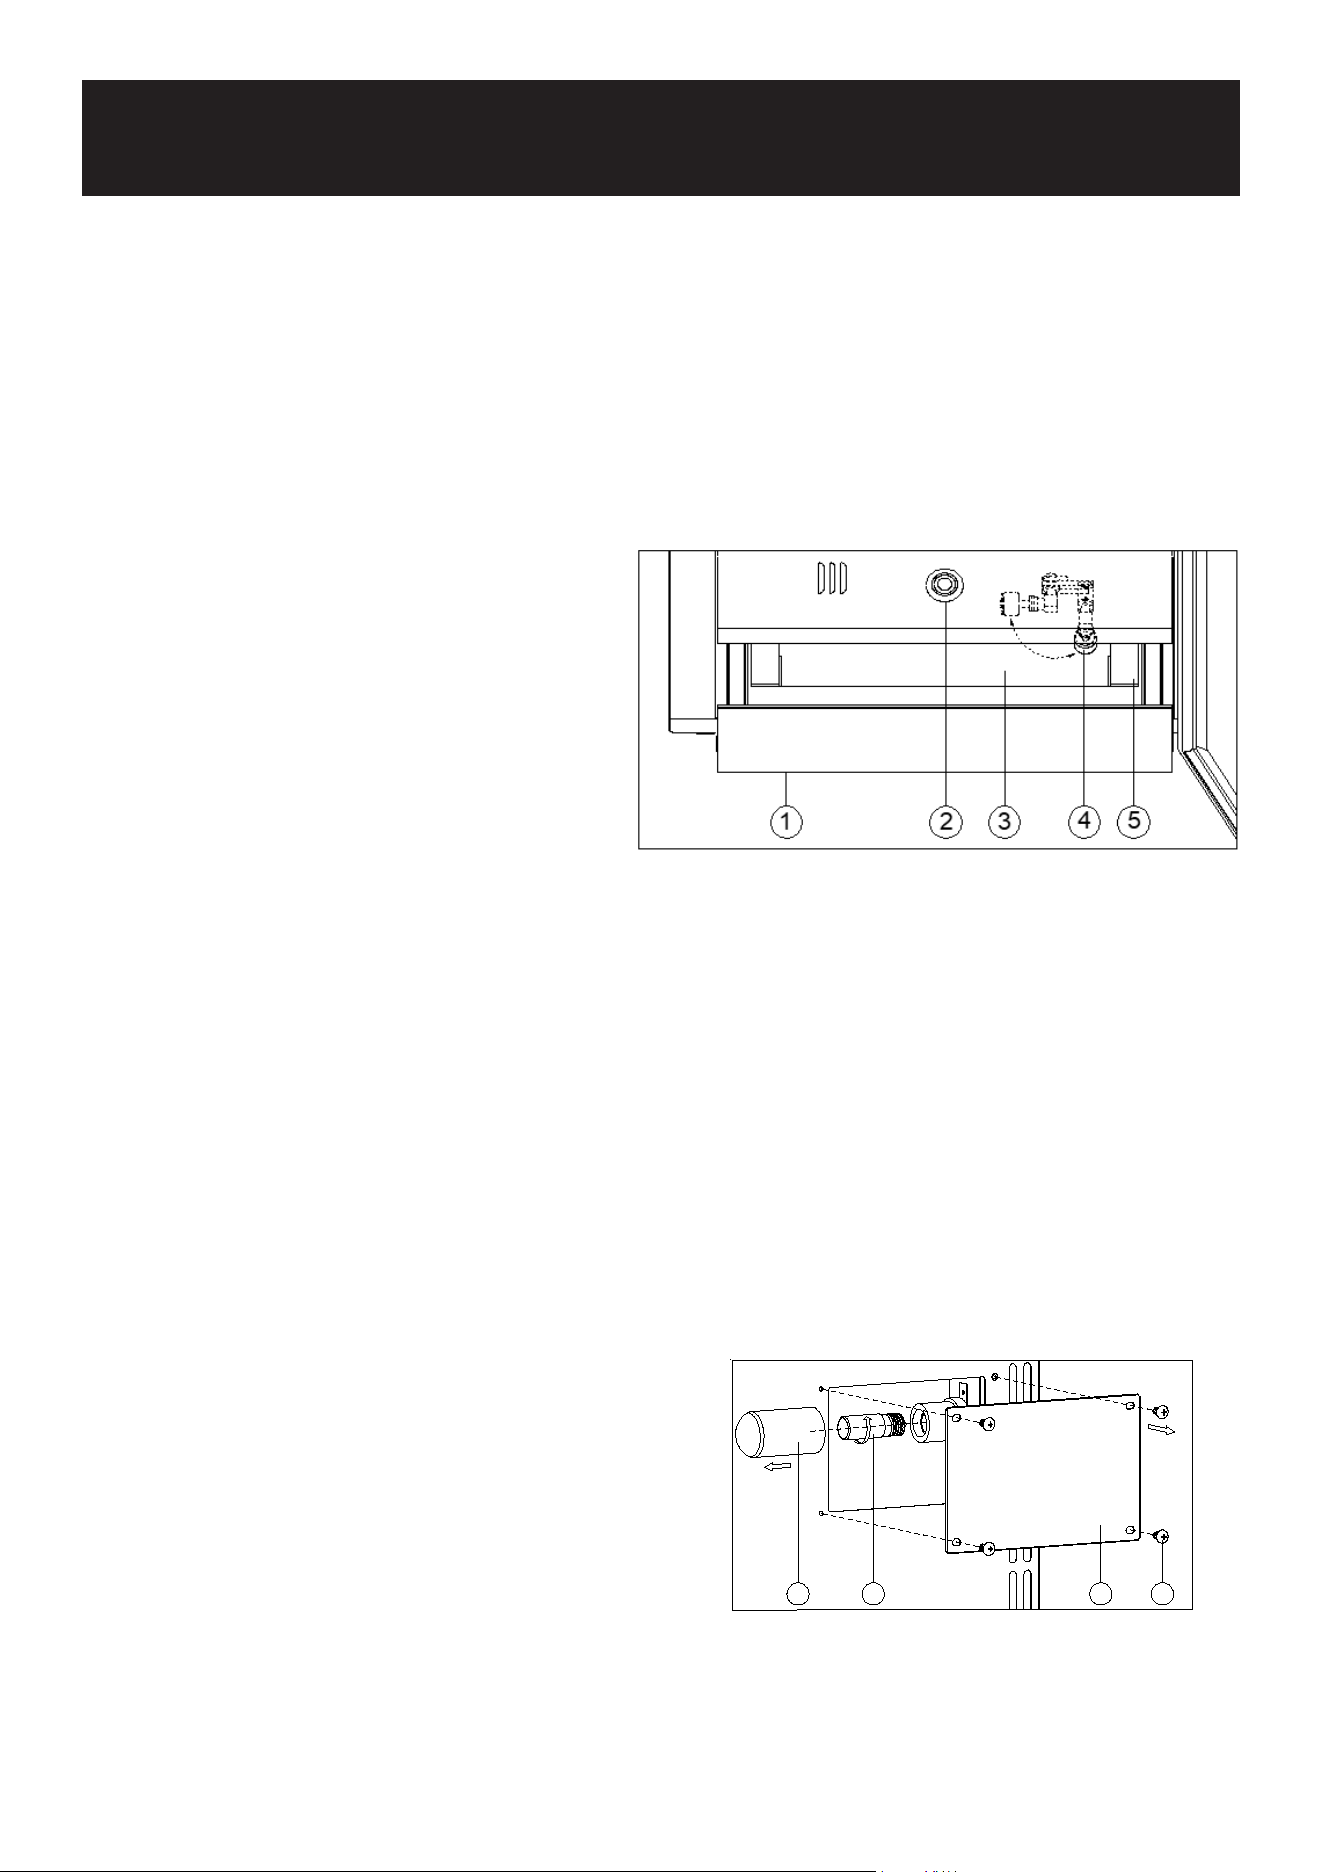
Gently pull out the water drawer (1). Fill with
water up to the max. level and then gently push
the water drawer back to the designated posi-
tion. Check the water level regularly and rell
as necessary when the water shortage alarm
is ON (The water level indicator (2) will ash in
red).
After nishing each dry aging of goods inside the appliance, clean the plastic water tank (3)
carefully. In order to remove the plastic water tank, gently open the drawer (1) and turn the water
level switch (4) to the horizontal position, then pull out the drawer fully and the water tank can be
removed. After cleaning reassemble the water tank and turn the water level switch back to the
upright position.
Replace the water reservoir (5) every 3 months after use.
UVC DISINFECTION
The UVC disinfection is located in the back of compartment. The UVC disinfection sterilizes the air
once every half hour when the UVC disinfection lamp is ON. It can be purchased from the manu-
facturer.
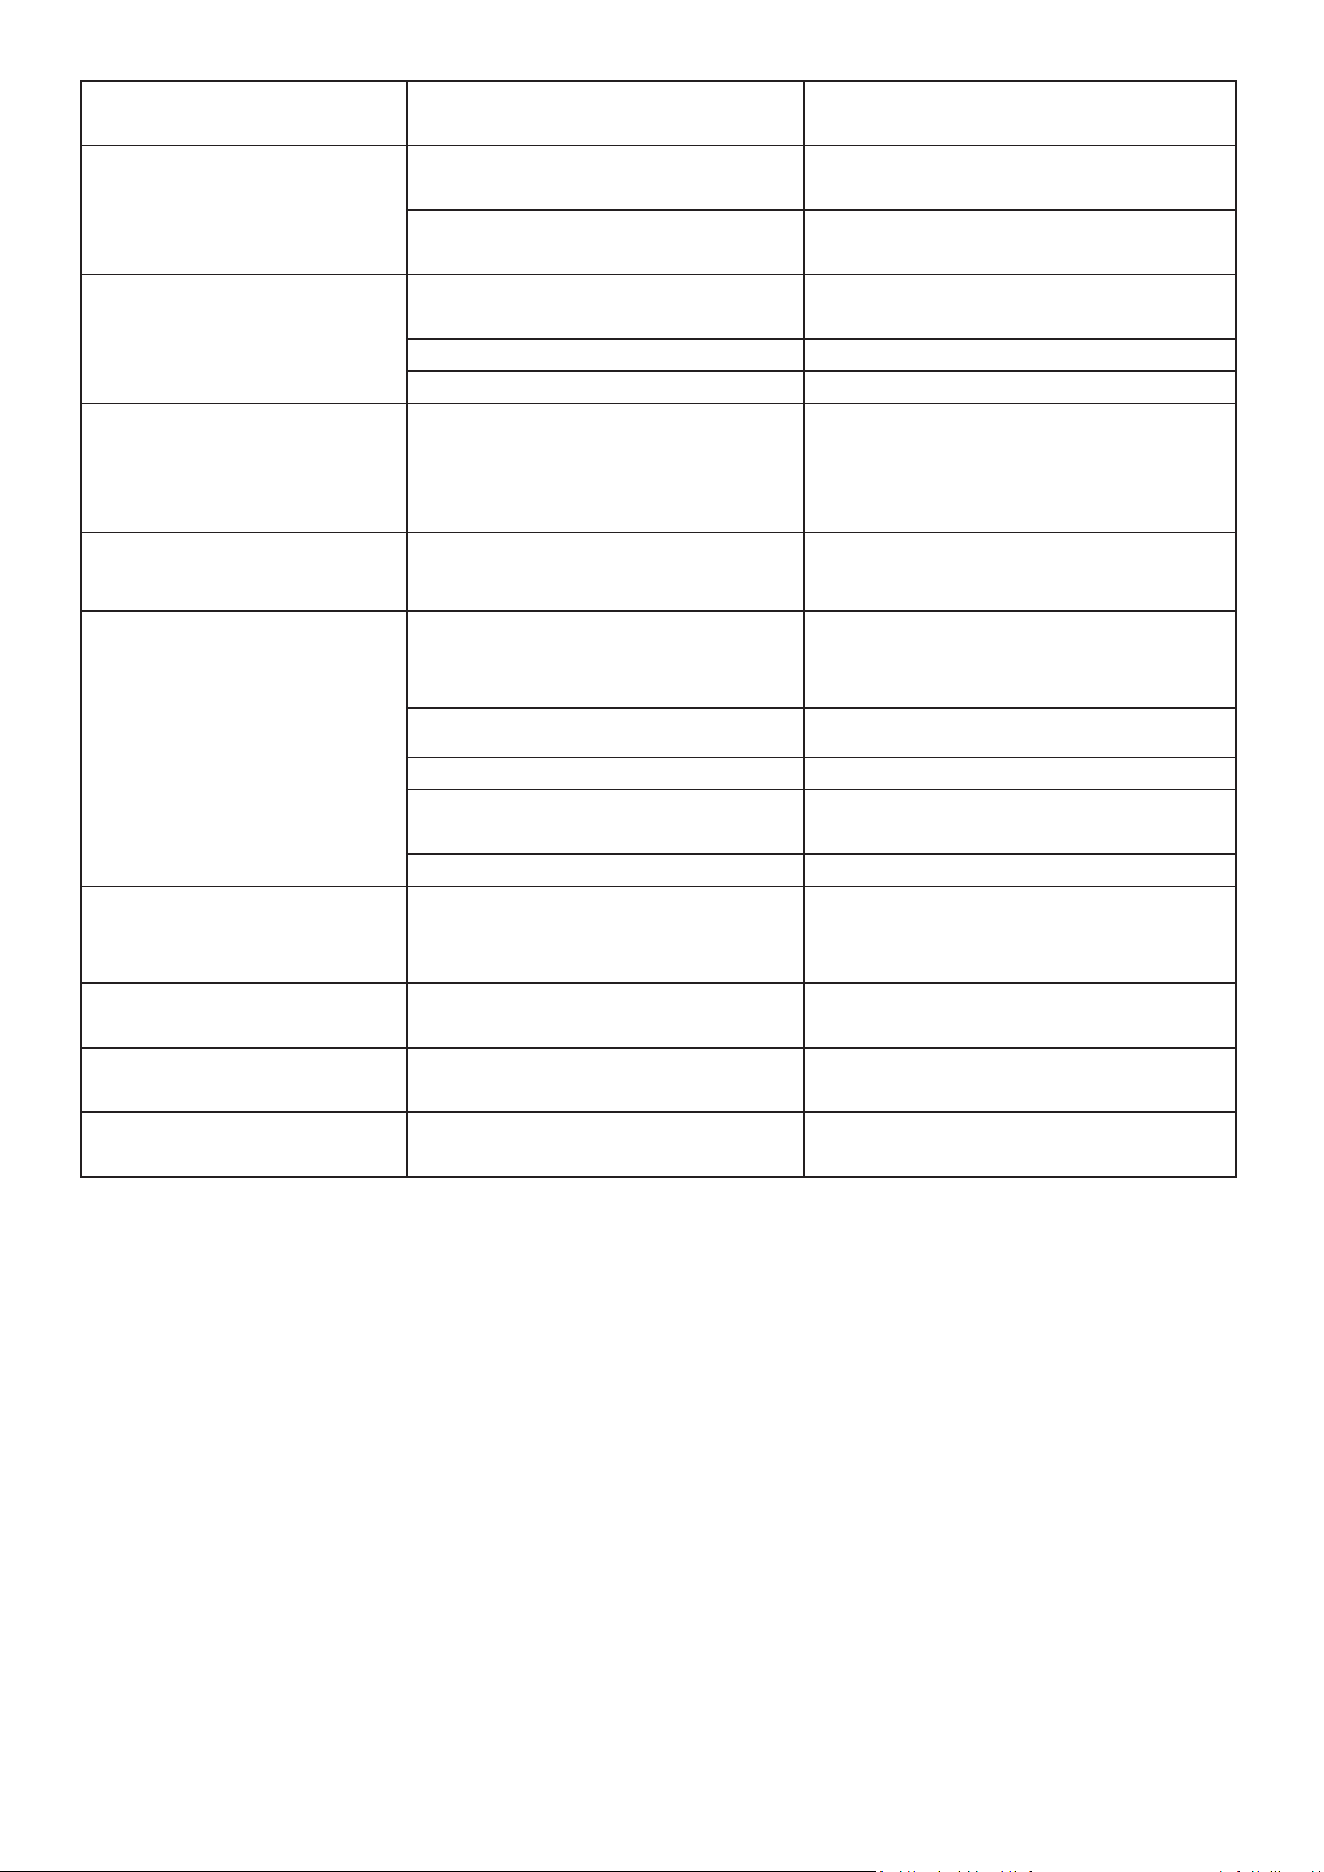
• Remove the guard (2) by unscrewing the four
screws (1).
• Pull the bulb (3) outwards. Unscrew and replace
the bulb (3).
• Replace the guard by screwing the four screws
(1).
• Switch on the UVC lamp to disinfect and close
the door. Pull the bulb guard (4) Unscrew and
replace the bulb (3)
ACTIVE CHARCOAL AIR FILTER
The active charcoal air lter is located in the back of compartment to absorb the odor and keep
MAINTENANCE
124 3

25
the air fresh. The optimum air quality by ltering the air and absorbing the unwanted odors. Re-
place it with a new one at least once a year. It can be purchased from the manufacturer.
• Remove the shelf in front of the lter.
• Unscrew the air lter cover and remove the old
lter.
• Insert the new lter in the vertical position and
turn it 90° clockwise or anti-clockwise until it
clicks into position.
DOOR LOCK
If the unit is provided with a lock system, the keys are in a plastic bag inside the box. Open the lock
by inserting the key into the lock and turn it counterclockwise to unlock the door. To lock the door
do the reverse operation making sure metal pin is engaged completely. Remove the key and place
it in a secure place for safekeeping.
CLEANING YOUR APPLIANCE
Clean the unit thoroughly after each aging process. Turn off the power, unplug the appliance, and
remove all items including shelves, meat hooks and drip collecting tray.
Wash the inside surfaces with a warm water and baking soda solution. The solution should be
about 2 tablespoons of baking soda to a quart of water.
Wash the shelves and plastic water tank with a mild detergent solution.
Wring excess water out of the sponge or cloth when cleaning any area of the controls.
The sealing gasket around the door must be cleaned regularly to prevent discoloration and prolong
service life. Use clean water. After cleaning the sealing gasket, check that it continues to provide a
tight seal.
Wash the outside cabinet with warm water and mild liquid detergent. Rinse well and wipe dry with
a clean, soft cloth.
Do not clean the stainless steel with steel wool pads. We suggest using an all-in-one stainless
steel cleaner to clean the stainless steel. Always clean in the direction of the grain.
Switch on the UVC disinfection for 24 hours after each cleaning process.
POWER FAILURE
In the event of a power interruption, all previous temperature settings are automatically memo-
rized. If power is interrupted (power surge, breaker switch, etc.) and then powered up again, the
unit will operate with the last temperature set-point.
Most power failures are corrected within a few hours and should not affect the temperature of
your appliance if you minimize the number of times the door is opened. If the power is going to be
off for a longer period of time, you need to take the proper steps to protect your contents.
NOTE: Irrespective of the cause, if you notice either abnormal temperature or humidity levels inside
your unit, be reassured that only long and frequent exposure to these abnormal conditions can
cause a detrimental effect on your meat.

26
VACATION TIME
Short holidays: Leave the unit in operation for holidays of less than three weeks.
Long absences: If the appliance will not be used for several months, remove all items, turn off the
appliance and unplug. Clean and dry the interior thoroughly. To prevent odor and mold growth,
leave the door open slightly, blocking it open if necessary.
MOVING YOUR APPLIANCE
Unplug the power plug from the electrical outlet.
Remove the contents from the racks and all moving parts from inside.
Raise the adjustable legs up to the base to avoid damage.
Tape the door shut and lock it with a lock system.
Transport the unit only in the upright position. Also protect the outside of the appliance with a
blanket or similar item.
ENERGY SAVING TIPS
Should the unit be left empty for long periods of time, it is suggested that the appliance is un-
plugged, and after careful cleaning, leave the door ajar to allow air to circulate inside the cabinet in
order to avoid possible condensation, mold or odors forming.
The appliance should be installed in the coolest area of the room, away from heat producing appli-
ances, and out of the direct sunlight.
Ensure that the unit is adequately ventilated. Never cover air vents. Clean dust and dirt from the
condenser at regular intervals.
Only open the door for as long as necessary and for as short a time as possible.
Position the content in an organized way. Prevent mutual contact and contact with the inner con-
tainer.
To allow air to circulate, do not overll the appliance. Do not cover any part of the shelves with alu-
minum foil or any other material that will prevent adequate air circulation within the cabinet.

27
PROBLEMS WITH YOUR APPLIANCE
You can solve many common problems easily, saving you the cost of a possible service call. Try
the suggestions below to see if you can solve the problem before calling customer service.
TROUBLESHOOTING
Problem Possible Cause Remedy
Nothing works. Appliance does
not operate.
Appliance is not connected to a power
supply.
Connect the appliance.
The appliance is turned o. Switch on the appliance.
Circuit breaker has tripped or a fuse has
blown.
Switch on circuit breaker or replace fuse.
Appliance is not cold enough. The door was not closed completely. Close door properly.
Door is not hermecally sealed. Check the door seal and clean or replace.
The condenser is too dirty. Clean the condenser when necessary.
The temperature is not set correctly. Check the set temperature.
The ambient temperature could require
a dierent temperature seng.
Set a dierent temperature.
The door was opened too oen. Do not open the door more oen than
necessary.
The venlaon opening is blocked or
too dusty.
Clean the obstrucons and clean o dust.
Appliance turns itself on and o
frequently.
The door is not closed completely. Close door properly.
The door gasket does not seal properly. Check the door seal and clean or replace.
The room temperature is higher than
average.
Fit the appliance in a cooler place.
A large amount of content has been
added to the unit.
Wait unl the set temperature has been
reached.
The door is opened too oen. Do not open the door more oen than
necessary.
The light does not come on. Appliance is not connected to a power
supply.
Connect the appliance.
Circuit breaker has tripped or a fuse has
blown.
Switch on circuit breaker or replace fuse.
The light was switched o on the
control panel.
Switch on the light.
Light malfunconing. Call for service to have it replaced.
Door will not open. Door lock. Unlock the door.
28
Vibraons. The appliance is not properly level. Level the appliance with the adjustable
feet.
The appliance seems to make
too much noise.
Normal refrigerant ow sounds. Normal operaon, no remedy needed.
Temperature uctuaons causing
popping and crackling sounds.
The door will not close properly. The door was reversed and not
properly reinstalled.
Check the door hinge and re-install it
correctly.
The gasket is dirty. Clean the door gasket.
The shelves are out of posion. Check the shelves and ret correctly.
E0, E1, E2, E3, E4, E5, E6, E7, E8
or E9 appears on the display.
Error codes. Try reseng the controls by disconnecng
power for 5 minutes. If the error code
returns, call for service.
Alarm sounds and temperature
display NOT ashing (door
alarm).
Door has been le open longer than 60
seconds.
Close door or touch any key to disable
alarm. Alarm will reset when door is
closed.
The alarm sounds AND the
temperature display ashes
(temperature alarm).
Appliance door open too long. Close door.
Door opened too oen. Do not open the door more oen than
necessary.
Venlaon opening blocked or dusty. Clean the obstrucons and clear the dust.
Lengthy power interrupon. Leave the appliance to work unl the set
temperature is reached.
Large amount of content added.
The icon dashes “--” is lit and
ashing in the temperature
display.
Temperature display out of range. Keep door closed and allow unit to cool to
set temperature.
Condensaon on outside
surfaces of glass door.
High humidity climate. Install the appliance in a dry and
Condensaon on outside
surfaces of glass door.
or air-condioned place.
The UVC disinfecon does not
work.
UVC disinfecon malfunconing. Call for service to have it replaced.
29