
Euromaid
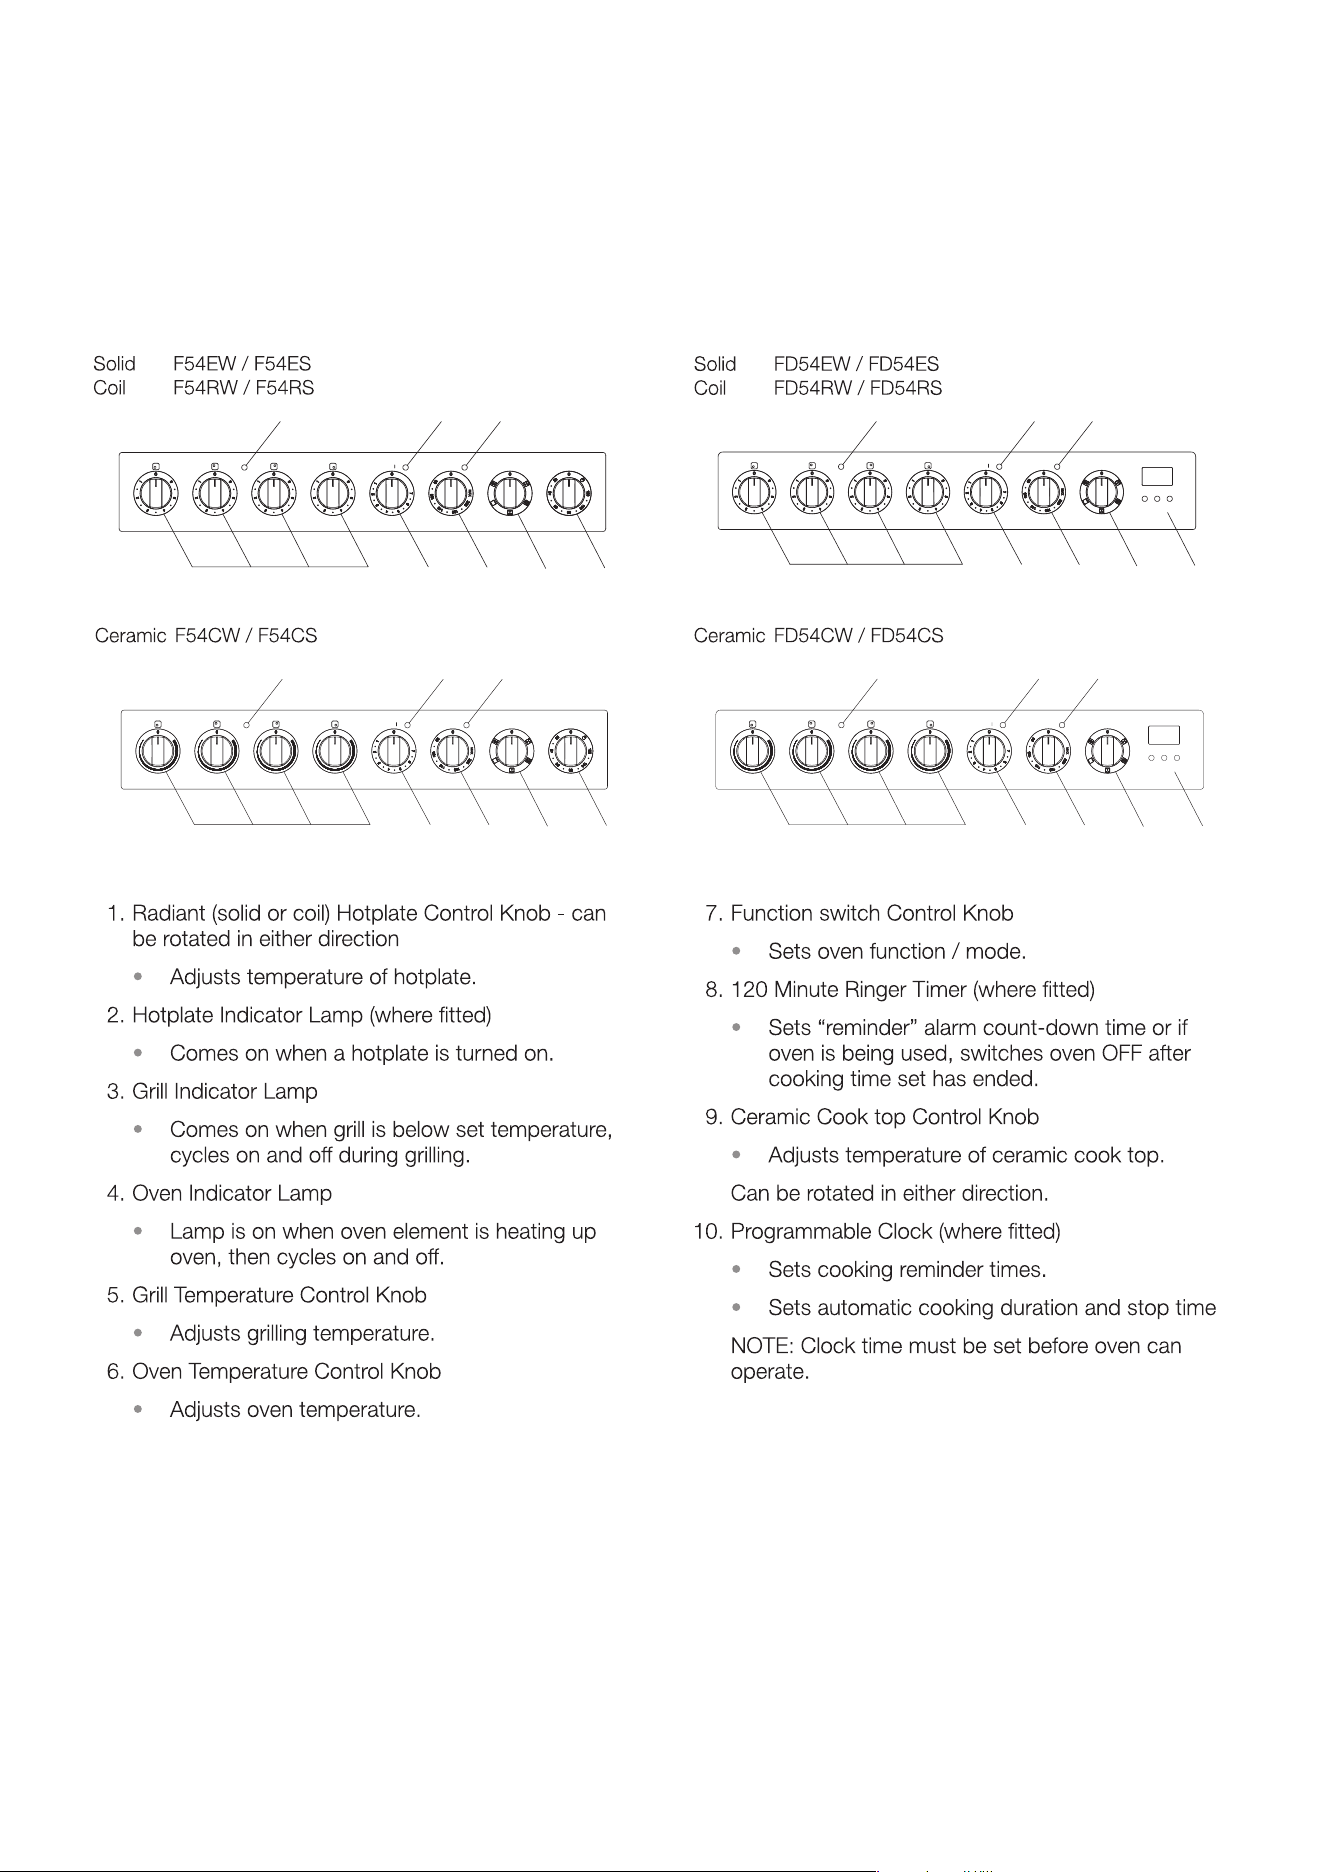
price, quality, performance
Front Control Models
White F54CW F54EW F54RW F54GW FD54CW FD54EW FD54RW
S/Steel F54CS
F54ES
F54RS F54GS
FRR54W FRC54W GG54RRW GG54RCW
FD54CS FD54ES FD54RS
Rear Control Models
White R54CW R54EW R54RW
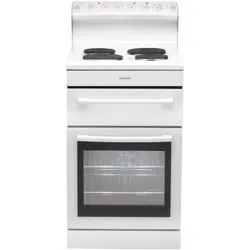
540mm Separate Grill Upright Cooker
USER MANUAL

Conditions of use .........................................................................................................................3
Safety precautions ....................................................................................................................... 3
Other important safety information ............................................................................................3
Warnings for use of grill, oven, and appliance hob ..................................................................4
Disposal of packaging ...............................................................................................................4
Installation, cleaning and servicing ...........................................................................................5
Product description .....................................................................................................................6
First time use of the appliance ...................................................................................................9
Using the oven ...........................................................................................................................10
Using the grill ..............................................................................................................................14
Using the hotplates of your cooker ..........................................................................................15
Using the hotplate gas burners ................................................................................................17
Fitting oven accessories and cleaning ....................................................................................18
Solving problems ........................................................................................................................22
Installing cooker – power connections ....................................................................................23
Installing the gas cooker ...........................................................................................................24
Testing the operation of the gas cooker .................................................................................. 26
Installing your new cooker.........................................................................................................27
Technical specifications ............................................................................................................30
Notes ...........................................................................................................................................33
Contents

Safety precautions
• Thisapplianceisnotintendedforusebypersons
(includingchildren)withreducedphysical,sensory
ormentalcapabilities,orlackofexperience
andknowledge,unlesstheyhavebeengiven
supervisionorinstructionconcerninguseofthe
appliancebyapersonresponsiblefortheirsafety.
• Warning–ensurethatnodownwardpressureis
appliedtotheovendoorwhenopen.Inparticular,
DONOTALLOWachildtoclimbontoopenoven
door
• Warning-accessiblepartscanbecomehotduring
use,especiallytheovendoor.Toavoidburns,
youngchildrenMUSTBEKEPTAWAY.
• Youngchildrenshouldbesupervisedtoensurethey
donotplaywiththisappliance.
• Duringusethisappliancebecomeshot.Care
shouldbetakentoavoidtouchinghotexternaland
internalsurfaceswheninuse.Useovengloves.
• Thecooktopareaincludingtheentirehobwill
becomeveryhotwheninuse.CareMUSTBE
TAKENwhenusingthispartoftheappliance.
• Installcooker,shelvingandttingsinaccordance
withthisManual.
• Ensureallspeciedvents,openingsandairspaces
arenotblocked.
Accordingtotheelectricalsafetyregulations
theapplianceequipmentmustbeproperly
earthed.
Donotusecorrosivecleanerse.g.oven
cleanersthatcontaincausticsoda.
Thisappliancemustnotbeusedasaspace
heater.
Donotobstructtheventilationslotsonfront
orbackofappliance.
Donotremoveanylabelsoruseabrasive/
corrosivecleanerson.
WerecommendthatyoureadtheinstructionsinthisManualcarefullybeforeuseforthebestperformanceandto
extendthelifeofyourappliance,asitwillprovideyouwithalltheinstructionsyourequiretoensureitssafeinstallation,
useandmaintenance.AlwayskeepthisManualclosetohandsinceyoumayneedtorefertoitinthefuture.Thank
you.
Conditions of use
Thisapplianceisintendedtobeusedfordomesticuse,notcommercialuse.
• Toensureyoursafety,allelectricappliancesshould
onlybeinstalledorservicedbyqualiedpersons.If
thesupplycordisdamaged,itmustbereplaceda
serviceagentorsimilarlyqualiedpersoninorderto
avoidahazard.
• ImportantNotice-ThisUprightCookermust
bettedsecurelyusingthesupplDonotspray
aerosolsinthevicinityofthisappliancewhileitisin
operation.
• Donotstoreammablematerialsintheapplianceor
nearthisappliance.
• Donotoperateanygasapplianceifthesmellofgas
persists.
• Donotmodifythisappliance.
• Appliancemustbeinstalledaccordingtocurrent
lawsandregulationsbyqualiedtradesmen/
Installers.
• GasmodelsareNOTAPPROVEDforinstallationin
marinecraft,caravansormobilehomes.
TheManufacturersandImporters/Distributors
andRetailersshallnotbeliabletoanylegalliability,
personalinjuryandpropertydamagedueto
incorrectoperationorincorrectInstallation.
Euromaid 540mm Upright Cooker CONDITIONS OF USE 3
Other important safety information

4 Euromaid 540mm Upright Cooker WARNINGS FOR USE OF GRILL, OVEN, AND APPLIANCE HOB
Warnings for use of grill, oven, and
appliance hob
Grill warnings
• DONOTleavegrillonunattended.
• DONOTcoverthegrilltraywirerackwithfoil.
• Tryingtogrillfoodmorethan25mmthickunder
grillcanbearehazard.Trimexcessfatfromfatty
meats,suchasporkandlamb.
• Fatleftonagrilltrayisarehazard!Keepgrillclean
andturnoffgrillimmediatelyafteruseandleave
draweropenforafewminutestocoolgrillarea.
Oven warnings
• DONOTpushdownorapplyanyweightonopen
ovendoor.
• DONOTplacedishesonopendoorofoven
• DONOTlineovenwithfoilorplaceanythingonthe
bottomoftheovenwhilebakingtoavoidpermanent
damage,astrappedheatwillcrackorcrazethe
enamelooroftheovencavityliner.
• Useofoliveoilandotherpoly-unsaturatedoils
(vegetableoils)whenroastinguncoveredfood
causesdepositsinsidetheovenwhicharevery
difculttoremove.
• Ifyouhaveanuprightcookerwithagasoventhat
doesnotlightwithinaboutin5-8seconds,allow1
minuteforgastodisperseclearbeforetryingagain.
Hotplate and burner warnings
• DONOTallowpotstoboildry,asdamageto
hotplatemayresult.
• DONOToperatehotplatesorburnerswithouta
pot,frypanetc.
• DONOTallowcookwaretooverhanghobonto
adjacentbenchtops,thiswillcausescorchingto
thebenchtopsurface.
• Gasmodels:Ensureburnercapsandcrownsare
intheircorrectpositiontoavoiddamagetothese
parts
Ceramic hotplate warnings
• DONOTplaceheatresistantmats,wirematsor
aluminumfoilunderpotsorpans.
• DONOTcookfooddirectlyontheceramicglass
surface.
• DONOTuseroundbottomwoksorsimilarutensils
whichcouldleadtooverheatingofhotplatesand
possibledamagetothecookingsurface.Cookware
usedshouldhavecompletelyatbases.
• Ensurecookwarestatesitissuitableforuseon
ceramicglass.Somealuminiumandcopperbased
cookwarecancauseminorpittingoftheceramic
glasssurface.
• DONOTusetheceramiccooktopasextrabench
spaceorasacuttingboard.
• AVOIDdroppingheavyobjectsontotheceramic
glasssurfaceasdamagecanoccur
• Immediatelycleanglasswhensugaryliquidshave
spilteg.stewedfruit,jam,meltedsugar.
Disposal of packaging
Pleaserecyclethecardboard,andalsoanypolystyrenepackagingwherepossible.

• Anauthorisedpersonmustinstallthisappliance.
(CerticateofCompliancetoberetained).
• Beforeusingtheappliance,ensurethatallpacking
materialsareremovedfromtheappliance.
• Inordertoavoidanypotentialhazard,the
InstallationInstructionsmustbefollowed.
• Inordertoavoidaccidentaltippingoftheappliance
(forexample,byachildclimbingontotheopen
ovendoor),theantitiltbracketandstabilitybolt
mustbeinstalledpropoerlyandsecurelytotheoor.
• Wheretheapplianceisinstallednexttocabinets,
thecabinetmaterialmustbecapableof
withstanding85º.
• Onlyauthorisedpersonnelshouldcarryout
servicing(CerticateofCompliancetoberetained).
• WARNING-Alwaysensuretheapplianceis
switchedoffbeforecleaningoranymaintenanceis
carriedoutsuchaschangingoflightglobes.
• DONOTuseabravisetypecleanerorcausticsoda-
basedcleaners.Usingwarmsoapywaterafterthe
appliancehascooledsomewhat,followedbyadry
clothissuitable.
• DONOTusesharpmetalscraperstocleanoven
doorastheycanscratchthesurface,whichmay
resultinshatteringoftheglass.
• DONOTusesteamcleanersasamethodtoclean
thisappliance.
• Alwayscleantheapplianceimmediatelyafterany
foodspillage.
• Tobeservicedonlybyanauthorizedperson.
• Appliancesrequiringconnectionto220-240Vand
mustbeearthed.
• GasmodelsareNOTAPPROVEDforinstallationin
marinecraft,caravansormobilehomes.
Installation, cleaning and servicing
Euromaid 540mm Upright Cooker INSTALLATION, CLEANING AND SERVICING 5
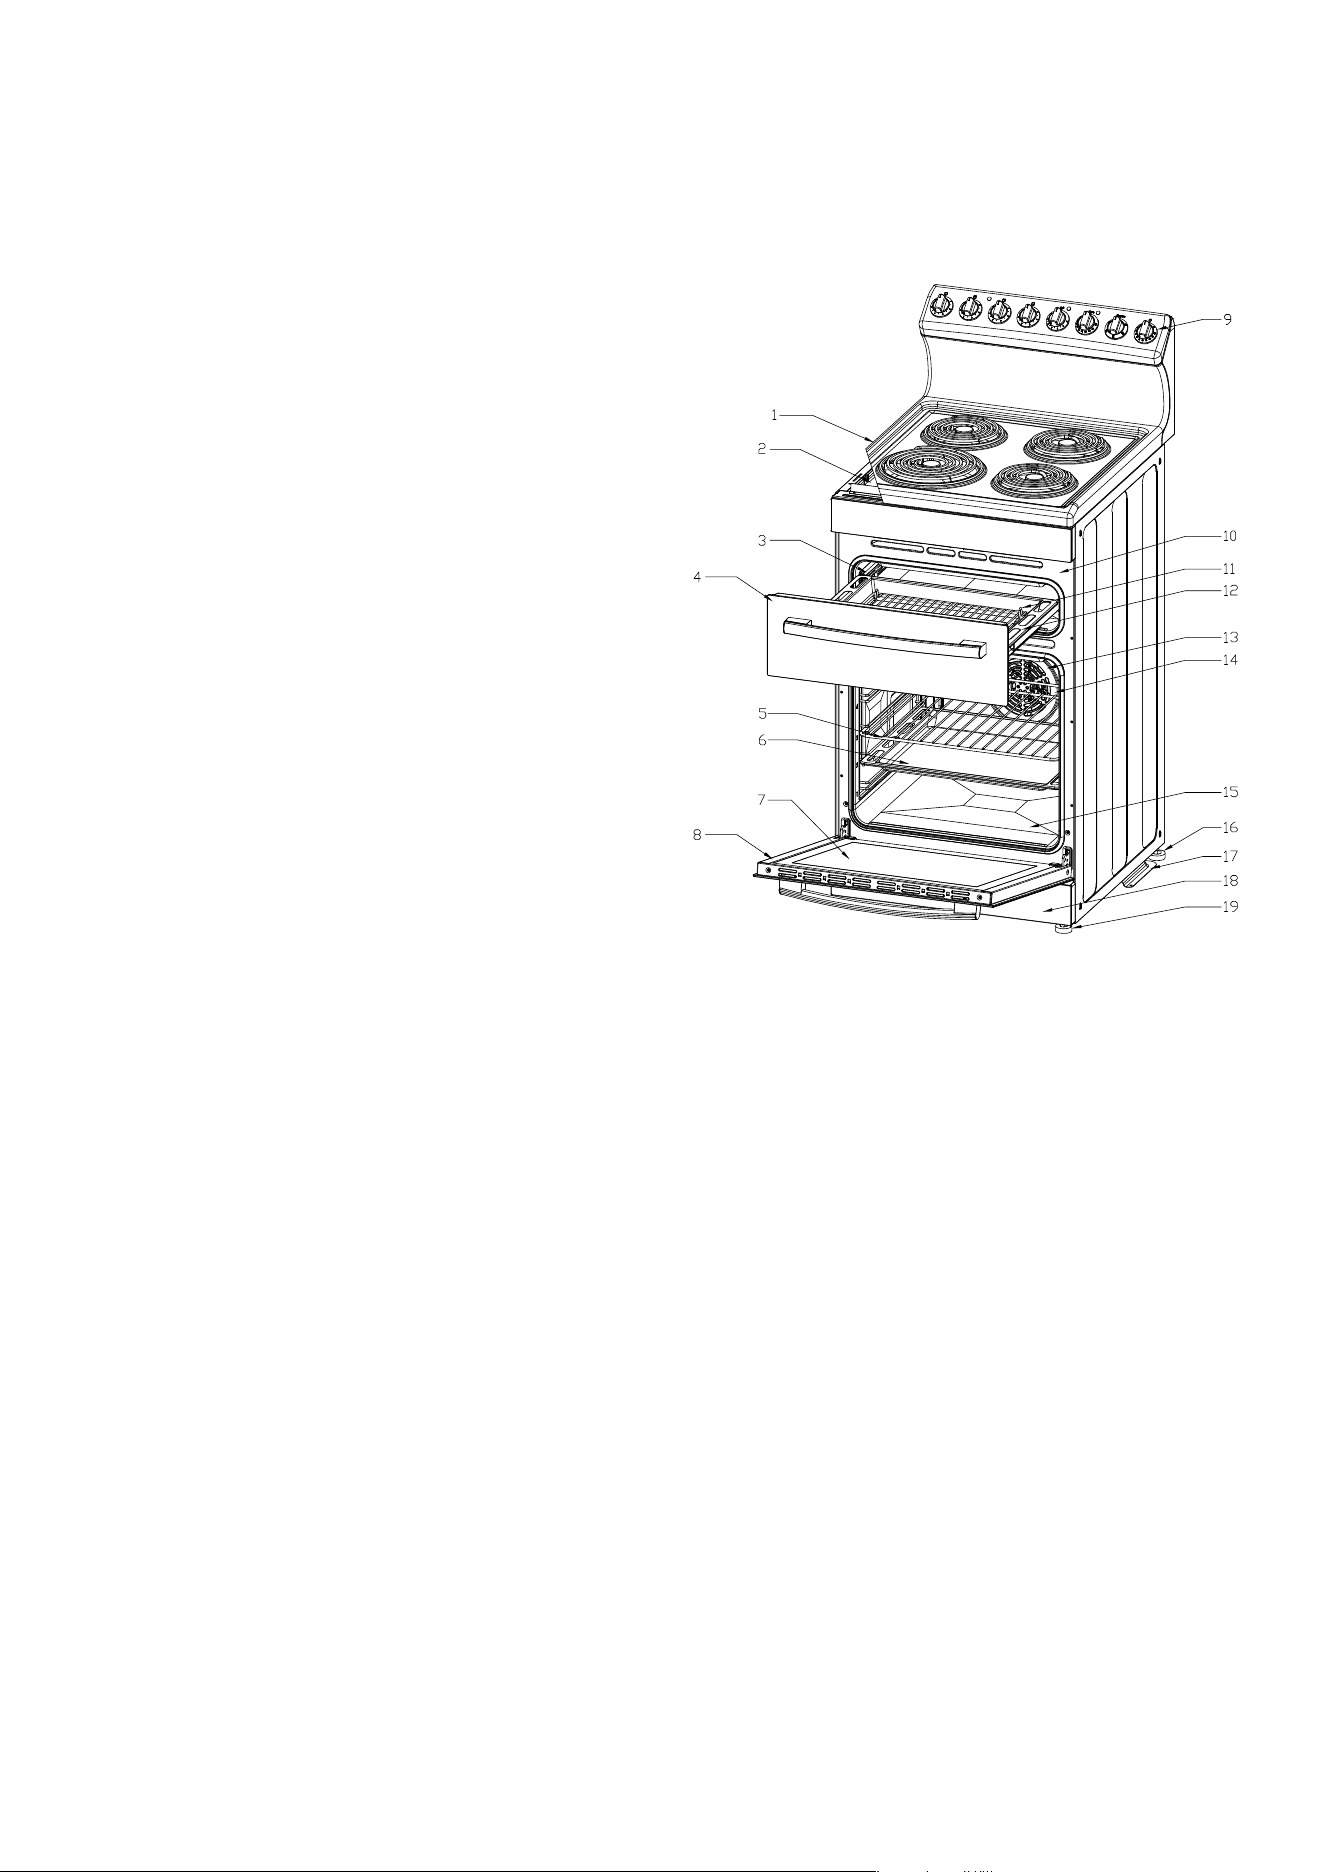
Description of cooker with separate grill
and rear controls
1.Hob(Solid,coilandceramic)
2.Heatshield(coilelementmodelsonly)
3.Telescopicrunner
4.Grilldrawer
5.Ovenshelf(2supplied)
6.Enamelledovenbakingtray(1supplied)
7.Oveninnerdoorglass
8.Ovendoor
9.Controlpanel
10.Grillelement(insidecompartment)
11.Grilltraywirerackinsert(reversibletoadjustheight)
12.Enamelledgrilltray(1supplied)
13.Fan&elementcover
14.Ovenrearfanforcedelement
15.Hiddenovenbaseelement
16.Rearadjustableantislipfeet(2)
17.Antitiltoorbracket
18.Kickpanel(stabilityboltlocatedbehindkickpanel)
19.Frontadjustableantislipfeet(2)
6 Euromaid 540mm Upright Cooker PRODUCT DESCRIPTION
Product description (Rear Control Models)
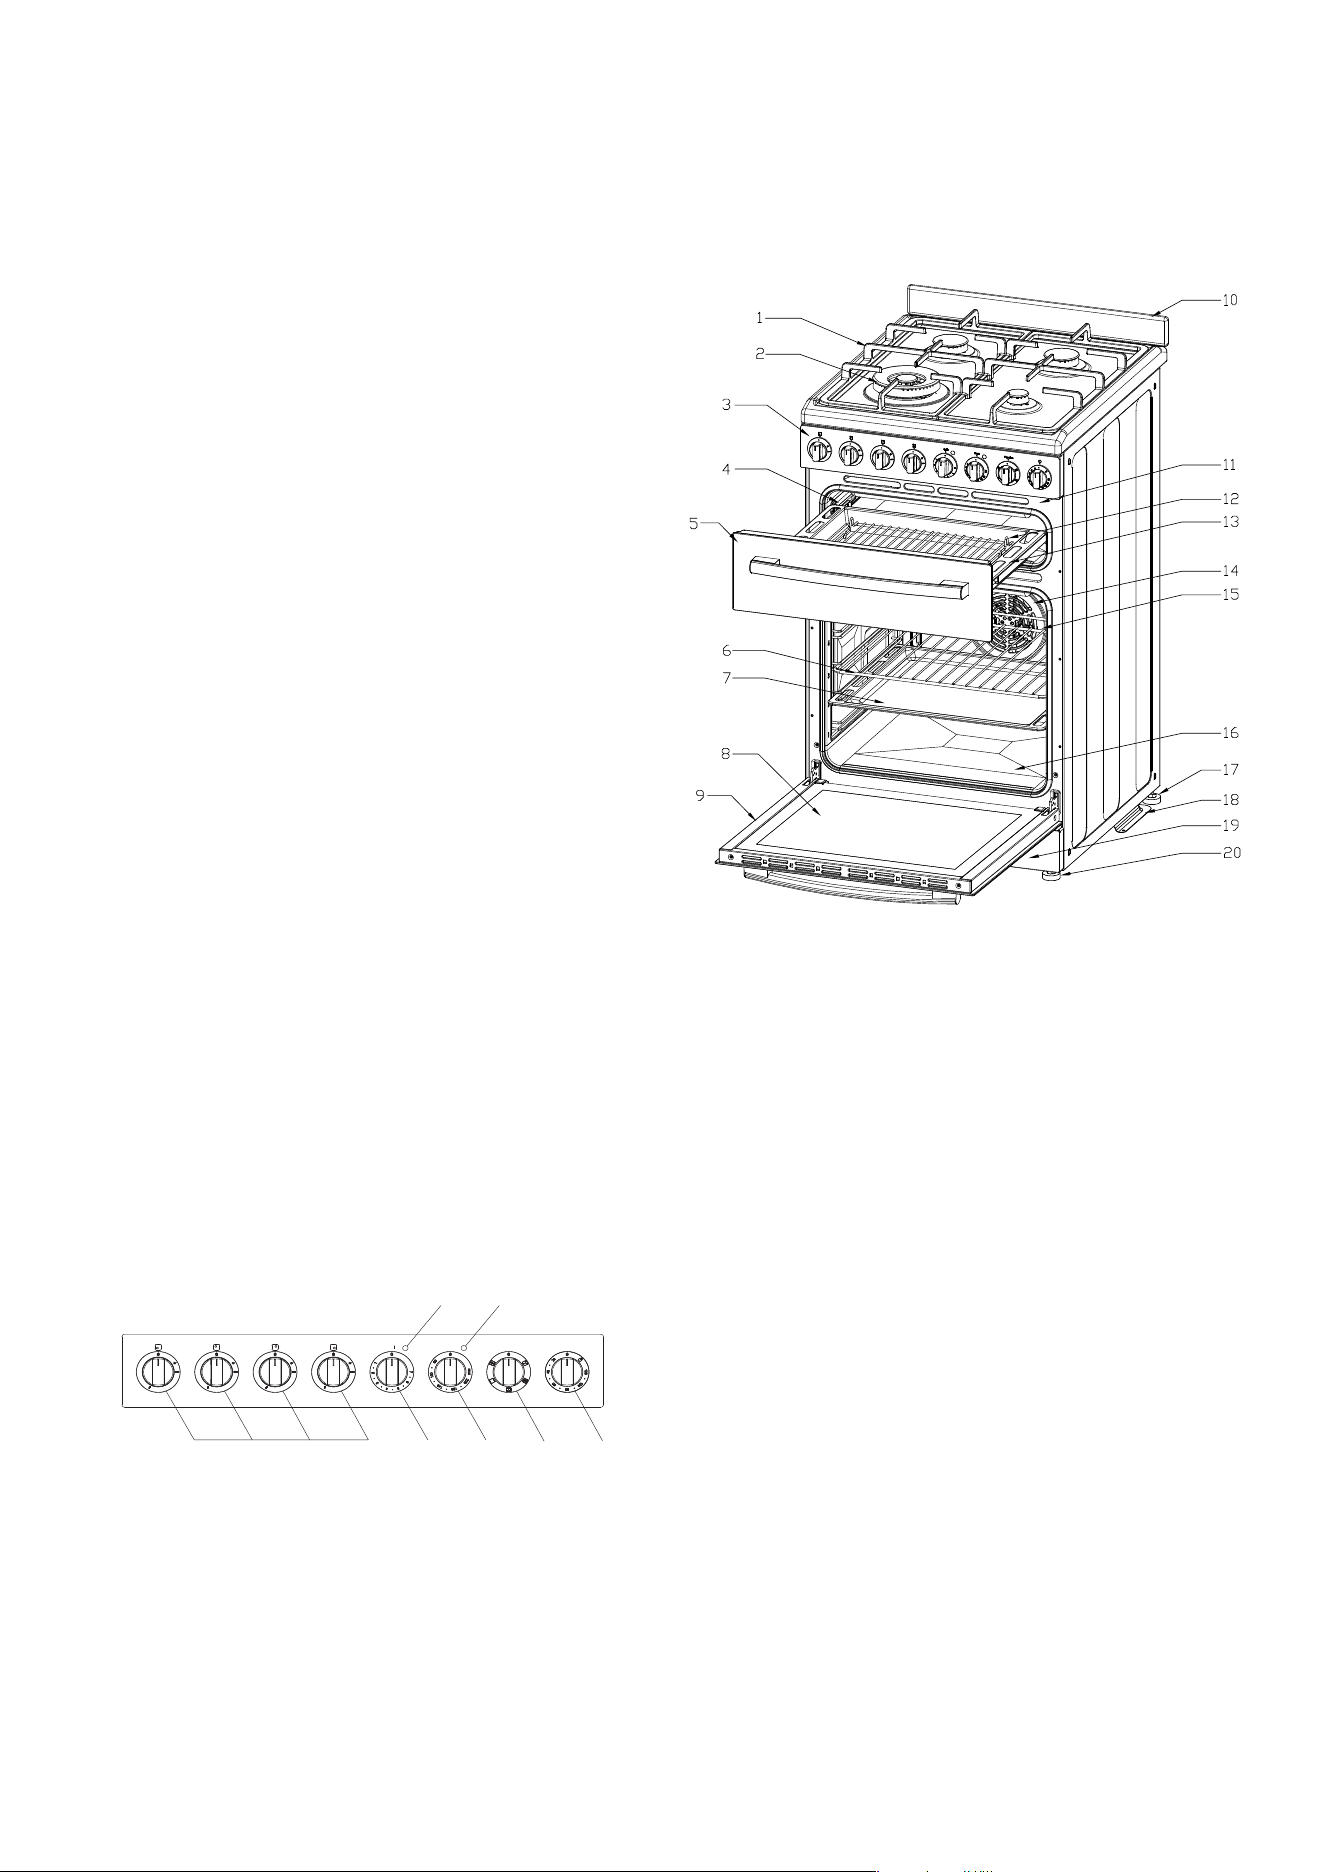
Description of cooker with separate grill
and front controls
1.Hob(Solid,coil,ceramicandgas).Gasmodel
suppliedwithcastirontrivetsandWOKadapter.
2.GasModel-Wokburner(1)(highlighted)with
removablecap,distributor,otherburners(2xsemi
rapid,1xauxiliiary).
3.Controlpanel
4.Telescopicrunner
5.Grilldrawer
6.Ovenshelf(2supplied)
7.Enamelledovenbakingtray(1supplied)
8.Oveninnerdoorglass
9.Ovendoor
10.Rearsplashback(1supplied)
11.Grillelement(insidecompartment)
12.Grilltraywirerackinsert(reversibletoadjustheight)
13.Enamelledgrilltray(1supplied)
14.Fan&elementcover
15.Ovenrearfanforcedelement
16.Hiddenovenbaseelement
17.Rearadjustableantislipfeet(2)
18.Antitiltoorbracket
19.Kickpanel(stabilityboltlocatedbehindkickpanel)
20.Frontadjustableantislipfeet(2)
7 Euromaid 540mm Upright Cooker PRODUCT DESCRIPTION
Product description (Front Control Models)
4.Grilltemperaturecontrolknob
• Adjustsgrillingtemperature.
5.Oventemperaturecontrolknob
• Adjustsoventemperature.
6.Functionswitchcontrolknob
• Setsovenfunction/mode.
7.120MinuteRingerTimer(Somemodelsttedwith3
buttonclockwithdigitaldisplay)
• Sets“reminder”alarmcount-downtime,orif
ovenisbeingused,thecookingtimeuntiloven
switchesOFF.
NOTE:Thegasburnercontrolknobshavetobe
helddownforapproximately5secondstoignite.
Grill
Oven Function
Timer
2 3
4 5 6
7
1
Description of gas cooktop model front
panel controls only
1. Hotplateelements/burnerscontrolknobs
• Setselementsorburnerscookingtemperature.
2.Grillindicatorlamp
• Comesonwhengrillisbelowsettemperature,
cyclesonandoffduringgrilling.
3.Ovenindicatorlamp
• Lampisonwhenovenelementisheatingup
oven,thencyclesonandof.
Gas F54GW/F54GS
Grill
Oven Function
Timer
2 3 4
5 6 7 8
1
Grill Oven
Function
2 3
4
5 6 7 10
1
Grill
Oven Function
Timer
2 3 4
5 6 7
8
9
Grill
Oven Function
2 3 4
5 6 7 1
0
9
Product description (control panels)
Controls
Euromaid 540mm Upright Cooker PRODUCT SPECIFICATION 8
/ R54EW / R54ES
/ R54RW / R54RS / GG54RRW
/ R54CW / R54CS / GG54RCW / FRC54W
/ FRR54W
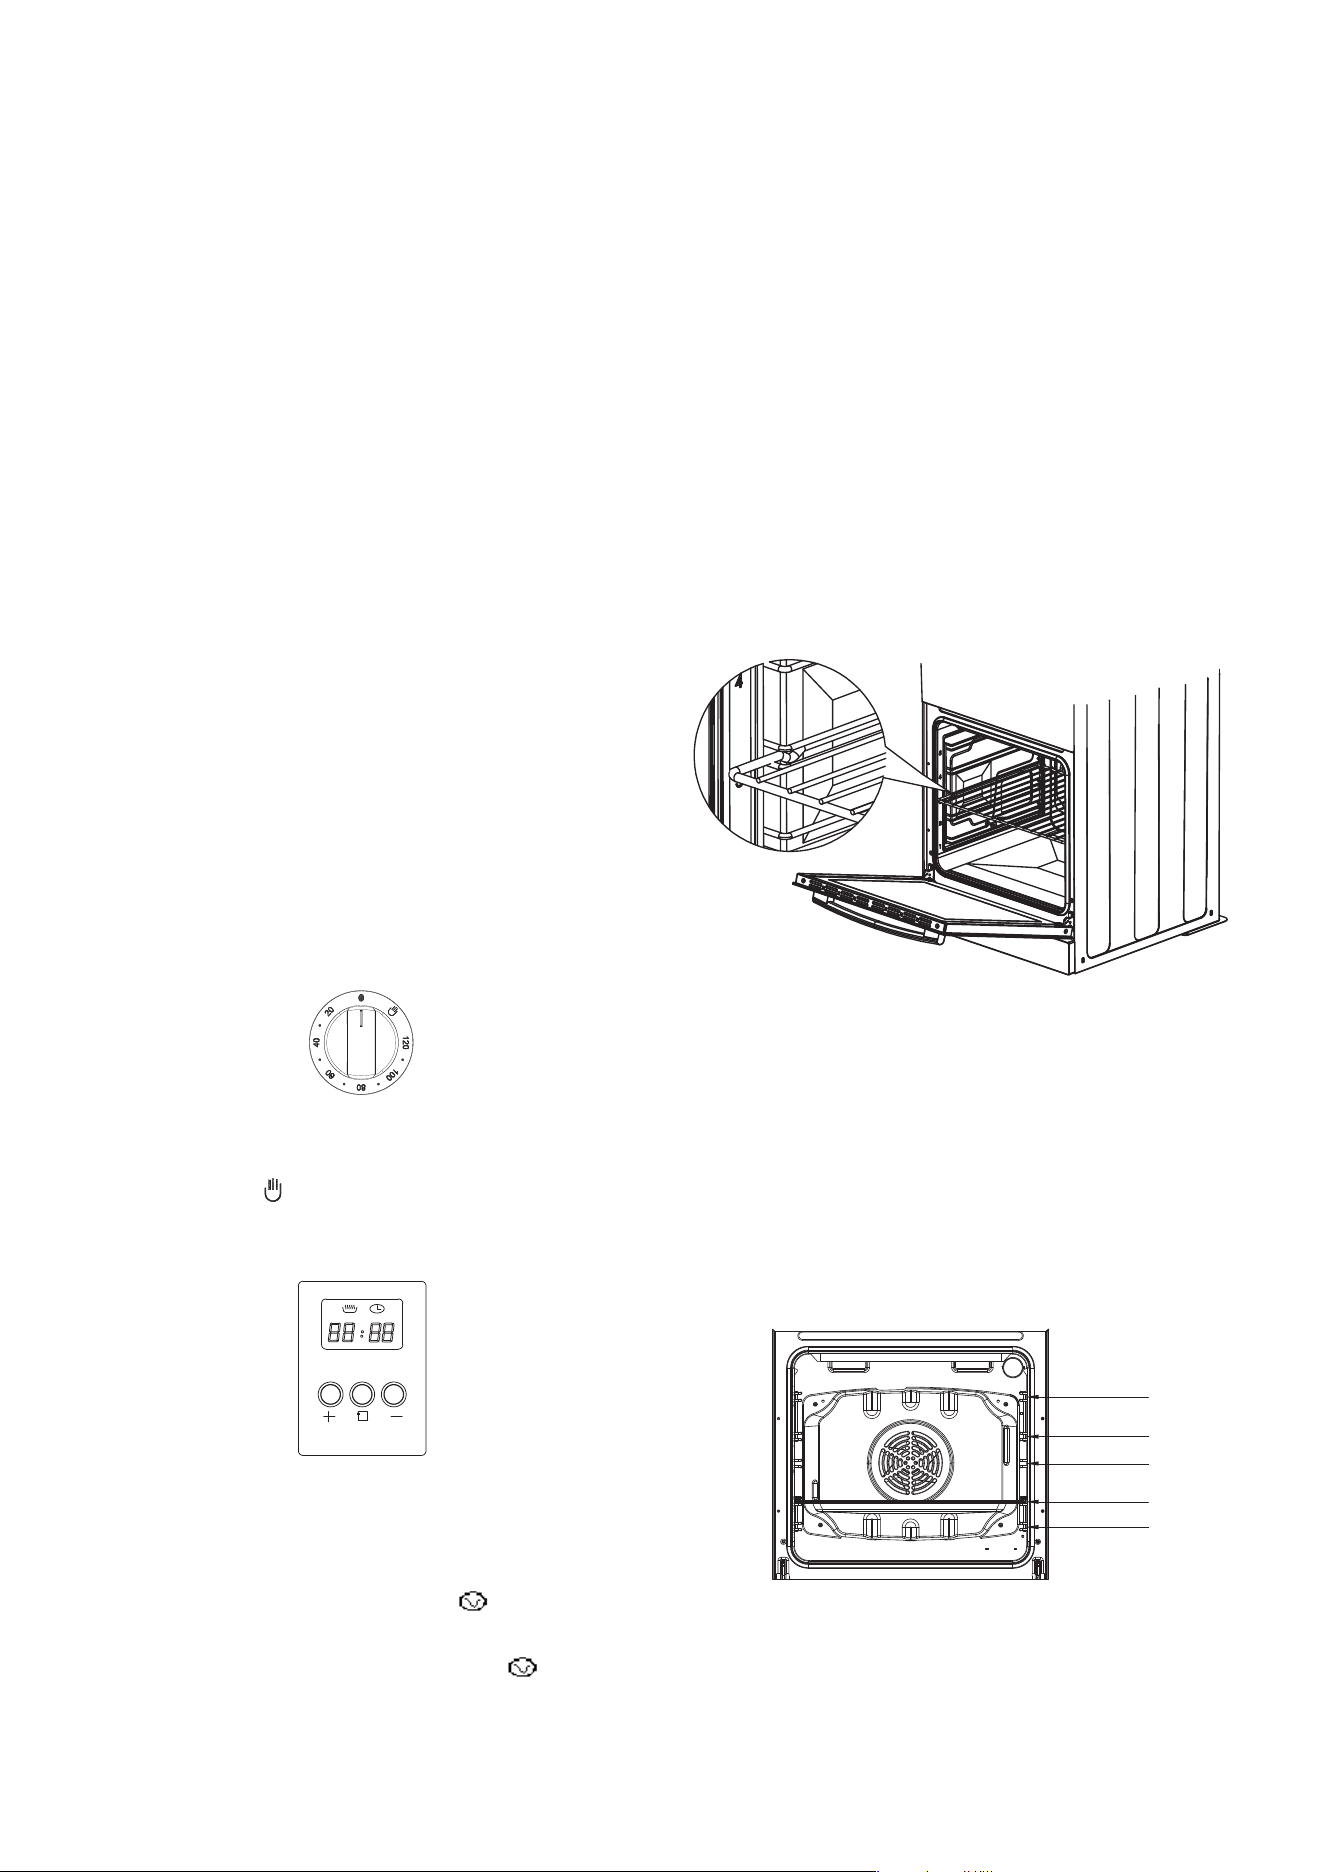
Fitting oven shelves
• Ensureshelforientationiscorrect(referpicture).
• Theshelfhasasafetybarttedtoreducetherisk
ofdishesslidingofftheshelf,thisistherearofthe
shelf
• Slideintoovenatanangleuntilraisedbackofshelf
ispastthestoponsiderunners.
• Lowerfrontofshelfandpushinuntilstopis
reached.
• NOTE:Thetopledgeisnotashelfposition
Oven shelf positions
• Themainovenhas5shelfpositionstochossefrom.
Position1isthepositionatthebottomoftheoven
andposition5islocatedatthehighestpointofthe
oven
• The5positionsideracksystemcanhouseboththe
standardovenshelvesandbakingtray.
Preparing your appliance for the
first time
• Pleasewipeouttheoveninteriorpriortooperation
withwarmsoapywaterandpolishdrywithasoft
cleancloth.
• Newappliancescanhaveanodourduringrst
operationfromcomponentsmanufacturedwiththe
aidofoils.Itisrecommendedto‘runin’youroven
beforeyoucookforthersttime.Runtheanempty
ovenat180°Cforapproximately1to2hours.
Ensurethattheroomiswellventilated.
• Pleaseinstallovenfurnitureasoutlinedinthe
“FittingOvenAccessoriesandCleaning”section.
• Ifyourapplianceisttedwithsolidhotplates,turn
heatsettingtohighfor3minutestofullyharden
thecoating.Whencooled,applyathincoatingof
cookingoiltosealthesurface.
• Thegrillelementmayhaveoilsleftonthegrillduring
manufacture.Beforeyoucookonthegrillforthe
rsttime,turnonfor15minuteswith10mmof
waterinthebottomofthegrilldish.
120 Minute Timer models
Ifyouruprightcookeristtedwitha120minutetimer
youmustselectacookingtimeorturntheknob
clockwisetothe‘ ’symboltooperate.Ifeitherof
thesearenotselectedtheovenwillnotheat.
Digital Timer with 3 buttons
Ifyouhavepurchasedamodelttedwitha3button
programmabletimer,youmustsetthetimeofday
beforeyoucanoperateyourappliance.
• Aftertheappliancehasbeenelectricallyconnected
“00.00”willbedisplayedandthe“ ”willash.
• Tosetthetimeofday,pressthe“–”or“+”buttons.
15secondsafterthelastchange,the“ ”will
disappear,conrmingthetimehasbeenset.
NOTE:Theclockhasa24-hourdisplay
Euromaid 540mm Upright Cooker FIRST TIME USE OF THE APPLIANCE 9
First time use of the appliance
Timer
Level 5
Level 4
Level 2
Level 3
Level 1
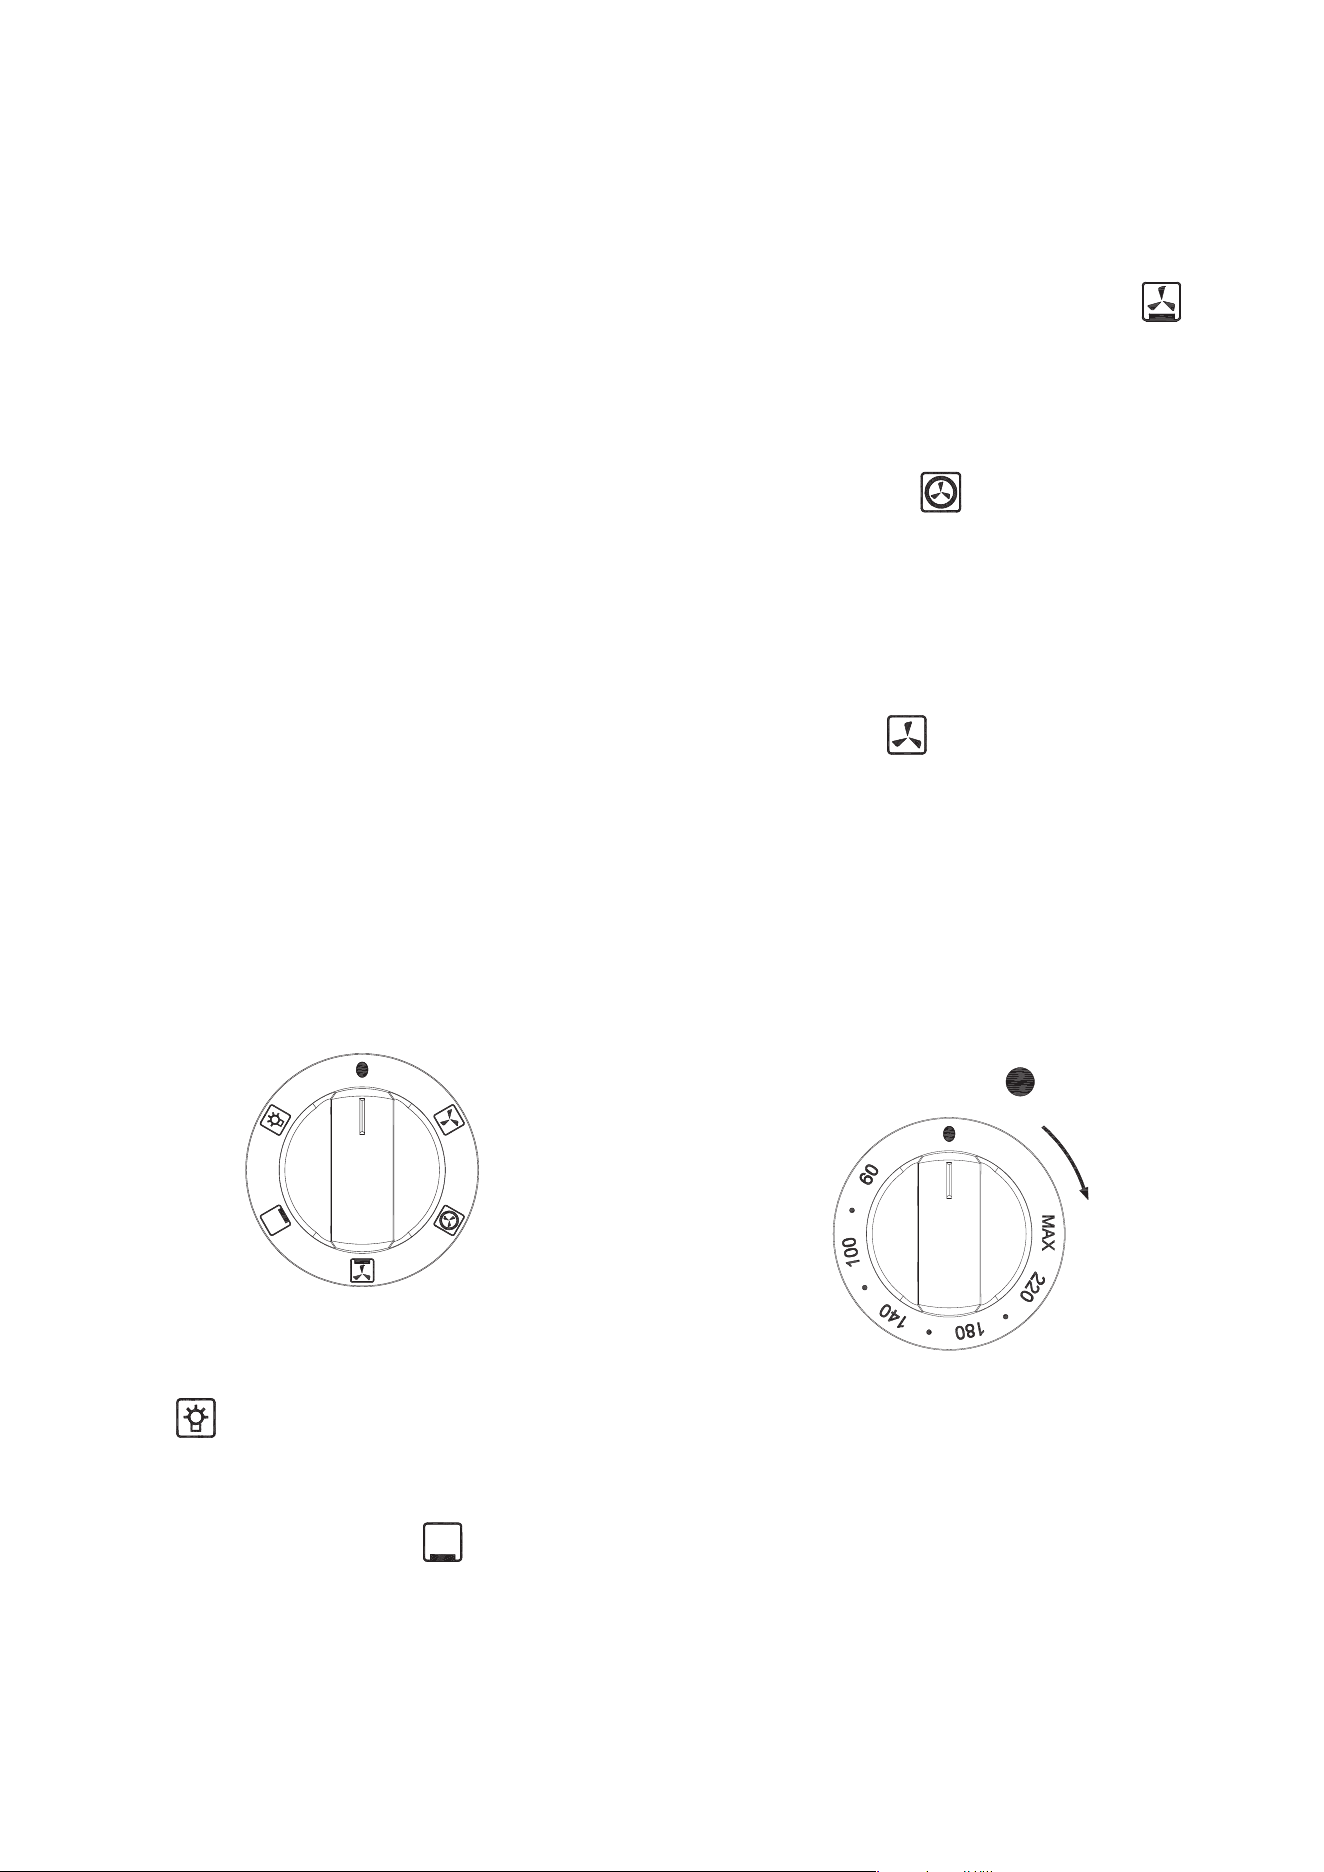
BottomElementwithFan(Pizza)Cooking“
”
Thebottomheatingelementandthefancomeon.
Suitableforpastries,pizzas,cakesandpuddingsin
bakingtinsormoulds
Donotuselowestshelfposition
Fan-forcedCooking“
”
Therearcircularheatingelementandthefancomeon
tomakeheatdistributedmoreuniformlythroughoutthe
oven.Idealforcookingonmorethanonelevelatatime.
Thismodeisidealforgeneralpurposecookingsuchas
bakingcakes,mufnsandroastingmeat.Cookion
multipleshelfpositionsatthesametime.
DefrostingMode“
”
Onlythefanoperates.Itislocatedonthebackof
theoven,causingmakestheairtocirculateatroom
temperaturearoundthefood.Thisisrecommendedfor
thedefrostingofalltypesoffood,butinparticularfor
delicatetypesoffoodwhichdonotrequiresubsequent
cooking,suchasforexample:icecreamcakes,cream
orcustarddesserts,fruitcakes.Byusingthismode,the
defrostingtimeisapproximatelyhalved.
2) Oven Temperature (thermostat) Knob
• Selectionofcookingtemperatureiscarriedout
byturningtheknobclockwisetotherequired
temperature,between60ºCtoMAX.
• Iftheapplianceiselectricthe“ovenindicatorlamp”
willcomeonwhentheovenisheatingup.When
itgoesoutitmeansthatitreachestherequired
temperature.Theovenindicatorlampgoing‘on&
off’duringuseisthennormal.Thismeansthatoven
temperatureisbeingconstantlymaintainedatthe
selectedlevel.
Oven safety warnings
• Alwaysfollowtheinstructionsforputtingtheshelves
andsideracksintotheoven,toavoidaccidents.
• DONOTlinetheovenwithfoil,itwilldamagethe
enamelcoating.
• DONOTplacecookwareoranythingelseonthe
bottomofovenastrappedheatwilldamagethe
ovenenamelcoating.
• DONOTtouchthehotsurfacesorheatingelements
insidetheoven.
• DONOTusetheovendoorasashelf.
• DONOTpushdownorsitontheopenovendoor.
• DONOTplaceshelvesontopofuppermostshelf
runnerastherearenostopsforshelfwithdrawal.
Operation
Set: 1) Oven Function 2) Temperature
3) Cooking time
1) Oven Function Knob
Descriptionofeachovenfunction(mode)
Lamp“
”
Thelampoftheovenison.Noheatingelementsareon.
Conventionalcooking/nofan
(useshiddenbottomelement)“
”
Suitableforcakes,biscuits,slowcookingandideal
forblindbaking.Goodforslowcookingatlower
tempeartures(below150degreescelcius).
Donotuselowestshelfpositionasbaseoffoodcan
burnasitisclosetotheelement.
Using the oven
Function
Oven
10 Euromaid 540mm Upright Cooker USING THE OVEN
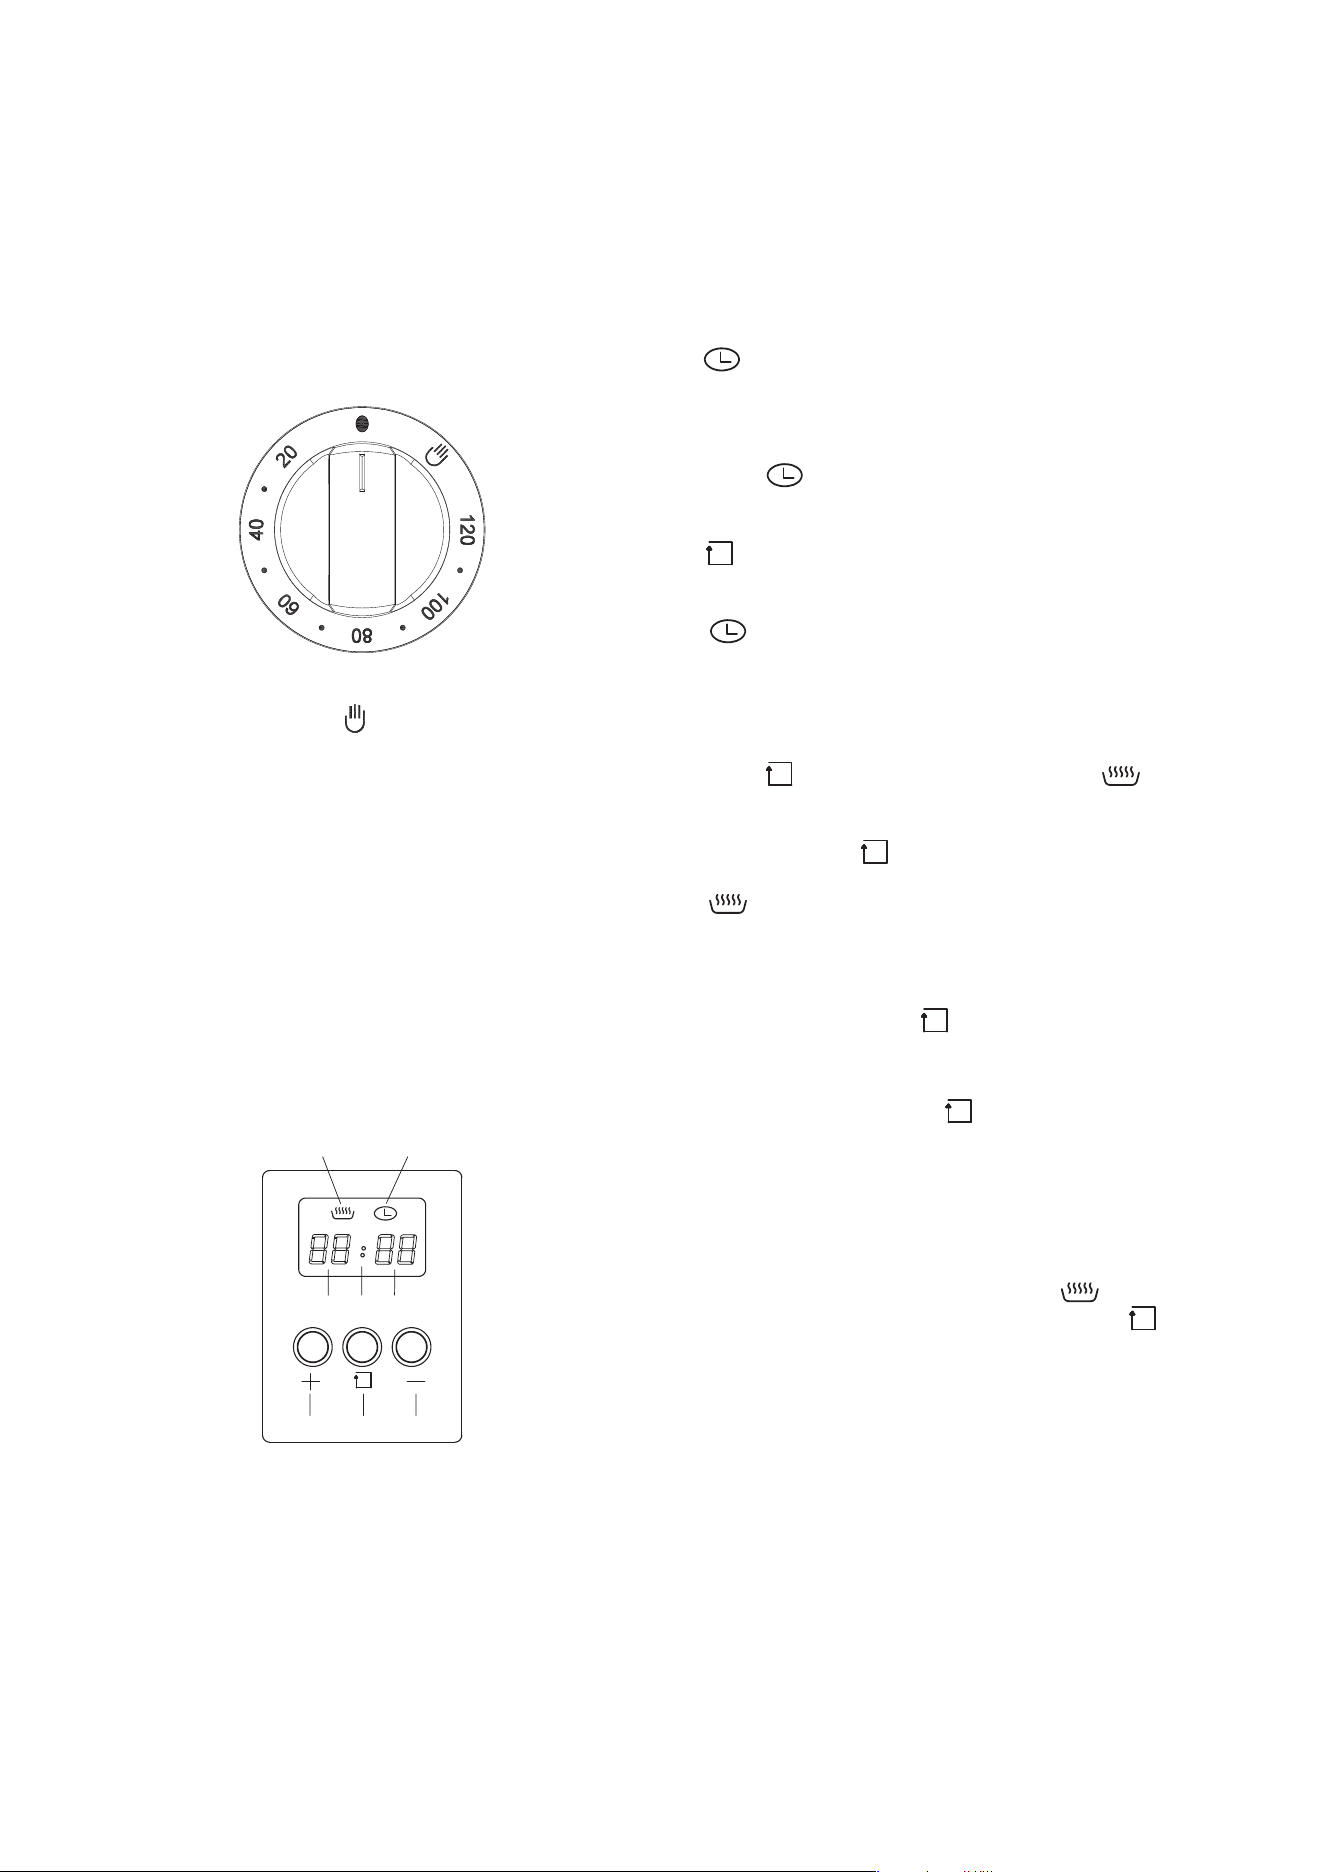
Starting-upprocedure
Afterpoweron,thescreenwilldisplay“00:00”and
“ ”clockindicatorwillbeon.
Timeofdaysettingprocedure
NOTE:Digital clock is displayed in 24 hour format
When“ ”clockindicatorandhourindicationare
ashing,press“+”upkeyor“–”downkeytoselecta
numbervaluefrom(0-23)forthehourtime,thenpress
“ ”setkeytochangetotheminutesetting.Whilst
ashingpress‘+‘upkeyor‘-“downkeytoselecta
numbervaluefrom(0-59)fortheminutetime.The
“ ”clockindicatorwillremainashingfor15
secondsoncethetimeissetandneitherofthe“+”up
keyor“–”downkeysandpressedagainwhilstashing
.
Durationtimersettingprocedure
Press“ ”selectionbutton3timesuntil“ ”heating
indicatorisashing,thenpress“+”upkeyorthe“–”
downkeytoselectthecookingdurationtimeinhours.
Thenpressthe“ ”selectionbuttontoenterthe
cookingdurationtimeinminutessetting.The
“ ”heatingindicatorwillremainashingfor15
secondsoncethecookingdurationtimeissetand
neitherofthe“+”upkeyor“–”downkeysare
pressedagainwhilstashing.
Alternativelypressthe“ ”selectionbuttonandthe
ovenwillstartcookingimmediately
Ifdurationtimersettingdoesneedtoexceed59
minutestheninitiallythe“ ”selectionbuttonshould
bepressed4timesinsteadof3tobypassthehour
durationselection.
Audible‘EndofCooking’buzzer
Thebuzzerwillsoundforup60secondsattheendof
thecookingtimedurationthathasbeensethasbeen
reached.The“00:00”displayand“ ”heating
indicationwillashforthisperiodunlessthe“
”selectionbuttonispressed.Theclockwillreturnto
thetimeofdaydisplaywheneitheroftheabovetow
actionsoccur.
Remarks
• Ifyoupress“+”upkeyor“–”downkeyformore
than3seconds,thevaluewillchangequickly.
• WhensettingtheTimeofDayorDurationTimerthe
“:”doesnotblinkalthoughwillblinkwhenineither
eithernormalTimeofDaymodeorDurationTimer
isdisplayed.
3) Set Cooking Time
■
120MinuteRingerTimerwith“OvenON/OFF”
• OperatingovenwithoutTimer-Turnknob
counterclockwiseto“ ”symbol.Theovenwill
operatewithuseofthetimerfunction.
• OperatingovenusingtheTimer-Tosetthetimer,
simplyturntheknobclockwisetotherequired
numberofminutes.Thetimerwillautomaticallyshut
downtheovenafterthesetminutesandthetimer
willringatthesametime.
•
NOTE:Foranytimebelowfteenminutesturntheknob
pastthefteenthenturnitbacktotherequirednumber
ofminutes.Whenthetimerreturnstozero,thetimer
givesashortring.
■
ProgrammableClock(somemodelsonly)
1 Heatingindication
2 Clockindication
3 Hourindication
4 Secondindication
5 Minuteindication
6 Up
7 Set
8 Down
Using the oven
Euromaid 540mm Upright Cooker USING THE OVEN 11
1
2
3 4 5
6 7 8
Timer

Oven cooking guide
Thefollowingcookingguideisintendedasaroughguideonly.Youmayberequiredtosetoven10-20degreesabove
orbelowthisguidetogettheresultyouwant.Alsoadjustmentsmaybeneededtothecookingtimetosuitpersonal
expectations.IfyouarenewtousingaFanForcedovenItisadvisabletomaketheseadjustmentsuntilyougetto
knowthewayyoorovenperforms.Iffollowingcookbookrecipesorpre-packagedgoodsyoushouldreadcarefully
theircookingtimesguidelines.
Forbestresultswhenbaking,preheatyourovenfor15-20minutes.
Food
Conventional Oven / Pizza Fan forced mode
Time in
minutes
Temperature (ºC) Oven shelf
position
Temperature(ºC) Oven shelf
position
Plainorfruitscones 200 Any 10-15
Rolledbiscuits 170 2-3 150 Any 10-15
Spoonedbiscuits 190 2-3 180 Any 12-15
Shortbreadbiscuits 160 2-3 150 Any 30-35
Hardindividualmeringues 110 2 100 Any 90
Softindividualmeringues 180 2 165 Any 15-20
Pavlova 110 2 100 Any 75
Pattycakes 190 2-3 170 Any 15-20
Sponge 180 2-3 170 Any 20-30
Plainbuttercake 180 2 170 Any 25-40
Richfruitcake 140 2 130 Any 180
Shortcrustcornishpasty 180-200 2* 160 Any 40-45
Shortcrustcustardtart 180-220 2* 170-200 Any 20-30
Creampuffs 210 2 200 Any 25-30
Yeastbread 210 2* 200 Any 25-30
Pizza 215 2* 205 Any 12-20
*Whenusingyoucoulduseposition3oftheoven
Meat/Poultry/Fish Fan Forced - Rec. Temp (ºC) Minutes per kilogram
Beef
Rare 180 35-40
Medium 180 45-50
Welldone 180 55-60
Lamb
Medium 180 40
Welldone 180 60
Veal 170 60
Pork 200 60
Chicken 180 45-60
Duck 180 60-70
Turkey 180
40–45(lessthan10kg)
35–40(morethan10kg)
Fish 160-170 20
Using the oven
12 Euromaid 540mm Upright Cooker USING THE OVEN
Understanding cooking problems
Problem Causes What to do
Unevencooking
Incorrectshelfposition Selectshelfthatputsfoodincentreofoven
Oventraytoolarge Removeoventray.Usesmallertraysordishes
Traysnotincentre Puttraysincentre
Ovenfancausingunevenbrowningorsmall
cakestoleanover
Rotatefoodduringcooking,oruseConventional
Mode(i.e.nofan)
Bakedproductstoo
brownontop
Ovennotpreheated Preheattheoven
Bakingtinstoolarge(diameter)forrecipe Usecorrectsizetins
Fan-forcedmodewithoventemperaturetoo
high
Checkrecipe.Reduceoventemperatureby
10–20ormore
Cookingtimetoolong Nexttime,shortencookingtime
Bakingtinsnotevenlyspaced Staggerbakingtinsatleast3cmbetweentinsand
theovenwalls
Itemstobecookedarenotevenlysizedor
spacedontrays
Makeintosamesizeandshapeandspread
evenlyovertrays
Bakedproductstoo
brownonbottom
Bakingtinstoolarge(diameter) Usecorrectsizetins
Bakingtinsaredarkmetalorglass Changetoshiny,lighttinsorlowerthe
temperatureby10°-20C
Foodtoolowinoven Cookoneshelfhigher
Ovendooropenedtoofrequentlyduring
baking
Don’topentheovendooruntilatleasthalfthe
cookingtimehaspassed
Bakingtemperaturetoohigh Lowerthetemperature
Oventrayblockingheat(belowthermostat) Usehighershelfpositionforoventray
Cakeshaveacracked
thickcrust
Bakingtemperaturetoohigh Lowerthetemperature
Foodtoolowinoven Cookoneshelfhigher
Cakebatterovermixed Mixjustlongenoughtocombinetheingredients
Bakingtintoodeeporwrongsize Checksizeoftinanduserecommendedsize
Bakingtinsdark Changetoshinylighttins
Bakedproductsarepale,
atandundercooked
Bakingtemperaturetoolow Raisethetemperature
Foodtoolowinoven Cookoneshelfhigher
Bakingtimetooshort Increasecookingtime
Incorrectbakingtinsize Usecorrectsizetin
Cakesfallenincentre
Bakingtemperaturetoolow Raisethetemperature
Bakingtimetooshort Increasecookingtime
Proportionsofingredientsincorrectforrecipe Checkrecipe
Openingdoortooearlyduringbaking Donotopendooruntilthelastquarterof
cookingtime
Roastmeatandpotatoes
notbrowninginfanoven
Poorhotaircirculation Elevatefoodontoaracktoallowaircirculation
Oventemperatureistoolow Increasetemperatureto200-220
Notlongenoughinoven Continuecookingforanother15+minutes
NOTE:Condensationonovendoorisnormal,especiallywhenkitcheniscold
Alsospacingandsizeoffoodontraysandthenumberofbakingdishesintheovencanaffectaircirculation.
Using the oven
Euromaid 540mm Upright Cooker USING THE OVEN 13
Using the grill
• Ensuregrillwirerackisturnedoverto‘high’position
intheenamelgrilltrayfortoast,foodlessthan
20mmthick,orturnedoverto‘low’positionfor
food20-30mmthick.
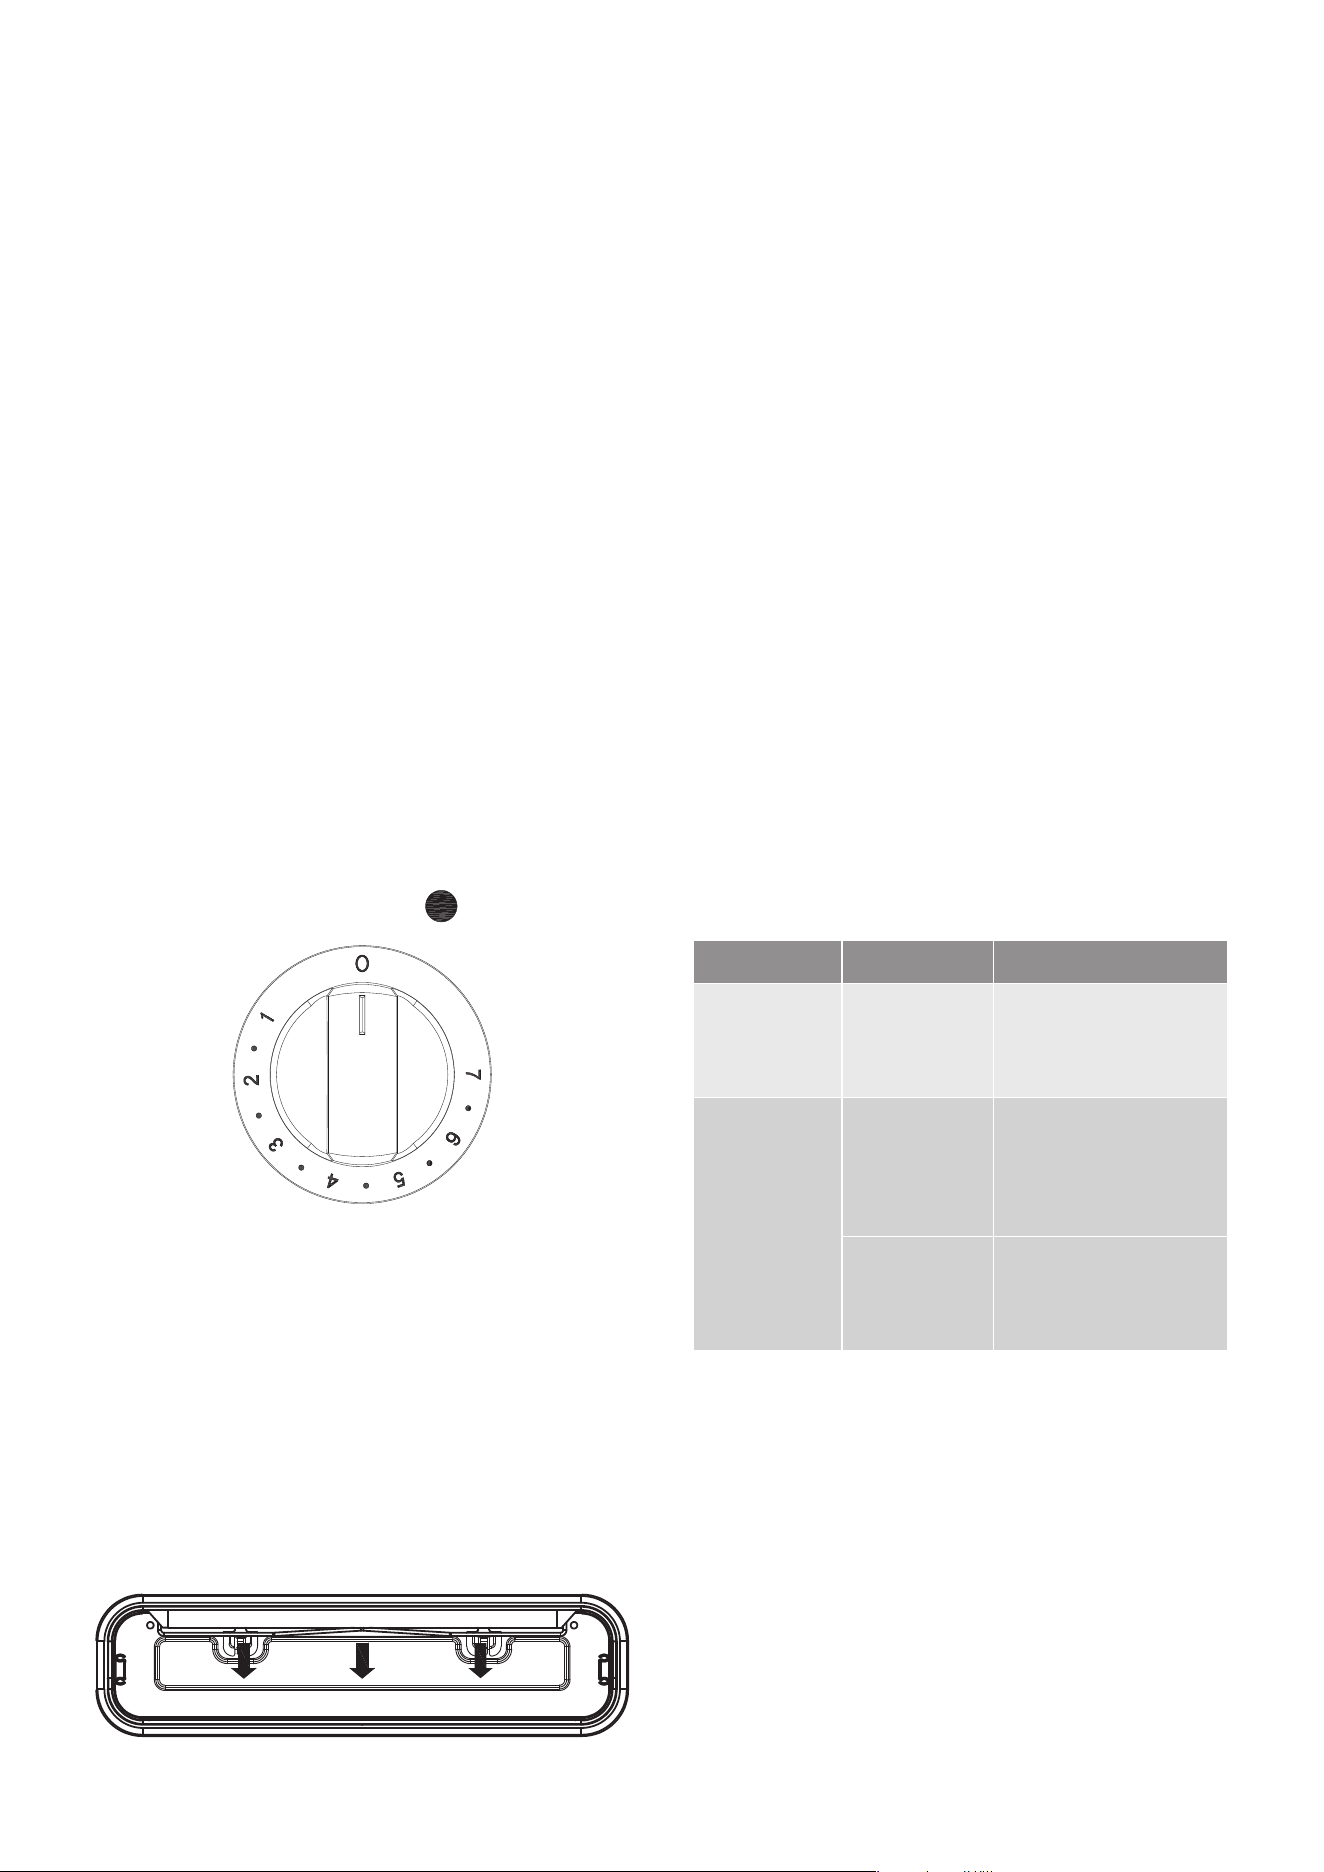
• Turnthegrillcontrolknobtoadjustthetemperature
togetthedesiredresult.Eg,toast4or5,meat6or
7.
• Ensurethattheenamelledgrilltrayispositioned
correctlyonthepinslocatedonthetelescopic
siderunners.Insertthegrillrackinsert,choosing
heightlevelrequiredforfoodbeinggrilled,intothe
enamelledgrilltrayandclosethegrilldrawerfully.
• Preheatthegrill.After3minutes,openthegrill
drawerandplacefoodontogrillrackinsert.
• Closethegrilldrawer.
• Intheprocessofgrilling,slideoutthegrilldrawer
every1minutetocheckprogressoftoast,every
2-3minutesformeats..
Handling grilling problems
Problem Causes What to do
Grilledmeats
burnton
outsideand
rawincentre
Meattoo
closetogrill
Useinvertedwirerack
insertand/orreduce
temperaturesetting
Excessgrill
smoke
Build-upof
fatsingrill
Cleangrillenamelled
trayandwirerackafter
everyuse
Trimfatfrommeatprior
tocooking
Grilledsteaks
andchops
curling
Cutslitsintofatwith
knifetowardsmeator
removeallfatpriorto
grilling
Grill safety warnings
• Alwaysturnoffthegrillimmediatelyafteryouhave
nishedcookingandpulldraweroutorremove
grilltrayotherwisefatleftinthetrayinthehotgrill
compartmentwillcontinuetosmokeorcouldcatch
re.
• Washgrilltray&grillinsertaftereveryuse.
• Grillinsertrackcanbeinverted…..toprovide2
differentsettingsforthedistancefromtopoffoodto
thegrillelement.
• DONOTlinethegrillrackwithfoil.
• DONOTleavethegrillunattendedandcheck
progressofcookingevery1–2minutes(especially
bread).
• DONOTtrytogrillplacefoodmorethan25mm
thick.Foodmaycatchre.Trimexcessfatfrom
fattytypemeatstoreduceanyriskofre.
• Donotstoreammablematerialsnearthegrill.
Grill information
• Thegrillfunctionissuitablefortendercutsof
meat,steak,chops,sausages,sh,bread,cheese
toastiesandotherquick-cookingfoods.
• Preheatfor3minutes.
• Placefoodoncethegrillchamberafetrpre-heating
isnished
• Thegrilldrawerdoormustbeclosedduringgrilling.
Using the grill
14 Euromaid 540mm Upright Cooker USING THE GRILL
Grill
Using the hotplates of your electric
cooker
Checkthehotplatesonyourcookeragainstthe
diagramsbelowbeforeyouuseyourcookerfortherst
time.
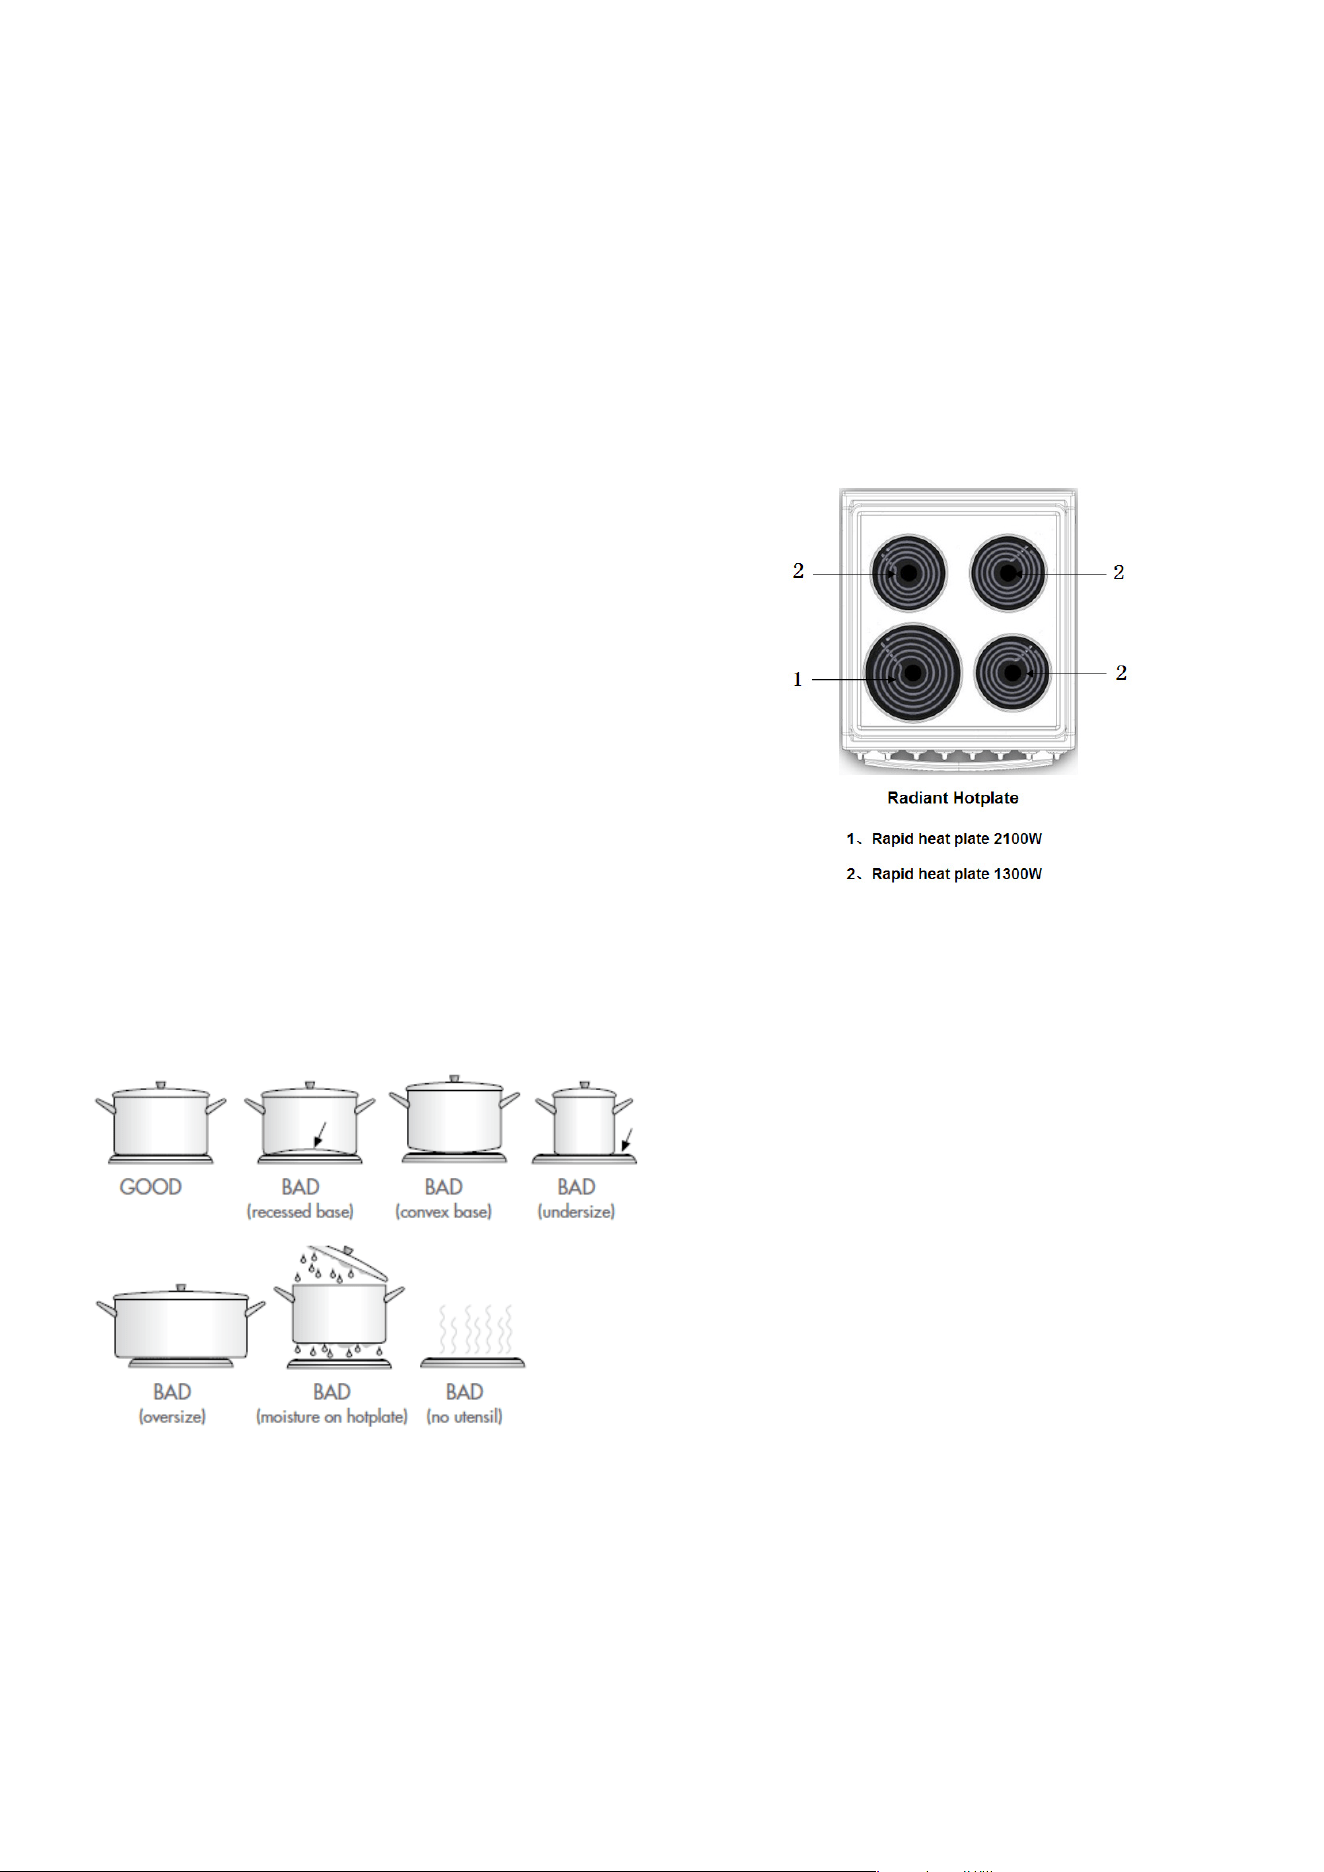
Radiant hotplates
• Thehigh-speedradianthotplatesheatrapidlyfrom
acoldstart.
• Theradiantelementscanbeunpluggedandthe
trimringscanberemovedforcleaningthespillage
bowls
Hotplates safety warnings
• DONOTusepotsandpanswhichareunsteady,as
thesecouldoverbalance.
• DONOTusematsorheatdiffusersontopof
hotplates.Thesewillcauseatemperaturebuild-up
whichcandamagethecooktop.
• DONOTturnonhotplatesifthereisnopotorpan
onhotplateoriftheydonotcontainfoodorliquids
inthem.
• DONOTletcookingpotsoverhangsidesorfrontof
hobastheycanradiatetoomuchheatontocontrol
knobsorbenchtopsurfaces.
Ceramic hotplates
• DONOTuseiftheceramicglasstopiscrackedor
broken.
• DONOTleavealuminiumfoilonthehotceramic
hotplates(permanentdamagewilloccur)
NOTE:Storedheatinthehotplatecanbeusedfor
thelastfewminutesofcooking.Simplyturnoffthe
control.
Choosing Cooking Pots
Lookatthisdiagrambelowwhichshowsyouwhich
cookingpotandpanstouseonthehotplatesand
whichonesthatshouldnotbeused.
• Alwaysusepotsandpanswithatbottoms.
Unevenorthinbottomswillwasteenergyandcook
slowly.
• Alwaysusepotsandpanswhichareslightlylarger
thanthehotplate.Smallpanswasteenergy.
• Alwaysputdrypotsandpansonthehotplates.
• Donotusepotsandpanswhicharetoolarge.Pans
whichoverhangthehotplatemorethan50mmcan
damagethehoborsurroundingsurfaces.
Using the hotplates of your cooker
Euromaid 540mm Upright Cooker USING THE HOTPLATES OF YOUR COOKER 15
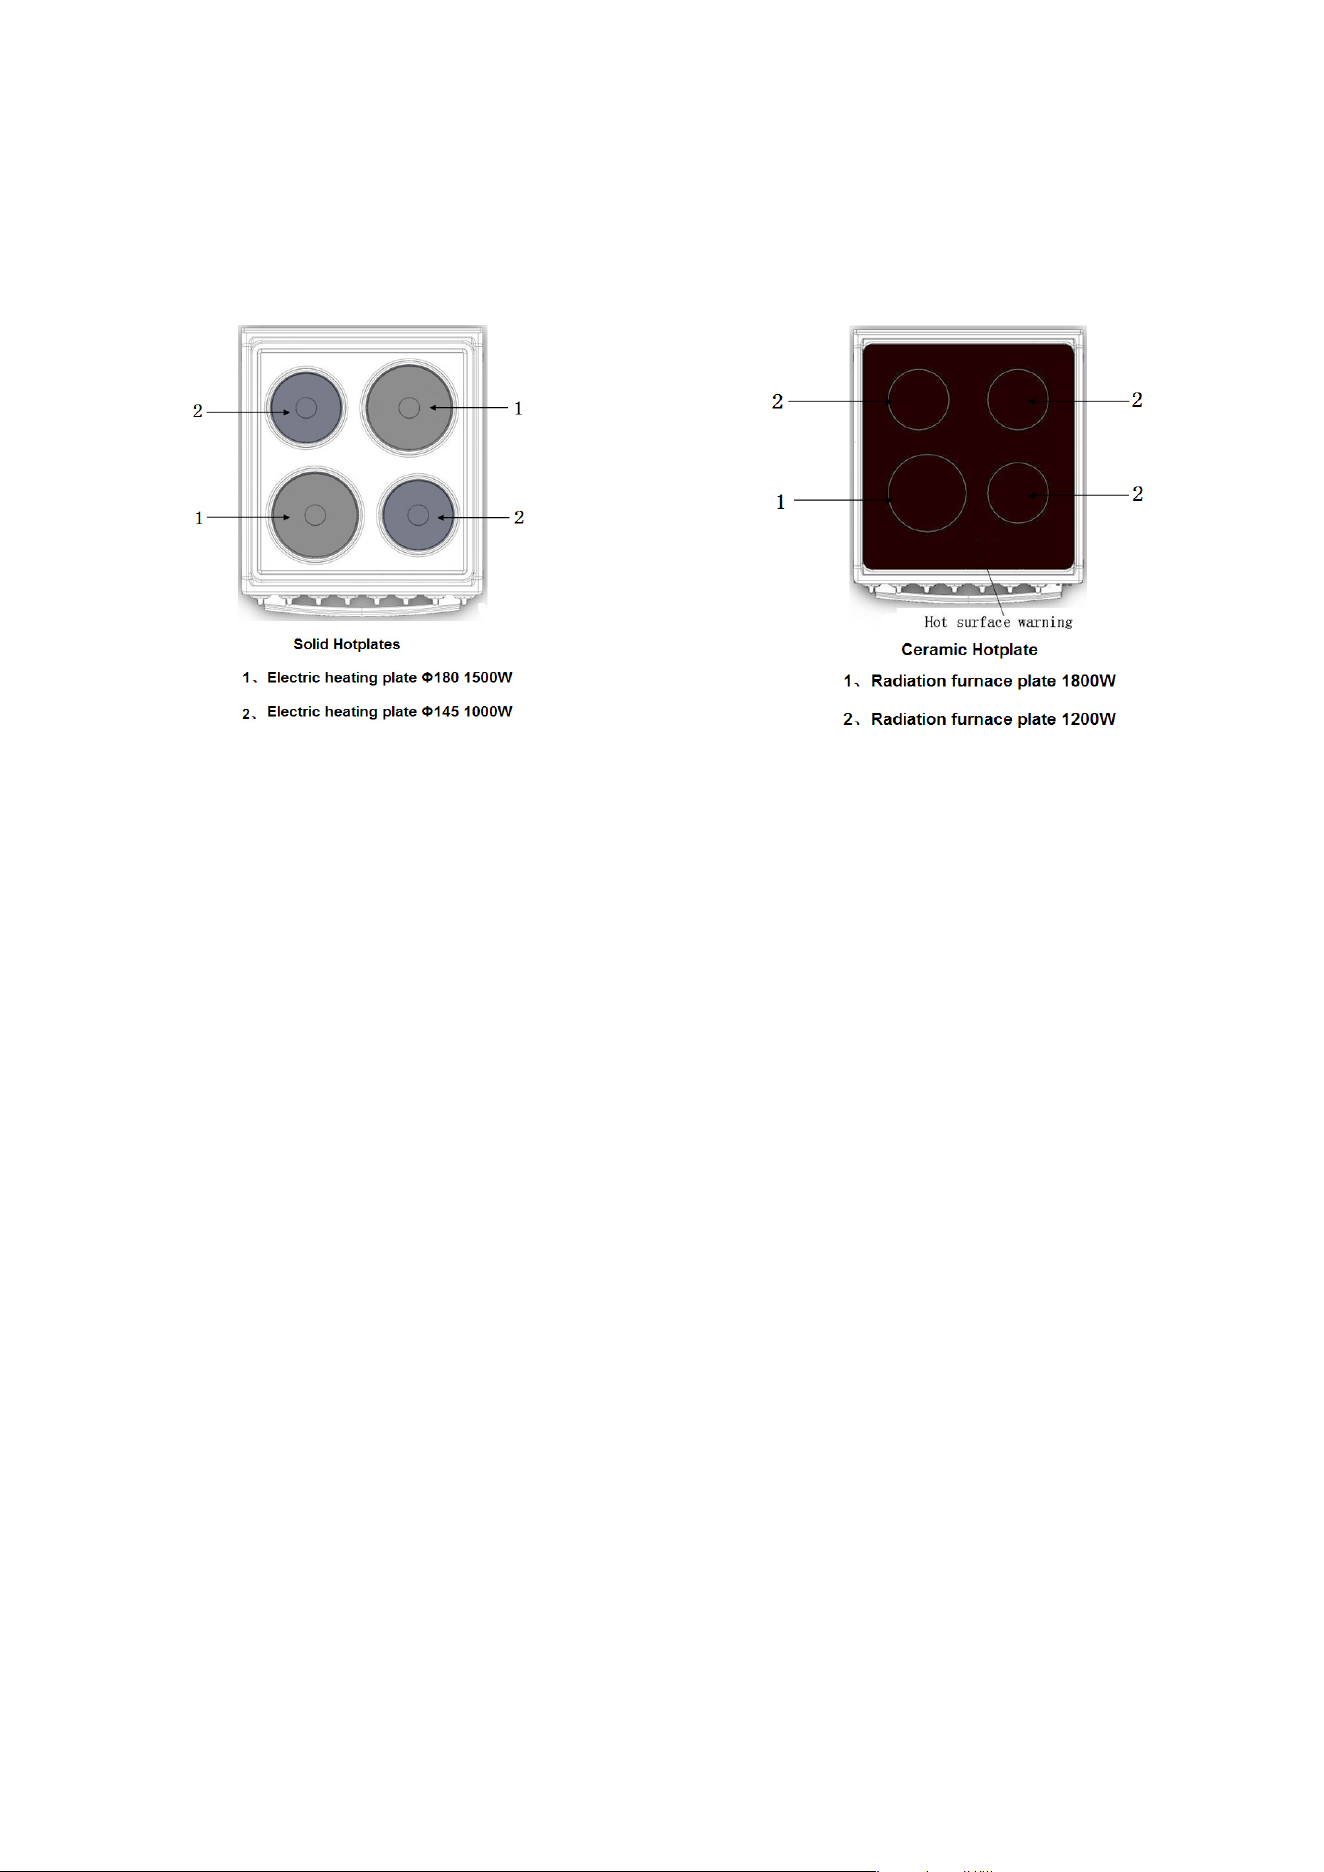
Ceramic hotplates
• DONOTusethecooktopiftheglassiscracked.
Contacttheservicedepartmentimmediatelyto
havethisrepaired.
• Theceramiccooktopismadefromceramicglass,
atough,durablematerialthatwithstandsheating
andcoolingwithoutbreaking.
• However,itmustberememberedthatasitisglass,
itmaybreak.
• Thesmoothglasssurfacehasapatterntoshow
wheretheelementsundertheglassarelocated.
• Whenahotplateison,thehotsurfacewarning
lightwillcomeon.Afterswitchingoff,thislight
willcontinuetoglowuntilthetemperatureofthe
hotplatedropsbelow60°C.
Care of ceramic glass surface
• Ensurethatspillsfromsugarysubstancesare
cleanedassoonaspossibleafterspillageassugar
candamagetheceramicglasssurfaceovertime.
• Aglassscrapershouldbeusedtoremoveburnt
onandverystubbornspillscreatedduringcooking,
Warmsoapywater,followedbywipingwithadry
softclothisnefordailycleaning.
• Periodiccare,approximatelyonceamonth,should
becarriedontheceramicglasssurface.We
recommendtheuseofHillmark‘Cerapol’ceramic
cooktopcleanertoremovestubbornstains.
• Tomaintainandprotecttheceramicglasssurface
overtimeHillmark‘Ceraseal’ceramiccooktop
protectorisrecommended.Thissiliconbased
productcreatesathinlmoftheceramicglass
surface.
• Scratchescanappearontheglasssurfacealthough
donoteffecttheuseofthecooktop.
Solid hotplates
• Thestrongsolid-casthotplatesgivewidecontact
forfast,efcientcooking.
• Thehotplatesaresealedallaroundwhichmeans
thatspiltliquidsdonotgounderthehotplates.
Before first use
• Thetopsurfaceofthehotplatesaresealedwitha
heatresistantcoating.Beforeusingforthersttime
thehotplatesshouldbeheatedforashortperiod
withoutapantohardentheprotectivecoating.
• Turntheheatsettingtohighforapprox.3minutes
tofullyhardenthecoating.Whenthehotplateshave
cooledapplyathincoatingofcookingoiltothe
hotplatetosealandprotectthesurface.
Care of the hotplates
• Ensurethatspillsfromoilandwaterarecleaned
oncehotplatesarecoolenoughtodoso.Ifwater
remainsonthehotplates,rustspotsmayappear
overtime.
• Overtime,thehotplatescandiscolourfromspills
duringcooking.WerecommendtouseHillmark
‘ShineOn’hotplateprotector,onaregularbasis
toextendthelifeofthehotplatesandreducethe
riskofrustingasthisformsaprotectivewaterproof
coatingonthehotplates.Thiscanbepurchased
frommajorhardwareoutletsandsupermarkets.
Using the hotplates of your cooker
16 Euromaid 540mm Upright Cooker USING THE HOTPLATES OF YOUR COOKER
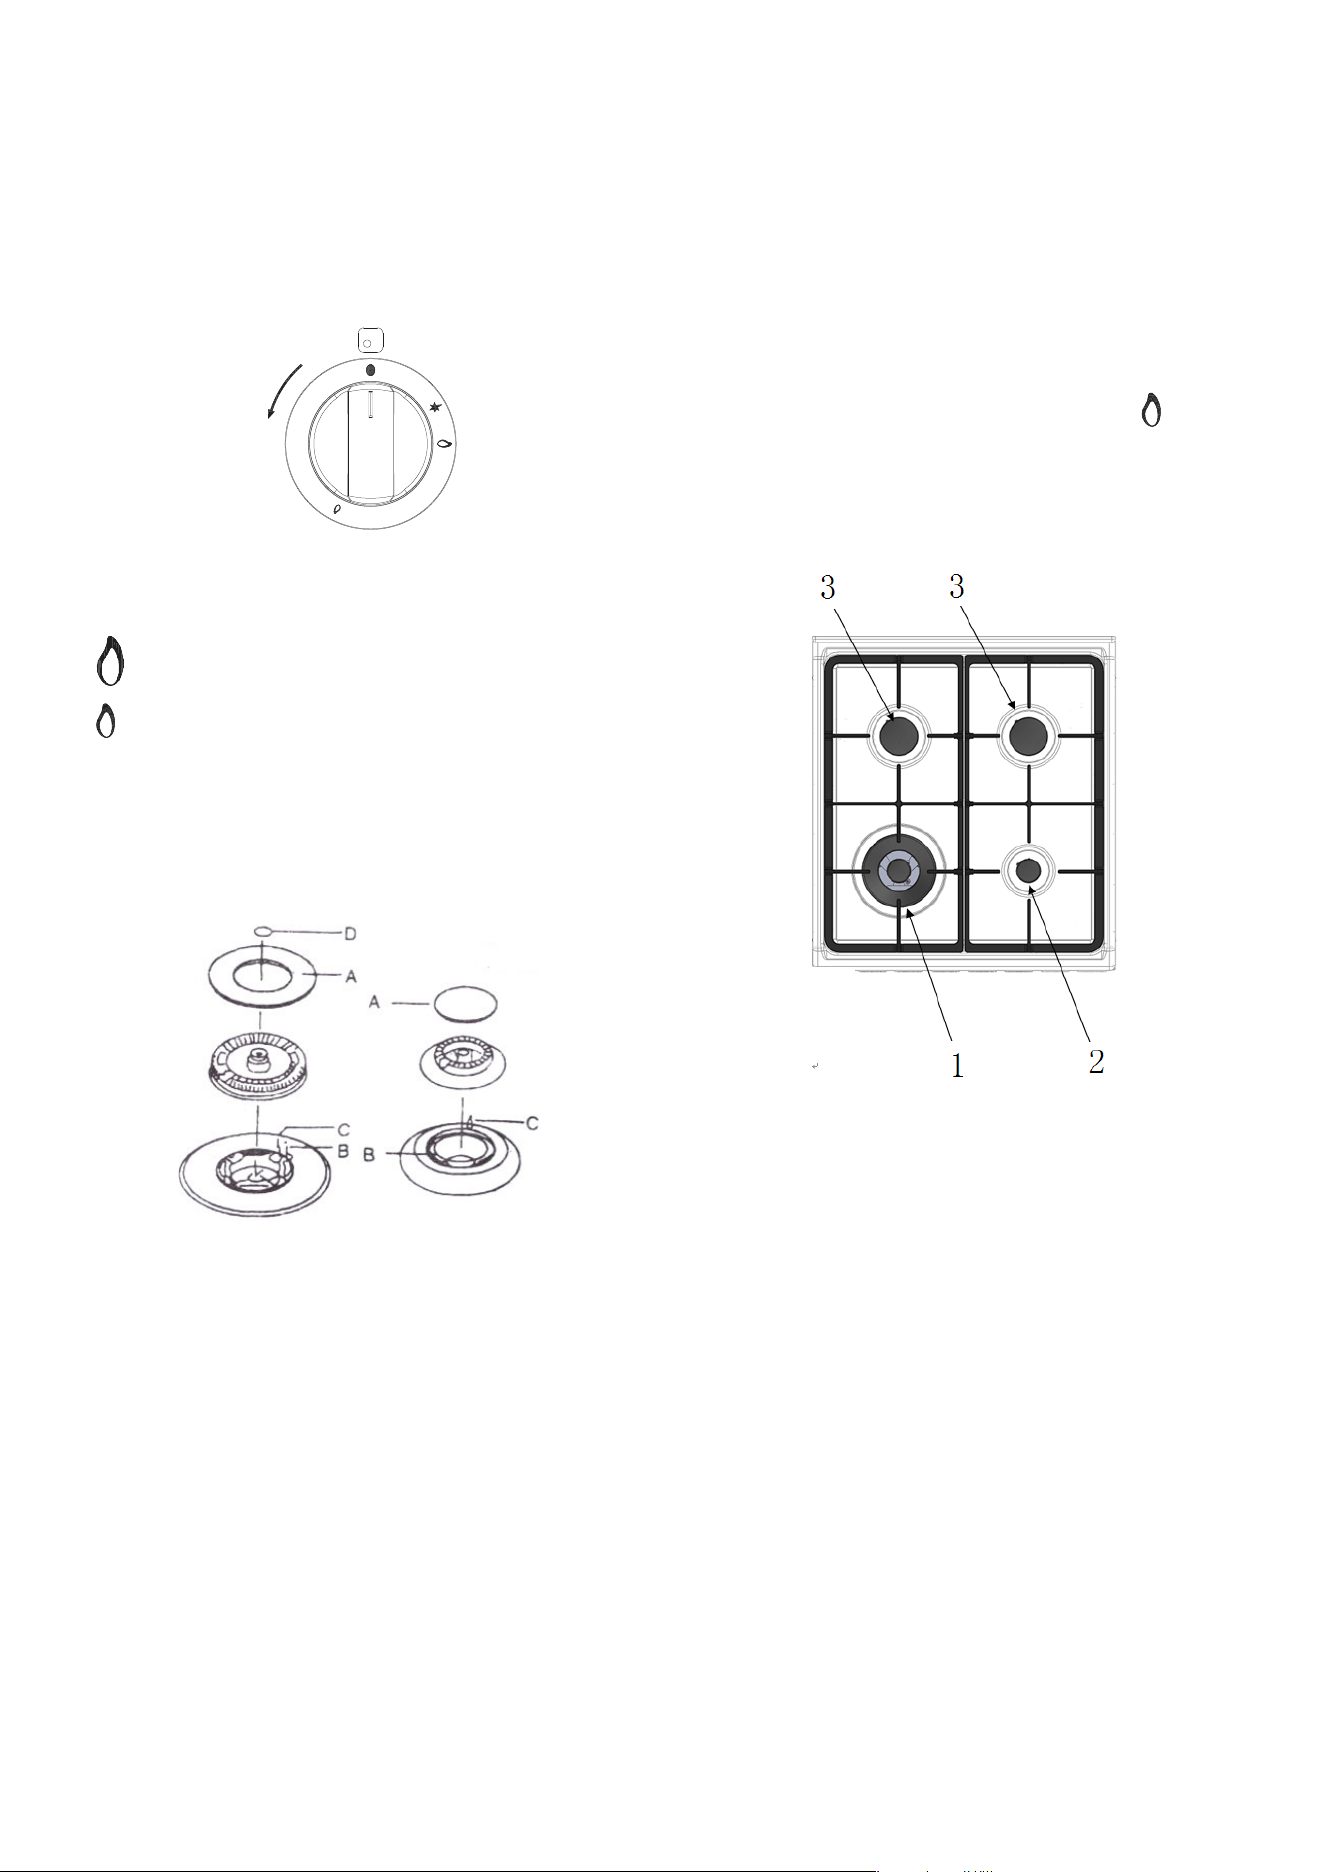
Hotplate Ignition
Tolightthesehotplates:
1. Choosethehotplateyouwanttouse.
2. Pushinburnercontrolknobandrotateto“ ”.
3. Holdcontrolknobfor2-3seconds,themrelease
androtateknobtoadjusttheameheight.Ifame
goesout,theknobwasnotheldinforsuffcient
time;repeatstep2.
Burner
1. Wokburner
• Usedforfastheating.
• UsedwithWOK,largesizepotsandpans.
• ForroundedbottomwoksuseWOKadapter.
2. SmallBurner
• Usedforsimmering.
• Usedwithsmallpotsandpans.
3. Semi-rapidBurner
• Usedfornormalcooking.
• Usedwithmiddlesizepotsandpans.
Toconservegas,placethepancentrallyovertheburner
andadjusttheamesothatitdoesnotgopastthe
edgesofthecookware.
The hob control knobs
Thesymbolsonthecontrolknobsmeanthefollowing:
● Nogasow
Maximumgasow
Minimumgasow
Alloperatingpositionsmustbesetbetweenthe
maximumandminimumowsettings,andnever
betweenthemaximumsettingandtheclosedposition.
Introduction to the burner
A Burnercap
B Ignitionplug
C Thermocouple
D Wokburnercap
Using the hotplate gas burners
Euromaid 540mm Upright Cooker USING THE HOTPLATE BURNERS OF YOUR GAS COOKER 17
Solid hotplates
• Fornormalcleaninguseamoistcloth.
• Forverydirtyhotplatesuseanycommercial
cleanser.
• Aftercleaning,removeanycleanserremainingand
drythehotplatecompletelybyrunningtheelement
forashortperiod.
• Overtime,thehotplatescandiscolourfromspills
duringcooking.WerecommendtouseHillmark
‘ShineOn’hotplateprotector,onaregularbasis
toextendthelifeofthehotplatesandreducethe
riskofrustingasthisformsaprotectivewaterproof
coatingonthehotplates..
• Permanentheat-discolourationofthetrimringis
normal.
Ceramic hotplates
• Removeallspiltfoodwiththerazorbladescraper
suppliedwhilethehotplateisstillwarmturnedoff)–
NOTHOT.
• Ifaluminiumfoil,plasticitemsorfoodswithahigh
sugarcontentmeltontoglass,usetherazorblade
scrapertoremoveimmediatelybeforethehotplate
hascooled,otherwisepittingofthesurfacemay
occur.Highsugarcontentfoodsincludejam,fruit,
carrots,tomatoesandpeas.
• Whentheceramichotplatehascooled,wipeclean
withdishwashingdetergentonadampcloth.
NOTE:Donotuseabrasivespongesorscourers,
ovenspraysorstainremoversonceramic
hotplates.Thesemaydamage,scratchorstainthe
ceramiccooktop.Anypitting,stainingorscratching
willnotbecoveredbywarranty.
Safety warnings about cleaning
• Alwaysmakesurethatthecookeristurnedoff
beforecleaning.
• Alwayscleancookerimmediatelyafteruse.
• Useofsteamcleanersisprohibitedtocleanthis
applaince.
• Donotusecaustic-basedcleaners.Thesewill
damagealuminumparts,andremoveenamelgloss.
Cleaning the enamel
• Keepenamelcleanbywipingitwithasoftcloth
dippedinwarmsoapywater.
• Rubdifcultstainswithanylonscourerorcreamed
powdercleanser.
• Donotuseabrasivecleaners,drypowdercleaners,
steelwoolorwaxpolishes.
• Ifyouuseanovencleaner,thenfollowthe
instructionsontheproductcarefully.
Cleaning the control panel
• Makesurecontrolknobsareinoffposition.
• Cleanthecontrolpanelbywipingitwithasoftcloth
dippedinwarmsoapywaterandsqueezeddry.
• Takecarewhencleaningaroundknobstoensure
printingoncontrolpanelisnotremoved,thiscan
occurifabrasivecleanersareused,therefore,
shouldnotusedatall.
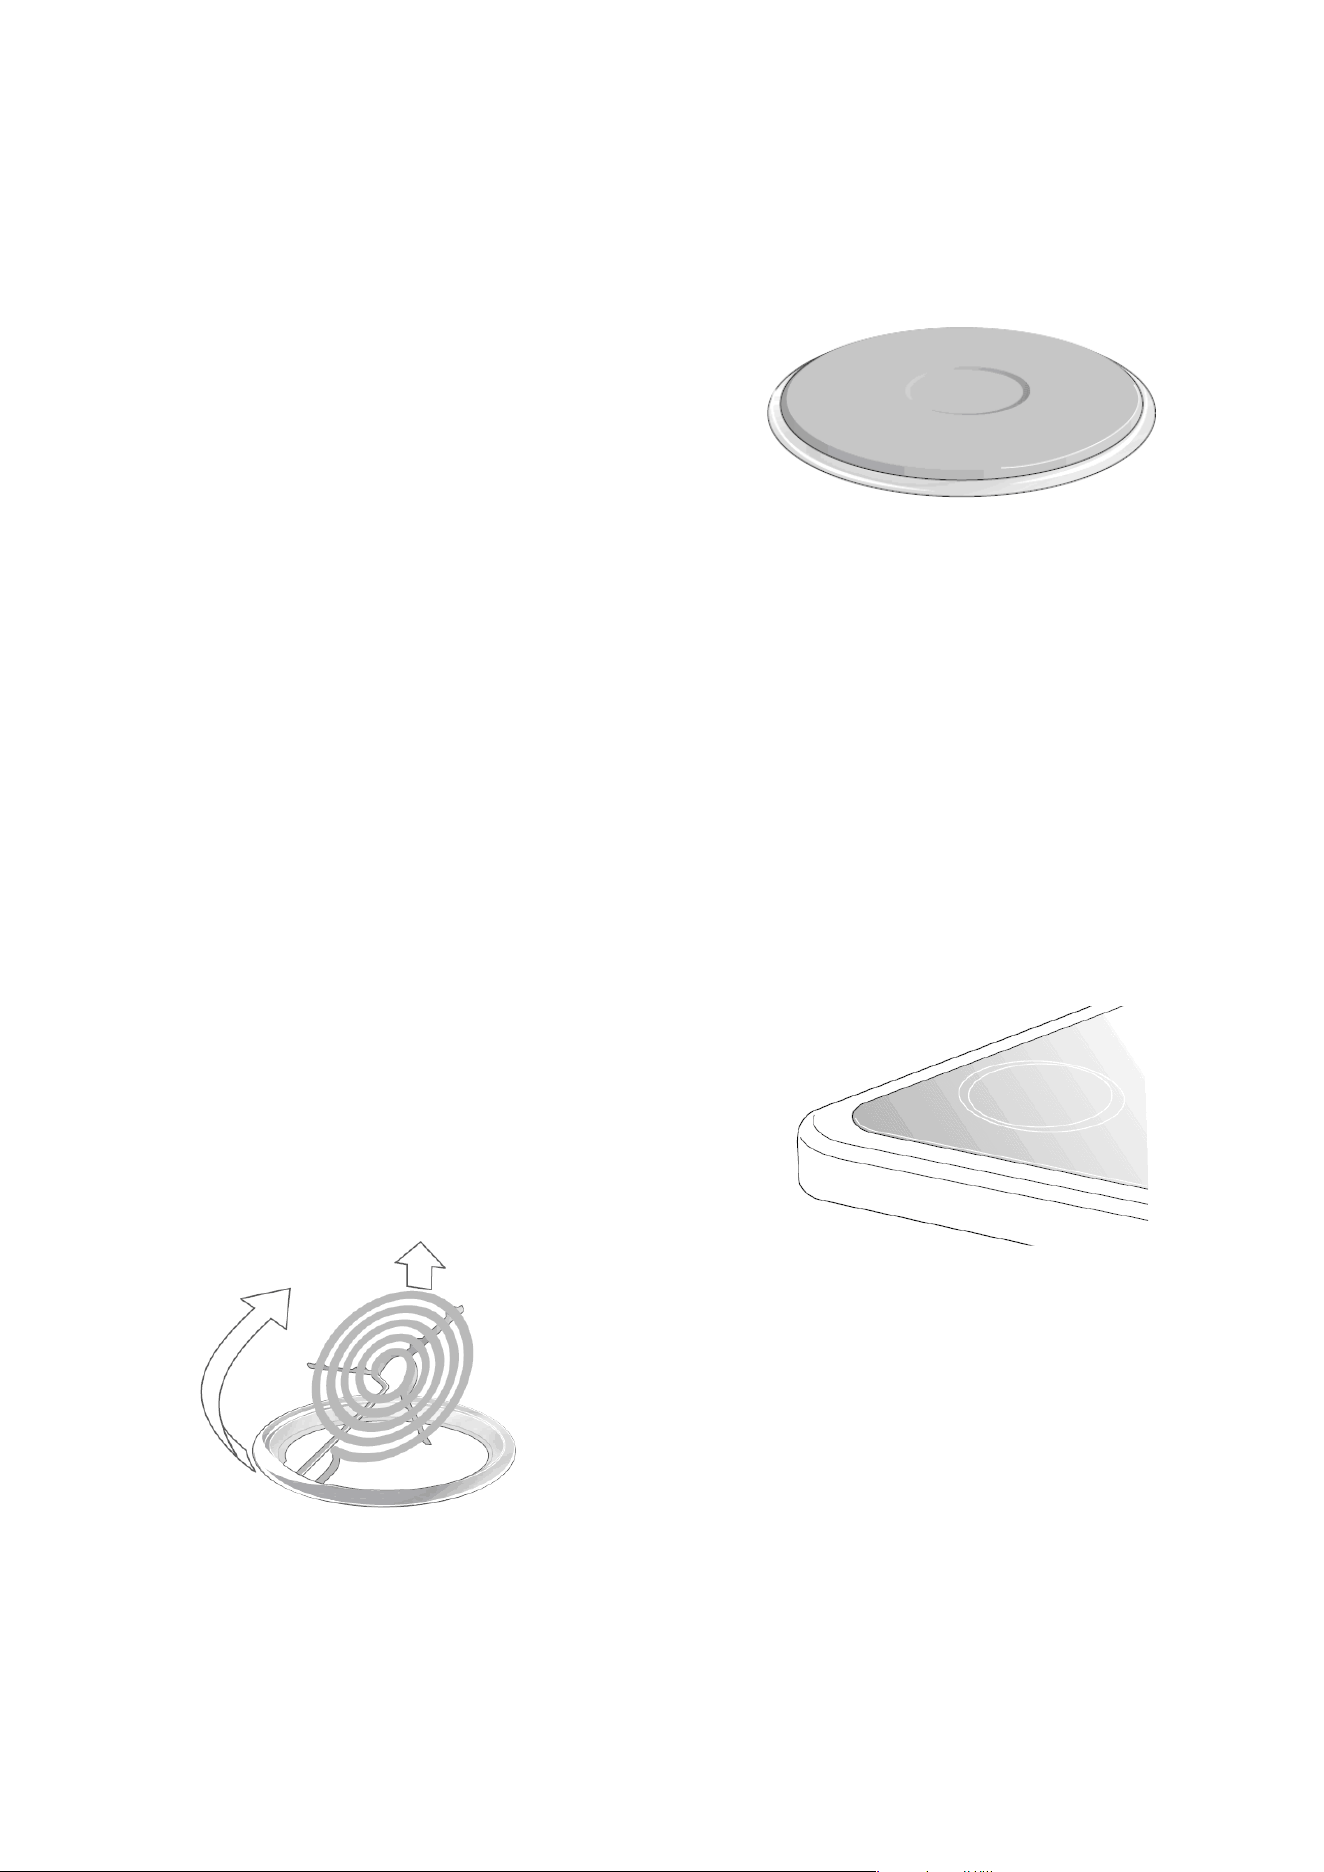
Cleaning the electric cook top
Radiant hotplates
Thesecoiledhotplatesareselfcleaning.Tocleanthe
trimrings,liftfrontofelementandremovetrimring.
Thenwashinwarm,soapywater.Tocleanthespillage
bowl,liftelementandpulloutofsocket.Remove
spillagebowlandwashinwarmsoapywater
DONOTPUTELEMENTSINWATER!
Fitting oven accessories and cleaning
18 Euromaid 540mm Upright Cooker FITTING OVEN ACCESSORIES AND CLEANING
Euromaid 540mm Upright Cooker FITTING OVEN ACCESSORIES AND CLEANING 19
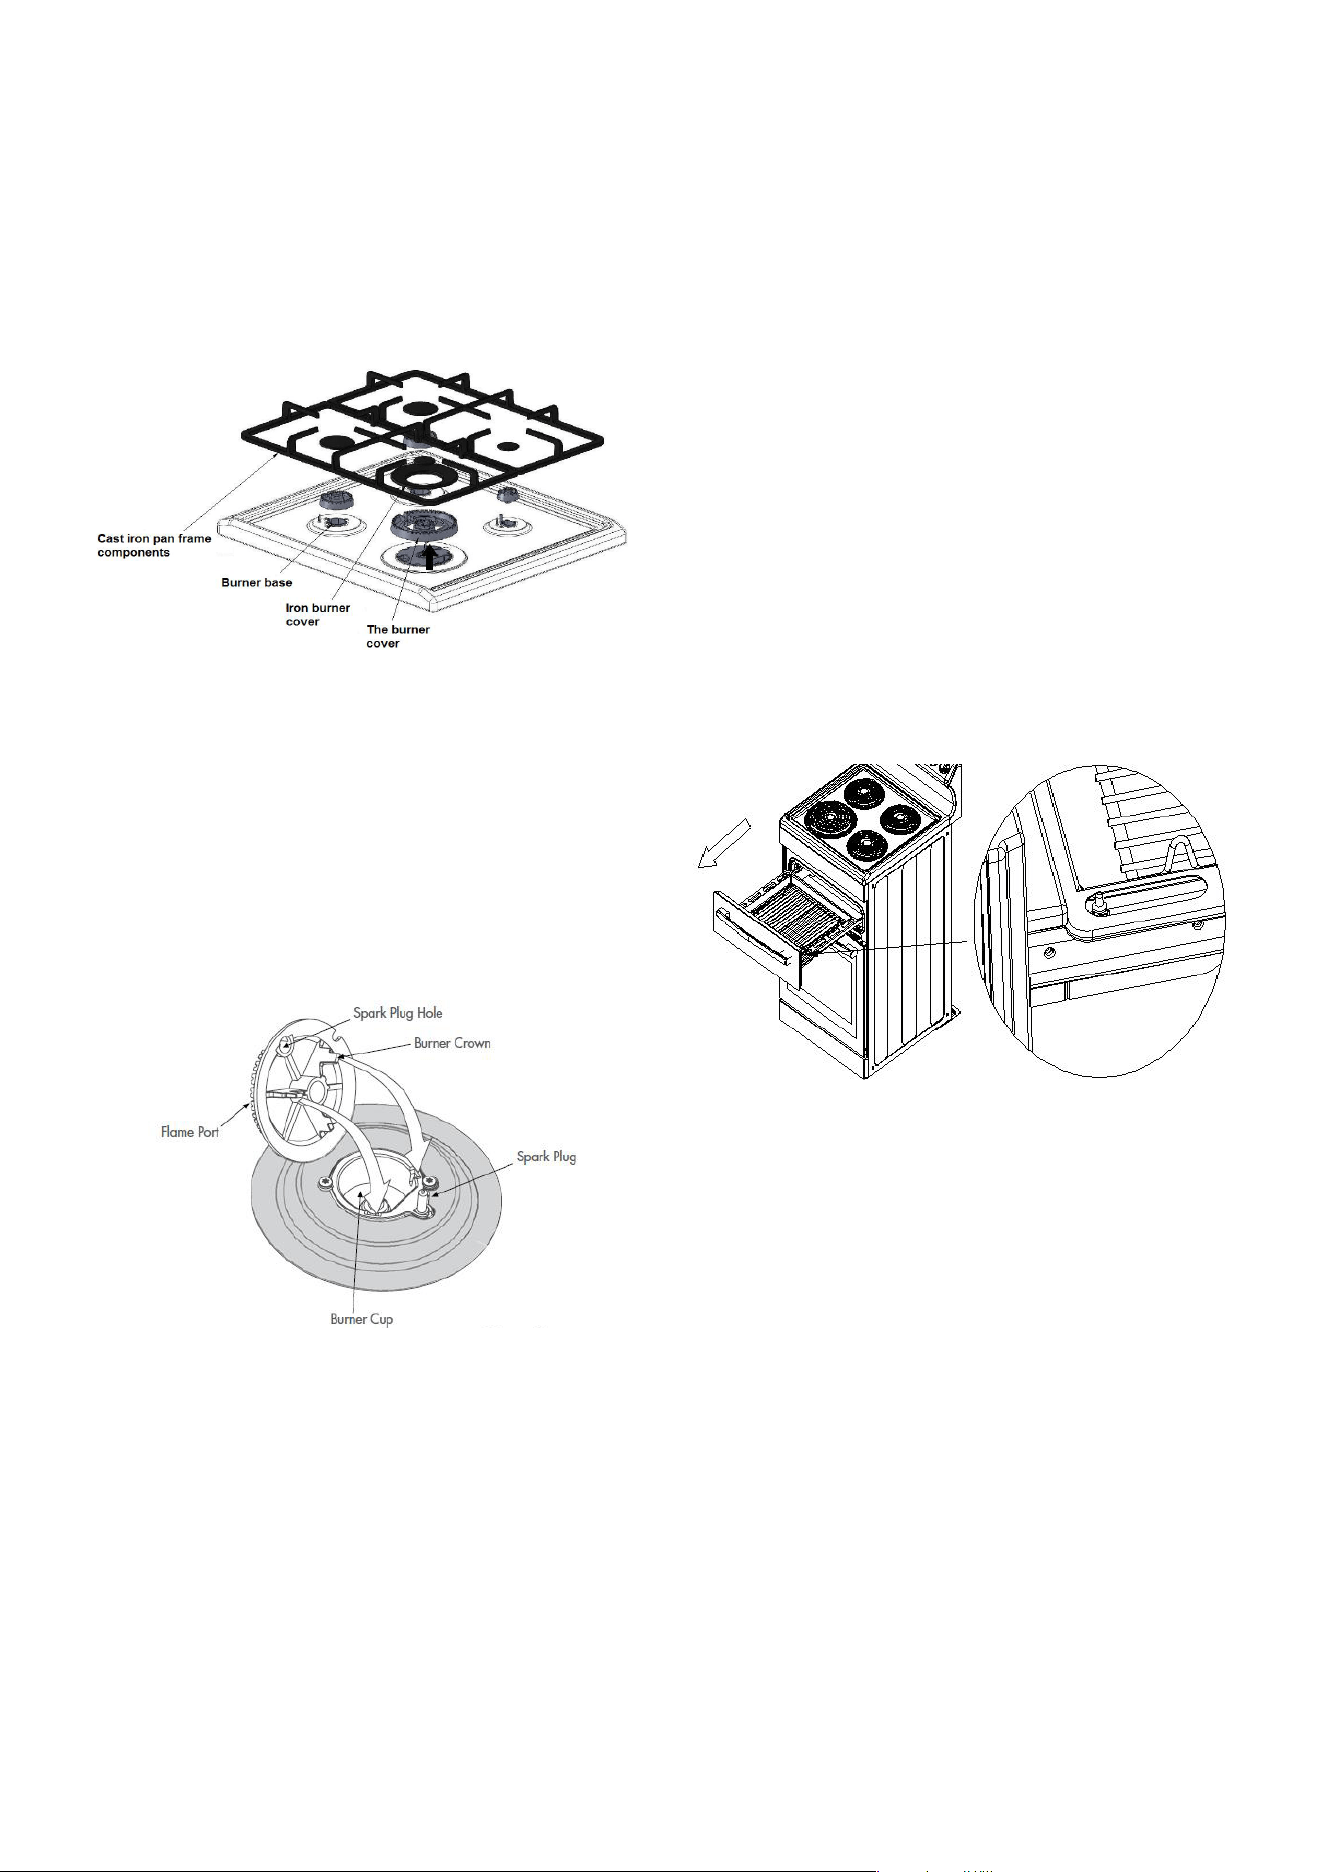
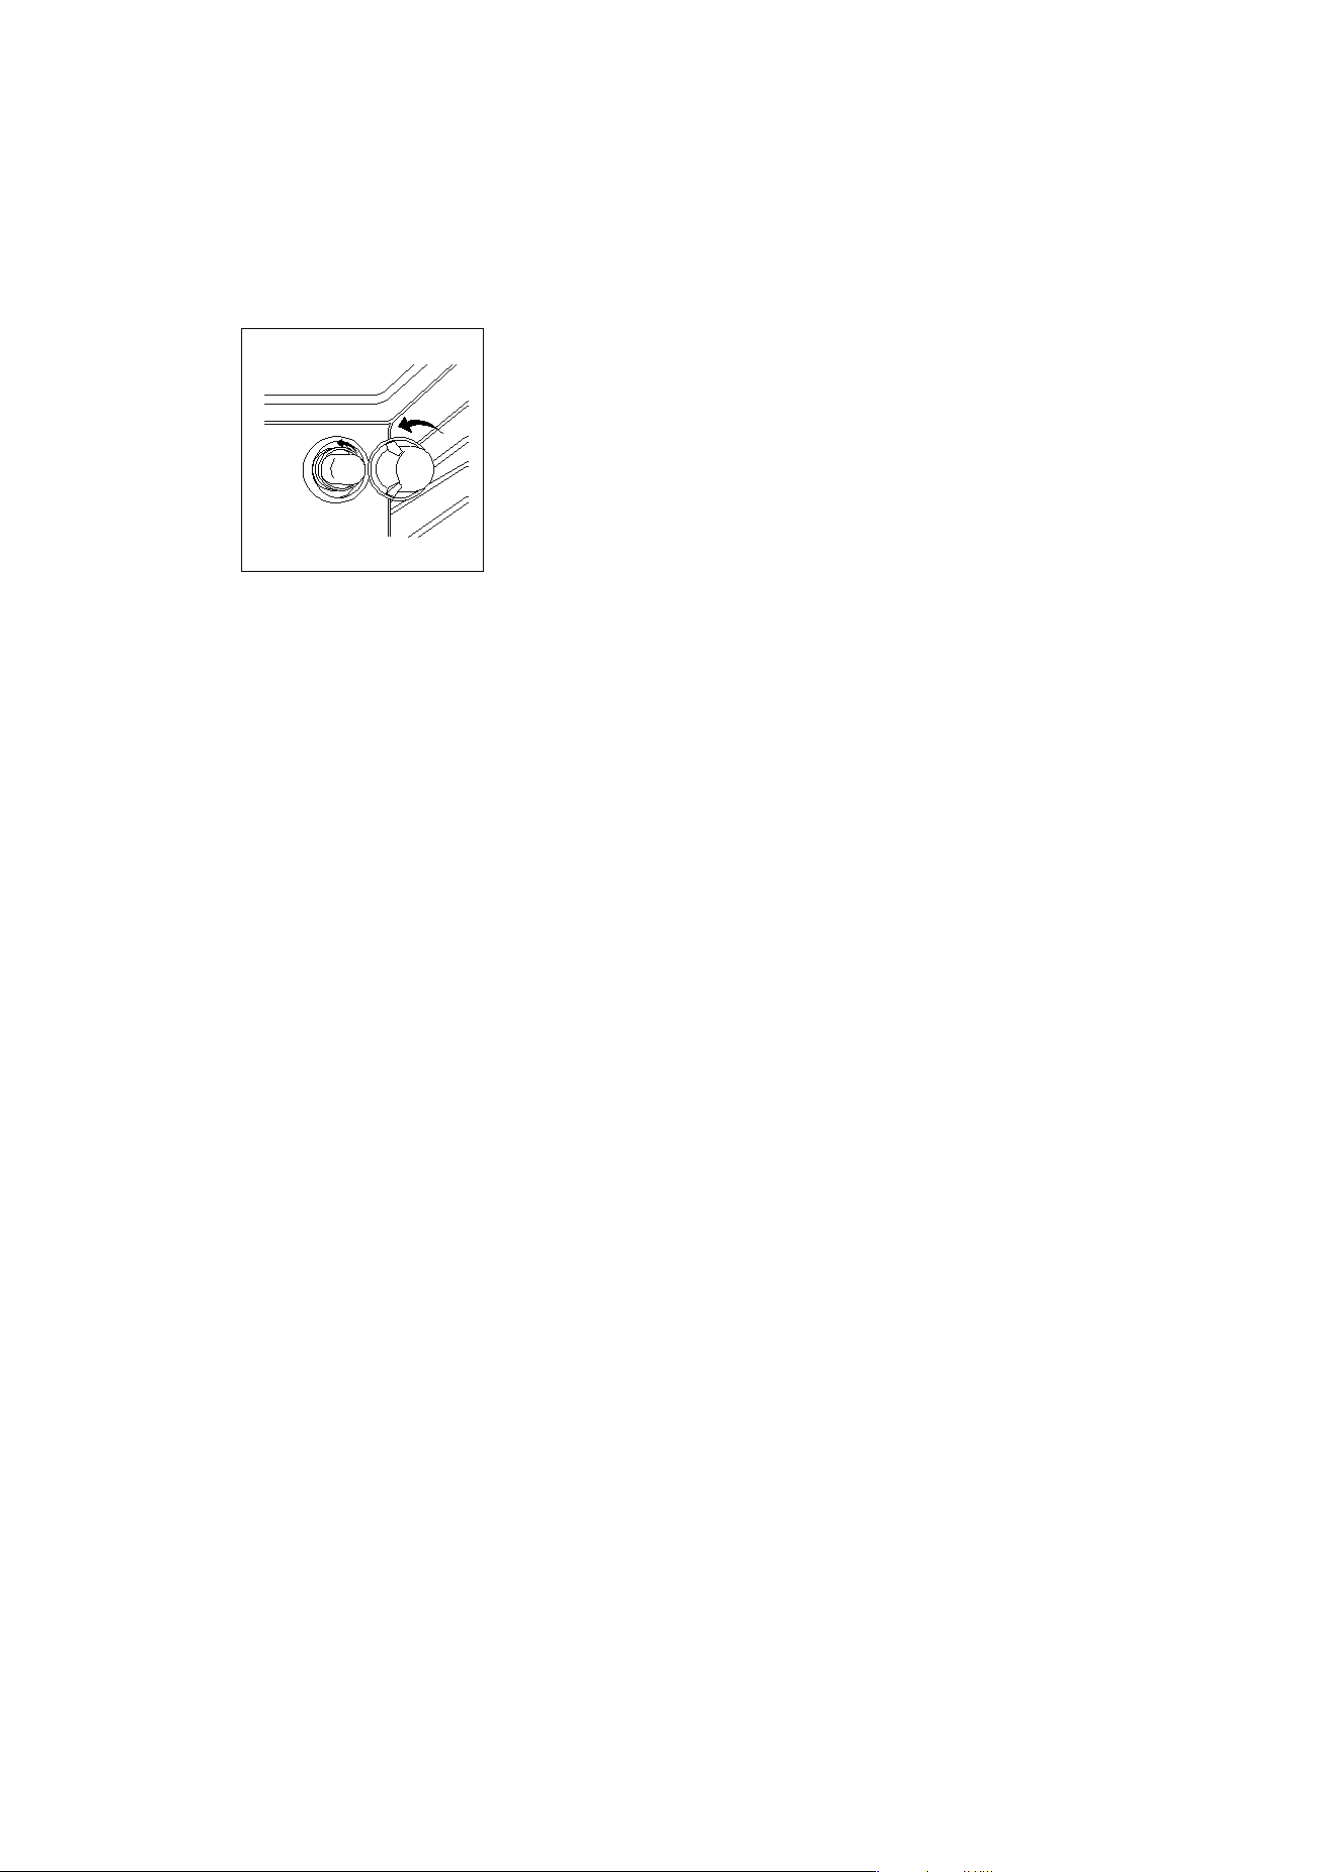
Refitting the burner crowns and caps
• Theburnercrownmustbettedcorrectlyintothe
burnercupordamagewilloccurduringoperation.
• Todothis,ensurethatthe2ribsoneithersideof
thesparkplugholearepositionedintothe2slots
ontheburnercup.(Seegure2).
• Theburnercapissimplypositionedoverthetopof
theburnercrown.
NOTE:Whentheburneriscorrectlytteditwillsit
levelonthehob.
Ifignitionisdifcultorfailsaftercleaning,orthe
amesarenotevenaroundtheburner,theneither
burnerpartsarenotdry/partshavenotbeen
positionedcorrectlyorincorrectcapistted.
Cleaning the grill compartment
• Lifttheenamelledgrilltrayout.
• Cleanthesidesanbottomofcompartmentwithhot
soapywater.
Ifstrongeractionisneededuseanonabrasive
cleanerappliedwithanylonscourer.
Cleaning the Oven
• Openthedoorfully.
• Removeovenshelvesandsideracks.
• Cleaninhotsoapywater.
• Thoroughlydrywithasoftclothtoremoveexcess
waterthatmaybepresent.
Cleaning the Gas Hob
Removing the trivets (Refer Figure 1)
• Thetrivetslocateintherecessedareaofthehob.
• Theycanberemovedforcleaningbycarefullylifting
themfromthehob.
• Cleanbywashinginwarmsoapywater.Dry
thoroughly.
• Takecarewhenreplacingthetrivetsasdropping
themontothehobmaydamagetheenamelled
surface.
Removing the burner partss (Refer Figure 2)
• Theburnercapsandcrownsareremovablefor
cleaning.
• Flameportblockageshouldberemovedbymeans
ofamatchstickorbrush.
• Ifthecaps,crownsandcupsareheavilysoiled,use
anon-abrasivecleaningcompound.
• Donotcleanthemwithabrasiveorcaustictype
cleaners,orputinadishwasherastheywillbe
damaged.
Fitting oven accessories and cleaning
Figure1
Figure2
20 Euromaid 540mm Upright Cooker FITTING OVEN ACCESSORIES AND CLEANING
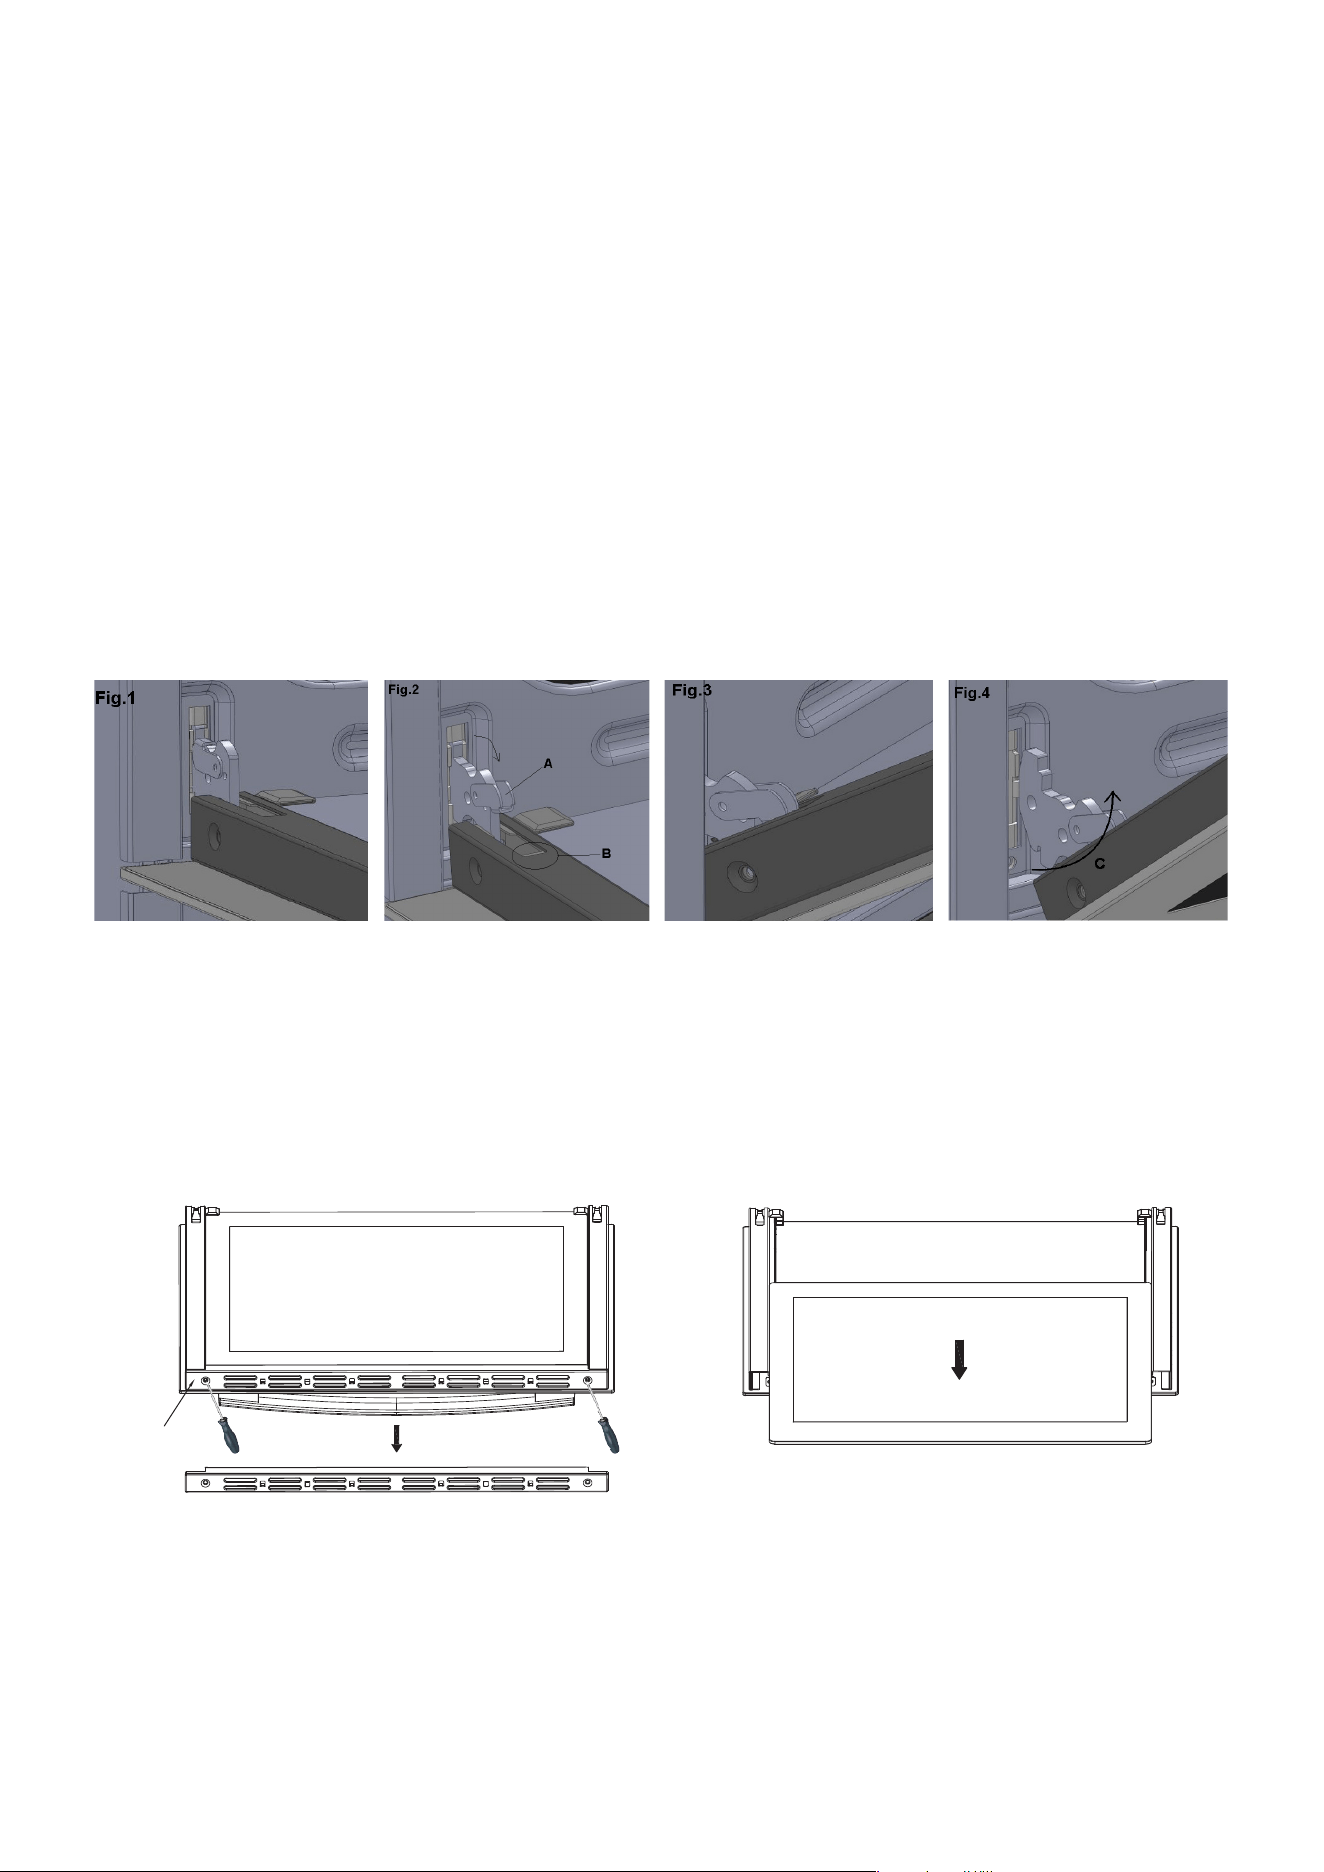
Cleaning the oven door / How to remove the oven doors
Foramorethoroughclean,youcanremoveanddisassembletheovendoor.Proceedasfollows:
• Openthedoortothefullextent(g.1)
• OpentheleverAcompletelyontheleftandrighthinges(g.2)
• Holdthedoorasshownin(g.3)approximatley30degreeangleupwards
• Gentlyclosethedoor(g.3)untilleftandrighthingeleversA(g.2)arehookedtopartB(g.2)ofthedoor
• WithdrawthehingehooksfromtheirlocationfollowingarrowC(g.4)
• Restthedooronasoftsurface,toreduceriskofdamagetothedoor
• Toreplacethedoor,repeattheabovestepsinreverseorder
Removing the Inner Pane of Glass
• TripleGlazedovendoor:Removethetopframe(G)byunscrewingthe2screws,locatedontheleftandrightsides
• Gentlypullouttheinnerpaneofglass(g.2).Alsoremovethecentrepaneofdoorglass,notshownhere.
• Cleantheglasspaneswithanappropriatecleaner.Drythoroughly,andplaceonasoftsurface.
• Nowyoucanalsocleantheinsideoftheouterglass.
Cleaning the door glass
• Cleantheglassdoorusingnon-abrasiveproductsorspongesanddryitwithasoftcloth.
• Donotusetheovenwithouttheinnerdoorpanesttedcorrectly.Whenre-ttinginnerglassdoorpanesensure
theygobackinfacingthesamewaytheycameout.Thedoorsarecoatedwithaveryslightreectivecoatingto
reecttheheatbackintotheovencavityandkeeptheouterdoorcoolertotouch.
• Donotuseharshabrasivecleanersorsharpmetalscraperstocleantheovendoorglasssincetheycanscratch
thesurface,whichmayresultinshatteringoftheglass.
Fitting oven accessories and cleaning
G
Fig. 1
Fig. 2
Euromaid 540mm Upright Cooker FITTING OVEN ACCESSORIES AND CLEANING 21
Replacing the Oven Lamp
• Disconnecttheovenfromthepowersupplyatthe
fuse-boxbymeansoftheswitchusedtoconnect
theappliancetotheelectricalmainsorunplugthe
applianceifagasmodel.
• Removetheglasscoverofthelamp-holderby
rotatinganti-clockwise.Beawarethattheglass
maybedifculttoremoveifthereisabuildupofoil
andgreasecreatedduringcooking.Inthiscasethe
glassmayneedtobecleanedwithhotsoapywater
tobreakthisbuildup.
• Removethelampandreplacewithalampresistant
tohightemperatures(300ºC)withthefollowing
characteristics:
• Voltage:220-240V
• Wattage:25W
• Type:E14
Replacetheglasscover.Reconnecttheappliance
tothemainspowersupply.
Fitting oven accessories and cleaning
22 Euromaid 540mm Upright Cooker SOLVING PROBLEMS
Ifyouhaveaproblemwithyourappliance,checkthetablebelowbeforecallingservice.Youmaybeabletoavoida
servicecallbyandavoidunnecessaryinconvenienceandexpense.
Forcookingproblems,refertoHandlingBakingProblems.
Problem Causes What to do
Nosparkobtainedwhen
gasburnerknobis
pushed/turned
Powernotturnedonorconnected Switchonelectricity
Householdfuseblown Checkfuses
Circuitbreakertripped Checkcircuitbreaker
Sparkplugiswetordirty Dryorcleansparkplug
Burnerwillnotlighteven
thoughsparkcanbe
seen/heard
Gassupplyvalveisturnedoff Turnongassupply
burnercrown&capnotpositionedcorrectly Removepartsandretcarefully
Portblockageinignitionarea Makesurethatportsandignitionareaarecleananddry
Ovenorgrillnotworking
DigitalClocknotsetproperly Refertodigitaltimerinstructions
120minTimernotin“Manual”position Referto120mintimerinstructions
Powernotturnedon Switchonelectricity
Householdfuseblown Checkfuses
Controlsincorrectlyset Resetcontrols
Circuitbreakertripped Checkcircuitbreaker
Ovenlightnotworking
Powernotturnedon Switchonelectricity
Householdfuseblown Checkfuses
Circuitbreakertripped Checkcircuitbreaker
Lampblownorlooseinsocket Replaceortightenglobe
‘Ovenheating’indicator
lampdoesnotgoOFF
Nofaultifyouareusingtemps>180with
conventionalorpizzamodeslected,thisisnormal
Itcantakealongtime(50-70minsormore)fortheoven
indicatorlmaptogoOFF/startcycling.
Ovennothotenough
Heatescapingthroughincorrectly
sealeddoor
Checkshelvesordishesarenotpreventingdoorclosing
properly,Checkthatdooristtedproperlyafterdoorremoval
forcleaning
Doorsealiswornorhasmoved Replacesealorretit
Digitaltimerdisplay
ashing
Powerfailureorinterruption Resettimeofday
Householdfuseblownorpower
supplyisoff
Checkfuses,powersupply
Unitsmokingwhenrst
used
Protectiveoilsbeingremoved Thisisnormal
Odouronrstuseof
oven
Thisisnormal
Allow1–4hoursforodourtodissipate(openallwindows)
120minutetimerbuzzer
notaudible
Timernotwoundsufciently Turntimerknobpast15minutemark
Thenturntotherequirednumberofminutes
Ovenshelftight Ovenshelfnotinsertedcorrectly,maybeupside
downorbacktofront
Removeshelfandinsertasperdiagram
Clockdisplayoff Householdfuseblownorpower
supplyisoff
Checkfuses,powersupply
NOTE:Onlyservicecentersshouldcarryoutservicing.Otherwisewarrantymaybevoid.
Solving Problems

Euromaid 540mm Upright Cooker INSTALLING COOKER – POWER CONNECTIONS 23
Fitting on a Power Supply Cable
WARNING: Installtion MUST ONLY be carried out by a qualified approved installer, ie. an Electrician.
Connectingappropriatepowersupply`terminalboard/connectorblock:
NOTE: REFER to TECHNICAL tables at the rear of this manual for correct rating for your
corresponding model purchased.
• Usingascrewdriver,prizeopentabsoftheTerminalboardcover.
• Removethewireclampscrew.
• Fastenthewiresbeneaththecorrespondingscrewheads,usingbrass‘bridge’forsinglephasesupply.
• Fastencableclampandclosethecoveroftheterminalboard.
• TheACpowersupplyshouldbe220-240V,50Hz.Forelectriccookers,theminimum45Afuse,oratleast45Aa
distributioncircuitbreaker.Forgascookers,theminimum20Afuse,oratleast20Acircuitbreaker.
WARNING:Connectthepowercordmustbeinaccordancewiththeinstructionslistedinthetablebelow
Connection mode
L1 L2 N E
1N~ Min6 — Min6 Min6
2N~ Min1.5 Min2.5 Min6 Min6
Connecting the supply cable to the mains
Installanapprovedcircuitbreakerwithaminimumcontactopeningof3mm,betweentheapplianceandthemains
fusebox.Thecircuitbreakershouldbesizedaccordingtotheloadandshouldcomplywithcurrentregulations(the
earthwireshouldnotbeinterruptedbythecircuitbreaker).
Thesupplycableshouldbepositionedsothatitdoesnotreachatemperatureofmorethan50ºCwithrespecttothe
roomtemperature,anywherealongitslengthBeforeswitchingfuseONinmeter-boxcheck:
• Earthcontinuity.Theelectricalsafetyofthisappliancecanonlybeguaranteedifthecookeriscorrectlyinstalled
andearthed,incompliancewithregulationsonelectricalinstallations.
• Theelectricalcapacityofthesystemandsocketswillsupportthemaximumpoweroftheappliance,asindicated
onthedataplate
• Gotosection19“Installingyournewcooker”
NOTE:AllUprightcookersmustcomplytolocalregulationstoAustralianStanadrdAS/NZS3000:2007
guidelines.QualiedElectricianwillhaveacopyoftheseguidesthatMUSTbeadheredto.
Installing cooker – power connections
Wire cross-sectional
area (mm
2
)

24 Euromaid 540mm Upright Cooker INSTALLING THE GAS COOKER
Gas connection
A Inletpipejoint
B Gasket
C Stableunion
Procedure
Maketheconnectiontothegassystemusingarigid
metalpipeandregulationunions,orwithastainless
steelhosecomplyingwiththelocalstandard.Ifmetal
hosesareused,takecarethattheydonotcomeinto
contactwithmobilepartsandarenotcrushed.
Whenmakingtheconnection,takecarenottoapply
stressesofanykindtotheappliance.
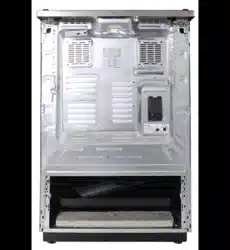
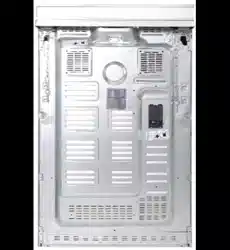
Readthesepointsbeforeconnectingtothegassupply;
• Thegasconnectionpointisa1/2”BSPexternal
threadlocatedattherearoftheapplianceasshown
intheRearView.
• Aregulatorissuppliedfornaturalgasappliances
whichmustbettedinthesupplylinetothe
appliance.ForLPGthesuppliedbrassTestPoint
Adapter/Fittingmustbettedtothesupplyline.
• Itisrecommendedtottheregulatorortestpoint
ttingtotheapplianceconnectionpoint,thent
eitherhardpipingoraexibleconnectionfrom
theregulatorortestpointttingtoconsumerhard
piping.Ensureinstallationallowswithdrawalof
appliance.ForexiblehoseinstallationAS/NZS
5601.1clauses5.9and6.10.1.9mustbefollowed.
Unpacking
Donotttheburnercrowns,burnercapsandtrivets
untilafterthecookerhasbeeninstalled.
Checking gas pressures
Beforeinstallationcheckthatthecookerissuitablefor
thegassupply.Todothischeckthegastypeonthe
cartonstickeroronthedataplatebehindthebottomof
theovendoor.Ifthecookerisrequiredtobeusedwith
LPG,thesuppliedconversionkitmustbeused.
Thefollowingshowsthesupplyandoperating
pressuresforvariousgassupplies.
Operatepressureatappliancetestpoint:
1.00KPa(Naturalgas);N2.75KPa(UniversalLPGgas)
Thefollowingtableshowstheinjectorsizesforeach
burner.
Injector Natural gas Universal LPG
Auxiliaryburner 0.93mm 0.57mm
Semi-rapidBurner 1.16mm 0.71mm
TripleringBurner 1.75mm 1.10mm
Connection to the gas supply
■
ThegasConnectionmustbemadeinaccordance
withthelocalstandards.
Wheninstalling,tasafetytapattheendofthe
pipeline.Theapplianceleavesthefactorytested
andsetforthetypeofgasindicatedonthe
plateinsidethebottomguard,closetothegas
connectionpipe.Makesurethatthetypeofgasto
besuppliedtotheapplianceisthesameasthat
shownontheplate.
■
Formaximumefciencyandminimumconsumption,
makesurethatthegassupplypressurecomplies
withthevaluesshowninthegasusedisdifferent
fromthatspecied(orvariable).asuitablepressure
regulatormustbeinstalledonthesupplypipeline.
Installing the gas cooker
Euromaid 540mm Upright Cooker INSTALLING THE GAS COOKER 25
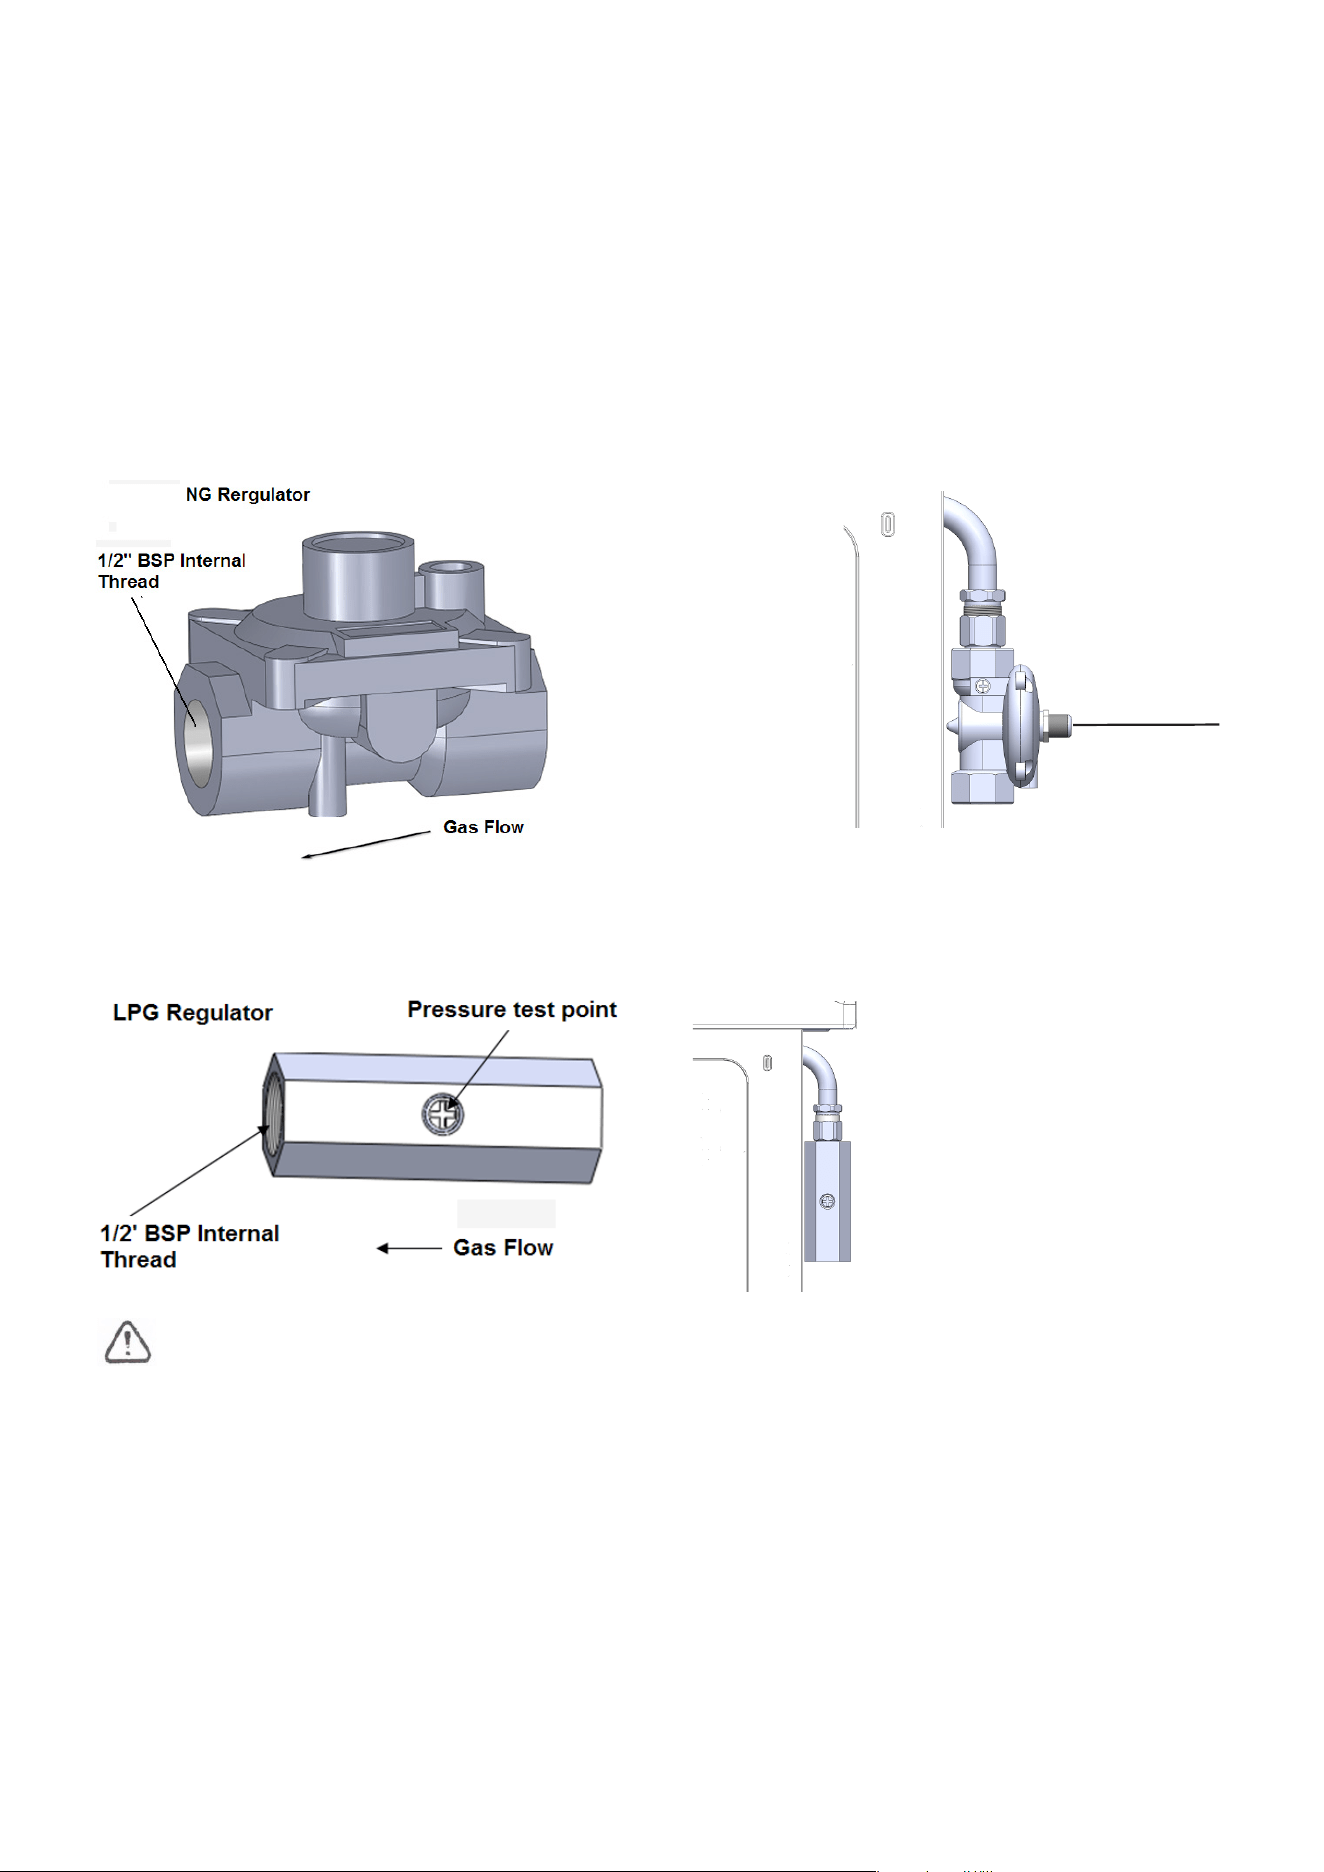
Operation on Natural Gas
ReadthesepointsaboutoperationonNG/SNGandlookcarefullyatthediagram:
• Theapplianceregulatorprovidedmustbeorientatedtogiveaccessthemanometertestpoint.
• Thearrowshowingthedirectionoftheowmustbefacingthecorrectwayfromgassourceintothecooker.
• Theregulatorhasa1/2”BSPinternalthreadatinletandoutlet
Operation on Universal LPG
Aninletttingwithpressuretestpointisprovided.Theinletttinghas1/2"BSPinternalthreadforbothinletandoutlet.
Theinletttingmustbeorientatedsothatthepressuretestpointisaccessible.
Whentheinstallationiscomplete,alwayscheckthatalltheunionsareabsolutelytightusingasoapysolution.
Neveruseaametomakethischeck.
Installing the gas cooker
BackofCooker
TestPoint

26 Euromaid 540mm Upright Cooker TESTING THE OPERATION OF THE GAS COOKER
Iftheregulatorappearstonotbeperforming
satisfactorilythencheckthefollowingpoints.
■
Iftheoutletpressureisconsistentlytoolowthenthe
inletpressuremaybetoolowandadjustmentofan
upstreamregulatormaybeneeded,oranupstream
regulatororvalvewithinsufcientowcapacitymay
bepresentinthegassupplyline.Ifthisissuspected
thenitmaybenecessarytorepeatthechecks
whilstmeasuringboththeinletandoutletpressure
todetermineiftheinletpressureisintherange
1.13–5kPa.
■
Checkthattheregulatorhasbeenttedtothegas
supplylineinthecorrectorientation,thearrowon
thebaseofthebodyindicatesthedirectionofgas
ow.Oncethesecheckshavebeencompleted,if
theregulatorstillfailstoperforminasatisfactory
manneritshouldbereplaced.
Testing the cooker features
Observetheameappearanceoneachburner.Ifitis
muchsmallerorlargerthanexpected,thentheinjector
sizeneedschecking.
Whenmaximumameappearanceiscorrect,then
checktheturn-downsettingoneachburner.Ifthe
settingsappeartobeincorrect,proceedasfollows:
• Adjustthebypassscrewmountedonthebodyof
eachhotplatecontrolcock.Thisisaccessiblewhen
thecontrolknobandthecontrolpanelareremoved.
• Checktheignitiononallburnersbothseparately
andincombination.
• Checktheoperationoftheelectricalcomponents,if
applicable.
• Ifyouaresatisedthatthecookerisoperating
correctly,thenturnitoffandshowthecustomer
howtouseit.Makesureyouaskthecustomerto
operatetheclockandcontrols.
NOTE:Ifthecookercannotbeadjustedtoperform
correctly,theninformthecustomeroftheproblem
andputawarningnoticeonthecooker.Ifthe
problemisdangerous,thendisconnectthecooker.
Ifthereisafault,thenthecustomershouldbe
advisedtocontactthemanufacturer’slocalservice
organisationortheretailer.
NOTE:Youmusttestthecookerafterinstallation,
beforeyouhanditovertothecustomer.Youmust
haveamanometerandaconnectingtube.
Checking gas supply
• Checkthemanometerzeropointiscorrect.
• Connectthemanometertothecookerpressuretest
point.ThisislocatedontheNGregulatororLPG
inlettting.
• Turnonthegassupplyandtheelectricity(if
applicable)andtrytoignitethegas.
NOTE:Itwilltakeadditionaltimetolightthegas
forthersttimeasairneedstobepurgedfromthe
pipes.
• Checktheoperatingpressurefortheparticulargas
type(seetable).
For LPG cookers
Adjustorreplacetheregulatoronthegasbottleif
necessary(thismayberemotefromthecooker).
For Natural Gas cookers
■
Regulatorsaresuppliedpre-adjustedand
conguredbythecomponentmakerforusewith
NaturalGas.Theapplianceinstallerisnotrequired
tomakeanadjustmenttoobtainthecorrectoutlet
pressuresetting.
■
Anarrowonthebaseoftheregulatorindicates
thedirectionofgasowwhentheinletandoutlet
oftheregulatorareorientatedcorrectly.Whenthe
regulatorhasbeenttedcheckforleaksfromthe
connectionswithsoapywater.
Checking the Function of the Regulator
Withtheapplianceoperatingchecktheoutletpressure:
■
Whenallburnersoftheapplianceareoperatingat
maximum,
■
Whenthesmallestburneroftheapplianceis
operatingatminimum.
Undertheseconditionstheoutletpressureshouldnot
varyfromthenominaloutletpressureof1.0kPabymore
than±20%ofthenominaloutletpressure(±0.20kPafor
NaturalGas).
Testing the operation of the gas cooker
Euromaid 540mm Upright Cooker INSTALLING YOUR NEW COOKER 27
Unpacking and installation Instructions
for Installer
Unpacking
• Pleasechecktheproductandmakesurethatthere
isnodamage.
• ReadtherelevantInstallationSectionsofthis
ManualrelatingtoyourModelandtypeofcooker.
• Conrmthatproductiscompatiblewithavailable
electrical/gassupply.Ensureproposedinstallation
positiondoesnotconictwithInstallationSections.
• Checktheattachmentpackingingoodcondition,
completeaccessories.
• UsescrewdrivertoremoveAnti-tiltoorbracket
screwedontotherearofthecooker.
Safety warnings about installation
• ThecookerMUSTBEinstalledandservicedonlyby
anauthorisedperson.
• Acerticateofcompliancemustbesuppliedby
installerandistobekeptbythecustomer.
• Thepackingmaterialsmustberemovedbeforeyou
installthecooker.
• Youmustfollowtheinstallationinstructionsinthis
booklet.
• ThesurroundingkitchencabinetsMUSTBEableto
withstand95°C.Wewillnotacceptresponsibility
fordamagecausedbyinstallationintokitchen
cabinetswhichcannotwithstand95°C.
• Theappliancemustnotbeinstalledinacorner.It
mustbeinstalledatleast100mmfromthesidewall.
• Theexiblepipeforgasmodelsmusthavesufcient
loopssothecookercanbemovedforservice.
• Thevents;openingsandairspacesMUSTNOTbe
blocked.
• Theanti-tiltoorbracketmustbeinstalledtoavoid
accidentaltipping.
• Thestabilityboltmustbeinstalledtoavoid
accidentalmoving.
• Youmustnotpullthecookerbythedoorhandles.
• Powersocket,ifprovidedforgasmodels,and
electricityisolationswitchforelectricmodelsand
gasmodelswithouta20Aplug,istobeinstalled
inanaccessiblepositionnearthecooker(butnot
behindcooker).
• Ifthesupplycordorcableisdamaged,itmustbe
replacedbyanapprovedserviceagentorasimilarly
qualiedpersoninordertoavoidahazard.
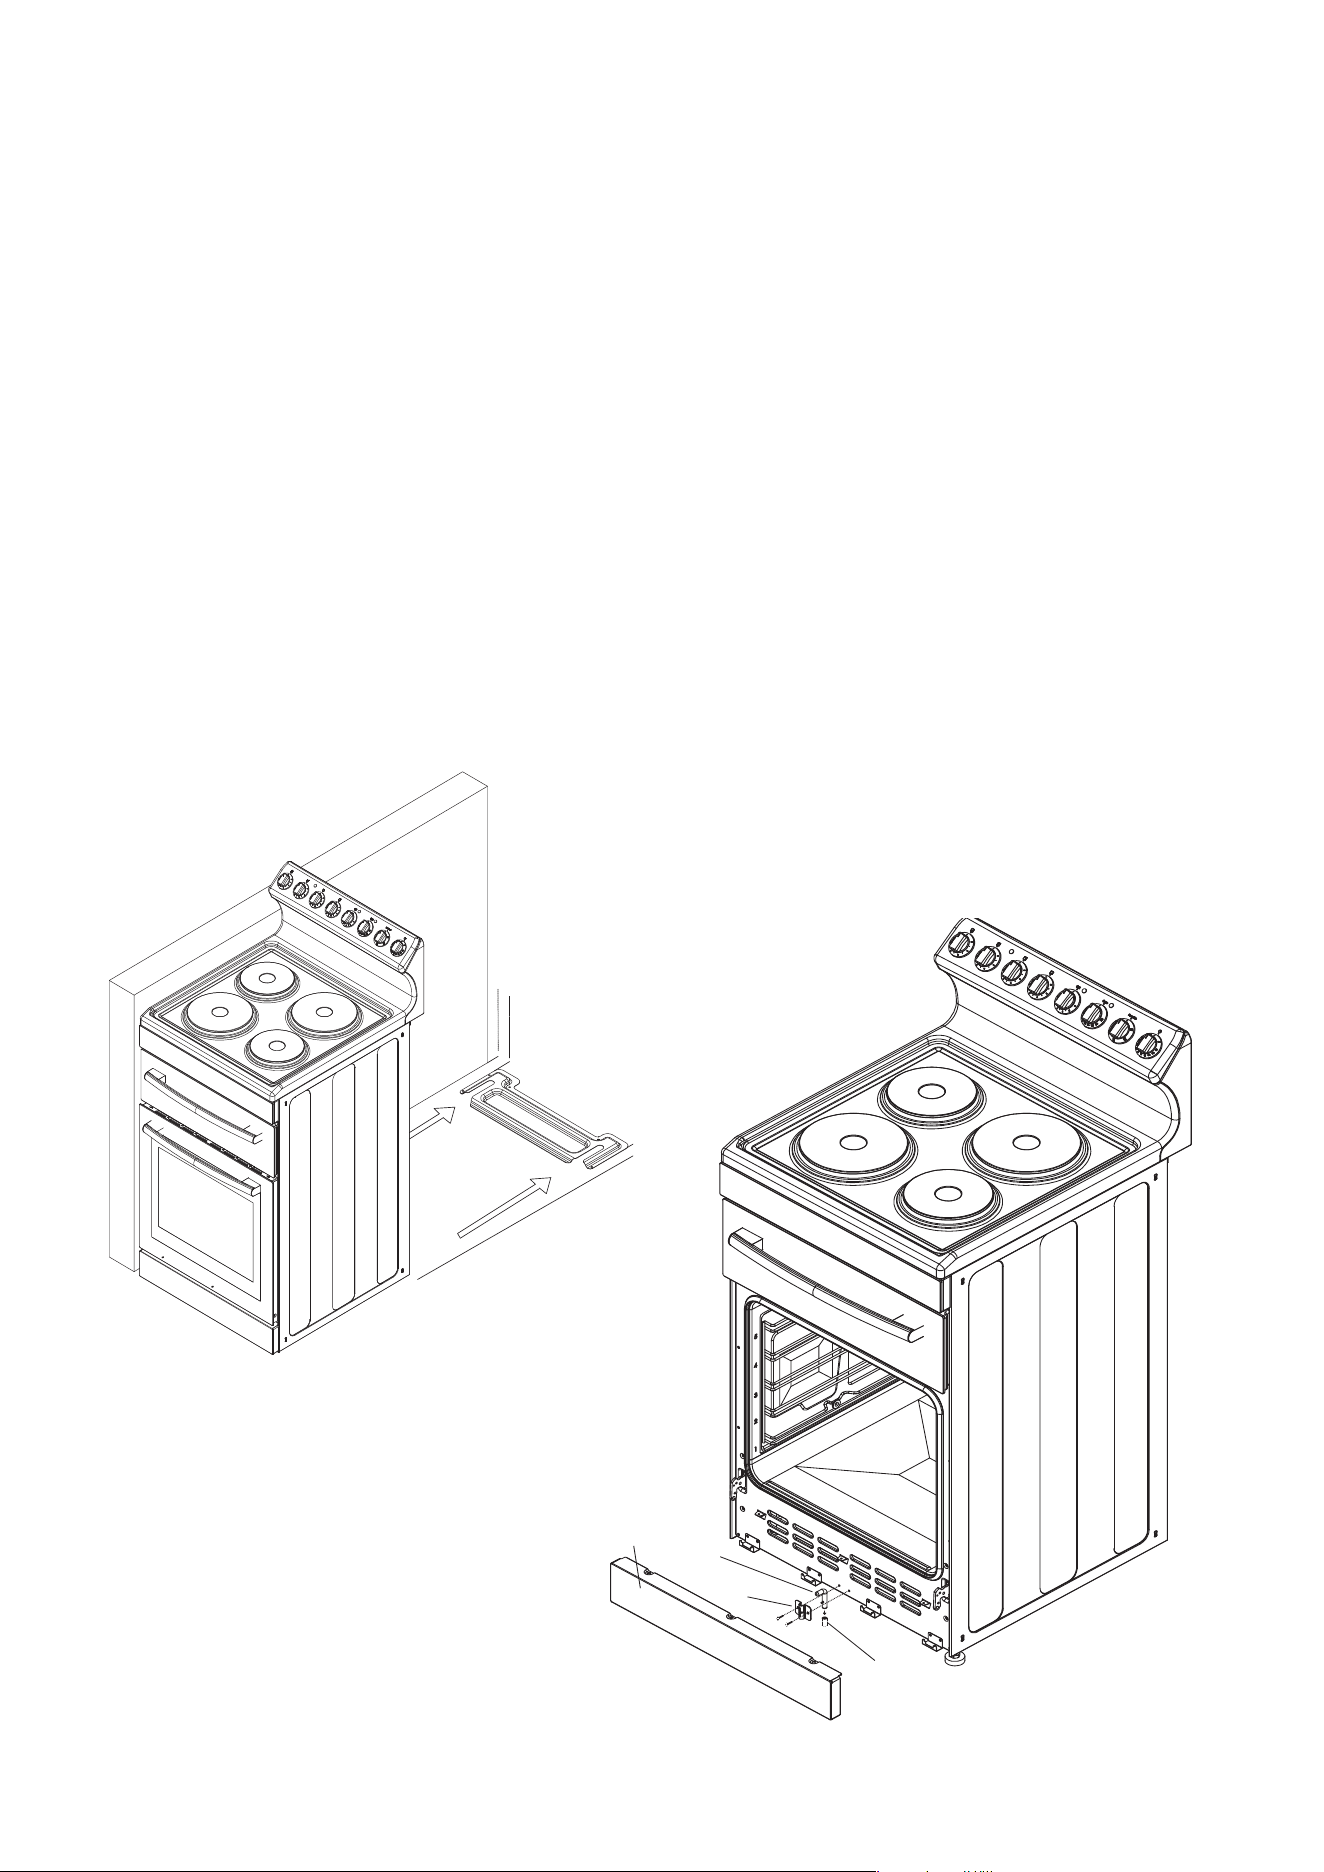
Installing your new cooker
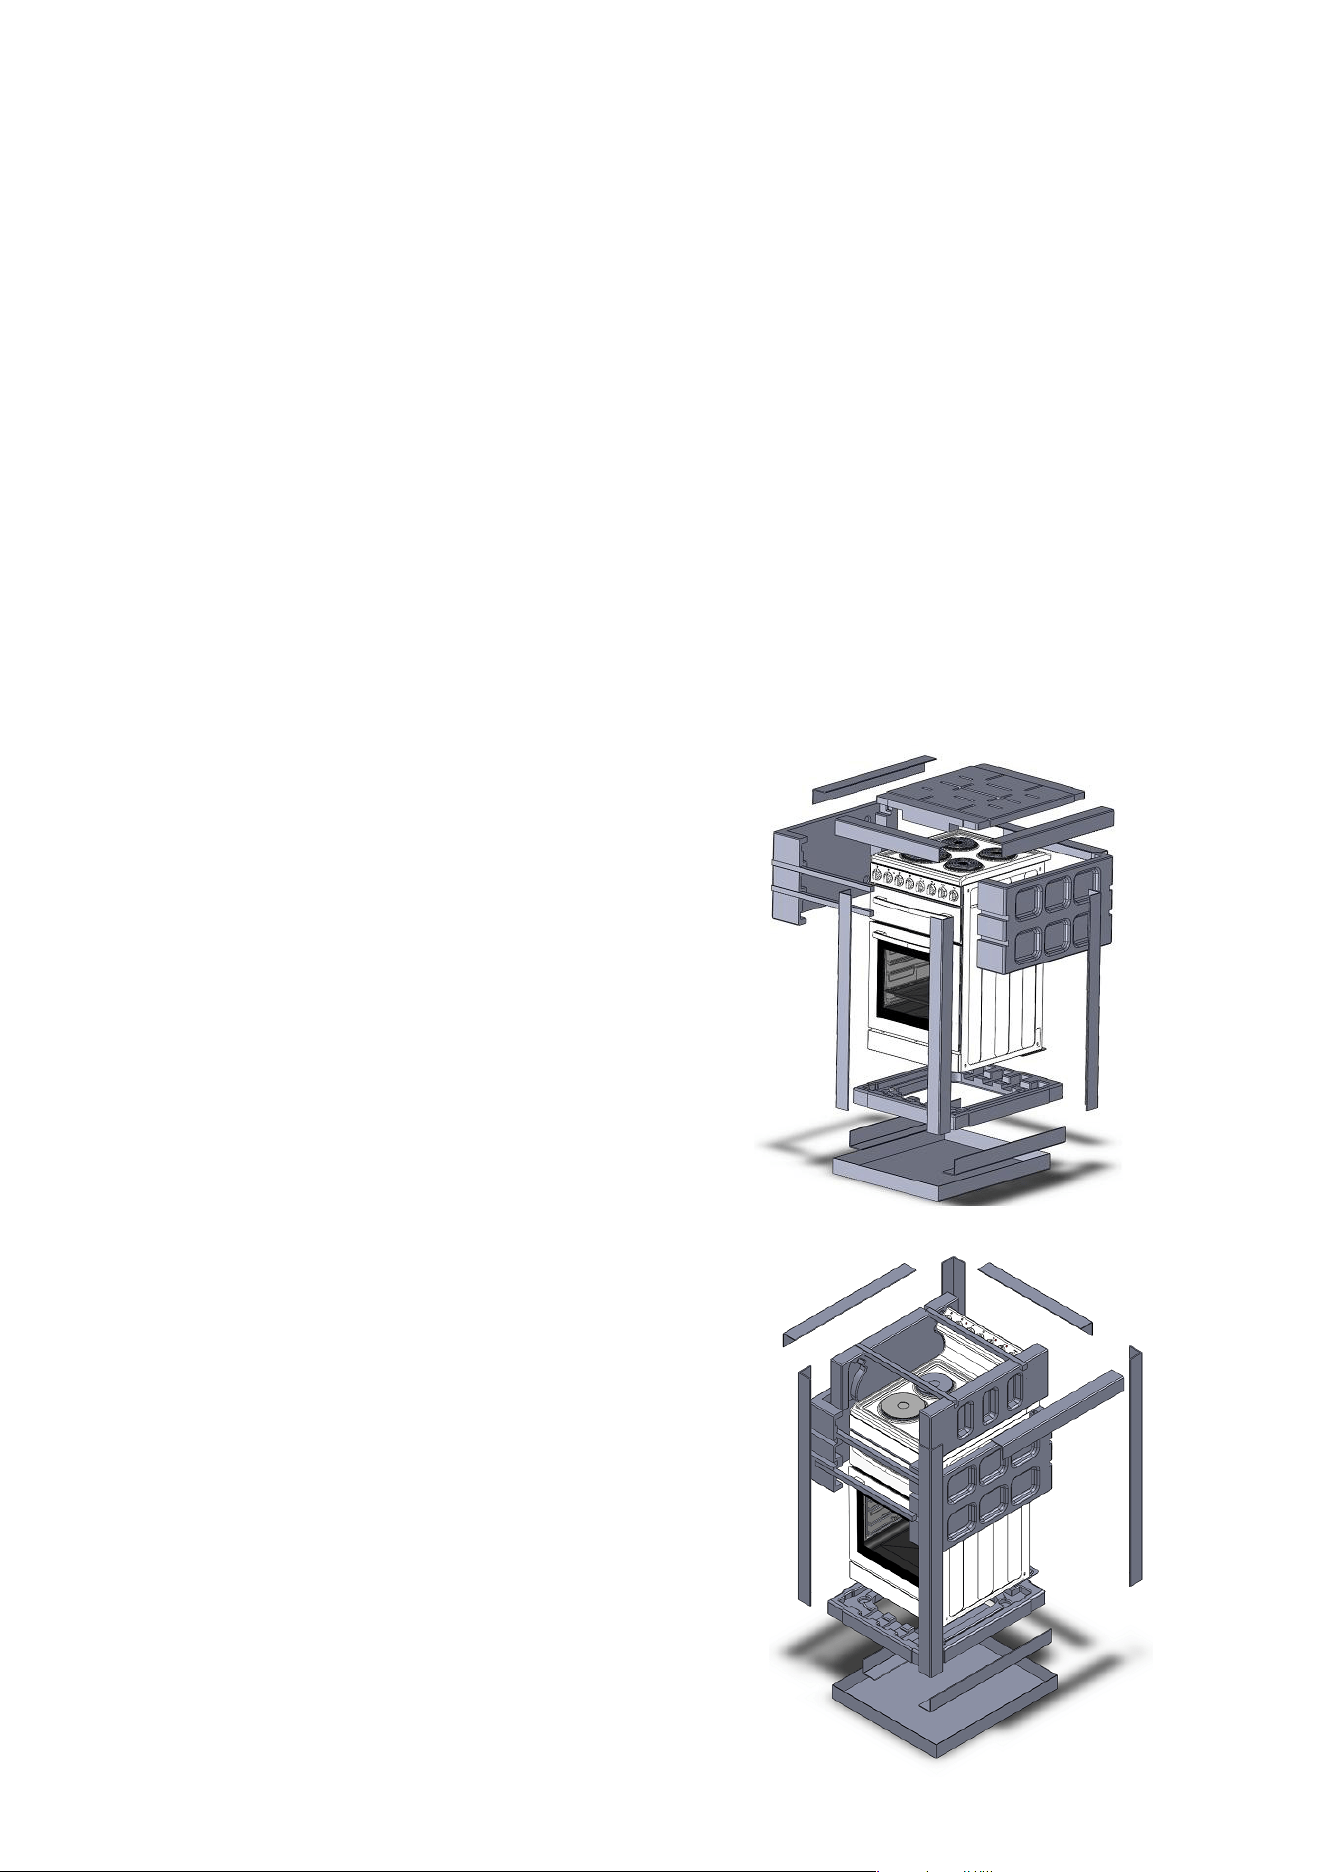
Packagingof
Frontcontrolmodels
Packagingof
Rearcontrolmodels

28 Euromaid 540mm Upright Cooker INSTALLING YOUR NEW COOKER
Frontcontrolmodels-gas
The installation of splash back
• Totsplashback,alignthe2tabsofthesplash
backwiththecorrespondingholesinthehoband
pushdownwards.
• Fitscrews.
Rearcontrolmodels
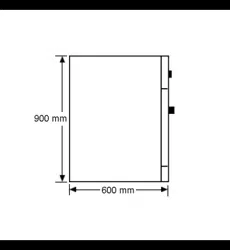
Locating the cooker
Studythediagramsbelowtobesureofthedimensions
requiredtolocatethecookersafely.Makesurethat
thetopofthecookerisatleast10mmhigherthanthe
levelofthebenchtops.Unscrewlevelinglegsbyabout
10mmtogiveclearancetotheanti-tiltoorbracket.
Theappliancehasbeendesignedtotina550mm
widegapinkitchencabinets.Thecookermayalsobe
installedattheendofalineofbenchesorwithafree
spaceoneitherside.
NOTE:Toensurecookerstability,boththeanti-tilt
oorbracketandanti-movement/stabilitybolt(this
isttedtothecookerduringandlocatedbehindthe
kickpanel)mustbeinstalledonallcookers(electric
andgas).
Installing your new cooker
Euromaid 540mm Upright Cooker INSTALLING YOUR NEW COOKER 29
Installing your new cooker
Kick Panel
Stability
Bolt
Stability
Bolt Bracket
Stability Bolt
Hole in Floor
Installation Sequence
• Determinepositionofcookerandant-tiltoor
bracket.
• Markpositionofholesthatneedtobedrilledinto
oor.
• Drillholeswithcorrecttypedrillsuitableforoor
type.
• Securelyxtheanti-tiltplatetotheoorwith
appropriatefasteners.
• Stabilityboltisttedduringproductiontofrontof
cookerbehindkickpanel.Removedoorfromoven,
unscrewkickpanelfromthetopandremovekick
paneltolocatestabilitybolt.
25mm from side of
bracket on both sides
to cupboards or walls
• Repositionthecookerbackintotheanti-tiltoor
bracketandthenmarkthepositionforholeinoor
tohousethestabilitybolt.
• Pullthecookerbackoutanddrilltheboltlocation
hole.Usea10mmmasonryorwooddrill,
dependingonoortype.Whendrillingintoconcrete
ensureaminimumholedepthof30mm.
• Repositionthecookerbackintotheanti-tiltplate,
aligningthestabilityboltbracketwiththe10mm
drilledhole.Thenremovetapefromstabilitybolt
andslidetheboltthroughthebracketandintothe
hole.
• ConnectElectricitysupply/gassupplybutdonot
turnonuntilinstallationiscompleted.
• Slidethecookerbackintotheanti-tiltplatesothat
rearcoverrestsagainsttherearwall.Thencheck
theheightandlevelofthecooker.
Ifrequired,pullthecookerbackoutandadjustthe
levelingfeetasrequired.
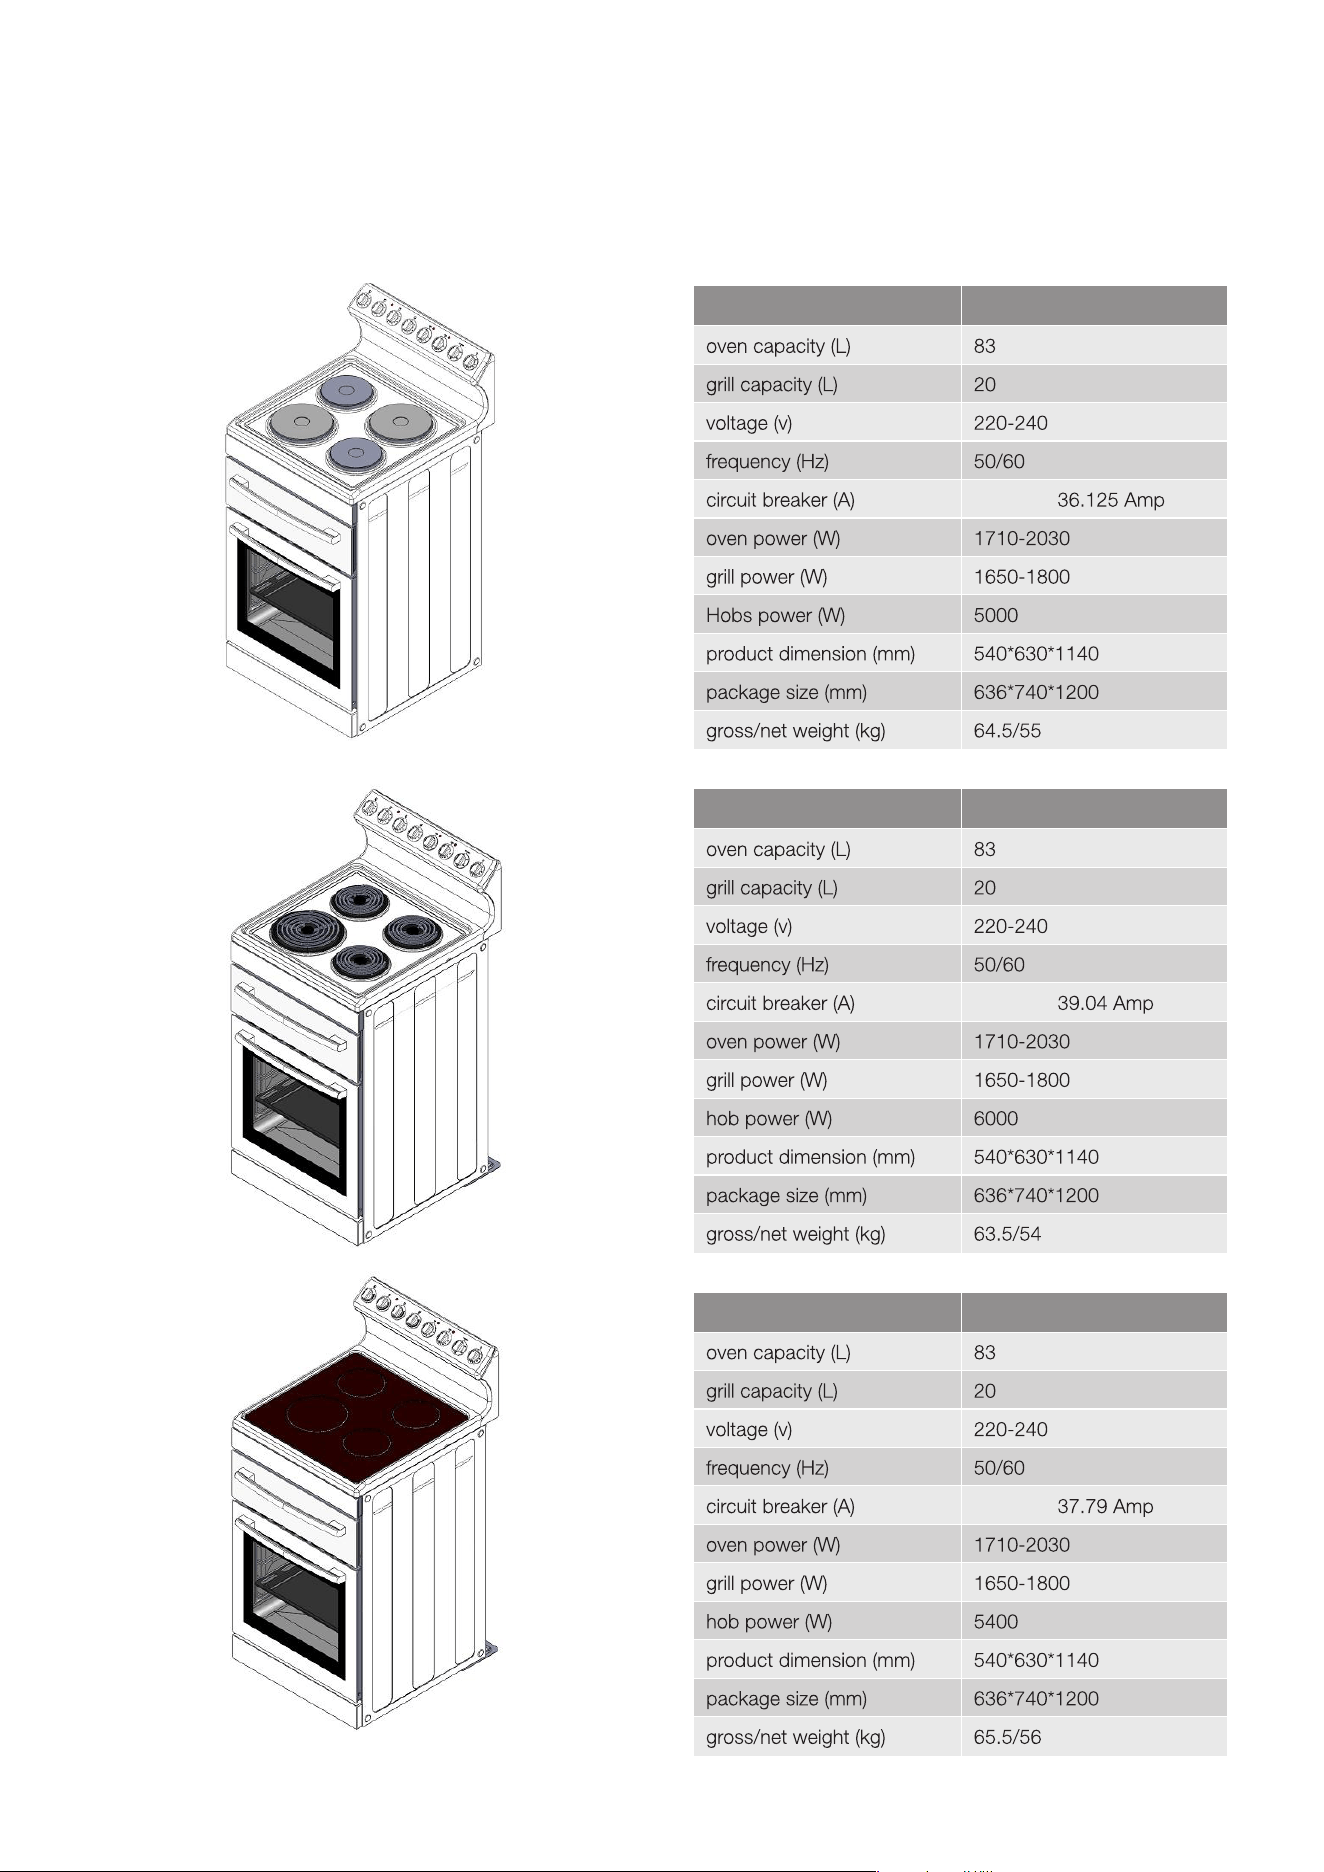
30 Euromaid 540mm Upright Cooker TECHNICAL SPECIFICATIONS
Technical specifications
Model R54EW
(8.67kW)
Model R54RW, FRR54W, GG54RRW
(9.37kW)
Model R54CW, FRC54W, GG54RCW
(9.07kW)
Model F54GW, F54GS
(3.65kW)
(NG/LPG 29.88 mj/h)
Model F54EW, F54ES
(8.67kW)
Model F54RW, F54RS
(9.37kW)
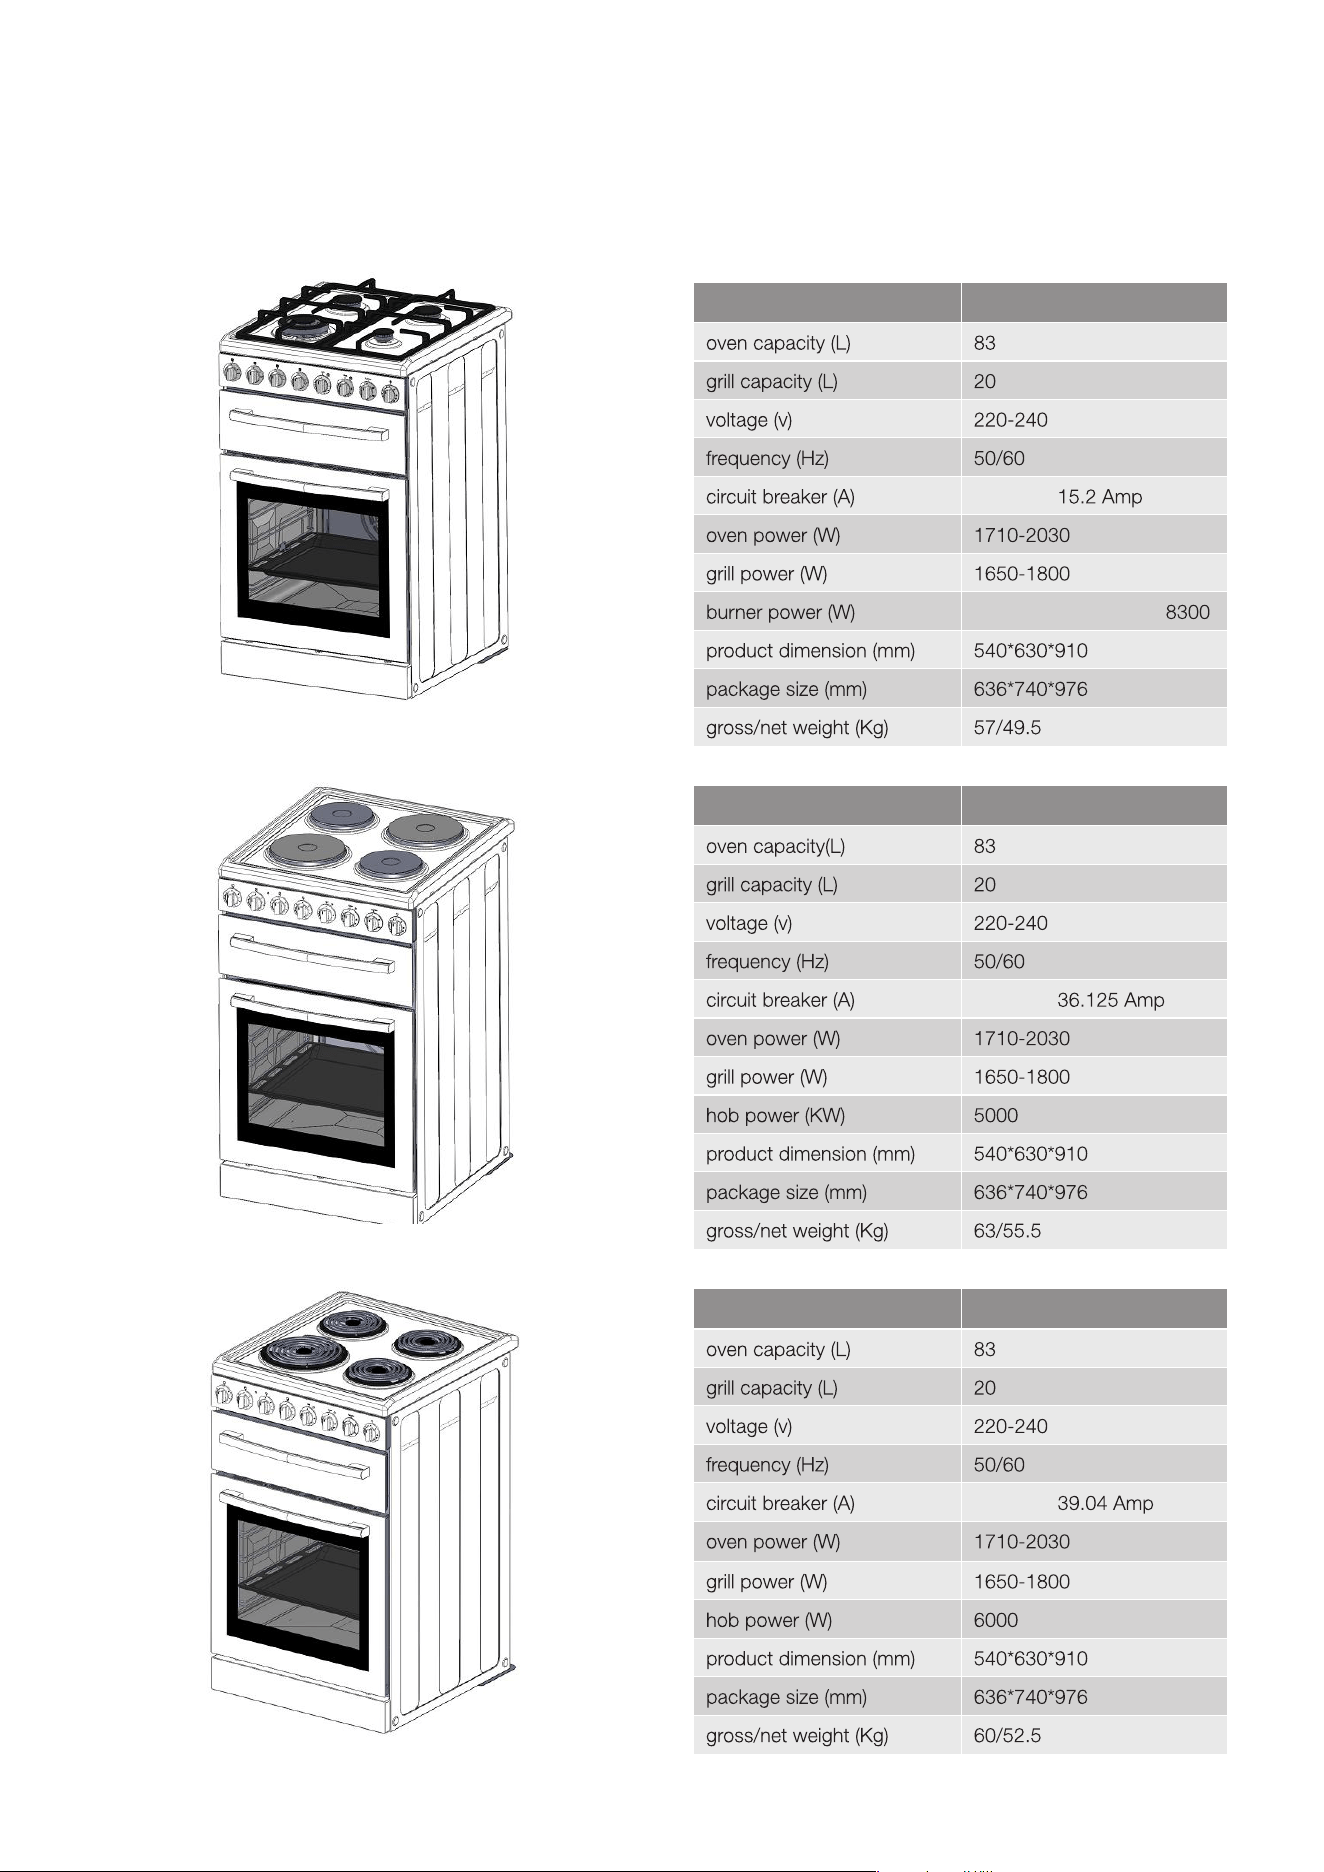
Technical specifications
Euromaid 540mm Upright Cooker TECHNICAL SPECIFICATIONS 31
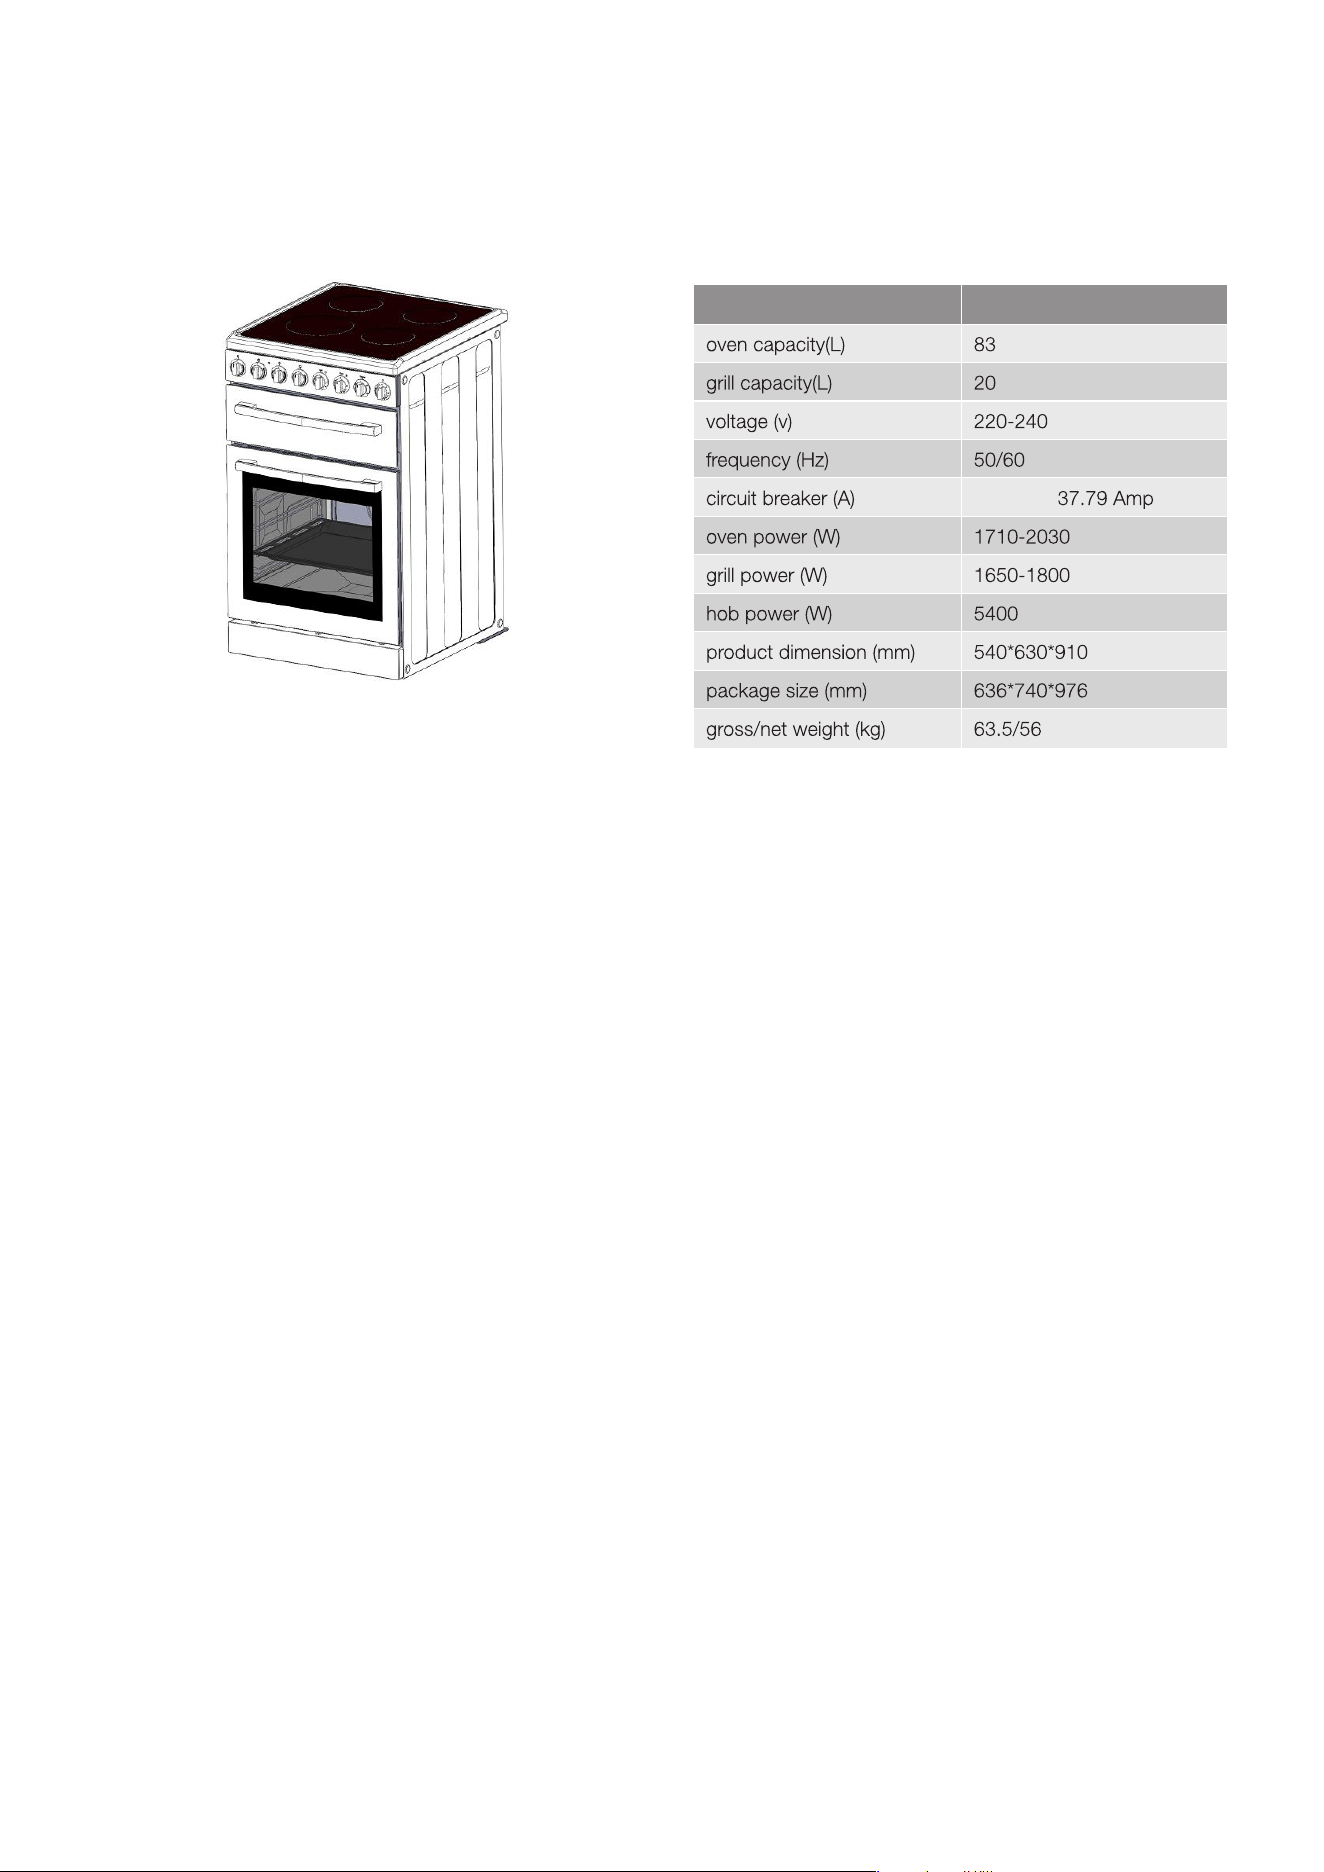
Model F54CW, F54CS
(9.07kW)
Technical specifications
32 Euromaid 540mm Upright Cooker TECHNICAL SPECIFICATIONS

Notes
Euromaid 540mm Upright Cooker NOTES 33

Euromaid
price, quality, performance
www.euromaid.com.au