

Wireless DPM 2D Area-imaging
Barcode Scanner with NFC
Model: 8300 Pro
Ver.01.1.01

For the English version,
refer to page 1 to page 6.
Für die deutsche Version,
siehe Seite 7 bis Seite 12
Para la versión en español,
consulte las páginas 13 a 18.

Feel free to contact us if you have any questions.
Customer Service
Email: [email protected]
Phone: +1 (626) 438 - 1404
Note:
Please have the following information available:
Serial number (found on manufacturing label)
Model number (found on manufacturing label)
Follow us:
Instagram: tera_digital
Youtube: Tera Digital
Twitter: Tera Digital
Facebook: Tera
You can visit our official website at:
https://www.tera-digital.com
or by scanning the QR code below.

Charging Safety
• Do not modify or tamper with the USB cable or charging port.
• Ensure the USB cable is securely connected.
• If using a USB adapter, ensure it provides a stable 5V/1A
output.
• Keep the charging area well-ventilated and free of flammable
materials.
• Unplug the USB cable from the power source when not in
use.
Failure to follow these guidelines may damage your device and
void the warranty. We are not liable for any damages resulting
from the use of incompatible power sources.
Charging Instructions
Please read the following instructions before charging your
scanner.
Power Requirements
The scanner requires a stable 5V/1A power source for charging.
Using a power source with a higher voltage or amperage could
damage the device and void the warranty.
Charging via USB Port
1. You can charge the scanner by connecting it to a 5V/1A USB
port found on various devices, such as computers, laptops, or
USB wall adapters.
2. Ensure the USB port provides a stable 5V/1A output for proper
charging.

Connect the Scanner
Connect with Receiver
1. Press the button to power up the scanner.
2. Plug the receiver into a working USB 3.0 port on the computer.
(If the scanner emits five beeps after scanning a barcode
and nothing appears on the computer screen, please
connect the scanner to the computer using the USB cable
and leave it charging for 2 hours. If the scanner emits three
beeps after scanning a barcode, please follow the
instructions in the “Pair the scanner with its receiver” section
to re-establish the connection.)
No driver is required as your computer's operating system
will automatically install the driver when the scanner is
connected to it with either the USB cable, or the USB receiver.
The device can be tested immediately in Notepad, Wordpad,
Microsoft Word or Excel.
Connect with USB cable
1. Connect the cable to the scanner first, then to the computer.
Report missing or damaged items?
+1 (626) 438 - 1404
https://www.tera-digital.com

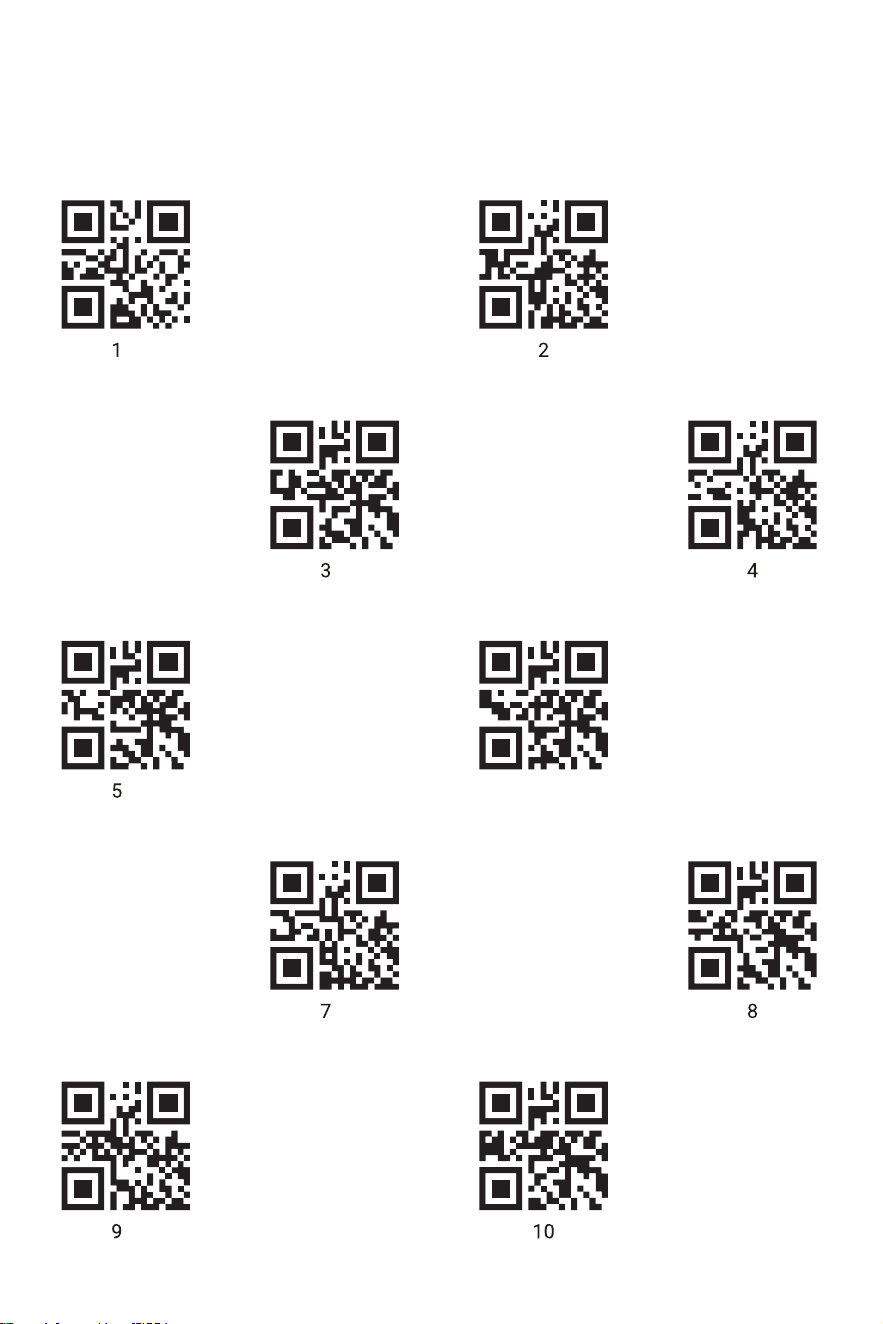
Setting Custom Defaults with NFC Cards
You can create custom defaults using NFC functionality. To set your own
defaults, follow these steps:
1. Scan the desired commands for your custom defaults from the manual.
2. After entering all commands you want to save, scan a numeric code from the
NFC program chart.
3. Tap an NFC card to save the settings.
Note: Scan mode settings cannot be saved as custom defaults. It's best to hold
the NFC card flat below the scanner head rather than at an angle.
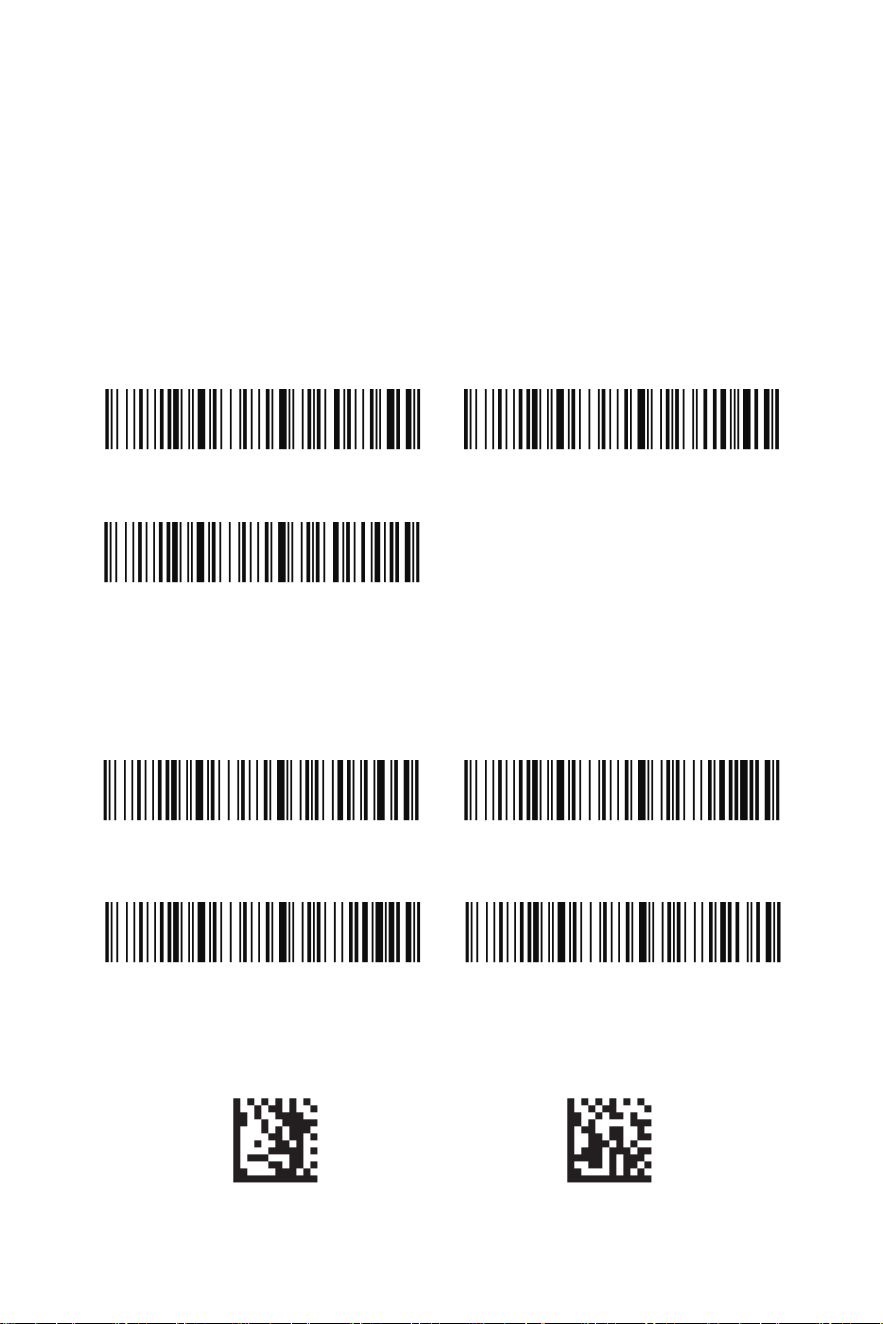
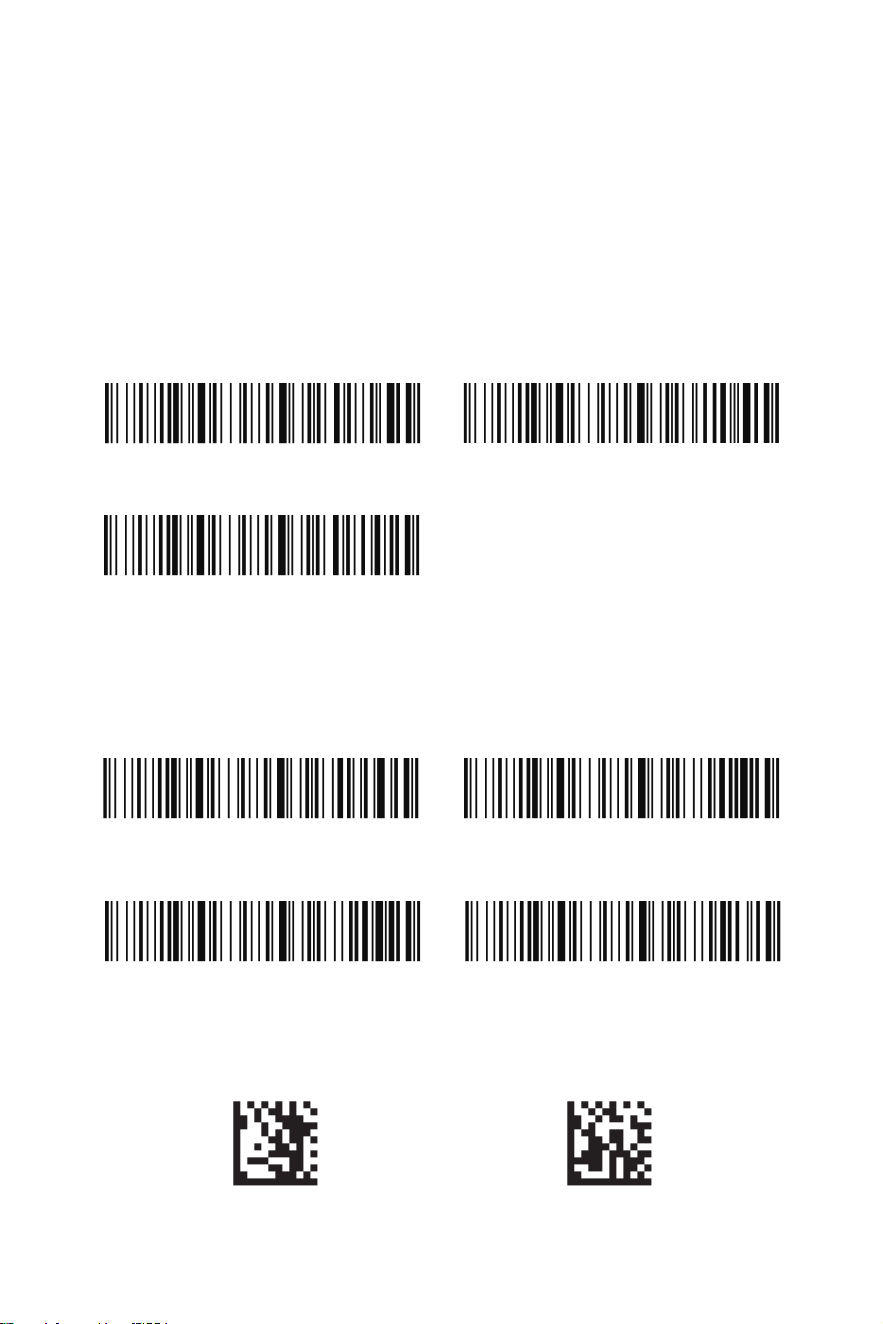
Factory Default Settings
Volume: Medium
Vibration: On
Sleep Timer: 300s
Operation Modes: Real Time Mode
Communication Interface: HID Keyboard
Data Entry Speed: Fast
Keyboard Layout: United States
Suffix: Carriage Return
Important Notes
You can modify these settings and save them as custom defaults. Once you
create custom defaults, factory defaults cannot be restored by scanning the
'Restore Defaults' barcode, as the custom defaults will replace the factory
settings. The NFC program chart accommodates up to 10 codes, allowing for up
to 10 groups of custom default settings.

NFC Program Chart
1 2
5 6
3 4
7 8
9 10

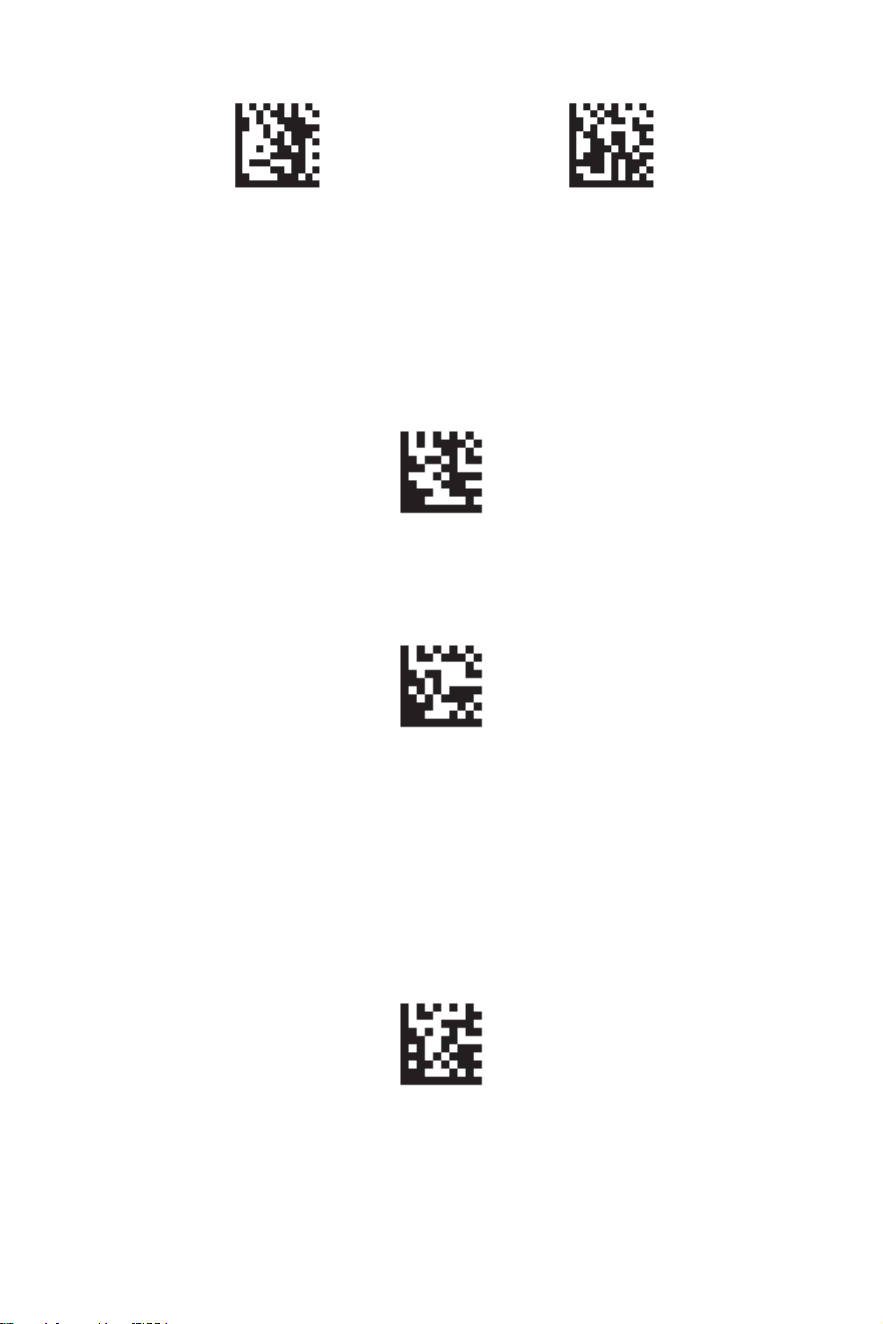
Restore Defaults
Show Software Version
High
Low Mute
Medium*
Factory Reset
Software Version
If you aren't sure what programming options are in your scanner, or you have changed
some options and want to restore the scanner to factory default settings, scan the
barcode below.
Scan the bar code below to output the current software version of the scanner.
Beeper Volume
The beeper volume codes modify the volume of the beep the scanner emits on a
good read. Default = Medium.
1

Show Battery Level
Vibration On*
300s
1800s
Never Turn Off Turn Off Immediately
Vibration Off
Battery Level
To check the remaining battery level, please scan the following barcode. Ensure your
cursor is in a text box when scanning.
Vibration
The scanner vibrates once when a barcode is successfully read. If you don't want the
scanner to vibrate, please scan the Vibration Off barcode.
Power Timeout Timer
When there is no activity within a specified time period, the scanner turns off. Scan
the appropriate scanner power time-out barcode to change the timeout duration.
Note: If there are no trigger pulls during the timer interval, the scanner turns off.
Whenever the trigger is pressed, the timer is reset.
Keyboard Country Layout
Your keyboard layout default is a US keyboard. To change this layout, scan the
appropriate Keyboard Country barcode below. (Please note that if the keyboard layout
on your scanner doesn't match your computer's, the outputs may be incorrect. )
2

Real Time Mode*
Storage Mode
Operation Modes
Real Time Mode
Storage Mode
By default, the barcode scanner operates in real time mode, transmitting scanned
data immediately to the host device.
This mode allows the scanner to store scanned data in its internal memory for later
transmission to the host system. The data won’t be lost even if the scanner is turned
off. To clear the scanner’s buffer, scan Clear All Stored Codes.
France Spain
Italy United Kingdom
United States* Germany
Upload All Stored Codes
Upload All Stored Codes
If you are operating in Storage Mode, you must scan the following barcode to upload
all stored data to the host system.
3

Total Records
Clear All Stored Codes
2.4GHz Mode Pairing
Total Records
If you wish to output the total number of barcodes scanned when in storage mode,
scan Total Records.
Clear All Stored Codes
If you want to clear the scanner's buffer of all data accumulated in storage mode,
scan Clear All Stored Codes.
Pairing the Scanner with its Receiver
If the scanner doesn’t connect to the USB receiver automatically, please follow these
steps to re-establish the connection.
Step 1: Unplug the receiver (If the receiver is not plugged in, please disregard this
step).
Step 2: Scan the “2.4GHz Mode” barcode.
Step 3: Scan the “Pairing” barcode.
Step 4: Plug the receiver in to a working USB port on your computer.
Bluetooth HID Mode Pairing
Pairing the Scanner with Bluetooth Devices
The scanner can be paired with Bluetooth devices such as personal computers,
laptops, and tablets.
Step 1: Scan the “Bluetooth HID” barcode and the “Pairing” barcode below to
establish one-way communication with the scanner.
4
Step 2: Set your personal computer, laptop, or tablet so it searches for other
Bluetooth devices.
Step 3: Once your personal computer, laptop, or tablet has located the scanner, select
the scanner name. They will automatically pair with the scanner.
Carriage Return*
None
Horizontal Tab
Show Current Time & Date Time & Date Prefix
Time & Date Suffix Clear Timestamp
Enter/Tab Suffix
By default, the scanner adds a carriage return suffix to all symbologies, which
functions the same as pressing the Enter key on a keyboard. If you don't want the
scanner to "press" the Enter key after each scan, please scan the "None" barcode
below. If you'd like the scanner to "press" the Tab key after each scan, please scan the
"Horizontal Tab" barcode below.
Timestamp
If you want to record the time and date for every scan, scan either Time & Date Prefix
or Time & Date Suffix.
Enter Programming Mode Exit Programming mode
Scan Modes
5
Manual Trigger Mode*
Continuous Scan Mode
Sensor-activated Mode
Manual Trigger Mode
A scan mode for reading barcodes by pulling the trigger. To enter Manual Trigger
Mode, first scan the “Enter Programming Mode” barcode, then the “Manual Trigger
Mode” barcode, and finally the “Exit Programming Mode” barcode. The same steps
apply for entering Continuous Scan Mode and Sensor-activated Mode.
Sensor-activated Mode
In sensor-activated mode, the scanner remains idle with no illumination, relying
primarily on ambient light to detect movement within its field of view. The scanner is
intended to stay in a fixed position. When movement is detected, the illumination
activates, and the scanner attempts to read a barcode. After successfully scanning
the barcode, the illumination will stay on for a predefined period before returning to
the idle state.
Note: Both Continuous Scan Mode and Sensor-Activated Mode are considered
"Hands-Free Modes." If the scanner’s trigger is pulled while in a hands-free mode, it
switches to manual trigger mode. Once the timeout period elapses (if no further
trigger pulls occur), the scanner automatically returns to the original hands-free
mode.
Continuous Scan Mode
A scan mode that continuously keeps scanning barcodes.
6

Zögern Sie nicht, uns zu kontaktieren,
wenn Sie Fragen haben.
Kundenservice
Hinweis:
E-Mail-Adresse: info@tera-digital.com
Telefonnummer: +1 (626) 438-1404
Halten Sie bitte die folgenden Informationen bereit:
Seriennummer (auf dem Herstellungslabel zu finden)
Modellnummer (auf dem Herstellungslabel zu finden)
Sie können unsere offizielle Website über den
folgenden Link besuchen:
https://www.tera-digital.com
oder indem Sie den unten angegebenen QR-Code
scannen.
Folgen Sie uns:
Instagram: tera_digital
YouTube: Tera Digital
Twitter: Tera Digital
Facebook: Tera

Ladesicherheit
• Ändern oder manipulieren Sie das USB-Kabel oder den
Ladeanschluss nicht.
• Stellen Sie sicher, dass das USB-Kabel sicher angeschlossen
ist.
• Wenn Sie einen USB-Adapter verwenden, stellen Sie sicher,
dass dieser eine stabile 5V/1A-Ausgangsspannung liefert.
• Halten Sie den Ladebereich gut belüftet und frei von brenn-
baren Materialien.
• Trennen Sie das USB-Kabel vom Stromquelle, wenn es nicht
verwendet wird.
Das Nichtbefolgen dieser Richtlinien kann Ihr Gerät beschädigen
und die Garantie erlöschen lassen. Wir übernehmen keine
Haftung für Schäden, die durch die Verwendung inkompatibler
Stromquellen entstehen.
Ladeanweisungen
Bitte lesen Sie die folgenden Anweisungen, bevor Sie Ihren
Scanner aufladen.
Stromanforderungen
Der Scanner benötigt eine stabile 5V/1A-Stromquelle zum
Aufladen. Die Verwendung einer Stromquelle mit höherer
Spannung oder Stromstärke könnte das Gerät beschädigen und
die Garantie erlöschen lassen.
Aufladen über USB-Port
1. Sie können den Scanner aufladen, indem Sie ihn an einen
5V/1A USB-Port anschließen, der an verschiedenen Geräten wie
Computern, Laptops oder USB-Wandadaptern zu finden ist.
2. Stellen Sie sicher, dass der USB-Port eine stabile
5V/1A-Ausgabe für das ordnungsgemäße Laden liefert.

Scanner verbinden
Verbindung über den Empfänger
1. Drücken Sie den Knopf, um den Scanner einzuschalten.
2. Stecken Sie den Empfänger in einen funktionierenden USB
3.0-Port am Computer.
(Wenn der Scanner nach dem Scannen eines Barcodes fünf
Pieptöne von sich gibt und nichts auf dem Computerbildschirm
erscheint, verbinden Sie bitte den Scanner mit dem USB-Kabel mit
dem Computer und lassen ihn 2 Stunden lang aufladen. Wenn der
Scanner nach dem Scannen eines Barcodes drei Pieptöne von
sich gibt, folgen Sie bitte den Anweisungen im Abschnitt „Scanner
mit seinem Empfänger koppeln“, um die Verbindung
wiederherzustellen.)
Es ist kein Treiber erforderlich, da das Betriebssystem Ihres
Computers den Treiber automatisch installiert, wenn der Scanner
über das USB-Kabel, oder den USB-Empfänger.
Das Gerät kann sofort in Notepad, Wordpad, Microsoft Word oder
Excel getestet werden.
Verbindung über USB-Kabel
1.Schließen Sie zuerst das Kabel an den Scanner an und dann
an den Computer.
Melden Sie fehlende oder beschädigte Artikel?
+1(626)438-1404
https://www.tera-digital.com

Eigene Standardwerte mit NFC-Karten festlegen
Sie können eigene Standardwerte mit der NFC-Funktionalität erstellen. Folgen Sie
diesen Schritten, um Ihre eigenen Standardwerte festzulegen:
1.Scannen Sie die gewünschten Befehle für Ihre benutzerdefinierten
Standardwerte aus dem Handbuch.
2.Nachdem Sie alle Befehle eingegeben haben, die Sie speichern möchten,
scannen Sie einen numerischen Code aus dem NFC-Programmdiagramm.
3.Tippen Sie eine NFC-Karte an, um die Einstellungen zu speichern.
Hinweis: Scannermodi können nicht als benutzerdefinierte Standardwerte
gespeichert werden. Es ist am besten, die NFC-Karte flach unter dem
Scannerkopf zu halten, anstatt sie im Winkel zu halten.
Werksstandardwerte
Lautstärke: Mittel
Vibration: Ein
Schlafmodus-Timer: 300s
Betriebsmodi: Echtzeitmodus
Kommunikationsschnittstelle: HID-Tastatur
Dateneingabegeschwindigkeit: Schnell
Tastaturlayout: Vereinigte Staaten
Tastaturkonvertierung: Aus
Suffix: Wagenrücklauf
Wichtige Hinweise
Sie können diese Einstellungen ändern und als benutzerdefinierte Standardwerte
speichern. Sobald Sie benutzerdefinierte Standardwerte erstellt haben, können
die Werkseinstellungen nicht mehr durch Scannen des Barcodes
„Standardeinstellungen wiederherstellen“ zurückgesetzt werden, da die
benutzerdefinierten Standardwerte die Werkseinstellungen ersetzen. Das
NFC-Programmdiagramm kann bis zu 10 Codes speichern, sodass bis zu 10
Gruppen benutzerdefinierter Standardwerte erstellt werden können.
NFC-Programmdiagramm
6

Einstellungen Zurücksetzen
Softwareversion Anzeigen
Hoch*
Niedrig Stumm
Mittel
Werkseinstellungen
Softwareversion
Wenn Sie sich unsicher sind, welche Programmieroptionen in Ihrem Scanner
eingestellt sind, oder wenn Sie einige Optionen geändert haben und den Scanner auf
die Werkseinstellungen zurücksetzen möchten, scannen Sie bitte den folgenden
Barcode.
Scannen Sie den folgenden Barcode, um die aktuelle Softwareversion des Scanners
auszugeben.
Lautstärke des Signaltons
Die Lautstärke-Codes passen die Lautstärke des Signaltons an, den der Scanner bei
erfolgreichem Scan abgibt. Voreinstellung = Hoch.
7

Batteriestand anzeigen
Ein
1800s
Nie ausschalten Sofort ausschalten
Aus
Batteriesstand
Um den verbleibenden Akkustand zu prüfen, scannen Sie bitte den folgenden
Barcode. Stellen Sie sicher, dass sich der Cursor in einem Textfeld befindet, wenn Sie
scannen.
Länderspezifisches Tastaturlayout
Standardmäßig ist das Tastaturlayout amerikanisch. Zum Ändern dieses Layouts
scannen Sie nachstehend den entsprechenden Ländercode, um die Tastatur für lhr
Land oder Ihre Sprache zu programmieren.
Vibration
Der Scanner vibriert einmal, wenn ein Barcode erfolgreich gelesen wurde. Wenn Sie
die Vibration deaktivieren möchten, scannen Sie bitte den Barcode „Vibration Aus“.
Zeitüberschreitung für die Stromversorgung
Wenn innerhalb eines festgelegten Zeitraums keine Aktivität stattfindet, schaltet sich
der Scanner aus. Scannen Sie den entsprechenden Barcode für die
Strom-Zeitüberschreitung, um die Abschaltdauer (in Sekunden) anzupassen.
Hinweis: Wenn der Auslöser während des Timer-Intervalls nicht betätigt wird, schaltet
sich der Scanner aus. Der Timer wird jedes Mal zurückgesetzt, wenn der Auslöser
gedrückt wird.
300s
8

Vereinigte Staaten* Deutschland
Frankreich Spanien
Italien Vereinigtes Königreich
Echtzeitmodus*
Speichermodus
Betriebsmodi
Echtzeitmodus
Speichermodus
Standardmäßig arbeitet der Barcodescanner im Echtzeitmodus und überträgt die
gescannten Daten sofort an das Host-Gerät.
In diesem Modus kann der Scanner die gescannten Daten in seinem internen
Speicher für eine spätere Übertragung an das Host-System speichern. Die Daten
gehen nicht verloren, selbst wenn der Scanner ausgeschaltet wird. Um den Speicher
des Scanners zu leeren, scannen Sie den Barcode „Alle gespeicherten Codes
löschen“.
Alle Gespeicherten Codes Hochladen
Alle Gespeicherten Codes Hochladen
Wenn Sie im Speicherungsmodus arbeiten, müssen Sie den folgenden Barcode
scannen, um alle gespeicherten Daten an das Host-System zu übertragen.
9

Gesamte Anzahl der Datensätze
Alle Gespeicherten Codes Löschen
2,4GHz-Modus Koppeln
Gesamte Anzahl der Datensätze
Wenn Sie die Gesamtzahl der im Speichermodus gescannten Barcodes ausgeben
möchten, scannen Sie Gesamte Anzahl der Datensätze.
Alle Gespeicherten Codes Löschen
Wenn Sie den Puffer des Scanners von allen im Speichermodus gesammelten Daten
leeren möchten, scannen Sie Alle Gespeicherten Codes Löschen.
Scanner mit dem Empfänger koppeln
Falls der Scanner sich nicht automatisch mit dem USB-Empfänger verbindet, folgen
Sie bitte diesen Schritten, um die Verbindung wiederherzustellen:
Schritt 1: Trennen Sie den Empfänger vom USB-Anschluss (Wenn der Empfänger
nicht eingesteckt ist, ignorieren Sie diesen Schritt)
Schritt 2: Scannen Sie den Barcode „2,4GHz-Modus“
Schritt 3: Scannen Sie den Barcode „Koppeln“
Schritt 4: Stecken Sie den Empfänger in einen funktionierenden USB-Anschluss Ihres
Computers.
Bluetooth HID Koppeln
Scanner mit Bluetooth-Geräten koppeln
Der Scanner kann mit Bluetooth-Geräten wie PCs, Laptops und Tablets gekoppelt
werden.
Schritt 1: Scannen Sie den Barcode „Bluetooth HID“ sowie den Barcode „Koppeln“
unten, um eine Einwegkommunikation mit dem Scanner herzustellen.
10
Schritt 2: Stellen Sie Ihren PC, Laptop oder Ihr Tablet so ein, dass es nach anderen
Bluetooth-Geräten sucht.
Schritt 3: Sobald Ihr PC, Laptop oder Tablet den Scanner gefunden hat, wählen Sie
den Scannernamen aus. Er wird sich automatisch mit dem Scanner koppeln..
Zeilenumbruch*
Kein
Horizontaler Tab
Aktuelle Uhrzeit und Datum anzeigen Datum & Uhrzeit als Präfix
Datum & Uhrzeit als Suffix Zeitstempel löschen
Zeilenumbruch-/Tab-Suffixe
Standardmäßig fügt der Scanner allen Symbologien ein Zeilenumbruch-Suffix hinzu.
Wenn Sie nicht möchten, dass der Scanner nach jedem Scan die Eingabetaste
„drückt“, scannen Sie bitte den Barcode „Kein Suffix“ unten, um dies zu entfernen.
Wenn Sie möchten, dass der Scanner nach jedem Scan die Tabulatortaste „drückt“,
scannen Sie bitte den Barcode „Horizontaler Tab“ unten.
Zeitstempel
Falls Sie das Datum und die Uhrzeit für jeden Scan aufzeichnen möchten, scannen
Sie entweder „Datum & Uhrzeit als Präfix“ oder „Datum & Uhrzeit als Suffix“.
Programmiermodus aktivieren Programmiermodus beenden
Scanmodi
11

Manueller Auslöser-Modus*
Kontinuierlicher Scanmodus
Sensoraktivierter Modus
Manueller Auslöser-Modus
Ein Scan-Modus zum Lesen von Barcodes durch Betätigen des Auslösers. Um in den
Manuellen Auslöser-Modus zu gelangen, scannen Sie zuerst den Barcode
„Programmiermodus aktivieren“, dann den Barcode „Manueller Auslöser-Modus“ und
schließlich den Barcode „Programmiermodus beenden“. Die gleichen Schritte gelten
für den Eintritt in den Kontinuierlicher Scanmodus und den Sensoraktivierter Modus.
Sensoraktivierter Modus
Für den sensoraktivierten Modus hat der Scanner im Leerlauf keine Beleuchtung und
nutzt überwiegend das Umgebungslicht, um zu erkennen, ob sich ein Objekt vor dem
Scanner bewegt. Der Scanner sollte sich in einer festen Position befinden. Sobald er
Aktivität im Sichtfeld erkennt, schaltet er die Beleuchtung ein und versucht, einen
Barcode zu scannen. Nach dem Scannen des Barcodes bleibt die Beleuchtung
standardmäßig für einen definierten Zeitraum eingeschaltet, bevor der Scanner
wieder in den Leerlauf zurückkehrt.
Hinweis: Sowohl der kontinuierliche Scanmodus als auch der sensoraktivierte Modus
werden als „freihändiger Modus“ bezeichnet. Wenn der Auslöser des Scanners
während der Verwendung eines freihändigen Modus betätigt wird, wechselt der
Scanner in den manuellen Trigger-Modus. Sobald der Zeitüberschreitungswert
erreicht ist (wenn es keine weiteren Auslöser gibt), kehrt der Scanner in den
ursprünglichen freihändigen Modus zurück.
Kontinuierlicher Scanmodus
Ein Scan-Modus, der kontinuierlich Barcodes scannt.
12

No dude en contactarnos si tiene alguna pregunta.
Servicio al Cliente
Nota:
Correo electrónico:info@tera-digital.com
Teléfono: +1 (626) 438-1404
Por favor tenga disponible la siguiente infor-
mación:
Número de serie (encontrado en la etiqueta de
fabricación)
Número de modelo (encontrado en la etiqueta de
fabricación)
Puede visitar nuestro sitio web oficial a través del
siguiente enlace:
https://www.tera-digital.com
o escaneando el código QR a continuación.
Síganos:
Instagram: tera_digital
YouTube: Tera Digital
Twitter: Tera Digital
Facebook: Tera

Seguridad al cargar
• No modifique ni manipule el cable USB o el puerto de carga.
• Asegúrese de que el cable USB esté bien conectado.
• Si utiliza un adaptador USB, asegúrese de que proporcione
una salida estable de 5V/1A.
• Mantenga el área de carga bien ventilada y libre de materia-
les inflamables.
• Desenchufe el cable USB de la fuente de alimentación
cuando no lo esté utilizando.
El incumplimiento de estas pautas puede dañar su dispositivo y
anular la garantía. No nos hacemos responsables de ningún
daño resultante del uso de fuentes de alimentación incompati-
bles.
Instrucciones de carga
Por favor, lea las siguientes instrucciones antes de cargar su
escáner.
Requisitos de energía
El escáner requiere una fuente de alimentación estable de 5V/1A
para la carga. El uso de una fuente de alimentación con un
voltaje o amperaje más alto podría dañar el dispositivo y anular
la garantía.
Carga a través de puerto USB
1. Puede cargar el escáner conectándolo a un puerto USB de
5V/1A encontrado en varios dispositivos, como computadoras,
laptops o adaptadores de pared USB.
2. Asegúrese de que el puerto USB proporcione una salida
estable de 5V/1A para una carga adecuada.

Conectar el escáner
Conectar con receptor
1.Presione el botón para encender el escáner.
2.Conecte el receptor a un puerto USB 3.0 funcional en la
computadora.
(Si el escáner emite cinco pitidos después de escanear un código
de barras y no aparece nada en la pantalla de la computadora,
por favor, conecte el escáner a la computadora usando el cable
USB y déjelo cargando durante 2 horas. Si el escáner emite tres
pitidos después de escanear un código de barras, siga las
instrucciones en la sección "Emparejar el escáner con su
receptor" para restablecer la conexión.)
No se requiere controlador, ya que el sistema operativo de su
computadora instalará automáticamente el controlador cuando el
escáner esté conectado a ella con el cable USB, o el receptor
USB. El dispositivo se puede probar inmediatamente en Notepad,
Wordpad, Microsoft Word o Excel.
Conectar con cable USB
1. Conecte el cable al escáner primero, y luego al computador.
¿Informar sobre artículos faltantes o dañados?
+1(626)438-1404
https://www.tera-digital.com

Establecer valores predeterminados personalizados con tarjetas
NFC
Puede crear valores predeterminados personalizados utilizando la funcionalidad
NFC. Para establecer sus propios valores predeterminados, siga estos pasos:
1.Escanee los comandos deseados para sus valores predeterminados
personalizados del manual.
2.Después de ingresar todos los comandos que desea guardar, escanee un
código numérico del gráfico del programa NFC.
3.Toque una tarjeta NFC para guardar la configuración.
Nota: Los modos de escaneo no se pueden guardar como valores
predeterminados personalizados. Es mejor sostener la tarjeta NFC plana debajo
de la cabeza del escáner, en lugar de en un ángulo.
Valores predeterminados de fábrica
Volumen: Medio
Vibración: Activada
Temporizador de suspensión: 300s
Modos de operación: Modo en tiempo real
Interfaz de comunicación: Teclado HID
Velocidad de entrada de datos: Rápida
Distribución del teclado: Estados Unidos
Conversión del teclado: Desactivada
Sufijo: Retorno de carro
Notas importantes
Puede modificar estos valores y guardarlos como valores predeterminados
personalizados. Una vez que cree valores predeterminados personalizados, no
podrá restaurar los valores predeterminados de fábrica escaneando el código de
barras "Restaurar valores predeterminados", ya que los valores predeterminados
personalizados reemplazarán los valores de fábrica. El gráfico del programa NFC
admite hasta 10 códigos, lo que permite crear hasta 10 grupos de valores
predeterminados personalizados.
6
Diagrama del Programa NFC

Restaurar Valores Predeterminados
Mostrar Versión de Software
Alto*
Bajo Apagado
Medion
Configuración Predeterminada de Fábrica
Versión de Software
Si no está seguro de las opciones de configuración en su escáner o ha cambiado
algunas opciones y desea restaurar el escáner a los valores predeterminados de
fábrica, escanee el código de barras a continuación.
Escanee el código de barras a continuación para mostrar la versión de software
actual del escáner.
Volumen del bíper
Los códigos de volumen del zumbador modifican el volumen del sonido que el
escáner emite cuando realiza una lectura correcta. Predeterminado = Alto.
13

Mostrar Nivel de Batería
Encendido
1800s
Nunca Apagar Apagar Inmediatamente
Apagado
Nivel de Batería
Para verificar el nivel de batería restante, escanee el siguiente código de barras.
Asegúrese de que el cursor esté en un cuadro de texto al escanear.
Vibración
El escáner vibra una vez cuando un código de barras se lee correctamente. Si no
desea que el escáner vibre, por favor escanee el código de barras "Vibración
Desactivada".
Temporizador de Apagado Automático
Cuando no hay actividad dentro de un período de tiempo específico, el escáner se
apaga. Escanee el código de barras correspondiente para cambiar la duración del
tiempo de espera del escáner (en segundos).
Nota: Si no se presiona el gatillo durante el intervalo del temporizador, el escáner se
apaga. Cada vez que se presiona el gatillo, el temporizador se restablece.
300s
14

Estados Unidos* Alemania
Francia España
Italia Reino Unido
Modo en Tiempo Real*
Modo de Almacenamiento
Modos de Operación
Modo en Tiempo Real
Modo de Almacenamiento
De forma predeterminada, el escáner de códigos de barras funciona en modo en
tiempo real, transmitiendo los datos escaneados inmediatamente al dispositivo host.
En este modo, el escáner puede almacenar los datos escaneados en su memoria
interna para su posterior transmisión al sistema host. Los datos no se perderán
incluso si el escáner se apaga. Para borrar la memoria del escáner, escanee el
código de barras "Borrar todos los códigos almacenados".
Distribución de Teclado por País
La distribución de teclado predeterminada es un teclado de EE. UU. Para cambiar
esta configuración, escanee el código de barras correspondiente al país del teclado a
continuación.
(Tenga en cuenta que si la distribución del teclado en su escáner no coincide con la
de su computadora, los resultados pueden ser incorrectos.)
Subir Todos los Códigos Almacenados
Si está operando en modo de almacenamiento, debe escanear el siguiente código de
barras para cargar todos los datos almacenados en el sistema host.
15

Emparejar el Escáner con Dispositivos Bluetooth
El escáner se puede emparejar con dispositivos Bluetooth, como computadoras
personales, laptops y tabletas.
Paso 1: Escanee el código de barras “Modo Bluetooth HID” y el código de barras
“Emparejamiento” a continuación para establecer una comunicación unidireccional
con el escáner.
Total de Registros
Borrar Todos los Códigos Almacenados
Modo 2.4GHz Emparejamiento
Total de Registros
Si desea ver el número total de códigos de barras escaneados en el modo de
almacenamiento, escanee Total de Registros.
Borrar Todos los Códigos Almacenados
Si desea borrar todos los datos acumulados en el modo de almacenamiento del
escáner, escanee Borrar Todos los Códigos Almacenados.
Emparejar el Escáner con su Receptor
Si el escáner no se conecta automáticamente al receptor USB, siga estos pasos para
restablecer la conexión.
Paso 1: Desconecte el receptor (si el receptor no está conectado, omita este paso)
Paso 2: Escanee el código de barras “Modo 2.4GHz”
Paso 3: Escanee el código de barras “Emparejamiento”
Paso 4: Conecte el receptor a un puerto USB que funcione en su computadora
Subir Todos los Códigos Almacenados
16

Modo Bluetooth HID Emparejamiento
Paso 2: Configure su computadora personal, laptop o tableta para que busque otros
dispositivos Bluetooth.
Paso 3: Una vez que su computadora personal, laptop o tableta haya localizado el
escáner, seleccione el nombre del escáner. Se emparejarán automáticamente con el
escáner.
Retorno de carro*
Ninguno
Tabulación Horizontal
Mostrar hora y fecha actuales Prefijo de hora y fecha
Sufijo de hora y fecha Borrar marca de tiempo
Sufijo de Enter/Tabulación
Por defecto, el escáner agrega un sufijo de retorno de carro a todos los tipos de
simbología. Si no desea que el escáner "presione" la tecla Enter después de cada
escaneo, escanee el código de barras "Ninguno" a continuación para eliminar el sufijo
de terminación predeterminado. Si necesita que el escáner "presione" la tecla Tab
después de cada escaneo, escanee el código de barras "Tabulación Horizontal" a
continuación.
Marca de tiempo
Si desea registrar la hora y la fecha de cada escaneo, escanee "Prefijo de hora y
fecha" o "Sufijo de hora y fecha".
17
Entrar en Modo de Programación
Modo de Activación Manual*
Modo de Escaneo Continuo
Modo Activado por Sensor
Salir del Modo de Programación
Modos de Escaneo
Modo de Activación Manual
Un modo de escaneo que permite leer códigos de barras presionando el gatillo. Para
activar el Modo de Activación Manual, primero escanee el código de barras “Entrar
en Modo de Programación”, luego el código de barras “Modo de Activación Manual”,
y finalmente el código de barras “Salir del Modo de Programación”. Los mismos
pasos aplican para activar el Modo de Escaneo Continuo y el Modo de Activación por
Sensor.
Modo Activado por Sensor
En el modo activado por sensor, el escáner permanece sin iluminación en estado de
espera y utiliza predominantemente la luz ambiental para detectar si hay movimiento
de un objeto frente a él. Se espera que el escáner esté en una posición fija. Cuando
detecta actividad en su campo de visión, activa la iluminación e intenta leer un
código de barras. Después de leer el código, la iluminación permanecerá encendida
durante un período definido antes de regresar al estado de espera.
Nota: Tanto el Modo de Escaneo Continuo como el Modo Activado por Sensor se
conocen como “Modos Manos Libres”. Si se presiona el gatillo del escáner mientras
se utiliza un modo manos libres, el escáner cambia al modo de activación manual.
Una vez que se alcanza el valor de tiempo de espera (si no se ha vuelto a presionar el
gatillo), el escáner regresa al modo manos libres original.
Modo de Escaneo Continuo
Un modo de escaneo que mantiene la lectura de códigos de barras de forma
continua.
18
