
Technical Support and E-Warranty Certificate www.vevor.com/support
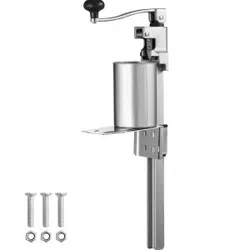
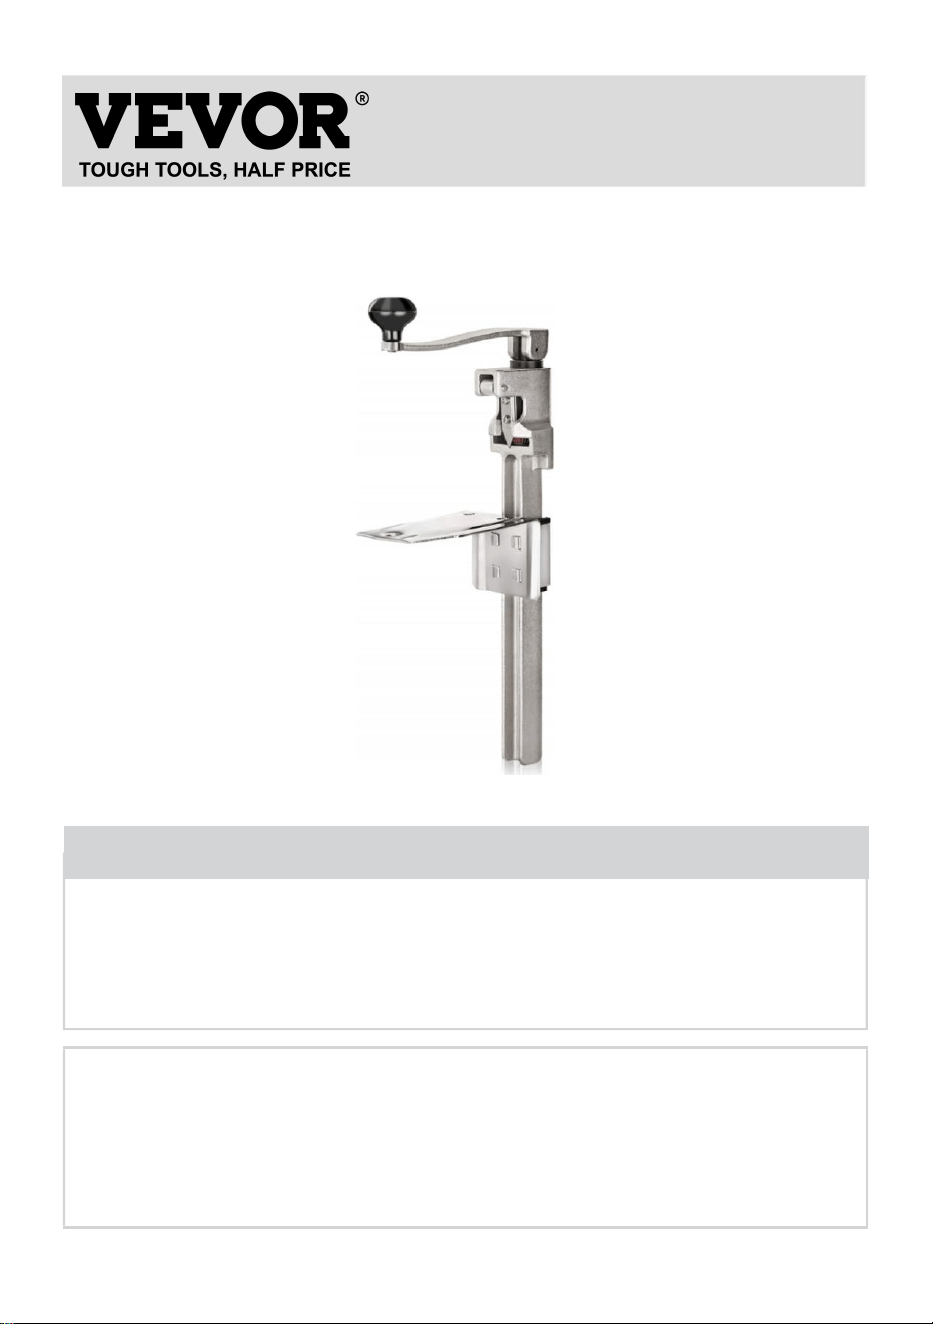
COMMERCIAL CAN OPENER
INSTRUCTIONS
MODEL:MM-ZG01-47 / MM-ZT01-47 / MM-ZG02-59
MM-BXG-30 / MM-BXG-40
We continue to be committed to provide you tools with competitive price.
"Save Half", "Half Price" or any other similar expressions used by us only represents an
estimate of savings you might benefit from buying certain tools with us compared to the major
top brands and does not necessarily mean to cover all categories of tools offered by us. You
are kindly reminded to verify carefully when you are placing an order with us if you are
actually saving half in comparison with the top major brands.
- 1 -
MODEL:MM-ZG01-47 / MM-ZT01-47 / MM-ZG02-59
MM-BXG-30 / MM-BXG-40
Have product questions? Need technical support? Please feel free to
contact us:
Technical Support and E-Warranty Certificate
www.vevor.com/support
NEED HELP? CONTACT US!
This is the original instruction, please read all manual instructions
carefully before operating. VEVOR reserves a clear interpretation of our
user manual. The appearance of the product shall be subject to the
product you received. Please forgive us that we won't inform you again if
there are any technology or software updates on our product.
COMMERCIAL CAN
OPENER

- 2 -
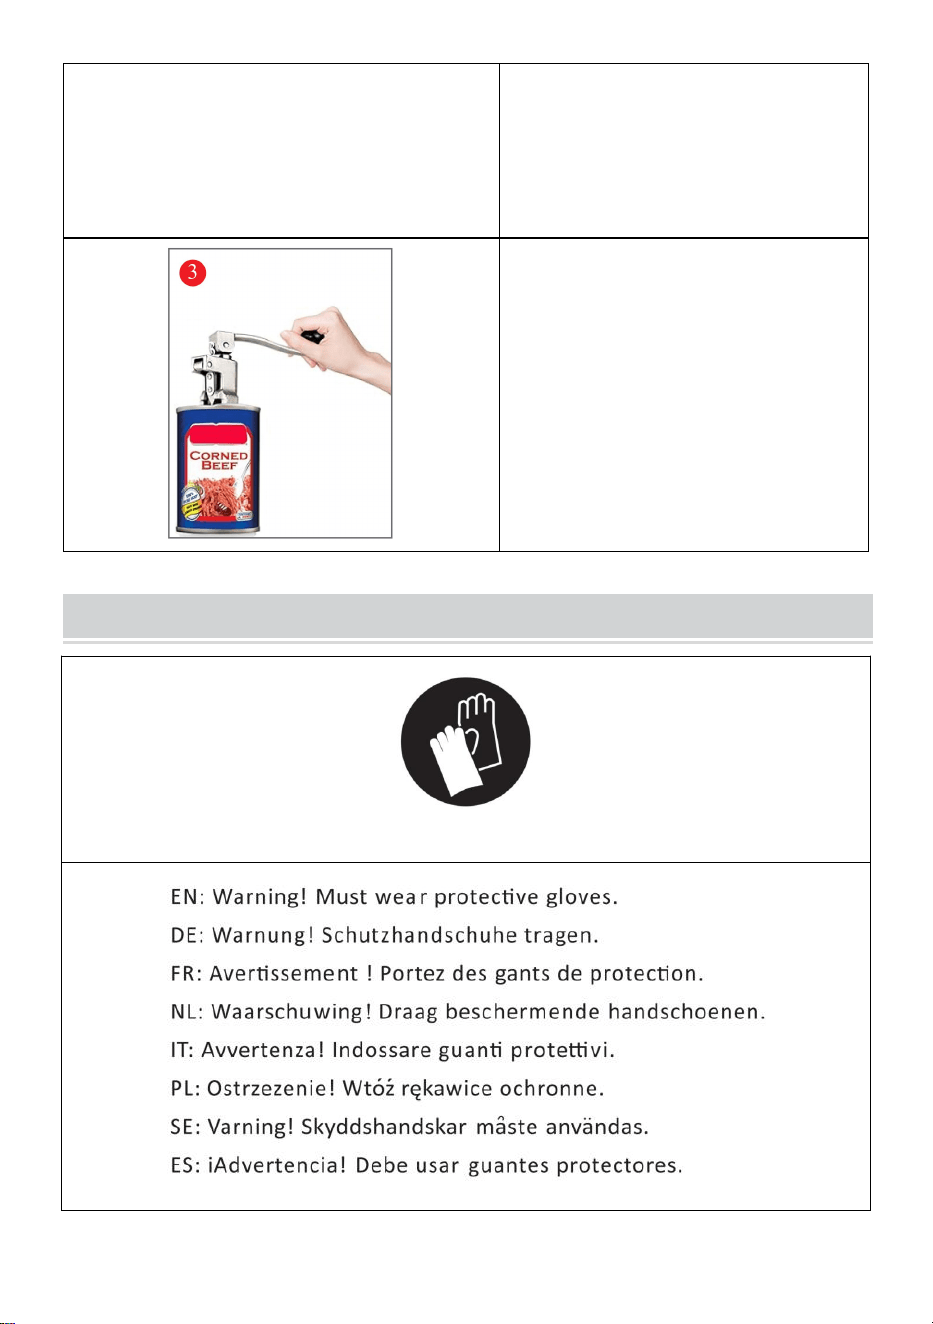
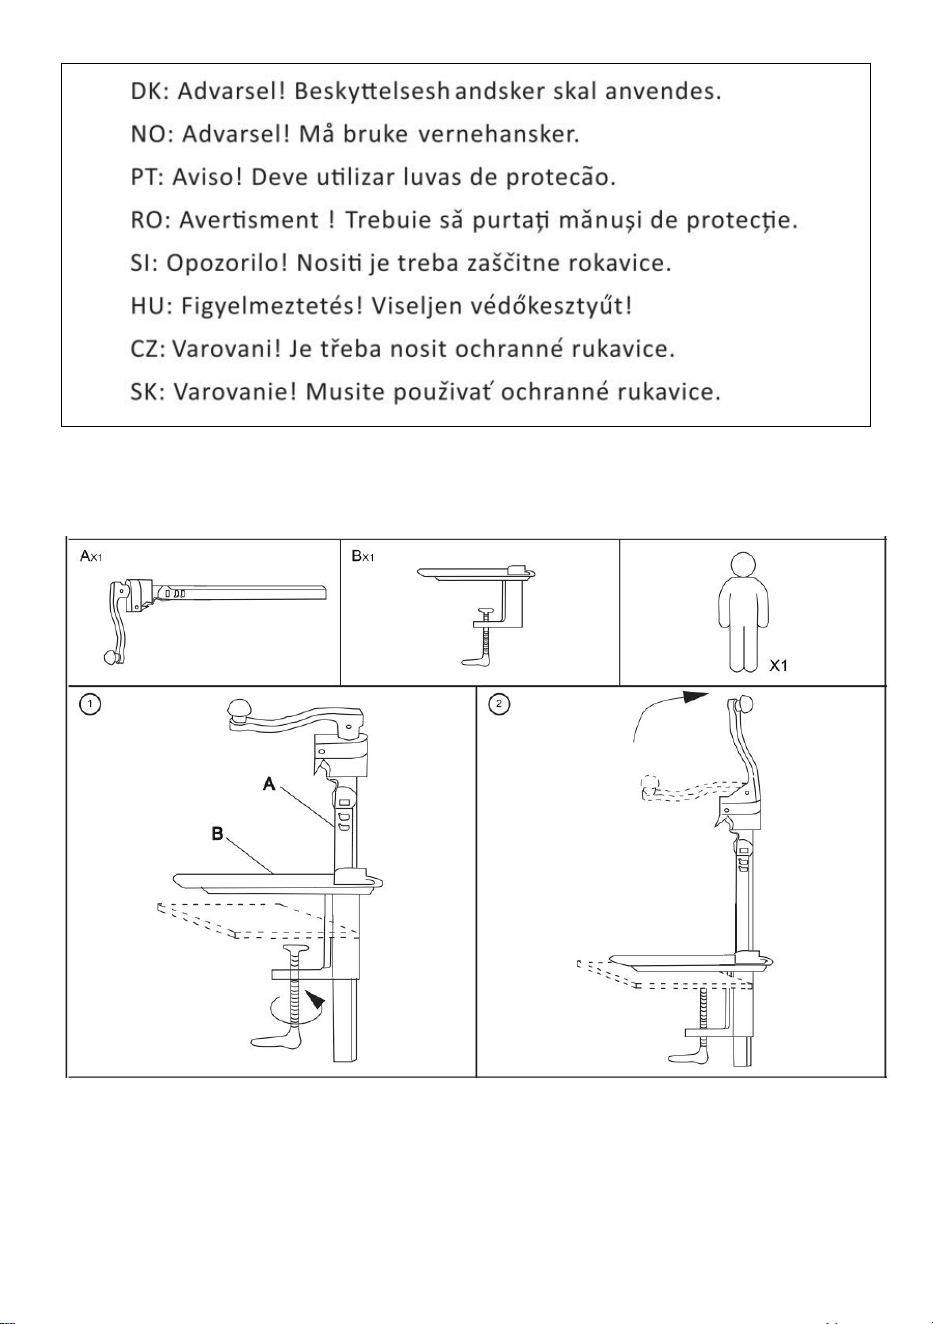
Warning-To reduce the risk of injury, user must read
instructions manual carefully.
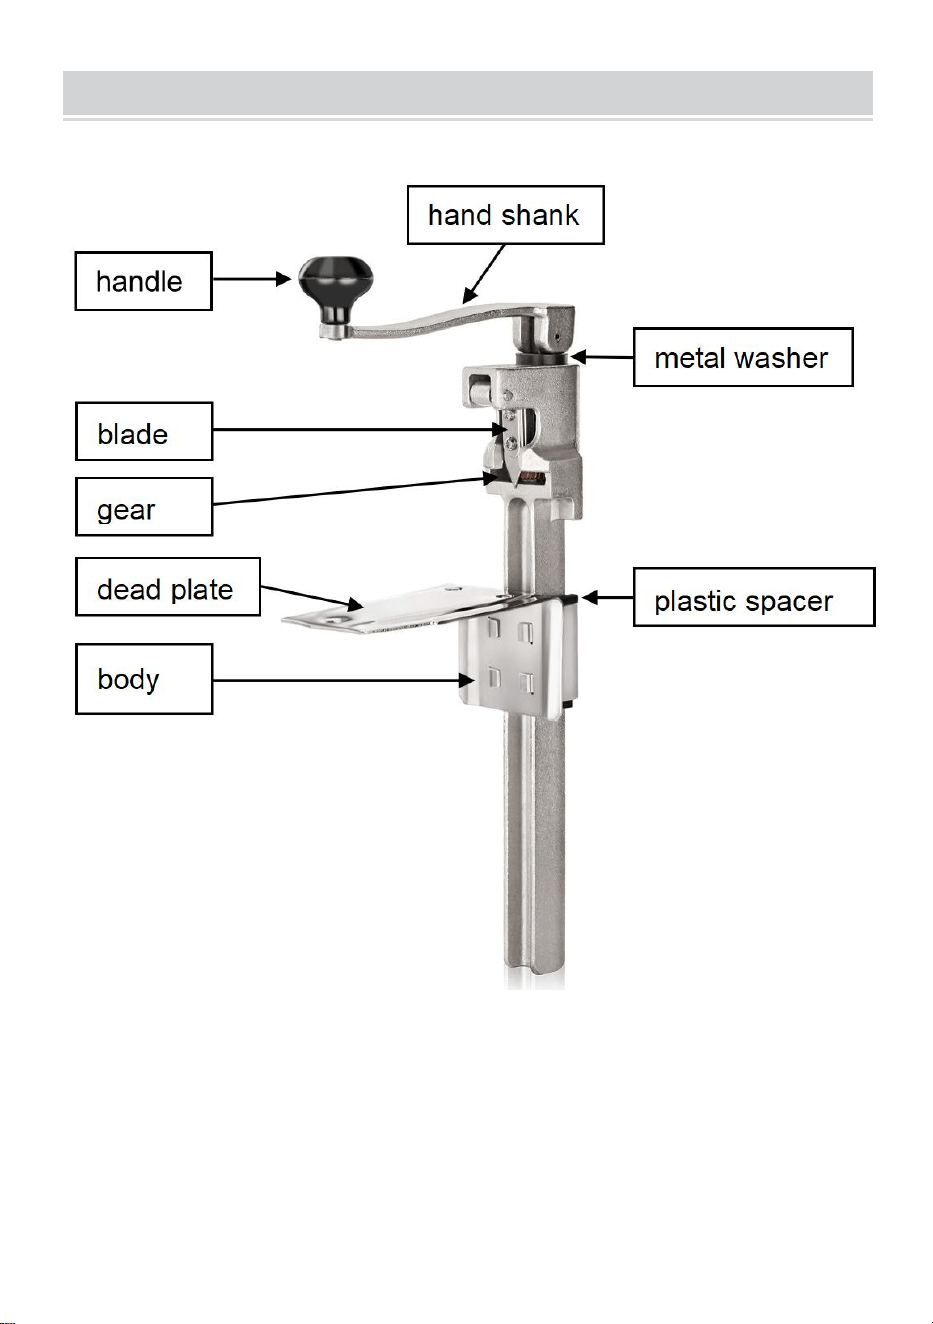
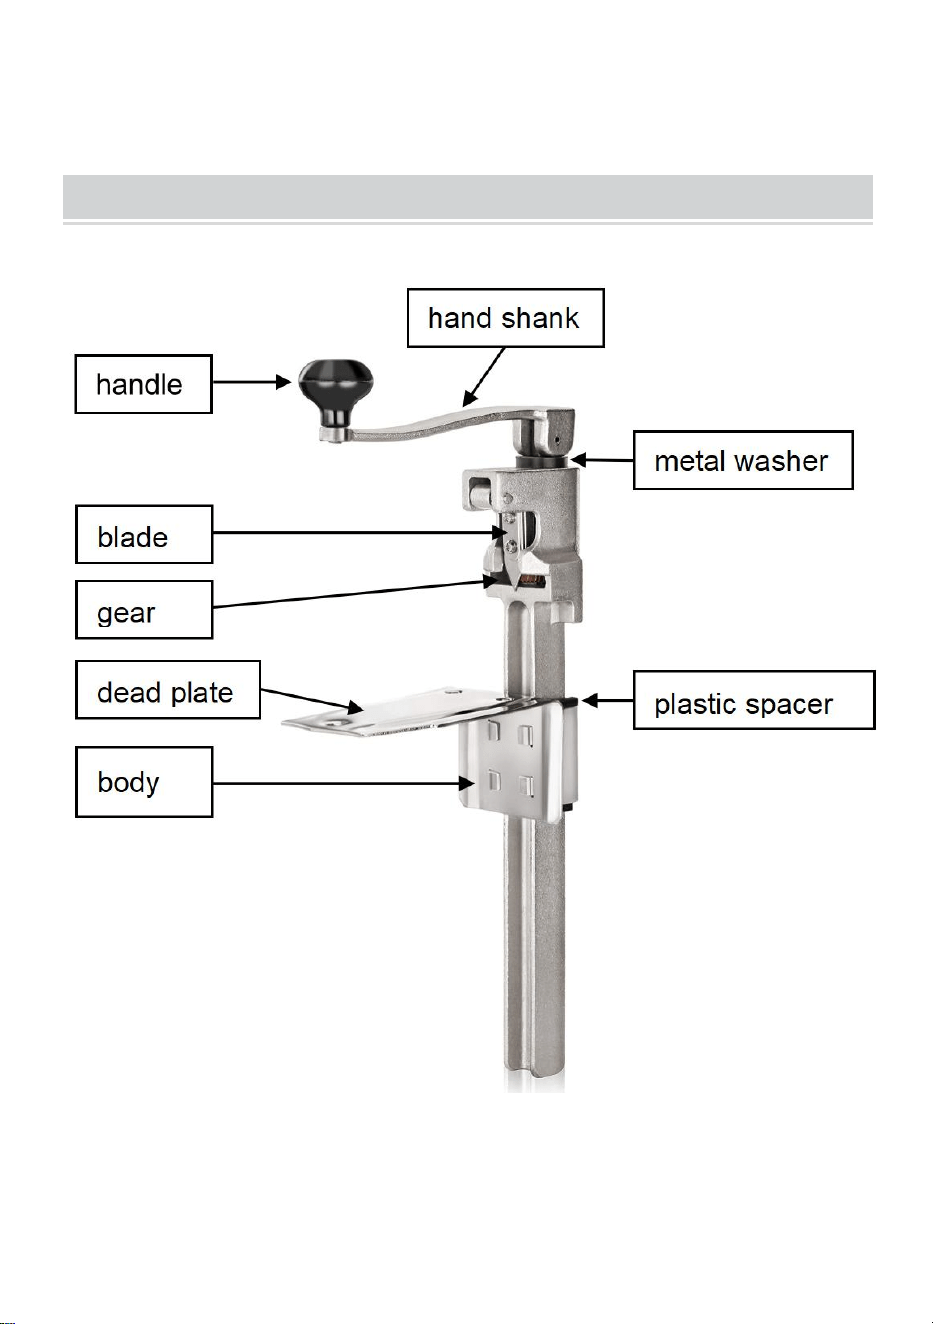
PRODUCT DESCRIPTION
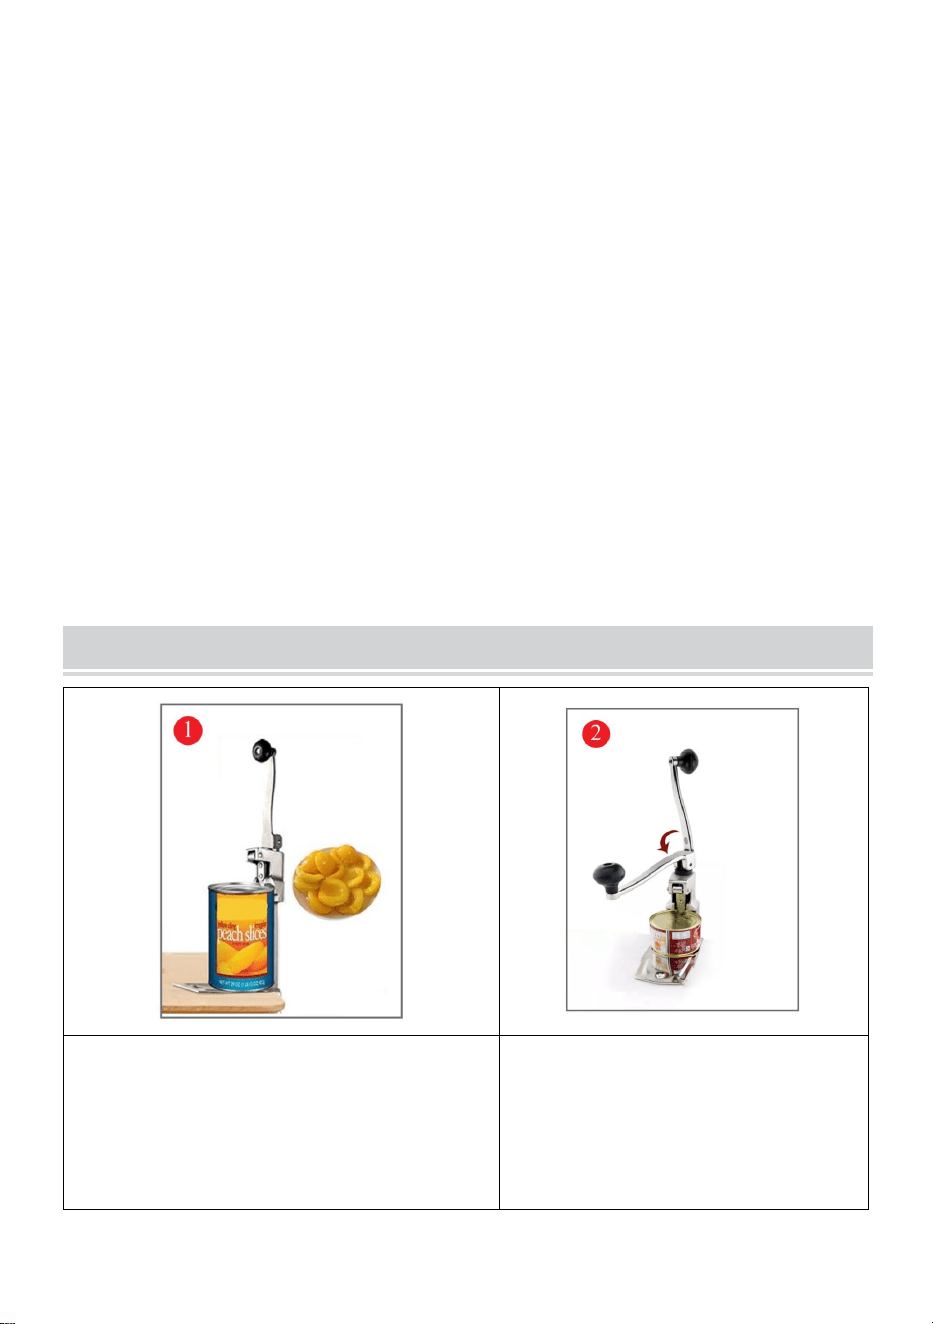
It is used for opening all kinds of iron cans,convenient to operate.It’s an
ideal utensil for hotels and restaurants.
1.After using it,Lay it aside with the handle to horizontal position,so as to
loosen the spring,lengthen the service life of it.
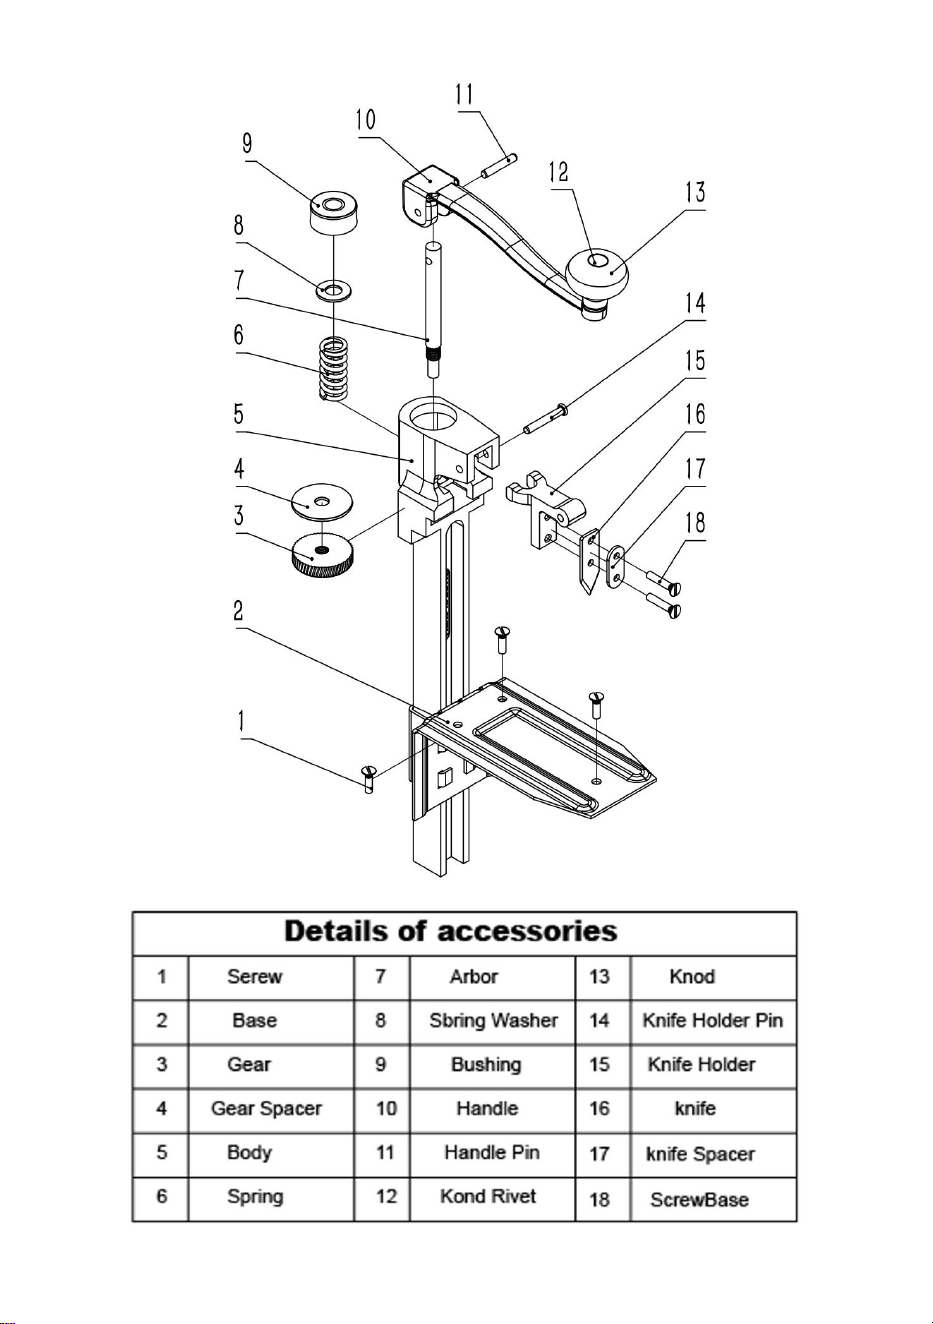
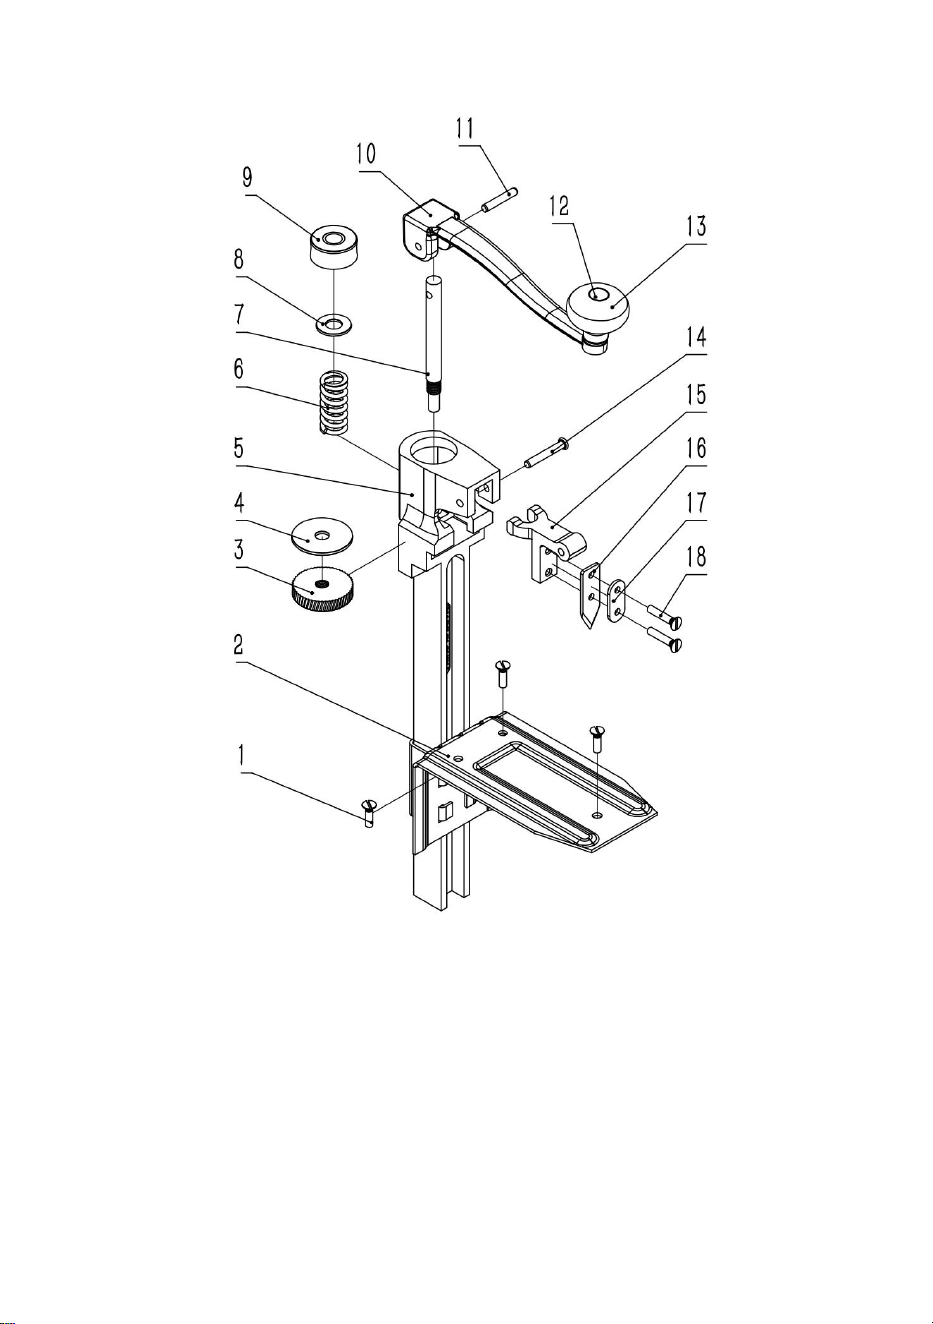
2.Often used,knife and gear may be worn for customer’s convenience,we
prepared completed set of parts,please order according to your need.
SPECIFICATION PARAMETERS
Model
Applicable height
Can opening size
MM-ZG01-47
≤300mm(11 inch)
Can open all diameter cans up to
300mm in height.
MM-ZT01-47
MM-BXG-30
MM-ZG02-59
≤400mm
(
15.7 inch
)
Can open all diameter cans up to
300mm in height.
MM-BXG-40
Blade material:SUS420(Food grade, surface hardened.)
NOTE: Open the can clockwise, do not turn the handle counterclockwise
when opening the can, otherwise it will affect the opening effect.
- 3 -
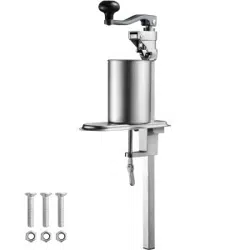
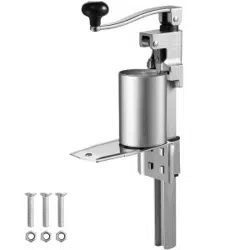
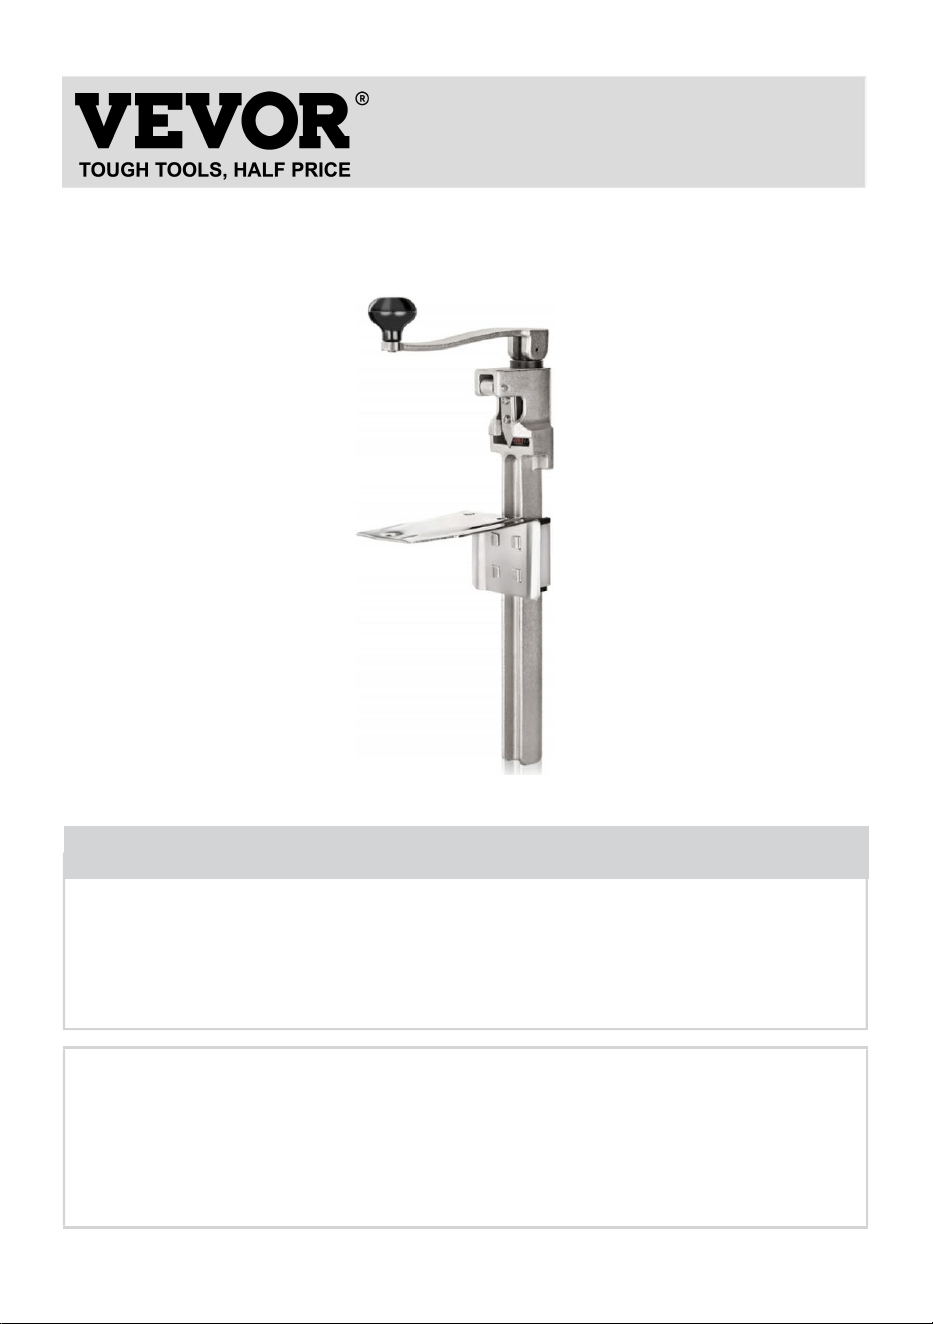
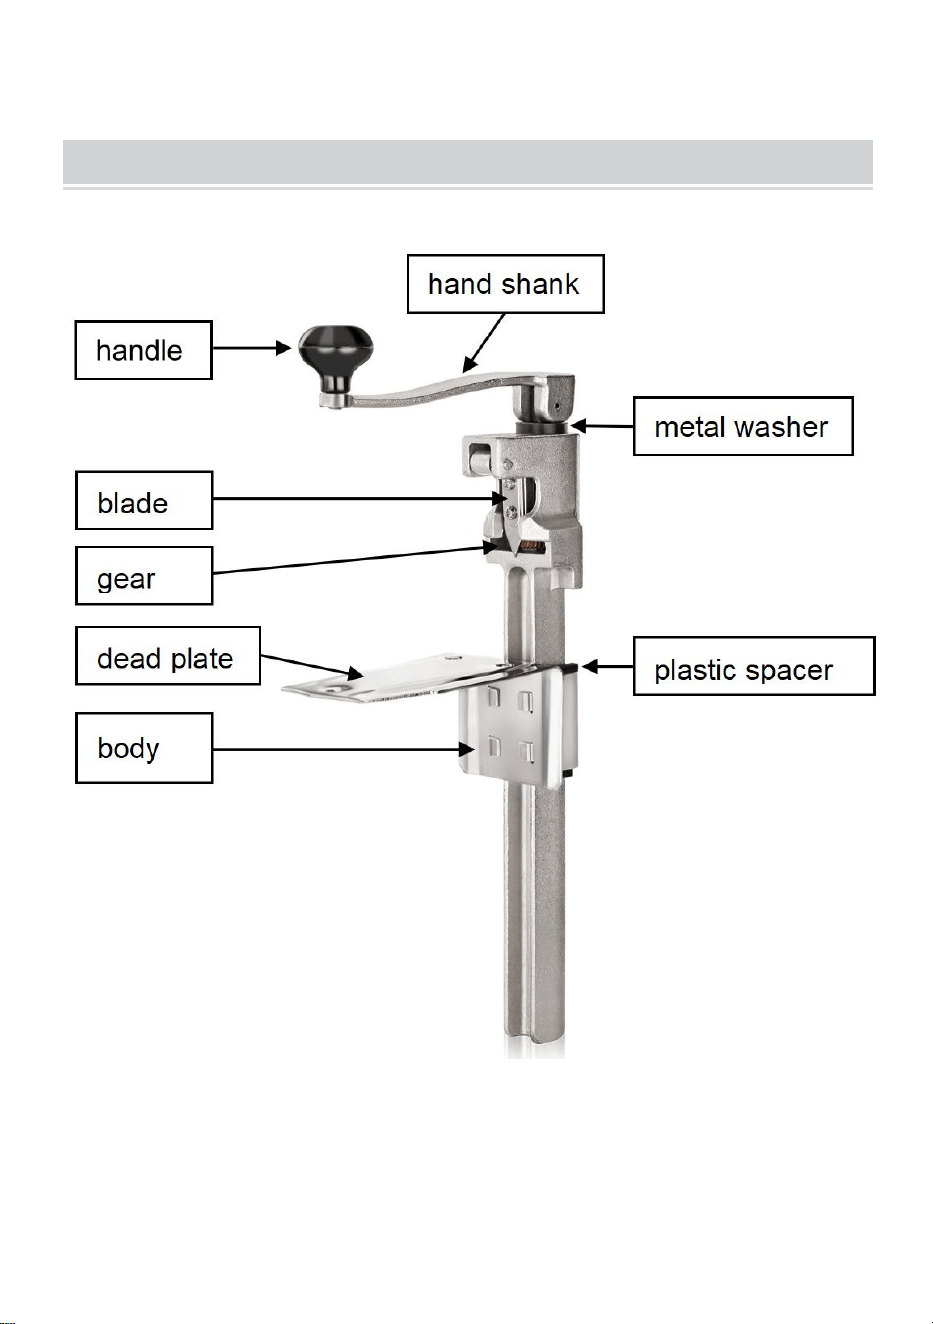
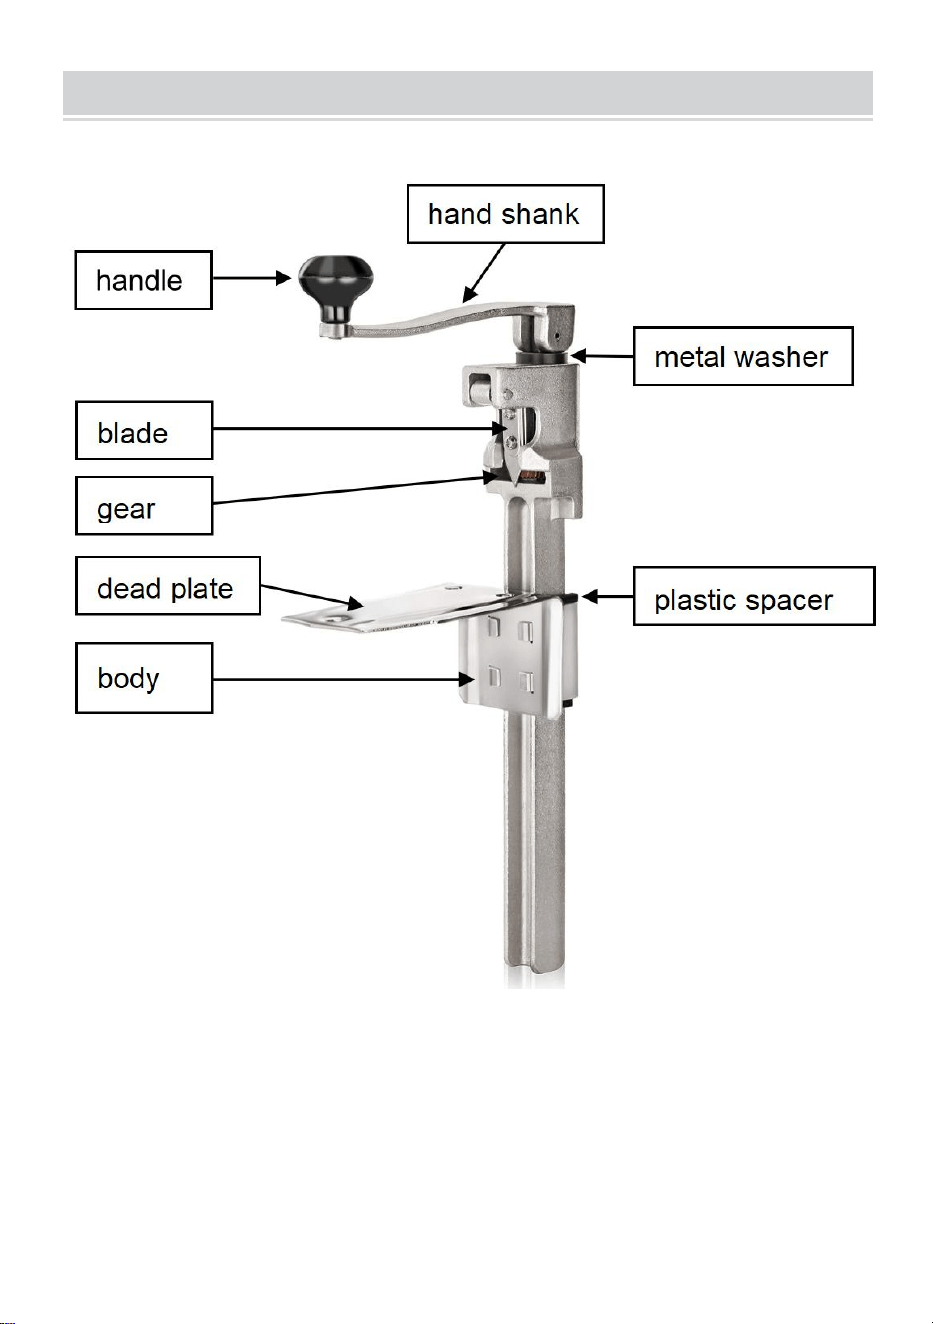
PRODUCT DIAGRAM
✱The picture is for reference only, please refer to the actual object.
- 4 -

- 5 -
KINDLY REMINDER
NOTE:
1.The opening should be near the edge of the jar. Due to the high hardness
of the blade, the position of the opening should not be too far away from
the gear to avoid damaging the blade due to excessive lateral force when
rotating the rocker arm.
2.After use, place the handles together in a horizontal position. Loosen the
spring to extend its service life.
3.Blades and gears are consumables, please check and replace them in
time.
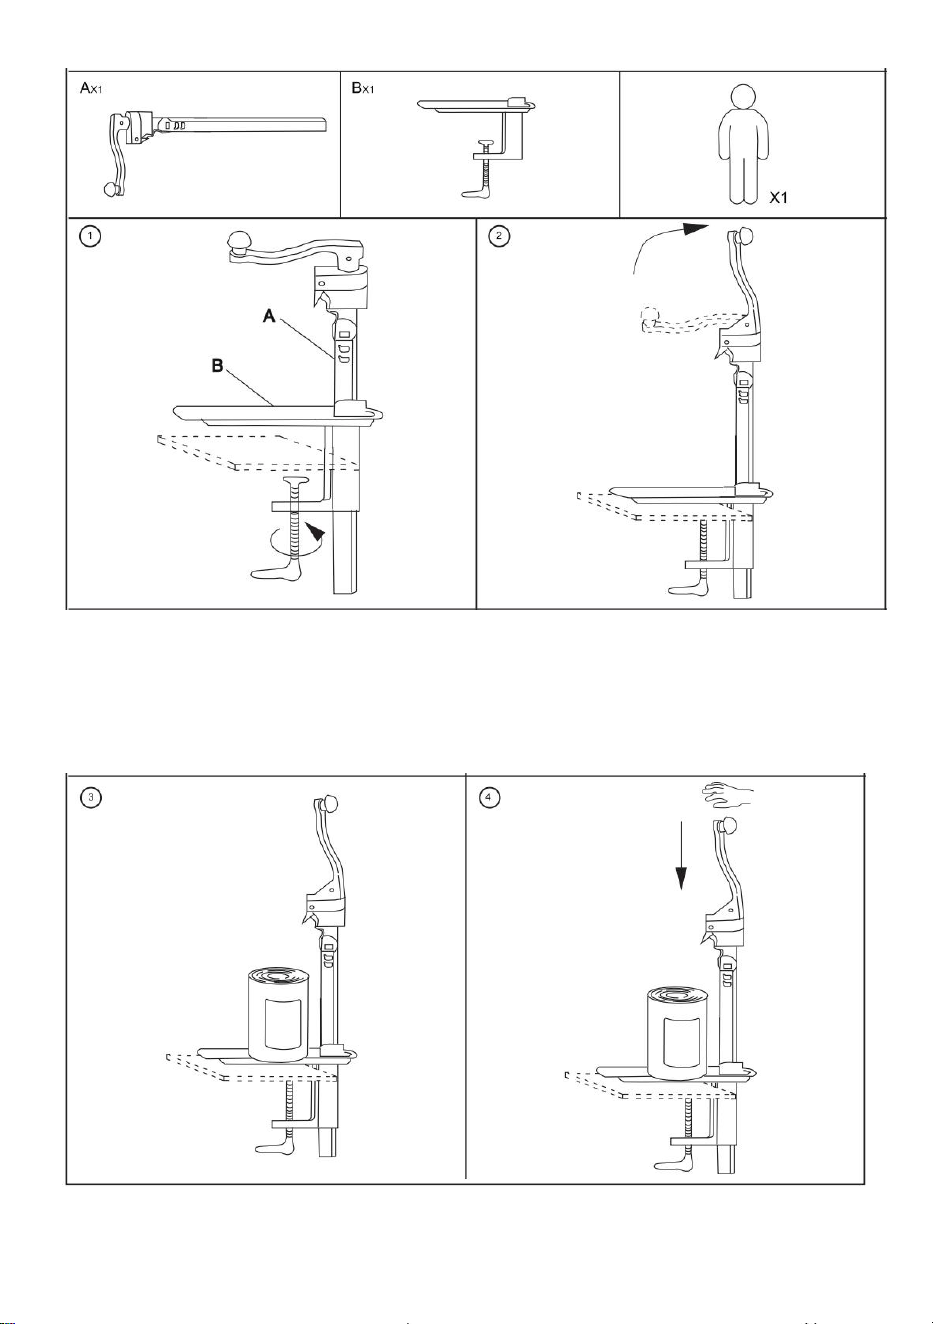
USAGE METHOD
1.When using the can opener for the first time, attach the base to a table or
bench with the base screws and place the can on a metal base. The
handle is in an illuminated position.
2.You will find a slot between the knife and the body. Place the fuselage
into the square hole in the base and properly Pierce the top of the can with
the knife.
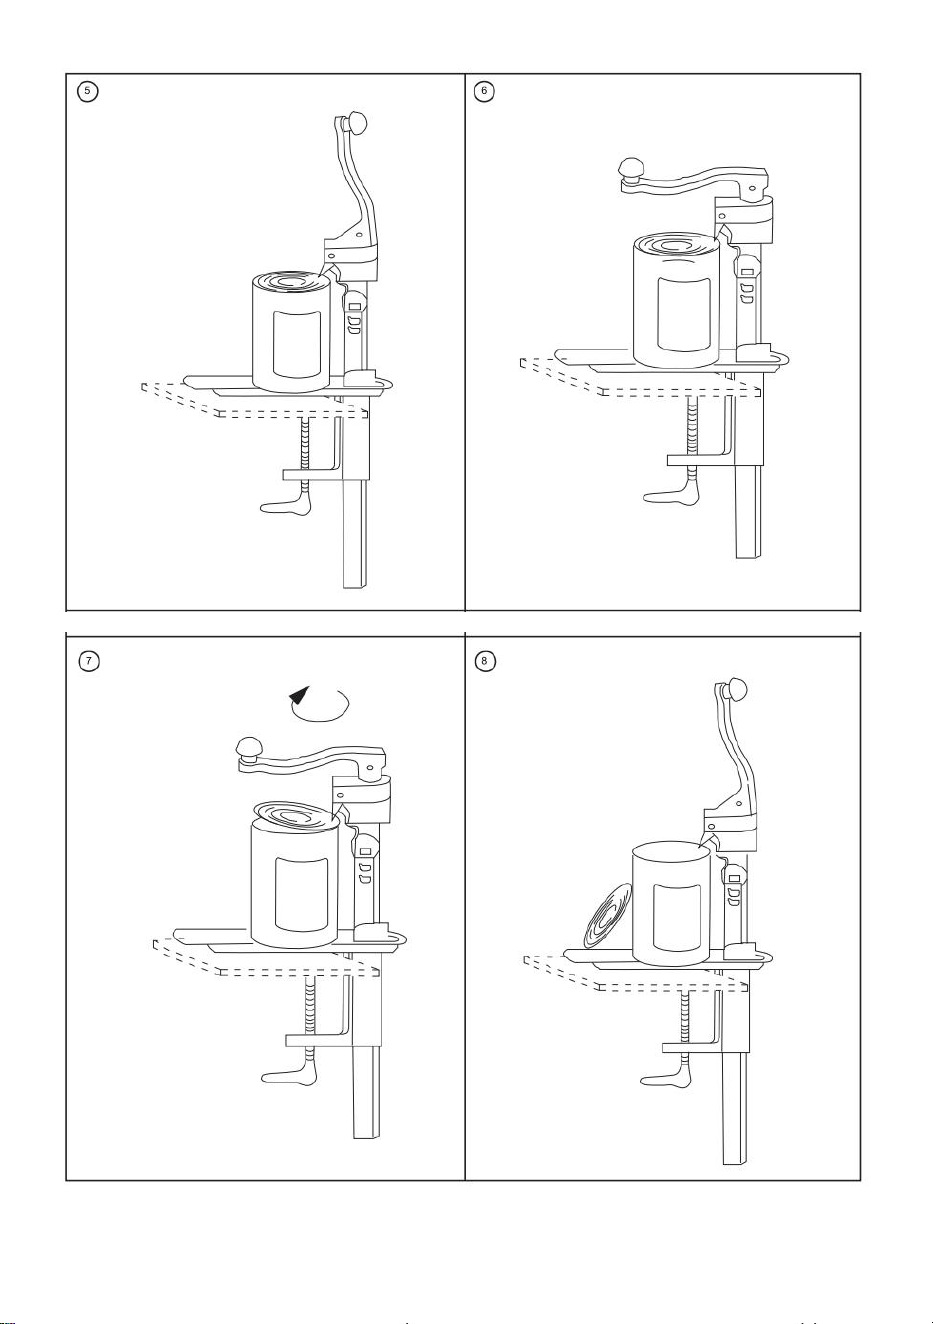
3.Bring the handle to the horizontal position and turn the handle to the right.
Can automatically turn until the top of the can rises to cut smoothly, lifting it
out to prevent falling into the can.
4.Lift handle to upright position. Lift the handle and rod and remove the
open can.
Change the blade:
Blade replacement is relatively simple, directly unscrew two screws, you
can complete the blade replacement.
Change the gear:
1.To replace the gear, you need to turn the handle counterclockwise when
the gear does not rotate (you can choose the appropriate tool to stick), and
remove the parts when the handle rotates.
2.When installing the gear, assemble the washers and other accessories in
- 6 -
the original sequence, press down the handle (press the internal spring)
and turn the handle clockwise to install the gear and other accessories.
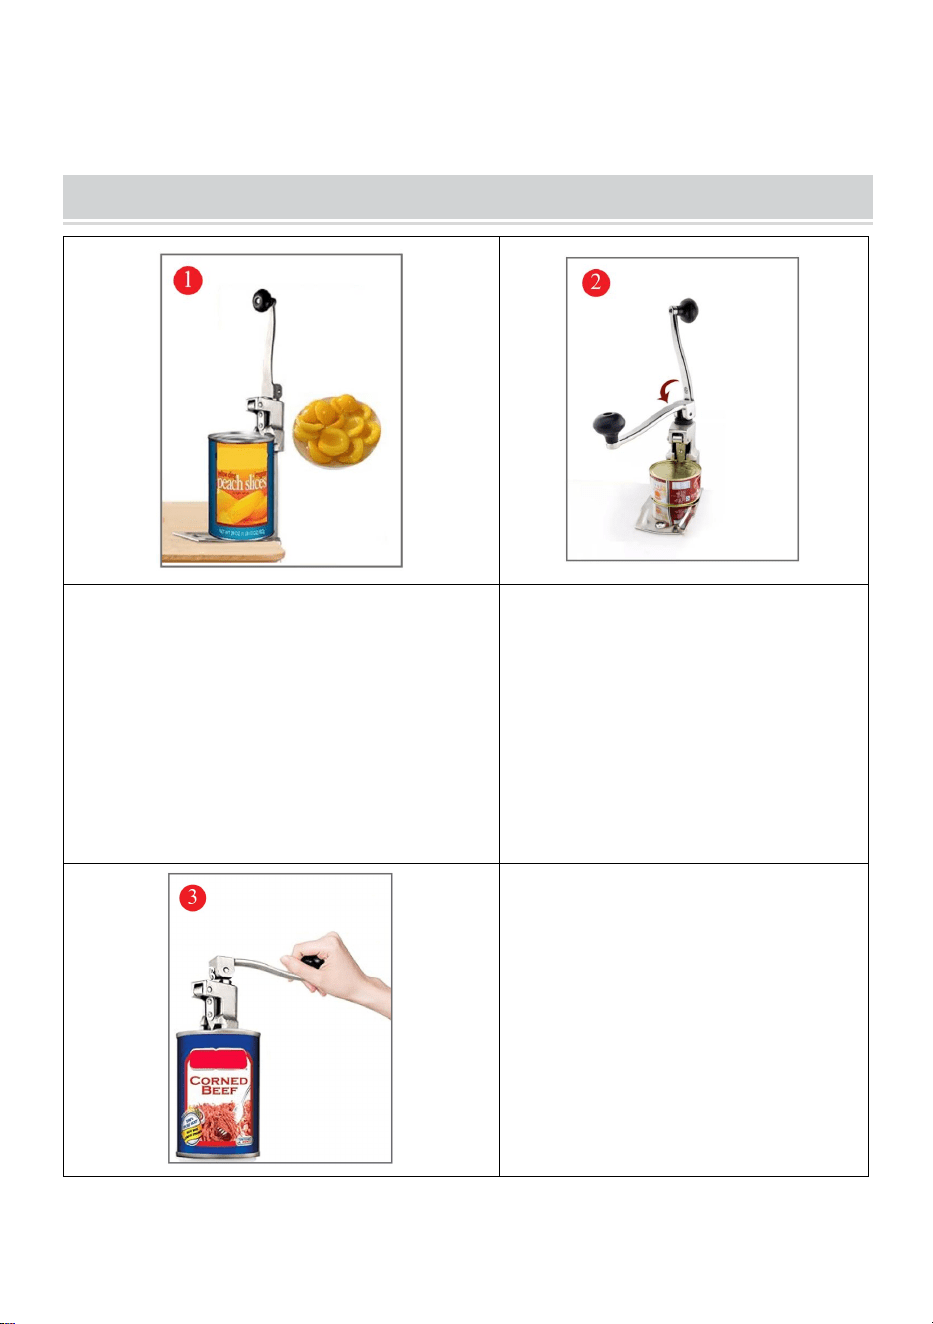
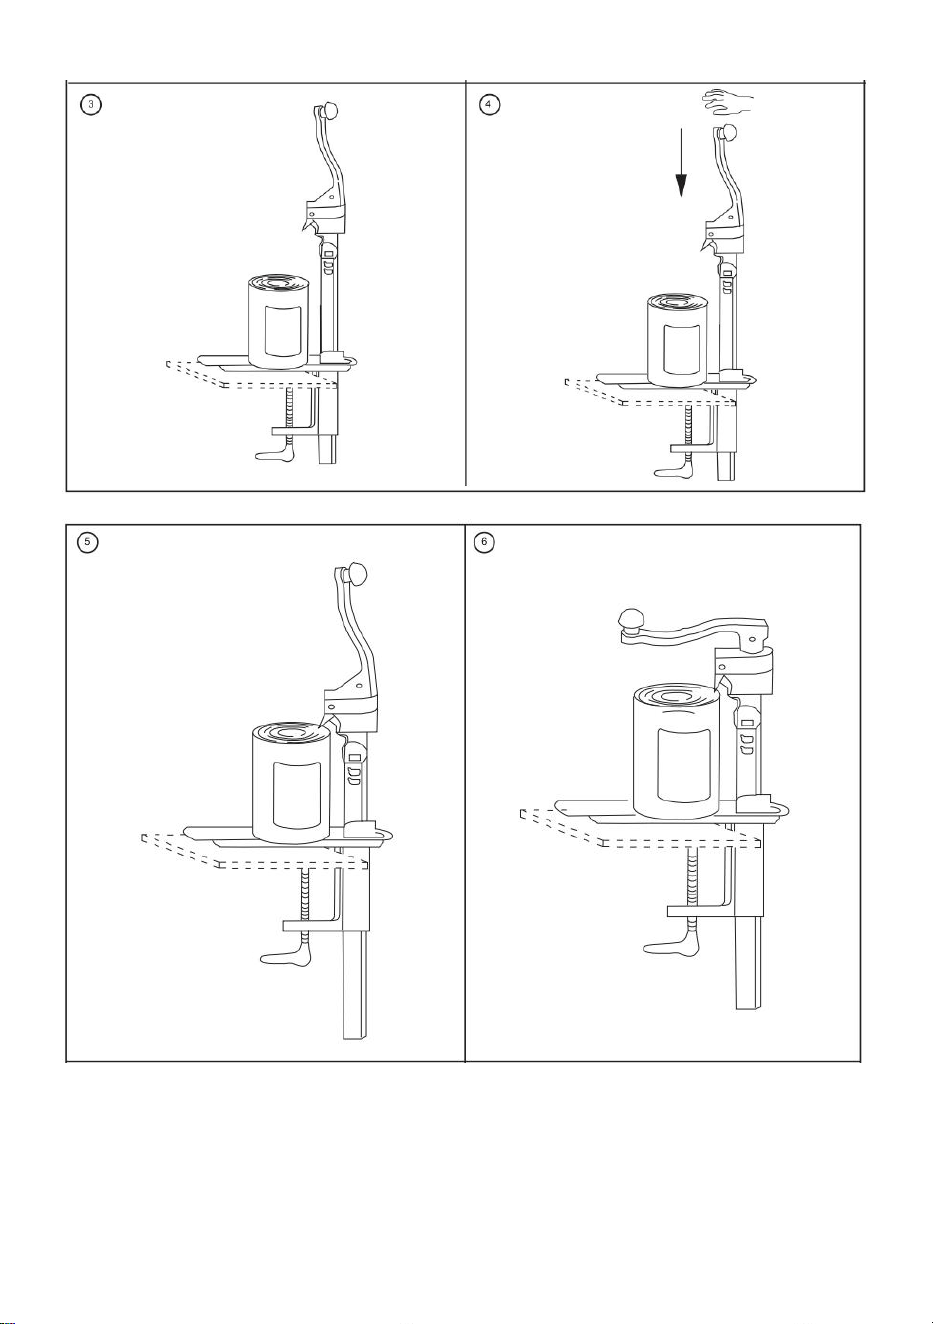
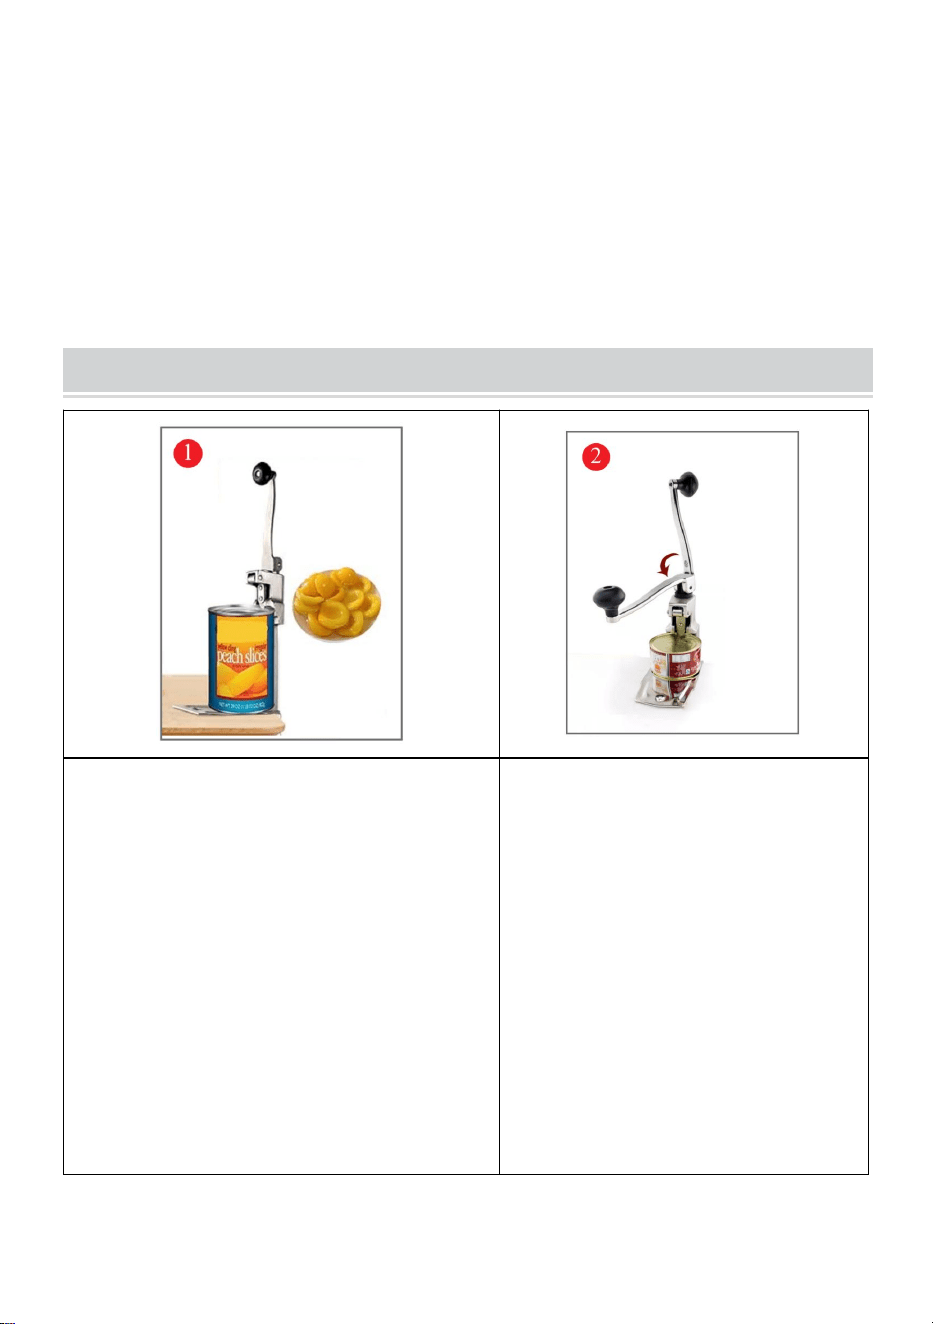
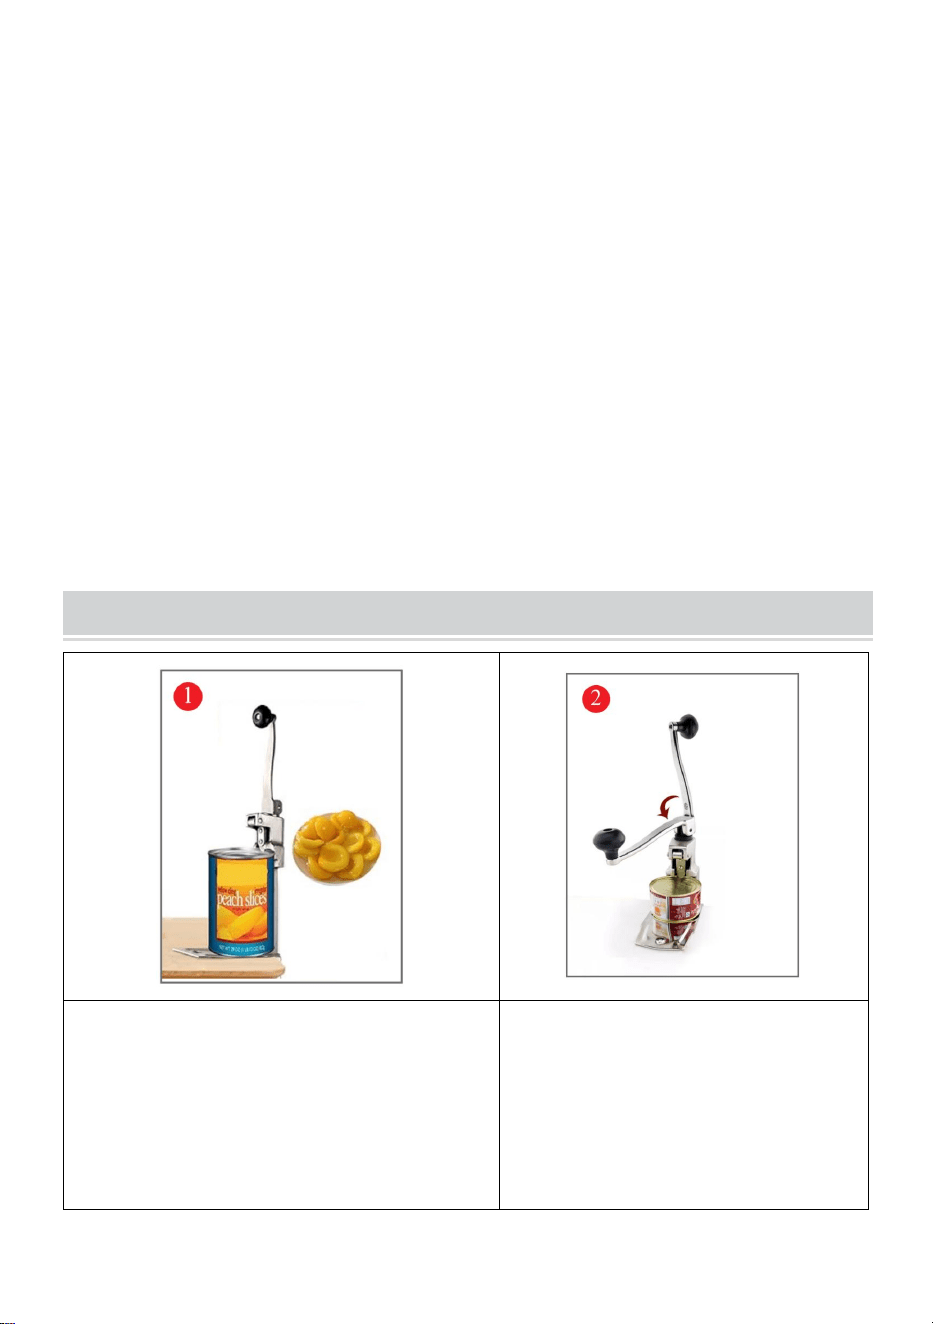
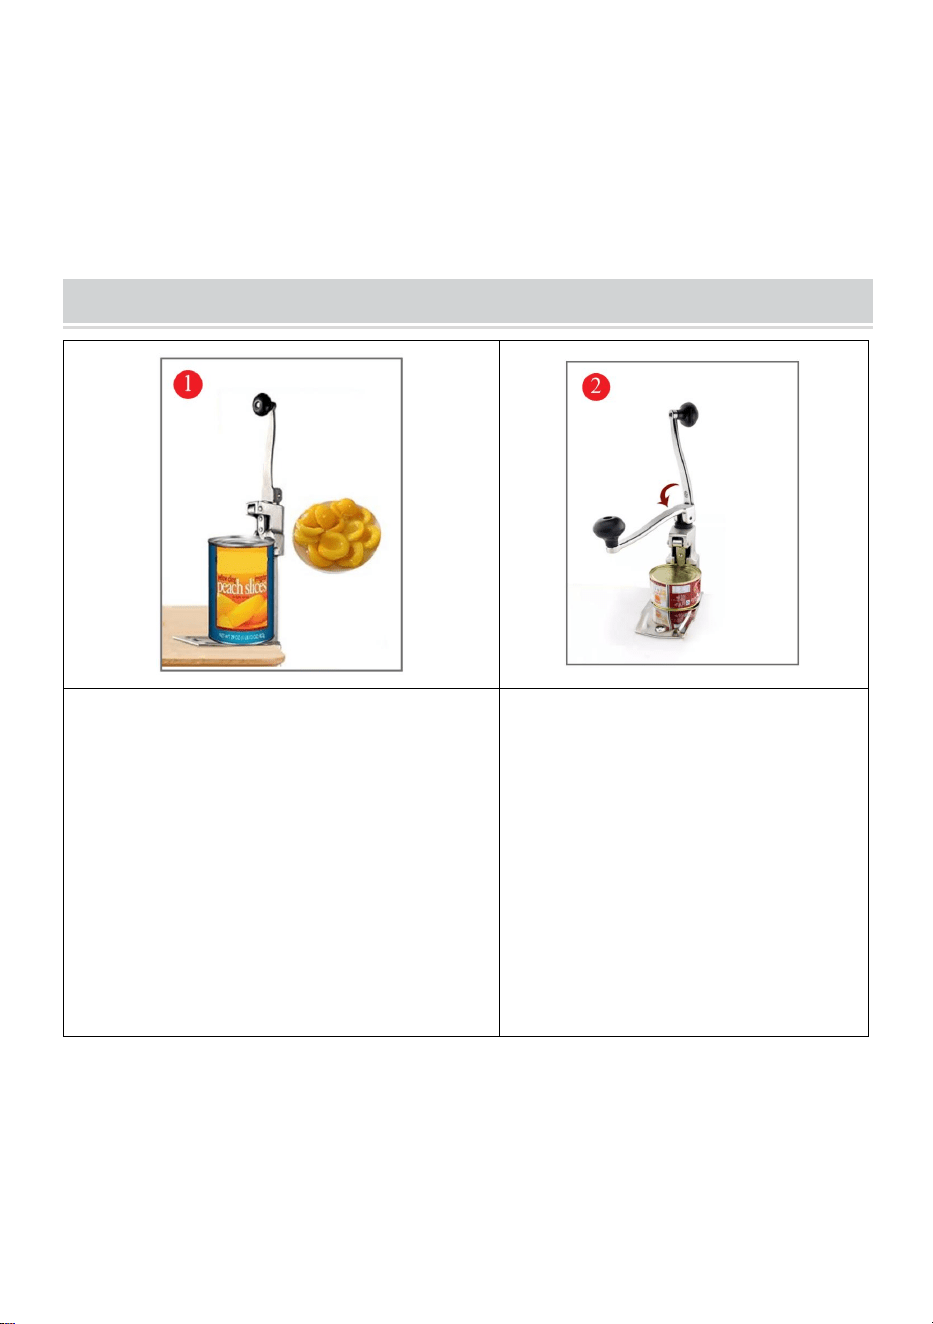
DIRECTIONS FOR USING
When using the Can Opener at first
time,fix the base on the table or bench
with base screw,then put can on metal
base. With handle in upright position,
you’ll find a slot between the knife and
the body,put the body down to the
square hole of the base,rightly making
the knife puncture the top of can.
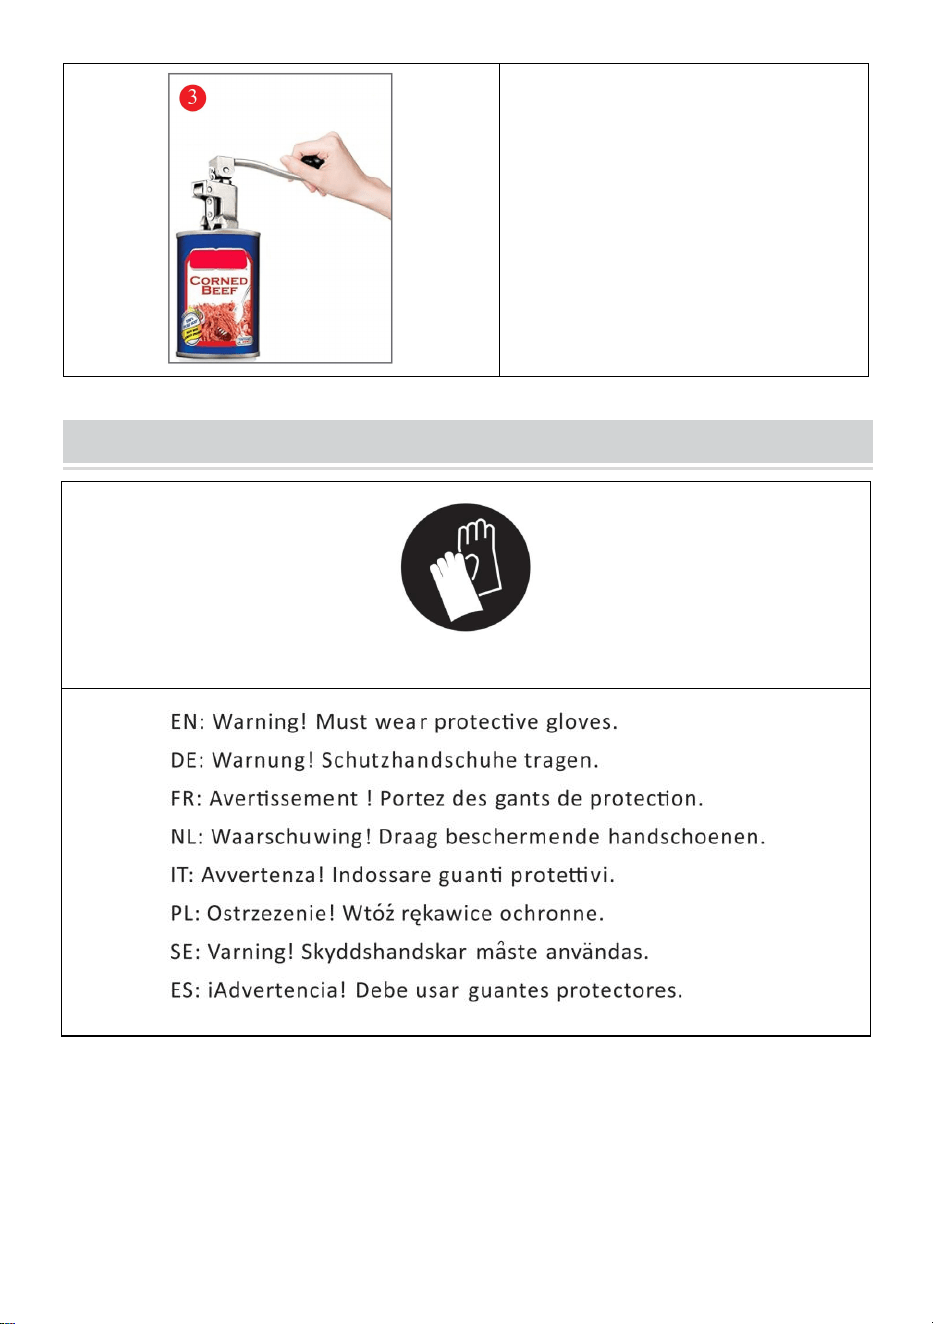
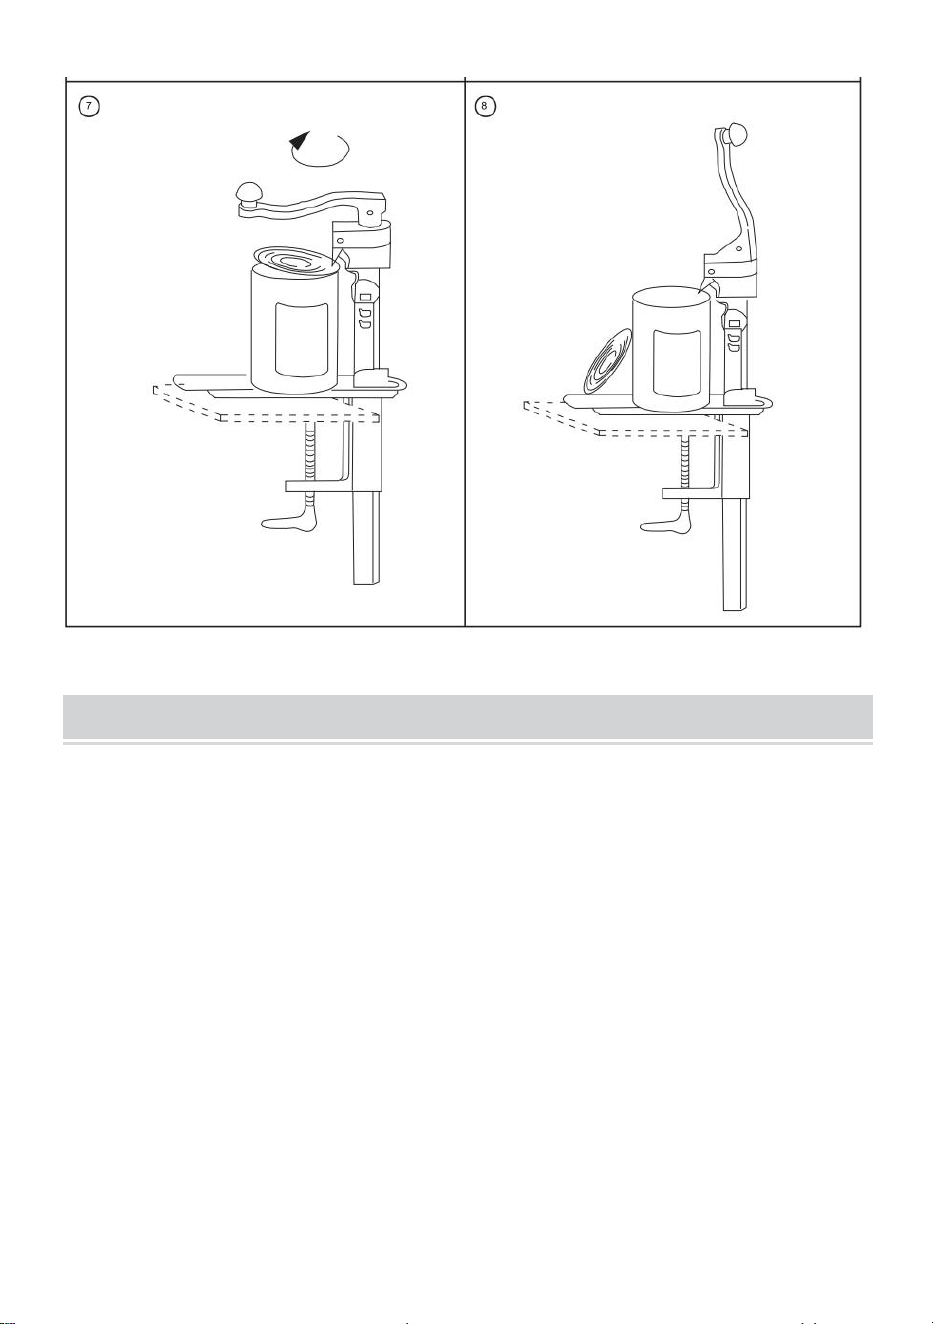
Bring handle to horizontal
position and rum handle to
right.Can antomatically turns
around until top of can is
smoothly cut out.As top of can
raises,Lift it out to prevent
falling into the cans contents.
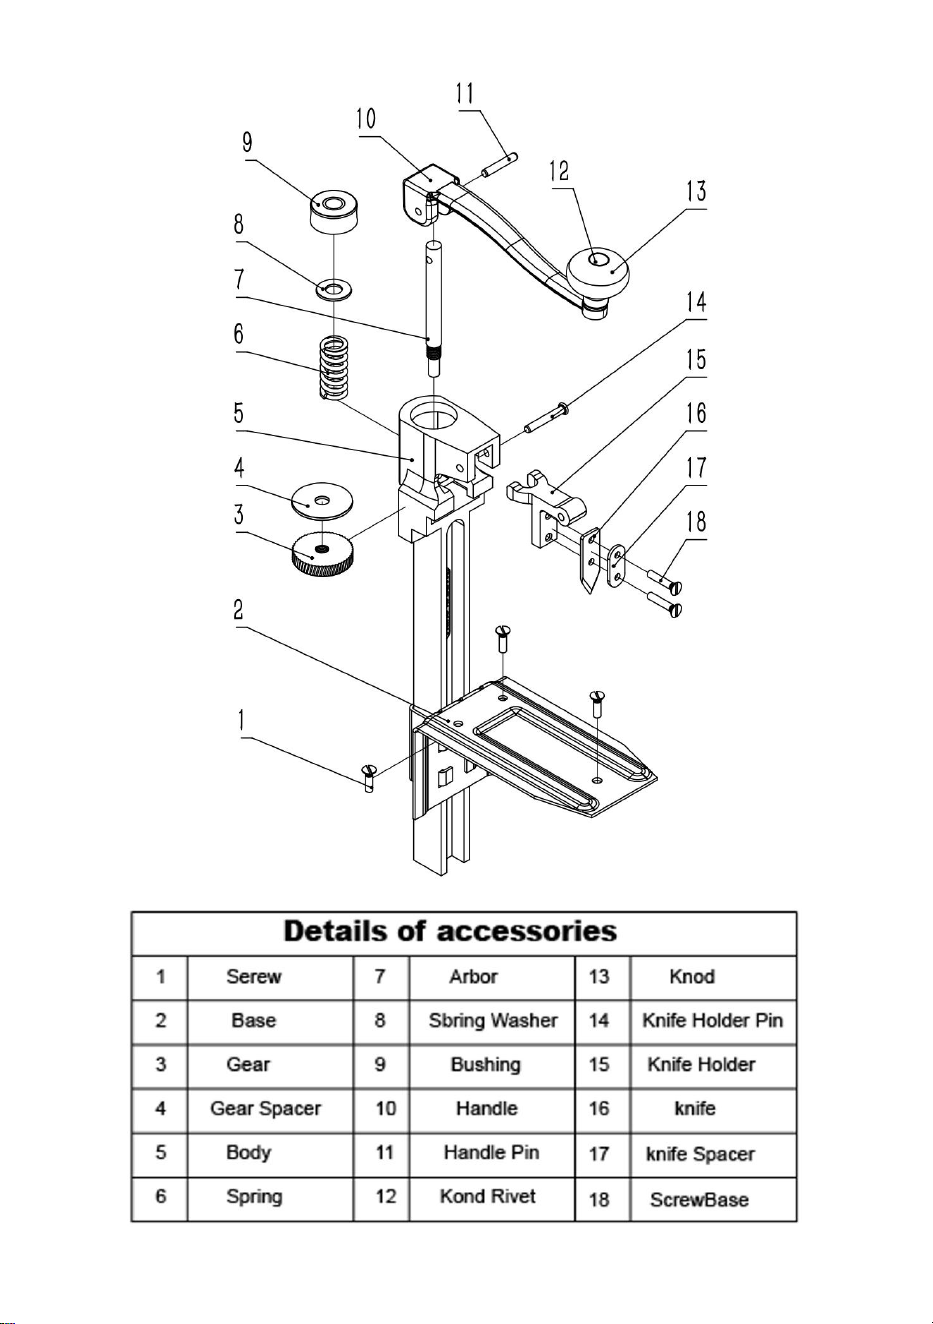
Lift handle to upright
position.Lift up handle and bar
and rimove opened can.

- 7 -
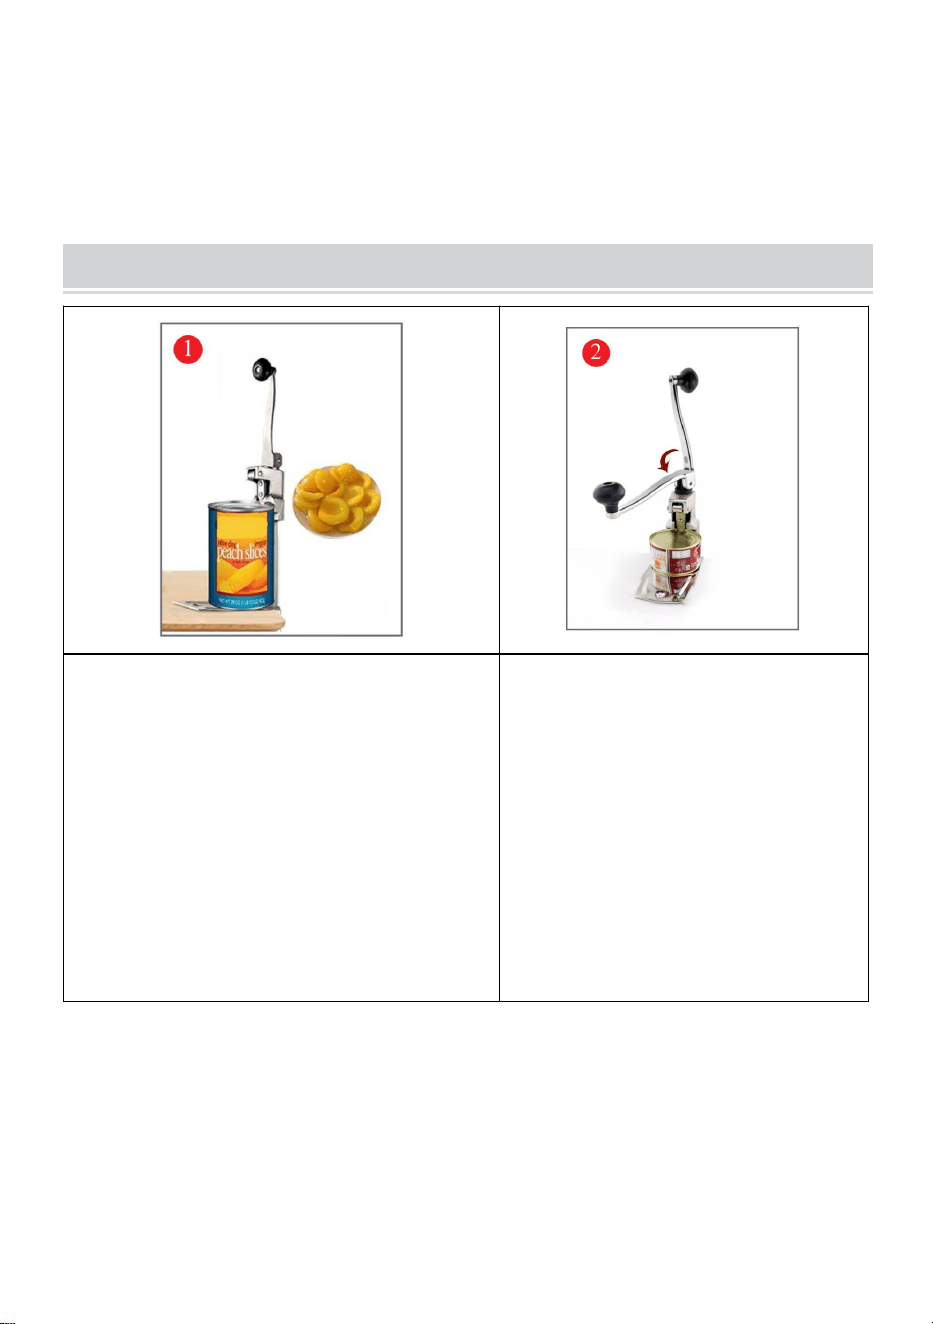
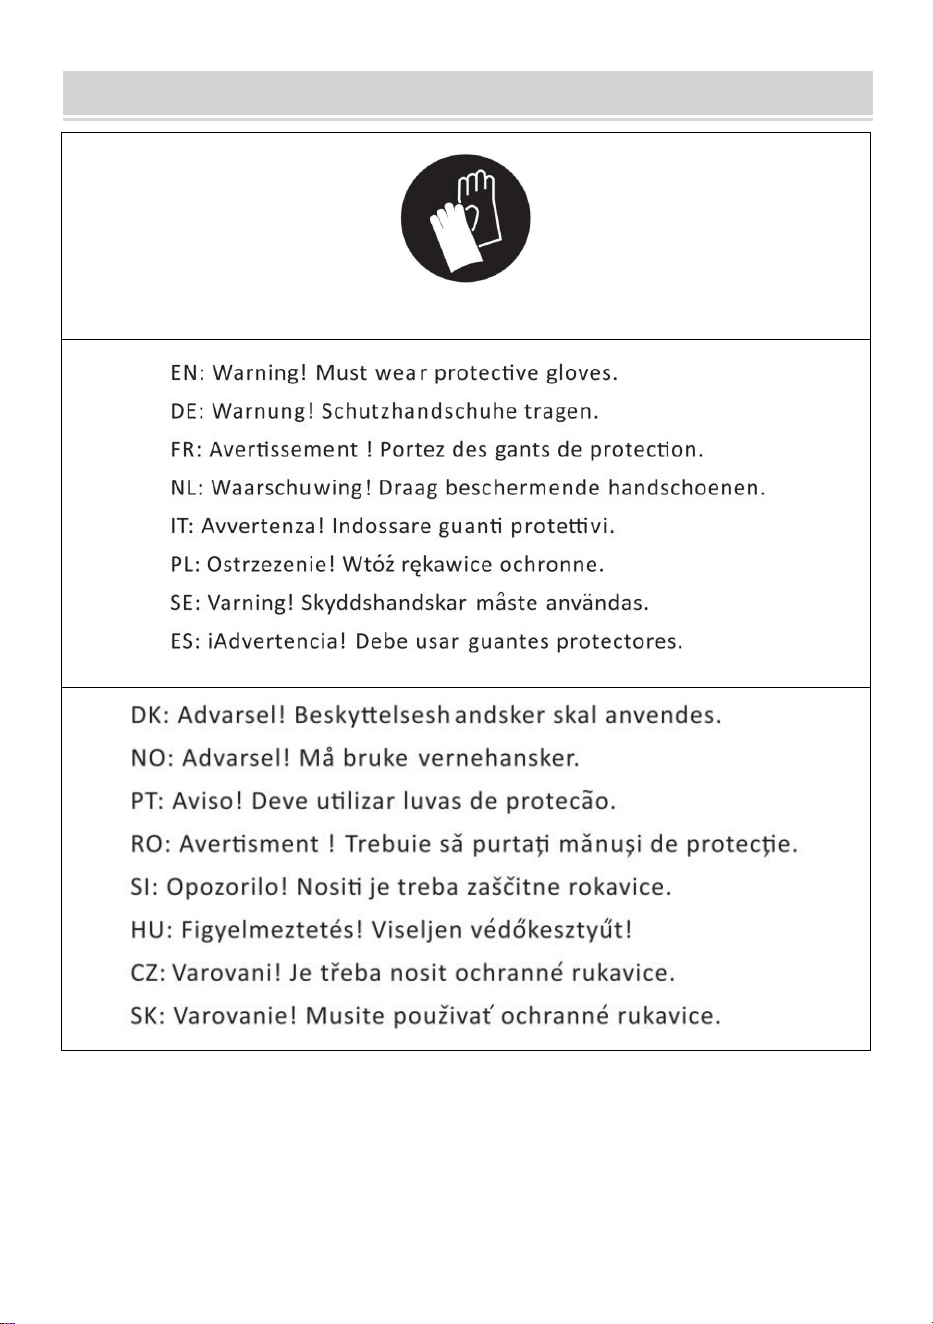
MATTERS NEED ATTENTION
WEAR PROTECTIVE GLOVES

- 8 -

- 9 -

- 10 -
CLEANING AND MAINTENANCE
Can openers must be cleaned daily or after each extended use.
Regular maintenance helps prevent unwanted residue buildup and
the growth of harmful bacteria.
1.Use a stainless steel cleaning brush to remove all food and open can
residue from gears, gear cavities and blades and food and can residue
from blades.
2.Clean the blades, gears, and any splash areas on the can opener with
warm water. Do not allow parts to soak.
3.Dry the cutter, gear, and can opener thoroughly with a dry cloth or towel.
Address: Baoshanqu Shuangchenglu 803long 11hao 1602A-1609shi
Shanghai
EC REP: SHUNSHUN GmbH. Römeräcker 9 Z2021,76351
Linkenheim-Hochstetten, Germany
UK REP:Pooledas Group Ltd. Unit 5 Albert Edward House, The Pavilions
Preston, United Kingdom
Imported to AUS: SIHAO PTY LTD. 1 ROKEVA STREETEASTWOOD
NSW 2122 Australia
Imported to USA: Sanven Technology Ltd. Suite 250, 9166 Anaheim
Place, Rancho Cucamonga, CA 91730
Made In China


- 2 -
Technique Assistance et certificat de garantie électronique
www.vevor.com/support
OUVRE-BOÎTE PROFESSIONNEL
INSTRUCTIONS
MODÈLE : MM-ZG01-47/MM-ZT01-47/MM-ZG02-59
MM-BXG-30 / MM-BXG-40
We continue to be committed to provide you tools with competitive price.
"Save Half", "Half Price" or any other similar expressions used by us only represents an
estimate of savings you might benefit from buying certain tools with us compared to the major
top brands and does not necessarily mean to cover all categories of tools offered by us. You
are kindly reminded to verify carefully when you are placing an order with us if you are
actually saving half in comparison with the top major brands.

- 3 -

- 1 -
MODÈLE : MM-ZG01-47/MM-ZT01-47/MM-ZG02-59
MM-BXG-30 / MM-BXG-40
Have product questions? Need technical support? Please feel free to
contact us:
Technical Support and E-Warranty Certificate
www.vevor.com/support
NEED HELP? CONTACT US!
This is the original instruction, please read all manual instructions
carefully before operating. VEVOR reserves a clear interpretation of our
user manual. The appearance of the product shall be subject to the
product you received. Please forgive us that we won't inform you again if
there are any technology or software updates on our product.
COMMERCIAL CAN
OPENER

- 2 -
Avertissement : Pour réduire le risque de blessure, l'utilisateur
doit lire attentivement le manuel d'instructions.
PRODUCT DESCRIPTION
Il est utilisé pour ouvrir toutes sortes de boîtes de fer, pratique à utiliser.
C'est un ustensile idéal pour les hôtels et les restaurants .
1. Après l'avoir utilisé, posez-le de côté avec la poignée en position
horizontale, de manière à desserrer le ressort et à prolonger sa durée de
vie.
2. Souvent utilisés, le couteau et l'équipement peuvent être portés pour la
commodité du client, nous avons préparé un ensemble complet de pièces,
veuillez commander en fonction de vos besoins.
SPECIFICATION PARAMETERS
Modèle
Une hauteur
applicable
Taille d'ouverture de la boîte
MM-ZG01-47
≤300 mm (11
pouces )
Peut ouvrir des canettes de tous
diamètres jusqu'à 300 mm de
hauteur.
MM-ZT01-47
MM-BXG-30
MM-ZG02-59
≤ 4 00mm
(1 5,7 pouces )
Peut ouvrir des canettes de tous
diamètres jusqu'à 300 mm de
hauteur.
MM-BXG-40
Matériau de charge B : SUS420 (qualité alimentaire, surface durcie.)
REMARQUE : ouvrez la boîte dans le sens des aiguilles d'une montre, ne
tournez pas la poignée dans le sens inverse des aiguilles d'une montre
lors de l'ouverture de la boîte, sinon cela affectera l'effet d'ouverture.

- 3 -
PRODUCT DIAGRAM
✱L'image est à titre de référence uniquement, veuillez vous référer à
- 4 -
l'objet réel.

- 5 -
KINDLY REMINDER
NOTE:
1. L'ouverture doit être proche du bord du pot. En raison de la dureté
élevée de la lame, la position de l'ouverture ne doit pas être trop éloignée
de l'engrenage pour éviter d'endommager la lame en raison d'une force
latérale excessive lors de la rotation du culbuteur.
2. Après utilisation, placez les poignées ensemble en position horizontale.
Desserrez le ressort pour prolonger sa durée de vie.
3. Les lames et les engrenages sont des consommables, veuillez les
vérifier et les remplacer à temps.
USAGE METHOD
1. Lorsque vous utilisez l'ouvre-boîte pour la première fois, fixez la base à
une table ou un banc avec les vis de base et placez la canette sur une
base métallique. La poignée est en position éclairée .
2. Vous trouverez une fente entre le couteau et le corps. Placez le fuselage
dans le trou carré de la base et percez correctement le haut de la boîte
avec le couteau.
3. Amenez la poignée en position horizontale et tournez-la vers la droite.
Peut tourner automatiquement jusqu'à ce que le haut de la boîte se lève
pour couper en douceur, en le soulevant pour éviter de tomber dans la
- 6 -
boîte.
4. Soulevez la poignée en position verticale. Soulevez la poignée et la tige
et retirez la boîte ouverte.
Changer la lame :
Le remplacement de la lame est relativement simple, dévissez directement
deux vis, vous pouvez terminer le remplacement de la lame.
Changer de vitesse :
1. Pour remplacer l'engrenage, vous devez tourner la poignée dans le sens
inverse des aiguilles d'une montre lorsque l'engrenage ne tourne pas (vous
pouvez choisir l'outil approprié à coller) et retirer les pièces lorsque la
poignée tourne.
2. Lors de l'installation de l'engrenage, assemblez les rondelles et autres
accessoires dans l'ordre d'origine, appuyez sur la poignée (appuyez sur le
ressort interne) et tournez la poignée dans le sens des aiguilles d'une
montre pour installer l'engrenage et les autres accessoires.
DIRECTIONS FOR USING
Lorsque vous utilisez l'ouvre-boîte
pour la première fois, fixez la base sur
la table ou le banc avec une vis de
base, puis placez la boîte sur une
base métallique. Avec la poignée en
Amenez la poignée en position
horizontale et tournez la
poignée vers la droite. La boîte
se retourne automatiquement
jusqu'à ce que le haut de la
- 7 -
position verticale, vous trouverez une
fente entre le couteau et le corps,
posez le corps jusqu'au trou carré de
la base, en faisant à juste titre percer
le dessus de la boîte par le couteau.
boîte soit découpé en douceur .
Lorsque le dessus de la boîte
se soulève, soulevez-le pour
éviter de tomber dans le
contenu de la boîte.
Soulevez la poignée en position
verticale. Soulevez la poignée
et la barre et retirez la boîte
ouverte.
MATTERS NEED ATTENTION
PORTER DES PROTECTEURS GANTS

- 8 -
- 9 -

- 10 -
CLEANING AND MAINTENANCE
Les ouvre-boîtes doivent être nettoyés quotidiennement ou après
chaque utilisation prolongée.
Un entretien régulier aide à prévenir l'accumulation de résidus
indésirables et la croissance de bactéries nocives .
1. Utilisez une brosse de nettoyage en acier inoxydable pour éliminer tous
les résidus de nourriture et de boîtes ouvertes provenant des engrenages,
des cavités d'engrenages et des lames, ainsi que les résidus de nourriture
et de boîtes de conserve des lames.
2. Nettoyez les lames, les engrenages et toutes les zones d'éclaboussures
de l'ouvre-boîte avec de l'eau tiède. Ne laissez pas les pièces tremper.
3. Séchez soigneusement le cutter, l'équipement et l'ouvre-boîte avec un
chiffon sec ou une serviette.

- 11 -
Adresse : Baoshanqu Shuangchenglu 803long 11hao 1602A-1609shi
Shanghai
REPRÉSENTANT CE : SHUNSHUN GmbH. Römeräcker 9 Z2021,76351
Linkenheim-Hochstetten, Allemagne
UK REP : Pooledas Group Ltd. Unit 5 Albert Edward House, The
Pavilions Preston, Royaume-Uni
Importé en Australie : SIHAO PTY LTD. 1 ROKEVA STREETASTWOOD
NSW 2122 Australie
Importé aux États-Unis : Sanven Technology Ltd. Suite 250, 9166
Anaheim Place, Rancho Cucamonga, CA 91730
Fabriqué en Chine


- 2 -
Technisch Support- und E-Garantie-Zertifikat www.vevor.com/support
KOMMERZIELLER DOSENÖFFNER
ANWEISUNGEN
MODELL: MM-ZG01-47 / MM-ZT01-47 / MM-ZG02-59
MM-BXG-30 / MM-BXG-40
We continue to be committed to provide you tools with competitive price.
"Save Half", "Half Price" or any other similar expressions used by us only represents an
estimate of savings you might benefit from buying certain tools with us compared to the major
top brands and does not necessarily mean to cover all categories of tools offered by us. You
are kindly reminded to verify carefully when you are placing an order with us if you are
actually saving half in comparison with the top major brands.

- 1 -
MODELL: MM-ZG01-47 / MM-ZT01-47 / MM-ZG02-59
MM-BXG-30 / MM-BXG-40
Have product questions? Need technical support? Please feel free to
contact us:
Technical Support and E-Warranty Certificate
www.vevor.com/support
NEED HELP? CONTACT US!
This is the original instruction, please read all manual instructions
carefully before operating. VEVOR reserves a clear interpretation of our
user manual. The appearance of the product shall be subject to the
product you received. Please forgive us that we won't inform you again if
there are any technology or software updates on our product.
COMMERCIAL CAN
OPENER

- 2 -
Warnung: Um das Verletzungsrisiko zu verringern, muss der
Benutzer die Bedienungsanleitung sorgfältig lesen.
PRODUCT DESCRIPTION
Es wird zum Öffnen aller Arten von Eisendosen verwendet und ist bequem
zu bedienen. Es ist ein ideales Utensil für Hotels und Restaurants .
1. Legen Sie es nach dem Gebrauch mit dem Griff in die horizontale
Position, um die Feder zu lösen und die Lebensdauer zu verlängern.
2. Messer und Ausrüstung werden häufig verwendet und können aus
Bequemlichkeit für den Kunden getragen werden. Wir haben einen
kompletten Teilesatz vorbereitet. Bitte bestellen Sie entsprechend Ihrem
Bedarf.
SPECIFICATION PARAMETERS
Modell
Anwendbare Höhe
Dosenöffnungsgröße
MM-ZG01-47
≤300 mm (11 Zoll )
Kann Dosen mit einem
Durchmesser von bis zu 300 mm
und einer Höhe öffnen.
MM-ZT01-47
MM-BXG-30
MM-ZG02-59
≤ 4 00 mm
(1 5,7 Zoll )
Kann Dosen mit einem
Durchmesser von bis zu 300 mm
und einer Höhe öffnen.
MM-BXG-40
Klingenmaterial : SUS420 (Lebensmittelqualität, oberflächengehärtet).
HINWEIS: Öffnen Sie die Dose im Uhrzeigersinn. Drehen Sie den Griff
beim Öffnen der Dose nicht gegen den Uhrzeigersinn, da dies sonst den
Öffnungseffekt beeinträchtigt.
- 3 -
PRODUCT DIAGRAM
✱Das Bild dient nur als Referenz, bitte beziehen Sie sich auf das
tatsächliche Objekt.

- 4 -

- 5 -
KINDLY REMINDER
NOTIZ:
1. Die Öffnung sollte sich in der Nähe des Randes des Glases befinden.
Aufgrund der hohen Härte des Messers sollte die Position der Öffnung
nicht zu weit vom Getriebe entfernt sein, um eine Beschädigung des
Messers durch zu hohe Seitenkräfte beim Drehen des Kipphebels zu
vermeiden.
2. Nach dem Gebrauch die Griffe zusammen in eine horizontale Position
bringen. Lösen Sie die Feder, um ihre Lebensdauer zu verlängern.
3. Klingen und Zahnräder sind Verbrauchsmaterialien. Bitte überprüfen
und ersetzen Sie sie rechtzeitig.
USAGE METHOD
1. Wenn Sie den Dosenöffner zum ersten Mal verwenden, befestigen Sie
den Sockel mit den Sockelschrauben an einem Tisch oder einer Bank und
stellen Sie die Dose auf einen Metallsockel. Der Griff befindet sich in einer
beleuchteten Position .
2. Zwischen Messer und Körper befindet sich ein Schlitz. Setzen Sie den
Rumpf in das quadratische Loch im Boden ein und durchstechen Sie die
Oberseite der Dose ordnungsgemäß mit dem Messer.
3. Bringen Sie den Griff in die horizontale Position und drehen Sie den Griff
nach rechts. Kann sich automatisch drehen, bis sich die Oberseite der
Dose anhebt, um sie glatt zu schneiden, und sie herausheben, um zu
verhindern, dass sie in die Dose fällt.
4. Heben Sie den Griff in die aufrechte Position. Heben Sie den Griff und
die Stange an und entnehmen Sie die geöffnete Dose.
Wechseln Sie die Klinge :
Der Klingenaustausch ist relativ einfach. Lösen Sie direkt zwei Schrauben,
um den Klingenaustausch abzuschließen.
Den Gang wechseln :
1. Um das Zahnrad auszutauschen, müssen Sie den Griff gegen den
- 6 -
Uhrzeigersinn drehen, wenn sich das Zahnrad nicht dreht (Sie können das
entsprechende Werkzeug zum Aufkleben auswählen) und die Teile
entfernen, wenn sich der Griff dreht.
2. Montieren Sie beim Einbau des Getriebes die Unterlegscheiben und
anderes Zubehör in der ursprünglichen Reihenfolge, drücken Sie den Griff
nach unten (drücken Sie die innere Feder) und drehen Sie den Griff im
Uhrzeigersinn, um das Getriebe und anderes Zubehör zu installieren.
DIRECTIONS FOR USING
Wenn Sie den Dosenöffner zum
ersten Mal verwenden, befestigen Sie
die Basis mit der Basisschraube auf
dem Tisch oder der Bank und stellen
Sie die Dose dann auf die Metallbasis.
Wenn sich der Griff in aufrechter
Position befindet, finden Sie einen
Schlitz zwischen dem Messer und
dem Körper. Setzen Sie den Körper in
das quadratische Loch der Basis ein,
sodass das Messer richtig in die
Oberseite der Dose eindringt.
Bringen Sie den Griff in die
horizontale Position und drehen
Sie den Griff nach rechts. Die
Dose dreht sich automatisch
um, bis die Oberseite der Dose
glatt ausgeschnitten ist . Wenn
sich der Deckel der Dose
anhebt, heben Sie sie heraus,
um zu verhindern, dass sie in
den Doseninhalt fällt.
- 7 -
Heben Sie den Griff in die
aufrechte Position. Heben Sie
Griff und Stange an und
entfernen Sie die geöffnete
Dose.
MATTERS NEED ATTENTION
TRAGEN SIE SCHUTZ HANDSCHUHE

- 8 -

- 9 -

- 10 -
CLEANING AND MAINTENANCE
Dosenöffner müssen täglich oder nach jedem längeren Gebrauch
gereinigt werden.
Regelmäßige Wartung hilft, unerwünschte Rückstände und das
Wachstum schädlicher Bakterien zu verhindern .
1. Entfernen Sie mit einer Edelstahl-Reinigungsbürste alle Speisereste und
offenen Dosenreste von Zahnrädern, Zahnradhohlräumen und Klingen
sowie Speisereste und Dosenreste von den Klingen.
2. Reinigen Sie die Klingen, Zahnräder und alle Spritzbereiche am
Dosenöffner mit warmem Wasser. Lassen Sie die Teile nicht durchnässen.
3. Trocknen Sie den Schneider, das Zahnrad und den Dosenöffner
gründlich mit einem trockenen Tuch oder Handtuch ab.

- 11 -
Adresse: Baoshanqu Shuangchenglu 803long 11hao 1602A-1609shi
Shanghai
EK-VERTRETER: SHUNSHUN GmbH. Römeräcker 9 Z2021,76351
Linkenheim-Hochstetten, Deutschland
UK REP : Pooledas Group Ltd. Unit 5 Albert Edward House, The Pavilions
Preston, Vereinigtes Königreich
Importiert nach AUS: SIHAO PTY LTD. 1 ROKEVA
STREETEASTWOOD NSW 2122 Australien
In die USA importiert: Sanven Technology Ltd. Suite 250, 9166 Anaheim
Place, Rancho Cucamonga, CA 91730
In China hergestellt


- 2 -
Tecnico Supporto e certificato di garanzia elettronica www.vevor.com/support
APRISCATOLE COMMERCIALE
ISTRUZIONI
MODELLO: MM-ZG01-47 / MM-ZT01-47 / MM-ZG02-59
MM-BXG-30 / MM-BXG-40
We continue to be committed to provide you tools with competitive price.
"Save Half", "Half Price" or any other similar expressions used by us only represents an
estimate of savings you might benefit from buying certain tools with us compared to the major
top brands and does not necessarily mean to cover all categories of tools offered by us. You
are kindly reminded to verify carefully when you are placing an order with us if you are
actually saving half in comparison with the top major brands.

- 1 -
MODELLO: MM-ZG01-47 / MM-ZT01-47 / MM-ZG02-59
MM-BXG-30 / MM-BXG-40
Have product questions? Need technical support? Please feel free to
contact us:
Technical Support and E-Warranty Certificate
www.vevor.com/support
NEED HELP? CONTACT US!
This is the original instruction, please read all manual instructions
carefully before operating. VEVOR reserves a clear interpretation of our
user manual. The appearance of the product shall be subject to the
product you received. Please forgive us that we won't inform you again if
there are any technology or software updates on our product.
COMMERCIAL CAN
OPENER

- 2 -
Avvertenza: per ridurre il rischio di lesioni, l'utente deve
leggere attentamente il manuale di istruzioni.
PRODUCT DESCRIPTION
Viene utilizzato per aprire tutti i tipi di lattine di ferro, comodo da usare. È
un utensile ideale per hotel e ristoranti .
1. Dopo averlo utilizzato, metterlo da parte con la maniglia in posizione
orizzontale, in modo da allentare la molla e allungarne la durata.
2. Spesso utilizzati, il coltello e l'attrezzatura possono essere indossati per
comodità del cliente, abbiamo preparato un set completo di parti, si prega
di ordinare in base alle proprie esigenze.
SPECIFICATION PARAMETERS
Modello
Altezza applicabile
Dimensioni dell'apertura della
lattina
MM-ZG01-47
≤300mm
(
11
pollici
)
Può aprire lattine di tutti i diametri
fino a 300 mm di altezza.
MM-ZT01-47
MM-BXG-30
MM-ZG02-59
≤ 4 00 mm
(1 5,7 pollici )
Può aprire lattine di tutti i diametri
fino a 300 mm di altezza.
MM-BXG-40
Materiale lama : SUS420
(
Per uso alimentare, superficie indurita.
)
NOTA: aprire la lattina in senso orario, non ruotare la maniglia in senso
antiorario durante l'apertura della lattina, altrimenti ciò influirà sull'effetto
di apertura.

- 3 -
PRODUCT DIAGRAM
✱L'immagine è solo di riferimento, fare riferimento all'oggetto reale.
- 4 -

- 5 -
KINDLY REMINDER
NOTA:
1.L'apertura dovrebbe essere vicino al bordo del barattolo. A causa
dell'elevata durezza della lama, la posizione dell'apertura non dovrebbe
essere troppo lontana dall'ingranaggio per evitare di danneggiare la lama a
causa dell'eccessiva forza laterale durante la rotazione del bilanciere.
2.Dopo l'uso, unire le maniglie in posizione orizzontale. Allentare la molla
per prolungarne la durata.
3. Le lame e gli ingranaggi sono materiali di consumo, si prega di
controllarli e sostituirli in tempo.
USAGE METHOD
1. Quando si utilizza l'apriscatole per la prima volta, fissare la base a un
tavolo o una panca con le viti della base e posizionare la base della lattina
in metallo. La maniglia è in posizione illuminata .
2. Troverai una fessura tra il coltello e il corpo. Posiziona la fusoliera nel
foro quadrato alla base e fora adeguatamente la parte superiore della
lattina con il coltello.
3. Portare la maniglia in posizione orizzontale e girarla verso destra. Può
ruotare automaticamente fino a quando la parte superiore della lattina si
solleva per tagliare senza intoppi, sollevandola per evitare di cadere nella
lattina.
4. Sollevare la maniglia in posizione verticale. Sollevare la maniglia e l'asta
e rimuovere la lattina aperta.
Cambia la lama :
La sostituzione della lama è relativamente semplice, svitando direttamente
due viti è possibile completare la sostituzione della lama.
Cambia la marcia :
1. Per sostituire l'ingranaggio, è necessario ruotare la maniglia in senso
antiorario quando l'ingranaggio non ruota (è possibile scegliere lo
strumento appropriato da attaccare) e rimuovere le parti quando la

- 6 -
maniglia ruota.
2. Durante l'installazione dell'ingranaggio, montare le rondelle e gli altri
accessori nella sequenza originale, premere verso il basso la maniglia
(premere la molla interna) e ruotare la maniglia in senso orario per
installare l'ingranaggio e gli altri accessori.
DIRECTIONS FOR USING
Quando si utilizza l'apriscatole per la
prima volta, fissare la base sul tavolo
o sulla panca con la vite della base,
quindi posizionare la lattina sulla base
metallica. Con il manico in posizione
verticale, troverai una fessura tra il
coltello e il corpo, metti il corpo nel
foro quadrato della base, facendo in
modo che il coltello fori correttamente
la parte superiore della lattina.
Portare la maniglia in posizione
orizzontale e la maniglia del
barattolo a destra. La lattina
gira antomaticamente finché la
parte superiore della lattina non
viene ritagliata senza problemi .
Quando la parte superiore della
lattina si solleva, sollevala per
evitare di cadere nel contenuto
della lattina.

- 7 -
Sollevare la maniglia in
posizione verticale. Sollevare la
maniglia e la barra e rimuovere
la lattina aperta.
MATTERS NEED ATTENTION
PROTETTIVO ALL'USURA GUANTI

- 8 -

- 9 -

- 10 -
CLEANING AND MAINTENANCE
Gli apriscatole devono essere puliti quotidianamente o dopo ogni
utilizzo prolungato.
Una manutenzione regolare aiuta a prevenire l'accumulo di residui
indesiderati e la crescita di batteri nocivi .
1. Utilizzare una spazzola per la pulizia in acciaio inossidabile per
rimuovere tutto il cibo e i residui di lattine aperte dagli ingranaggi, le cavità
degli ingranaggi e le lame, nonché i residui di cibo e di lattina dalle lame.
2. Pulisci le lame, gli ingranaggi e le eventuali aree soggette a schizzi
sull'apriscatole con acqua tiepida. Non lasciare che le parti si impregnino.
3. Asciugare accuratamente la taglierina, l'ingranaggio e l'apriscatole con
un panno o un asciugamano asciutto.

- 11 -
Indirizzo: Baoshanqu Shuangchenglu 803long 11hao 1602A-1609shi
Shanghai
RAPPRESENTANTE CE: SHUNSHUN GmbH. Römeräcker 9
Z2021,76351
Linkenheim-Hochstetten, Germania
REP UK : Pooledas Group Ltd. Unit 5 Albert Edward House, The Pavilions
Preston, Regno Unito
Importato in AUS: SIHAO PTY LTD. 1 ROKEVA STREETEASTWOOD
NSW 2122 Australia
Importato negli Stati Uniti: Sanven Technology Ltd. Suite 250, 9166
Anaheim Place, Rancho Cucamonga, CA 91730
Made in China


- 2 -
Técnico Soporte y certificado de garantía electrónica www.vevor.com/support
ABRELATAS COMERCIAL
INSTRUCCIONES
MODELO: MM-ZG01-47 / MM-ZT01-47 / MM-ZG02-59
MM-BXG-30 / MM-BXG-40
We continue to be committed to provide you tools with competitive price.
"Save Half", "Half Price" or any other similar expressions used by us only represents an
estimate of savings you might benefit from buying certain tools with us compared to the major
top brands and does not necessarily mean to cover all categories of tools offered by us. You
are kindly reminded to verify carefully when you are placing an order with us if you are
actually saving half in comparison with the top major brands.

- 1 -
MODELO: MM-ZG01-47 / MM-ZT01-47 / MM-ZG02-59
MM-BXG-30 / MM-BXG-40
Have product questions? Need technical support? Please feel free to
contact us:
Technical Support and E-Warranty Certificate
www.vevor.com/support
NEED HELP? CONTACT US!
This is the original instruction, please read all manual instructions
carefully before operating. VEVOR reserves a clear interpretation of our
user manual. The appearance of the product shall be subject to the
product you received. Please forgive us that we won't inform you again if
there are any technology or software updates on our product.
COMMERCIAL CAN
OPENER

- 2 -
Advertencia: para reducir el riesgo de lesiones, el usuario
debe leer atentamente el manual de instrucciones.
PRODUCT DESCRIPTION
Se utiliza para abrir todo tipo de latas de hierro, es cómodo de operar. Es
un utensilio ideal para hoteles y restaurantes .
1. Después de usarlo, déjelo a un lado con el mango en posición horizontal,
para aflojar el resorte y alargar su vida útil.
2. De uso frecuente, se pueden usar cuchillos y equipos para comodidad
del cliente, preparamos un juego completo de piezas, solicite según sus
necesidades.
SPECIFICATION PARAMETERS
Modelo
Una altura
aplicable
Tamaño de apertura de lata
MM-ZG01-47
≤300 mm (11
pulgadas )
Puede abrir latas de todos los
diámetros hasta 300 mm de altura.
MM-ZT01-47
MM-BXG-30
MM-ZG02-59
≤ 400 mm
(1 5,7 pulgadas )
Puede abrir latas de todos los
diámetros hasta 300 mm de altura.
MM-BXG-40
Material de carga B : SUS420 (calidad alimentaria, superficie
endurecida).
NOTA: Abra la lata en el sentido de las agujas del reloj, no gire la manija
en el sentido contrario a las agujas del reloj al abrir la lata, de lo contrario
afectará el efecto de apertura.

- 3 -
PRODUCT DIAGRAM
✱La imagen es solo de referencia, consulte el objeto real.

- 4 -

- 5 -
KINDLY REMINDER
NOTA:
1.La abertura debe estar cerca del borde del frasco. Debido a la alta
dureza de la pala, la posición de la apertura no debe estar demasiado
alejada del engranaje para evitar dañar la pala debido a una fuerza lateral
excesiva al girar el balancín.
2. Después de su uso, coloque las asas juntas en posición horizontal.
Afloje el resorte para extender su vida útil.
3. Las cuchillas y los engranajes son consumibles; revíselos y
reemplácelos a tiempo.
USAGE METHOD
1. Cuando utilice el abrelatas por primera vez, fije la base a una mesa o
banco con los tornillos de la base y coloque la lata sobre una base
metálica. La manija está en una posición iluminada .
2. Encontrarás una ranura entre el cuchillo y el cuerpo. Coloque el fuselaje
en el orificio cuadrado de la base y perfore adecuadamente la parte
superior de la lata con el cuchillo.
3. Lleve el mango a la posición horizontal y gírelo hacia la derecha. Puede
girar automáticamente hasta que la parte superior de la lata se levante
para cortar suavemente, levantándola para evitar que caiga dentro de la
lata.
4. Levante la manija a la posición vertical. Levante la manija y la varilla y
retire la lata abierta.
Cambiar la hoja :
El reemplazo de la hoja es relativamente simple, desenrosque
directamente dos tornillos y puede completar el reemplazo de la hoja.
Cambiar de marcha :
1. Para reemplazar el engranaje, debe girar la manija en sentido
antihorario cuando el engranaje no gira (puede elegir la herramienta
adecuada para pegar) y quitar las piezas cuando la manija gira.
- 6 -
2. Al instalar el engranaje, monte las arandelas y otros accesorios en la
secuencia original, presione hacia abajo la manija (presione el resorte
interno) y gire la manija en el sentido de las agujas del reloj para instalar el
engranaje y otros accesorios.
DIRECTIONS FOR USING
Cuando utilice el abrelatas por
primera vez, fije la base a la mesa o
banco con un tornillo de base y luego
coloque la lata sobre una base de
metal. Con el mango en posición
vertical, encontrará una ranura entre
el cuchillo y el cuerpo, coloque el
cuerpo en el orificio cuadrado de la
base, haciendo que el cuchillo perfore
la parte superior de la lata.
Lleve la manija a la posición
horizontal y gire la manija hacia
la derecha. La lata gira
automáticamente hasta que la
parte superior de la lata se
corte suavemente . A medida
que la parte superior de la lata
se levante, levántela para evitar
que caiga dentro del contenido
de la lata.

- 7 -
Levante la manija a la posición
vertical. Levante la manija y la
barra y retire la lata abierta.
MATTERS NEED ATTENTION
DESGASTE PROTECCIÓN GUANTES
- 8 -

- 9 -

- 10 -
CLEANING AND MAINTENANCE
Los abrelatas deben limpiarse diariamente o después de cada uso
prolongado.
El mantenimiento regular ayuda a prevenir la acumulación de
residuos no deseados y el crecimiento de bacterias dañinas .
1. Utilice un cepillo de limpieza de acero inoxidable para eliminar toda la
comida y los residuos de latas abiertas de los engranajes, las cavidades
de los engranajes y las cuchillas, y los residuos de comida y latas de las
cuchillas.
2. Limpie las cuchillas, los engranajes y las áreas de salpicaduras del
abrelatas con agua tibia. No permita que las piezas se remojen.
3. Seque bien el cortador, el engranaje y el abrelatas con un paño o toalla
seca.

- 11 -
Dirección: Baoshanqu Shuangchenglu 803long 11hao 1602A-1609shi
Shanghai
REPRESENTANTE CE: SHUNSHUN GmbH. Römeräcker 9 Z2021,76351
Linkenheim-Hochstetten, Alemania
REPRESENTANTE DEL REINO UNIDO : Pooledas Group Ltd. Unidad 5
Albert Edward House, The Pavilions Preston, Reino Unido
Importado a AUS: SIHAO PTY LTD. 1 ROKEVA STREET ASTWOOD
NSW 2122 Australia
Importado a EE. UU.: Sanven Technology Ltd. Suite 250, 9166 Anaheim
Place, Rancho Cucamonga, CA 91730
Hecho en china


- 2 -
Techniczny Certyfikat wsparcia i e-gwarancji www.vevor.com/support
KOMERCYJNY OTWIERACZ DO PUSZEK
INSTRUKCJE
MODEL: MM-ZG01-47 / MM-ZT01-47 / MM-ZG02-59
MM-BXG-30 / MM-BXG-40
We continue to be committed to provide you tools with competitive price.
"Save Half", "Half Price" or any other similar expressions used by us only represents an
estimate of savings you might benefit from buying certain tools with us compared to the major
top brands and does not necessarily mean to cover all categories of tools offered by us. You
are kindly reminded to verify carefully when you are placing an order with us if you are
actually saving half in comparison with the top major brands.

- 1 -
MODEL: MM-ZG01-47 / MM-ZT01-47 / MM-ZG02-59
MM-BXG-30 / MM-BXG-40
Have product questions? Need technical support? Please feel free to
contact us:
Technical Support and E-Warranty Certificate
www.vevor.com/support
NEED HELP? CONTACT US!
This is the original instruction, please read all manual instructions
carefully before operating. VEVOR reserves a clear interpretation of our
user manual. The appearance of the product shall be subject to the
product you received. Please forgive us that we won't inform you again if
there are any technology or software updates on our product.
COMMERCIAL CAN
OPENER

- 2 -
Ostrzeżenie — aby zmniejszyć ryzyko obrażeń, użytkownik
musi uważnie przeczytać instrukcję obsługi.
PRODUCT DESCRIPTION
Służy do otwierania wszelkiego rodzaju puszek żelaznych, jest wygodny w
obsłudze. Jest idealnym narzędziem do hoteli i restauracji .
1. Po użyciu odłóż go na bok z uchwytem do pozycji poziomej, aby
poluzować sprężynę i wydłużyć jej żywotność.
2. Często używany nóż i sprzęt mogą być noszone dla wygody klienta.
Przygotowaliśmy kompletny zestaw części, prosimy zamawiać zgodnie ze
swoimi potrzebami.
SPECIFICATION PARAMETERS
Model
Odpowiednia
wysokość
Rozmiar otwarcia puszki
MM-ZG01-47
≤300mm (11 cali )
Może otwierać puszki o dowolnej
średnicy i wysokości do 300 mm.
MM-ZT01-47
MM-BXG-30
MM-ZG02-59
≤ 4 00 mm
(1 5,7 cala )
Może otwierać puszki o dowolnej
średnicy i wysokości do 300 mm.
MM-BXG-40
Materiał ostrza : SUS420 (dopuszczony do kontaktu z żywnością,
utwardzany powierzchniowo.)
UWAGA: Otwórz puszkę zgodnie z ruchem wskazówek zegara, podczas
otwierania puszki nie przekręcaj uchwytu w kierunku przeciwnym do
ruchu wskazówek zegara, w przeciwnym razie będzie to miało wpływ na
efekt otwierania.
- 3 -
PRODUCT DIAGRAM
✱Zdjęcie ma wyłącznie charakter poglądowy. Proszę zapoznać się z

- 4 -
rzeczywistym obiektem.

- 5 -
KINDLY REMINDER
NOTATKA:
1. Otwór powinien znajdować się blisko krawędzi słoika. Ze względu na
dużą twardość ostrza, położenie otworu nie powinno znajdować się zbyt
daleko od przekładni, aby uniknąć uszkodzenia ostrza na skutek
nadmiernej siły bocznej podczas obracania wahacza.
2. Po użyciu złóż uchwyty razem w pozycji poziomej. Poluzuj sprężynę,
aby przedłużyć jej żywotność.
3. Ostrza i koła zębate są materiałami eksploatacyjnymi, należy je
sprawdzić i wymienić na czas.
USAGE METHOD
1. Przy pierwszym użyciu otwieracza do puszek przymocuj podstawę do
stołu lub ławki za pomocą śrub podstawy i umieść puszkę na metalowej
podstawie. Uchwyt znajduje się w pozycji podświetlonej .
2. Pomiędzy nożem a korpusem znajdziesz szczelinę. Umieść kadłub w
kwadratowym otworze w podstawie i odpowiednio przebij górną część
puszki nożem.
3. Ustaw uchwyt w pozycji poziomej i obróć uchwyt w prawo. Może
automatycznie obracać się, aż górna część puszki podniesie się, aby
płynnie ciąć, podnosząc ją, aby zapobiec wpadnięciu do puszki.
- 6 -
4. Podnieś uchwyt do pozycji pionowej. Podnieś uchwyt i drążek i wyjmij
otwartą puszkę.
Zmień ostrze :
Wymiana ostrza jest stosunkowo prosta, odkręć bezpośrednio dwie śruby,
możesz dokończyć wymianę ostrza.
Zmień bieg :
1. Aby wymienić zębatkę należy obrócić rączkę w kierunku przeciwnym do
ruchu wskazówek zegara, gdy zębatka się nie obraca (można wybrać
odpowiednie narzędzie do przyklejenia), a gdy klamka się obraca,
zdemontować części.
2. Podczas montażu przekładni zamontuj podkładki i pozostałe akcesoria
w oryginalnej kolejności, wciśnij uchwyt (wciśnij wewnętrzną sprężynę) i
obróć uchwyt w kierunku zgodnym z ruchem wskazówek zegara, aby
zamontować przekładnię i inne akcesoria.
DIRECTIONS FOR USING
Używając otwieracza do puszek po
raz pierwszy, przymocuj podstawę do
stołu lub ławki za pomocą śruby
podstawy, a następnie umieść puszkę
na metalowej podstawie. Trzymając
uchwyt w pozycji pionowej, znajdziesz
Ustaw uchwyt w pozycji
poziomej i uchwyt przesuń w
prawo. Puszka obraca się
anatomicznie, aż górna część
puszki zostanie gładko
wycięta . Gdy górna część

- 7 -
szczelinę pomiędzy nożem a
korpusem, połóż korpus do
kwadratowego otworu w podstawie,
prawidłowo powodując przebicie noża
w górnej części puszki.
puszki się uniesie, podnieś ją,
aby zapobiec wpadnięciu do
zawartości puszki.
Podnieś uchwyt do pozycji
pionowej. Podnieś uchwyt i
drążek i przesuń otwartą
puszkę.
MATTERS NEED ATTENTION
NOSIĆ ŚRODKI OCHRONNE RĘKAWICE

- 8 -

- 9 -
- 10 -
CLEANING AND MAINTENANCE
Otwieracze do puszek należy czyścić codziennie lub po każdym
dłuższym użyciu.
Regularna konserwacja pomaga zapobiegać gromadzeniu się
niepożądanych pozostałości i rozwojowi szkodliwych bakterii .
1. Za pomocą szczotki czyszczącej ze stali nierdzewnej usuń pozostałości
żywności i otwartych puszek z przekładni, wnęk przekładni i ostrzy, a także
pozostałości żywności i puszek z ostrzy.
2. Wyczyść ostrza, przekładnie i wszelkie obszary rozprysków na
otwieraczu do puszek ciepłą wodą. Nie dopuścić do zamoczenia części.
3. Dokładnie osusz przecinak, przekładnię i otwieracz do puszek suchą
szmatką lub ręcznikiem.

- 11 -
Adres: Baoshanqu Shuangchenglu 803long 11hao 1602A-1609shi
Szanghaj
Przedstawiciel WE: SHUNSHUN GmbH. Römeräcker 9 Z2021,76351
Linkenheim-Hochstetten, Niemcy
REPUBLIKA WIELKIEJ BRYTANII : Pooledas Group Ltd. Unit 5 Albert
Edward House, The Pavilions Preston, Wielka Brytania
Import do AUS: SIHAO PTY LTD. 1 ROKEVA STREETEASTWOOD
NSW 2122 Australia
Import do USA: Sanven Technology Ltd. Suite 250, 9166 Anaheim Place,
Rancho Cucamonga, CA 91730
Wyprodukowano w Chinach


- 2 -
Technisch Ondersteuning en e-garantiecertificaat www.vevor.com/support
COMMERCIËLE BLIKOPENER
INSTRUCTIES
MODEL: MM-ZG01-47 / MM-ZT01-47 / MM-ZG02-59
MM-BXG-30 / MM-BXG-40
We continue to be committed to provide you tools with competitive price.
"Save Half", "Half Price" or any other similar expressions used by us only represents an
estimate of savings you might benefit from buying certain tools with us compared to the major
top brands and does not necessarily mean to cover all categories of tools offered by us. You
are kindly reminded to verify carefully when you are placing an order with us if you are
actually saving half in comparison with the top major brands.
- 1 -
MODEL: MM-ZG01-47 / MM-ZT01-47 / MM-ZG02-59
MM-BXG-30 / MM-BXG-40
Have product questions? Need technical support? Please feel free to
contact us:
Technical Support and E-Warranty Certificate
www.vevor.com/support
NEED HELP? CONTACT US!
This is the original instruction, please read all manual instructions
carefully before operating. VEVOR reserves a clear interpretation of our
user manual. The appearance of the product shall be subject to the
product you received. Please forgive us that we won't inform you again if
there are any technology or software updates on our product.
COMMERCIAL CAN
OPENER

- 2 -
Waarschuwing-Om het risico op letsel te verminderen, moet
de gebruiker de handleiding zorgvuldig lezen.
PRODUCT DESCRIPTION
Het wordt gebruikt voor het openen van allerlei soorten ijzeren blikjes,
handig in gebruik. Het is een ideaal gebruiksvoorwerp voor hotels en
restaurants .
1. Leg het na gebruik opzij met het handvat in horizontale positie, om de
veer los te maken en de levensduur ervan te verlengen.
2. Vaak gebruikt, mes en uitrusting kunnen worden gedragen voor het
gemak van de klant, we hebben een voltooide set onderdelen voorbereid,
bestel volgens uw behoefte.
SPECIFICATION PARAMETERS
Model
Een toepasbare
hoogte
Grootte van blikopening
MM-ZG01-47
≤300 mm (11 inch )
Kan blikken met alle diameters tot
een hoogte van 300 mm openen.
MM-ZT01-47
MM-BXG-30
MM-ZG02-59
≤ 4 00 mm
(1 5,7 inch )
Kan blikken met alle diameters tot
een hoogte van 300 mm openen.
MM-BXG-40
Materiaal blad : SUS420 (voedselkwaliteit, oppervlak gehard.)
OPMERKING: Open het blik met de klok mee, draai de hendel niet tegen
de klok in bij het openen van het blik, anders heeft dit invloed op het
openingseffect.

- 3 -
PRODUCT DIAGRAM
✱De afbeelding dient alleen ter referentie, raadpleeg het werkelijke object.

- 4 -

- 5 -
KINDLY REMINDER
OPMERKING:
1.De opening moet zich dichtbij de rand van de pot bevinden. Vanwege de
hoge hardheid van het blad mag de positie van de opening niet te ver van
het tandwiel verwijderd zijn om schade aan het blad als gevolg van
overmatige zijdelingse kracht bij het draaien van de tuimelaar te
voorkomen.
2. Plaats de handgrepen na gebruik in een horizontale positie. Maak de
veer los om de levensduur te verlengen.
3.Messen en tandwielen zijn verbruiksartikelen. Controleer en vervang ze
op tijd.
USAGE METHOD
1. Wanneer u de blikopener voor het eerst gebruikt, bevestigt u de basis
aan een tafel of bank met de basisschroeven en plaatst u het blik op een
metalen basis. De handgreep bevindt zich in een verlichte positie .
2. Je vindt een gleuf tussen het mes en het lichaam. Plaats de romp in het
vierkante gat in de basis en prik met het mes de bovenkant van het blik
goed door.
3. Breng de hendel naar de horizontale positie en draai de hendel naar
rechts. Kan automatisch draaien totdat de bovenkant van het blik omhoog
komt om soepel te snijden, waardoor het eruit wordt getild om te
voorkomen dat het in het blik valt.
4. Til de handgreep rechtop. Til het handvat en de stang op en verwijder
het geopende blik.
Vervang het mes :
Het vervangen van het mes is relatief eenvoudig, draai direct twee
schroeven los, u kunt de vervanging van het mes voltooien.
Verander de versnelling :
1. Om het tandwiel te vervangen, moet je de hendel tegen de klok in
draaien als het tandwiel niet draait (je kunt het juiste gereedschap kiezen
- 6 -
om vast te plakken) en de onderdelen verwijderen als de hendel draait.
2. Monteer bij het installeren van het tandwiel de ringen en andere
accessoires in de oorspronkelijke volgorde, druk de hendel naar beneden
(druk op de interne veer) en draai de hendel met de klok mee om het
tandwiel en andere accessoires te installeren.
DIRECTIONS FOR USING
Wanneer u de blikopener voor het
eerst gebruikt , bevestig dan de basis
op de tafel of bank met de
basisschroef en plaats het blik
vervolgens op de metalen basis. Met
het handvat rechtop, vindt u een gleuf
tussen het mes en het lichaam. Plaats
het lichaam in het vierkante gat van
de basis, waardoor het mes terecht de
bovenkant van het blik doorboort.
Breng het handvat naar de
horizontale positie en het
handvat naar rechts. Het blik
draait anatomisch rond totdat
de bovenkant van het blik
soepel wordt uitgesneden .
Terwijl de bovenkant van het
blik omhoog komt, tilt u het eruit
om te voorkomen dat het in de
inhoud van het blik valt.

- 7 -
Til de hendel omhoog naar de
rechtopstaande positie. Til de
hendel en de stang op en
verwijder de geopende bus.
MATTERS NEED ATTENTION
DRAAG BESCHERMEND HANDSCHOENEN

- 8 -

- 9 -

- 10 -
CLEANING AND MAINTENANCE
Blikopeners moeten dagelijks of na elk langdurig gebruik worden
gereinigd.
Regelmatig onderhoud helpt ongewenste ophoping van resten en de
groei van schadelijke bacteriën te voorkomen .
1. Gebruik een roestvrijstalen reinigingsborstel om alle voedsel- en
blikresten van tandwielen, tandwielholtes en messen en voedsel- en
blikresten van de messen te verwijderen.
2. Maak de messen, tandwielen en eventuele spatplekken op de
blikopener schoon met warm water. Laat de onderdelen niet weken.
3. Droog het mes, het tandwiel en de blikopener grondig af met een droge
doek of handdoek.

- 11 -
Adres: Baoshanqu Shuangchenglu 803long 11hao 1602A-1609shi
Shanghai
EG-REP: SHUNSHUN GmbH. Römeräcker 9 Z2021,76351
Linkenheim-Hochstetten, Duitsland
UK REP : Pooledas Group Ltd. Unit 5 Albert Edward House, The Pavilions
Preston, Verenigd Koninkrijk
Geïmporteerd naar AUS: SIHAO PTY LTD. 1 ROKEVA
STREETEASTWOOD NSW 2122 Australië
Geïmporteerd naar de VS: Sanven Technology Ltd. Suite 250, 9166
Anaheim Place, Rancho Cucamonga, CA 91730
Gemaakt in China


- 2 -
Teknisk Support och e-garanticertifikat www.vevor.com/support
KOMMERSIELL KONSERVÖPPNARE
INSTRUKTIONER
MODELL: MM-ZG01-47 / MM-ZT01-47 / MM-ZG02-59
MM-BXG-30 / MM-BXG-40
We continue to be committed to provide you tools with competitive price.
"Save Half", "Half Price" or any other similar expressions used by us only represents an
estimate of savings you might benefit from buying certain tools with us compared to the major
top brands and does not necessarily mean to cover all categories of tools offered by us. You
are kindly reminded to verify carefully when you are placing an order with us if you are
actually saving half in comparison with the top major brands.

- 1 -
MODELL: MM-ZG01-47 / MM-ZT01-47 / MM-ZG02-59
MM-BXG-30 / MM-BXG-40
Have product questions? Need technical support? Please feel free to
contact us:
Technical Support and E-Warranty Certificate
www.vevor.com/support
NEED HELP? CONTACT US!
This is the original instruction, please read all manual instructions
carefully before operating. VEVOR reserves a clear interpretation of our
user manual. The appearance of the product shall be subject to the
product you received. Please forgive us that we won't inform you again if
there are any technology or software updates on our product.
COMMERCIAL CAN
OPENER

- 2 -
Varning - För att minska risken för skada måste användaren
läsa instruktionerna noggrant.
PRODUCT DESCRIPTION
Det används för att öppna alla typer av järnburkar, bekvämt att använda.
Det är ett idealiskt redskap för hotell och restauranger .
1. Efter att ha använt den, lägg den åt sidan med handtaget i horisontellt
läge, för att lossa fjädern, förlänga dess livslängd.
2.Används ofta, kniv och redskap kan bäras för kundens bekvämlighet, vi
förberedde en färdig uppsättning delar, vänligen beställ enligt ditt behov.
SPECIFICATION PARAMETERS
Modell
En tillämplig höjd
Burköppningsstorlek
MM-ZG01-47
≤300 mm(11 tum )
Kan öppna burkar med alla
diameter upp till 300 mm i höjd.
MM-ZT01-47
MM-BXG-30
MM-ZG02-59
≤ 4 00 mm
(
1 5,7 tum
)
Kan öppna burkar med alla
diameter upp till 300 mm i höjd.
MM-BXG-40
B ladematerial : SUS420(Livsmedelskvalitet, ythärdad.)
OBS: Öppna burken medurs, vrid inte handtaget moturs när du öppnar
burken, annars kommer det att påverka öppningseffekten.
- 3 -
PRODUCT DIAGRAM
✱Bilden är endast för referens, vänligen hänvisa till det faktiska objektet.

- 4 -

- 5 -
KINDLY REMINDER
NOTERA:
1. Öppningen ska vara nära burkens kant. På grund av bladets höga
hårdhet bör öppningens läge inte vara för långt bort från växeln för att
undvika att skada bladet på grund av för stor sidokraft när vipparmen
roteras.
2.Sätt ihop handtagen i horisontellt läge efter användning. Lossa fjädern
för att förlänga dess livslängd.
3. Blad och växlar är förbrukningsvaror, kontrollera och byt ut dem i tid.
USAGE METHOD
1. När du använder konservöppnaren för första gången, fäst basen på ett
bord eller en bänk med basskruvarna och placera burken på en metallbas.
Handtaget är i ett upplyst läge .
2. Du hittar en slits mellan kniven och kroppen. Placera flygkroppen i det
fyrkantiga hålet i basen och hål ordentligt i toppen av burken med kniven.
3. För handtaget till horisontellt läge och vrid handtaget åt höger. Kan
automatiskt vridas tills toppen av burken reser sig för att skära smidigt, lyft
ut den för att förhindra att den faller ner i burken.
4. Lyft handtaget till upprätt läge. Lyft handtaget och stången och ta bort
den öppna burken.
Byt blad :
Bladbyte är relativt enkelt, skruva direkt loss två skruvar, du kan slutföra
bladbytet.
Byt växel :
1. För att byta ut växeln måste du vrida handtaget moturs när växeln inte
roterar (du kan välja lämpligt verktyg att sticka) och ta bort delarna när
handtaget roterar.
2. När du installerar växeln, montera brickorna och andra tillbehör i den
ursprungliga ordningen, tryck ner handtaget (tryck på den inre fjädern) och
vrid handtaget medurs för att installera växeln och andra tillbehör.

- 6 -
DIRECTIONS FOR USING
När du använder konservöppnaren för
första gången, fixera basen på bordet
eller bänken med basskruven, sätt
sedan burken på metallbasen. Med
handtaget i upprätt läge hittar du en
slits mellan kniven och kroppen, lägg
ner kroppen till det fyrkantiga hålet på
basen, så att kniven med rätta
punkterar toppen av burken.
Flytta handtaget till horisontellt
läge och rullhandtaget åt höger.
Burken vänder sig antomatiskt
runt tills toppen av burken är
smidigt utskuren . När toppen
av burken höjs, lyft ut den för att
förhindra att den faller ner i
burkens innehåll.
Lyft handtaget till upprätt läge.
Lyft upp handtaget och stången
och ta bort den öppna burken.
- 7 -
MATTERS NEED ATTENTION
BÄR SKYDD HANDSKAR
- 8 -
- 9 -

- 10 -
CLEANING AND MAINTENANCE
Burköppnare måste rengöras dagligen eller efter varje längre
användning.
Regelbundet underhåll hjälper till att förhindra oönskade rester och
tillväxten av skadliga bakterier .
1. Använd en rengöringsborste av rostfritt stål för att ta bort all mat och
öppna burkrester från kugghjul, hålrum i kugghjul och blad och mat och
burkrester från blad.
2. Rengör bladen, kugghjulen och eventuella stänkområden på
burköppnaren med varmt vatten. Låt inte delar blötläggas.
3. Torka kniven, redskapet och burköppnaren noggrant med en torr trasa
eller handduk.
Adress: Baoshanqu Shuangchenglu 803long 11hao 1602A-1609shi
Shanghai
EC REP: SHUNSHUN GmbH. Römeräcker 9 Z2021,76351
Linkenheim-Hochstetten, Tyskland
UK REP : Pooledas Group Ltd. Unit 5 Albert Edward House, The Pavilions
Preston, Storbritannien
Importerad till AUS: SIHAO PTY LTD. 1 ROKEVA STREETEASTWOOD
NSW 2122 Australien
Importerad till USA: Sanven Technology Ltd. Suite 250, 9166 Anaheim
Place, Rancho Cucamonga, CA 91730
Tillverkad i Kina