HairPro® Pet
with
™
EX300 Series
OWNER’S GUIDE

1. If the power cord plug does not fit fully into
the outlet, contact a qualified electrician. DO
NOT force into outlet or try to modify to fit.
2. To reduce the risk of shock and unintended
operation, unplug before servicing.
3. This carpet cleaner consists of a motorized
nozzle, main body, pole, handle, hose, and
hand tools. These components contain
electrical connections, electrical wiring, and
moving parts that potentially present risk to
the user.
4. Before each use, carefully inspect all parts
for any damage. If a part is damaged,
discontinue use.
5. Use only identical Shark replacement parts.
6. DO NOT use the carpet cleaner for any
purpose other than those described in this
Guide.
7. DO NOT immerse or spray water on the
body of the carpet cleaner.
8. To clean the surface, wipe with a dry cloth.
9. Keep the carpet cleaner’s cord out of reach
of children.
10. DO NOT allow the appliance to be used by
children. DO NOT allow to be used as a toy.
Close supervision is necessary when used
near children.
11. This appliance can be used by persons
with reduced physical, sensory, or
mental capabilities or lack of experience
or knowledge if they have been given
supervision or instruction concerning use of
the appliance in a safe way and understand
the hazards involved. Cleaning and user
maintenance shall not be done by children.
12. DO NOT handle plug or carpet cleaner with
wet hands.
13. DO NOT use without the dirty water tank,
clean solution tank, filter, brushroll, diverter
valve, and brushroll cover in place.
14. Use only identical replacement parts. Only
use Shark® branded filters and accessories.
15. DO NOT put any objects into nozzle
opening. DO NOT use with any opening
blocked; keep free of dust, lint, hair, and
anything that may reduce airflow.
16. DO NOT use if nozzle airflow is restricted. If
the air paths or the motorized floor nozzle
become blocked, turn the carpet cleaner o.
Remove all obstructions before you turn on
the unit again. Keep nozzle and all carpet
cleaner openings away from hair, face,
fingers, uncovered feet, or loose clothing.
17. DO NOT use if carpet cleaner is not working
as it should, or has been dropped, damaged,
left outdoors, or dropped into water.
18. Use extra care when cleaning on stairs.
19. DO NOT leave the carpet cleaner
unattended while plugged in.
20. When using on any surface, always keep the
carpet cleaner moving to avoid damaging
the surface (e.g., carpet fibers).
21. DO NOT place carpet cleaner on unstable
surfaces such as chairs or tables. The
surrounding area may be slippery and
present a risk of injury.
22. DO NOT use to pick up:
a) Large objects.
b) Hard or sharp objects (glass, nails,
screws, or coins).
c) Large quantities of dust (e.g., drywall
dust).
d) Smoking or burning objects (hot coals,
cigarette butts, or matches).
e) Flammable or combustible materials
(lighter fluid, gasoline, or kerosene).
f) Toxic materials (chlorine bleach,
ammonia, or drain cleaner).
23. DO NOT use in the following areas:
a) Poorly lit areas.
b) Outdoor areas.
c) Spaces that are enclosed and may
contain explosive or toxic fumes or
vapors (lighter fluid, gasoline, kerosene,
paint, paint thinners, mothproofing
substances, or flammable dust).
24. Turn o the carpet cleaner before any
adjustment, cleaning, maintenance, or
troubleshooting.
25. During cleaning or routine maintenance, DO
WARNING
To reduce the risk of fire, electric shock, injury, or property damage:
IMPORTANT SAFETY INSTRUCTIONS
FOR HOUSEHOLD USE ONLY READ ALL INSTRUCTIONS BEFORE USING THIS
CARPET CLEANER
SAVE THESE INSTRUCTIONS
NOT cut anything other than hair, fibers,
or string wrapped around the brushroll.
26. DO NOT modify or attempt to repair the
carpet cleaner yourself. DO NOT use the
carpet cleaner if it has been modified or
damaged.
27. Turn o all controls before unplugging.
28. To reduce the risk of fire or electric shock
due to internal component damage,
use only Shark® cleaning fluid. See the
Cleaning Fluid section of this Instruction
Book.
29. DO NOT pull or carry by cord, use cord as
a handle, close a door on cord, or pull cord
around sharp edges or corners. DO NOT
run appliance over cord. Keep cord away
from heated surfaces.
30. DO NOT unplug by pulling on cord. To
unplug, grasp the plug, not the cord.
31. Use indoors only.
32. DO NOT use carpet cleaner on hard floors
as it may damage your floor. To avoid
damage to flooring and to avoid potential
slip hazard, after use:
a) move to a hard sealed surface (avoid
unsealed, wood and laminate) and
b) place unit on absorbent material like a
towel to soak up any liquid.
33. DO NOT fill solution tanks while installed
on the appliance. Remove before filling.
34. The areas around where you are cleaning
may become wet, use care to avoid
slipping and falling.
35. Use care when removing and reattaching
the hand tool to avoid accidental
activation of the cleaning solution. DO
NOT spray solution on your skin or in your
eyes.
36. GROUNDING INSTRUCTIONS: This
appliance must be grounded. If it should
malfunction or break down, grounding
provides a path of least resistance for
electric current to reduce the risk of
electric shock. This appliance’s cord has
an equipment-grounding conductor and a
grounding plug. The plug must be inserted
into an appropriate outlet that is properly
installed and grounded in accordance with
all local codes and ordinances.
37. WARNING: Improper connection of the
equipment grounding conductor can
result in a risk of electric shock. Check
with a qualified electrician or service
person if you are in doubt as to whether
the outlet is properly grounded. DO
NOT modify the plug provided with
the appliance. If the plug will not fit the
outlet, have a proper outlet installed by a
qualified electrician.
Grounded
Outlet Box
Grounded
Outlet
AA200
Gr
ounding
Pin
38. This appliance is for use on a nominal V
circuit and has a grounding attachment
plug that looks like the plug illustrated
above. Make sure that the appliance is
connected to an outlet having the same
configuration as the plug. No adaptor
should be used with this appliance.
39. DO NOT immerse. To reduce risk of
electric shock, use only on carpet
moistened by cleaning.
40. DO NOT use vinegar in any tanks.
41. DO NOT run over edges of area rugs.
42. Stalling the brush roll may result in
premature failure.
43. Avoid repeated strokes over the same area
to help prevent damage to Berber carpets.
44. Check manufacturer’s tag prior to cleaning
area rugs for any specific cleaning
guidelines. We DO NOT recommend deep
cleaning delicate rugs (including wool,
cotton, silk, antique, or area rugs that DO
NOT have a manufacturer’s tag).
45. DO NOT store unit where temperatures
reach freezing levels to avoid damaging
internal parts.
46. FIRST AID Keep out of reach of children.
Causes skin and serious eye irritation. IF
IN EYES, rinse continuously with water for
minutes. Remove contact lenses if present
and easy to do so. Continue rinsing. IF ON
SKIN, wash with soap and water. If skin
and eye irritation persists, seek medical
attention.
47. Please recycle container. Dispose of
contents/container with a licensed waste
disposal site in accordance with the
requirements of the local waste disposal
authority.
48. DO NOT dispose in drains or watercourses
in concentrate form.
sharkclean.comsharkclean.com

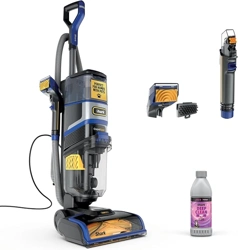
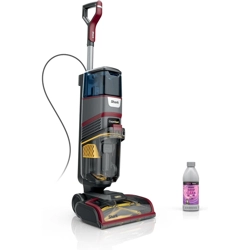
WHAT’S INCLUDED ASSEMBLY
F
N
E
C
Shark® CarpetXpert, 12 oz. Shark Deep Clean Pet Solution, 16 oz. Shark OXY Multiplier,
3.5” Stain Eliminator, 3.5” Reversible Bristles, Pet Hair Extractor
O
D
M
R S
The 7” XL Stain Eliminator tool, Pet Mess
Extractor Tool, and Tray are included
with select models, and available for
purchase at sharkclean.com.
H
A Mode Button
B Power Button
C CarpetXpert™ Tank
D Rinse & Go Self-Wash Cycle
E StainStriker™ Tank
F Dirty Water Tank
G Carry Handle
H Mini Stain Eliminator
I Suction Inlet
J Removable Bristles
K Spray Outlet
L Hand Tool Trigger
M Hand Tool Release Button
N 3.5’’ Stain Eliminator
O 3.5’’ Reversible Bristles
P Pet Hair Extractor
Q Hand Tool Mount
R 12 oz. Deep Clean Pet
S 16 oz. OXY StainStriker
T Floor Nozzle
Note: When assembling your CarpetXpert, there may be a little water in or around
the water tanks. This is because we test all units before shipping to ensure the
highest quality.
1. Insert the pole into the top of the unit until it clicks into place (fig. 1). Make sure
the pole is properly installed to prevent it from falling out during use.
2. Attach the 3.5” Stain Eliminator hand tool onto the Mini Stain Eliminator on the
unit, or store it on the tool-holder that snaps onto the wand. Some models may
also come with an accessory storage tray (fig. 2, 3).
3. Be sure the rubber seal is seated in place under the dirty water tank.
4. Make sure that the Dirty Water Tank is fully inserted. Remove the tank and reinstall
by placing the bottom of the tank on the bottom edge of the main unit (fig. 4)
and tilting the tank back until it clicks into place.
fig. 1
Q G
fig. 2
P
I
J
L
K
WHAT’S INCLUDED ASSEMBLY
B
A
T
fig. 3
fig. 4
Dirty Water
Tank
CarpetXpert™
Tank
sharkclean.comsharkclean.com
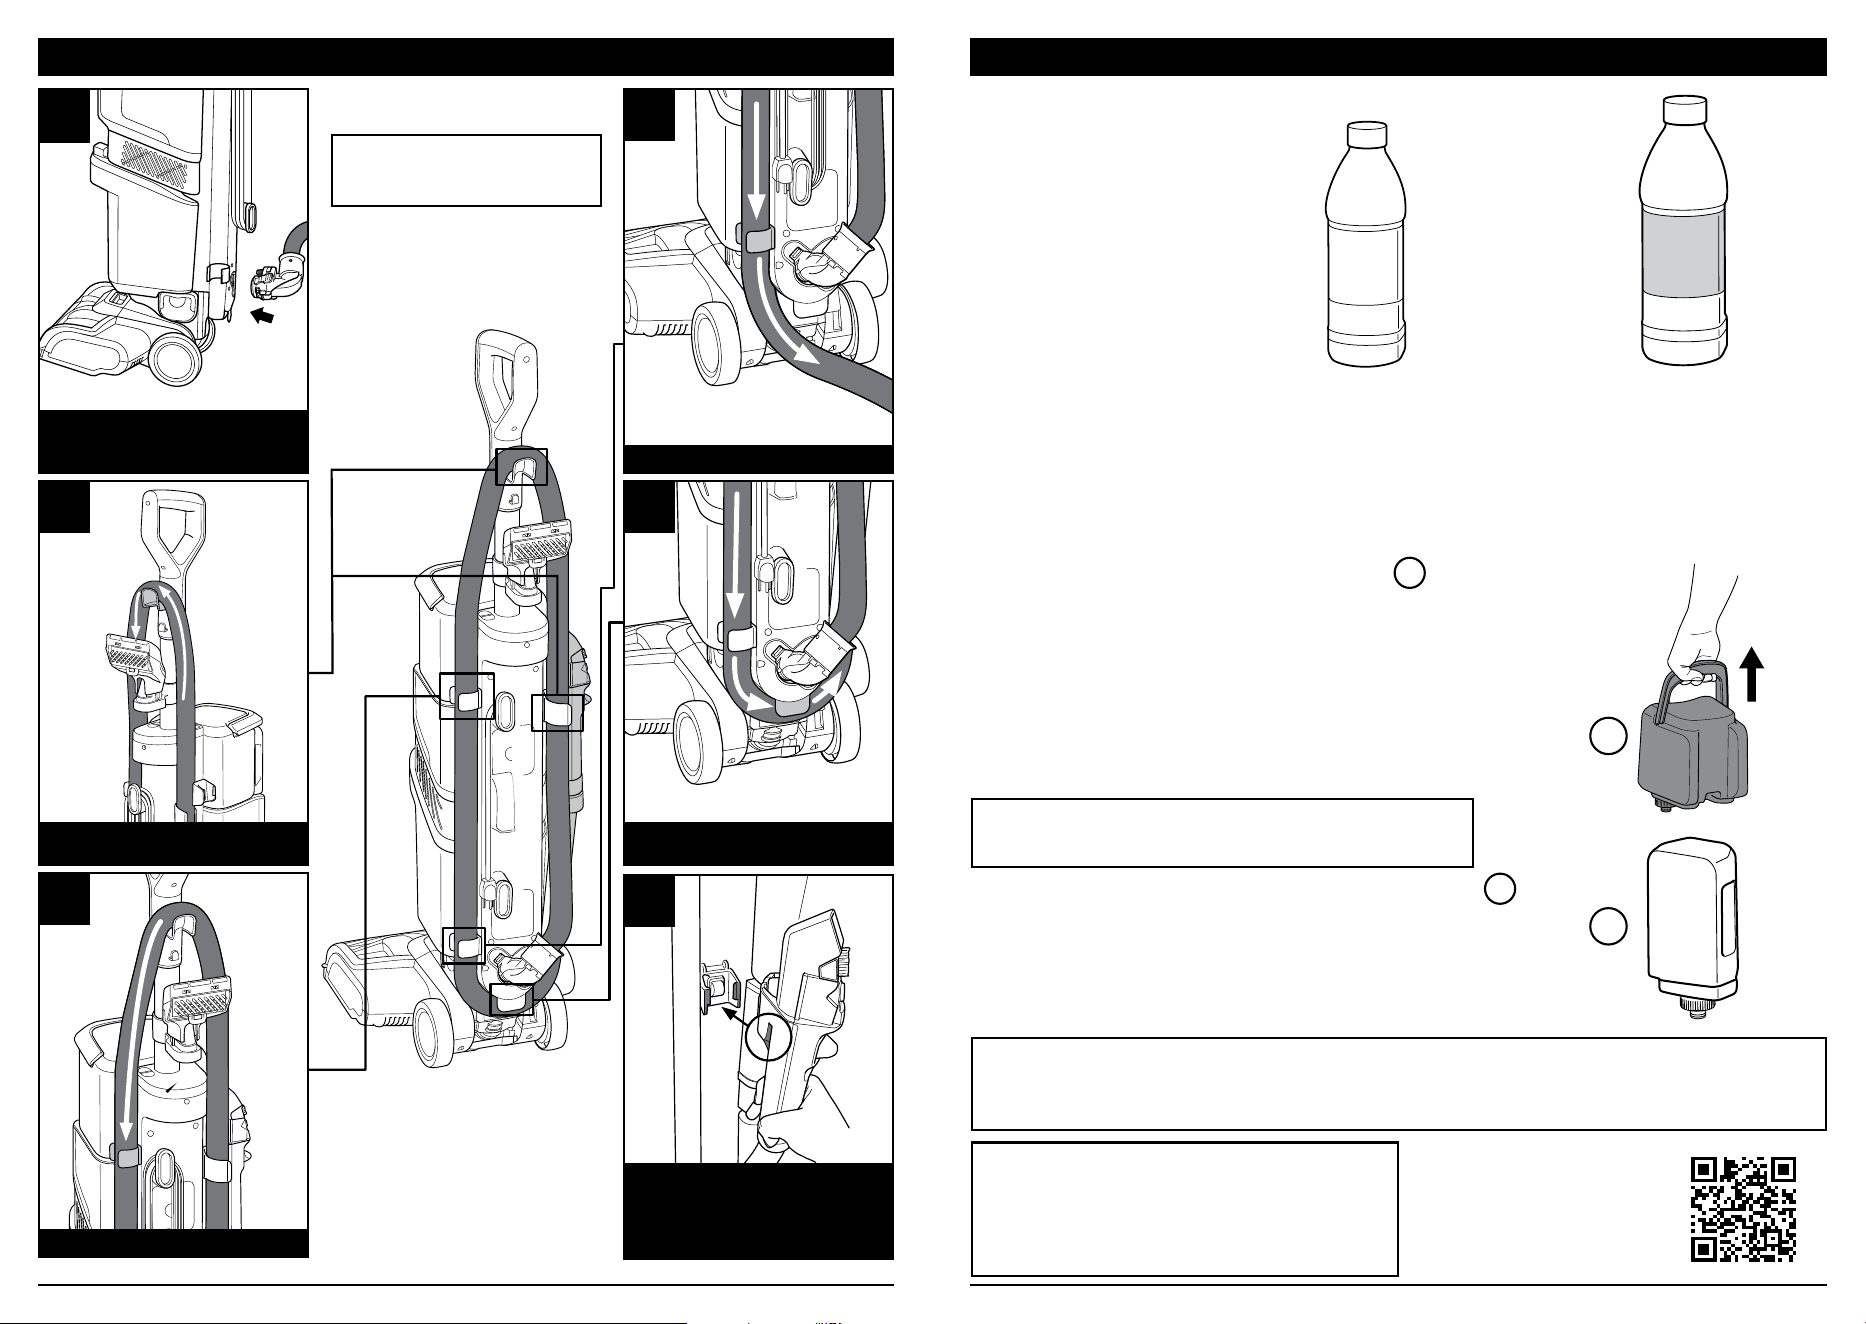
HOSE ASSEMBLY
TIP: Wrap hose tightly,
leaving no slack
6
Align the grooves in the hand
tool with the grooves in the
holder, then slide the tool
down to attach.
4
Press hose into third clip.
5
Loop hose tightly under the
bottom tab
1
Insert hose tightly into back
of unit until it clicks twice
to avoid leaks.
2
3
Press hose into second clip.
Loop hose tightly over the
top tab.
Tip: Use carry handle on the back of unit
(G) for easy transport on stairs. To reduce
carry weight, fill tanks after moving unit to
the area you are cleaning.
Note: When cleaning with the hand tool above floor, both CarpetXpert tank and Stain-
Striker tank are being used. The StainStriker tank dispenses at a slower rate than the
CarpetXpert Tank.
Note: When cleaning on the floor, solution is only
dispensing from the CarpetXpert Tank.
Shark Cleaning Solutions
The cleaning solution tanks are
designed to work with Shark
cleaning solutions ONLY. To order
refills, scan the QR code located
on the bottom of the CarpetXpert
Tank or at the bottom of this
page. Do not use third party or
homemade cleaners.
2. Filling the StainStriker Tank (smaller, blue tank).
• Lift the StainStriker Tank by its sides to detach it, then
remove the cap.
• Add Shark OXY Multiplier up to the MAX FILL line.
• Reattach the cap, then reinstall the tank, making sure
it securely clicks into place.
1. Filling the CarpetXpert Tank (top tank).
• Lift the CarpetXpert Tank by the handle to detach it,
then remove cap by unscrewing it.
• Add warm water to the tank up to the WATER fill
line. Do not use water hotter than 140°F (60°C).
• Add Shark Deep Clean Pet up to the
CONCENTRATE fill line.
• Reattach the cap, then reinstall the CarpetXpert tank,
making sure it securely clicks into place.
2
1
Shark Deep Clean Pet™
Dispensed from the
CarpetXpert tank. Used for
deep-cleaning carpets with
the floor nozzle.
Shark OXY Multiplier™
Dispensed from the
StainStriker™ tank.
Combines with Deep Clean
Pet from the CarpetXpert
Tank to be used at the hand
tool for stain cleaning.
SHARK® CLEANING SOLUTIONS AND TANKS
To order cleaning
solutions, scan the
QR code or go to
sharkclean.com
1
2
1
2
sharkclean.comsharkclean.com
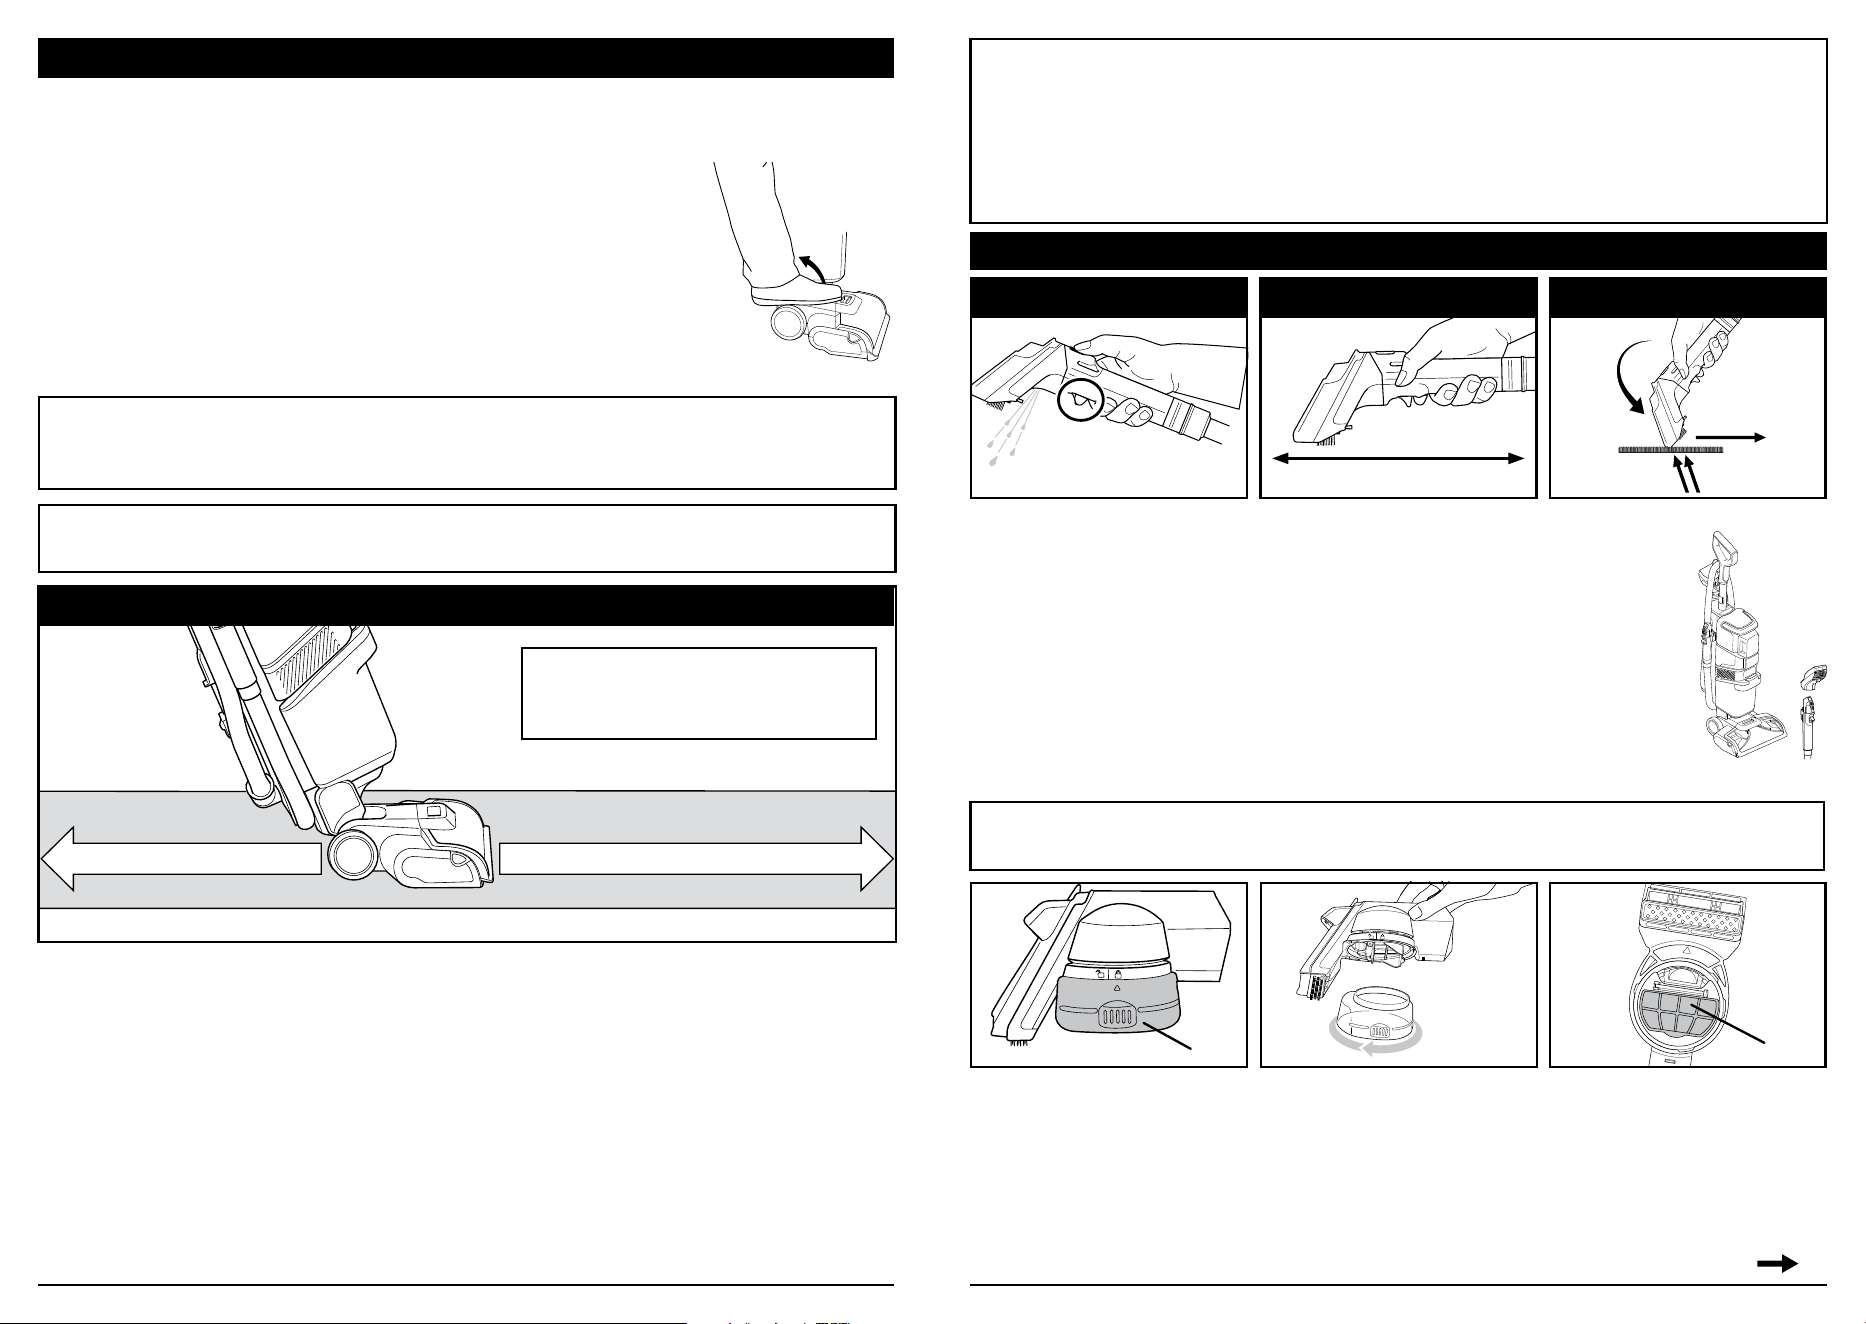
DEEP CLEANING WITH CARPETXPERT
DEEP CLEANING with the brushroll: Uses Deep Clean Pet Formula and water.
Important: CarpetXpert is not a vacuum cleaner and is
not designed for dry vacuuming. Before using
CarpetXpert, first remove pet hair and other debris
with a traditional vacuum cleaner.
1. Gently step on the floor nozzle and tilt the handle back.
2. Press power button; unit will enter Deep Clean Mode.
3. Move unit forward; it will automatically dispense water and
Deep Clean Pet formula.
4. Move unit back to dry with suction only (does not dispense
fluid on back stroke).
5. Repeat steps 3 and 4 on the same area once.
Tip: Carpet cleaners are designed to move slower than a traditional vacuum. For
best results, push and pull CarpetXpert at intervals of a few feet in a slower pace
than you would a vacuum.
WARNING: Moving too slowly will oversaturate carpets. Be sure to not stay in
place while the unit is reclined in Deep Clean Mode.
MOVE BACKWARDS TO DRY MOVE FORWARD TO DISPENSE SOLUTION
STAIN CLEANING with a hand tool:
Uses Deep Clean Pet Formula + OXY Multiplier.
1. To clean with a hand tool, make sure the unit is in the upright position,
then unwrap the hose and attach a hand tool to the end of it.
2. When the Mini Stain Eliminator is removed from the holder on the side
of the unit, StainStriker mode is automatically activated.
3. For wet stains, use a stain eliminator hand tool to suction up the mess
(fig. 9), then spray the stained area (fig. 7). Scrub the stain with the
bristles on the tool, (fig. 8) then tilt the tool up (fig. 9) and drag it
across the stained area to extract the mess. Repeat if needed.
For dry stains, first scrub with the bristles to break up the stain,
then follow the steps shown in figures 7-9 to remove the stain.
4. When finished, return the hand tool to its holder or use Rinse & Go to
clean hose.
fig. 7 fig. 8 fig. 9
CLEANING WITH HAND TOOLS
SPRAY SCRUB EXTRACT
Area Rugs
Check manufacturer’s tag prior to cleaning and follow all guidelines. We DO NOT
recommend cleaning delicate rugs (including wool, cotton, silk, antique, or rugs
that DO NOT have a manufacturer’s tag).
We recommend first testing a small, discrete area of the rug to make sure it is okay
to clean.
Tip: Be mindful of edges when cleaning area rugs. If your area rug has decorative
or loose fibers, do not run CarpetXpert near edges.
Rinsing: Some users may want to rinse their carpet after cleaning. To do this,
fill CarpetXpert Tank with only water, and repeat cleaning steps.
Dry Only Mode
After deep cleaning is complete, it may take a few hours for the carpet to dry. For
quicker dry times, use Dry Only Mode. This mode will turn off liquid and will dry while
moving forward and backward.
Note: Dry Only Mode should ONLY be used after Deep Cleaning Mode. You do not
need to switch back and forth between the two modes while cleaning. Using Dry Only
Mode once Deep Cleaning is complete will help reduce dry times.
See following pages for Hand Tool Accessory guides, tips, and maintenance.
Cup
Filter
The Pet Mess Extractor Tool is included with select models. The tool extracts wet pet
messes, while preventing them from reaching the interior of the hose or unit. Use on wet
pet messes only. DO NOT use to remove pet hair. To use, first spray the wet mess, then
extract it with the tool. Do not overspray or oversaturate the mess. Make sure that the
extracted mess does NOT exceed the MAX FILL line on the tool cup. Keep the tool level,
without tipping, to prevent spills and leakage. After use, turn off the CarpetXpert power
and empty the waste from the tool cup into a toilet. Wash the cup, filter, and the rest of the
tool thoroughly with soap and water after every use.
Tip:
No clumps left behind! To
pick up clumps, move forward
slowly.
Tip:
For improved suction, tilt the angle of the tool forward (fig. 9). More extracted
liquid will appear in the window on the tool as suction increases.
WHILE IN DEEP CLEAN MODE
sharkclean.comsharkclean.com
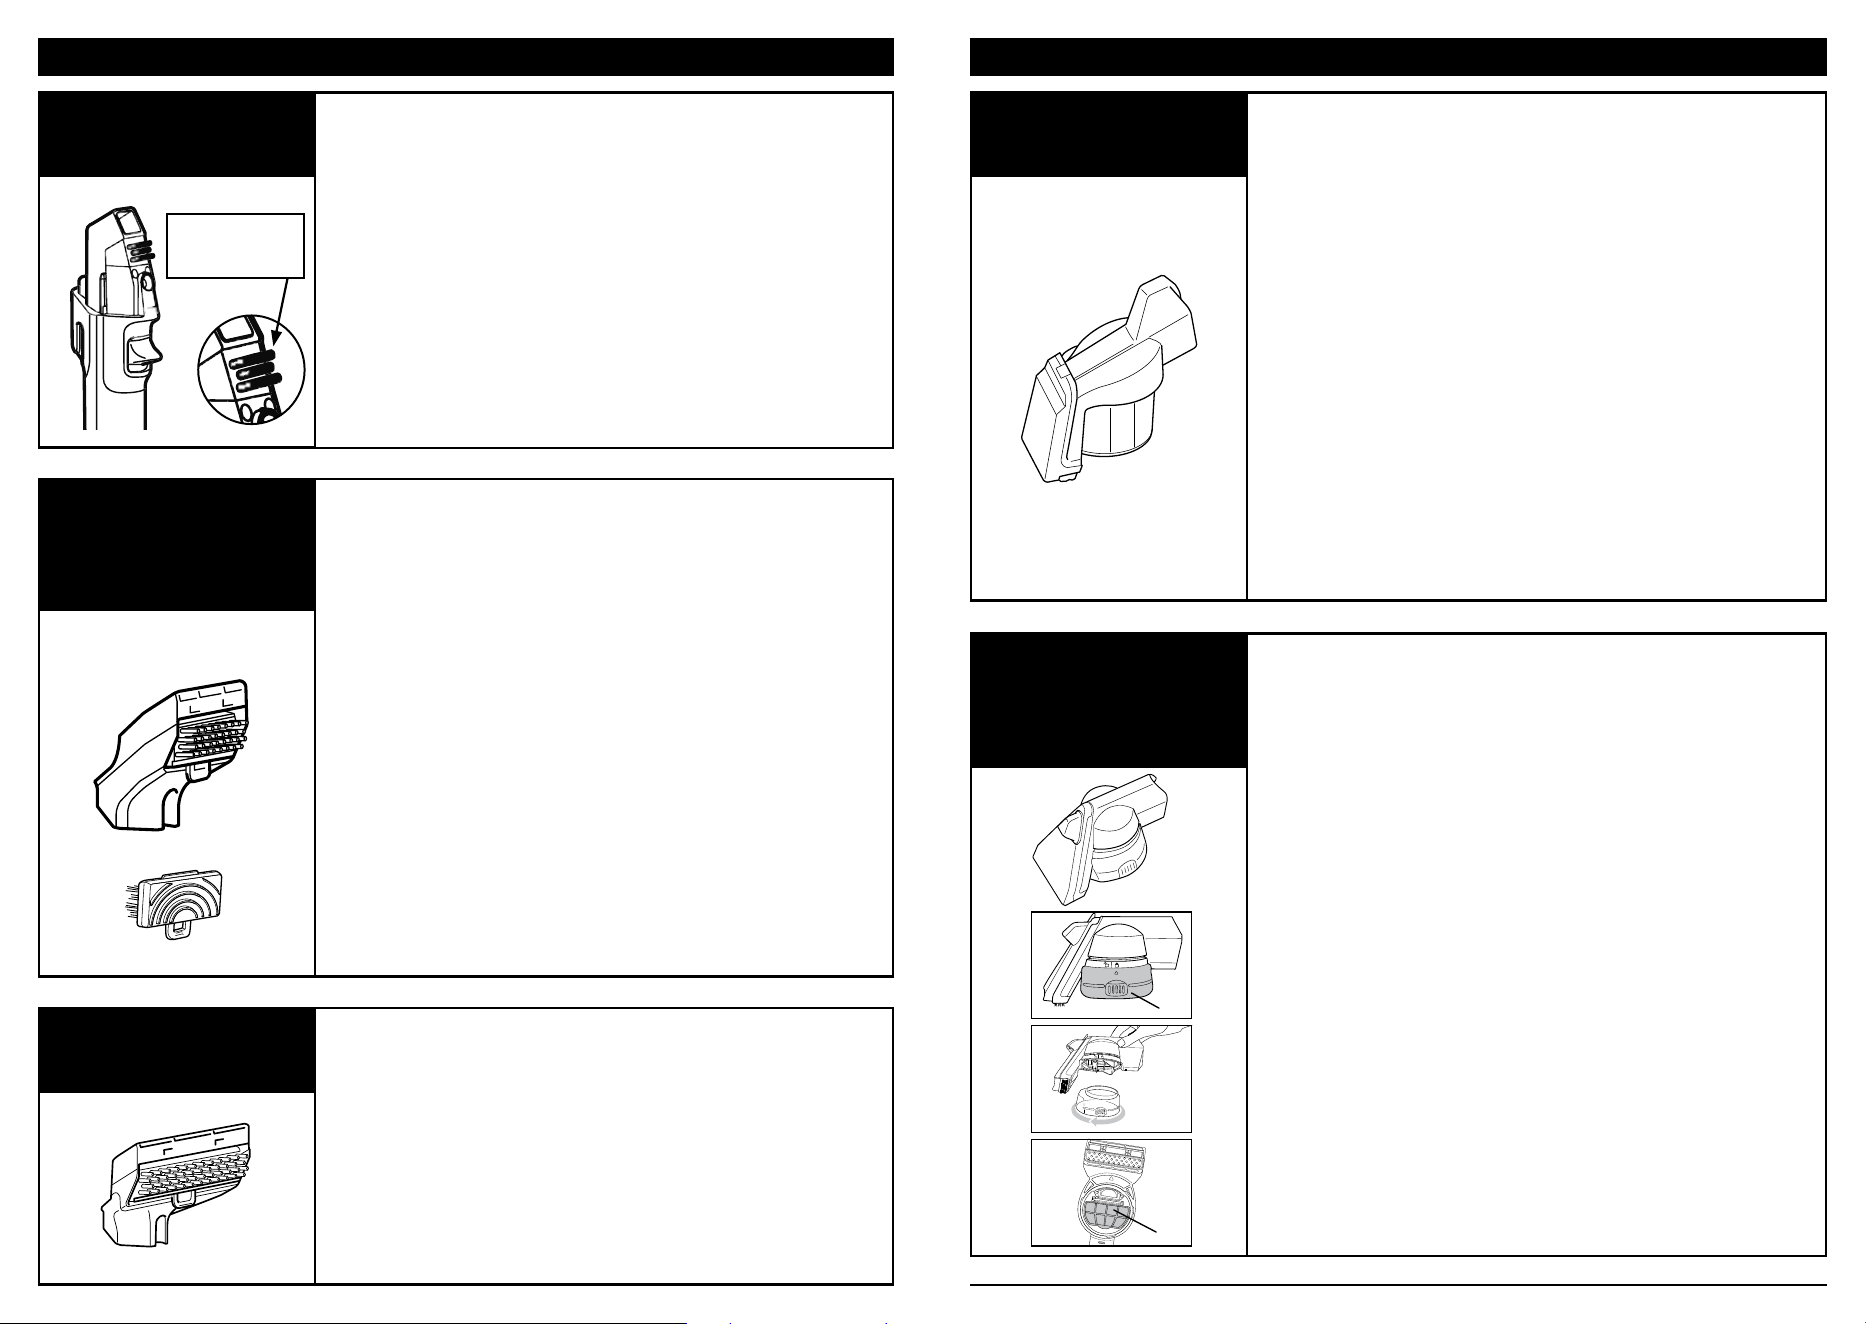
HAND TOOLS: USAGE, TIPS, AND MAINTENANCE
Dicult Stains
Light Hair Pickup
Tight Corners
Use with Solution (wet)
Rinse & Go
Dicult Stains
Light Hair Pickup
Use with Solution (wet)
Rinse & Go
Larger Area Stains
Light Hair Pickup
Use with Solution (wet)
Rinse & Go
PET HAIR EXTRACTOR
PET MESS EXTRACTOR
(SELECT MODELS)
Maintenance: Regularly remove the cup and filter from
the tool and empty debris into the trash to maintain
strong suction. Remove the window on the tool and
wash it before storing.
Maintenance: Remove the window from the tool and
wash it before storing. To clean the hose, see the
Using a Rinse & Go With Hand Tools instructions in
the Maintenance section on the next 2 pages.
TIPS:
• Use a back-and-forth scrubbing motion in short
strokes to pull up hair or break down a stain.
• When removing a large amount of hair, use shorter
strokes to avoid clumps. Remove hair as soon as it
appears. Do not let it accumulate.
• To maintain suction power, make sure to regularly
dispose of the liquid from the cup.
• Make sure to clean the hose regularly by removing
the Pet Hair Extractor tool and using Rinse & Go
with the Mini Stain Eliminator tool.
• Do not empty the cup into toilets or drains, as that
may cause clogs.
TIPS:
• Not intended for solid messes or for picking
up hair.
• Before cleaning liquid messes, first use a paper
towel to pick up any solids and dispose of them
in the trash.
• Spray the mess with solution, and use short back-
and-forth strokes with the tool to scrub the mess
and suction-up the solution.
• Make sure to keep the tool level, without tipping,
to prevent dirty liquid from entering the hose and
unit interior.
• Periodically dump out the dirty liquid from the
cup in the tool to maintain suction power.
• DO NOT exceed the MAX FILL LINE on the Pet
Mess Extractor cup to keep messes from entering
the interior of the hose or unit.
HAND TOOLS: USAGE, TIPS, AND MAINTENANCE
Surface Stains
Heavy Hair Pickup
Use Dry or with Solution (wet)
Rinse & Go
Liquid Pet Messes
Spot Cleaning
Use with Solution (wet)
Rinse & Go
MINI STAIN ELIMINATOR
(INTEGRATED)
3.5” STAIN ELIMINATOR
7’’ XL STAIN
ELIMINATOR
(SELECT MODELS)
Maintenance: Wash the bristles before storing if
needed. To clean, follow the Using Rinse & Go With
Hand Tools instructions in the Maintenance section.
Maintenance: Remove the window and reversible
bristles from the stain eliminator and wash them
before storing. Clean the hose after each use. See the
Using Rinse & Go With Hand Tools instructions in the
Maintenance section.
Maintenance: Refer to the 3.5” Stain Eliminator
maintenance section above.
TIPS:
• Use the rubber nubs on the Mini Stain Eliminator
rather than the bristles when cleaning softer
fabrics and to avoid hair tangling in the bristles.
Replaceable bristles and nubs are available for
sale at sharkclean.com.
• Bristles are intended for deeper stain cleaning.
TIPS:
• When cleaning softer fabrics, avoid hair tangles
by using the rubber nubs on the tool rather than
the bristles.
• Bristles are intended for deeper stain cleaning.
• When removing hair, use shorter strokes to avoid
clumps. Remove hair as soon as it appears.
Do not let it accumulate.
• Make sure to clean the hose regularly using
Rinse & Go.
• To remove large amounts of hair, use the
Pet Hair Extractor tool.
TIPS:
• This tool is similar to the 3.5” Stain Eliminator but
its cleaning path is twice as wide.
• Intended for larger jobs including sofas, stairs,
and large stains.
Bristles are
removable and
replaceable
Cup
Filter
sharkclean.comsharkclean.com
1 2 3 4
1 3
lid with float
filter
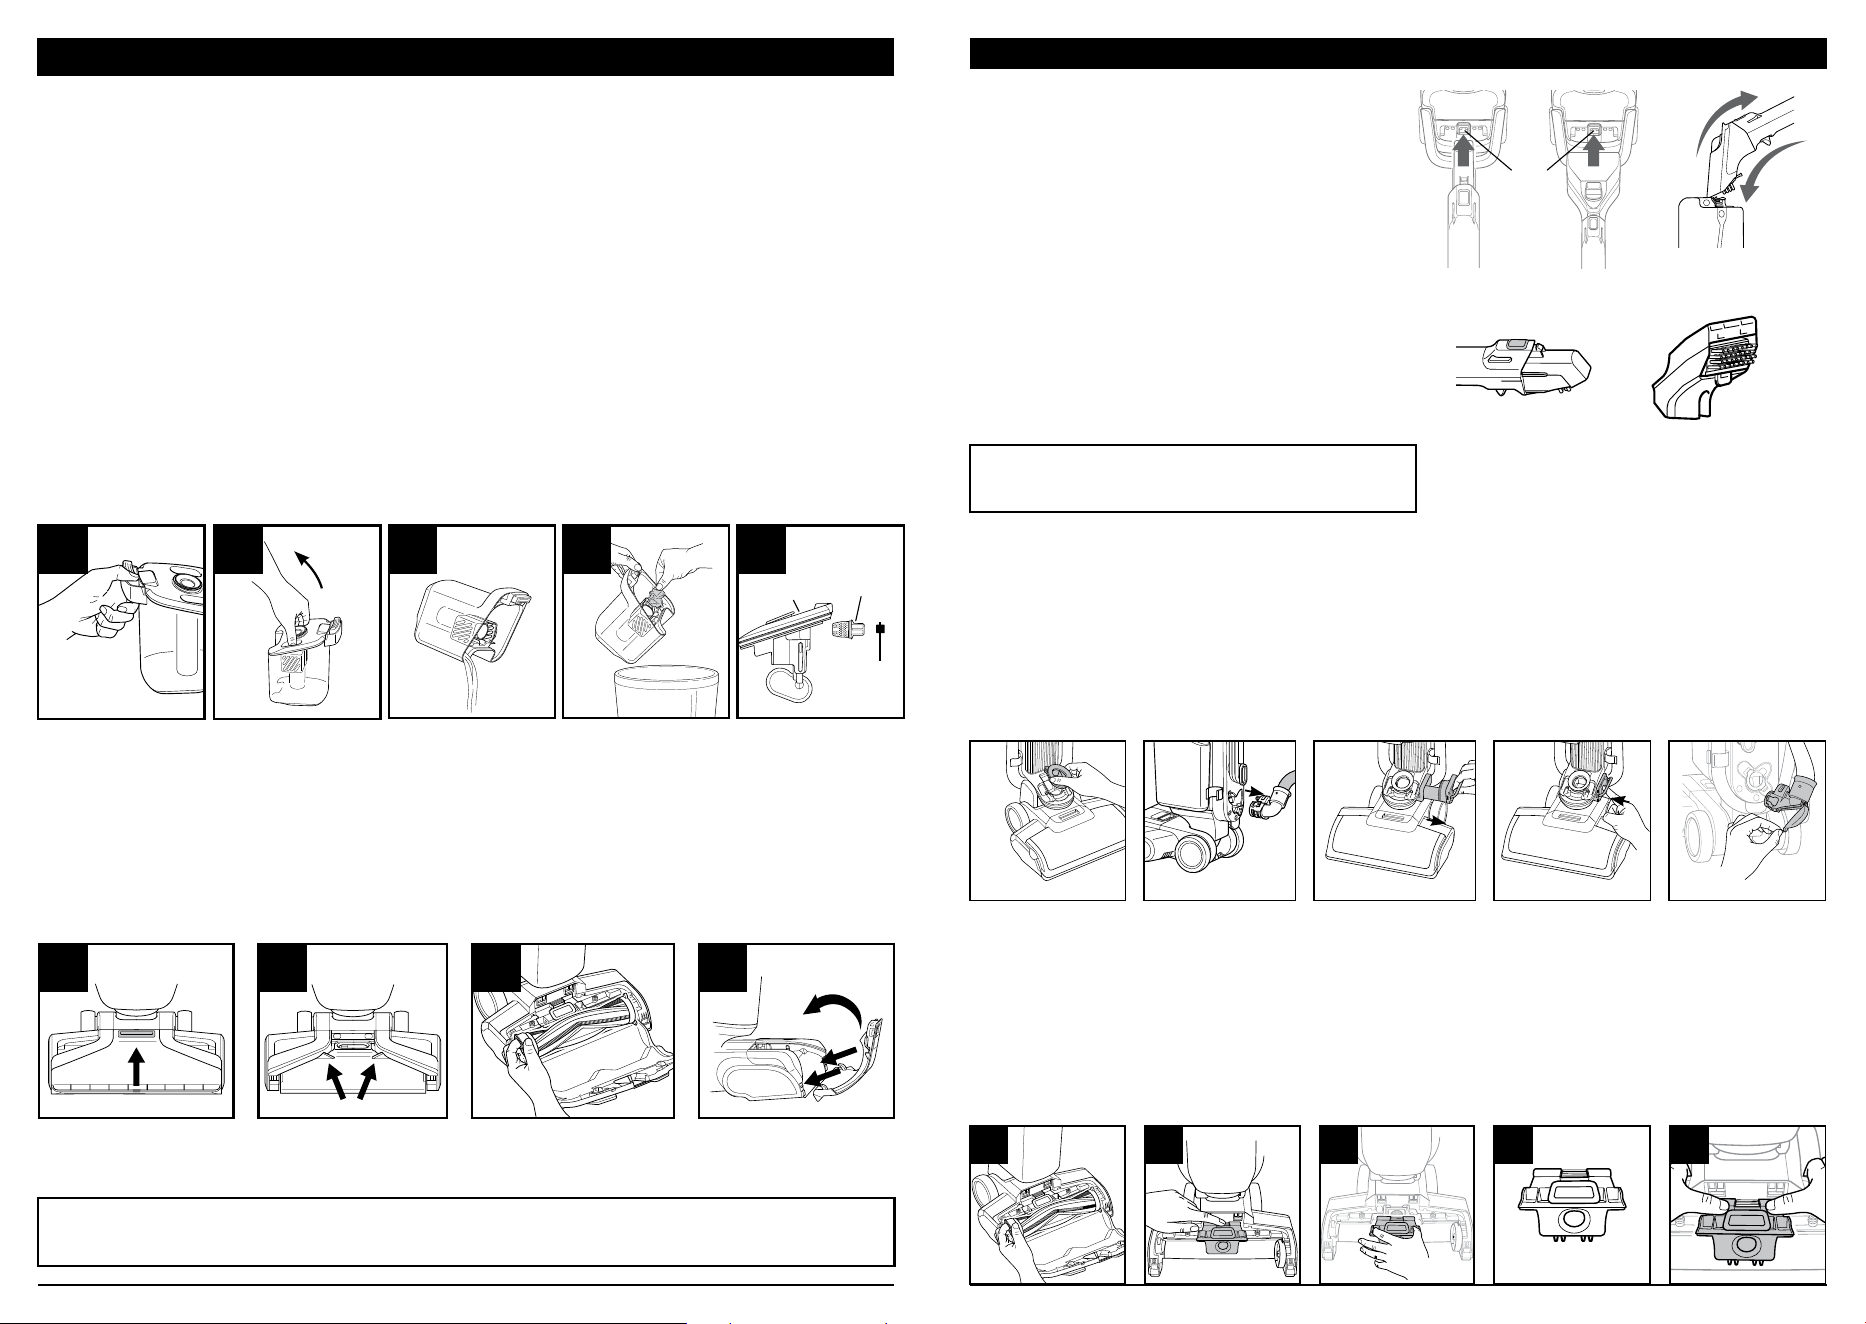
MAINTENANCE
DIRTY WATER TANK
Note: When the dirty water tank is full, there will be a change in motor noise or airflow,
and the indicator light will flash blue. The CarpetXpert unit will also turn o.
1. Press the release button and remove the tank (fig. 1).
2. Lift out lid with float (fig. 2). DO NOT pour out dirty water until float is fully
removed.
3. Pour dirty water from the tank down a drain.
4. Empty dirty water from tank (fig. 3). Dump hair and debris out of the
non-removeable hair cage into the trash (fig. 4). Rinse the dirty water tank and
the hair cage inside.
5. Remove the filter cover, then lift out the filter. Wash the filter with soap and water,
then allow it to air-dry completely before reinstalling.
6. Be sure to return the filter to the dirty water tank before reinstalling it. For
long-term storage, allow tank to air-dry completely before reinstalling it.
BRUSHROLL
1. Pull the latch to remove nozzle cover (fig. 1).
2. Open the inner cover by lifting it by the tabs marked PULL (fig. 2).
3. Remove the brushroll by pulling up on the side tab (fig. 3). If hair is wrapped,
cut it away by running scissors along the groove in the brushroll. Rinse brushroll,
cover, and doors and allow them to air-dry before reinstalling.
4. To reinstall the outer cover, connect the 2 hooks at the bottom, then push forward
until it clicks into place (fig. 4).
Note: When turning o the power, it will take 2 to 3 seconds for the unit to clear the
lines and power down completely.
Tip: Clean unit after every use to avoid odors, bacteria, and mold.
MAINTENANCE
CHECKING FOR DEBRIS
To check airpath for clogs, hair, or debris:
1. Unplug unit.
2. Remove dirty water tank.
3. Remove seal (fig. 10).
4. Detach the hose by squeezing the clips
on the hose attachment. (fig. 11).
5. Remove any clogs by pulling the
change-over valve while the unit is in
the upright position (fig. 12).
6. Remove any debris and rinse the
change-over valve if needed.
7. Reattach all parts. Make sure the
change-over valve clicks securely into
place (fig. 13).
8. Check the connection where the hose
attaches to the bottom of the unit and
clean out any debris (fig. 14).
Note: Use a paper towel to wipe away any debris on interior of the inner cover.
CLEANING THE DIVERTER VALVE
Clean the diverter valve behind the brushroll if you are doing a deep clean of the
CarpetXpert unit.
1. Remove the brushroll (fig. 1).
2. Press the release button at the top of the diverter valve (fig. 2), then pull out
the valve (fig. 3).
3. Use a damp cloth or paper towel to wipe away any debris on the valve or in
the opening.
4. Rinse the valve and wipe with paper towel before reinserting to unit.
5. Reinsert the valve and secure it by pushing firmly until it clicks into place (fig. 5).
4 5
5
2
1 2 3 4
fig. 10 fig. 11 fig. 12 fig. 13 fig. 14
USING RINSE & GO WITH HAND TOOLS
Rinse & Go can be used with the Mini Stain
Eliminator and the 3.5” Stain Eliminator.
To clean the interior of these tools and the
hose:
1. Turn on power to the unit.
2. Insert the tip of the hand tool into
the Rinse & Go groove on top of the
CarpetXpert tank. Press the tool down
onto the button to suction up cleaning
solution (fig.1, fig.2).
3. Tilt tool back and forth for optimal
liquid flow (fig. 3).
4. After cleaning is complete, hold the tool
high and let unit run for 3 seconds.
5. Turn off power.
fig. 3fig. 2fig. 1
Mini Stain
Eliminator
3.5” Stain
Eliminator
filter
cover
button
Tip:
If hose is not fully clean, shake it gently
back-and-forth while using Rinse & Go.
sharkclean.comsharkclean.com
Note: The StainStriker tank dispenses at a slower rate than the CarpetXpert Tank
and only when using hand tools.
FIVE (5) YEAR LIMITED WARRANTY
The Five (5) Year Limited Warranty applies to purchases made from authorized retailers of
SharkNinja Operating LLC. Warranty coverage applies to the original owner and to the original
product only and is not transferable.
SharkNinja warrants that the unit shall be free from defects in material and workmanship for
a period of Five (5) years from the date of purchase when it is used under normal household
conditions and maintained according to the requirements outlined in the Owner’s Guide, subject
to the following conditions and exclusions:
What is covered by this warranty?
1. The original unit and/or non-wearable parts deemed defective, in SharkNinja’s sole discretion,
will be repaired or replaced up to Five (5) years from the original purchase date.
2. In the event a replacement unit is issued, the warranty coverage ends six (6) months following
the receipt date of the replacement unit or the remainder of the existing warranty, whichever is
later. SharkNinja reserves the right to replace the unit with one of equal or greater value.
What is not covered by this warranty?
1. Normal wear and tear of wearable parts (such as Shark Cleaner, Pad, etc.), which require
regular maintenance and/or replacement to ensure the proper functioning of your
unit, are not covered by this warranty. Replacement parts are available for purchase at
sharkaccessories.com.
2. Any unit that has been tampered with or used for commercial purposes.
3. Damage caused by misuse, abuse, negligent handling, failure to perform required maintenance,
or damage due to mishandling in transit.
4. Consequential and incidental damages.
5. Defects caused by repair persons not authorized by SharkNinja. These defects include
damages caused in the process of shipping, altering, or repairing the SharkNinja product (or
any of its parts) when the repair is performed by a repair person not authorized by SharkNinja.
6. Products purchased, used, or operated outside North America.
How to get service
If your appliance fails to operate properly while in use under normal household conditions within
the warranty period, visit sharkclean.com/support for product care and maintenance self-help. Our
Customer Service Specialists are also available at 1-800-798-7398 to assist with product support
and warranty service options, including the possibility of upgrading to our VIP warranty service
options for select product categories. So we may better assist you, please register your product
online at registeryourshark.com and have the product on hand when you call. SharkNinja will
cover the cost for the customer to send in the unit to us for repair or replacement. A fee of $25.95
(subject to change) will be charged when SharkNinja ships the repaired or replacement unit.
How to initiate a warranty claim
You must call 1-800-798-7398 to initiate a warranty claim. You will need the receipt as proof of
purchase. We also ask that you register your product online at registeryourshark.com and have
the product on hand when you call, so we may better assist you. A Customer Service Specialist will
provide you with return and packing instruction information.
How state law applies
This warranty gives you specific legal rights, and you also may have other rights that vary from
state to state. Some states do not permit the exclusion or limitation of incidental or consequential
so the above might not apply to you.
FIVE (5) YEAR LIMITED WARRANTY
Note: To buy cleaning solution, accessories, or replacement parts, visit sharkclean.com.
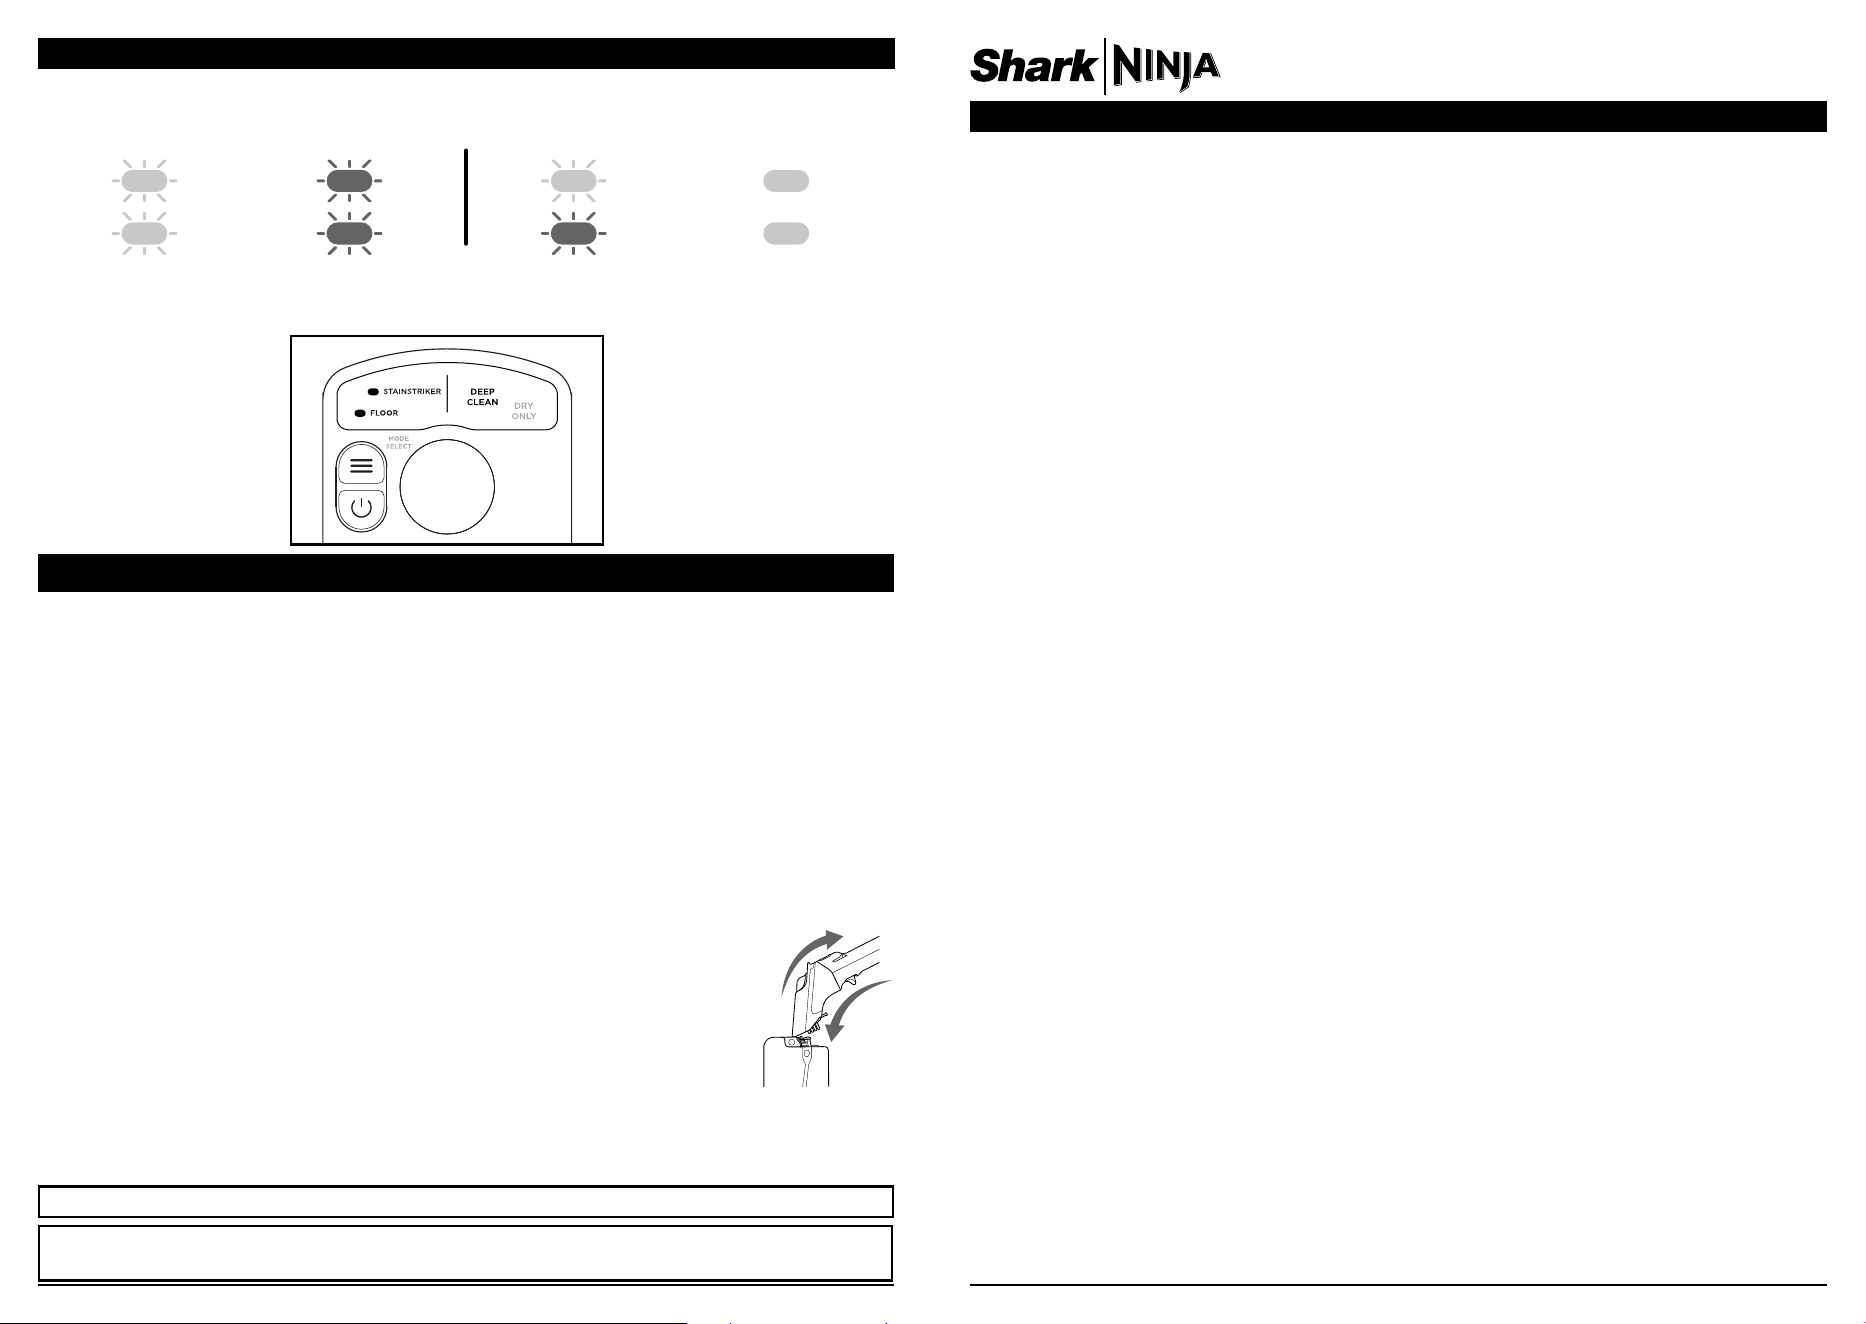
INDICATOR LIGHTS
Valve Error
Top blinking red,
bottom blinking
blue
Door Open
Both
blinking red
Brushroll Jam
Steady red
LED Warnings
Dirty Water
Tank Full
Both
blinking blue
TROUBLESHOOTING
Purple Indicator Lights: High temperature alarm. Unit shut down due to overheating. Unplug and allow
to cool for 10 minutes.
Valve Error Occurred: Reset unit by turning o. This Valve Error will trigger if you are moving forward
only or backward only for an extended period of time. Use CarpetXpert in shorter back and forth
motions. Follow steps in CHECKING FOR DEBRIS section under maintenance to check for clogs.
Leaking: Be sure the hose is inserted all the way, hearing 2 clicks when connected properly and the caps
on the tanks are tightened.
Poor suction: Make sure all parts are connected securely and the hose clicks twice when attaching it
to the back of the unit. See CHECKING FOR DEBRIS section above for more information. If issue is not
resolved, remove parts and put them back in to make sure they are fully inserted.
Hand tool not spraying: Be sure valves and hose are properly inserted. See CHECKING FOR DEBRIS
and CLEANING THE DIVERTER VALVE sections under maintenance for removal and insertion tips. Both
solution tanks should be full and fully inserted. Unit needs to be in upright position to use hand tool.
Floor nozzle not dispensing solution: Be sure the solution tanks are full. Make sure the change-over
valve is properly installed and clicks securely into place. Make sure unit is fully reclined and in Deep
Clean Mode.
Oxy Multiplier is not being dispensed: Be sure tanks are attached securely. OXY Multiplier is only
dispensed when using hand tools for above-floor cleaning.
The Dirty Water Tank Full indicator lights are on, but the tank is not full: Make sure the
change-over valve is installed properly. See CHECKING FOR DEBRIS section for more
information. Remove the tank, empty the water and non-removable hair cage, reinstall
it, then restart the unit. Error could be due to a full hair cage.
Rinse & Go is not working with a hand tool: Be sure that the tip of the clear window is
fully inserted into the Rinse & Go groove. If Rinse & Go is still not working, rock the
hand tool back and forth to improve liquid flow.
No Clumps left behind: To pick up clumps, move forward slowly over remaining hair.
Debris is stuck in the hose: While using Rinse & Go, tap or shake the hose
to help clear debris.
Oversaturated Carpets: Passing over cleaned areas in Dry Only Mode will help reduce dry times.
Dry times will vary based on cleaning speed, carpet type and humidity. See DEEP CLEANING WITH
CARPETXPERT section for cleaning tips.
sharkclean.comsharkclean.com

© 2024 SharkNinja Operating LLC. HAIRPRO and SHARK are registered trademarks of SharkNinja Operating LLC.
CARPETXPERT and STAINSTRIKER are trademarks of SharkNinja Operating LLC.
EX300Series_IB_MP_Mv39
PLEASE READ CAREFULLY AND KEEP FOR FUTURE REFERENCE.
This Owner’s Guide is designed to help you get a complete understanding of your new
Shark® CarpetXpert™ HairPro® Pet.
SharkNinja Operating LLC
US: Needham, MA 02494
CAN: Ville St-Laurent, QC H4S 1A7
1-800-798-7398
sharkclean.com
Illustrations may dier from actual product. We are constantly striving to improve our
products, therefore the specifications contained herein are subject to change without
notice.
This product may be covered by one or more U.S. patents. See sharkninja.com/patents
for more information.