USER MANUAL
Before using, please read the operating instructions carefully to
ensure proper application and achieve satisfactory results.
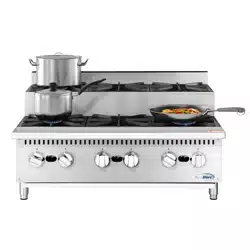
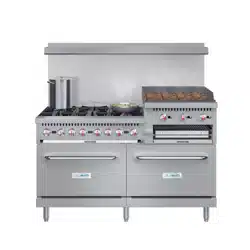
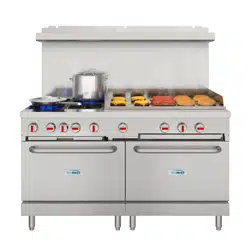
KoolMore Commercial Range with
Griddle & Burners
Models: KM-CR24-NG, KM-CR24-LP, KM-CR36-NG, KM-CR36-LP,
KM-CR60-NG, KM-CR60-LP
KM-CRG36-NG, KM-CRG36-LP, KM-CRG60-NG, KM-CRG60-LP,
KM-CRG364-NG, KM-CRG482-NG
KM-CRGB60-NG, KM-CRGB60-LP
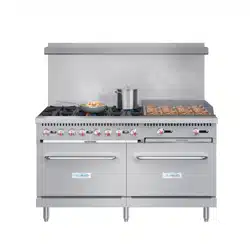
COMMERCIAL RANGE
KM-CRG364-NG KM-CRG482-NG

Stay informed with the latest information for your
KoolMore Range.
If you need any assistance or have questions, our customer support
team is here to help.

3
Safety ................................................................... 4
Product Features .................................................. 5
Set up .................................................................... 6
Backsplash Assembly .......................................... 8
Operation ...............................................................9
Maintenance ........................................................ 11
Troubleshooting ................................................. 13
Warranty .............................................................. 14
Content

4
• Any self-modication, incorrect installation, adjustment, or maintenance may result in property loss or
injury. Please contact the manufacturer for any adjustments or maintenance, and ensure that the work is
done by a trained and quali- ed person.
• For your safety, keep the machine away from any liquids, gases, or other objects that are ammable or
explosive.
• Do not obstruct the ow of combustion and ventilation air.
• The installation must comply with local codes, or in the absence of local codes, with the National Fuel Gas
Code, ANSI Z223.1/NFPA 54, or the Natural Gas and Propane Installation Code, CSA B149.1. The appliance
must be isolated from the gas supply piping system by closing its individual manual shut-off valve during
any pressure testing of the gas supply piping system at test pressures equal to or less than 1/2 psi (3.5
kPa).
• The installation must be made with a connector that complies with the Standard for Connectors for
Movable Gas Appliances, ANSI Z21.69
• CSA 6.16, and a quick-disconnect device that complies with the Standard for Quick-Disconnect Devices for
Use With Gas Fuel, ANSI Z21.41
• CSA 6.9. Adequate means must be provided to limit the movement of the appliance without depending on
the connec- tor and the quick-disconnect device or its associated piping to limit the appliance movement,
and the location(s) where the restraining means may be attached to the appliance shall be specied.
• Ensure adequate clearance for air openings into the combustion chamber.
• Ensure adequate clearances for servicing and proper operation.
• This appliance should not be operated by those with physical, sensory, or mental disabilities, or those
with insucient experience or knowledge (including children). Only those who have been given sucient
supervision and guarantees of personal safety, as well as proper instructions and guidance, may perform
specic operations on this device.
• Keep children away from the device.
• Keep this manual safe. When passing on or selling the device to a third party, the manuals must be handed
over along with the device. All users must operate the device in compliance with the user manual and
related safety guidelines.
• If the appliance is placed near walls, partitions, or kitchen furniture, it is advisable to make these facilities
with non-com- bustible material. Otherwise, cover them with non-combustible heat-resistant material and
pay attention to re preven- tion regulations.
• The appliance should be installed in a well-ventilated area with exhausting facilities that ensure all burnt
gases produced during the combustion process are completely exhausted.
• The appliance is only suitable for use with low-pressure gas regulating valves. Using other types of
regulating valves may result in property loss and injury.
• Do not seal the screw on the gas valve with seal welding.
• Fire warning: If you smell gas, move away from any source of re. Do not light any device or touch any
electronic switch- es. Do not use any phones inside the building. Close the main gas valve immediately and
call a professional to carry out maintenance. Operating or maintaining the appliance by force or improperly
may result in large gas leaks or deagration. The manufacturer will not be held responsible for any re
accidents caused by improper operation or maintenance.
Safety

5
• The bracket, exterior nish, and adjustable feet are all stainless steel.
• The control panel features a convenient design with a knob control switch for operating the
device.
• The device is equipped with cast-iron burners. If the burner accidentally goes out, the safety valve
will shut off automatically.
• The oven is insulated with black cast-iron frameworks and stainless steel slag collectors.
• The oven temperature is adjustable from 250°F to 550°F.
• The oven is equipped with a ame self-stabilizing function. If the burner goes out accidentally, the
gas valve will shut off automatically.
• The burner power is 30000Btu, designed with a pilot ame for standby.
• The enamel base plate is designed to be removable, high-radiant, and heat-resistant.
Product features

6
Transportation and Storage
Transportation: Handle the machine carefully and do not turn it upside down to avoid damaging the exterior and internal
parts. Store the packaged machine in a well-ventilated warehouse away from corrosive gases. If storing outside, protect it
from rain.
Installation
Professional Installation: This device should be installed by professional technicians.
Elevation Suitability: This device works best at elevations below 6562 feet above sea level. For higher elevations, consult
the manufacturer.
Special Notice
• Professional Handling: Only trained professionals should install, rst use, or maintain this device.
• Safety First: Keep the device in its original packaging until installed to maintain its integrity. When using, follow all
safety guidelines.
• First Use of Ignition: If the ignition switch doesn’t work the rst time, turn it off, wait 3 minutes, and try again.
• Gas Pressure: Only use the specied gas type and pressure for this device. High or unregulated gas pressure can
damage the appliance or cause accidents. Ensure the gas regulator matches the device’s requirements.
• Gas Leaks: If you smell gas, do not operate any electrical switches. Turn off the gas supply, ventilate the area, and
contact a professional for assistance.
• Professional Maintenance: This is a commercial appliance designed for trained cooks. It requires professional
installation and maintenance. Do not attempt to use or repair it without proper training.
• Usage: This device is intended for commercial cooking only. It should not be used for any other purpose.
• Operation: Always operate the device as instructed. Unauthorized modications or tampering can lead to malfunction
or safety hazards.
• Assembly: Do not disassemble or modify the appliance. Any unauthorized changes or repairs might compromise its
safety and performance.
• Load Limits: Avoid placing heavy objects on the appliance. Overloading can cause damage or dangerous operation.
• Ventilation: Keep the appliance’s vents clear of obstructions to ensure proper airow. Blocked vents can lead to
overheating and re hazards.
• Cleaning: Clean the appliance regularly, especially after spills. Use a damp cloth for cleaning and avoid abrasive
materials that could scratch the surface.
• Surface Contact: Avoid direct contact with hot surfaces to prevent burns. Use handles or oven mitts when necessary.
• Spillage: In case of a spill, especially ammable liquids, clean immediately to prevent re risks.
• Electrical Safety: Ensure the electrical connection conforms to local codes. If the appliance is not functioning
correctly, contact the manufacturer or a qualied technician.
• Installation Environment: Install the appliance in a well-ventilated area, away from ammable materials. Follow all
local building and re codes during installation.
• Object Placement: Do not place objects like towels or utensils on the appliance or its surfaces to avoid re risks.
• Emergency Response: If you suspect a gas leak, do not use the appliance. Turn off the gas supply and ventilate the
room.
• Troubleshooting: If the appliance does not work, check the power supply and ensure all switches are on before calling
for service. If it still doesn’t function, contact a professional.
Installation Tips
• Gas Connection: Follow local gas safety and installation regulations when connecting the device.
Set up

7
• Clearance: Keep at least 4 inches away from combustible objects on the sides and 8 inches at the back. Ensure there’s
enough space around the motor for ventilation, especially if installed near walls or other enclosures.
• Weight and Stability: Install on a stable, level oor. Use adjustable feet to level the device if necessary.
• Ventilation: Make sure there’s good airow to remove any combustion gases.
• Secure Installation: After setting up, ensure the device is stable and doesn’t wobble.
• Emergency Shutoff: Install an easily accessible shutoff valve near the device for safety.
• Gas Type Compatibility: Verify that the gas supply matches what the device is designed for. If unsure, don’t use the
device.
• Pressure Regulation: Use only the recommended low-pressure gas regulator for this device.
• Leak Prevention: After connecting gas pipes, check for leaks with soapy water or a leak detector. Do not use open
ames to check for leaks.
• Final Checks: After installation, verify the gas pressure to ensure it’s correct.
Griddle Seasoning
Caution: The griddle plate is made of steel, which has a relatively soft surface. Be careful not to dent, scratch, or gouge
the plate surface with spatulas or scrapers. Use tools gently and avoid tapping the edge of the spatula on the griddle, as it
could cause damage.
Why Season the Griddle? Seasoning is essential to maintain the griddle’s surface by lling its pores with oil. This process
creates a slick, hard nish that helps food release easily during cooking.
How to Season the Griddle:
1. Initial Cleaning: Clean the griddle surface to remove any manufacturing residues or debris.
2. Heating: Heat the griddle top section at a low burner setting.
3. Oil Application: Pour one ounce of cooking oil onto the center of the griddle surface.
4. Spreading the Oil: Use an insulated cloth, spread the oil evenly across the griddle to form a thin lm.
5. Removing Excess Oil: Wipe off any excess oil with a dry cloth to avoid pooling.
6. Repeat: Repeat this process 2 to 3 times or until the griddle achieves a slick surface.
This seasoning process not only prepares the griddle for cooking but also helps in maintaining its longevity by protecting
the surface from rust and wear.
8
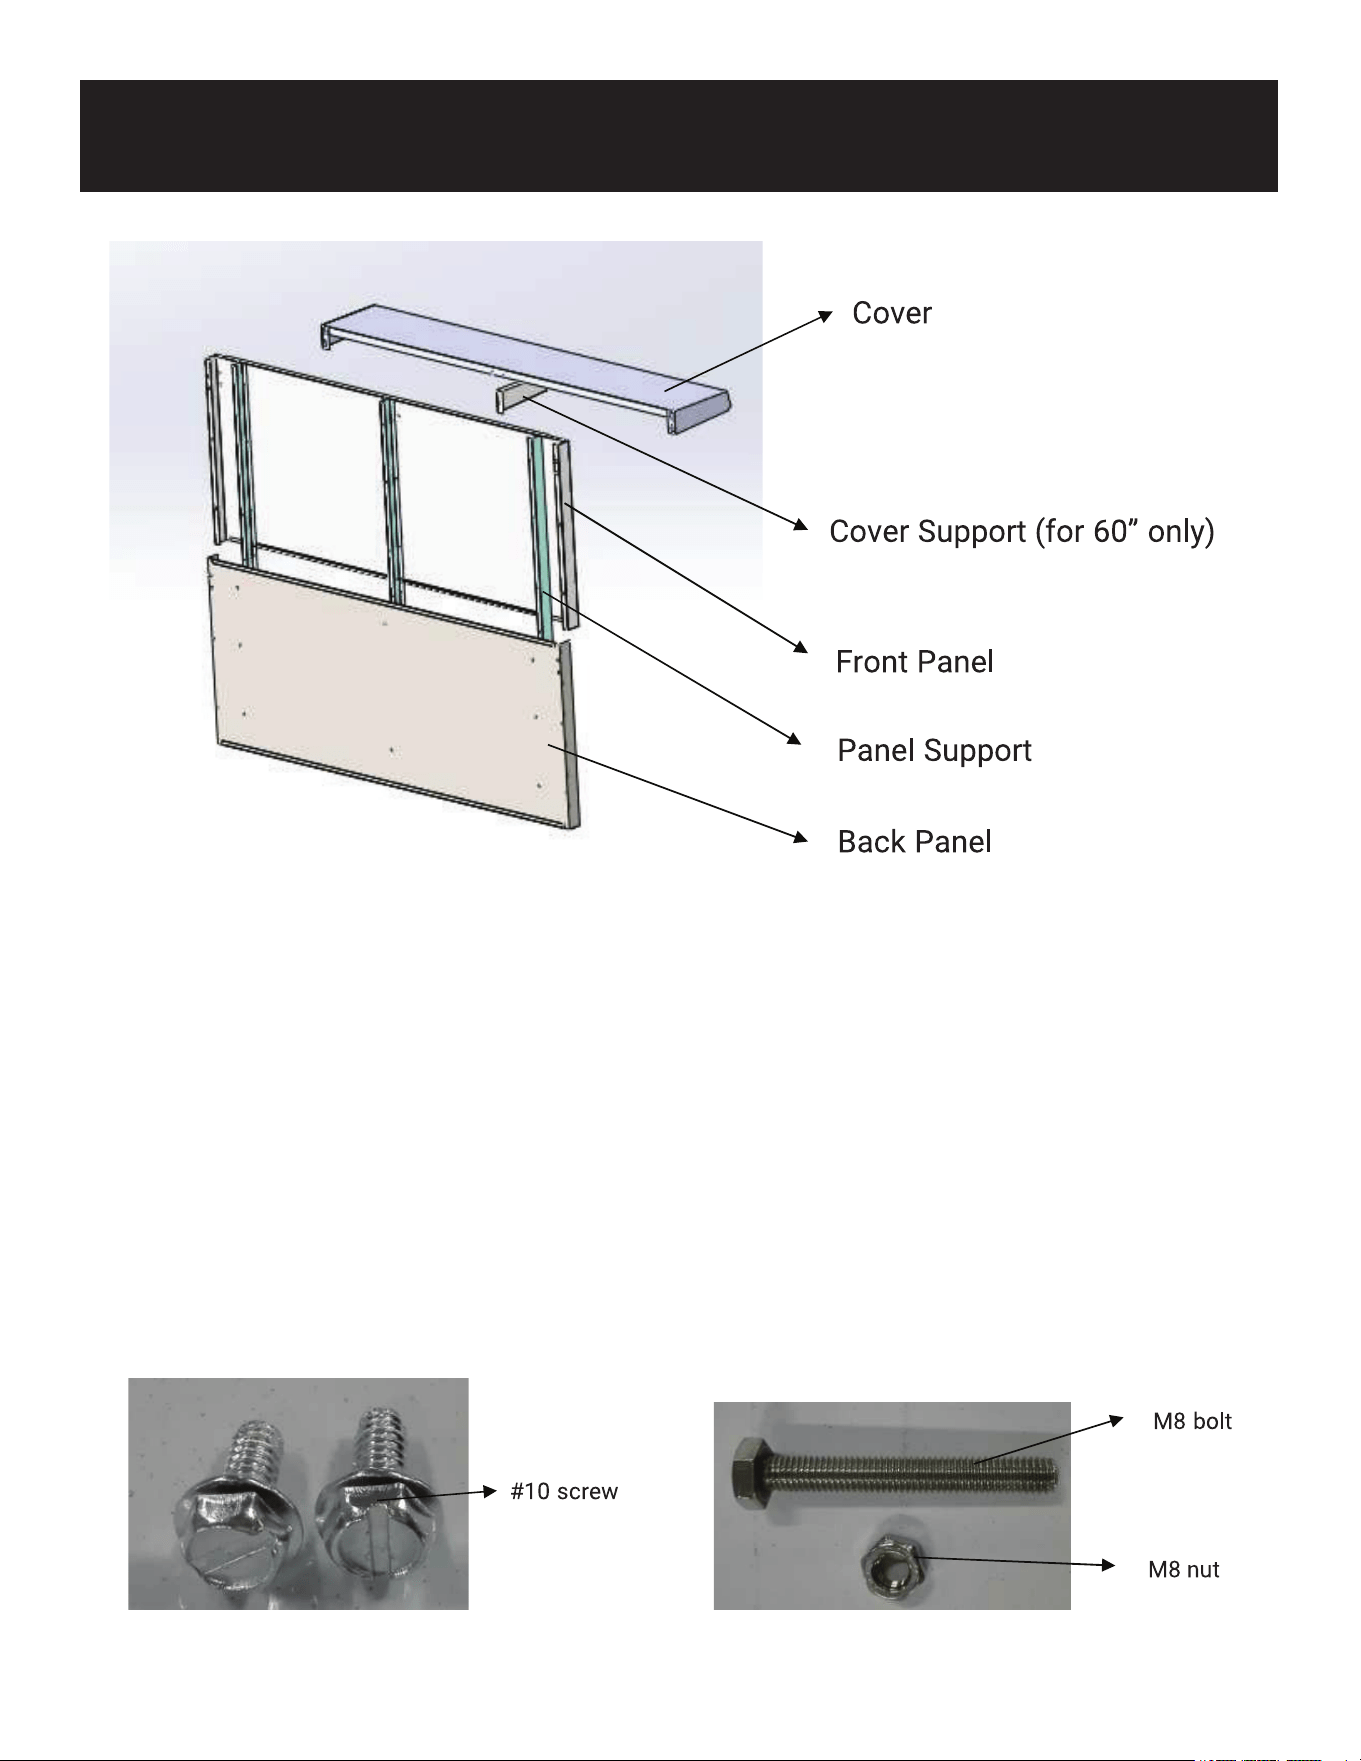
Backsplash Assembly
1. Open the package and remove the backsplash components.
2. Assemble the required components according to the above image.
3. Slide the back panel into the front panel from the bottom of the front panel.
4. Align the holes and use four #10 sheet metal screws to fasten the front and back panels together
rmly from the backside.
5. Insert the sliding panel support into the panel from the openings on top of the front panel, align the
holes, and use eleven #10 sheet metal screws to fasten them together rmly from both the back and
front.
6. Attach the cover to the front panel using four sets of M8 bolts and nuts, making sure that the M8
nut is at the backside.
7. Assemble the cover support (for 60” only), and use a #10 sheet metal screw to fasten it rmly.
9
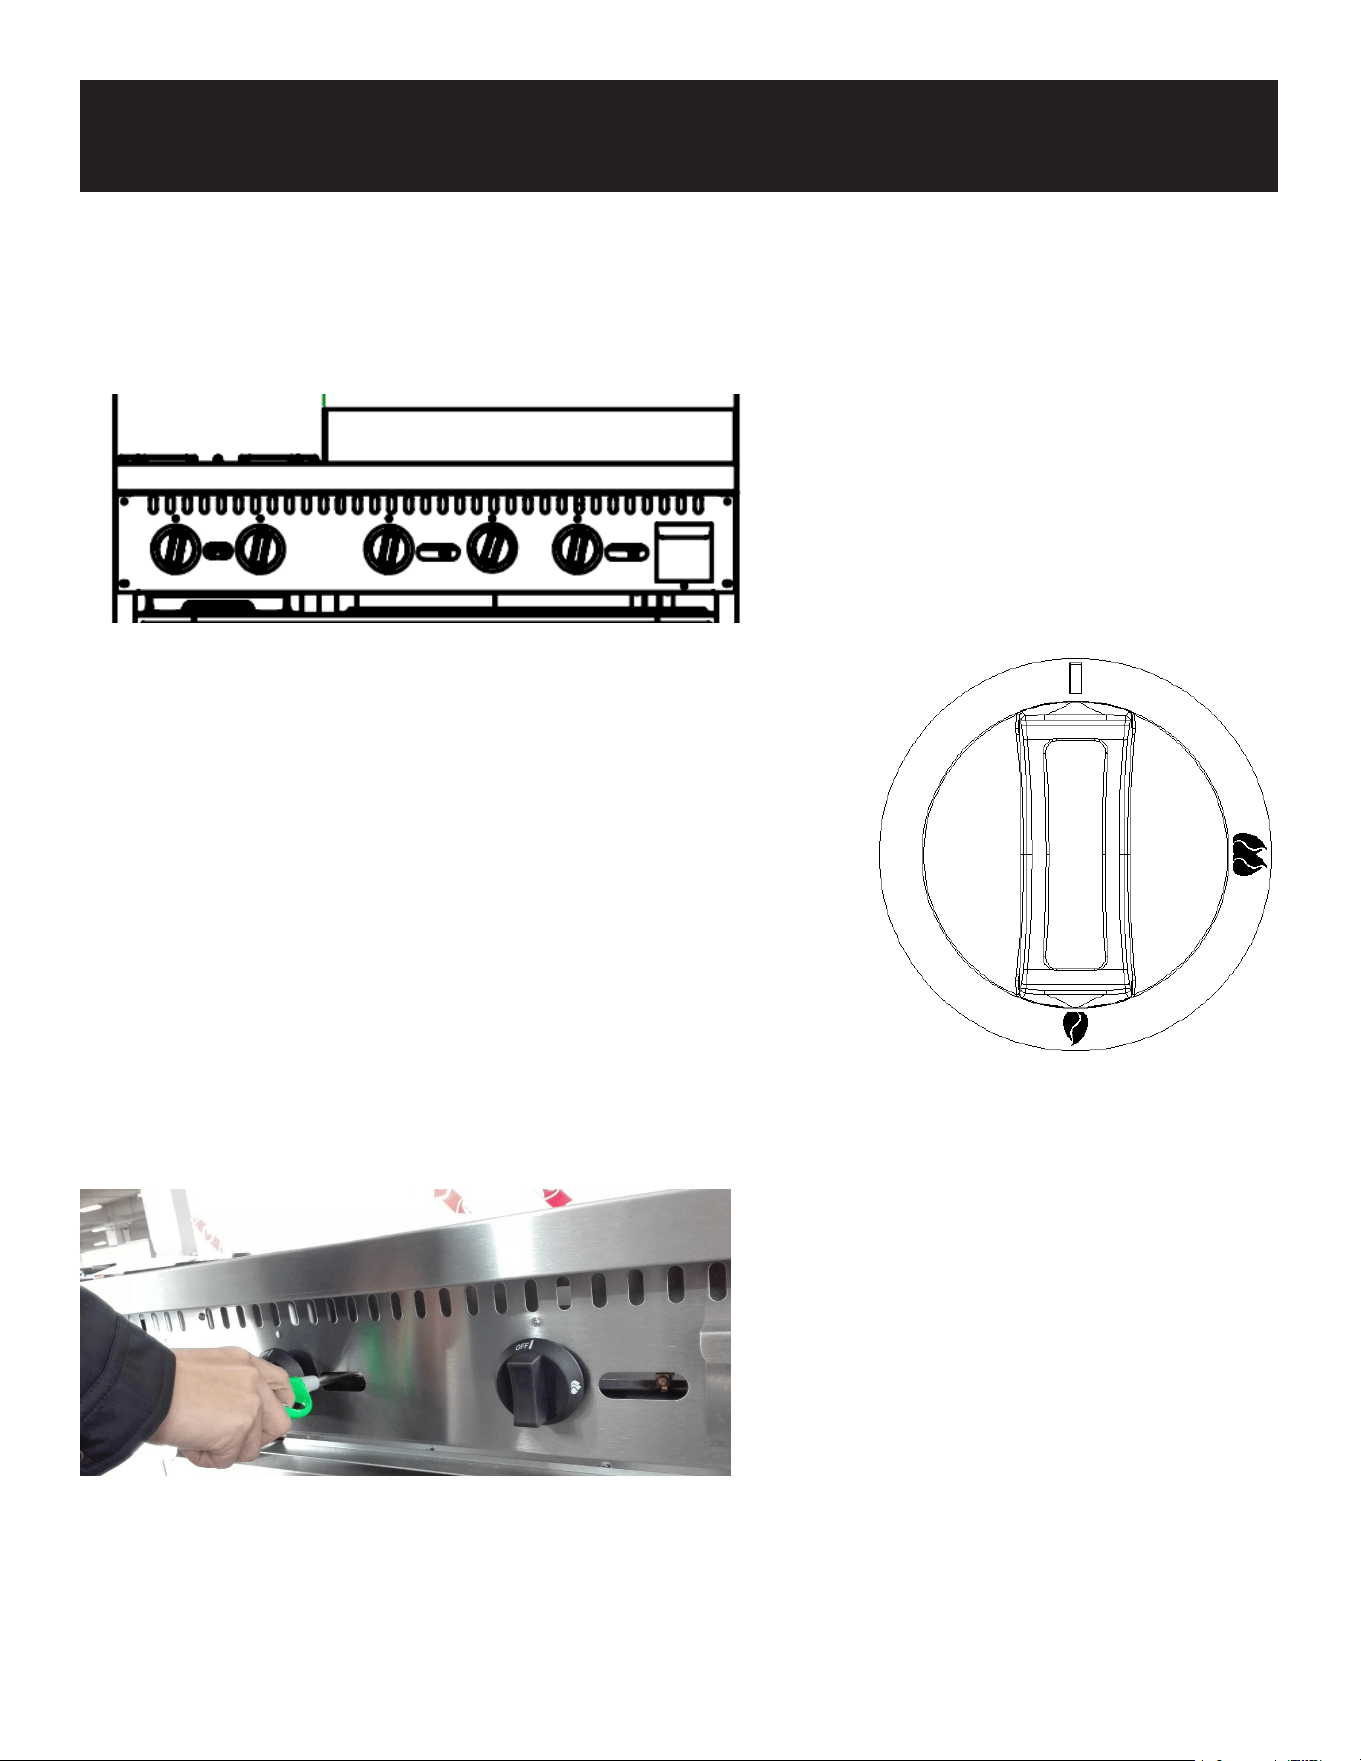
Control Panel:
Using the Gas Range:
Turning on the Gas:
Turn on the gas valve and light the pilot ame with an igniter. If
the appliance has been idle for an extended period or is used for
the rst time, the ignition process might take longer (about 2-3
minutes).
Adjusting the Burner:
Press the valve knob slightly and rotate it counterclockwise to
light the burner. To turn the ame up to MAX, align the knob
with the double ame symbol. To turn it down to MIN, rotate the
knob counterclockwise to single ame symbol.
Need use a long lighter to ignite the Griddle pilot through the pilot holes, see below
gure:
Shutting Down:
After using the main burner, turn off by rotating the knob clockwise back to its original position.
Caution! When not in use, ensure the quick-acting shut-off valve is turned off for safety.
Operation

10
Initial Cleaning and Preparation:
Before rst use, thoroughly clean the oven to remove any packaging materials and manufacturing
residues. Also, clean the stainless steel surfaces with a suitable detergent, then dry the device com-
pletely to avoid any moisture inside.
• First Use and Smell: It's normal to experience an unpleasant smell during the rst few uses. Ensure
this smell is not due to gas leakage. Any smell from overheating is typically from the insulation
material curing or oil residue from manufacturing heating up. If the oven is new, do not put any
food inside until the smell has dissipated, which might take about 30 to 60 minutes.
• Ignition Duration: The rst ignition might take slightly longer as air needs to be purged from the
gas lines.
• Temperature Control: The oven can reach temperatures between 250°F and 550°F. Use the tem-
perature knob to set your desired temperature.
• Igniting the Oven: To ignite the oven, open the oven door slightly, press the temperature control
knob down, and rotate it counterclockwise to the ignite position. Keep pressing for about 10 sec-
onds until the pilot light ignites, then release the knob. If the pilot doesn't light, repeat the process.
Ensure the oven door is closed after ignition.
• Setting the Timer: Use the timer to set the cooking duration. The oven will automatically turn off
once the timer reaches zero.
• Using the Oven: Place your dishes inside the oven on the appropriate rack level. For baking, the
middle rack is often ideal unless the recipe species otherwise. For roasting, the lower rack might
be preferable.
• Cooking Modes: Most standard ovens come with different cooking modes like bake, broil, and
sometimes convection. Choose the mode based on your cooking needs. For instance, use the
broil setting for top-down cooking to brown the top of dishes, or bake for even heat distribution
from all sides.
• Safety Precautions: Always use oven mitts when handling hot dishes. Never leave the oven unat-
tended for long periods when in use, especially when cooking at high temperatures or with oils
that could overheat.
• Post-Use: Once cooking is complete, turn the oven off and let it cool down before cleaning. This
helps in preventing burns and allows for safer cleaning.
• Cleaning the Oven: After it has cooled, clean the oven interior with a damp cloth or sponge with a
mild detergent. Avoid using abrasive cleaners or steel wool which can scratch

11
Maintenance
Routine Inspection
Daily Checks:
• Regular Maintenance: It's crucial to inspect the machine daily to prevent accidents or unexpected
issues.
• Stop Use: Immediately stop using the machine if any abnormalities are detected or if there are
unusual vibrations.
Before and After Use:
• Machine Stability: Ensure the machine is not tilted.
• Control Panel: Check for any damage to the control panel.
• Grease Tray: Make sure the grease tray is clean and properly placed.
During Use:
• Strange Smells or Vibrations: Be alert for any unusual smells or vibrations which could indicate a
malfunction.
• Flame Status: Monitor the burner's ame for normality. Look out for issues like ameouts or light-
backs.
• Power Supply: Verify that the power supply to the machine is stable and functioning correctly.
Cleaning & Maintenance
• Preparation: Before cleaning, ensure the device is turned off and cool. Also, turn off the gas valve.
• Daily Cleaning: Use warm soapy water to clean surfaces. Avoid using hot water directly on the
device.
• Avoid Abrasives: Do not use abrasive materials or steel wool for cleaning as these can scratch
surfaces. Instead, use a soft cloth or sponge.
• Cleaning Agents: For tough stains, use a mild chlorine cleaner or a similar non-abrasive
substance. Avoid harsh chemicals like hydrochloric acid, which can damage the device.
• Electrical Components: Do not clean electrical parts with water or any liquid. Use a dry cloth for
these areas.
• Burner Maintenance: Regularly check and clean the burners to avoid gas ow issues. Ensure no
food residue or grease blocks the burner ports.
• Ventilation: Keep the ventilation system clean to prevent re hazards. Clear any grease buildup
regularly.
• Rust Removal: If rust appears, use an industrial rust remover. Follow up with a water rinse and dry
thoroughly. For persistent rust, a professional might be needed.
• Storage: If not using the device for an extended period, clean it thoroughly and store it in a dry,

12
ventilated space
• Spillage: Clean spills immediately to prevent staining or damage to the device. Use a scraper for
solid food but avoid metal tools that could scratch surfaces.
• Long-term Storage: If storing the device for a long time, ensure it’s completely dry to avoid rust.
Consider using a protective cover.
• Regular Inspection: Check the device periodically for any signs of wear or damage. This includes
looking for dents, leaks, or any malfunctioning parts.
• Professional Servicing: If any part of the device seems damaged beyond simple cleaning or if
there are issues with gas ow, consult a professional for repairs.
• Final Check: After cleaning, ensure all parts are dry before reassembling or using the device again.
Check that all knobs and switches are functioning correctly.
• Safety First: Always disconnect the device from the power source before cleaning. If gas-powered,
ensure the gas supply is turned off.
• Disposal: When the device reaches the end of its life, dispose of it according to local
environmental regulations. Many parts can be recycled, so check with local recycling programs.
Note: Regular cleaning and maintenance not only ensure the longevity of your kitchen appliances
but also maintain hygiene and safety standards in your cooking environment.
13
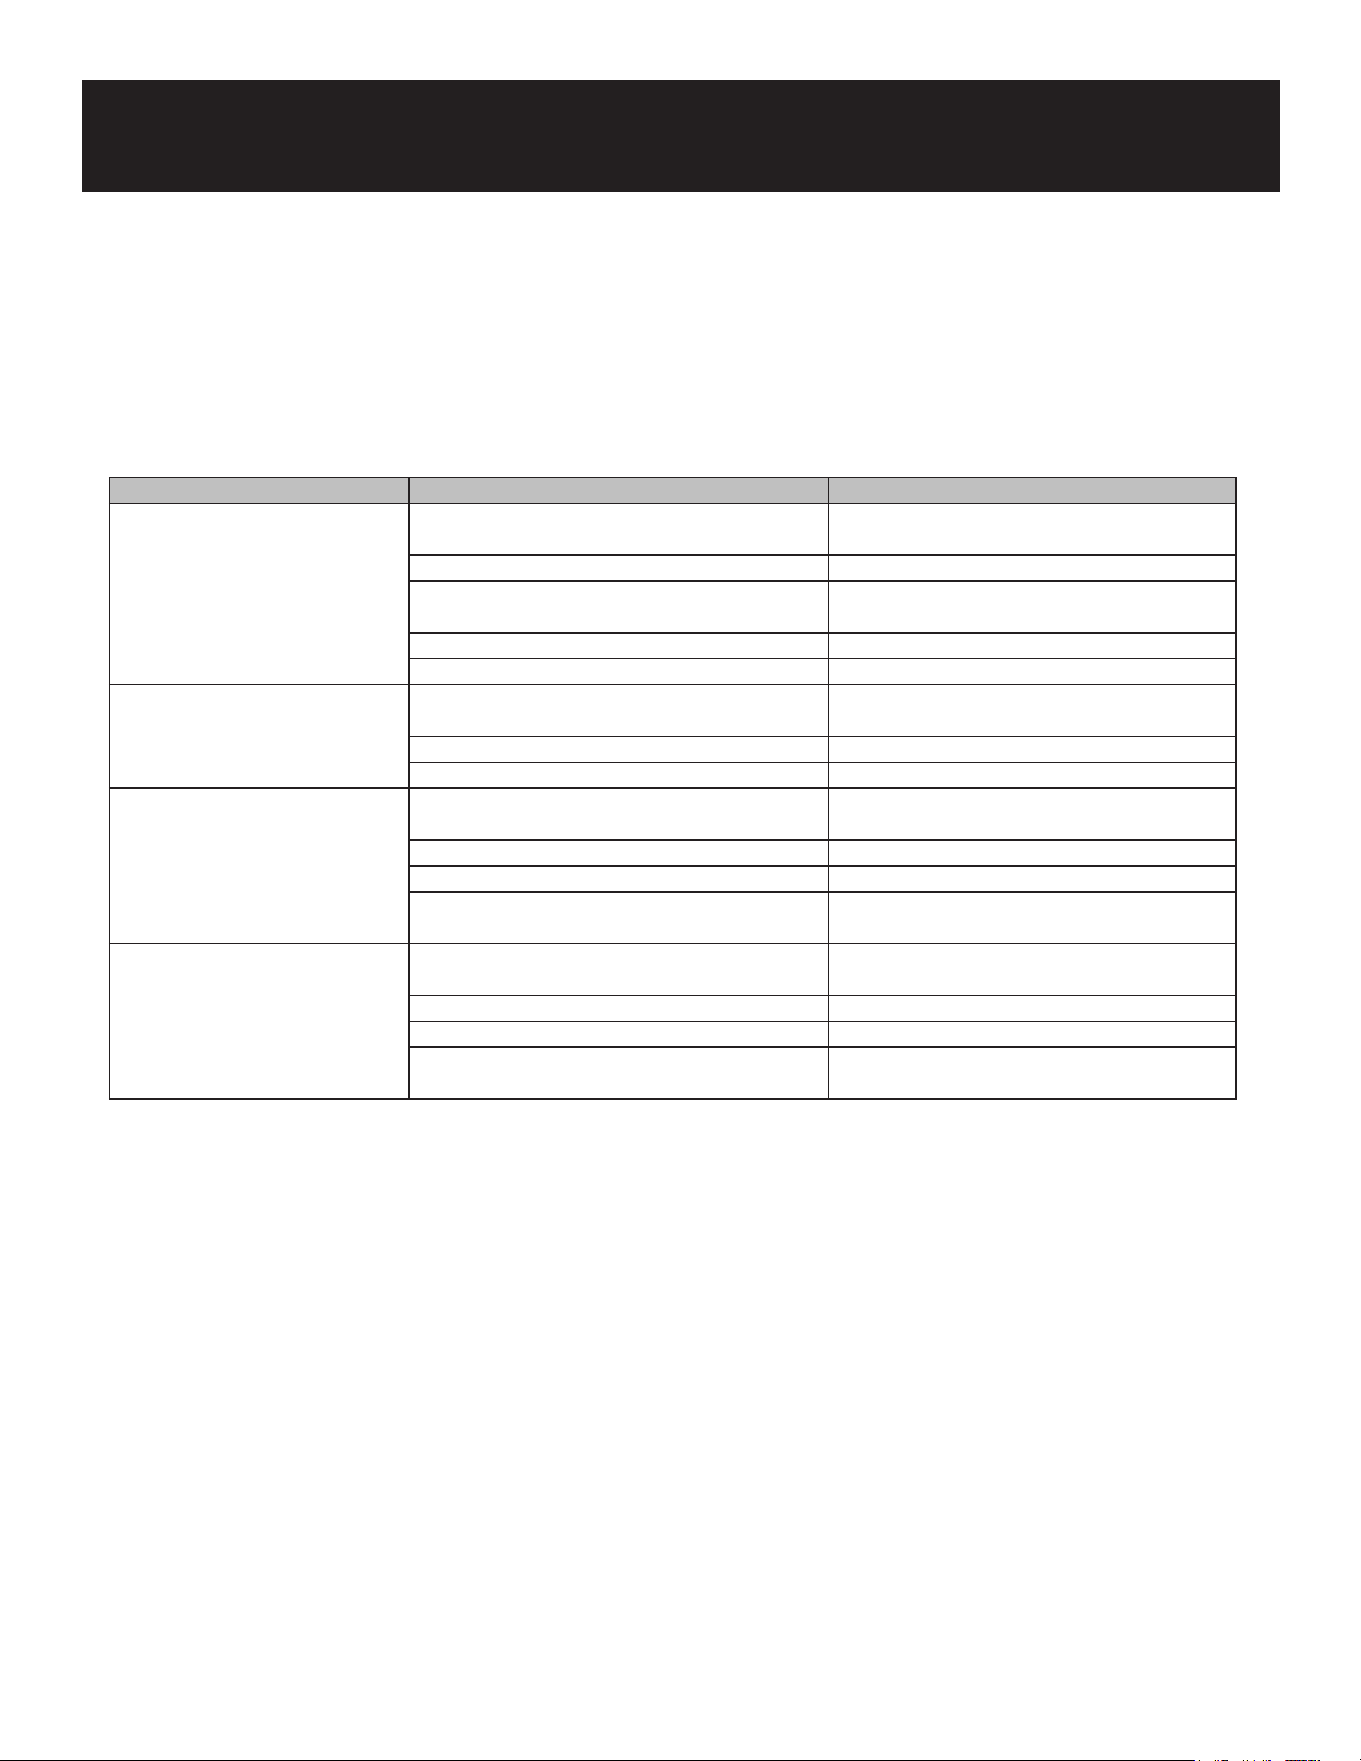
Symptom Causes Solutions
The pilot ame cannot be ignited.1. The gas pressure is not enough. 1. Adjust the relief valve to get a proper
pressure.
2. The nozzle is blocked. 2. Unblock the nozzle.
3. The connection of the thermocouple is
loose.
3. Please screw the thermocouple.
4. The thermocouple is defective. 4. Replace the thermocouple.
5. The gas control valve is malfunctioning. 5. Please replace the gas control valve.
The pilot ame is on, but the
main burner cannot be ignited.
1. The gas pressure is not enough. 1. Adjust the relief valve to get a proper
pressure.
2. The main burner nozzle is blocked. 2. Unblock the nozzle.
3. The gas control valve is defective. 3. Replace the gas control valve.
It has a lightback sound when
the gas supply is turned o.
1. The diameter of nozzle does not match with
the gas supply.
1. Please adjust the nozzle diameter.
2. The damper is too large. 2. Adjust the damper.
3. The gas pressure is too low. 3. Adjust the relief valve.
4. The ow of the connected pipe is not
enough.
4. Increase the permitted ow.
It has red ame, and black
smoke.
1. The diameter of nozzle does not match with
the gas supply.
1. Please adjust the nozzle diameter.
2. The damper is too small. 2. Adjust the damper.
3. The gas is dirty. 3. Replace the gas.
4. The gas ingredient reduces. Please replace
the gas.
4. Decrease the gas ow and increase it after
the peak demand of the gas.
Troubleshooting
Please note:
• The troubleshooting guide provided here is for informational purposes only.
• If you encounter any issues or failures with your appliance, stop using it immediately. Contact pro-
fessional technicians to diagnose and repair the problem.
• Always prioritize safety. Ensure that both the power supply and gas supply are turned off before
any maintenance or repair work begins.

14
WARRANTY
LIMITED WARRANTY
Koolmore Supply, Inc. extends a limited warranty to the original purchaser, guaranteeing that this Koolmore
product is free from manufacturing defects in material or workmanship for one year from the date of
purchase.
Should you discover any such defect within the warranty period, Koolmore Supply, Inc., reserves the right to
repair or replace the product without charge, or to cover the cost of replacement parts and repair labor needed
to correct defects present at the time of purchase or resulting from regular usage, when the appliance has been
installed, operated, and maintained as per the instructions provided.
At its sole discretion, Koolmore Supply Inc. may decide to replace the product. In such an event, your replace-
ment appliance will carry the warranty for the remaining term of the original unit's warranty period.
This warranty is valid exclusively to the original purchaser of the product and only applicable within the United
States. The warranty commences from the date of original consumer purchase. Proof of the original purchase
date will be required to obtain service under this warranty.
Under this limited warranty, your sole and exclusive remedy will be product repair, as outlined above. All
services must be provided by a Koolmore-designated service company.
To claim warranty or request repair service:
Email support@koolmore.com. Please include your name, address, phone number, warranty repair request,
and a copy of your proof of purchase receipt. Alternatively, visit koolmore.com and use the contact us page. A
Koolmore customer service representative will promptly arrange service for your appliance.
We thank you for choosing Koolmore.
WARRANTY EXCLUSIONS
This limited warranty will not cover:
1. Failure of the product to perform during power failures or interruptions,
or due to inadequate electrical service.
2. Damage incurred during transportation or handling.
3. Damage caused by accidents, vermin, lightning, winds, re, oods, or acts of God.
4. Damage resulting from accidents, alterations, misuse, abuse, improper installation, repair, or maintenance.
This includes using any external device that alters or converts the voltage or frequency of
electricity.
5. Unauthorized product modications, repairs by unauthorized centers, or use of non-approved
replacement parts.
6. Abnormal cleaning and maintenance not aligned with the user's manual.
7. Use of incompatible accessories or components.
8. Any costs associated with repairs or replacements under these excluded circumstances shall be the
responsibility of the consumer.