HAMPTONBAY.COM
Please contact 1-855-HD-HAMPTON for further assistance.
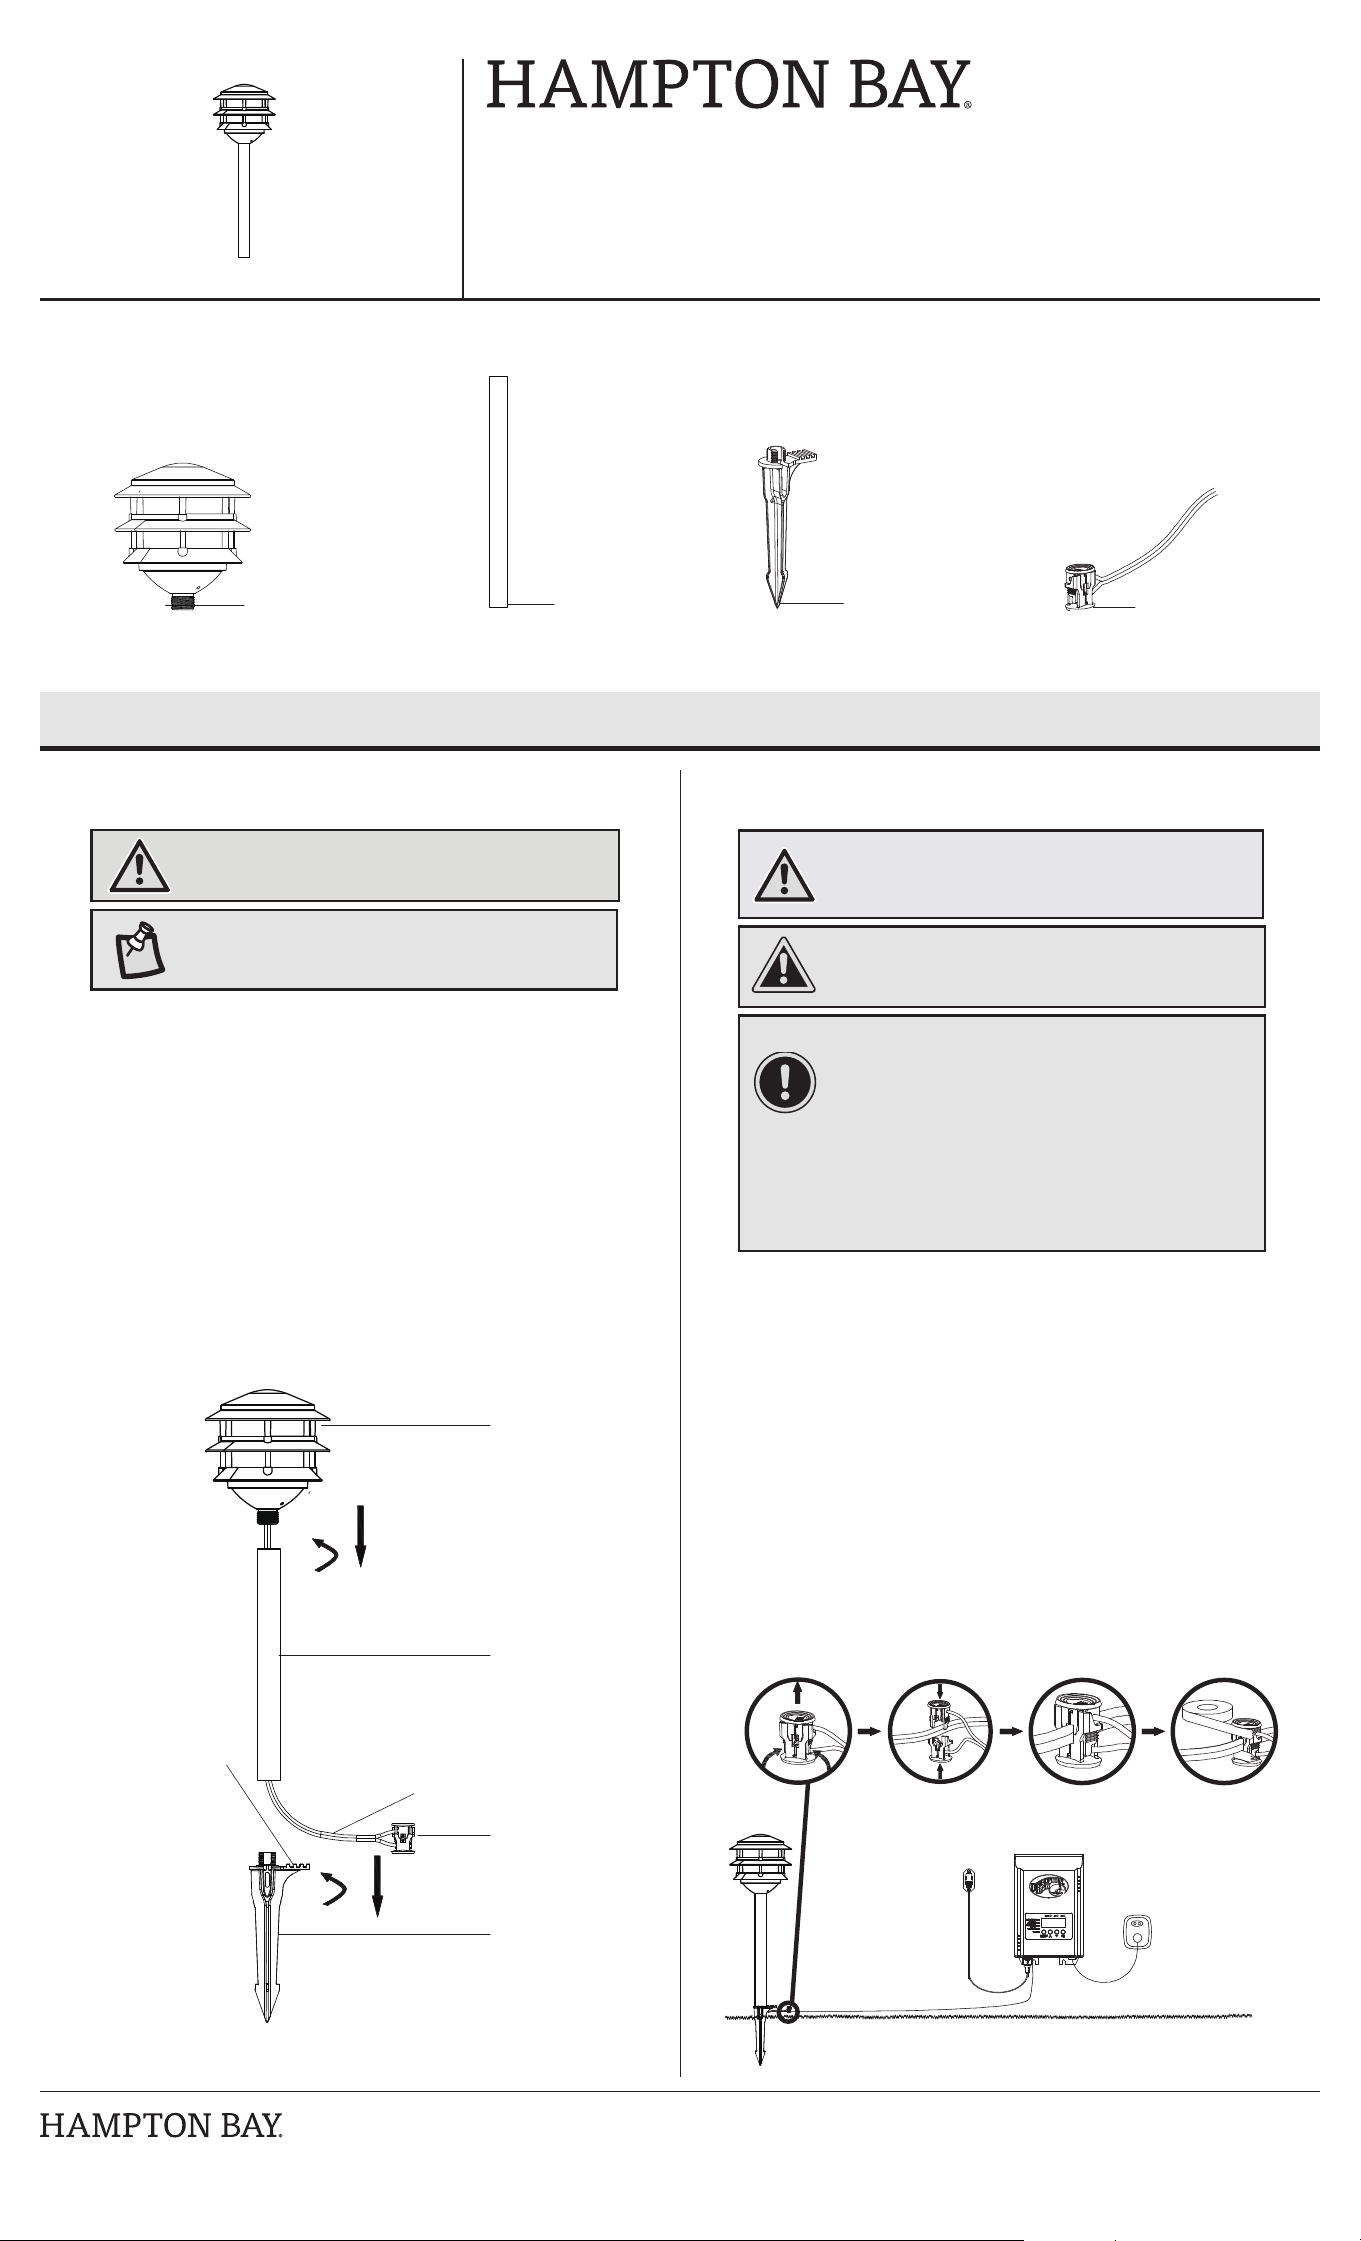
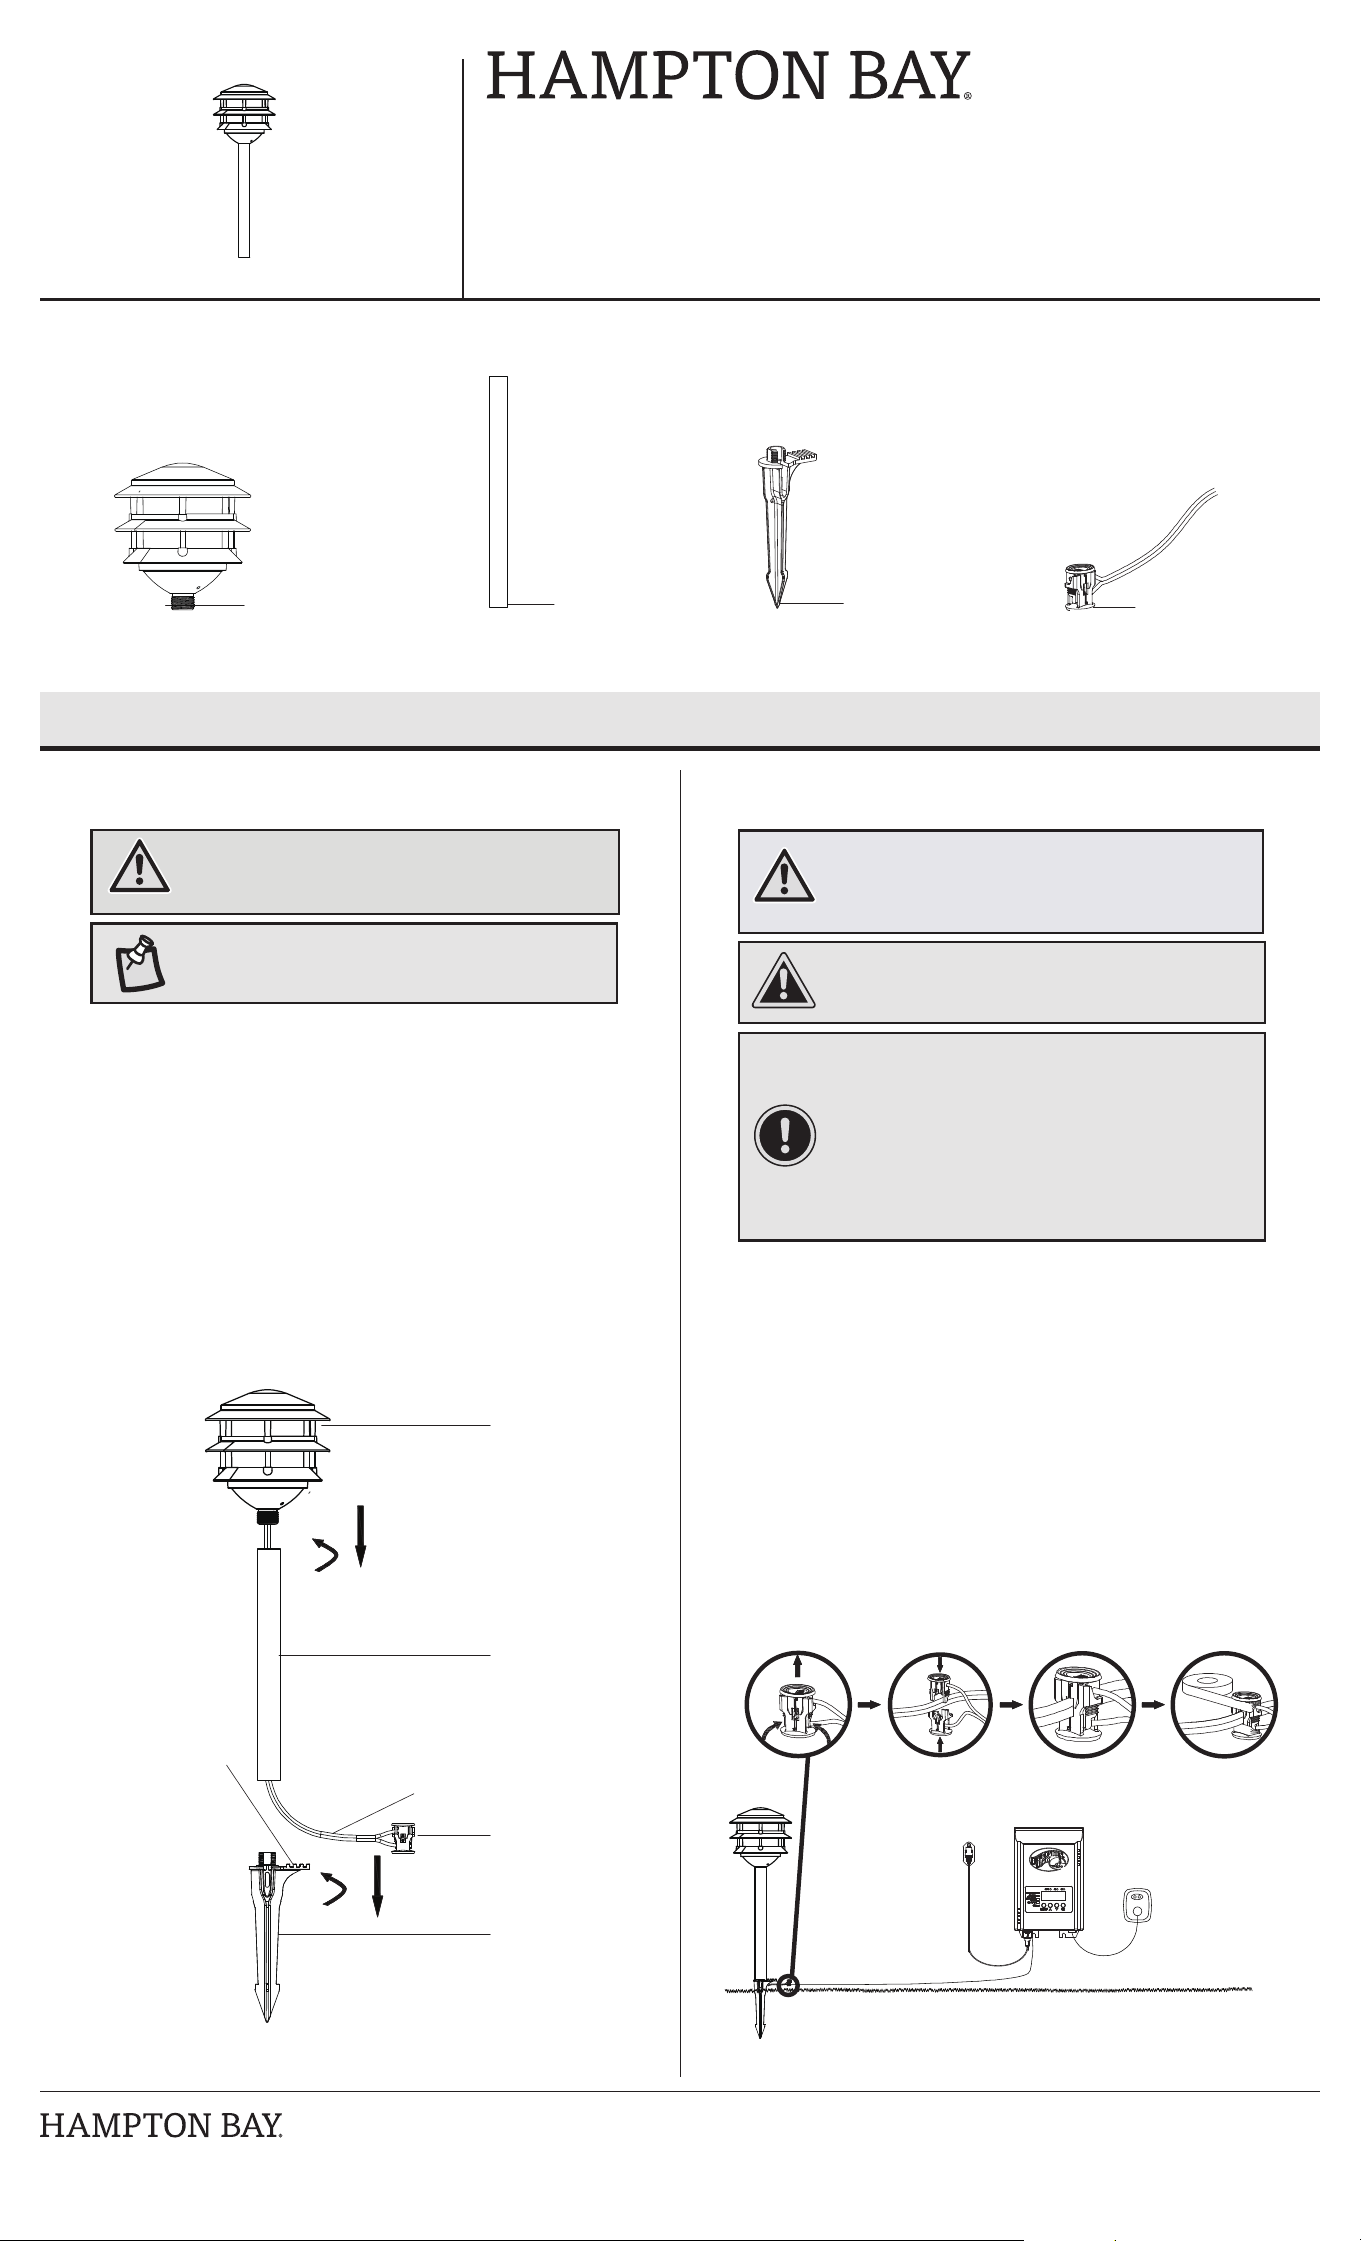
PACKAGE CONTENTS
Installation
Attaching and installing the light
1
Item #1007 976 431
Model #92899
□ Detach and place the wire connector (D) on opposite sides of the
low- voltage cable (not included) where the xture will be located
(additional landscape lighting cable can be purchased at your local
Home Depot store).
□ Align and t the main low-voltage cable vertically in the slot of the
wire connector as shown.
□ Press the wire connector (D) together until it is fully seated and locked
around the cable. Pre-set prongs will pierce the cable insulation and
establish contact.
□ Turn on the power unit. If the light xture does not turn on, repeat the
previous 3 steps.
□ Once the clip-on connector is in place, we recommend wrapping it in
electrical tape (not included) for additional protection.
□ Attach the xture head (A) to the top post (B) by inserting the upper end of
the post (B) into the xture head and then twisting clockwise.
□ Insert the xture wire (2) into the groove located on the top of the ground
stake.
□ Attach the post (B) to the stake (C) by placing the bottom of the post (B)
onto the top of the stake (C) and twist clockwise.
□ Prepare a hole in the installation location. Use a screwdriver to prepare
the installation hole to ensure that the hole is not larger than the stake (C).
□ Install the xture in the ground by pushing on the foot step (1) on the
stake (C). Do not push the xture head.
Connecting the wires
2
A - Fixture head B - Post C - Stake with foot step
D - Connector with
12 in. wire length
(attached to xture)
CAUTION: The wire from the low voltage power unit shall
be 12-16 AWG type underground low-voltage cable.
IMPORTANT:
□ Protect the wiring by routing it in close proximity to the
light, or next to a building structure such as a house or
deck.
□ Do not bury the wiring by more than 6 in. (15.24 cm) in
order to connect to the main secondary wire.
□ Do not submerge xtures in water.
□ Have the length cut off so that it is connected to a
connector within 6 inches (15.2 cm) from a building
structure, a luminaire, or tting.
NOTE: Do not use a hammer. If the ground is hard, use
water to soften it or a trowel to loosen the soil.
WARNING: The connector contacts (D) have sharp edges
for piercing the main low voltage cable. To avoid injury,
do not touch the metal contacts.
Use and Care Guide
LAUDERDALE
LED Low Voltage RGBW Smart Path Light
WARNING: Risk of electric shock. Do not install the light
within 10 ft. (3.05 m) of a pool, spa or fountain.
A
B
C
D
A
B
D
2
1
C
D

HAMPTONBAY.COM
Please contact 1-855-HD-HAMPTON for further assistance.
Control the Light with Bluetooth
®
wireless technology and WiFi
®
network
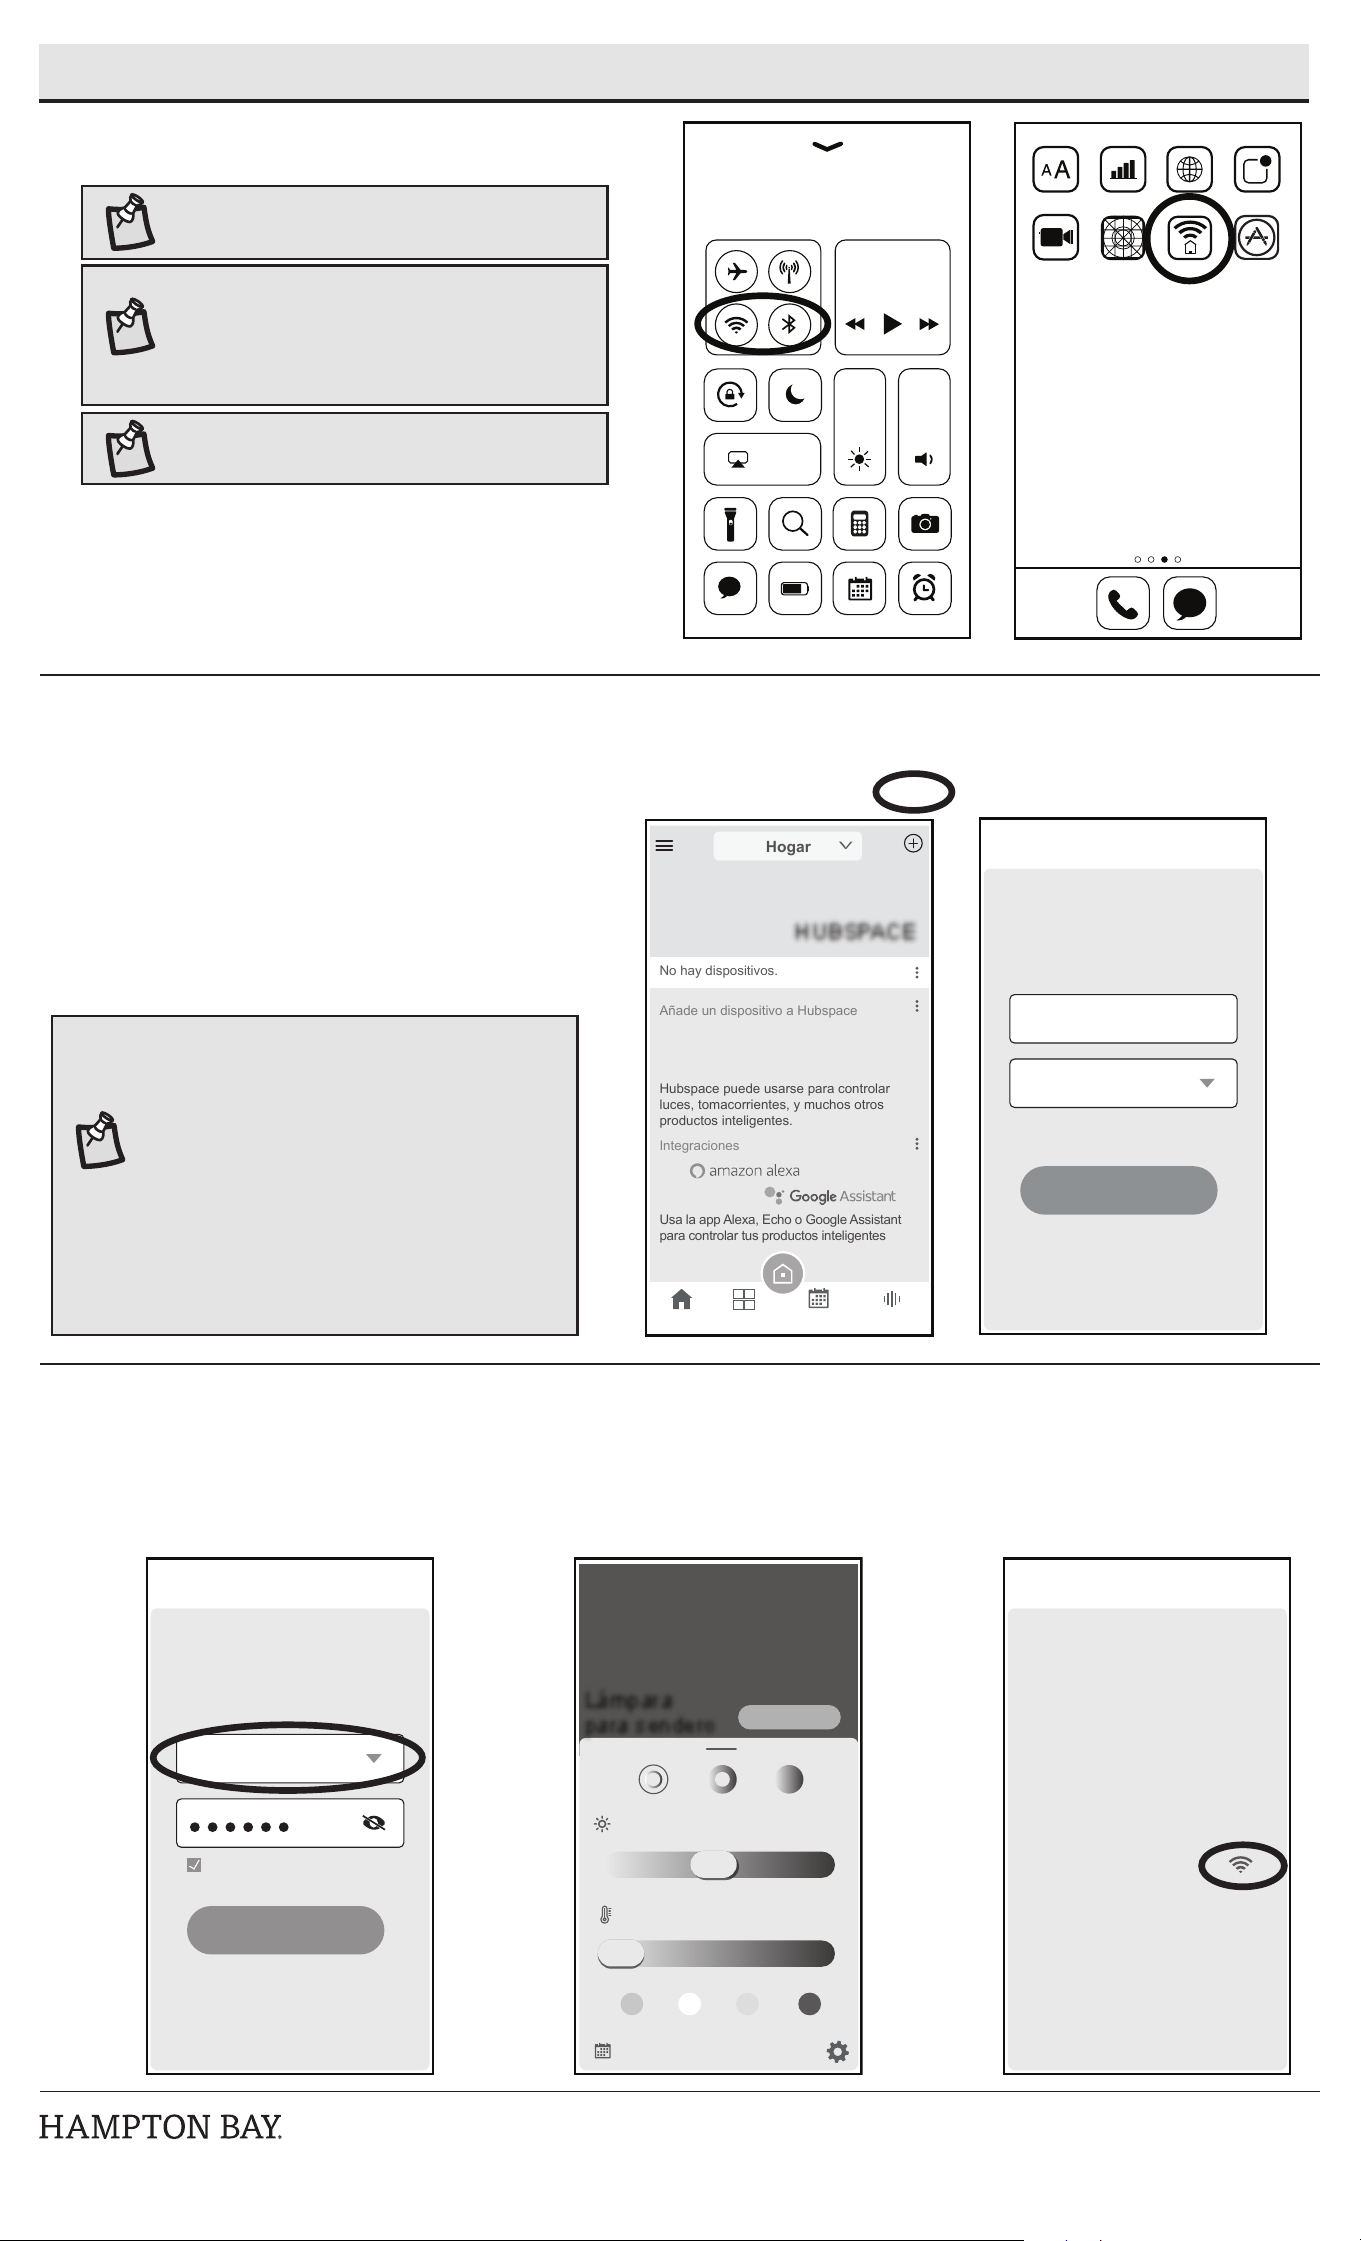
Download the Hubspace app
1
□ Download the Hubspace app from the device’s App Store or the
Google play store to your mobile device.
□ Turn on the Bluetooth
®
and Wi-Fi
®
functions of the smart device to
ensure the Wi-Fi
®
signal at home is stable and reliable.
□ Open the Hubspace app.
NOTE: To register, enter your email address and a password
or login if you already have an account.
NOTE: Bluetooth enabled smart devices typically have a
range of approximately 33 ft. (10 m). Attempting to pair
your smart device to the path light beyond the intended
range can result in inconsistent performance or failure to
connect.
Select and pair the LED path light
2
□ Connect your device to power and follow the instructions on
screen.
□ In the Hubspace app screen, tap the plus sign “+” in the upper
right corner and select “add product”.
□ Scan your product’s QR code or quick start guide. If the QR code
cannot be scanned for some reason, you can enter the code
manually. Tap Enter Code and follow the instructions.
□ Name the LED path light identied and assign it to a room, for
example “Pathlight”.
NOTE: If you are unable to access the QR code for your
light, you can put it into discovery mode with the following
sequence:
□ In the Hubspace app, tap the “+” in the upper right
hand corner and select “add Product”.
□ On the next screen, tap the magnifying glass icon at
the bottom next to “QR code not available?”
□ Next, select “My product has no buttons” and
follow the instruction in the app to place the light in
discovery mode.
□ Once the light is in discovery mode, the light will
pulse and the app will connect to the light.
NOTE: For optimal performance, ensure that the path light
is within range of the Wi-Fi signal and as close to the
router as possible.
Network Connection
3
□ Select your 2.4 GHz network during setup in the Hubspace app.
□ Enter network password.
□ You can also select the network in the product settings screen.
Screen
Mirroring
+
Hubspa...
X
Let’s give your device a
friendly name and assign it
to a room
Tap to select a room
Next
Device Added
Pathlight
HUBSPACE
Integrations
There are no devices.
Add a device to Hubspace
Hubspace can be used to manage lights,
outlets, and many other smart products.
Use the Alexa App, Echo, or Google Assistant
to control your smart products
Home
V
Home Rooms Schedules Integrations
X
Connect your product to a
2.4GHz Wi-Fi network.
Tap to change the network
Password
Save Password
CONNECT
Wi-Fi Setup
X
Path Light
Brightness:
White Temp:
ON
55%
3000
K
General
Product Name
Product Settings
Room
Location
Time Zone
Connectivity
Network
Wi-Fi MAC Address
Info
Product Type
Firmware Version
Device ID
Path Light
Backyard
87c44417939b6606
United States
8675309b52
Light
View Versions
V
V
V
VVVVVV
<
HAMPTONBAY.COM
Please contact 1-855-HD-HAMPTON for further assistance.
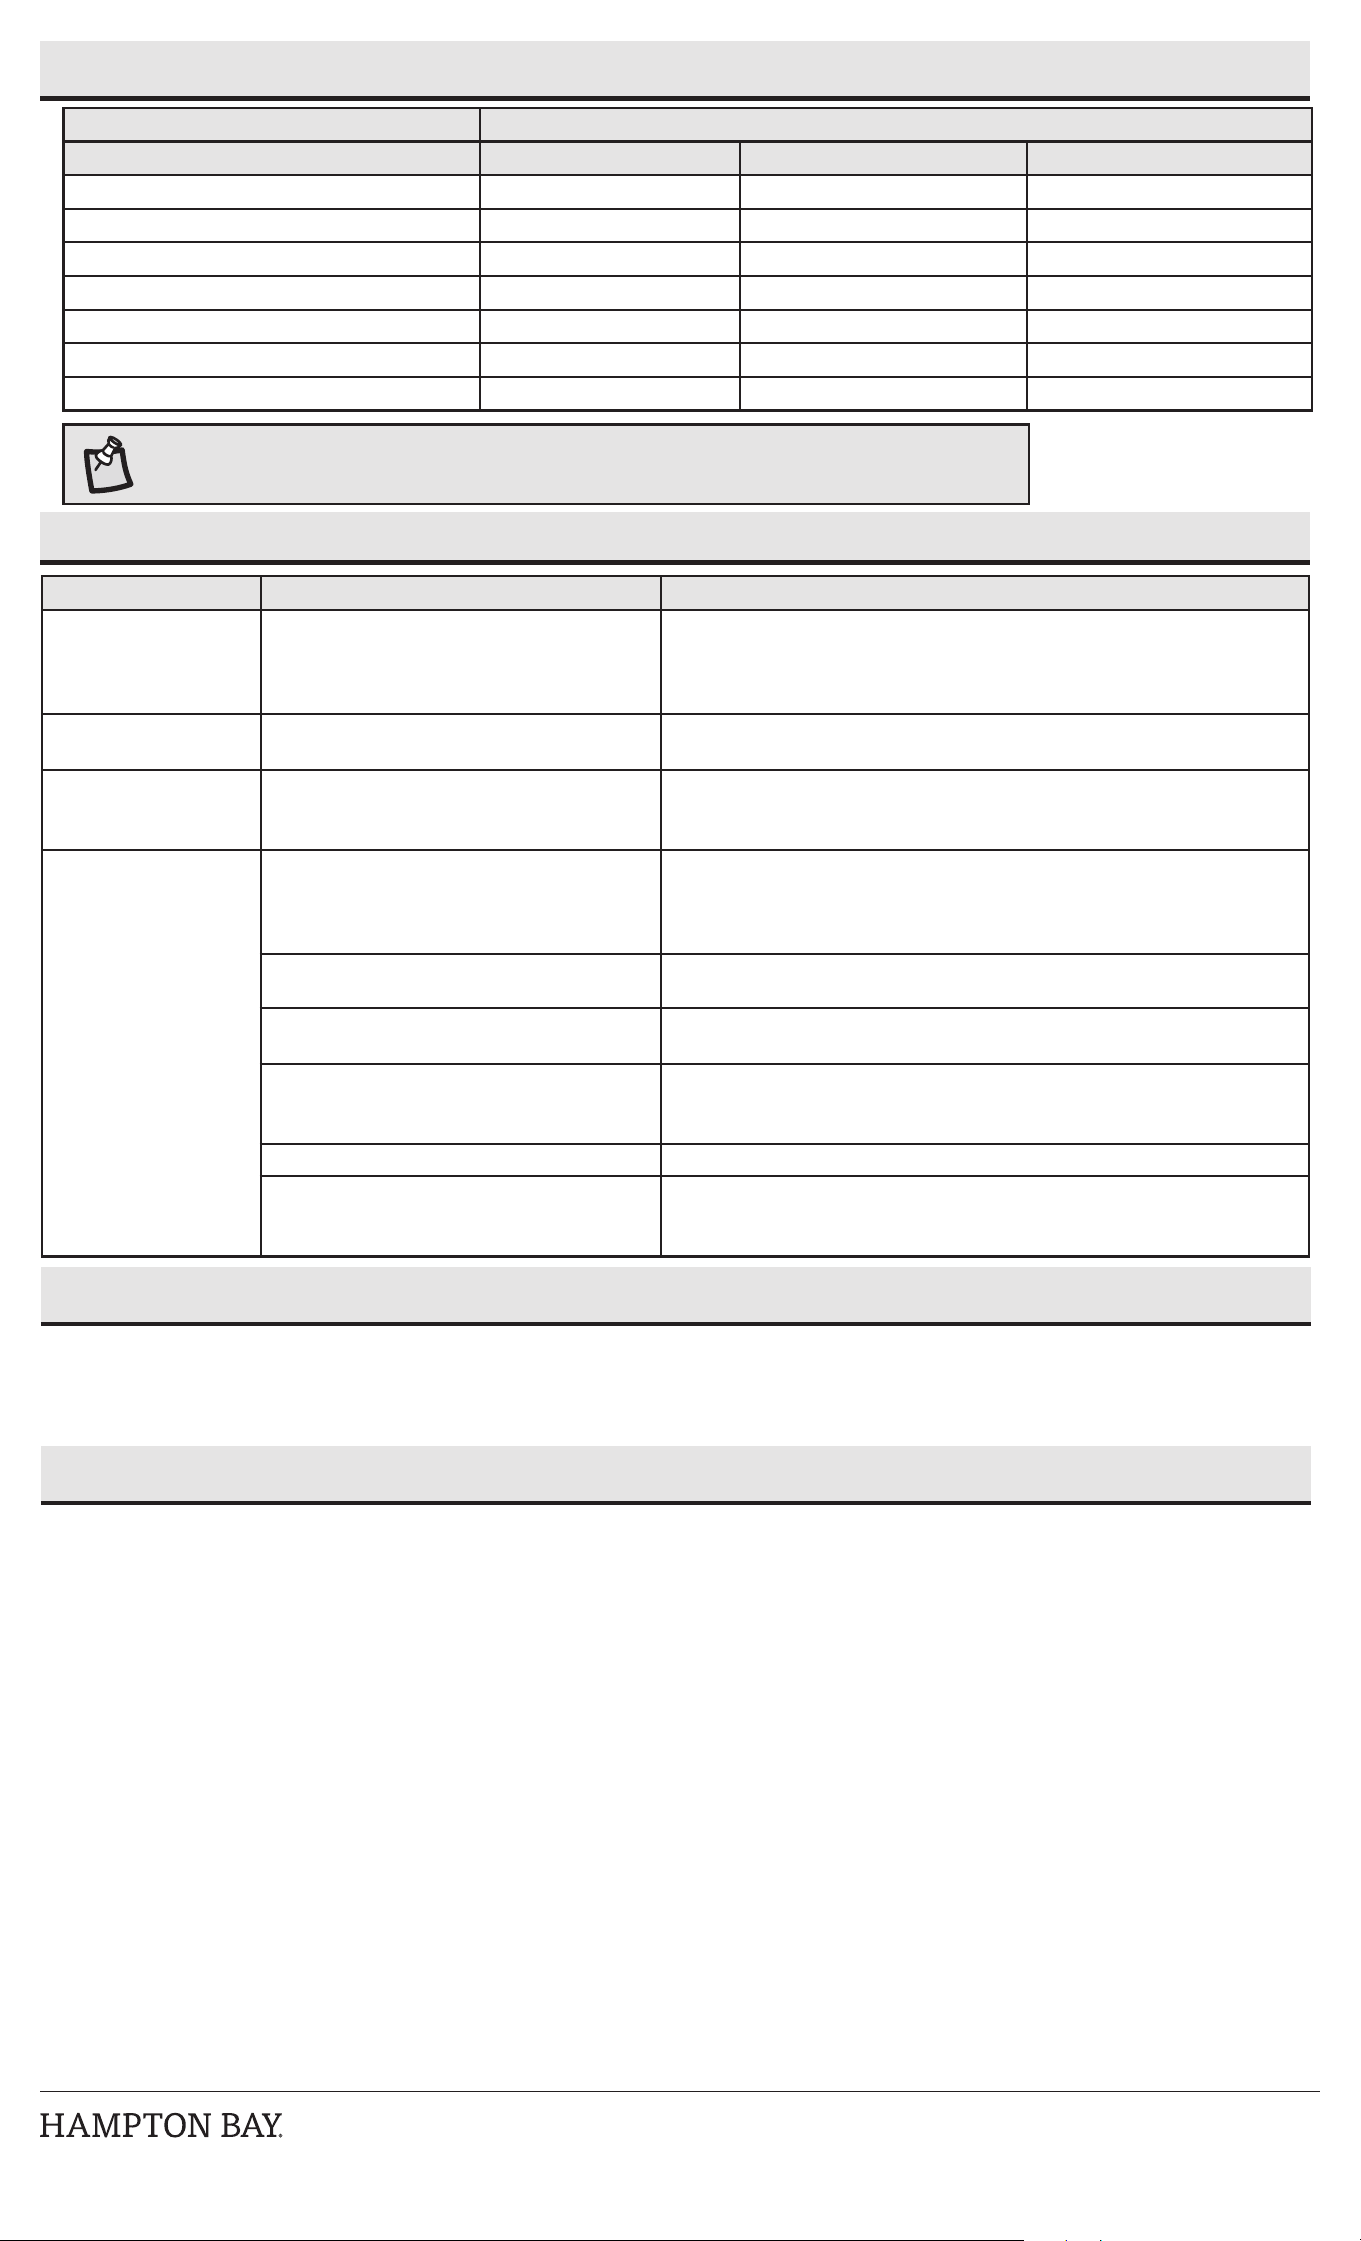
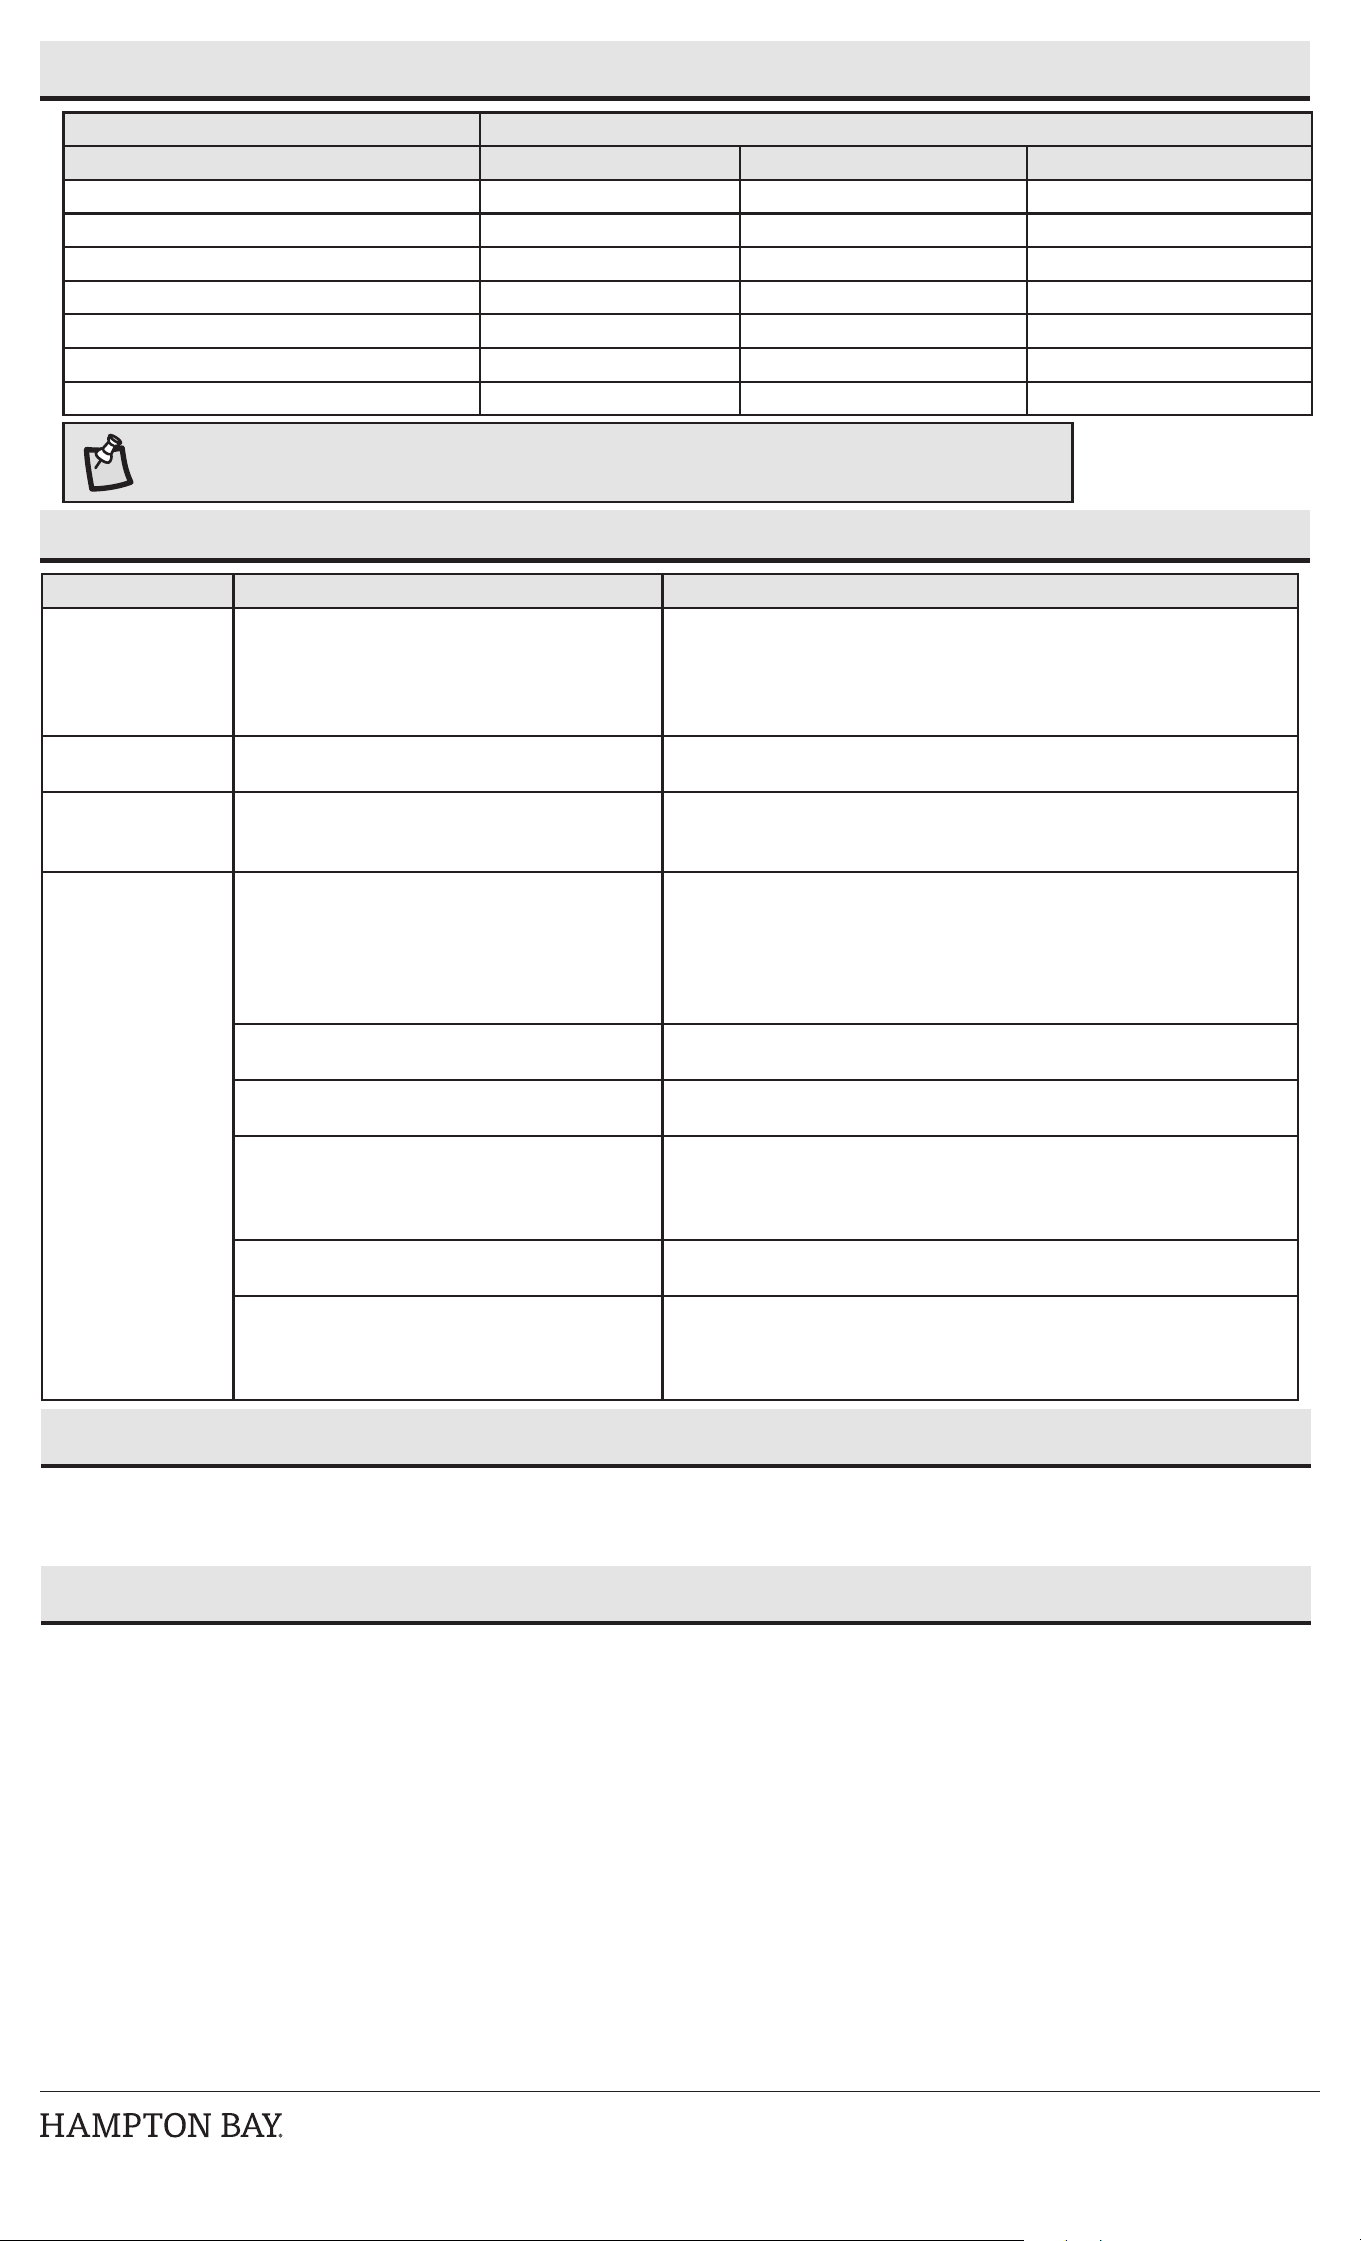
Troubleshooting
Problem Possible Cause Solution
The light does not turn
on.
□ There is no power.
□ There is a disconnection or break in the wire.
□ The transformer setting is incorrect.
□ Check the outlet and ensure that a breaker or GFCI circuit has not been tripped.
□ Follow the wires from the xture and ensure a continuous connected path back to
the transformer.
□ Check the settings on the transformer.
The light ickers. □ There is a loose wire connector to the xture. □ Tighten the wire connector and ensure the metal contacts pierce the insulation on
the low voltage cable from the transformer.
The lights icker (all
xtures).
□ There is a loose connection at the
transformer.
□ Unplug the transformer from the outlet and visually inspect the positive and nega-
tive connecting posts. Each wire should be securely screwed in and not in contact
with any other.
The Bluetooth path light
will not pair with a smart
device
□ The Bluetooth feature is turned off on the
smart device.
□ Ensure the Bluetooth function is turned on within the device settings. A
Bluetooth symbol should be visible somewhere on the device screen.
□ Charge up the device being paired with the path light. Smart power management
may have turned off the Bluetooth function when low on power.
□ The smart device is out of range of the
Bluetooth path light.
□ Be sure the path light is within 33 ft. (10 m) of the smart device.
□ The smart device is not discoverable. □ Turn on “discoverable” mode on the device to allow the path light and smart
device to recognize each other.
□ The smart device did not automatically
connect to the Bluetooth path light.
□ Conrm the device’s “discoverable” mode is turned on to allow the path light
and smart device to recognize each other. Go to the pairing list on the device
and manually connect the device to the path light.
□ The path light is not powered on. □ Make sure the path light is properly connected and the power is turned on.
□ Interference is causing confusion with the
connection.
□ Power both the device and the path light off and back on.
□ Delete the path light from the smart device and rediscover it.
□ Move away from Wi-Fi routers or computers that could be causing interference.
Cable Selection
12 Volt Tap Cable Length
Total Fixture Wattage 0-50 feet 51-100 feet 101-150 feet
0-60 Watts 16 AWG 16 AWG 14 AWG
61-120 Watts 16 AWG 14 AWG 12 AWG
121-180 Watts 14 AWG 12 AWG NOT RECOMMENDED
181-240 Watts 14 AWG 12 AWG NOT RECOMMENDED
241-300 Watts 12 AWG NOT RECOMMENDED NOT RECOMMENDED
600W Transformer = (2x300 Watts) 12 AWG NOT RECOMMENDED NOT RECOMMENDED
900W Transformer = (3x300 Watts) 12 AWG NOT RECOMMENDED NOT RECOMMENDED
NOTE: Most LED landscape xtures can operate with full illumination from 9V all the way to as little as 6V. It is possible
to have extended length runs with LED xtures that go beyond the specications shown on the charts above.
Care and Cleaning
□ Before attempting to clean the xture, disconnect the power to the xture by turning the breaker off or removing the fuse from the fuse box.
□ To clean the xture, use a dry or slightly dampened clean cloth.
□ Do not use cleaners with chemicals, solvents, or harsh abrasives, as damage to the xture may occur.
Warranty
WHAT IS COVERED
The manufacturer warrants this lighting xture to be free from defects in materials and workmanship for a period of ve (5) years from date of purchase. This warranty applies only
to the original consumer and only to products used in normal use and service. If this product is found to be defective, the manufacturer’s only obligation, and your exclusive remedy, is
the repair or replacement of the product at the manufacturer’s discretion, provided that the product has not been damaged through misuse, abuse, accident, modications, alterations,
neglect, or mishandling.
WHAT IS NOT COVERED
This warranty shall not apply to any product that is found to have been improperly installed, set up, or used in any way not in accordance with the instructions supplied with the
product. This warranty shall not apply to a failure of the product as a result of an accident, misuse, abuse, negligence, alteration or faulty installation, or any failure not relating to faulty
material or workmanship. The warranty shall not apply to the nish on any portion of the product, such as surface and/or weathering, as this is considered normal wear and tear.
The manufacturer does not warrant and specially disclaims any warranty, whether express or implied, of tness for a particular purpose, other than the warranty contained herein. The
manufacturer specically disclaims any liability and shall not be liable for any consequential or incidental loss or damage, including but not limited to any labor/expense cost involved in
the replacement or repair of said product.
Contact the Customer Service team at 1-855-HD-HAMPTON or visit www.HamptonBay.com
This equipment has been tested and found to comply with the limits for a Class B digital device, pursuant to Part 15 of the FCC Rules. These limits are designed to provide reasonable protection against harmful
interference in a residential installation. This equipment generates, uses and can radiate radio frequency energy and, if not installed and used in accordance with the instructions, may cause harmful interference
to radio communications. However, there is no guarantee that interference will not occur in a particular installation. If this equipment does cause harmful interference to radio or television reception, which can be
determined by turning the equipment off and on, the user is encouraged to try to correct the interference by one or more of the following measures:
--Reorient or relocate the receiving antenna.
--Increase the separation between the equipment and receiver.
--Connect the equipment into an outlet on a circuit different from that to which the receiver is connected.
--Consult the dealer or an experienced radio/TV technician for help.
CAUTION: Any changes or modications not expressly approved by the grantee of this device could void the user’s authority to operate the equipment.
This device complies with Part 15 of the FCC Rules. Operation is subject to the following two conditions: (1) This device may not cause harmful interference, and (2) this device must accept any interference received,
including interference that may cause undesired operation.
RF Radiation Exposure Statement Caution: This transmitter must be installed to provide a separation distance of at least 20 cm from all persons.
HAMPTONBAY.COM
Llame al 1-855-HD-HAMPTON para mayor asistencia.
CONTENIDO DEL PAQUETE
Instalación
Cómo jar e instalar la lámpara
1
Artículo #1007 976 431
Modelo #92899
□ Separa y coloca el conector de cable (D) en los extremos opuestos del
cable de bajo voltaje (no incluido) donde se colocará la lámpara (se
puede comprar un cable de iluminación adicional para jardines en su
tienda local de Home Depot).
□ Alinea y ajusta el cable de bajo voltaje principal verticalmente en la
ranura del conector de cable, como se muestra.
□ Presiona para unir el conector de cable (D) hasta que esté
completamente asentado y seguro alrededor del cable. Las clavijas
premontadas atravesarán el aislamiento del cable y harán contacto.
□ Enciende la fuente de energía. Si la lámpara no enciende, repite los 3
pasos anteriores.
□ Una vez colocado el conector con abrazadera, recomendamos cubrirlo
con cinta de electricista (no incluida) como medida de protección
adicional.
□ Instala el cabezal de la lámpara (A) en el poste superior (B) insertando
el extremo superior del poste (B) en el cabezal de la lámpara y girándolo
hacia la derecha.
□ Inserta el cable de la lámpara (2) en la ranura localizada en la parte
superior de la estaca para clavar en la tierra.
□ Asegura el poste (B) a la estaca (C) insertando la parte inferior del poste
(B) en la parte superior de la estaca (C) y enroscando hacia la derecha.
□ Haz un oricio en el lugar de la instalación. Usa un destornillador para
preparar el oricio en el lugar de la instalación y garantizar que el oricio
no sea mayor que la estaca (C).
□ Instala la lámpara en el suelo empujando sobre el estribo (1) de la estaca
(C). No empujes por el cabezal de la lámpara.
Cómo conectar los cables
2
A - Cabezal de la lámpara B - Poste C - Estaca con estribo para el pie
D - Conector con cable de
30.5 cm (12 plg)
(conectado a la lámpara)
PRECAUCIÓN: El cable de la unidad de energía de bajo
voltaje será uno de tipo soterrado de bajo voltaje de
calibre 12-16 AWG.
IMPORTANTE:
□ Protege el cableado pasándolo muy cerca de la lámpara
o cerca de una estructura como una casa o terraza.
□ No entierres el cableado más de 6 plg (15.2 cm) para
que pueda conectarse al cable principal de respaldo.
□ No sumergir las lámparas en agua.
□ Haga cortar la longitud para que se conecte a un conector
dentro de las 6 pulgadas (15,2 cm) de la estructura del
edicio, una luminaria o un accesorio.
NOTA: No uses un martillo. Si el suelo está duro, usa agua
para ablandarlo o una espátula para aojar la tierra.
ADVERTENCIA: Los contactos del conector (D) tienen
bordes alados para perforar el cable de bajo voltaje
principal. Para evitar lesiones, no toques los contactos
de metal.
Guía de uso y cuidado
LAUDERDALE
Lámpara inteligente para sendero, de luz LED
y bajo voltaje, RGBW
ADVERTENCIA: Riesgo de descarga eléctrica. No
instales la lámpara a una distancia menor de 10 pies
(3.05 m) de una piscina, spa o fuente.
A
B
C
D
A
B
D
2
1
C
D
HAMPTONBAY.COM
Llame al 1-855-HD-HAMPTON para mayor asistencia.
Controla la luz con tecnología inalámbrica Bluetooth
®
y a través de una red WiFi
®
Descarga la aplicación Hubspace
1
□ Descarga la aplicación Hubspace en la tienda de apps de Apple o
Google Play a tu dispositivo móvil.
□ Activa las funciones de Bluetooth
®
y Wi-Fi
®
de tu dispositivo
inteligente para asegurarte de que la señal Wi-Fi
®
del hogar sea
estable y conable.
□ Abre la aplicación Hubspace.
NOTA: Para registrarte, ingresa tu dirección de correo
electrónico y una contraseña, o inicia sesión si ya tienes
una cuenta.
NOTA: Los dispositivos con capacidad de Bluetooth
normalmente tienen un alcance de aproximadamente
33 pies (10 metros). Si tratas de vincular tu dispositivo
inteligente con la lámpara para sendero a una
distancia mayor que la establecida, el rendimiento será
inconsistente o no se conectará.
Selecciona y vincula la lámpara LED para sendero
2
□ Conecta tu dispositivo a la corriente y sigue las instrucciones en
la pantalla.
□ En la pantalla de la aplicación Hubspace, toca el signo “más” (+)
en la esquina superior derecha y selecciona “agregar producto”.
□ Escanea el código QR de tu producto o la guía de inicio rápido.
Si el código QR no se puede escanear por alguna razón, puedes
ingresar el código manualmente. Toca Ingresar código y sigue
las instrucciones.
□ Nombra la lámpara LED para sendero identicada y asígnale un
espacio, por ejemplo, “Lámpara para sendero”.
NOTA: Si no puedes acceder al código QR de tu lámpara,
puedes ponerla en modo de descubrimiento con la
siguiente secuencia:
□ En la aplicación Hubspace, toca el signo “más” (+)
en la esquina superior derecha y selecciona “agregar
producto”.
□ En la siguiente pantalla, toca el ícono de lupa
ubicado al lado de la frase: “¿No hay un código QR
disponible?”
□ Después, selecciona “Mi producto no tiene botones” y
sigue las instrucciones de la aplicación para colocar
la lámpara en modo de descubrimiento.
□ Una vez que la lámpara está en modo de
descubrimiento, la luz parpadeará y la aplicación se
conectará a la lámpara.
NOTA: Para un rendimiento óptimo, asegúrate de que la
lámpara para sendero esté dentro del alcance de la señal
Wi-Fi y tan cerca del router como sea posible.
Conexión a la red
3
□ Selecciona la red de 2.4 GHz durante la conguración en la aplicación Hubspace.
□ Ingresa la contraseña de la red.
□ También puedes seleccionar la red en la pantalla de conguración del producto.
Visualización
de pantalla
+
Hubspace
X
Dale un nombre fácil a
tu dispositivo y asígnalo
a una habitación
Toca para elegir
una habitación
Siguiente
Dispositivo añadido
Lámpara para sendero
HUBSPACE
Integraciones
No hay dispositivos.
Añade un dispositivo a Hubspace
Hubspace puede usarse para controlar
luces, tomacorrientes, y muchos otros
productos inteligentes.
Usa la app Alexa, Echo o Google Assistant
para controlar tus productos inteligentes
Hogar
V
Hogar Habitación Horarios Integraciones
X
Conecta tu producto a
una red Wi-Fi de 2.4 GHz.
Toca para cambiar la red
Contraseña
Guardar contraseña:
CONECTAR
Configuración de Wi-Fi
X
Lámpara
para sendero
Luminosidad:
Temp. Blanca:
ON (ENCENDIDO)
55%
3000
K
Instrucciones generales
Nombre
del producto
Configuraciones del producto
Habitación
Ubicación
Zona horaria
Conectividad
Red
Dirección MAC
de la Wi-Fi
Info
Tipo de producto
Versión de Firmware
ID de dispositivo
Lámpara
para sendero
Patio
87c44417939b6606
Estados Unidos
8675309b52
Luz
Ver versiones
V
V
V
VVVVVV
<
HAMPTONBAY.COM
Llame al 1-855-HD-HAMPTON para mayor asistencia.
Solución de problemas
Selección del cable
Enchufe de 12 V Longitud del cable
Vataje total de la lámpara De 0 a 15.2 metros De 15.5 a 30.5 metros De 30.8 a 45.7 metros
De 0 a 60 W Calibre 16 AWG Calibre 16 AWG Calibre 14 AWG
De 61 a 120 W Calibre 16 AWG Calibre 14 AWG Calibre 12 AWG
De 121 a 180 W Calibre 14 AWG Calibre 12 AWG NO SE RECOMIENDA
De 181 a 240 W Calibre 14 AWG Calibre 12 AWG NO SE RECOMIENDA
De 241 a 300 W Calibre 12 AWG NO SE RECOMIENDA NO SE RECOMIENDA
Transformador de 600 W = (2x300 W) Calibre 12 AWG NO SE RECOMIENDA NO SE RECOMIENDA
Transformador de 900 W = (3x300 W) Calibre 12 AWG NO SE RECOMIENDA NO SE RECOMIENDA
NOTA: La mayoría de las lámparas para jardín LED pueden funcionar con iluminación completa desde 9 V hasta 6 V. Es posible
instalar líneas más largas con lámparas LED que superen las especicaciones mostradas en las tablas anteriores.
Mantenimiento y limpieza
□ Antes de limpiar la lámpara, desconecta la electricidad apagando el cortacircuitos o quitando el fusible de la caja correspondiente.
□ Para limpiar la lámpara, usa un paño seco o ligeramente humedecido.
□ No uses limpiadores con productos químicos, solventes o abrasivos intensos para no dañar la lámpara.
Garantía
QUÉ CUBRE LA GARANTÍA
El fabricante garantiza que esta lámpara no presentará defectos materiales o de fabricación por un período de cinco (5) años a partir de la fecha de compra. Esta garantía es válida solo para el
consumidor original y cubre solo productos en uso y servicio normales. Si este producto resultara defectuoso, la única obligación y solución exclusiva del fabricante, será reparar o reemplazar el
producto, a su entera discreción, siempre que el producto no haya sido dañado por mal uso, abuso, accidente, modicaciones, alteraciones, negligencia o manejo indebido.
QUÉ NO CUBRE LA GARANTÍA
Esta garantía no cubre ningún producto mal instalado, congurado o usado de algún modo no acorde con las instrucciones adjuntas. Esta garantía no cubre fallas del producto a consecuencia de
un accidente, mal uso, abuso, negligencia, modicaciones o instalaciones defectuosas, o cualquier otra falla no relacionada con defectos materiales o de fabricación. Esta garantía no se aplica al
acabado de ninguna parte del producto, como por ejemplo el de la supercie, ni al deterioro por condiciones ambientales, ya que eso se considera un desgaste normal.
El fabricante no garantiza y se exime especialmente de cualquier garantía expresa o implícita, o de idoneidad para un n en particular, distintas de la garantía indicada por este medio. El
fabricante se exime especícamente de cualquier obligación y no es responsable por pérdidas o daños directos o indirectos, incluyendo sin limitarse a cualquier costo de mano de obra o gastos
relacionados con el reemplazo o reparación de dicho producto.
Comuníquese con el equipo de servicio al cliente al 1-855-HD-HAMPTON o visite www.HamptonBay.com
Problema Causa posible Solución
La luz no se enciende. □ No hay corriente eléctrica.
□ Hay un cable desconectado o roto.
□ La conguración del transformador es incorrecta.
□ Revisa el tomacorrientes y asegúrate de que no se ha fundido un
cortacircuitos o circuito con interruptor diferencial.
□ Sigue los cables de la lámpara para garantizar una conexión continua hasta
el transformador.
□ Revisa la conguración del transformador.
La luz parpadea. □ Está suelto un conector de cable que va a la
lámpara.
□ Aprieta el conector de cable y asegúrate de que los contactos de metal
perforen el aislamiento en el cable de bajo voltaje del transformador.
Las luces parpadean
(en todas las
lámparas).
□ Hay una conexión suelta en el transformador. □ Desconecta el transformador del tomacorrientes y revisa los postes de
conexión positivo y negativo. Cada cable debe estar bien atornillado y sin
contacto con ningún otro.
La lámpara para
sendero con Bluetooth
no se vincula con el
dispositivo inteligente
□ La función Bluetooth está desactivada en el
dispositivo inteligente.
□ Asegúrate de que la función Bluetooth esté activada en las conguraciones
del dispositivo. Debe haber un símbolo de Bluetooth visible en algún lugar
de la pantalla del dispositivo.
□ Carga completamente el dispositivo que se está vinculando con la lámpara
para sendero. Puede que el control de energía inteligente del dispositivo
haya desactivado la función Bluetooth si el nivel de energía era bajo.
□ El dispositivo inteligente está fuera del alcance
de Bluetooth de la lámpara para sendero.
□ Asegúrate de que la lámpara esté a menos de 33 pies (10 m) del dispositivo
inteligente.
□ El dispositivo inteligente no es reconocible. □ Activa el modo “reconocible” del dispositivo para permitir que la lámpara
para sendero y el dispositivo inteligente se reconozcan el uno al otro.
□ El dispositivo inteligente no se conectó
automáticamente a la lámpara para sendero con
Bluetooth.
□ Comprueba que el modo “reconocible” del dispositivo esté activado para
permitir que la lámpara para sendero y el dispositivo inteligente se reconozcan
el uno al otro. Ve a la lista de dispositivos a vincular en el dispositivo y conecta
manualmente el dispositivo con la lámpara para sendero.
□ La lámpara para sendero no tiene energía. □ Asegúrate de que la lámpara para sendero esté bien conectada y que esté
encendida.
□ Hay interferencia provocando que la conexión no
sea buena.
□ E
nciende y apaga tanto el dispositivo como la lámpara para sendero.
□ Elimina la lámpara para sendero del dispositivo inteligente y vuelve a descubrirla.
□ Aléjate de computadoras o routers de Wi-Fi que puedan estar causando
interferencia.
Este equipo fue sometido a prueba y se determinó que cumple con los límites establecidos para un dispositivo digital Clase B según la Parte 15 de las Normas FCC. Estos límites fueron establecidos para dar
protección razonable contra la interferencia dañina en uso residencial. Este equipo genera, consume y puede irradiar energía de radiofrecuencia; si no se instala y usa de acuerdo con las instrucciones, puede
causar interferencia nociva a comunicaciones radiales. Sin embargo, no hay garantía de que no ocurrirá interferencia en cierta instalación particular. Si este equipo causa interferencia perjudicial a la recepción de
radio o televisión, que puede determinarse encendiendo y apagando el equipo, se recomienda al usuario tratar de corregir la interferencia con una o más de las siguientes medidas:
– Reorientar o reubicar la antena receptora.
– Incrementar la distancia entre los equipos y el receptor.
– Conectar el equipo a un tomacorriente en circuito distinto del receptor.
– Pedir asistencia al concesionario o a un técnico de radio/TV con experiencia.
PRECAUCIÓN: Los cambios o modicaciones sin aprobación expresa del responsable de este dispositivo podrían anular el derecho del usuario a operar el equipo.
Este dispositivo cumple con la Parte 15 de las Normas FCC. Su operación está sujeta a las dos condiciones siguientes: (1) Este dispositivo no debe causar interferencia dañina y (2) tiene que aceptar cualquier
interferencia recibida, incluyendo aquella que pudiera afectar su funcionamiento.
Declaración de exposición a la radiación de radiofrecuencia Precaución: este transmisor debe instalarse para proporcionar una distancia de separación de al menos 20 cm de todas las personas.