
FREEZER
Instruction Manual
ER1A-FS
ER2A-FS
EF1A-FS
EF2A-FS
Issued: 07-26-2019
Revised: 03-20-2023
2
Only qualified service technicians should install and service the
appliance. To obtain the name and phone number of your local Cered
Service Representave, visit www.economyseries.com. No installaon
or service should be undertaken unl the technician has thoroughly
read this Instrucon Manual. Likewise, the owner/manager should
not proceed to operate the appliance unl the installer has instructed
them on its proper operaon. Failure to install, operate, and maintain
the appliance in accordance with this manual may adversely aect
safety, performance, component life, and warranty coverage. Proper
installaon is the responsibility of the installer. Product failure or
property damage due to improper installaon is not covered under
warranty.
This manual is provided primarily to assist qualied service technicians in
the installaon, maintenance, and service of the appliance.
Should the reader have any quesons or concerns which have not been
sasfactorily addressed, please call, send an e-mail message, or write to
the Technical Support Department for assistance.
Phone: (800) 227-3172
E-mail: techsupport@economyseries.com
ECONOMY SERIES
618 Highway 74 South
Peachtree City, GA 30269
An: Technical Support Department
Web Site: www.economyseries.com
NOTE: To expedite assistance, all correspondence/communicaon MUST
include the following informaon:
• Model Number ____________________________
• Serial Number _____________________________
• Complete and detailed explanaon of the problem.
WARNING

3
TABLE OF CONTENTS
Important Safety Informaon ...................................................... 5
Know your Equipment ................................................................. 9
Check for Shipping Damage ......................................................... 10
Handling the Cabinet ................................................................... 10
Locaon ....................................................................................... 11
Remove the Crate and Skid ......................................................... 12
Level the Cabinet .........................................................................12
Electrical Installaon ................................................................... 13
Installing the Shelves ................................................................... 14
Pressure Relief Valve Installaon ................................................. 14
Start up the Cabinet ....................................................................15
Door Reversal .............................................................................. 16
Controls and Adjustments ........................................................... 21
Cleaning and Prevenve Maintenance ........................................22
Disposal ....................................................................................... 23
4
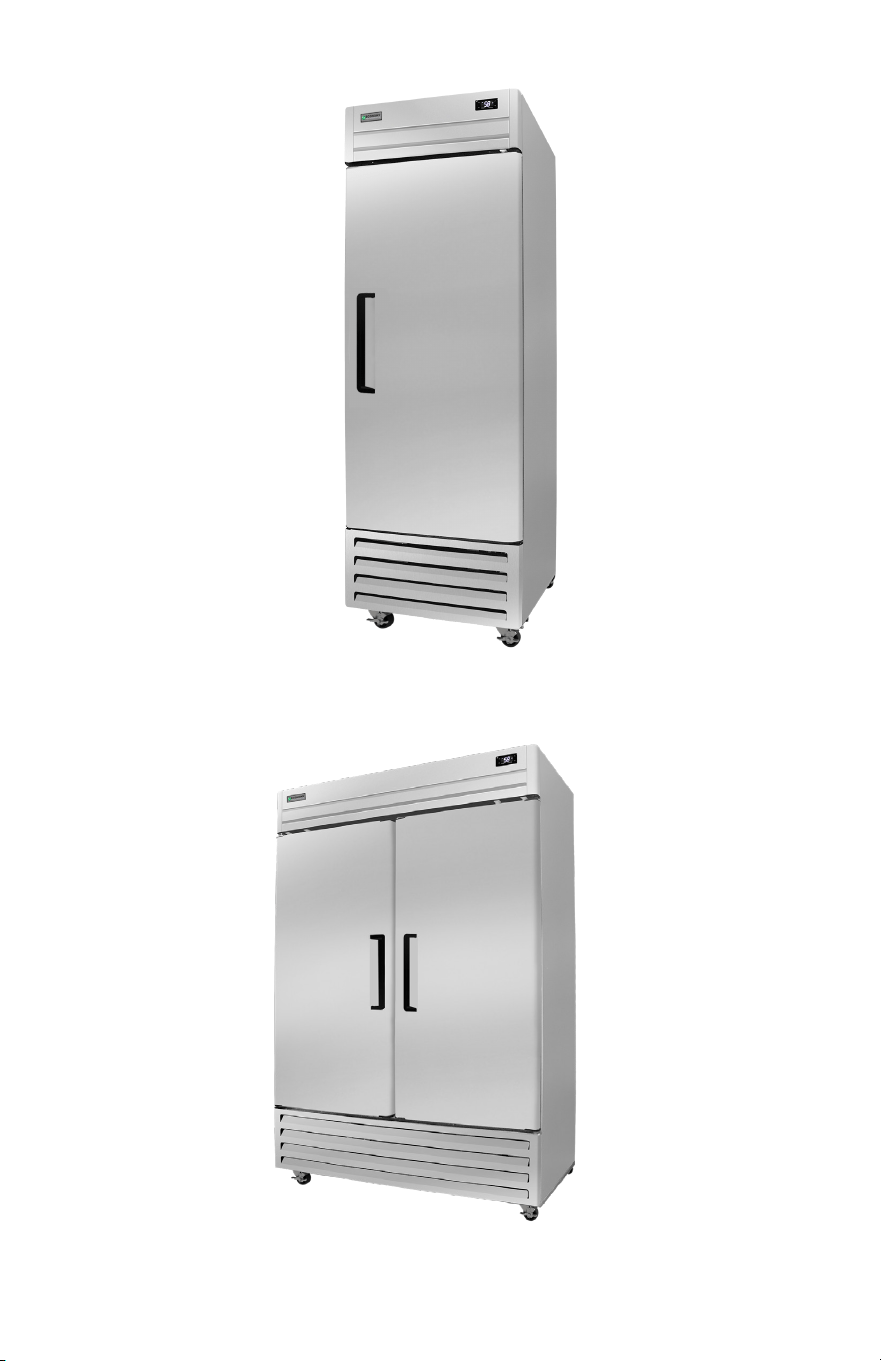
ER1A-FS, EF1A-FS
ER2A-FS, EF2A-FS
5
Important Safety Informaon
Important Safety Information
Throughout this manual, notices appear to bring your attention to situations which could
result in death, serious injury, damage to the appliance, or damage to property.
DANGER
Indicates a hazardous situation that, if not avoided, will result in
death or serious injury.
WARNING
Indicates a hazardous situation that, if not avoided, could result
in death or serious injury.
NOTICE
Indicates a situation that, if not avoided, could result in damage
to the appliance or property.
IMPORTANT
Indicates important information about the use and care of the
appliance.
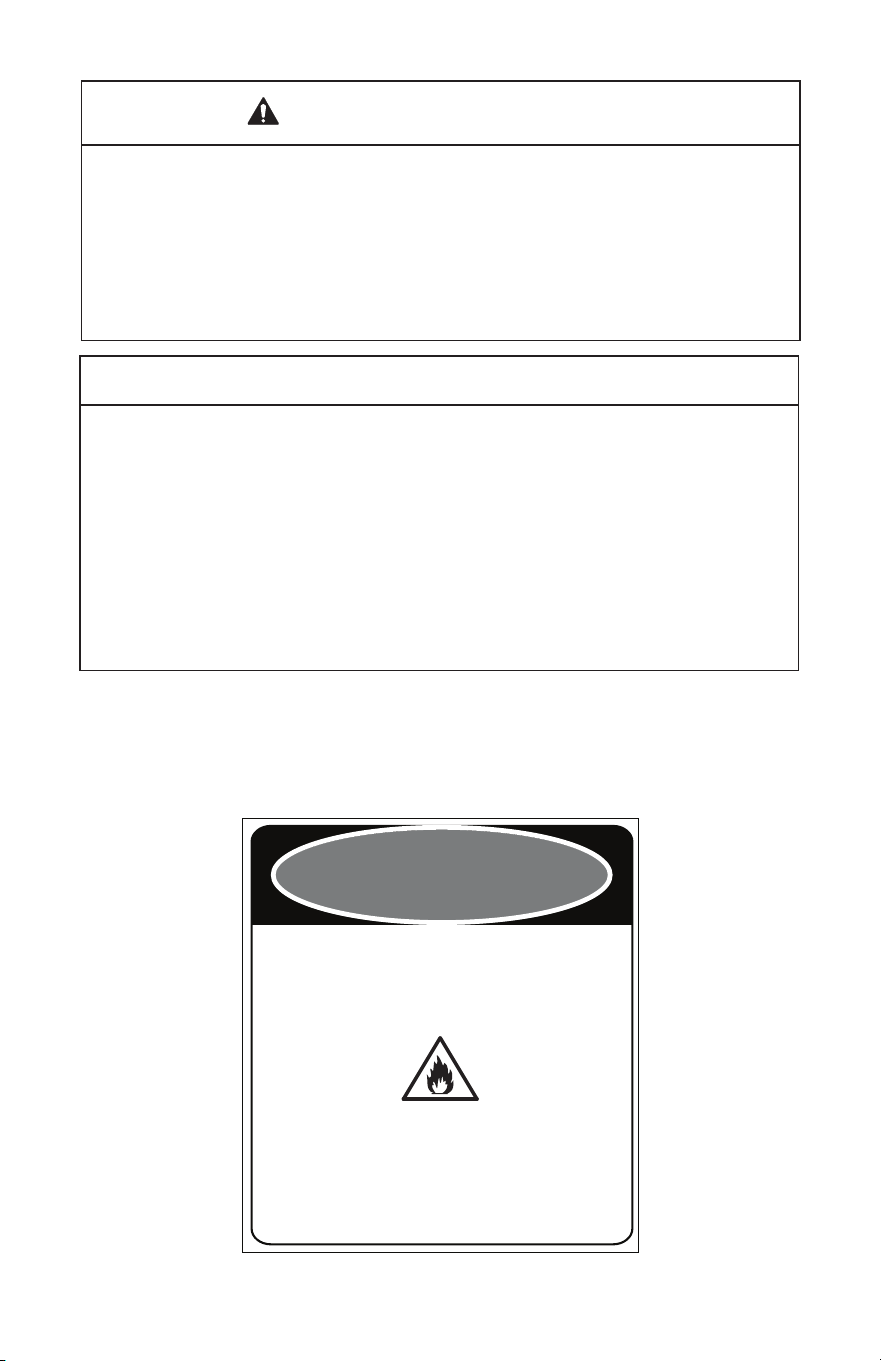
DANGER
Risk of Fire or Explosion
Flammable Refrigerant Used
• Follow handling instructions carefully
in compliance with U.S. government
regulations.
• Do not use mechanical devices to defrost.
• Do not puncture refrigerant tubing. Risk
of re or explosion due to puncture
of refrigerant tubing; follow handling
instructions carefully.
• Component parts shall be replaced with
like components.
• Servicing shall be done by factory
authorized service personnel to minimize
the risk of possible ignition due to incorrect
parts or improper service.
• Consult instruction manual/ service
manual before attempting to install or
service this product. All safety precautions
must be followed.
• Dispose of properly in accordance with
federal or local regulations.
• Do not place any potential ignition sources
in or near the appliance.
Risque De Feu Ou D'Explosion
Le Frigorigène Est Inammable
• Suivre attentivement les instructions
de manipulation conformément à la
réglementation gouvernementale.
• Ne pas utiliser d'appareils mécaniques
pour dégivrer le réfrigérateur.
• Ne pas perforer la tubulure contenant le
frigorigène. Risque de feu ou d'explosion
si la tubulure contenant le frigorigène
est perforée; suivre les instructions de
manutention avec soin.
• Les pièces des composants doivent être
remplacées par des pièces et accessoires
équivalents.
• L’entretien doit être effectué par le
personnel de service autorisé par le
fabricant an de minimiser les risques
d’inammation attribuables à l’installation
d’une pièce inadéquate ou à la mauvaise
exécution du service.
• Consulter le manuel du propriétaire/
guide de réparation avant de tenter une
réparation. Toutes les mesures de sécurité
doivent être respectées.
• Éliminer conformément aux règlements
fédéraux ou locaux.
• Ne placez aucune source d’inammation
potentielle dans ou près de l’appareil.
6
WARNING
This appliance should be desned only to the use for which it has been
expressly conceived. Any other use should be considered improper and
therefore dangerous. The manufacturer cannot be held responsible for injury
or damage resulng from improper, incorrect, and unreasonable use. Failure
to install, operate, and maintain the appliance in accordance with this manual
will adversely aect safety, performance, component life, and warranty
coverage.
To reduce the risk of death, electric shock, serious injury, or re, follow basic
precauons including the following:
• Only qualied service technicians should install and service this appliance.
• Wear appropriate personal protecve equipment (PPE) when servicing
the appliance.
• The appliance must be installed in accordance with applicable naonal,
state, and local codes and regulaons.
• Appliance is heavy. Use care when liing or posioning. Work in pairs
when needed to prevent injury or damage.
• The appliance requires an independent power supply of proper
capacity. See the nameplate for electrical specicaons. Failure to use
an independent power supply of proper capacity can result in a tripped
breaker, blown fuse, or damage to exisng wiring. This could lead to heat
generaon or re.
• To reduce the risk of electric shock, do not touch the plug with damp
hands.
• Unplug the appliance from the electrical outlet.
• THE APPLIANCE MUST BE GROUNDED: The appliance is equipped with a
NEMA 5-15 three-prong grounding plug to reduce the risk of potenal
shock hazards. It must be plugged into a properly grounded, independent
3-prong wall outlet. If the outlet is a 2-prong outlet, it is your personal
responsibility to have a qualied electrician replace it with a properly
grounded, independent 3-prong wall outlet. Do not remove the ground
prong from the plug and do not use an adapter plug. Failure to follow
these instrucons may result in death, electric shock, or re.
• The GREEN ground wire in the factory-installed power cord is connected
to the appliance. If it becomes necessary to remove or replace the power
cord, be sure to connect the power cord’s ground wire.
• Do not use an extension cord.
• Do not use an appliance with a damaged power cord. The power cord
should not be altered, jerked, bundled, weighed down, pinched, or
tangled. Such acons could result in electric shock or re. To unplug the
appliance, be sure to pull the plug, not the cord, and do not jerk the cord.
• Do not splash, pour, or spray water directly onto or into the appliance.
This might cause short circuit, electric shock, corrosion, or failure.
• Do not make any alteraons to the appliance. Alteraons could result in
electric shock, injury, re, or damage to the appliance.
7
WARNING, continued
• This appliance is not intended for use by persons (including children) with
reduced physical, sensory, or mental capabilies, or lack of experience
and knowledge, unless they have been given supervision or instrucon
concerning use of the appliance by a person responsible for their safety.
• Children should be properly supervised around this appliance.
• Do not climb, stand, or hang on the appliance or door or allow children
or animals to do so. Do not climb into the appliance or allow children or
animals to do so. Death or serious injury could occur or the appliance
could be damaged.
• Be careful not to pinch ngers when opening and closing the doors. Be
careful when opening and closing the doors when children are in the area.
• Open and close the doors with care. Doors opened too quickly or forcefully
may cause injury or damage to the appliance or surrounding equipment.
• Do not use combusble spray or place volale or ammable substances
in or near the appliance. They might catch re.
• Keep the area around the appliance clean. Dirt, dust, or insects in the
appliance could cause harm to individuals or damage to the equipment.
• Do not throw anything onto the shelves or load any single shelf with more
than 100 lb. (45.36 kg) of product. They might fall o and cause injury.
• Do not place anything on top of the appliance. Foreign objects or moisture
could enter the appliance and result in electric shock or re.
• This appliance is designed only for storage and/or display of packaged or
boled products. Employ sanitary methods. Use for any other purposes
(for example, storage of chemicals or medical supplies such as vaccine
and serum) could cause deterioraon of stored items.
• Do not block the cabinet air inlet or outlet, otherwise cooling performance
may be reduced.
• Do not ghtly pack the cabinet. Allow some space between items to
ensure good air ow. Also allow space between items and interior
surfaces.
• Do not place any product on the oor of the cabinet. All product must be
placed on properly installed shelves.
• Do not put warm or hot products in the cabinet. Let them cool rst, or
they will raise the cabinet temperature and could deteriorate other foods
in the cabinet or overload the appliance.
• Do not store items near the air outlet. They might freeze up and crack or
break causing a risk of injury or contaminaon of other food.
• This unit must be installed and located appropriately, following the
installaon instrucons before its use.
• Do not allow children to climb, step or hang onto the shelves inside the
appliance. Death or serious injury could occur or the appliance could be
damaged.
• Do not touch the cold surfaces of the appliance with wet or moist hands.
Skin can sck to these cold surfaces.
8
NOTICE
• Protect the oor when moving the appliance to prevent damage to the
oor.
• Keep venlaon openings, in the appliance enclosure or in the built-
in structure, clear of obstrucon. Do not place anything on top of the
appliance. Blockage of airow could negavely aect performance and
damage the appliance.
• To prevent deformaon or cracks, do not spray inseccide onto the plasc
parts or let them come into contact with oil.
• To avoid damage to the gasket, use only the door handle when opening
and closing.
- Avoid prolonged exposure of the appliance to direct sunlight.
- Only genuine spare parts should be used to service this freezer.
GENERAL SAFETY
WARNING, continued
• Do not store gasoline or other ammable liquids or gases, near this or
other electrical equipment.
• Keep your ngers away from grills; the spaces between doors and cabinet
are small, so be careful when closing doors when children are around.
• Unplug the cooler before cleaning or performing any repair.
DANGER
DANGER-RISQUE DE FEU OU D´EXPLOSION.
LE FRIGORIGÈNE EST INFLAMMABLE.
CONFIER LES RÉPARATIONS À UN
TECHNICIEN SPÉCIALISÉ. NE PAS
PERFORER LA TUBULURE CONTENANT LE
FRIGORIGÈNE.
DANGER-RISK OF FIRE OR EXPLOSION.
FLAMMABLE REFRIGERANT USED. TO BE
REPAIRED ONLY BY TRAINED SERVICE
PERSONNEL. DO NOT PUNCTURE
REFRIGERANT TUBING.
9
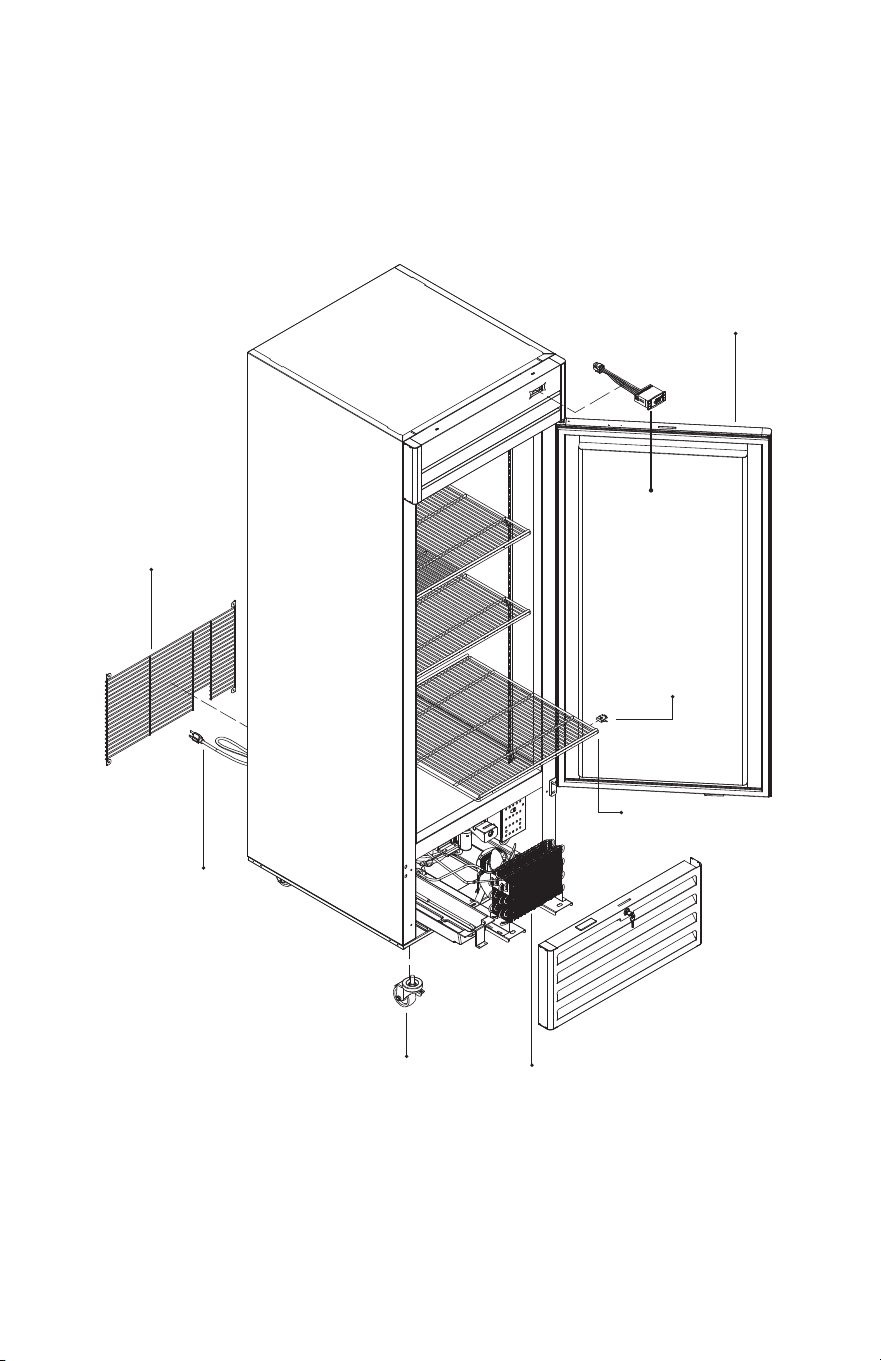
CONTROL
MODULE
DOOR
SHELF CLIP
CASTER
POWER
CORD
BACK GRILL
SHELF
CONDENSER
Know your Equipment
10
Check for Shipping Damage
Prior to leaving the factory, each cabinet is throughly inspected and
performance tested to assure proper operang temperatures.
Check the crate thoroughly for signs of shipping damage. If external
damage exists, internal damage is also probable. Uncrang should be done
while the carrier´s representave is present. Otherwise, the equipment
should be uncrated as soon as possible, preferably within ve (5) days.
The manufacturer is not responsible for in-transit damage and the
consignee must le any required damage claims directly with the carrier.
If the damage is severe and obvious, write a brief descripon of the evidence
on the carrier’s delivery receipt, and above the carrier representave’s
signature. Call the distributor or dealer immediately, indicang that the
cabinet was damaged.
If no obvious crate damage is present, within two hours of receiving the
cabinet from the carrier, remove the packaging to inspect for concealed
damage.
1. If concealed damage is found, call the carrier immediately, save all
crang materials, and le the necessary freight claim with the carrier.
• This appliance must be installed in accordance with all applicable naonal,
state, and local regulaons.
• Appliance is heavy. Use care when liing or posioning. Work in pairs
when needed to prevent injury or damage.
• Do not lt the appliance more than 45°.
Installaon instrucons
Check for accesories: Check that the shelves are inside the unit, including
the four clips or supports for each shelf.
WARNING
Handling the Cabinet
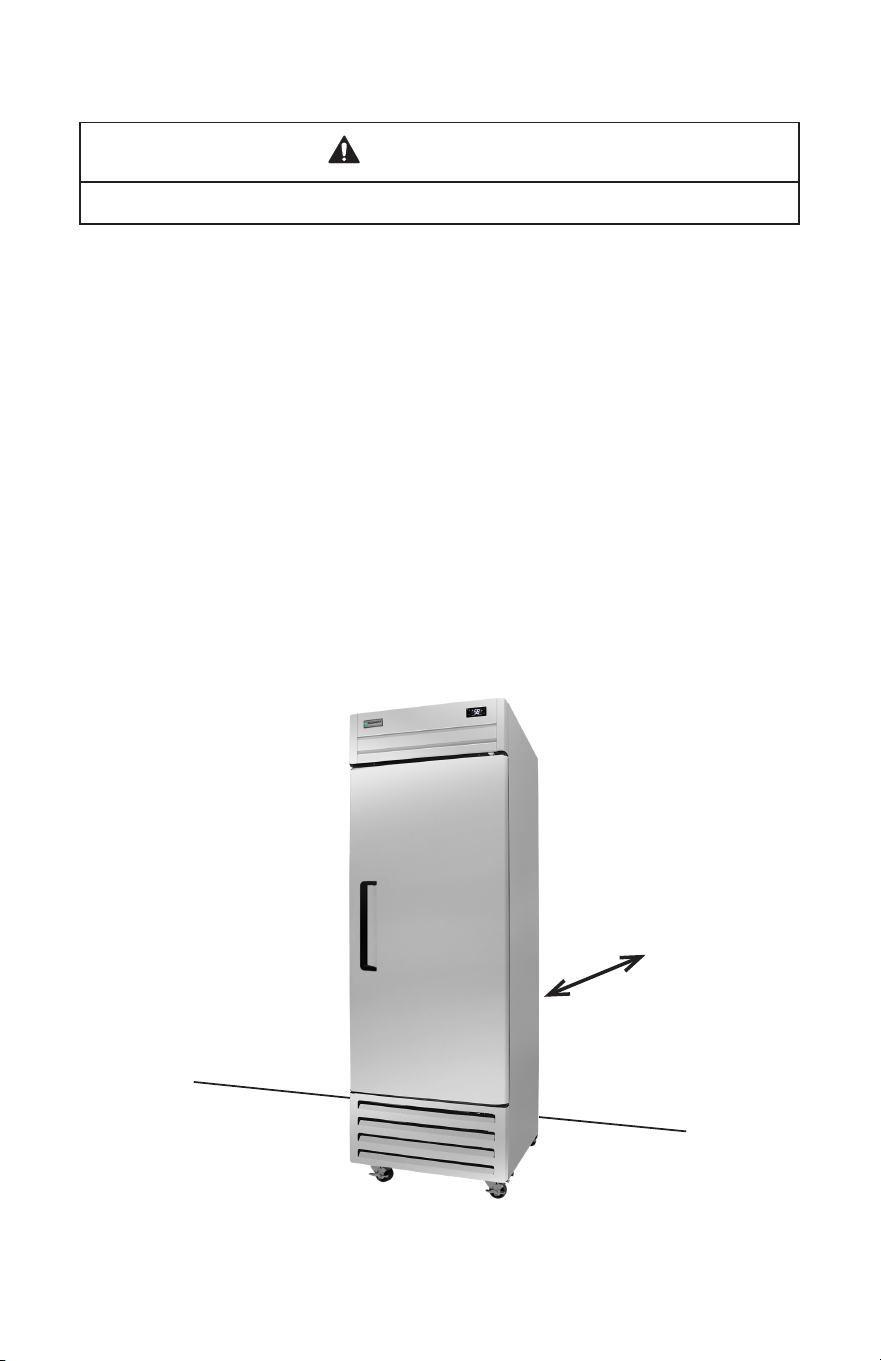
1. Always move the unit in an upright posion. Do not set it on its side or upside
down as you may damage the cabinet and spill the compressor oil.
2. If liing the unit, hold it from its base. It is recommended to use a dolly.
3. Do not let the unit fall abruptly.
11
8”
1. Place the cabinet on a surface solid enough to prevent vibraon and strong
enough to support the combined weight of the cabinet and the product load.
Quick guideline: Esmate 35 pounds per cubic foot of storage space.
2. Cabinets should never be placed in front of windows or glass doors where
sunlight will be in direct contact with the units. If a cabinet is located near
a window or glass door, provide an adequate shade to block the sun´s rays.
3. Ambient temperature must be between 45°F (7°C) and 90°F (32°C). Low
ambient temperatures below 45°F (7°C) are as harmful as high ambient
temperatures. Extreme temperatures will denitely aect the performance
of the cabinet.
4. Failure to properly level the cabinet could hinder proper drainage and door
operaon. Casters are provided with the cabinets.
5. Clearance: Leave a space of at least 8” between the back of the cabinet and
the wall to provide adequate air circulaon of the unit compartment.
Locaon
• This appliance is not intended for outdoor use.
WARNING
12
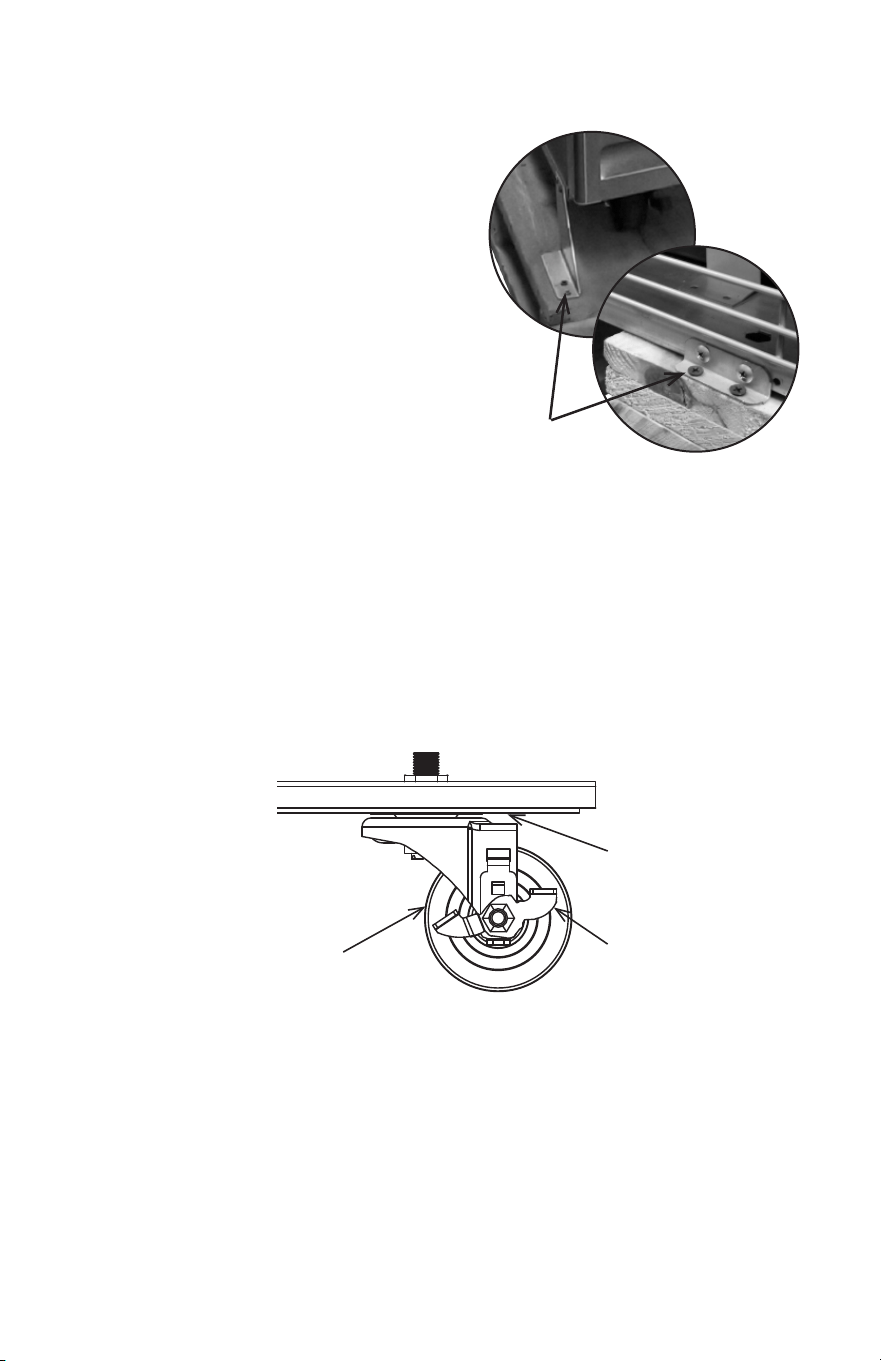
Level the Cabinet
To install casters:
Casters are supplied with the equipment. Only use genuine casters or the base of
the cooler might suer damages. When installing the casters it is important to hand
ghten securely against the base rail reinforcement assembly (see image). The
top edge of the caster must make rm contact with the reinforcement assembly.
Caster
Base rail
NOTE:
Casters with hand-brakes must be placed in FRONT of the unit.
Hand-brake
Remove the Crate and Skid
1. Remove the external packaging
(corrugated board and plastic
wrapping). Check for concealed
damage. If any damage is idened,
immediately forward a complaint to
the transportaon company.
2. Move the cooler to its nal locaon,
before removing the skid.
3. Using a screwdriver remove the
screws that aaches the skid to the
appliance.
Screw
13
Electrical Installaon
• Electrical connecon must meet naonal, state, and local electrical code
requirements. Failure to meet these code requirements could result in
death, electric shock, serious injury, re, or severe damage to equipment.
• This appliance requires an independent power supply of proper
capacity. See the nameplate for electrical specicaons. Failure to use
an independent power supply of proper capacity can result in a tripped
breaker, blown fuse, damage to exisng wiring, or component failure.
This could lead to heat generaon or re.
• THIS APPLIANCE MUST BE GROUNDED: This appliance is equipped with a
NEMA 5-15 three-prong grounding plug to reduce the risk of potenal
shock hazards. It must be plugged into a properly grounded, independent
3-prong wall outlet. If the outlet is a 2-prong outlet, it is your personal
responsibility to have a qualied electrician replace it with a properly
grounded, independent 3-prong wall outlet. Do not remove the ground
prong from the plug and do not use an adapter plug. Failure to follow
these instrucons may result in death, electric shock, or re.
• To reduce the risk of electric shock, do not touch the power switch or plug
with damp hands.
• Do not use an extension cord.
• Do not use an appliance with a damaged power cord. The power cord
should not be altered, jerked, bundled, weighed down, pinched, or
tangled. Such acons could result in electric shock or re. To unplug the
appliance, be sure to pull the plug, not the cord, and do not jerk the cord.
• The GREEN ground wire in the factory-installed power cord is connected
to the appliance. If it becomes necessary to remove or replace the power
cord, be sure to connect the power cord’s ground wire.
Electrical Connecon
• Usually an electrical permit and services of a licensed electrician are required.
• The maximun allowable voltage variaon is ± 10 percent of the nameplate
rang.
WARNING
14
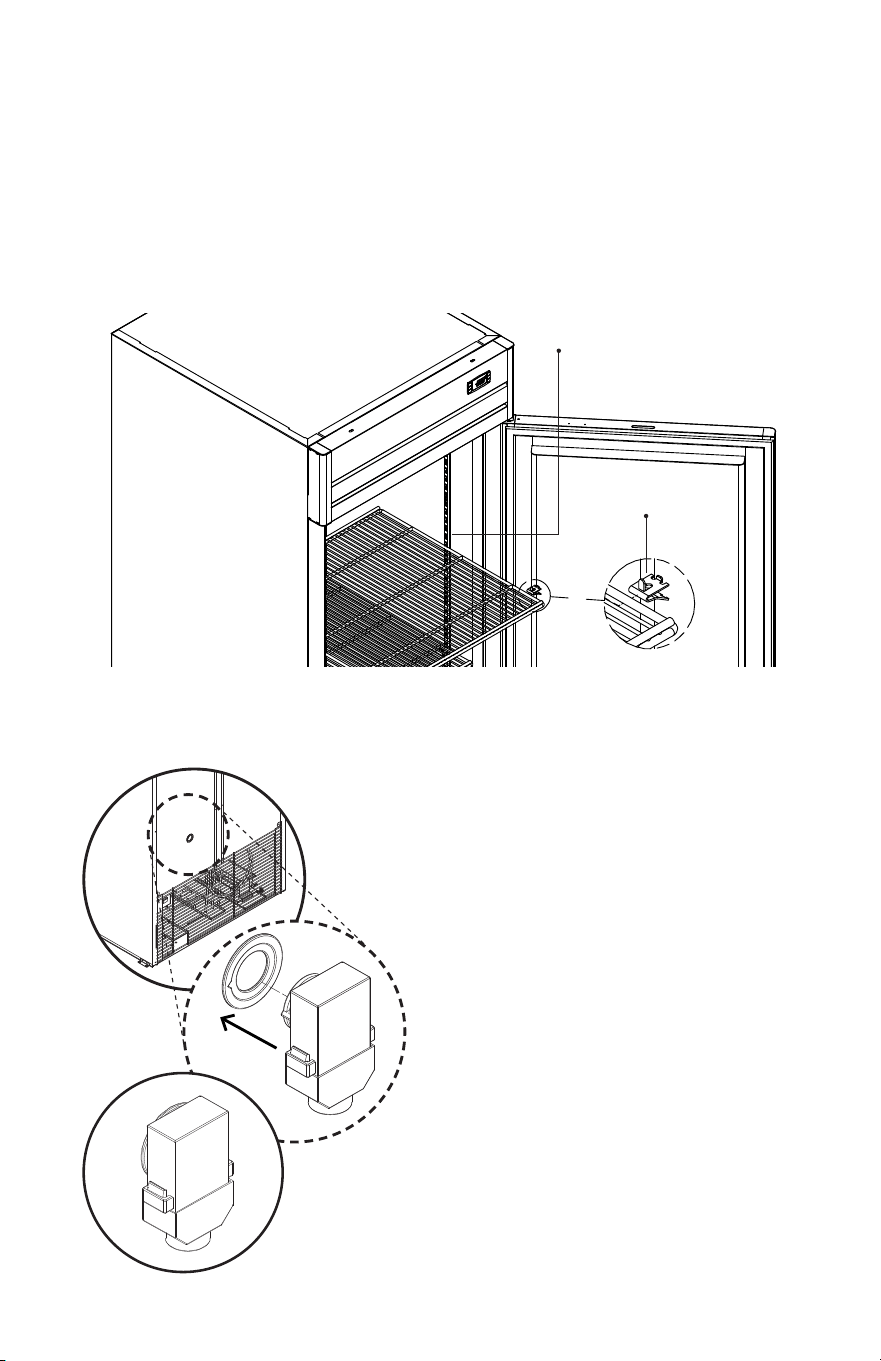
Installing the Shelves
Shelves and shelf clips (4 clips per shelf) are packed inside the cabinet prior
to shipment. Aer selecng the appropriate spacing inside the cabinet,
install shelf clips by inserng top of clip inside the pilaster and then press
the lower secon of the clip while pushing inwards unl it snaps into place.
Repeat unl all clips are in desired locaon. Place shelf on clips checking that
all four corners of shelves are leveled and supported by the four shelf clips.
Pilaster
Shelf clip
Pressure Relief Valve Installaon
1. Locate the pressure relief valve inside your appliance.
2. Locate the hole in the back of your
appliance.
3. Align the pressure relief valve with the hole,
using the marking as a guide.
4. Push the pressure relief valve until you
hear a click. This means the valve was
correctly xed into place.

15
1. Plug in the electrical cord of the unit to a wall outlet, following the
recommendaons about electrical installaon in this manual.
2. Let the cooler run with no product load for 2 hours, or let the
compressor complete three on/o cycles to assure that the
temperature inside is appropriate for the products before loading
them into the freezer.
3. When placing products in the cooler, you should leave small gaps
between one and the other to assure free circulaon of air inside the
cabinet.
4. Do not leave the door open for extended periods of me to avoid
raising the temperature inside the cabinet.
5. Do not unplug your cooler during the night, since when you turn it
back on during the day the electrical consumpon will increase.
Factory Default Temperature Setpoint:
• Refrigerator +38°F (3°C)
• Freezer -5°F (-21°C)
The temperature of a refrigerator should be between +33°F(1°C) to +41°F(5°C)
The temperature of a freezer should be between -5°F(-21°C) to +5°F(-15°C)
Start up the Cabinet
16
Door Reversal
APPLIES ONLY FOR SINGLE DOOR MODELS
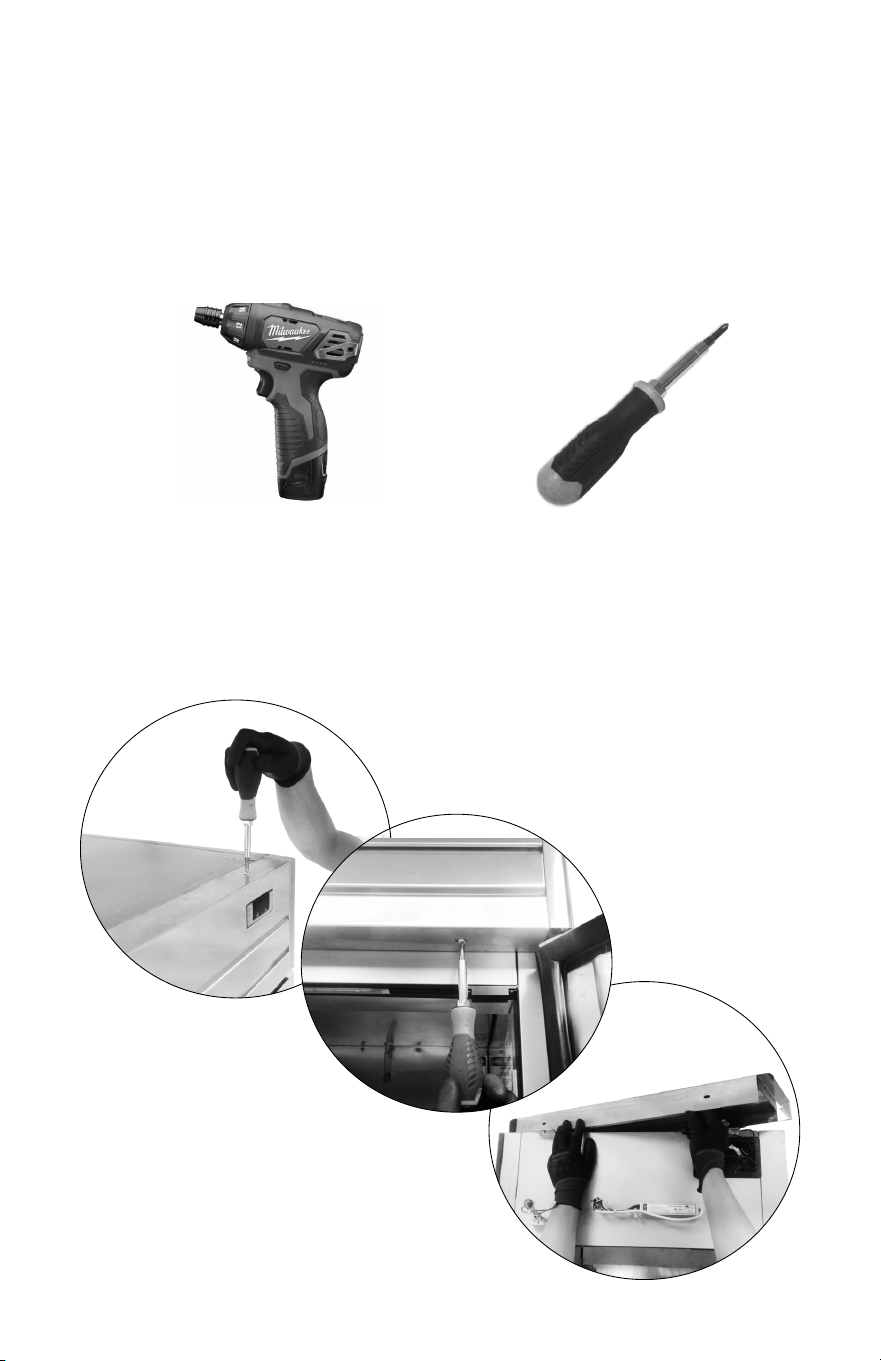
Step 1. Remove the four screws (two upper and two lower) from the
header sign, then place it on top of the equipment.
TOOLS
PHILLIPS # 2 SCREWDRIVER
INSTRUCTIONS
If you would like to reverse the door swing, follow the steps below.
Otherwise, skip to section “Controls and adjustments”.
3/8” NUT DRIVER BIT
17
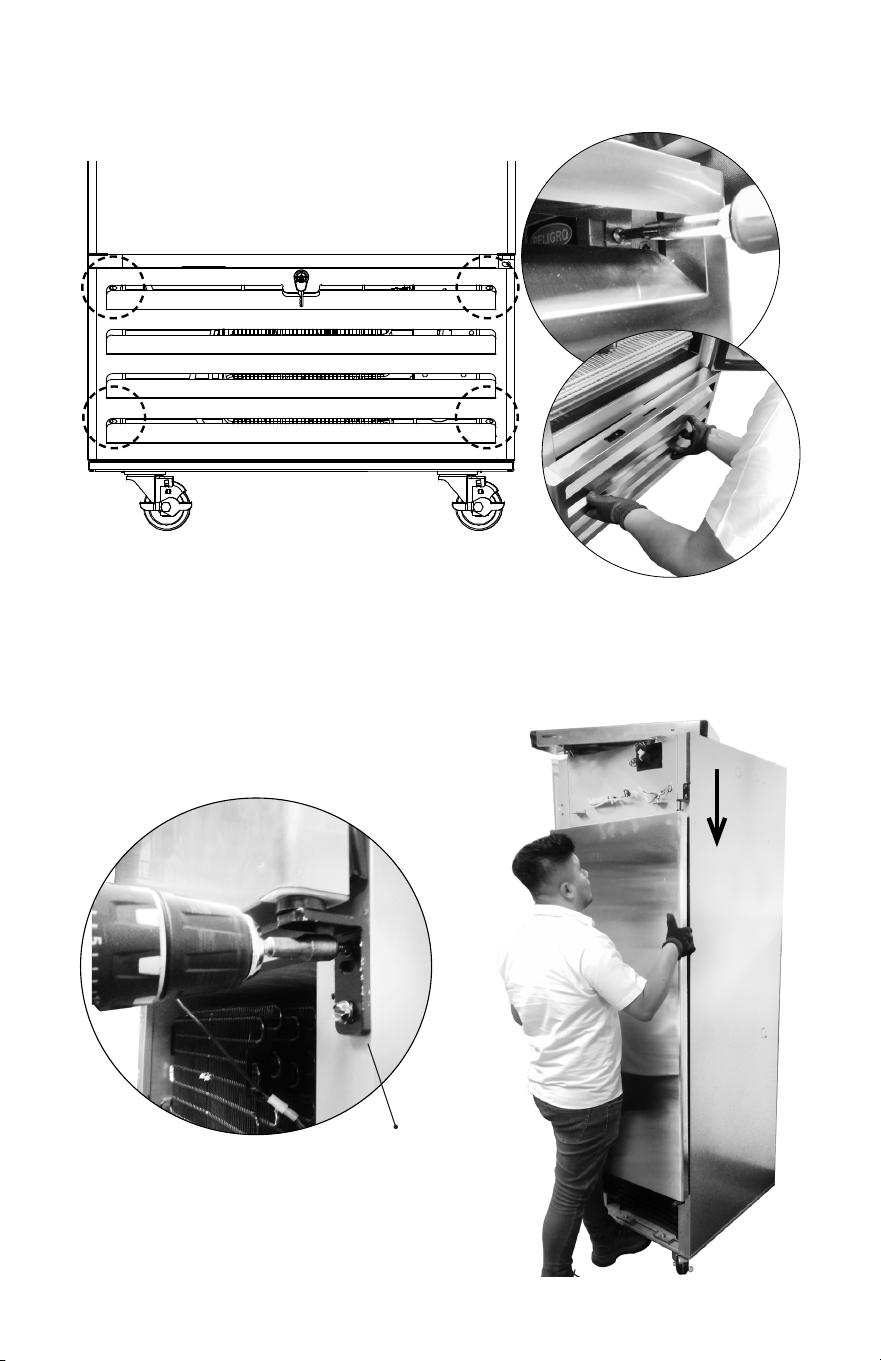
Step 2. Remove the four screws from the front grill, then remove the
front grill.
Step 3. Remove the two screws from the lower hinge and remove
the door by pulling straight down until it is free of the upper hinge pin.
Lower hinge
18
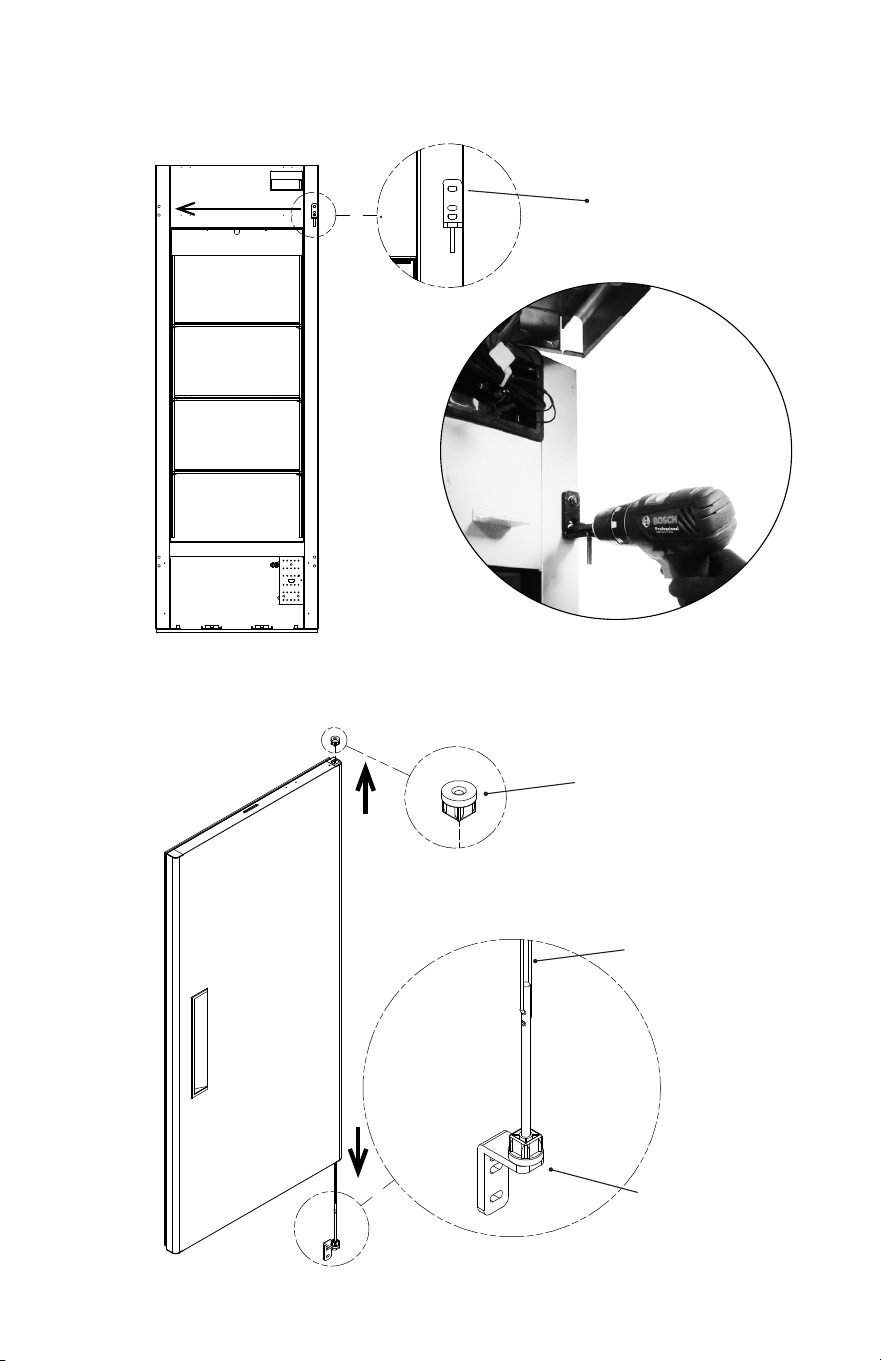
Step 5. Remove the door bushing from the upper right corner and
the lower hinge with the torsion mechanism and switch them, see
the image below.
Step 4. Remove the two screws from the upper hinge and place it
on the opposite side of the equipment.
Upper hinge
Door bushing
Torsion
mechanism
Lower hinge
19
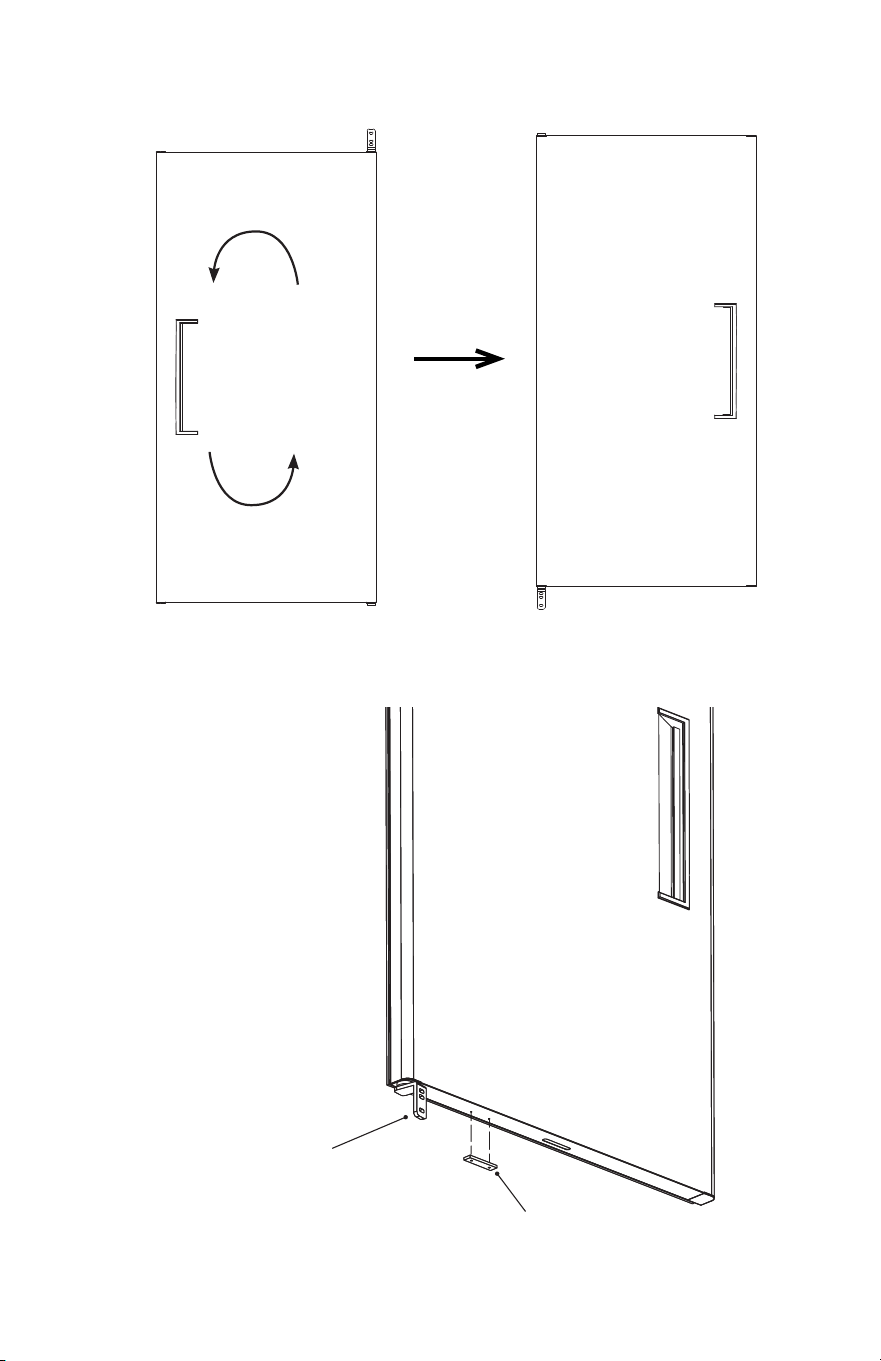
Step 6. After switching hinge and bushing position, turn the door 180°.
Step 7. Change the door magnet from the top to the bottom of the door.
This is the correct
position to enter the
lower hinge into the
door
Door magnet
(new posion)
20
Step 8. Insert the door into the upper hinge and hold it while placing
the lower hinge .
Step 9. Re-install the front grill and the header sign reversing the
Steps 1 and 2.
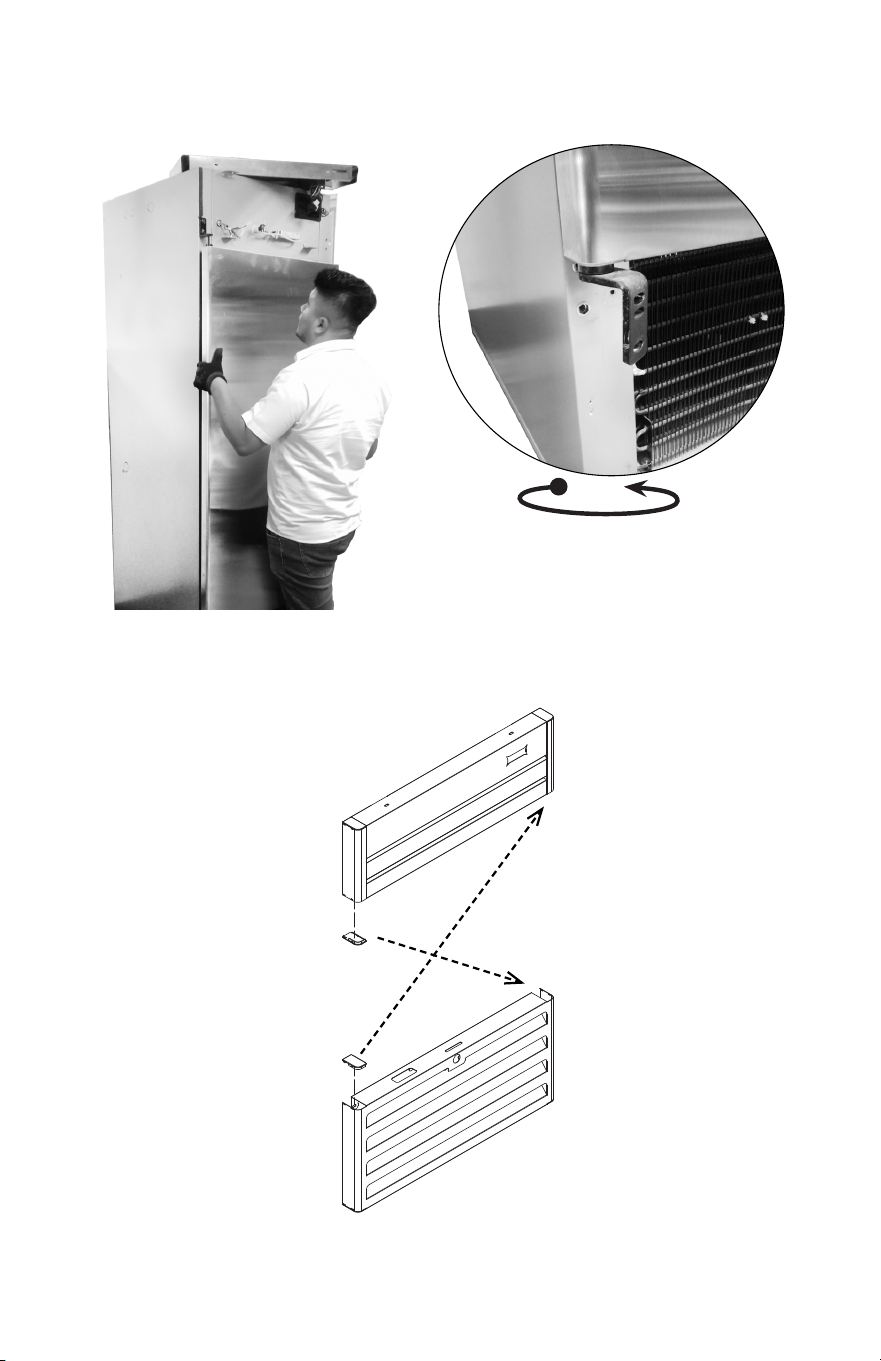
Step 9. Replace the lower left cap from the header sign to the upper
right corner of the front grill and the upper left cap from the front grill
to the lower right corner of the header sign.
Note: Turn the hinge in the opposite
direction of the door opening, then x
it to the equipment with the two screws
21
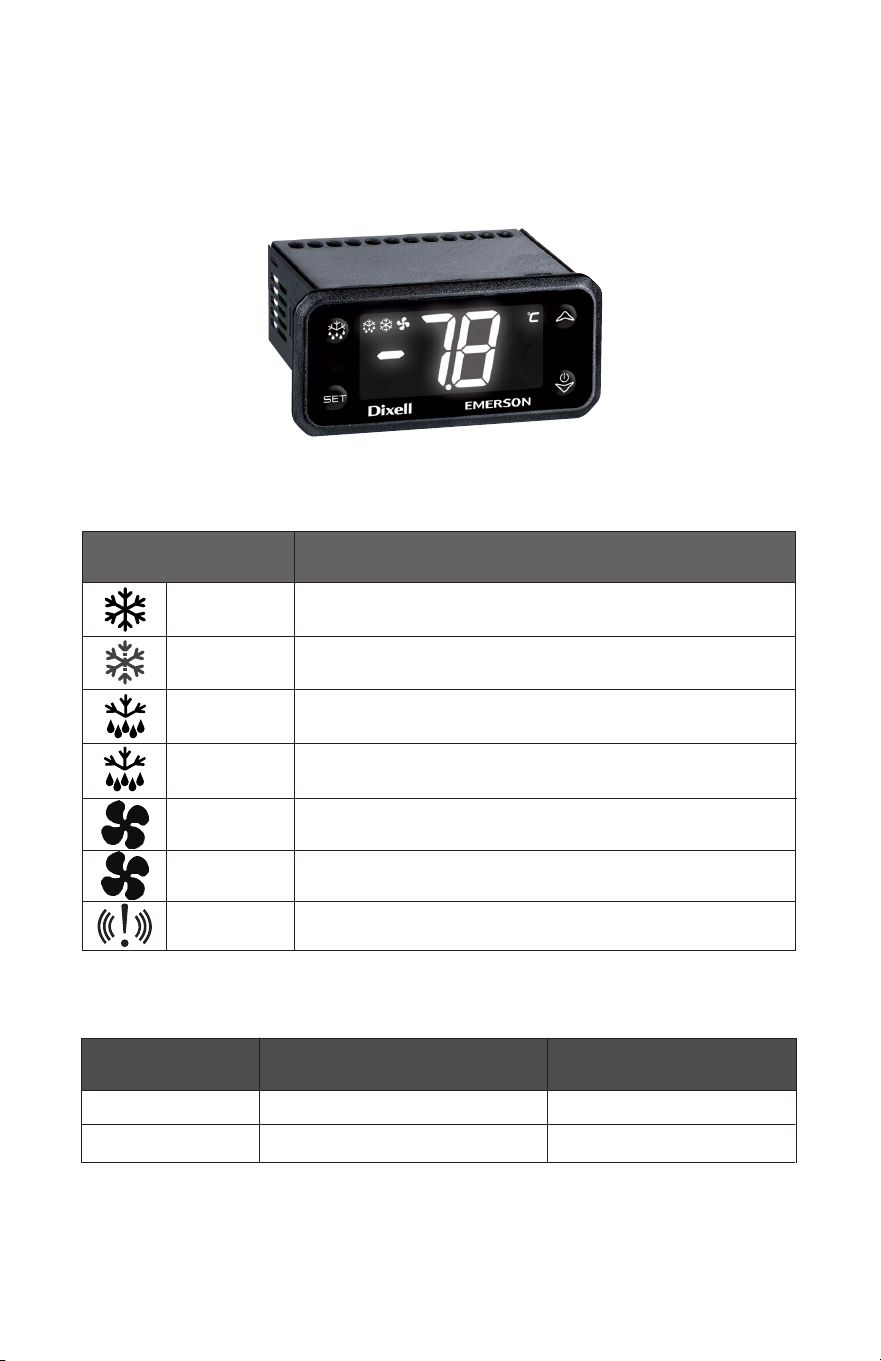
Controls and Adjustments
Your commercial Refrigerator or Freezer is manufactured with an
electronic thermostat to control various functions of your unit, such
as temperature, defrost cycles, alarms, etc.
TEMPERATURE SELECTION*
TEMPERATURE
ITEM
-5°F to +5°F (-21°C to -15°C)
+33°F to +41°F (+1°C to +5°C)
DIXELL XR07CH
FREEZER
REFRIGERATOR DIXELL XR07CH
*These temperatures may vary according to customer request.
Compressor enabled
Anti-short cycle delay enabled
Defrost enabled
* Drip time in progress
Fans enabled
* Fans delay after defrost in progress
An alarm is occurring
LED
MODE
FUNCTION
Flashing
ON
Flashing
ON
Flashing
ON
ON
* Freezers only
READING THE LEDS:
Each LED funcon is described in the following table:
22
DIXELL ALARM INDICATORS
Mess. Cause Outputs
P1
Room probe failure Compressor output according to CY e Cn
P2
Evaporator probe failure Defrost end is timed
P3
Third probe failure Outputs unchanged
HA
Maximum temperature alarm Outputs unchanged
LA
Minimum temperature alarm Outputs unchanged
H2
Maximum temperature alarm for condenser Outputs unchanged
L2
Minimum temperature alarm for condenser Outputs unchanged
EA
External alarm Outputs unchanged
CA
Serious external alarm All outputs OFF
PA
Pressure switch alarm All outputs OFF
dA
Door open Depends on par. rd
HOW TO SEE THE SET POINT
1. The set point parameter is the temperature at which the compressor
cuts out.
2. Push and immediately release the SET key: the display will show the
set point value.
3. Push and immediately release the SET key or wait for 5 seconds to
display the probe value again.
HOW TO CHANGE THE SET POINT
1. Push the SET key for more than 5 seconds to change the SET point value.
2. The value of the set point will be displayed and the “C” or “F” LED
starts blinking.
3. To change the Set value push the or arrows within 10 s.
4. To memorize the new set point value push the SET key again or wait
10 s.
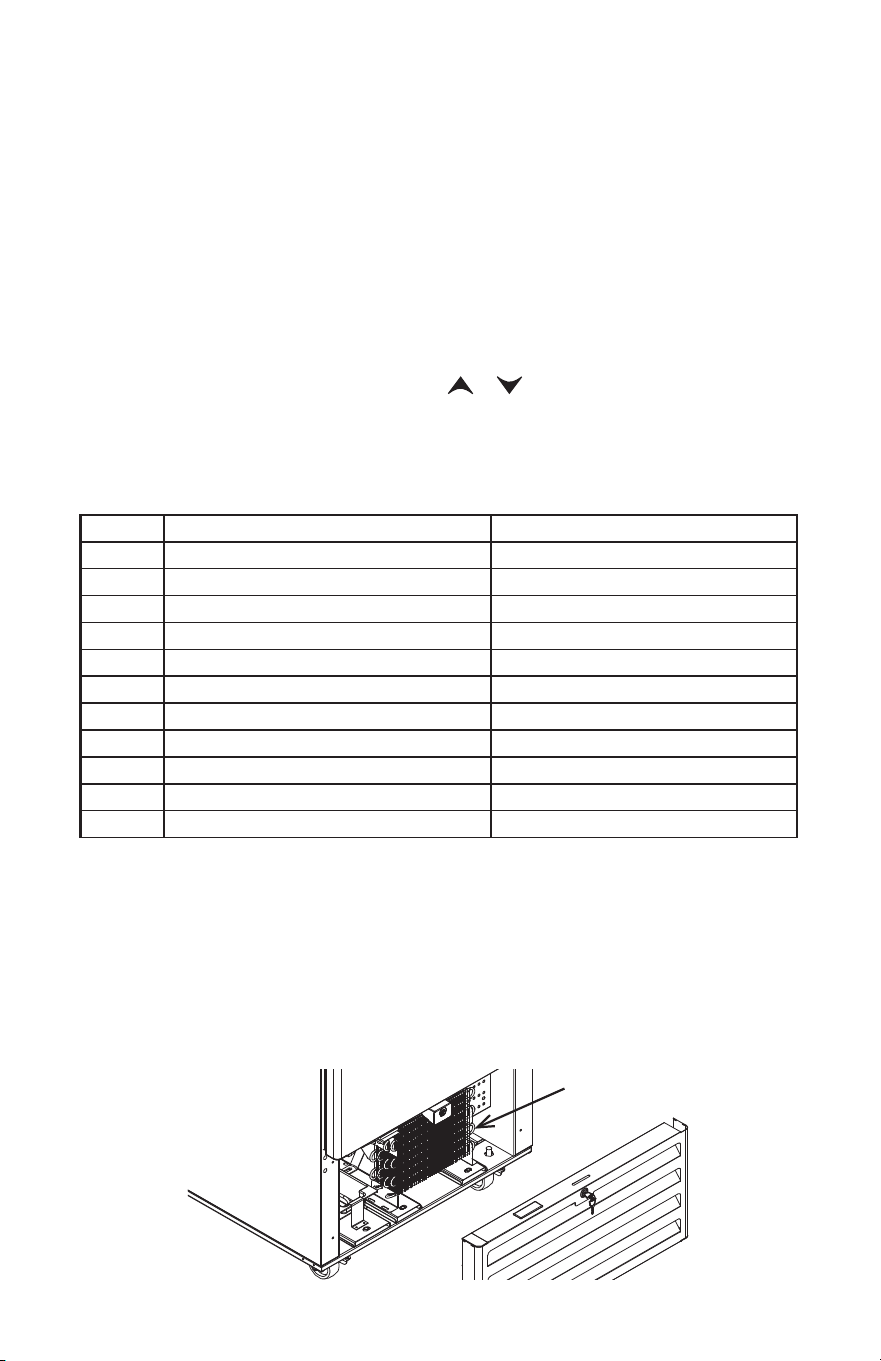
Your unit requires very lile maintenance. However, periodic cleaning can
help maintain eciency and prolong product life. Remember to disconnect
the power source before cleaning. Remove all products and place them
in another cooler.
1. Clean once a month the condenser with a grease remover. The
condenser is located in the lower part of your unit, behind the front grill.
Cleaning and Prevenve Maintenance
Condenser

23
1. Clean the inside and the exterior of your cooler, including the shelves,
with a mild soap soluon. Do not use strong detergents. Wipe dry the
inside of the cooler before loading product again.
2. Allow the appliance to cool down to setpoint before loading with
product.
Disposal
• The appliance contains refrigerant and must be disposed of in accordance
with applicable naonal, state, and local codes and regulaons.
Refrigerant must be recovered by properly cered service personnel.
• The insulaon foaming agent used for the unit body contains ammable
gas cyclopentane. With this in mind, dispose of the product properly.
• Remove the door to reduce the risk of children geng trapped. Leave the
shelves in place so that children may not easily climb inside.
FLAMMABLE
• Follow handling instrucons carefully in compliance with U.S. government
regulaons.
• Do not puncture refrigerant tubing. Risk of re or explosion due to
puncture of refrigerant tubing; follow handling instrucons carefully.
• Dispose of properly in accordance with federal or local regulaons.
Risk of Fire or Explosion Flammable Refrigerant Used
DANGER
• Suivre aenvement les instrucons de manipulaon conformément à la
réglementaon gouvernementale.
• Ne pas perforer la tubulure contenant le frigorigène. Risque de feu ou
d’explosion si la tubulure contenant le frigorigène est perforèe; suivre les
instrucons de manutenon avec soin.
• Éliminer conformément aux règlements fédéraux ou locaux.
Risque De Feu Ou D’Explosion Le Frigorigène Est Inammable
DANGER

SERIES
618 Hwy. 74 South, Peachtree City, GA 30269 USA (P) (800) 227-3172 www.economyseries.com
MAN-341-R

