
Technical Support and E-Warranty Certificate www.vevor.com/support
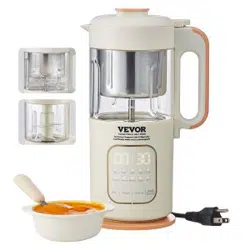
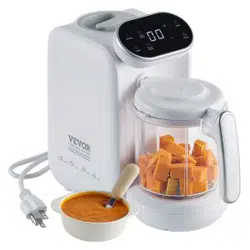
Baby Food mills
MODEL:BFP-1600E
We continue to be committed to provide you tools with competitive price.
"Save Half", "Half Price" or any other similar expressions used by us only represents an
estimate of savings you might benefit from buying certain tools with us compared to the major
top brands and dose not necessarily mean to cover all categories of tools offered by us. You
are kindly reminded to verify carefully when you are placing an order with us if you are
actually saving half in comparison with the top major brands.
- 1 -
MODEL:BFP-1600E
Have product questions? Need technical support? Please feel free to
contact us:
Technical Support and E-Warranty Certificate
www.vevor.com/support
NEED HELP? CONTACT US!
This is the original instruction, please read all manual instructions
carefully before operating. VEVOR reserves a clear interpretation of our
user manual. The appearance of the product shall be subject to the
product you received. Please forgive us that we won't inform you again if
there are any technology or software updates on our product.
Baby Food mills

- 2 -
IMPORTANT SAFEGUARDS
When using electrical appliances, basic safety precautions should always
be folowedincluding the following:
a) Read all instructions.
b) To protect against risk of electrical shock do not put main body in water
or other liquid.
c) This appliance is not intended for use by persons (including children)
with reduced physical,sensory, or mental capabilities, or lack of experience
and knowledge,unless they are closelysupervised and instructed
concerning use of the appliance by a person responsible for theirsafety.
Close supervision is necessary when any appliance is used by or near
children.Children should be supervised to ensure that they do not play with
the appliance.
d) Turn the appliance OFF, then unplug from the outlet when not in use,
before assembling or disassembling parts and before cleaning. To unplug.
grasp the plug and pullfrom the outlet. Never pull from the power cord.
Permanently Installed - Make sure applianceis OFF when not in use,
before putting on or taking off parts, and before cleaning.
e) Avoid contacting moving parts.
f) Do not operate any appliance with a damaged cord or plug or after the
appliancemalfunctions, or is dropped or damaged in any manner. Contact
the manufacturer at theircustomer service telephone number for
information on examination, repair, or adjustment.
g) The use of attachments not recommended or sold by the manufacturer
may cause fire,electric shock or injury.
h) Do not use outdoors.
i) Do not let cord hang over edge of table or counter.
j) Hand-held, other than cordless types - Do not let cord contact hot surface,
including thestove.
k) Double-blade knife is sharp. Handle carefully. Use special tool when
removing or replacingknife blade.
I) Bowl must be in place before replacing knife blades.

- 3 -
m) The appliance is intended for processing small quantities of food for
immediate consumption, and is especially recommended for preparing
baby food. The appliance is notintended to prepare large quantities of food
at one time.
n) Keep hands and utensils away from moving blades or discs while
processing food toreduce the risk of severe injury to persons or damage to
the food processor. A scraper may beused but must be used only when the
food processor is not running
o) Blades are sharp. Handle carefully.
p) To reduce the risk of injury. never place cutting blade or discs on base
without first puttingbowl properly in place.
q) Be certain cover is securely locked in place before operating appliance.
r) Do not attempt to defeat the cover interlock mechanism.
s) Do not fill the bowl above the marked maximum fill line (or rated capacity)
to avoid risk of injury due to damage to the cover or bowl.
t) Do not touch hot surfaces. Use handles or knobs.
u) Close supervision is necessary when any appliance is used by or near
children.
v) Unplug from outlet when not in use and before cleaning. Allow to cool
before putting on ortaking off parts, and before cleaning the appliance.
w) Do not operate any appliance with a damaged cord or plug or after the
appliancemalfunctions, or has been damaged in any manner. Return
appliance to the nearestauthorized service facility for examination, repair
or adjustment.
x).The use of accessory attachments not recommended by the appliance
manufacturer mayresult in fire, electric shock or injury to persons.
y). Do not let cord hang over edge of table or counter, or touch hot
surfaces.z). Do not place on or near a hot gas or electric burner, or in a
heated oven.
aa). Always attach plug to appliance first, then plug cord into the wall outlet.
To disconnect,turn any control to off, then remove plug from wall outlet.
ab) Do not use appliance for other than intended use.

- 4 -
ac)To reduce the risk of injury, do not drape cord over the counter top or
table top where it canbe pulled on by children or tripped over
unintentionally.
SAVE THESE INSTRUCTIONS
HOUSEHOLD USE ONLY
a) A short power-supply cord (or detachable power-supply cord) is
provided to reduce risksresulting from becoming entangled in or tripping
over a longer cord.
b) Longer detachable power-supply cords or extension cords are available
and may be used ifcare is exercised in their use.
c) If a long detachable power-supply cord or extension cord is used:
1) The marked electrical rating of the detachable power-supply cord or
extension cordshould be at least as great as the electrical rating of the
appliance;
2) If the appliance is of the grounded type, the extension cord should be a
groundingtype3-wire cord;
3) The longer cord should be arranged so that it will not drape over the
counter top ortable top where it can be pulled on by children or tripped
over.
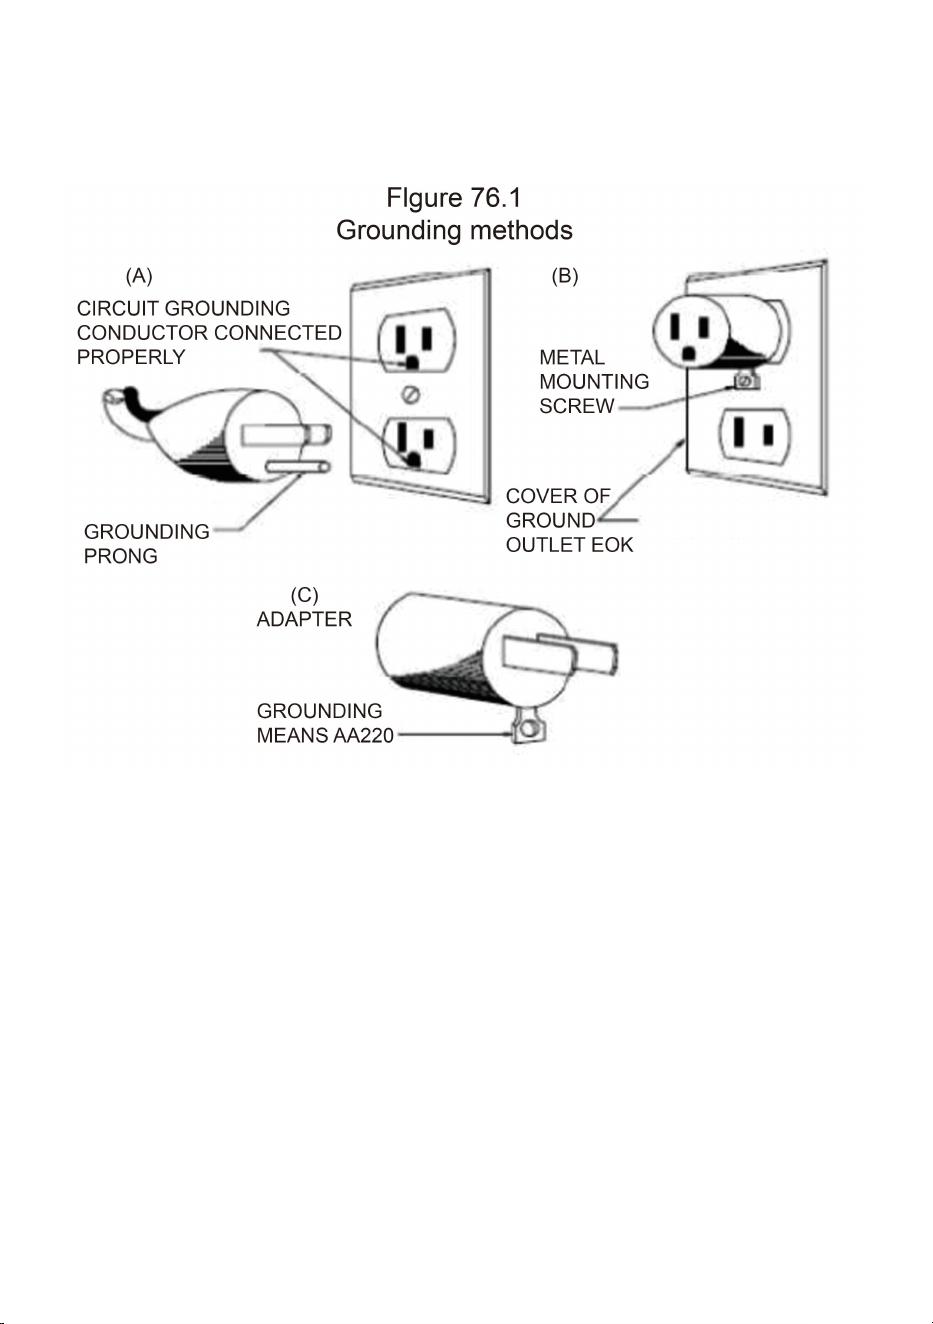
GROUNDING INSTRUCTIONS
This appliance must be grounded while in use to protect the operator from
electrical shock.The appliance is equipped with a 3-conductor cord and a
3-prong grounding-type plug to fit theproper grounding-type receptacle.
The appliance has a plug that looks like sketch A in Figure 76.1.An adaptor,
sketch B, should be used for connecting sketch-A plugs to
two-prongreceptacles. The grounding tab which extends from the adaptor
must be connected to apermanent ground such as a properly grounded
outlet box as shown in sketch C using a metalscrew.
EXTENSION CORDS
- 5 -
Use only 3-wire extension cords which have 3-prong grounding-type plugs
and 3-pole cordconnectors that accept the plug from the appliance. Use
only extension cords which areintended for outdoor use.
1. Warning
1. Check if the voltage indicated at the bottom of the appliance
corresponds to the local main voltage before using the product.
2. Do not use the product if the plug, main cord, or appliance is damaged.
3. The damaged cord may only be replaced by VEVOR, VEVOR's
authorized service center, or similarly qualified persons to avoid hazards.
4. If the blade is stuck, add water to loosen the food up, then gently clean it
off.
5. Avoid touching the water tank and stirring the cup while steaming to
avoid scalding. Please use the stirring cup with the handle.

- 6 -
6. Be careful when opening the cup while steaming as it may reach a high
temperature.
7. Make sure that the stirring cup is placed in the proper position.
Otherwise, the product won't work.
8. Be careful when adding water or cleaning the product. Avoid adding too
much water. This may cause a short circuit and/or other problems.
9. Test the temperature of baby food by putting a couple of drops on the
back of your hand before feeding.
10. Make sure that the stirring cup is cooled down first before opening. You
may add more food to the mixture after steaming.
11. Please note that food content cannot exceed 300ml.
12. Empty the water tank and add purified water before steaming.
After steaming, add the appropriate amount of broth according to the
desired food consistency.
These extension cords are identified by a marking 3Suitable for use with
outdoor appliances;store indoors while not in use.3 Use only extension
cords having an electrical rating not less than the rating of the appliance.
Do not use damaged extension cords. Examine extensioncord before
using and replace if damaged. Do not abuse extension cord and do not
yank onany cord to disconnect. Keep cord away from heat and sharp
edges.
2.CAUTION
1. Do not use other parts and accessories produced by manufacturers not
recommended by vevor. Using different parts and accessories will
invalidate the warranty.
2. Do not immerse the appliance in water nor place the appliance on or
near the stove.
3. Do not use a sterilizer or microwave oven to disinfect the stirring cup or
any appliance parts. This method is not suitable for handles or blades.
4. The appliance is designed for household use only. Misusing the
appliance will invalidate the warranty.

- 7 -
5. Place the appliance on a stable, flat surface and ensure enough space
to avoid damaging wooden cabinets and other items caused by the steam
from the appliance.
6. Always add water before steaming.
7. Do not use the products if there is any damage or broken parts. You can
send the product to vevor's authorized servicing facility for repair.
8. Avoid dripping puree or juice into the water tank to prevent the coating of
the heating plate from rusting due to the food's acidity and basicity.
9. Avoid moving the appliance while using it.
10. Do not insert any objects into the water inlet or steam outlet.
11. Do not add water to the tank when steaming. Otherwise, the hot water
or steam may overflow.
12. Always check the food consistency to ensure that nothing else has
gotten into the cooked food.
13. Steaming time takes roughly about 15 mins. When using the product
continuously, please allow 3 minutes intervals.
14. You must not stir in any bones or nuts (including walnuts and
macadamia nuts).
15. Food should only be stirred for 15 seconds at a time, followed by a
10-second pause/break before starting again.
16. Please be aware that colorful food may cause the goods to stain. You
can nevertheless use the product because this is usual. To prevent stains,
be sure to clean the stirring cup frequently.
17. Be careful when handling the sharp blades when emptying the bowl
and cleaning.
18. Be careful in pouring hot liquid into the processor, as it can be ejected
from the appliance due to a sudden temperature rise.
19. Switch off the appliance and disconnect from the supply before
changing parts and accessories.
20. This appliance is intended to be used in household and similar
applications such as:
— staff kitchen areas in shops, offices, and other working environments;
— farmhouses;

- 8 -
— by clients in hotels and motels;
— bed and breakfast type environments.
21. Always disconnect the appliance from the power supply after every use
to avoid the danger of electrocution.
22. This appliance shall not be used or played with by children. Keep the
appliance and its cord out of reach of children.
23. This appliance can be used by children aged eight years and above
and persons with reduced physical, sensory or mental capabilities if they
have been given safe supervision concerning the appliance use and
understand the hazards involved. Children shall not play with this device.
Children shall not clean and do product maintenance without supervision.
24. The damaged cord supply must only be replaced by the manufacturer’s
service agent or similarly qualified persons to avoid hazards.
25. To avoid the danger of electrocution, do not immerse the main parts of
the product, cord, or plug in liquids.
3.FCC Information
CAUTION: Changes or modifications not expressly approved by the party
responsible for compliance could void the user's authority to operate the
equipment!
This device complies with Part 15 of the FCC Rules. Operation is subject to
the following two conditions:
1) This product may cause harmful interference.
2)This product must accept any interference received, including
interference that may cause undesired operation.
WARNING: Changes or modifications to this product not expressly
approved by the party.responsible for compliance could void the user's
authority to operate the product.
Note: This product has been tested and found to comply with the limits for
a Class B digital device pursuant to Part 15 of the FCC Rules, These limits
are designed to provide reasonable protection against harmful interference
in a residential installation.

- 9 -
This product generates, uses and can radiate radio frequency energy, and
if not installed and used in accordance with the instructions, may cause
harmful interference to radio communications. However, there is no
guarantee that interference will not occur in a particular installation. If this
product does cause harmful interference to radio or television
reception,which can be determined by turning the product off and on, the
user is encouraged to try to correct the interference by one or more of the
following measures.
· Reorient or relocate the receiving antenna.
· Increase the distance between the product and receiver.
· Connect the product to an outlet on a circuit different from that to which
the receiver is connected.
· Consult the dealer or an experienced radio/TV technician for assistance.
4.Product technical parameters
product model
BFP -1600E
Rated voltage/frequency
120V~ 60Hz
Heating Power
300W
Stirring Power
130W
Water Tank Capacity
200ml
Stirring Capacity
300ml
- 10 -
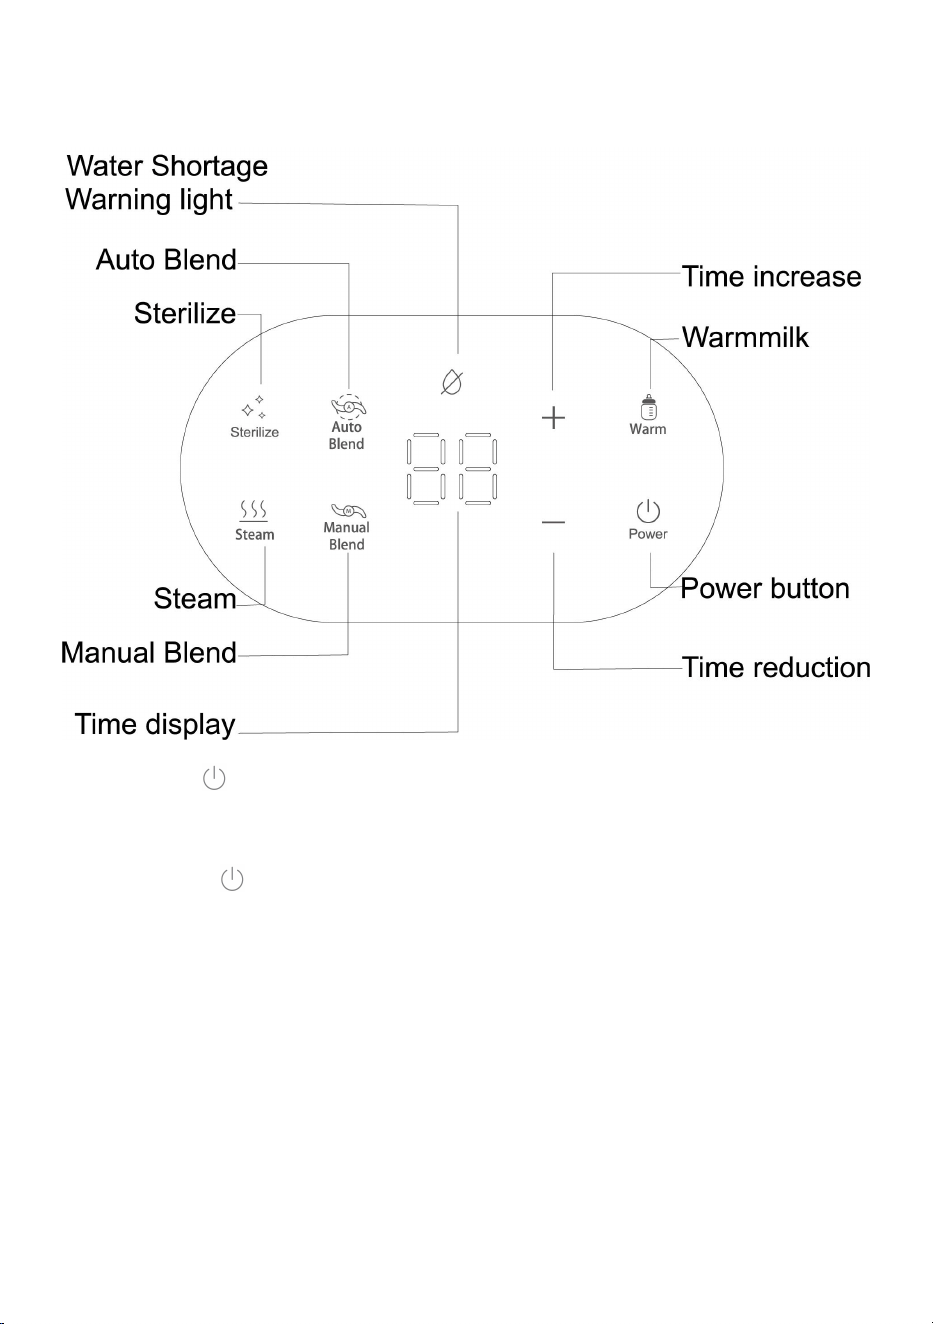
5.Panel Features
The panel's " " indicator goes red when you connect the appliance. It
means that the device is ON and ready to use. A white light indicates that
the product is functional and ready to use. The white light turns on when
touching the " "button. This button light glows brilliant white when a
panel button is pressed. Red light indicates a water shortage warning. The
appliance is in standby mode when the time displays " 00 ". In other words,
it is functional and ready to use.
Water Shortage Warning light:The water shortage indicator will
blink/flash if the tank is empty or the water has dried up. The LED will only
stop flashing when the tank has cooled down by adding water. Please note
that the water tank could not be heated when empty.

- 11 -
Time display:To show working time for STEAM or STERILIZE. To display
the working status of blending.
Time increase :The working time could be increased manually for steam
function or sterilizing.
Sterilize :The remaining time will be shown by pressing this button, a
"Beep" sound will play, and the product will begin working. You can adjust
the time (increase or decrease) according to your preference.After
disinfecting the product, you will hear five continuous beeping sounds.
Manual Blend: When you press this button, the product will start to stir.
The appliance will stop working when you release your hand, and the
display light will turn off. A revolving/rotating prompt would appear on the
monitor at the same time. Repeat this process throughout to complete the
"Pulse" operation.
Time reduction :The working time could be reduced manually for
steaming or disinfecting.
Steam : The product will start working with a 15-minute time default if you
press this button. You can adjust the time according to personal preference.
You will hear five continuous beeping sounds after the preset time.
Warm milk :Put the bottle into the water tank after adding roughly 60mI of
water. When you click the button, the machine will automatically warm the
milk (at about 6 minutes). The device will produce the sound "Beep" five
times after finishing the warming operation. (Note: The temperature of
warming milk is influenced by the ambient temperature, the water volume,
and the bottle's kind and thickness. PLEASE make sure to hand-test the
temperature of the product/food before feeding).
Auto Blend :When you press the button, it begins to stir and emits a
"Beep" sound. You will hear a constant beeping sound (five times
continuous beeping sound) which ends after the stirring is complete. A
revolving prompt would also be visible on display.
- 12 -
Power button :The Power Button will become red after you connect your
appliance to the power supply. To activate your baby food processor, press
the power button. (To turn ON, press and hold the power button for three
seconds).
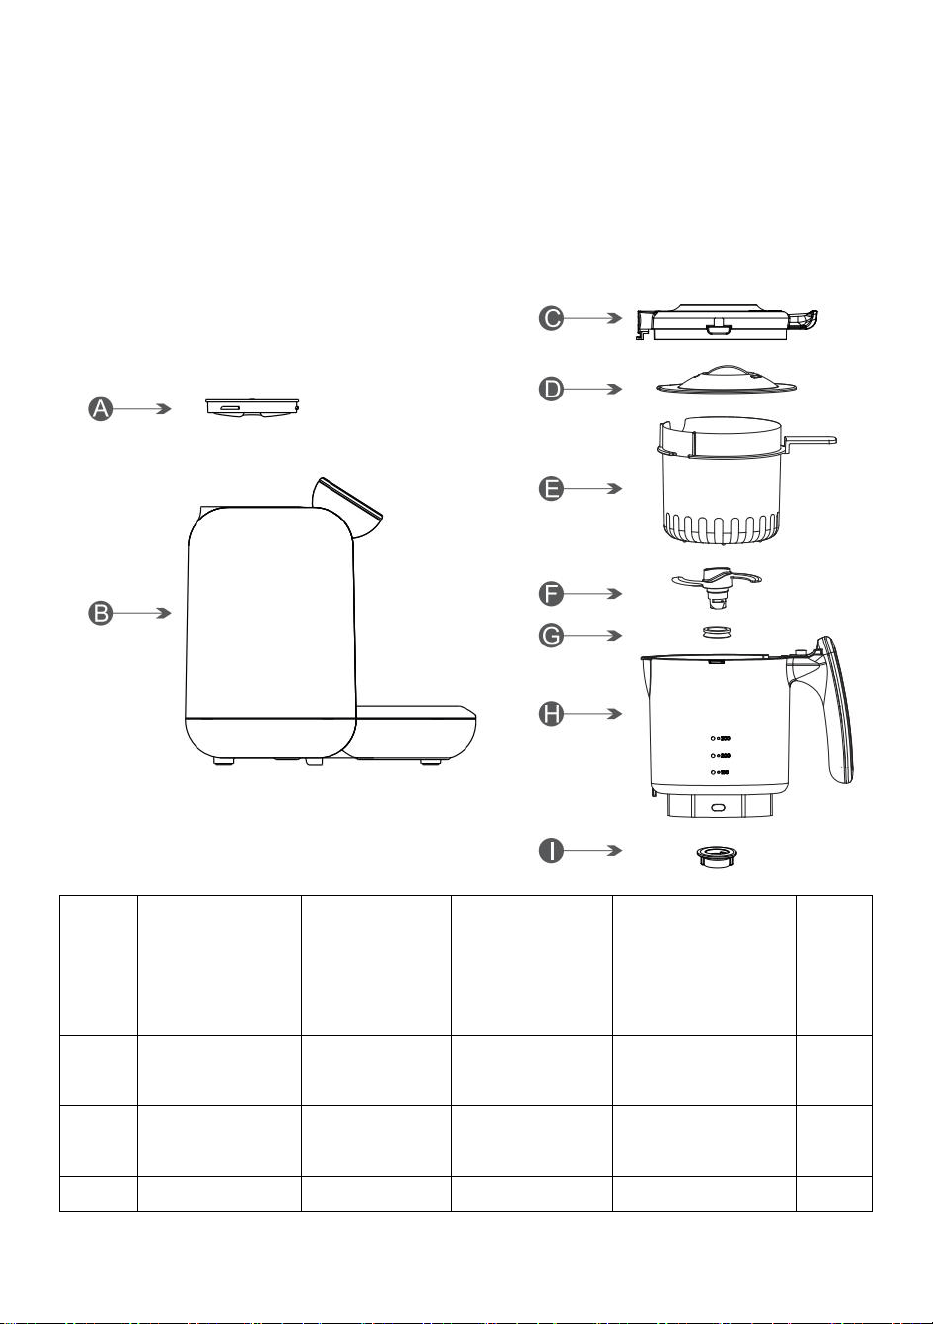
6. Parts Of Product
Item
Name
Material
Heat
Resistant
Temperatur
e
Cold Resistant
Temperature
Qua
ntity
A
Rotary cover
of water tank
Food-grade
PP
120℃/248
℉
-20℃/-4℉
1
B
Main body
PP
120
℃
/248
℉
-20
℃
/-4
℉
1
C
Lid of the
Food-grade
120
℃
/248
-20
℃
/-4
℉
1

- 13 -
stirring cup
PP
℉
D
Spill-proof
cover
Food-grade
PP
120℃/248
℉
-20℃/-4℉
1
E
Steaming
basket
Food-grade
PP
120
℃
/248
℉
-20
℃
/-4
℉
1
F
Blade
Food-grade
PA
120
℃
/248
℉
-20
℃
/-4
℉
1
G
Waterproof
circle
Food-grade
silicone
120℃/248
℉
-20℃/-4℉
1
H
Stirring cup
Food-grade
silicone
120℃/248
℉
-20℃/-4℉
1
I
Blade holder
Tritan
120℃/248
℉
-20℃/-4℉
1
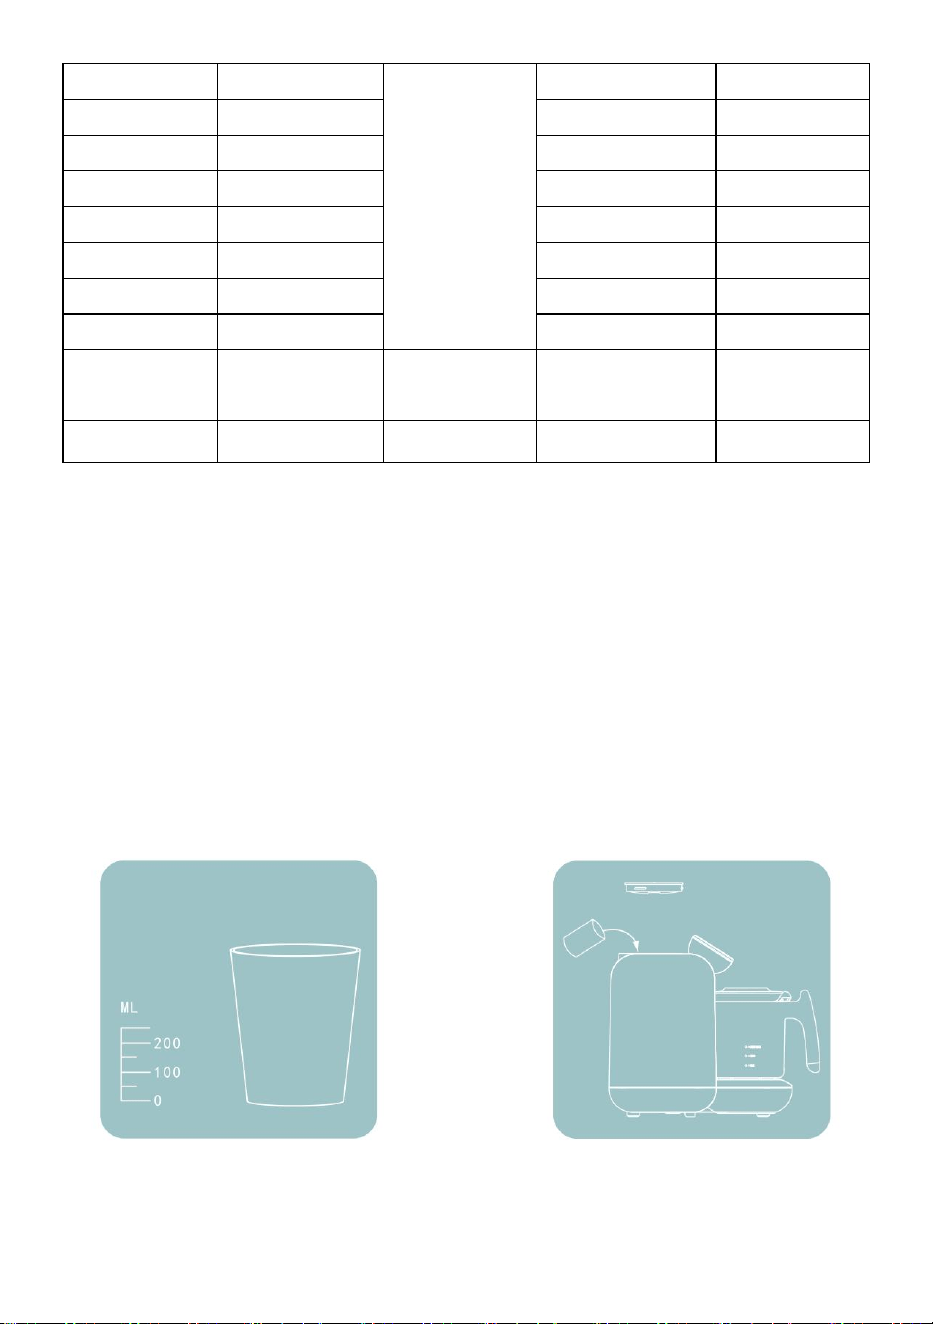
7.Preparation
Adding water to the tank: Fill the tank with distilled or filtered water until you
reach the MAX logo, then turn/rotate the tank's cover.
Caution :
1. Do not use tap water or mineral water. Because it is easy to cause the
incrustation scale on water tank.
2. Make sure not to add too much water to the tank. Water can not exceed the
MAX logo.
3. Only the purified water can be poured into the tank.
8.Ingredients & Steaming Time
Material
Steaming
Time
Product
Name
Material
Steaming
Time
Apple
15min
Vegetable
Green beans
15min
Orange
15min
Leek
15min
Peach
15min
Onion
15min
- 14 -
Pear
15min
Peas
15min
Pineapple
15min
Leaf mustard
15min
Plum
15min
Potato
20min
Asparagus
15min
Pumpkin
15min
Broccoli
15min
Spinach
15min
Carrot
20min
Cabbage
15min
Cauliflower
15min
Sweet potato
15min
Celery
15min
Tomato
15min
Watermelon
15min
Meat
Chicken /
Beef/ Mutton
20min
Fennel
15min
Fish
Salmon / Cod
15min
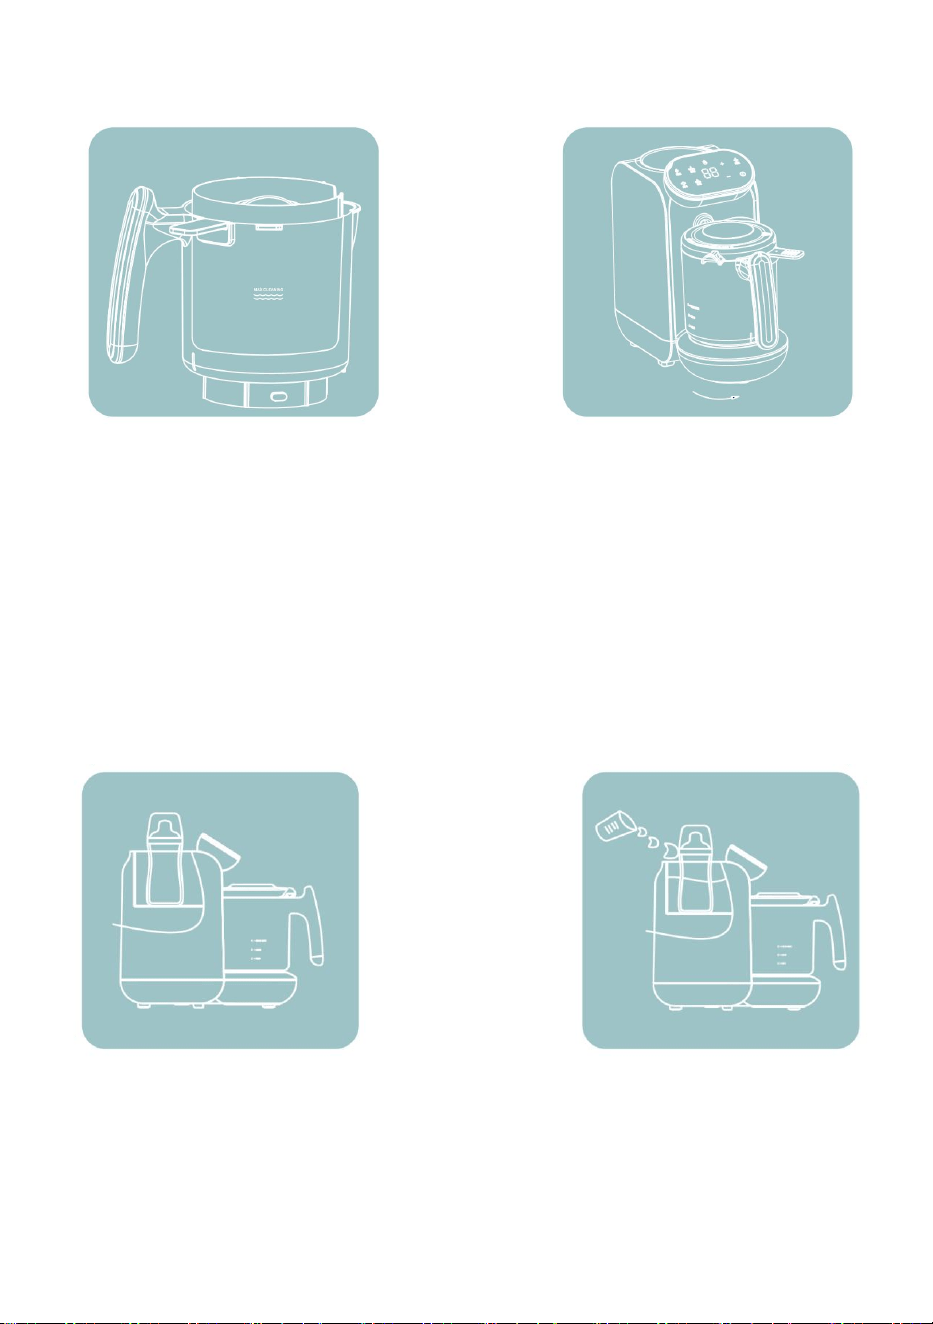
9.Functions & Operation
5-in-1 baby food processor ( Steam, Sterilize, Warm milk, Manual
Blend,Auto-Blend). This appliance is designed for making fresh food for
babies. Operate and use it according to the user manual.
Step1 : Steaming
1. Start by filling the water tank (ideally with purified water). Please do not
fill past the "Max" line (approx 7 oz). Gently turn the cap to Ensure the
Water Tank Cover is securely locked.
2. Simply tap the Power Button to turn ON (you will hear a beep, and the
control panel will light up).
- 15 -
3. We advise you to "sterilize" the cycle before the initial usage and
frequently. Just click the "Sterilize" button; the process takes 10 minutes
(the timer will show the time remaining).
4. Refill the water tank up the "Max" line.
5. Preparing your food - we suggest you cut ingredients into 1-inch chunks.
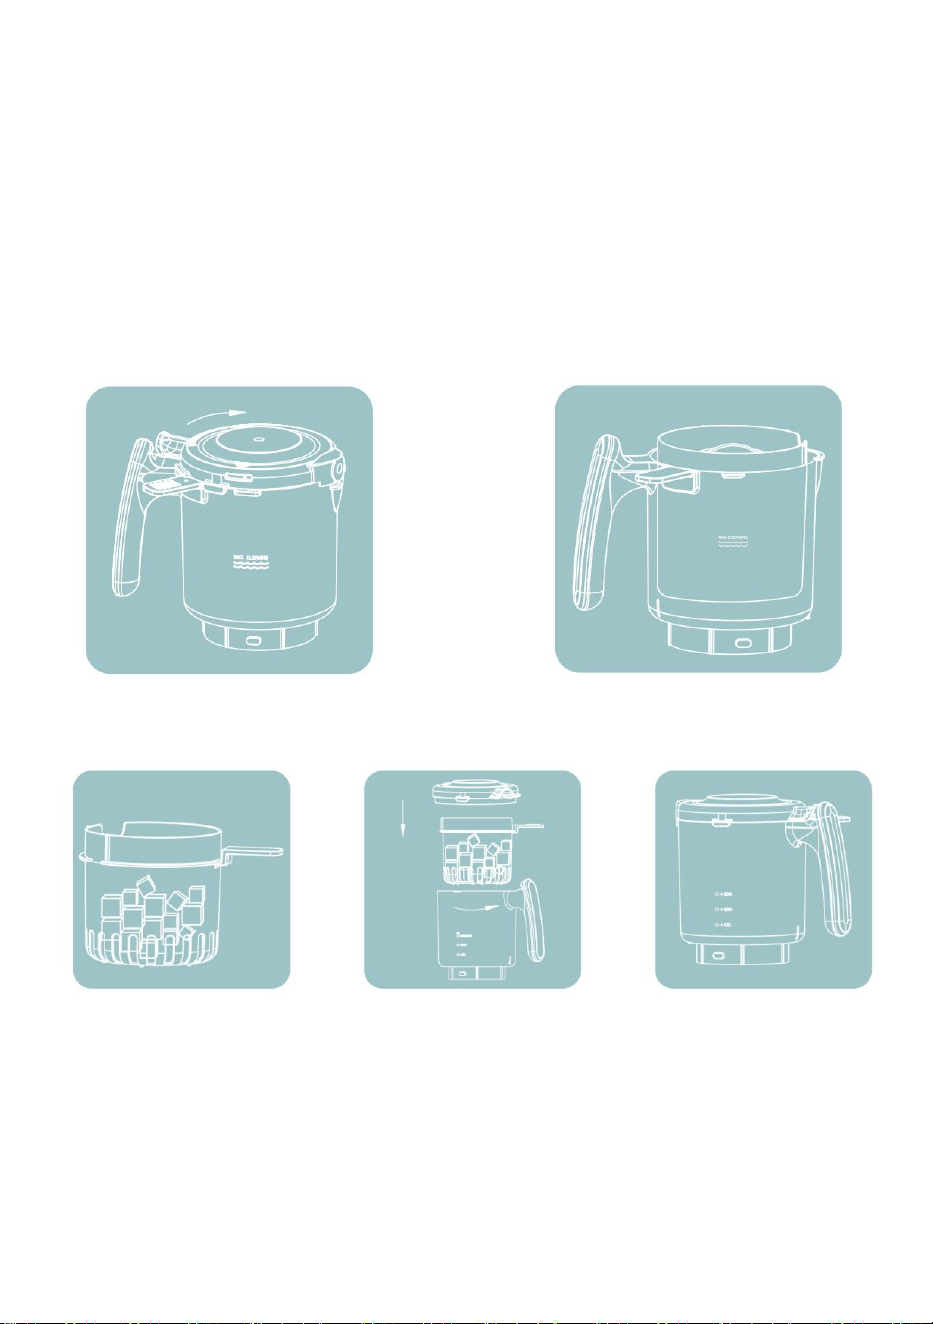
6. To remove the stirring cup from the main body of the baby food
processor, simply rotate the handle clockwise and lift it.
7. To open the stirring cup's lid, hold the stirring cup's handle in one hand,
and then twist the cap clockwise.
8. Place your prepared food in the steaming basket (DO NOT overfill).
- 16 -
9. Place the steaming basket securely inside the stirring cup (To ensure
that the handle and the steaming basket are properly aligned).
10. Attach the stirring cup lid by placing it on top and rotating
counterclockwise to lock it in place.
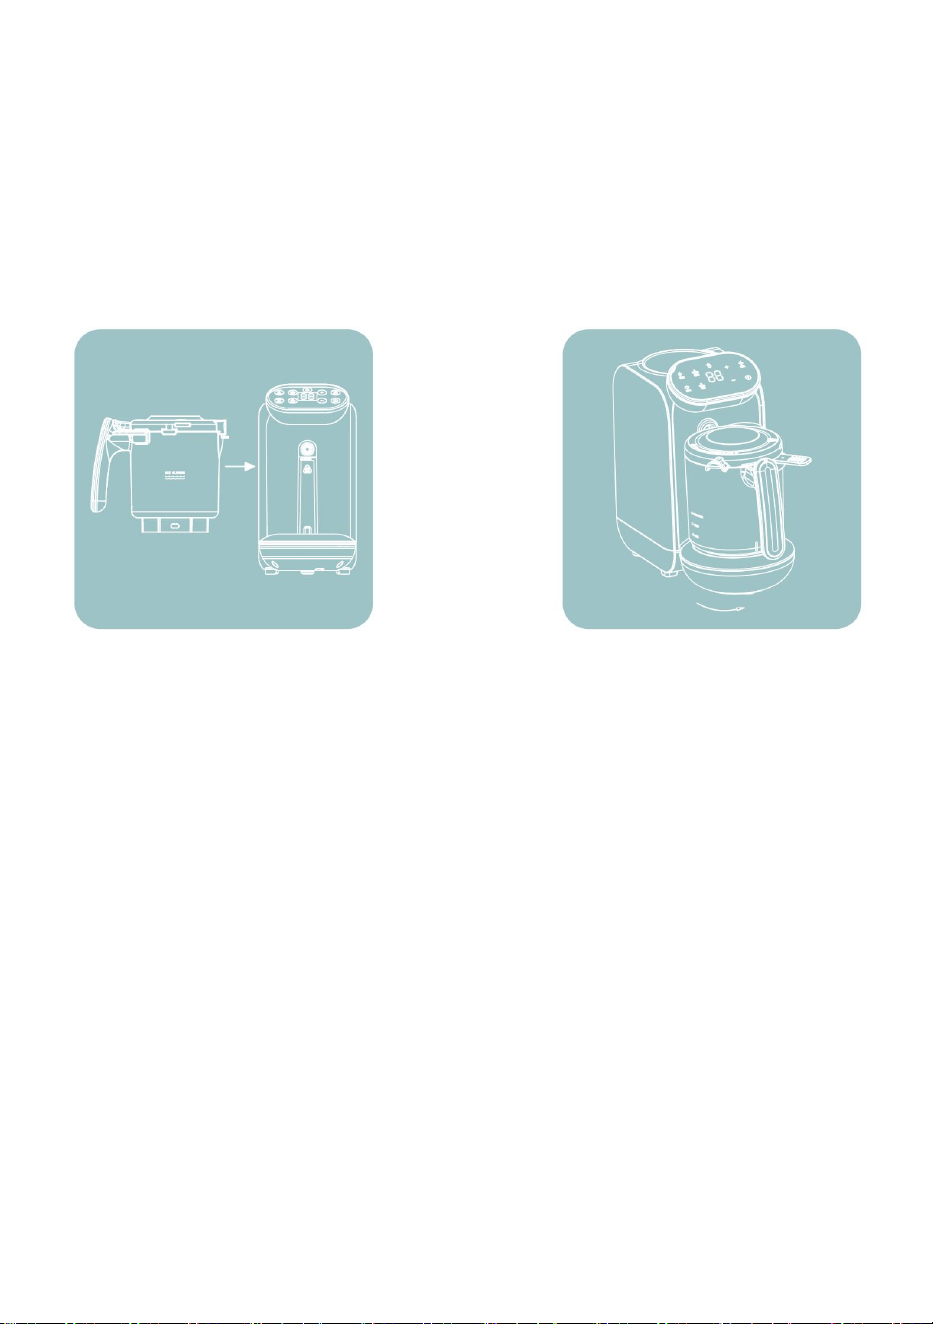
11. Make sure the stirring cup handle is in line with the "open" marking on
the base, then simply twist it counterclockwise to lock it in place to
reconnect the stirring cup to the main body.
12. Press the steam button, and the steam cycle will start. The default
steam time is 15 minutes. This can be adjusted depending on your
preference (use the increase or decrease time buttons).
13. Once the steaming process is complete, you will hear five quick beeps.
Step2 : Blending
1. Assuming the steaming process has just been completed, start by
twisting the stirring cup clockwise to detach it from the main body.
2. Open the stirring cup lid (by holding by the handle and then twisting the
cap in a clockwise direction).
3. Carefully remove the steaming basket and empty the contents into the
stirring cup. You may wish to add/remove water at this stage depending on
your preferred food consistency.
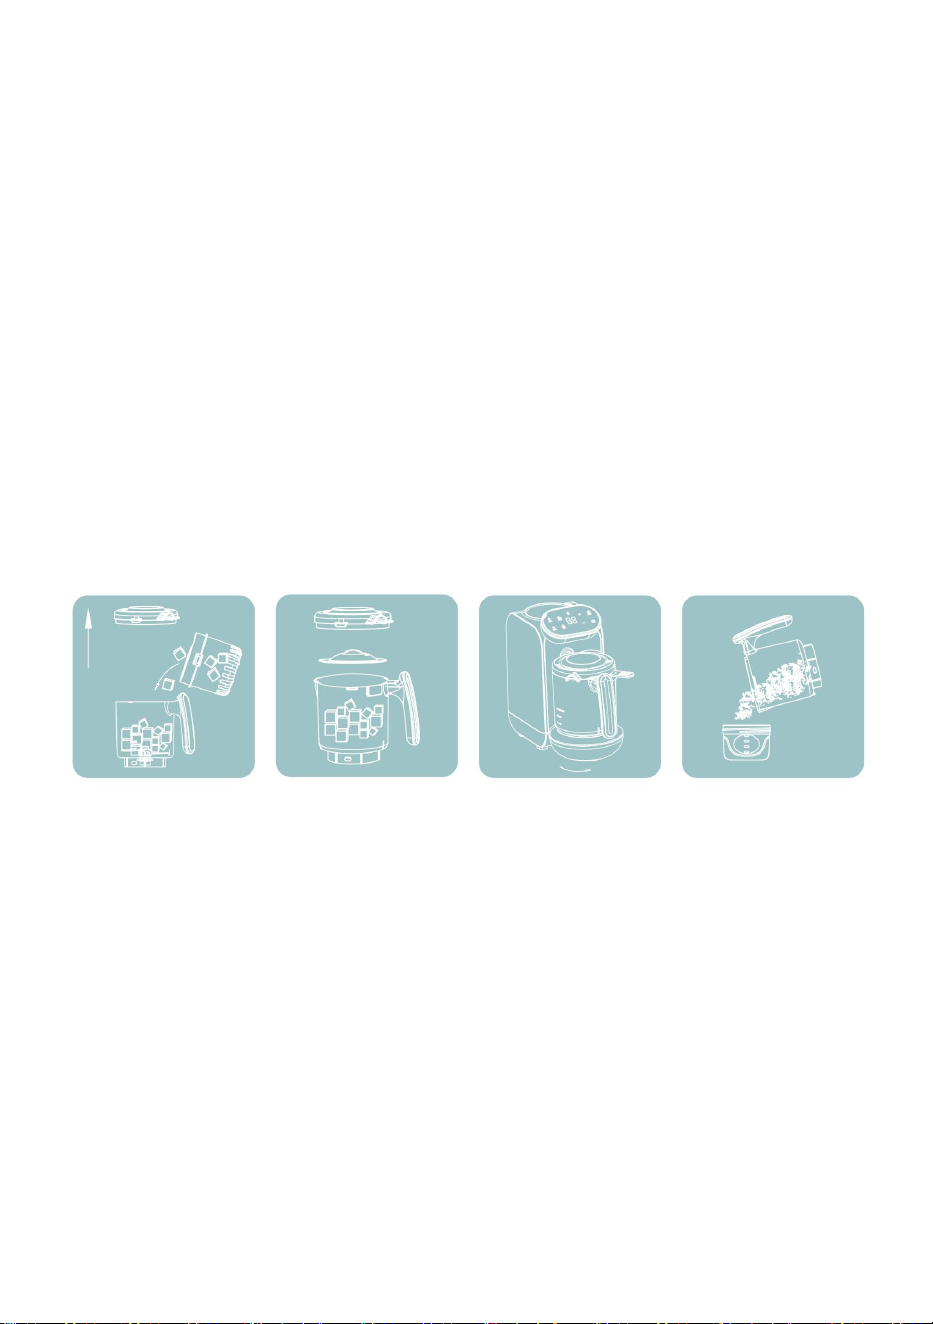
- 17 -
4. Reattach the stirring cup lid by twisting it in a counterclockwise direction,
and then attach the stirring cup to the main body by aligning the handle
with the "Open" label on the base and locking it in place by twisting it in the
opposite direction. Please check if the blending cup has the spill-proof lid
on it.
5. Press the Auto blend button to start the automatic blending cycle. When
the blending cycle is complete, you will hear a beep (at about 1 minute).
6. Open the lid, and your food should be ready for your little one to enjoy.
Be sure to check the temperature before serving. Please allow the food to
cool down first before freezing.
7. If you prefer to blend your little one's food manually (perhaps you want it
chunkier), simply press and hold the manual blend button. The blades will
stop when the button is released. The maximum blending time is 1 min for
one time.
Step3 : Sterilizing
1. Before first use and at regular intervals, we recommend you run the
"sterilize"cycle. Simply press the "Sterilize button"... it will take 10 minutes
to complete (the count-down timer will show minutes remaining).
2. Start by ensuring the water tank is filled up to the Max line.
3. Ensure the stirring cup is correctly attached (please see step 1 above if
you do not know how to do this).
4. You may start the sterilization process with an empty unit, or you can
place small items within the steaming basket (e.g., pacifiers or bottle tops).
5. To turn it ON, tap the power button and press the sterilize button.
6. The Sterilize process lasts around 10 minutes. You will hear five beeps
- 18 -
once the process is complete.
Step4 : Warming
Place milk bottle into the water tank, then fill water to MAX line. Press the
"Warm" button. The display will show 7 minutes by default (NOTE: time is
adjustable from2-15 minutes).
The "Warm" indicator will blink three times before it starts working, the
machine will beep five times when sterilizing is complete. (NOTE: The
device includes a memory feature. The time defaults to the last option
when this function is chosen).
Warning: Final milk temperature might be slightly higher or lower as
compared to body temperature. (Different initial temp, ambient temp, bottle
material, milk volume,etc.. will impact final temp).
Test the milk temp by sprinkling a few drops on the back of your hand. If the

- 19 -
milk is too hot, cool it down by placing the bottle into room temperature
water; if it is too cold, put it back in the water tank to heat an extra 0.5-1
minute.
Check the Milk Heating Timetable for recommended heating time.
Milk Warming Time Reference Sheet
Put the bottle into the water tank and add room temperature water
(22°C/71.6Fto max line, then heat milk to 37°C/98.6°F
Material
Initial temperature
2oz
4oz
6oz
8oz
Glass
4
℃
/39.2
℉
4'6"
5'56"
8'30"
11'56"
20℃/68℉
1'56"
3'40"
4'30"
5'30"
PP
4℃/39.2℉
4'
5'20"
8'20"
12'40"
20℃/68℉
2'40"
4'38"
5'38"
7'48"
Silicone
4
℃
/39.2
℉
6'20"
8'47"
9'10"
12'45"
20℃/68℉
4'45"
7'
7'55"
9'10"
Milk bag
4℃/39.2℉
4'
6'30"
8'50"
12'5"
20℃/68℉
3'20"
4'50"
6'40"
7'
Note: The time sheet is not exact duration. Test the milk temp by sprinkle
a few drops on inside of your wrist. If the milk is too hot, cool it down by
put bottle into room temperature water; if the milk is too cold, put it back
to water tank for heating extra 0.5-1 minutes.
- 20 -
Step5 : Cleaning & Maintenance
1. Switch off and remove the stirring cup.
2. Remove the lid of the stirring cup.
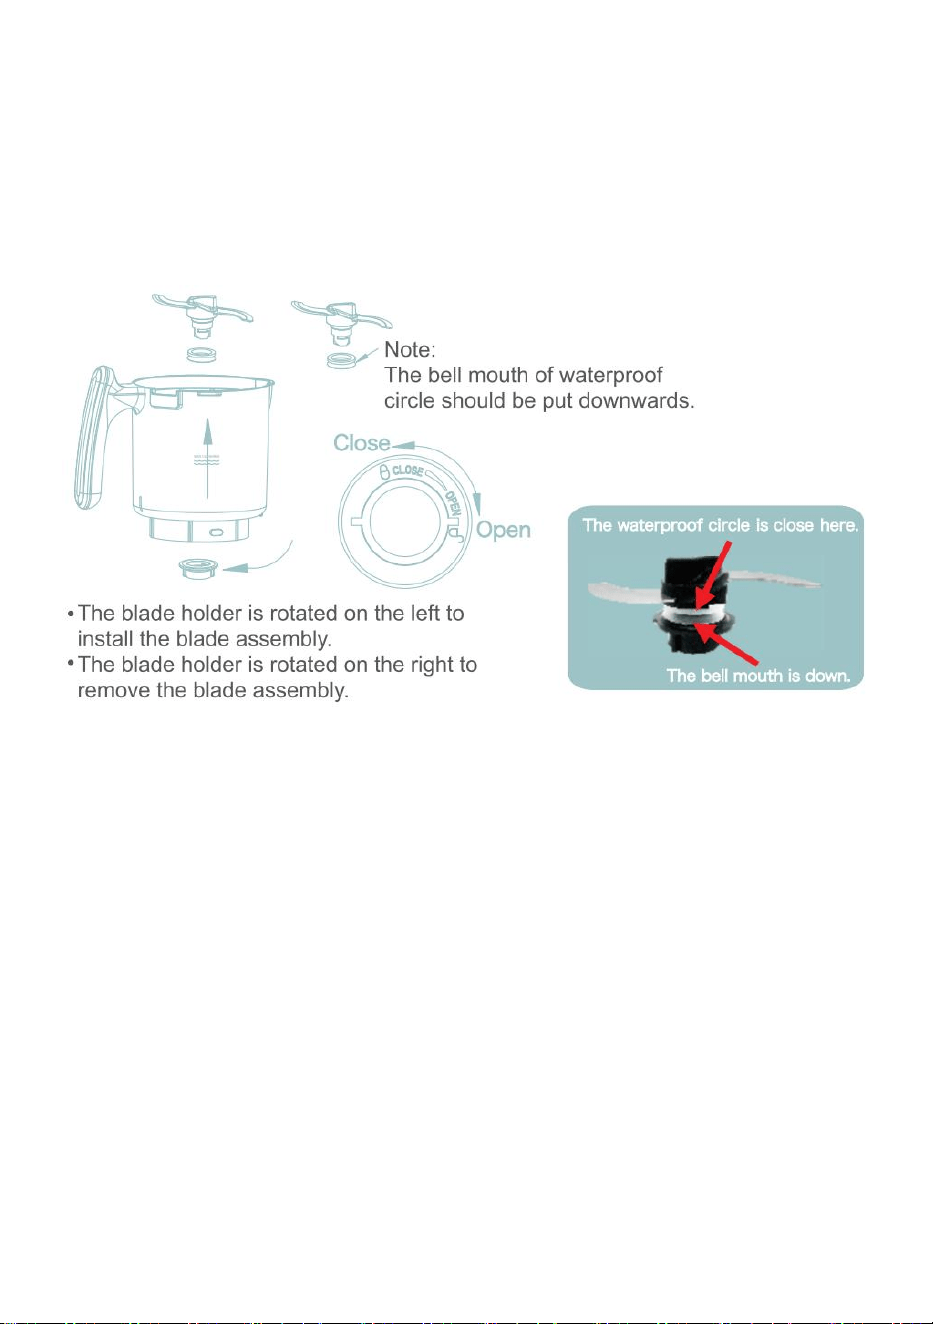
3. Take out the blade from the stirring cup. Disassemble the blade.
4. Add water and the right amount of detergent into the stirring cup to reach
the Max Cleaning position. Ensure the spill-proof cover has been installed
on the blending cup, and then attach the stirring cup to the main body.
Restart the power and touch the "Auto Blend button to wash. It is
necessary to empty the water in the tank before washing. Clean it 2-3
times according to the same step.
5. Remove excess water and leave the unit to air dry. Repeat the cleaning
cycle as necessary.

- 21 -
10.Troubleshooting
TROUBLE SHOOTING:
Q: The timer display showing the error message E1?
A: This usually means the stirring cup is not correctly attached to the base
unit. Start by lining up the handle of the stirring cup with the "Open" label
on the base. Twist the handle in a counterclockwise direction to lock it in
place. Double check if the lid remains closed by pushing the cap in the
counterclockwise direction.
Q: Water is leaking from the water tank during the steaming process?
A: You have probably added too much water to the tank. Please do not fill
past the"Max line."
Q: The baby food processor not generating any steam?
A: First, check that the water tank is not empty. Second, check the stirring
cup is correctly attached to the base unit. Align the stirring cup's handle
with the base's"Open" label. To lock it in place, turn the handle in the
counterclockwise direction.Double check if the lid remains closed by
pushing the cap in the counterclockwise direction.
Q: The food not being cooked thoroughly enough?
A: Firstly, check that the water tank is not empty or low on water.
Secondly,double-check that the steam outlet is not blocked. Lastly, make
sure that the steaming basket does not contain too much food. (NOTE:
make sure the food is cut into 1-inch chunks before placing it in the
steaming basket).
Q: The blades are not spinning to blend food?
A: This often indicates that the stirring cup is not correctly attached to the
base unit To begin, align the stirring cup's handle with the "Open" label on
the base. To lock the handle in place, turn it counterclockwise.
Double-check by turning the cap counterclockwise.

- 22 -
Q: The food is not blending properly?
A: First, ensure the stirring cup doesn't contain too much food and the
consistency isn't too thick; you might need to add a little water. Before
attempting to combine the meal, make sure that the food has been cooked
properly; the food must be soft.
Q: The unit has overheated and is no longer working ?
A: If your infant food processor overheats (perhaps if you run numerous
steaming or blending cycles back-to-back) , it will automatically shut off for
safety reasons. In this situation, we advise you to disconnect for 34
minutes. Make sure the tank has enough water before using it again.