1
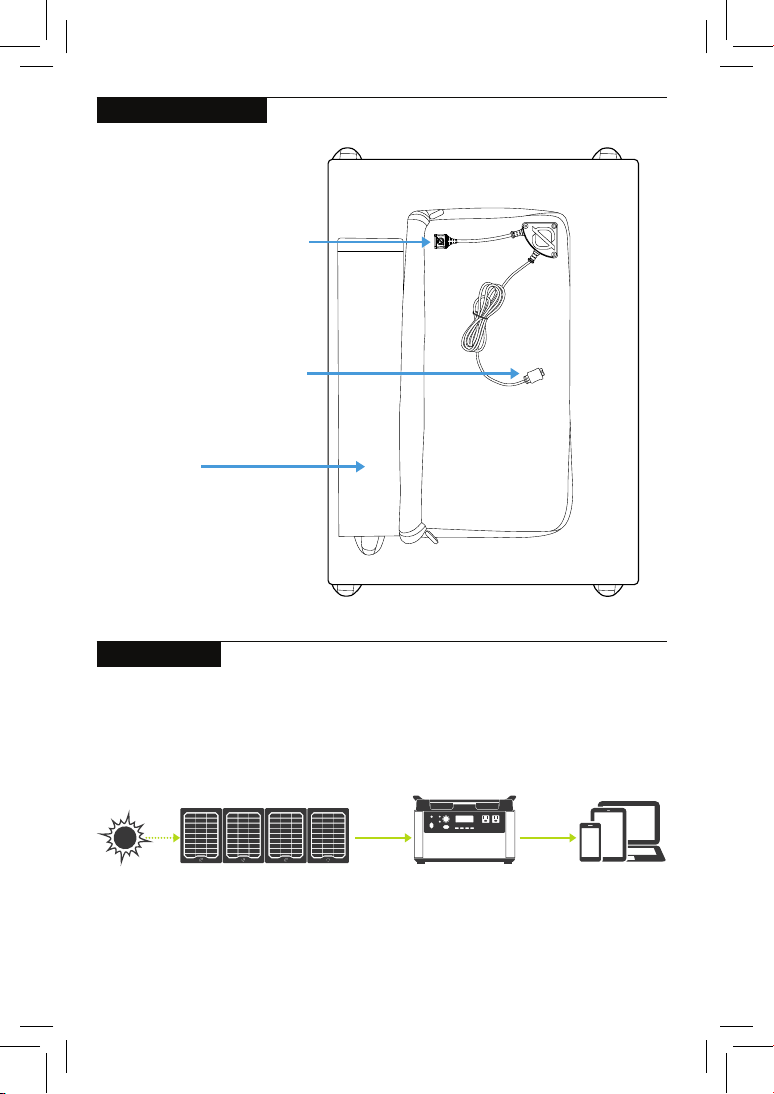
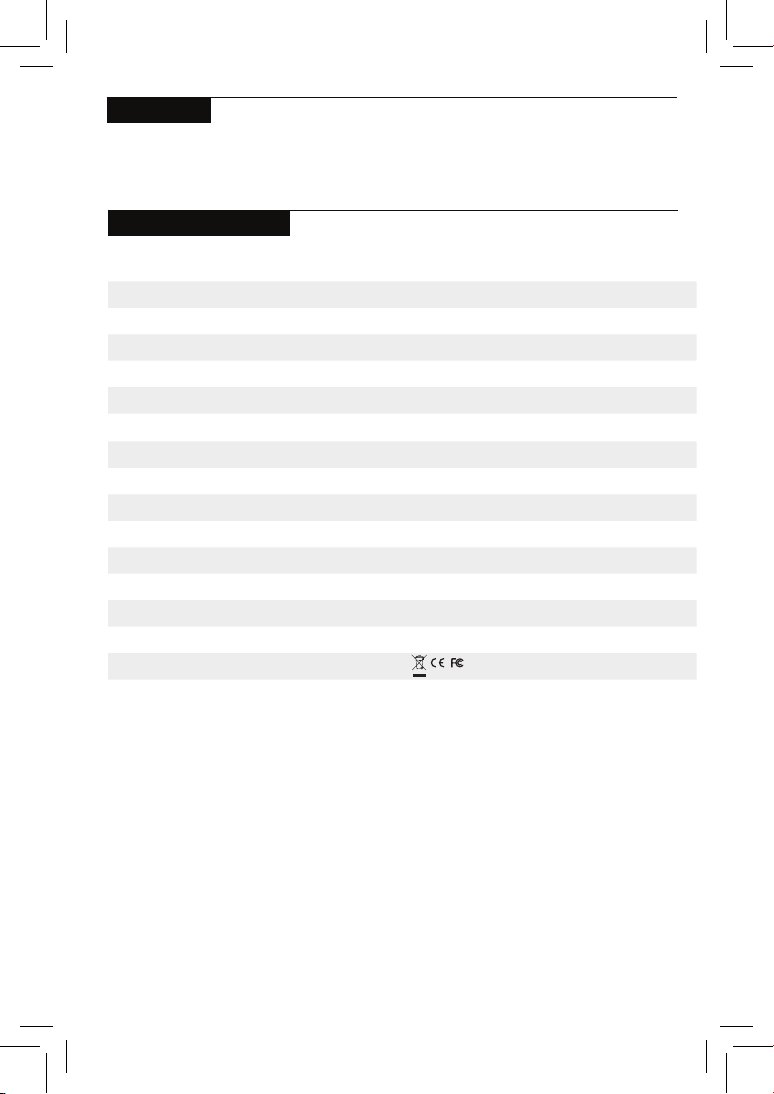
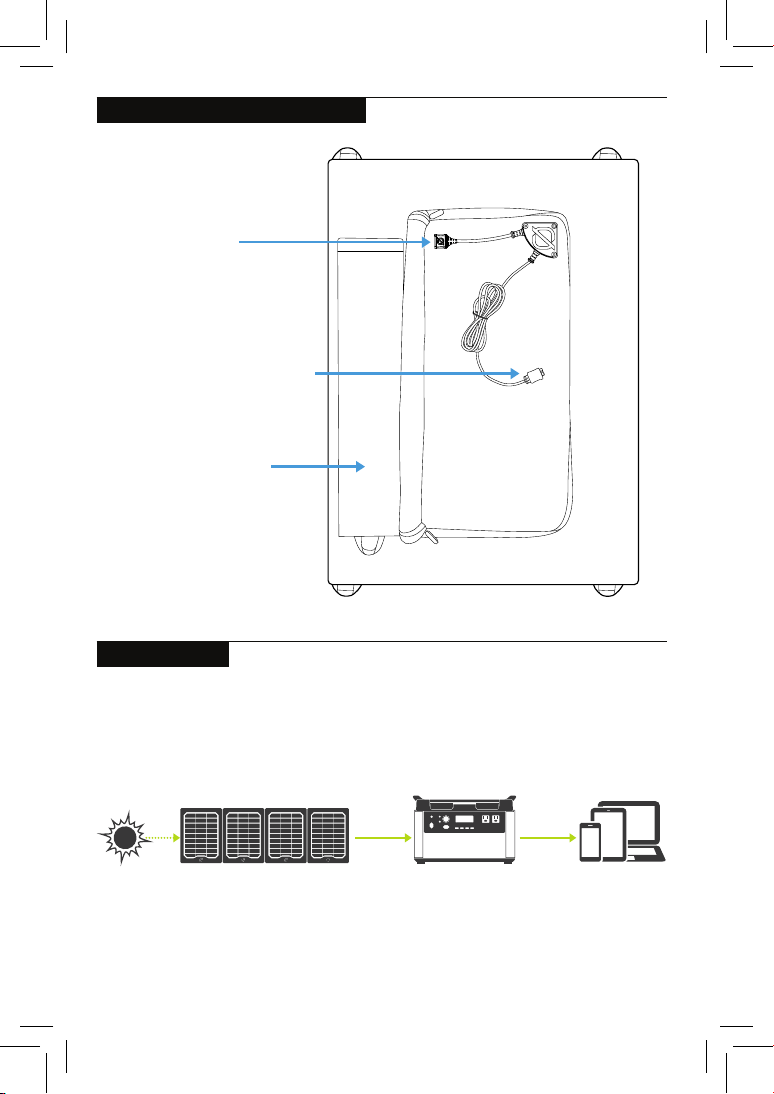
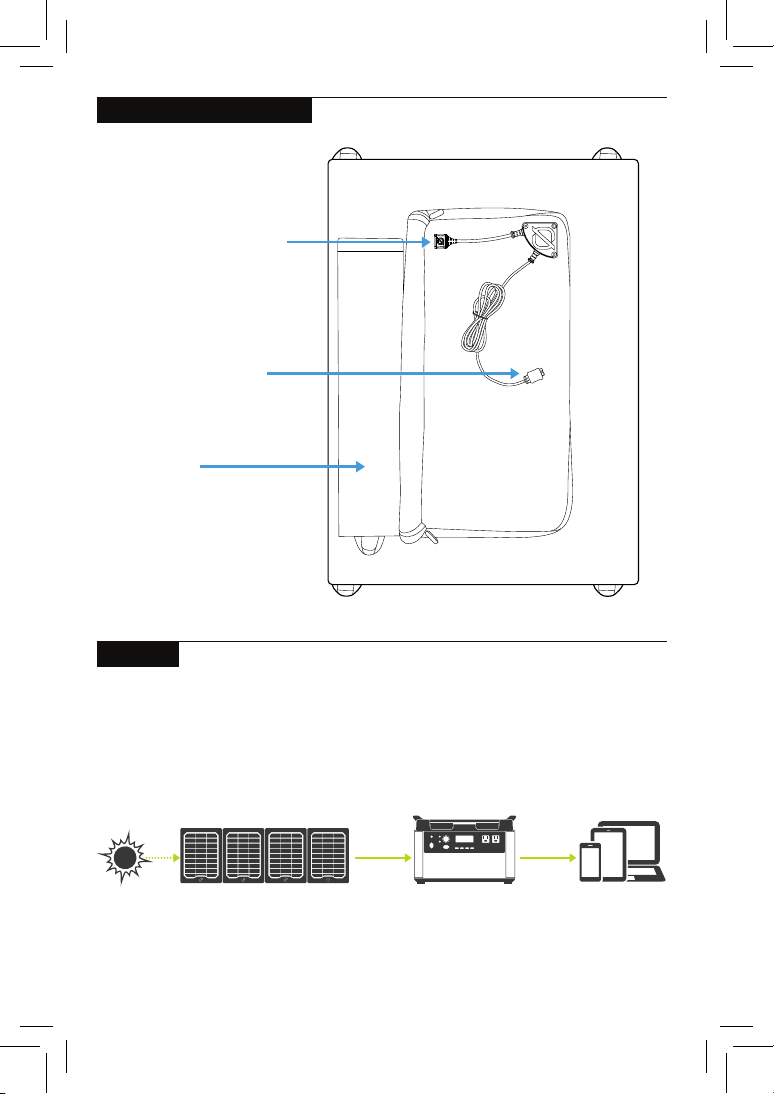
GET TO KNOW YOUR GEAR
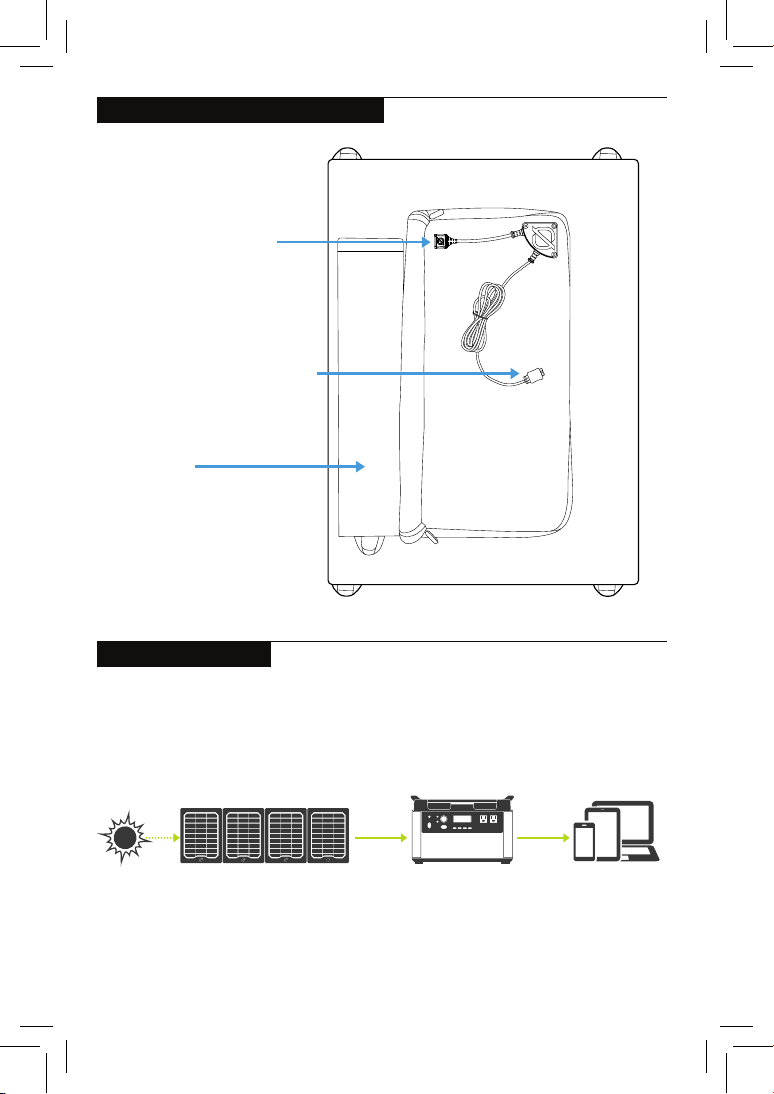
Plug the APP connector into the input port on the Goal Zero Yeti. You’ll get the best solar charging
experience if you continue to reposition the solar panel throughout the day. Make sure to reference the
specs of what you’re plugging the Nomad 200 into. On Yeti Portable Power Stations, you’ll be checking the
input specs.
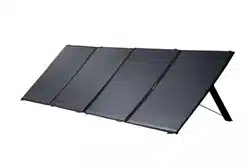
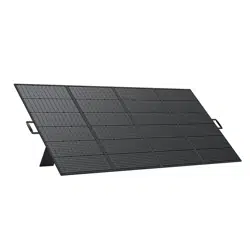
Kickstand
2.4A USB-A Output Port
Anderson Powerpole
Output Connector (6 FT.)
HOW TO CONNECT
Goal Zero Yeti
Portable Power Station
Nomad 200
Solar Panel
Phones, Tablets,
and Laptops
HOW IT WORKS
To chain multiple Nomad 200 Solar Panels together, you’ll need to purchase the 4x Anderson Combiner Cable
(SKU 98061) from Goal Zero.
Charge Times
Goal Zero Yeti 1000X 6-12 hrs
Goal Zero Yeti 1500X 9-18 hrs
Goal Zero Yeti 3000X 18-36 hrs
Solar Panel
Rated Power 200W
Open Circuit Voltage Voc 23.0V
Cell Type Monocrystalline
Ports
Anderson Powerpole 14-23V, up to 14A (200W max)
USB-A (output) 5V, 2.4A(12W max)
General
Weight 22 lbs (10.0 kg)
Dimensions (unfolded) 28.2 x 100.7 x 1.0 in (71.6 x 255.8 x 2.5 cm)
Dimensions (folded) 28.2 x 22.3 x 2.0 in (71.6 x 56.6 x 5.0 cm)
Certs
Warranty 12 months
Be sure to activate your warranty at goalzero.com/warranty
TECHNICAL SPECIFCATIONS
HOW TO CHAIN
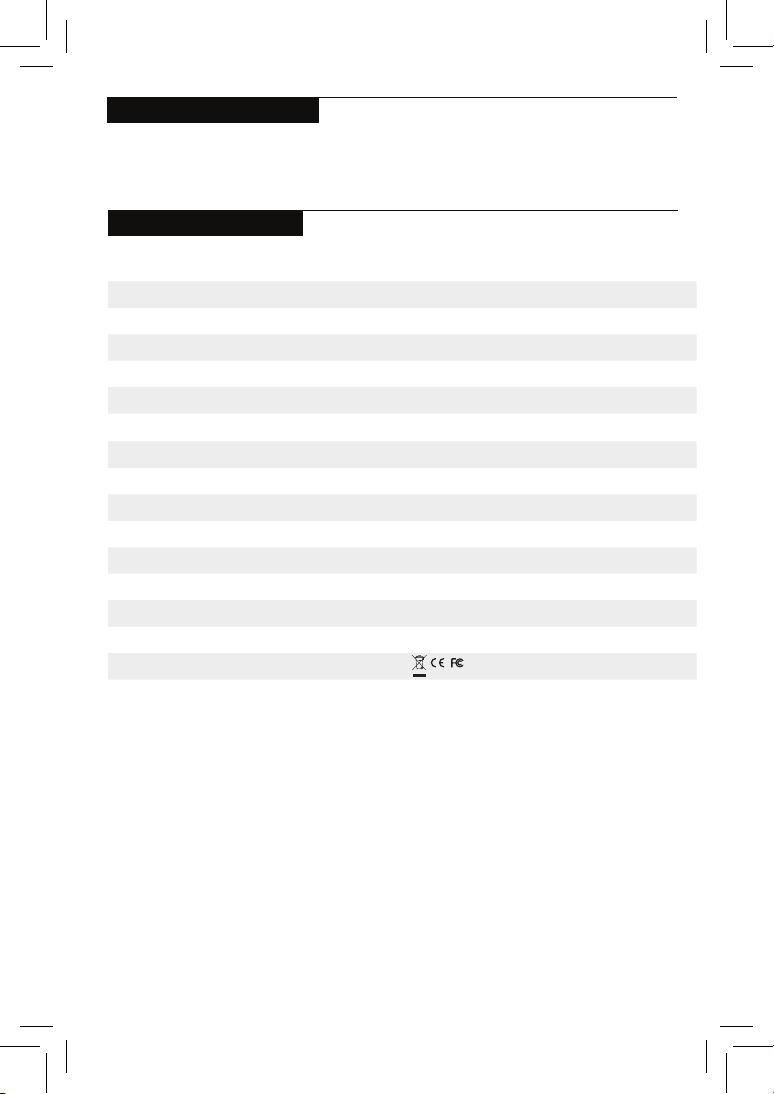
APPRENEZ À CONNAÎTRE VOTRE ÉQUIPEMENT
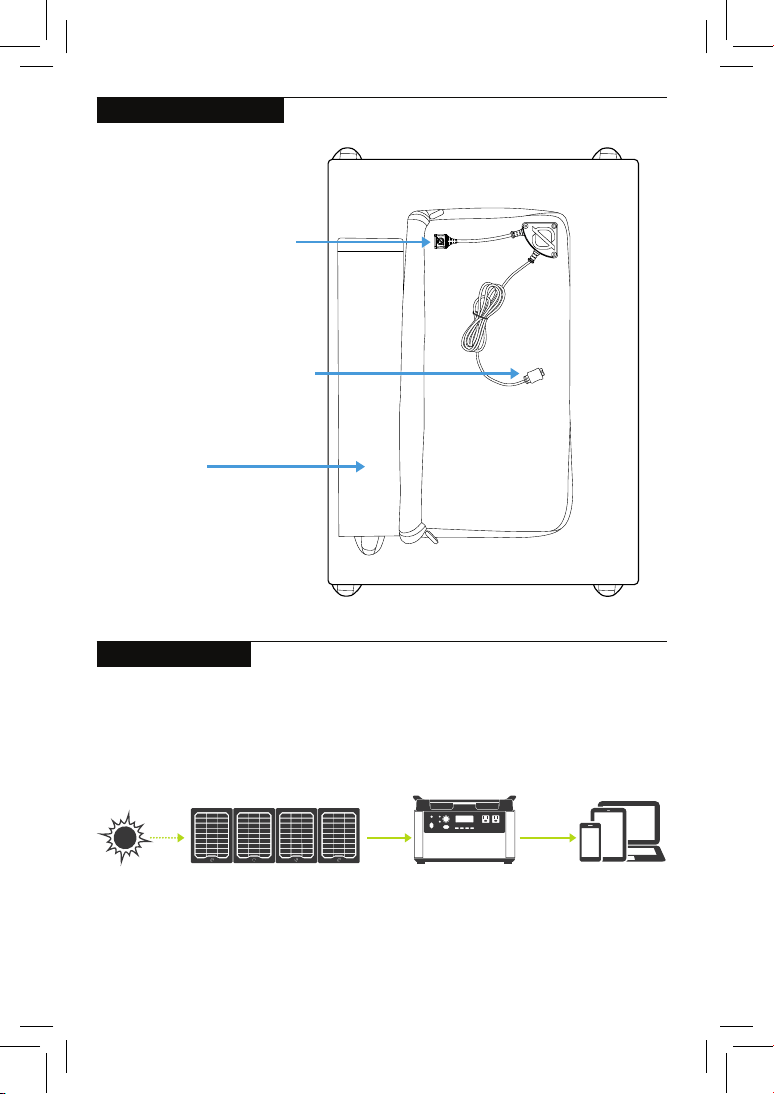
Branchez le connecteur APP dans le port d'entrée du Goal Zero Yeti. Vous obtiendrez la meilleure expérience
de charge solaire qui soit en réorientant le panneau solaire tout au long de la journée. Assurez-vous de
faire référence aux spécifications de ce que vous connectez à votre Nomad 200. Pour les alimentations
portatives Yeti Portable Power Stations, vous devrez vérifier les spécifications d'entrée.
Béquille
Port de sortie 2,4 A
USB-A
Anderson Power Pole
Connecteur de sortie (2 m)
COMMENT LE CONNECTER
Goal Zero Yeti
Alimentation Portative
Nomad 200
Panneau Solaire
Téléphones, Tablettes,
et Ordinateurs
portables
COMMENT ÇA
FONCTIONNE
Pour connecter plusieurs panneaux solaires Nomad 200 en série, vous devrez acheter le câble combinateur
4x Anderson Combiner Cable (SKU 98061) vendu par Goal Zero.
Temps de charge
Goal Zero Yeti 1000X 6-12 hrs
Goal Zero Yeti 1500X 9-18 hrs
Goal Zero Yeti 3000X 18-36 hrs
Panneau Solaire
Puissance nominale 200 W
Tension en circuit ouvert (Vco) 23.0V
Type de batterie Monocristalline
Ports
Anderson Power Pole 14-23 V, jusqu'à 14 A (200 W max)
USB-A (sortie) 5 V, 2,4 A (12 W max)
Général
Poids 10,0 kg (22 lb)
Dimensions (déplié) 71,6 x 255,8 x 2,5 cm (28,2 x 100,7 x 1,0 in)
Dimensions (plié) 71,6 x 56,6 x 5,0 cm (28,2 x 22,3 x 2,0 in)
Certifications
Garantie 12 mois
N'oubliez pas d'activer votre garantie sur goalzero.com/warranty
SPÉCIFICATIONS TECHNIQUES
COMMENT CONNECTER EN SÉRIE
LERNE DEIN GERÄT KENNEN
Stecken Sie den APP-Stecker in den Eingangsanschluss des Goal Zero Yeti. Die beste Solaraufladung
findet statt, wenn Sie das Solarpanel während des Tages immer wieder neu platzieren. Überprüfe
unbedingt die Spezifikationen der Anschlüsse, an die du das Nomad 200 ansteckst. An den Yeti Tragbaren
Stromversorgungen können Sie die Eingangsspezifikationen prüfen.
Kickstand
2,4 A USB-A-Ausgang
Anderson Powerpole
Ausgangsanschluss (6 FT.)
VERBINDE DEIN GERÄT
Goal Zero Yeti
Tragbare Power Station
Nomad 200
Solarmodul
Telefone, Tablets,
Laptops
SO FUNKTIONIERT'S
Um mehrere Nomad 200 Solarmodule miteinander zu verketten ist der Kauf eines 4x Anderson-
Kombinationskabels (SKU 98061) von Goal Zero notwendig.
Ladezeiten
Goal Zero Yeti 1000X 6-12 Std.
Goal Zero Yeti 1500X 9-18 Std.
Goal Zero Yeti 3000X 18-36 Std.
Solarmodul
Nennleistung 200 W
Leerlaufspannung (Voc) 23.0V
Akkutyp Monokristallin
Anschlüsse
Anderson Powerpole 14 - 23 V, bis zu 14 A (max. 200 W)
USB-A (Ausgang) 5 V, 2,4 A(12 W max.)
Allgemein
Gewicht 10,0 kg
Abmessungen (auseinandergeklappt): 71,6 x 255,8 x 2,5 cm
Abmessungen (zusammengeklappt): 71,6 x 56,6 x 5,0 cm
Zertifikate
Garantie 12 Monate
Denke daran, deine Garantie zu aktivieren: goalzero.com/warranty
TECHNISCHE SPEZIFIKATIONEN
VERKETTE DEIN GERÄT

CONOZCA SU EQUIPO
Enchufe el conector de la aplicación en el puerto de entrada del Goal Zero Yeti. Obtendrá la mejor
experiencia de carga solar si continúa reposicionando el panel solar durante todo el día. Asegúrese de hacer
referencia a las especificaciones de lo que está conectando al Nomad 200. En las estaciones de energía
portátil Yeti, debe verificar las especificaciones de entrada.
Soporte
Puerto de Salida 2.4A
USB-A
Polo de Energía Anderson
Conector de Salida (6 pies)
COMO CONECTAR
Goal Zero Yeti
Estación de Energía Portátil
Nomad 200
Nomad 28 Plus
Teléfonos, tabletas
y ordenadores
portátiles
CÓMO FUNCIONA
Para encadenar múltiples paneles solares Nomad 200, deberá comprar el 4x Anderson Combiner Cable
(SKU98061) de Goal Zero.
Tiempos de Carga
Goal Zero Yeti 1000X 6-12 horas
Goal Zero Yeti 1500X 9-18 horas
Goal Zero Yeti 3000X 18-36 horas
Nomad 28 Plus
Potencia nominal 200W
Voc, voltaje en circuito abierto 23.0V
Tipo de Celda Monocristalino
Entradas
Polo de Energía Anderson 14-23V, hasta 14A (200W máx)
USB-A (salida) 5V, 2.4A(12W máx)
General
Peso 22 lbs (10,0 kg)
Dimensiones (desplegado) 28,2 x 100,7 x 1,0 pulg (71,6 x 255,8 x 2,5 cm)
Dimensiones (plegado) 28,2 x 22,3 x 2,0 pulg (71,6 x 56,6 x 5,0 cm)
Certificaciones
Garantía 12 meses
Asegúrese de activar su garantía en goalzero.com/warranty
ESPECIFICACIONES TÉCNICAS
COMO CONECTAR EN SERIE
FAMILIARIZZA CON LA TUA ATTREZZATURA
Inserire il connettore APP nella porta di entrata sulla Yeti Goal Zero. Si otterrà la migliore esperienza
di ricarica solare se si continua a riposizionare il pannello solare nel corso della giornata. Assicurarsi di
indirizzare le specifiche di ciò che si inserisce al bauletto Nomad 200. Sulle centrali elettriche portatili Yeti,
si dovrà controllare le specifiche di entrata.
Supporto estraibile
Porta di uscita
USB-A 2.4 A
Polo di energia elettrica
Anderson
Connettore uscita (6 piedi.)
COME COLLEGARLO
Yeti Goal Zero
Stazione elettrica portatile
Nomad 200
Pannello solare
Telefoni, tablet e
portatili
COME FUNZIONA
Per concatenare i multipli pannelli solari Nomad 200 insieme, sarà necessario acquistare il cavo combinatore
4x Anderson (SKU 98061) da Goal Zero.
Tempi di carica
Yeti 1000X Goal Zero 6-12 ore
Yeti Goal Zero 1500X 9-18 ore
Yeti 3000X Goal Zero 18-36 ore
Pannello solare
Potenza nominale 200W
Tensione circuito aperto Cov 23.0V
Tipo cella Monocristallina
Porte
Polo di energia elettrica Anderson 14-23V, fino a 14A (200W massimo)
USB-A (uscita) 5V, 2.4A(12W max)
Generale
Peso 22 libre (10.0 kg)
Dimensioni (distese) 28.2 x 100.7 x 1.0 pollici (71.6 x 255.8 x 2.5 cm)
Dimensioni (distese) 28.2 x 22.3 x 2.0 pollici (71.6 x 56.6 x 5.0 cm)
Certificati
Garanzia 12 mesi
Assicurarsi di attivare la garanzia su goalzero.com/warranty
SPECIFICHE TECNICHE
COME CONCATENARE
あなたのギアを知りましょう
APP コネクターを Goal Zero Yeti の入力ポートに接続します。 1日を通してソーラーパネルの角度を太陽に向けて調
整し続けると、 最適な充電が行えます。 Nomad 200 に接続する機器については、 製品仕様を必ず参照してください。
Yeti ポータブルパワーステーションで、 入力仕様を確認します。
キックスタンド
2.4A USB-A 出力ポート
アンダーソンパワーポール
出 力コネクター (6 フィート )
接続方法
Goal Zero Yeti
ポータブルパワーステ
ー ション
Nomad 200
ソーラーパネル
携帯電話、 タブ
レ ッ ト 、
ノートパソコン
使用方法
複数の Nomad 200 ソーラーパネルを連結して使用するには、 Goal Zero からアンダーソンコンバイナーケーブル
(SKU 98061) を
4 本購入する必要があります。
充電時間
Goal Zero Yeti 1000X 6~12 時間
Goal Zero Yeti 1500X 9~18 時間
Goal Zero Yeti 3000X 18~36 時間
ソーラーパネル
定格出力 200W
開回路電圧 Voc 23.0V
セルタイプ 単結晶
ポ ート
アンダーソンパワーポール 14~23V、 14A まで (最大 200W)
USB-A (出力) 5V、 2.4A (最大 12W)
全般
重量 22 lbs (10.0 kg)
寸法 (使用時) 28.2 x 100.7 x 1.0 インチ (71.6 x 255.8 x 2.5 cm)
寸法 (収納時) 28.2 x 22.3 x 2.0 インチ (71.6 x 56.6 x 5.0 cm)
安全規格
保証 12 ヶ月
goalzero.com/warranty にて製品保証を必ず有効にしてください
技術仕様
チェーン接続の方法
GOAL ZERO HEADQUARTERS
675 West 14600 South
Bluffdale, UT 84065
1-888-794-6250
Designed in the U.S.A.
Made in China
Nomad is a trademark of Goal Zero.
JG071720V2
This equipment has been tested and found to comply with the limits for a Class
B digital device, pursuant to part 15 of the FCC Rules. These limits are designed
to provide reasonable protection against harmful interference in a residential
installation. This equipment generates, uses and can radiate radio frequency
energy and, if not installed and used in accordance with the instructions, may
cause harmful interference to radio communications. However, there is no
guarantee that interference will not occur in a particular installation. If this
equipment does cause harmful interference to radio or television reception,
which can be determined by turning the equipment off and on, the user is
encouraged to try to correct the interference by one or more of the following
measures:
—Reorient or relocate the receiving antenna.
—Increase the separation between the equipment and receiver.
—Connect the equipment into an outlet on a circuit different from that to which
the receiver is connected.
—Consult the dealer or an experienced radio/TV technician for help.
This device complies with part 15 of the FCC Rules. Operation is subject to the
following two conditions: (1) This device may not cause harmful interference, and
(2) this device must accept any interference received, including interference that
may cause undesired operation.