USER MANUAL
Cook & Hold
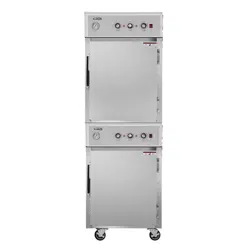
Model: KM-CCAH3-1D, KM-CCAH3-2D
KoolMore Commercial
Cook And Hold Oven

Stay informed with the latest information for your
KoolMore Reserve Appliance.
If you need any assistance or have questions, our
customer support team is here to help.

GENERAL INTRODUCTION
The Ovens are produced with quality workmanship and material. Proper installation, usage, and maintenance of your oven will result in many
years of satisfactory performance. The Cook & Hold Oven is more than just an oven – it’s a “System”: precisely controlled heat, regulated to
retain ascorbic acid and maximize the nutritional value, taste and eye-appeal of food.
In this environment, virtually any food product can be prepared to delicious perfection in just ONE oven! “System” food preparation eliminates
the need for multiple ovens with duplicate features.
This manual is provided to assist persons responsible for the operation and maintenance of the oven with a simple, but comprehensive
understanding of its proper use. We recommend that you thoroughly read this entire manual and carefully follow all of the instructions provided
prior to placing the oven into operation. As with any piece of food service equipment, this oven system requires a minimum of care and
maintenance. Recommended procedures are contained in this manual and should become a regular part of the operation of the unit.
The Cook & Hold Oven is the right choice for low temperature food preparation.
PRINCIPLE OF COOK & HOLD OVENS
The Cook & Hold Ovens are designed and perfected for cooking at a lower temperature. The principles of Low Temperature Cooking and
Holding can be summarized into several objectives: increased product yields, increased profits from increased yields, increased moisture
retention, increased tenderization, and consistency of doneness. When the Cook & Hold Oven finishes the cooking cycle, it automatically
switches to the hold cycle. Throughout this manual we recommend holding temperatures such as 140⁰ F (60⁰ C). This temperature refers to the
oven’s hold temperature setting and not to the internal temperature of the food being roasted. The internal product temperature will run below
the hold temperature. (For example: roast beef held at 140⁰ F will be about 130⁰ F internally or medium rare.) All meat products contain
enzymes. These enzymes perform the important function of tenderizing the meat when they reach temperatures of 100⁰ F (38⁰ C) to 140⁰ F
(60⁰ C). As these enzymes are heated, they break down the connective tissue that is inherent in all red meat products. The hold cycle allows
this natural tenderization process to proceed in an orderly manner. As long as the internal temperature of the meat does not exceed 140⁰ F, the
process will continue. Once the temperature reaches 140⁰ F the process will stop, because the enzymes will be deactivated.
This tenderization process makes the meat more flavorful. It is similar to aging meat before it is sold.The longer the hold, the higher degree of
tenderization. Each hour of holding is equal to one day of aging.
BENEFITS OF COOK & HOLD OVENS
Superior Results:
Low temperature roasting has been recognized as the best method for preparing meat and poultry because of increased tenderness, more
even roasting, and a juicier product.
Increased Sales:
You will attract more customers and have more repeat business because you are now producing a superior product in your market area. All of
your products will be unique, from prime rib and chicken to BBQ ribs, pork roasts, and even bakery items!
Reduced Energy Costs:
It costs significantly less to run a Cook & Hold Oven instead of a conventional oven. Also, in most areas, no exhaust hood is needed.
Reduced Shrinkage of Product:
You can cut your percent shrinkage from 25 to 30% down to 5 to 10%. This means more servings to sell to your customers! The Cook & Hold
Oven can pay for itself in just months, depending on your volume.
Reduced Labor Cost:
Your cooks do not have to come in early to put roasts in or stay late to take them out of the oven. Holding banquet foods in a Cook & Hold Oven
reduces that last minute party prep to almost nothing.
COMPARISON OF COOK & HOLD OVENS
Convection ovens, unlike this Cook & Hold Ovens, blast high temperature dry air over the product. The end result with convection oven cooking
is excessive and unnecessary shrinkage.
Cook & Hold Oven Systems:
• Offer a lifetime heating element warranty.
• Provide a natural roasted broccomaromelized product without coloring agents."You can taste the difference."
• Do not require a ventilation hood. (See pg. 3)
• Are accurate to, plus or minus 5° F.
• Are easy to clean.
• Have stainless steel construction inside and out.
INTRODUCTION

INSTALLATION
Before installing, verify that the electrical service agrees with the specifications on the rating plate located on the lower back corner of the oven. (Fig. 4)
If the supply and equipment requirements do not agree, do not proceed with unpacking and installation. Contact your Customer Service Department
immediately.
UNPACKING:
The oven was inspected before leaving the factory. The transportation company assumes full responsibility for safe delivery upon acceptance of the
shipment. Immediately after unpacking, check for possible shipping damage to the oven.
If the oven is found to be damaged, save the packaging material and contact the carrier within 15 days of delivery.
Carefully unpack and place in a work accessible area as near the installation position as possible.
Open oven door(s) and remove packing material.
Check under oven or separate package for racks, pans, etc.
Peel off vinyl protection film from oven.
The oven should be thoroughly cleaned prior to putting into service. Refer to cleaning instructions in this manual.
LOCATION:
For efficient oven operation, choose a location that will provide easy loading and unloading without interfering with the final assembly of food orders.
The installation location must be level and allow adequate clearances for servicing and proper operation.
SOVHD
The SOVHD oven is simply two (2) SOVHs ovens stacked on top of each other. One (1) oven will come with a caster kit and a stacking assembly on top.
The oven without casters is placed inside the stacking assembly.
VENTILATION HOOD REQUIREMENTS
The unit must be installed in accordance with state and local codes, or in the absence of state and local codes, with the National Electrical Code
ANSI/NFPA 70 (latest edition) and Standard for Ventilation Control and Fire Protection of Commercial Cooking Operations NFPA 96 (latest edition).
Both are available from The National Fire Protection Association, Batterymarch Park, Quincy, MA 02269.
ELECTRICAL REQUIREMENTS
ELECTRICAL CODES & STANDARDS:
The oven must be installed in accordance with:
In the United States of America:
State and Local Codes.
National Electrical Code, ANSI/ NFPA-70 (latest edition). Copies may be obtained from: The National Fire Protection Association.
WARNING
The Oven and its parts are hot. Be very careful when operating, cleaning, or servicing the oven.
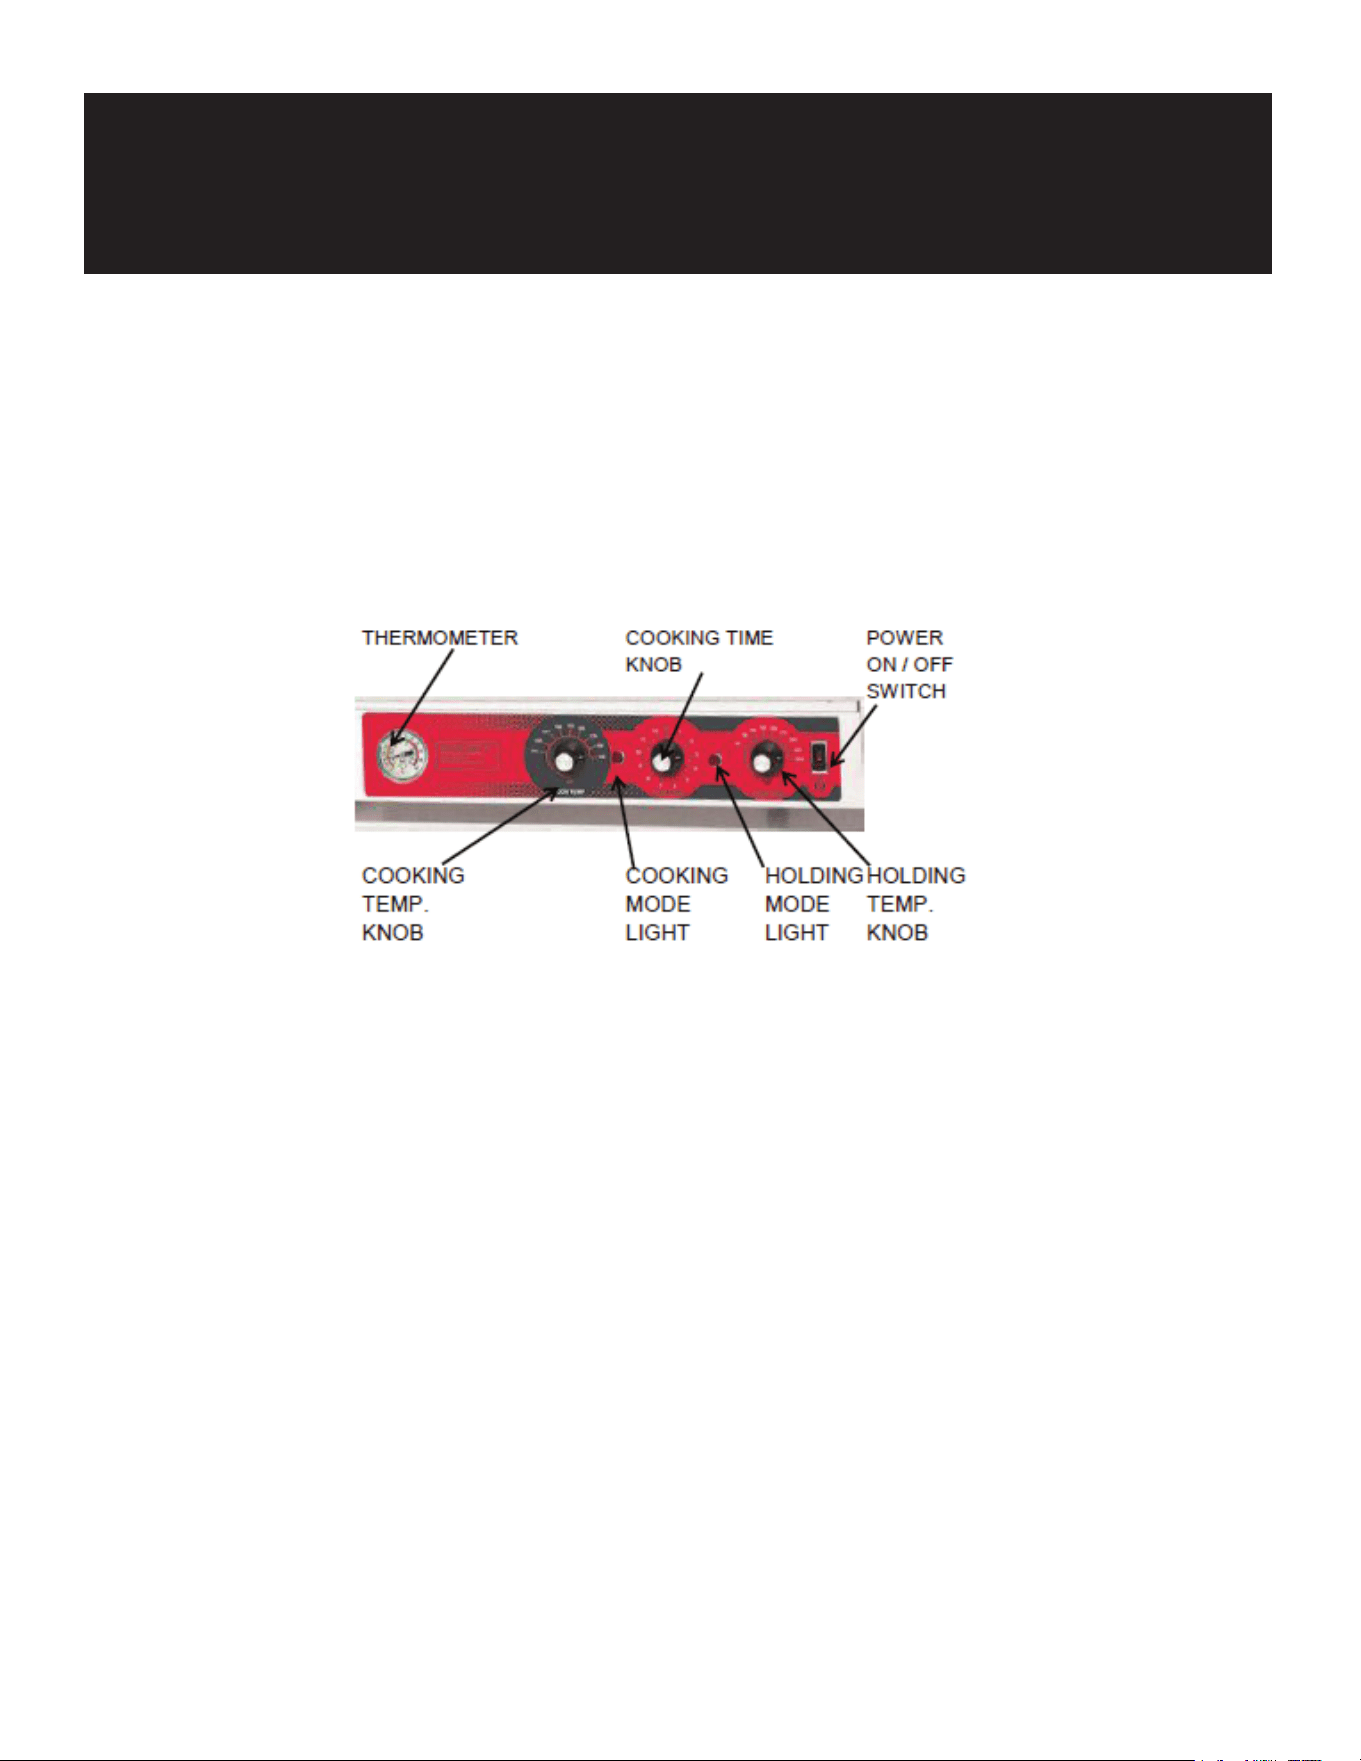
All operating controls are located on the front Control Panel(s). The oven is supplied with individual operating controls for each
oven cavity.
OPERATION
Thermometer: Indicates the interior temperature of the oven.
Cooking Time Knob: Sets the desired cooking time from ½ hour to 12 hours.
Power ON/OFF Switch: Turns the oven On or Off.
Cooking Temperature Knob: Sets the desired cooking temperature.
COOKING MODE LIGHT
HOLDING MODE LIGHT
Cooking Mode Light: Indicates oven is in Cooking Mode.
Holding Mode Light: Indicates oven is in Holding Mode.
Holding Temperature Knob: Sets the desired holding temperature.
OPERATING INSTRUCTIONS
WARNING
The Oven and its parts are hot. Be very careful when operating, cleaning, or servicing the oven.
1. Turn Cooking Temperature knob to desired cooking temperature
2. Set Cooking timer knob(s) to desired cooking time to include 30 to 60 minute preheat time.
3. Turn Holding Temperature knob to desired holding temperature.
4. Turn On/Off switch to On position. On/Off Indicator Light and Holding Temperature Light will illuminate. When the oven reaches the desired cooking
temperature it is ready for use. Keep the oven door closed during the preheating cycle.
BEFORE FIRST USE
WARNING
The Oven and its parts are hot. Be very careful when operating, cleaning, or servicing the oven.
1. Thoroughly clean the oven before initial use. Please refer to cleaning instructions in this manual.
2. Test the oven to verify that the oven operates normally. Please refer to "Testing The Oven" procedure in this manual.

TESTING THE OVEN
WARNING
The Oven and its parts are hot. Be very careful when operating, cleaning, or servicing the oven.
Before using the oven for the first time, verify that the oven operates normally.
1. Check that the oven is connected to the correct power source.
2. Set the COOKING TIME knob to 0.
3. Turn the HOLDING TEMPERATURE knob to 140° F.
4. Set Power ON/OFF Switch to ON position.
5. Check that the Oven Circulating Fan(s) are running.
6. Check that the Holding Temperature Indicator Light is illuminated
7. Each Oven is equipped with cooling fans. The cooling fans may not operate when the oven is first turned on. The cooling fans operate only when the
thermostat, to which they are connected, requires it
8. Set the COOKING TIME knob to 2 hours. The Holding Temperature Indicator Light will go out and the Cooking Temperature Indicator Light will
illuminate.
9. Turn the COOKING TEMPERATURE knob to 250° F. Check the interior rear of the oven cavity to determine that the oven is heating.
10. Turn the COOKING TIME KNOB to 0 and set the HOLDING TEMPERATURE knob at 250° F. 10. Check that the Cooking Temperature Indicator Light has
gone out and the Holding Temperature Indicator Light has illuminated.
11. Check the interior rear of the oven to ensure that the oven is heating. If all the functions perform satisfactorily, the oven is ready for operation.
SHUTDOWN
WARNING
The Oven and its parts are hot. Be very careful when operating, cleaning, or servicing the oven.
1. Turn Holding Temperature knob and Cooking Temperature knob counter-clockwise until they stop at the Off position.
2. Open door slightly to allow ventilation and cool down period. This is to allow oven to properly cool down so components are not damaged. Wait 15
minutes before turning On/Off Switch to OFF because the cooling fans need to operate during the cool-down period.
3. Turn On/Off Switch to OFF position. The cooling fans will automatically turn off when the proper cool-down temperature is reached.
EXTENDED SHUTDOWN
WARNING
The Oven and its parts are hot. Be very careful when operating, cleaning, or servicing the oven. Perform the following procedure to shut down the oven for an
extended period of time.
1. Perform the SHUTDOWN procedure.
2. Unplug the oven.
3. Thoroughly clean the oven according to the cleaning procedures in this manual.
4. Leave the door(s) slightly open to allow ventilation and preservation of the gasket(s).
COOKING
INTRODUCTION
This cooking guide has been produced for your Cook & Hold Oven System. It should be used as a handy reference when using your oven. The guide has
been developed to help
answer questions which you may have relating to product preparation as well as making you familiar with the operation of your oven. When using your
oven, experiment with your own house specialties. The degree of doneness varies based upon individual preferences. These preferences can be easily
accomplished by varying the recommended time
guidelines in this manual. The guidelines which are presented in this manual are suggested and have been tested to insure product preparation as
indicated.
The concept of “Low Temperature Cooking” is not a science, it is an art. Chefs from around the world vary in terms of the doneness and
appearance in the products which they prefer. Therefore, we suggest first understanding what your Oven System
will do for the multitude of applications available to you
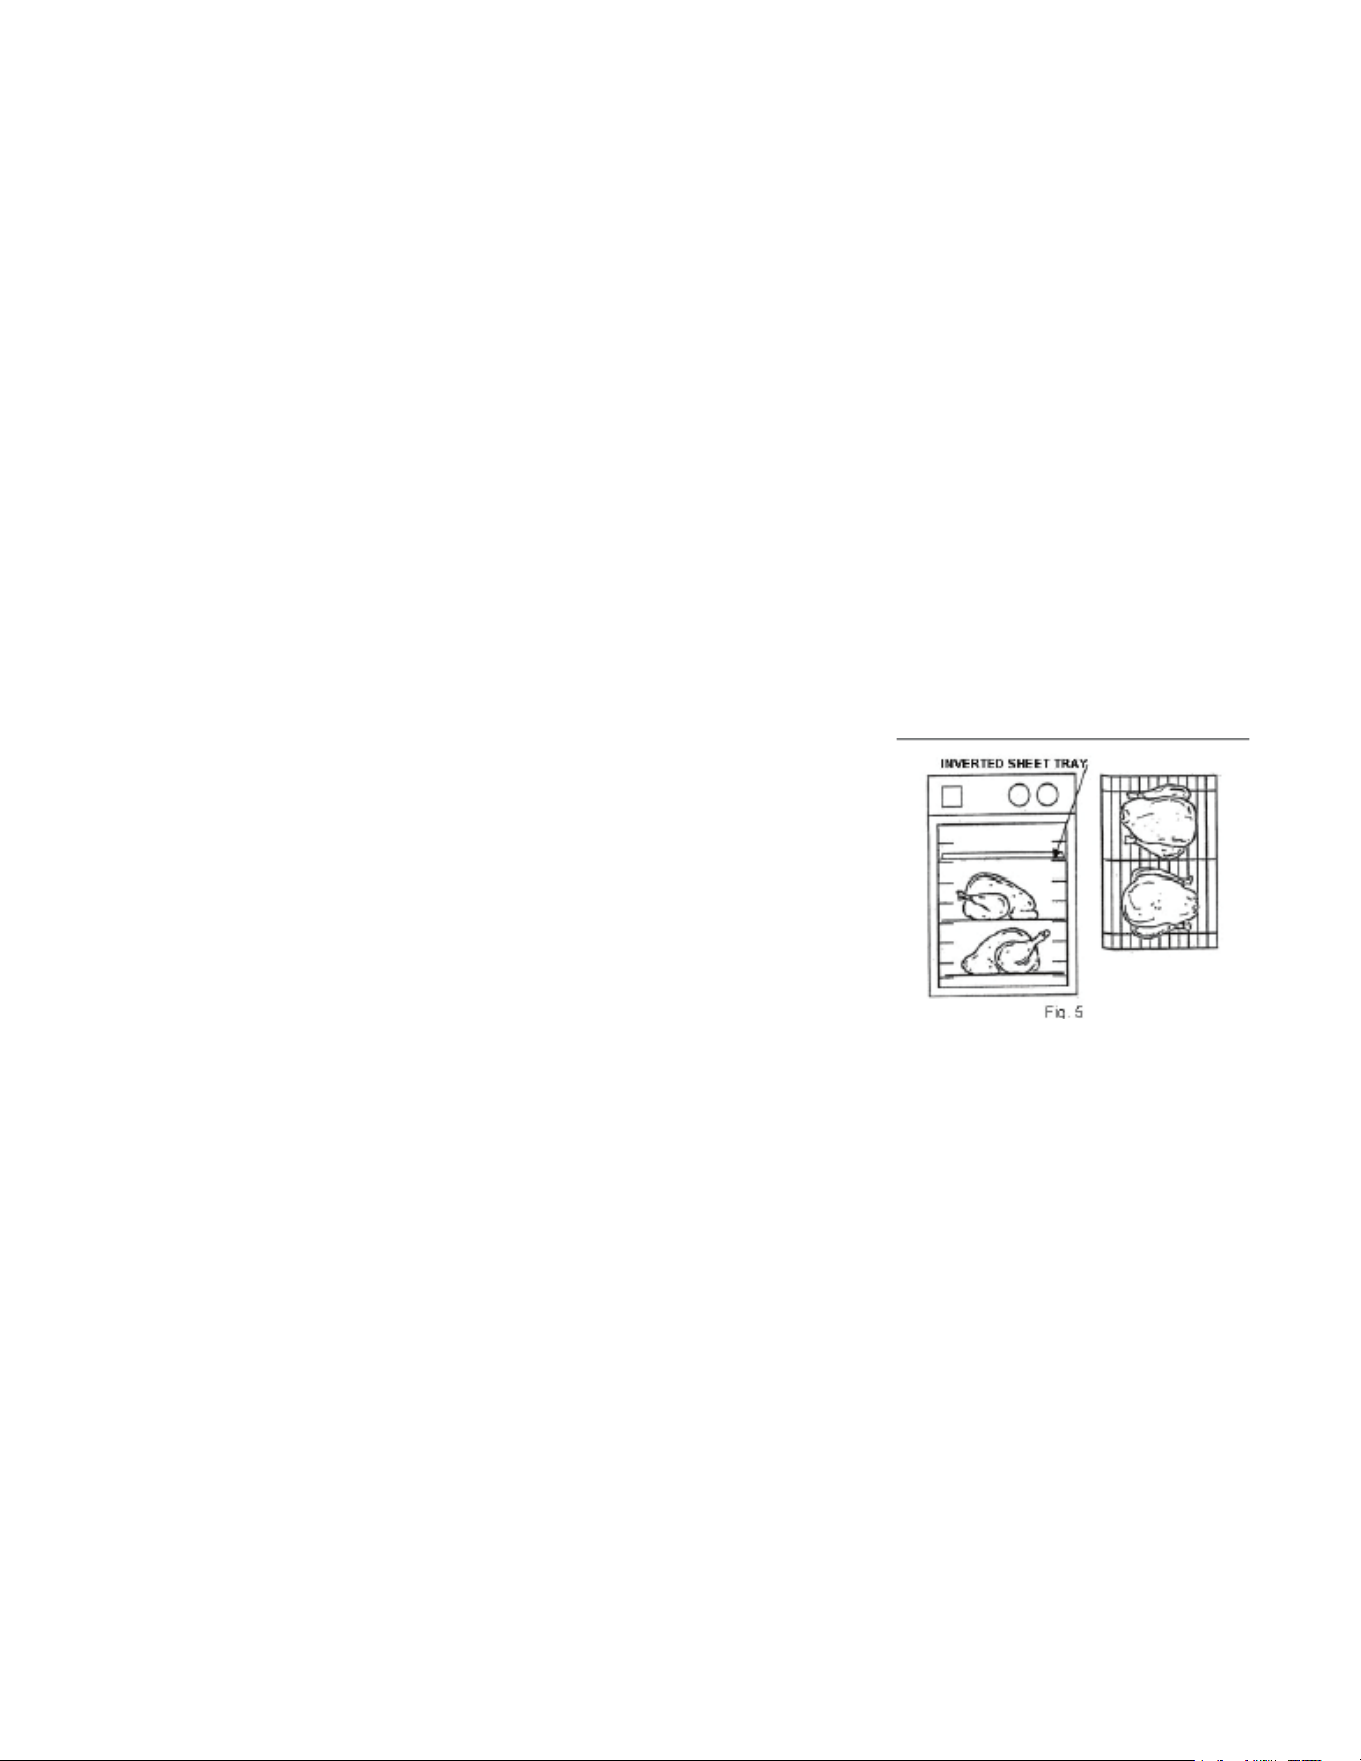
COOKING RACK
Depending upon the size of the Cook & Hold Oven, each unit is supplied with a specially designed cooking rack(s). The cooking rack must be used when
cooking food products to insure absolute product quality and integrity.
The cooking rack is simply placed inside a standard 18” x 26” sheet tray (2/1 Gastronorm) and the product which is to be cooked and held is placed on
top of the cooking rack. When more than one product is being prepared, the food products should not be crammed together onto one cooking rack
Sufficient room should separate the products on a single cooking rack to insure proper circulation of air around
the product. When loading the oven, an additional 18” x 26” sheet tray, in an inverted position, (Fig. 5) should be placed directly above the food product
being prepared. This creates the necessary air flow pattern to produce highly desirable carmelization and uniform roasting of the product.
A helpful hint when loading your food product on the cooking rack is to either
line your 18” x 26” sheet tray with foil, or spray with a quality vegetable oil. This helps with easy clean up after cooking.
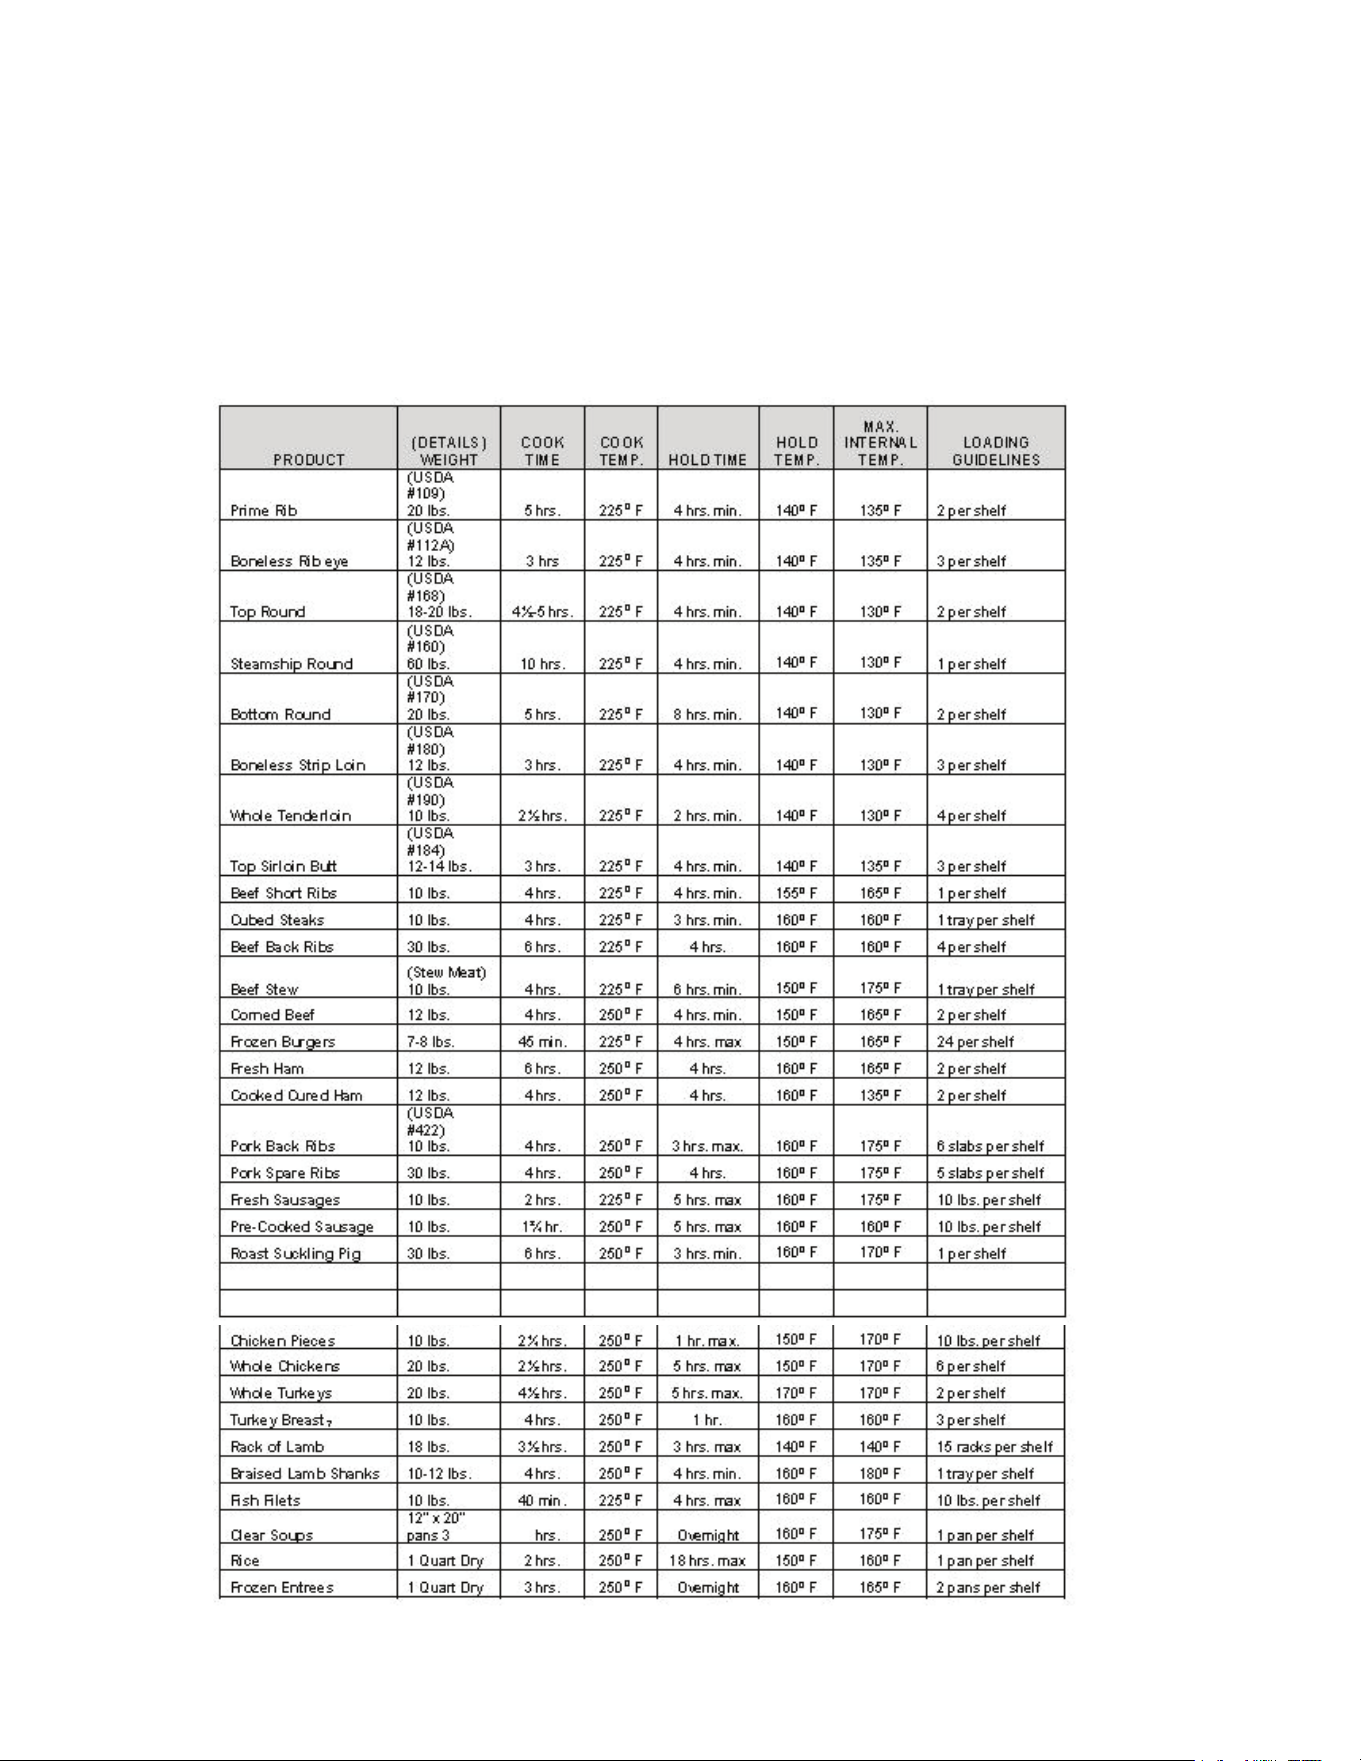
COOKING AND HOLDING GUIDE
Please note that as products vary, as well as other elements such as altitude, so shall actual cooking times and temperatures. These should be
adjusted as needed based upon your actual experience. Finished product temperatures should be verified manually, prior to serving, in order to insure
food safety.

REHEATING GUIDE

CLEANING
WARNING
The Oven and its parts are hot. Be very careful when operating, cleaning, or servicing the oven.
WARNING
• Always unplug electrical power supply before cleaning.
• Avoid splashing water into upper areas of the oven to prevent damage to electrical components or connections.
• Never spray the unit with a hose.
• Never use harsh chemicals or abrasive pads to clean the oven.
DAILY:
1. Unplug electrical power supply.
2. Allow oven to go through cooldown period before cleaning.
3. Remove the Interior Side Racks
4. Take the Interior Side Racks to a sink or dishwasher for a thorough cleaning. Use a mild soap and water solution to clean these items.
5. If necessary, clean the interior of the oven with a damp cloth. Wipe dry with a soft dry cloth.
6. Reassemble oven.
7. Clean the exterior of the oven with a clean damp cloth.
HEAT TINT:
Darkened areas, called "heat tint," may appear on stainless steel exposed to excessive heat. Excessive heat causes the protective film to thicken. This is
unsightly, but is not a sign of permanent damage.
DOOR GASKET CARE
DOOR GASKET:
At least once a week, thoroughly check the door gasket for damage/wear. A damaged gasket can cause inefficient and unsatisfactory operation of the
oven.
If the gasket requires cleaning:
1. Gently wash gasket using a moist cloth, a mild detergent solution, and warm water.
2. Rinse with a fresh cloth moistened in warm water to remove all traces of detergent.
3. Gently wipe dry with a clean dry cloth
Never apply food oils, or petroleum lubricants directly to the gasket(s). Petroleum based solvents and lubricants will reduce the gasket's life.
LOCKOUT/TAGOUT PROCEDURE
WARNING
Always perform the Lockout / Tagout Procedure before removing any sheet metal panels or attempting to service this equipment.
The Lockout /Tagout Procedure is used to protect personnel working on an electrical appliance. Before performing any type of maintenance or service on
an electrically operated appliance, follow these steps:
1. In electrical box, place unit’s circuit breaker into OFF position.
2. Place a lock or other device on electrical box cover to prevent someone from placing circuit breaker ON.
3. Place a tag on electrical box cover to indicate that unit has been disconnected for service and power should not be restored until tag is removed by
maintenance personnel.
4. Disconnect unit power cord from electrical outlet.
5. Place a tag on cord to indicate that unit has been disconnected for service and power should not be restored until tag is removed by maintenance
personnel.
MAINTENANCE
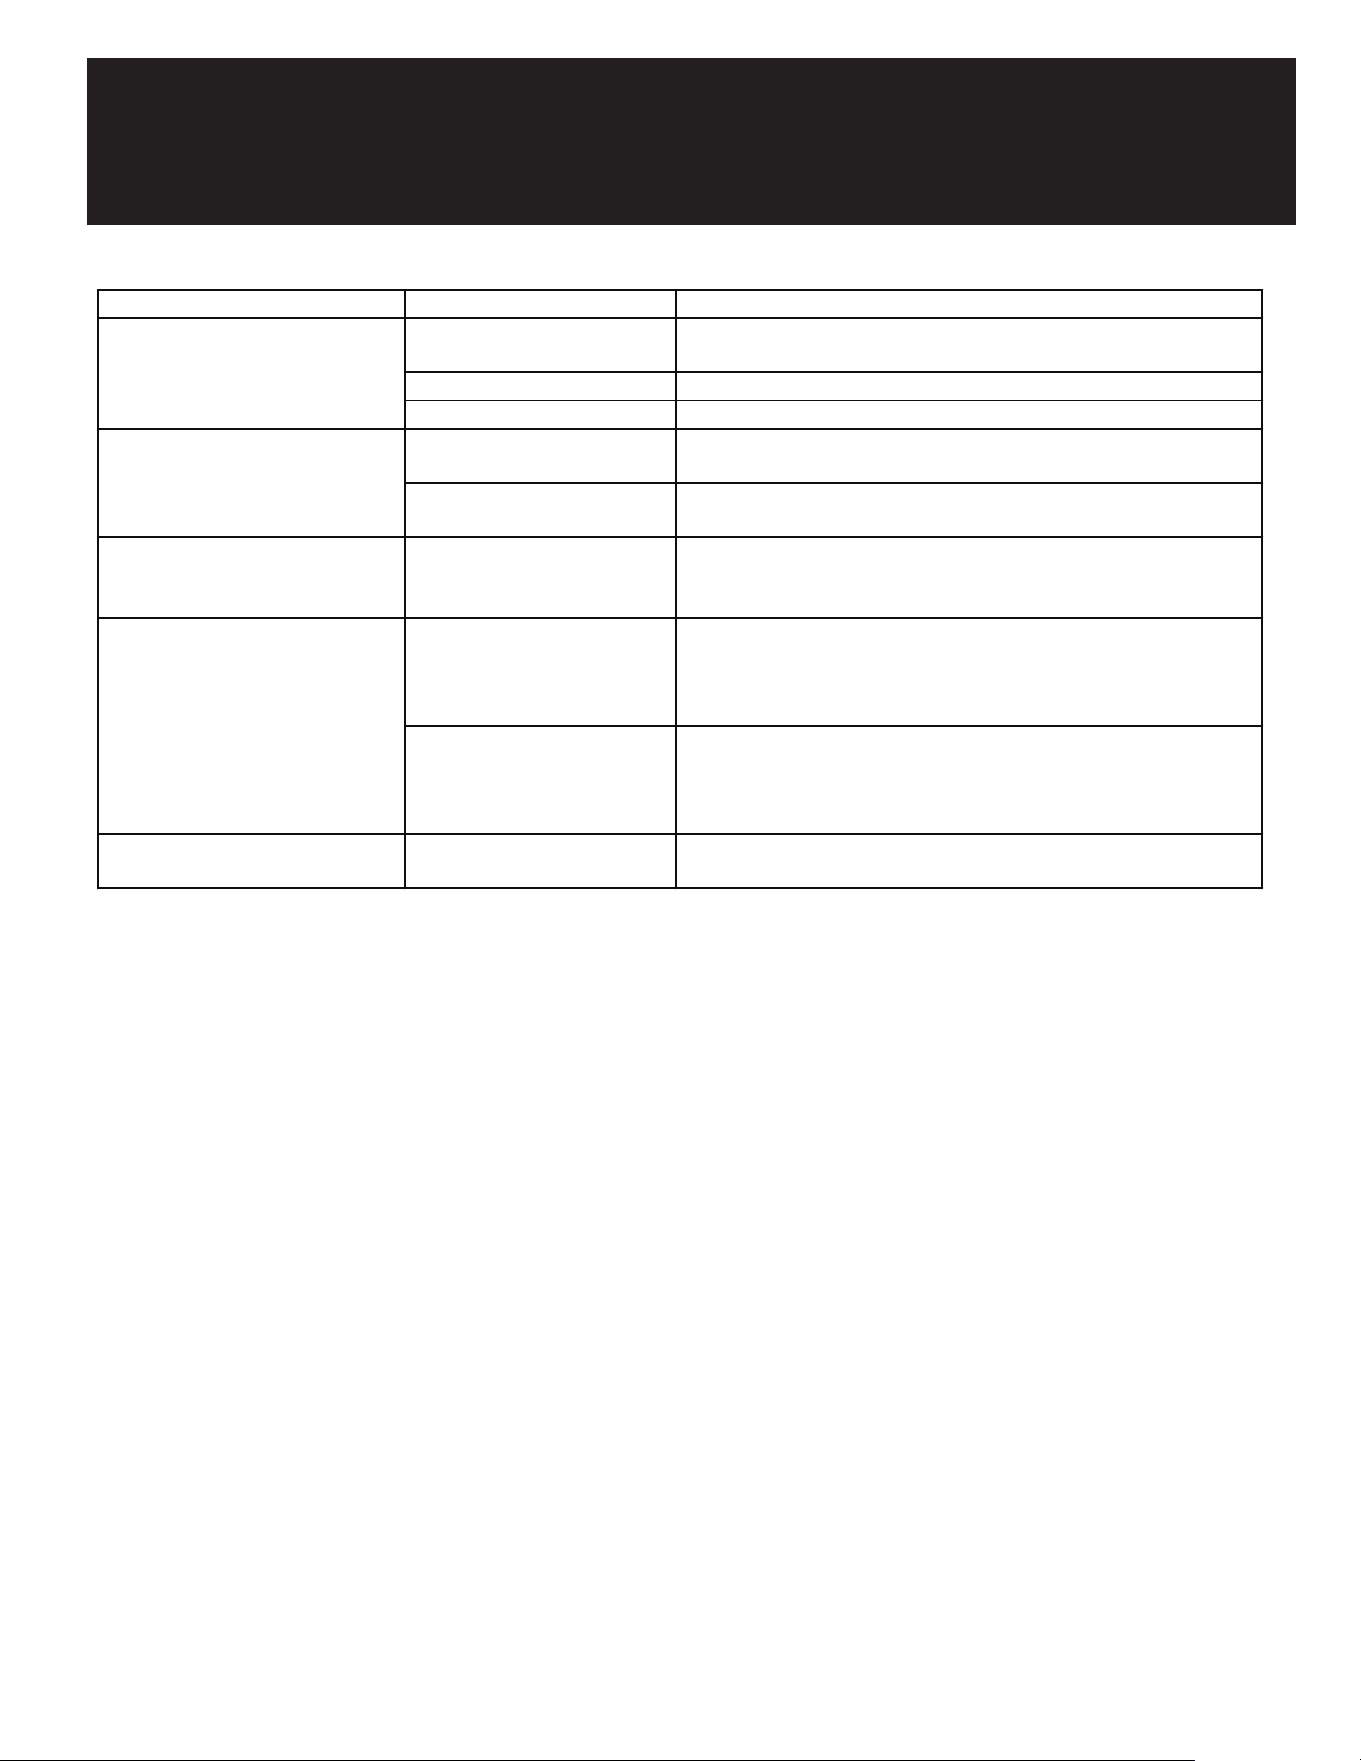
TROUBLESHOOTING
SYMPTO MS POSSIBLE CAUSES REME DY
Oven not operating
Oven not connected to power
source
Connect oven to power
ON/OFF switch not ON Press Power ON/OFF switch to ON
No power <br>Check circuit breaker
Indicator Lights are lit but Cooling
Fan(s) are NOT operating
Oven is below 150° F
This is normal when unit is cold. If unit is above 150° F, Contact
Authorized Service Provider.
Defective: connection, wiring,
fan, thermostat
Contact Authorized Service Provider.
Oven compartment IS heating and
Blower Motor IS NOToperating with
Defective connection or wiring
to motor
Contact Authorized Service Provider
Oven compartment IS NOT heating
and Blower Motor IS operating with
Power Switch ON
Defective Cooking Temperature
Thermostat
Set Cooking Thermostat to 250° F, wait several minutes and check the
rear of the oven for heating. Both the Power Switch and Cooking
Temperature Indicator Lights will be lit. If oven cavity does not heat,
Contact Authorized Service Provider.
Defective Cooking Temperature
Thermostat
Turn Holding Temperature knob to 250⁰ F. and check for heat at rear
of oven cavity. Both the Power Switch and Cooking Temperature
Indicator Lights w ill be lit. If the oven cavity does not heat, Contact
Authorized Service Provider.
Incorrect oven temperature
Thermostat(s) require
calibration
Contact Authorized Service Provider

LIMITED WARRANTY
Koolmore Supply, Inc. extends a limited warranty to the original purchaser, guaranteeing that this Koolmore
product is free from manufacturing defects in material or workmanship for one year from the date of
purchase.
Should you discover any such defect within the warranty period, Koolmore Supply, Inc., reserves the right to
repair or replace the product without charge, or to cover the cost of replacement parts and repair labor needed
to correct defects present at the time of purchase or resulting from regular usage, when the appliance has been
installed, operated, and maintained as per the instructions provided.
At its sole discretion, Koolmore Supply Inc. may decide to replace the product. In such an event, your replace)
ment appliance will carry the warranty for the remaining term of the original unit's warranty period.
This warranty is valid exclusively to the original purchaser of the product and only applicable within the United
States. The warranty commences from the date of original consumer purchase. Proof of the original purchase
date will be required to obtain service under this warranty.
Under this limited warranty, your sole and exclusive remedy will be product repair, as outlined above. All
services must be provided by a Koolmore-designated service company.
To claim warranty or request repair service:
Email suppor[email protected]. Please include your name, address, phone number, warranty repair request,
and a copy of your proof of purchase receipt. Alternatively, visit koolmore.com and use the contact us page. A
Koolmore customer service representative will promptly arrange service for your appliance.
We thank you for choosing Koolmore.
WARRANTY EXCLUSIONS
This limited warranty will not cover:
1. Failure of the product to perform during power failures or interruptions,
or due to inadequate electrical service.
2. Damage incurred during transportation or handling.
3. Damage caused by accidents, vermin, lightning, winds, fire, floods, or acts of God.
4. Damage resulting from accidents, alterations, misuse, abuse, improper installation, repair, or mainte)
nance. This includes using any external device that alters or converts the voltage or frequency of
electricity.
5. Unauthorized product modifications, repairs by unauthorized centers, or use of non-approved
replacement parts.
6. Abnormal cleaning and maintenance not aligned with the user's manual.
7. Use of incompatible accessories or components.
8. Any costs associated with repairs or replacements under these excluded circumstances shall be the
responsibility of the consumer.
WARRANTY