USER GUIDE
Amplifiers
Visit Our Website
SCAN ME
PyleUSA.com

www.PyleUSA.com
2
You've made a great choice with the Lanzar Vibe amplier—a quality product
designed and engineered to provide many years of uncompromised musical
service. Vibe ampliers feature the latest technology, including a DC to DC
Switching Power Supply, oering the headroom needed for the most
demanding peaks and dynamic ranges in modern CDs and recordings.
TABLE OF CONTENTS
FEATURES
TECHNICAL SPECS
PRECAUTIONS
INSTALLATION
CONTROLS
SYSTEM WIRING
TROUBLESHOOTING
CLEANING AND STORAGE
REGISTER PRODUCT
PLEASE READ THIS USER MANUAL COMPLETELY BEFORE OPERATING
THIS UNIT AND RETAIN THIS BOOKLET FOR FUTURE REFERENCE.
California Prop 65 Warning
WARNING:
This product may expose you to chemicals, which is known to
the state of California to cause cancer, birth defects and other
reproductive harm. Do not ingest.
For more info go to: www.P65warnings.ca.gov
3
3
4
4
5
8
11
12
13

www.PyleUSA.com
3
FEATURES:
• MOSFET Switches: Maintain rated power over a wide range of battery voltages.
• Regulated PWM Power Supplies: Stiy regulated for consistent performance.
• 2-Ohm Stable Stereo Operation
• Variable Input Level Controls: For each pair of channels.
• High and Low Pass Crossover Controls
• Thermal and Speaker Short Protection Circuits
• Power and Protection LED Indicators
• Bass Boost Circuitry
• Compatibility: Stereo, Bridge Mode, and Tri-Mode System applications.
• Silver-Plated Power, RCA, and Speaker Connectors
• High-Eciency Heavy Aluminum Heatsink
• Bass Boost Remote Control
TECHNICAL SPECS
MODEL
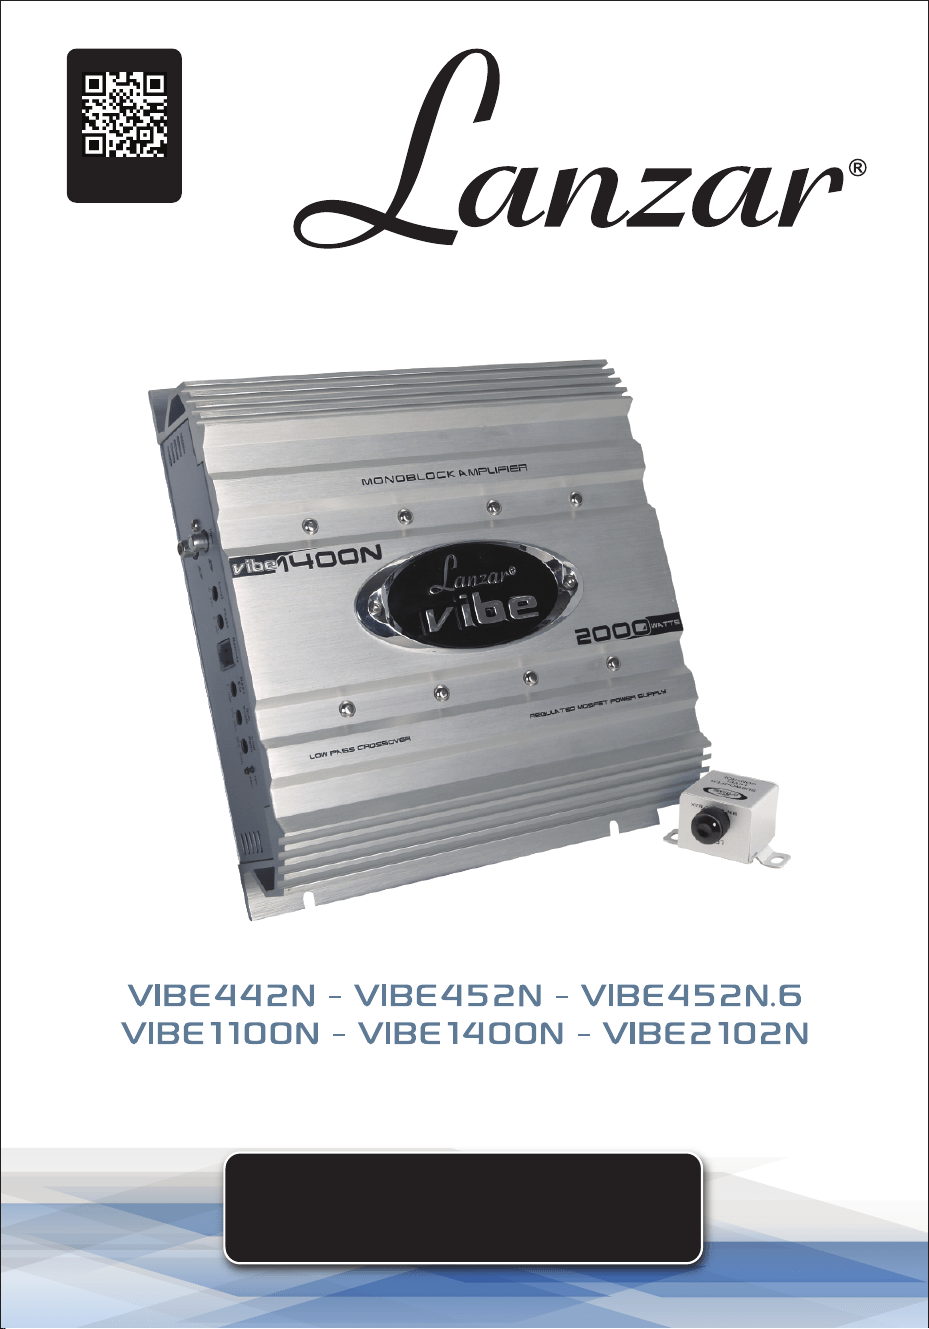
VIBE1100N VIBE1400N VIBE2102N VIBE442N VIBE452N VIBE452N.6
Mono Channel
Amplier
Mono Channel
Amplier
2 Channel
Amplier
4 Channel
Amplier
4 Channel
Amplier
4 Channel
Amplier
RMS at 4 Ohms 1x800W 1x1000W 2x1500W 4x625W 4x1250W 4x1250W
MAX at 4 Ohms N/A N/A 2x3000W 4x1250W 4x1500W 4x1500W
at 4 Ohms Bridged
N/A N/A 1x6000W 2x2500W 2x3000W 2x3000W
RMS at 2 Ohms
1x1600W 1x2000W 2x2400W 4x1000W 4x2000W 4x2000W
Min. Speaker
Impedance
2 Ohm 2 Ohm 2 Ohm 2 Ohm 2 Ohm 2 Ohm
T.H.D.
0.05% 0.05% 0.05% 0.05% 0.05% 0.05%
Frequency Response
15Hz-150Hz,-1dB
15Hz-150Hz,-1dB 10Hz-40kHz,-1dB 10Hz-40kHz,-1dB 10Hz-40kHz,-1dB 10Hz-40kHz,-1dB
Input Sensitivity
200mV-9000mV 200mV-9000mV 200mV-6000mV 200mV-6000mV 200mV-6000mV 200mV-6000mV
Input Impedance
20 k Ohm 20 k Ohm 20 k Ohm 20 k Ohm 20 k Ohm 20 k Ohm
S/N Ratio
>95dB >95dB >95dB >95dB >95dB >95dB
Channel Separation
N/A N/A >60dB >60dB >60dB >60dB
Crossover Filters
35Hz-250Hz 35Hz-250Hz 40Hz-350Hz 40Hz-350Hz 40Hz-350Hz 40Hz-350Hz
Low Pass
N/A N/A 40Hz-3kHz 40Hz-3kHz 40Hz-3kHz 40Hz-3kHz
High Pass
Band Pass
N/A N/A N/A N/A N/A N/A
Bass Boost
+10dB +10dB +18dB +18dB +18dB +18dB
Dimensions (In.)
10.25x2.36x7.87 10.25x2.36x9.45 10.25x2.36x24.41 10.25x2.36x18.90 10.25x2.36x20.47 10.25x2.36x20.47
Fuse(s)
10Ax2 15Ax2 30Ax4 40Ax2 35Ax3 35Ax3

www.PyleUSA.com
4
PRECAUTIONS
1. Before drilling or cutting any holes, carefully investigate your car's layout to
avoid damaging fuel lines, gas tanks, hydraulic lines, and electrical wiring.
2. Do not operate the amplier when it is unmounted. Securely attach all audio
system components within the vehicle to prevent damage, especially in the
event of an accident.
3. Do not mount the amplier in a manner that leaves wire connections
unprotected or in a pinched condition. Ensure adequate ventilation for the
amplier.
4. Before making or breaking power connections, disconnect the vehicle battery.
Ensure the head unit or other equipment is turned o while connecting the
input jacks and speaker terminals.
5. If replacing the power fuse, only use a fuse identical to that supplied with the
system. Using a fuse of a dierent type or rating may result in system damage
not covered by the manufacturer's warranty.
INSTALLATION
1. Find a suitable location in the vehicle to mount the amplier.
2. Ensure sucient airow around the intended mounting location.
3. Bolt the amplier to the mounting surface.
4. Connect the power ground terminal to the nearest chassis point.
Keep this ground wire less than 39 inches in length and use 8 gauge wire.
5. Connect the remote terminal to the remote output of the head unit using 14
gauge wire.
6. Install an empty fuse holder within 12 inches of the battery and run 8 gauge
or larger high-quality cable from this fuse to the amplier location.
7. Connect this cable to the "BATT" connection on the amplier. If using multiple
ampliers, use separate cables with their own fuse at the battery or a #0 or
#2 cable from the fuse holder at the battery to a distribution block near the
amplier's location.
8. Connect all line inputs and outputs using high-quality RCA cables.
9. Insert fuse(s) at the battery fuse holder(s).
10. Recheck all connections before powering up.
11. Set all level controls to their least sensitive positions and adjust all crossover
controls, switches, etc., to the desired frequency or position.
12. Power up the system and set the head unit volume to about the 2 o'clock
position, then adjust the amplier's level controls for maximum output.
13. Further ne-tuning of the various controls may be necessary to achieve the
desired sound quality.
www.PyleUSA.com
5
CONTROLS
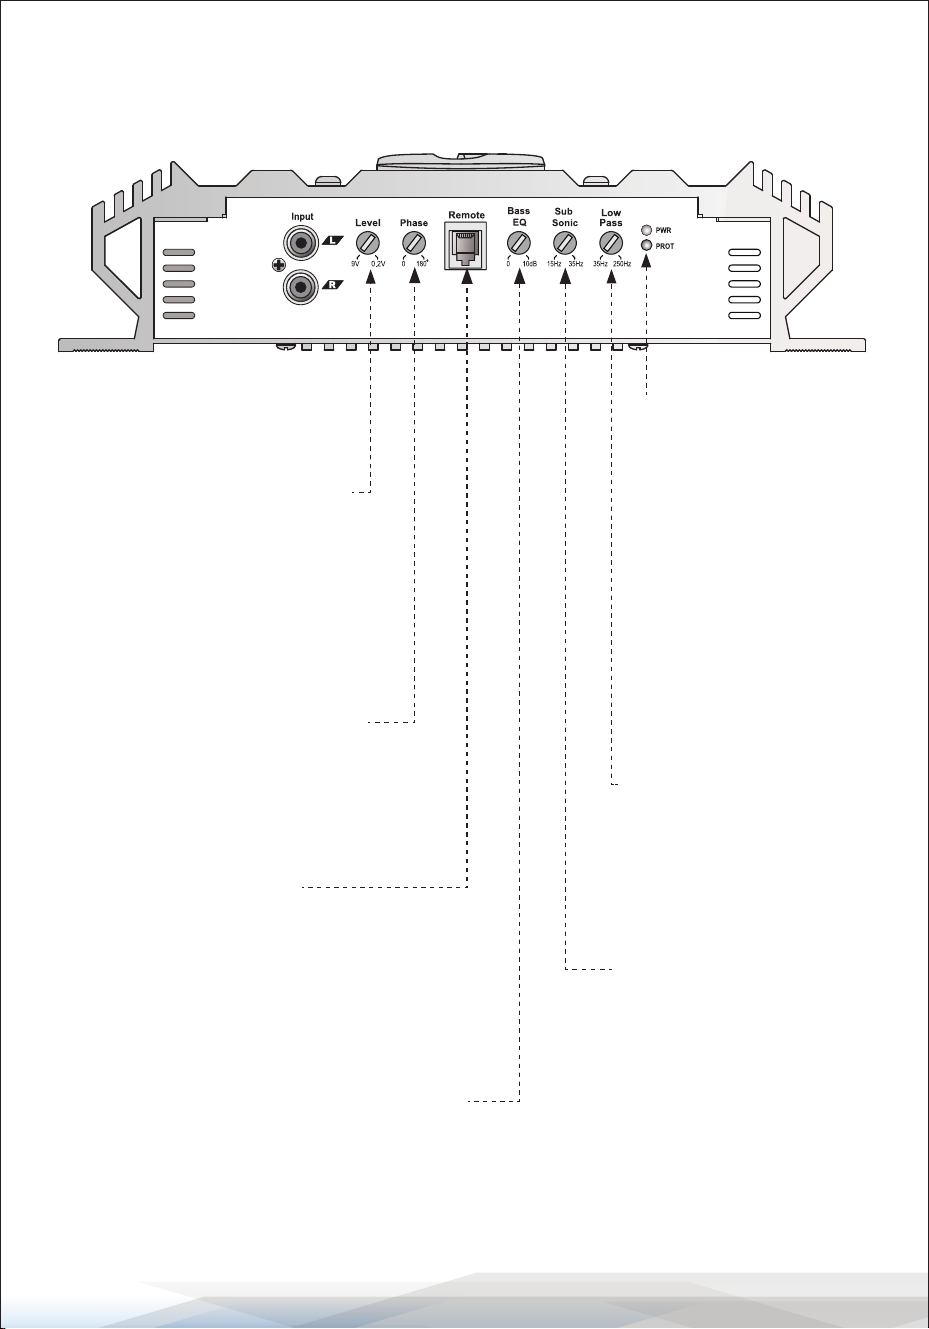
VIBE1100N - VIBE1400N
Input Level Controls
Enables matching of input levels
to the output levels from the head
unit (or other signal source).
Phase Shift
Allows you to change the phase
of your subwoofer from 0 to 180
degrees to help compensate for
timing dierences between drivers.
Remote Control
Power & Protection
Indicators
Provides instant information
on the status of the amplier,
including short-circuit and
thermal overload alerts.
Low Pass Filter
This control limits the
frequencies that will be
distributed to the speakers
to those below the value set
within the range of 35-250 Hz.
Subsonic Filter
Adjustable between 15 Hz
and 35 Hz.
Bass EQ Control
Increases sound level in lower
frequencies by up to 10 dB.

www.PyleUSA.com
6
CONTROLS
VIBE2102N
Input Level Controls
Enables matching of input levels
to the output levels from the head
unit (or other signal source).
Crossover Mode Selector
Determines the mode of the built-in crossover:
Low Pass (permits only low-frequency signals to
pass to speakers), High Pass (permits only high-
frequency signals to pass to speakers), or Full.
Remote Control
Power & Protection
Indicators
Provides instant
information on the
status of the amplier,
including short-circuit
and thermal overload
alerts.
Low Pass Filter
This control limits the
frequencies that will be
distributed to the speakers
to those below the value set
within the range of 40-350 Hz.
High Pass Filter
When the Crossover Mode
Selector is set to High Pass
Mode, this control limits the
frequencies that will be
distributed to the speakers
to those above the value set
within the range of 40 Hz to
3 kHz.
Bass EQ Control
Increases sound level in lower
frequencies by up to 18 dB.
www.PyleUSA.com
7
CONTROLS
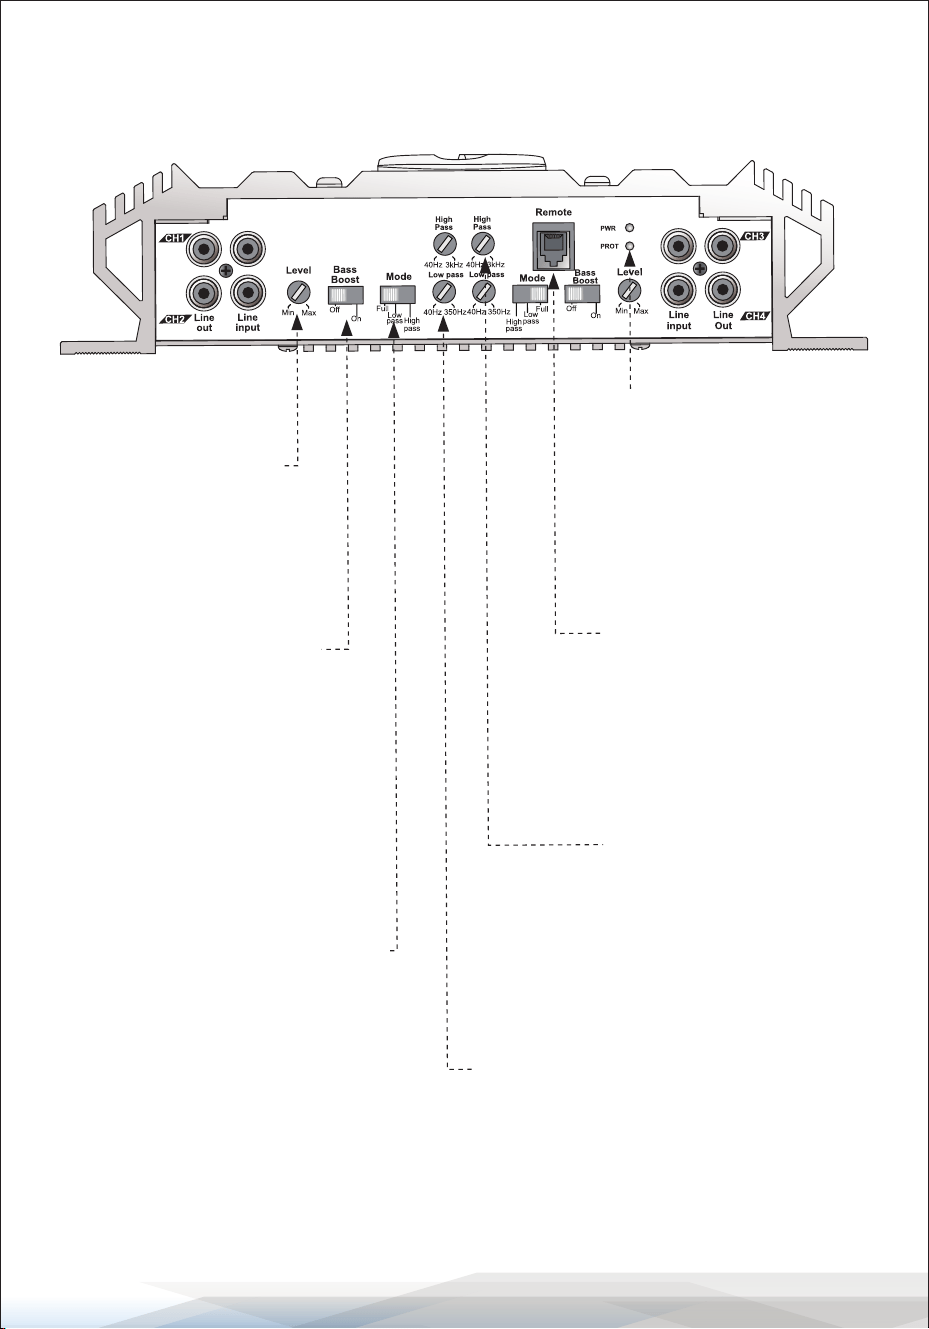
VIBE442N - VIBE452N - VIBE452N.6
Input Level Controls
Enables matching of input
levels to the output levels
from the head unit
(or other signal source).
Remote Control
Power & Protection
Indicators
Provides instant information
on the status of the amplier,
including short-circuit and
thermal overload alerts.
Low Pass Filter
This control limits the
frequencies that will be
distributed to the speakers
to those below the value set
within the range of 40-350 Hz.
Bass EQ Control
Increases sound level in lower
frequencies by up to 18 dB.
Crossover Mode Selector
Determines the mode of the
built-in crossover:
Low Pass (permits only low-frequency
signals to pass to speakers),
High Pass (permits only high- frequency
signals to pass to speakers), or Full.
High Pass Filter
When the Crossover Mode
Selector is set to High Pass
Mode, this control limits the
frequencies that will be
distributed to the speakers
to those above the value set
within the range of 40 Hz to
3 kHz.
www.PyleUSA.com
8
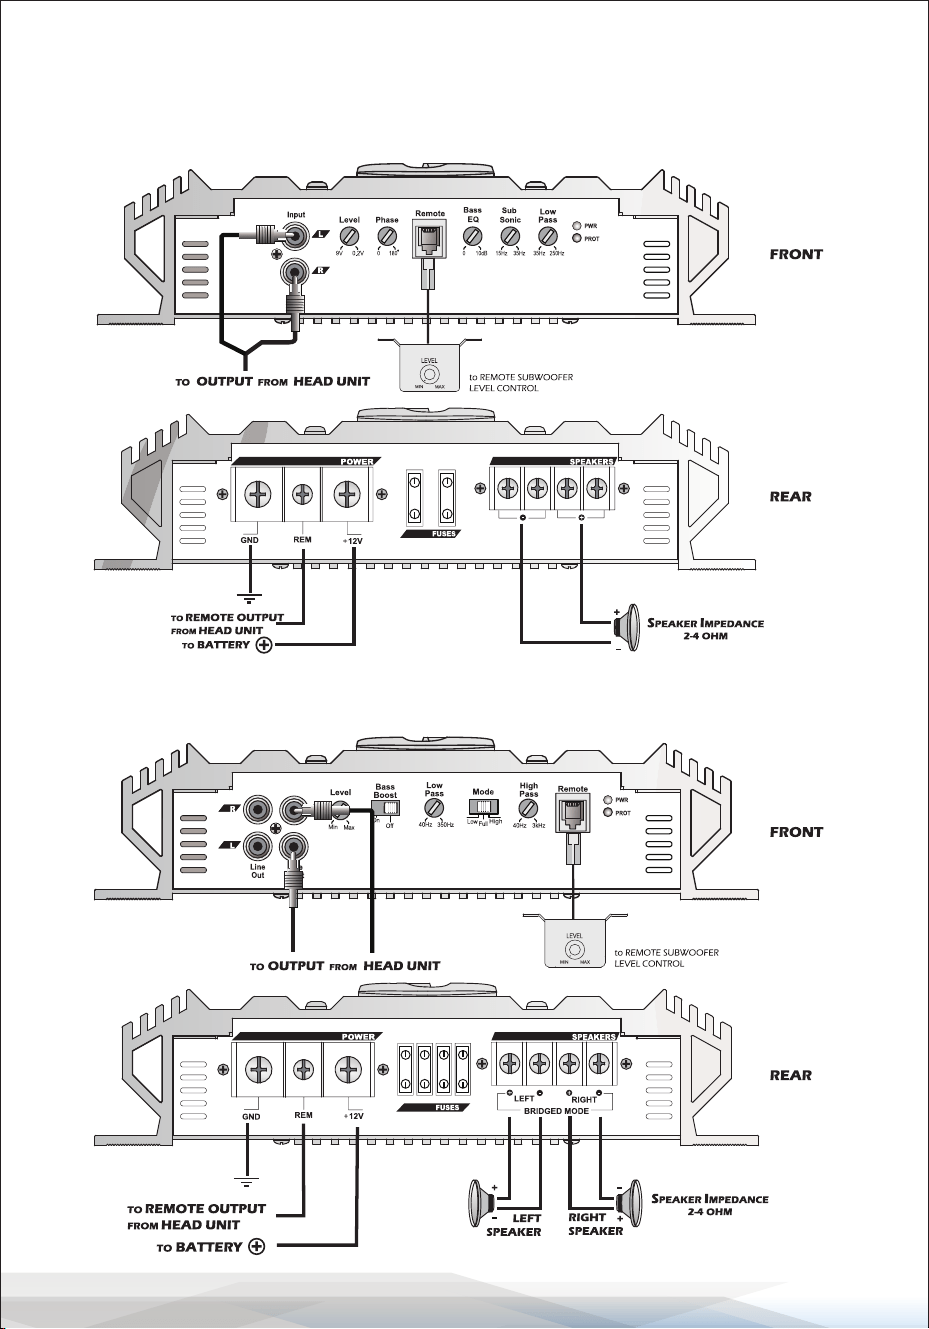
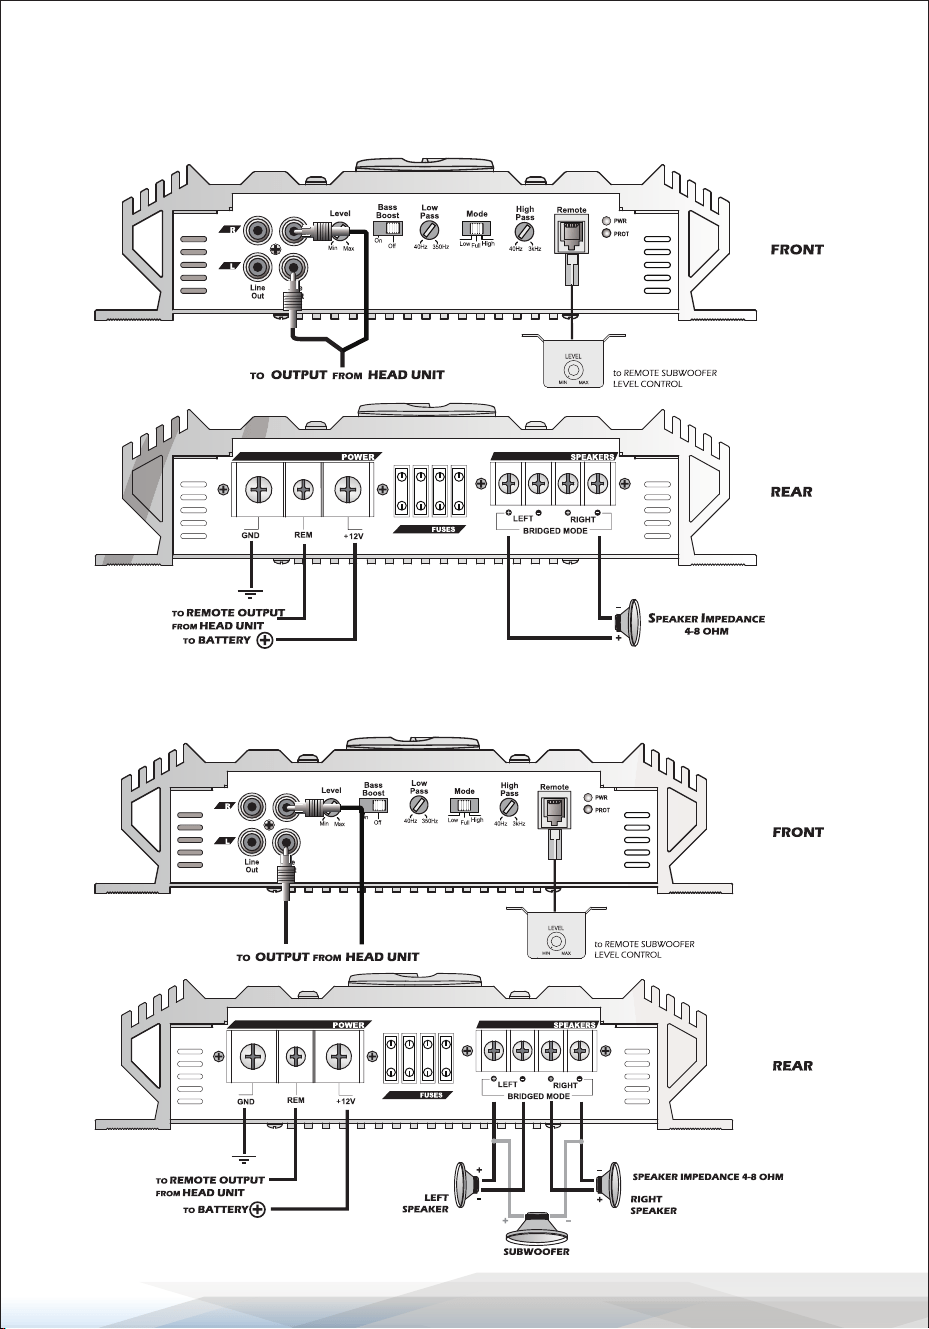
SYSTEM WIRING
Mono Block Conguration
VIBE1100N - VIBE1400N
2 Channel Stereo Conguration
VIBE2102N
www.PyleUSA.com
9
SYSTEM WIRING
2 Channel Bridged Mode Conguration
VIBE2102N
2 Channel Tri-Mode Conguration
VIBE2102N
www.PyleUSA.com
10
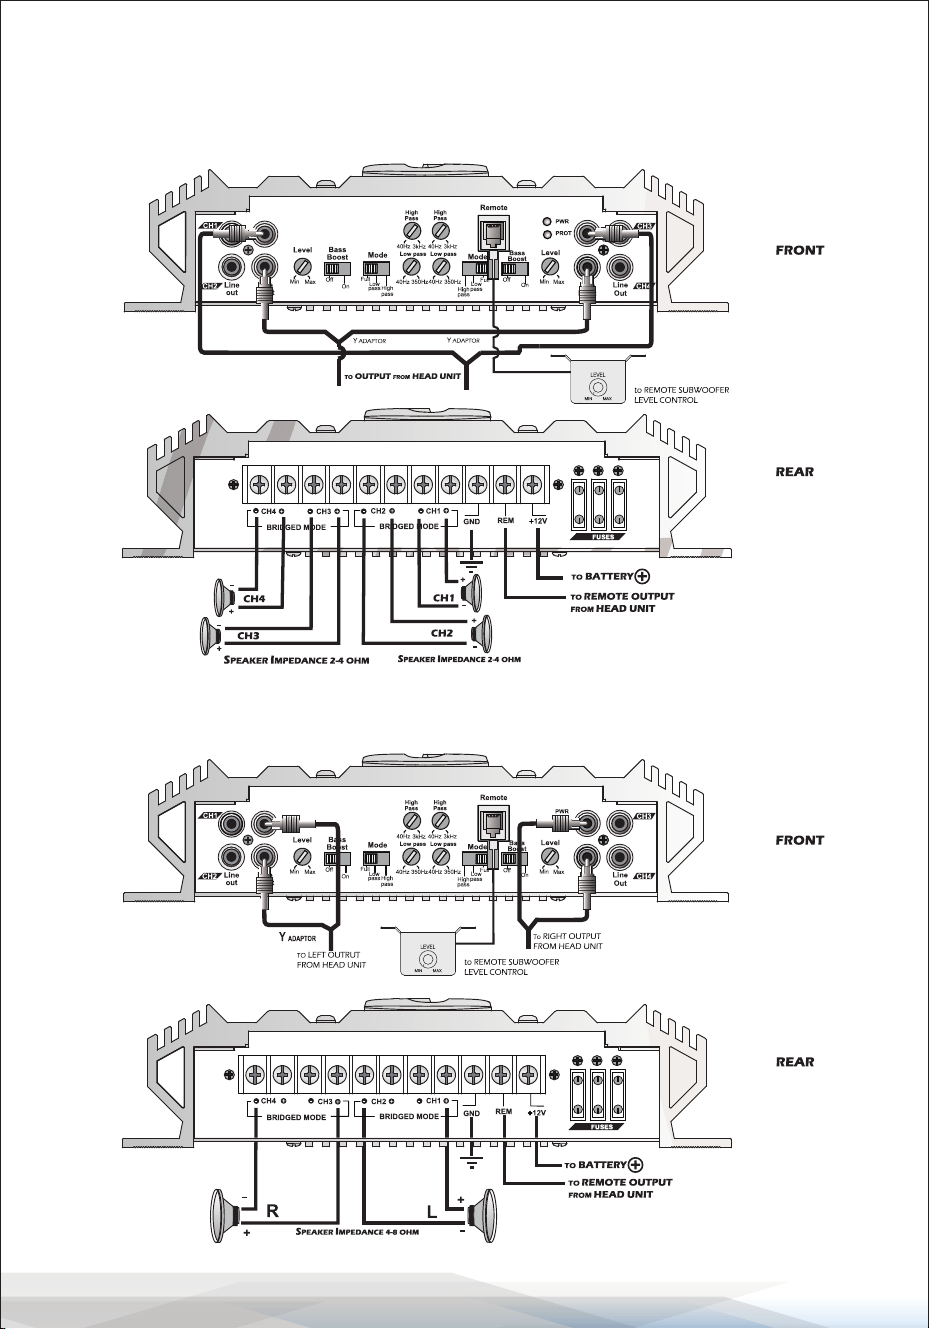
SYSTEM WIRING
4 Channel Stereo Conguration
VIBE442N - VIBE452N - VIBE452N.6
4 Channel Bridged Mode Conguration
VIBE442N - VIBE452N - VIBE452N.6
www.PyleUSA.com
11
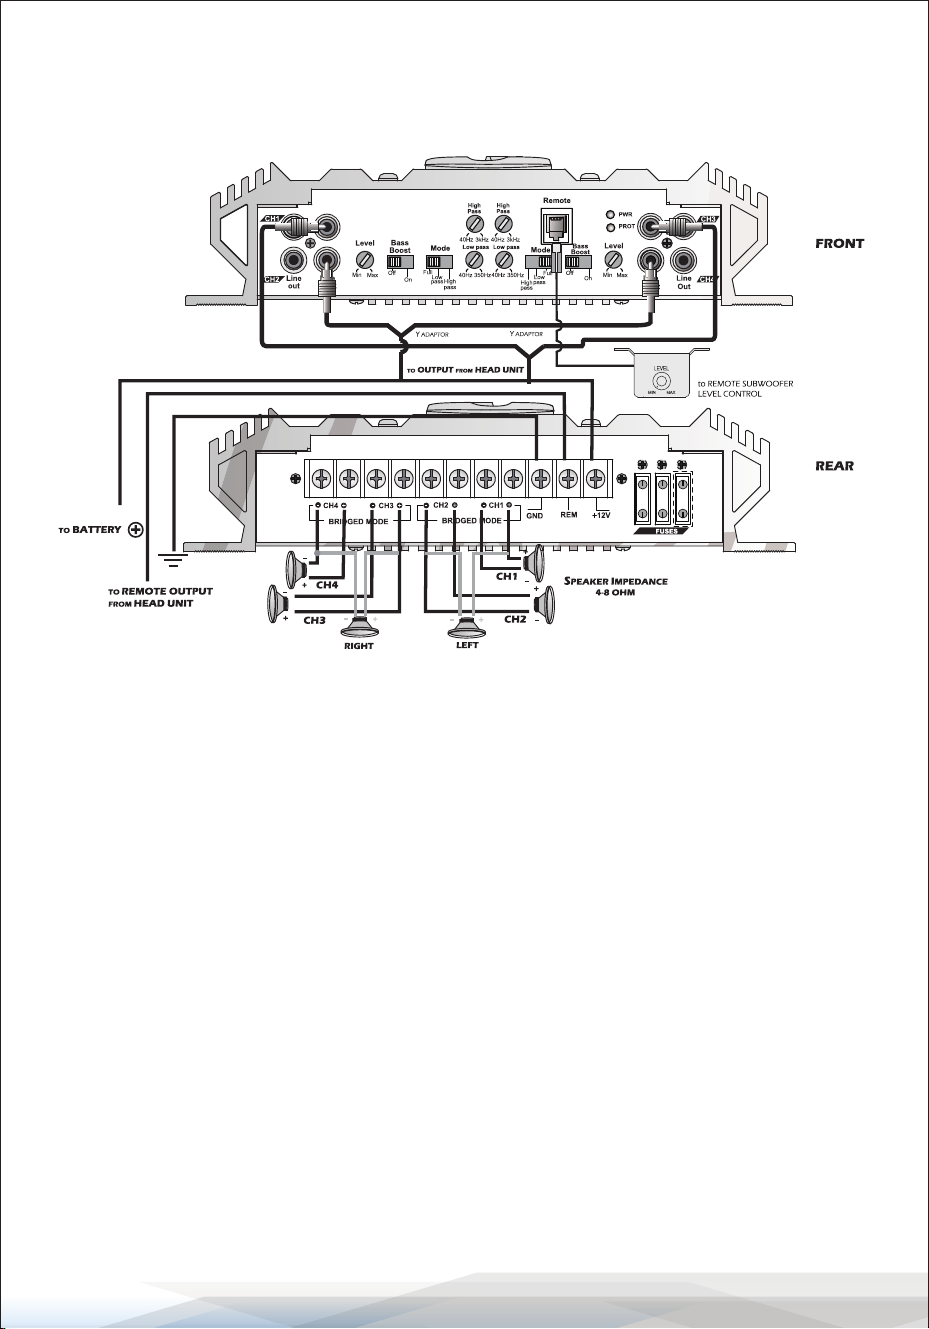
SYSTEM WIRING
4 Channel Tri-Mode Conguration
VIBE442N - VIBE452N - VIBE452N.6
TROUBLESHOOTING
AMPLIFIER WILL NOT POWER UP
• Check for a good ground connection.
• Ensure that the remote DC terminal has at least 3V DC.
• Verify battery power on the + terminal.
• Inspect all fuses.
• Check that the Protection LED is not lit. If it is, shut o the amplier briey and
then repower it.
HIGH HISS OR ENGINE NOISE (ALTERNATOR WHINE) IN SPEAKERS
• Disconnect all RCA inputs to the amplier(s). If hiss/noise disappears, then
plug in the component driving the amplier and unplug its inputs.
Continue until the faulty/noisy component is identied.
• Set the amplier's input level as low as possible. The best subjective S/N ratio
is obtainable this way. Try to drive the signal level from the head unit as high
as possible.

www.PyleUSA.com
12
PROTECTION LED COMES ON WHEN THE AMPLIFIER IS POWERED UP
• Check for shorts on speaker leads.
• Ensure the volume control on the head unit is turned down low.
• Remove speaker leads and reset the amplier.
If the Protection LED still comes on, the amplier may be faulty.
AMPLIFIER(S) GETS VERY HOT
• Verify that the minimum speaker impedance for the model is correct.
• Check for speaker shorts.
• Ensure good airow around the amplier. In some applications, an external
cooling fan may be required.
DISTORTED SOUND
• Verify that the Level control(s) is set to match the signal level of the head unit.
• Ensure all crossover frequencies are properly set.
• Check for shorts on the speaker leads.
HIGH SQUEAL NOISE FROM SPEAKERS
Ensure all connections are secure and no components are loose.
CLEANING AND STORAGE
CLEANING
Exterior Surface:
To clean the exterior surface of your amplier, use a soft, dry cloth. If necessary,
slightly dampen the cloth with water or a mild detergent.
Avoid using any harsh chemicals, solvents, or abrasive materials, as these can
damage the surface nish.
Vents and Openings:
Ensure that the ventilation openings are free from dust and debris.
Use a can of compressed air to gently blow out any accumulated dust, taking
care not to force debris deeper into the unit.

www.PyleUSA.com
13
STORAGE
Disconnect All Cables:
Before storing the amplier, disconnect all power, input, and output cables.
Store these cables separately to avoid tangling and potential damage.
Cool, Dry Environment:
Store the amplier in a cool, dry place, away from direct sunlight, heat sources,
and moisture. Extreme temperatures and humidity can aect the performance
and longevity of the unit.
Protect from Dust:
If possible, store the amplier in its original packaging or a dust cover to
protect it from dust accumulation. Alternatively, place it in a padded storage
case.
Avoid Stacking:
Do not stack heavy objects on top of the amplier during storage, as this can
cause physical damage to the unit.
Register Product
Thank you for choosing PyleUSA. By registering your product,
you ensure that you receive the full benets of our exclusive
warranty and personalized customer support.
Complete the form to access expert support and to keep your
PyleUSA purchase in perfect condition.
PyleUSA.com/register

Questions or Comments?
We are here to help!
Phone: 1.718.535.1800
PyleUSA.com/ContactUs