Technical Support and E-Warranty Certificate
www.vevor.com/support
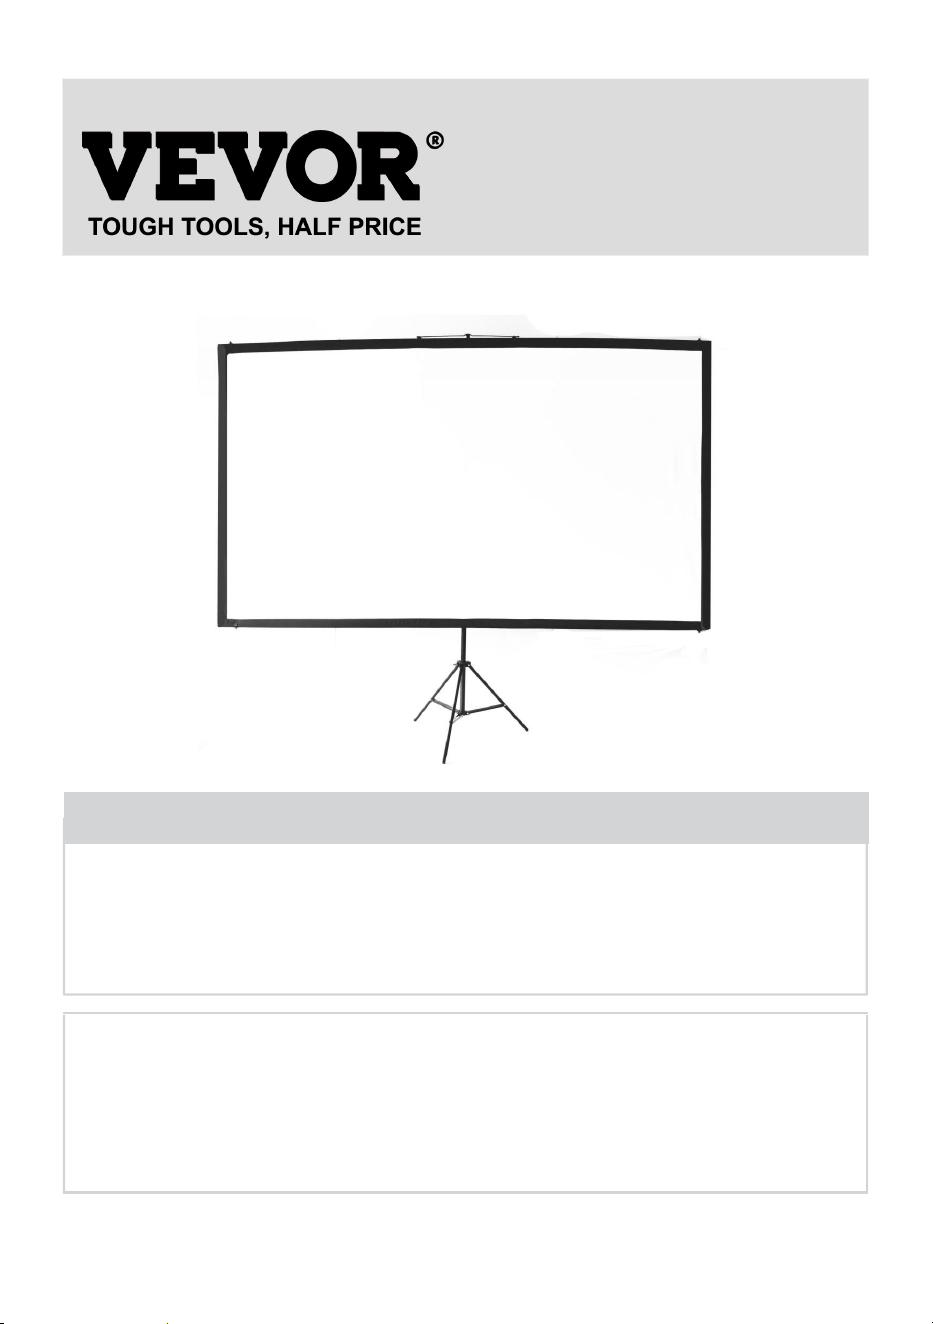
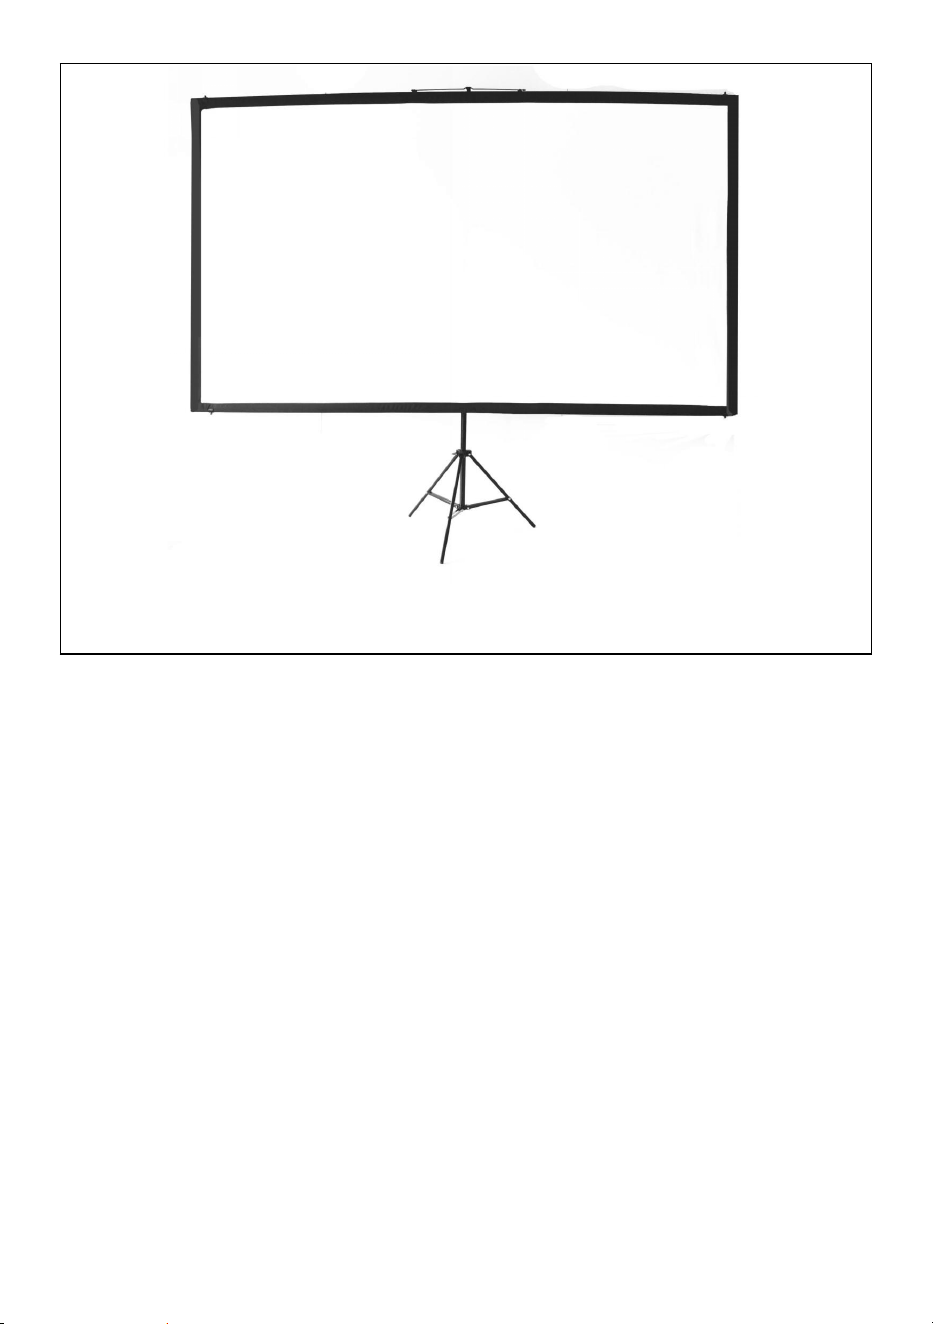
PROJECTION SCREEN
USER MANUAL
MODEL NO.: DZC-60, DZC-70, DZC-80, DZC-90, DZC-100, DZC-110
We continue to be committed to provide you tools with competitive price.
"Save Half", "Half Price" or any other similar expressions used by us only represents an
estimate of savings you might benefit from buying certain tools with us compared to the major
top brands and does not necessarily mean to cover all categories of tools offered by us. You
are kindly reminded to verify carefully when you are placing an order with us if you are
actually saving half in comparison with the top major brands.

- 1 -
MODEL NO.: DZC-60, DZC-70, DZC-80, DZC-90, DZC-100, DZC-110
Have product questions? Need technical support? Please feel free to
contact us:
Technical Support and E-Warranty Certificate
www.vevor.com/support
NEED HELP? CONTACT US!
This is the original instruction, please read all manual instructions
carefully before operating. VEVOR reserves a clear interpretation of our
user manual. The appearance of the product shall be subject to the
product you received. Please forgive us that we won't inform you again if
there are any technology or software updates on our product.
Projection Screen

- 2 -
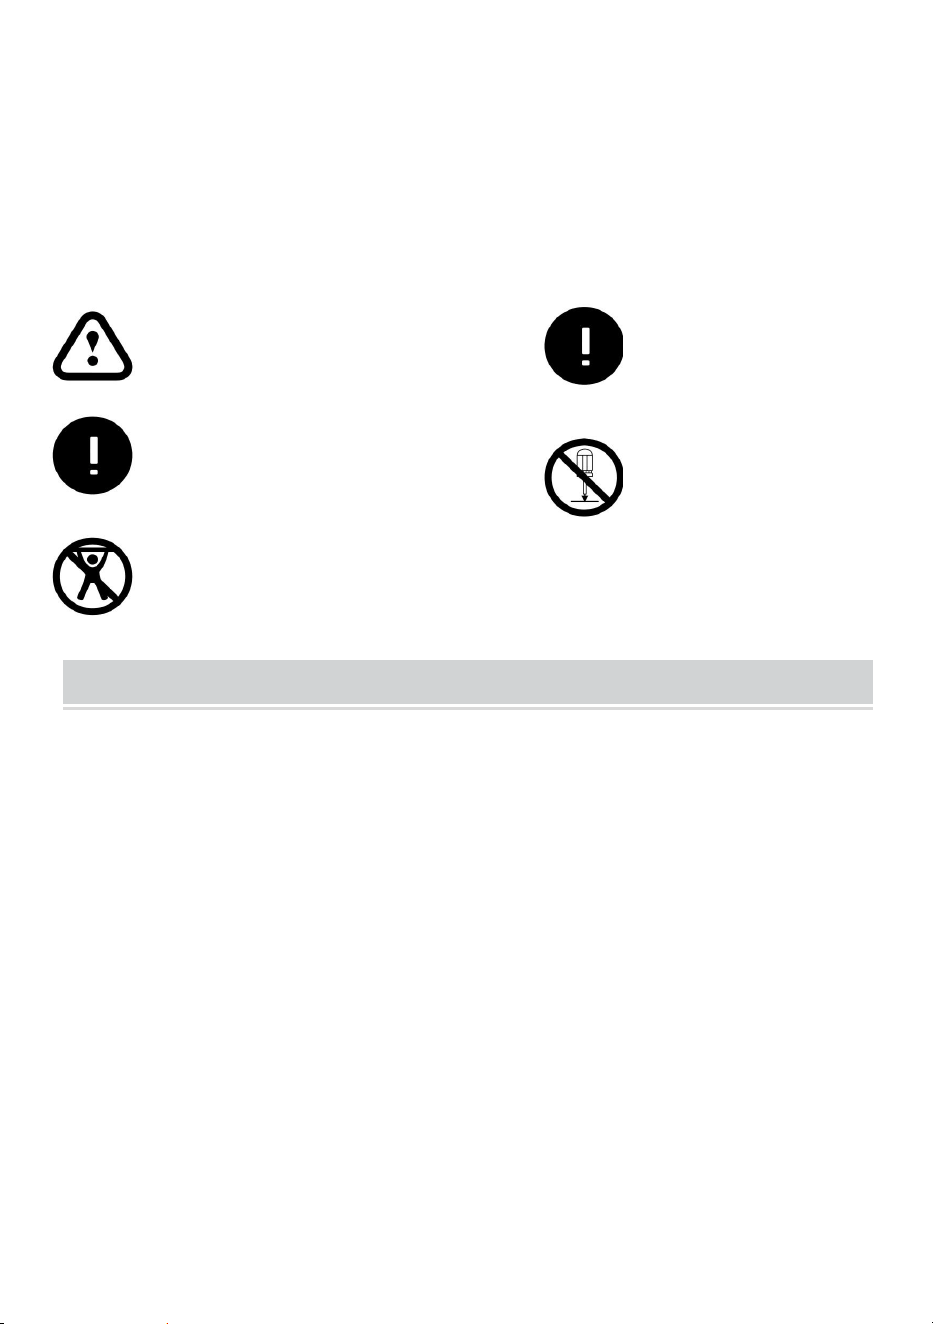
WARNING:
Please read this manual carefully before using the product. Failure to
do so may result in serious injury. SAVE THESE INSTRUCTION
ASSEMBLY PRECAUTIONS
1. Assemble only according to these instructions. Improper assembly can
create hazards.
2. Wear ANSI-approved safety goggles and work gloves during assembly.
3. Keep the assembly area clean and well-lit.
4. Keep bystanders out of the area during assembly.
5. Do not assemble when tired or under the influence of alcohol, drugs or
medication.
6. The product capabilities apply to properly and completely assembled
products only.
7. Assemble on a flat, level, hard and smooth surface capable of safely
supporting the Projection Screen.
8. For additional information regarding the parts listed in the following
pages, please refer to the Assembly Diagram of this manual. Unwrap
and separate all parts in a clean work area.
9. The warranty will only be valid if you follow the instructions below
carefully! Improper use and care may cause serious injury and/or
damage!
10. Make sure the surface you have chosen for installing the screen is flat
and secure.. Please read the following as any damage to the screen
surface will impact the image's quality:
A. Do not touch the screen surface by hand.
B. Do not write or draw on the screen surface.
C. Do not poke the screen surface with finger or edge tools as it may
cause scratches or tears.
11. Retract the screen after every use.
12. Do not pull two sides of the screen fabric by hands, do not fold the
screen fabric.
- 3 -
13. To prevent unnecessary damage, the operation and maintenance of
the screen should be done by adult.
USE PRECAUTIONS
TO PREVENT SERIOUS INJURY AND DEATH FROM TIPPING:
1. DO NOT SIT OR STAND ON THIS ITEM.
2. This product is not a toy. Do not allow children to play with or near this
item.
3. Use only on a flat, level, hard and smooth surface capable of safely
supporting a fully loaded Projection Screen.
4. Use as intended only.
5. Inspect before every use. Do not use if parts are loose or damaged.
6. Clear out an area to assemble the screen. Make sure the area is larger
than the size of the screen.
7. Remember that the assembly will require at least two people for some
steps.
8. Do not assemble in areas with a high temperature to avoid damaging
the screen.
9. Read through this entire Assembly Guide before.
SAVE THESE INSTRUCTIONS
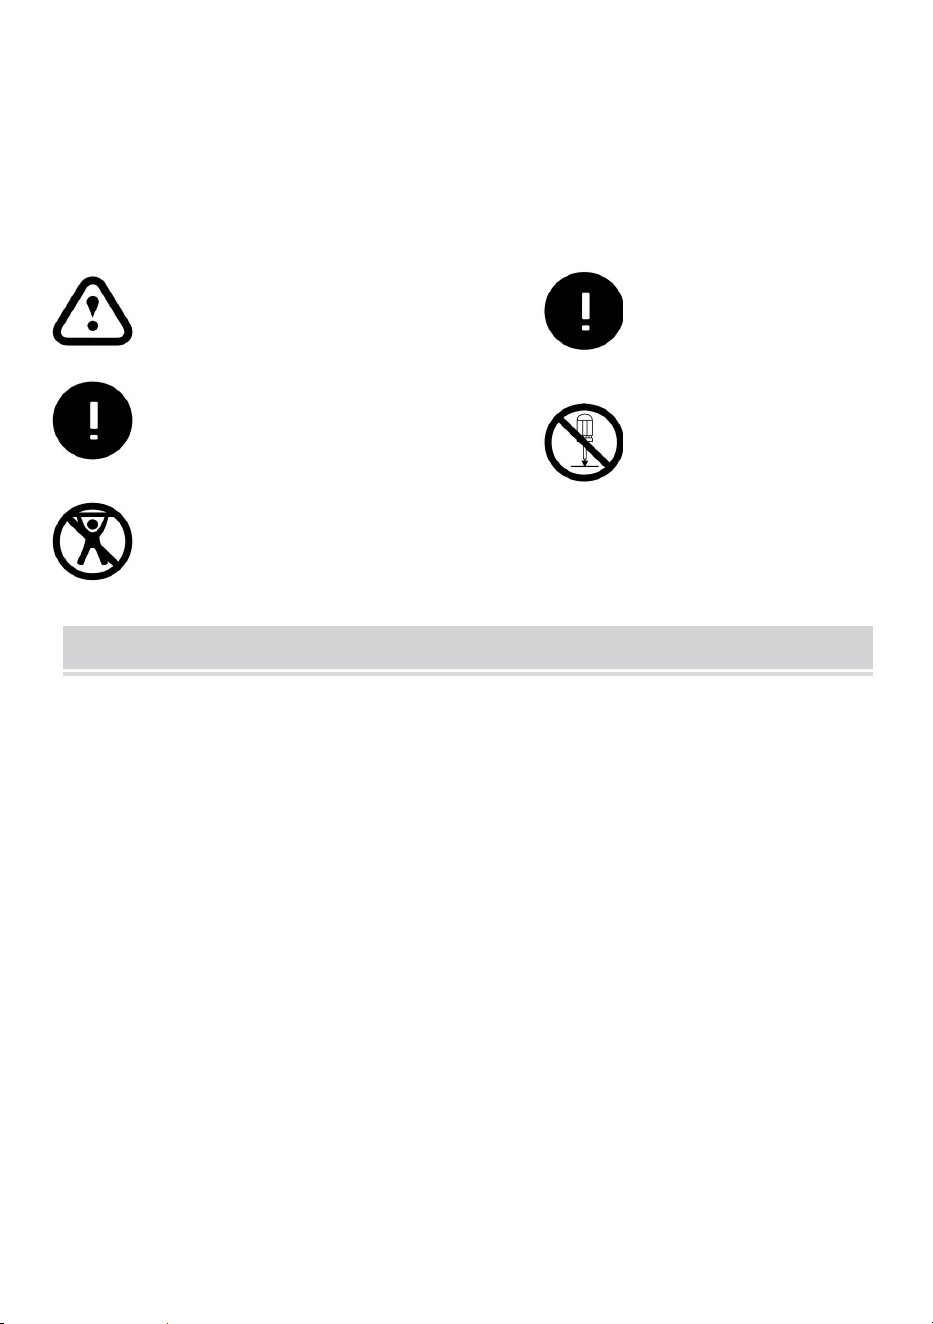
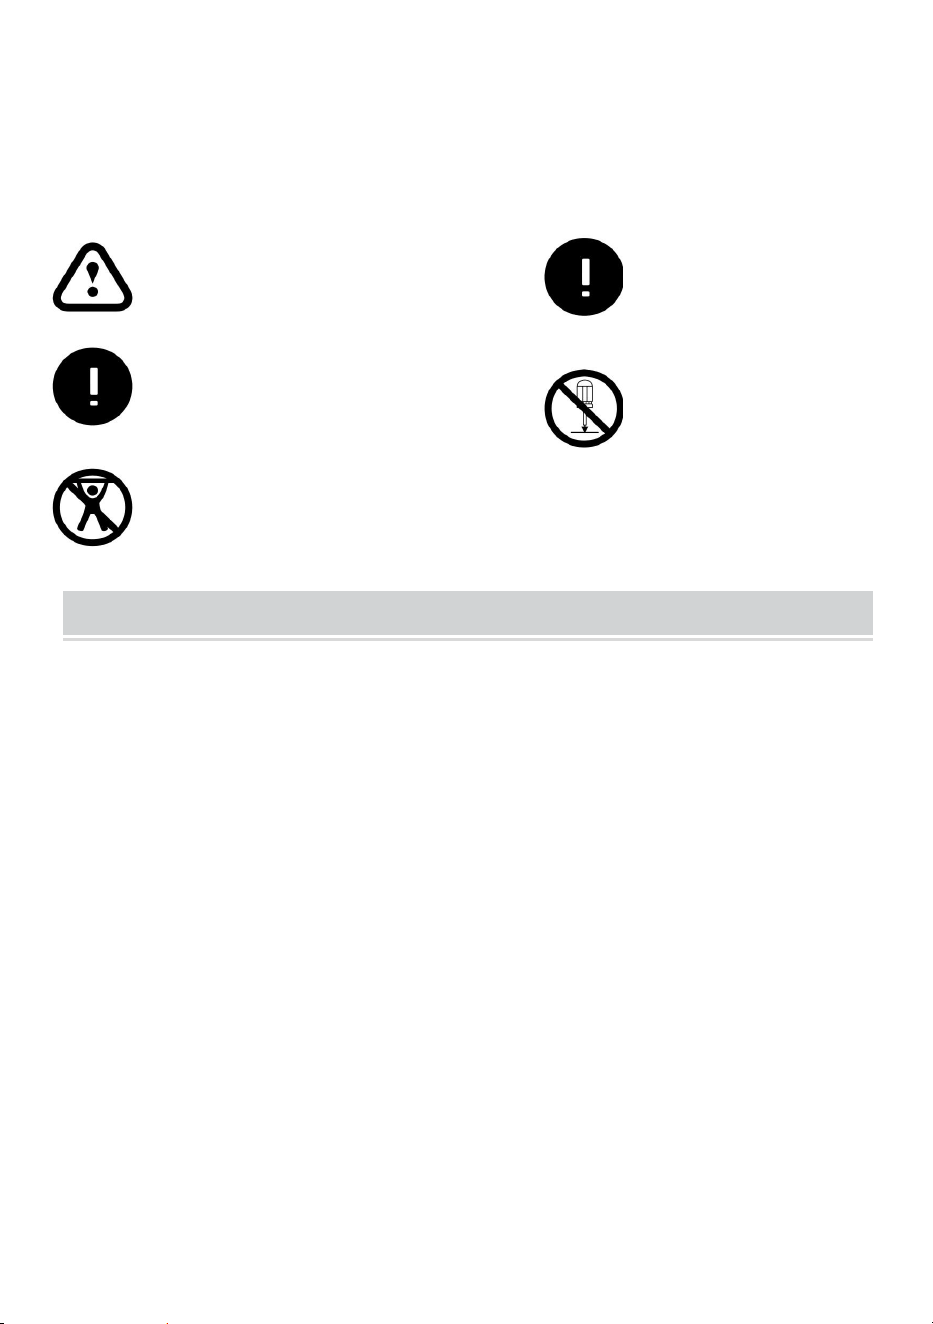
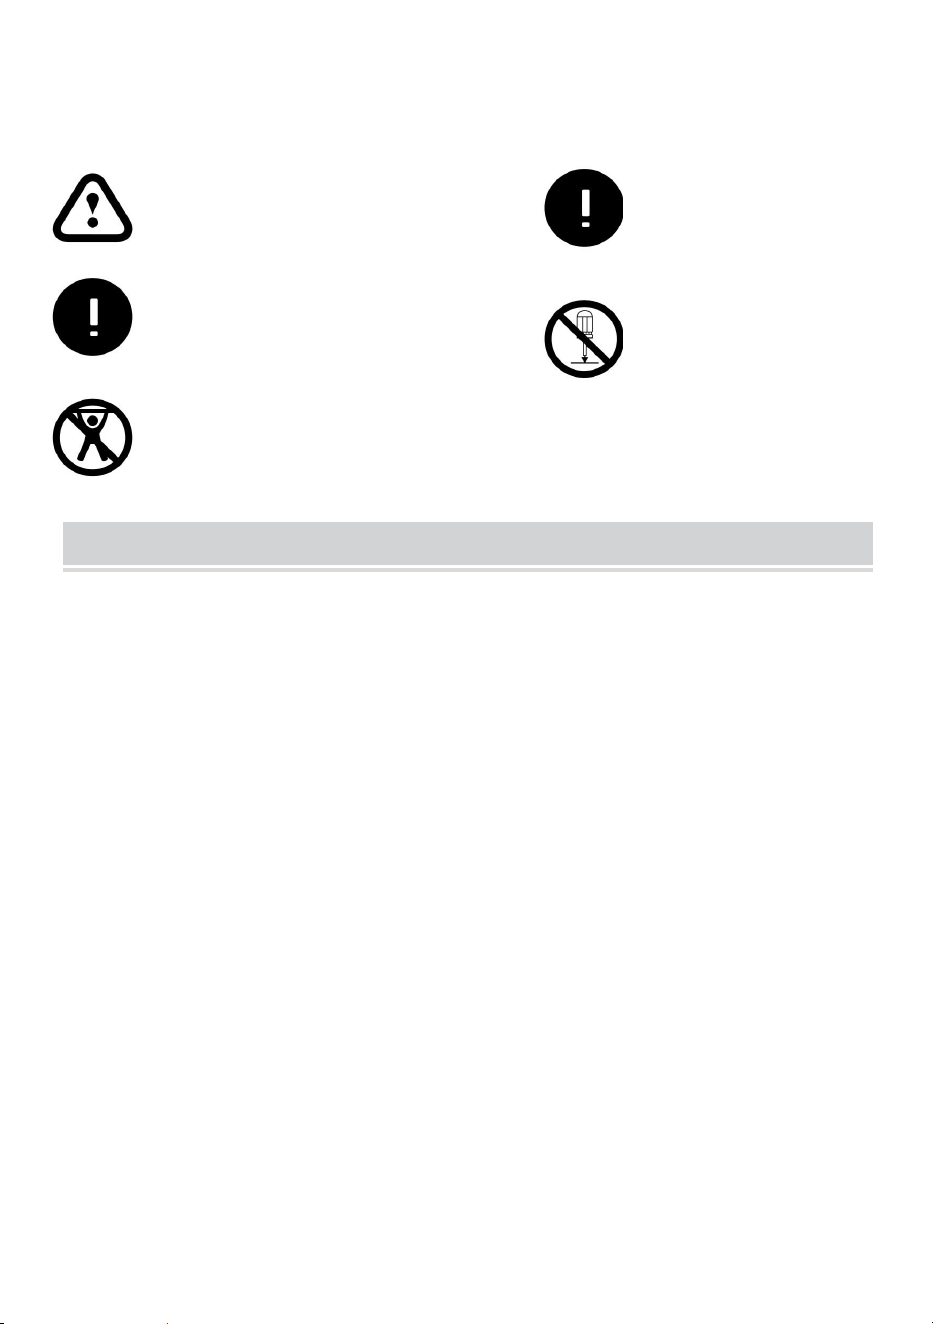
Ignoring the safety warnings
may lead to injuries or
damaging the product.
Retract the screen after every
use.Leave it hanging for along
period may cause screen fabric
loose.
Avoid hanging anything on the
screen as it may cause the
screen to fall down.
The screen should be
installed at secure place
to avoid any accidents or
the screen falling down
Loose parts may cause
the screen fall down.
- 4 -
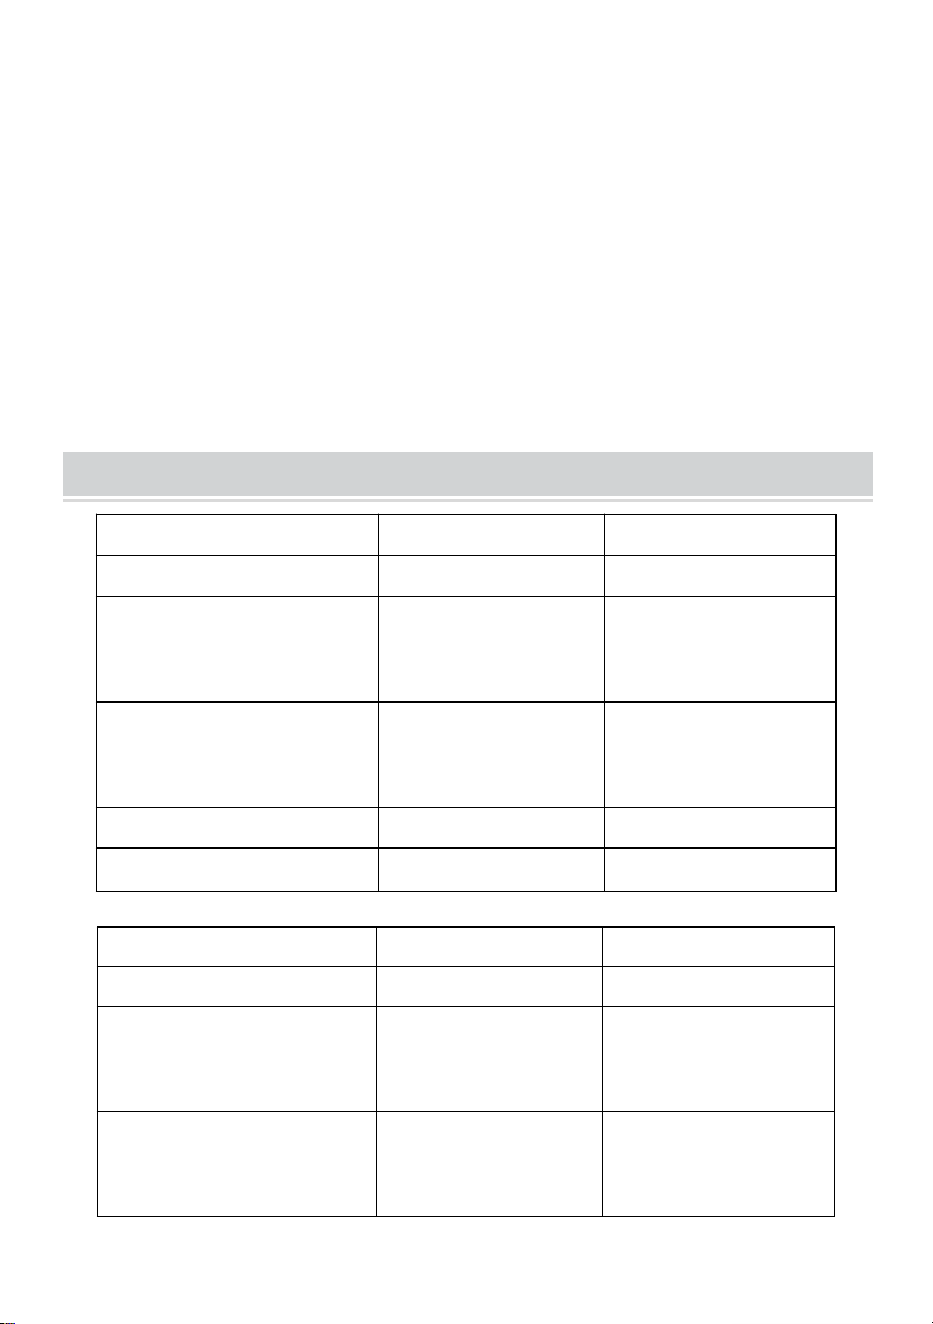
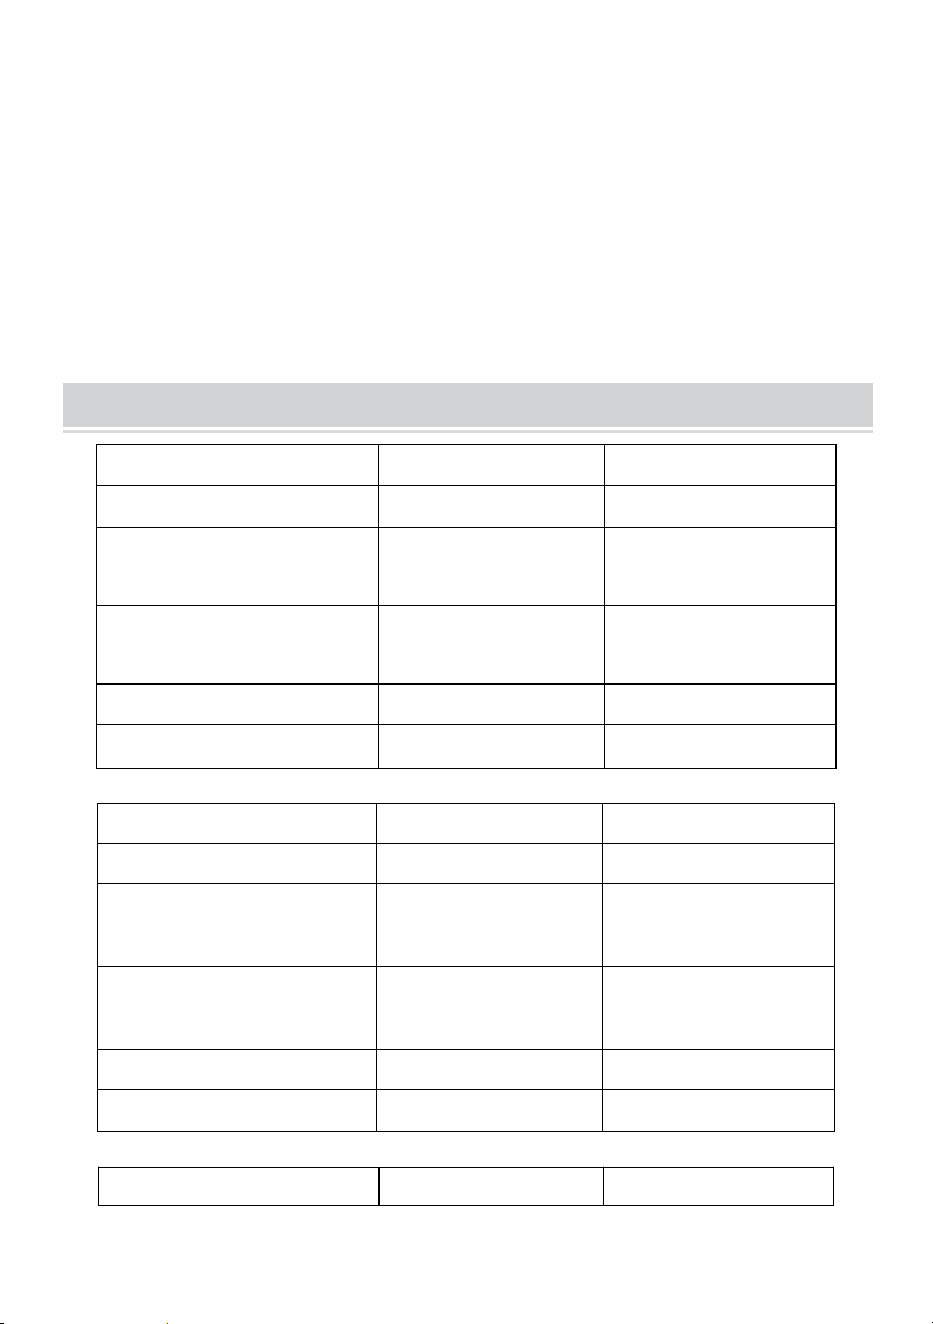
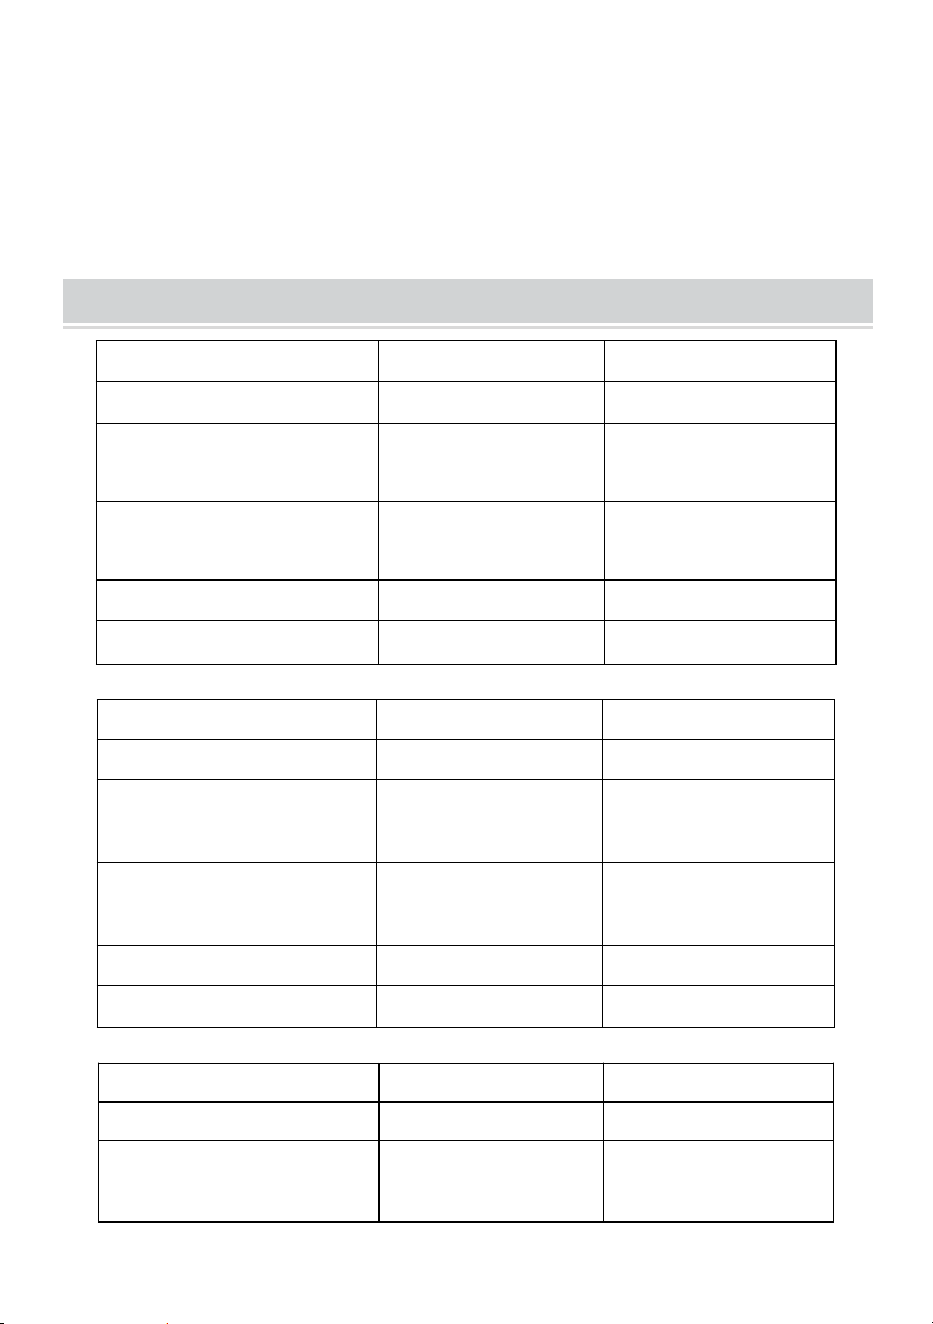
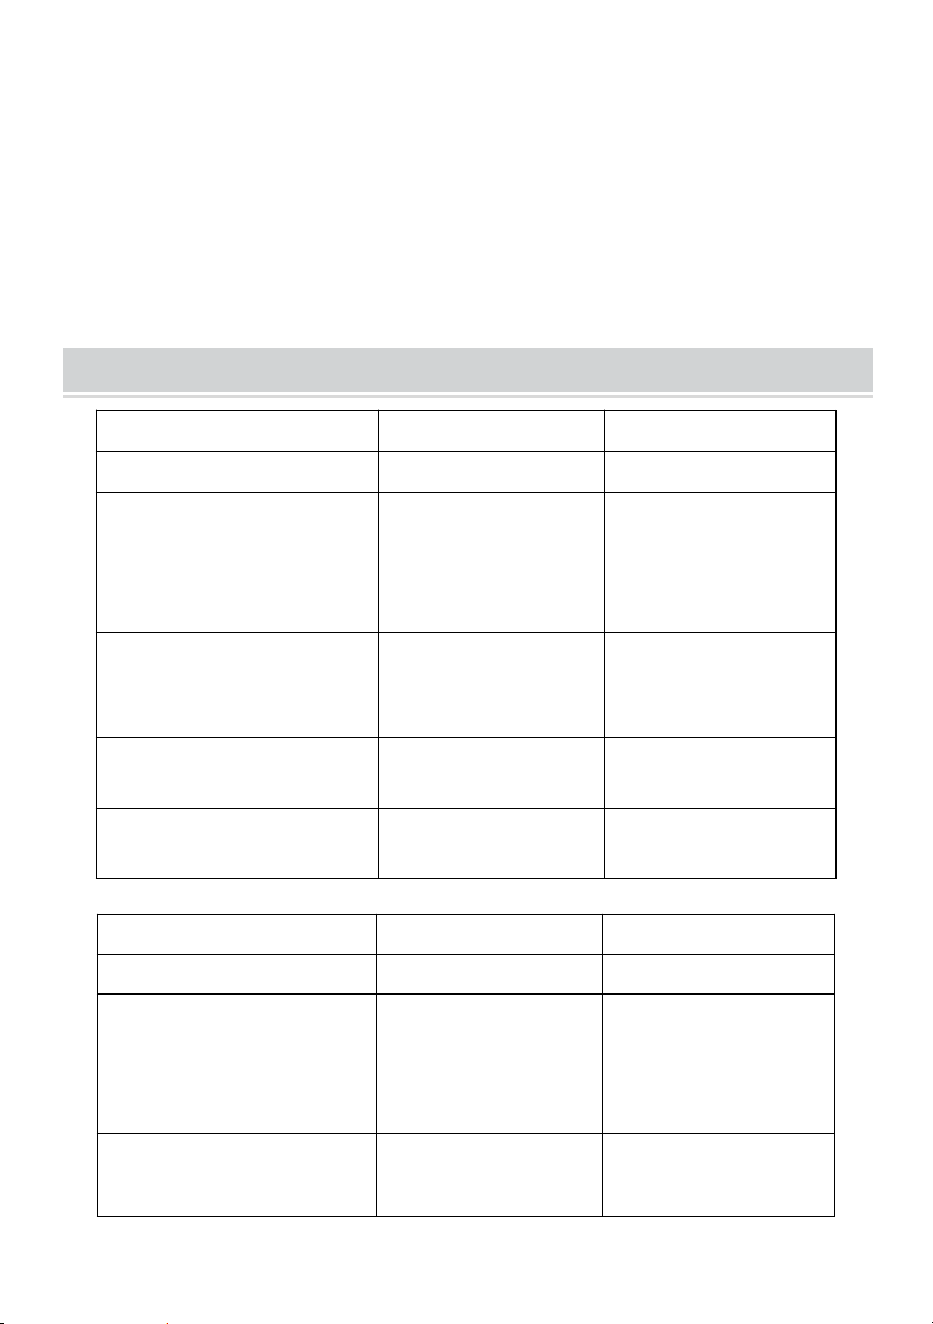
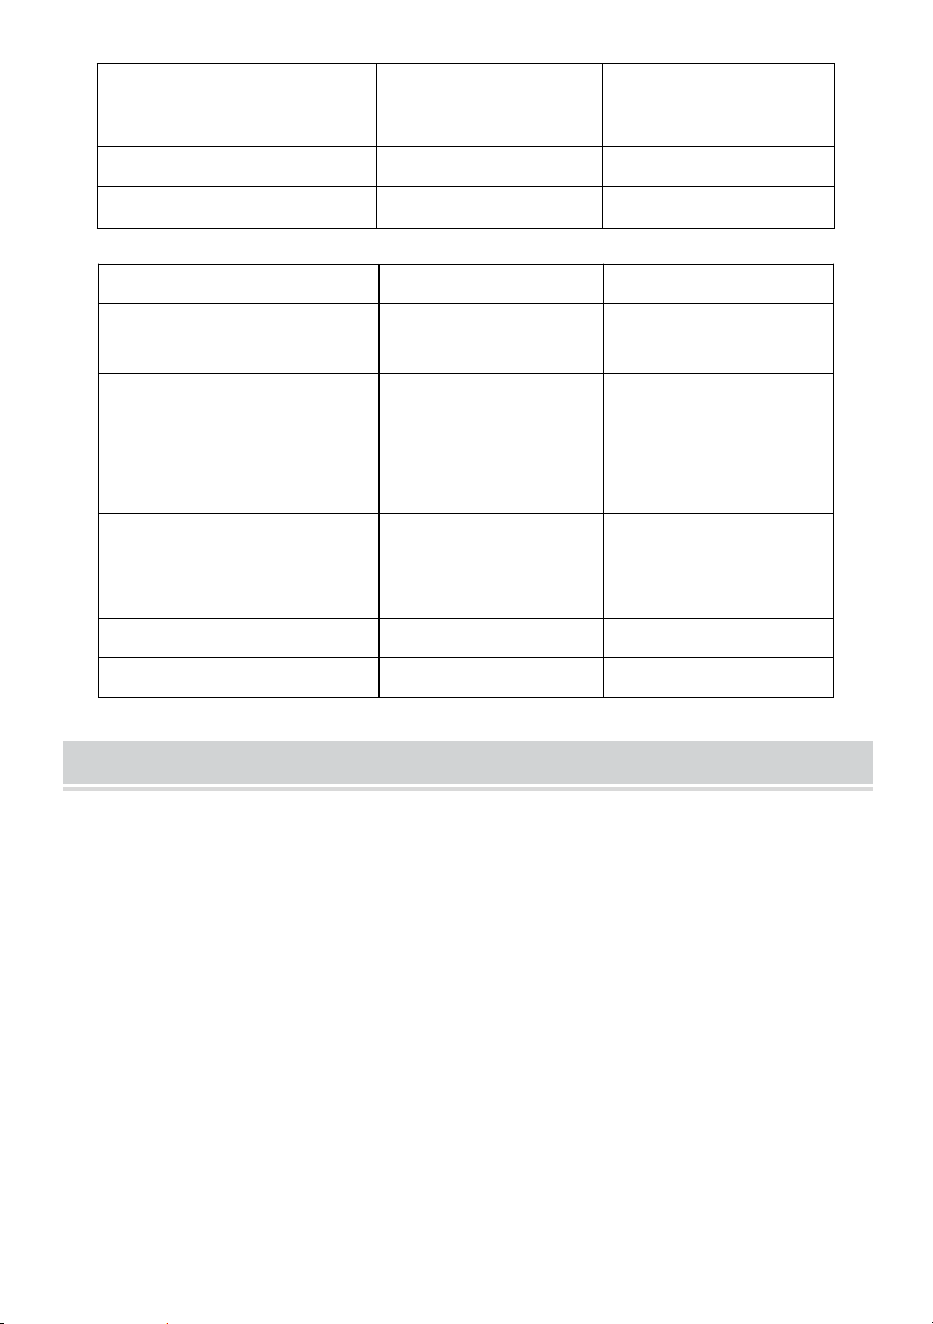
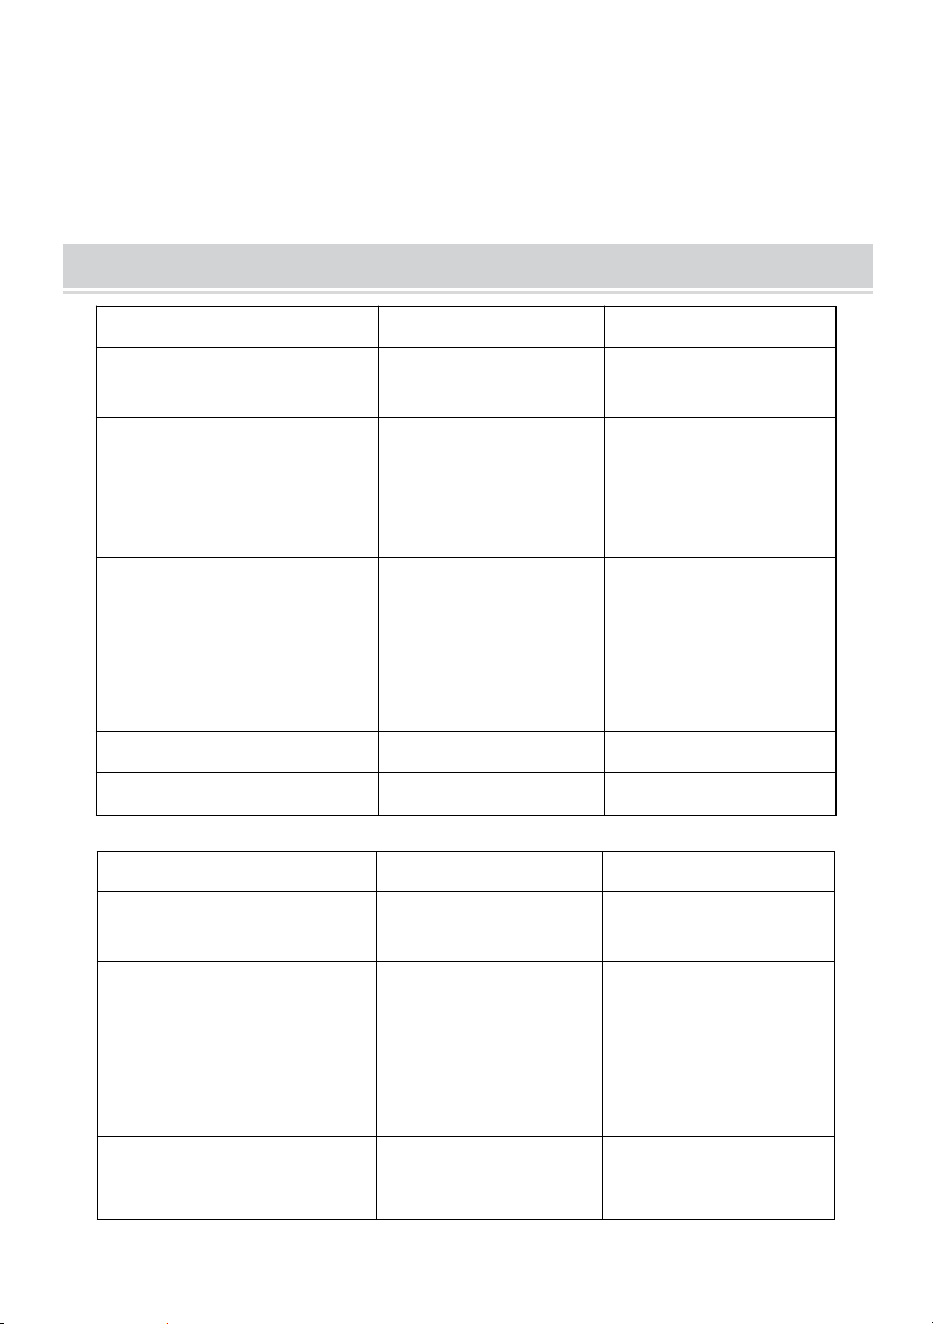
TECHNICAL SPECIFICATIONS
Model
DZC-60
DZC-70
Screen Size
60 inch, 16:9
70 inch, 16:9
Product Dimensions
(LxWxH)(mm)
1350*2320
1630*2320
Packing Size
(LxWxH)(mm)
725*135*95
725*135*95
Net Weight (kg)
About 1.9
About 2.2
Gross Weight (kg)
About 2.3
About 2.5
Model
DZC-80
DZC-90
Screen Size
80 inch, 16:9
90 inch, 16:9
Product Dimensions
(LxWxH)(mm)
1840*2320
2025*2320
Packing Size
(LxWxH)(mm)
725*140*95
725*155*115
Net Weight (kg)
About 2.4
About 2.6
Gross Weight (kg)
About 2.7
About 2.9
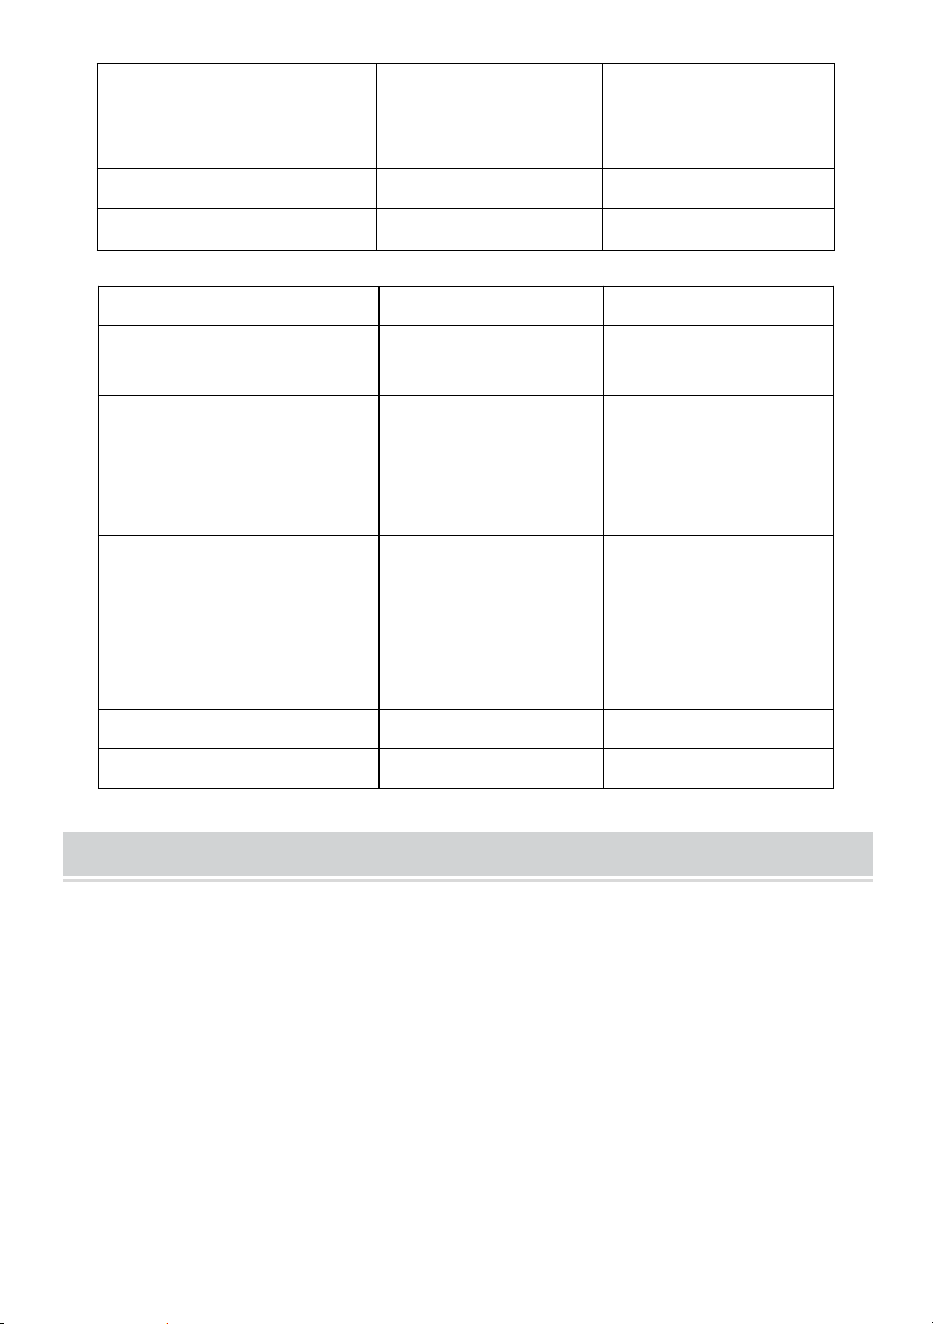
Model
DZC-100
DZC-110
Screen Size
100 inch, 16:9
110 inch, 16:9
Product Dimensions
(LxWxH)(mm)
2270*2320
2470*2320
Packing Size
(LxWxH)(mm)
725*155*115
725*155*115
Net Weight (kg)
About 2.9
About 3
Gross Weight (kg)
About 3.2
About 3.3
- 5 -
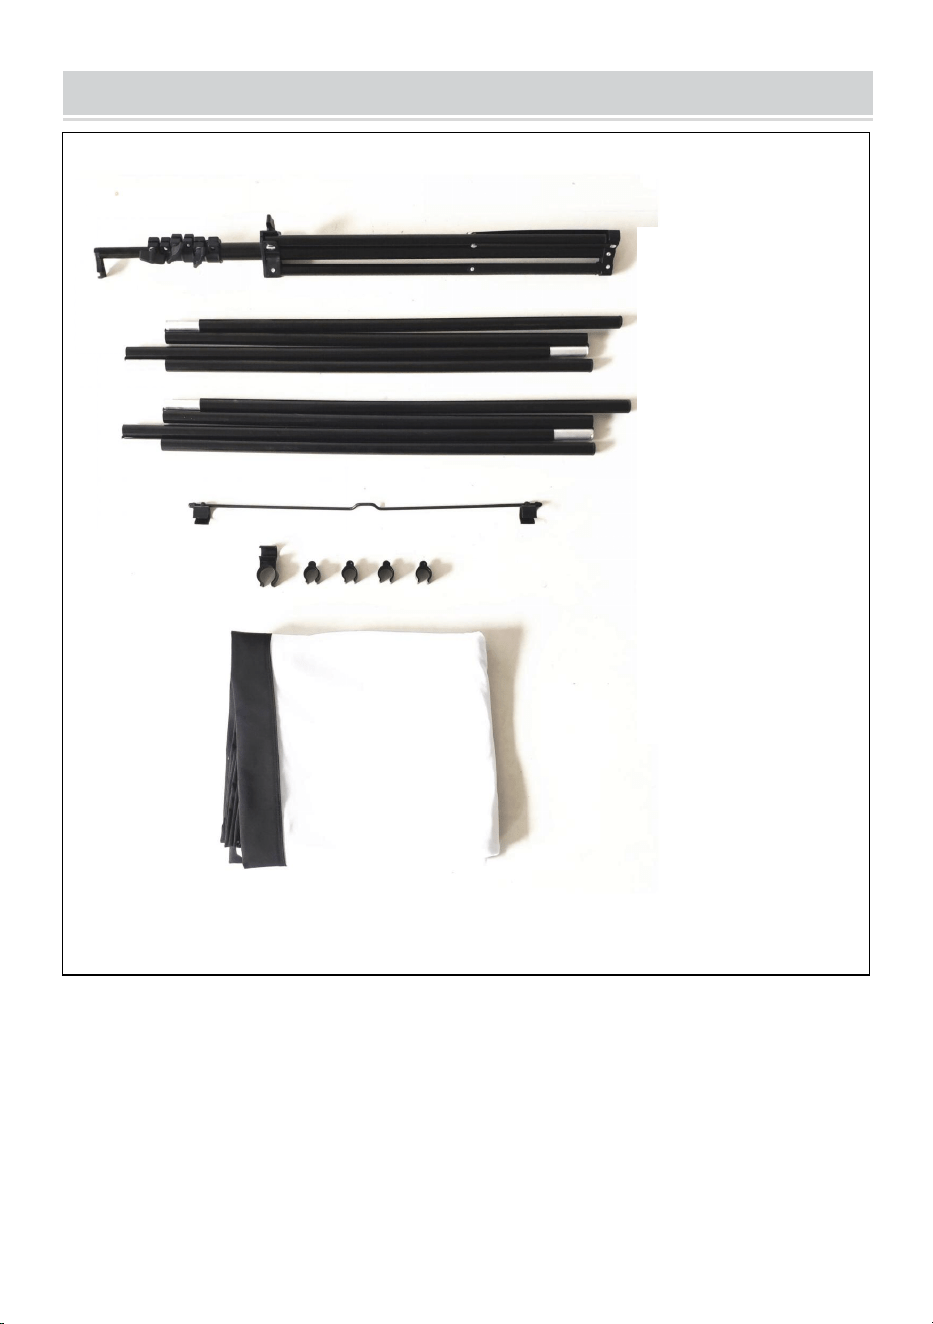
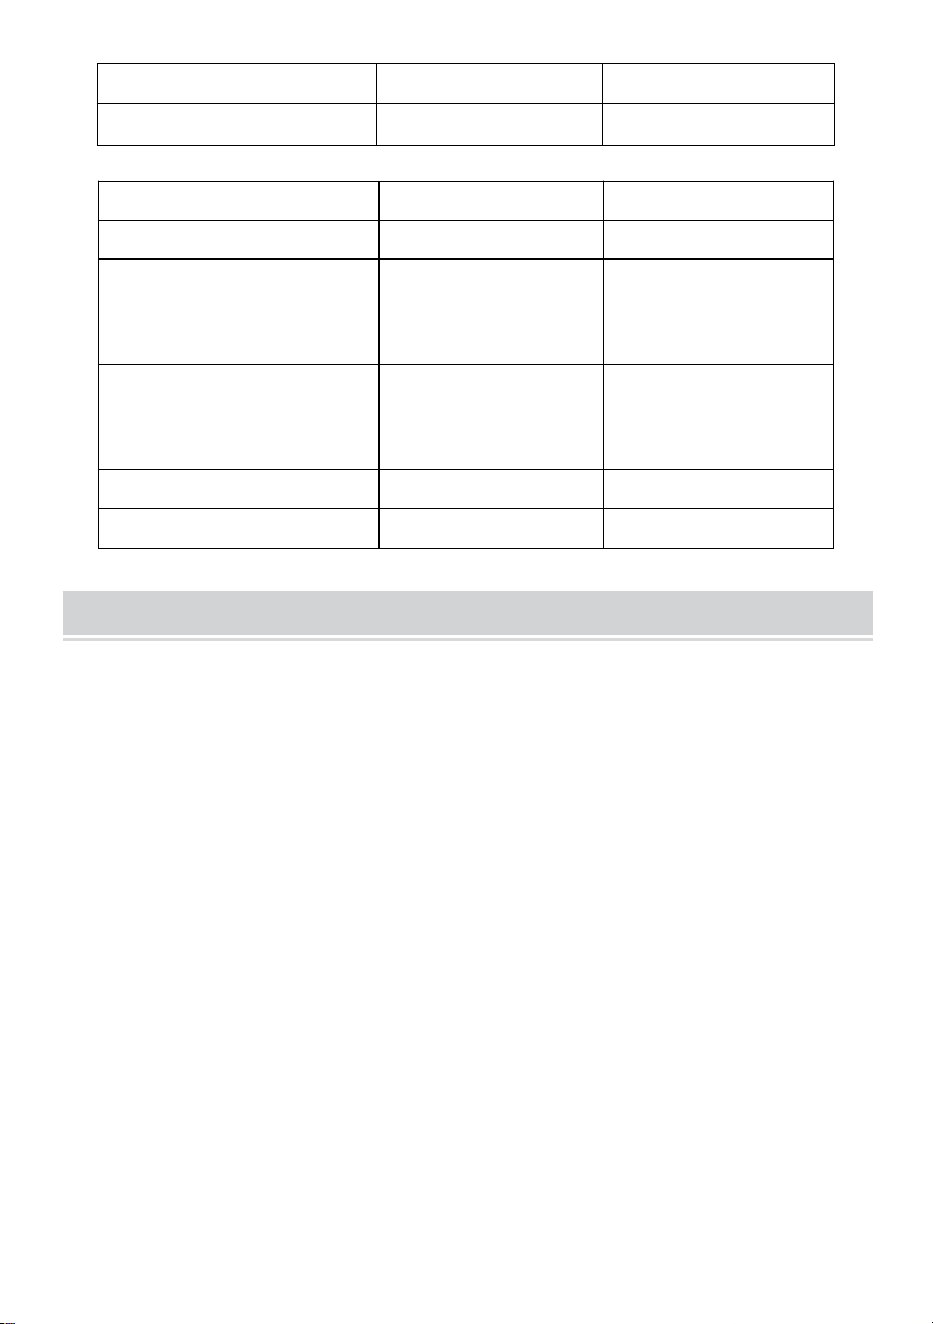
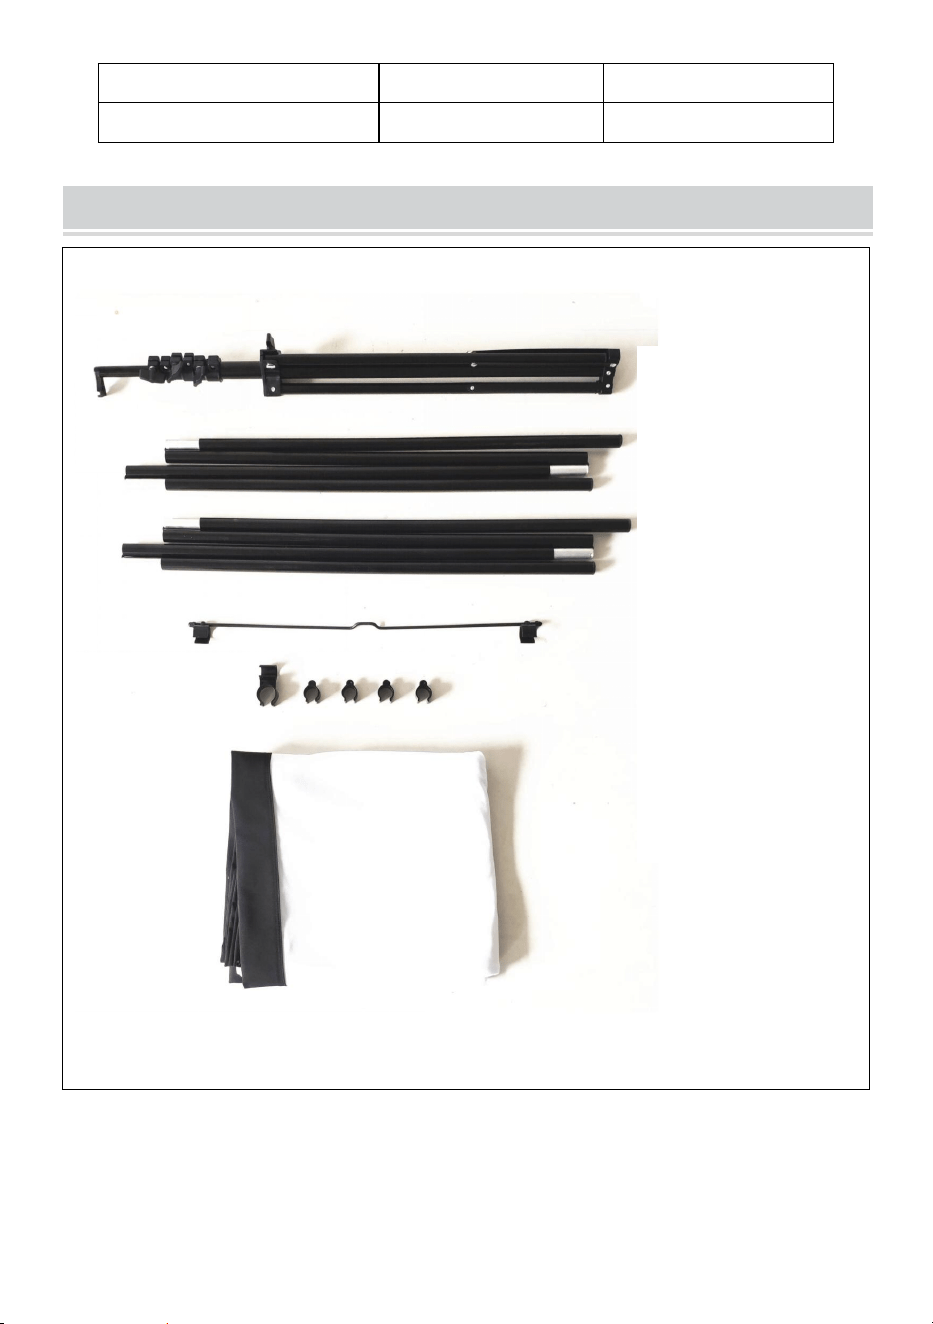
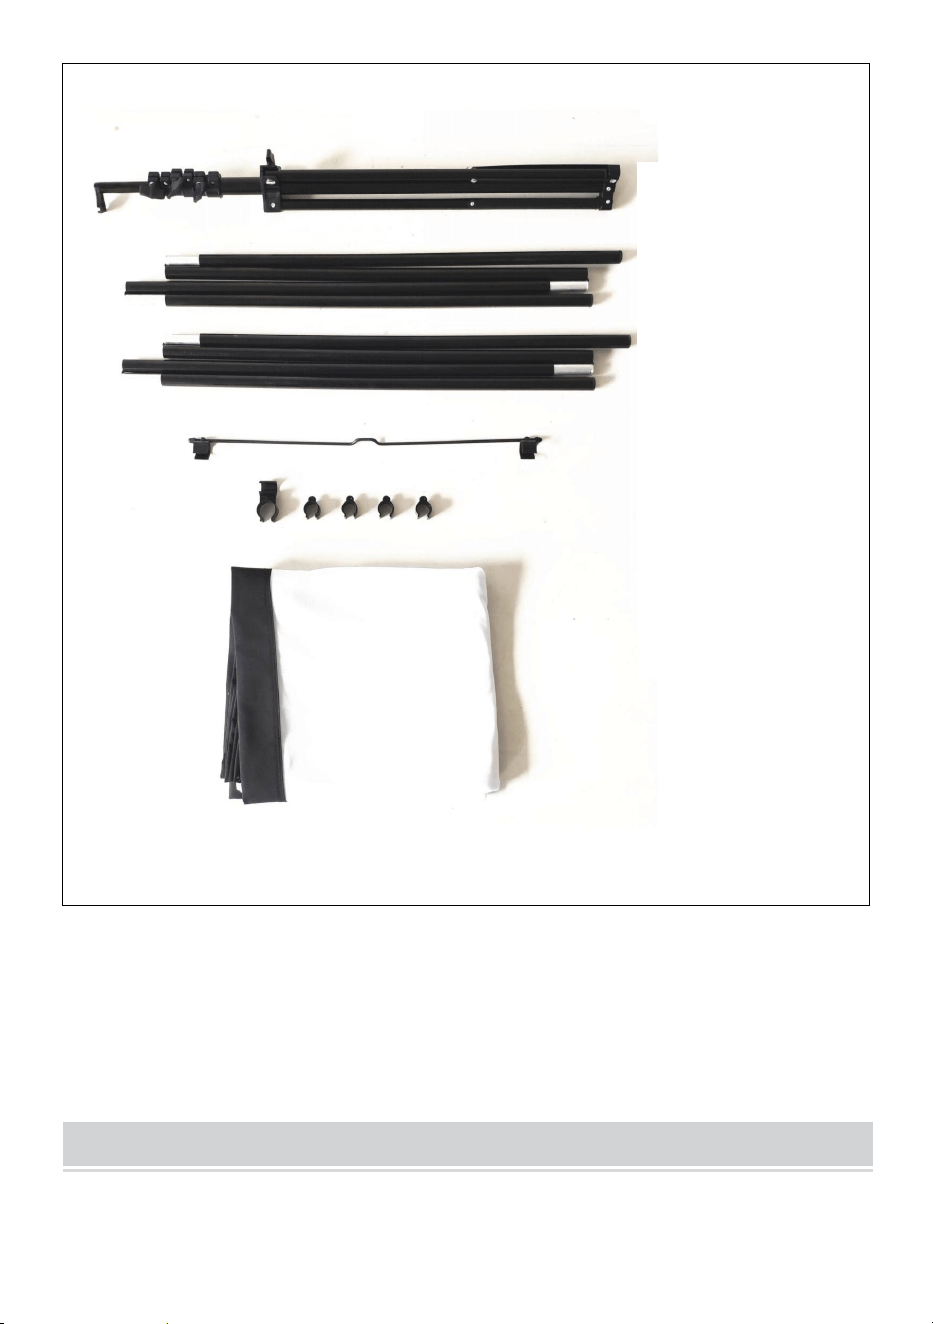
PACKAGE CONTENTS
Stand
top pole
bottom pole
metal hanging
part connector
and plastic clip
fabric screen
- 6 -
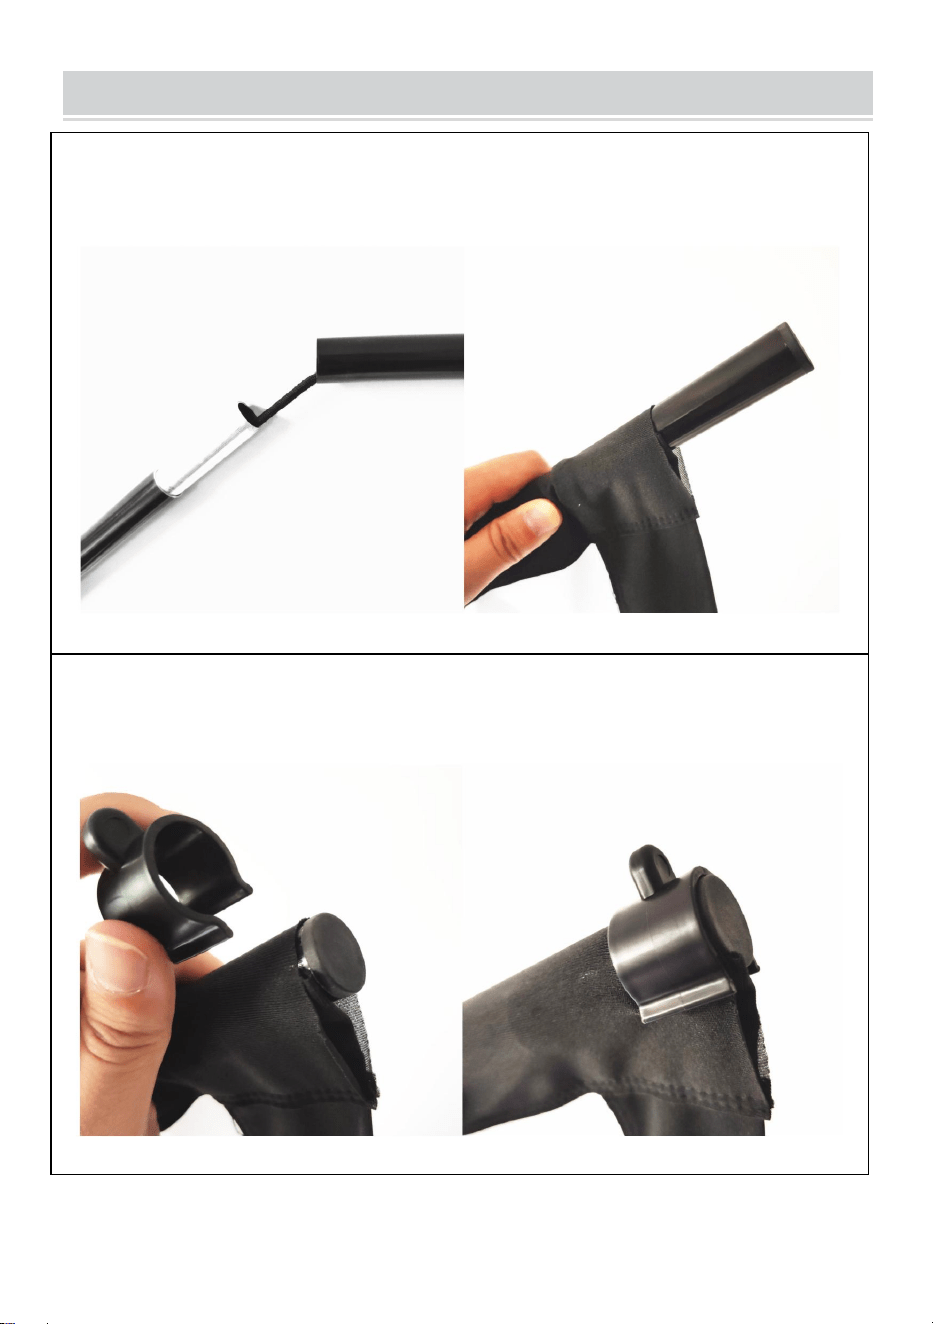
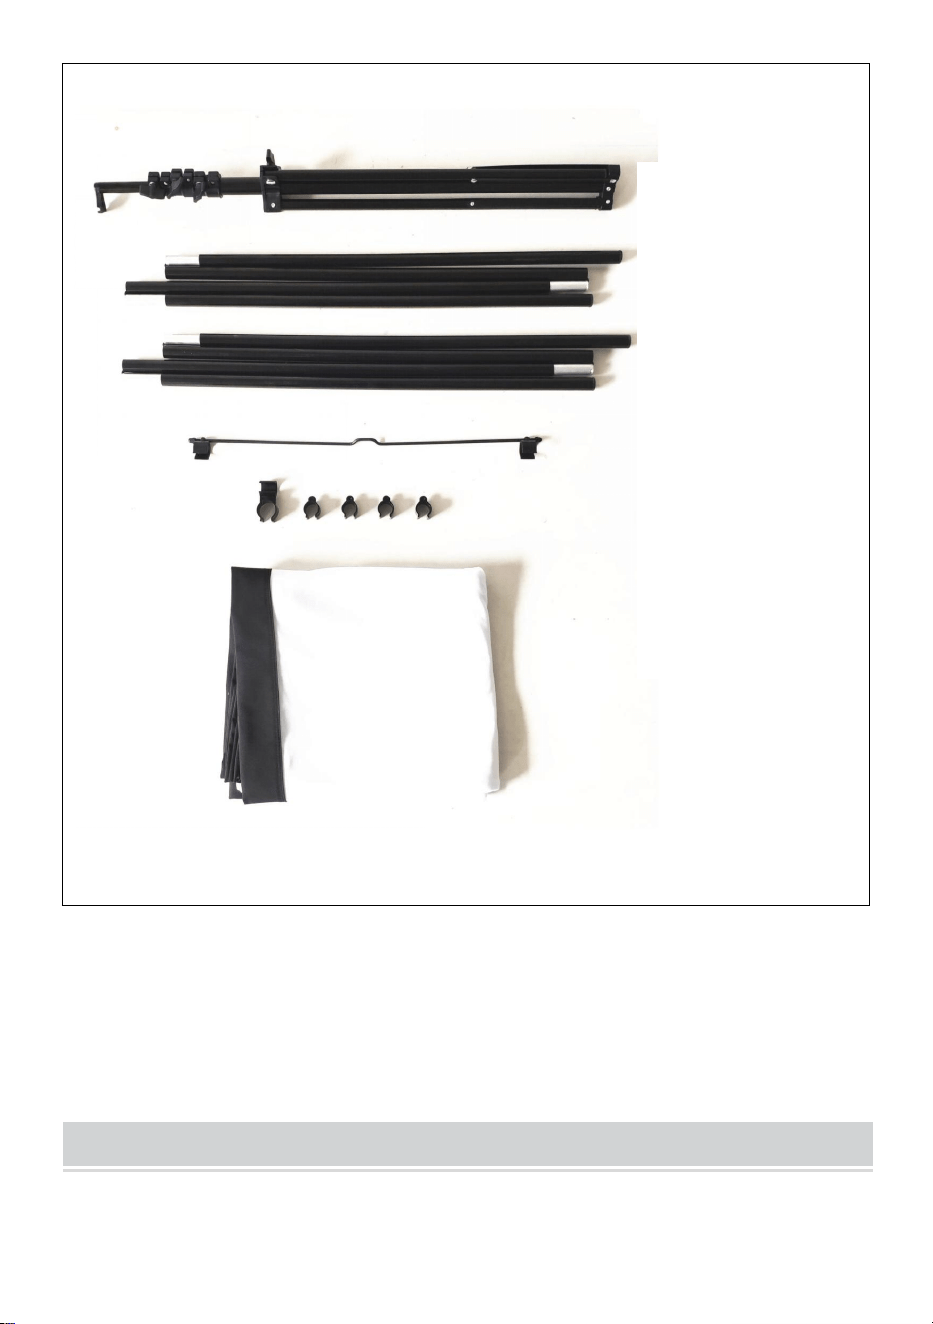
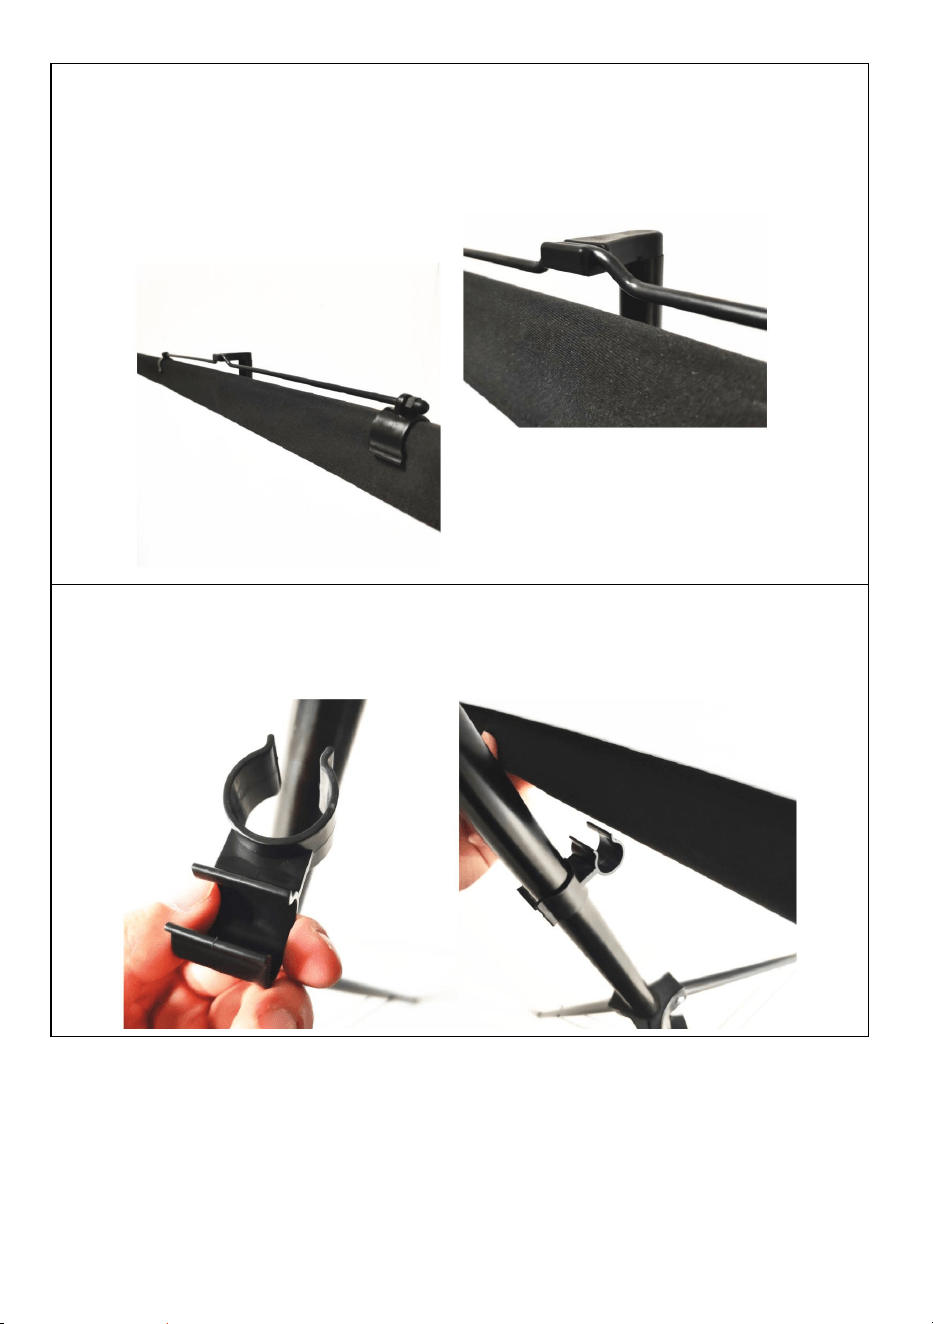
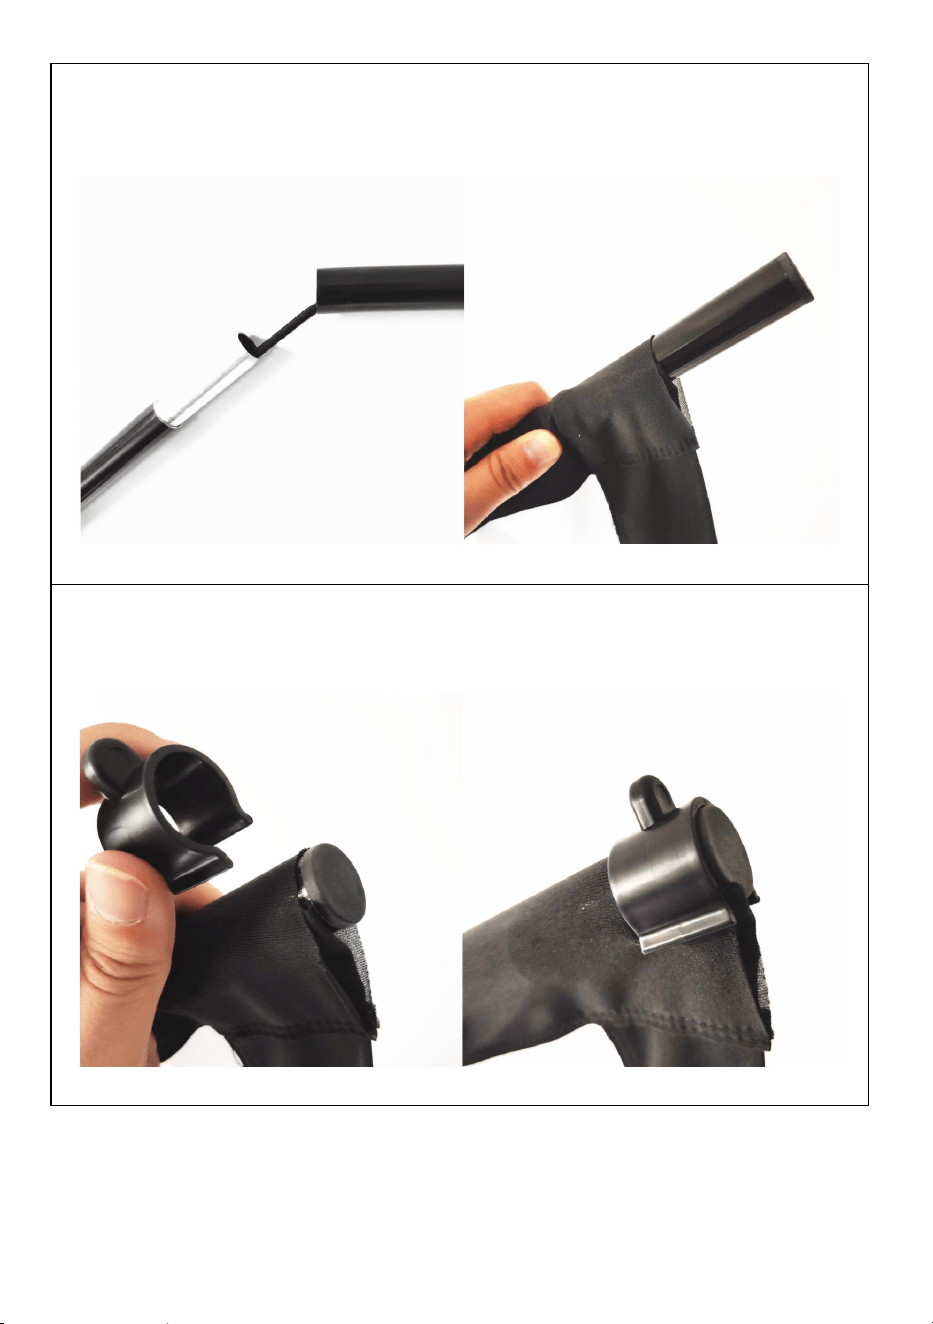
ASSEMBLY STEPS
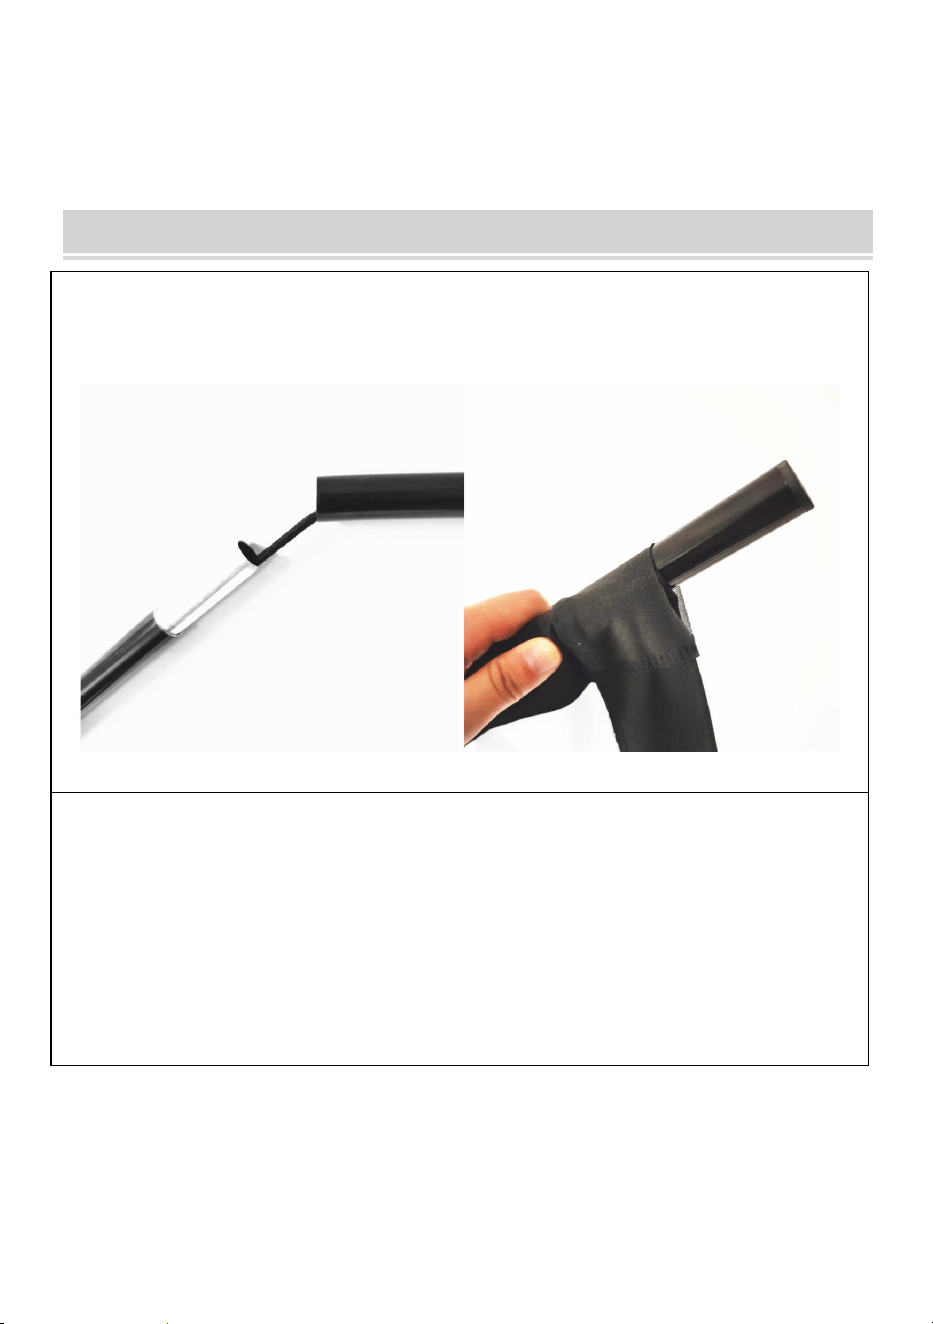
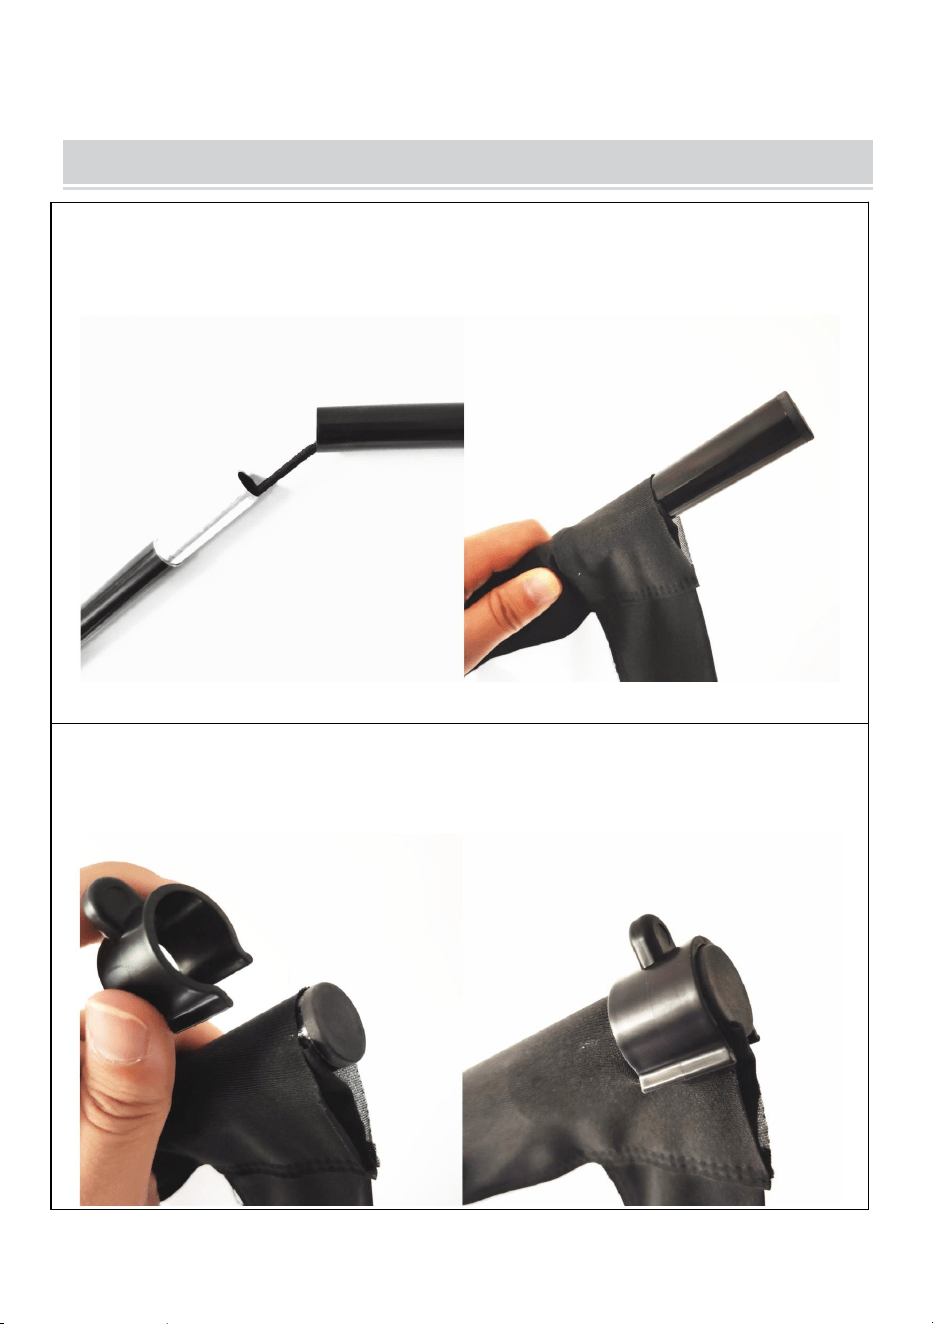
STEP1
assemble the top and bottom horizontal poles and slide the poles
through the fabric screen pole pocket
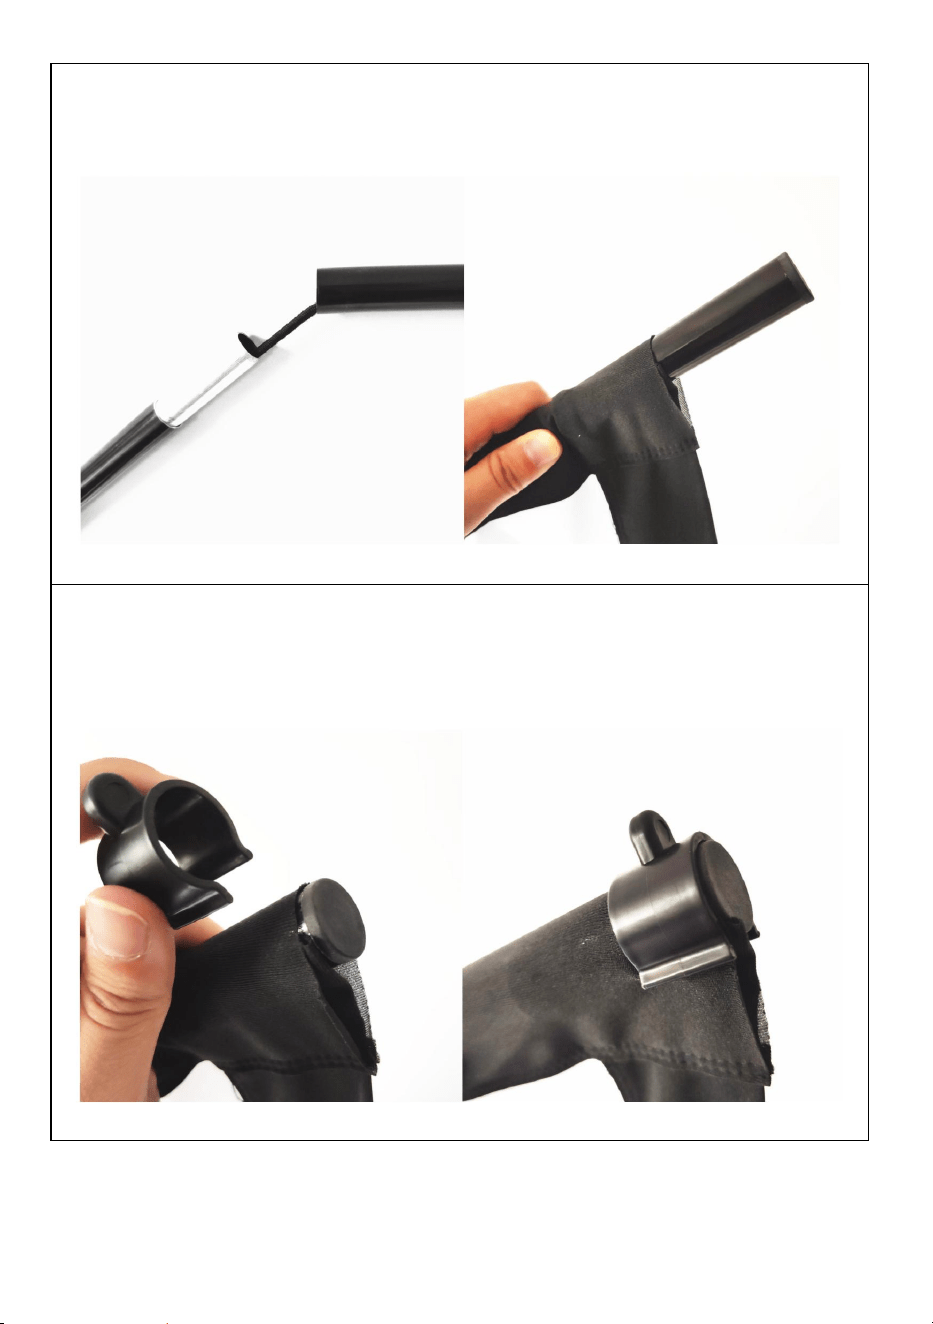
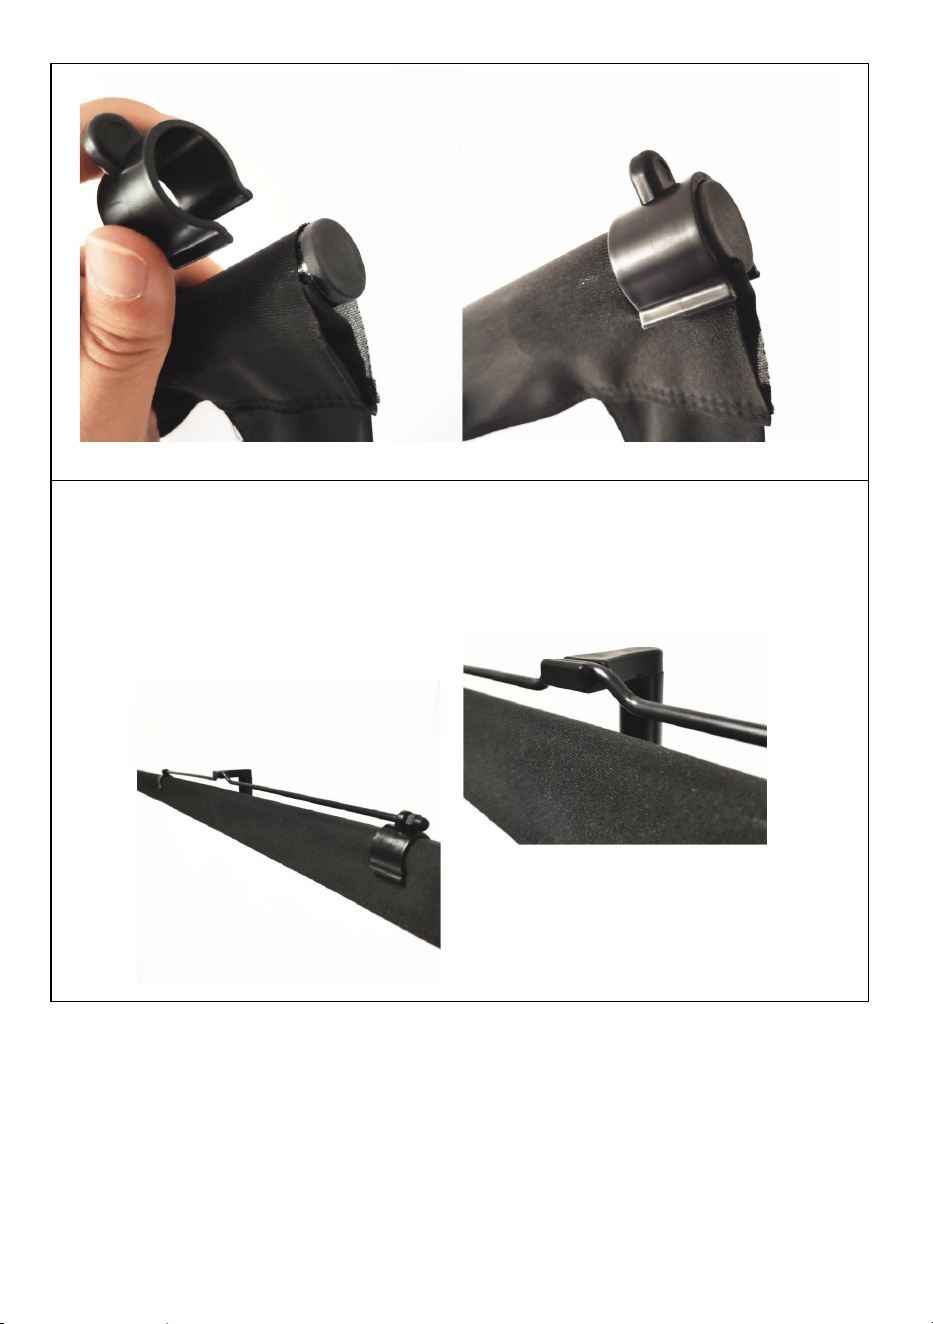
STEP2
use the plastic U-shaped clips to fix the fabric screen with the top and
bottom poles on each end.
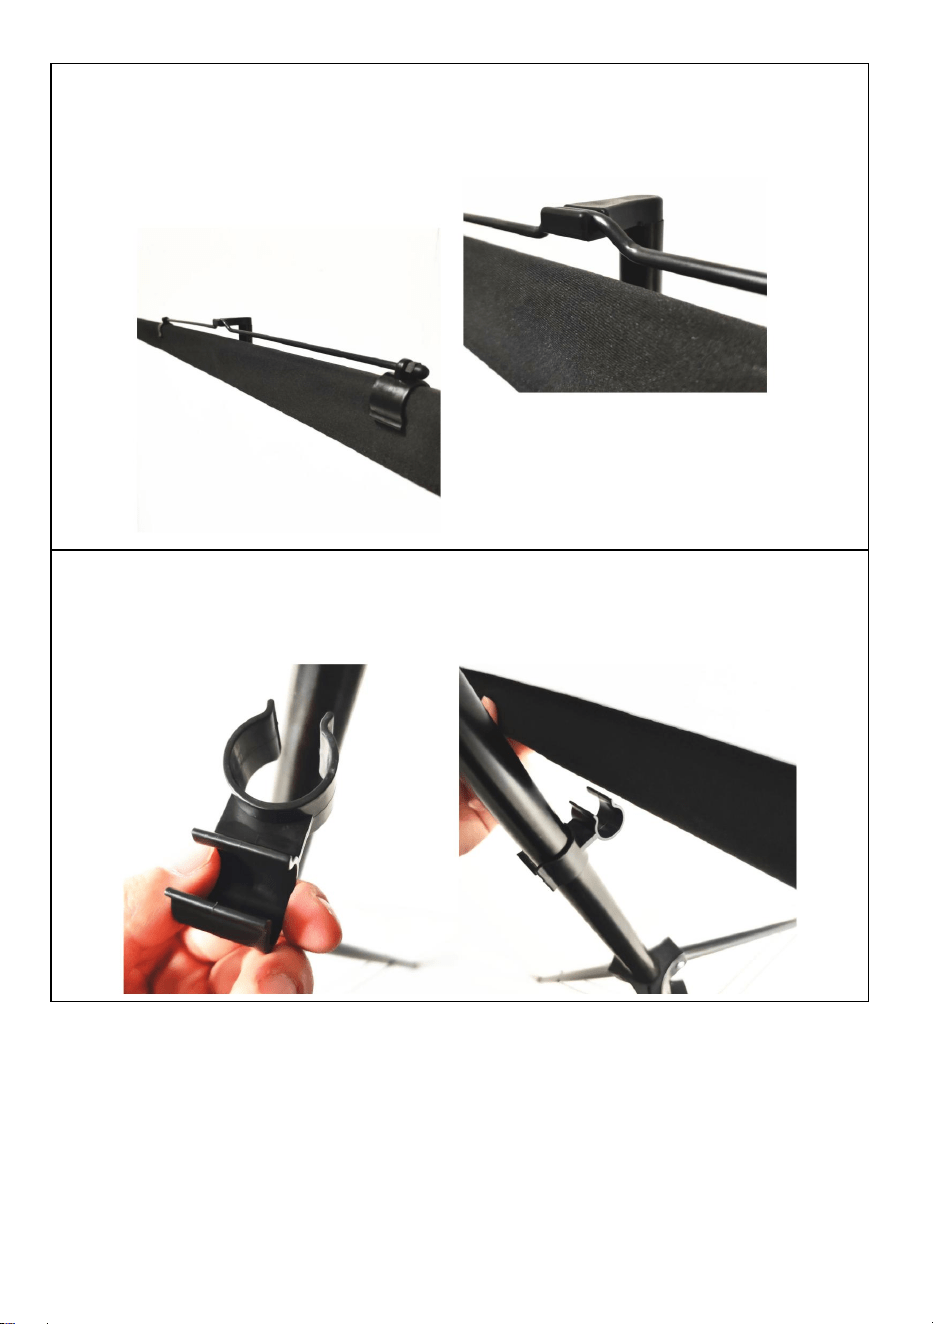
- 7 -
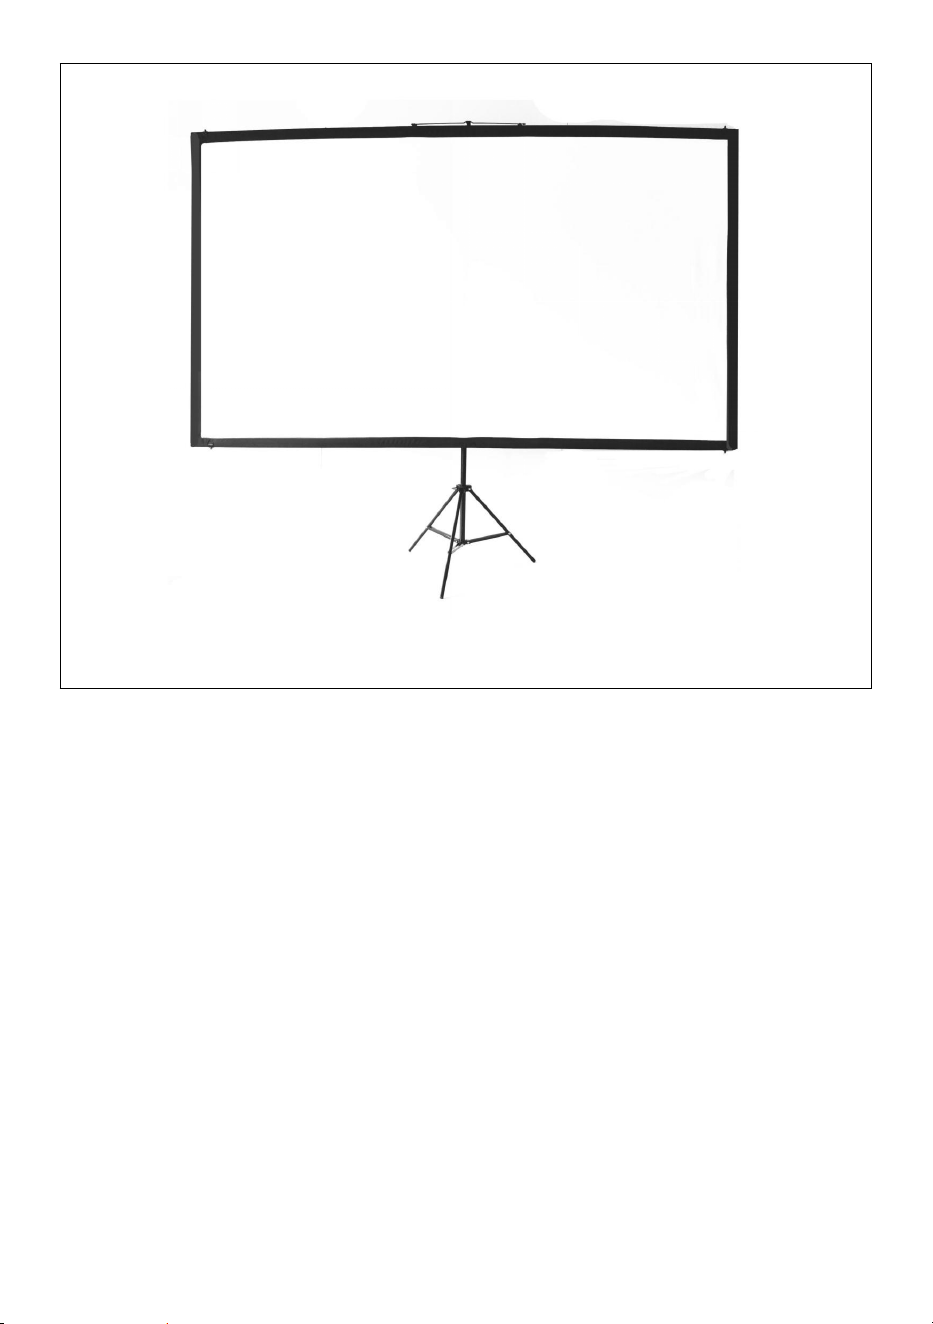
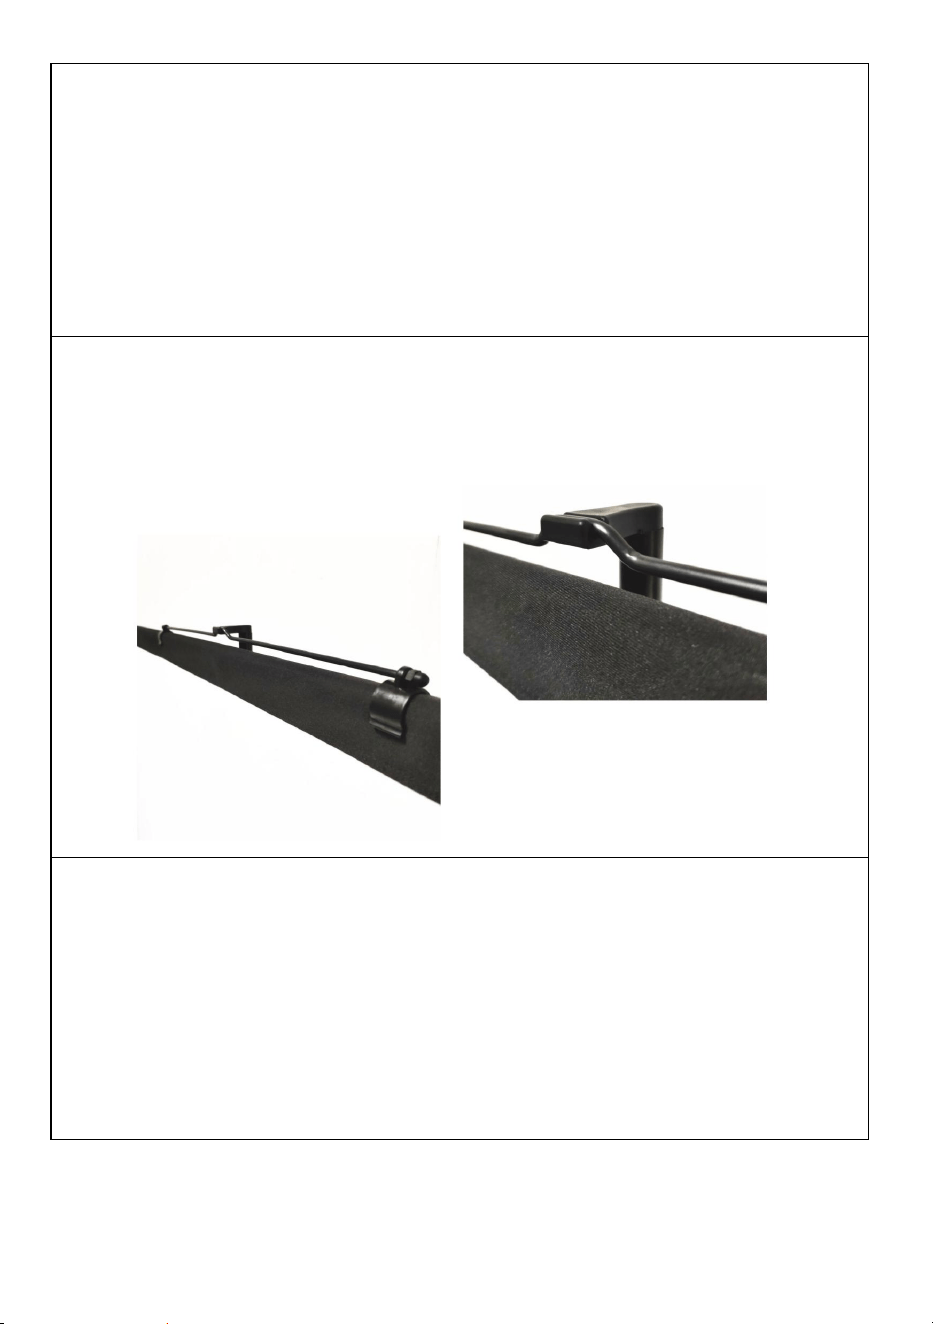
STEP3
fix the metal hanging part on the top pole make sure it is in the middle
position to keep balance, then hang on the top of the stand.
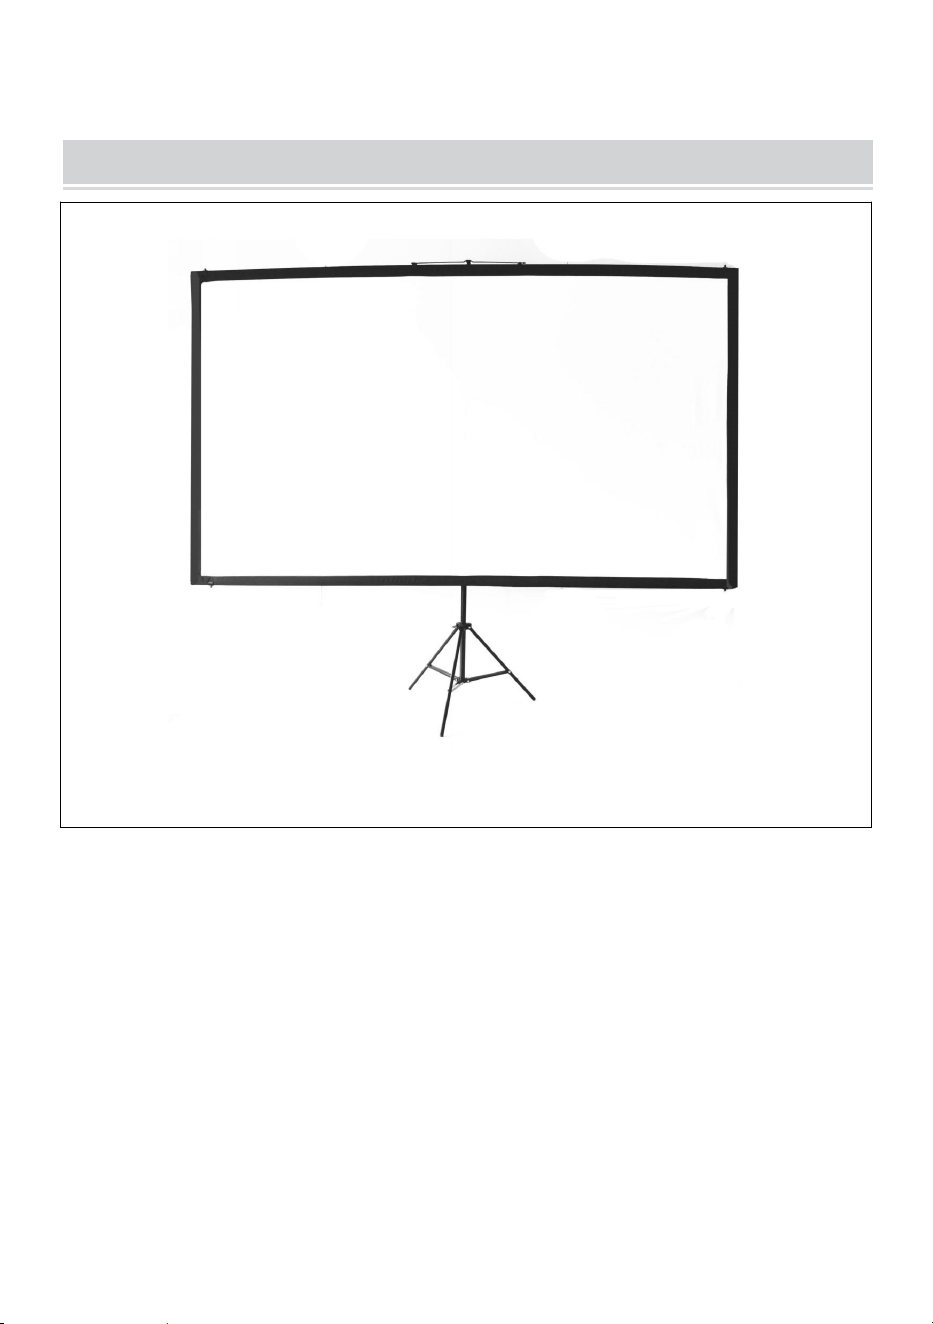
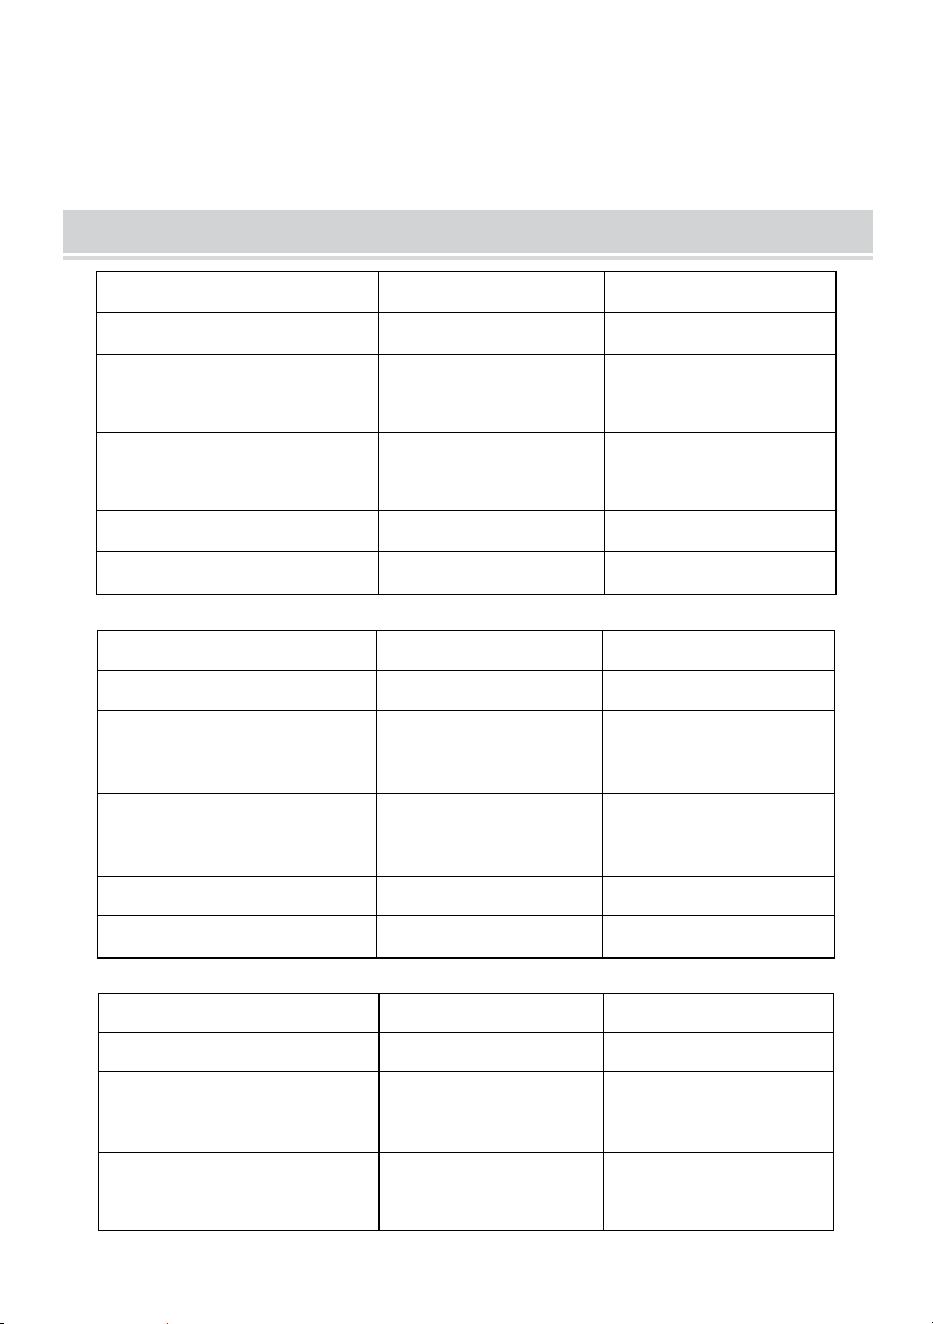
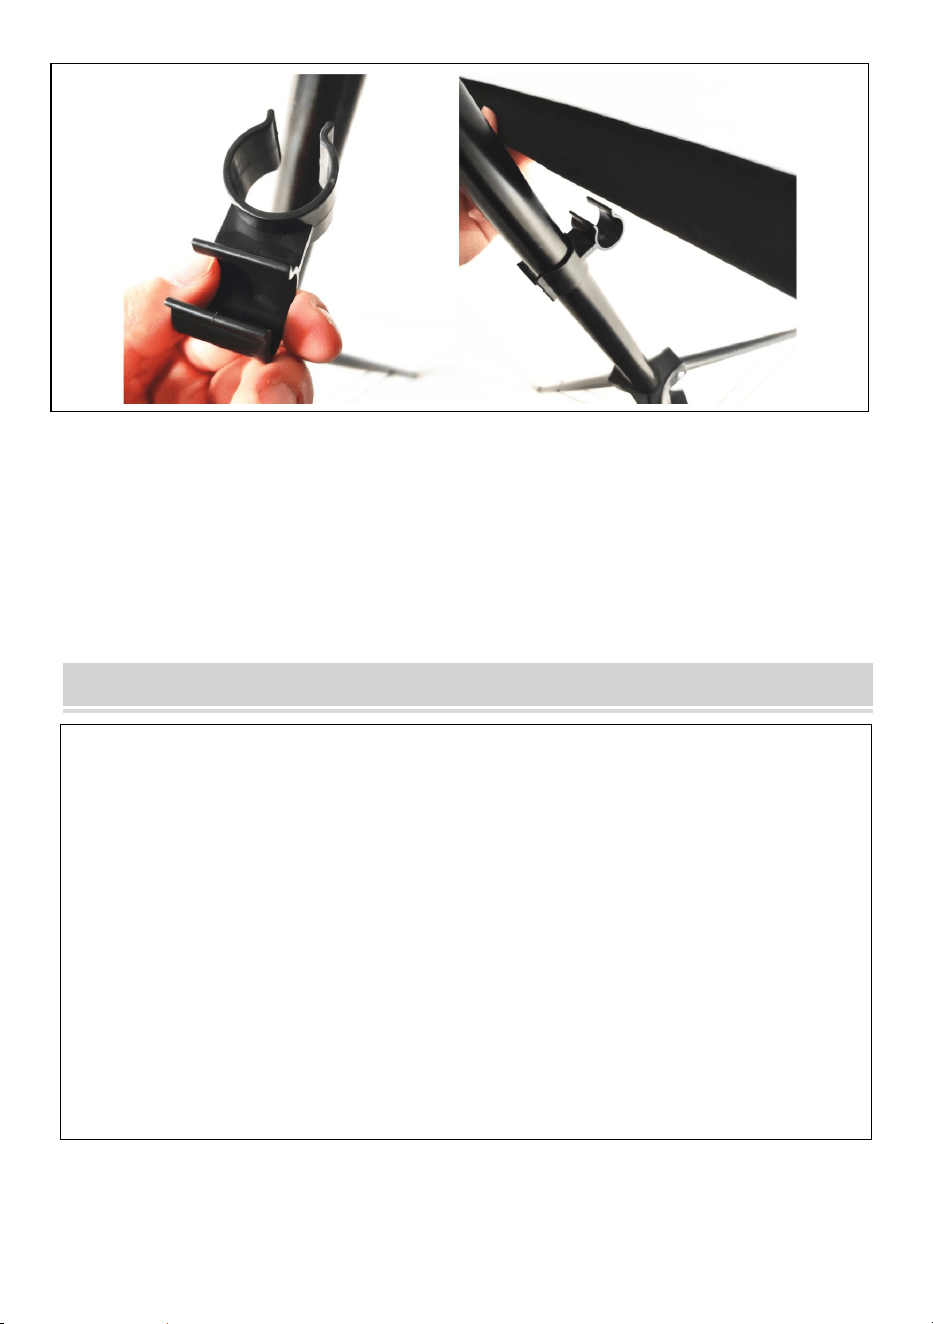
STEP4
adjust the stand height and use the connector to fix the bottom pole on
the stand.
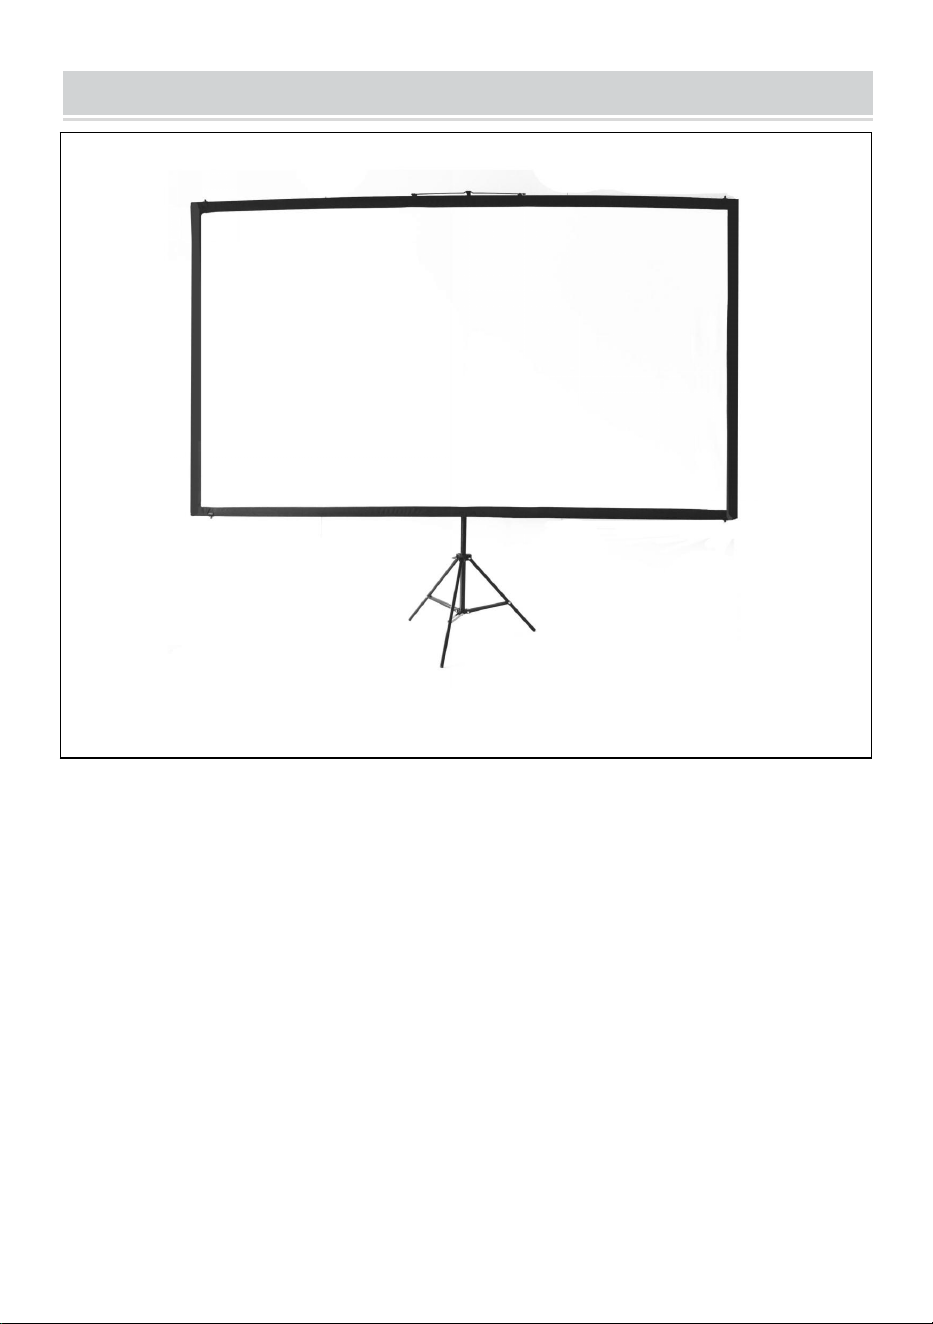
Note: this product is suitable for dark environment for a better
projection effect
- 8 -
COMPLETION

- 9 -
Manufacturer: Shanghaimuxinmuyeyouxiangongsi
Address: Shuangchenglu 803nong11hao1602A-1609shi, baoshanqu,
shanghai 200000 CN.
Imported to AUS: SIHAO PTY LTD. 1 ROKEVA STREETEASTWOOD
NSW 2122 Australia
Imported to USA: Sanven Technology Ltd. Suite 250, 9166 Anaheim
Place, Rancho Cucamonga, CA 91730
REP
EC
E-CrossStu GmbH
Mainzer Landstr.69, 60329 Frankfurt am Main.
REP
UK
YH CONSULTING LIMITED.
C/O YH Consulting Limited Office 147, Centurion
House, London Road, Staines-upon-Thames, Surrey,
TW18 4AX


Techniczny Wsparcie i certyfikat e-gwarancji
www.vevor.com/support
EKRAN PROJEKCYJNY
INSTRUKCJA OBSŁUGI
NR MODELU: DZC-60, DZC-70, DZC-80, DZC-90, DZC-100, DZC-110
We continue to be committed to provide you tools with competitive price.
"Save Half", "Half Price" or any other similar expressions used by us only represents an
estimate of savings you might benefit from buying certain tools with us compared to the major
top brands and does not necessarily mean to cover all categories of tools offered by us. You
are kindly reminded to verify carefully when you are placing an order with us if you are
actually saving half in comparison with the top major brands.

- 1 -
NR MODELU: DZC-60, DZC-70, DZC-80, DZC-90, DZC-100, DZC-110
Have product questions? Need technical support? Please feel free to
contact us:
Technical Support and E-Warranty Certificate
www.vevor.com/support
NEED HELP? CONTACT US!
This is the original instruction, please read all manual instructions
carefully before operating. VEVOR reserves a clear interpretation of our
user manual. The appearance of the product shall be subject to the
product you received. Please forgive us that we won't inform you again if
there are any technology or software updates on our product.
Projection Screen

- 2 -
OSTRZEŻENIE:
uważnie przeczytać tę instrukcję. Nieprzestrzeganie jej może
spowodować poważne obrażenia. ZACHOWAJ TE INSTRUKCJA
ASSEMBLY PRECAUTIONS
1. Montaż należy wykonywać wyłącznie zgodnie z niniejszą instrukcją.
Nieprawidłowy montaż może stwarzać zagrożenia.
2. Podczas montażu należy nosić okulary ochronne i rękawice robocze
zatwierdzone przez ANSI.
3. Utrzymuj miejsce zgromadzenia w czystości i zapewnij dobre
oświetlenie.
4. Nie dopuszczać osób postronnych na teren montażu podczas jego
trwania.
5. Nie przychodź na spotkania, jeśli jesteś zmęczony lub pod wpływem
alkoholu, narkotyków lub leków.
6. Możliwości produktu odnoszą się wyłącznie do produktów prawidłowo i
kompletnie zmontowanych.
7. Montaż należy wykonać na płaskiej, równej, twardej i gładkiej
powierzchni, zapewniającej bezpieczne utrzymanie ekranu
projekcyjnego.
8. Aby uzyskać dodatkowe informacje dotyczące części wymienionych na
kolejnych stronach, zapoznaj się ze schematem montażu w tym
podręczniku. Rozpakuj i oddziel wszystkie części w czystym miejscu
pracy.
9. Gwarancja będzie ważna tylko wtedy, gdy będziesz dokładnie
przestrzegać poniższych instrukcji! Niewłaściwe użytkowanie i
pielęgnacja mogą spowodować poważne obrażenia i/lub uszkodzenia!
10. Upewnij się, że powierzchnia, którą wybrałeś do zainstalowania
ekranu, jest płaska i bezpieczna. Przeczytaj poniższe informacje,
ponieważ jakiekolwiek uszkodzenie powierzchni ekranu będzie miało
wpływ na jakość obrazu:
A. Nie dotykaj powierzchni ekranu rękami.
- 3 -
B. Nie pisz i nie rysuj na powierzchni ekranu.
C. Nie należy dotykać powierzchni ekranu palcami ani ostrymi
narzędziami, ponieważ może to spowodować zarysowania lub
rozdarcia.
11. Po każdym użyciu należy schować ekran.
12. Nie należy ciągnąć ręcznie za dwa boki materiału ekranu, nie należy
go składać.
13. Aby zapobiec niepotrzebnym uszkodzeniom, obsługę i konserwację
ekranu powinna wykonywać osoba dorosła.
USE PRECAUTIONS
ABY ZAPOBIEC POWAŻNYM OBRAŻENIOM I ŚMIERCI
SPOWODOWANEJ PRZEWRÓCENIEM:
1. NIE SIADAĆ ANI NIE STAWAĆ NA TYM PRZEDMIOCIE.
2. Ten produkt nie jest zabawką. Nie pozwalaj dzieciom bawić się tym
przedmiotem ani przebywać w jego pobliżu.
3. Używać wyłącznie na płaskiej, równej, twardej i gładkiej powierzchni,
która może bezpiecznie utrzymać w pełni załadowany ekran projekcyjny.
4. Stosować wyłącznie zgodnie z przeznaczeniem.
5. Sprawdź przed każdym użyciem. Nie używaj, jeśli części są luźne lub
uszkodzone.
6. Wyczyść obszar, aby złożyć ekran. Upewnij się, że obszar jest większy
niż rozmiar ekranu.
Ignoring the safety warnings
may lead to injuries or
damaging the product.
Retract the screen after every
use.Leave it hanging for along
period may cause screen fabric
loose.
Avoid hanging anything on the
screen as it may cause the
screen to fall down.
The screen should be
installed at secure place
to avoid any accidents or
the screen falling down
Loose parts may cause
the screen fall down.
- 4 -
7. Pamiętaj, że do wykonania niektórych czynności potrzebne będą co
najmniej dwie osoby.
8. Aby uniknąć uszkodzenia ekranu, nie należy montować w miejscach o
wysokiej temperaturze.
9. Przed montażem należy dokładnie zapoznać się z treścią niniejszego
Poradnika montażu.
ZAPISZ TE INSTRUKCJE
TECHNICAL SPECIFICATIONS
Model
DZC-60
DZC-70
Rozmiar ekranu
60 cali, 16:9
70 cali, 16:9
Wymiary produktu
(Dł. x Szer. x Wys.)
(mm)
1350*2320
1630*2320
Rozmiar opakowania
(Dł. x Szer. x Wys.)
(mm)
725*135*95
725*135*95
Masa netto (kg)
Około 1.9
Około 2.2
Masa brutto (kg)
Około 2.3
Około 2,5
Model
DZC-80
DZC-90
Rozmiar ekranu
80 cali, 16:9
90 cali, 16:9
Wymiary produktu
(Dł. x Szer. x Wys.)
(mm)
1840*2320
2025*2320
Rozmiar opakowania
(Dł. x Szer. x Wys.)
(mm)
725*140*95
725*155*115
- 5 -
Masa netto (kg)
Około 2.4
Około 2,6
Masa brutto (kg)
Około 2,7
Około 2.9
Model
DZC-100
DZC-110
Rozmiar ekranu
100 cali, 16:9
110 cali, 16:9
Wymiary produktu
(Dł. x Szer. x Wys.)
(mm)
2270*2320
2470*2320
Rozmiar opakowania
(Dł. x Szer. x Wys.)
(mm)
725*155*115
725*155*115
Masa netto (kg)
Około 2.9
Około 3
Masa brutto (kg)
Około 3.2
Około 3.3
PACKAGE CONTENTS
- 6 -
ASSEMBLY STEPS
Stand
top pole
bottom pole
metal hanging
part connector
and plastic clip
fabric screen
- 7 -
KROK 1
zmontuj górę i dół poziomo drążki i przesuń je przez kieszeń na
drążek z tkaniny
KROK 2
Za pomocą plastikowych klipsów w kształcie litery U zamocuj ekran
materiałowy za pomocą górnych i dolnych drążków na każdym
końcu.

- 8 -
KROK 3
zamocuj metalową część wiszącą na górnym słupku upewnij się, że
jest w środkowej pozycji, aby utrzymać równowagę, a następnie
zawieś na górze stojaka.
KROK 4
wyreguluj wysokość stojaka i za pomocą łącznika zamocuj dolny
drążek na stojaku.
Uwaga: ten produkt nadaje się do stosowania w ciemnym
otoczeniu, aby uzyskać lepszy efekt projekcji.
- 9 -
COMPLETION
- 10 -
Producent: Shanghaimuxinmuyeyouxiangongsi
Adres: Shuangchenglu 803nong11hao1602A-1609shi, baoshanqu,
szanghaj 200000 CN.
Importowane do AUS: SIHAO PTY LTD. 1 ROKEVA
STREETEASTWOOD NSW 2122 Australia
Importowane do USA: Sanven Technology Ltd. Suite 250, 9166 Anaheim
Place, Rancho Cucamonga, CA 91730
REP
EC
E-CrossStu GmbH
Mainzer Landstr.69, 60329 Frankfurt am Main.
REP
UK
YH CONSULTING LIMITED.
C/O YH Consulting Limited Office 147, Centurion
House, London Road, Staines-upon-Thames, Surrey,
TW18 4AX


Technisch Support und E-Garantie-Zertifikat
www.vevor.com/support
PROJEKTIONSLEINWAND
BENUTZERHANDBUCH
MODELL-NR.: DZC-60, DZC-70, DZC-80, DZC-90, DZC-100, DZC-110
We continue to be committed to provide you tools with competitive price.
"Save Half", "Half Price" or any other similar expressions used by us only represents an
estimate of savings you might benefit from buying certain tools with us compared to the major
top brands and does not necessarily mean to cover all categories of tools offered by us. You
are kindly reminded to verify carefully when you are placing an order with us if you are
actually saving half in comparison with the top major brands.

- 1 -
MODELL-NR.: DZC-60, DZC-70, DZC-80, DZC-90, DZC-100, DZC-110
Have product questions? Need technical support? Please feel free to
contact us:
Technical Support and E-Warranty Certificate
www.vevor.com/support
NEED HELP? CONTACT US!
This is the original instruction, please read all manual instructions
carefully before operating. VEVOR reserves a clear interpretation of our
user manual. The appearance of the product shall be subject to the
product you received. Please forgive us that we won't inform you again if
there are any technology or software updates on our product.
Projection Screen

- 2 -
WARNUNG:
, bevor Sie das Produkt verwenden. Andernfalls kann es zu schweren
Verletzungen kommen. BEWAHREN SIE DIESES ANWEISUNG
ASSEMBLY PRECAUTIONS
1. Führen Sie die Montage nur gemäß dieser Anleitung durch. Eine
unsachgemäße Montage kann zu Gefahren führen.
2. Tragen Sie während der Montage eine ANSI-geprüfte Schutzbrille und
Arbeitshandschuhe.
3. Halten Sie den Versammlungsbereich sauber und gut beleuchtet.
4. Halten Sie während der Montage unbeteiligte Zuschauer vom Bereich
fern.
5. Nicht zusammenbauen, wenn Sie müde sind oder unter Einfluss von
Alkohol, Drogen oder Medikamenten stehen.
6. Die Produktfunktionen gelten nur für ordnungsgemäß und vollständig
montierte Produkte.
7. Montieren Sie es auf einer flachen, ebenen, harten und glatten
Oberfläche, die die Projektionsleinwand sicher tragen kann.
8. Weitere Informationen zu den auf den folgenden Seiten aufgeführten
Teilen finden Sie im Montagediagramm dieses Handbuchs. Packen Sie
alle Teile in einem sauberen Arbeitsbereich aus und trennen Sie sie.
9. Die Garantie gilt nur, wenn Sie die folgenden Anweisungen sorgfältig
befolgen! Unsachgemäßer Gebrauch und Pflege können schwere
Verletzungen und/oder Schäden verursachen!
10. Stellen Sie sicher, dass die von Ihnen für die Installation des
Bildschirms gewählte Oberfläche eben und stabil ist. Beachten Sie bitte
die folgenden Hinweise, da sich jegliche Beschädigung der
Bildschirmoberfläche auf die Bildqualität auswirkt:
A. Berühren Sie die Bildschirmoberfläche nicht mit der Hand.
B. Schreiben oder zeichnen Sie nicht auf der Bildschirmoberfläche.
C. Stochern Sie nicht mit dem Finger oder mit Kantenwerkzeugen auf der
Bildschirmoberfläche, da dies zu Kratzern oder Rissen führen kann.

- 3 -
11. Fahren Sie den Bildschirm nach jedem Gebrauch ein.
12. Ziehen Sie nicht mit der Hand an zwei Seiten des Leinwandgewebes
und falten Sie das Leinwandgewebe nicht.
13. Um unnötige Schäden zu vermeiden, sollte die Bedienung und
Wartung des Bildschirms von einem Erwachsenen durchgeführt werden.
USE PRECAUTIONS
UM SCHWERE VERLETZUNGEN UND TOD DURCH KIPPEN ZU
VERMEIDEN:
1. Setzen oder stellen Sie sich nicht auf diesen Gegenstand.
2. Dieses Produkt ist kein Spielzeug. Erlauben Sie Kindern nicht, mit oder
in der Nähe dieses Artikels zu spielen.
3. Nur auf einer flachen, ebenen, harten und glatten Oberfläche
verwenden, die eine voll beladene Projektionsleinwand sicher tragen
kann.
4. Nur bestimmungsgemäß verwenden.
5. Vor jedem Gebrauch prüfen. Nicht verwenden, wenn Teile lose oder
beschädigt sind.
6. Räumen Sie einen Bereich frei, in dem Sie den Bildschirm montieren
können. Stellen Sie sicher, dass der Bereich größer als die Größe des
Bildschirms ist.
7. Bedenken Sie, dass für die Montage für einige Schritte mindestens zwei
Personen erforderlich sind.
Ignoring the safety warnings
may lead to injuries or
damaging the product.
Retract the screen after every
use.Leave it hanging for along
period may cause screen fabric
loose.
Avoid hanging anything on the
screen as it may cause the
screen to fall down.
The screen should be
installed at secure place
to avoid any accidents or
the screen falling down
Loose parts may cause
the screen fall down.
- 4 -
8. Um eine Beschädigung des Bildschirms zu vermeiden, montieren Sie
den Bildschirm nicht in Bereichen mit hohen Temperaturen.
9. Lesen Sie vorher die gesamte Montageanleitung durch.
BEWAHREN SIE DIESE ANWEISUNGEN AUF
TECHNICAL SPECIFICATIONS
Modell
DZC-60
DZC-70
Bildschirmgröße
60 Zoll, 16:9
70 Zoll, 16:9
Technische Daten
(L x B x H) (mm)
1350*2320
1630*2320
Verpackungsgröße
(L x B x H) (mm)
725*135*95
725*135*95
Nettogewicht (kg)
Etwa 1,9
Über 2.2
Bruttogewicht (kg)
Über 2.3
Etwa 2,5
Modell
DZC-80
DZC-90
Bildschirmgröße
80 Zoll, 16:9
90 Zoll, 16:9
Technische Daten
(L x B x H) (mm)
1840*2320
2025*2320
Verpackungsgröße
(L x B x H) (mm)
725*140*95
725*155*115
Nettogewicht (kg)
Über 2.4
Über 2.6
Bruttogewicht (kg)
Etwa 2,7
Etwa 2,9
Modell
DZC-100
DZC-110
Bildschirmgröße
100 Zoll, 16:9
110 Zoll, 16:9

- 5 -
Technische Daten
(L x B x H) (mm)
2270*2320
2470*2320
Verpackungsgröße
(L x B x H) (mm)
725*155*115
725*155*115
Nettogewicht (kg)
Etwa 2,9
Über 3
Bruttogewicht (kg)
Über 3.2
Über 3.3
PACKAGE CONTENTS

- 6 -
ASSEMBLY STEPS
Stand
top pole
bottom pole
metal hanging
part connector
and plastic clip
fabric screen

- 7 -
SCHRITT 1
Montieren Sie die oberen und unteren horizontalen Stangen und
schieben Sie die Stangen durch die Stoff-Bildschirmstangentasche
SCHRITT 2
Befestigen Sie den Stoffschirm mit den U-förmigen
Kunststoffklammern an den oberen und unteren Stangen an jedem
Ende.
- 8 -
SCHRITT 3
Befestigen Sie das Metallteil zum Aufhängen an der oberen Stange
Stellen Sie sicher, dass es sich in der mittleren Position befindet,
Gleichgewicht halten und dann oben auf den Ständer hängen.
SCHRITT 4
Passen Sie die Ständerhöhe an und befestigen Sie die untere Stange
mithilfe des Verbinders am Ständer.
Hinweis: Dieses Produkt ist für dunkle Umgebungen geeignet,
um einen besseren Projektionseffekt zu erzielen

- 9 -
COMPLETION

- 10 -
Hersteller: Shanghaimuxinmuyeyouxiangongsi
Adresse: Shuangchenglu 803nong11hao1602A-1609shi, baoshanqu,
Shanghai 200000 CN.
Nach AUS importiert: SIHAO PTY LTD. 1 ROKEVA
STREETEASTWOOD NSW 2122 Australien
Importiert in die USA: Sanven Technology Ltd. Suite 250, 9166 Anaheim
Place, Rancho Cucamonga, CA 91730
REP
EC
E-CrossStu GmbH
Mainzer Landstr.69, 60329 Frankfurt am Main.
REP
UK
YH CONSULTING LIMITED.
C/O YH Consulting Limited Office 147, Centurion
House, London Road, Staines-upon-Thames, Surrey,
TW18 4AX


Technique Certificat d'assistance et de garantie électronique
www.vevor.com/support
ÉCRAN DE PROJECTION
MANUEL D' UTILISATION
N° DE MODÈLE : DZC-60, DZC-70, DZC-80, DZC-90, DZC-100, DZC-110
We continue to be committed to provide you tools with competitive price.
"Save Half", "Half Price" or any other similar expressions used by us only represents an
estimate of savings you might benefit from buying certain tools with us compared to the major
top brands and does not necessarily mean to cover all categories of tools offered by us. You
are kindly reminded to verify carefully when you are placing an order with us if you are
actually saving half in comparison with the top major brands.

- 1 -
N° DE MODÈLE : DZC-60, DZC-70, DZC-80, DZC-90, DZC-100, DZC-110
Have product questions? Need technical support? Please feel free to
contact us:
Technical Support and E-Warranty Certificate
www.vevor.com/support
NEED HELP? CONTACT US!
This is the original instruction, please read all manual instructions
carefully before operating. VEVOR reserves a clear interpretation of our
user manual. The appearance of the product shall be subject to the
product you received. Please forgive us that we won't inform you again if
there are any technology or software updates on our product.
Projection Screen

- 2 -
AVERTISSEMENT:
consigne peut entraîner des blessures graves. CONSERVEZ CE
MANUEL INSTRUCTION
ASSEMBLY PRECAUTIONS
1. Assembler uniquement selon ces instructions. Un assemblage incorrect
peut créer des dangers.
2. Portez des lunettes de sécurité et des gants de travail approuvés par l’
ANSI pendant l’assemblage.
3. Gardez la zone de montage propre et bien éclairée.
4. Gardez les spectateurs hors de la zone pendant le montage.
5. Ne pas monter si vous êtes fatigué ou sous l'influence de l'alcool, de
drogues ou de médicaments.
6. Les capacités du produit s'appliquent uniquement aux produits
correctement et entièrement assemblés.
7. Assembler sur une surface plane, de niveau, dure et lisse capable de
supporter en toute sécurité l'écran de projection.
8. Pour plus d'informations sur les pièces répertoriées dans les pages
suivantes, reportez-vous au schéma d'assemblage de ce manuel.
Déballez et séparez toutes les pièces dans un espace de travail propre.
9. La garantie ne sera valable que si vous suivez attentivement les
instructions ci-dessous ! Une utilisation et un entretien inappropriés
peuvent entraîner des blessures et/ou des dommages graves !
10. Assurez-vous que la surface que vous avez choisie pour installer
l'écran est plane et sécurisée. Veuillez lire ce qui suit car tout dommage
à la surface de l'écran aura un impact sur la qualité de l'image :
A. Ne touchez pas la surface de l’écran avec la main.
B. N'écrivez pas et ne dessinez pas sur la surface de l'écran.
C. Ne percez pas la surface de l'écran avec vos doigts ou des outils de
- 3 -
bord, car cela pourrait provoquer des rayures ou des déchirures.
11. Rétractez l'écran après chaque utilisation.
12. Ne tirez pas les deux côtés du tissu de l'écran avec les mains, ne pliez
pas le tissu de l'écran.
13. Pour éviter des dommages inutiles, l'utilisation et l'entretien de l'écran
doivent être effectués par un adulte.
USE PRECAUTIONS
POUR ÉVITER LES BLESSURES GRAVES ET LA MORT RÉSULTANT
DU BASCULEMENT :
1. NE PAS S'ASSEOIR OU SE TENIR DEBOUT SUR CET ARTICLE.
2. Ce produit n'est pas un jouet. Ne laissez pas les enfants jouer avec ou à
proximité de cet article.
3. Utiliser uniquement sur une surface plane, plane, dure et lisse capable
de supporter en toute sécurité un écran de projection entièrement
chargé.
4. Utiliser uniquement comme prévu.
5. Inspectez avant chaque utilisation. Ne pas utiliser si des pièces sont
desserrées ou endommagées.
6. Dégagez une zone pour assembler l'écran. Assurez-vous que la zone
est plus grande que la taille de l'écran.
7. N'oubliez pas que le montage nécessitera au moins deux personnes
pour certaines étapes.
Ignoring the safety warnings
may lead to injuries or
damaging the product.
Retract the screen after every
use.Leave it hanging for along
period may cause screen fabric
loose.
Avoid hanging anything on the
screen as it may cause the
screen to fall down.
The screen should be
installed at secure place
to avoid any accidents or
the screen falling down
Loose parts may cause
the screen fall down.
- 4 -
8. Ne pas assembler dans des zones à haute température pour éviter
d'endommager l'écran.
9. Lisez d’abord l’intégralité de ce guide d’assemblage.
CONSERVEZ CES INSTRUCTIONS
TECHNICAL SPECIFICATIONS
Modèle
DZC-60
DZC-70
Taille de l' écran
60 pouces, 16:9
70 pouces, 16:9
Dimensions du produit
(L x l x H) (mm)
1350*2320
1630*2320
Taille de l'emballage
(L x l x H) (mm)
725*135*95
725*135*95
Poids net (kg)
Environ 1,9
Environ 2,2
Poids brut (kg)
Environ 2,3
Environ 2,5
Modèle
DZC-80
DZC-90
Taille de l' écran
80 pouces, 16:9
90 pouces, 16:9
Dimensions du produit
(L x l x H) (mm)
1840*2320
2025*2320
Taille de l'emballage
(L x l x H) (mm)
725*140*95
725*155*115
Poids net (kg)
Environ 2,4
Environ 2,6
Poids brut (kg)
Environ 2,7
Environ 2,9
Modèle
DZC-100
DZC-110

- 5 -
Taille de l' écran
100 pouces, 16:9
110 pouces, 16:9
Dimensions du produit
(L x l x H) (mm)
2270*2320
2470*2320
Taille de l'emballage
(L x l x H) (mm)
725*155*115
725*155*115
Poids net (kg)
Environ 2,9
Environ 3
Poids brut (kg)
À propos de 3,2
À propos de 3,3
PACKAGE CONTENTS

- 6 -
ASSEMBLY STEPS
Stand
top pole
bottom pole
metal hanging
part connector
and plastic clip
fabric screen

- 7 -
ÉTAPE 1
assembler le haut et le bas horizontaux poteaux et faites glisser les
poteaux à travers le poche pour poteau d'écran en tissu
ÉTAPE 2
utilisez les clips en plastique en forme de U pour fixer l'écran en tissu
avec les poteaux supérieur et inférieur à chaque extrémité.

- 8 -
ÉTAPE 3
fixer la partie suspendue en métal sur le poteau supérieur
assurez-vous qu'il est en position médiane pour garder équilibre, puis
accrochez-le au sommet du support.
ÉTAPE 4
ajustez la hauteur du support et utilisez le connecteur pour fixer le
poteau inférieur sur le support.
Remarque : ce produit est adapté aux environnements sombres
pour un meilleur effet de projection

- 9 -
COMPLETION

- 10 -
Fabricant : Shanghaimuxinmuyeyouxiangongsi
Adresse : Shuangchenglu 803nong11hao1602A-1609shi, baoshanqu,
Shanghai 200000 CN.
Importé en Australie : SIHAO PTY LTD. 1 ROKEVA
STREETEASTWOOD NSW 2122 Australie
Importé aux États-Unis : Sanven Technology Ltd. Suite 250, 9166
Anaheim Place, Rancho Cucamonga, CA 91730
REP
EC
E-CrossStu GmbH
Mainzer Landstr.69, 60329 Frankfurt am Main.
REP
UK
YH CONSULTING LIMITED.
C/O YH Consulting Limited Office 147, Centurion
House, London Road, Staines-upon-Thames, Surrey,
TW18 4AX


Technisch Ondersteuning en E-garantiecertificaat
www.vevor.com/support
PROJECTIESCHERM
GEBRUIKSAANWIJZING
MODELNR.: DZC-60, DZC-70, DZC-80, DZC-90, DZC-100, DZC-110
We continue to be committed to provide you tools with competitive price.
"Save Half", "Half Price" or any other similar expressions used by us only represents an
estimate of savings you might benefit from buying certain tools with us compared to the major
top brands and does not necessarily mean to cover all categories of tools offered by us. You
are kindly reminded to verify carefully when you are placing an order with us if you are
actually saving half in comparison with the top major brands.
- 1 -
MODELNR.: DZC-60, DZC-70, DZC-80, DZC-90, DZC-100, DZC-110
Have product questions? Need technical support? Please feel free to
contact us:
Technical Support and E-Warranty Certificate
www.vevor.com/support
NEED HELP? CONTACT US!
This is the original instruction, please read all manual instructions
carefully before operating. VEVOR reserves a clear interpretation of our
user manual. The appearance of the product shall be subject to the
product you received. Please forgive us that we won't inform you again if
there are any technology or software updates on our product.
Projection Screen

- 2 -
WAARSCHUWING:
dit niet doet, kan dit leiden tot ernstig letsel. BEWAAR DEZE
INSTRUCTIE
ASSEMBLY PRECAUTIONS
1. Monteer alleen volgens deze instructies. Onjuiste montage kan gevaren
opleveren.
2. Draag tijdens de montage een ANSI-goedgekeurde veiligheidsbril en
werkhandschoenen.
3. Zorg ervoor dat de verzamelplaats schoon en goed verlicht is.
4. Houd omstanders uit de buurt tijdens de montage.
5. Kom niet in actie als u moe bent of onder invloed van alcohol, drugs of
medicijnen.
6. De producteigenschappen gelden uitsluitend voor correct en volledig
gemonteerde producten.
7. Monteer het geheel op een vlak, egaal, hard en glad oppervlak dat het
projectiescherm veilig kan dragen.
8. Voor aanvullende informatie over de onderdelen die op de volgende
pagina's worden vermeld, raadpleegt u het montageschema van deze
handleiding. Pak alle onderdelen uit en scheid ze in een schone
werkruimte.
9. De garantie is alleen geldig als u de onderstaande instructies zorgvuldig
opvolgt! Onjuist gebruik en onderhoud kunnen ernstig letsel en/of
schade veroorzaken!
10. Zorg ervoor dat het oppervlak dat u hebt gekozen voor de installatie
van het scherm vlak en stevig is. Lees het volgende aandachtig door,
aangezien schade aan het schermoppervlak de kwaliteit van de
afbeelding kan beïnvloeden:
A. Raak het schermoppervlak niet met uw handen aan.
B. Schrijf of teken niet op het schermoppervlak.
C. Raak het schermoppervlak niet aan met uw vingers of met een scherp
voorwerp, omdat dit krassen of scheuren kan veroorzaken.
- 3 -
11. Trek het scherm na elk gebruik terug.
12. Trek niet met de hand aan twee kanten van het gaasdoek en vouw het
gaasdoek niet.
13. Om onnodige schade te voorkomen, dient de bediening en het
onderhoud van het scherm door een volwassene te worden uitgevoerd.
USE PRECAUTIONS
OM ERNSTIG LETSEL EN DE DOOD DOOR KANTELEN TE
VOORKOMEN:
1. NIET OP DIT ARTIKEL ZITTEN OF STAAN.
2. Dit product is geen speelgoed. Laat kinderen niet met of in de buurt van
dit item spelen.
3. Gebruik het apparaat alleen op een vlak, egaal, hard en glad oppervlak
dat een volledig beladen projectiescherm veilig kan dragen.
4. Alleen gebruiken zoals bedoeld.
5. Inspecteer voor elk gebruik. Niet gebruiken als onderdelen los of
beschadigd zijn.
6. Maak een gebied vrij om het scherm te monteren. Zorg ervoor dat het
gebied groter is dan de grootte van het scherm.
7. Houd er rekening mee dat er voor sommige stappen minimaal twee
personen nodig zijn voor de montage.
8. Monteer het apparaat niet op een plek met een hoge temperatuur, om
schade aan het scherm te voorkomen.
Ignoring the safety warnings
may lead to injuries or
damaging the product.
Retract the screen after every
use.Leave it hanging for along
period may cause screen fabric
loose.
Avoid hanging anything on the
screen as it may cause the
screen to fall down.
The screen should be
installed at secure place
to avoid any accidents or
the screen falling down
Loose parts may cause
the screen fall down.
- 4 -
9. Lees eerst de hele montagehandleiding door.
BEWAAR DEZE INSTRUCTIES
TECHNICAL SPECIFICATIONS
Model
DZC-60
DZC-70
Schermgrootte
60 inch, 16:9
70 inch, 16:9
Productafmetingen
(LxBxH)(mm)
1350*2320
1630*2320
Verpakkingsgrootte
(LxBxH)(mm)
725*135*95
725*135*95
Nettogewicht (kg)
Ongeveer 1,9
Ongeveer 2.2
Brutogewicht (kg)
Ongeveer 2.3
Ongeveer 2,5
Model
DZC-80
DZC-90
Schermgrootte
80 inch, 16:9
90 inch, 16:9
Productafmetingen
(LxBxH)(mm)
1840*2320
2025*2320
Verpakkingsgrootte
(LxBxH)(mm)
725*140*95
725*155*115
Nettogewicht (kg)
Ongeveer 2,4
Ongeveer 2.6
Brutogewicht (kg)
Ongeveer 2.7
Ongeveer 2,9
Model
DZC-100
DZC-110
Schermgrootte
100 inch, 16:9
110 inch, 16:9
Productafmetingen
(LxBxH)(mm)
2270*2320
2470*2320

- 5 -
Verpakkingsgrootte
(LxBxH)(mm)
725*155*115
725*155*115
Nettogewicht (kg)
Ongeveer 2,9
Ongeveer 3
Brutogewicht (kg)
Ongeveer 3.2
Ongeveer 3.3
PACKAGE CONTENTS
Stand
top pole
bottom pole
metal hanging
part connector
and plastic clip
fabric screen
- 6 -
ASSEMBLY STEPS
STAP1
Monteer de bovenste en onderste horizontale palen en schuif de
palen door de zak voor stoffen schermstok
STAP 2
Gebruik de U-vormige plastic clips om het doek aan de boven- en
onderpalen aan beide uiteinden vast te zetten.
- 7 -
STAP 3
Bevestig het metalen ophangdeel aan de bovenste paal zorg ervoor
dat het in de middelste stand staat om Houd het in evenwicht en hang
het vervolgens aan de bovenkant van de standaard.

- 8 -
STAP 4
Pas de hoogte van de standaard aan en gebruik de connector om de
onderste paal aan de standaard te bevestigen.
Let op: dit product is geschikt voor een donkere omgeving voor
een beter projectie-effect
COMPLETION
- 9 -
Fabrikant: Shanghaimuxinmuyeyouxiangongsi
Adres: Shuangchenglu 803nong11hao1602A-1609shi, baoshanqu,

- 10 -
shanghai 200000 CN.
Geïmporteerd naar AUS: SIHAO PTY LTD. 1 ROKEVA
STREETEASTWOOD NSW 2122 Australië
Geïmporteerd naar de VS: Sanven Technology Ltd. Suite 250, 9166
Anaheim Place, Rancho Cucamonga, CA 91730
REP
EC
E-CrossStu GmbH
Mainzer Landstr.69, 60329 Frankfurt am Main.
REP
UK
YH CONSULTING LIMITED.
C/O YH Consulting Limited Office 147, Centurion
House, London Road, Staines-upon-Thames, Surrey,
TW18 4AX


Teknisk Support och e-garanticertifikat
www.vevor.com/support
PROJEKTIONSDUK
ANVÄNDARMANUAL
MODELLNR: DZC-60, DZC-70, DZC-80, DZC-90, DZC-100, DZC-110
We continue to be committed to provide you tools with competitive price.
"Save Half", "Half Price" or any other similar expressions used by us only represents an
estimate of savings you might benefit from buying certain tools with us compared to the major
top brands and does not necessarily mean to cover all categories of tools offered by us. You
are kindly reminded to verify carefully when you are placing an order with us if you are
actually saving half in comparison with the top major brands.

- 1 -
MODELLNR: DZC-60, DZC-70, DZC-80, DZC-90, DZC-100, DZC-110
Have product questions? Need technical support? Please feel free to
contact us:
Technical Support and E-Warranty Certificate
www.vevor.com/support
NEED HELP? CONTACT US!
This is the original instruction, please read all manual instructions
carefully before operating. VEVOR reserves a clear interpretation of our
user manual. The appearance of the product shall be subject to the
product you received. Please forgive us that we won't inform you again if
there are any technology or software updates on our product.
Projection Screen

- 2 -
VARNING:
Läs denna bruksanvisning noggrant innan du använder produkten.
Underlåtenhet att göra det kan leda till allvarliga skador. SPARA DET
E S E INSTRUKTION
ASSEMBLY PRECAUTIONS
1. Montera endast enligt dessa instruktioner. Felaktig montering kan skapa
faror.
2. Använd ANSI-godkända skyddsglasögon och arbetshandskar vid
montering.
3. Håll monteringsområdet rent och väl upplyst.
4. Håll åskådare borta från området under monteringen.
5. Sätt dig inte ihop när du är trött eller påverkad av alkohol, droger eller
mediciner.
6. Produktegenskaperna gäller endast för korrekt och färdigmonterade
produkter.
7. Montera på en plan, jämn, hård och slät yta som säkert kan stödja
projektionsduken.
8. För ytterligare information om delarna som listas på följande sidor, se
monteringsdiagrammet i denna manual. Packa upp och separera alla
delar på ett rent arbetsområde.
9. Garantin gäller endast om du följer instruktionerna nedan noggrant!
Felaktig användning och skötsel kan orsaka allvarliga skador och/eller
skada!
10. Se till att ytan du har valt för att installera skärmen är platt och säker.
Läs följande eftersom eventuella skador på skärmens yta påverkar
bildens kvalitet:
A. Rör inte skärmytan för hand.
B. Skriv eller rita inte på skärmytan.
C. Stick inte på skärmytan med finger- eller kantverktyg eftersom det kan
orsaka repor eller revor.
11. Dra tillbaka skärmen efter varje användning.

- 3 -
12. Dra inte två sidor av skärmtyget med händerna, vik inte skärmtyget.
13. För att förhindra onödiga skador bör drift och underhåll av skärmen
utföras av en vuxen.
USE PRECAUTIONS
FÖR ATT FÖRHINDRA ALLVARLIGA SKADA OCH DÖDSFALL VID
VÄLLNING:
1. SIT ELLER STÅ INTE PÅ DETTA FÖREMÅL.
2. Denna produkt är inte en leksak. Låt inte barn leka med eller nära detta
föremål.
3. Använd endast på en plan, jämn, hård och slät yta som säkert kan
stödja en fullastad projektionsduk.
4. Använd endast som avsett.
5. Inspektera före varje användning. Använd inte om delar är lösa eller
skadade.
6. Rensa ut ett område för att montera skärmen. Se till att området är
större än storleken på skärmen.
7. Kom ihåg att monteringen kommer att kräva minst två personer för
vissa moment.
8. Montera inte i områden med hög temperatur för att undvika att skada
skärmen.
9. Läs igenom hela denna monteringsguide innan.
SPARA DESSA INSTRUKTIONER
Ignoring the safety warnings
may lead to injuries or
damaging the product.
Retract the screen after every
use.Leave it hanging for along
period may cause screen fabric
loose.
Avoid hanging anything on the
screen as it may cause the
screen to fall down.
The screen should be
installed at secure place
to avoid any accidents or
the screen falling down
Loose parts may cause
the screen fall down.
- 4 -
TECHNICAL SPECIFICATIONS
Modell
DZC-60
DZC-70
S skärmstorlek
60 tum, 16:9
70 tum, 16:9
Produktens mått
(LxBxH)(mm)
1350*2320
1630*2320
Förpackningsstorlek
(LxBxH)(mm)
725*135*95
725*135*95
Nettovikt (kg)
Cirka 1,9
Ungefär 2,2
Bruttovikt (kg)
Cirka 2,3
Cirka 2,5
Modell
DZC-80
DZC-90
S skärmstorlek
80 tum, 16:9
90 tum, 16:9
Produktens mått
(LxBxH)(mm)
1840*2320
2025*2320
Förpackningsstorlek
(LxBxH)(mm)
725*140*95
725*155*115
Nettovikt (kg)
Cirka 2,4
Cirka 2,6
Bruttovikt (kg)
Cirka 2,7
Cirka 2,9
Modell
DZC-100
DZC-110
S skärmstorlek
100 tum, 16:9
110 tum, 16:9
Produktens mått
(LxBxH)(mm)
2270*2320
2470*2320
Förpackningsstorlek
(LxBxH)(mm)
725*155*115
725*155*115
- 5 -
Nettovikt (kg)
Cirka 2,9
Ungefär 3
Bruttovikt (kg)
Cirka 3,2
Cirka 3,3
PACKAGE CONTENTS
Stand
top pole
bottom pole
metal hanging
part connector
and plastic clip
fabric screen
- 6 -
ASSEMBLY STEPS
STEG1
montera toppen och botten horisontellt stolpar och skjut stolparna
genom tyg skärm stångficka
STEG 2
använd de U-formade plastklämmorna för att fixera tygskärmen med
de övre och nedre polerna i varje ände.
- 7 -
STEG 3
fixera den hängande metalldelen på den översta stolpen se till att den
är i mittläget för att hålla den balansera och häng sedan på toppen av
stativet.
STEG 4
justera stativets höjd och använd kontakten för att fästa bottenstången
på stativet.
- 8 -
Obs: denna produkt är lämplig för mörk miljö för en bättre
projektionseffekt
COMPLETION
- 9 -
Tillverkare: Shanghaimuxinmuyeyouxiangongsi
Adress: Shuangchenglu 803nong11hao1602A-1609shi, baoshanqu,
shanghai 200000 CN.
- 10 -
Importerad till AUS: SIHAO PTY LTD. 1 ROKEVA STREETEASTWOOD
NSW 2122 Australien
Importerad till USA: Sanven Technology Ltd. Suite 250, 9166 Anaheim
Place, Rancho Cucamonga, CA 91730
REP
EC
E-CrossStu GmbH
Mainzer Landstr.69, 60329 Frankfurt am Main.
REP
UK
YH CONSULTING LIMITED.
C/O YH Consulting Limited Office 147, Centurion
House, London Road, Staines-upon-Thames, Surrey,
TW18 4AX


Técnico Certificado de soporte y garantía electrónica
www.vevor.com/support
PANTALLA DE PROYECCIÓN
MANUAL DEL USUARIO
N.º DE MODELO: DZC-60, DZC-70, DZC-80, DZC-90, DZC-100, DZC-110
We continue to be committed to provide you tools with competitive price.
"Save Half", "Half Price" or any other similar expressions used by us only represents an
estimate of savings you might benefit from buying certain tools with us compared to the major
top brands and does not necessarily mean to cover all categories of tools offered by us. You
are kindly reminded to verify carefully when you are placing an order with us if you are
actually saving half in comparison with the top major brands.

- 1 -
N.º DE MODELO: DZC-60, DZC-70, DZC-80, DZC-90, DZC-100, DZC-110
Have product questions? Need technical support? Please feel free to
contact us:
Technical Support and E-Warranty Certificate
www.vevor.com/support
NEED HELP? CONTACT US!
This is the original instruction, please read all manual instructions
carefully before operating. VEVOR reserves a clear interpretation of our
user manual. The appearance of the product shall be subject to the
product you received. Please forgive us that we won't inform you again if
there are any technology or software updates on our product.
Projection Screen

- 2 -
ADVERTENCIA:
Lea atentamente este manual antes de utilizar el producto. De lo
contrario, podría sufrir lesiones graves. GUARDE ESTE MANUAL
INSTRUCCIÓN
ASSEMBLY PRECAUTIONS
1. Realice el montaje únicamente de acuerdo con estas instrucciones. Un
montaje inadecuado puede generar peligros.
2. Use gafas de seguridad y guantes de trabajo aprobados por ANSI
durante el montaje.
3. Mantenga el área de reunión limpia y bien iluminada.
4. Mantenga a los transeúntes fuera del área durante el montaje.
5. No se reúna cuando esté cansado o bajo la influencia del alcohol,
drogas o medicamentos.
6. Las capacidades del producto se aplican únicamente a productos
ensamblados de forma correcta y completa.
7. Móntelo sobre una superficie plana, nivelada, dura y lisa capaz de
soportar de forma segura la pantalla de proyección.
8. Para obtener información adicional sobre las piezas que se enumeran
en las páginas siguientes, consulte el diagrama de ensamblaje de este
manual. Desembale y separe todas las piezas en un área de trabajo
limpia.
9. ¡La garantía solo será válida si sigue atentamente las instrucciones que
se indican a continuación! ¡El uso y el cuidado inadecuados pueden
provocar lesiones y/o daños graves!
10. Asegúrese de que la superficie que ha elegido para instalar la pantalla
sea plana y segura. Lea lo siguiente, ya que cualquier daño a la
superficie de la pantalla afectará la calidad de la imagen:
A. No toque la superficie de la pantalla con la mano.
B. No escriba ni dibuje sobre la superficie de la pantalla.
- 3 -
C. No golpee la superficie de la pantalla con los dedos ni con
herramientas de borde, ya que puede causar rayones o rasgaduras.
11. Retraiga la pantalla después de cada uso.
12. No tire de los dos lados de la tela de la pantalla con las manos, no
doble la tela de la pantalla.
13. Para evitar daños innecesarios, la operación y el mantenimiento de la
pantalla deben ser realizados por un adulto.
USE PRECAUTIONS
PARA EVITAR LESIONES GRAVES Y LA MUERTE POR VUELCO:
1. NO SE SIENTA NI SE PARE SOBRE ESTE ARTÍCULO.
2. Este producto no es un juguete. No permita que los niños jueguen con
este artículo ni cerca de él.
3. Úselo únicamente sobre una superficie plana, nivelada, dura y lisa
capaz de soportar de forma segura una pantalla de proyección
completamente cargada.
4. Úselo únicamente según lo previsto.
5. Inspeccione el producto antes de cada uso. No lo utilice si hay piezas
sueltas o dañadas.
6. Despeje un área para ensamblar la pantalla. Asegúrese de que el área
sea más grande que el tamaño de la pantalla.
7. Recuerde que el montaje requerirá al menos dos personas para
algunos pasos.
Ignoring the safety warnings
may lead to injuries or
damaging the product.
Retract the screen after every
use.Leave it hanging for along
period may cause screen fabric
loose.
Avoid hanging anything on the
screen as it may cause the
screen to fall down.
The screen should be
installed at secure place
to avoid any accidents or
the screen falling down
Loose parts may cause
the screen fall down.
- 4 -
8. No montar en zonas con altas temperaturas para evitar dañar la
pantalla.
9. Lea esta guía de montaje completa antes.
GUARDE ESTAS INSTRUCCIONES
TECHNICAL SPECIFICATIONS
Modelo
DZC-60
DZC-70
Tamaño de la pantalla
60 pulgadas, 16:9
70 pulgadas, 16:9
Dimensiones del
producto
(Largo x Ancho x Alto)
(mm)
1350*2320
1630*2320
Tamaño del embalaje
(Largo x Ancho x Alto)
(mm)
725*135*95
725*135*95
Peso neto (kg)
Aproximadamente
1,9
Acerca de 2.2
Peso bruto (kg)
Acerca de 2.3
Aproximadamente
2,5
Modelo
DZC-80
DZC-90
Tamaño de la pantalla
80 pulgadas, 16:9
90 pulgadas, 16:9
Dimensiones del
producto
(Largo x Ancho x Alto)
(mm)
1840*2320
2025*2320
Tamaño del embalaje
(Largo x Ancho x Alto)
725*140*95
725*155*115
- 5 -
(mm)
Peso neto (kg)
Acerca de 2.4
Acerca de 2.6
Peso bruto (kg)
Acerca de 2.7
Acerca de 2.9
Modelo
DZC-100
DZC-110
Tamaño de la pantalla
100 pulgadas,
16:9
110 pulgadas, 16:9
Dimensiones del
producto
(Largo x Ancho x Alto)
(mm)
2270*2320
2470*2320
Tamaño del embalaje
(Largo x Ancho x Alto)
(mm)
725*155*115
725*155*115
Peso neto (kg)
Acerca de 2.9
Acerca de 3
Peso bruto (kg)
Acerca de 3.2
Acerca de 3.3
PACKAGE CONTENTS
- 6 -
ASSEMBLY STEPS
Stand
top pole
bottom pole
metal hanging
part connector
and plastic clip
fabric screen
- 7 -
PASO 1
ensamblar la parte superior e inferior horizontal postes y deslizar los
postes a través de la Bolsillo para barra de pantalla de tela
PASO 2
Utilice los clips de plástico en forma de U para fijar la pantalla de tela
con los postes superior e inferior en cada extremo.

- 8 -
PASO 3
Fije la parte colgante de metal en el poste superior. Asegúrese de que
esté en la posición media para mantenerlo equilibrar, luego colgar en
la parte superior del soporte.
PASO 4
Ajuste la altura del soporte y utilice el conector para fijar el poste
inferior en el soporte.
Nota: este producto es adecuado para entornos oscuros para
un mejor efecto de proyección.

- 9 -
COMPLETION

- 10 -
Fabricante: Shanghaimuxinmuyeyouxiangongsi
Dirección: Shuangchenglu 803nong11hao1602A-1609shi, baoshanqu,
shanghai 200000 CN.
Importado a AUS: SIHAO PTY LTD. 1 ROKEVA STREETEASTWOOD
NSW 2122 Australia
Importado a EE. UU.: Sanven Technology Ltd. Suite 250, 9166 Anaheim
Place, Rancho Cucamonga, CA 91730
REP
EC
E-CrossStu GmbH
Mainzer Landstr.69, 60329 Frankfurt am Main.
REP
UK
YH CONSULTING LIMITED.
C/O YH Consulting Limited Office 147, Centurion
House, London Road, Staines-upon-Thames, Surrey,
TW18 4AX


Tecnico Supporto e certificato di garanzia elettronica
www.vevor.com/support
SCHERMO DI PROIEZIONE
MANUALE D' USO
MODELLO N.: DZC-60, DZC-70, DZC-80, DZC-90, DZC-100, DZC-110
We continue to be committed to provide you tools with competitive price.
"Save Half", "Half Price" or any other similar expressions used by us only represents an
estimate of savings you might benefit from buying certain tools with us compared to the major
top brands and does not necessarily mean to cover all categories of tools offered by us. You
are kindly reminded to verify carefully when you are placing an order with us if you are
actually saving half in comparison with the top major brands.

- 1 -
MODELLO N.: DZC-60, DZC-70, DZC-80, DZC-90, DZC-100, DZC-110
Have product questions? Need technical support? Please feel free to
contact us:
Technical Support and E-Warranty Certificate
www.vevor.com/support
NEED HELP? CONTACT US!
This is the original instruction, please read all manual instructions
carefully before operating. VEVOR reserves a clear interpretation of our
user manual. The appearance of the product shall be subject to the
product you received. Please forgive us that we won't inform you again if
there are any technology or software updates on our product.
Projection Screen

- 2 -
AVVERTIMENTO:
di utilizzare il prodotto. La mancata osservanza di questa precauzione
potrebbe causare gravi lesioni. CONSERVARE QUESTO ISTRUZIONE
ASSEMBLY PRECAUTIONS
1. Montare solo secondo queste istruzioni. Un montaggio improprio può
creare pericoli.
2. Durante il montaggio indossare occhiali di sicurezza e guanti da lavoro
omologati ANSI.
3. Mantenere l'area di riunione pulita e ben illuminata.
4. Durante l'assemblea, tenere gli astanti lontani dall'area.
5. Non riunirsi quando si è stanchi o sotto l'effetto di alcol, droghe o
farmaci.
6. Le capacità del prodotto si applicano solo ai prodotti correttamente e
completamente assemblati.
7. Montare su una superficie piana, livellata, dura e liscia, in grado di
sostenere in modo sicuro lo schermo di proiezione.
8. Per ulteriori informazioni sulle parti elencate nelle pagine seguenti, fare
riferimento allo schema di montaggio di questo manuale. Disimballare e
separare tutte le parti in un'area di lavoro pulita.
9. La garanzia sarà valida solo se seguirai attentamente le istruzioni
sottostanti! Un uso e una cura impropri possono causare gravi lesioni
e/o danni!
10. Assicurati che la superficie scelta per l'installazione dello schermo sia
piana e sicura. Leggi quanto segue poiché eventuali danni alla superficie
dello schermo influiranno sulla qualità dell'immagine:
A. Non toccare la superficie dello schermo con le mani.
B. Non scrivere o disegnare sulla superficie dello schermo.
C. Non toccare la superficie dello schermo con le dita o con utensili
appuntiti perché potresti graffiarla o strapparla.
11. Ritrarre lo schermo dopo ogni utilizzo.
12. Non tirare con le mani i due lati del telo dello schermo, non piegare il
- 3 -
telo dello schermo.
13. Per evitare danni inutili, l'uso e la manutenzione dello schermo devono
essere eseguiti da un adulto.
USE PRECAUTIONS
PER PREVENIRE LESIONI GRAVI E MORTALI DOVUTE AL
RIBALTAMENTO:
1. NON SEDERSI O STARE IN PIEDI SU QUESTO OGGETTO.
2. Questo prodotto non è un giocattolo. Non permettere ai bambini di
giocare con o vicino a questo articolo.
3. Utilizzare solo su una superficie piana, livellata, dura e liscia, in grado di
sostenere in modo sicuro uno schermo di proiezione completamente
carico.
4. Utilizzare solo come previsto.
5. Ispezionare prima di ogni utilizzo. Non utilizzare se le parti sono
allentate o danneggiate.
6. Liberare un'area per montare lo schermo. Assicurarsi che l'area sia più
grande delle dimensioni dello schermo.
7. Ricordatevi che per alcune fasi del montaggio saranno necessarie
almeno due persone.
8. Non montare in aree con temperature elevate per evitare di
danneggiare lo schermo.
9. Prima di tutto, leggere attentamente questa Guida al montaggio.
Ignoring the safety warnings
may lead to injuries or
damaging the product.
Retract the screen after every
use.Leave it hanging for along
period may cause screen fabric
loose.
Avoid hanging anything on the
screen as it may cause the
screen to fall down.
The screen should be
installed at secure place
to avoid any accidents or
the screen falling down
Loose parts may cause
the screen fall down.
- 4 -
SALVA QUESTE ISTRUZIONI
TECHNICAL SPECIFICATIONS
Modello
Codice DZC-60
Codice DZC-70
Dimensioni dello
schermo
60 pollici, 16:9
70 pollici, 16:9
Dimensioni del prodotto
(Lunghezza x
Larghezza x
Altezza)(mm)
Dimensioni:
1350*2320
Dimensioni:
1630*2320
Dimensioni
dell'imballaggio
(Lunghezza x
Larghezza x
Altezza)(mm)
Dimensioni
Dimensioni
Peso netto (kg)
Circa 1,9
Circa 2.2
Peso lordo (kg)
Circa 2.3
Circa 2,5
Modello
Codice DZC-80
Codice DZC-90
Dimensioni dello
schermo
80 pollici, 16:9
90 pollici, 16:9
Dimensioni del
prodotto
(Lunghezza x
Larghezza x
Altezza)(mm)
Dimensioni:
1840*2320
Dimensioni:
2025*2320
Dimensioni
dell'imballaggio
Dimensioni:
725*140*95
Dimensioni
- 5 -
(Lunghezza x
Larghezza x
Altezza)(mm)
Peso netto (kg)
Circa 2.4
Circa 2.6
Peso lordo (kg)
Circa 2.7
Circa 2,9
Modello
DZC-100
Codice DZC-110
Dimensioni dello
schermo
100 pollici, 16:9
110 pollici, 16:9
Dimensioni del prodotto
(Lunghezza x
Larghezza x
Altezza)(mm)
Dimensioni:
2270*2320
Dimensioni:
2470*2320
Dimensioni
dell'imballaggio
(Lunghezza x
Larghezza x
Altezza)(mm)
Dimensioni
Dimensioni
Peso netto (kg)
Circa 2,9
Circa 3
Peso lordo (kg)
Circa 3.2
Circa 3.3
PACKAGE CONTENTS

- 6 -
ASSEMBLY STEPS
Stand
top pole
bottom pole
metal hanging
part connector
and plastic clip
fabric screen

- 7 -
PASSO 1
assemblare la parte superiore e inferiore orizzontale pali e far scorrere
i pali attraverso il tasca per palo con schermo in tessuto
PASSO 2
utilizzare le clip di plastica a forma di U per fissare la zanzariera in
tessuto con i pali superiore e inferiore su ciascuna estremità.

- 8 -
PASSO 3
fissare la parte metallica sospesa sul palo superiore assicurati che sia
nella posizione centrale per mantenerlo equilibrio, quindi appendetevi
alla cima del supporto.
PASSO 4
regolare l'altezza del supporto e utilizzare il connettore per fissare il
palo inferiore al supporto.
Nota: questo prodotto è adatto per ambienti bui per un migliore
effetto di proiezione

- 9 -
COMPLETION

- 10 -
Produttore: Shanghaimuxinmuyeyouxiangongsi
Indirizzo: Shuangchenglu 803nong11hao1602A-1609shi, baoshanqu,
shanghai 200000 CN.
Importato in AUS: SIHAO PTY LTD. 1 ROKEVA STREETEASTWOOD
NSW 2122 Australia
Importato negli USA: Sanven Technology Ltd. Suite 250, 9166 Anaheim
Place, Rancho Cucamonga, CA 91730
REP
EC
E-CrossStu GmbH
Mainzer Landstr.69, 60329 Frankfurt am Main.
REP
UK
YH CONSULTING LIMITED.
C/O YH Consulting Limited Office 147, Centurion
House, London Road, Staines-upon-Thames, Surrey,
TW18 4AX