To learn about other Suncast products please call
1-855-477-1260 or 1-630-879-2050.
Product Feedback? Email us at: feedback@suncastcommercial.com
© 2023 Suncast Corporation, Batavia, IL 0361539B
Cleaning Cart:
CC200
High-Security Cleaning Cart:
CCH255
*
*Included in parts bag
Tools Needed
Before You Begin...
• Read instructions thoroughly prior to assembly.
This kit contains parts that can be damaged if assembled incorrectly or in the wrong sequence.
• Please follow instructions.
Suncast is not responsible for replacing parts lost or damaged due to incorrect assembly.
• Check for all parts before you begin assembly.
Using the provided parts check list, verify that you have all the parts required to construct your cart.
Caution
• This product is not a toy and is not intended for use by children.
• Exercise caution when moving fully loaded product.
• Do not sit or stand on product.
Care Instructions
• We recommend cleaning your product with soap and water. DO NOT use bleach, ammonia, or other caus-
tic cleaners, and DO NOT use stiff bristle brushes. Rinse and dry well before using.
2
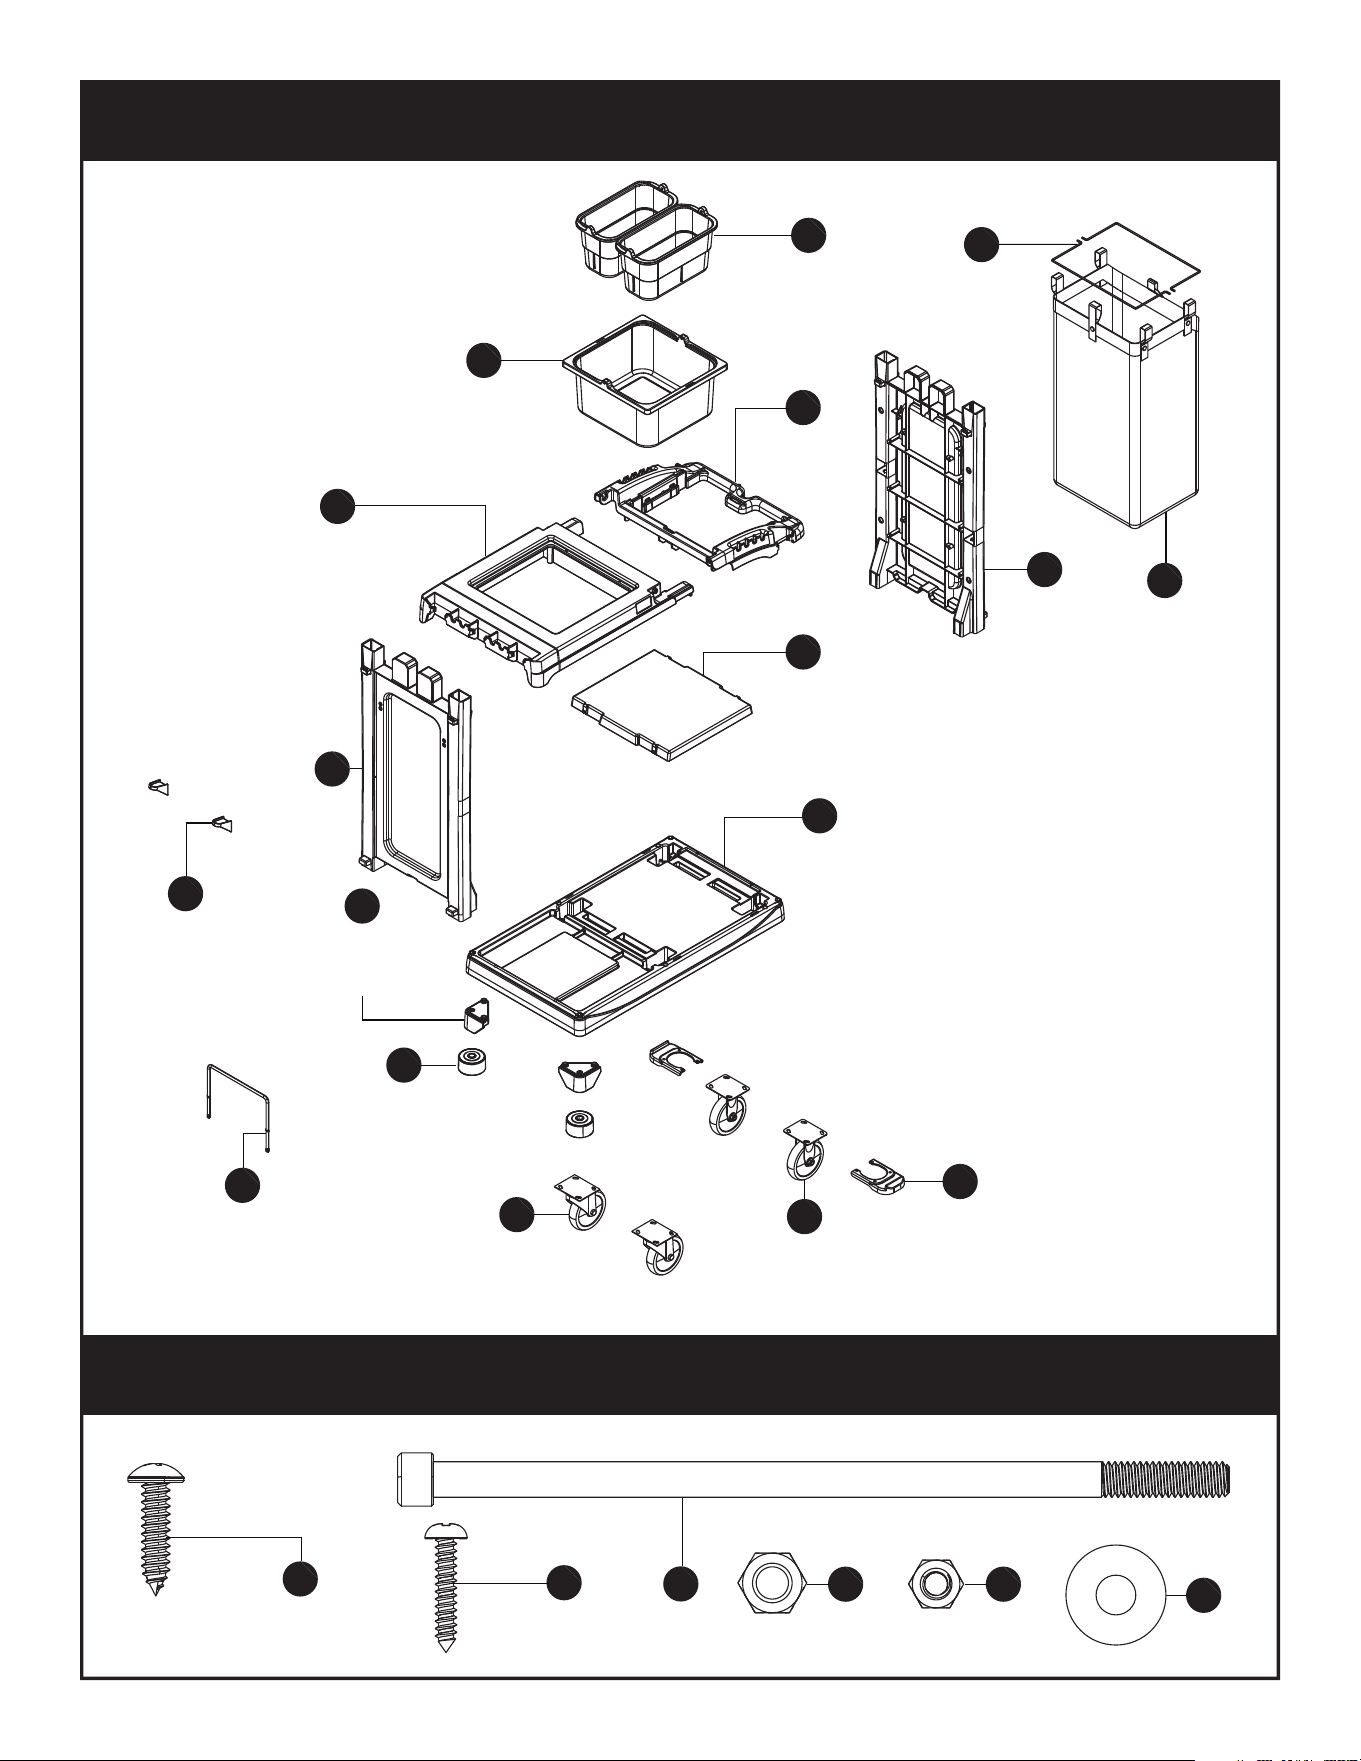
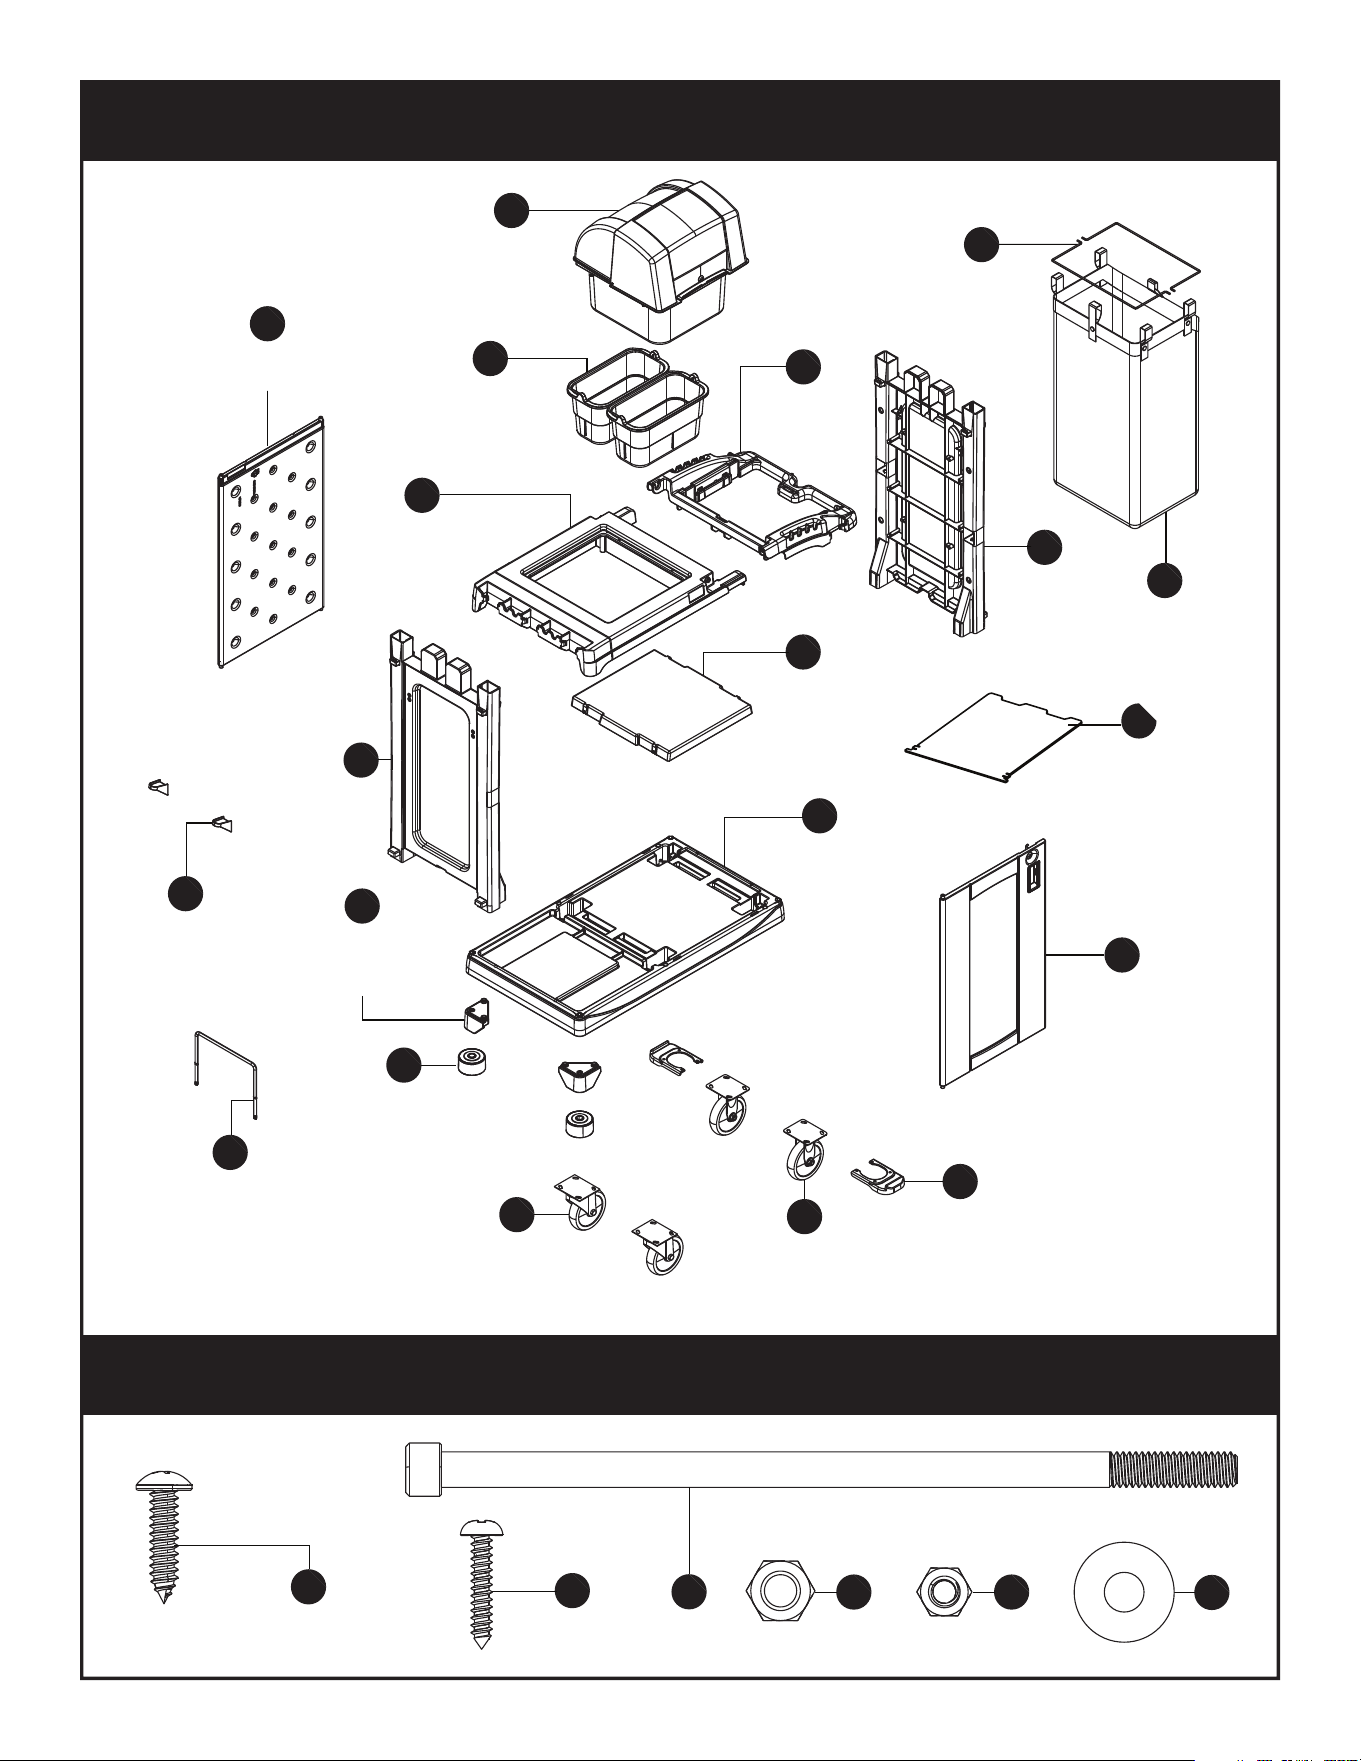
Hardware - CC200 Cleaning Cart
Parts - CC200 Cleaning Cart
AA
BB
CC
DD EE
FF
P
R
L
K
J
G
O
T
S
I
G
H
W
X
N
C
D
10252510
Base
0510836
Laundry Bag
10252110
Side Wall
x2
0440842
Bag Wire
x2
10252210
Shelf
x1
10252910
Large Bin
10252710
Folding Handle
10253510
Tool Rack/Top Frame
10252810
Sign Hooks
x2
10253310
Smaller Buckets
x2
0510920
Charging Wire
0440961
Fixed Casters
x2
10253210
Wall Glides
x2
10252310
Roller Brackets
x2
0440962
Swivel Casters
x2
0463698
Roller Assembly
x2
Bolt
x2
Lock Nut
x2
Lock Nut
x2
Self Tapping Screw
x44
#10 x 1 Screw
x8
Washer
x2
3
Hardware - CCH255 High-Security Cleaning Cart
Parts - CCH255 High-Security Cleaning Cart
B
M
A
C
P
R
L
I
G
K
H
N
J
G
O
S
T
D
X
HH
0464022
Bin Cover and
Large Bin
0B0053010
Door
0B0053110
Back Panel
10253310
Smaller Buckets
x2
0440961
Fixed Casters
x2
10253210
Wall Glides
x2
10252510
Base
0510836
Laundry Bag
10252110
Side Wall
x2
10252310
Roller Brackets
x2
0440842
Bag Wire
x2
10252210
Shelf
x1
10253510
Tool Rack/Top Frame
10252810
Sign Hooks
x2
0440962
Swivel Casters
x2
0510920
Charging Wire
0463698
Roller Assembly
x2
10252710
Folding Handle
0510959
Bag Cover
x1
AA
BB
CC
DD EE FF
Bolt
x2
Lock Nut
x2
Lock Nut
x2
Self Tapping Screw
x44
#10 x 1 Screw
x8
Washer
x2
4
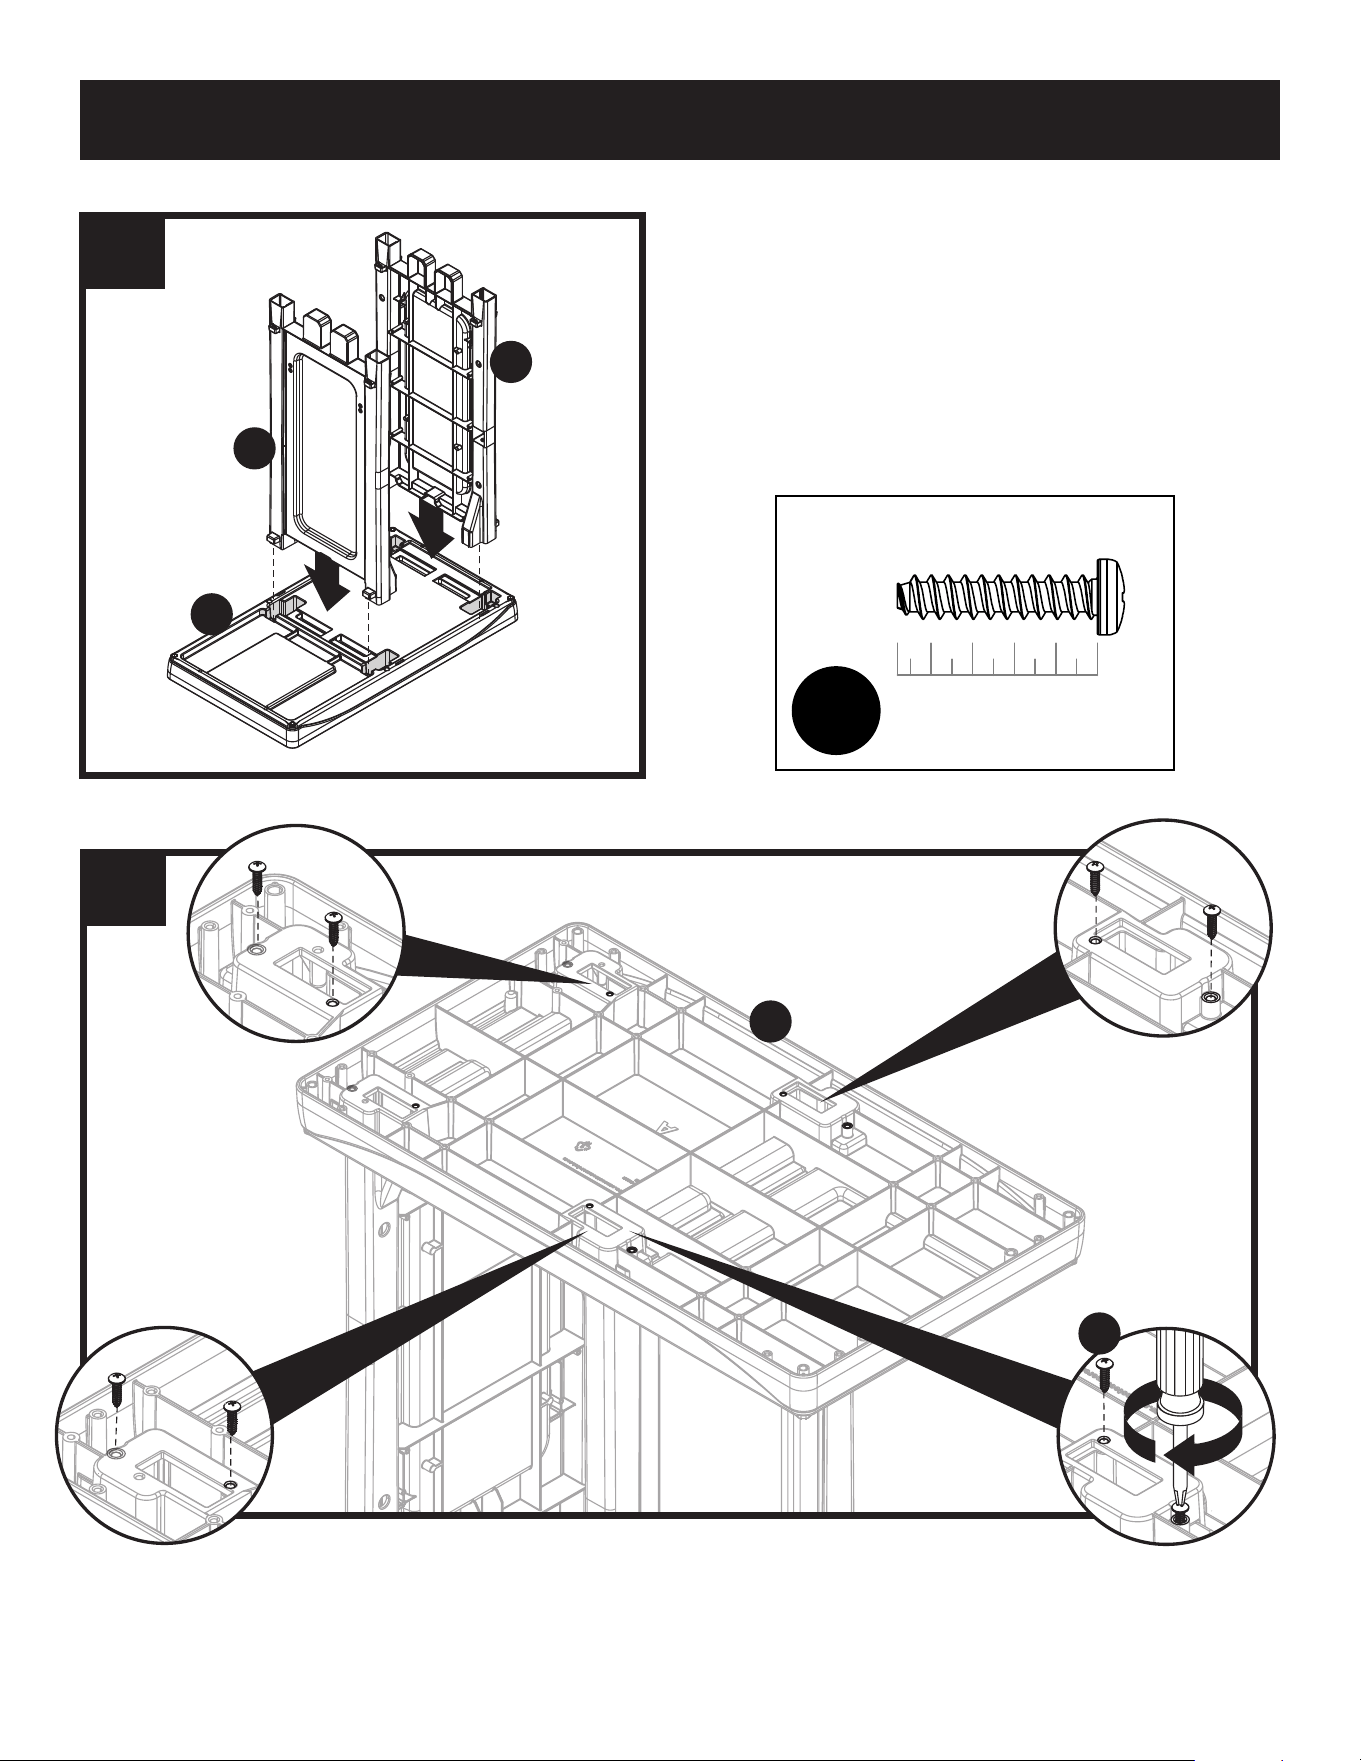
Turn cart assembly upside down, and secure sides to base (L) with eight screws (AA).
AA
L
2
x8
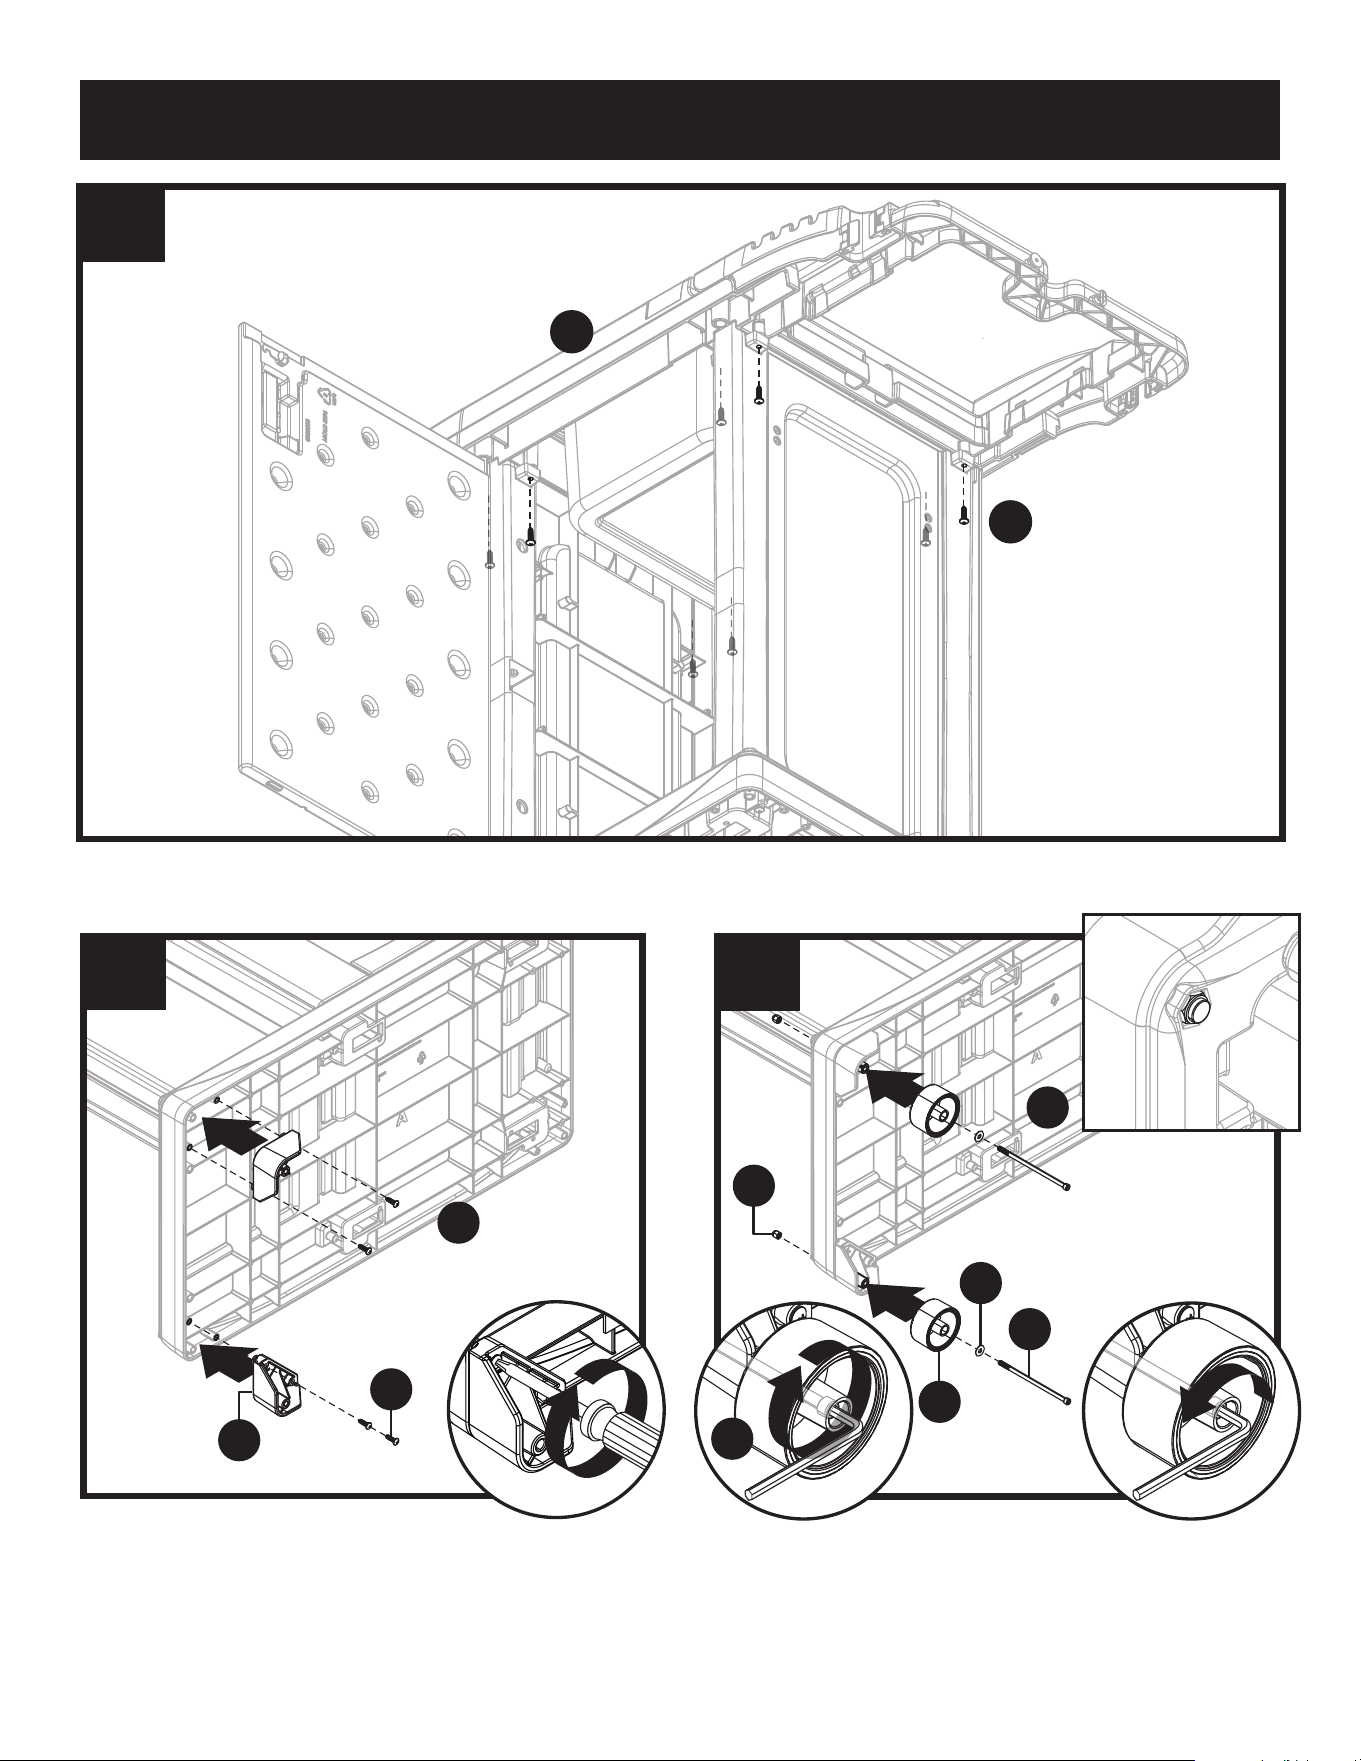
Install cart sides (G) into slots on base (L).
Assembly
1
G
G
L
10
AA
5
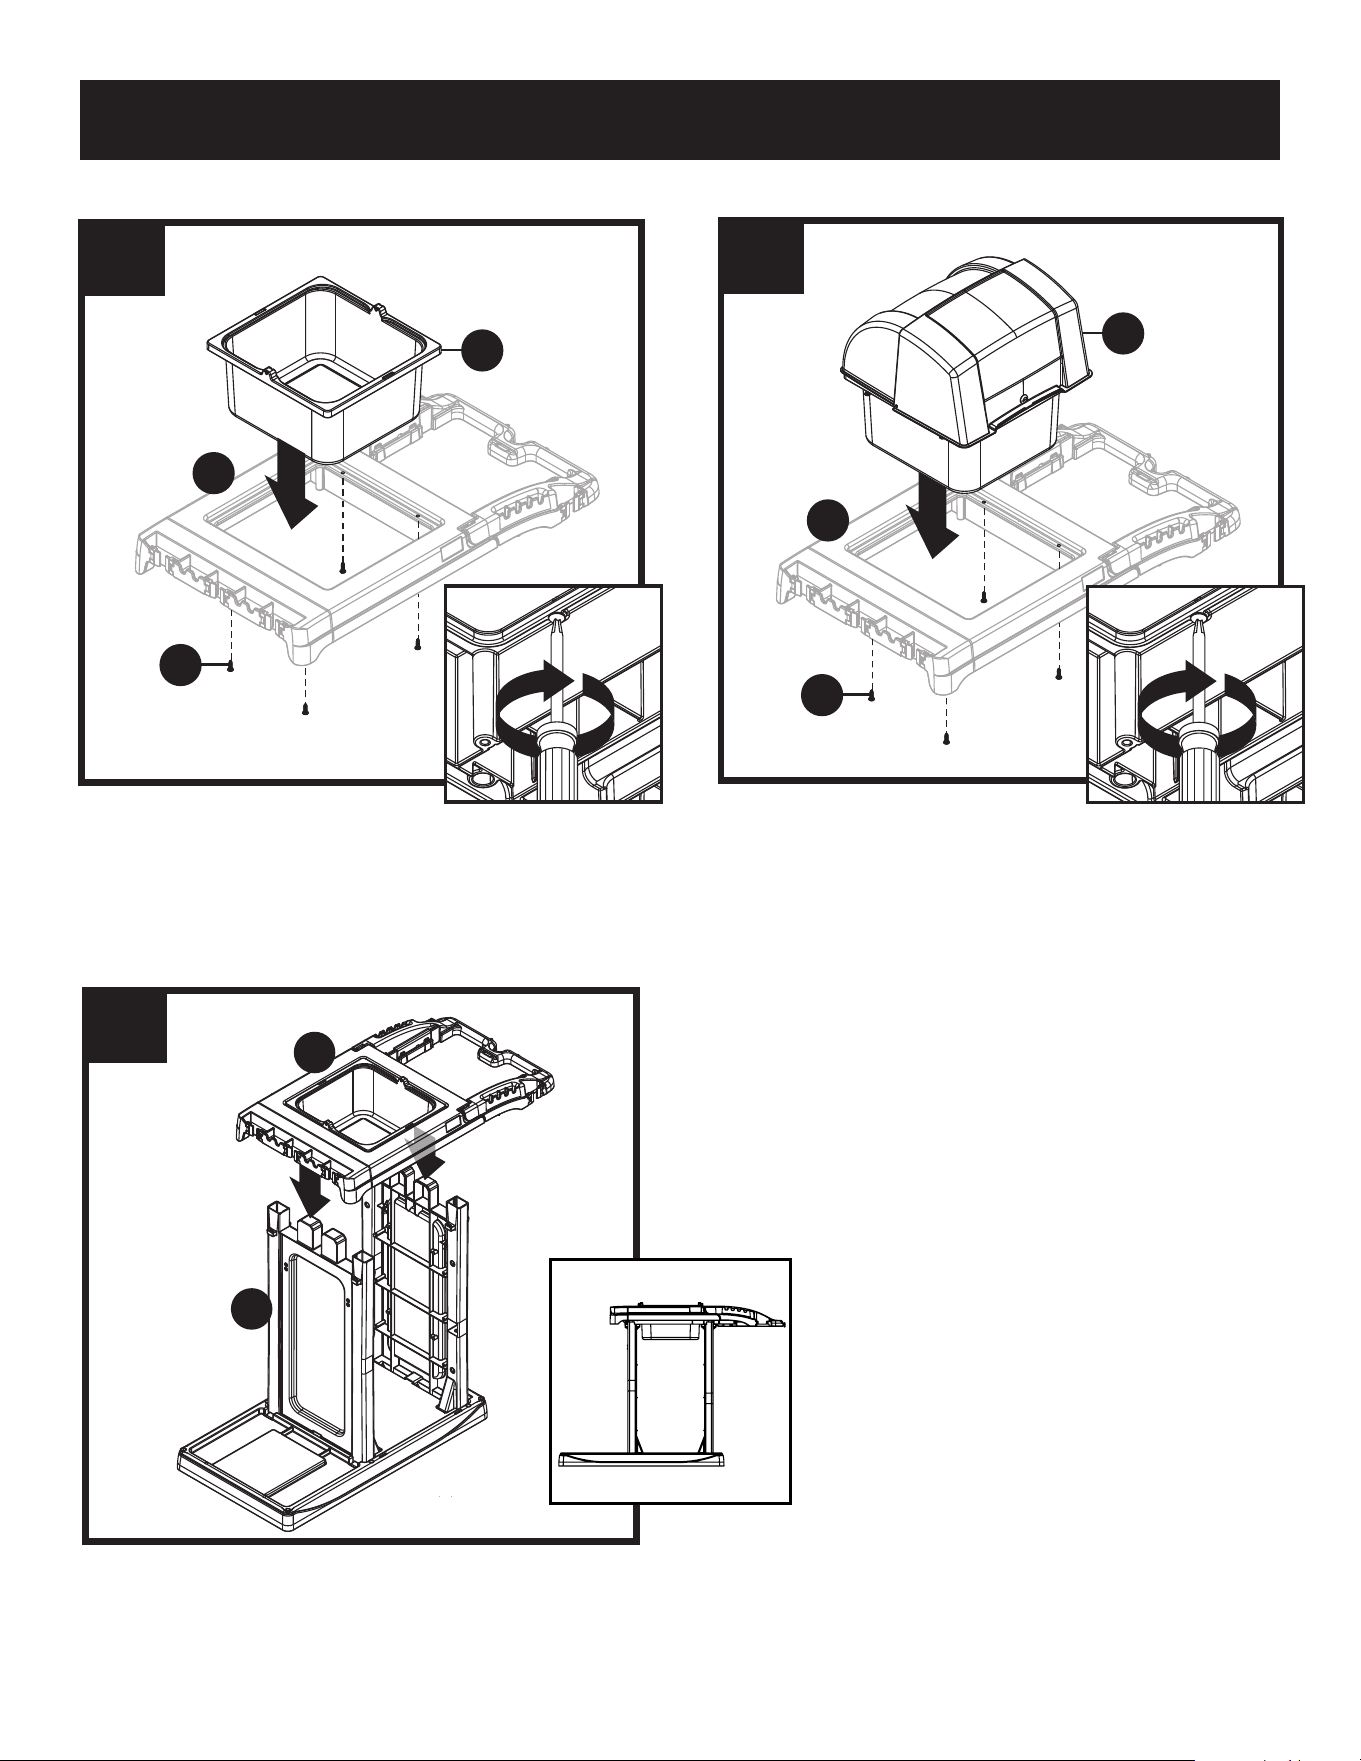
CCH255 install Bin Cover with Large Bin (B) to top panel
(N). Secure from below with four screws (AA).
x4
2
3b
x4
AA
N
B
1
CC200, install Large Bin (W) to top panel (N). Secure
from below with four screws (AA).
x4
2
3a
x4
AA
N
W
1
Assembly
4
G
N
Stand cart upright and place top panel (N) onto side
panels (G). DO NOT use screws to attach at this point.
Note: CC200 top panel is pictured throughout the rest
of the manual. CCH255 follows the same sequence of
steps.
6
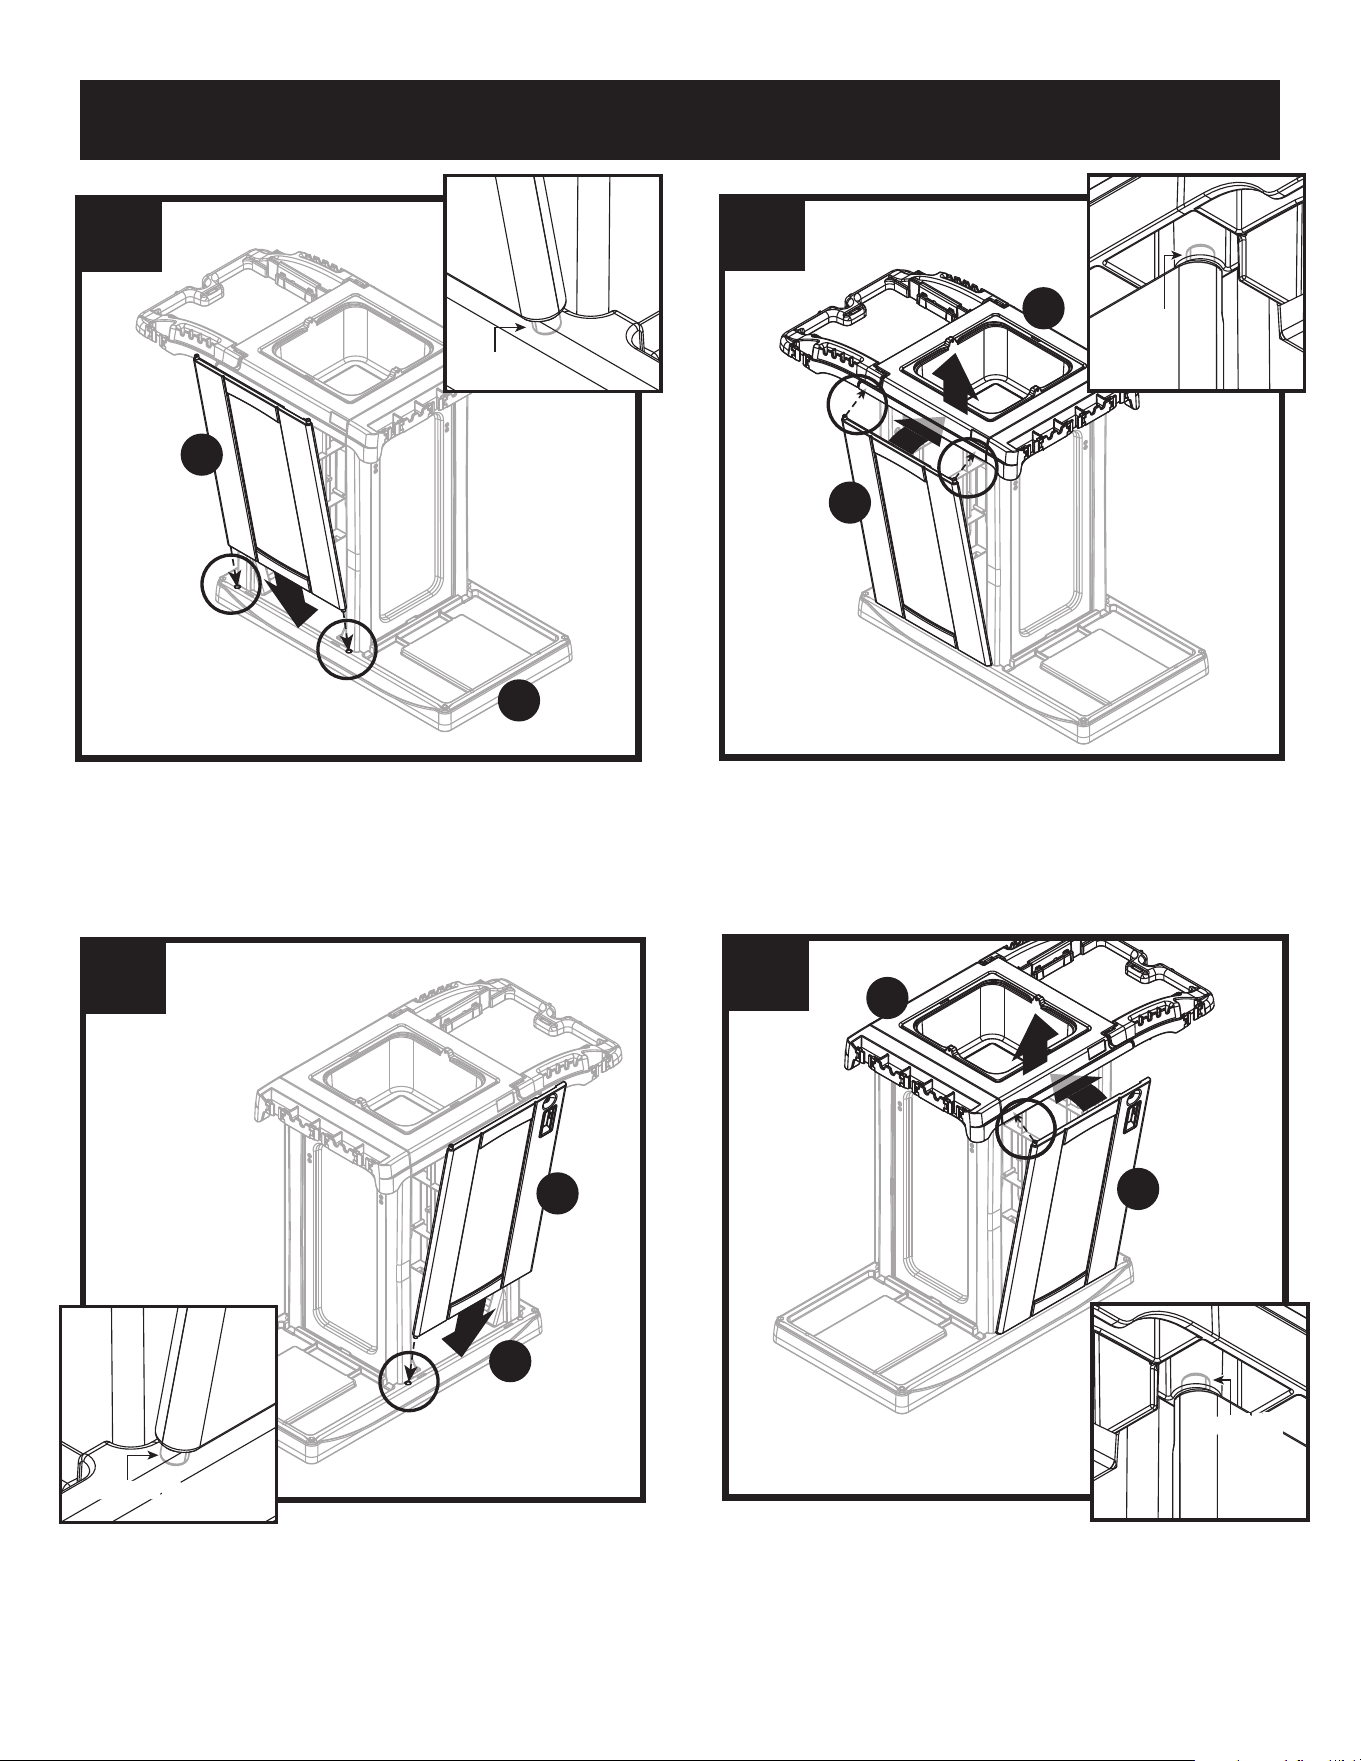
Assembly - Steps 5-8 are for CCH250, skip this page for CC200
On CCH255, at a slight angle, insert lower dowel pins
of back panel (A) into holes in base (L). Skip this step for
CC200,
Note: Dowel pins must be engaged to base before
proceeding.
5
A
L
Dowel Pin
On CCH255, sightly lift up top panel (N) and insert dowel
pins on top of back panel (A) into holes on underside of
top panel. Skip this step for CC200,
Note: Dowel pins must be engaged to top panel before
proceeding.
6
A
N
1
Dowel Pin
2
7
M
L
Dowel PinDowel Pin
On CCH255, at a slight angle, insert lower dowel pin of
locking door panel (M) into hole on base (L). Skip this
step for CC200,
Note: Dowel pin must be engaged to base before
proceeding.
On CCH255 slightly lift up top panel (N) and insert
dowel pin on top of locking door panel (M) into holes on
underside of top panel. Skip this step for CC200.
Note: Dowel pin must be engaged to top panel before
proceeding.
2
1
8
M
Dowel PinDowel Pin
N
7
Assembly
Secure top panel (N) with eight screws (AA). Install four screws on exterior, then four screws on interior corners.
(Interior corner screws will be a blind installation.)
x8
AA
N
9
1
1
2
10
L
x2
x4
AA
K
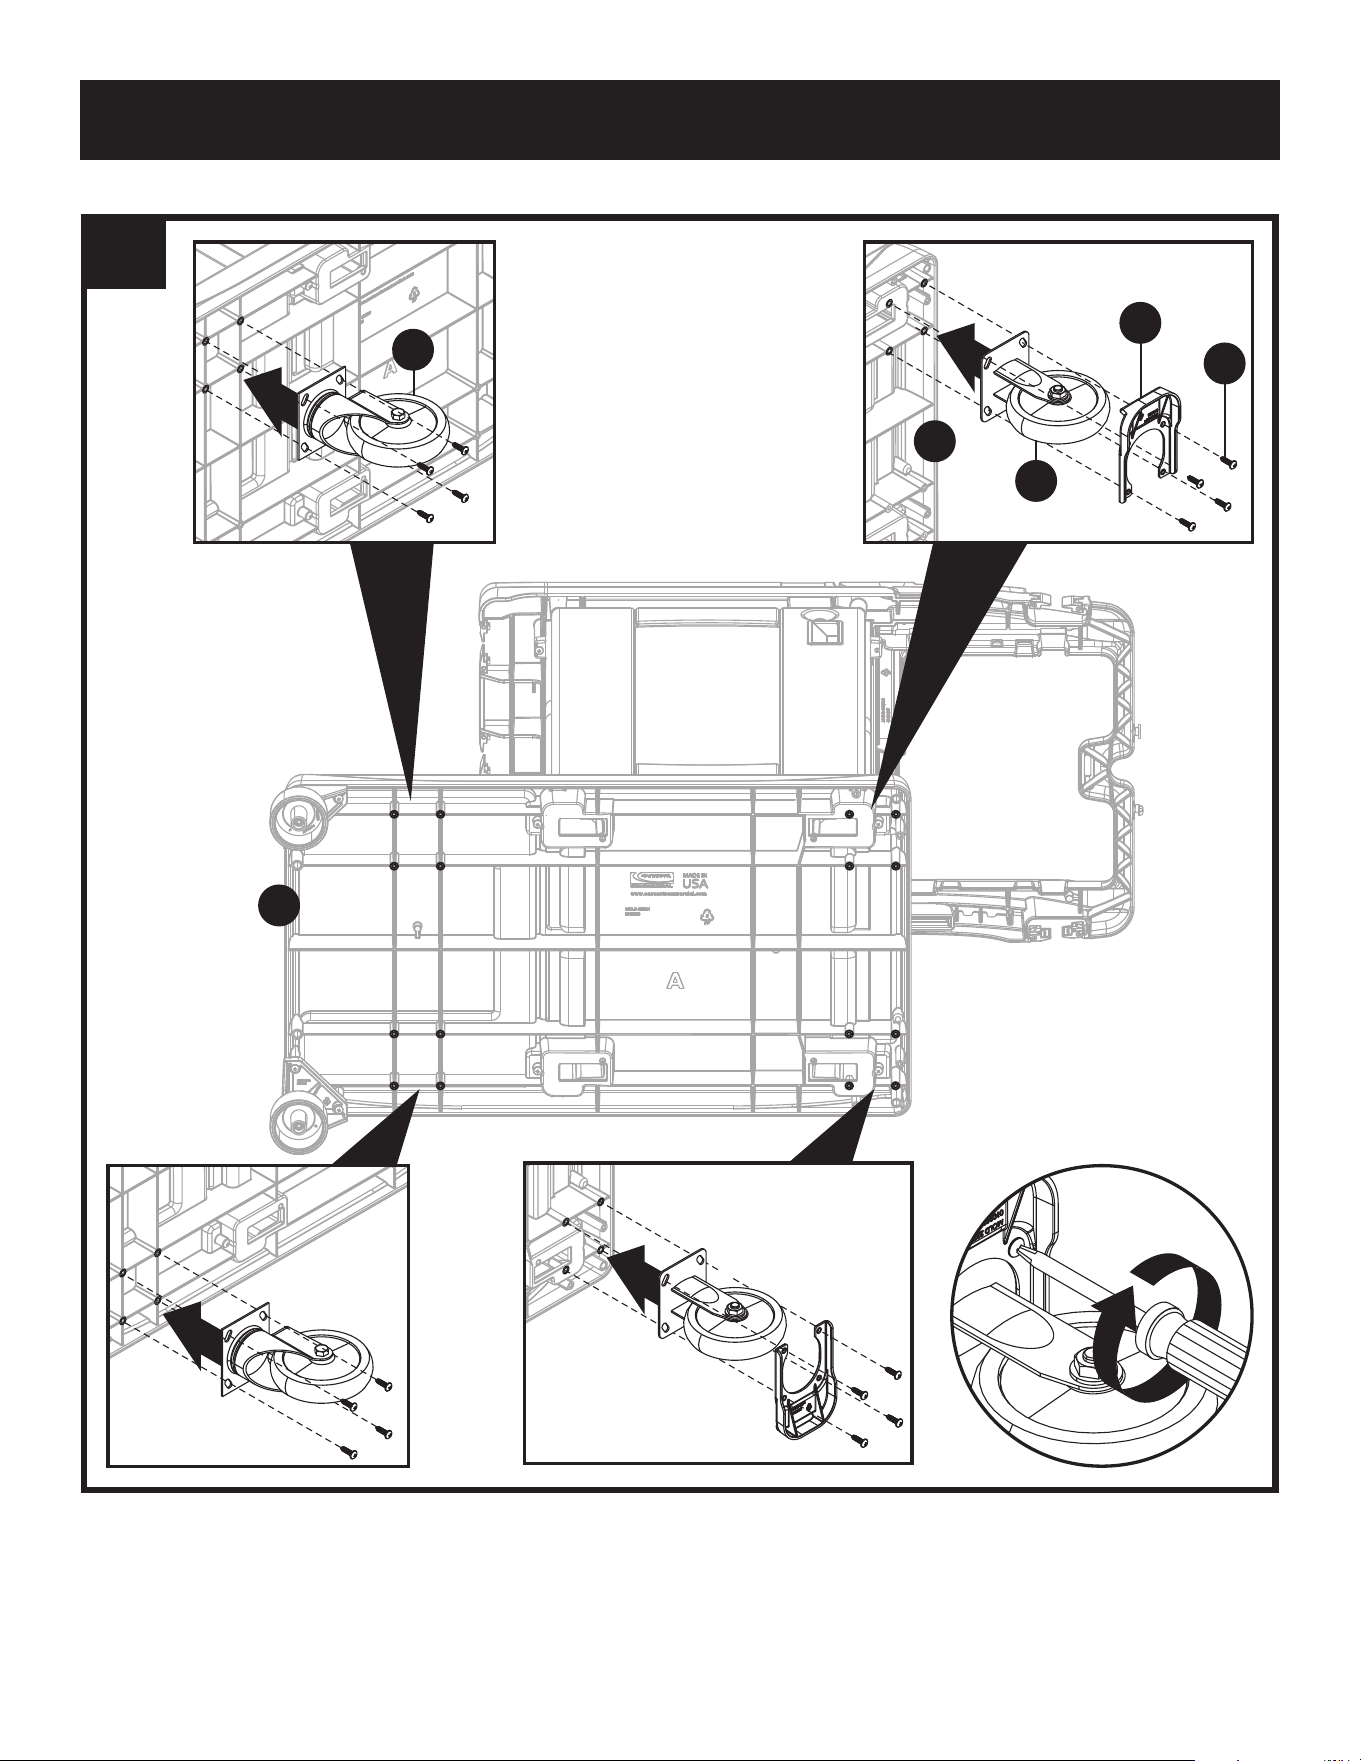
Place cart carefully on its side. Install roller brackets (K)
to front corners of base (L). Secure with two screws (AA)
for each roller bracket.
1
1
2
3
11
L
x2
CC
x2
EE
T
x2
FF
x2
T
Install a long bolt (CC) and washer (FF) through each
roller (T). Secure each bolt with a capped nut (EE).
Tighten bolt with an Allen wrench (nut will fit into a slot
at top of base (L).Tighten until nut is pulled all the way
into the hexagonal hole. Loosen bolt slightly until
roller can spin.
8
Assembly
1
1
1
1
2
12
L
L
P
x2
R
x16
AA
x2
x2
O
Attach swivel casters (O) to location shown in illustration above. Slide a wall guide (R) onto both fixed casters (P) and
attach as shown on handle side. Secure each caster with four screws (AA).
9
Assembly (cont)
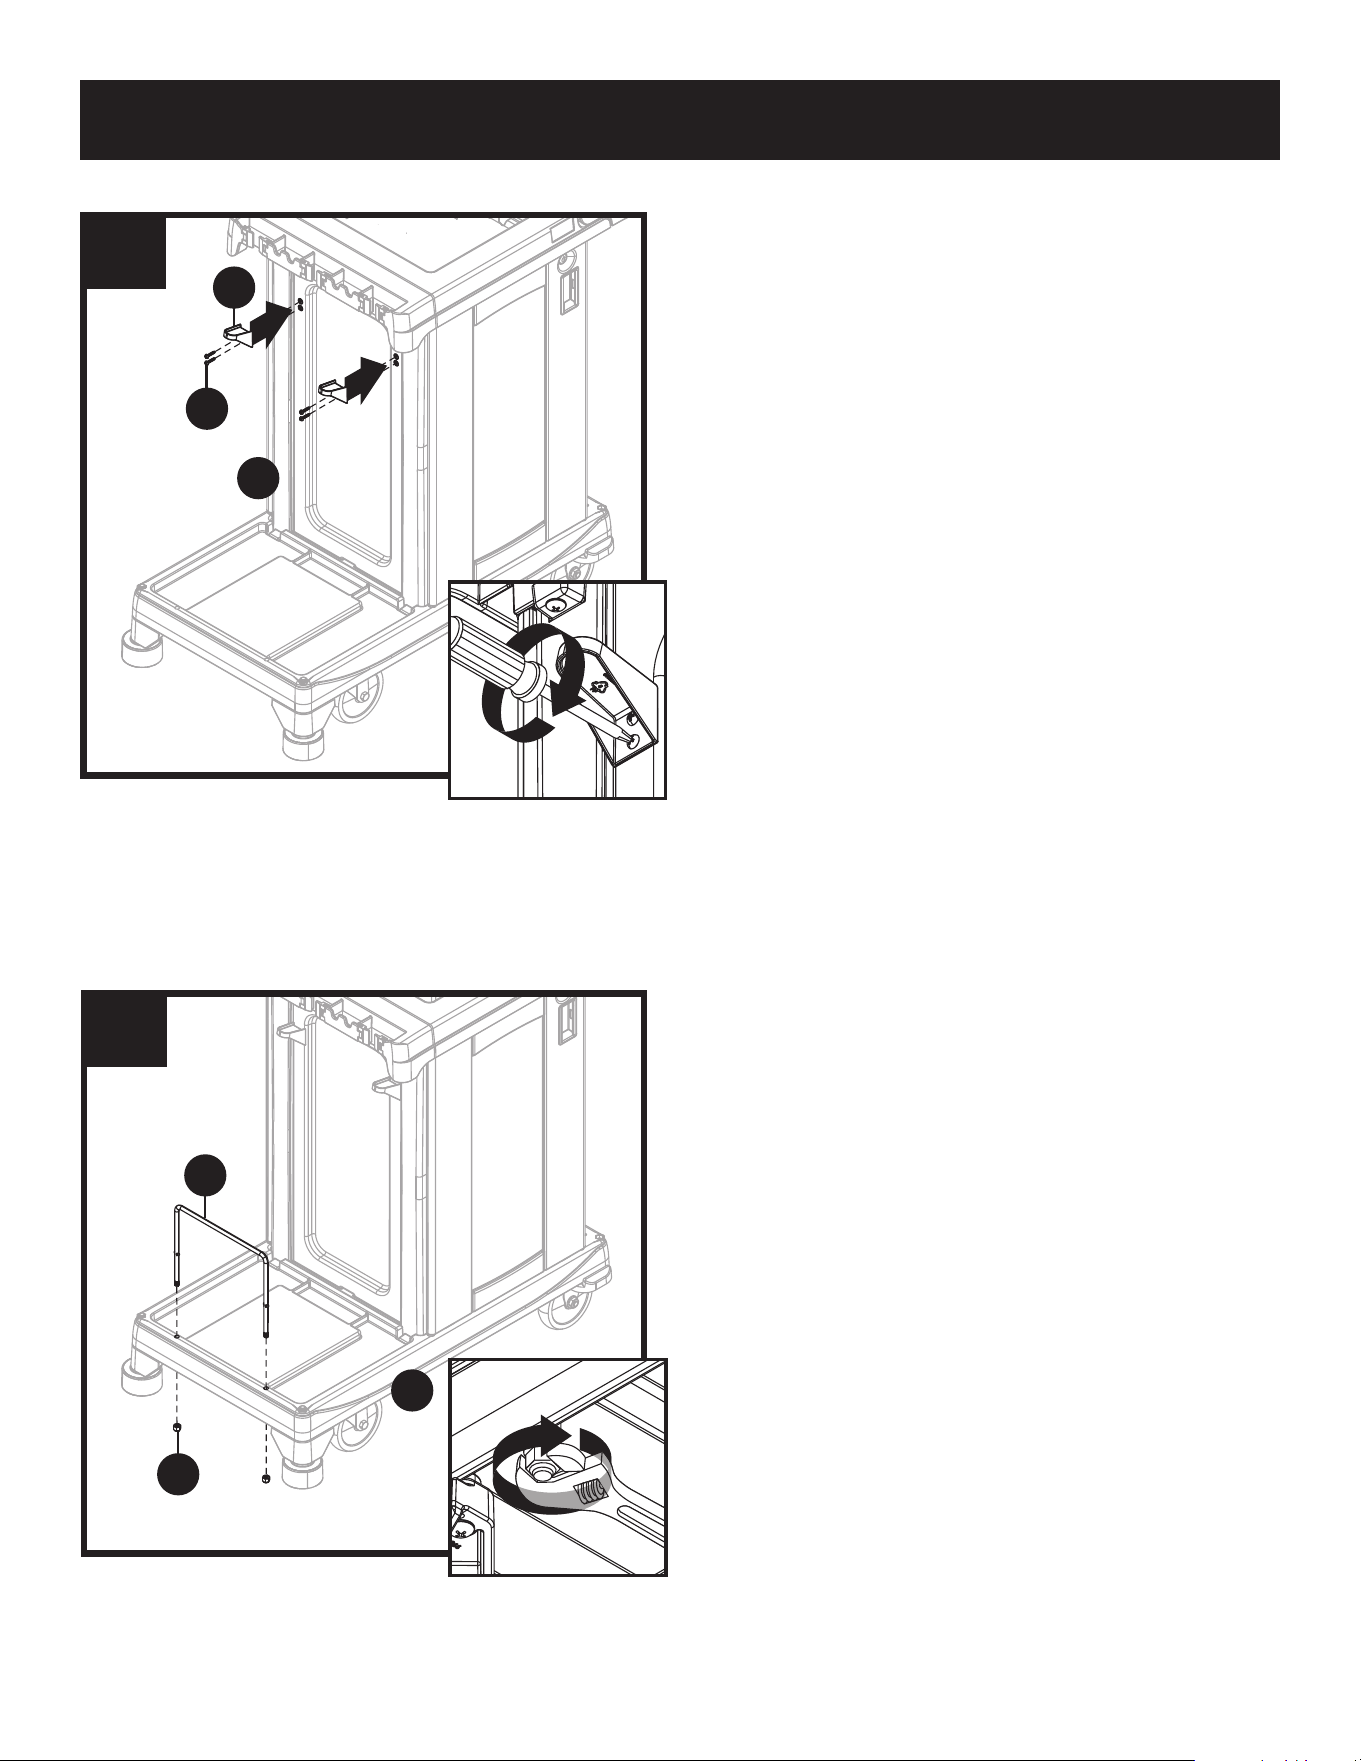
Stand cart upright. Install sign hooks (J) to front side
cart panel (G). Secure with two screws (BB) for each
sign hook.
1
1
2
13
G
x4
BB
x2
J
14
L
x2
DD
S
Install charging wire (S) into front of base (L). Secure
with nuts (DD).
Note: Charging wire (S) is optional, and can be removed
to fit bucket if needed.
Assembly (cont)
10
1
2
2
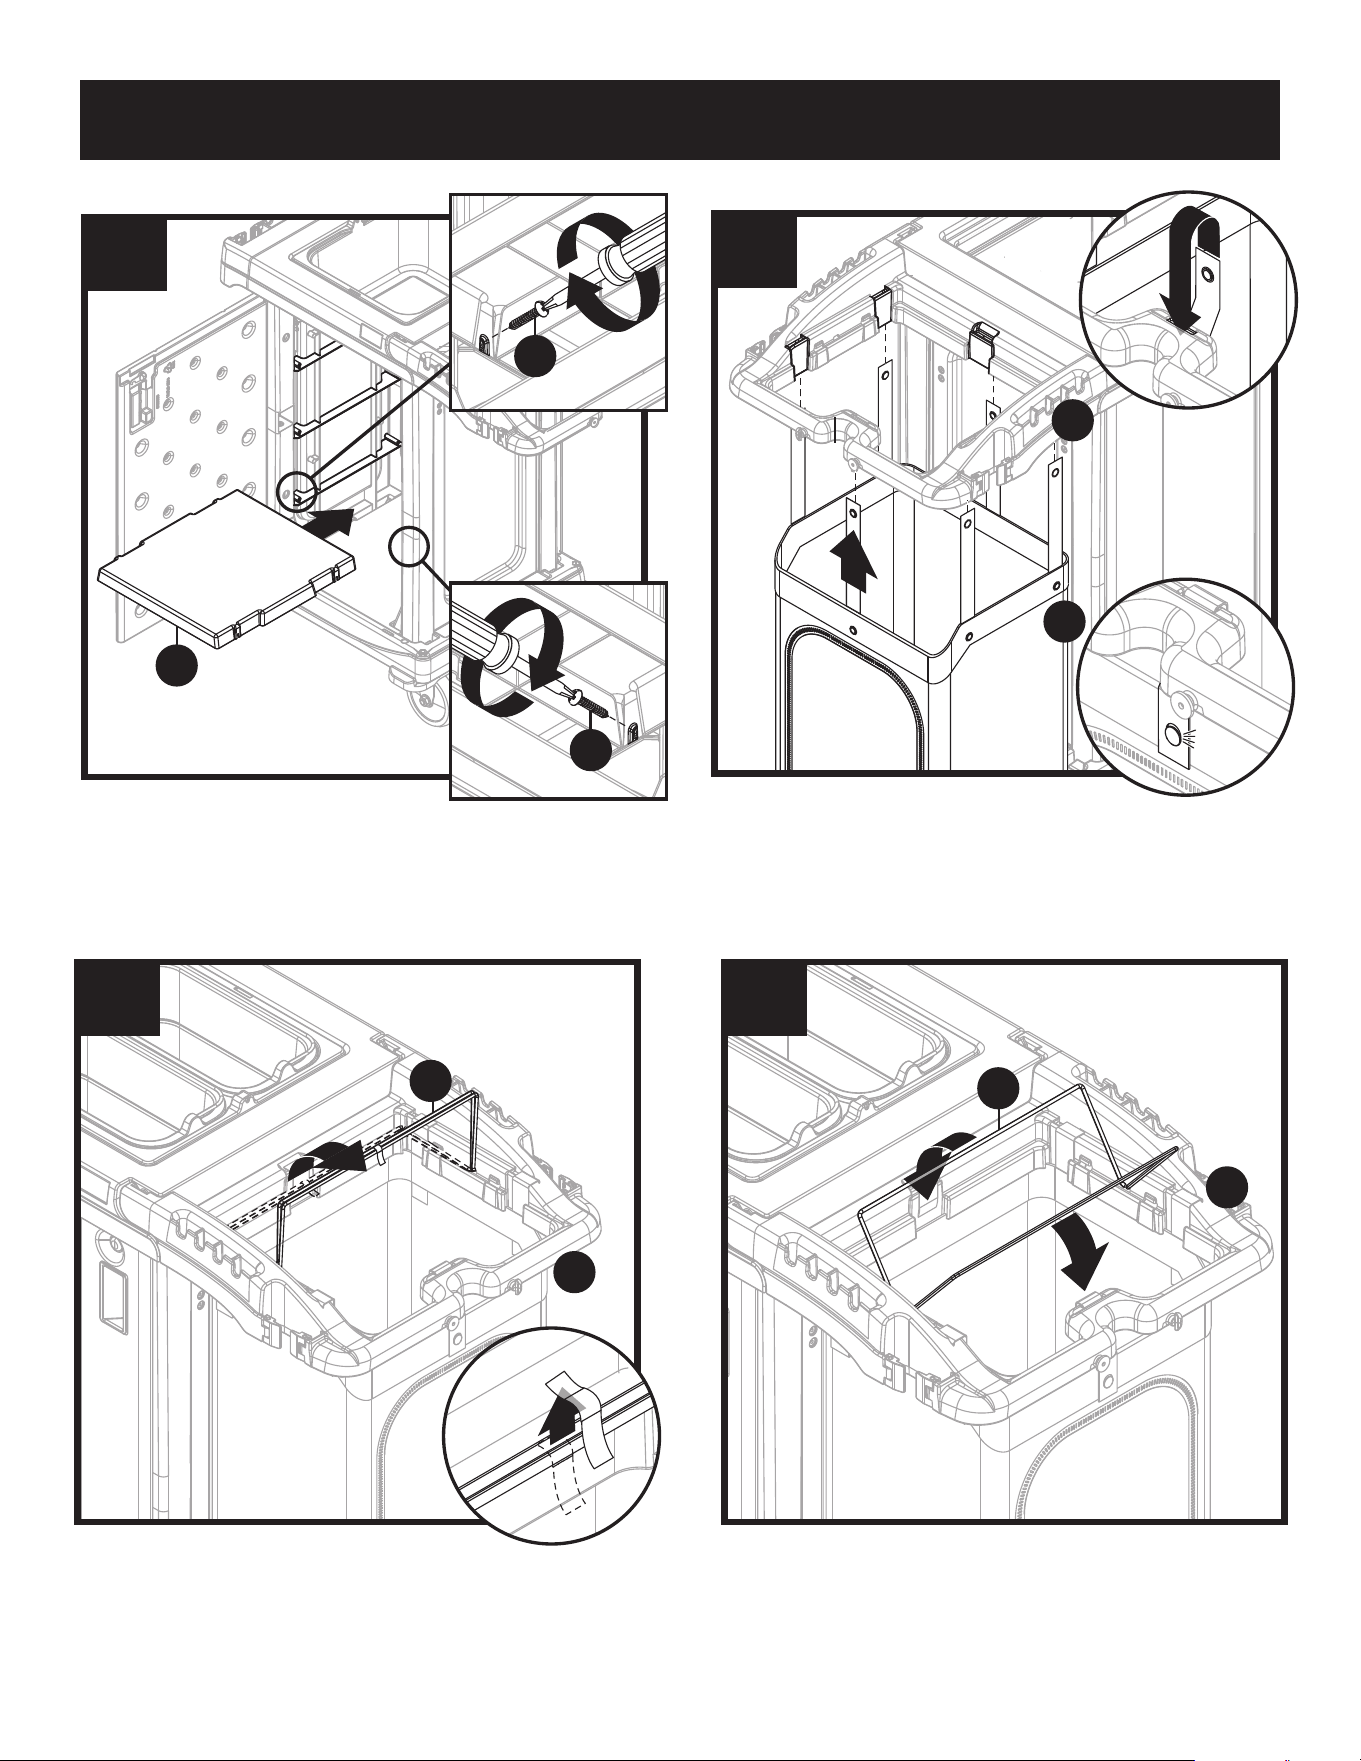
15
H
BB
BB
At the desired height, insert shelf into cart at an angle.
Once in position, lay flat on the shelf supports. Secure
with screw (BB) on each front side of shelf.
Install laundry bag (I) loops into slots on top frame (F)
and snap closed to secure.
1
3
2
16
X
I
1
1
2
17
D
F
Lift plastic bag wires (D) into upper position and remove
tape securing wires together.
18
D
F
Fold plastic bag wires (D) down into position on top
frame (F).
11
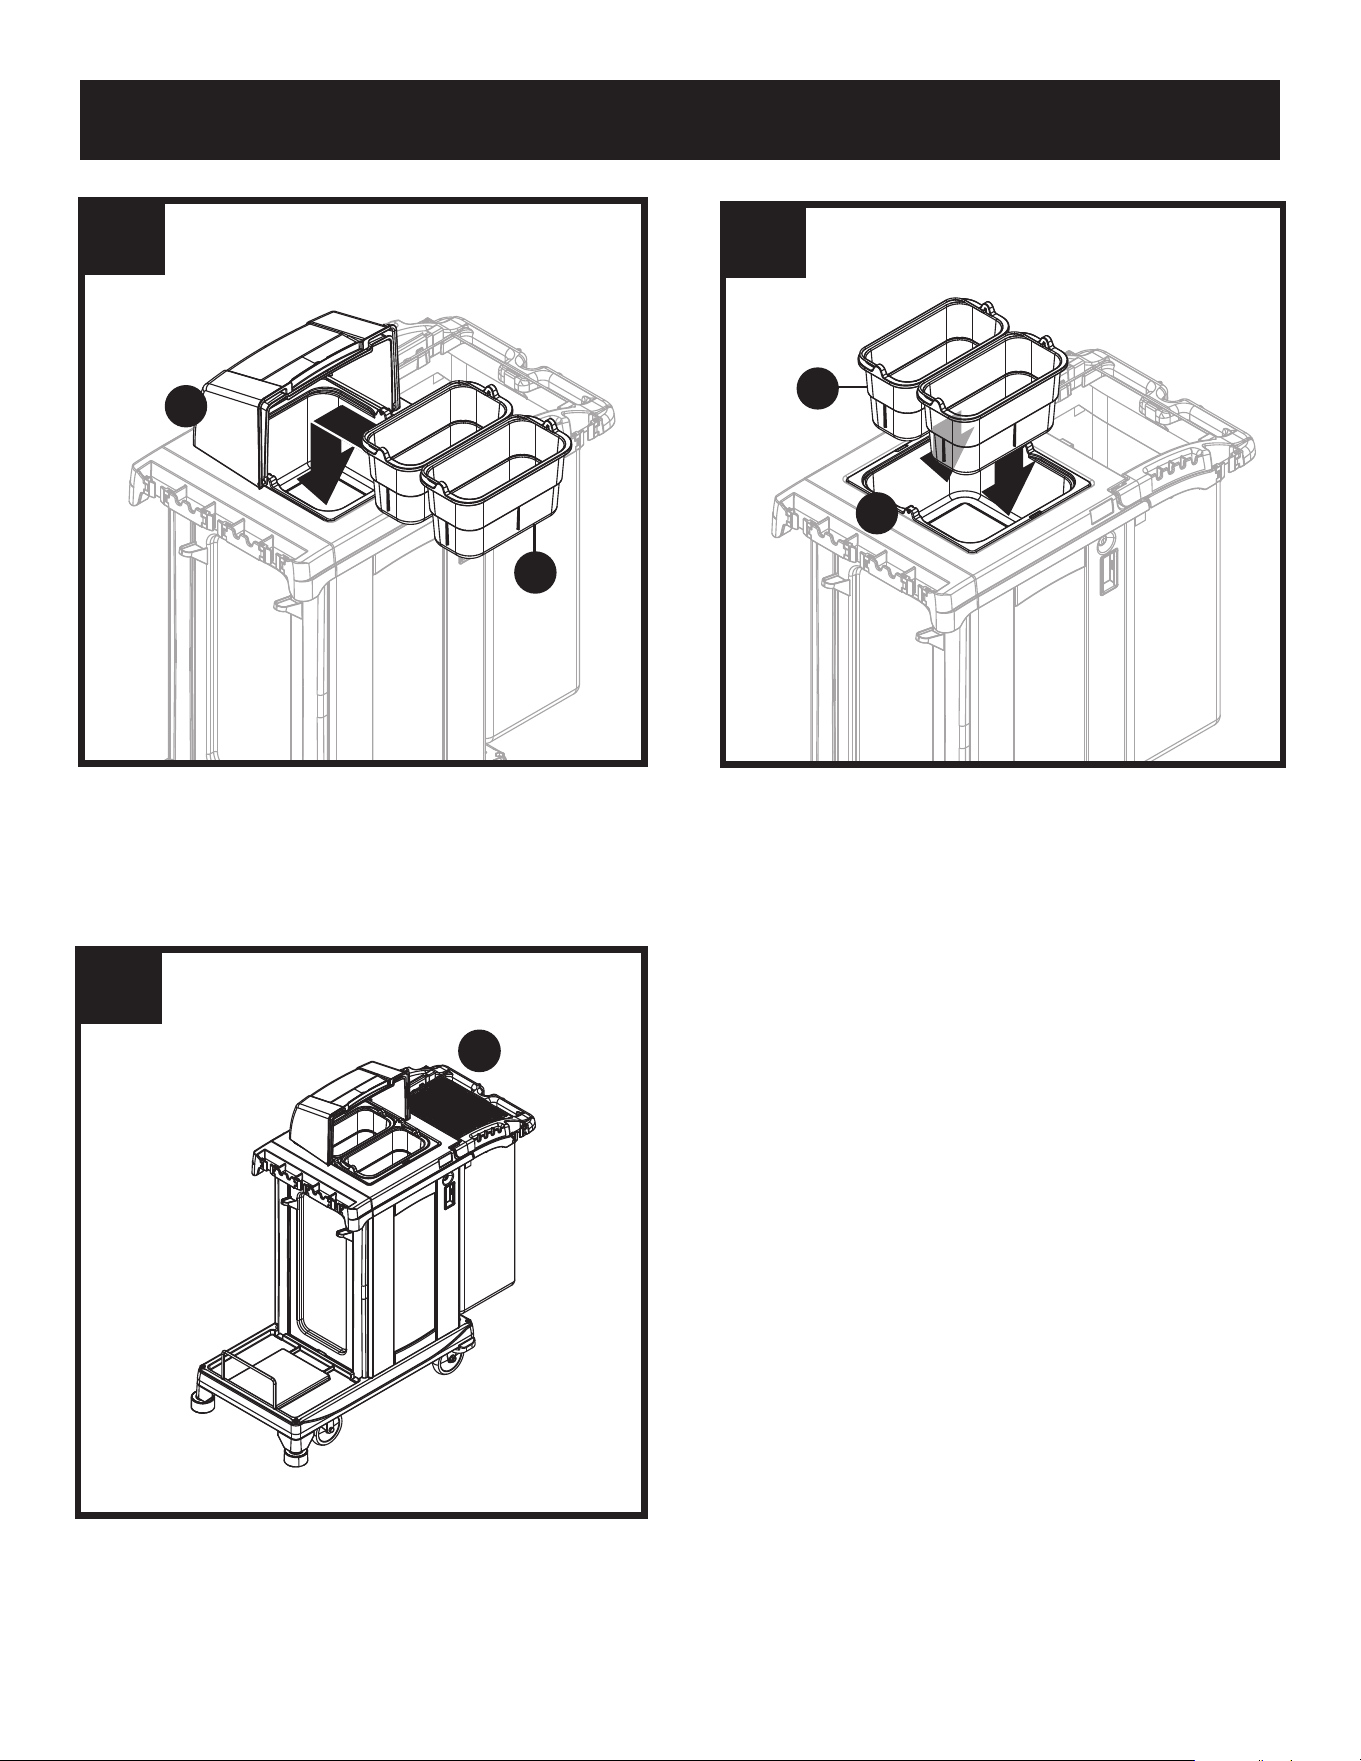
Assembly (cont)
19a
B
C
CCH255, open Bin Cover (B) and install Small Buckets
(C) into Large Bin.
19b
C
W
CC200, install small buckets (C) into Large Bin (W).
20
HH
CCH255, place lid cover (HH) over bag.