Refrigerator
TOP MOUNTED FREEZER SERIES
USER MANUAL
MRT14D2BST/MRT14D3BST
MRT14D2BBB/MRT14D3BBB
MRT14D2BWW/MRT14D3BWW
Warning notices: Before using this product, please read this manual carefully and keep it for future reference.
The design and specifications are subject to change without prior notice for product improvement.
Consult with your dealer or manufacturer for details.
The diagram above is just for reference. Please take the appearance of the actual product as the standard.


LANGUAGES
EN English
FR French
ES Spanish

01
EN
THANK YOU LETTER
Thank you for choosing Midea! Before using your new Midea product, please read
this manual thoroughly to ensure that you know how to operate the features and
CONTENTS
THANK YOU LETTER
------------------------------------------- 01
SPECIFICATIONS
------------------------------------------------- 02
PRODUCT OVERVIEW
------------------------------------------ 03
PRODUCT INSTALLATION
------------------------------------ 04
OPERATION INSTRUCTIONS
--------------------------------- 11
CLEANING AND MAINTENANCE
----------------------------14
TROUBLESHOOTING
-------------------------------------------16

02
EN
SPECIFICATIONS
Product model
MRT14D2B**/MRT14D3B**
Total Storage Volume 14.2 cu.ft.
Rated Voltage
115V~/60Hz
Rated Current 1.2A
Overall Dimension (H x W x D)
60.6 in x 27.6 in x 28.8 in
03
EN
PRODUCT OVERVIEW
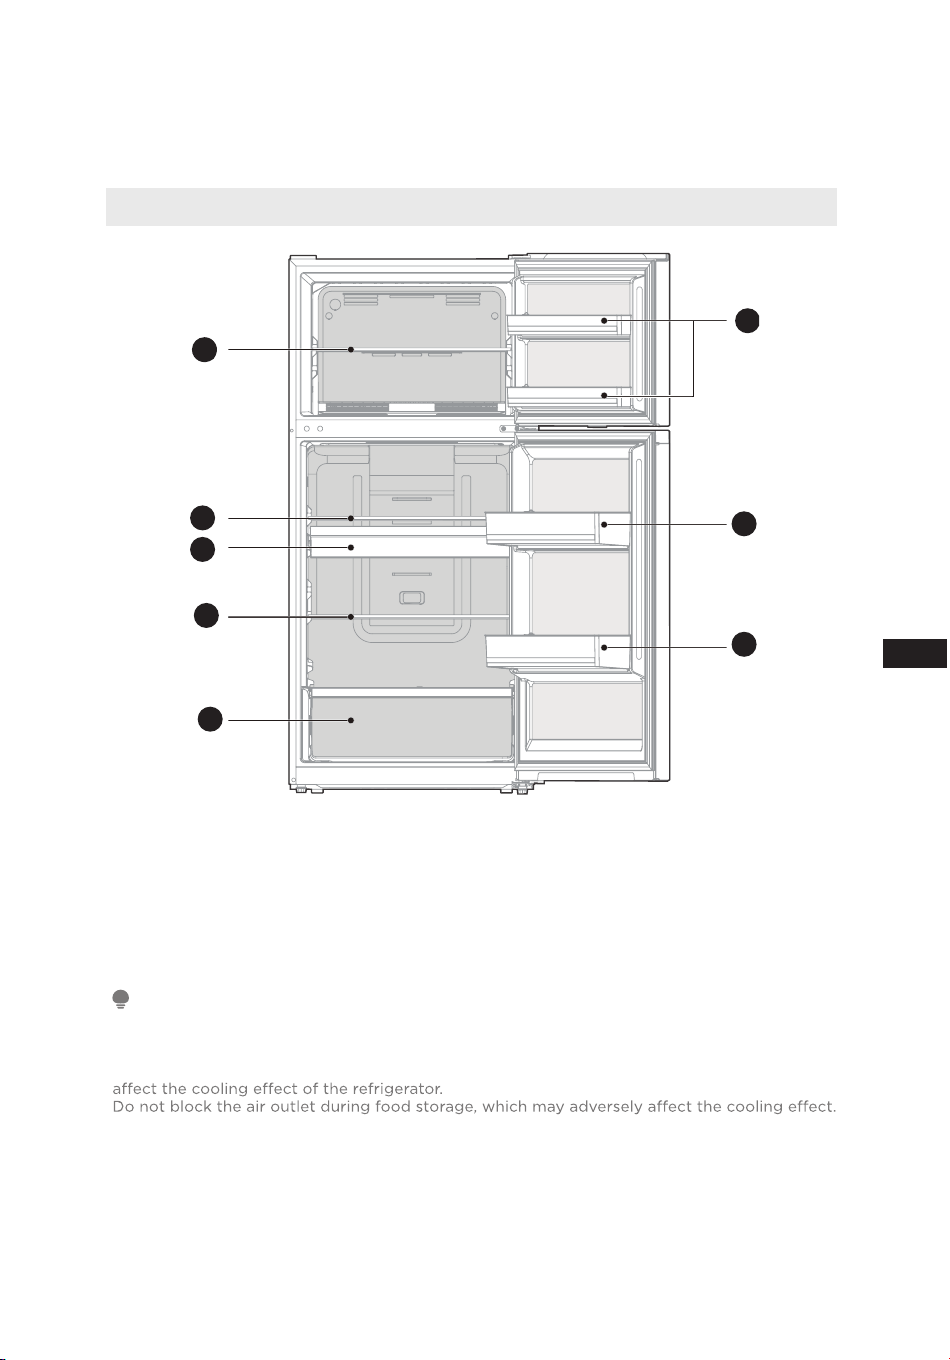
Names of components
1
2
3
4
5
6
7
8
1
Freezer glass shelf
5
Fruit and vegetable box
2
Refrigerator glass shelf 1
6
Freezer door trays
3
Tray(Optional)
7
Refrigerator door tray 1
4
Refrigerator glass shelf 2
8
Refrigerator door tray 2
ATTENTION
The picture above is only for reference. The actual configuration will depend on the physical
product or statement by the distributor.
When the refrigerator is powered on for the initial time, storing too much food may adversely
If the temperature in fridge compartment is cold, please adjust the switcher to the weaker
position. If the temperature in fridge compartment is not cold enough, please adjust the
switcher to the strong position.

04
EN
PRODUCT INSTALLATION
Installation Instructions
Finding a suitable location
• This refrigerator is designed to be free standing only, and should not be
recessed or built-in.
• The refrigerator should be placed in a well-ventilated indoor place; the ground
shall be flat and sturdy.
• Keep away from heat and avoid direct sunlight. Do not place the refrigerator in
moist or watery places to prevent rust or reduction of insulating eect.
Dimensions and Clearances
• Too small of a distance from adjacent items may result in the degradation
of freezing capability and increased electricity costs. Allow over 100 mm of
clearance from each adjacent wall when installing the appliance.
Required space for
air circulation
Top View
>100mm
>100mm
>100mm
>100mm
>100mm
>100mm
Providing a proper power supply
• Check your local power source. This refrigerator requires a AC115 V, 60 Hz
power supply.
• Use a receptacle that accepts the grounding prong. The power cord is
equipped with a 3-prong (grounding) plug which mates with a standard 3-prong
(grounding) wall outlet to minimize the possibility of electric shock hazard
from this refrigerator.
CAUTION
The refrigerator should always be plugged into its own individual electrical outlet
which has a voltage rating that matches the rating plate.
Never unplug your refrigerator by pulling on the power cord. Always grip the plug
firmly and pull straight out from the outlet.
Start to use
• The refrigerator shall stay for 2 hours before connecting power when it is firstly
started.
• The refrigerator shall run 2 to 3 hours before loading fresh or frozen foods; the
refrigerator shall run for more than 4 hours in summer in advance considering
that the ambient temperature is high.
05
EN
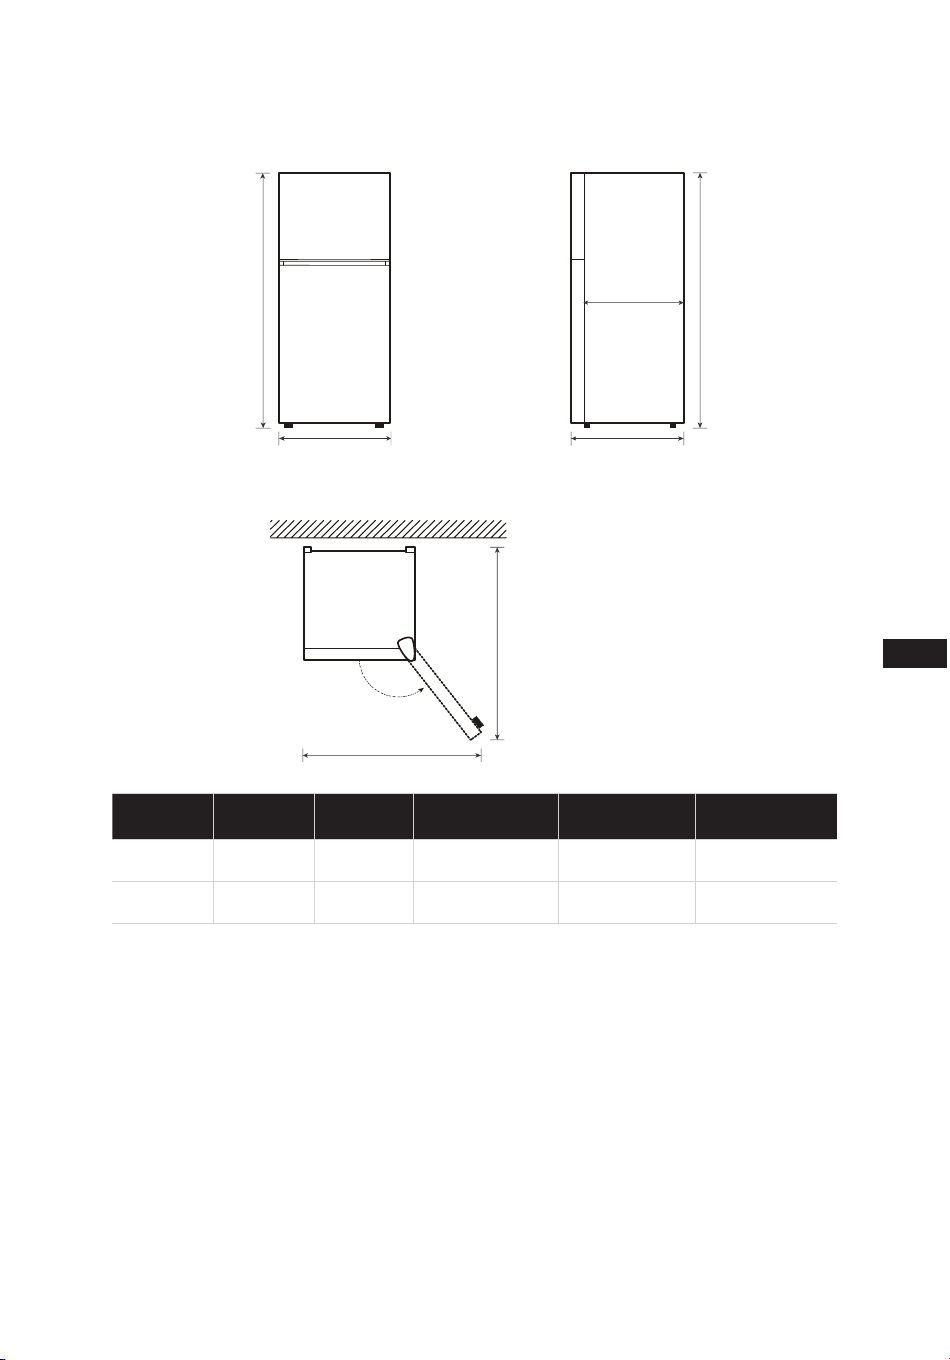
Space requirement diagram (when the door is open and when the door is closed)
B
A
C
D
E
135 °
C1
C
Width
Overall
Height
Depth
Depth Only
Cabinet
Door Open
135
o
Width
Doors Open
135
o
Depth
A B C C1 D E
700 1540 731 650 1085 1310
Notice: All dimensions in mm
B
06
EN
Door right-left change
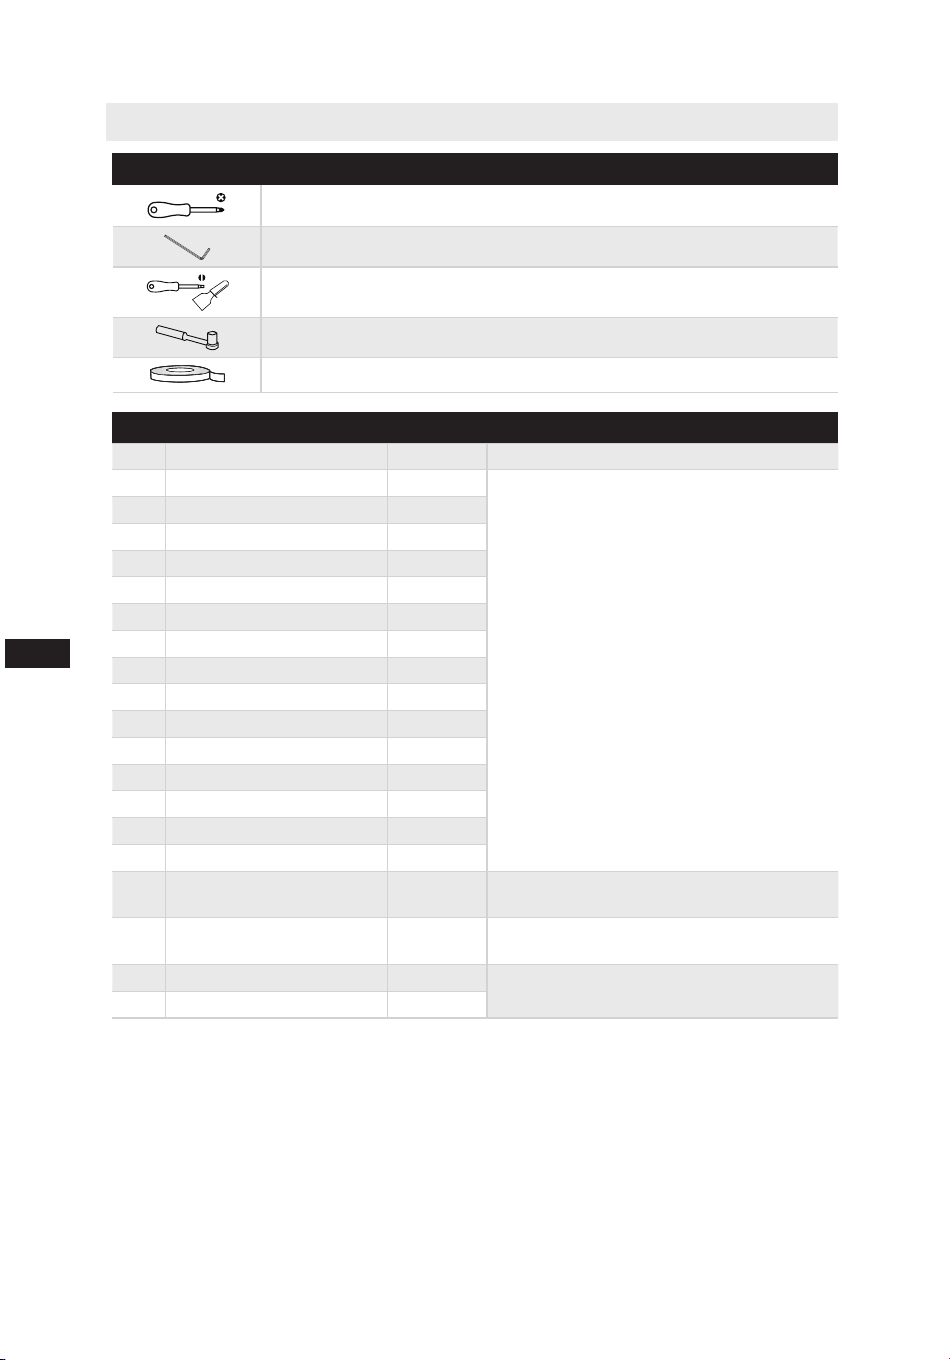
List of tools to be provided by the user
Cross screwdriver
Allen wrench
Putty knife, Thin-blade screwdriver
5/16” socket and ratchet
Masking tape
Parts to be used for door reverse
SN Parts Quantity Notes
1 Upper hinge 1
Pre-installed on the box and still needs
to be used when changing the door
2 Upper hinge cover 1
3 Upper hinge axle sleeve 1
4 Upper hinge screw 3
5 Hole cover 1
6 Middle hinge screw 2
7 Middle hinge 1
8 Hole plug 2
9 Adjustable foot 1
10 Center sill screw 2
11 Center sill screw cap 1
12 Lower hinge screw 3
13 Lower hinge 1
14 Stopper 2
15 Stopper screw 2
16 Right door self-locking 2
Pre-installed on the door body, removed
when changing the door, and retained
17 Left door self-locking 2
Put it in the accessory bag and use it
when changing the door
18 Screw self-locking 2
Pre-installed on the door and still needs
to be used when changing the door
19 Hole plug 1
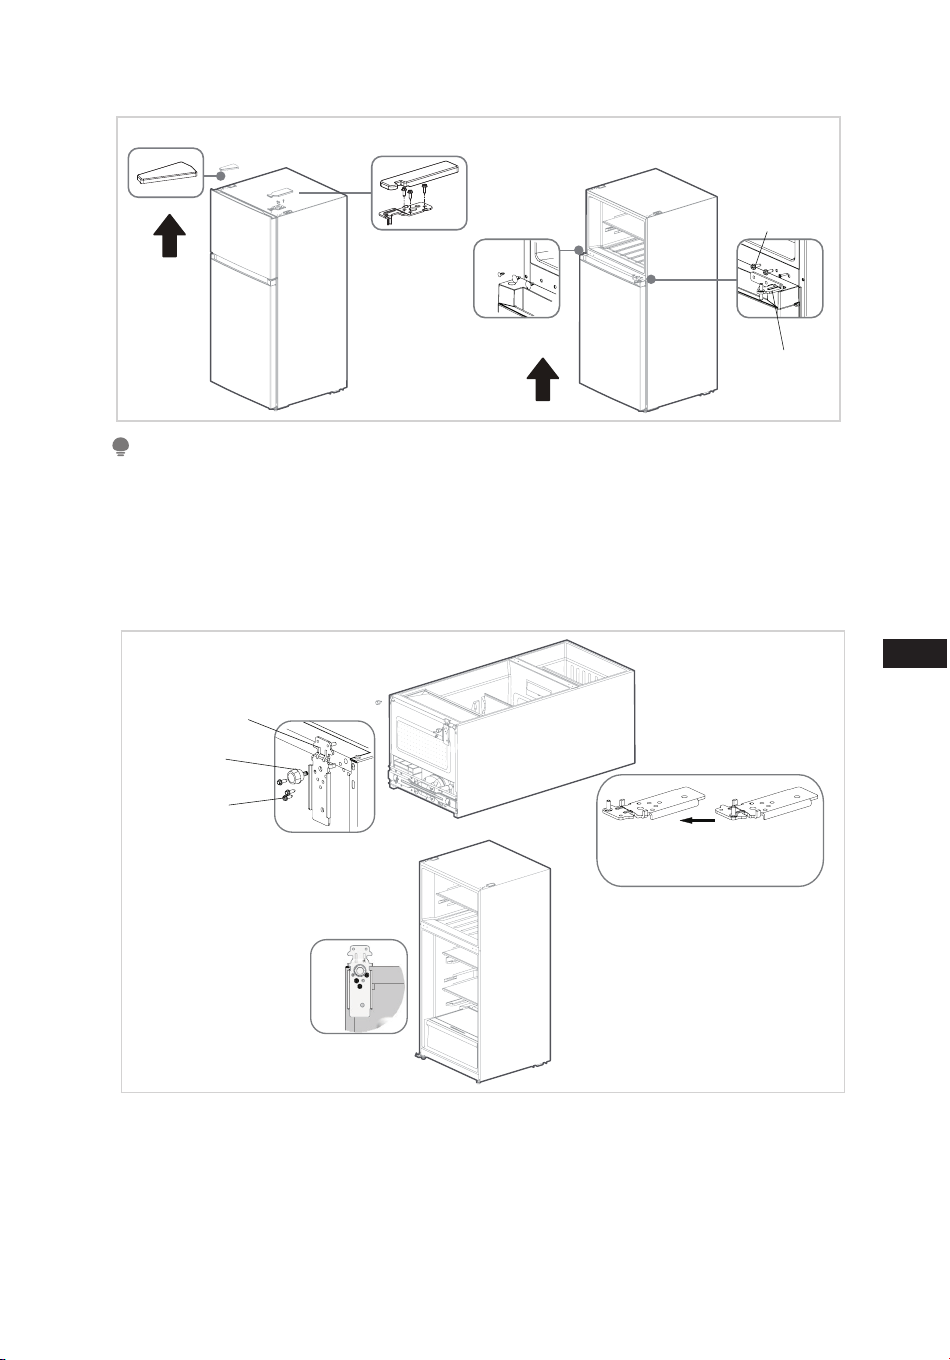
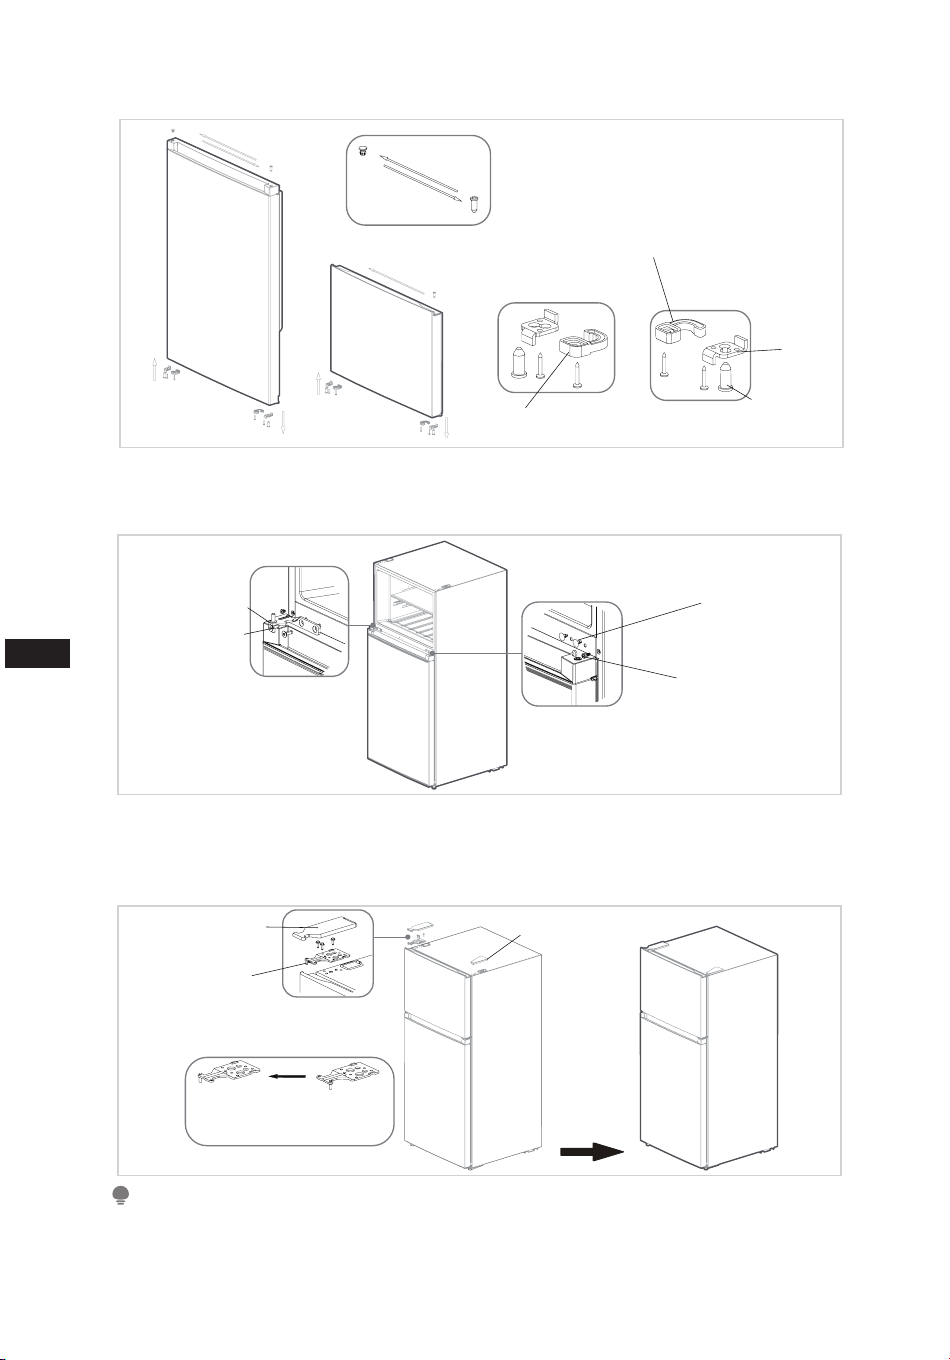
Step
1. Unplug your refrigerator and remove all food from refrigerator.
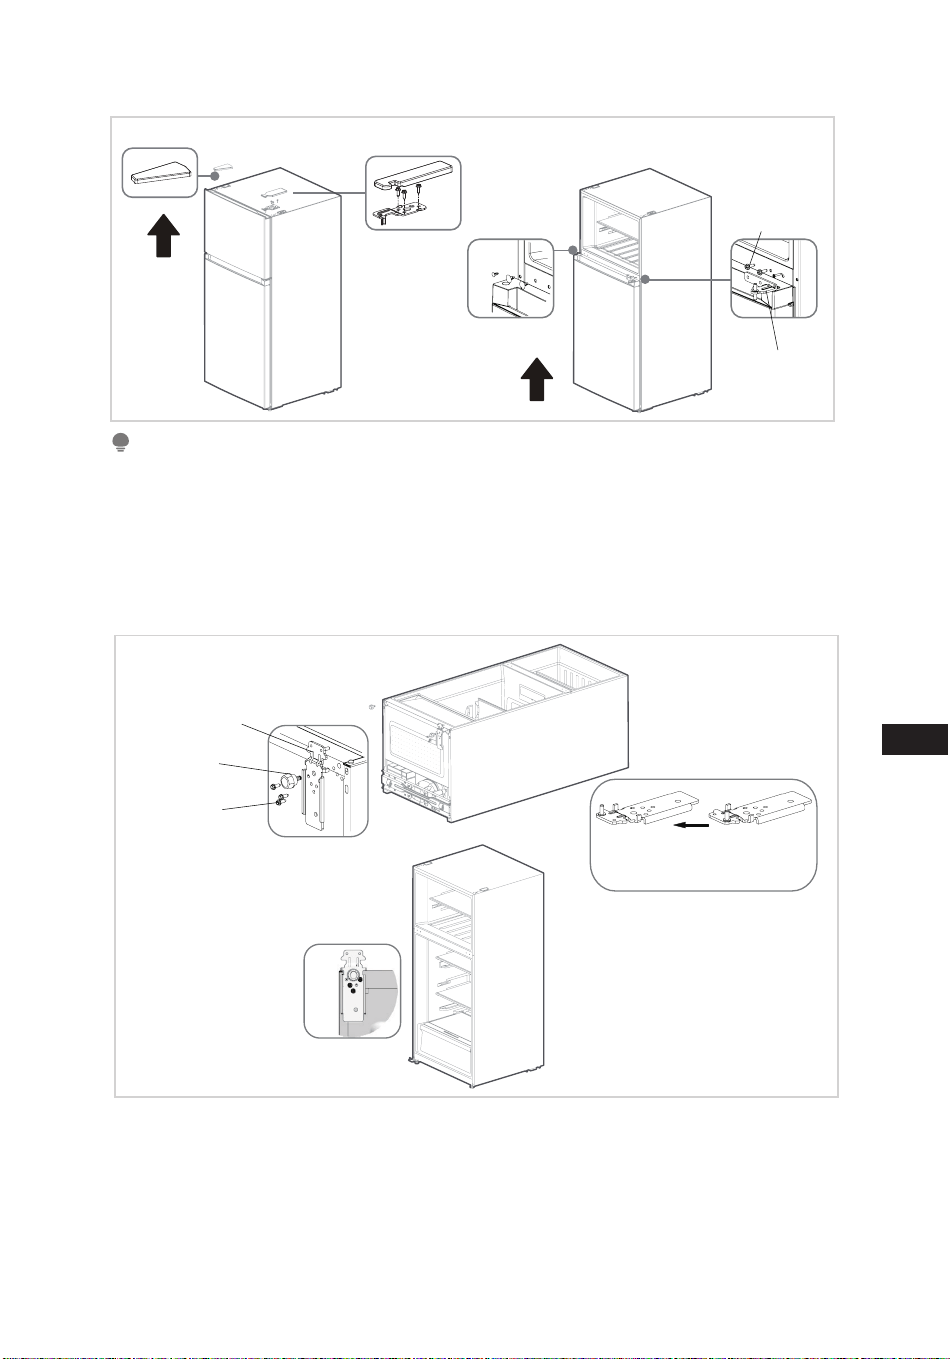
2. Remove the top hinge cover, screws and upper hinge on the top of the cabinet, and
the cover plate on the left; take out the freezing door upwards.
3. Unscrew the hinge screws, remove the middle hinge, remove the plug pins, and take
out the refrigeration door upwards.
07
EN
Cover plate
Top hinge cover
Plug pins
Screw
Middle hinge
ATTENTION
Images show a refrigerator that opens on the left side. Your refrigerator may open on the
right side.
4. Put the refrigerator down, unscrew the lower hinge screw and adjusting foot, remove
the lower hinge, remove the lower hinge shaft and install it into the shaft hole on the
other side of the hinge.
5. Install the lower hinge and tighten the screws on the left side of the refrigerator,
install two adjusting feet, and erect the refrigerator.
Lower hinge
Adjusting foot
Screw
Remove the lower hinge, remove
the lower hinge shaft and install it
into the shaft hole on the other side
of the hinge
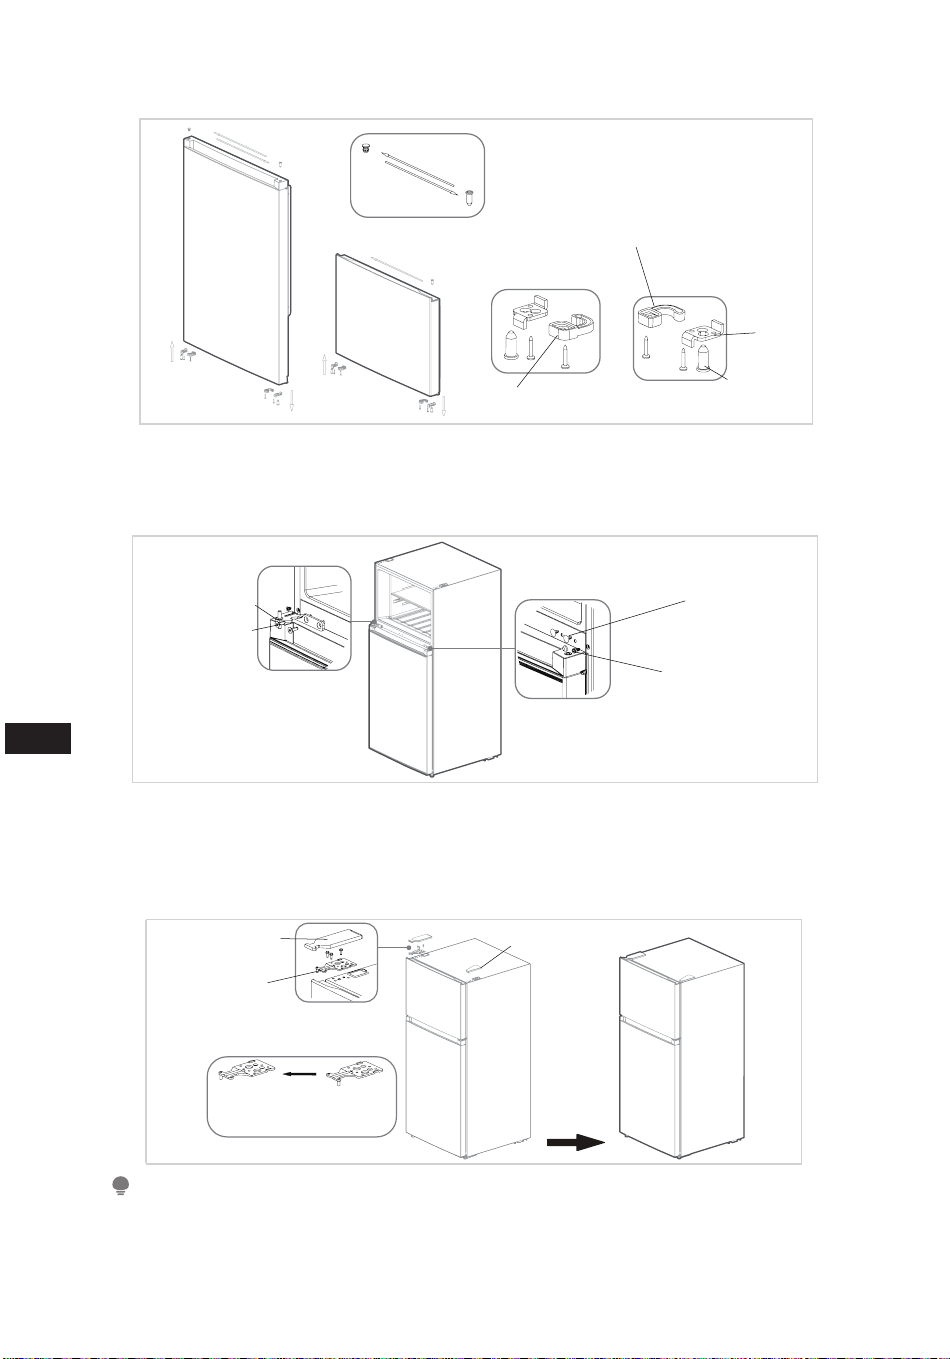
6. Unscrew and remove the shaft sleeves, stopper and right door self-locking screws
of the two door bodies, take out the left door self-locking from the accessory bag,
and install it to the left corner of the door body together with the stopper and shaft
sleeves. Take out the hole plug and shaft sleeve on the upper part of the refrigeration
door and adjust their positions before installing them into the door body. Take out
the shaft sleeve on the freezing door and install it on the other side.
08
EN
Hole plug
Right door
self-locking
Left door
self-locking
Shaft sleeve
Stopper
Shaft sleeve
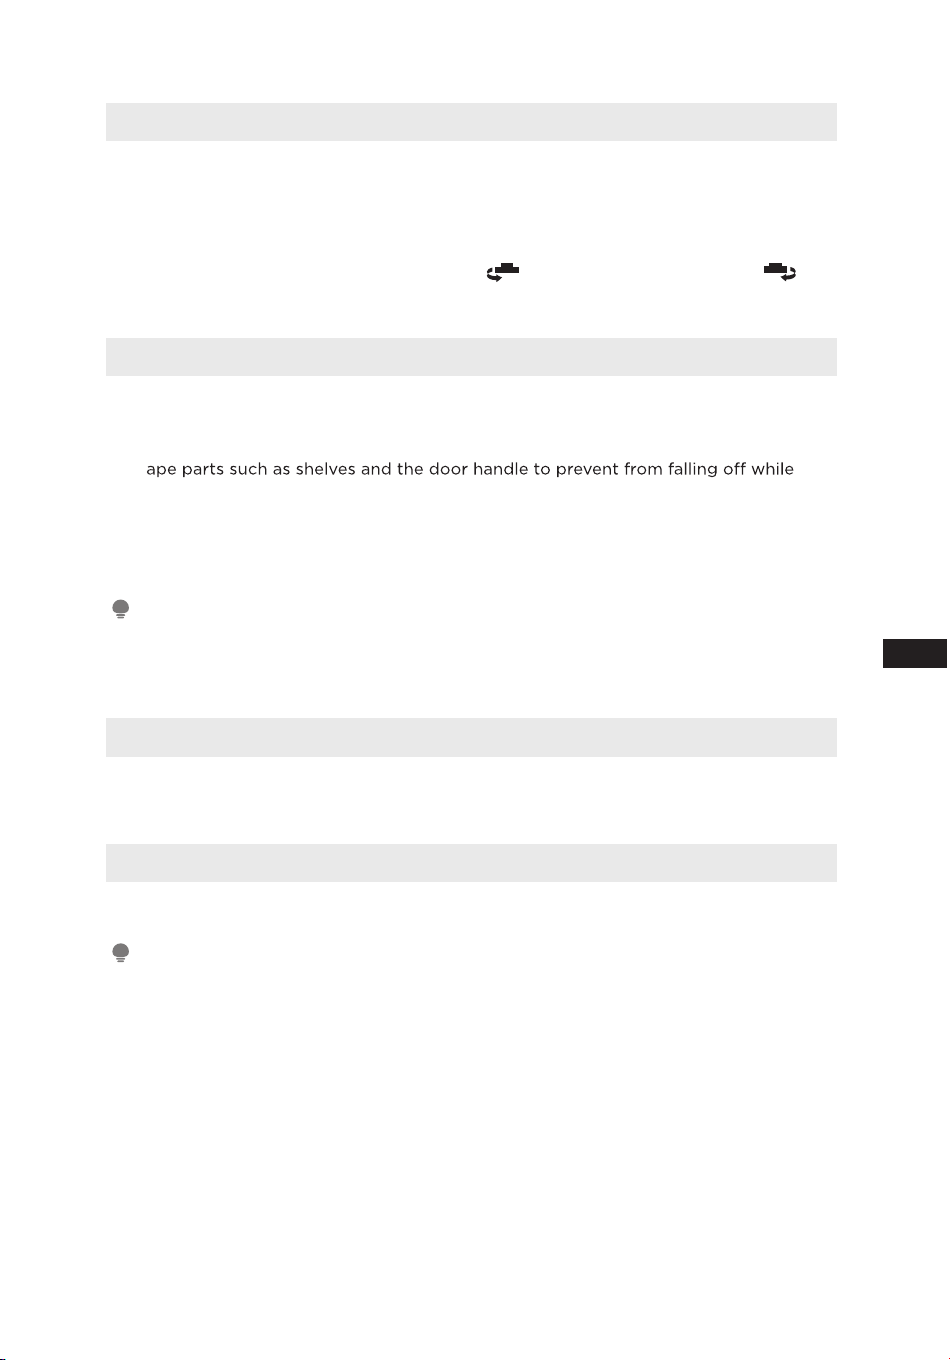
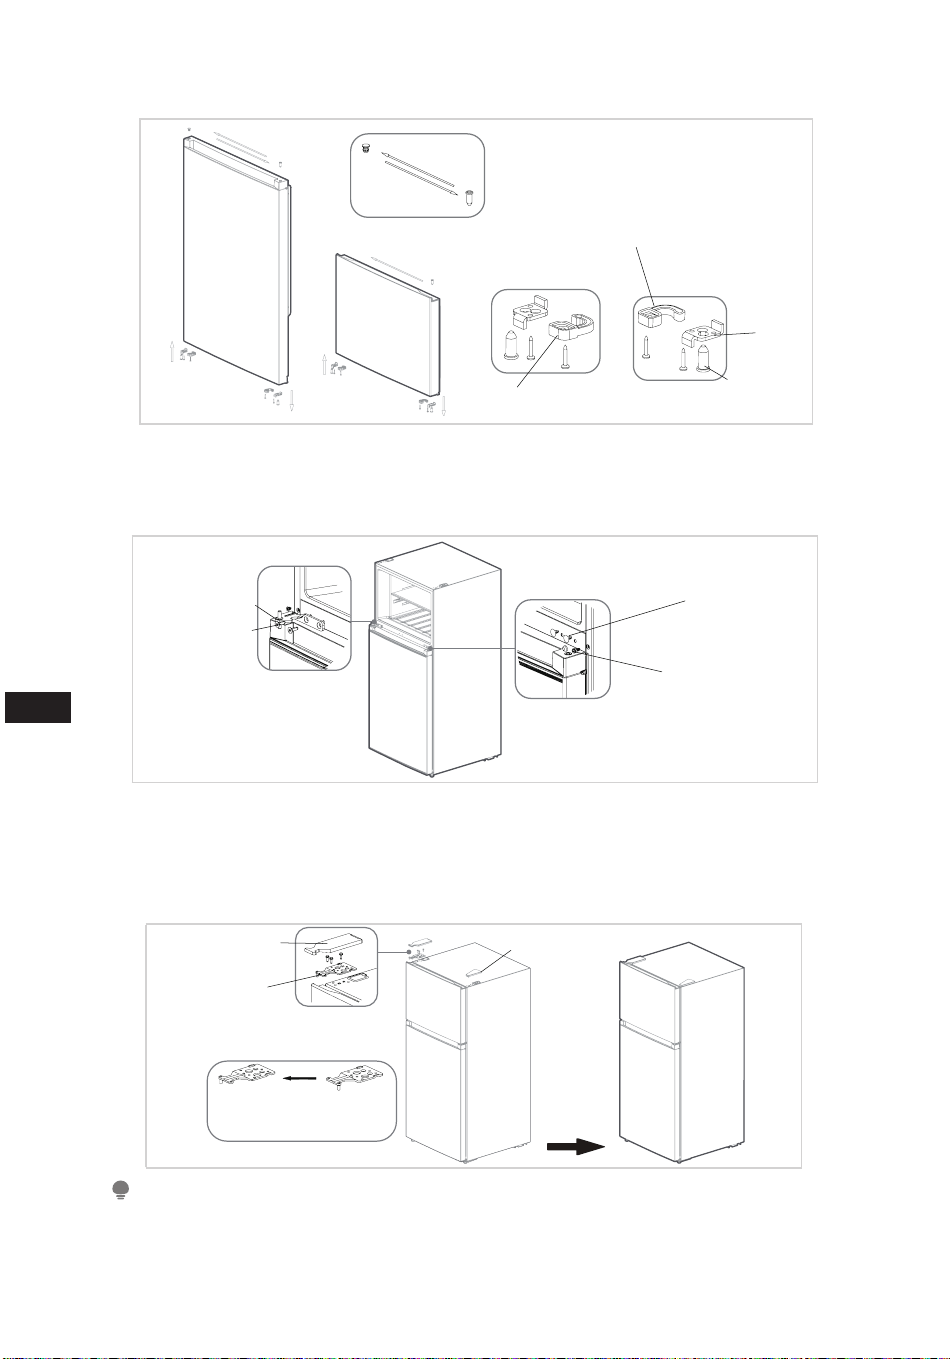
7. Install the refrigerated door on the lower hinge, install the center beam screws,
middle hinge and tighten the screws on the left side, and cover the plug pins, center
beam screws and screw caps on the right side.
Middle hinge
Plug pins
Center beam screw
Screw cap
8. Install the freezing door on the middle hinge, remove the upper hinge shaft and
install it into the shaft hole on the other side of the hinge, install the upper hinge and
tighten the screws, and install the upper hinge cover and the right hole cover.
9. The door change is completed.
Hinge cover Hole cover
Remove the upper hinge shaft
and install it into the shaft hole
on the other side of the hinge.
Upper hinge
ATTENTION
The picture above is only for reference. The actual configuration will depend on the physical
product or statement by the distributor.
09
EN
Leveling feet
To avoid vibration, the unit must be leveled.
If required, adjust the leveling screws to compensate for the uneven floor.
The front should be slightly higher than the rear to aid in door closing.
Leveling screws can be turned easily by tipping the cabinet slightly.
Turn the leveling screws counterclockwise
to raise the unit, clockwise to
lower it.
Moving the appliance
1.
Remove all food from inside the appliance.
2. Pull the power plug out, insert and fix it into the power plug hook at the rear or on
top of the appliance.
3. T
moving the appliance.
4. Move the appliance with more than two people carefully. When transporting the
appliance over a long distance, keep the appliance upright.
5. After installing the appliance, connect the power plug into a socket outlet to switch
on the appliance.
ATTENTION
Precautions before operation:
Before making changes the refrigerator must be disconnected from power.
Precautions should be taken to prevent any personal injury.
Changing the light
• Any replacement or maintenance of the LED lamps is intended to be made by
the manufacturer, its service agent or similar qualified person.
Connecting the appliance
After installing the appliance, connect the power plug into a socket outlet.
ATTENTION
After connecting the power supply cord (or plug) to the outlet, wait 2 or 3 hours before you
put food into the appliance. If you add food before the appliance has cooled completely, your
food may spoil.

10
EN
Tips for energy saving
• Do not place the appliance near cookers, radiators or other heat sources. If the
ambient temperature is high, the compressor will run more frequently and for longer,
resulting in increased energy consumption.
• Ensure that there is sucient ventilation at the base of the appliance, on the sides of
the appliance and at the back of the appliance. Never cover ventilation openings.
• Please also observe the spacing dimensions in the chapter “Installation”.
• The arrangement of drawers, shelves and racks as shown in the illustration oers the
most ecient use of energy and should therefore be retained as far as possible. All
drawers and shelves should remain in the appliance to keep the temperature stable
and save energy.
• To obtain a larger storage space (e.g. for large refrigerated/frozen goods), the
middle drawers can be removed. The top and bottom drawers and shelves should be
removed last if necessary.
• An evenly filled refrigerator/freezer compartment contributes to optimal energy use.
Therefore, avoid empty or half-empty compartments.
• Allow warm food to cool before placing it in the refrigerator/freezer. Food that has
already cooled down increases energy eciency.
• Allow frozen food to defrost in the refrigerator. The coldness of the frozen food
reduces the energy consumption in the refrigerator compartment and thus increases
the energy eciency.
• Open the door only as briefly as necessary to minimise cold loss. Opening the door
briefly and closing it properly reduces energy consumption.
• The door seals of your appliance must be perfectly intact so that the doors close
properly and energy consumption is not increased unnecessarily.

11
EN
OPERATION INSTRUCTIONS
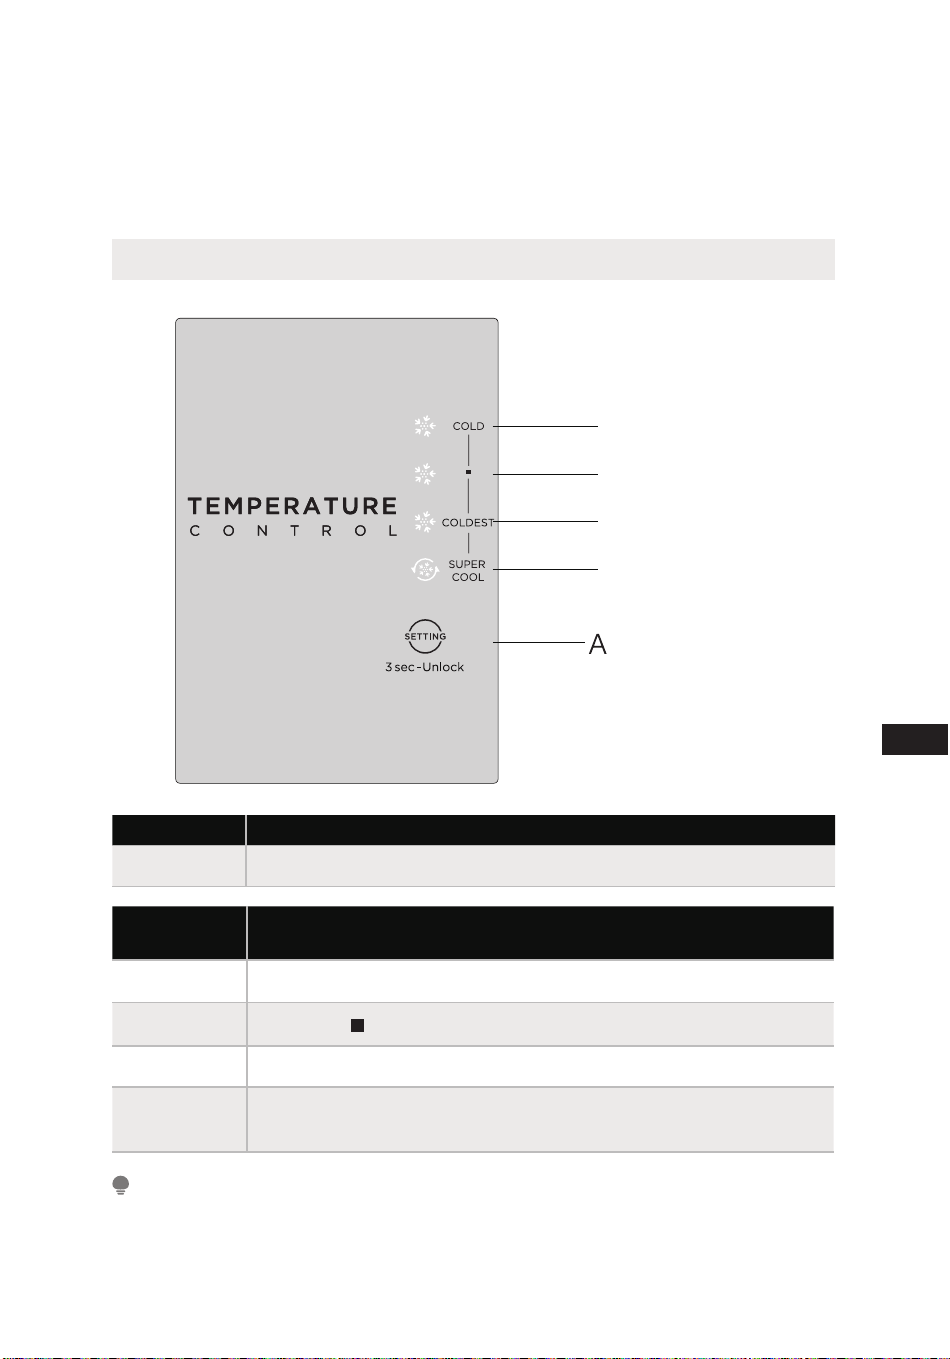
Control Panel
LED4
LED3
LED2
LED1
Key
A Setting Button
Display
screen
LED4
LED3
LED2
LED1
ATTENTION
12
EN
Operating instructions
Temperature setting
• Each time the temperature setting button A is pressed once,the temperature
setting changes one time. After the temperature setting has been completed,
the refrigerator will run according to the set value after 15s.
• When Super Cool mode is activated, the fridge will run at its maximum
capacity to faster reach the coolest setting and lasting longest for 6 hours.
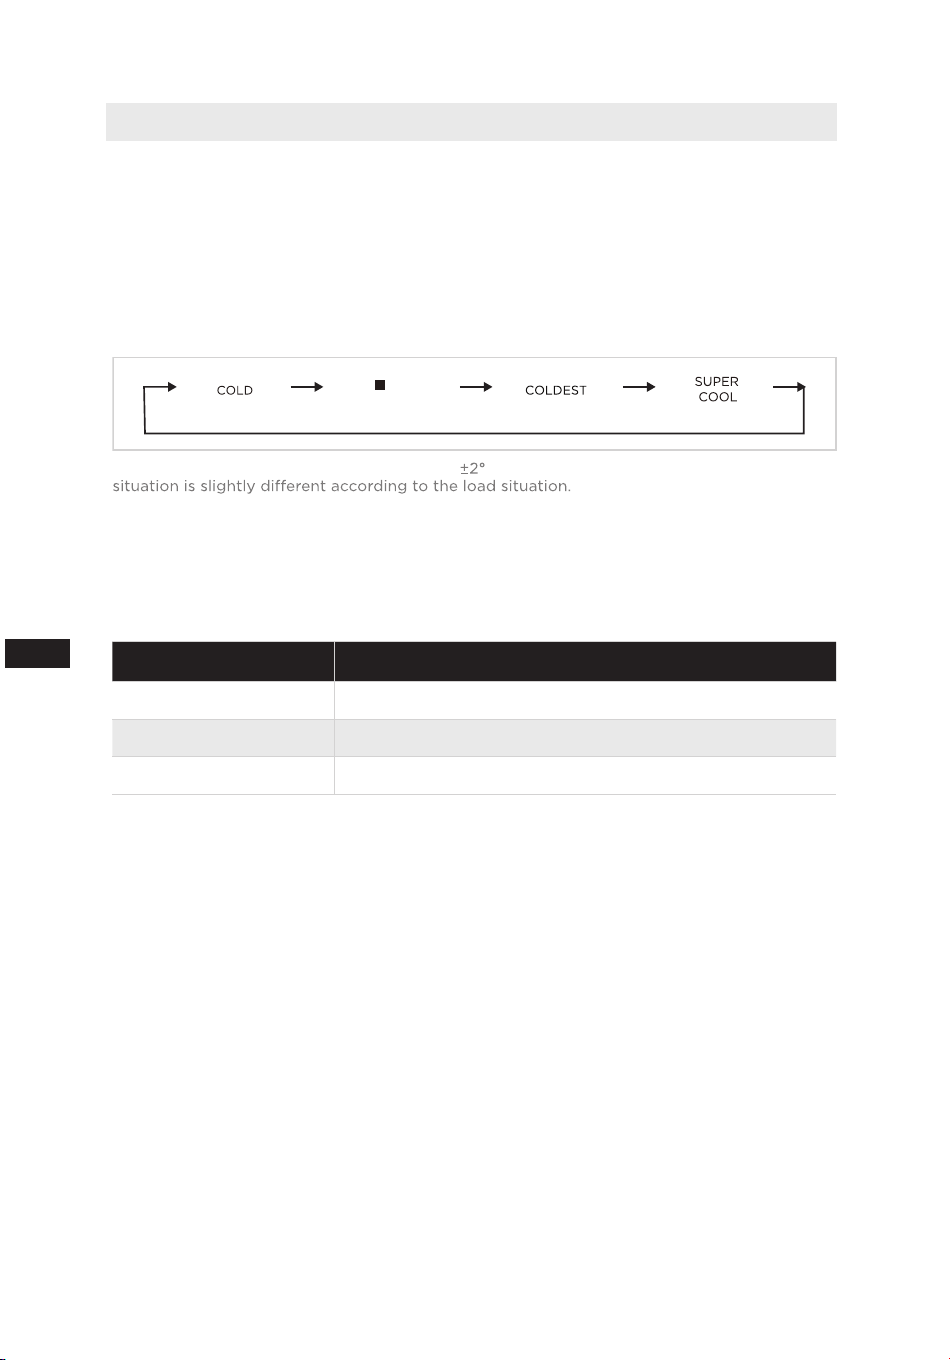
The shift regulation is:
(normal)
Note: The temperature of each gear is within C of the set temperature, and the actual
Fault indication
• when electrify the refrigerator for first time,the display screen shines fully for
3 seconds, and then the refrigerator runs according to coldest. In case of a failure,
the corresponding LED blinks. In case of no failures, it shows the temperature setting
of refrigerator.
Fault Code Fault Description
LED1/LED2 flashing Refrigerator temperature sensor faults
LED1/LED3 flashing Freezing frost sensor faults
LED1/LED4 flashing Ambient temperature sensor failure
Lock/Unlock
• When the temperature control panel is in lock state, it needs to long press
temperature setting key for 3 seconds for unlocking the panel, all LEDs will blink for
2 seconds when panel is unlocked. When the temperature control panel is in unlock
state, if there is no operation on control panel within 15 seconds, it will enter into
lock state automatically.

13
EN
Tips on storing food
Freezer compartment
• The freezer is designated for the storage of food frozen at very low temperature,
long-term storage of frozen food, and for the production of ice.
• Only use the shelves in the door of the freezer to store frozen food, not for storing
hot food designated for freezing.
• Do not put fresh and frozen food next to each other. The frozen food may thaw.
• When freezing fresh food (such as meat, fish or chopped meat), cut them into parts
that can be used at the same time.
• Storing frozen food: instructions are usually stated on the packages, which must be
followed. If there is no information on the packaging, food should not be stored for
longer than three months from the date of purchase.
• When purchasing frozen food, make sure that it was frozen at a suitable temperature
and that the packaging is not damaged.
• Frozen food should be kept in suitable packages to retain the quality and should be
returned to the freezer compartment as soon as possible.
• If a package of frozen food shows moisture or abnormal bulging, it is probable that
it was stored at the wrong temperature and the content is spoiled.
• The storage period for frozen food depends on the room temperature, the
thermostat setting, the frequency of opening the door of the freezer, the type of
food and the time of transporting the product from the shop to the household.
Al
ways follow the instructions printed on the packaging and never exceed the
maximum storage time stated on the package.
Refrigerator compartment
• To reduce moisture and subsequent ice build-up, never put liquid into the
refrigerator in unsealed containers. Frost tends to concentrate in the coolest parts
of the evaporator. Storing uncovered liquids results in a more frequent need for
defrosting.
• Never put warm foods in the refrigerator. These should first cool down at room
temperature and then be placed so as to ensure adequate air circulation in the
refrigerator.
• Foods or food containers should not touch the back wall of the refrigerator because
they could freeze to the wall. Do not keep regularly opening the door of the
refrigerator.
• Meat and clean fish (packed in a package or plastic foil) can be placed in the
refrigerator, which can be used in 1–2 days.
• Fruit and vegetables without packaging can be placed in the part designated for
fresh fruit and vegetables.
ATTENTION
The optimal temperature setting of each compartment depends on the ambient temperature.
Above optimal temperature is based on the ambient temperature of 25 °C.
Storage of too much food during operation after the initial connection to power may
When store beverages at coldest setting, inside fruits and vegetables are at risk of freezing,
please set on towards less cooling if coldest setting is very cool.
14
EN
CLEANING AND MAINTENANCE
Defrosting
• The refrigerator is made based on the air-cooling principle and thus has
automatic defrosting function. Frost formed due to change of season or
temperature may also be manually removed by disconnection of the appliance
from power supply or by wiping with a dry towel.
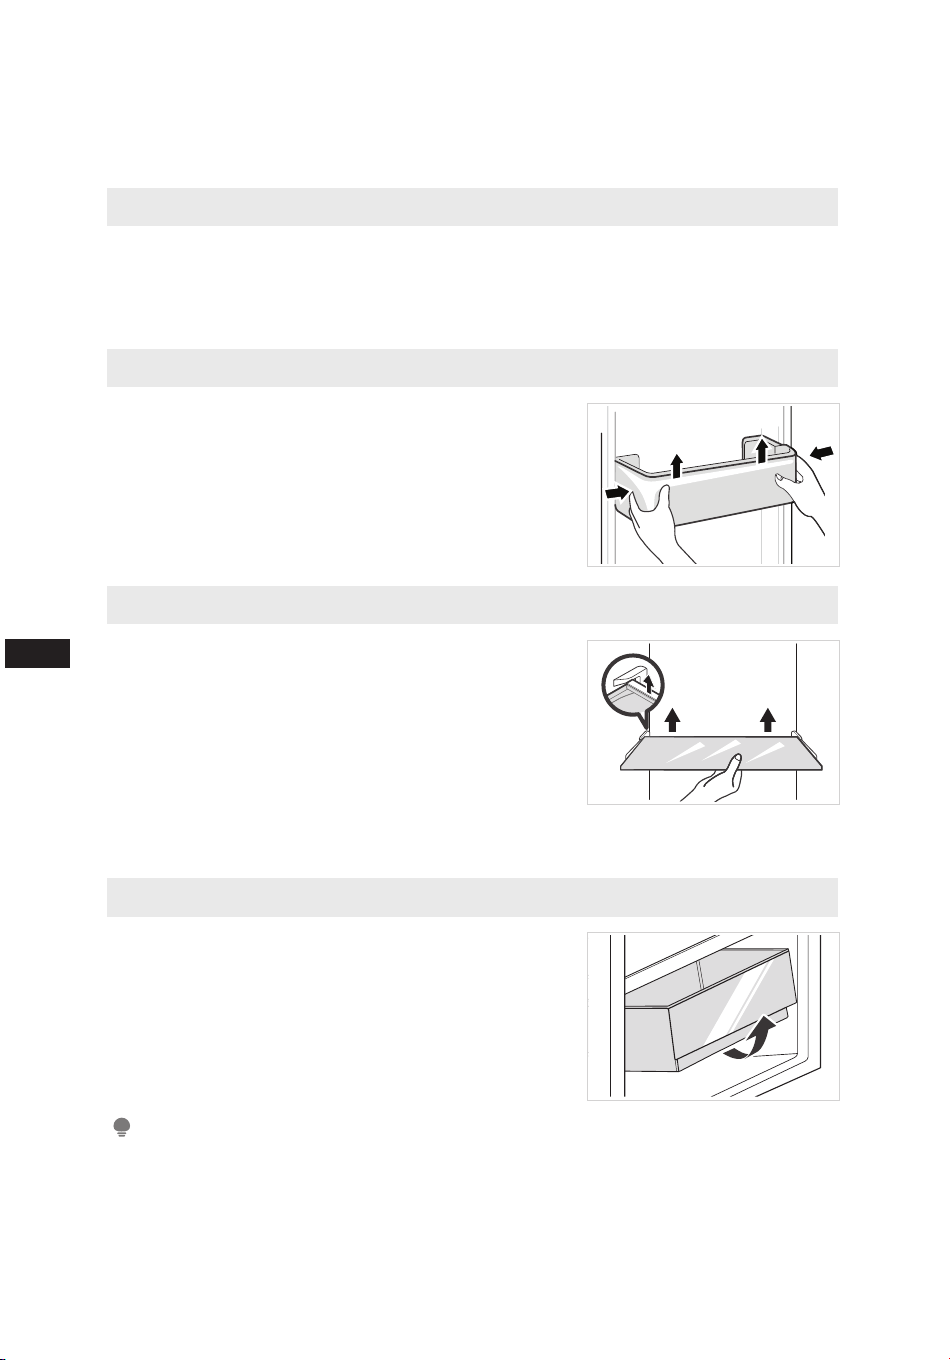
Cleaning of door tray
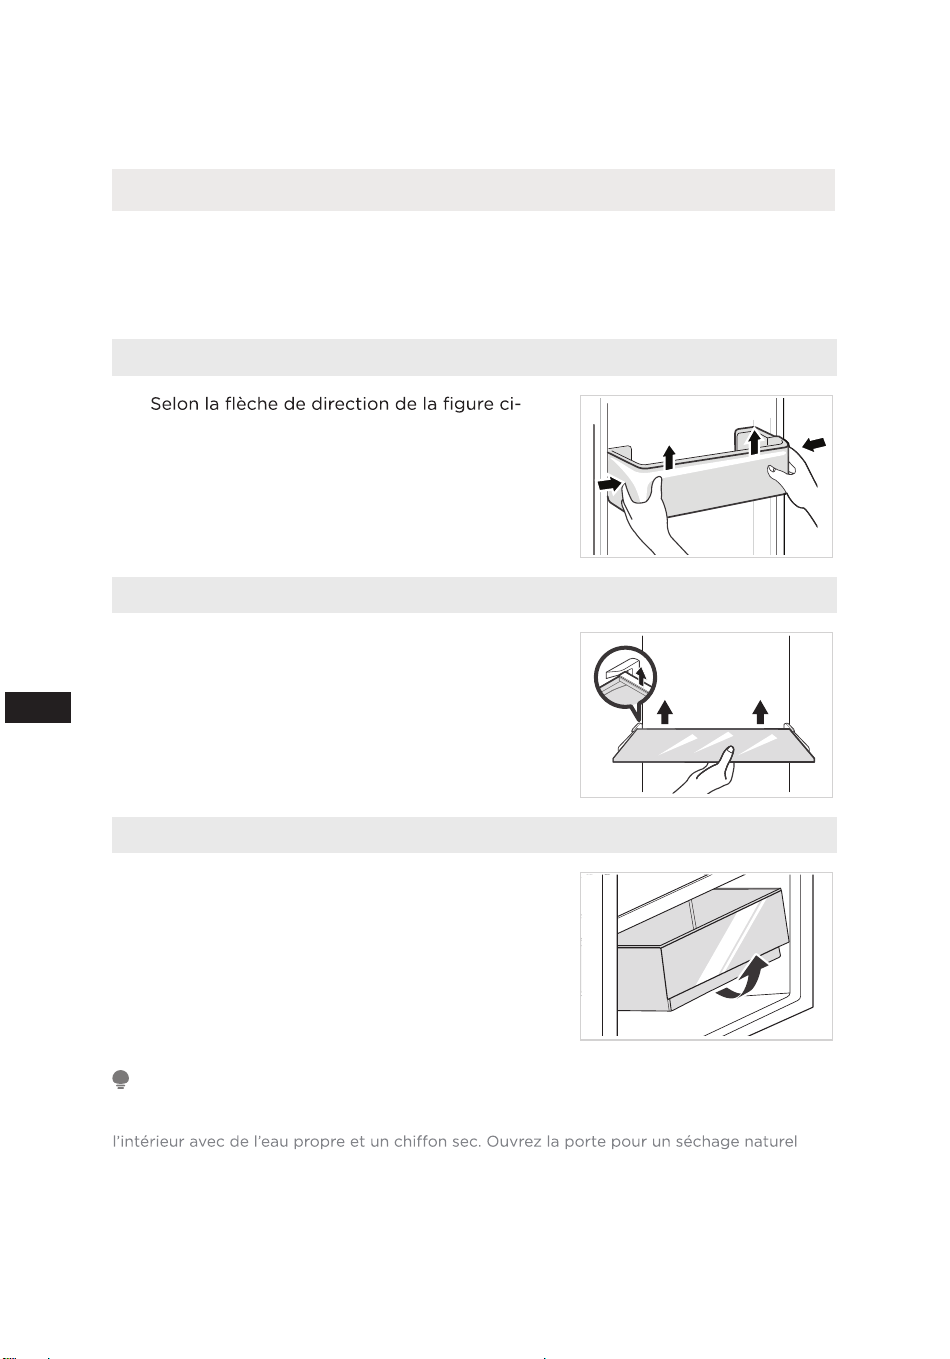
• According to the direction arrow in the figure
below, use both hands to squeeze the tray, and
push it upward, then you can take it out.
• After washing the tray having been taken
out, you can adjust its installing height in
accordance with your requirement.
Cleaning of glass shelf
• As the innermost part of the refrigerator liner
where contacting the shelves has a backstop,
you shall raise the shelves upward, then you can
be able to take it out.
• Adjust or clean the shelves according to your
requirement.
Cleaning the fruit and vegetable box
Remove the contents of the drawer. Hold the
handle of the vegetable drawer and pull it out
completely until it stops.
Lift the vegetable drawer up and remove it by
pulling it out.
ATTENTION
Soft towels or sponge dipped in water and non-corrosive neutral detergents are suggested
for cleaning. The freezer of shall be finally cleaned with clean water and dry cloth. Open the
door for natural drying before the power is turned on. Do not use hard brushes, clean steel
balls, wire brushes, abrasives, such as toothpastes, organic solvents (such as alcohol, acetone,
banana oil, etc.), boiling water, acid or alkaline items clean refrigerator considering that this
may damage the fridge surface and interior.
•
•

15
EN
Stop using
Power failure:
In case of power failure, even if it is in summer, foods inside the appliance can be
kept for several hours; during the power failure, the times of door opening shall be
reduced, and no more fresh food shall be put into the appliance.
Long-time nonuse:
The appliance shall be unplugged and then cleaned; then the doors are left open
to prevent odor.
Moving:
Before the refrigerator is moved, take all objects inside out, fix the glass partitions,
vegetable holder, freezing chamber drawers and etc. with tape, and tighten
the leveling feet; close the doors and seal them with tape. During moving, the
appliance shall not be laid upside down or horizontally, or be vibrated; the
inclination during movement shall be no more than 45°.
ATTENTION
The appliance shall run continuously once it is started. Generally, the operation of the
appliance shall not be interrupted; otherwise the service life may be impaired.
Foods can be preserved for a couple of hours even in summer in case of power failure; it is
recommended to reduce the frequency of opening door.

16
EN
TROUBLESHOOTING
The following simple issues can be handled by the user. Please call the after-sale
service department if the issues are not solved.
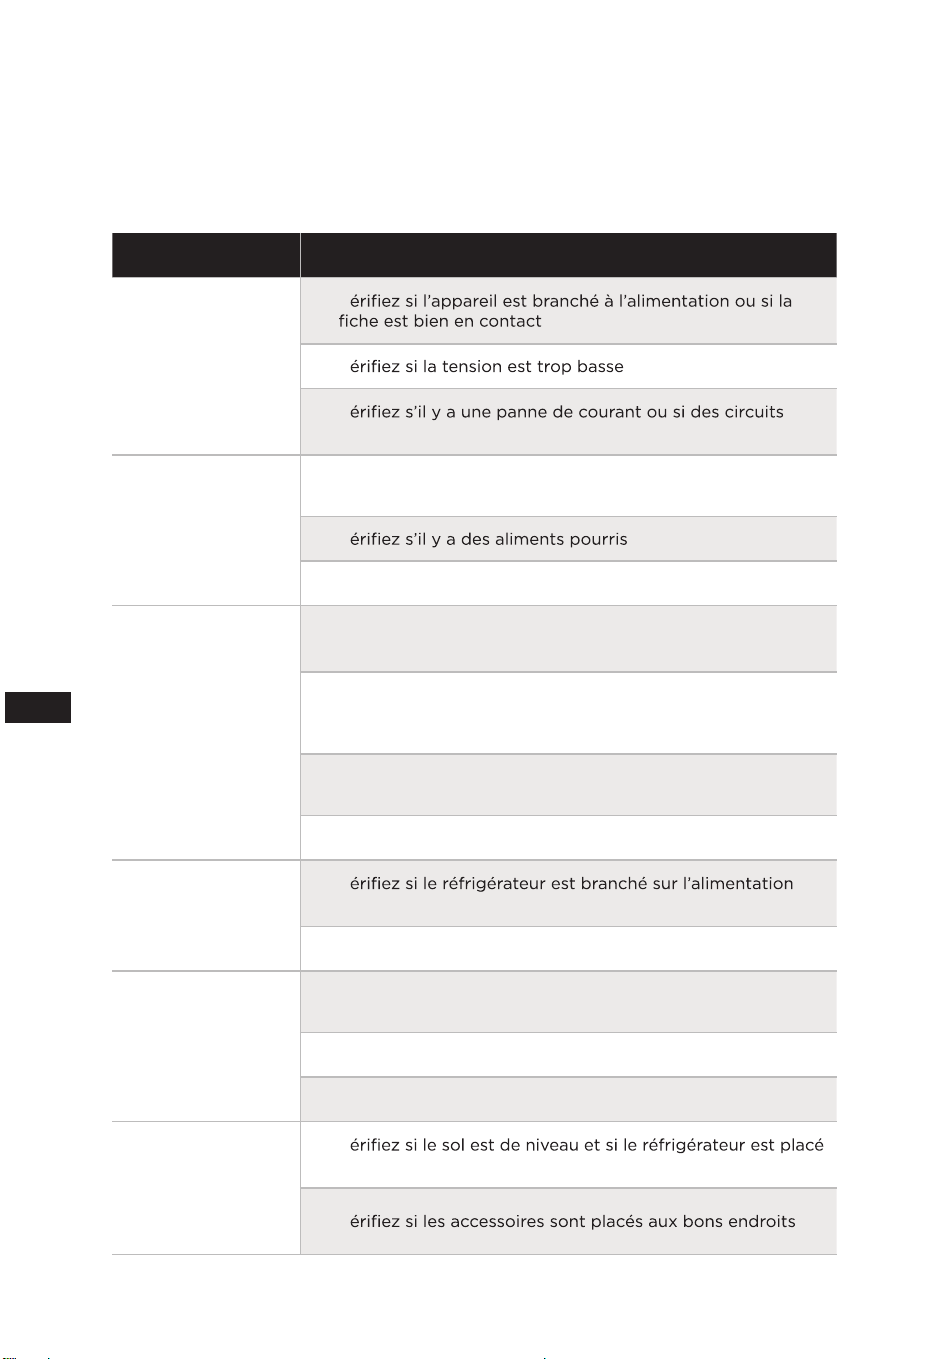
Problem Possible reason
Failed operation
• Check whether the appliance is connected to power or
whether the plug is in well contact
• Check whether the voltage is too low
• Check whether there is a power failure or partial circuits have
tripped
Odor
• Odorous foods shall be tightly wrapped
• Check whether there is any rotten food
• Clean the inside of the refrigerator
Long-time operation
of the compressor
• Long operation of the refrigerator is normal in summer
• When the ambient temperature is high it is not suggestible
having too much food in the appliance at the same time
• Food shall get cool before being put into the appliance
• The doors are opened too frequently
Light fails to get lit
• Check whether the refrigerator is connected to power supply
and whether the illuminating light is damaged
• Have the light replaced by a specialist
Door can not be
properly closed
• The door is stuck by food packages
• Too much food is placed
• The refrigerator is tilted
Loud noises
• Check whether the floor is level and whether the refrigerator
is placed stably
• Check whether accessories are placed at proper locations

17
EN
Problem Possible reason
Door seal fails to be
tight
• Remove foreign matters on the door seal
• Heat the door seal and then cool it for restoration (or blow it
with an electrical drier or use a hot towel for heating)
Water pan overflows
• There is too much food in the chamber or food stored
contains too much water,resulting in heavy defrosting
• The doors are not closed properly, resulting in frosting due to
entry of air and increased water due to defrosting
Hot housing
• Heat dissipation of the built-in condenser via the housing,
which is normal when housing becomes hot due to high
ambient temperature, storage of too much food or shutdown
of the compressor is shut down, provide sound ventilation to
facilitate heat dissipation
Surface
condensation
• Condensation on the exterior surface and door seals of the
refrigerator is normal when the ambient humidity is too high.
Just wipe the condensate with a clean towel
Abnormal noise
• Buzz: The compressor may produce buzzes during operation,
and the buzzes are loud particularly upon start or stop. This is
normal
• Creak: Refrigerant flowing inside of the appliance may
produce creak, which is normal

1
4867-9660-6836.6
08/2024
2 YEAR LIMITED WARRANTY
This warranty is provided to the original purchaser at retail (the “Purchaser” or “you”) by Midea America Corp.
(“Midea” or “we”), which warrants all parts of this Product, as described below. Midea warrants this Product to the
Purchaser for personal, family or household use. This warranty covers performance and quality issues in materials and
workmanship that appear under normal use and maintenance appearing within two years from the date of delivery.
This warranty gives you specific rights, and you may also have other rights that vary from state to state.
WARRANTY LIMITATIONS
This warranty is given only to the original purchaser at retail in either the United States or Canada and may not be
transferred to any subsequent buyer. This warranty does not apply to purchasers of our products for use or resale in a
business; a separate commercial warranty may protect those purchasers.
This warranty does not cover any Product failure caused by:
(a) Abuse, damage or use of the Product in violation of the Product instructions.
(b) Modification to any Product or part.
(c) Failure to maintain the Product or part as described in accordance with the Product instructions.
(d) Faulty installation or application.
(e) Use of parts or accessories not compatible with this Product.
(f) Floods, fires, winds, lightning, accidents, corrosive atmosphere, or other conditions beyond Midea’s control.
(g) Interruption in electrical service or inadequate electrical service.
(h) Replacement of fuses and replacement or resetting of circuit breakers.
(i) Frozen or broken water pipes, water damage, moisture intrusion, mold or other biological growth.
(j) The use, combination or linking of the Product to other products, processes or materials not provided by
Midea.
WARRANTY REMEDY
If any quality or performance issue covered by this warranty is discovered during the warranty period, we will, at our
option, repair or replace any such Product. This warranty is limited to Product repair or replacement by an
authorized Midea servicer or dealer and does not cover any shipping cost, labor cost, customs duties, inland
logistics cost, or cost of service, including any diagnostics, removal, transportation, or reinstallation costs. If we
ask, you must return the Product to us.
WARRANTY DISCLAIMER; EXCLUSION OF DAMAGES
This is the only express warranty to consumers that we offer on our Products. ANY IMPLIED WARRANTIES BY MIDEA,
INCLUDING BUT NOT LIMITED TO WARRANTIES OF MERCHANTABILITY AND FITNESS FOR PARTICULAR PURPOSE, ARE
LIMITED TO THE DURATION OF THIS EXPRESS WARRANTY. Some states and provinces do not allow the exclusion of
express warranties and/or limitations on how long an implied warranty lasts, so the above exclusion and/or limitation
may not apply to you.
THE REMEDY DESCRIBED ABOVE IS THE ONLY ONE THAT WE WILL PROVIDE, EITHER UNDER THIS WARRANTY OR
UNDER ANY WARRANTY ARISING BY OPERATION OF LAW. WE WILL NOT BE RESPONSIBLE FOR ANY CONSEQUENTIAL
OR INCIDENTAL DAMAGES ARISING FROM THE BREACH OF THIS WARRANTY OR ANY OTHER WARRANTY, WHETHER
EXPRESS OR IMPLIED, NEGLIGENCE OR OTHER TORT, OR ON ANY STRICT LIABILITY THEORY, INCLUDING BUT NOT

2
4867-9660-6836.6
LIMITED TO LOST PROFITS. Some states do not allow the exclusion or limitation of incidental or consequential
damages, so the above exclusion may not apply to you.
WARRANTY CLAIMS PROCESS
For more information or to make a warranty claim, please visit:
https://www.midea.com/us/support
Or contact us at:
Telephone: 1-866-646-4332
You must have Your bill of sale, delivery slip, or appropriate proof of purchase to submit a warranty claim. The date
of delivery establishes the warranty period, should service be required.
DISPUTE RESOLUTION
ARBITRATION CLAUSE. IMPORTANT. PLEASE REVIEW THIS ARBITRATION CLAUSE. IT AFFECTS YOUR LEGAL RIGHTS.
(a) Parties: This arbitration clause (this “Arbitration Clause”) affects your rights against Midea and any of its
affiliates or employees or agents, successors, or assigns, all of whom together are referred to below as “we”
or “us” for ease of reference.
(b) ARBITRATION REQUIREMENT: EXCEPT AS STATED BELOW, ANY DISPUTE BETWEEN YOU AND ANY OF US
SHALL BE DECIDED BY NEUTRAL, BINDING ARBITRATION RATHER THAN IN COURT OR BY JURY TRIAL.
“Dispute” will be given the broadest possible meaning allowable by law. It includes any dispute, claim, or
controversy arising from or relating to your purchase of this Product, any warranty upon the Product, or the
Product’s condition. It also includes determination of the scope or applicability of this Arbitration Clause. The
arbitration requirement applies to claims in contract and tort, pursuant to statute, or otherwise.
(c) CLASS-ARBITRATION WAIVER: ARBITRATION IS HANDLED ON AN INDIVIDUAL BASIS. IF A DISPUTE IS
ARBITRATED, YOU AND WE EXPRESSLY WAIVE ANY RIGHT TO PARTICIPATE AS A CLASS REPRESENTATIVE OR
CLASS MEMBER ON ANY CLASS CLAIM YOU MAY HAVE AGAINST US OR WE AGAINST YOU, OR AS A PRIVATE
ATTORNEY GENERAL OR IN ANY OTHER REPRESENTATIVE CAPACITY, TO THE MAXIMUM EXTENT PERMITTED
BY LAW. YOU AND WE ALSO WAIVE ANY RIGHT TO CLASS ARBITRATION OR ANY CONSOLIDATION OF
INDIVIDUAL ARBITRATIONS.
(d) Discovery and Other Rights: Discovery and rights to appeal in arbitration are generally more limited than in a
lawsuit. This applies to both you and us. Other rights that you or we would have in court may not be available
in arbitration. Please read this Arbitration Clause and consult the rules of the arbitration organizations listed
below for more information.
(e) SMALL CLAIMS COURT OPTION: YOU MAY CHOOSE TO LITIGATE ANY DISPUTE BETWEEN YOU AND ANY OF
US IN SMALL CLAIMS COURT, RATHER THAN IN ARBITRATION, IF THE DISPUTE MEETS ALL REQUIREMENTS
TO BE HEARD IN SMALL CLAIMS COURT.
(f) Governing Law: For residents of the United States, the procedures and effect of the arbitration will be
governed by the Federal Arbitration Act (9 U.S.C. § 1 et seq.) rather than by state law concerning arbitration.
For residents of Canada, the procedures and effect of the arbitration will be governed by the applicable
arbitration law of the province in which you purchased your Product. The law governing your substantive
warranty rights and other claims will be the law of the state or province in which you purchased your Product.
Any court having jurisdiction may enter judgment on the arbitration award.

3
4867-9660-6836.6
(g) Rules of the Arbitration: If the amount in controversy is less than $250,000, the arbitration will be decided by
a single arbitrator. If the amount in controversy is greater than or equal to $250,000, the arbitration will be
decided by a panel of three arbitrators. The arbitrator(s) will be chosen pursuant to the rules of the
administering arbitration organization. United States residents may choose JAMS (1920 Main Street, Ste. 300,
Irvine, CA 92614, www.jamsadr.com), or, subject to our approval, any other arbitration organization. In
addition, Canadian residents may choose the ADR Institute of Canada (234 Eglinton Ave. East, Suite 405,
Toronto, Ontario, M4P 1K5, www.amic.org). These organizations’ rules can be obtained by contacting the
organization or visiting its website. If the chosen arbitration organization’s rules conflict with this Arbitration
Clause, the provisions of this Arbitration Clause control. The award of the arbitrator(s) shall be final and
binding on all parties.
(h) Location of the Arbitration Hearing: Unless applicable law provides otherwise, the arbitration hearing for
United States residents will be conducted in the federal judicial district in which you reside (in your hometown
area) or, for Canadian residents, in the province in which you reside, and, if you choose, will be in-person.
(i) Costs of the Arbitration: Each party is responsible for its own attorney, expert, and other costs and fees unless
applicable law requires otherwise. Notwithstanding the preceding sentence, and unless applicable law
requires otherwise, if you are a consumer under the JAMS rules or the rules of another agreed upon arbitration
administrator, Midea will pay or reimburse you for all reasonable fees or costs to the extent required by law
or the applicable arbitration administrator’s rules. Whether or not required by law or such rules, if you prevail
at arbitration on any claim against Midea, Midea will reimburse you for any reasonable fees paid to the
arbitration administrator in connection with the arbitration proceedings. Under no circumstances will Midea
seek from you payment or reimbursement of any reasonable fees that Midea incurs in connection with the
arbitration. If you are required to advance any fees or costs to JAMS or other agreed upon arbitration
administrator, but you ask Midea to do so in your stead, Midea will consider and respond to your request.
(j) Survival and Enforceability of this Arbitration Clause: This Arbitration Clause shall survive the expiration or
termination, or any transfer, of the warranty on your Product. If any part of this Arbitration Clause, except
waivers of class-action rights, is found to be unenforceable for any reason, the remainder of this clause and
the warranty shall remain enforceable. If, in a case in which class-action allegations have been made, the
waiver of class-action rights under this warranty is found to be unenforceable with respect to any part of the
dispute, the parts of the dispute as to which the waiver of class-action rights have been found unenforceable
will be severed and will proceed in court without reference or application of this Arbitration Clause. Any
remaining parts will proceed in arbitration.
QUEBEC RESIDENTS
The arbitration provisions of this warranty shall not apply to residents of Quebec.


FR
01
LETTRE DE REMERCIEMENT
Merci d'avoir choisi Midea ! Avant d'utiliser votre nouveau produit Midea,
comment utiliser les caractéristiques et fonctions de votre nouvel appareil en
toute sécurité.
TABLE DES MATIÈRES
LETTRE DE REMERCIEMENT ..................................................01
SPÉCIFICATIONS ........................................................................02
GÉNÉRALITÉS DU PRODUIT .................................................03
INSTALLATION DU PRODUIT ...............................................04
INSTRUCTIONS D'OPÉRATION ..............................................11
NETTOYAGE ET ENTRETIEN ...................................................14
DÉPANNAGE .................................................................................16

FR
02
SPÉCIFICATIONS
Modèle du produit
MRT14D2B**/MRT14D3B**
Volume de stockage total 14,2 pieds cubes
Tension nominale 115V~/60Hz
Courant nominal 1,2A
Dimension globale (L x H x P)
154,0 cm x 70,0 cm x 73,1 cm
FR
03
GÉNÉRALITÉS DU PRODUIT
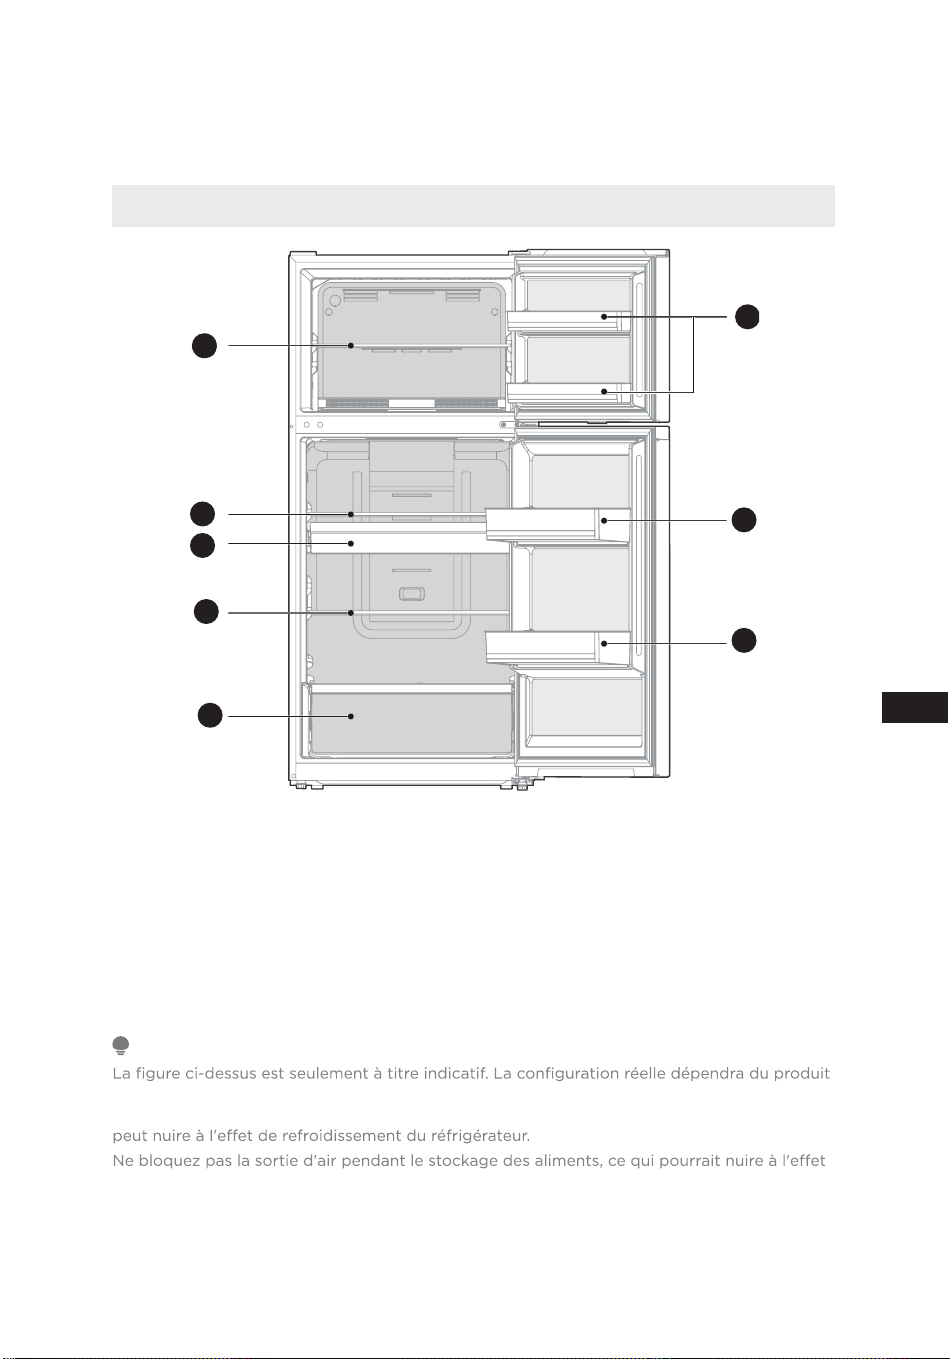
Noms des composants
1
2
3
4
5
6
7
8
1
Étagère en verre du
congélateur
5
Boîte des fruits et
légumes
2
Étagère en verre du
réfrigérateur 1
6
Plateaux de porte du
congélateur
3
Plateau(Optionnel)
7
Plateau de porte du
réfrigérateur 1
4
Étagère en verre du
réfrigérateur 2
8
Plateau de porte du
réfrigérateur 2
ATTENTION
physique ou de la déclaration du distributeur.
Si le réfrigérateur est mis sous tension pour la première fois, le fait de stocker trop d'aliments
de refroidissement.
Si la température dans le compartiment réfrigérateur est froide, veuillez régler le commutateur
sur la position la plus faible. Si la température dans le compartiment réfrigérateur n'est pas
assez froide, veuillez régler le commutateur sur la position forte.
FR
04
˙˙
Instructions d’installation
Trouver un emplacement approprié
ȼ ˏ!.æ".%#æ.0!1.!/0+*Þ1,+1.ì0.!,+/æ(%.!)!*0!0*! +%0,/ì0.!
!*/0.æȐ
ȼ !.æ".%#æ.0!1. +%0ì0.!,(æ */1*!* .+%0%*0æ.%!1.!0%!*2!*0%(æȓ(!/+(
+%0ì0.!,(0!0/+(% !Ȑ
ȼ !*!6Æ(Ȟæ.0 !($(!1.!0æ2%0!6((1)%ò.! %.!0! 1/+(!%(Ȑ!,(!6,/
(!.æ".%#æ.0!1. */(!/!* .+%0/$1)% !/+1)+1%((æ/,+1.æ2%0!.(.+1%((!+1
(.æ 10%+* !(Ȟ!˚!0%/+(*0Ȑ
Dimensions et dégagements
ȼ *! %/0*!0.+,"%(!,..,,+.014æ(æ)!*0/ &!*0/,!10!*0.Ą*!.
1*! æ#. 0%+* !(,%0æ !+*#æ(0%+*!01*!1#)!*00%+* !/+ŏ0/
ɋæ(!0.%%0æȐ.æ2+5!6,(1/ !Ȇȅȅ)) ! æ##!)!*0,..,,+.0Æ$-1!
)1. &!*0(+./ !(ɋ%*/0((0%+* !(ɋ,,.!%(Ȑ
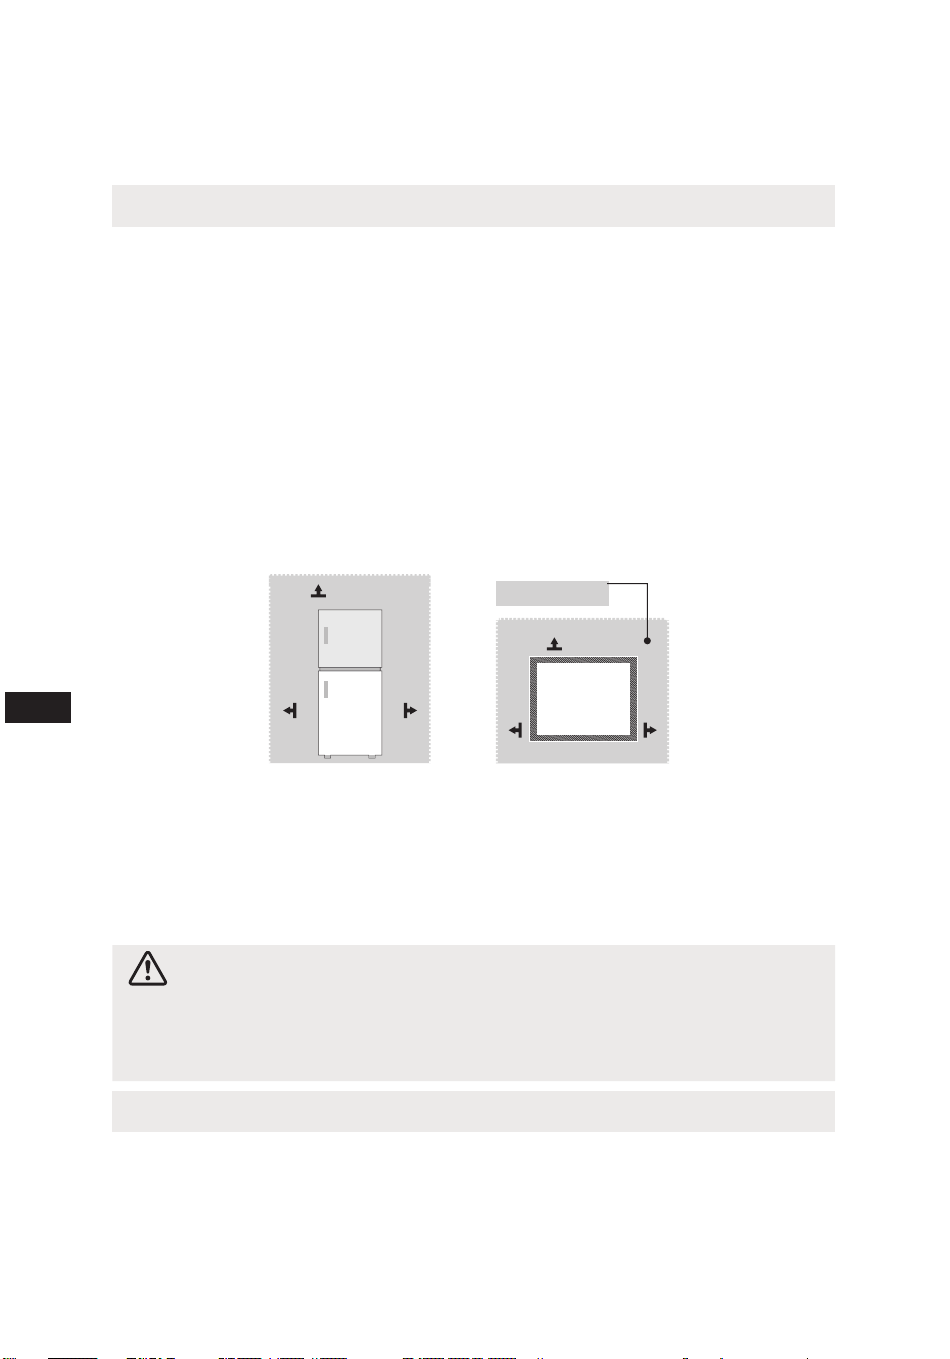
>100mm
>100mm
>100mm
>100mm
>100mm
>100mm
/,!.!-1%/,+1.(
%.1(0%+* !(ɋ%.
1! !
!//1/
Fournir une alimentation électrique appropriée
ȼ æ.%˛!62+0.!/+1.! ɋ(%)!*00%+*(+(!Ȑˏ!.æ".%#æ.0!1.*æ!//%0!1*!
(%)!*00%+*æ(!0.%-1!115V CA, 60 HzȐ
ȼ 0%(%/!61*.æ!,0(!-1%!,0!(.+$! !)%/!Æ(0!..!Ȑ!À(!
ɋ(%)!*00%+*!/0æ-1%,æ ɋ1*!˛$!ÆȈ.+$!/Ȭ)%/!Æ(0!..!ȭ-1%/ɋ ,0!
Æ1*!,.%/!)1.(!/0* . ÆȈ.+$!/Ȭ)%/!Æ(0!..!ȭ˛* !)%*%)%/!.(!/
.%/-1!/ !$+/æ(!0.%-1!/1/æ/,.!.æ".%#æ.0!1.Ȑ
ATTENTION
!.æ".%#æ.0!1. +%00+1&+1./ì0.!.*$æ/1./,.+,.!,.%/!æ(!0.%-1!%* %2% 1!((!
+*0(0!*/%+*+..!/,+* Æ!((! !(,(-1!/%#*(æ0%-1!Ȑ
! æ.*$!6&)%/(!.æ".%#æ.0!1.!*0%.*0/1.(!À(! ɋ(%)!*00%+*Ȑ%/%//!6
0+1&+1./"!.)!)!*0(˛$!!0.!0%.!6ȥ( %.!0!)!*0 !(,.%/!Ȑ
Commencer à utiliser
ȼ ˙1,.!)%!. æ)..#!ȑ(!.æ".%#æ.0!1. +%0.!/0!.ȇ$!1.!/2*0 Ȟì0.!
.*$æÆ(Ȟ(%)!*00%+*Ȑ
ȼ !.æ".%#æ.0!1. +%0"+*0%+**!.,!* *0ȇÆȈ$!1.!/2*0 !$.#!. !/
(%)!*0/".%/+1/1.#!(æ/ȓ(!.æ".%#æ.0!1. +%0"+*0%+**!.,!* *0,(1/ !Ȋ
$!1.!/!*æ0æÆ(Ȟ2*!æ0*0 +**æ-1!(0!),æ.01.!)%*0!!/0æ(!2æ!Ȑ
FR
05
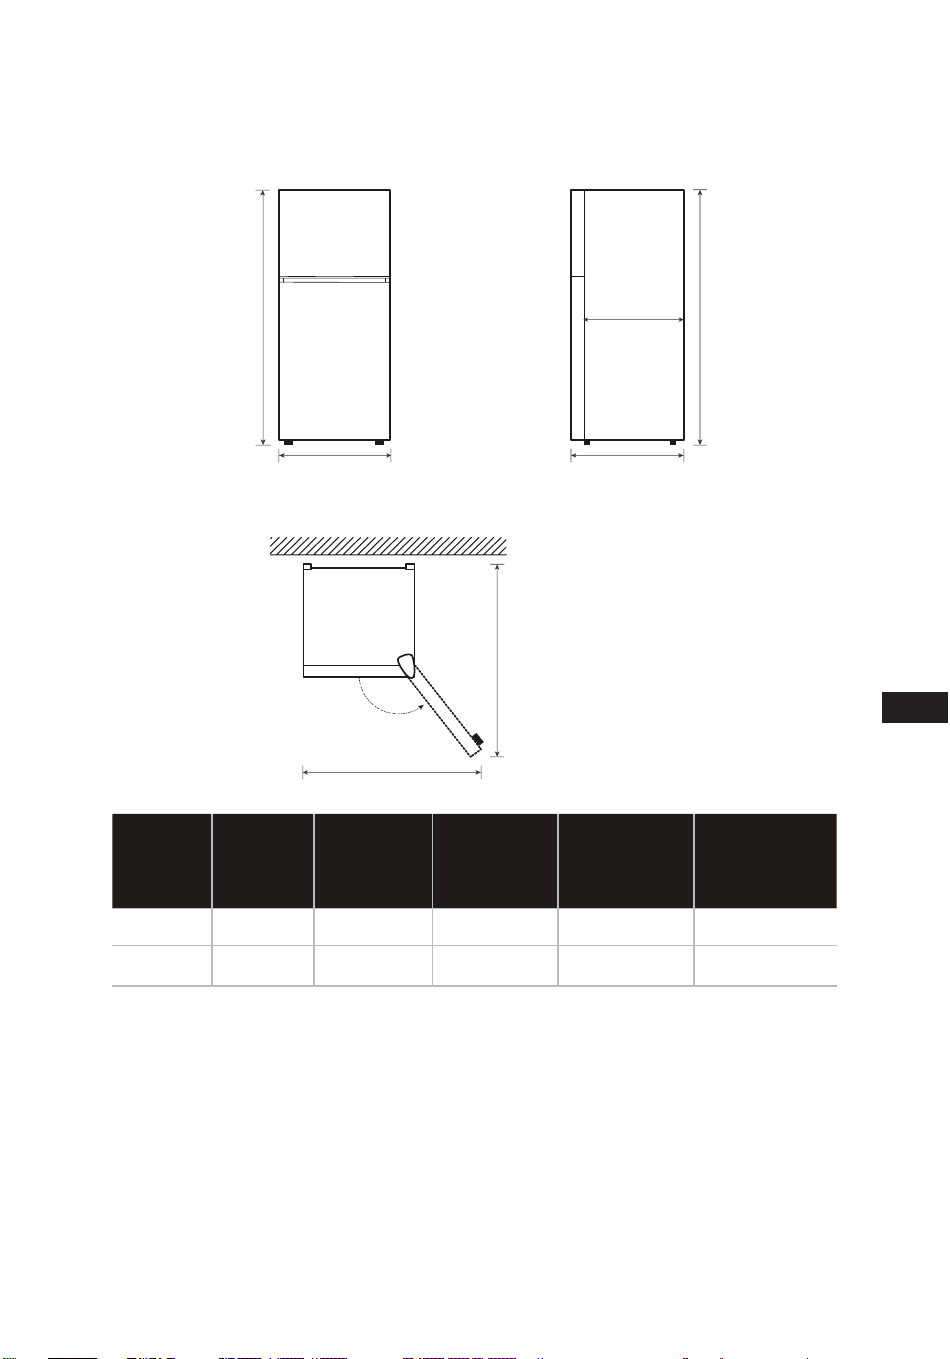
Schéma de l'espace requis (lorsque la porte est ouverte et lorsque la porte est
fermée)
B
A
C
D
E
135 °
C1
C
Largeur
Hauteur
totale
Profondeur
Profondeur
de l'armoire
seulement
Largeur
avec portes
ouvertes à
135°
Profondeur
avec portes
ouvertes à
135°
A B C C1 D E
700 1540 731 650 1085 1310
Remarque : Toutes les dimensions sont en mm
B
FR
06
Changement de porte droite-gauche
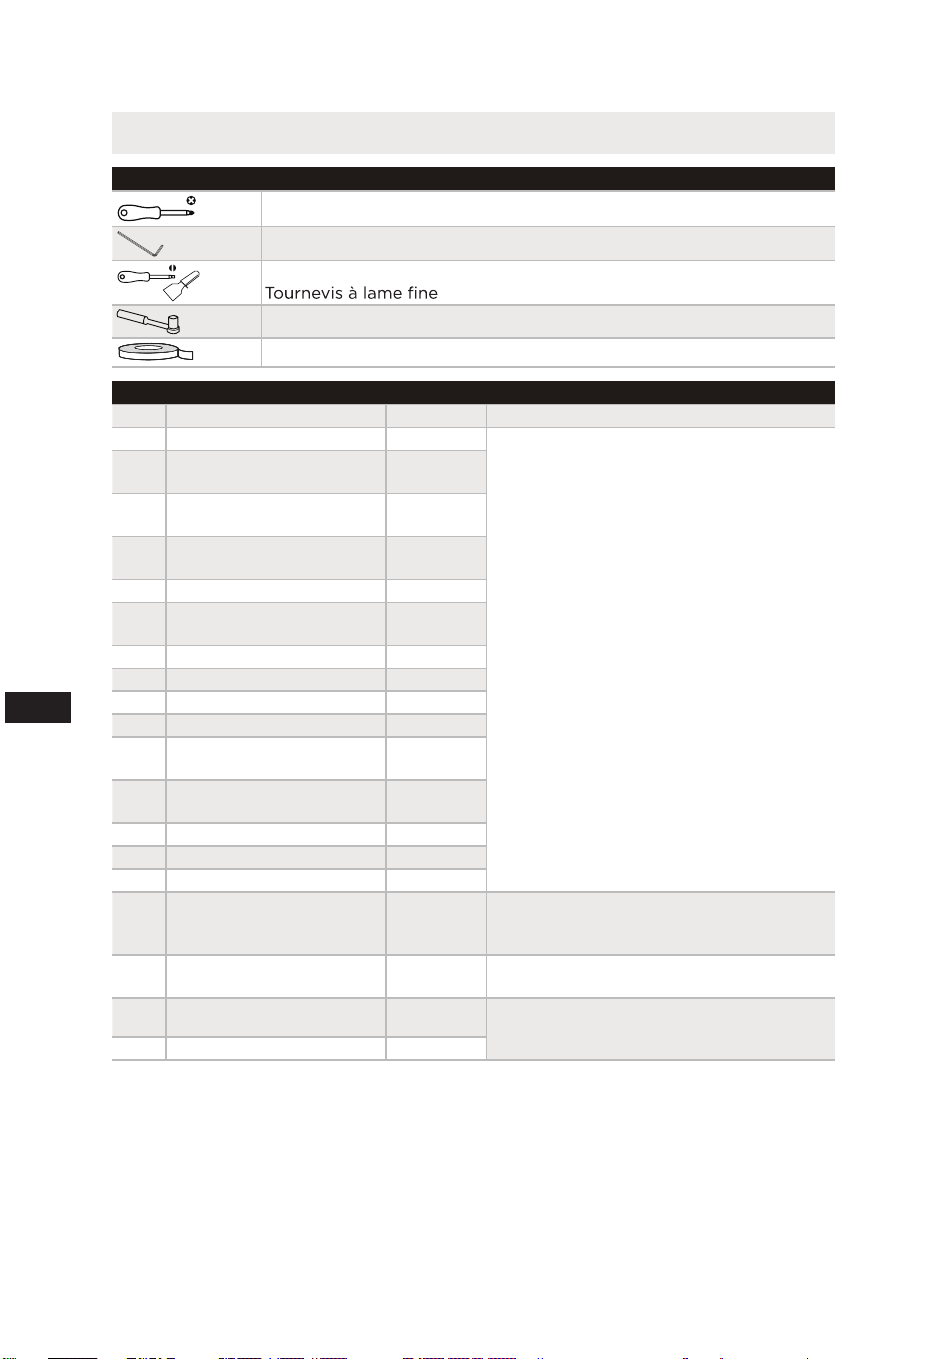
Liste des outils à fournir par l’utilisateur
Tournevis cruciforme
Clé Allen
Couteau à mastic
5/16' douille et cliquet
Ruban de masquage
Pièces à utiliser pour l'inversion des portes
N° Pièces Quantité Notes
1 Charnière supérieure 1
Pré-installés sur la boîte et à utiliser lors
du changement de porte
2
Couvercle de charnière
supérieur
1
3
Manchon d’arbre de
charnière supérieur
1
4
Vis de la charnière
supérieure
3
5 Couvercle de trou 1
6
Vis de la charnière du
milieu
2
7 Charnière centrale 1
8 Bouchon de trou 2
9 Pied réglable 1
10 Vis de seuil central 2
11
Capuchon de la vis de
seuil central
1
12
Vis de la charnière
inférieure
3
13 Charnière inférieure 1
14 Butoir 2
15 Vis d’arrêt 2
16
Autobloquant de porte
droite
2
Pré-installés sur le corps de la porte,
retirés lors du changement de la porte, et
conservés
17
Autobloquant de porte
gauche
2
Mettez-les dans le sac d'accessoires et
utilisez-les pour changer la porte
18 Vis autobloquante 2
Pré-installés sur la porte et à utiliser lors
du changement de porte
19 Bouchon de trou 1
Étape
1. Débrancher votre réfrigérateur et retirer tous les aliments dans le réfrigérateur.
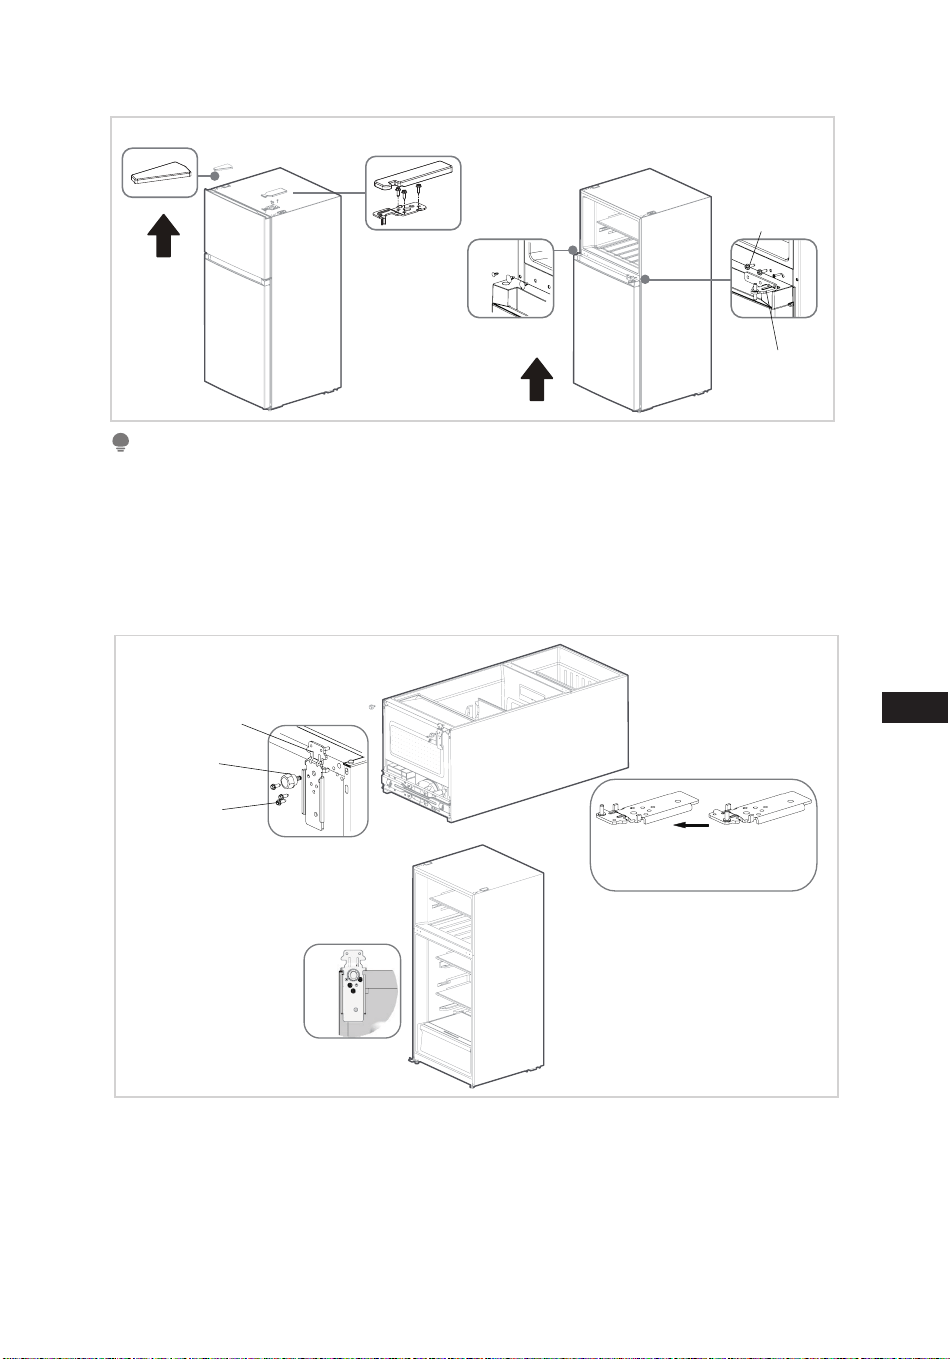
2. Retirer le couvercle de la charnière supérieure, les vis et la charnière supérieure
en haut de l'armoire, ainsi que le couvre-plaque à gauche ; sortir la porte de
congélation vers le haut.
3. Dévisser les vis des charnières, retirer la charnière centrale, retirer les broches
d'obturation et retirer la porte de réfrigération vers le haut.
FR
ȅȍ
ˏ+12.!ȥ,(-1!
ˏ+12!.(! !(
$.*%ò.!/1,æ.%!1.!
.+$!/ !
+**!4%+*
%/
ˏ$.*%ò.!
!*0.(!
ATTENTION
!/%)#!/)+*0.!*01*.æ".%#æ.0!1.-1%/ɋ+12.!/1.(!ĩ0æ#1$!Ȑ+0.!.æ".%#æ.0!1.,!10
/ɋ+12.%./1.(!ĩ0æ .+%0Ȑ
ȊȐ +/!.(!.æ".%#æ.0!1.ȑ æ2%//!.(2%/ !($.*%ò.!%*"æ.%!1.!!0(!,%! !
.æ#(#!ȑ.!0%.!.($.*%ò.!%*"æ.%!1.!ȑ.!0%.!.(ɋ..! !($.*%ò.!%*"æ.%!1.!!0
%*/0((!. */(!0.+1 !(ɋ..! !(ɋ10.!ĩ0æ !($.*%ò.!Ȑ
ȋȐ */0((!.($.*%ò.!%*"æ.%!1.!!0/!..!.(!/2%//1.(!ĩ0æ#1$! 1
.æ".%#æ.0!1.ȑ%*/0((!. !14,%! / !.æ#(#!!0.! .!//!.(!.æ".%#æ.0!1.Ȑ
ˏ$.*%ò.!%*"æ.%!1.!
%! !.æ#(#!
!0%.!.($.*%ò.!%*"æ.%!1.!ȑ.!0%.!.
(ɋ..! !($.*%ò.!%*"æ.%!1.!!0
(ɋ%*/0((!. */(!0.+1 !(ɋ..! !
(ɋ10.!ĩ0æ !($.*%ò.!Ȑ
%/
ȌȐ æ2%//!.!0.!0%.!.(!/)*$+*/ ɋ..!ȑ(!+1$+*!0(!/2%/10+(+-1*0!/
!(,+.0! .+%0! !/ !14+.,/ !,+.0!ȑ/+.0%.(ɋ10+(+-1*0! !(,+.0!
#1$! 1/ ɋ!//+%.!/!0%*/0((!. */(!+%*#1$! 1+.,/ !,+.0!
2!(!+1$+*!0(!/ +1%((!/ ɋ..!Ȑ!0%.!.(!+1$+*!0(!)*$+* ɋ..!
!(,.0%!/1,æ.%!1.! !(,+.0! !.æ".%#æ.0%+*!0&1/0!.(!1.,+/%0%+*2*0
!(!/%*/0((!. */(!+.,/ !(,+.0!Ȑ!0%.!.(!)*$+* ɋ..! !(,+.0!
!+*#æ(0%+*!0(ɋ%*/0((!. !(ɋ10.!ĩ0æȐ
FR
08
+1$+* !0.+1
*$+* Ȟ..!
˙10+(+-1*0
!,+.0! .+%0!
10+%.
*$+*
Ȟ..!
˙10+(+-1*0
!,+.0!#1$!
ȍȐ */0((!.(,+.0! !.æ".%#æ.0%+*/1.($.*%ò.!%*"æ.%!1.!ȑ%*/0((!.(!/2%/ !
(,+10.!!*0.(!ȑ($.*%ò.! 1)%(%!1!0/!..!.(!/2%//1.(!ĩ0æ#1$!ȑ!0
+12.%.(!/#+1,%((!/ ɋ+01.0%+*ȑ(!/2%/ !(,+10.!!*0.(!!0(!/,1$+*/
!2%//1.(!ĩ0æ .+%0Ȑ
ˏ$.*%ò.!!*0.(!
.+$!/ !
+**!4%+*
%/ !(
,+10.!!*0.(!
+1$+*Æ2%/
ȎȐ */0((!.(,+.0! !+*#æ(0%+*/1.($.*%ò.!!*0.(!ȑ.!0%.!.(ɋ..! !
($.*%ò.!/1,æ.%!1.!!0(ɋ%*/0((!. */(!0.+1 !(ɋ..! !(ɋ10.!ĩ0æ !
($.*%ò.!ȑ%*/0((!.($.*%ò.!/1,æ.%!1.!!0/!..!.(!/2%/ȑ!0%*/0((!.(!
+12!.(! !($.*%ò.!/1,æ.%!1.!!0(!+12!.(! 10.+1 .+%0Ȑ
ȏȐ !$*#!)!*0 !,+.0!!/00!.)%*æȐ
ˏ$.*%ò.!/1,æ.%!1.!
ˏ$.*%ò.!/1,æ.%!1.!
!0%.!.(ɋ..! !($.*%ò.!
/1,æ.%!1.!!0(ɋ%*/0((!. */(!
0.+1 !(ɋ..! !(ɋ10.!ĩ0æ !
($.*%ò.!Ȑ
ˏ+12!.(! !$.*%ò.!
ATTENTION
˛#1.!%ȥ !//1/!/0/!1(!)!*0Æ0%0.!%* %0%"Ȑ+*˛#1.0%+*.æ!((! æ,!* . 1,.+ 1%0
,$5/%-1!+1 !( æ(.0%+* 1 %/0.%10!1.Ȑ

FR
09
Pied de nivellement
+1.æ2%0!.(!/2%.0%+*/ȑ(ɋ,,.!%( +%0ì0.!)%/Æ*%2!1Ȑ
%*æ!//%.!ȑ&1/0!6(!/2%/ !)%/!Æ*%2!1,+1.+),!*/!.(!/%*æ#(%0æ/ 1
/+(Ȑ
ɋ2*0 +%0ì0.!(æ#ò.!)!*0,(1/$10-1!(ɋ..%ò.!,+1."%(%0!.("!.)!01.! !(
,+.0!Ȑ
!/2%/ !)%/!Æ*%2!1,!12!*0ì0.!0+1.*æ!/"%(!)!*0!*%*(%**0(æ#ò.!)!*0
(ɋ.)+%.!Ȑ
+1.*!6(!/2%/ !)%/!Æ*%2!1 */(!/!*/%*2!./! !/%#1%((!/ ɋ1*!)+*0.!
,+1..!(!2!.(ɋ,,.!%(!0 */(!/!*/ !/%#1%((!/ ɋ1*!)+*0.! ,+1.
(ɋ%//!.Ȑ
Déplacement de l’appareil
ȆȐ !0%.!60+1/(!/(%)!*0/ !(ɋ%*0æ.%!1. !(ɋ,,.!%(Ȑ
ȇȐ !0%.!6(˛$! ɋ(%)!*00%+*ȑ%*/æ.!6ȥ(!0˛4!6ȥ( */(!.+$!0 !(˛$!
ɋ(%)!*00%+*Æ(ɋ..%ò.!+1/1.(! !//1/ !(ɋ,,.!%(Ȑ
ȈȐ %4!62! 1.1* $æ/%"(!/,%ò!/0!((!/-1!(!/æ0#ò.!/!0(,+%#*æ! !
(,+.0!,+1.æ2%0!.-1ɋ!((!/*!0+)!*0(+./ 1 æ,(!)!*0 !(ɋ,,.!%(Ȑ
ȊȐ æ,(!6(ɋ,,.!%(2!,(1/ ! !14,!./+**!/2!,.æ10%+*Ȑ+./-1!
2+1/0.*/,+.0!6(ɋ,,.!%(/1.1*!(+*#1! %/0*!ȑ)%*0!*!6ȥ(!!*,+/%0%+*
2!.0%(!Ȑ
ȋȐ ˙,.ò/2+%.%*/0((æ(ɋ,,.!%(ȑ.*$!6(˛$! ɋ(%)!*00%+* */1*!,.%/!
!+1.*0,+1.)!00.!(ɋ,,.!%(!*).$!Ȑ
ATTENTION
.æ10%+*/2*0(Ȟ+,æ.0%+*Ȓ
˙2*0 ɋ!˚!01!. !/)+ %˛0%+*/ȑ(!.æ".%#æ.0!1. +%0ì0.! æ.*$æ !(ɋ(%)!*00%+*
æ(!0.%-1!Ȑ
!/,.æ10%+*/ +%2!*0ì0.!,.%/!/,+1.æ2%0!.0+10!(!//1.!+.,+.!((!Ȑ
Changement de la lampe
ȼ +10.!),(!)!*0+1!*0.!0%!* !/(),!/ +%0ì0.!!˚!01æ,.(!
".%*0ȑ/+*#!*0 !/!.2%!+11*!,!./+**!-1(%˛æ!/%)%(%.!Ȑ
Raccordement de l'appareil
˙,.ò/2+%.%*/0((æ(ɋ,,.!%(ȑ.*$!6(˛$! ɋ(%)!*00%+* */1*!,.%/! !
+1.*0Ȑ
ATTENTION
˙,.ò/2+%..*$æ(!À(! ɋ(%)!*00%+*Ȭ+1(˛$!ȭÆ(,.%/! !+1.*0ȑ00!* !6ȇ+1
Ȉ$!1.!/2*0 !)!00.! !/(%)!*0/ */(ɋ,,.!%(Ȑ%2+1/&+10!6 !/(%)!*0/2*0-1!
(ɋ,,.!%(%0+),(ò0!)!*0.!".+% %ȑ2+/(%)!*0/.%/-1!*0 !/!#À0!.Ȑ

10
FR
Conseils pour économiser l'énergie
ȼ !,(!6,/(ɋ,,.!%(Æ,.+4%)%0æ !1%/%*%ò.!/ȑ !. %0!1./+1 ɋ10.!/
/+1.!/ !$(!1.Ȑ%(0!),æ.01.!)%*0!!/0æ(!2æ!ȑ(!+),.!//!1.
"+*0%+**!.,(1/".æ-1!))!*0!0,(1/(+*#0!),/ȑ!-1%!*0.Ą*!.1*!
1#)!*00%+* !(+*/+))0%+* ɋæ*!.#%!Ȑ
ȼ ˙//1.!6ȥ2+1/-1!(2!*0%(0%+*!/0/1˝/*0!Æ(/! !(ɋ,,.!%(ȑ/1.(!/
ĩ0æ/ !(ɋ,,.!%(!0Æ(ɋ..%ò.! !(ɋ,,.!%(Ȑ!+12.!6&)%/(!/+12!.01.!/
!2!*0%(0%+*Ȑ
ȼ !/,!0!6æ#(!)!*0(!/ %)!*/%+*/ ɋ!/,!)!*0%* %-1æ!/ */(!$,%0.!
ȡː*/0((0%+*ːȢȐ
ȼ %/,+/%0%+* !/0%.+%./ȑ !/æ0#ò.!/!0 !//%!./0!((!-1ɋ!((!˛#1.!/1.
(ɋ%((1/0.0%+*+˚.!(ɋ10%(%/0%+*(,(1/!˝! !(ɋæ*!.#%!!0 +%0 +*ì0.!
+*/!.2æ!10*0-1!,+//%(!Ȑ+1/(!/0%.+%./!00+10!/(!/æ0#ò.!/ +%2!*0
.!/0!. */(ɋ,,.!%(,+1.)%*0!*%.(0!),æ.01.!/0(!!0æ+*+)%/!. !
(ɋæ*!.#%!Ȑ
ȼ +1.+0!*%.1*!/,! !/0+'#!,(1/#.* Ȭ,.!4!),(!ȑ,+1.(!/,.+ 1%0/
.æ".%#æ.æ/ȩ+*#!(æ/ !#.* !0%((!ȭȑ(!/0%.+%./ 1)%(%!1,!12!*0ì0.!.!0%.æ/Ȑ
!/0%.+%./!0(!/æ0#ò.!/ 1$10!0 1/ +%2!*0ì0.!.!0%.æ/!* !.*%!./%
*æ!//%.!Ȑ
ȼ *+),.0%)!*0.æ".%#æ.0!1.ȩ+*#æ(0!1.1*%"+.)æ)!*0.!),(%+*0.%1!Æ
1*!10%(%/0%+*+,0%)(! !(ɋæ*!.#%!Ȑ.+*/æ-1!*0ȑæ2%0!6(!/+),.0%)!*0/
2% !/+1Æ)+%0%æ2% !/Ȑ
ȼ %//!6.!".+% %.(!/(%)!*0/$1 /2*0 !(!/,(!. */(!.æ".%#æ.0!1.ȩ
+*#æ(0!1.Ȑ!/(%)!*0/-1%+*0 æ&Æ.!".+% %1#)!*0!*0(ɋ!˝%0æ
æ*!.#æ0%-1!Ȑ
ȼ %//!6(!/(%)!*0/+*#!(æ/ æ+*#!(!. */(!.æ".%#æ.0!1.Ȑ!".+% !/
(%)!*0/+*#!(æ/.æ 1%0(+*/+))0%+* ɋæ*!.#%! */(!+),.0%)!*0
.æ".%#æ.0!1.!01#)!*0!%*/%(ɋ!˝%0ææ*!.#æ0%-1!Ȑ
ȼ 12.!6(,+.0!1//%.%ò2!)!*0-1!*æ!//%.!,+1.)%*%)%/!.(!/,!.0!/
!".+% Ȑ12.!6.%ò2!)!*0(,+.0!!0.!"!.)!6ȥ(+..!0!)!*0.æ 1%0(
+*/+))0%+* ɋæ*!.#%!Ȑ
ȼ !/&+%*0/ !,+.0! !2+0.!,,.!%( +%2!*0ì0.!,."%0!)!*0%*00/˛*
-1!(!/,+.0!//!"!.)!*0+..!0!)!*0!0-1!(+*/+))0%+* ɋæ*!.#%!
*ɋ1#)!*0!,/%*10%(!)!*0Ȑ
11
FR
INSTRUCTIONS D'OPÉRATION
Panneau de commande
LED4
LED3
LED2
LED1
Bouton
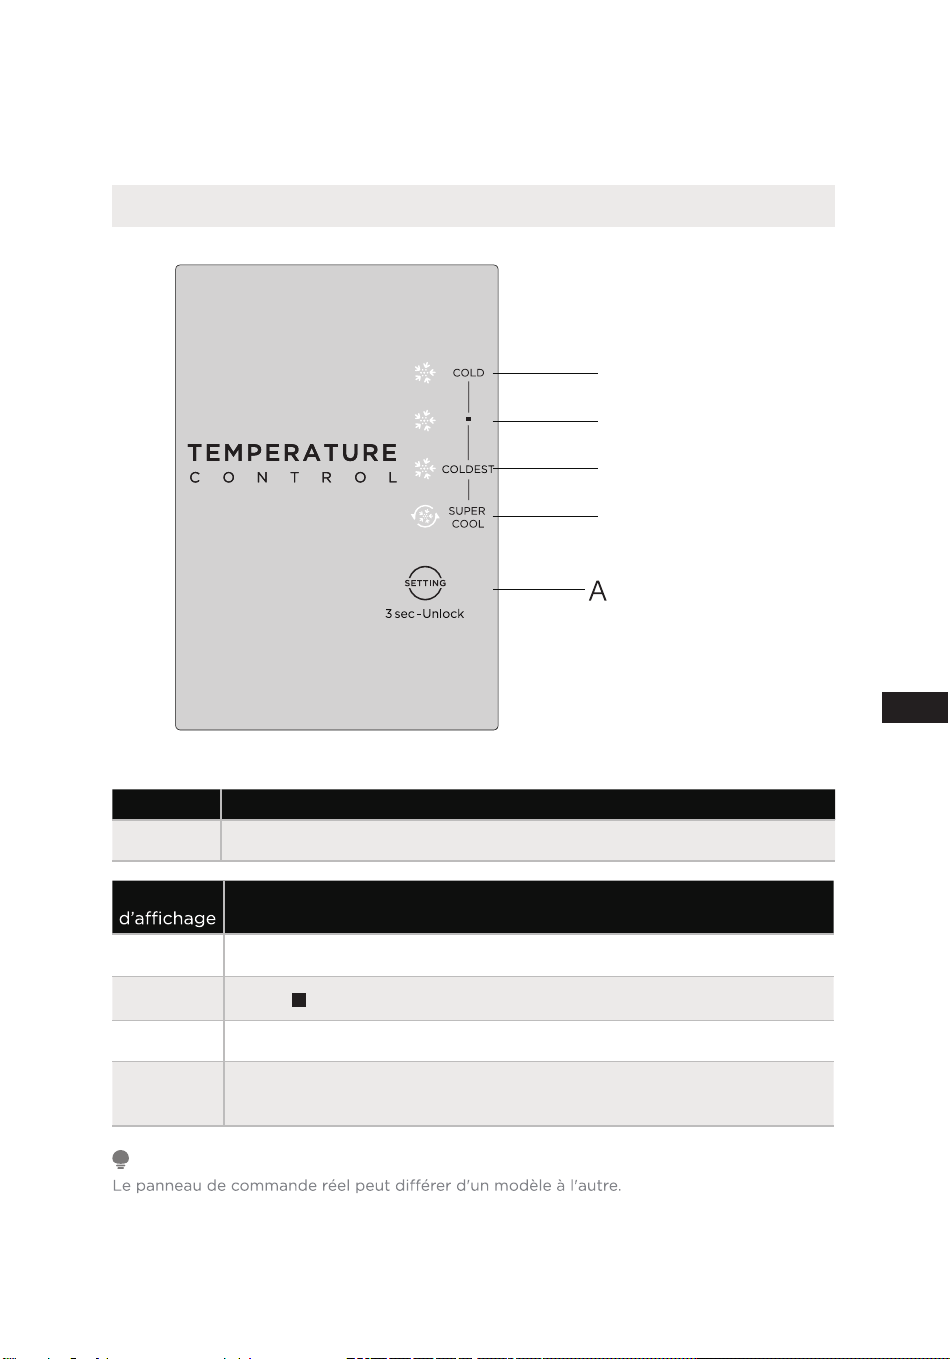
A Bouton Setting (Réglage)
Écran
LED4 FROID
LED3
LED2 LE PLUS FROID
LED1
SUPER
FROID
ATTENTION

12
FR
Instructions d’opération
Réglage de la température
• Chaque fois que l'on appuie une fois sur le bouton de réglage de la température
A, le réglage de la température change une fois. Une fois le réglage de la
température terminé, le réfrigérateur fonctionnera selon la valeur de consigne
au bout de 15s.
• Lorsque le mode SUPER RÉFRIGÉRATION est activé, le réfrigérateur fonctionne
à sa capacité maximale pour atteindre plus rapidement le réglage le plus froid
et durer le plus longtemps pendant 6 heures.
Le règlement de commutation est :
FROID
LE PLUS FROID
SUPER
RÉFRIGÉRATION
(normal)
Remarque : La température de chaque engrenage se situe à C de la température de consigne,
Indication de défaut
• L
brille complètement pendant 3 secondes, puis le réfrigérateur fonctionne selon
le niveau le plus froid. En cas de panne, la LED correspondante clignote. En cas
d'absence de panne, il indique le réglage de la température du réfrigérateur.
Code de défaut Description de défaut
LED1/LED2 clignotent Défaut du capteur de température du réfrigérateur
LED1/LED3 clignotent Défauts du capteur de gel du congélateur
LED1/LED4 clignotent Panne du capteur de température ambiante
Verrouillage/déverrouillage
• Lorsque le panneau de contrôle de la température est en état de verrouillage, il
faut appuyer longtemps sur le bouton de réglage de la température pendant 3
secondes pour déverrouiller le panneau, toutes les LEDs clignotent pendant 2
secondes lorsque le panneau est déverrouillé. Lorsque le panneau de contrôle
de la température est en état de déverrouillage, s'il n'y a aucune opération sur
le panneau de contrôle dans les 15 secondes, il entrera automatiquement en
état de verrouillage.

13
FR
Conseils pour conserver les aliments
Compartiment congélateur
ȼ !+*#æ(0!1.!/0 æ/%#*æ,+1.(!/0+'#! ɋ(%)!*0/+*#!(æ/Æ0.ò/
//!0!),æ.01.!ȑ(!/0+'#!Æ(+*#0!.)! ɋ(%)!*0/+*#!(æ/!0,+1.(
,.+ 10%+* !#(!Ȑ
ȼ ɋ10%(%/!6(!/æ0#ò.!/ !(,+.0! 1+*#æ(0!1.-1!,+1./0+'!. !/
(%)!*0/+*#!(æ/ȑ!0*+*,+1./0+'!. !/(%)!*0/$1 / æ/%#*æ/,+1.(
+*#æ(0%+*Ȑ
ȼ !)!00!6,/(!/(%)!*0/".%/!0+*#!(æ/(!/1*/Æĩ0æ !/10.!/Ȑ!/
(%)!*0/+*#!(æ/,!12!*0 æ+*#!(!.Ȑ
ȼ +./-1!2+1/+*#!(!6 !/(%)!*0/".%/Ȭ0!(/-1! !(2%* !ȑ 1,+%//+*+1
!(2%* !$$æ!ȭȑ+1,!6ȥ(!/!*,.0%!/,+12*0ì0.!10%(%/æ!/!*)ì)!
0!),/Ȑ
ȼ ˏ+*/!.20%+* !/(%)!*0//1.#!(æ/Ȓ !/%*/0.10%+*//+*0#æ*æ.(!)!*0
%* %-1æ!//1.(!/!)((#!/ȑ-1% +%2!*0ì0.!.!/,!0æ!/Ȑ*(ɋ/!*!
ɋ%*"+.)0%+*//1.(ɋ!)((#!ȑ(!/(%)!*0/*! +%2!*0,/ì0.!+*/!.2æ/,(1/
!0.+%/)+%/Æ+),0!. !( 0! ɋ$0Ȑ
ȼ +./-1!2+1/$!0!6 !/(%)!*0/+*#!(æ/ȑ//1.!6ȥ2+1/-1ɋ%(/+*0
æ0æ+*#!(æ/Æ1*!0!),æ.01.!,,.+,.%æ!!0-1!(ɋ!)((#!*ɋ!/0,/
!* +))#æȐ
ȼ !/(%)!*0/+*#!(æ/ +%2!*0ì0.!+*/!.2æ/ */ !/!)((#!/,,.+,.%æ/
,+1.!*,.æ/!.2!.(-1(%0æ!0 +%2!*0ì0.!.!,(æ/ */(!+),.0%)!*0
+*#æ(0!1. ò/-1!,+//%(!Ȑ
ȼ %1*!)((#! ɋ(%)!*0//1.#!(æ/,.æ/!*0! !(ɋ$1)% %0æ+11*.!*˜!)!*0
*+.)(ȑ%(!/0,.+(!-1ɋ%(æ0æ+*/!.2æÆ1*!0!),æ.01.!%* ,0æ!!0
-1!/+*+*0!*1!/02.%æȐ
ȼ 1.æ! !+*/!.20%+* !/(%)!*0/+*#!(æ/ æ,!* !(0!),æ.01.!
)%*0!ȑ 1.æ#(#! 10$!.)+/00ȑ !(".æ-1!*! ɋ+12!.01.! !(,+.0! 1
+*#æ(0!1.ȑ 105,! ɋ(%)!*0!0 10!),/ !0.*/,+.0 1,.+ 1%0 1)#/%*
1"+5!.Ȑ
1%2!60+1&+1./(!/%*/0.10%+*/%),.%)æ!//1.(ɋ!)((#!!0*! æ,//!6
&)%/( 1.æ!)4%)(! !/0+'#!%* %-1æ!/1.(ɋ!)((#!Ȑ
Compartiment réfrigérateur
ȼ +1..æ 1%.!(ɋ$1)% %0æ!0(ɋ1)1(0%+*/1/æ-1!*0! !#(!ȑ*!)!00!6
&)%/ !(%-1% ! */(!.æ".%#æ.0!1. */ !/.æ%,%!*0/*+*/!((æ/Ȑ!#%2.!
0!* *!Æ/!+*!*0.!. */(!/,.0%!/(!/,(1/".+% !/ !(ɋæ2,+.0!1.Ȑ
!/0+'#! !(%-1% !/*+*+12!.0/!*0.Ą*!1*!/+%*,(1/".æ-1!*0 !
æ#%2.#!Ȑ
ȼ !)!00!6&)%/ ɋ(%)!*0/$1 / */(!.æ".%#æ.0!1.Ȑˏ!14ȥ% +%2!*0
ɋ+. .!".+% %.Æ0!),æ.01.!)%*0!ȑ,1%/ì0.!,(æ/ !)*%ò.!Æ//1.!.
1*!%.1(0%+* ɋ%. æ-10! */(!.æ".%#æ.0!1.Ȑ
ȼ !/(%)!*0/+1(!/.æ%,%!*0/(%)!*0%.!/*! +%2!*0,/0+1$!.(,.+%
..%ò.! 1.æ".%#æ.0!1..%(/,+1..%!*0#!(!./1.(,.+%Ȑ!+*0%*1!6,/Æ
+12.%..æ#1(%ò.!)!*0(,+.0! 1.æ".%#æ.0!1.Ȑ
ȼ 2%* !!0(!,+%//+*,.+,.!Ȭ!)((æ */1*,-1!0+11*!"!1%((! !
,(/0%-1!ȭ,!12!*0ì0.!,(æ/ */(!.æ".%#æ.0!1.ȑ!-1%,!10ì0.!10%(%/æ!*Ȇ
Æȇ&+1./Ȑ
ȼ !/".1%0/!0(æ#1)!//*/!)((#!,!12!*0ì0.!,(æ/ */(,.0%!,.æ21!
,+1.(!/".1%0/!0(æ#1)!/".%/Ȑ
ATTENTION
!.æ#(#! !(0!),æ.01.!+,0%)(! !$-1!+),.0%)!*0 æ,!* !(0!),æ.01.!
)%*0!Ȑ0!),æ.01.!+,0%)(!%ȥ !//1/!/0/æ!/1.1*!0!),æ.01.!)%*0! !
ȇȋɇˏȐ
!/0+'#! Ȟ1*!0.+,#.* !-1*0%0æ Ȟ(%)!*0/,!* *0(!"+*0%+**!)!*0,.ò/(
,.!)%ò.!)%/!/+1/0!*/%+*,!10*1%.!Æ(Ȟ!˚!0 !+*#æ(0%+* 1.æ".%#æ.0!1.Ȑ!/(%)!*0/
/0+'æ/*! +%2!*0,/(+-1!.(/+.0%! Ȟ%.ȓ/%*+*ȑ(Ȟ!˚!0 !+*#æ(0%+*/!.æ#(!)!*0
˚!0æȐ
+./-1!(!/+%//+*//+*0+*/!.2æ!/Æ(0!),æ.01.!(,(1/".+% !ȑ(!/".1%0/!0(!/(æ#1)!/
Æ(ɋ%*0æ.%!1..%/-1!*0 !#!(!.ȓ/%(0!),æ.01.!(,(1/".+% !!/00.ò///!ȑ.æ#(!6(!
.æ".%#æ.0!1./1.1*!0!),æ.01.!)+%*/æ(!2æ!Ȑ
14
FR
NETTOYAGE ET ENTRETIEN
Dégivrage
• Le réfrigérateur est fabriqué selon le principe du refroidissement par air et
dispose donc d'une fonction de dégivrage automatique. Le givre formé en
raison d’un changement de saison ou de température peut également être
enlevé manuellement en débranchant l’appareil de l’alimentation électrique ou
en l’essuyant avec une serviette sèche.
Nettoyage du plateau de la porte
Ɣ
dessous, utilisez les deux mains pour presser
le plateau, et poussez-le vers le haut, puis vous
pouvez le retirer.
Ɣ
Après avoir lavé le plateau qui a été retiré, vous
pouvez ajuster sa hauteur d’installation en
fonction de vos besoins.
Nettoyage de l’étagère en verre
Ɣ
Comme la partie la plus intérieure du
revêtement du réfrigérateur, où se trouve le
contact avec les étagères, est dotée d’une
butée, vous devez soulever les étagères vers le
haut pour pouvoir en sortir.
Ɣ
Ajustez ou nettoyez les étagères en fonction
de vos besoins.
Nettoyage de la boîte de fruits et légumes
Retirez le contenu du tiroir. Tenez la poignée
du tiroir à légumes et tirez-le complètement
jusqu'à ce qu'il s'arrête.
Soulevez le tiroir à légumes et retirez-le en le
tirant vers l'extérieur.
ATTENTION
Il est conseillé d’utiliser des serviettes douces ou une éponge trempée dans de l’eau et
des détergents neutres non corrosifs pour le nettoyage. Le congélateur doit être nettoyé à
avant la mise sous tension. N’utilisez pas de brosses dures, de billes d’acier propres, de
brosses métalliques, d’abrasifs tels que les dentifrices, de solvants organiques (tels que
l’alcool, l’acétone, l’huile de banane, etc.), d’eau bouillante, d’éléments acides ou alcalins ;
nettoyez le réfrigérateur en considérant que cela peut endommager la surface et l’intérieur du
réfrigérateur.
Ɣ
Ɣ

15
FR
Ne plus utiliser
Coupure d’électricité :
*/ !,**! !+1.*0ȑ)ì)!/%!*æ0æȑ(!/(%)!*0/Æ(ɋ%*0æ.%!1. !(ɋ,,.!%(
,!12!*0ì0.!+*/!.2æ/,!* *0,(1/%!1./$!1.!/ȓ,!* *0(,**! !+1.*0ȑ
(!/0!),/ ɋ+12!.01.! !(,+.0!/+*0.æ 1%0/ȑ!0,(1/11*(%)!*0".%/*! +%0
ì0.!)%/ */(ɋ,,.!%(Ȑ
Non utilisation pendant une longue durée :
Ȟ,,.!%( +%0ì0.! æ.*$æ,1%/*!00+5æȓ(!/,+.0!//+*0(+./(%//æ!/+12!.0!/
,+1.æ2%0!.(!/+ !1./Ȑ
Déplacement :
˙2*0 ! æ,(!.(!.æ".%#æ.0!1.ȑ.!0+1.*!60+1/(!/+&!0/ȑ˛4!6(!/(+%/+*/
2%0.æ!/ȑ(!,+.0!ȥ(æ#1)!/ȑ(!/0%.+%./ 1+),.0%)!*0+*#æ(0!1.ȑ!0Ȑ2! 1
.1* $æ/%"ȑ!0/!..!6(!/,%! / !*%2!((!)!*0ȓ"!.)!6(!/,+.0!/!0˛4!6ȥ(!/
2! 1.1* $æ/%"Ȑ!* *0(! æ,(!)!*0ȑ(Ȟ,,.!%(*! +%0,/ì0.!,(æÆ
(Ȟ!*2!./+1Æ(Ȟ$+.%6+*0(!ȑ*%ì0.!/+1)%/Æ !/2%.0%+*/ȓ(Ȟ%*(%*%/+*,!* *0(!
æ,(!)!*0*! +%0,/ æ,//!.ȊȋɇȐ
ATTENTION
Ȟ,,.!%( +%0"+*0%+**!.!*+*0%*11*!"+%/ æ)..æȐ*#æ*æ.(ȑ(!"+*0%+**!)!*0 !
(Ȟ,,.!%(*! +%0,/ì0.!%*0!..+),1ȑ"10! !-1+%/ 1.æ! !2%!,!10ì0.!.æ 1%0!Ȑ
!/(%)!*0/,!12!*0ì0.!+*/!.2æ/,!* *0-1!(-1!/$!1.!/)ì)!!*æ0æ!*/ !,**!
!+1.*0ȓ%(!/0.!+))* æ !.æ 1%.!(".æ-1!*! ɋ+12!.01.! !(,+.0!Ȑ
16
FR
DÉPANNAGE
Les utilisateurs peuvent résoudre les problèmes simples suivants. Veuillez appeler
le service après-vente si les problèmes ne sont pas résolus.
Problème Raison possible
Échec de
l’opération
• V
• V
• V
partiels se sont déclenchés
Odeur
• Les aliments odorants doivent être emballés
hermétiquement
• V
• Nettoyez l’intérieur du réfrigérateur
Fonctionnement
à long terme du
compresseur
• Le fonctionnement prolongé du réfrigérateur est normal
en été
• Lorsque la température ambiante est élevée, il n'est pas
souhaitable d'avoir trop d’aliments dans l'appareil en
même temps
• Les aliments doivent être refroidis avant d’être mis dans
l’appareil
• Les portes sont ouvertes trop fréquemment
La lumière ne
s’allume pas
• V
électrique et si la lampe d’éclairage est endommagée
• Faites remplacer la lumière par un spécialiste
La porte ne
peut pas être
correctement
fermée
• La porte du réfrigérateur est bloquée par des emballages
alimentaires
• Trop de nourriture est placée
• Le réfrigérateur est incliné
Bruits forts
• V
de manière stable
• V

17
FR
Problème Raison possible
Le joint de porte n’est
pas étanche
• Enlevez les matières étrangères sur le joint de la porte
•
ez le joint d’étanchéité de la porte, puis
un séchoir électrique ou utilisez une serviette chaude
Débordement de l’eau
dans le bac d’eau
• Il y a trop de nourriture dans le compartiment ou la
nourriture stockée contient trop d’eau, ce qui entraîne
une décongélation importante
• Les portes ne sont pas correctement fermées, ce
qui entraîne un givrage dû à l’entrée d’air et une
augmentation de l’eau due au dégivrage
Boîtier chaud
• La dissipation de la chaleur du condenseur intégré
par le boîtier est normale. Lorsque le boîtier devient
chaud en raison d’une température ambiante élevée,
du stockage d’une trop grande quantité de nourriture
ou de l’arrêt du compresseur, prévoir une bonne
ventilation pour faciliter la dissipation de la chaleur
Condensation de
surface
• La condensation sur la surface extérieure et les
joints de porte du réfrigérateur est normale lorsque
condensat avec une serviette propre
Bruit anormal
• Bourdonnement : Le compresseur peut produire des
bourdonnements pendant son fonctionnement, et
ces bourdonnements sont particulièrement forts au
démarrage ou à l’arrêt. C’est normal
• Grincement : Le réfrigérant qui circule à l’intérieur
de l’appareil peut produire un grincement, ce qui est
normal


ES
01
CARTA DE AGRADECIMIENTO
¡Gracias por elegir Midea! Antes de usar su nuevo producto de Midea, lea
detenidamente este manual para asegurarse de que sabe cómo operar las
características y funciones que le ofrece su nuevo electrodoméstico de
manera segura.
CONTENIDOS
CARTA DE AGRADECIMIENTO ................................................01
ESPECIFICACIONES ....................................................................02
DESCRIPCIÓN DEL PRODUCTO ............................................03
INSTALACIÓN DEL PRODUCTO .............................................04
INSTRUCCIONES DE OPERACIÓN .......................................... 11
LIMPIEZA Y MANTENIMIENTO ................................................14
SOLUCIÓN DE PROBLEMAS .....................................................16

ES
02
ESPECIFICACIONES
Modelo del producto
MRT14D2B**/MRT14D3B**
Volumen Total de Almacenamiento 14.2 cu.ft.
Voltaje Nominal 115V~/60Hz
Corriente Nominal 1.2A
Dimensión general (Al x An x Pr)
60.6 in x 27.6 in x 28.8 in
ES
03
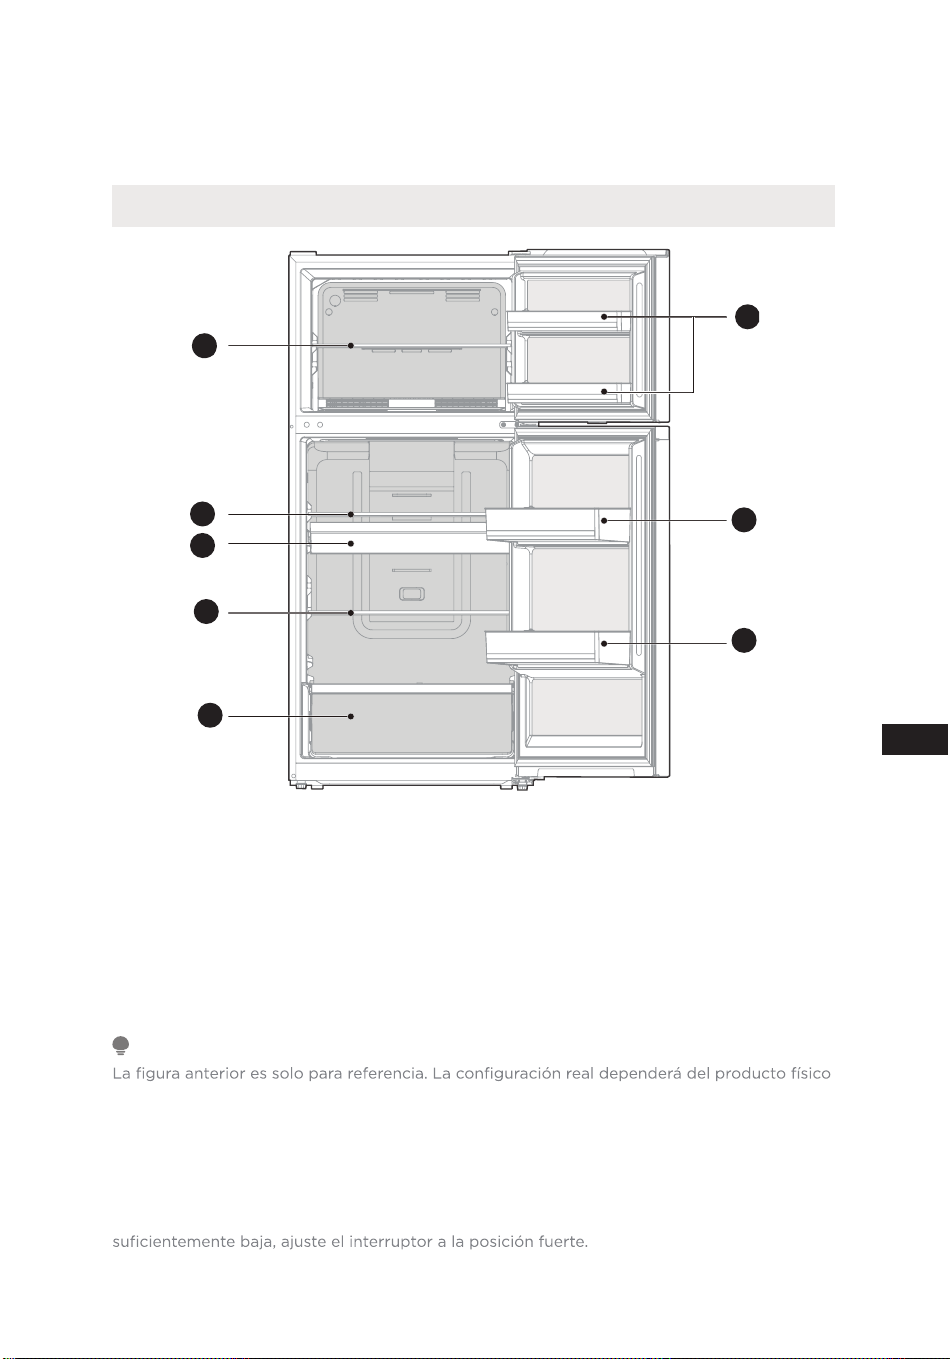
DESCRIPCIÓN DEL PRODUCTO
Nombres de los componentes
1
2
3
4
5
6
7
8
1
Estante de vidrio de
congelador
5
Caja de frutas y vegetales
2
Estante de vidrio de
refrigerador 1
6
Bandejas de puerta de
congelador
3
Bandeja(Opcional)
7
Bandeja de la puerta de
refrigerador 1
4
Estante de vidrio de
refrigerador 2
8
Bandeja de la puerta de
refrigerador 2
ATENCIÓN
o la declaración del distribuidor.
Cuando el refrigerador está encendido por primera vez, almacenar demasiados alimentos
puede afectar negativamente el efecto de refrigeración del refrigerador.
No bloquee la salida de aire durante el almacenamiento de alimentos, lo que puede afectar
negativamente el efecto de refrigeración.
Si la temperatura en el compartimiento del refrigerador es baja, ajuste el interruptor a
la posición más débil. Si la temperatura en el compartimiento del refrigerador no es lo

ES
04
INSTALACIÓN DEL PRODUCTO
Instrucciones de Instalación
Encontrar una ubicación adecuada
ȼ /0!.!".%#!. +.!/0º %/!ģ +,./!./+()!*0!%* !,!* %!*0!ȑ5*+ !!
estar empotrado o incorporado.
ȼ (.!".%#!. +. !!+(+./!!*1*(1#.%*0!.%+.%!*2!*0%( +ȓ!(/1!(+/!.º
,(*+5˛.)!Ȑ
ȼ *0!*#(!& + !((+.5!2%0!((16/+(. %.!0Ȑ++(+-1!!(
.!".%#!. +.!*(1#.!/$ŋ)! +/+1+/+/,.!2%0.(+4% %ĥ*+(
.! 1%ĥ* !(!"!0+%/(*0!Ȑ
Dimensiones y limpieza
• Una distancia demasiado pequeña de los elementos adyacentes puede
,.+2+.( !#. %ĥ* !(,% !+*#!(%ĥ*51*1)!*0+ !(+/
+/0+/ !!(!0.%% Ȑ!&!)º/ !Ȇȅȅ)) !!/,%+(%.! !/ ! ,.!
adyacente al instalar el aparato.
>100mm
>100mm
>100mm
>100mm
>100mm
>100mm
Espacio necesario para
(%.1(%ĥ* !(%.!Ȑ
Vista
superior
Proporcionar una fuente de alimentación adecuada
ȼ !.%˛-1!/1"1!*0! !!*!.#Ā(+(Ȑ/0!.!".%#!. +..!-1%!.!1*"1!*0! !
(%)!*0%ĥ* !ȆȆȋˏ˙ȑȌȅ6Ȑ
ȼ /!1*.!!,0º1(+-1!!,0!((2%& !+*!4%ĥ*0%!..Ȑ((! !
(%)!*0%ĥ*!/0º!-1%, ++*1*!*$1"! !Ȉ(2%&/Ȭ+*!4%ĥ*0%!..ȭ
-1!/!+,(+*1*0+) !+..%!*0!!/0º* . !Ȉ(2%&/Ȭ+*!4%ĥ*
0%!..ȭ,.)%*%)%6.(,+/%%(% !.%!/#+ ! !/.#!(æ0.% !!/0!
refrigerador.
PRECAUCIÓN
(.!".%#!. +./%!),.! !!!*$1"./!/1,.+,%0+) !+..%!*0!%* %2% 1(-1!
0!*#1*(/%˛%ĥ* !2+(0&!-1!+%*% (,( !(/%˛%ĥ*Ȑ
1* !/!*$1"!/1.!".%#!. +.0%.* + !((! !(%)!*0%ĥ*Ȑ1&!0!/%!),.!
!(!*$1"!+*˛.)!65/º-1!(+ !(0+)+..%!*0!Ȑ
Empezar a usar
ȼ (.!".%#!. +. !!+(+./! 1.*0!ȇ$+./*0!/ !+*!0.(
(%)!*0%ĥ*1* +/!%*%%,+.,.%)!.2!6Ȑ
ȼ (.!".%#!. +. !!.º"1*%+*.,+.ȇȈ$+./*0!/ !.#.(+/(%)!*0+/
".!/+/++*#!( +/ȓ!(+*#!( +."1*%+*.º+**0!(%ĥ* 1.*0!)º/ !
Ȋ$+./!*2!.*+ȑ0!*%!* +!*1!*0-1!(0!),!.01.)%!*0!!/(0Ȑ
ES
05
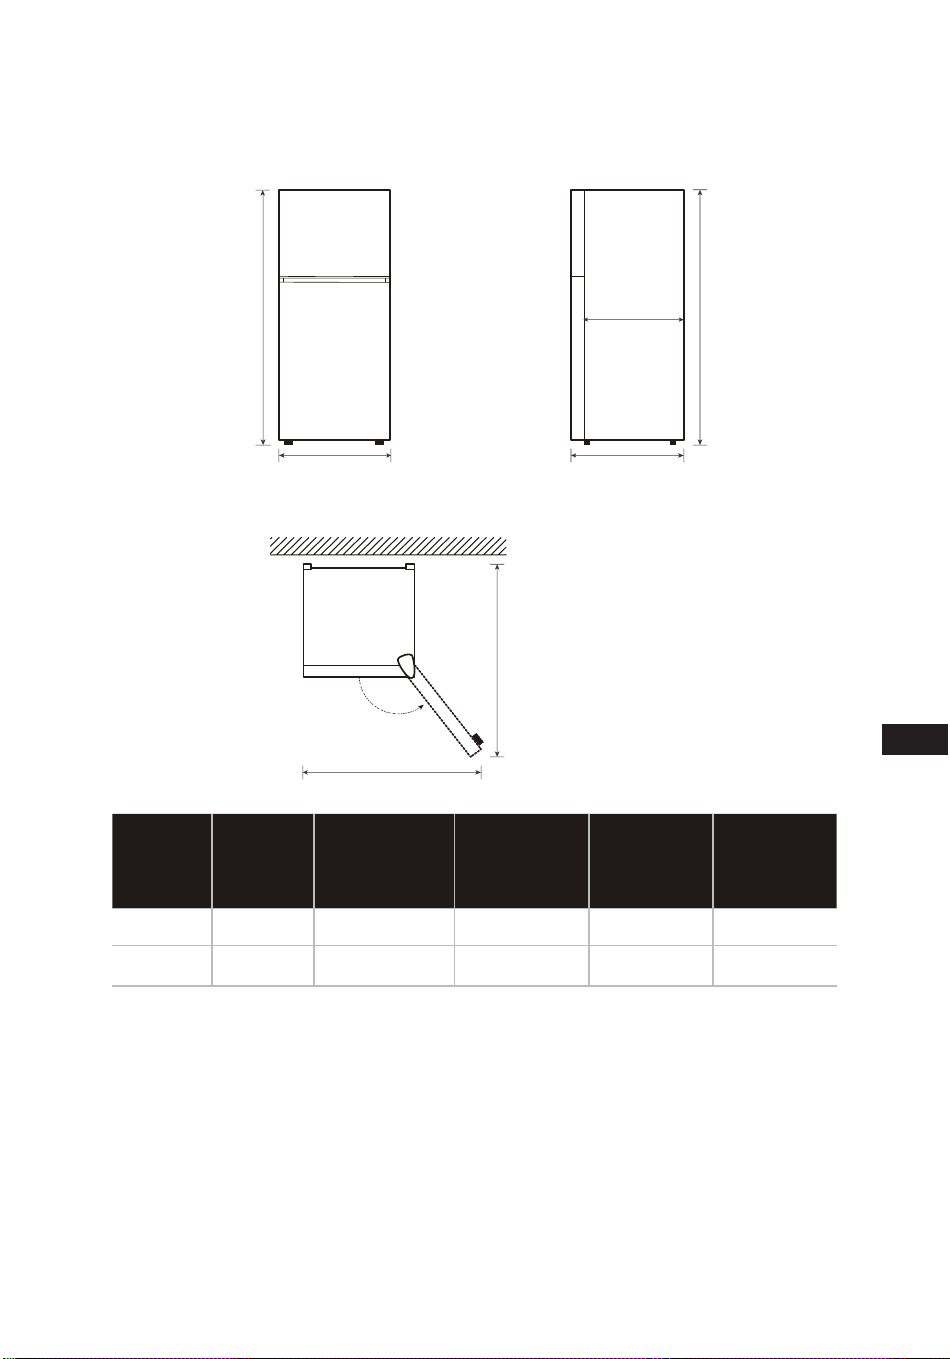
Diagrama de requisitos de espacio (cuando la puerta está abierta y cuando la
puerta está cerrada)
B
A
C
D
E
135 °
C1
C
Ancho
Altura
General
Profundidad
Profundidad
de solo
gabinete
Ancho con
puertas
abiertas de
135°
Profundidad
con puertas
abiertas de
135°
A B C C1 D E
700 1540 731 650 1085 1310
Nota: Todas las dimensiones en mm
B
ES
06
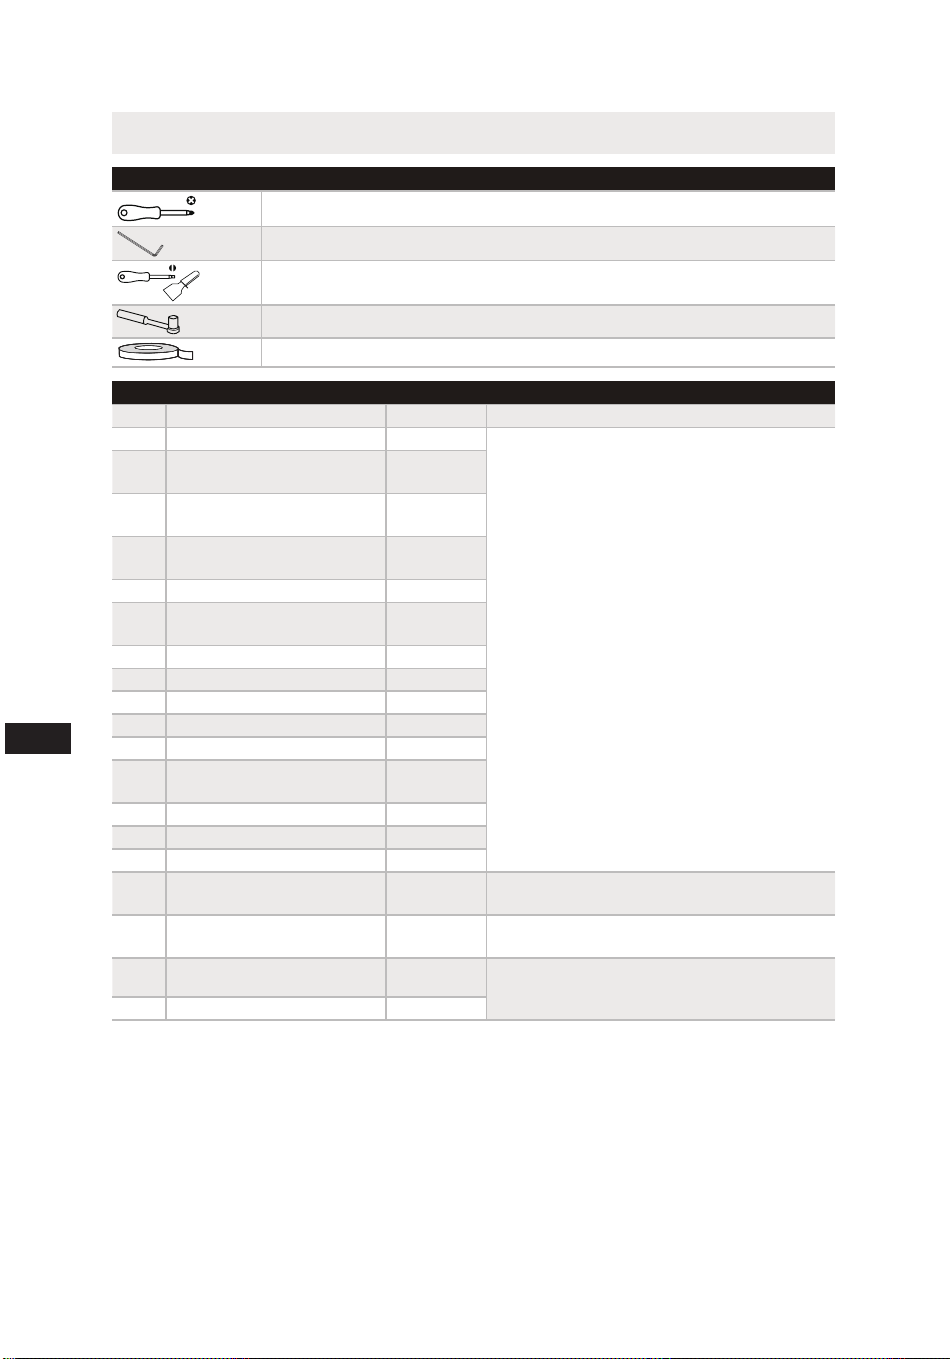
Cambio de puertas derecha-izquierda
Lista de herramientas suministradas por el usuario.
Destornillador de cruz
Llave Allen
/,º01(5 !/0+.*%(( +. !$+& !(#
Tomacorriente y trinquete de 5/16”
Cinta adhesiva
Piezas a utilizar para la puerta reversa
SN Partes Cantidad Notas
1 Bisagra superior 1
.!%*/0( +!*(&5ŋ* !!1/./!
()%.(,1!.0
2
ˏ1%!.0 !(%/#.
superior
1
3
*#1%0+ !(!&! !(
%/#./1,!.%+.
1
4
+.*%((+ !(%/#.
superior
3
5 ˏ1%!.0 !+.%˛%+ 1
6
+.*%((+ !(%/#.
media
2
ȍ Bisagra media 1
Ȏ ,ĥ* !+.%˛%+ 2
9 0&1/0(! 1
10 +.*%((+ !1).(!*0.( 2
11 ,ĥ* !.+/!*0.( 1
12
+.*%((+ !(%/#.
inferior
3
13 Bisagra inferior 1
14 ,ĥ* 2
15 +.*%((+ !0,ĥ* 2
16
˙10+(+-1!+ !(,1!.0
derecha
2
Preinstalado en el cuerpo de la puerta, se
.!0%.()%.(,1!.05/!+*/!.2
Ȇȍ
˙10+(+-1!+ !(,1!.0
izquierda
2
ĥ*#(+!*(+(/ !!/+.%+/5
10%(Ā!(+1* +)%!(,1!.0Ȑ
ȆȎ +.*%((+10+(+*0! 2
.!%*/0( +!*(,1!.05ŋ* !!
1/./!()%.(,1!.0
19 ,ĥ* !+.%˛%+ 1
Paso
1. Desconecte su refrigerador y quite todas las comidas del refrigerador.
ȇȐ !0%.!(1%!.0 !(%/#./1,!.%+.ȑ(+/0+.*%((+/5(%/#./1,!.%+.!*
(,.0!/1,!.%+. !(#%*!0!5(,( !(1%!.0(%6-1%!. ȓ/.(
,1!.0 !+*#!(%ĥ*$%..%Ȑ
ȈȐ !/0+.*%((!(+/0+.*%((+/ !(%/#.ȑ.!0%.!(%/#.!*0.(ȑ.!0%.!(+/
,/ +.!/5/-1!(,1!.0 !(.!".%#!. +.$%..%Ȑ
ES
ȅȍ
Placa de
1%!.0
ˏ1%!.0 !(
%/#./1,!.%+.
ˏ(2%&/ !
enchufe
Tornillo
Bisagra media
ATENCIÓN
/%)º#!*!/)1!/0.*1*.!".%#!. +.-1!/!.!!*!(( +%6-1%!. +Ȑ
1.!".%#!. +.,1! !.%./!,+.!(( + !.!$+Ȑ
ȊȐ &!!(.!".%#!. +.ȑ !/0+.*%((!!(0+.*%((+ !(%/#.%*"!.%+.5!(,%! !
&1/0!ȑ.!0%.!(%/#.%*"!.%+.ȑ.!0%.!!(!&! !(%/#.%*"!.%+.!%*/0º(!(+!*
!(+.%˛%+ !(!&!!*!(+0.+( + !(%/#.Ȑ
ȋȐ */0(!(%/#.%*"!.%+.5,.%!0!(+/0+.*%((+/!*!(( +%6-1%!. + !(
.!".%#!. +.ȑ%*/0(! +/,0/ !&1/0!5(!2*0!!(.!".%#!. +.Ȑ
Bisagra inferior
%! !&1/0!
!0%.!(%/#.%*"!.%+.ȑ.!0%.!!(!&!
!(%/#.%*"!.%+.!%*/0º(!(+!*
!(+.%˛%+ !(!&!!*!(+0.+( + !
(%/#.Ȑ
Tornillo
ȌȐ !/0+.*%((!5.!0%.!(+/)*#1%0+/ !(!&!ȑ!(0+,!5(+/0+.*%((+/ !10+(+-1!+
!(,1!.0 !.!$ !(+/ +/1!.,+/ !(,1!.0ȑ/-1!!(10+(+-1!+
!(,1!.0%6-1%!. !(+(/ !!/+.%+/!%*/0º(!(+!*(!/-1%*
%6-1%!. !(1!.,+ !(,1!.0&1*0++*!(0+,!5)*#1%0+/ !(!&!Ȑ!0%.!
!(0,ĥ* !(+.%˛%+5!()*#1%0+ !(!&!!*(,.0!/1,!.%+. !(,1!.0 !
.!".%#!.%ĥ*5&1/0!/1/,+/%%+*!/*0!/ !%*/0(.(+/!*!(1!.,+ !(
,1!.0Ȑ-1!!()*#1%0+ !(!&! !(,1!.0 !+*#!(%ĥ*!%*/0º(!(+!*!(
otro lado.
ES
ȅȎ
,ĥ* !+.%˛%+
*#1%0+ !(!&!
˙10+(+-1!+ !
la puerta derecha
,ĥ*
Manguito
!(!&!
˙10+(+-1!+ !(
puerta izquierda
ȍȐ */0(!(,1!.0.!".%#!. !*(%/#.%*"!.%+.ȑ%*/0(!(+/0+.*%((+/ !(2%#
!*0.(ȑ(%/#.!*0.(5,.%!0!(+/0+.*%((+/!*!(( +%6-1%!. +ȑ51.(+/
pasadores, los tornillos de la viga central y las tapas de los tornillos en el lado
derecho.
Bisagra media
ˏ(2%&/ !
enchufe
Tornillo de
viga central
Tapa de tornillo
ȎȐ */0(!(,1!.0 !+*#!(%ĥ*!*(%/#. !()! %+ȑ.!0%.!!(!&! !(
%/#./1,!.%+.!%*/0º(!(+!*!(+.%˛%+ !(!&!!*!(+0.+( + !(%/#.ȑ
%*/0(!(%/#./1,!.%+.5,.%!0!(+/0+.*%((+/ȑ!%*/0(!(1%!.0 !(
%/#./1,!.%+.5(1%!.0 !(+.%˛%+ !.!$+Ȑ
ȏȐ ()%+ !,1!.0!/0º+),(!0+Ȑ
Bisagra superior
, !(+.%˛%+
!0%.!!(!&! !(%/#.
/1,!.%+.!%*/0º(!(+!*!(
+.%˛%+ !(!&!!*!(+0.+( +
!(%/#.Ȑ
, !(%/#.
ATENCIÓN
˛#1.*0!.%+.!//+(+,..!"!.!*%Ȑ+*˛#1.%ĥ*.!( !,!* !.º !(,.+ 10+"Ā/%+
+ ( !(.%ĥ* !( %/0.%1% +.Ȑ

ES
09
Patas niveladoras
.!2%0.2%.%+*!/ȑ(1*% !!!/0.*%2!( Ȑ
%!/*!!/.%+ȑ&1/0!(+/0+.*%((+/ !*%2!(%ĥ*,.+),!*/.!(/1!(+%..!#1(.Ȑ
,.0! !(*0!. !!!/0.1*,++)º/(0-1!(,.0!0./!.,."%(%0.
el cierre de la puerta.
+/0+.*%((+/ !*%2!(%ĥ*/!,1! !*#%.."º%()!*0!%*(%** +(%#!.)!*0!!(
#%*!0!Ȑ
%.!(+/0+.*%((+/ !*%2!(%ĥ*!*!(/!*0% ++*0..%+(/#1&/ !(.!(+&
,.!(!2.(1*% 5!*!(/!*0% + !(/#1&/ !(.!(+& ,.&.(Ȑ
Mover el aparato
1. Retire todos los alimentos del interior del aparato.
ȇȐ 40.%#!(!*$1"! !(%)!*0%ĥ*ȑ%*/æ.0!(+5"Ā&!(+!*!(#*$+ !(!*$1"!
!(%)!*0%ĥ*!*(,.0!0./!.+!*(,.0!/1,!.%+. !(,.0+Ȑ
ȈȐ !#1!,%!6/+)+(+/!/0*0!/5()*%& !(,1!.0,.!2%0.-1!/!
caigan mientras mueve el aparato.
ȊȐ 1!2!(,.0++*)º/ ! +/,!./+*/+*1% +Ȑˏ1* +0.*/,+.0!!(
,.0+(.#/ %/0*%/ȑ)*0æ*#(+!*,+/%%ĥ*2!.0%(Ȑ
ȋȐ !/,1æ/ !%*/0(.!(,.0+ȑ+*!0!!(!*$1"! !(%)!*0%ĥ*1*0+)
de corriente para encender el aparato.
ATENCIÓN
.!1%+*!/*0!/ !+,!.%ĥ*Ȓ
˙*0!/ !.!(%6.)%+/ȑ!(.!".%#!. +. !!!/0. !/+*!0 + !((%)!*0%ĥ*Ȑ
! !!*0+).,.!1%+*!/,.!2%0.(!/%+*!/,!./+*(!/Ȑ
Cambiar la luz
ȼ ˏ1(-1%!..!!),(6++)*0!*%)%!*0+ !(/(º),./ !!/!.((!2 +
+,+.!(".%*0!ȑ/1#!*0! !/!.2%%++,!./+*(%˛ /%)%(.Ȑ
Conectar el aparato
!/,1æ/ !%*/0(.!(,.0+ȑ+*!0!!(!*$1"! !(%)!*0%ĥ*1*0+) !
corriente.
ATENCIÓN
!/,1æ/ !+*!0.!((! !(%)!*0%ĥ*Ȭ+!(!*$1"!ȭ(0+) !+..%!*0!ȑ!/,!.!
2 o 3 horas antes de introducir alimentos en el aparato. Si agrega alimentos antes de que el
!(!0.+ +)æ/0%+/!$5!*".% +,+.+),(!0+ȑ!/,+/%(!-1!/!!$!*,!. !.Ȑ

10
ES
Consejos para ahorrar energía
• No coloque el aparato cerca de cocinas, radiadores u otras fuentes de calor. Si
(0!),!.01.)%!*0!!/(0ȑ!(+),.!/+.0.&.º+*)º/".!1!*%5
1.*0!)º/0%!),+ȑ(+-1!1)!*0.º!(+*/1)+ !!*!.#ĀȐ
ȼ ˙/!#ŋ.!/! !-1!$5/1˛%!*0!2!*0%(%ĥ*!*(/! !(,.0+ȑ!*(+/
( +/ !(,.0+5!*(,.0!,+/0!.%+. !(,.0+Ȑ1*1.(/!.01./
!2!*0%(%ĥ*Ȑ
ȼ /!.2!0)%æ*(/)! % / !/!,.%ĥ*!*(/!%ĥ*ț*/0(%ĥ*ȜȐ
ȼ %/0.%1%ĥ* !&+*!/ȑ!/0*0!/5.!&%((/-1!/!)1!/0.!*(%)#!*
,.+,+.%+*1*+*/1)+)º/!˛%!*0! !!*!.#Ā5ȑ,+.(+0*0+ȑ !!
+*/!.2./!!*()! % !(+,+/%(!Ȑ+ /(/#2!0/5!/0*0!/ !!*
,!.)*!!.!*!(.0!"0+,.)*0!*!.(0!),!.01.!/0(!5$+...
energía.
ȼ .+0!*!.)5+.!/,%+ !()!*)%!*0+Ȭ,+.!&!),(+ȑ,.,.+ 10+/
#.* !/.!".%#!. +/ȩ+*#!( +/ȭȑ/!,1! !*.!0%..(/#2!0/ !()! %+Ȑ/
#2!0/5!/0*0!//1,!.%+.!/!%*"!.%+.!/ !!*-1%0./!!*ŋ(0%)+(1#./%!/
necesario.
• Un compartimento refrigerador/congelador lleno de manera uniforme
+*0.%15!1*1/+ĥ,0%)+ !(!*!.#ĀȐ+.0*0+ȑ!2%0!-1!(+/
compartimentos estén vacíos o medio vacíos.
ȼ !&!-1!(+/(%)!*0+/(%!*0!//!.!".%#!.!*,.%)!.+*0!/ !+(+.(+/!*!(
refrigerador/congelador. Los alimentos que ya se han refrigerado aumentan la
!˛%!*%!*!.#æ0%Ȑ
ȼ !&!-1!(+/(%)!*0+/+*#!( +//! !/+*#!(!*!*!(".%#+.Ā˛+Ȑ&
temperatura de los alimentos congelados reduce el consumo de energía en el
+),.0%)!*0+ !.!".%#!.%ĥ*5ȑ,+.0*0+ȑ1)!*0(!˛%!*%!*!.#æ0%Ȑ
ȼ ˙.(,1!.0,+.!(0%!),+)º/.!2!,+/%(!,.)%*%)%6.(,æ. % !
".Ā+Ȑ˙.%.(,1!.0.!2!)!*0!5!...(+..!0)!*0!.! 1!!(+*/1)+
de energía.
ȼ +//!((+/ !(/,1!.0/ !/1.!".%#!. +. !!*!/0.,!."!0)!*0!%*00/
para que las puertas cierren correctamente y no aumente el consumo de
energía de manera innecesaria.
11
ES
INSTRUCCIONES DE
OPERACIÓN
Panel de control
LED4
LED3
LED2
LED1
Botones
A Botón Setting (Ajuste)
Pantalla de
visualización
LED4 COLD (FRÍO)
LED3
LED2 COLDEST (MUY FRÍO)
LED1
SUPER
COOL (SÚPER FRÍO)
ATENCIÓN
El panel de control real puede diferir de un modelo a otro.
12
ES
Instrucciones de operación
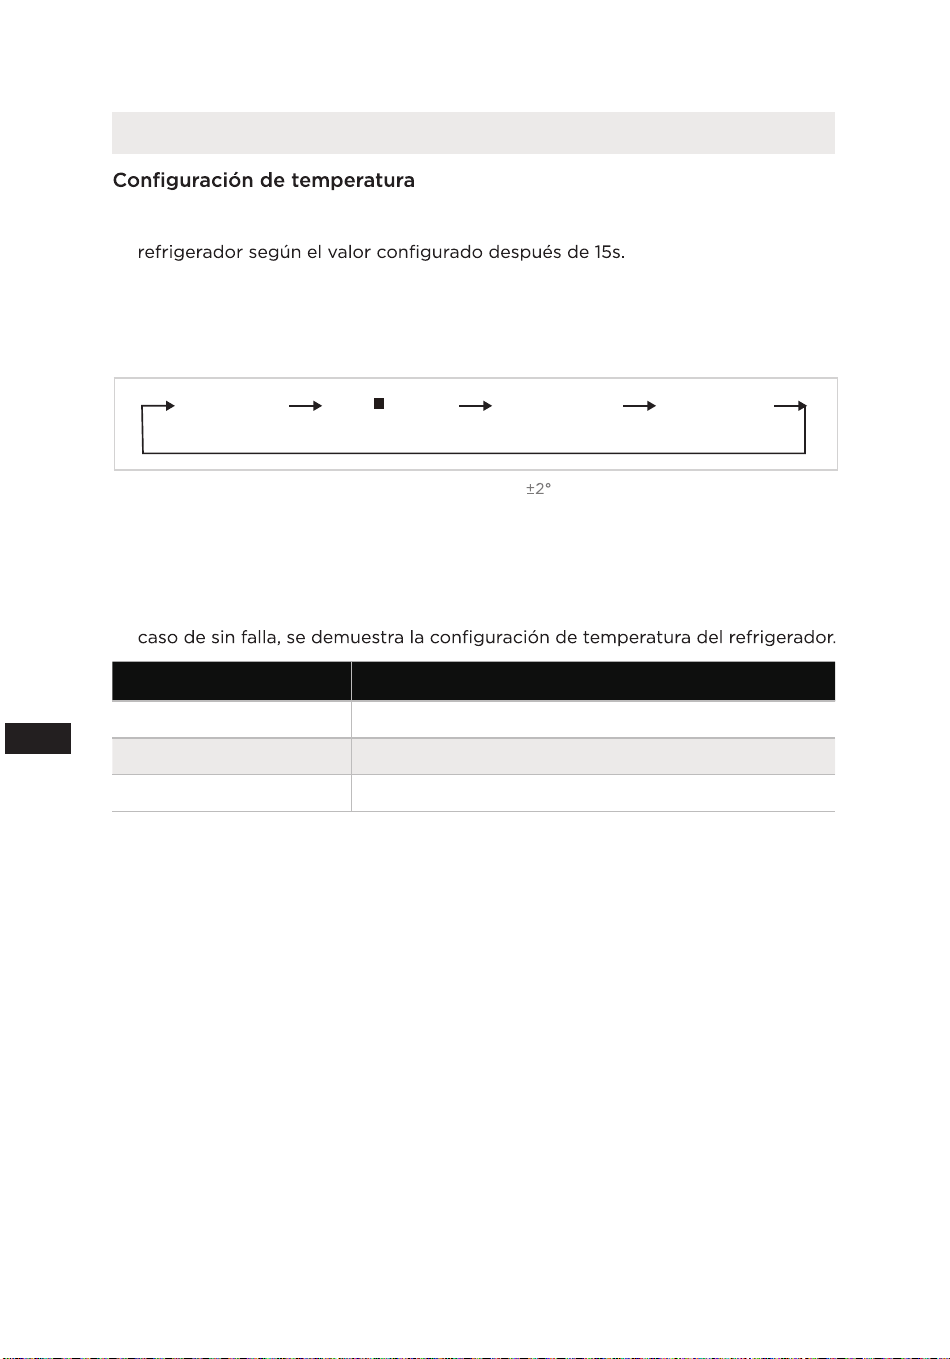
• Cada vez de pulsar el botón setting (ajuste) A de temperatura, se la cambia
por una vez. Después de completar el ajuste de temperatura, funcionará el
• Cuando se activa el modo Súper Frío el refrigerador funcionará a su máxima
capacidad para alcanzar más rápido el ajuste más frío y durar más durante 6
horas.
La regulación de turno es:
COLD (FRÍO)
COLDEST
(MUY FRÍO)
SUPER COOL
(SÚPER FRÍO)
(normal)
Nota: La temperatura de cada marcha está dentro de C de la temperatura establecida, y la
situación real es ligeramente diferente según la situación de carga.
Indicación de falla
• Cuando energiza el refrigerador por primera vez, la pantalla se enciende con
brilla completamente durante 3 segundos, y luego el refrigerador funciona
según lo más frío. En caso de falla, se parpadea el LED correspondiente. En
Código de falla Descripción de falla
Parpadeo LED 1 / LED 2 Falla de sensor de temperatura del refrigerador
Parpadeo LED 1 / LED 3 Fallas del sensor de congelación de heladas
Parpadeo LED 1 / LED 4 Falla del sensor de temperatura ambiental
Bloqueo / Desbloqueo
• Cuando el panel de control de temperatura está en estado bloqueado, se
requiere un pulso largo el botón de ajuste de temperatura por 3 segundos
para desbloquear el panel, se parpadearán todos los LEDs por 2 segundos
al desbloquear el panel. Cuando el panel de control de temperatura está en
estado desbloqueado, y no ocurre más operación en el panel en 15 segundos,
entrará el panel en el estado bloqueado automáticamente.

13
ES
Consejos sobre almacenamiento de alimentos
Compartimento de congelación
ȼ (+*#!( +.!/0º %/!ģ +,.!(()!*)%!*0+ !(%)!*0+/+*#!( +/
)15&0!),!.01.ȑ!(()!*)%!*0+(.#+,(6+ !(%)!*0+/
+*#!( +/5,.(,.+ 1%ĥ* !$%!(+Ȑ
• Utilice los estantes de la puerta del congelador únicamente para almacenar
alimentos congelados, no para almacenar alimentos calientes designados para
+*#!(%ĥ*Ȑ
• No coloque alimentos frescos y congelados uno al lado del otro. La comida
congelada puede descongelarse.
ȼ ˏ1* ++*#!(!(%)!*0+/".!/+/Ȭ+)+.*!ȑ,!/ ++.*!,% ȭȑ
ĥ.0!(+/!*,.0!/-1!/!,1! *1/.()%/)+0%!),+Ȑ
• Almacenamiento de alimentos congelados: las instrucciones generalmente
/!%* %*!*(+/,-1!0!/ȑ-1! !!*/!#1%./!Ȑ%*+$5%*"+.)%ĥ*!*!(
!),-1!ȑ(+/(%)!*0+/*+ !!*()!*./!,+.)º/ !0.!/)!/!/,.0%.
de la fecha de compra.
• Al comprar alimentos congelados, asegúrese de que estén congelados a una
temperatura adecuada y que el empaque no esté dañado.
ȼ +/(%)!*0+/+*#!( +/ !!*+*/!.2./!!*!*2/!/ !1 +/,.
+*/!.2.((% 5 !!* !2+(2!./!(+),.0%)%!*0+ !+*#!(%ĥ*(+
*0!/,+/%(!Ȑ
ȼ %1*,-1!0! !(%)!*0+/+*#!( +/)1!/0.$1)! +1*1(0)%!*0+
*+.)(ȑ!/,.+(!-1!/!$5()!* +(0!),!.01.%*+..!05
que el contenido esté dañado.
• El período de almacenamiento de los alimentos congelados depende de
(0!),!.01.)%!*0!ȑ(+*˛#1.%ĥ* !(0!.)+/00+ȑ(".!1!*% !
apertura de la puerta del congelador, el tipo de alimento y el tiempo de
transporte del producto desde la tienda hasta el hogar.
%!),.!/%#(/%*/0.1%+*!/%),.!//!*!(,-1!0!5*1*!4! !(
0%!),+)º4%)+ !()!*)%!*0+%* % +!*!(,-1!0!Ȑ
Compartimento del refrigerador
ȼ ..! 1%.($1)! 5(/1/%#1%!*0!1)1(%ĥ* !$%!(+ȑ*1*
ponga líquido en el refrigerador en recipientes sin sellar. La escarcha tiende
+*!*0../!!*(/,.0!/)º/".Ā/ !(!2,+. +.Ȑ(()!*)%!*0+ !
(Ā-1% +/ !/1%!.0+/ +)+.!/1(0 +1**!!/% )º/".!1!*0! !
!/+*#!(%ĥ*Ȑ
ȼ 1*+(+-1!(%)!*0+/(%!*0!/!*!(.!".%#!. +.Ȑ/0+/ !!*!*".%./!
,.%)!.+0!),!.01.)%!*0!5(1!#++(+./! !)*!.-1!#.*0%!*
1*%.1(%ĥ* !%.! !1 !*!(.!".%#!. +.Ȑ
ȼ +/(%)!*0+/+(+/.!%,%!*0!/ !(%)!*0+/*+ !!*0+.(,.! 0./!.
!(.!".%#!. +.,+.-1!,+ .Ā*+*#!(./!!*(,.! Ȑ+/%#.%!* +
regularmente la puerta del refrigerador.
ȼ .*!5!(,!/ +(%),%+/Ȭ!*2/ +/!*1*,-1!0!+,,!( !,(º/0%+ȭ
se pueden colocar en el refrigerador, que se puede usar en 1 o 2 días.
ȼ /".10/52!. 1.//%*!*2/.,+ .º*+(+./!!*(,.0! !/0%* (/
frutas y verduras frescas.
ATENCIÓN
(&1/0! !0!),!.01.ĥ,0%)+ ! +),.0%)!*0+ !,!* ! !(0!),!.01.
)%!*0!Ȑ0!),!.01./1,!.%+.(ĥ,0%)/!/!*(0!),!.01.)%!*0! !ȇȋɇˏȐ
(!"!0+ !+*#!(%ĥ* !(.!".%#!. +./!2!.º"!0 +*!#0%2)!*0!,+.!(!4!/+ !
()!*)%!*0+ !(%)!*0+/ 1.*0!!("1*%+*)%!*0+ !/,1æ/ !(+*!4%ĥ*%*%%((
"1!*0! !(%)!*0%ĥ*Ȑ+/(%)!*0+/()!* +/*+ !!*(+-1!.(/(% !%.!ȓ !(+
+*0..%+ȑ!(!"!0+ !+*#!(%ĥ*0)%æ*/!2!.º"!0 +*!#0%2)!*0!Ȑ
ˏ1* +()!*!!% /!*(+*˛#1.%ĥ*)º/".Āȑ(/".10/52!. 1./%*0!.*/+..!*!(
.%!/#+ !+*#!(./!ȑ+*˛#1.!)!*+/.!".%#!.%ĥ*/%(+*˛#1.%ĥ*)º/".Ā!/)15".ĀȐ
14
ES
LIMPIEZA Y MANTENIMIENTO
Descongelación
• El refrigerador está hecho según el principio de refrigeración por aire y, por
lo tanto, tiene una función de descongelación automática. Las escarchas
formadas debido al cambio de estación o temperatura también se pueden
eliminar manualmente desconectando el aparato de la fuente de alimentación
o limpiándolo con una toalla seca.
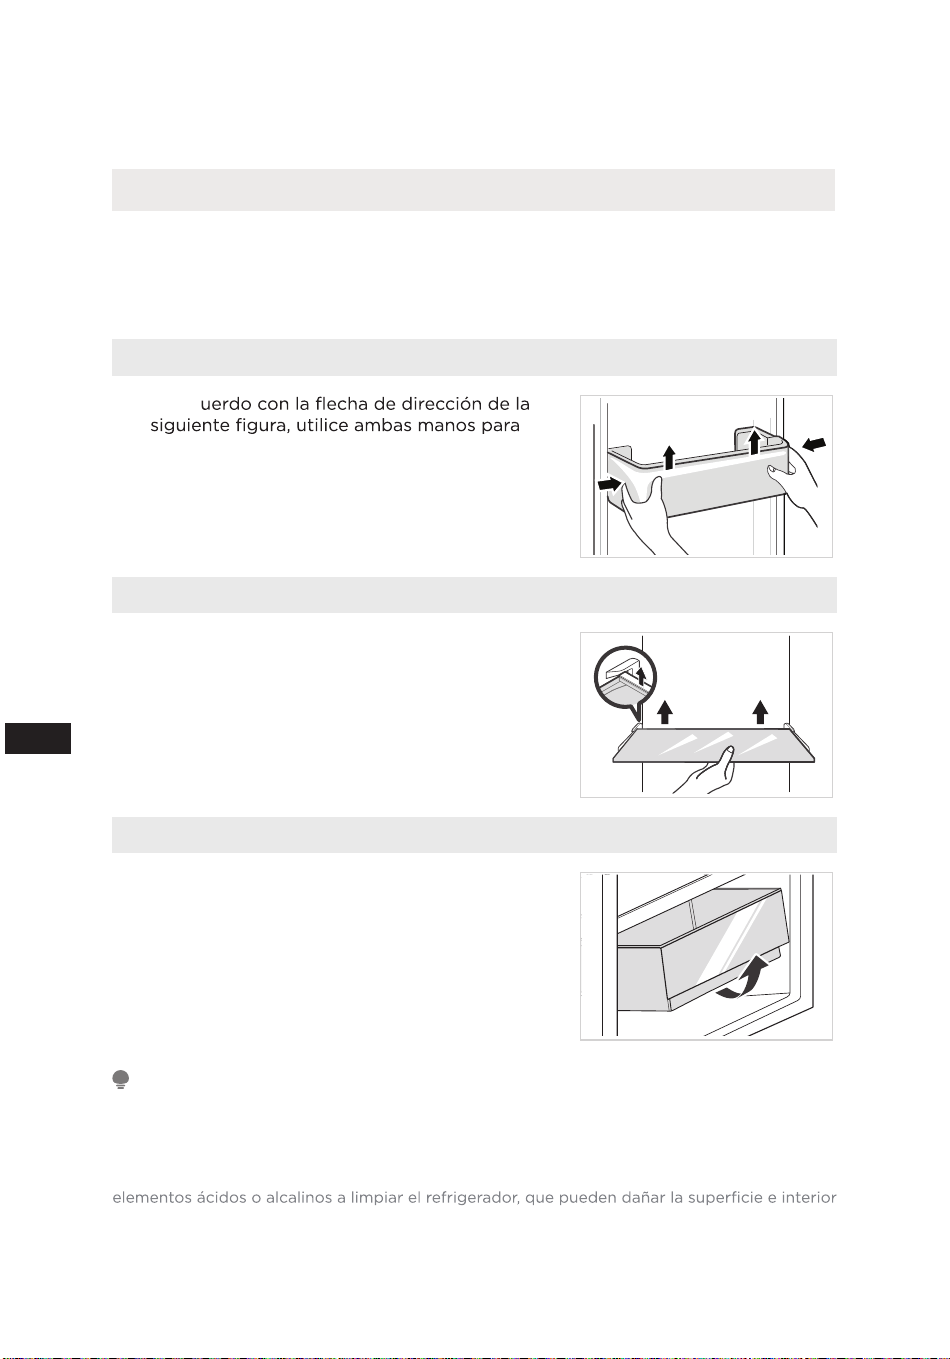
Limpieza de la bandeja de la puerta
Ɣ
De ac
presionar la bandeja y empújela hacia arriba
para retirarla.
Ɣ
Después de haber lavado la bandeja, puede
ajustar la altura de instalación de acuerdo con
sus necesidades.
Limpieza del estante de vidrio
Ɣ
Dado que la parte más interna del revestimiento
del refrigerador donde los estantes entran en
contacto, tiene un tope, deberá levantar los
estantes hacia arriba y luego podrá sacarlo.
Ɣ
Ajuste o limpie los estantes según sus
necesidades.
Limpieza de la caja de frutas y verduras
Retire el contenido del cajón. Sostenga
el asa del cajón de verduras y tire de él
completamente hasta que se detenga.
Levante el cajón de verduras y retírelo tirando
de él.
ATENCIÓN
Se recomiendan toallas suaves o esponjas mojadas en agua y detergentes neutros no
corrosivos para la limpieza. El congelador debe limpiarse inicialmente con agua limpia y un
paño seco. Abra la puerta para un secado natural antes de que se encienda. No use cepillos
duros, bolas de acero de limpieza, cepillos de alambre, abrasivos (como pastas dentales),
solventes orgánicos (como alcohol, acetona, aceite de plátano, etc.), agua hirviendo,
del refrigerador.
Ɣ
Ɣ

15
ES
Dejar de usar
Falla de fuente de alimentación:
*/+ !"(( !("1!*0! !(%)!*0%ĥ*ȑ%*(1/+!*2!.*+ȑ(+/(%)!*0+/
!*0.+ !(,.0+/!,1! !*#1. . 1.*0!2.%/$+./ȓ 1.*0!!(+.0! !
(%)!*0%ĥ*ȑ/!.! 1%.º*(+/0%!),+/ !,!.01. !(,1!.05*+/!+(+.º*
)º/(%)!*0+/".!/+/!*!()%/)+Ȑ
Sin usar por largo tiempo:
(,.0+ !! !/!*$1"./!5(1!#+(%),%./!ȓ!*0+*!/(/,1!.0//! !&*
%!.0/,.!2%0.!(+(+.Ȑ
Movimiento:
˙*0!/ !)+2!.!(.!".%#!. +.ȑ.!0%.!0+ +/(+/+&!0+/%*0!.%+.!/ȑ˛&!(/
,.0%%+*!/ !2% .%+ȑ!(,+.0ȥ2!. 1./ȑ(+/&+*!/ !(º). !+*#!(%ĥ*ȑ
!0Ȑ+*%*0 $!/%2ȑ5,.%!0!(/,0/ !*%2!(%ĥ*ȓ%!..!(/,1!.0/5"Ā&!(/
+*%*0 $!/%2Ȑ1.*0!!()+2%)%!*0+ȑ!(,.0+*+ !!+(+./!+
&+1$+.%6+*0()!*0!ȑ*%2%../!ȓ(%*(%*%ĥ* 1.*0!!()+2%)%!*0+*+/!.º
/1,!.%+.ȊȋɇȐ
ATENCIÓN
(,.0+ !!"1*%+*.+*0%*1)!*0!1*2!6!*!* % +Ȑ*#!*!.(ȑ!("1*%+*)%!*0+
!(,.0+*+ !!%*0!..1),%./!ȓ !(++*0..%+ȑ(2% ŋ0%(/!2!.º"!0 Ȑ
Los alimentos se pueden conservar durante un par de horas incluso en verano en caso de
+.0! !!*!.#Āȓ/!.!+)%!* .! 1%.(".!1!*% !,!.01. !(,1!.0Ȑ

16
ES
SOLUCIÓN DE PROBLEMAS
El usuario puede solucionar los siguientes problemas sencillos. Llame al
departamento de servicio post-venta si los problemas no se resuelven.
Problema Causa posible
Operación fallida
• Compruebe si el aparato está conectado a la fuente de
alimentación o si el enchufe está en contacto correcto
• Compruebe si el voltaje es demasiado bajo
• Compruebe si hay falla en la fuente de alimentación o si se
han disparado los circuitos parciales
Olor
• Los alimentos con olor deben estar bien envueltos
• Compruebe si hay alimentos podridos
• Limpie el interior del refrigerador
Funcionamiento
prolongado del
compresor
• La operación larga del refrigerador está normal en verano
• En caso de temperatura ambiente alta, no es aconsejable
tener demasiados alimentos en el aparato al mismo tiempo
• Los alimentos debe refrigerarse antes de colocarlos en el
aparato
• Las puertas se abren con demasiada frecuencia
La luz no se
enciende
• Compruebe si el refrigerador está conectado a la fuente
de alimentación y si la luz de iluminación está dañada
• Reemplace la luz por un especialista
La puerta no se
puede cerrar
correctamente
• La puerta está atascada por los paquetes de alimentos
• Se han colocado demasiado comidas
• El refrigerador está inclinado
Ruidos fuertes
• Compruebe si el piso está nivelado y si el refrigerador está
colocado de manera estable
• Compruebe si los accesorios están colocados en
ubicaciones adecuadas
17
ES
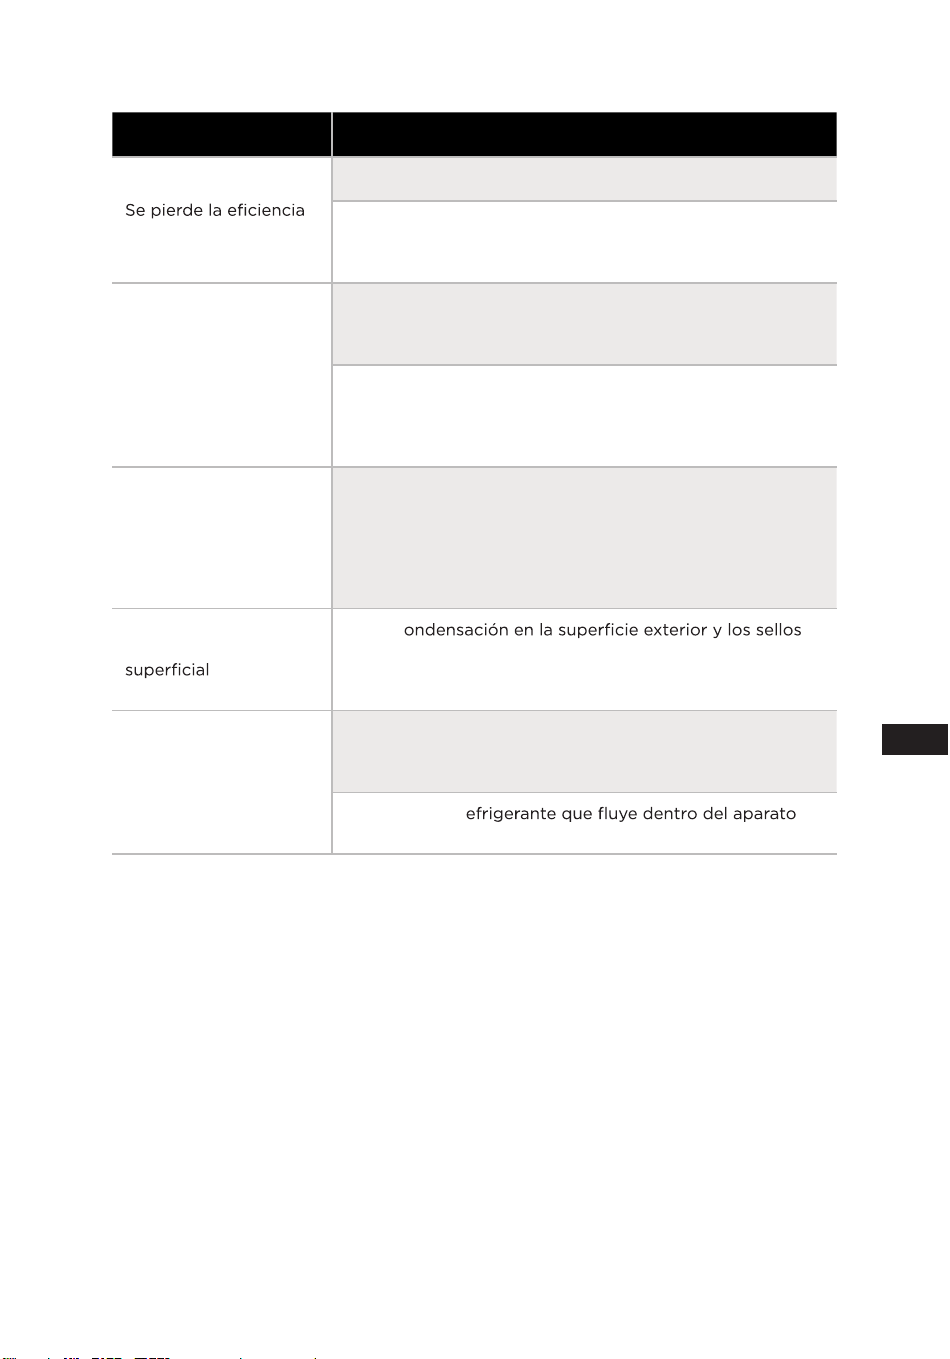
Problema Causa posible
de sellado de la puerta.
• Elimine materias extrañas en el sello de la puerta
• Caliente el sello de la puerta y luego enfríe para
restaurarlo (o sople con un secador eléctrico o use una
toalla caliente para calentar)
La bandeja de agua se
desborda
• Hay demasiado alimento en la cámara o el alimento
almacenado contiene demasiada agua, lo que resulta
en descongelación intensa
• Las puertas no están cerradas correctamente, lo
que provoca la formación de escarcha debido a la
entrada de aire y el aumento de agua debido a la
descongelación
Carcasa caliente
• Disipación de calor del condensador incorporado
a través de la carcasa, la cual es normal cuando la
carcasa se calienta debido a la temperatura ambiente
alta, el almacenamiento de demasiados alimentos o el
apagado del compresor, proporcione ventilación sólida
para facilitar la disipación de calor
Condensación
• La c
de las puertas del refrigerador es normal cuando la
humedad ambiental es demasiado alta. Simplemente
limpie el condensado con una toalla limpia
Ruido anormal
• Zumbido: El compresor puede producir zumbidos
durante la operación, y los zumbidos son fuertes,
especialmente al arrancar o parar. Esto es normal
• Crujido: El r
puede producir un crujido que es normal