MODEL#GST-210
STIRIFFIC
HANDS-FREE
AUTO STIRRER
USER
MANUAL
Safety Precautions 4
Product Specs 6
Using Your Device 7
Cleaning and Care 8
Warranty Details 9
MODEL#GST-210
UMGST210-A
STIRIFFIC
HANDS-FREE
AUTO STIRRER

SAFETY PRECAUTIONS:
Disclaimer: Manual instructions should always be read and implemented prior to
product use. Manufacturer/ importer advisory boards are not responsible for
improper use due to instruction manual negligence or failure to follow directions.
This product is intended for indoor household use only!
Keep this device out of the reach of children or unqualified persons, since the
misuse of contents and packaging materials may result in hazard or death.
Scorching and Burns: Refrain from touching hot surfaces or water content while
the device is in use. Instead, use handles or knobs as needed.
These necessary precautions must be taken when using electrical appliances:
1. Never leave the appliance exposed to the elements (rain, sun, etc).
2. Appliances can be used by persons with reduced physical, sensory, or mental
capabilities. It may also be used by those lacking experience, as long as they are
given explicit instructions and supervision concerning the use of the appliance in a
safe way and understand the hazards involved.
3. Do not use the appliance if the power cord or plug are damaged, or if the
appliance itself is faulty. All repairs, including replacement of power cord, must be
done by an authorized technician in order to avoid hazard or risk
4. If an extension cord is being used, check to be sure it is suitable for the appli
-
ance's power source in order to avoid danger to the operator or surroundings.
5. This appliance is designed for household use only and may not be used for
commercial or industrial purposes.
6. This appliance conforms to the directives 2006/95/EC and EMC 2004/108/EC,
and to the regulations (EC) No. 1935/2004 of 27/10/2004 regarding material in
contact with foods.
7. Any changes to this product that have not been expressly authorized by the
manufacturer may lead to the user’s guarantee being rendered null and void.
8. Packaging must never be left within the reach of children since it can be danger
-
ous.
9. The appliance may be used on pots with a diameter of 6 1/4” - 10 1/4” and a
height of 3 1/4” - 6 3/4”.
10. Before switching the appliance on, make sure the motor support is tightly fixed
to the container and all components are properly assembled.
11. To prevent deforming, do not leave the motor support connected to the
container after use.
12. Never use the appliance while empty.
13. To prevent personal injuries and damages to the appliance, always keep hands
and kitchenware away from moving parts.
14. Never remove the motor unit during operation.
15. Do not remove food from the sides of the container while the appliance is
operating. Switch the appliance o and always use an appropriate spatula.
4 5
16. In case of replacement and/or maintenance of the charger or the power cord,
contact an authorized service center or skilled person to prevent any risk.
17. In case of battery leakage, do not use the appliance; take it to your nearest
authorized assistance center for replacement of batteries.
18. The appliance works with rechargeable batteries, therefore it shall not be
disposed with normal waste. Take it to an appropriate dierentiated waste
collection center in your area. Contact your local administrations for dealers
providing this service. Disposing an appliance separately means avoiding
possible negative consequences both to the environment and people’s health.

A. ON/OFF button
B. Motor unit
C. Extendable motor support
D. Charging adaptor
E. Mixing paddle
F. Shaft
G. Speed adjusting button
H. Charging socket
USING YOUR DEVICE
PRODUCT SPECS
USING YOUR DEVICE
BATTERY CHARGING
Attention: Fully recharge the battery before use.
Recharge for at least 24 hours to activate the battery before the first use, after
which the time for a complete recharge is approximately 16 hours.
Do not start the appliance during recharge.
Fully discharge the battery before a new recharge.
• Connect the adaptor (D) to the charging socket (H) and insert the plug of the
adapter (D) into a mains power socket. The LED light on the upper part of the
motor unit will be red and turns green when the appliance is full charge.
Attention: The upper part of the motor unit (B) may warm up during recharge,
this is normal.
Avoid recharging the unit at a temperature below 40°F or above 105°F to prevent
damage to the batteries.
If the appliance does not work, check that it is properly powered on and correctly
plugged in. The appliance will have a longer and better operation when it is used
at certain intervals.
Important: if its functioning seems to be shorter after repeated use, it does not
mean the motor unit is faulty. Such inconvenience may be solved by leaving the
appliance on until it stops working, and then recharging it for approximately 16
hours. This procedure serves to improve the accumulator charging time. Repeat
this operation several times if necessary. If the operating time is still short, contact
the service center.
HOW TO OPERATE
6 7
Fig. 1
H
G
B
C
D
F
E
A
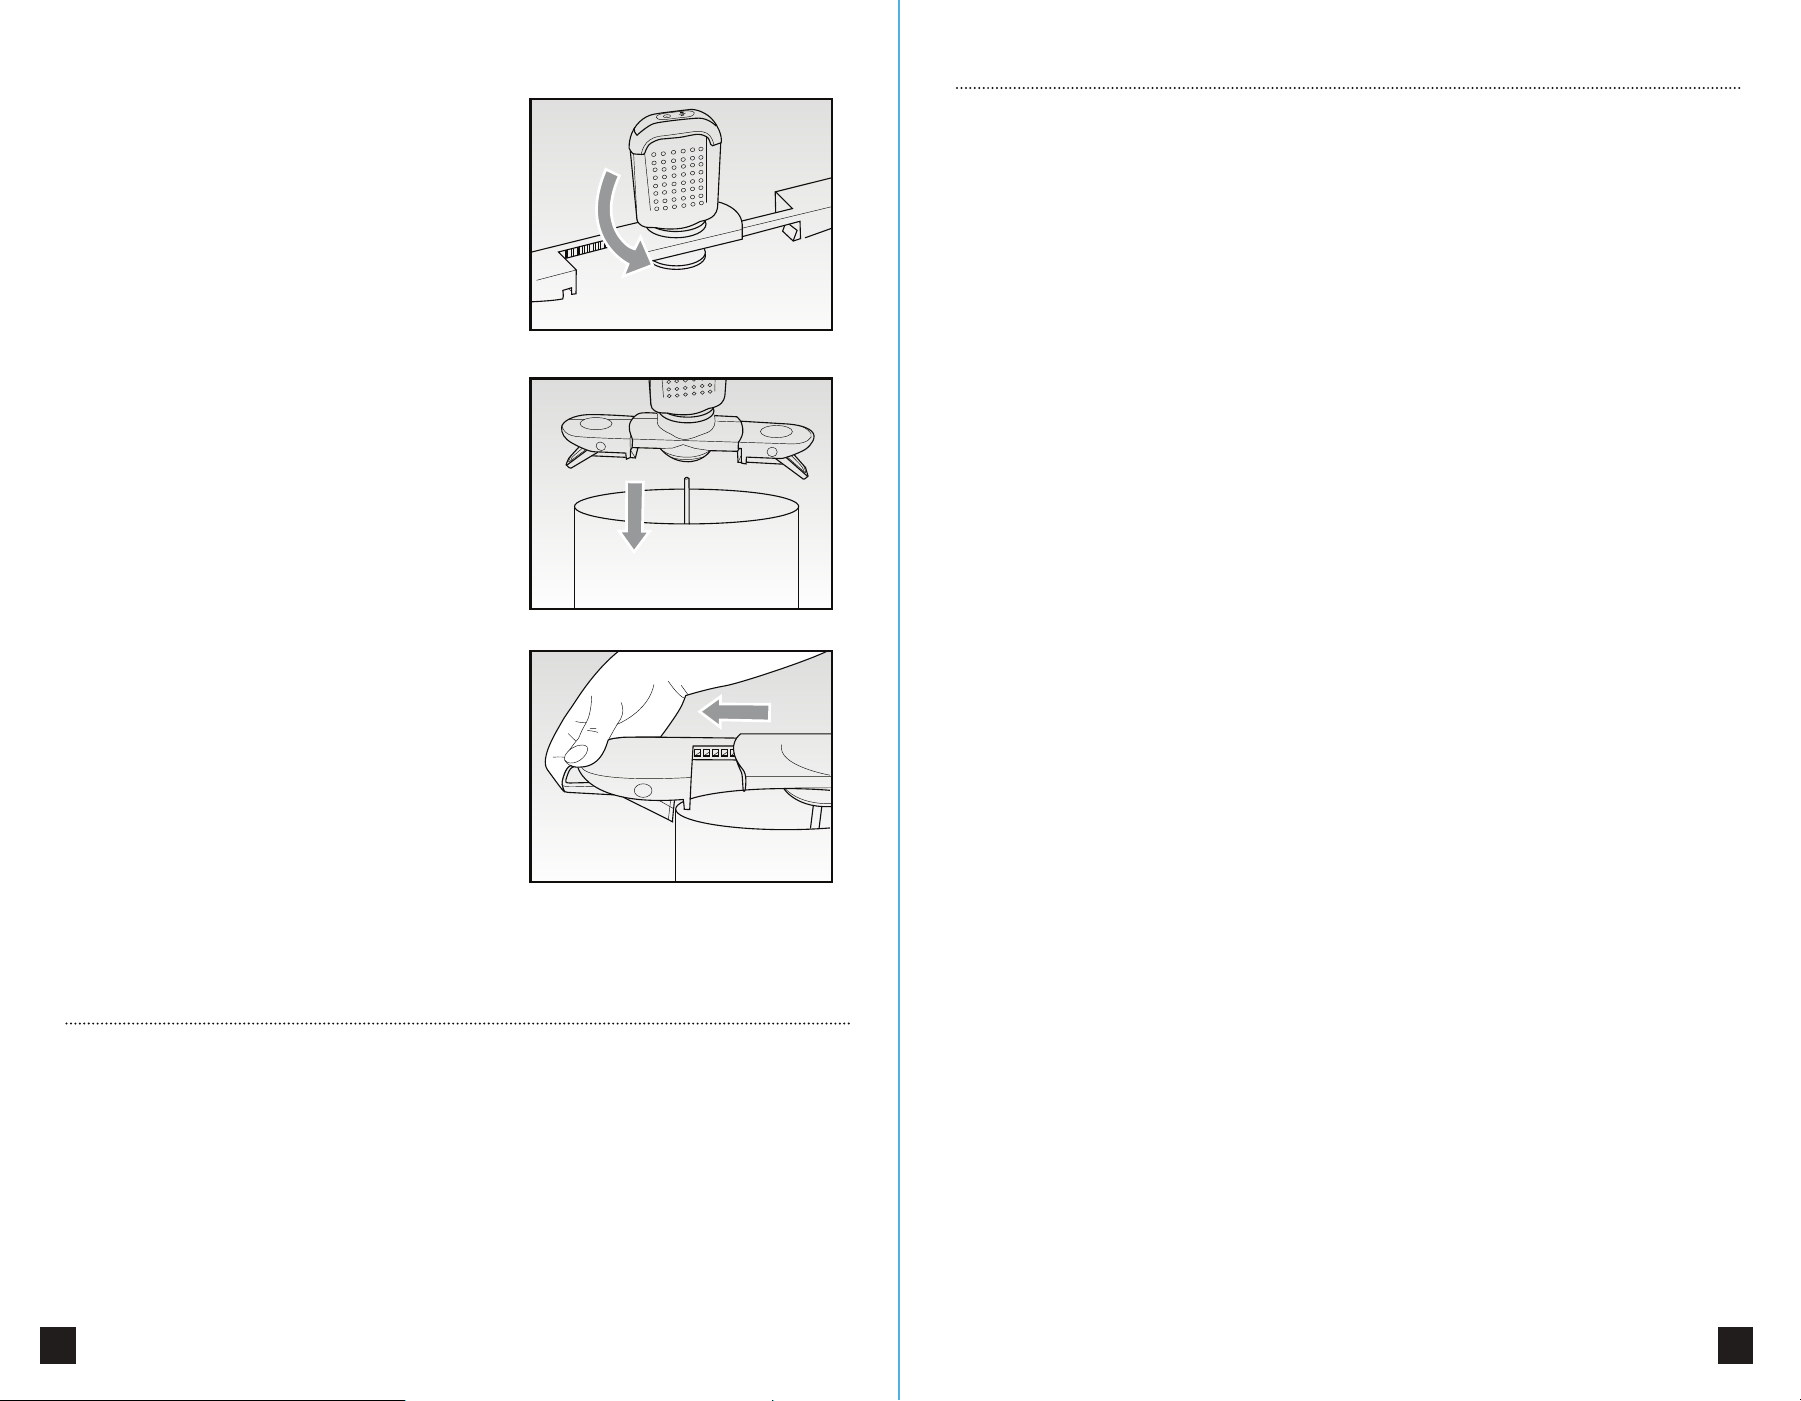
• Insert the shaft (F) into the central hole of
the mixing paddle (E) (Fig. 2).
• Position the shaft (F) previously
assembled into the container where the
food to be mixed will be poured (Fig. 3).
NOTE: the container must have a diameter
of 6 1/4” - 10 1/4” and height of 3 1/4” - 6
3/4”.
• Insert the motor unit (B) into the support
(C), by rotating it counterclockwise (Fig. 4).
• Position the assembled motor support (C)
onto the container so that he shaft (F)
inserts properly in the lower hole of the
support itself (Fig. 5).
• Adjust the extendable arms of the motor
support (C) according to the container
diameter and lock the support (C) to the
Fig. 2
Fig. 3
container itself by means of the suitable
clamps (Fig. 6).
• Switch the appliance on by pressing the
apposite ON/OFF button (A).
• Start the operation by means of the
button (G) of the speed “I”. Increase the
speed according to requirements by
pressing the apposite button (G) of the
speed “II” again.
• In case some food remains on the
container sides, switch the appliance o
and move food towards the center, using
an appropriate spatula.
• After the operation, switch the appliance
o by pressing the ON/OFF button (B).
When the battery is low, the appliance
emits a warning.
• Recharge the motor unit (B) by removing
it from the appropriate support (C) and
rotating it clockwise or disassemble the
appliance to clean it.
ATTENTION: Before using the appliance,
make sure all attachments are properly
mounted. To prevent personal injuries and
damages to the appliance, always keep
hands and kitchenware out of moving
parts.
BATTERY CHARGING
Attention: Fully recharge the battery before use.
Recharge for at least 24 hours to activate the battery before the first use, after
which the time for a complete recharge is approximately 16 hours.
Do not start the appliance during recharge.
Fully discharge the battery before a new recharge.
• Connect the adaptor (D) to the charging socket (H) and insert the plug of the
adapter (D) into a mains power socket. The LED light on the upper part of the
motor unit will be red and turns green when the appliance is full charge.
Attention: The upper part of the motor unit (B) may warm up during recharge; this
is normal.
Avoid recharging the unit at a temperature below 40°F or above 105°F to prevent
damage to the batteries.
If the appliance does not work, check that it is properly powered on and correctly
plugged in. The appliance will have a longer and better operation when it is used
at certain intervals.
Important: if its functioning seems to be shorter after repeated use, it does not
mean the motor unit is faulty. Such inconvenience may be solved by leaving the
appliance on until it stops working, and then recharging it for approximately 16
hours. This procedure serves to improve the accumulator charging time. Repeat
this operation several times if necessary. If the operating time is still short, contact
the service center.
HOW TO OPERATE
CLEANING AND CARE
WARRANTY DETAILS
This product is guaranteed under
a one
year limited warranty period, applicable to
the original purchaser and not transferable to a third party user.
Repair or replacement of defective parts are at the seller's discretion. In the event
that repair isn't possible, the seller will replace the product/ part. If product repair/
replacement won’t suce, the seller has the option of refunding the cash value of
the product or component returned.
Product defects not covered under the warranty provisions include normal wear
and damage incurred from use or accidental negligence, misuse of instruction
specifications, or repair by unauthorized parties. The manufacturing company is not
liable for any incidental or consequential damages incurred by such circumstances.
8 9
Fig. 5
Fig. 6
Fig. 4
container itself by means of the suitable
clamps (Fig. 6).
• Switch the appliance on by pressing the
apposite ON/OFF button (A).
• Start the operation by means of the
button (G) of the speed “I”. Increase the
speed according to requirements by
pressing the apposite button (G) of the
speed “II” again.
• In case some food remains on the
container sides, switch the appliance o
and move food towards the center, using
an appropriate spatula.
• After the operation, switch the appliance
o by pressing the ON/OFF button (B).
When the battery is low, the appliance
emits a warning.
• Recharge the motor unit (B) by removing
it from the appropriate support (C) and
rotating it clockwise or disassemble the
appliance to clean it.
ATTENTION: Before using the appliance,
make sure all attachments are properly
mounted. To prevent personal injuries and
damages to the appliance, always keep
hands and kitchenware out of moving
parts.
• The shaft (F) and the mixing paddle (E) can be put in the dishwasher or washed by
hand in warm water with mild detergent.
• Use a damp cloth for cleaning the motor unit (B) and the motor support (C).
ATTENTION: After cleaning, allow all parts to dry completely before mounting.

