Portable Air Conditioner
Model No.: JHS-A020H-10KR-D
Instruction Manual
Before using this product, please read this manual carefully
and keep it for future reference.


Safety Precautions-------------------------------------
Electrical Safety Warning--------------------------------
Cautions----------------------------------------------
Introduction------------------------------------------
Components------------------------------------------
Control Panel-----------------------------------------
Remote----------------------------------------------
Specifications------------------------------------------
Installation--------------------------------------------
Location---------------------------------------------
LCDI Power Plug---------------------------------------
Window Slider Kit--------------------------------------
Exhaust Hose------------------------------------------
Water Drainage----------------------------------------
Maintenance------------------------------------------
Precautions-------------------------------------------
Clean the Surface--------------------------------------
Clean the Filters----------------------------------------
Storage----------------------------------------------
Troubleshooting---------------------------------------
Customer Service--------------------------------------
Warranty---------------------------------------------
Customer Service--------------------------------------
Video Guide------------------------------------------
Content
1
1
1
2
2
3
4
4
5
5
5
6
6
7
8
8
8
8
9
9
10
10
10
10

Electrical Safety Warning
To reduce the risk of fire, electrical shock, injury, or death to persons using or near the air
conditioner, the following instructions must be followed.
• Follow local grid interconnection rules when installing the appliance.
• Ensure that the power outlet you are using is properly grounded and has the correct voltage.
• Make sure the power plug is intact and securely inserted into the power outlet after the
appliance is installed.
• Do not install and use the appliance in bathrooms, laundry rooms, or other humid environments.
• Avoid pulling the plug to turn off the appliance; use the designated controls.
• Organize the power cord neatly to prevent tripping hazards or accidental unplugging.
• Do not modify the length of the power cord or use an extension cord to power the appliance.
• Do not operate any appliance that has been dropped or damaged.
• If the power cord is damaged, it must be replaced by the manufacturer or authorized service
technicians to avoid all risks.
• Keep the appliance away from gasoline, flammable gases, stoves, and other heat sources.
• Do not use insecticide sprays or other flammable substances near the appliance.
• Do not wipe or wash the appliance with chemical solvents like gasoline or alcohol.
• Do not attempt to disassemble, overhaul, or modify the appliance, as it may lead to malfunc-
tions or potential harm to persons and properties.
• Use only the included accessories and parts, and specified tools for the installation. Using
non-standard parts can cause water leakage, electrical shock, fire, and injury or property damage.
• Be aware that refrigerants may not contain an odor.
• Risk Of Fire Or Explosion. Flammable Refrigerant Used. For repair or maintenance of the app-
liance, contact the manufacturer or authorized service technicians to prevent all risks.
• Do not use any methods or substances to expedite the defrosting process or for cleaning
purposes, except those recommended by the manufacturer.
• Do not place cups or other objects on the appliance to prevent spillage of water or other
liquids into the appliance.
• Risk Of Fire Or Explosion. Flammable Refrigerant Used. Dispose of the appliance properly in
accordance with federal or local regulations to prevent the risk of fire or explosion.
Cautions
• This appliance is for indoor use only.
• Children aged eight (8) years and older, or individuals with reduced physical, sensory, or mental
capabilities, may use this appliance provided they have received supervision or instructions on
safe usage and understand associated risks.
• Keep children from playing with the appliance. Cleaning and maintenance should always be
performed under adult supervision.
• When relocating the appliance, always maintain an upright position.
• Avoid inserting objects into the air inlet and outlet. Keep these areas free from any obstructions.
• When adjusting the upper and lower wind-guide strips of the air outlet, handle them gently to
prevent damage.
• If a drain hose is installed, ensure it is properly connected and free from distortion or bends.
• Before cleaning the appliance, disconnect the power supply.
1
Safety Precautions
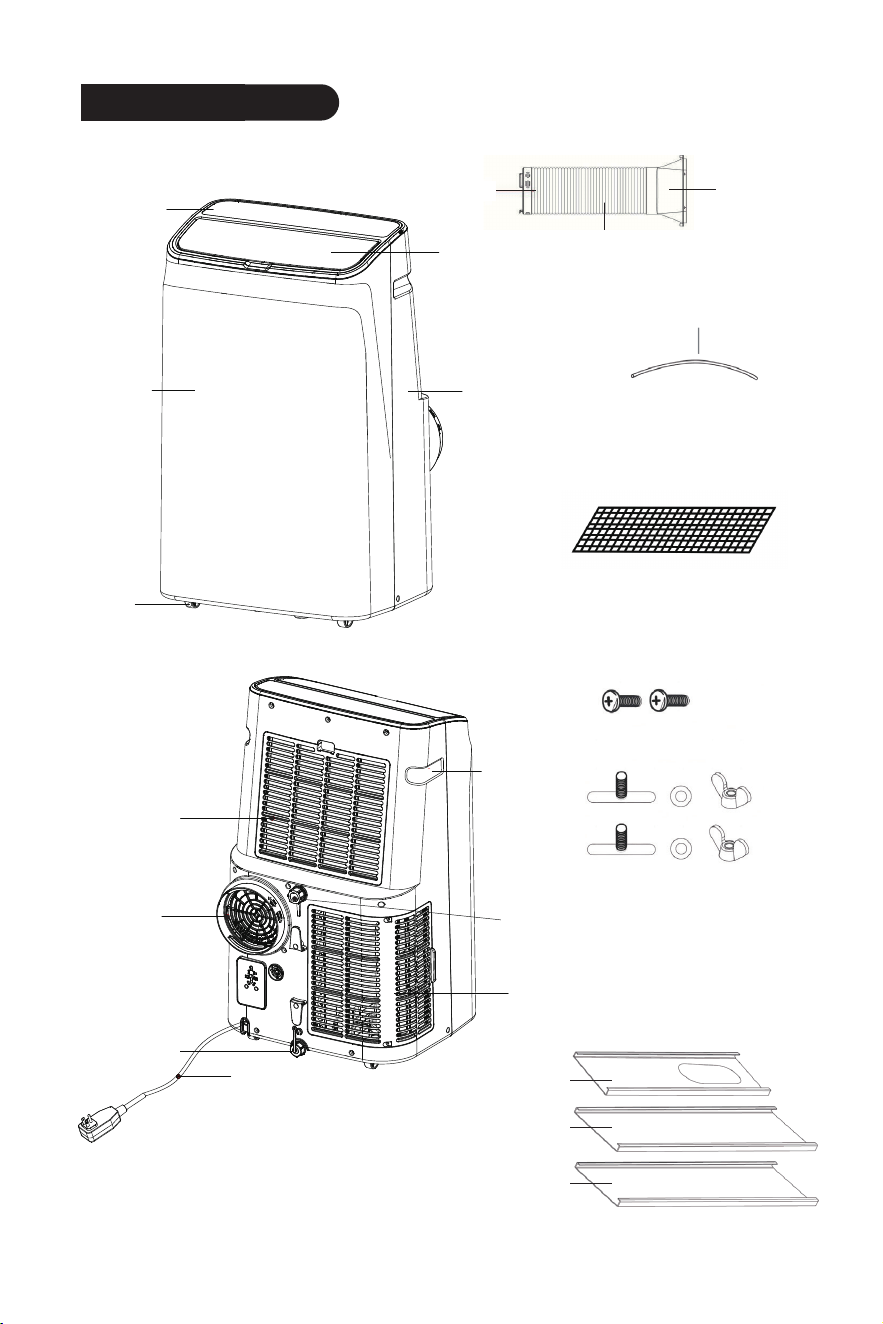
Components
2
Introduction
Hose Inlet
Hose Outlet
Air Exhaust Hose
Insect Guard
Drain Hose
Insect Guard
Wing Nuts and Screws
Window Slider Kit
Plate A
Plate B
Plate C
Control
Panel
Louver
Rear Housing
Front
Housing
Casters
EVA Filter
Air Vent
Power cord
Aircon Filter
Handle
Dehumidification Drain
Condensation
Drain
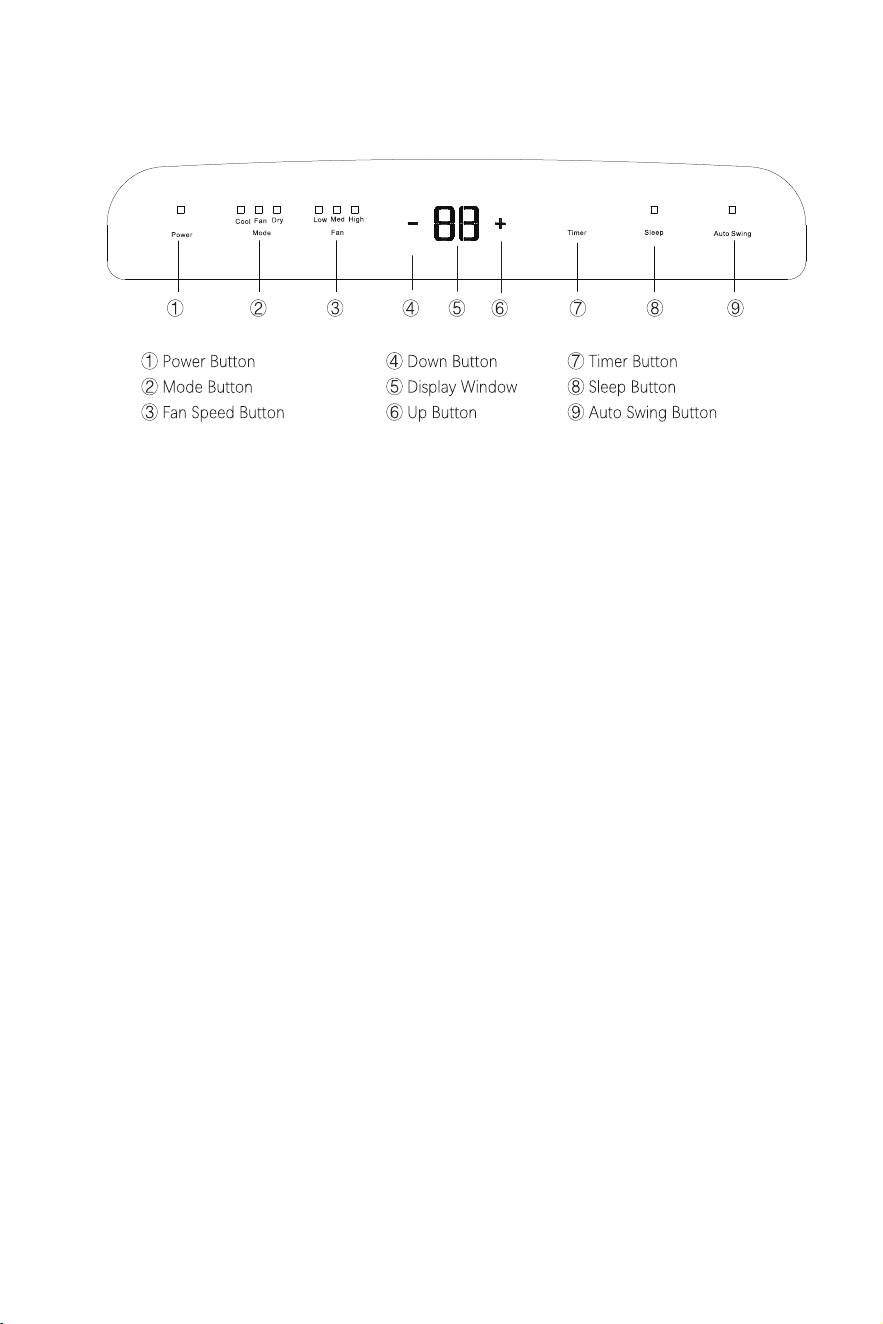
Power Button
Press the button to turn on and off the appliance.
Mode Button
When powering on, press the button to cycle through the following modes: cooling,
fan and dehumidifying.
Fan Speed Button
Press the button to cycle the fan speed through 3 speeds - low, medium, and high
speeds. Not available under sleep and dehumidifying modes.
Up (+) and Down (-) Button
Press the buttons to change the temperature setting of 61°F-88°F (16°C-31°C). Not
available under fan and dehumidifying modes.
Display Window
Shows the set temperature in °C or °F and the auto-timer setting. While under
dehumidifying and fan modes, the temperature display is not active.
Timer Button
• When the appliance is running, press the button to schedule when it will power off,
by using the up (+) and down (-) button to adjust the length of the shutdown time.
• When the appliance is not running, press the button to schedule when it will power
on, by using the up (+) and down (-) button to set the delay start time.
• Press the timer button to cancel the timer mode.
• Timing values can be set in 1-24 hours and the timing value is adjusted up or down
by one hour.
Sleep Button
Under the cooling mode, press the button to enter the eco-friendly sleep mode.
Auto Swing Button
Press the button, and the louver will swing up and down automatically. Press it again
to stop the louver at a desired angle.
3
Control Panel
4
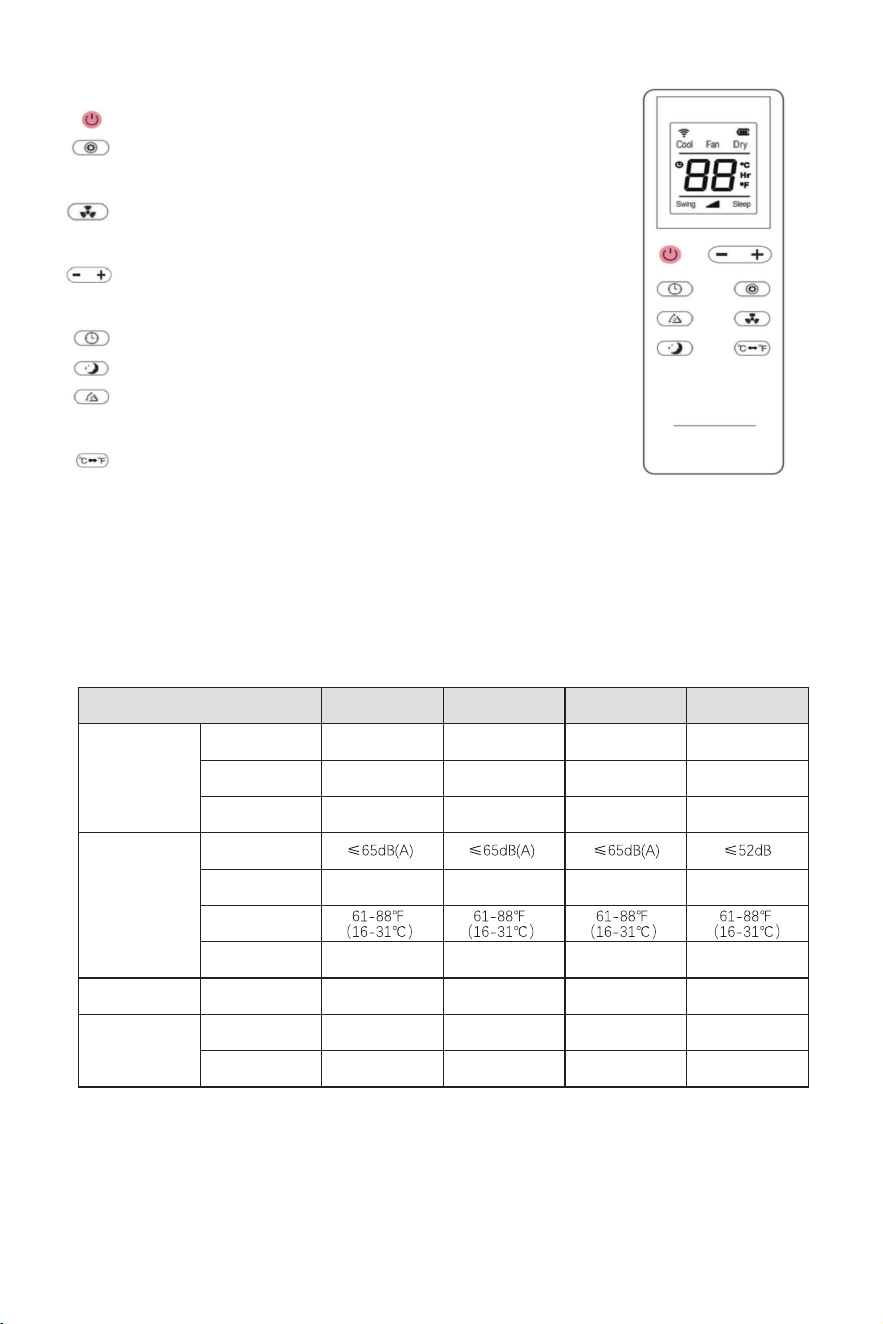
Remote
NOTE: AAA 1.5VDC battery (not included)
Specifications
BTU 8000 10000 15000 1500
Electrical
Parameters
Power Supply
Rated Input
Rated Current
Noise Level
Refrigerant Type
Cooling Area
Fan Speeds
Air Circulation Area
150-200 sq ft
45 Pint/Day
2
300m³/h
200-250 sq ft
55 Pint/Day
2
350m³/h
250-400 sq ft
100 Pint/Day
3
560m³/h
25-50 sq ft
/
3
140m³/h
115V/60Hz
850W
7.5A
R32
115V/60Hz
1030W
9.2A
R32
115V/60Hz
1340W
12A
R32
100-240V/50-60Hz
264W
1.1A
R134A
Cooling Mode
Fan Mode
Dehumidifying
Mode
Operating
Temperature
Power Button: Press the button to turn on and off the appliance.
Mode Button: Press the button to cycle through cooling, fan
and dehumidifying modes.
Fan Speed Button: Press the button to cycle the fan speed
through 3 speeds.
Up and Down Button: Press the buttons to change the
temperature setting.
Timer Button: Press the button to set a delay start or shutdown time.
Sleep Button: Press the button to turn on the sleep mode.
Auto Swing Button : Press the button to let the louver swing
up and down automatically.
°C/°F Switch Button: Press the button to switch display
between Celsius and Fahrenheit.
Dehumidifying
Capacity
Installation
5
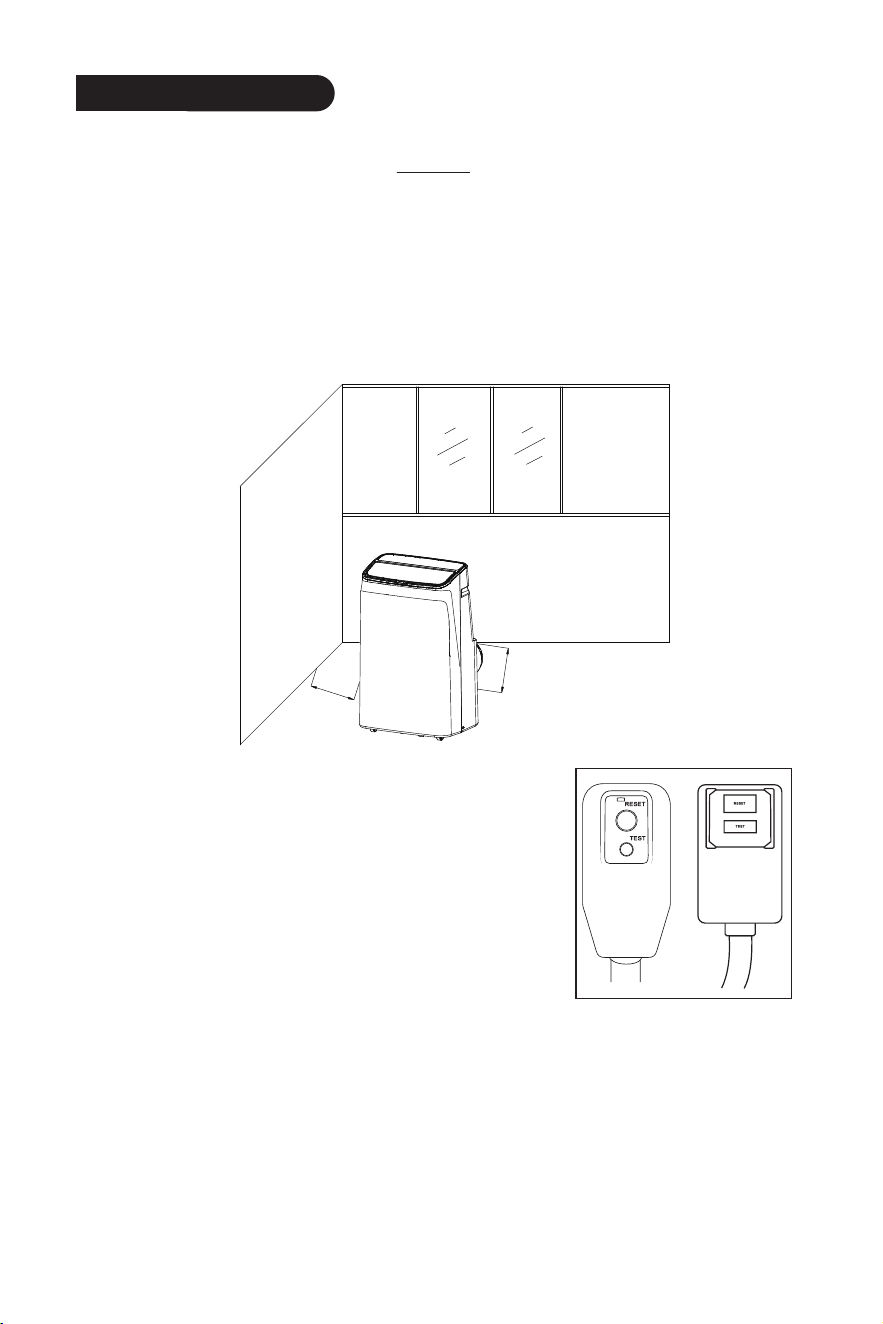
LCDI Power Plug
The air conditioner is equipped with an LCDI (Leakage
Current Detection and Interruption) power cord that is
required by UL. The TEST and RESET buttons on the LCDI
Plug are used to check if the plug is functioning properly. If
the cord is damaged, or leakage occurs, unplug the air
conditioner and contact Customer Service for help.
Finish the LCDI test before each use:
1. Plug the power cord into a grounded 3-prong outlet.
2. Press the TEST button. The circuit should trip and cut all power to the air conditioner.
3. Press the RESET button. You will hear a click and the air conditioner is ready for use.
NOTE:
• Do not use the LCDI plug to turn the air conditioner on or off.
• Do not press the TEST button while the air conditioner is operating.
• Make sure the RESET button is pushed in for correct operation.
• The power cord must be replaced if the appliance fails to reset.
Location
• Let the air conditioner sit upright for 24 hours before turning it on to let the refrigerant
redistribute evenly inside, as shipping may have caused it to accumulate in certain areas.
• The air conditioner should be placed on a level, stable surfaces to minimize noise and vibration.
• During installation, maintain a minimum 20-inch (50 cm) gap between the appliance and
walls or objects.
• Ensure the air inlet and outlet remain unobstructed.
• Position the appliance near a properly grounded electrical outlet.
• Use the casters for mobility on smooth surfaces, but be careful on carpets and avoid obstacles.
min:50cm
min:50cm
6
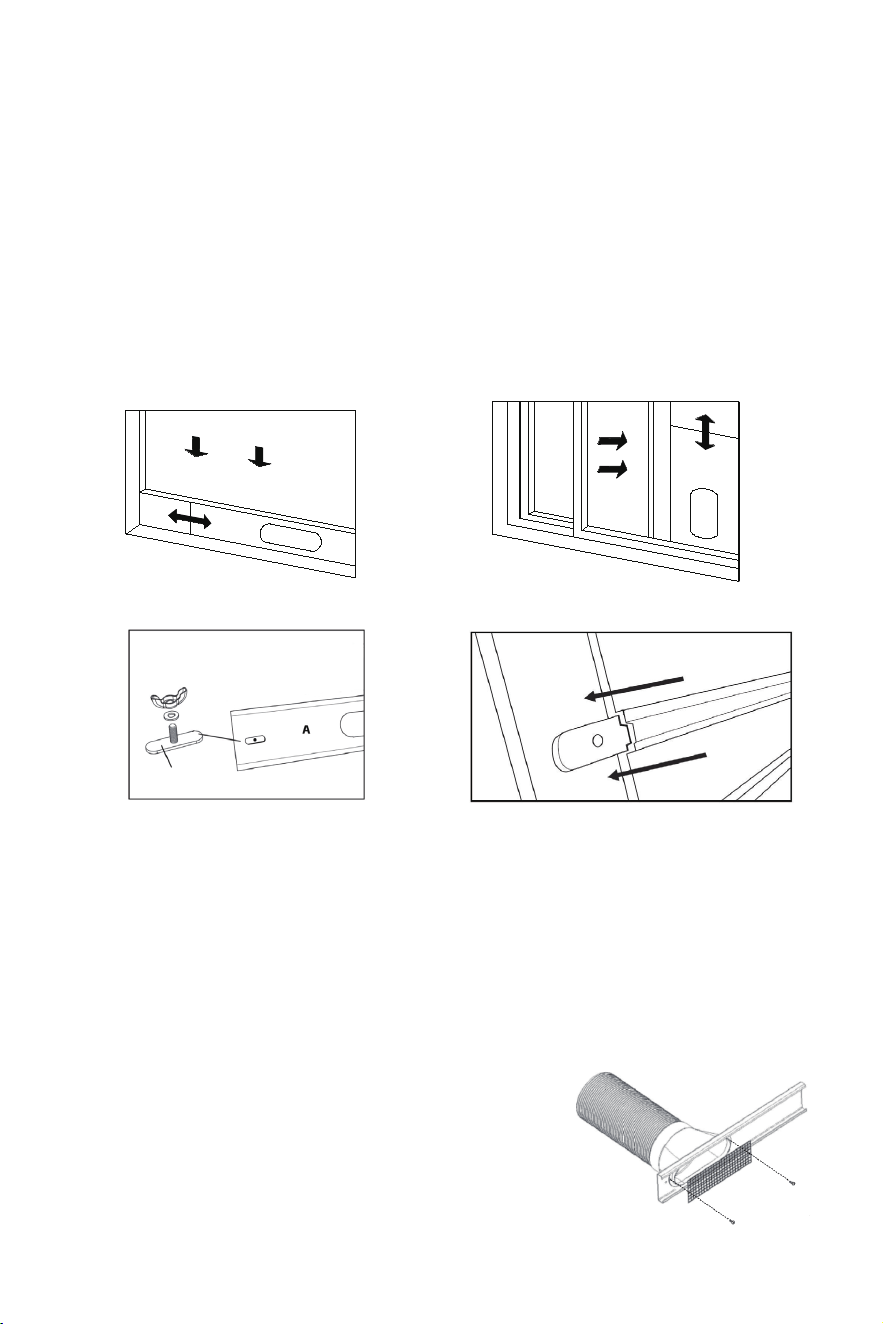
Window Slider Kit
The window slider kit is designed to fit most standard “Vertical” and “Horizontal” window
applications. However, for certain types of windows, it may be necessary to make some
improvisations or modifications during the installation process.
• Minimum and Maximum Window Openings:
Maximum: 57 inches (145 cm)
Minimum: 9 inches (23 cm)
• For window openings under 18 inches, trim Plate A as needed. Never cut out a hole in Plate A.
• For window openings between 18 to 38 inches, use Plates A and B, trimming Plate B if needed.
• For window openings between 38 to 57 inches, use Plates A, B, and C, and trim Plate B if
needed.
To install it, follow the steps:
1. Attach the window slider kit to match the window's dimensions.
2. Take the wing nut apart, and
loosely attach it to the hole on the
right side of Plate A.
3. Slide Plate B into Plate A, and the wing nut
base should pass through the track on Plate
B. If needed, connect Plate B to Plate C using
the same method.
WING NUT BASE
Exhaust Hose
The air exhaust hose should be installed or removed from the air conditioner in
accordance with its operating mode.
• Cooling Mode: Connect the air exhaust hose to the air conditioner.
• Dehumidifying Mode: Connect the air exhaust hose to the air conditioner.
• Fan Mode: Disconnect the air exhaust hose from the air conditioner.
To install it, follow the steps:
1. Connect the hose outlet and inlet to the air exhaust hose.
2. Extend the hose, align the hose outlet with Plate A's
opening, and slide it to click in place. Secure the insect guard
with the provided screws.
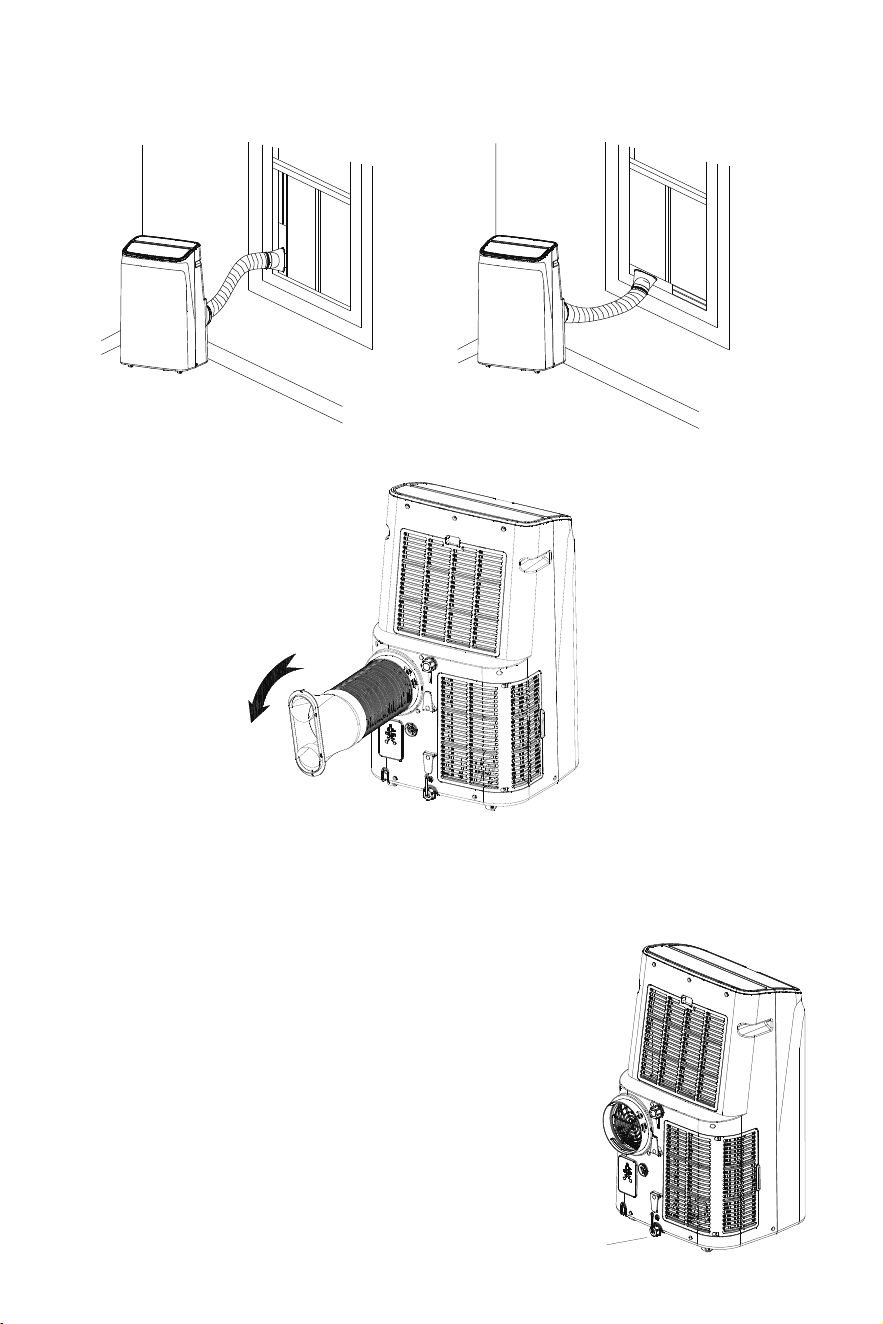
7
3. Attach the window slider kit to the window sash, and make sure the window is tightly
closed against the window slider kit.
4. Align the hose inlet with the air vent on the back of the appliance, and rotate it counter
clockwise to secure it.
Water Drainage
The air conditioner comes equipped with an auto water evaporation feature, ensuring
that the water collection compartment should not typically fill up during the cooling
and dehumidifying modes unless humidity levels are exceptionally high.
Intermittent Drainage
Applicable to the cooling mode.
1. When the LED display shows the "FL" error code, unplug
the appliance from the power source.
2. Carefully move the appliance to a drain area over your
basement floor or a drip pan (not included). Unscrew the
bottom condensation drain cap.
3. Let the water drain away and replace the drain cap.
Restart the appliance until the error code "FL" disappears.
If the error repeats, contact our Customer Service.
Drain Cap
Maintenance
8
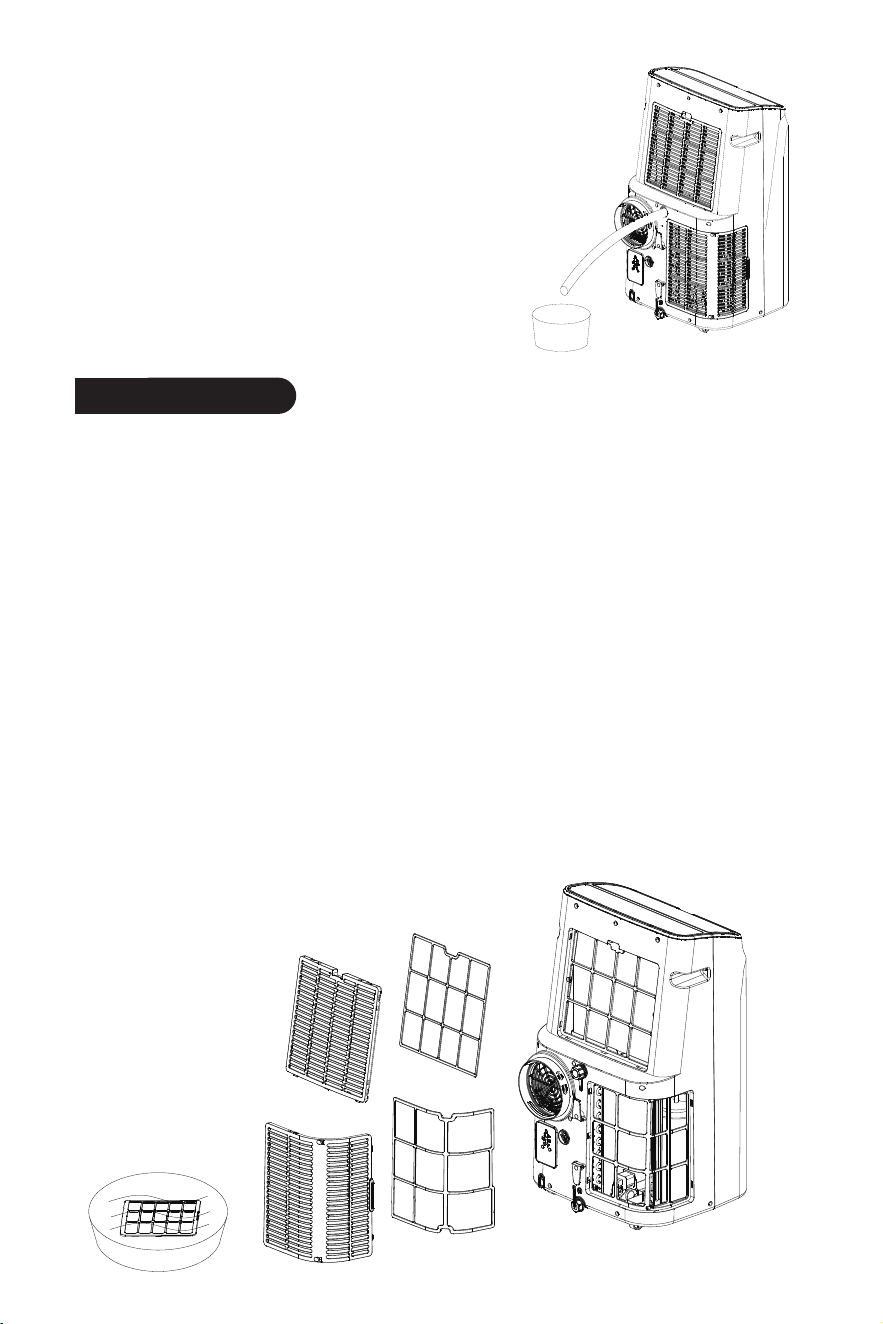
Continuous Drainage
Applicable to the dehumidifying mode.
1. Unplug the appliance from the power source.
2. Unscrew the drain cap of the dehumidification
drain located in the back center of the appliance.
3. Connect the drain hose as shown in the figure. The
water will be continuously drained through the
hose into a floor drain or a bucket.
4. Turn on the appliance.
Precautions
• Always unplug the appliance before cleaning and maintenance.
• Do not use flammable liquids or chemicals to clean the appliance.
• Do not wash the appliance under running water.
Clean the Surface
Clean the surface of the appliance using a damp, soft cloth and mild detergent.
Clean the EVA Filter
1. Press the clasp at the back of the appliance and remove the filter.
2. Place the filter into the warm water around 104°F (40°C) with a neutral detergent.
Carefully rinse the filter clean and allow it to dry naturally in the shade.
3. Re-insert the filter into the appliance.
Clean the Aircon Filter
1. Unscrew the four (4) screws that are securing the filter, as illustrated in the figure.
2. Place the filter into the warm water around 104°F (40°C) with a neutral deterg
ent.
Carefully rinse the filter clean and allow it to dry naturally in the shade.
3. Re-insert the filter, and have it screwed.
9
Storage
• Drain the air conditioner's water collection by tilting it or using a separate container.
• Operate the air conditioner in low-speed fan mode for 12 hours to ensure the
drainage system is completely dry, maintaining a dry interior and preventing mildew.
• Clean the filters thoroughly and allow them to dry before storage.
• Turn off the appliance, disconnect the power plug, and neatly coil the power cord
around the designated holder. Ensure the drain cap is closed.
• Remove the air exhaust hose and store it properly.
• Pack the air conditioner well, and place it in a dry location to prevent dust.
• Remove the batteries from the remote for storage.
Problems Reasons Solutions
The appliance
cannot operate.
The appliance does
not cool well.
The remote
control does not
work.
LED displays "E1".
LED displays "E2".
The appliance is
noisy and vibrates.
The appliance is not plugged properly. Reinsert the plug, and turn it on.
Drain the water.
Change the set temperature.
Use the appliance at the temperature
of 44-95°F (7-35°C).
Place the appliance in a room with an ambient
temperature of greater than 62°F (17°C).
Overheat protection activates.
There are heat sources inside the room.
The windows and doors in the room are open.
The filters are blocked by dust.
The room area is too large. Double-check the cooling area.
Clean the filters.
Close doors and windows.
Remove the heat sources if possible.
The appliance is not placed on a flat surface.
The distance between the appliance and
the remote control is too far.
The remote control is not pointed at the
remote control receiver on the appliance.
Batteries are dead. Replace batteries.
The room temperature sensor is malfunctioning.
The pipe temperature sensor is malfunctioning.
Contact Customer Service for assistance.
Contact Customer Service for assistance.
LED displays "FL". The water tank may be full. Drain the water.
Place the appliance on a flat, level surface.
The air exhaust hose is not connected or blocked.
Turn off the appliance, disconnect the hose,
and check for blockage.
After the defrosting is finished, it will
resume operation.
Wait for 3 minutes until the temperature
drops, and restart the appliance.
The ambient temperature is too low or too high.
The appliance restarts immediately after stopping.
The Frost Protection function triggers at a low
exhaust hose temperature.
Under the cooling mode, the room
temperature is lower than the set temperature.
Under the dehumidifying mode, the
room temperature is too low.
The water tank may be full if the display
window shows the “FL” error code.
Troubleshooting
Ensure the remote is being pointed at the
remote control receiver on the appliance
within the receiving range, and that there
are no obstructions.
Due to the 3-minute Compressor Protection.
Wait for 3 minutes, and turn it on again.

10
Warranty
• 1-Year Warranty
All DENBIG products come with a 1-year warranty from the date of purchase.
DENBIG warrants to the original purchaser that the product will be free from defects in
material, parts and workmanship, and replaces any defective product with a new unit
that is equivalent to your original purchase within the warranty period.
• 12-Month Warranty Extension
You can get a 12-month warranty extension by registering your new product at
www.denbig.shop.
Customer Service
If you have any questions or encounter issues with your product, including problems
not covered in the Troubleshooting section, or if the recommended solutions do not
resolve the problem, please reach out to our Customer Service for assistance.
www.denbig.shop
Video Guide
Visit our official website to watch an installation tutorial video at www.denbig.shop.
Customer Service