®
Perfect Grind™
Single Serve Coffee Maker
Perfect Grind™
Cafetera individual
Instruction Manual
Manual de instrucciones
19332_19333_19334_19335_19432_19433_BTFL WMUS_PerfectGrind Single Serve CM_IM_V21_R9.indd 119332_19333_19334_19335_19432_19433_BTFL WMUS_PerfectGrind Single Serve CM_IM_V21_R9.indd 1 2023-11-02 9:51 AM2023-11-02 9:51 AM
The kitchen is my family’s happy
place. It’s where we cook and eat
and bake and laugh and share our
most beautiful moments together.
That’s what inspired the creation
of Beautiful, my new collection
of easy-to-use kitchenware that
you’ll want to keep out on your
kitchen counter. So whether
your kitchen has flour all over
the place from a kid's baking
session or you’re throwing an adult
dinner party, I hope every step will
be simple, delicious and beautiful!
www.beautifulbydrew.com
19332_19333_19334_19335_19432_19433_BTFL WMUS_PerfectGrind Single Serve CM_IM_V21_R9.indd 219332_19333_19334_19335_19432_19433_BTFL WMUS_PerfectGrind Single Serve CM_IM_V21_R9.indd 2 2023-11-02 9:51 AM2023-11-02 9:51 AM
Section 1: Safety
Important Safeguards ............................................ 6-8
Additional Important Safeguards ................................... 9
Notes on the Plug ............................................... 10
Notes on the Cord ............................................... 11
Plasticizer Warning .............................................. 11
Electric Power ................................................... 12
Section 2: Instructions
Getting To Know Your Perfect Grind
TM
Single Serve Coffee Maker ... 14
Touch-Activated Display Control Panel ......................... 15-17
Before Using for the First Time ................................17-18
Operation ........................................................ 18
Set the Current Time ......................................... 18-19
Brew Set-Up Using Whole Bean Coffee ........................... 19-20
Brew Set-Up Using Ground Coffee ............................... 20-22
Grind & Brew Coffee Later..................................... 22-24
Beautiful Hints for Great Tasting Coffee ........................ 24
User Maintenance Instructions .................................... 25
Care & Cleaning Instructions ..................................... 25
Brew Clean: Decalcication .................................... 25-26
Grinder Door and Channel Cleaning ............................... 27
Grinder Auto Clean ............................................ 27-28
Storing Instructions ............................................. 29
Perfect Grind™ FAQ’S ............................................. 29
Troubleshooting ............................................... 30-32
Tips For Best Tasting Coffee ..................................... 32
Warranty ...................................................... 33-34
Table of Contents
Table of Contents
19332_19333_19334_19335_19432_19433_BTFL WMUS_PerfectGrind Single Serve CM_IM_V21_R9.indd 319332_19333_19334_19335_19432_19433_BTFL WMUS_PerfectGrind Single Serve CM_IM_V21_R9.indd 3 2023-11-02 9:51 AM2023-11-02 9:51 AM

4
Sección 1: Seguridad
Medidas importantes de seguridad ............................. 36-39
Medidas de seguridad importantes adicionales .................. 39-41
Notas sobre el enchufe .......................................... 41
Notas sobre el cable ......................................... 41-42
Advertencia sobre el acabado .................................... 42
Alimentación eléctrica ........................................... 42
Sección 2: Instrucciones
Conozca su Cafetera individual Perfect Grind
TM
.................... 44
Panel de control de pantalla de activación táctil ............. 45-47
Antes del primer uso ............................................ 48
Funcionamiento ................................................... 49
Establecer el tiempo actual ...................................... 49
Conguración de preparación con café en granos ............... 49-51
Conguración de preparación con café molido .................. 51-52
Moler y preparar café más tarde .............................. 52-55
Consejos de Beautiful para un café de gran sabor ............... 55
Instrucciones de mantenimiento para el usuario ................... 55
Instrucciones de limpieza y cuidado .............................. 56
Limpieza para preparación: Descalcicación .................... 56-57
Puerta del molino y limpieza de canal ........................... 58
Limpieza automática del molino ................................ 58-60
Instrucciones de almacenamiento .................................. 60
Preguntas Frecuentes Sobre Perfect Grind™ ..................... 60-61
Solución De Problemas......................................... 61-63
Consejos Para Hacer Un Café De Estupendo Sabor .................. 64
Garantía ...................................................... 65-66
Índice
19332_19333_19334_19335_19432_19433_BTFL WMUS_PerfectGrind Single Serve CM_IM_V21_R9.indd 419332_19333_19334_19335_19432_19433_BTFL WMUS_PerfectGrind Single Serve CM_IM_V21_R9.indd 4 2023-11-02 9:51 AM2023-11-02 9:51 AM
Section 1
Safety
1
19332_19333_19334_19335_19432_19433_BTFL WMUS_PerfectGrind Single Serve CM_IM_V21_R9.indd 519332_19333_19334_19335_19432_19433_BTFL WMUS_PerfectGrind Single Serve CM_IM_V21_R9.indd 5 2023-11-02 9:51 AM2023-11-02 9:51 AM

6
IMPORTANT SAFEGUARDS
When using electrical appliances, basic safety precautions
should always be followed including the following:
1. READ ALL INSTRUCTIONS.
2. Do not touch hot surfaces. Use handles or knobs.
3. This Coffee Maker is not intended for use by persons
(including children) with reduced physical, sensory
or mental capabilities, or lack of experience and
knowledge, unless they have been given supervision or
instruction concerning use of the appliance by a
person responsible for their safety.
4. Close supervision is necessary when any appliance
is used by or near children.
5. Place the appliance on a table or at surface.
6. In order to minimize the risk of property damage, never
place the Coffee Maker under a wall cabinet. Make sure
the area several feet above the Coffee Maker is clear
from all furniture or cabinetry.
7. Do not operate your appliance in an appliance garage.
When storing in an appliance garage, always unplug the
unit from the electrical outlet.
8. To reduce the risk of re, do not place unit over or
near any portion of a heating or cooking appliance.
Do not place appliance on or near a hot gas or electric
burner or in a heated oven.
19332_19333_19334_19335_19432_19433_BTFL WMUS_PerfectGrind Single Serve CM_IM_V21_R9.indd 619332_19333_19334_19335_19432_19433_BTFL WMUS_PerfectGrind Single Serve CM_IM_V21_R9.indd 6 2023-11-02 9:51 AM2023-11-02 9:51 AM

7
9. To reduce the risk of re, do not store anything
directly on top of the appliance surface when the
appliance is in operation.
10. Do not use outdoors.
11. To reduce the risk of electric shock, do not mount
over a sink.
12. To protect against re, electrical shock and injury to
persons, do not immerse cord, plugs, or appliance in
water or other liquids.
13. Do not operate any appliance with a damaged cord or
plug, or after the appliance malfunctions, or has been
damaged in any manner. Contact Consumer Service.
NOTE: DO NOT ATTEMPT TO REPAIR THE UNIT YOURSELF.
THIS WILL VOID THE WARRANTY.
14. The use of accessory attachments not recommended by
the appliance manufacturer may result in re, electric
shock or injury to persons.
15. Never move the appliance by pulling the cord. Do not
let the cord hang over the edge of a table or counter or
touch hot surfaces.
16. Always ll water reservoir rst, then plug cord into
the wall outlet.
17. Never use your Coffee Maker without water in the water
reservoir.
18. Unplug unit from outlet when not in use and before
cleaning. Allow unit to cool before putting on or
19332_19333_19334_19335_19432_19433_BTFL WMUS_PerfectGrind Single Serve CM_IM_V21_R9.indd 719332_19333_19334_19335_19432_19433_BTFL WMUS_PerfectGrind Single Serve CM_IM_V21_R9.indd 7 2023-11-02 9:51 AM2023-11-02 9:51 AM

8
taking off parts, and before cleaning.
19. To interrupt the BREW cycle at any time, press
BREW/OFF. Unless the Coffee Maker is malfunctioning,
do not remove plug from wall outlet.
20. To disconnect, press BREW/OFF, then unplug the power
cord from the electrical outlet.
21. Unplug the power cord from the electrical outlet when
the appliance is not in use or left unattended.
22. Do not use this appliance for other than its intended
use.
23. Avoid contact with moving parts. Do not attempt to
defeat any safety interlock mechanisms.
24. Use the coffee grinder to grind roasted coffee beans
only. Grinding other substances, such as nuts, spices
or unroasted beans, may dull the blade and cause poor
grinding or injury.
WARNING: To avoid the risk of injury, do not open the
brew chamber drawer while coffee is brewing. Scalding
may occur if the drawer is opened during the BREW cycle.
25. Check the coffee bean hopper for presence of foreign
objects before using or cleaning.
SAVE THESE
INSTRUCTIONS
19332_19333_19334_19335_19432_19433_BTFL WMUS_PerfectGrind Single Serve CM_IM_V21_R9.indd 819332_19333_19334_19335_19432_19433_BTFL WMUS_PerfectGrind Single Serve CM_IM_V21_R9.indd 8 2023-11-02 9:51 AM2023-11-02 9:51 AM

9
FOR HOUSEHOLD USE
ONLY
ADDITIONAL IMPORTANT
SAFEGUARDS
WARNING: This Coffee Maker generates heat and escaping
steam during use. Proper precautions must be taken to
prevent the risk of burns, res, or other injury to persons
or damage to property.
1. All users of this Coffee Maker must read and understand
this instruction manual before operating or cleaning
this Coffee Maker.
2. The cord to this Coffee Maker should be plugged into a
120V AC polarized electrical outlet only.
3. Use water only in this Coffee Maker! Do not put any
other liquids or food products in this Coffee Maker.
Do not mix or add anything to the water placed in this
Coffee Maker, except as instructed in the Brew Clean:
Decalcication section of this instruction manual to
descale the Coffee Maker.
4. DO NOT attempt to move a Coffee Maker containing hot
liquids. Allow Coffee Maker to cool completely before
moving.
19332_19333_19334_19335_19432_19433_BTFL WMUS_PerfectGrind Single Serve CM_IM_V21_R9.indd 919332_19333_19334_19335_19432_19433_BTFL WMUS_PerfectGrind Single Serve CM_IM_V21_R9.indd 9 2023-11-02 9:51 AM2023-11-02 9:51 AM

10
5. Keep Coffee Maker at least 4 inches away from walls
or other objects during operation. Do not place any
objects on top of Coffee Maker while it is operating.
Place the Coffee Maker on a surface that is resistant
to heat.
6. If this Coffee Maker begins to malfunction during use,
immediately press BREW/OFF and unplug the cord. Do not
use or attempt to repair the malfunctioning Coffee
Maker. Call Consumer Service.
7. If this Coffee Maker falls or accidentally becomes
immersed in water or any other liquid, unplug it
immediately. Do not reach into the water! Do not use
this Coffee Maker after it has fallen into or has become
immersed in water.
CAUTION: Allow 15 minutes for the Coffee Maker to cool
sufciently before adding water to the water reservoir.
8. Always use fresh, cool water in your Coffee Maker. Warm
water or other liquids, except as listed in cleaning
section, may damage the Coffee Maker.
NOTES ON THE PLUG
This appliance has a polarized plug (one blade is wider
than the other). To reduce the risk of electric shock, this
plug will t in a polarized outlet only one way. If the
plug does not t fully into the outlet, reverse the plug.
If it still does not t, contact a qualied electrician.
Do not attempt to modify the plug in any way.
19332_19333_19334_19335_19432_19433_BTFL WMUS_PerfectGrind Single Serve CM_IM_V21_R9.indd 1019332_19333_19334_19335_19432_19433_BTFL WMUS_PerfectGrind Single Serve CM_IM_V21_R9.indd 10 2023-11-02 9:51 AM2023-11-02 9:51 AM

11
NOTES ON THE CORD
a) A short power-supply cord (or detachable power-supply
cord) is to be provided to reduce risks resulting from
becoming entangled in or tripping over a longer cord.
b) Longer detachable power-supply cords or extension cords
are available and may be used if care is exercised in
their use.
c) If a long detachable power-supply cord or extension
cord is used:
1) The marked electrical rating of the detachable
power-supply cord or extension cord should be at least
as great as the electrical rating of the appliance.
2) If the appliance is of the grounded type, the
extension cord should be a grounding- type 3-wire cord;
and
3) The longer cord should be arranged so that it will
not drape over the counter top or table top where it
can be pulled on by children or tripped over.
PLASTICIZER WARNING
CAUTION: To prevent Plasticizers from migrating to the
nish of the counter top or table top or other furniture,
place NON-PLASTIC coasters or place mats between the
appliance and the nish of the counter top or table top.
Failure to do so may cause the nish to darken; permanent
blemishes may occur, or stains can appear.
19332_19333_19334_19335_19432_19433_BTFL WMUS_PerfectGrind Single Serve CM_IM_V21_R9.indd 1119332_19333_19334_19335_19432_19433_BTFL WMUS_PerfectGrind Single Serve CM_IM_V21_R9.indd 11 2023-11-02 9:51 AM2023-11-02 9:51 AM

12
ELECTRIC POWER
If the electrical circuit is overloaded with other
appliances, your appliance may not operate properly. It
should be operated on a separate electrical circuit from
other appliances.
19332_19333_19334_19335_19432_19433_BTFL WMUS_PerfectGrind Single Serve CM_IM_V21_R9.indd 1219332_19333_19334_19335_19432_19433_BTFL WMUS_PerfectGrind Single Serve CM_IM_V21_R9.indd 12 2023-11-02 9:51 AM2023-11-02 9:51 AM
Section 2
Instructions
2
19332_19333_19334_19335_19432_19433_BTFL WMUS_PerfectGrind Single Serve CM_IM_V21_R9.indd 1319332_19333_19334_19335_19432_19433_BTFL WMUS_PerfectGrind Single Serve CM_IM_V21_R9.indd 13 2023-11-02 9:51 AM2023-11-02 9:51 AM

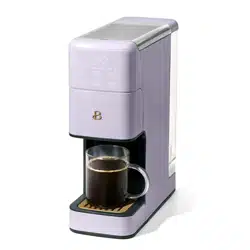
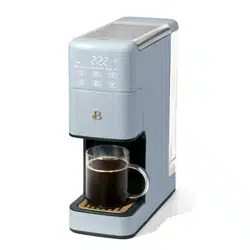
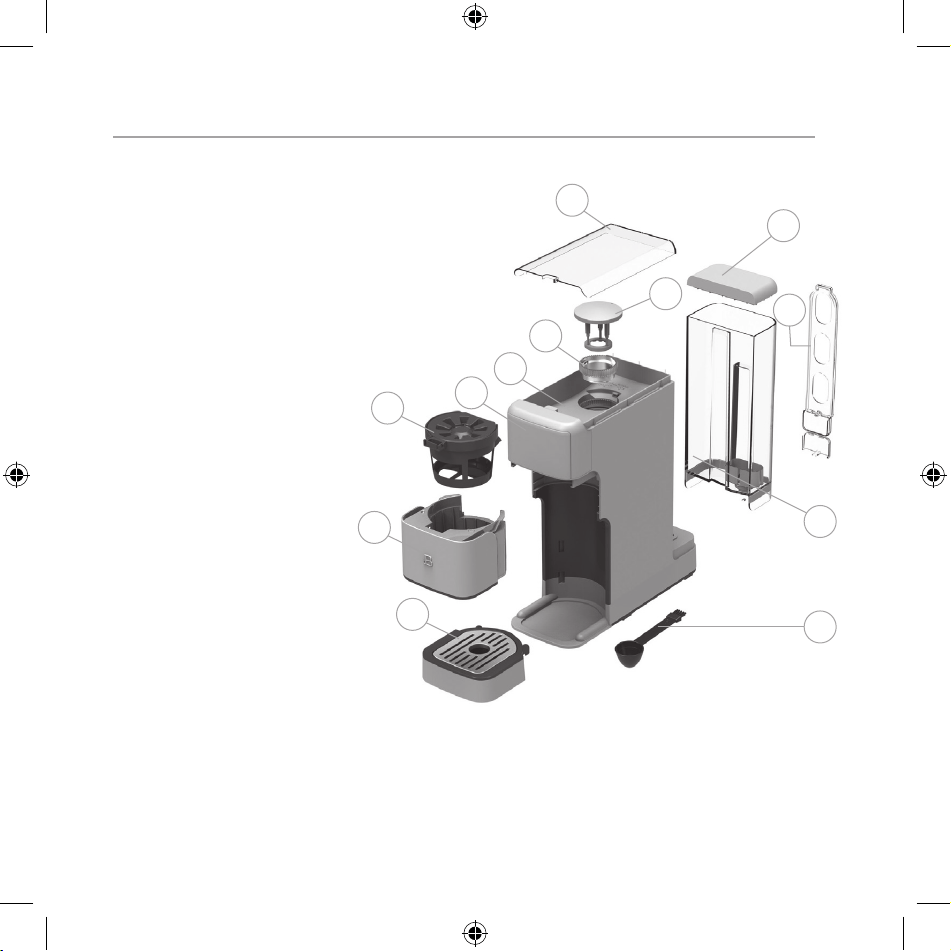
14
Getting To Know Your Perfect Grind
TM
Single Serve Coffee Maker
Product may vary slightly from illustrations
1. Coffee Bean Hopper Lid
2. 180g/7 oz. Coffee Bean
Hopper
3. Top Burr Grinder
4. Grinder Protective Cover
5. Grinder Door (not shown)
6. Water Reservoir Lid
7. Removable 64oz.
Water Reservoir
8. Charcoal Filter
with Filter Holder
9. Touch-Activated
Display Control Panel
10. Removable Brew
Chamber Drawer
11. Permanent Gold tone
lter basket with Cover
12. Removable Drip Tray
with Cover
13. 2-in-1 cleaning
brush measuring scoop
14. Polarized Plug (not shown)
15. Non-Skid Feet (not shown)
13
7
6
8
4
1
3
2
9
11
10
12
19332_19333_19334_19335_19432_19433_BTFL WMUS_PerfectGrind Single Serve CM_IM_V21_R9.indd 1419332_19333_19334_19335_19432_19433_BTFL WMUS_PerfectGrind Single Serve CM_IM_V21_R9.indd 14 2023-11-02 9:51 AM2023-11-02 9:51 AM

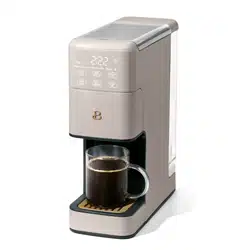
15
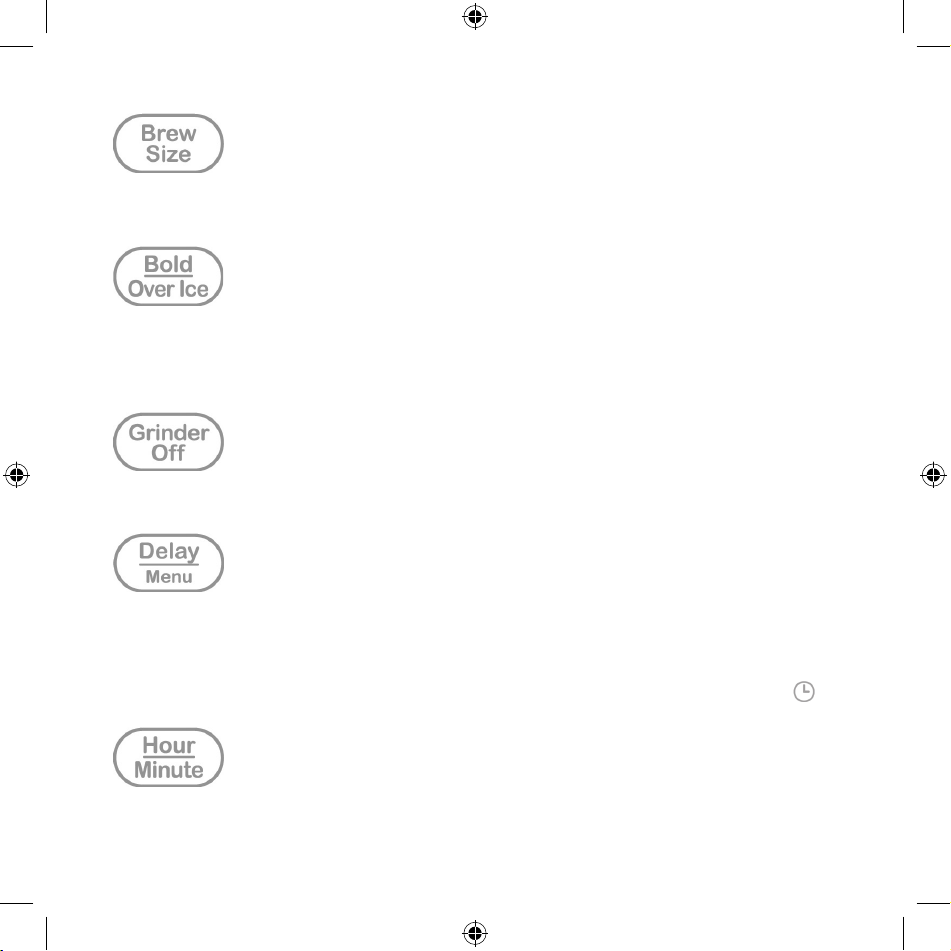
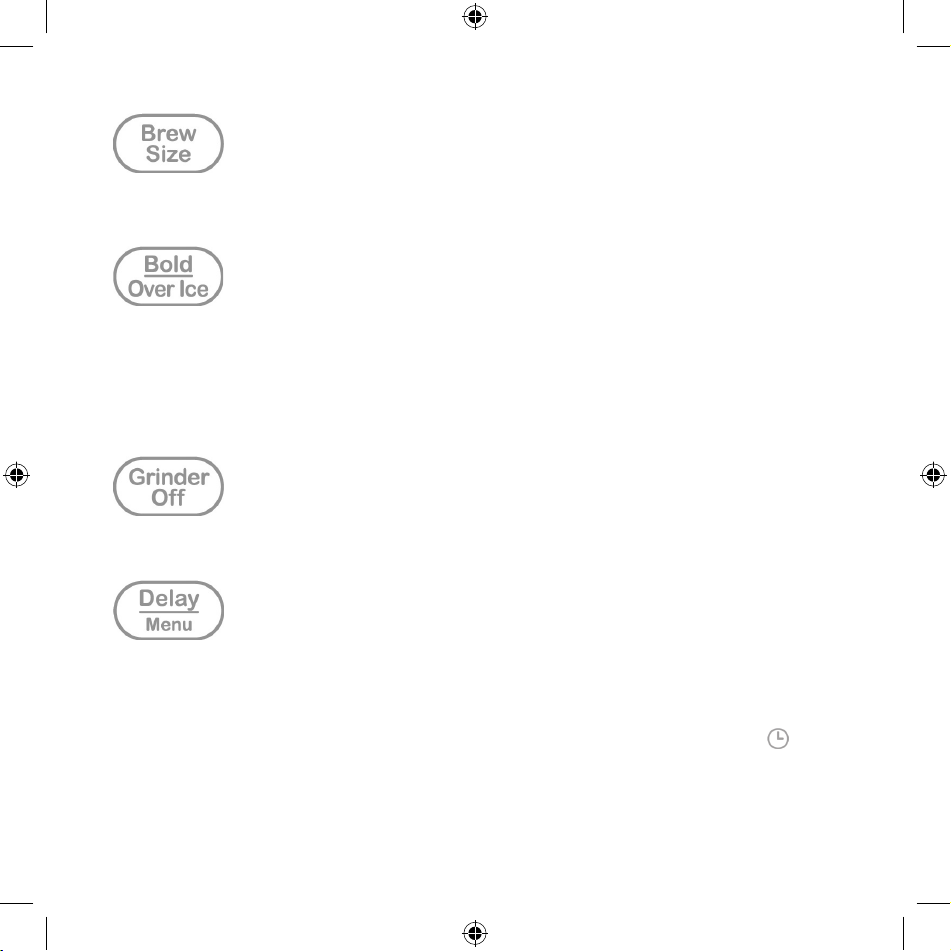
Touch-Activated Display Control Panel
A screen that only shows up when you need it.
1
2
8
4
12
14
10
11
3
9
6
5 7
13
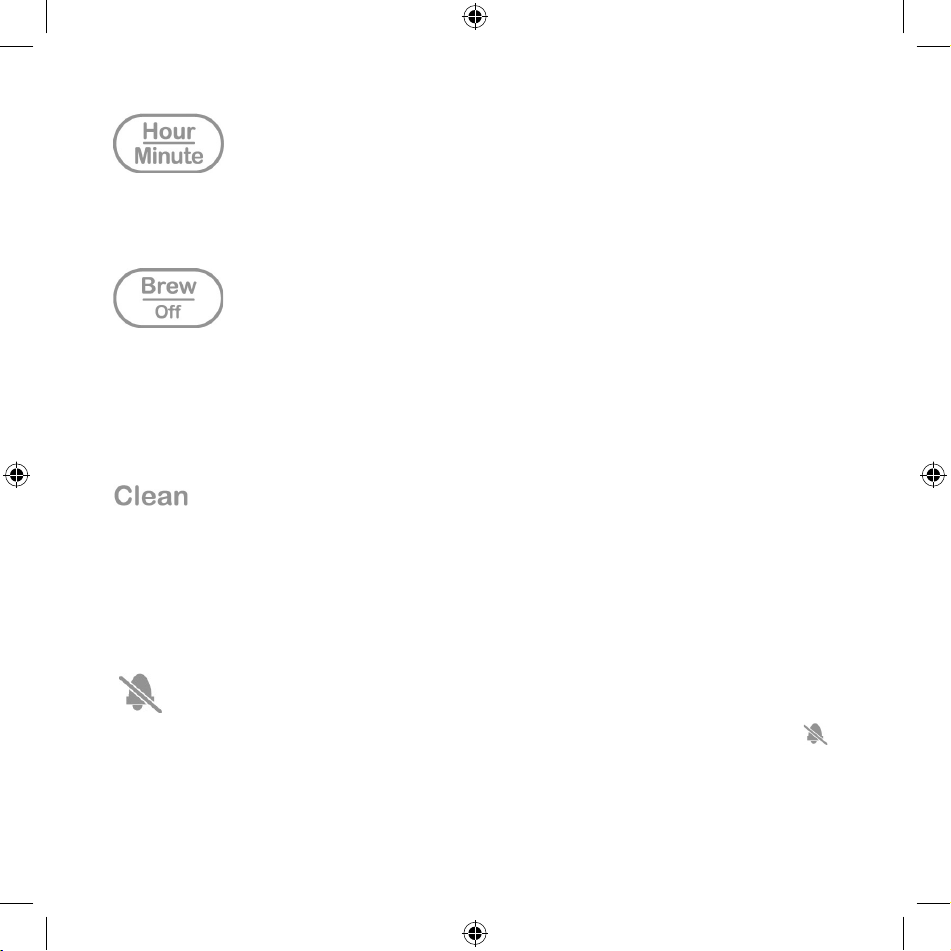
1. 24-hour LED Digital Clock
with AM/PM Indicator.
2. BREW SIZE
3. BOLD/OVER ICE
4. GRINDER OFF
5. DELAY/MENU
6. HOUR/MINUTE
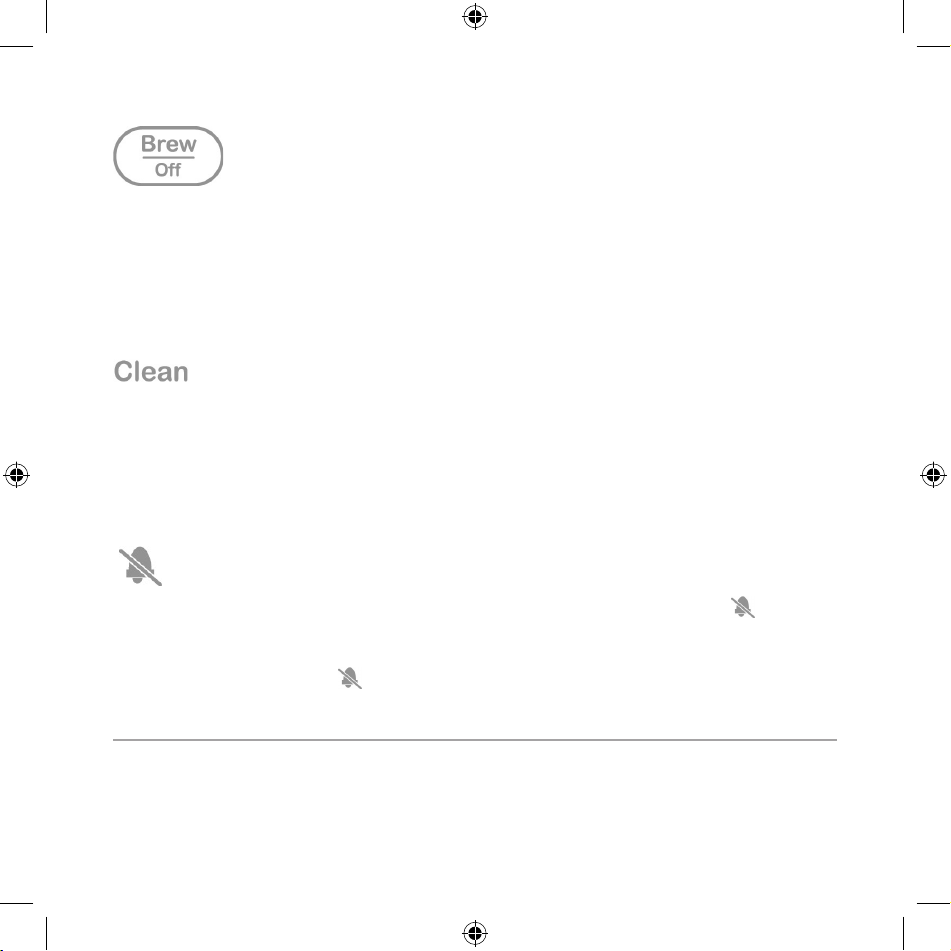
7. BREW/OFF
8. BOLD Indicator Light
9. OVER ICE Indicator Light
10. GRINDER OFF Indicator Light
11. CLEAN Indicator Light
12. MUTE Indicator Light
13. DELAY BREW indicator light
14. OZ Indicator Light
19332_19333_19334_19335_19432_19433_BTFL WMUS_PerfectGrind Single Serve CM_IM_V21_R9.indd 1519332_19333_19334_19335_19432_19433_BTFL WMUS_PerfectGrind Single Serve CM_IM_V21_R9.indd 15 2023-11-02 9:51 AM2023-11-02 9:51 AM
16
• Press BREW SIZE until the desired size appears on the display.
• Choose from 6 sizes: 6 oz., 8 oz., 10 oz., 12 oz., 14 oz., or 16 oz.
• For bolder coffee, press BOLD/OVER ICE to increase brew strength to BOLD.
• For iced beverages, press BOLD/OVER ICE again to change to OVER ICE setting.
• The active BOLD or OVER ICE brew strength appears on the display.
• When using pre-ground coffee, press GRINDER OFF. The GRINDER OFF indicator
light will illuminate.
• Press DELAY/MENU to enter the DELAY mode.
• Press DELAY/MENU to conrm HOURS and MINUTES when current or future TIME is
displayed.
• When brewing coffee in the future, press DELAY/MENU. The DELAY Indicator
will illuminate.
• Press HOUR/MINUTE to adjust HOURS and MINUTES in time setting modes
• Press and hold HOUR / MINUTE to quickly scroll through digits
19332_19333_19334_19335_19432_19433_BTFL WMUS_PerfectGrind Single Serve CM_IM_V21_R9.indd 1619332_19333_19334_19335_19432_19433_BTFL WMUS_PerfectGrind Single Serve CM_IM_V21_R9.indd 16 2023-11-02 9:51 AM2023-11-02 9:51 AM
17
• Press BREW/OFF to wake the Coffee Maker. The control panel will illuminate
and remain active for 5 minutes. Press BREW/OFF once more to grind & brew an 8
oz. cup of REGULAR strength coffee (Default settings).
• Press & hold BREW/OFF at any time to turn the Coffee Maker OFF.
• Press BREW/OFF to immediately turn the Coffee Maker OFF during the BREW
cycle.
• Descaling is necessary when the CLEAN indicator is illuminated.
• Please refer to the Brew Clean: Decalcication and Grinder Auto Clean
sections of this instruction manual for optimal results.
• IMPORTANT! For optimal performance it is recommended the grinder is cleaned
every 2 to 3 weeks
Press and hold GRINDER OFF + BREW/OFF until the MUTE indicator light appears
on the display. Audible alarms will be OFF.
To turn the audible alarms back on press and hold GRINDER OFF and BREW/OFF until
the MUTE indicator light disappears from the display.
Before Using for the First Time
CAUTION: To protect against electrical shock, do not immerse the Coffee
Maker or allow power cord to come into contact with water or other
liquids.
1. Remove all packing material and labels from the inside and outside of
the Coffee Maker. Place the unit on a at, clean surface.
19332_19333_19334_19335_19432_19433_BTFL WMUS_PerfectGrind Single Serve CM_IM_V21_R9.indd 1719332_19333_19334_19335_19432_19433_BTFL WMUS_PerfectGrind Single Serve CM_IM_V21_R9.indd 17 2023-11-02 9:51 AM2023-11-02 9:51 AM

18
2. Before preparing coffee, thoroughly clean the removable brew chamber
drawer, gold tone lter basket and coffee scoop in hot, sudsy water.
Rinse and dry. Replace disassembled parts. Wipe the coffee bean lid and
hopper with a clean, dry paper towel.
NOTE: The gold tone lter basket and brew chamber drawer are top-rack
dishwasher safe. The coffee scoop should be placed in the dishwasher
alongside the cutlery.
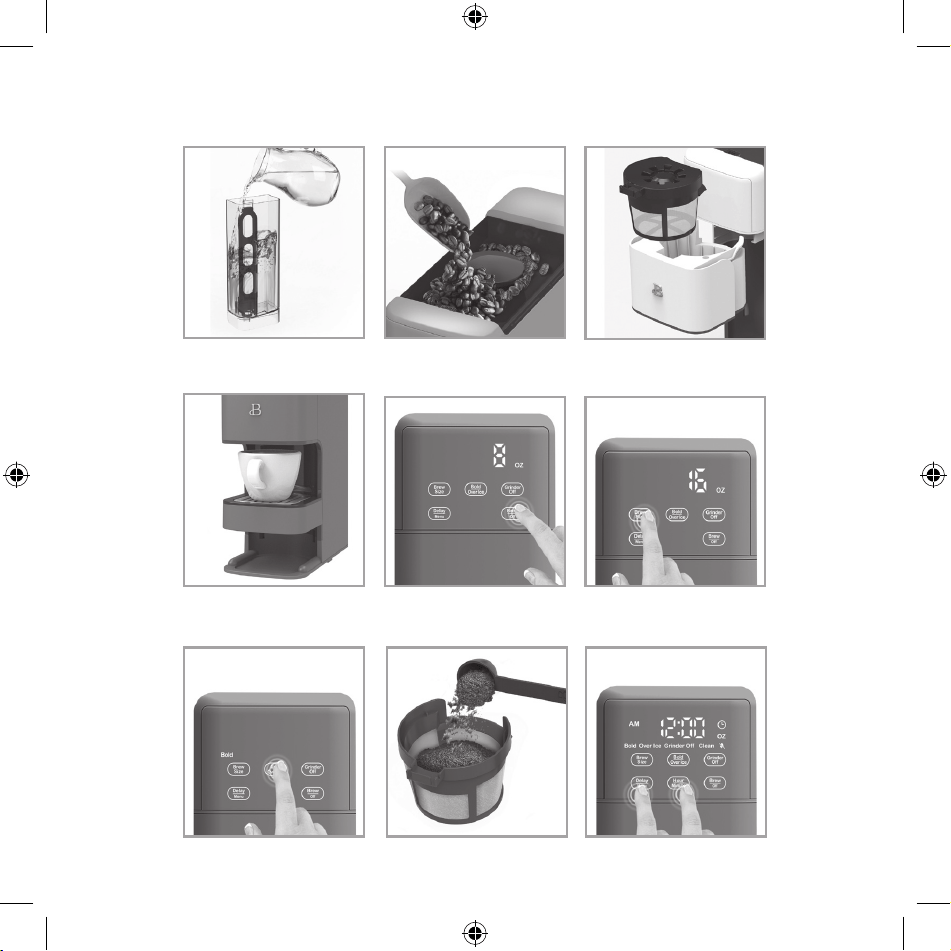
3. Lift to remove the water reservoir. Remove the lid, insert the charcoal
lter into the lter holder and install into the base of the water
reservoir by pushing down. Fill with cold tap, ltered or distilled
water. (Figure 1) Replace the water reservoir and lid.
CAUTION: Never operate the Coffee Maker when the water reservoiris empty.
CAUTION: Never add water to exceed the MAX line.
NOTE: Remove the charcoal lter from the bag and soak it in cold tap
water for at least 15 minutes before using. Rinse lter with fresh cold
tap water for at least 10 seconds, and allow it to drain completely.
NOTE: it is recommend to change the charcoal water lter every 60 days or
after lling the water tank 60 times. It should be change more frequently
if you live in an area with hard water.
4. Lift to remove the hopper lid. Add whole coffee beans to the bean hopper.
(Figure 2) Replace the lid. Max capacity is up to 180g (depending on type
and size of coffee bean being used).
5. Open the brew chamber drawer by pulling outwards. Place the clean gold
tone lter basket into the brew chamber drawer. Push the gold tone lter
basket cover down (Figure 3). Close the brew chamber drawer.
Operation
CAUTION: If the brew chamber drawer is not securely locked, 3 audible tones
will sound and PUSH DOOR will appear on the display. Once the brew chamber
drawer is securely locked, the Coffee Maker will return to the home screen.
Set the Current Time
1. Plug the power cord into a 120V AC electrical outlet.
2. When the Coffee Maker is plugged in, 1 audible tone will sound.
The control panel will illuminate. 12:00 AM will begin to ash. BREW/OFF
will appear on the display.
19332_19333_19334_19335_19432_19433_BTFL WMUS_PerfectGrind Single Serve CM_IM_V21_R9.indd 1819332_19333_19334_19335_19432_19433_BTFL WMUS_PerfectGrind Single Serve CM_IM_V21_R9.indd 18 2023-11-02 9:51 AM2023-11-02 9:51 AM

19
3. Press BREW/OFF. The DELAY/MENU and HOUR/MINUTE buttons will illuminate.
4. Press HOUR/ MINUTE to adjust the HOURS. Hold the button down to scroll
through the digits quickly. Press DELAY/MENU to conrm the set hour.
(Figure 9)
NOTE: Pay attention to AM and PM setting.
5. Press HOUR/ MINUTE to adjust MINUTES. Hold the button down to scroll
through digits quickly. Press DELAY/MENU to conrm the set minutes.
(Figure 9)
NOTE: If DELAY/MENU is not pressed to conrm, the Coffee Maker will
remain in current mode. After 5 minutes, the Coffee Maker will turn OFF.
NOTE: To adjust the time after brewing, press and hold DELAY/MENU for
1.5s. Press the HOUR/MINUTE button when it appears on the toggling
display. HOURS will begin to ash. Follow the instructions previously
described to set and conrm both HOURS and MINUTES.
Brew Set-Up Using Whole Bean Coffee
1. Ensure the water reservoir is lled to a sufcient level.
CAUTION: Never operate the Coffee Maker when the water reservoir is empty
CAUTION: Never add water to exceed the MAX line.
2. Ensure the coffee bean hopper is full of coffee beans. Max capacity
is up to 180g (depending on type and size of coffee bean being used).
CAUTION: if the Grinder Off icon ashes three times and the unit returns
to standby mode, this indicates that the grinder protective cover is not
locked in the correct position. Make sure to remove the protective cover
and then reposition it correctly into place.
3. Remove the brew chamber drawer by pulling it outwards and ensure the
gold tone lter basket is free of ground coffee or any residue.
IMPORTANT: If there is any remaining ground coffee from the last brew,
empty the gold tone lter basket and wash, rinse and dry. Replace the
gold tone lter basket, push the top cover down, and reinsert the brew
chamber drawer.
NOTE: Do not use a paper lter with this unit. There are no compatible
size paper lters available. The gold tone lter included with this
unit is custom designed for optimal performance and best brew quality and
taste with this coffee maker.
19332_19333_19334_19335_19432_19433_BTFL WMUS_PerfectGrind Single Serve CM_IM_V21_R9.indd 1919332_19333_19334_19335_19432_19433_BTFL WMUS_PerfectGrind Single Serve CM_IM_V21_R9.indd 19 2023-11-02 9:51 AM2023-11-02 9:51 AM

20
CAUTION: Failing to remove pre-existing coffee grounds can result in
the Coffee Maker overowing.
4. Place an empty cup or mug onto the drip tray. Remove the drip tray to
accommodate up to a 7” tumbler. (Figure 4).
5. Press BREW SIZE until the desired size appears on the display. Choose
from 6 sizes: 6 oz., 8 oz., 10 oz., 12 oz., 14 oz., or 16 oz. (Figure 6)
6. Adjust BREW STRENGTH if desired. Press BOLD/OVER ICE for a more robust
brew or for brewing iced beverages. BOLD or OVER ICE brew strength is
displayed. (Figure 7)
7. Press BREW/OFF to grind and brew coffee with the selected settings
shown on the display (Figure 5). The Coffee Maker will display a
circling animation during the brew cycle.
CAUTION: The display will show FILL H2o if there is no water in the
water tank. Add water up to the MAX line, and press Brew/Off to
continue brewing within 5 minutes.
IMPORTANT: If the brew chamber drawer has not been removed since the
last brew, 3 audible tones will sound and FULL, OPEN, DOOR will appear
on the display. Once the brew chamber drawer has been removed, the gold
tone lter basket emptied, and brew chamber drawer has been replaced,
the Coffee Maker will return to the standby status.
WARNING: To avoid the risk of injury, do not open the brew chamber
drawer while coffee is brewing. Scalding may occur if the drawer is
opened during the BREW cycle.
WARNING: It is NOT recommended to grind and brew more than 4 times
consecutively. Wait at least 15 minutes before grinding and brewing
again. This will allow the motor to properly cool down so that it will
not overheat.
Brew Set-Up Using Ground Coffee
1. Ensure the water reservoir is lled to a sufcient level.
CAUTION: Never operate the Coffee Maker when the water reservoir is
empty
CAUTION: Never add water to exceed the MAX line.
2. Open the brew chamber drawer by pulling it outwards and ensure the gold
tone lter basket is free of ground coffee or any residue.
19332_19333_19334_19335_19432_19433_BTFL WMUS_PerfectGrind Single Serve CM_IM_V21_R9.indd 2019332_19333_19334_19335_19432_19433_BTFL WMUS_PerfectGrind Single Serve CM_IM_V21_R9.indd 20 2023-11-02 9:51 AM2023-11-02 9:51 AM

21
NOTE: If there is any remaining ground coffee from the last brew, empty
the gold tone lter basket and wash, rinse and dry.
CAUTION: Failing to remove pre-existing coffee grounds can result in the
Coffee Maker overowing.
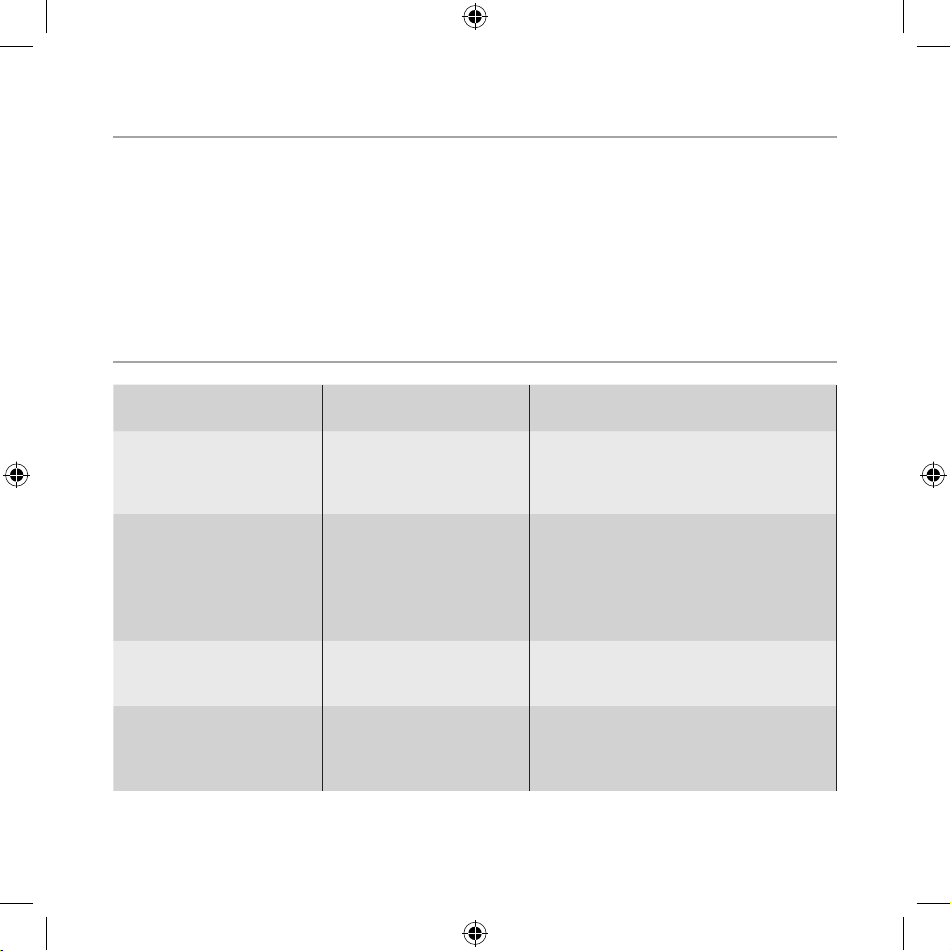
3. Add the amount of coffee to the gold tone lter basket based on the
desired cup size as indicated in the chart. NOTE: Do not add more than
40g of coffee.
NOTE: Do not use a paper lter with this unit. There are no compatible
size paper lters available. The gold tone lter included with this unit
is custom designed for optimal performance and best brew quality and
taste with this coffee maker.
4. Fold the gold tone lter basket cover down, place it into the brew
chamber drawer and re-insert it into the Coffee Maker.
5. Place an empty cup or mug onto the drip tray. Remove the drip tray to
accommodate up to a 7” tumbler (Figure 4).
6. Press GRINDER OFF to turn off the grinder. GRINDER OFF is displayed.
7. Press BREW SIZE until the desired size appears on the display. Choose
from 6 sizes: 6 oz., 8 oz., 10 oz., 12 oz., 14 oz., or 16 oz. (Figure 6)
8. Adjust BREW STRENGTH if desired. Press BOLD/OVER ICE for brewing iced
beverages. OVER ICE brew strength is displayed. (Figure 7)
9. Press BREW/OFF to brew coffee with the selected settings shown on the
display (Figure 5). The Coffee Maker will display a circling animation
during the brew cycle.
IMPORTANT: If the brew chamber drawer has not been removed since the
last brew, 3 audible tones will sound and FULL, OPEN, DOOR will appear
on the display. Once the brew chamber drawer has been removed, the gold
tone lter basket emptied, and brew chamber drawer has been replaced,
the Coffee Maker will return to the standby status.
WARNING: To avoid the risk of injury, do not open the brew chamber
drawer while coffee is brewing. Scalding may occur if the drawer is
opened during the BREW cycle.
19332_19333_19334_19335_19432_19433_BTFL WMUS_PerfectGrind Single Serve CM_IM_V21_R9.indd 2119332_19333_19334_19335_19432_19433_BTFL WMUS_PerfectGrind Single Serve CM_IM_V21_R9.indd 21 2023-11-02 9:51 AM2023-11-02 9:51 AM
22
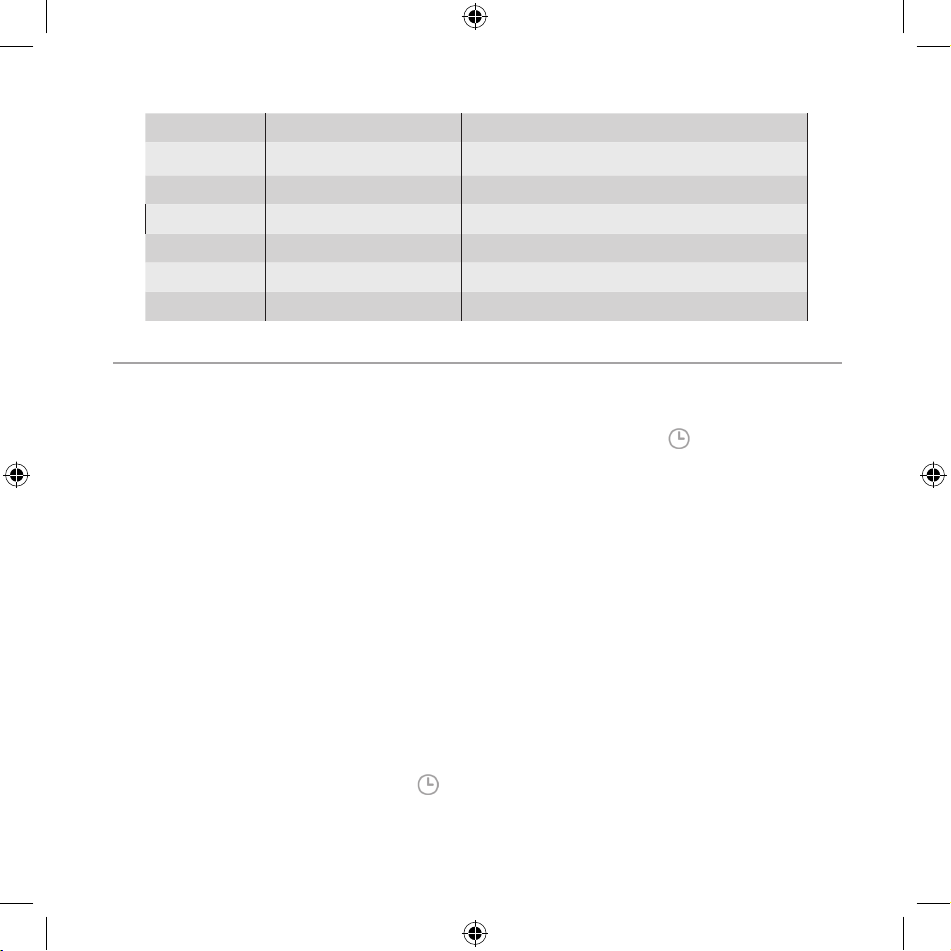
BREW SIZE NUMBER OF SCOOPS GRAMS OF GROUND COFFEE
6oz 2 10 g
8oz 2.5 12.5 g
10oz 3.5 17.5 g
12oz 4 20 g
14oz 4.5 22.5 g
16oz 5.5 2 7.5 g
Grind & Brew Coffee Later
1. The Coffee Maker can be programmed to begin grinding & brewing up to 24
hours in the future. Make sure the Coffee Maker is set up to brew coffee.
2. Press DELAY/MENU to begin the process. The FUTURE BREW TIME will appear
on the display with ashing hours. The DELAY Indicator will appear
ashing.
3. Press HOUR/ MINUTE to adjust the HOURS. Hold the button down to scroll
through the digits quickly. Press DELAY/MENU to conrm the set hour.
(Figure 9)
NOTE: Pay attention to AM and PM setting.
4. Press HOUR/ MINUTE to adjust MINUTES. Hold the button down to scroll
through digits quickly. Press DELAY/MENU to conrm the desired FUTURE
BREW TIME.
5. The BREW SIZE, BOLD/OVER ICE and GRINDER OFF buttons will illuminate.
6. Press BREW SIZE until the desired size appears on the display.
7. Adjust BREW STRENGTH if desired. Press BOLD/OVER ICE for a more robust
brew or for brewing iced beverages. BOLD or OVER ICE brew strength is
displayed.
8. If using ground coffee is desired instead of whole beans, press GRINDER
OFF to turn off the grinder. GRINDER OFF is displayed.
9. With the desired settings selected, press DELAY/MENU to conrm the
program. The DELAY Indicator will appear solid on the display along
with current time.
19332_19333_19334_19335_19432_19433_BTFL WMUS_PerfectGrind Single Serve CM_IM_V21_R9.indd 2219332_19333_19334_19335_19432_19433_BTFL WMUS_PerfectGrind Single Serve CM_IM_V21_R9.indd 22 2023-11-02 9:51 AM2023-11-02 9:51 AM
23
Figure 1
Figure 5
Figure 2
Figure 6
Figure 3
Figure 7
Figure 4
Figure 8 Figure 9
19332_19333_19334_19335_19432_19433_BTFL WMUS_PerfectGrind Single Serve CM_IM_V21_R9.indd 2319332_19333_19334_19335_19432_19433_BTFL WMUS_PerfectGrind Single Serve CM_IM_V21_R9.indd 23 2023-11-02 9:51 AM2023-11-02 9:51 AM

24
NOTE: If DELAY/MENU is not pressed to conrm, the Coffee Maker will rest
in this state. After 5 minutes, the Coffee Maker will turn OFF. The
Coffee Maker will NOT be ready to brew in the future.
IMPORTANT: If the brew chamber drawer has not been removed since the
last brew, 3 audible tones will sound and FULL, OPEN, DOOR will appear
on the display. Once the brew chamber drawer has been removed, the gold
tone lter basket emptied, and brew chamber drawer has been replaced,
the Coffee Maker will return to the standby status.
10. While the program set, the user can view the FUTURE BREW TIME and future
brew settings. The program can also be cancelled if desired by pressing
and holding DELAY/MENU for 1.5 seconds.
NOTE: While the program is set, the Coffee Maker is unable to brew
coffee until the program has been completed or cancelled.
11. Press DELAY/MENU to view the FUTURE BREW TIME. Press DELAY/MENU again
to view the future brew settings.
12. When the pre-programmed time is reached, the Coffee Maker will grind &
brew coffee.
NOTE: When using the Delay Brew function, always make sure to empty the
lter basket after your last brew. If the brew basket is not emptied,
Full Open Door message will be displayed on the screen.
Beautiful Hints For Great Tasting Coffee
• A clean Coffee Maker is essential for brewing great tasting coffee.
Regular cleaning is suggested monthly or whenever brewing becomes
sluggish or the avor is off. Please follow detailed procedures
described in the Brew Clean: Decalcication and Grinder Auto Clean
sections of this instruction manual.
• Always use fresh, ltered or distilled cold water in your Coffee Maker.
• Press BOLD/OVER ICE for a more robust brew. Brewing iced coffee? Our
Exact Xtract™ technology promises no watered down iced coffee.
• Reheating coffee is not recommended. Coffee is at its peak avor
immediately after brewing.
• Small oil droplets on the surface of brewed, black coffee is due to
the extraction of oil from the coffee grounds. Oiliness may occur more
frequently if heavily roasted coffees are used. Overextraction may also
cause oiliness, indicating a need to clean your Coffee Maker.
19332_19333_19334_19335_19432_19433_BTFL WMUS_PerfectGrind Single Serve CM_IM_V21_R9.indd 2419332_19333_19334_19335_19432_19433_BTFL WMUS_PerfectGrind Single Serve CM_IM_V21_R9.indd 24 2023-11-02 9:51 AM2023-11-02 9:51 AM
25
User Maintenance Instructions
This appliance requires little maintenance. It contains no user-serviceable
parts. Any servicing requiring disassembly other than cleaning must be
performed by a qualied appliance repair technician.
Care & Cleaning Instructions
1. Always make sure the Coffee Maker is unplugged and cool before
attempting to clean.
2. Thoroughly clean the removable brew chamber drawer, gold tone lter
basket and coffee scoop in hot, sudsy water. Rinse and dry. Replace
disassembled parts. Wipe the coffee bean lid and hopper with a clean,
dry paper towel.
NOTE: The gold tone lter basket is top-rack dishwasher safe. The coffee
scoop should be placed in the dishwasher alongside the cutlery.
3. Wipe the Coffee Maker exterior with a damp cloth to remove supercial
stains. For stubborn stains, use a nylon or plastic pad with a non-
abrasive cleanser.
CAUTION: Do not use metal scouring pads or abrasive cleansers on any
parts or surfaces of the Coffee Maker.
4. Dry and replace disassembled parts. Insert the clean gold tone lter
basket into the brew chamber drawer. Push the gold tone lter basket
cover down. (Figure 3)
5. Close the brew chamber drawer.
Brew Clean: Decalcification
Minerals in water can detract from the avor of the coffee and possibly lengthen
brew time. To assure optimal avor and performance, it is recommended that the
CLEAN cycle be performed when the CLEAN indicator illuminates.
IMPORTANT:
• CLEAN will ash on the display.
• Before running the CLEAN cycle, remove the
charcoal lter and lter holder from the water
reservoir. Set aside for later use.
• Always remove the gold tone lter basket before
running the CLEAN cycle.
19332_19333_19334_19335_19432_19433_BTFL WMUS_PerfectGrind Single Serve CM_IM_V21_R9.indd 2519332_19333_19334_19335_19432_19433_BTFL WMUS_PerfectGrind Single Serve CM_IM_V21_R9.indd 25 2023-11-02 9:51 AM2023-11-02 9:51 AM

26
1. Remove the drip tray and insert a large container with a capacity of at
least 64 oz. underneath the brew chamber drawer.
2. Press and hold DELAY/MENU for 1.5 seconds. Press the BREW SIZE button
when it appears on the toggling display to enter CLEAN mode.
3. When the BREW SIZE button is ashing and the message FILL,
CLn is displayed, ll the reservoir with the cleaning solution:
• 2 parts water
• 1 part vinegar
4. With the reservoir lled with cleaning solution, press BREW SIZE
to begin the CLEAN cycle.
IMPORTANT! Press and Hold BREW/OFF for 1.5 seconds at any time to turn
the Coffee Maker OFF
5. Once the Coffee Maker has cycled all of the cleaning solution,
carefully empty the container into the sink.
CAUTION: The cleaning solution will be hot! Use extreme care when
handling and emptying the container.
6. When the BREW SIZE button is ashing and the message FILL,
H2O is displayed, ll the reservoir with clean, cold water.
7. With the reservoir lled with water, press BREW SIZE to continue
the CLEAN cycle.
IMPORTANT! Press BREW/OFF at any time to turn the Coffee Maker OFF.
8. Once the Coffee Maker has cycled all of the water, carefully empty
the container into the sink.
CAUTION: The water will be hot! Use extreme care when handling and
emptying the container.
9. The CLEAN cycle is now complete. The unit will return to the home
screen and the CLEAN indicator will disappear until the next time it
is recommended to be run.
10. Dry parts thoroughly. Replace the gold tone lter basket into the brew
chamber drawer and reinstall it into the Coffee Maker.
IMPORTANT: Reinstall the charcoal lter and lter holder into the water
reservoir.
19332_19333_19334_19335_19432_19433_BTFL WMUS_PerfectGrind Single Serve CM_IM_V21_R9.indd 2619332_19333_19334_19335_19432_19433_BTFL WMUS_PerfectGrind Single Serve CM_IM_V21_R9.indd 26 2023-11-02 9:51 AM2023-11-02 9:51 AM

27
Grinder Door and Channel Cleaning
IMPORTANT! For optimal performance it is recommended to clean the grinder door
and channel every two weeks OR as needed.
1. Ensure the brew chamber drawer is installed and securely locked in the
Coffee Maker.
2. To access the internal grinder channel, press and hold GRINDER OFF for
1.5 seconds. The Coffee Maker will display a circling animation while
the door is opening.
IMPORTANT: If the brew chamber drawer is not securely locked, 3 audible
tones will sound and PUSH DOOR will appear on the display. Once the brew
chamber drawer is securely locked, the Coffee Maker will return to the
home screen.
NOTE: When the brew chamber drawer is not securely locked, the GRINDER
OFF button can't be pressed.
3. Once the door is fully open the message OPEN will be displayed. The
brew chamber drawer can now be removed to access the grinder door and
channel.
4. Use the cleaning brush to clear any residual coffee from around the
grinder door.
5. Use the cleaning brush to clear any residual coffee from the grinder
channel by sweeping outwards, towards the front of the Coffee Maker.
6. Reinstall the brew chamber drawer and ensure it is securely locked.
7. Press and hold GRINDER OFF for 1.5 seconds. The Coffee Maker will
display a circling animation when the door is opening.
IMPORTANT: If the brew chamber drawer is not securely locked, 3 audible
tones will sound and PUSH DOOR will appear on the display. Once the brew
chamber drawer is securely locked, the Coffee Maker will return to the
home screen.
Grinder Auto Clean
IMPORTANT! For optimal performance, it is recommended to clean the grinder
every week OR as needed.
IMPORTANT! The bean hopper must be completely empty of coffee beans before
running the Grinder Auto Clean cycle
19332_19333_19334_19335_19432_19433_BTFL WMUS_PerfectGrind Single Serve CM_IM_V21_R9.indd 2719332_19333_19334_19335_19432_19433_BTFL WMUS_PerfectGrind Single Serve CM_IM_V21_R9.indd 27 2023-11-02 9:51 AM2023-11-02 9:51 AM

28
1. Unplug the Coffee Maker power cord.
2. Lift to remove the bean hopper lid. Check to make sure the bean hopper
is free from coffee beans and any debris.
3. Turn the Grinder Protective Cover counterclockwise to unlock and
remove from the Coffee Maker
4. Lift up the metal handle on the Top Grinder Burr, grasping rmly,
rotate the Top Grinder Burr counterclockwise to unlock and remove
from the Coffee Maker.
5. Using the cleaning brush, clear any residual coffee and debris from
the grinder chamber.
6. Using the cleaning brush, clear any residual coffee from both top and
bottom grinding burrs.
7. Replace the Top Grinder Burr by rotating clockwise to lock in place
8. Replace the Grinder Protective cover by rotating clockwise.
IMPORTANT! Ensure the Grinder Protective Cover is fully installed.
There will be a tactile click when the cover is fully installed.
WARNING: Do not use excessive force when reinstalled the Grinder
Protective Cover.
9. Replace the lid and plug the unit in to 120V AC power.
10. Ensure the gold tone lter basket and brew chamber drawer are installed.
11. Press and hold DELAY/MENU for 1.5 seconds. Press the GRINDER OFF button
when it appears on the toggling display to enter Grinder Auto Clean
mode.
12. When the GRINDER OFF button is ashing and the message CLr is displayed,
press GRINDER OFF to run the Grinder Auto Clean cycle.
13. The grinder will run for 20 seconds to clean the bean hopper channel.
14. Remove the brew chamber drawer and empty any ground coffee from the gold
tone lter basket. Reinstall the brew chamber drawer.
IMPORTANT: If the brew chamber drawer is not securely locked, 3 audible
tones will sound and PUSH DOOR will appear on the display. Once the brew
chamber drawer is securely locked, the Coffee Maker will return to the
home screen.
19332_19333_19334_19335_19432_19433_BTFL WMUS_PerfectGrind Single Serve CM_IM_V21_R9.indd 2819332_19333_19334_19335_19432_19433_BTFL WMUS_PerfectGrind Single Serve CM_IM_V21_R9.indd 28 2023-11-02 9:51 AM2023-11-02 9:51 AM
29
ALERT MESSAGES
APPEARING ON DISPLAY
REASON SOLUTION
FULL OPEN DOOR
Drawer has not been
removed & lter
cleaned out from the
last brew cycle
Remove drawer, empty coffee
grinds from the lter basket.
Clean and replace.
FILL H2O
Unit ran out of water
during brewing
Rell reservoir with
clean cold water and press
BREW/OFF within 10 minutes.
Note: After 10 minutes of
inactivity, the coffee maker
will return to sleep mode.
PUSH DOOR
Drawer is not
inserted properly
into unit
Push drawer until fully inserted
"GRINDER OFF" light
ashing & beeping 3
times
Grinder protective
cover is not properly
inserted into place
Ensure that your grinder
protective cover is securely
locked in place
Storing Instructions
1. Never store the Coffee Maker while it is still plugged in.
2. Ensure the water reservoir is complete empty before storing.
3. Unplug the Coffee Maker and allow it to cool before storing.
4. Store the Coffee Maker fully assembled, with the gold tone lter basket
installed. Close the brew chamber drawer. Make sure the bean hopper lid
is in place.
5. Store Coffee Maker in its box or in a cool, dry place. Store Coffee
Maker in its upright position – not on its side or upside down
Perfect Grind™ FAQ’S
19332_19333_19334_19335_19432_19433_BTFL WMUS_PerfectGrind Single Serve CM_IM_V21_R9.indd 2919332_19333_19334_19335_19432_19433_BTFL WMUS_PerfectGrind Single Serve CM_IM_V21_R9.indd 29 2023-11-02 9:51 AM2023-11-02 9:51 AM

30
Troubleshooting
MY PERFECT GRIND™ COFFEE MAKER STOPPED WORKING
• Check to ensure the unit is properly plugged in
• Make sure the water reservoir is lled past the min line and
under the max line
• Make sure there are enough coffee beans in the bean hopper
NOTE: Never ll with more than 180g/6oz of coffee beans
(approximately half a standard size bag of coffee beans)
• Clean the grinder door / grinder channel – refer to page 27
of the instruction manual
• Grinder auto clean – refer to page 27 of the instruction manual
• Descale the coffee maker – refer to page 25 of the instruction manual
• Be sure to descale the unit when the clean icon appears on your screen
for optimal performance or as needed
MY PERFECT GRIND™ COFFEE MAKER NO LONGER GRINDS COFFEE BEANS / IS CLOGGED
• Make sure there are enough coffee beans in the bean hopper
Note: Never ll with more than 180g/6oz of coffee beans
(approximately half a standard size bag of coffee beans)
• Clean the grinder door / grinder channel – refer to page 27
of the instruction manual
• Grinder Auto Clean – refer to page 27 of the instruction manual
MY PERFECT GRIND™ GRINDER DOOR IS JAMMED
• Clean the grinder door / grinder channel – refer to page 27
of the instruction manual
MY COFFEE ISN’T STRONG ENOUGH / MY COFFEE TASTES TOO WEAK?
• Press BOLD/OVER ICE for a more robust brew
• Always use freshly roasted coffee beans for optimal strength & avor
• Make sure the cover of the permanent gold tone lter basket is
securely in place
• Clean the grinder door / grinder channel – refer to page 27
of the instruction manual
19332_19333_19334_19335_19432_19433_BTFL WMUS_PerfectGrind Single Serve CM_IM_V21_R9.indd 3019332_19333_19334_19335_19432_19433_BTFL WMUS_PerfectGrind Single Serve CM_IM_V21_R9.indd 30 2023-11-02 9:51 AM2023-11-02 9:51 AM

31
• Grinder Auto Clean – refer to page 27 of the instruction manual
• Descale the coffee maker – refer to page 25 of the instruction manual
MY COFFEE ISN’T HOT ENOUGH?
• Brew water through the coffee maker to preheat the unit & heat your cup.
NOTE: Turn “GRINDER OFF” when doing this step.
• Descale the coffee maker – refer to page 25 of the instruction manual
NO COFFEE CAME OUT WHILE BREWING / STOPPED BREWING MID CYCLE
• If “Fill H2O” appears on the display, re-ll reservoir with clean cold
water to the max line and press BREW/OFF within 10 minutes to continue
the brew cycle.
NOTE: Must press BREW/OFF within the rst 10 minutes after the
“Fill H2O message appears on the screen. After 10 minutes of inactivity,
the coffee maker will return to sleep mode.
• Always check to ensure there is a sufcient amount of beans in the
bean hopper or it will result in weak tasting coffee or will not brew
properly
HOW OFTEN SHOULD I CLEAN MY PERFECT GRIND™ COFFEE MAKER?
• Clean the grinder door / grinder channel and surrounding area every
2 weeks or as needed for optimal performance – refer to page 27 of
the instruction manual
• Clean the grinder (grinder auto clean function) weekly for optimal
performance & to avoid clogging the grinder – refer to page 27 of
the instruction manual
• Descale the coffee maker when the “clean” icon illuminates on your
Perfect Grind™ display – refer to page 25 of the instruction manual
for further details
HOW OFTEN DO I HAVE TO REPLACE MY CHARCOAL WATER FILTER
• Replace the charcoal lter every 60 days or every 60 water tank rells
• If you live in areas where you have hard water, it should be replaced
more frequently
• Compatible with most standard size charcoal water lters for coffee
makers
19332_19333_19334_19335_19432_19433_BTFL WMUS_PerfectGrind Single Serve CM_IM_V21_R9.indd 3119332_19333_19334_19335_19432_19433_BTFL WMUS_PerfectGrind Single Serve CM_IM_V21_R9.indd 31 2023-11-02 9:51 AM2023-11-02 9:51 AM

32
ARE ANY PARTS DISHWASHER SAFE?
• The gold tone lter basket & 2-in-1 cleaning brush measuring scoop
are dishwasher safe – refer to page 24 of the instruction manual for
further details
CAN I USE A PAPER FILTER?
• Do not use a paper lter with this unit. There are no compatible size
paper lters available. The gold tone lter included with this unit is
custom designed for optimal performance and best brew quality and taste
with this coffee maker.
Tips For Best Tasting Coffee
• Make sure your Perfect Grind™ coffee maker is clean
• It is recommended to use light or medium roasted coffee beans
• It is recommended that you use freshly roasted coffee beans to
ensure optimal avor
• Store coffee beans in a cool, air tight dark container
• Always use fresh cold water
• Reheating coffee is not recommended. Coffee is at its peak avor
immediately after brewing.
• Tips for pre-ground coffee
• It is recommended to use medium ground coffee
• Using a ne ground coffee can result in overow
• Using coarse ground coffee can result in weak tasting avor
19332_19333_19334_19335_19432_19433_BTFL WMUS_PerfectGrind Single Serve CM_IM_V21_R9.indd 3219332_19333_19334_19335_19432_19433_BTFL WMUS_PerfectGrind Single Serve CM_IM_V21_R9.indd 32 2023-11-02 9:51 AM2023-11-02 9:51 AM

Limited Two-Year Warranty
Sensio Inc. dba Made by Gather™
hereby warrants that for a period
of TWO YEARS from the date of
purchase, this product will be free
from mechanical defects in material
and workmanship, and for 90 days in
respect to non-mechanical parts. At
its sole discretion, Sensio Inc. dba
Made by Gather™ will either repair
or replace the product found to be
defective, or issue a refund on the
product during the warranty period.
The warranty is only valid for
the original retail purchaser from
the date of initial retail purchase
and is not transferable.
Keep the original sales receipt,
as proof of purchase isrequired
to obtain warranty validation.
Retail stores selling this product
do not have the right to alter,
modify, or in any way revise the
terms and conditions of the warranty.
Exclusions:
The warranty does not cover normal
wear of parts or damage resulting
from any of thefollowing: negligent
use of the product, use of improper
voltage or current, improper routine
maintenance, use contrary to the
operating instructions, disassembly,
repair, or alteration by anyone
other than qualied Sensio Inc.
dba Made by Gather™ personnel.
Also, the warranty does not cover
Acts of God such as re, oods,
hurricanes, or tornadoes.
Sensio Inc. dba Made by Gather™ shall
not be liable for any incidental or
consequential damages caused by the
breach of any express or implied
warranty. Apart from the extent
prohibited by applicable law, any
implied warranty of merchantability
or tness for a particular purpose
is limited in time to the duration
of the warranty. Some states,
provinces or jurisdictions do not
allow the exclusion or limitation
of incidental or consequential
damages, or limitations on how
long an implied warranty lasts,
and therefore, the above exclusions
or limitations may not apply to you.
The warranty covers specic legal
rights which may vary by state,
province and/or jurisdiction.
33
19332_19333_19334_19335_19432_19433_BTFL WMUS_PerfectGrind Single Serve CM_IM_V21_R9.indd 3319332_19333_19334_19335_19432_19433_BTFL WMUS_PerfectGrind Single Serve CM_IM_V21_R9.indd 33 2023-11-02 9:51 AM2023-11-02 9:51 AM

34
How To Obtain Warranty Service
You must contact Customer Service at
our toll-free number: 1-877-775-3564.
A Customer Service Representative
will attempt to resolve warranty
issues over thephone. If the
Customer Service Representative
is unable to resolve the problem,
you will be provided with a case
number and asked to return the
product to Sensio Inc. dba
Made by Gather™ Attach a tag to the
product that includes: your name,
address, daytime contact telephone
number, case number, and description
of the problem.
Also, include a copy of the original
sales receipt. Carefully package
the tagged product with the sales
receipt, and send it (with shipping
and insurance prepaid) to SENSIO
Inc.’s address. Sensio Inc.
dba Made by Gather™ shall bear
no responsibility or liability
for the returned product while
in transit to Sensio Inc.
dba Made by Gather™ Customer
Service Center.
®
19332_19333_19334_19335_19432_19433_BTFL WMUS_PerfectGrind Single Serve CM_IM_V21_R9.indd 3419332_19333_19334_19335_19432_19433_BTFL WMUS_PerfectGrind Single Serve CM_IM_V21_R9.indd 34 2023-11-02 9:51 AM2023-11-02 9:51 AM
Sección 1
Seguridad
1
19332_19333_19334_19335_19432_19433_BTFL WMUS_PerfectGrind Single Serve CM_IM_V21_R9.indd 3519332_19333_19334_19335_19432_19433_BTFL WMUS_PerfectGrind Single Serve CM_IM_V21_R9.indd 35 2023-11-02 9:51 AM2023-11-02 9:51 AM

36
MEDIDAS IMPORTANTES
DE SEGURIDAD
Al usar electrodomésticos, se deben tener en cuenta
precauciones de seguridad básicas, como las siguientes:
1. LEA TODAS LAS INSTRUCCIONES.
2. No toque supercies calientes. Use las asas o las
perillas.
3. Esta cafetera no está diseñada para que lo utilicen
personas (incluidos niños) con capacidades físicas,
sensoriales o mentales limitadas, ni con falta de
experiencia o conocimiento, a menos que hayan recibido
instrucciones o estén bajo supervisión en el uso del
aparato por parte de una persona responsable de su
seguridad.
4. Es necesaria una estrecha supervisión cuando los niños
utilizan un aparato o si este se utiliza cerca de ellos.
5. Coloque el aparato en una mesa o supercie plana.
6. Para minimizar el riesgo de que se produzcan daños
materiales, no coloque nunca la cafetera debajo de
armarios. Asegúrese de que haya una separación vertical
aceptable de varios pies de distancia entre la cafetera
y muebles o armarios.
7. No utilice su aparato en un armario con aparatos. Si lo
guarda en un armario con aparatos, siempre desconéctelo
del tomacorriente.
19332_19333_19334_19335_19432_19433_BTFL WMUS_PerfectGrind Single Serve CM_IM_V21_R9.indd 3619332_19333_19334_19335_19432_19433_BTFL WMUS_PerfectGrind Single Serve CM_IM_V21_R9.indd 36 2023-11-02 9:51 AM2023-11-02 9:51 AM

37
8. Para reducir el riesgo de incendio, no coloque la
unidad sobre o cerca de ninguna parte de un aparato de
calefacción o de cocinar. No coloque el aparato sobre
o cerca de un hornillo eléctrico o a gas, o en un horno
caliente.
9. Para reducir el riesgo de incendio, no ponga nada
directamente encima de la supercie del aparato cuando
esté en funcionamiento.
10. No utilice en exteriores.
11. Para reducir el riesgo de descarga eléctrica, no lo
coloque sobre un fregadero.
12. Para evitar un incendio o una descarga eléctrica, no
sumerja el cable, los enchufes ni el aparato en agua u
otros líquidos.
13. No utilice un aparato con un cable o enchufe dañados,
después de una avería, de una caída o si se dañó de
cualquier manera. Póngase en contacto con Servicio de
Atención al Cliente.
NOTA: NO INTENTE REPARAR EL APARATO POR SU CUENTA.
ESTO ANULARÁ LA GARANTÍA.
14. El uso de accesorios no recomendados por el fabricante
del aparato puede ocasionar incendios, descargas
eléctricas o lesiones.
15. Nunca mueva el aparato tirando del cable. No deje que el
cable cuelgue sobre el borde de una mesa o mostrador,
ni que toque las supercies calientes.
19332_19333_19334_19335_19432_19433_BTFL WMUS_PerfectGrind Single Serve CM_IM_V21_R9.indd 3719332_19333_19334_19335_19432_19433_BTFL WMUS_PerfectGrind Single Serve CM_IM_V21_R9.indd 37 2023-11-02 9:51 AM2023-11-02 9:51 AM

38
16. Llene siempre el depósito de agua primero y luego
enchufe el cable en el tomacorriente.
17. No use nunca la cafetera sin agua en el depósito de
agua.
18. Desenchufe la unidad del tomacorriente cuando no
lo utilice y antes de limpiarlo. Deje que la unidad
se enfríe antes de poner o quitar piezas y antes de
limpiarla.
19. Para interrumpir el ciclo de preparación de café en
cualquier momento, presione BREW/OFF. A menos que la
cafetera no funcione correctamente, no quite el enchufe
del tomacorriente de pared.
20. Para desconectar, presione BREW/OFF, luego desconecte
el cable de alimentación del tomacorriente.
21. Desenchufe el cable de alimentación del tomacorriente
cuando el aparato no esté en uso o se deje sin
supervisión.
22. No utilice este aparato para otro uso que no sea el
indicado.
23. Evite el contacto con piezas en movimiento.
24. Use el molino de café para moler solo granos de café
tostado. Moler otras sustancias, como nueces, especies
u otros granos no tostados podrían desalar la cuchilla
y bajar la calidad del molido o causar lesiones.
ADVERTENCIA: Para evitar el riesgo de lesión, no abra
la cámara de preparación mientras está preparando café.
19332_19333_19334_19335_19432_19433_BTFL WMUS_PerfectGrind Single Serve CM_IM_V21_R9.indd 3819332_19333_19334_19335_19432_19433_BTFL WMUS_PerfectGrind Single Serve CM_IM_V21_R9.indd 38 2023-11-02 9:51 AM2023-11-02 9:51 AM

39
Pueden producirse quemaduras si se abre la tapa durante
el ciclo de preparación.
25. Verique si la tolva de granos de café tiene objetos
extraños antes de usarla o limpiarla.
GUARDE ESTAS
INSTRUCCIONES
SOLO PARA USO
DOMÉSTICO
MEDIDAS DE SEGURIDAD
IMPORTANTES
ADICIONALES
ADVERTENCIA: Esta cafetera genera calor y vapor durante
el uso. Se deben tomar las precauciones adecuadas para
prevenir el riesgo de quemaduras, incendios u otras
lesiones o daños.
1. Todos los usuarios de esta cafetera deben leer y
comprender el manual de instrucciones antes de
utilizarla o limpiarla.
19332_19333_19334_19335_19432_19433_BTFL WMUS_PerfectGrind Single Serve CM_IM_V21_R9.indd 3919332_19333_19334_19335_19432_19433_BTFL WMUS_PerfectGrind Single Serve CM_IM_V21_R9.indd 39 2023-11-02 9:51 AM2023-11-02 9:51 AM

40
2. El cable de esta cafetera solo debe enchufarse en un
tomacorriente polarizado de 120 V CA.
3. ¡Use solo agua en esta cafetera! No añada otros
líquidos o alimentos en la cafetera. No mezcle ni
agregue nada al agua que añada a la cafetera, excepto
como se indica en las instrucciones de limpieza para
preparación: La sección de descalcicación de este
manual de instrucciones para descalcicar la cafetera.
4. NO intente mover una cafetera que contenga líquidos
calientes. Deje que la cafetera se enfríe completamente
antes de moverla.
5. Mantenga la cafetera a al menos 4 pulgadas de las
paredes u otros objetos cuando está en funcionamiento.
No coloque objetos encima de la cafetera mientras
está en funcionamiento. Coloque la cafetera sobre una
supercie resistente al calor.
6. Si esta cafetera comienza a fallar durante el uso,
presione BREW/OFF y desenchufe de inmediato el cable.
No use ni intente reparar una cafetera averiada. Llame
a Servicio al cliente.
7. Si esta cafetera cae o por accidente se sumerge en agua
u otro líquido, desenchúfela inmediatamente. ¡No meta
la mano en el agua! No utilice esta cafetera después de
que se haya caído o sumergido en agua.
PRECAUCIÓN: Espere 15 minutos a que la cafetera se
enfríe lo suciente antes de agregar agua al depósito.
19332_19333_19334_19335_19432_19433_BTFL WMUS_PerfectGrind Single Serve CM_IM_V21_R9.indd 4019332_19333_19334_19335_19432_19433_BTFL WMUS_PerfectGrind Single Serve CM_IM_V21_R9.indd 40 2023-11-02 9:51 AM2023-11-02 9:51 AM

41
8. Utilice siempre agua fresca y fría en su cafetera. El
agua caliente u otros líquidos, excepto como se indique
en la sección de limpieza, pueden dañar la cafetera.
NOTAS SOBRE EL ENCHUFE
Este aparato posee un enchufe polarizado (una clavija es
más ancha que la otra). Para reducir el riesgo de descarga
eléctrica, este enchufe encajará en un tomacorriente
polarizado de una sola manera. Si el enchufe no entra
completamente en el tomacorriente, gire el enchufe. Si
aun así no encaja, contacte a un técnico electricista
calicado. No modique el enchufe de ninguna manera.
NOTAS SOBRE EL CABLE
a) Se debe brindar un cable de alimentación corto (o un
cable de alimentación desconectable) para reducir los
riesgos de enredarse o tropezarse con un cable largo.
b) Hay disponibles cables eléctricos desconectables
más largos o cables de extensión, y estos se pueden
utilizar si se tiene cuidado al usarlos.
c) Si se utiliza un cable eléctrico desconectable largo o
un cable de extensión:
1) La clasicación eléctrica marcada en el cable de
alimentación desconectable o cable de extensión debe
ser al menos igual a la clasicación eléctrica del
aparato.
2) Si el aparato es del tipo con conexión a tierra, el
cable de extensión deberá ser un cable de 3 hilos con
conexión a tierra; y
19332_19333_19334_19335_19432_19433_BTFL WMUS_PerfectGrind Single Serve CM_IM_V21_R9.indd 4119332_19333_19334_19335_19432_19433_BTFL WMUS_PerfectGrind Single Serve CM_IM_V21_R9.indd 41 2023-11-02 9:51 AM2023-11-02 9:51 AM

42
3) El cable más largo deberá colocarse de manera que
no cuelgue de un mostrador o mesa de donde los niños
pudieran jalarlo o tropezar con él.
ADVERTENCIA SOBRE EL ACABADO
PRECAUCIÓN: Para evitar que el acabado del mostrador o
de la mesa u otros muebles se dañe, coloque posavasos o
manteles individuales que NO SEAN DE PLÁSTICO entre el
electrodoméstico y la supercie del mostrador o de la mesa.
No hacerlo puede provocar el oscurecimiento del acabado,
provocar desperfectos permanentes o causar la aparición de
manchas.
ALIMENTACIÓN ELÉCTRICA
Si el circuito eléctrico está sobrecargado con otros
aparatos, este aparato podría no funcionar correctamente.
Debe utilizarse en un circuito eléctrico diferente al de
otros electrodomésticos.
19332_19333_19334_19335_19432_19433_BTFL WMUS_PerfectGrind Single Serve CM_IM_V21_R9.indd 4219332_19333_19334_19335_19432_19433_BTFL WMUS_PerfectGrind Single Serve CM_IM_V21_R9.indd 42 2023-11-02 9:51 AM2023-11-02 9:51 AM
Sección 2
Instrucciones
2
19332_19333_19334_19335_19432_19433_BTFL WMUS_PerfectGrind Single Serve CM_IM_V21_R9.indd 4319332_19333_19334_19335_19432_19433_BTFL WMUS_PerfectGrind Single Serve CM_IM_V21_R9.indd 43 2023-11-02 9:51 AM2023-11-02 9:51 AM
44
Conozca su Cafetera individual Perfect Grind
TM
El producto puede diferir ligeramente del que aparece en las ilustraciones
1. Tapa de tolva de granos de café
2. Tolva de granos de café
de 180 g /7 oz.
3. Molino fresador superior
4. Cubierta protectora del molino
5. Puerta del molino
(no se muestra)
6. Tapa del depósito de agua
7. Depósito de agua
de 64 oz.
8. Filtro de carbón con
portaltros
9. Panel de control
de pantalla de
activación táctil
10. Compartimento
de preparación
desmontable
11. Canasta de ltro tono
dorado permanente
con cubierta
12. Bandeja de goteo
desmontable con cubierta
13. Cuchara medidora y
cepillo de limpieza 2 en 1
14. Enchufe polarizado (no se muestra)
15. Patas antideslizantes (no se muestran)
13
7
6
8
4
1
3
2
9
11
10
12
19332_19333_19334_19335_19432_19433_BTFL WMUS_PerfectGrind Single Serve CM_IM_V21_R9.indd 4419332_19333_19334_19335_19432_19433_BTFL WMUS_PerfectGrind Single Serve CM_IM_V21_R9.indd 44 2023-11-02 9:51 AM2023-11-02 9:51 AM

45
Panel de control de pantalla de activación táctil
Una pantalla que solo aparece cuando la necesita
1. Reloj digital LED de 24 horas
con indicador A.M./P.M.
2. TAMAÑO DE LA PREPARACIÓN
3. FUERTE/SOBRE HIELO
4. MOLINO APAGADO
5. DEMORA/MENÚ
6. HORA/MINUTO
7. PREPARAR/APAGAR
8. Luz indicadora de FUERTE
9. Luz indicadora de SOBRE HIELO
10. Luz indicadora de MOLINO APAGADO
11. Luz indicadora de LIMPIEZA
12. Luz indicadora de SILENCIADO
13. Luz indicadora de preparación
DEMORADA
14. Luz indicadora de OZ
1
2
8
4
12
14
10
11
3
9
6
5 7
13
19332_19333_19334_19335_19432_19433_BTFL WMUS_PerfectGrind Single Serve CM_IM_V21_R9.indd 4519332_19333_19334_19335_19432_19433_BTFL WMUS_PerfectGrind Single Serve CM_IM_V21_R9.indd 45 2023-11-02 9:51 AM2023-11-02 9:51 AM
46
• Presione BREW SIZE hasta que aparezca el tamaño deseado en la pantalla.
• Elija entre 6 tamaños: 6 oz., 8 oz., 10 oz., 12 oz., 14 oz. o 16 oz.
• Para un café más intenso, presione BOLD/OVER ICE para aumentar la intensidad
de la preparación a FUERTE.
• Para bebidas con hielo, presiones BOLD/OVER ICE de nuevo para cambiar al
ajuste SOBRE HIELO.
• La intensidad de preparación activa BOLD o OVER ICE aparece en la pantalla.
• Al utilizar café premolido, presione GRINDER OFF. La luz indicadora
GRINDER OFF se encenderá.
• Presione DELAY/MENU para ingresar al modo DEMORA.
• Presione DELAY/MENU para conrmar las HORAS y MINUTOS cuando se muestre el
TIEMPO actual o futuro.
• Cuando prepare café a futuro, presione DELAY/MENU. El indicador DELAY
se encenderá
19332_19333_19334_19335_19432_19433_BTFL WMUS_PerfectGrind Single Serve CM_IM_V21_R9.indd 4619332_19333_19334_19335_19432_19433_BTFL WMUS_PerfectGrind Single Serve CM_IM_V21_R9.indd 46 2023-11-02 9:51 AM2023-11-02 9:51 AM
47
• Presione el botón HOUR/MINUTE para ajustar HORAS y MINUTOS en los modos de
ajuste de tiempo
• Mantenga presionado HOUR/MINUTE para pasar rápido por los dígitos
• Presione BREW/OFF para despertar la cafetera. El panel de control se
encenderá y permanecerá activo por 5 minutos. Presione nuevamente BREW/OFF
para moler y preparar una taza de 8 oz. de café de intensidad NORMAL (ajustes
por defecto).
• Presione el botón BREW/OFF en cualquier momento para apagar la cafetera.
• Presione el botón BREW/OFF para apagar de inmediato la cafetera durante el
ciclo de PREPARACIÓN.
• Es necesario descalcicar cuando se encienda el indicador CLEAN.
• Consulte las secciones Limpieza para preparación: Descalcicación y Limpieza
automática del molino en este manual de instrucciones para obtener resultados
óptimos.
• ¡IMPORTANTE! Para un rendimiento óptimo, se recomienda limpiar el molino cada
2 o 3 semanas
Mantenga presionado GRINDER OFF + BREW/OFF hasta que la luz indicadora MUTE
aparezca en la pantalla. Las alarmas sonoras estarán APAGADAS.
Para volver a encender las alarmas audibles, mantenga presionado GRINDER OFF y
BREW/OFF hasta que la luz indicadora de silencio desaparezca de la pantalla.
19332_19333_19334_19335_19432_19433_BTFL WMUS_PerfectGrind Single Serve CM_IM_V21_R9.indd 4719332_19333_19334_19335_19432_19433_BTFL WMUS_PerfectGrind Single Serve CM_IM_V21_R9.indd 47 2023-11-02 9:51 AM2023-11-02 9:51 AM

48
Antes del primer uso
PRECAUCIÓN: Para protegerse contra las descargas eléctricas, no sumerja
la cafetera ni permita que el cable de alimentación entre en contacto
con agua u otros líquidos.
1. Retire todo el material de embalaje y las etiquetas del interior y el
exterior de la cafetera. Coloque la unidad sobre una supercie plana y
limpia.
2. Antes de preparar café, limpie bien el compartimento de preparación
desmontable, la canasta de ltro tono dorado y la cuchara para café
en agua caliente y jabón. Enjuáguelos y séquelos. Vuelva a colocar las
piezas desmontadas. Limpie la tapa de granos de café y la tolva con una
toalla de papel limpia y seca.
NOTA: La canasta de ltro tono dorado y el compartimento de preparación
son aptos para la rejilla superior del lavavajillas. La cuchara para
café debe colocarse en el lavavajillas junto a los cubiertos.
3. Levantar para quitar el depósito de agua. Quite la tapa, inserte el
ltro de carbón en el portaltros e instálelo en la base del depósito
de agua empujando hacia abajo. Llene con agua fría de grifo, ltrada o
destilada. (Figura 1) Vuelva a colocar el depósito de agua y la tapa.
PRECAUCIÓN: Nunca haga funcionar la cafetera cuando el depósito de agua
esté vacío.
PRECAUCIÓN: Nunca agregue agua por encima de la línea MAX.
NOTA: Se recomienda cambiar el ltro de agua de carbón cada 60 días o
después de llenar el tanque de agua 60 veces. Debe cambiarse con más
frecuencia si vive en una zona con agua dura.
NOTA: Retire el ltro de carbón de la bolsa y sumérjalo en agua fría del
grifo durante al menos 15 minutos antes de usarlo. Enjuague el ltro con
agua corriente fría durante al menos 10 segundos y déjelo escurrir por
completo.
4. Levante para quitar la tapa de la tolva. Agregue granos de café enteros
a la tolva de granos. (Figura 2) Vuelva a colocar la tapa. La capacidad
máxima es de hasta 180 g (según el tipo y el tamaño del grano de café
que se utilice).
5. Abra el compartimento de preparación jalándolo hacia afuera. Coloque la
canasta de ltro tono dorado en el compartimento de preparación. Empuje
la cubierta de la canasta de ltro tono dorado hacia abajo (Figura 3).
Cierre el compartimento de preparación.
19332_19333_19334_19335_19432_19433_BTFL WMUS_PerfectGrind Single Serve CM_IM_V21_R9.indd 4819332_19333_19334_19335_19432_19433_BTFL WMUS_PerfectGrind Single Serve CM_IM_V21_R9.indd 48 2023-11-02 9:51 AM2023-11-02 9:51 AM

49
Funcionamiento
IMPORTANTE: Si el compartimento de preparación no está bien jado, oirá
3 tonos y aparecerá PUSH DOOR en la pantalla. Una vez que el compartimento
de preparación esté bien jado, la cafetera volverá a la pantalla inicial.
Establecer el tiempo actual
1. Enchufe el cable de alimentación a un tomacorriente de 120 V de CA.
2. Cuando la cafetera esté enchufada, oirá 1 tono. El panel de control
se encenderá. Comenzará a parpadear 12 A.M. Aparecerá BREW/OFF en la
pantalla.
3. Presione BREW/OFF. Se encenderán los botones DELAY/MENU y HOUR/MINUTE.
4. Presione HOUR/MINUTE para ajustar las HORAS. Mantenga presionado el botón
para pasar rápido por los dígitos. Presione DELAY/MENU para conrmar la
hora establecida. (Figura 9)
NOTA: Preste atención a la conguración de A.M. y P.M.
5. Presione HOUR/MINUTE para ajustar los MINUTOS. Mantenga presionado
el botón para pasar rápido por los dígitos. Presione DELAY/MENU para
conrmar los minutos establecidos. (Figura 9)
NOTA: Si no se presiona DELAY/MENU para conrmar, la cafetera permanecerá
en el modo actual. Pasados 5 minutos, la cafetera se APAGARÁ.
NOTA: Para ajustar el tiempo después de la preparación, mantenga
presionado DELAY/MENU por 1.5 segundos. Presione el botón HOUR/MINUTE
cuando aparece en la pantalla de cambio. Comenzarán a parpadear las
HORAS. Siga las instrucciones anteriores para establecer y conrmar
las HORAS y los MINUTOS.
Configuración de preparación con café en granos
1. Asegúrese de que el depósito de agua esté lleno hasta un nivel suciente.
PRECAUCIÓN: Nunca haga funcionar la cafetera cuando el depósito de agua
esté vacío.
PRECAUCIÓN: Nunca agregue agua por encima de la línea MAX.
2. Asegúrese de que la tolva de café en grano esté llena de granos de café.
La capacidad máxima es de hasta 180 g (según el tipo y el tamaño del
grano de café que se utilice).
19332_19333_19334_19335_19432_19433_BTFL WMUS_PerfectGrind Single Serve CM_IM_V21_R9.indd 4919332_19333_19334_19335_19432_19433_BTFL WMUS_PerfectGrind Single Serve CM_IM_V21_R9.indd 49 2023-11-02 9:51 AM2023-11-02 9:51 AM

50
PRECAUCIÓN: si el ícono Grinder Off parpadea tres veces y la unidad
vuelve al modo de espera, esto indica que la cubierta protectora del
molinillo no está bloqueada en la posición correcta. Asegúrese de quitar
la cubierta protectora y luego vuelva a colocarla correctamente en su
lugar.
3. Quite el compartimento de preparación jalándolo hacia afuera y
asegurándose de que la canasta de ltro tono dorado no tenga café ni
desechos.
IMPORTANTE: Si hay restos de café molido de la preparación anterior,
vacíe la canasta de ltro tono dorado, lávela, enjuáguela y séquela.
Vuelva a colocar la canasta de ltro tono dorado, presione la cubierta
superior hacia abajo y vuelva a insertar el compartimento de preparación.
NOTA: No use un ltro de papel con esta unidad. No hay ltros de papel
de tamaño compatible disponibles. El ltro de tono dorado incluido con
esta unidad está diseñado a medida para un rendimiento óptimo y la mejor
calidad y sabor de preparación con esta cafetera.
PRECAUCIÓN: No quitar el café molido ya presente puede hacer que la
cafetera se rebalse.
4. Coloque una taza vacía en la bandeja de goteo. Quite la bandeja de goteo
para que entre una taza de 7.0”. (Figura 4).
5. Presione BREW SIZE hasta que aparezca el tamaño deseado en la pantalla.
Elija entre 6 tamaños: 6 oz., 8 oz., 10 oz., 12 oz., 14 oz. o 16 oz.
(Figura 6)
6. Ajuste la INTENSIDAD DE PREPARACIÓN si lo desea. Presione BOLD/OVER ICE
para una preparación más robusta o para bebidas con hielo. BOLD o OVER
ICE aparece en la pantalla. (Figura 7)
7. Presione BREW/OFF para moler y preparar café con los ajustes
seleccionados en pantalla (Figura 5). La cafetera mostrará una animación
circular durante el ciclo de preparación.
PRECAUCIÓN: La pantalla mostrará FILL H2o si no hay agua en el tanque de
agua. Agregue agua hasta la línea MAX y presione Brew/Off para continuar
preparando en 5 minutos.
IMPORTANTE: Si el compartimento de preparación no se extrajo desde la
última preparación, oirá 3 tonos y aparecerá FULL, OPEN, DOOR en la
pantalla. Una vez que haya extraído el compartimento de preparación,
19332_19333_19334_19335_19432_19433_BTFL WMUS_PerfectGrind Single Serve CM_IM_V21_R9.indd 5019332_19333_19334_19335_19432_19433_BTFL WMUS_PerfectGrind Single Serve CM_IM_V21_R9.indd 50 2023-11-02 9:51 AM2023-11-02 9:51 AM

51
haya vaciado la canasta de ltro tono dorado y haya vuelto a colocar el
compartimento de preparación, la cafetera regresará al estado de espera.
ADVERTENCIA: Para evitar el riesgo de lesión, no abra la cámara de
preparación mientras está preparando café. Pueden producirse quemaduras
si se abre la tapa durante el ciclo de preparación.
ADVERTENCIA: NO se recomienda moler y preparar más de 4 veces
consecutivas. Espere al menos 15 minutos antes de moler y preparar
nuevamente. Esto permitirá que el motor se enfríe adecuadamente para
que no se sobrecaliente.
Configuración de preparación con café molido
1. Asegúrese de que el depósito de agua esté lleno hasta un nivel suciente.
PRECAUCIÓN: Nunca haga funcionar la cafetera cuando el depósito de agua
esté vacío.
PRECAUCIÓN: Nunca agregue agua por encima de la línea MAX.
2. Abra el compartimento de preparación jalándolo hacia afuera y
asegurándose de que la canasta de ltro tono dorado no tenga café ni
desechos.
NOTA: Si hay restos de café molido de la preparación anterior,
vacíe la canasta de ltro tono dorado, lávela, enjuáguela y séquela.
PRECAUCIÓN: No quitar el café molido ya presente puede hacer que la
cafetera se rebalse.
3. Agregue la cantidad de café canasta de ltro tono dorado en función del
tamaño de taza deseado como se indica en la tabla. NOTA: No agregue más
de 40 g de café. NOTA: No use un ltro de papel con esta unidad. No hay
ltros de papel de tamaño compatible disponibles. El ltro de tono dorado
incluido con esta unidad está diseñado a medida para un rendimiento
óptimo y la mejor calidad y sabor de preparación
4. Pliegue la cubierta de la canasta de ltro tono dorado hacia abajo,
colóquela en el compartimento de preparación y vuelva a insertar en la
cafetera.
5. Coloque una taza vacía en la bandeja de goteo. Quite la bandeja de goteo
para que entre una taza de 7” (Figura 4).
6. Presione GRINDER OFF para apagar el molino. GRINDER OFF aparece en la
pantalla.
19332_19333_19334_19335_19432_19433_BTFL WMUS_PerfectGrind Single Serve CM_IM_V21_R9.indd 5119332_19333_19334_19335_19432_19433_BTFL WMUS_PerfectGrind Single Serve CM_IM_V21_R9.indd 51 2023-11-02 9:51 AM2023-11-02 9:51 AM
52
7. Presione BREW SIZE hasta que aparezca el tamaño deseado en la pantalla.
Elija entre 6 tamaños: 6 oz., 8 oz., 10 oz., 12 oz., 14 oz. o 16 oz.
(Figura 6)
8. Ajuste la INTENSIDAD DE PREPARACIÓN si lo desea. Presione BOLD/OVER ICE
para bebidas con hielo. BOLD o OVER ICE aparece en la pantalla.
(Figura 7)
9. Presione BREW/OFF para preparar café con los ajustes seleccionados en
pantalla (Figura 5). La cafetera mostrará una animación circular durante
el ciclo de preparación.
IMPORTANTE: Si el compartimento de preparación no se extrajo desde
la última preparación, oirá 3 tonos y aparecerá FULL, OPEN, DOOR en
la pantalla. Una vez que haya extraído el compartimento de preparación,
haya vaciado la canasta de ltro tono dorado y haya vuelto a colocar el
compartimento de preparación, la cafetera regresará al estado de espera.
ADVERTENCIA: Para evitar el riesgo de lesión, no abra la cámara de
preparación mientras está preparando café. Pueden producirse quemaduras
si se abre la tapa durante el ciclo de preparación.
TAMAÑO DE LA
PREPARACIÓN
CANTIDAD DE
CUCHARADAS
GRAMOS DE CAFÉ MOLIDO
6oz 2 10 g
8oz 2.5 12.5 g
10oz 3.5 17.5 g
12oz 4 20 g
14oz 4.5 22.5 g
16oz 5.5 2 7.5 g
Moler y preparar café más tarde
1. La cafetera se puede programar para que comience a moler y preparar
hasta 24 horas más adelante. Asegúrese de que la cafetera esté
congurada para preparar café.
19332_19333_19334_19335_19432_19433_BTFL WMUS_PerfectGrind Single Serve CM_IM_V21_R9.indd 5219332_19333_19334_19335_19432_19433_BTFL WMUS_PerfectGrind Single Serve CM_IM_V21_R9.indd 52 2023-11-02 9:51 AM2023-11-02 9:51 AM
53
2. Presione DELAY/MENU para ingresar al modo DEMORA. FUTURE BREW TIME
aparecerá en la pantalla con la hora parpadeando. El indicador DELAY
parpadeará.
3. Presione HOUR/MINUTE para ajustar las HORAS. Mantenga presionado el botón
para pasar rápido por los dígitos. Presione DELAY/MENU para conrmar
la hora establecida. (Figura 9)
NOTA: Preste atención a la conguración de A.M. y P.M.
4. Presione HOUR/MINUTE para ajustar los MINUTOS. Mantenga presionado
el botón para pasar rápido por los dígitos. Presione DELAY/MENU para
conrmar el TIEMPO DE PREPARACIÓN FUTURA deseado.
5. Se encenderán los botones BREW SIZE, BOLD/OVER ICE y GRINDER OFF.
6. Presione BREW SIZE hasta que aparezca el tamaño deseado en la pantalla.
7. Ajuste la INTENSIDAD DE PREPARACIÓN si lo desea. Presione BOLD/OVER ICE
para una preparación más robusta o para bebidas con hielo. La intensidad
de preparación BOLD o OVER ICE aparece en la pantalla.
8. Si desea utilizar café molido en lugar de granos de café, presione
GRINDER OFF para apagar el molino. GRINDER OFF aparece en la pantalla.
9. Presione DELAY/MENU para conrmar el programa con los ajustes deseados
seleccionados. El indicador DELAY aparecerà jo en la pantalla junto
con el tiempo actual.
NOTA: Si no se presiona DELAY/MENU para conrmar, la cafetera permanecerá
en este estado. Pasados 5 minutos, la cafetera se APAGARÁ. La cafetera
NO estará lista para preparar café en el futuro.
IMPORTANTE: Si el compartimento de preparación no se extrajo desde la
última preparación, oirá 3 tonos y aparecerá FULL, OPEN, DOOR en la
pantalla. Una vez que haya extraído el compartimento de preparación,
haya vaciado la canasta de ltro tono dorado y haya vuelto a colocar el
compartimento de preparación, la cafetera regresará al estado de espera.
10. Mientras el programa esté establecido, el usuario puede ver los ajustes
de preparación futura y el TIEMPO DE PREPARACIÓN FUTURA. El programa
también se puede cancelar si lo desea manteniendo presionado DELAY/MENU
por 1.5 segundos.
NOTA: Mientras el programa esté establecido, la cafetera no puede
preparar café hasta que se haya completado o cancelado el programa.
19332_19333_19334_19335_19432_19433_BTFL WMUS_PerfectGrind Single Serve CM_IM_V21_R9.indd 5319332_19333_19334_19335_19432_19433_BTFL WMUS_PerfectGrind Single Serve CM_IM_V21_R9.indd 53 2023-11-02 9:51 AM2023-11-02 9:51 AM
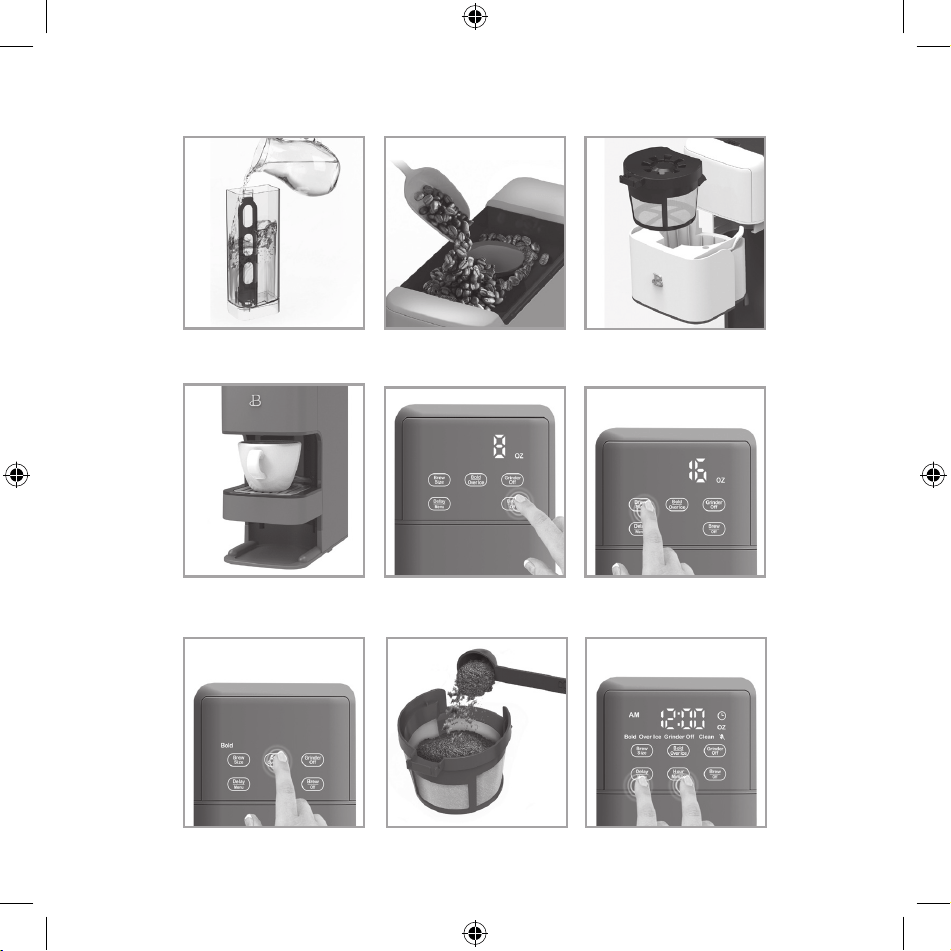
54
Figure 1
Figure 5
Figure 2
Figure 6
Figure 3
Figure 7
Figure 4
Figure 8 Figure 9
19332_19333_19334_19335_19432_19433_BTFL WMUS_PerfectGrind Single Serve CM_IM_V21_R9.indd 5419332_19333_19334_19335_19432_19433_BTFL WMUS_PerfectGrind Single Serve CM_IM_V21_R9.indd 54 2023-11-02 9:51 AM2023-11-02 9:51 AM

55
11. Presione DELAY/MENU para ver el TIEMPO DE PREPARACIÓN FUTURA. Presione
DELAY/MENU de nuevo para ver la conguración de preparación futura.
12. Cuando se llegue al tiempo preprogramado, la cafetera molerá y preparará
café.
ADVERTENCIA: Cuando utilice la función Delay Brew, asegúrese siempre
de vaciar la cesta del ltro después de la última preparación. Si
la canasta de preparación no se vacía, se mostrará el mensaje Puerta
completamente abierta en la pantalla.
Consejos de Beautiful para un café de gran sabor
• Una cafetera limpia es esencial para preparar un café de gran sabor.
Se sugiere limpiar cada mes o siempre que la preparación se vuelva
lenta o el sabor se sienta raro. Siga los procedimientos descritos en
las secciones Limpieza para preparación: Descalcicación y Limpieza
automática del molino de este manual de instrucciones.
• Utilice siempre agua fría fresca, ltrada o destilada en la cafetera.
• Presione BOLD/OVER ICE para una preparación más robusta. ¿Quiere café
con hielo? Nuestra tecnología Exact Xtract™ promete un café helado que
no quede aguado.
• No se recomienda recalentar el café. El café tiene el mejor sabor justo
después de prepararse.
• Las pequeñas gotas de aceite en la supercie del café solo preparado
se deben a la extracción del aceite del café molido. La presencia de
este aceite puede ocurrir con mayor frecuencia si se utilizan cafés muy
tostados. La extracción excesiva también puede causar exceso de aceites,
lo que indica la necesidad de limpiar su cafetera.
Instrucciones de mantenimiento para el usuario
This appliance requires little maintenance. It contains no user-serviceable
parts. Any servicing requiring disassembly other than cleaning must be
performed by a qualied appliance repair technician.
19332_19333_19334_19335_19432_19433_BTFL WMUS_PerfectGrind Single Serve CM_IM_V21_R9.indd 5519332_19333_19334_19335_19432_19433_BTFL WMUS_PerfectGrind Single Serve CM_IM_V21_R9.indd 55 2023-11-02 9:51 AM2023-11-02 9:51 AM
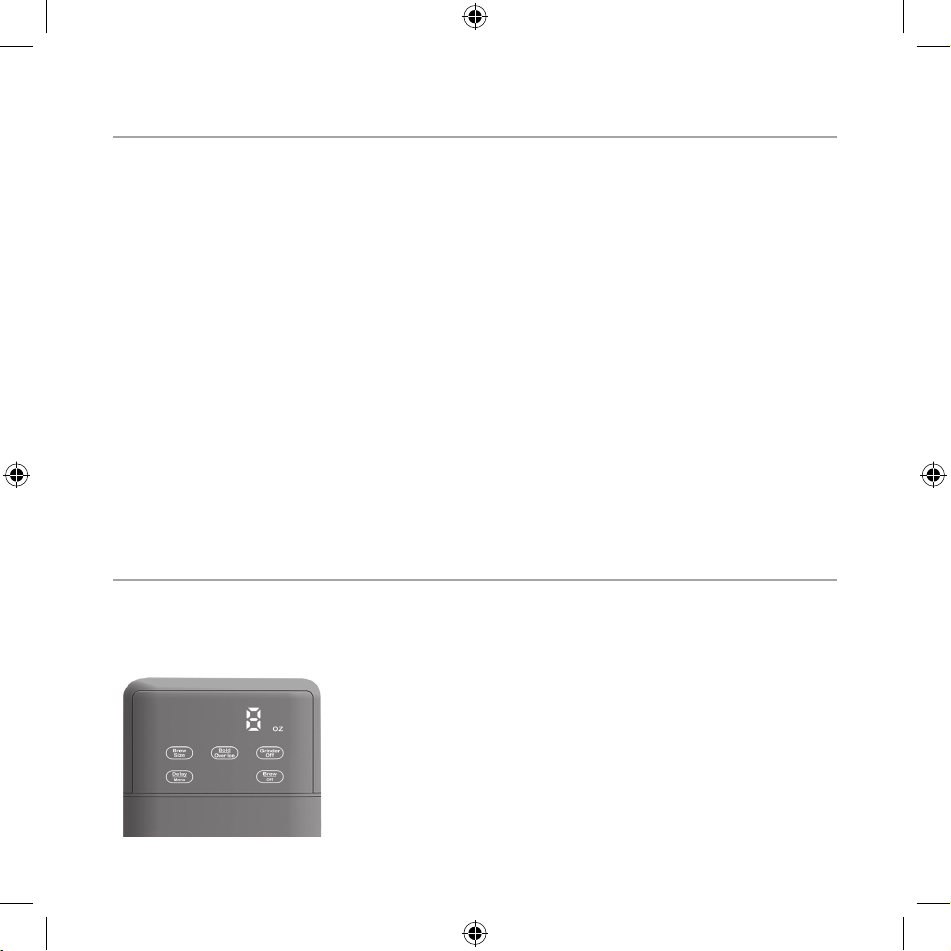
56
Instrucciones de limpieza y cuidado
1. Asegúrese siempre que la cafetera esté desenchufada y fría antes de
limpiarla.
2. Limpie bien el compartimento de preparación desmontable, la canasta
de ltro tono dorado y la cuchara para café en agua caliente y jabón.
Enjuáguelos y séquelos. Vuelva a colocar las piezas desmontadas.
Limpie la tapa de granos de café y la tolva con una toalla de papel
limpia y seca.
NOTA: La canasta de ltro tono dorado es apta para la rejilla superior
del lavavajillas. La cuchara para café debe colocarse en el lavavajillas
junto a los cubiertos.
3. Limpie el exterior de la cafetera con un paño húmedo para eliminar las
manchas superciales. Para las manchas difíciles, use un estropajo de
nilón o plástico con un limpiador no abrasivo.
PRECAUCIÓN: No utilice estropajos ni limpiadores abrasivos en las partes
o supercies de la cafetera.
4. Seque y vuelva a colocar las piezas desmontadas. Inserte la canasta de
ltro tono dorado en el compartimento de preparación. Empuje la cubierta
de la canasta de ltro tono dorado hacia abajo. (Figura 3)
5. Cierre el compartimento de preparación.
Limpieza para preparación: Descalcificación
Los minerales del agua pueden restarle sabor al café y posiblemente alargar
el tiempo de preparación. Para garantizar un sabor y desempeño óptimos, se
recomienda que el ciclo de LIMPIEZA se realice cuando se encienda el indicador
CLEAN.
IMPORTANTE:
• CLEAN parpadeará en la pantalla.
• Antes de ejecutar el ciclo de LIMPIEZA, quite el
ltro de carbón y el portaltro del depósito de agua.
Apártela para usarla más tarde.
• Siempre quite la canasta de ltro tono dorado
antes de ejecutar el ciclo de LIMPIEZA.
19332_19333_19334_19335_19432_19433_BTFL WMUS_PerfectGrind Single Serve CM_IM_V21_R9.indd 5619332_19333_19334_19335_19432_19433_BTFL WMUS_PerfectGrind Single Serve CM_IM_V21_R9.indd 56 2023-11-02 9:51 AM2023-11-02 9:51 AM

57
1. Quite la bandeja de goteo e inserte un contenedor grande con una
capacidad de al menos 64 oz. debajo del compartimento de preparación.
2. Mantenga presionado DELAY/MENU por 1.5 segundos. Presione el botón BREW
SIZE cuando aparezca en la pantalla para ingresar al modo LIMPIEZA.
3. Cuando el botón BREW SIZE parpadea y el mensaje FILL, CLn aparece en la
pantalla, llene el depósito con la solución de limpieza:
• 2 partes de agua
• 1 parte de vinagre
4. Con el depósito lleno de solución de limpieza, presione BREW SIZE para
iniciar el ciclo de LIMPIEZA.
¡IMPORTANTE! Presione BREW/OFF en cualquier momento para apagar
la cafetera.
5. Una vez que la cafetera haya pasado toda la solución de limpieza,
vacíe con cuidado el contenedor en el lavabo.
PRECAUCIÓN: ¡La solución de limpieza estará caliente! Tenga mucho
cuidado al manipular y vaciar el contenedor.
6. Cuando el botón BREW SIZE parpadea y el mensaje FILL, CLn aparece en
la pantalla, llene el depósito con agua fría y limpia.
7. Con el depósito lleno de agua, presione BREW SIZE para continuar el
ciclo de LIMPIEZA.
¡IMPORTANTE! Presione BREW/OFF en cualquier momento para apagar la
cafetera.
8. Una vez que la cafetera haya pasado toda el agua, vacíe con cuidado
el contenedor en el lavabo.
PRECAUCIÓN: ¡El agua estará caliente! Tenga mucho cuidado al manipular
y vaciar el contenedor.
9. El ciclo de LIMPIEZA está completo. La unidad regresará a la pantalla
de inicio y el indicador CLEAN desaparecerá hasta la próxima vez que
se recomienda repetirlo.
10. Seque bien todas las piezas. Vuelva a colocar la canasta de ltro tono
dorado en el compartimento de preparación y vuelva a instalar en la
cafetera.
IMPORTANTE: Vuelva a instalar el ltro de carbón y el portaltro en
el depósito de agua.
19332_19333_19334_19335_19432_19433_BTFL WMUS_PerfectGrind Single Serve CM_IM_V21_R9.indd 5719332_19333_19334_19335_19432_19433_BTFL WMUS_PerfectGrind Single Serve CM_IM_V21_R9.indd 57 2023-11-02 9:51 AM2023-11-02 9:51 AM

58
Puerta del molino y limpieza de canal
¡IMPORTANTE! Para un rendimiento óptimo, se recomienda limpiar la puerta y el
canal del molinillo cada dos semanas O según sea necesario.
1. Asegúrese de que el compartimento de preparación esté instalado
y bien jado en la cafetera.
2. Para acceder al canal del molino interno, mantenga presionado
GRINDER OFF por 1.5 segundos. La cafetera mostrará una animación
circular mientras la puerta se esté abriendo.
IMPORTANTE: Si el compartimento de preparación no está bien jado,
oirá 3 tonos y aparecerá PUSH DOOR en la pantalla. Una vez que el
compartimento de preparación esté bien jado, la cafetera volverá
a la pantalla inicial.
3. Una vez esté del todo abierta, el mensaje OPEN aparecerá en la pantalla.
Ahora puede quitar el compartimento de preparación para acceder a la
puerta del molino y el canal.
4. Use el cepillo de limpieza para quitar los restos de café de la puerta
del molino.
5. Use el cepillo de limpieza para quitar café residual del canal del
molino limpiando hacia afuera, hacia el frente de la cafetera.
6. Vuelva a instalar el compartimento de preparación y asegúrese de que
esté bien jado.
7. Mantenga presionado GRINDER OFF por 1.5 segundos. La cafetera mostrará
una animación circular mientras la puerta se esté abriendo.
IMPORTANTE: Si el compartimento de preparación no está bien jado,
oirá 3 tonos y aparecerá PUSH DOOR en la pantalla. Una vez que el
compartimento de preparación esté bien jado, la cafetera volverá a
la pantalla inicial.
Limpieza automática del molino
¡IMPORTANTE! Para un rendimiento óptimo, se recomienda limpiar el molinillo
cada semana O según sea necesario.
¡IMPORTANTE! La tolva de café no debe contener granos de café antes de ejecutar
el ciclo de limpieza automática del molino.
19332_19333_19334_19335_19432_19433_BTFL WMUS_PerfectGrind Single Serve CM_IM_V21_R9.indd 5819332_19333_19334_19335_19432_19433_BTFL WMUS_PerfectGrind Single Serve CM_IM_V21_R9.indd 58 2023-11-02 9:51 AM2023-11-02 9:51 AM

59
1. Desenchufe el cable de alimentación de la cafetera.
2. Levante la tapa de la tolva para retirarla. Asegúrese de que la tolva
para granos no tenga granos de café ni desechos.
3. Gire la cubierta protectora del molino en sentido antihorario para
desbloquearlo y quitarlo de la cafetera.
4. Levante la manija de metal de la fresa superior del molino, sujetándolo
con rmeza, y gírelo en sentido antihorario para desbloquearlo y
quitarlo de la cafetera.
5. Use el cepillo de limpieza para quitar los restos de café y desechos
de la cámara del molino.
6. Use el cepillo de limpieza para quitar los restos de café de las fresas
superior e inferior del molino.
7. Vuelva a colocar la fresa superior del molino girándolo en sentido
horario para jarlo.
8. Vuelva a colocar la cubierta protectora girándola en sentido horario.
¡IMPORTANTE! Asegúrese de que la cubierta protectora del molino esté
bien instalada. Sentirá un clic cuando la cubierta esté bien instalada.
ADVERTENCIA: No use fuerza excesiva al volver a instalar la cubierta
protectora del molino.
9. Vuelva a colocar la tapa y enchufe la unidad en un tomacorriente
de 120 V de CA.
10. Asegúrese de que la canasta de ltro tono dorado y el compartimento
de preparación estén instalados.
11. Mantenga presionado DELAY/MENU por 1.5 segundos. Presione el botón
GRINDER OFF cuando aparezca en la pantalla para ingresar al modo
Limpieza automática del molino.
12. Cuando el botón GRINDER OFF parpadea y el mensaje CLr aparece en la
pantalla, presione GRINDER OFF para ejecutar el ciclo de limpieza
automática del molino.
13. El molino funcionará durante 20 segundos para limpiar el canal de la
tolva de granos.
14. Quite el compartimento de preparación y vacíe cualquier café molido
de la canasta de ltro tono dorado. Vuelva a instalar el compartimento
de preparación.
19332_19333_19334_19335_19432_19433_BTFL WMUS_PerfectGrind Single Serve CM_IM_V21_R9.indd 5919332_19333_19334_19335_19432_19433_BTFL WMUS_PerfectGrind Single Serve CM_IM_V21_R9.indd 59 2023-11-02 9:51 AM2023-11-02 9:51 AM
60
IMPORTANTE: Si el compartimento de preparación no está bien jado,
oirá 3 tonos y aparecerá PUSH DOOR en la pantalla. Una vez que el
compartimento de preparación esté bien jado, la cafetera volverá
a la pantalla inicial.
Instrucciones de almacenamiento
1. Nunca guarde la cafetera mientras aún esté enchufada.
2. Asegúrese de que el depósito de agua esté completamente vacío antes
de guardarlo.
3. Desenchufe la cafetera y deje que se enfríe antes de guardarla.
4. Guarde la cafetera completamente ensamblada, con la canasta de
ltro tono dorado instalada. Cierre el compartimento de preparación.
Asegúrese de que la tapa de la tolva de granos esté en su sitio.
5. Guarde la cafetera en su caja o en un lugar fresco y seco.
Guarde la cafetera en posición vertical, no de lado o invertida.
Preguntas Frecuentes Sobre Perfect Grind™
MENSAJE DE ALERTA QUE
APARECE EN LA PANTALLA
MOTIVO SOLUCIÓN
FULL OPEN DOOR (PUERTA
COMPLETAMENTE ABIERTA)
No se retiró el
contenedor ni se
limpió el ltro en
el último ciclo de
preparación
Retire el contenedor, vacíe los
granos de café de la canasta
del ltro. Límpielo y vuelva a
insertarlo.
FILL H2O
(LLENAR CON H2O)
La unidad se quedó
sin agua durante
la preparación
Vuelva a llenar el depósito
con agua fría y limpia, luego
presione BREW/OFF (preparar/
apagar) antes de que transcurran
10 minutos.
NOTA: La cafetera volverá al modo
de reposo después de 10 minutos
de inactividad.
19332_19333_19334_19335_19432_19433_BTFL WMUS_PerfectGrind Single Serve CM_IM_V21_R9.indd 6019332_19333_19334_19335_19432_19433_BTFL WMUS_PerfectGrind Single Serve CM_IM_V21_R9.indd 60 2023-11-02 9:51 AM2023-11-02 9:51 AM
61
PUSH DOOR
(EMPUJAR PUERTA)
El contenedor no
está insertado
correctamente en la
unidad
Empuje el contenedor hasta que
quede completamente insertado.
La luz "GRINDER OFF"
(molino apagado)
parpadea y emite
un pitido 3 veces
La cubierta
protectora del molino
no está insertada
correctamente en
su lugar
Asegúrese de que la cubierta
protectora del molino esté bien
bloqueada en su lugar.
Solución De Problemas
LA CAFETERA PERFECT GRIND™ DEJÓ DE FUNCIONAR
• Verique que la unidad esté enchufada correctamente
• Asegúrese de que el depósito de agua esté lleno por encima de la línea
de llenado mínimo y por debajo de la línea de llenado máximo
• Asegúrese de que haya granos de café sucientes en la tolva de granos
NOTA: Nunca llene con más de 180 g/6 onzas de granos de café
(aproximadamente la mitad de una bolsa de granos de café de tamaño
estándar)
• Limpie la puerta o el canal del molino: consulte la página 27 del
manual de instrucciones
• Limpieza automática del molino: consulte la página 27 del manual
de instrucciones
• Descalcique la cafetera: consulte la página 25 del manual de
instrucciones
• Para un rendimiento óptimo, asegúrese de descalcicar la unidad cuando
aparezca el ícono de limpieza en la pantalla o según sea necesario
MI CAFETERA PERFECT GRIND™ YA NO MUELE GRANOS DE CAFÉ O ESTÁ OBSTRUIDA
• Asegúrese de que haya granos de café sucientes en la tolva de granos
Nota: Nunca llene con más de 180 g/6 onzas de granos de café
(aproximadamente la mitad de una bolsa de granos de café de tamaño
estándar)
• Limpie la puerta o el canal del molino: consulte la página 27 del
manual de instrucciones
19332_19333_19334_19335_19432_19433_BTFL WMUS_PerfectGrind Single Serve CM_IM_V21_R9.indd 6119332_19333_19334_19335_19432_19433_BTFL WMUS_PerfectGrind Single Serve CM_IM_V21_R9.indd 61 2023-11-02 9:51 AM2023-11-02 9:51 AM

62
• Limpieza automática del molino: consulte la página 27 del manual de
instrucciones
LA PUERTA DE MI MOLINO PERFECT GRIND™ ESTÁ ATASCADA
• Limpie la puerta o el canal del molino: consulte la página 27 del
manual de instrucciones
MI CAFÉ NO ES LO SUFICIENTEMENTE INTENSO/MI CAFÉ TIENE UN SABOR MUY SUAVE
• Presione BOLD/OVER ICE (fuerte/sobre hielo) para una preparación
más robusta.
• Siempre use granos de café tostados para obtener una intensidad
y sabor óptimos
• Asegúrese de que la cubierta de la canasta del ltro permanente
de tono dorado esté bien colocada en su lugar
• Limpie la puerta o el canal del molino: consulte la página 27 del
manual de instrucciones
• Limpieza automática del molino: consulte la página 27 del manual
de instrucciones
• Descalcique la cafetera: consulte la página 25 del manual de
instrucciones
MI CAFÉ NO ESTÁ LO SUFICIENTEMENTE CALIENTE
• Deje pasar agua a través de la cafetera para precalentar la unidad y
calentar su taza.
NOTA: Presione “GRINDER OFF” (molino apagado) para apagar el molino y
realizar este paso.
• Descalcique la cafetera: consulte la página 25 del manual de
instrucciones
NO SALE CAFÉ DURANTE LA PREPARACIÓN/LA PREPARACIÓN SE DETUVO
A LA MITAD DEL CICLO
• Si en la pantalla aparece el mensaje "Fill H2O" (llenar con H2O),
vuelva a llenar el depósito con agua fría y limpia hasta la línea de
máximo y presione BREW/OFF (preparar/apagar) antes de que transcurran 10
minutos para continuar con el ciclo de preparación.
NOTA: Debe presionar BREW/OFF (preparar/apagar) antes de que transcurran
10 minutos después de que haya aparecido el mensaje "Fill H2O" (llenar
19332_19333_19334_19335_19432_19433_BTFL WMUS_PerfectGrind Single Serve CM_IM_V21_R9.indd 6219332_19333_19334_19335_19432_19433_BTFL WMUS_PerfectGrind Single Serve CM_IM_V21_R9.indd 62 2023-11-02 9:51 AM2023-11-02 9:51 AM

63
con H2O) en la pantalla. La cafetera volverá al modo de reposo después
de 10 minutos de inactividad.
• Verique siempre que haya la cantidad suciente de granos en la tolva
de granos, de lo contrario, el café tendrá un sabor suave o no quedará
preparado correctamente
¿CON QUÉ FRECUENCIA DEBO LIMPIAR MI CAFETERA PERFECT GRIND™?
• Para un rendimiento óptimo, limpie la puerta/canal del molino y sus
alrededores cada 2 semanas o según sea necesario: consulte la página 27
del manual de instrucciones
• Limpie el molino (con la función de limpieza automática del molino) una
vez a la semana para que tenga un rendimiento óptimo y evitar que se
obstruya: consulte la página 27 del manual de instrucciones
• Descalcique la cafetera cuando se encienda el ícono "clean" (limpiar)
en la pantalla de su Perfect Grind™: consulte la página 25 del manual
de instrucciones para ver más detalles
¿CON QUÉ FRECUENCIA DEBO REEMPLAZAR EL FILTRO DE CARBÓN PARA AGUA?
• Reemplace el ltro de carbón cada 60 días o cada 60 recargas del
tanque de agua
• Si vive en una zona donde el agua es dura, deberá reemplazarlo con
mayor frecuencia
• Es compatible con la mayoría de los ltros de carbón de agua de tamaño
estándar para cafeteras
¿HAY PIEZAS QUE PUEDEN LAVARSE EN EL LAVAVAJILLAS?
• La canasta de ltro de tono dorado y la cuchara dosicadora del cepillo
de limpieza dos en uno pueden lavarse en el lavavajillas: consulte la
página 24 del manual de instrucciones para ver más detalles
¿PUEDO USAR FILTRO DE PAPEL?
• No use ltro de papel con esta unidad No hay ltros de papel de tamaño
compatible disponibles. El ltro de tono dorado que viene incluido con
esta unidad está diseñado especícamente para esta cafetera con el n
de ofrecer un rendimiento óptimo y una preparación y sabor de alta
calidad.
19332_19333_19334_19335_19432_19433_BTFL WMUS_PerfectGrind Single Serve CM_IM_V21_R9.indd 6319332_19333_19334_19335_19432_19433_BTFL WMUS_PerfectGrind Single Serve CM_IM_V21_R9.indd 63 2023-11-02 9:51 AM2023-11-02 9:51 AM

64
Consejos Para Hacer Un Café De Estupendo Sabor
• Asegúrese de que su cafetera Perfect Grind™ esté limpia
• Se recomienda usar granos de café con un tostado ligero o medio
• Se recomienda usar granos de café tostado recién tostados para
obtener un sabor óptimo
• Guarde los granos de café en un contenedor oscuro, frío y con
cierre hermético
• Siempre use agua fría y fresca
• No se recomienda recalentar el café. El café tiene el mejor sabor
justo después de prepararse.
• Consejos para el café premolido
• Se recomienda usar café molido mediano
• Usar café molido no puede provocar un derrame
• Usar café molido grueso puede dar como resultado un café con
sabor suave
19332_19333_19334_19335_19432_19433_BTFL WMUS_PerfectGrind Single Serve CM_IM_V21_R9.indd 6419332_19333_19334_19335_19432_19433_BTFL WMUS_PerfectGrind Single Serve CM_IM_V21_R9.indd 64 2023-11-02 9:51 AM2023-11-02 9:51 AM

Garantía limitada de dos años
Mediante la presente, Sensio Inc.
dba Made by Gather™. garantiza que,
durante el plazo de DOS AÑOS a partir
de la fecha de compra, este producto
no presentará defectos mecánicos en
el material ni en la mano de obra, y
durante 90 días, no los presentará en
las piezas no mecánicas. A su entera
discreción, Sensio Inc. dba Made by
Gather™ que resulte defectuoso, o
emitirá un reembolso por el producto
durante el plazo de garantía.
Esta garantía es válida únicamente
para el comprador minorista
original a partir de la fecha de
compra minorista inicial y no es
transferible. Conserve el recibo
de compra original, ya que se exige
una prueba de compra para obtener
la validación de la garantía. Las
tiendas minoristas no tienen derecho
a alterar, modicar ni corregir
de ninguna manera los términos y
condiciones de la garantía.
Exclusiones:
La garantía no cubre el desgaste
normal de las piezas ni el daño
ocasionado por cualquiera de las
siguientes causas: uso negligente
del producto, uso de un voltaje o
corriente incorrectos, mantenimiento
de rutina inadecuado, uso
contrario al de las instrucciones
de funcionamiento, desarmado,
reparación o alteración a cargo
de personas que no sean miembros
del personal calicado de Sensio
Inc. dba Made by Gather™ Asimismo,
la garantía no cubre actos de
la naturaleza, como incendios,
inundaciones, huracanes o tornados.
Sensio Inc. dba Made by Gather™
no asumirá responsabilidad por
daños incidentales o resultantes
ocasionados por la violación
de cualquier garantía expresa
o implícita. Salvo en la medida
en que lo prohíban las leyes
aplicables, cualquier garantía
implícita de comerciabilidad o
aptitud para un propósito particular
se limita temporalmente a la
duración de la garantía. Algunos
estados, provincias o jurisdicciones
no permiten la exclusión ni la
limitación de daños incidentales
o resultantes, o limitaciones
sobre la duración de una garantía
implícita y, por lo tanto, es posible
que las exclusiones o limitaciones
mencionadas no le correspondan.
La garantía cubre derechos legales
especícos que pueden variar de
un estado, una provincia o una
jurisdicción a otros.
65
19332_19333_19334_19335_19432_19433_BTFL WMUS_PerfectGrind Single Serve CM_IM_V21_R9.indd 6519332_19333_19334_19335_19432_19433_BTFL WMUS_PerfectGrind Single Serve CM_IM_V21_R9.indd 65 2023-11-02 9:51 AM2023-11-02 9:51 AM

66
Cómo obtener el servicio de garantía
Debe comunicarse con el Servicio
de atención al cliente a nuestro
número telefónico gratuito:
1-877-775-3564. Un representante
del Servicio de atención al cliente
intentará resolver los problemas
referidos a la garantía por
teléfono. Si este no puede resolver
el problema, le proporcionarán un
número de caso y le solicitarán que
devuelva el producto a Sensio Inc.
dba Made by Gather™ Adhiera una
etiqueta al producto que incluya:
su nombre, dirección, número
telefónico de contacto durante
el día, número de caso y descripción
del problema. Además, incluya una
copia del recibo de compra original.
Envuelva cuidadosamente el producto
etiquetado con el recibo de compra,
y envíelo (con el envío y el seguro
prepagados) a la dirección de
Sensio Inc. dba Made by Gather™.
Sensio Inc. dba Made by Gather™
no asumirá obligación ni
responsabilidad alguna por el
producto devuelto que esté en el
trayecto hacia el Centro de servicio
al cliente de Sensio Inc.
dba Made by Gather™
®
19332_19333_19334_19335_19432_19433_BTFL WMUS_PerfectGrind Single Serve CM_IM_V21_R9.indd 6619332_19333_19334_19335_19432_19433_BTFL WMUS_PerfectGrind Single Serve CM_IM_V21_R9.indd 66 2023-11-02 9:51 AM2023-11-02 9:51 AM

19332_19333_19334_19335_19432_19433_BTFL WMUS_PerfectGrind Single Serve CM_IM_V21_R9.indd 6719332_19333_19334_19335_19432_19433_BTFL WMUS_PerfectGrind Single Serve CM_IM_V21_R9.indd 67 2023-11-02 9:51 AM2023-11-02 9:51 AM
Sensio Inc.
dba Made by Gather™
New York, NY 10016/USA
www.beautifulbydrew.com
19332, 19333, 19334, 19335, 19432, 19433 R9
19332_19333_19334_19335_19432_19433_BTFL WMUS_PerfectGrind Single Serve CM_IM_V21_R9.indd 6819332_19333_19334_19335_19432_19433_BTFL WMUS_PerfectGrind Single Serve CM_IM_V21_R9.indd 68 2023-11-02 9:51 AM2023-11-02 9:51 AM