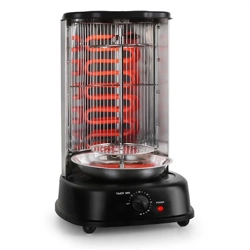
Kebap Master
Vertikalgrill
Vertical Grill
Parrilla vertical
Gril vertical
Griglia verticale
10009353
10009354


3
DE
English 11
Français 17
Español 23
Italiano 29
Sehr geehrter Kunde,
wir gratulieren Ihnen zum Erwerb Ihres Gerätes. Lesen
Sie die folgenden Hinweise sorgfältig durch und befolgen
Sie diese, um möglichen Schäden vorzubeugen. Für
Schäden, die durch Missachtung der Hinweise und
unsachgemäßen Gebrauch entstehen, übernehmen wir
keine Haftung. Scannen Sie den QR-Code, um Zugriff
auf die aktuellste Bedienungsanleitung und weitere
Informationen rund um das Produkt zu erhalten.
INHALTSVERZEICHNIS
Sicherheitshinweise 4
Vor dem ersten Gebrauch 5
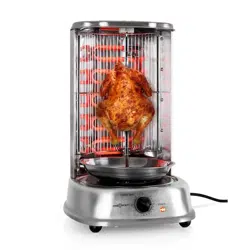
Den Grill als Bräter verwenden 5
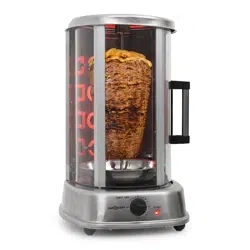
Kebab mit dem Grill zubereiten 7
Reinigung und Pflege 8
Hinweise zur Entsorgung 8
Spezielle Entsorgungshinweise für Verbraucher in Deutschland 9
TECHNISCHE DATEN
Artikelnummer 10009353, 10009354
Stromversorgung 220-240 V ~ 50 Hz
Leistung 1800 W
HERSTELLER & IMPORTEUR (UK)
Hersteller:
Chal-Tec GmbH, Wallstraße 16, 10179 Berlin, Deutschland.
Importeur für Großbritannien:
Berlin Brands Group UK Limited
PO Box 42
272 Kensington High Street
London, W8 6ND
United Kingdom

4
DE
SICHERHEITSHINWEISE
• Schließen Sie das Gerät so an, dass der Netzstecker jederzeit leicht
zugänglich ist.
• Untersuchen Sie das Netzkabel regelmäßig auf Beschädigungen. Falls das
Netzkabel beschädigt ist, muss es vom Hersteller oder einem autorisierten
Fachbetrieb oder einer ähnlich qualizierten Person ersetzt werden.
• Reparaturen dürfen nur von Fachpersonal ausgeführt werden, versuchen
Sie nicht das Gerät selbst zu reparieren.
• Schließen Sie das Gerät nicht an einen Timer oder eine ferngesteuerte
Steckdose an.
• Tauchen Sie das Gerät, das Netzkabel und den Stecker niemals in Wasser
oder andere Flüssigkeiten.
• Fassen Sie den Stecker nicht mit nassen Händen an.
• Ziehen sie den Stecker nicht am Kabel aus der Steckdose, sondern halten
Sie ihn beim Abziehen mit der Hand fest.
• Benutzen Sie das Kabel nicht als Handgriff.
• Verlegen Sie das Kabel so, dass keiner darüber stolpert.
• Lassen Sie das Kabel nicht über scharfe Kanten verlaufen.
• Benutzen Sie das Gerät nicht in nassen Räumen oder im Regen.
• Stellen Sie das Gerät so auf, dass es nicht in Wasser fallen kann. Sollte es
doch in Wasser fallen, ziehen Sie sofort den Stecker aus der Steckdose und
fassen Sie das Gerät erst dann an.
• Ziehen Sie den Stecker aus der Steckdose wenn Sie das Gerät nicht mehr
benutzen.
• Halten Sie das Gerät fern von offenem Feuer und Wärmequellen.
• Kinder ab 8 Jahren, psychisch, sensorisch und körperlich eingeschränkte
Menschen dürfen das Gerät nur benutzen, wenn sie vorher von einer für
sie verantwortlichen Aufsichtsperson ausführlich mit den Funktionen und
den Sicherheitsvorkehrungen vertraut gemacht wurden und die damit
verbundenen Risiken verstehen.
• Halten Sie Kinder vom Grill fern und lassen Sie das Gerät während des
Betriebs nicht unbeaufsichtigt.
• Stellen Sie das Gerät auf einen stabilen, ebenen Untergrund.
• Achten Sie darauf, dass sich um den Grill herum keine leicht entzündlichen
Gegenstände und Materialien benden.
• Halten Sie mindestens 30 cm Abstand zu Wänden.
• Fassen Sie während des Betriebs nicht den Grillrost oder andere heiße
Oberflächen an.
• Bewegen Sie das Gerät erst wenn es komplett abgekühlt ist. Fassen Sie das
Gerät nur an den dafür vorgesehenen Griffen an.
• Stellen Sie das Gerät nur auf hitzeunempndliche Oberflächen. Stellen Sie
das Gerät so auf, dass es nicht zu nah am Rand steht.
• Um einen Hitzestau zu vermeiden, stellen Sie das Gerät nicht direkt unter
Küchenschränke oder regale.
• Stellen Sie das Gerät nicht auf oder in die Nähe eines Herdes.
5
DE
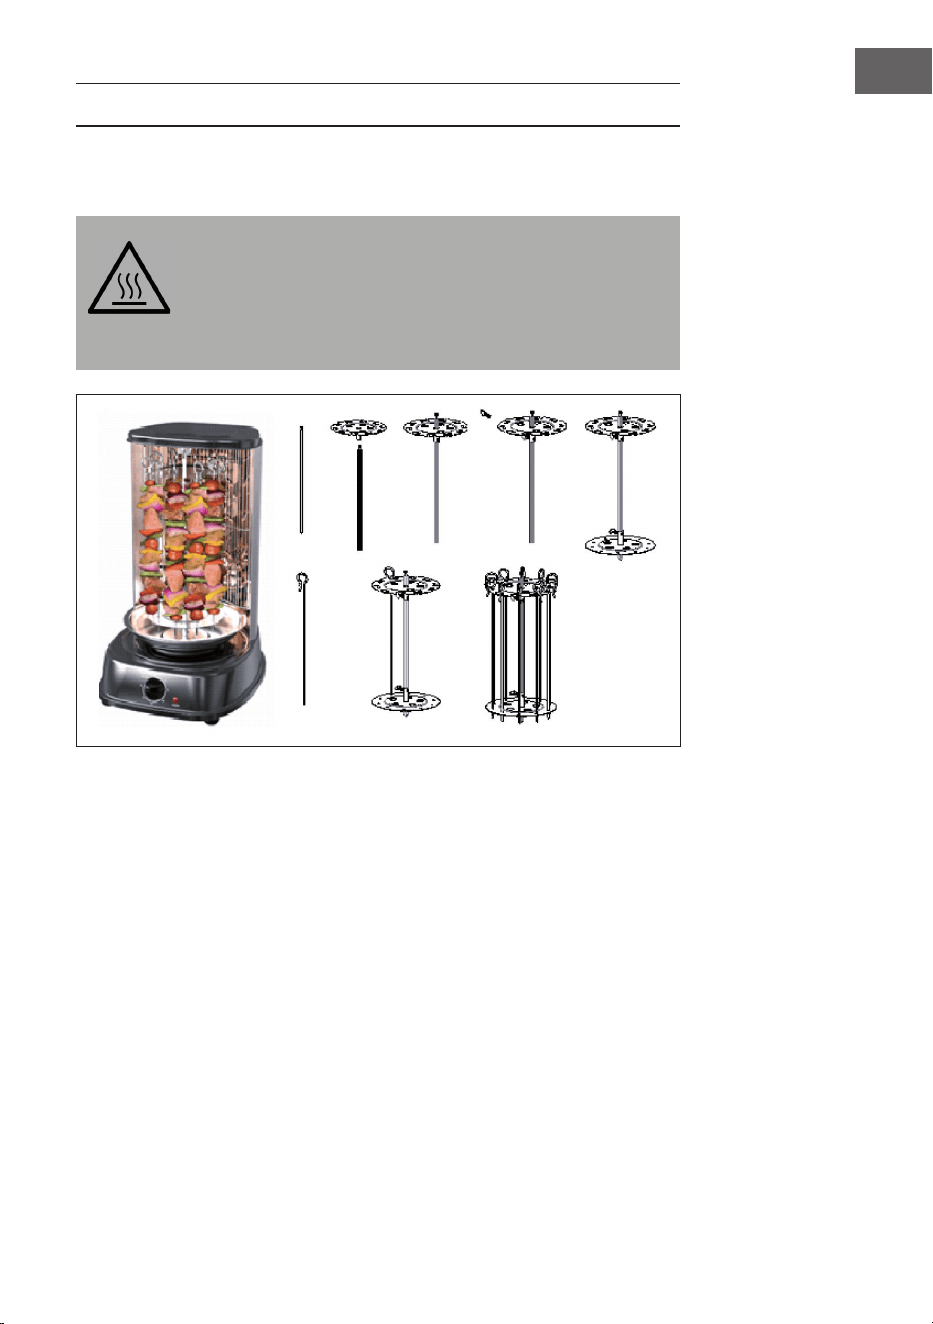
VOR DEM ERSTEN GEBRAUCH
Lesen Sie die Anleitung sorgfältig. Diese Informationen sind für den Gebrauch
des vertikalen Grills notwendig.
Stellen Sie den Grill auf eine ebene Oberfl äche, wie eine Küchenarbeitsplatte
oder Tisch. Rund um das Gerät muss ein Abstand von 10 cm zu Wänden,
Schränken oder anderen Gegenständen eingehalten werden. Entfernen Sie
sämtliche Aufkleber vom Gerät. Entnehmen Sie die Tropfschale, Drehspieß,
Gabeln und Kebabhalter und waschen diese in warmem Wasser mit etwas
Spülmittel oder in der Spülmaschine ab. Trocken Sie diese vor dem Ein- setzen
gründlich ab.
Vergewissern Sie sich, dass während der Vorbereitung der Regler TIMER auf
“Off” steht und das Gerät vom Stromnetz getrennt ist. Es wird empfohlen, dass
Gerät probeweise einzuschalten und so Produktionsrückstände zu entfernen.
Stecken Sie den Netzstecker in eine 230 V-Steckdose. Stellen Sie den Regler
TIMER auf “20” Minuten. Es kann etwas Qualm und Geruch dabei entstehen.
Dies ist normal.
Um Kratzen, Verklebungen, Entfärben oder Feuer zu vermeiden, darf nichts
oben auf dem Ofen gelegt werden. Dies gilt vor allem während des Gebrauchs.
DEN GRILL ALS BRÄTER VERWENDEN
VORSICHT
Die Oberfl ächen des Geräts werden während des Gebrauchs
und bleiben auch danach heiß! Legen Sie nichts auf das Gerät.
Tragen Sie immer schützende, isolierende Ofenhandschuhe
wenn Sie Gegenstände in das Gerät legen oder entnehmen.
Verwenden Sie das Gerät nie ohne Tropfschale.

6
DE
1. Schieben Sie eine Endgabel mit den Zinken zur Mitte zeigend auf den
Drehspieß und ziehen Sie die Schraube fest.
2. Führen Sie das spitze Ende mittig durch die zu bratenden Lebensmittel.
3. Schieben Sie die andere Endgabel so auf den Drehspieß, dass die Zinken
zum Grillgut zeigen.
4. Richten Sie das Grillgut mittig aus, sichern dieses mir der Endgabel und
ziehen die Schraube fest.
5. Beim Kochen von Geflügel sollten die Schenkel und Flügel mit Küchengarn
am Körper befestigt werden, dass sich der Spieß leicht drehen kann.
werden.
6. Würzen oder garnieren Sie das Grillgut nach Ihren Wünschen.
7. WICHTIG! Stellen Sie die Tropfschale zum Auffangen der Tropfen unten in
das Gerät.
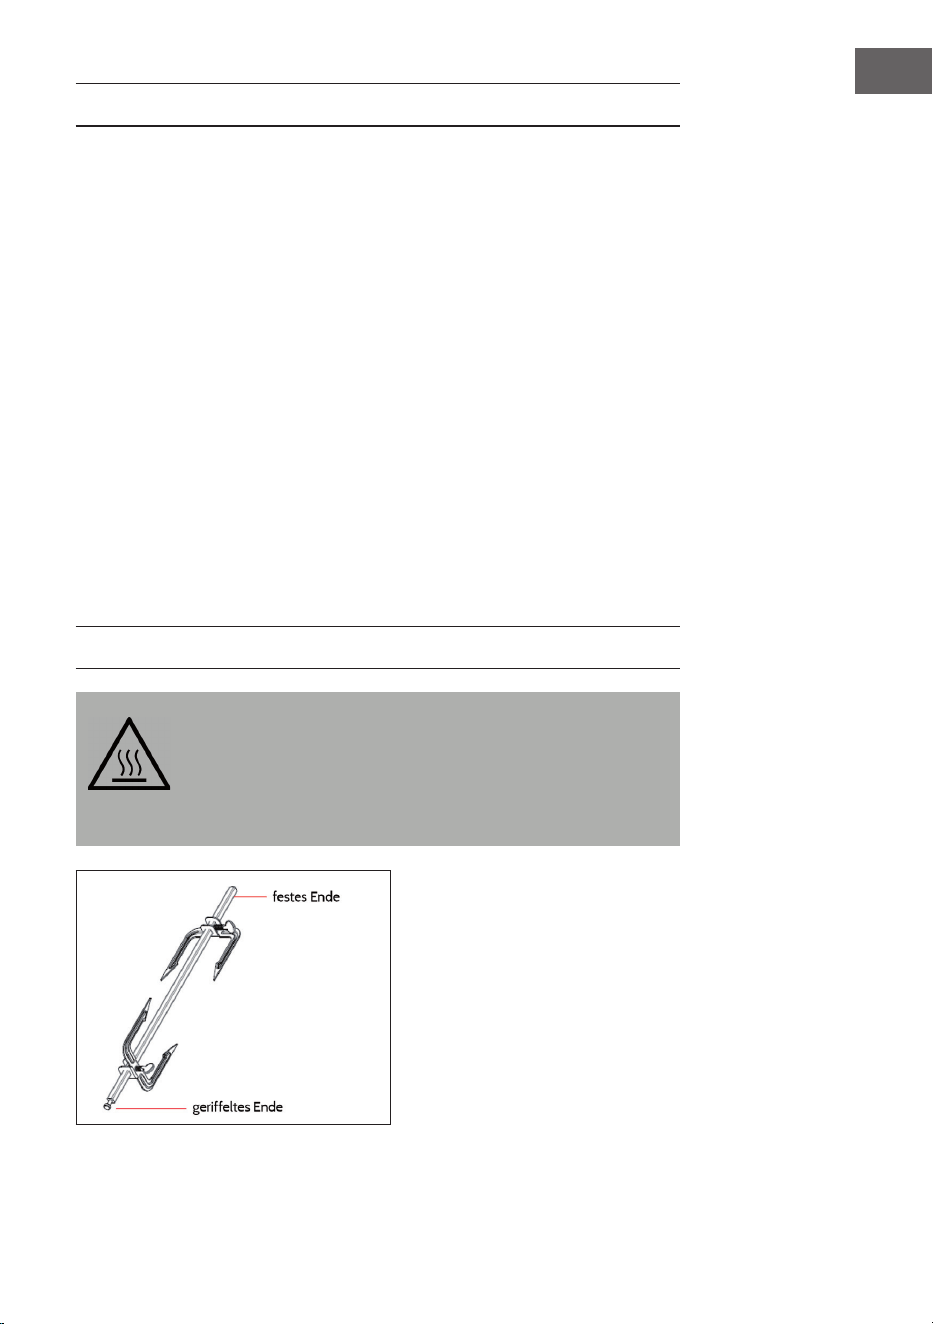
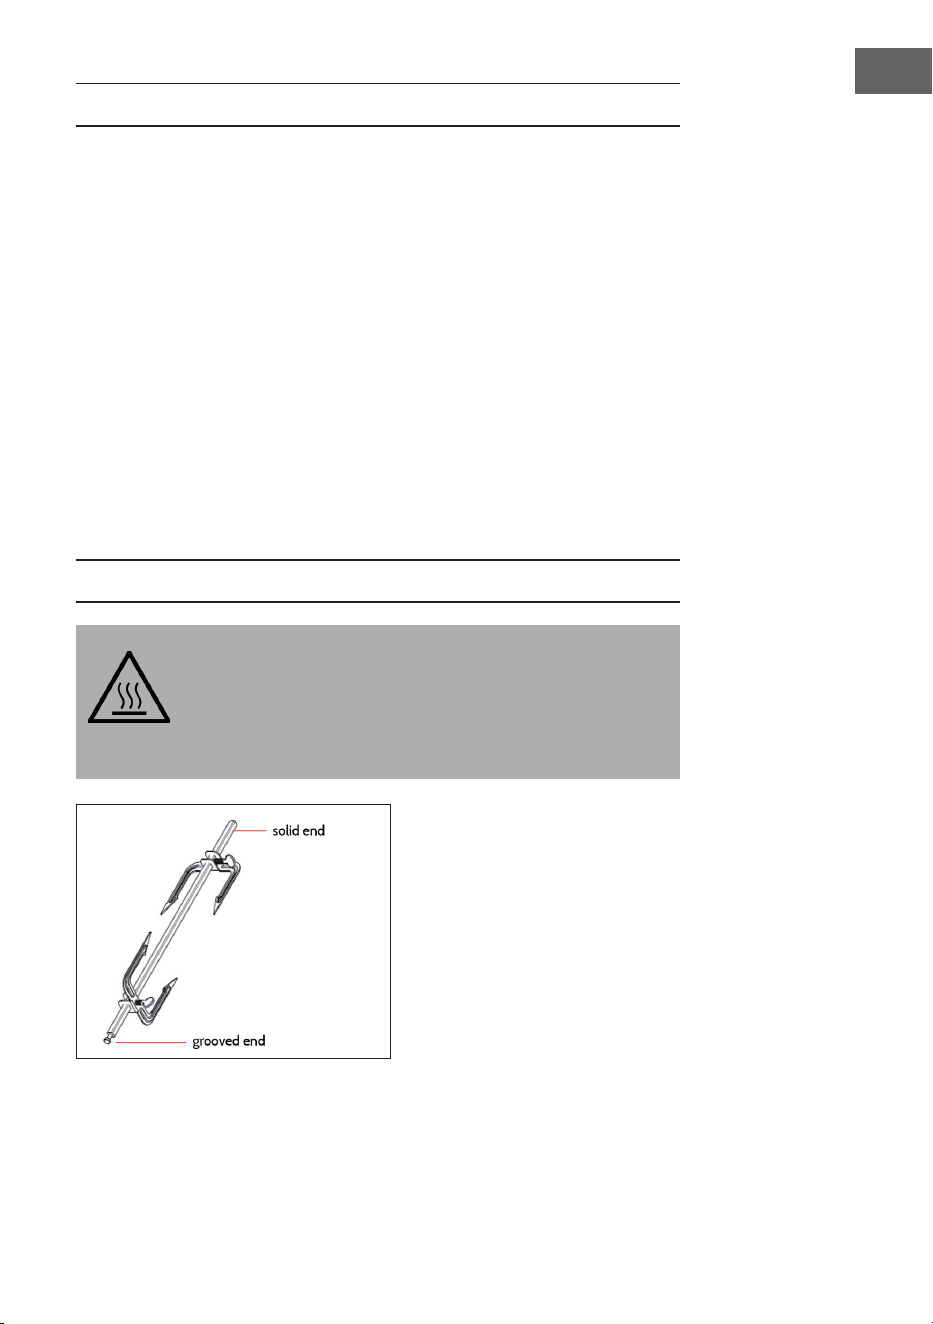
8. Stecken Sie das feste Ende des Drehspießes in die Antriebsöffnung in der
Mitte der Tropfschale.
9. Stecken Sie das genutete Ende in den Halter oben im Inneren des Ofens.
10. Stellen Sie den Regler TIMER je nach Rezept ein (Siehe Rezepte). Ist
die Zeit mehr als 1 Stunde, stellen Sie den Regler auf “Stay On” und
kontrollieren das Gerät nach Ablauf der Zubereitungszeit.
11. Ist das Grillgut fertig, stellen Sie den Regler auf “Off” und ziehen den
Netzstecker. ACHTUNG: Der Grill ist oben und an den Seiten sehr heiß.
Verwenden Sie zum Entnehmen des Grillguts Ofenhandschuhe oder
andere hitzefeste Handschuhe. Sie können auch eine Bratengabel oder
Zange verwenden.
12. Entfernen Sie den Drehspieß durch Anheben und zu sich ziehen. Der
untere Teil muss aus der Antriebsöffnung gehoben werden, danach
können Sie das Grillgut auf ein Schneidbrett legen.
13. Legen Sie das Grillgut auf ein Schneidbrett oder eine Servierplatte und
lassen es 10-15 Minuten ruhen.
14. Lösen Sie die Schrauben der Endgabel mit einem Topflappen und
entfernen diese vom Drehspieß. Entfernen Sie danach vorsichtig das
Grillgut vom Spieß und schneiden es.
7
DE
KEBAB MIT DEM GRILL ZUBEREITEN
Falls ein Kebabhalter im Lieferumfang enthalten ist, folgen Sie diesen
Anweisungen für die Verwendung.
VORSICHT
Die Oberfl ächen des Geräts werden während des Gebrauchs
und bleiben auch danach heiß! Legen Sie nichts auf das Gerät.
Tragen Sie immer schützende, isolierende Ofenhandschuhe
wenn Sie Gegenstände in das Gerät legen oder entnehmen.
Verwenden Sie das Gerät nie ohne Tropfschale.
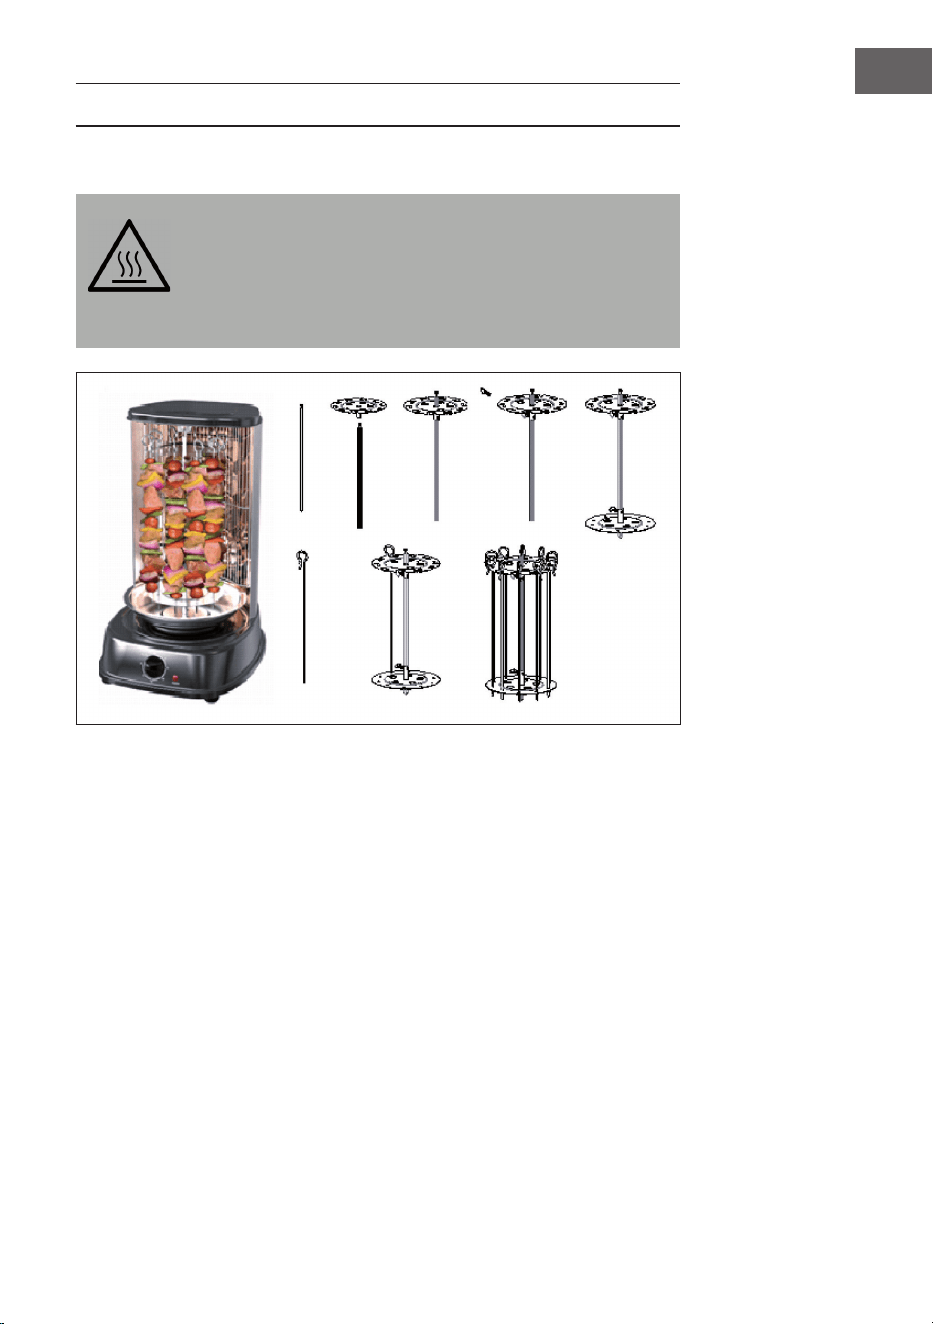
1. Bauen Sie den Kebabhalter wie auf den Bildern zu sehen zusammen.
2. Stellen Sie die runde Tropfschale zum Auffangen der Tropfen unten in das
Gerät.
3. Stecken Sie das feste Ende des Drehspießes in die Antriebsöffnung in der
Mitte der Tropfschale.
4. Stecken Sie das genutete Ende in den Halter oben im Inneren des Ofens.
5. Stellen Sie den Regler TIMER je nach Rezept ein (Siehe Rezepte). Ist
die Zeit mehr als 1 Stunde, stellen Sie den Regler auf “Stay On” und
kontrollieren das Gerät nach Ablauf der Zubereitungszeit.
6. Ist das Grillgut fertig, stellen Sie den Regler auf “Off” und ziehen den
Netzstecker.

8
DE
Garzeiten
• Hühnchen, Ente 30~45 Minuten
• Steak 45~60 Minuten
• Kebab 20~30 Minuten
• Fisch 20~32 Minuten
• Gemüse 15~20 Minuten
REINIGUNG UND PFLEGE
• Ziehen den Netzstecker aus der Steckdose. Lassen Sie den Grill vollständig
abkühlen. Entfernen Sie sämtliches Zubehör.
• Verwenden Sie zum Reinigen des Gehäuses einen feuchten und/oder
weichen Lappen. TAUCHEN SIE DAS GERÄT NIE IN WASSER. Reinigen
Sie die Innenseiten mit Wasser und einem trockenen Tuch. Verwenden
Sie keine starken Reiniger. Sämtliches Zubehör kann mit Seifenwasser
gereinigt werden.
• Reiben Sie die Wände mit einem feuchten Tuch ab.
HINWEISE ZUR ENTSORGUNG
Wenn es in Ihrem Land eine gesetzliche Regelung
zur Entsorgung von elektrischen und elektronischen
Geräten gibt, weist dieses Symbol auf dem Produkt
oder auf der Verpackung darauf hin, dass dieses
Produkt nicht im Hausmüll entsorgt werden darf.
Stattdessen muss es zu einer Sammelstelle für das
Recycling von elektrischen und elektronischen Geräten
gebracht werden. Durch regelkonforme Entsorgung
schützen Sie die Umwelt und die Gesundheit
Ihrer Mitmenschen vor negativen Konsequenzen.
Informationen zum Recycling und zur Entsorgung
dieses Produkts, erhalten Sie von Ihrer örtlichen
Verwaltung oder Ihrem Hausmüllentsorgungsdienst.

9
DE
SPEZIELLE ENTSORGUNGSHINWEISE FÜR
VERBRAUCHER IN DEUTSCHLAND
Entsorgen Sie Ihre Altgeräte fachgerecht. Dadurch wird gewährleistet, dass
die Altgeräte umweltgerecht verwertet und negative Auswirkungen auf die
Umwelt und menschliche Gesundheit vermieden werden. Bei der Entsorgung
sind folgende Regeln zu beachten:
• Jeder Verbraucher ist gesetzlich verpflichtet, Elektro- und
Elektronikaltgeräte (Altgeräte) sowie Batterien und Akkus
getrennt vom Hausmüll zu entsorgen. Sie erkennen die
entsprechenden Altgeräte durch folgendes Symbol der
durchgestrichene Mülltonne (WEEE Symbol).
• Sie haben Altbatterien und Altakkumulatoren, die nicht vom Altgerät
umschlossen sind, sowie Lampen, die zerstörungsfrei aus dem Altgerät
entnommen werden können, vor der Abgabe an einer Entsorgungsstelle
vom Altgerät zerstörungsfrei zu trennen.
• Bestimmte Lampen und Leuchtmittel fallen ebenso unter das Elektro- und
Elektronikgesetz und sind dementsprechend wie Altgeräte zu behandeln.
Ausgenommen sind Glühbirnen und Halogenlampen. Entsorgen Sie
Glühbirnen und Halogenlampen bitte über den Hausmüll, sofern Sie nicht
das WEEE Symbol tragen.
• Jeder Verbraucher ist für das Löschen von personenbezogenen Daten auf
dem Elektro- bzw. Elektronikgerät selbst verantwortlich.
Rücknahmepicht der Vertreiber
Vertreiber mit einer Verkaufsfläche für Elektro- und Elektronikgeräte von
mindestens 400 Quadratmetern sowie Vertreiber von Lebensmitteln mit einer
Gesamtverkauffläche von mindestens 800 Quadratmetern, die mehrmals im
Kalenderjahr oder dauerhaft Elektro- und Elektronikgeräte anbieten und auf
dem Markt bereitstellen, sind verpflichtet,
1 bei der Abgabe eines neuen Elektro- oder Elektronikgerätes an einen
Endnutzer ein Altgerät des Endnutzers der gleichen Geräteart, das
im Wesentlichen die gleichen Funktionen wie das neue Gerät erfüllt,
am Ort der Abgabe oder in unmittelbarer Nähe hierzu unentgeltlich
zurückzunehmen und
2 auf Verlangen des Endnutzers Altgeräte, die in keiner äußeren
Abmessung größer als 25 Zentimeter sind, im Einzelhandelsgeschäft
oder in unmittelbarer Nähe hierzu unentgeltlich zurückzunehmen; die
Rücknahme darf nicht an den Kauf eines Elektro- oder Elektronikgerätes
geknüpft werden und ist auf drei Altgeräte pro Geräteart beschränkt.

10
DE
• Bei einem Vertrieb unter Verwendung von Fernkommunikationsmitteln
ist die unentgeltliche Abholung am Ort der Abgabe auf Elektro- und
Elektronikgeräte der Kategorien 1, 2 und 4 gemäß § 2 Abs. 1 ElektroG,
nämlich „Wärmeüberträger“, „Bildschirmgeräte“ (Oberfläche von mehr
als 100 cm²) oder „Großgeräte“ (letztere mit mindestens einer äußeren
Abmessung über 50Zentimeter) beschränkt. Für andere Elektro- und
Elektronikgeräte (Kategorien 3, 5, 6) ist eine Rückgabemöglichkeit in
zumutbarer Entfernung zum jeweiligen Endnutzer zu gewährleisten.
• Altgeräte dürfen kostenlos auf dem lokalen Wertstoffhof oder in
folgenden Sammelstellen in Ihrer Nähe abgegeben werden: www.take-e-
back.de
• Für Elektro- und Elektronikgeräte der Kategorien 1, 2 und 4 an bieten
wir auch die Möglichkeit einer unentgeltlichen Abholung am Ort der
Abgabe. Beim Kauf eines Neugeräts haben sie die Möglichkeit eine
Altgerätabholung über die Webseite auszuwählen.
• Batterien können überall dort kostenfrei zurückgegeben werden, wo sie
verkauft werden (z. B. Super-, Bau-, Drogeriemarkt). Auch Wertstoff- und
Recyclinghöfe nehmen Batterien zurück. Sie können Batterien auch per
Post an uns zurücksenden. Altbatterien in haushaltsüblichen Mengen
können Sie direkt bei uns von Montag bis Freitag zwischen 08:00 und
16:00 Uhr unter der folgenden Adresse unentgeltlich zurückgeben:
Chal-Tec Fulllment GmbH
Norddeutschlandstr. 3
47475 Kamp-Lintfort
• Wichtig zu beachten ist, dass Lithiumbatterien aus Sicherheitsgründen
vor der Rückgabe gegen Kurzschluss gesichert werden müssen (z. B. durch
Abkleben der Pole).
• Finden sich unter der durchgestrichenen Mülltonne auf der Batterie
zusätzlich die Zeichen Cd, Hg oder Pb ist das ein Hinweis darauf, dass die
Batterie gefährliche Schadstoffe enthält. (»Cd« steht für Cadmium, »Pb«
für Blei und »Hg« für Quecksilber).
Hinweis zur Abfallvermeidung
Indem Sie die Lebensdauer Ihrer Altgeräte verlängern, tragen Sie dazu
bei, Ressourcen efzient zu nutzen und zusätzlichen Müll zu vermeiden.
Die Lebensdauer Ihrer Altgeräte können Sie verlängern indem Sie defekte
Altgeräte reparieren lassen. Wenn sich Ihr Altgerät in gutem Zustand bendet,
könnten Sie es spenden, verschenken oder verkaufen.
11
EN
Dear Customer,
Congratulations on purchasing this device. Please read
the following instructions carefully and follow them to
prevent possible damages. We assume no liability for
damage caused by disregard of the instructions and
improper use. Scan the QR code to get access to the
latest user manual and more product information.
CONTENT
Safety Instructions 12
Before rst Use 13
Using the Grill as a Roaster 13
Preparing Kebabs with the Grill 15
Cleaning and Care 16
Hints on Disposal 16
TECHNICAL DATA
Item number 10009353, 10009354
Power supply 220-240 V ~ 50 Hz
Power consumtion 1800 W
MANUFACTURER & IMPORTER (UK)
Manufacturer:
Chal-Tec GmbH, Wallstrasse 16, 10179 Berlin, Germany.
Importer for Great Britain:
Berlin Brands Group UK Limited
PO Box 42
272 Kensington High Street
London, W8 6ND
United Kingdom

12
EN
SAFETY INSTRUCTIONS
• Connect the device so that the mains plug is easily accessible at all times.
• Inspect the power cord regularly for damage. If the power cord is
damaged, it must be replaced by the manufacturer or an authorized
service center or a similarly qualied person.
• Repairs may only be carried out by qualied personnel, do not attempt to
repair the device yourself.
• Do not connect the unit to a timer or a remote control power outlet.
• Never immerse the appliance, power cord or plug in water or other liquids.
• Do not handle the plug with wet hands.
• Do not pull the plug out of the socket by the cable, but hold it rmly by
hand when pulling it off.
• Do not use the cable as a handle.
• Lay the cable in such a way that no one will trip over it.
• Do not let the cable run over sharp edges.
• Do not use the unit in wet rooms or in the rain.
• Place the appliance in such a way that it cannot fall into water. If it does fall
into water, immediately unplug the appliance from the wall outlet and only
then touch the appliance.
• Unplug the appliance from the wall outlet when it is no longer in use.
• Keep the appliance away from open re and heat sources.
• This device may be only used by children 8 years old or older and persons
with limited physical, sensory and mental capabilities and / or lack of
experience and knowledge, provided that they have been instructed in
use of the device by a responsible person who understands the associated
risks.
• Keep children away from the grill and do not leave the appliance
unattended during operation.
• Place the appliance on a stable, level surface.
• Make sure that there are no easily inflammable objects or materials
around the grill.
• Keep at least 30 cm away from walls.
• Do not touch the grill grate or other hot surfaces during operation.
• Do not move the appliance until it has cooled down completely. Only touch
the appliance by the handles provided for this purpose.
• Only place the appliance on surfaces that are insensitive to heat. Position
the appliance so that it is not too close to the edge.
• To avoid heat build-up, do not place the appliance directly under kitchen
cabinets or shelves.
• Do not place the appliance on or near a stove.
13
EN
BEFORE FIRST USE
Read the instructions carefully. This information is necessary for using the
vertical grill.
Place the grill on a fl at surface, such as a kitchen worktop or table. Around the
appliance, keep a distance of 10 cm from walls, cupboards or other objects.
Remove all stickers from the appliance. Remove the drip tray, spit, forks and
kebab holders and wash them in warm water with some detergent or in the
dishwasher. Dry them thoroughly before use.
During preparation, make sure that the TIMER control is set to „Off“ and that
the appliance is disconnected from the power supply. It is recommended that
the appliance be switched on for a trial period to remove production residues.
Insert the power plug into a 230 V socket. Set the TIMER control to „20“
minutes. Some smoke and odor may be produced. This is normal.
To avoid scratching, sticking, discoloration or re, do not place anything on top
of the oven. This is especially important during use.
USING THE GRILL AS A ROASTER
CAUTION
The surfaces of the device become hot during use and remain
hot afterwards! Do not place anything on the appliance.
Always wear protective, insulating oven gloves when placing or
removing objects from the appliance. Never use the appliance
without the drip tray.

14
EN
1. Push an end fork with the tines pointing to the centre onto the rotating
spike and tighten the screw.
2. Guide the pointed end through the middle of the food to be fried.
3. Push the other end fork onto the rotating spit so that the tines point
towards the food to be grilled.
4. Align the food to be grilled centrally, secure it with the end fork and
tighten the screw.
5. When cooking poultry, fasten the legs and wings to the body with kitchen
string so that the spit can turn easily.
6. Season or garnish the barbecue according to your wishes.
7. Place the drip tray at the bottom of the appliance to catch the drops.
8. Insert the xed end of the rotary spit into the drive opening in the middle
of the drip tray.
9. Insert the grooved end into the holder at the top inside the oven.
10. Set the timer control according to the recipe (see recipes). If the time is
more than 1 hour, set the controller to „stay on“ and check the appliance
after the preparation time has expired.
11. When the food is ready, set the controller to „off“ and unplug the
appliance. Attention: the grill is very hot at the top and sides. Use oven
gloves or other heat-resistant gloves to remove the food from the grill. You
can also use a roasting fork or tongs.
12. Remove the spit by lifting it up and pulling it towards you. The lower part
must be lifted out of the drive opening, after which you can place the food
on a cutting board.
13. Place the food on a cutting board or serving plate and let it rest for 10-15
minutes.
14. Loosen the screws of the end fork with a pot cloth and remove them from
the spit. Then carefully remove the food from the spit and cut it.
15
EN
PREPARING KEBABS WITH THE GRILL
If a kebab holder is included, follow these instructions for use.
CAUTION
The surfaces of the device become hot during use and remain
hot afterwards! Do not place anything on the appliance.
Always wear protective, insulating oven gloves when placing or
removing objects from the appliance. Never use the appliance
without the drip tray.
1. Assemble the kebab holder as shown in the pictures.
2. Place the round drip tray at the bottom of the appliance to catch the drops.
3. Insert the xed end of the rotating spit into the drive opening in the middle
of the drip tray.
4. Insert the grooved end into the holder at the top inside the oven.
5. Set the TIMER control according to the recipe (see Recipes). If the time is
more than 1 hour, set the controller to „Stay On“ and check the appliance
after the preparation time has expired.
6. When the food is ready, set the controller to „Off“ and unplug the
appliance.

16
EN
Cooking times
• Chicken, duck 30~45 minutes
• Steak 45~60 minutes
• Kebab 20~30 minutes
• Fish 20~32 minutes
• Vegetables 15~20 minutes
CLEANING AND CARE
• Pull the power plug out of the socket. Let the grill cool down completely.
Remove all accessories.
• Use a damp and/or soft cloth to clean the housing. NEVER IMMERSE THE
APPLIANCE IN WATER. Clean the insides with water and a dry cloth. Do
not use strong cleaners. All accessories can be cleaned with soapy water.
• Rub the walls with a damp cloth.
HINTS ON DISPOSAL
If there is a legal regulation for the disposal of electrical
and electronic devices in your country, this symbol
on the product or on the packaging indicates that this
product must not be disposed of with household waste.
Instead, it must be taken to a collection point for the
recycling of electrical and electronic equipment. By
disposing of it in accordance with the rules, you are
protecting the environment and the health of your
fellow human beings from negative consequences. For
information about the recycling and disposal of this
product, please contact your local authority or your
household waste disposal service.

17
FR
Cher client,
Toutes nos félicitations pour l’acquisition de ce nouvel
appareil. Veuillez lire attentivement les instructions
suivantes de branchement et d’utilisation an d’éviter
d’éventuels dommages. Le fabricant ne saurait être tenu
pour responsable des dommages dus au non-respect
des consignes de sécurité et à la mauvaise utilisation de
l’appareil. Scannez le QR-Code pour accéder à la dernière
version du mode d‘emploi et à d‘autres informations
concernant le produit.
SOMMAIRE
Consignes de sécurité 18
Avant la première utilisation 19
Utiliser le gril comme rôtissoire 19
Préparer un kebab avec le gril 21
Nettoyage et entretien 22
Conseils pour le recyclage 22
FICHE TECHNIQUE
Numéro d’article 10009353, 10009354
Alimentation 220-240 V ~ 50 Hz
Puissance 1800 W
FABRICANT ET IMPORTATEUR (UK)
Fabricant :
Chal-Tec GmbH, Wallstraße 16, 10179 Berlin, Allemagne.
Importateur pour la Grande Bretagne :
Berlin Brands Group UK Limited
PO Box 42
272 Kensington High Street
London, W8 6ND
United Kingdom

18
FR
CONSIGNES DE SÉCURITÉ
• Brancher l’appareil de telle manière à ce que la che d’alimentation soit
facilement accessible à tout moment.
• Contrôler régulièrement l’état du cordon d’alimentation pour déceler
d’éventuelles détériorations. Si le cordon d‘alimentation est endommagé, il
doit être remplacé par le fabricant, une entreprise spécialisée habilitée ou
une personne présentant une qualication analogue.
• Les réparations doivent être effectuées uniquement par un personnel
spécialisé et ne jamais essayer de réparer l’appareil soi-même.
• Ne pas brancher l’appareil à une minuterie ou à une prise de courant
télécommandée.
• Ne jamais plonger le cordon d’alimentation dans l’eau ou dans tout autre
liquide.
• Ne pas toucher la che d’alimentation avec des mains humides.
• Ne pas tirer sur le cordon d’alimentation pour débrancher la che de la
prise, mais le saisir fermement au niveau de la che pour le débrancher.
• Ne pas utiliser le câble comme une poignée.
• Disposer le cordon d’alimentation de telle manière à ce que personne ne
trébuche dessus.
• Ne pas faire passer le câble au-dessus de rebords coupants.
• Ne pas utiliser l’appareil dans des pièces humides ou sous la pluie.
• Installer l’appareil de sorte à ce qu’il ne puisse pas tomber dans de l’eau. S’il était
amené à tomber à l’eau, débrancher immédiatement l’appareil avant de pouvoir
le toucher.
• Débrancher l’appareil après utilisation.
• Tenir l’appareil éloigné des flammes nues et des sources de chaleur.
• Cet appareil peut être utilisé par des enfants de 8 ans ou plus et des
personnes ayant des capacités physiques, sensorielles et mentales limitées
et / ou dénuées d‘expérience et de connaissances, à condition d‘avoir été
instruits au fonctionnement de l‘appareil par une personne responsable et
d‘en comprendre les risques associés.
• Tenir les enfants éloignés du grill et ne jamais laisser l’appareil fonctionner
sans surveillance.
• Installer l’appareil sur une surface stable et plane.
• Veiller à ce qu’aucun objet ou substance facilement inflammables ne se
trouvent autour de l’appareil.
• Maintenir une distance minimale de 30 cm entre l’appareil et les murs
environnants.
• Ne pas toucher la grille ou toute autre surface brûlante pendant le
fonctionnement du grill.
• Déplacer l’appareil uniquement lorsqu’il a complètement refroidi.
Manipuler l’appareil uniquement en saisissant les poignées prévues.
• Installer l’appareil uniquement sur des surfaces thermorésistantes. Ne pas
placer l’appareil trop près du bord.
• Pour éviter une accumulation de chaleur, ne pas placer l’appareil
directement sous un placard ou sous une étagère de cuisine.
• Ne pas placer l’appareil sur une cuisinière ou à proximité de celle-ci.
19
FR
AVANT LA PREMIÈRE UTILISATION
Lisez les indications consciencieusement. Ces informations sont importantes
pour pouvoir utiliser le gril vertical.
Placez le gril sur une surface plane telle qu‘un plan de travail ou une table.
Un espace de 10 cm minimum doit se trouver tout autour de l‘appareil
pour le tenir à distance des murs, placards ou autres objets. Retirez tous les
autocollants de l‘appareil. Retirez le bac d‘égouttage, la broche tournante,
les fourchettes et le support de kébab et lavez-les à l‘eau chaude légèrement
savonneuse ou au lave-vaisselle. Séchez ensuite les éléments soigneu- sement
avant de les utiliser.
Assurez-vous que le bouton de réglage TIMER soir sur “Off” pendant que vous
vous prépa- rez et que l‘appareil soit débranché du secteur. Il est recommandé
de tester l‘allumage de l‘appareil à vide pour éliminer les restes de matériaux
de la fabrication. Branchez la che dans une prise de 230V. Placez le bouton de
réglage TIMER sur “20” minutes. Il peut alors y avoir un dégagement de fumée
et d‘odeur. Cela est normal.
Pour éviter les rayures, adhérences, décolorations ou incendies, rien ne doit se trouver
posé sur le haut du four. Cela est particulièrement valable pendant l‘utilisation.
UTILISER LE GRIL COMME RÔTISSOIRE
ATTENTION
Les surfaces de l‘appareil sont très chaudes pendant le
fonctionnement et le restent ensuite ! Ne posez rien sur
l‘appareil. Portez toujours des protections comme des gants de
cuisine isolants lorsque vous placez des objets dans l‘appareil
ou que vous les en retirez. N‘utilisez jamais l‘appareil sans son
bac d‘égouttage.

20
FR
1. Glissez le support de n avec les dents xes dirigées vers le milieu sur la
broche et serrez les vis.
2. Faites passer l‘extrémité pointue à travers les aliments à rôtir.
3. Faites glisser l‘autre extrémité de la fourche sur la broche de la rôtissoire
an que les dents pointent vers les aliments à griller.
4. Centrez la nourriture au milieu, xez-la avec la fourche et serrez la vis.
5. Lors de la cuisson de la volaille, les cuis- ses et les ailes doivent être
attachées au corps avec du l de cuisine an que la broche puisse tourner
facilement.
6. Assaisonnez ou garnissez la grillade à votre goût.
7. IMPORTANT ! Placez le bac d‘égouttage en bas de l‘appareil pour recueillir
les gouttes.
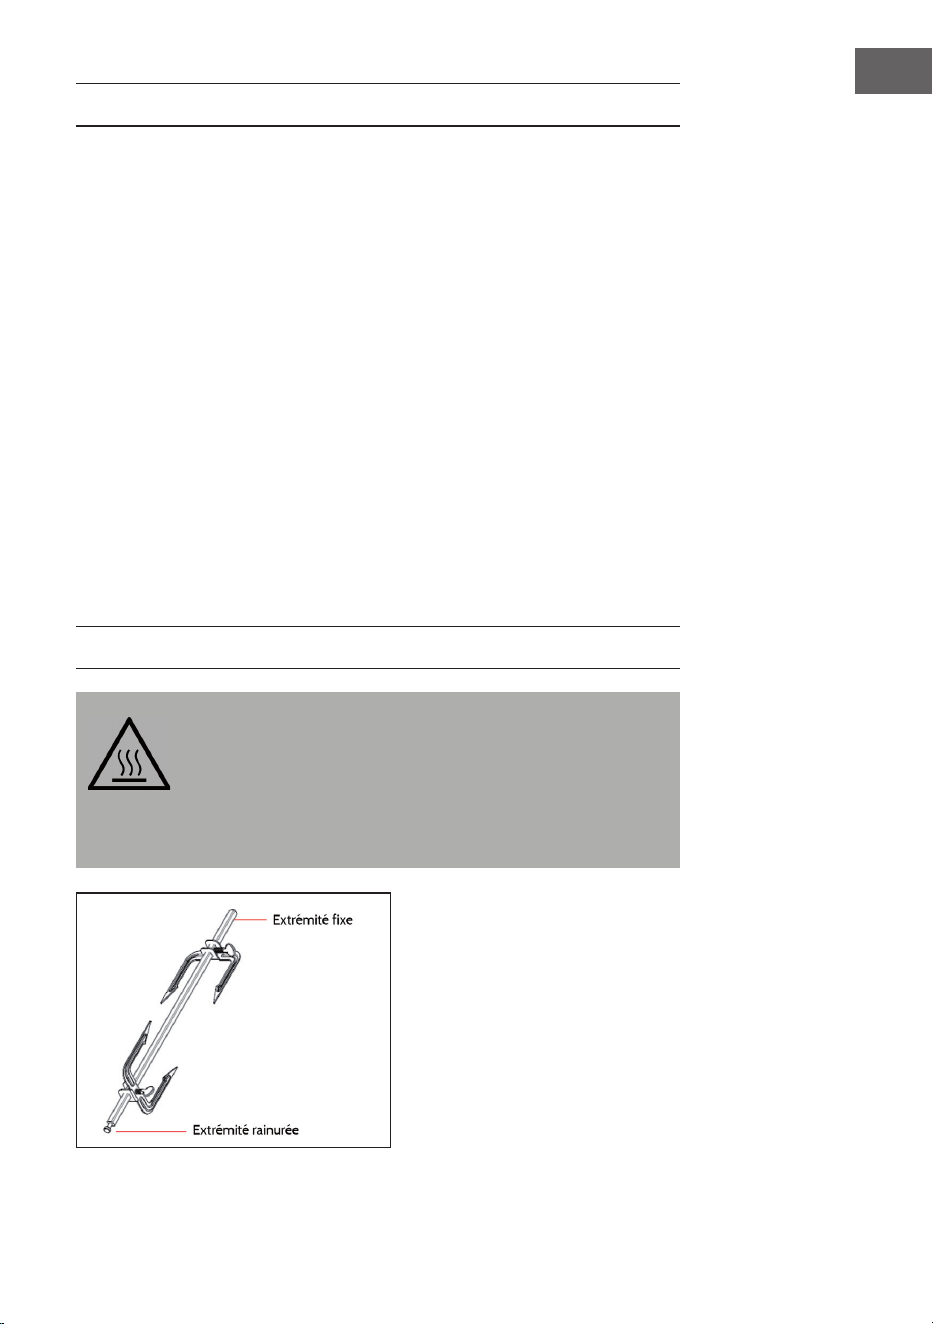
8. Insérez l‘extrémité xe de la broche rôtissoire dans l‘ouverture de
l‘entraînement au centre du bac d‘égouttage.
9. Insérez l‘extrémité rainurée dans le support en haut à l‘intérieur du four.
10. Réglez le bouton TIMER suivant votre recette (voir recettes). Si votre
durée de cuisson dépasse 1 heure, réglez le bouton de durée sur “Stay On”
et contrôlez l‘appareil pendant la cuisson.
11. Lorsque les aliments sont cuits, placez le bouton de réglage de la durée
sur “Off” et débranchez la che. ATTENTION : le gril est très chaud sur
le haut et sur les côtés. Pour retirer la nourriture, utilisez toujours des
maniques ou autres gants résistant à la chaleur. Vous pouvez aussi utiliser
un ustensile de rôtissoire ou une pince.
12. Retirez la broche tournante en la soulevant et en la tirant vers vous. La
partie inférieure doit être soulevée hors de l‘ouverture d‘entrainement,
puis vous pouvez poser les aliments sur une planche de découpe.
13. Posez les aliments sur une planche de découpe ou un plat de service et
laissez-les reposer 10-15 minutes.
14. Desserrez les vis de la fourche avec des maniques et retirez-les de la
broche tournante. Retirez ensuite avec précaution les aliments de la
broche et découpez-les.

21
FR
PRÉPARER UN KEBAB AVEC LE GRIL
Si un support pour kébab est fourni avec la livraison, suivez les indications
ci-après pour l‘utiliser.
ATTENTION
Les surfaces de l‘appareil sont très chaudes pendant le
fonctionnement et le restent ensuite ! Ne posez rien sur
l‘appareil. Portez toujours des protections comme des gants de
cuisine isolants lorsque vous placez des objets dans l‘appareil
ou que vous les en retirez. N‘utilisez jamais l‘appareil sans son
bac d‘égouttage.
1. Assemblez le support de kébab tel qu‘indiqué par les illustrations.
2. Placez le bac d‘égouttage rond pour récupérer les gouttes sous l‘appareil.
3. Insérez l‘extrémité xe de la broche tournante dans l‘ouverture
d‘entrainement au milieu du bac de récupération.
4. Insérez l‘extrémité rainurée dans le support en haut à l‘intérieur du four.
5. Réglez le bouton TIMER selon votre recette (voir recettes). Si la durée
dépasse 1 heure, placez le bouton de réglage sur “Stay On” et surveillez
l‘appareil pendant la cuisson.
6. Lorsque les aliments sont cuits, mettez le bouton de réglage de la durée
sur „Off“ et débranchez la che.
22
FR
Temps de cuisson
• Poulet, canard 30~45 minutes
• Steak 45~60 minutes
• Kebab 20~30 minutes
• Poisson 20~32 minutes
• Légumes 15~20 minutes
NETTOYAGE ET ENTRETIEN
• Débranchez la che de la prise. Laissez le gril refroidir complètement.
Retirez tous les accessoires.
• Pour le nettoyage du corps de l‘appareil, utilisez un chiffon humide et /
ou doux. NE PLONGEZ JAMAIS L‘APPAREIL DANS L‘EAU. Nettoyez les
parois intérieures à l‘eau et avec un chiffon sec. N‘utilisez pas de produit
de nettoyage puissant. Tous les accessoires peuvent être nettoyés à l‘eau
savonneuse.
• Frottez les parois avec un chiffon humide.
CONSEILS POUR LE RECYCLAGE
S‘il existe une réglementation pour l‘élimination ou le
recyclage des appareils électriques et électroniques
dans votre pays, ce symbole sur le produit ou sur
l‘emballage indique que cet appareil ne doit pas
être jeté avec les ordures ménagères. Vous devez le
déposer dans un point de collecte pour le recyclage des
équipements électriques et électroniques. La mise au
rebut conforme aux règles protège l‘environnement
et la santé de vos semblables des conséquences
négatives. Pour plus d‘informations sur le recyclage
et l‘élimination de ce produit, veuillez contacter votre
autorité locale ou votre service de recyclage des
déchets ménagers.
23
ES
Estimado cliente:
Le felicitamos por la adquisición de este producto. Lea
atentamente el siguiente manual y siga cuidadosamente
las instrucciones de uso con el n de evitar posibles
daños. La empresa no se responsabiliza de los daños
ocasionados por un uso indebido del producto o por haber
desatendido las indicaciones de seguridad. Escanee el
código QR para obtener acceso al manual de usuario más
reciente y otra información sobre el producto.
ÍNDICE DE CONTENIDOS
Indicaciones de seguridad 24
Antes del primer uso 25
Uso de la parrilla como asador 25
Preparar el kebab con la parrilla 27
Limpieza y mantenimiento 28
Retirada del aparato 28
DATOS TÉCNICOS
Número de artículo 10009353, 10009354
Fuente de alimentación 220-240 V ~ 50 Hz
Potencia 1800 W
FABRICANTE E IMPORTADOR (REINO UNIDO)
Fabricante:
Chal-Tec GmbH, Wallstraße 16, 10179 Berlín, Alemania.
Importador para Gran Bretaña:
Berlin Brands Group UK Limited
PO Box 42
272 Kensington High Street
London, W8 6ND
United Kingdom

24
ES
INDICACIONES DE SEGURIDAD
• Coloque el aparato de tal manera que el enchufe sea fácilmente accesible.
• Compruebe regularmente el cable de alimentación. Si el cable de
alimentación está dañado, deberá ser sustituido por el fabricante, un
servicio técnico autorizado o una personal igualmente cualicada.
• No intente reparar el aparato usted mismo. Contacte siempre con
personal especializado.
• No conecte el aparato a tomas de corriente manejadas por control remoto
ni con temporizador.
• No sumerja el aparato, el cable de alimentación ni el enchufe en agua ni en
ningún otro líquido.
• No toque el enchufe con las manos mojadas.
• Para desconectar el aparato no tire del cable, sino del cuerpo del enchufe.
• No utilice el cable como un asidero.
• Coloque el cable de tal manera que nadie pueda pisarlo ni tropezar con él.
• No deje que el cable quede colgando sobre cantos alados.
• No utilice el aparato en estancias húmedas o expuesto a la lluvia
• Coloque el aparato de tal manera que no exista riesgo de sumergirse
en el agua. En caso de que esto sucediera, desconecte el enchufe
inmediatamente y a continuación retire el aparato del agua.
• Desconecte el enchufe de la toma de corriente cuando no utilice el
aparato.
• Mantenga el aparato lejos de fuentes de ignición y fuentes de calor.
• Este aparato puede ser utilizado por niños mayores de 8 años y personas
con discapacidades físicas, sensoriales y mentales y/o con falta de
experiencia y conocimientos, siempre y cuando hayan sido instruidos
sobre el uso del aparato y comprendan los peligros y riesgos asociados.
• Mantenga a los niños alejados del aparato y no deje el aparato en marcha
si no se encuentra bajo supervisión.
• Coloque el aparato en una supercie plana y estable.
• Asegúrese de que no existen objetos o materiales fácilmente inflamables
alrededor de la parrilla.
• Mantenga una distancia de al menos 30 cm entre el aparato y las paredes.
• Durante el funcionamiento del aparato, no toque la rejilla ni otras supercies
calientes.
• Mueva el aparato solo cuando se haya enfriado por completo. Agarre el
aparato solamente por las asas previstas para tal n.
• No coloque el aparato sobre supercies que no resistan el calor. Coloque el
aparato de tal manera que no exista riesgo de que se caiga de la supercie de
trabajo.
• Para evitar acumulación de calor, no coloque el aparato directamente bajo
un mueble o estantería de cocina.
• No coloque el aparato cerca o encima de un horno.
25
ES
ANTES DEL PRIMER USO
Lea las instrucciones atentamente. Esta información es necesaria para usar la
parrilla vertical.
Coloque la parrilla en una super cie plana, como la encimera o la mesa de
la cocina. Alrededor del aparato, mantenga una distancia de 10 cm de las
paredes, armarios u otros objetos. Quite todas las pegatinas del aparato.
Quite la bandeja de goteo, la escupidera, los tenedores y los soportes de las
brochetas y lávelos en agua tibia con algún detergente o en el lavavajillas.
Séquelos bien antes de usarlos.
Durante la preparación, asegúrese de que el control del TEMPORIZADOR
esté en „Off“ y que el aparato esté desconectado de la fuente de alimentación.
Se recomienda encender el aparato durante un período de prueba para
eliminar los residuos de producción. Inserte el enchufe en una toma de 230
V. Ponga el control del TEMPORIZADOR en „20“ minutos. Se puede producir
algo de humo y olor. Esto es normal.
Para evitar que se raye, se pegue, se decolore o se incendie, no se debe colocar
nada encima de la parrilla, especialmente durante el uso.
USO DE LA PARRILLA COMO ASADOR
ATENCIÓN
Las super cies del dispositivo se calientan durante el uso y
permanecen calientes después. No coloque nada en el aparato.
Use siempre guantes de horno protectores y aislantes cuando
coloque o retire objetos del aparato. Nunca use el aparato sin
la bandeja de goteo.

26
ES
1. Empuje la horquilla nal con las púas apuntando al centro en la espita
giratoria y apriete el tornillo.
2. Guíe el extremo puntiagudo a través del medio de la comida que se va a
asar.
3. Empuje el otro extremo de la horquilla en el espetón para que las púas
sujeten la barbacoa.
4. Alinee la barbacoa en el medio, asegúrela a la horquilla nal y apriete el
tornillo.
5. Cuando se cocinan aves de corral, las patas y las alas deben atarse con hilo
de cocina para que se queden pegadas al cuerpo y pueda girar fácilmente.
6. Sazone la barbacoa a su gusto.
7. Coloque la bandeja de goteo en el aparato para recoger las gotas en el
fondo de la parrilla.
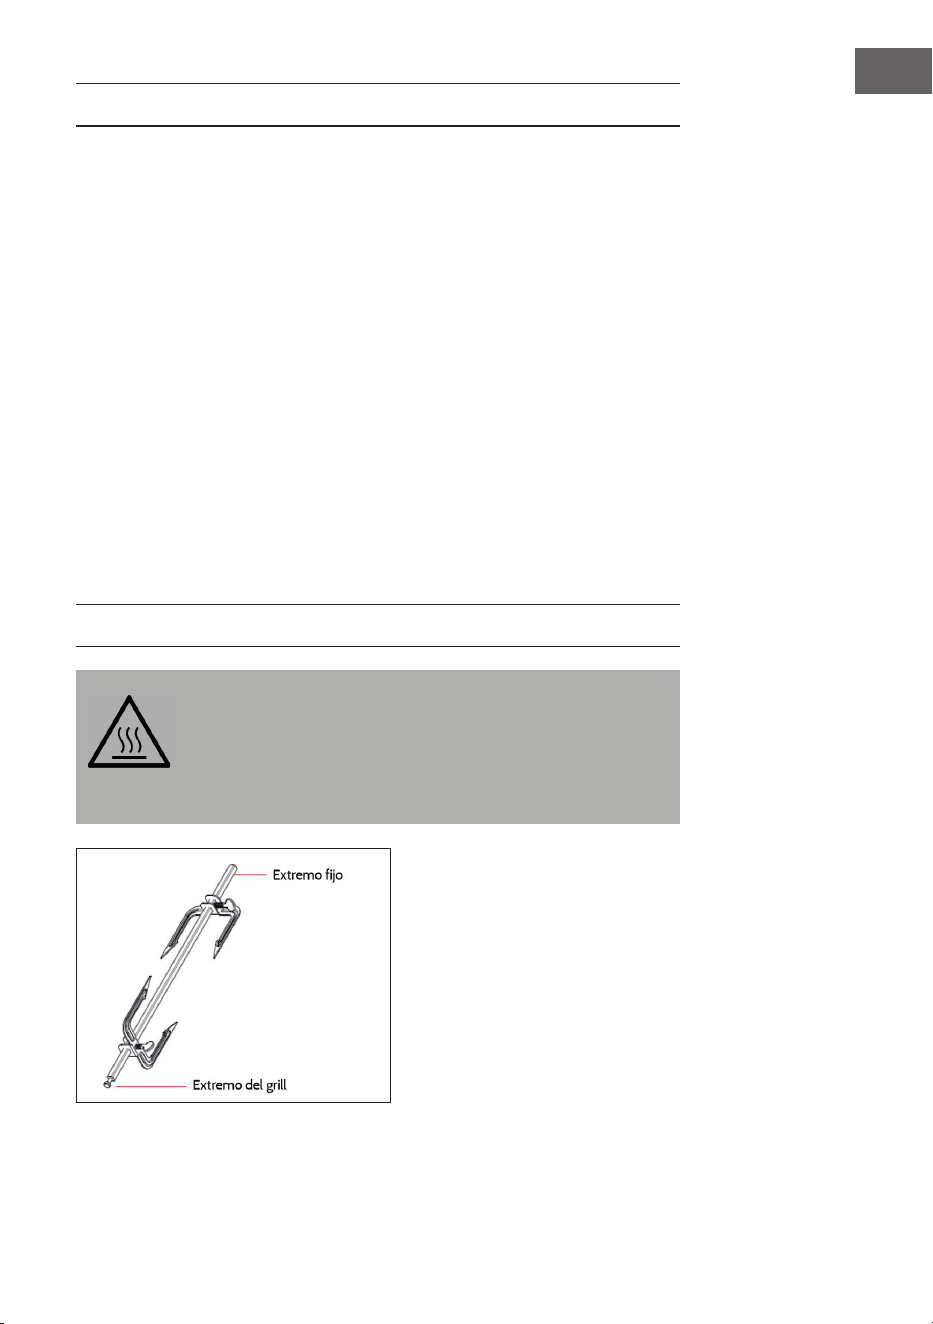
8. Inserte el extremo jo de la espita giratoria en la abertura de la unidad en
el centro de la bandeja de goteo.
9. Inserte el extremo ranurado en el soporte de la parte superior dentro del
horno.
10. Ajuste el control del TEMPORIZADOR de acuerdo con la receta (ver
Recetas). Si hace falta más de 1 hora, ajuste el controlador a „Stay On“ y
compruebe el aparato al nal del tiempo de preparación.
11. Cuando la parrilla esté lista, ponga el controlador en „Off“ y desenchúfelo.
ATENCIÓN: La parrilla está muy caliente en la parte superior y en los
lados. Use guantes de horno u otros guantes resistentes al calor para sacar
la comida de la parrilla. También puede usar un tenedor para asar o unas
pinzas.
12. Retire la espita levantándola y tirando de ella hacia usted. La parte inferior
debe ser levantada de la abertura del motor, después puede colocar la
comida en una tabla de cortar.
13. Coloque la comida en una tabla de cortar o en un plato de servir y déjala
reposar durante 10-15 minutos.
14. Afloje los tornillos de la horquilla del extremo con un trapo de cocina y
quételos de la espetera. Luego, con cuidado, saque la comida de la espita y
córtela.

27
ES
PREPARAR EL KEBAB CON LA PARRILLA
Si se incluye un soporte para kebab, siga estas instrucciones de uso.
ATENCIÓN
Las super cies del dispositivo se calientan durante el uso y
permanecen calientes después. No coloque nada en el aparato.
Use siempre guantes de horno protectores y aislantes cuando
coloque o retire objetos del aparato. Nunca use el aparato sin
la bandeja de goteo.
1. Monte el soporte del kebab como se muestra en las fotos
2. Coloque la bandeja de goteo redonda para recoger las gotas en el fondo
del aparato.
3. Inserte el extremo jo de la espita giratoria en la abertura de la unidad en
el centro de la bandeja de goteo.
4. Inserte el extremo ranurado en el soporte en la parte superior dentro del
horno.
5. Ajuste el control del TEMPORIZADOR de acuerdo con la receta (ver
Recetas). Si es más de de más de 1 hora, ajuste el controlador a „Stay On“ y
compruebe el aparato al nal del tiempo de preparación.
6. Cuando la parrilla esté lista, ponga el controlador en „Off“ y desenchúfelo.
28
ES
Tiempos de cocción
• Pollo, pato 30~45 minutos
• Bistec 45~60 minutos
• Kebab 20~30 minutos
• Pescado 20~32 minutos
• Verduras 15~20 minutos
LIMPIEZA Y MANTENIMIENTO
• Saque el enchufe de la toma de corriente. Deje que la parrilla se enfríe
completamente. Retire todos los accesorios.
• Utilice un paño húmedo y suave para limpiar la carcasa. NUNCA
SUMERGIR EL APARATO EN AGUA. Limpie el interior con agua y un paño
seco. No use limpiadores fuertes. Todos los accesorios se pueden limpiar
con agua jabonosa.
• Frote las paredes con un paño húmedo.
RETIRADA DEL APARATO
Si en su país existe una disposición legal relativa a la
eliminación de aparatos eléctricos y electrónicos, este
símbolo estampado en el producto o en el embalaje
advierte que no debe eliminarse como residuo
doméstico. En lugar de ello, debe depositarse en un
punto de recogida de reciclaje de aparatos eléctricos y
electrónicos. Una gestión adecuada de estos residuos
previene consecuencias potencialmente negativas
para el medio ambiente y la salud de las personas.
Puede consultar más información sobre el reciclaje y
la eliminación de este producto contactando con su
administración local o con su servicio de recogida de
residuos.
29
IT
Gentile cliente,
La ringraziamo per aver acquistato il dispositivo. La
preghiamo di leggere attentamente le seguenti istruzioni
per l’uso e di seguirle per evitare possibili danni tecnici.
Non ci assumiamo alcuna responsabilità per danni
scaturiti da una mancata osservazione delle avvertenze
di sicurezza e da un uso improprio del dispositivo.
Scansionare il codice QR seguente, per accedere al
manuale d’uso più attuale e per ricevere informazioni sul
prodotto.
INDICE
Avvertenze di sicurezza 30
Prima di procedere all’utilizzo 31
Utilizzare la griglia per arrostire 31
Preparare un kebab con la griglia 33
Pulizia e manutenzione 34
Smaltimento 34
DATI TECNICI
Numero articolo 10009353, 10009354
Alimentazione 220-240 V ~ 50 Hz
Potenza 1800 W
PRODUTTORE E IMPORTATORE (UK)
Produttore:
Chal-Tec GmbH, Wallstraße 16, 10179 Berlino, Germania.
Importatore per la Gran Bretagna:
Berlin Brands Group UK Limited
PO Box 42
272 Kensington High Street
London, W8 6ND
United Kingdom

30
IT
AVVERTENZE DI SICUREZZA
• Collegare il dispositivo in modo che la spina sia facilmente accessibile in
qualsiasi momento.
• Controllare regolarmente che il cavo di alimentazione non sia danneggiato.
Se il cavo di alimentazione è danneggiato, rivolgersi al produttore o ad un
tecnico qualicato.
• Le riparazioni devono essere eseguite esclusivamente da personale
qualicato, non tentare di riparare il dispositivo autonomamente.
• Non collegare il dispositivo ad un timer o ad una presa con telecomando.
• Non immergere mai il dispositivo, il cavo di alimentazione o la spina in
acqua o in altri liquidi.
• Non toccare la spina con le mani bagnate.
• Non tirare il cavo per staccare la spina, bensì afferrare la spina alla base.
• Non spostare il dispositivo tirando il cavo di alimentazione.
• Installare il dispositivo in modo che nessuno vi possa inciampare.
• Non far scorrere il cavo di alimentazione su spigoli vivi.
• Non utilizzare il dispositivo in ambienti umidi o sotto la pioggia.
• Collocare il dispositivo in un punto dove non possa cadere in acqua. Nel
caso in cui cada in acqua, prima di toccarlo, staccare immediatamente la
spina dalla presa.
• In caso di inutilizzo del dispositivo, staccare la spina dalla presa.
• Tenere il dispositivo lontano da amme libere e da fonti di calore.
• Questo dispositivo può essere utilizzato da bambini a partire da 8 anni
e da persone con limitate capacità siche e psichiche o con conoscenza
ed esperienza limitate, solo se sono stati istruiti sulle modalità d’uso e
comprendono i rischi e i pericoli connessi.
• Tenere i bambini lontano dal dispositivo e non lasciarlo incustodito mentre
è in funzione.
• Collocare il dispositivo su una supercie stabile e piana.
• Assicurarsi che intorno al dispositivo non ci siano oggetti e materiali
inammabili.
• Lasciare almeno 30 cm di distanza tra il dispositivo e le pareti.
• Non toccare la griglia o le superci calde quando il dispositivo è in
funzione.
• Spostare il dispositivo solo quando si è completamente raffreddato.
Afferrare il dispositivo solo tramite le impugnature.
• Collocare il dispositivo solo su superci resistenti al calore e in modo che
non sia troppo vicino al bordo della supercie.
• Per evitare accumulo di calore, non collocare il dispositivo direttamente
sotto mobili da cucina o mensole.
• Non collocare il dispositivo sopra o vicino ai fornelli da cucina.
31
IT
PRIMA DI PROCEDERE ALL’UTILIZZO
Leggere attentamente il presente manuale. Le informazioni sono necessarie
per l’utilizzo della griglia.
Posizionare la griglia su una super cie piana, come un piano di lavoro in cucina
o un tavolo. Intorno al dispositivo bisogna mantenere una distanza di 10 cm da
pareti, mobili e altri oggetti. Rimuovere tutti gli adesivi dal dispositivo. Togliere
la vaschetta di gocciolamento, lo spiedo rotante, la forca e il supporto per
kebab e lavarli con acqua calda e un po’ di detersivo per piatti o in lavastoviglie.
Asciugarli per bene prima di riposizionarli.
Durante la preparazione, assicurarsi che la manopola TIMER sia su “Off” e
che il dispositivo sia scollegato dalla rete elettrica. Si consiglia di effettuare
un’accensione di prova per eliminare eventuali residui del processo produttivo.
Inserire la spina in una presa da 230 V. Posizionare la manopola TIMER su “20”
minuti. Possono comparire fumo e odori. Questo è del tutto normale.
Per evitare graf , scolorimento, incendi e che qualcosa rimanga incollato,
non poggiare nulla sopra al dispositivo. Questo vale in particolare durante il
funzionamento.
UTILIZZARE LA GRIGLIA PER ARROSTIRE
ATTENZIONE
Le super ci del dispositivo diventano estremamente calde
durante l’uso e rimangono bollenti anche dopo lo spegnimento!
Non poggiare nulla sul dispositivo. Indossare guanti protettivi e
isolanti quando si mettono oggetti nel o tolgono oggetti dal
dispositivo.

32
IT
1. Inserire la forca di ssaggio sullo spiedo rotante con i denti rivolti verso il
centro e stringere saldamente la vite.
2. Far passare la punta al centro dell’alimento da arrostire.
3. Inserire l’altra forca di ssaggio sullo spiedo, in modo che i denti siano
rivolti verso la pietanza.
4. Centrare l’alimento sullo spiedo, ssarlo con le forche e stringere
saldamente la vite.
5. Quando si cucina pollame, si consiglia di legare ali e cosce al corpo del
volatile con uno spago da cucina, in modo che lo spiedo possa girare
liberamente.
6. Condire e guarnire secondo le preferenze.
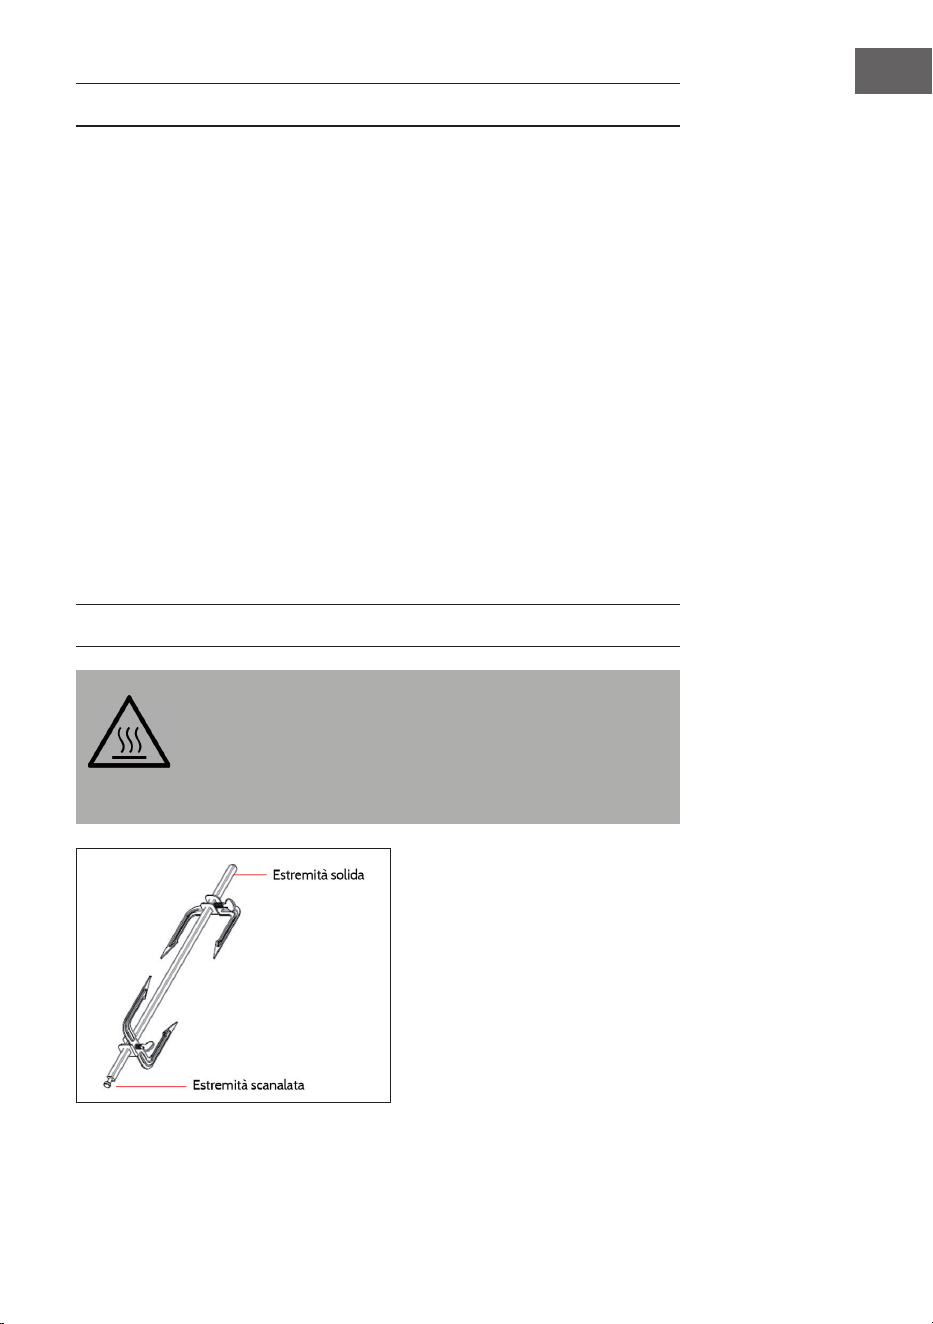
7. IMPORTANTE! Posizionare la vaschetta di gocciolamento nella parte
bassa del dispositivo.
8. Inserire l’estremità solida dello spiedo nell’apertura di trazione al centro
della vaschetta di gocciolamento.
9. Inserire l’estremità scanalata nel supporto in alto all’interno del
dispositivo.
10. Impostare il TIMER in base alla ricetta (v. ricette). Se il timer è superiore
a 1 ora, posizionare la manopola su “Stay On” e controllare il dispositivo
quando scade il tempo di preparazione.
11. Quando le pietanze sono pronte, posizionare la manopola su “Off” e
staccare la spina. ATTENZIONE: la griglia è estremamente calda nella
parte alta e sui lati. Utilizzare guanti da forno o guanti termoresistenti per
togliere gli alimenti. È possibile anche utilizzare una forca da cucina o una
pinza.
12. Rimuovere lo spiedo sollevandolo e tirandolo verso di sé. La parte inferiore
deve essere sollevata dall’apertura di trazione ed è poi possibile poggiare
la pietanza sul tagliere.
13. Poggiare la pietanza su un tagliere o su un piatto da portata e lasciar
riposare per 10-15 minuti.
14. Svitare le viti delle forche di ssaggio con una presina e rimuoverle dallo
spiedo. Procedere a togliere la pietanza facendo attenzione e procedere a
tagliarla.
33
IT
PREPARARE UN KEBAB CON LA GRIGLIA
Se nel volume di consegna è incluso un supporto per kebab, seguire queste
indicazioni per l’uso.
ATTENZIONE
Le super ci del dispositivo diventano estremamente calde
durante l’uso e rimangono bollenti anche dopo lo spegnimento!
Non poggiare nulla sul dispositivo. Indossare guanti protettivi e
isolanti quando si mettono oggetti nel o tolgono oggetti dal
dispositivo. Non utilizzare il dispositivo senza vaschetta di
gocciolamento.
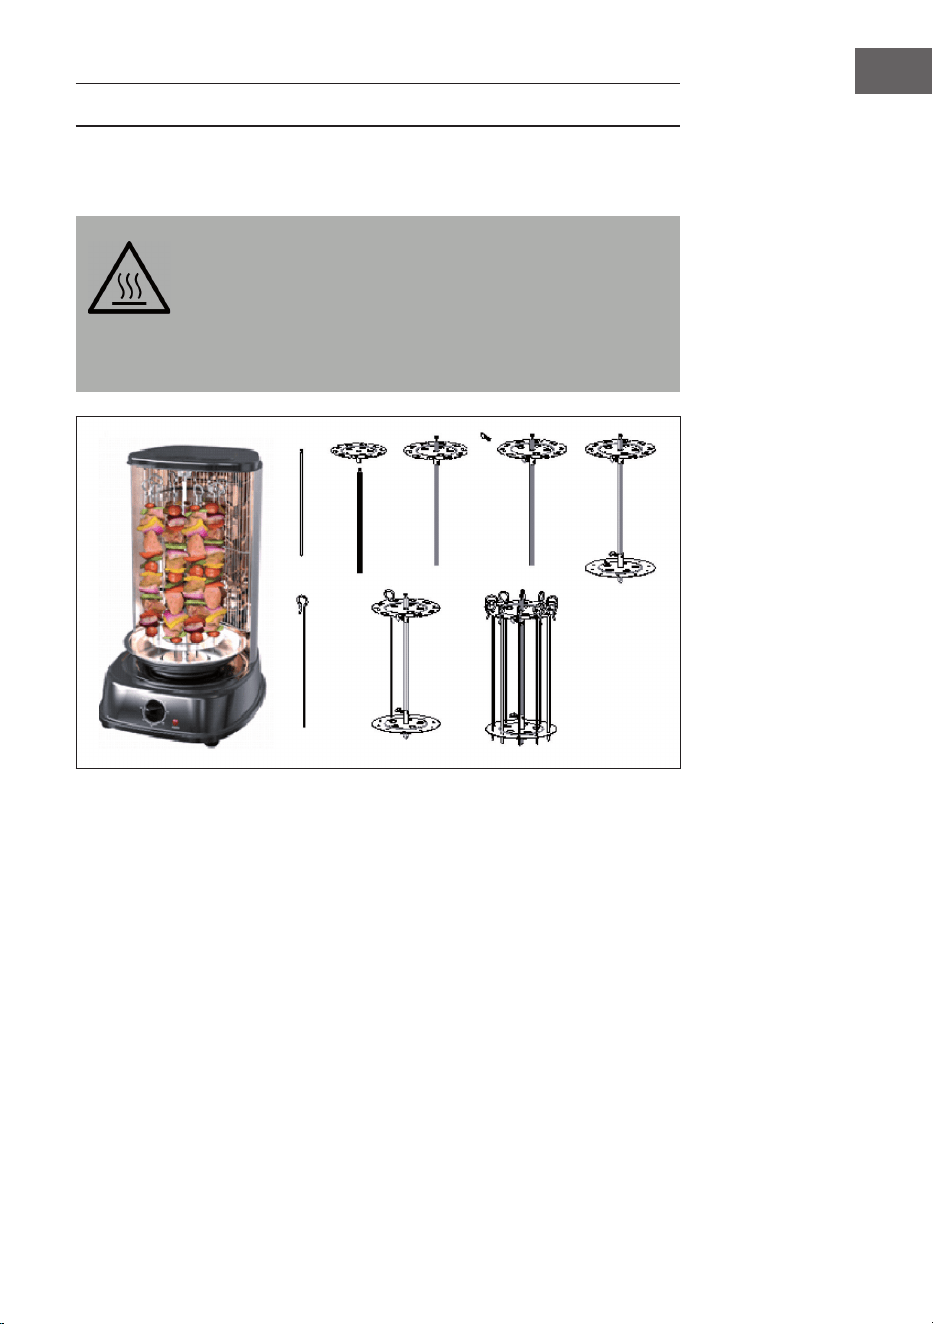
1. Assemblare il supporto per kebab come indicato in immagine.
2. Posizionare nella parte del dispositivo la vaschetta di gocciolamento.
3. Inserire l’estremità solida dello spiedo nell’apertura di trazione al centro
della vaschetta di gocciolamento.
4. Inserire l’estremità scanalata nel supporto in alto all’interno del
dispositivo.
5. Impostare il TIMER in base alla ricetta (v. ricette). Se il timer è superiore
a 1 ora, posizionare la manopola su “Stay On” e controllare il dispositivo
quando scade il tempo di preparazione.
6. Quando le pietanze sono pronte, posizionare la manopola su “Off” e
staccare la spina.
34
IT
Tempi di cottura
• Pollo, anatra: 30-45 minuti
• Bistecca: 45-60 minuti
• Kebab: 20-30 minuti
• Pesce: 20-32 minuti
• Verdure: 15-20 minuti
PULIZIA E MANUTENZIONE
• Staccare la spina dalla presa elettrica, lasciare raffreddare la griglia e
togliere tutti gli accessori.
• Utilizzare un panno umido e/o morbido per pulire l’alloggiamento. NON
IMMERGERE ASSOLUTAMENTE L’ALLOGGIAMENTO IN ACQUA. Pulire
i lati interni con acqua e un panno asciutto. Non utilizzare detergenti
aggressivi. Tutti gli accessori possono essere lavati con acqua e sapone.
• Stronare le superci con un panno umido.
SMALTIMENTO
Se nel proprio paese si applicano le regolamentazioni
inerenti lo smaltimento di dispositivi elettrici ed
elettronici, questo simbolo sul prodotto o sulla
confezione segnala che questi prodotti non possono
essere smaltiti con i riuti normali e devono essere
portati a un punto di raccolta di dispositivi elettrici ed
elettronici. Grazie al corretto smaltimento dei vecchi
dispositivi si tutela il pianeta e la salute delle persone
da possibili conseguenze negative. Informazioni
riguardanti il riciclo e lo smaltimento di questi prodotti
si ottengono presso l’amministrazione locale oppure il
servizio di gestione dei riuti domestici.