Sense
™
User Guide

4 Features
6 Important Safeguards
7 Before First Use
Cooking with the Sense
8 Cleaning and Maintenance
9 Sense Do’s and Don’ts
Terms and Conditions
Table of Contents

This guide contains instructions for using your
Sense™ including helpful cooking tips
and warranty information. Just scroll down to
discover all that your thermometer can do. You
can also find more information on our FAQ
pages on both the app and our website.
Whether you’re craving a perfectly rare ribeye,
juicy and tender chicken, or silky seared salmon,
has you covered. With the
Sense on your side, there’s no more
guesswork, only guaranteed success.
We know you’re excited to start cooking—better
than ever!—with your new thermometer, but
please read all safety information before you
light the grill, turn on the oven, or heat the pan.
Happy Cooking!
Welcome to

4
THE SMART HUB™
The Smart Hub not only charges the probe(s), but also relays
temperature data from the probe(s) to the App and
comes equipped with a speaker for voice alerts and notifications.
(You can mute the hub on the app.) For best results, position the
hub close to the probe(s) during cooking. A fully charged hub is
capable of operating for at least 20 hours of cooking time and
will hold its charge even when turned o.
THE APP
The Sense will only work in conjunction with the free
App, which must be downloaded onto your smartphone
or tablet. Once paired with the hub and probe(s), the app will
display live temperature readings, which you can view from
anywhere (using Wi-Fi). More than that, the app can show you
how to prepare hundreds of your favorite foods to the perfect
doneness. You can also look to the app for Guided Cooking
recipes that take you through every step of the process, with
accompanying videos for each step. In Guided Cooking, the
thermometer is automatically set for you, and the app will notify
you when you need to take any action. You can also set and
control the thermometer manually via Cook Control on the app.
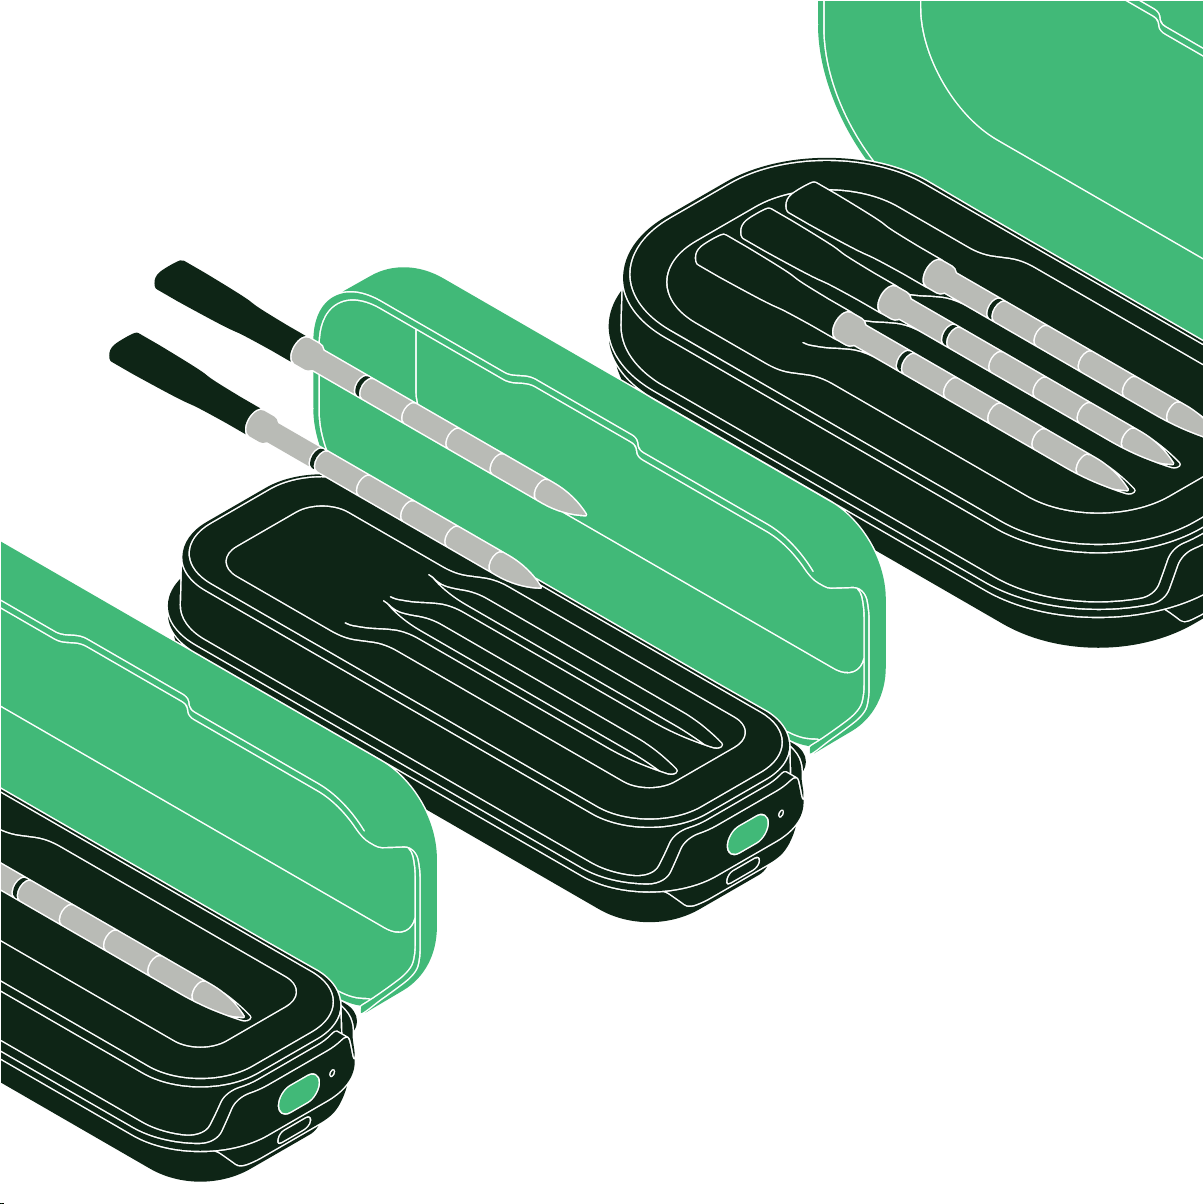
FEATURES
The Sense is made up of three components—the
Probe(s), the Smart Hub™ and the CHEF® App—
working together to bring you accurate live temperature
readings, as well as step-by-step guided cooking recipes, video
how-to’s, and more! You can use your wireless probe for most
kinds of cooking and with most appliances including grills, smok-
ers, ovens, stoves, deep fryers, and air fryers. You can even use
your probe when cooking with the Cooker by CHEF-
(except when pressure cooking). DO NOT use the
probes for pressure cooking or microwaving as those cooking
methods can damage the probe, and the probe could damage
the microwave. The three components of your Sense
work together seamlessly and wirelessly to bring you precise,
accurate temperature readings while cooking:
THE PROBE(S)
Made of stainless steel and ceramic, the wireless probe has five
sensors for reading both the internal temperature of your food
(where the probe is inserted) and the ambient temperature
(the temperature of the air surrounding your food). The internal
temperature sensors are positioned at the tip, as well as at three
other points in the stainless-steel portion and have a range
of 32˚F to 212˚F. The ambient temperature sensor is housed
toward the ceramic end and has a range of 32˚F to 1000˚F.
When the probe is fully charged, it is capable of operating for
up to 40 hours.
5
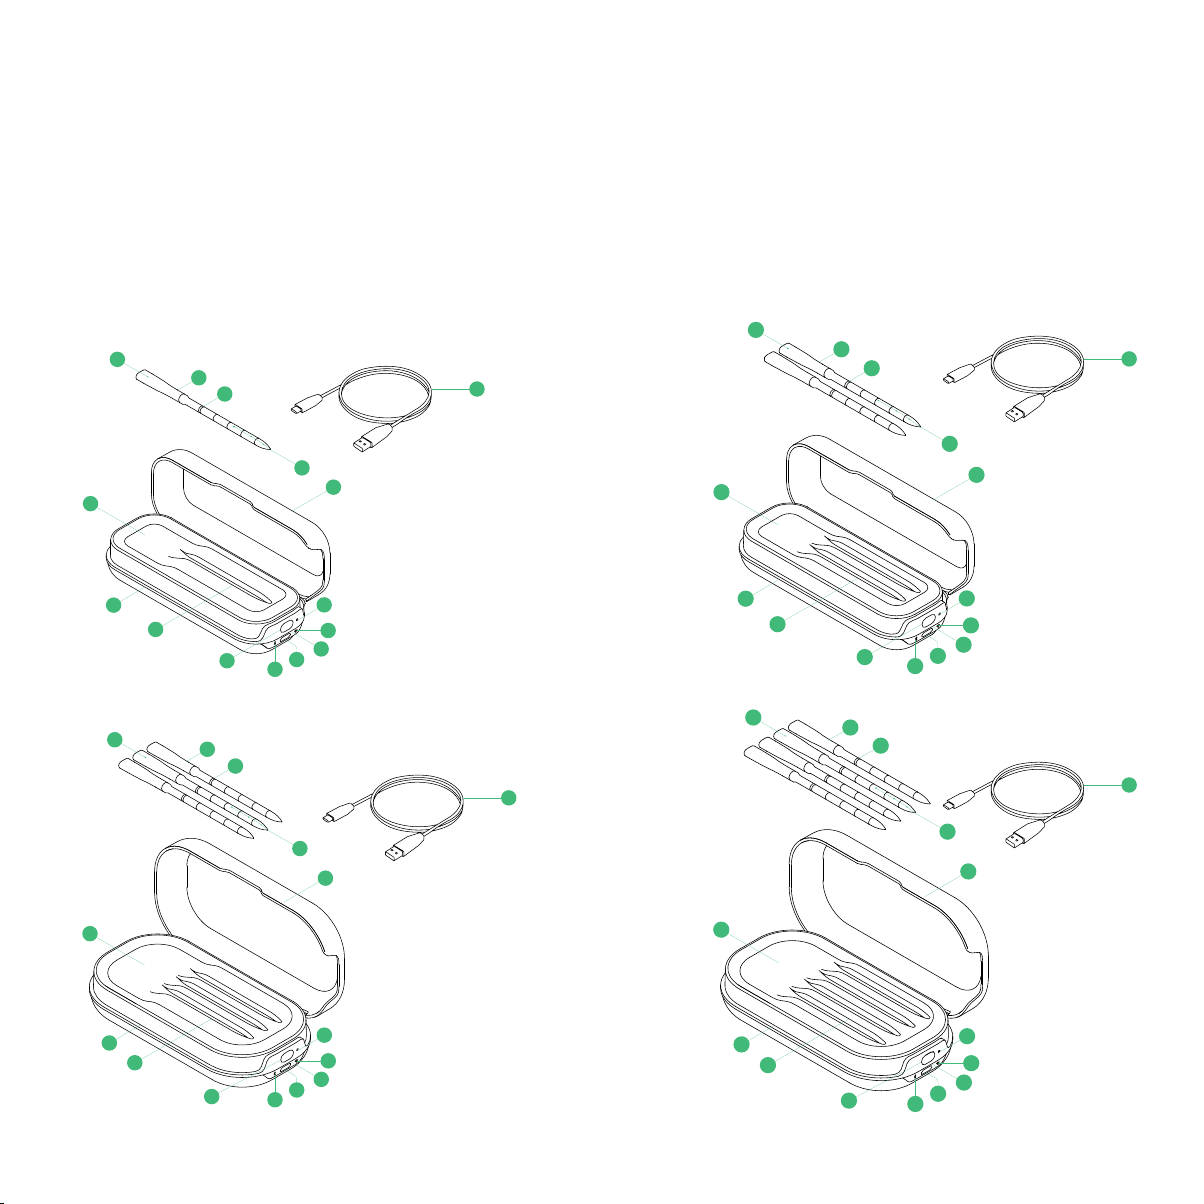
FEATURES
1. Smart Hub™
2. Probe(s)*
3. Probe Minimum Insertion Point
4. Probe Charging Nest(s)
5. Hub Lid
6. Hub Power Button (also used when pairing)
7. Factory Reset Pin Hole
CQ60-V3
10
12
2
3
13
5
14
7
1
11
4
4
4 4
8
8
6
9
10
12
2
3
13
5
14
7
1
11
8
8
6
9
10
12
2
3
13
5
14
7
1
11
8
8
6
9
10
12
2
3
13
5
14
7
1
11
8
8
6
9
CQ60-V3
10
12
2
3
13
5
14
7
1
11
4 4
4
4
8
8
6
9
10
12
2
3
13
5
14
7
1
12
8
8
6
9
10
12
2
3
13
5
14
7
1
11
8
8
6
9
10
12
2
3
13
5
14
5
1
11
8
8
6
9
CQ60-V3
10
12
2
3
13
5
14
7
1
11
4 4 4
4
8
8
6
9
10
12
2
3
13
5
14
7
1
11
8
8
6
9
10
12
2
3
13
5
14
7
1
11
8
8
6
9
10
12
2
3
13
5
14
7
1
11
8
8
6
9
SINGLE SET
CQ60-V3
10
12
2
3
13
5
14
7
1
11
4
4 4 4
8
8
6
9
10
12
2
3
13
5
14
7
1
12
8
8
6
9
10
12
2
3
13
5
14
7
1
11
8
8
6
9
10
12
2
3
13
5
14
5
1
11
8
8
6
9
CQ60-V3
10
12
2
3
13
5
14
7
1
11
4 4 4 4
8
8
6
9
10
12
2
3
13
5
14
7
1
12
8
8
6
9
10
12
2
3
13
5
14
7
1
11
8
8
6
9
10
12
2
3
13
5
14
5
1
11
8
8
6
9
CQ60-V3
10
12
2
3
13
5
14
7
1
11
4 4 4 4
8
8
6
9
10
12
2
3
13
5
14
7
1
12
8
8
6
9
10
12
2
3
13
5
14
7
1
11
8
8
6
9
10
12
2
3
13
5
14
5
1
11
8
8
6
9
CQ60-V3
10
12
2
3
13
5
14
7
1
11
4 4 4 4
8
8
6
9
10
12
2
3
13
5
14
7
1
12
8
8
6
9
10
12
2
3
13
5
14
7
1
11
8
8
6
9
10
12
2
3
13
5
14
5
1
11
8
8
6
9
CQ60-V3
10
12
2
3
13
5
14
7
1
11
4 4 4 4
8
8
6
9
10
12
2
3
13
5
14
7
1
12
8
8
6
9
10
12
2
3
13
5
14
7
1
11
8
8
6
9
10
12
2
3
13
5
14
5
1
11
8
8
6
9
DOUBLE SET
TRIPLE SET
QUADRUPLE SET
8. Wi-Fi and Bluetooth BLE 5.1 Connection Status Indicator Lights
9. Charging Cord Port
10. Charge Status Indicator Light
11. Speaker
12. Internal Temperature Sensors (inside probe)
13. Ambient Temperature Sensor (inside probe)
14. Hub Charging Cable
*Number of probes depends on the set purchased. Additional probes sold separately.

6
IMPORTANT SAFEGUARDS
Basic safety precautions should always be followed, including:
READ ALL THE INSTRUCTIONS
1. Use the Sense™ for its intended purpose only.
For use with food only.
2. CAUTION: The probe gets HOT! Do not touch the probe
with bare hands during or after cooking.
3. To reduce the risk of electrical shock, do not submerge the
hub in water or other liquids.
4. To avoid damage to the probe, insert it in the food to
the minimum insertion point marked on the probe. The
internal components have a max temperature of 212°F.
Temperatures above that can damage the probe. When
cooking, ensure that the exposed end of the probe does
not touch hot cooking surfaces.
5. Do not use the thermometer when microwaving
or pressure cooking.
6. After using, let the probe cool, then clean as directed. Dry
completely before storing.
7. Do not drop the probe(s) on a hard surface.
8. Though the probe is top-rack dishwasher safe, it’s better to hand
wash it. Use warm, soapy water, and rinse and dry it well. Do not
use scouring pads or abrasive cleaners, which will scratch it.
9. The Sense probe is waterproof. However, avoid
drastic changes in temperature; for example, do not
plunge it in ice water when hot.
10. Store the probe(s) in the charging nest(s) of the Smart Hub.
Be sure they are completely dry before storing.
11. The probe is SHARP! Care should be exercised when handling
the probe. This appliance should not be used by or near children
or individuals with certain disabilities.
12. Take care when inserting and removing the probe. Do not apply
excessive pressure and avoid extreme changes in direction.
13. Consuming undercooked meats, poultry, or seafood may
increase the risk of foodborne illness. To avoid this risk, cook
your food to the temperatures recommended by the USDA.
14. Follow local regulations when recycling.
CALIFORNIA PROPOSITION 65:
(Applicable to California residents only.)
WARNING: Cancer and Reproductive Harm –
www.P65Warnings.ca.gov.
HOUSEHOLD USE ONLY
SAVE THESE INSTRUCTIONS
FCC STATEMENT
This device complies with Part 15 of the FCC Rules. Operation
is subject to the following two conditions:
1. This device may not cause harmful interference, and
2. This device must accept any interference received, including
interference that may cause undesired operation.
CAUTION
Changes or modifications to this unit not expressly approved
by the party responsible for compliance could void the user’s
authority to operate the equipment.
NOTE
This equipment has been tested and found to comply with
the limits for a Class B digital device, pursuant to Part 15 of
the FCC Rules. These limits are designed to provide reason-
able protection against harmful interference in a residential
installation. This equipment generates, uses, and can radiate
radio frequency energy and, if not installed and used in accor-
dance with the instructions, may cause harmful interference
to radio communications. However, there is no guarantee
that interference will not occur in a particular installation. If
this equipment does cause harmful interference to radio or
television reception, which can be determined by turning the
equipment o and on, the user is encouraged to try to correct
the interference by one or more of the following measures:
1. Reorient or relocate the receiving antenna.
2. Increase the separation between the equipment and receiver.

7
3. Connect the equipment to an outlet on a circuit dierent
from that to which the receiver is connected.
4. Consult the dealer or an experienced radio/TV technician
for help.
To satisfy RF exposure requirements, a separation distance of
20cm or more should be maintained between the antenna of this
device and persons during device operation. To ensure compliance,
operation at closer than this distance is not recommended.
ISED REGULATORY COMPLIANCE
This device contains license-exempt transmitter(s)/receiver(s)
that comply with Innovation, Science and Economic Develop-
ment Canada’s license-exempt RSS(s). Operation is subject to
the following two conditions:
1. This device may not cause interference.
2. This device must accept any interference, including inter-
ference that may cause undesired operation of the device.
L’émetteur/récepteur exempt de licence contenu dans le
présent appareil est conforme aux CNR d’Innovation, Sciences
et Développement économique Canada applicables aux
appareils radio exempts de licence. L’exploitation est autorisée
aux deux conditions suivantes :
1. L’appareil ne doit pas produire de brouillage.
2. L’appareil doit accepter tout brouillage radioélectrique
subi, même si le brouillage est susceptible d’en comprom-
ettre le fonctionnement.
This equipment complies with IC RSS-102 radiation exposure
limits set forth for an uncontrolled environment. This equip-
ment should be installed and operated with minimum distance
20 cm between the radiator and your body.
Cet équipement est conforme aux limites d’exposition aux
radiations IC CNR-102 établies pour un environnement non
contrôlé. Cet équipement doit être installé et utilisé avec une
distance minimale de 20 cm entre le radiateur et votre corps.
BEFORE FIRST USE
For best results, follow these steps before using your Sense
for the first time. Note that the hub and probe(s) must be
paired with the free App in order to work.
1. Remove all packaging materials and check to ensure that
all parts are accounted for.
2. Carefully wipe the probe(s) down with a damp cloth to
remove any packing debris.
3. Charge the hub and the probe(s). Plug the smaller end
of the USB cord (included) into the charging port on the
hub. Plug the other end into a USB charger, such as a wall
charger (not included). If using a wall charger, be sure it’s
plugged into an electric socket. The ON button will light up.
If the button is red or blinking red, it means the hub’s
charge is very low. During charging, the button will blink
green; it will turn solid green when the hub is fully charged.
The hub requires about 3 hours to fully charge and will
sustain its charge for at least 20 hours of active use. When
turned o, the hub will keep its charge for up to 1 year.
4. Press the probe(s) into the nest on the hub to charge them.
Be sure they’re securely nestled. A probe requires about
20 minutes to fully charge and will sustain its charge for up
to 40 hours of active use. (However, after just 1 minute of
charging, you can use a probe and it will work for hours.)
5. While the hub and probe(s) are charging, download the
App from the App Store or Google Play (if you
don’t already have it).
6. Pair your hub and probe(s) as directed on the app to set
up and activate your new thermometer.
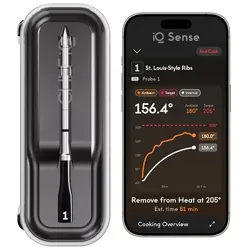
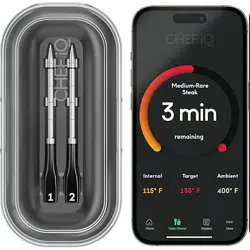
COOKING WITH THE SENSE
The Sense makes cooking food to the perfect
doneness easy. Using the free App, you can either set the
thermometer manually to the desired temperature or follow one
of our Guided Cooking recipes, which provide you with directions
based on the internal temperature of the specific food you’re
cooking. You can also take advantage of our presets to benefit
from hundreds of hours of testing by our culinary team. Simply
input the type of food you want to cook, and this guide will suggest
the method, temperature, time (and more!) to ensure perfectly
cooked food. For best results, follow these steps:

8
1. Ensure the hub is charged and turned on, and that the
probe(s) are charged. The hub not only charges the probe
but also relays information from the probe to the
App for you to receive on your smartphone or tablet.
2. Preheat your cooking appliance as needed, prep your
ingredients, and season your food as desired or directed. You
can use the probes in the oven, grill, or smoker, on the stove,
and in an air fryer. Because they’re waterproof, you can use
the probes for simmering, boiling, cooking sous vide, and
even for deep frying when inserted into the food to be fried.
IMPORTANT: The probes should not be used when micro-
waving or pressure cooking. They should also not be used as
candy or deep-fry thermometers because some components
in the metal portion cannot exceed 212˚F.
3. Place the hub near (but never in or on) the cooking appliance.
Though it has a Bluetooth
®
connectivity range of 200 feet
in the open air, the hub works quickest and most eiciently
if placed near the probes during cooking, especially if the
probes are in a closed environment, such as an oven or
closed grill. Be aware that the hub shell is plastic, however,
and so can melt if placed too close to the heat source, or
warp if left in direct sunlight for long periods of time.
4. Set the temperature for one probe as desired via the
App. You can either quickly set a custom temperature
using Cook Control on the app, or—if you choose to follow
a Guided Cooking recipe—a temperature will be set for
you (some recipes oer a choice of doneness). Alternatively,
you have the option of using the presets: enter what you
want to cook, and this interactive guide will share with you
the best way to do it.
NOTE: When using the presets, you’ll see suggestions for
the remove-from-heat temperature as well as the target
temperature. The target temperature is the final tempera-
ture of the food after being taken o the heat and resting.
In almost all cases, the remove-from-heat temperature will
be lower than the final temperature due to residual carry-
over cooking that occurs after the food is o the heat.
5. When ready to cook, insert the probe into the thickest part
of your food, avoiding any bones.
IMPORTANT: To avoid damage, insert the probe all the
way to the minimum insertion point, indicated on the
probe by the dark line. Also be sure the tip is positioned in
the food properly for the most accurate reading. For more
detailed probe placement instruction, refer to the illustra-
tions in the app presets and/or recipe videos in the Guided
Cooking section.
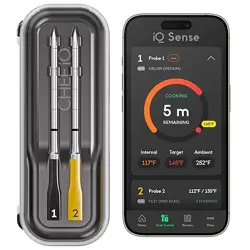
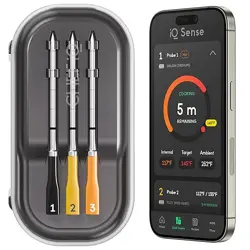
6. If using multiple probes, set the temperature for your second
(or third) probe via the App the same way as you
did the first, and insert the probe.
NOTE: You can run any combination of Guided Cooking
recipes, preset sessions, and manually set sessions at the
same time. The only limitation is that you cannot run
the same Guided Cooking recipe on two probes at the
same time.
7. Cook your food. When cooking, be sure that the exposed
ends of the probe(s), which house the ambient temperature
sensors, are not directly touching the heat source or any hot
surfaces (such as the grates on a grill or the sides or edges
of pots and pans). Although they’re heat resistant to 1000˚F,
the probes can break at temperatures hotter than that.
8. Follow your cooking progress on your smartphone or
tablet—from anywhere, if using Wi-Fi. (If using Bluetooth
only, your range will be more limited.) The app, as well as
the hub, will keep you informed.
9. Cook your food until done. You’ll get an alert when it’s time
to take your food o the heat.
10. Remove the probe(s) carefully. When it’s time to remove
the probe (usually after the food has rested), be extremely
careful as it may still be hot and can cause burns. Use a
towel, potholder, or oven mitt when pulling the probe out
of the food.
CLEANING AND MAINTENANCE
1. Be sure to clean the probes well and dry them before
placing them in the charging nest in the hub. A dirty
probe may not charge.
2. Though the probes are top-rack dishwasher safe, it’s best
to wash them by hand with soapy water to avoid scratch-
ing. Also steer clear of using very abrasive sponges and
cleansers to prevent scratches.
3. If the hub gets dirty, wipe it down with a damp cloth. The
hub is not dishwasher safe and is not waterproof. Do not
immerse it in water.

9
SENSE DO’S AND DON’TS
DO use the thermometer when cooking your favorite
meat, fish, poultry, and even some vegetables, to the
perfect doneness.
DON’T use the thermometer for making pastry or candy.
We love candy, too, but the temperature required to make it
exceeds the range of the probe’s internal sensors.
DON’T use the probe for taking bodily temperatures.
DO refer to the app for detailed directions on proper probe
insertion. The presets include illustrations showing correct
probe positioning for just about anything you’ll want to cook.
In addition, the Guided Cooking section provides advice on
probe placement in its recipe videos.
DON’T let the probe touch bone as this will cause
inaccurate readings.
DO charge your probe for at least 5 minutes before cooking.
DO consider plugging in the hub for longer cooking sessions.
Although the hub maintains its charge for about 20 hours, the
charge may not last for extremely long cooking sessions—such
as smoking. To ensure you don’t run out of battery, leave the
hub plugged in during some or all of the cooking time.
DO keep the hub close to the probe(s) when cooking for the
most accurate and quick temperature readings.
DON’T place the hub on any hot surfaces, such as a grill lid, an
oven door, or the stove.
DO insert the probe fully and securely into the food to avoid
damage. If the temperature near the probe’s internal sensors
exceeds 212˚F the probe can be damaged.
DON’T cover a probe with foil as this will prevent accurate
readings. If your food —for example, ribs— needs to be
wrapped in foil, create a hole in the foil to expose the probe.
DON’T pull a hot probe out of the food barehanded as the
ceramic end retains heat and can cause burns.
DO use a potholder, oven mitt, or towel when handling a hot probe.
DO wash the probes by hand. Use soapy water; rinse and dry well.
DON’T use scouring pads or harsh cleansers that can scratch.
DO use the factory reset if you want to change to whom the
Smart Hub is registered. Look for more information on the
MORE page of the app.
TERMS AND CONDITIONS
Limited Warranty
RJ Brands, LLC d/b/a ® oers a limited 1-year Warranty
(the “Warranty”) available on sales through authorized
distributors and retailers only. Please note that this Warranty
becomes valid from the date that you connect your product with
the App. To activate your Warranty, follow these steps:
1. Download the App from the App Store
or Google Play.
2. Connect your product to the app.
In cases where there is no connection, requires a
proof of purchase to include receipt, order confirmation, etc.
at the discretion of the Support Team. Please retain
your proof of purchase even after registering. In the event
that you do not have proof of your purchase date, we may
declare your Warranty void, or we may, at our sole discretion,
apply the date of manufacture as the purchase date for pur-
poses of this Warranty.
The Warranty is nontransferable, applies only to the original
purchaser, supersedes all other warranties, and constitutes the
entire agreement between the consumer and . Any
changes to the Terms and Conditions of this Warranty must
be in writing, signed by a representative of . No other
party has the right or ability to alter or change the Terms and
Conditions of this Warranty.

10
WHAT THE WARRANTY COVERS
Manufacturer Defects
products are warranted against defects in material
and workmanship, under normal household use, for a period
of 1 year from the date the Warranty is activated in accordance
with the directions listed in the User Guide. If your
product does not work as it should, please contact Customer
Support at support@chefiq.com so that we may assist you.
We may ask you to please submit, via email, photos and/or
video of the issue you are experiencing. This is to help us better
assess the matter and possibly oer a quick fix. Photos and/or
video may also be required to determine Warranty eligibility.
If the product is damaged, does not work as it should, or is no
longer available, a replacement product of equal or lesser value
will be sent at the discretion of Support Team. We
reserve sole discretion whether to require you to return the
purchased product to us prior to shipping you a replacement.
THIS WARRANTY DOES NOT COVER
Misuse
Damage that occurs from neglectful or improper use of
products, including, but not limited to, damage that occurs as
a result of usage with incompatible voltage, regardless of
whether the product was used with a converter or adapter.
See Safety Instructions in the User Guide for information
on proper use of product;
Poor Maintenance
General lack of proper care. Please see Cleaning and Mainte-
nance directions in the User Guide for information on
proper maintenance.
Commercial Use
Damage that occurs from commercial use.
Normal Wear and Tear
Damage or degradation expected to occur due to normal
use over time.
Altered Products
Damage that occurs from alterations or modifications by any
entity other than ; removal of the rating label aixed
to the product.
Catastrophic Events
Damage that occurs from fire, floods, or natural disasters.
Loss of Interest/Buyer’s Remorse
Claims of loss of interest or enjoyment.
HAVE A QUESTION?
Please reach out to us at chefiq.com/support.
Need more help? We’re here for you!
Contact us at support@chefiq.com or (888) 593-1701.
OTHER LIMITATIONS:
ALL WARRANTIES OF ANY KIND WHATSOEVER, EXPRESS,
IMPLIED AND STATUTORY, ARE HEREBY DISCLAIMED. ALL
IMPLIED WARRANTIES OF MERCHANTABILITY AND FIT-
NESS FOR A PARTICULAR PURPOSE ARE HEREBY
DISCLAIMED, PROVIDED THAT IF ANY IMPLIED WARRANTY
OF ANY KIND IS REQUIRED BY ANY JURISDICTION,
INCLUDING MERCHANTABILITY AND FITNESS FOR A
PARTICULAR PURPOSE, THE DURATION OF SUCH
IMPOSED IMPLIED WARRANTY IS LIMITED TO ONE (1) YEAR.
EXCEPT WHERE SUCH LIABILITY IS REQUIRED BY LAW,
THIS WARRANTY DOES NOT COVER, AND SHALL
NOT BE LIABLE FOR, INCIDENTAL, INDIRECT, SPECIAL, OR
CONSEQUENTIAL DAMAGES, INCLUDING WITHOUT
LIMITATION, DAMAGE TO, OR LOSS OF USE OF THE PROD-
UCT, OR LOST SALES OR PROFITS OR DELAY OR FAILURE
TO PERFORM THIS WARRANTY OBLIGATION. THE REME-
DIES PROVIDED HEREIN ARE THE EXCLUSIVE REMEDIES
UNDER THIS WARRANTY, WHETHER BASED ON CON-
TRACT, TORT OR OTHERWISE.
® is a registered trademark of RJ Brands, LLC.
Sense™ is a trademark of RJ Brands, LLC.
Smart Hub™ is a trademark of RJ Brands, LLC.
Cook smarter with
CQ60ALLSETV3UG111524
Distributed by RJ Brands, LLC d/b/a ® Mahwah, NJ 07495.
For questions, comments, or warranty information, please visit
chefiq.com or send inquiries to support@chefiq.com. Due to
continued product improvement, the product illustrated on this
carton may vary slightly from the actual product you buy.
Made in China • Hecho en China • Fabriqué en Chine
1-YEAR LIMITED WARRANTY • USB-C Charging cable included
SÓLO PARA USO DOMÉSTICO
DESTINÉ A L’USAGE DOMESTIQUE UNIQUEMENT
FOR HOUSEHOLD
USE ONLY
The Bluetooth® word mark and logos are registered trademarks
owned by Bluetooth SIG, Inc. and any use of such marks by RJ
Brands, LLC is under license. Other trademarks and trade names
are those of their respective owners. ® is a registered
trademark of RJ Brands, LLC. Sense™ is a trademark of RJ
Brands, LLC. Smart Hub™ is a trademark of RJ Brands, LLC.
Smart Hub™
CHEF HUB2-V3 CQ60-1C-HUB, CQ60-2C-HUB,
CQ60-3C-HUB, CQ60-4C-HUB
Contains FCC ID: 2AC7Z–ESP32WROVERE
IC: 21098–ESPWROVERE
Sense™
CHEF PROBE-V3 CQ60-PRC-01, CQ60-PRC-02,
CQ60-PRC-03, CQ60-PRC-04
FCC ID: 2A2YP-CQ60QPROBE
IC: 27740-CQ60QPROBE
Designed by ® in the USA; made in China.
www.chefiq.com support@chefiq.com
For more information please visit chefiq.com
or send inquiries to support@chefiq.com