
A
C
2
3
5
2
6
7
8
9
10
11
1
B
2
4
1
1 2
3 4 5
2
3 4
5
6
7
8
9
10
11 12
13
14
15
16
17

id
5
Untuk informasi lebih lanjut, silakan meru-
juk ke Panduan Pengguna Digital.
Daftar isi
1 Keselamatan................................7
1.1 Petunjuk umum ......................... 7
1.2 Penggunaan yang sesuai.......... 7
1.3 Pembatasan grup pengguna .... 7
1.4 Pengangkutan yang aman ........ 7
1.5 Pemasangan yang aman .......... 8
1.6 Penggunaan yang aman ........... 9
1.7 Alat yang rusak ....................... 11
2 Menghindari kerusakan pada
alat .............................................13
3 Perlindungan lingkungan dan
penghematan.............................13
3.1 Membuang kemasan .............. 13
3.2 Menghemat energi .................. 13
4 Memasang dan menyam-
bungkan.....................................14
4.1 Lingkup pengiriman................. 14
4.2 Kriteria lokasi pemasangan..... 14
4.3 Memasang alat........................ 15
4.4 Mempersiapkan alat untuk
penggunaan pertama kali ....... 15
4.5 Menghubungkan alat deng-
an listrik ................................... 15
5 Pendahuluan .............................15
5.1 Perangkat ................................ 15
5.2 Panel kontrol ........................... 15
6 Perlengkapan ............................16
6.1 Rak .......................................... 16
6.2 Rak tetap ................................. 16
6.3 Kontainer buah dan sayuran
dengan pengontrol kelemba-
pan .......................................... 16
6.4 Kontainer variabel suhu .......... 16
6.5 Rak pintu ................................. 16
6.6 Kontainer pintu ........................ 16
6.7 Mesin es batu.......................... 17
6.8 Aksesori................................... 17
7 Pengoperasian dasar................17
7.1 Menghidupkan alat.................. 17
7.2 Petunjuk pengoperasian ......... 17
7.3 Mematikan alat ........................ 17
7.4 Mengatur suhu ........................ 18
8 Fungsi tambahan ......................19
8.1 Super-dingin ........................... 19
9 Alarm..........................................19
9.1 Alarm pintu .............................. 19
10 Kompartemen pendingin ........19
10.1 Tips menyimpan bahan ma-
kanan di kompartemen
pendingin............................... 19
10.2 Zona-zona dingin dalam
kompartemen pendingin ....... 20
11 Kompartemen pembeku .........20
11.1 Kapasitas pembekuan .......... 20
11.2 Memanfaatkan sepenuhnya
volume kompartemen pem-
beku....................................... 20
11.3 Tips menyimpan bahan ma-
kanan di dalam komparte-
men pembeku ....................... 20
11.4 Tips untuk membekukan
bahan makanan segar .......... 20
11.5 Umur penyimpanan makan-
an beku pada suhu−18°C .... 21
11.6 Metode pencairan untuk
makanan beku....................... 21

id
6
12 Kompartemen pengubah su-
hu .............................................21
12.1 Rekomendasi penyimpan-
an di kompartemen pengu-
bah suhu ............................... 22
13 Menghilangkan beku es..........22
13.1 Menghilangkan beku es pa-
da kompartemen pendingin .. 22
13.2 Menghilangkan beku es pa-
da kompartemen pembeku... 22
13.3 Menghilangkan beku es di
kompartemen pengubah
suhu....................................... 22
14 Pembersihan dan perawatan..22
14.1 Menyiapkan alat untuk di-
bersihkan............................... 22
14.2 Membersihkan alat................ 23
14.3 Melepaskan bagian peralat-
an........................................... 23
15 Pemecahan masalah...............25
15.1 Mati listrik .............................. 28
15.2 Melakukan uji mandiri pada
perangkat .............................. 28
16 Penyimpanan dan pembu-
angan .......................................28
16.1 Mematikan alat ...................... 28
16.2 Membuang alat yang su-
dah tidak terpakai ................. 29
17 Layanan pelanggan.................29
17.1 Nomor seri (E-Nr.) dan no-
mor produksi (FD)................. 29
18 Data teknis...............................29
id
7
1 Keselamatan
Perhatikan petunjuk keselamatan berikut.
1.1 Petunjuk umum
¡ Baca dengan saksama petunjuk ini.
¡ Simpan petunjuk seperti informasi produk untuk penggunaan
berikutnya atau untuk pemilik berikutnya.
¡ Jangan menghubungkan alat yang mengalami kerusakan akibat
pengangkutan.
1.2 Penggunaan yang sesuai
Hanya gunakan alat:
¡ untuk mendinginkan dan membekukan bahan makanan serta
membuat es.
¡ dalam peralatan rumah tangga pribadi dan di ruang tertutup di
lingkungan rumah.
¡ hingga ketinggian 2000 m di atas permukaan laut.
1.3 Pembatasan grup pengguna
Alat ini dapat digunakan oleh anak-anak yang berusia mulai 8 ta-
hun dan oleh orang dengan keterbatasan fisik, sensorik, atau
mental, atau pengalaman dan/atau pengetahuan tidak mencu-
kupi, jika mereka diawasi atau dilatih terkait penggunaan alat
yang aman, sehingga memahami bahaya yang bisa terjadi.
Anak-anak tidak boleh bermain-main dengan alat.
Pembersihan dan perawatan pengguna tidak boleh dilakukan oleh
anak-anak tanpa pengawasan.
1.4 Pengangkutan yang aman
PERINGATAN‒Risiko cedera!
Besarnya berat alat dapat menyebabkan cedera ketika diangkat.
▶ Jangan mengangkat alat seorang diri.
id
8
1.5 Pemasangan yang aman
PERINGATAN‒Risiko sengatan listrik!
Pemasangan yang tidak tepat akan membahayakan.
▶ Peralatan hanya boleh disambungkan dan digunakan sesuai de-
ngan data-data yang tercantum pada label tipe peralatan.
▶ Perangkat hanya boleh disambungkan dengan stopkontak sis-
tem grounding yang dipasang sesuai petunjuk ke pasokan lis-
trik dengan arus alternatif.
▶ Sistem konduktor pelindung instalasi listrik rumah harus dipa-
sang sesuai petunjuk.
▶ Jangan pernah menyuplai perangkat melalui alat sakelar ekster-
nal, misalnya, pewaktu atau pengendali jarak jauh.
▶ Saat perangkat dipasang, steker listrik dari kabel sambungan
listrik harus dapat diakses secara leluasa, atau jika akses yang
leluasa tidak dimungkinkan, perangkat pemutus harus dipasang
di instalasi listrik yang terpasang secara permanen sesuai deng-
an peraturan pemasangan.
▶ Pada saat menempatkan peralatan, pastikan bahwa kabel listrik
tidak terjepit atau rusak.
Isolasi kabel daya yang rusak akan membahayakan.
▶ Jangan pernah mendekatkan kabel daya ke sumber panas.
PERINGATAN‒Risiko ledakan!
Jika lubang ventilasi alat tertutup, kebocoran pada sirkuit pendi-
ngin dapat menimbulkan campuran gas-udara yang mudah terba-
kar.
▶ Jangan tutup lubang ventilasi pada housing perangkat atau pa-
da housing pemasangan.
PERINGATAN‒Risiko kebakaran!
Penggunaan kabel daya yang diperpanjang dan adaptor yang ti-
dak diizinkan akan membahayakan.
▶ Jangan gunakan kabel ekstensi atau strip stopkontak ganda.
▶ Hanya gunakan adaptor dan kabel daya yang disetujui oleh pro-
dusen.
id
9
▶ Jika kabel sambungan listrik terlalu pendek dan kabel sam-
bungan listrik tidak tersedia lagi, hubungi teknisi listrik untuk
menyesuaikan pemasangan di rumah.
Strip stopkontak ganda portabel atau komponen jaringan dapat
menjadi sangat panas dan menyebabkan kebakaran.
▶ Jangan letakkan strip stopkontak ganda portabel atau kompo-
nen jaringan di bagian belakang alat.
1.6 Penggunaan yang aman
PERINGATAN‒Risiko sengatan listrik!
Kelembapan yang masuk dapat menyebabkan sengatan listrik.
▶ Hanya gunakan alat dalam ruang yang tertutup.
▶ Jangan letakkan alat di tempat yg panas dan basah.
▶ Jangan gunakan pembersih uap atau pembersih bertekanan
tinggi untuk membersihkan perangkat.
PERINGATAN‒Risiko mati lemas!
Anak-anak dapat menarik material kemasan ke atas kepala mere-
ka atau membungkus diri mereka dengan kemasan tersebut se-
hingga menyebabkan kesulitan bernapas.
▶ Jauhkan material kemasan dari jangkauan anak-anak.
▶ Jangan biarkan anak-anak bermain dengan material kemasan.
Anak-anak dapat menghirup atau menelan komponen kecil se-
hingga menyebabkan kesulitan bernapas.
▶ Jauhkan komponen kecil dari jangkauan anak-anak.
▶ Jangan biarkan anak-anak bermain dengan komponen kecil.
PERINGATAN‒Risiko ledakan!
Jika sirkuit pendingin rusak, cairan pendingin yang mudah terba-
kar dapat mengalir keluar dan meledak.
▶ Jangan gunakan perangkat mekanis lain atau alat lain selain
yang direkomendasikan oleh produsen untuk mempercepat pro-
ses pencairan.
▶ Angkat bahan makanan yang membeku dengan benda tum-
pul,misalnya gagang sendok kayu.

id
10
Produk dengan propelan yang mudah terbakar dan zat-zat pele-
dak dapat meledak,misalnya kaleng semprot aerosol.
▶ Jangan menyimpan produk yang mengandung propelan yang
mudah terbakar atau zat-zat peledak di dalam alat.
PERINGATAN‒Risiko kebakaran!
Perangkat listrik di dalam alat dapat menyebabkan kebakaran,mi-
salnya alat pemanas atau pembuat es listrik.
▶ Jangan mengoperasikan perangkat listrik di dalam alat.
PERINGATAN‒Risiko cedera!
Kontainer berisikan minuman berkarbonasi dapat pecah.
▶ Jangan simpan kontainer berisikan minuman berkarbonasi di
dalam kompartemen pembeku.
Cedera pada mata akibat kebocoran cairan pendingin yang mu-
dah terbakar dan gas berbahaya.
▶ Jangan merusak tabung sistem sirkulasi cairan pendingin dan
isolasi.
Perangkat dapat terguling.
▶ Jangan menginjak atau bersandar pada alas tumpuan, laci, atau
pintu.
PERINGATAN‒Risiko luka bakar!
Setiap komponen di bagian belakang alat menjadi panas selama
pengoperasian.
▶ Jangan pernah menyentuh komponen yang panas.
PERINGATAN‒Risiko radang dingin!
Bersentuhan dengan makanan beku dan permukaan yang dingin
dapat menyebabkan luka bakar karena kedinginan.
▶ Jangan pernah memasukkan makanan beku langsung ke da-
lam mulut begitu makanan dikeluarkan dari kompartemen pen-
dingin.
▶ Hindari menyentuh makanan beku, es, dan permukaan pada
kompartemen pembeku dalam waktu yang lama.
id
11
WASPADA‒Risiko bahaya bagi kesehatan!
Perhatikan petunjuk berikut untuk menghindari kontaminasi pada
bahan makanan.
▶ Jika pintu dibuka untuk waktu yang lama, suhu di kompartemen
alat dapat meningkat secara signifikan.
▶ Bersihkan permukaan yang dapat bersentuhan dengan bahan
makanan dan sistem pembuangan yang mudah diakses secara
berkala.
▶ Simpan daging dan ikan mentah dalam wadah yang sesuai di
lemari pendingin agar tidak menyentuh atau menetes pada ba-
han makanan lainnya.
▶ Jika perangkat pendingin/pembeku sudah lama dibiarkan ko-
song, matikan alat, cairkan, bersihkan, dan biarkan pintu terbu-
ka untuk mencegah pembentukan jamur.
Bagian dalam alat yang terbuat dari logam atau dengan tampilan
logam dapat mengandung aluminium. Jika bahan makanan asam
bersentuhan dengan aluminium, ion aluminium dapat berpindah
ke bahan makanan.
▶ Jangan makan bahan makanan yang terkontaminasi.
1.7 Alat yang rusak
PERINGATAN‒Risiko sengatan listrik!
Alat yang rusak atau kabel daya yang rusak akan membahayak-
an.
▶ Jangan pernah mengoperasikan alat yang rusak.
▶ Untuk memutus sambungan listrik pada alat, jangan pernah me-
lepas pada kabel daya. Selalu lepas pada steker kabel daya.
▶ Jika alat atau kabel daya rusak, segera cabut steker kabel daya
atau matikan sekring di kotak sekring.
▶ Hubungi layanan pelanggan. →Halaman29
Perbaikan yang tidak tepat dapat berbahaya.
▶ Hanya teknisi ahli yang boleh melakukan perbaikan pada alat.
▶ Hanya komponen pengganti asli yang boleh digunakan untuk
perbaikan peralatan.

id
12
▶ Jika kabel daya alat rusak, kabel ini harus digantikan oleh pihak
produsen atau layanan pelanggan atau seorang yang ahli, un-
tuk menghindarkan terjadinya bahaya.
PERINGATAN‒Risiko kebakaran!
Jika pipa rusak, cairan pendingin yang mudah terbakar dan gas
berbahaya dapat keluardan terbakar.
▶ Jauhkan api dan sumber api dari alat.
▶ Alirkan udara di ruangan.
▶ Matikan alat. →Halaman17
▶ Lepaskan steker kabel daya atau matikan sekring di kotak
sekring.
▶ Hubungi layanan pelanggan. →Halaman29

id
13
Menghindari kerusakan pada alat
2 Menghindari kerusakan
pada alat
Menghindari kerusakan pada alat
PERHATIAN!
Memiringkan roda alat dapat meru-
sak lantai saat alat dipindahkan.
▶ Angkut perangkat dengan troli ba-
rang.
▶ Gunakan pelindung lantai saat me-
mindahkan perangkat dan jangan
bergerak secara zig-zag.
Menggunakan alat, alas tumpuan, la-
ci, atau pintu sebagai permukaan du-
duk atau alas untuk dinaiki dapat me-
rusak alat.
▶ Dilarang menginjak atau bersandar
pada alat, alas tumpuan, laci, atau
pintu.
Bagian plastik dan gasket pintu da-
pat menjadi keropos akibat noda mi-
nyak atau lemak.
▶ Jaga bagian plastik dan gasket
pintu bebas dari minyak dan le-
mak.
Bagian dalam alat yang terbuat dari
logam atau dengan tampilan logam
dapat mengandung aluminium. Jika
bersentuhan dengan bahan makanan
yang mengandung asam, aluminium
akan berkarat dan berubah warna.
▶ Hanya bahan makanan yang dike-
mas yang dapat disimpan di da-
lam alat.
Jika bagian peralatan dan aksesori
dibersihkan di dalam mesin pencuci
piring, keduanya dapat berubah ben-
tuk atau berubah warna.
▶ Jangan pernah membersihkan ba-
gian peralatan dan aksesori di da-
lam mesin pencuci piring.
Perlindungan lingkungan dan penghematan
3 Perlindungan lingkung-
an dan penghematan
Perlindungan lingkungan dan penghematan
3.1 Membuang kemasan
Material kemasannya ramah ling-
kungan dan dapat didaur ulang.
▶ Buang setiap komponen secara
terpisah sesuai jenis materialnya.
3.2 Menghemat energi
Jika petunjuk ini diperhatikan, alat
akan menghabiskan lebih sedikit da-
ya.
Pilihan lokasi pemasangan
¡ Lindungi alat dari paparan sinar
matahari langsung.
¡ Pasang alat dengan jarak sejauh
mungkin dari radiator, kompor dan
sumber panas lainnya:
– Jaga jarak 30 mm ke kompor
listrik atau gas.
– Jaga jarak 300 mm dari kompor
minyak atau batubara.
¡ Jaga jarak sebesar 50mm di sam-
ping dinding.
¡ Jangan pernah menutupi atau
menghalangi lubang ventilasi eks-
ternal.
Menghemat energi saat
penggunaan
Catatan:Penyusunan bagian peralat-
an tidak memengaruhi konsumsi da-
ya pada alat.
¡ Hanya buka alat secara singkat
dan tutup dengan hati-hati.
¡ Jangan pernah menutupi atau
menghalangi lubang ventilasi inter-
nal atau lubang ventilasi eksternal.
¡ Pindahkan bahan makanan yang
dibeli ke dalam tas pendingin dan
segera simpan di dalam alat.
id
14
¡ Biarkan bahan makanan dan mi-
numan hangat menjadi dingin se-
belum disimpan.
¡ Untuk menggunakan suhu dingin
makanan beku, simpan makanan
beku di kompartemen pendingin
untuk menghilangkan beku es.
¡ Selalu beri sedikit ruang di antara
bahan makanan dan dinding bela-
kang.
Mode hemat daya panel kontrol
Jika alat tidak digunakan, panel kon-
trol secara otomatis beralih ke mode
hemat daya panel kontrol.
Kecerahan display dikurangi dalam
mode hemat daya panel kontrol.
Catatan:Jika Super-dingin diaktifkan,
"super" akan menyala.
Bagitu panel kontrol dioperasikan
atau pintu dibuka, mode hemat daya
panel kontrol akan dinonaktifkan.
Memasang dan menyambungkan
4 Memasang dan me-
nyambungkan
Memasang dan menyambungkan
4.1 Lingkup pengiriman
Setelah membongkar, periksa semua
komponen dari kerusakan saat peng-
angkutan dan kelengkapan pengirim-
an.
Apabila ada keluhan, tanyakan kepa-
da dealer tempat Anda atau kepada
layanan pelanggan →Halaman29
kami.
Pengiriman terdiri atas:
¡ Freestanding
¡ Perlengkapan dan aksesori
1
¡ Instruksi pemasangan
¡ Petunjuk penggunaan
¡ Direktori layanan pelanggan
¡ Lampiran garansi
2
¡ Label energi
4.2 Kriteria lokasi pemasang-
an
PERINGATAN
Risiko ledakan!
Jika alat terletak di ruangan yang ter-
lalu kecil, udara dan gas yang mu-
dah terbakar dapat bercampur saat
terjadi kebocoran sirkuit pendinginan.
▶ Hanya pasang alat di ruangan de-
ngan volume minimal 1m
3
per 8g
cairan pendingin. Jumlah cairan
pendingin ditunjukkan pada label
peringkat. →Gbr. 1 /
6
Bergantung pada modelnya, berat
alat dari produsen dapat mencapai
85kg.
Untuk menopang berat alat, permu-
kaan harus cukup stabil.
Permukaan lantai harus rata.
Perangkat pendingin ini sesuai untuk
digunakan pada suhu sekitar mulai
16°C hingga 43°C.
Alat berfungsi penuh dalam suhu ru-
angan yang diperbolehkan.
Pemasangan atas bawah dan
berdampingan
Jika 2 lemari pendingin ingin dipa-
sang secara atas bawah atau berse-
belahan, jarak antar alat setidaknya
harus sebesar 150mm. Alat yang di-
pilih dapat dipasang tanpa jarak mini-
mal. Tanyakan kepada toko penjual-
an khusus atau perencana dapur An-
da tentang hal ini.
1
Tergantung perlengkapan peralatan
2
Tidak di semua negara
id
15
4.3 Memasang alat
▶ Pasang alat sesuai dengan petun-
juk pemasangan yang disertakan.
4.4 Mempersiapkan alat un-
tuk penggunaan pertama
kali
1. Keluarkan materi informasi.
2. Lepaskan foil pelindung dan per-
lengkapan pengaman, misalnya
selotip dan karton.
3. Bersihkan alat untuk pertama kali.
→Halaman23
4.5 Menghubungkan alat de-
ngan listrik
1. Hubungkan steker jaringan kabel
daya perangkat ke stop kontak di
dekat peralatan.
Data sambungan perangkat ter-
cantum pada pelat label.
→Gbr. 1 /
6
2. Periksa steker jaringan apakah su-
dah terpasang kuat.
a Perangkat siap untuk digunakan.
Pendahuluan
5 Pendahuluan
Pendahuluan
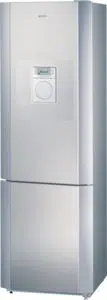
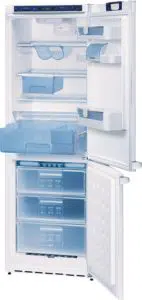
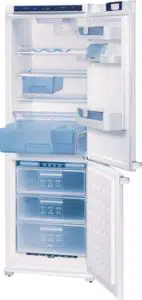
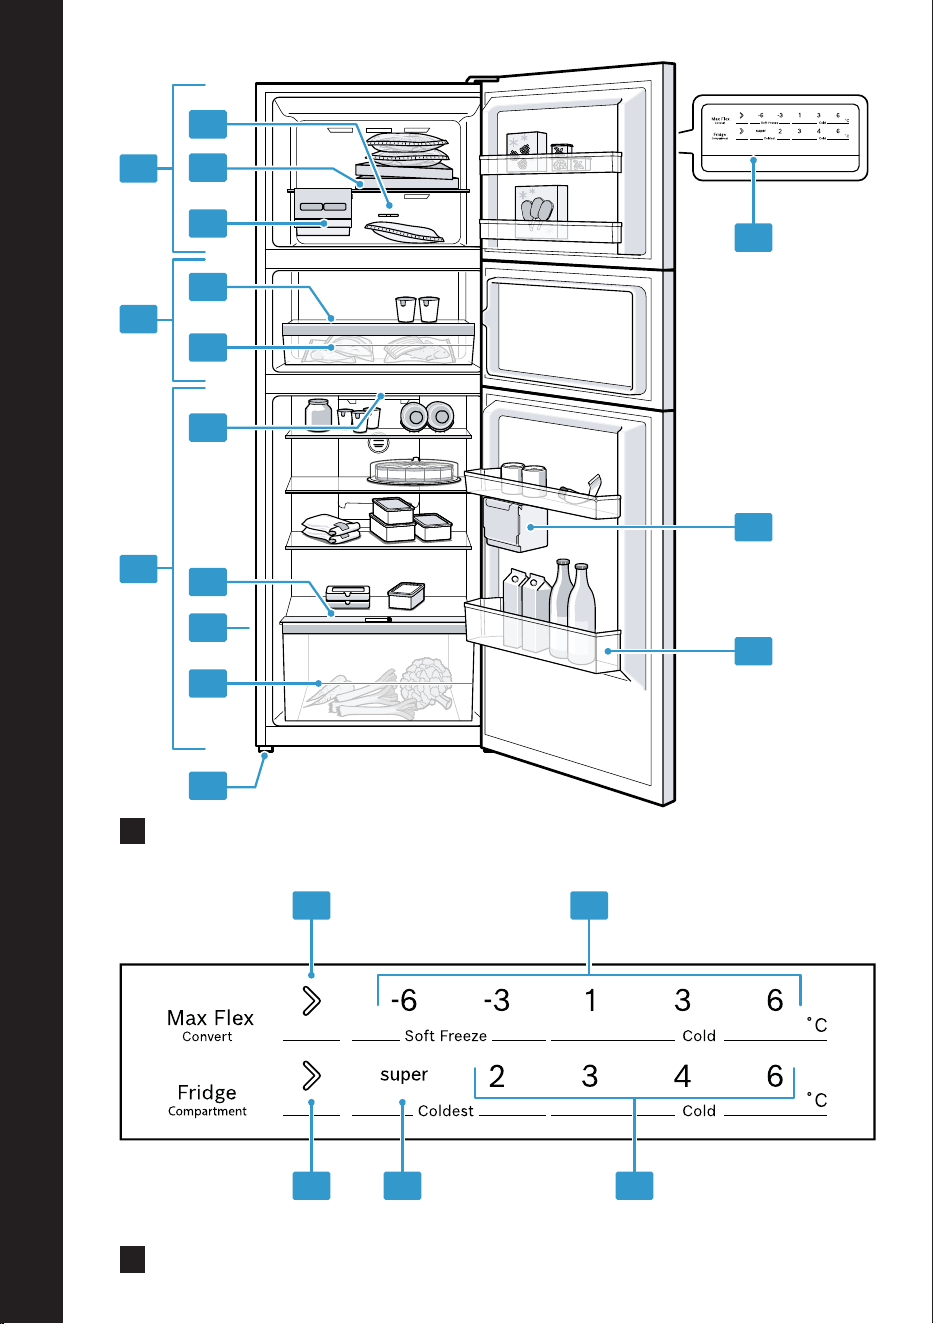
5.1 Perangkat
Ikhtisar mengenai komponen alat da-
pat ditemukan di sini.
→Gbr. 1 , Kemungkinan terdapat
perbedaan antara alat dan ilustrasi
terkait fitur dan ukuran.
A
Kompartemen pembeku
→Halaman20
B
Kompartemen pengubah su-
hu →Halaman21
C
Kompartemen pendingin
→Halaman19
1
Pengatur suhu (kompartemen
pembeku) →Halaman18
2
Rak tetap →Halaman16
3
Mesin es batu
→Halaman17
4
Kontainer variabel suhu
→Halaman16
5
Lampu
6
Pelat label →Halaman29
7
Kontainer buah dan sayuran
dengan pengontrol kelembap-
an →Halaman16
8
Dudukan sekrup
9
Panel kontrol →Halaman15
10
Kontainer pintu
→Halaman16
11
Rak pintu untuk botol besar
→Halaman16
5.2 Panel kontrol
Panel kontrol dapat digunakan untuk
mengatur semua fungsi alat dan me-
nerima informasi tentang status
pengoperasian.
→Gbr. 2
1
(Kompartemen variabel su-
hu) mengatur suhu komparte-
men suhu variabel.
2
Menampilkan suhu komparte-
men suhu variabel yang dia-
tur dalam°C.
3
(Kompartemen pendingin)
menyetel suhu kompartemen
pendingin.
4
super menyala saat Super-di-
ngin diaktifkan.
id
16
5
Menampilkan suhu komparte-
men pendingin yang diatur
dalam°C.
Perlengkapan
6 Perlengkapan
Perlengkapan
Perlengkapan alat bergantung pada
model.
6.1 Rak
Untuk memvariasikan rak sesuai ke-
butuhan, rak dapat dilepaskan dan
dipasang kembali ke posisi lainnya.
→"Melepaskan rak", Halaman23
6.2 Rak tetap
Selalu letakkan rak tetap pada posisi
yang ditentukan.
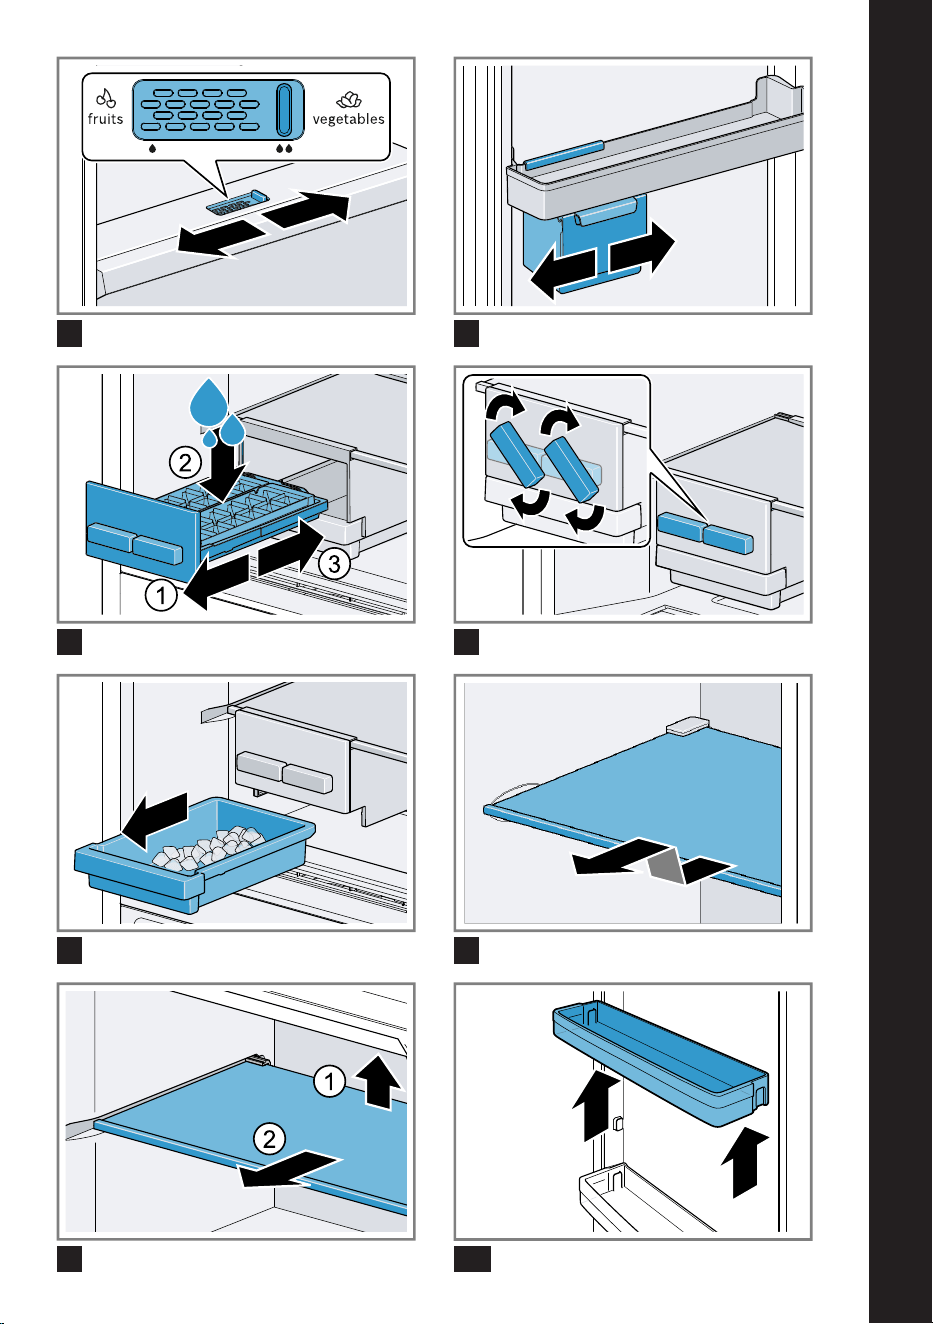
6.3 Kontainer buah dan sa-
yuran dengan pengontrol
kelembapan
Simpan buah dan sayuran segar tan-
pa kemasan dalam kontainer buah
dan sayuran.
Tutupi potongan buah dan sayuran
atau simpan dalam kemasan kedap
udara.
Kelembapan udara pada kontainer
buah dan sayuran dapat disesuaikan
melalui pengontrol kelembapan. De-
ngan demikian, buah dan sayuran se-
gar dapat disimpan lebih lama dari-
pada ketika disimpan dalam penyim-
panan biasa.
→Gbr. 3
Geser pengontrol kelembapan untuk
mengatur kelembapan udara pada
kontainer buah dan sayuran
berdasarkan jenis dan jumlah bahan
makanan yang akan disimpan:
¡ Geser ke kiri untuk kelembapan
rendah saat menyimpan ba-
nyak buah, berbagai makanan dan
makanan dalam jumlah besar.
¡ Geser ke kanan untuk kelembapan
tinggi saat menyimpan
banyak sayuran atau makanan da-
lam jumlah sedikit.
Air kondensat dapat muncul di dalam
kontainer buah dan sayuran bergan-
tung pada jumlah dan produk yang
disimpan.
Bersihkan air kondensat dengan kain
kering dan atur kelembapan udara
rendah dengan pengontrol kelemba-
pan.
Untuk menjaga kualitas dan aroma,
simpan buah dan sayuran yang sen-
sitif terhadap suhu dingin di luar alat
pada suhu sekitar 8°C hingga 12°C,
misalnya nanas, pisang, buah jeruk,
mentimun, zukini, paprika, tomat dan
kentang.
6.4 Kontainer variabel suhu
Simpan makanan sensitif pada suhu
rendah untuk waktu singkat dalam
kontainer dengan pengubah suhu.
6.5 Rak pintu
Untuk memvariasikan rak pintu sesu-
ai kebutuhan, rak pintu dapat dile-
paskan dan dipasang kembali di po-
sisi lainnya.
→"Melepaskan rak pintu",
Halaman23
6.6 Kontainer pintu
Posisikan kontainer pintu di mana sa-
ja di sepanjang rak pintu.
→Gbr. 4

id
17
6.7 Mesin es batu
Gunakan mesin es batu untuk mem-
buat es batu dari air minum.
Membuat es batu
Hanya gunakan air minum untuk
membuat es batu.
1. Lepaskan cetakan es batu dan
isi ¾ cetakan dengan air minum
, lalu pasang kembali .
→Gbr. 5
Catatan:Terlalu banyak air minum
dapat mengganggu fungsi mesin
es batu. Es batu tidak keluar satu
per satu dari cetakan es batu. Ter-
lalu banyak air minum yang masuk
ke kontainer es batu, es batu yang
sudah ada akan membeku bersa-
maan.
2. Saat es batu telah membeku, putar
kenop pada cetakan es batu ke
kanan beberapa kali dan lepaskan.
→Gbr. 6
a Es batu akan keluar dan jatuh ke
dalam kontainer es batu.
3. Lepaskan kontainer es batu dan
keluarkan es batu.
→Gbr. 7
6.8 Aksesori
Gunakan aksesori asli. Aksesori ter-
sebut telah dirancang khusus untuk
alat ini.
Aksesori alat Anda tergantung pada
modelnya.
Rak telur
Simpan telur dengan aman pada rak
telur.
Pengoperasian dasar
7 Pengoperasian dasar
Pengoperasian dasar
7.1 Menghidupkan alat
1. Sambungkan perangkat dengan
daya listrik. →Halaman15
a Alat mulai mendingin.
2. Atur suhu yang diinginkan.
→Halaman18
7.2 Petunjuk pengoperasian
¡ Setelah alat dihidupkan, diperlukan
waktu hingga beberapa jam untuk
mencapai suhu yang diatur.
Jangan memasukkan bahan ma-
kanan apa pun sebelum suhu
yang diatur tercapai.
¡ Sisi depan dan dinding samping
housing terkadang akan sedikit pa-
nas. Hal tersebut dapat mencegah
proses kondensasi.
¡ Saat menutup pintu, pastikan pintu
tidak terhalang oleh makanan yang
disimpan.
¡ Jika pintu ditutup, mungkin terda-
pat tekanan negatif. Pintu hampir
tidak dapat dibuka kembali. Tung-
gu beberapa saat hingga tekanan
negatif merata.
¡ Suhu di dalam alat bervariasi aki-
bat kondisi berikut:
– Frekuensi dibukanya alat
– Jumlah muatan
– Suhu makanan yang baru disim-
pan
– Suhu sekitar
– Sinar matahari langsung
7.3 Mematikan alat
▶ Putus perangkat dari sambungan
listrik. Lepaskan steker kabel daya
atau matikan sekring di kotak
sekring.
id
18
7.4 Mengatur suhu
Mengatur suhu kompartemen
pendingin
▶ Tekan (Kompartemen pendingin)
beberapa kali hingga indikator su-
hu menampilkan pengaturan suhu
yang diinginkan.
Tunggu 5detik hingga suhu diatur
pada panel kontrol.
Suhu yang direkomendasikan pa-
da kompartemen pendingin sebe-
sar 4°C.
Mengatur suhu kompartemen
pembeku
▶ Geser pengatur suhu (komparte-
men pembeku) ke posisi yang dii-
nginkan.
Coldest Suhu terendah
Cold Suhu tertinggi
OPTIMAL Suhu yang disa-
rankan
Mengatur kompartemen pengubah
suhu
▶ Tekan (Kompartemen variabel
suhu) beberapa kali hingga indika-
tor suhu menampilkan suhu yang
diinginkan.
Tunggu 5detik hingga suhu diatur
pada panel kontrol.
Suhu yang direkomendasikan pa-
da kompartemen pengubah suhu
sebesar 3°C.
Ikhtisar pengaturan suhu yang direkomendasikan
Atur suhu yang direkomendasikan di kompartemen pendingin dan komparte-
men pembeku sesuai musim.
Musim Komparte-
men pendi-
ngin
Freezer
Musim dingin
Suhu ruangan di bawah 20°C
4°C Cold
Standar, monsun 3°C OPTIMAL
Musim panas
Suhu ruangan di atas 35°C
2°C Coldest

id
19
Fungsi tambahan
8 Fungsi tambahan
Fungsi tambahan
Temukan fungsi tambahan yang da-
pat diatur yang dimiliki oleh alat.
8.1 Super-dingin
Pada Super-dingin, kompartemen
pendingin mendinginkan hingga sedi-
ngin mungkin.
Aktifkan Super-dingin sebelum me-
nyimpan bahan makanan dalam jum-
lah besar di kompartemen pendingin.
Catatan:Saat Super-dingin diaktif-
kan, kebisingan dapat meningkat.
Mengaktifkan Super-dingin
1. Geser pengatur suhu (komparte-
men freezer) ke posisi "Cold".
2. Tekan dan tahan (Kompartemen
pendingin) hingga "super" menya-
la.
Tunggu 5detik hingga suhu diatur
pada panel kontrol.
Catatan:Setelah sekitar 2jam, alat
beralih ke mode normal.
Menonaktifkan Super-dingin
▶ Tekan dan tahan (Kompartemen
pendingin) hingga tampilan suhu
(kompartemen pendingin) menam-
pilkan suhu yang diinginkan.
Tunggu 5detik hingga suhu diatur
pada panel kontrol.
Alarm
9 Alarm
Alarm
9.1 Alarm pintu
Jika pintu alat dibuka terlalu lama,
alarm pintu akan menyala.
Nada peringatan berbunyi.
Mematikan alarm pintu
▶ Tutup pintu alat atau tekan bidang
sentuh mana pun pada panel kon-
trol.
a Nada peringatan dimatikan.
Kompartemen pendingin
10 Kompartemen pendi-
ngin
Kompartemen pendingin
Produk susu, telur, makanan siap sa-
ji, produk pastri, makanan kaleng
yang sudah dibuka, dan keju keras
dapat disimpan di dalam komparte-
men pendingin.
Suhu dapat diatur dari 2°C hingga
6°C.
Melalui penyimpanan dingin, bahan
makanan yang mudah busuk juga
dapat disimpan dalam jangka pen-
dek atau menengah. Semakin rendah
suhu yang dipilih, semakin lama ba-
han makanan akan tetap segar.
10.1 Tips menyimpan bahan
makanan di komparte-
men pendingin
¡ Hanya masukkan bahan makanan
yang segar dan tidak rusak.
¡ Simpan bahan makanan dalam ke-
masan kedap udara atau tertutup.
¡ Agar tidak mengganggu sirkulasi
udara dan mencegah makanan
membeku, jangan meletakkan ba-
han makanan menempel langsung
di dinding belakang.
¡ Biarkan hidangan dan minuman
hangat mendingin terlebih dahulu.
¡ Perhatikan tanggal kedaluwarsa
produk atau tanggal penggunaan
yang ditentukan oleh produsen.

id
20
10.2 Zona-zona dingin dalam
kompartemen pendingin
Sirkulasi udara di kompartemen pen-
dingin menciptakan zona dingin yang
berbeda.
Zona terdingin
Zona terdingin berada di rak paling
atas.
Catatan:Simpan makanan yang mu-
dah busuk di kompartemen pengu-
bah suhu,misalnya ikan, sosis, dan
daging.
→"Kompartemen pengubah suhu",
Halaman21
Zona terhangat
Zona terhangat berada di rak tetap.
Kiat:Simpan bahan makanan yang
tidak lunak seperti keju keras dan
mentega di zona terhangat. Keju da-
pat tetap menyebarkan aromanya,
sedangkan mentega dapat tetap dio-
leskan.
Kompartemen pembeku
11 Kompartemen pembe-
ku
Kompartemen pembeku
Makanan beku dapat disimpan, ba-
han makanan dapat dibekukan, dan
es batu dapat dibuat di komparte-
men pembeku.
Suhu di dalam kompartemen pembe-
ku bergantung pada suhu di dalam
kompartemen pendingin.
Penyimpanan bahan makanan jang-
ka panjang harus pada suhu −18°C
atau lebih rendah.
Penyimpanan pembeku memungkin-
kan Anda untuk menyimpan bahan
makanan yang mudah busuk untuk
waktu yang lama. Suhu rendah mem-
perlambat atau menghentikan proses
pembusukan.
11.1 Kapasitas pembekuan
Kapasitas pembekuan menunjukkan,
bahan makanan mana saja yang da-
pat dibekukan secara menyeluruh
hingga inti dalam waktu beberapa
jam.
Keterangan terkait kapasitas pembe-
kuan dapat ditemukan di pelat label.
→Gbr. 1 /
6
Persyaratan untuk kapasitas
pembekuan
11.2 Memanfaatkan sepenuh-
nya volume komparte-
men pembeku
Temukan cara memasukkan jumlah
maksimal makanan beku ke dalam
kompartemen pembeku.
1. Lepaskan semua bagian peralatan
pada kompartemen pembeku.
→Halaman23
2. Simpan bahan makanan langsung
di bagian dasar freezer.
11.3 Tips menyimpan bahan
makanan di dalam kom-
partemen pembeku
¡ Simpan bahan makanan dalam ke-
masan kedap udara.
¡ Jauhkan bahan makanan yang
akan dibekukan dari bahan ma-
kanan yang sudah beku.
¡ Simpan dan letakkan makanan di
area yang luas dalam kontainer
pembeku.
11.4 Tips untuk membekukan
bahan makanan segar
¡ Hanya bekukan bahan makanan
segar dan belum rusak.
¡ Bekukan bahan makanan dalam
porsi.

id
21
¡ Bahan makanan siap saji lebih co-
cok daripada bahan makanan
mentah.
¡ Cuci, potong dan rebus sayuran
sebelum dibekukan.
¡ Cuci, buang biji dan kupas buah
sebelum dibekukan bila perlu,
mungkin tambahkan gula atau la-
rutan asam askorbat.
¡ Bahan makanan yang cocok untuk
dibekukan adalah misalnya produk
pastri, ikan dan hidangan laut, da-
ging, daging rusa dan daging ung-
gas, telur yang telah dikupas, keju,
mentega, quark, makanan siap sa-
ji, dan sisa makanan.
¡ Bahan makanan yang tidak cocok
untuk dibekukan misalnya selada,
lobak, telur tanpa dikupas, anggur,
apel dan pir mentah, yoghurt, krim
asam, crème fraîche, dan mayo-
nes.
Mengemas makanan beku
Bahan kemasan yang sesuai dan je-
nis kemasan yang tepat merupakan
faktor penting dalam menjaga kuali-
tas produk dan mencegah freezer
burn.
1. Masukkan bahan makanan dalam
kemasan.
2. Buang udara.
3. Tutup kemasan kedap udara untuk
mencegah bahan makanan kehi-
langan rasanya atau menjadi ke-
ring.
4. Labeli kemasan dengan keterang-
an isi dan tanggal pembekuan.
11.5 Umur penyimpanan ma-
kanan beku pada su-
hu−18°C
Bahan makanan Waktu pe-
nyimpanan
Ikan, sosis, makanan
siap saji, kue kering
hingga 6bu-
lan
Bahan makanan Waktu pe-
nyimpanan
Daging unggas, da-
ging
hingga 8bu-
lan
Sayuran, buah-buah-
an
hingga
12bulan
11.6 Metode pencairan untuk
makanan beku
WASPADA
Risiko bahaya bagi kesehatan!
Saat makanan mencair, bakteri dapat
tumbuh dan makanan beku dapat
membusuk.
▶ Jangan membekukan ulang ma-
kanan beku yang mencair atau te-
lah menjadi cair.
▶ Bekukan ulang setelah makanan
dimasak atau dibakar.
▶ Jangan gunakan lagi bahan ma-
kanan yang melewati periode pe-
nyimpanan maksimal.
¡ Mencairkan beku es pada bahan
makanan hewani di kompartemen
pendingin,misalnya ikan, daging,
keju dan quark.
¡ Hilangkan beku es roti pada suhu
ruangan.
¡ Masak bahan makanan yang ha-
rus segera dikonsumsi dalam mic-
rowave, oven, atau zona mema-
sak.
Kompartemen pengubah suhu
12 Kompartemen pengu-
bah suhu
Kompartemen pengubah suhu
Kompartemen pengubah suhu dapat
digunakan sebagai kompartemen
pendingin atau membekukan makan-
an secara perlahan pada suhu yang
lebih rendah.
Suhu dapat diatur dari −6°C hingga
6°C.

id
22
12.1 Rekomendasi penyim-
panan di kompartemen
pengubah suhu
Dari suhu 1°C hingga 6°C, simpan
makanan siap saji, makanan yang di-
panggang, dan makanan yang tidak
boleh dibekukan, misalnya yogurt
dan produk susu lainnya.
Dari suhu −3°C hingga −6°C, beku-
kan secara perlahan makanan sensi-
tif hingga satu minggu, misalnya da-
ging, sosis, ikan, dan makanan yang
dihaluskan. Makanan lebih mudah di-
potong, dibagi, atau dibagi porsinya
dan dicairkan lebih cepat.
Menghilangkan beku es
13 Menghilangkan beku
es
Menghilangkan beku es
13.1 Menghilangkan beku es
pada kompartemen pen-
dingin
Kompartemen pendingin pada pe-
rangkat akan mencairkan beku es
secara otomatis.
13.2 Menghilangkan beku es
pada kompartemen pem-
beku
Berkat sistem NoFrost yang benar-
benar otomatis, freezer tetap bebas
dari bunga es. Mencairkan beku es
tidak diperlukan.
13.3 Menghilangkan beku es
di kompartemen pengu-
bah suhu
Kompartemen pengubah es pada
alat akan mencairkan beku es secara
otomatis.
Pembersihan dan perawatan
14 Pembersihan dan pe-
rawatan
Pembersihan dan perawatan
Agar alat Anda tetap baik dan ber-
fungsi normal, bersihkan dan rawat
secara menyeluruh.
Pembersihan area yang tidak dapat
diakses harus dilakukan oleh layanan
pelanggan. Pembersihan oleh layan-
an pelanggan dapat dikenakan biaya.
14.1 Menyiapkan alat untuk
dibersihkan
1. Putus alat dari sambungan listrik.
id
23
Lepaskan steker kabel daya atau
matikan sekring di kotak sekring.
2. Keluarkan semua bahan makanan
dan simpan di tempat yang dingin.
Jika tersedia, letakkan kemasan es
pada bahan makanan.
3. Lepaskan semua bagian peralatan
dan komponen aksesori dari alat.
→Halaman23
14.2 Membersihkan alat
PERINGATAN
Risiko sengatan listrik!
Kelembapan yang masuk dapat me-
nyebabkan sengatan listrik.
▶ Jangan gunakan pembersih uap
atau pembersih bertekanan tinggi
untuk membersihkan perangkat.
Cairan pada lampu atau elemen kon-
trol dapat membahayakan.
▶ Air bilasan tidak boleh masuk ke
dalam lampu atau elemen kontrol.
PERHATIAN!
Bahan pembersih yang tidak sesuai
dapat merusak permukaan alat.
▶ Jangan menggunakan spons go-
sok yang keras atau spons cuci.
▶ Jangan menggunakan bahan pem-
bersih yang keras atau abrasif.
▶ Jangan menggunakan bahan pem-
bersih yang mengandung kadar al-
kohol tinggi.
Jika bagian peralatan dan aksesori
dibersihkan di dalam mesin pencuci
piring, keduanya dapat berubah ben-
tuk atau berubah warna.
▶ Jangan pernah membersihkan ba-
gian peralatan dan aksesori di da-
lam mesin pencuci piring.
1. Siapkan alat untuk dibersihkan.
→Halaman22
2. Bersihkan alat, bagian peralatan,
komponen aksesori, dan gasket
pintu dengan kain lap, air hangat,
dan sedikit bahan pembersih pH
netral.
3. Lalu keringkan secara menyeluruh
dengan kain yang lembut dan ke-
ring.
4. Masukkan bagian perlengkapan.
5. Sambungkan alat dengan listrik.
→Halaman15
6. Masukkan bahan makanan.
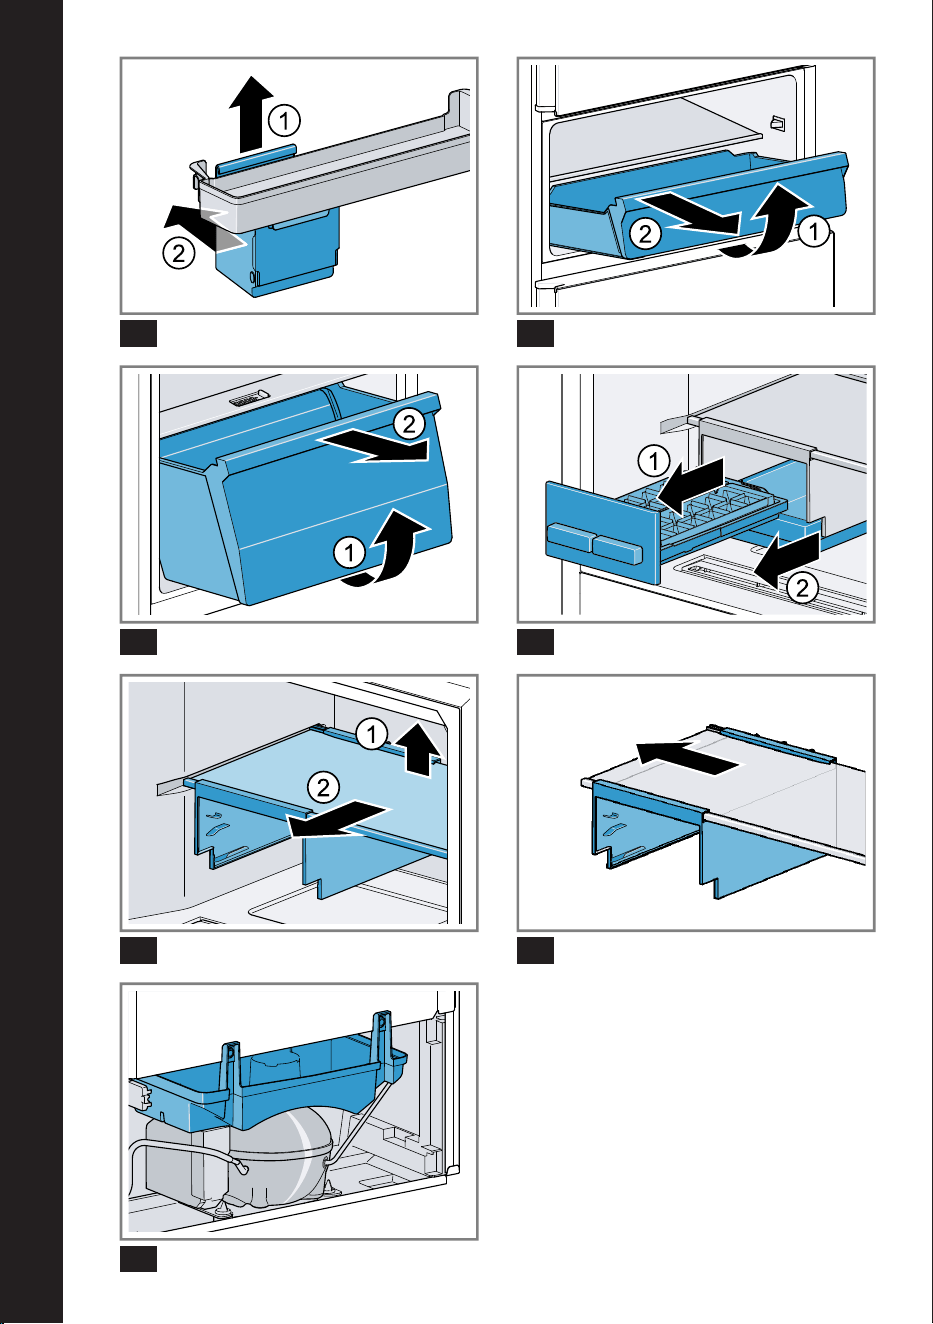
14.3 Melepaskan bagian per-
alatan
Jika bagian peralatan ingin dibersih-
kan secara menyeluruh, keluarkan
bagian peralatan dari alat.
Melepaskan rak
▶ Tarik keluar rak bagian, angkat,
dan lepaskan.
→Gbr. 8
Melepaskan rak tetap
▶ Angkat rak tetap bagian bela-
kang dan lepaskan .
→Gbr. 9
Melepaskan rak pintu
▶ Angkat dan lepaskan rak pintu.
→Gbr. 10
Melepaskan kontainer pintu
1. Angkat rak pintu dengan kontainer
pintu ke atas dan lepaskan.
2. Angkat kontainer pintu bagian be-
lakang rak pintu ke atas dan le-
paskan .
→Gbr. 11
Melepaskan kontainer pengubah
suhu
1. Keluarkan kontainer pengubah su-
hu sepenuhnya.
id
24
2. Angkat kontainer pengubah suhu
bagian depan dan lepaskan .
→Gbr. 12
Melepaskan kontainer buah dan
sayuran
1. Keluarkan kontainer buah dan sa-
yuran hingga maksimal.
2. Angkat bagian depan kontainer
buah dan sayur dan lepaskan
.
→Gbr. 13
Melepaskan mesin es batu
1. Keluarkan dan kosongkan nampan
es batu dan wadah es batu .
→Gbr. 14
2. Angkat rak tetap dengan dudukan
belakang dan lepaskan .
→Gbr. 15
3. Geser dudukan ke samping dari
rak tetap.
→Gbr. 16
Kiat:Agar tidak menutupi lubang
ventilasi dalam (kompartemen pem-
beku) saat pemasangan, posisikan
mesin es batu di sisi kiri rak tetap.

id
25
Pemecahan masalah
15 Pemecahan masalah
Pemecahan masalah
Gangguan kecil pada alat dapat Anda atasi sendiri. Gunakan informasi terkait
pemecahan masalah sebelum menghubungi layanan pelanggan. Dengan begi-
tu, Anda dapat menghindari biaya yang tidak perlu.
PERINGATAN
Risiko sengatan listrik!
Perbaikan yang tidak tepat dapat berbahaya.
▶ Hanya teknisi ahli yang boleh melakukan perbaikan pada alat.
▶ Hanya komponen pengganti asli yang boleh digunakan untuk perbaikan per-
alatan.
▶ Jika kabel daya alat rusak, kabel ini harus digantikan oleh pihak produsen
atau layanan pelanggan atau seorang yang ahli, untuk menghindarkan terja-
dinya bahaya.
Gangguan Penyebab dan pemecahan masalah
Alat tidak dalam kea-
daan dingin, indikator
dan lampu menyala.
Mode pajangan diaktifkan.
1. Tekan dan tahan (Kompartemen pendingin) sela-
ma 9 bis 11detik hingga terdengar sinyal akustik.
2. Setelah beberapa saat, periksa apakah alat mendi-
ngin.
Lampu LED tidak ber-
fungsi.
Penyebab yang berbeda-beda dimungkinkan.
▶ Hubungi layanan pelanggan.
Nomor layanan pelanggan dapat ditemukan di dir-
ektori layanan pelanggan yang disertakan.
Mesin pendingin bero-
perasi lebih sering
dan lebih lama.
Alat sering dibuka.
▶ Jangan membuka pintu alat bila tidak perlu.
Lubang ventilasi eksternal tertutup.
▶ Singkirkan penghalang yang berada di depan lu-
bang ventilasi eksternal.
Tidak ada gangguan. Chiller modern lebih sering me-
nyala dan memiliki level daya berbeda untuk mendi-
nginkan secara lebih efisien.
▶ Singkirkan penghalang yang berada di depan lu-
bang ventilasi eksternal.
▶ Pasang alat dengan jarak sejauh mungkin dari radi-
ator, kompor, dan sumber panas lainnya. Hindari
paparan sinar matahari langsung dalam waktu lama
pada alat.
▶ Hanya buka pintu alat secara singkat selama diper-
lukan.
▶ Biarkan hidangan dan minuman hangat menjadi di-
ngin sebelum disimpan.
id
26
Gangguan Penyebab dan pemecahan masalah
Lapisan es terbentuk
di dinding belakang
kompartemen pendi-
ngin.
Tidak ada gangguan. Chiller modern memastikan su-
hu yang lebih merata dalam kompartemen pendingin.
Dinding belakang kompartemen pendingin otomatis
dihilangkan beku esnya secara teratur.
▶ Hanya buka pintu alat secara singkat selama diper-
lukan.
▶ Kemas bahan makanan secara kedap udara atau
tutupi bahan makanan.
▶ Biarkan hidangan dan minuman hangat menjadi di-
ngin sebelum disimpan.
▶ Selalu beri sedikit ruang di antara bahan makanan
dan dinding dalam.
Dinding samping alat
hangat.
Tidak ada gangguan. Terdapat pipa di dinding sam-
ping yang akan memanas selama proses pendingin-
an. Furnitur yang mengenai alat tidak akan rusak aki-
bat pemanasan tersebut.
Tidak diperlukan penanganan.
Nada peringatan ber-
bunyi.
Alarm pintu diaktifkan.
Pintu alat terbuka.
▶ Tutup pintu alat.
Suhu yang diatur tidak
tercapai.
Pencairan bunga es
yang sepenuhnya oto-
matis tidak lagi ber-
fungsi.
Pintu kontainer pembeku terbuka dalam waktu yang
lama. Terdapat banyak sekali bunga es pada evapor-
ator (generator pendingin) dalam sistem NoFrost.
Persyaratan:Makanan beku disimpan di tempat yang
dingin dan terisolasi dengan baik.
1.
Matikan alat. →Halaman17
2. Putus sambungan listrik dari alat.
Lepaskan steker kabel daya atau matikan sekring
di kotak sekring.
3. Jauhkan alat dari dinding.
4. Biarkan pintu alat terbuka.
a Setelah sekitar 20 menit, air kondensasi akan
mengalir ke baki penguapan di bagian belakang
alat.
→Gbr. 17
5. Serap air kondensasi dengan spons agar tidak me-
luap dari baki penguapan.
Bunga es pada evaporator akan dicairkan ketika ti-
dak ada lagi air kondensasi yang mengalir ke baki
penguapan.
6.
Bersihkan bagian dalam alat. →Halaman23
7.
Hidupkan kembali alat. →Halaman17

id
27
Gangguan Penyebab dan pemecahan masalah
Suhu sangat berbeda
dari pengaturan.
Penyebab yang berbeda-beda dimungkinkan.
1.
Matikan alat. →Halaman17
2. Hidupkan kembali alat setelah sekitar 5menit.
→Halaman17
‒ Jika suhu terlalu panas, periksa kembali suhu se-
telah beberapa jam.
‒ Jika suhu terlalu dingin, periksa kembali suhu pa-
da hari berikutnya.
Air kondensasi terben-
tuk di permukaan alat
dan rak pada alat.
Air yang terkandung dalam udara hangat dan lembap
akan berkondensasi pada permukaan alat yang lebih
dingin.
Catatan:Kondensasi tidak mempengaruhi daya pen-
dinginan.
1. Seka air kondensasi dengan kain lap yang lembut
dan kering.
2. Buka alat sesingkat mungkin.
3. Pastikan alat selalu ditutup dengan benar.
Perangkat berde-
ngung, menderu, me-
ngeluarkan bunyi de-
sis, bunyi klik, atau
bunyi retak.
Tidak ada gangguan. Mesin sedang beroperasi, misal-
nyaunit pendingin, ventilator. Cairan pendingin meng-
alir melalui pipa. Motor, sakelar, atau katup solenoid
aktif atau nonaktif. Pencairan es berlangsung otoma-
tis.
Tidak diperlukan penanganan.
Alat mengeluarkan su-
ara bising.
Posisi perangkat tidak stabil.
▶ Sejajarkan perangkat dengan bantuan waterpass
dan dudukan sekrup.
Perangkat harus ditopang.
▶ Beri jarak minimal pada perangkat.
Bagian peralatan longgar atau macet.
▶ Periksa bagian peralatan yang dapat dilepas dan
masukkan kembali bila perlu.
Botol-botol atau wadah saling bersentuhan.
▶ Pisah botol atau wadah.
id
28
15.1 Mati listrik
Selama mati listrik, suhu di dalam
alat akan meningkat, hal itu dapat
mempersingkat waktu penyimpanan
dan mengurangi kualitas makanan
beku.
Waktu penyimpanan makanan beku
saat terjadi gangguan dapat ditemu-
kan pada data teknis di situs web ka-
mi untuk alat.
Catatan
¡ Jangan terlalu sering membuka
alat dan memasukkan bahan ma-
kanan lain selama listrik mati.
¡ Periksa kualitas bahan makanan
begitu listrik mati.
– Buang makanan beku yang te-
lah mencair dan lebih hangat
dari 5°C.
– Rebus atau bakar makanan be-
ku yang telah sedikit dicairkan
dan konsumsi atau bekukan
kembali.
15.2 Melakukan uji mandiri
pada perangkat
Alat memiliki uji mandiri pada pe-
rangkat yang menampilkan ganggu-
an yang dapat diperbaiki oleh layan-
an pelanggan Anda.
1. Putus alat dari sambungan listrik.
Lepaskan steker kabel daya atau
matikan sekring di kotak sekring.
2. Sambungkan kembali perangkat
dengan daya listrik setelah 5 me-
nit. →Halaman15
3. Tekan dan tahan (Kompartemen
pendingin) selama 5 hingga
10detik dalam waktu 10 detik se-
telah disambungkan ke listrik hing-
ga sinyal akustik berbunyi.
a Uji mandiri pada alat dimulai.
a Selama uji mandiri pada alat, sese-
kali sinyal akustik akan berbunyi
lama.
a Jika 2 sinyal akustik berbunyi sete-
lah uji mandiri pada alat berakhir
dan indikator suhu menampilkan
suhu yang diatur, sensor suhu alat
dalam keadaan baik. Perangkat
beroperasi dengan mode normal.
a Hubungi layanan pelanggan, jika 5
sinyal akustik berbunyi setelah uji
mandiri alat berakhir dan LED indi-
kator suhu menyala dengan tingkat
kecerahan yang berbeda. LED
memberikan informasi kepada la-
yanan pelanggan tentang ganggu-
an saat ini.
Penyimpanan dan pembuangan
16 Penyimpanan dan
pembuangan
Penyimpanan dan pembuangan
16.1 Mematikan alat
1. Putus alat dari sambungan listrik.
Lepaskan steker kabel daya atau
matikan sekring di kotak sekring.
2. Keluarkan seluruh bahan makan-
an.
3.
Bersihkan alat. →Halaman23
4. PERHATIAN! Benda yang terjepit
di antara pintu dan housing dapat
merusak engsel pintu.
▶ Buka pintu alat hingga tetap terbu-
ka secara otomatis.
▶ Jangan meletakkan benda apa
pun di antara pintu dan housing.
Biarkan alat terbuka untuk memas-
tikan sirkulasi udara pada bagian
dalam alat.
id
29
16.2 Membuang alat yang su-
dah tidak terpakai
Bahan baku yang berharga dapat di-
gunakan kembali melalui pembuang-
an yang ramah lingkungan.
PERINGATAN
Risiko bahaya bagi kesehatan!
Anak-anak dapat terjebak di dalam
alat dan dapat membahayakan kese-
lamatan mereka.
▶ Untuk mencegah anak-anak me-
masuki alat, jangan keluarkan baki
dan wadah.
▶ Jauhkan anak-anak dari alat yang
sudah tidak digunakan.
PERINGATAN
Risiko kebakaran!
Jika pipa rusak, cairan pendingin
yang mudah terbakar dan gas berba-
haya dapat keluar dan terbakar.
▶ Jangan merusak tabung sistem sir-
kulasi cairan pendingin dan isolasi.
1. Cabut steker listrik dari kabel da-
ya.
2. Potong kabel daya.
3. Singkirkan alat dengan cara yang
ramah lingkungan.
Informasi mengenai metode pem-
buangan teraktual dapat diperoleh
dari toko khusus, pemerintah dae-
rah atau pemerintah kota.
Layanan pelanggan
17 Layanan pelanggan
Layanan pelanggan
Informasi terperinci tentang masa ga-
ransi dan ketentuan garansi di nega-
ra Anda dapat diperoleh melalui ko-
de QR pada dokumen kontak servis
dan ketentuan garansi terlampir dari
layanan pelanggan kami, dealer, atau
di situs web kami.
Saat menghubungi layanan pelang-
gan, Anda memerlukan nomor seri
(E-Nr.) dan nomor produksi (FD) alat
Anda.
Data kontak layanan pelanggan da-
pat diperoleh melalui kode QR pada
dokumen kontak servis dan ketentu-
an garansi terlampir atau di situs web
kami.
17.1 Nomor seri (E-Nr.) dan
nomor produksi (FD)
Nomor seri (E-Nr.) dan nomor pro-
duksi (FD) dapat ditemukan di label
tipe alat.
→Gbr. 1 /
6
Untuk kembali menemukan data alar
dan nomor telepon layanan pelang-
gan dengan cepat, Anda dapat men-
catat data-data tersebut.
Data teknis
18 Data teknis
Data teknis
Cairan pendingin, kapasitas yang da-
pat digunakan, dan spesifikasi lain
berada pada pelat label.
→Gbr. 1 /
6

en
30
Further information and explanations are
available online:
Table of contents
1 Safety .........................................32
1.1 General information................. 32
1.2 Intended use............................ 32
1.3 Restriction on user group........ 32
1.4 Safe transport.......................... 32
1.5 Safe installation ....................... 33
1.6 Safe use .................................. 34
1.7 Damaged appliance................ 36
2 Preventing material damage ....38
3 Environmental protection and
saving energy............................38
3.1 Disposing of packaging .......... 38
3.2 Saving energy.......................... 38
4 Installation and connection......39
4.1 Scope of delivery..................... 39
4.2 Criteria for the installation
location .................................... 39
4.3 Installing the appliance ........... 39
4.4 Preparing the appliance for
the first time............................. 40
4.5 Connecting the appliance to
the electricity supply................ 40
5 Familiarising yourself with
your appliance...........................40
5.1 Appliance ................................ 40
5.2 Control panel........................... 40
6 Features.....................................41
6.1 Shelf......................................... 41
6.2 Fixed shelf ............................... 41
6.3 Fruit and vegetable con-
tainer with humidity control ..... 41
6.4 Variable-temperature con-
tainer........................................ 41
6.5 Door tray.................................. 41
6.6 Door container......................... 41
6.7 Ice cube maker ....................... 41
6.8 Accessories............................. 42
7 Basic operation .........................42
7.1 Switching on the appliance ..... 42
7.2 Operating tips.......................... 42
7.3 Switching off the appliance ..... 42
7.4 Setting the temperature........... 43
8 Additional functions .................44
8.1 Super cooling ......................... 44
9 Alarm..........................................44
9.1 Door alarm .............................. 44
10 Refrigerator compartment ......44
10.1 Tips for storing food in the
refrigerator compartment ...... 44
10.2 Chill zones in the refriger-
ator compartment.................. 45
11 Freezer compartment..............45
11.1 Freezing capacity .................. 45
11.2 Fully utilising the freezer
compartment volume ............ 45
11.3 Tips for storing food in the
freezer compartment ............. 45
11.4 Tips for freezing fresh food ... 45
11.5 Shelf life of frozen food at
−18°C................................... 46
11.6 Defrosting methods for
frozen food ............................ 46

en
31
12 Variable-temperature com-
partment ..................................46
12.1 Storage recommendations
in the variable-temperature
compartment ......................... 46
13 Defrosting................................47
13.1 Defrosting in the refriger-
ator compartment.................. 47
13.2 Defrosting in the freezer
compartment ......................... 47
13.3 Defrosting in the variable-
temperature compartment..... 47
14 Cleaning and servicing...........47
14.1 Preparing the appliance for
cleaning ................................. 47
14.2 Cleaning the appliance ......... 47
14.3 Removing the fittings............. 48
15 Troubleshooting......................49
15.1 Power failure.......................... 52
15.2 Conducting an appliance
self-test .................................. 52
16 Storage and disposal..............52
16.1 Taking the appliance out of
operation ............................... 52
16.2 Disposing of old appliance ... 53
17 Customer Service....................53
17.1 Product number (E-Nr.) and
production number (FD)........ 53
18 Technical data .........................53
en
32
1 Safety
Observe the following safety instructions.
1.1 General information
¡ Read this instruction manual carefully.
¡ Keep the instruction manual and the product information safe
for future reference or for the next owner.
¡ Do not connect the appliance if it has been damaged in transit.
1.2 Intended use
Only use this appliance:
¡ for chilling and freezing food and for making ice cubes.
¡ in private households and in enclosed spaces in a domestic en-
vironment.
¡ Up to an altitude of 2000 m above sea level.
1.3 Restriction on user group
This appliance may be used by children aged 8 or over and by
people who have reduced physical, sensory or mental abilities or
inadequate experience and/or knowledge, provided that they are
supervised or have been instructed on how to use the appliance
safely and have understood the resulting dangers.
Do not let children play with the appliance.
Cleaning and user maintenance must not be performed by chil-
dren unless they are being supervised.
1.4 Safe transport
WARNING‒Risk of injury!
The heavy weight of the appliance may result in injury when lifted.
▶ Do not lift the appliance on your own.
en
33
1.5 Safe installation
WARNING‒Risk of electric shock!
Incorrect installation is dangerous.
▶ Connect and operate the appliance only in accordance with the
specifications on the rating plate.
▶ Connect the appliance to a power supply with alternating cur-
rent only via a properly installed socket with earthing.
▶ The protective conductor system of the domestic electrical in-
stallation must be properly installed.
▶ Never equip the appliance with an external switching device,
e.g. a timer or remote control.
▶ When the appliance is installed, the mains plug of the power
cord must be freely accessible. If free access is not possible, an
isolating switch must be integrated into the permanent electrical
installation according to the installation regulations.
▶ When installing the appliance, check that the power cable is not
trapped or damaged.
If the insulation of the power cord is damaged, this is dangerous.
▶ Never let the power cord come into contact with heat sources.
WARNING‒Risk of explosion!
If the appliance's ventilation openings are closed off, a leak in the
refrigeration circuit may result in a flammable mixture of gas and
air.
▶ Keep ventilation openings in the appliance casing or in the in-
tegrated casing clear of obstruction.
WARNING‒Risk of fire!
It is dangerous to use an extended power cord and non-approved
adapters.
▶ Do not use extension cables or multiple socket strips.
▶ Only use adapters and power cords approved by the manufac-
turer.
▶ If the power cord is too short and a longer one is not available,
please contact an electrician to have the domestic installation
adapted.
en
34
Portable multiple socket strips or portable power supply units may
overheat and cause a fire.
▶ Do not place portable multiple socket strips or power supply
units on the back of the appliance.
1.6 Safe use
WARNING‒Risk of electric shock!
An ingress of moisture can cause an electric shock.
▶ Only use the appliance in enclosed spaces.
▶ Never expose the appliance to intense heat or humidity.
▶ Do not use steam- or high-pressure cleaners to clean the appli-
ance.
WARNING‒Risk of suffocation!
Children may put packaging material over their heads or wrap
themselves up in it and suffocate.
▶ Keep packaging material away from children.
▶ Do not let children play with packaging material.
Children may breathe in or swallow small parts, causing them to
suffocate.
▶ Keep small parts away from children.
▶ Do not let children play with small parts.
WARNING‒Risk of explosion!
If the cooling circuit is damaged, flammable refrigerant may es-
cape and explode.
▶ To accelerate the defrosting process, do not use any other
mechanical devices or means other than those recommended
by the manufacturer.
▶ If food is stuck to the freezer compartment, loosen it with a blunt
object such as the handle of a wooden spoon.
Products which contain flammable propellants and explosive sub-
stances may explode, e.g. spray cans.
▶ Do not store products which contain flammable propellants (e.g.
spray cans) or explosive substances in the appliance.
en
35
WARNING‒Risk of fire!
Electrical devices within the appliance may cause a fire, e.g. heat-
ers or electric ice makers.
▶ Do not operate electrical devices within the appliance.
WARNING‒Risk of injury!
Containers that contain carbonated drinks may burst.
▶ Do not store containers that contain carbonated drinks in the
freezer compartment.
Injury to the eyes caused by escaping flammable refrigerant and
hazardous gases.
▶ Do not damage the tubes of the refrigerant circuit or the insula-
tion.
The appliance may tip.
▶ Do not stand or support yourself on the base, runners or doors.
WARNING‒Risk of burns!
Individual parts on the back of the appliance become hot during
operation.
▶ Never touch these hot parts.
WARNING‒Risk of cold burns!
Contact with frozen food and cold surfaces may cause burns by
refrigeration.
▶ Never put frozen food straight from the freezer compartment
into your mouth.
▶ Avoid prolonged contact of the skin with frozen food, ice and
surfaces in the freezer compartment.
CAUTION‒Risk of harm to health!
To prevent food from being contaminated, you must observe the
following instructions.
▶ If the door is open for an extended period of time, this may lead
to a considerable temperature increase in the compartments of
the appliance.
▶ Regularly clean the surfaces that may come into contact with
food and accessible drain systems.
en
36
▶ Store raw meat and fish in suitable containers in the refrigerator
so that they do not touch or drip on other food.
▶ If the fridge/freezer is empty for an extended period of time,
switch off the appliance, defrost it, clean it and leave the door
open to prevent the formation of mould.
Metal or metal-style parts in the appliance may contain aluminium.
If acidic food comes into contact with aluminium in the appliance,
aluminium foil ions may pass into the food.
▶ Do not consume soiled food.
1.7 Damaged appliance
WARNING‒Risk of electric shock!
If the appliance or the power cord is damaged, this is dangerous.
▶ Never operate a damaged appliance.
▶ Never pull on the power cord to unplug the appliance. Always
unplug the appliance at the mains.
▶ If the appliance or the power cord is damaged, immediately un-
plug the power cord or switch off the fuse in the fuse box.
▶ Call customer service. →Page53
Improper repairs are dangerous.
▶ Repairs to the appliance should only be carried out by trained
specialist staff.
▶ Only use genuine spare parts when repairing the appliance.
▶ If the power cord of this appliance is damaged, it must be re-
placed by the manufacturer, the manufacturer's Customer Ser-
vice or a similarly qualified person in order to prevent any risk.
WARNING‒Risk of fire!
If the tubes are damaged, flammable refrigerant and harmful
gases may escape and ignite.
▶ Keep naked flames and ignition sources away from the appli-
ance.
▶ Ventilate the room.
▶ Switch off the appliance. →Page42


en
38
Preventing material damage
2 Preventing material
damage
Preventing material damage
ATTENTION!
If not rolling freely, the appliance's
castors may damage the floor when
the appliance is moved.
▶ Transport the appliance using a
sack truck.
▶ Use floor protection when moving
the appliance, and do not move it
in a zigzag fashion.
Using the appliance, base, runners or
doors as a seat or climbing surface
may damage the appliance.
▶ Do not stand or lean on the appli-
ance, base, runners or doors.
Contamination with oil or fat may
cause plastic parts and door seals to
become porous.
▶ Keep plastic parts and door seals
free of oil and grease.
Metal or metal-style parts in the appli-
ance may contain aluminium. When
aluminium comes into contact with
acidic foods, it corrodes and discol-
ours.
▶ Only store packaged food in the
appliance.
If you clean fittings and accessories
in the dishwasher, this may cause
them to become deformed or discol-
our.
▶ Never clean fittings and accessory
in the dishwasher.
Environmental protection and saving energy
3 Environmental protec-
tion and saving energy
Environmental protection and saving energy
3.1 Disposing of packaging
The packaging materials are environ-
mentally compatible and can be re-
cycled.
▶ Sort the individual components by
type and dispose of them separ-
ately.
3.2 Saving energy
If you follow these instructions, your
appliance will use less power.
Selecting the installation location
¡ Keep the appliance out of direct
sunlight.
¡ Install the appliance as far away as
possible from heating elements,
cookers and other heat sources:
– Maintain a 30mm clearance to
electric or gas cookers.
– Maintain a 300mm clearance to
oil or solid-fuel cookers.
¡ Make sure there is a distance of
50mm between the side wall and
the appliance.
¡ Never cover or block the external
ventilation openings.
Saving energy during use
Note:The arrangement of the fittings
does not affect the energy consump-
tion of the appliance.
¡ Open the appliance only briefly
and then close it carefully.
¡ Never cover or block the interior
ventilation openings or the exterior
ventilation openings.
¡ Transport purchased food in a
cool bag and place in the appli-
ance quickly.

en
39
¡ Allow warm food and drinks to
cool down before storing them.
¡ Thaw frozen food in the refrigerator
compartment to utilise the low tem-
perature of the food.
¡ Always leave some space between
the food and to the back panel.
Control panel energy-saving mode
If the appliance is not being used,
the control panel automatically
switches to control panel energy-sav-
ing mode.
In control panel energy-saving mode,
the display brightness is reduced.
Note:If Super cooling is switched on,
"super" lights up.
Control panel energy-saving mode is
deactivated as soon as you operate
the control panel or open the door.
Installation and connection
4 Installation and con-
nection
Installation and connection
4.1 Scope of delivery
After unpacking all parts, check for
any transport damage and for com-
pleteness of delivery.
If you have any complaints, contact
your dealer or our after-sales service
→Page53.
The delivery consists of the following:
¡ Free-standing appliance
¡ Equipment and accessories
1
¡ Installation instructions
¡ User manual
¡ Customer service directory
¡ Warranty enclosure
2
¡ Energy label
4.2 Criteria for the installation
location
WARNING
Risk of explosion!
If the appliance is in a space that is
too small, a leak in the refrigeration
circuit may result in a flammable mix-
ture of gas and air.
▶ Only install the appliance in a
space with a volume of at least
1m
3
per 8g refrigerant. The
volume of refrigerant is indicated
on the rating plate. →Fig. 1 /
6
The weight of the appliance ex works
may be up to 85kg depending on
the model.
The subfloor must be sufficiently
stable to bear the weight of the appli-
ance.
The surface must be level.
This refrigerator is intended for use at
ambient temperatures of 16°C to
43°C.
The appliance is fully functional within
the permitted room temperature.
Over-and-under and side-by-side
installation
If you want to install 2 refrigerating
appliances one over the other or side
by side, you must maintain a clear-
ance of at least 150mm between the
appliances. Selected appliances can
be installed without a minimum clear-
ance. Ask your dealer or kitchen
planner about this.
4.3 Installing the appliance
▶ Install the appliance in accordance
with the enclosed installation in-
structions.
1
Depending on the appliance specifications
2
Not in all countries
en
40
4.4 Preparing the appliance
for the first time
1. Remove the informative material.
2. Remove the protective foil and
transit bolts, e.g. remove the ad-
hesive strips and carton.
3. Clean the appliance for the first
time. →Page47
4.5 Connecting the appliance
to the electricity supply
1. Insert the mains plug of the appli-
ance's power cable in a socket
nearby.
The connection data of the appli-
ance can be found on the rating
plate. →Fig. 1 /
6
2. Check the mains plug is inserted
properly.
a The appliance is now ready for
use.
Familiarising yourself with your appliance
5 Familiarising yourself
with your appliance
Familiarising yourself with your appliance
5.1 Appliance
You can find an overview of the parts
of your appliance here.
→Fig. 1 , Deviations between your
appliance and the diagrams may dif-
fer with regard to their features and
size.
A
Freezer compartment
→Page45
B
Variable-temperature com-
partment →Page46
C
Refrigerator compartment
→Page44
1
Temperature controller
(freezer compartment)
→Page43
2
Fixed shelf →Page41
3
Ice cube maker →Page41
4
Variable-temperature con-
tainer →Page41
5
Lighting
6
Rating plate →Page53
7
Fruit and vegetable container
with humidity control
→Page41
8
Screw foot
9
Control panel →Page40
10
Door container →Page41
11
Door tray for large bottles
→Page41
5.2 Control panel
You can use the control panel to con-
figure all functions of your appliance
and to obtain information about the
operating status.
→Fig. 2
1
(Variable-temperature com-
partment) sets the temperat-
ure of the variable temperat-
ure compartment.
2
Displays the set temperature
of the variable temperature
compartment in °C.
3
(Refrigerator compartment)
sets the temperature of the
refrigerator compartment.
4
super lights up when Super
cooling is switched on.
5
Displays the set temperature
for the refrigerator compart-
ment in°C.
en
41
Features
6 Features
Features
The features of your appliance de-
pend on the model.
6.1 Shelf
To vary the shelf as required, you
can remove the shelf and re-insert it
elsewhere.
→"Removing the shelf", Page48
6.2 Fixed shelf
Always put the fixed shelf in the spe-
cified position.
6.3 Fruit and vegetable con-
tainer with humidity con-
trol
Store fresh fruit and vegetables loose
in the fruit and vegetable container.
Cover any chopped fruit and veget-
ables, or store in air-tight packaging.
You can adjust the humidity in the
fruit and vegetable container using
the humidity controller. This allows
fresh fruit and vegetables to be
stored for longer than with conven-
tional storage.
→Fig. 3
The air humidity in the fruit and
vegetable container can be set
according to the type and amount of
food to be stored by moving the
humidity controller:
¡ Move to the left for low humidity
when primarily storing fruit or
mixed items, or if the appliance is
very full.
¡ Move to the right for high humidity
when primarily storing
vegetables or when the appliance
is not very full.
Condensation may form in the fruit
and vegetable container depending
on the food and quantity stored.
Remove the condensation with a dry
cloth and adjust the air humidity to a
lower setting using the humidity con-
troller.
To ensure that the quality and aroma
are retained, store fruit and veget-
ables that are sensitive to cold out-
side of the appliance at temperatures
of approx. 8°C to 12°C, e.g. pine-
apple, bananas, citrus fruits, cucum-
bers, courgettes, peppers, tomatoes
and potatoes.
6.4 Variable-temperature con-
tainer
Store delicate foods at lower temper-
atures in the variable-temperature
container for short periods.
6.5 Door tray
To adjust the door tray as required,
you can remove the door tray and re-
insert elsewhere.
→"Removing door tray", Page48
6.6 Door container
Position the door container anywhere
along the door tray.
→Fig. 4
6.7 Ice cube maker
Use the ice cube maker to make ice
cubes out of drinking water.
Making ice cubes
Use only drinking water tomake ice
cubes.

en
42
1. Remove the ice cube tray , fill ¾
full with drinking water and re-in-
sert .
→Fig. 5
Note:If it is filled with too much
drinking water, this may impair the
function of the ice cube maker.
The ice cubes cannot be removed
individually from the ice cube tray.
Too much drinking water was ad-
ded and isrunning into the ice
cube container, causing any ice
cubes tofreeze together.
2. When the ice cubes are frozen, ro-
tate the knob on the ice cube tray
several times in a clockwise direc-
tion and release it.
→Fig. 6
a The ice cubes will loosen and fall
into the ice cube container.
3. Pull out the ice storage container
and remove the ice cubes.
→Fig. 7
6.8 Accessories
Use original accessories. These have
been made especially for your appli-
ance.
The accessories for your appliance
depend on the model.
Egg tray
Store eggs safely on the egg tray.
Basic operation
7 Basic operation
Basic operation
7.1 Switching on the appli-
ance
1. Electrically connect the appliance.
→Page40
a The appliance begins to cool.
2. Set the required temperature.
→Page43
7.2 Operating tips
¡ Once you have switched on the
appliance, the set temperature is
only reached after several hours.
Do not put any food in the appli-
ance until the set temperature has
been reached.
¡ The front and side panels of
thehousing heat up occasionally.
This prevents condensation from
forming.
¡ When closing the door, make sure
that the door is not blocked by
stored items.
¡ When you close the door, a va-
cuum may be created. The door is
then difficult to open again. Wait a
moment until the vacuum is offset.
¡ The temperature in the appliance
varies due to the following condi-
tions:
– How often the appliance is
opened
– Load capacity
– Temperature of newly stored
food
– Ambient temperature
– Direct sunlight
7.3 Switching off the appli-
ance
▶ Disconnect the appliance from the
power supply. Unplug the appli-
ance from the mains or switch off
the circuit breaker in the fuse box.
en
43
7.4 Setting the temperature
Setting the refrigerator
compartment temperature
▶ Press (Refrigerator compart-
ment) repeatedly until the temper-
ature display shows the required
temperature setting.
Wait 5seconds until the temperat-
ure on the control panel is set.
The recommended temperature in
the refrigerator compartment is
4°C.
Setting the freezer compartment
temperature
▶ Move the temperature controller
(freezer compartment) to the re-
quired position.
Coldest lowest temper-
ature
Cold maximum tem-
perature
OPTIMAL recommended
temperature
Setting the variable-temperature
compartment
▶ Press (Variable-temperature
compartment) repeatedly until the
temperature display shows the re-
quired temperature.
Wait 5seconds until the temperat-
ure on the control panel is set.
The recommended temperature in
the variable-temperature compart-
ment is 3°C.
Overview of the recommended temperature setting
Set the recommended temperature in the refrigerator compartment and in the
freezer compartment based on the season.
Season Refrigerator
compartment
Freezer compartment
Winter
Room temperature below 20°C
4°C Cold
Standard, monsoon 3°C OPTIMAL
Summer
Room temperature above 35°C
2°C Coldest
en
44
Additional functions
8 Additional functions
Additional functions
Find out which additional functions
can be used for your appliance.
8.1 Super cooling
With Super cooling, the refrigerator
compartment cools as cold as pos-
sible.
Switch on Super cooling before pla-
cing large quantities of food in the re-
frigerator compartment.
Note:When Super cooling is
switched on, increased noise may
occur.
Switching on Super cooling
1. Move the temperature controller
(freezer compartment) to the "cold"
position.
2. Press (Refrigerator compart-
ment) repeatedly until "super"
lights up.
Wait 5seconds until the temperat-
ure on the control panel is set.
Note:After approx. 2hours, the ap-
pliance switches to normal operation.
Switching off Super cooling
▶ Press (Refrigerator compart-
ment) repeatedly until the temper-
ature display (refrigerator compart-
ment) shows the required temper-
ature.
Wait 5seconds until the temperat-
ure on the control panel is set.
Alarm
9 Alarm
Alarm
9.1 Door alarm
If the appliance door is open for a
while, the door alarm switches on.
A warning tone sounds.
Switching off the door alarm
▶ Close the appliance door or press
any touch field on the control
panel.
a The warning tone is switched off.
Refrigerator compartment
10 Refrigerator compart-
ment
Refrigerator compartment
You can keep dairy products, eggs,
prepared meals, pastries, open pre-
serves and hard cheese in the refri-
gerator compartment.
The temperature can be set from
2°C to 6°C.
The refrigerator compartment can
also be used to store highly perish-
able foods in the short to medium
term. The lower the selected temper-
ature, the longer the food remains
fresh.
10.1 Tips for storing food in
the refrigerator compart-
ment
¡ Only store food when fresh and
undamaged.
¡ Store food covered or in air-tight
packaging.
¡ To avoid impeding the circulation
of air and to prevent food from
freezing, do not place food so that
it has direct contact with the back
wall.
¡ Allow hot food and drinks to cool
down first before placing in the ap-
pliance.
¡ Observe the best-before date or
use-by date specified by the manu-
facturer.

en
45
10.2 Chill zones in the refri-
gerator compartment
The air circulation in the refrigerator
compartment creates different chill
zones.
Coldest zone
The coldest zone is on the top shelf.
Note:Store highly perishable food
such as fish, sausages and meat in
the variable-temperature compart-
ment.
→"Variable-temperature compart-
ment", Page46
Warmest zone
The warmest zone is on the fixed
shelf.
Tip:Store food that does not spoil
easily in the warmest zone, e.g. hard
cheese and butter. Cheese can then
continue to release its aroma and the
butter will still be easy to spread.
Freezer compartment
11 Freezer compartment
Freezer compartment
You can store frozen food, freeze
food and make ice cubes in the
freezer compartment.
The temperature in the freezer com-
partment depends on the temperat-
ure in the refrigerator compartment.
Long-term storage of food should be
at –18°C or lower.
The freezer compartment can be
used to store perishable food long-
term. The low temperatures slow
down or stop the spoilage.
11.1 Freezing capacity
The freezing capacity indicates the
quantity of food that can be frozen
right through to the centre within a
specific period of time.
Information on freezing capacity can
be found on the rating plate.
→Fig. 1 /
6
Prerequisites for freezing capacity
11.2 Fully utilising the freezer
compartment volume
Learn how to store the maximum
amount of frozen food in the freezer
compartment.
1. Remove all fittings from the freezer
compartment. →Page48
2. Stack food directly on the floor of
the freezer compartment.
11.3 Tips for storing food in
the freezer compartment
¡ Store food in air-tight packaging.
¡ Do not bring food which is to be
frozen into contact with frozen
food.
¡ Spread out the food over a wide
area in the freezer compartment.
11.4 Tips for freezing fresh
food
¡ Freeze fresh and undamaged food
only.
¡ Freeze food in portions.
¡ Cooked food is more suitable than
food that can be eaten raw.
¡ Vegetables: Wash, chop up and
blanch before freezing.
¡ Fruit: Wash, pit and perhaps peel,
possibly add sugar or ascorbic
acid solution.
en
46
¡ Food that is suitable for freezing in-
cludes baked items, fish and sea-
food, meat, game, poultry, eggs
without shells, cheese, butter and
quark, ready meals and leftovers.
¡ Food that is unsuitable for freezing
includes lettuce, radishes, eggs in
shells, grapes, raw apples and
pears, yoghurt, sour cream, crème
fraîche and mayonnaise.
Packing frozen food
If you select suitable packaging ma-
terial and the correct type of pack-
aging, you can determine the product
quality and prevent freezer burn.
1. Place the food in the packaging.
2. Squeeze out the air.
3. Pack food airtight to prevent it
from losing flavour and drying out.
4. Label the packaging with the con-
tents and the date of freezing.
11.5 Shelf life of frozen food
at −18°C
Food Storage time
Fish, sausages, pre-
pared meals and
baked goods
up to
6months
Poultry, meat up to
8months
Vegetables, fruit up to
12months
11.6 Defrosting methods for
frozen food
CAUTION
Risk of harm to health!
During the thawing process, bacteria
may multiply and spoil the frozen
food.
▶ Do not refreeze food after it has
been defrosted or started to de-
frost.
▶ Refreeze food only after cooking.
▶ These items should no longer be
stored for the maximum storage
period.
¡ Defrost animal-based food, such
as fish, meat, cheese, quark, in the
refrigerator compartment.
¡ Defrost bread at room temperat-
ure.
¡ Prepare food for immediate con-
sumption in the microwave, in the
oven, or on the hob.
Variable-temperature compartment
12 Variable-temperature
compartment
Variable-temperature compartment
You can use the variable-temperature
compartment as a refrigerator com-
partment or to gently freeze food at
lower temperatures.
The temperature can be set from
−6°C to 6°C.
12.1 Storage recommenda-
tions in the variable-tem-
perature compartment
From 1°C to 6°C, store ready
meals, baked goods and food that
should not be frozen, e.g. yoghurt
and other dairy products.
From −3°C to −6°C, gently freeze
delicate foods – such as meat, saus-
age and fish and pureed food – for
up to a week. The food is easier to
cut, divide or portion and thaws
faster.

en
47
Defrosting
13 Defrosting
Defrosting
13.1 Defrosting in the refri-
gerator compartment
The refrigerator compartment in your
appliance defrosts automatically.
13.2 Defrosting in the freezer
compartment
The fully automatic NoFrost system
ensures that the freezer compartment
remains frost-free. Defrosting is not
required.
13.3 Defrosting in the vari-
able-temperature com-
partment
The variable-temperature compart-
ment in your appliance defrosts auto-
matically.
Cleaning and servicing
14 Cleaning and servi-
cing
Cleaning and servicing
To keep your appliance working effi-
ciently for a long time, it is important
to clean and maintain it carefully.
Customer Service must clean inac-
cessible points. Cleaning by cus-
tomer service can give rise to costs.
14.1 Preparing the appliance
for cleaning
1. Disconnect the appliance from the
power supply.
Unplug the appliance from the
mains or switch off the circuit
breaker in the fuse box.
2. Take out all of the food and store it
in a cool place.
Place ice packs (if available) onto
the food.
3. Remove all fittings and accessor-
ies from the appliance.
→Page48
14.2 Cleaning the appliance
WARNING
Risk of electric shock!
An ingress of moisture can cause an
electric shock.
▶ Do not use steam- or high-pres-
sure cleaners to clean the appli-
ance.
Liquid in the lighting or in the con-
trols can be dangerous.
▶ The rinsing water must not drip
into the lighting or controls.
ATTENTION!
Unsuitable cleaning products may
damage the surfaces of the appli-
ance.
▶ Do not use hard scouring pads or
cleaning sponges.
▶ Do not use harsh or abrasive de-
tergents.
▶ Do not use cleaning products with
a high alcohol content.
If you clean fittings and accessories
in the dishwasher, this may cause
them to become deformed or discol-
our.
▶ Never clean fittings and accessory
in the dishwasher.
1. Prepare the appliance for cleaning.
→Page47
2. Clean the appliance, the fittings,
the accessories and the door seals
with a dish cloth, lukewarm water
and a little pH-neutral washing-up
liquid.
3. Dry thoroughly with a soft, dry
cloth.
4. Insert the fittings.
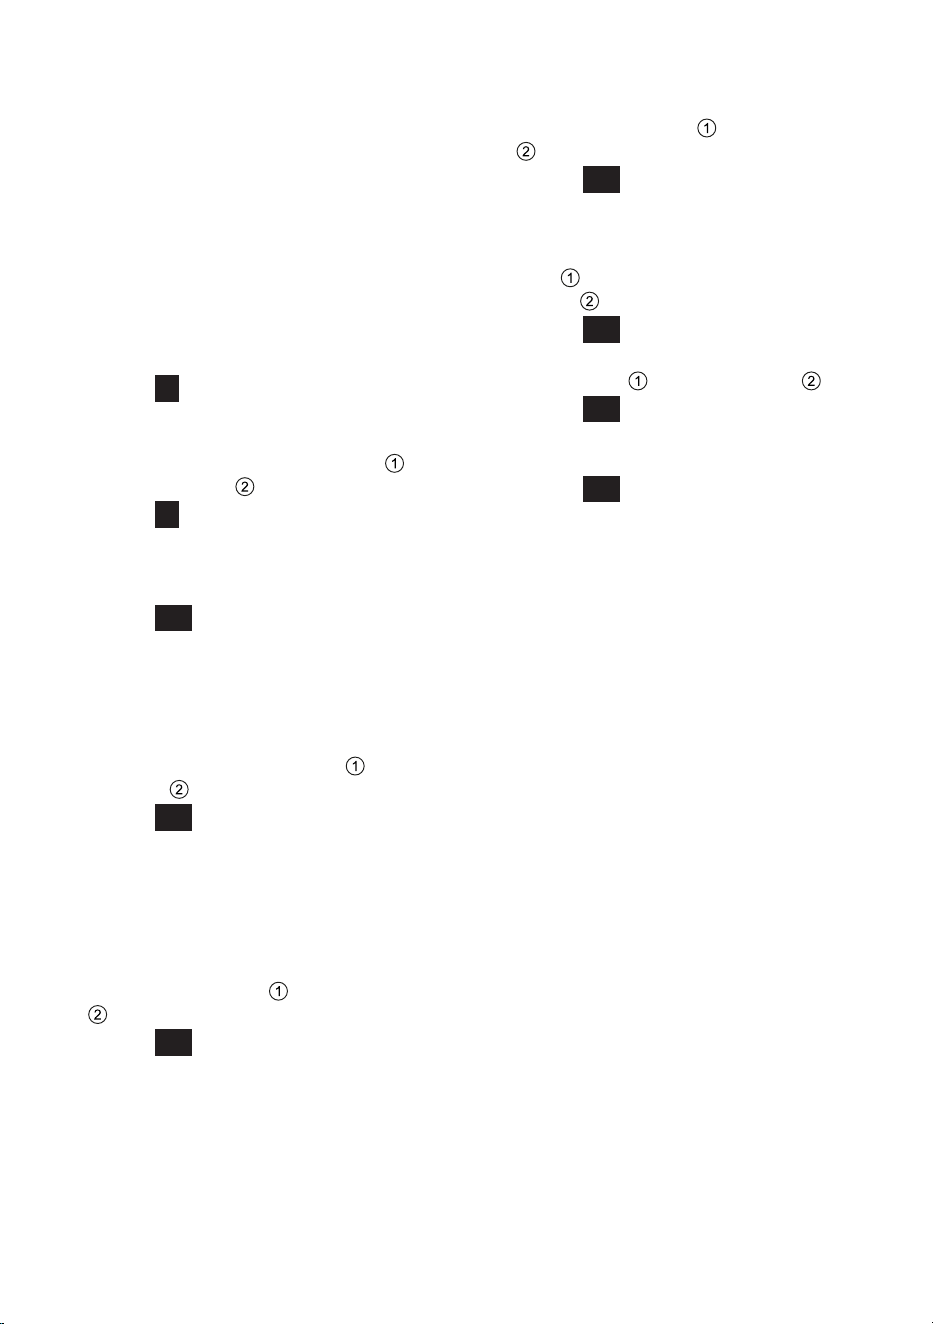
en
48
5. Electrically connect the appliance.
→Page40
6. Putting the food into the appliance.
14.3 Removing the fittings
If you want to clean the fittings thor-
oughly, remove these from your ap-
pliance.
Removing the shelf
▶ Pull out, lift and remove the shelf.
→Fig. 8
Removing the fixed shelf
▶ Lift the fixed shelf at the rear
and remove it .
→Fig. 9
Removing door tray
▶ Lift the door tray and remove it.
→Fig. 10
Removing the door container
1. Lift the door tray with the door con-
tainer upwards and remove it.
2. Lift the door container at the rear
of the door tray upwards and re-
move it .
→Fig. 11
Removing the variable-
temperature compartment
1. Pull out the variable-temperature
container as far as it will go.
2. Lift the variable-temperature con-
tainer at the front and remove it
.
→Fig. 12
Removing the fruit and vegetable
container
1. Pull out the fruit and vegetable
container as far as it will go.
2. Lift the fruit and vegetable con-
tainer at the front and remove it
.
→Fig. 13
Removing the ice cube maker
1. Remove and empty the ice cube
tray and the ice storage con-
tainer .
→Fig. 14
2. Lift the fixed shelf with the holder
at the rear and remove it .
→Fig. 15
3. Slide the holder out of the fixed
shelf at the side.
→Fig. 16
Tip:In order to avoid covering the in-
ner ventilation openings (freezer com-
partment) during installation, position
the ice cube maker on the left-hand
side of the fixed shelf.
en
49
Troubleshooting
15 Troubleshooting
Troubleshooting
You can rectify minor faults on your appliance yourself. Read the troubleshoot-
ing information before contacting after-sales service. This will avoid unneces-
sary costs.
WARNING
Risk of electric shock!
Improper repairs are dangerous.
▶ Repairs to the appliance should only be carried out by trained specialist
staff.
▶ Only use genuine spare parts when repairing the appliance.
▶ If the power cord of this appliance is damaged, it must be replaced by the
manufacturer, the manufacturer's Customer Service or a similarly qualified
person in order to prevent any risk.
Fault Cause and troubleshooting
The appliance is not
cooling, the displays
and lighting are lit.
Showroom mode is switched on.
1. Press and hold (Refrigerator compartment) for 9–
11seconds until an audible signal sounds.
2. After a short time, check whether your appliance is
cooling.
The LED lighting does
not work.
Different causes are possible.
▶ Call customer service.
The customer service number can be found in the
enclosed customer service directory.
The refrigeration unit
is switching on more
frequently and for
longer.
The appliance has been opened frequently.
▶ Do not open appliance door unnecessarily.
External ventilation openings are covered up.
▶ Remove any obstructions from in front of the ex-
ternal ventilation openings.
Not a fault. Modern refrigeration machines switch on
more frequently and have different power levels to
cool more efficiently.
▶ Remove any obstructions from in front of the ex-
ternal ventilation openings.
▶ Install the appliance as far away as possible from
heating elements, cookers and other heat sources.
Avoid prolonged exposure of the appliance to dir-
ect sunlight.
▶ Only open the appliance door as briefly as neces-
sary.
▶ Allow hot food and drinks to cool down first before
storing in the appliance.
en
50
Fault Cause and troubleshooting
A layer of frost forms
on the back wall of
the refrigerator com-
partment.
Not a fault. Modern refrigeration machines ensure a
more even temperature in the refrigerator compart-
ment. The back wall of the refrigerator compartment is
defrosted automatically at regular intervals.
▶ Only open the appliance door as briefly as neces-
sary.
▶ Pack the food airtight or cover it.
▶ Allow hot food and drinks to cool down first before
storing in the appliance.
▶ Always leave some space between the food and
the interior walls.
Side panels of the ap-
pliance are warm.
Not a fault. The side panels contain pipes which heat
up during the cooling process. Units touching the ap-
pliance will not be damaged by the heat.
No action required.
The warning tone
sounds.
The door alarm is
switched on.
The appliance door is open.
▶ Close the appliance door.
The set temperature is
not reached.
Fully automatic de-
frosting no longer
works.
The freezer compartment door was open for a long
time. The evaporator (refrigeration unit) in the noFrost
system is heavily iced up.
Requirement:Store the frozen food well insulated in a
cool place.
1.
Switch off the appliance. →Page42
2. Disconnect the appliance from the mains.
Unplug the appliance from the mains or switch off
the circuit breaker in the fuse box.
3. Move the appliance away from the wall.
4. Leave the appliance door open.
a After approx. 20 minutes, the condensation starts to
run into the evaporation pan at the rear of the appli-
ance.
→Fig. 17
5. To prevent the evaporation pan from overflowing,
mop up the condensation water with a sponge.
The evaporator is defrosted if no more condensa-
tion water runs into the evaporation pan.
6.
Clean the interior of the appliance. →Page47
7.
Switch the appliance back on. →Page42
en
51
Fault Cause and troubleshooting
The temperature dif-
fers greatly from the
setting.
Different causes are possible.
1.
Switch off the appliance. →Page42
2. Switch the appliance back on after fiveminutes.
→Page42
‒ If the temperature is too warm, check the temper-
ature again after a couple of hours.
‒ If the temperature is too cold, check the temper-
ature again on the following day.
Condensation accu-
mulates on the sur-
face of the appliance
and on the shelves in-
side.
The water contained in warm and humid air con-
denses on the colder surfaces of the appliance.
Note:Condensation does not adversely affect the
cooling capability.
1. Wipe away the condensation water with a soft, dry
cloth.
2. Open the appliance as briefly as possible.
3. Ensure that the appliance is always closed properly.
The appliance hums,
bubbles, buzzes,
gargles, clicks or
crackles.
Not a fault. A motor is running, e.g. refrigerating unit,
fan. Refrigerant flows through the pipes. The motor,
switches or solenoid valves are switching on or off.
Automatic defrosting is running.
No action required.
The appliance makes
noises.
The appliance is not level.
▶ Align the appliance using a spirit level and the
screw feet.
The appliance is not free-standing.
▶ Observe the minimum clearances for the appliance.
Fittings wobble or stick.
▶ Check the removable fittings and, if required, re-
place these.
Bottles or containers are touching.
▶ Move the bottles or containers away from each
other.
en
52
15.1 Power failure
During a power failure, the temperat-
ure in the appliance rises; this re-
duces the storage time and the qual-
ity of the frozen food.
On the website for your appliance,
the technical data provides you with
the storage times for frozen food in
the event of a fault.
Notes
¡ Open the appliance as little as
possible during a power failure
and do not place any other food in
the appliance.
¡ Check the quality of the food
immediately after a power failure.
– Dispose of any frozen food that
has defrosted and is hotter than
5°C.
– Cook or fry slightly thawed
frozen food, and then either con-
sume it or freeze it again.
15.2 Conducting an appliance
self-test
Your appliance has an appliance self-
test which displays faults that can be
eliminated by your customer service.
1. Disconnect the appliance from the
power supply.
Unplug the appliance from the
mains or switch off the circuit
breaker in the fuse box.
2. Electrically reconnect the appli-
ance after 5minutes. →Page40
3. Within the first 10seconds after
connecting to the power supply,
press and hold (Refrigerator
compartment) for 5 to 10seconds
until an audible signal sounds.
a The appliance self-test starts.
a While the appliance self-test is run-
ning, a long audible signal sounds.
a If, at the end of the appliance self-
test, 2 audible signals sound and
the temperature display indicates
the set temperature, the temperat-
ure sensors on your appliance are
OK. The appliance switches to nor-
mal operation.
a If, at the end of the appliance self-
test, 5audible signals sound and
the temperature display LEDs light
up with a different brightness, in-
form customer service. The LEDs
provide customer service with in-
formation about this fault.
Storage and disposal
16 Storage and disposal
Storage and disposal
16.1 Taking the appliance out
of operation
1. Disconnect the appliance from the
power supply.
Unplug the appliance from the
mains or switch off the circuit
breaker in the fuse box.
2. Remove all of the food.
3.
Clean the appliance. →Page47
4. ATTENTION! Objects jammed
between the door and the housing
may damage the door hinge.
▶ Open the door until it remains
open by itself.
▶ Do not insert any objects between
the door and the housing.
To guarantee the ventilation inside
the appliance, leave the appliance
open.
en
53
16.2 Disposing of old appli-
ance
Valuable raw materials can be re-
used by recycling.
WARNING
Risk of harm to health!
Children can lock themselves in the
appliance, thereby putting their lives
at risk.
▶ Leave shelves and containers in-
side the appliance to prevent chil-
dren from climbing in.
▶ Keep children away from the re-
dundant appliance.
WARNING
Risk of fire!
If the tubes are damaged, flammable
refrigerant and harmful gases may
escape and ignite.
▶ Do not damage the tubes of the re-
frigerant circuit or the insulation.
1. Unplug the appliance from the
mains.
2. Cut through the power cord.
3. Dispose of the appliance in an en-
vironmentally friendly manner.
Information about current disposal
methods are available from your
specialist dealer or local authority.
Customer Service
17 Customer Service
Customer Service
Detailed information about the war-
ranty period and the warranty condi-
tions in your country is available via
the QR code on the enclosed docu-
ment on service contacts and war-
ranty conditions, from our customer
service or on our website.
If you contact Customer Service, you
will require the product number (E-
Nr.) and the production number (FD)
of your appliance.
You can find the contact details for
our customer service via the QR
code on the enclosed document on
service contacts and warranty condi-
tions or on our website.
17.1 Product number (E-Nr.)
and production number
(FD)
You can find the product number (E-
Nr.) and the production number (FD)
on the appliance's rating plate.
→Fig. 1 /
6
Make a note of your appliance's de-
tails and the Customer Service tele-
phone number to find them again
quickly.
Technical data
18 Technical data
Technical data
Refrigerant, cubic capacity and fur-
ther technical specifications can be
found on the rating plate.
→Fig. 1 /
6


Thank you for buying a
Bosch Home Appliance!
Register your new device on MyBosch now and profit directly from:
• Expert tips & tricks for your appliance
• Warranty extension options
• Discounts for accessories & spare-parts
• Digital manual and all appliance data at hand
• Easy access to Bosch Home Appliances Service
Free and easy registration – also on mobile phones:
www.bosch-home.com/welcome
Looking for help?
You'll find it here.
Expert advice for your Bosch home appliances, help with problems
or a repair from Bosch experts.
Find out everything about the many ways Bosch can support you:
www.bosch-home.com/service
Contact data of all countries are listed in the attached service direc-
tory.
*9001941098*
9001941098 (050225) IMKG.956.05.2024; IMKG.1005.05.2024
id, en
BSH Hausgeräte GmbH
Carl-Wery-Straße 34
81739 München, GERMANY
www.bosch-home.com
A Bosch Company
IMPORTIR:
PT. BSH HOME APPLIANCES
ARKADIA GREEN PARK TOWER G
LANTAI 7,
JL. TB SIMATUPANG KAV.88 KE-
BAGUSAN, PASAR MINGGU
KOTA ADM. JAKARTA SELATAN DKI
JAKARTA 12520