Technical Support and E-Warranty Certificate
www.vevor.com/support
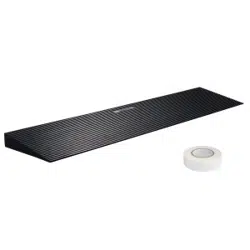
THRESHOLD RAMP
USER MANUAL
We continue to be committed to provide you tools with competitive price.
"Save Half", "Half Price" or any other similar expressions used by us only represents an
estimate of savings you might benefit from buying certain tools with us compared to the major
top brands and does not necessarily mean to cover all categories of tools offered by us. You
are kindly reminded to verify carefully when you are placing an order with us if you are
actually saving half in comparison with the top major brands.

Model: LD9YV0 /LYIMV0 /Z2UAV0 /GRBRV0 /OVUSV0 /SNPTV0
Have product questions? Need technical support? Please feel free to
contact us:
Technical Support and E-Warranty Certificate
www.vevor.com/support
NEED HELP? CONTACT US!
This is the original instruction, please read all manual instructions
carefully before operating. VEVOR reserves a clear interpretation of our
user manual. The appearance of the product shall be subject to the
product you received. Please forgive us that we won't inform you again if
there are any technology or software updates on our product.
THRESHOLD RAMP

1. Safety Instructions
WARNING:
Carefully read and understand instructions and procedures before
installing and using the threshold ramp.
Do not modify the threshold ramp design.
• Do not move a threshold ramp while standing on it.
• Do not use it in bad weather, such as wind, rain, snow, and so on. It is
recommended to use the ladder in clear weather.
1.During installation, please wear gloves to prevent hand injuries.
2.Do not stack items or allow children to play on the ramp.
3.Regularly check the structure and fasteners of the ramp to ensure its
stability and safety.
4.If the surface of the ramp is worn or damaged, please replace or repair
it in time.
2. Maintenance Guide
1. Place the product on a sturdy, secure, accessible, and level starting
point. The minimum weight capacity of the starting point must be equal to
that of the ramp (800 lbs). Do not exceed the maximum weight capacity of
the product.
2. Ensure that the product is securely flush against the starting point. If a
safe, accessible, and level starting point cannot be found, or if the product
does not fit securely against a higher starting point, do not use the ramp.
3. Do not tamper with, attempt to repair, or modify any part of the product.
Exercise caution to avoid pinch points during assembly and handling.
4. If using the product with other mobility equipment, refer to the user
guide of the equipment to understand the acceptable usage guidelines,
including appropriate slope, incline, and chair direction. Do not exceed the

recommendations of the mobility equipment.
5.Before each use, carefully inspect the fasteners on the ramp to ensure
they are not loose. Tighten any loose fasteners if necessary.
6.When using the ramp, ensure it is securely flush against the starting
point to ensure safety.
7.Before each use, clean the ramp surface of ice, snow, dust, leaves, and
other debris. Remove accumulated ice and snow, and sweep the surface
clean. For dust and debris, use a soft bristle brush and non-alkaline
detergent to clean the ramp surface, then rinse thoroughly.
8.The ramp surface may become slippery in wet conditions. Walk with
caution and pay attention to your footing to prevent slipping.
9.If the ramp will not be used for an extended period, store it in a dry and
well-ventilated area away from direct sunlight.
SAVE THESE INSTRUCTIONS
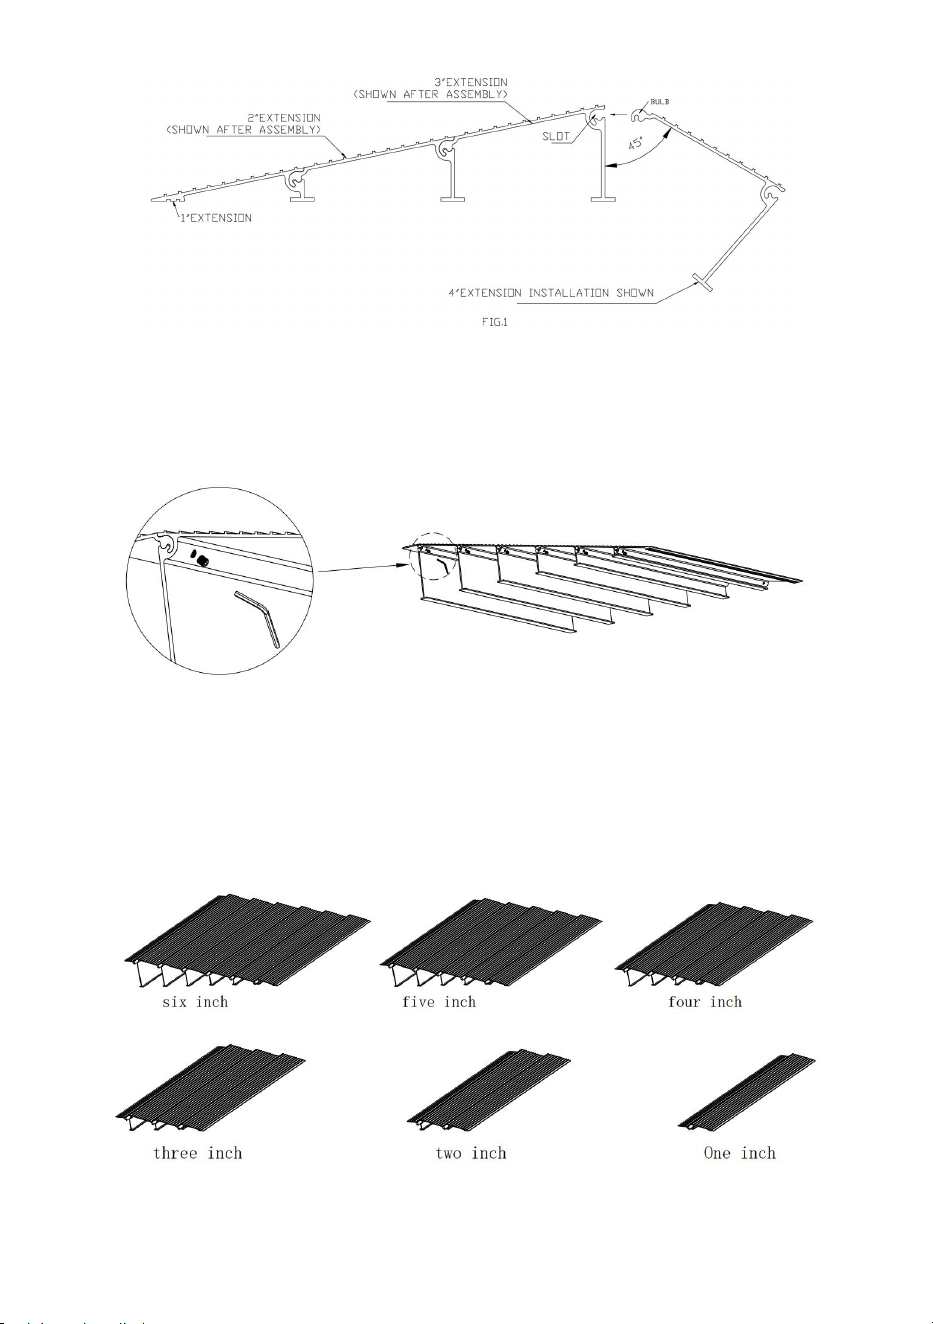
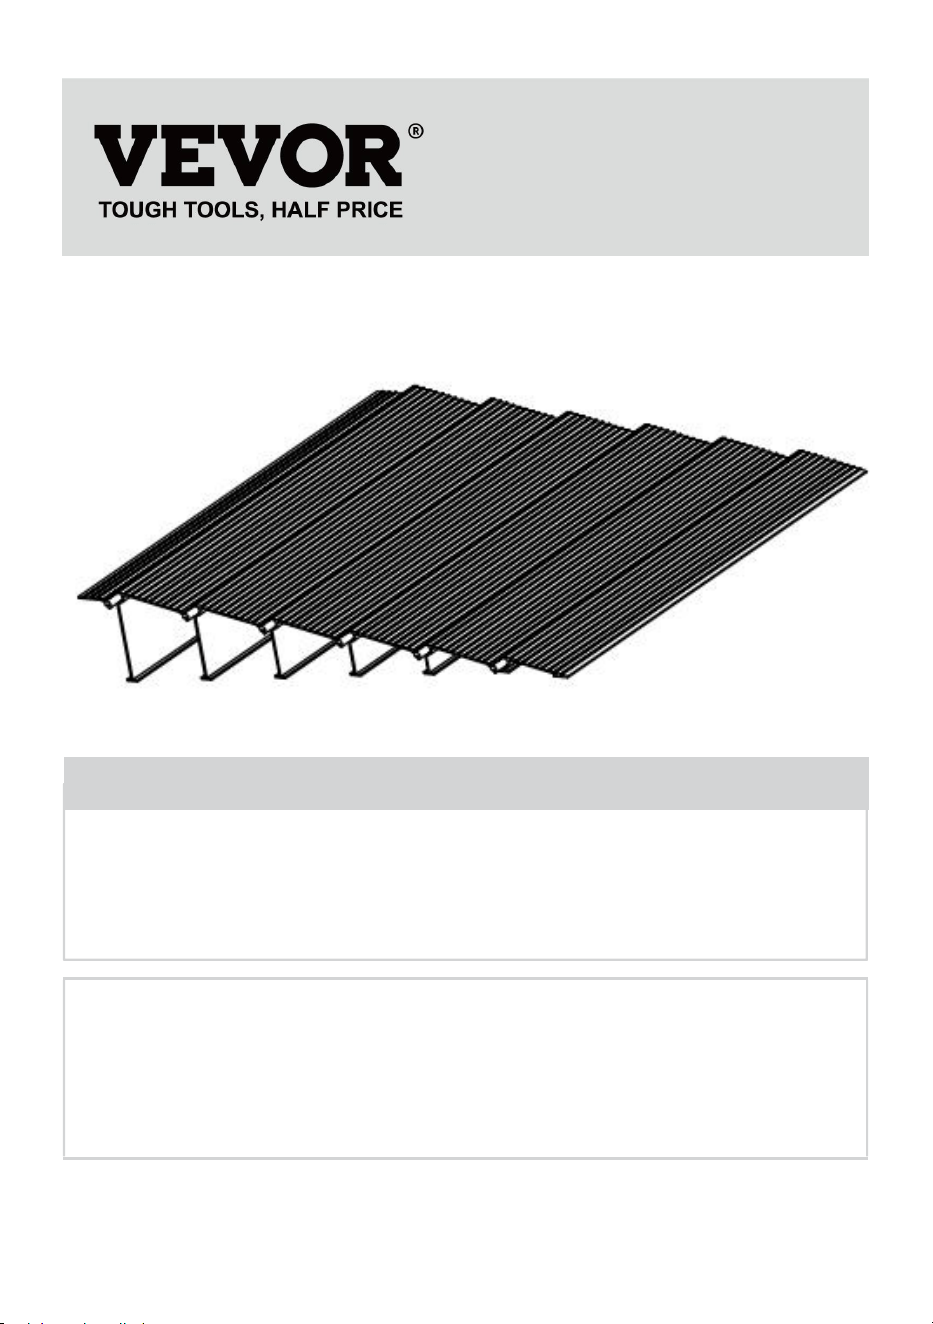
3. Product Description and Main Features
The threshold interlocking aluminum alloy ramp is made of high-quality
aluminum alloy extrusion. This product is durable and provides
convenience for people. It is lightweight, portable, stable, and durable and
features an interlocking design for easy installation and storage.
Main Features:
1. Material: High-strength aluminum alloy, extruded.
2. Surface: Anti-slip treatment, deburring.
3. Interlocking design: Each section’s interface is precisely designed;
align each section's interface and push them together for installation.
4. Load limit: Up to 800 lbs.
5. Height optional: suitable for thresholds of different heights.
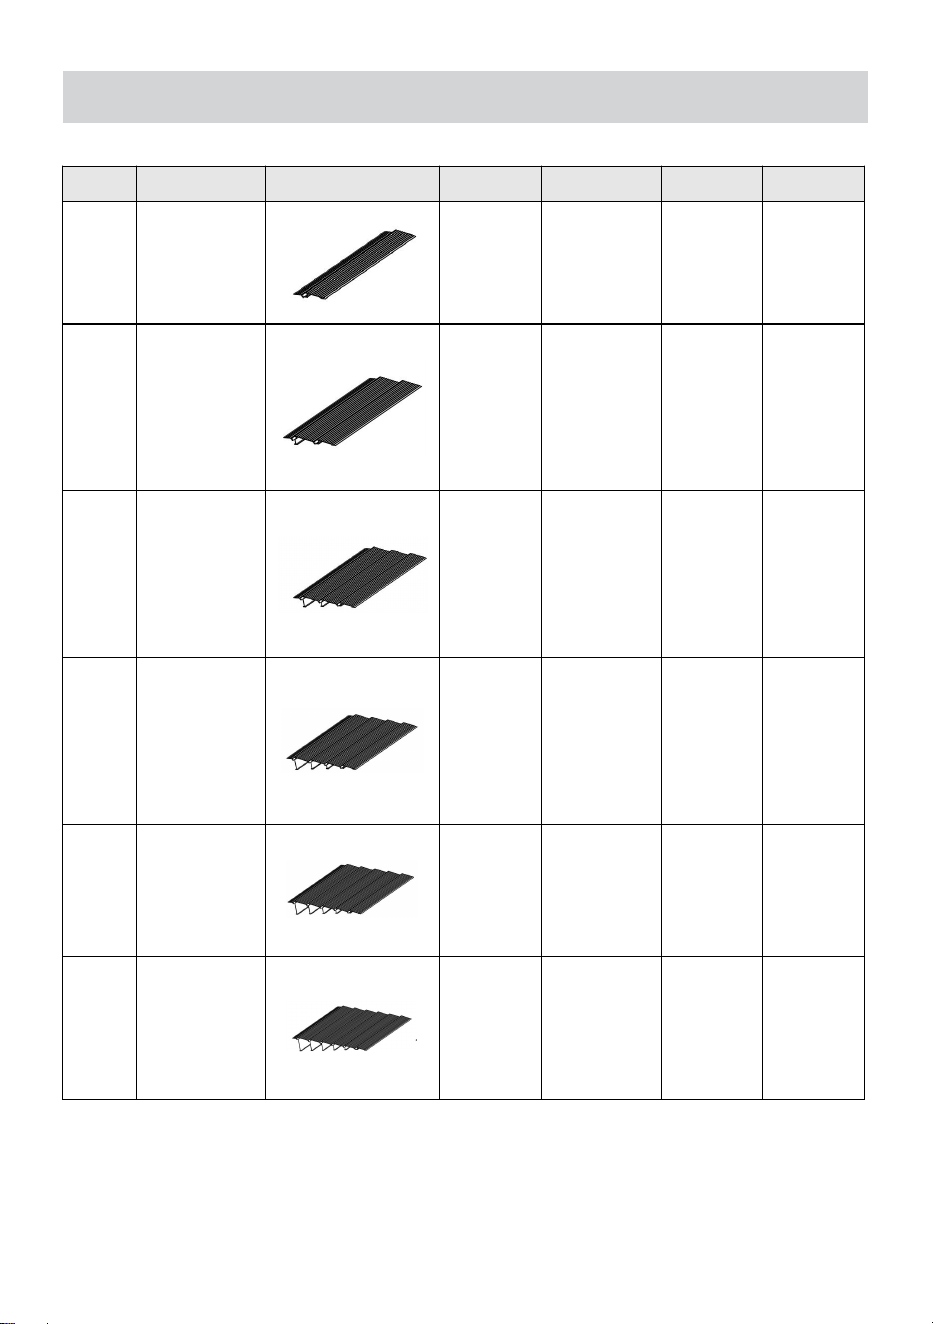
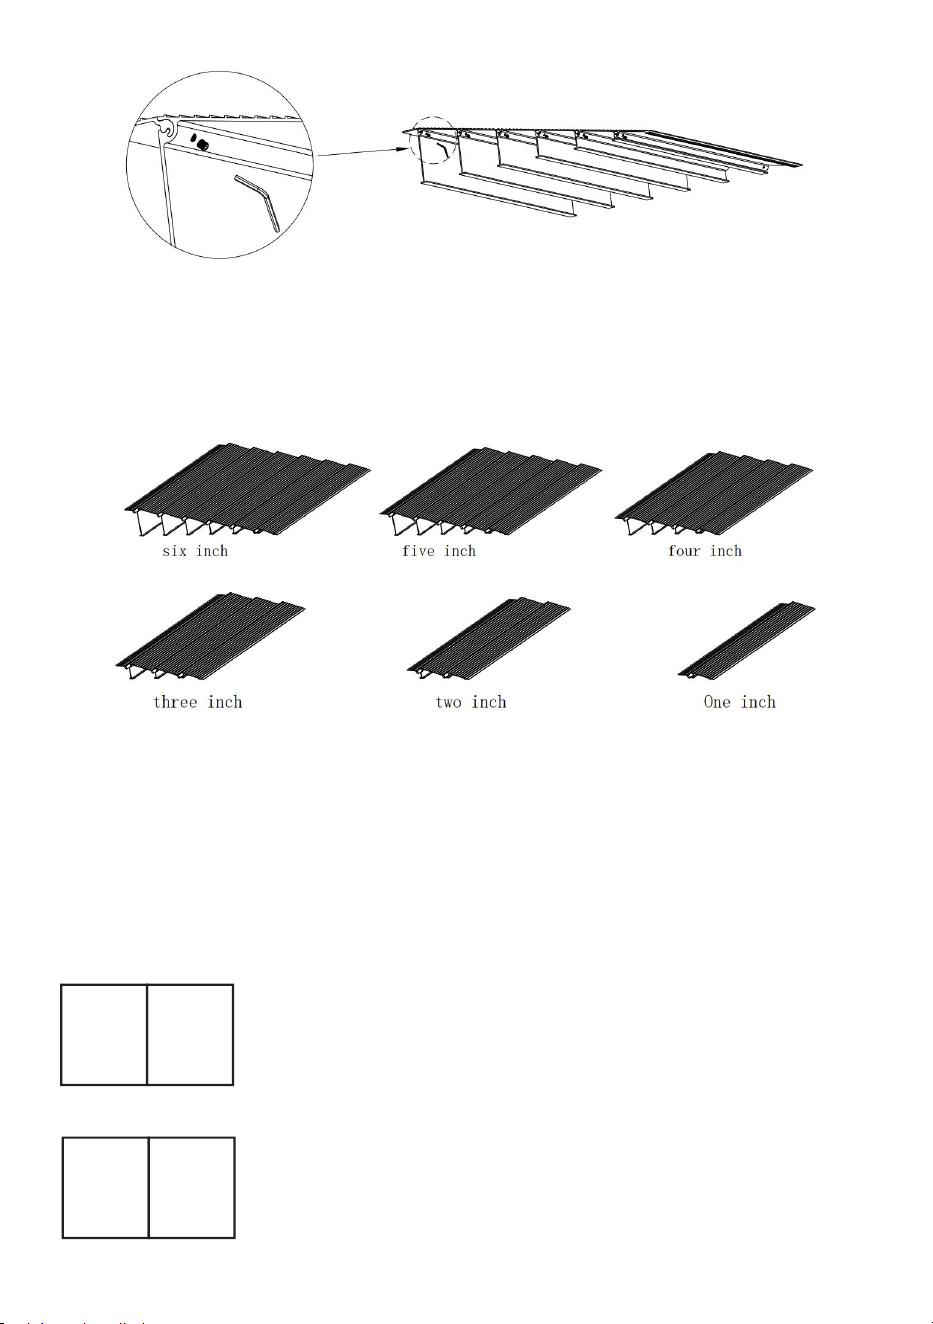
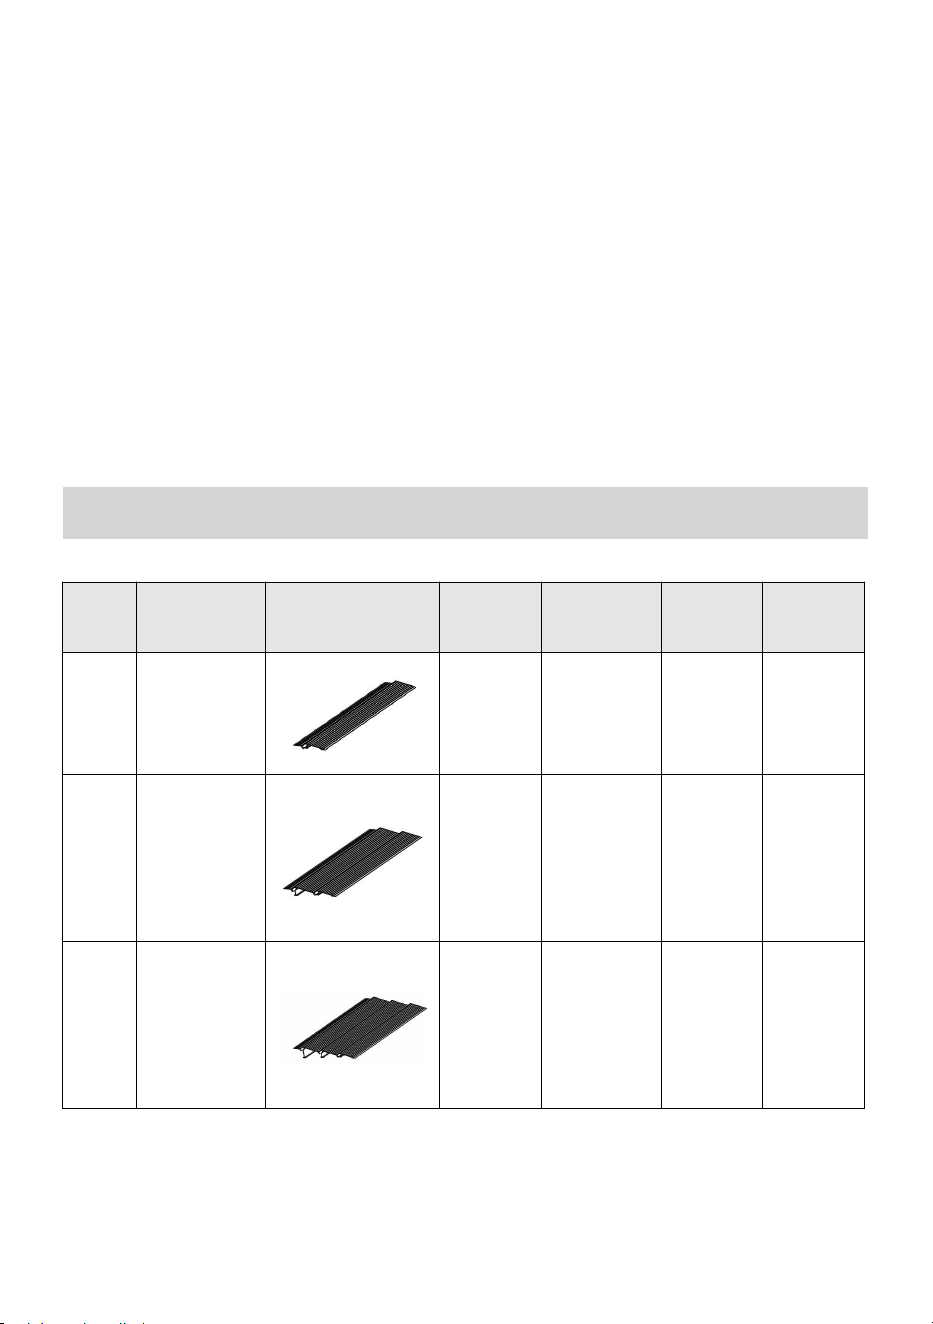
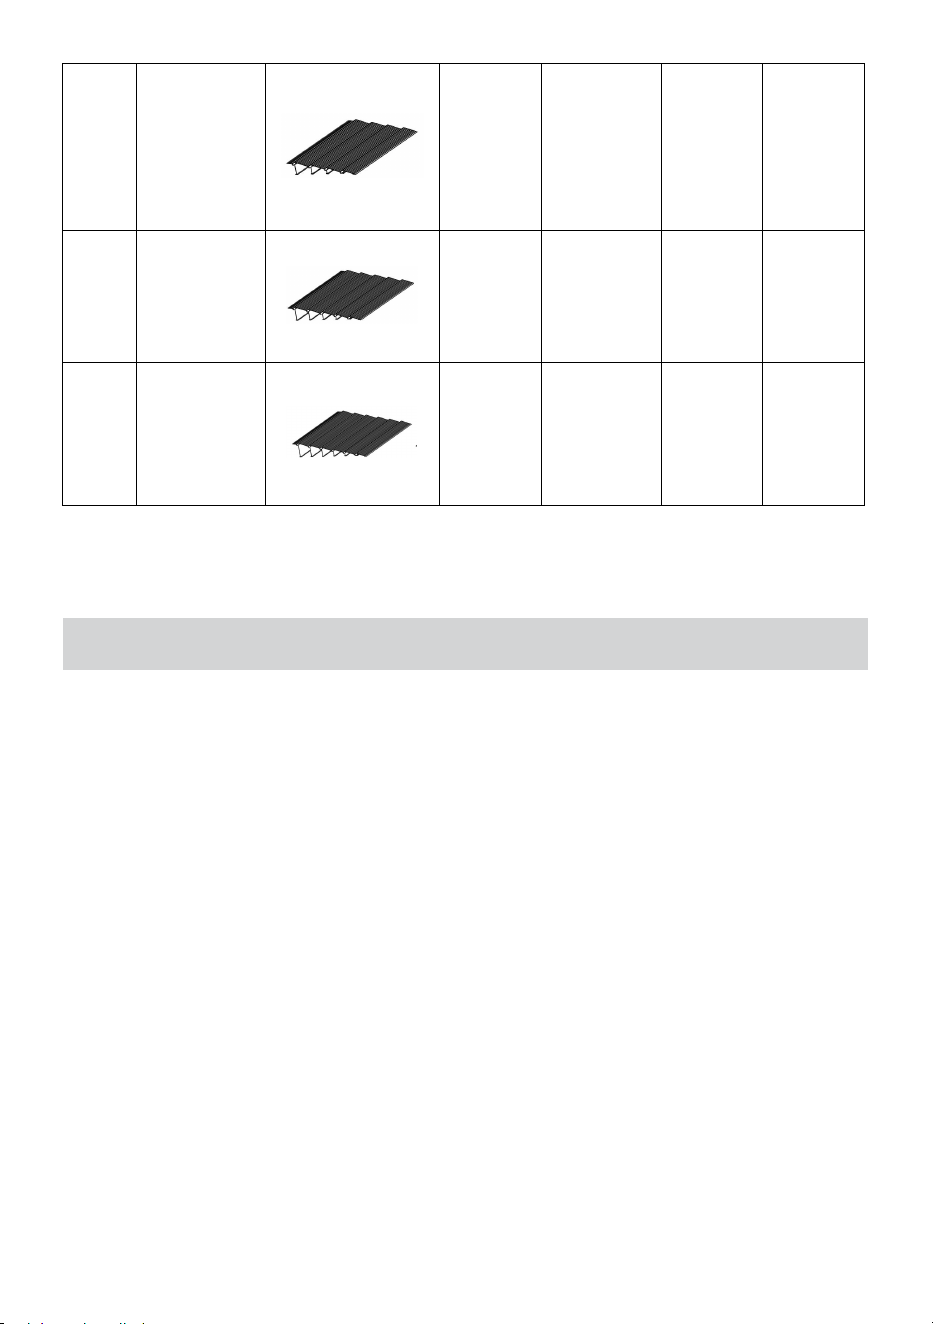
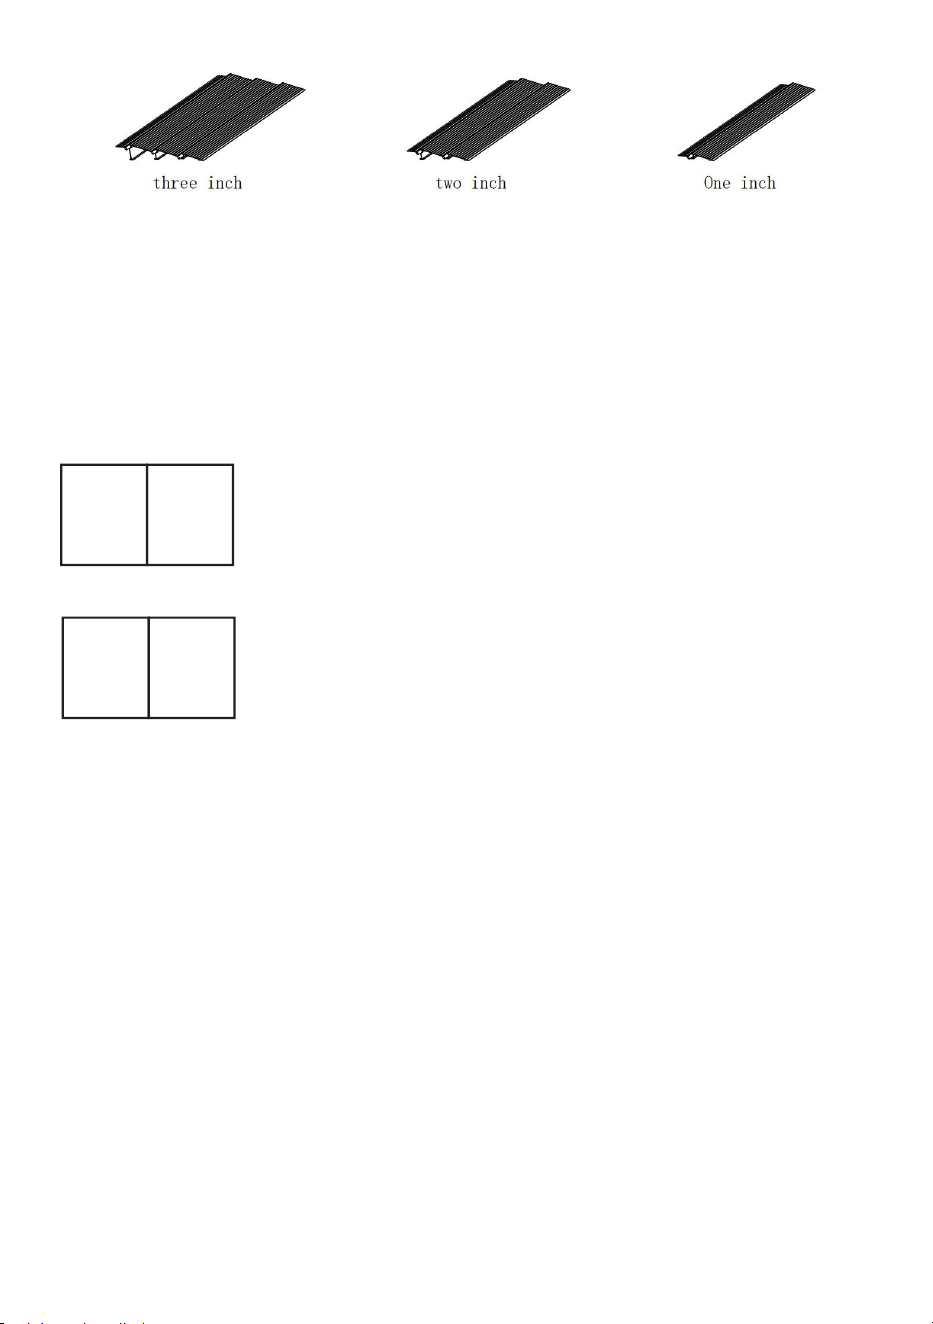
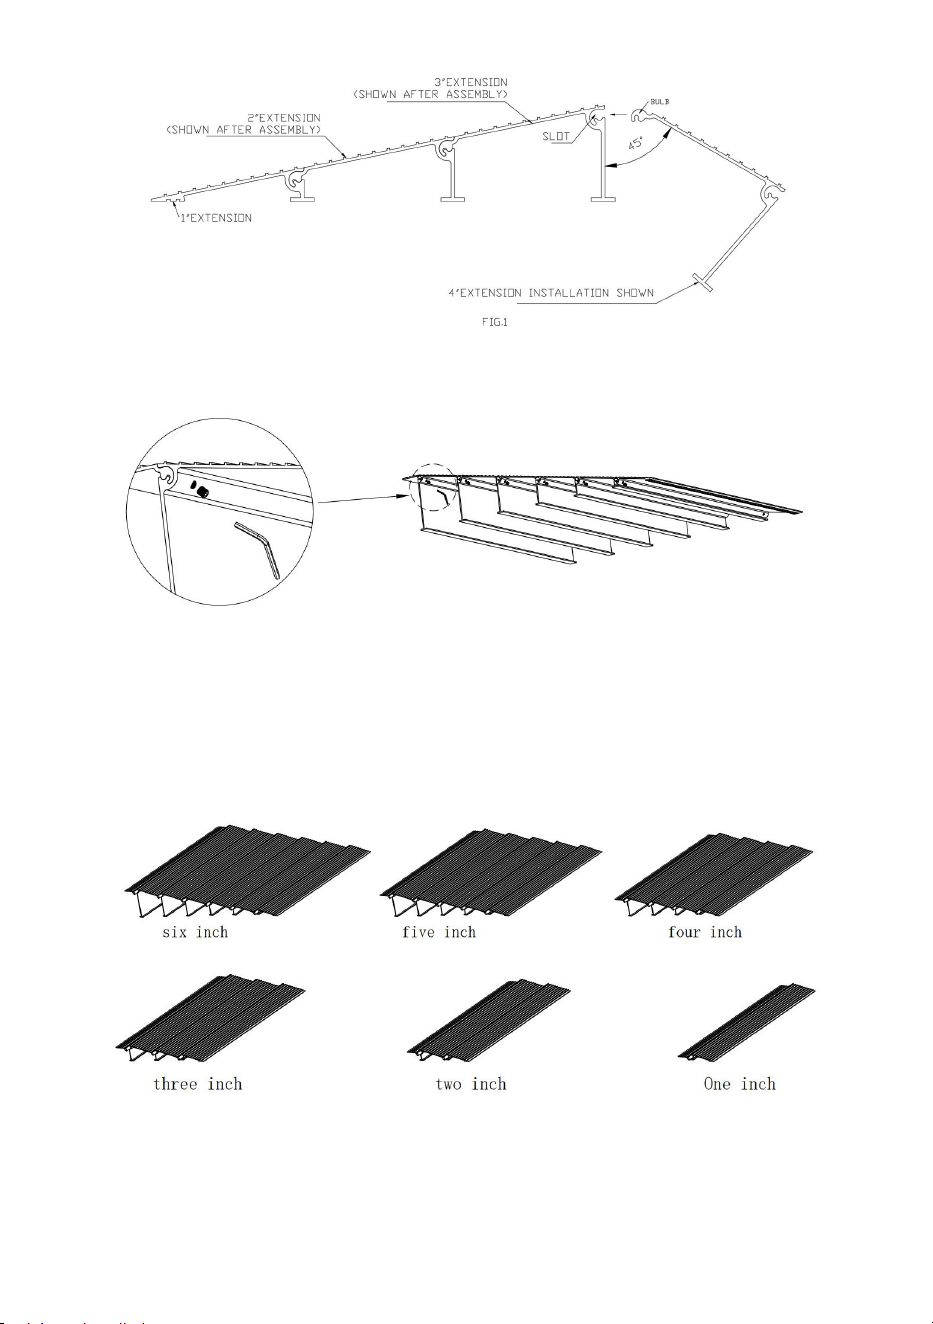
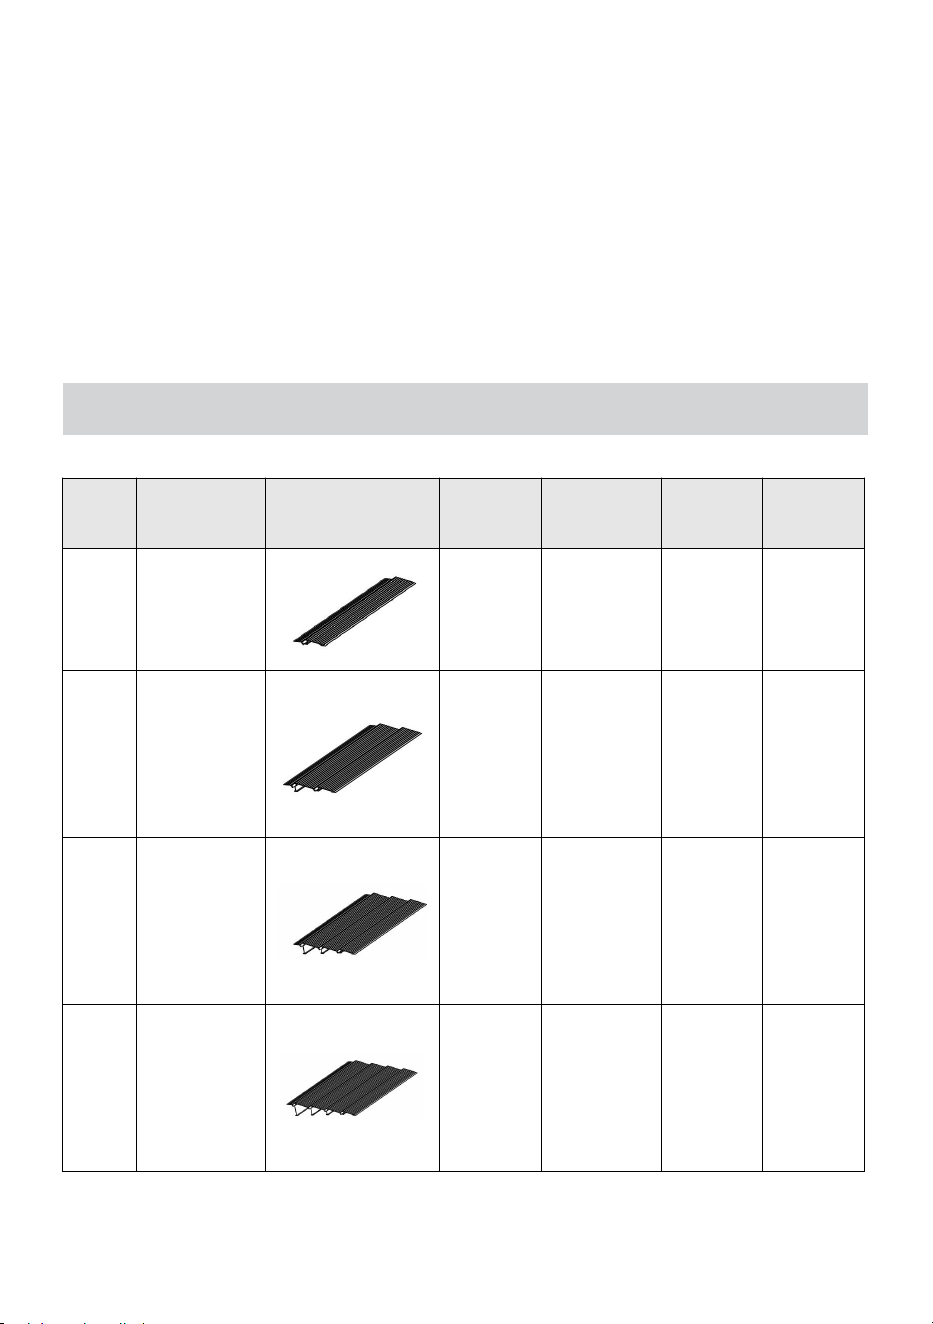
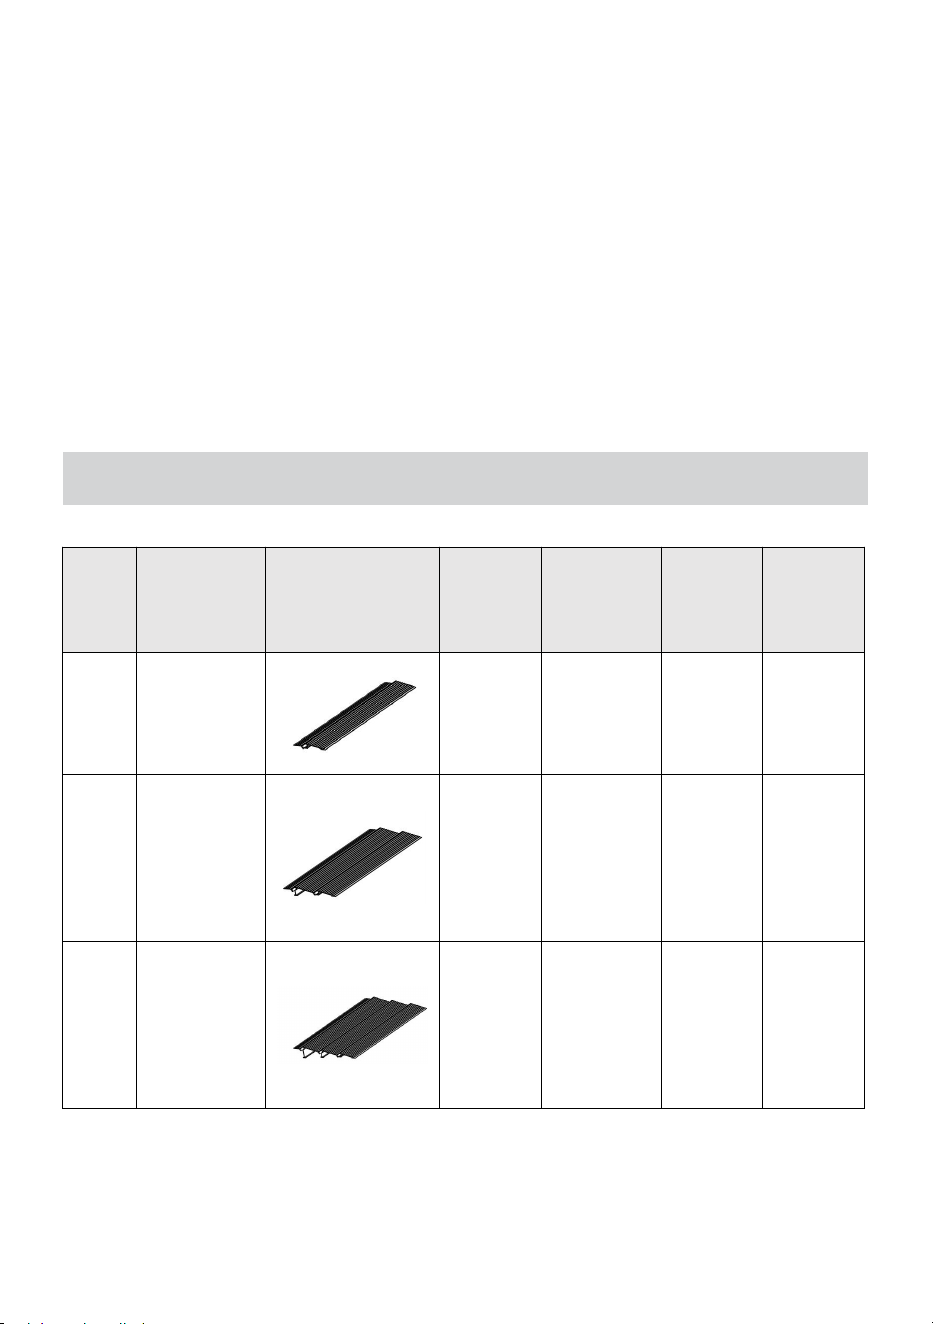
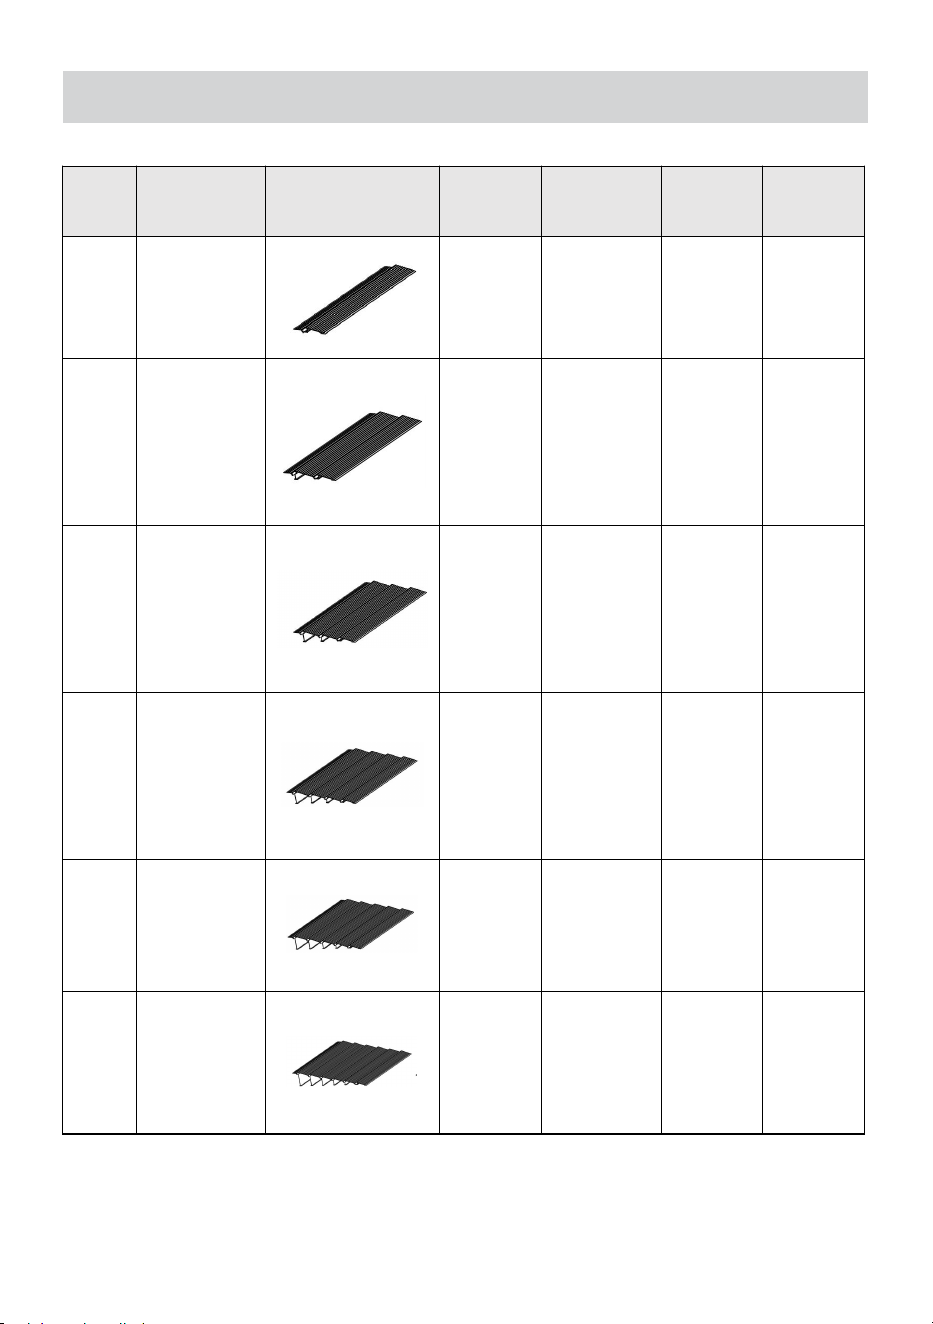
4. Product Parameter
Item
Model
Picture
Height
Load Limit
N.W
G.W
1
LD9YV0
1inch
800lbs
1.9kg
2.6kg
2
LYIMV0
2inch
800lbs
3.6kg
4.4kg
3
Z2UAV0
3inch
800lbs
5.4kg
6.25kg
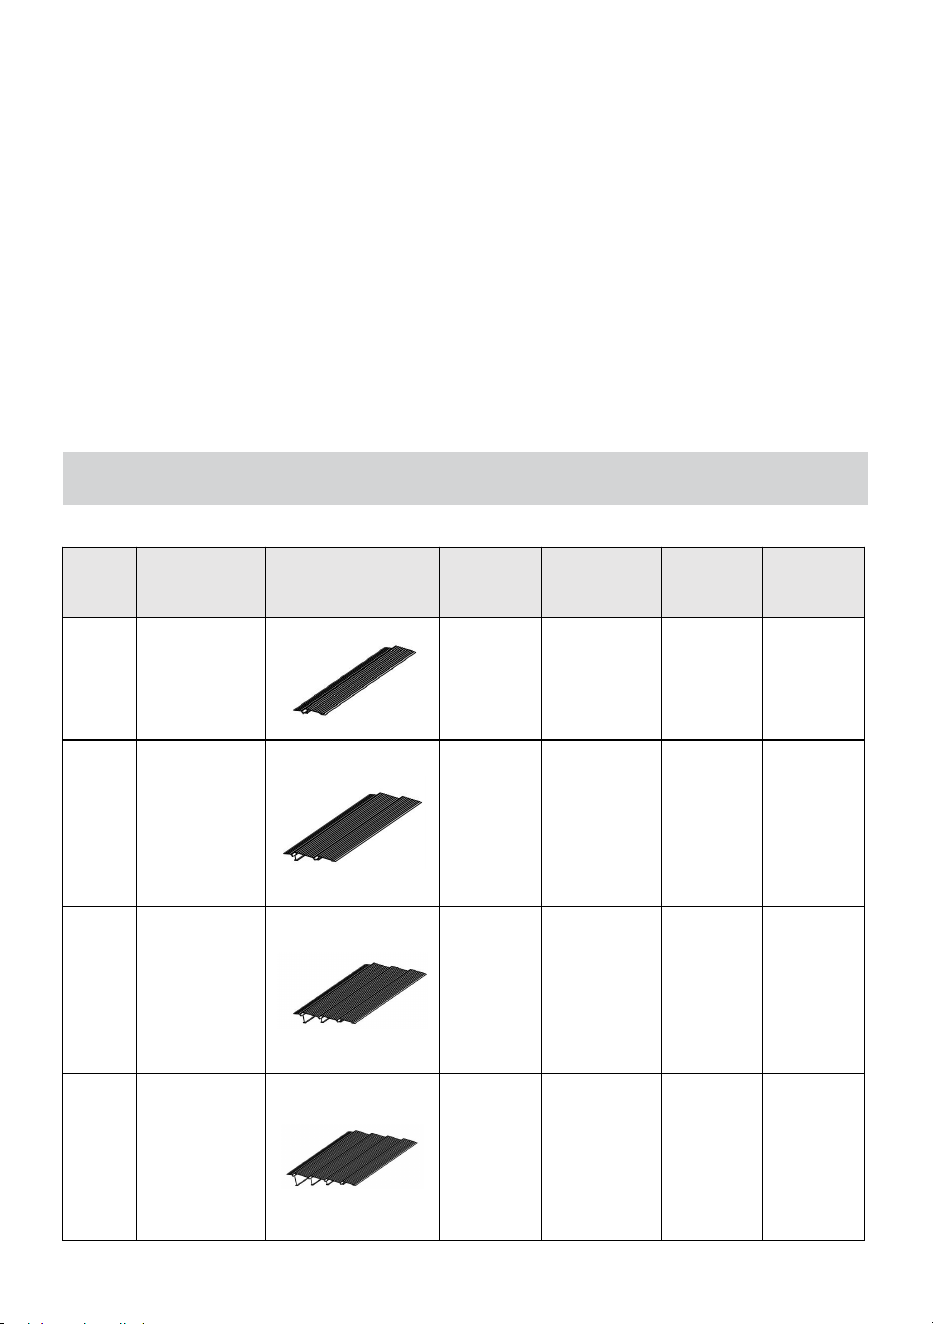
4
GRBRV0
4inch
800lbs
7.35kg
8.35kg
5
OVUSV0
5inch
800lbs
9.4kg
10.5g
6
SNPTV0
6inch
800lbs
11.7kg
12.55kg
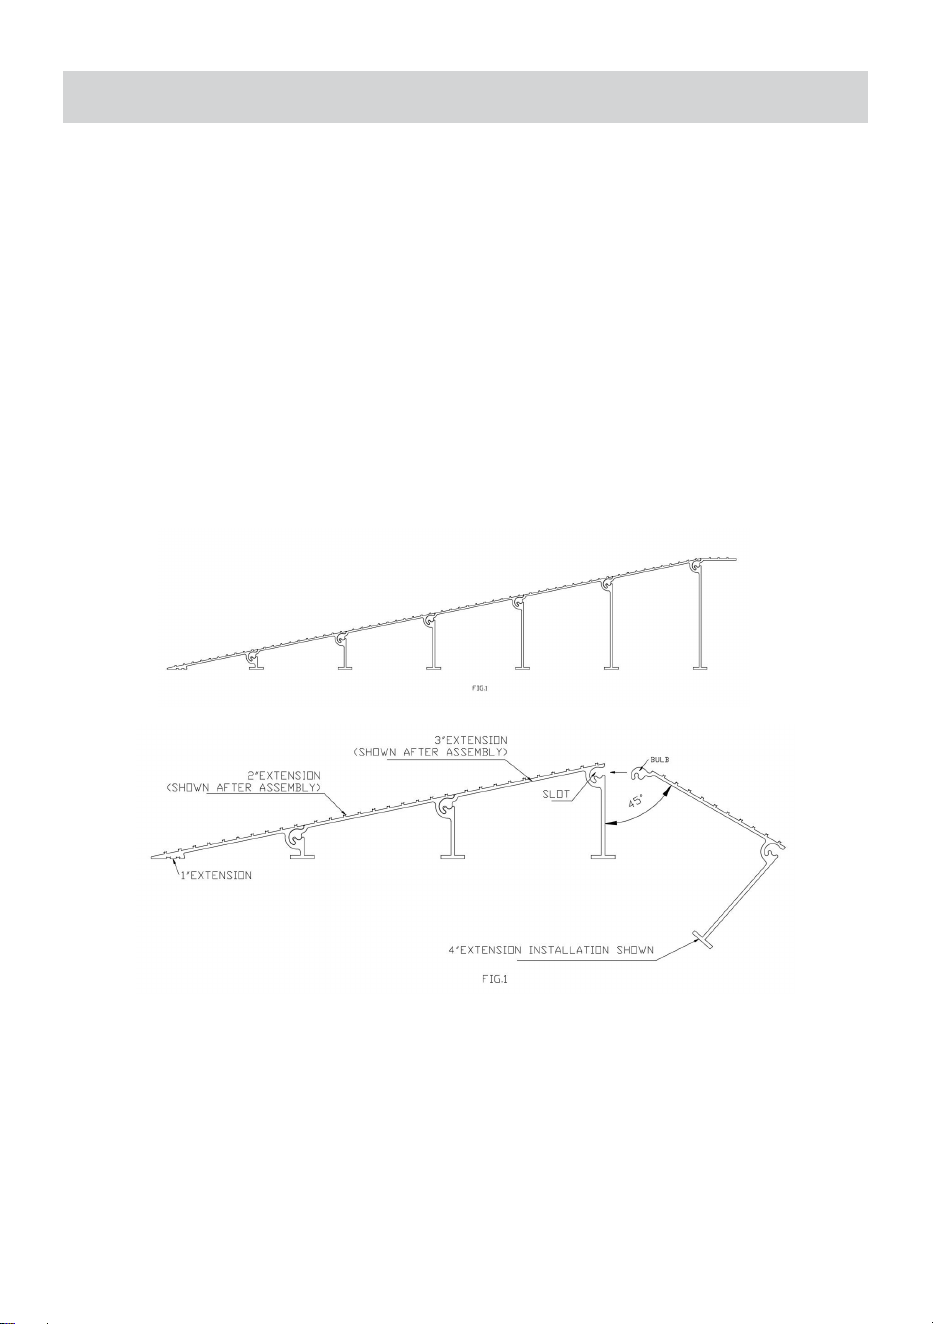
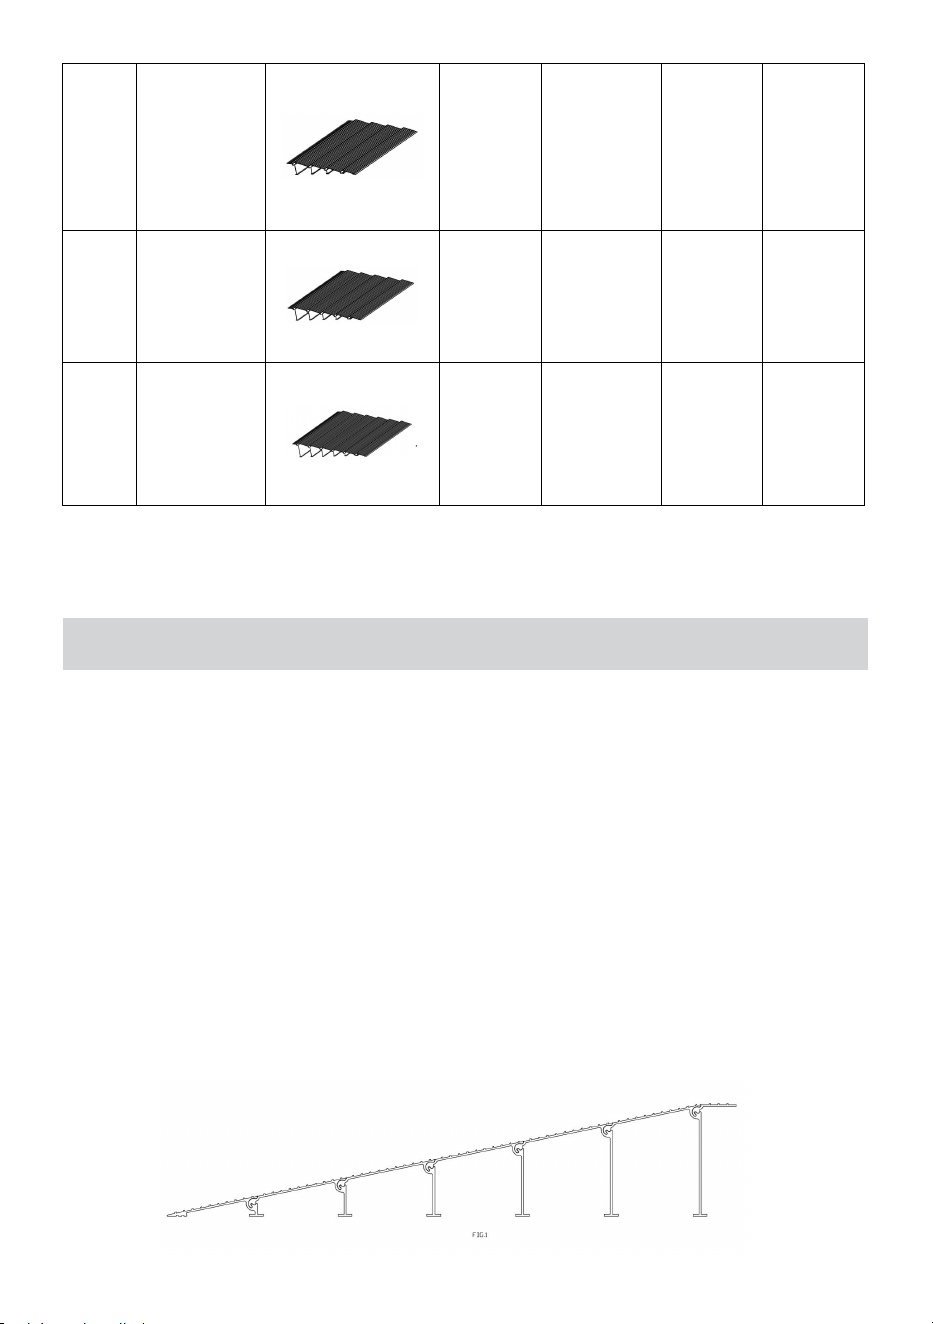
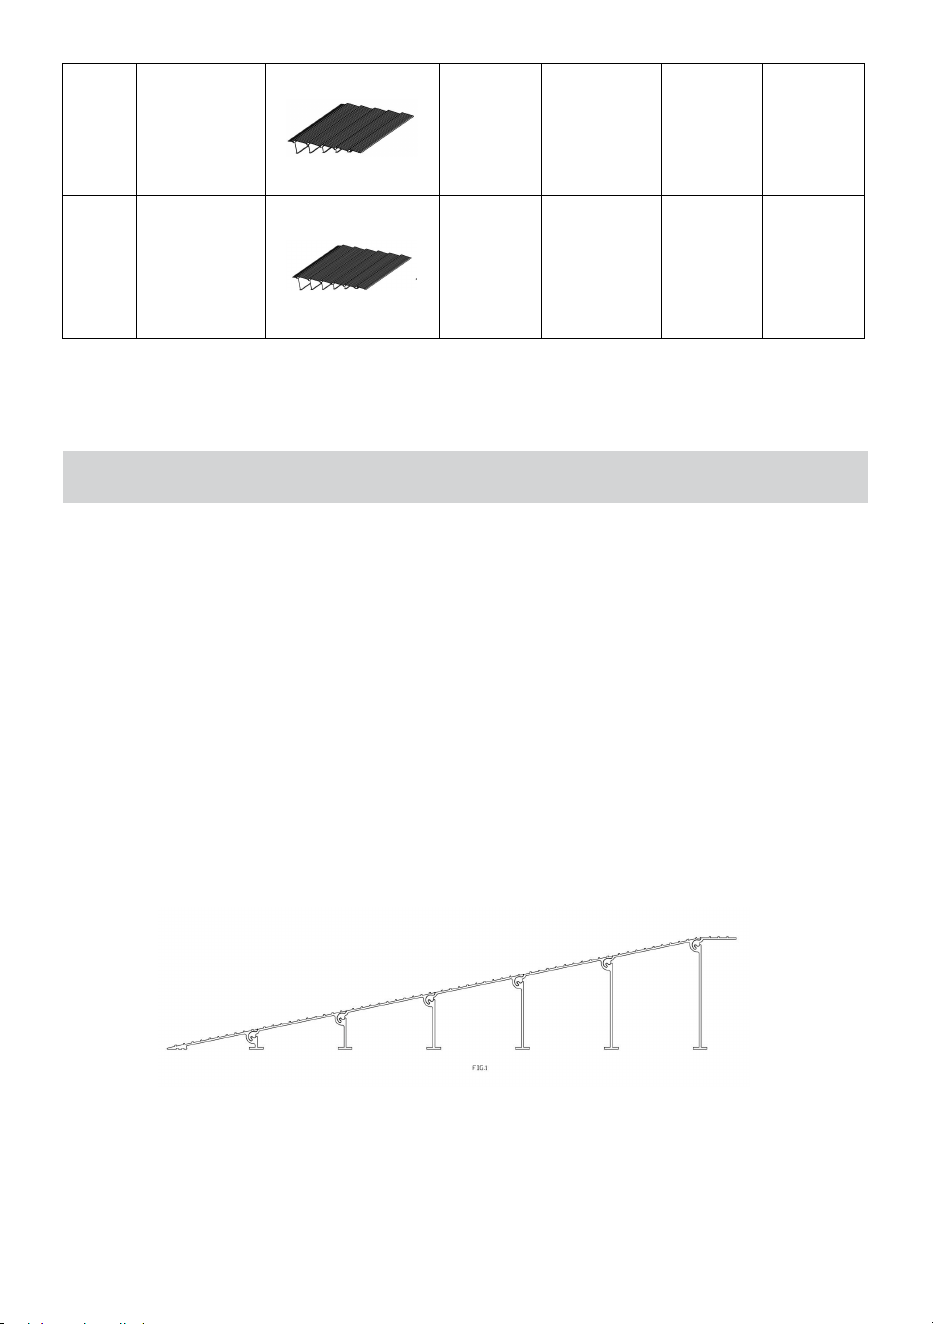
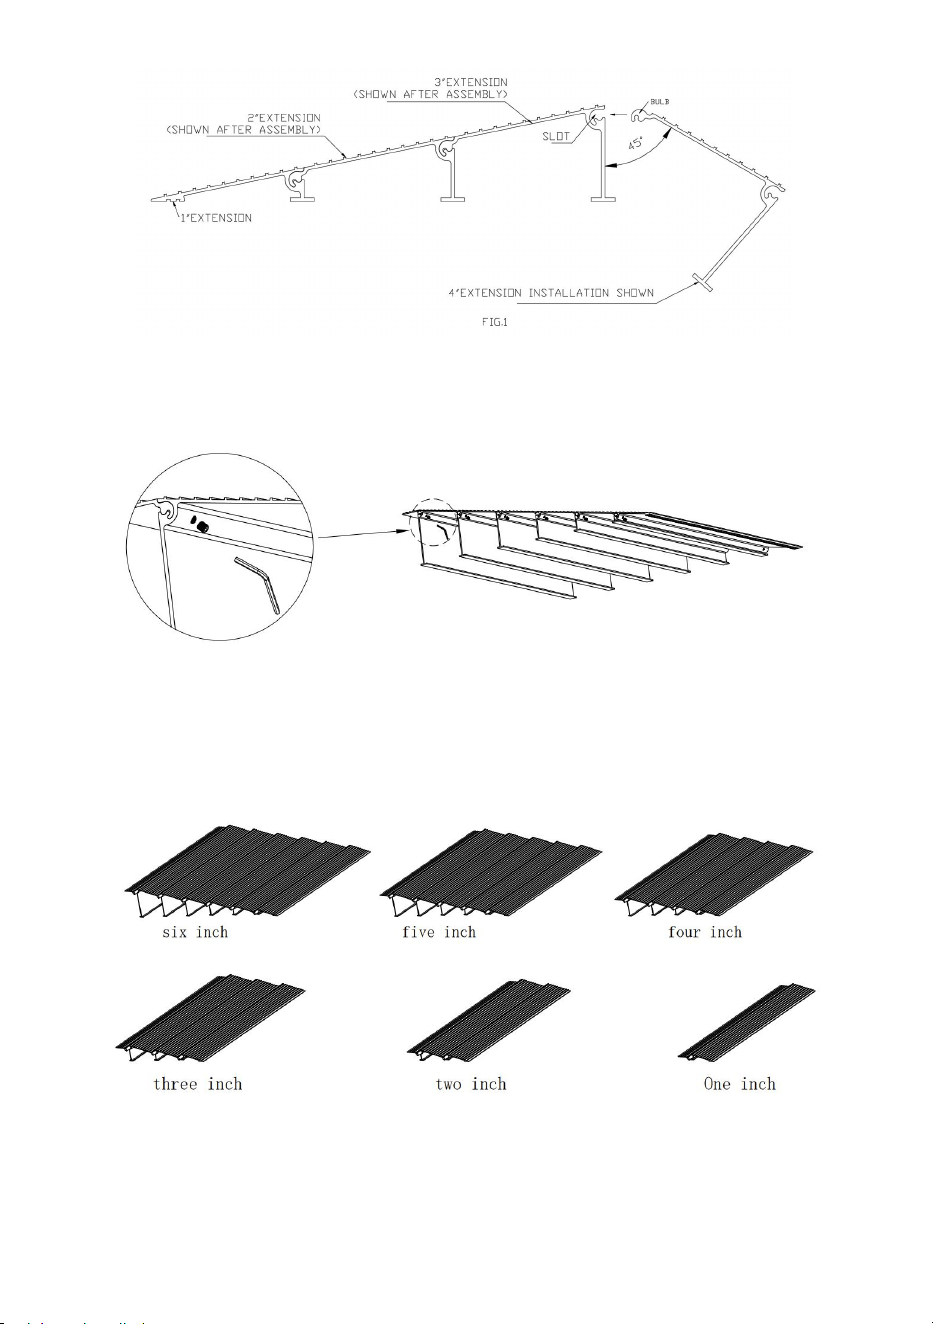
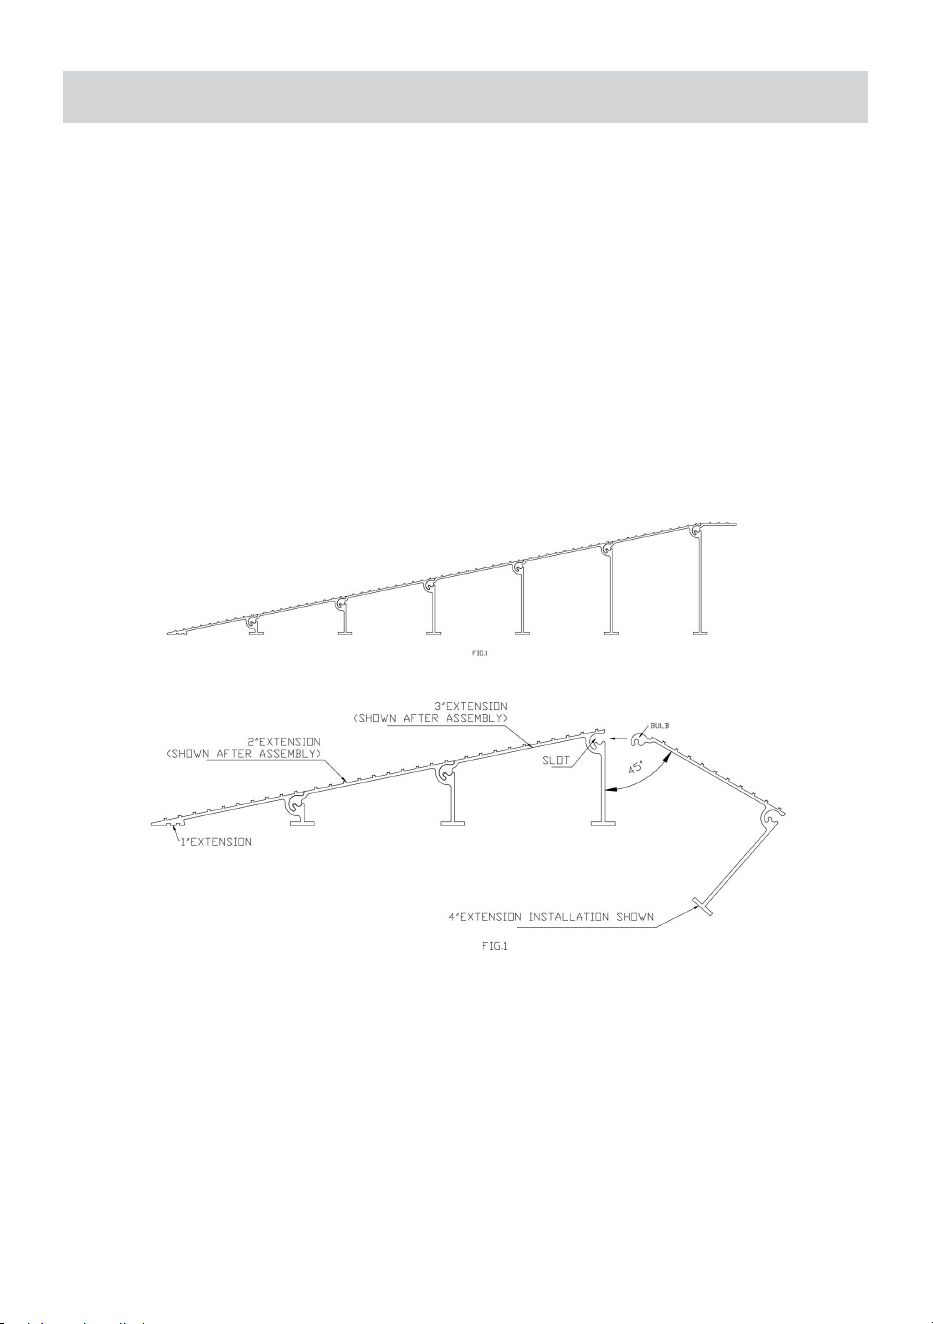
5. Installation Guide
(1) Before starting the installation, please wear gloves to protect your
hands.
(2) Choose an appropriate installation location, ensuring that the
ground is level and firm.
(3) Align and interlock each section of the ramp together until all parts
are even.
(4) Starting with the 1” extension, install the threshold extensions in
the order shown (FIG. 1) until the final height is reached. Bring the
threshold extensions together at an approximate 45° angle, then
rotate them into place after the bulb is engaged in the slot。
(5)Use the provided screws to tighten each section of the ramp to
ensure that the ramp does not slip out or make noise during use.
(5) After installation, check whether the ramp is stable and tightly
attached to the ground.
(6) When using the ramp, push the equipment up and down the ramp
steadily, avoiding sharp turns or speeding.
Manufacturer: Shanghaimuxinmuyeyouxiangongsi
Address: Shuangchenglu 803nong11hao1602A-1609shi, baoshanqu,
shanghai 200000 CN.
Imported to AUS: SIHAO PTY LTD. 1 ROKEVA STREETEASTWOOD
NSW 2122 Australia
Imported to USA: Sanven Technology Ltd. Suite 250, 9166 Anaheim
Place, Rancho Cucamonga, CA 91730
REP
EC
E-CrossStu GmbH
Mainzer Landstr.69, 60329 Frankfurt am Main.
REP
UK
YH CONSULTING LIMITED.
C/O YH Consulting Limited Office 147, Centurion
House, London Road, Staines-upon-Thames,
Surrey, TW18 4AX


Technique Certificat d'assistance et de garantie électronique
www.vevor.com/support
SEUIL RAMPE
MANUEL D'UTILISATION
We continue to be committed to provide you tools with competitive price.
"Save Half", "Half Price" or any other similar expressions used by us only represents an
estimate of savings you might benefit from buying certain tools with us compared to the major
top brands and does not necessarily mean to cover all categories of tools offered by us. You
are kindly reminded to verify carefully when you are placing an order with us if you are
actually saving half in comparison with the top major brands.

Modèle : LD9YV0 /LYIMV0 /Z2UAV0 /GRBRV0 /OVUSV0 /SNPTV0
Have product questions? Need technical support? Please feel free to
contact us:
Technical Support and E-Warranty Certificate
www.vevor.com/support
NEED HELP? CONTACT US!
This is the original instruction, please read all manual instructions
carefully before operating. VEVOR reserves a clear interpretation of our
user manual. The appearance of the product shall be subject to the
product you received. Please forgive us that we won't inform you again if
there are any technology or software updates on our product.
THRESHOLD RAMP

6. Safety Instructions
AVERTISSEMENT:
Lisez attentivement et comprenez les instructions et les procédures avant
d’installer et d’utiliser la rampe de seuil.
Ne pas modifier la conception de la rampe de seuil.
• Ne déplacez pas une rampe de seuil en vous tenant debout dessus.
• Ne pas utiliser l'échelle par mauvais temps, comme le vent, la pluie, la
neige, etc. Il est recommandé d'utiliser l'échelle par temps clair.
10.Lors de l'installation, veuillez porter des gants pour éviter les
blessures aux mains.
11.N’empilez pas d’objets et ne laissez pas les enfants jouer sur la
rampe.
12.Vérifiez régulièrement la structure et les fixations de la rampe pour
assurer sa stabilité et sa sécurité.
13.Si la surface de la rampe est usée ou endommagée, veuillez la
remplacer ou la réparer à temps.
7. Maintenance Guide
5. Placez le produit sur un point de départ solide, sûr, accessible et de
niveau. La capacité de poids minimale du point de départ doit être égale à
celle de la rampe (800 lb). Ne dépassez pas la capacité de poids maximale
du produit.
6. Assurez-vous que le produit est bien aligné avec le point de départ. Si
vous ne parvenez pas à trouver un point de départ sûr, accessible et de
niveau, ou si le produit ne s'adapte pas solidement à un point de départ
plus élevé, n'utilisez pas la rampe.
7. Ne pas altérer, réparer ou modifier une quelconque partie du produit.
Soyez prudent afin d'éviter les points de pincement lors de l'assemblage et

de la manipulation.
8. Si vous utilisez le produit avec un autre équipement de mobilité,
reportez-vous au guide d'utilisation de l'équipement pour comprendre les
consignes d'utilisation acceptables, notamment la pente, l'inclinaison et
l'orientation du fauteuil appropriés. Ne dépassez pas les recommandations
de l'équipement de mobilité.
14.Avant chaque utilisation, inspectez soigneusement les fixations de la
rampe pour vous assurer qu'elles ne sont pas desserrées. Resserrez les
fixations desserrées si nécessaire.
15.Lorsque vous utilisez la rampe, assurez-vous qu'elle est bien alignée
avec le point de départ pour garantir la sécurité.
16.Avant chaque utilisation, nettoyez la surface de la rampe pour éliminer
la glace, la neige, la poussière, les feuilles et autres débris. Retirez la glace
et la neige accumulées et balayez la surface pour la nettoyer. Pour la
poussière et les débris, utilisez une brosse à poils doux et un détergent
non alcalin pour nettoyer la surface de la rampe, puis rincez
abondamment.
17.La surface de la rampe peut devenir glissante en cas de pluie.
Marchez avec prudence et faites attention à vos pieds pour éviter de
glisser.
18.Si la rampe n’est pas utilisée pendant une période prolongée,
rangez-la dans un endroit sec et bien ventilé, à l’abri de la lumière directe
du soleil.
CONSERVEZ CES INSTRUCTIONS
8. Product Description and Main Features
La rampe de seuil en alliage d'aluminium emboîtable est fabriquée en
alliage d'aluminium extrudé de haute qualité. Ce produit est durable et offre
un confort aux personnes. Il est léger, portable, stable et durable et
présente une conception emboîtable pour une installation et un stockage
faciles.
Caractéristiques principales :
6. Matériau : alliage d'aluminium haute résistance, extrudé.
7. Surface : Traitement antidérapant, ébavurage.
8. Conception imbriquée : l'interface de chaque section est conçue avec
précision ; alignez l'interface de chaque section et poussez- les
ensemble pour l'installation.
9. Limite de charge : Jusqu'à 800 livres .
10. Hauteur optionnelle : convient aux seuils de différentes hauteurs.
9. Product Parameter
Articl
e
Modèle
Image
Hauteur
Limite de
charge
Nord-Ou
est
GW
1
LD9YV0
1 pouce
800 livres
1,9 kg
2,6 kg
2
LYIMV0
2 pouces
800 livres
3,6 kg
4,4 kg
3
Z2UAV0
3 pouces
800 livres
5,4 kg
6,25 kg
10. Installation Guide
(1) Avant de commencer l'installation, veuillez porter des gants pour
protéger vos mains.
(2) Choisissez un emplacement d’installation approprié, en vous
assurant que le sol est plat et ferme.
(3) Alignez et imbriquez chaque section de la rampe jusqu'à ce que
toutes les pièces soient uniformes.
(4) En commençant par l'extension de 1", installez les extensions de
seuil dans l'ordre indiqué (FIG. 1) jusqu'à ce que la hauteur finale
soit atteinte. Rassemblez les extensions de seuil à un angle
d'environ 45°, puis faites-les pivoter en place une fois l'ampoule
insérée dans la fente .
4
GRBRV0
4 pouces
800 livres
7,35 kg
8,35 kg
5
OVUSV0
5 pouces
800 livres
9,4 kg
10,5 g
6
SNPTV0
6 pouces
800 livres
11,7 kg
12,55 kg
(5) Utilisez les vis fournies pour serrer chaque section de la rampe afin
de garantir que la rampe ne glisse pas ou ne fait pas de bruit pendant
l'utilisation .
(5) Après l'installation, vérifiez si la rampe est stable et solidement
fixée au sol.
(6) Lorsque vous utilisez la rampe, poussez l'équipement de haut en
bas de la rampe de manière constante, en évitant les virages
serrés ou les excès de vitesse.
Fabricant : Shanghaimuxinmuyeyouxiangongsi
Adresse : Shuangchenglu 803nong11hao1602A-1609shi, baoshanqu,

Shanghai 200000 CN.
Importé en Australie : SIHAO PTY LTD. 1 ROKEVA
STREETEASTWOOD NSW 2122 Australie
Importé aux États-Unis : Sanven Technology Ltd. Suite 250, 9166
Anaheim Place, Rancho Cucamonga, CA 91730
REP
EC
E-CrossStu GmbH
Mainzer Landstr.69, 60329 Frankfurt am Main.
REP
UK
YH CONSULTING LIMITED.
C/O YH Consulting Limited Office 147, Centurion
House, London Road, Staines-upon-Thames,
Surrey, TW18 4AX


Technisch Support und E-Garantie-Zertifikat
www.vevor.com/support
SCHWELLE RAMPE
BENUTZERHANDBUCH
We continue to be committed to provide you tools with competitive price.
"Save Half", "Half Price" or any other similar expressions used by us only represents an
estimate of savings you might benefit from buying certain tools with us compared to the major
top brands and does not necessarily mean to cover all categories of tools offered by us. You
are kindly reminded to verify carefully when you are placing an order with us if you are
actually saving half in comparison with the top major brands.

Modell: LD9YV0 /LYIMV0 /Z2UAV0 /GRBRV0 /OVUSV0 /SNPTV0
Have product questions? Need technical support? Please feel free to
contact us:
Technical Support and E-Warranty Certificate
www.vevor.com/support
NEED HELP? CONTACT US!
This is the original instruction, please read all manual instructions
carefully before operating. VEVOR reserves a clear interpretation of our
user manual. The appearance of the product shall be subject to the
product you received. Please forgive us that we won't inform you again if
there are any technology or software updates on our product.
THRESHOLD RAMP

11. Safety Instructions
WARNUNG:
und verstehen Sie die Anweisungen und Verfahren sorgfältig, bevor Sie die
Schwellenrampe installieren und verwenden .
Ändern Sie das Design der Schwellenrampe nicht.
• Bewegen Sie eine Schwellenrampe nicht, während Sie darauf stehen.
• Verwenden Sie sie nicht bei schlechtem Wetter wie Wind, Regen, Schnee
usw. Es wird empfohlen, die Leiter bei klarem Wetter zu verwenden.
19.Bitte tragen Sie während der Installation Handschuhe, um
Handverletzungen vorzubeugen.
20.Stapeln Sie keine Gegenstände auf der Rampe und lassen Sie Kinder
nicht darauf spielen.
21.Überprüfen Sie regelmäßig die Struktur und Befestigungen der
Rampe, um ihre Stabilität und Sicherheit sicherzustellen.
22.Wenn die Oberfläche der Rampe abgenutzt oder beschädigt ist,
ersetzen oder reparieren Sie sie bitte rechtzeitig.
12. Maintenance Guide
9. Stellen Sie das Produkt auf einen stabilen, sicheren, zugänglichen und
ebenen Ausgangspunkt. Die Mindesttragfähigkeit des Ausgangspunkts
muss der der Rampe (800 lbs) entsprechen. Überschreiten Sie nicht die
maximale Tragfähigkeit des Produkts.
10. Stellen Sie sicher, dass das Produkt sicher am Startpunkt anliegt.
Wenn kein sicherer, zugänglicher und ebener Startpunkt gefunden werden
kann oder das Produkt nicht sicher an einem höheren Startpunkt anliegt,
verwenden Sie die Rampe nicht.
11. Versuchen Sie nicht, Teile des Produkts zu manipulieren, zu reparieren
oder zu modifizieren. Gehen Sie bei der Montage und Handhabung

vorsichtig vor, um Quetschstellen zu vermeiden.
12. Wenn Sie das Produkt mit anderen Mobilitätshilfen verwenden, lesen
Sie die Bedienungsanleitung der jeweiligen Hilfestellung, um die
zulässigen Nutzungsrichtlinien zu verstehen, einschließlich der
entsprechenden Neigung, Steigung und Stuhlrichtung. Überschreiten Sie
die Empfehlungen der Mobilitätshilfe nicht.
23.Überprüfen Sie vor jedem Gebrauch sorgfältig die
Befestigungselemente an der Rampe, um sicherzustellen, dass sie nicht
locker sind. Ziehen Sie lose Befestigungselemente bei Bedarf fest.
24.Achten Sie bei der Verwendung der Rampe darauf, dass diese aus
Sicherheitsgründen bündig am Startpunkt anliegt.
25.Reinigen Sie die Rampenoberfläche vor jedem Gebrauch von Eis,
Schnee, Staub, Blättern und anderen Ablagerungen. Entfernen Sie
angesammeltes Eis und Schnee und fegen Sie die Oberfläche sauber.
Reinigen Sie die Rampenoberfläche bei Staub und Ablagerungen mit einer
weichen Bürste und einem alkalifreien Reinigungsmittel und spülen Sie sie
anschließend gründlich ab.
26.Bei Nässe kann die Oberfläche der Rampe rutschig werden. Gehen
Sie vorsichtig und achten Sie auf Ihren Tritt, um ein Ausrutschen zu
verhindern.
27.Wenn die Rampe längere Zeit nicht verwendet wird, lagern Sie sie an
einem trockenen und gut belüfteten Ort und vermeiden Sie direkte
Sonneneinstrahlung.
BEWAHREN SIE DIESE ANWEISUNGEN AUF
13. Product Description and Main Features
Die Schwellenrampe aus ineinandergreifender Aluminiumlegierung besteht
aus hochwertigem Aluminiumlegierungsstrangpressprofil. Dieses Produkt

ist langlebig und bietet den Menschen Komfort. Es ist leicht, tragbar, stabil
und langlebig und verfügt über ein ineinandergreifendes Design für
einfache Installation und Lagerung.
Haupteigenschaften:
11. Material: Hochfeste Aluminiumlegierung, extrudiert.
12. Oberfläche: Anti-Rutsch-Behandlung, Entgraten.
13. Ineinandergreifendes Design: Die Schnittstelle jedes Abschnitts ist
präzise gestaltet. Richten Sie die Schnittstelle jedes Abschnitts aus
und drücken Sie sie zur Installation zusammen.
14. Belastungsgrenze : Bis zu 800 Pfund .
15. Höhe optional : passend für Schwellen unterschiedlicher Höhe.
14. Product Parameter
Artik
el
Modell
Bild
Höhe
Lastgrenze
NW
GW
1
LD9YV0
1 Zoll
800 Pfund
1,9 kg
2,6 kg
2
LYIMV0
2 Zoll
800 Pfund
3,6 kg
4,4 kg
3
Z2UAV0
3 Zoll
800 Pfund
5,4 kg
6,25 kg
15. Installation Guide
(1) Bitte ziehen Sie vor Beginn der Installation Handschuhe an, um
Ihre Hände zu schützen.
(2) Wählen Sie einen geeigneten Installationsort und stellen Sie
sicher, dass der Boden eben und fest ist.
(3) Richten Sie die einzelnen Abschnitte der Rampe aus und
verriegeln Sie sie miteinander, bis alle Teile gleichmäßig sind.
(4) Beginnen Sie mit der 1-Zoll-Verlängerung und installieren Sie die
Schwellenverlängerungen in der gezeigten Reihenfolge (Abb. 1),
bis die endgültige Höhe erreicht ist. Bringen Sie die
Schwellenverlängerungen in einem Winkel von ungefähr 45°
zusammen und drehen Sie sie dann in Position, nachdem die
Glühbirne in den Schlitz eingerastet ist .
4
GRBRV0
4 Zoll
800 Pfund
7,35 kg
8,35 kg
5
OVUSV0
5 Zoll
800 Pfund
9,4 kg
10,5 g
6
SNPTV0
6 Zoll
800 Pfund
11,7 kg
12,55 kg

(5) Ziehen Sie jeden Abschnitt der Rampe mit den mitgelieferten
Schrauben fest, um sicherzustellen, dass die Rampe während der
Verwendung nicht herausrutscht oder Geräusche macht .
(5) Prüfen Sie nach der Montage, ob die Rampe stabil und fest am
Boden befestigt ist.
(6) Schieben Sie das Gerät beim Benutzen der Rampe gleichmäßig
die Rampe hinauf und hinunter und vermeiden Sie scharfe Kurven
oder zu schnelles Fahren.
Hersteller: Shanghaimuxinmuyeyouxiangongsi
Adresse: Shuangchenglu 803nong11hao1602A-1609shi, baoshanqu,
Shanghai 200000 CN.
Nach AUS importiert: SIHAO PTY LTD. 1 ROKEVA
STREETEASTWOOD NSW 2122 Australien
Importiert in die USA: Sanven Technology Ltd. Suite 250, 9166 Anaheim
Place, Rancho Cucamonga, CA 91730
REP
EC
E-CrossStu GmbH
Mainzer Landstr.69, 60329 Frankfurt am Main.
REP
UK
YH CONSULTING LIMITED.
C/O YH Consulting Limited Office 147, Centurion
House, London Road, Staines-upon-Thames,
Surrey, TW18 4AX


Tecnico Supporto e certificato di garanzia elettronica
www.vevor.com/support
SOGLIA RAMPA
MANUALE D'USO
We continue to be committed to provide you tools with competitive price.
"Save Half", "Half Price" or any other similar expressions used by us only represents an
estimate of savings you might benefit from buying certain tools with us compared to the major
top brands and does not necessarily mean to cover all categories of tools offered by us. You
are kindly reminded to verify carefully when you are placing an order with us if you are
actually saving half in comparison with the top major brands.

Modello: LD9YV0 /LYIMV0 /Z2UAV0 /GRBRV0 /OVUSV0 /SNPTV0
Have product questions? Need technical support? Please feel free to
contact us:
Technical Support and E-Warranty Certificate
www.vevor.com/support
NEED HELP? CONTACT US!
This is the original instruction, please read all manual instructions
carefully before operating. VEVOR reserves a clear interpretation of our
user manual. The appearance of the product shall be subject to the
product you received. Please forgive us that we won't inform you again if
there are any technology or software updates on our product.
THRESHOLD RAMP

16. Safety Instructions
AVVERTIMENTO:
Leggere attentamente e comprendere le istruzioni e le procedure prima di
installare e utilizzare la rampa di soglia.
Non modificare la progettazione della rampa di soglia.
• Non spostare una rampa di soglia mentre ci si trova sopra.
• Non utilizzarla in caso di maltempo, come vento, pioggia, neve e così via.
Si consiglia di utilizzare la scala con tempo sereno.
28.Durante l'installazione, indossare guanti per evitare lesioni alle mani.
29.Non accatastare oggetti e non permettere ai bambini di giocare sulla
rampa.
30.Controllare regolarmente la struttura e gli elementi di fissaggio della
rampa per garantirne la stabilità e la sicurezza.
31.Se la superficie della rampa è usurata o danneggiata, sostituirla o
ripararla in tempo.
17. Maintenance Guide
13. Posizionare il prodotto su un punto di partenza robusto, sicuro,
accessibile e livellato. La capacità di peso minima del punto di partenza
deve essere uguale a quella della rampa (800 libbre). Non superare la
capacità di peso massima del prodotto.
14. Assicurarsi che il prodotto sia saldamente a filo con il punto di
partenza. Se non è possibile trovare un punto di partenza sicuro,
accessibile e livellato, o se il prodotto non si adatta saldamente a un punto
di partenza più alto, non utilizzare la rampa.
15. Non manomettere, tentare di riparare o modificare alcuna parte del
prodotto. Prestare attenzione a evitare punti di schiacciamento durante il
montaggio e la movimentazione.

16. Se si utilizza il prodotto con altre attrezzature per la mobilità, fare
riferimento alla guida utente dell'attrezzatura per comprendere le linee
guida di utilizzo accettabili, tra cui pendenza, inclinazione e direzione della
sedia appropriate. Non superare le raccomandazioni dell'attrezzatura per
la mobilità.
32.Prima di ogni utilizzo, ispezionare attentamente i dispositivi di
fissaggio sulla rampa per assicurarsi che non siano allentati. Stringere
eventuali dispositivi di fissaggio allentati, se necessario.
33.Quando si utilizza la rampa, assicurarsi che sia ben a filo con il punto
di partenza per garantire la sicurezza.
34.Prima di ogni utilizzo, pulire la superficie della rampa da ghiaccio,
neve, polvere, foglie e altri detriti. Rimuovere il ghiaccio e la neve
accumulati e spazzare la superficie per pulirla. Per polvere e detriti,
utilizzare una spazzola a setole morbide e un detergente non alcalino per
pulire la superficie della rampa, quindi risciacquare abbondantemente.
35.La superficie della rampa potrebbe diventare scivolosa in condizioni di
bagnato. Camminare con cautela e prestare attenzione ai propri passi per
evitare di scivolare.
36.Se la rampa non verrà utilizzata per un lungo periodo, riporla in un
luogo asciutto e ben ventilato, al riparo dalla luce solare diretta.
SALVA QUESTE ISTRUZIONI
18. Product Description and Main Features
La rampa in lega di alluminio interbloccata della soglia è realizzata in
estrusione di lega di alluminio di alta qualità. Questo prodotto è durevole e
offre praticità alle persone. È leggero, portatile, stabile e durevole e
presenta un design ad incastro per una facile installazione e
conservazione.

Caratteristiche principali:
16. Materiale: lega di alluminio ad alta resistenza, estrusa.
17. Superficie: Trattamento antiscivolo, sbavatura.
18. Design ad incastro: l'interfaccia di ogni sezione è progettata con
precisione; allineare l'interfaccia di ogni sezione e unirle per
l'installazione.
19. Limite di carico : fino a 800 libbre .
20. Altezza facoltativa : adatto a soglie di diverse altezze.
19. Product Parameter
Artic
olo
Modello
Immagine
Altezza
Limite di
carico
Nord-Ov
est
GW
1
LD9YV0
1 pollice
800 libbre
1,9 kg
2,6 kg
2
LYIMV0
2 pollici
800 libbre
3,6 kg
4,4 kg
3
Z2UAV0
3 pollici
800 libbre
5,4 kg
6,25 kg
4
GRBRV0
4 pollici
800 libbre
7,35 kg
8,35 kg
20. Installation Guide
(1) Prima di iniziare l'installazione, indossare guanti per proteggere le
mani.
(2) Scegliere un luogo di installazione appropriato, assicurandosi che
il terreno sia livellato e solido.
(3) Allineare e incastrare insieme ogni sezione della rampa finché
tutte le parti non risultano uniformi.
(4) Iniziando con l'estensione da 1", installare le estensioni della
soglia nell'ordine mostrato (FIG. 1) fino a raggiungere l'altezza
finale. Avvicinare le estensioni della soglia a un angolo di circa 45°,
quindi ruotarle in posizione dopo che la lampadina è inserita nella
fessura .
5
OVUSV0
5 pollici
800 libbre
9,4 kg
10,5
grammi
6
SNPTV0
6 pollici
800 libbre
11,7 kg
12,55 kg
(5) Utilizzare le viti fornite per stringere ciascuna sezione della rampa per
garantire che la rampa non scivoli via o faccia rumore durante l'uso .
(5) Dopo l'installazione, verificare che la rampa sia stabile e ben
fissata al terreno.
(6) Quando si utilizza la rampa, spingere l'attrezzatura su e giù per la
rampa in modo costante, evitando curve strette o velocità
eccessive.
Produttore: Shanghaimuxinmuyeyouxiangongsi
Indirizzo: Shuangchenglu 803nong11hao1602A-1609shi, baoshanqu,
shanghai 200000 CN.
Importato in AUS: SIHAO PTY LTD. 1 ROKEVA STREETEASTWOOD

NSW 2122 Australia
Importato negli USA: Sanven Technology Ltd. Suite 250, 9166 Anaheim
Place, Rancho Cucamonga, CA 91730
REP
EC
E-CrossStu GmbH
Mainzer Landstr.69, 60329 Frankfurt am Main.
REP
UK
YH CONSULTING LIMITED.
C/O YH Consulting Limited Office 147, Centurion
House, London Road, Staines-upon-Thames,
Surrey, TW18 4AX


Técnico Certificado de soporte y garantía electrónica
www.vevor.com/support
LÍMITE RAMPA
MANUAL DEL USUARIO
We continue to be committed to provide you tools with competitive price.
"Save Half", "Half Price" or any other similar expressions used by us only represents an
estimate of savings you might benefit from buying certain tools with us compared to the major
top brands and does not necessarily mean to cover all categories of tools offered by us. You
are kindly reminded to verify carefully when you are placing an order with us if you are
actually saving half in comparison with the top major brands.

Modelo: LD9YV0 /LYIMV0 /Z2UAV0 /GRBRV0 /OVUSV0 /SNPTV0
Have product questions? Need technical support? Please feel free to
contact us:
Technical Support and E-Warranty Certificate
www.vevor.com/support
NEED HELP? CONTACT US!
This is the original instruction, please read all manual instructions
carefully before operating. VEVOR reserves a clear interpretation of our
user manual. The appearance of the product shall be subject to the
product you received. Please forgive us that we won't inform you again if
there are any technology or software updates on our product.
THRESHOLD RAMP

21. Safety Instructions
ADVERTENCIA:
Lea atentamente y comprenda las instrucciones y los procedimientos
antes de instalar y utilizar la rampa de umbral.
No modifique el diseño de la rampa de umbral.
• No mueva una rampa de umbral mientras esté parado sobre ella.
• No la utilice en condiciones climáticas adversas, como viento, lluvia,
nieve, etc. Se recomienda utilizar la escalera en condiciones climáticas
despejadas.
37.Durante la instalación, utilice guantes para evitar lesiones en las
manos.
38.No apile artículos ni permita que los niños jueguen en la rampa.
39.Revise periódicamente la estructura y los sujetadores de la rampa
para garantizar su estabilidad y seguridad.
40.Si la superficie de la rampa está desgastada o dañada, reemplácela o
repárela a tiempo.
22. Maintenance Guide
17. Coloque el producto sobre un punto de partida firme, seguro,
accesible y nivelado. La capacidad de peso mínima del punto de partida
debe ser igual a la de la rampa (800 lb). No exceda la capacidad de peso
máxima del producto.
18. Asegúrese de que el producto esté bien alineado con el punto de
partida. Si no se puede encontrar un punto de partida seguro, accesible y
nivelado, o si el producto no encaja de forma segura en un punto de
partida más alto, no utilice la rampa.
19. No manipule, intente reparar ni modificar ninguna pieza del producto.
Tenga cuidado para evitar puntos de atrapamiento durante el montaje y la

manipulación.
20. Si utiliza el producto con otro equipo de movilidad, consulte la guía del
usuario del equipo para conocer las pautas de uso aceptables, incluidas la
inclinación y la dirección de la silla adecuadas. No exceda las
recomendaciones del equipo de movilidad.
41.Antes de cada uso, inspeccione cuidadosamente los sujetadores de
la rampa para asegurarse de que no estén flojos. Apriete los sujetadores
flojos si es necesario.
42.Al utilizar la rampa, asegúrese de que esté bien nivelada contra el
punto de inicio para garantizar la seguridad.
43.Antes de cada uso, limpie la superficie de la rampa para eliminar el
hielo, la nieve, el polvo, las hojas y otros residuos. Retire el hielo y la nieve
acumulados y barra la superficie para limpiarla. Para eliminar el polvo y los
residuos, utilice un cepillo de cerdas suaves y un detergente no alcalino
para limpiar la superficie de la rampa y, luego, enjuague bien.
44.La superficie de la rampa puede volverse resbaladiza en condiciones
húmedas. Camine con precaución y preste atención a dónde pisa para
evitar resbalones.
45.Si la rampa no se utilizará durante un período prolongado, guárdela
en un área seca y bien ventilada, lejos de la luz solar directa.
GUARDE ESTAS INSTRUCCIONES
23. Product Description and Main Features
La rampa de aleación de aluminio entrelazada con umbral está hecha de
extrusión de aleación de aluminio de alta calidad. Este producto es
duradero y brinda comodidad a las personas. Es liviano, portátil, estable y
duradero y presenta un diseño entrelazado para una fácil instalación y
almacenamiento.
Características principales:
21. Material: Aleación de aluminio de alta resistencia, extruido.
22. Superficie: Tratamiento antideslizante, desbarbado.
23. Diseño entrelazado: la interfaz de cada sección está diseñada con
precisión; alinee la interfaz de cada sección y empújelas juntas para la
instalación.
24. Límite de carga : hasta 800 libras .
25. Altura opcional : adecuado para umbrales de diferentes alturas.
24. Product Parameter
Artíc
ulo
Modelo
Imagen
Altura
Límite de
carga
noroeste
GW
1
LD9YV0
1
pulgada
800 libras
1,9 kilos
2,6
kilogramo
s
2
LYIMV0
2
pulgadas
800 libras
3,6
kilogramo
s
4,4 kilos
3
Z2UAV0
3
pulgadas
800 libras
5,4 kilos
6,25 kilos
4
GRBRV0
4
pulgadas
800 libras
7,35 kilos
8,35 kilos

25. Installation Guide
(1) Antes de comenzar la instalación, utilice guantes para protegerse
las manos.
(2) Elija una ubicación de instalación adecuada, asegurándose de
que el suelo esté nivelado y firme.
(3) Alinee y entrelace cada sección de la rampa hasta que todas las
partes estén uniformes.
(4) Comenzando con la extensión de 1”, instale las extensiones del
umbral en el orden que se muestra (FIG. 1) hasta alcanzar la
altura final. Junte las extensiones del umbral en un ángulo
aproximado de 45° y luego gírelas hasta colocarlas en su lugar
después de que la bombilla esté colocada en la ranura .
5
OVUSV0
5
pulgadas
800 libras
9,4 kilos
10,5
gramos
6
SNTPTV0
6
pulgadas
800 libras
11,7 kilos
12,55
kilos

(5) Utilice los tornillos provistos para apretar cada sección de la rampa
para garantizar que la rampa no se resbale ni haga ruido durante el uso .
(5) Después de la instalación, verifique que la rampa esté estable y
bien fijada al suelo.
(6) Al utilizar la rampa, empuje el equipo hacia arriba y hacia abajo de
manera constante, evitando giros bruscos o exceso de velocidad.
Fabricante: Shanghaimuxinmuyeyouxiangongsi
Dirección: Shuangchenglu 803nong11hao1602A-1609shi, baoshanqu,
shanghai 200000 CN.
Importado a AUS: SIHAO PTY LTD. 1 ROKEVA STREETEASTWOOD

NSW 2122 Australia
Importado a EE. UU.: Sanven Technology Ltd. Suite 250, 9166 Anaheim
Place, Rancho Cucamonga, CA 91730
REP
EC
E-CrossStu GmbH
Mainzer Landstr.69, 60329 Frankfurt am Main.
REP
UK
YH CONSULTING LIMITED.
C/O YH Consulting Limited Office 147, Centurion
House, London Road, Staines-upon-Thames,
Surrey, TW18 4AX


Techniczny Wsparcie i certyfikat e-gwarancji
www.vevor.com/support
PRÓG RAMPA
INSTRUKCJA OBSŁUGI
We continue to be committed to provide you tools with competitive price.
"Save Half", "Half Price" or any other similar expressions used by us only represents an
estimate of savings you might benefit from buying certain tools with us compared to the major
top brands and does not necessarily mean to cover all categories of tools offered by us. You
are kindly reminded to verify carefully when you are placing an order with us if you are
actually saving half in comparison with the top major brands.

Modele: LD9YV0 /LYIMV0 /Z2UAV0 /GRBRV0 /OVUSV0 /SNPTV0
Have product questions? Need technical support? Please feel free to
contact us:
Technical Support and E-Warranty Certificate
www.vevor.com/support
NEED HELP? CONTACT US!
This is the original instruction, please read all manual instructions
carefully before operating. VEVOR reserves a clear interpretation of our
user manual. The appearance of the product shall be subject to the
product you received. Please forgive us that we won't inform you again if
there are any technology or software updates on our product.
THRESHOLD RAMP

26. Safety Instructions
OSTRZEŻENIE:
Przed zainstalowaniem i użyciem rampy progowej należy uważnie
przeczytać i zrozumieć instrukcję oraz procedury .
Nie należy modyfikować konstrukcji rampy progowej.
• Nie przesuwaj progu rampy, stojąc na nim.
• Nie należy używać drabiny w złą pogodę, np. przy wietrze, deszczu,
śniegu itp. Zaleca się korzystanie z drabiny przy bezchmurnej pogodzie.
46.Podczas montażu należy założyć rękawice, aby zapobiec obrażeniom
dłoni.
47.Nie należy układać przedmiotów jeden na drugim i pozwalać dzieciom
bawić się na rampie.
48.Regularnie sprawdzaj konstrukcję i elementy mocujące rampy, aby
zapewnić jej stabilność i bezpieczeństwo.
49.Jeśli powierzchnia rampy jest zużyta lub uszkodzona, należy ją jak
najszybciej wymienić lub naprawić.
27. Maintenance Guide
21. Umieść produkt na solidnym, bezpiecznym, dostępnym i równym
punkcie początkowym. Minimalna nośność punktu początkowego musi być
równa nośności rampy (800 funtów). Nie przekraczaj maksymalnej
nośności produktu.
22. Upewnij się, że produkt jest bezpiecznie wyrównany z punktem
początkowym. Jeśli nie można znaleźć bezpiecznego, dostępnego i
równego punktu początkowego lub jeśli produkt nie pasuje bezpiecznie do
wyższego punktu początkowego, nie używaj rampy.
23. Nie wolno manipulować, próbować naprawiać ani modyfikować żadnej
części produktu. Należy zachować ostrożność, aby uniknąć punktów

zaciskania podczas montażu i obsługi.
24. W przypadku korzystania z produktu z innym sprzętem
wspomagającym mobilność należy zapoznać się z instrukcją obsługi
sprzętu, aby zrozumieć wytyczne dotyczące dopuszczalnego użytkowania,
w tym odpowiednie nachylenie, pochylenie i kierunek krzesła. Nie należy
przekraczać zaleceń dotyczących sprzętu wspomagającego mobilność.
50.Przed każdym użyciem dokładnie sprawdź zapięcia na rampie, aby
upewnić się, że nie są luźne. W razie potrzeby dokręć wszelkie luźne
zapięcia.
51.Podczas korzystania z rampy należy upewnić się, że jest ona
dokładnie przylegająca do punktu początkowego, by zapewnić
bezpieczeństwo.
52.Przed każdym użyciem oczyść powierzchnię rampy z lodu, śniegu,
kurzu, liści i innych zanieczyszczeń. Usuń nagromadzony lód i śnieg i
zamiataj powierzchnię. W przypadku kurzu i zanieczyszczeń użyj miękkiej
szczotki i niealkalicznego detergentu, aby wyczyścić powierzchnię rampy,
a następnie dokładnie spłucz.
53.Powierzchnia rampy może stać się śliska w mokrych warunkach.
Zachowaj ostrożność i zwracaj uwagę na to, gdzie stawiasz stopy, aby
uniknąć poślizgnięcia.
54.Jeżeli rampa nie będzie używana przez dłuższy czas, należy
przechowywać ją w suchym i przewiewnym miejscu, chroniąc ją przed
bezpośrednim działaniem promieni słonecznych.
ZAPISZ TE INSTRUKCJE
28. Product Description and Main Features
Aluminiowa rampa progowa z blokadą jest wykonana z wysokiej jakości
wytłaczanego stopu aluminium. Ten produkt jest trwały i zapewnia wygodę
ludziom. Jest lekki, przenośny, stabilny i trwały, a także ma konstrukcję
blokującą, co ułatwia instalację i przechowywanie.
Główne cechy:
26. Materiał: Wysokowytrzymały stop aluminium, wytłaczany.
27. Powierzchnia: obróbka antypoślizgowa, gratowanie.
28. Konstrukcja łącząca: interfejs każdej sekcji jest precyzyjnie
zaprojektowany; należy wyrównać interfejs każdej sekcji i docisnąć je
do siebie w celu instalacji.
29. Limit obciążenia : do 800 funtów .
30. Wysokość opcjonalna : nadaje się do progów o różnej wysokości.
29. Product Parameter
Przed
miot
Model
Zdjęcie
Wysoko
ść
Obciążenie
L imit
Północn
y Zachód
GW
1
LD9YV0
1 cal
800 funtów
1,9kg
2,6 kg
2
LYIMV0
2 cale
800 funtów
3,6 kg
4,4 kg
3
Z2UAV0
3 cale
800 funtów
5,4 kg
6,25 kg

30. Installation Guide
(1) Przed rozpoczęciem instalacji należy założyć rękawice, aby
chronić dłonie.
(2) Wybierz odpowiednie miejsce instalacji, upewniając się, że
podłoże jest równe i twarde.
(3) Wyrównaj i zablokuj wszystkie sekcje rampy, aż wszystkie części
będą równe.
(4) Zaczynając od 1-calowego przedłużenia, zamontuj przedłużenia
progowe w kolejności pokazanej (FIG. 1), aż do osiągnięcia
ostatecznej wysokości. Zbliż przedłużenia progowe pod kątem
około 45°, a następnie obróć je na miejsce po wsunięciu żarówki
w szczelinę .
4
GRBRV0
4 cale
800 funtów
7,35 kg
8,35 kg
5
OVUSV0
5 cali
800 funtów
9,4 kg
10,5
grama
6
SNPTV0
6 cali
800 funtów
11,7 kg
12,55 kg

(5) Za pomocą dołączonych śrub dokręć każdą sekcję rampy, aby mieć
pewność, że rampa nie będzie się ślizgać ani nie będzie wydawać hałasu
podczas użytkowania .
(5) Po zamontowaniu należy sprawdzić, czy rampa jest stabilna i
dobrze przytwierdzona do podłoża.
(6) Korzystając z rampy, należy pchać sprzęt w górę i w dół rampy
równomiernie, unikając ostrych zakrętów i nadmiernej prędkości.
Producent: Shanghaimuxinmuyeyouxiangongsi
Adres: Shuangchenglu 803nong11hao1602A-1609shi, baoshanqu,
szanghaj 200000 CN.
Importowane do AUS: SIHAO PTY LTD. 1 ROKEVA

STREETEASTWOOD NSW 2122 Australia
Importowane do USA: Sanven Technology Ltd. Suite 250, 9166 Anaheim
Place, Rancho Cucamonga, CA 91730
REP
EC
E-CrossStu GmbH
Mainzer Landstr.69, 60329 Frankfurt am Main.
REP
UK
YH CONSULTING LIMITED.
C/O YH Consulting Limited Office 147, Centurion
House, London Road, Staines-upon-Thames,
Surrey, TW18 4AX


Technisch Ondersteuning en E-garantiecertificaat
www.vevor.com/support
DREMPELWAARDE HELLING
GEBRUIKERSHANDLEIDING
We continue to be committed to provide you tools with competitive price.
"Save Half", "Half Price" or any other similar expressions used by us only represents an
estimate of savings you might benefit from buying certain tools with us compared to the major
top brands and does not necessarily mean to cover all categories of tools offered by us. You
are kindly reminded to verify carefully when you are placing an order with us if you are
actually saving half in comparison with the top major brands.

Model: LD9YV0 /LYIMV0 /Z2UAV0 /GRBRV0 /OVUSV0 /SNPTV0
Have product questions? Need technical support? Please feel free to
contact us:
Technical Support and E-Warranty Certificate
www.vevor.com/support
NEED HELP? CONTACT US!
This is the original instruction, please read all manual instructions
carefully before operating. VEVOR reserves a clear interpretation of our
user manual. The appearance of the product shall be subject to the
product you received. Please forgive us that we won't inform you again if
there are any technology or software updates on our product.
THRESHOLD RAMP

31. Safety Instructions
WAARSCHUWING:
Lees de instructies en procedures zorgvuldig door en zorg dat u ze begrijpt
voordat u de drempelhulp installeert en gebruikt .
Wijzig het ontwerp van de drempelhelling niet.
• Verplaats een drempelhulp niet terwijl u erop staat.
• Gebruik het niet bij slecht weer, zoals wind, regen, sneeuw, enzovoort.
Het wordt aanbevolen om de ladder te gebruiken bij helder weer.
55.Draag tijdens de installatie handschoenen om handletsel te
voorkomen.
56.Stapel geen voorwerpen op de helling en laat kinderen er niet op
spelen.
57.Controleer regelmatig de structuur en de bevestigingsmiddelen van
de hellingbaan om de stabiliteit en veiligheid ervan te garanderen.
58.Als het oppervlak van de oprit versleten of beschadigd is, vervang of
repareer het dan tijdig.
32. Maintenance Guide
25. Plaats het product op een stevig, veilig, toegankelijk en vlak startpunt.
Het minimale draagvermogen van het startpunt moet gelijk zijn aan dat van
de helling (800 lbs). Overschrijd het maximale draagvermogen van het
product niet.
26. Zorg ervoor dat het product stevig tegen het startpunt aanligt. Als er
geen veilig, toegankelijk en vlak startpunt kan worden gevonden, of als het
product niet stevig tegen een hoger startpunt aanligt, gebruik de helling
dan niet.
27. Knoei niet met, probeer niet te repareren of wijzig geen enkel
onderdeel van het product. Wees voorzichtig om knelpunten te voorkomen

tijdens de montage en het hanteren.
28. Als u het product gebruikt met andere mobiliteitsapparatuur, raadpleeg
dan de gebruikershandleiding van de apparatuur om de acceptabele
gebruiksrichtlijnen te begrijpen, inclusief de juiste helling, helling en
stoelrichting. Overschrijd de aanbevelingen van de mobiliteitsapparatuur
niet.
59.Controleer voor elk gebruik zorgvuldig de bevestigingsmiddelen op de
helling om er zeker van te zijn dat ze niet los zitten. Draai losse
bevestigingsmiddelen indien nodig vast.
60.Wanneer u de oprit gebruikt, zorg er dan voor dat deze stevig aansluit
op het startpunt om de veiligheid te garanderen.
61.Reinig het oppervlak van de helling voor elk gebruik van ijs, sneeuw,
stof, bladeren en ander vuil. Verwijder opgehoopt ijs en sneeuw en veeg
het oppervlak schoon. Gebruik voor stof en vuil een zachte borstel en een
niet-alkalisch reinigingsmiddel om het oppervlak van de helling schoon te
maken en spoel het vervolgens grondig af.
62.Het oppervlak van de helling kan glad worden bij natte
omstandigheden. Loop voorzichtig en let op uw voeten om uitglijden te
voorkomen.
63.Als de oprijplaat gedurende een langere periode niet wordt gebruikt,
berg deze dan op in een droge en goed geventileerde ruimte, uit de buurt
van direct zonlicht.
BEWAAR DEZE INSTRUCTIES
33. Product Description and Main Features
De drempel interlocking aluminiumlegering ramp is gemaakt van
hoogwaardige aluminiumlegering extrusie. Dit product is duurzaam en
biedt gemak voor mensen. Het is lichtgewicht, draagbaar, stabiel en
duurzaam en heeft een interlocking design voor eenvoudige installatie en
opslag.
Belangrijkste kenmerken:
31. Materiaal: Hoogwaardige aluminiumlegering, geëxtrudeerd.
32. Oppervlakte: Antislipbehandeling, ontbraamd.
33. In elkaar grijpend ontwerp: De interface van elke sectie is nauwkeurig
ontworpen. Lijn de interface van elke sectie uit en druk ze in elkaar
voor installatie.
34. Laadlimiet : tot 800 pond .
35. Hoogte optioneel : geschikt voor drempels van verschillende hoogtes.
34. Product Parameter
Ik
tem
Model
Afbeelding
Hoogte
Belastingsl
imiet
NW
GW
1
LD9YV0
2,54 cm
800 pond
1,9 kilo
2,6 kilo
2
LYIMV0
2 inch
800 pond
3,6kg
4,4 kilo
3
Z2UAV0
3 inch
800 pond
5,4 kg
6,25kg
4
GRBRV0
4 inch
800 pond
7,35kg
8,35kg

35. Installation Guide
(1) Draag handschoenen om uw handen te beschermen voordat u
met de installatie begint.
(2) Kies een geschikte installatielocatie en zorg ervoor dat de
ondergrond vlak en stevig is.
(3) Lijn de verschillende delen van de helling uit en vergrendel ze
totdat alle delen gelijk zijn.
(4) Begin met de 1” verlenging en installeer de drempelverlengingen
in de aangegeven volgorde (FIG. 1) totdat de uiteindelijke hoogte
is bereikt. Breng de drempelverlengingen samen in een hoek van
ongeveer 45° en draai ze vervolgens op hun plaats nadat de lamp
in de sleuf is geplaatst .
5
OVUSV0
5 inch
800 pond
9,4 kilo
10,5
gram
6
SNPTV0
6 inch
800 pond
11,7 kg
12,55 kg
(5) Gebruik de meegeleverde schroeven om elk deel van de oprijplaat vast
te draaien, zodat de oprijplaat niet wegglijdt of geluid maakt tijdens
gebruik .
(5) Controleer na de installatie of de oprijplaat stabiel is en stevig aan
de grond vastzit.
(6) Wanneer u de hellingbaan gebruikt, duwt u het apparaat rustig
omhoog en omlaag. Vermijd scherpe bochten en te hard rijden.
Fabrikant: Shanghaimuxinmuyeyouxiangongsi
Adres: Shuangchenglu 803nong11hao1602A-1609shi, baoshanqu,
shanghai 200000 CN.
Geïmporteerd naar AUS: SIHAO PTY LTD. 1 ROKEVA

STREETEASTWOOD NSW 2122 Australië
Geïmporteerd naar de VS: Sanven Technology Ltd. Suite 250, 9166
Anaheim Place, Rancho Cucamonga, CA 91730
REP
EC
E-CrossStu GmbH
Mainzer Landstr.69, 60329 Frankfurt am Main.
REP
UK
YH CONSULTING LIMITED.
C/O YH Consulting Limited Office 147, Centurion
House, London Road, Staines-upon-Thames,
Surrey, TW18 4AX


Teknisk Support och e-garanticertifikat
www.vevor.com/support
TRÖSKEL RAMP
ANVÄNDARMANUAL
We continue to be committed to provide you tools with competitive price.
"Save Half", "Half Price" or any other similar expressions used by us only represents an
estimate of savings you might benefit from buying certain tools with us compared to the major
top brands and does not necessarily mean to cover all categories of tools offered by us. You
are kindly reminded to verify carefully when you are placing an order with us if you are
actually saving half in comparison with the top major brands.
Modell: LD9YV0 /LYIMV0 /Z2UAV0 /GRBRV0 /OVUSV0 /SNPTV0
Have product questions? Need technical support? Please feel free to
contact us:
Technical Support and E-Warranty Certificate
www.vevor.com/support
NEED HELP? CONTACT US!
This is the original instruction, please read all manual instructions
carefully before operating. VEVOR reserves a clear interpretation of our
user manual. The appearance of the product shall be subject to the
product you received. Please forgive us that we won't inform you again if
there are any technology or software updates on our product.
THRESHOLD RAMP

36. Safety Instructions
VARNING:
och förstå instruktionerna och procedurerna noggrant innan du installerar
och använder tröskelrampen.
Ändra inte tröskelrampens design.
• Flytta inte en tröskelramp när du står på den.
• Använd den inte i dåligt väder, som vind, regn, snö och så vidare. Det
rekommenderas att använda stegen i klart väder.
64.Under installationen, använd handskar för att förhindra handskador.
65.Stapla inte föremål och låt inte barn leka på rampen.
66.Kontrollera regelbundet strukturen och fästelementen på rampen för
att säkerställa dess stabilitet och säkerhet.
67.Om rampens yta är sliten eller skadad, vänligen byt ut eller reparera
den i tid.
37. Maintenance Guide
29. Placera produkten på en stadig, säker, tillgänglig och jämn
utgångspunkt. Minsta viktkapacitet för startpunkten måste vara lika med
rampens (800 lbs). Överskrid inte produktens maximala viktkapacitet.
30. Se till att produkten ligger ordentligt i linje med startpunkten. Om en
säker, tillgänglig och jämn startpunkt inte kan hittas, eller om produkten
inte passar säkert mot en högre startpunkt, använd inte rampen.
31. Ändra inte, försök att reparera eller modifiera någon del av produkten.
Var försiktig för att undvika klämpunkter under montering och hantering.
32. Om du använder produkten med annan mobilitetsutrustning, se
användarhandboken för utrustningen för att förstå de acceptabla
användningsriktlinjerna, inklusive lämplig lutning, lutning och stolens
riktning. Överskrid inte rekommendationerna för rörelsehjälpmedel.

68.Före varje användning, inspektera noggrant fästelementen på rampen
för att säkerställa att de inte är lösa. Dra åt eventuella lösa fästen vid
behov.
69.När du använder rampen, se till att den ligger ordentligt i linje med
startpunkten för att garantera säkerheten.
70.Före varje användning, rengör rampytan från is, snö, damm, löv och
annat skräp. Ta bort ansamlad is och snö och sopa rent ytan. För damm
och skräp, använd en mjuk borste och icke-alkaliskt rengöringsmedel för
att rengöra rampens yta och skölj sedan noggrant.
71.Ramytan kan bli hal i våta förhållanden. Gå med försiktighet och var
uppmärksam på ditt fotfäste för att förhindra halka.
72.Om rampen inte kommer att användas under en längre tid, förvara
den på ett torrt och välventilerat utrymme borta från direkt solljus.
SPARA DESSA INSTRUKTIONER
38. Product Description and Main Features
Den tröskellåsande aluminiumlegeringsrampen är gjord av högkvalitativ
aluminiumlegeringsextrudering. Denna produkt är hållbar och ger
bekvämlighet för människor. Den är lätt, bärbar, stabil och hållbar och har
en sammankopplande design för enkel installation och förvaring.
Huvudfunktioner:
36. Material: Höghållfast aluminiumlegering, extruderad.
37. Yta: Anti-halkbehandling, gradning.
38. Interlocking design: Varje sektions gränssnitt är exakt utformat; rikta in
varje sektions gränssnitt och tryck ihop dem för installation.
39. Belastningsgräns : Upp till 800 lbs .
40. H åtta tillval : lämplig för trösklar med olika höjder.
39. Product Parameter
Jag
tem
Modell
Bild
H åtta
Ladda L
imitera
NW
GW
1
LD9YV0
1 tum
800 pund
1,9 kg
2,6 kg
2
LYIMV0
2 tum
800 pund
3,6 kg
4,4 kg
3
Z2UAV0
3 tum
800 pund
5,4 kg
6,25 kg
4
GRBRV0
4 tum
800 pund
7,35 kg
8,35 kg
5
OVUSV0
5 tum
800 pund
9,4 kg
10,5 g
6
SNPTV0
6 tum
800 pund
11,7 kg
12,55 kg
40. Installation Guide
(1) Innan du påbörjar installationen, använd handskar för att skydda
dina händer.
(2) Välj en lämplig installationsplats och se till att marken är jämn och
fast.
(3) Rikta in och lås ihop varje sektion av rampen tills alla delar är
jämna.
(4) Börja med 1”-förlängningen, installera tröskelförlängningarna i den
ordning som visas (FIG. 1) tills den slutliga höjden uppnås. För
ihop tröskelförlängningarna i en vinkel på ungefär 45° och vrid
dem sedan på plats efter att glödlampan har fästs i skåran .
(5) Använd de medföljande skruvarna för att dra åt varje sektion av
rampen för att säkerställa att rampen inte glider ut eller gör oväsen under
användning .

(5) Efter installationen, kontrollera om rampen är stabil och tätt
fastsatt i marken.
(6) När du använder rampen, tryck utrustningen upp och ner för
rampen stadigt, undvik skarpa svängar eller fortkörning.
Tillverkare: Shanghaimuxinmuyeyouxiangongsi
Adress: Shuangchenglu 803nong11hao1602A-1609shi, baoshanqu,
shanghai 200000 CN.
Importerad till AUS: SIHAO PTY LTD. 1 ROKEVA STREETEASTWOOD
NSW 2122 Australien
Importerad till USA: Sanven Technology Ltd. Suite 250, 9166 Anaheim
Place, Rancho Cucamonga, CA 91730
REP
EC
E-CrossStu GmbH
Mainzer Landstr.69, 60329 Frankfurt am Main.
REP
UK
YH CONSULTING LIMITED.
C/O YH Consulting Limited Office 147, Centurion
House, London Road, Staines-upon-Thames,
Surrey, TW18 4AX