WONDERWALL 72
Infrarot-Heizung
Infrared Heater
Radiador infrarrojo
Radiateur Infrarouge
Radiatore a infrarossi
Infrarood verwarming
Hinweis: Dieses Produkt ist nur für gut isolierte Räume
oder für den gelegentlichen Gebrauch geeignet.
Note: This product is only suitable for well insulated
spaces or occasional use.
Nota: Este producto está indicado únicamente en
lugares abrigados o para una utilización punctual.
Remarque : Ce produit ne peut être utilisé que dans
des locaux bien isolés ou de manière occasionnelle.
Advertencia: Questo prodotto è adatto solo per spazi
ben isolati o uso occasionale.
Let op! Dit artikel is alleen geschikt voor goed geïsoleer-
de ruimtes en voor incidenteel gebruik.
www.klarstein.com
10032809

3
DE
Sehr geehrter Kunde,
wir gratulieren Ihnen zum Erwerb Ihres Gerätes. Lesen Sie
die folgenden Hinweise sorgfältig durch und befolgen Sie
diese, um möglichen Schäden vorzubeugen. Für Schäden,
die durch Missachtung der Hinweise und unsachgemäßen
Gebrauch entstehen, übernehmen wir keine Haftung. Scannen
Sie den folgenden QR-Code, um Zugriff auf die aktuellste
Bedienungsanleitung und weitere Informationen rund um das
Produkt zu erhalten:
INHALTSVERZEICHNIS
Produktdatenblatt4
Sicherheitshinweise5
Wandmontage6
Geräteübersicht und Bedienfeld8
Displayanzeigen8
Bedienung9
Fehlersuche und Fehlerbehebung11
Reinigung und Pege11
Spezielle Entsorgungshinweise für Verbraucher in Deutschland12
Hinweise zur Entsorgung14
Hersteller & Importeur (UK)14
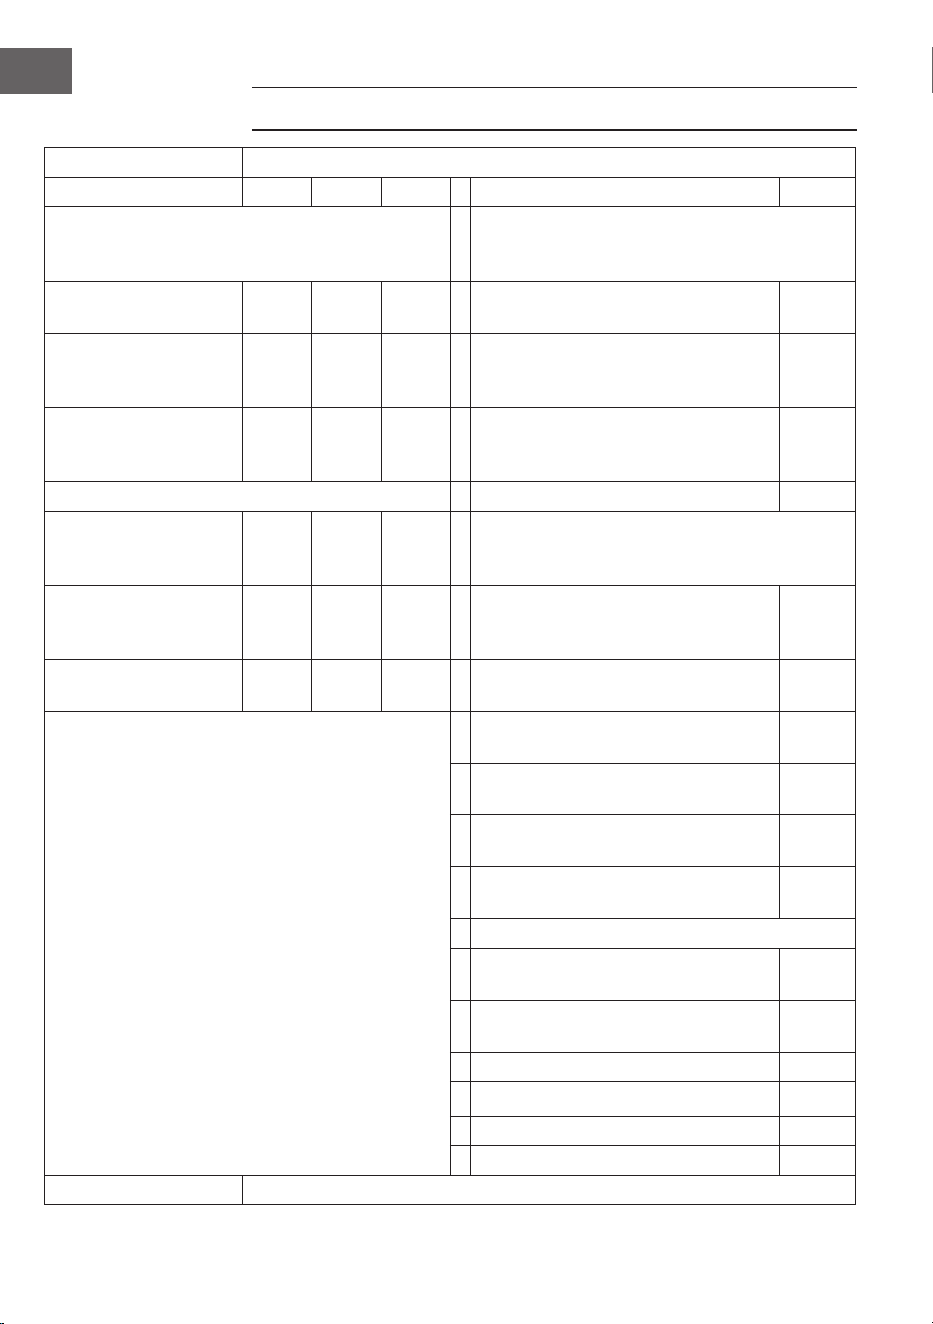
TECHNISCHE DATEN
Artikelnummer Stromversorgung Leistung Abmessungen
10032809 220-240 V
50/60 Hz
720 W 60 x 120 cm
English 15
Español 25
Français 35
Italiano 45
Nederlands 55
4
DE
PRODUKTDATENBLATT
Modellkennung(en) 10032809
Angabe Symbol Wert Einheit Angabe Einheit
Wärmeleistung Nur bei elektrischen Speicher-Einzelraumheizgeräten:
Art der Regelung der Wärmezufuhr
Nennwärmeleistung P
nom
0,72
kW Manuelle Regelung der Wärmezufuhr mit
integriertem Thermostat
nein
Mindestwärmeleistung
(Richtwert)
P
min
0,72
kW Manuelle Regelung der Wärmezufuhr
mit Rückmeldung der Raum- und/oder
Außentemperatur
nein
Maximale kontinuierliche
Wärmeleistung
P
max
0,72
kW Elektronische Regelung der Wärmezufuhr
mit Rückmeldung der Raum- und/oder
Außentemperatur
nein
Hilfsstromverbrauch
Wärmeabgabe mit Gebläseunterstützung nein
Bei Nennwärmeleistung
(Ventilator-Motor)
el
max
k.A. kW
Art der Wärmeleistung/Raumtemperaturkontrolle
Bei Mindestwärmeleistung
(Ventilator-Motor)
el
min
k.A. kW Einstuge Wärmeleistung, keine
Raumtemperaturkontrolle
nein
Im Bereitschaftszustand el
SB
0,26
W Zwei oder mehr manuell einstellbare Stufen,
keine Raumtemperaturkontrolle
nein
Raumtemperaturkontrolle mit mechanischem
Thermostat
nein
Mit elektronischer Raumtemperaturkontrolle nein
Mit elektronischer Raumtemperaturkontrolle und
Tageszeitregelung
nein
Mit elektronischer Raumtemperaturkontrolle und
Wochentagsregelung
ja
Sonstige Regelungsoptionen
Raumtemperaturkontrolle mit Präsenzerkennung nein
Raumtemperaturkontrolle mit Erkennung offener
Fenster
ja
Mit Fernbedienungsoption nein
Mit adaptiver Regelung des Heizbeginns nein
Mit Betriebszeitbegrenzung ja
Mit Schwarzkugelsensor nein
Kontaktangaben Chal-Tec GmbH, Wallstraße 16, 10179, Berlin, Deutschland
5
DE
SICHERHEITSHINWEISE
• Prüfen Sie vor der Benutzung die Spannung auf der Geräteplakette und schließen
Sie das Gerät nur an Steckdosen an, die der Spannung des Geräts entsprechen.
• Falls das Netzkabel beschädigt ist, lassen Sie es von einer ausgebildeten Fachkraft
ersetzen.
• Stellen Sie den Kamin nicht direkt unter der Steckdose auf.
• Halten Sie einen Meter Abstand zu brennbaren Materialien wie Möbeln,
Vorhängen oder Ähnlichem.
• Lassen Sie das Gerät während der Benutzung nicht unbeaufsichtigt.
• Lassen Sie das Gerät nicht unbeaufsichtigt, während es an die Steckdose
angeschlossen ist.
• Benutzen Sie das Gerät außerhalb der Reichweite von Kindern. Kinder dürfen das
Gerät nur unter Aufsicht bedienen.
• Das Gerät ist nicht für den kommerziellen Gebrauch, sondern nur für Gebrauch im
Haushalt und in ähnlichen Umgebungen vorgesehen.
• Benutzen Sie das Gerät nicht, wenn es Fehlfunktionen aufweist oder in irgendeiner
Form beschädigt wurde.
• Reparaturen dürfen nur von ausgebildeten Fachkräften durchgeführt werden.
• Falsch oder eigenständig ausgeführte Reparaturen stellen ein Verletzungsrisiko dar.
• Verlegen Sie das Netzkabel nicht unter Teppichen oder Läufern.
• Achten Sie darauf, dass das Netzkabel nicht über scharfe Kanten oder heiße
Oberächen verläuft.
• Decken Sie den Kamin nicht ab, um Überhitzen zu vermieden.
• Benutzen Sie das Gerät nicht mit einem externen Timer, einer ferngesteuerten
Steckdose oder einem anderen Gerät, das den Kamin automatisch ein- und
ausschaltet.
• Tauchen Sie das Gerät nicht in Wasser oder andere Flüssigkeiten.
• Benutzen Sie das Gerät nicht in der Nähe von Badewannen, Duschen oder
Swimmingpools.
• Benutzen Sie das Gerät nicht im Freien.
• Benutzen Sie das Gerät nicht mit nassen Händen.
• Benutzen Sie das Gerät nicht auf oder in der Nähe heißer Oberächen.
• Benutzen Sie das Gerät nicht mit beschädigtem Netzkabel.
• Ziehen Sie vor der Reinigung den Stecker aus der Steckdose und lassen Sie das
Gerät vollständig abkühlen.
• Benutzen Sie zur Reinigung keine Scheuermittel.
• Verwenden Sie nur Zubehör, das vom Hersteller ausdrücklich dafür zugelassen ist.
• Kinder, physisch und körperlich eingeschränkte Menschen sollten das Gerät nur
benutzen, wenn sie vorher von einer Aufsichtsperson ausführlich mit den Funktionen
und den Sicherheitsvorkehrungen vertraut gemacht wurden.
• Achten Sie darauf, dass Kinder nicht mit dem Gerät spielen.
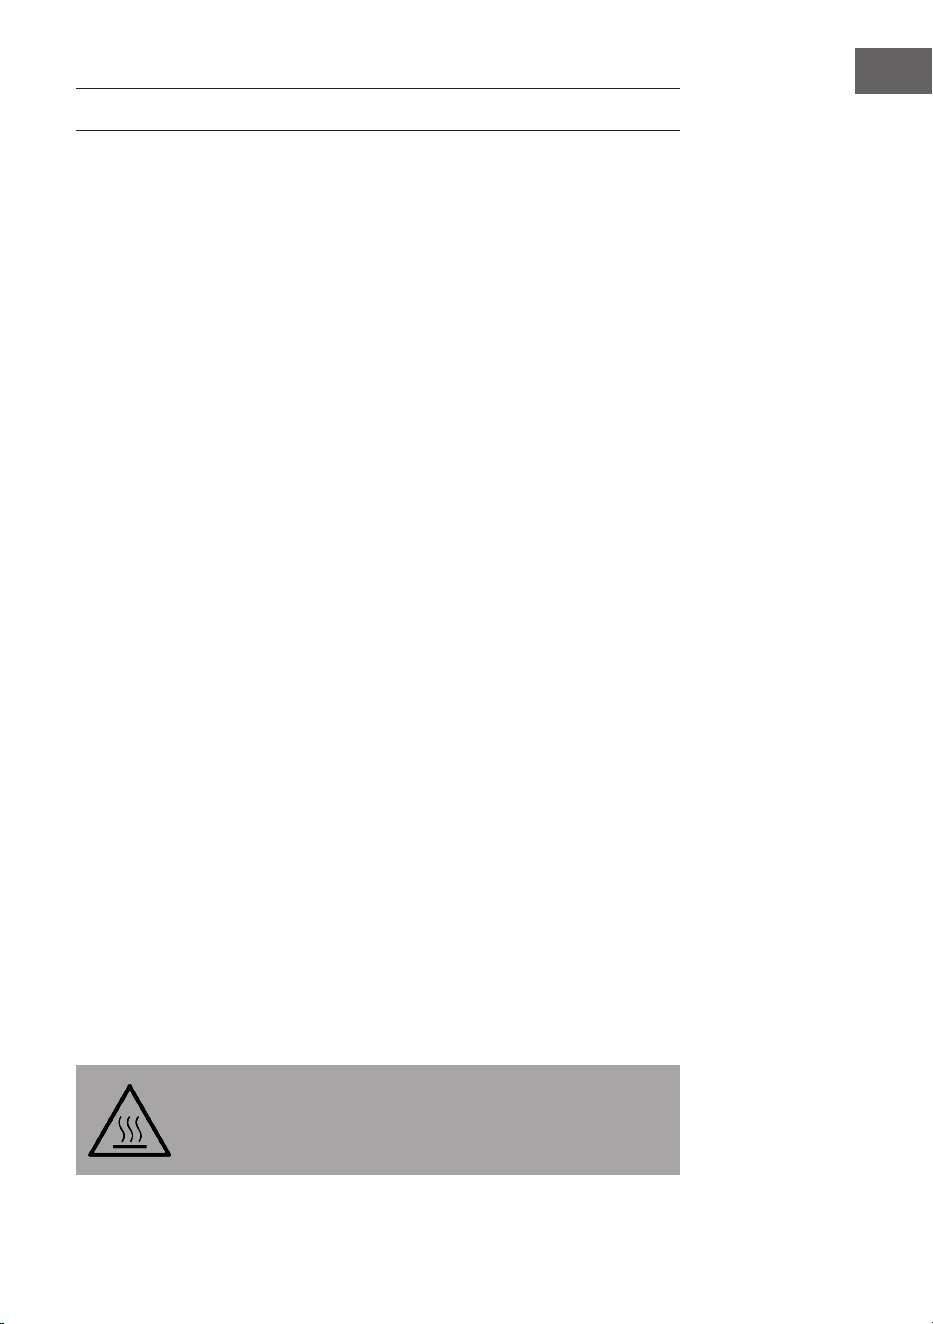
VORSICHT
Verbrennungsgefahr! Einige Geräteteile können sehr heiß werden.
Achten Sie darauf, dass Sie oder Ihre Kinder sich nicht daran
verbrennen.
6
DE
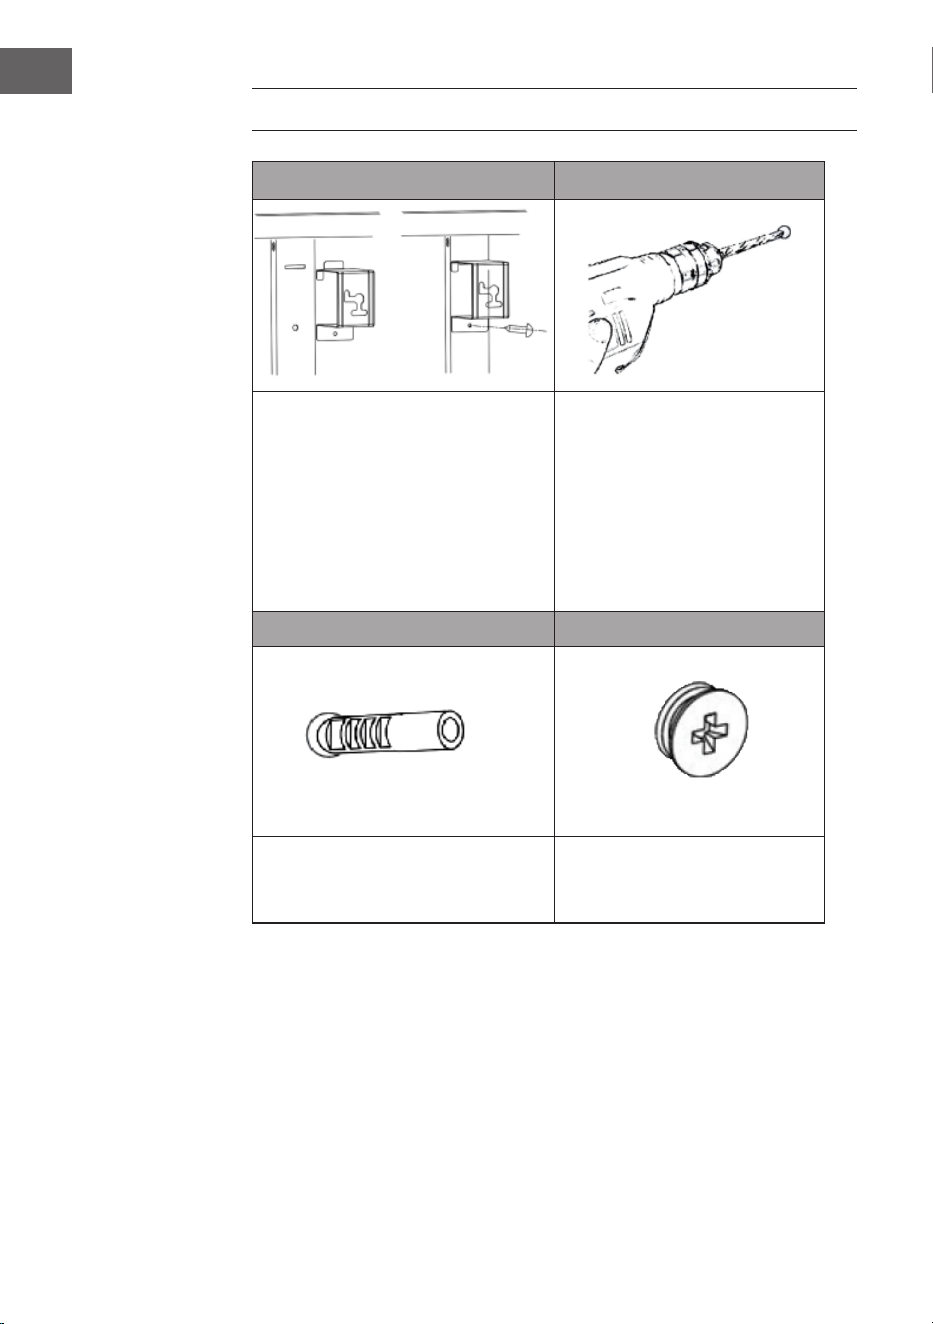
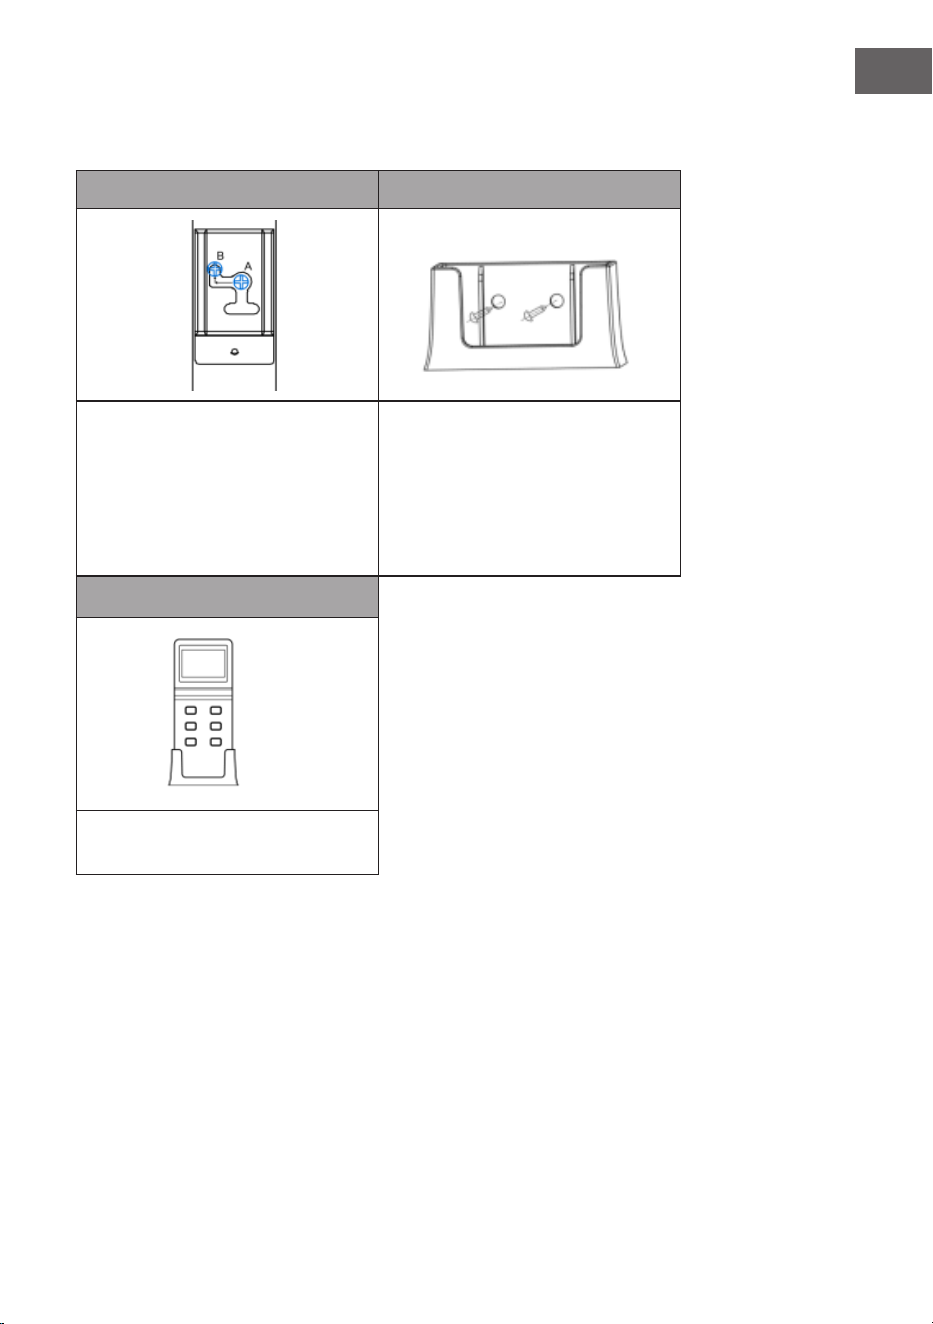
WANDMONTAGE
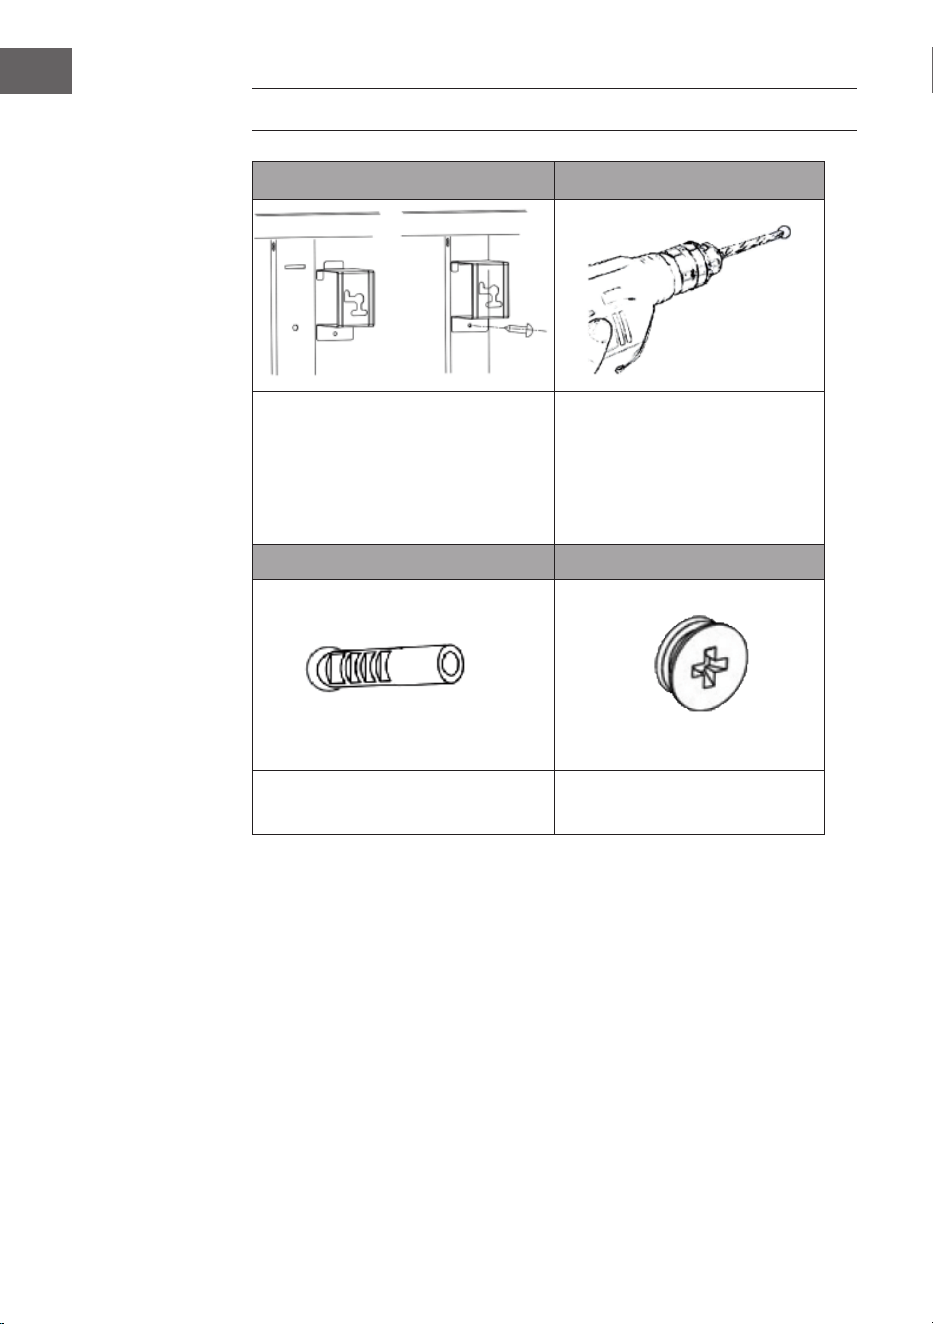
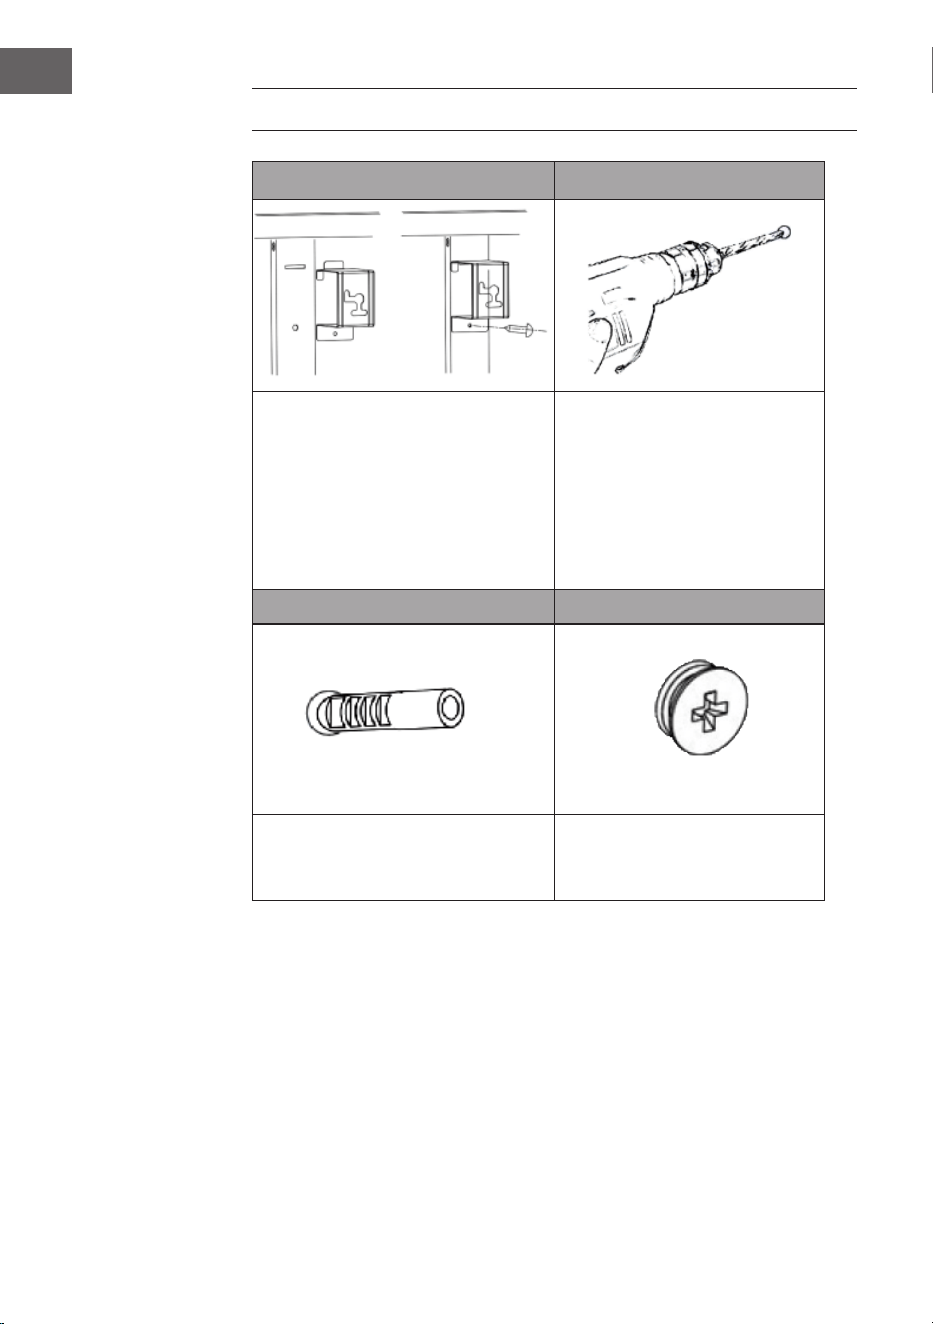
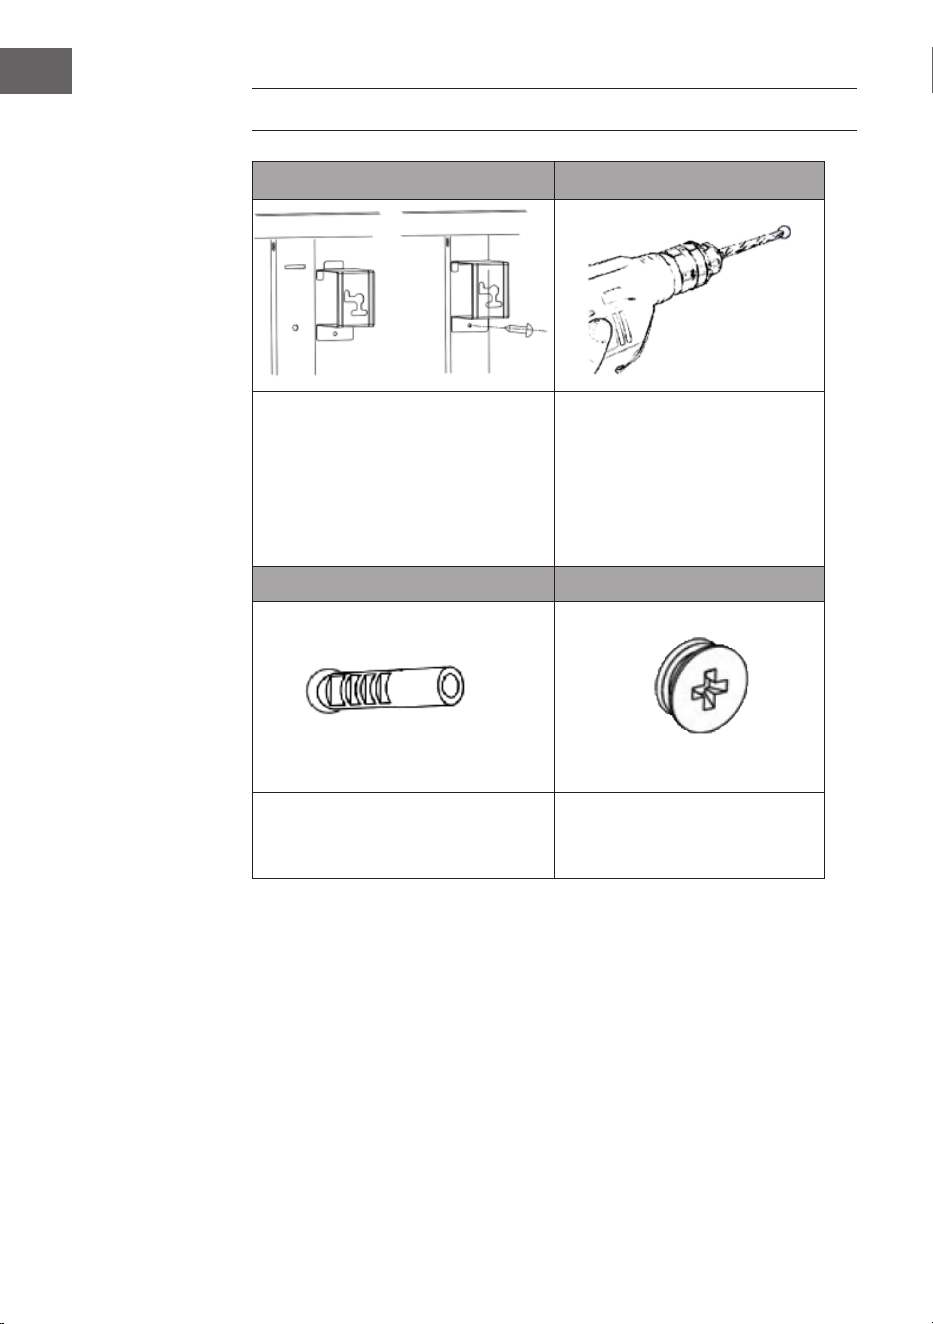
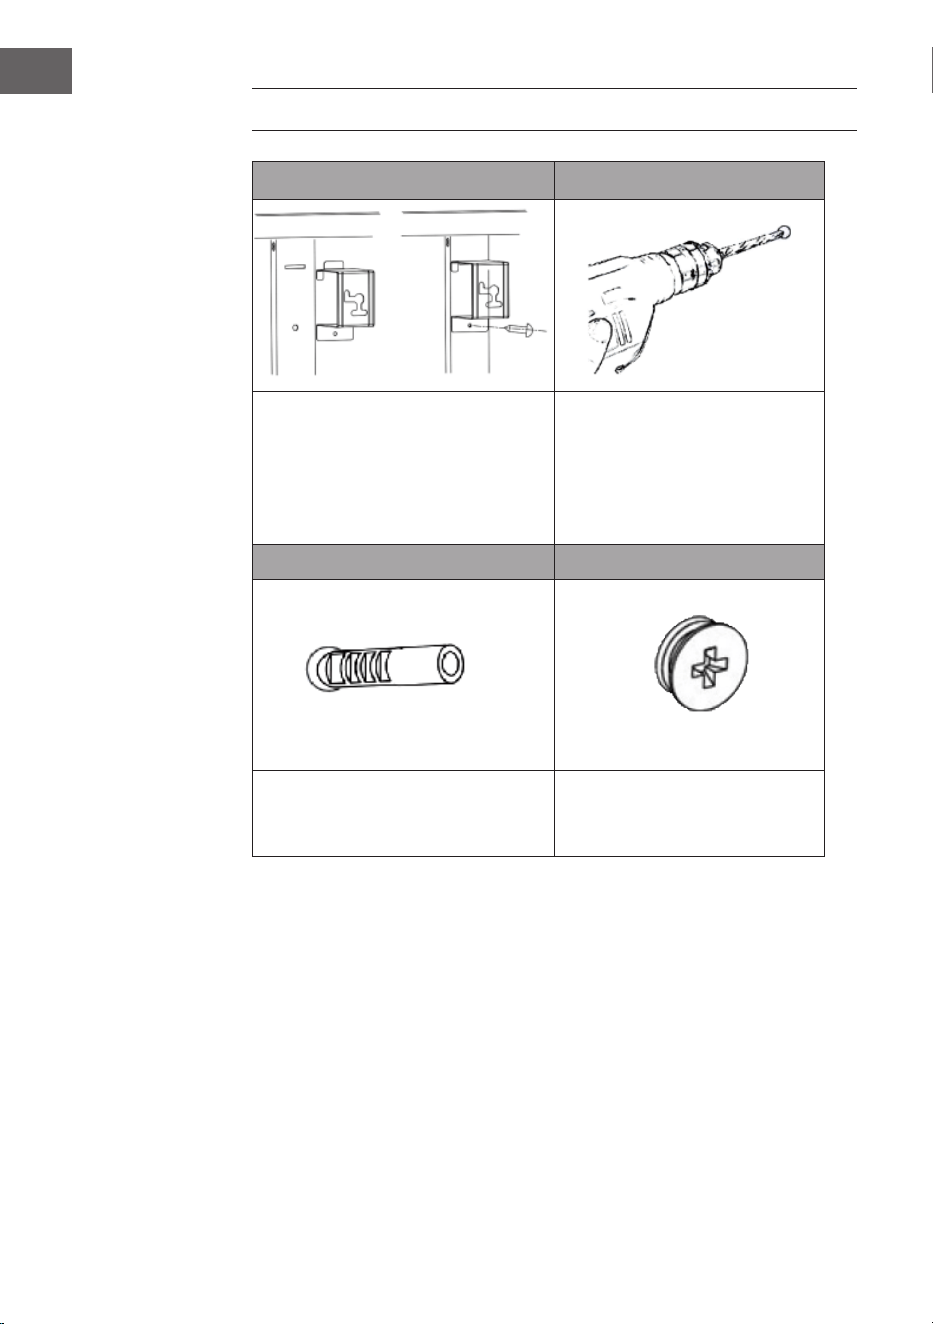
1 2
Nehmen Sie die 4 x Metall-
Wandhalterungen und 4 x
Metallschrauben für Wandhalterungen
aus der Halterung und befestigen Sie
diese Halterungen an der Rückseite des
Geräts.
Markieren Sie die Positionen der
vier zu bohrenden Löcher an der
Wand, und bohren Sie die Löcher
mit dem Bohrer. Achten Sie darauf,
dass der Abstand zwischen den
einzelnen Löchern mit den runden
Löchern der Wandhalterungen
übereinstimmt.
3 4
Setzen Sie die Kunststoffdübel in die
Löcher ein.
Setzen Sie die 4 x Metallschrauben
für die Wandmontage in die
Kunststoffdübel ein.
7
DE
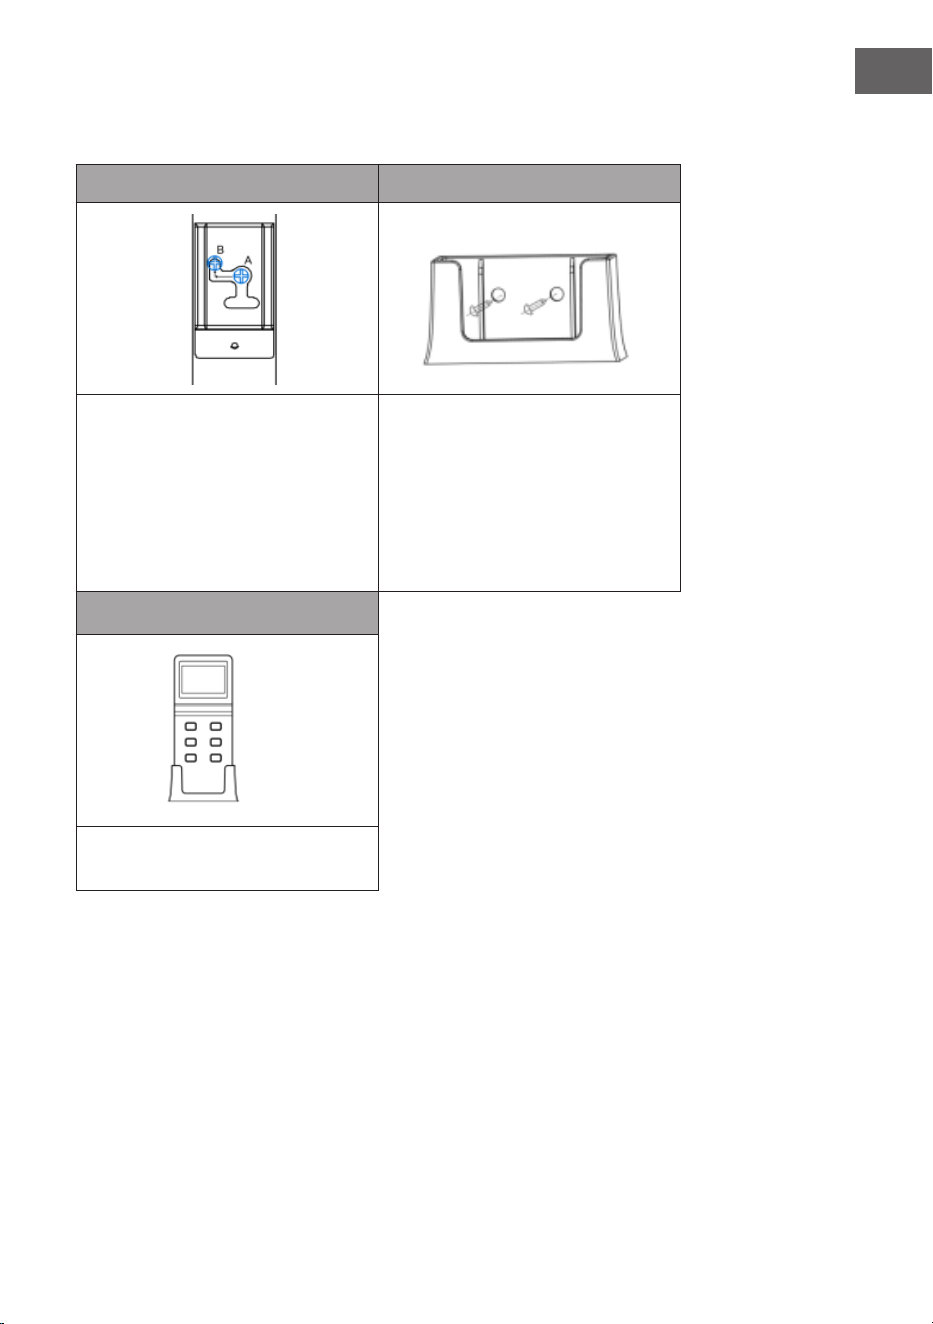
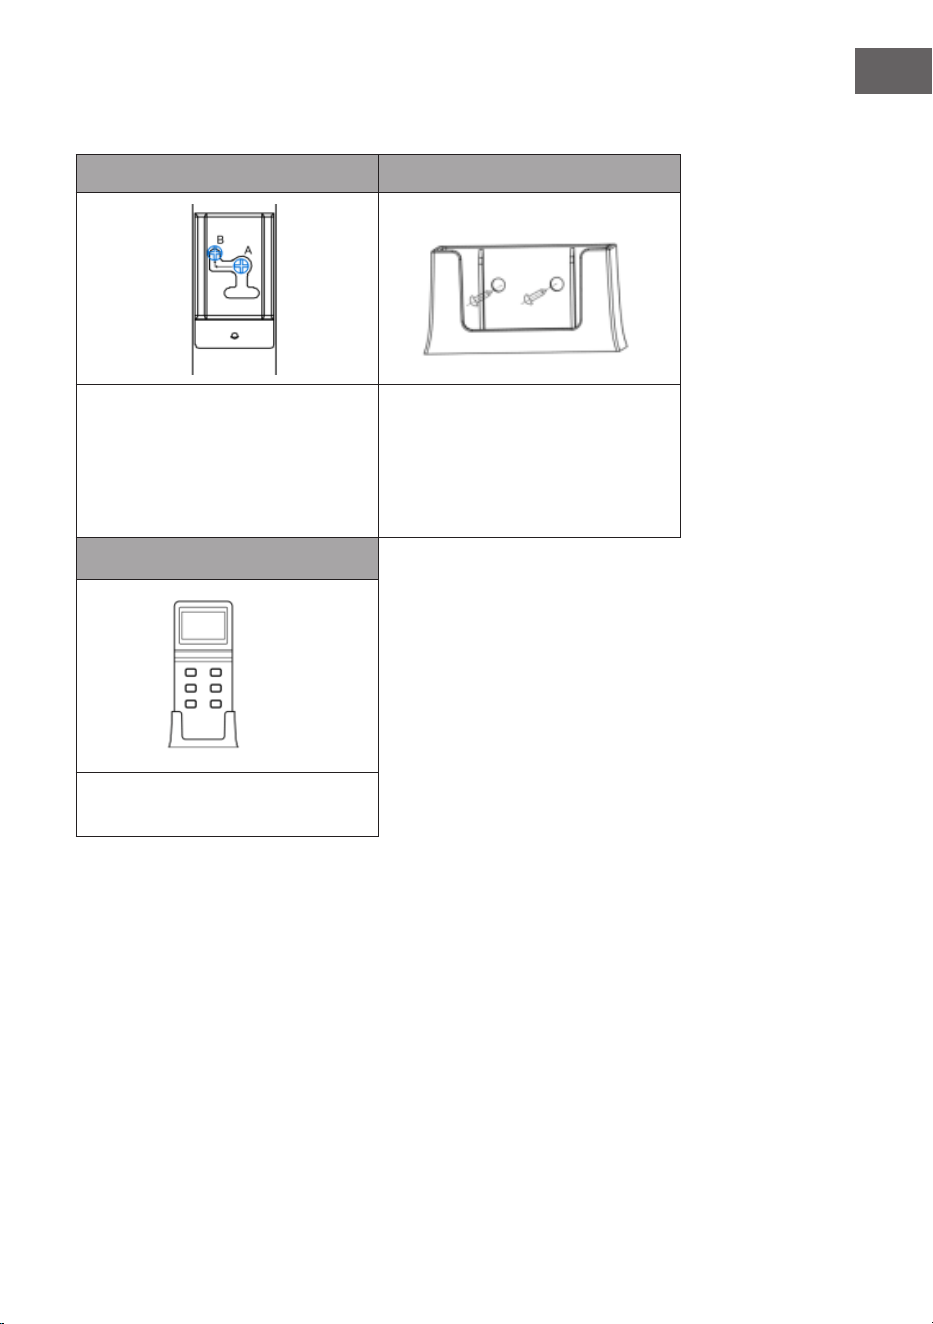
5 6
Heben Sie das Heizgerät an, richten
Sie die vier runden Löcher an den
Halterungen auf der Rückseite des
Heizgeräts auf die vier Schrauben
an der Wand aus. Schieben Sie die
Schraube von Position A nach Position
B, indem Sie das Heizgerät leicht
bewegen.
Befestigen Sie die Halterung des
Bedienfelds an der Wand neben dem
Heizgerät.
7
Setzen Sie das Bedienfeld in die
Halterung ein.
8
DE
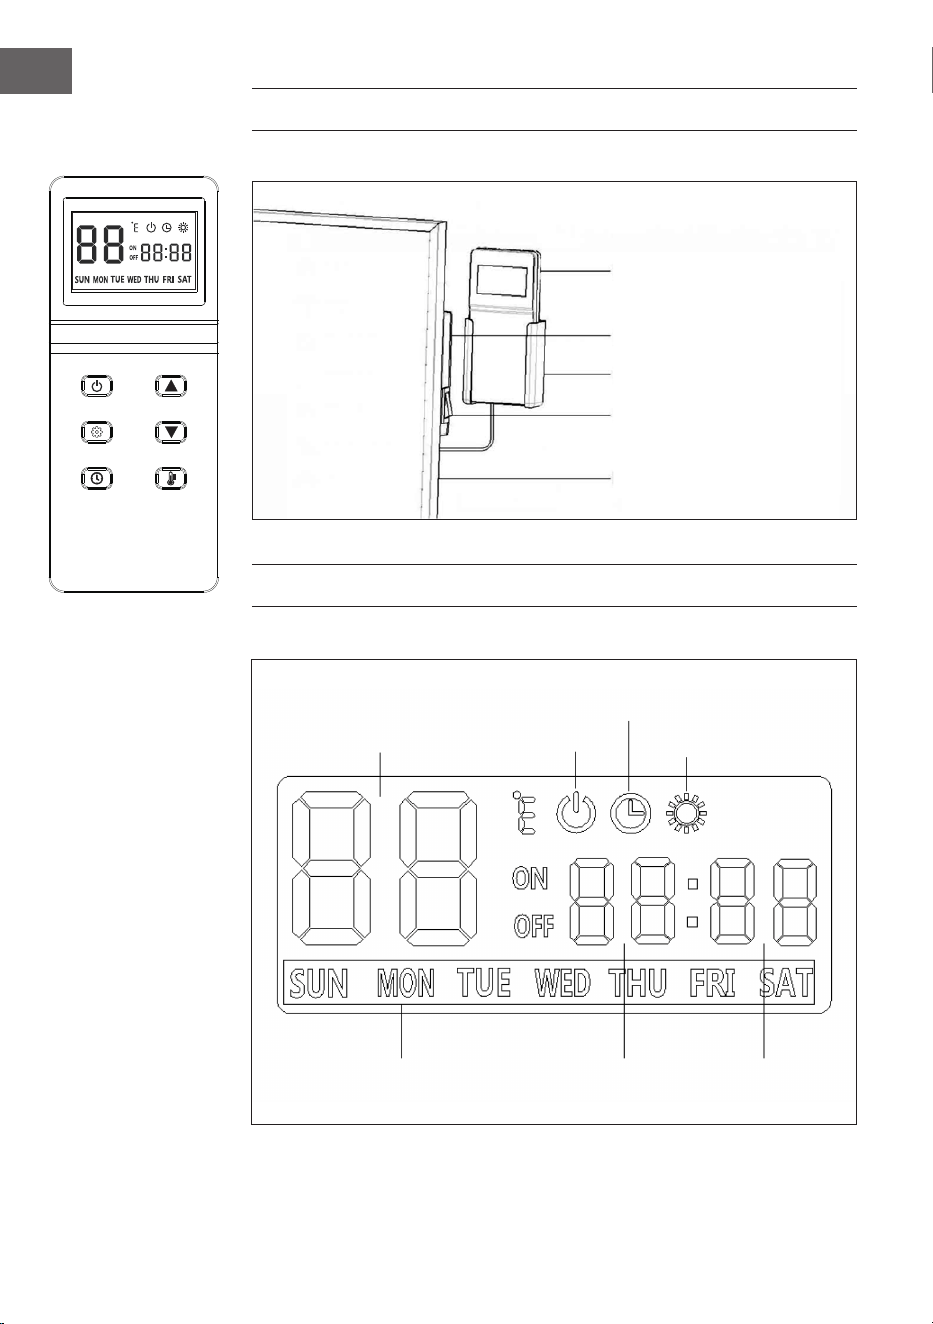
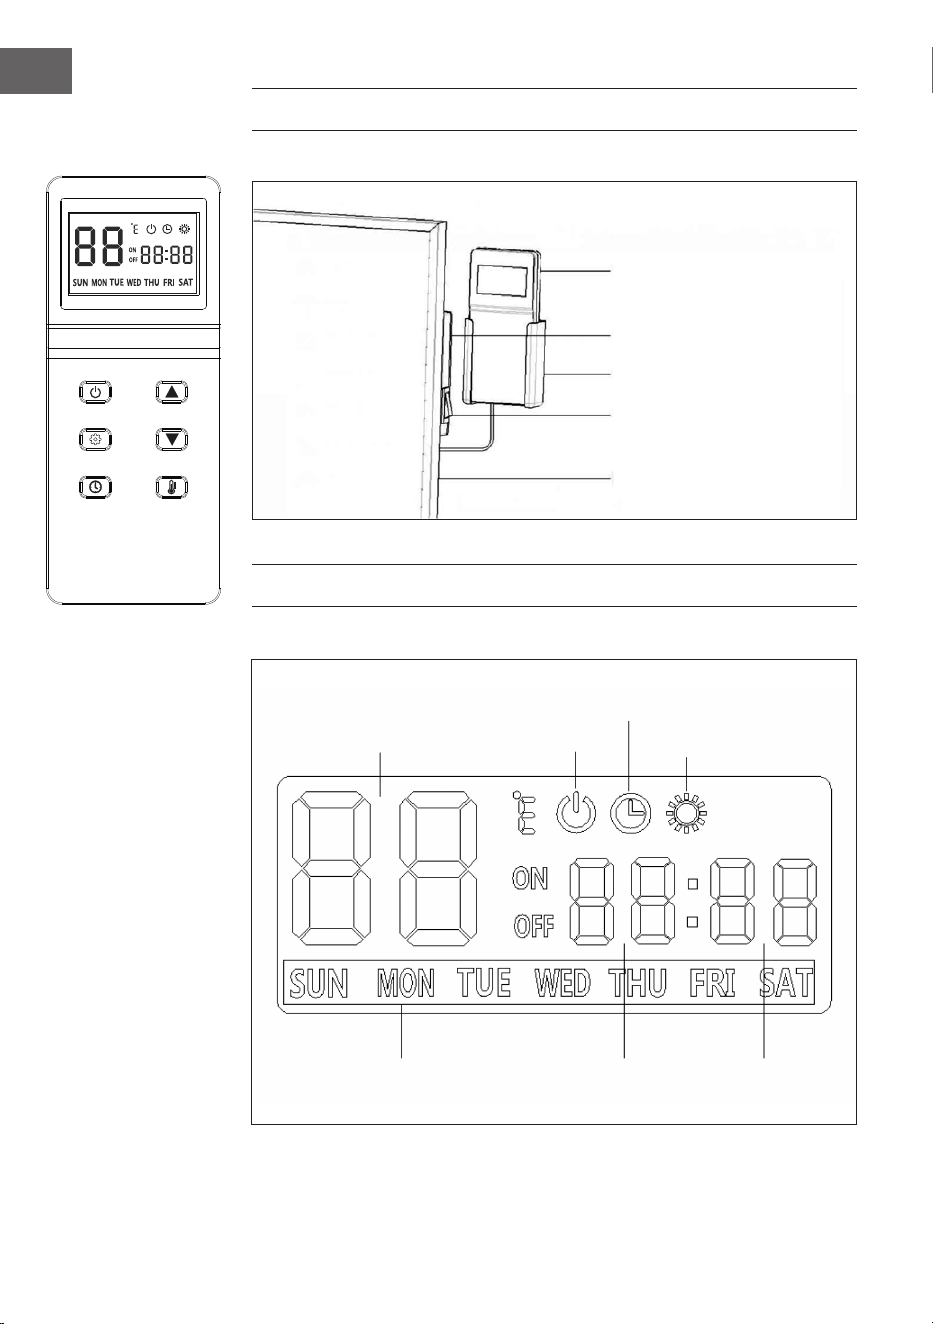
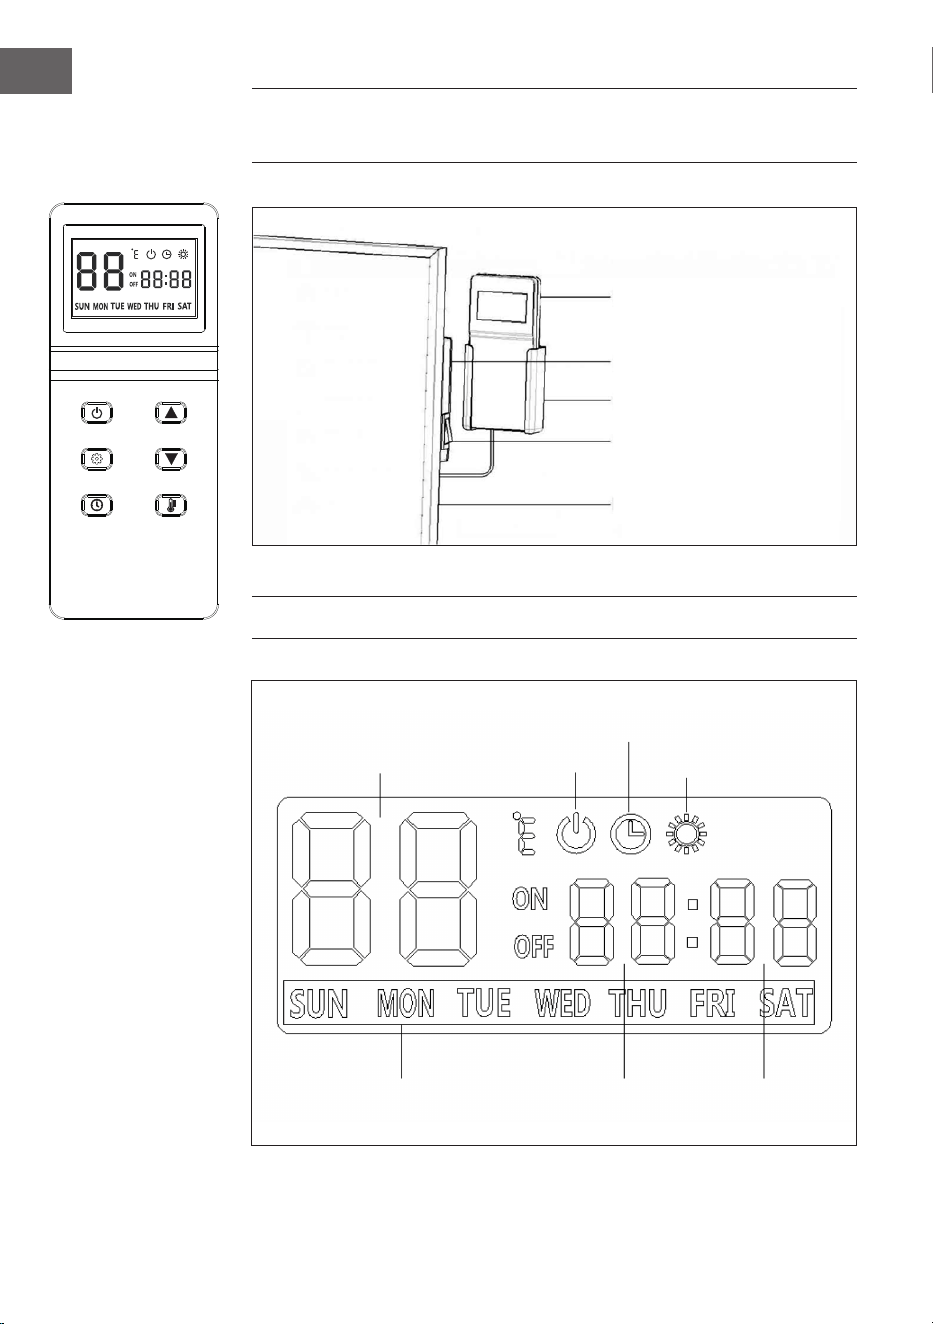
GERÄTEÜBERSICHT UND BEDIENFELD
DISPLAYANZEIGEN
Bedienfeld
Schaltelement
Halterung
Beleuchteter ON/OFF-
Schalter
Heizung
Temperaturanzeige
Heizung
Woche Stunde Minuten
Power
Wochentimer
9
DE
BEDIENUNG
Inbetriebnahme
Überprüfen Sie das Heizgerät, um sicherzustellen, dass es nicht beschädigt ist.
Stecken Sie dann den Netzstecker ein und schalten Sie den beleuchteten Hauptschalter
an der Seite des Heizgeräts ein.
Es gibt zwei Möglichkeiten, das Heizgerät zu benutzen:
(1) Normalmodus: Einschalten/Ausschalten
Wenn das Gerät eingeschaltet ist, ertönt der Summer einmal, und es bendet sich im
Standby-Modus. Drücken Sie die Taste auf der Steuerung. Das Symbol
leuchtet
im Display auf. Wenn die eingestellte Temperatur höher als die Raumtemperatur von
2°C ist, heizt sich das Gerät automatisch auf. Das Symbol ☼ leuchtet im Display auf
und die Heizungsanzeige am Gerät leuchtet ebenfalls.
(2) Wochenzeitschaltuhr-Modus
Starten Sie das Gerät im Wochentimer-Modus: Drücken Sie die Taste , wenn das
Symbol
im Display erlischt, drücken Sie die Taste , dann blinken die Symbole für
den Timer und den Kalender ◷.
Einstellen des Wochentimers
Drücken Sie oder , um den Wochentag einzustellen, und drücken Sie dann
die Taste zur Bestätigung. Dann blinkt “P1”, drücken Sie die Taste erneut zur
Bestätigung.
Stellen Sie die Einschaltzeit ein, die Stunden blinken, drücken Sie oder , um die
Stunde einzustellen, und drücken Sie dann die Taste zur Bestätigung. Dann blinken
die Minuten. Drücken Sie oder , um die Minuten einzustellen, und drücken Sie
dann zur Bestätigung die Taste .
Stellen Sie die Ausschaltzeit auf die gleiche Weise wie die Einschaltzeit ein.
Stellen Sie die tägliche Einschalt- und Ausschaltzeit für P2, P3 und P4 nach der gleichen
Methode wie für P1 ein. P1, P2, P3 und P4 können so eingestellt werden, dass sie sich
jeden Tag zu unterschiedlichen Zeiten ein- oder ausschalten.
Nachdem Sie den Wochentimer eingestellt haben, warten Sie, bis das Display nach
ca. 10 Sekunden in den Standby-Modus zurückkehrt. Drücken Sie einmal die Taste
und dann die Taste . Vergewissern Sie sich, dass die beiden Symbole
und ◷
gleichzeitig im Fenster aueuchten, dann arbeitet das Gerät im Wochentimer-Modus.
Wenn Sie wieder in den normalen Modus wechseln möchten, drücken Sie direkt
erneut auf , um in den Standby-Modus zurückzukehren. Befolgen Sie die obigen
Anweisungen für den Ein- und Ausschalt-Modus.
10
DE
So stellen Sie die Systemzeit ein
Drücken Sie die Taste . Wenn das Symbol
im Display leuchtet, drücken Sie die
Taste einmal, und die Stunde auf dem Display blinkt. Drücken Sie oder , um
die aktuelle Stunde einzustellen, und drücken Sie dann die Taste zur Bestätigung.
Dann blinkt die Minute, drücken Sie oder , um die aktuelle Minute einzustellen,
und drücken Sie dann die Taste zur Bestätigung. Dann blinkt der Wochenkalender,
drücken Sie oder , um den Wochentag einzustellen, und drücken Sie dann die
Taste zur Bestätigung.
So stellen Sie die Temperatur ein
Drücken Sie oder , um die Temperatur im Bereich von 5 bis 50 °C einzustellen.
Die beiden Ziffern blinken einige Sekunden lang, ohne dass eine Bedienung erfolgt,
und kehren dann zur Anzeige der Raumtemperatur zurück. Wenn die Raumtemperatur
niedriger als die eingestellte Temperatur von 2 °C ist, wird die Heizung automatisch
gestartet. Wenn die Raumtemperatur die eingestellte Temperatur erreicht oder
überschreitet, wird die Heizung automatisch abgeschaltet.
Erkennung offener Fenster
Dieses Heizgerät verfügt über eine Funktion zur Erkennung offener Fenster. Das
heißt, wenn die Heizung eingeschaltet ist (egal ob im Normalmodus oder im
Wochentimermodus), wird sie automatisch abgeschaltet, wenn die ermittelte Temperatur
innerhalb von 5 Minuten um 5 °C (oder mehr) abfällt.

11
DE
FEHLERSUCHE UND FEHLERBEHEBUNG
Wenn Ihr Heizgerät nicht funktioniert, befolgen Sie bitte diese Anweisungen:
• Vergewissern Sie sich, dass er Hauptschalter oder Ihre Sicherung ordnungsgemäß
funktioniert.
• Vergewissern Sie sich, dass die Heizung angeschlossen ist und die Steckdose
ordnungsgemäß funktioniert.
• Wenn der ON/OFF-Schalter in der Stellung ON nicht leuchtet, wenden Sie sich an
einen Fachbetrieb in Ihrer Nähe.
Hinweis: Wenn Sie weiterhin ein Problem mit Ihrem Heizgerät haben, versuchen
Sie nicht, das Gerät zu öffnen oder selbst zu reparieren. Dies kann zum Verlust der
Garantie, zu Schäden oder Verletzungen führen. Wenden Sie sich an den Händler.
REINIGUNG UND PFLEGE
Schalten Sie das Heizgerät vor der Reinigung aus und lassen Sie es abkühlen. Trennen
Sie die Stromzufuhr zum Gerät. Die Außenseite kann mit einem weichen, feuchten Tuch
abgewischt und anschließend getrocknet werden. Verwenden Sie keine scheuernden
Reinigungspulver oder Möbelpolitur, da dies die Oberäche beschädigen kann.
Um das Heizgerät von der Wand zu lösen, öffnen Sie einfach die Schraubkappe und
schrauben Sie die Schrauben ab. Wenn Sie die Heizung für einen kurzen Zeitraum nicht
benutzen, ziehen Sie den Stecker. Wenn Sie das Gerät länger nicht benutzen, können
Sie es von der Wand entfernen oder abdecken.
12
DE
SPEZIELLE ENTSORGUNGSHINWEISE FÜR
VERBRAUCHER IN DEUTSCHLAND
Entsorgen Sie Ihre Altgeräte fachgerecht. Dadurch wird gewährleistet, dass die
Altgeräte umweltgerecht verwertet und negative Auswirkungen auf die Umwelt und
menschliche Gesundheit vermieden werden. Bei der Entsorgung sind folgende Regeln
zu beachten:
• Jeder Verbraucher ist gesetzlich verpichtet, Elektro- und
Elektronikaltgeräte (Altgeräte) sowie Batterien und Akkus getrennt
vom Hausmüll zu entsorgen. Sie erkennen die entsprechenden
Altgeräte durch folgendes Symbol der durchgestrichene Mülltonne
(WEEE Symbol).
• Sie haben Altbatterien und Altakkumulatoren, die nicht vom Altgerät umschlossen
sind, sowie Lampen, die zerstörungsfrei aus dem Altgerät entnommen werden
können, vor der Abgabe an einer Entsorgungsstelle vom Altgerät zerstörungsfrei zu
trennen.
• Bestimmte Lampen und Leuchtmittel fallen ebenso unter das Elektro- und
Elektronikgesetz und sind dementsprechend wie Altgeräte zu behandeln.
Ausgenommen sind Glühbirnen und Halogenlampen. Entsorgen Sie Glühbirnen
und Halogenlampen bitte über den Hausmüll, sofern Sie nicht das WEEE Symbol
tragen.
• Jeder Verbraucher ist für das Löschen von personenbezogenen Daten auf dem
Elektro- bzw. Elektronikgerät selbst verantwortlich.
Rücknahmepicht der Vertreiber
Vertreiber mit einer Verkaufsäche für Elektro- und Elektronikgeräte von mindestens 400
Quadratmetern sowie Vertreiber von Lebensmitteln mit einer Gesamtverkaufäche von
mindestens 800 Quadratmetern, die mehrmals im Kalenderjahr oder dauerhaft Elektro-
und Elektronikgeräte anbieten und auf dem Markt bereitstellen, sind verpichtet,
1. bei der Abgabe eines neuen Elektro- oder Elektronikgerätes an einen Endnutzer ein
Altgerät des Endnutzers der gleichen Geräteart, das im Wesentlichen die gleichen
Funktionen wie das neue Gerät erfüllt, am Ort der Abgabe oder in unmittelbarer
Nähe hierzu unentgeltlich zurückzunehmen und
2. auf Verlangen des Endnutzers Altgeräte, die in keiner äußeren Abmessung größer
als 25 Zentimeter sind, im Einzelhandelsgeschäft oder in unmittelbarer Nähe hierzu
unentgeltlich zurückzunehmen; die Rücknahme darf nicht an den Kauf eines Elektro-
oder Elektronikgerätes geknüpft werden und ist auf drei Altgeräte pro Geräteart
beschränkt.

13
DE
• Bei einem Vertrieb unter Verwendung von Fernkommunikationsmitteln ist die
unentgeltliche Abholung am Ort der Abgabe auf Elektro- und Elektronikgeräte der
Kategorien 1, 2 und 4 gemäß § 2 Abs. 1 ElektroG, nämlich „Wärmeüberträger“,
„Bildschirmgeräte“ (Oberäche von mehr als 100 cm²) oder „Großgeräte“
(letztere mit mindestens einer äußeren Abmessung über 50 Zentimeter)
beschränkt. Für andere Elektro- und Elektronikgeräte (Kategorien 3, 5, 6) ist eine
Rückgabemöglichkeit in zumutbarer Entfernung zum jeweiligen Endnutzer zu
gewährleisten.
• Altgeräte dürfen kostenlos auf dem lokalen Wertstoffhof oder in folgenden
Sammelstellen in Ihrer Nähe abgegeben werden: www.take-e-back.de
• Für Elektro- und Elektronikgeräte der Kategorien 1, 2 und 4 an bieten wir auch die
Möglichkeit einer unentgeltlichen Abholung am Ort der Abgabe. Beim Kauf eines
Neugeräts haben sie die Möglichkeit eine Altgerätabholung über die Webseite
auszuwählen.
• Batterien können überall dort kostenfrei zurückgegeben werden, wo sie verkauft
werden (z. B. Super-, Bau-, Drogeriemarkt). Auch Wertstoff- und Recyclinghöfe
nehmen Batterien zurück. Sie können Batterien auch per Post an uns zurücksenden.
Altbatterien in haushaltsüblichen Mengen können Sie direkt bei uns von Montag bis
Freitag zwischen 08:00 und 16:00 Uhr unter der folgenden Adresse unentgeltlich
zurückgeben:
Chal-Tec Fulllment GmbH
Norddeutschlandstr. 3
47475 Kamp-Lintfort
• Wichtig zu beachten ist, dass Lithiumbatterien aus Sicherheitsgründen vor der
Rückgabe gegen Kurzschluss gesichert werden müssen (z. B. durch Abkleben der
Pole).
• Finden sich unter der durchgestrichenen Mülltonne auf der Batterie zusätzlich die
Zeichen Cd, Hg oder Pb ist das ein Hinweis darauf, dass die Batterie gefährliche
Schadstoffe enthält. (»Cd« steht für Cadmium, »Pb« für Blei und »Hg« für
Quecksilber).
Hinweis zur Abfallvermeidung
Indem Sie die Lebensdauer Ihrer Altgeräte verlängern, tragen Sie dazu bei, Ressourcen
efzient zu nutzen und zusätzlichen Müll zu vermeiden. Die Lebensdauer Ihrer Altgeräte
können Sie verlängern indem Sie defekte Altgeräte reparieren lassen. Wenn sich
Ihr Altgerät in gutem Zustand bendet, könnten Sie es spenden, verschenken oder
verkaufen.

14
DE
HINWEISE ZUR ENTSORGUNG
Wenn es in Ihrem Land eine gesetzliche Regelung zur
Entsorgung von elektrischen und elektronischen Geräten
gibt, weist dieses Symbol auf dem Produkt oder auf der
Verpackung darauf hin, dass dieses Produkt nicht im
Hausmüll entsorgt werden darf. Stattdessen muss es zu
einer Sammelstelle für das Recycling von elektrischen
und elektronischen Geräten gebracht werden. Durch
regelkonforme Entsorgung schützen Sie die Umwelt und die
Gesundheit Ihrer Mitmenschen vor negativen Konsequenzen.
Informationen zum Recycling und zur Entsorgung dieses
Produkts, erhalten Sie von Ihrer örtlichen Verwaltung oder
Ihrem Hausmüllentsorgungsdienst.
HERSTELLER & IMPORTEUR (UK)
Hersteller:
Chal-Tec GmbH, Wallstraße 16, 10179 Berlin, Deutschland.
Importeur für Großbritannien:
Berlin Brands Group UK Limited
PO Box 42
272 Kensington High Street
London, W8 6ND
United Kingdom

15
EN
Dear Customer,
Congratulations on purchasing this device. Please read the
following instructions carefully and follow them to prevent
possible damages. We assume no liability for damage caused
by disregard of the instructions and improper use. Scan the QR
code to get access to the latest user manual and more product
information.
CONTENTS
Product Data Sheet16
Safety Instructions17
Wall Mounting Instructions18
Overview and Control Panel20
Display Screen20
Operation21
Troubleshooting23
Cleaning and Care23
Disposal Considerations24
Manufacturer & Importer (UK)24
TECHNICAL DATA
Item number Power supply Power Dimensions
10032809 220-240 V
50/60 Hz
720 W 60 x 120 cm
16
EN
PRODUCT DATA SHEET
Model identier(s): 10032809
Item Symbol Value Unit Item Unit
Heat output Type of heat input, for electric storage local space
heaters only
Nominal heat output P
nom
0.72 kW manual heat charge control, with integrated
thermostat
no
Minimum heat output
(indicative)
P
min
0.72 kW manual heat charge control with room and/or
outdoor temperature feedback
no
Maximum continuous heat
output
P
max,c
0.72 kW electronic heat charge control with room and/or
outdoor temperature feedback
no
Auxiliary electricity consumption
fan assisted heat output no
At nominal heat output
(fan motor)
el
max
N/A kW
Type of heat output/room temperature control
At minimum heat output
(fan motor)
el
min
N/A kW single stage heat output and no room
temperature control
no
In standby mode el
SB
0.26 W Two or more manual stages, no room
temperature control
no
with mechanic thermostat room temperature
control
no
with electronic room temperature control no
electronic room temperature control plus day
timer
no
electronic room temperature control plus week
timer
yes
Other control options (multiple selections possible)
room temperature control, with presence
detection
no
room temperature control, with open window
detection
ja
with distance control option no
with adaptive start control no
with working time limitation ja
with black bulb sensor no
Contact details Chal-Tec GmbH, Wallstraße 16, 10179, Berlin, Germany

17
EN
SAFETY INSTRUCTIONS
• Do not use the appliance until it is securely xed as described in this manual.
• Check that the voltage indicates on the data plate corresponds with that of the local
network before connecting the appliance to the mains power supply.
• If the supply cord is damaged, it must be replaced by a qualied engineer in order
to avoid a hazard.
• The replace heater must not be positioned directly under the power socket.
• Keep furniture, curtains and other ammable material at least 1 meter away from
the appliance.
• Do not leave the appliance unattended during use.
• Do not leave the appliance unattended whilst connected to the mains supply.
• Keep out of reach of children and do not allow them to operate this appliance.
• This appliance is intended for household use only and should not be used for
industrial purposes.
• Do not operate this appliance after a malfunction or after being damaged in any way.
• Repairs to electrical appliances should only be performed by a qualied electrician.
• Improper repairs may place user at serious risk.
• Do not run the mains cable under carpets, rugs, etc.
• Do not allow the mains cable to hang over sharp edges or come in contact with hot surfaces.
• In order to avoid overheating, do not cover the heater.
• Do not use this heater with a programmer, timer, separate remote control system or
any other device that switches the heater on automatically, since a re risk exists if
the heater is covered or positioned incorrectly.
• Never immerse the product in water or any other liquid for any reasons.
• Do not use this heater in the immediate surroundings of a bath, a shower or a
swimming pool.
• Do not use the appliance outdoors.
• Do not use if you have wet hands.
• Never use the appliance on or near hot surfaces.
• Do not operate with a damaged cord.
• Before cleaning the appliance, make sure it is unplugged from the power and that it is
completely cooled.
• Do not clean the appliance with abrasive chemicals.
• Never use accessories that are not recommended or supplied by the manufacturer.
It could cause danger to the user or damage to the appliance.
• This appliance is not intended for use by persons (including children) with reduced
Physical, sensory or mental capabilities, or lack of experience and knowledge
unless they have been given supervision or instruction concerning use of the
appliance by a person responsible for their safety.
• Children should be supervised to ensure that they do not play with the appliance.
CAUTION
Risk of burns! Some parts of this product can become very hot and
cause burns. Particular attention has to be given where children and
vulnerable people are present.
18
EN
WALL MOUNTING INSTRUCTIONS
1 2
Take out the 4 x metal wall mounting
brackets and 4 x metal screws for wall
mounting brackets from attachment.
Fix these brackets onto the back of the
product.
Mark the positions of the four holes
to be drilled on the wall, and drill
the holes with the drill bit. Make
sure the distance between each
holes is same as the round holes on
the wall mounting brackets.
3 4
Insert the plastic dowels tting into the
holes.
Insert the 4 x metal screws for wall
mounting into the plastic dowels.

19
EN
5 6
Lift the heater and aim the four round
holes on the brackets at back of the
heater to the 4 screws on the wall,
and slide the screw from Position A to
Position B by moving the heater slightly.
Install the control panel holder onto the
wall beside the heater.
7
Insert the control panel into the holder.
20
EN
OVERVIEW AND CONTROL PANEL
DISPLAY SCREEN
Control Panel
Main switch box
Holder
Illuminated ON/OFF switch
Heating panel
Temperature display
Heater
Week Hour Minute
Power
Week timer
21
EN
OPERATION
To begin to use the heater, please follow these instructions:
1. Check the heater to be sure it is not damaged.
2. Then plug in it and then switch on the main illuminated ON/OFF switch on the side
of the heater.
There are two ways to use the heater:
(1) Power ON/OFF
When the product is powered on, the buzzer sounds once, and the product is in standby
mode. Press the ON/OFF button on the controller, the icon
illuminates on
window. If the set temperature is higher than the room temperature of 2°C, the product
will automatically heat up, the icon ☼ will illuminate on window, and the indicator light
of heating on product will be on too.
(2) Week timer Mode
Start the heater in week timer mode: press ON/OFF button, when the icon
disappears from window, press time button, then the timer and calendar icons ◷ ash.
How to set week timer
• Press or to adjust the day of the week, and then press the button to
conrm. Then „P1“ ashes, press the button again to conrm.
• Set the startup time, ash in hours, press or to adjust the hour, and then
press the button to conrm. Then the minutes ash, press or to adjust the
minutes, and then press the set button to conrm.
• Set the shutdown time, the same method as setting the startup time.
• Set the daily startup and shutdown time for P2, P3, and P4, using the same method
as for P1. P1, P2, P3, and P4 can be set to turn on or off at different time intervals
every day.
• After setting the week timer, wait until the display goes back to standby mode after
around 10 seconds. Press the button once and then press the button. Make
sure the two icons
and ◷ illuminate on the window at the same time, then the
product will work in week timer mode. If you want to change back to normal mode,
directly press , once more to go back to standby mode. And follow the above
instructions of Power ON/OFF mode.
22
EN
How to set the system time
Press ON/OFF button, when the icon
illuminates on window. Press the button
once, and the hour on the display will ash. Press or to adjust the current hour,
and then press the button to conrm. Then the minute ashes, press or to
adjust the current minute, and then press the button to conrm. Then the weekly
calendar ashes, press or to adjust the day of the week, and then press the
button conrm.
How to set the temperature
Press or to adjust the temperature, range from 5 to 50°C, the two digits ash
for a few seconds without any operation, and then return to display room temperature.
When the room temperature is lower than the set temperature of 2°C, the heating
will automatically start. When the room temperature reaches or is higher than the set
temperature, the heating will automatically stop.
Open window detection
This heater has open window detective function, which is when the heater is power on
(no matter normal mode or week timer mode), it will automatically stop heating if the
detected temperature drops 5°C (or more) in 5 minutes.
23
EN
TROUBLESHOOTING
If your heater fails to operate, please follow these instructions:
• Ensure that your circuit breaker or fuse is working properly.
• Be sure the heater is plugged in and that the electrical outlet is working properly.
• If the ON/OFF switch is not illuminated at ON position, send it to service center for
reparation directly.
Note: If you experience a problem with your heater, please see the warranty
information for instructions. Please do not attempt to open or repair the heater
yourself. Doing so may void the warranty and could cause damage or personal
injury. If the problem still persists, please contact the distributor.
CLEANING AND CARE
Before cleaning your heater, switch off the heater and allow it to cool. Disconnect the
electricity supply to the appliance. The outside can be cleaned by wiping it over with
a soft damp cloth and then dried. Do not use abrasive cleaning powders or furniture
polish, as this can damage the surface nish. To release the heater from the wall, for
cleaning or redecoration, just open the screw bolt cap and unscrew the bolts to take off
from the wall.
For short term storage, just plug off the heater and leave it away; for long term storage,
you can dismantle from the wall or cover it with some material.
24
EN
DISPOSAL CONSIDERATIONS
If there is a legal regulation for the disposal of electrical
and electronic devices in your country, this symbol on the
product or on the packaging indicates that this product must
not be disposed of with household waste. Instead, it must be
taken to a collection point for the recycling of electrical and
electronic equipment. By disposing of it in accordance with
the rules, you are protecting the environment and the health of
your fellow human beings from negative consequences. For
information about the recycling and disposal of this product,
please contact your local authority or your household waste
disposal service.
MANUFACTURER & IMPORTER (UK)
Manufacturer:
Chal-Tec GmbH, Wallstrasse 16, 10179 Berlin, Germany.
Importer for Great Britain:
Berlin Brands Group UK Limited
PO Box 42
272 Kensington High Street
London, W8 6ND
United Kingdom

25
ES
Estimado cliente:
Le felicitamos por la adquisición de este producto. Lea
atentamente el siguiente manual y siga cuidadosamente las
instrucciones de uso con el n de evitar posibles daños. La
empresa no se responsabiliza de los daños ocasionados por
un uso indebido del producto o por haber desatendido las
indicaciones de seguridad. Escanee el código QR para obtener
acceso al manual de usuario más reciente y otra información
sobre el producto:
ÍNDICE DE CONTENIDOS
Hoja de datos del producto26
Indicaciones de seguridad27
Instalación28
Vista general del aparato y teclas de control30
Indicadores del display30
Funcionamiento31
Limpieza y cuidado33
Indicaciones sobre la retirada del aparato34
Fabricante e importador (Reino Unido)34
DATOS TÉCNICOS
Número de
artículo
Suministro eléctrico Potencia Dimensiones
10032809 220-240 V 50/60 Hz 720 W 60 x 120 cm
26
ES
HOJA DE DATOS DEL PRODUCTO
Denominación del modelo 10032809
Dato Símbolo Valor Unidad Dato Unidad
Potencia térmica Solo con disposítivos de acumulación de calor
eléctricos para abastecimiento local: Tipo de regulación
del abastecimiento de calor
Potencia térmica nominal P
nom
0,72 kW Regulación manual del abastecimiento de calor
con termostato integrado:
no
Potencia térmica mínima
(valor orientativo)
P
min
0,72 kW Regulación manual de abastecimiento de calor
con aviso de temperatura ambiente y/o exterior
no
Potencia térmica continua
máxima
P
max,c
0,72 kW Regulación electrónica de abastecimiento de
calor con aviso de temperatura ambiente y/o
exterior
no
Consumo de corriente auxiliar
Disípación de calor con ventilación auxiliar no
Con potencia térmica
nominal (Motor del
ventilador)
el
max
n/a kW
Tipo de potencia térmica/control de temperatura
ambiente
Con potencia térmica mínima
(Motor del ventilador)
el
min
n/a kW Potencia térmica de un solo nivel, sín control de
temperatura ambiente
no
En modo de espera el
SB
0,26 W Dos o más niveles regulables manualmente, sín
control de temperatura ambiente
no
Control de temperatura ambiente con termostato
mecánico
no
Con control electrónico de temperatura
ambiente
no
Con control de temperatura ambiente y
regulación del momento del día
no
Con control de temperatura ambiente y
regulación del día de la semana
sí
Otras opciones de regulación
Control de temperatura ambiente con detección
de presencia
no
Control de temperatura ambiente con detección
de ventanas abiertas
sí
Con opción de control remoto no
Con regulación adaptable del comienzo de la
calefacción
no
Con limitación de tiempo de funcionamiento sí
Con sensor de bulbo negro no
Información de contacto Chal-Tec GmbH, Wallstraße 16, 10179, Berlín (Alemania)

27
ES
INDICACIONES DE SEGURIDAD
• Antes de utilizar el aparato, compruebe la tensión en la placa técnica del mismo y
conecte el aparato solamente a tomas de corriente que se adecuen a dicha tensión.
• Si el cable de alimentación está dañado, deberá ser sustituido por un servicio técnico.
• No coloque la chimenea justo bajo una toma de corriente.
• Mantenga los materiales inamables, como muebles, cortinas o similares, a un
metro de distancia.
• No deje el aparato en marcha si no se encuentra bajo supervisión.
• No deje el aparato sin supervisión mientras permanezca conectado a la toma de
corriente.
• Mantenga el aparato fuera del alcance de los niños. Los niños solamente podrán
manejar el aparato si se encuentran bajo supervisión.
• Este aparato no ha sido concebido para un uso comercial, sino doméstico o para
entornos similares.
• No utilice el aparato si detecta fallos en su funcionamiento o si se ha visto dañado
de otro modo.
• Las reparaciones solamente podrán realizarse por parte de un servicio técnico
cualicado.
• Las reparaciones mal realizadas o por cuenta del usuario representan un riesgo de
lesiones.
• No coloque el cable de alimentación bajo alfombras.
• Asegúrese de que el cable de alimentación no entre en contacto con supercies
calientes ni cantos alados.
• No cubra la chimenea para evitar un sobrecalentamiento.
• No conecte el aparato a tomas de corriente manejadas por control remoto ni con
temporizador ni otro aparato que encienda o apague automáticamente la chimenea.
• No sumerja el aparato en agua ni en ningún otro líquido.
• No utilice el aparato cerca de bañeras, duchas o piscinas.
• No utilice el aparato al aire libre.
• No manipule el aparato con las manos mojadas.
• No utilice el aparato encima o cerca de supercies calientes.
• No utilice el aparato con el cable de alimentación dañado.
• Desconecte el enchufe antes de limpiar el aparato y deje que este se enfríe por
completo.
• Para la limpieza, no utilice productos abrasivos.
• Utilice exclusivamente los accesorios recomendados por el fabricante.
• Los niños y las personas con discapacidades físicas o psíquicas solamente podrán
utilizar el aparato si han sido previamente instruidas sobre su uso y conocen las
indicaciones de seguridad.
• Asegúrese de que los niños no jueguen con el aparato.
ATENCIÓN
Existe riesgo de quemaduras. Las piezas del aparato pueden alcanzar
temperaturas muy elevadas. Tenga cuidado de que los niños no se
quemen.
28
ES
INSTALACIÓN
1 2
Retire los 4 soportes metálicos de pared
y los 4 tornillos metálicos que contienen
y je estos soportes a la parte posterior
del aparato.
Marca en la pared las posiciones
de los cuatro oricios que debes
perforar y haz los agujeros con
el taladro. Asegúrate de que
la distancia entre cada oricio
coincide con los oricios redondos
de los soportes de pared.
3 4
Inserte los tacos de plástico en los
oricios.
Inserte los 4 tornillos metálicos
para montaje en pared en los tacos
de plástico.
29
ES
5 6
Levante el aparato y alinee los cuatro
oricios redondos de los soportes de
la parte posterior del aparato con los
cuatro tornillos de la pared. Pase los
tornillos de la posición A a la posición B
moviendo ligeramente el aparato.
Monte el soporte para el panel de
control junto al radiador en la pared.
7
Deslice el panel de control en el
soporte.

30
ES
VISTA GENERAL DEL APARATO Y TECLAS DE
CONTROL
INDICADORES DEL DISPLAY
Panel de control
Elemento de activación
Soporte
Interruptor iluminado on/off
Calefactor
Indicador de
temperatura
Calefacción
Semana Hora Minutos
Encendido
Temporizador semanal

31
ES
FUNCIONAMIENTO
Puesta en funcionamiento
Compruebe el aparato para asegurarse de que no esté dañado.
Conecte el enchufe a la toma de corriente y encienda el interruptor principal luminoso
situado en la parte lateral del aparato.
Hay dos opciones de utilizar el aparato:
(1) Modo normal: Encender y apagar
Cuando enciende el aparato, suena un pitido una vez y el calefactor entra en modo
de espera. Pulse el botón en el control. Los símbolos
se iluminan en la pantalla.
Si la temperatura programada es 2 ºC superior a la temperatura ambiente, el aparato
se calienta automáticamente. El símbolo ☼ se ilumina en la pantalla y se enciende el
indicador de temperatura en el aparato.
(2) Modo temporizador semanal
Ponga el aparato en modo temporizador semanal: pulse el botón cuando el
símbolo
desaparezca en la pantalla, pulse el botón , entonces los símbolos de
temporizador y calendario ◷ parpadearán.
Cómo congurar el temporizador semanal
Pulse o para ajustar el día de la semana y, a continuación, pulse el botón
para conrmar. Ahora parpadea "P1". Pulse de nuevo el botón para conrmar.
Ya puede ajustar la hora de encendido. Las horas parpadean. Pulse o para
ajustar la hora. A continuación, pulse el botón para conrmar. Ahora parpadean
los minutos. Pulse o para ajustar los minutos y luego, pulse el botón para
conrmar.
Ajuste la hora de apagado del mismo modo que la de encendido.
Ajuste la hora diaria de encendido y apagado de P2, P3 y P4 siguiendo el mismo
método que para P1. P1, P2, P3 y P4 pueden programarse para encenderse o
apagarse a diferentes horas cada día.
Una vez que haya ajustado el temporizador semanal, espere a que la pantalla vuelva
al modo de espera después de unos 10 segundos. Pulse el botón una vez y luego,
el botón . Asegúrese de que los dos iconos
y ◷se encienden en la ventana al
mismo tiempo, así sabrá que el aparato se encuentra en modo temporizador semanal.
Si desea volver al modo normal, pulse de nuevo el botón para volver al modo de
espera. Siga las instrucciones anteriores para el modo encendido y apagado.
Cómo congurar la hora del aparato

32
ES
Pulse el botón . Cuando el símbolo
se encienda en la pantalla, pulse el botón
una vez y la hora parpadeará en la pantalla. Pulse o para ajustar la hora actual
y, a continuación, pulse el botón para conrmar. A continuación, parpadean los
minutos. Pulse o para ajustar los minutos y, a continuación, pulse el botón
para conrmar. Ahora parpadea el calendario semanal. Pulse o para ajustar el
día de la semana y, a continuación, pulse el botón para conrmar.
Cómo congurar la temperatura
Pulse o para ajustar la temperatura en el rango de 5-50º C. Los dos dígitos
parpadean durante unos segundos sin realizar ninguna operación y luego vuelven
a mostrar la temperatura ambiente. Si la temperatura ambiente es 2 ºC inferior a la
temperatura congurada, la calefacción se pone en marcha automáticamente. Si la
temperatura ambiente es alcanza o supera la temperatura congurada, la calefacción
se detiene automáticamente.
Detección de ventanas abiertas
El aparato dispone de una función que detecta las ventanas abiertas. Si el aparato
está encendido (independientemente de si se encuentra en modo normal o en modo
de temporizador semanal), se apagará automáticamente cuando la temperatura
registrada descienda en 5 °C o más en el transcurso de 5 minutos.
33
ES
DETECCIÓN Y REPARACIÓN DE ANOMALÍAS
Si su radiador no funciona, siga estas indicaciones:
• Asegúrese de que el interruptor principal o el fusible funcionen correctamente.
• Asegúrese de que el radiador esté enchufado y la toma de corriente funcione
correctamente.
• Si el interruptor ON/OFF no se ilumina en la posición ON, contacte con un
servicio técnico de su zona.
Nota: Si continúa teniendo problemas con su radiador, no intente abrirlo ni
repararlo usted mismo. Esto puede provocar la pérdida de la garantía, daños o
lesiones. Contacte con su distribuidor.
LIMPIEZA Y CUIDADO
Apague el aparato antes de la limpieza y deje que se enfríe. Desconecte el aparato
del suministro eléctrico. La parte exterior se puede limpiar con un paño suave y húmedo
para a continuación secarla. No utilice limpiador en polvo abrasivo ni cera de muebles,
pues puede dañar la supercie.
Para soltar el radiador de la pared, abra simplemente la tapa del tornillo y aoje los
tornillos. Si no utiliza el radiador durante un periodo breve de tiempo, desconecte el
enchufe. Si no utiliza el aparato durante un periodo prolongado de tiempo, puede
descolgarlo de la pared o cubrirlo.
34
ES
INDICACIONES SOBRE LA RETIRADA DEL
APARATO
Si en su país existe una disposición legal relativa a la
eliminación de aparatos eléctricos y electrónicos, este
símbolo estampado en el producto o en el embalaje
advierte que no debe eliminarse como residuo doméstico.
En lugar de ello, debe depositarse en un punto de recogida
de reciclaje de aparatos eléctricos y electrónicos. Una
gestión adecuada de estos residuos previene consecuencias
potencialmente negativas para el medio ambiente y la salud
de las personas. Puede consultar más información sobre el
reciclaje y la eliminación de este producto contactando con
su administración local o con su servicio de recogida de
residuos.
FABRICANTE E IMPORTADOR (REINO UNIDO)
Fabricante:
Chal-Tec GmbH, Wallstraße 16, 10179 Berlín, Alemania.
Importador para Gran Bretaña:
Berlin Brands Group UK Limited
PO Box 42
272 Kensington High Street
London, W8 6ND
United Kingdom
35
FR
Cher client,
Toutes nos félicitations pour l’acquisition de ce nouvel
appareil. Veuillez lire attentivement les instructions suivantes de
branchement et d’utilisation an d’éviter d’éventuels dommages.
Le fabricant ne saurait être tenu pour responsable des dommages
dus au non-respect des consignes de sécurité et à la mauvaise
utilisation de l’appareil. Scannez le QR-Code pour accéder à
la dernière version du mode d‘emploi et à d‘autres informations
concernant le produit:
SOMMAIRE
Fiche de données produit36
Consignes de sécurité37
Montage murale38
Aperçu de l‘appareil et panneau de commande40
Afchages de l‘écran40
Utilisation41
Identication et résolution des problèmes43
Nettoyage et entretien43
Informations sur le recyclage44
Fabricant et importateur (UK)44
FICHE TECHNIQUE
Numéro
d'article
Alimentation Puissance Dimensions
10032809 220-240 V 50/60 Hz 720 W 60 x 120 cm
36
FR
FICHE DE DONNÉES PRODUIT
Référence (s) du produit 10032809
Donnée Symbole Valeur Unité Donnée Unité
Puissance calorique Uniquement pour les radiateurs électriques à
accumulation : Type de régulation de l'apport de chaleur
Puissance calorique
nominale
P
nom
0,72
kW Régulation manuelle de l'apport de chaleur
avec thermostat intégré
non
Puissance calorique
minimale (indicative)
P
min
0,72
kW Régulation manuelle de l'apport de chaleur
avec indication de la température de la pièce
et/ou de l'extérieur
non
Puissance maximale continue
de chauffage
P
max
0,72
kW Régulation électronique de l'apport de chaleur
avec indication de la température de la pièce
et/ou de l'extérieur
non
Consommation de courant auxiliaire
Apport de chaleur assisté par ventilateur non
A puissance calorique
nominale (moteur de
ventilateur)
el
max
Sans
objet
kW
Type de chauffage/contrôle de la température de la
pièce
A puissance calorique
minimale (moteur de
ventilateur)
el
min
Sans
objet
kW Chauffage à une seule vitesse, pas de contrôle
de la température ambiante
non
En mode veille el
SB
0,26
W Deux vitesses ou plus réglables manuellement,
pas de contrôle de la température ambiante
non
Contrôle de la température ambiante par
thermostat mécanique
non
Contrôle électronique de la température
ambiante
non
Contrôle électronique de la température
ambiante et régulation par jour
non
Contrôle électronique de la température
ambiante et régulation par semaine
oui
Autres options de régulation
Contrôle de la température ambiante avec
détection de présence
non
Contrôle de la température ambiante avec
détection de fenêtre ouverte
oui
Avec option télécommande non
Avec contrôle du démarrage du chauffage non
Avec limitation de la durée de fonctionnement oui
Avec globe noir capteur de température non
Coordonnées de contact Chal-Tec GmbH, Wallstraße 16, 10179, Berlin, Allemagne
37
FR
CONSIGNES DE SÉCURITÉ
• Avant utilisation, vériez la tension sur l‘étiquette de l‘appareil et ne branchez
l‘appareil que sur des prises correspondant à la tension de l‘appareil.
• Si le câble d‘alimentation est endommagé, faites-le remplacer par un professionnel
qualié.
• Ne placez pas la cheminée directement sous une prise.
• Tenez l‘appareil à un mètre de distance des matériaux combustibles tels que
meubles, rideaux ou similaires.
• Ne laissez pas l‘appareil sans surveillance pendant l‘utilisation.
• Ne laissez pas l‘appareil branché sans surveillance.
• Utilisez l‘appareil hors de portée des enfants. Les enfants ne sont autorisés à utiliser
l‘appareil que sous surveillance.
• L‘appareil n‘est pas destiné à un usage commercial, mais seulement pour une
utilisation domestique et dans des environnements similaires.
• N‘utilisez pas l‘appareil s‘il fonctionne mal ou a été endommagé de quelque façon
que ce soit.
• Les réparations ne peuvent être effectuées que par des spécialistes qualiés.
• Les réparations mal effectuées ou de votre propre chef représentent un risque de
blessure.
• Ne faites pas passer le câble d‘alimentation sous des tapis ou moquettes.
• Assurez-vous que le câble d‘alimentation ne passe pas sur des recoins pointus ou
des surfaces chaudes.
• Ne recouvrez pas la cheminée pour éviter la surchauffe.
• N‘utilisez pas l‘appareil avec une minuterie externe, une prise de courant
télécommandée ou un autre appareil qui allume et éteint automatiquement le poêle.
• Ne plongez pas l‘appareil dans l‘eau ou d‘autres liquides.
• N‘utilisez pas l‘appareil près d‘une baignoire, d‘une douche ou d‘une piscine.
• N‘utilisez pas l‘appareil à l‘extérieur.
• N‘utilisez pas l‘appareil avec des mains mouillées.
• N‘utilisez pas l‘appareil sur ou à proximité de surfaces chaudes.
• N‘utilisez pas l‘appareil avec un câble d‘alimentation endommagé.
• Avant le nettoyage, débranchez la che de la prise et laissez l‘appareil refroidir
complètement.
• N‘utilisez pas d‘abrasifs pour le nettoyage.
• N‘utilisez que des accessoires expressément approuvés par le fabricant.
• Les enfants et les personnes aux capacités psychiques ou physiques réduites ne
doivent utiliser l‘appareil qu‘après avoir été familiarisés avec les fonctionnalités et
les principes de sécurité par une personne responsable de leur supervision.
• Veillez à ce que les enfants ne jouent pas avec l‘appareil.
ATTENTION
Risque de brûlures ! Certaines parties de l‘appareil peuvent devenir très
chaudes. Veillez à ne pas vous brûler ni vous-même ni vos enfants.
38
FR
MONTAGE MURALE
1 2
Retirez les 4 x supports muraux
métalliques et les 4 x vis métalliques
pour supports muraux du support
et xez ces supports à l‘arrière de
l‘appareil.
Marquez les positions des quatre
trous à percer sur le mur et percez
les trous avec la perceuse. Veillez
à ce que la distance entre chaque
trou corresponde aux trous ronds
des supports muraux..
3 4
Placez les chevilles en plastique dans
les trous.
Insérez les 4 x vis métalliques pour
le montage mural dans les chevilles
en plastique.

39
FR
5 6
Soulevez l‘appareil de chauffage,
alignez les quatre trous ronds sur les
supports à l‘arrière de l‘appareil de
chauffage avec les quatre vis sur le mur.
Faites glisser la vis de la position A à
la position B en déplaçant légèrement
l‘appareil de chauffage.
Fixez le support du panneau de
commande au mur, à côté de l‘appareil
de chauffage.
7
Placez le panneau de commande dans
le support.
40
FR
APERÇU DE L‘APPAREIL ET PANNEAU DE
COMMANDE
AFFICHAGES DE L‘ÉCRAN
Panneau de commande
Interrupteur
Support
Interrupteur ON/OFF éclairé
radiateur
afchage de la
température
radiateur
semaine heure minutes
alimentation
Minuterie hebdomadaire

41
FR
UTILISATION
• Vériez le radiateur pour vous assurer qu‘il n‘est pas endommagé.
• Branchez la che dans la prise et allumez l‘interrupteur principal éclairé sur le côté
du radiateur.
Il y a deux façons d‘utiliser le radiateur :
(1) Allumer/Éteindre
Appuyez sur le bouton ON/OFF du panneau de commande pour démarrer le
radiateur. Le radiateur chauffe jusqu‘à ce que la température réglée soit atteinte.
Appuyez à nouveau sur le bouton ON/OFF pour éteindre le radiateur.
(2) Mode minuterie hebdomadaire
Lancez le radiateur avec l‘option de minuterie hebdomadaire en appuyant sur le bouton
SET. Puis, appuyez sur le bouton ON/OFF.
Comment régler la minuterie hebdomadaire
1. Appuyez sur le bouton TIME lorsque le chauffage est éteint. L‘interrupteur principal
doit être allumé.
2. Après avoir appuyé sur la touche TIME, le symbole MINUTERIE HEBDOMADAIRE
se met à clignoter à l‘écran. Sélectionnez le jour où vous souhaitez régler la
minuterie en appuyant sur le bouton [+] ou [-]. Ensuite, appuyez sur SET pour
conrmer.

42
FR
3. L‘icône de regroupement se met à clignoter à l‘écran. Appuyez sur [+] ou [-] pour
programmer un groupe. Vous pouvez dénir un total de 4 groupes par jour de P1 à
P4. Appuyez sur SET pour régler l‘heure d‘activation du groupe sélectionné.
• L‘icône ON s‘afche. Le témoin des heures clignote à l‘écran [-]. Appuyez
sur [+] ou [-] et sélectionnez l‘heure de démarrage du chauffage. Appuyez à
nouveau sur SET, l‘afchage des minutes se met à clignoter [-].
• Appuyez sur [+] ou [-] pour régler les minutes. Appuyez sur SET pour régler
l‘heure d‘arrêt du chauffage. L‘icône OFF s‘allume à l‘écran et l‘indicateur des
heures se met à clignoter [-].
• Appuyez sur [+] ou [-] pour sélectionner l‘heure d‘arrêt du chauffage. Appuyez
à nouveau sur SET, l‘afchage des minutes se met à clignoter.
• Appuyez sur [+] ou [-] pour régler les minutes. Vous venez de dénir avec
succès le premier groupe de temporisation.
• Appuyez à nouveau sur SET et le symbole SEMAINE se met à clignoter. Vous
pouvez maintenant dénir un deuxième temporisateur pour le même jour ou
pour un autre jour. Si vous souhaitez dénir le deuxième temporisateur ou un
autre jour, procédez comme décrit ci-dessus.
4. Après avoir programmé un ou plusieurs groupes, appuyez sur le bouton TIME
ou attendez plus de 10 secondes pour terminer le réglage de la minuterie
hebdomadaire.
Réglage du jour de la semaine et de l‘heure actuels
L‘appareil en marche, appuyez sur la touche TIME, le symbole [--] de l‘heure
commence à clignoter. Appuyez sur [+] ou [-] pour régler l‘heure actuelle. Appuyez sur
le bouton SET et le symbole des minutes [--] se met à clignoter. Utilisez la touche [+] ou
[-] pour régler les minutes. Appuyez sur le bouton SET, le symbole SEMAINE se met à
clignoter. Appuyez sur [+] ou [-] pour régler le jour de la semaine en cours. Appuyez à
nouveau sur SET pour conrmer.
Comment régler la température
Appuyez sur le bouton TEMP pour démarrer le réglage de la température. Appuyez sur
[+] ou [-] pour régler la température désirée. Appuyez sur SET pour conrmer.
Détection automatique de fenêtre ouverte
Le radiateur possède une fonction de détection de fenêtre ouverte. Lorsque le radiateur
est allumé (que ce soit en mode normal ou en mode minuterie hebdomadaire), il s‘éteint
automatiquement lorsque la température mesurée chute de 5 °C (ou plus) dans un
intervalle de 5 minutes.

43
FR
IDENTIFICATION ET RÉSOLUTION DES
PROBLÈMES
• Si votre radiateur ne fonctionne pas, veuillez suivre ces instructions :
• Assurez-vous que l‘interrupteur principal ou le fusible fonctionne correctement.
• Assurez-vous que le radiateur est branché et que la prise fonctionne correctement.
• Si l‘interrupteur ON/OFF ne s‘allume pas alors qu‘il est en position ON, contactez
un spécialiste près de chez vous.
Remarque : Si vous avez toujours un problème avec votre radiateur, n‘essayez pas
d‘ouvrir l‘appareil ou de le réparer vous-même. Cela peut entraîner une perte de
garantie, des dommages ou des blessures. Contactez votre revendeur.
NETTOYAGE ET ENTRETIEN
Éteignez le radiateur avant de le nettoyer et laissez-le refroidir. Débranchez
l‘alimentation de l‘appareil. Vous pouvez essuyer l‘extérieur avec un chiffon doux et
humide puis sécher les surfaces. N‘utilisez pas de poudre nettoyante abrasive ou de
poli pour meubles car cela pourrait endommager la surface.
Pour retirer le radiateur du mur, ouvrez simplement le capuchon vissé et dévissez les vis.
Si vous n‘utilisez pas le radiateur pendant une courte période, débranchez-le. Si vous
n‘utilisez pas l‘appareil pendant une longue période, vous pouvez le retirer du mur ou
le couvrir.

44
FR
INFORMATIONS SUR LE RECYCLAGE
S‘il existe une réglementation pour l‘élimination ou le
recyclage des appareils électriques et électroniques dans
votre pays, ce symbole sur le produit ou sur l‘emballage
indique que cet appareil ne doit pas être jeté avec les
ordures ménagères. Vous devez le déposer dans un point
de collecte pour le recyclage des équipements électriques
et électroniques. La mise au rebut conforme aux règles
protège l‘environnement et la santé de vos semblables des
conséquences négatives. Pour plus d‘informations sur le
recyclage et l‘élimination de ce produit, veuillez contacter
votre autorité locale ou votre service de recyclage des
déchets ménagers.
FABRICANT ET IMPORTATEUR (UK)
Fabricant :
Chal-Tec GmbH, Wallstraße 16, 10179 Berlin, Allemagne.
Importateur pour la Grande Bretagne :
Berlin Brands Group UK Limited
PO Box 42
272 Kensington High Street
London, W8 6ND
United Kingdom

45
IT
Gentile cliente,
La ringraziamo per aver acquistato il dispositivo. La preghiamo
di leggere attentamente le seguenti istruzioni per l’uso e di
seguirle per evitare possibili danni tecnici. Non ci assumiamo
alcuna responsabilità per danni scaturiti da una mancata
osservazione delle avvertenze di sicurezza e da un uso
improprio del dispositivo. Scansionare il codice QR seguente,
per accedere al manuale d’uso più attuale e per ricevere
informazioni sul prodotto.
INDICE
Scheda informativa del prodotto46
Avvertenze di sicurezza47
Montaggio a parete48
Descrizione del dispositivo e pannello di controllo50
Indicazioni del display50
Utilizzo51
Riconoscimento e correzione degli errori53
Pulizia53
Avviso di smaltimento54
Produttore e importatore (UK)54
DATI TECNICI
Numero articolo Alimentazione Potenza Dimensioni
10032809 220-240 V
50/60 Hz
720 W 60 x 120 cm
46
IT
SCHEDA INFORMATIVA DEL PRODOTTO
Identicazione del modello (i) 10032809
Indicazione Simbolo Valore Unità Indicazione Unità
Potenza termica Solo per gli apparecchi per il riscaldamento d'ambiente
locale elettrici ad accumulo: Tipo di controllo
dell´apporto termico
Potenza termica nominale P
nom
0,72
kW Controllo manuale del carico termico con
termostato integrato
no
Potenza termica minima
(valore indicativo)
P
min
0,72
kW Controllo manuale del carico termico con
riscontro della tempetratura ambiente e/o
esterna
no
Potenza termica massima
continua
P
max,c
0,72
kW Controllo elettronico del carico termico con
riscontro della temperatura ambiente e/o
esterna
no
Consumo di elettricità ausiliaria
Potenza termica con supporto del ventilatore no
Per la potenza termica
nominale (Motore del
ventilatore)
el
max
N.D. kW
Tipo di potenza termica / controllo della temperatura
ambiente
Per la potenza termica
minima (Motore del
ventilatore)
el
min
N.D. kW Potenza termica di un solo livello, senza
controllo della temperatura ambiente
no
In modalità di attesa el
SB
0,26
W Due o più livelli impostabili manualmente, senza
controllo della temperatura ambiente
no
Con controllo della temperatura ambiente
tramite termostato meccanico
no
Con controllo elettronico della temperatura
ambiente
no
Controllo elettronico della temperatura
ambiente e timer giornaliero
no
Controllo elettronico della temperatura
ambiente e timer settimanale
si
Altre opzioni di controllo
Controllo della temperatura ambiente con
rilevamento di presenza
no
Controllo della temperatura ambiente con
rilevamento di nestre aperte
si
Con opzione telecomando no
Con controllo di avvio adattabile no
Con limitazione del tempo di funzionamento si
Con sensore lampada nero no
Informazioni di contatto Chal-Tec GmbH, Wallstraße 16, 10179, Berlino, Germania
47
IT
AVVERTENZE DI SICUREZZA
• Prima dell‘uso, controllare la tensione sulla targhetta del dispositivo e collegare il
dispositivo solo ad una presa che corrisponde alla tensione indicata.
• Se il cavo di alimentazione è danneggiato, farlo sostituire da un tecnico qualicato.
• Non posizionare il dispositivo direttamente sotto la presa.
• Tenere materiali inammabili come mobili, tende o simili ad un metro di distanza.
• Non lasciare il dispositivo incustodito durante l‘uso.
• Non lasciare il dispositivo incustodito mentre è collegato alla corrente.
• Tenere il dispositivo fuori dalla portata dei bambini. I bambini possono utilizzare il
dispositivo solo se sorvegliati.
• Il dispositivo non è per un uso commerciale, bensì per un uso domestico e per
ambienti simili.
• Non utilizzare il dispositivo se presenta malfunzionamenti o se è danneggiato in
qualche modo.
• Le riparazioni possono essere eseguite solo da un tecnico qualicato.
• Le riparazioni eseguite in modo errato o autonomamente comportano il rischio di
infortuni.
• Non sistemare il cavo di alimentazione sotto tappeti o simili.
• Assicurarsi che il cavo di alimentazione non sia collocato su spigoli vivi o superci
calde.
• Non coprire il dispositivo per evitare il pericolo di surriscaldamento.
• Non utilizzare il dispositivo con un timer esterno, una presa con telecomando o un
altro apparecchio che accende e spenge automaticamente il dispositivo.
• Non immergere il dispositivo in acqua o in altri liquidi.
• Non utilizzare il dispositivo vicino a vasche da bagno, docce o piscine.
• Non utilizzare il dispositivo all‘aperto.
• Non utilizzare il dispositivo con le mani bagnate.
• Non utilizzare il dispositivo sopra o vicino a superci calde.
• Non utilizzare il dispositivo con un cavo di alimentazione danneggiato.
• Prima di eseguire la pulizia, disinserire la spina dalla presa e far raffreddare
completamente il dispositivo.
• Non utilizzare prodotti abrasivi per la pulizia.
• Utilizzare solo accessori espressamente approvati dal produttore.
• I bambini, le persone con capacità siche, sensoriali o mentali ridotte possono
utilizzare il dispositivo solo se sorvegliati o ben istruiti relativamente all’utilizzo del
dispositivo stesso da parte di un supervisore responsabile della loro sicurezza.
• Assicurarsi che i bambini non giochino con il dispositivo.
ATTENZIONE
Pericolo di ustioni! Alcuni componenti del dispositivo possono diventare
molto caldi. Prestare la massima attenzione in presenza di bambini e di
persone vulnerabili.
48
IT
MONTAGGIO A PARETE
1 2
Prendere i 4 supporti a parete in
metallo, le relative 4 viti in metallo e
ssarli al lato posteriore del dispositivo.
Segnare la posizione dei quattro
fori da praticare sulla parete e
praticare i fori con il trapano.
Assicurarsi che la distanza tra i fori
corrisponda ai fori rotondi delle
staffe a muro.
3 4
Inserire i tasselli di plastica nei fori. Inserire le 4 viti in metallo per il
montaggio a parete nelle guide di
plastica.

49
IT
5 6
Sollevare la stufa e posizionare i
quattro fori rotondi sui supporti sul
lato posteriore del dispositivo in
corrispondenza delle viti sulla parete.
Far scorrere la vite dalla posizione A
alla posizione B muovendo leggermente
la stufa.
Fissare il supporto del pannello di
controllo alla parete accanto alla stufa.
7
Inserire il pannello di controllo nel
supporto.

50
IT
DESCRIZIONE DEL DISPOSITIVO E PANNELLO DI
CONTROLLO
INDICAZIONI DEL DISPLAY
Pannello di controllo
Elemento di commutazione
Supporto
Interruttore ON/OFF
illuminato
Riscaldatore
Temperatura
Riscaldamento
Settimana Ora Minuti
Power
Timer settimanale
51
IT
UTILIZZO
Messa in funzione
Controllare la stufa per accertarsi che non sia danneggiata.
Inserire la spina e attivare l'interruttore principale illuminato sul lato della stufa.
La stufa può essere utilizzata in due modi:
(1) Modalità normale: accensione/spegnimento
Quando il dispositivo è acceso, viene emesso un segnale acustico e si trova in modalità
standby. Premere il tasto sul pannello di controllo. Sul display si illumina il simbolo
. Se la temperatura impostata supera di 2 °C la temperatura ambiente, il dispositivo
inizia automaticamente a scaldarsi. Il simbolo ☼ si illumina sul display e l'indicazione di
riscaldamento si accende sul dispositivo.
(2) Modalità timer settimanale
Avviare il dispositivo in modalità timer settimanale: premere il tasto , quando il
simbolo
sul display si spegne, premere il tasto e i simboli per timer e calendario
◷ lampeggiano.
Impostare il timer settimanale
Premere o per impostare il giorno della settimana e confermare con .
Quando lampeggia "P1", premere di nuovo il tasto per confermare.
Impostare l'ora di accensione: quando lampeggia la posizione delle ore, premere
o per impostare l'ora e confermare con . Adesso lampeggiano i minuti. Premere
o per impostare i minuti e confermare con .
Impostare l'ora di spegnimento seguendo lo stesso procedimento.
Impostare gli orari di accensione e spegnimento giornalieri per P2, P3 e P4 seguendo lo
stesso procedimento utilizzato per P1. P1, P2, P3 e P4 possono essere impostati in modo
da avere orari di accensione e spegnimento diversi per ogni giorno.
Dopo aver impostato il timer settimanale, attendere che il display torni in modalità
standby dopo circa 10 secondi. Premere una volta il tasto e poi il tasto
. Assicurarsi che entrambi i simboli
e ◷ si illuminino contemporaneamente nella
nestra. Il dispositivo funziona ora in modalità timer settimanale. Per tornare alla
modalità normale, premere direttamente per passare alla modalità standby.
Seguire le indicazioni precedenti per la modalità Accensione/Spegnimento.
Impostare l'ora di sistema
Premere il tasto . Quando si illumina il simbolo
sul display, premere il tasto
52
IT
una volta e la posizione delle ore lampeggia sul display. Premere o per
impostare l'ora attuale e confermare con . Quando lampeggia la posizione dei
minuti, premere o per impostare i minuti attuali e confermare con . Quando
lampeggia la posizione del calendario settimanale, premere o per impostare il
giorno della settimana e premere per confermare.
Impostare la temperatura
Premere o per impostare la temperatura tra 5 e 50 °C. Entrambe le cifre
lampeggiano per alcuni secondi senza che venga premuto alcun tasto e tornano
poi a indicare la temperatura ambiente. Se la temperatura ambiente è inferiore di
2 °C rispetto a quella impostata, il riscaldamento si attiva automaticamente. Se la
temperatura ambiente è maggiore o uguale alla temperatura impostata, la funzione di
riscaldamento si spegne automaticamente.
Rilevamento di nestre aperte
Questa stufa è dotata di una funzione di rilevamento di nestre aperte. Se il
riscaldamento è attivo (in modalità normale o timer settimanale) e la temperatura
registrata scende di 5 °C (o più) nel giro di 5 minuti viene spento automaticamente.

53
IT
RICONOSCIMENTO E CORREZIONE DEGLI
ERRORI
Se il riscaldatore non funziona, seguire le seguenti istruzioni:
• Assicurarsi che l’interruttore principale o il suo fusibile funzionino correttamente.
• Assicurarsi che il riscaldatore sia collegato a una presa di corrente e che questa
funzioni correttamente.
• Se l’interruttore ON/OFF non si illumina in posizione ON, rivolgersi a un’azienda
specializzata della zona.
Avvertenza: se i problemi con il riscaldatore persistono, non cercare di riparare
il dispositivo autonomamente. Questo può comportare la perdita di validità della
garanzia, danneggiamenti o lesioni. Rivolgersi ai distributori.
PULIZIA
Prima della pulizia, spegnere il riscaldatore e lasciarlo raffreddare. Staccare la spina.
L’esterno può essere pulito con un panno morbido e umido e deve poi essere asciugato.
Non utilizzare polveri detergenti abrasive o lucidi per mobili, in quanto potrebbero
rovinare la supercie.
Per staccare il riscaldatore dalla parete, aprire lo sportello delle viti e svitarle. Se il
dispositivo non viene utilizzato per brevi periodi, staccare la spina. Se il dispositivo non
viene utilizzato per lunghi periodi, staccarlo dalla parete o coprirlo.

54
IT
AVVISO DI SMALTIMENTO
Se nel proprio paese si applicano le regolamentazioni
inerenti lo smaltimento di dispositivi elettrici ed elettronici,
questo simbolo sul prodotto o sulla confezione segnala che
questi prodotti non possono essere smaltiti con i riuti normali
e devono essere portati a un punto di raccolta di dispositivi
elettrici ed elettronici. Grazie al corretto smaltimento dei
vecchi dispositivi si tutela il pianeta e la salute delle persone
da possibili conseguenze negative. Informazioni riguardanti il
riciclo e lo smaltimento di questi prodotti si ottengono presso
l’amministrazione locale oppure il servizio di gestione dei
riuti domestici.
PRODUTTORE E IMPORTATORE (UK)
Produttore:
Chal-Tec GmbH, Wallstraße 16, 10179 Berlino, Germania.
Importatore per la Gran Bretagna:
Berlin Brands Group UK Limited
PO Box 42
272 Kensington High Street
London, W8 6ND
United Kingdom
55
NL
Geachte klant,
gefeliciteerd met de aanschaf van dit apparaat. Lees de
hierna volgende handleiding aandachtig door en volg
de instructies op om schade te voorkomen. Voor schade
veroorzaakt door het niet in acht nemen van de instructies of
door onjuist gebruik nemen wij geen verantwoordelijkheid.
Scan de QR code voor toegang tot de meest actuele
gebruikershandleiding en voor meer informatie rondom het
artikel.
INHOUDSOPGAVE
Technische gegevens 55
Productinformatieblad 56
Veiligheidsinstructies 57
Wandmontage 58
Overzicht apparaat en bedieningspaneel 60
Weergave display 60
Bediening 61
Problemen en oplossingen 63
Reiniging en onderhoud 63
Instructies voor afvoer 64
Fabrikant & importeur (UK) 64
TECHNISCHE GEGEVENS
Artikelnummer Stroomvoorziening Vermogen Afmetingen
10032809 220-240 V
50/60 Hz
720 W 60 x 120 cm
56
NL
PRODUCTINFORMATIEBLAD
Identicatie model(len) 10032809
Specicatie Symbool Waarde Eenheid Specicatie Eenheid
Warmtevermogen Alleen voor individuele elektrische accumulatiekachels:
regulering van de warmtetoevoer
Nominaal
warmtevermogen
P
nom
0,72
kW Handmatige regeling van de warmtetoevoer
met ingebouwde thermostaat
nee
Minimaal warmtevermogen
(richtwaarde)
P
min
0,72
kW Handmatige regeling van de warmtetoevoer
met terugmelding van de kamer- en/ of externe
temperatuur
nee
Maximaal continue
warmtevermogen
P
max
0,72
kW Elektronische regeling van de warmtetoevoer
met terugmelding van de kamer- en/ of externe
temperatuur
nee
Hulpenergieverbruik
Warmteafgifte met ondersteuning van een
ventilator
nee
Bij nominaal
warmtevermogen
(ventilatormotor)
el
max
k.A. kW
Soort warmte / Kamertemperatuurcontrole
Bij minimaal
warmtevermogen
(ventilatormotor)
el
min
k.A. kW Enkele warmtestand, geen
kamertemperatuurcontrole
nee
In stand-by modus el
sb
0,26
W Twee of meer handmatig in te stellen standen,
geen kamertemperatuurcontrole
nee
Controle kamertemperatuur met mechanische
thermostaat
nee
Met elektronische kamertemperatuurcontrole nee
Met elektronische kamertemperatuurcontrole en
tijdregulering
nee
Met elektronische kamertemperatuurcontrole en
weekdagregulering
ja
Overige regelopties
Kamertemperatuurcontrole met
aanwezigheidsherkenning
nee
Kamertemperatuurcontrole met open raam
detectie
ja
Met afstandsbediening optie nee
Met adaptieve regeling van het begin van de
verwarming
nee
Met bedrijfstijdbegrenzing ja
Met black bulb sensor nee
Contactgegevens Chal-Tec GmbH, Wallstraße 16, 10179 Berlijn, Duitsland
57
NL
VEILIGHEIDSINSTRUCTIES
• Controleer voor gebruik de spanning op het typeplaatje en sluit het apparaat
alleen aan als deze overeenkomt met de spanning van het stopcontact.
• Wanneer de stroomkabel of stekker beschadigd is laat u deze vervangen door een
gediplomeerde kracht.
• Plaats de haard niet direct onder het stopcontact.
• Houdt een meter afstand tot brandbare materialen, zoals meubels, gordijnen, e.d.
• Laat het apparaat tijdens gebruik niet zonder toezicht.
• Laat het apparaat niet onbeheerd achter wanneer het is aangesloten op het
stopcontact.
• Gebruik het apparaat buiten bereik van kinderen. Kinderen mogen het apparaat
alleen onder toezicht bedienen.
• Het apparaat is niet bestemd voor commercieel gebruik, maar voor gebruik in een
conventioneel huishouden en gelijkwaardige omgevingen.
• Gebruik het apparaat niet wanneer het een foutmelding geeft of in welke vorm dan
beschadigd is.
• Reparaties mogen alleen door gekwaliceerde krachten worden uitgevoerd.
• Verkeerde en eigenhandig uitgevoerde reparaties vormen een risico.
• Leg de stroomkabel niet onder tapijten of lopers.
• Let erop dat de stroomkabel niet langs scherpe hoeken of hete oppervlaktes loopt.
• Bedek de haard niet om oververhitting te voorkomen.
• Gebruik het apparaat niet met een externe timer, een stopcontact met
afstandsbediening of een ander apparaat dat de haard automatisch aanzet en
uitschakelt.
• Dompel het apparaat niet in water of andere vloeistof(fen) onder.
• Gebruik het apparaat niet nabij bad, douche of zwembad.
• Gebruik het apparaat niet buitenshuis.
• Gebruik het apparaat niet met natte handen.
• Gebruik het apparaat niet op of nabij hete oppervlaktes.
• Gebruik het apparaat niet wanneer de stekker of stroomkabel beschadigd is.
• Neem voor het reinigen de stekker uit het stopcontact en laat het apparaat, indien
nodig, volledig afkoelen.
• Gebruik geen schuurmiddel voor het schoonmaken.
• Gebruik alleen accessoires die nadrukkelijk door de fabrikant zijn goedgekeurd.
• Kinderen, psychisch en fysiek beperkte mensen mogen het apparaat alleen
gebruiken wanneer ze vooraf door een toezichthoudend persoon uitgebreid met de
functies en veiligheidsinstructies van het apparaat vertrouwd zijn gemaakt.
• Let erop dat kinderen niet met het apparaat spelen.
LET OP!
Verbrandingsgevaar! Sommige onderdelen kunnen heel heet worden.
Let erop dat u, uw kinderen of uw huisdieren zich niet verbranden.

58
NL
WANDMONTAGE
1 2
Neem de 4 metalen wandbeugels
en 4 metalen schroeven voor de
wandbeugels uit de beugel en bevestig
deze beugels aan de achterkant van het
apparaat.
Markeer de posities van de vier te
boren gaten op de muur en boor
de gaten met de boormachine.
Zorg ervoor dat de afstand tussen
elk gat overeenkomt met de ronde
gaten van de muurbeugels.
3 4
Steek de plastic deuvels in de gaten. Plaats de 4 metalen schroeven voor
de wandmontage in de kunststof
pluggen.
59
NL
5 6
Hef de verwarming op en richt de vier
ronde gaten in de beugels aan de
achterkant van de verwarming op de
vier schroeven in de muur. Schuif de
schroef van positie A naar positie B
door het verwarmingselement iets te
bewegen.
Bevestig de houder van de bediening
aan de muur naast de verwarming.
7
Schuif het bedieningspaneel in de
houder.

60
NL
OVERZICHT APPARAAT EN BEDIENINGSPANEEL
WEERGAVE DISPLAY
Bedieningspaneel
Schakelaar
Beugel
Verlichte ON/OFF
schakelaar
Verwarming
Temperatuurweergave
Verwarming
Week Uur Minuten
Vermogen
Weektimer

61
NL
BEDIENING
Ingebruikname
Controleer de verwarming om er zeker van te zijn dat die niet beschadigd is.
Steek de stekker in het stopcontact en zet de verlichte hoofdschakelaar aan de zijkant
van het apparaat om.
U kunt de verwarming op twee manieren gebruiken:
(1) Normale modus: inschakelen/ uitschakelen
Wanneer het apparaat ingeschakeld is klinkt eenmalig een zoemtoon waarna het
apparaat zich in stand-by modus bevindt. Druk op de toets op de bediening. Het
symbool
licht op in het display. Als de ingestelde temperatuur 2°C hoger is dan de
kamertemperatuur, begint het apparaat met verwarmen. Het symbool ☼ licht op in het
display en de verwarmingsindicator op het apparaat is ook verlicht.
(2) Weektimer modus
Start het apparaat in de weektimer modus: Druk op de toets , als het symbool
in
het display dooft, drukt u de toets , vervolgens knipperen de symbolen voor timer en
kalender ◷.
De weektimer programmeren
Druk op of om de weekdag in te stellen, en druk vervolgens toets ter
bevestiging. Vervolgens knippert 'P1', druk opnieuw op de toets om te bevestigen.
Programmeer de inschakeltijd, de uren knipperen, druk op of om de uren in
te stellen en druk vervolgens op toets ter bevestiging. De minuten knipperen nu.
Druk op of om de minuten te programmeren en druk vervolgens toets ter
bevestiging.
Programmeer de uitschakeltijd op dezelfde manier.
Programmeer de dagelijkse inschakeltijd voor P2, P3 en P4 op dezelfde manier. P1, P2,
P3 en P4 kunnen zo geprogrammeerd worden, dat de verwarming iedere dag op een
ander tijdstip aan- of uitgaat.
Zodra u de weektimer heeft geprogrammeerd, wacht u tot het display na circa 10
seconden terugkeert in de stand-by modus. Druk eenmaal de toets en vervolgens
de toets . Controleer of de beide symbolen
en ◷ tegelijk in het venster oplichten
zodat u weet dat de weektimer actief is. Wanneer u weer naar de normale modus wilt
wisselen, drukt u opnieuw op om terug naar de stand-by modus te gaan. Volg de
bovenstaande aanwijzingen op voor de in- en uitschakelmodus.
De systeemtijd instellen
62
NL
Druk op de toets . Als het symbool
oplicht in het display, drukt u de toets
eenmaal in en de uren knipperen op het display. Druk op of om de actuele uren
in te stellen en druk daarna op toets om te bevestigen. Nu knipperen de minuten.
Druk op of om het actuele aantal minuten in te stellen en druk daarna op
toets om te bevestigen. Nu knippert de weekkalender. Druk op of om de
weekdag te selecteren, en druk vervolgens toets ter bevestiging.
De temperatuur instellen
Druk op of om de temperatuur in het bereik van 5 tot 50 °C in te stellen. De
beide cijfers knipperen een paar seconden en geven daarna de kamertemperatuur
weer aan. Als de ingestelde temperatuur 2°C hoger is dan de kamertemperatuur,
begint het apparaat automatisch met verwarmen. Als de kamertemperatuur de
ingestelde temperatuur bereikt of overschrijdt, wordt het apparaat automatisch
uitgeschakeld.
Detectie van open ramen
Deze verwarming beschikt over een open raam detectie. Dat betekent dat wanneer de
verwarming ingeschakeld is (ongeacht welke modus), het apparaat zich automatisch
uitschakelt als de gemeten temperatuur binnen 5 minuten met 5°C (of meer) daalt.

63
NL
PROBLEMEN EN OPLOSSINGEN
Als uw verwarming niet meer functioneert, volg dan deze instructies:
• Controleer of de hoofdschakelaar en de zekering naar behoren functioneren.
• Controleer of de stekker van de verwarming in het stopcontact zit en of het
stopcontact naar behoren functioneert.
• Wanneer de ON/OFF-schakelaar niet oplicht in de ON-positie, neemt u contact
op met een gespecialiseerd bedrijf in uw regio.
Let op! Als u problemen met uw verwarming blijft houden, probeer dan niet zelf het
toestel te openen of te repareren. Dit kan leiden tot verlies van garantie, schade en
letsel. Neem contact op met de vakhandel.
REINIGING EN ONDERHOUD
Schakel het apparaat altijd uit en laat het afkoelen voordat u met de schoonmaak
begint. Neem de stekker uit het stopcontact. De buitenkant kan met een zachte, vochtige
doek worden afgeveegd en vervolgens worden afgedroogd. Gebruik geen schurende
schoonmaakmiddelen of boenwas, aangezien dit het oppervlak kan aantasten.
Om de verwarming van de muur halen, opent u gewoon de schroefdop en draait u
de schroeven los. Neem de stekker uit het stopcontact als u de verwarming een tijdje
niet gebruikt. Als u het toestel langere tijd niet gebruikt, kunt u het van de muur halen of
afdekken.
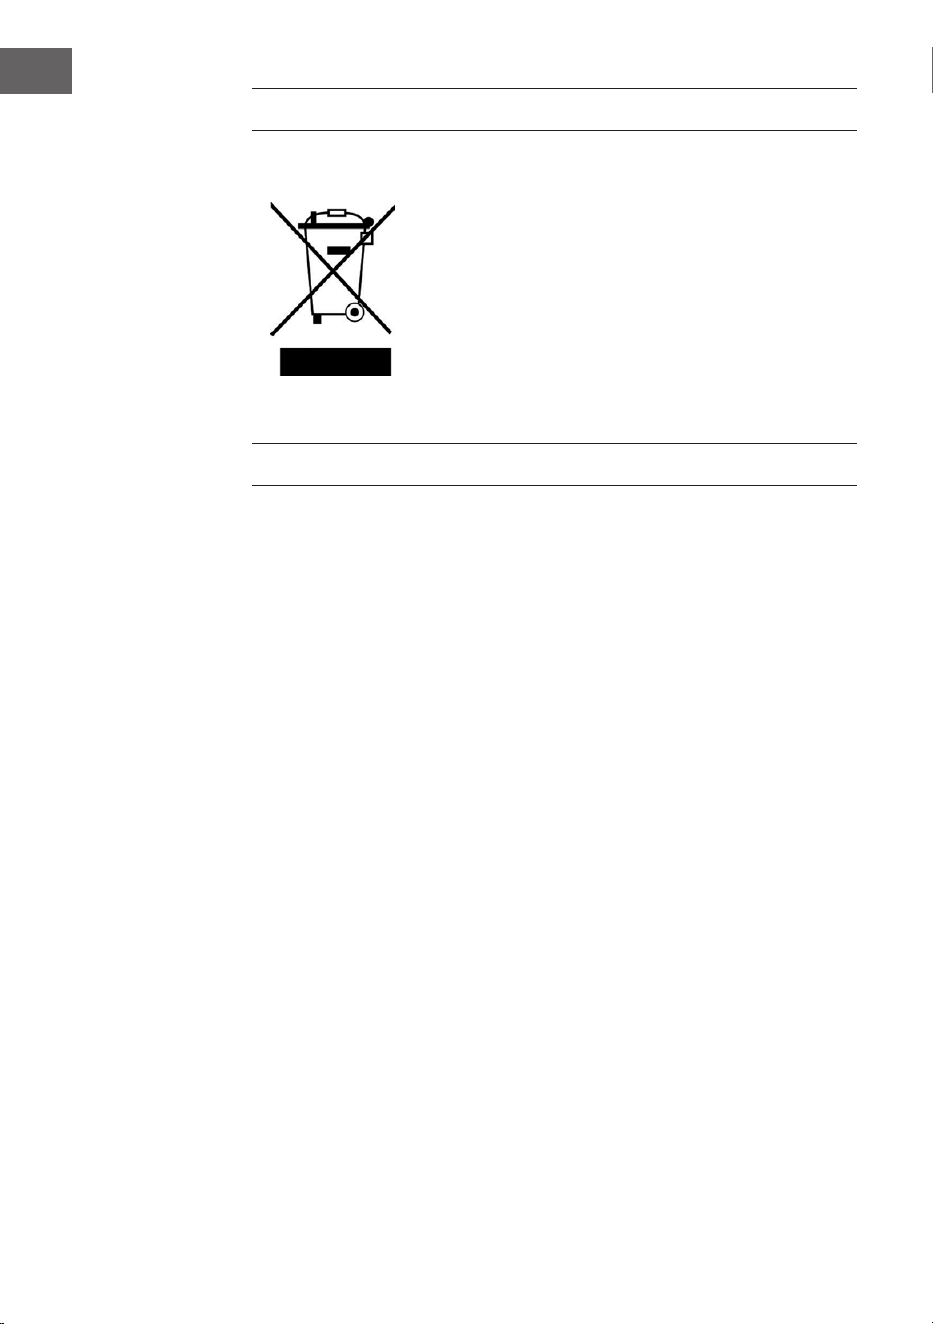
64
NL
INSTRUCTIES VOOR AFVOER
Wanneer in uw land een wettelijke regeling geldt voor het
afvoeren van elektrische en elektronische apparaten, wijst dit
symbool, op het product zelf of op de verpakking, erop dat
het betreffende product niet met het huisvuil afgevoerd mag
worden. In plaats daarvan dient het naar een centraal depot
voor het recyclen van elektrische en elektronische apparaten
te worden gebracht Door het afval volgens de voorschriften
af te voeren beschermt u het milieu en de gezondheid van uw
medemensen tegen negatieve consequenties. Informatie over
recycling en het afvoeren van dit product ontvangt u van uw
gemeente of van uw plaatselijke grondstoffen- en afvaldienst.
FABRIKANT & IMPORTEUR (UK)
Fabrikant:
Chal-Tec GmbH, Wallstraße 16, 10179 Berlijn, Duitsland.
Importeur voor Groot-Brittannië:
Berlin Brands Group UK Limited
PO Box 42
272 Kensington High Street
London, W8 6ND
United Kingdom