
FRONT Cover
2-in-1 Panini Press & Grill
Prensa y parrilla de Panini 2 en 1
®
Instruction Manual
Manual de instrucciones
19392_19424_19425_19426_19450_BTFL_WUS_DetachablePlates_PaniniMaker_IM_V8_R1.indd 119392_19424_19425_19426_19450_BTFL_WUS_DetachablePlates_PaniniMaker_IM_V8_R1.indd 1 2023-12-05 4:54 PM2023-12-05 4:54 PM
The kitchen is my family’s happy
place. It’s where we cook and eat
and bake and laugh and share our
most beautiful moments together.
That’s what inspired the creation
of Beautiful, my new collection
of easy-to-use kitchenware that
you’ll want to keep out on your
kitchen counter. So whether
your kitchen has flour all over
the place from a kid's baking
session or you’re throwing an adult
dinner party, I hope every step will
be simple, delicious and beautiful!
www.beautifulbydrew.com
19392_19424_19425_19426_19450_BTFL_WUS_DetachablePlates_PaniniMaker_IM_V8_R1.indd 219392_19424_19425_19426_19450_BTFL_WUS_DetachablePlates_PaniniMaker_IM_V8_R1.indd 2 2023-12-05 4:54 PM2023-12-05 4:54 PM

Table of Contents
Table of Contents
Section 1: Safety
Important Safeguards ............................................ 4-6
Additional Important Safeguards ................................... 7
Notes on the Plug ................................................ 8
Notes on the Cord ................................................ 8
Plasticizer Warning ............................................... 9
Electric Power .................................................... 9
Section 2: Instructions
Getting to Know Your 2-in-1 Panini Press & Grill ................. 11
Before Using for the First Time ................................. 12
Operating Instructions ........................................... 13
To Use as a Panini Press (Closed Position) .................... 14-15
Panini Press: Hints for Best Results .......................... 15-16
To Use as a Contact Grill (Closed Position) ...................... 16
Grilling Meats/Poultry/Fish ................................... 16-17
To Use as a Full Grill (Open Position) .........................17-18
Full Grill: Hints For Best Results ............................ 19-20
2-in-1 Panini Press & Grill General Cooking Chart ............. 21-22
USDA Cooking Guidelines.......................................... 23
User Maintenance Instructions .................................... 23
Care & Cleaning Instructions ..................................... 24
Storing Instructions ............................................. 25
Warranty ...................................................... 25-26
19392_19424_19425_19426_19450_BTFL_WUS_DetachablePlates_PaniniMaker_IM_V8_R1.indd 119392_19424_19425_19426_19450_BTFL_WUS_DetachablePlates_PaniniMaker_IM_V8_R1.indd 1 2023-12-05 4:54 PM2023-12-05 4:54 PM

2
Sección 1: Seguridad
Medidas importantes de seguridad ............................. 29-32
Medidas de seguridad importantes adicionales .................. 32-33
Notas sobre el enchufe .......................................... 33
Notas sobre el cable ......................................... 33-34
Advertencia sobre el acabado .................................... 34
Alimentación eléctrica ........................................... 34
Sección 2: Instrucciones
Conozca mejor su prensa y parrilla de panini 2 en 1 ............. 36
Antes del primer uso ............................................ 37
Instrucciones de funcionamiento ............................... 38-39
Para usar como prensa de Panini (posición cerrada) ............ 39-40
Prensa de panini: consejos para obtener mejores resultados .... 40-41
Uso como parrilla de contacto (posición cerrada) .............. 41-42
Asar carne, aves o pescado ...................................... 42
Uso como parrilla completa (posición abierta) ................. 43-44
Parrilla completa: consejos para obtener mejores resultados ... 45-46
Tabla de cocción general de la prensa y
parrilla de panini 2 en 1 .................................... 47-48
Pautas de cocina del USDA ....................................... 49
Instrucciones de mantenimiento para el usuario ................... 49
Instrucciones de limpieza y cuidado ........................... 49-50
Instrucciones de almacenamiento .................................. 51
Garantía ...................................................... 52-53
Índice
19392_19424_19425_19426_19450_BTFL_WUS_DetachablePlates_PaniniMaker_IM_V8_R1.indd 219392_19424_19425_19426_19450_BTFL_WUS_DetachablePlates_PaniniMaker_IM_V8_R1.indd 2 2023-12-05 4:54 PM2023-12-05 4:54 PM
Section 1
Safety
1
19392_19424_19425_19426_19450_BTFL_WUS_DetachablePlates_PaniniMaker_IM_V8_R1.indd 319392_19424_19425_19426_19450_BTFL_WUS_DetachablePlates_PaniniMaker_IM_V8_R1.indd 3 2023-12-05 4:54 PM2023-12-05 4:54 PM

4
IMPORTANT SAFEGUARDS
When using electrical appliances, basic safety precautions
should always be followed, including the following:
1. Read all instructions.
2. The cord to this appliance should be plugged into
a 120V A C electrical outlet only.
CAUTION: NEVER PLUG UNIT IN WITHOUT BOTH UPPER AND
LOWER GRILL PLATES PROPERLY INSTALLED.
3. To protect against risk of electric shock, do not
immerse the cord, plug or cooking body in water or any
other liquid.
4. Do not touch hot surfaces. Use handles or knobs.
5. This appliance is not intended for use by persons
(including children) with reduced physical, sensory
or mental capabilities, or lack of experience and
knowledge, unless they have been given supervision
or instruction concerning use of the appliances by a
person responsible for their safety.
6. Close supervision is necessary when any appliance is
used by or near children.
7. Unplug from outlet when not in use and before cleaning.
Allow to cool before cleaning or storing this
appliance.
8. Never yank the cord to disconnect the cooking unit
from the outlet. Instead, grasp the plug and pull to
disconnect.
9. Do not operate any appliance if the cord is damaged.
19392_19424_19425_19426_19450_BTFL_WUS_DetachablePlates_PaniniMaker_IM_V8_R1.indd 419392_19424_19425_19426_19450_BTFL_WUS_DetachablePlates_PaniniMaker_IM_V8_R1.indd 4 2023-12-05 4:54 PM2023-12-05 4:54 PM

5
Do not use this appliance if the unit malfunctions,
if it is dropped or has been damaged in any manner.
In order to avoid the risk of an electric shock,
never try to repair the Panini Grill yourself.
Bring it to a qualied technician for examination,
repair or electrical or mechanical adjustment.
An incorrect reassembly could present a risk of electric
shock when the Panini Grill is used.
10. The use of accessories or attachments not recommended
by the manufacturer may cause re, electrical shock
or injury.
11. Do not use outdoors or for commercial purposes.
12. Do not let the electrical cord hang over the edge
of the table or counter top, or touch hot surfaces.
13. Do not place on or near a hot gas or electric burner,
or in a heated oven.
14. Use on a heat-resistant, at level surface only.
15. Use extreme caution when moving any appliance
containing hot food, water, oil or other liquids.
16. To disconnect, turn the knob to OFF, then remove plug
from outlet.
17. WARNING! ALWAYS UNPLUG UNIT WHEN COOKING IS FINISHED.
18. CAUTION HOT SURFACES: This appliance generates heat
during use. Proper precautions must be taken to prevent
the risk of burns, re or other damage to persons or
property.
19392_19424_19425_19426_19450_BTFL_WUS_DetachablePlates_PaniniMaker_IM_V8_R1.indd 519392_19424_19425_19426_19450_BTFL_WUS_DetachablePlates_PaniniMaker_IM_V8_R1.indd 5 2023-12-05 4:54 PM2023-12-05 4:54 PM

6
19. When using this appliance, provide adequate ventilation
above and on all sides for air circulation. Do not
allow this appliance to touch curtains, wall coverings,
clothing, dish towels or other ammable materials
during use.
21. Do not use for other than intended use.
WARNING: TO AVOID POSSIBLE FIRE HAZARD AND DAMAGE
TOTHE UNIT, THE PANINI GRILL MUST BE STORED AND USED
WITH BOTH UPPER/LOWER GRILL PLATES INSTALLED.
FOR HOUSEHOLD USE
ONLY
SAVE THESE
INSTRUCTIONS
19392_19424_19425_19426_19450_BTFL_WUS_DetachablePlates_PaniniMaker_IM_V8_R1.indd 619392_19424_19425_19426_19450_BTFL_WUS_DetachablePlates_PaniniMaker_IM_V8_R1.indd 6 2023-12-05 4:54 PM2023-12-05 4:54 PM

7
ADDITIONAL IMPORTANT
SAFEGUARDS
CAUTION HOT SURFACES: This appliance generates heat and
escaping steam during use. Proper precautions must be taken
to prevent the risk of burns, res or other damage
to persons or property.
CAUTION: This appliance is hot during operation and retains
heat for some time after unplugging. Always use oven mitts
when handling hot materials and allow metal parts to
cool before cleaning. Do not place anything on top of the
appliance while it is operating or while it is hot.
1. All users of this appliance must read and understand
this instruction manual before operating or cleaning
this appliance.
2. If this appliance begins to malfunction during use,
Immediately turn the knob to OFF, than unplug the cord
Do not use or attempt to repair the malfunctioning
appliance.
3. Do not leave this appliance unattended during use.
19392_19424_19425_19426_19450_BTFL_WUS_DetachablePlates_PaniniMaker_IM_V8_R1.indd 719392_19424_19425_19426_19450_BTFL_WUS_DetachablePlates_PaniniMaker_IM_V8_R1.indd 7 2023-12-05 4:54 PM2023-12-05 4:54 PM

8
NOTES ON THE PLUG
This appliance has a polarized plug (one blade is wider
than the other). To reduce the risk of electric shock,
this plug will t in a polarized outlet only one way. If the
plug does not t fully into the outlet, reverse the plug.
If it still does not t, contact a qualied electrician.
Do not modify the plug in any way.
NOTES ON THE CORD
A. A short power-supply cord (or detachable power-supply
cord) is to be provided to reduce the risk resulting
from becoming entangled in or tripping over a longer
cord.
B. Longer detachable power-supply cords or extension cords
are available and may be used if care is exercised
in their use.
C. If a long detachable power-supply cord or extension
cord is used:
1. The marked electrical rating of the cord or
extension cord should be at least as great
as the electrical rating of the appliance;
2. If the appliance is of the grounded type, the
extension cord should be a grounding-type3-wire
cord; and
3. The longer cord should be arranged so that it does
not drape over the countertop or table top where
it can be pulled on by children or tripped over
unintentionally.
19392_19424_19425_19426_19450_BTFL_WUS_DetachablePlates_PaniniMaker_IM_V8_R1.indd 819392_19424_19425_19426_19450_BTFL_WUS_DetachablePlates_PaniniMaker_IM_V8_R1.indd 8 2023-12-05 4:54 PM2023-12-05 4:54 PM

9
PLASTICIZER WARNING
CAUTION: To prevent Plasticizers from migrating to the
nish of the counter top or table top or other furniture,
place NON-PLASTIC coasters or place mats between the
appliance and the nish of the counter top or table top.
Failure to do so may cause the nish to darken; permanent
blemishes may occur or stains can appear.
ELECTRIC POWER
If the electrical circuit is overloaded with other
appliances, yourappliance may not operate properly.
It should be operated on a separate electrical circuit from
other appliances.
19392_19424_19425_19426_19450_BTFL_WUS_DetachablePlates_PaniniMaker_IM_V8_R1.indd 919392_19424_19425_19426_19450_BTFL_WUS_DetachablePlates_PaniniMaker_IM_V8_R1.indd 9 2023-12-05 4:54 PM2023-12-05 4:54 PM
Section 2
Instructions
2
19392_19424_19425_19426_19450_BTFL_WUS_DetachablePlates_PaniniMaker_IM_V8_R1.indd 1019392_19424_19425_19426_19450_BTFL_WUS_DetachablePlates_PaniniMaker_IM_V8_R1.indd 10 2023-12-05 4:54 PM2023-12-05 4:54 PM
11
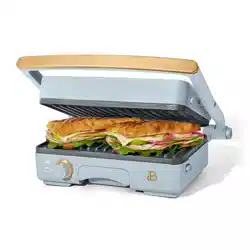
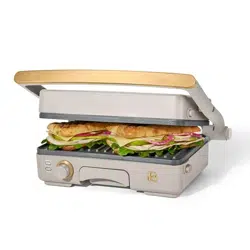
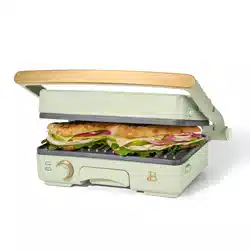
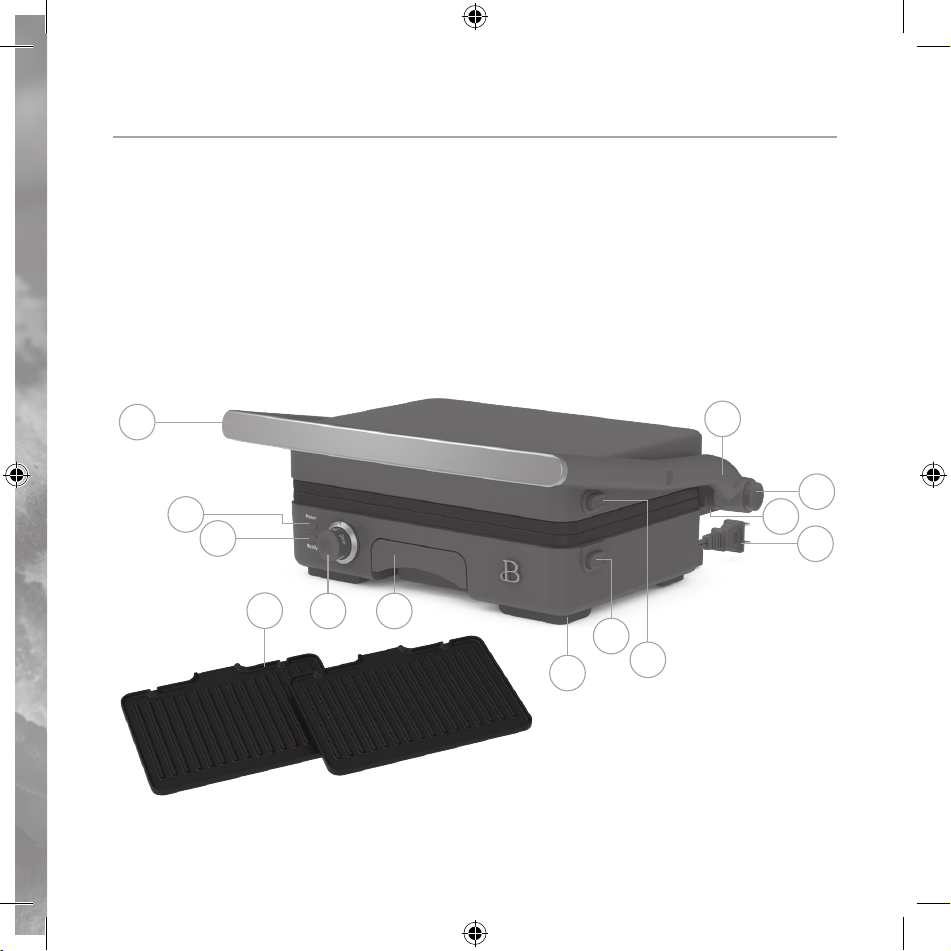
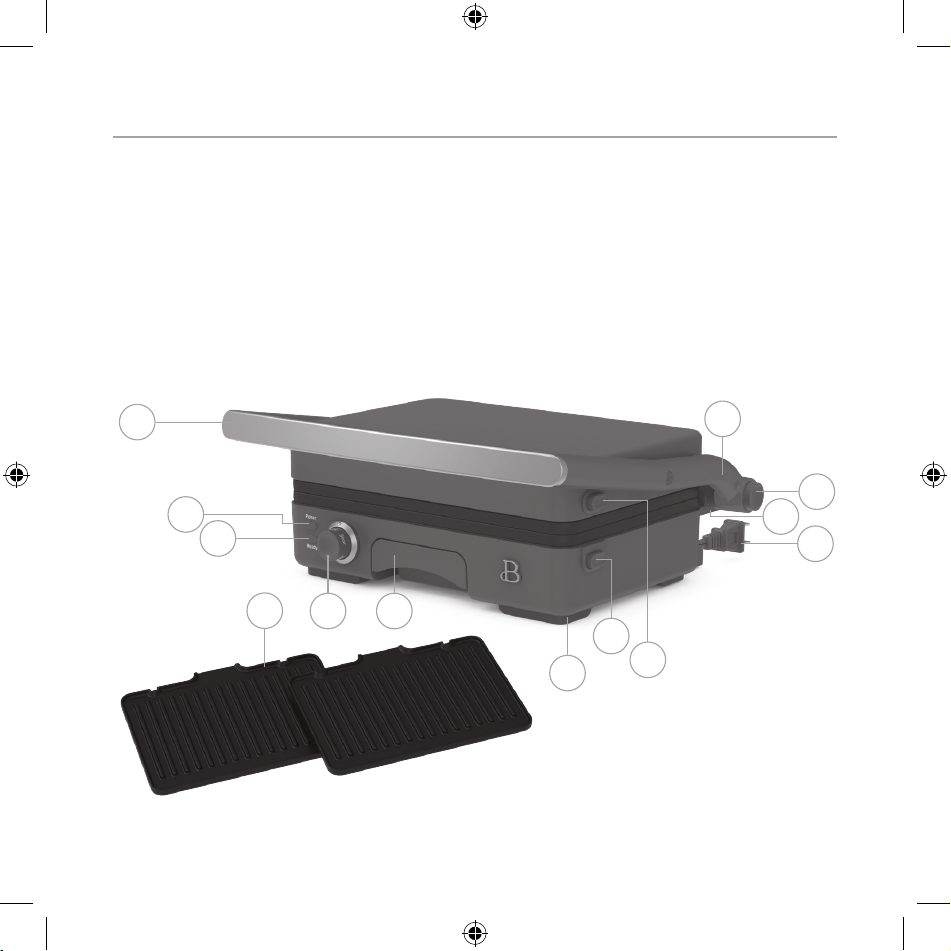
Getting To Know Your 2-in-1 Panini Press & Grill
Product may vary slightly from illustration
2
1. Handle
2. Adjustable Knob
3. Removable Drip Tray
4. White POWER Light
5. White READY Light
6. Removable Non-Stick Grill Plates
7. Arm
8. Grease Drain (not shown)
9. Hinge Release Button
10. Floating Hinge
11. Polarized Plug
12. Tilt-Up Feet
13. Top Grill Plate Release Button
14. Bottom Grill Plate Release Button
1
9
11
10
4
5
2 3
12
14
13
6
7
19392_19424_19425_19426_19450_BTFL_WUS_DetachablePlates_PaniniMaker_IM_V8_R1.indd 1119392_19424_19425_19426_19450_BTFL_WUS_DetachablePlates_PaniniMaker_IM_V8_R1.indd 11 2023-12-05 4:54 PM2023-12-05 4:54 PM

12
Before Using for the First Time
1. Carefully unpack the 2-in-1 Panini Press & Grill and remove all
packaging and materials.
2. Set the 2-in-1 Panini Press & Grill on a dry, clean and at surface.
Keep the 2-in-1 Panini Press & Grill closed until use.
3. Make sure the removable drip tray is fully inserted into the front
of the unit.
4. Use the handle to lift the upper grill plate.
5. To insert the plates: Pick up the grill plate, press the release button
on the side of the unit, and click in the plate. Repeat for the upper
plate with the release button on the side of the unit.
6. Caution: Keep the 2-in-1 Panini Press & Grill away from water.
NEVER IMMERSE PANINI GRILL INTO WATER OR ANY OTHER LIQUIDS
7. Wipe the non-stick grill plates with a damp cloth to remove all dust.
Wipe the 2-in-1 Panini Press & Grill body with a slightly damp,
soft cloth or sponge. Dry all parts before use.
CAUTION: Take care to prevent water from running into the appliance.
NEVER IMMERSE PANINI GRILL BODY IN WATER OR ANY OTHER LIQUIDS!
8. Plug the unit into a 120V AC electrical outlet. Turn the knob to desired
setting, the unit will start heating and the power light will illuminate
and remain lighted during use.
9. Operate the unit in the closed position for 2 to 4 minutes without food.
This will burn off residue on the plates.
NOTE: When the grill plates are heated for the rst time, they may emit
slight smoke or odor. This is normal and should disappear in a few
minutes. This will not affect the safety of the appliance.
10. Condition grill plates. Use a brush or paper towel to lightly coat
the grill surfaces with solid vegetable shortening or vegetable oil.
Wipe dry and keep closed until ready to use.
19392_19424_19425_19426_19450_BTFL_WUS_DetachablePlates_PaniniMaker_IM_V8_R1.indd 1219392_19424_19425_19426_19450_BTFL_WUS_DetachablePlates_PaniniMaker_IM_V8_R1.indd 12 2023-12-05 4:54 PM2023-12-05 4:54 PM

13
Operating Instructions
WARNING: TO AVOID POSSIBLE FIRE HAZARD AND DAMAGE TO THE UNIT, THE 2-in-1 PANINI
PRESS & GRILL MUST BE USED WITH BOTH UPPER/LOWER GRILL PLATES INSTALLED AT ALL
TIMES.
1. Preheat the 2-in-1 Panini Press & Grill. Use the handle to close the
2-in-1 Panini Press & Grill. Check to make sure that the cord does
not come in contact with any exterior parts of the unit. Plug the unit
into a 120VAC electrical outlet. Turn the knob to desired setting, the
unit will start heating and the power light will illuminate and remain
lighted during use.
2. After approximately 4 to 6 minutes, the white READY light will
illuminate, indicating the unit has reached preheat temperature
and is ready for use.
3. Oil grill plates before use… or not! Wearing a protective oven mitt,
use a heat-proof brush or paper towel dipped in vegetable oil to lightly
coat the upper and lower grill plates to encourage even browning.
For health-conscious cooks, the non-stick coating of the grill plates
assures crisp and delicious toasting without the use of oil or butter.
IMPORTANT: Do not use non-stick sprays as they can cause build-up
on the grill plates. Use vegetable or olive oil instead.
4. Center food on the lower grill plate; then lower the lid. The white
READY light will cycle on and off as the temperature is maintained.
5. Cook foods according to recipe instructions or consult the General
Cooking Chart for reference. Recipes will vary in cook time and
brownness. Note the perfect grill/cooking times for each food for future
reference.
6. Always turn the knob to OFF,then unplug unit when cooking is nished.
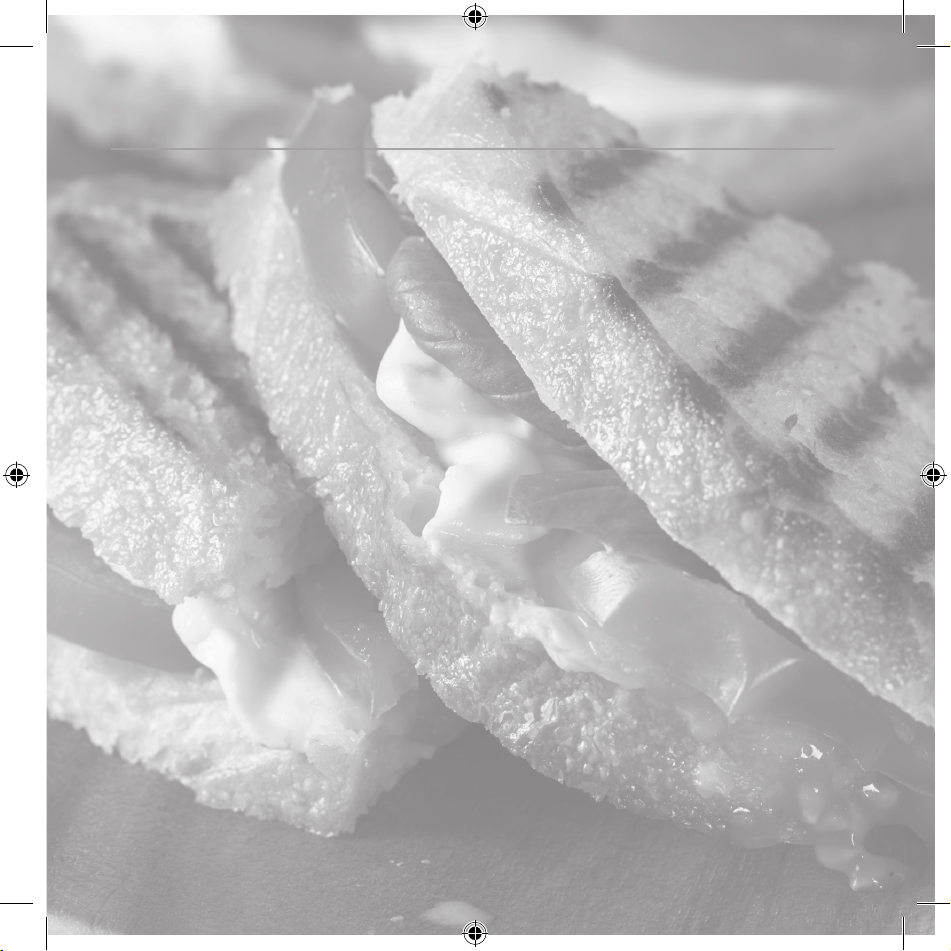
Traditionally, Paninis are sandwiches made with a variety of breads,
stuffed with meats, cheeses, vegetables…then pressed and grilled until
the crust is delightfully crisp. This 2-in-1 Panini Press & Grill is
calibrated at the optimum temperature for perfect results every time.
19392_19424_19425_19426_19450_BTFL_WUS_DetachablePlates_PaniniMaker_IM_V8_R1.indd 1319392_19424_19425_19426_19450_BTFL_WUS_DetachablePlates_PaniniMaker_IM_V8_R1.indd 13 2023-12-05 4:54 PM2023-12-05 4:54 PM

14
To Use as a Panini Press (Closed Position)
CAUTION: To avoid personal injury or damage to property, make sure the removable
drip tray is fully inserted into the front of the unit.
1. Lightly oil both grill plates, if desired.
IMPORTANT: Do not use non-stick sprays as they can cause build-up on the
grill plates. Use vegetable or olive oil instead.
WARNING: Do not use non-fat spreads as they may burn and damage the
non-stick grill plates.
2. Preheat the 2-in-1 Panini Press & Grill. Plug the unit into a 120V AC
electrical outlet. Turn the knob to desired setting, the unit will start
heating and the power light will illuminate and remain lighted during
use.
3. Prepare your sandwiches as the appliance heats. Paninis can be prepared
ahead of time, sealed with plastic wrap, and refrigerated; then grilled
as needed.
4. When the white READY light illuminates, wearing oven mitts, carefully
open the lid and center 1 or 2 sandwiches on the lower grill plate.
IMPORTANT: Do not overload the grill plate.
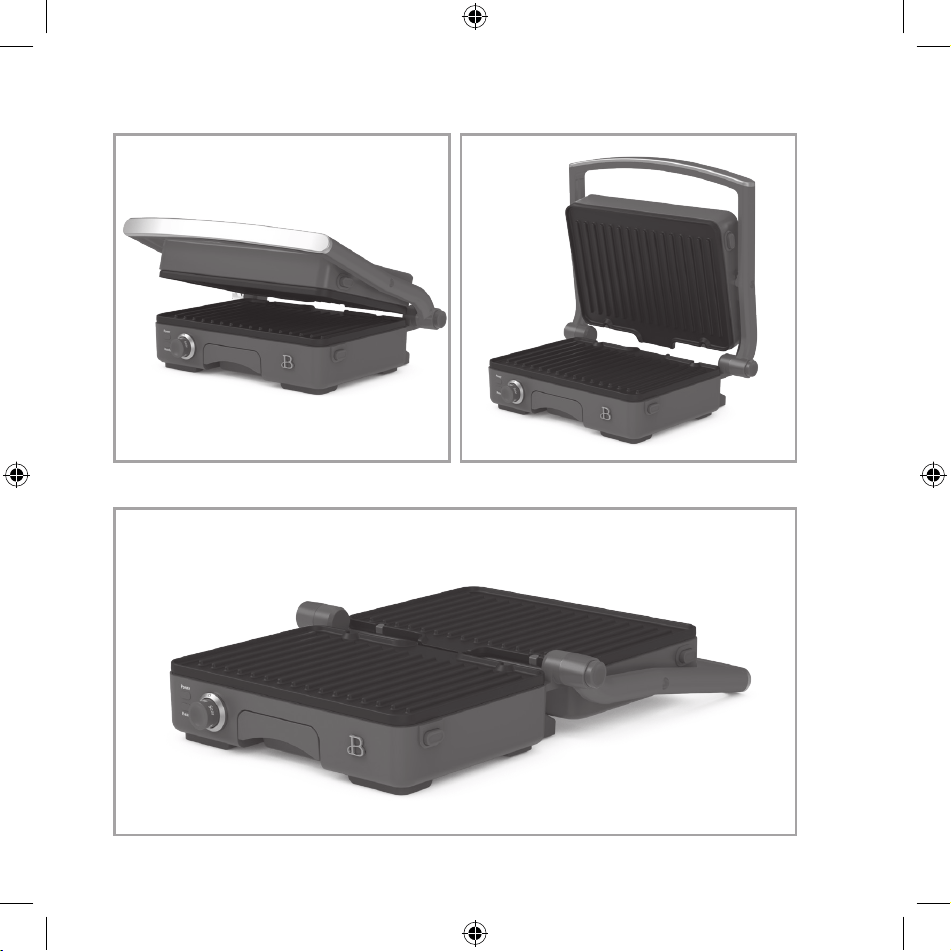
5. Your 2-in-1 Panini Press & Grill is equipped with a oating hinge that
allows the upper lid to accommodate thicker foods: meats, veggies,
desserts, etc. (Figure 1)
6 To ensure perfectly grilled Paninis and pressed sandwiches, check to
make sure that the upper plate lies evenly on the top of the food and
the food is centered on the lower plate. If desired, press the handle
down several times while cooking.
7. Check pressed sandwiches at 5 minutes or according to recipe time.
Using an oven mitt or pot holder, grasp the handle and carefully lift
the upper grill plate to check doneness. If desired, continue grilling
until the food is cooked to your liking.
WARNING! ALWAYS USE A MEAT THERMOMETER TO ENSURE THAT MEAT, POULTRYAND
FISH ARE COOKED THOROUGHLY BEFORE EATING
8. Wearing oven mitts, remove grilled food from the grill plate(s) using
a non-metallic utensil spatula.
WARNING: Never use a sharp or metal object as it may damage the
non-stick surface of the grill plates.
19392_19424_19425_19426_19450_BTFL_WUS_DetachablePlates_PaniniMaker_IM_V8_R1.indd 1419392_19424_19425_19426_19450_BTFL_WUS_DetachablePlates_PaniniMaker_IM_V8_R1.indd 14 2023-12-05 4:54 PM2023-12-05 4:54 PM

15
9. If additional sandwiches are to be cooked, close the 2-in-1 Panini Press
& Grill to retain heat.
10. When sandwiches are nished cooking, Turn the knob to OFF, then remove
the plug from the outlet.
WARNING! ALWAYS UNPLUG UNIT WHEN COOKING IS FINISHED.
11. Allow the 2-in-1 Panini Press & Grill to cool completely before removing
the drip tray or grill plates or to clean the unit.
12. To remove the plates, press the release buttons on the side of the unit.
Panini Press: Hints for Best Results
• It is customary to prepare Panini using a hearty loaf of bread. However,
Panini made from store-bought sliced breads or rolls can be delicious
and simple to prepare. Have fun and experiment with a variety of breads,
tortillas, atbreads, even pitas.
• For health-conscious cooks, the non-stick coating of the grill plates
assures crisp and delicious toasting without the use of oil or butter.
• While it is not necessary to butter or oil the outside of the bread,
spreading a small amount of butter or olive oil is recommended to
encourage even browning of the bread.
• Use nut butters, garlic aioli, hummus, guacamole, olive tapenade, pesto,
your favorite mustard, grilled onion jam on your Panini’s for added
creaminess and avors.
• Have all ingredients at hand before preparing Panini.
• When using soft or liquid llings, use denser, thicker-sliced breads.
Remove the insides of soft rolls to create a cup in which lling can
be added.
• Most fruits release juice when heated. Drain and pat fresh or canned
fruit dry with a clean paper towel.
• Avoid using processed cheeses, as they tend to “run” under high
temperatures.
• A teaspoon of sugar sprinkled on the buttered side makes grilled Panini
crispier and adds avor when using sweet llings.
19392_19424_19425_19426_19450_BTFL_WUS_DetachablePlates_PaniniMaker_IM_V8_R1.indd 1519392_19424_19425_19426_19450_BTFL_WUS_DetachablePlates_PaniniMaker_IM_V8_R1.indd 15 2023-12-05 4:54 PM2023-12-05 4:54 PM

16
• Whole grain and sweet breads will grill faster than white breads and
should be grilled for less time.
• To avoid food contamination, wearing oven mitts, use a soft, absorbent
paper towel to wipe the grill plates clean after each use.
To Use as a Contact Grill (Closed Position)
1. Besides pressing sandwiches, your 2-in-1 Panini Press & Grill doubles as
a contact grill.
2. Use cuts of meat, vegetables, sh, poultry of equal depth; all food
should be thick enough to touch the top and bottom grill plates when the
2-in-1 Panini Press & Grill is closed.
3. To ensure perfectly grilled food, check to make sure that the upper
plate lies evenly on the top of the food and the food is centered on
the lower plate. If desired, press the handle down several times while
cooking.
4. Close the top lid of the 2-in-1 Panini Press & Grill gently over the
food to prevent juices from releasing.
5. Foods cooked in a contact grill will take roughly half the cooking time
as the full grill, since they are being cooked top and bottom in a
conned cooking area.
Grilling Meats/Poultry/Fish
• To ensure moist and delicious grilled meats, always allow meat to rest
10 to 20 minutes before cutting.
• Tougher cuts such as ank steak should be tenderized by marinating
for few hours or overnight.
• Marinades using wine or vinegar will help to break down the connective
tissue before grilling.
• Drain excess marinade and dry meat well before placing on the grill
plate.
• Avoid using marinades that contain high sugar levels that can burn
on the grill plate.
19392_19424_19425_19426_19450_BTFL_WUS_DetachablePlates_PaniniMaker_IM_V8_R1.indd 1619392_19424_19425_19426_19450_BTFL_WUS_DetachablePlates_PaniniMaker_IM_V8_R1.indd 16 2023-12-05 4:54 PM2023-12-05 4:54 PM

17
• To ensure a tender piece of grilled meat, do not salt meat before
cooking.
• Do not overcook meat.
• To avoid tough and dry meats, never cut or pierce meats while cooking.
Use scratch-proof tongs to add or remove meat from grill plates.
To Use as a Full Grill (Open Position)
1. Place the 2-in-1 Panini Press & Grill on a at, level surface. Make sure
there is ample available space to accommodate the fully opened 2-in-1
Panini Press & Grill.
CAUTION: To avoid personal injury or damage to property, make sure the
removable drip tray is fully inserted into the front of the unit.
2. Lightly oil both grill plates, if desired.
IMPORTANT: Do not use non-stick sprays as they can cause build-up on the
grill plates. Use vegetable or olive oil instead.
WARNING: Do not use non-fat spreads as they may burn and damage the non-
stick grill plates.
3. The full grill is a necessary tool when cooking a combination of foods
of varying thickness, for bone-in chops thicker than 1-inch, larger cuts
of meats or sausages, delicate sh or unevenly cut larger vegetables
where grill marks are desired.
4. Open the lid to 90º.
5. Grasp the handle and push the hinge release button (Figure 2) and open
to create a full cooking surface. (See Figure 3)
7. Preheat the 2-in-1 Panini Press & Grill. Plug the unit into a 120V AC
electrical outlet. Turn the knob to desired setting, the unit will start
heating and the power light will illuminate and remain lit during use.
8. While preheating, prepare food to be cooked.
9. When the white READY light illuminates, center food on the open grill
plate(s). Foods with high fat content should be placed on the front
grill plate to enable grease to empty into the drain in the center of
the 2 grill plates.
19392_19424_19425_19426_19450_BTFL_WUS_DetachablePlates_PaniniMaker_IM_V8_R1.indd 1719392_19424_19425_19426_19450_BTFL_WUS_DetachablePlates_PaniniMaker_IM_V8_R1.indd 17 2023-12-05 4:54 PM2023-12-05 4:54 PM

18
10. HINT: To achieve attractive grill marks, place food on the grill at a
45˚ angle. Allow food to cook, undisturbed, until browning occurs along
the sides. Lift a corner, and when you can see browned grill marks, ip
the food over, setting it at the opposite angle to the grill lines.
Continue cooking until food is cooked to your liking.
CAUTION: To prevent risk of burns, always use oven mitts. Be careful not
to touch any hot surfaces such as the upper housing or grill plates,
or any hot liquid in the drip tray. Extreme care must be taken as the
surface temperatures get dangerously hot.
11. Cook foods according to recipe time or consult the General Cooking Chart
for reference. Recipes may vary in cook time and brownness. Note the
perfect grill times for each food for future reference.
WARNING! ALWAYS USE A MEAT THERMOMETER TO ENSURE THAT MEAT, POULTRY AND
FISH ARE COOKED THOROUGHLY BEFORE EATING.
12. Wearing oven mitts, remove grilled food from the grill plate(s) using
a non-metallic utensil. A plastic spatula will help to remove delicate
food in one piece. Scratch-proof tongs are helpful when grilling meats
or sausages.
WARNING: Never use a sharp or metal utensils as it may damage the
non-stick surface ofthe grill plates.
13. When food is nished cooking, turn the knob to OFF, then remove the plug
from the outlet.
WARNING! ALWAYS TURN KNOB TO OFF, THEN UNPLUG THE UNIT WHEN COOKING
IS FINISHED.
14. Allow the 2-in-1 Panini Press & Grill to cool completely before removing
the drip tray or grill plates or toclean the unit.
19392_19424_19425_19426_19450_BTFL_WUS_DetachablePlates_PaniniMaker_IM_V8_R1.indd 1819392_19424_19425_19426_19450_BTFL_WUS_DetachablePlates_PaniniMaker_IM_V8_R1.indd 18 2023-12-05 4:54 PM2023-12-05 4:54 PM

19
Full Grill: Hints For Best Results
• Open the 2-in-1 Panini Press & Grill to a full grill when cooking a
combination of foods of varying thicknesses: bone-in chops thicker than
1-inch, larger cuts of meats or sausages, delicate sh or unevenly cut
larger vegetables where grill marks are desired.
• Tougher cuts such as ank steak should be tenderized by marinating
for few hours or overnight. Wine or vinegar will help to break down
connective tissue before grilling.
• Drain excess marinade and dry meat well before placing on the grill
plate.
• Avoid using marinades with high sugar levels that will burn on the grill
plate when cooked.
• To ensure a tender piece of grilled meat, do not salt meat before
cooking.
• Use a heat-resistant sh spatula to remove sh from the hot grill.
DO NOT OVERCOOK!
• To avoid tough and dry meats, never cut or pierce meats while cooking.
Usescratch-proof tongs to add or remove meat from grill plates.
• And most importantly: to ensure moist and delicious results,
always allow meats to rest 10 to 20 minutes before cutting.
19392_19424_19425_19426_19450_BTFL_WUS_DetachablePlates_PaniniMaker_IM_V8_R1.indd 1919392_19424_19425_19426_19450_BTFL_WUS_DetachablePlates_PaniniMaker_IM_V8_R1.indd 19 2023-12-05 4:54 PM2023-12-05 4:54 PM

20
Figure 1
Figure 3
Figure 2
19392_19424_19425_19426_19450_BTFL_WUS_DetachablePlates_PaniniMaker_IM_V8_R1.indd 2019392_19424_19425_19426_19450_BTFL_WUS_DetachablePlates_PaniniMaker_IM_V8_R1.indd 20 2023-12-05 4:54 PM2023-12-05 4:54 PM

21
2-in-1 Panini Press & Grill General Cooking Chart
SANDWICH COOK TIME NOTES
Panini 5 to 7
minutes
Press lightly at the beginning of
cooking. Cook until cheese is melted.
Grilled cheese, plain 3 to 5
minutes
Cook until bread is browned and crispy,
cheese is melted.
Grilled cheese with
bacon, ham, turkey,
beef, tuna, sausage,
vegetables
5 to 7
minutes
Cook until bread is browned and crispy,
cheese is melted.
Quesadillas 3 to 5
minutes
Cook until tortilla is lightly browned
and cheese is melted
Sandwich Wraps 3 to 5
minutes
Cook until tortilla, pita
or pocket is browned and crispy, cheese
is melted
19392_19424_19425_19426_19450_BTFL_WUS_DetachablePlates_PaniniMaker_IM_V8_R1.indd 2119392_19424_19425_19426_19450_BTFL_WUS_DetachablePlates_PaniniMaker_IM_V8_R1.indd 21 2023-12-05 4:54 PM2023-12-05 4:54 PM

22
Full Grill
FOOD TIME DIRECTIONS
Sirloin Steak,
1/2 - 1-inch thick, rare-medium
3 to 4 minutes ip once
Sirloin Steak,
1/2 - 1-inch thick, well done
6 to 8 minutes ip once
Flank Steak 12 to 14 minutes ip once
Hamburger Patties,
1/4 lb., rare-medium
2 to 4 minutes ip once
Hamburger Patties, 1/4 lb., well done 5 to 7 minutes ip once
Chicken Breast, boneless-skinless,
1/2" thick
8 to 12 minutes ip once
Pork, boneless, 1-inch thick 7 to 9 minutes ip once
Lamb Loin Chops, bone in, 8 to 12 minutes ip once
Hot Dogs 5 to 8 minutes ip once
Sausage, Italian thick, 6 to 8 minutes ip once
Sausage, breakfast, frozen 4 to 8 minutes ip once
Vegetables:
mushrooms, asparagus, zucchini,
onions, peppers, green beans
5 to 10 minutes ip several times
Salmon llet,
1/2 lb. piece, with skin
5 to 8 minutes ip once
19392_19424_19425_19426_19450_BTFL_WUS_DetachablePlates_PaniniMaker_IM_V8_R1.indd 2219392_19424_19425_19426_19450_BTFL_WUS_DetachablePlates_PaniniMaker_IM_V8_R1.indd 22 2023-12-05 4:54 PM2023-12-05 4:54 PM

23
USDA Cooking Guidelines
A meat thermometer should always be used to gauge internal temperature.
The thermometer should be inserted into the thickest portion of meat,
away from bones or fatty areas.
The United States Department of Agriculture recommends that meat and poultry
be cooked to the following internal temperatures to be sure any harmful bacteria
have been killed. Ground turkey and chicken should be cooked to an internal
temperature of 165° F and ground beef, veal, lamb and pork be cooked to an
internal temperature of 160° F. Chicken and turkey should be cooked
to an internal temperature of 170° F for white meat and 180° F for dark meat.
Goose and duck should be cooked to an internal temperature of 180° F.
Fresh beef, veal and lamb, etc. should be cooked to an internal temperature
of at least 145° F. Fresh pork should be cooked to an internal temperature
of at least 160° F. When re-heating meat and poultry products, they should also
be cooked to an internal temperature of 165° F.
User Maintenance Instructions
This appliance requires little maintenance. It contains no user serviceable
parts. Do not try to repair it yourself. Contact a qualied appliance repair
technician if the product requires servicing.
19392_19424_19425_19426_19450_BTFL_WUS_DetachablePlates_PaniniMaker_IM_V8_R1.indd 2319392_19424_19425_19426_19450_BTFL_WUS_DetachablePlates_PaniniMaker_IM_V8_R1.indd 23 2023-12-05 4:54 PM2023-12-05 4:54 PM

24
Care & Cleaning Instructions
CAUTION: Unplug from electrical outlet and allow to cool thoroughly before
removing the drip tray or grill plates or cleaning the unit.
WARNING! ALWAYS UNPLUG UNIT WHEN COOKING IS FINISHED. OTHERWISE,
THE PANINI GRILL WILL CONTINUE TO HEAT UNTIL UNIT IS UNPLUGGED.
1. When the 2-in-1 Panini Press & Grill has cooled completely and is safe
to handle, slide the removable drip tray out from the front of the unit.
2. Clean drip tray in hot, soapy water.
NOTE: The removable drip tray is top rack dishwasher safe.
3. Remove the grill plates for easy cleaning. Open the lid to 90º.
Press the upper plate release button on the front of the top lid.
(See Figure 1) The locks will release the grill plate. Pull the plate
forward, then up from the slots on the bottom of the upper lid. (See
Figure 6)
4. Press the lower plate release button on the right side of the base,
then pull the plate up, then out from the slots on the bottom
of the lower lid.
5. Brush non-stick grill plates with a clean, brush or cloth. If necessary,
clean plates in hot, soapy water. Remove stubborn stains with a plastic
mesh puff or pad. For best results, use only products with directions
stating they are safe for cleaning non-stick cooking surfaces. Do not
use steel wool or coarse scouring pads.
NOTE: Grill plates are top rack dishwasher safe.
CAUTION: Never immerse 2-in-1 Panini Press & Grill body in water
or other liquids.
6. Replace both clean grill plates. Position grease drains and tabs facing
inward, fully insert the 2 tabs into the 2 slots, and press the upper
and lower grill plates into the body until each snap securely into
place. (See Figure 7.)
7. Replace the clean removable drip tray under the front of the unit.
Push to ensure the drip tray is fully inserted and resting under
the grease drain at the back of the unit.
8. The exterior nish should be cleaned with a non-abrasive cleaner
and a soft, damp cloth. Dry thoroughly.
19392_19424_19425_19426_19450_BTFL_WUS_DetachablePlates_PaniniMaker_IM_V8_R1.indd 2419392_19424_19425_19426_19450_BTFL_WUS_DetachablePlates_PaniniMaker_IM_V8_R1.indd 24 2023-12-05 4:54 PM2023-12-05 4:54 PM

25
Storing Instructions
WARNING: Never store 2-in-1 Panini Press & Grill while it is hot or still
plugged in.
1. Make sure unit is unplugged and fully cooled.
WARNING: TO AVOID POSSIBLE FIRE HAZARD AND DAMAGE TO THE UNIT,
THEPANINIGRILL MUST BE STORED WITH BOTH UPPER/LOWER GRILL
PLATESINSTALLED.
2. Make sure the removable drip tray is fully inserted into the front
of the unit.
3. Never wrap cord tightly around appliance. Do not put any stress on cord
where it enters unit, as this could cause cord to fray and break.
4. Store 2-in-1 Panini Press & Grill in its box or store closed for easy
and compact storage.
19392_19424_19425_19426_19450_BTFL_WUS_DetachablePlates_PaniniMaker_IM_V8_R1.indd 2519392_19424_19425_19426_19450_BTFL_WUS_DetachablePlates_PaniniMaker_IM_V8_R1.indd 25 2023-12-05 4:54 PM2023-12-05 4:54 PM

Limited Two-Year Warranty
Sensio Inc. dba Made by Gather™
hereby warrants that for a period
of TWO YEARS from the date of
purchase, this product will be free
from mechanical defects in material
and workmanship, and for 90 days in
respect to non-mechanical parts. At
its sole discretion, Sensio Inc. dba
Made by Gather™ will either repair
or replace the product found to be
defective, or issue a refund on the
product during the warranty period.
The warranty is only valid for
the original retail purchaser from
the date of initial retail purchase
and is not transferable.
Keep the original sales receipt,
as proof of purchase isrequired
to obtain warranty validation.
Retail stores selling this product
do not have the right to alter,
modify, or in any way revise the
terms and conditions of the warranty.
Exclusions:
The warranty does not cover normal
wear of parts or damage resulting
from any of thefollowing: negligent
use of the product, use of improper
voltage or current, improper routine
maintenance, use contrary to the
operating instructions, disassembly,
repair, or alteration by anyone
other than qualied Sensio Inc.
dba Made by Gather™ personnel.
Also, the warranty does not cover
Acts of God such as re, oods,
hurricanes, or tornadoes.
Sensio Inc. dba Made by Gather™ shall
not be liable for any incidental or
consequential damages caused by the
breach of any express or implied
warranty. Apart from the extent
prohibited by applicable law, any
implied warranty of merchantability
or tness for a particular purpose
is limited in time to the duration
of the warranty. Some states,
provinces or jurisdictions do not
allow the exclusion or limitation
of incidental or consequential
damages, or limitations on how
long an implied warranty lasts,
and therefore, the above exclusions
or limitations may not apply to you.
The warranty covers specic legal
rights which may vary by state,
province and/or jurisdiction.
26
19392_19424_19425_19426_19450_BTFL_WUS_DetachablePlates_PaniniMaker_IM_V8_R1.indd 2619392_19424_19425_19426_19450_BTFL_WUS_DetachablePlates_PaniniMaker_IM_V8_R1.indd 26 2023-12-05 4:54 PM2023-12-05 4:54 PM

27
How To Obtain Warranty Service
You must contact Customer Service at
our toll-free number: 1-877-775-3564.
A Customer Service Representative
will attempt to resolve warranty
issues over thephone. If the
Customer Service Representative
is unable to resolve the problem,
you will be provided with a case
number and asked to return the
product to Sensio Inc. dba
Made by Gather™ Attach a tag to the
product that includes: your name,
address, daytime contact telephone
number, case number, and description
of the problem.
Also, include a copy of the original
sales receipt. Carefully package
the tagged product with the sales
receipt, and send it (with shipping
and insurance prepaid) to SENSIO
Inc.’s address. Sensio Inc.
dba Made by Gather™ shall bear
no responsibility or liability
for the returned product while
in transit to Sensio Inc.
dba Made by Gather™ Customer
Service Center.
®
19392_19424_19425_19426_19450_BTFL_WUS_DetachablePlates_PaniniMaker_IM_V8_R1.indd 2719392_19424_19425_19426_19450_BTFL_WUS_DetachablePlates_PaniniMaker_IM_V8_R1.indd 27 2023-12-05 4:54 PM2023-12-05 4:54 PM
Sección 1
Seguridad
1
19392_19424_19425_19426_19450_BTFL_WUS_DetachablePlates_PaniniMaker_IM_V8_R1.indd 2819392_19424_19425_19426_19450_BTFL_WUS_DetachablePlates_PaniniMaker_IM_V8_R1.indd 28 2023-12-05 4:54 PM2023-12-05 4:54 PM

29
MEDIDAS IMPORTANTES
DE SEGURIDAD
Al utilizar electrodomésticos, se deben tomar siempre
precauciones de seguridad básicas, incluidas las
siguientes:
1. Lea todas las instrucciones.
2. El cable de este aparato debe conectarse solo a un
tomacorriente de 120 V de CA.
PRECAUCIÓN: NUNCA ENCHUFE LA UNIDAD SIN HABER INSTALADO
CORRECTAMENTE LA PLACA INFERIOR Y SUPERIOR DE LA
PARRILLA.
3. Para protegerse de descargas eléctricas, no sumerja el
cable, el enchufe o el cuerpo de cocción en agua u otro
líquido.
4. No toque las supercies calientes. Use las asas o las
perillas.
5. Este aparato no está concebido para ser utilizado
por personas (incluidos niños) con capacidades
físicas, sensoriales o mentales reducidas; o con
falta de experiencia y conocimiento, a menos que
sean supervisados o reciban instrucciones relativas
al uso del aparato por una persona responsable de su
seguridad.
1
19392_19424_19425_19426_19450_BTFL_WUS_DetachablePlates_PaniniMaker_IM_V8_R1.indd 2919392_19424_19425_19426_19450_BTFL_WUS_DetachablePlates_PaniniMaker_IM_V8_R1.indd 29 2023-12-05 4:54 PM2023-12-05 4:54 PM

30
6. Es necesaria una estrecha supervisión cuando los niños
utilizan un aparato o si este se utiliza cerca de ellos.
7. Desenchufe el aparato del tomacorriente cuando no lo
utilice y antes de limpiarlo. Espere a que el aparato
se enfríe antes de limpiarlo o guardarlo.
8. Nunca tire del cable para desconectar la unidad de
cocción del tomacorriente. En su lugar, sujete el
enchufe y tire para desconectarlo.
9. No utilice este aparato si el cable está dañado. No
utilice este aparato si la unidad se averió, se cayó o
se dañó de cualquier manera. A n de evitar el riesgo
de una descarga eléctrica, nunca intente reparar la
parrilla de panini por su cuenta. Lleve este aparato
a un técnico calicado para que lo examine, repare o
ajuste. Un montaje incorrecto podría suponer un riesgo
de descarga eléctrica al utilizar la parrilla de
panini.
10. El uso de accesorios no recomendados por el fabricante
puede causar incendios, descargas eléctricas o
lesiones.
11. No usar al aire libre o con nes comerciales.
12. No deje que el cable cuelgue sobre el borde de una mesa
o una encimera, o toque supercies calientes.
13. No lo coloque sobre o cerca de un hornillo eléctrico o a
gas, o en un horno caliente.
19392_19424_19425_19426_19450_BTFL_WUS_DetachablePlates_PaniniMaker_IM_V8_R1.indd 3019392_19424_19425_19426_19450_BTFL_WUS_DetachablePlates_PaniniMaker_IM_V8_R1.indd 30 2023-12-05 4:54 PM2023-12-05 4:54 PM

31
14. Utilizarlo solo sobre supercies niveladas, planas
y resistentes al calor.
15. Tenga mucho cuidado al mover aparatos que contengan
alimentos, agua, aceite u otros líquidos calientes.
16. Para desconectar, gire la perilla hacia la posición
de apagado (OFF), luego retire el enchufe del
tomacorriente.
17. ¡ADVERTENCIA! SIEMPRE DESENCHUFE LA UNIDAD CUANDO
TERMINE DE COCINAR.
18. PRECAUCIÓN SUPERFICIES CALIENTES: Este aparato genera
calor durante el uso. Deben tomarse las medidas
correspondientes para evitar riesgo de quemaduras,
incendios u otros daños a personas o a la propiedad.
19. Durante el uso, asegúrese de que haya una ventilación
adecuada sobre el aparato y a su alrededor para que el
aire pueda circular. Asegúrese de que este aparato no
toque cortinas, revestimientos de paredes, vestimenta,
toallas de vajilla u otros materiales inamables
mientras está funcionando.
21. No utilice este aparato para un uso que no sea
el previsto.
ADVERTENCIA: PARA EVITAR POSIBLES INCENDIOS Y DAÑOS
A LA UNIDAD, LA PARRILLA DE PANINI DEBE GUARDARSE Y
USARSE CON AMBAS PLACAS SUPERIOR E INFERIOR INSTALADAS.
19392_19424_19425_19426_19450_BTFL_WUS_DetachablePlates_PaniniMaker_IM_V8_R1.indd 3119392_19424_19425_19426_19450_BTFL_WUS_DetachablePlates_PaniniMaker_IM_V8_R1.indd 31 2023-12-05 4:54 PM2023-12-05 4:54 PM

32
SOLO PARA USO
DOMÉSTICO
GUAR DE ESTAS
INSTRUCCIONES
MEDIDAS DE SEGURIDAD
IMPORTANTES
ADICIONALES
PRECAUCIÓN, SUPERFICIES CALIENTES: Este aparato genera
calor y vapor durante el uso. Deben tomarse las medidas
correspondientes para evitar riesgo de quemaduras,
incendios u otros daños a personas o a la propiedad.
PRECAUCIÓN: Este aparato se calienta durante el
funcionamiento y retiene calor por un tiempo después de
desenchufarlo. Use siempre guantes de horno cuando manipule
materiales calientes y deje que las piezas de metal se
enfríen antes de limpiarlas. No coloque objetos encima del
aparato mientras esté funcionando o se encuentre caliente.
19392_19424_19425_19426_19450_BTFL_WUS_DetachablePlates_PaniniMaker_IM_V8_R1.indd 3219392_19424_19425_19426_19450_BTFL_WUS_DetachablePlates_PaniniMaker_IM_V8_R1.indd 32 2023-12-05 4:54 PM2023-12-05 4:54 PM

33
1. Todos los usuarios de este aparato deben leer y
comprender el manual de instrucciones antes de utilizar
o limpiar el aparato.
2. Si este aparato comienza a funcionar incorrectamente,
gire la perilla a la posición de apagado (OFF) y
desenchufe el cable de inmediato. No use ni intente
reparar el aparato averiado.
3. No deje este aparato sin supervisión mientras está en
uso
NOTAS SOBRE EL ENCHUFE
Este aparato posee un enchufe polarizado (una clavija es
más ancha que la otra). Para reducir el riesgo de descarga
eléctrica, este enchufe encajará en un tomacorriente
polarizado de una sola manera. Si el enchufe no entra
completamente en el tomacorriente, gire el enchufe. Si
aun así no encaja, contacte a un técnico electricista
calicado. No modique el enchufe de ninguna manera.
NOTAS SOBRE EL CABLE
A. Se proporciona un cable de alimentación corto (o un
cable de alimentación desmontable) para reducir el
riesgo de enredarse o tropezarse con un cable más
largo.
B. Hay disponibles cables de alimentación desconectables
más largos o cables de extensión, y estos se pueden
utilizar si se tiene cuidado en su uso.
19392_19424_19425_19426_19450_BTFL_WUS_DetachablePlates_PaniniMaker_IM_V8_R1.indd 3319392_19424_19425_19426_19450_BTFL_WUS_DetachablePlates_PaniniMaker_IM_V8_R1.indd 33 2023-12-05 4:54 PM2023-12-05 4:54 PM

34
C. Si se utiliza un cable de alimentación desconectable
largo o un cable de extensión:
1. La clasicación eléctrica marcada en el cable o
extensión debe ser al menos igual a la clasicación
eléctrica del aparato;
2. Si el aparato es del tipo con conexión a tierra, el
cable de extensión deberá ser un cable de 3 hilos con
conexión a tierra; y
3. El cable más largo debe colocarse de manera que no
cuelgue de una encimera o mesa de donde los niños
pudieran jalarlo o tropezar con él por accidente.
ADVERTENCIA SOBRE EL ACABADO
PRECAUCIÓN: Para evitar que el acabado de la encimera o
de la mesa u otros muebles se dañe, coloque posavasos o
manteles individuales que NO SEAN DE PLÁSTICO entre el
electrodoméstico y el acabado de la encimera o de la mesa.
No hacerlo puede provocar que el acabado se oscurezca;
provocar imperfecciones permanentes o pueden aparecer
manchas.
ALIMENTACIÓN ELÉCTRICA
Si el circuito eléctrico está sobrecargado con otros
aparatos, este aparato podría no funcionar correctamente.
Debe utilizarse en un circuito eléctrico diferente al de
otros electrodomésticos.
19392_19424_19425_19426_19450_BTFL_WUS_DetachablePlates_PaniniMaker_IM_V8_R1.indd 3419392_19424_19425_19426_19450_BTFL_WUS_DetachablePlates_PaniniMaker_IM_V8_R1.indd 34 2023-12-05 4:54 PM2023-12-05 4:54 PM
Sección 2
Instrucciones
2
19392_19424_19425_19426_19450_BTFL_WUS_DetachablePlates_PaniniMaker_IM_V8_R1.indd 3519392_19424_19425_19426_19450_BTFL_WUS_DetachablePlates_PaniniMaker_IM_V8_R1.indd 35 2023-12-05 4:54 PM2023-12-05 4:54 PM
36
Conozca mejor su prensa y parrilla de panini 2 en 1
El producto puede diferir ligeramente del que aparece en la ilustración
1. Asa
2. Perilla ajustable
3. Bandeja de goteo extraíble
4. Sonda de la luz blanca POWER
(encendido)
5. Luz blanca READY (listo)
6. Placas antiadherentes extraíbles
de la parrilla
7. Brazo
8. Salida de grasa (no se muestra)
9. Botón de liberación de la bisagra
10. Bisagra otante
11. Enchufe polarizado
12. Pata inclinable
13. Botón de liberación de la placa
superior de la parrilla
14. Botón de liberación de la placa
inferior de la parrilla
1
9
11
10
4
5
2 3
12
14
13
6
7
19392_19424_19425_19426_19450_BTFL_WUS_DetachablePlates_PaniniMaker_IM_V8_R1.indd 3619392_19424_19425_19426_19450_BTFL_WUS_DetachablePlates_PaniniMaker_IM_V8_R1.indd 36 2023-12-05 4:54 PM2023-12-05 4:54 PM

37
Antes del primer uso
1. Desembale cuidadosamente la prensa y parrilla de panini 2 en 1 y retire
todo el embalaje y los materiales.
2. Deje la prensa y parrilla de panini 2 en 1 sobre una supercie seca,
limpia y plana. Mantenga la prensa y parrilla de panini 2 en 1 cerrada
mientras no está en uso.
3. Verique que la bandeja de goteo desmontable esté bien insertada
en el frente de la unidad.
4. Use el asa para levantar la placa superior de la parrilla.
5. Para insertar las placas, haga lo siguiente: Tome la placa
de la parrilla, presione el botón de liberación ubicado en el costado
de la unidad y encaje la placa. Repita el mismo procedimiento con la
placa superior usando el botón de liberación del costado de la unidad.
6. Precaución: mantenga la parrilla de panini 2 en 1 lejos del agua.
NUNCA SUMERJA LA PARRILLA DE PANINI EN AGUA NI OTROS LÍQUIDOS
7. Limpie las placas antiadherentes de la parrilla con un paño húmedo para
retirar el polvo. Limpie el cuerpo de la prensa y parrilla de panini
2 en 1 con un paño o esponja suaves ligeramente humedecidos. Seque todas
las piezas antes de usar.
PRECAUCIÓN: Se debe tener cuidado para evitar que entre agua
en el aparato. ¡NUNCA SUMERJA EL CUERPO DE LA PARRILLA DE PANINI EN AGUA
NI NINGÚN OTRO LÍQUIDO!
8. Enchufe la unidad en un tomacorriente de 120 V de CA. Gire la perilla
al ajuste deseado, la unidad comenzará a calentarse y la luz de
encendido se encenderá y permanecerá así durante el uso.
9. Opere la unidad en posición cerrada durante 2 a 4 minutos sin alimentos.
Hacer esto quemará los residuos de las placas.
NOTA: cuando las placas de la parrilla se calientan por primera
vez, pueden emitir un ligero humo u olor. Esto es normal y debería
desaparecer en un par de minutos. Esto no afecta la seguridad del
aparato.
10. Acondicione las placas de la parrilla. Use un cepillo o una toalla
de papel para cubrir ligeramente las supercies de la parrilla con
manteca vegetal sólida o aceite vegetal. Seque con un paño y manténgala
cerrada hasta que vuelva a usarla.
19392_19424_19425_19426_19450_BTFL_WUS_DetachablePlates_PaniniMaker_IM_V8_R1.indd 3719392_19424_19425_19426_19450_BTFL_WUS_DetachablePlates_PaniniMaker_IM_V8_R1.indd 37 2023-12-05 4:54 PM2023-12-05 4:54 PM

38
Instrucciones de funcionamiento
ADVERTENCIA: PARA EVITAR POSIBLES INCENDIOS Y DAÑOS A LA UNIDAD, LA PRENSA Y
PARRILLA DE PANINI DEBE USARSE CON AMBAS PLACAS INFERIOR Y SUPERIOR INSTALADAS
EN TODO MOMENTO.
1. Precaliente la prensa y parrilla de panini 2 en 1. Use el asa para
cerrar la prensa y parrilla de panini 2 en 1. Verique que el cable no
entre en contacto con las piezas exteriores de la unidad. Enchufe la
unidad en un tomacorriente de 120 V de CA. Gire la perilla al ajuste
deseado, la unidad comenzará a calentarse y la luz de encendido se
encenderá y permanecerá así durante el uso.
2. Después de aproximadamente 5 a 7 minutos, la luz blanca READY (listo)
se iluminará para indicar que la unidad alcanzó la temperatura de
precalentamiento y que está lista para usarse.
3. Siempre unte las placas de la parrilla con aceite antes de usarla.
Utilice guantes de cocina y un cepillo resistente al calor o una toalla
de papel humedecida con aceite vegetal para recubrir ligeramente la
placa superior e inferior para favorecer un dorado uniforme. Para
los cocineros que desean cocinar saludablemente, el revestimiento
antiadherente de las placas de la parrilla garantiza un tostado
crujiente y delicioso sin necesidad de utilizar aceite ni mantequilla.
IMPORTANTE: No use rociadores antiadherentes, ya que pueden generar
acumulaciones en las placas de la parrilla. En su lugar, use aceite
vegetal o de oliva.
4. Centre el alimento en la placa inferior de la parrilla, luego baje la
tapa. La luz blanca READY (listo) se encenderá y apagará para mantener
la temperatura.
5. Cocine alimentos según las instrucciones de la receta o consulte la
tabla de cocción general. Las recetas variarán en cuanto a tiempo
de cocción y dorado. Tenga en cuenta los tiempos ideales de cocción/
parrilla de cada alimento para usos a futuro.
19392_19424_19425_19426_19450_BTFL_WUS_DetachablePlates_PaniniMaker_IM_V8_R1.indd 3819392_19424_19425_19426_19450_BTFL_WUS_DetachablePlates_PaniniMaker_IM_V8_R1.indd 38 2023-12-05 4:54 PM2023-12-05 4:54 PM

39
6. Siempre gire la perilla a la posición de apagado (OFF), luego desenchufe
la unidad cuando termine de cocinar. Por tradición, los panini son
sándwiches que se preparan con varios tipos de pan, se rellenan con
carne, quesos y verduras, y luego se presionan y tuestan hasta quedar
con una corteza deliciosa y crujiente. Esta prensa y parrilla de panini
2 en 1 está calibrada para proporcionar la temperatura óptima para
obtener resultados perfectos cada vez que la use.
Para usar como prensa de Panini (posición cerrada)
PRECAUCIÓN: Para evitar lesiones o daños a la propiedad, verique que la bandeja
de goteo desmontable esté bien insertada en el frente de la unidad.
1. Si lo desea, unte una ligera capa de aceite en ambas placas de la
parrilla.
IMPORTANTE: No use rociadores antiadherentes, ya que pueden generar
acumulaciones en las placas de la parrilla. En su lugar, use aceite
vegetal o de oliva.
ADVERTENCIA: No use productos para untar sin grasa, ya que pueden quemar
o dañar las placas antiadherentes de la parrilla.
2. Precaliente la prensa y parrilla de panini 2 en 1. Enchufe la unidad
en un tomacorriente de 120 V de CA. Gire la perilla al ajuste deseado,
la unidad comenzará a calentarse y la luz de encendido se encenderá y
permanecerá así durante el uso.
3. Prepare sus sándwiches mientras se calienta el aparato. Los panini
pueden prepararse con antelación, sellarse con un envoltorio plástico y
refrigerarse para luego cocinarlos cuando lo desee.
4. Cuando se encienda la luz blanca READY (listo), colóquese los guantes de
cocina, abra la tapa con cuidado y centre 1 o 2 sándwiches en la placa
inferior de la parrilla.
IMPORTANTE: No sobrecargue la placa de la parrilla.
5. Su prensa y parrilla de panini 2 en 1 está equipada con una bisagra
otante que permite colocar alimentos más gruesos en la tapa superior,
ya sea carnes, verduras, pasteles, etc. (Figura 1).
6. Para asegurarse de que los panini queden perfectamente cocinados,
verique que la placa superior cubra uniformemente la parte superior
del alimento mientras está centrado en la placa inferior. Si lo desea,
presione el asa hacia abajo varias veces mientras cocina.
19392_19424_19425_19426_19450_BTFL_WUS_DetachablePlates_PaniniMaker_IM_V8_R1.indd 3919392_19424_19425_19426_19450_BTFL_WUS_DetachablePlates_PaniniMaker_IM_V8_R1.indd 39 2023-12-05 4:54 PM2023-12-05 4:54 PM

40
7. Verique los sándwiches o los alimentos a los 5 minutos o según
el tiempo de la receta. Con un guante de cocina o un agarrador,
sujete el asa y levante con cuidado la placa superior de la parrilla
para revisar si el panini está listo. Si lo desea, siga preparando hasta
alcanzar la cocción deseada.
¡ADVERTENCIA! UTILICE SIEMPRE UN TERMÓMETRO DE CARNE PARA ASEGURARSE DE
QUE LA CARNE, LAS AVES DE CORRAL Y EL PESCADO SE COCINAN COMPLETAMENTE
ANTES DE COMER.
8. Usando guantes de cocina, retire el alimento cocido de la placa
de la parrilla con una espátula no metálica.
ADVERTENCIA: Nunca use objetos alados o de metal, ya que puede dañar
la supercie antiadherente de las placas de la parrilla.
9. Si va a cocer más sándwiches, cierre la prensa y parrilla de panini
2 en 1 para mantener el calor.
10. Cuando termine de cocer los sándwiches, gire la perilla a la posición
de apagado (OFF) y desenchufe el cable del tomacorriente.
¡ADVERTENCIA! SIEMPRE DESENCHUFE LA UNIDAD CUANDO TERMINE DE COCINAR.
11. Deje que la prensa y parrilla de panini 2 en 1 se enfríe por completo
antes de retirar la bandeja de goteo o las placas de la parrilla
o de limpiar la unidad.
12. Para retirar las placas, presione los botones de liberación ubicados
en el costado de la unidad.
Prensa de panini: consejos para obtener mejores resultados
• Los panini suelen prepararse con una barra de pan abundante. Sin
embargo, los panini hechos con pan de molde o panecillos comprados en
tiendas pueden ser deliciosos y sencillos de preparar. Diviértase y
experimente con una variedad de panes, tortillas, panes planos e incluso
panes de pitas.
• Para los cocineros que desean cocinar saludablemente, el revestimiento
antiadherente de las placas de la parrilla garantiza un tostado
crujiente y delicioso sin necesidad de utilizar aceite ni mantequilla.
• Aunque no es necesario untar mantequilla o aceite en el exterior del
pan, se recomienda untar una pequeña cantidad de mantequilla o aceite de
oliva para favorecer un dorado uniforme del pan.
19392_19424_19425_19426_19450_BTFL_WUS_DetachablePlates_PaniniMaker_IM_V8_R1.indd 4019392_19424_19425_19426_19450_BTFL_WUS_DetachablePlates_PaniniMaker_IM_V8_R1.indd 40 2023-12-05 4:54 PM2023-12-05 4:54 PM

41
• Use mantequilla de nueces, alioli de ajo, hummus, guacamole, tapenade de
aceitunas, pesto, su mostaza favorita o mermelada de cebolla asada en
sus paninis para añadir cremosidad y sabor.
• Tenga todos los ingredientes a mano antes de preparar los panini.
• Cuando use rellenos blandos o líquidos, utilice panes más densos
y de rebanadas más gruesas. Retire el interior de los panecillos suaves
para formar un vaso donde pueda poner el relleno.
• La mayoría de las frutas sueltan jugo al calentarse. Escurra y seque
la fruta fresca o en conserva con una toalla de papel limpia.
• Evite usar quesos procesados, ya que tienden a "escurrirse" cuando están
a temperaturas altas.
• Rociar una cucharadita de azúcar en el lado con mantequilla hace que
el panini cocido sea más crujiente y le da sabor cuando tiene rellenos
dulces.
• Los panes integrales y dulces se asan más rápido que los panes blancos,
por lo que debe asarlos menos tiempo.
• Para evitar la contaminación de los alimentos, use guantes de cocina
y toallas de papel suaves y absorbentes para limpiar las placas
de la parrilla después de cada uso.
Para usar como parrilla de contacto (posición cerrada)
1. Además de prensar sándwiches, la prensa y parrilla de panini 2 en 1
sirve como parrilla de contacto.
2. Use trozos de carne, verduras, pescado y aves de igual profundidad;
todos los alimentos deben tener el grosor suciente para tocar la placa
superior e inferior de la parrilla cuando la prensa y parrilla de panini
2 en 1 esté cerrada.
3. Para asegurarse de que el alimento quede perfectamente cocinado, verique
que la placa superior cubra uniformemente la parte superior del alimento
mientras está centrado en la placa inferior. Si lo desea, presione el
asa hacia abajo varias veces mientras cocina.
19392_19424_19425_19426_19450_BTFL_WUS_DetachablePlates_PaniniMaker_IM_V8_R1.indd 4119392_19424_19425_19426_19450_BTFL_WUS_DetachablePlates_PaniniMaker_IM_V8_R1.indd 41 2023-12-05 4:54 PM2023-12-05 4:54 PM

42
4. Cierre suavemente la tapa superior de la prensa y parrilla de panini 2
en 1 sobre el alimento para evitar que se salga el jugo.
5. Los alimentos cocidos en contacto con la parrilla tardarán casi la mitad
del tiempo que en la parilla completa, ya que se cuecen por arriba y por
abajo en una zona de cocción reducida.
Asar carnes, aves o pescado
• Para asegurarse de obtener carnes asadas deliciosas y jugosas, siempre
deje reposar la carne entre 10 y 20 minutos antes de cortarla.
• Los cortes más duros, como el bistec de vacío, deben marinarse durante un
par de horas o durante la noche para que se ablanden.
• Los adobos de vino o vinagre ayudarán a romper el tejido conector antes
de asar.
• Escurra el exceso de adobo y seque bien la carne antes de colocarla en
la placa de la parrilla.
• Evite usar adobos que contengan altos niveles de azúcar, ya que pueden
quemar la placa de la parrilla.
• Para asegurarse de obtener un trozo tierno de carne asada, no agregue
sal antes de asar.
• No ase la carne en exceso.
• Para evitar que las carnes queden secas y duras, nunca corte ni perfore
la carne mientras se asa.
• Use pinzas a prueba de rayones para colocar o retirar la carne de las
placas de la parrilla.
19392_19424_19425_19426_19450_BTFL_WUS_DetachablePlates_PaniniMaker_IM_V8_R1.indd 4219392_19424_19425_19426_19450_BTFL_WUS_DetachablePlates_PaniniMaker_IM_V8_R1.indd 42 2023-12-05 4:54 PM2023-12-05 4:54 PM

43
Para usar como parrilla completa (posición abierta)
1. Coloque la prensa y parrilla de panini 2 en 1 sobre una supercie plana
y nivelada. Asegúrese de que haya espacio suciente para acomodar la
prensa y parrilla de panini 2 en 1 completamente abierta.
PRECAUCIÓN: Para evitar lesiones o daños a la propiedad, verique que
la bandeja de goteo desmontable esté bien insertada en el frente de la
unidad.
2. Si lo desea, unte una ligera capa de aceite en ambas placas de la
parrilla.
IMPORTANTE: No use rociadores antiadherentes, ya que pueden generar
acumulaciones en las placas de la parrilla. En su lugar, use aceite
vegetal o de oliva.
ADVERTENCIA: No use productos para untar sin grasa, ya que pueden quemar
o dañar las placas antiadherentes de la parrilla.
3. La parrilla completa es necesaria cuando vaya a cocinar varios alimentos
con distintos grosores, chuletas con hueso de más de 1 pulgada de
grosor, cortes más grandes de carnes o salchichas, pescados delicados o
verduras grandes cortadas de forma irregular en las que se desee dejar
marcas de la parrilla.
4. Abra la tapa a 90°.
5. Sostenga el asa y presione el botón de liberación de la bisagra
(Figura 2) y abra la parrilla obtener una supercie de cocción completa.
(Ver Figura 3).
7. Precaliente la prensa y parrilla de panini 2 en 1. Enchufe la unidad
en un tomacorriente de 120 V de CA. Gire la perilla al ajuste deseado,
la unidad comenzará a calentarse y la luz de encendido se encenderá y
permanecerá así durante el uso.
8. Durante el precalentamiento, prepare el alimento que va a asar.
9. Cuando se encienda la luz blanca READY (listo), coloque el alimento en
la(s) placa(s) abierta(s) de la parrilla. Los alimentos con un alto
contenido de grasa deben colocarse en la placa delantera de la parrilla
para que la grasa se vacíe en el drenaje del centro de las dos placas de
la parrilla.
19392_19424_19425_19426_19450_BTFL_WUS_DetachablePlates_PaniniMaker_IM_V8_R1.indd 4319392_19424_19425_19426_19450_BTFL_WUS_DetachablePlates_PaniniMaker_IM_V8_R1.indd 43 2023-12-05 4:54 PM2023-12-05 4:54 PM

44
10. CONSEJO: Para obtener marcas de parrilla atractivas, coloque el alimento
en la parrilla en un ángulo de 45°. Deje que los alimentos se asen sin
tocarlos hasta que comiencen a dorarse en los costados. Levante una
esquina, y si ve que hay marcas doradas de la parrilla, voltee
el alimento y déjelo en el ángulo opuesto a las líneas de la parrilla.
Siga asando hasta que el alimento esté en el punto de cocción deseado.
PRECAUCIÓN: Para evitar el riesgo de quemaduras, siempre use guantes
de cocina. Tenga cuidado de no tocar las supercies calientes como
la carcasa superior, las placas de la parrilla o los líquidos calientes
de la bandeja de goteo. Debe tener mucho cuidado, ya que las supercies
alcanzan temperaturas peligrosamente altas.
11. Ase los alimentos según el tiempo de la receta o consulte la tabla
de cocción general. Las recetas pueden variar en cuanto a tiempo de
cocción y dorado. Tenga en cuenta los tiempos ideales de asado para cada
alimento para usos a futuro.
¡ADVERTENCIA! UTILICE SIEMPRE UN TERMÓMETRO DE CARNE PARA ASEGURARSE DE
QUE LA CARNE, LAS AVES DE CORRAL Y EL PESCADO SE COCINAN COMPLETAMENTE
ANTES DE COMER.
12. Usando guantes de cocina, retire el alimento cocido de la placa de
la parrilla con un utensilio no metálico. Las espátulas de plástico
ayudarán a retirar los alimentos delicados en una sola pieza. Las pinzas
a prueba de rayones son útiles para asar carnes o salchichas.
ADVERTENCIA: Nunca use utensilios alados o de metal, ya que puede dañar
la supercie antiadherente de las placas de la parrilla.
13. Cuando termine de asar los alimentos, gire la perilla a la posición
de apagado (OFF) y desenchufe el cable del tomacorriente.
¡ADVERTENCIA! SIEMPRE GIRE LA PERILLA A LA POSICIÓN DE APAGADO (OFF),
LUEGO DESENCHUFE LA UNIDAD CUANDO TERMINE DE ASAR.
14. Deje que la prensa y parrilla de panini 2 en 1 se enfríe por completo
antes de retirar la bandeja de goteo o las placas de la parrilla o
de limpiar la unidad.
19392_19424_19425_19426_19450_BTFL_WUS_DetachablePlates_PaniniMaker_IM_V8_R1.indd 4419392_19424_19425_19426_19450_BTFL_WUS_DetachablePlates_PaniniMaker_IM_V8_R1.indd 44 2023-12-05 4:54 PM2023-12-05 4:54 PM

45
Parrilla completa: Consejos para obtener mejores resultados
• Abra la prensa y parrilla de panini 2 en 1 en forma de parrilla completa
cuando necesite asar una variedad de alimentos de distintos grosores:
chuletas con hueso de más de 1 pulgada de grosor, cortes más grandes de
carnes o salchichas, pescados delicados o verduras grandes cortadas de
forma irregular en las que se desee dejar marcas de la parrilla.
• Los cortes más duros, como el bistec de vacío, deben marinarse durante
un par de horas o durante la noche para que se ablanden. El vino o el
vinagre ayudarán a romper el tejido conector antes de asar.
• Escurra el exceso de adobo y seque bien la carne antes de colocarla en
la placa de la parrilla.
• Evite usar adobos con altos niveles de azúcar, ya que quemarán la placa
de la parrilla mientras se asa.
• Para asegurarse de obtener un trozo tierno de carne asada, no agregue
sal antes de asar.
• Use una espátula para pescado resistente al calor para retirar el
pescado de la parrilla caliente.
¡NO ASE EN EXCESO!
• Para evitar que las carnes queden secas y duras, nunca corte ni perfore
la carne mientras se asa. • Use pinzas a prueba de rayones para colocar
o retirar la carne de las placas de la parrilla.
• Y lo más importante: Para asegurarse de obtener resultados jugosos y
deliciosos, siempre deje reposar la carne entre 10 y 20 minutos antes de
cortarla.
19392_19424_19425_19426_19450_BTFL_WUS_DetachablePlates_PaniniMaker_IM_V8_R1.indd 4519392_19424_19425_19426_19450_BTFL_WUS_DetachablePlates_PaniniMaker_IM_V8_R1.indd 45 2023-12-05 4:54 PM2023-12-05 4:54 PM
46
Figura 1
Figura 3
Figura 2
19392_19424_19425_19426_19450_BTFL_WUS_DetachablePlates_PaniniMaker_IM_V8_R1.indd 4619392_19424_19425_19426_19450_BTFL_WUS_DetachablePlates_PaniniMaker_IM_V8_R1.indd 46 2023-12-05 4:54 PM2023-12-05 4:54 PM

47
Tabla de cocción general de la prensa y parrilla de panini 2 en 1
SÁNDWICHES TIEMPO DE
COCCIÓN
NOTAS
Panini 5 a 7 minutos Presione ligeramente al inicio
de la cocción. Cocine hasta que el
queso se derrita.
Queso gratinado,
a la plancha
3 a 5 minutos Cocine hasta que el pan esté dorado y
crujiente, y el queso esté derretido.
Queso gratinado con
tocino, jamón, pavo,
carne de res, atún,
salchicha, verduras
5 a 7 minutos Cocine hasta que el pan esté dorado y
crujiente, y el queso esté derretido.
Quesadillas 3 a 5 minutos Cocine hasta que la tortilla esté
ligeramente dorada y el queso esté
derretido
Sándwiches envueltos 3 a 5 minutos Cocine hasta que la tortilla, el pan
de pita o bolsita estén dorados y
crujientes y el queso esté derretido
19392_19424_19425_19426_19450_BTFL_WUS_DetachablePlates_PaniniMaker_IM_V8_R1.indd 4719392_19424_19425_19426_19450_BTFL_WUS_DetachablePlates_PaniniMaker_IM_V8_R1.indd 47 2023-12-05 4:54 PM2023-12-05 4:54 PM

48
Parrilla completa
ALIMENTO TIEMPO DE COCCIÓN INSTRUCCIONES
Solomillo, 1/2 a 1 pulgada de grosor,
término medio
3 a 4 minutos Voltear una vez
Solomillo, 1/2 a 1 pulgada de grosor,
bien cocido
6 a 8 minutos Dar vuelta una vez
Bistec de vacío 12 a 14 minutos Dar vuelta una vez
Hamburguesas, 1/4 de libra,
término medio
2 a 4 minutos Dar vuelta una vez
Hamburguesas, 1/4 de libra,
bien cocidas
5 a 7 minutos Dar vuelta una vez
Pechuga de pollo, deshuesada y sin
pellejo, 1/2" de grosor
8 a 12 minutos Dar vuelta una vez
Cerdo, deshuesado, 1 pulgada de grosor 7 a 9 minutos Dar vuelta una vez
Chuletas de lomo de cordero, con hueso, 8 a 12 minutos Dar vuelta una vez
Perros calientes 5 a 8 minutos Dar vuelta una vez
Salchichas, italianas gruesas 6 a 8 minutos Dar vuelta una vez
Salchichas, desayuno, congeladas 4 a 8 minutos Dar vuelta una vez
Verduras: hongos, espárragos,
calabacín, pimientos, frijoles verdes
5 a 10 minutos Voltear varias
veces
Filete de salmón, trozo de 1/2 libra,
con piel
5 a 8 minutos Dar vuelta una vez
19392_19424_19425_19426_19450_BTFL_WUS_DetachablePlates_PaniniMaker_IM_V8_R1.indd 4819392_19424_19425_19426_19450_BTFL_WUS_DetachablePlates_PaniniMaker_IM_V8_R1.indd 48 2023-12-05 4:54 PM2023-12-05 4:54 PM

49
Pautas de cocina del USDA
Siempre use un termómetro para carne para medir la temperatura internal.
El termómetro debe insertarse en la parte más gruesa de la carne, lejos de
los huesos o zonas con grasa.
El Departamento de Agricultura de los Estados Unidos recomienda que la carne
y las aves se cocinen a las siguientes temperaturas internas para garantizar
que se eliminen las bacterias dañinas. El picadillo de pavo y de pollo se deben
cocinar a una temperatura interna de 165 °F/74 °C y el picadillo de carne de res,
ternera, cordero y cerdo se deben cocinar a una temperatura interna de
160 °F/71 °C. El pollo y el pavo deben cocinarse a una temperatura interna
de 170 °F/76.6 °C para las carnes blancas y de 180 °F/82 °C para las carnes rojas.
El ganso y el pato deben cocinarse a una temperatura interna de 180 °F/82 °C.
La carne fresca de res, ternera y cordero, etc., debe cocinarse a una temperatura
interna de al menos 145 °F/62.7 °C. La carne de cerdo fresca debe cocinarse a una
temperatura interna de al menos 160 °F/71 °C. Al recalentar productos de carnes
y aves, también deben cocinarse a una temperatura interna de 165 °F/74 °C.
Instrucciones de mantenimiento para el usuario
Este aparato requiere poco mantenimiento. No contiene piezas que el usuario
pueda reparar. No intente repararla por cuenta propia. Comuníquese con un
técnico calicado en reparación de electrodomésticos si el producto requiere
reparación.
Instrucciones de limpieza y cuidado
PRECAUCIÓN: Desenchufe del tomacorriente y deje enfriar por completo antes de
quitar la bandeja de goteo o de limpiar la unidad.
¡ADVERTENCIA! SIEMPRE DESENCHUFE LA UNIDAD CUANDO TERMINE DE COCINAR. DE LO
CONTRARIO, LA PARRILLA DE PANINI SEGUIRÁ CALENTÁNDOSE HASTA QUE SE DESENCHUFE.
1. Cuando la prensa y parrilla de panini 2 en 1 se enfríe completamente
y sea seguro manipularla, deslice la bandeja de goteo extraíble hacia
afuera desde la parte delantera de la unidad.
2. Limpie la bandeja de goteo con agua caliente y jabón.
NOTA: La bandeja de goteo extraíble puede lavarse en la parte superior
del lavavajillas.
19392_19424_19425_19426_19450_BTFL_WUS_DetachablePlates_PaniniMaker_IM_V8_R1.indd 4919392_19424_19425_19426_19450_BTFL_WUS_DetachablePlates_PaniniMaker_IM_V8_R1.indd 49 2023-12-05 4:54 PM2023-12-05 4:54 PM

50
3. Retire las placas de la parrilla para limpiarlas fácilmente.
Abra la tapa a 90°.
Presione el botón de liberación de la placa superior de la parte
delantera de la tapa superior. (Vea la Figura 1). Los seguros liberarán
la placa de la parrilla. Jale la placa hacia adelante y luego levántela
de las ranuras en la parte más baja de la tapa inferior.
(vea la Figura 6)
4. Presione el botón de liberación de la placa inferior del lado derecho
de la base, luego jale la placa hacia arriba y luego hacia afuera
de las ranuras de la parte inferior de la tapa inferior.
5. Limpie las placas antiadherentes de la parrilla con un cepillo o paño
limpios. De ser necesario, limpie las placas con agua caliente y jabón.
Quite las manchas persistentes con una almohadilla o esponja
de malla. Para obtener los mejores resultados, use solo productos cuyas
instrucciones indiquen que son seguros para limpiar supercies de cocción
antiadherentes. No use lana de acero o estropajos de metal.
NOTA: Las placas de la parrilla pueden lavarse en la parte superior
del lavavajillas.
PRECAUCIÓN: Nunca sumerja la prensa y parrilla de panini 2 en 1 en agua
u otros líquidos.
6. Vuelva a colocar ambas placas de la parrilla limpias. Coloque los
drenajes de grasa y las lengüetas orientadas hacia adelante, inserte
completamente las 2 lengüetas en las 2 ranuras y presione la placa
inferior y superior de la parrilla dentro del cuerpo hasta que se jen
rmemente en su lugar. (Vea la Figura 7).
7. Vuelva a colocar la bandeja de goteo extraíble limpia debajo de la parte
delantera de la unidad. Presione para asegurarse de que la bandeja
de goteo esté completamente insertada debajo del drenaje de grasa
en la parte posterior de la unidad.
8. Debe limpiar el acabado exterior con un limpiador no abrasivo y un paño
suave y húmedo. Seque bien.
19392_19424_19425_19426_19450_BTFL_WUS_DetachablePlates_PaniniMaker_IM_V8_R1.indd 5019392_19424_19425_19426_19450_BTFL_WUS_DetachablePlates_PaniniMaker_IM_V8_R1.indd 50 2023-12-05 4:54 PM2023-12-05 4:54 PM

51
Instrucciones de almacenamiento
ADVERTENCIA: Nunca guarde la prensa y parrilla de panini 2 en 1 mientras está
caliente o enchufada.
1. Asegúrese de que la unidad esté desenchufada y completamente fría.
ADVERTENCIA: PARA EVITAR POSIBLES INCENDIOS Y DAÑOS A LA UNIDAD,
LA PARRILLA DE PANINI DEBE GUARDARSE CON AMBAS PLACAS SUPERIOR
E INFERIOR INSTALADAS.
2. Verique que la bandeja de goteo desmontable esté bien insertada
en el frente de la unidad.
3. Nunca envuelva el cable de forma que quede apretado alrededor del
aparato. No ejerza fuerza por la parte del cable que entra a la unidad,
pues esto podría hacer que se deshilache y se rompa.
4. Guarde la prensa y parrilla de panini 2 en 1 en su caja o guárdela
cerrada para almacenarla de forma fácil y compacta.
19392_19424_19425_19426_19450_BTFL_WUS_DetachablePlates_PaniniMaker_IM_V8_R1.indd 5119392_19424_19425_19426_19450_BTFL_WUS_DetachablePlates_PaniniMaker_IM_V8_R1.indd 51 2023-12-05 4:54 PM2023-12-05 4:54 PM

Garantía limitada de dos años
Mediante la presente, Sensio Inc.
dba Made by Gather™. garantiza que,
durante el plazo de DOS AÑOS a partir
de la fecha de compra, este producto
no presentará defectos mecánicos en
el material ni en la mano de obra, y
durante 90 días, no los presentará en
las piezas no mecánicas. A su entera
discreción, Sensio Inc. dba Made by
Gather™ que resulte defectuoso, o
emitirá un reembolso por el producto
durante el plazo de garantía.
Esta garantía es válida únicamente
para el comprador minorista
original a partir de la fecha de
compra minorista inicial y no es
transferible. Conserve el recibo
de compra original, ya que se exige
una prueba de compra para obtener
la validación de la garantía. Las
tiendas minoristas no tienen derecho
a alterar, modicar ni corregir
de ninguna manera los términos y
condiciones de la garantía.
Exclusiones:
La garantía no cubre el desgaste
normal de las piezas ni el daño
ocasionado por cualquiera de las
siguientes causas: uso negligente
del producto, uso de un voltaje o
corriente incorrectos, mantenimiento
de rutina inadecuado, uso
contrario al de las instrucciones
de funcionamiento, desarmado,
reparación o alteración a cargo
de personas que no sean miembros
del personal calicado de Sensio
Inc. dba Made by Gather™ Asimismo,
la garantía no cubre actos de
la naturaleza, como incendios,
inundaciones, huracanes o tornados.
Sensio Inc. dba Made by Gather™
no asumirá responsabilidad por
daños incidentales o resultantes
ocasionados por la violación
de cualquier garantía expresa
o implícita. Salvo en la medida
en que lo prohíban las leyes
aplicables, cualquier garantía
implícita de comerciabilidad o
aptitud para un propósito particular
se limita temporalmente a la
duración de la garantía. Algunos
estados, provincias o jurisdicciones
no permiten la exclusión ni la
limitación de daños incidentales
o resultantes, o limitaciones
sobre la duración de una garantía
implícita y, por lo tanto, es posible
que las exclusiones o limitaciones
mencionadas no le correspondan.
La garantía cubre derechos legales
especícos que pueden variar de
un estado, una provincia o una
jurisdicción a otros.
52
19392_19424_19425_19426_19450_BTFL_WUS_DetachablePlates_PaniniMaker_IM_V8_R1.indd 5219392_19424_19425_19426_19450_BTFL_WUS_DetachablePlates_PaniniMaker_IM_V8_R1.indd 52 2023-12-05 4:54 PM2023-12-05 4:54 PM

53
Cómo obtener el servicio de garantía
Debe comunicarse con el Servicio
de atención al cliente a nuestro
número telefónico gratuito:
1-877-775-3564. Un representante
del Servicio de atención al cliente
intentará resolver los problemas
referidos a la garantía por
teléfono. Si este no puede resolver
el problema, le proporcionarán un
número de caso y le solicitarán que
devuelva el producto a Sensio Inc.
dba Made by Gather™ Adhiera una
etiqueta al producto que incluya:
su nombre, dirección, número
telefónico de contacto durante
el día, número de caso y descripción
del problema. Además, incluya una
copia del recibo de compra original.
Envuelva cuidadosamente el producto
etiquetado con el recibo de compra,
y envíelo (con el envío y el seguro
prepagados) a la dirección de
Sensio Inc. dba Made by Gather™.
Sensio Inc. dba Made by Gather™
no asumirá obligación ni
responsabilidad alguna por el
producto devuelto que esté en el
trayecto hacia el Centro de servicio
al cliente de Sensio Inc.
dba Made by Gather™
®
19392_19424_19425_19426_19450_BTFL_WUS_DetachablePlates_PaniniMaker_IM_V8_R1.indd 5319392_19424_19425_19426_19450_BTFL_WUS_DetachablePlates_PaniniMaker_IM_V8_R1.indd 53 2023-12-05 4:54 PM2023-12-05 4:54 PM

19392_19424_19425_19426_19450_BTFL_WUS_DetachablePlates_PaniniMaker_IM_V8_R1.indd 5419392_19424_19425_19426_19450_BTFL_WUS_DetachablePlates_PaniniMaker_IM_V8_R1.indd 54 2023-12-05 4:54 PM2023-12-05 4:54 PM

19392_19424_19425_19426_19450_BTFL_WUS_DetachablePlates_PaniniMaker_IM_V8_R1.indd 5519392_19424_19425_19426_19450_BTFL_WUS_DetachablePlates_PaniniMaker_IM_V8_R1.indd 55 2023-12-05 4:54 PM2023-12-05 4:54 PM

INSIDE back cover
19392_19424_19425_19426_19450_BTFL_WUS_DetachablePlates_PaniniMaker_IM_V8_R1.indd 5619392_19424_19425_19426_19450_BTFL_WUS_DetachablePlates_PaniniMaker_IM_V8_R1.indd 56 2023-12-05 4:54 PM2023-12-05 4:54 PM

INSIDE back cover
19392_19424_19425_19426_19450_BTFL_WUS_DetachablePlates_PaniniMaker_IM_V8_R1.indd 5719392_19424_19425_19426_19450_BTFL_WUS_DetachablePlates_PaniniMaker_IM_V8_R1.indd 57 2023-12-05 4:54 PM2023-12-05 4:54 PM

Sensio Inc.
dba Made by Gather™
New York, NY 10016/USA
www.beautifulbydrew.com
BACK Cover
19392, 19424, 19425, 19426, 19450 R1
19392_19424_19425_19426_19450_BTFL_WUS_DetachablePlates_PaniniMaker_IM_V8_R1.indd 5819392_19424_19425_19426_19450_BTFL_WUS_DetachablePlates_PaniniMaker_IM_V8_R1.indd 58 2023-12-05 4:54 PM2023-12-05 4:54 PM