
Technical Support and E-Warranty Certificate
www.vevor.com/support
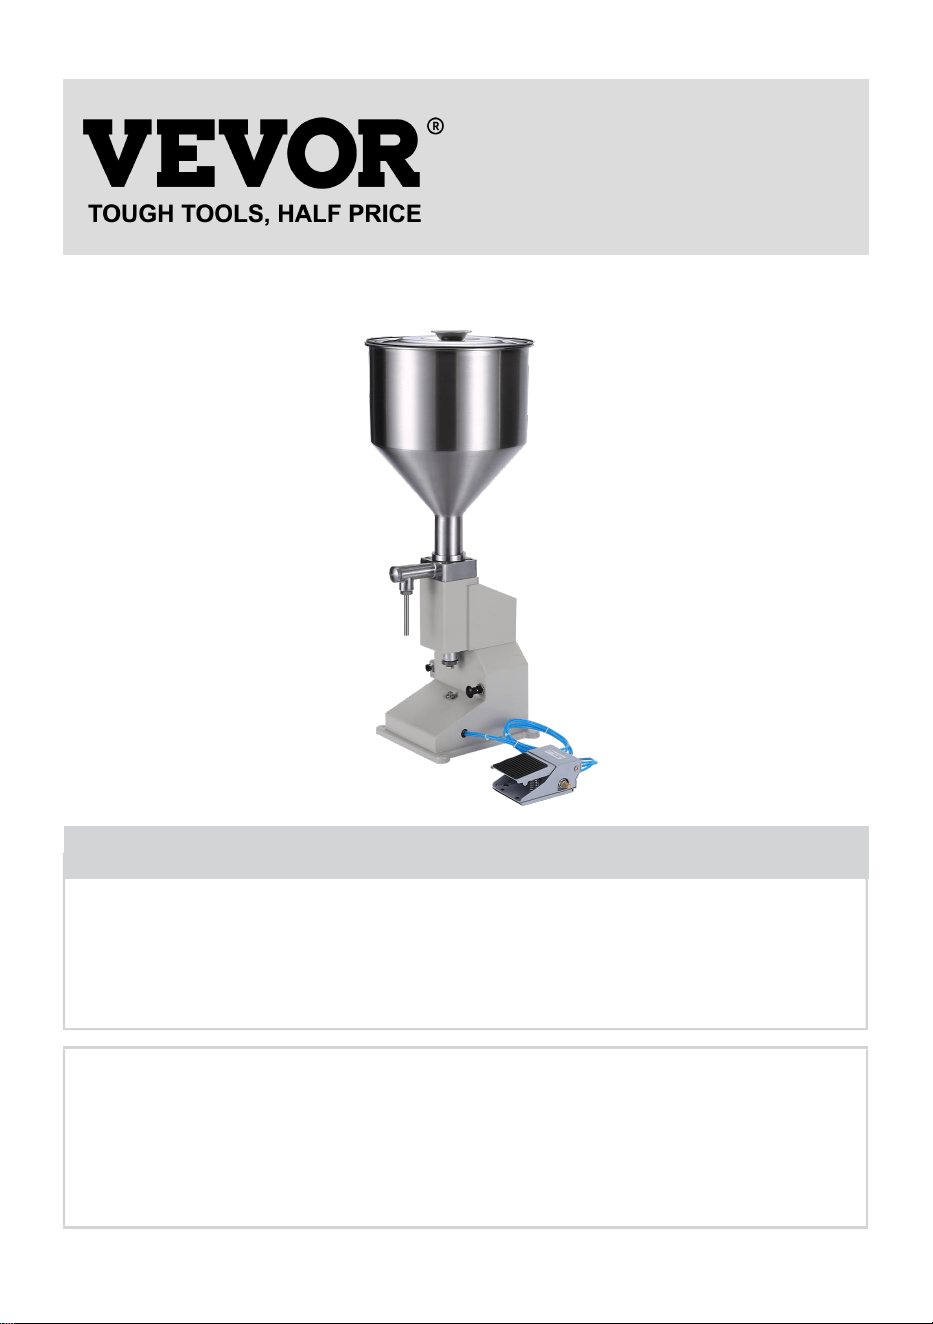
PASTE LIQUID FILLING MACHINE
USER MANUAL
We continue to be committed to provide you tools with competitive price.
"Save Half", "Half Price" or any other similar expressions used by us only represents an
estimate of savings you might benefit from buying certain tools with us compared to the major
top brands and does not necessarily mean to cover all categories of tools offered by us. You
are kindly reminded to verify carefully when you are placing an order with us if you are
actually saving half in comparison with the top major brands.

- 1 -
MODEL:A02
Have product questions? Need technical support? Please feel free to
contact us:
Technical Support and E-Warranty Certificate
www.vevor.com/support
NEED HELP? CONTACT US!
This is the original instruction, please read all manual instructions
carefully before operating. VEVOR reserves a clear interpretation of our
user manual. The appearance of the product shall be subject to the
product you received. Please forgive us that we won't inform you again if
there are any technology or software updates on our product.
Paste Liquid Filling
Machine

- 2 -
1. Read carefully and understand all ASSEMBLY AND OPERATION
INSTRUCTIONS before operating.
2. Failure to follow the safety rules and other basic safety precautions may
result in serious personal injury.
GENERAL SAFETY RULES
Important reminder
1.Before use, please carefully read the product manual and ensure that
you understand and comply with all safety warnings and usage
precautions.
2. Do not use this product for other non-designated purposes to avoid
unexpected risks.
3. This product is only applicable to users within the specified age group
and scope of application. Please strictly comply with relevant age
restrictions and warnings.
4. If there are any abnormalities in the product, please stop using it
immediately and contact the after-sales service center for consultation or to
arrange for repair.
Environmental requirements for use
1. Please use in a dry and well-ventilated environment to avoid extreme
environmental conditions such as water activation, high temperature, high
humidity, and extremely low temperature.
2. Avoid direct sunlight or contact with fire sources to prevent product
damage or fire.
3. Please ensure a stable usage environment and prevent the product from
being hit or dropped to avoid damage.
Safety Operation Guidelines
1.When foreign objects are found on the surface of the product, please
immediately stop using and remove the foreign objects before continuing to
use them.
2. When using this product continuously for a long time, please rest in good
time to avoid excessive fatigue.
Maintenance and upkeep

- 3 -
1. Regularly maintain and clean the product. Use a dry cloth for wiping,
paying attention to avoiding the use of corrosive substances such as
alcohol, acid and alkali solutions.
2. Do not disassemble the product or replace components on your own. If
you encounter any malfunctions, please contact the after-sales service
center.
Emergency handling measures
1. When there are abnormal situations or accidents with the product,
please stop using it as soon as possible.
If overheating, smoking, or abnormal sound are found, please immediately
cut off the air source and contact the after-sales service center.
2. If the product involves an emergency situation that may harm personal
safety, please call the emergency rescue number in a timely manner.
Disclaimers
We attach great importance to the safety and quality of our products, but
cannot assume responsibility for safety accidents caused by improper use
or operation.
SAVE THESE INSTRUCTIONS
MODEL AND PARAMETERS
Model
A02
Suitable liquid
All free-flowing pastes and liquids (no
particles)Such as shampoo, shower gel,
essential oil, etc
Filling Range
5~50ml
Control Mode
Pedal Switch,The pneumatic filling
Air Supply Pressure
0.4-0.6Mpa
Hopper
10L, 304 Stainless Steel
- 4 -
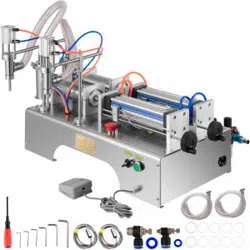
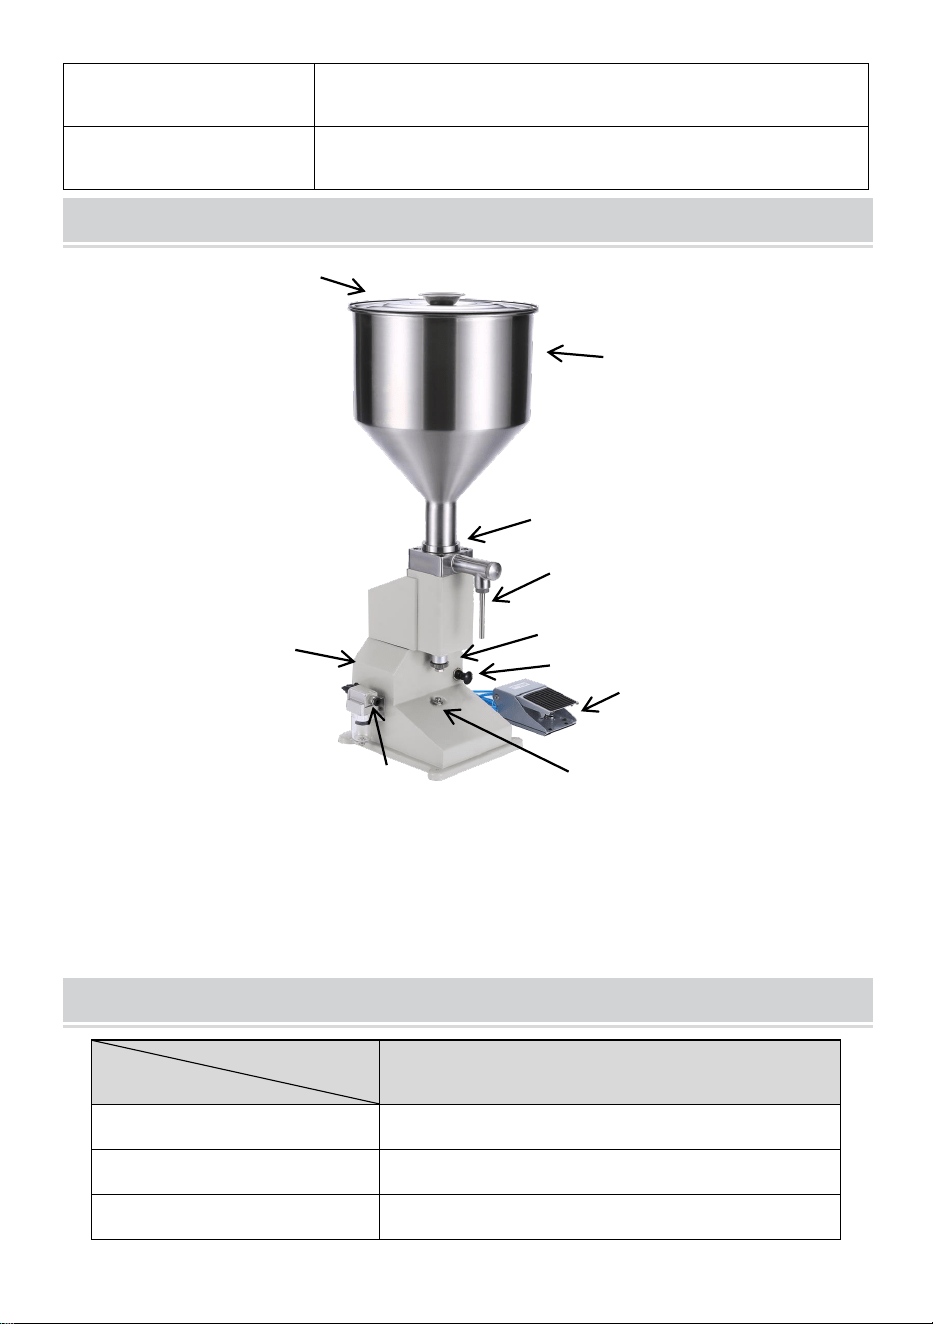
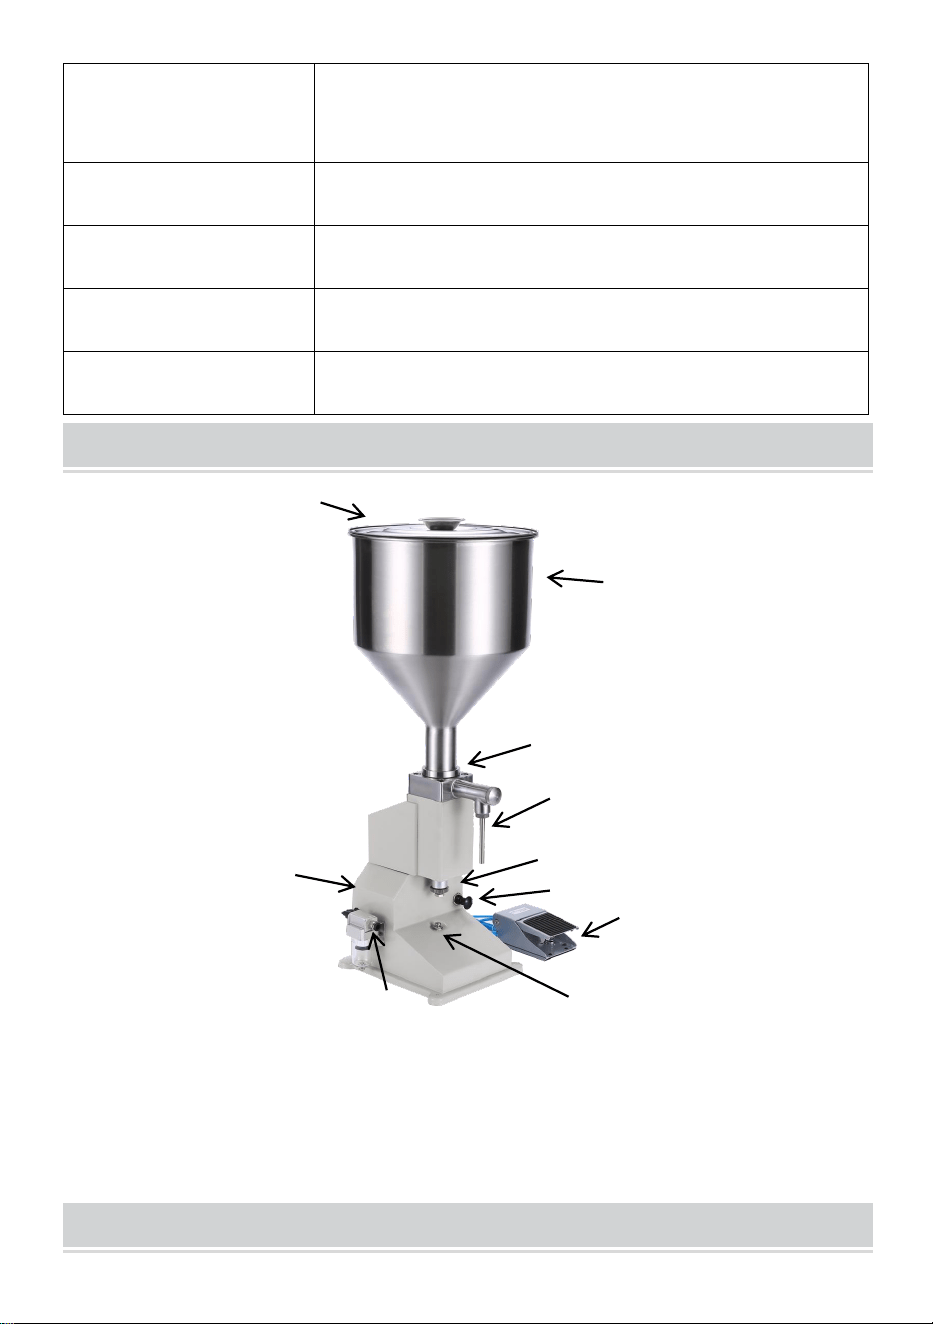
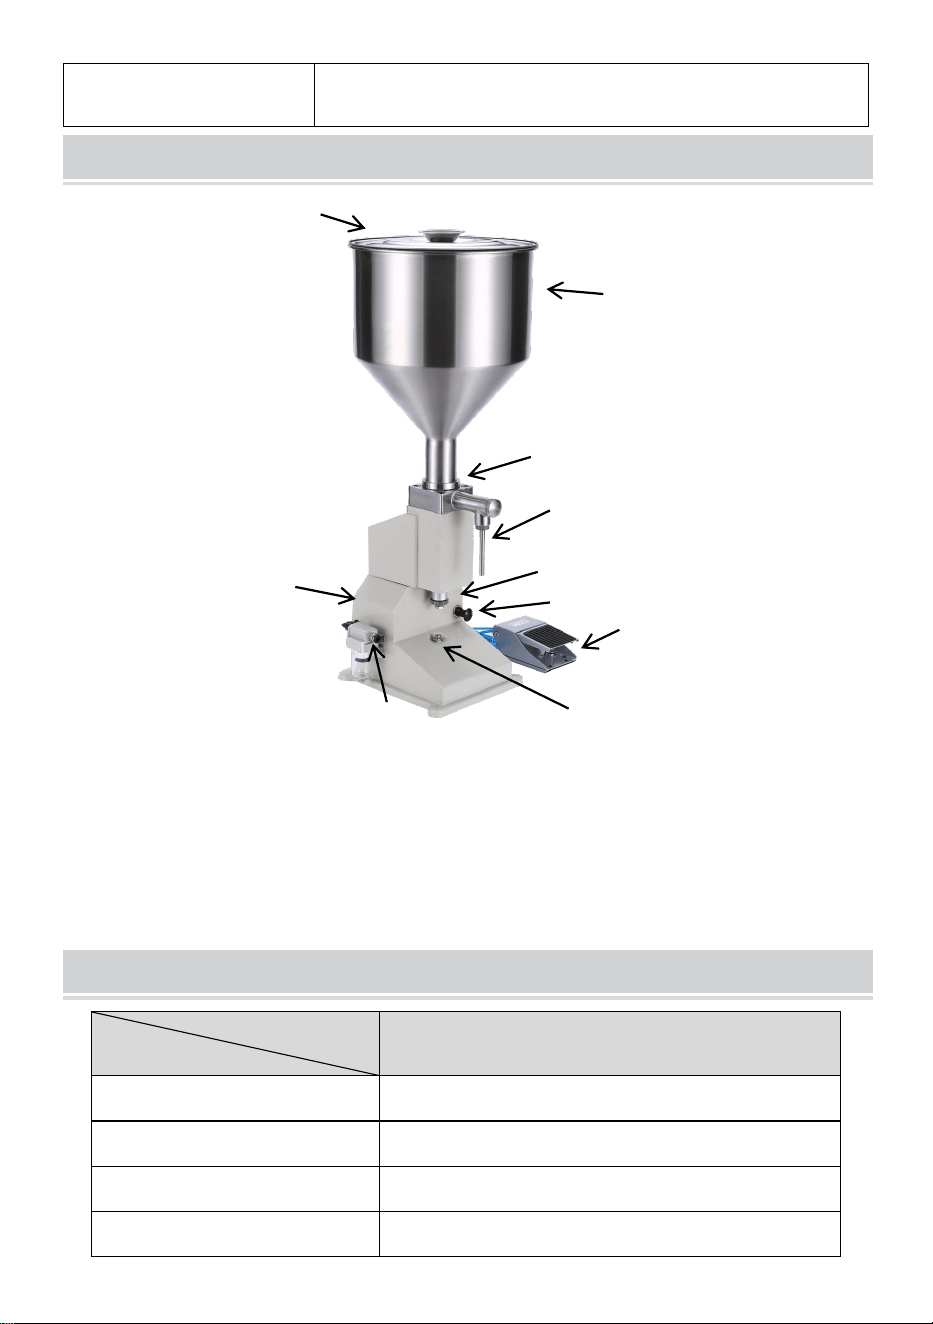
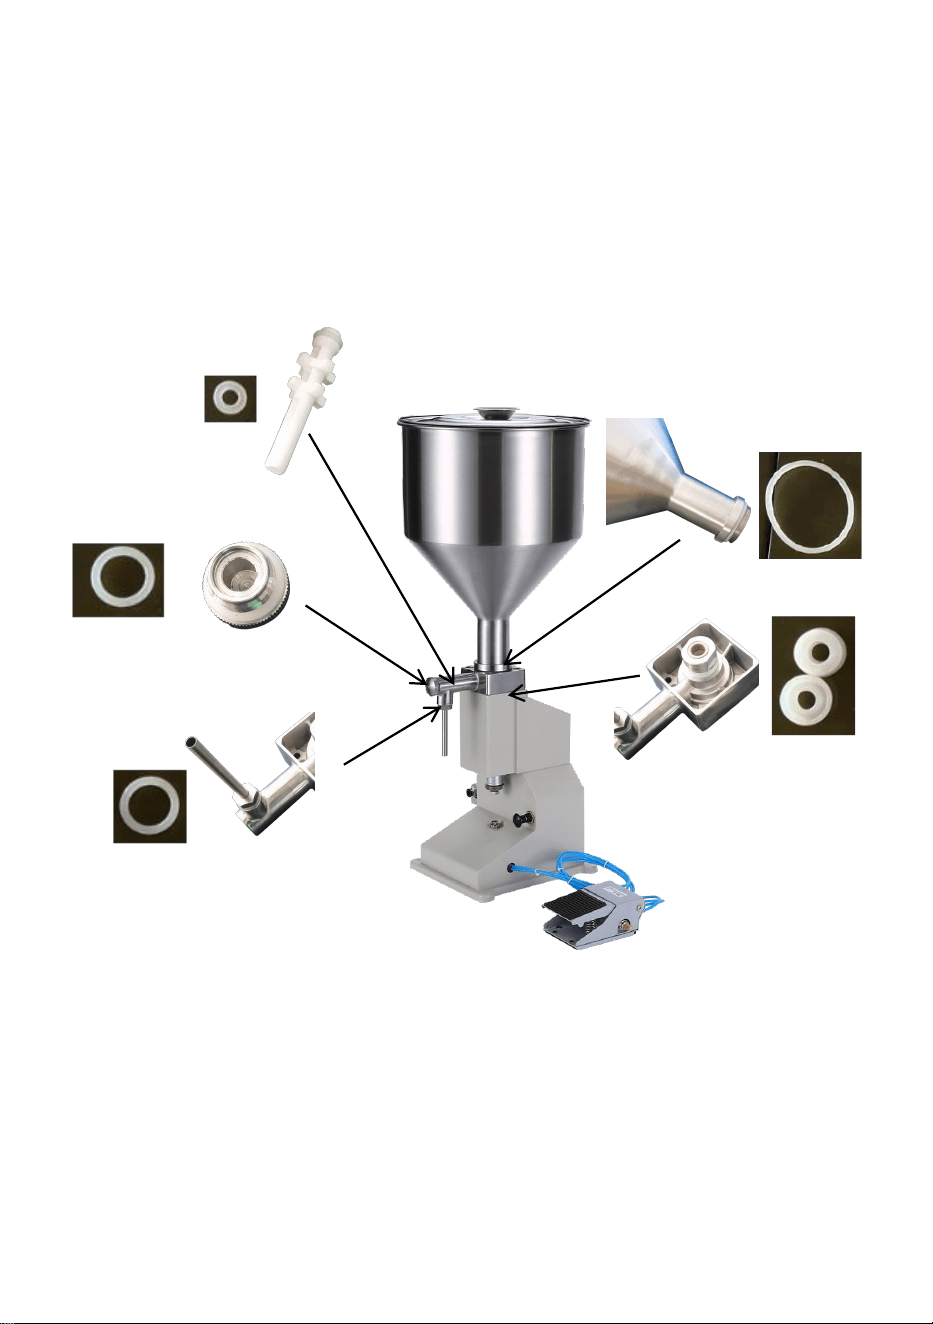
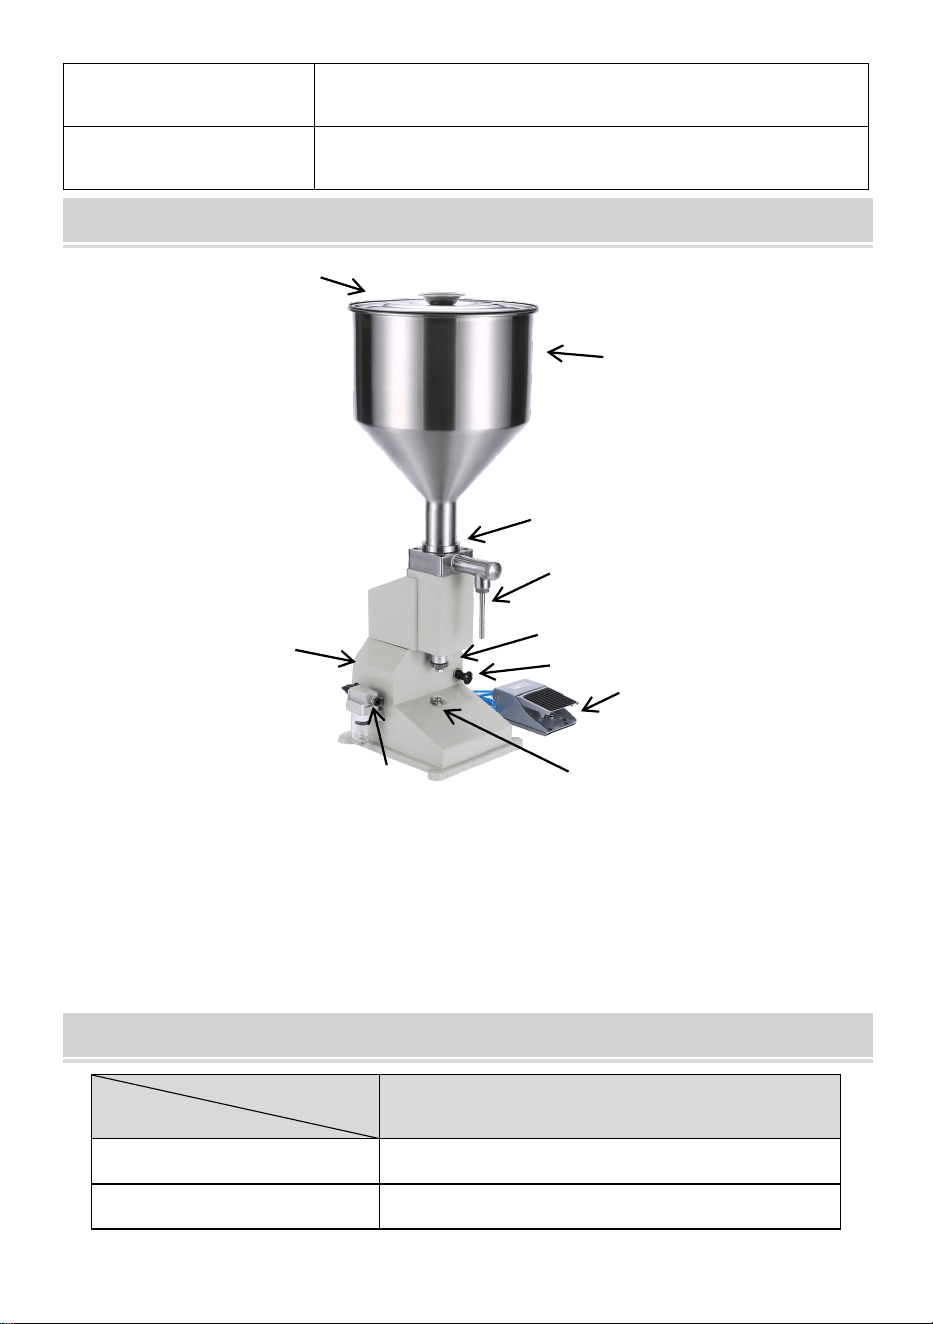
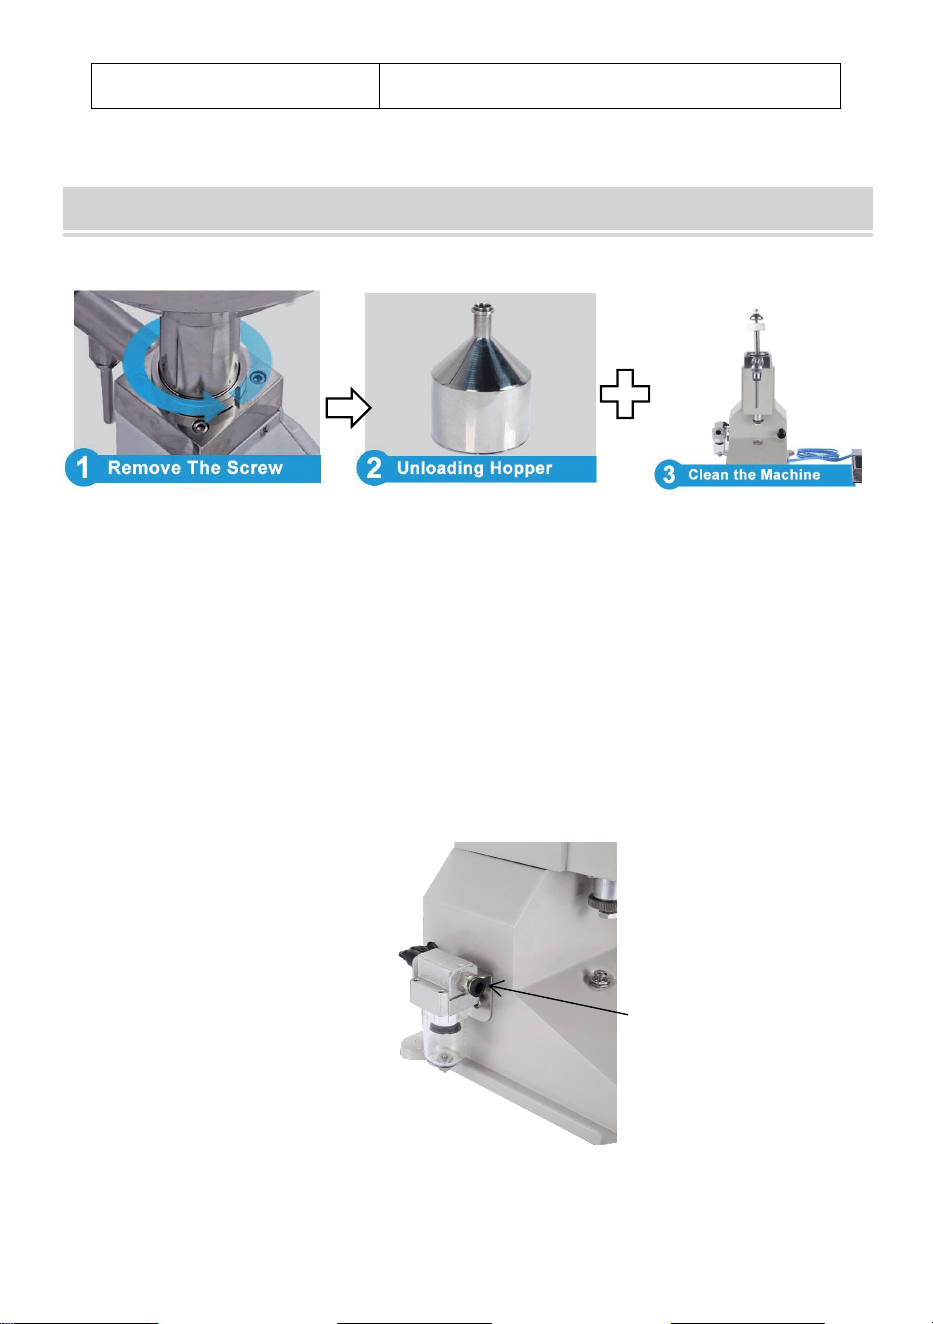
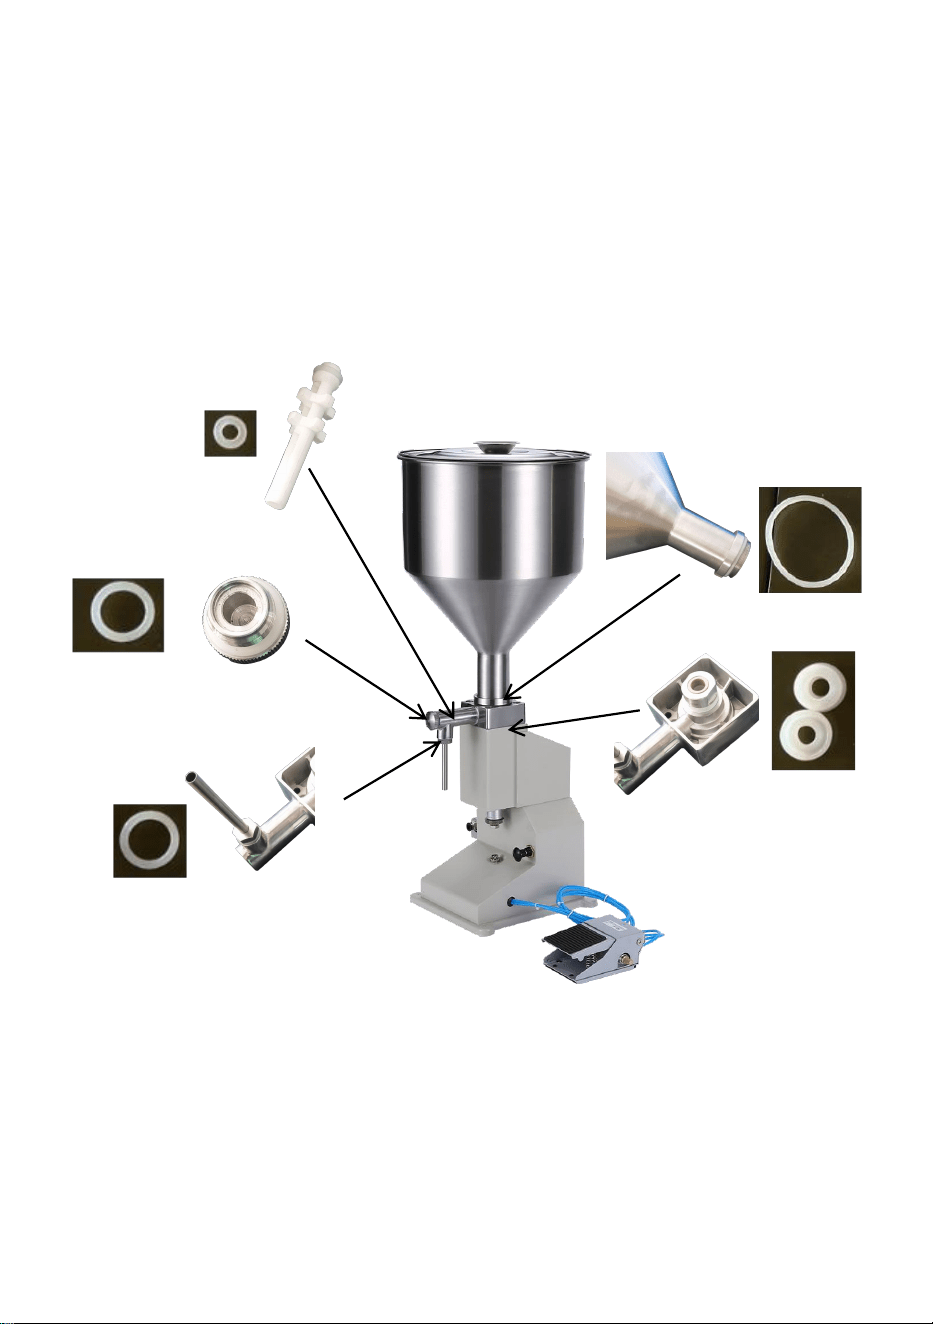
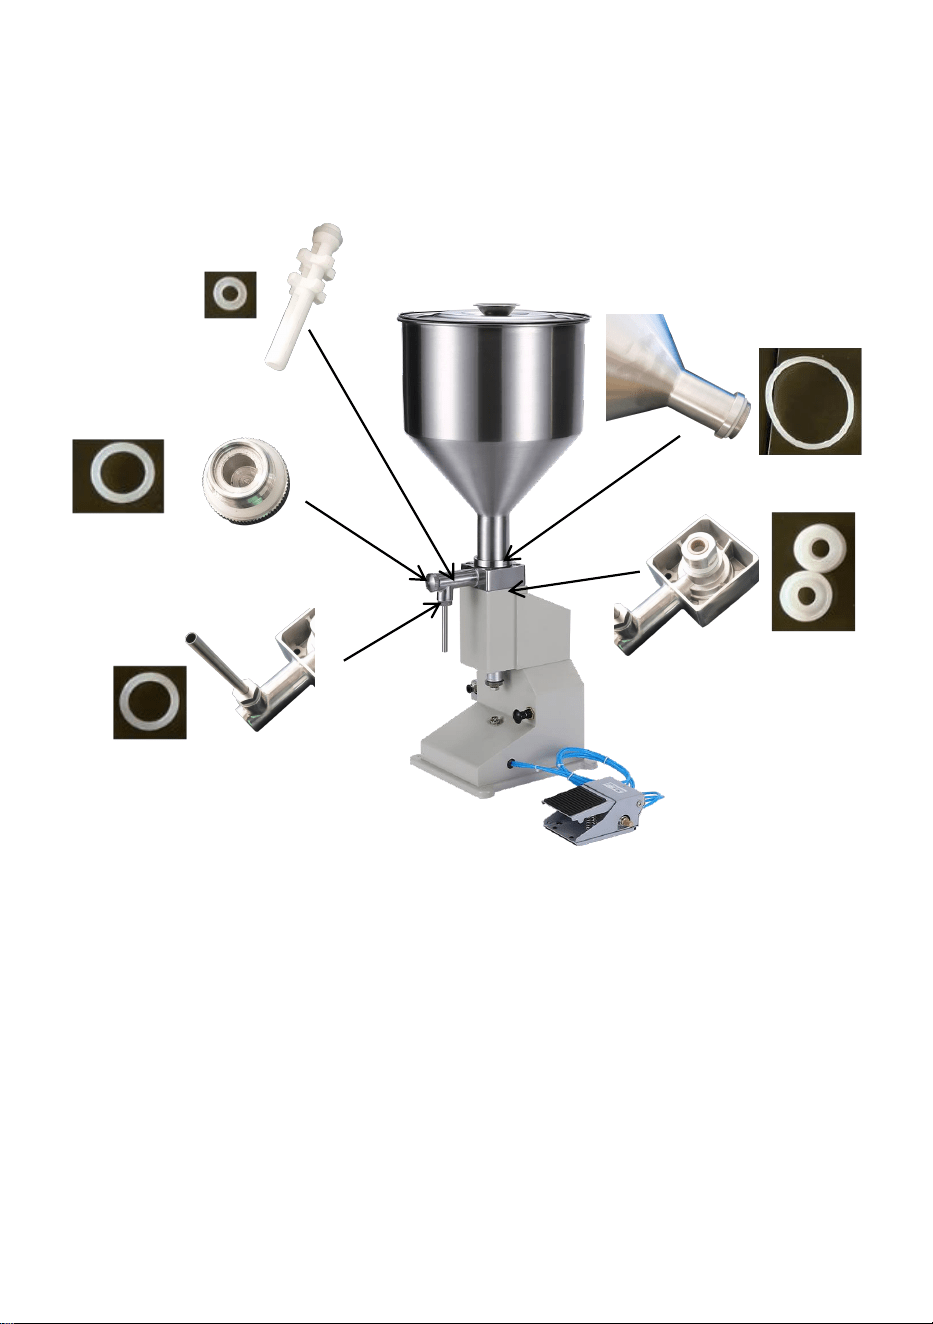
STRUCTURE DIAGRAM
1. Hopper Cover 2. Hopper 3. Hopper seal 4. Filling Nozzle
5.Filling Adjusting Screw 6.Air source switch 7. Pedal Switch
8.Trigger 9. Air Inlet and Air Filter 10. Base
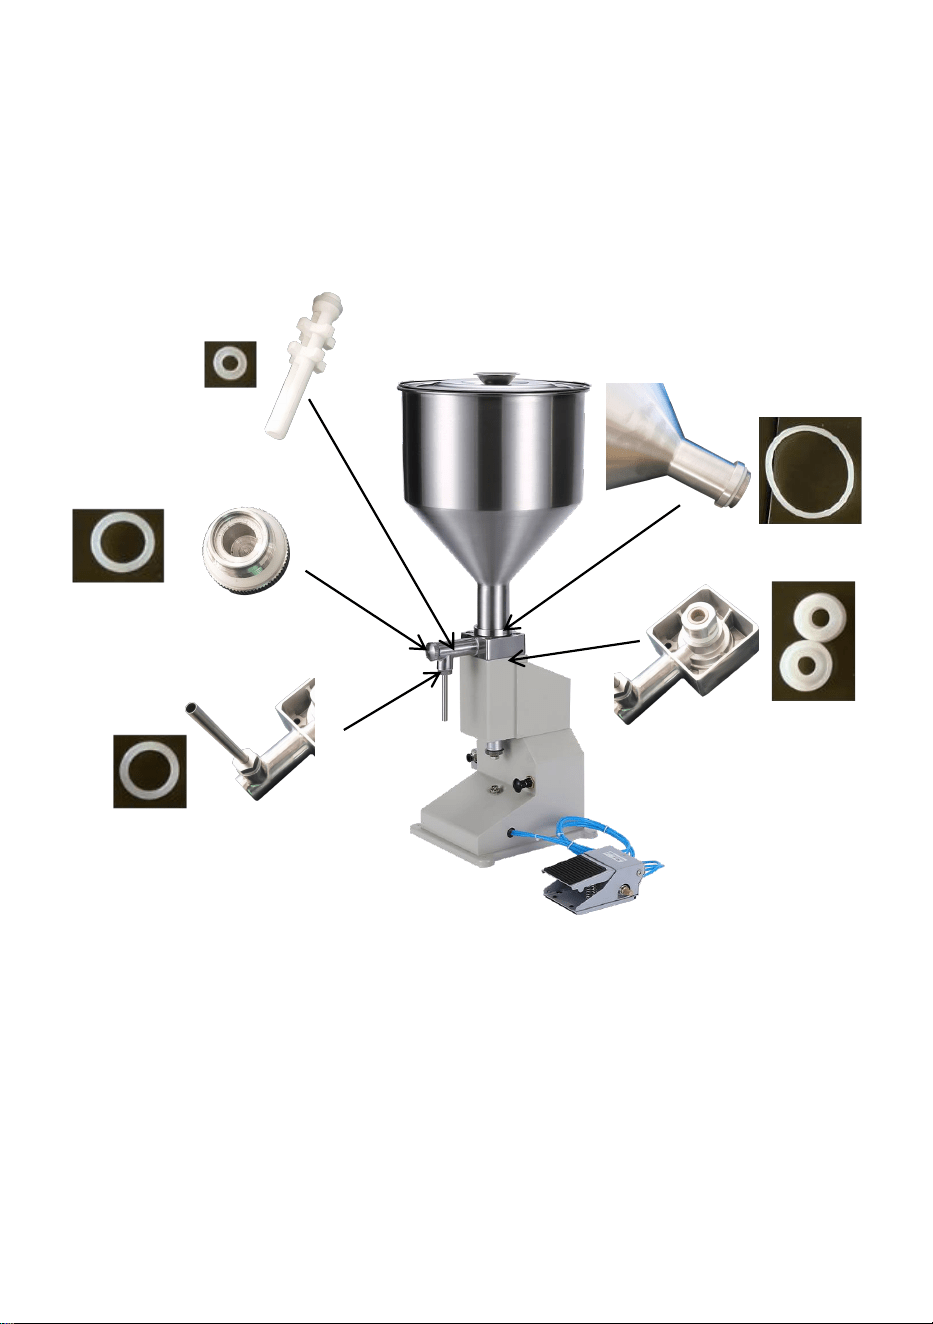
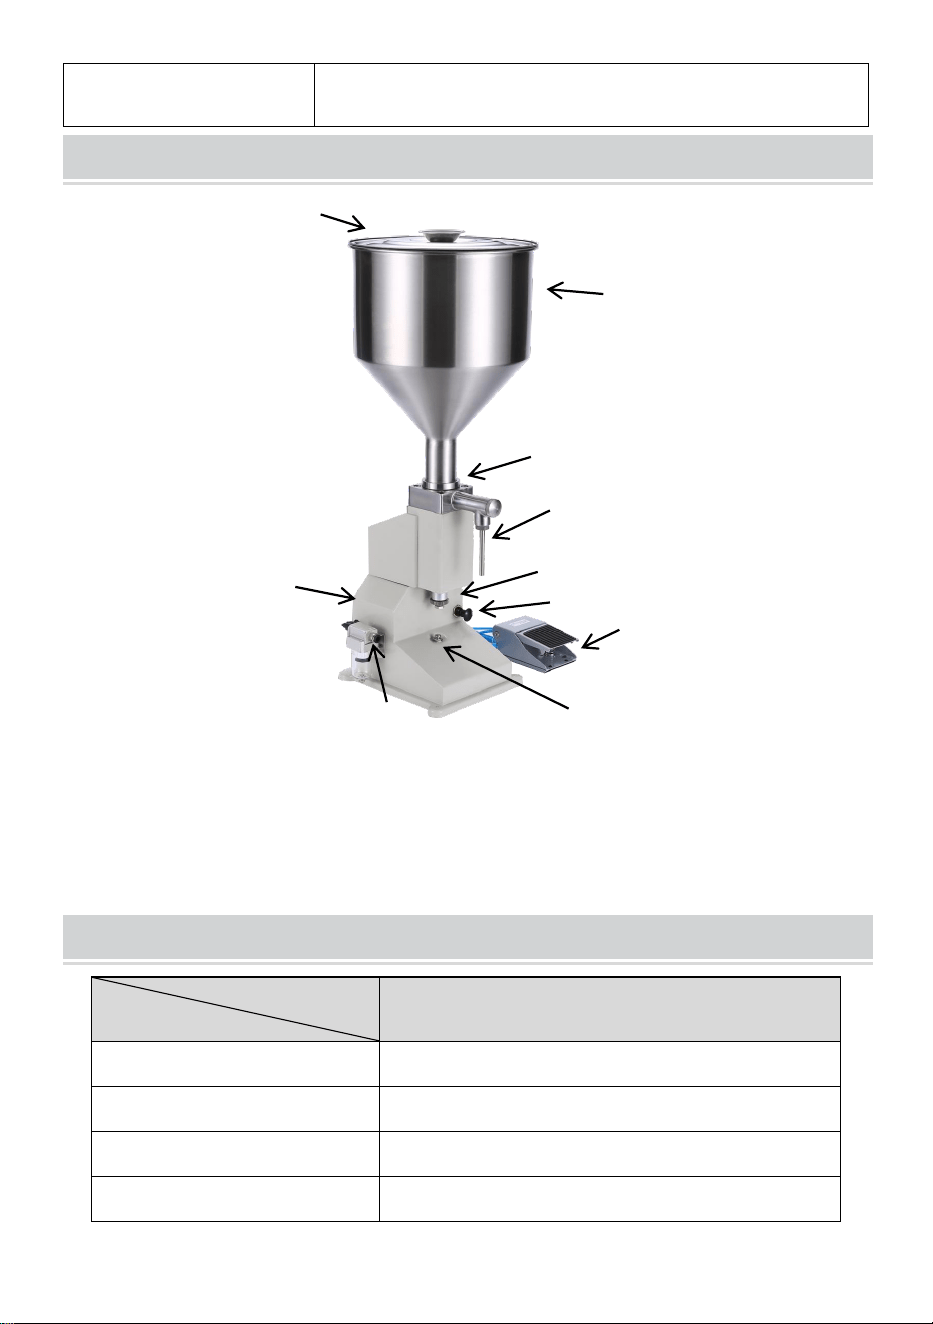
COMPONENTS
A02
Sealing Ring
×2
O-ring
×7
Hex Wrench
×2
User Manual
×1
Filling Nozzle
×2(Ф4,Ф8)
2
6
5
7
9
10
0
8
4
1
3
Model
Parts
- 5 -
OPERATING INSTRUCTIONS
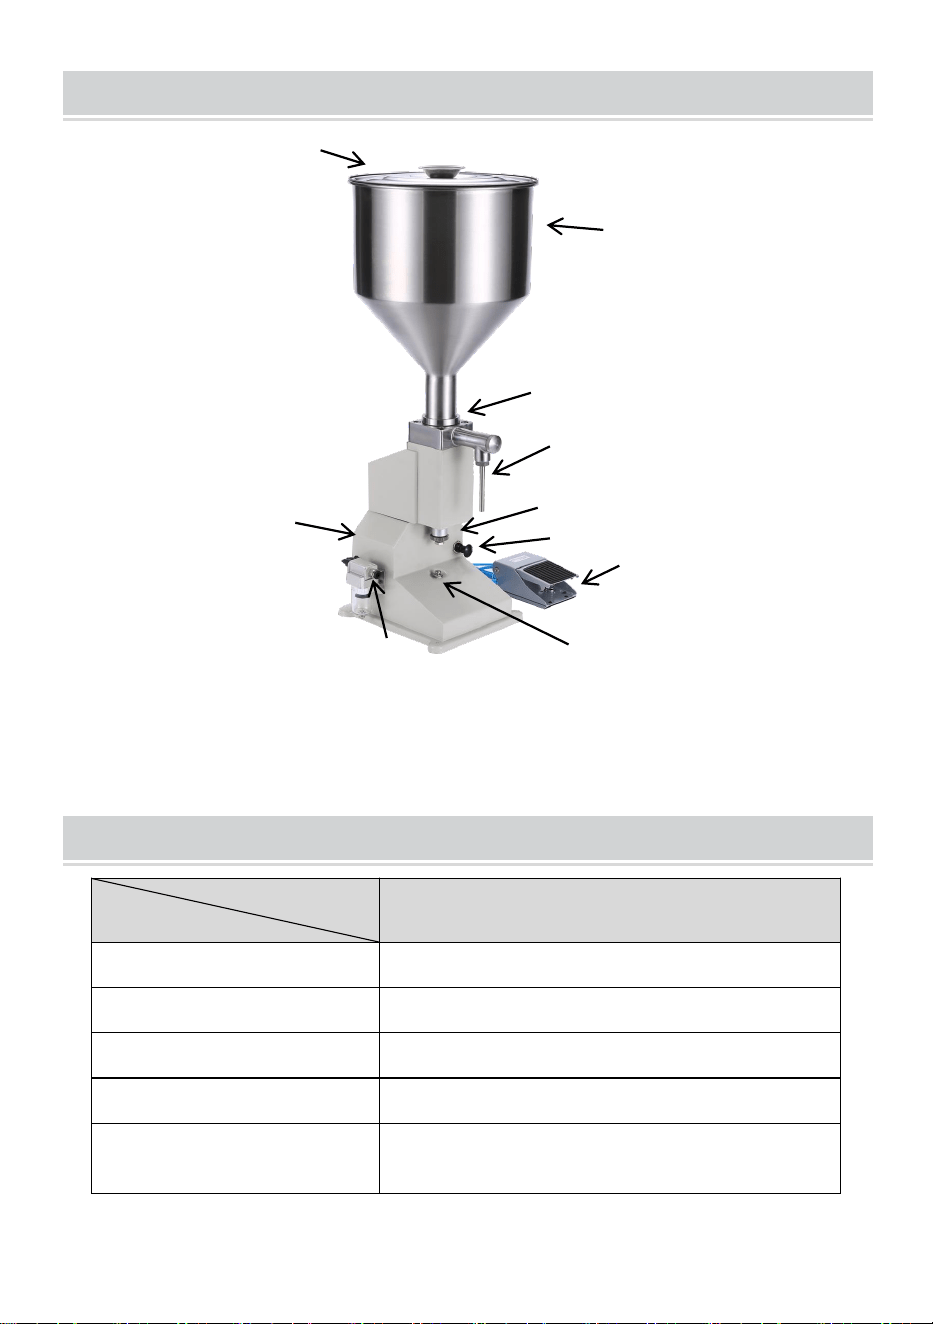
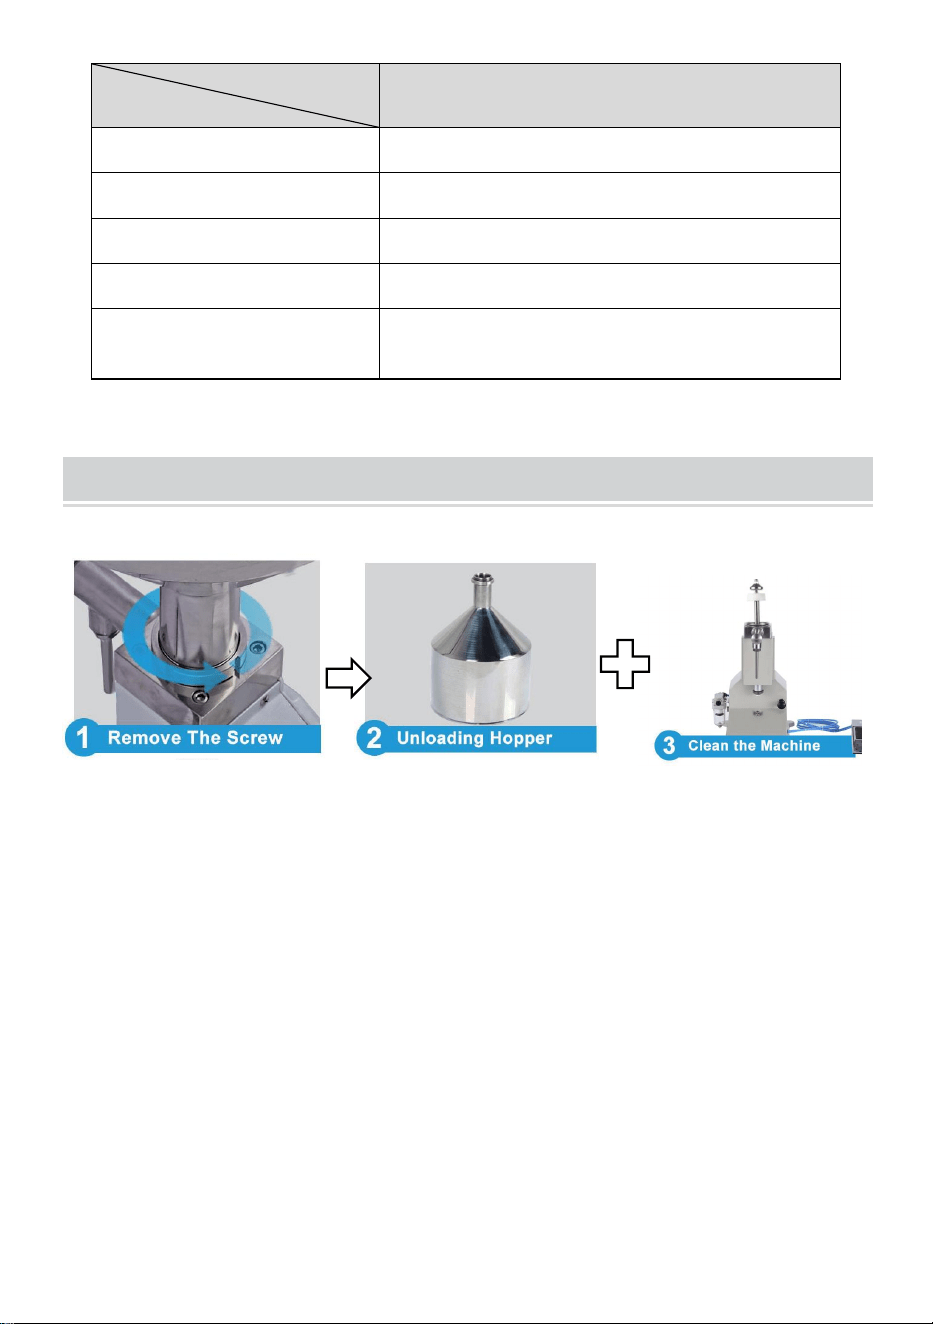
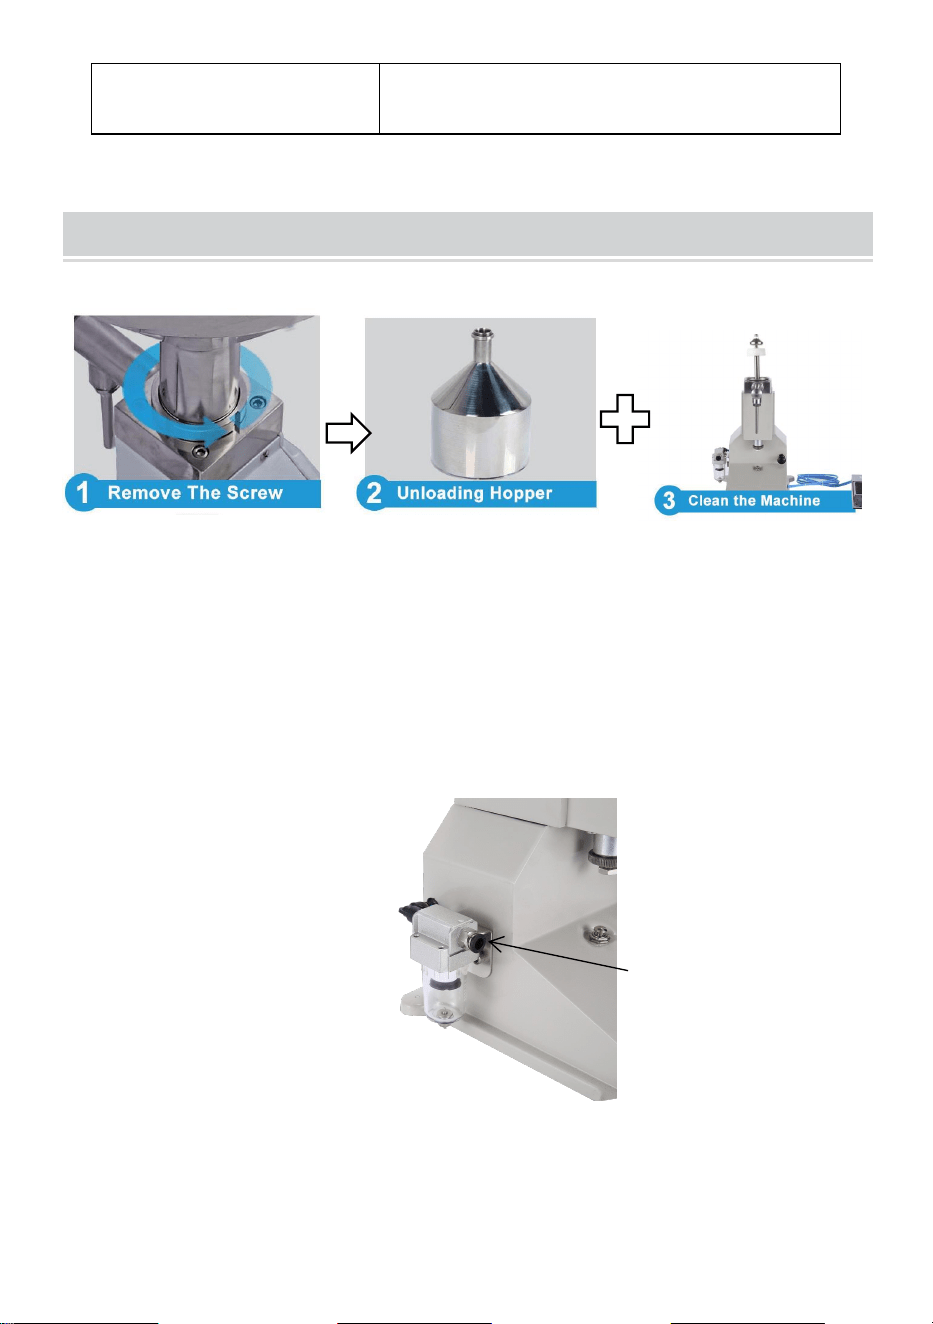
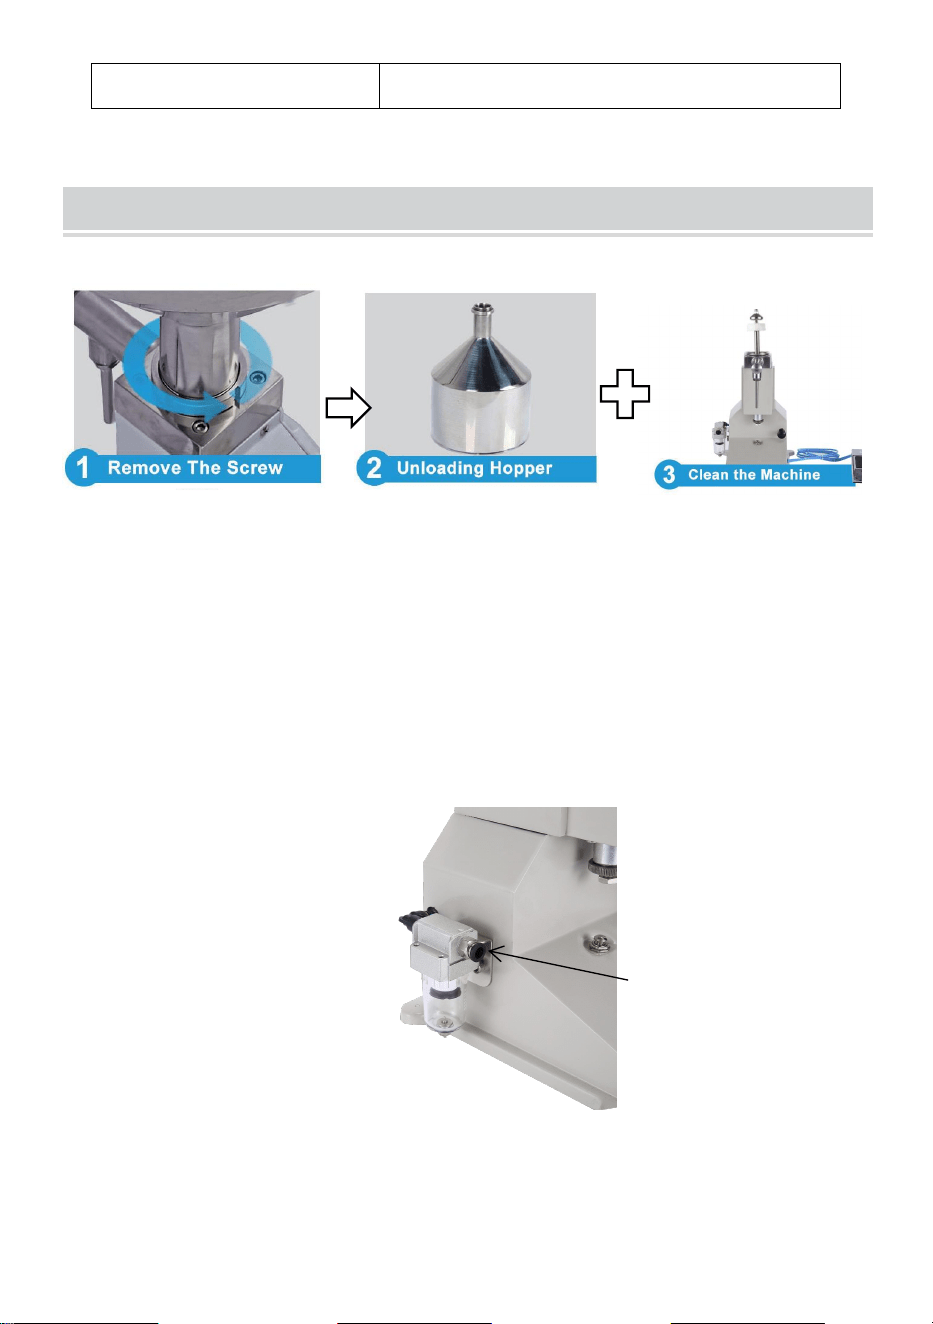
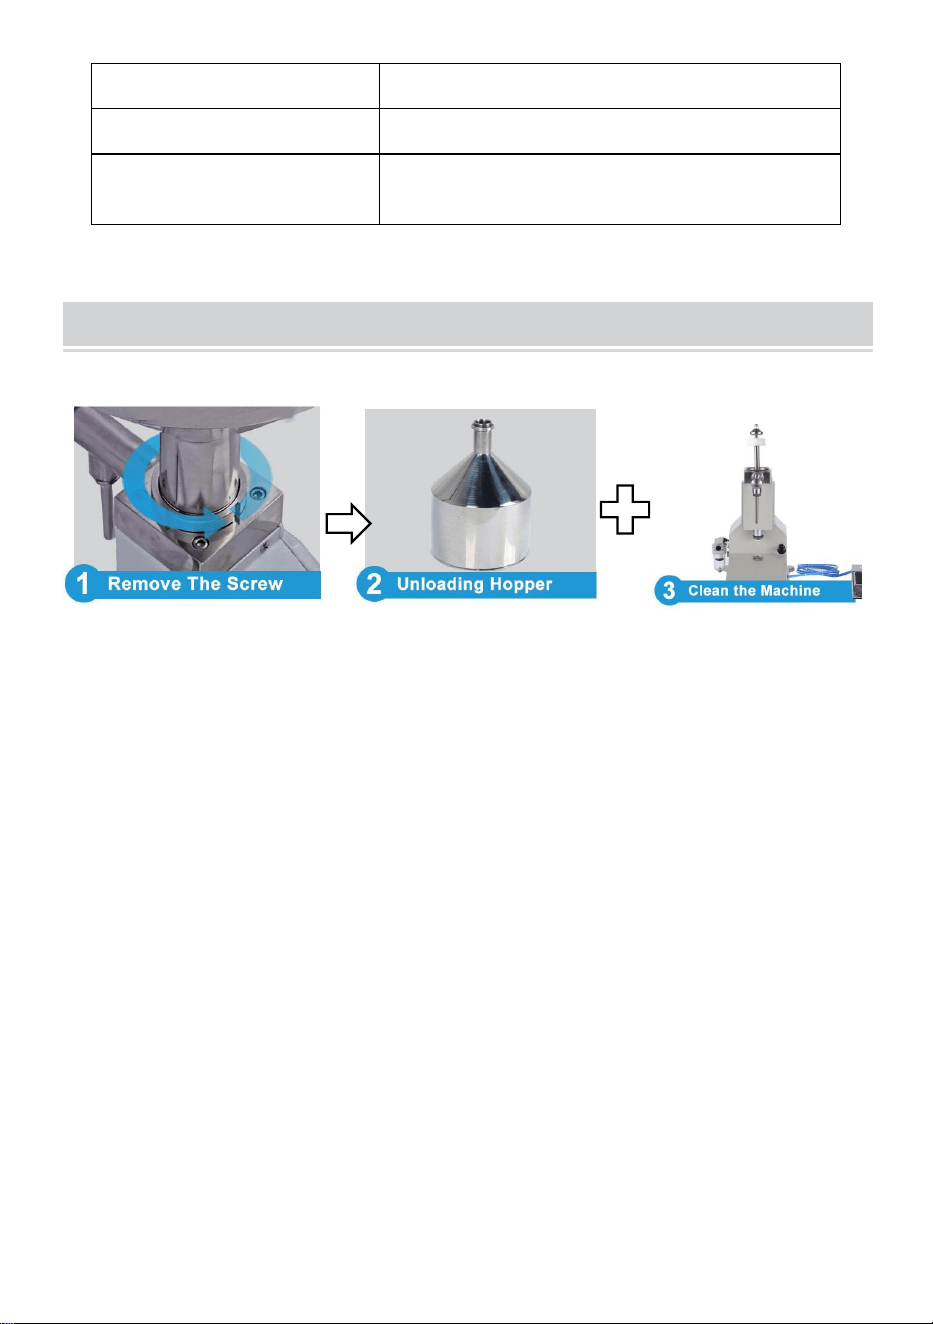
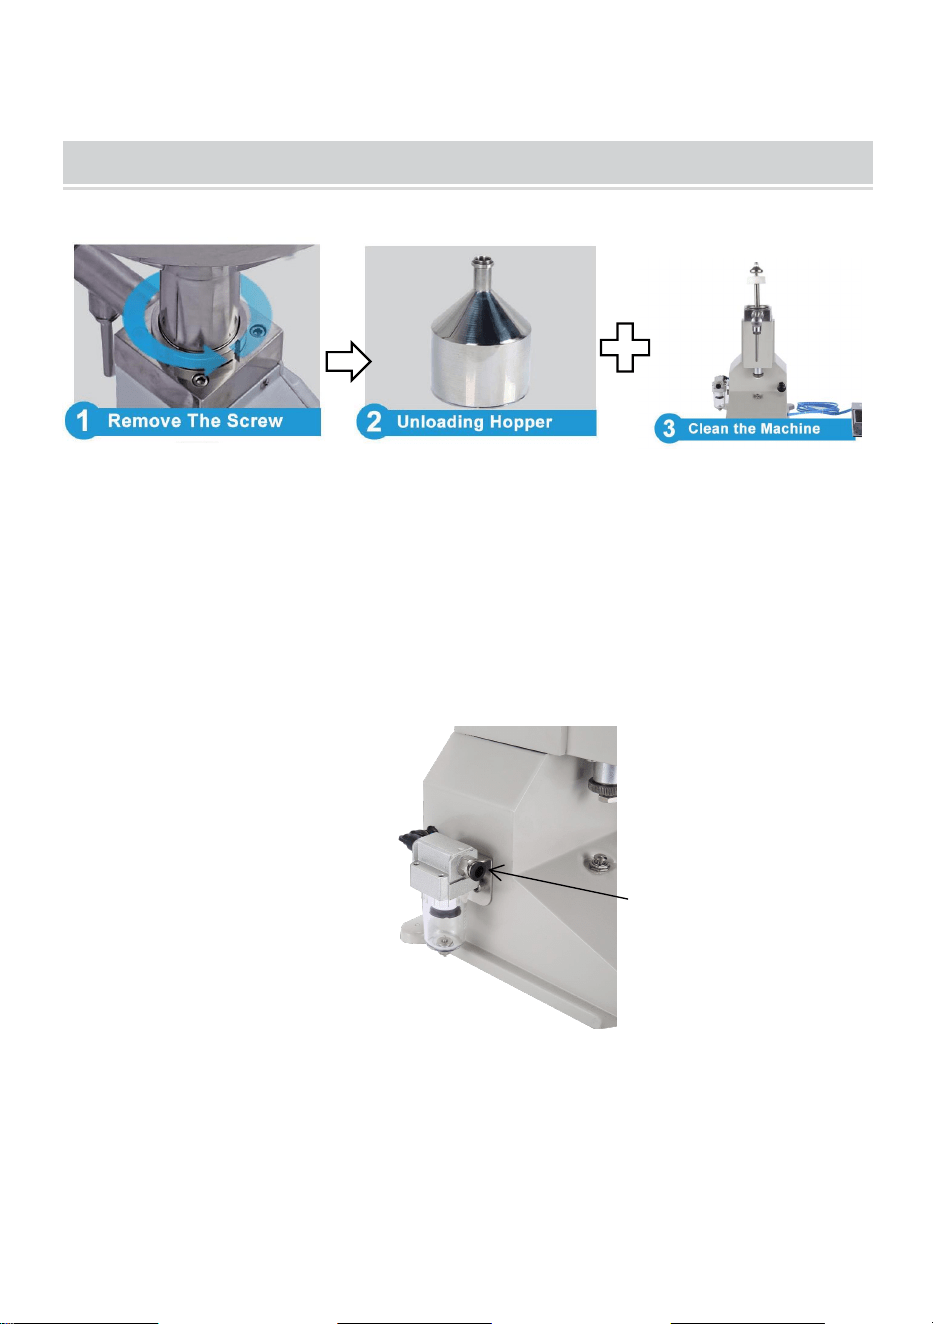
1. Cleaning machine before use.
Hold the base in place, and turn the hopper counterclockwise.
Clean the parts of the hopper and the filling nozzle that touch the filling
materials, and then install them.
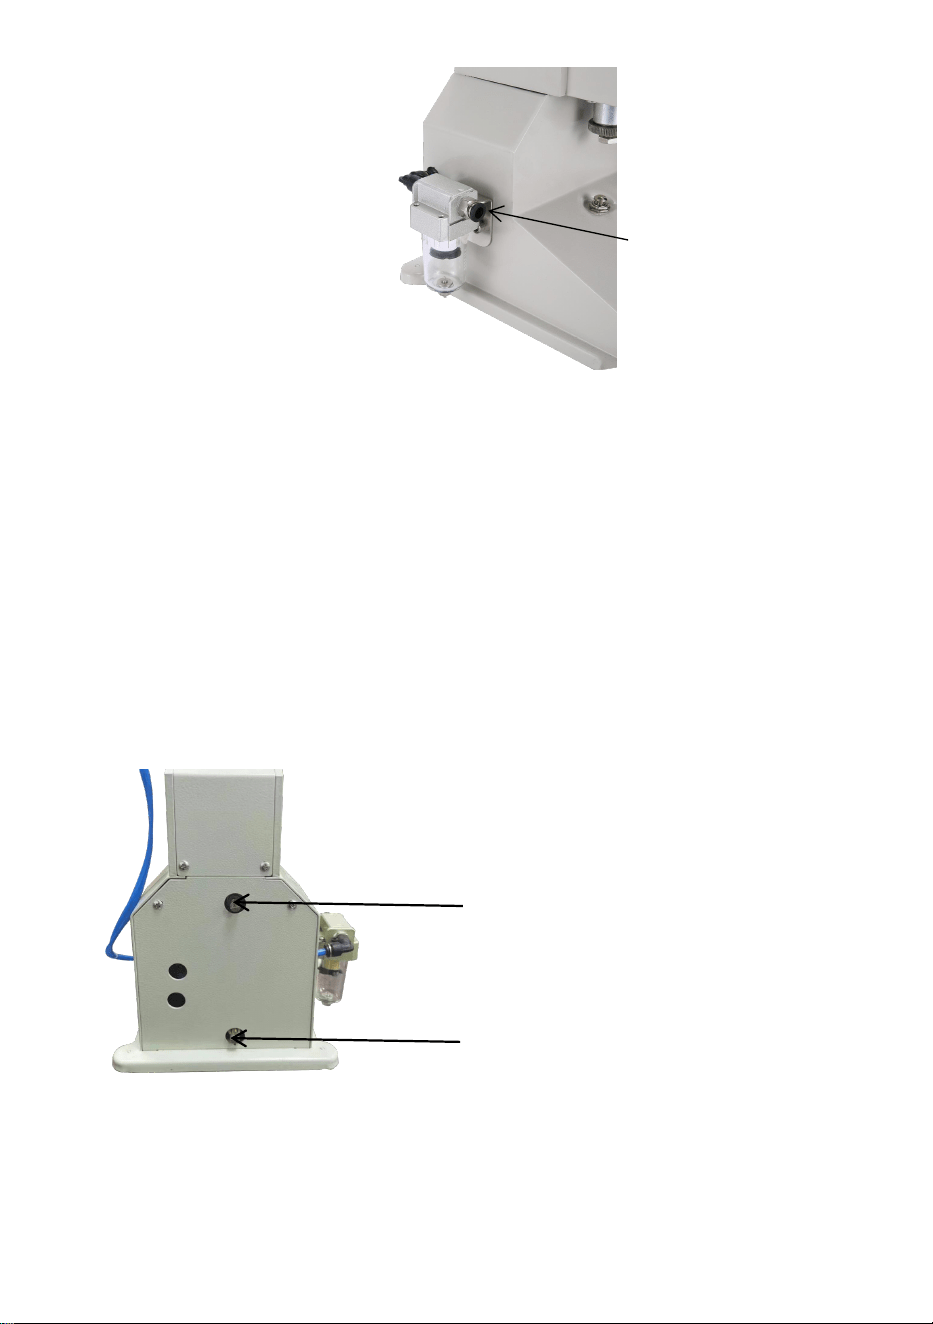
2. Connect the machine to the air source by using aφ8mm pipe.
Note:Working Air Pressure: 0.4-0.6Mpa.The supplied air is already filtered.
Air inlet
- 6 -
3.The filling speed can be adjusted by adjusting the inlet and outlet
throttle to change the inlet and outlet air volume.
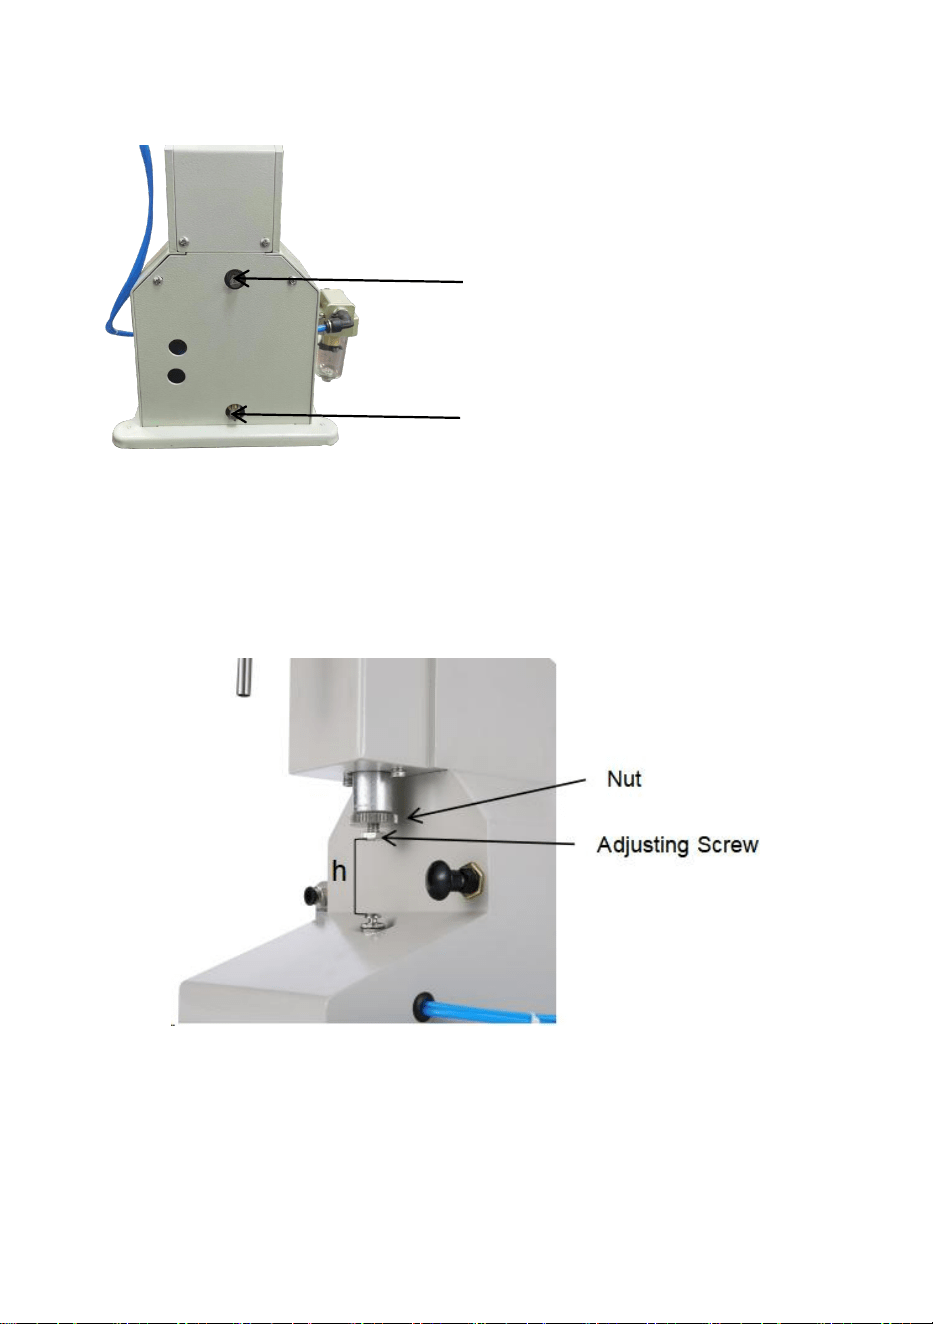
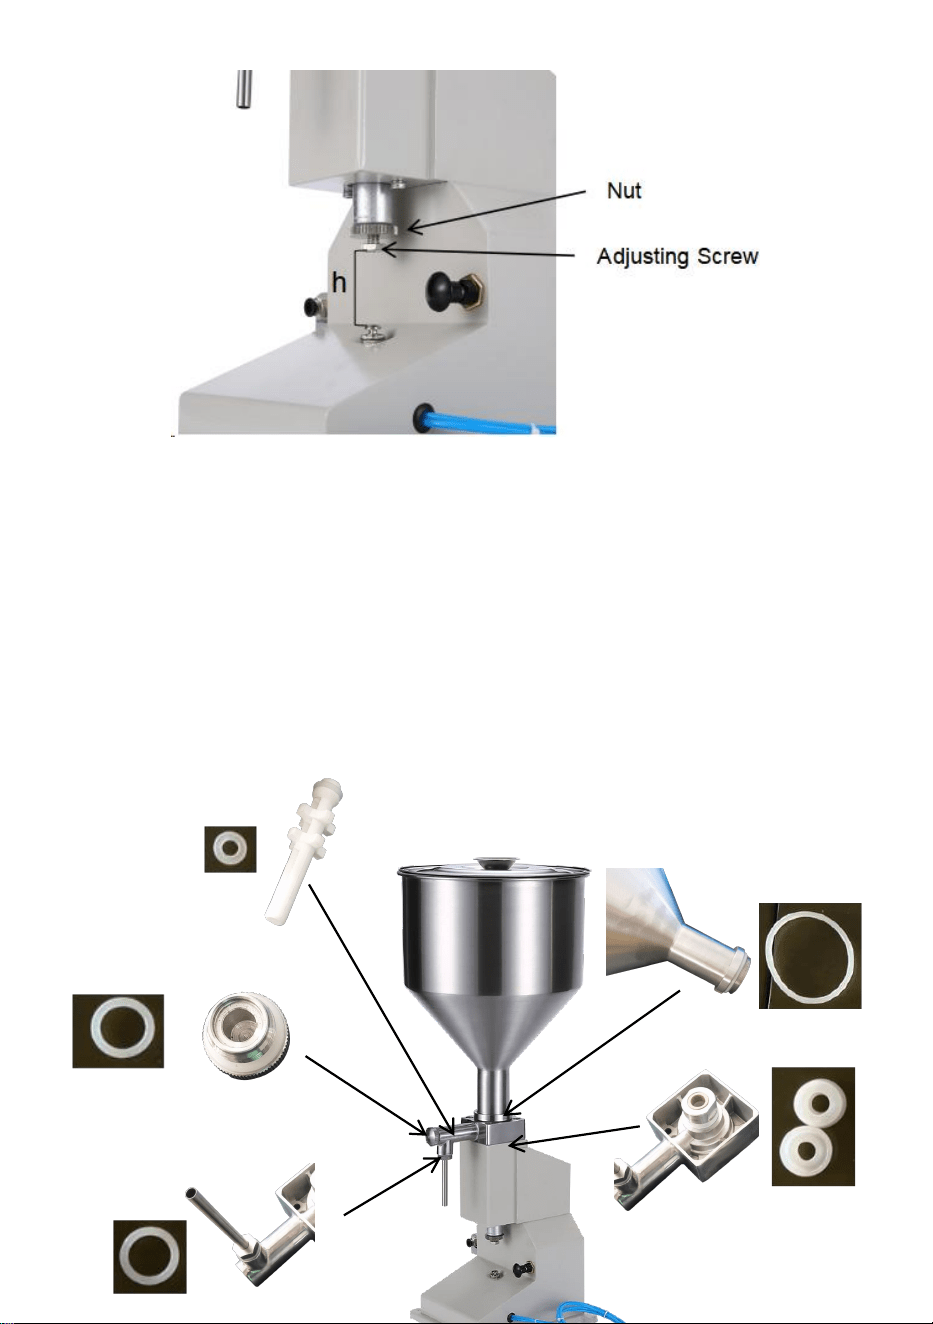
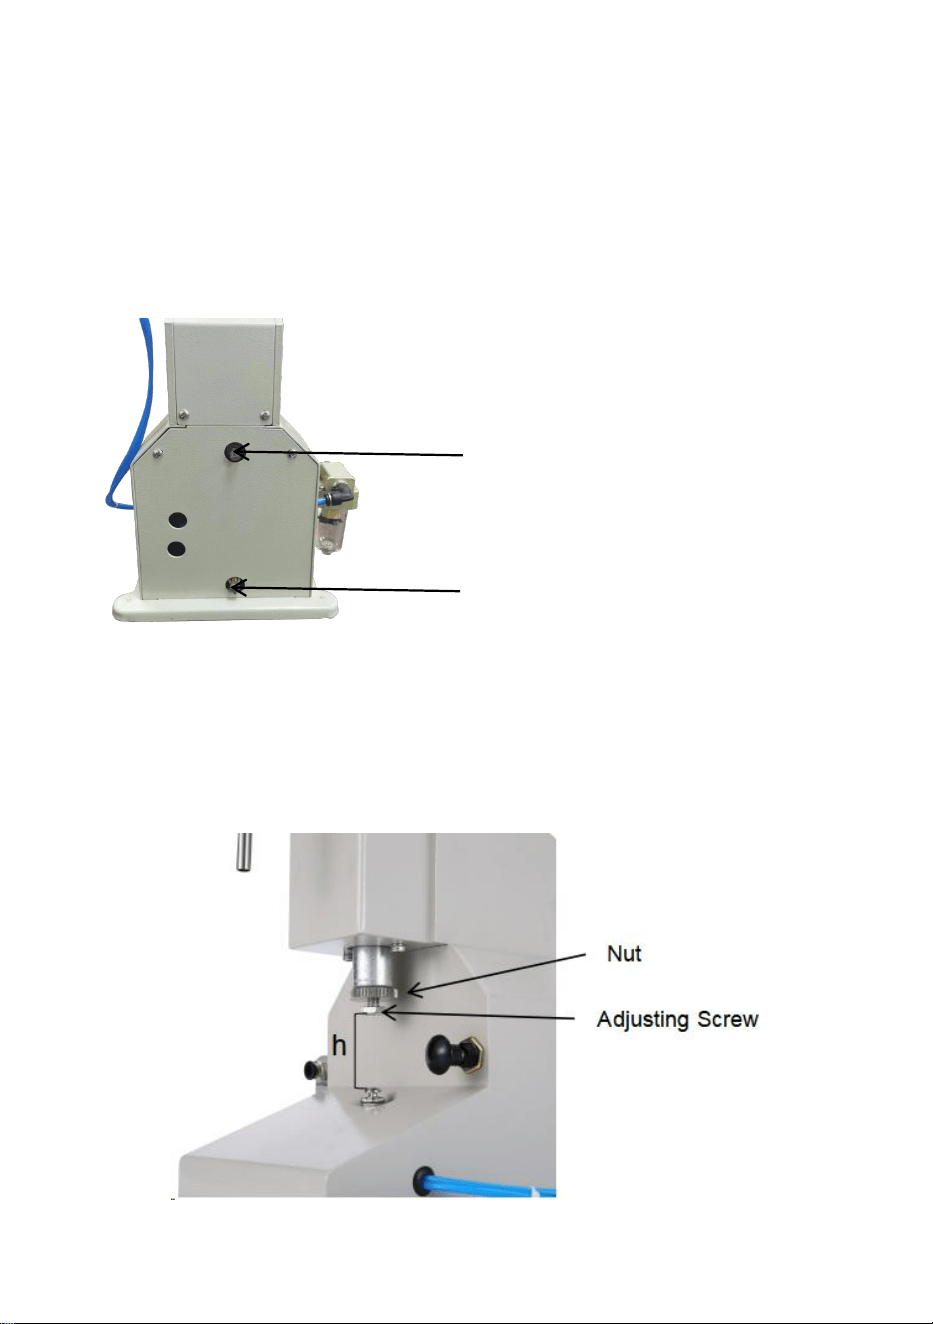
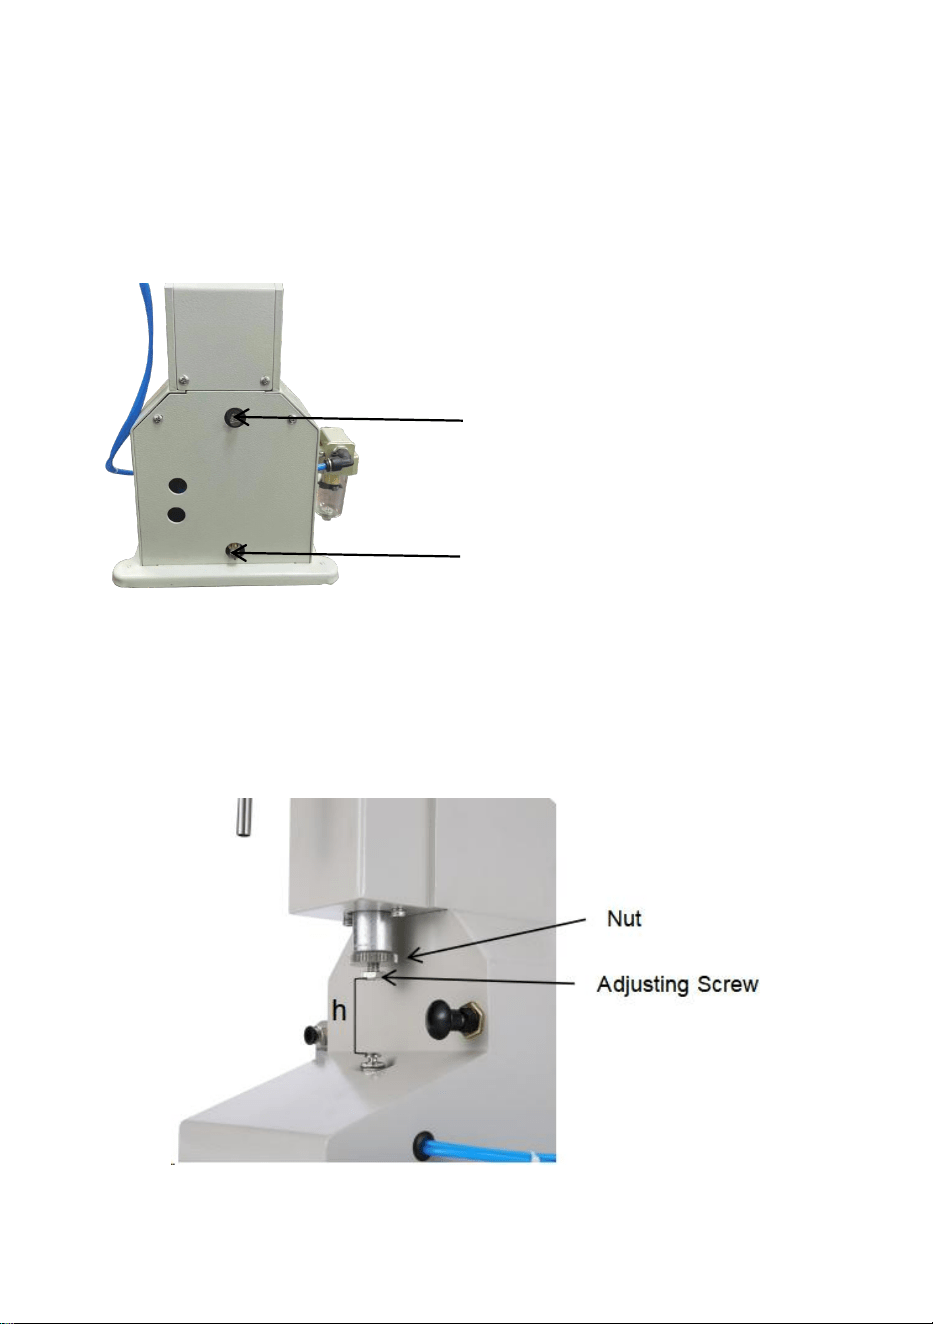
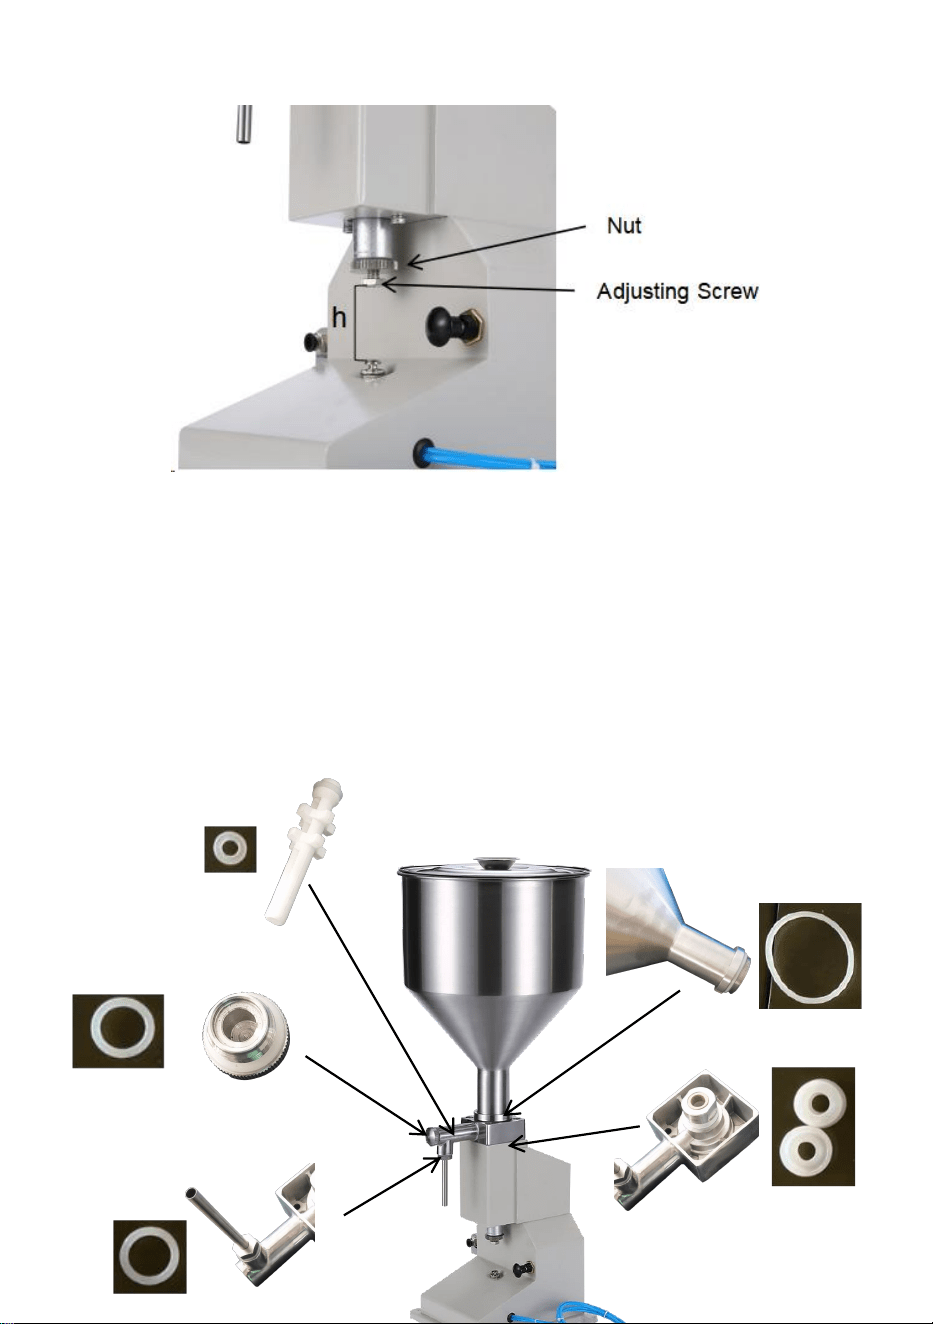
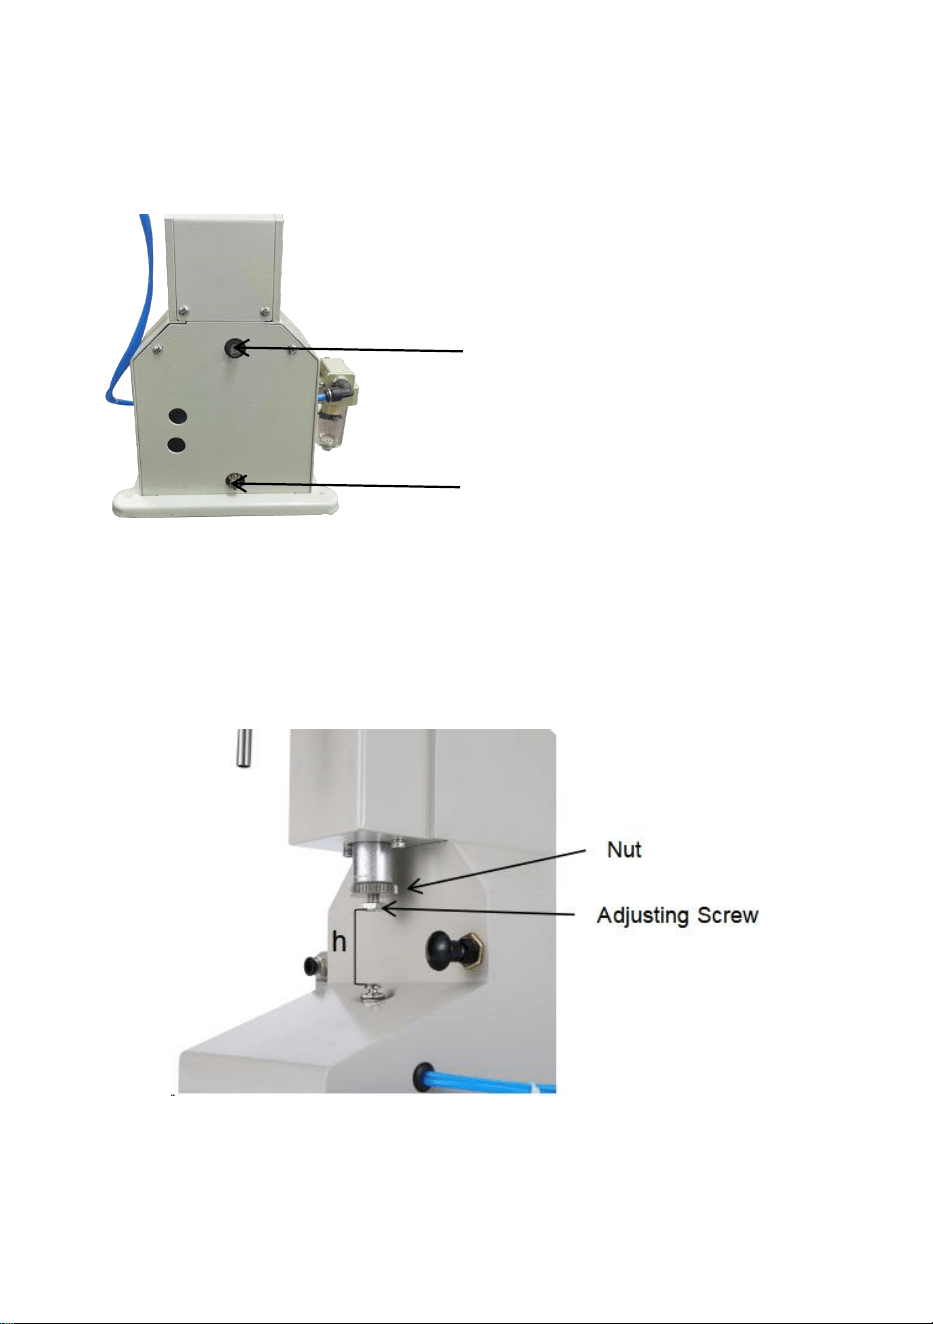
4.Adjust the filling volume:
1). Loosen the nut.
2). Adjust the adjusting screw length to determine h, h corresponds to the
filling volume.
3). After adjusting to the filling volume, tighten the nut.
5.After the above steps are completed, turn on the air source switch,you
can fill by stepping on the pedal switch.
Note:Press the air source switch to open, pull up the air source switch to
close.
Inlet Throttle
Outlet Throttle
- 7 -
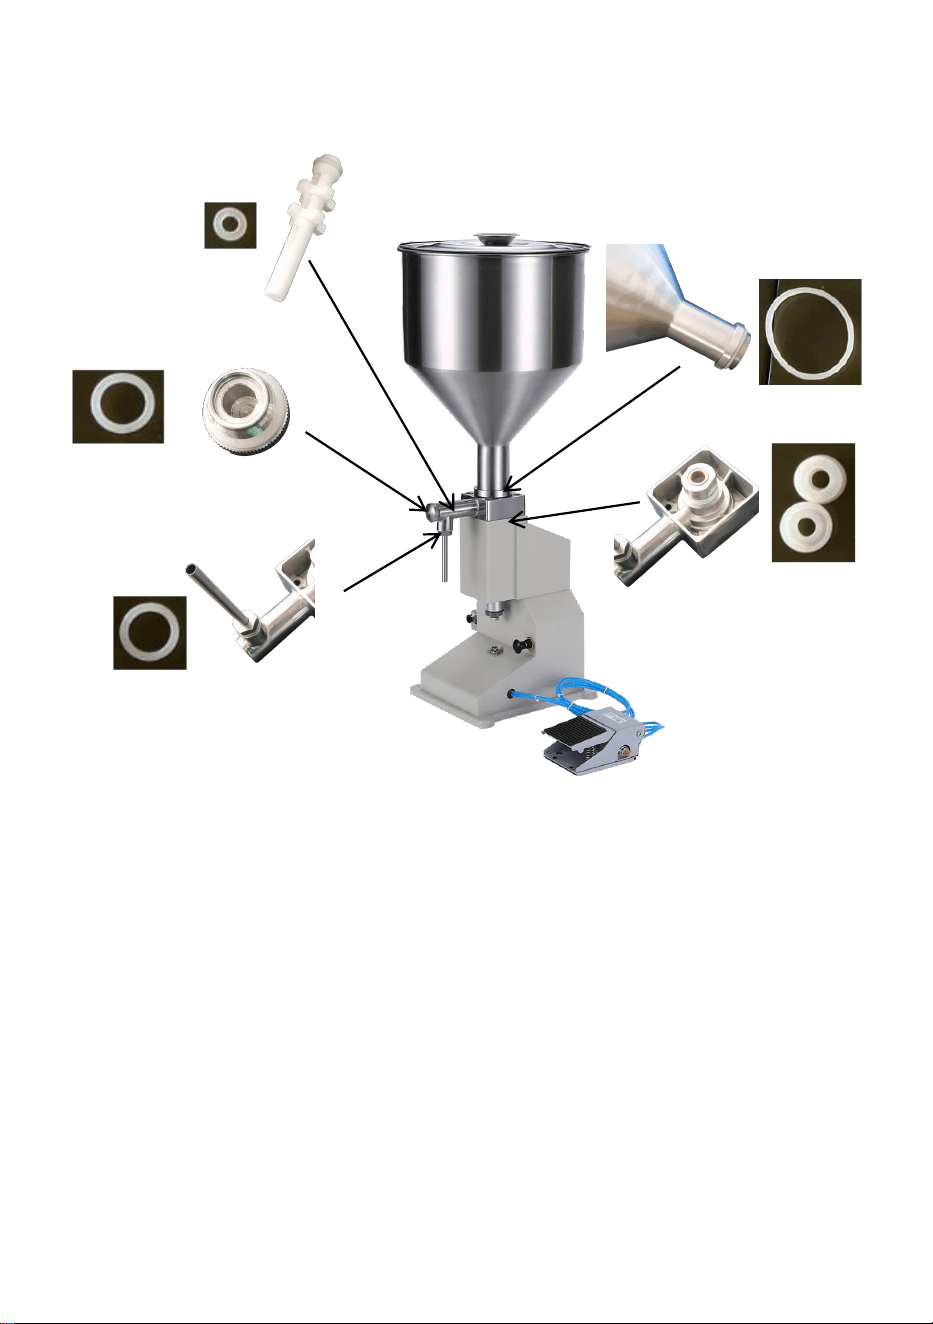
Sealing rings and O-rings distribution

- 8 -
MAINTENANCE
1.Please clean the product in time after each use.
2.Always keep the product outside clean.
3. Do not throw or drop the product.
4. When storing and using, avoid the sharp point of the hard object scratch
products.
5. Please store the product in a dry and ventilated place.
6. If not used for a long time, please empty the hopper and clean it.
TROUBLESHOOTING
Problem
Possible Cause
Possible Solution
Filling volume is
not accurate.
There is sundries between
the cone screw cover and
piston ring
Clean the piston ring
Piston ring over wears.
Replace the piston ring
The filling speed is unstable.
Supply a stable air source.
The filling nozzle is
leaking.
The o-ring of the valve core
is damaged
Replace the o-ring
There are sundries sticking
to the o-ring
Clean the O-ring
Bubble while filling
Filling speed is too fast
Lower filling speed
Failure of sealing ring inside
sealing seat
Replace sealing ring

- 9 -
Address:Baoshanqu Shuangchenglu 803long 11hao 1602A-1609shi
Shanghai
Imported to AUS: SIHAO PTY LTD. 1 ROKEVA STREETEASTWOOD
NSW 2122 Australia
Imported to USA: Sanven Technology Ltd. Suite 250, 9166 Anaheim
Place, Rancho Cucamonga, CA 91730
REP
EC
SHUNSHUN GmbH
Römeräcker 9 Z2021, 76351
Linkenheim-Hochstetten, Germany
REP
UK
Pooledas Group Ltd
Unit 5 Albert Edward House, The
Pavilions Preston, United Kingdom
Made In China


Assistance technique et certificat de garantie électronique
www.vevor.com/support
MACHINE DE REMPLISSAGE DE LIQUIDE DE
PÂTE
MANUEL DE L'UTILISATEUR
We continue to be committed to provide you tools with competitive price.
"Save Half", "Half Price" or any other similar expressions used by us only represents an
estimate of savings you might benefit from buying certain tools with us compared to the major
top brands and does not necessarily mean to cover all categories of tools offered by us. You
are kindly reminded to verify carefully when you are placing an order with us if you are
actually saving half in comparison with the top major brands.
- 1 -
MODÈLE: A02
Have product questions? Need technical support? Please feel free to
contact us:
Technical Support and E-Warranty Certificate
www.vevor.com/support
NEED HELP? CONTACT US!
This is the original instruction, please read all manual instructions
carefully before operating. VEVOR reserves a clear interpretation of our
user manual. The appearance of the product shall be subject to the
product you received. Please forgive us that we won't inform you again if
there are any technology or software updates on our product.
Paste Liquid Filling
Machine

- 2 -
3. Lisez attentivement et comprenez toutes les INSTRUCTIONS
D'ASSEMBLAGE ET D'UTILISATION avant d'utiliser l'appareil.
4. Le non-respect des règles de sécurité et des autres précautions de
sécurité de base peut entraîner des blessures graves.
GENERAL SAFETY RULES
Rappel important
1. Avant utilisation, veuillez lire attentivement le manuel du produit et vous
assurer que vous comprenez et respectez tous les avertissements de
sécurité et précautions d'utilisation.
2. N'utilisez pas ce produit à d'autres fins non désignées pour éviter les
risques inattendus.
3. Ce produit s'applique uniquement aux utilisateurs appartenant au
groupe d'âge et au champ d'application spécifiés. Veuillez respecter
strictement les restrictions d'âge et les avertissements pertinents.
4. S'il y a des anomalies dans le produit, veuillez cesser de l'utiliser
immédiatement et contacter le centre de service après-vente pour
consultation ou pour organiser une réparation.
Exigences environnementales d'utilisation
1. Veuillez utiliser dans un environnement sec et bien ventilé pour éviter les
conditions environnementales extrêmes telles que l'activation de l'eau, les
températures élevées, l'humidité élevée et les températures extrêmement
basses.
2. Évitez la lumière directe du soleil ou tout contact avec des sources
d'incendie pour éviter d'endommager le produit ou d'incendier.
3. Veuillez garantir un environnement d'utilisation stable et éviter que le
produit ne soit heurté ou laissé tomber pour éviter tout dommage.
Directives d'exploitation de sécurité
1. Lorsque des objets étrangers sont trouvés sur la surface du produit,
veuillez immédiatement cesser d'utiliser et retirer les objets étrangers
avant de continuer à les utiliser.
2. Lorsque vous utilisez ce produit en continu pendant une longue période,
veuillez vous reposer à temps pour éviter une fatigue excessive.

- 3 -
Entretien et maintenance
1. Entretenez et nettoyez régulièrement le produit. Utilisez un chiffon sec
pour essuyer, en veillant à éviter l'utilisation de substances corrosives
telles que des solutions alcooliques, acides et alcalines.
2. Ne démontez pas le produit et ne remplacez pas les composants
vous-même. Si vous rencontrez des dysfonctionnements, veuillez
contacter le centre de service après-vente.
Mesures de gestion d'urgence
1. En cas de situations anormales ou d'accidents avec le produit, veuillez
cesser de l'utiliser dès que possible.
En cas de surchauffe, de fumée ou de bruit anormal, veuillez
immédiatement couper la source d'air et contacter le centre de service
après-vente.
2. Si le produit implique une situation d'urgence pouvant nuire à la sécurité
personnelle, veuillez appeler le numéro de secours d'urgence en temps
opportun.
Avis de non-responsabilité
Nous attachons une grande importance à la sécurité et à la qualité de nos
produits, mais ne pouvons assumer la responsabilité des accidents de
sécurité causés par une utilisation ou une utilisation inappropriée.
CONSERVEZ CES INSTRUCTIONS
MODEL AND PARAMETERS
Modèle
A02
Liquide approprié
Toutes les pâtes et liquides fluides (sans
particules) Tels que shampoing, gel douche,
huile essentielle, etc.
Gamme de
remplissage
5~50 ml
Mode de contrôle
Interrupteur à pédale, le remplissage
pneumatique
- 4 -
Pression
d'alimentation en air
0,4-0,6 MPa
Trémie
10L, acier inoxydable 304
STRUCTURE DIAGRAM
2. Trémie C sur 2. Trémie 3. Joint de trémie 4. Buse de remplissage
5. Remplissage d'une vis de réglage 6. Commutateur de source d'air
7. Pédale Sorcière _ 8. Déclencheur _ 9. Entrée d' air et filtre à air 10.
Fond
COMPONENTS
A02
Bague d'étanchéité
×2
Joint torique
×7
Clé hexagonale
×2
2
6
5
7
9
10
0
8
4
1
3
Model
Parts

- 5 -
Manuel de l'Utilisateur
×1
Buse de remplissage
×2( Ф4 ,Ф8)
OPERATING INSTRUCTIONS
3. Machine de nettoyage avant utilisation.
Maintenez la base en place et tournez la trémie dans le sens inverse des
aiguilles d'une montre .
Nettoyez les parties de la trémie et de la buse de remplissage qui touchent
les matériaux de remplissage , puis installez-les.
4. Connectez la machine à la source d'air à l'aide d'un tuyau de
φ
8 mm.
Remarque : Pression d'air de fonctionnement : 0,4-0,6 MPa . L'air fourni
est déjà filtré.
Air inlet

- 6 -
3. La vitesse de remplissage peut être ajustée en ajustant l' accélérateur
d'entrée et de sortie pour modifier le volume d'air d'entrée et de sortie .
4.Ajustez le volume de remplissage :
1 ) . Desserrez l' écrou .
2 ) . Ajustez la longueur de la vis de réglage pour déterminer h, h
correspond au volume de remplissage .
3 ) . Après avoir réglé le volume de remplissage , serrez l' écrou .
Inlet Throttle
Outlet Throttle
- 7 -
5. Une fois les étapes ci-dessus terminées, allumez l' interrupteur de la
source d' air , vous pouvez le remplir en appuyant sur l'interrupteur à
pédale.
Remarque : appuyez sur l'interrupteur de la source d'air pour ouvrir, tirez
l'interrupteur de la source d'air pour le fermer .
Distribution de bagues d'étanchéité et de joints toriques

- 8 -
MAINTENANCE
1. Veuillez nettoyer le produit à temps après chaque utilisation .
2. Gardez toujours le produit propre à l'extérieur .
3 . Ne jetez pas et ne laissez pas tomber le produit.
4 . Lors du stockage et de l'utilisation, évitez la pointe pointue des produits
anti-rayures d'objets durs.
5 . Veuillez stocker le produit dans un endroit sec et aéré.
6 . Si vous ne l'utilisez pas pendant une longue période, veuillez vider la
trémie et la nettoyer.
TROUBLESHOOTING
Problème
Cause possible
Solution possible
Le volume de
remplissage n'est
Là Il y a des articles divers
entre le couvercle de la vis
Nettoyer le segment de
piston

- 9 -
pas précis .
conique et le segment de
piston
Segment de piston terminé
porte .
Remplacer le segment de
piston
La vitesse de remplissage
est instable .
Fournir une source d'air
stable .
La buse de
remplissage fuit.
Le joint torique du noyau de
valve est endommagé
Remplacer le joint torique
Il y a des objets divers qui
collent au joint torique
Nettoyer le joint torique
Bulle pendant le
remplissage
La vitesse de remplissage
est trop rapide
Vitesse de remplissage
inférieure
Défaillance de la bague
d'étanchéité à l'intérieur du
siège d'étanchéité
Remplacer bague
d'étanchéité
Adresse : Baoshanqu Shuangchenglu 803long 11hao 1602A-1609shi
Shanghai
Importé en Australie : SIHAO PTY LTD . 1 ROKEVA STREETASTWOOD
NSW 2122 Australie
Importé aux États-Unis : Sanven Technology Ltd. Bureau 250, 9166
Anaheim Place, Rancho Cucamonga, CA 91730

- 10 -
REP
EC
SHUNSHUN GmbH
Römeräcker 9 Z2021, 76351
Linkenheim-Hochstetten, Germany
REP
UK
Pooledas Group Ltd
Unit 5 Albert Edward House, The
Pavilions Preston, United Kingdom
Fabriqué en Chine


Zertifikat für technischen Support und E-Garantie
www.vevor.com/support
PASTE-FLÜSSIGKEITSFÜLLMASCHINE
BENUTZERHANDBUCH
We continue to be committed to provide you tools with competitive price.
"Save Half", "Half Price" or any other similar expressions used by us only represents an
estimate of savings you might benefit from buying certain tools with us compared to the major
top brands and does not necessarily mean to cover all categories of tools offered by us. You
are kindly reminded to verify carefully when you are placing an order with us if you are
actually saving half in comparison with the top major brands.

- 1 -
MODELL: A02
Have product questions? Need technical support? Please feel free to
contact us:
Technical Support and E-Warranty Certificate
www.vevor.com/support
NEED HELP? CONTACT US!
This is the original instruction, please read all manual instructions
carefully before operating. VEVOR reserves a clear interpretation of our
user manual. The appearance of the product shall be subject to the
product you received. Please forgive us that we won't inform you again if
there are any technology or software updates on our product.
Paste Liquid Filling
Machine

- 2 -
5. Lesen Sie alle MONTAGE- UND BETRIEBSANWEISUNGEN
sorgfältig durch und verstehen Sie sie , bevor Sie das Gerät in Betrieb
nehmen.
6. Die Nichtbeachtung der Sicherheitsregeln und anderer grundlegender
Sicherheitsvorkehrungen kann zu schweren Verletzungen führen.
GENERAL SAFETY RULES
Wichtige Erinnerung
1. Bitte lesen Sie vor der Verwendung das Produkthandbuch sorgfältig
durch und stellen Sie sicher, dass Sie alle Sicherheitswarnungen und
Vorsichtsmaßnahmen bei der Verwendung verstanden und eingehalten
haben.
2. Verwenden Sie dieses Produkt nicht für andere, nicht
bestimmungsgemäße Zwecke, um unerwartete Risiken zu vermeiden.
3. Dieses Produkt ist nur für Benutzer innerhalb der angegebenen
Altersgruppe und des angegebenen Anwendungsbereichs anwendbar.
Bitte beachten Sie unbedingt die entsprechenden Altersbeschränkungen
und Warnhinweise.
4. Wenn es irgendwelche Anomalien am Produkt gibt, beenden Sie bitte
sofort die Verwendung und wenden Sie sich an das Kundendienstzentrum,
um eine Beratung zu erhalten oder eine Reparatur zu veranlassen.
Umweltanforderungen für die Nutzung
1. Bitte verwenden Sie es in einer trockenen und gut belüfteten Umgebung,
um extreme Umgebungsbedingungen wie Wasseraktivierung, hohe
Temperaturen, hohe Luftfeuchtigkeit und extrem niedrige Temperaturen zu
vermeiden.
2. Vermeiden Sie direkte Sonneneinstrahlung oder Kontakt mit
Feuerquellen, um Produktschäden oder Brände zu vermeiden.
3. Bitte sorgen Sie für eine stabile Nutzungsumgebung und verhindern Sie,
dass das Produkt Stößen oder Stürzen ausgesetzt wird, um Schäden zu
vermeiden.
Sicherheitsrichtlinien für den Betrieb
1.Wenn Fremdkörper auf der Oberfläche des Produkts gefunden werden,

- 3 -
beenden Sie bitte sofort die Verwendung und entfernen Sie die
Fremdkörper, bevor Sie das Produkt weiter verwenden.
2. Wenn Sie dieses Produkt über einen längeren Zeitraum kontinuierlich
verwenden, ruhen Sie sich bitte rechtzeitig aus, um übermäßige Ermüdung
zu vermeiden.
Wartung und Instandhaltung
1. Warten und reinigen Sie das Produkt regelmäßig. Verwenden Sie zum
Abwischen ein trockenes Tuch und achten Sie darauf, keine ätzenden
Substanzen wie Alkohol, Säuren und Laugen zu verwenden.
2. Zerlegen Sie das Produkt nicht und tauschen Sie keine Komponenten
selbst aus. Bei Störungen wenden Sie sich bitte an den Kundendienst.
Maßnahmen zur Notfallbehandlung
1. Wenn es zu ungewöhnlichen Situationen oder Unfällen mit dem Produkt
kommt, stellen Sie die Verwendung des Produkts bitte so schnell wie
möglich ein.
Wenn Überhitzung, Rauchen oder ungewöhnliche Geräusche festgestellt
werden, unterbrechen Sie bitte sofort die Luftzufuhr und wenden Sie sich
an das Kundendienstzentrum.
2. Wenn es sich bei dem Produkt um eine Notfallsituation handelt, die die
persönliche Sicherheit gefährden könnte, rufen Sie bitte rechtzeitig die
Notrufnummer an.
Haftungsausschluss
Wir legen großen Wert auf die Sicherheit und Qualität unserer Produkte,
können jedoch keine Verantwortung für Sicherheitsunfälle übernehmen,
die durch unsachgemäße Verwendung oder Bedienung verursacht
werden.
ANLEITUNG AUFBEWAHREN
MODEL AND PARAMETERS
Modell
A02
- 4 -
Geeignete
Flüssigkeit
Alle frei fließenden Pasten und Flüssigkeiten
(keine Partikel) wie Shampoo, Duschgel,
ätherisches Öl usw
Füllbereich
5~50 ml
Steuermodus _
Pedalschalter, die pneumatische Befüllung
Luftversorgungsdruc
k
0,4–0,6 MPa
Trichter
10 l, Edelstahl 304
STRUCTURE DIAGRAM
3. Trichter C über 2. Trichter 3. Trichterdichtung 4. Fülldüse _ _
5. Fülleinstellschraube _ _ _ 6. Luftquellenschalter 7. Treten Sie in
die Pedale Schalter _ 8. Auslöser _ 9. Lufteinlass und Luftfilter _ 10.
Basis
COMPONENTS
2
6
5
7
9
10
0
8
4
1
3
- 5 -
A02
Siegelring
×2
O-Ring
×7
Sechskantschlüssel
×2
Benutzerhandbuch
×1
Fülldüse
×2( Ф4 , Ф8)
OPERATING INSTRUCTIONS
5. vor Gebrauch reinigen .
Halten Sie die Basis fest und drehen Sie den Trichter gegen den
Uhrzeigersinn .
Reinigen Sie die Teile des Trichters und der Fülldüse , die mit den
Füllmaterialien in Berührung kommen , und installieren Sie sie dann .
6. Schließen Sie die Maschine über ein Rohr mit einem Durchmesser von
8 mm an die Luftquelle an .
Hinweis: Arbeitsluftdruck: 0,4–0,6 MPa . Die zugeführte Luft ist bereits
gefiltert.
Model
Parts

- 6 -
3. Die Füllgeschwindigkeit kann durch Einstellen der Einlass- und
Auslassdrossel angepasst werden, um das Einlass- und
Auslassluftvolumen zu ändern .
4. Passen Sie die Füllmenge an :
1 ) . Lösen Sie die Mutter.
2 ) . Stellen Sie die Länge der Einstellschraube ein , um h zu bestimmen, h
entspricht dem Füllvolumen .
Air inlet
Inlet Throttle
Outlet Throttle

- 7 -
3 ) . Nachdem Sie das Füllvolumen eingestellt haben , ziehen Sie die
Mutter fest .
Sie den Luftquellenschalter ein . Sie können die Luft befüllen , indem Sie
auf den Pedalschalter treten .
Hinweis: Zum Öffnen den Luftquellenschalter drücken und zum Schließen
nach oben ziehen .
Vertrieb von Dichtringen und O-Ringen

- 8 -
MAINTENANCE
1. Bitte reinigen Sie das Produkt rechtzeitig nach jedem Gebrauch .
2. Halten Sie das Produkt von außen immer sauber .
3 . Werfen Sie das Produkt nicht und lassen Sie es nicht fallen.
4 . Vermeiden Sie bei der Lagerung und Verwendung, dass die scharfen
Spitzen der harten Gegenstände die Produkte zerkratzen.
5 . Bitte lagern Sie das Produkt an einem trockenen und belüfteten Ort.
6 . Bei längerem Nichtgebrauch entleeren Sie bitte den Trichter und
reinigen Sie ihn.
TROUBLESHOOTING
Problem
Mögliche Ursache
Mögliche Lösung

- 9 -
Das Füllvolumen
ist nicht genau .
Dort Es handelt sich um
Kleinteile zwischen
Kegelschraubendeckel und
Kolbenring
Reinigen Sie den Kolbenring
Kolbenring über trägt .
Ersetzen Sie den Kolbenring
Die Füllgeschwindigkeit ist
instabil .
Sorgen Sie für eine stabile
Luftquelle .
Der Füllstutzen ist
undicht.
Der O-Ring des Ventilkerns
ist beschädigt
Ersetzen Sie den O-Ring
Am O-Ring kleben
Kleinigkeiten
Reinigen Sie den O-Ring
Blase beim
Befüllen
Die Füllgeschwindigkeit ist
zu hoch
Niedrigere
Füllgeschwindigkeit
Defekt des Dichtrings im
Dichtsitz
Ersetzen Siegelring
Adresse: Baoshanqu Shuangchenglu 803long 11hao 1602A-1609shi
Shanghai
Importiert nach AUS: SIHAO PTY LTD . 1 ROKEVA
STREETEASTWOOD NSW 2122 Australien
Importiert in die USA: Sanven Technology Ltd. Suite 250, 9166 Anaheim
Place, Rancho Cucamonga, CA 91730

- 10 -
REP
EC
SHUNSHUN GmbH
Römeräcker 9 Z2021, 76351
Linkenheim-Hochstetten, Germany
REP
UK
Pooledas Group Ltd
Unit 5 Albert Edward House, The
Pavilions Preston, United Kingdom
In China hergestellt


Supporto tecnico e certificato di garanzia elettronica
www.vevor.com/support
MACCHINA PER IL RIEMPIMENTO DI LIQUIDI
PER PASTA
MANUALE D'USO
We continue to be committed to provide you tools with competitive price.
"Save Half", "Half Price" or any other similar expressions used by us only represents an
estimate of savings you might benefit from buying certain tools with us compared to the major
top brands and does not necessarily mean to cover all categories of tools offered by us. You
are kindly reminded to verify carefully when you are placing an order with us if you are
actually saving half in comparison with the top major brands.

- 1 -
MODELLO: A02
Have product questions? Need technical support? Please feel free to
contact us:
Technical Support and E-Warranty Certificate
www.vevor.com/support
NEED HELP? CONTACT US!
This is the original instruction, please read all manual instructions
carefully before operating. VEVOR reserves a clear interpretation of our
user manual. The appearance of the product shall be subject to the
product you received. Please forgive us that we won't inform you again if
there are any technology or software updates on our product.
Paste Liquid Filling
Machine

- 2 -
7. Leggere attentamente e comprendere tutte le ISTRUZIONI DI
MONTAGGIO E FUNZIONAMENTO prima dell'uso.
8. La mancata osservanza delle norme di sicurezza e di altre precauzioni
di sicurezza di base può provocare gravi lesioni personali.
GENERAL SAFETY RULES
Promemoria importante
1.Prima dell'uso, leggere attentamente il manuale del prodotto e
assicurarsi di comprendere e rispettare tutte le avvertenze di sicurezza e le
precauzioni d'uso.
2. Non utilizzare questo prodotto per altri scopi non previsti per evitare
rischi imprevisti.
3. Questo prodotto è applicabile solo agli utenti all'interno della fascia di
età e dell'ambito di applicazione specificati. Si prega di rispettare
rigorosamente le limitazioni e le avvertenze relative all'età.
4. In caso di anomalie nel prodotto, interrompere immediatamente l'utilizzo
e contattare il centro di assistenza post-vendita per consulenza o per
organizzare la riparazione.
Requisiti ambientali per l'uso
1. Utilizzare in un ambiente asciutto e ben ventilato per evitare condizioni
ambientali estreme come l'attivazione dell'acqua, temperature elevate,
umidità elevata e temperature estremamente basse.
2. Evitare la luce solare diretta o il contatto con fonti di fuoco per evitare
danni al prodotto o incendi.
3. Garantire un ambiente di utilizzo stabile ed evitare che il prodotto venga
colpito o lasciato cadere per evitare danni.
Linee guida per le operazioni di sicurezza
1.Quando si trovano oggetti estranei sulla superficie del prodotto,
interrompere immediatamente l'utilizzo e rimuovere gli oggetti estranei
prima di continuare a utilizzarli.
2. Quando si utilizza questo prodotto ininterrottamente per un lungo
periodo, riposarsi in tempo utile per evitare un affaticamento eccessivo.
Manutenzione e manutenzione

- 3 -
1. Mantenere e pulire regolarmente il prodotto. Per la pulizia utilizzare un
panno asciutto, prestando attenzione ad evitare l'uso di sostanze corrosive
come alcool, soluzioni acide e alcaline.
2. Non smontare il prodotto né sostituire i componenti autonomamente. Se
si riscontrano malfunzionamenti, contattare il centro di assistenza
post-vendita.
Misure di gestione delle emergenze
1. In caso di situazioni anomale o incidenti con il prodotto, interrompere
l'utilizzo il prima possibile.
Se si riscontra surriscaldamento, fumo o suoni anomali, interrompere
immediatamente la fonte d'aria e contattare il centro di assistenza
post-vendita.
2. Se il prodotto comporta una situazione di emergenza che potrebbe
compromettere la sicurezza personale, chiamare tempestivamente il
numero di soccorso di emergenza.
Disclaimer
Attribuiamo grande importanza alla sicurezza e alla qualità dei nostri
prodotti, ma non possiamo assumerci la responsabilità per incidenti di
sicurezza causati da un uso o funzionamento improprio.
CONSERVA QUESTE ISTRUZIONI
MODEL AND PARAMETERS
Modello
A02
Liquido adatto
Tutte le paste e i liquidi a flusso libero (senza
particelle) come shampoo, gel doccia, olio
essenziale, ecc
Intervallo di
riempimento
5~50 ml
Modalità di controllo
Interruttore a pedale, riempimento pneumatico
Pressione di
alimentazione
0,4-0,6 MPa
- 4 -
Tramoggia
10 litri, acciaio inossidabile 304
STRUCTURE DIAGRAM
4. Tramoggia C oltre 2. Tramoggia 3. Guarnizione della tramoggia 4.
Ugello di riempimento
5. Riempimento Vite di regolazione 6. Interruttore della fonte d'aria 7.
Pedale Cambia _ 8. Grilletto _ 9. Ingresso aria e filtro dell'aria 10.
Base
COMPONENTS
A02
Anello di tenuta
×2
O-ring
×7
Chiave esagonale
×2
Manuale d'uso
×1
2
6
5
7
9
10
0
8
4
1
3
Model
Parts
- 5 -
Ugello di riempimento
×2( Ф4 ,Ф8)
OPERATING INSTRUCTIONS
7. Macchina per pulire prima dell'uso.
Tenere la base in posizione e ruotare la tramoggia in senso antiorario .
Pulire le parti della tramoggia e l' ugello di riempimento che toccano i
materiali di riempimento , quindi installarli.
8. Collegare la macchina alla fonte d' aria utilizzando un tubo φ 8 mm.
Nota: pressione dell'aria di lavoro: 0,4-0,6 MPa . L'aria fornita è già filtrata.
Air inlet
- 6 -
3. La velocità di riempimento può essere regolata regolando la valvola a
farfalla di ingresso e uscita per modificare il volume dell'aria di ingresso e
uscita .
4.Regolare il volume di riempimento:
1 ) . Allentare il dado .
2 ) . Regolare la lunghezza della vite di regolazione per determinare h, h
corrisponde al volume di riempimento .
3 ) . Dopo aver regolato il volume di riempimento , serrare il dado .
5. Dopo aver completato i passaggi precedenti, accendere l' interruttore
Inlet Throttle
Outlet Throttle
- 7 -
della fonte d' aria , è possibile riempirlo premendo l'interruttore a pedale .
Nota: premere l'interruttore della fonte d'aria per aprire, sollevare
l'interruttore della fonte d'aria per chiudere .
Anelli di tenuta e distribuzione O-ring

- 8 -
MAINTENANCE
1. Si prega di pulire il prodotto in tempo dopo ogni utilizzo .
2. Mantenere sempre pulito il prodotto all'esterno .
3 . Non gettare o far cadere il prodotto.
4 . Durante la conservazione e l'utilizzo, evitare la punta affilata dei prodotti
antigraffio con oggetti duri.
5 . Conservare il prodotto in un luogo asciutto e ventilato.
6 . Se non viene utilizzata per un lungo periodo, svuotare la tramoggia e
pulirla.
TROUBLESHOOTING
Problema
Causa possibile
Possibile soluzione
Il volume di
riempimento non è
accurato .
Là ci sono articoli vari tra il
coperchio della vite del cono
e l'anello del pistone
Pulire l' anello del pistone
Anello del pistone sopra
indossa .
Sostituire l' anello del
pistone
La velocità di riempimento è
instabile .
Fornire una fonte d'aria
stabile .
L'ugello di
riempimento
perde.
L'o-ring del nucleo della
valvola è danneggiato
Sostituire l'anello di tenuta
Ci sono articoli vari attaccati
all'o-ring
Pulire l'O-ring
Bolle durante il
riempimento
La velocità di riempimento è
troppo elevata
Velocità di riempimento
inferiore

- 9 -
Rottura dell'anello di tenuta
all'interno della sede di
tenuta
Sostituire anello di tenuta
Indirizzo: Baoshanqu Shuangchenglu 803long 11hao 1602A-1609shi
Shanghai
Importato in AUS: SIHAO PTY LTD . 1 ROKEVA STREETEASTWOOD
NSW 2122 Australia
Importato negli Stati Uniti: Sanven Technology Ltd. Suite 250, 9166
Anaheim Place, Rancho Cucamonga, CA 91730
REP
EC
SHUNSHUN GmbH
Römeräcker 9 Z2021, 76351
Linkenheim-Hochstetten, Germany
REP
UK
Pooledas Group Ltd
Unit 5 Albert Edward House, The
Pavilions Preston, United Kingdom
Made in China


Soporte técnico y certificado de garantía electrónica
www.vevor.com/support
MÁQUINA DE LLENADO DE PASTA LÍQUIDA
MANUAL DE USUARIO
We continue to be committed to provide you tools with competitive price.
"Save Half", "Half Price" or any other similar expressions used by us only represents an
estimate of savings you might benefit from buying certain tools with us compared to the major
top brands and does not necessarily mean to cover all categories of tools offered by us. You
are kindly reminded to verify carefully when you are placing an order with us if you are
actually saving half in comparison with the top major brands.

- 1 -
MODELO: A02
Have product questions? Need technical support? Please feel free to
contact us:
Technical Support and E-Warranty Certificate
www.vevor.com/support
NEED HELP? CONTACT US!
This is the original instruction, please read all manual instructions
carefully before operating. VEVOR reserves a clear interpretation of our
user manual. The appearance of the product shall be subject to the
product you received. Please forgive us that we won't inform you again if
there are any technology or software updates on our product.
Paste Liquid Filling
Machine

- 2 -
9. Lea atentamente y comprenda todas las INSTRUCCIONES DE
MONTAJE Y OPERACIÓN antes de operar.
10. El incumplimiento de las reglas de seguridad y otras precauciones
básicas de seguridad puede provocar lesiones personales graves.
GENERAL SAFETY RULES
Recordatorio importante
1.Antes de usar, lea atentamente el manual del producto y asegúrese de
comprender y cumplir con todas las advertencias de seguridad y
precauciones de uso.
2. No utilice este producto para otros fines no designados para evitar
riesgos inesperados.
3. Este producto solo es aplicable a usuarios dentro del grupo de edad y
ámbito de aplicación especificados. Cumpla estrictamente con las
restricciones de edad y advertencias pertinentes.
4. Si hay alguna anomalía en el producto, deje de usarlo inmediatamente y
comuníquese con el centro de servicio posventa para realizar consultas o
concertar una reparación.
Requisitos ambientales para su uso.
1. Úselo en un ambiente seco y bien ventilado para evitar condiciones
ambientales extremas como activación de agua, altas temperaturas, alta
humedad y temperaturas extremadamente bajas.
2. Evite la luz solar directa o el contacto con fuentes de fuego para evitar
daños al producto o incendios.
3. Asegúrese de que haya un entorno de uso estable y evite que el
producto se golpee o caiga para evitar daños.
Pautas de operación segura
1. Cuando se encuentren objetos extraños en la superficie del producto,
deje de usarlo inmediatamente y retírelos antes de continuar usándolos.
2. Cuando utilice este producto de forma continua durante un período
prolongado, descanse a tiempo para evitar la fatiga excesiva.
Mantenimiento y conservación
1. Mantenga y limpie periódicamente el producto. Utilice un paño seco

- 3 -
para limpiar, prestando atención a evitar el uso de sustancias corrosivas
como alcohol, soluciones ácidas y alcalinas.
2. No desmonte el producto ni reemplace componentes por su cuenta. Si
encuentra algún mal funcionamiento, comuníquese con el centro de
servicio posventa.
Medidas de manejo de emergencia
1. Cuando haya situaciones anormales o accidentes con el producto, deje
de usarlo lo antes posible.
Si detecta sobrecalentamiento, humo o ruidos anormales, corte
inmediatamente la fuente de aire y comuníquese con el centro de servicio
posventa.
2. Si el producto implica una situación de emergencia que pueda dañar la
seguridad personal, llame al número de rescate de emergencia de manera
oportuna.
Descargos de responsabilidad
Damos gran importancia a la seguridad y la calidad de nuestros productos,
pero no podemos asumir responsabilidad por accidentes de seguridad
causados por un uso u operación inadecuados.
GUARDA ESTAS INSTRUCCIONES
MODEL AND PARAMETERS
Modelo
A02
Líquido adecuado
Todas las pastas y líquidos que fluyen libremente
(sin partículas) como champú, gel de ducha,
aceite esencial, etc.
Rango de llenado
5~50ml
Modo de control
Interruptor de pedal, llenado neumático.
Presión de
suministro de aire
0,4-0,6 MPa

- 4 -
Tolva
10L, acero inoxidable 304
STRUCTURE DIAGRAM
5. Tolva C sobre 2. Tolva 3. Sello de tolva 4. Boquilla de llenado
5. Tornillo de ajuste de llenado 6. Interruptor de fuente de aire 7.
pedalear bruja _ 8. Gatillo _ 9. Entrada de aire y filtro de aire 10.
base
COMPONENTS
A02
Anillo de sellado
×2
junta tórica
×7
Llave hexagonal
×2
Manual de usuario
×1
2
6
5
7
9
10
0
8
4
1
3
Model
Parts
- 5 -
Boquilla de llenado
×2 ( Ф4 , Ф8)
OPERATING INSTRUCTIONS
9. Máquina de limpieza antes de su uso.
Sostenga la base en su lugar y gire la tolva en sentido antihorario .
Limpie las partes de la tolva y la boquilla de llenado que tocan los
materiales de llenado y luego instálelas.
10. Conecte la máquina a la fuente de aire mediante un tubo de
φ
8 mm.
Nota: Presión de aire de trabajo: 0,4-0,6 Mpa . El aire suministrado ya está
filtrado.
Air inlet
- 6 -
3. La velocidad de llenado se puede ajustar ajustando el acelerador de
entrada y salida para cambiar el volumen de aire de entrada y salida .
4.Ajuste el volumen de llenado:
1 ) . Afloje la tuerca.
2 ) . Ajuste la longitud del tornillo de ajuste para determinar h, h
corresponde al volumen de llenado .
3 ) . Después de ajustar el volumen de llenado , apriete la tuerca .
5. Después de completar los pasos anteriores, encienda el interruptor de
la fuente de aire ; puede llenarlo pisando el interruptor del pedal.
Inlet Throttle
Outlet Throttle
- 7 -
Nota: Presione el interruptor de la fuente de aire para abrir, levante el
interruptor de la fuente de aire para cerrar .
Distribución de juntas tóricas y juntas tóricas.

- 8 -
MAINTENANCE
1. Limpia el producto a tiempo después de cada uso .
2. Mantenga siempre limpio el exterior del producto .
3 . No arroje ni deje caer el producto.
4 . Al almacenar y utilizar, evite la punta afilada de los productos duros que
rayen.
5 . Guarde el producto en un lugar seco y ventilado.
6 . Si no se utiliza durante mucho tiempo, vacíe la tolva y límpiela.
TROUBLESHOOTING
Problema
Causa posible
Solución posible
El volumen de
llenado no es
exacto .
Allá Hay artículos diversos
entre la cubierta del tornillo
cónico y el anillo del pistón.
Limpiar el anillo del pistón
Anillo de pistón terminado
lleva .
Reemplace el anillo del
pistón
La velocidad de llenado es
inestable .
Suministre una fuente de
aire estable .
La boquilla de
llenado tiene
fugas.
La junta tórica del núcleo de
la válvula está dañada.
Reemplace la junta tórica
Hay artículos diversos
pegados a la junta tórica.
Limpiar la junta tórica
Burbuja mientras
se llena
La velocidad de llenado es
demasiado rápida
Menor velocidad de llenado
Fallo del anillo de sellado
dentro del asiento de sellado
Reemplazar anillo de
sellado

- 9 -
Dirección: Baoshanqu Shuangchenglu 803long 11hao 1602A-1609shi
Shanghai
Importado a AUS: SIHAO PTY LTD . 1 ROKEVA STREET ASTWOOD
NSW 2122 Australia
Importado a EE. UU.: Sanven Technology Ltd. Suite 250, 9166 Anaheim
Place, Rancho Cucamonga, CA 91730
REP
EC
SHUNSHUN GmbH
Römeräcker 9 Z2021, 76351
Linkenheim-Hochstetten, Germany
REP
UK
Pooledas Group Ltd
Unit 5 Albert Edward House, The
Pavilions Preston, United Kingdom
Hecho en china


Wsparcie techniczne i certyfikat e-gwarancji
www.vevor.com/support
MASZYNA DO NAPEŁNIANIA PŁYNEM WKLEJ
INSTRUKCJA OBSŁUGI
We continue to be committed to provide you tools with competitive price.
"Save Half", "Half Price" or any other similar expressions used by us only represents an
estimate of savings you might benefit from buying certain tools with us compared to the major
top brands and does not necessarily mean to cover all categories of tools offered by us. You
are kindly reminded to verify carefully when you are placing an order with us if you are
actually saving half in comparison with the top major brands.
- 1 -
MODEL: A02
Have product questions? Need technical support? Please feel free to
contact us:
Technical Support and E-Warranty Certificate
www.vevor.com/support
NEED HELP? CONTACT US!
This is the original instruction, please read all manual instructions
carefully before operating. VEVOR reserves a clear interpretation of our
user manual. The appearance of the product shall be subject to the
product you received. Please forgive us that we won't inform you again if
there are any technology or software updates on our product.
Paste Liquid Filling
Machine

- 2 -
11. przeczytaj uważnie i zrozum całą INSTRUKCJĘ MONTAŻU I
OBSŁUGI .
12. Nieprzestrzeganie zasad bezpieczeństwa i innych podstawowych
środków ostrożności może skutkować poważnymi obrażeniami ciała.
GENERAL SAFETY RULES
Ważne przypomnienie
1. Przed użyciem przeczytaj uważnie instrukcję produktu i upewnij się, że
rozumiesz i przestrzegasz wszystkich ostrzeżeń dotyczących bezpieczeń
stwa i środków ostrożności podczas użytkowania.
2. Nie używaj tego produktu do innych, nieprzeznaczonych celów, aby
uniknąć nieoczekiwanego ryzyka.
3. Ten produkt jest przeznaczony wyłącznie dla użytkowników w określonej
grupie wiekowej i zakresie zastosowania. Należy ściśle przestrzegać
odpowiednich ograniczeń wiekowych i ostrzeżeń.
4. W przypadku jakichkolwiek nieprawidłowości w produkcie należy
natychmiast zaprzestać jego używania i skontaktować się z centrum
obsługi posprzedażnej w celu konsultacji lub umówienia naprawy.
Wymagania środowiskowe dotyczące stosowania
1. Proszę używać w suchym i dobrze wentylowanym środowisku, aby
uniknąć ekstremalnych warunków środowiskowych, takich jak aktywacja
wody, wysoka temperatura, wysoka wilgotność i wyjątkowo niska
temperatura.
2. Unikaj bezpośredniego światła słonecznego lub kontaktu ze źródłami
ognia, aby zapobiec uszkodzeniu produktu lub pożarowi.
3. Zapewnij stabilne środowisko użytkowania i chroń produkt przed
uderzeniem lub upuszczeniem, aby uniknąć uszkodzeń.
Wytyczne dotyczące bezpieczeństwa
1. Jeżeli na powierzchni produktu zostaną znalezione ciała obce, należy
natychmiast zaprzestać ich używania i usunąć je przed dalszym użyciem.
2. W przypadku ciągłego używania tego produktu przez długi czas należy
odpocząć w odpowiednim czasie, aby uniknąć nadmiernego zmęczenia.
Konserwacja i utrzymanie

- 3 -
1. Regularnie konserwuj i czyść produkt. Do wycierania używaj suchej
szmatki, zwracając uwagę na unikanie stosowania substancji żrących,
takich jak alkohol, roztwory kwasów i zasad.
2. Nie demontuj produktu ani nie wymieniaj podzespołów samodzielnie. W
przypadku stwierdzenia jakichkolwiek usterek prosimy o kontakt z
serwisem posprzedażowym.
Środki postępowania w sytuacjach awaryjnych
1. W przypadku wystąpienia nietypowych sytuacji lub wypadków
związanych z produktem należy jak najszybciej zaprzestać jego używania.
W przypadku stwierdzenia przegrzania, dymienia lub nietypowego dźwięku
należy natychmiast odciąć źródło powietrza i skontaktować się z centrum
obsługi posprzedażnej.
2. Jeżeli produkt wiąże się z sytuacją awaryjną mogącą zagrozić
bezpieczeństwu osobistemu, należy niezwłocznie zadzwonić pod numer
ratunkowy.
Zastrzeżenia
Przywiązujemy dużą wagę do bezpieczeństwa i jakości naszych produktów,
ale nie możemy ponosić odpowiedzialności za wypadki związane z
bezpieczeństwem spowodowane niewłaściwym użytkowaniem lub
obsługą.
ZACHOWAJ TE INSTRUKCJE
MODEL AND PARAMETERS
Model
A02
Odpowiedni płyn
Wszystkie sypkie pasty i płyny (bez cząstek),
takie jak szampon, żel pod prysznic, olejek
eteryczny itp
Zakres napełniania
5 ~ 50 ml
Tryb sterowania
Przełącznik pedałowy, napełnianie
pneumatyczne
- 4 -
Ciśnienie zasilania
powietrzem
0,4-0,6 MPa
Zbiornik
10L, stal nierdzewna 304
STRUCTURE DIAGRAM
6. Zbiornik C ponad 2. Zbiornik 3. Uszczelka zbiornika 4. Dysza do
napełniania
5. Napełnianie Śruba regulacyjna _ 6. Przełącznik źródła powietrza
7. Pedał Czarownica _ 8. Spust _ 9. Wlot powietrza i filtr powietrza
10. Baza
COMPONENTS
A02
Uszczelka
×2
O-ring
×7
2
6
5
7
9
10
0
8
4
1
3
Model
Parts
- 5 -
Klucz sześciokątny
×2
Instrukcja obsługi
×1
Dysza do napełniania
×2( Ф4 ,Ф8)
OPERATING INSTRUCTIONS
11. Czyszczenie maszyny przed użyciem.
Przytrzymaj podstawę w miejscu i obróć zbiornik w kierunku przeciwnym
do ruchu wskazówek zegara .
Oczyść części leja zasypowego i dyszę napełniającą , które stykają się z
materiałem wypełniającym , a następnie je zamontuj.
12. Podłącz maszynę do źródła powietrza za pomocą rury φ 8 mm.
Uwaga: Robocze ciśnienie powietrza: 0,4-0,6Mpa . Dostarczone powietrze
jest już przefiltrowane.
- 6 -
3. Szybkość napełniania można regulować, regulując przepustnicę
wlotową i wylotową , aby zmienić objętość powietrza wlotowego i
wylotowego .
4. Dostosuj objętość napełniania :
1 ) . Poluzuj nakrętkę .
2 ) . Dostosuj długość śruby regulacyjnej , aby określić h, h odpowiada
objętości napełnienia .
Air inlet
Inlet Throttle
Outlet Throttle
- 7 -
3 ) . Po dostosowaniu się do objętości napełnienia dokręcić nakrętkę .
5. Po wykonaniu powyższych kroków włącz źródło powietrza , które
możesz napełnić , naciskając przełącznik pedałowy.
Uwaga: Naciśnij przełącznik źródła powietrza, aby otworzyć, pociągnij
przełącznik źródła powietrza, aby zamknąć .
Dystrybucja pierścieni uszczelniających i O-ringów

- 8 -
MAINTENANCE
1. Proszę wyczyścić produkt na czas po każdym użyciu .
2. Zawsze utrzymuj produkt na zewnątrz w czystości .
3 . Nie rzucaj ani nie upuszczaj produktu.
4 . Podczas przechowywania i używania należy unikać ostrych końcówek
produktów do zarysowania twardych przedmiotów.
5 . Proszę przechowywać produkt w suchym i wentylowanym miejscu.
6 . Jeśli nie będziesz używać produktu przez dłuższy czas, opróżnij
zbiornik i wyczyść go.
TROUBLESHOOTING
Problem
Możliwa przyczyna
Możliwe rozwiązanie
Objętość
napełniania nie
Tam znajduje się pomiędzy
pokrywą śruby stożkowej a
Wyczyścić pierścień tłokowy

- 9 -
jest dokładna .
pierścieniem tłokowym
Pierście ń tłokowy się sko ń
czył nosi .
Wymienić pierścień tłokowy
Prędkość napełniania jest
niestabilna .
Zapewnij stabilne źródło
powietrza .
Dysza
napełniająca
nieszczelna.
Uszkodzony pierście ń
uszczelniający rdzenia
zaworu
Wymień o-ring
Do pierścienia
uszczelniającego przyklejają
się różne rzeczy
Wyczyść o-ring
Bąbel podczas
napełniania
Szybkość napełniania jest
zbyt duża
Niższa prędkość napełniania
Awaria pierścienia
uszczelniającego wewnątrz
gniazda uszczelniającego
Zastępować uszczelka
Adres: Baoshanqu Shuangchenglu 803long 11hao 1602A-1609shi
Szanghaj
Import do AUS: SIHAO PTY LTD . 1 ROKEVA STREETEASTWOOD
NSW 2122 Australia
Import do USA: Sanven Technology Ltd. Apartament 250, 9166 Anaheim
Place, Rancho Cucamonga, Kalifornia 91730

- 10 -
REP
EC
SHUNSHUN GmbH
Römeräcker 9 Z2021, 76351
Linkenheim-Hochstetten, Germany
REP
UK
Pooledas Group Ltd
Unit 5 Albert Edward House, The
Pavilions Preston, United Kingdom
Wyprodukowano w Chinach


Technische ondersteuning en e-garantiecertificaat
www.vevor.com/support
PASTA VLOEISTOF VULMACHINE
HANDLEIDING
We continue to be committed to provide you tools with competitive price.
"Save Half", "Half Price" or any other similar expressions used by us only represents an
estimate of savings you might benefit from buying certain tools with us compared to the major
top brands and does not necessarily mean to cover all categories of tools offered by us. You
are kindly reminded to verify carefully when you are placing an order with us if you are
actually saving half in comparison with the top major brands.

- 1 -
MODEL: A02
Have product questions? Need technical support? Please feel free to
contact us:
Technical Support and E-Warranty Certificate
www.vevor.com/support
NEED HELP? CONTACT US!
This is the original instruction, please read all manual instructions
carefully before operating. VEVOR reserves a clear interpretation of our
user manual. The appearance of the product shall be subject to the
product you received. Please forgive us that we won't inform you again if
there are any technology or software updates on our product.
Paste Liquid Filling
Machine

- 2 -
13. Lees zorgvuldig alle MONTAGE- EN BEDIENINGSINSTRUCTIES
voordat u ermee aan de slag gaat.
14. Het niet naleven van de veiligheidsregels en andere elementaire
veiligheidsmaatregelen kan leiden tot ernstig persoonlijk letsel.
GENERAL SAFETY RULES
Belangrijke herinnering
1. Lees vóór gebruik zorgvuldig de producthandleiding en zorg ervoor dat u
alle veiligheidswaarschuwingen en gebruiksvoorzorgsmaatregelen begrijpt
en naleeft.
2. Gebruik dit product niet voor andere niet-aangewezen doeleinden om
onverwachte risico's te voorkomen.
3. Dit product is alleen van toepassing op gebruikers binnen de
aangegeven leeftijdsgroep en toepassingsgebied. Houd u strikt aan de
relevante leeftijdsbeperkingen en waarschuwingen.
4. Als er afwijkingen aan het product zijn, stop dan onmiddellijk met het
gebruik ervan en neem contact op met het after-sales servicecentrum voor
advies of om een reparatie te regelen.
Omgevingseisen voor gebruik
1. Gebruik het in een droge en goed geventileerde omgeving om extreme
omgevingsomstandigheden zoals wateractivering, hoge temperaturen,
hoge luchtvochtigheid en extreem lage temperaturen te voorkomen.
2. Vermijd direct zonlicht of contact met vuurbronnen om productschade of
brand te voorkomen.
3. Zorg voor een stabiele gebruiksomgeving en voorkom dat het product
wordt geraakt of valt om schade te voorkomen.
Richtlijnen voor veilige bediening
1. Als er vreemde voorwerpen op het oppervlak van het product worden
aangetroffen, stop dan onmiddellijk met het gebruik en verwijder de
vreemde voorwerpen voordat u ze verder gebruikt.
2. Als u dit product langdurig continu gebruikt, rust dan tijdig uit om
overmatige vermoeidheid te voorkomen.
Onderhoud en onderhoud

- 3 -
1. Onderhoud en reinig het product regelmatig. Gebruik een droge doek
om af te vegen en let erop dat u het gebruik van bijtende stoffen zoals
alcohol, zuur en alkalische oplossingen vermijdt.
2. Haal het product niet zelf uit elkaar en vervang geen onderdelen. Als u
storingen ondervindt, neem dan contact op met het after-sales
servicecentrum.
Maatregelen voor noodbehandeling
1. Als er abnormale situaties of ongelukken met het product optreden, stop
dan zo snel mogelijk met het gebruik ervan.
Als u oververhitting, rook of abnormaal geluid constateert, sluit dan
onmiddellijk de luchtbron af en neem contact op met het after-sales
servicecentrum.
2. Als er bij het product sprake is van een noodsituatie die de persoonlijke
veiligheid in gevaar kan brengen, bel dan tijdig het noodhulpnummer.
Disclaimers
Wij hechten veel belang aan de veiligheid en kwaliteit van onze producten,
maar kunnen geen verantwoordelijkheid aanvaarden voor
veiligheidsongevallen veroorzaakt door oneigenlijk gebruik of bediening.
BEWAAR DEZE INSTRUCTIES
MODEL AND PARAMETERS
Model
A02
Geschikte vloeistof
Alle vrij stromende pasta's en vloeistoffen (geen
deeltjes) Zoals shampoo, douchegel, etherische
olie, etc
Vulbereik
5~50 ml
Controlemodus _
Pedaalschakelaar, de pneumatische vulling
Luchttoevoerdruk
0,4-0,6 MPa
- 4 -
Hopper
10L, 304 roestvrij staal
STRUCTURE DIAGRAM
7. Hopper C boven 2. Vultrechter 3. Afdichting van de trechter 4.
Vulmondstuk _ _
5. Vul een stelschroef _ 6. Luchtbronschakelaar 7. Pedaal S heks
8. Trigger _ 9. Luchtinlaat en luchtfilter _ 10. Basis
COMPONENTS
A02
Afsluitring
×2
O-ring
×7
Inbussleutel
×2
Handleiding
×1
2
6
5
7
9
10
0
8
4
1
3
Model
Parts
- 5 -
Vulmondstuk
×2 ( Ф4 , Ф8)
OPERATING INSTRUCTIONS
13. Reinigingsmachine voor gebruik.
Houd de basis op zijn plaats en draai de trechter tegen de klok in .
Reinig de delen van de trechter en het vulmondstuk die in contact komen
met het vulmateriaal en installeer ze vervolgens.
14. Sluit de machine aan op de luchtbron met behulp van een leiding van
φ
8 mm.
Opmerking: Werkluchtdruk: 0,4-0,6 MPa . De aangevoerde lucht is al
gefilterd.
Air inlet

- 6 -
3. De vulsnelheid kan worden aangepast door de inlaat- en uitlaatgasklep
aan te passen om het inlaat- en uitlaatluchtvolume te wijzigen .
4. Pas het vulvolume aan :
1 ) . Draai de moer los .
2 ) . Pas de lengte van de stelschroef aan om h te bepalen, h komt overeen
met het vulvolume .
3 ) . Nadat u het vulvolume heeft aangepast , draait u de moer vast .
Nadat de bovenstaande stappen zijn voltooid, schakelt u de
Inlet Throttle
Outlet Throttle
- 7 -
luchtbronschakelaar in . U kunt vullen door op de pedaalschakelaar te
trappen .
Opmerking: Druk op de luchtbronschakelaar om te openen, trek de
luchtbronschakelaar omhoog om te sluiten .
Afdichtingsringen en O-ringen distributie

- 8 -
MAINTENANCE
1. Reinig het product na elk gebruik op tijd .
2. Houd het product altijd schoon aan de buitenkant .
3 . Gooi het product niet en laat het niet vallen.
4 . Vermijd bij het opbergen en gebruiken de scherpe punten van de
krasproducten voor harde voorwerpen.
5 . Bewaar het product op een droge en geventileerde plaats.
6 . Als u het apparaat langere tijd niet gebruikt, leegt u het reservoir en
maakt u het schoon.
TROUBLESHOOTING
Probleem
Mogelijke oorzaak
Mogelijke oplossing
Vulvolume is niet
nauwkeurig .
Daar zit diversen tussen het
kegelschroefdeksel en de
zuigerveer
Maak de zuigerveer schoon
Zuigerveer voorbij draagt .
Vervang de zuigerveer
De vulsnelheid is onstabiel .
Zorg voor een stabiele
luchtbron .
Het vulmondstuk
lekt.
De O-ring van de klepkern is
beschadigd
Vervang de O-ring
Er blijven allerlei dingen aan
de O-ring plakken
Maak de O-ring schoon
Bubbel tijdens het
De vulsnelheid is te snel
Lagere vulsnelheid

- 9 -
vullen
Defecte afdichtring in de
afdichtingszitting
Vervangen afsluitring
Adres: Baoshanqu Shuangchenglu 803long 11hao 1602A-1609shi
Shanghai
Geïmporteerd naar AUS: SIHAO PTY LTD . 1 ROKEVA
STREETEASTWOOD NSW 2122 Australië
Geïmporteerd naar de VS: Sanven Technology Ltd. Suite 250, 9166
Anaheim Place, Rancho Cucamonga, CA 91730
REP
EC
SHUNSHUN GmbH
Römeräcker 9 Z2021, 76351
Linkenheim-Hochstetten, Germany
REP
UK
Pooledas Group Ltd
Unit 5 Albert Edward House, The
Pavilions Preston, United Kingdom
Gemaakt in China


Teknisk support och e-garanticertifikat
www.vevor.com/support
KLISTRA VÄTSKEFYLLNINGSMASKIN
ANVÄNDARMANUAL
We continue to be committed to provide you tools with competitive price.
"Save Half", "Half Price" or any other similar expressions used by us only represents an
estimate of savings you might benefit from buying certain tools with us compared to the major
top brands and does not necessarily mean to cover all categories of tools offered by us. You
are kindly reminded to verify carefully when you are placing an order with us if you are
actually saving half in comparison with the top major brands.

- 1 -
MODELL: A02
Have product questions? Need technical support? Please feel free to
contact us:
Technical Support and E-Warranty Certificate
www.vevor.com/support
NEED HELP? CONTACT US!
This is the original instruction, please read all manual instructions
carefully before operating. VEVOR reserves a clear interpretation of our
user manual. The appearance of the product shall be subject to the
product you received. Please forgive us that we won't inform you again if
there are any technology or software updates on our product.
Paste Liquid Filling
Machine

- 2 -
15. Läs noga och förstå alla MONTERINGS- OCH
DRIFTINSTRUKTIONER innan användning.
16. Underlåtenhet att följa säkerhetsreglerna och andra grundläggande
säkerhetsåtgärder kan leda till allvarliga personskador.
GENERAL SAFETY RULES
Viktig påminnelse
1. Innan användning, läs noga igenom produktmanualen och se till att du
förstår och följer alla säkerhetsvarningar och försiktighetsåtgärder vid
användning.
2. Använd inte denna produkt för andra icke-avsedda ändamål för att
undvika oväntade risker.
3. Denna produkt är endast tillämplig på användare inom den specificerade
åldersgruppen och tillämpningsområdet. Vänligen följ strikt relevanta
åldersbegränsningar och varningar.
4. Om det finns några avvikelser i produkten, vänligen sluta använda den
omedelbart och kontakta kundservice för konsultation eller för att ordna
reparation.
Miljökrav för användning
1. Använd i en torr och välventilerad miljö för att undvika extrema
miljöförhållanden som vattenaktivering, hög temperatur, hög luftfuktighet
och extremt låg temperatur.
2. Undvik direkt solljus eller kontakt med brandkällor för att förhindra
produktskador eller brand.
3. Se till en stabil användningsmiljö och förhindra att produkten träffas eller
tappas för att undvika skador.
Riktlinjer för säkerhet och drift
1. När främmande föremål hittas på produktens yta, sluta omedelbart att
använda och ta bort främmande föremål innan du fortsätter att använda
dem.
2. När du använder denna produkt kontinuerligt under en längre tid,
vänligen vila i god tid för att undvika överdriven trötthet.
Underhåll och skötsel

- 3 -
1. Underhåll och rengör produkten regelbundet. Använd en torr trasa för att
torka av, var uppmärksam på att undvika användning av frätande ämnen
som alkohol, syra och alkalilösningar.
2. Ta inte isär produkten eller byt ut komponenter på egen hand. Om du
stöter på några fel, vänligen kontakta servicecentret.
Akuthanteringsåtgärder
1. Om det uppstår onormala situationer eller olyckor med produkten,
vänligen sluta använda den så snart som möjligt.
Om överhettning, rökning eller onormalt ljud upptäcks, stäng omedelbart
av luftkällan och kontakta servicecentret.
2. Om produkten innebär en nödsituation som kan skada den personliga
säkerheten, ring nödräddningsnumret i tid.
Friskrivningsklausuler
Vi lägger stor vikt vid våra produkters säkerhet och kvalitet, men kan inte ta
ansvar för säkerhetsolyckor orsakade av felaktig användning eller
användning.
SPARA DESSA INSTRUKTIONER
MODEL AND PARAMETERS
Modell
A02
Lämplig vätska
Alla fririnnande pastor och vätskor (inga partiklar)
som schampo, duschtvål, eterisk olja, etc.
Fyllningsområde
5~50 ml
Kontrollläge _
Pedalomkopplare,Pneumatiska fyllningen
Lufttillförseltryck
0,4-0,6Mpa
Ficka
10L, 304 rostfritt stål

- 4 -
STRUCTURE DIAGRAM
8. Ficka C över 2. Hopper 3. Behållarens tätning 4. Fyllning N
munstycke
5. Påfyllning av en justeringsskruv 6. Omkopplare för luftkälla 7.
Pedal S häxa 8. T riggar 9. Luftinlopp och luftfilter _ 10. Bas
COMPONENTS
A02
Tätningsring
×2
O-ring
×7
Insexnyckel
×2
Användarmanual
×1
Påfyllningsmunstycke
×2( Ф4 ,Ф8)
2
6
5
7
9
10
0
8
4
1
3
Model
Parts
- 5 -
OPERATING INSTRUCTIONS
15. Rengör maskinen före användning.
Håll basen på plats och vrid behållaren moturs .
Rengör de delar av behållaren och påfyllningsmunstycket som vidrör
påfyllningsmaterialet och installera dem sedan .
16. Anslut maskinen till luftkällan med hjälp av ett
φ
8 mm rör .
Obs: Arbetslufttryck: 0,4-0,6Mpa. Den tillförda luften är redan filtrerad.
Air inlet
- 6 -
3. Påfyllningshastigheten kan justeras genom att justera inlopps- och
utloppsgasreglaget för att ändra inlopps- och utloppsluftens volym .
4.A justera påfyllningsvolymen :
1 ) . Lossa muttern .
2 ) . Justera justerskruvens längd för att bestämma h , h motsvarar
påfyllningsvolymen .
3 ) . Efter att ha justerat till påfyllningsvolymen, dra åt muttern .
5. När stegen ovan är klara, slå på luftkällans växel , du kan fylla på genom
att trampa på pedalomkopplaren .
Obs: Tryck på luftkällans omkopplare för att öppna, dra upp luftkällans
omkopplare för att stänga .
Inlet Throttle
Outlet Throttle
- 7 -
Tätningsringar och O-ringsfördelning

- 8 -
MAINTENANCE
1. Rengör produkten i tid efter varje användning .
2. Håll alltid produkten ren utomhus .
3 . Kasta eller tappa inte produkten.
4 . Vid förvaring och användning, undvik den vassa spetsen på de hårda
föremålen som repar produkterna.
5 . Förvara produkten på en torr och ventilerad plats.
6 . Om den inte används under en längre tid, töm behållaren och rengör
den.
TROUBLESHOOTING
Problem
Möjlig orsak
Möjlig lösning
Fyllningsvolymen är
inte korrekt .
där är diverse mellan
konskruvkåpan och
kolvringen
Rengör kolvringen
Kolvring över bär .
Byt ut kolvringen
Påfyllningshastigheten är
instabil .
Tillför en stabil luftkälla .
Påfyllningsmunstycket
läcker.
O-ringen på ventilkärnan är
skadad
Byt ut o-ringen
Det finns diverse som
fastnar på o-ringen
Rengör O-ringen
Bubbla medan du
fyller
Fyllningshastigheten är för
hög
Lägre påfyllningshastighet
Fel i tätningsringen inuti
tätningssätet
Byta ut tätningsring

- 9 -
Adress: Baoshanqu Shuangchenglu 803long 11hao 1602A-1609shi
Shanghai
Importerad till AUS: SIHAO PTY LTD . 1 ROKEVA STREETEASTWOOD
NSW 2122 Australien
till USA: Sanven Technology Ltd. Suite 250, 9166 Anaheim Place, Rancho
Cucamonga, CA 91730
REP
EC
SHUNSHUN GmbH
Römeräcker 9 Z2021, 76351
Linkenheim-Hochstetten, Germany
REP
UK
Pooledas Group Ltd
Unit 5 Albert Edward House, The
Pavilions Preston, United Kingdom
Tillverkad i Kina