
Technical Support and E-Warranty Certificate
www.vevor.com/support
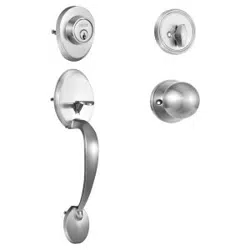
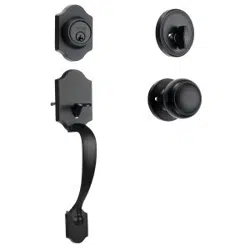
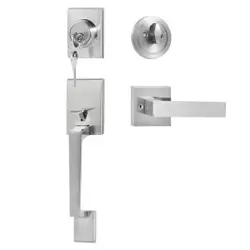
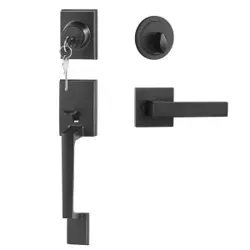
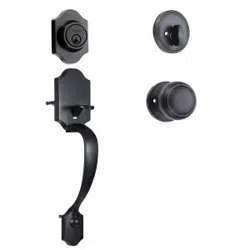
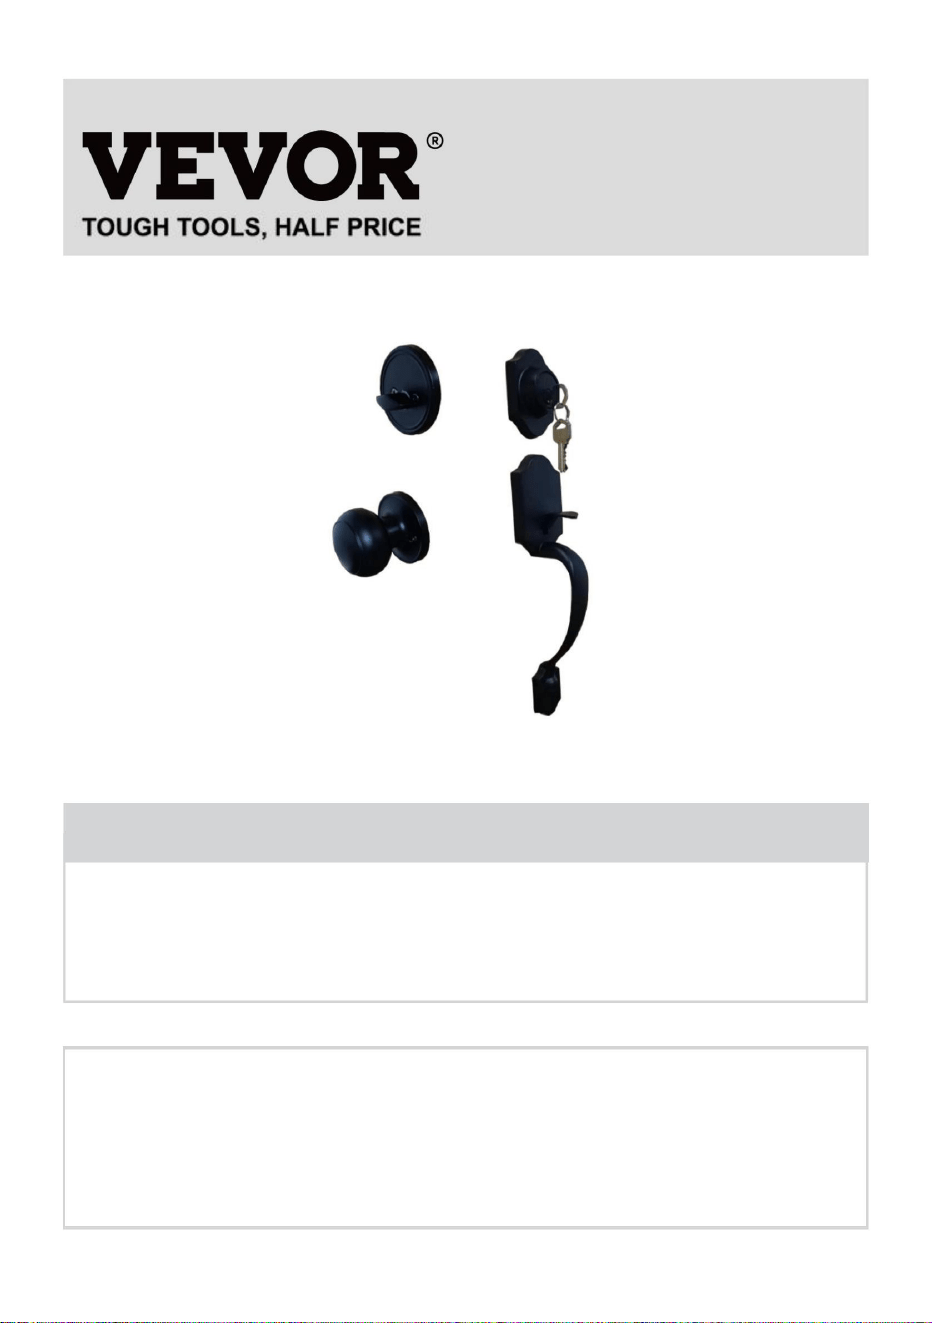
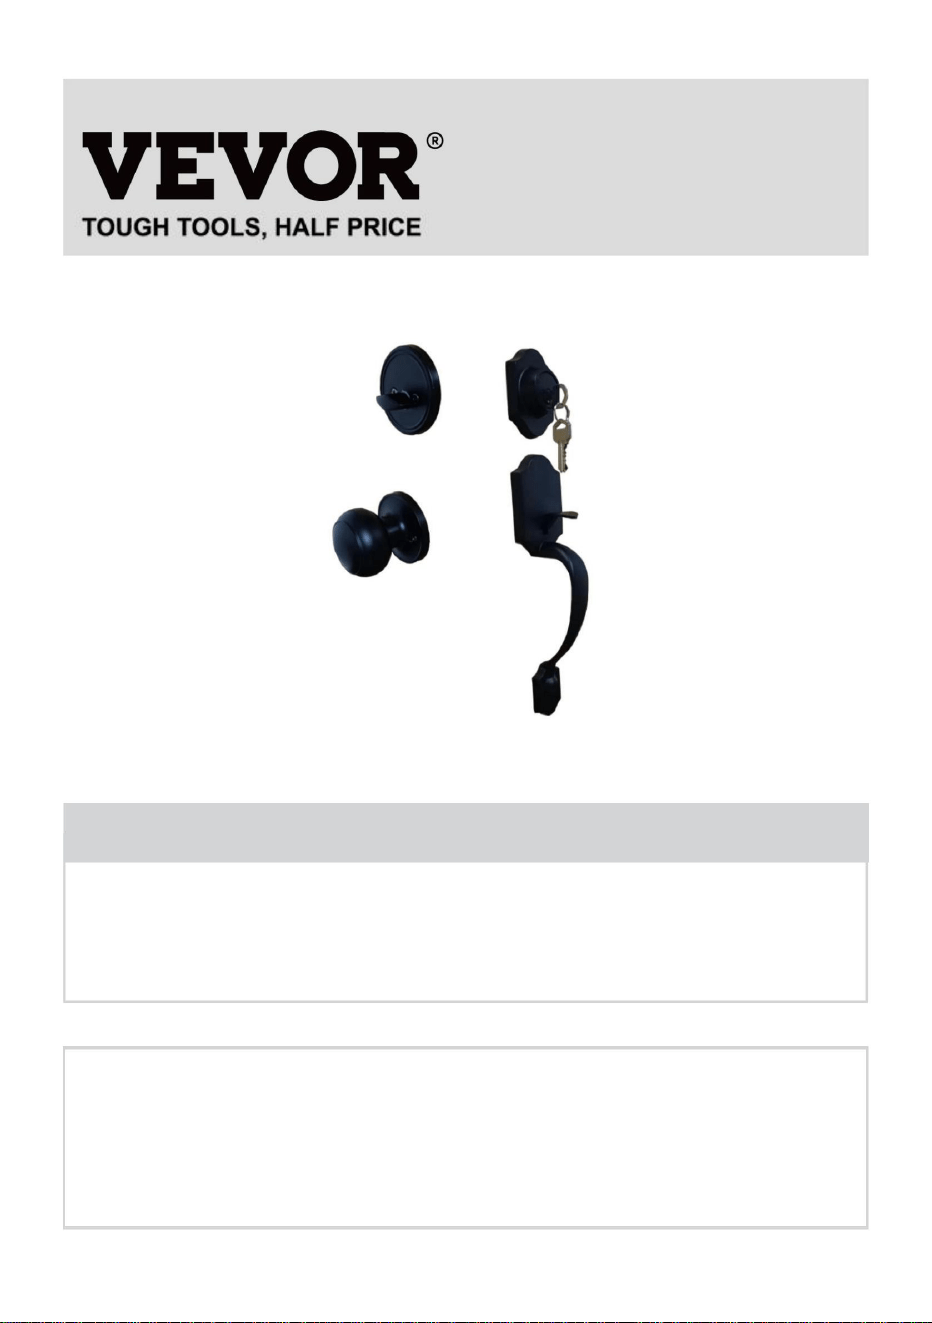
KNOB HANDLESETS
MODEL: 19985-SN / 20185-AC / 20185-10B
We continue to be committed to provide you tools with competitive price.
"Save Half", "Half Price" or any other similar expressions used by us only
represents an estimate of savings you might benefit from buying certain tools with
us compared to the major top brands and does not necessarily mean to cover all
categories of tools offered by us. You are kindly reminded to verify carefully when
you are placing an order with us if you are actually saving half in comparison with
the top major brands.

1
MODEL: 19985-SN / 20185-AC / 20185-10B
NOTE: The shown is for illustration purposes only. Please refer to the
color you purchased.
Have product questions? Need technical support? Please feel free to
contact us:
Technical Support and E-Warranty Certificate
www.vevor.com/support
NEED HELP? CONTACT US!
This is the original instruction, please read all manual instructions
carefully before operating. VEVOR reserves a clear interpretation of our
user manual. The appearance of the product shall be subject to the
product you received. Please forgive us that we won't inform you again if
there are any technology or software updates on our product.
KNOB HANDLESETS

2
SAFETY INSTRUCTIONS
1. This product contains small parts. If swallowed, it will pose a choking
hazard. Keep these small parts away from children !
2. Read, understand and follow your power tool manufacturer's
instructions for safety. Always wear safety glasses or eye shields before
assembly and commencing power tool operation. Always keep hands,
face, hair, loose clothing, and body at a safe distance from spindles and
cutting tools. Always keep a firm grip on tool handles when in operation.
Always disconnect from the power source before adjusting power tools.
MODEL AND PARAMETERS
Model
19985-SN
20185-AC
20185-10B
Color
Satin Nickel
Antique Copper
Matte Black
Applicable Door
Thickness
1-3/8"~1-3/4"
Latch Length
2-3/8" and 2-3/4"
Pitch-row(Door Handle)
7-11/16"-8-13/16"
3
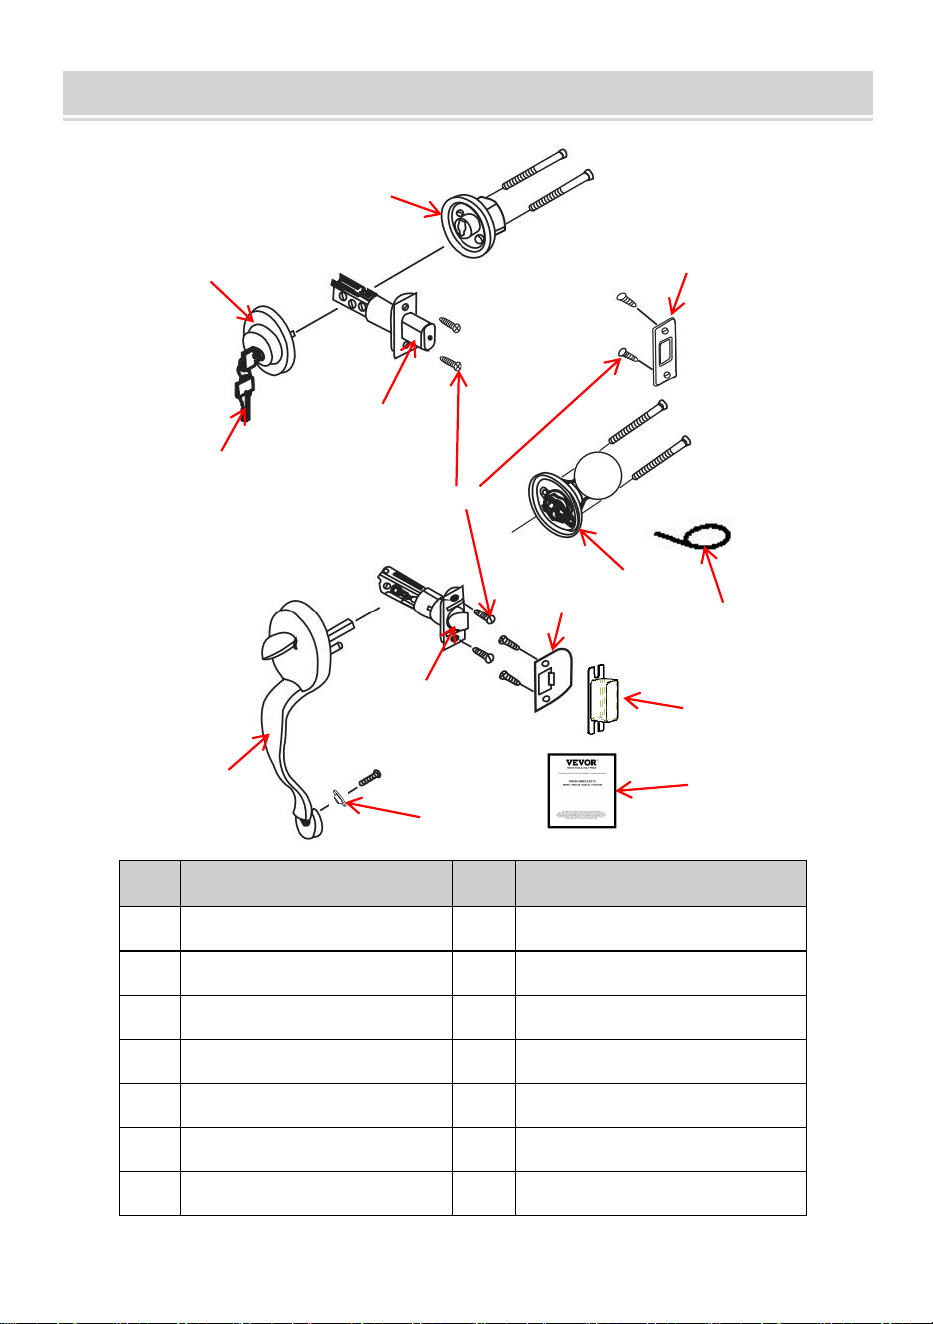
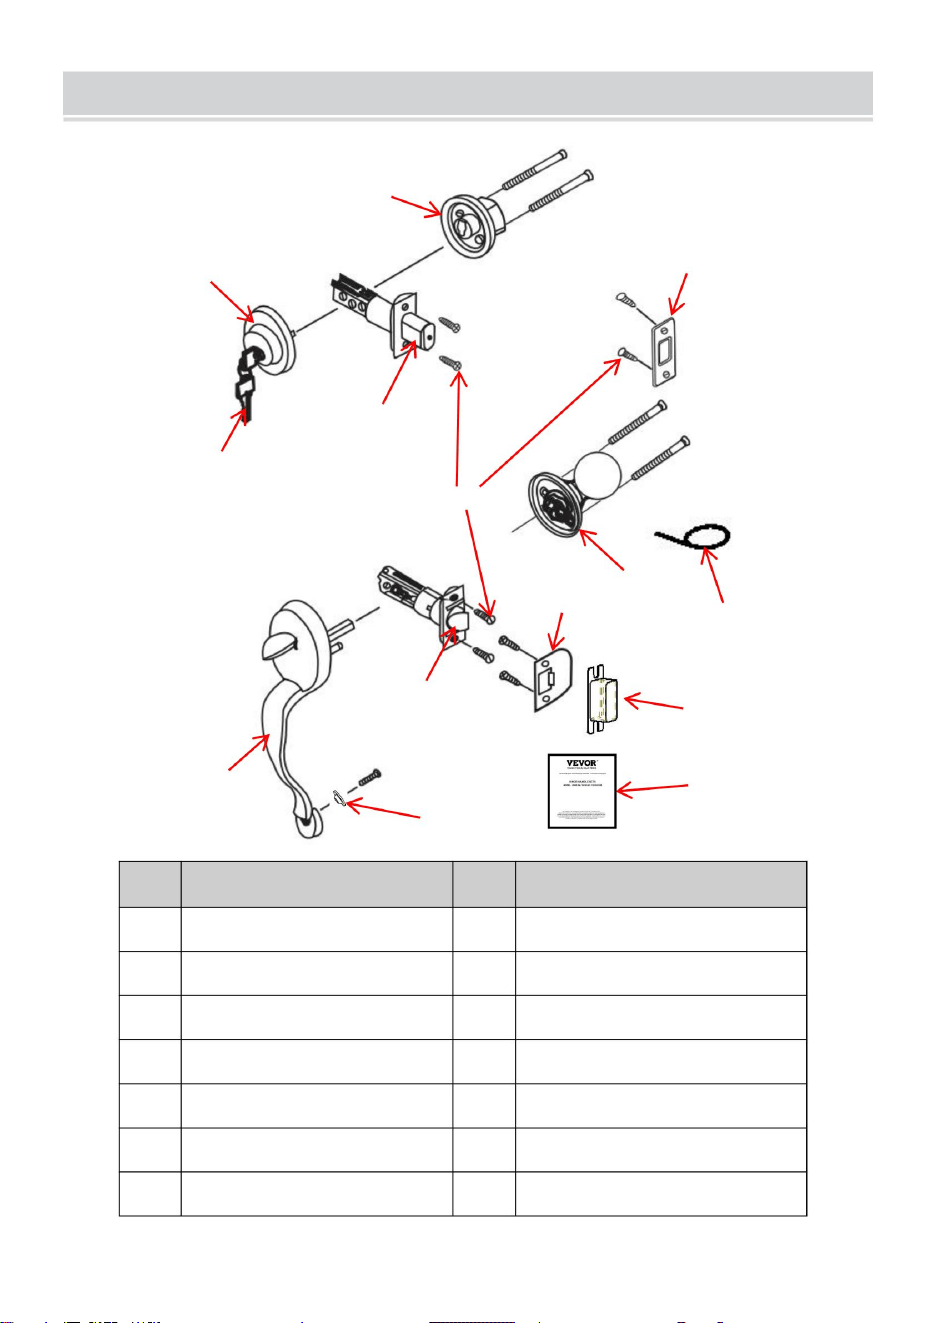
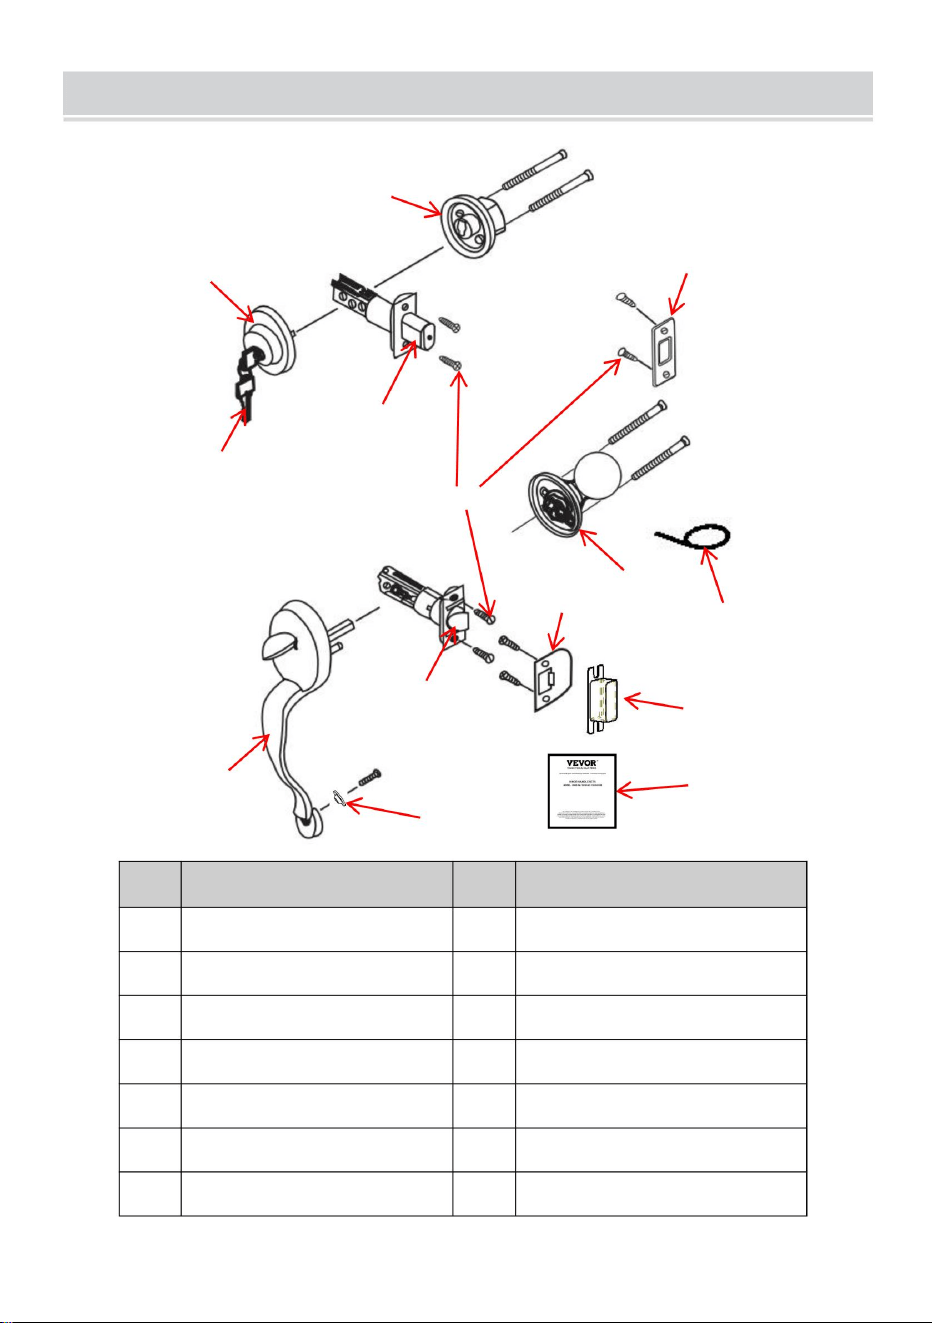
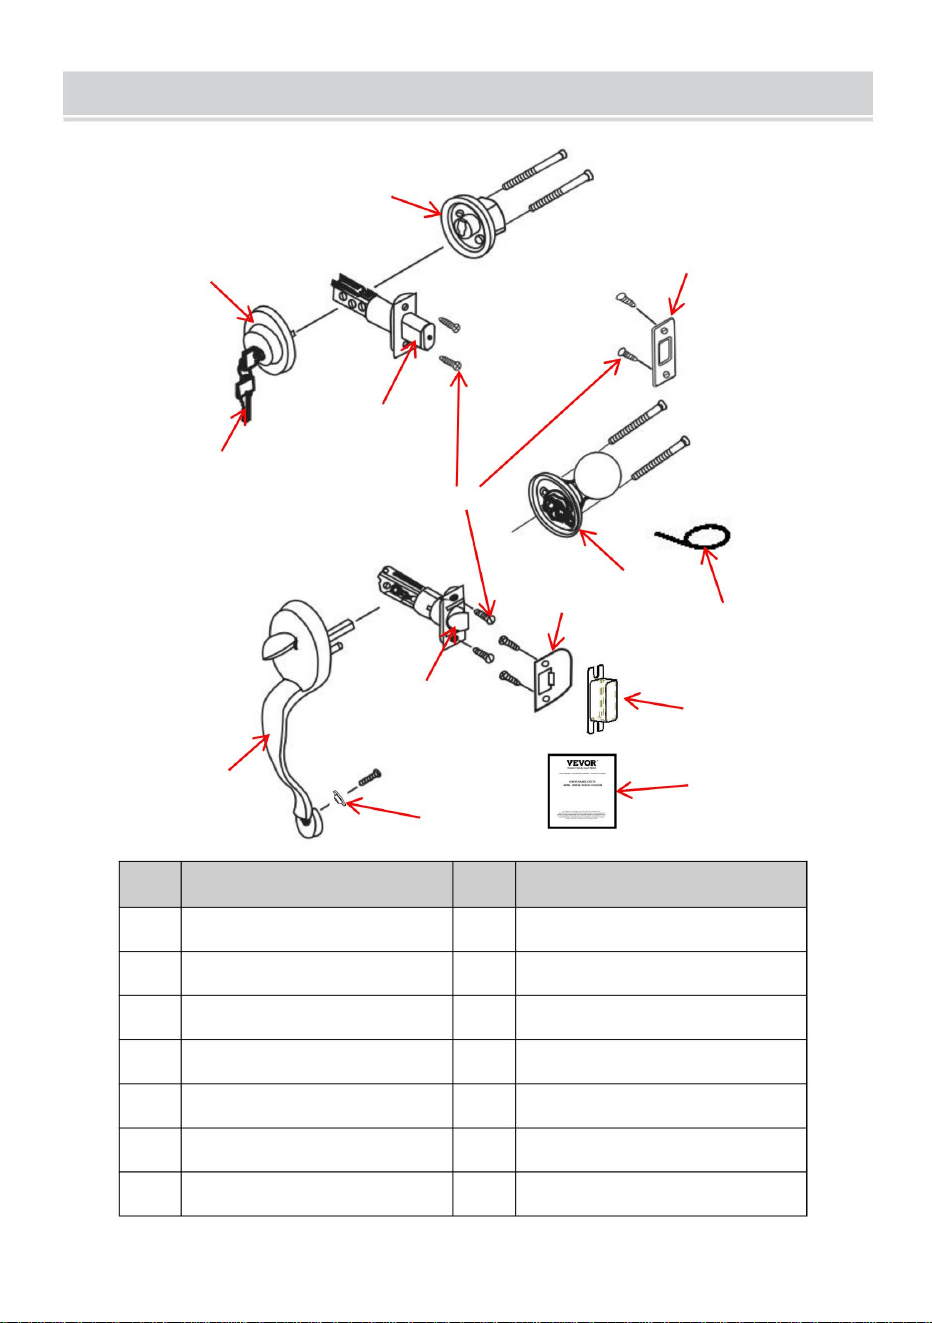
STRUCTURE DIAGRAM AND COMPONENTS
No.
Name and Qty
No.
Name and Qty
1
Front Handle x 1
2A
Latch A x 1
2B
Lower Latch x 1
3
Cylinder x 1
4
Deadbolt Rose x 1
5
Strike Plate x 1
6
Back Knob x 1
7
Strike Plate x 1
8
Strike Box x 1
9
Screws x 8
10
Pin x 1
11
Door Key x 3
12
Washer x 1
13
User Manual x 1
1
2B
3
4
5
6
8
7
9
2A
10
11
12
13
4
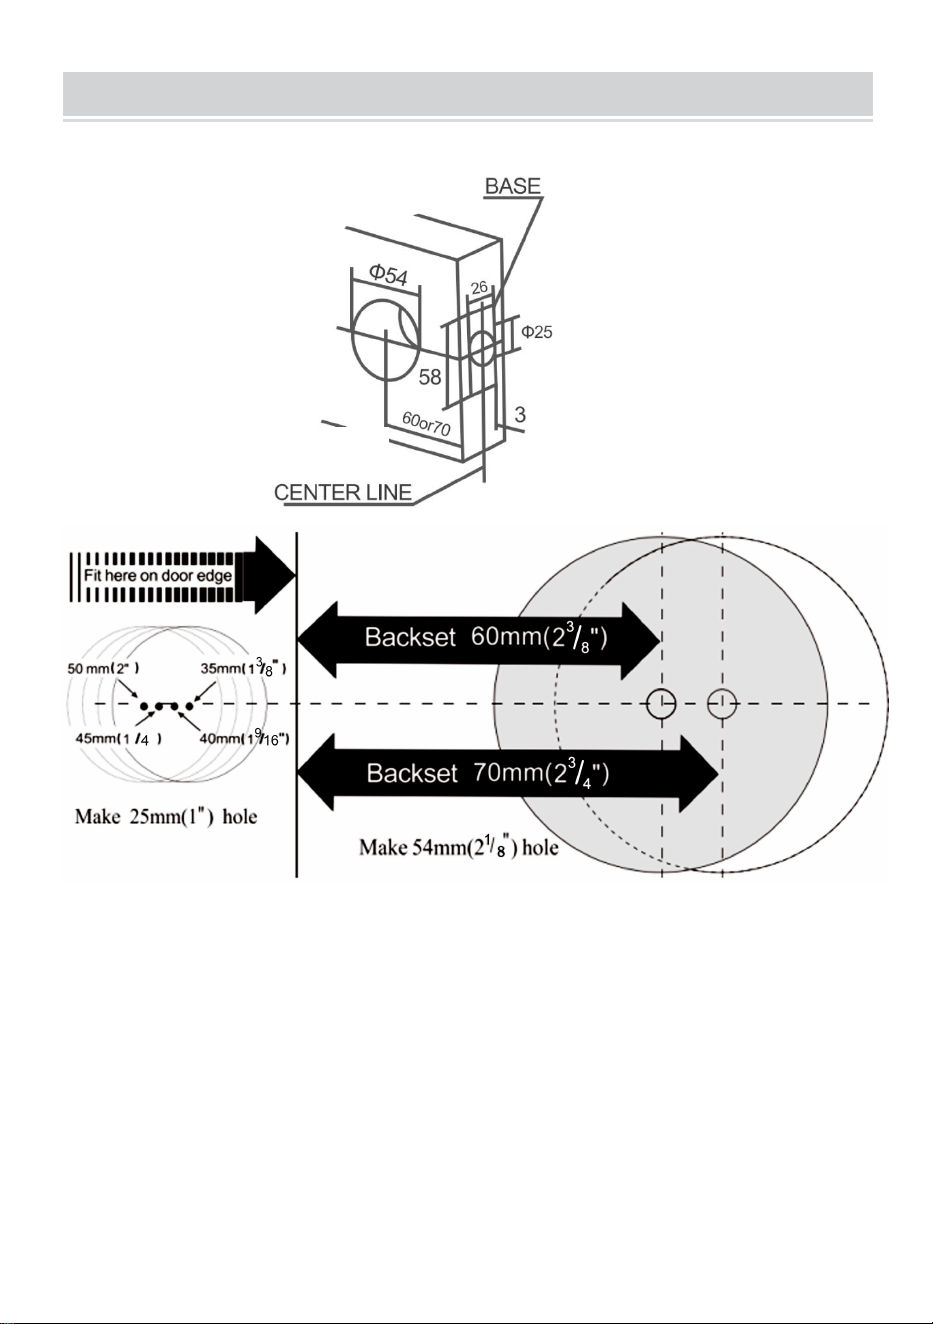
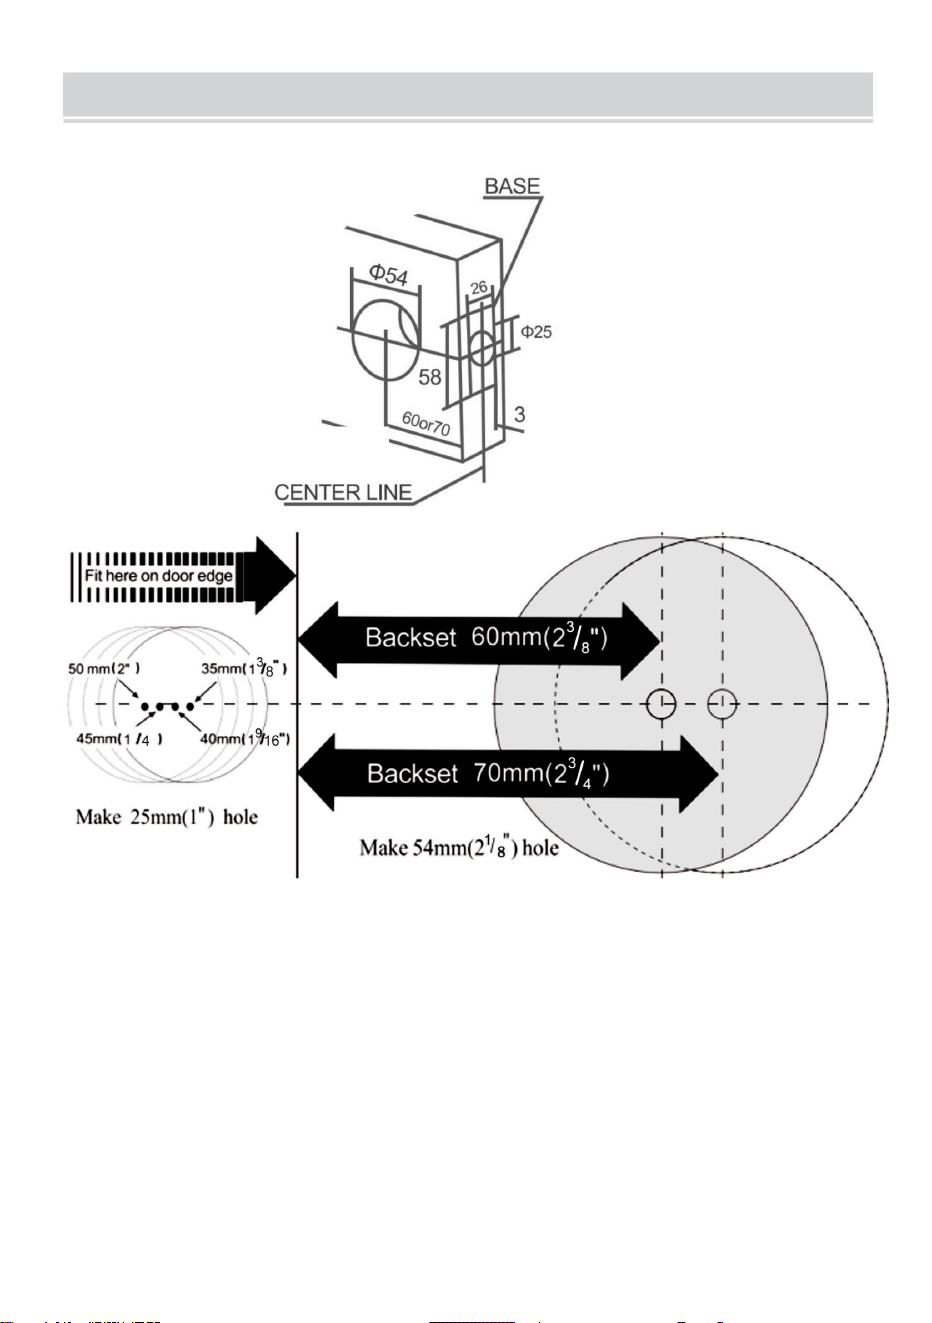
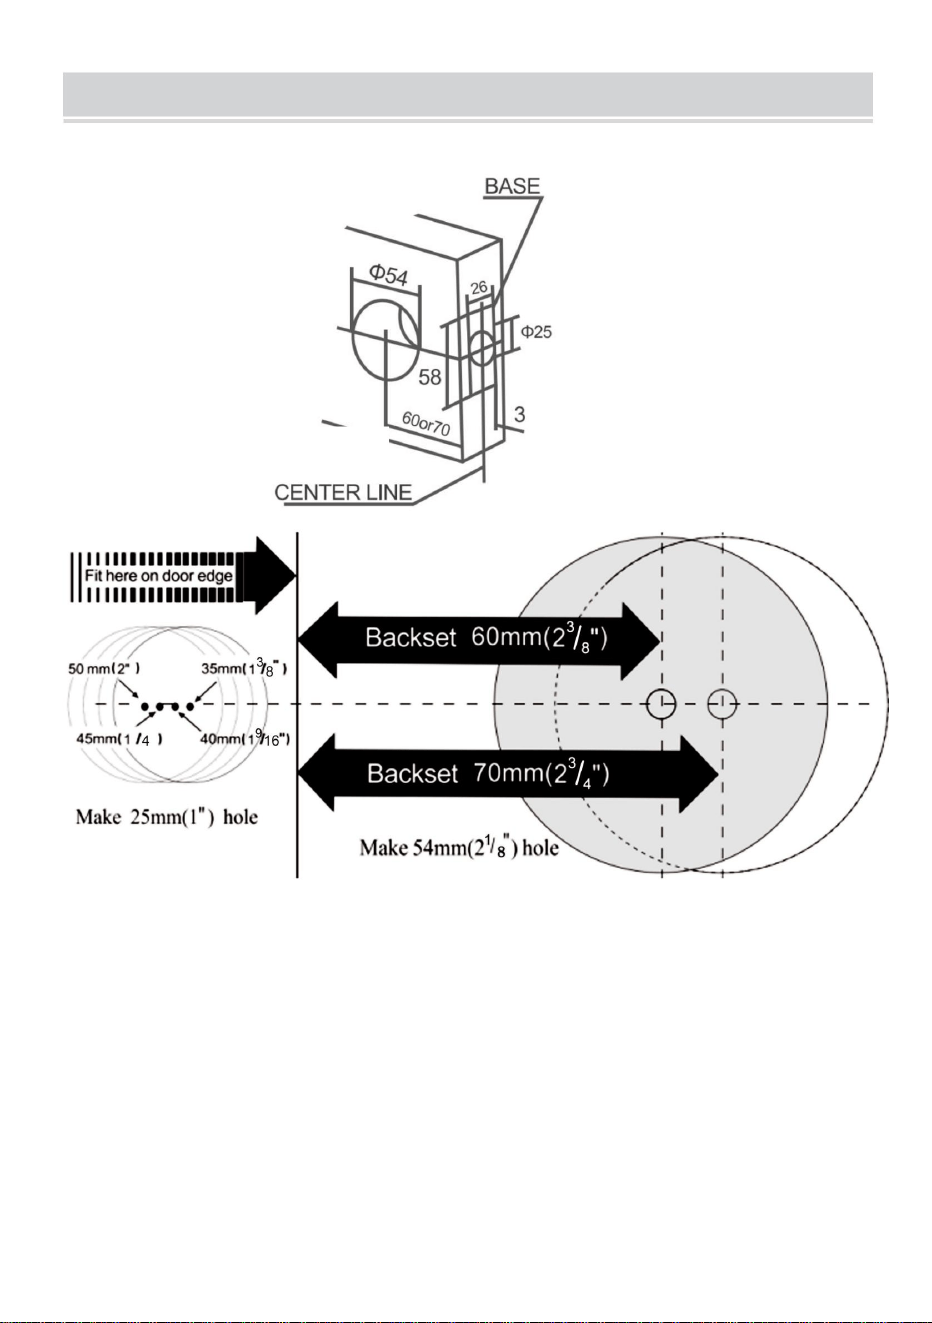
INSTALLATION
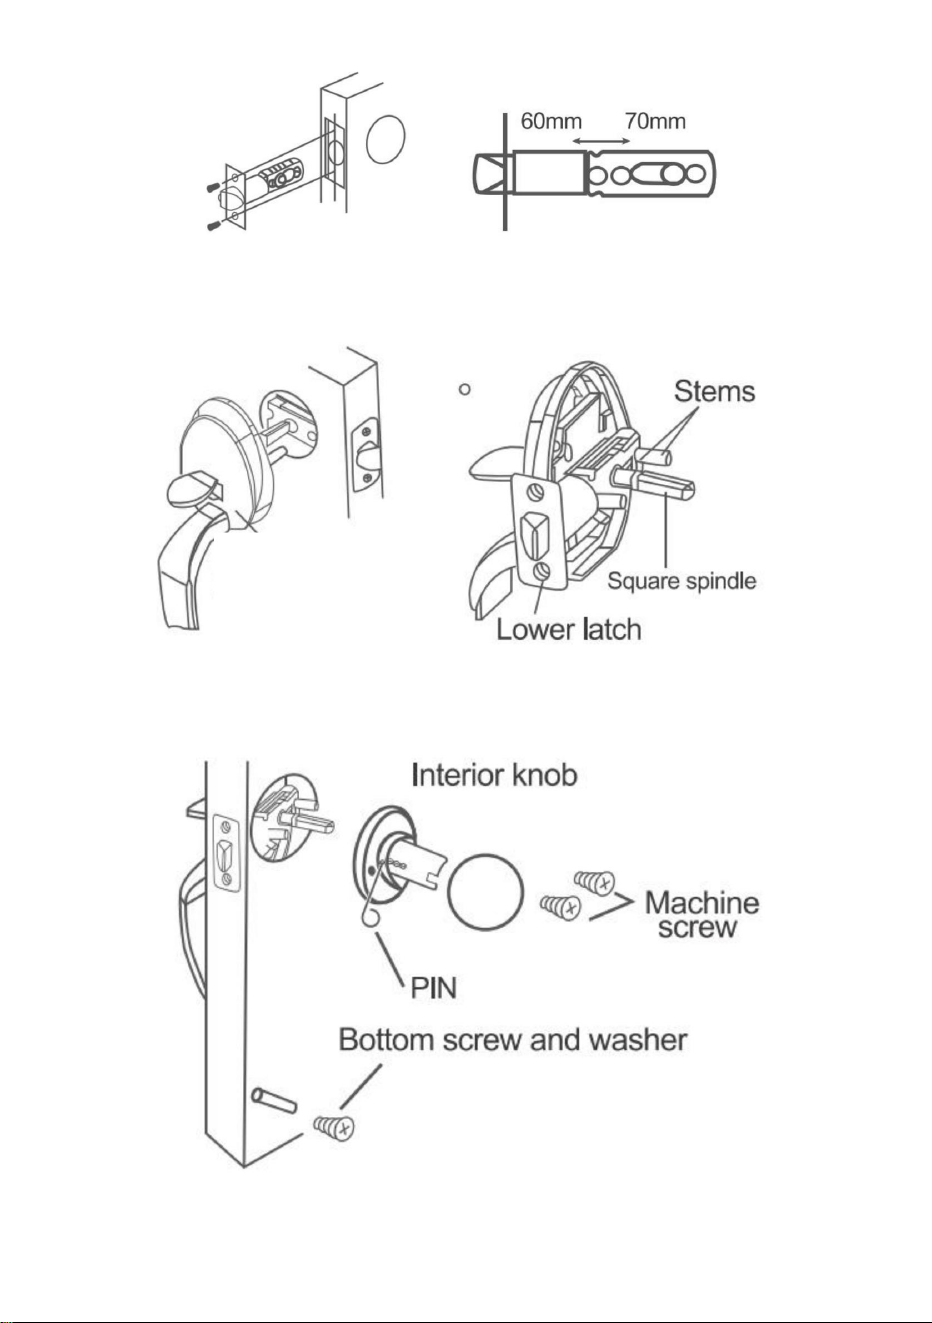
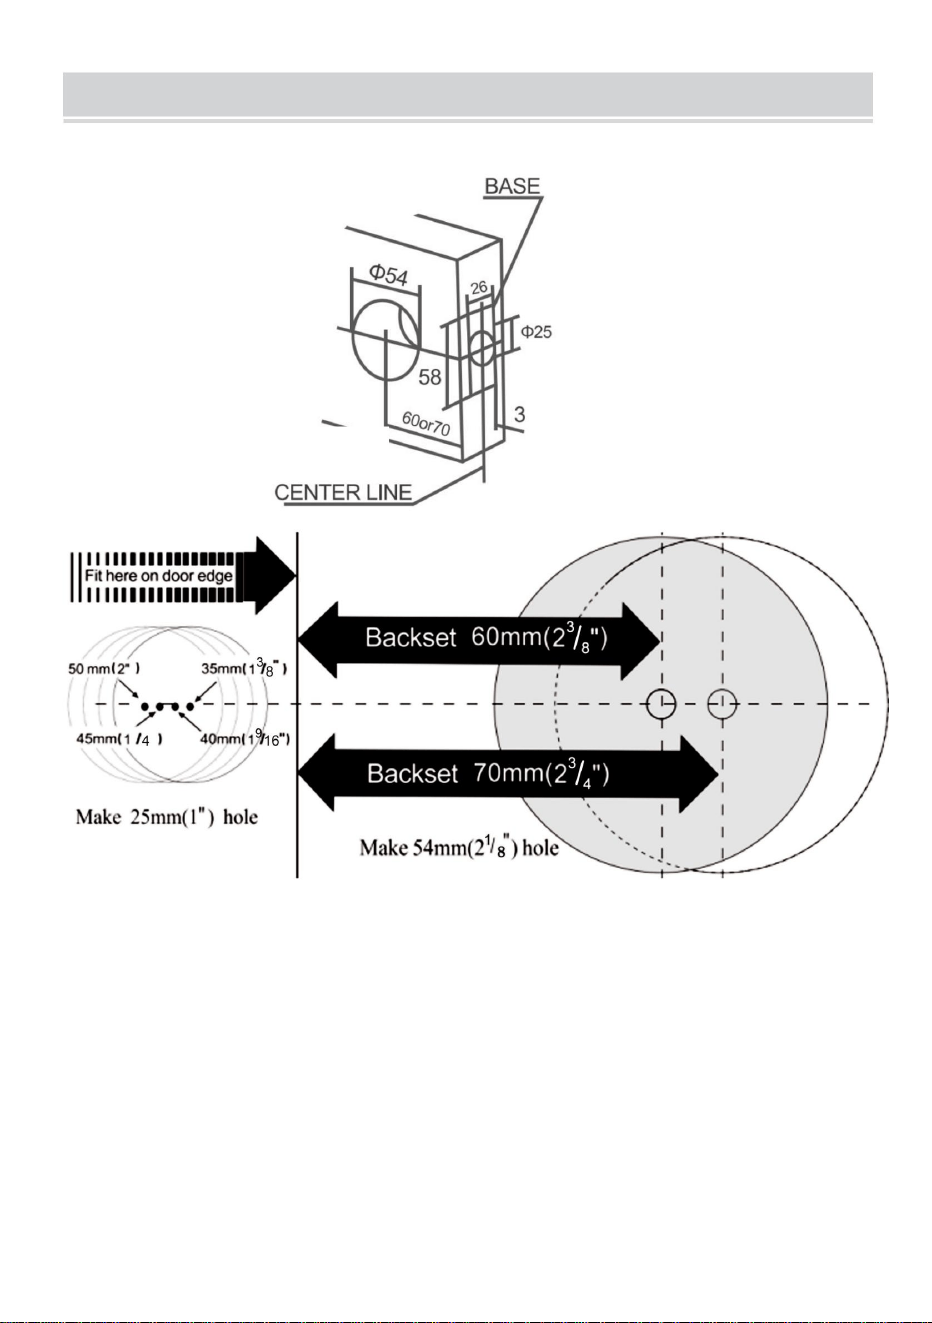
1. MARK DOOR & BORE HOLES(Please refer to the attached opening diagram.)
A: Fold the template over the edge of the door and mark the site 60mm or
70 mm of holes.
B: Bore the Φ54mm andΦ25mm holes through the door.
C: Cut out a 58x26x3mm base.
2. INSTALL THE LATCH
According to the site of lock holes, adjust the latch for 60mm or 70mm.

5
NOTE: The cam is pushed fully to the right for 70mm backset.(During the
adjustment, keep two teeth of the cam to forward always.)
3. INSTALL EXTERIOR HANDLE MECHANISM
Place the front handle with stems and square spindle into the latch as
shown. Press tightly against the door face.
4. INSTALL THE INTERIOR KNOBS
After the front handle is in position, install the interior knob and tighten
screws. Insert screw through washer and into bottom hole tighten firmly.
Front Handle
(It is used to remove the back knob
after inserting the hole.)
6
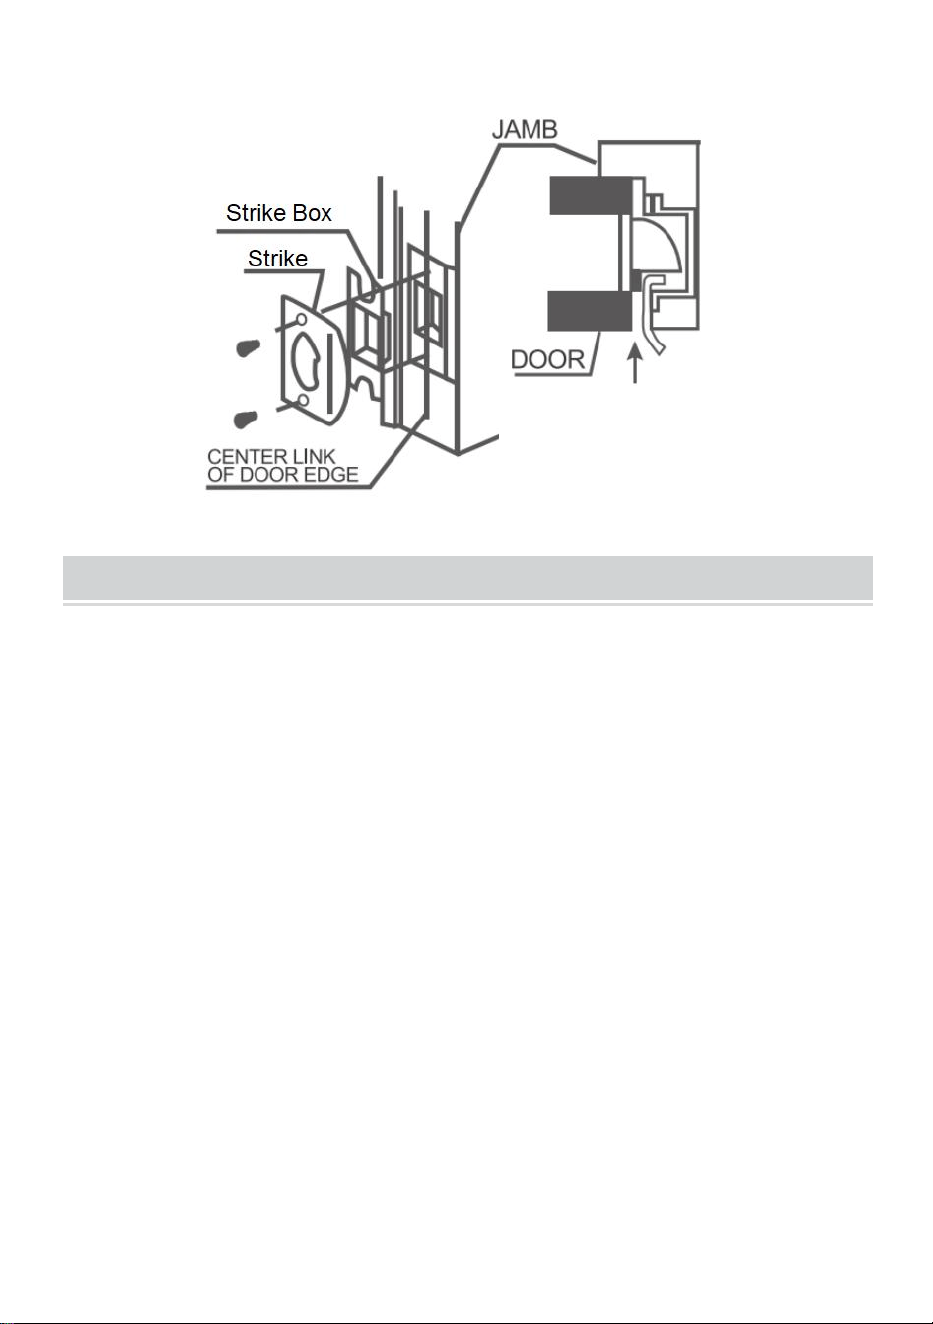
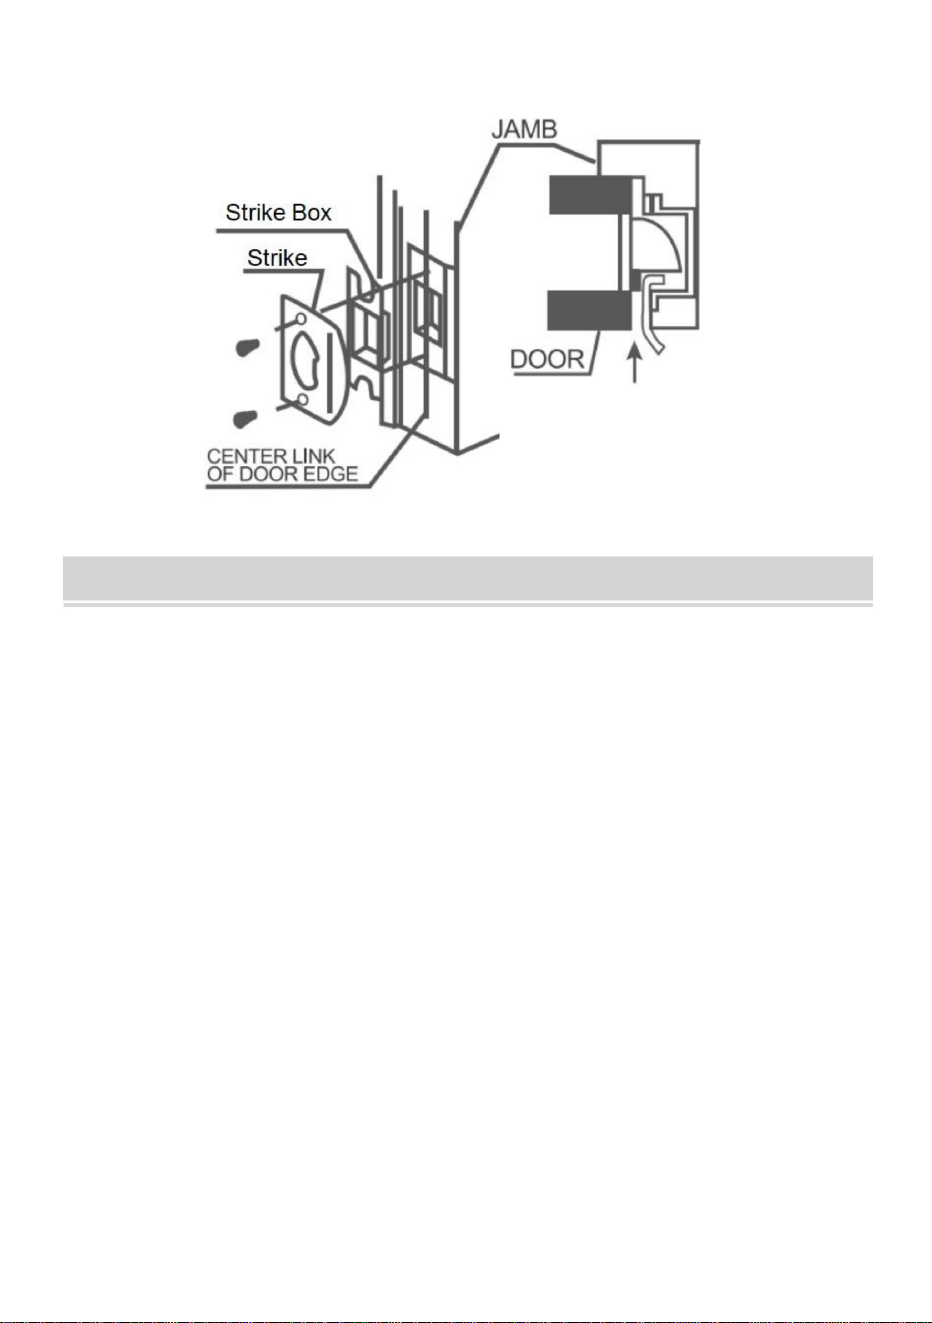
5. INSTALL THE STRIKES
MAINTENANCE
1. Do not strike with force to avoid damage to the latch and door frame.
2. If there is dirt, use a dry cloth to remove, do not scrub with chemicals such as
dishwashing liquid. Otherwise, it will destroy the protective film of exposed parts
and cause fading.
3. Periodically (half a year or once a year) or when the key is not smoothly
inserted and removed, graphite powder (pencil powder) can be added in the
keyhole to lubricate.
The locking bar is
pressed down when
the door is closed.

Manufacturer: Shanghaimuxinmuyeyouxiangongsi
Address: Shuangchenglu 803nong11hao1602A-1609shi, baoshanqu,
shanghai 200000 CN.
EC REP: E-CrossStu GmbH
Mainzer Landstr.69, 60329 Frankfurt am Main.
UK REP: YH CONSULTING LIMITED.
C/O YH Consulting Limited Office 147, Centurion House, London Road,
Staines-upon-Thames, Surrey, TW18 4AX
Imported to AUS: SIHAO PTY LTD.
1 ROKEVA STREETEASTWOOD NSW 2122 Australia
Imported to USA: Sanven Technology Ltd.
Suite 250, 9166 Anaheim Place, Rancho Cucamonga, CA 91730
Technical Support and E-Warranty Certificate
www.vevor.com/support

ZESTAWY UCHWYTÓW GAŁKOWYCH
„Oszczędź połowę”, „Połowa ceny” lub inne podobne wyrażenia używane przez
nas stanowią jedynie szacunkowe oszczędności, jakie możesz uzyskać, kupując u nas
określone narzędzia w porównaniu z głównymi markami i niekoniecznie oznaczają one
objęcie wszystkich kategorii narzędzi oferowanych przez nas. Uprzejmie przypominamy,
aby dokładnie sprawdzić, czy składając u nas zamówienie faktycznie oszczędzasz połowę
w porównaniu z głównymi markami.
Nadal staramy się oferować Państwu narzędzia w konkurencyjnych cenach.
MODEL: 19985-SN / 20185-AC / 20185-10B
Wsparcie techniczne i certyfikat gwarancji
elektronicznej www.vevor.com/support
Machine Translated by Google

To jest oryginalna instrukcja, przed użyciem należy uważnie przeczytać wszystkie
instrukcje. VEVOR zastrzega sobie jasną interpretację naszej instrukcji obsługi. Wygląd produktu
będzie zależał od produktu, który otrzymałeś. Prosimy o wybaczenie, że nie poinformujemy
Cię ponownie, jeśli w naszym produkcie pojawią się jakiekolwiek aktualizacje technologiczne lub
oprogramowania.
Masz pytania dotyczące produktu? Potrzebujesz wsparcia technicznego? Skontaktuj się z
nami: Wsparcie
techniczne i certyfikat E-Gwarancji www.vevor.com/support
UWAGA: Pokazany kolor jest tylko ilustracją. Proszę odnieść się do zakupionego
koloru.
POTRZEBUJESZ POMOCY? SKONTAKTUJ SIĘ Z NAMI!
MODEL: 19985-SN / 20185-AC / 20185-10B
ZESTAWY UCHWYTÓW GAŁKOWYCH
1
Machine Translated by Google

Kolor Nikiel satynowy
Antyczna miedź matowa czerń
Długość zatrzasku
20185-AC 20185-10B19985-SNModel
2-3/8" i 2-3/4"
Drzwi odpowiednie
7-11/16"–8-13/16"
Rząd drzwi (klamka)
Grubość
1-3/8"~1-3/4"
2
montaż i rozpoczęcie pracy elektronarzędzia. Zawsze trzymaj ręce,
twarz, włosy, luźne ubranie i ciało w bezpiecznej odległości od wrzecion i
narzędzia tnące. Zawsze trzymaj mocno uchwyty narzędzi podczas pracy.
2. Przeczytaj, zrozum i postępuj zgodnie z instrukcją producenta elektronarzędzi.
instrukcje bezpieczeństwa. Zawsze zakładaj okulary ochronne lub osłony oczu przed
zagrożenie. Trzymaj te małe części z dala od dzieci!
1. Ten produkt zawiera małe części. W przypadku połknięcia może dojść do zadławienia.
Przed przystąpieniem do regulacji elektronarzędzi należy zawsze odłączyć je od źródła zasilania.
MODEL I PARAMETRY
INSTRUKCJE BEZPIECZEŃSTWA
Machine Translated by Google

11
9
6
5
3
2A
7
4
10
2B
8
1
13
12
Szpilka x 1
Gałka tylna x 1
Podkładka x 1
Zatrzask A x 1
Róża zasuwkowa x 1
Skrzynka uderzeniowa x 1
Dolny zatrzask x 1
Uchwyt przedni x 1
Cylinder x 1
Płytka uderzeniowa x 1
Śruby x 8
Płytka uderzeniowa x 1
Klucz do drzwi x 3
Instrukcja obsługi x 1
Nazwa i ilość
2A
NIE.
12
10
Nazwa i ilość
13
8
11
6
9
4
7
2B
1
5
3
NIE.
SCHEMAT STRUKTURY I SKŁADNIKI
3
Machine Translated by Google

4
INSTALACJA
Otwory 70 mm.
B: Wywierć otwory o średnicy Φ54 mm i Φ25 mm w drzwiach.
A: Złóż szablon na krawędź drzwi i zaznacz miejsce w odległości 60 mm lub
1. OZNACZ OTWORY DRZWIOWE I WYWIERTUJ (skorzystaj z załączonego schematu otworów).
C: Wytnij podstawę o wymiarach 58x26x3mm.
2. ZAMONTUJ ZATRZASK
W zależności od rozmieszczenia otworów na zamek należy ustawić zatrzask na 60 mm lub 70 mm.
Machine Translated by Google
Uchwyt przedni
5
(Służy do usunięcia tylnego pokrętła
po włożeniu otworu.)
Umieść przednią klamkę z trzpieniami i kwadratowym wrzecionem w zatrzasku, jak
pokazano. Mocno dociśnij do powierzchni drzwi.
4. ZAMONTUJ WEWNĘTRZNE GAŁKI
3. ZAMONTUJ MECHANIZM KLAMKI ZEWNĘTRZNEJ
UWAGA: Krzywka jest przesunięta maksymalnie w prawo o 70 mm. (Podczas regulacji
należy zawsze ustawić dwa zęby krzywki tak, aby były przesunięte do przodu.)
Po umieszczeniu przedniego uchwytu na miejscu zamontuj wewnętrzne pokrętło i
dokręć śruby. Włóż śrubę przez podkładkę i do dolnego otworu, mocno dokręć.
Machine Translated by Google

KONSERWACJA
Blokada jest wciskana
w dół przy zamykaniu
drzwi.
6
3. Okresowo (co pół roku lub raz na rok) lub gdy wkładanie i wyjmowanie klucza nie
przebiega płynnie, do zamka można dodać proszek grafitowy (proszek ołówkowy) w
celu nasmarowania.
1. Nie uderzaj z dużą siłą, aby uniknąć uszkodzenia zatrzasku i ościeżnicy.
2. Jeśli jest brud, usuń go suchą szmatką, nie szoruj środkami chemicznymi, takimi jak płyn
do mycia naczyń. W przeciwnym razie zniszczy to warstwę ochronną odsłoniętych części i
spowoduje blaknięcie.
5. ZAMONTUJ STRIKES
Machine Translated by Google

ODPOWIEDZIALNOŚĆ W WIELKIEJ BRYTANII: YH CONSULTING LIMITED.
C/O YH Consulting Limited Biuro 147, Centurion House, London Road,
Staines-upon-Thames, Surrey, TW18 4AX
1 ROKEVA STREETEASTWOOD NSW 2122 Australia
Adres: Shuangchenglu 803nong11hao1602A-1609shi, baoshanqu, szanghaj 200000 CN.
Mainzer Landstr.69, 60329 Frankfurt nad Menem.
Przedstawiciel KE: E-CrossStu GmbH
Producent: Shanghaimuxinmuyeyouxiangongsi
Importowane do USA: Sanven Technology Ltd.
Apartament 250, 9166 Anaheim Place, Rancho Cucamonga, CA 91730
www.vevor.com/support
Importowane do AUS: SIHAO PTY LTD.
Wsparcie techniczne i certyfikat e-gwarancji
Machine Translated by Google

MODELLO: 19985-SN / 20185-AC / 20185-10B
"Risparmia la metà", "Metà prezzo" o qualsiasi altra espressione simile da noi
utilizzata rappresenta solo una stima del risparmio che potresti ottenere acquistando
determinati utensili con noi rispetto ai principali marchi principali e non significa
necessariamente coprire tutte le categorie di utensili da noi offerti. Ti ricordiamo gentilmente
di verificare attentamente quando effettui un ordine con noi se stai effettivamente
risparmiando la metà rispetto ai principali marchi principali.
Continuiamo a impegnarci per fornirvi strumenti a prezzi competitivi.
MANIGLIE A MANOPOLA
Supporto tecnico e certificato di garanzia
elettronica www.vevor.com/support
Machine Translated by Google
Questa è l'istruzione originale, si prega di leggere attentamente tutte le istruzioni del
manuale prima di utilizzare. VEVOR si riserva una chiara interpretazione del nostro manuale
utente. L'aspetto del prodotto sarà soggetto al prodotto ricevuto. Vi preghiamo di
perdonarci se non vi informeremo di nuovo se ci sono aggiornamenti tecnologici o software sul
nostro prodotto.
Hai domande sul prodotto? Hai bisogno di supporto tecnico? Non esitare a contattarci:
Supporto
tecnico e certificato di garanzia elettronica www.vevor.com/
support
MODELLO: 19985-SN / 20185-AC / 20185-10B
NOTA: quanto mostrato è solo a scopo illustrativo. Fare riferimento al
colore acquistato.
MANIGLIE A POMELLO
HAI BISOGNO DI AIUTO? CONTATTACI!
1
Machine Translated by Google

viso, capelli, indumenti larghi e corpo a distanza di sicurezza dai fusi e
utensili da taglio. Mantenere sempre una presa salda sulle impugnature degli utensili quando sono in funzione.
montaggio e avvio del funzionamento dell'utensile elettrico. Tenere sempre le mani,
Scollegare sempre l'utensile elettrico dalla fonte di alimentazione prima di regolarlo.
2. Leggere, comprendere e seguire le istruzioni del produttore dell'elettroutensile
istruzioni per la sicurezza. Indossare sempre occhiali di sicurezza o protezioni per gli occhi prima
pericolo. Tenere queste piccole parti lontano dalla portata dei bambini!
1. Questo prodotto contiene piccole parti. Se ingerito, può causare soffocamento.
2
Nichel satinato
Rame antico Nero opaco
Colore
Porta applicabile
20185-AC 20185-10B19985-SNModello
Spessore
1-3/8"~1-3/4"
Lunghezza del fermo
Pitch-row (Maniglia della porta)
2-3/8" e 2-3/4"
7-11/16"ÿ8-13/16"
ISTRUZIONI DI SICUREZZA
MODELLO E PARAMETRI
Machine Translated by Google
9
6
11
5
3
2A
7
4
10
2B
8
1
13
12
Scatola di attacco x 1
Spillo x 1
Rondella x 1
Fermo A x 1
Catenaccio a rosa x 1
Manopola posteriore x 1
Fermo inferiore x 1
Maniglia anteriore x 1
Cilindro x 1
Piastra di battuta x 1
Viti x 8
Piastra di battuta x 1
Chiave della porta x 3
Manuale utente x 1
13
10
Nome e quantità
11
8
Nome e quantità
2A
NO.
12
1
5
NO.
3
9
4
6
7
2B
SCHEMA STRUTTURALE E COMPONENTI
3
Machine Translated by Google
4
INSTALLAZIONE
70 mm di fori.
B: Praticare i fori da ÿ54mm e ÿ25mm attraverso la porta.
A: Piegare il modello sul bordo della porta e segnare il sito a 60 mm o
1. CONTRASSEGNARE LA PORTA E FORARE (fare riferimento allo schema di apertura allegato).
2. INSTALLARE IL CHIAVISTELLO
A seconda della posizione dei fori della serratura, regolare il fermo su 60 mm o 70 mm.
C: Ritagliare una base da 58x26x3mm.
Machine Translated by Google

Maniglia anteriore
5
(Viene utilizzato per rimuovere la manopola
posteriore dopo aver inserito il foro.)
Posizionare la maniglia anteriore con steli e perno quadrato nel fermo come mostrato.
Premere con forza contro la facciata della porta.
4. INSTALLARE LE MANOPOLE INTERNE
3. INSTALLARE IL MECCANISMO DELLA MANIGLIA ESTERNA
NOTA: la camma viene spinta completamente verso destra per un arretramento di 70 mm.
(Durante la regolazione, tenere sempre due denti della camma in avanti.)
Dopo che la maniglia anteriore è in posizione, installare la manopola interna e stringere le
viti. Inserire la vite attraverso la rondella e nel foro inferiore, stringere saldamente.
Machine Translated by Google

2. Se c'è sporcizia, usare un panno asciutto per rimuoverla, non strofinare con prodotti chimici
come il detersivo per i piatti. Altrimenti, distruggerà la pellicola protettiva delle parti esposte e
causerà lo scolorimento.
1. Non colpire con forza per evitare di danneggiare il chiavistello e il telaio della porta.
3. Periodicamente (ogni sei mesi o una volta all'anno) o quando la chiave non viene
inserita e rimossa agevolmente, è possibile aggiungere polvere di grafite (polvere di matita)
nella serratura per lubrificarla.
6
Quando la porta è
chiusa, la barra di bloccaggio
viene premuta verso il basso.
MANUTENZIONE
5. INSTALLARE GLI SCIOPERI
Machine Translated by Google

RAPPRESENTANTE DEL REGNO UNITO: YH CONSULTING LIMITED.
Mainzer Landstr.69, 60329 Francoforte sul Meno.
C/O YH Consulting Limited Ufficio 147, Centurion House, London Road,
1 ROKEVA STREET EASTWOOD NSW 2122 Australia
Indirizzo: Shuangchenglu 803nong11hao1602A-1609shi, baoshanqu,
shanghai 200000 CN.
Staines-upon-Thames, Surrey, TW18 4AX
RAPPRESENTANTE CE: E-CrossStu GmbH
Produttore: Shanghaimuxinmuyeyouxiangongsi
Importato negli USA: Sanven Technology Ltd.
Suite 250, 9166 Anaheim Place, Rancho Cucamonga, CA 91730
www.vevor.com/support
Importato in AUS: SIHAO PTY LTD.
Supporto tecnico e certificato di garanzia elettronica
Machine Translated by Google

MODELO:19985SN/20185AC/2018510B
"Ahorrelamitad","mitaddeprecio"ocualquierotraexpresiónsimilarqueutilicemos
solorepresentaunaestimacióndelahorroquepodríaobteneralcomprarciertasherramientas
connosotrosencomparaciónconlasprincipalesmarcasynonecesariamentesignificaque
cubratodaslascategoríasdeherramientasqueofrecemos.Lerecordamosque,alrealizarun
pedidoconnosotros,verifiquecuidadosamentesirealmenteestáahorrandolamitaden
comparaciónconlasprincipalesmarcas.
Seguimoscomprometidosabrindarleherramientasaprecioscompetitivos.
JUEGOSDEMANIJASCONPOMO
Soportetécnicoycertificadodegarantía
electrónicawww.vevor.com/support
Machine Translated by Google

Estassonlasinstruccionesoriginales,leaatentamentetodaslasinstruccionesdel
manualantesdeutilizarelproducto.VEVORsereservaunainterpretaciónclaradenuestro
manualdeusuario.Laaparienciadelproductoestarásujetaalproductoquerecibió.
Perdónenospornoinformarlenuevamentesihayactualizacionesdetecnologíaosoftwareen
nuestroproducto.
¿Tienepreguntassobreelproducto?¿Necesitaasistenciatécnica?Nodudeenponerseen
contactocon
nosotros:Asistenciatécnicaycertificadodegarantíaelectrónica
www.vevor.com/support
MODELO:19985SN/20185AC/2018510B
NOTA:Laimagenquesemuestraessoloparafinesilustrativos.Consulteelcolor
quecompró.
JUEGOSDEMANIJASCONPOMO
¿NECESITAAYUDA?¡CONTÁCTENOS!
1
Machine Translated by Google

cara,cabello,ropasueltaycuerpoaunadistanciaseguradeloshusosy
Herramientasdecorte.Sujetesiempreconfirmezalosmangosdelasherramientascuandoesténenfuncionamiento.
antesdemontaryponerenfuncionamientolaherramientaeléctrica.Mantengasiemprelasmanos,
Desconectesiemprelaherramientadelafuentedealimentaciónantesdeajustarla.
2.Lea,comprendaysigalasinstruccionesdelfabricantedesuherramientaeléctrica.
Instruccionesdeseguridad.Utilicesiempregafasdeseguridadoprotectoresocularesantesde
Peligro.¡Mantengaestaspiezaspequeñasfueradelalcancedelosniños!
1.Esteproductocontienepiezaspequeñas.Siseingieren,puedenprovocarasfixia.
2
Níquelsatinado
Cobreantiguonegromate
Color
Puertaaplicable
20185C.A. 2018510B19985SNModelo
Espesor
13/8"~13/4"
Longituddelpestillo
Filadepaso(manijadelapuerta)
23/8"y23/4"
711/16"813/16"
MODELOYPARÁMETROS
INSTRUCCIONESDESEGURIDAD
Machine Translated by Google
12
1
5
No.
3
4
6
9
2B
7
13
10
Nombreycantidad
11
8
Nombreycantidad
2A
No.
Cajadeataquex1
Alfilerx1
Arandelax1
PestilloAx1
Pestilloinferiorx1
Perillatraserax1
CerrojodeseguridadRosex1
Mangodelanterox1
Cilindrox1
Placadeimpactox1
Tornillosx8
Llavedepuertax3
Manualdeusuariox1
Placadeimpactox1
9
6
11
5
3
2A
7
4
10
2B
8
13
1
12
DIAGRAMADEESTRUCTURAYCOMPONENTES
3
Machine Translated by Google

70mmdeagujeros.
B:PerforeorificiosdeΦ54mmyΦ25mmatravésdelapuerta.
A:Doblelaplantillasobreelbordedelapuertaymarqueelsitioa60mmo
1.MARQUELAPUERTAYPERFORELOSORIFICIOS(consulteeldiagramadeaperturaadjunto).
2.INSTALEELPESTILLO
Segúnlaubicacióndelosorificiosdelacerradura,ajusteelpestilloa60mmo70mm.
C:Recortarunabasede58x26x3mm.
INSTALACIÓN
4
Machine Translated by Google

(Seutilizaparaquitarlaperillatrasera
despuésdeinsertarelorificio).
5
Mangodelantero
Coloquelamanijadelanteraconvástagoyejecuadradoenelpestillocomosemuestra.
Presionefirmementecontralacaradelapuerta.
4.INSTALELASPERILLASINTERIORES
3.INSTALEELMECANISMODELAMANIJAEXTERIOR
NOTA:Lalevaseempujacompletamentehacialaderechaparaunretrocesode70mm.
(Duranteelajuste,mantengasiempredosdientesdelalevahaciaadelante).
Unavezquelamanijadelanteraestéensuposición,instalelaperillainterioryajustelos
tornillos.Inserteeltornilloatravésdelaarandelayenelorificioinferioryajustefirmemente.
Machine Translated by Google

2.Sihaysuciedad,utiliceunpañosecoparaeliminarla,nofroteconproductosquímicos
comoellavavajillas,yaquesedestruirálapelículaprotectoradelaspartesexpuestasy
sedecolorará.
1.Nogolpeeconfuerzaparaevitardañarelpestilloyelmarcodelapuerta.
3.Periódicamente(semestreounavezalaño)ocuandolallavenoseinsertayse
retiraconsuavidad,sepuedeagregarpolvodegrafito(polvodelápiz)enelojodela
cerraduraparalubricar.
6
MANTENIMIENTO
Labarradebloqueose
presionahaciaabajo
cuandolapuertaestácerrada.
5.INSTALELOSCERRADERO
Machine Translated by Google

Soportetécnicoycertificadodegarantíaelectrónica
REPRESENTANTEDELREINOUNIDO:YHCONSULTINGLIMITED.
MainzerLandstr.69,60329FráncfortdelMeno.
C/OYHConsultingLimitedOficina147,CenturionHouse,LondonRoad,
1ROKEVASTREETEASTWOODNSW2122Australia
Dirección:Shuangchenglu803nong11hao1602A1609shi,baoshanqu,
shanghai200000CN.
StainesuponThames,Surrey,TW184AX
REPRESENTANTECE:ECrossStuGmbH
Fabricante:Shanghaimuxinmuyeyouxiangongsi
ImportadoaEE.UU.:SanvenTechnologyLtd.
Suite250,9166AnaheimPlace,RanchoCucamonga,CA91730
www.vevor.com/support
ImportadoaAUS:SIHAOPTYLTD.
Machine Translated by Google

VRED HANDTAG
"Spara hälften", "halva priset" eller andra liknande uttryck som används av oss
representerar bara en uppskattning av besparingar du kan dra nytta av att köpa vissa
verktyg hos oss jämfört med de stora toppmärkena och betyder inte nödvändigtvis att
täcka alla kategorier av verktyg som erbjuds av oss. Du påminns vänligen om att noggrant
kontrollera när du gör en beställning hos oss om du faktiskt sparar hälften i jämförelse
med de främsta stora varumärkena.
Vi fortsätter att vara engagerade i att ge dig verktyg till konkurrenskraftiga priser.
MODELL: 19985-SN / 20185-AC / 20185-10B
Teknisk support och e-garanticertifikat
www.vevor.com/support
Machine Translated by Google

Detta är den ursprungliga instruktionen, läs alla instruktioner noggrant innan du
använder den. VEVOR reserverar sig för en tydlig tolkning av vår användarmanual. Utseendet
på produkten är beroende av den produkt du fått. Ursäkta oss att vi inte kommer att
informera dig igen om det finns någon teknik eller mjukvaruuppdateringar på vår produkt.
Har du produktfrågor? Behöver du teknisk support? Kontakta oss gärna: Teknisk support och
e-
garanticertifikat www.vevor.com/support
OBS: Det visade är endast i illustrationssyfte. Se vilken färg du köpte.
BEHÖVER HJÄLP? KONTAKTA OSS!
MODELL: 19985-SN / 20185-AC / 20185-10B
VRED HANDTAG
1
Machine Translated by Google

Färg Satin Nickel
Antik koppar matt svart
1-3/8"~1-3/4"
20185-AC 20185-10B19985-SNModell
Tillämplig dörr
Spärrlängd
2-3/8" och 2-3/4"
Pitch-row (dörrhandtag)
Tjocklek
7-11/16"–8-13/16"
2
montering och påbörjande av drift av elverktyg. Håll alltid händerna,
ansikte, hår, löst sittande kläder och kropp på säkert avstånd från spindlar och
skärande verktyg. Håll alltid ett stadigt grepp om verktygshandtagen under drift.
2. Läs, förstå och följ din elverktygstillverkares
instruktioner för säkerhet. Bär alltid skyddsglasögon eller ögonskydd innan
fara. Håll dessa små delar borta från barn!
1. Denna produkt innehåller små delar. Om den sväljs kommer den att utgöra en kvävning
Koppla alltid från strömkällan innan du justerar elverktyg.
MODELL OCH PARAMETRAR
SÄKERHETSINSTRUKTIONER
Machine Translated by Google

2A
Namn och antal
Inga.
12
10
Namn och antal
13
8
11
6
9
4
7
2B
1
5
3
Inga.
Pin x 1
Bakre knopp x 1
Bricka x 1
Cylinder x 1
Deadbolt Rose x 1
Strike Box x 1
Nedre spärr x 1
Främre handtag x 1
Slagplatta x 1
Slagplatta x 1
Skruvar x 8
Spärr A x 1
Användarmanual x 1
Dörrnyckel x 3
11
9
6
2B
3
2A
7
4
5
8
1
10
13
12
STRUKTURDIAGRAM OCH KOMPONENTER
3
Machine Translated by Google

70 mm hål.
B: Borra hålen ÿ54 mm och ÿ25 mm genom dörren.
A: Vik mallen över kanten på dörren och markera platsen 60 mm eller
1. MARKERA DÖRR & HÅL (Se bifogade öppningsdiagram.)
C: Klipp ut en 58x26x3mm bas.
2. INSTALLERA LÅSEN
Beroende på platsen för låshålen, justera spärren till 60 mm eller 70 mm.
INSTALLATION
4
Machine Translated by Google

(Den används för att ta bort den bakre
knappen efter att hålet har satts in.)
5
Främre handtag
3. INSTALLERA EXTERIÖR HANDTAGSMEKANISM
4. INSTALLERA INTERIÖR VRED
Placera det främre handtaget med skaft och fyrkantig spindel i spärren enligt bilden.
Tryck hårt mot dörrsidan.
OBS: Kammen skjuts helt åt höger för 70 mm bakåt. (Under justeringen, håll alltid två
tänder på kammen framåt.)
När det främre handtaget är på plats, installera det inre vredet och dra åt skruvarna.
Sätt in skruven genom brickan och dra åt ordentligt i det nedre hålet.
Machine Translated by Google

UNDERHÅLL
Låsbygeln trycks ned
när dörren stängs.
6
3. Med jämna mellanrum (ett halvår eller en gång om året) eller när nyckeln
inte är smidigt insatt och borttagen, kan grafitpulver (pennpulver) tillsättas i
nyckelhålet för att smörja.
1. Slå inte till med våld för att undvika skador på spärren och dörrkarmen.
2. Om det finns smuts, använd en torr trasa för att ta bort, skrubba inte med
kemikalier som diskmedel. Annars kommer det att förstöra skyddsfilmen på utsatta
delar och orsaka blekning.
5. INSTALLERA STRIKEN
Machine Translated by Google

Teknisk support och e-garanticertifikat
UK REP: YH CONSULTING LIMITED.
C/O YH Consulting Limited Office 147, Centurion House, London Road,
Staines-upon-Thames, Surrey, TW18 4AX
Importerad till AUS: SIHAO PTY LTD.
EC REP: E-CrossStu GmbH
Mainzer Landstr.69, 60329 Frankfurt am Main.
Adress: Shuangchenglu 803nong11hao1602A-1609shi, baoshanqu, shanghai
200000 CN.
Tillverkare: Shanghaimuxinmuyeyouxiangongsi
Importerad till USA: Sanven Technology Ltd.
www.vevor.com/support
Suite 250, 9166 Anaheim Place, Rancho Cucamonga, CA 91730
1 ROKEVA STREETEASTWOOD NSW 2122 Australien
Machine Translated by Google

MODEL: 19985-SN / 20185-AC / 20185-10B
"Save Half", "Half Price" of andere soortgelijke uitdrukkingen die wij gebruiken, geven alleen
een schatting van de besparingen die u kunt behalen door bepaalde gereedschappen bij ons te kopen in
vergelijking met de grote topmerken en betekent niet noodzakelijkerwijs dat alle categorieën
gereedschappen die wij aanbieden, worden gedekt. Wij herinneren u eraan om zorgvuldig te controleren
of u daadwerkelijk de helft bespaart in vergelijking met de grote topmerken wanneer u een bestelling bij
ons plaatst.
Wij streven er voortdurend naar om u gereedschappen tegen concurrerende prijzen te leveren.
Knoppensets voor knoppen
Technische ondersteuning en e-garantiecertificaat
www.vevor.com/support
Machine Translated by Google

Dit is de originele instructie, lees alle handleidingen zorgvuldig door voordat u het
product gebruikt. VEVOR behoudt zich een duidelijke interpretatie van onze gebruikershandleiding
voor. Het uiterlijk van het product is afhankelijk van het product dat u hebt ontvangen.
Vergeef ons dat we u niet opnieuw zullen informeren als er technologie- of software-updates
voor ons product zijn.
Heeft u vragen over het product? Heeft u technische ondersteuning nodig? Neem dan gerust
contact met
ons op: Technische ondersteuning en E-garantiecertificaat
www.vevor.com/support
OPMERKING: De getoonde afbeelding is alleen ter illustratie. Raadpleeg de kleur
die u hebt gekocht.
MODEL: 19985-SN / 20185-AC / 20185-10B
Knoppensets voor knoppen
HULP NODIG? NEEM CONTACT MET ONS OP!
1
Machine Translated by Google

Satijn nikkel
Antiek Koper Mat Zwart
Kleur
Toepasselijke deur
20185-AC 20185-10B19985-SNModel
1-3/8"~1-3/4"
Lengte van de grendel
2-3/8" en 2-3/4"
Dikte
7-11/16" - 8-13/16"
Steekrij (Deurhendel)
2
gezicht, haar, losse kleding en lichaam op een veilige afstand van spindels en
snijgereedschappen. Houd de handgrepen van het gereedschap altijd stevig vast tijdens het gebruik.
montage en het starten van de bediening van het elektrische gereedschap. Houd altijd uw handen,
Koppel het apparaat altijd los van de stroombron voordat u aanpassingen aanbrengt aan het elektrische gereedschap.
2. Lees, begrijp en volg de instructies van de fabrikant van uw elektrisch gereedschap.
instructies voor veiligheid. Draag altijd een veiligheidsbril of oogbescherming voordat u
Gevaar. Houd deze kleine onderdelen buiten bereik van kinderen!
1. Dit product bevat kleine onderdelen. Als het wordt ingeslikt, kan dit verstikkingsgevaar opleveren.
MODEL EN PARAMETERS
VEILIGHEIDSINSTRUCTIES
Machine Translated by Google

1
5
12
Nee.
3
4
6
9
2B
7
13
10
Naam en Hoeveelheid
11
8
Naam en Hoeveelheid
2A
Nee.
Slagdoos x 1
Pen x 1
Ring x 1
Sluitplaat x 1
Nachtschootrozet x 1
Achterknop x 1
Onderste grendel x 1
Voorste handgreep x 1
Cilinder x 1
Sluitplaat x 1
Deursleutel x 3
Gebruiksaanwijzing x 1
Vergrendeling A x 1
Schroeven x 8
9
6
11
1
3
2A
7
4
8
2B
12
13
10
5
STRUCTUURDIAGRAM EN COMPONENTEN
3
Machine Translated by Google
70 mm gaten.
B: Boor de gaten van ÿ54mm en ÿ25mm door de deur.
A: Vouw de sjabloon over de rand van de deur en markeer de locatie op 60 mm of
1. MARKEER DE DEUR EN BOORGATEN (Raadpleeg het bijgevoegde openingsdiagram.)
2. INSTALLEER DE VERGRENDEL
Stel de grendel in op 60 mm of 70 mm, afhankelijk van de plaats van de slotgaten.
C: Knip een basis uit van 58x26x3mm.
INSTALLATIE
4
Machine Translated by Google

(Dit wordt gebruikt om de achterste knop te
verwijderen nadat het gat is geplaatst.)
5
Voorste handgreep
3. INSTALLEER HET EXTERIEURE HANDVATMECHANISME
4. INSTALLEER DE INTERIEURKNOPPEN
Plaats de voorste handgreep met stelen en vierkante spindel in de grendel zoals afgebeeld.
Druk stevig tegen het deurvlak.
OPMERKING: De nok wordt volledig naar rechts geduwd voor een doornmaat van 70 mm.
(Houd tijdens de afstelling altijd twee tanden van de nok naar voren.)
Nadat de voorste handgreep op zijn plaats zit, installeert u de binnenknop en draait u de
schroeven vast. Steek de schroef door de ring en in het onderste gat en draai deze stevig vast.
Machine Translated by Google

2. Als er vuil is, gebruik dan een droge doek om het te verwijderen, schrob niet met chemicaliën
zoals afwasmiddel. Anders zal het de beschermende film van blootgestelde delen vernietigen en
vervaging veroorzaken.
1. Sla niet met geweld om schade aan de grendel en het deurkozijn te voorkomen.
3. Periodiek (een half jaar of eens per jaar) of wanneer de sleutel niet soepel in en uit het
sleutelgat gaat, kan er grafietpoeder (potloodpoeder) in het sleutelgat worden gedaan om
het te smeren.
6
ONDERHOUD
De vergrendelingsbalk
wordt naar beneden gedrukt
wanneer de deur gesloten is.
5. INSTALLEER DE SLAGSCHAKELAARS
Machine Translated by Google

Technische ondersteuning en e-garantiecertificaat
VK VERTEGENWOORDIGING: YH CONSULTING LIMITED.
Mainzer Landstr.69, 60329 Frankfurt am Main.
C/O YH Consulting Limited Kantoor 147, Centurion House, London Road,
Geïmporteerd naar AUS: SIHAO PTY LTD.
EC-REP: E-CrossStu GmbH
Staines-upon-Thames, Surrey, TW18 4AX
Adres: Shuangchenglu 803nong11hao1602A-1609shi, baoshanqu, shanghai
200000 CN.
Fabrikant: Shanghaimuxinmuyeyouxiangongsi
www.vevor.com/support
Suite 250, 9166 Anaheim Place, Rancho Cucamonga, CA 91730
Geïmporteerd naar de VS: Sanven Technology Ltd.
1 ROKEVA STRAAT EASTWOOD NSW 2122 Australië
Machine Translated by Google

MODÈLE:19985SN/20185AC/2018510B
«Économisezlamoitié»,«Moitiéprix»outouteautreexpressionsimilaireutiliséepar
nousnereprésentequ'uneestimationdeséconomiesquevouspourriezréaliserenachetant
certainsoutilscheznousparrapportauxgrandesmarquesetnecouvrepasnécessairement
touteslescatégoriesd'outilsquenousproposons.Nousvousrappelonsdebienvouloirvérifier
soigneusementlorsquevouspassezunecommandecheznoussivouséconomisezréellementla
moitiéparrapportauxgrandesmarques.
Nouscontinuonsànousengageràvousfournirdesoutilsàdesprixcompétitifs.
POIGNÉESÀBOUTON
Assistancetechniqueetcertificatdegarantie
électroniquewww.vevor.com/support
Machine Translated by Google

Ils'agitdelanoticed'utilisationd'origine.Veuillezlireattentivementtoutesles
instructionsdumanuelavantdel'utiliser.VEVORseréserveledroitd'interpréterclairement
notremanueld'utilisation.L'apparenceduproduitdépendduproduitquevousavez
reçu.Veuilleznousexcuser,nousnevousinformeronsplusencasdemiseàjourtechnologique
oulogicielledenotreproduit.
Vousavezdesquestionssurnosproduits?Vousavezbesoind'assistancetechnique?
N'hésitezpas
ànouscontacter:Assistancetechniqueetcertificatdegarantie
électroniquewww.vevor.com/support
MODÈLE:19985SN/20185AC/2018510B
REMARQUE:l'illustrationestfournieàtitred'illustrationuniquement.Veuillezvousréféreràla
couleurquevousavezachetée.
POIGNÉESÀBOUTON
BESOIND'AIDE?CONTACTEZNOUS!
1
Machine Translated by Google
visage,cheveux,vêtementsamplesetcorpsàunedistancesécuritairedesbrocheset
outilsdecoupe.Mainteneztoujoursfermementlespoignéesdesoutilspendantleurfonctionnement.
assemblageetmiseenmarchedel'outilélectrique.Gardeztoujourslesmains,
2.Lisez,comprenezetsuivezlesinstructionsdufabricantdevotreoutilélectrique.
consignesdesécurité.Porteztoujoursdeslunettesdesécuritéoudeslunettesdeprotectionavant
Danger.Gardezcespetitespièceshorsdeportéedesenfants!
1.Ceproduitcontientdepetitespièces.Encasd'ingestion,ilpeutprésenterunrisqued'étouffement.
Débrancheztoujoursl’appareildelasourced’alimentationavantderéglerlesoutilsélectriques.
2
Nickelsatiné
Cuivreantiquenoirmat
Couleur
Longueurduloquet
20185AC 2018510B19985SNModèle
23/8"et23/4"
Porteapplicable
711/16"813/16"
Rangéedepas(poignéedeporte)
Épaisseur
13/8"~13/4"
CONSIGNESDESÉCURITÉ
MODÈLEETPARAMÈTRES
Machine Translated by Google

12
1
5
Non.
3
4
6
9
2B
7
13
10
Nometquantité
11
8
Nometquantité
2A
Non.
Boîtedefrappex1
Brochex1
Rondellex1
LoquetAx1
Loquetinférieurx1
Boutonarrièrex1
Rosacedepênedormantx1
Poignéeavantx1
Cylindrex1
Gâchex1
Visx8
Gâchex1
Clédeportex3
Manueld'utilisationx1
9
6
11
5
3
2A
7
4
10
2B
8
13
1
12
SCHÉMADESTRUCTUREETCOMPOSANTS
3
Machine Translated by Google

A:Pliezlegabaritsurleborddelaporteetmarquezl'emplacementà60mmou
B:PercezlestrousdeΦ54mmetΦ25mmàtraverslaporte.
70mmdetrous.
1.MARQUEZLAPORTEETPERCEZLESTROUS(Veuillezvousréférerauschémad'ouverturecijoint.)
2.INSTALLERLELOQUET
Selonl'emplacementdestrousdeverrouillage,ajustezleloquetà60mmou70mm.
C:Découpezunebasede58x26x3mm.
INSTALLATION
4
Machine Translated by Google

(Ilestutilisépourretirerleboutonarrière
aprèsavoirinséréletrou.)
5
Poignéeavant
Placezlapoignéeavantaveclestigesetlatigecarréedansleloquetcommeindiqué.
Appuyezfermementcontrelafaçadedelaporte.
4.INSTALLERLESBOUTONSINTÉRIEURS
3.INSTALLERLEMÉCANISMEDEPOIGNÉEEXTÉRIEURE
REMARQUE:lacameestpousséecomplètementversladroitepourunreculde70mm.
(Pendantleréglage,gardeztoujoursdeuxdentsdelacameversl'avant.)
Unefoislapoignéeavantenplace,installezleboutonintérieuretserrezlesvis.Insérez
lavisdanslarondelleetdansletrouinférieur,serrezfermement.
Machine Translated by Google
3.Périodiquement(touslessixmoisouunefoisparan)oulorsquelaclén'estpasinséréeet
retiréeendouceur,delapoudredegraphite(poudredecrayon)peutêtreajoutéedansletrou
deserrurepourlubrifier.
1.Nefrappezpasavecforcepouréviterd’endommagerleloquetetlecadredelaporte.
2.S'ilyadelasaleté,utilisezunchiffonsecpourl'enlever,nefrottezpasavecdesproduitschimiques
telsqueduliquidevaisselle.Sinon,celadétruiraitlefilmprotecteurdespartiesexposéeset
provoqueraitunedécoloration.
6
ENTRETIEN
Labarredeverrouillage
estenfoncéelorsquela
porteestfermée.
5.INSTALLERLESGRÈVES
Machine Translated by Google

Assistancetechniqueetcertificatdegarantieélectronique
REPRÉSENTANTAUROYAUMEUNI:YHCONSULTINGLIMITED.
MainzerLandstr.69,60329FrancfortsurleMain.
C/OYHConsultingLimitedBureau147,CenturionHouse,LondonRoad,
1ROKEVASTREETEASTWOODNSW2122Australie
REPRÉSENTANTDELACE:ECrossStuGmbH
StainesuponThames,Surrey,TW184AX
Adresse:Shuangchenglu803nong11hao1602A1609shi,baoshanqu,Shanghai
200000CN.
Fabricant:Shanghaimuxinmuyeyouxiangongsi
ImportéauxÉtatsUnis:SanvenTechnologyLtd.
Suite250,9166AnaheimPlace,RanchoCucamonga,CA91730
ImportéenAUS:SIHAOPTYLTD.
www.vevor.com/support
Machine Translated by Google

MODELL: 19985-SN / 20185-AC / 20185-10B
„Sparen Sie die Hälfte“, „Halber Preis“ oder andere ähnliche Ausdrücke, die wir verwenden,
stellen nur eine Schätzung der Ersparnis dar, die Sie beim Kauf bestimmter Werkzeuge bei uns im
Vergleich zu den großen Topmarken erzielen können, und decken nicht unbedingt alle von uns
angebotenen Werkzeugkategorien ab. Wir möchten Sie freundlich daran erinnern, bei Ihrer Bestellung
bei uns sorgfältig zu prüfen, ob Sie im Vergleich zu den großen Topmarken tatsächlich die Hälfte
sparen.
Wir sind weiterhin bestrebt, Ihnen Werkzeuge zu wettbewerbsfähigen Preisen anzubieten.
KNOPF-GRIFFSATZ
Technischer Support und E-Garantie-Zertifikat
www.vevor.com/support
Machine Translated by Google
Dies ist die Originalanleitung. Bitte lesen Sie alle Anweisungen sorgfältig durch, bevor
Sie das Gerät in Betrieb nehmen. VEVOR behält sich eine klare Auslegung unserer
Bedienungsanleitung vor. Das Erscheinungsbild des Produkts richtet sich nach dem
Produkt, das Sie erhalten haben. Bitte verzeihen Sie uns, dass wir Sie nicht erneut informieren,
wenn es Technologie- oder Software-Updates für unser Produkt gibt.
Haben Sie Fragen zum Produkt? Benötigen Sie technischen Support? Bitte kontaktieren Sie
uns:
Technischer Support und E-Garantie-Zertifikat www.vevor.com/
support
MODELL: 19985-SN / 20185-AC / 20185-10B
HINWEIS: Die Abbildung dient nur zur Veranschaulichung. Bitte beachten Sie die
Farbe, die Sie gekauft haben.
KNOPF-GRIFFSATZ
Brauchen Sie Hilfe? Kontaktieren Sie uns!
1
Machine Translated by Google

Gesicht, Haare, lose Kleidung und Körper in sicherer Entfernung von Spindeln und
Halten Sie die Griffe der Werkzeuge während des Betriebs immer fest.
Montage und Inbetriebnahme des Elektrowerkzeugs. Halten Sie Hände,
Trennen Sie Elektrowerkzeuge immer von der Stromquelle, bevor Sie Einstellungen vornehmen.
Gefahr! Bewahren Sie diese Kleinteile außerhalb der Reichweite von Kindern auf!
Anweisungen zur Sicherheit. Tragen Sie immer eine Schutzbrille oder einen Augenschutz, bevor
2. Lesen, verstehen und befolgen Sie die Anweisungen Ihres Elektrowerkzeugherstellers.
1. Dieses Produkt enthält Kleinteile. Bei Verschlucken besteht Erstickungsgefahr.
2
Satiniertes Nickel
Antikes Kupfer Mattschwarz
Farbe
Anwendbare Tür
20185-AC 20185-10B19985-SNModell
Dicke
1-3/8"~1-3/4"
Riegellänge
Pitch-Reihe (Türgriff)
2-3/8" und 2-3/4"
7-11/16"–8-13/16"
MODELL UND PARAMETER
SICHERHEITSHINWEISE
Machine Translated by Google
13
10
Name und Menge
11
8
Name und Menge
2A
NEIN.
12
1
5
NEIN.
3
9
4
6
7
2B
Schlagkasten x 1
Stift x 1
Unterlegscheibe x 1
Riegel A x 1
Riegelrosette x 1
Hinterer Knopf x 1
Unterer Riegel x 1
Vorderer Griff x 1
Zylinder x 1
Schließblech x 1
Schrauben x 8
Schließblech x 1
Türschlüssel x 3
Benutzerhandbuch x 1
9
6
11
5
3
2A
7
4
10
2B
8
1
13
12
STRUKTURDIAGRAMM UND KOMPONENTEN
3
Machine Translated by Google
4
INSTALLATION
70 mm Löcher.
B: Bohren Sie die Löcher mit ÿ54 mm und ÿ25 mm durch die Tür.
A: Falten Sie die Schablone über die Kante der Tür und markieren Sie die Stelle 60mm oder
1. TÜR MARKIEREN UND LÖCHER BOHREN (Bitte beachten Sie das beigefügte Öffnungsdiagramm.)
2. INSTALLIEREN SIE DEN RIEGEL
Stellen Sie den Riegel je nach Lage der Schlosslöcher auf 60ÿmm oder 70ÿmm ein.
C: Schneiden Sie eine 58 x 26 x 3 mm große Basis aus.
Machine Translated by Google

Vorderer Griff
5
(Es wird verwendet, um den hinteren Knopf nach
dem Einsetzen des Lochs zu entfernen.)
Setzen Sie den vorderen Griff mit Stiel und Vierkantspindel wie gezeigt in den Riegel ein. Drücken Sie
ihn fest gegen die Türfläche.
4. INSTALLIEREN SIE DIE INNENKNÖPFE
3. ÄUSSEREN GRIFFMECHANISMUS INSTALLIEREN
HINWEIS: Für einen Dornabstand von 70ÿmm wird die Nocke ganz nach rechts gedrückt. (Beim Einstellen
immer zwei Zähne der Nocke nach vorne halten.)
Nachdem der vordere Griff angebracht ist, montieren Sie den inneren Knopf und ziehen Sie die
Schrauben fest. Führen Sie die Schraube durch die Unterlegscheibe in das untere Loch und ziehen Sie sie fest an.
Machine Translated by Google

2. Entfernen Sie Schmutz mit einem trockenen Tuch und verwenden Sie keine Chemikalien wie Spülmittel, da
sonst der Schutzfilm freiliegender Teile zerstört wird und das Produkt verblasst.
1. Schlagen Sie nicht mit Gewalt zu, um Schäden am Riegel und Türrahmen zu vermeiden.
3. In regelmäßigen Abständen (halbjährlich oder einmal jährlich) oder wenn sich der Schlüssel nicht
reibungslos einstecken oder herausziehen lässt, kann zur Schmierung Graphitpulver (Bleistiftpulver) in das
Schlüsselloch gegeben werden.
6
WARTUNG
Beim Schließen der
Tür wird der Riegel nach
unten gedrückt.
5. INSTALLIEREN SIE DIE SCHLÄGE
Machine Translated by Google

Technischer Support und E-Garantie-Zertifikat
UK-VERTRETER: YH CONSULTING LIMITED.
Mainzer Landstr.69, 60329 Frankfurt am Main.
C/O YH Consulting Limited Office 147, Centurion House, London Road,
Suite 250, 9166 Anaheim Place, Rancho Cucamonga, CA 91730
EG-Vertreter: E-CrossStu GmbH
Staines-upon-Thames, Surrey, TW18 4AX
Adresse: Shuangchenglu 803nong11hao1602A-1609shi, baoshanqu, Shanghai
200000 CN.
Hersteller: Shanghaimuxinmuyeyouxiangongsi
1 ROKEVA STREETEASTWOOD NSW 2122 Australien
In die USA importiert: Sanven Technology Ltd.
www.vevor.com/support
Nach AUS importiert: SIHAO PTY LTD.
Machine Translated by Google