
`
Technical Support and E-Warranty Certificate www.vevor.com/support
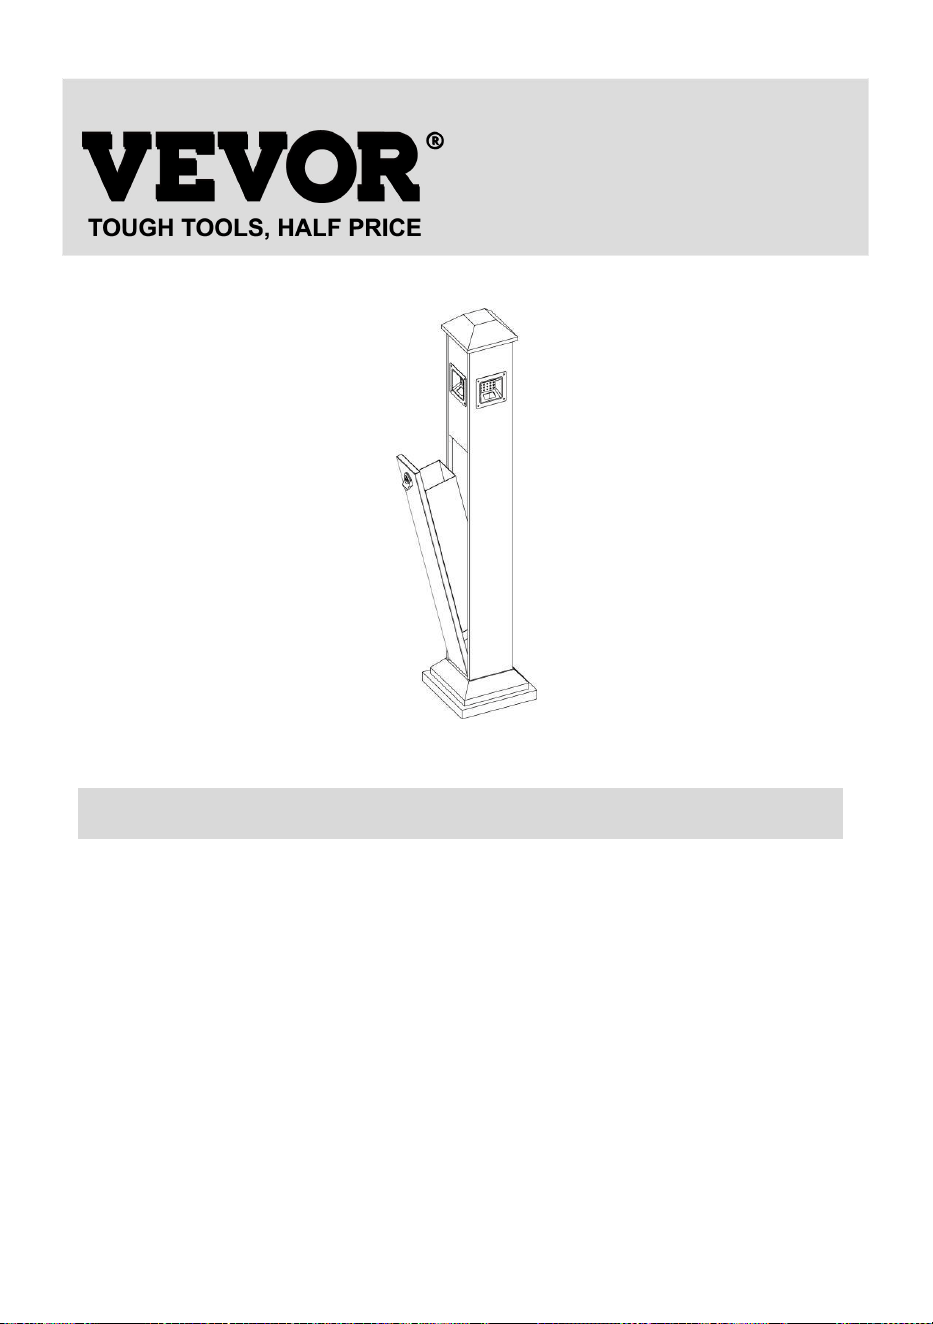
COMMERCIAL SMOKING RECEPTACLES
USER MANUAL
YD-27A
YD-27B
We continue to be committed to provide you tools with competitive price.
"Save Half", "Half Price" or any other similar expressions used by us only
represents an estimate of savings you might benefit from buying certain tools
with us compared to the major top brands and does not necessarily mean to cover
all categories of tools offered by us. You are kindly reminded to verify carefully
when you are placing an order with us if you are actually Saving
Half in comparison with the top major brands.
- 1 -
MODEL:YD-27A YD-27B
NEED HELP? CONTACT US!
Have product questions? Need technical support? Please feel free to
contact us:
Technical Support and E-Warranty Certificate
www.vevor.com/support
This is the original instruction, please read all manual instructions
carefully before operating. VEVOR reserves a clear interpretation of our
user manual. The appearance of the product shall be subject to the
product you received. Please forgive us that we won't inform you again if
there are any technology or software updates on our product.
COMMERCIAL SMOKING
RECEPTACLES

- 2 -
SAFETY INSTRUCTIONS
WARNING:
Read this material before using this product. Failure to do so can
result in serious injury.
Assembly precautions
1. Assemble only according to these instructions. Improper assembly can
create hazards.
2. Wear ANSI-approved safety goggles and heavy-duty work gloves
during assembly.
3. Keep the assembly area clean and well-lit.
4. Keep bystanders out of the area during assembly.
5. Do not assemble if tired or when under the influence of alcohol, drugs
or medication.
6. The product capabilities apply to properly and completely assembled
products only.
7. Assemble on a flat, level, hard and smooth surface capable of safely
supporting the Commercial Smoking Receptacles.
8. For additional information regarding the parts listed in the following
pages, please refer to the Assembly Diagram of this manual. Unwrap
and separate all parts in a clean work area.
Use precautions
1. DO NOT SIT OR STAND ON THIS ITEM.
2. This product is not a toy. Do not allow children to play with or near this
item.
3. Do not exceed specified weight capacities.
4. Use only on a flat, level, hard, and smooth surface that can safely
support a fully loaded Commercial Smoking Receptacles.
5. Use as intended only.
6. Inspect before every use; do not use if parts are loose or damaged.
SAVE THIS MANUAL
- 3 -
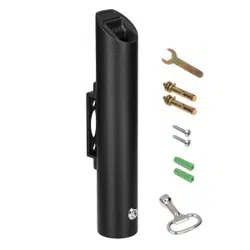
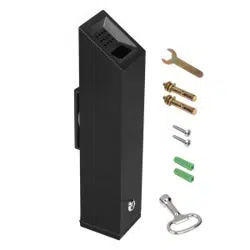
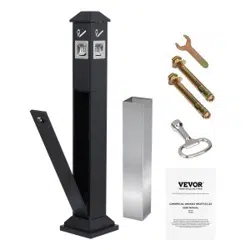
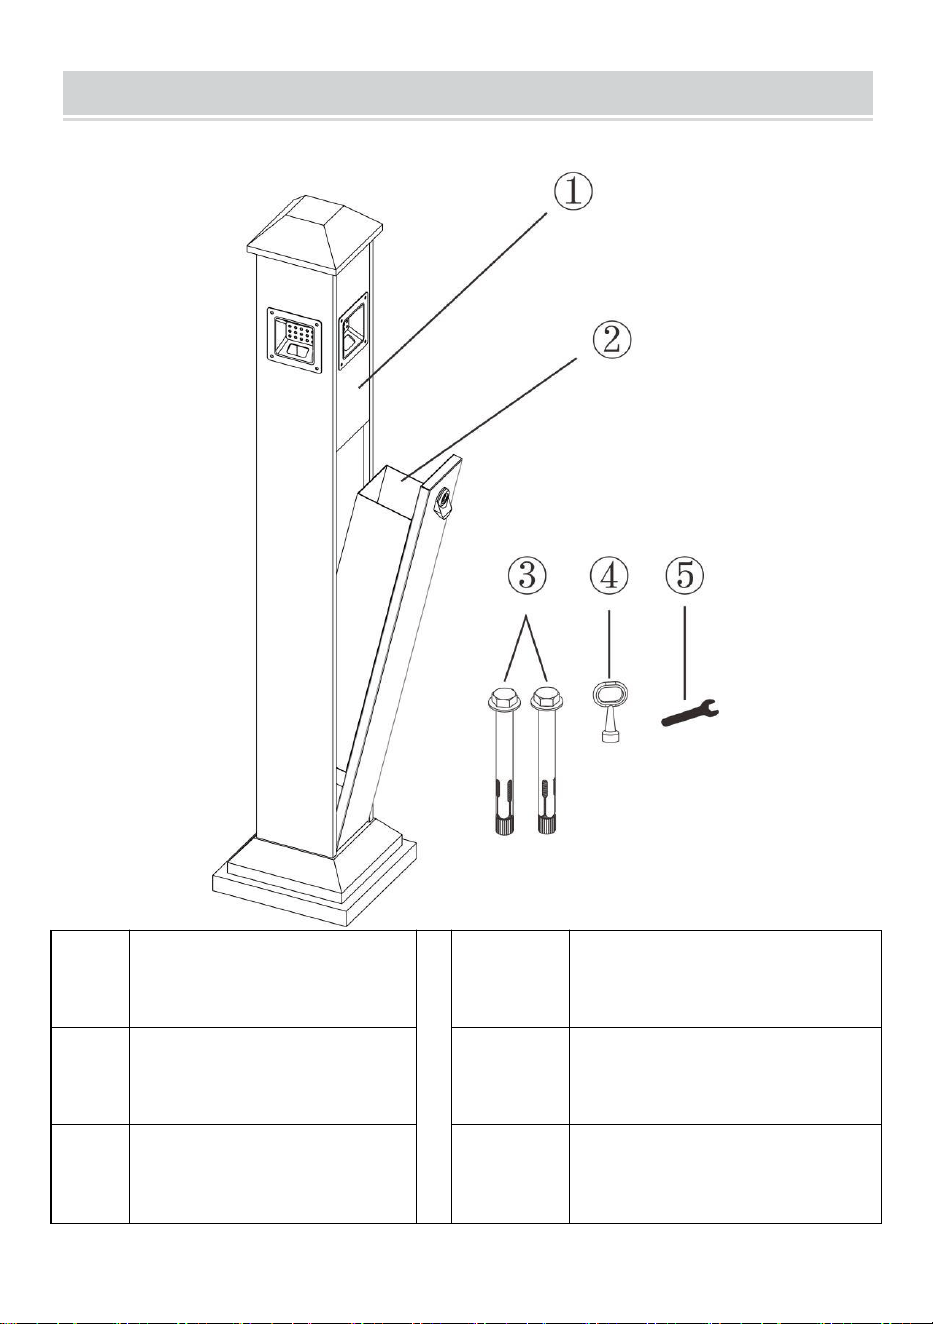
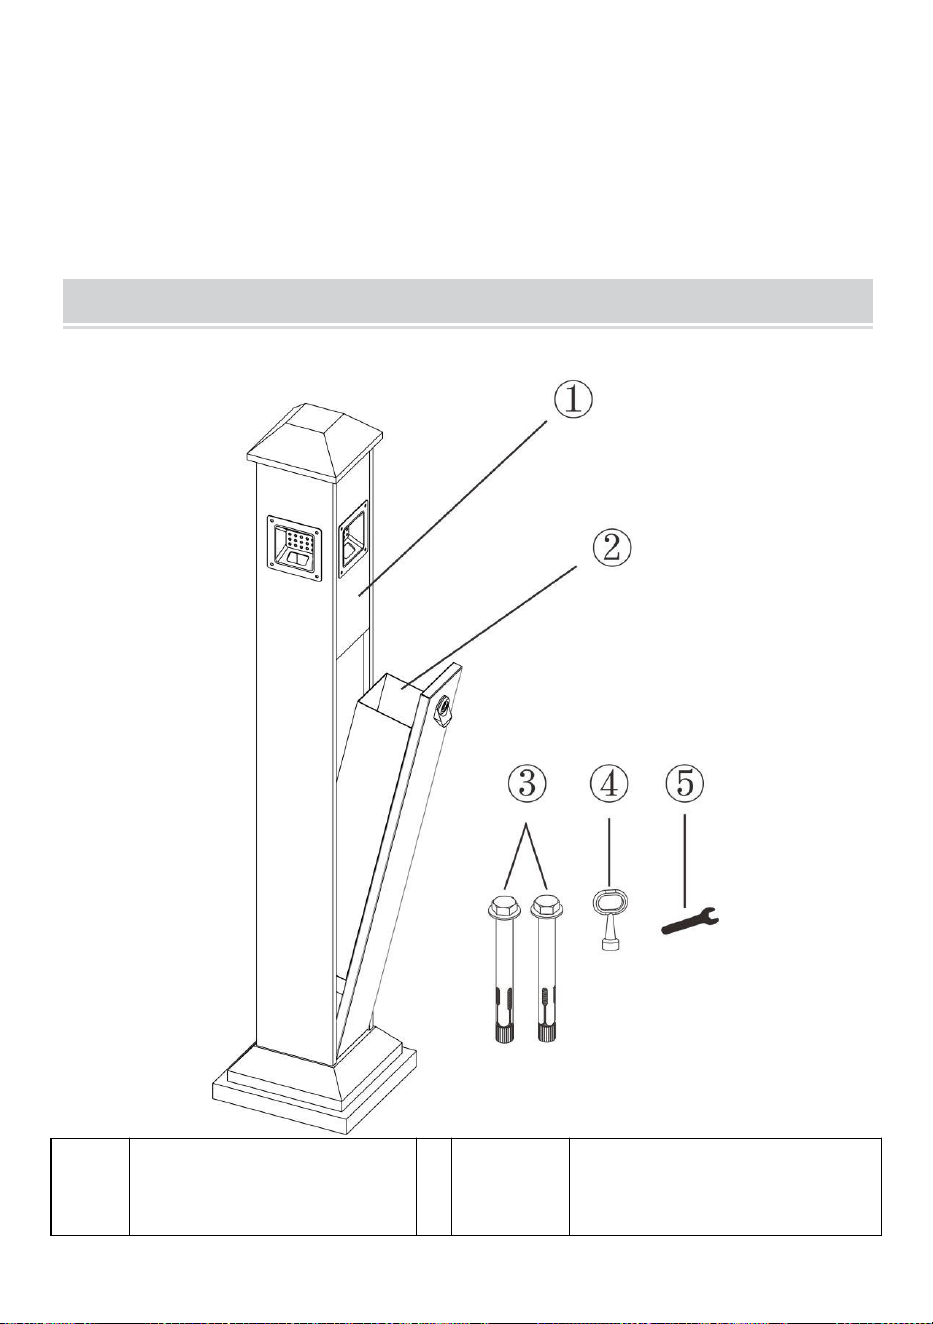
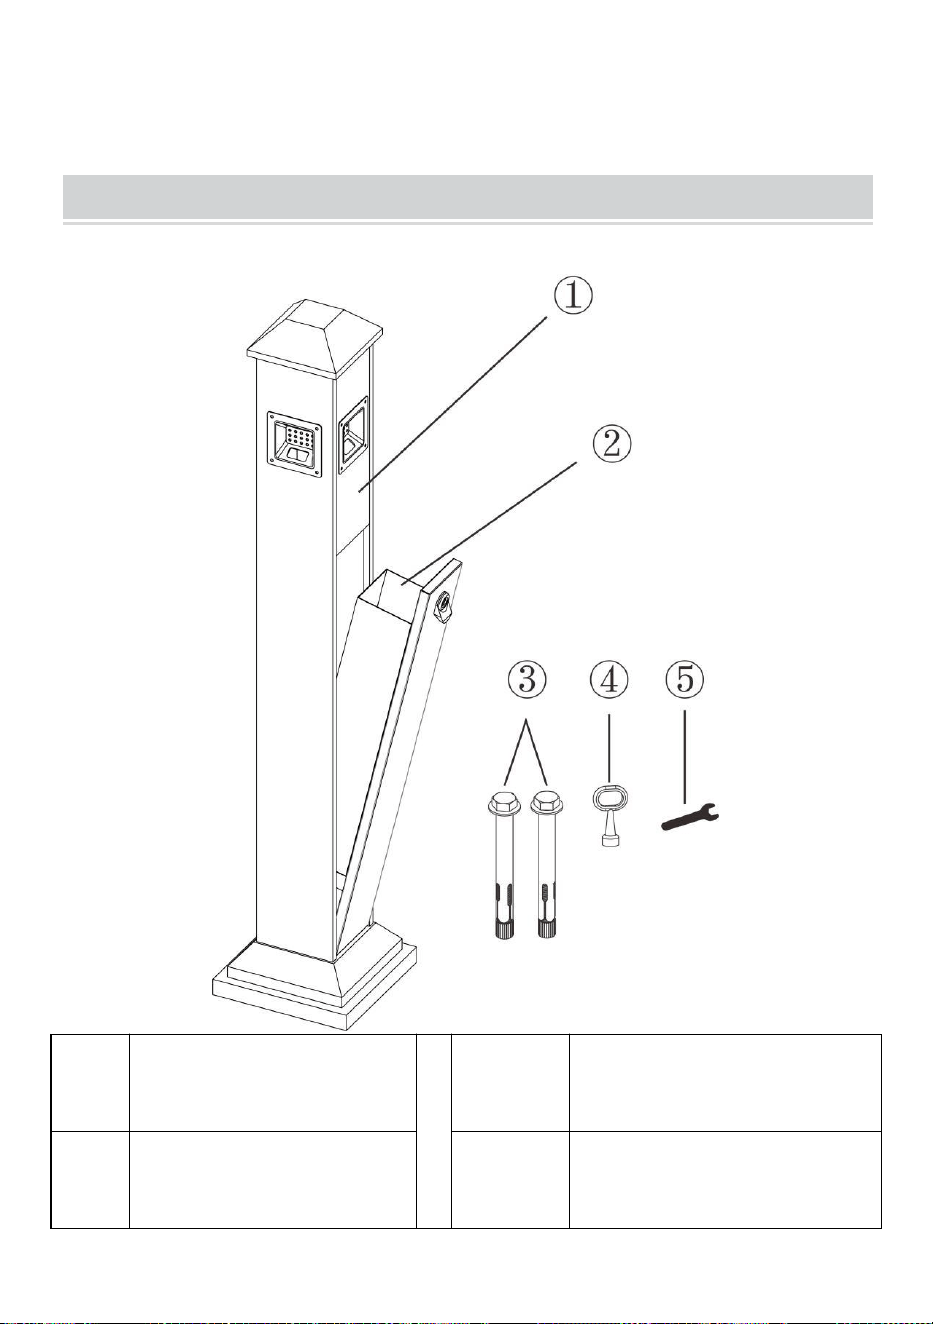
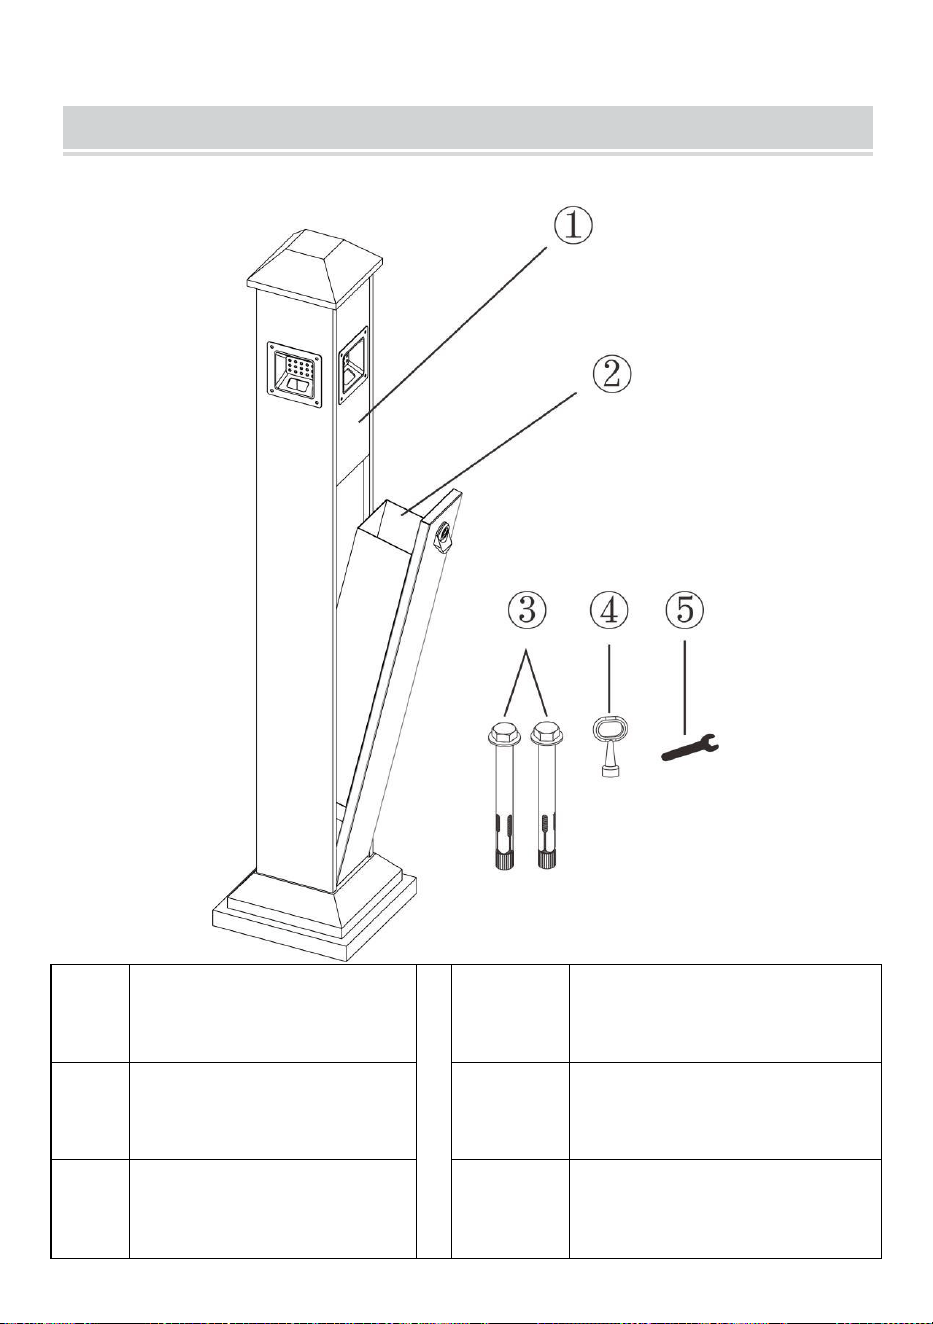
PARTS LIST
①
Main Body Of Ash Column
④
Key *1
②
Inner Barrel *1
⑤
19mm Open End Wrench *1
③
M10*120 Expansion Bolt
*2

- 4 -
ASSEMBLY STEP
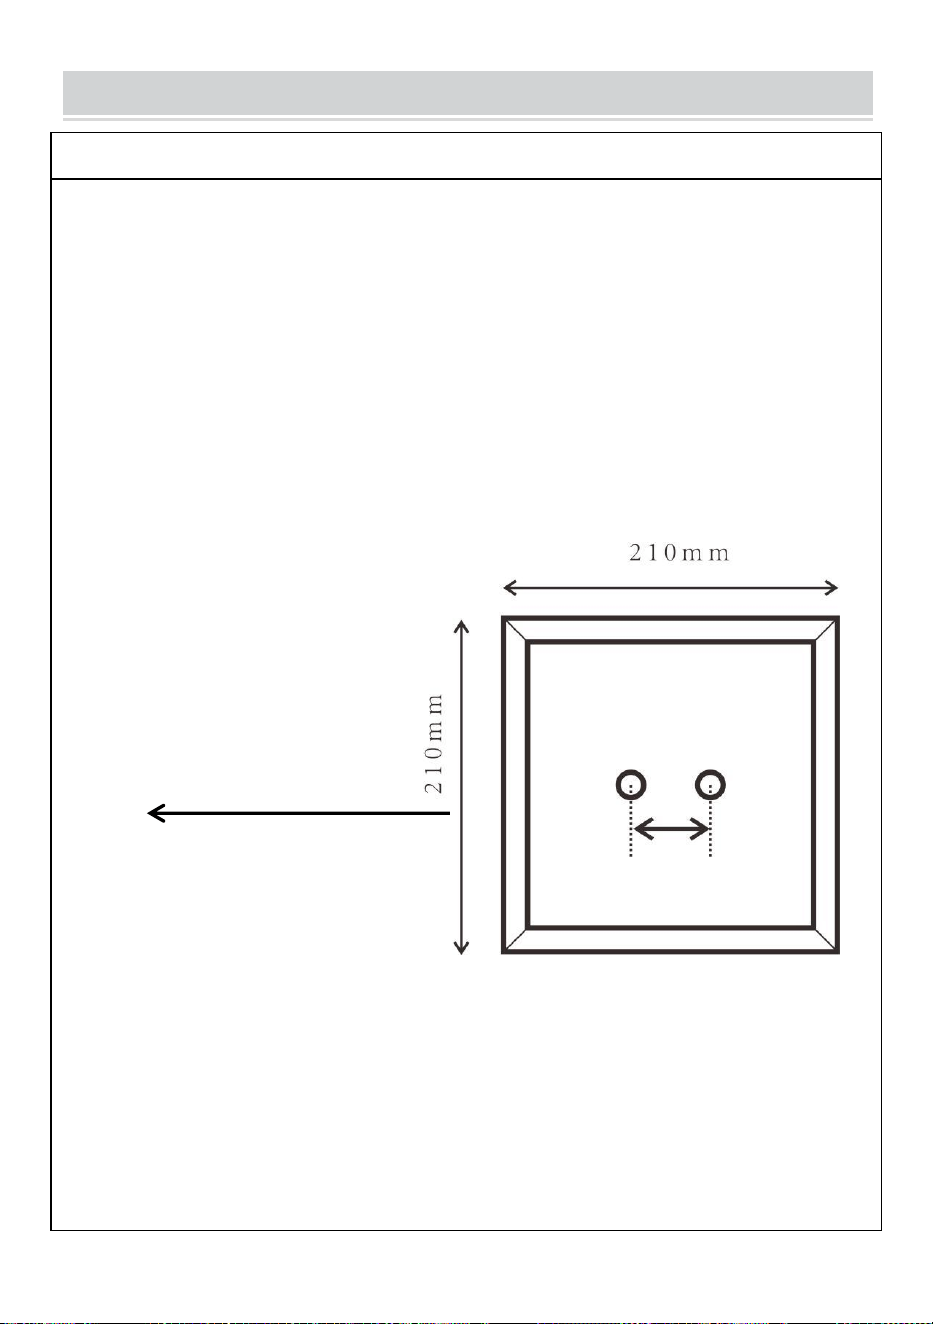
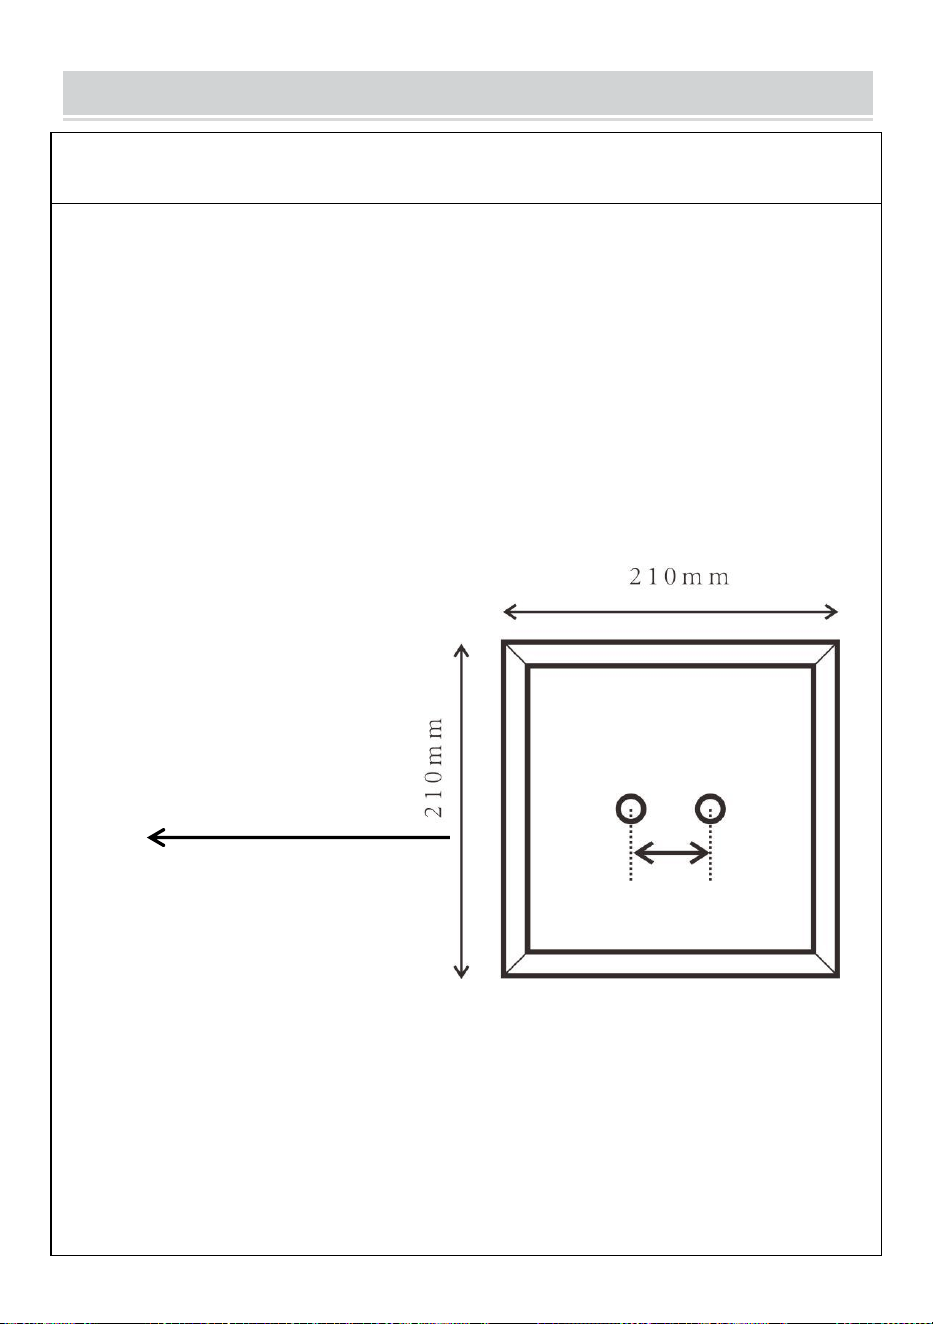
STEP 1: Select The Installation Position And Drilling
Note: Please ensure that the direction of the door opening in the
installation position is free from obstacles.
1. Set the drilling position on the hard ground, the center distance
=50mm (as shown below).
2. With a diameter of 12mm drill bit in the selected position, the
drilling depth is not less than 60mm.
The center distance between
the two holes is 50mm
Base and mounting hole
spacing dimensions
The arrow indicates the
direction of the door
- 5 -
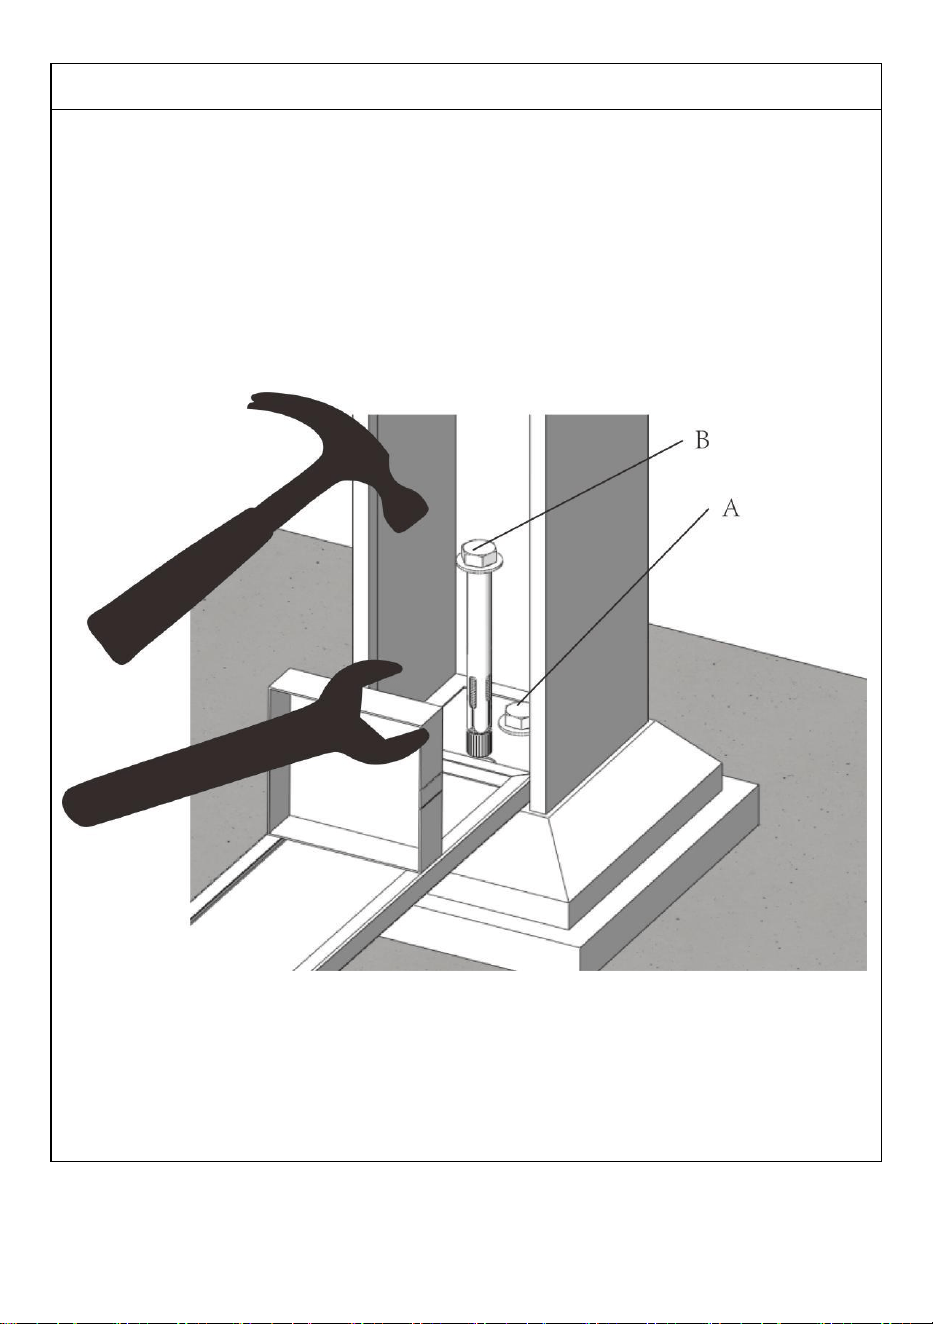
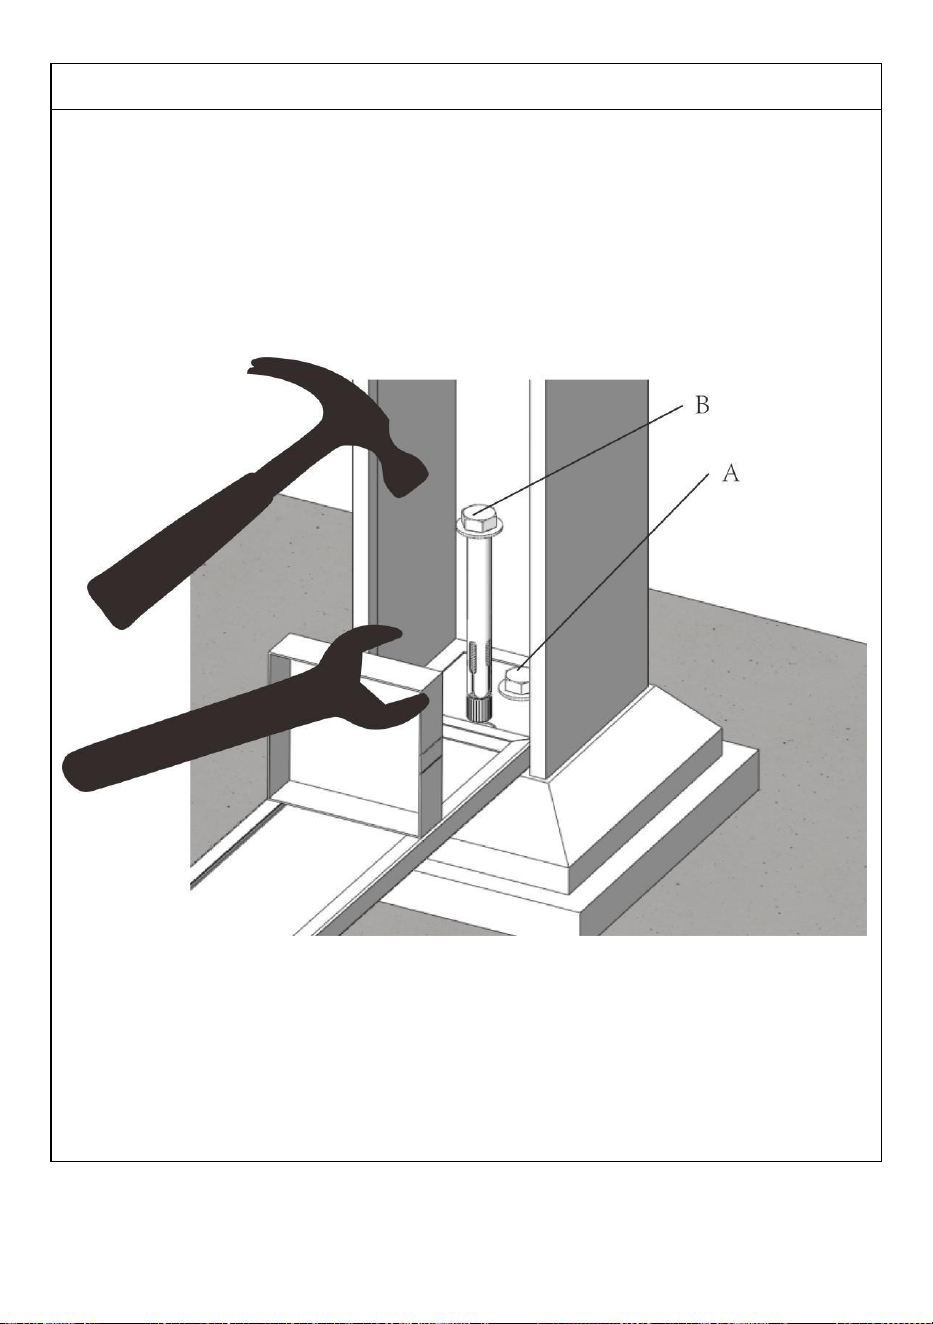
STEP 2: Install
1. Fully open the door, align the base holes with the ground, and
insert M10*120mm expansion bolts into the holes in sequence A and
B.
2. Use the open end wrench to lock the bolt

- 6 -
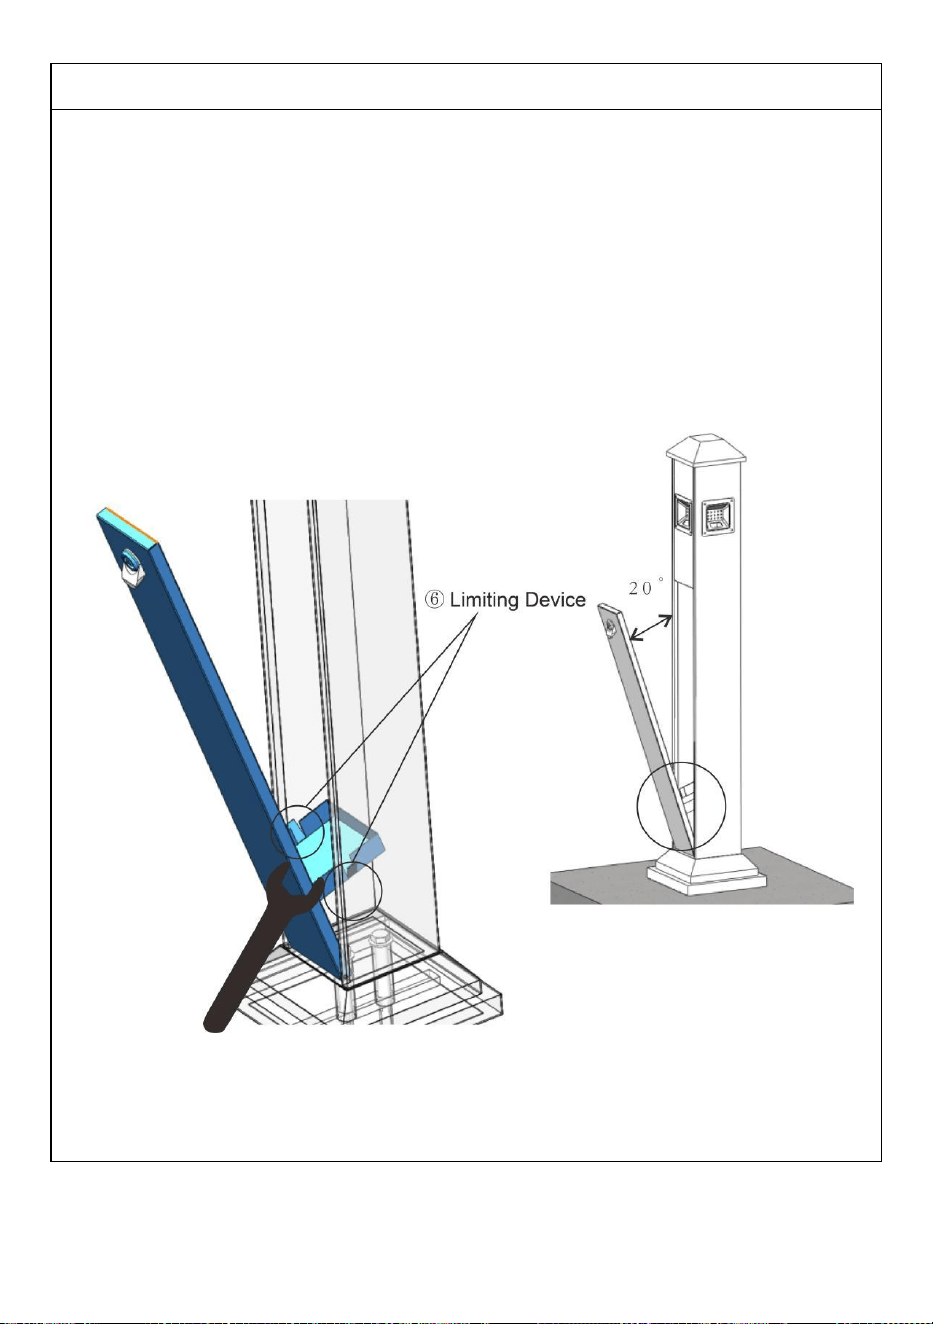
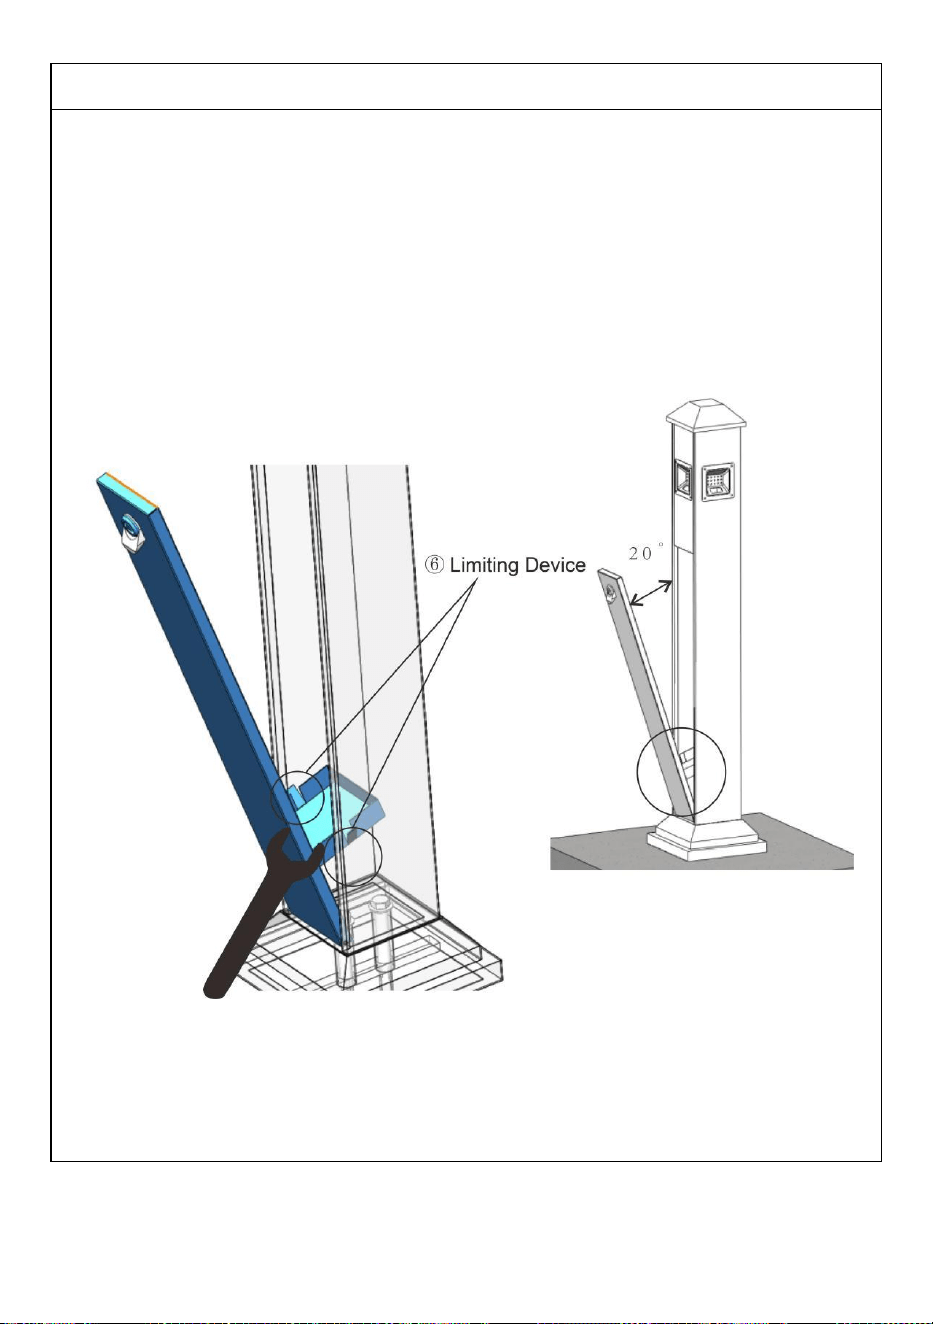
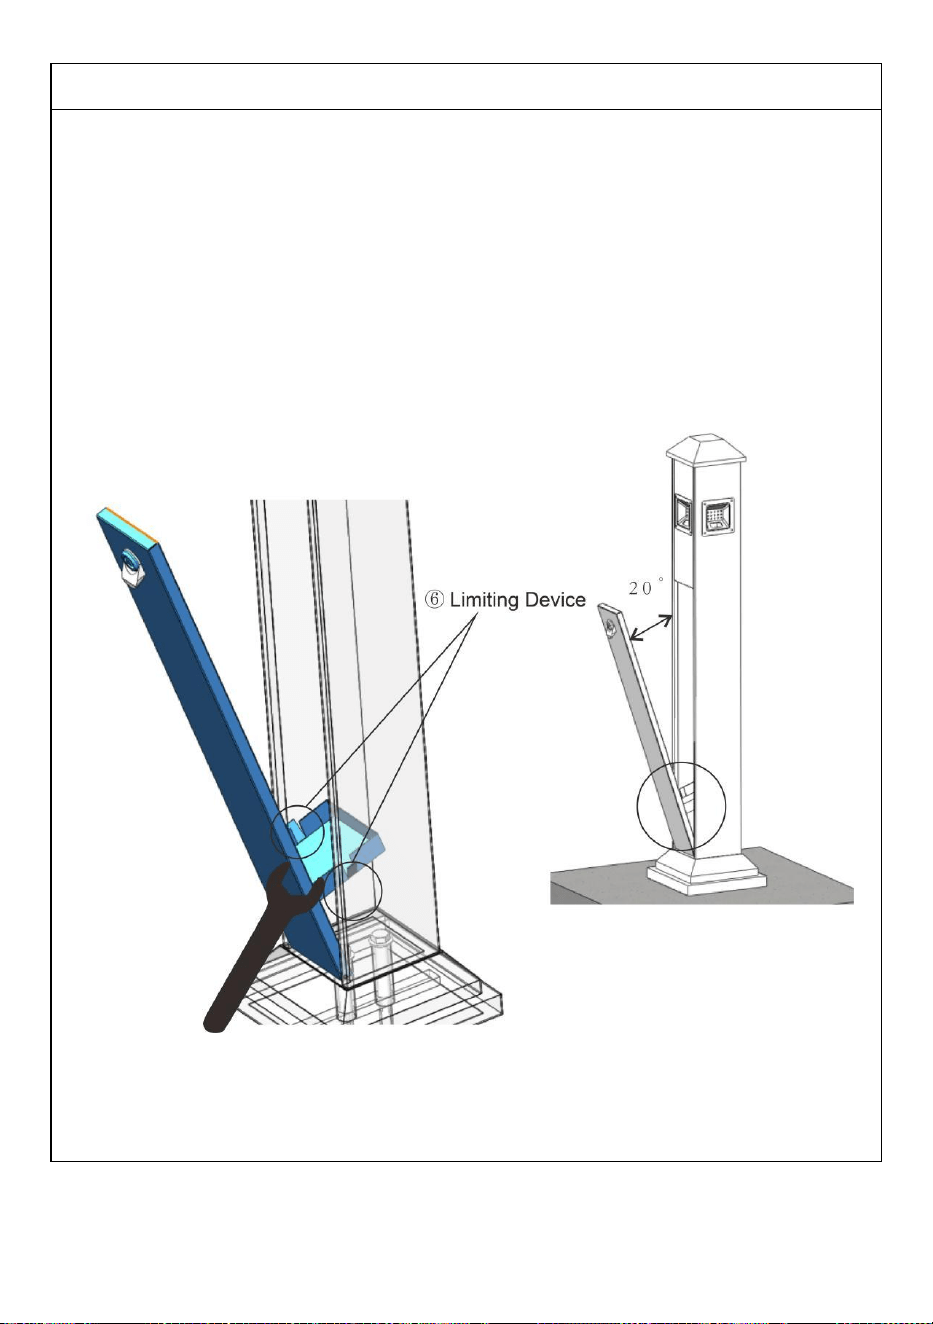
STEP 3: Open Limit
1. Use an open end wrench to push the limiting device ⑥ on the door
panel to both sides.
2. The limit can maintain the opening Angle of the door panel at
about 20, which is easy to remove the inner barrel and avoid the door
panel falling directly to the ground.
- 7 -
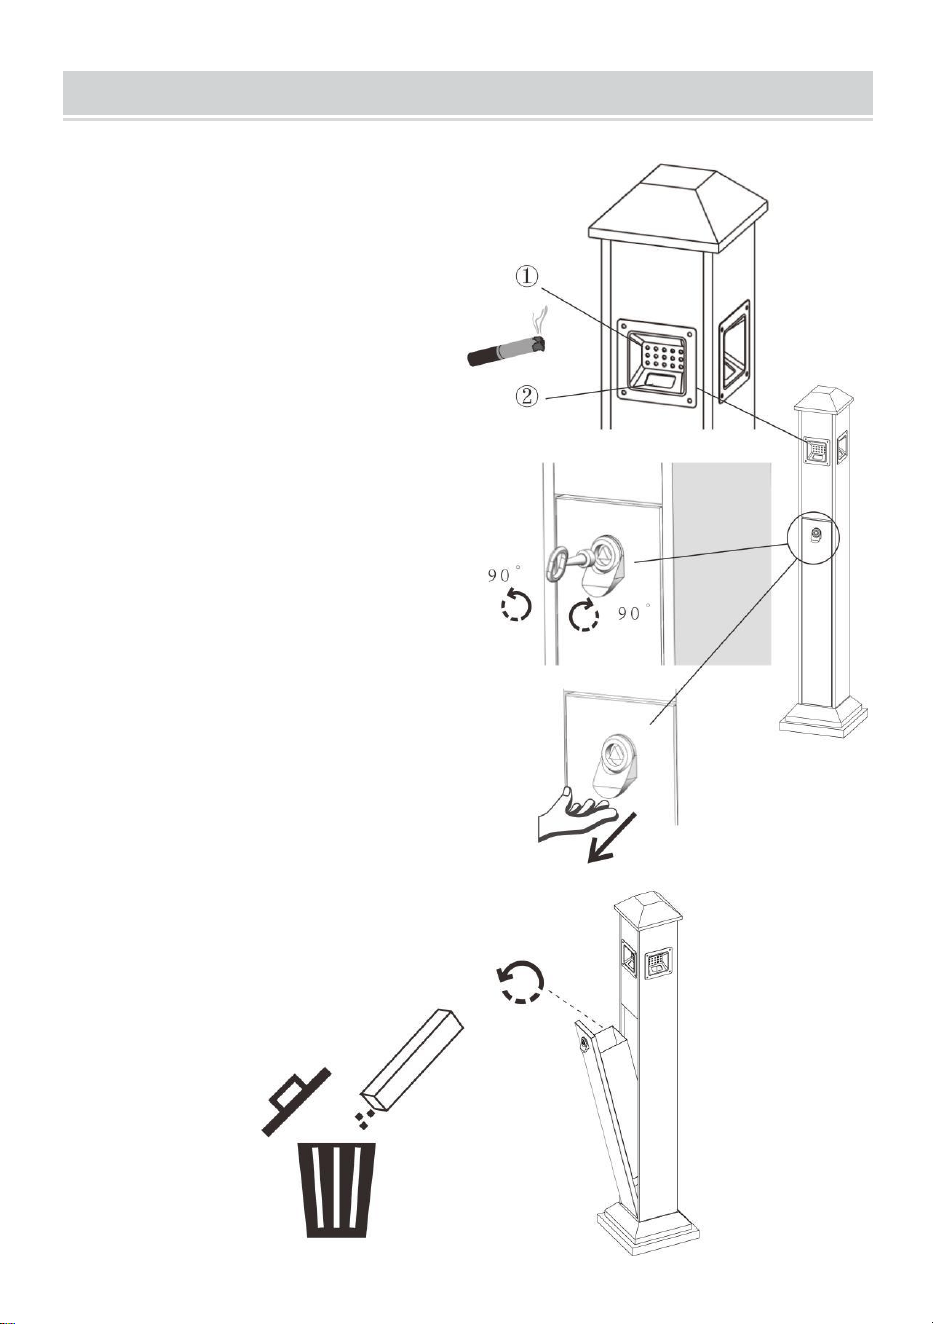
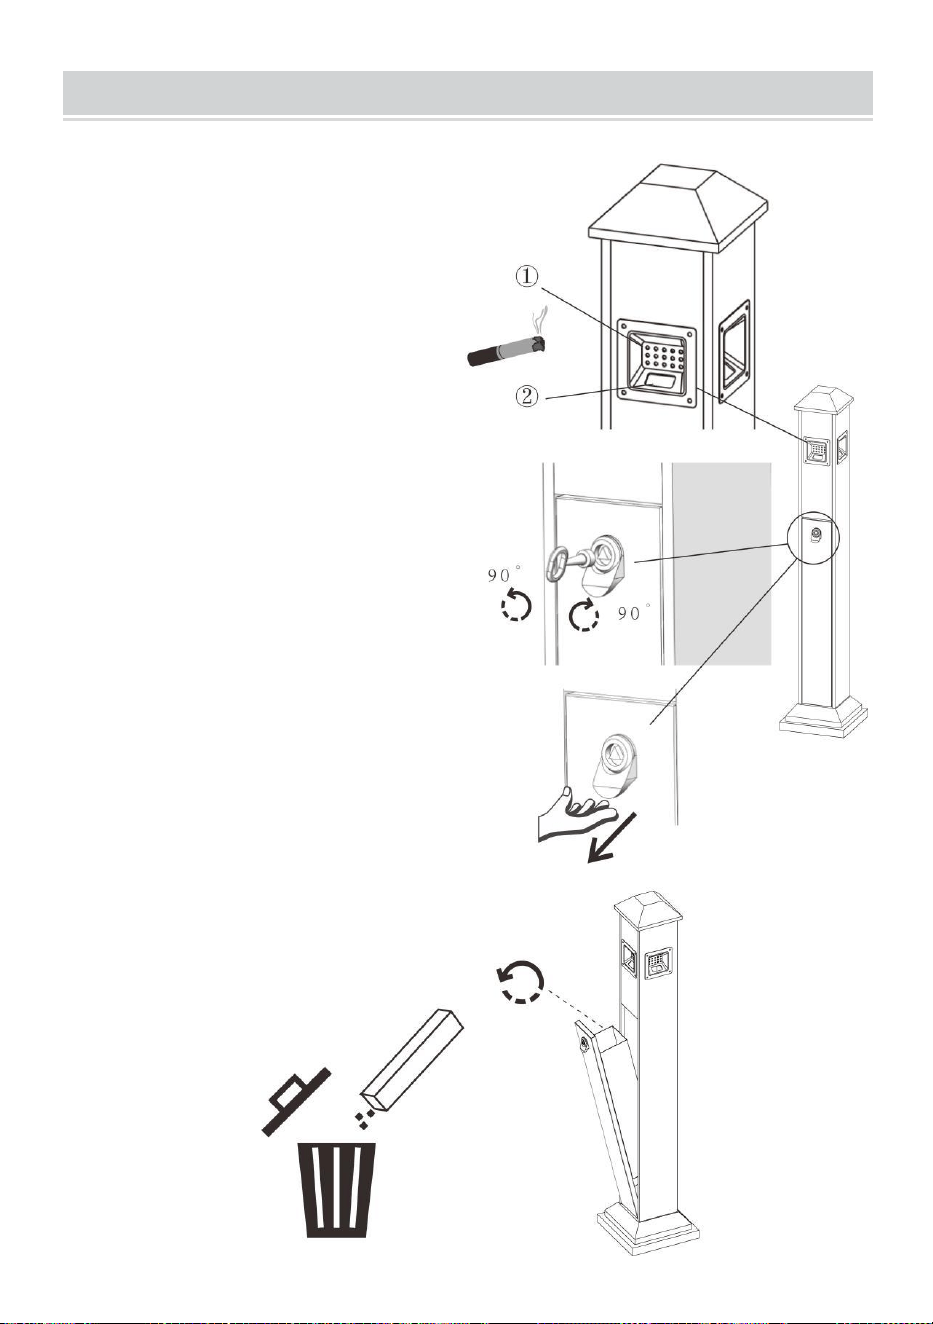
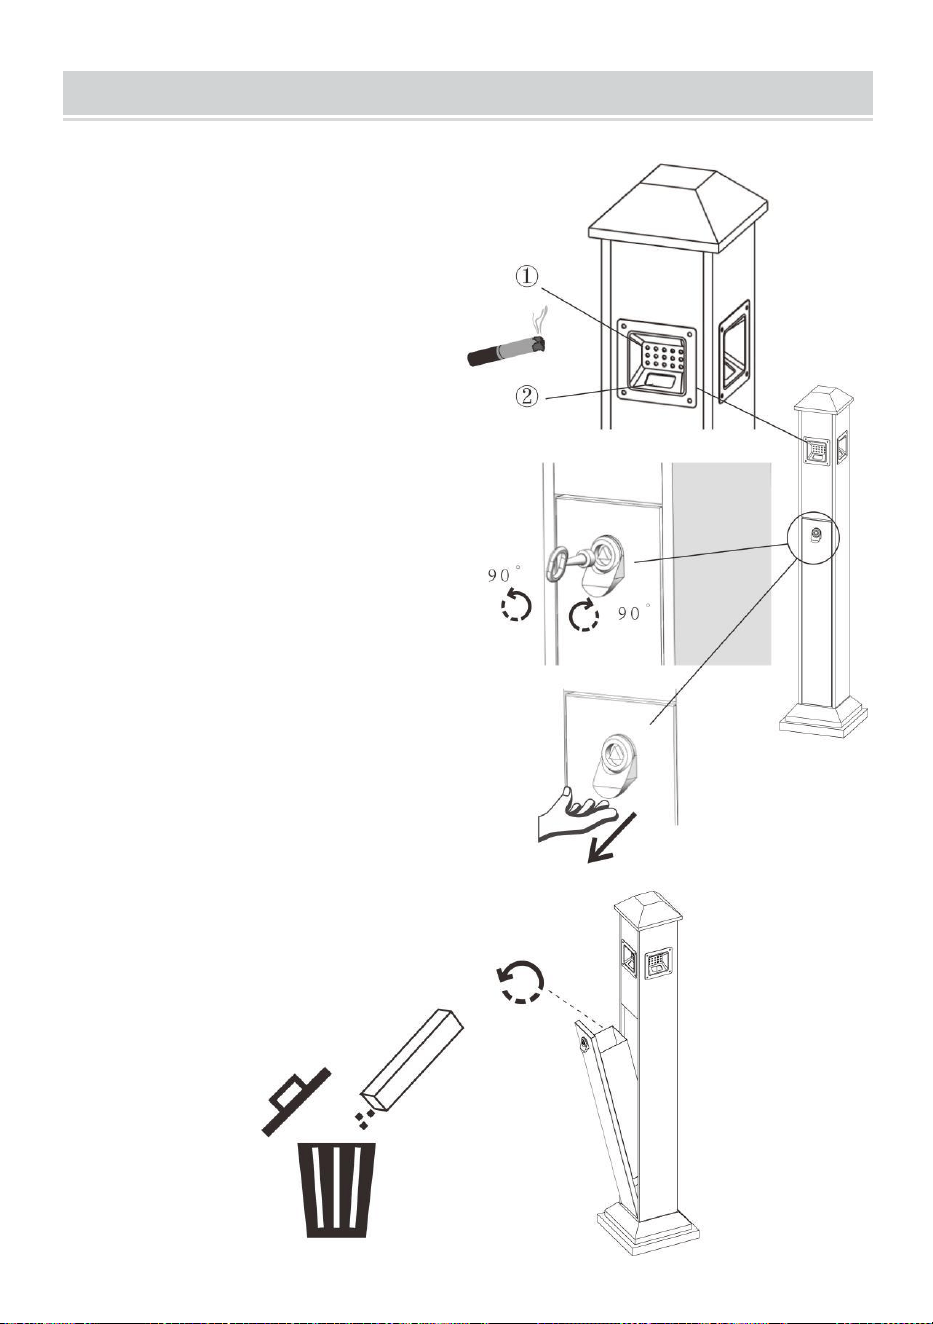
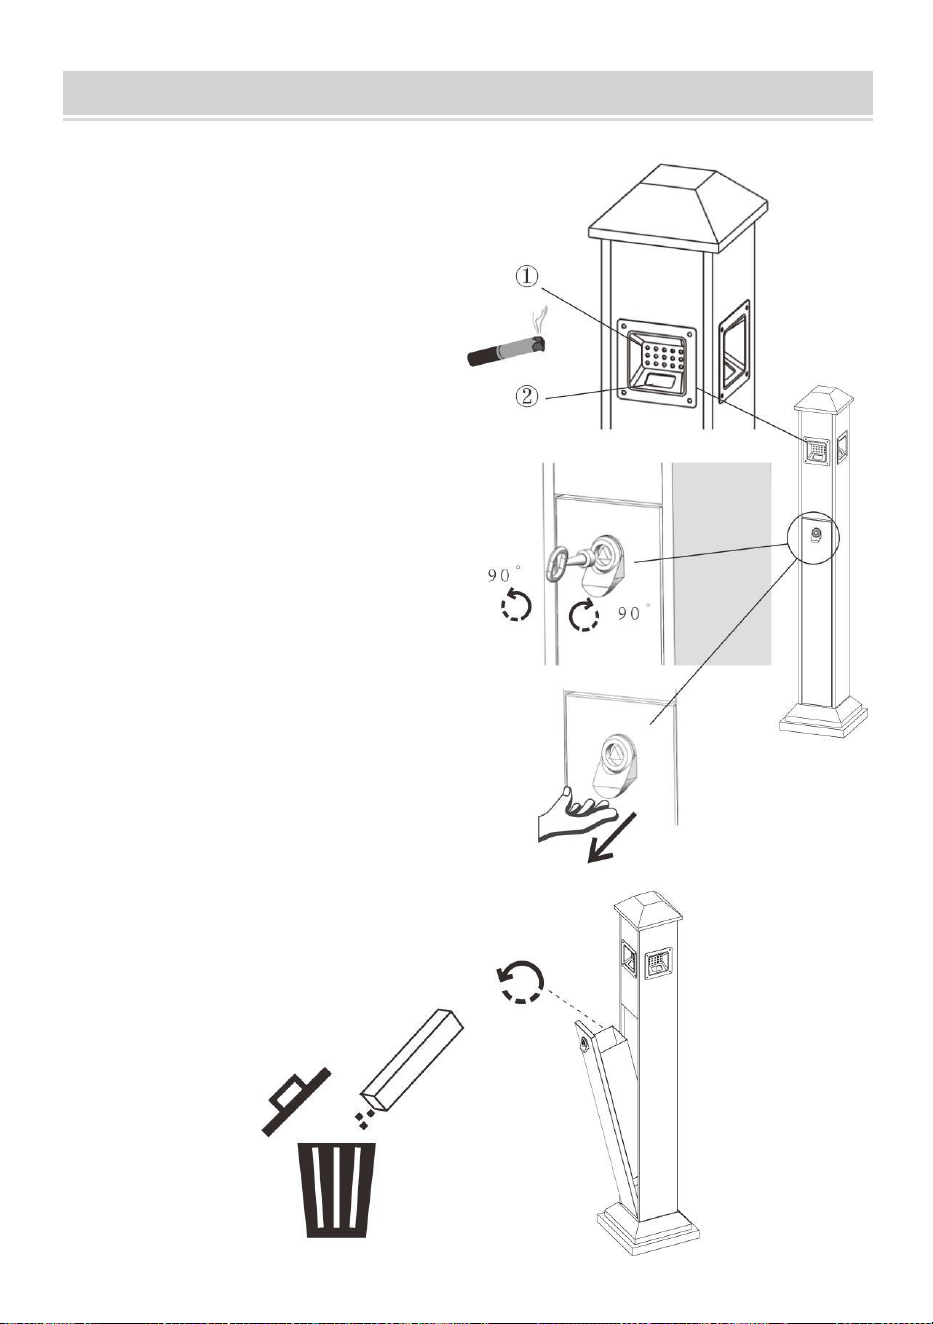
① Porous smoke extinguishing plate
Flue hole
INSTRUCTIONS FOR USE
First,:Smoke Out, Input
1. Align the burning cigarette with the
①
position and rub until the end of the
cigarette is extinguished.
2. Put the extinguished cigarette or
burned cigarette butt into the collector
from the
②
position.
Second:Opening/Closing of the Lock
Insert the key into the keyhole and turn
it 90 degrees to the left or right to open
or close the lock.
Thirdly:Clean Up Soot And Cigarette
Butts
After unlocking, hold the plastic handle
under the hand and pull the door in the
direction of the arrow.
You can remove the inner liner to clean
the soot and cigarette butts.
Close the door after cleaning and repeat
step 2 to lock the door.


Manufacturer: Shanghaimuxinmuyeyouxiangongsi
Address: Shuangchenglu 803nong11hao1602A-1609shi, baoshanqu,
shanghai 200000 CN.
Imported to AUS: SIHAO PTY LTD. 1 ROKEVA STREETEASTWOOD
NSW 2122 Australia
Imported to USA: Sanven Technology Ltd. Suite 250, 9166 Anaheim
Place, Rancho Cucamonga, CA 91730
REP
EC
E-CrossStu GmbH
Mainzer Landstr.69, 60329 Frankfurt am Main.
REP
UK
YH CONSULTING LIMITED.
C/O YH Consulting Limited Office 147, Centurion
House, London Road, Staines-upon-Thames, Surrey,
TW18 4AX

`


`
Technique Certificat d'assistance et de garantie électronique
www.vevor.com/support
RÉCIPIENTS POUR FUMEURS
COMMERCIAUX
MANUEL D' utilisation
YD-27A
YD-27 B
Nous continuons à nous engager à vous fournir des outils à des prix compétitifs.
« Économisez la moitié », « Moitié prix » ou toute autre expression similaire utilisée par
nous uniquement
représente une estimation des économies dont vous pourriez bénéficier en achetant
certains outils
avec nous par rapport aux grandes marques et ne signifie pas nécessairement couverture
toutes les catégories d'outils que nous proposons. Nous vous rappelons de bien vouloir
vérifier soigneusement

`
lorsque vous passez une commande chez nous si vous êtes réellement Économie
Moitié par rapport aux plus grandes marques.
- 1 -
MODÈLE : YD-27A YD-27B
BESOIN D'AIDE? CONTACTEZ-NOUS!
Vous avez des questions sur nos produits ? Vous avez besoin d'une
assistance technique ? N'hésitez pas à nous contacter :
Assistance technique et certificat de garantie électronique
www.vevor.com/support
Il s'agit de la notice d'utilisation d'origine. Veuillez lire attentivement toutes
les instructions du manuel avant de l'utiliser. VEVOR se réserve le droit
d'interpréter clairement notre manuel d'utilisation. L'apparence du produit
dépend du produit que vous avez reçu. Veuillez nous excuser, nous ne
vous informerons plus si des mises à jour technologiques ou logicielles
sont disponibles sur notre produit.
COMMERCIAL SMOKING
RECEPTACLES

- 2 -
SAFETY INSTRUCTIONS
AVERTISSEMENT:
Lisez ce document avant d'utiliser ce produit. Le non-respect de ces
instructions peut entraîner des blessures graves.
Précautions de montage
9. Assembler uniquement selon ces instructions. Un assemblage
incorrect peut créer des dangers.
10. Portez des lunettes de sécurité approuvées ANSI et des gants de
travail robustes pendant l’assemblage.
11. Gardez la zone de montage propre et bien éclairée.
12. Gardez les spectateurs hors de la zone pendant le montage.
13. Ne pas monter si vous êtes fatigué ou sous l'influence de l'alcool, de
drogues ou de médicaments.
14. Les capacités du produit s'appliquent uniquement aux produits
correctement et entièrement assemblés.
15. Assembler sur une surface plane, de niveau, dure et lisse capable de
supporter en toute sécurité les récipients à fumer commerciaux.
16. Pour plus d'informations sur les pièces répertoriées dans les pages
suivantes, reportez-vous au schéma d'assemblage de ce manuel.
Déballez et séparez toutes les pièces dans un espace de travail
propre.
Précautions d'emploi
7. NE PAS S'ASSEOIR OU SE TENIR DEBOUT SUR CET ARTICLE.
8. Ce produit n'est pas un jouet. Ne laissez pas les enfants jouer avec ou
à proximité de cet article.
9. Ne pas dépasser la quantité spécifiée capacités de poids.
10. Utiliser uniquement sur une surface plane, de niveau, dure et lisse
pouvant supporter en toute sécurité des récipients à fumer
commerciaux entièrement chargés.
11. Utiliser uniquement comme prévu.

- 3 -
12. Inspectez avant chaque utilisation ; ne pas utiliser si des pièces sont
desserrées ou endommagées.
CONSERVER CE MANUEL
PARTS LIST
①
Corps principal de la
colonne de cendres
④
Clé *1

- 4 -
②
Canon intérieur * 1
⑤
Clé à fourche de 19 mm * 1
③
Boulon d'expansion
M10*120* 2

- 5 -
ASSEMBLY STEP
ÉTAPE 1 : Sélectionnez la position d' installation et le perçage
Remarque : Assurez-vous que le sens d'ouverture de la porte dans la
position d'installation est libre de tout obstacle .
3. Réglez la position de perçage sur un sol dur, l'entraxe = 50 mm
(comme indiqué ci-dessous).
4. Avec un foret de diamètre 12 mm dans la position sélectionnée, la
profondeur de perçage n'est pas inférieure à 60 mm.
The center distance between
the two holes is 50mm
Base and mounting hole
spacing dimensions
The arrow indicates the
direction of the door

- 6 -
ÉTAPE 2 : Installer
1. Ouvrez complètement la porte, alignez les trous de base avec le sol
et insérez les boulons d'expansion M10*120 mm dans les trous de la
séquence A et B.
2. Utilisez la clé à fourche pour verrouiller le boulon

- 7 -
ÉTAPE 3 : Limite d'ouverture
3. Utilisez une clé plate pour pousser le dispositif de limitation ⑥ sur
le panneau de porte des deux côtés .
4. La limite peut maintenir l'angle d'ouverture du panneau de porte à
environ 20, ce qui permet de retirer facilement le canon intérieur et
d'éviter que le panneau de porte ne tombe directement au sol.
- 8 -
① Porous smoke extinguishing plate
Flue hole
INSTRUCTIONS FOR USE
First,:Smoke Out, Input
1. Align the burning cigarette with the
①
position and rub until the end of the
cigarette is extinguished.
2. Put the extinguished cigarette or
burned cigarette butt into the collector
from the
②
position.
Second:Opening/Closing of the Lock
Insert the key into the keyhole and turn
it 90 degrees to the left or right to open
or close the lock.
Thirdly:Clean Up Soot And Cigarette
Butts
After unlocking, hold the plastic handle
under the hand and pull the door in the
direction of the arrow.
You can remove the inner liner to clean
the soot and cigarette butts.
Close the door after cleaning and repeat
step 2 to lock the door.

Fabricant : Shanghaimuxinmuyeyouxiangongsi
Adresse : Shuangchenglu 803nong11hao1602A-1609shi, baoshanqu,
Shanghai 200000 CN.
Importé en Australie : SIHAO PTY LTD. 1 ROKEVA
STREETEASTWOOD NSW 2122 Australie
Importé aux États-Unis : Sanven Technology Ltd. Suite 250, 9166
Anaheim Place, Rancho Cucamonga, CA 91730
REP
EC
E-CrossStu GmbH
Mainzer Landstr.69, 60329 Frankfurt am Main.
REP
UK
YH CONSULTING LIMITED.
C/O YH Consulting Limited Office 147, Centurion
House, London Road, Staines-upon-Thames, Surrey,
TW18 4AX

`


`
Technisch Support und E-Garantie-Zertifikat www.vevor.com/support
KOMMERZIELLE RAUCHERBEHÄLTER
Benutzerhandbuch
YD-27A
YD-27 B
Wir sind weiterhin bestrebt, Ihnen Werkzeuge zu wettbewerbsfähigen Preisen anzubieten.
"Sparen Sie die Hälfte", "Halber Preis" oder andere ähnliche Ausdrücke, die wir nur
verwenden
stellt eine Schätzung der Einsparungen dar, die Sie durch den Kauf bestimmter Werkzeuge
erzielen können
mit uns im Vergleich zu den großen Top-Marken und bedeutet nicht unbedingt, Abdeckung
alle von uns angebotenen Werkzeugkategorien. Wir möchten Sie bitten, zu überprüfen
sorgfältig
wenn Sie bei uns eine Bestellung aufgeben, wenn Sie tatsächlich Speichern
Hälfte im Vergleich mit den Top-Großmarken.

- 1 -
MODELL: YD-27A YD-27B
Brauchen Sie Hilfe? Kontaktieren Sie uns!
Sie haben Fragen zu unseren Produkten? Sie benötigen technischen
Support? Dann kontaktieren Sie uns gerne:
Technischer Support und E-Garantie-Zertifikat
www.vevor.com/support
Dies ist die Originalanleitung. Bitte lesen Sie alle Anweisungen sorgfältig
durch, bevor Sie das Gerät in Betrieb nehmen. VEVOR behält sich eine
klare Auslegung unserer Bedienungsanleitung vor. Das Erscheinungsbild
des Produkts richtet sich nach dem Produkt, das Sie erhalten haben. Bitte
verzeihen Sie uns, dass wir Sie nicht erneut informieren, wenn es
Technologie- oder Software-Updates für unser Produkt gibt .
COMMERCIAL SMOKING
RECEPTACLES

- 2 -
SAFETY INSTRUCTIONS
WARNUNG:
Lesen Sie dieses Material, bevor Sie dieses Produkt verwenden.
Andernfalls kann es zu schweren Verletzungen kommen.
Vorsichtsmaßnahmen bei der Montage
17. Führen Sie die Montage nur gemäß dieser Anleitung durch. Eine
unsachgemäße Montage kann Gefahren verursachen.
18. Tragen Sie während der Montage eine ANSI-geprüfte Schutzbrille und
robuste Arbeitshandschuhe.
19. Halten Sie den Versammlungsbereich sauber und gut beleuchtet.
20. Halten Sie während der Montage unbeteiligte Zuschauer vom Bereich
fern.
21. Nicht zusammenbauen, wenn Sie müde sind oder unter Einfluss von
Alkohol, Drogen oder Medikamenten stehen.
22. Die Produktfunktionen gelten nur für ordnungsgemäß und vollständig
montierte Produkte.
23. Stellen Sie es auf eine flache, ebene, harte und glatte Oberfläche, auf
der die kommerziellen Raucherbehälter sicher stehen können.
24. Weitere Informationen zu den auf den folgenden Seiten aufgeführten
Teilen finden Sie im Montagediagramm dieses Handbuchs. Packen
Sie alle Teile in einem sauberen Arbeitsbereich aus und trennen Sie
sie.
Vorsichtsmaßnahmen treffen
13. SETZEN ODER STELLEN SIE SICH NICHT AUF DIESEN GEGENSTAND.
14. Dieses Produkt ist kein Spielzeug. Erlauben Sie Kindern nicht, mit
oder in der Nähe dieses Artikels zu spielen.
15. Überschreiten Sie nicht die angegebenen Gewichtskapazitäten.
16. Nur auf einer flachen, ebenen, harten und glatten Oberfläche
verwenden, die einen voll beladenen kommerziellen Raucherbehälter
sicher tragen kann.
17. Nur bestimmungsgemäß verwenden.

- 3 -
18. Vor jedem Gebrauch prüfen; nicht verwenden, wenn Teile lose oder
beschädigt sind.
BEWAHREN SIE DIESES HANDBUCH AUF
PARTS LIST
①
Hauptkörper der Ash -
Säule
④
Taste *1

- 4 -
②
Innenlauf * 1
⑤
19 mm Maulschlüssel *
1
③
M10*120 Spreizbolzen * 2

- 5 -
ASSEMBLY STEP
SCHRITT 1 : Einbauposition auswählen und Bohren
Hinweis: Bitte achten Sie darauf, dass die Türöffnungsrichtung in der
Einbaulage frei von Hindernissen ist .
5. Legen Sie die Bohrposition auf dem harten Boden fest, der
Achsabstand beträgt 50 mm (wie unten gezeigt).
6. Bei einem Bohrerdurchmesser von 12 mm in der gewählten
Position beträgt die Bohrtiefe nicht weniger als 60 mm.
The center distance between
the two holes is 50mm
Base and mounting hole
spacing dimensions
The arrow indicates the
direction of the door

- 6 -
SCHRITT 2: Installieren
1. Öffnen Sie die Tür vollständig, richten Sie die Basislöcher auf den
Boden aus und stecken Sie M10 x 120 mm Spreizbolzen in der
Reihenfolge A und B in die Löcher.
2. Mit dem Maulschlüssel den Bolzen festziehen
- 7 -
SCHRITT 3: Offenes Limit
5. Mittels Gabelschlüssel die Begrenzungsvorrichtung ⑥ am Türblatt
nach beiden Seiten drücken .
6. Durch die Begrenzung kann der Öffnungswinkel des Türblatts bei
etwa 20° gehalten werden, wodurch sich der innere Zylinder leicht
entfernen lässt und verhindert wird, dass das Türblatt direkt auf den
Boden fällt.

- 8 -
① Porous smoke extinguishing plate
Flue hole
INSTRUCTIONS FOR USE
First,:Smoke Out, Input
1. Align the burning cigarette with the
①
position and rub until the end of the
cigarette is extinguished.
2. Put the extinguished cigarette or
burned cigarette butt into the collector
from the
②
position.
Second:Opening/Closing of the Lock
Insert the key into the keyhole and turn
it 90 degrees to the left or right to open
or close the lock.
Thirdly:Clean Up Soot And Cigarette
Butts
After unlocking, hold the plastic handle
under the hand and pull the door in the
direction of the arrow.
You can remove the inner liner to clean
the soot and cigarette butts.
Close the door after cleaning and repeat
step 2 to lock the door.


Hersteller: Shanghaimuxinmuyeyouxiangongsi
Adresse: Shuangchenglu 803nong11hao1602A-1609shi, baoshanqu,
Shanghai 200000 CN.
Nach AUS importiert: SIHAO PTY LTD. 1 ROKEVA
STREETEASTWOOD NSW 2122 Australien
Importiert in die USA: Sanven Technology Ltd. Suite 250, 9166 Anaheim
Place, Rancho Cucamonga, CA 91730
REP
EC
E-CrossStu GmbH
Mainzer Landstr.69, 60329 Frankfurt am Main.
REP
UK
YH CONSULTING LIMITED.
C/O YH Consulting Limited Office 147, Centurion
House, London Road, Staines-upon-Thames, Surrey,
TW18 4AX

`


`
Tecnico Supporto e certificato di garanzia elettronica www.vevor.com/support
RECIPIENTI PER FUMATORI
COMMERCIALI
MANUALE D' uso
YD-27A
YD-27B .
Continuiamo a impegnarci per fornirvi strumenti a prezzi competitivi.
"Risparmia la metà", "Metà prezzo" o altre espressioni simili utilizzate solo da noi
rappresenta una stima dei risparmi che potresti ottenere acquistando determinati strumenti
con noi rispetto ai principali marchi top e non significa necessariamente copertina
tutte le categorie di strumenti da noi offerti. Ti ricordiamo cortesemente di verificare
accuratamente
quando effettui un ordine con noi se sei effettivamente Risparmio
Metà rispetto ai marchi più importanti.

- 1 -
MODELLO:YD-27A YD-27B
HAI BISOGNO DI AIUTO? CONTATTACI!
Hai domande sui prodotti? Hai bisogno di supporto tecnico? Non
esitare a contattarci:
Supporto tecnico e certificato di garanzia elettronica
www.vevor.com/support
Questa è l'istruzione originale, si prega di leggere attentamente tutte le
istruzioni del manuale prima di utilizzare. VEVOR si riserva una chiara
interpretazione del nostro manuale utente. L'aspetto del prodotto sarà
soggetto al prodotto ricevuto. Vi preghiamo di perdonarci se non vi
informeremo di nuovo se ci sono aggiornamenti tecnologici o software sul
nostro prodotto.
COMMERCIAL SMOKING
RECEPTACLES

- 2 -
SAFETY INSTRUCTIONS
AVVERTIMENTO:
Leggere questo materiale prima di utilizzare questo prodotto. La
mancata osservanza di questa precauzione può causare gravi lesioni.
Precauzioni di montaggio
25. Montare solo secondo queste istruzioni. Un montaggio improprio può
creare pericoli.
26. Durante il montaggio, indossare occhiali di sicurezza omologati ANSI e
guanti da lavoro resistenti.
27. Mantenere l'area di riunione pulita e ben illuminata.
28. Durante l'assemblea, tenere gli astanti lontani dall'area.
29. Non riunirsi se si è stanchi o sotto l'effetto di alcol, droghe o farmaci.
30. Le capacità del prodotto si applicano solo ai prodotti correttamente e
completamente assemblati.
31. Montare su una superficie piana, livellata, dura e liscia, in grado di
sostenere in modo sicuro i contenitori per fumatori commerciali.
32. Per ulteriori informazioni sulle parti elencate nelle pagine seguenti,
fare riferimento allo schema di montaggio di questo manuale.
Disimballare e separare tutte le parti in un'area di lavoro pulita.
Usare precauzioni
19. NON SEDERSI O STARE IN PIEDI SU QUESTO OGGETTO.
20. Questo prodotto non è un giocattolo. Non permettere ai bambini di
giocare con o vicino a questo articolo.
21. Non superare i limiti specificati capacità di peso.
22. Utilizzare solo su una superficie piana, livellata, dura e liscia che
possa sostenere in modo sicuro un contenitore per fumatori
completamente carico.
23. Utilizzare solo come previsto.
24. Ispezionare prima di ogni utilizzo; non utilizzare se le parti sono
allentate o danneggiate.

- 3 -
SALVA QUESTO MANUALE
PARTS LIST
①
Corpo principale della
colonna di cenere
④
Chiave *1
②
Canna interna * 1
⑤
Chiave inglese aperta da 19
mm * 1
③
Bullone di espansione
M10*120 * 2

- 4 -
ASSEMBLY STEP
FASE 1 : Selezionare la posizione di installazione e la foratura
Nota: assicurarsi che la direzione di apertura della porta nella
posizione di installazione sia libera da ostacoli .
7. Impostare la posizione di foratura sul terreno duro, distanza dal
centro = 50 mm (come mostrato di seguito).
8. Con una punta da trapano dal diametro di 12 mm nella posizione
selezionata, la profondità di foratura non è inferiore a 60 mm.
The center distance between
the two holes is 50mm
Base and mounting hole
spacing dimensions
The arrow indicates the
direction of the door

- 5 -
FASE 2: Installare
1. Aprire completamente la porta, allineare i fori della base con il
pavimento e inserire i bulloni di espansione M10*120mm nei fori nella
sequenza A e B.
2. Utilizzare la chiave inglese per bloccare il bullone

- 6 -
FASE 3: Limite aperto
7. Utilizzare una chiave inglese per spingere il dispositivo di
limitazione ⑥ sul pannello della porta su entrambi i lati .
8. Il limite può mantenere l'angolo di apertura del pannello della porta
a circa 20°, il che semplifica la rimozione del cilindro interno ed evita
che il pannello della porta cada direttamente a terra.

- 7 -
① Porous smoke extinguishing plate
Flue hole
INSTRUCTIONS FOR USE
First,:Smoke Out, Input
1. Align the burning cigarette with the
①
position and rub until the end of the
cigarette is extinguished.
2. Put the extinguished cigarette or
burned cigarette butt into the collector
from the
②
position.
Second:Opening/Closing of the Lock
Insert the key into the keyhole and turn
it 90 degrees to the left or right to open
or close the lock.
Thirdly:Clean Up Soot And Cigarette
Butts
After unlocking, hold the plastic handle
under the hand and pull the door in the
direction of the arrow.
You can remove the inner liner to clean
the soot and cigarette butts.
Close the door after cleaning and repeat
step 2 to lock the door.


Produttore: Shanghaimuxinmuyeyouxiangongsi
Indirizzo: Shuangchenglu 803nong11hao1602A-1609shi, baoshanqu,
shanghai 200000 CN.
Importato in AUS: SIHAO PTY LTD. 1 ROKEVA STREETEASTWOOD
NSW 2122 Australia
Importato negli USA: Sanven Technology Ltd. Suite 250, 9166 Anaheim
Place, Rancho Cucamonga, CA 91730
REP
EC
E-CrossStu GmbH
Mainzer Landstr.69, 60329 Frankfurt am Main.
REP
UK
YH CONSULTING LIMITED.
C/O YH Consulting Limited Office 147, Centurion
House, London Road, Staines-upon-Thames, Surrey,
TW18 4AX

`


`
Técnico Soporte y certificado de garantía electrónica www.vevor.com/support
RECIPIENTES PARA FUMAR
COMERCIALES
MANUAL DE usuario
YD-27A
YD-27 B
Seguimos comprometidos a brindarle herramientas a precios competitivos.
"Ahorra la mitad", "mitad de precio" o cualquier otra expresión similar utilizada únicamente
por nosotros
Representa una estimación de los ahorros que podría obtener al comprar ciertas
herramientas.
con nosotros en comparación con las principales marcas líderes y no significa
necesariamente cubrir
Todas las categorías de herramientas que ofrecemos. Le recordamos que debe verificar
con cuidado

`
Cuando realiza un pedido con nosotros, si realmente está Ahorro
Medio en comparación con las principales marcas líderes.

- 1 -
MODELO: YD-27A YD-27B
¿NECESITAS AYUDA? ¡CONTÁCTANOS!
¿Tiene preguntas sobre el producto? ¿Necesita asistencia técnica? No
dude en ponerse en contacto con nosotros:
Soporte técnico y certificado de garantía electrónica
www.vevor.com/support
Estas son las instrucciones originales, lea atentamente todas las
instrucciones del manual antes de utilizar el producto. VEVOR se reserva
una interpretación clara de nuestro manual de usuario. La apariencia del
producto estará sujeta al producto que recibió. Perdónenos por no
informarle nuevamente si hay actualizaciones de tecnología o software
en nuestro producto.
COMMERCIAL SMOKING
RECEPTACLES

- 2 -
SAFETY INSTRUCTIONS
ADVERTENCIA:
Lea este material antes de utilizar este producto. No hacerlo puede
provocar lesiones graves.
Precauciones de montaje
33. Realice el montaje únicamente de acuerdo con estas instrucciones.
Un montaje inadecuado puede generar peligros.
34. Use gafas de seguridad aprobadas por ANSI y guantes de trabajo
resistentes durante el montaje.
35. Mantenga el área de reunión limpia y bien iluminada.
36. Mantenga a los transeúntes fuera del área durante el montaje.
37. No se reúna si está cansado o bajo la influencia del alcohol, drogas o
medicamentos.
38. Las capacidades del producto se aplican únicamente a productos
ensamblados de forma correcta y completa.
39. Móntelo sobre una superficie plana, nivelada, dura y lisa capaz de
soportar de forma segura los receptáculos para fumar comerciales.
40. Para obtener información adicional sobre las piezas que se enumeran
en las páginas siguientes, consulte el diagrama de ensamblaje de
este manual. Desembale y separe todas las piezas en un área de
trabajo limpia.
Tome precauciones
25. NO SE SIENTA NI SE PARE SOBRE ESTE ARTÍCULO.
26. Este producto no es un juguete. No permita que los niños jueguen con
este artículo ni cerca de él.
27. No exceda lo especificado Capacidades de peso.
28. Úselo únicamente sobre una superficie plana, nivelada, dura y lisa
que pueda soportar de manera segura un recipiente para fumar
comercial completamente cargado.
29. Úselo únicamente según lo previsto.
30. Inspeccione antes de cada uso; no utilice si las piezas están sueltas o

- 3 -
dañadas.
GUARDE ESTE MANUAL
PARTS LIST
①
Cuerpo principal de la
columna de ceniza
④
Clave *1
②
Cañón interior * 1
⑤
Llave de boca abierta de 19
mm * 1

- 4 -
③
Perno de expansión
M10*120 *2

- 5 -
ASSEMBLY STEP
PASO 1 : Seleccione la posición de instalación y la perforación
Nota: Asegúrese de que la dirección de la apertura de la puerta en la
posición de instalación esté libre de obstáculos .
9. Coloque la posición de perforación sobre el suelo duro, la
distancia entre centros = 50 mm (como se muestra a continuación).
10.Con un diámetro de broca de 12 mm en la posición seleccionada,
la profundidad de perforación no es inferior a 60 mm.
The center distance between
the two holes is 50mm
Base and mounting hole
spacing dimensions
The arrow indicates the
direction of the door

- 6 -
PASO 2: Instalar
1. Abra completamente la puerta, alinee los orificios de la base con el
suelo e inserte pernos de expansión M10*120 mm en los orificios en
secuencia A y B.
2. Utilice la llave de boca abierta para bloquear el perno.

- 7 -
PASO 3: Límite de apertura
9. Utilice una llave de boca abierta para empujar el dispositivo
limitador ⑥ en el panel de la puerta hacia ambos lados .
10. El límite puede mantener el ángulo de apertura del panel de la
puerta en aproximadamente 20, lo que facilita quitar el barril interior y
evitar que el panel de la puerta caiga directamente al suelo.
- 8 -
① Porous smoke extinguishing plate
Flue hole
INSTRUCTIONS FOR USE
First,:Smoke Out, Input
1. Align the burning cigarette with the
①
position and rub until the end of the
cigarette is extinguished.
2. Put the extinguished cigarette or
burned cigarette butt into the collector
from the
②
position.
Second:Opening/Closing of the Lock
Insert the key into the keyhole and turn
it 90 degrees to the left or right to open
or close the lock.
Thirdly:Clean Up Soot And Cigarette
Butts
After unlocking, hold the plastic handle
under the hand and pull the door in the
direction of the arrow.
You can remove the inner liner to clean
the soot and cigarette butts.
Close the door after cleaning and repeat
step 2 to lock the door.


Fabricante: Shanghaimuxinmuyeyouxiangongsi
Dirección: Shuangchenglu 803nong11hao1602A-1609shi, baoshanqu,
shanghai 200000 CN.
Importado a AUS: SIHAO PTY LTD. 1 ROKEVA STREETEASTWOOD
NSW 2122 Australia
Importado a EE. UU.: Sanven Technology Ltd. Suite 250, 9166 Anaheim
Place, Rancho Cucamonga, CA 91730
REP
EC
E-CrossStu GmbH
Mainzer Landstr.69, 60329 Frankfurt am Main.
REP
UK
YH CONSULTING LIMITED.
C/O YH Consulting Limited Office 147, Centurion
House, London Road, Staines-upon-Thames, Surrey,
TW18 4AX

`


`
Techniczny Wsparcie i certyfikat gwarancji elektronicznej www.vevor.com/support
KOMERCYJNE POJEMNIKI DO PALENIA
INSTRUKCJA obsługi
YD-27A
YD- 27B
Nadal staramy się oferować Państwu narzędzia w konkurencyjnych cenach.
„Oszczędź połowę”, „Połowa ceny” lub jakiekolwiek inne podobne wyrażenia używane
wyłącznie przez nas
przedstawia szacunkowe oszczędności, jakie możesz uzyskać kupując określone
narzędzia
z nami w porównaniu do głównych, najlepszych marek i niekoniecznie oznacza to okładka
wszystkie kategorie narzędzi oferowanych przez nas. Przypominamy o sprawdzeniu
ostrożnie
gdy składasz u nas zamówienie, jeśli faktycznie Oszczędność
Połowa w porównaniu z wiodącymi markami.

- 1 -
MODELE:YD-27A YD-27B
POTRZEBUJESZ POMOCY? SKONTAKTUJ SIĘ Z NAMI!
Masz pytania dotyczące produktu? Potrzebujesz wsparcia
technicznego? Skontaktuj się z nami:
Wsparcie techniczne i certyfikat e-gwarancji
www.vevor.com/support
To jest oryginalna instrukcja, przed użyciem należy uważnie przeczytać
wszystkie instrukcje. VEVOR zastrzega sobie jasną interpretację naszej
instrukcji obsługi. Wygląd produktu będzie zależał od produktu, który
otrzymałeś. Prosimy o wybaczenie, że nie poinformujemy Cię ponownie,
jeśli w naszym produkcie pojawią się jakiekolwiek aktualizacje
technologiczne lub oprogramowania.
COMMERCIAL SMOKING
RECEPTACLES

- 2 -
SAFETY INSTRUCTIONS
OSTRZEŻENIE:
Przeczytaj ten materiał przed użyciem tego produktu.
Nieprzestrzeganie tego może spowodować poważne obrażenia.
Środki ostrożności podczas montażu
41. Montaż należy wykonywać wyłącznie zgodnie z niniejszą instrukcją.
Nieprawidłowy montaż może stwarzać zagrożenia.
42. Podczas montażu należy nosić okulary ochronne z atestem ANSI oraz
wytrzymałe rękawice robocze.
43. Utrzymuj miejsce zgromadzenia w czystości i zapewnij dobre
oświetlenie.
44. Nie dopuszczać osób postronnych na teren montażu podczas jego
trwania.
45. Nie przychodź na spotkanie, jeśli jesteś zmęczony lub znajdujesz się
pod wpływem alkoholu, narkotyków lub leków.
46. Możliwości produktu odnoszą się wyłącznie do produktów prawidłowo i
kompletnie zmontowanych.
47. Należy je montować na płaskiej, równej, twardej i gładkiej powierzchni,
która zapewni bezpieczne podparcie komercyjnych pojemników do
palenia.
48. Aby uzyskać dodatkowe informacje dotyczące części wymienionych
na kolejnych stronach, zapoznaj się ze schematem montażu w tym
podręczniku. Rozpakuj i oddziel wszystkie części w czystym miejscu
pracy.
Stosuj środki ostrożności
31. NIE SIADAĆ ANI NIE STAWAĆ NA TYM PRZEDMIOCIE.
32. Ten produkt nie jest zabawką. Nie pozwalaj dzieciom bawić się tym
przedmiotem ani przebywać w jego pobliżu.
33. Nie przekraczać określonej wartości nośność.
34. Stosować wyłącznie na płaskiej, równej, twardej i gładkiej powierzchni,
która może bezpiecznie utrzymać w pełni załadowane komercyjne
- 3 -
pojemniki na papierosy.
35. Stosować wyłącznie zgodnie z przeznaczeniem.
36. Przed każdym użyciem należy przeprowadzić kontrolę. Nie należy
używać produktu, jeśli jakieś części są luźne lub uszkodzone.
ZAPISZ TĘ INSTRUKCJĘ
PARTS LIST
①
Główny korpus kolumny
popiołu
④
Klucz *1

- 4 -
②
Wewnętrzna osłona lufy *
1
⑤
Klucz płaski 19 mm * 1
③
Śruba rozporowa
M10*120 *2
- 5 -
ASSEMBLY STEP
KROK 1 : Wybierz miejsce instalacji i wiercenie
Uwaga: Należy upewnić się, że kierunek otwierania drzwi w miejscu
montażu nie jest żaden .
11.Ustaw miejsce wiercenia na twardym podłożu, odległość między
środkami = 50 mm (jak pokazano poniżej).
12.Przy zastosowaniu wiertła o średnicy 12mm w wybranym
położeniu głębokość wiercenia nie będzie mniejsza niż 60mm.
The center distance between
the two holes is 50mm
Base and mounting hole
spacing dimensions
The arrow indicates the
direction of the door

- 6 -
KROK 2: Zainstaluj
1. Otwórz drzwi na oścież, wyrównaj otwory w podstawie z podłożem i
włóż śruby rozporowe M10*120 mm do otworów w kolejności A i B.
2. Za pomocą klucza płaskiego zablokuj śrubę
- 7 -
KROK 3: Otwórz limit
11. Za pomocą klucza płaskiego przesuń ogranicznik ⑥ na panelu
drzwi w obie strony .
12. Ogranicznik pozwala na utrzymanie kąta otwarcia panelu drzwi na
poziomie około 20°, co ułatwia wyjęcie wewnętrznej belki i zapobiega
bezpośredniemu upadkowi panelu drzwi na ziemię.
- 8 -
① Porous smoke extinguishing plate
Flue hole
INSTRUCTIONS FOR USE
First,:Smoke Out, Input
1. Align the burning cigarette with the
①
position and rub until the end of the
cigarette is extinguished.
2. Put the extinguished cigarette or
burned cigarette butt into the collector
from the
②
position.
Second:Opening/Closing of the Lock
Insert the key into the keyhole and turn
it 90 degrees to the left or right to open
or close the lock.
Thirdly:Clean Up Soot And Cigarette
Butts
After unlocking, hold the plastic handle
under the hand and pull the door in the
direction of the arrow.
You can remove the inner liner to clean
the soot and cigarette butts.
Close the door after cleaning and repeat
step 2 to lock the door.


Producent: Shanghaimuxinmuyeyouxiangongsi
Adres: Shuangchenglu 803nong11hao1602A-1609shi, baoshanqu,
szanghaj 200000 CN.
Importowane do AUS: SIHAO PTY LTD. 1 ROKEVA
STREETEASTWOOD NSW 2122 Australia
Importowane do USA: Sanven Technology Ltd. Suite 250, 9166 Anaheim
Place, Rancho Cucamonga, CA 91730
REP
EC
E-CrossStu GmbH
Mainzer Landstr.69, 60329 Frankfurt am Main.
REP
UK
YH CONSULTING LIMITED.
C/O YH Consulting Limited Office 147, Centurion
House, London Road, Staines-upon-Thames, Surrey,
TW18 4AX

`


`
Technisch Ondersteuning en E-garantiecertificaat www.vevor.com/support
COMMERCIËLE ROOKCONTAINERS
Gebruikershandleiding
YD-27A
YD- 27B
Wij streven er voortdurend naar om u gereedschappen tegen concurrerende prijzen te
leveren.
"Bespaar de helft", "halve prijs" of andere soortgelijke uitdrukkingen die alleen door ons
worden gebruikt
geeft een schatting van de besparingen die u kunt behalen door bepaalde gereedschappen
te kopen
bij ons vergeleken met de grote topmerken en betekent niet per se dat omslag
alle categorieën van tools die wij aanbieden. U wordt vriendelijk verzocht om te verifiëren
voorzichtig
wanneer u een bestelling bij ons plaatst, als u daadwerkelijk Besparing
Half in vergelijking met de grote topmerken.

`

- 1 -
MODEL: YD-27A YD-27B
HULP NODIG? NEEM CONTACT MET ONS OP!
Heeft u vragen over het product? Heeft u technische ondersteuning
nodig? Neem dan gerust contact met ons op:
Technische ondersteuning en e-garantiecertificaat
www.vevor.com/support
Dit is de originele instructie, lees alle handleidingen zorgvuldig door
voordat u het product gebruikt. VEVOR behoudt zich een duidelijke
interpretatie van onze gebruikershandleiding voor. Het uiterlijk van het
product is afhankelijk van het product dat u hebt ontvangen. Vergeef ons
dat we u niet opnieuw zullen informeren als er technologie- of
software-updates voor ons product zijn .
COMMERCIAL SMOKING
RECEPTACLES

- 2 -
SAFETY INSTRUCTIONS
WAARSCHUWING:
Lees dit materiaal voordat u dit product gebruikt. Als u dit niet doet,
kan dit leiden tot ernstig letsel.
Voorzorgsmaatregelen bij de montage
49. Monteer alleen volgens deze instructies. Onjuiste montage kan
gevaren opleveren.
50. Draag tijdens de montage een ANSI-goedgekeurde veiligheidsbril en
stevige werkhandschoenen.
51. Zorg ervoor dat de verzamelplaats schoon en goed verlicht is.
52. Houd omstanders uit de buurt tijdens de montage.
53. Kom niet bijeen als u moe bent of onder invloed van alcohol, drugs of
medicijnen.
54. De producteigenschappen gelden uitsluitend voor correct en volledig
gemonteerde producten.
55. Monteer het geheel op een vlak, egaal, hard en glad oppervlak dat de
commerciële rookbakken veilig kan dragen.
56. Voor aanvullende informatie over de onderdelen die op de volgende
pagina's worden vermeld, raadpleegt u het montageschema van deze
handleiding. Pak alle onderdelen uit en scheid ze in een schone
werkruimte.
Neem voorzorgsmaatregelen
37. NIET OP DIT ARTIKEL ZITTEN OF STAAN.
38. Dit product is geen speelgoed. Laat kinderen niet met of in de buurt
van dit item spelen.
39. Overschrijd de aangegeven waarden niet draagvermogen.
40. Gebruik het apparaat alleen op een vlak, egaal, hard en glad
oppervlak dat een volledig gevulde commerciële rookcontainer veilig
kan dragen.
41. Alleen gebruiken zoals bedoeld.
42. Controleer het product voor elk gebruik. Gebruik het niet als er
- 3 -
onderdelen loszitten of beschadigd zijn.
BEWAAR DEZE HANDLEIDING
PARTS LIST
①
Hoofdgedeelte van een
kolom
④
Sleutel *1
②
Binnenvat * 1
⑤
19mm steeksleutel * 1

- 4 -
③
M10*120 expansiebout * 2

- 5 -
ASSEMBLY STEP
STAP 1 : Selecteer de installatiepositie en het boren
Let op: Zorg ervoor dat de draairichting van de deur in de
installatiepositie vrij is van obstakels .
13.Plaats de boorpositie op de harde ondergrond, met een
hartafstand van 50 mm (zoals hieronder weergegeven).
14.Bij een boordiameter van 12 mm in de geselecteerde positie
bedraagt de boordiepte minimaal 60 mm.
The center distance between
the two holes is 50mm
Base and mounting hole
spacing dimensions
The arrow indicates the
direction of the door

- 6 -
STAP 2: Installeren
1. Open de deur volledig, lijn de gaten in de basis uit met de grond en
plaats M10*120mm expansiebouten in de gaten in volgorde A en B.
2. Gebruik de steeksleutel om de bout vast te zetten
- 7 -
STAP 3: Open limiet
13. Gebruik een steeksleutel om de begrenzingsinrichting ⑥ op het
deurpaneel naar beide kanten te duwen .
14. De limiet kan de openingshoek van het deurpaneel op ongeveer
20° houden, waardoor de binnencilinder eenvoudig kan worden
verwijderd en wordt voorkomen dat het deurpaneel rechtstreeks op
de grond valt.

- 8 -
① Porous smoke extinguishing plate
Flue hole
INSTRUCTIONS FOR USE
First,:Smoke Out, Input
1. Align the burning cigarette with the
①
position and rub until the end of the
cigarette is extinguished.
2. Put the extinguished cigarette or
burned cigarette butt into the collector
from the
②
position.
Second:Opening/Closing of the Lock
Insert the key into the keyhole and turn
it 90 degrees to the left or right to open
or close the lock.
Thirdly:Clean Up Soot And Cigarette
Butts
After unlocking, hold the plastic handle
under the hand and pull the door in the
direction of the arrow.
You can remove the inner liner to clean
the soot and cigarette butts.
Close the door after cleaning and repeat
step 2 to lock the door.


Fabrikant: Shanghaimuxinmuyeyouxiangongsi
Adres: Shuangchenglu 803nong11hao1602A-1609shi, baoshanqu,
shanghai 200000 CN.
Geïmporteerd naar AUS: SIHAO PTY LTD. 1 ROKEVA
STREETEASTWOOD NSW 2122 Australië
Geïmporteerd naar de VS: Sanven Technology Ltd. Suite 250, 9166
Anaheim Place, Rancho Cucamonga, CA 91730
REP
EC
E-CrossStu GmbH
Mainzer Landstr.69, 60329 Frankfurt am Main.
REP
UK
YH CONSULTING LIMITED.
C/O YH Consulting Limited Office 147, Centurion
House, London Road, Staines-upon-Thames, Surrey,
TW18 4AX

`


`
Teknisk Support och e-garanticertifikat www.vevor.com/support
KOMMERSIELLA RÖKKÄRL
Användarmanual
YD-27A
YD-27 B
Vi fortsätter att vara engagerade i att ge dig verktyg till konkurrenskraftiga priser.
"Spara hälften", "Halva priset" eller andra liknande uttryck som endast används av oss
representerar en uppskattning av besparingar du kan dra nytta av att köpa vissa verktyg
med oss jämfört med de stora toppmärkena och betyder inte nödvändigtvis att täcka
alla kategorier av verktyg som erbjuds av oss. Du påminns vänligen om att verifiera
försiktigt
när du gör en beställning hos oss om du faktiskt gör det Sparande
Halv i jämförelse med de främsta varumärkena.

- 1 -
MODELL: YD-27A YD-27B
BEHÖVER HJÄLP? KONTAKTA OSS!
Har du produktfrågor? Behöver du teknisk support? Kontakta oss
gärna:
Teknisk support och e-garanticertifikat
www.vevor.com/support
Detta är den ursprungliga instruktionen, läs alla instruktioner noggrant
innan du använder den. VEVOR reserverar sig för en tydlig tolkning av vår
användarmanual. Utseendet på produkten är beroende av den produkt du
fått. Ursäkta oss att vi inte kommer att informera dig igen om det finns
någon teknik eller mjukvaruuppdateringar på vår produkt.
COMMERCIAL SMOKING
RECEPTACLES

- 2 -
SAFETY INSTRUCTIONS
VARNING:
Läs detta material innan du använder denna produkt. Underlåtenhet
att göra det kan resultera i allvarliga skador.
Försiktighetsåtgärder vid montering
57. Montera endast enligt dessa instruktioner. Felaktig montering kan
skapa faror.
58. Använd ANSI-godkända skyddsglasögon och kraftiga arbetshandskar
vid montering.
59. Håll monteringsområdet rent och väl upplyst.
60. Håll åskådare borta från området under monteringen.
61. Sätt dig inte ihop om du är trött eller påverkad av alkohol, droger eller
medicin.
62. Produktegenskaperna gäller endast för korrekt och färdigmonterade
produkter.
63. Montera på en plan, jämn, hård och slät yta som säkert kan stödja de
kommersiella rökkärlen.
64. För ytterligare information om delarna som listas på följande sidor, se
monteringsdiagrammet i denna manual. Packa upp och separera alla
delar på ett rent arbetsområde.
Använd försiktighetsåtgärder
43. SIT ELLER STÅ INTE PÅ DETTA FÖREMÅL.
44. Denna produkt är inte en leksak. Låt inte barn leka med eller nära
detta föremål.
45. Överskrid inte specificerat viktkapacitet.
46. Använd endast på en plan, jämn, hård och slät yta som säkert kan
stödja ett fullt laddat kommersiellt rökkärl.
47. Använd endast som avsett.
48. Inspektera före varje användning; Använd inte om delar är lösa eller
skadade.
- 3 -
SPARA DENNA MANUAL
PARTS LIST
①
Huvuddel av Ash -
kolumnen
④
Nyckel *1
②
Inre B- pipa *1
⑤
19 mm Öppen Ä nd W rench
*1
③
M10*120 Expansion B olt
*2
- 4 -
ASSEMBLY STEP
STEG 1 : VÄLJ INSTALLATIONSPOSITIONEN OCH BORRNING
Observera: Se till att dörröppningens riktning i installationsläget är fri
från hinder .
15.Ställ in borrpositionen på den hårda marken, mittavståndet =50
mm (som visas nedan).
16.Med en diameter på 12 mm borr i den valda positionen är
borrdjupet inte mindre än 60 mm.
The center distance between
the two holes is 50mm
Base and mounting hole
spacing dimensions
The arrow indicates the
direction of the door
- 5 -
STEG 2: Installera
1. Öppna dörren helt, rikta in bashålen mot marken och sätt in
M10*120 mm expansionsbultar i hålen i sekvens A och B.
2. Använd den öppna skiftnyckeln för att låsa bulten

- 6 -
STEG 3: Öppen gräns
15. Använd en skiftnyckel för att skjuta begränsningsanordningen ⑥
på dörrpanelen åt båda sidor .
16. Gränsen kan bibehålla öppningsvinkeln för dörrpanelen på cirka
20, vilket är lätt att ta bort den inre pipan och undvika att dörrpanelen
faller direkt till marken.

- 7 -
① Porous smoke extinguishing plate
Flue hole
INSTRUCTIONS FOR USE
First,:Smoke Out, Input
1. Align the burning cigarette with the
①
position and rub until the end of the
cigarette is extinguished.
2. Put the extinguished cigarette or
burned cigarette butt into the collector
from the
②
position.
Second:Opening/Closing of the Lock
Insert the key into the keyhole and turn
it 90 degrees to the left or right to open
or close the lock.
Thirdly:Clean Up Soot And Cigarette
Butts
After unlocking, hold the plastic handle
under the hand and pull the door in the
direction of the arrow.
You can remove the inner liner to clean
the soot and cigarette butts.
Close the door after cleaning and repeat
step 2 to lock the door.


Tillverkare: Shanghaimuxinmuyeyouxiangongsi
Adress: Shuangchenglu 803nong11hao1602A-1609shi, baoshanqu,
shanghai 200000 CN.
Importerad till AUS: SIHAO PTY LTD. 1 ROKEVA STREETEASTWOOD
NSW 2122 Australien
Importerad till USA: Sanven Technology Ltd. Suite 250, 9166 Anaheim
Place, Rancho Cucamonga, CA 91730
REP
EC
E-CrossStu GmbH
Mainzer Landstr.69, 60329 Frankfurt am Main.
REP
UK
YH CONSULTING LIMITED.
C/O YH Consulting Limited Office 147, Centurion
House, London Road, Staines-upon-Thames, Surrey,
TW18 4AX