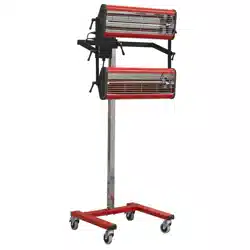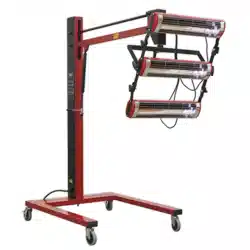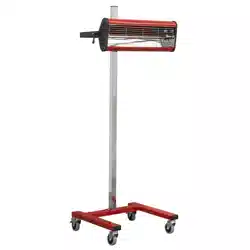
1050W INFRARED PANEL DRYER - SHORT WAVE
MODEL NO:IR1000S.V2
Thank you for purchasing a Sealey product. Manufactured to a high standard, this product will, if used according to these instructions,
and properly maintained, give you years of trouble free performance.
IMPORTANT: PLEASE READ THESE INSTRUCTIONS CAREFULLY. NOTE THE SAFE OPERATIONAL REQUIREMENTS, WARNINGS & CAUTIONS. USE
THE PRODUCT CORRECTLY AND WITH CARE FOR THE PURPOSE FOR WHICH IT IS INTENDED. FAILURE TO DO SO MAY CAUSE DAMAGE AND/OR
PERSONAL INJURY AND WILL INVALIDATE THE WARRANTY. KEEP THESE INSTRUCTIONS SAFE FOR FUTURE USE.
Refer to
instruction
manual
IR1000S.V2 Issue:3 (3, 4, 5) 23/05/23
Original Language Version
© Jack Sealey Limited
1. SAFETY
1.1. ELECTRICAL SAFETY
WARNING! It is the user’s responsibility to check the following:
Check all electrical equipment and appliances to ensure that they are safe before using. Inspect power supply leads, plugs and all
electrical connections for wear and damage. Sealey recommend that an RCD (Residual Current Device) is used with all electrical
products. You may obtain an RCD by contacting your local Sealey stockist.
If the product is used in the course of business duties, it must be maintained in a safe condition and routinely PAT (Portable Appliance
Test) tested.
Electrical safety information: it is important that the following information is read and understood.
1.1.1. Ensure that the insulation on all cables and on the appliance is safe before connecting it to the power supply.
1.1.2. Regularly inspect power supply cables and plugs for wear or damage and check all connections to ensure that they are secure.
1.1.3. Important: Ensure that the voltage rating on the appliance suits the power supply to be used and that the plug is tted with the correct
fuse - see fuse rating in these instructions.
8 DO NOT pull or carry the appliance by the power cable.
8 DO NOT pull the plug from the socket by the cable.
8 DO NOT use worn or damaged cables, plugs or connectors. Ensure that any faulty item is repaired or
replaced immediately by a qualied electrician.
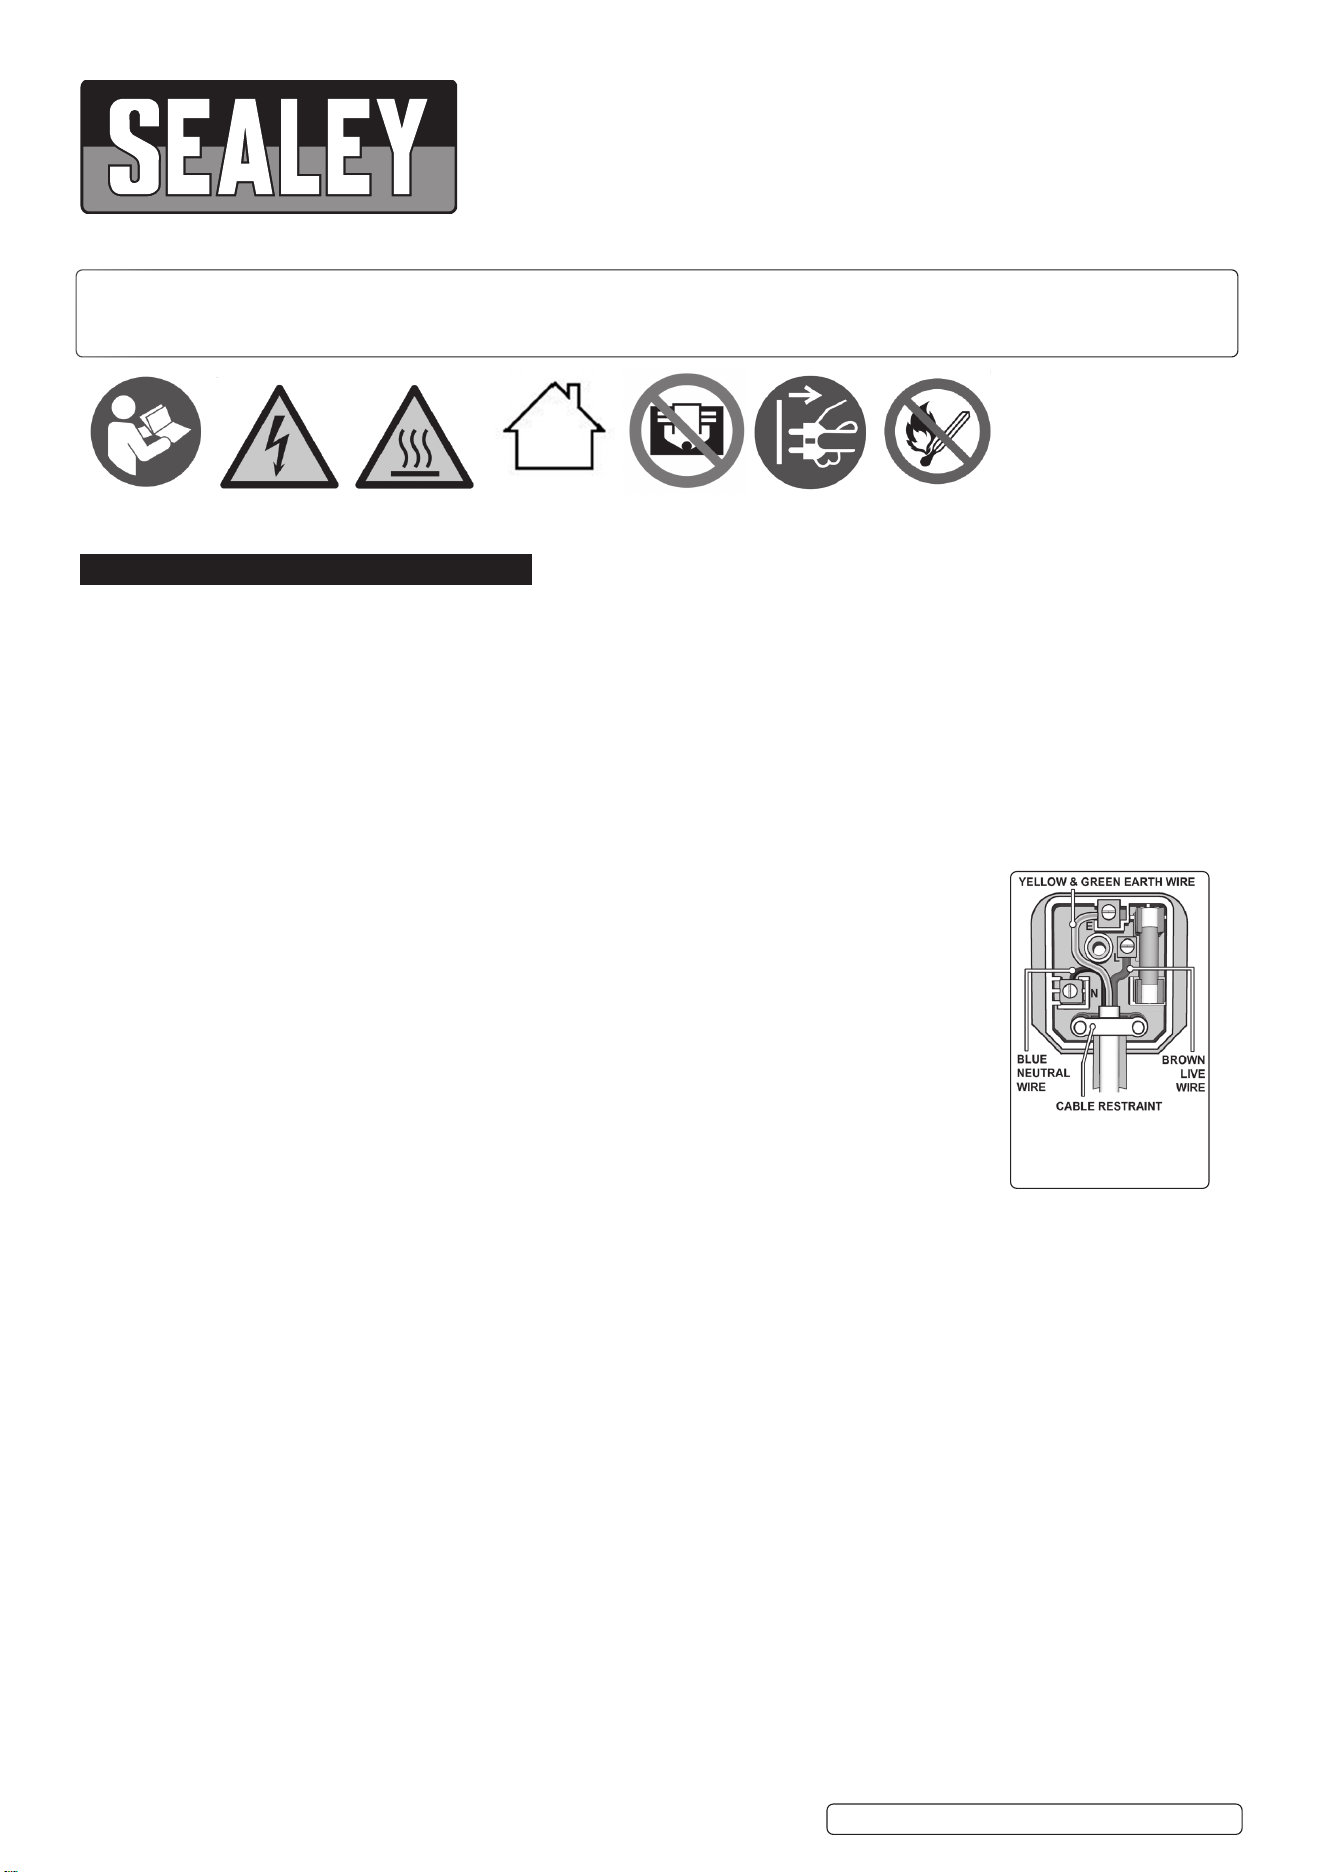
1.1.4. This product is tted with a BS1363/A 3 pin plug.
If the cable or plug is damaged during use, switch the electricity supply and remove from use.
Ensure that repairs are carried out by a qualied electrician.
Replace a damaged plug with a BS1363/A 3 pin plug. If in doubt contact a qualied electrician.
A) Connect the GREEN/YELLOW earth wire to the earth terminal ‘E’.
B) Connect the BROWN live wire to the live terminal ‘L’.
C) Connect the BLUE neutral wire to the neutral terminal ‘N’.
Ensure that the cable outer sheath extends inside the cable restraint and that the restraint is tight.
Sealey recommend that repairs are carried out by a qualied electrician.
1.2. GENERAL SAFETY
WARNING! If a fuse blows, ensure it is replaced with a fuse of identical type and rating.
WARNING! Ensure there is nobody in front of the lamp when it is switched on.
9 Disconnect the panel dryer from the power supply before servicing, changing accessories, or performing any maintenance.
9 Ensure that the panel dryer is in good condition before use. If in any doubt do not use the unit and contact an electrician.
9 Familiarise yourself with the application and limitations of the panel dryer.
9 Check that lamp guards are in place, undamaged and firmly attached.
9 Keep tools and other items away from the panel dryer when it is in use.
9 Keep the work area clean and clear of unnecessary items.
9 Remember that the lamp panel will get hot, allow to cool after use.
9 Maintain the panel dryer in good condition. Use authorised agent for servicing.
9 Keep the dryer clean, but DO NOT use solvents.
9 Use only genuine parts and accessories. Unauthorised parts and accessories may be dangerous and will invalidate your warranty.
8 DO NOT use this product to perform a task for which it has not been designed.
8 DO NOT use the panel dryer outdoors, or in damp, or wet locations.
8 DO NOT operate within the vicinity of flammable liquids, gases or solids.
WARNING! Never use in explosive situations.
9 Keep children and unauthorised persons away from the work area.
9 When not in use, store the panel dryer carefully in a safe, dry, childproof location.
9 Maintain a safe and tidy working environment.
9 In case the machine is used in a spray booth, ensure purification of the spray booth air first.
9 Be careful of the uneven floor when moving the machine to avoid tipping over.
9 Remove all objects in front of the lamp tubes before use.
9 Keep any person at least 4 metres away from the painting surface.
Replacement fuse
rating: 13A
Do Not Cover
Warning:
Electricity
Warning:
Hot Surface
Indoor
Use Only
Unplug Before
Cleaning
Keep Away
From Flammable
Substances
During Operation
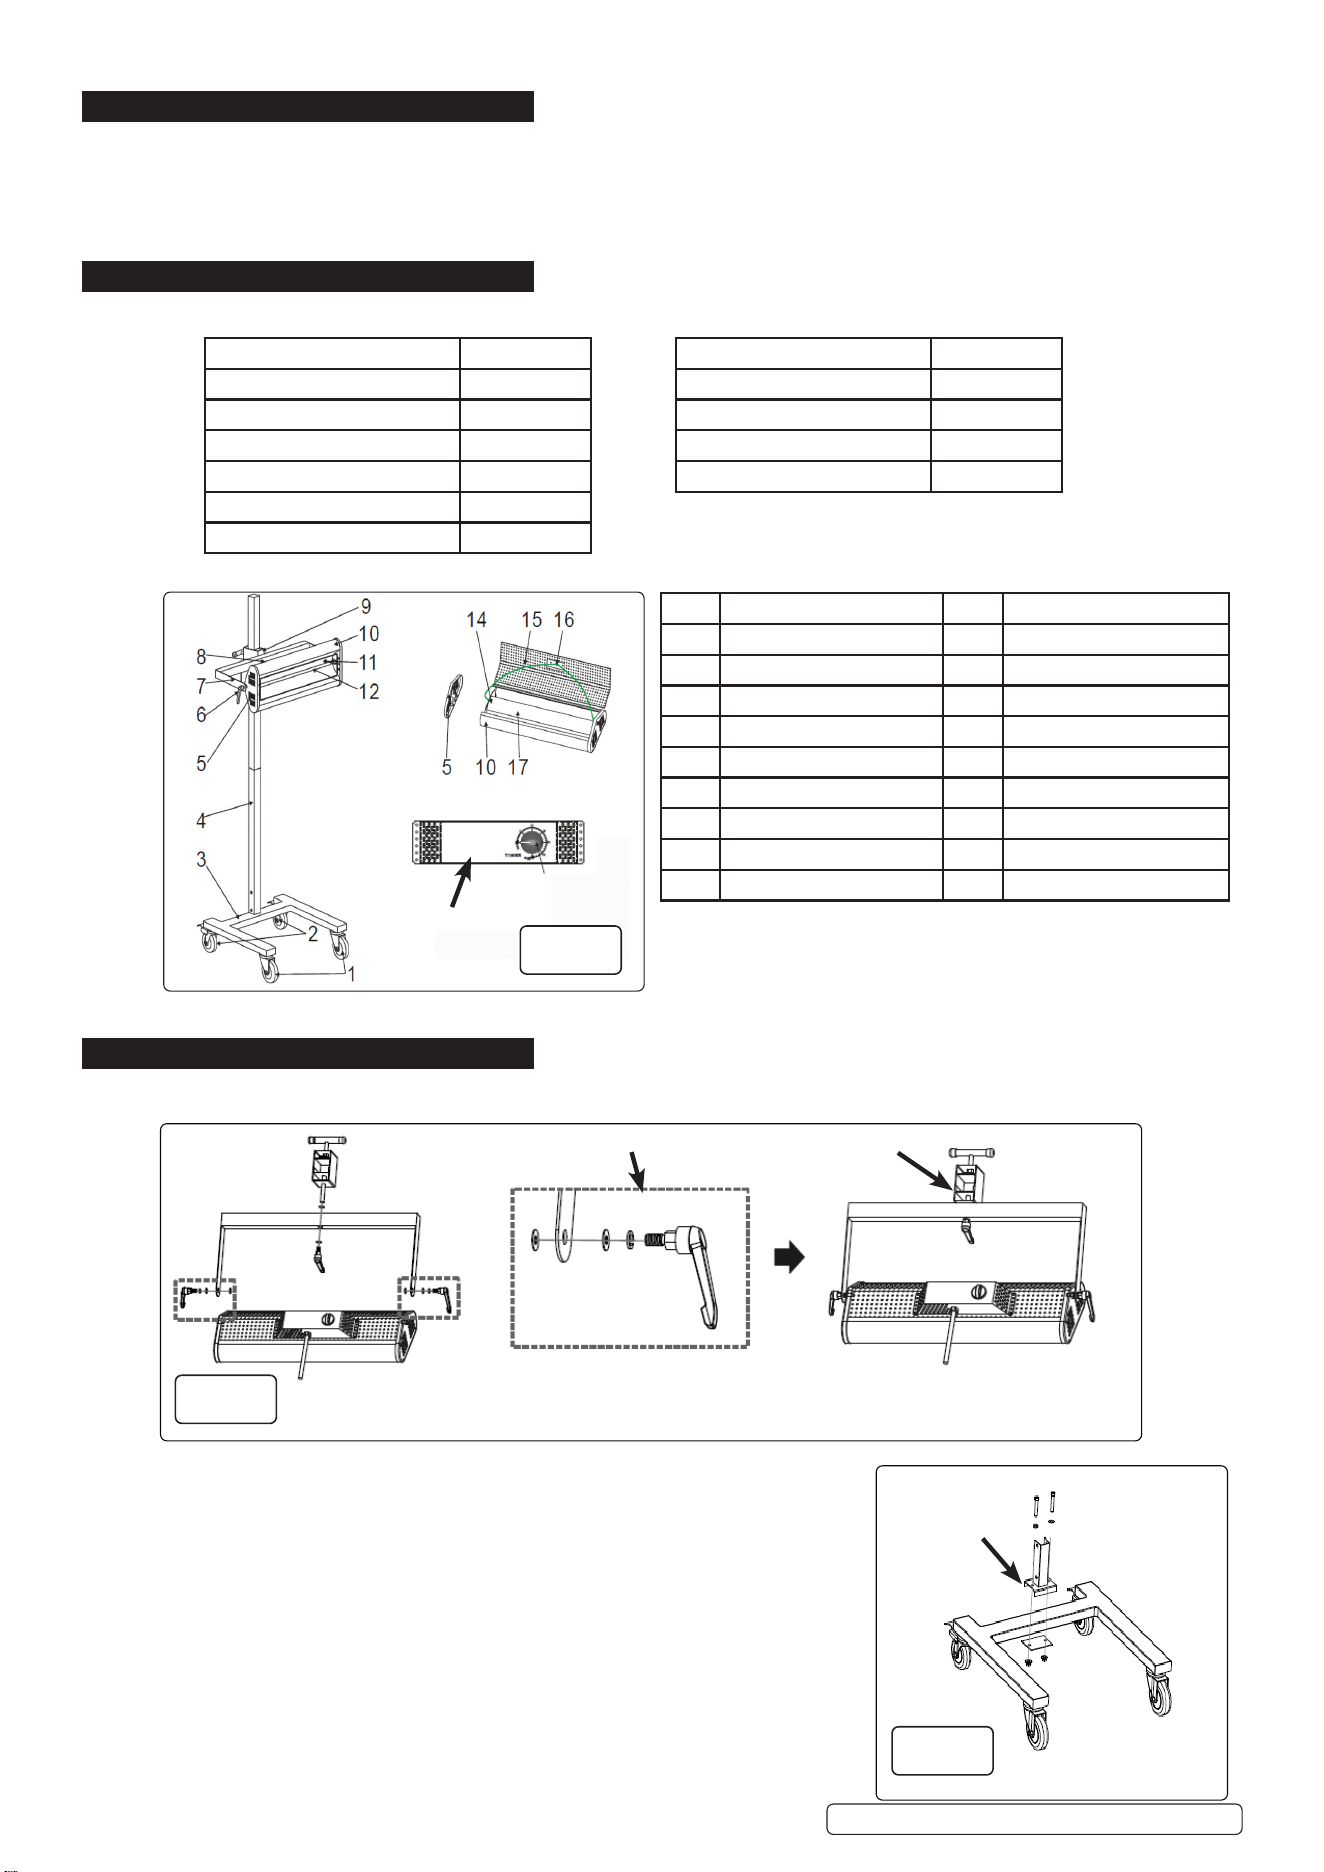
Item Description Item Description
1 Front castor wheel 10 Bent panel
2 Back castor wheel 11 Front Protective Net
3 Pedestal 12 Emitter tube
4 Post 13 Control Panel
5 Side panel of emitter 14 Small Reective Panel
6 AM8 Adjustable Handle 15 Rear panel
7 U shape support 16 Ceramic connector
8 Control box 17 Reective panel
9 Locking hoop 18 Timer
Original Language Version
© Jack Sealey Limited
2. INTRODUCTION
Designed and developed to assist with any number of small drying processes. Ideal for spot repairs, engine drying, adhesive stripe
removal, drying ller, drying primer or just preheating prior to spraying. Supplied with a sturdy 1500mm plated steel stand and a 3.7m
power cable and 3-pin plug.
3. SPECIFICATION
4. ASSEMBLY
4.1. LAMPASSEMBLY(g.2)
4.1.1. Assemble lamp arrangement using the adjustment handle, spring washer and plain
washers (g.2) in two positions shown.
4.1.2. Assemble post mounting section using adjustment handle, spring washer and plain
washers in position shown.
4.2. FRAME ASSEMBLY (g.3,g.4)
4.2.1. Take out the pedestal (g.1.3) from package.
4.2.2. Install the castor wheels with a brake (g.1.2) at the rear side of the pedestal, and the
brakeless wheels (1) in the front of the pedestal.
4.2.3. Fix the post mounting arrangement on the pedestal (g.1.3) using the supplied xings.
Model No: IR1000S.V2
Element Power: 1050W
Fuse Rating: 13A
Plug Type: 3-Pin BS
Power Supply Cable Length: 3.7m
Reector Size: 530 x 140mm
Supply: 230V ~50Hz
Model No: IR1000S.V2
No. of Elements: 1 x 1050W
Optimal Baking Area: 0.4m x 0.8m
Operating Temperature (°C): 60-70°C
Timer Range: 0-30mins
fig.2
IR1000S.V2 Issue:3 (3, 4, 5) 23/05/23
fig.3
Post Mounting
Arrangement
Handle Arrangement
(3 positions)
Post Mounting Section
fig.1
13
Original Language Version
© Jack Sealey Limited
4.2.4. Take the two parts of the post and insert the upper section
into the lower section (g.4).
4.2.5. Lower the assembled post onto the post mounting
arrangement (g.3, 4) and x in place securely using supplied xings.
4.2.6. Slide the lamp assembly onto the post and clamp in place using
the T-bar tted to the post mounting section.
4.2.7. Rotate the control knob to the required time (max. 30 minutes).
When the time set has expired, the unit the will stop
working automatically.
5. OPERATION
5.1. TIMING CONTROL
5.1.1. Rotate the control knob to the required time (max. 30 minutes).
When the time set has expired, the unit the will stop working automatically.
5.2. LAMP HEIGHT ADJUSTMENT.
5.2.1. Support the lamp assembly and loosen the T-bar clamp so that the lamp assembly can be raised or lowered on the support post.
5.2.2. When at the required height, securely clamp the lamp assembly to the post using the T-bar.
5.3. LAMP ROTATION ADJUSTMENT
5.3.1. To rotate the lamp in the horizontal plane, loosen the adjustable handles on the side of the lamp (g.1.6) and tighten securely when the
required rotation is achieved.
5.3.2. To rotate the lamp in the vertical plane, loosen the handle on the post mounting section (g.1.9) and tighten securely when the
required rotation is achieved.
6. MAINTENANCE
WARNING! Disconnect from the mains before carrying out any maintenance.
WARNING! Never touch the element glass directly with ngers, only touch the ceramic ends or use a soft cloth,
otherwise the tube may get damaged.
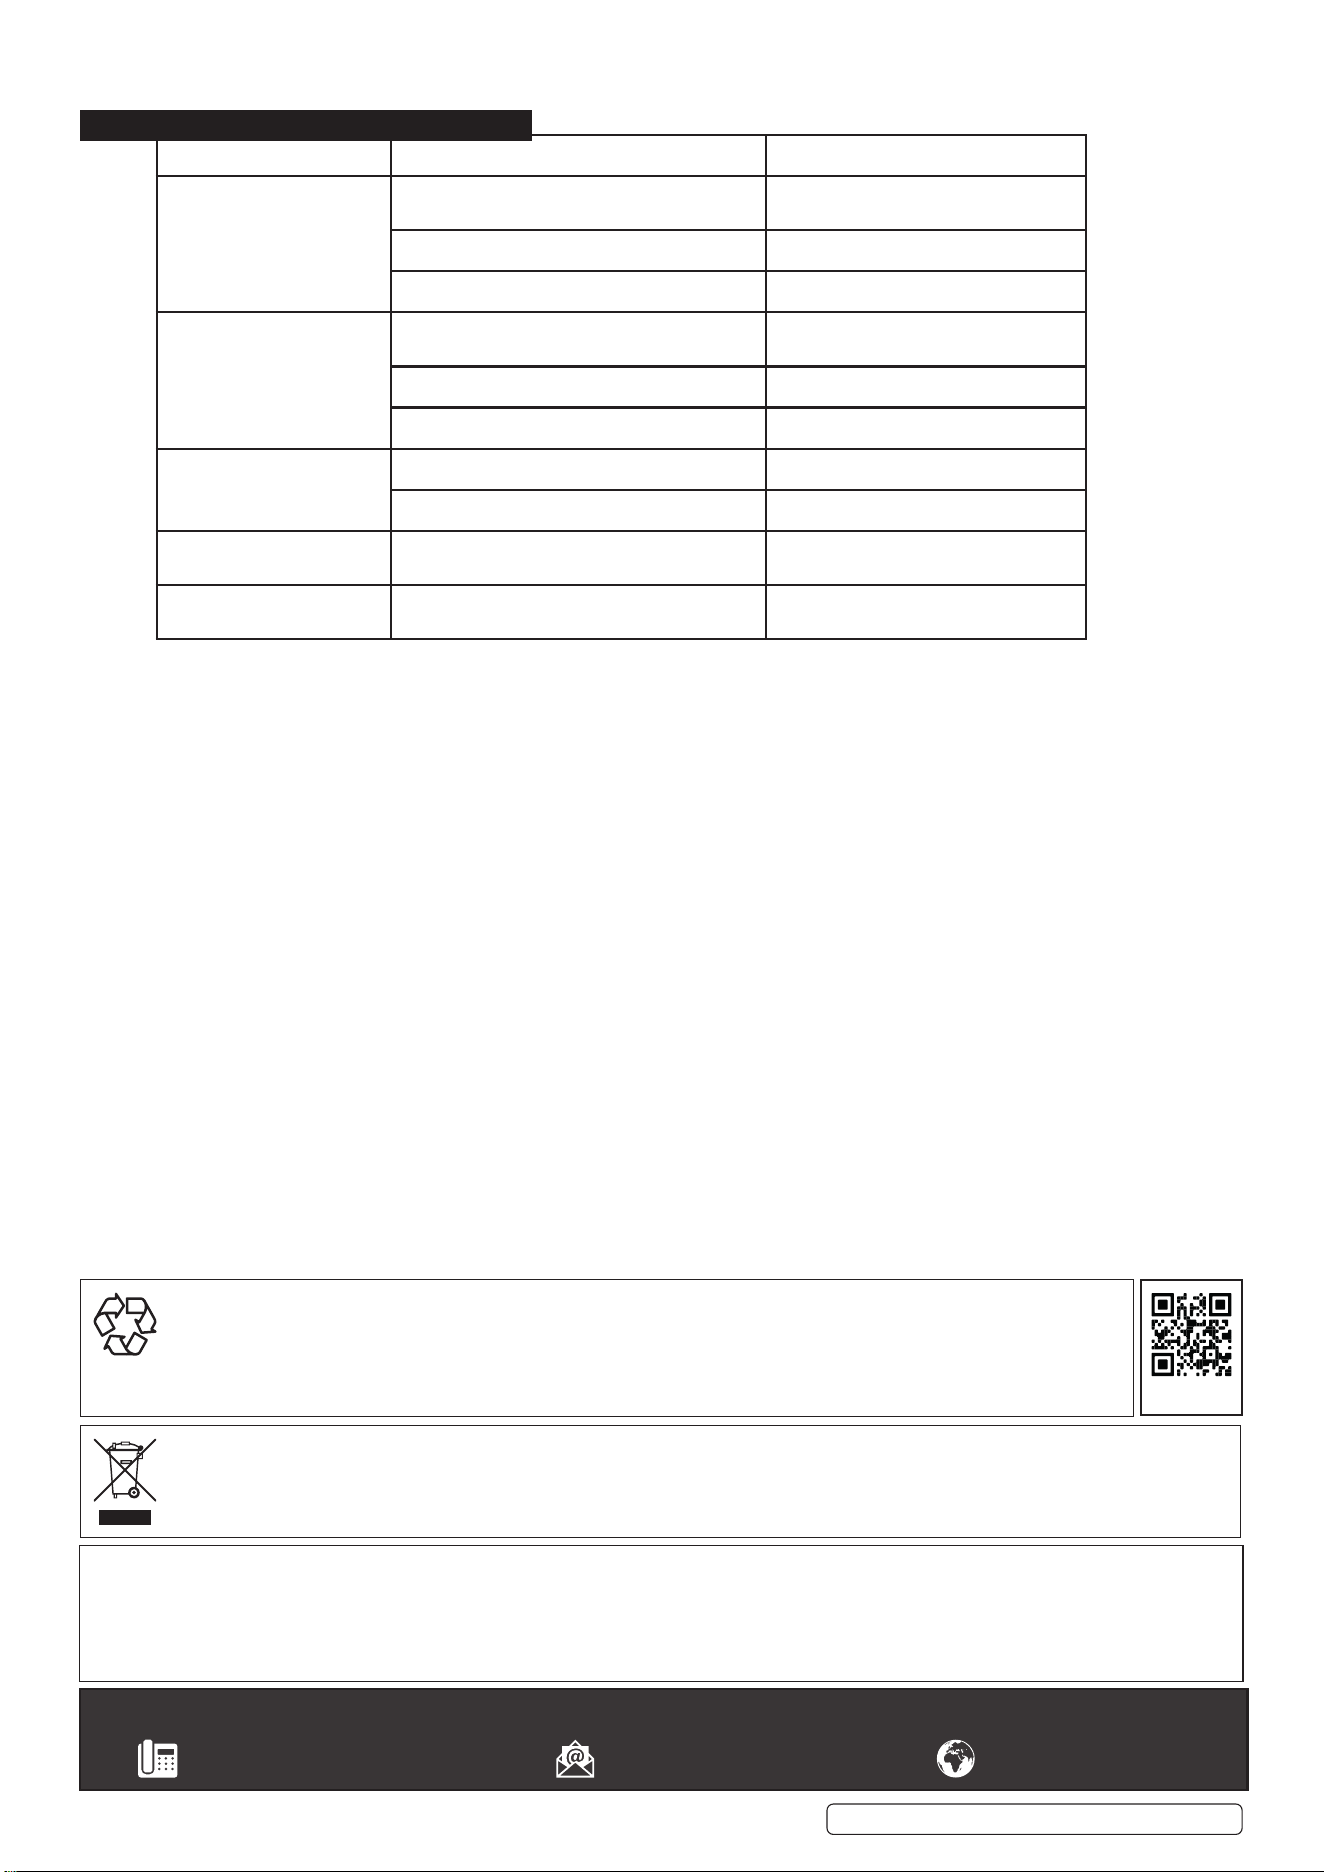
6.1. REPLACEMENT OF EMITTER TUBE
6.1.1. Check power switches are in the o
position and is disconnected from
the mains supply.
6.1.2. Take out the front protective grill
(g.5.1) in front of the emitter.
6.1.3. Loosen screws on the side panel (g.5.2)
of emitter and remove side panel.
6.1.4. Release rear panel (g.5.4).
6.1.5. Loosen the two leads in the lamp tube
and remove the tube.
6.1.6. Fix the new tube with same model
number and wire the tube correctly.
6.1.7. Install the rear panel reective panel
and the side panel.
6.1.8. Use a piece of soft cloth or cotton to
clean the reective panel and the
tube with alcohol. Allow to evaporate
before use.
6.1.9. Install the front protective grill.
6.1.10. Regularly inspect power cables and if damaged, DO NOT use and replace as soon as possible.
IR1000S.V2 Issue:3 (3, 4, 5) 23/05/23
fig.4
fig.5
7. TROUBLESHOOTING
Original Language Version
© Jack Sealey Limited
IR1000S.V2 Issue:3 (All) 23/05/23
Sealey Group, Kempson Way, Suffolk Business Park, Bury St Edmunds, Suffolk. IP32 7AR
01284 757500 sales@sealey.co.uk www.sealey.co.uk
ENVIRONMENT PROTECTION
Recycle unwanted materials instead of disposing of them as waste. All tools, accessories and packaging should be sorted,
taken to a recycling centre and disposed of in a manner which is compatible with the environment. When the product
becomes completely unserviceable and requires disposal, drain any fluids (if applicable) into approved containers and
dispose of the product and fluids according to local regulations.
WEEE REGULATIONS
Dispose of this product at the end of its working life in compliance with the EU Directive on Waste Electrical and Electronic Equipment
(WEEE). When the product is no longer required, it must be disposed of in an environmentally protective way. Contact your local solid
waste authority for recycling information.
Note: It is our policy to continually improve products and as such we reserve the right to alter data, specifications and component parts without prior
notice. Please note that other versions of this product are available. If you require documentation for alternative versions, please email or call
our technical team on technical@sealey.co.uk or 01284 757505.
Important: No Liability is accepted for incorrect use of this product.
Warranty: Guarantee is 12 months from purchase date, proof of which is required for any claim.
REGISTER YOUR
PURCHASE HERE
DEFECT CAUSE TROUBLESHOOTING
Small pores on the baked
paint surface.
Too near between the lamp cassette and the
repaired surface.
Increase the distance.
Insucient Preheating time. Increase the preheating time.
Fast thinning agent included in the paint. Use standard or slow thinning agent.
Dim paint. Too far between the emitter and the repaired
surface.
Make the machine closer.
Insucient baking. Increase the baking time
Too thick coating. Thin the coating.
Stains. Too long baking. Shorten the baking.
Too near distance. Increase the distance.
Fuzzy edge. The repair surface is too large. Preheating for rst time, and do not
use preheating for second time.
Uneven baking. The emitter is not at same height as the
repaired surface.
Adjust the emitter to allow it to be at
height as the repaired surface.