
Technical Support and E-Warranty Certificate www.vevor.com/support
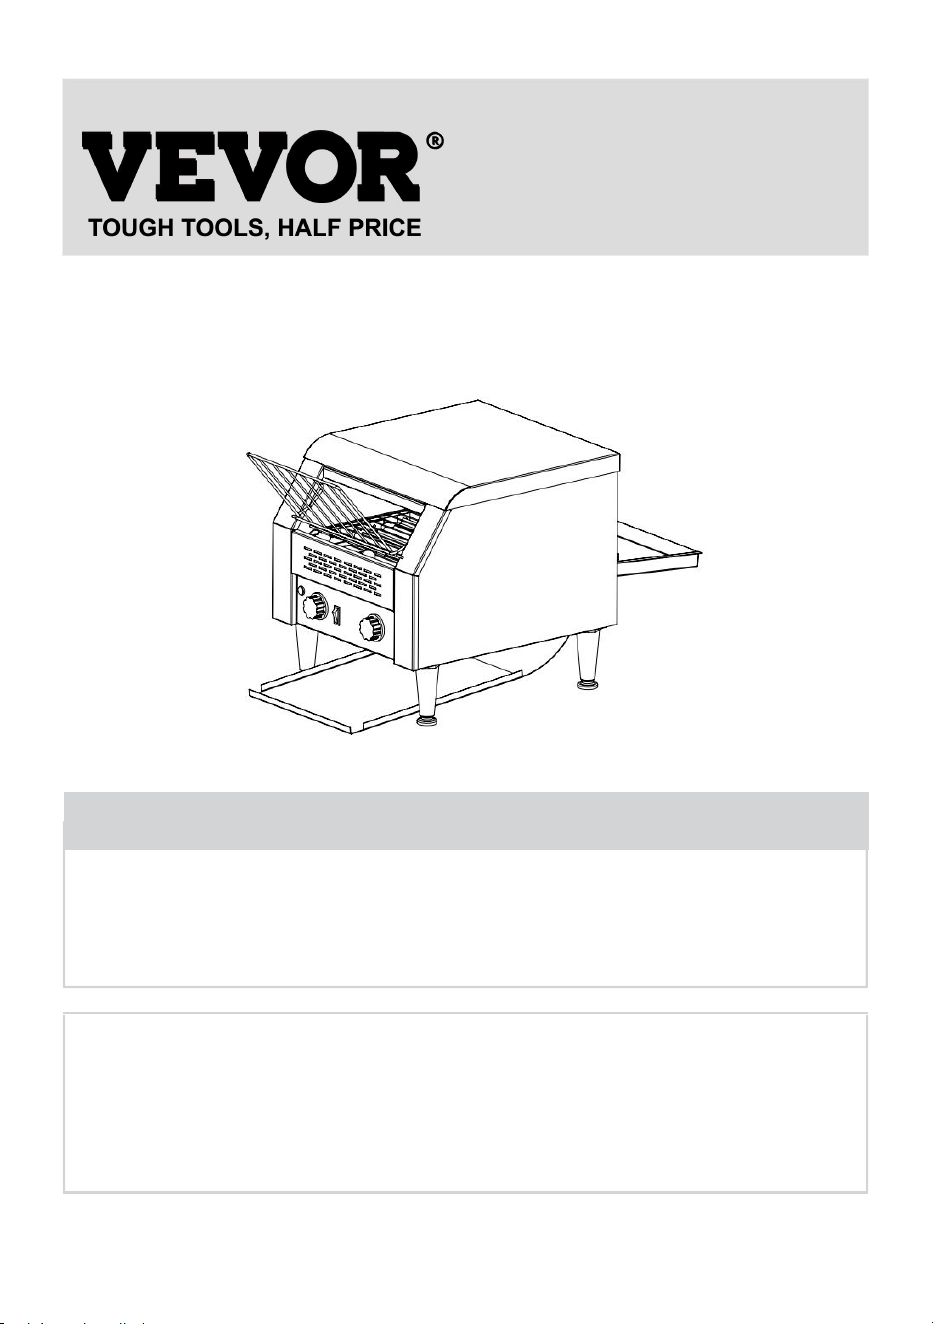
ELECTRIC CONVEYOR TOASTER
MODEL:TT-150 TT-300 TT-450
We continue to be committed to provide you tools with competitive price.
"Save Half", "Half Price" or any other similar expressions used by us only represents an
estimate of savings you might benefit from buying certain tools with us compared to the major
top brands and does not necessarily mean to cover all categories of tools offered by us. You
are kindly reminded to verify carefully when you are placing an order with us if you are
actually saving half in comparison with the top major brands.

- 1 -
MODEL:TT-150 TT-300 TT-450
Have product questions? Need technical support? Please feel free to
contact us:
Technical Support and E-Warranty Certificate
www.vevor.com/support
NEED HELP? CONTACT US!
This is the original instruction, please read all manual instructions
carefully before operating. VEVOR reserves a clear interpretation of our
user manual. The appearance of the product shall be subject to the
product you received. Please forgive us that we won't inform you again if
there are any technology or software updates on our product.
ELECTRIC CONVEYOR TOASTER

- 2 -
Specification of the toaster for different models:
Model
Region
Capacity
(slices/per
hour)
Size
(mm)
Voltage,
Frequency
(V, Hz)
Power
(w)
TT-150
USA
150-180
735*285*435
120, 60
1300
EU
150-180
735*285*435
220-240, 50/60
1300
TT-300
USA
300-350
735*365*435
120, 60
1770
EU
300-350
735*365*435
220-240, 50/60
2200
TT-450
USA
450-500
735*465*415
120, 60
1770
EU
450-500
735*465*435
220-240, 50/60
2600
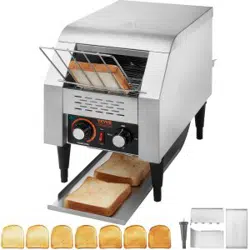
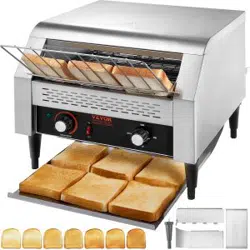
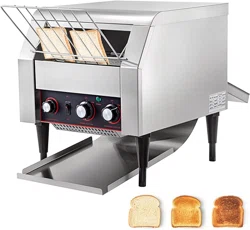
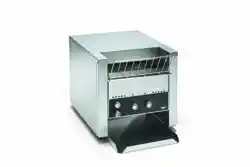
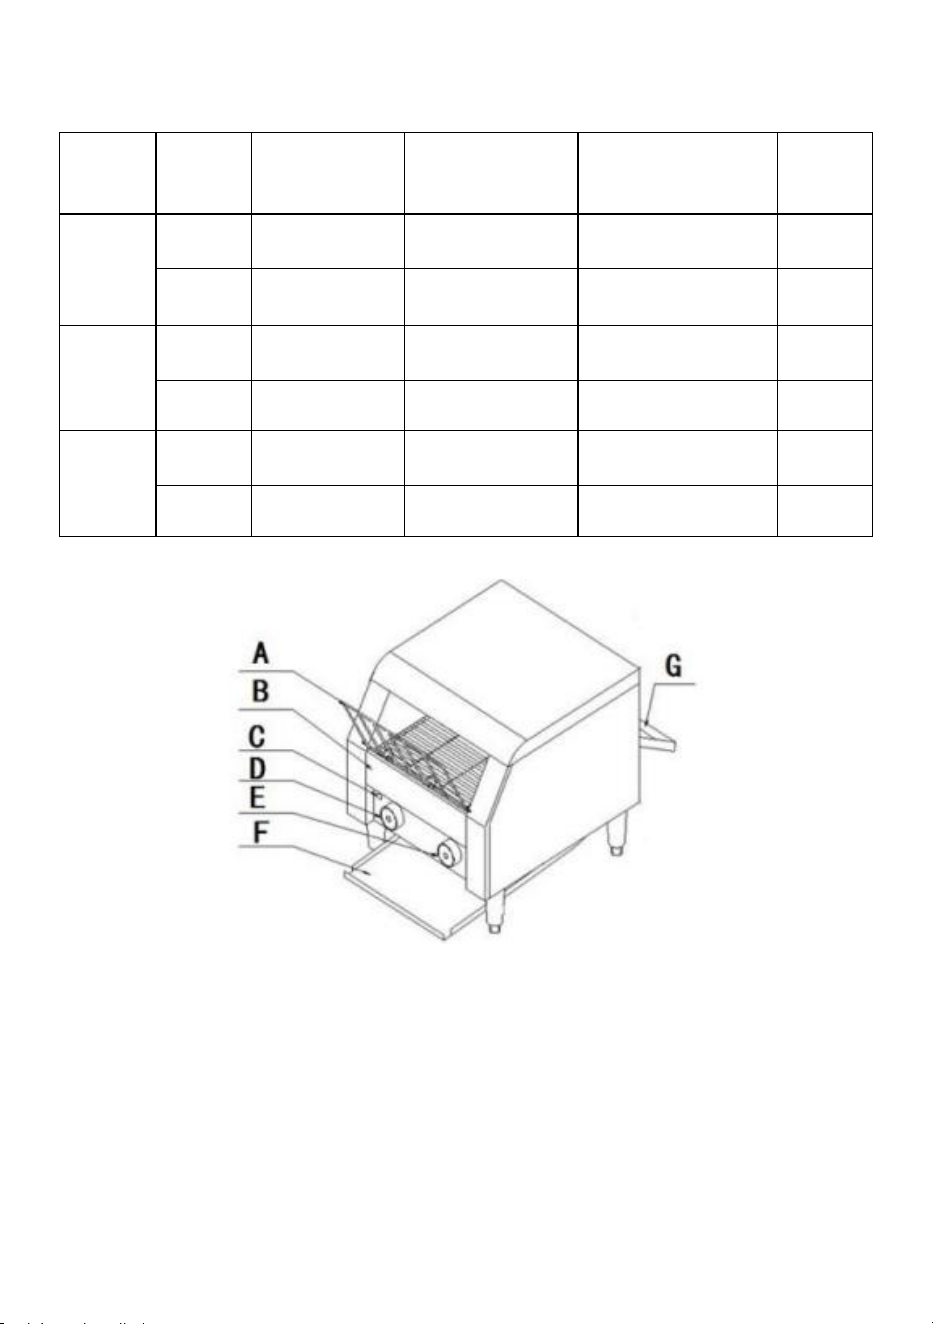
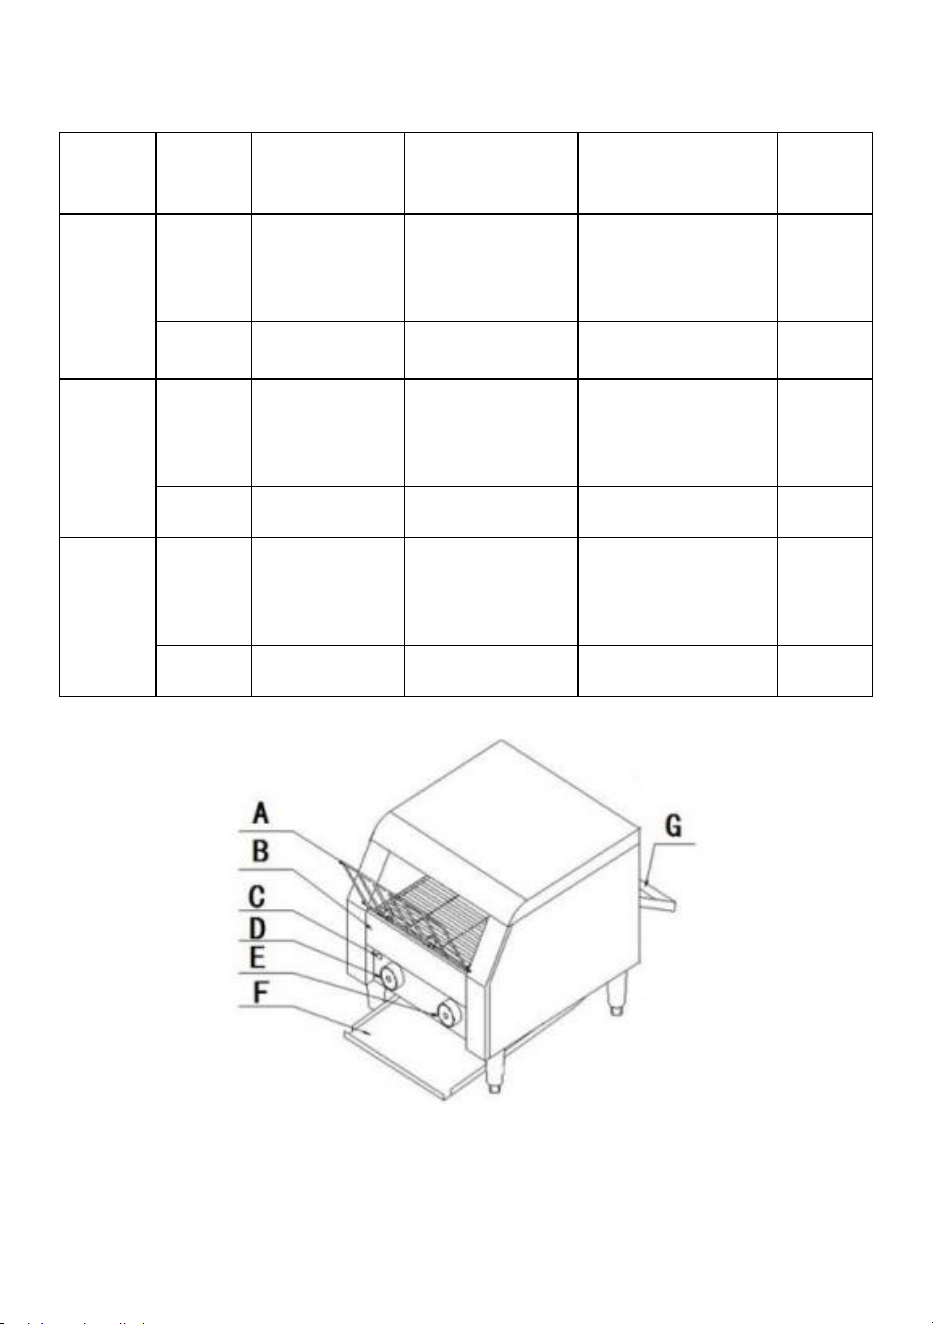
Name of the Components:
A. Inputting net
:
Put bread on the net
B. Trash tray
:
For putting trash during producing
C. Power light(green): Machine is working well When power is on.
D. Speed button
:
Adjusting speed of chain network
E. Gear button: For adjusting temperature of the bread.
F. Front side bread tray
:
Food sliding to front side after baking
G. Back side bread tray
:
Food sliding to back side after baking

- 3 -
IMPORTANT SAFEGUARDS:
When using the electnical applance,basie satety precautions should
aiways be folowed inouding the tolowing.Read at instrucions.
1. Please read the relevant instructions carefully before using the products.
2. This appliance can be used by children aged 8 years and above and
persons with reduced physical, sensory, or mental capabilities or lack of
experience and knowledge if they have been given supervision or
instruction concerning using the appliance safely and understand the
hazards. Children shall not play with the appliance. Cleaning and children
shall not make user maintenance unless they are older than 8 and
supervised.
3. Keep the appliance and cord out of reach of children less than 8 years.
3. If the supply cord is damaged, it must be replaced by the manufacturer,
its service agent, or similarly qualified persons to avoid a hazard.
4. CAUTION: Hot surfaces. Do not touch hot surfaces. Use handles or
knobs, Do not let the cord hang over the edge of a table or hot surface.
5. To protect against electric shock, do not immerse the cord, plugs, or
housing in water or other liquid.
6. Please don’t share the same power and other high-power appliances to
prevent overloading and cause other hazards.
7. Never touch the plate or around while the products is working or just
close because they are very hot, it could result in burn.
8. If you have a child near the machine, please take extra care to use the
product, don’t let children alone and place the product in baby hand can
reach.
9. Don’t allow the product to be used in unattended.
10.Please don’t contact the power line with sharp objects and hot surfaces,
avoiding damaging the power line.
11. Always check the power line and plug if damaged, please stop using it
once there are signs of damage,then looking for professional worker to
repair or replacement.
12. Don’t damage, excessively bend, stretch, twist the power line and put
heavy objects on the power line or nip the power line.

- 4 -
13. After using it, the thermostat knob should be turned to the "O" position,
and then pull the plug from the socket, to avoid the occurrence of leakage
or insulation aging shock.
14. The product should be installed in a dry, clean, well-ventilated location
and placed in level position.
15. In order to ensure safety, the product must be grounded, and install the
leakage switch, ensure personal safety, otherwise shall not be used.
16. Please pull off the plug and until the product is completely cooled
before moving, check or clean up.
17. Don’t insert or unplug the plug with wet hand, avoiding the risk of
electric shock.
18. If a longer extension cable is used:
1) The marked electrical rating of the power cord group or extension cord
should be at least as large as the electrical rating of the appliance;
2) The power cord shall be arranged so that it will not hang on the table or
desktop to prevent children from unintentionally pulling or tripping.
19. If the appliance is grounded, the extension wire shall be grounded
3-core.
a) A short power-supply cord should be used to reduce the risk resulting
from becoming entangled in ortripping overa longercord.
b) Longer extension cords are available and may be used if care is
exercised in their use.
c) If a longer extension cord is used:
1) The marked electical rsting of the cord set or extension cord should be
at least as grest as theelectrical rating of the sppliance; and
2) The cord should be arranged so that it will no drape over the countertop
or table top where it can be pulled on by chidren or tripped over
unintentionally.
lf the appliance is of the grounded type,the extension cord should be a
grounding-type 3-wire cord.
SAVE THESE INSTRUCTIONS
Note for the first time use:

- 5 -
1.Pls check if power of the machine comply with your local power or not
before using the machine.
2. Power light turns on after connecting the power, Press D to “3”gear(note:
Chain network will work faster if color is lighter).
Pls turn the button to “bread” on right side of the machine, then heats
willcome from both upper and lower heating tubes, it will heat up gradually.
Inside temperature of the toaster will reach 284℃ in 12 minutes when
bread has been put inside, then temperature will be constant at 284℃.
3. Machine should be pre-heat from 10-12 minutes, then bake 1-2 slices of
bread for testing and check if color of the bread is OK or not, if color is too
light, and you want darker coler, pls adjust D more than “3” gear(note:
Chain network will work slower if color of the break is darker). After
adjusting speed of the chain network, pls put the bread to chain network,
bread will be moved inside of the machine when chain network is moving.
4. Bread will slide to Front side bread tray from firepot.
5. There is back side bread tray on back of the toaster, pls put the hook of
the back tray down, the bread will slide to back side bread tray, pls put
hook of the back tray up after getting the bread.
6. Pls adjust the gear to “BUNS” position, then only upper heating tube will
work when baking steamed bread, pls adjust gear to “STBY”position when
you only need warm up function.
7. Pls turn the button to “OFF” positon and pull off plug.
8. Pls do not use the machine to heat up food with sugar or food will
become liquid after heating, or it will damage the toaster.
9. If cable of toaster is broken, ONLY professional engineers can change it
with specialized cable, pls be noted.
Care and Cleaning
1. Unplug the power cable and ensure that the product is cooled
completely, then cleaning and collection.
2. Cleaning cooking surface with a soft cloth or sponge dampened in a mild
detergent.
3. Please don’t use wire brush, stiff brush or other corrosive liquids to clean
it, avoiding damage the surface coating.
- 6 -
4. Never clean the product by sprinkling water and immersed in water.
Special Declaration
1. All the contents of this information have been checked carefully, if there
is any misunderstanding because of printing and content, our company will
reserve the right of final explanations.
2. If there is a technical improvement, we will compiled new specification
into the Instructions, without prior notice. If the appearance of the product,
color changes, please make the object as the standard.
CORRECT DISPOSAL
This product is subject to the provision of european Directive
2012/19/EU. The symbol showing a wheelie bin crossed through
indicates that the product requires separate refuse collection in
the European Union. This applies to the product and all
accessories marked with this symbol. Products marked as such
may not be discarded with normal domestic waste, but must be taken to
acollection point for recycling electrical and electronic devices.
Address
:
Baoshanqu Shuangchenglu 803long 11hao 1602A-1609shi
Shanghai
Imported to USA: Sanven Technology Ltd. Suite 250, 9166 Anaheim
Place, Rancho Cucamonga, CA 91730
REP
UK
Pooledas Group Ltd
Unit 5 Albert Edward House, The Pavilions
Preston, United Kingdom
REP
EC
SHUNSHUN GmbH
Römeräcker 9 Z2021, 76351
Linkenheim-Hochstetten, Germany
Made In China


- 2 -
Technique Assistance et certificat de garantie électronique
www.vevor.com/support
CONVOYEUR ÉLECTRIQUE MODÈLE DE
GRILLE-PAIN
: TT-150 TT-300 TT-450
We continue to be committed to provide you tools with competitive price.
"Save Half", "Half Price" or any other similar expressions used by us only represents an
estimate of savings you might benefit from buying certain tools with us compared to the major
top brands and does not necessarily mean to cover all categories of tools offered by us. You
are kindly reminded to verify carefully when you are placing an order with us if you are
actually saving half in comparison with the top major brands.

- 3 -

- 1 -
MODÈLE: TT-150 TT-300 TT-450
Have product questions? Need technical support? Please feel free to
contact us:
Technical Support and E-Warranty Certificate
www.vevor.com/support
NEED HELP? CONTACT US!
This is the original instruction, please read all manual instructions
carefully before operating. VEVOR reserves a clear interpretation of our
user manual. The appearance of the product shall be subject to the
product you received. Please forgive us that we won't inform you again if
there are any technology or software updates on our product.
ELECTRIC CONVEYOR TOASTER
- 2 -
Spécifications du grille-pain pour différents modèles :
Modèl
e
Région
Capacité
(tranches/pa
r heure)
Taille
(mm)
Tension,
fréquence
(V, Hz)
Pouvoi
r
(w)
TT-150
Etats-
Unis
150-180
735*285*435
120, 60
1300
je
150-180
735*285*435
220-240, 50/60
1300
TT-300
Etats-
Unis
300-350
735*365*435
120, 60
1770
je
300-350
735*365*435
220-240, 50/60
2200
TT-450
Etats-
Unis
450-500
735*465*415
120, 60
1770
je
450-500
735*465*435
220-240, 50/60
2600
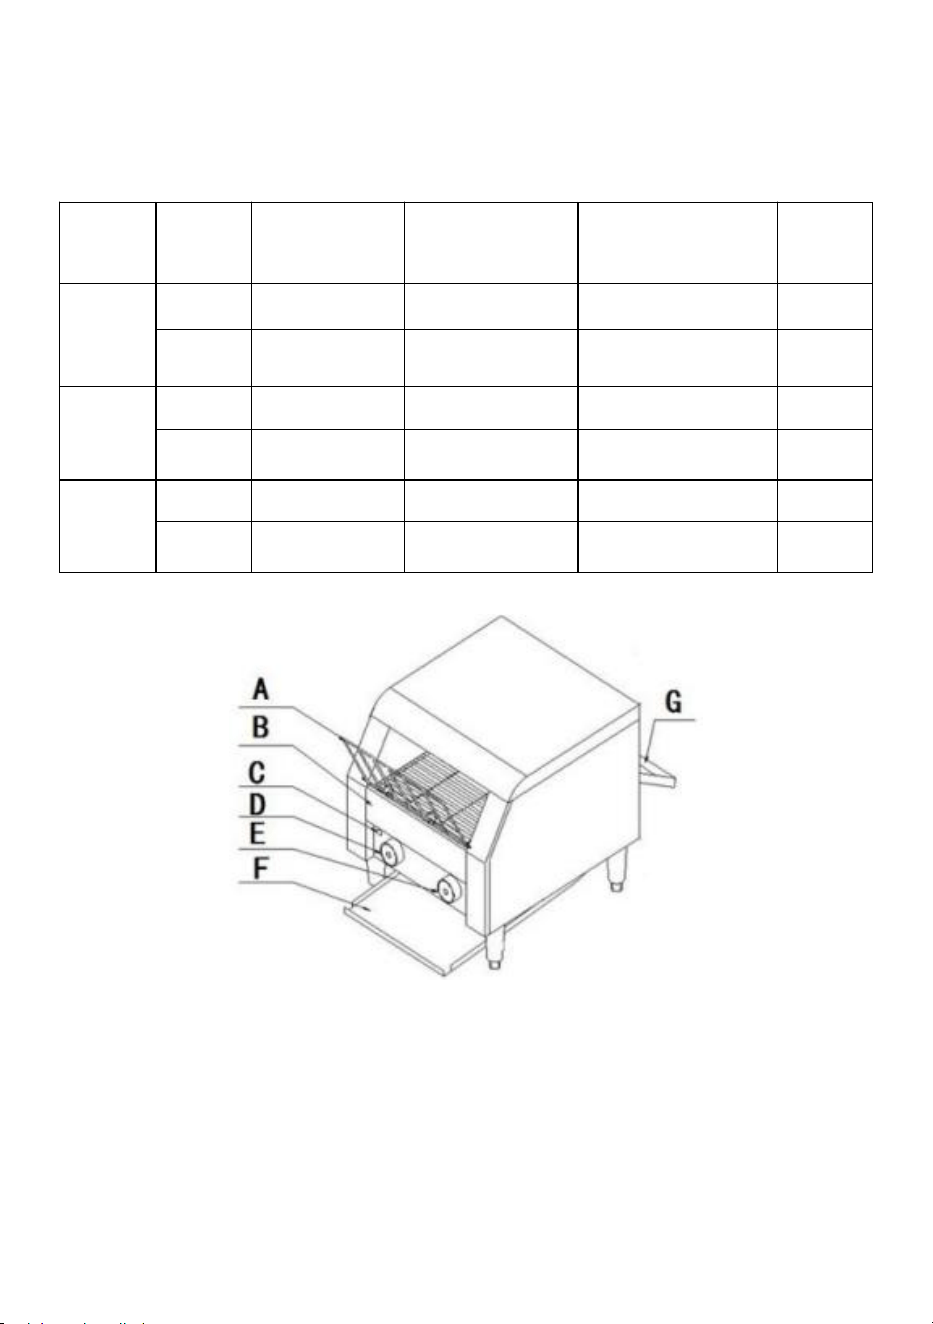
Nom des composants :
Un . Saisie du filet : mettre du pain sur le filet
B. _ Poubelle Plateau : pour mettre les déchets pendant produire
C. _ Voyant d'alimentation (vert) : la machine fonctionne bien Lorsque
l'appareil est sous tension.
D. _ Bouton de vitesse : réglage de la vitesse du réseau de chaînes
E. _ Bouton d'engrenage : pour régler la température du pain.
F. _ Plateau à pain sur le devant : les aliments glissent vers l'avant après la

- 3 -
cuisson.
G. _ Plateau à pain arrière : les aliments glissent vers l'arrière après la
cuisson.
MESURES DE SÉCURITÉ IMPORTANTES :
Lors de l'utilisation de l'appareil électrique, des précautions de sécurité de
base doivent toujours être suivies en tenant compte des instructions
suivantes.
1. Veuillez lire attentivement les instructions pertinentes avant d'utiliser les
produits.
2. Cet appareil peut être utilisé par des enfants âgés de 8 ans et plus et
des personnes ayant des capacités physiques, sensorielles ou mentales
réduites ou un manque d'expérience et de connaissances s'ils ont reçu
une supervision ou des instructions concernant l'utilisation de l'appareil en
toute sécurité et comprennent les dangers. Les enfants ne doivent pas
jouer avec l'appareil. Le nettoyage et les enfants ne doivent pas effectuer
d'entretien par l'utilisateur à moins qu'ils aient plus de 8 ans et soient
surveillés.
3. Gardez l'appareil et le cordon hors de portée des enfants de moins de 8
ans.
3. Si le cordon d'alimentation est endommagé, il doit être remplacé par le
fabricant, son agent de service ou des personnes de qualification similaire
pour éviter tout danger.
4. ATTENTION : Surfaces chaudes. Ne touchez pas les surfaces chaudes.
Utilisez des poignées ou des boutons. Ne laissez pas le cordon pendre du
bord d'une table ou d'une surface chaude.
5. Pour vous protéger contre les chocs électriques, ne plongez pas le
cordon, les fiches ou le boîtier dans l'eau ou tout autre liquide.
6 . Veuillez ne pas partager la même alimentation et d'autres appareils à
haute puissance pour éviter les surcharges et provoquer d'autres dangers.
7 . Ne touchez jamais la plaque ou ses alentours pendant que les produits
fonctionnent ou simplement fermez-les car ils sont très chauds, cela
pourrait entraîner des brûlures.

- 4 -
8 . Si vous avez un enfant à proximité de la machine, veuillez faire très
attention lors de l'utilisation du produit, ne laissez pas les enfants seuls et
placez le produit dans la main de bébé.
9 . Ne laissez pas le produit être utilisé sans surveillance.
10. Veuillez ne pas contacter la ligne électrique avec des objets pointus et
des surfaces chaudes, afin d'éviter d'endommager la ligne électrique.
11 . Vérifiez toujours la ligne électrique et la prise si elles sont
endommagées, veuillez cesser de l'utiliser une fois qu'il y a des signes de
dommages, puis recherchez un travailleur professionnel pour la réparer ou
le remplacer.
12 . N'endommagez pas , ne pliez pas excessivement, n'étirez pas, ne
tordez pas la ligne électrique et ne posez pas d'objets lourds sur la ligne
électrique ou ne la pincez pas.
13 . Après l'avoir utilisé, le bouton du thermostat doit être tourné sur la
position « O », puis retirer la fiche de la prise, pour éviter l'apparition de
fuites ou de chocs liés au vieillissement de l'isolation.
1 4 . Le produit doit être installé dans un endroit sec, propre et bien ventilé
et placé dans une position horizontale.
1 5 . Afin de garantir la sécurité, le produit doit être mis à la terre et installer
le commutateur de fuite, assurer la sécurité personnelle, sinon il ne doit
pas être utilisé.
1 6 . Veuillez retirer la fiche et jusqu'à ce que le produit soit complètement
refroidi avant de le déplacer, vérifiez ou nettoyez.
1 7 . N'insérez pas et ne débranchez pas la fiche avec les mains mouillées,
pour éviter tout risque de choc électrique.
18. Si une rallonge plus longue est utilisée :
1) La puissance électrique indiquée sur le groupe de cordons
d'alimentation ou la rallonge doit être au moins aussi grande que la
puissance électrique de l'appareil ;
2) Le cordon d'alimentation doit être disposé de manière à ce qu'il ne
pende pas sur la table ou le bureau afin d'empêcher les enfants de tirer ou
de trébucher involontairement.
19. Si l'appareil est mis à la terre, la rallonge doit être mise à la terre à

- 5 -
3 conducteurs.
a) Un cordon d'alimentation court doit être utilisé pour réduire le risque de
s'emmêler ou de trébucher sur un cordon plus long.
b) Des rallonges plus longues sont disponibles et peuvent être utilisées si
l'on prend soin de leur utilisation.
c) Si une rallonge plus longue est utilisée :
1) La résistance électrique marquée du cordon ou de la rallonge doit être
au moins aussi élevée que la valeur électrique de l'appareil ; et
2) Le cordon doit être disposé de manière à ce qu'il ne pende pas sur le
comptoir ou dessus de table où les enfants peuvent tirer dessus ou
trébucher involontairement.
Si l'appareil est du type mis à la terre, la rallonge doit être un cordon à 3 fils
de type mis à la terre.
CONSERVEZ CES INSTRUCTIONS
Remarque pour la première utilisation :
1. Veuillez vérifier si l'alimentation de la machine est conforme à votre
alimentation locale ou non avant d'utiliser la machine.
2. Le voyant d'alimentation s'allume après avoir connecté l'alimentation,
appuyez sur D pour passer à la vitesse « 3 » (remarque :
Le réseau de chaînes fonctionnera plus rapidement si la couleur est plus
claire).
Veuillez tourner le bouton sur « pain » sur le côté droit de la machine, puis
la chaleur proviendra des tubes chauffants supérieur et inférieur, elle
chauffera progressivement.
La température intérieure du grille-pain atteindra 284 ℃ en 12 minutes
lorsque le pain aura été mis à l'intérieur, puis la température sera
constante à 284 ℃.
3. La machine doit être préchauffée pendant 10 à 12 minutes, puis cuire 1
à 2 tranches de pain pour tester et vérifier si la couleur du pain est correcte
ou non, si la couleur est trop claire et que vous voulez une couleur plus
foncée, veuillez ajuster D plus de « 3 » (remarque : le réseau de chaîne
fonctionnera plus lentement si la couleur de la rupture est plus foncée).

- 6 -
Après avoir ajusté la vitesse du réseau de chaîne, veuillez placer le pain
sur le réseau de chaîne, le pain sera déplacé à l'intérieur de la machine
lorsque le réseau de chaîne se déplace.
4. Le pain glissera vers le plateau à pain avant depuis le pot à feu.
5. Il y a un plateau à pain arrière à l'arrière du grille-pain, veuillez poser le
crochet du plateau arrière vers le bas, le pain glissera vers le plateau à
pain arrière, veuillez relever le crochet du plateau arrière après avoir
récupéré le pain.
6. Veuillez régler l'engrenage sur la position « BUNS », puis seul le tube
chauffant supérieur fonctionnera lors de la cuisson du pain cuit à la
vapeur . Veuillez régler l'engrenage sur la position « STBY » lorsque vous
n'avez besoin que de la fonction de préchauffage.
7. Veuillez tourner le bouton sur la position « OFF » et retirer la fiche.
8. Veuillez ne pas utiliser la machine pour réchauffer des aliments avec du
sucre, sinon les aliments deviendront liquides après chauffage ou cela
endommagerait le grille-pain.
9. Si le câble du grille-pain est cassé, SEULS les ingénieurs professionnels
peuvent le changer avec un câble spécialisé, veuillez le noter.
Entretien et nettoyage
1. Débranchez le câble d'alimentation et assurez-vous que le produit est
complètement refroidi, puis nettoyez et collectez.
2. Nettoyer la surface de cuisson avec un chiffon doux ou une éponge
imbibée d'un détergent doux.
3. Veuillez ne pas utiliser de brosse métallique, de brosse dure ou d'autres
liquides corrosifs pour le nettoyer, afin d'éviter d'endommager le
revêtement de surface.
4. Ne nettoyez jamais le produit en l'aspergeant d'eau et en l'immergeant
dans l'eau.
Déclaration spéciale
1. Tout le contenu de ces informations a été soigneusement vérifié, en cas
de malentendu en raison de l'impression et du contenu, notre société se
réserve le droit de donner des explications finales.
- 7 -
2. En cas d'amélioration technique, nous compilerons de nouvelles
spécifications dans les instructions, sans préavis. Si l'apparence du produit
change de couleur, veuillez faire de l'objet la norme.
ÉLIMINATION CORRECTE
Ce produit est soumis aux dispositions de la directive
européenne 2012/19/UE. Le symbole représentant une poubelle
barrée indique que le produit nécessite une collecte sélective des
déchets dans l'Union européenne. Ceci s'applique au produit et à
tous les accessoires marqués de ce symbole. Les produits
marqués comme tels ne doivent pas être jetés avec les ordures
ménagères normales, mais doivent être déposés dans un point de collecte
pour le recyclage des appareils électriques et électroniques.
Une adresse : Baoshanqu Shuangchenglu 803long 11hao 1602A-1609shi
Shanghai
Importé aux États-Unis : Sanven Technology Ltd. Suite 250, 9166
Anaheim Place, Rancho Cucamonga, CA 91730
REP
UK
Pooledas Group Ltd
Unit 5 Albert Edward House, The Pavilions
Preston, United Kingdom
REP
EC
SHUNSHUN GmbH
Römeräcker 9 Z2021, 76351
Linkenheim-Hochstetten, Germany
Fabriqué en Chine


- 2 -
Technisch Support- und E-Garantie-Zertifikat www.vevor.com/support
ELEKTRISCHER FÖRDERER TOASTER
MODELL: TT-150 TT-300 TT-450
We continue to be committed to provide you tools with competitive price.
"Save Half", "Half Price" or any other similar expressions used by us only represents an
estimate of savings you might benefit from buying certain tools with us compared to the major
top brands and does not necessarily mean to cover all categories of tools offered by us. You
are kindly reminded to verify carefully when you are placing an order with us if you are
actually saving half in comparison with the top major brands.

- 1 -
MODELL: TT-150 TT-300 TT-450
Have product questions? Need technical support? Please feel free to
contact us:
Technical Support and E-Warranty Certificate
www.vevor.com/support
NEED HELP? CONTACT US!
This is the original instruction, please read all manual instructions
carefully before operating. VEVOR reserves a clear interpretation of our
user manual. The appearance of the product shall be subject to the
product you received. Please forgive us that we won't inform you again if
there are any technology or software updates on our product.
ELECTRIC CONVEYOR TOASTER

- 2 -
Spezifikationen des Toasters für verschiedene
Modelle:
Modell
Region
Kapazität
(Scheiben/pr
o Stunde)
Größe
(mm)
Spannung,
Frequenz
(V, Hz)
Leistu
ng
(w)
TT-150
USA
150-180
735*285*435
120, 60
1300
ICH
150-180
735*285*435
220-240, 50/60
1300
TT-300
USA
300-350
735*365*435
120, 60
1770
ICH
300-350
735*365*435
220-240, 50/60
2200
TT-450
USA
450-500
735*465*415
120, 60
1770
ICH
450-500
735*465*435
220-240, 50/60
2600
Name der Komponenten:
A. _ Eingabenetz: Brot auf das Netz legen
B. _ Müll Tablett: Zum Ablegen des Mülls während produzieren
C. _ Betriebsanzeige (grün): Die Maschine funktioniert einwandfrei Wenn
der Strom eingeschaltet ist.
D. _ Geschwindigkeitstaste: Passen Sie die Geschwindigkeit des
Kettennetzwerks an

- 3 -
E. _ Gangtaste: Zum Einstellen der Temperatur des brot.
F. _ Brotfach auf der Vorderseite: Lebensmittel rutschen nach dem Backen
zur Vorderseite
G. _ Backblech auf der Rückseite: Lebensmittel rutschen nach dem
Backen auf die Rückseite
WICHTIGE SICHERHEITSHINWEISE :
Bei der Verwendung des Elektrogeräts sollten bei der Inbetriebnahme stets
grundlegende Sicherheitsvorkehrungen befolgt werden. Lesen Sie die
Anweisungen.
1. Bitte lesen Sie die entsprechenden Anweisungen sorgfältig durch, bevor
Sie die Produkte verwenden.
2. Dieses Gerät kann von Kindern ab 8 Jahren und Personen mit
eingeschränkten physischen, sensorischen oder geistigen Fähigkeiten
oder mangelnder Erfahrung und Wissen verwendet werden, wenn sie
beaufsichtigt werden oder Anweisungen zur sicheren Verwendung des
Geräts erhalten und die Gefahren verstehen. Kinder dürfen nicht mit dem
Gerät spielen. Reinigung und Kinder dürfen keine Benutzerwartungen
durchführen, es sei denn, sie sind älter als 8 Jahre und werden
beaufsichtigt.
3. Bewahren Sie das Gerät und das Kabel außerhalb der Reichweite von
Kindern unter 8 Jahren auf.
3. Wenn das Netzkabel beschädigt ist, muss es vom Hersteller, seinem
Kundendienstmitarbeiter oder ähnlich qualifizierten Personen ersetzt
werden, um Gefahren zu vermeiden.
4. VORSICHT: Heiße Oberflächen. Berühren Sie keine heißen
Oberflächen. Verwenden Sie Griffe oder Knöpfe. Lassen Sie das Kabel
nicht über die Tischkante oder heiße Oberfläche hängen.
5. Um Stromschläge zu vermeiden, tauchen Sie das Kabel, die Stecker
oder das Gehäuse nicht in Wasser oder andere Flüssigkeiten.
6 . Bitte nutzen Sie nicht den gleichen Strom und andere
Hochleistungsgeräte, um eine Überlastung und andere Gefahren zu
vermeiden.

- 4 -
7 . Berühren Sie niemals die Platte oder die Umgebung, während die
Produkte in Betrieb sind, oder schließen Sie sie einfach, da sie sehr heiß
sind, da dies zu Verbrennungen führen kann.
8 . Wenn sich ein Kind in der Nähe der Maschine befindet, gehen Sie bei
der Verwendung des Produkts bitte besonders vorsichtig vor. Lassen Sie
Kinder nicht alleine und platzieren Sie das Produkt in der Reichweite Ihres
Babys.
9 . Lassen Sie das Produkt nicht unbeaufsichtigt verwenden.
10. Bitte berühren Sie die Stromleitung nicht mit scharfen Gegenständen
oder heißen Oberflächen, um eine Beschädigung der Stromleitung zu
vermeiden .
11 . Überprüfen Sie immer das Stromkabel und den Stecker, wenn sie
beschädigt sind. Bitte stellen Sie die Verwendung ein, sobald Anzeichen
einer Beschädigung erkennbar sind, und suchen Sie dann einen
Fachmann für die Reparatur oder den Austausch auf.
12 . Beschädigen Sie das Stromkabel nicht , biegen Sie es nicht
übermäßig, dehnen Sie es nicht, verdrehen Sie es nicht, stellen Sie keine
schweren Gegenstände auf das Stromkabel und klemmen Sie es nicht ein.
13 . Nach der Verwendung sollte der Thermostatknopf auf die Position „O
“ gedreht werden und dann der Stecker aus der Steckdose gezogen
werden, um das Auftreten von Undichtigkeiten oder einen Alterungsschock
der Isolierung zu vermeiden.
1 4 . Das Produkt sollte an einem trockenen, sauberen, gut belüfteten Ort
installiert und waagerecht aufgestellt werden.
1 5 . Um die Sicherheit zu gewährleisten, muss das Produkt geerdet
werden und der Leckageschalter installiert werden, um die persönliche
Sicherheit zu gewährleisten, andernfalls darf es nicht verwendet werden.
1 6 . Bitte ziehen Sie den Stecker ab und warten Sie, bis das Produkt
vollständig abgekühlt ist, bevor Sie es bewegen, überprüfen oder reinigen.
1 7 . Stecken Sie den Stecker nicht mit nassen Händen ein oder aus, um
die Gefahr eines Stromschlags zu vermeiden.
18. Wenn ein längeres Verlängerungskabel verwendet wird:
1) Die angegebene elektrische Nennleistung der Netzkabelgruppe oder

- 5 -
des Verlängerungskabels sollte mindestens so groß sein wie die
elektrische Nennleistung des Geräts.
2) Das Netzkabel muss so angeordnet sein, dass es nicht auf dem Tisch
oder Schreibtisch hängen bleibt, um zu verhindern, dass Kinder
unbeabsichtigt daran ziehen oder darüber stolpern.
19. Wenn das Gerät geerdet ist, muss das Verlängerungskabel
dreiadrig geerdet sein.
a) Es sollte ein kurzes Netzkabel verwendet werden, um das Risiko zu
verringern, dass man sich in einem längeren Kabel verheddert oder
darüber stolpert.
b) Längere Verlängerungskabel sind erhältlich und können verwendet
werden, wenn bei der Verwendung Vorsicht geboten ist.
c) Bei Verwendung eines längeren Verlängerungskabels:
1) Der gekennzeichnete elektrische Anschluss des Kabelsatzes oder
Verlängerungskabels sollte mindestens so groß sein wie die elektrische
Nennleistung des Netzteils; Und
2) Das Kabel sollte so verlegt werden, dass es nicht über die Arbeitsplatte
fällt Tischplatte, wo es von Kindern gezogen oder unbeabsichtigt darüber
gestolpert werden kann.
Wenn das Gerät geerdet ist, sollte das Verlängerungskabel ein dreiadriges
Erdungskabel sein.
ANLEITUNG AUFBEWAHREN
Hinweis bei Erstgebrauch:
1. Bitte prüfen Sie, ob die Leistung des Geräts mit der örtlichen
Stromversorgung übereinstimmt, bevor Sie das Gerät verwenden.
2. Die Betriebsanzeige leuchtet nach dem Anschließen an die
Stromversorgung auf. Drücken Sie D, um in den 3. Gang zu schalten
(Hinweis:
Das Kettennetzwerk funktioniert schneller, wenn die Farbe heller ist.
Bitte drehen Sie den Knopf auf der rechten Seite der Maschine auf „Brot“,
dann kommt die Hitze sowohl vom oberen als auch vom unteren Heizrohr
und das Gerät heizt sich allmählich auf.

- 6 -
Die Innentemperatur des Toasters erreicht nach dem Einlegen des Brotes
innerhalb von 12 Minuten 284 °C und bleibt dann konstant bei 284 °C.
3. Die Maschine sollte 10–12 Minuten vorgeheizt werden, dann 1–2
Scheiben Brot zum Testen backen und prüfen, ob die Farbe des Brotes in
Ordnung ist oder nicht. Wenn die Farbe zu hell ist und Sie eine dunklere
Farbe wünschen, passen Sie diese bitte an D mehr als „3“ Gang (Hinweis:
Das Kettennetzwerk arbeitet langsamer, wenn die Farbe der
Unterbrechung dunkler ist). Nachdem Sie die Geschwindigkeit des
Kettennetzwerks angepasst haben, legen Sie bitte das Brot in das
Kettennetzwerk. Das Brot wird in der Maschine bewegt, wenn sich das
Kettennetzwerk bewegt.
4. Das Brot gleitet vom Feuertopf in die vordere Brotschale.
5. Auf der Rückseite des Toasters befindet sich ein Brotfach auf der
Rückseite. Bitte klappen Sie den Haken des hinteren Tabletts nach unten.
Das Brot gleitet dann in das hintere Brotfach. Bitte schieben Sie den Haken
des hinteren Tabletts nach oben, nachdem Sie das Brot entnommen
haben.
von gedämpftem Brot nur das obere Heizrohr . Bitte stellen Sie den Gang
auf die Position „STBY“, wenn Sie nur die Aufwärmfunktion benötigen.
7. Bitte drehen Sie den Knopf auf die Position „OFF“ und ziehen Sie den
Stecker ab.
8. Bitte verwenden Sie das Gerät nicht zum Erhitzen von Speisen mit
Zucker, da die Speisen sonst nach dem Erhitzen flüssig werden oder den
Toaster beschädigen.
9. Wenn das Kabel des Toasters defekt ist, können NUR professionelle
Techniker es durch ein Spezialkabel austauschen. Bitte beachten Sie dies.
Pflege und Reinigung
1. Ziehen Sie das Netzkabel ab und stellen Sie sicher, dass das Produkt
vollständig abgekühlt ist. Anschließend reinigen und sammeln Sie es.
2. Reinigen Sie die Kochfläche mit einem weichen Tuch oder Schwamm,
der mit einem milden Reinigungsmittel angefeuchtet ist.
3. Bitte verwenden Sie zum Reinigen keine Drahtbürste, harte Bürste oder
andere ätzende Flüssigkeiten, um eine Beschädigung der

- 7 -
Oberflächenbeschichtung zu vermeiden.
4. Reinigen Sie das Produkt niemals, indem Sie es mit Wasser besprühen
oder in Wasser eintauchen.
Sondererklärung
1. Der gesamte Inhalt dieser Informationen wurde sorgfältig geprüft. Sollte
es aufgrund des Drucks und des Inhalts zu Missverständnissen kommen,
behält sich unser Unternehmen das Recht auf abschließende
Erläuterungen vor.
2. Im Falle einer technischen Verbesserung werden wir ohne vorherige
Ankündigung neue Spezifikationen in die Anleitung aufnehmen. Wenn sich
das Aussehen des Produkts oder die Farbe ändert, stellen Sie bitte das
Objekt als Standard ein.
RICHTIGE ENTSORGUNG
Dieses Produkt unterliegt den Bestimmungen der europäischen
Richtlinie 2012/19/EU. Das Symbol einer durchgestrichenen
Mülltonne weist darauf hin, dass das Produkt in der
Europäischen Union einer getrennten Müllsammlung bedarf.
Dies gilt für das Produkt und alle Zubehörteile, die mit diesem
Symbol gekennzeichnet sind. Als solche gekennzeichnete Produkte dürfen
nicht über den normalen Hausmüll entsorgt werden, sondern müssen an
einer Sammelstelle für das Recycling von Elektro- und Elektronikgeräten
abgegeben werden.
Adresse : Baoshanqu Shuangchenglu 803long 11hao 1602A-1609shi
Shanghai
In die USA importiert: Sanven Technology Ltd. Suite 250, 9166 Anaheim
Place, Rancho Cucamonga, CA 91730

- 8 -
REP
UK
Pooledas Group Ltd
Unit 5 Albert Edward House, The Pavilions
Preston, United Kingdom
REP
EC
SHUNSHUN GmbH
Römeräcker 9 Z2021, 76351
Linkenheim-Hochstetten, Germany
Hergestellt in China


- 2 -
Tecnico Supporto e certificato di garanzia elettronica www.vevor.com/support
TRASPORTATORE ELETTRICO
TOSTAPANE
MODELLO: TT-150 TT-300 TT-450
We continue to be committed to provide you tools with competitive price.
"Save Half", "Half Price" or any other similar expressions used by us only represents an
estimate of savings you might benefit from buying certain tools with us compared to the major
top brands and does not necessarily mean to cover all categories of tools offered by us. You
are kindly reminded to verify carefully when you are placing an order with us if you are
actually saving half in comparison with the top major brands.

- 3 -

- 1 -
MODELLO: TT-150 TT-300 TT-450
Have product questions? Need technical support? Please feel free to
contact us:
Technical Support and E-Warranty Certificate
www.vevor.com/support
NEED HELP? CONTACT US!
This is the original instruction, please read all manual instructions
carefully before operating. VEVOR reserves a clear interpretation of our
user manual. The appearance of the product shall be subject to the
product you received. Please forgive us that we won't inform you again if
there are any technology or software updates on our product.
ELECTRIC CONVEYOR TOASTER
- 2 -
Specifiche del tostapane per diversi modelli:
Modell
o
Region
e
Capacità
(fette/all'ora)
Misurare
(mm)
Voltaggio,
Frequenza
(V, Hz)
Energi
a
(w)
TT-150
Stati
Uniti
d'Amer
ica
150-180
735*285*435
120, 60
1300
IO
150-180
735*285*435
220-240, 50/60
1300
TT-300
Stati
Uniti
d'Amer
ica
300-350
735*365*435
120, 60
1770
IO
300-350
735*365*435
220-240, 50/60
2200
TT-450
Stati
Uniti
d'Amer
ica
450-500
735*465*415
120, 60
1770
IO
450-500
735*465*435
220-240, 50/60
2600
Nome dei componenti:
A. _ Inserimento rete: metti il pane in rete
B. _ Spazzatura vassoio: per riporre la spazzatura durante produrre

- 3 -
C. _ Spia di alimentazione (verde): la macchina funziona bene Quando
l'alimentazione è accesa.
D. _ Pulsante velocità: regolazione della velocità della rete a catena
E. _ Pulsante ingranaggio: per regolare la temperatura del pane.
F. _ Vassoio per il pane sul lato anteriore: il cibo scorre verso il lato
anteriore dopo la cottura
G. _ Vassoio per il pane sul retro: il cibo scivola sul lato posteriore dopo la
cottura
PRECAUZIONI IMPORTANTI :
Quando si utilizza l'apparecchio elettrico, è necessario seguire sempre le
precauzioni di base per la sicurezza nell'ambiente. Leggere le istruzioni.
1. Si prega di leggere attentamente le istruzioni pertinenti prima di
utilizzare i prodotti.
2. Questo apparecchio può essere utilizzato da bambini di età pari o
superiore a 8 anni e da persone con ridotte capacità fisiche, sensoriali o
mentali o con mancanza di esperienza e conoscenza se hanno ricevuto
supervisione o istruzioni sull'uso sicuro dell'apparecchio e ne
comprendono i pericoli. I bambini non devono giocare con l'apparecchio.
Pulizia e bambini non devono effettuare la manutenzione da parte
dell'utente a meno che non abbiano più di 8 anni e siano supervisionati.
3. Tenere l'apparecchio e il cavo fuori dalla portata dei bambini di età
inferiore a 8 anni.
3. Se il cavo di alimentazione è danneggiato, deve essere sostituito dal
produttore, dal suo agente di assistenza o da persone similmente
qualificate per evitare pericoli.
4. ATTENZIONE: superfici calde. Non toccare le superfici calde. Utilizzare
maniglie o manopole. Non lasciare che il cavo penda dal bordo di un tavolo
o da una superficie calda.
5. Per proteggersi dalle scosse elettriche, non immergere il cavo, le spine o
l'alloggiamento in acqua o altri liquidi.
6 . Si prega di non condividere la stessa potenza e altri apparecchi ad alta
potenza per evitare sovraccarichi e causare altri pericoli.

- 4 -
7 . Non toccare mai la piastra o le zone circostanti mentre il prodotto è in
funzione o semplicemente chiuderla perché è molto calda, potrebbe
provocare ustioni.
8 . Se c'è un bambino vicino alla macchina, prestare particolare attenzione
all'utilizzo del prodotto, non lasciare i bambini soli e posizionare il prodotto
a portata di mano del bambino.
9 . Non consentire l'utilizzo del prodotto incustodito.
10. Si prega di non contattare la linea elettrica con oggetti appuntiti e
superfici calde, evitando di danneggiare la linea elettrica.
11 . Controllare sempre la linea di alimentazione e la spina se danneggiate,
smettere di usarla quando compaiono segni di danno, quindi cercare un
operatore professionista per la riparazione o la sostituzione.
12 . Non danneggiare , piegare, allungare eccessivamente, torcere la linea
elettrica e non appoggiare oggetti pesanti sulla linea elettrica né
schiacciare la linea elettrica.
13 . Dopo averlo utilizzato, la manopola del termostato deve essere ruotata
in posizione "O", quindi staccare la spina dalla presa, per evitare il
verificarsi di perdite o shock da invecchiamento dell'isolamento.
1 4 . Il prodotto deve essere installato in un luogo asciutto, pulito e ben
ventilato e posizionato in piano.
1 5 . Per garantire la sicurezza, il prodotto deve essere collegato a terra e
installare un interruttore di dispersione, garantire la sicurezza personale,
altrimenti non deve essere utilizzato.
1 6 . Si prega di staccare la spina e finché il prodotto non si è
completamente raffreddato prima di spostarlo, controllarlo o pulirlo.
17 . _ Non inserire o scollegare la spina con le mani bagnate, evitando il
rischio di scosse elettriche.
18. Se si utilizza una prolunga più lunga:
1) La potenza elettrica indicata sul gruppo cavo di alimentazione o sulla
prolunga deve essere almeno pari alla potenza elettrica dell'apparecchio;
2) Il cavo di alimentazione deve essere disposto in modo tale da non
pendere dal tavolo o dalla scrivania per evitare che i bambini lo tirino o
inciampino involontariamente.

- 5 -
19. Se l'apparecchio è dotato di messa a terra, il cavo di prolunga
deve essere a 3 conduttori collegati a terra.
a) Utilizzare un cavo di alimentazione corto per ridurre il rischio derivante
dall'impigliarsi o dall'inciampare in un cavo più lungo.
b) Sono disponibili prolunghe più lunghe che possono essere utilizzate
prestando attenzione al loro utilizzo.
c) Se si utilizza una prolunga più lunga:
1) Il valore elettrico indicato del set di cavi o della prolunga deve essere
almeno pari alla potenza elettrica dell'apparecchio; E
2) Il cavo deve essere sistemato in modo che non penda dal piano di
lavoro o piano del tavolo dove i bambini possono tirarlo o inciamparvi
involontariamente.
Se l'apparecchio è del tipo con messa a terra, la prolunga deve essere un
cavo a 3 fili con messa a terra.
CONSERVA QUESTE ISTRUZIONI
Nota per il primo utilizzo:
1. Prima di utilizzare la macchina, verificare se l'alimentazione della
macchina è conforme a quella locale o meno.
2. La spia di alimentazione si accende dopo aver collegato l'alimentazione,
premere D sulla marcia "3" (nota:
La rete a catena funzionerà più velocemente se il colore è più chiaro).
Si prega di ruotare il pulsante su "pane" sul lato destro della macchina,
quindi il calore arriverà da entrambi i tubi di riscaldamento superiore e
inferiore, si riscalderà gradualmente.
La temperatura interna del tostapane raggiungerà 284 ℃ in 12 minuti dopo
aver inserito il pane, quindi la temperatura sarà costante a 284 ℃.
3. La macchina deve essere preriscaldata per 10-12 minuti, quindi cuocere
1-2 fette di pane per testarle e controllare se il colore del pane è ok o no,
se il colore è troppo chiaro e si desidera un colore più scuro, si prega di
regolare D più di “3” marce (nota: la rete di catene funzionerà più
lentamente se il colore della rottura è più scuro). Dopo aver regolato la
velocità della rete a catena, inserire il pane nella rete a catena, il pane

- 6 -
verrà spostato all'interno della macchina quando la rete a catena è in
movimento.
4. Il pane scivolerà nel vassoio del pane sul lato anteriore del braciere.
5. C'è un vassoio per il pane sul lato posteriore sul retro del tostapane, si
prega di abbassare il gancio del vassoio posteriore, il pane scivolerà sul
vassoio del pane sul lato posteriore, si prega di posizionare il gancio del
vassoio posteriore verso l'alto dopo aver preso il pane.
6. Si prega di regolare la marcia in posizione “BUNS”, quindi solo il tubo di
riscaldamento superiore funzionerà durante la cottura del pane al vapore ,
si prega di regolare la marcia in posizione “STBY” quando è necessaria
solo la funzione di riscaldamento.
7. Ruotare il pulsante in posizione "OFF" e staccare la spina.
8. Si prega di non utilizzare la macchina per riscaldare cibi con zucchero,
altrimenti il cibo diventerà liquido dopo il riscaldamento o danneggerà il
tostapane.
9. Se il cavo del tostapane è rotto, SOLO gli ingegneri professionisti
possono cambiarlo con un cavo specializzato, si prega di notare.
Cura e pulizia
1. Scollegare il cavo di alimentazione e assicurarsi che il prodotto sia
completamente raffreddato, quindi procedere alla pulizia e al ritiro.
2. Pulire la superficie di cottura con un panno morbido o una spugna
inumidita con un detergente delicato.
3. Non utilizzare spazzole metalliche, spazzole rigide o altri liquidi corrosivi
per pulirlo, evitando di danneggiare il rivestimento superficiale.
4. Non pulire mai il prodotto spruzzando acqua e immergendolo in acqua.
Dichiarazione speciale
1. Tutti i contenuti di queste informazioni sono stati controllati attentamente,
in caso di malintesi a causa della stampa e del contenuto, la nostra
azienda si riserva il diritto di spiegazioni finali.
2. In caso di miglioramenti tecnici, inseriremo nuove specifiche nelle
istruzioni, senza preavviso. Se l'aspetto del prodotto o il colore cambiano,
si prega di rendere l'oggetto come standard.
- 7 -
CORRETTO SMALTIMENTO
Questo prodotto è soggetto alle disposizioni della Direttiva
europea 2012/19/UE. Il simbolo del bidone della spazzatura
barrato indica che nell'Unione Europea il prodotto richiede la
raccolta differenziata dei rifiuti. Ciò vale per il prodotto e tutti gli
accessori contrassegnati da questo simbolo. I prodotti
contrassegnati come tali non possono essere smaltiti con i normali rifiuti
domestici, ma devono essere portati in un punto di raccolta per il riciclaggio
di dispositivi elettrici ed elettronici.
Indirizzo : Baoshanqu Shuangchenglu 803long 11hao 1602A-1609shi
Shanghai
Importato negli Stati Uniti: Sanven Technology Ltd. Suite 250, 9166
Anaheim Place, Rancho Cucamonga, CA 91730
REP
UK
Pooledas Group Ltd
Unit 5 Albert Edward House, The Pavilions
Preston, United Kingdom
REP
EC
SHUNSHUN GmbH
Römeräcker 9 Z2021, 76351
Linkenheim-Hochstetten, Germany
Prodotto in Cina


- 2 -
Técnico Soporte y certificado de garantía electrónica www.vevor.com/support
TRANSPORTADOR ELECTRICO MODELO
TOSTADORA
: TT-150 TT-300 TT-450
We continue to be committed to provide you tools with competitive price.
"Save Half", "Half Price" or any other similar expressions used by us only represents an
estimate of savings you might benefit from buying certain tools with us compared to the major
top brands and does not necessarily mean to cover all categories of tools offered by us. You
are kindly reminded to verify carefully when you are placing an order with us if you are
actually saving half in comparison with the top major brands.

- 3 -

- 1 -
MODELO: TT-150 TT-300 TT-450
Have product questions? Need technical support? Please feel free to
contact us:
Technical Support and E-Warranty Certificate
www.vevor.com/support
NEED HELP? CONTACT US!
This is the original instruction, please read all manual instructions
carefully before operating. VEVOR reserves a clear interpretation of our
user manual. The appearance of the product shall be subject to the
product you received. Please forgive us that we won't inform you again if
there are any technology or software updates on our product.
ELECTRIC CONVEYOR TOASTER
- 2 -
Especificaciones de la tostadora para diferentes
modelos:
Model
o
Región
Capacidad
(rebanadas/
por hora)
Tamaño
(mm)
voltaje,
frecuencia
(V,Hz)
Fuerza
(w)
TT-150
EE.UU
150-180
735*285*435
120, 60
1300
I
150-180
735*285*435
220-240, 50/60
1300
TT-300
EE.UU
300-350
735*365*435
120, 60
1770
I
300-350
735*365*435
220-240, 50/60
2200
TT-450
EE.UU
450-500
735*465*415
120, 60
1770
I
450-500
735*465*435
220-240, 50/60
2600
Nombre de los Componentes:
Un . Ingresando red: Pon pan en la red
B. _ Basura bandeja: Para poner la basura durante productor
C. _ Luz de encendido (verde): la máquina funciona bien Cuando hay
energía.
D. _ Botón de velocidad: ajuste de la velocidad de la red de cadena
mi . Botón de engranaje: Para ajustar la temperatura del pan.

- 3 -
F. _ Bandeja de pan frontal: los alimentos se deslizan hacia el frente
después de hornear
G. _ Bandeja de pan en la parte posterior: los alimentos se deslizan hacia
la parte posterior después de hornear
SALVAGUARDIAS IMPORTANTES :
Al utilizar el aparato eléctrico, siempre se deben seguir las precauciones
básicas de seguridad durante el remolque. Lea las instrucciones.
1. Lea atentamente las instrucciones pertinentes antes de utilizar los
productos.
2. Este aparato puede ser utilizado por niños de 8 años o más y personas
con capacidades físicas, sensoriales o mentales reducidas o con falta de
experiencia y conocimiento si han recibido supervisión o instrucciones
sobre el uso seguro del aparato y comprenden los peligros. Los niños no
deben jugar con el aparato. La limpieza y los niños no deberán realizar
mantenimiento por parte del usuario a menos que sean mayores de 8 años
y estén supervisados.
3. Mantenga el aparato y el cable fuera del alcance de niños menores de 8
años.
3. Si el cable de alimentación está dañado, debe ser reemplazado por el
fabricante, su agente de servicio o personas igualmente calificadas para
evitar riesgos.
4. PRECAUCIÓN: Superficies calientes. No toque superficies calientes.
Utilice manijas o perillas. No deje que el cable cuelgue del borde de una
mesa o superficie caliente.
5. Para protegerse contra descargas eléctricas, no sumerja el cable, los
enchufes o la carcasa en agua u otro líquido.
6 . No comparta la misma energía con otros aparatos de alta potencia para
evitar sobrecargas y causar otros peligros.
7 . Nunca toque la placa o sus alrededores mientras los productos estén
funcionando o simplemente cerca porque están muy calientes, podría
provocar quemaduras.

- 4 -
8 . Si tiene un niño cerca de la máquina, tenga especial cuidado al utilizar
el producto, no deje que los niños estén solos y coloque el producto en la
mano del bebé al que pueda alcanzar.
9 . No permita que el producto se utilice sin supervisión.
10. No contacte la línea eléctrica con objetos afilados ni superficies
calientes, evitando dañar la línea eléctrica.
11 . Siempre verifique la línea eléctrica y el enchufe si están dañados, deje
de usarlos una vez que haya signos de daño y luego busque un trabajador
profesional para repararlos o reemplazarlos.
12 . No dañe , doble excesivamente, estire, tuerza la línea eléctrica ni
coloque objetos pesados sobre la línea eléctrica ni la corte.
13 . Después de usarlo, la perilla del termostato debe girarse a la posición
"O" y luego desconectar el enchufe del tomacorriente para evitar fugas o
daños por envejecimiento del aislamiento.
1 4 . El producto debe instalarse en un lugar seco, limpio y bien ventilado y
colocarse en una posición nivelada.
1 5 . Para garantizar la seguridad, el producto debe estar conectado a
tierra e instalar el interruptor de fuga para garantizar la seguridad personal;
de lo contrario, no se utilizará.
1 6 . Desenchufe el producto y desenchufelo por completo antes de
moverlo, revisarlo o limpiarlo hasta que se enfríe por completo.
1 7 . No inserte ni desenchufe el enchufe con las manos mojadas, evitando
el riesgo de descarga eléctrica.
18. Si se utiliza un cable de extensión más largo:
1) La clasificación eléctrica marcada del grupo de cables de alimentación o
del cable de extensión debe ser al menos tan grande como la clasificación
eléctrica del aparato;
2) El cable de alimentación deberá estar dispuesto de manera que no
cuelgue de la mesa o escritorio para evitar que los niños tiren o tropiecen
involuntariamente.
19. Si el aparato está conectado a tierra, el cable de extensión deberá
ser de 3 núcleos.
a) Se debe utilizar un cable de alimentación corto para reducir el riesgo de

- 5 -
enredarse o tropezar con un cable más largo.
b) Hay disponibles cables de extensión más largos que pueden usarse si
se tiene cuidado al usarlos.
c) Si se utiliza un cable de extensión más largo:
1) La tensión eléctrica marcada del cable o cable de extensión debe ser al
menos tan grande como la clasificación eléctrica del aparato; y
2) El cable debe colocarse de manera que no cuelgue sobre la encimera o
mesa donde los niños puedan tirar de ella o tropezarse sin querer.
Si el aparato es del tipo con conexión a tierra, el cable de extensión debe
ser un cable de 3 hilos con conexión a tierra.
GUARDA ESTAS INSTRUCCIONES
Nota para el primer uso:
1. Compruebe si la potencia de la máquina cumple con la potencia local o
no antes de usar la máquina.
2. La luz de encendido se enciende después de conectar la alimentación,
presione D para cambiar a “3” (nota:
La red de cadenas funcionará más rápido si el color es más claro).
Gire el botón para “pan” en el lado derecho de la máquina, luego el calor
provendrá de los tubos de calentamiento superior e inferior y se calentará
gradualmente.
La temperatura interior de la tostadora alcanzará los 284 ℃ en 12 minutos
cuando se haya colocado el pan dentro, luego la temperatura se
mantendrá constante en 284 ℃.
3. La máquina debe precalentarse de 10 a 12 minutos, luego hornear 1 o 2
rebanadas de pan para probar y verificar si el color del pan está bien o no,
si el color es demasiado claro y desea un color más oscuro, ajuste D más
de “3” marchas (nota: la red de la cadena funcionará más lentamente si el
color de la rotura es más oscuro). Después de ajustar la velocidad de la
red de la cadena, coloque el pan en la red de la cadena, el pan se moverá
dentro de la máquina cuando la red de la cadena se esté moviendo.
4. El pan se deslizará hacia la bandeja de pan del frente desde la olla.
5. Hay una bandeja de pan en la parte posterior de la tostadora, coloque el

- 6 -
gancho de la bandeja posterior hacia abajo, el pan se deslizará hacia la
bandeja de pan de la parte posterior, coloque el gancho de la bandeja
posterior hacia arriba después de recibir el pan.
6. Ajuste el engranaje a la posición "BUNS", luego solo funcionará el tubo
de calentamiento superior al hornear pan al vapor , ajuste el engranaje a la
posición "STBY" cuando solo necesite la función de calentamiento.
7. Gire el botón a la posición "OFF" y desconecte el enchufe.
8. No utilice la máquina para calentar alimentos con azúcar o los alimentos
se volverán líquidos después de calentarlos o dañarán la tostadora.
9. Si el cable de la tostadora está roto, SÓLO los ingenieros profesionales
pueden cambiarlo con un cable especializado, tenga en cuenta.
Cuidado y Limpieza
1. Desenchufe el cable de alimentación y asegúrese de que el producto se
enfríe por completo, luego limpie y recoja.
2. Limpiar la superficie de cocción con un paño suave o una esponja
humedecida en un detergente suave.
3. No utilice cepillos de alambre, cepillos rígidos u otros líquidos corrosivos
para limpiarlo, evitando dañar el revestimiento de la superficie.
4. Nunca limpie el producto rociándolo con agua y sumergiéndolo en agua.
Declaración especial
1. Todo el contenido de esta información ha sido revisado cuidadosamente,
si hay algún malentendido debido a la impresión y el contenido, nuestra
empresa se reservará el derecho de dar explicaciones finales.
2. Si hay una mejora técnica, compilaremos nuevas especificaciones en
las Instrucciones, sin previo aviso. Si la apariencia del producto o el color
cambian, haga que el objeto sea el estándar.
ELIMINACIÓN CORRECTA
Este producto está sujeto a las disposiciones de la Directiva
europea 2012/19/UE. El símbolo que muestra un contenedor con
ruedas tachado indica que el producto requiere recogida
selectiva de basura en la Unión Europea. Esto se aplica al
- 7 -
producto y a todos los accesorios marcados con este símbolo. Los
productos marcados como tales no podrán desecharse junto con la basura
doméstica normal, sino que deberán llevarse a un punto de recogida para
el reciclaje de aparatos eléctricos y electrónicos.
Dirección : Baoshanqu Shuangchenglu 803long 11hao 1602A-1609shi
Shanghai
Importado a EE. UU.: Sanven Technology Ltd. Suite 250, 9166 Anaheim
Place, Rancho Cucamonga, CA 91730
REP
UK
Pooledas Group Ltd
Unit 5 Albert Edward House, The Pavilions
Preston, United Kingdom
REP
EC
SHUNSHUN GmbH
Römeräcker 9 Z2021, 76351
Linkenheim-Hochstetten, Germany
Hecho en China


- 2 -
Techniczny Certyfikat wsparcia i e-gwarancji www.vevor.com/support
PRZENOŚNIK ELEKTRYCZNY TOSTER
MODEL: TT-150 TT-300 TT-450
We continue to be committed to provide you tools with competitive price.
"Save Half", "Half Price" or any other similar expressions used by us only represents an
estimate of savings you might benefit from buying certain tools with us compared to the major
top brands and does not necessarily mean to cover all categories of tools offered by us. You
are kindly reminded to verify carefully when you are placing an order with us if you are
actually saving half in comparison with the top major brands.

- 1 -
MODEL: TT-150 TT-300 TT-450
Have product questions? Need technical support? Please feel free to
contact us:
Technical Support and E-Warranty Certificate
www.vevor.com/support
NEED HELP? CONTACT US!
This is the original instruction, please read all manual instructions
carefully before operating. VEVOR reserves a clear interpretation of our
user manual. The appearance of the product shall be subject to the
product you received. Please forgive us that we won't inform you again if
there are any technology or software updates on our product.
ELECTRIC CONVEYOR TOASTER

- 2 -
Specyfikacja tostera dla różnych modeli:
Model
Region
Pojemność
(plastry/na
godzinę)
Rozmiar
(mm)
Napięcie,
częstotliwość
(V, Hz)
Moc
(w)
TT-150
USA
150-180
735*285*435
120, 60
1300
I
150-180
735*285*435
220-240, 50/60
1300
TT-300
USA
300-350
735*365*435
120, 60
1770
I
300-350
735*365*435
220-240, 50/60
2200
TT-450
USA
450-500
735*465*415
120, 60
1770
I
450-500
735*465*435
220-240, 50/60
2600
Nazwa komponentów:
A. _ Wprowadzanie sieci: Połóż chleb w siatce
B. _ Śmieci taca: Do odkładania śmieci podczas produkować
C. _ Lampka zasilania (zielona): Maszyna działa dobrze Gdy zasilanie jest
włączone.
D. _ Przycisk prędkości: regulacja prędkości sieci łańcuchowej
E. _ Przycisk zmiany biegów: do regulacji temperatury chleb.
F. _ Taca na chleb z przodu: Po upieczeniu żywność przesuwa się na
przód

- 3 -
G. _ Tylna blacha na chleb: Po upieczeniu żywność przesuwa się na tylną
stronę
WAŻNE ZABEZPIECZENIA :
Podczas korzystania z urządzenia elektrycznego należy zawsze
przestrzegać podstawowych środków ostrożności dotyczących obsługi.
Przeczytaj instrukcje.
1. Przed użyciem produktów prosimy o uważne przeczytanie odpowiednich
instrukcji.
2. To urządzenie może być używane przez dzieci w wieku 8 lat i starsze
oraz osoby o ograniczonych zdolnościach fizycznych, sensorycznych lub
umysłowych lub nieposiadające doświadczenia i wiedzy, jeśli znajdują się
pod nadzorem lub zostały poinstruowane na temat bezpiecznego
użytkowania urządzenia i rozumieją zagrożenia. Dzieciom nie wolno bawić
się urządzeniem. Czyszczenie i dzieci nie powinny wykonywać czynności
konserwacyjnych przez użytkownika, chyba że mają więcej niż 8 lat i są
pod nadzorem.
3. Trzymaj urządzenie i przewód poza zasięgiem dzieci w wieku poniżej 8
lat.
3. Jeśli przewód zasilający jest uszkodzony, musi go wymienić producent,
jego agent serwisowy lub podobnie wykwalifikowana osoba, aby uniknąć
zagrożenia.
4. UWAGA: Gorące powierzchnie. Nie dotykaj gorących powierzchni.
Używaj uchwytów lub gałek. Nie pozwól, aby przewód zwisał z krawędzi
stołu lub gorącej powierzchni.
5. Aby zabezpieczyć się przed porażeniem prądem, nie zanurzaj przewodu,
wtyczek ani obudowy w wodzie lub innym płynie.
6 . Nie używaj tej samej mocy i innych urządzeń o dużej mocy, aby
zapobiec przeciążeniu i spowodować inne zagrożenia.
7 . Nigdy nie dotykaj płyty ani jej okolic, gdy produkty działają lub po prostu
je zamykają, ponieważ są bardzo gorące, może to spowodować oparzenia.
8 . Jeśli w pobliżu urządzenia znajduje się dziecko, należy zachować
szczególną ostrożność podczas korzystania z produktu, nie zostawiać
dzieci samych i umieścić produkt w zasięgu ręki dziecka.

- 4 -
9 . Nie pozwalaj na używanie produktu bez nadzoru.
10. Nie dotykaj linii energetycznej ostrymi przedmiotami i gorącymi
powierzchniami, aby uniknąć uszkodzenia linii energetycznej.
11 . Zawsze sprawdzaj przewód zasilający i wtyczkę, jeśli są uszkodzone,
przestań ich używać, gdy pojawią się oznaki uszkodzenia, a następnie
poszukaj profesjonalnego pracownika w celu naprawy lub wymiany.
12 . Nie uszkadzaj, nie zginaj nadmiernie, nie rozciągaj, nie skręcaj linii
energetycznej, nie kładź na niej ciężkich przedmiotów ani nie ściskaj linii
energetycznej.
13 . Po jego użyciu należy ustawić pokrętło termostatu w pozycji „O”, a
następnie wyciągnąć wtyczkę z gniazdka, aby uniknąć wystąpienia
wycieku lub szoku związanego ze starzeniem się izolacji.
1 4 . Produkt należy zainstalować w suchym, czystym, dobrze
wentylowanym miejscu i ustawić w pozycji poziomej.
1 5 . Aby zapewnić bezpieczeństwo, produkt musi być uziemiony i
zainstalować wyłącznik upływowy, zapewnić bezpieczeństwo osobiste, w
przeciwnym razie nie będzie używany.
1 6 . Przed przeniesieniem należy wyjąć wtyczkę i poczekać, aż produkt
całkowicie ostygnie, sprawdzić lub wyczyścić.
1 7 . Nie wkładaj ani nie odłączaj wtyczki mokrymi rękami, aby uniknąć
ryzyka porażenia prądem.
18. Jeżeli używany jest dłuższy przedłużacz:
1) Oznaczona moc elektryczna grupy przewodów zasilających lub
przedłużacza powinna być co najmniej tak duża, jak moc elektryczna
urządzenia;
2) Przewód zasilający należy ułożyć w taki sposób, aby nie wisiał na stole
lub biurku, aby zapobiec niezamierzonemu pociągnięciu lub potknięciu się
dzieci.
19. Jeżeli urządzenie jest uziemione, przedłużacz powinien być
uziemiony 3-żyłowo.
a) Należy używać krótkiego przewodu zasilającego, aby zmniejszyć ryzyko
wynikające z zaplątania się lub potknięcia o dłuższy przewód.
b) Dostępne są dłuższe przedłużacze, które można stosować, jeśli

- 5 -
zachowa się ostrożność podczas ich używania.
c) Jeżeli używany jest dłuższy przedłużacz:
1) Oznaczona moc elektryczna zestawu przewodów lub przedłużacza
powinna być co najmniej tak duża, jak wartość znamionowa elektryczna
splotu; I
2) Przewód należy ułożyć w taki sposób, aby nie zwisał z blatu lub blatu,
na którym dzieci mogą go pociągnąć lub przypadkowo się o niego potknąć.
Jeśli urządzenie jest uziemione, przedłużacz powinien być 3-żyłowym
kablem uziemiającym.
ZACHOWAJ TE INSTRUKCJE
Uwaga przy pierwszym użyciu:
1. Przed użyciem urządzenia sprawdź, czy moc urządzenia jest zgodna z
lokalnym zasilaniem.
2. Kontrolka zasilania włącza się po podłączeniu zasilania. Naciśnij D, aby
wybrać bieg „3” (uwaga:
Sieć łańcuchowa będzie działać szybciej, jeśli kolor będzie jaśniejszy).
Proszę przekręcić przycisk do pozycji „chleb” po prawej stronie urządzenia,
wówczas ciepło będzie pochodzić z górnej i dolnej rury grzewczej i
urządzenie będzie się nagrzewać stopniowo.
Temperatura wewnątrz tostera osiągnie 284℃ w ciągu 12 minut po
włożeniu chleba, a następnie temperatura będzie stała na poziomie 284℃.
3. Urządzenie należy rozgrzać przez 10-12 minut, następnie upiec 1-2
kromki chleba do sprawdzenia i sprawdzić, czy kolor chleba jest w
porządku, czy kolor jest za jasny i chcesz uzyskać ciemniejszy kolor,
proszę dostosować D więcej niż „3” biegu (uwaga: sieć łańcuchowa będzie
działać wolniej, jeśli kolor przerwy będzie ciemniejszy). Po dostosowaniu
prędkości sieci łańcuchowej, należy umieścić chleb w sieci łańcuchowej.
Chleb będzie przesuwany wewnątrz maszyny, gdy sieć łańcuchowa będzie
się poruszać.
4. Chleb zsunie się z paleniska na przednią tackę na chleb.
5. Z tyłu tostera znajduje się taca na chleb. Odłóż hak tylnej tacy w dół,
chleb zsunie się na tylną tacę. Po wyjęciu chleba podnieś hak tylnej tacy.

- 6 -
6. Proszę ustawić bieg w pozycji „BUNS”, wówczas podczas pieczenia
chleba na parze będzie działać tylko górna rura grzewcza . Należy ustawić
bieg w pozycji „STBY”, gdy potrzebna jest jedynie funkcja rozgrzewania.
7. Proszę przekręcić przycisk do pozycji „OFF” i wyciągnąć wtyczkę.
8. Nie używaj urządzenia do podgrzewania potraw zawierających cukier,
gdyż po podgrzaniu żywność stanie się płynna lub spowoduje to
uszkodzenie tostera.
9. Jeśli kabel tostera jest uszkodzony, należy pamiętać, że WYŁĄCZNIE
profesjonalni inżynierowie mogą go wymienić na specjalistyczny kabel.
Pielęgnacja i czyszczenie
1. Odłącz kabel zasilający i upewnij się, że produkt całkowicie ostygł, a
następnie wyczyść i zbierz.
2. Czyść powierzchnię kuchenną miękką szmatką lub gąbką zwilżoną
łagodnym detergentem.
3. Do czyszczenia nie używaj szczotki drucianej, sztywnej szczotki ani
innych żrących płynów, aby uniknąć uszkodzenia powłoki
powierzchniowej.
4. Nigdy nie czyść produktu poprzez polewanie wodą i zanurzanie w
wodzie.
Deklaracja Specjalna
1. Cała treść tych informacji została dokładnie sprawdzona. W przypadku
jakichkolwiek nieporozumień związanych z drukiem i treścią, nasza firma
zastrzega sobie prawo do ostatecznych wyjaśnień.
2. W przypadku wprowadzenia ulepszeń technicznych, bez
wcześniejszego powiadomienia, wprowadzimy do Instrukcji nową
specyfikację. W przypadku zmiany wyglądu produktu, koloru prosimy o
wykonanie obiektu w standardzie.
PRAWIDŁOWA UTYLIZACJA
Ten produkt podlega postanowieniom dyrektywy europejskiej
2012/19/UE. Symbol przekreślonego kosza na śmieci oznacza,
że produkt wymaga selektywnej zbiórki śmieci na terenie Unii

- 7 -
Europejskiej. Dotyczy to produktu i wszystkich akcesoriów oznaczonych
tym symbolem. Produktów oznaczonych jako takie nie można wyrzucać
razem ze zwykłymi odpadami domowymi, lecz należy je przekazać do
punktu zbiórki w celu recyklingu urządzeń elektrycznych i elektronicznych.
Adres : Baoshanqu Shuangchenglu 803long 11hao 1602A-1609shi
Szanghaj
Import do USA: Sanven Technology Ltd. Suite 250, 9166 Anaheim Place,
Rancho Cucamonga, CA 91730
REP
UK
Pooledas Group Ltd
Unit 5 Albert Edward House, The Pavilions
Preston, United Kingdom
REP
EC
SHUNSHUN GmbH
Römeräcker 9 Z2021, 76351
Linkenheim-Hochstetten, Germany
M ade W Chinach


- 2 -
Technisch Ondersteuning en e-garantiecertificaat www.vevor.com/support
ELEKTRISCHE TRANSPORTBAND
BROODROOSTER
MODEL: TT-150 TT-300 TT-450
We continue to be committed to provide you tools with competitive price.
"Save Half", "Half Price" or any other similar expressions used by us only represents an
estimate of savings you might benefit from buying certain tools with us compared to the major
top brands and does not necessarily mean to cover all categories of tools offered by us. You
are kindly reminded to verify carefully when you are placing an order with us if you are
actually saving half in comparison with the top major brands.

- 3 -
- 1 -
MODEL: TT-150 TT-300 TT-450
Have product questions? Need technical support? Please feel free to
contact us:
Technical Support and E-Warranty Certificate
www.vevor.com/support
NEED HELP? CONTACT US!
This is the original instruction, please read all manual instructions
carefully before operating. VEVOR reserves a clear interpretation of our
user manual. The appearance of the product shall be subject to the
product you received. Please forgive us that we won't inform you again if
there are any technology or software updates on our product.
ELECTRIC CONVEYOR TOASTER

- 2 -
Specificatie van de broodrooster voor verschillende
modellen:
Model
Regio
Capaciteit
(plakjes/per
uur)
Maat
(mm)
Spanning,
frequentie
(V, Hz)
Stroo
m
(w)
TT-150
VS
150-180
735*285*435
120, 60
1300
I
150-180
735*285*435
220-240, 50/60
1300
TT-300
VS
300-350
735*365*435
120, 60
1770
I
300-350
735*365*435
220-240, 50/60
2200
TT-450
VS
450-500
735*465*415
120, 60
1770
I
450-500
735*465*435
220-240, 50/60
2600
Naam van de componenten:
EEN . Net invoeren: leg brood op het net
B. _ Afval lade: Voor het plaatsen van afval tijdens produceren
C. _ Aan/uit-lampje (groen): Machine werkt goed Wanneer de stroom is
ingeschakeld.
D. _ Snelheidsknop: snelheid van het kettingnetwerk aanpassen
E. _ Versnellingsknop: Voor het aanpassen van de temperatuur van de

- 3 -
brood.
F. _ Broodbak voorzijde: Voedsel schuift na het bakken naar de voorkant
G. _ Broodbakje aan de achterkant: het voedsel schuift na het bakken naar
de achterkant
BELANGRIJKE VOORZORGSMAATREGELEN :
Bij gebruik van het elektrische apparaat moeten altijd
basisvoorzorgsmaatregelen voor de veiligheid worden gevolgd tijdens het
slepen. Lees de instructies.
1. Lees de relevante instructies zorgvuldig door voordat u de producten
gebruikt.
2. Dit apparaat kan worden gebruikt door kinderen van 8 jaar en ouder en
door personen met verminderde fysieke, zintuiglijke of mentale
capaciteiten of een gebrek aan ervaring en kennis, als zij onder toezicht
staan of instructies hebben gekregen over het veilige gebruik van het
apparaat en de gevaren begrijpen. Kinderen mogen niet met het apparaat
spelen. Reiniging en kinderen mogen geen gebruikersonderhoud uitvoeren,
tenzij ze ouder zijn dan 8 jaar en onder toezicht staan.
3. Houd het apparaat en het snoer buiten het bereik van kinderen jonger
dan 8 jaar.
3. Als het netsnoer beschadigd is, moet het worden vervangen door de
fabrikant, zijn serviceagent of vergelijkbaar gekwalificeerde personen om
gevaar te voorkomen.
4. LET OP: Hete oppervlakken. Raak hete oppervlakken niet aan. Gebruik
handgrepen of knoppen. Laat het snoer niet over de rand van een tafel of
een heet oppervlak hangen.
5. Ter bescherming tegen elektrische schokken mag u het snoer, de
stekkers of de behuizing niet onderdompelen in water of een andere
vloeistof.
6 . Deel niet dezelfde stroomvoorziening als andere krachtige apparaten
om overbelasting en andere gevaren te voorkomen.
7 . Raak de plaat of de omgeving ervan nooit aan terwijl de producten in
werking zijn, of sluit ze gewoon omdat ze erg heet zijn, dit kan
brandwonden tot gevolg hebben.

- 4 -
8 . Als u een kind in de buurt van de machine heeft, wees dan extra
voorzichtig bij het gebruik van het product, laat kinderen niet alleen en
plaats het product binnen handbereik.
9 . Zorg ervoor dat het product niet onbeheerd wordt gebruikt.
10. Maak geen contact met de stroomkabel met scherpe voorwerpen en
hete oppervlakken, om beschadiging van de stroomkabel te voorkomen.
11 . Controleer altijd de voedingskabel en de stekker als deze beschadigd
zijn. Stop met het gebruik ervan zodra er tekenen van schade zijn en zoek
vervolgens een professionele vakman om deze te repareren of te
vervangen.
12 . Beschadig , buig, rek en strek de stroomkabel niet, plaats er geen
zware voorwerpen op en knijp niet in de stroomkabel .
13 . Na gebruik moet de thermostaatknop in de "O"-positie worden
gedraaid en vervolgens de stekker uit het stopcontact worden getrokken
om lekkage of isolatieverouderingsschokken te voorkomen.
1 4 . Het product moet op een droge, schone, goed geventileerde locatie
worden geïnstalleerd en op een vlakke plaats worden geplaatst.
1 5 . Om de veiligheid te garanderen, moet het product geaard zijn en de
lekschakelaar installeren, de persoonlijke veiligheid garanderen, anders
mag het niet worden gebruikt.
1 6 . Trek de stekker uit het stopcontact en controleer of reinig totdat het
product volledig is afgekoeld voordat u het verplaatst.
1 7 . Steek de stekker niet in het stopcontact en trek deze er ook niet uit
met natte handen, om het risico op een elektrische schok te vermijden .
18. Als een langere verlengkabel wordt gebruikt:
1) Het aangegeven elektrische vermogen van de netsnoergroep of het
verlengsnoer moet minstens zo groot zijn als het elektrische vermogen van
het apparaat;
2) Het netsnoer moet zo worden geplaatst dat het niet op de tafel of het
bureaublad hangt, om te voorkomen dat kinderen onbedoeld trekken of
struikelen.
19. Als het apparaat geaard is, moet de verlengdraad 3-aderig geaard
zijn.

- 5 -
a) Er moet een kort netsnoer worden gebruikt om het risico te verkleinen
dat u verstrikt raakt in of struikelt over een langer snoer.
b) Er zijn langere verlengsnoeren verkrijgbaar, die gebruikt kunnen worden
als er voorzichtig mee wordt omgegaan.
c) Als een langer verlengsnoer wordt gebruikt:
1) De gemarkeerde elektrische spanning van de snoerset of het
verlengsnoer moet minstens zo hoog zijn als de elektrische capaciteit van
de aansluiting; En
2) Het snoer moet zo worden geplaatst dat het niet over het aanrecht of
over het aanrecht hangt tafelblad waar kinderen aan kunnen trekken of
onbedoeld over kunnen struikelen.
Als het apparaat van het geaarde type is, moet het verlengsnoer een
geaard 3-draads snoer zijn.
BEWAAR DEZE INSTRUCTIES
Opmerking voor het eerste gebruik:
1. Controleer of de stroom van de machine overeenkomt met uw lokale
stroomvoorziening of niet voordat u de machine gebruikt.
2. Het aan/uit-lampje gaat branden nadat de stroom is aangesloten. Druk
op D naar versnelling “3” (opmerking:
Het kettingnetwerk werkt sneller als de kleur lichter is).
Zet de knop op "brood" aan de rechterkant van de machine, dan komt er
warmte uit de bovenste en onderste verwarmingsbuizen, deze zal
geleidelijk opwarmen.
De binnentemperatuur van de broodrooster zal in 12 minuten 284℃
bereiken als er brood in wordt geplaatst, daarna zal de temperatuur
constant zijn op 284℃.
3. De machine moet 10-12 minuten voorverwarmen, bak dan 1-2 sneetjes
brood om te testen en controleer of de kleur van het brood in orde is of niet,
als de kleur te licht is en u een donkerdere kleur wilt, pas dan aan D meer
dan “3” versnelling (let op: kettingnetwerk werkt langzamer als de kleur van
de rem donkerder is). Nadat u de snelheid van het kettingnetwerk hebt
aangepast, plaatst u het brood in het kettingnetwerk. Het brood wordt in de

- 6 -
machine verplaatst wanneer het kettingnetwerk in beweging is.
4. Het brood glijdt vanuit de vuurpot naar de broodbak aan de voorzijde.
5. Er zit een broodbakje aan de achterkant aan de achterkant van de
broodrooster. Plaats de haak van de bakplaat aan de achterkant naar
beneden, het brood schuift naar de broodbak aan de achterkant. Plaats de
haak van de bakplaat aan de achterkant nadat je het brood hebt gehaald.
6. Stel de versnelling in op de “BUNS”-positie, dan werkt alleen de
bovenste verwarmingsbuis bij het bakken van gestoomd brood . Stel de
versnelling in op de “STBY”-positie als je alleen de opwarmfunctie nodig
hebt.
7. Draai de knop naar de “UIT”-positie en trek de stekker uit het
stopcontact.
8. Gebruik de machine niet om voedsel met suiker op te warmen, anders
wordt het voedsel vloeibaar na het verwarmen of beschadigt het de
broodrooster.
9. Als de kabel van de broodrooster kapot is, kunnen ALLEEN
professionele technici deze vervangen met een speciale kabel, houd er
rekening mee.
Onderhoud en reiniging
1. Haal de stekker uit het stopcontact en zorg ervoor dat het product
volledig is afgekoeld, reinig het vervolgens en verzamel het.
2. Reinig het kookoppervlak met een zachte doek of spons bevochtigd met
een mild schoonmaakmiddel.
3. Gebruik geen staalborstel, harde borstel of andere bijtende vloeistoffen
om het schoon te maken, om schade aan de oppervlaktecoating te
voorkomen.
4. Maak het product nooit schoon door er water over te sprenkelen en het
in water onder te dompelen.
Speciale verklaring
1. Alle inhoud van deze informatie is zorgvuldig gecontroleerd. Als er
sprake is van misverstanden vanwege drukwerk en inhoud, behoudt ons
bedrijf zich het recht voor op definitieve uitleg.
- 7 -
2. Als er een technische verbetering is, zullen we zonder voorafgaande
kennisgeving nieuwe specificaties in de instructies opnemen. Als het
uiterlijk van het product of de kleur verandert, maak het object dan als
standaard.
CORRECTE VERWIJDERING
Dit product valt onder de bepalingen van de Europese Richtlijn
2012/19/EU. Het symbool met een doorgestreepte afvalcontainer
geeft aan dat het product in de Europese Unie een aparte
afvalinzameling vereist. Dit geldt voor het product en alle
accessoires die met dit symbool zijn gemarkeerd. Producten die
als zodanig zijn gemarkeerd, mogen niet bij het normale huisvuil worden
weggegooid, maar moeten worden ingeleverd bij een inzamelpunt voor
recycling van elektrische en elektronische apparaten.
Een adres: Baoshanqu Shuangchenglu 803long 11hao 1602A-1609shi
Shanghai
Geïmporteerd naar de VS: Sanven Technology Ltd. Suite 250, 9166
Anaheim Place, Rancho Cucamonga, CA 91730
REP
UK
Pooledas Group Ltd
Unit 5 Albert Edward House, The Pavilions
Preston, United Kingdom
REP
EC
SHUNSHUN GmbH
Römeräcker 9 Z2021, 76351
Linkenheim-Hochstetten, Germany
Gemaakt in China


- 2 -
Teknisk Support och e-garanticertifikat www.vevor.com/support
ELEKTRISK TRANSPORTÖR BRÖDROST
MODELL: TT-150 TT-300 TT-450
We continue to be committed to provide you tools with competitive price.
"Save Half", "Half Price" or any other similar expressions used by us only represents an
estimate of savings you might benefit from buying certain tools with us compared to the major
top brands and does not necessarily mean to cover all categories of tools offered by us. You
are kindly reminded to verify carefully when you are placing an order with us if you are
actually saving half in comparison with the top major brands.

- 1 -
MODELL: TT-150 TT-300 TT-450
Have product questions? Need technical support? Please feel free to
contact us:
Technical Support and E-Warranty Certificate
www.vevor.com/support
NEED HELP? CONTACT US!
This is the original instruction, please read all manual instructions
carefully before operating. VEVOR reserves a clear interpretation of our
user manual. The appearance of the product shall be subject to the
product you received. Please forgive us that we won't inform you again if
there are any technology or software updates on our product.
ELECTRIC CONVEYOR TOASTER
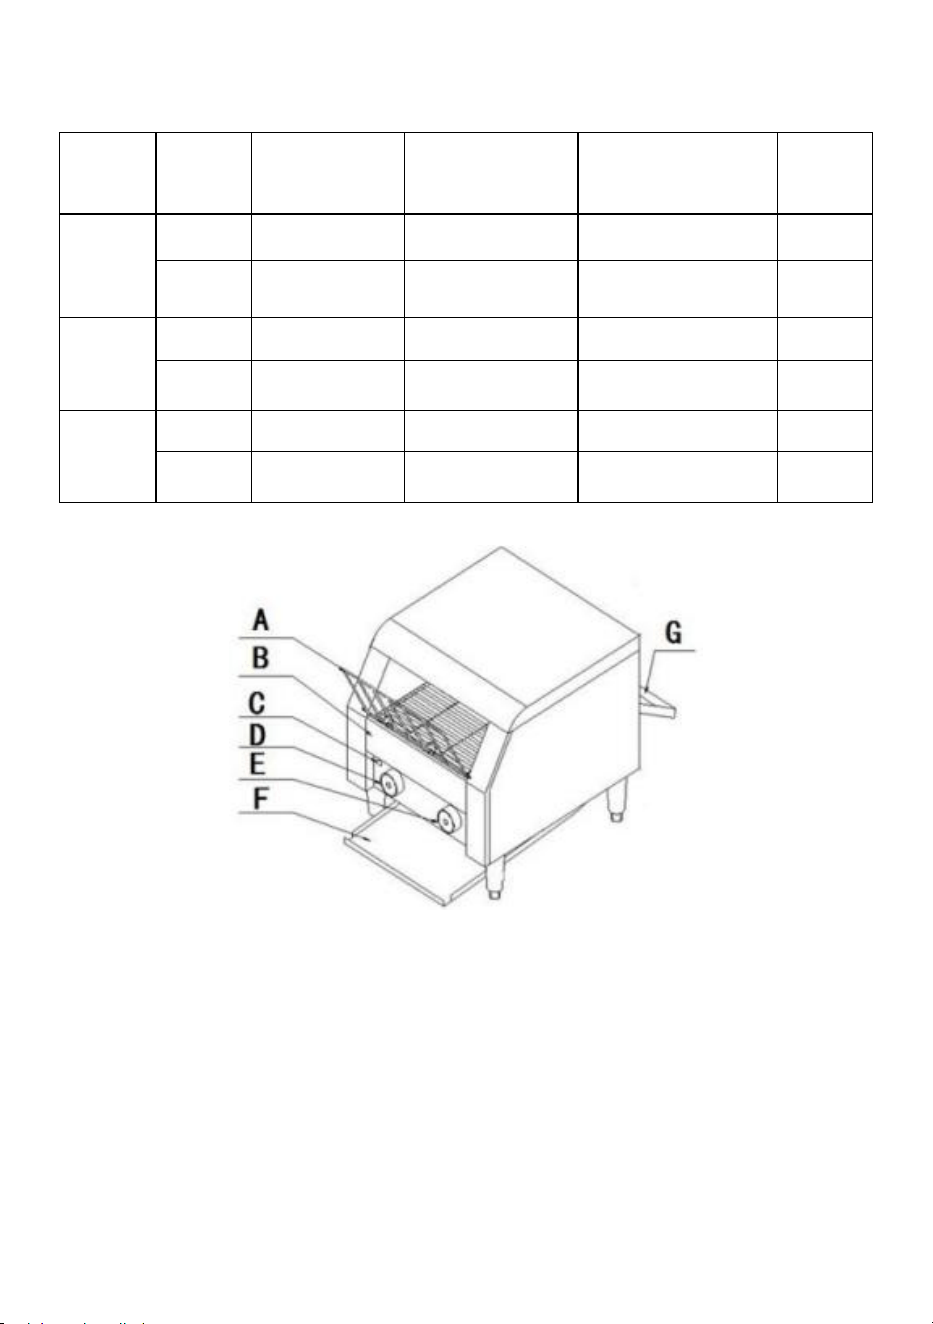
- 2 -
Specifikation av brödrosten för olika modeller:
Modell
Områd
e
Kapacitet
(skivor/per
timme)
Storlek
(mm)
Spänning,
Frekvens
(V, Hz)
Kraft
(w)
TT-150
USA
150-180
735*285*435
120, 60
1300
jag
150-180
735*285*435
220-240, 50/60
1300
TT-300
USA
300-350
735*365*435
120, 60
1770
jag
300-350
735*365*435
220-240, 50/60
2200
TT-450
USA
450-500
735*465*415
120, 60
1770
jag
450-500
735*465*435
220-240, 50/60
2600
Komponenternas namn:
A . Inmatning av nät: Lägg bröd på nätet
B . Skräp bricka: För att lägga skräp under producerar
C . Strömlampa (grön): Maskinen fungerar bra När strömmen är på.
D . Hastighetsknapp: Justera hastigheten på kedjenätverket
E . Växelknapp: För att justera temperaturen på bröd.
F . Brödbricka på framsidan
:
Maten glider till framsidan efter gräddning
G . Baksida brödbricka: Mat glider till baksidan efter gräddning

- 3 -
VIKTIGA SÄKERHETSÅTGÄRDER :
När du använder den elektriska apparaten, bör grundläggande
säkerhetsåtgärder alltid följas inom släpningen. Läs instruktionerna.
1. Läs de relevanta instruktionerna noggrant innan du använder
produkterna.
2. Denna apparat kan användas av barn från 8 år och uppåt och personer
med nedsatt fysisk, sensorisk eller mental förmåga eller bristande
erfarenhet och kunskap om de har fått övervakning eller instruktioner om
att använda apparaten på ett säkert sätt och förstår farorna. Barn får inte
leka med apparaten. Rengöring och barn får inte utföra underhåll av
användaren om de inte är äldre än 8 år och övervakade.
3. Förvara apparaten och sladden utom räckhåll för barn under 8 år.
3. Om nätsladden är skadad måste den bytas ut av tillverkaren, dess
servicerepresentant eller liknande kvalificerade personer för att undvika
fara.
4. VARNING: Heta ytor. Rör inte vid heta ytor. Använd handtag eller
knoppar. Låt inte sladden hänga över kanten på ett bord eller en het yta.
5. För att skydda mot elektriska stötar, doppa inte ner sladden, kontakterna
eller höljet i vatten eller annan vätska.
6 . Vänligen dela inte samma kraft och andra högeffektsapparater för att
förhindra överbelastning och orsaka andra faror.
7 . Rör aldrig vid plattan eller runt om medan produkterna arbetar eller bara
stängs eftersom de är väldigt varma, det kan leda till brännskador.
8 . Om du har ett barn nära maskinen, var extra försiktig med att använda
produkten, låt inte barn vara ensamma och placera produkten i babyhand
kan nå.
9 . Låt inte produkten användas utan uppsikt.
10. Vänligen kontakta inte kraftledningen med vassa föremål och heta ytor,
undvik att skada kraftledningen.
11 . Kontrollera alltid elledningen och kontakten om den är skadad, sluta
använda den när det finns tecken på skada, leta sedan efter en
professionell arbetare för att reparera eller byta ut.
12 . Skada inte , böj inte för mycket, sträck, vrid inte elledningen och lägg
inte tunga föremål på elledningen eller kläm på elledningen.

- 4 -
13 . Efter att ha använt den ska termostatvredet vridas till "O"-läget och
sedan dra ut kontakten ur uttaget för att undvika läckage eller
isolationsåldring.
1 4 . Produkten ska installeras på en torr, ren, välventilerad plats och
placeras i plant läge.
1 5 . För att garantera säkerheten måste produkten vara jordad och
installera läckagebrytaren, säkerställa personlig säkerhet, annars ska den
inte användas.
1 6 . Dra ur kontakten och tills produkten är helt kyld innan du flyttar,
kontrollerar eller städar upp.
1 7 . Sätt inte i eller dra ur kontakten med våta händer, undvik risken för
elektriska stötar.
18. Om en längre förlängningskabel används:
1) Den markerade elektriska märkningen för nätsladdsgruppen eller
förlängningssladden bör vara minst lika stor som apparatens elektriska
märkvärde;
2) Nätsladden ska placeras så att den inte hänger på bordet eller
skrivbordet för att förhindra att barn oavsiktligt drar eller snubblar.
19. Om apparaten är jordad, ska förlängningskabeln jordas med tre
kärnor.
a) En kort nätsladd bör användas för att minska risken för att fastna i eller
snubbla över en längre sladd.
b) Längre förlängningssladdar finns tillgängliga och kan användas om
försiktighet iakttas vid användningen.
c) Om en längre förlängningssladd används:
1) Den markerade elektriska rstingen på sladdsatsen eller
förlängningssladden bör vara minst lika kraftig som apparatens elektriska
märkning; och
2) Sladden bör placeras så att den inte draperas över bänkskivan eller
bordsskiva där den kan dras på av barn eller snubbla över oavsiktligt.
Om apparaten är av jordad typ, bör förlängningssladden vara en 3-trådig
jordad sladd.
SPARA DESSA INSTRUKTIONER

- 5 -
Observera för första gången:
1. Kontrollera om maskinens ström överensstämmer med din lokala ström
eller inte innan du använder maskinen.
2. Strömlampan tänds efter att strömmen anslutits. Tryck på D till
"3"-växeln (observera:
Kedjenätverk fungerar snabbare om färgen är ljusare).
Snälla vrid knappen till "bröd" på höger sida av maskinen, sedan kommer
värmen från både övre och nedre värmerör, den kommer att värmas upp
gradvis.
Innertemperaturen i brödrosten kommer att nå 284 ℃ på 12 minuter när
bröd har lagts in, då kommer temperaturen att vara konstant på 284 ℃.
3. Maskinen ska vara förvärmd från 10-12 minuter, baka sedan 1-2
brödskivor för testning och kontrollera om färgen på brödet är OK eller inte,
om färgen är för ljus och du vill ha mörkare färg, justera. D mer än "3"
växlar (notera: Kedjenätverket fungerar långsammare om färgen på
brytningen är mörkare). Efter att ha justerat hastigheten på kedjenätverket,
lägg gärna brödet till kedjan, brödet flyttas in i maskinen när kedjenätverket
rör sig.
4. Bröd kommer att glida till brödfatet på framsidan från eldgrytan.
5. Det finns baksida brödbricka på baksidan av brödrosten, snälla lägg
kroken på bakfacket ner, brödet kommer att glida till baksidan av
brödbrickan, snälla sätt kroken på baksidan upp efter att du har hämtat
brödet.
6. Snälla justera växeln till "BUNS"-läget, då fungerar bara det övre
värmeröret när du bakar ångat bröd , justera växeln till "STBY"-läget när du
bara behöver uppvärmningsfunktion.
7. Snälla vrid knappen till "OFF"-läget och dra ur kontakten.
8. Använd inte maskinen för att värma upp mat med socker, annars blir
maten flytande efter uppvärmning eller skadar brödrosten.
9. Om kabeln till brödrosten är trasig, kan ENDAST professionella
ingenjörer byta den med specialkabel, notera gärna.
Skötsel och rengöring
- 6 -
1. Koppla ur strömkabeln och se till att produkten är helt kyld, rengör sedan
och samla in den.
2. Rengör matlagningsytan med en mjuk trasa eller svamp fuktad i ett milt
rengöringsmedel.
3. Använd inte stålborste, styv borste eller andra frätande vätskor för att
rengöra den, undvik att skada ytbeläggningen.
4. Rengör aldrig produkten genom att stänka vatten och sänka ner den i
vatten.
Särskild förklaring
1. Allt innehåll i denna information har kontrollerats noggrant, om det finns
något missförstånd på grund av tryckning och innehåll, kommer vårt
företag att förbehålla sig rätten till slutliga förklaringar.
2. Om det finns en teknisk förbättring kommer vi att sammanställa ny
specifikation i instruktionerna, utan föregående meddelande. Om
produktens utseende ändras färg, vänligen gör objektet som standard.
KORREKT AVFALLSHANTERING
Denna produkt omfattas av bestämmelserna i det europeiska
direktivet 2012/19/EU. Symbolen som visar en soptunna korsad
anger att produkten kräver separat sophämtning i EU. Detta
gäller för produkten och alla tillbehör märkta med denna symbol.
Produkter märkta som sådana får inte slängas tillsammans med
vanligt hushållsavfall, utan måste lämnas till en insamlingsplats för
återvinning av elektriska och elektroniska apparater.
En dress: Baoshanqu Shuangchenglu 803long 11hao 1602A-1609shi
Shanghai
Importerad till USA: Sanven Technology Ltd. Suite 250, 9166 Anaheim
Place, Rancho Cucamonga, CA 91730
- 7 -
REP
UK
Pooledas Group Ltd
Unit 5 Albert Edward House, The Pavilions
Preston, United Kingdom
REP
EC
SHUNSHUN GmbH
Römeräcker 9 Z2021, 76351
Linkenheim-Hochstetten, Germany
Tillverkad i Kina