Scan to register
bellakitchenware.com
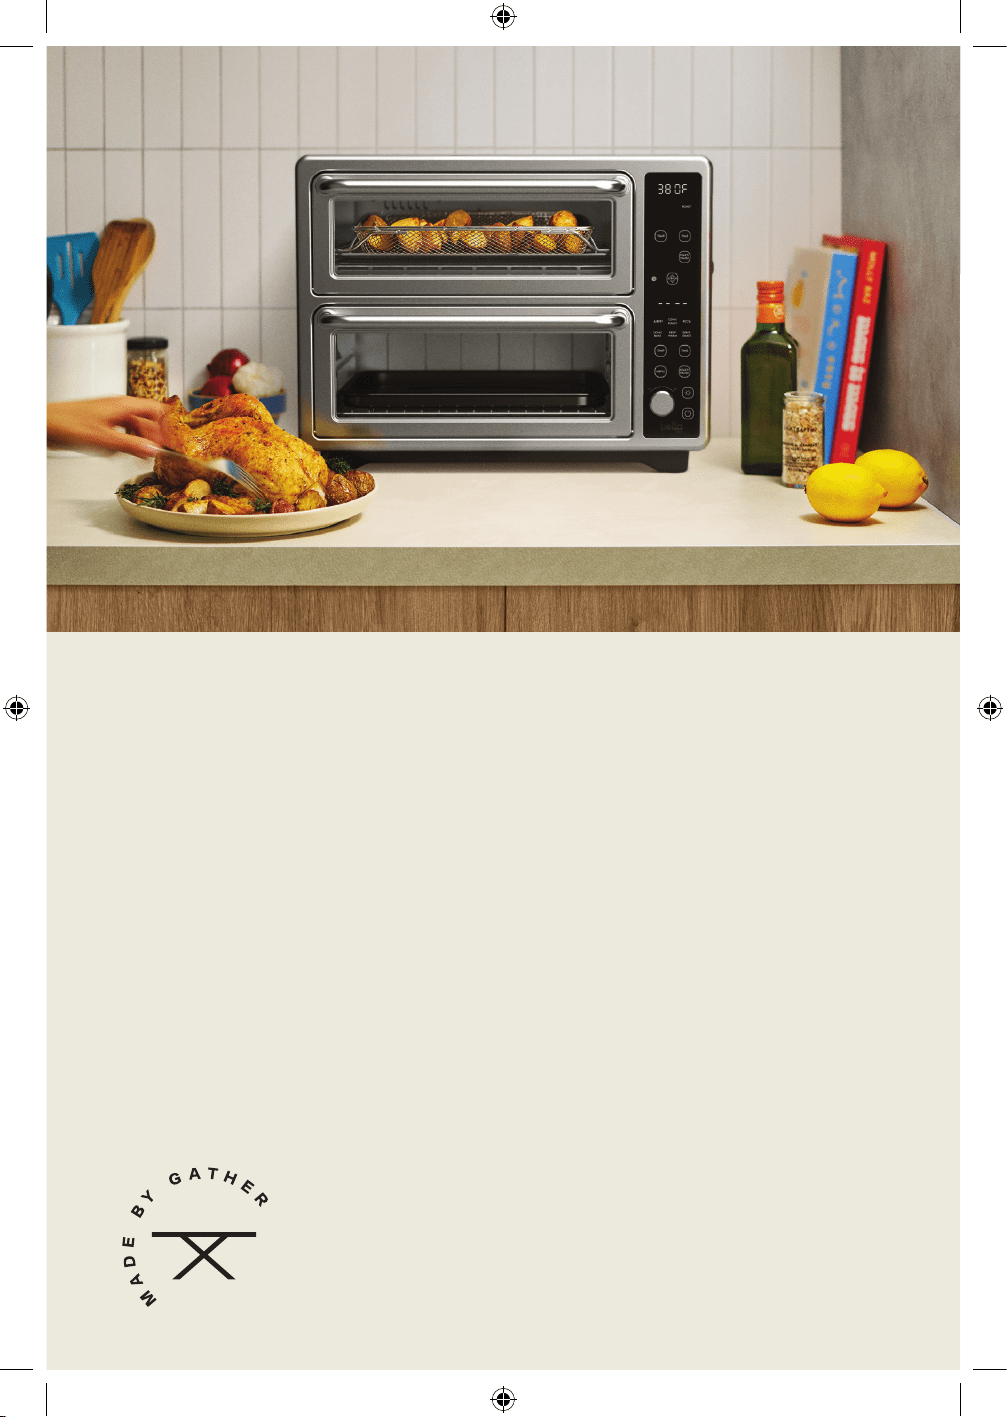
DoubleUp Oven
with Probe Thermometer
Instruction Manual
90209 Bella Pro Double TOV IM V4 R0.indd 190209 Bella Pro Double TOV IM V4 R0.indd 1 2024-04-12 5:45 PM2024-04-12 5:45 PM

2
TABLE OF CONTENTS
IMPORTANT SAFEGUARDS ....................................................................................................................................................3
ADDITIONAL IMPORTANT SAFEGUARDS ........................................................................................................................4
NOTES ON THE PLUG ..............................................................................................................................................................4
NOTES ON THE CORD.............................................................................................................................................................5
PLASTICIZER WARNING .........................................................................................................................................................5
ELECTRIC POWER ......................................................................................................................................................................5
GETTING TO KNOW YOUR DOUBLE OVEN .................................................................................................................. 6
TOUCHSCREEN CONTROL ................................................................................................................................................... 7
FUNCTION CHART................................................................................................................................................................... 7
WEIGHT/SIZE RESTRICTIONS ...............................................................................................................................................8
BEFORE USING FOR THE FIRST TIME .................................................................................................................................8
OPERATING INSTRUCTIONS (UPPER COOKING CHAMBER) ...................................................................................8
OPERATING INSTRUCTIONS (LOWER COOKING CHAMBER) ............................................................................... 9
OPERATING INSTRUCTIONS (TEMPERATURE PROBE) ............................................................................................... 9
USDA COOKING GUIDELINES ...........................................................................................................................................10
USER MAINTENANCE INSTRUCTIONS ..........................................................................................................................10
CARE & CLEANING INSTRUCTIONS ................................................................................................................................ 10
STORING INSTRUCTIONS ...................................................................................................................................................10
LIMITED TWO-YEAR WARRANTY .......................................................................................................................................11
90209 Bella Pro Double TOV IM V4 R0.indd 290209 Bella Pro Double TOV IM V4 R0.indd 2 2024-04-12 5:45 PM2024-04-12 5:45 PM

3
IMPORTANT SAFEGUARDS
When using electrical appliances, basic safety precautions shouldalways
be followed, including the following:
1. READ ALL INSTRUCTIONS.
2. Do not touch hot surfaces. Use handles or knobs.
3. To protect against electrical shock, do not immerse cord, plugs, or appliance
in water or other liquid.
4. This appliance is not intended for use by persons (including children)
with reduced physical, sensory or mental capabilities, or lack of experience
and knowledge, unless they have been given supervision or instruction
concerning use of the appliance by a person responsible for their safety.
5. Close supervision is necessary when any appliance is used by or near children.
6. Unplug from outlet when not in use and before cleaning. Allow toaster oven
to cool before putting on or taking o parts.
7. Do not operate any appliance with a damaged cord or plug or aer
the appliance malfunctions or has been damaged in any manner.
Bring it to a qualied technician for examination, repair or electrical
or mechanical adjustment.
8. The use of accessory attachments not recommended by the appliance
manufacturer may cause injuries.
9. Do not use outdoors.
10. Do not let cord hang over edge of table or counter or touch hot surfaces.
11. Do not place on or near a hot gas or electric burner or in a heated oven.
12. Extreme caution must be used when moving an appliance containing hot oil
or other liquids.
13. To disconnect, press the power button, then remove plug from wall outlet.
14. Do not use appliance for other than intended use.
15. Oversize foods or metal utensils must not be inserted in the toaster oven
as they may create a re or risk of electric shock.
16. A re may occur if the toaster oven is covered or touching ammable material,
including curtains, draperies, walls, and the like, when in operation.
Do not store any item on top of the appliance when in operation.
17. Do not clean with metal scouring pads. Pieces can break o the pad and touch
electrical parts involving a risk of electrical shock.
18. Extreme caution should be exercised when using containers constructed
of other than metal or glass.
19. Do not store any materials, other than manufacturer’s recommended
accessories, in this toaster oven when not in use.
20. Do not place any of the following materials in the toaster oven: paper,
cardboard, plastic, and the like.
21. Do not cover crumb tray or any part of the toaster oven with metal foil.
This will cause overheating of the toaster oven.
22. Use extreme caution when removing the crumb tray or disposing of hot grease.
90209 Bella Pro Double TOV IM V4 R0.indd 390209 Bella Pro Double TOV IM V4 R0.indd 3 2024-04-12 5:45 PM2024-04-12 5:45 PM

4
23. Do not cover the toaster oven with anything that would prevent steam from
escaping. This may cause warping, discolouration, malfunction or even re.
24. To turn o the appliance, press the power button.
ADDITIONAL IMPORTANT
SAFEGUARDS
CAUTION, HOT SURFACES: This appliance generates heat and escaping steam
during use. Proper precautions must be taken to prevent the risk of burns, res,
or other injury to persons or damage to property.
1. A person who has not read and understood all operating and safety
instructions is not qualied to operate this appliance. All users of this appliance
must read and understand this instruction manual before operating or cleaning
this appliance.
2. If this appliance falls or accidentally becomes immersed in water, unplug it
from the wall outlet immediately. Do not reach into the water!
3. When using this appliance, provide adequate air space above and on all sides
for air circulation. Do not operate this appliance while it is touching or near
curtains, wall coverings, clothing, dishtowels or other ammable materials.
4. To reduce the risk of re, do not leave this appliance unattended during use.
5. If this appliance begins to malfunction during use, remove the plug from
the wall outlet. Do not use or attempt to repair a malfunctioning appliance!
6. The cord to this appliance should only be plugged into a 120V AC electrical
wall outlet.
7. Do not use this appliance in an unstable position.
8. To reduce the risk of burns or other injuries, do not touch hot surfaces.
Use of protective oven mitts or gloves as well as long handled utensils is
recommended.
9. To reduce the risk of injury to persons or property, unplug this appliance before
inserting food. Always keep the appliance unplugged from the wall outlet
when not in use.
CAUTION: Never leave the toaster oven unattended while in use.
FOR HOUSEHOLD USE ONLY
NOTES ON THE PLUG
This appliance has a polarized plug (one blade is wider than the other).
To reduce the risk of electric shock, this plug will t in a polarized outlet only
one way. If the plug does not t fully into the outlet, reverse the plug.
If it still does not t, contact a qualied electrician. Do not modify the plug
in any way.
90209 Bella Pro Double TOV IM V4 R0.indd 490209 Bella Pro Double TOV IM V4 R0.indd 4 2024-04-12 5:45 PM2024-04-12 5:45 PM

5
NOTES ON THE CORD
A. A short power-supply cord (or detached power-supply cord) is provided
to reduce the risk resulting from becoming entangled in or tripping over
a long cord.
B. Longer detachable power-supply cords or extension cords are available
and may be used if care is exercised in their use.
C. If a long detachable power-supply cord or extension cord is used:
1. The marked electrical rating of the cord set, or extension cord should
be at least as great as the electrical rating of the appliance.
2. If the appliance is of the grounded type, the extension cord should
be a grounding-type3-wire cord.
3. The longer cord should be arranged so that it will not drape over
the countertop or tabletop where it can be pulled on by children
or tripped over.
SAVE THESE INSTRUCTIONS
PLASTICIZER WARNING
CAUTION: To prevent plasticizers from migrating to the nish of the countertop
or tabletop or other furniture, place NON-PLASTIC coasters or place mats between
the appliance and the nish of the countertop or tabletop.
Failure to do so may cause the nish to darken, permanent blemishes may occur,
or stains can appear.
ELECTRIC POWER
If the electrical circuit is overloaded with other appliances, your appliance may not
operate properly. It should be operated on a separate electrical circuit from other
appliances.
90209 Bella Pro Double TOV IM V4 R0.indd 590209 Bella Pro Double TOV IM V4 R0.indd 5 2024-04-12 5:45 PM2024-04-12 5:45 PM
6
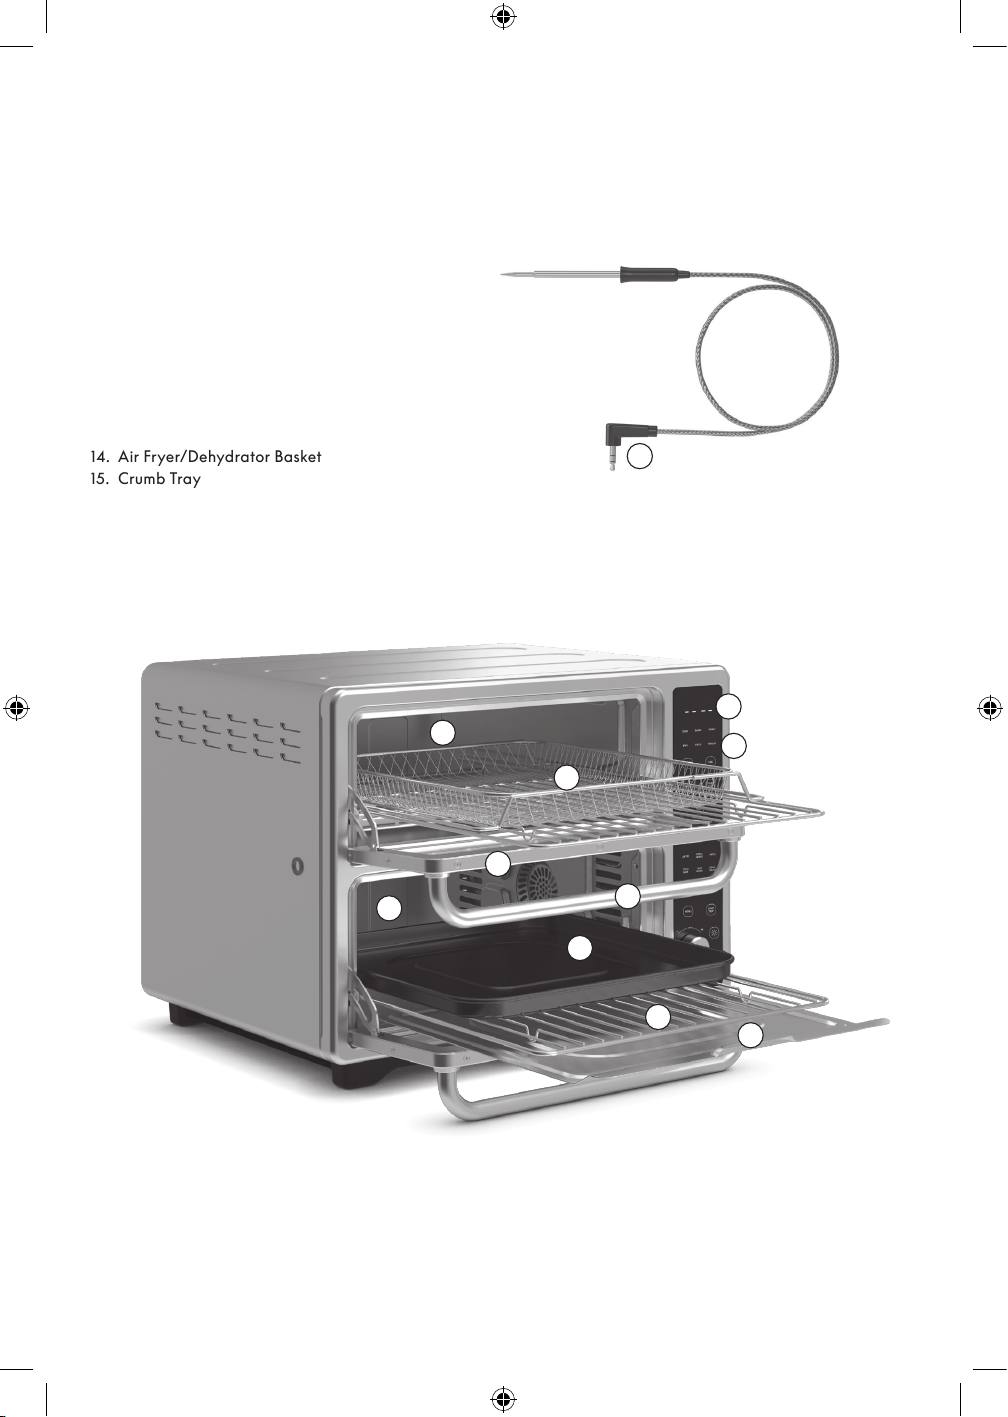
GETTING TO KNOW YOUR DOUBLE OVEN
Product may vary slightly from illustration.
1. Upper Cooking Chamber
2. Lower Cooking Chamber
3. Glass Door
4. Door Handle
5. Backlighted Digital Display
6. Control Panel
7. Convection/Air fry Fan (not shown)
8. Polarized Plug (not shown)
9. Upper Heating Element (not shown)
10. Lower Heating Element (not shown)
11. Probe Insert
Accessories
12. Bake/Broil Pan
13. Wire Rack
14. Air Fryer/Dehydrator Basket
15. Crumb Tray
1
2
3
4
5
6
11
12
14
15
13
90209 Bella Pro Double TOV IM V4 R0.indd 690209 Bella Pro Double TOV IM V4 R0.indd 6 2024-04-12 5:45 PM2024-04-12 5:45 PM
7
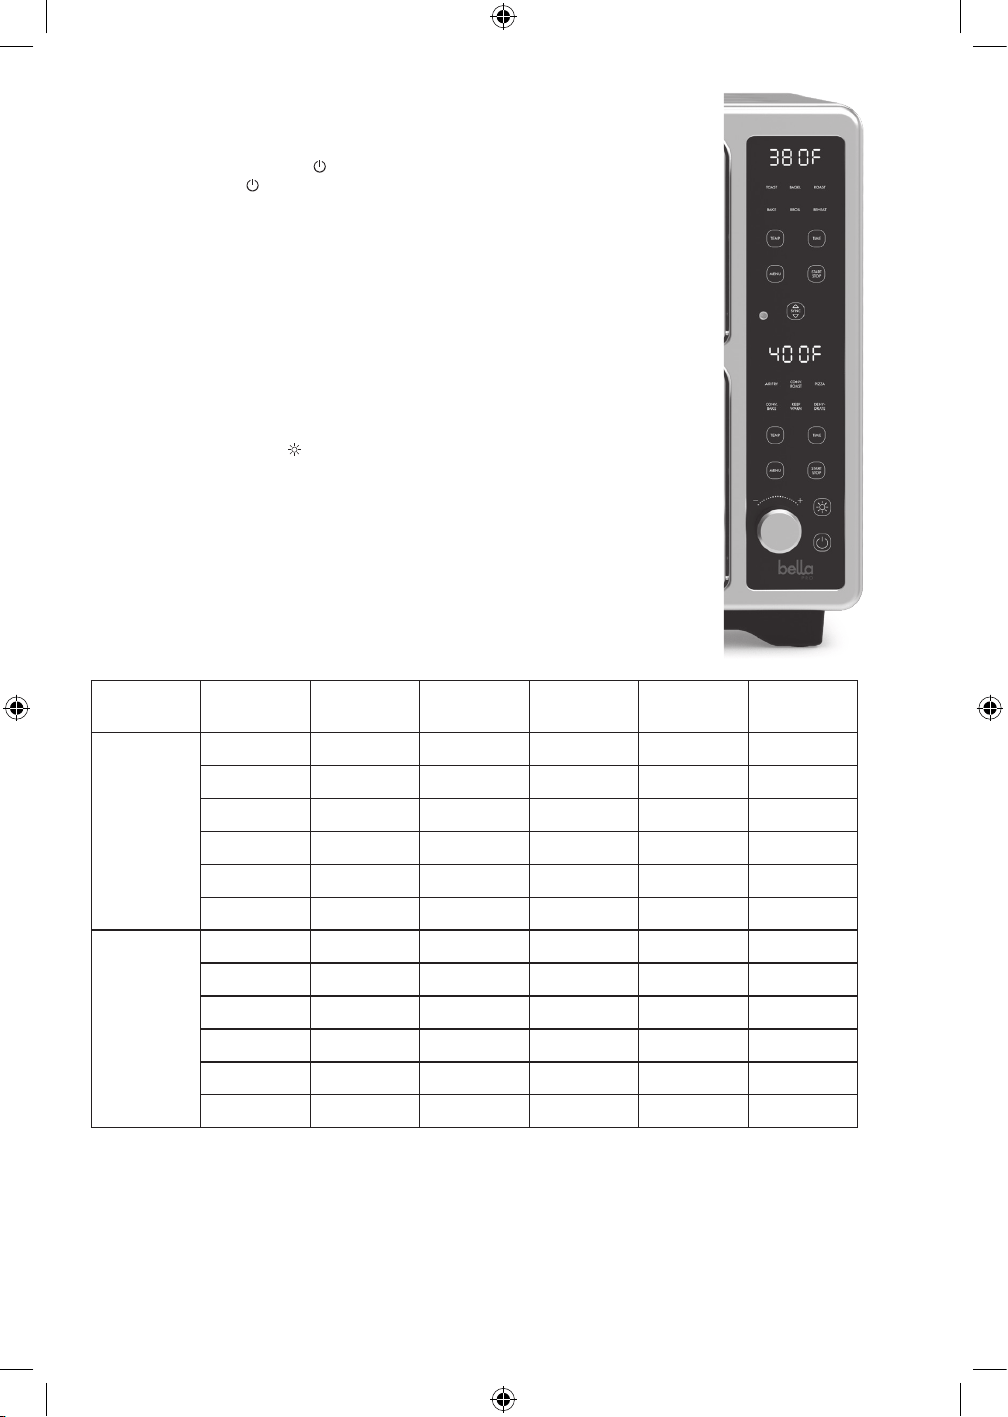
TOUCHSCREEN CONTROL
1. DIGITAL DISPLAY. When the unit is plugged in, an audible beep will sound
and the control panel will be displayed for 1 second.
2. POWER. Press the POWER
button once to enter standby mode.
Press the POWER
button again to shutdown.
3. Upper MENU. Press the upper MENU button to switch through the function menu
(TOAST > BAGEL > ROAST > BAKE > BROIL > REHEAT) An audible beep can be
heard and the active function will ash. The default TIME/TEMP will be displayed.
4. Lower MENU. Press the upper MENU button to switch through the function menu
(AIR FRY> CONV. ROAST > PIZZA > CONV. BAKE > KEEP WARM > DEHYDRATE).
An audible beep can be heard and the active function will ash. The default
TIME/TEMP will be displayed.
5. START/STOP. Once the desired function is selected, press the START/STOP button
to begin cooking. Press the START/STOP again to STOP.
6. TEMPERATURE. Press the TEMP button to adjust the temperature displayed using
the knob.
7. TIME. Press the TIME button to adjust the time displayed using the knob.
8. LIGHT. Press the LIGHT
button to turn on the oven light. Once pressed the light in
both the upper and lower oven will turn on. Aer 30 seconds the light will turn o.
9. SYNC. Aer setting up the upper and lower ovens, press SYNC the button so both
cooking chambers nish cooking at the same time. The cooking chamber with
the longer time set will begin the cooking process rst and the other cooking
chamber will follow.
FUNCTION CHART
Function Default
Temp
Temp Range Default Time Time Range Preheat
Upper
Cooking
Chamber
Toast 450°F / Darkness 4 Darkness 1-7
Bagel 450°F / Darkness 4 Darkness 1-7
Roast 380°F 350 – 450°F 30mins 1 – 60mins Ye s
Bake 350°F 170 – 450°F 25mins 1 – 99mins Ye s
Broil 450°F / 10mins 1 – 30mins Ye s
Reheat 250°F 170 – 450°F 15mins 1 – 60mins
Lower
Cooking
Chamber
Air Fry 400°F 170 – 450°F 25mins 1 – 60mins Ye s
Conv. Roast 400°F 350 – 450°F 35mins 1 – 60mins Ye s
Pizza 350°F 350 – 450°F 20mins 1 – 60mins Ye s
Conv. Bake 350°F 170 – 450°F 30mins 1 – 99mins Ye s
Keep Warm 170°F 150 – 200°F 60mins 1 – 99mins
Dehydrate 120°F 80 – 180°F 8hrs 1 – 72hrs
NOTE: When the functions, ROAST, BAKE, BROIL, AIR FRY, CONV. ROAST, PIZZA and CONV. BAKE are selected the
Toaster Oven requires a few minutes to pre-heat to reach the optimum temperature. Once the function is selected the
text PRE HEAT will appear on the screen and the unit will begin pre-heating. The timer will begin to count down only
aer pre‑heat is completed. Aer the desired temperature is achieved, 3 beeps will sound and the text will disappear
from the screen and the unit will continue to cook in the selected function. When using both the upper cooking chamber
and lower cooking chamber at the same time, the cooking time will automatically increase by 1.5x.
90209 Bella Pro Double TOV IM V4 R0.indd 790209 Bella Pro Double TOV IM V4 R0.indd 7 2024-04-12 5:45 PM2024-04-12 5:45 PM

8
WEIGHT/SIZE RESTRICTIONS
WARNING:
• Food cooked on the shelf must be no wider than 9 inches and must t comfortably in the Toaster Oven without
touching either the lower or the upper heating elements.
• The Toaster Oven can cook up to a 3 lb. chicken or turkey and up to a 3 lb. roast.
• We suggest that you periodically check the cooking progress with a meat thermometer.
BEFORE USING FOR THE FIRST TIME
CAUTION: To protect against electric shock, do not immerse the Toaster Oven or allow cord to come into contact with
water or other liquids.
1. Read all operating instructions carefully.
2. Carefully unpack the Toaster Oven and accessories, removing all packaging materials. Remove any labels from
the outer surfaces.
3. Place your Toaster Oven on a level surface such as a countertop or table. Be sure the sides, back, and top of the
Toaster Oven are at least 4 inches away from any walls, cabinets, or objects on the counter or table.
4. To avoid scratching, marring, or discoloration, do not store anything on top of the Toaster Oven during
operation.
5. Wash the wire rack, bake/broil pan, air fry basket and crumb tray in warm, soapy water. Rinse and dry
thoroughly before placing in the Toaster Oven.
6. Do not use abrasive cleaners.
7. To ensure that the Toaster Oven is free from oils used in manufacturing, it is necessary to operate the unit once,
empty for at least 30 minutes.
8. Make sure the crumb tray is in place on the bottom of the upper cooking chamber of the Toaster Oven.
9. Plug into a 120V AC electrical wall outlet. A long audible beep will sound and the control panel will ash once;
press the POWER
button. If no buttons are pressed within 5 minutes, the digital display will turn OFF as the
Toaster Oven rests in standby mode. Press any button. The digital display will illuminate.
10. Press the MENU button on the upper control panel until you reach BAKE. Increase the TEMP to 400°F.
The default 25:00 minutes will be displayed.
11. Press the START/STOP button; The time displayed on the upper control panel will begin to count down. This will
burn o any residue or oils on the oven or heating elements.
12. At the end of the 25:00 minutes, END will be displayed and 5 audible beeps can be heard and the Toaster
Oven will return to standby mode.
13. Press the MENU button on the lower control panel until you reach CONV. BAKE. Increase the TEMP to 400ºF.
The default 30:00 minutes will be displayed.
14. Press the START/STOP button; The time displayed on the lower control panel will begin to count down. This will
burn o any residue or oils on the oven or heating elements.
15. At the end of the 30:00 minutes, END will be displayed and 5 audible beeps can be heard and the Toaster
Oven will return to standby mode.
CAUTION: Appliance surfaces are hot during and aer use. Always wear protective, insulated oven mitts on
hands when touching a hot Toaster Oven.
NOTE: The Toaster Oven will not operate until the START/STOP button is pressed.
NOTE: Press the POWER button at any time to turn the Toaster Oven OFF. If no buttons are pressed within
5 minutes, the digital display will turn OFF as the Toaster Oven rests in standby mode.
OPERATING INSTRUCTIONS (UPPER COOKING CHAMBER)
1. Plug the cord in the wall outlet. When the unit is plugged in an audible beep will sound and the control panel
will be displayed for 1 second.
2. Press the POWER
button once to enter standby mode.
3. Press the MENU on the upper control panel to toggle through the 6 preset functions available for the upper
cooking chamber (TOAST > BAGEL > ROAST > BAKE > BROIL > REHEAT).
4. Once the function is selected, the default temperature and time will alternate on the LED screen of the upper
control panel.
5. To adjust the default temperature, press the TEMP button on the upper control panel and then use the knob to
adjust.
6. To adjust the default time, press the TIME button on the upper control panel and then use the knob to adjust.
90209 Bella Pro Double TOV IM V4 R0.indd 890209 Bella Pro Double TOV IM V4 R0.indd 8 2024-04-12 5:45 PM2024-04-12 5:45 PM

9
7. When the desired TIME and TEMP appear on the upper LED screen, press the START/STOP button associated
with the cooking chamber to begin the cooking process.
NOTE: When the function BROIL is selected, the Toaster Oven requires a few minutes to pre-heat to reach the
optimum temperature. Once the function is selected the text PRE HEAT will appear on the screen and the unit
will begin pre‑heating. The timer will begin to count down only aer pre‑heat is completed. Aer the desired
temperature is achieved, 3 beeps will sound and the text will disappear from the screen
and the unit will continue to cook in the selected function.
8. The time will begin to countdown and the time remaining will be displayed on the LED screen.
NOTE: Press START/STOP to STOP the cooking process at any time. When START/STOP is pressed again,
cooking will resume.
9. When the remaining time reaches 00:00, END will be displayed on the upper control panel and 5 beeps will
sound as the Toaster Oven returns to standby mode.
NOTE: The quantity, density and weight of the food will alter the total cooking time necessary.
Remember, cooking smaller batches will result in shorter cooking times and higher food quality.
IMPORTANT: Always check food halfway though cooking time to determine the nal cook TIME and TEMP
needed.
OPERATING INSTRUCTIONS (LOWER COOKING CHAMBER)
1. Plug the cord in the wall outlet. When the unit is plugged in an audible beep will sound and the control panel
will be displayed for 1 second.
2. Press the POWER
button once to enter standby mode.
3. Press the MENU on the lower control panel to toggle through the 6 preset functions available for the lower
cooking chamber (AIR FRY > CONV. ROAST > PIZZA > CONV. BAKE > KEEP WARM > DEHYDRATE).
4. Once the function is selected, the default temperature and time will alternate on the LED screen of the lower
control panel.
5. To adjust the default temperature, press TEMP the button on the lower control panel and then use the knob
to adjust.
6. To adjust the default time, press the TIME button on the lower control panel and then use the knob to adjust.
7. When the desired TIME and TEMP appear on the lower LED screen, press the START/STOP button associated
with the cooking chamber to begin the cooking process.
NOTE: When the functions Air Fry and Pizza are selected, the Toaster Oven requires a few minutes to
pre-heat to reach the optimum temperature. Once the function is selected the text PRE HEAT will appear
on the screen and the unit will begin pre‑heating. The timer will begin to count down only aer pre‑heat
is completed. Aer the desired temperature is achieved, 3 beeps will sound and the text will disappear from
the screen and the unit will continue to cook in the selected function.
8. The time will begin to countdown and the time remaining will be displayed on the LED screen.
NOTE: Press START/STOP to STOP the cooking process at any time. When START/STOP is pressed again,
cooking will resume.
9. When the remaining time reaches 00:00, END will be displayed on the lower control panel and 5 beeps will
sound as the Toaster Oven returns to standby mode.
NOTE: The quantity, density and weight of the food will alter the total cooking time necessary.
Remember, cooking smaller batches will result in shorter cooking times and higher food quality.
IMPORTANT: Always check food halfway though cooking time to determine the nal cook TIME and TEMP
needed.
OPERATING INSTRUCTIONS (TEMPERATURE PROBE)
1. Select the cooking desired cooking preset.
NOTE: The use of the probe is only available for the following presets; Roast, Bake, Broil, Air Fry, Conv. Bake
& Conv. Roast.
2. Insert the temperature probe to the control panel.
NOTE: By default, the probe will sync to the lower cooking chamber.
3. Push the knob to select the cooking chamber you would like the probe to be used on.
NOTE: The probe is only able to be programmed to one cooking chamber at a time.
NOTE: Once the probe is inserted, the SYNC function will be disabled.
4. Once you have selected the cooking chamber where the probe will be used, you can then adjust your desired
internal temperature using the knob.
NOTE: The temperature range with the probe is 120 - 200°F.
NOTE: The temp will be displayed with the letter P in front of the 3 digits showing you that you are using
the probe.
NOTE: During the cooking process the LED screen will alternate between the pre-set internal temperature
and the desired internal temperature every 5 seconds.
90209 Bella Pro Double TOV IM V4 R0.indd 990209 Bella Pro Double TOV IM V4 R0.indd 9 2024-04-12 5:45 PM2024-04-12 5:45 PM

10
5. Once the desired temperature is reached, END will be displayed on the lower control panel and 5 beeps will
sound as the Toaster Oven returns to standby mode.
IMPORTANT: The probe will stop working once it reaches the desired internal temperature.
IMPORTANT: To prevent overheating when using the probe since the timer is not being used, the unit will stop
automatically aer 60 minutes and return to stand‑by‑mode.
USDA COOKING GUIDELINES
A meat thermometer should always be used to gauge internal temperature. The thermometer should be inserted into
thickest portion of roast away from bones or fatty areas. The United States Department of Agriculture recommends that
meat and poultry be cooked to the following internal temperatures to be sure any harmful bacteria has been killed.
Ground turkey and chicken should be cooked to an internal temperature of 165°F and ground beef, veal, lamb and
pork be cooked to an internal temperature of 160°F. Chicken and turkey should be cooked to an internal temperature
of 170°F for white meat and 180°F for dark meat. Goose and duck should be cooked to an internal temperature of
180°F. Fresh beef, veal and lamb, etc. should be cooked to an internal temperature of at least 145°F. Fresh pork should
be cooked to an internal temperature of at least 160°F. When re-heating meat and poultry products, they should also
be cooked to an internal temperature of 165°F.
USER MAINTENANCE INSTRUCTIONS
This appliance requires little maintenance. It contains no user serviceable parts. Do not try to repair it yourself.
Any servicing that requires disassembly other than cleaning must be performed by a qualied appliance
repair technician.
CARE & CLEANING INSTRUCTIONS
1. Allow the Toaster Oven and all accessories to cool completely before cleaning.
2. Clean the outside of the Toaster Oven with a damp cloth and dry thoroughly. A nonabrasive liquid cleaner may
be used for stubborn stains. Rinse and dry thoroughly. Do not use metal scouring pads or abrasive cleaners that
will scratch the surface.
3. Clean interior with a mild or non‑abrasive cleaner and plastic scouring pad aer each use to avoid
build-up. Do not rub too hard as surface can be scratched.
4. To remove baked-on food, pour a small amount of cooking oil onto the food and allow to stand
for 5 to 10 minutes. Remove the soened food with a so cloth. Do not use steel wool, scouring pads or abrasive
cleaners.
5. Rinse and dry thoroughly before closing the glass door. Clean the glass door with a cloth or sponge dampened
with warm, sudsy water. Dry thoroughly.
6. Wash bake/broil pan, wire rack, air fry mesh basket and crumb tray in soapy water and dry thoroughly.
Toaster Oven accessories may be washed in the dishwasher.
7. If crumbs and spills have accumulated on the crumb tray, wipe with a damp cloth. Always dry the crumb tray
thoroughly before replacing.
8. DO NOT use abrasive cleaners or metal scouring pads to clean bake/broil pan, wire rack, rotisserie spit, or
crumb tray. For stubborn stains, clean with a nylon or polyester mesh pad and a mild, non-abrasive cleaner.
Rinse and dry thoroughly.
CAUTION: DO NOT use spray-on or other oven cleaners. Using these types of cleaners may cause cosmetic
and/or electrical damage to the Toaster Oven.
STORING INSTRUCTIONS
1. Unplug unit, allow to cool, and clean before storing.
2. Store Toaster Oven in its box in a clean, dry place.
3. Never store appliance while it is hot or still plugged in.
4. Never wrap cord tightly around the appliance. Do not put any stress on the cord where it enters the unit,
as it could cause the cord to fray and break.
90209 Bella Pro Double TOV IM V4 R0.indd 1090209 Bella Pro Double TOV IM V4 R0.indd 10 2024-04-12 5:45 PM2024-04-12 5:45 PM

11
SENSIO Inc. hereby warrants that for a period of TWO YEARS from the date of purchase,
this product will be free from mechanical defects in material and workmanship, and
for 90 days in respect to non-mechanical parts. At its sole discretion, SENSIO Inc. will
either repair or replace the product found to be defective, or issue a refund on the
product during the warranty period.
The warranty is only valid for the original retail purchaser from the date of initial retail
purchase and is not transferable. Keep the original sales receipt, as proof of purchase is
required to obtain warranty validation. Retail stores selling this product do not have the
right to alter, modify, or in any way revise the terms and conditions of the warranty.
EXCLUSIONS:
The warranty does not cover normal wear of parts or damage resulting from any of the
following: negligent use of the product, use of improper voltage or current, improper
routine maintenance, use contrary to the operating instructions, disassembly, repair, or
alteration by anyone other than qualied SENSIO Inc. personnel. Also, the warranty
does not cover Acts of God such as re, oods, hurricanes, or tornadoes.
SENSIO Inc. shall not be liable for any incidental or consequential damages caused
by the breach of any express or implied warranty. Apart from the extent prohibited
by applicable law, any implied warranty of merchantability or tness for a particular
purpose is limited in time to the duration of the warranty. Some states, provinces or
jurisdictions do not allow the exclusion or limitation of incidental or consequential
damages, or limitations on how long an implied warranty lasts, and therefore, the
above exclusions or limitations may not apply to you. The warranty covers specic legal
rights which may vary by state, province and/or jurisdiction.
HOW TO OBTAIN WARRANTY SERVICE:
You must contact Customer Service at our toll-free number: 1-866-832-4843.
A Customer Service Representative will attempt to resolve warranty issues over the
phone. If the Customer Service Representative is unable to resolve the problem, you will
be provided with a case number and asked to return the product to SENSIO Inc. Attach
a tag to the product that includes: your name, address, daytime contact telephone
number, case number, and description of the problem. Also, include a copy of the
original sales receipt. Carefully package the tagged product with the sales receipt,
and send it (with shipping and insurance prepaid) to SENSIO Inc.’s address. SENSIO
Inc. shall bear no responsibility or liability for the returned product while in transit to
SENSIOInc.’s Customer Service Center.
LIMITED TWO-YEAR WARRANTY
90209 Bella Pro Double TOV IM V4 R0.indd 1190209 Bella Pro Double TOV IM V4 R0.indd 11 2024-04-12 5:45 PM2024-04-12 5:45 PM
For customer service questions or comments
1-866-832-4843 / help@bellahousewares.com
Made in China
Sensio Inc.
dba Made by Gather
TM
New York, NY 10016/USA
90209 R. 0
90209 Bella Pro Double TOV IM V4 R0.indd 1290209 Bella Pro Double TOV IM V4 R0.indd 12 2024-04-12 5:45 PM2024-04-12 5:45 PM