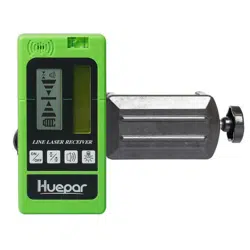

LR-5RG
LINE LASER RECEIVER
English
1~12
Deutsch
13~25
Français
26~38
Italiano
39~50
Español
51~62
Pусский
63~75
support@huepar.com
V4
日本語
76~85


-1-
Thank you for purchasing Huepar LR-5RG Laser
Receiver.
Please read the Safety Instructions and User Manual
thoroughly before using this product.
Note:
• Safety
• Product Overview
• Set Up
• Operation
• Specifications
• Warranty
• Please turn on the Pulse Mode of the laser level when
using with the receiver. The receiver can ONLY be used
in Pulse Mode.
• Huepar receiver can only be compatible with Huepar
laser levels that feature PULSE MODE function.
Please pay attention to whether the laser level can be
used with the Huepar receiver when purchasing. If you
have any questions, please contact us by
support@huepar.com.
CONTENTS

-2-
General Safety Rules:
• This product does not project laser. However, when working with laser
tools, please follow the safety instructions for that particular laser
instrument.
Safety
Electronic Safety:
• Batteries can explode or leak, cause injury or fire. To reduce this risk,
please always follow all instructions and warnings on the battery label
and package.
• Place the battery (+) and battery (-) correctly, it may cause liquid
leakage or heat generation if reverse them.
• Please take out the battery and put it into the storage box or cardboard
if it is not used for a long time.
Personal Safety:
• Be careful not to expose your eyes to the emitting laser beam while a
laser tool is in operation. Exposure to a laser beam for an extended time
may be hazardous to your eyes.
Use and Care:
• Please do not disassemble or repair by yourself if any abnormality is
found.
• Please do not keep it in an overheated place, the best storage
temperature is -25℃ ~ +70℃.
• Please avoid prolonged use in damp, dusty areas, even though the
product is waterproof and dustproof.
• Please keep the reception window clean, and do not press it hard.
• Please avoid violent striking or shocking, and do not press the keys
hard.
• It is sensible to fluorescent light, sunshine, flash light & alternative
electric wave signal, which can affect the actual measurements and may
cause errors.

-3-
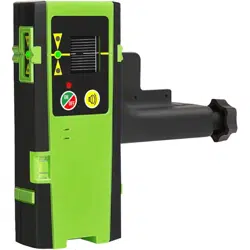
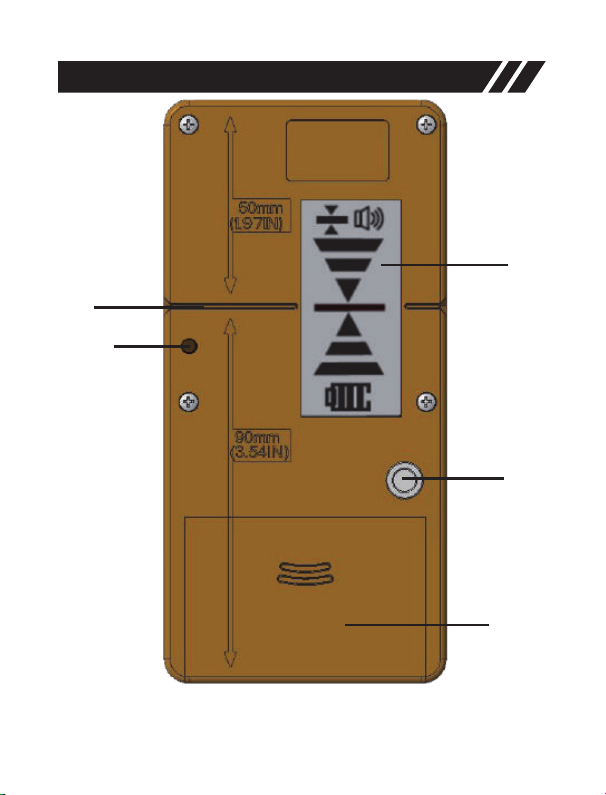
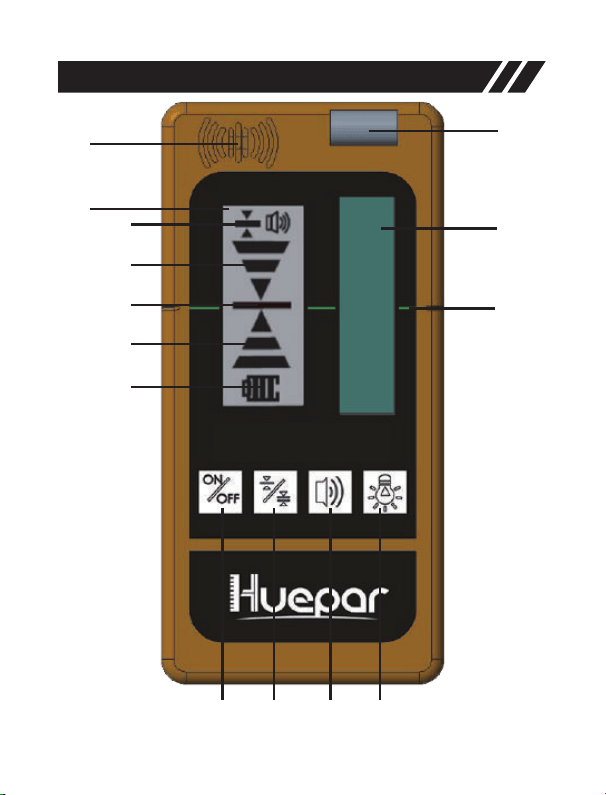
Product Overview
1
2
3
4
5
a
b
c
d
e
6 7 8 9
LINE LASER RE CEIVE ER
-4-
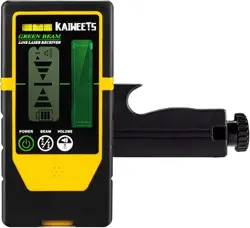
Product Overview
10
11
12
13
14
-5-
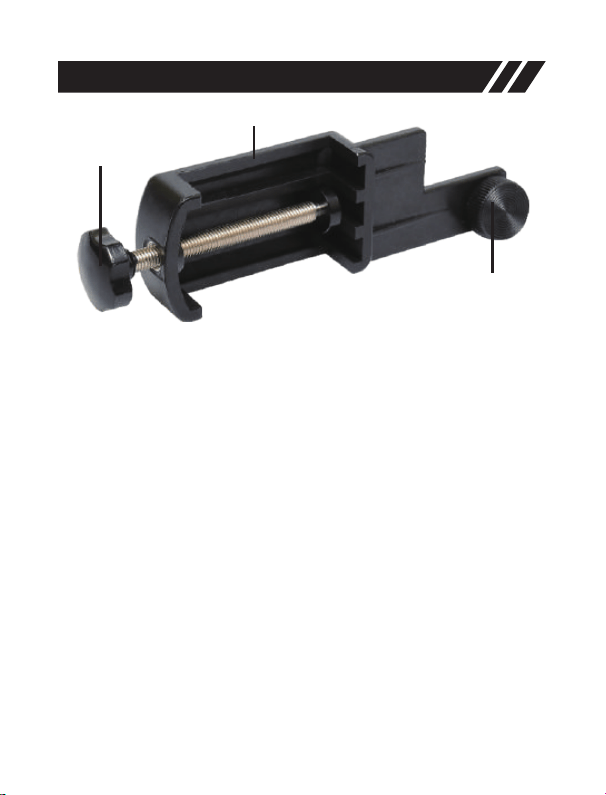
Product Overview
17
15
16
1. Speaker
2. Front Center Mark
3. Front LCD Display Screen
a Accuracy indicator
b Upper Indicator: move downward
c Center Indicator
d Lower Indicator: move upward
e Power Indicator
4. Bubble Vial
5. Laser Reception Window
6. Power ON/OFF Button
7. Accuracy Button (Fine/Medium)
8. Volume Button (Loud/Soft/Mute)
9. Illumination ON/OFF Button
10. Rear Center Mark
11. Alignment Hole
12. Rear LCD Display Screen
13. Thread Mount
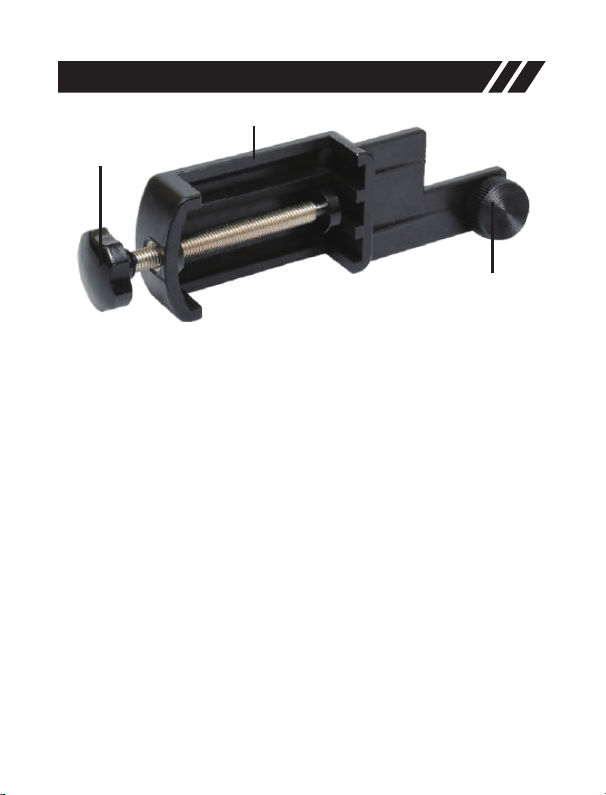
14. Battery Compartment
15. Clamp
16. Tightening Knob on the Clamp
17. Adjusting Knob on the Clamp

-6-
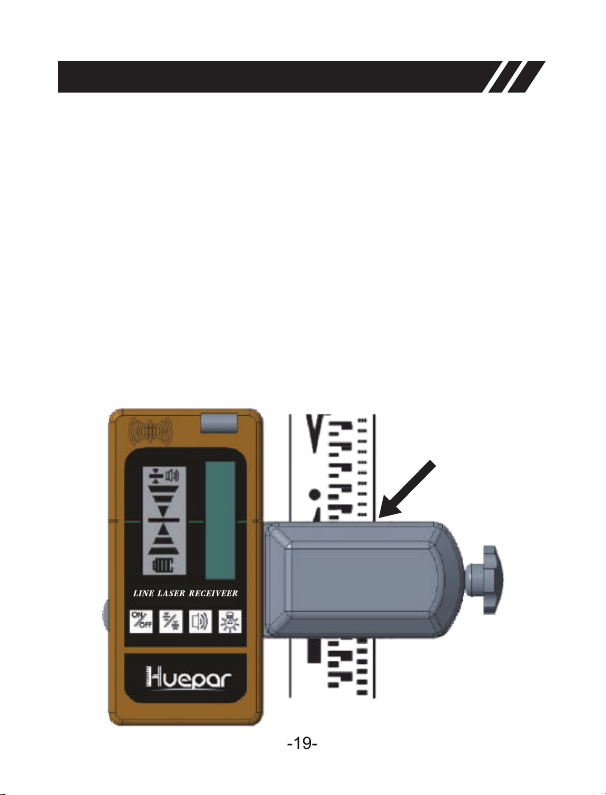
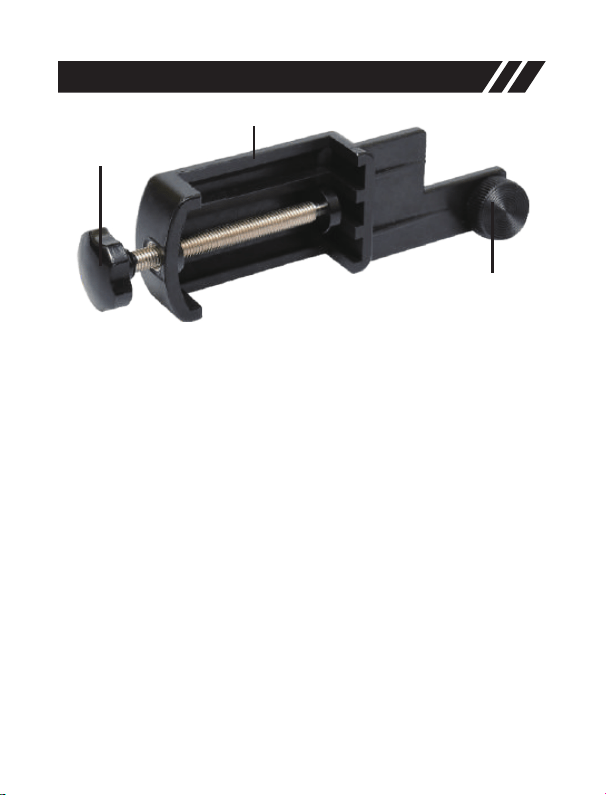
The laser receiver can be used directly by hand or be mounted to a
measuring rod, pole, or similar object with the clamp.
• Attach the receiver to the clamp by matching with the alignment hole
(11) and tighten the tightening knob (16).
Set Up
• Loosen the adjusting knob (17) and fix the clamp onto a measuring rod,
pole, or similar object.
• Tighten the adjusting knob (17) to secure the clamp.
• Switch on the pulse mode of the laser level.
• When locating the laser beam, loosen the clamp to allow for up / down
positioning.
• When the laser beam is found, tighten the adjusting knob (17) again to
secure the object.
-7-
Power ON/OFF
• Power ON: Press to turn the receiver ON.
※Note: When powered on, all the icons will be displayed on the LCD
screen to ensure the LCD is functioning properly.
Illuminate LCD
• When powered ON, press to turn ON / OFF LCD illumination.
Accuracy
• When powered ON, the accuracy setting FINE is set, press to
switch accuracy setting between FINE and MEDIUM.
Operation
※Note: Please turn on the Pulse Mode of the laser level when using
with the receiver. The receiver can ONLY be used in Pulse Mode.
• Power OFF: Press again to turn the receiver OFF.
※Note: When no laser beam reaches the laser reception window (5) for
10 minutes, the receiver will automatically switch off in order to save the
battery.
MEDIUM adjustment
FINE adjustment
※Note:
• MEDIUM accuracy setting should be selected only when a stable laser
beam cannot be obtained due to slight vibrations at or near the work site.
• If the point to be measured is at a long distance, the MEDIUM accuracy
setting is necessary because heat waves or slight vibrations may
interfere with obtaining a stable laser beam.
Speaker Volume
• When powered ON, the default volume setting is LOUD, to change the
volume level or switch off the audio signal, press .

-8-
• At LOUD volume level, the audio signal indicator appears .
• At SOFT volume level, the audio signal indicator appears .
• When the audio signal is set to MUTE, the indicator goes out.
Detecting the Laser Beam
※Note: Position the receiver at least 17ft (5m) away from the laser level.
• With the receiver on, position the receiver to where the laser beam can
reach the laser reception window (5). Align the receiver so that the laser
beam can run laterally through the laser reception window (5).
• Use the bubble vial to maintain a level plane with the receiver.
• Be sure that the laser reception window (5) is facing the direction of the
laser beam.
Direction Indicators
• If the Upper Indicator lights up, move the receiver down to match the
center indicator (c) because it indicates that the laser line is above the
center mark.
Move the receiver as indicated on the LED to align with the laser
beam:
• If the Lower Indicator lights up, move the receiver up to match the
center indicator (c) because it indicates that the laser line is below the
center mark.
• If the center Indicator lights up, it indicates that the laser line just
matches the center mark.
Audio Signal for Indication of the Laser Beam
• A beep sounds to indicate that the laser beam has been detected.
In addition to the indicator light, if speaker volume is ON, an audible
sound helps locate the receiver.
• A fast beep sounds to indicate that the receiver must be moved down.
• A slow beep sounds to indicate that the receiver must be moved up.
• A steady beep sounds to indicate that the laser beam is aligned with
the center mark on receiver.

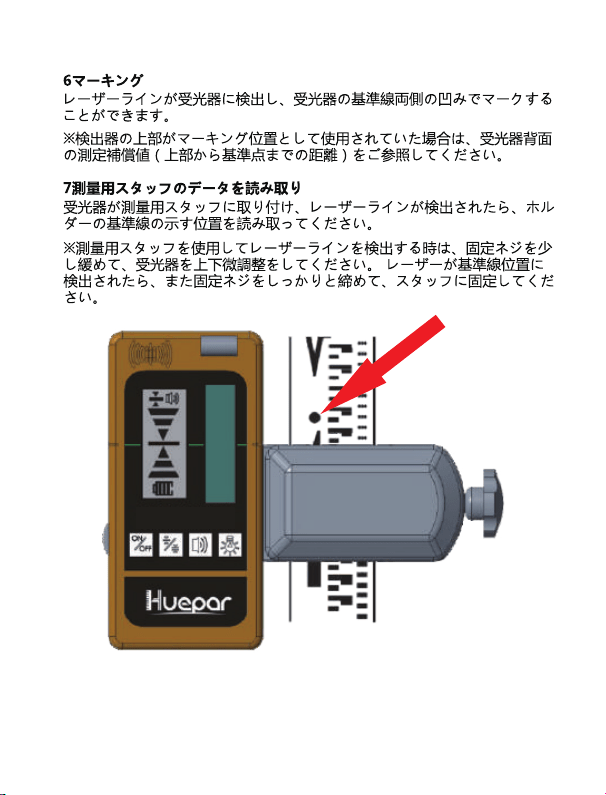
-9-
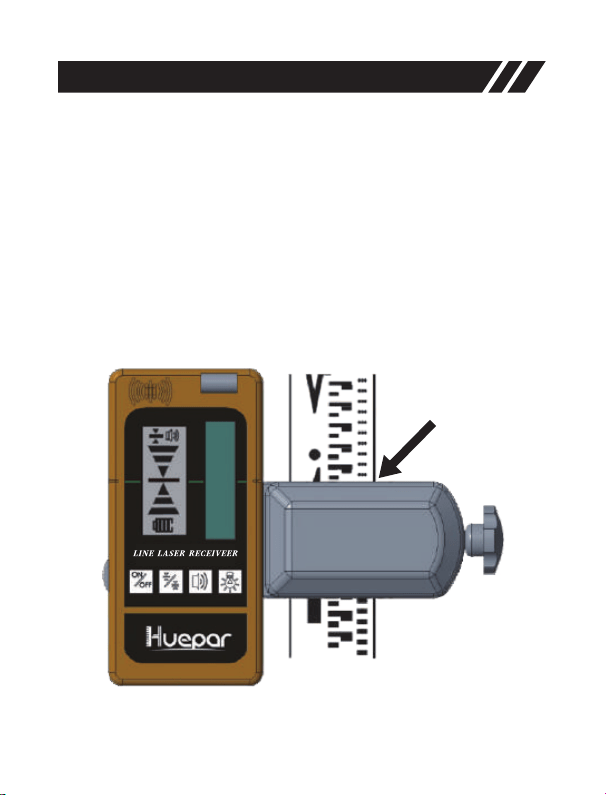
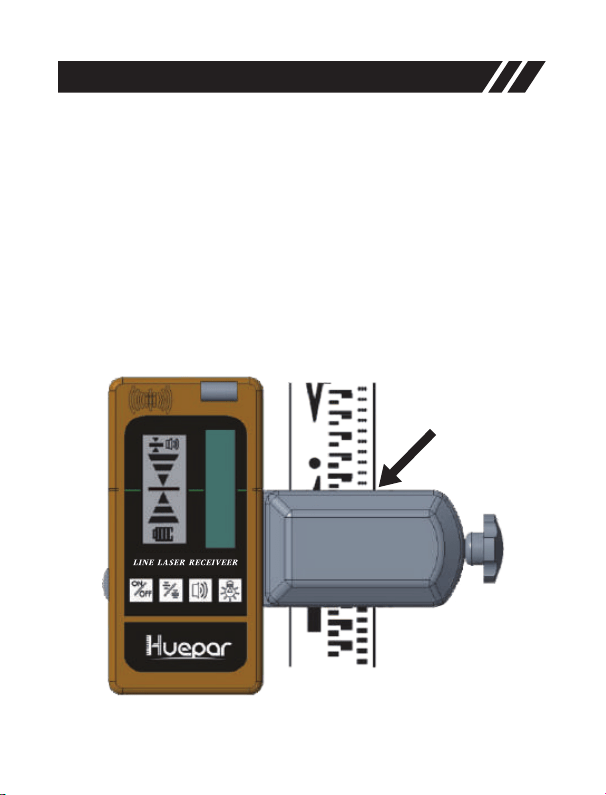
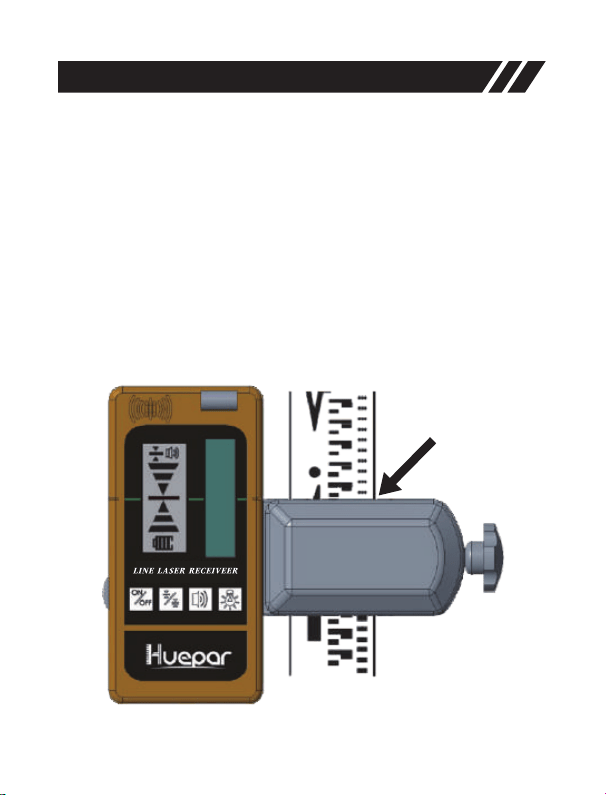
• Once the laser beam has been detected, mark the position shown at
the edge of the clamp.
Marking
※Note:
• When looking for the laser beam by using a measuring rod, slightly
loosen the adjusting knob (17) to move the receiver up or down more
easily. When laser beam has been found securely, tighten the clamp to
ensure the receiver remains stable on the rod.
• When marking, take care to align the tool exactly vertical (for horizontal
laser beam), or horizontal (for vertical laser beam), as otherwise the
marks are offset with respect to the laser beam.
• Be sure to refer to the back of the receiver for the measurement of the
compensation value (the distance from the top of the receiver to the
center mark), if the top of the receiver is used as a marking position.

-10-
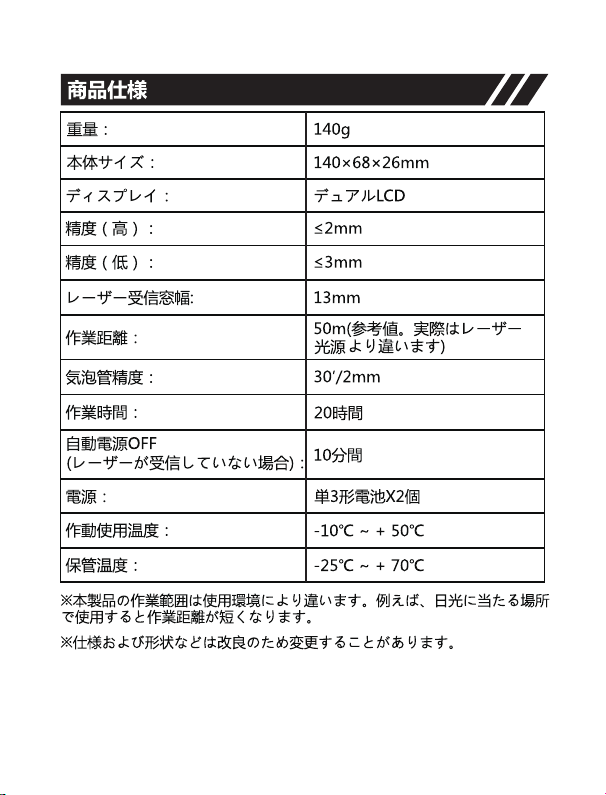
Weight
Dimension
Laser Reception
Window Size
Display
Accuracy
Working Range (R/G)
PWM
Receiving Frequency
Automatic Power OFF
Working Time
Power Source
IP Rating
Operating Temperature Range
185g with battery
140mm (H) x 68mm (W) x 26mm (D)
13mm(W) x 52mm(H)
Dual LCD display
High: 2mm/0.08in
Low: 3mm/0.12in
(May differ due to the working range
and laser power)
Up to 50m/165ft
5:5
10K Hz
Up to 20 hours
-10℃ to + 50℃
-25℃ to + 70℃
Specifications
Storage Temperature Range
10 mins
2 x AA battery
IP55, waterproof, dustproof and
shockproof
※Note:
• Position the receiver at least 17ft (5m) away from the laser level.
• The working distance and detection accuracy will be affected by the
operating environment.
• Appearance and specifications may differ due to the product
improvement.

-11-
Warranty
The laser tool passed a rigorous and comprehensive product inspection.
We are confident in the quality of our products and provide excellent
guarantee for professional users of the products.
We offer One Year Warranty from date of purchase including that:
• Proof of purchase is provided
• Service/repairs have not been attempted by unauthorized persons
• The product has not been misused
Defective products will be repaired or replaced, free of charge or at our
discretion, if sent together with proof of purchase to our authorized
distributor(s).
This Warranty does not cover:
• Faults caused by accidental damage
• The product has suffered unreasonable wear and tear
• Failure to use according to manufacturers’ instructions
• Defects caused by maintenance or renovation without our authorization
• Calibration and maintenance are not included in the warranty
Note:
• We are not liable for any direct or indirect loss caused by the failure of
this product beyond the scope stipulated by law.
• Repair or replacement under this Warranty does not affect the expiry
date of the Warranty.
• This warranty is only applied to customers who have purchased this
product, and is not permitted to transfer this warranty to any third parties.
• This Warranty shall not be altered without our authorization.

-12-
You can enjoy a 12 months limited warranty but it can be
up to 24 months if you register as a member through the
product registration. Please scan the QR code to activate
your priority.
If you encounter any question or confusion about the
product, please feel free to contact us:
support@huepar.com

-13-
Vielen Dank dass Sie sich für den Huepar LR-5RG
Laserdetektor entschieden haben.
Bitte lesen Sie die Sicherheitshinweise und das
Benutzerhandbuch sorgfältig durch, bevor Sie dieses
Produkt verwenden.
Hinweis:
• Sicherheit
• Produktbeschreibung
• Einrichtung
• Inbetriebnahme
• Spezifikationen
• Garantie
• Bitte schalten Sie den Impulsmodus der Laserebene
ein, wenn Sie den Laserdetektor verwenden. Der
Laserdetektor kann NUR im Impulsmodus verwendet
werden.
• Der Huepar Laserdetektor kann nur mit Huepar-
Kreuzlinienlaser kompatibel sein, die über die Funktion
IMPULSMODUS verfügen. Bitte achten Sie beim Kauf
darauf, ob das Kreuzlinienlaser mit dem Huepar
Laserdetektor verwendet werden kann. Wenn Sie
Fragen haben, wenden Sie sich bitte an
support@huepar.com.
INHALTE

-14-
Allgemeine Sicherheitsregeln:
• Dieses Produkt projiziert keine Laserlinie. Wenn Sie jedoch mit
Lasergeräten arbeiten, beachten Sie bitte die Sicherheitshinweise von
dem betreffenden Lasergerät.
Sicherheit
Elektronische Sicherheit:
• Batterien können explodieren oder auslaufen, was zu Verletzungen
oder Feuer führen kann. Um dieses Risiko zu verringern, befolgen Sie
bitte immer alle Anweisungen und Warnungen auf dem Batterieetikett
und der Verpackung.
• Legen Sie die Batterie (+) und die Batterie (-) richtig ein, sonst kann es
zum Austreten von schädlichen Substanzen oder zur übermäßigen
Hitzeentwicklung führen.
• Wird das Gerät längere Zeit nicht benutzt, sollte die Batterie
herausgenommen und das Gerät in die Aufbewahrungsbox oder den
Karton gelegt werden.
Persönliche Sicherheit:
• Achten Sie darauf, die direkte Bestrahlung des Laserstrahls mit den
Augen zu vermeiden, während ein Lasergerät in Betrieb ist. Eine längere
Bestrahlung mit einem Laserstrahl kann gefährlich für Ihre Augen sein.
Gebrauch und Pflege:
• Versuchen Sie nicht, das Gerät selbst zu zerlegen oder zu reparieren,
falls irgendwelche Fehlfunktionen vorhanden sind.
• Bitte bewahren Sie es nicht an einem überhitzten Ort auf, die beste
Lagertemperatur ist -25℃ ~ +70℃.
• Bitte nicht über einen längeren Zeitraum in feuchten, staubigen
Bereichen verwenden, auch wenn das Produkt wasser- und
staubdicht ist.
• Bitte halten Sie das Empfangsfenster sauber und drücken Sie es nicht
zu stark.

-15-
• Bitte vermeiden Sie heftige Schläge oder Erschütterungen und drücken
Sie die Tasten nicht zu stark.
• Es ist empfindlich gegenüber Leuchtstofflampe, Sonnenschein,
Blitzlicht und alternativen elektrischen Wellensignalen, die die
tatsächlichen Messungen beeinflussen und Fehler verursachen können.
-16-
Produktbeschreibung
1
2
3
4
5
a
b
c
d
e
6 7 8 9
LINE L ASER RE CEIVE ER

-17-
Produktbeschreibung
10
11
12
13
14
-18-
Produktbeschreibung
17
15
16
1. Lautsprecher
2. Mittellinie auf der Vorderseite
3. LCD-Bildschirm auf der Vorderseite
a Genauigkeitsindikator
b Obere Anzeige: Nach unten bewegen
c Mittlere Anzeige
d Untere Anzeige :Nach oben bewegen
e Stromanzeige
4. Libelle
5. Laser-Empfangsfenster
6. EIN/AUS-Taste
7. Genauigkeitstaste (Fein/Mittel)
8. Lautstärketaste (laut/leise/Mute)
9. Beleuchtung EIN/AUS-Taste
10. Mittellinie auf der Rückseite
11. Ausrichtungsbohrung
12. LCD-Bildschirm auf der Rückseite
13. Gewindemontage
14. Batteriefach
15. Klemmhalter
16. Befestigungsknopf an dem Klemmhalter
17. Einstellknopf an dem Klemmhalter
-19-
Der Laserdetektor kann direkt von Hand verwendet oder mit dem
Klemmhalter an einem Messstab, einer Stange oder einem ähnlichen
Zielpunkt befestigt werden.
• Befestigen Sie den Laserdetektor an dem Klemmhalter, indem Sie ihn
an das Ausrichtungsbohrung (11) anpassen und den Befestigungsknopf
(16) anziehen.
Einrichtung
• Lösen Sie den Einstellknopf (17) und befestigen Sie den Klemmhalter
an einem Messstab, einer Stange oder einem ähnlichen Zielpunkt.
• Ziehen Sie den Einstellknopf (17) fest, um den Klemmhalter zu
befestigen.
• Schalten Sie den Impulsmodus des Lasergeräts ein.
• Wenn Sie den Laserstrahl lokalisieren, lösen Sie die Klemme, um die
Positionierung nach oben/unten zu ermöglichen.
• Wenn der Laserstrahl gefunden wird, ziehen Sie den Einstellknopf (17)
wieder fest, um das Objekt zu befestigen.
-20-
Ein-/Ausschalten
• Einschalten: drücken, um den Laserdetektor einzuschalten.
※Hinweis: Nach dem Einschalten werden alle Symbole auf dem LCD-
Bildschirm angezeigt, um sicherzustellen, dass der LCD richtig
funktioniert.
LCD mit Hintergrundbeleuchtung
• Wenn das Gerät eingeschaltet ist, drücken Sie auf, um die LCD-
Hintergrundbeleuchtung ein- und auszuschalten.
Genauigkeit
• Beim Einschalten ist die Genauigkeitseinstellung auf FEIN eingestellt,
drücken Sie , um die Genauigkeitseinstellung zwischen FEIN und
MITTEL umzuschalten.
Inbetriebnahme
※Hinweis: Bitte schalten Sie den Impulsmodus der Laserebene ein,
wenn Sie mit einem Laserdetektor arbeiten möchten. Der Laserdetektor
kann NUR unter dem Impulsmodus verwendet werden.
• Ausschalten: nochmals drücken, um den Laserdetektor
auszuschalten.
※Hinweis: Wenn 10 Minuten lang kein Laserstrahl das
Laserempfangsfenster (5) erreicht, schaltet sich der Laserdetektor
automatisch ab, um die Batterie zu schonen.
MITTEL Einstellung
FEIN-Einstellung
※Hinweis:
• Die Genauigkeitseinstellung MITTEL sollte nur dann gewählt werden,
wenn ein stabiler Laserstrahl aufgrund leichter Vibrationen an oder in
der Nähe der Arbeitsstelle nicht erreicht werden kann.
• Wenn sich der zu messende Punkt weit entfernt befindet, ist die
Genauigkeitseinstellung MITTEL erforderlich, da Hitzewellen oder
leichte Vibrationen die Erzielung eines stabilen Laserstrahls stören
können.

-21-
Lautstärke des Lautsprechers
• Beim Einschalten ist die Lautstärke auf LAUT voreingestellt, um die
Lautstärke zu ändern oder das Audiosignal auszuschalten, drücken Sie
.
• Bei LAUT-Lautstärkenniveau erscheint diese Tonsignalanzeige .
• Bei LEISE-Lautstärkenniveau erscheint diese Tonsignalanzeige .
• Wenn das Audiosignal auf MUTE gesetzt ist, wird das Symbol nicht
angezeigt.
Erkennen des Laserstrahls
※Hinweis: Stellen Sie den Laserdetektor mindestens 5 m (17 Fuß) von
der Laserebene entfernt auf.
• Stellen Sie den Laserdetektor bei eingeschaltetem Laserdetektor so
auf, dass der Laserstrahl das Laserempfangsfenster (5) erreichen kann.
Richten Sie den Laserdetektor so aus, dass der Laserstrahl seitlich
durch das Laserempfangsfenster (5) durchlaufen kann.
• Mithilfe der Libelle können Sie eine waagerechte Ebene mit dem
Laserdetektor zu halten.
• Achten Sie darauf, dass das Laserempfangsfenster (5) in Richtung des
Laserstrahls zeigt.
Richtungsanzeiger
• Wenn die obere Anzeige aufleuchtet, das bedeutet, dass der
Laserstrahl höher als die Mittellinie ist, dann bewegen Sie den
Laserdetektor nach unten, so dass die mittlere Anzeige (c) angezeigt
wird.
Bewegen Sie den Laserdetektor wie in der LED gezeigt, um ihn auf
den Laserstrahl auszurichten:
• Wenn die untere Anzeige aufleuchtet, das bedeutet, dass der
Laserstrahl niedriger als die Mittellinie ist, dann bewegen Sie den
Laserdetektor nach oben, so dass die mittlere Anzeige (c) angezeigt
wird.
• Wenn die mittlere Anzeige aufleuchtet, zeigt sie an, dass die Mittellinie
in Linie mit Laserstrahl ist.

Audiosignal zur Erkennung des Laserstrahls
Wenn die Lautstärke des Lautsprechers eingeschaltet ist, hilft
neben der Kontrollleuchte noch ein akustisches Signal bei der
Lokalisierung des Laserdetektors.
• Ein Piepton signalisiert, dass der Laserstrahl erkannt wurde.
• Ein schneller Piepton signalisiert, dass der Laserdetektor nach unten
bewegt werden muss.
• Ein langsamer Piepton signalisiert, dass der Laserdetektor nach oben
bewegt werden muss.
• Ein stetiger Piepton zeigt an, dass der Laserstrahl mit der Mittellinie am
Laserdetektor ausgerichtet ist.
-22-
• Wenn der Laserstrahl erkannt wurde, markieren Sie die angezeigte
Position am Rand der Klemmhalter.
Markierung
※Hinweis:
• Wenn Sie den Laserstrahl mit einem Messstab suchen, lösen Sie den
Einstellknopf (17) leicht, um den Laserdetektor leichter nach oben oder
unten zu bewegen. Wenn der Laserstrahl richtig gefunden wurde,
ziehen Sie die Klemme fest, um sicherzustellen, dass der Laserdetektor
weiterhin stabil auf dem Stab montiert.
• Achten Sie beim Markieren darauf, dass das Werkzeug genau vertikal
(bei horizontalem Laserstrahl) bzw. horizontal (bei vertikalem
Laserstrahl) ausgerichtet wird, sonst sind die Markierungen gegenüber
dem Laserstrahl versetzt.
• Beachten Sie bei der Messung des Kompensationswertes (der Abstand
von der Oberseite des Laserdetektors zur Mittellinie) unbedingt die
Rückseite des Laserdetektors, wenn die Oberseite des Laserdetektors
als Markierungsposition verwendet wird.

-23-
Gewicht
Abmessung
Laserempfangsfenstergröße
Anzeige
Genauigkeit
Arbeitsbereich (R/G)
PWM
Empfangsfrequenz
Automatische Abschaltung
Betriebszeit
Stromquelle
IP Schutzarten
Betriebstemperaturbereich
185g mit Batterie
140mm (H) x 68mm (B) x 26mm (T)
13mm(B) x 52mm(H)
Dual LCD display
Doppeltes LCD-Display
Hoch: 2mm/0,08 Zoll
Niedrig: 3mm/0,12 Zoll
(Kann aufgrund des Arbeitsbereichs
und der Laserleistung abweichen)
Bis zu 50m/165 Fuß
5:5
10K Hz
Bis zu 20 Stunden
-10℃ to + 50℃
-25℃ to + 70℃
Spezifikationen
Lagertemperaturbereich
10 Minuten
2 x AA Batterien
IP55, wasserdicht, staubdicht und
stoßfest
※Hinweis:
• Stellen Sie den Laserdetektor mindestens 5 m (17 Fuß) von der
Laserebene entfernt auf.
• Der Arbeitsabstand und die Erkennungsgenauigkeit werden durch die
Betriebsumgebung beeinflusst.
• Aufgrund der Produktentwicklung können das Aussehen und
Spezifikationen unter Umständen von den Detailangaben abweichen.

-24-
Garantie
Das Laserwerkzeug hat eine strenge und umfassende Produktkontrolle
bestanden. Qualität unserer Produkte ist so zuverlässig, dass wir auf
alle Produkte eine ausgezeichnete Garantie für professionelle Anwender
bieten.
Wir bieten 1 (ein) Jahre Garantie auf unsere Produkte ab dem
Zeitpunkt des Kaufens unter den folgenden Bedingungen:
• Kaufbeleg wird vorgelegt
• Service/Reparaturen sind nicht von Unberechtigten durchgeführt
worden
• Das Produkt ist nicht missbräuchlich verwendet worden
Wenn ein defektes Produkt zusammen mit einem Kaufbeleg an unseren
autorisierten Händler gesendet wird, reparieren oder umtauschen wir
das defekte Produkt kostenlos oder nach unserem Ermessen.
Diese Garantie gilt nicht für:
• Defekte durch zufällige Beschädigung
• Mängel am Produkt aufgrund von ungewöhnlichem Verschleiß.
• Bei Nichtbeachtung der Anweisung des Herstellers.
• Mängel, die durch Wartung oder Umbau ohne unsere Genehmigung
entstanden sind.
• Kalibrierung und Wartung sind von der Garantie nicht umfasst.
Hinweis:
• Wir haften nicht für direkte oder indirekte Verluste aufgrund des
Fehlers dieses Produkts, die über das gesetzliche Maß hinausgehen.
• Eine Reparatur oder ein Umtausch gemäß den Bedingungen dieser
Garantie hat keinen Einfluss auf das Ablaufdatum der Garantie.
• Diese Garantie gilt nur für Kunden, die dieses Produkt gekauft haben,
und es ist nicht gestattet, diese Garantie auf Dritte zu übertragen.
• Diese Garantie darf ohne unsere Genehmigung nicht geändert werden.

-25-
Sie können eine 12-Monate eingeschränkte Garantie,
aber bis zu 24 Monate längere Garantie genießen, wenn
Sie sich durch die Produktregistrierung als Mitglied
registrieren. Bitte scannen Sie den QR-Code ein, um Ihre
Priorität zu genießen.
Sollten Sie Fragen oder Unklarheiten bezüglich des
Produkts haben, können Sie sich gerne an uns wenden:
support@huepar.com

-26-
Merci d'avoir acheté le détecteur laser Huepar LR-5RG.
Veuillez lire attentivement les instructions de sécurité et
le manuel d'utilisation avant d'utiliser ce produit.
Remarque:
• Sécurité
• Présentation du produit
• Installation
• Fonctionnement
• Spécifications
• Garantie
• Veuillez activer le mode d'impulsion du niveau laser
lors de l'utilisation avec le détecteur. Le détecteur peut
être utilisé UNIQUEMENT en mode impulsion.
• Le détecteur Huepar ne peut être compatible qu'avec
les niveaux laser Huepar dotés de la fonction PULSE
MODE. Veuillez faire attention à savoir si le niveau
laser peut être utilisé avec le détecteur Huepar lors de
l'achat. Si vous avez des questions,veuillez nous
contacter par support@huepar.com.
CONTENU

-27-
Règles générales de sécurité:
• Ce produit ne lance pas de laser. Cependant, lorsque vous travaillez
avec des outils laser, veuillez suivre les instructions de sécurité pour cet
instrument laser spécial.
Sécurité
Sécurité électronique:
• Les batteries peuvent exploser ou fuir, qui peut provoquer des
blessures ou des incendies. Pour réduire ce risque, veuillez toujours
suivre toutes les instructions et tous les avertissements sur l'étiquette et
l'emballage de la batterie.
• Placez correctement la batterie (+) et la batterie (-), cela pourrait
provoquer des fuites de liquide ou générer de la chaleur si vous les
inversiez.
• Veuillez retirer la batterie et la mettre dans la boîte de rangement ou le
carton si elle n'est pas utilisée pendant une longue période.
Sécurité personnelle:
• Veillez à ne pas exposer vos yeux au faisceau lasérique émetteur
pendant qu'un outil laser est en fonctionnement. Une exposition
prolongée à un faisceau lasérique peut être dangereuse pour vos yeux.
Utilisation et entretien:
• Veuillez ne pas démonter ni réparer vous-même si une anomalie est
détectée.
• Veuillez ne pas le conserver dans un endroit surchauffé, la meilleure
température de stockage est de -25℃ ~ +70℃.
• Veuillez éviter une utilisation à long terme dans des zones humides et
poussiéreuses, même si le produit est étanche à l'eau et à la poussière.
• Veuillez garder la fenêtre de réception propre et n'appuyez pas trop
fort.
• Veuillez éviter les frappes ou les chocs violents et n'appuyez pas trop
fort sur les touches.

-28-
• Il est sensible à la lumière fluorescente, au soleil, à la lumière flash et
aux signaux d'ondes électriques alternatifs, qui peuvent affecter les
mesures réelles et provoquer des erreurs.

-29-
Présentation du produit
1
2
3
4
5
a
b
c
d
e
6 7 8 9
LINE L ASER RE CEIVE ER

-30-
Présentation du produit
10
11
12
13
14
-31-
Présentation du produit
17
15
16
1. Haut-parleur
2. Marque centrale avant
3. Écran d'affichage LCD avant
a Indicateur de précision
b Indicateur supérieur: descendre
c Indicateur central
d Indicateur inférieur: monter
e Voyant d'alimentation
4. Flacon à bulles
5. Fenêtre de réception laser
6. Bouton marche / arrêt
7. Bouton de précision (fin / moyen)
8. Bouton de volume (fort / doux / muet)
9. Bouton d'éclairage ON / OFF
10. Marque centrale arrière
11. Trou d'alignement
12. Écran d'affichage LCD arrière
13. Montage sur filetage
14. Compartiment à piles
15. Pince
16. Bouton de serrage sur la pince
17. Bouton de réglage sur la pince
-32-
Le détecteur laser peut être utilisé directement à la main ou être installé
sur une tige de mesure, un poteau ou un objet similaire avec la pince.
• Fixez le détecteur à la pince en faisant correspondre le trou
d'alignement (11) et serrez le bouton de serrage (16).
Installation
• Desserrez le bouton de réglage (17) et fixez la pince sur une tige de
mesure, un poteau ou un objet similaire.
• Serrez le bouton de réglage (17) pour fixer la pince.
• Activez le mode d'impulsion du niveau laser.
• Lors de la localisation du faisceau lasérique, desserrez la pince pour
permettre un positionnement haut / bas.
• Lorsque le faisceau lasérique est détecté, resserrez le bouton de
réglage (17) pour fixer l'objet.
-33-
Marche / Arrêt
• Marche : Appuyez pour allumer le détecteur.
※Remarque: Une fois allumé, toutes les icônes seront affichées sur
l'écran LCD pour garantir que l'écran LCD fonctionne correctement.
Luminaire LCD
• Une fois allumé, appuyez pour allumer / éteindre le luminaire LCD.
Précision
• Une fois allumé, le paramètre de précision FINE est défini. Appuyez
pour changer le paramètre de précision entre FINE et MEDIUM.
Opération
※Remarque: veuillez activer le mode d'impulsion du niveau laser lors
de l'utilisation du récepteur. Le détecteur peut être utilisé UNIQUEMENT
en mode impulsion.
• Arrêt: appuyez à nouveau pour éteindre le détecteur.
※ Remarque: Quand aucun faisceau lasérique n'atteint la fenêtre de
réception laser (5) pendant 10 minutes, le détecteur s'éteint
automatiquement afin d'économiser la batterie.
Réglage MOYEN
Réglage précis
※Remarque:
• Le réglage de précision MOYEN ne doit être sélectionné que lorsqu'un
faisceau lasérique stable ne peut pas être obtenu en raison de légères
vibrations sur ou à proximité du chantier.
• Si le point à mesurer se trouve à une longue distance, le réglage de
précision MOYEN est nécessaire car les ondes chaudes ou les légères
vibrations peuvent interférer avec l'obtention d'un faisceau lasérique
stable.

-34-
Volume du haut-parleur
• Une fois allumé, le réglage de volume de défaut est LOUD. Pour
modifier le niveau du volume ou éteindre le signal audio, appuyez .
• Au niveau de volume LOUD, l'indicateur de signal audio apparaît .
• Au niveau de volume SOFT, l'indicateur de signal audio apparaît .
• Lorsque le signal audio est réglé sur MUTE, l'indicateur s'éteint.
Détection du faisceau lasérique
※Remarque: Positionnez le détecteur à au moins 5 m (17 pi) du niveau
laser.
• Avec le détecteur allumé, placez le détecteur à l'endroit où le faisceau
laser peut atteindre la fenêtre de réception laser (5). Alignez le détecteur
de sorte que le faisceau lasérique puisse passer latéralement à travers
la fenêtre de réception laser (5).
• Utilisez le flacon à bulles pour maintenir un plan horizontal avec le
détecteur.
• Assurez-vous que la fenêtre de réception laser (5) fait face à la
direction du faisceau lasérique.
Indicateurs de direction
• Si l'indicateur supérieur s'allume, déplacez le détecteur vers le bas
pour qu'il corresponde à l'indicateur central (c) car cela indique que la
ligne laser est au-dessus de la marque centrale.
Déplacez le détecteur selon les instructions sur la LED pour
l'aligner avec le faisceau lasérique:
• Si l'indicateur inférieur s'allume, déplacez le détecteur vers le haut pour
qu'il corresponde à l'indicateur central (c) car cela indique que la ligne
laser est en dessous de la marque centrale.
•
Si l'indicateur central s'allume, cela indique que la ligne laser
correspond juste à la marque centrale.

-35-
Signal audio pour l'indication du faisceau lasérique
En plus de la lampe de témoin, si le volume du haut-parleur est
activé, un son audible aide à localiser le détecteur.
• Un bip retentit pour indiquer que le faisceau lasérique a été détecté.
• Un bip rapide retentit pour indiquer que le détecteur doit être abaissé.
• Un bip lent retentit pour indiquer que le détecteur doit être déplacé vers
le haut.
• Un bip régulier retentit pour indiquer que le faisceau laser est aligné
avec la marque centrale du récepteur.
• Une fois le faisceau lasérique détecté, marquez la position indiquée sur
le bord de la pince.
Marquage
※Remarque:
• Lorsque vous recherchez le faisceau laser à l'aide d'une tige de
mesure, desserrez légèrement le bouton de réglage (17) pour déplacer
le détecteur vers le haut ou vers le bas plus facilement. Lorsque le
faisceau lasérique a été trouvé en sécurité, serrez la pince pour que le
détecteur reste stable sur la tige.
• Lors du marquage, veillez à aligner l'outil exactement verticalement
(pour le faisceau lasérique horizontal) ou horizontal (pour le faisceau
lasérique vertical), sinon les marques dévient du faisceau lasérique.
• Assurez-vous de vous référer à l'arrière du récepteur pour la mesure de
la valeur de compensation (la distance entre le haut du récepteur et la
marque centrale), si le haut du récepteur est utilisé comme position de
marquage.

-36-
Poids
Dimension
Taille de la fenêtre de
réception laser
Afficheur
Précision
zone de travail (R / G)
PWM
Fréquence de réception
Arrêt automatique
Temps de travail
Source d'énergie
Niveau de protection
Plage de température de
fonctionnement
185g avec batterie
140mm (H) x 68mm (W) x 26mm (D)
13mm(W) x 52mm(H)
Affichage LCD double
Haut: ≤2 mm / 0,08 pouces
Faible: ≤3 mm / 0,12 pouces
(Peut différer en raison de la plage
de travail et de la puissance du laser)
Jusqu'à 50 m / 165 pieds
5:5
10K Hz
Jusqu'à 20 heures
-10℃ to + 50℃
-25℃ to + 70℃
Spécifications
Plage de température de
stockage
10 mins
2 x AA batterie
Ip55, étanche, antipoussière et
antichoc
※Remarque:
• Positionnez le détecteur à au moins 5 m (17 ft) du niveau laser.
• La distance de travail et la précision de détection seront affectées par
l'environnement d'exploitation.
• L'apparence et les spécifications peuvent différer en raison de
l'amélioration du produit.

-37-
Garantie
L'outil laser a passé une inspection rigoureuse et complète. Nous
sommes confiants en la qualité de nos produits et offrons une excellente
garantie aux utilisateurs professionnels des produits.
Nous offrons une garantie d'un an à compter de la date d'achat,
notamment:
• Une preuve d'achat
• Les services / réparations qui n'ont pas été essayés par des personnes
non autorisées
• Le produit n'a pas été mal utilisé
Les produits défectueux seront réparés ou remplacés, gratuitement ou
à notre discrétion, s'ils sont envoyés avec une preuve d'achat à nos
distributeurs autorisés.
Cette garantie ne comprend pas:
• Défauts causés par des dommages accidentels
• Le produit a subi une usure excessive
• L'utilisation sans les instructions du fabricant
• Défauts causés par l'entretien ou la rénovation sans notre autorisation
• L'étalonnage et l'entretien ne sont pas inclus dans la garantie
Remarque:
• Nous ne sommes pas responsables de toute perte directe ou indirecte
causée par la défaillance de ce produit au-delà de la portée prévue par
la loi.
• La réparation ou le remplacement sous cette garantie n'affecte pas la
date d'expiration de la garantie.
• Cette garantie s'applique uniquement aux clients qui ont acheté ce
produit et n'est pas autorisée à transférer cette garantie à des tiers.
• Cette garantie ne peut être modifiée sans notre autorisation.

-38-
Vous pouvez bénéficier d'une garantie limitée de 12 mois,
mais elle peut être prorogé jusqu'à 24 mois si vous vous
inscrivez en tant que membre via l'enregistrement du
produit. Veuillez scanner le code QR pour activer votre
priorité.
Si vous rencontrez des questions ou des confusions sur le
produit, n'hésitez pas à nous contacter: support@huepar.com

-39-
Grazie per aver acquistato il Huepar LR-5RG Rilevatore
Laser.
Si prega di leggere attentamente le Istruzioni di
Sicurezza e il Manuale Utente prima di utilizzare questo
prodotto.
Note:
• Sicurezza
• Descrizione di Prodotto
• Come Installare
• Operazione
• Specifiche
• Garanzia
• Si prega di attivare la Modalità di Impulso della livella
laser quando è utilizzata con il rilevatore. Il rilevatore
può essere utilizzato SOLO nella Modalità di Impulso.
• Il Huepar rilevatore può essere compatibile solo con le
Huepar livelle laser che dispongono della funzione
Modalità di Impulso. Si prega di prestare attenzione a
se la livella laser può essere utilizzata con il Huepar
rilevatore quando si acquista. In caso di domande,
si prega di contattarci: support@huepar.com.
CONTENUTI

-40-
Regole Generali di Sicurezza:
• Questo prodotto non proietta il laser. Tuttavia, quando è utilizzato con
strumenti laser, si prega di seguire le istruzioni di sicurezza per quello
strumento laser particolare.
Sicurezza
Sicurezza Elettronica:
• Le batterie potrebbero esplodere o perdere liquido, provocando lesione
o incendio. Per ridurre questo rischio, si prega di seguire sempre tutte le
istruzioni e le avvertenze sull'etichetta della batteria e sulla sua
confezione.
• Posizionare correttamente la batteria (+) e la batteria (-). Potrebbe
causare perdita di liquido o generazione di calore se sono invertite.
• Estrarre la batteria e riporla nella scatola o cartone per conservazione
se non è utilizzata per un lungo periodo.
Sicurezza Personale:
• Quando uno strumento laser è in funzione, fare attenzione a non
esporre gli occhi al raggio laser che emette. L'esposizione a un raggio
laser per lungo tempo potrebbe essere pericolosa per gli occhi.
Uso e Cura:
• Non smontare o riparare da solo in qualsiasi caso di anormalità.
• Non tenerlo in un luogo surriscaldato, la migliore temperatura di
conservazione è -25℃ ~ +70℃.
• Evitare l'uso prolungato in aree umide e polverose, anche se il prodotto
è impermeabile e antipolvere.
• Mantenere pulita la finestra di ricezione e non premerla con forza.
• Evitare colpo violente e non premere i tasti con forza.
• È sensibile alla luce fluorescente, luce del sole, luce del flash e altri
segnali di onde elettriche, che può influire sulle misurazioni effettive e
potrebbe causare errori.
-41-
Descrizione di Prodotto
1
2
3
4
5
a
b
c
d
e
6 7 8 9
LINE L ASER RE CEIVE ER

-42-
Descrizione di Prodotto
10
11
12
13
14

-43-
Descrizione di Prodotto
17
15
16
1. Altoparlante
2. Segno Centrale Anteriore
3. Schermata LCD Anteriore
a Indicatore di Precisione
b Indicatore Superiore: spostare verso il basso
c Indicatore Centrale
d Indicatore Inferiore: spostare verso l'alto
e Indicatore di Energia
4. Fiala a Bolla
5. Finestra di Ricezione Laser
6. Pulsante ON/OFF
7. Pulsante di Precisione (Normale/Alta)
8. Pulsante di Volume (Alto/Basso/Muto)
9. Pulsante ON/OFF di Illuminazione
10. Segno Centrale Posteriore
11. Foro di Allineamento
12. Schermata LCD Posteriore
13. Attacco Filettato
14. Vano Batteria
15. Morsetto
16. Pomello da Stringere sul Morsetto
17. Pomello da Regolare sul Morsetto
-44-
Il rilevatore laser può essere utilizzato direttamente a mano o essere
montato su un'asta, un palo o un oggetto simile di misurazione con il
morsetto.
• Collegare il rilevatore al morsetto facendo corrispondere con il foro di
allineamento (11), e stringere il pomello (16).
Come Installare
• Allentare il pomello da regolare (17) e fissare il morsetto su un'asta,
un palo o un oggetto simile di misurazione.
• Stringere il pomello da regolare (17) per fissare il morsetto.
• Attivare la modalità di impulso della livella laser.
• Quando si localizza il raggio laser, allentare il morsetto per consentire il
posizionamento su/giù.
• Quando il raggio laser è rilevato, stringere di nuovo il pomello da
regolare (17) per fissare l'oggetto.
-45-
Accendere / Spegnere
• Accendere: Premere per accendere il rilevatore.
※Nota: Quando il rilevatore è acceso, tutte le icone saranno
visualizzate sulla schermata LCD per garantire il corretto funzionamento
dell'LCD.
Illuminare LCD
• Quando il rilevatore è acceso, premere per accendere/spegnere
l'illuminazione LCD.
Precisione
• Quando il rilevatore è acceso, è impostata la precisione NORMALE.
Premere per cambiare l'impostazione di precisione tra NORMALE e
ALTA.
Operazione
※Nota: Si prega di attivare la Modalità di Impulso della livella laser
quando è utilizzata con il rilevatore. Il rilevatore può essere utilizzato
SOLO nella Modalità di Impulso.
• Spegnere: Premere di nuovo per spegnere il rilevatore.
※Nota: Se nessun raggio laser raggiunge la finestra di ricezione laser
(5) per 10 minuti, il rilevatore si spegne automaticamente per risparmiare
la batteria.
Cambiare a ALTA
Cambiare a NORMALE
※Note:
• L'impostazione di precisione ALTA deve essere selezionata solo
quando non può essere ottenuto un raggio laser stabile a causa di lievi
vibrazioni nel o vicino al luogo di lavoro.
• Se il punto da misurare è a lunga distanza, l'impostazione di precisione
ALTA è necessaria perché onde di calore o lievi vibrazioni potrebbero
interferire con l'ottenimento di un raggio laser stabile.

-46-
Volume dell'Altoparlante
• Quando il rilevatore è acceso, l'impostazione del volume predefinita è
ALTO. Per cambiare il livello del volume o spegnere il segnale audio,
premere .
• Al livello del volume ALTO, l'indicatore del segnale audio appare .
• Al livello del volume BASSO, l'indicatore del segnale audio appare .
• Quando il segnale audio è impostato su MUTO, l'indicatore si spegne.
Rilevare il Raggio Laser
※Nota: Posizionare il rilevatore ad almeno 5 m (17 piedi) di distanza
dalla livella laser.
• Con il rilevatore acceso, posizionare il rilevatore nel punto in cui il
raggio laser può raggiungere la finestra di ricezione laser (5). Allineare il
rilevatore in modo che il raggio laser possa scorrere lateralmente
attraverso la finestra di ricezione laser (5).
• Utilizzare la fiala a bolla per mantenere un piano livellato con il
rilevatore.
• Assicurarsi che la finestra di ricezione laser (5) sia rivolta verso la
direzione del raggio laser.
Indicatori di Direzione
• Se l'Indicatore Superiore si illumina, spostare il rilevatore verso il basso
in modo che corrisponda all'indicatore centrale (c) perché indica che la
linea laser si trova sopra il segno centrale.
Spostare il rilevatore come indicato sul LED per allinearlo al raggio
laser:
• Se l'Indicatore Inferiore si illumina, spostare il rilevatore verso l'alto in
modo che corrisponda all'indicatore centrale (c) perché indica che la
linea laser si trova sotto il segno centrale.
• Se l'Indicatore Centrale si illumina, indica che la linea laser corrisponde
appena al segno centrale.

Segnale Audio per l'Indicazione del Raggio Laser
Oltre all'indicatore luminoso, se il volume dell'altoparlante è attivo,
un suono udibile aiuta a localizzare il rilevatore.
• Un suono di bip per indicare che il raggio laser è stato rilevato.
• Un bip rapido per indicare che il rilevatore deve essere spostato verso
il basso.
• Un bip lento per indicare che il rilevatore deve essere spostato verso
l'alto.
• Un bip stabile per indicare che il raggio laser è allineato con il segno
centrale sul rilevatore.
-47-
• Una volta rilevato il raggio laser, segnare la posizione mostrata sul
bordo del morsetto.
Fare Segno
※Note:
• Quando si cerca il raggio laser utilizzando un'asta di misurazione,
allentare leggermente il pomello da regolare (17) per spostare il
rilevatore su o giù più facilmente. Quando il raggio laser è trovato in
modo sicuro, stringere il morsetto per assicurarsi che il rilevatore
rimanga stabile sull'asta.
• Quando si fa un segno, fare attenzione ad allineare lo strumento
esattamente in verticale (per raggio laser orizzontale) o orizzontale (per
raggio laser verticale), altrimenti i segni saranno spostati rispetto al
raggio laser.
• Assicurarsi di fare riferimento alla parte posteriore del rilevatore per la
misurazione del valore di compensazione (la distanza dalla parte
superiore del rilevatore al segno centrale), se la parte superiore del
rilevatore è utilizzata come una posizione di segno.

-48-
Peso
Dimensioni
Dimensioni della Finestra di
Ricezione Laser
Schermata
Precisione
Limite di Funzione (R/G)
PWM
Frequenza di Ricezione
Spegnimento Automatico
Tempo di Funzione
Fonte di Energia
Valutazione IP
Limite di Temperatura per
Funzione
185g con batteria
140mm (H) x 68mm (W) x 26mm (D)
13mm (W) x 52mm (H)
Doppie schermate LCD
Alta: 2 mm/0,08 pollice
Normale: 3 mm/0,12 pollice
(Potrebbe differire a causa del limite
di funzione e della potenza del laser)
Fino a 50 m/165 piedi
5:5
10K Hz
Fino a 20 ore
-10℃ a + 50℃
-25℃ a + 70℃
Specifiche
Limite di Temperatura per
Conservazione
10 minuti
2 x Batteria AA
IP55, impermeabile, antipolvere e
antiurto
※Note:
• Posizionare il rilevatore ad almeno 5 m (17 piedi) di distanza dalla
livella laser.
• La distanza di funzione e la precisione del rilevamento saranno
influenzate dall'ambiente di operazione.
• L'aspetto e le specifiche potrebbero differire a causa del miglioramento
del prodotto.

-49-
Garanzia
Questo strumento laser ha superato un'ispezione di prodotto rigorosa e
completa. Siamo fiduciosi della qualità dei nostri prodotti e offriamo una
garanzia eccezionale per gli utenti professionali dei prodotti.
Offriamo una Garanzia di Un Anno dalla data di acquisto a
condizione che:
• La prova di acquisto sia offerta.
• Assistenza/riparazione non siano state tentate da persone non
autorizzate.
• Il prodotto non sia stato utilizzato in modo improprio.
I prodotti difettosi saranno riparati o sostituiti, gratuitamente o a nostra
discrezione, se inviati insieme alla prova di acquisto al nostro
distributore autorizzato.
Questa Garanzia non include:
• Guasti causati da danni accidentali.
• Il prodotto ha subito un'irragionevole usura.
• Uso senza osservanza delle istruzioni del produttore.
• Difetti causati da manutenzione o ristrutturazione senza la nostra
autorizzazione
• La calibrazione e la cura non sono coperte dalla Garanzia.
Note:
• Nella misura consentita dalla legge, non saremo responsabili per
qualsiasi perdita diretta o indiretta causata da guasti a questo prodotto.
• La riparazione o la sostituzione ai sensi della presente Garanzia non
influenzano la data di scadenza della Garanzia.
• Questa garanzia è applicata solo ai clienti che hanno acquistato questo
prodotto. Non è consentito trasferire questa garanzia a terzi.
• Questa Garanzia non può essere modificata senza la nostra
autorizzazione.

-50-
Godi di una garanzia limitata di 12 mesi, ma può essere
fino a 24 mesi se ti registri come membro attraverso la
registrazione del prodotto. Si prega di scansionare questo
codice QR per attivare la priorità.
In caso di qualsiasi domanda o confusione sul prodotto,
non esitare a contattarci:
support@huepar.com

-51-
Gracias por comprar el receptor láser Huepar LR-5RG.
Lea atentamente las Instrucciones de seguridad y el
manual del usuario antes de utilizar este producto.
Nota:
• Seguridad
• Descripción del Producto
• Configuración
• Operación
• Especificaciones
• Garantía
• Active el Modo de Pulso del nivel láser cuando use el
receptor. El receptor SOLO se puede usar en modo de
pulso.
• El receptor Huepar solo puede ser compatible con los
niveles de láser Huepar que cuentan con la función de
Modo de Pulso. Por favor, preste atención a si el nivel
láser se puede usar con el receptor Huepar al comprar.
Si tiene alguna pregunta, contáctenos a través de
support@huepar.com.
CONTENIDO

-52-
Reglas Generales de Seguridad:
• Este producto no proyecta láser. Sin embargo, cuando trabaje con
herramientas láser, siga las instrucciones de seguridad para ese
instrumento láser en particular.
Seguridad
Seguridad Electrónica:
• Las baterías pueden explotar o tener fugas, causar lesiones o
incendios. Para reducir este riesgo, siga siempre todas las instrucciones
y advertencias en la etiqueta y el paquete de la batería.
• Coloque la batería (+) y la batería (-) correctamente, puede causar
fugas de líquido o generación de calor si las invierte.
• Saque la batería y colóquela en la caja de almacenamiento o cartón si
no se utiliza durante mucho tiempo.
Seguridad Personal:
• Tenga cuidado de no exponer sus ojos al rayo láser emisor mientras
una herramienta láser está en funcionamiento. La exposición a un rayo
láser durante un tiempo prolongado puede ser peligroso para sus ojos.
Uso y Cuidado:
• Si se encuentra alguna anomalía, no la desmonte ni la repare usted
mismo.
• No lo guarde en un lugar sobrecalentado, la mejor temperatura de
almacenamiento es -25 ℃ ~ 70 ℃.
• Evite el uso prolongado en áreas húmedas y polvorientas, aunque el
producto sea resistente al agua y al polvo.
• Mantenga limpia la ventana de recepción y no la presione con fuerza.
• Evite golpes violentos o impactantes, y no presione las teclas con
fuerza.
• Es sensible a la luz fluorescente, la luz solar, la luz del flash y la señal
de onda eléctrica alternativa, lo que puede afectar las mediciones reales
y puede causar errores.

-53-
Descripción del Producto
1
2
3
4
5
a
b
c
d
e
6 7 8 9
LINE LASER RE CEIVE ER

-54-
Descripción del Producto
10
11
12
13
14

-55-
Descripción del Producto
17
15
16
1. Altavoz
2. Marca Central Delantera
3. Pantalla LCD Frontal
a Indicador de Precisión
b Indicador Superior: moverse hacia abajo
c Indicador Central
d Indicador Inferior: moverse hacia arriba
e Indicador de Encendido
4. Vial de Burbuja
5. Ventana de Recepción Láser
6. Botón de Encendido / Apagado
7. Botón de Precisión (Fino / Medio)
8. Botón de Volumen (Alto / Suave / Silencio)
9. Botón de ENCENDIDO / APAGADO de iluminación
10. Marca Central Trasera
11. Agujero de Alineación
12. Pantalla LCD Trasera
13. Montaje de Rosca
14. Compartimento de la Batería
15. Abrazadera
16. Perilla de Apriete de la Abrazadera
17. Perilla de Ajuste de la Abrazadera

-56-
El receptor láser se puede usar directamente a mano o se puede montar
en una vara de medir, poste u objeto similar con la abrazadera.
• Fije el receptor a la abrazadera haciendo coincidir el orificio de
alineación (11) y apriete la perilla de ajuste (16).
Configuración
• Afloje la perilla de ajuste (17) y fije la abrazadera en una varilla de
medición, poste u objeto similar.
• Apriete la perilla de ajuste (17) para asegurar la abrazadera.
• Active el modo de pulso del nivel láser.
• Al ubicar el rayo láser, afloje la abrazadera para permitir el
posicionamiento arriba / abajo.
• Cuando encuentre el rayo láser, vuelva a apretar la perilla de ajuste
(17) para asegurar el objeto.
-57-
ENCENDIDO / APAGADO
• ENCENDIDO: Presione para ENCENDER el receptor.
※Nota: Cuando se enciende, todos los iconos se mostrarán en la
pantalla LCD para garantizar que la pantalla LCD funcione
correctamente.
Iluminar LCD
• Cuando se ENCIENDE, presione para ENCENDER / APAGAR la
iluminación de la pantalla LCD.
Exactitud
• Cuando está ENCENDIDO, la configuración de precisión FINA está
configurada, presione para cambiar la configuración de precisión
entre FINA y MEDIA.
Operación
※Nota: Active el Modo de Pulso del nivel láser cuando lo use con el
receptor. El receptor SOLO se puede usar en modo de pulso.
• APAGADO: Presione nuevamente para APAGAR el receptor
※Nota: Cuando ningún rayo láser alcanza la ventana de recepción del
láser (5) durante 10 minutos, el receptor se apagará automáticamente
para ahorrar batería.
Ajuste MEDIO
Ajuste FINO
※Nota:
• La configuración de precisión MEDIA debe seleccionarse solo cuando
no se puede obtener un rayo láser estable debido a ligeras vibraciones
en o cerca del sitio de trabajo.
• Si el punto a medir está a una distancia larga, la configuración de
precisión MEDIA es necesaria porque las ondas de calor o las
vibraciones leves pueden interferir con la obtención de un rayo láser
estable.

-58-
Volumen del Altavoz
• Cuando está ENCENDIDO, el ajuste de volumen predeterminado es
ALTO, para cambiar el nivel de volumen o apagar la señal de audio,
presione .
• En el nivel de volumen ALTO, el indicador de señal de audio aparece
.
• En el nivel de volumen SUAVE, el indicador de señal de audio aparece
.
• Cuando la señal de audio se establece en SILENCIO, el indicador se
apaga.
Detectando el Rayo Láser
※Nota: Coloque el receptor al menos a 5 m (17 pies) del nivel del láser.
• Con el receptor encendido, colóquelo donde el rayo láser pueda
alcanzar la ventana de recepción del láser (5). Alinee el receptor para
que el rayo láser pueda correr lateralmente a través de la ventana de
recepción del láser (5).
• Use el vial de burbujas para mantener un plano nivelado con el
receptor.
• Asegúrese de que la ventana de recepción del láser (5) esté orientada
en la dirección del rayo láser.
Indicadores de Dirección
• Si el indicador superior se ilumina, mueva el receptor hacia abajo para
que coincida con el indicador central (c) porque indica que la línea del
láser está por encima de la marca central.
Mueva el receptor como se indica en el LED para alinearlo con el
rayo láser:
• Si el indicador inferior se ilumina, mueva el receptor hacia arriba para
que coincida con el indicador central (c) porque indica que la línea del
láser está por debajo de la marca central.
• Si el indicador central se ilumina, indica que la línea láser coincide con
la marca central.

Señal de audio para indicación del rayo láser
Además de la luz indicadora, si el volumen del altavoz está
ENCENDIDO, un sonido audible ayuda a localizar el receptor.
• Suena un pitido para indicar que se ha detectado el rayo láser.
• Suena un pitido rápido para indicar que el receptor debe moverse hacia
abajo.
• Suena un pitido lento para indicar que el receptor debe moverse hacia
arriba.
• Suena un pitido constante para indicar que el rayo láser está alineado
con la marca central del receptor.
-59-
• Una vez que se ha detectado el rayo láser, marque la posición que se
muestra en el borde de la abrazadera.
Marcar
※Nota:
• Cuando busque el rayo láser utilizando una vara de medir, afloje
ligeramente la perilla de ajuste (17) para mover el receptor hacia arriba
o hacia abajo con mayor facilidad. Después de asegurarse de que se
encuentre el rayo láser, apriete la abrazadera para asegurarse de que el
receptor se mantenga estable en la varilla.
• Al marcar, tenga cuidado de alinear el receptor con precisión en la
dirección vertical (para rayos láser horizontales) o alinear el receptor con
precisión en la dirección horizontal (para rayos láser verticales), de lo
contrario las marcas se compensan con respecto al rayo láser.
• Asegúrese de consultar la parte posterior del receptor para medir el
valor de compensación (la distancia desde la parte superior del receptor
hasta la marca central), si la parte superior del receptor se utiliza como
posición de marcado.

-60-
Peso
Dimensión
Tamaño de Ventana de
Recepción Láser
Pantalla
Exactitud
Rango de Trabajo(Rayo Láser
Rojo / Verde)
PWM
Frecuencia de Recepción
Apagado Automático
Tiempo de Trabajo
Fuente de Alimentación
Clasificación del IP
Rango de Temperatura de
Funcionamiento
185g con batería
140mm x 68mm x 26mm
13mm x 52mm
Doble pantalla LCD
Alto: ≤2mm / 0,08 pulgadas
Bajo: ≤3mm / 0,12 pulgadas
(Puede diferir debido al rango de
trabajo y la potencia del láser)
Hasta 50 m / 165 pies
5:5
10K Hz
Hasta 20 horas
-10℃ a + 50℃
-25℃ a + 70℃
Especificaciones
Rango de Temperatura de
Almacenamiento
10 minutos
2 x Batería AA
IP55, impermeable, a prueba de
polvo y a prueba de golpes
※Nota:
• Coloque el receptor al menos a 5 m (17 pies) del nivel del láser.
• La distancia de trabajo y la precisión de detección se verán afectadas
por el entorno operativo.
• La apariencia y las especificaciones pueden diferir debido a la mejora
del producto.

-61-
Garantía
La herramienta láser pasó una inspección rigurosa e integral del
producto. Confiamos en la calidad de nuestros productos y ofrecemos
una excelente garantía para los usuarios profesionales de los
productos.
Ofrecemos garantía de un año a partir de la fecha de compra,
que incluye:
• Se proporciona comprobante de compra
• El servicio / reparaciones no han sido intentados por personas no
autorizadas
• El producto no ha sido mal utilizado
Los productos defectuosos serán reparados o reemplazados, sin cargo
o a nuestra discreción, si se envían junto con el comprobante de
compra a nuestros distribuidores autorizados.
Esta garantía no cubre:
• Fallos causados por daños accidentales.
• El producto ha sufrido un desgaste irrazonable
• No se utiliza según las instrucciones del fabricante.
• Defectos causados por mantenimiento o renovación sin nuestra
autorización.
• La calibración y el mantenimiento no están incluidos en la garantía.
Nota:
• No somos responsables de ninguna pérdida directa o indirecta
causada por la falla de este producto más allá del alcance estipulado
por la ley.
• La reparación o reemplazo bajo esta Garantía no afecta la fecha de
vencimiento de la Garantía.
• Esta garantía solo se aplica a los clientes que han comprado este
producto y no está permitido transferir esta garantía a ningún tercero.
• Esta garantía no se modificará sin nuestra autorización.

-62-
Puede disfrutar de una garantía limitada de 12 meses,
pero puede ser de hasta 24 meses si se registra como
miembro a través del registro del producto. Escanee el
código QR para activar su prioridad.
Si tiene alguna pregunta o confusión sobre el producto,
no dude en contactarnos: support@huepar.com

-63-
Благодарим за покупку лазерного приемника Huepar
LR-5RG.
Просим внимательно ознакомиться с данной
инструкцией перед использованием продукта
Примечание:
• Безопасность
• Описание продукта
• Установка
• Использование
• Спецификации
• Гарантия
• Пожалуйста включите режим работы с приемником
(Pulse Mode/Импульсный режим) на Вашем
лазерном уровне. Приемник будет работать ТОЛЬКО
в таком режиме.
• Приемник Huepar может быть использован только
с лазерными уровнями Huepar, которые
поддерживают функцию «Работа с приемником»
(PULSE MODE). Перед покупкой лазерного уровня,
убедитесь в наличии данной функции. Если у Вас
имеются какие-либо вопросы, пожалуйста,
свяжитесь с нами по электронной почте
support@huepar.com.
СОДЕРЖАНИЕ

-64-
Основные правила по технике безопасности:
• Данный продукт не является излучающим лазерным устройством.
Однако, работая с лазерными приборами, пожалуйста, следуйте
инструкциям безопасности от используемого Вами инструмента.
Безопасность
Электробезопасность:
• Батарейки могут взрываться, течь, причинять травмы и
возгораться. Чтобы уменьшить эти риски, всегда следуйте
указаниям на этикетках и упаковках от батареек.
• При установке соблюдайте полярность батареек (+/-), в противном
случае это может привести к нагреву, возгоранию, поломке прибора
и другим неприятным последствиям.
• Извлекайте батарейки из прибора и храните отдельно в
специальном контейнере если не планируете пользоваться
прибором длительное время.
Личная безопасность:
• Будьте осторожны и не направляйте луч лазера в глаза.
Продолжительное воздействие лазерного луча может стать
причиной травмирования глаз.
Использование и уход:
• Не разбирайте и не ремонтируйте инструмент самостоятельно.
• Температура хранения инструмента должна быть в диапазоне от
-25℃ ~ +70℃.
• Хотя прибор и имеет защиту от воды и пыли, тем ни менее,
старайтесь избегать продолжительного использования прибора во
влажных и пыльных помещениях.
• Держите окно сенсора приемника в чистоте и не нажимайте на
него сильно.
• Избегайте сильных вибраций и ударов, не давите на кнопки
слишком сильно.

-65-
• Прибор чувствителен к флуоресцентному свету, солнечному свету,
вспышке и альтернативному электрическому сигналу, который
может повлиять на фактические измерения и вызвать ошибки.

LINE LASER RE CEIVE ER
-66-
Обзор продукции
1
2
3
4
5
a
b
c
d
e
6 7 8 9

-67-
Обзор продукции
10
11
12
13
14
-68-
Обзор продукции
17
15
16
1. динамик
2. передняя центровая метка
3. передний LCD дисплей
a индикатор точности
b верхний индикатор, перемещайте вниз
c центровой индикатор
d Нижний индикатор : перемещайте вверх
e индикатор питания
4. пузырьковый уровень
5. окно сенсора приёмника
6. кнопка включения/выключения
7. кнопка выбора точности (максимальная/средняя)
8. кнопка громкости (громко, тихо, без звука)
9. включение/выключение подсветки
10. задняя центровая метка
11. точка центровки с креплением
12. задний LCD дисплей
13. резьба крепления
14. отсек для батареек
15. крепление к рейке
16. ручка крепления к приемнику
17. ручка регулировки зажима
-69-
Лазерный приёмник может быть использован без дополнительных
аксессуаров или будучи установленным на измерительную линейку,
штангу и подобные предметы.
• Присоедините приёмник на крепление (15) совмещая точку
центровки (11) и затяните ручку крепления (16)
Установка
• Разведите зажимной механизм (17) и прикрепите держатель на
измерительную линейку, штангу или похожий предмет.
• Зафиксируйте крепление регулировочной ручкой (17).
• Включите импульсный режим работы с приёмником (Pulse mode)
на лазерном уровне.
• При поиске лазерного луча, ослабьте крепление для свободного
движения вверх/вниз.
• Когда лазерный луч пойман, надежно затяните крепление (17).
-70-
Включение/выключение приемника
• Включение: нажмите кнопку Включение : нажмите кнопку
※Примечание: при включении устройства, на дисплее отобразятся
все иконки, таким образом можно убедиться в работоспособности
дисплея.
Подсветка LCD дисплея
• Когда устройство включено, нажмите кнопку чтобы ВКЛ/ВЫКЛ
подсветку дисплея.
Точность
• Когда устройство включено, точность приемника установлена на
«максимальный», нажимая кнопку можно переключать между
режимами «максимальный» и «средний»
Операция
※Внимание: Пожалуйста включите режим работы с
приемником (Pulse Mode/Импульсный режим) на Вашем
лазерном инвелиром. Приемник будет работать ТОЛЬКО в
таком режиме.
• Выключение: нажмите кнопку еще раз, чтобы выключить
приемник
※Примечание: если лазерный луч не попадает в окно приемника в
течении 10 минут, устройство автоматически отключится для
экономии батареек.
Средняя (грубая) настройка точности
Максимальная настройка точности
※Примечание:
• Среднюю (грубую) настройку точности следует выбирать только
тогда, когда нет возможности точно поймать луч из-за небольших
вибраций в рабочей зоне.

-71-
• Если измеряемая точка находится на далеком расстоянии, так же
необходимо использовать среднюю настройку, так как тепловые
волны и слабые вибрации могут влиять на стабильность луча.
Громкость динамика
• При включении приемника, стандартное значение громкости
динамика установлено на «Громкий», для изменения уровня
громкости, а так же для полного его отключения, нажимайте кнопку
.
• При выборе «Громкого» уровня звука, будет гореть пиктограмма
.
• При выборе «Среднего» уровня громкости, будет гореть
пиктограмма .
• При выборе «Беззвучного» режима пиктограмма не показывается.
Обнаружение лазерного луча
※Примечание: Минимально рекомендуемое расстояние от
лазерного уровня – 5 метров (17 футов).
• При включенном приемнике расположите приемник так, чтобы
лазерный луч мог попасть в окно приема лазера (5). Выровняйте
приемник так, чтобы лазерный луч мог проходить в боковом
направлении через окно приема лазера (5) – параллельно средним
отметкам на приемнике.
• Используйте пузырьковый уровень приемника, чтобы выровнять
его в одной плоскости с лазерным уровнем.
• Убедитесь, что окно приема лазера (5) обращено по направлению
к лазерному лучу.
Индикаторы направления
• Если загорается верхний индикатор, перемещайте приемник вниз
пока не загорится средний индикатор. Верхний индикатор
символизирует, что луч находится выше центровой отметки.
Перемещайте приемник согласно направлению индикаторов:

-72-
• Если загорается нижний индикатор, перемещайте приемник вверх,
пока не достигните центровой отметки. Нижний индикатор
символизирует, что луч находится ниже центровой отметки.
• Загорание среднего индикатора свидетельствует о том, что луч
совпадает с линией центровой отметки.
Звуковая сигнализация опознавания луча
В дополнение к световой индикации, если не был выключен
динамик, звуковой сигнал помогает позиционировать
приемник.
• Звуковой сигнал означает, что лазерный луч был обнаружен.
• Быстрый звуковой сигнал указывает на необходимость перемещать
приемник по направлению вниз.
• Медленный звуковой сигнал указывает на необходимость
перемещать приемник вверх.
• Непрерывный звуковой сигнал указывает на совпадение лазерного
луча с центровой отметкой.
• Когда лазерный луч пойман и центрирован, отметьте положение по
краю крепления-зажима.
Разметка
※Примечание:
• При использовании измерительной линейки, слегка ослабьте
зажим крепления (17), так Вы сможете перемещать приемник вверх-
вниз. Когда луч будет пойман, затяните зажим крепления, надежно
зафиксировав приемник на линейке.
• Когда делаете разметку, держите приемник строго вертикально
(для горизонтальной плоскости) или строго горизонтально (для
вертикальной плоскости), в противном случае может появиться
смещение от лазерного луча.
• Если используете верхнюю часть приемника для отметки,
используйте заднюю часть приемника для измерения значения
компенсации (расстояние от вершины приемника до центровой
отметки).

-73-
Вес
Размеры
Размер окна приемного
сенсора
Дисплей
Точность
Рабочая дистанция (К/З)
ШИМ
Частота приема
Автоматическое отключение
Время работы
Источник питания
Класс защиты
Диапазон рабочей
температуры
185гр. с батарейками
140mm (H) x 68mm (W) x 26mm (D)
13mm(W) x 52mm(H)
Двойной ЖКИ дисплей
Высокая: 2mm/0.08дюйма
Низкая: 3mm/0.12дюйма
(Может отличаться из-за рабочей
дистанции и мощности лазера)
До 50 м / 165 фт
5:5
10 КГц
До 20 часов
-10℃ до + 50℃
-25℃ до + 70℃
Характеристики
Диапазон температуры
хранения
10 минут
2 x AA батарейки
Ip55, защита от влаги, пыли и
падений
※Внимание:
• Минимально рекомендуемое расстояние от лазерного
прибора – 5 метров (17 футов).
• Рабочая дистанция и точность определения луча могут
зависеть от условий окружающей среды.
• Внешний вид и технические характеристики могут отличаться
в результате улучшений продукта.

-74-
Гарантия
Данный инструмент прошел строгую и всестороннюю проверку.
Мы уверены в качестве нашей продукции и предоставляем
отличную гарантию для профессиональных пользователей
продукции.
Мы предлагаем один год гарантии с момента покупки, если:
• Имеется документ покупки
• Обслуживание/ремонт не производились не квалифицированным
персоналом
• Продукт не был использован не по назначению
Дефектные продукты будут отремонтированы или заменены
бесплатно по нашему усмотрению, если они отправлены вместе с
доказательством покупки нашему авторизованному
дистрибьютору(ам).
Гарантия не распространяется на:
• Неисправности, вызванные случайным повреждением
• Продукт имеет необоснованную степень износа
• Неиспользование в соответствии с инструкциями производителя
• Дефекты, вызванные обслуживанием или ремонтом без нашего
разрешения
• Калибровка и обслуживание не включены в гарантию.
Примечание:
• Мы не несем ответственности за любые прямые или косвенные
убытки, вызванные отказом данного продукта, за исключением
случаев предусмотренных законодательством.
• Ремонт или замена по гарантии не влияет на срок гарантийных
обязательств.
• Эта гарантия распространяется только на клиентов, которые
приобрели этот продукт. Запрещается передавать данную гарантию
третьим лицам.
• Эта гарантия не может быть изменена без нашего разрешения.

-75-
Вам предлагается 12-месячная гарантия, которая
может быть увеличена до 24 месяцев, если вы
зарегистрируетесь в качестве клиента через форму
регистрации продукта. Пожалуйста, отсканируйте
QR-код, чтобы активировать продленную гарантию.
Если у вас возникнут какие-либо вопросы или
сомнения относительно продукта, пожалуйста,
свяжитесь с нами: support@huepar.com
-76-
使用前のご注意
①本機はHueparレーザー墨出し器専用の受光器です。
他社の物には対応できないので、ご注意ください。
②モデル9011G、9211Gのレーザー墨出し器は受光器
が対応できないので、ご注意ください。
③受光器と合わせて使用する前は、墨出し器のパルスモード
(受光器モード)を起動してください。
パルスモードを起動しないと、受光器は反応できないです。
※墨出し器のパルスモードの起動方法は
当該取扱説明書をご参照ください。
各部の名称
-77-
-78-
LINE LAS ER RE CEI VEE R
-79-
-80-
-81-

-82-
-83-
LI NE L AS ER RECE IV EE R
Clamp
-84-
-85-
support@huepar.com

Facebook:@Huepartools
Made in China
E-mail:support@huepar.com
www.huepar.com
Changzhou Levelsure Optoelectronics Technology Co.,Ltd.