
ROBOTIC POOL CLEANER
USER MANUAL
Osprey 1000
EN

1
Thank you for purchasing Wybot
TM
Robotic Pool Cleaner.
Please read through the entire manual before using your new
robotic pool cleaner. We are not held liable for any loss or
injury caused by improper use. If you encounter a problem
with your Wybot
TM
product, please contact our customer
service for assistance.
Wybot Customer Service:
Email: [email protected]
Web: www.wybotpool.com
Facebook: @WybotPool
TM

2
CONTENTS
Important Precautions .............................................................01
1. Introduction ..........................................................................03
2. Safety ....................................................................................03
3. Packing List ...........................................................................04
4. Product Diagram ...................................................................05
5. Specifications ........................................................................06
6. Operation Instructions .........................................................07
6.1 Place the Pool Cleaner in the Water ............................... 07
6.2 Instructions for button and indicator .............................08
6.3 Remove the Pool Cleaner from the Water .....................09
6.4 Charge the battery ..........................................................10
6.5 Filter Cleaning .................................................................12
6.6 Installation of floating blocks (optional) ......................... 14
7. Warranty ...............................................................................15

01
Important Precautions
1. Please read the manual carefully, and use the cleaner according to
the manual. We are not held liable for any loss or injury caused by
improper use.
2. The cleaner cannot be used by children under 8 years old or people
with mental disabilities. If necessary, please do so under adult
guardian. Please do not let children ride on the product or play the
product as a toy.
3. In order to avoid any accident or damage, it is strongly
recommended to remove the cleaner from the pool and to fix the
cleaner indoor in at least 3.5m away from the swimming pool for
charging.
4. Make sure the charging socket is dry and the cleaner is powered off
(the indicator is off) before charging. Otherwise, the cleaner can’t
be charged normally.
5. Power off the cleaner and the adapter must be connected to a
leakage protected and earthed socket when charging.
6. Use the accessories recommended or sold by the manufacturer
only.
7. Do not enter into the pool when the cleaner is working.
8. Do not power on the cleaner when it is out of the water.
9. Always clean and wash the filter tray after use.
10. The cleaner should be stored in a cool and ventilated place, away
from direct sunshine.
11. Only professionals can disassemble the sealed driving kit of the
cleaner.
12. It is forbidden to collide the battery box with sharp parts and to

02
fall or impact it.
13. Power off the cleaner and charge before battery runs out or
working power reduces.
14. Do not charge when the battery is full. Overcharge will reduce
battery life.
15. It is forbidden to use the cleaner in an environment above 140
℉
(60
℃
)
and charge it in the environment below 32
℉
(0
℃
).
16. The battery should be charged in an environment between 41
℉-
95
℉
(5
℃-
35
℃
). Cool down the battery if it is overheated.
17. Charge the battery if it has been stored for over 6 months.
18. Do not overcharge the battery. It is recommended that the battery
should not be charged for more than 7 hours.
Save These Instructions

03
1. Introduction
The robotic pool cleaner Osprey 1000 is a new type of highly efficient
and energy-saving swimming pool cleaning robot. Through its
advanced computer-controlled program, it can clean the pool walls
and bottom automatically. At the same time, it filters the pool water
and gets rid of suspended particles without replacing the pool water.
It’s totally environmental-friendly.
For safe operation, the cleaner is powered by a rechargeable lithium
battery (25.9V 7.8Ah).
In order to use the Cleaner properly, please read the manual carefully
before using.
2. Safety
1. For the charging location
:
please refer to the 3th line of “Important
Precautions” at page 1.
2. Do not use any non-original charging adapter to charge the battery
or use the original charging adapter to charge other battery.
3. Make sure the cleaner is powered off before charging.
4. Do not use the cleaner while charging.
5. It is forbidden to collide the battery box with sharp parts and to fall
or impact it.
6. Do not use the cleaner when the temperature is above 140
℉
(60
℃
).
7. Charge before the battery runs out or the working power is reducing.

04
8. Do not charge when the battery is full. Overcharge will reduce the
battery life.
9. Make sure the temperature is between 50
℉-
104
℉
(10
℃-
40
℃
)
before charging. If the battery is overheated, cool it down before
charging.
10. Charge the battery when it has been stored for over 6 months.
3. Packing List
Item Name Quantity
1 Cleaner 1 pc
2 Hook 1 pc
3 User manual 1 pc
4 Charger 1 pc
5 Quick guide 1 pc
6 Floating blocks 4 pcs
05
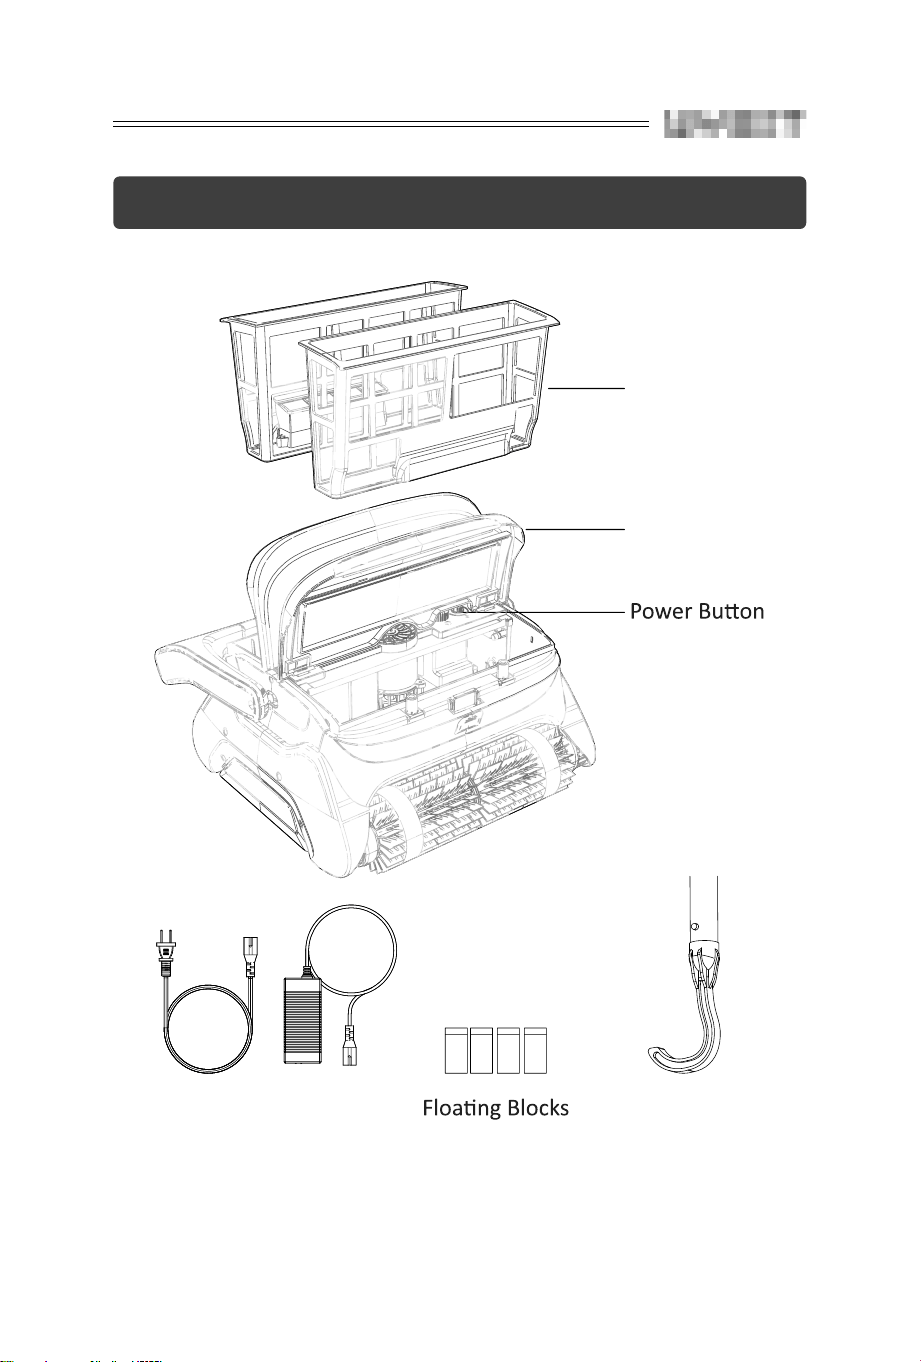
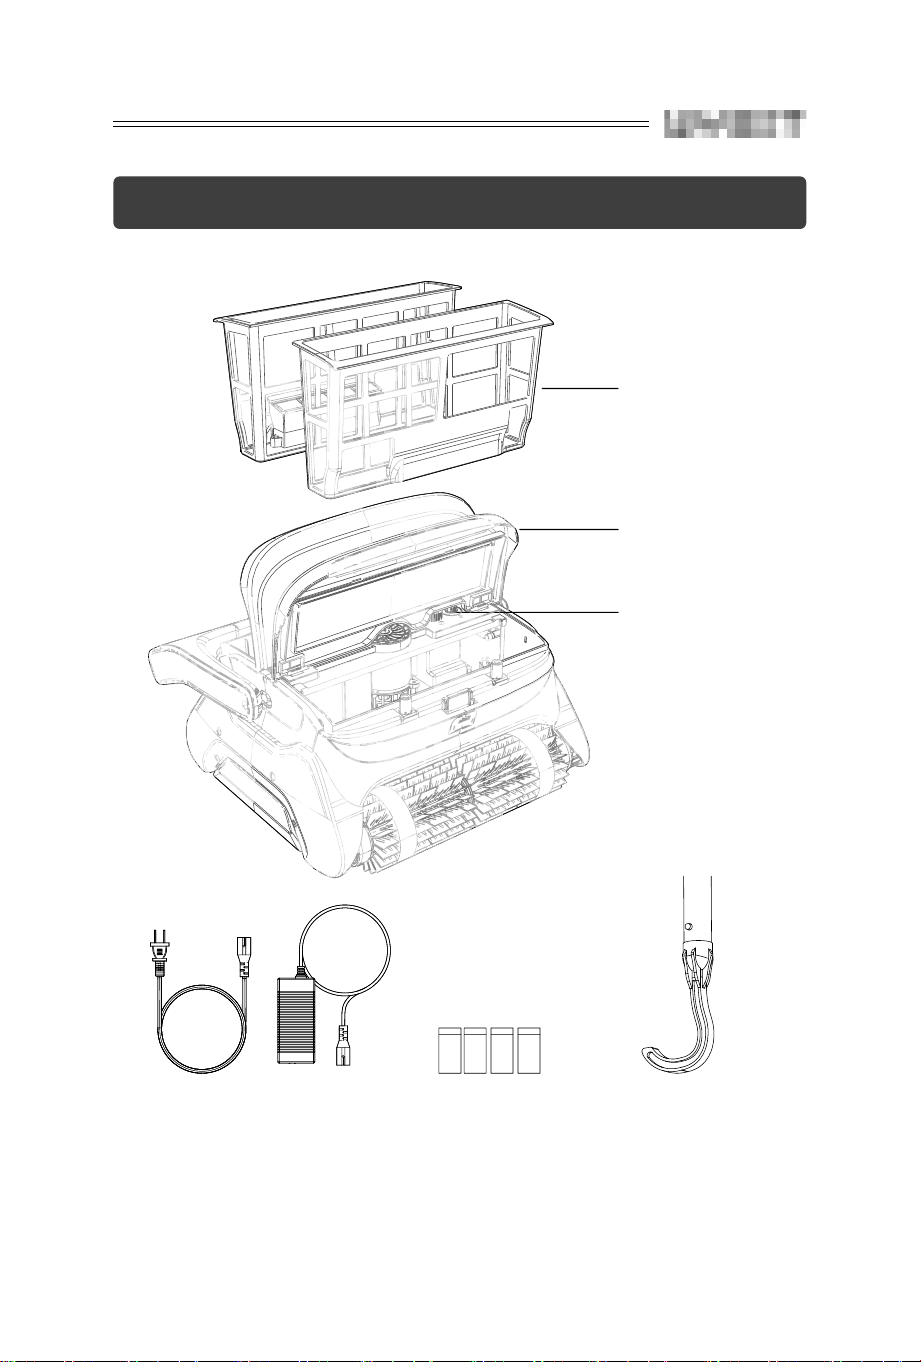
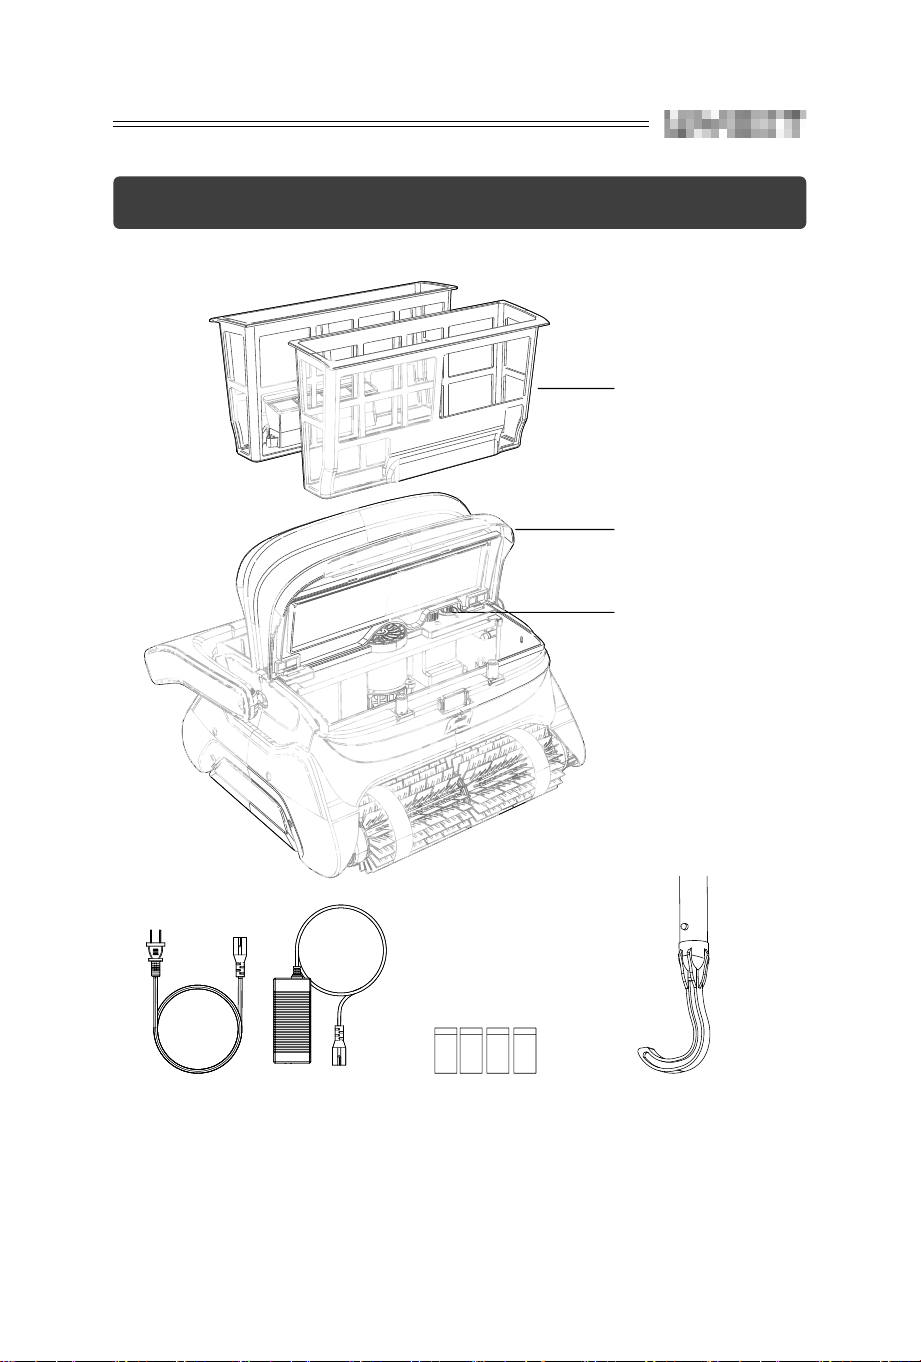
4. Product Diagram
Top
Filter Basket
Retrieving HookCharger

06
5. Specifications
1. Rated Working Voltage 25.9V
2. Power appr.120W
3. Run Time 120Minutes
4. Charger Input 100-240V, 50/60Hz
5. Charger Output 2.0A
6. Battery Capacity 7800mAh
7. Charging Time 5-6 Hours
8. Max. Cleaning Surface Up to 1291sq.ft (120m
2
)
9. Filter Capacity approx. 70gal/min (267L/min)
10. Filter Density 180 μm
11. Moving Speed approx. 32.8ft/min(10m/min)
12. Waterproof Grade IPX8
13. Charging Environment Temperature 41
℉
-95
℉
(5
℃
-35
℃
)
14. Max Water Depth 8.2ft(2.5m)
15. Product Size
17.6x18.6x9.0(inches)
447x473x230(mm)
16. Weight 24.0lbs(10.9KG)
17. Storage Condition 41
℉
-95
℉
(5
℃
-35
℃
), RH≤75%

07
6. Operation Instructions
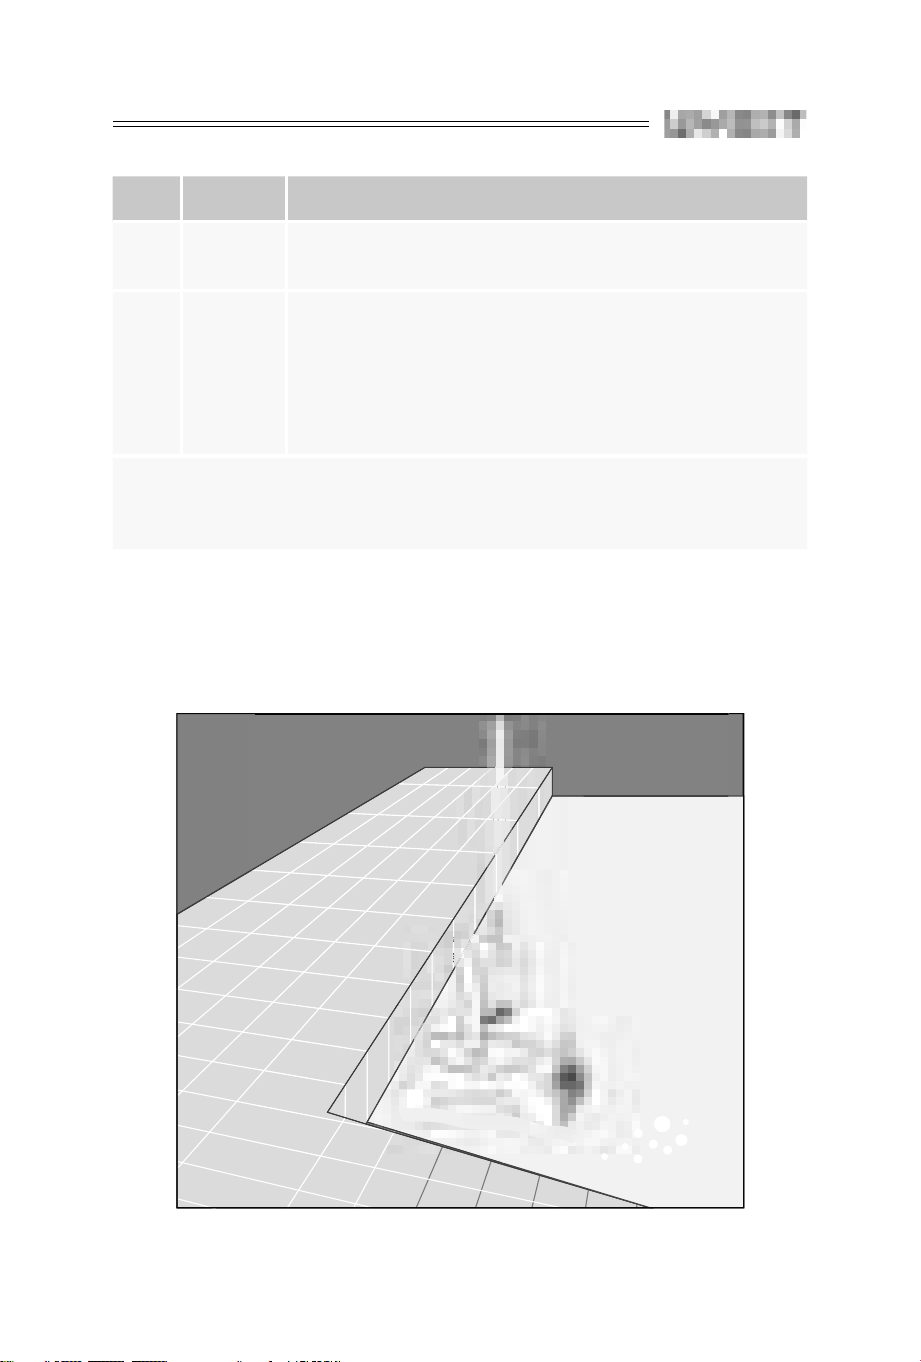
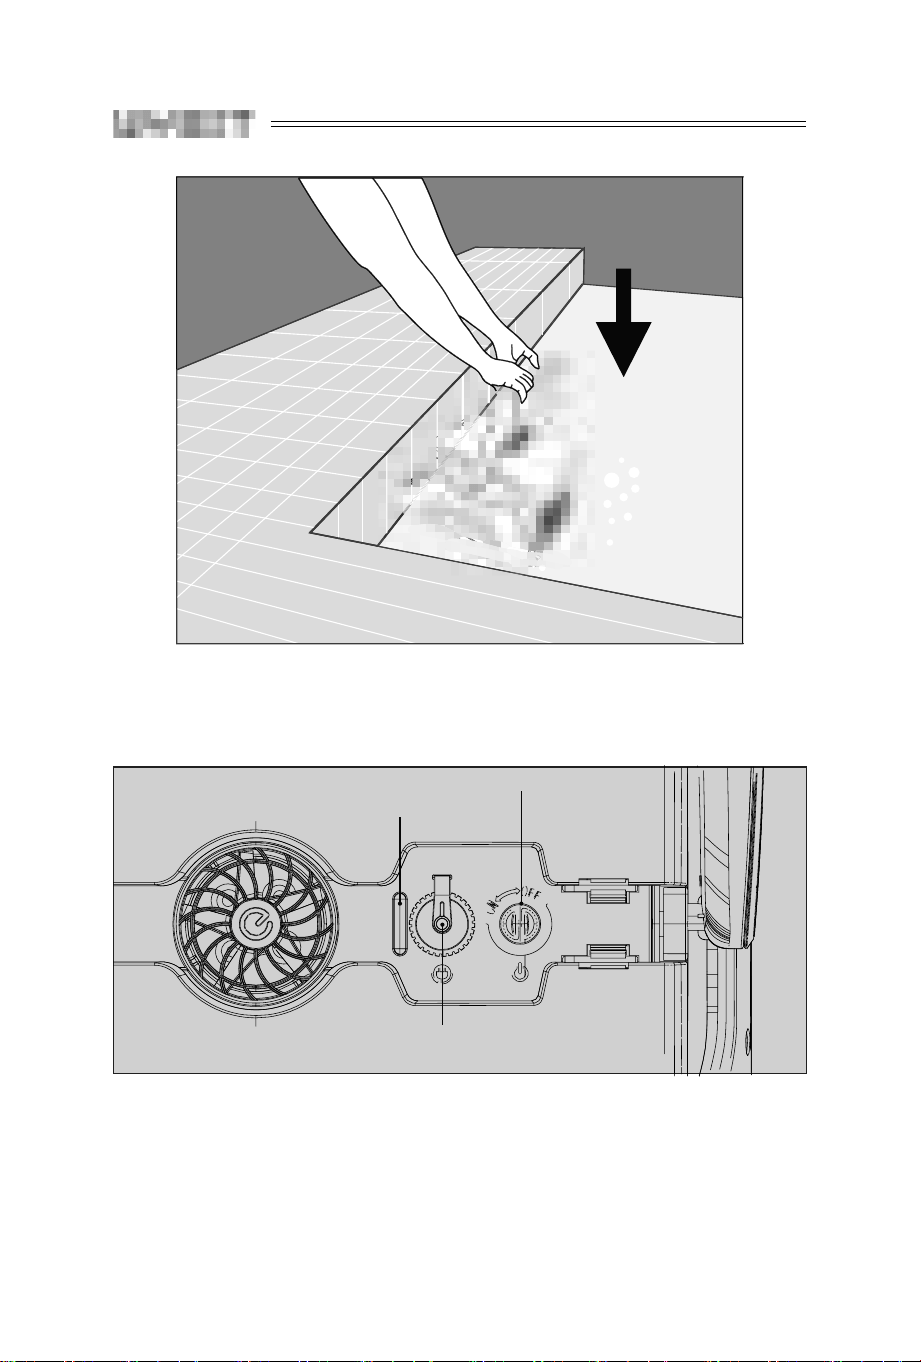
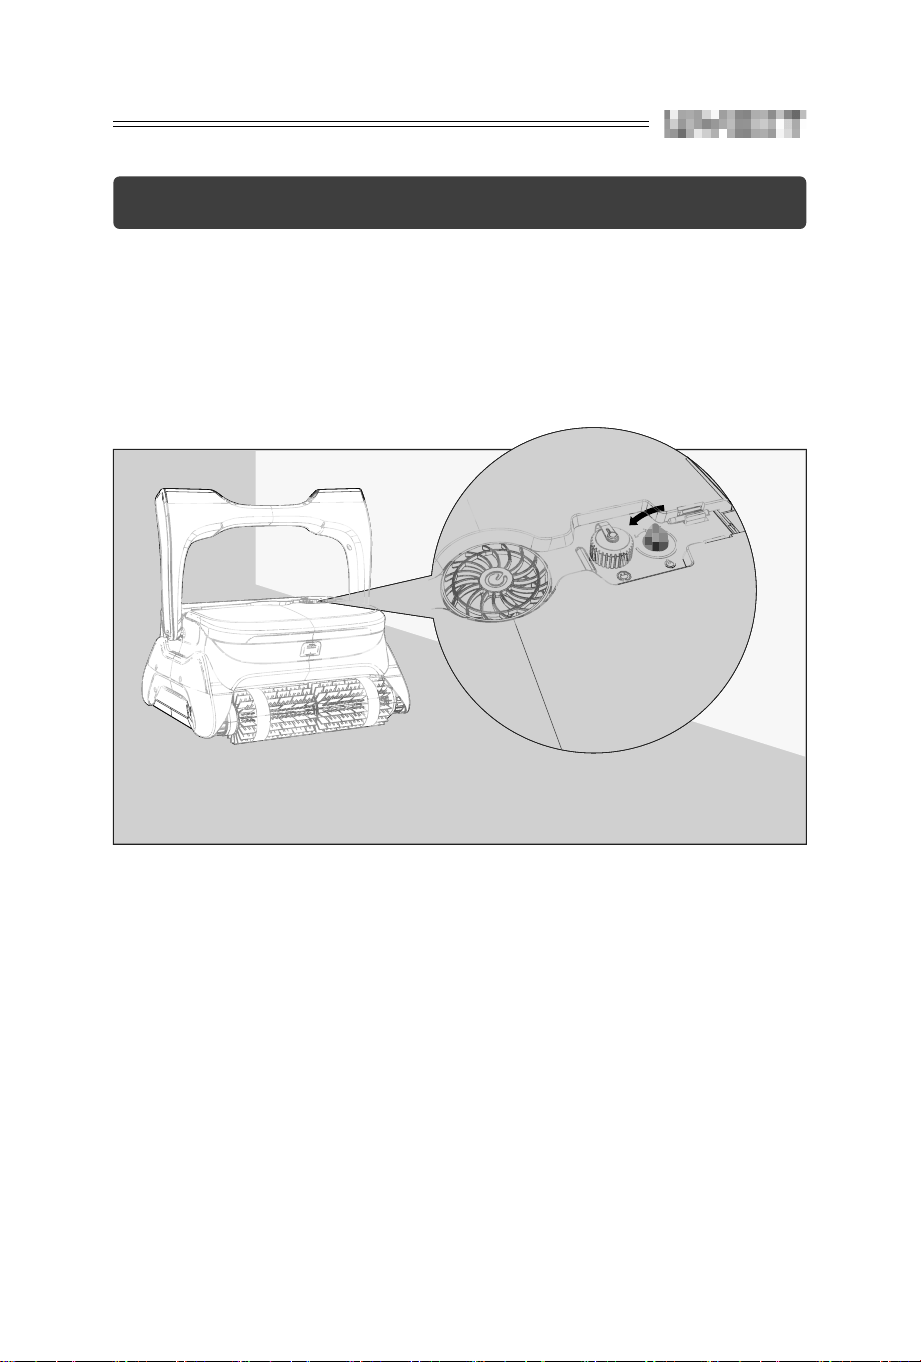
6.1 Place the Pool Cleaner in the Water
1. Turn the switch knob to ON to power on the cleaner.
2. Hold the top handle to put into or lift out of the pool with the
cleaner bottom towards the wall to avoid any possible scratches
to the pool. The cleaner will start working after emptying trapped
air inside (about 15s), then the cleaner can immerse into the pool
floor.

08
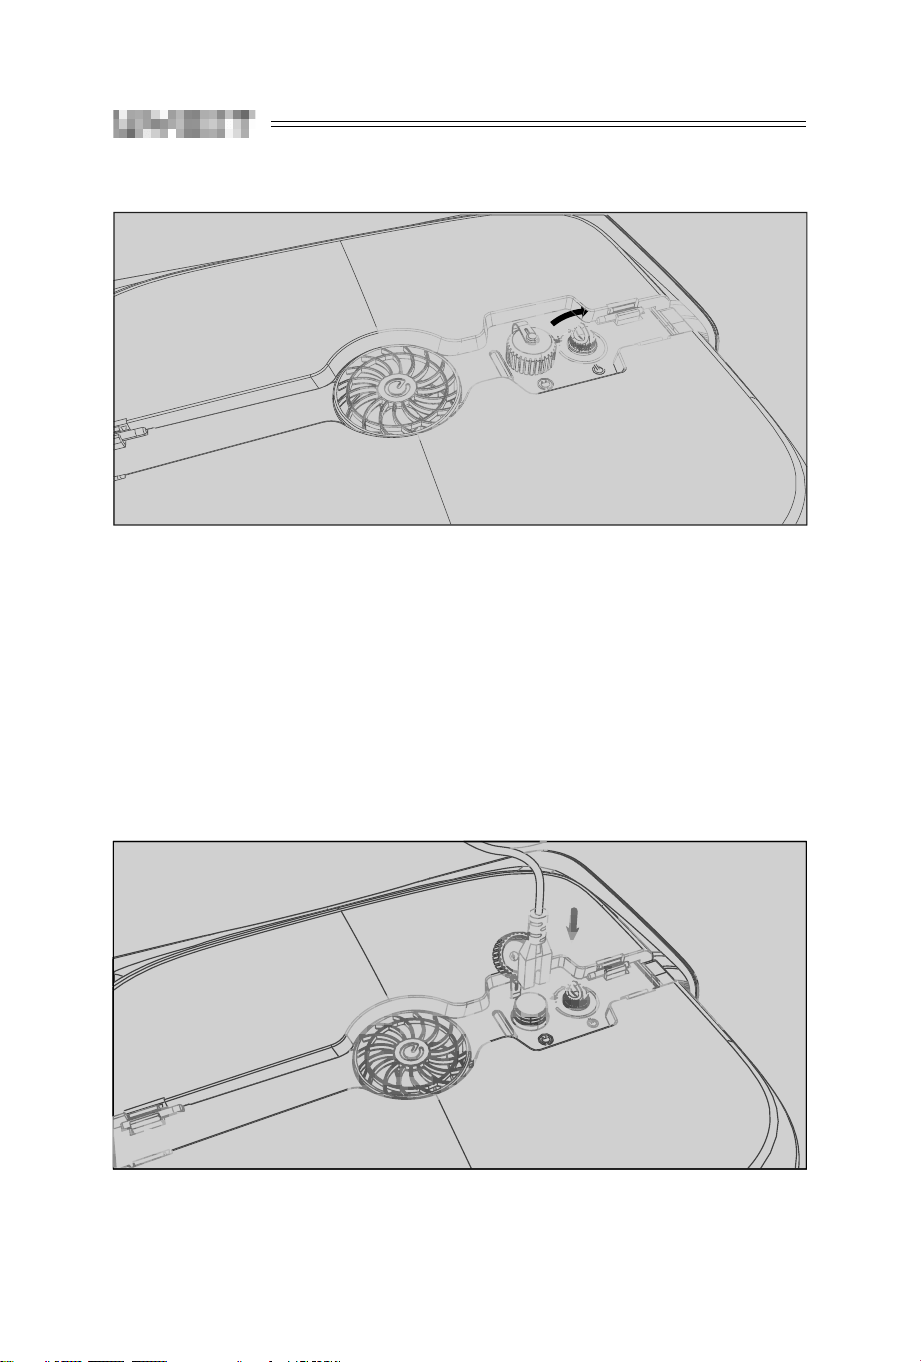
6.2 Instructions for button and indicator
Switch Knob
Charging Port
Indicator Light
09
Item Functioin Description
1
Power
on/off
Push the switch to ON, the cleaner starts running. Push the
switch to OFF, then the cleaner stop running.
2 Indicator
1. Blue light is steady on: switch on
2. Blue light flashes: the cleaner is working
3. Yellow light flashes: low battery and self-beaching
4. Yellow light is steady on: finish self-beaching
5. Red light is steady on: switch off
6. Red light flashes: faults
Fault handling: When red light flashes, please switch off and charge it, then put it
into the pool again and switch on. If the cleaner cannot get back
to normal, please contact after-sales.
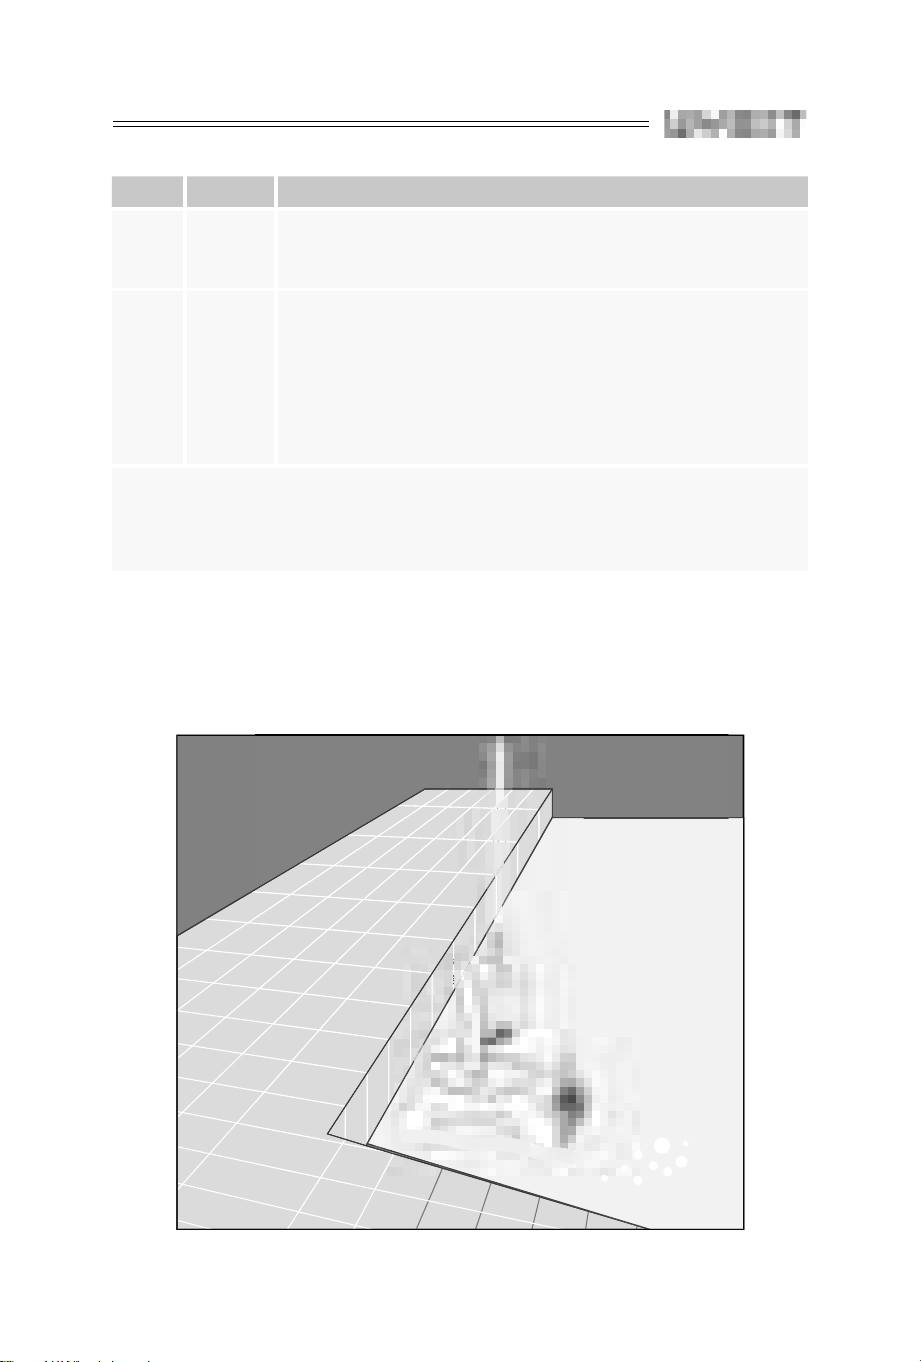
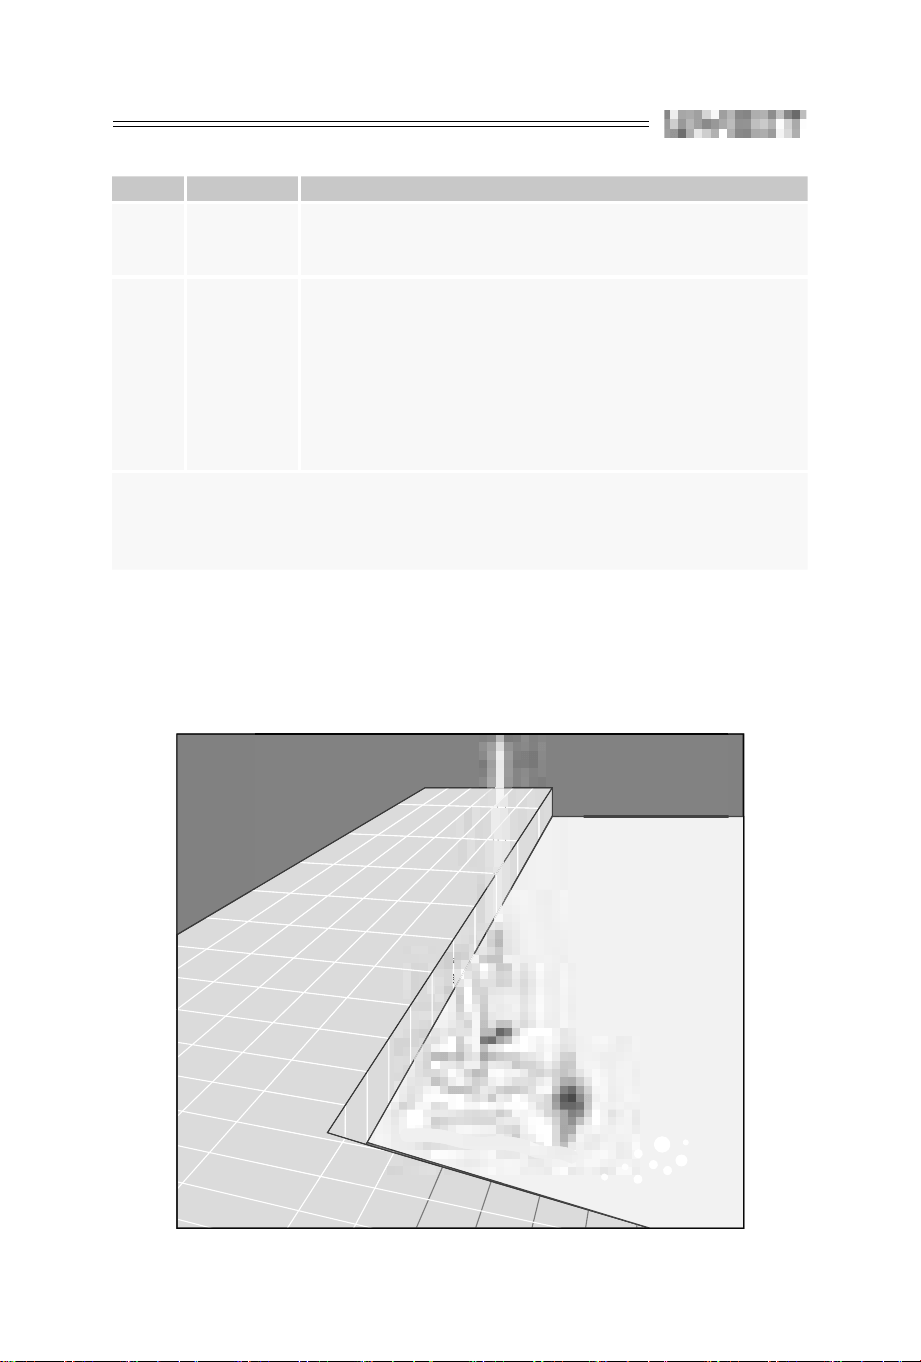
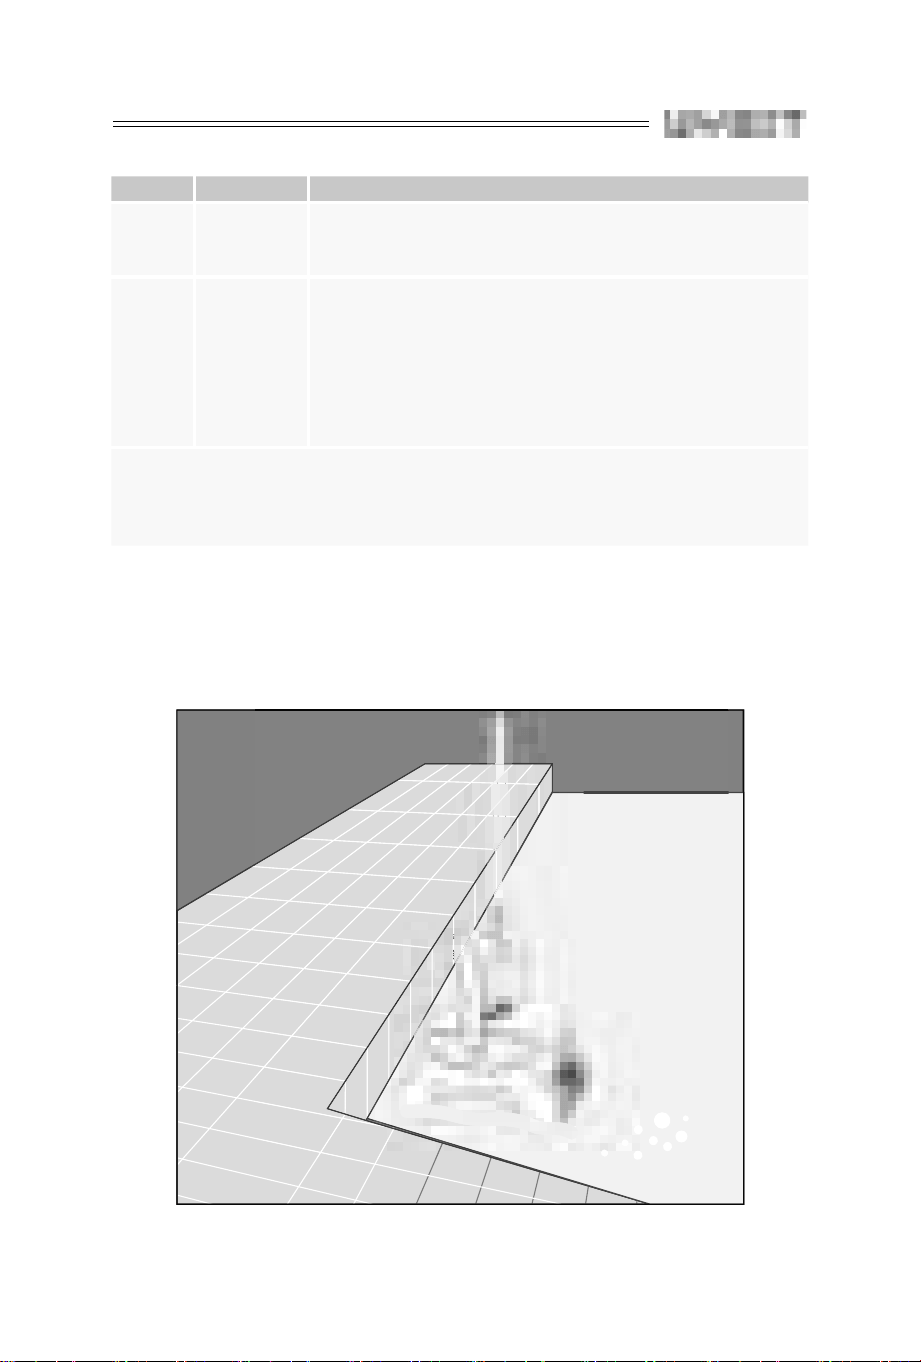
6.3 Remove the Pool Cleaner from the Water
1. The cleaner will self-beach when finishing working, then use the
hook to lift it out of the pool.
10
2. Turn the switch knob to OFF to power off the cleaner.
6.4 Charge the battery
1. Remove the cleaner from the pool
Make sure the cleaner is powered off (the indicator is off). Place the
cleaner indoor in at least 3.5m away from the swimming pool for
charging.
Red light indicates the battery is being charged.
Green light indicates the charging is finished.

11
2. Instructions for charger indicator
The color and state of indicator Charging state
Green light is steady on
Waiting for charging or battery not
plugged or charging finished
Red light is steady on The battery is being charged
Red light flashes Low battery or battery damaged

12
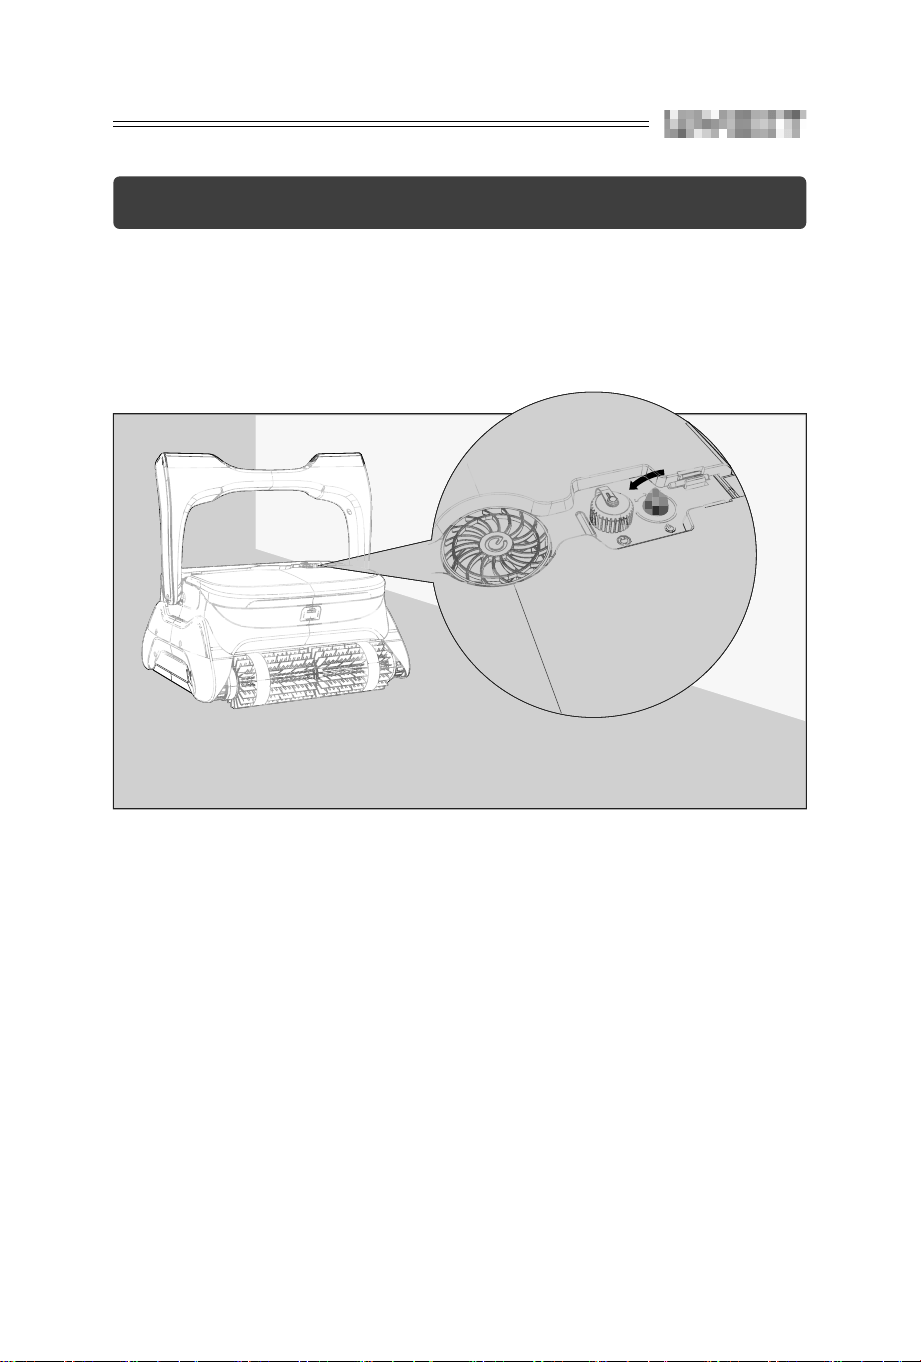
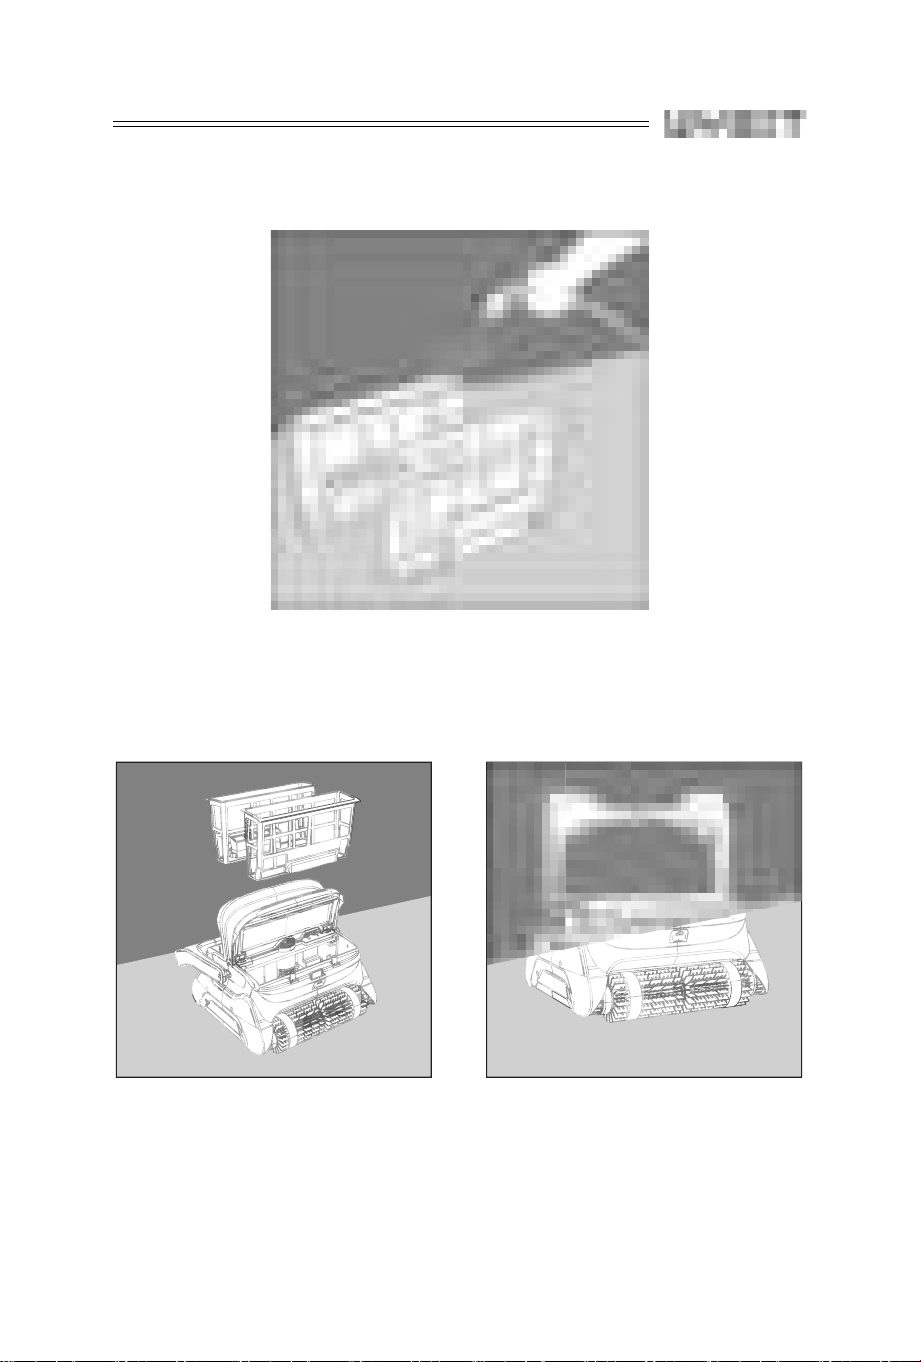
6.5 Filter Cleaning
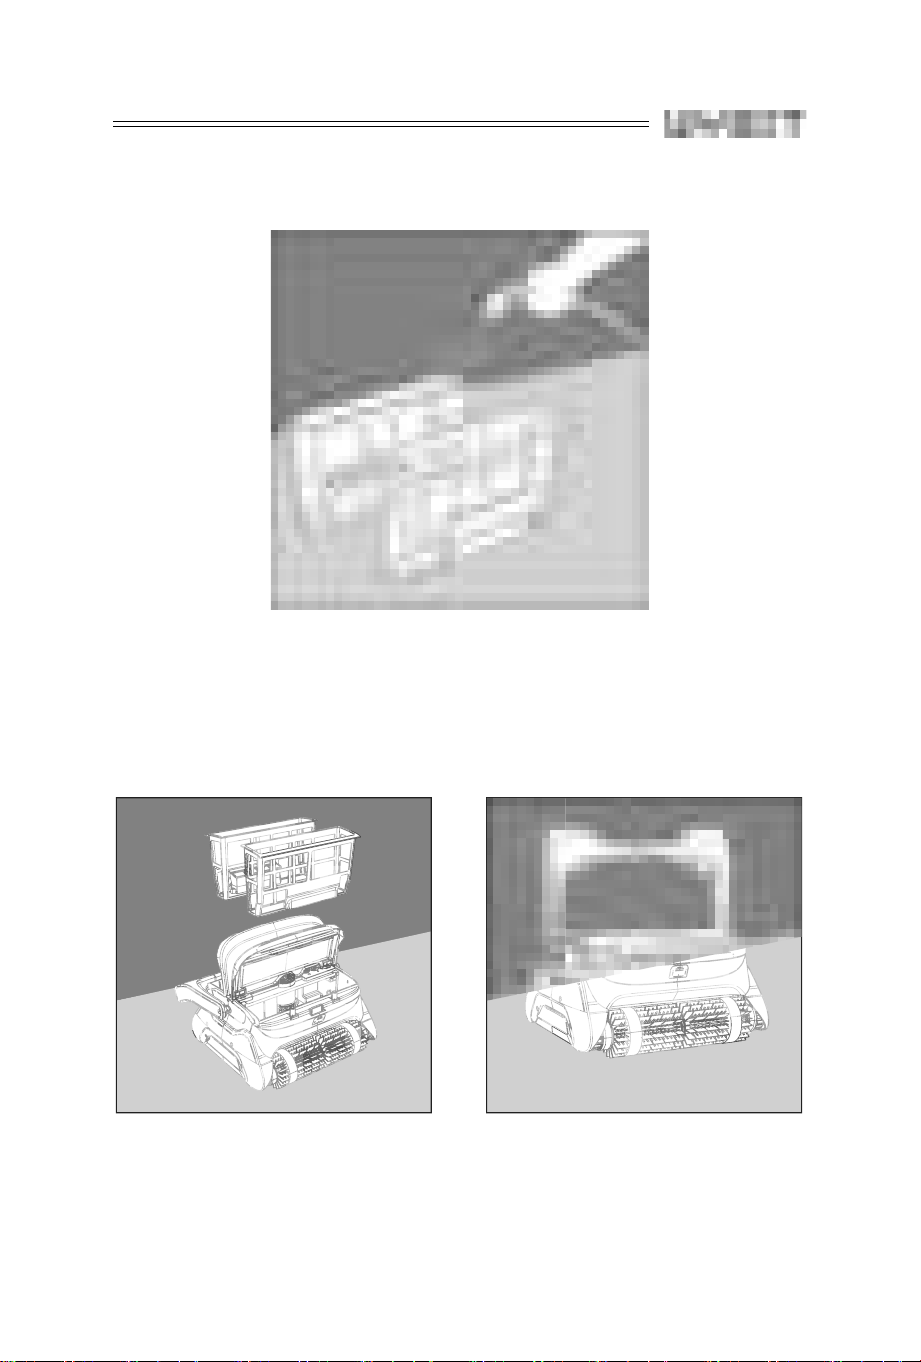
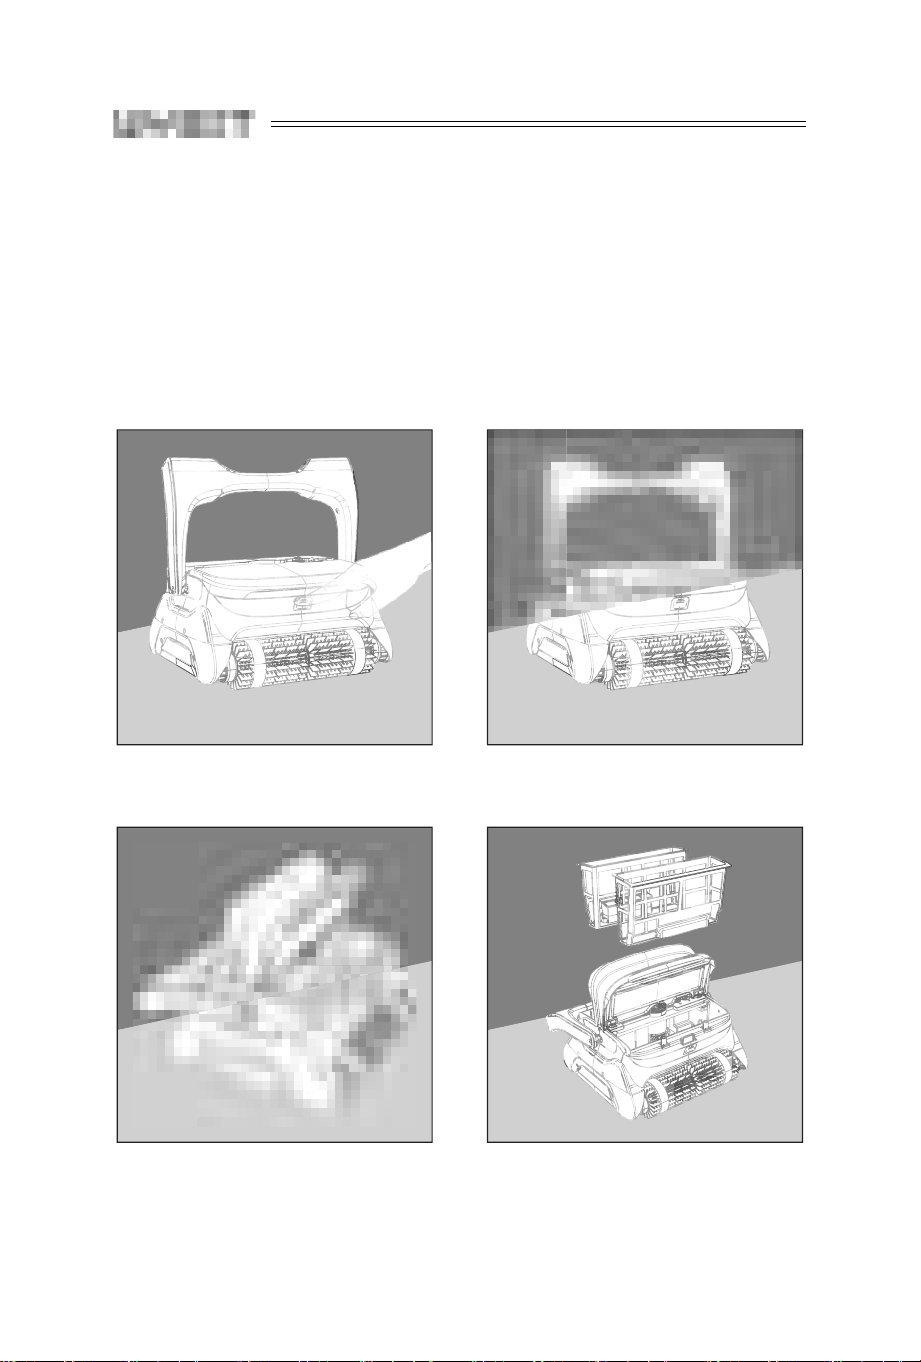
1. Take out the filter baskets:
a. Press the opening button (Figure 1)
b. The top cover will pop-up automatically (Figure 2)
c. Open the top cover (Figure 3)
d. Take out the filter basket (Figure 4)
Figure 1 Figure 2
Figure 3 Figure 4

13
2. Clean the filter baskets (Figure 5).
Figure 5
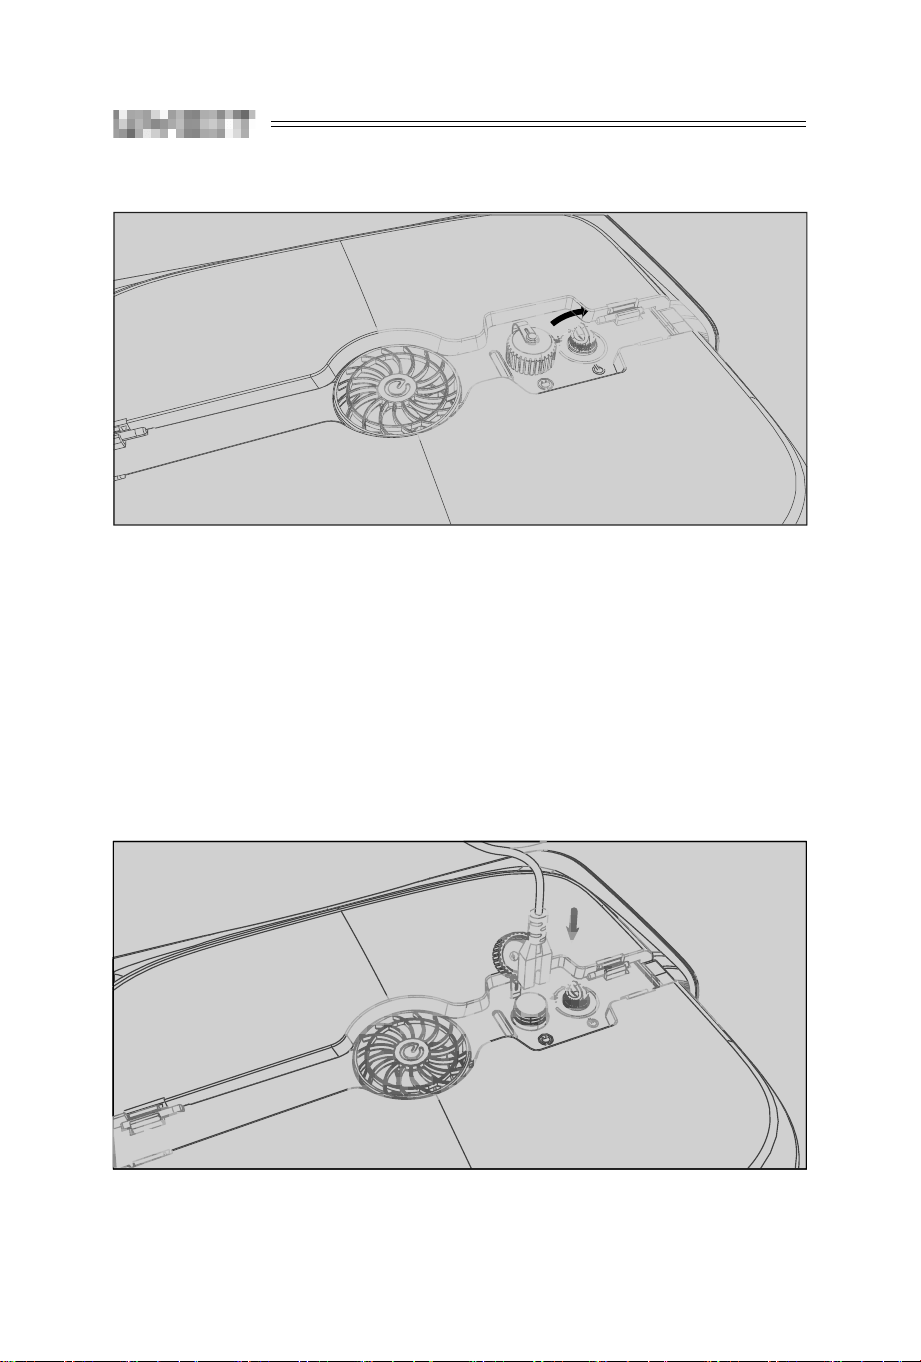
3. Re-install the filter baskets (Figure 6). Pay attention to the
installation position and close the top cover (Figure 7).
Figure 6 Figure 7
14
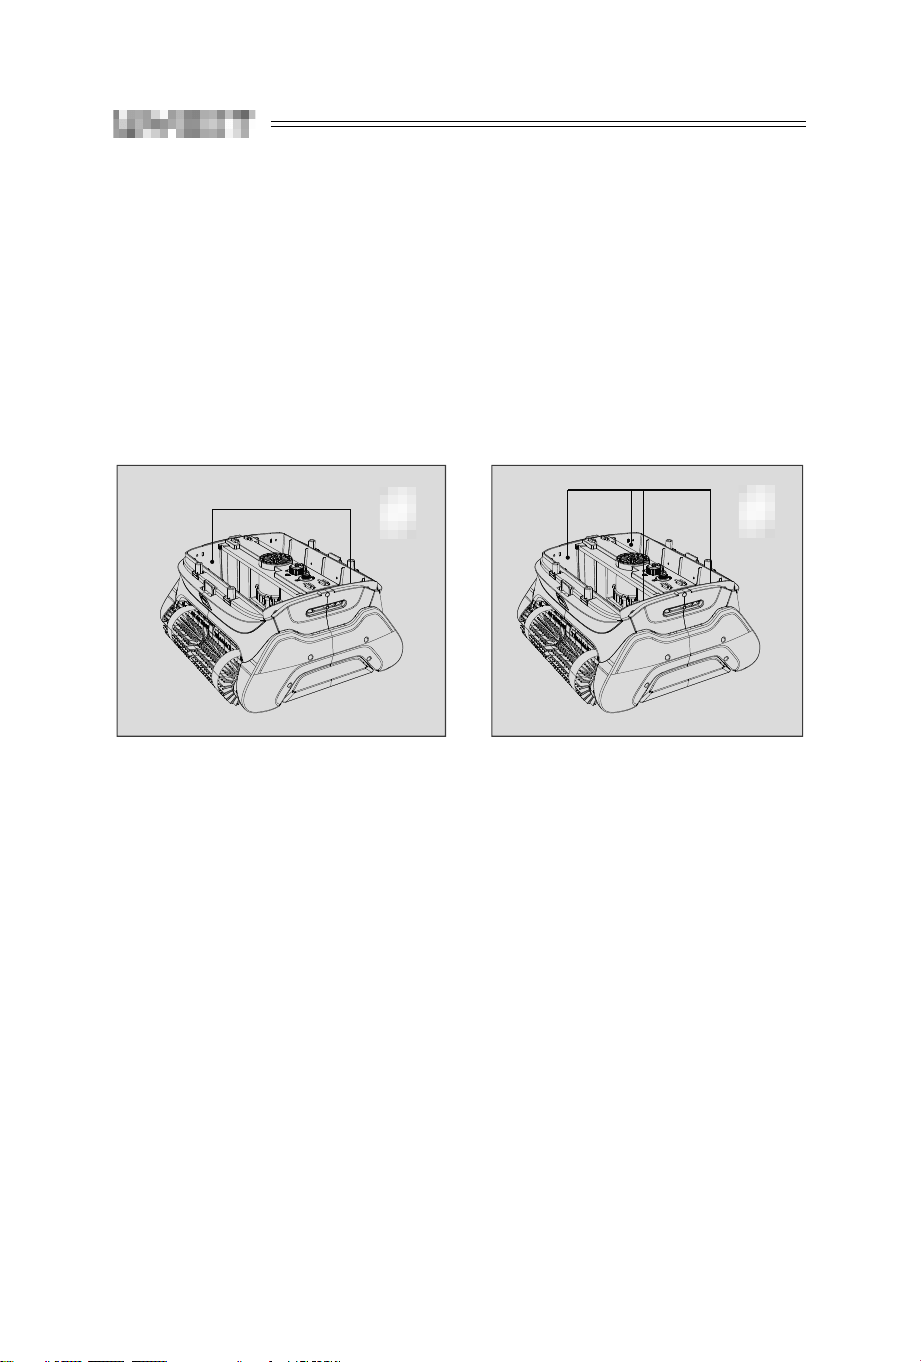
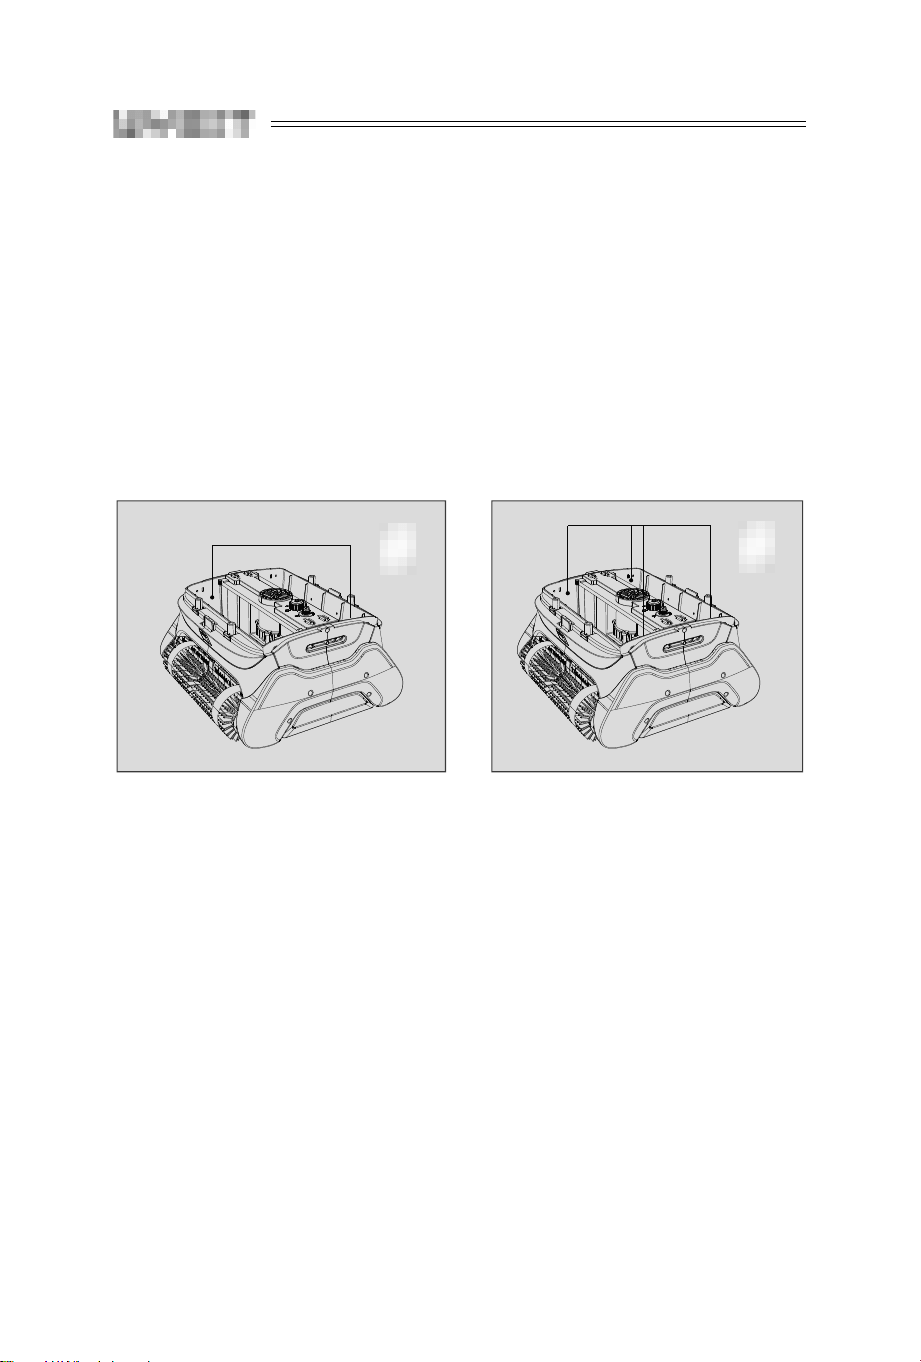
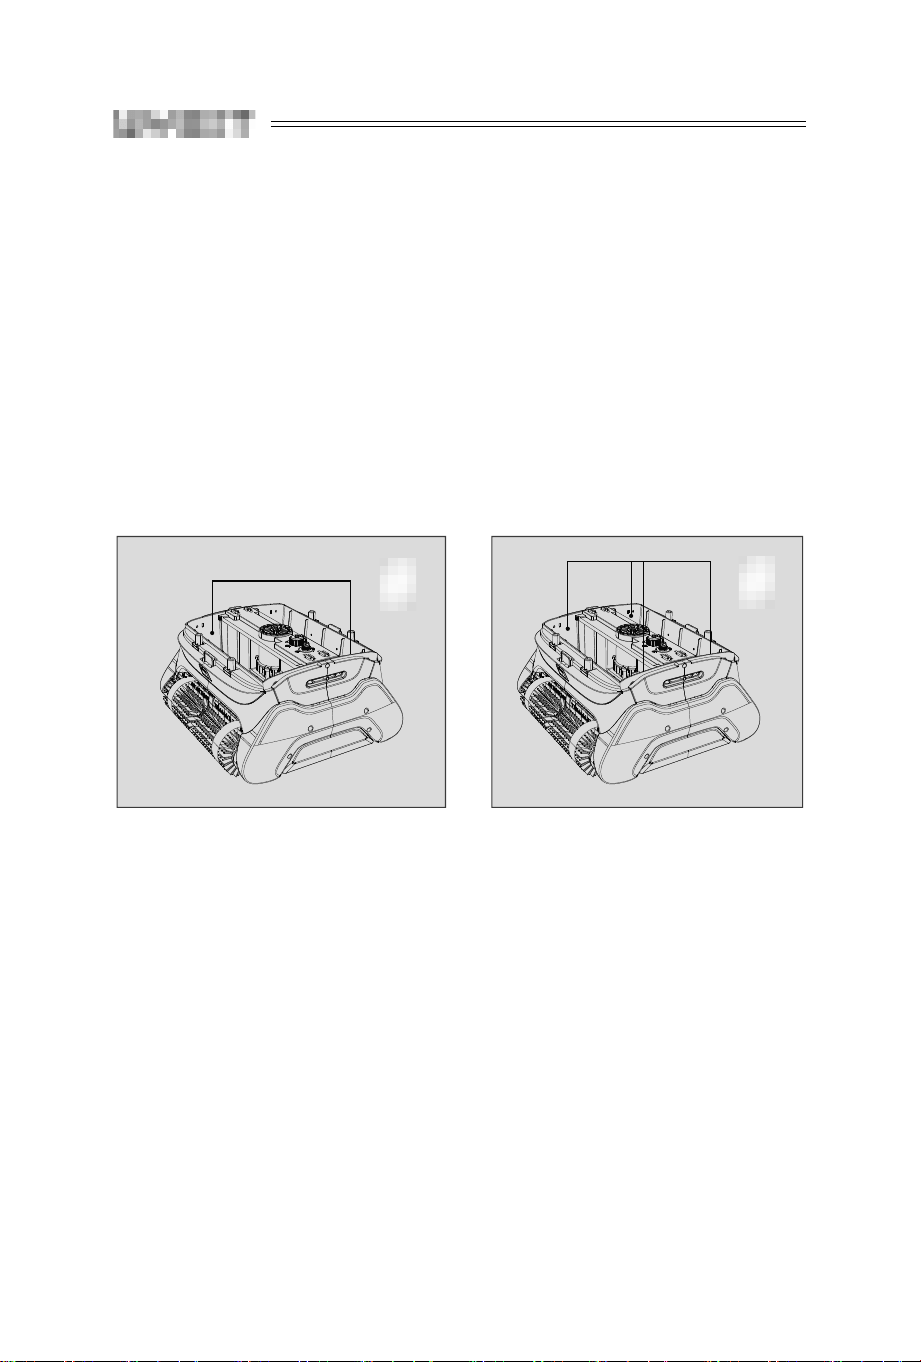
6.6 Installation of floating blocks (optional)
If the cleaner is difficult to climb the wall or wash the waterline,
please follow the instructions bellow to fix it. If your robot is
preforming well, please ignore these instructions.
Open the top cover, and stick the floating block onto the position as
show in figure 8/figure 9. Do the same to the other side.
Figure 8 Figure 9
Attention: 1. If fully understanding the instructions, you can feel the
position with your hand, and attach the floating blocks
there with no need to open the top cover.
2. There is glue on the back of the floating blocks. So
please make sure it is firmly installed, and do not put
the cleaner into the pool until 24 hours later.
15
7. Warranty
1. This product is covered by Wybot
TM
warranty for 24 months (only
for driving kit and control box kit) from the date of purchase.
Consumable parts are beyond warranty which include Filter Tray/
Brush/ Wheels/Nozzles.
2. This warranty is voided if the product has been altered, misused, or
has been repaired by unauthorized personnels.
3. The warranty extends only to manufacturing defects and does not
cover any damage resulting from mishandling of the product by
the owner.
4. The order number or record must be presented for any claim or
repair during the warranty period.
Please respect the European Union regulations and help to protect
the environment.
Return non-working electrical equipment to a facility appointed by
your municipality that properly recycles electrical and electronic
equipment. Do not dispose them in unsorted waste bins.
For items containing removable batteries, remove batteries before
disposing of the product.
Environmental Programmes, WEEE European Directive


NETTOYEUR DE PISCINE ROBOTISÉ
Manuel de l'Utilisateur
Osprey 1000
FR


19
Merci d'avoir acheté le robot nettoyeur de piscine Wybot
TM
.
Veuillez lire l'intégralité de ce manuel avant d'utiliser votre
nouveau robot nettoyeur de piscine. Nous ne sommes pas
tenus responsables de toute perte ou blessure causée par
une utilisation inappropriée. Si vous rencontrez un problème
avec votre produit Wybot
TM
, veuillez contacter notre service
clientèle pour obtenir de l'aide.
Service client Wybot:
Courriel: [email protected]
Web: www.wybotpool.com
Facebook: @WybotPool
TM

20
CONTENU
Important Précautions .............................................................01
1. Introduction ..........................................................................03
2. Sécurité .................................................................................03
3. Liste de colisage ....................................................................04
4. Schéma du produit ...............................................................05
5. Caractéristiques .................................................................... 06
6. Instructions d'utilisation ....................................................... 07
6.1 Placez le nettoyeur dans l'eau ........................................07
6.2 Instructions pour le bouton et l'indicateur .....................08
6.3 Retirer le nettoyeur de piscine ......................................09
6.4 Charger la batterie ..........................................................10
6.5 Nettoyage du filtre .........................................................12
6.6 Installation de blocs flottants (facultatif) ........................14
7. Garantie ................................................................................15

01
Important Précautions
1. Veuillez lire attentivement le manuel et utiliser le nettoyeur
conformément au manuel. Nous ne sommes pas tenus
responsables de toute perte ou blessure causée par une utilisation
inappropriée.
2. Le nettoyeur ne peut pas être utilisé par des enfants de moins de 8
ans ou des personnes handicapées mentales. Si nécessaire, veuillez
le faire sous un tuteur adulte. Veuillez ne pas laisser les enfants
monter sur le produit ou jouer avec le produit comme un jouet.
3. Afin d'éviter tout accident ou dommage, il est fortement
recommandé de retirer la machine de la piscine et de fixer le
nettoyeur à l'intérieur à au moins 3,5 m de la piscine pour le
chargement.
4. Assurez-vous que la prise est sèche et que le nettoyeur est éteint (le
voyant est éteint) avant de charger. Sinon, le nettoyeur ne peut pas
être chargé normalement.
5. Éteignez le nettoyeur et l'adaptateur doit être connecté à une prise
protégée contre les fuites et mise à la terre lors de la charge.
6. Utilisez uniquement les accessoires recommandés ou vendus par le
fabricant.
7. N'entrez pas dans la piscine lorsque le nettoyeur fonctionne.
8. N'allumez pas le nettoyeur lorsqu'il est hors de l'eau.
9. Nettoyez et lavez toujours le plateau du filtre après l’utilisation.
10. Le nettoyeur doit être stocké dans un endroit frais et ventilé, à
l'abri des rayons directs du soleil.
11. Seuls les professionnels peuvent démonter le kit scellé du
nettoyeur.

02
12. Il est interdit de heurter le boîtier de la batterie avec des pièces
tranchantes et de le faire tomber ou de le heurter.
13. Éteignez le nettoyeur et chargez-le avant que la batterie ne soit
épuisée ou que la puissance ne diminue.
14. Ne chargez pas lorsque la batterie est pleine. Une surcharge
réduira la durée de vie de la batterie.
15. Il est interdit d'utiliser le nettoyeur dans un environnement au-
dessus de 140°F (60°C) et de le charger dans un environnement
en dessous de 32°F (0°C).
16. La batterie doit être chargée dans un environnement entre 41° et
95° (5°C-35°C). Refroidissez la batterie en cas de surchauffe.
17. Rechargez la batterie si elle a été stockée pendant plus de 6
mois.
18. Ne surchargez pas la batterie. Il est recommandé de ne pas
charger la batterie pendant plus de 7 heures.
Conservez ces instructions

03
1. Introduction
Le robot nettoyeur de piscine Osprey 1000 est un nouveau type de
robot de nettoyage de piscine très efficace et économe en énergie.
Grâce à son programme avancé contrôlé par l’ordinateur, il peut
nettoyer automatiquement les parois et le fond de la piscine. En
même temps, il filtre l'eau de la piscine et élimine les particules
en suspension sans remplacer l'eau de la piscine. C'est totalement
écologique.
Pour un fonctionnement en toute sécurité, le nettoyeur est alimenté
par une batterie au lithium rechargeable (25,9 V 7,8 Ah).
2. Sécurité
1. Pour l'emplacement de la charge: veuillez vous référer à la 3ème
ligne de "Précautions importantes" à la page 1.
2. N'utilisez pas d'adaptateur de charge non original pour charger
la batterie ou utilisez l'adaptateur initial pour charger une autre
batterie.
3. Assurez-vous que le nettoyeur est éteint avant de le charger.
4. N'utilisez pas le nettoyeur pendant le chargement.
5. Il est interdit de heurter le boîtier de la batterie avec des pièces
tranchantes et de le faire tomber ou de le heurter.
6. N'utilisez pas le nettoyeur lorsque la température est supérieure à
140
℉
(60
℃
).

04
7. Chargez avant que la batterie ne soit épuisée ou que la puissance
ne diminue.
8. Ne chargez pas lorsque la batterie est pleine. Une surcharge réduira
la durée de vie de la batterie.
9. Assurez-vous que la température est comprise entre 50
℉
-104
℉
(10
℃
-40
℃
) avant de charger. Si la batterie est en surchauffe,
refroidissez-la avant de la recharger.
10. Rechargez la batterie lorsqu'elle a été stockée pendant plus de 6
mois.
3. Liste de colisage
Article Nom Quantité
1 Nettoyeur 1 pc
2 Crochet 1 pc
3 Manuel d'utilisation 1 pc
4 Chargeur 1 pc
5 Guide pratique 1 pc
6 Blocs flottants 4 pièces

05
4. Schéma du produit
Top
Filter Basket
Retrieving HookCharger
Panier de filtre
Haut
Bouton
d'alimentation
Chargeur Bloc flottant Crochet de
reprise

06
5. Caractéristiques
1. Tension nominale 25,9V
2. Puissance appr.120W
3. Durée 120Minutes
4. Entrée du courant 100-240V, 50/60Hz
5. Sortie du courant 2,0A
6. Capacité de la batterie 7800mAh
7. Temps de charge 5-6 Heures
8. Max. Surface de nettoyage Up to 1291sq.ft (120m
2
)
9. Capacité du filtre approx. 70gal/min (267L/min)
10. Densité du filtre 180 μm
11. Vitesse du déplacement approx. 32,8ft/min(10m/min)
12. Niveau d'étanchéité IPX8
13. Température de l'environnement 41
℉
-95
℉
(5
℃
-35
℃
)
14. Profondeur d'eau maximale 8,2 pieds (2,5 m)
15. Taille du produit
17,6x18,6x9,0 (pouces)
447x473x230(mm)
16. Poids 24,0lbs(10.9KG)
17. Condition de stockage 41
℉
-95
℉
(5
℃
-35
℃
), RH≤75%

07
6. Instructions d'utilisation
6.1 Placez le nettoyeur dans l'eau
1. Tournez le bouton sur ON pour allumer le nettoyeur
2. Tenez la poignée du haut pour entrer ou sortir de la piscine en
orientant le nettoyeur vers le fond de la paroi pour éviter toute
rayure éventuelle de la piscine. Le nettoyeur commencera à
fonctionner après avoir vidé l'air emprisonné à l'intérieur (environ
15 secondes), puis le nettoyeur pourra être plonger dans le fond de
la piscine.

08
6.2 Instructions pour le bouton et l'indicateur
Voyant lumineux
Port de chargement
Bouton
09
Article Fonction La description
1 ON / OFF
Poussez le bouton sur ON, le nettoyeur commence à
fonctionner. Poussez le bouton sur OFF, puis le nettoyeur arrête
de fonctionner.
2 Indicator
1. La lumière bleue est allumée : allumez
2. La lumière bleue clignote : le nettoyeur fonctionne
3. La lumière jaune clignote : batterie faible et l'auto échouage
4. La lumière jaune est allumé en permanence : fin de l'auto
échouage .
5. La lumière rouge est fixe : éteignez
6. La lumière rouge clignote : défauts
Gestion des pannes: lorsque la lumière rouge clignote, veuillez l'éteindre et le
charger, puis le remettre dans la piscine et l'allumer. Si le
nettoyeur ne peut pas revenir à la normale, veuillez contacter
le service après-vente.
6.3 Retirer le nettoyeur de piscine
1. Le nettoyeur s'échouera automatiquement à la fin du travail, puis
utilisera le crochet pour le sortir de la piscine.

10
2. Tournez le bouton sur OFF pour éteindre le nettoyeur.
6.4 Charger la batterie
1. Retirer le nettoyeur de la piscine
Assurez-vous que le nettoyeur est éteint ( La lumière est éteint).
Placez le nettoyeur à l'intérieur à au moins 3,5 m de la piscine pour le
recharger.
La lumière rouge indique que la batterie est en cours de chargement.
La lumière vert indique que la charge est terminée.

11
2. Instructions pour l'indicateur de charge
La couleur et l'état de l'indicateur État de charge
Le voyant vert est fixe
En attente de la charge ou batterie
débranchée ou charge terminée
Le voyant rouge est fixe La batterie est en charge
Le voyant rouge clignote
Batterie faible ou batterie
endommagée

12
6.5 Nettoyage du filtre
1. Sortez les paniers-filtres :
a. Appuyez sur le bouton (Figure 1)
b. Le capot du haut s'ouvrira automatiquement (Figure 2)
c. Ouvrez le capot du haut (Figure 3)
d. Retirez le panier-filtre (Figure 4)
Figure 1 Figure 2
Figure 3 Figure 4

13
2. Nettoyez les paniers-filtres (Figure 5).
Figure 5
3. Réinstallez les paniers-filtre (Figure 6). Faites attention à la position
d'installation et fermez le capot du haut (Figure 7).
Figure 6 Figure 7
14
6.6 Installation de blocs flottants (facultatif)
Si le nettoyeur a du mal à escalader le mur ou à laver la conduite d'eau,
veuillez suivre les instructions ci-dessous pour le réparer. Si votre
machine fonctionne bien, veuillez ignorer ces instructions.
Ouvrez le capot du haut et collez le bloc flottant sur la position
comme indiqué la figure 8/figure 9. Faites la même chose de l'autre
côté.
Figure 8 Figure 9
Attention : 1. Si vous comprenez parfaitement les instructions, vous
pouvez sentir la position avec votre main et y fixer les
blocs flottants sans avoir besoin d'ouvrir le capot du
haut.
2. Il y a de la colle au dos des blocs flottants. Assurez-vous
qu'il est bien installé et ne mettez pas le nettoyeur dans
la piscine dans les 24 heures.

15
7. Garantie
1. Ce produit est couvert par la garantie Wybot
TM
pendant 24
mois (uniquement pour le kit de conduite et le kit du boîtier
de commande) à compter de la date d'achat. Les pièces
consommables ne sont pas couvertes par la garantie, notamment
le plateau de filtration, la brosse, les roues et les buses.
2. Cette garantie est annulée si le produit a été modifié, mal utilisé ou
réparé par le personnel non autorisé.
3. La garantie s'étend uniquement aux défauts de fabrication et ne
couvre pas les dommages résultant d'une mauvaise manipulation
du produit par le propriétaire.
4. Le numéro de commande ou l'enregistrement doit être présenté
pour toute réclamation ou réparation pendant la période de
garantie.
Veuillez respecter les réglementations de l'Union européenne et
contribuer à la protection de l'environnement.
Retournez les équipements électriques hors d'usage à une
installation désignée par votre municipalité qui recycle
correctement les équipements électriques et électroniques. Ne les
jetez pas dans des poubelles non triées.
Pour les articles contenant des piles amovibles, retirez les piles
avant de mettre le produit au rebut.
Programmes environnementaux, directive européenne DEEE


ROBOTER-POOLREINIGER
Benutzerhandbuch
Osprey 1000
DE

19
Vielen Dank, dass Sie sich für den Wybot
TM
Roboter-
Poolreiniger entschieden haben. Bitte lesen Sie die gesamte
Bedienungsanleitung durch, bevor Sie Ihren neuen Pool-
Reinigungsroboter verwenden. Wir übernehmen keine
Haftung für Verluste oder Verletzungen, die aufgrund
unsachgemäßer Verwendung entstehen. Wenn Sie ein
Problem mit Ihrem Wybot
TM
-Produkt haben, wenden Sie sich
bitte an unseren Kundendienst, um Unterstützung zu erhalten.
Wybot-Kundendienst:
E-Mai: [email protected]
Internet: www.wybotpool.com
Facebook: @WybotPool
TM

20
Inhalte
Wichtige Vorsichtsmaßnahmen ...............................................01
1. Einführung ............................................................................ 03
2. Sicherheit..............................................................................03
2. Packliste ................................................................................04
4. Produktdiagramm .................................................................05
5. Spezifikationen .....................................................................06
6. Bedienungsanleitung ............................................................07
6.1 Geben Sie den Poolreiniger ins Wasser ..........................07
6.2 Anweisungen für Taste und Anzeige ...............................08
6.3 Entfernen Sie den Reiniger aus dem Wasser .................. 09
6.4 Aufladen der Batterie .....................................................10
6.5 Reinigung des Filters .......................................................12
6.6 Einbau von schwimmenden Blöcken (optional) .............14
7. Garantie ................................................................................15

01
Wichtige Vorsichtsmaßnahmen
1. Lesen Sie bitte die Bedienungsanleitung sorgfältig durch und
verwenden Sie den Reiniger entsprechend der Anleitung. Wir
übernehmen keine Haftung für Verluste oder Verletzungen, die
aufgrund unsachgemäßer Verwendung entstehen.
2. Der Reiniger kann nicht von Kindern unter 8 Jahren oder Menschen
mit geistiger Behinderung benutzt werden. Wenn notwendig, tun
Sie dies bitte unter Aufsicht eines Erwachsenen. Bitte lassen Sie
Kinder nicht auf dem Produkt reiten oder das Produkt als Spielzeug
benutzen.
3. Zur Vermeidung von Unfällen oder Schäden wird dringend
empfohlen, den Reiniger aus dem Schwimmbecken zu entfernen
und ihn zum Laden in einem Abstand von mindestens 3,5 m vom
Schwimmbecken entfernt zu fixieren.
4. Stellen Sie sicher, dass die Ladebuchse trocken und der Reiniger
ausgeschaltet ist (die Anzeige ist aus), bevor Sie ihn laden.
Ansonsten kann der Reiniger nicht normal geladen werden.
5. Schalten Sie den Reiniger aus und verbinden Sie den Adapter beim
Laden mit einer leckgeschützten und geerdeten Steckdose.
6. Verwenden Sie nur das vom Hersteller empfohlene oder verkaufte
Zubehör.
7. Begeben Sie sich nicht in den Pool, wenn der Reiniger in Betrieb
ist.
8. Schalten Sie den Staubsauger nicht ein, wenn dieser nicht im
Wasser ist.
9. Reinigen und waschen Sie die Filterschale nach jedem Gebrauch.

02
10.Lagern Sie den Reiniger an einem kühlen und belüfteten Ort,
abseits von direkter Sonneneinstrahlung.
11. Das versiegelte Antriebskit des Reinigers darf nur von Fachleuten
demontiert werden.
12. Es ist verboten, den Batteriekasten mit scharfen Teilen zu stoßen,
fallen zu lassen oder dagegen zu schlagen.
13. Schalten Sie den Reiniger aus und laden Sie ihn, bevor die Batterie
leer ist oder der Strom schwächer wird.
14. Laden Sie nicht, wenn die Batterie voll ist. Eine Überladung
verkürzt die Lebensdauer der Batterie.
15. Es ist verboten, den Reiniger in einer Umgebung über 60°C (140°F)
zu verwenden und ihn in einer Umgebung unter 0°C (32°F) zu
laden.
16. Die Batterie sollte in einer Umgebung zwischen 41° - 95° (5°C-35°C )
geladen werden. Lassen Sie die Batterie abkühlen, wenn sie überhitzt
ist.
17. Laden Sie die Batterie auf, wenn sie länger als 6 Monate gelagert
wurde.
18. Überladen Sie den Akku nicht. Es wird empfohlen, die Batterie
nicht länger als 7 Stunden zu laden.
Bewahren Sie diese Anleitung auf

03
1. Einführung
Der Roboter-Poolreiniger Osprey 1000 ist ein neuartiger, hocheffizienter
und energiesparender Schwimmbeckenreinigungsroboter. Dank
seines fortschrittlichen computergesteuerten Programms kann er die
Poolwände und den Boden automatisch reinigen. Zur gleichen Zeit
filtert er das Poolwasser und befreit es von ausgesetzten Partikeln,
ohne dass das Poolwasser ausgetauscht werden muss. Er ist absolut
umweltfreundlich.
Für einen sicheren Betrieb wird der Reiniger von einer
wiederaufladbaren Lithium-Batterie (25,9V 7,8Ah) betrieben.
2. Sicherheit
1. Bezüglich des Ortes der Ladung: beziehen Sie sich bitte auf die 3.
Zeile von "Wichtige Vorsichtsmaßnahmen" auf Seite 1.
2. Verwenden Sie zum Laden der Batterie keinen anderen als den
Original-Ladeadapter und verwenden Sie den Original-Ladeadapter
nicht zum Laden einer anderen Batterie.
3. Stellen Sie sicher, dass der Reiniger vor dem Laden ausgeschaltet
ist.
4. Verwenden Sie den Reiniger nicht während der Ladung.
5. Es ist verboten, den Batteriekasten mit scharfen Teilen zu stoßen,
fallen zu lassen oder dagegen zu schlagen.
6. Verwenden Sie den Reiniger nicht, wenn die Temperatur über
140
℉
(60
℃
) liegt.

04
7. Laden Sie das Gerät auf, bevor die Batterie leer ist oder der Strom
schwächer wird.
8. Laden Sie nicht, wenn die Batterie voll ist. Eine Überladung verkürzt
die Lebensdauer der Batterie.
9. Stellen Sie sicher, dass die Temperatur vor dem Laden zwischen 50
℉
-
104
℉
(10
℃
-40
℃
) liegt. Falls die Batterie überhitzt ist, lassen Sie sie
vor dem Laden abkühlen.
10. Laden Sie die Batterie auf, wenn sie länger als 6 Monate gelagert
wurde.
2. Packliste
Artikel Name Menge
1 Reiniger 1 Stk
2 Haken 1 Stk
3 Benutzerhandbuch 1 Stk
4 Ladegerät 1 Stk
5 Kurzanleitung 1 Stk
6 Schwebende Blöcke 4 Stk
05
4. Produktdiagramm
Top
Filter Basket
Retrieving HookCharger
Filterkorb
Oberseite
Einschalttaste
Ladegerät Schwebender Block Auffanghaken

06
5. Spezifikationen
1. Nennbetriebsspannung 25,9 V
2. Strom ca. 120W
3. Laufzeit 120 Minuten
4. Ladegerät-Eingang 100-240 V, 50/60 Hz
5. Ladegerät-Ausgang 2,0A
6. Batteriekapazität 7800 mAh
7. Ladezeit 5-6 Stunden
8. Max. Reinigungsoberfläche Bis zu 120 m² (1291 ft²)
9. Filterkapazität ca. 267 l/min (70 gal/min)
10. Filterdichte 180 μm
11. Bewegungsgeschwindigkeit ca. 32,8 ft/min (10 m/min)
12. Wasserdichtheits-Klasse IPX8
13. Temperatur der Ladeumgebung 41
℉
-95
℉
(5
℃
-35
℃
)
14. Maximale Wassertiefe 8,2 Fuß (2,5 m)
15. Produkt Abmessungen
17,6 x 18,6 x 9,0 (Zoll)
447 x 473 x 230 (mm)
16. Gewicht 24,0 Pfund (10.9KG)
17. Lagerbedingungen 41
℉
-95
℉
(5
℃
-35
℃
), RH≤75%

07
6. Bedienungsanleitung
6.1 Geben Sie den Poolreiniger ins Wasser
1. Drehen Sie den Schalterknopf auf ON, um den Reiniger einzuschalten.
2. Um den Reiniger in den Pool zu setzen oder aus dem Pool zu heben,
halten Sie ihn am oberen Griff fest, wobei die Unterseite des
Reinigers zur Wand gerichtet sein sollte, um mögliche Kratzer am
Pool zu vermeiden. Der Reiniger nimmt seine Arbeit auf, nachdem
er die eingeschlossene Luft entleert hat (ca. 15 Sekunden),
anschließend kann der Reiniger in den Boden des Schwimmbeckens
abtauchen.
08
6.2 Anweisungen für Taste und Anzeige
Kontrollleuchte
Anschluss für die Ladung
Schaltknopf
09
Artikel Funktion Beschreibung
1
Ein/
Ausschalten
Schieben Sie den Schalter auf ON, der Reiniger beginnt zu
laufen. Schieben Sie den Schalter auf OFF, dann stoppt der
Reiniger den Betrieb.
2 Indikator
1. Blaues Licht leuchtet dauerhaft: eingeschaltet
2. Blaues Licht blinkt: der Reiniger ist in Betrieb
3. Gelbes Licht blinkt: schwache Batterie und selbständiges
Stranden
4. Gelbes Licht leuchtet dauerhaft: selbständiges Stranden
beendet
5. Rotes Licht leuchtet dauerhaft: ausgeschaltet
6. Rotes Licht blinkt: Fehler
Fehlerbehandlung: Sollte das rote Licht blinken, schalten Sie ihn bitte aus, laden Sie
ihn auf und schalten Sie ihn dann wieder ein. Sollte der Reiniger
nicht wieder normal funktionieren, wenden Sie sich bitte an den
Kundendienst.
6.3 Entfernen Sie den Reiniger aus dem Wasser
1. Der Reiniger zieht sich nach Beendigung der Arbeit selbst aus dem
Wasser und kann dann mit dem Haken aus dem Pool gehoben werden.
10
2. Drehen Sie den Schalterknopf auf OFF, um den Reiniger auszuschalten.
6.4 Aufladen der Batterie
1. Nehmen Sie den Reiniger aus dem Pool
Vergewissern Sie sich, dass der Reiniger ausgeschaltet ist (die Anzeige
ist aus). Stellen Sie den Reiniger zum Laden in einem Abstand von
mindestens 3,5 m vom Schwimmbecken entfernt auf.
Rotes Licht gibt an, dass die Batterie gerade geladen wird.
Grünes Licht gibt an, dass die Ladung abgeschlossen ist.

11
2. Anweisungen für die Ladeanzeige
Die Farbe und der Status der Anzeige Ladestatus
Grünes Licht leuchtet dauerhaft
Warten auf Ladung oder Batterie nicht
angeschlossen oder Ladung beendet
Rotes Licht leuchtet dauerhaft Die Batterie wird momentan geladen
Rotes Licht blinkt
Schwache Batterie oder Batterie
beschädigt

12
6.5 Reinigung des Filters
1. Entnehmen Sie die Filterkörbe:
a. Drücken Sie den Öffnungsknopf (Abbildung 1)
b. Die obere Abdeckung klappt automatisch auf (Abbildung 2)
c. Öffnen Sie die obere Abdeckung (Abbildung 3)
d. Entnehmen Sie den Filterkorb (Abbildung 4)
Abbildung 1 Abbildung 2
Abbildung 3 Abbildung 4
13
2. Reinigen Sie die Filterkörbe (Abbildung 5).
Abbildung 5
3. Setzen Sie die Filterkörbe wieder ein (Abbildung 6). Achten Sie
auf die Einbauposition und schließen Sie die obere Abdeckung
(Abbildung 7).
Abbildung 6 Abbildung 7
14
6.6 Einbau von schwimmenden Blöcken (optional)
Sollte der Reiniger Schwierigkeiten haben, die Wand zu erklimmen
oder die Wasserlinie zu waschen, befolgen Sie bitte zur Behebung
des Problems die nachstehenden Anweisungen. Falls Ihr Roboter gut
funktioniert, ignorieren Sie bitte diese Anweisungen.
Öffnen Sie die obere Abdeckung und stecken Sie den schwimmenden
Block in die Position, die in Abbildung 8/Abbildung 9 gezeigt wird.
Verfahren Sie auf der anderen Seite genauso
Abbildung 8 Abbildung 9
Achtung: 1. Sofern Sie die Anleitung richtig verstanden haben,
können Sie die Position mit der Hand ertasten und die
schwimmenden Blöcke dort anbringen, ohne die obere
Abdeckung öffnen zu müssen.
2. Die Rückseite der schwimmenden Blöcke ist mit Klebstoff
versehen. Achten Sie also darauf, dass diese fest
installiert sind, und setzen Sie den Reiniger erst 24
Stunden später in den Pool ein.
15
7. Garantie
1. Dieses Produkt wird von der Wybot
TM
-Garantie für 24 Monate ab
Kaufdatum abgedeckt (nur für das Antriebskit und das Kontrollbox-
Kit). Verschleißteile wie Filterbehälter/Bürste/Räder/Düsen sind
von der Garantie ausgenommen.
2. Diese Garantie verliert ihre Gültigkeit, falls das Produkt verändert,
missbräuchlich verwendet oder von nicht autorisiertem Personal
repariert wurde.
3. Die Garantie umfasst nur Fabrikationsfehler und deckt keine
Schäden ab, welche durch unsachgemäße Handhabung des
Produkts durch den Besitzer verursacht wurden.
4. Bei jeder Beanstandung oder Reparatur während der Garantiezeit
muss die Bestellnummer oder der Beleg vorgelegt werden.
Bitte respektieren Sie die Vorschriften der Europäischen Union
und helfen Sie, die Umwelt zu schützen.
Bringen Sie nicht mehr funktionierende Elektrogeräte zu einer von
Ihrer Gemeinde bestellten Einrichtung, welche elektrische und
elektronische Geräte ordentlich recycelt. Entsorgen Sie diese nicht
in unsortierte Mülltonnen.
Bei Geräten, die herausnehmbare Batterien enthalten, entnehmen
Sie die Batterien, bevor Sie das Produkt entsorgen.
Umweltprogramme, WEEE Europäische Richtlinie

LIMPIADOR DE PISCINA ROBÓTICO
Manual de usuario
Osprey 1000
ES

19
Gracias por comprar el limpiador robótico para piscinas
Wybot
TM
. Lea todo el manual antes de usar su nuevo
limpiafondos robótico para piscinas. No nos hacemos
responsables de ninguna pérdida o lesión causada por un
uso inadecuado. Si encuentra un problema con su producto
Wybot
TM
, comuníquese con nuestro servicio de atención al
cliente para obtener ayuda.
Servicio de atención al cliente de Wybot:
Correo electrónico: [email protected]
Web: www.wybotpool.com
Facebook: @WybotPool
TM

20
CONTENIDO
Precauciones importantes ........................................................01
1. Introducción .........................................................................03
2. Seguridad ..............................................................................03
2. Lista de embalaje ..................................................................04
4. Esquema del producto .........................................................05
5. Especificaciones ....................................................................06
6. Instrucciones de operación ..................................................07
6.1 Coloque el limpiador de piscinas en el agua ..................07
6.2 Instrucciones para botón e indicador ............................. 08
6.3 Retirar el limpiador de piscinas del agua ........................ 09
6.4 Cargar la batería .............................................................10
6.5 Limpieza del filtro ...........................................................12
6.6 Instalación de bloques flotantes (opcional) ....................14
7. Garantía ................................................................................ 15

01
Precauciones importantes
1. Lea atentamente el manual y use el limpiador de acuerdo con el
manual. No nos hacemos responsables de ninguna pérdida o lesión
causada por un uso inadecuado.
2. El limpiafondos no puede ser utilizado por niños menores de 8 años
o personas con discapacidad mental. Si es necesario, que se haga
bajo el control de un tutor adulto. No deje que los niños se suban
al producto ni lo usen como un juguete.
3. Para evitar accidentes o daños, se recomienda encarecidamente
retirar el limpiafondos de la piscina y fijar el limpiafondos en
el interior a una distancia mínima de 3,5 m de la piscina para
cargarlo.
4. Asegúrese de que la toma de carga esté seca y que el limpiador
esté apagado (el indicador esté apagado) antes de cargarlo. De lo
contrario, el limpiafondos no se puede cargar normalmente.
5. Apague el limpiafondos y el adaptador debe estar conectado a un
enchufe protegido contra fugas y conectado a tierra durante la
carga.
6. Utilice únicamente los accesorios recomendados o vendidos por el
fabricante.
7. No extraiga la batería cuando la cámara termográfica esté
funcionando.
8. No encienda el limpiador cuando esté fuera del agua.
9. Limpie y lave siempre la bandeja del filtro después de su uso.
10. El limpiador debe almacenarse en un lugar fresco y ventilado,
lejos de la luz solar directa.

02
11. Solo los profesionales pueden desmontar el kit de conducción
sellado del limpiafondos.
12. Está prohibido hacer chocar la caja de la batería con partes
afiladas y dejarla caer o golpearla.
13. Apague el limpiador y cárguelo antes de que se agote la batería o
se reduzca la potencia de trabajo.
14. No cargue cuando la batería esté llena. La sobrecarga reducirá la
duración de la batería.
15. Está prohibido usar el limpiador en un ambiente por encima de
140 °F (60 °C) y cargarlo en un ambiente por debajo de 32 °F (0
°C).
16. La batería debe cargarse en un ambiente entre 41° - 95° (5°C-35°C).
Enfríe la batería si se sobrecalienta.
17. Cargue la batería si ha estado guardada durante más de 6
meses.
18. No sobrecargue la batería. Se recomienda que la batería no se
cargue durante más de 7 horas.
Guarde estas instrucciones

03
1. Introducción
El limpiafondos robótico para piscinas Osprey 1000 es un nuevo
tipo de robot limpiafondos para piscinas altamente eficiente y que
ahorra energía. A través de su avanzado programa controlado por
computadora, puede limpiar las paredes y el fondo de la piscina
automáticamente. Al mismo tiempo, filtra el agua de la piscina y elimina
las partículas en suspensión sin reemplazar el agua de la piscina. Es
totalmente respetuoso con el medio ambiente.
Para un funcionamiento seguro, el limpiafondos funciona con una
batería de litio recargable (25,9 V 7,8 Ah).
2. Seguridad
1. Para la ubicación de carga: consulte la tercera línea de
"Precauciones importantes" en la página 1.
2. No utilice ningún adaptador de carga que no sea original para
cargar la batería ni utilice el adaptador de carga original para cargar
otra batería.
3. Asegúrese de que el limpiador esté apagado antes de cargarlo.
4. No utilice el limpiador mientras se está cargando.
5. Está prohibido hacer chocar la caja de la batería con partes afiladas
y dejarla caer o golpearla.
6. No use el limpiador cuando la temperatura sea superior a 140
℉
(60
℃
).

04
7. Cargue antes de que se agote la batería o se reduzca la potencia de
trabajo.
8. No cargue cuando la batería esté llena. La sobrecarga reducirá la
vida útil de la batería.
9. Asegúrese de que la temperatura esté entre 50
℉
y 104
℉
(10
℃
y
40
℃
) antes de cargar. Si la batería se sobrecalienta, enfríela antes
de cargarla.
10. Cargue la batería si ha estado guardada durante más de 6 meses.
2. Lista de embalaje
Objeto Nombre Cantidad
1 Limpiador 1 PC
2 Gancho 1 PC
3 Manual de usuario 1 PC
4 Cargador 1 PC
5 Guía rápida 1 PC
6 Bloques flotantes 4 pcs

05
4. Esquema del producto
Top
Filter Basket
Retrieving HookCharger
Cesta de filtro
Parte superior
Botón de
encendido
Cargador Bloque flotante Gancho de
recuperación

06
5. Especificaciones
1. Voltaje de trabajo nominal 25,9 V
2. Potencia aprox. 120W
3. Tiempo de ejecución 120 minutos
4. Entrada del cargador 100-240 V, 50/60 Hz
5. Salida del cargador 2.0A
6. Capacidad de la batería 7800mAh
7. Tiempo de carga 5-6 horas
8. Máx. superficie de limpieza Hasta 1291 pies cuadrados (120 m
2
)
9. Capacidad del filtro aprox. 70 gal/min (267 L/min)
10. Densidad del filtro 180 micras
11. Velocidad de movimiento aprox. 32,8 pies/min (10 m/min)
12. Grado de protección IPX8
13. Temperatura del entorno de carga 41
℉
-95
℉
(5
℃
-35
℃
)
14. Profundidad máxima del agua 8,2 pies (2,5 m)
15. Tamaño del producto
17,6x18,6x9,0 (pulgadas)
447x473x230 (mm)
16. Peso 24,0 libras (10,9 KG)
17. Condición de almacenamiento 41
℉
-95
℉
(5
℃
-35
℃
), RH≤75%
07
6. Instrucciones de operación
6.1 Coloque el limpiador de piscinas en el agua
1. Gire la rosca del interruptor a ON para encender el limpiador.
2. Sostenga el asa superior para introducirlo o sacarlo de la piscina
con la parte inferior del limpiafondos hacia la pared para evitar
posibles arañazos en la piscina. El limpiador comenzará a funcionar
después de vaciar el aire atrapado en el interior (alrededor de 15
segundos), luego el limpiador puede sumergirse en el fondo de la
piscina.

08
6.2 Instrucciones para botón e indicador
Luz Indicadora
Puerto de carga
Rosca de interruptor

09
Objeto Función Descripción
1
Encendido /
apagado
Mueva el interruptor a ON, el limpiafondos comienza a
funcionar. Mueva el interruptor a OFF, luego el limpiador
dejará de funcionar.
2 Indicador
1. La luz azul está fija: encienda
2. La luz azul parpadea: el limpiador está funcionando
3. La luz amarilla parpadea: batería baja y varada automática
4. La luz amarilla está fija: termine de pararse por sí mismo
5. La luz roja está fija: apagar
6. La luz roja parpadea: fallas
Manejo de fallas: cuando la luz roja parpadee, apáguela y cárguela, luego vuelva a
colocarla en la piscina y enciéndala. Si el limpiador no puede volver
a la normalidad, comuníquese con el servicio posventa.
6.3 Retirar el limpiador de piscinas del agua
1. El limpiafondos parará automáticamente cuando termine de trabajar,
luego use el gancho para sacarlo de la piscina.

10
2. Gire la perilla del interruptor a la posición de OFF para apagar el limpiador.
6.4 Cargar la batería
1. Retire el limpiafondos de la piscina
Asegúrese de que el limpiador esté apagado (el indicador está
apagado). Coloque el limpiador en interiores a una distancia mínima
de 3,5 m de la piscina para cargarlo.
La luz roja indica que la batería se está cargando.
La luz verde indica que la carga ha terminado.

11
2. Instrucciones para el indicador del cargador
El color y el estado del indicador Estado de carga
La luz verde está fija
Esperando carga o batería no
enchufada o carga finalizada
La luz roja está fija La batería se está cargando
La luz roja parpadea Batería baja o batería dañada
12
6.5 Limpieza del filtro
1. Saque las cestas del filtro:
a. Pulse el botón de apertura (Figura 1)
b. La cubierta superior se abrirá automáticamente (Figura 2)
c. Abra la cubierta superior (Figura 3)
d. Saque la canasta del filtro (Figura 4)
Figura 1 Figura 2
Figura 3 Figura 4

13
2. Limpie las cestas del filtro (Figura 5).
Figura 5
3. Vuelva a instalar las cestas del filtro (Figura 6). Preste atención a la
posición de instalación y cierre la cubierta superior (Figura 7).
Figura 6 Figura 7

14
6.6 Instalación de bloques flotantes (opcional)
Si para el limpiador es difícil trepar por la pared o lavar la línea de
flotación, siga las instrucciones a continuación para solucionarlo. Si su
robot funciona bien, ignore estas instrucciones.
Abra la cubierta superior y pegue el bloque flotante en la posición
como se muestra en la figura 8/figura 9. Haz lo mismo con el otro
lado.
Figura 8 Figura 9
Atención: 1. Si comprende completamente las instrucciones, puede
colocar la posición con la mano y colocar los bloques
flotantes allí sin necesidad de abrir la cubierta superior.
2. Hay pegamento en la parte posterior de los bloques
flotantes. Por lo tanto, asegúrese de que esté
firmemente instalado y no coloque el limpiafondos en la
piscina hasta 24 horas después.

15
7. Garantía
1. Este producto está cubierto por la garantía de Wybot™ durante 24
meses (solo para el kit de conducción y el kit de caja de control)
a partir de la fecha de compra. Las piezas consumibles no están
cubiertas por la garantía, lo que incluye la bandeja del filtro, el
cepillo, las ruedas y las boquillas.
2. Esta garantía queda anulada si el producto ha sido alterado, usado
incorrectamente o ha sido reparado por personal no autorizado.
3. La garantía se extiende únicamente a los defectos de fabricación y
no cubre ningún daño resultante del mal manejo del producto por
parte del propietario.
4. Se debe presentar el número de pedido o registro para cualquier
reclamo o reparación durante el período de garantía.
Respete las normas de la Unión Europea y ayude a proteger el
medio ambiente.
Devuelva los equipos eléctricos que no funcionen a una instalación
designada por su municipio que recicle adecuadamente los
equipos eléctricos y electrónicos. No los deseche en contenedores
de basura sin clasificar.
Para artículos que contengan baterías extraíbles, retire las baterías
antes de desechar el producto.
Programas Ambientales, Directiva Europea WEEE

PULITORE ROBOTICO PER PISCINE
Manuale d'uso
Osprey 1000
IT


19
Grazie per aver acquistato il Pulitore Robotico per Piscine
Wybot
TM
Si prega di leggere l'intero manuale prima di
utilizzare il nuovo pulitore robotizzato per piscine. Non siamo
ritenuti responsabili per eventuali perdite o lesioni causate da
un uso improprio. Se riscontri un problema con il tuo prodotto
Wybot
TM
, contatta il nostro servizio clienti per ricevere
assistenza.
Servizio Clienti Wybot:
E-Mai: [email protected]
web: www.wybotpool.com
Facebook: @WybotPool
TM

20
INDICE
Precauzioni importanti .............................................................01
1. Introduzione .........................................................................03
2. Sicurezza ............................................................................... 03
2. Lista imballaggio ................................................................... 04
4. Schema del prodotto ............................................................05
5. Specifiche .............................................................................06
6. Istruzioni per l'uso ................................................................07
6.1 Immergere il pulitore per piscina in acqua .....................07
6.2 Istruzioni per pulsante e indicatore ................................ 08
6.3 Rimuovere il pulitore per piscina dall'acqua ..................09
6.4 Caricare la batteria .........................................................10
6.5 Pulizia del filtro ............................................................... 12
6.6 Installazione di blocchi flottanti (opzionale) ................... 14
7. Garanzia ................................................................................15

01
Precauzioni importanti
1. Si prega di leggere attentamente il manuale e utilizzare il
detergente secondo il manuale. Non siamo ritenuti responsabili
per eventuali perdite o lesioni causate da un uso improprio.
2. Il pulitore non può essere utilizzato da bambini di età inferiore a 8
anni o da persone con disabilità mentali. Se necessario, si prega di
farlo sotto tutore adulto. Si prega di non permettere ai bambini di
salire sul prodotto o di utilizzarlo come un giocattolo.
3. Per evitare incidenti o danni, si consiglia vivamente di rimuovere
il pulitore dalla piscina e di fissarlo al coperto ad almeno 3,5 m di
distanza dalla piscina per la ricarica.
4. Assicurarsi che la presa di ricarica sia asciutta e che il pulitore sia
spento (l'indicatore è spento) prima della ricarica. In caso contrario,
il pulitore non può essere caricato normalmente.
5. Spegnere il pulitore e l'adattatore deve essere collegato a una presa
protetta da perdite e con messa a terra durante la ricarica.
6. Utilizzare solo gli accessori consigliati o venduti dal produttore.
7. Non estrarre la batteria quando la Termocamera è in funzione.
8. Non accendere il pulitore quando è fuori dall'acqua.
9. Pulire e lavare sempre il vassoio del filtro dopo l'uso.
10. Il pulitore deve essere conservato in un luogo fresco e ventilato,
lontano dalla luce diretta del sole.
11. Solo i professionisti possono smontare il kit di guida sigillato del
pulitore.
12. È vietato urtare la scatola della batteria con parti taglienti e farla
cadere o urtarla.

02
13. Spegnere il pulitore e caricarlo prima che la batteria si esaurisca o
che la potenza operativa si riduca.
14. Non caricare quando la batteria è carica. Il sovraccarico ridurrà la
durata della batteria.
15. È vietato utilizzare il pulitore in un ambiente al di sopra di 140°F
(60°C) e caricarlo in un ambiente al di sotto di 32°F (0°C).
16. La batteria deve essere caricata in un ambiente con temperatura
compresa tra 41° e 95° (5°C-35°C). Raffreddare la batteria se è
surriscaldata.
17. Caricare la batteria se è stata conservata per più di 6 mesi.
18. Non sovraccaricare la batteria. Si consiglia di non caricare la
batteria per più di 7 ore
Conserva queste istruzioni

03
1. Introduzione
Il pulitore robotico per piscine Osprey 1000 è un nuovo tipo di robot
per la pulizia delle piscine altamente efficiente e a risparmio energetico.
Attraverso il suo avanzato programma controllato da computer, può
pulire automaticamente le pareti e il fondo della piscina. Allo stesso
tempo, filtra l'acqua della piscina ed elimina le particelle in sospensione
senza sostituire l'acqua della piscina. È totalmente rispettoso
dell'ambiente.
Per un funzionamento sicuro, il pulitore è alimentato da una batteria
al litio ricaricabile (25,9 V 7,8 Ah).
2. Sicurezza
1. Per il luogo di ricarica: fare riferimento alla terza riga di "Precauzioni
importanti" a pagina 1.
2. Non utilizzare alcun adattatore di ricarica non originale per caricare
la batteria o utilizzare l'adattatore di ricarica originale per caricare
un'altra batteria.
3. Assicurarsi che il pulitore sia spento prima della ricarica.
4. Non utilizzare il pulitore e durante la ricarica.
5. È vietato urtare la scatola della batteria con parti taglienti e farla
cadere o urtarla.
6. Non utilizzare il pulitore quando la temperatura è superiore a 140
℉
(60
℃
).

04
7. Carica prima che la batteria si esaurisca o che la potenza di lavoro si
riduca.
8. Non caricare quando la batteria è carica. Il sovraccarico ridurrà la
durata della batteria.
9. Assicurarsi che la temperatura sia compresa tra 50
℉
e 104
℉
(10
℃
- 40
℃
) prima della ricarica. Se la batteria è surriscaldata,
raffreddarla prima di caricarla.
10. Caricare la batteria quando è rimasta inutilizzata per più di 6 mesi.
2. Lista imballaggio
Prodotto Nome Quantità
1 Più pulito 1 pz
2 Gancio 1 pz
3 Manuale d'uso 1 pz
4 Caricabatterie 1 pz
5 Guida veloce 1 pz
6 Blocchi galleggianti 4 pz
05
4. Schema del prodotto
Top
Filter Basket
Retrieving HookCharger
Filtro a cestello
Superiore
Pulsante di
accensione
Caricabatterie Blocco galleggiante Gancio di recupero

06
5. Specifiche
1. Tensione di lavoro nominale 25,9 V
2. Potenza circa 120W
3. Tempo di esecuzione 120 minuti
4. Ingresso caricabatterie 100-240V, 50/60Hz
5. Uscita caricabatterie 2.0A
6. Capacità della batteria 7800 mAh
7. Tempo di carica 5-6 ore
8. Massimo. Superficie di pulizia Fino a 120 m
2
(1291 piedi quadrati)
9. Capacità filtro ca. 70 gal/min (267 l/min)
10. Filtro Densità 180 micron
11. Velocità di movimento ca. 32,8 piedi/min (10 m/min)
12. Grado impermeabile IPX8
13. Temperatura dell'ambiente di ricarica 41
℉
-95
℉
(5
℃
-35
℃
)
14. Profondità massima dell'acqua 8,2 piedi (2,5 m)
15. Taglia del prodotto
17,6x18,6x9,0 (pollici)
447x473x230(mm)
16. Peso 24,0 libbre (10,9 KG)
17. Condizioni di conservazione 41
℉
-95
℉
(5
℃
-35
℃
), RH≤75%
07
6. Istruzioni per l'uso
6.1 Immergere il pulitore per piscina in acqua
1. Ruotare la manopola dell'interruttore su ON per accendere il
pulitore.
2. Tenere la maniglia superiore per inserirla o sollevarla dalla piscina
con il fondo del pulitore rivolto verso il muro per evitare possibili
graffi alla piscina. Il pulitore inizierà a funzionare dopo aver
svuotato l'aria intrappolata all'interno (circa 15 secondi), quindi il
pulitore può immergersi nel fondo della piscina.

08
6.2 Istruzioni per pulsante e indicatore
Indicatore luminoso
Porta di ricarica
Interruttore manopola
09
Prodotto Funzione Descrizione
1
Accensione/
spegnimento
Schieben Sie den Schalter auf ON, der Reiniger beginnt zu
laufen. Schieben Sie den Schalter auf OFF, dann stoppt der
Reiniger den Betrieb.
2 Indicatore
1. La luce blu è fissa: accendere
2. La luce blu lampeggia: il pulitore è in funzione
3. Luce gialla lampeggiante: batteria scarica e
auto-arenamento
4. La luce gialla è fissa: terminare l'auto-arenamento
5. Luce rossa accesa fissa: spegnere
6. La luce rossa lampeggia: guasti
Gestione dei guasti: quando la luce rossa lampeggia, spegnerla e caricarla, quindi
inserirla nuovamente nella piscina e riaccenderla. Se il pulitore
non riesce a tornare alla normalità, contattare l'assistenza post-
vendita.
6.3 Rimuovere il pulitore per piscina dall'acqua
1. Il pulitore si arenerà da solo al termine del lavoro, quindi utilizzerà il
gancio per sollevarlo dalla piscina.

10
2. Ruotare la manopola dell'interruttore su OFF per spegnere il pulitore.
6.4 Caricare la batteria
1. Rimuovere il pulitore dalla piscina
Assicurarsi che il pulitore sia spento (l'indicatore è spento).
Posizionare il pulitore al chiuso ad almeno 3,5 m di distanza dalla
piscina per la ricarica.
La luce rossa indica che la batteria è in carica.
La luce verde indica che la ricarica è terminata.

11
2. Istruzioni per l'indicatore del caricatore
Il colore e lo stato dell'indicatore Stato di carica
La luce verde è fissa
In attesa di ricarica o batteria non
collegata o ricarica terminata
La luce rossa è fissa La batteria è in carica
La luce rossa lampeggia Batteria scarica o batteria danneggiata

12
6.5 Pulizia del filtro
1. Estrarre i cestelli del filtro:
a. Premere il pulsante di apertura (Figura 1)
b. Il coperchio superiore si aprirà automaticamente (Figura 2)
c. Aprire il coperchio superiore (Figura 3)
d. Estrarre il cestello del filtro (Figura 4)
Figura 1 Figura 2
Figura 3 Figura 4
13
2. Pulire i cestelli del filtro (Figura 5).
Figura 5
3. Reinstallare i cestelli del filtro (Figura 6). Prestare attenzione alla
posizione di installazione e chiudere il coperchio superiore (Figura 7).
Figura 6 Figura 7

14
6.6 Installazione di blocchi flottanti (opzionale)
Se il pulitore è difficile da scalare il muro o lavare la linea di
galleggiamento, seguire le istruzioni qui sotto per ripararlo. Se il tuo
robot funziona bene, ignora queste istruzioni.
Aprire il coperchio superiore e incollare il blocco galleggiante nella
posizione come mostrato nella figura 8/figura 9. Fai lo stesso dall'altra
parte.
Figura 8 Figura 9
Attenzione: 1. Se comprendi appieno le istruzioni, puoi sentire la
posizione con la tua mano e attaccare i blocchi
galleggianti lì senza bisogno di aprire il coperchio
superiore.
2. C'è della colla sul retro dei blocchi galleggianti. Quindi
assicurati che sia installato saldamente e non mettere
il pulitore nella piscina fino a 24 ore dopo.
15
7. Garanzia
1. Questo prodotto è coperto dalla garanzia Wybot
TM
per 24 mesi (solo
per kit guida e kit scatola comandi) dalla data di acquisto. Le parti
di consumo non sono garantite, tra cui vassoio filtro/spazzola/
ruote/ugelli.
2. Questa garanzia è annullata se il prodotto è stato alterato, usato in
modo improprio o è stato riparato da personale non autorizzato.
3. La garanzia si estende solo ai difetti di fabbricazione e non copre
eventuali danni derivanti da un uso improprio del prodotto da
parte del proprietario.
4. Il numero d'ordine o la registrazione devono essere presentati per
qualsiasi reclamo o riparazione durante il periodo di garanzia.
Si prega di rispettare le normative dell'Unione Europea e
contribuire a proteggere l'ambiente.
Restituisci le apparecchiature elettriche non funzionanti a una
struttura designata dal tuo comune che ricicla correttamente
le apparecchiature elettriche ed elettroniche. Non gettarli nei
cassonetti dei rifiuti indifferenziati.
Per gli articoli contenenti batterie rimovibili, rimuovere le batterie
prima di smaltire il prodotto.
Programmi Ambientali, Direttiva Europea WEEE


TM
www.wybotpool.com