
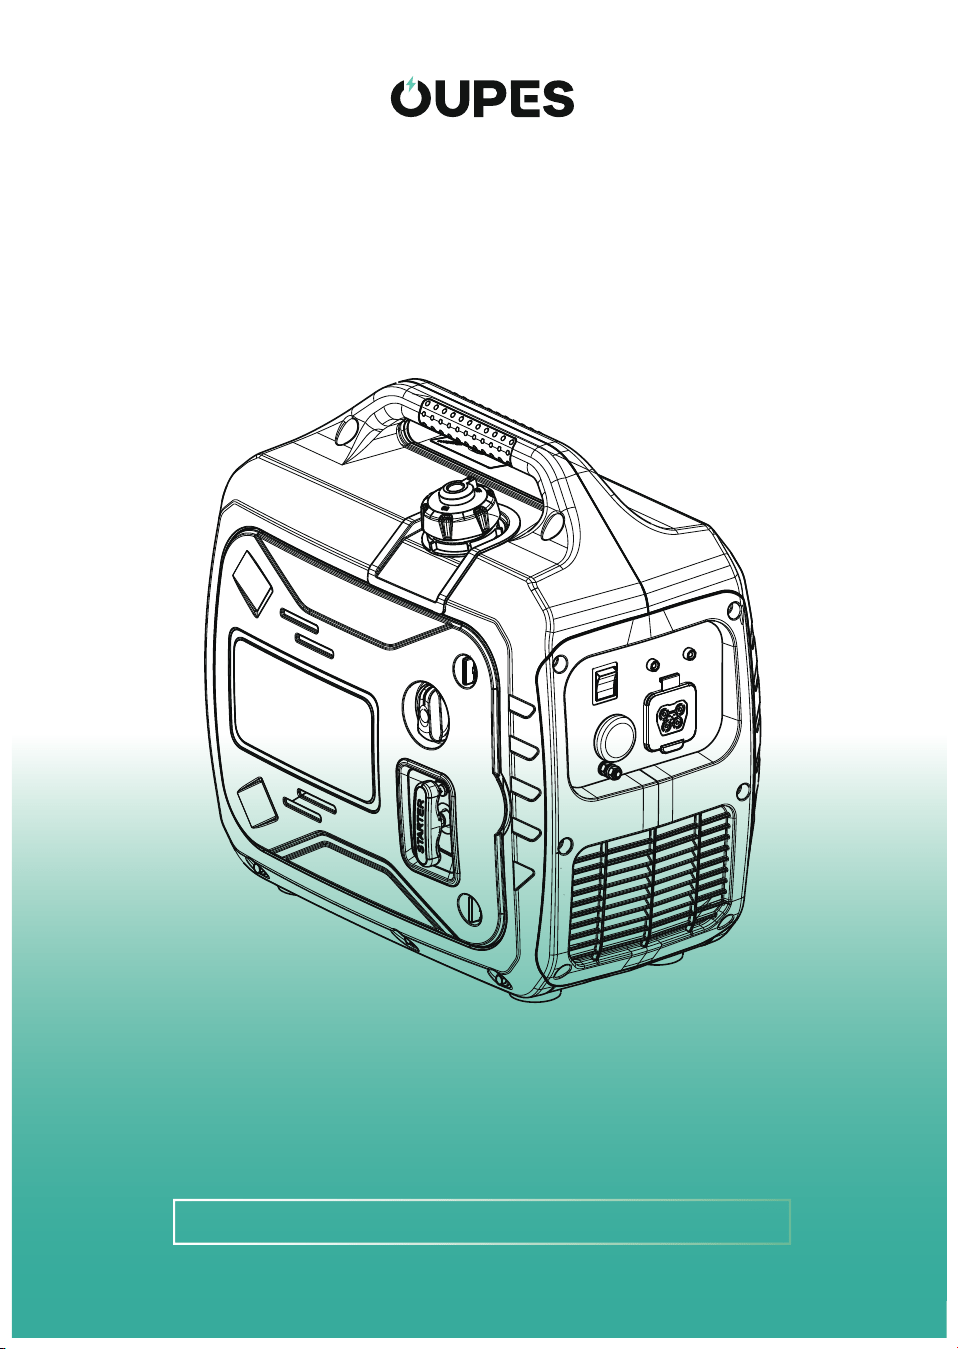
Recoil Start Silent Inverter Generator
1600w Running Watts
Please read the manual carefully before operation
GASOLINE SILENT INVERTER GENERATOR
OPERATOR 'S MANUAL

Contents
01
Ⅰ. INTRODUCTION
Disclaimers ———————————————————————
Ⅱ.SAFETY
Safety Notice ——————————————————————
Safety Symbols —————————————————————
General Safety —————————————————————
Fuel Safety————————————————————————
Generator Running Safety —————————————
Safety Labels ——————————————————————
Ⅲ. SPECIFICATIONS
Technical Spec —————————————————————
Ⅳ. COMPONENTS
Open Carton ——————————————————————
Accessories ———————————————————————
General Components ————————————————
Control Panel Components ————————————
Ⅴ.ASSEMBLY
Oil Fill ———————————————————————————
04
05
05
05-06
07
08-09
10
11
12
12
13
14-16
17

Contents
02
Fuel Fill ——————————————————————————
Air Filter Checking ——————————————————
Battery ——————————————————————————
Check Before Use ———————————————————
Ⅵ.OPERATION
Checking Before Starting The Generator ————
Starting The Generator ————————————————
Shutting Down The Generator ———————————
Ⅶ. MAINTENANCE
Maintenance Chart ——————————————————
Fuel Check ———————————————————————
Oil Level Check and Oil Changing ————————
Air Filter Maintenance ————————————————
Spark Plug Maintenance ——————————————
Spark Arrester Maintenance ————————————
Fuel Tank Strainer Maintenance —————————
Fuel Filter Maintenance ———————————————
Fuel Pipe/Blast Pipe Check —————————————
18-19
20
20
21
23
23
25-26
26-27
28
29-30
31-32
33
34
35
36
37

Contents
03
Ⅷ.TRANSPORTATION
Transportation —————————————————————
Ⅸ. STORAGE
Storage ——————————————————————————
Ⅹ.TROUBLESHOOTING
Troubleshooting ————————————————————
Ⅺ. SCHEMATICS
Schematics ———————————————————————
38
40
39
41

04
This manual describes the operation and maintenance of the gasoline silent
inverter generator. Before operating the generator, please read and understand
this manual carefully to ensure that you can operate it safely and prolong the
lifetime of the generator.
Due to the continuous improvement of the product, the company reserves the
right to improve and adjust the spec of the generator without notice. At the
same time, due to the improvement of the product, please pay attention to the
difference between the generator described in the manual and your generator,
which is subject to the actual product.
Ⅰ. INTRODUCTION
Disclaimers
05
To ensure personal and property safety, read and understand this manual
carefully before operating the generator.
Ⅱ. SAFETY
2.1 Safety Notice
For the personal and property safety of all people who operate, maintain and
near this product, please read the safety warnings carefully abide by the
symbol and the safety notices abide by the symbol.
Details are as follows:
1.The exhaust gas of the generator contains CO and other harmful gases. Do
not use the generator indoors or in an environment with poor ventilation. If
you feel sick or dizzy, shut off the generator and move to fresh air immedi-
ately. Go to hospital if necessary, you may get monoxide poisoning.
2.2 Safety Symbols
Serious injury if instructions are not followed.
DANGER
Risk of serious injury if instructions are not followed.
WARNING
Risk of injury if instructions are not followed.
CAUTION
The generator and other property may be damaged if instruc-
tions are not followed.
NOTICE
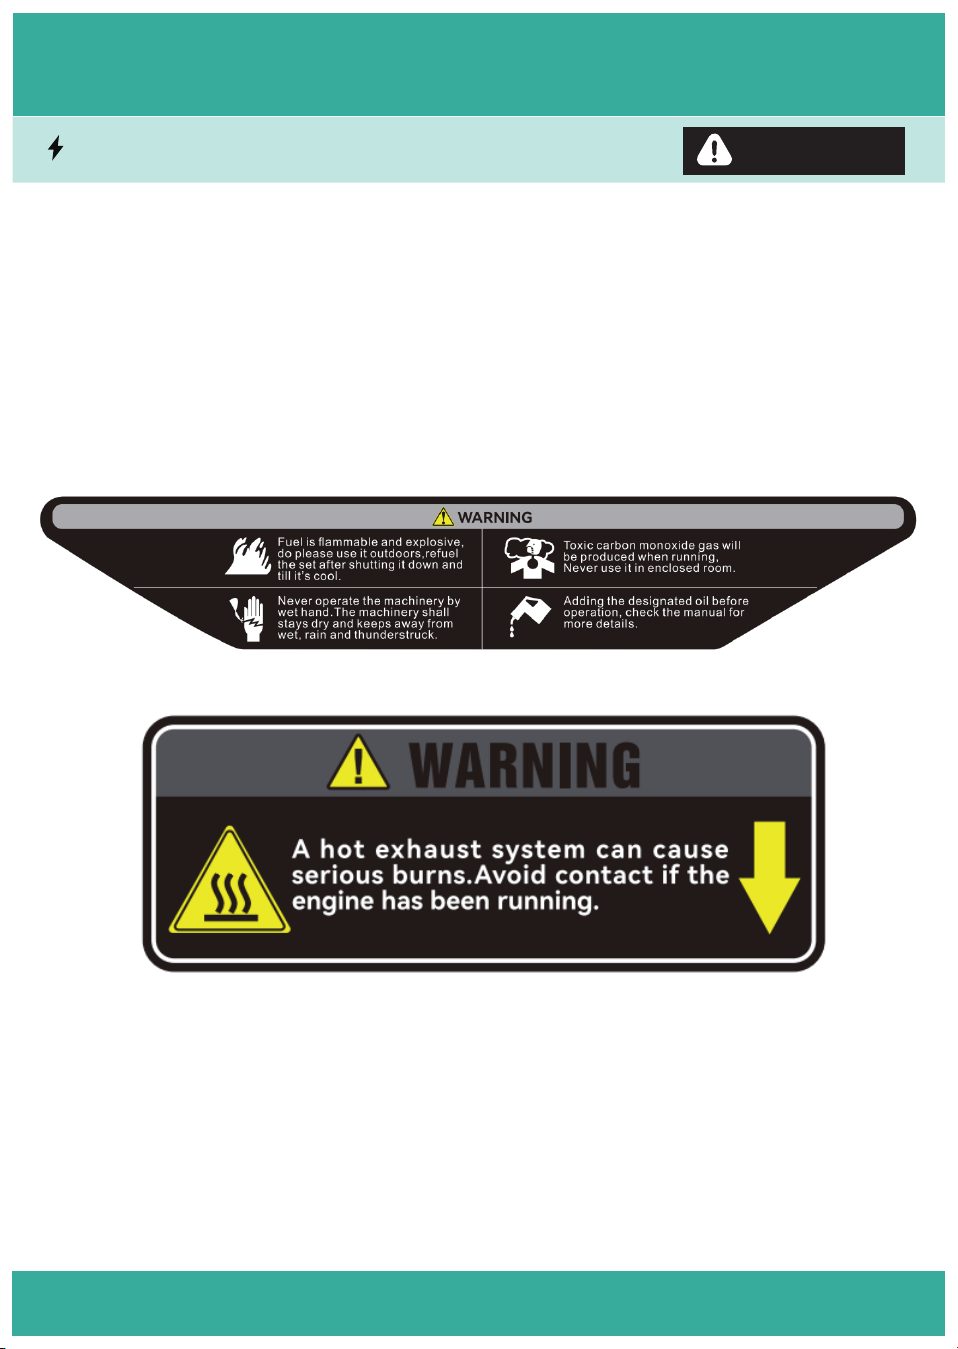
WARNING
2.3. General Safety
WARNING

06
2.Make sure the generator is on a flat surface and in a well-ventilated area. The
generator must leave at least 5ft. (1.5m) of clearance from all combustible
materials.
3.Do not use the generator in any fire or explosive risk area.
4.Keep children and pets away from the generator operating area
5.Do not use the generator in wet, rain, snow or with wet hands.
6.Do not connect the generator directly to the household circuit or any electric
system, or it may cause death from electric shock, and generator and applianc-
es damage.
7.Do not touch live parts of the generator control panel, such as the socket and
the exposed port of the plug conductor.
8.Keep the generator front cover, rear cover, and bottom plate vents clear and
free of debris, mud, water, etc. If these vents are blocked, damage to the
generator may occur.
9.The generator maintenance should be done by a professional electrician.
10.This generator is a special generator for lithium power charging. Please do
not use it for other purposes.
Ⅱ. SAFETY
2.3. General Safety
WARNING

07
1.When adding gasoline, make sure the gasoline added to the red line of fuel
tank strainer. When adding oil, make sure the oil added to the range between
“High” and “Low” of dipstick.
2.The gasoline and oil are extremely flammable, do not add gasoline and oil
near fire or combustible or explosive materials.
3.Add the gasoline to fuel tank and oil to engine in a dry and well-ventilated
area.
4.Shut down and cool the engine before adding gasoline and oil. After adding
enough gasoline and oil, tighten the fuel cap and dipstick securely
5.Wipe spilled gasoline and oil if there is any.
6.Do not smoke or be drunk and unconscious with drugs when adding gasoline
and oil.
7.Store fuel in a container approved in a well-ventilated area, away from any
combustibles or source of ignition.
Ⅱ. SAFETY
2. 4. Fuel Safety
WARNING

08
2.5.1. Before Running
1.Make sure the generator is on a flat surface and in a well-ventilated area.
2.Make sure the generator is at least 3.3ft (1m) far away from house or building
and other equipment.
3.Keep children and pets away from the operating area.
4.Check the generator situation, check gasoline and oil, check the fuel cap, air
filter, spark plug, fuel lines and exhaust system are properly in place.
5.Make sure the generator is grounded.
2.5.2. When Running
1.Make sure the generator running in outside place that is with good ventilation.
2.Do not touch the generator when it is running, the muffler and other engine
parts are very hot and may cause burns.
3.Far away from the muffler exhaust port, the temperature of exhaust gas is
high and the gas is poisonous.
Ⅱ. SAFETY
2.5. Generator Running Safety
WARNING

09
2.5.3. After Running
1.Do not touch the generator when it is just stopped, the muffler and other
engine parts are very hot and may cause burns. Touch or move the generator
after it is totally cooled.
2.When store the generator, drain the gasoline and oil, turn off the three-in-one
switch and disconnect the spark plug and battery.
3.Generators should be stored and used away from the environments that with
fire, smoke, high temperature and so on. If gasoline/oil leaks, it may damage the
generator or your property.
Ⅱ. SAFETY
2.5. Generator Running Safety
WARNING
10
Safety labels are affixed to the generator. These labels warn you of potential
hazards that may cause serious injury or death. Please carefully read the labels,
safety warnings and notes affixed to the fuselage. If the label has fallen off or
cannot be seen clearly, contact our after-sales team for a replacement.
Ⅱ. SAFETY
2.6. Safety Labels
WARNING

11
Ⅲ. SPECIFICATIONS
Engine
Engine Model
Engine Type
Displacement
Spark Plug Model
Starting Type
Engine rpm
E1600
Single cylinder/four-stroke/forced
air cooling/overhead valve
79.7CC
A7TC/A7RTC
Recoil/ Electric start
3600-5000r/min
Oil Type/ Rated Capacity SAE 10W-40/0.35L
Fuel Type/ Rated Capacity 92# unleaded gasoline or above/4L
Running Time (full load) 4H
Generator
Generator Model
Generator Type
Rated Voltage
Rated Current
Rated Power
E1600
Silent inverter generator
DC56V
28.5A
1.6KW
The whole machine
Overall dimensions (L*W*H)
Net Weight
Noise(7m)
The Scope of Work
20.6×12.99×19.96in
39.68lb
68db(A)
23℉~104℉/Altitude≤1000M
92# unleaded gasoline or above/4L
12
Ⅳ. COMPONENTS
1. Move the generator to an open and flat surface.
2. Remove everything from the carton except the generator.
3. Use the carry handle of generator to take the generator out of the carton.
4. Recycle or dispose the packaging materials properly.
4.1. Open Carton
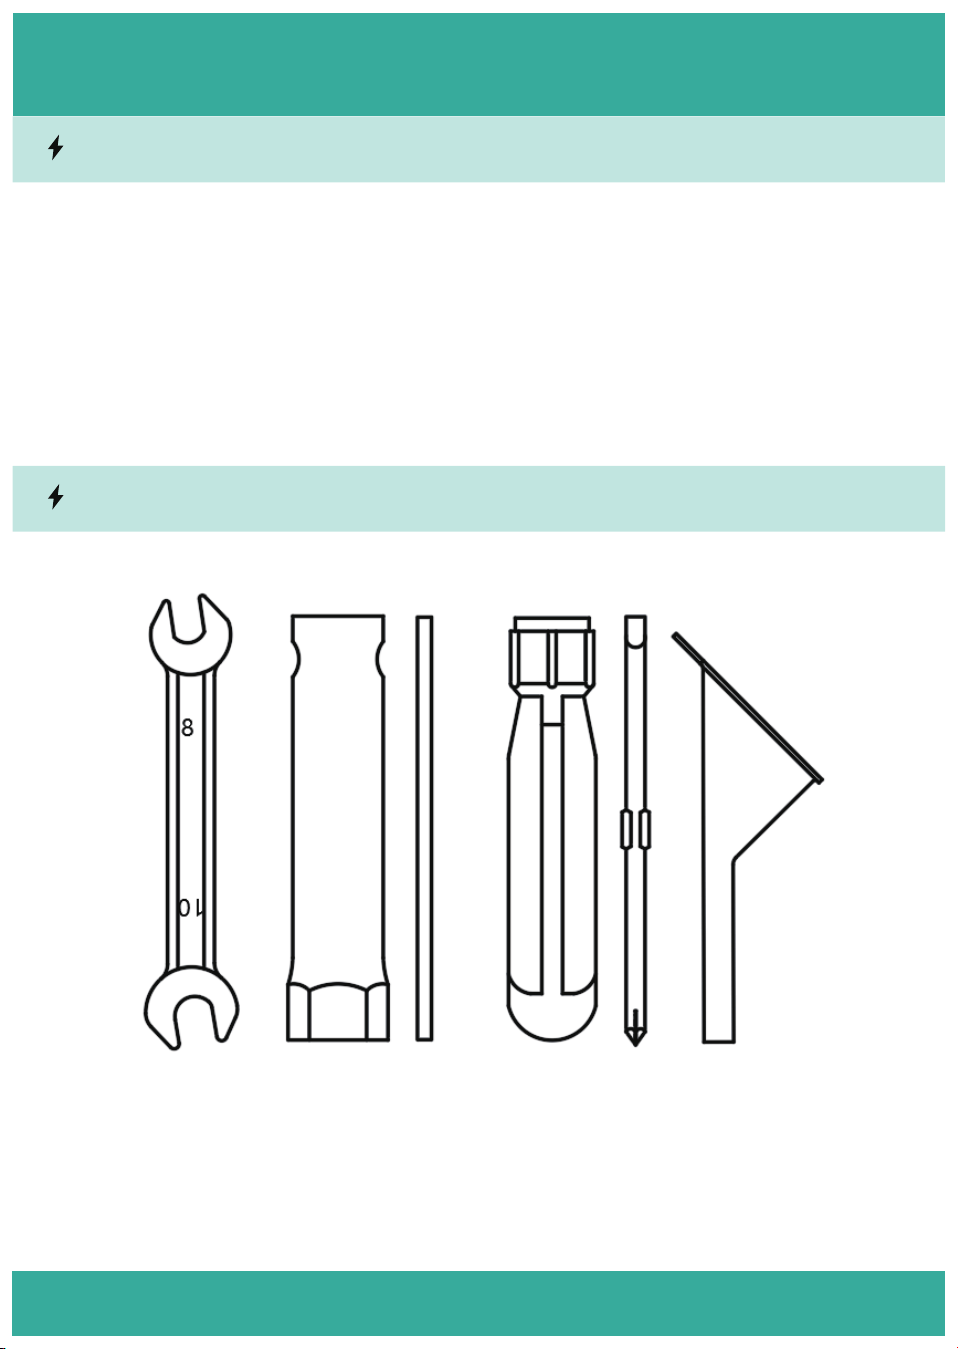
4.2. Accessories
1. 1*Spark Plug Wrench
2. 1*8/10mm Wrench
3. 1*Reversible Phillips/Flathead Screwdriver
4. 1*Funnel
5. 1*Manual
6. 1*Warranty
13
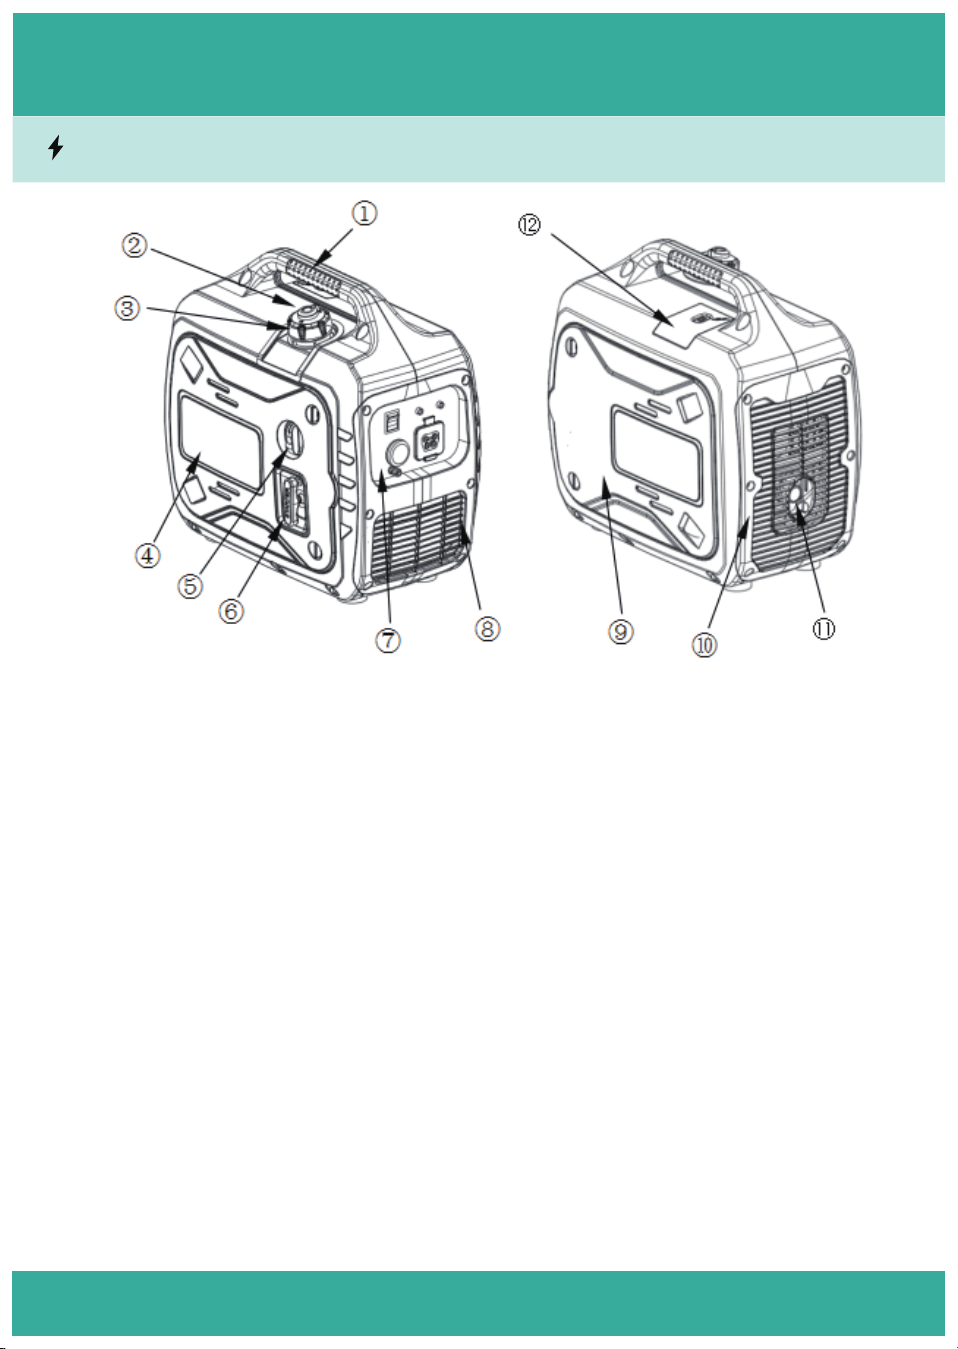
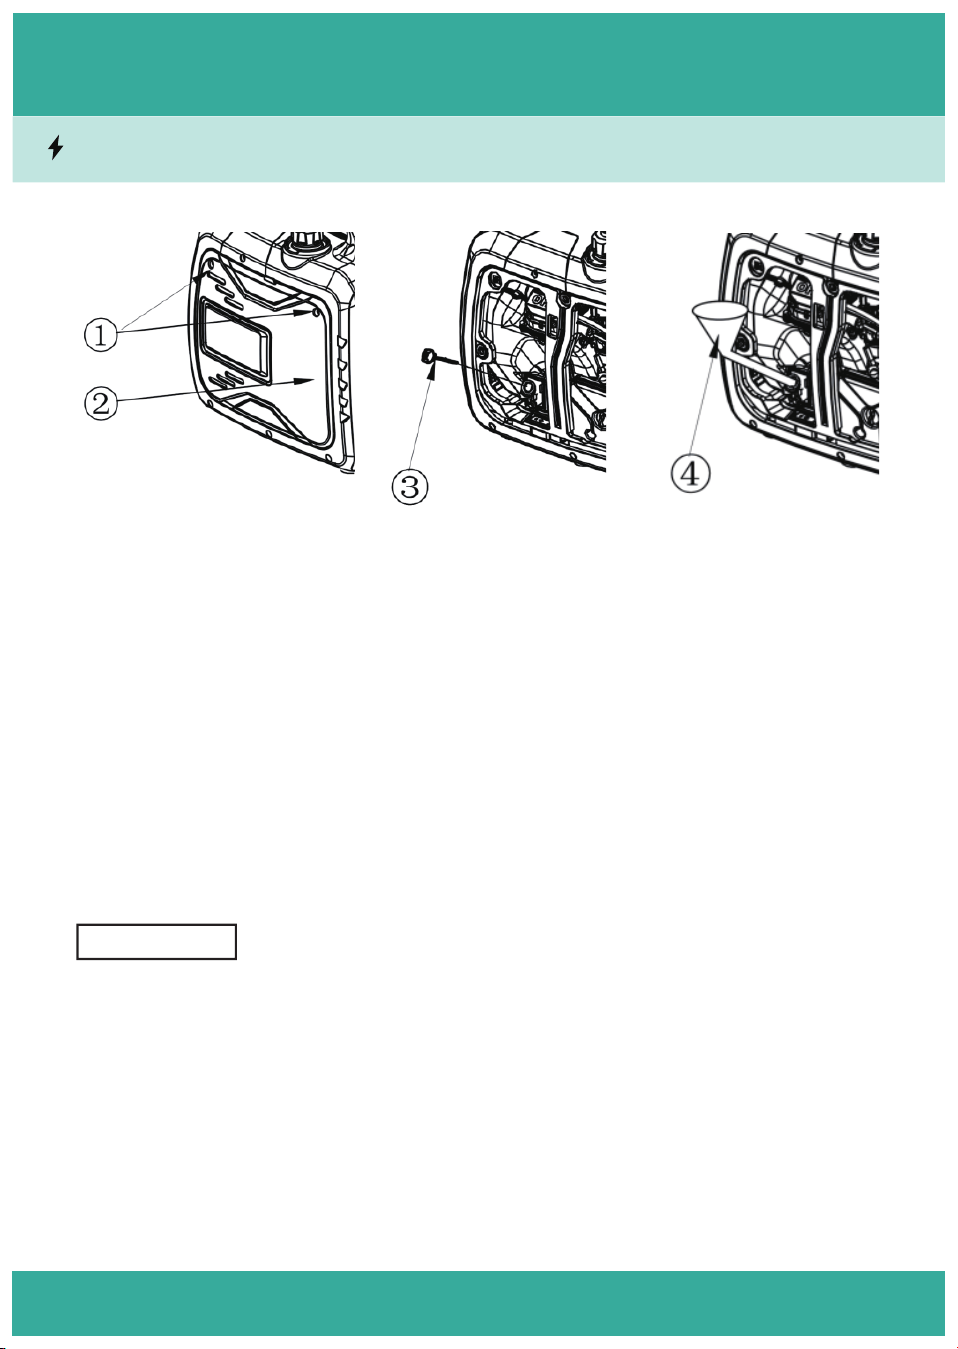
Ⅳ. COMPONENTS
1.Carrying Handle: Carries the generator during transportation.
2.Fuel Tank Cap Vent Knob: Uses to balance the air pressure of fuel tank and outside.
3.Fuel tank cap: Open it and add gasoline here, close it tightly after add enough.
4.Left Side Cover: Protects the spare parts inside and contains the recoil handle. Open
left and this right side cover to access to fuel filter.
5.Fuel Switch: Use to control the fuel circuit.
6.Recoil Handle: Pull the recoil handle to start the generator.
7.Control Panel: Contains sockets and operational electronic parts.
8.Panel Rear Cover: Uses to protect the electronic parts.
9.Right Side Cover(Oil): Protects the spare parts inside. Open this left side cover to
access to oil, air filter, carburetor and battery.
10.Muffler Outer Cover: Protects the muffler and other parts inside.
11.Muffler Mesh: The exhausted gas comes out from here
12.Spark plug maintenance cover: Open it for easy spark plug check and maintenance.
4.3. General Components
14
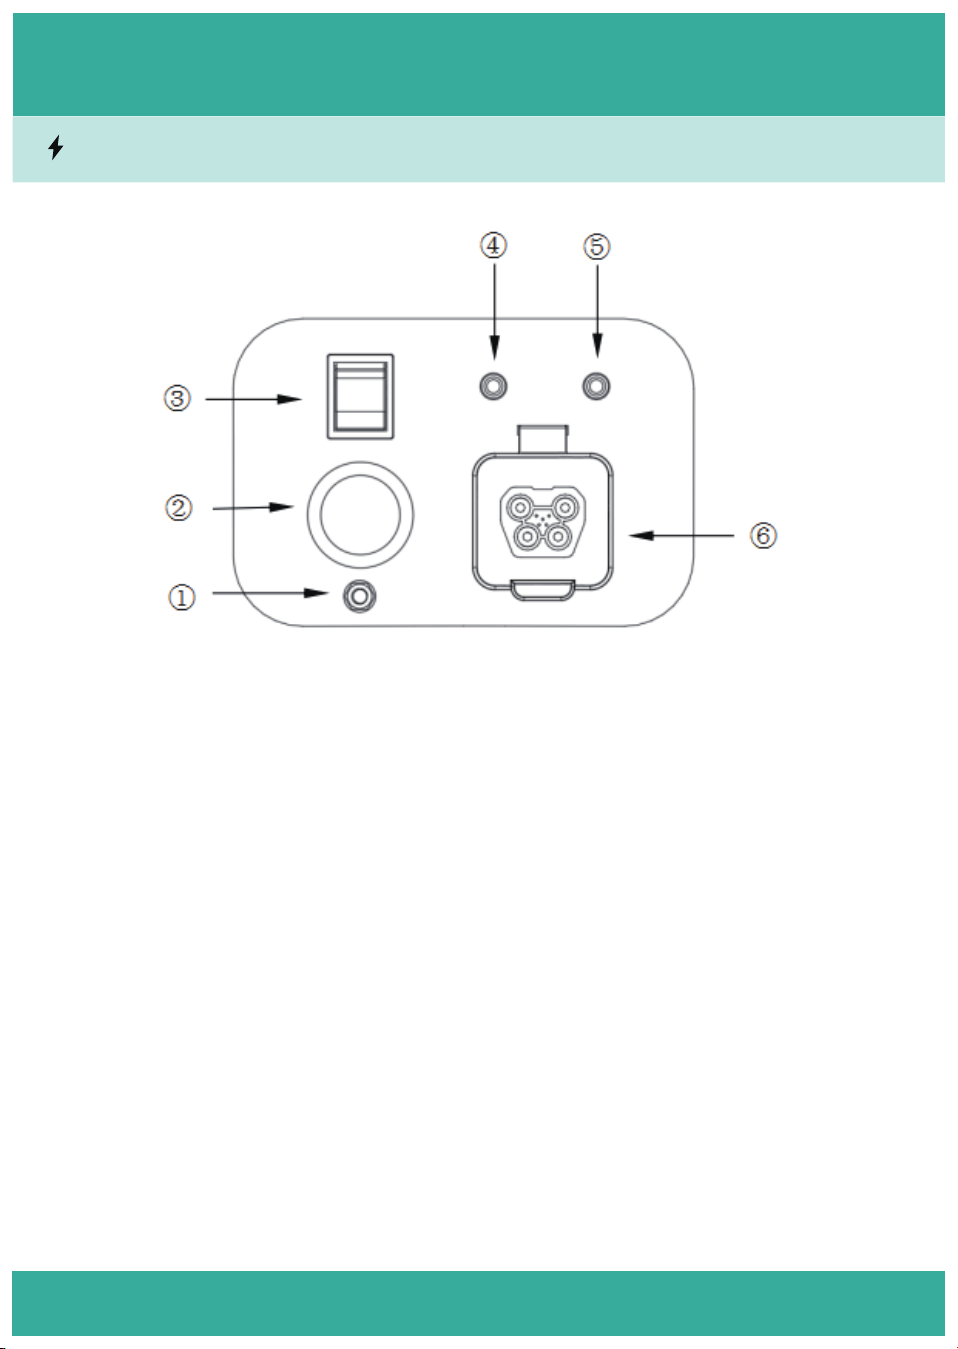
Ⅳ. COMPONENTS
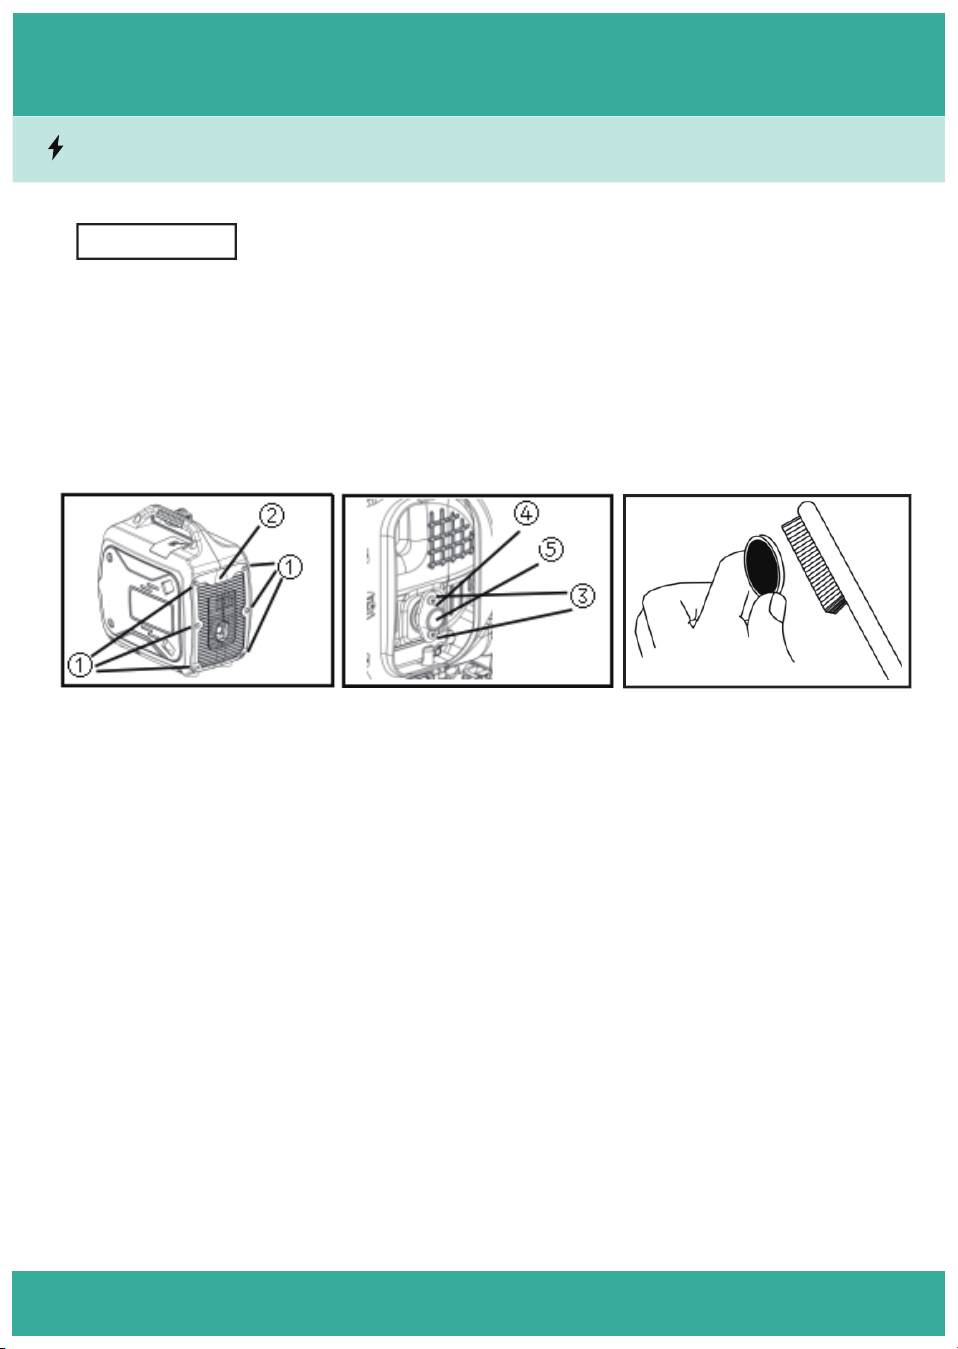
1.Grounding Terminal: Grounds the generator to earth for safety.
2.Emergency Button: Shuts down the generator when emergency issue happens
3.Engine Switch: Controls the start, running and shut down of generator.
4.Oil Alarm Indicator (Yellow): Will flash when need to add oil.
5.Running Indicator (Green): Will flash when the generator starts and runs regularly.
6.DC socket: DC current output
Note:
a.The actual control panel features are subject to the products.
4.4.1. Engine Switch
15
Ⅳ. COMPONENTS
The panel grounding terminal is connected to the ground with a grounding wire to
prevent the risk of electric shock caused by leakage. When using a generator, the
generator must be grounded.
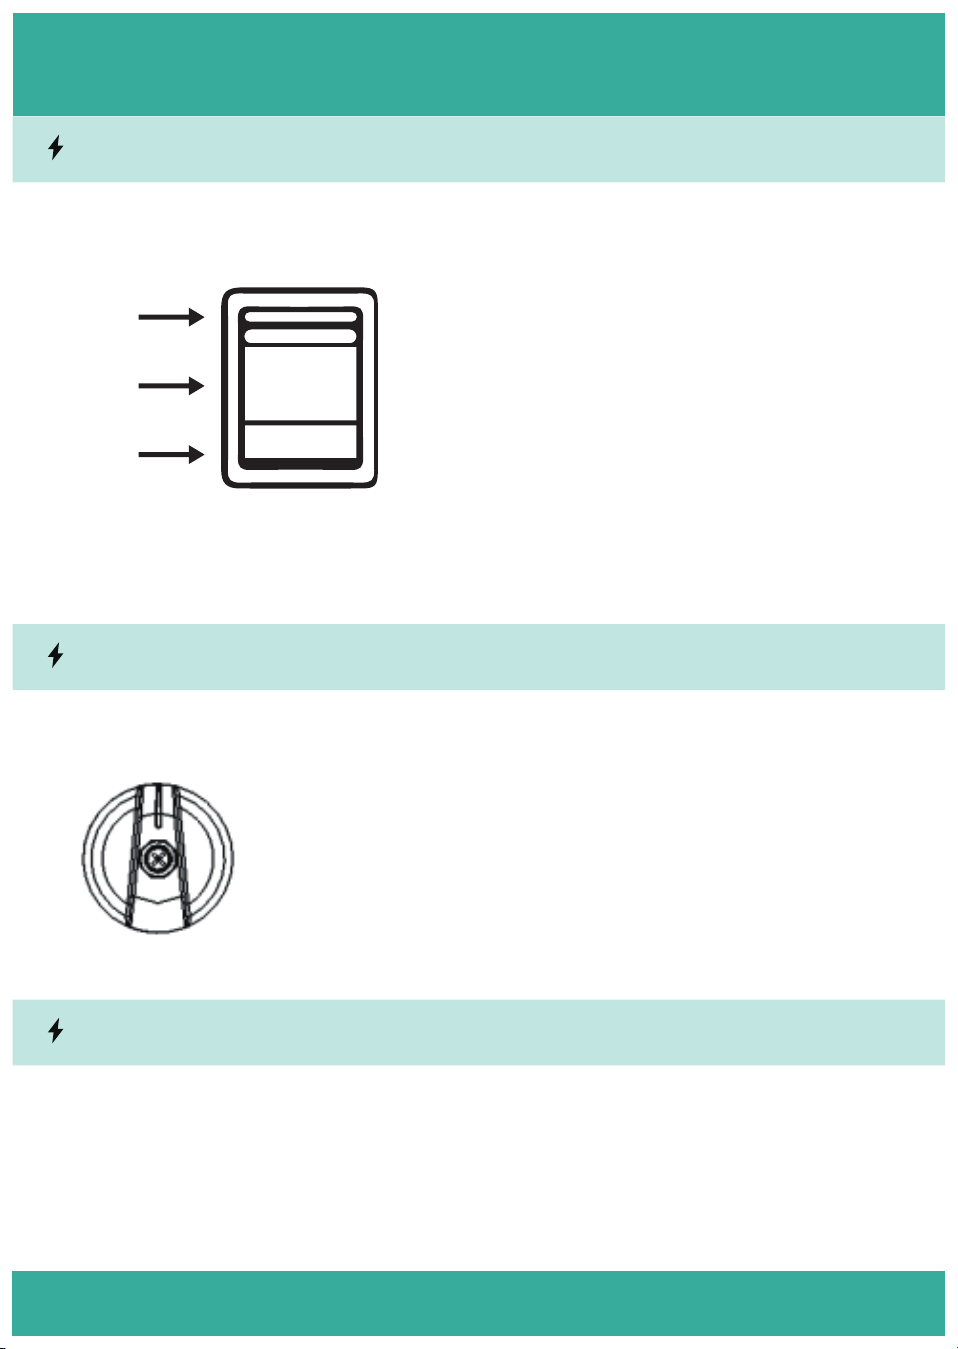
1.Switch set to "OFF"
The ignition system is disconnected and the genera-
tor cannot start or run;
2.Switch set to "RUN"
The generator ignition system is connected and the
generator can start and run normally;
3.Switch set to "ON"
The generator starts and the ignition system starts
the ignition (the battery needs to be connected).
1.The knob set to "OFF"
The fuel switch knob is in a fully closed state, and the
generator will not. be able to run at this time;
2.The knob set to "ON"
The fuel switch knob is fully open and the generator can
run normally.
4.4.1. Engine Switch
4.4.2. Fuel Switch Knob
4.4.3. Grounding Terminal:
ON
RUN
OFF
OFF
ON
16
Ⅳ. COMPONENTS
When the generator needs to stop urgently, press the emergency stop button to quickly
disconnect the ignition power supply and stop the generator. After the generator
returns to normal, turn the emergency stop button to the right until the button
rebounds. After canceling the emergency stop, the generator can be started normally.
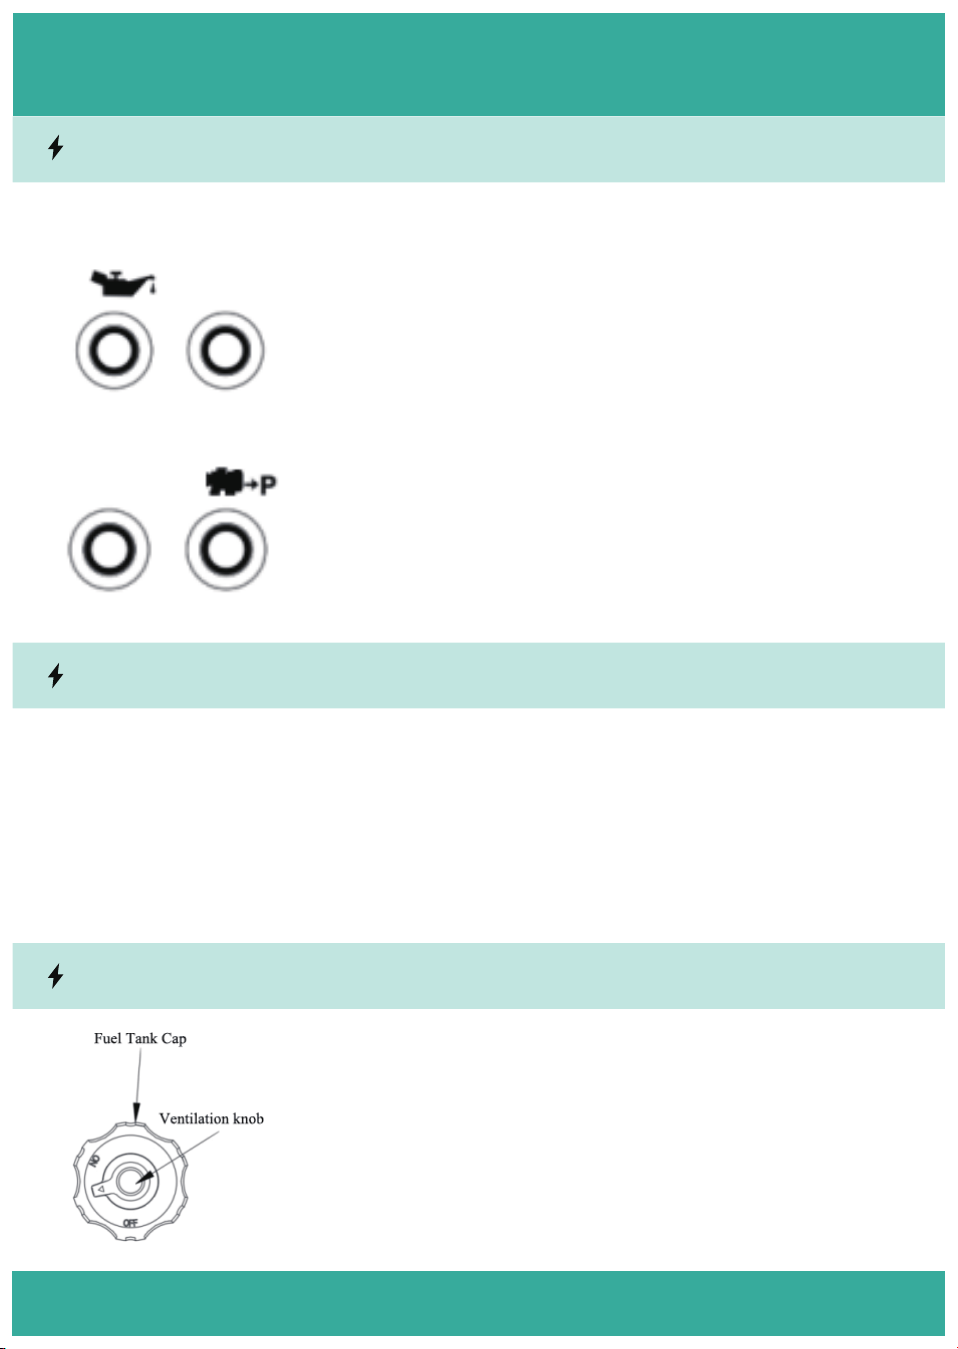
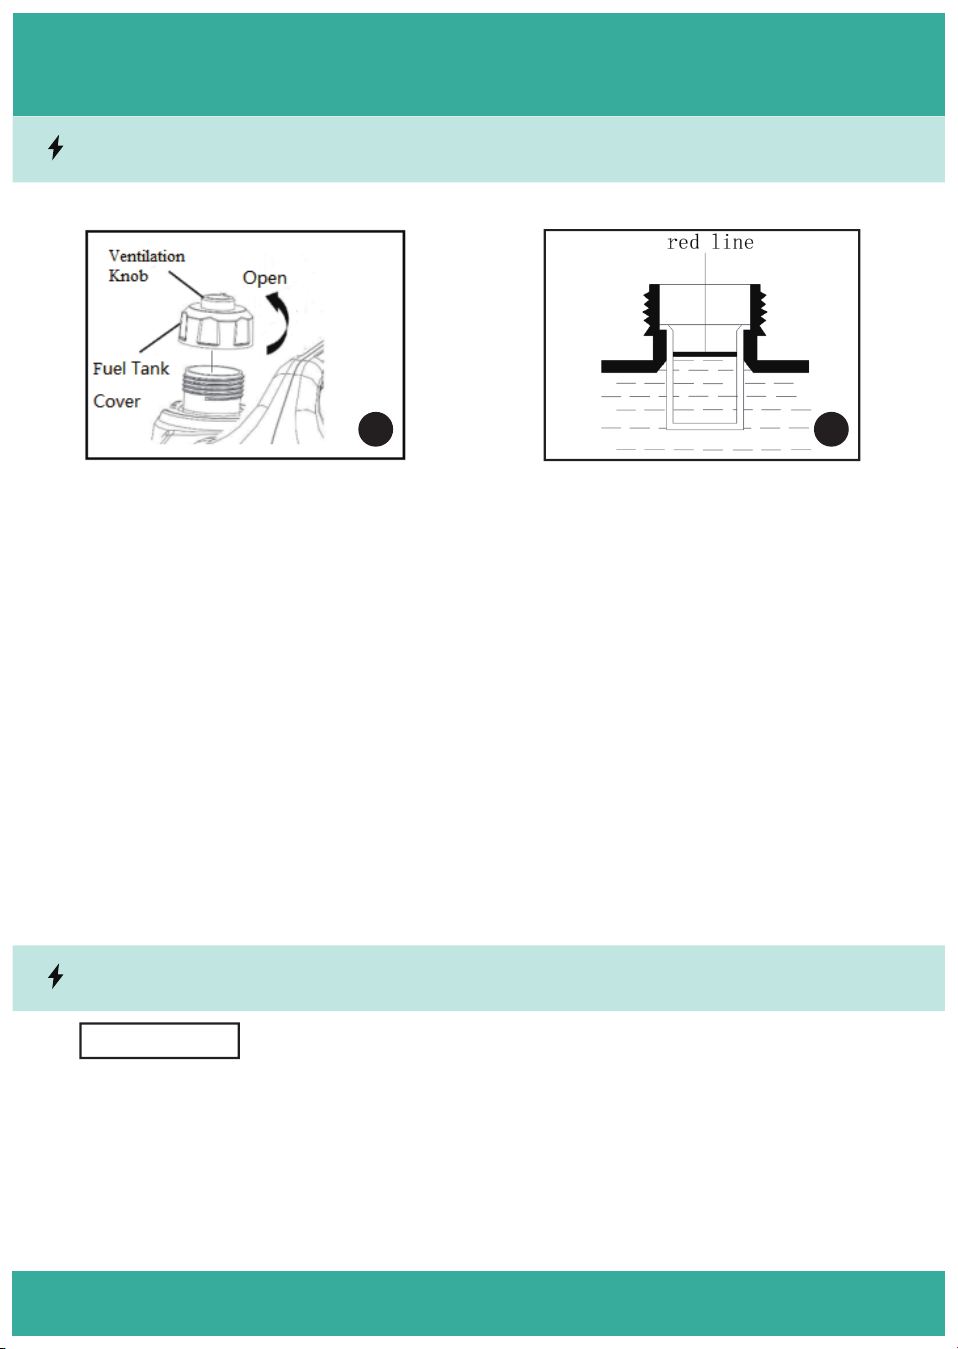
There is a ventilation knob on the fuel tank cover. When using
the generator, put the ventilation knob in the "ON" position.
When not using the generator, put the ventilation knob in the
"OFF" position. This will prevent the fuel tank from being
connected to the outside world and prevent Fuel leakage.
Oil Alarm Indicator (Yellow Light)
When the oil in the crankcase is not enough, the oil protec-
tion system will automatically shut down the engine, and
the oil alarm indicator (yellow light) will flash; The engine
can be restarted only when the oil is filled to the oil level.
Running Indicator (Green Light)
When the generator starts and outputs regular-
ly, the running indicator light will be on.
4.4.4. Indicator
4.4.5. Emergency Button
4.4.6. Fuel Tank Cap Vent Knob
17
Ⅴ. ASSEMBLY
NOTICE
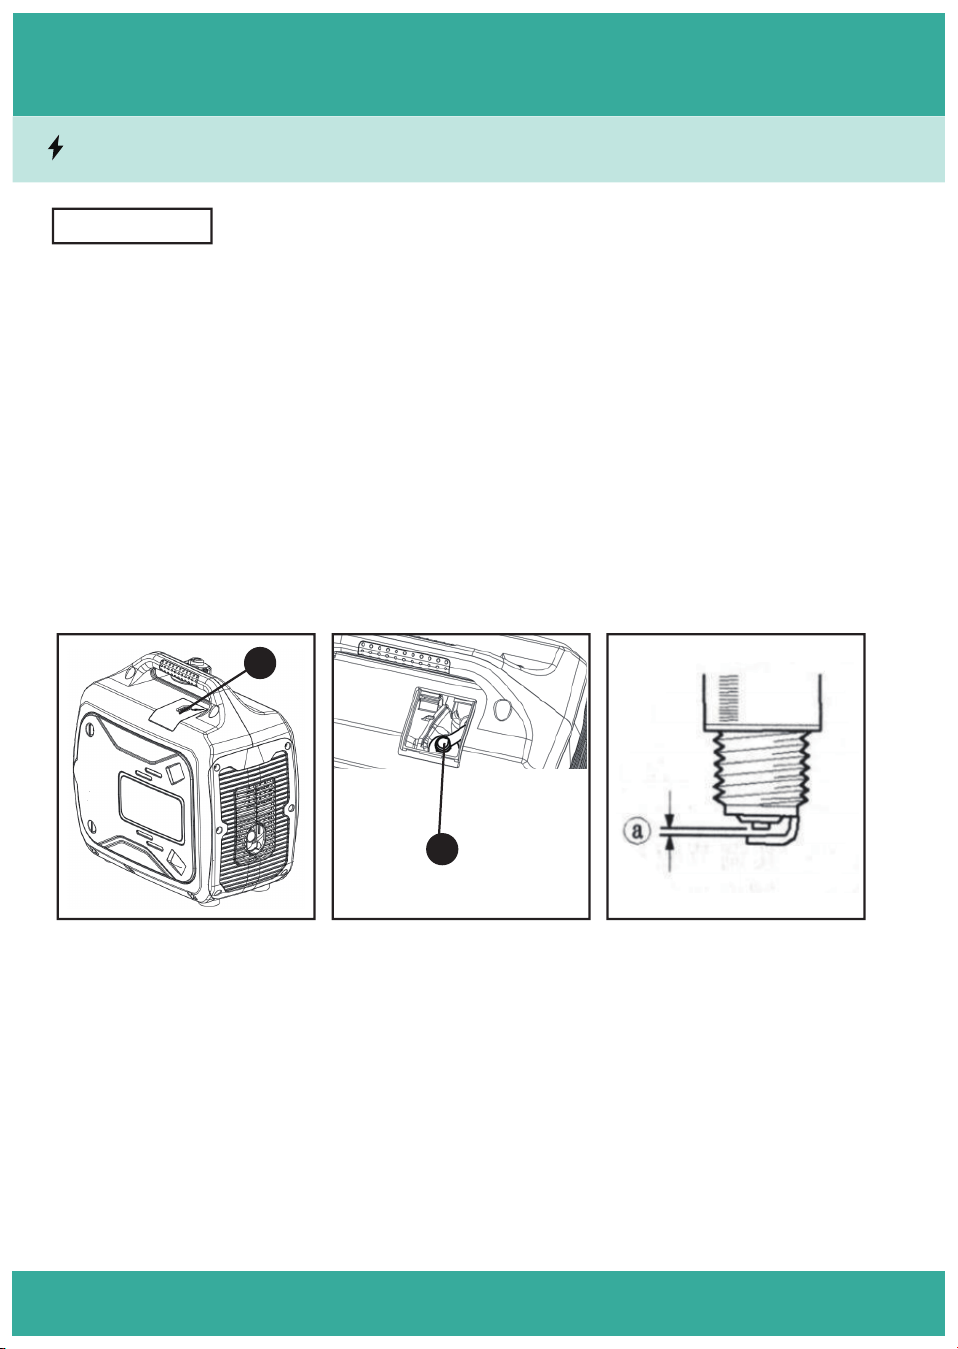
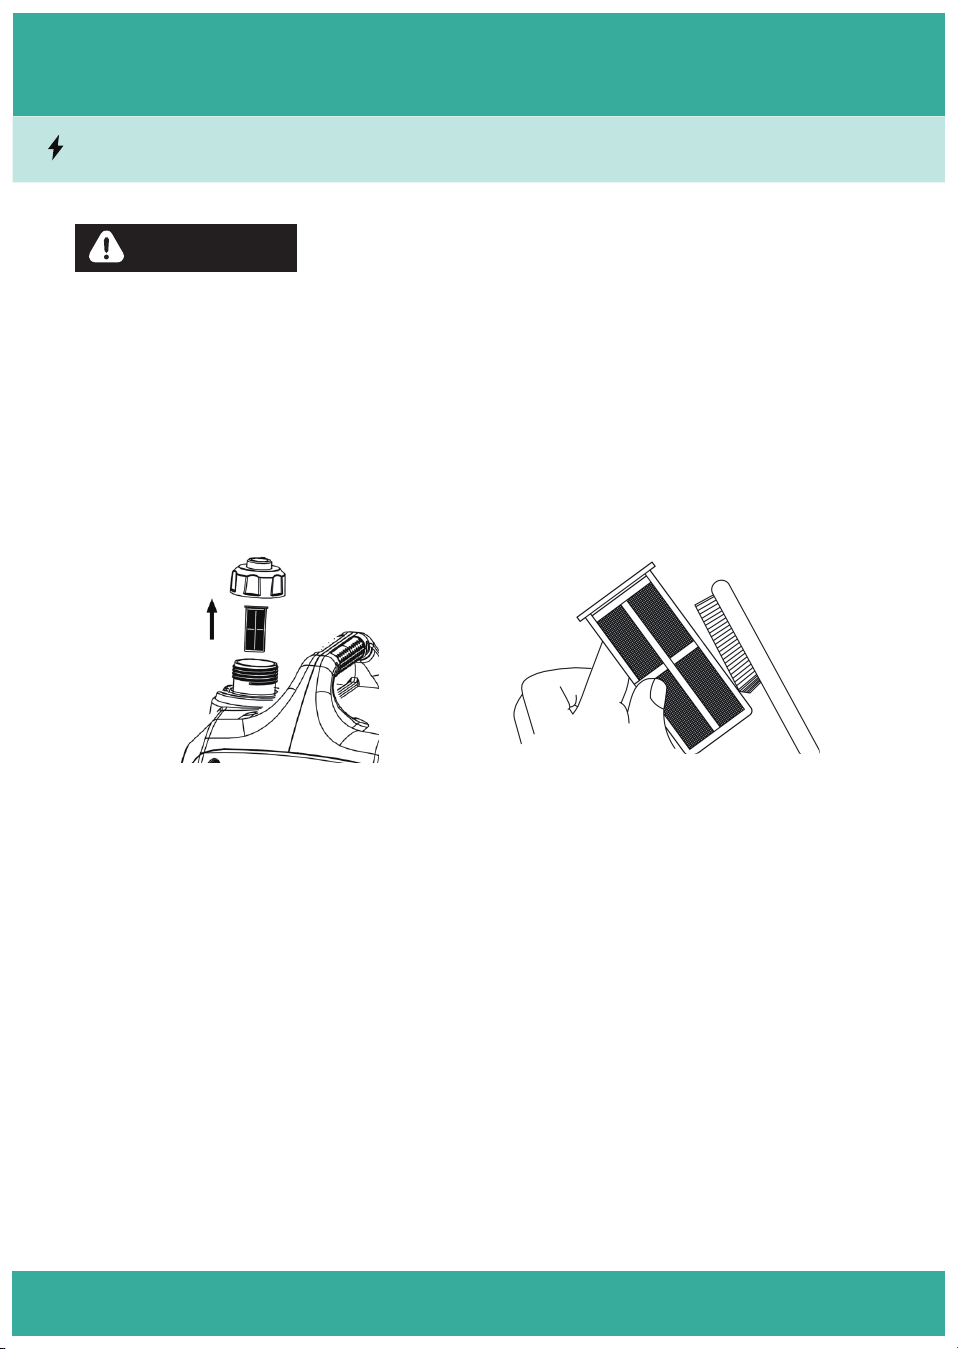
5.1.1 Oil Fill
1.Place the generator on a dry and flat surface.
2.Loosen the cover knob ①, remove the right cover ②.
3.Remove the oil dipstick ③.
4.Use the supplied funnel④ and recommended oil, add oil into the engine
crankcase. Please pay attention to the engine oil level check with oil dipstick.
5.Reinstall the oil dipstick and tighten
6.Wipe away residual engine oil with a clean cloth to prevent dirt or dust from
falling into the oil.
7.Reinstall the side cover and tighten the screws.
1.The generator is shipped from factory without oil, do not start the generator
until sufficient oil has been added, or it will severely damage the engine and the
oil alarm system will shut down the engine.
2.When adding oil, make sure the generator is on a flat surface and in a
well-ventilated area, do not tilt the generator to prevent damage.

18
Ⅴ. ASSEMBLY
DANGER
5.1.1 Oil Fill
5.1.2. Low Oil Shut Down
5.2 Fuel Fill
3.Do not tip the generator after adding oil to prevent oil from pouring back and
damaging the generator.
4.When using the engine oil beyond the recommended operating temperature
range, select an engine oil of appropriate viscosity.
5.Do not use two-stroke engine oil or any other cleanser-free oil, or it will cause
engine damage.
Recommended oil:
SAE 10W-40.
Recommended oil grade: Grade API, Standard, SE type or higher level.
Recommended initial oil filling volume: 0.35L
Low oil shut down is designed for preventing engine damage from lack of oil.
Before the oil level decrease to the safety line of crankcase, the low oil shut down
system will automatically shut down the generator (but the engine switch is still in
“ON” position).
After the system shut down the generator, restart the generator. If the oil alarm
indicator (yellow light) flashes, the engine will stop. In this case, add enough oil
immediately.
1.The gasoline is extremely flammable and combustible, do not add gasoline near
fire or combustible or explosive materials.

19
Ⅴ. ASSEMBLY
5.2 Fuel Fill
2.Never use a gasoline container, gasoline tank, or any other fuel item that is
broken, cut, torn or damaged.
3.Do not mix oil and gasoline, or mix any other unapproved gasoline.
4.Do not overfill the fuel tank, or may cause fire or explosion.
5.Do not add gasoline when the generator is running, or may cause fire or explo-
sion.
6.When adding gasoline, make sure the generator is on a flat surface and in a
well-ventilated area, do not tilt the generator to prevent damage.
7.Tighten the fuel tank cap after fueling.
1.After fueling, use a clean and soft cloth to dry the residual gasoline in time to
avoid damage to the plastic cover.
2.The unleaded gasoline must be used. The leaded gasoline, ethanol gasoline and
methyl gasoline will seriously damage the internal parts of generator.
3.Never use dirty gasoline or allow dirt or water to enter the fuel tank
Recommended gasoline: clean, fresh and unleaded gasoline 92# or above.
Fuel Tank Capacity: 4L
NOTICE
20
Ⅴ. ASSEMBLY
5.2.1. Gasoline Filling Steps:
5.3 Battery
1.Remove the fuel tank cap.
2. Add gasoline to the red mark position.
3. After refueling, tighten the fuel tank cap.
4. Use a clean, soft cloth to wipe away the remaining gasoline to avoid damaging
the plastic casing.
Notes:
1. Unleaded gasoline must be used, otherwise the engine may be damaged.
2. Do not use gasoline containing ethanol or methanol, otherwise the engine may
be damaged.
3. Never use dirty gasoline, or allow dirt or water to enter the fuel tank.
1.This generator is specially used for WEIPENG lithium power, need to cooperate
with this lithium power.
2.Before connecting to the generator, make sure the battery is off; make sure the
equipment, including leads and plugs, are in good condition.
NOTICE
1 2
21
Ⅴ. ASSEMBLY
5.3.1. Connect battery
5.4 Check Before Use
Notes:
1.Please unplug if the battery is not used for a long time. Connecting the generator
will consume a small amount of battery power.
2.Lithium batteries are prone to danger when exposed to high temperatures and
impact. Please keep the battery away from fire sources.
Pay attention to the status of the generator. Even if the generator is not in use, its
important components may be abnormal. Please check and maintain it carefully
when using the generator for the first time or after long-term storage. If there are
any abnormalities, deal with them before use.
Note: Before each use of the generator, the following checks should be carried
out:
● Fuel ● Oil ● Fuel pipe (fuel system)
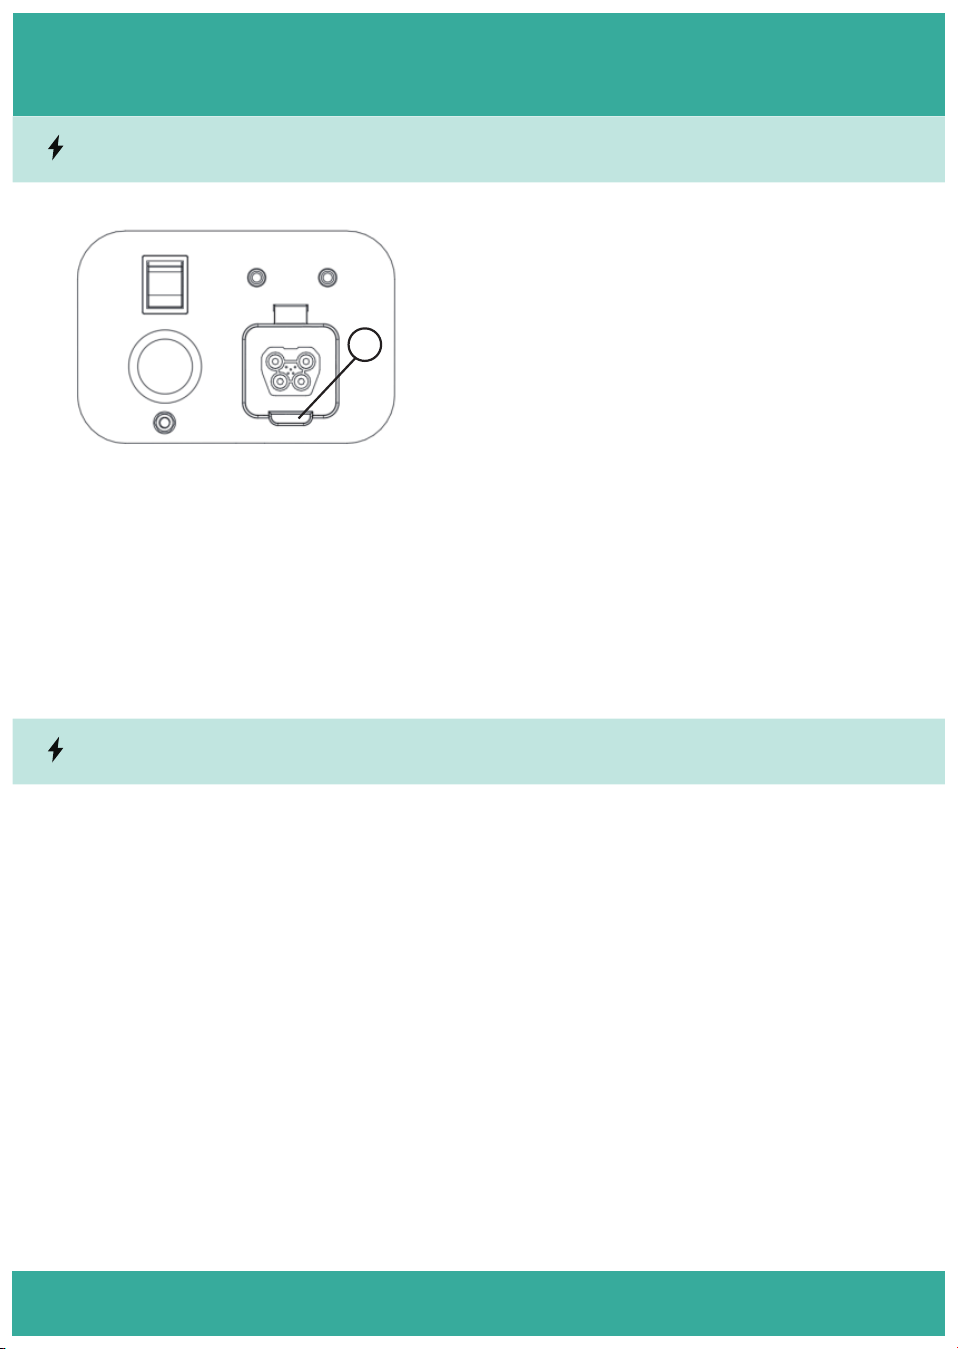
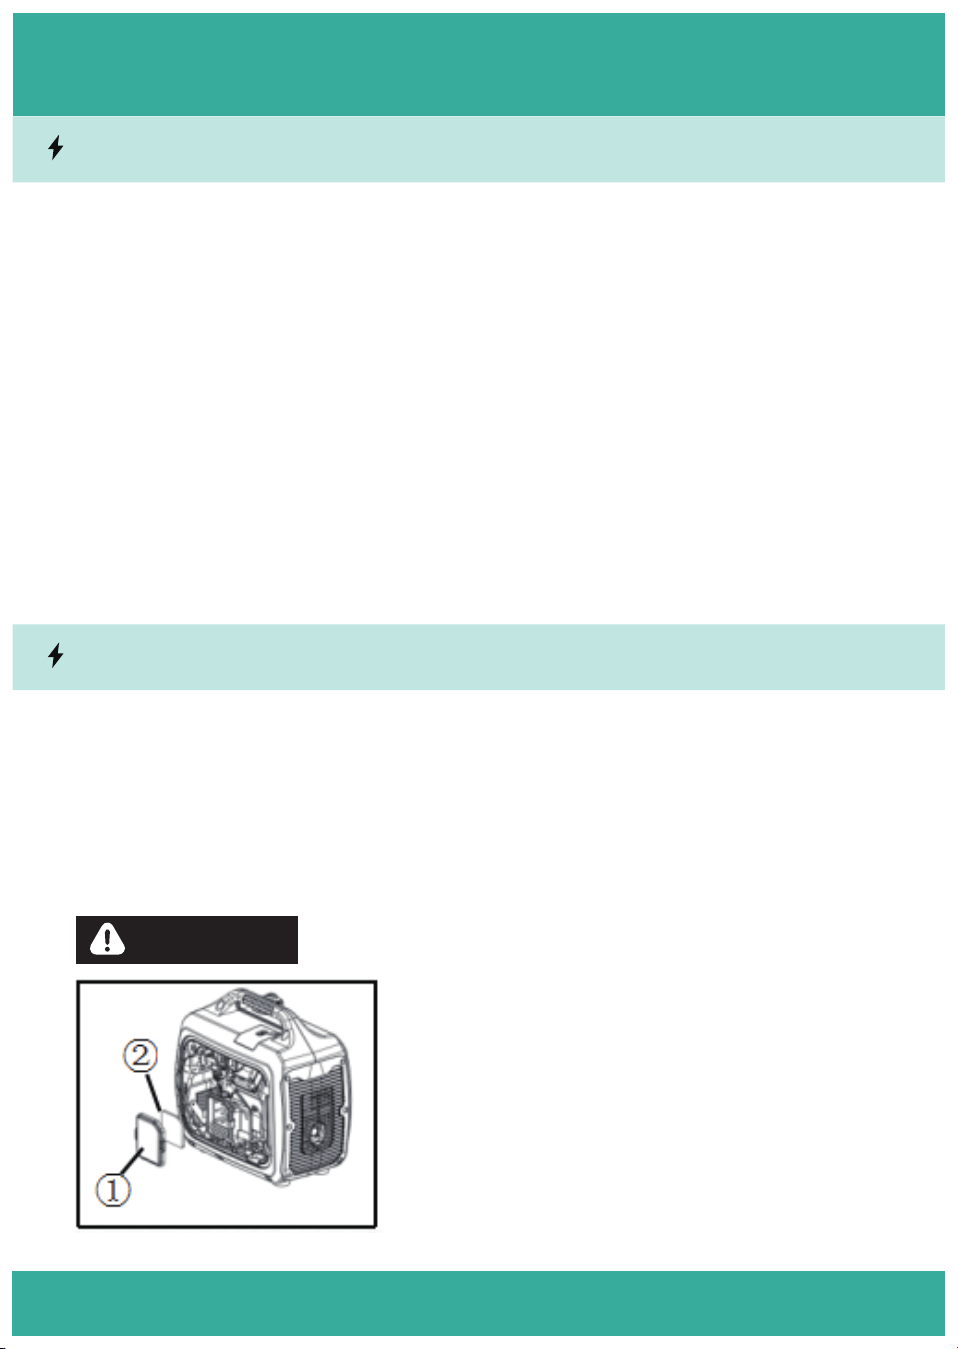
1. Open the dust cover of the DC socket ①.
2. Plug the panel socket and the other end
connect the lithium power.
1

22
Ⅵ. OPERATION
WARNING
1. Do not use the generator in a confined space. The accumulation of exhaust gas
can cause loss of consciousness or even death. Please use it in a well-ventilated area;
2. Do not connect any electrical equipment before starting the generator;
3. The generator can work at rated output power in the rated environment. When it
deviates from the rated environment, the starting and output performance may be
slightly reduced;
Rated operating environment: ambient temperature 77℉, atmospheric pressure
100kPa, relative humidity 30%
4. The operating environment of the generator should not exceed the operating
range, otherwise the performance of the generator may decline with the environ-
mental conditions, and may even fail to start;
Generator usage range: ambient temperature 23℉~104℉, altitude ≤1000M, relative
humidity ≤95%
5. When the generator is used in a small space, the cooling of the generator is
affected and part of the load needs to be reduced;
6. Please keep the generator at least 1 meter away from other equipment or
obstructions to prevent danger or affect performance;
7. When the generator is in use, in case of emergency, press the emergency stop
button to stop the generator immediately.
Notes:
Please read the "Safety Instructions" carefully before using the generator to help you
avoid accidents.

23
Ⅵ. OPERATION
1.Make sure the generator is on a flat surface and in a well-ventilated area.
2.Check the oil level.
3.Check the gasoline level.
4.Check the grounding
5.Check the battery wires connection.
6.1. Checking Before Starting The Generator
Notes:
1. When pulling the starting handle, hold the handle tightly to prevent the generator
from falling;
2. When the generator does not start automatically, the generator will automatically
stop if there is no output within 30 seconds after starting;
3. The generator runs stably in the "Run" position, and the running indicator light
flashes slowly and evenly.
6.2. Starting The Generator
24
Ⅵ. OPERATION
6.2. Starting The Generator
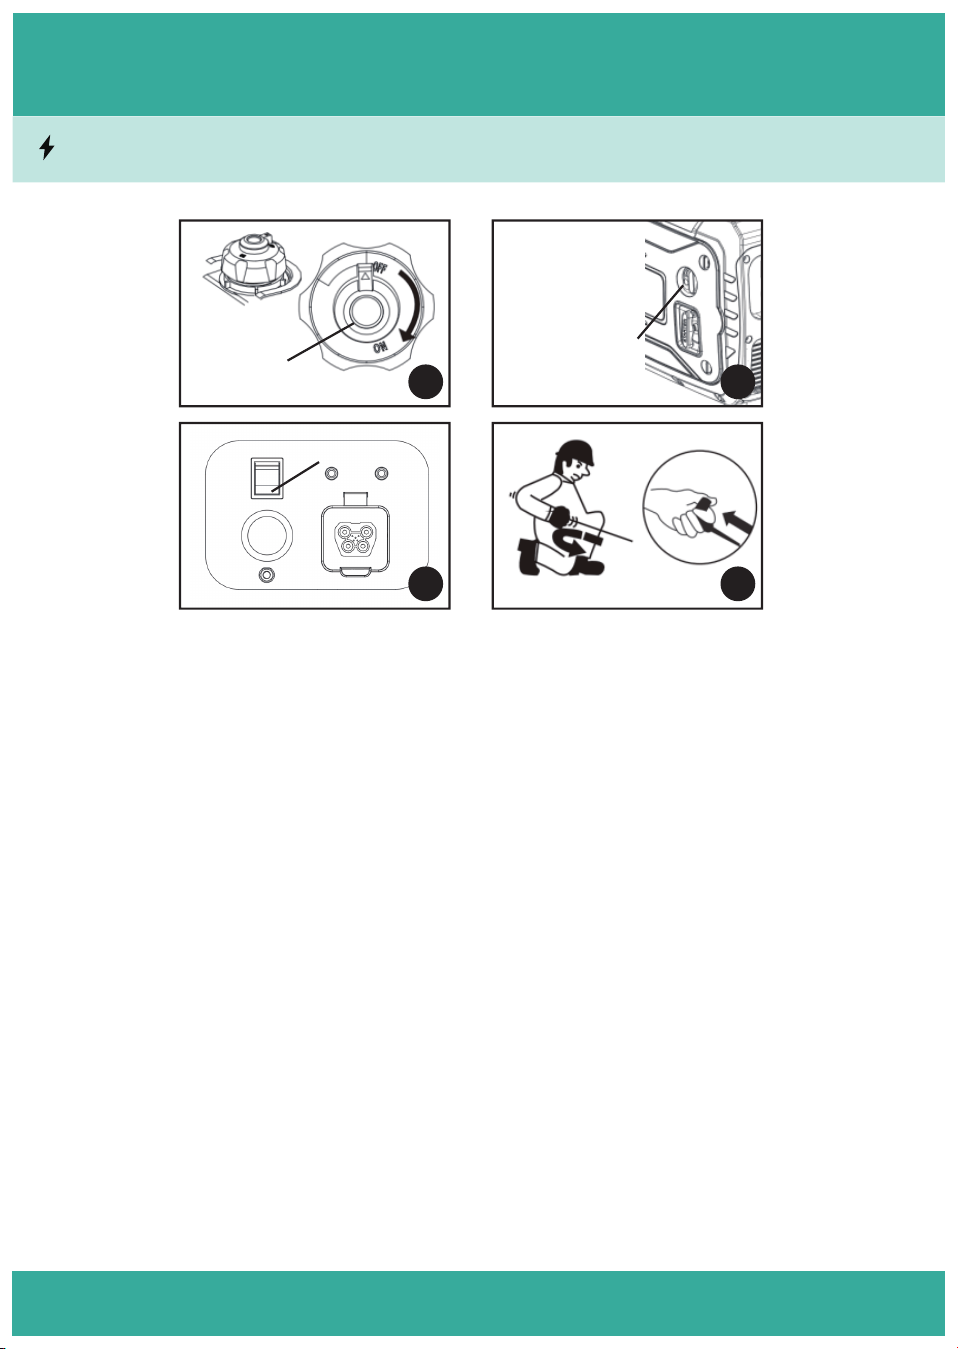
1.Turn the fuel tank cap ventilation knob to "ON".
2.Turn the fuel cock knob to the "ON" position.
Note: When starting a new machine or refilling it with fuel after using up the fuel,
need to wait a few seconds.
3. a. Press the start switch to "Run" to start the battery. When the battery power is
lower than 20%, the generator will automatically start charging.
b. Press the start switch to "Start" for a few seconds until the generator starts and
then release it (the switch automatically returns to "Run").
c. Press the start switch to "Run" and pull the recoil handle to start the generator.
6.2. Starting The Generator
fuel cock knob
start switch
fuel tank cap
ventilation knob
1
3
2
4

25
Ⅵ. OPERATION
6.3. Shutting Down The Generator
1. If the generator has not stopped automatically, follow these steps if it needs to be
stopped;
2. If the battery needs to be charged multiple times within a period of time, the
generator will automatically stop when the battery charge reaches 90%, and no
operation is required. When the connected battery power is lower than 20%, the
generator will automatically start to continue charging;
3. During the use of the generator, in case of emergency, you can directly press the
emergency stop button to stop the generator;
4. Please read the "Safety Information" carefully before using the generator to help
you avoid accidents;
5. If you plan to transfer or store the generator for a long time, please complete the
protection measures according to the "Storage/Transportation" requirements.
When the battery charge reaches 90%, the generator will automatically shut down,
then please follow the steps below:
a. Press the start switch to "OFF";
b. Turn the fuel switch knob to "OFF";
c. Unplug the battery;
d. After the generator has completely cooled down, turn the fuel tank cap ventila-
tion knob to "OFF";
e. Put away the generator.
DANGER

26
Ⅶ. MAINTENANCE
WARNING
No.
2
3
4
5
6
7
Oil
Items
Fuel
Fuel Pipe
Fuel Tank
& Strainer
Fuel Filter
Spark plug
Air filter
Check
Before Use
Check
Check
-
Check
-
Change
First 25 Hours
or First
Month
-
-
-
-
-
-
Change
Every 50
Hours or 6
Months
-
-
-
-
-
-
Clean
Change
Every 100
Hours or 6
Months
-
-
Clean
Check and
Clean
Clean and
Adjust
-
Change
Change
Change
Every 300
Hours or 12
Months
-
-
Clean
Check
7.1. Maintenance Chart
The user should run the generator safely. Periodic inspection, adjustment and
lubrication can ensure the generator to work more safely and efficiently. The
following items are important inspection for generators.
1.If you are not familiar with maintenance operations, please leave it to the
after-sales team for your service.
2.Please turn off the generator and cool it down before performing maintenance.
Some items may cause burns.
3.Only designated genuine parts can be used for replacement. Please contact the
after-sales team for specific precautions.

27
Ⅶ. MAINTENANCE
Notes:
a.The air filter should be cleaned more frequently when it is used in damp or dusty
places or even change.
b.When in high-load or high-temperature situation, more frequent maintenance
should be performed.
c.No. 9 to No. 13 maintenance should be performed by after-sales service or genera-
tor maintenance store.
8
No.
9
10
11
12
13
Spark
Arrester
Items
Idle Speed
Crankcase
Breather Pipe
Cylinder
Head
Valve
Clearance
Fittings/Re-
tainers
-
Before Use
-
-
-
-
-
-
First 25 Hours
or First
Month
-
-
-
-
-
-
Every 50
Hours or 6
Months
-
-
-
-
-
Check and
Clean
Every 100
Hours or 6
Months
-
-
-
-
-
-
Every 300
Hours or 12
Months
Check and
Adjust
Check and
Change
Clean
Check and
Adjust
Check and
Adjust
7.1. Maintenance Chart

28
Ⅶ. MAINTENANCE
7.2. Fuel Check
This generator uses gasoline fuel. Under certain circumstances, gasoline is extremely
flammable and explosive. In order to use this generator more safely, please check
the fuel according to the following steps before each use:
1. Open the fuel tank cap and take out the fuel tank filter;
2. Check the fuel condition in the fuel tank. This model is recommended to use 92#
gasoline with a rated volume of 4L. Check whether the fuel type is correct, whether
the fuel remaining in the tank meets the usage requirements, and the fuel level
does not exceed the rated oil level (red mark position);
3. Observe whether there is oil leakage in the fuel tank, and check whether there is
fuel at the bottom of the generator and the surrounding ground to avoid fuel
leakage;
4. Never use gasoline in places with high temperatures, smoke or flames.
NOTICE
29
Ⅶ. MAINTENANCE
7.3. Oil Level Check and Oil Changing
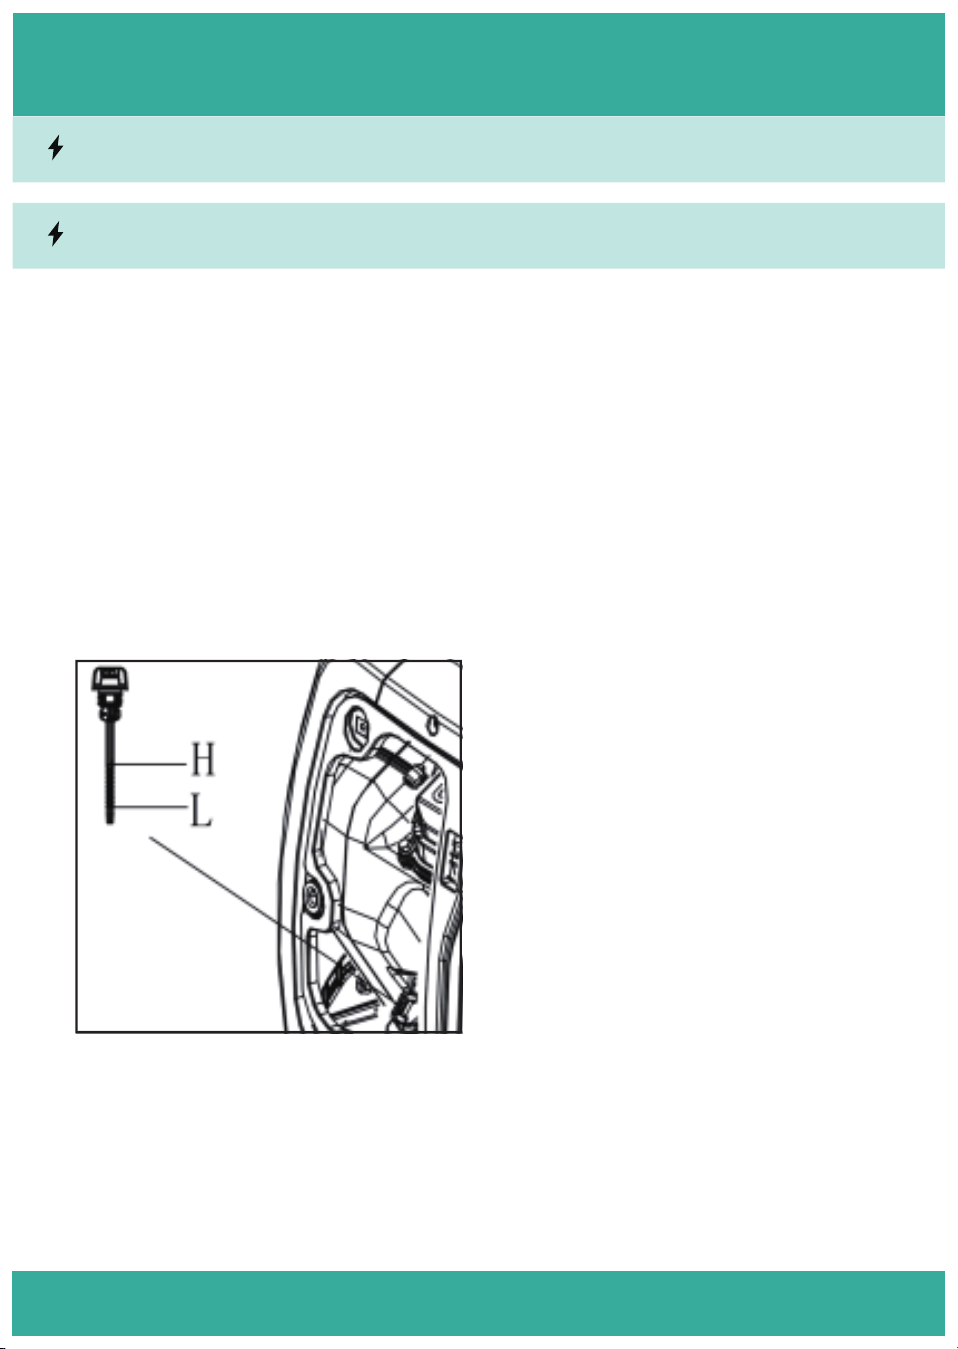
7.3.1. Oil Level Checking Steps:
1.Place the generator on a dry and flat surface.
2.Loosen the screws of left side cover, remove the cover.
3.Remove the oil dipstick.
4.Clean the oil dipstick with cloth.
5.Insert the oil dipstick in the crankcase and then remove out.
6.Check the oil level, if it is between “L” and “H”, it is in a normal range. If below “L”,
the oil is not enough, need to add oil. If beyond “H”, the oil is too much, need to
drain some oil.
7.Reinstall the oil dipstick and tighten.
8.Reinstall the side cover and tighten the screws.
30
Ⅶ. MAINTENANCE
7.3.2. Oil Changing Steps:
With dirty oil, it does not cool the generator properly and can lead to severe engine
damage. Therefore, regular oil changing is necessary.
1.Do not drain the oil immediately after shutting down the generator. The
temperature of the oil is very high, it can cause burning.
2.Don’t allow deposits to enter the generator crankcase.
3.Used engine oil should be stored in special containers and handed over to a
professional processing center for recycling.
Recommended oil: SAE 10W-40.
Recommended oil grade: Grade API, Standard, SE type or higher level.
Recommended initial oil filling volume: 0.35L
In order to achieve better operating results and longer service life of the generator,
please change the oil once a month or after 20 hours of operation, and then every 6
months or 100 hours. The steps to change engine oil are as follows:
1.After the generator has fully cooled down, place the generator on a horizontal
surface;
WARNING
1
1
Maximum oil level
Minimum oil level
31
Ⅶ. MAINTENANCE
7.3.2. Oil Changing Steps:
7.4. Air Filter Maintenance
2.Turn the fuel cock to "OFF" and the ventilation knob to "OFF".
3.Loosen the cover knob and remove the right cover.
4.Remove the oil dipstick.
5.Place the oil basin under the generator ②, tilt the generator, and pour out the oil
quickly;
6.Place the generator back on a horizontal surface and use the funnel to refill the
rated engine oil (0.35L);
7.Wipe the oil dipstick clean, and then tighten the oil dipstick;
8.Wipe off the spilled engine oil, replace the right cover, and tighten the cover knob.
The dirt air filter will obstruct the air into the carburetor, to prevent carburetor
failure, maintain the air filter every 6 months or 100 hours..
If the generator is often used in dusty area or severe environment, need to increase
the maintenance frequency.
Do not use gasoline or any low ignition point solvent
to clean the air filter element, they are flammable
and explosive.
The cleaning steps are as follows:
1.Loosen the cover knob and remove the right cover.
2.Remove the air filter cover ① and foam filter
element ②.
WARNING
32
Ⅶ. MAINTENANCE
1.Spark plug is an important spare part of generator and must be checked regularly.
2.The spark plug should be free of carbon deposits and keep proper clearance, or it
will influence the generator performance.
NOTICE
Notes:
1. Special solvent or gasoline is required to clean the filter element.
2. Be careful not to twist the foam filter element forcefully to avoid damage.
3. Confirm that the filter element and air filter are in close contact with each
other, leaving no gaps for air leakage.
4. Do not start the generator without installing the air filter.
5. If the filter element is damaged or not clean, it needs to be replaced with a
new one.
7.4. Air Filter Maintenance
7.5. Spark Plug Maintenance
4.Clean the filter element, squeeze it dry and let it
dry;
5.Put the filter element back into the air filter, put
back the air filter cover, and the right side cover.
33
Ⅶ. MAINTENANCE
7.5. Spark Plug Maintenance
The cleaning steps are as follows:
1.Remove the spark plug maintenance cover ① and spark plug cap ②.
2.Put the spark plug wrench on the spark plug and insert the force rod into the wrench.
3.Turn counterclockwise to remove the spark plug (A7TC/A7RTC).
4.Check whether the porcelain core of the spark plug center electrode has faded and
remove carbon deposits.
5.Check the spark plug gap (a: 0.6~0.8mm).
6.Install the spark plug back, the spark plug locking torque: 20.0N*m.
7.Install the spark plug cap and spark plug maintenance cover.
NOTICE
Notes:
1. Do not check immediately after turning off the generator;
2. The spark plug porcelain core should be light brown;
3. Measure the spark plug gap with a feeler gauge and adjust it if necessary;
4. If you don’t have a torque wrench, you can use a sleeve to tighten the spark plug to
the maximum strength;
5. If there are cracks in the insulator, the spark plug must be scrapped and replaced
with the required specifications.
1
2
34
Ⅶ. MAINTENANCE
7.6. Spark Arrester Maintenance
Spark Arrester Cleaning Steps:
The Spark Arrester is a component at the end of the generator that eliminates
sparks and absorbs exhaust particles. In order to achieve better operating results
and longer service life of the generator, please clean or replace it every 6 months
or 100 hours. The cleaning steps are as follows:
1.Remove the screws ① and remove the tail cover shutter ②.
2.Loosen the bolt ③, remove the Spark Arrester Cover ④, Spark Arrester ⑤.
3.Use a wire brush to clean the carbon deposits on the muffler grille;
4.Check the Spark Arrester and replace it immediately if it is damaged.
5.Replace the Spark Arrester and Spark Arrester Cover.
6.Reinstall the tail cover shutter and tighten the screws.
NOTICE
Notes:
1. Do not check immediately after turning off the generator;
2. Clean the Spark Arrester gently with a wire brush to avoid damage;
3. The tail cover heat insulation rubber sleeve needs to be installed outside the opening
of the air deflector;
4. If the Spark Arrester is damaged or not cleaned properly, the grille needs to be
replaced with a new one.
WARNING
35
Ⅶ. MAINTENANCE
7.7. Fuel Tank Strainer Maintenance
Do not operate in places with high temperatures, smoke or flames.
The fuel tank filter can filter out debris from the injected gasoline and prevent
debris from falling into the fuel tank. The fuel tank filter must be installed when
injecting gasoline, and please clean or replace it every 6 months or 100 hours. The
cleaning steps are as follows:
1.Remove the fuel tank cap and fuel tank filter;
2.Clean the fuel tank filter with gasoline and brush.
3.Dry the filter and put it back into the fuel tank.
4.Replace the fuel tank cap.
Notes:
1.The fuel tank cap must be tightened.
2.When not in use, please turn the ventilation knob to "OFF".
36
Ⅶ. MAINTENANCE
7.8. Fuel Filter Maintenance
Fuel Filter Cleaning Steps:
The fuel filter can prevent the oil system from clogging. In order to obtain better operating
results and long service life of the generator, please clean it every 12 months or 300 hours.
The cleaning steps are as follows:
1.Turn the fuel switch knob to "ON" and the ventilation knob to "ON".
2.Loosen the cover knob, remove the right cover, loosen the screws, and remove the front
cover.
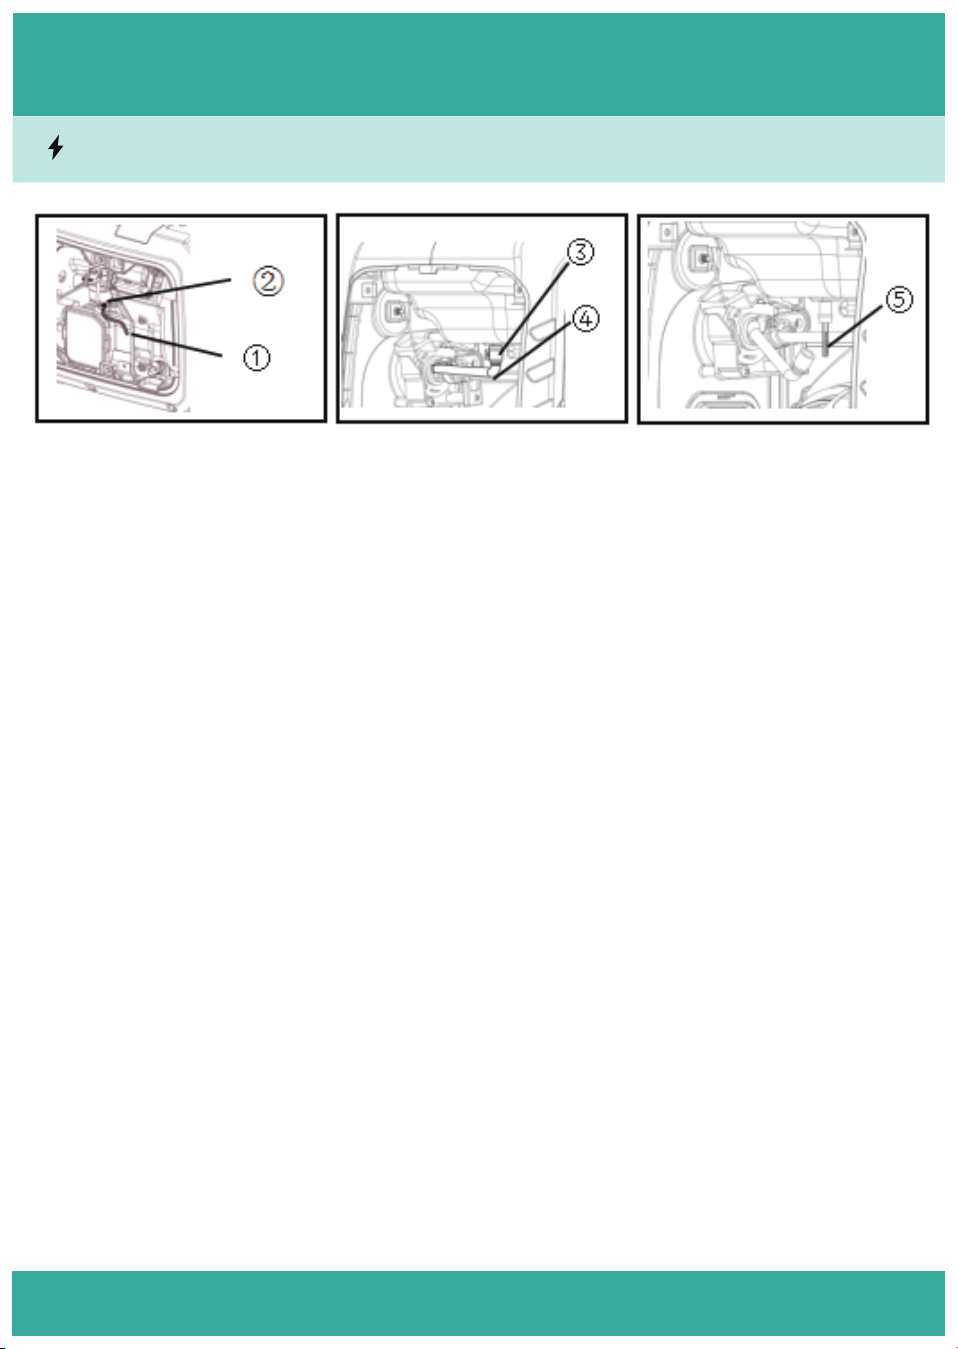
3.Take out the oil drain pipe ①, collect the fuel in a container, loosen the oil drain screw ②,
and then drain all the fuel.
4.Insert the oil drain pipe and tighten the oil drain screw.
5.Use pliers to hold the clamp ③, and move the clamp downward to exit the position and
pull out the fuel pipe ④ downward.
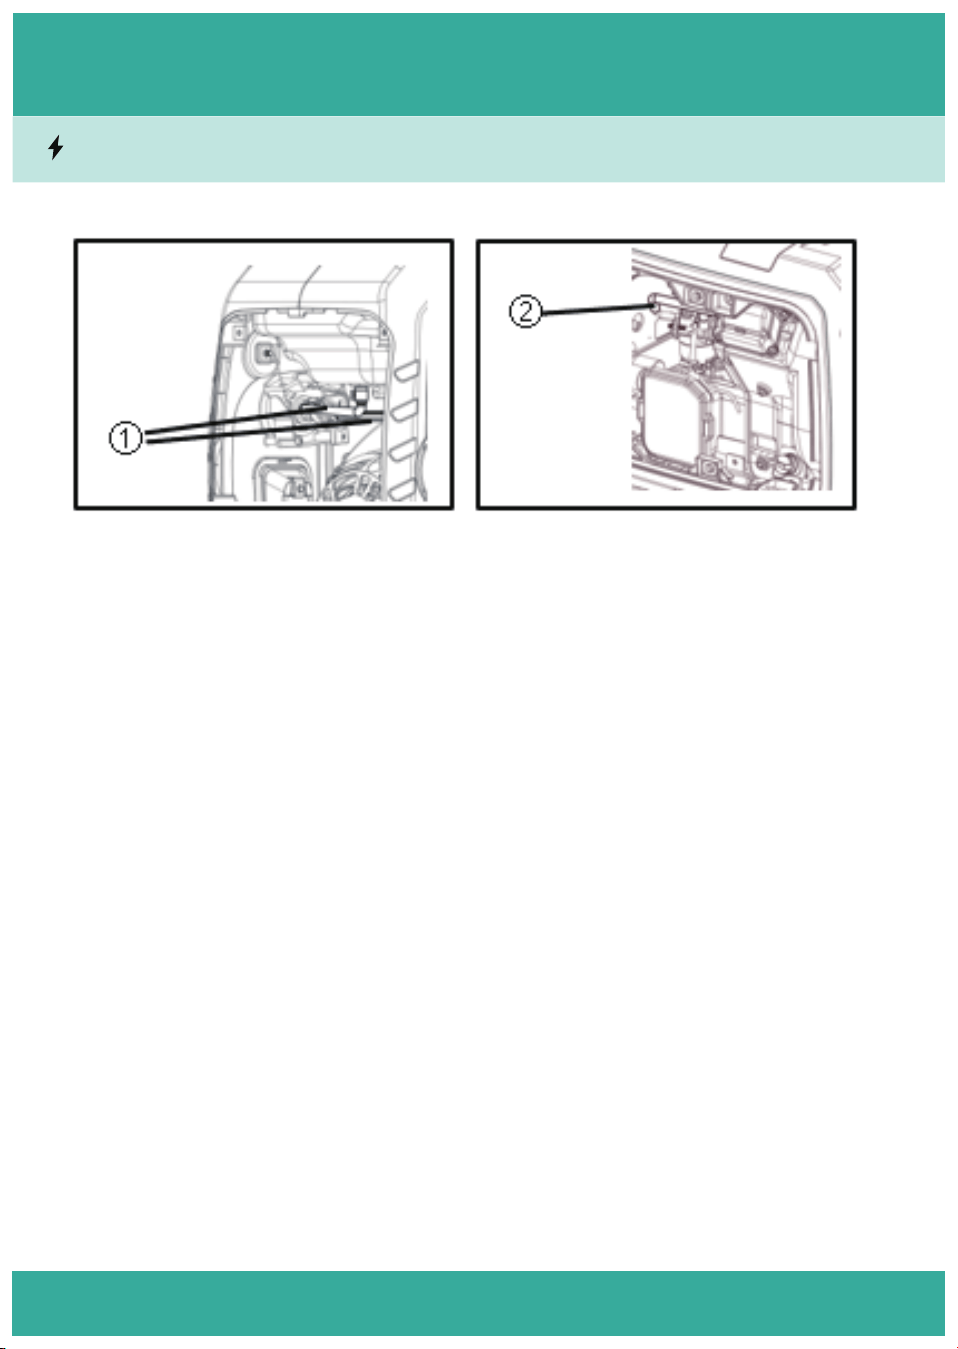
6.Take out the fuel filter ⑤ and clean it.
7.Dry the fuel filter, put it back into the fuel tank, and put back the fuel pipe and clamp.
8.Inject fuel into the fuel tank and check whether the fuel pipe is leaking or damaged.
9.Close the fuel cock and ventilation knob, and replace the right side cover and front cover.
Notes:
1. Do not operate in places with high temperatures, smoke or flames.
2. Note that the upper edge of the clamp should be lower than the end face of the oil pipe.
3. The fuel filter is damaged or dirty and needs to be changed.
37
Ⅶ. MAINTENANCE
7.9. Fuel Pipe/Blast Pipe Check
Fuel pipe/blast pipe are rubber products and are important components of
generators. They will age and become brittle with use. To prevent accidents and
property losses caused by aging of fuel pipe/blast pipe, please inspect them every
12 months or 300 hours. The fuel pipe/blast pipe inspection steps are as follows:
1.Loosen the cover and remove the right cover.
2.Turn the fuel switch knob to "ON" and the ventilation knob to "ON".
3.Observe whether there is any fuel leakage or damage in the fuel pipe ①.
4.Observe whether the blast pipe ② is damaged.
5.Reinstall the right cover and tighten the cover knob.
6.Turn the fuel switch knob to "OFF" and the ventilation knob to "OFF".
Notes:
1. Do not operate in places with high temperatures, smoke or flames.
2. The fuel pipe/blast pipe is damaged and needs to be changed in time.
3. Before replacing the fuel pipe, all the fuel must be drained.

38
Ⅶ. TRANSPORTATION
1.Do not transport the generator when it is hot. Transport the generator when it is
cool.
2.If short-term and short-distance transporting, do not let the gasoline leak out
from fuel tank during transportation.
3.If long-distance transporting, drain the gasoline and oil.
4.Do not connect the spark plug
5.When manually transport, only use the generator’s fixed handle to lift the
generator.
6.When transporting with vehicles, do not jolt the generator on rugged road. If had
to, drain the oil and gasoline in advance.
7.After transporting with vehicles, do not leave the generator in confined trunk.
The high temperature inside the confined trunk will cause evaporation of gasoline
and even cause explosion.
WARNING

39
Ⅸ. STORAGE
If you plan to store the generator for a long time, you need to complete some
protective measures to prevent aging, corrosion or accidents. Stop the generator
first. After the generator has fully cooled down, follow the following protective
measures:
1.Open the fuel tank cap, take out the fuel tank filter, pump the gasoline in the
tank into a special container, and replace the fuel tank filter and fuel tank cap.
2.Turn the engine switch to "RUN" and the fuel tank cap vent knob to "ON".
3.Remove the right cover.
4.Take out the oil drain pipe and use a container to collect it, loosen the carburetor
drain bolt, and drain all the fuel in the fuel tank.
5.After draining all the fuel in the fuel tank, tighten the carburetor drain bolt and
insert the carburetor drain pipe back into the fixing hole on the bottom plate of
the body.
6.Turn the fuel switch to "OFF" and the fuel tank cap vent knob to "OFF".
7.If the engine oil has been used for a long time, change new engine oil and
replace the right cover.
8.Remove the spark plug and pour about a spoonful of new oil into the engine.
9.Replace the spark plug and slowly pull the starter handle for a few minutes to
allow the engine oil to lubricate the box.
10.Slowly pull up the starting handle until you feel obvious resistance. At this time,
the intake valve and exhaust valve are closed, which helps to prevent internal rust.
11.Use a clean cotton cloth to wipe the surface of the generator, cover it in a bag,
and store it in a dry, cool and ventilated area.

The Genera-
tor Cannot
Start or Stop
Generator
operation
output is
unstable
Electric
System
Situation
Fuel System
Faulty
System
Oil System
-
-
Faulty Reason
-
-
-
Test Method
Solution
Add oil
Note: If the generator still cannot return to normal after the above maintenance,
please seek after-sales help.
40
Ⅸ. TROUBLESHOOTING
Turn the fuel cock to
"ON", do not connect the
battery, turn the engine
switch to "RUN", start by
hand, the generator has a
ignition and does not
start or stops soon after
starting.
Turn the engine switch to
"RUN", do not connect
the battery, pull the
handle to start. The oil
alarm light flashes for a
few seconds, and the
generator ignites but
does not start.
No fuel in the tank
Fuel filter blocked
Low oil level
protection
Electric
System
Turn the fuel cock to
"ON", do not connect the
battery, turn the engine
switch to "RUN", pull the
handle to start, the
generator does not ignite.
The spark plug has
carbon deposits or
moisture.
Spark plug does not
ignite.
The fuel tank cap vent
knob is not opened
Add fuel
Clean the fuel
filter
Open the
fuel tank cap
vent knob.
Clean and dry
the spark plug,
let it sit for a
while and then
reinstall the
spark plug to
start.
The generator is still in a
hot state and does not
ignite when started
manually.
The operating sound of
the generator fluctuates
greatly and the output is
unstable.
The generator
is in a hot
state and
needs to open
the choke to
start.
Generator
connection
load overload.
Wait for the generator
to cool down before
starting, or remove
the right cover and
manually open the
choke before starting.
Stop the engine to
check the operating
environment and
generator, check the
factors that affect the
generator output,
and then restart the
generator.
Change spark
plug.
-
43
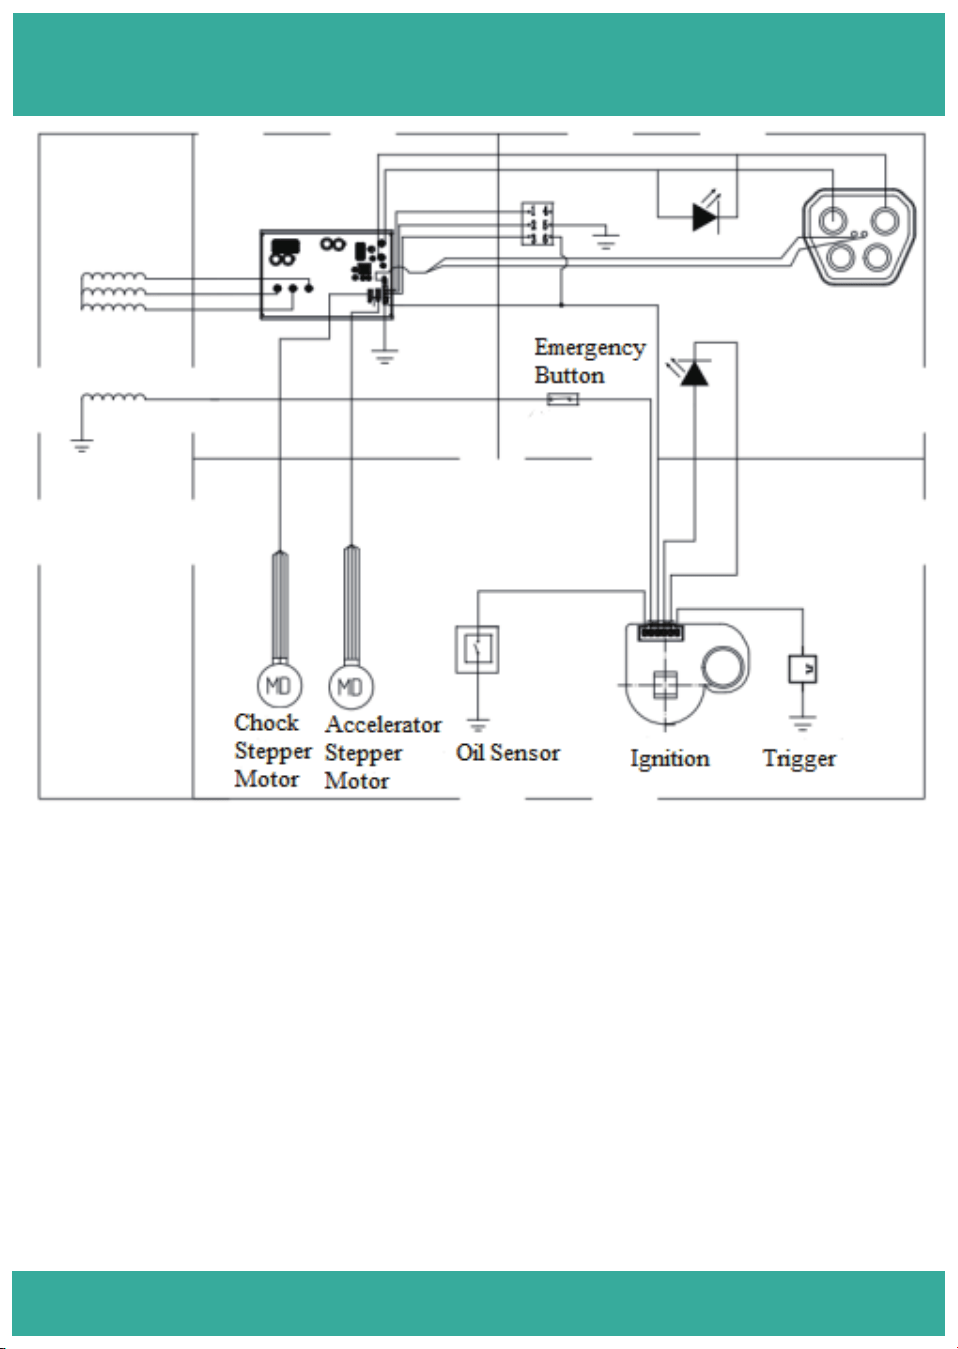
Ⅺ. SCHEMATICS

-
41
Ⅸ. TROUBLESHOOTING
E031
Overcurrent
1、Check whether the wire is damaged
2、Reduce the load
E033
Inverter Output
Abnormality
1、Check whether the power speed is
abnormal (too low)
2、Replace the motor
E035
Short Circuit
1、Check the wiring
2、Reduce the load
E039
Startup Failure
1、Check whether there is gasoline in the
fuel tank
2、Check whether the spark plug is igniting.
E032
Output Overvoltage
1、Adjust the battery voltage
2、 Check whether the controller is damaged
E040
Input Overvoltage
Check whether the power speed is abnor-
mal (too high)
2、 Replace the motor
Fault code Description
E034
Overtemperature
The device would shut down automatically
when over-temperature warning occurs.
Please check whether the ambient tempera-
ture is too high. And wait for the internal
temperature of the controller to drop.
E036
Fan Abnormality Check if the fan is working normally
E038
Low Engine Oil Add engine oil to the specified volume
E037
Controller Failure Replace the controller

42
Ⅸ. TROUBLESHOOTING
E041
Output Voltage
Backflow
1、Adjust the battery voltage
2、 The controller is damaged
Fault code Description
Trouble shooting
E042
Overload Reduce the load
E044
Maintenance
Reminder
After maintenance as required, turn the
switch from OFF to ON, and repeat 3 times to
eliminate the maintenance prompt.
E045
Lack of Gasoline Works normally after adding gasoline
E043
Startup Overcurrent
Check engine valve clearance and adjust to
specified clearance