CLHF-G2BS CLHF-G2KS CLHF-G2DS
User Guide
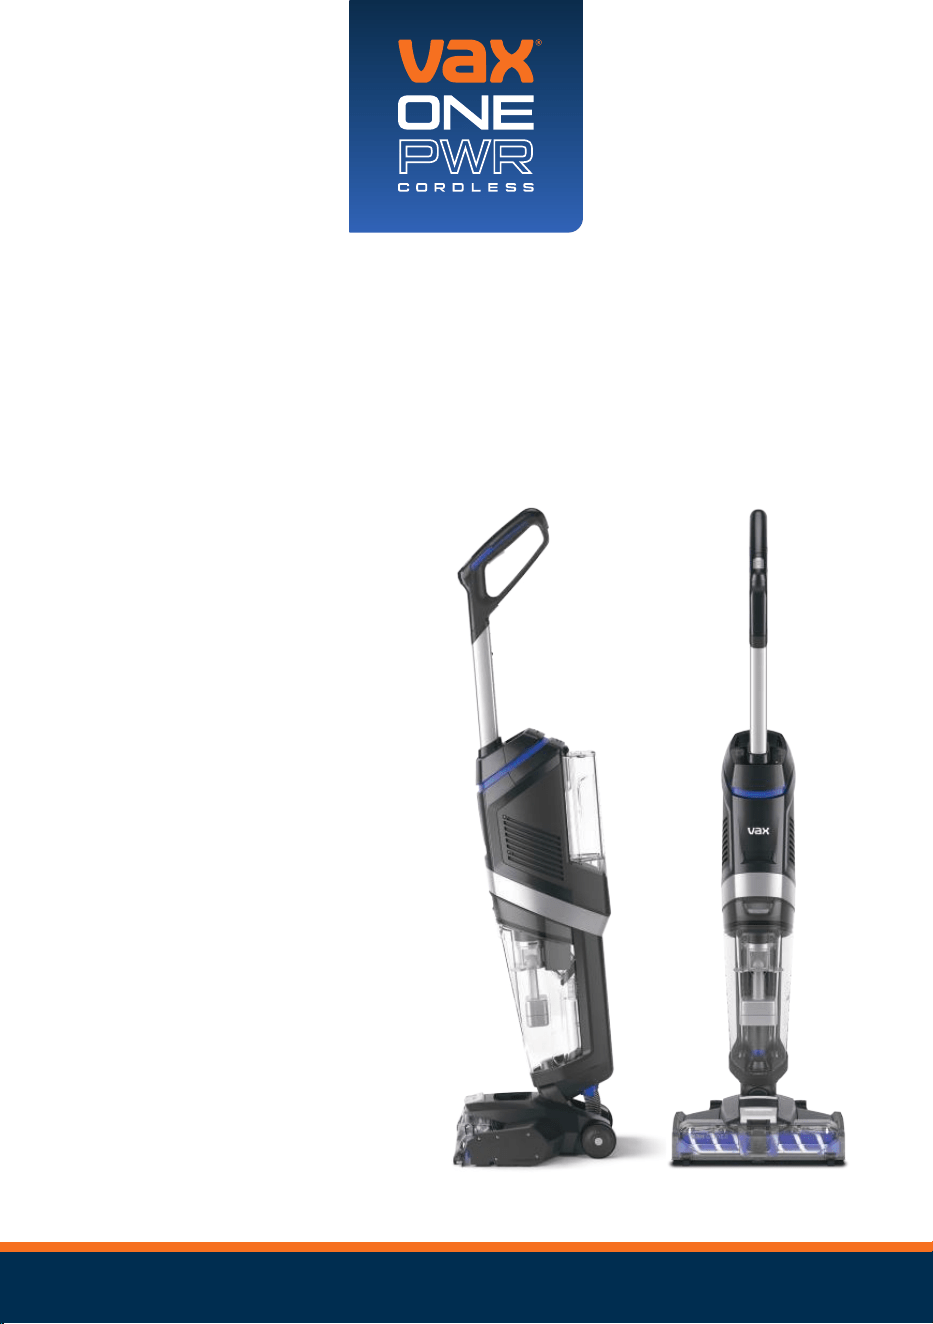
VAX Glide 2
Hard Floor Cleaner
2
20 21 22
Welcome to the Vax family!
You are now the proud owner of a VAX Glide 2.
Here, you’ll find everything you need to know about your machine and, most importantly, instructions on
how to get started so that you can get cleaning!
2
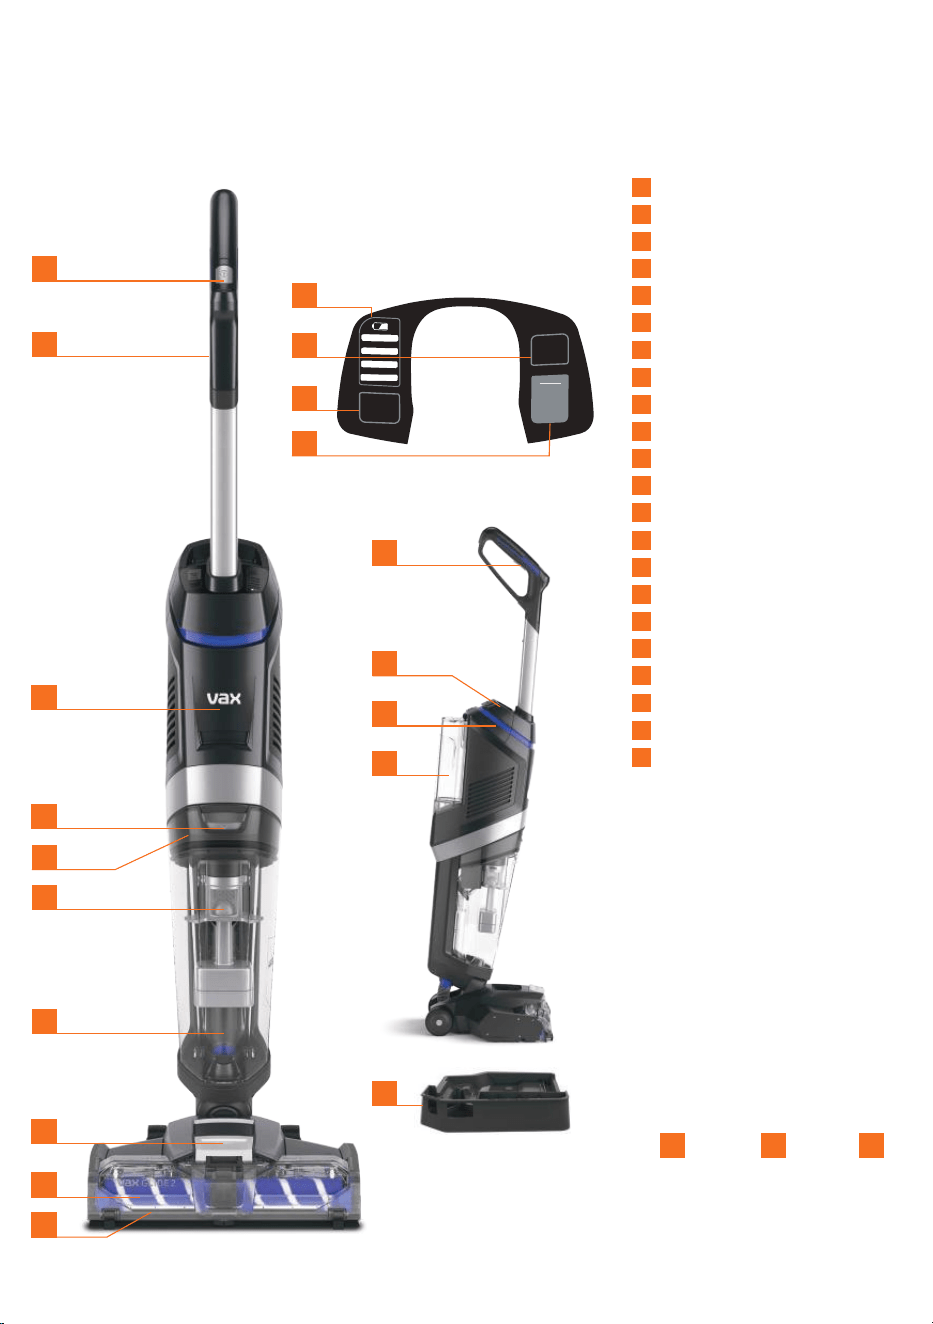
1
Power ON/OFF
2
Handle
3
Battery level indicators
4
Dry roller indicator
5
Tank full indicator
6
Self-clean mode button
7
Main unit
8
Dirty water tank release button
9
Filter (hidden)
10
Separator
11
Dirty water tank
12
Brush cover release button
13
Brushroll
14
Brushroll cover
15
Trigger
16
Battery cover
17
Battery dock (hidden)
18
Water/solution tank
19
Rinse Storage Tray
20
ONEWPWR Battery*
21
ONEPWR Charger*
22
250ml Solution
Weight 5.3kg (without battery pack).
Water/Solution tank capacity 1L. Dirt water tank capacity 0.75L.
Runtime and charge time dependent on battery pack and mode used.
*Battery and charger included with models CLHF-G2KS & CLHF-G2DS only.
Subject to technical change without notice. Images are illustrative only.
15
SELF
CLEAN
DIRTY
TANK
FULL
DRY
ROLLER
4
3
16
2
6
18
19
1
5
17
7
8
10
11
9
12
13
14
* *
3
Registration and Support
All ONEPWR products come with
a standard one year warranty
Register your product to receive
2 YEARS FREE additional
warranty
†
For details visit: vax.co.uk/registration
Scan here
For help and support with
your new product
or visit us online: support.vax.co.uk
Still need to get in touch?
Our UK based Customer Care Team are here to
support you. For help with assembly, operational or
performance problems, or buying and fitting new
accessories, you can find all our contact details at
vax.co.uk/contact
This user guide can be found online at:
support.vax.co.uk
† Registration required. Terms and conditions apply,
see vax.co.uk for details.
3
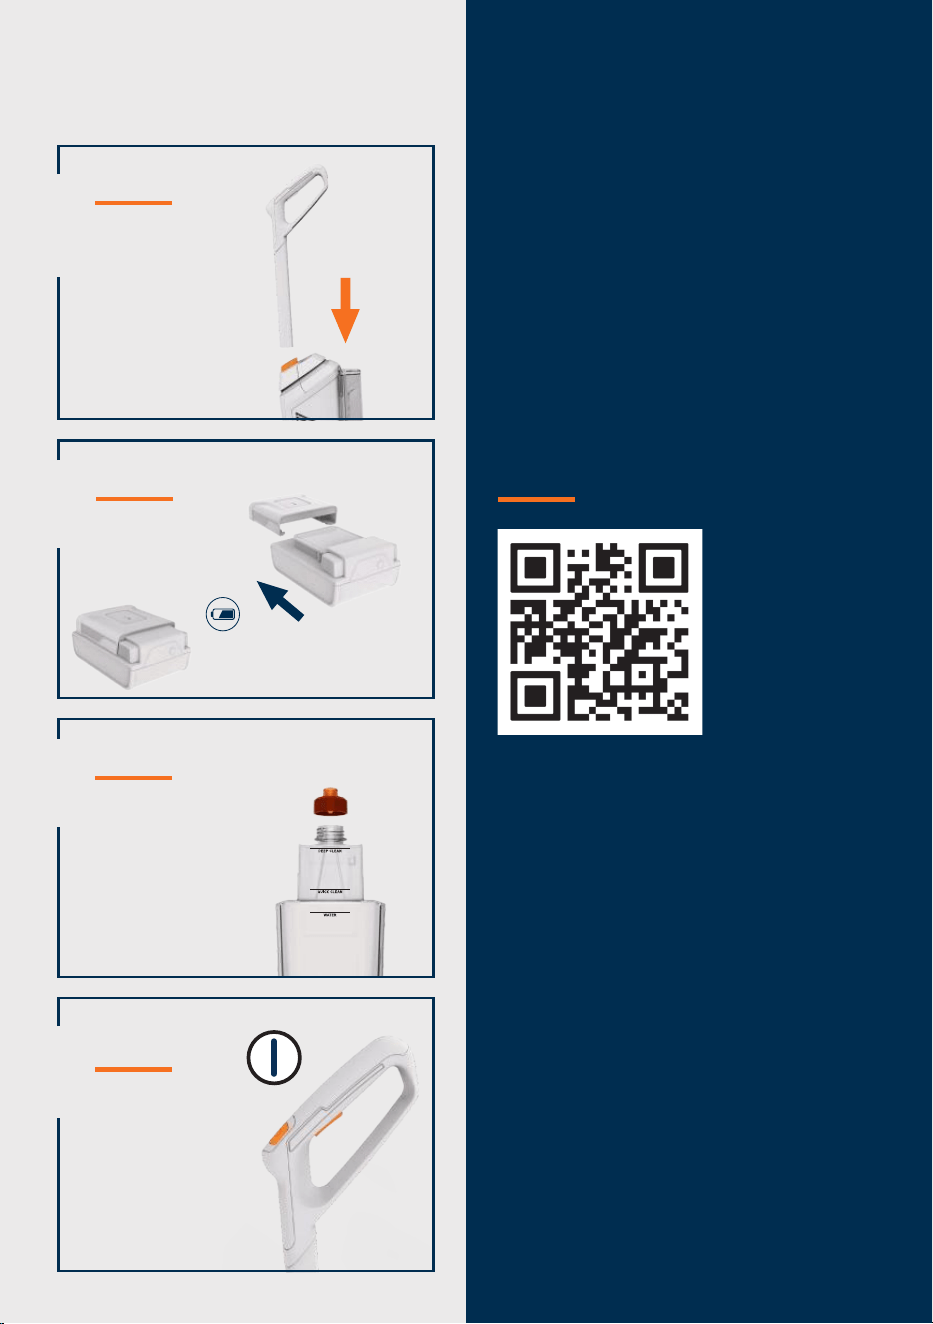
Please read ‘Getting Started’ section
before first use.
1
Assembly
Attach the
handle to the
machine.
Quick Start
2
3
Add water and solution
Fill the tank with
water and solution.
4
Operation
Press the ON/
OFF button. Press
the trigger on the
handle to release
water and solution.
Charging the battery
Fully charge the
battery before
first use
Press the battery symbol
to check the battery status

4
support.vax.co.uk
If a Vax machine is used in the way it is intended and it breaks down within the
guarantee period, it’s our responsibility to repair or replace it.
Here’s what isn’t covered:
• Normal wear and tear of consumable items, for example: belts, filters, brushbars,
fuses etc.
• Batteries which have become faulty as a result of improper handling.
• Batteries which have a reduced service life as a result of normal wear.
• Accidental damage
- Damage as a result of use not in accordance with the product user guide.
- Damage caused by not carrying out regular maintenance.
- Damage to the charger cable.
- Blockages caused by misuse.
• Faults caused by:
- Negligent use, misuse, neglect or careless operation of the machine.
- Use of the machine cleaner which is not in accordance with the user guide.
- Use of a Vax machine for anything other than normal domestic household
purposes in the country in which it was purchased.
- Use of parts, accessories and consumables, which are not genuine Vax
components.
- Faulty installation or repairs – unless carried out by a qualified electrician or
engineer.
Technical
Statement of Compliance: Manufacturer/EU importer: Vax Limited, hereby
on our own responsibility, declare that the VAX Glide 2 is manufactured in
compliance with the following Legislation: Safety: 2014/35/EU Low Voltage
Directive/Electrical Equipment (Safety) Regulations 2016. EMC: 2014/30/EU
Electromagnetic Compatibility Directive/ Electromagnetic Compatibility Regulations
2016.
Waste electrical products should not be disposed of with household
waste. Please recycle where facilities exist. Check with your Local
Authority or retailer for recycling advice.
VAX is a trade mark of Techtronic Cordless GP.
© 2022 Techtronic Cordless GP. All rights reserved.
Vax Ltd, Artillery House, Heritage Way, Droitwich, WR9 8YB, UK.
Warranty
Warranty and technical
5
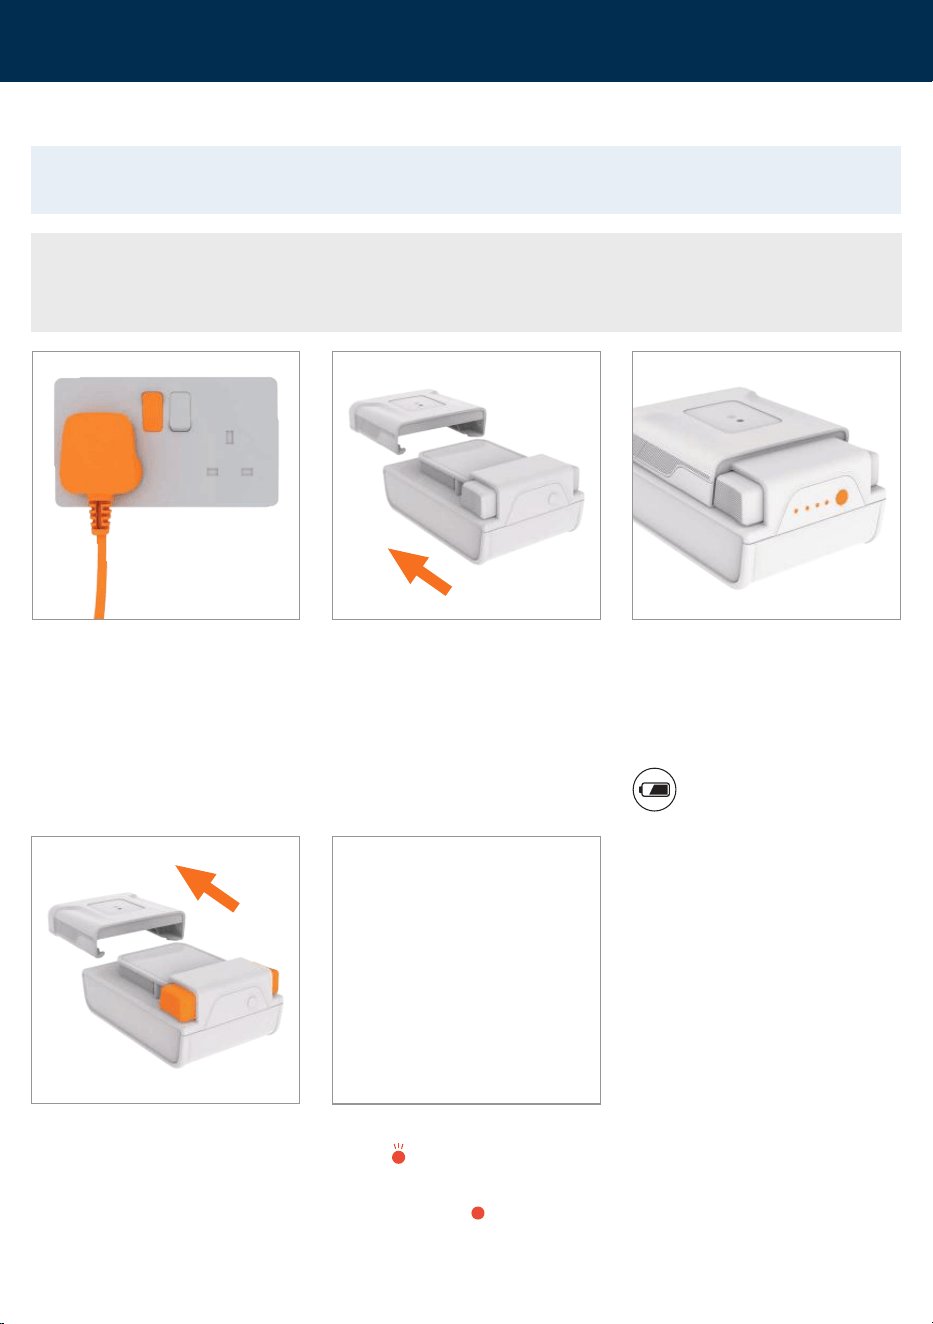
Charging the battery
Getting started
THIS MACHINE IS ONLY TO BE USED WITH VAX ONEPWR BATTERIES AND CHARGER.
PLEASE READ THE SAFETY GUIDE BEFORE USE.
NOTE: Before first use, ensure the battery is fully charged. Failure to fully charge the battery
before first use may result in poor battery performance. The life expectancy of the battery will vary
depending on the usage of the machine.
Plug the charger into the mains.
When fully charged, press and hold the
side buttons and slide the charger off
the battery to remove.
Slide the battery on to the charger.
Charging light indicators
ERROR
Charge/battery fault.
CHARGING DELAY
Battery pack is too hot or too cold.
The battery lights will flash white to
indicate the battery is charging. The
battery lights will illuminate in turn until
all four lights are illuminated and the
battery is charged. When fully charged
the lights will go out.
To check the battery charge
level press the battery symbol.
6
support.vax.co.uk
Getting started
Assembly
THIS MACHINE IS ONLY TO BE USED WITH VAX ONEPWR BATTERIES AND CHARGER.
PLEASE READ THE SAFETY GUIDE BEFORE USE.
IMPORTANT: Test the machine over a small hidden area of your flooring before use. If no damage
occurs, continue cleaning. Not suitable for water sensitive flooring.
When using the machine, basic safety precautions should always be observed. Take care not to
oversaturate flooring. Always finish on a dry stroke (no trigger pressed). For heavily soiled areas, it
may be necessary to repeat the cleaning process.
Only use VAX hard floor solutions. Using other solutions may cause excess foaming and will
invalidate your guarantee.
The water/solution tank should only be filled with warm water (max 40⁰C). Filling the water/
solution tank with hot/boiling water will damage your washer and invalidate the guarantee.
Empty and rinse out the dirty water tank and leave to air dry before storage. Do not leave water/
solution in the tanks for a prolonged period. A small amount of water/solution can be left in the tank
for short periods of time in between cleans if the machine is used regularly.
For prolonged storage the brushrolls and filters should be removed, cleaned, dried and stored in the
rinse/storage tray. Stand the machine in the storage tray when not in use.
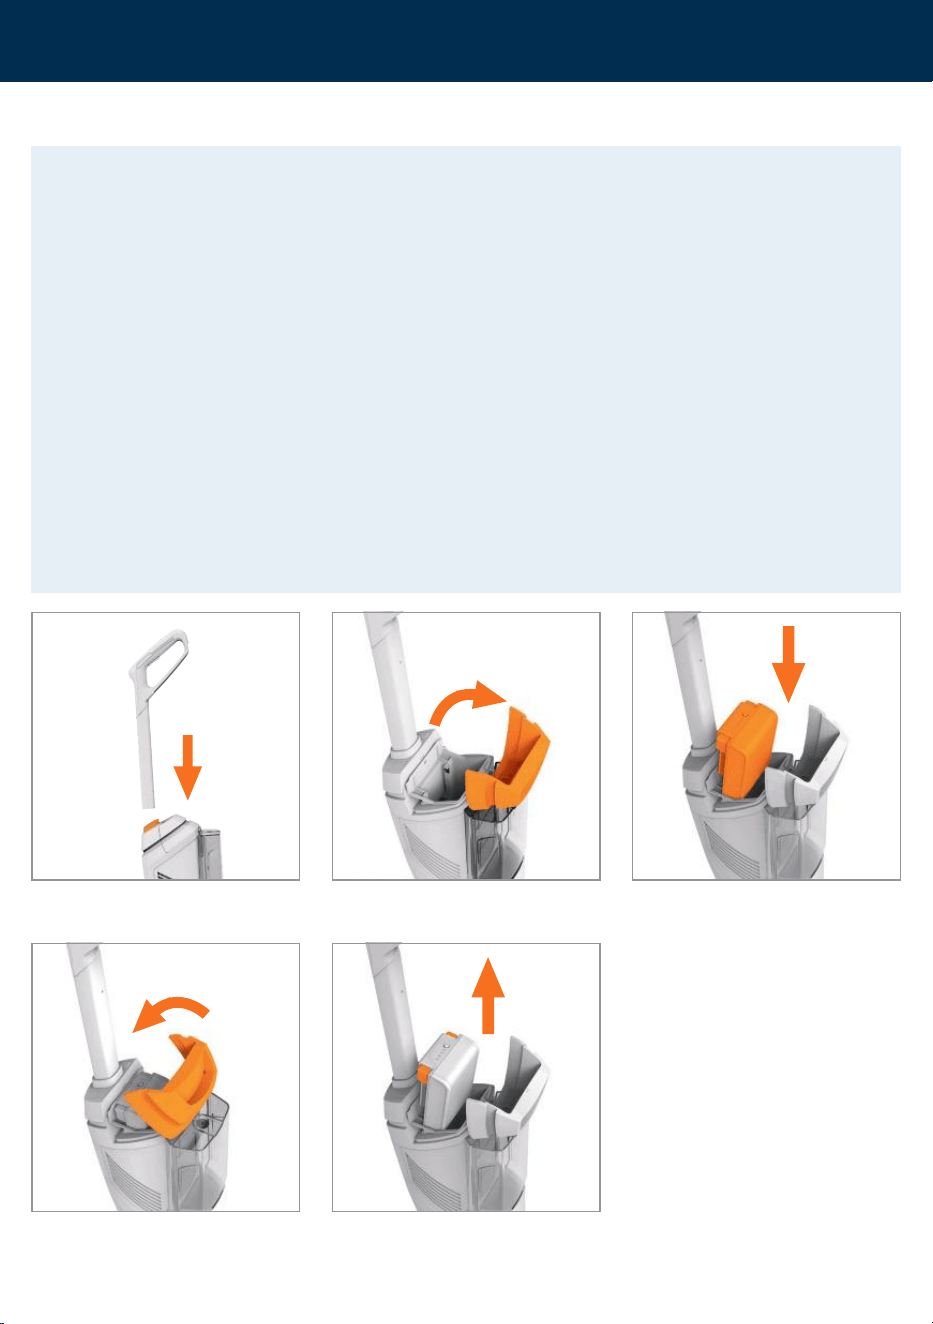
Push the handle into the main body until
it clicks into place.
To remove the battery press both the
buttons to release.
Pull to open the battery cover.
Close the battery cover.
Holding the cover open, slide the battery
into the machine until it clicks into place.
7
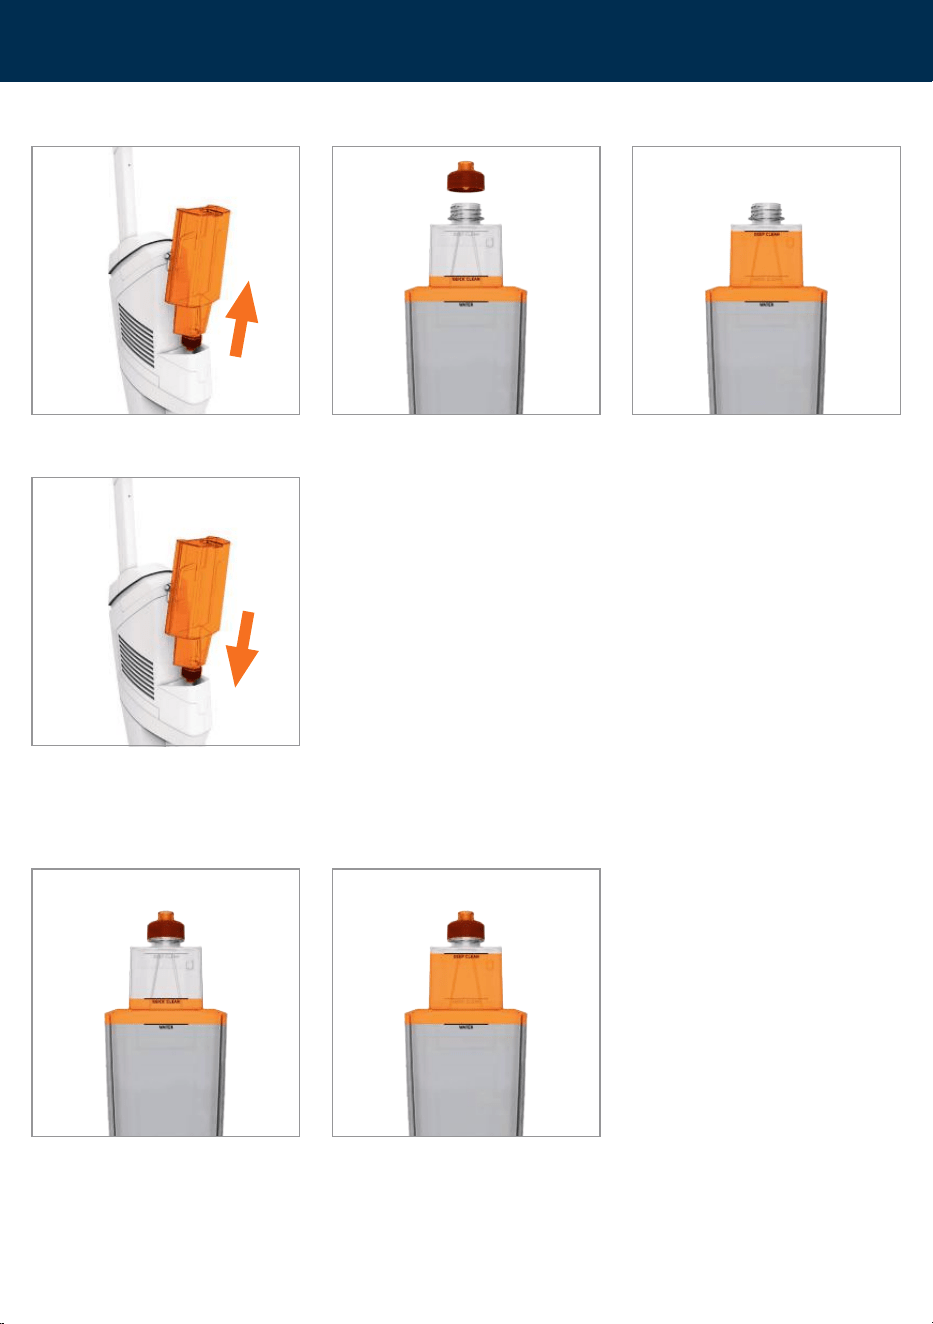
Getting started
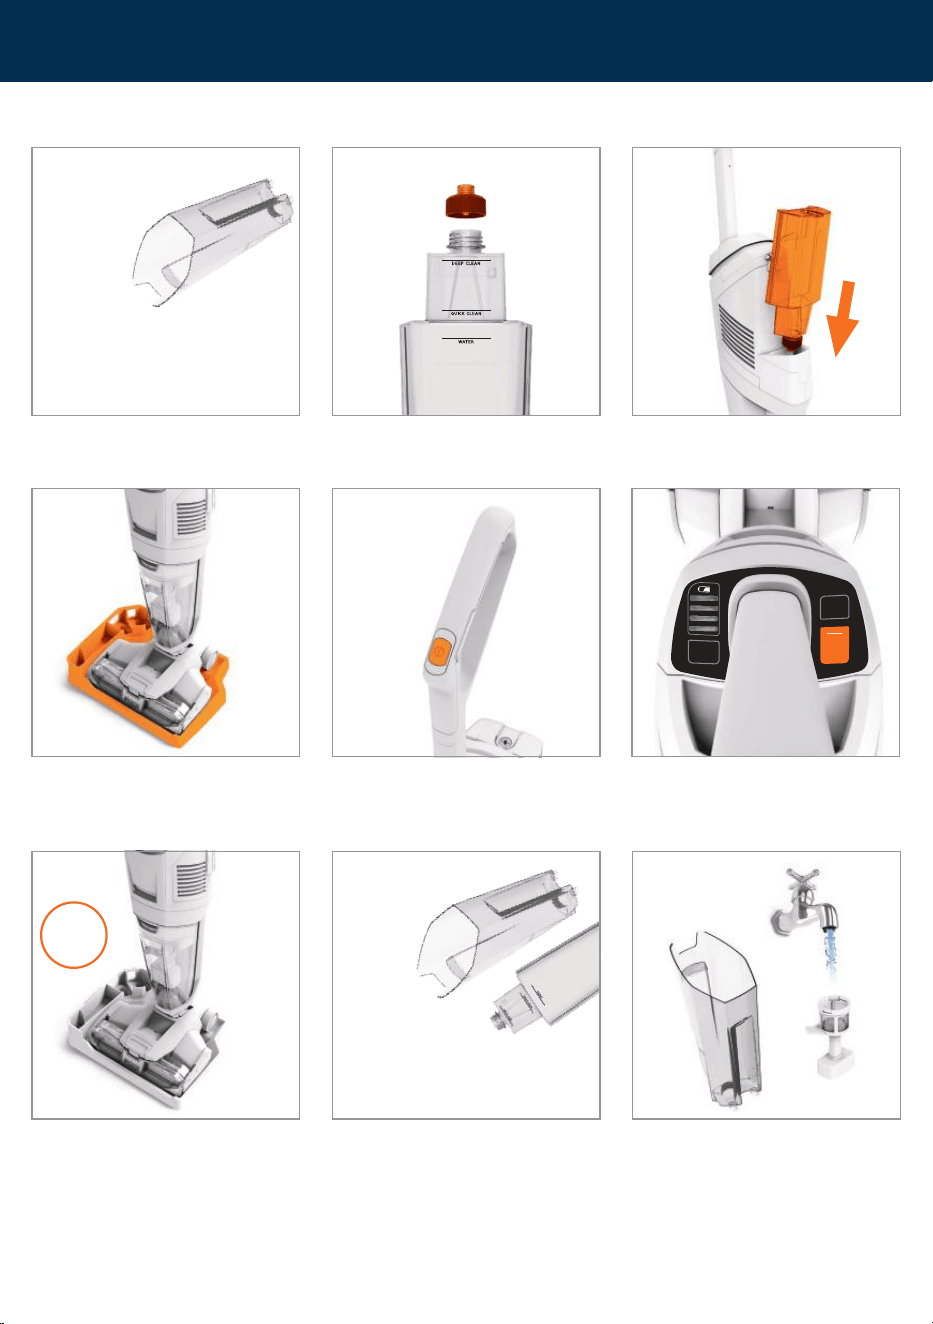
Filling the water/solution tank
Lift to remove the water/solution tank
from the back of the machine.
Unscrew the cap and fill with water (max 40°C) and solution to the quick or deep
cleaning markers on the tank.
Quick Clean
Dilution for your every day clean.
Deep Clean
Dilution for heavy duty cleaning and
where additional sanitisation is required.
Replace the cap tightly and push the tank
down firmly on to the machine.
8
support.vax.co.uk
Getting started
Operation
IMPORTANT: When the dirty water tank is full, the tank full light will illuminate and flash. Once the
light is activated the machine will run for 5 seconds before switching off. Remove the dirty water
tank and empty.
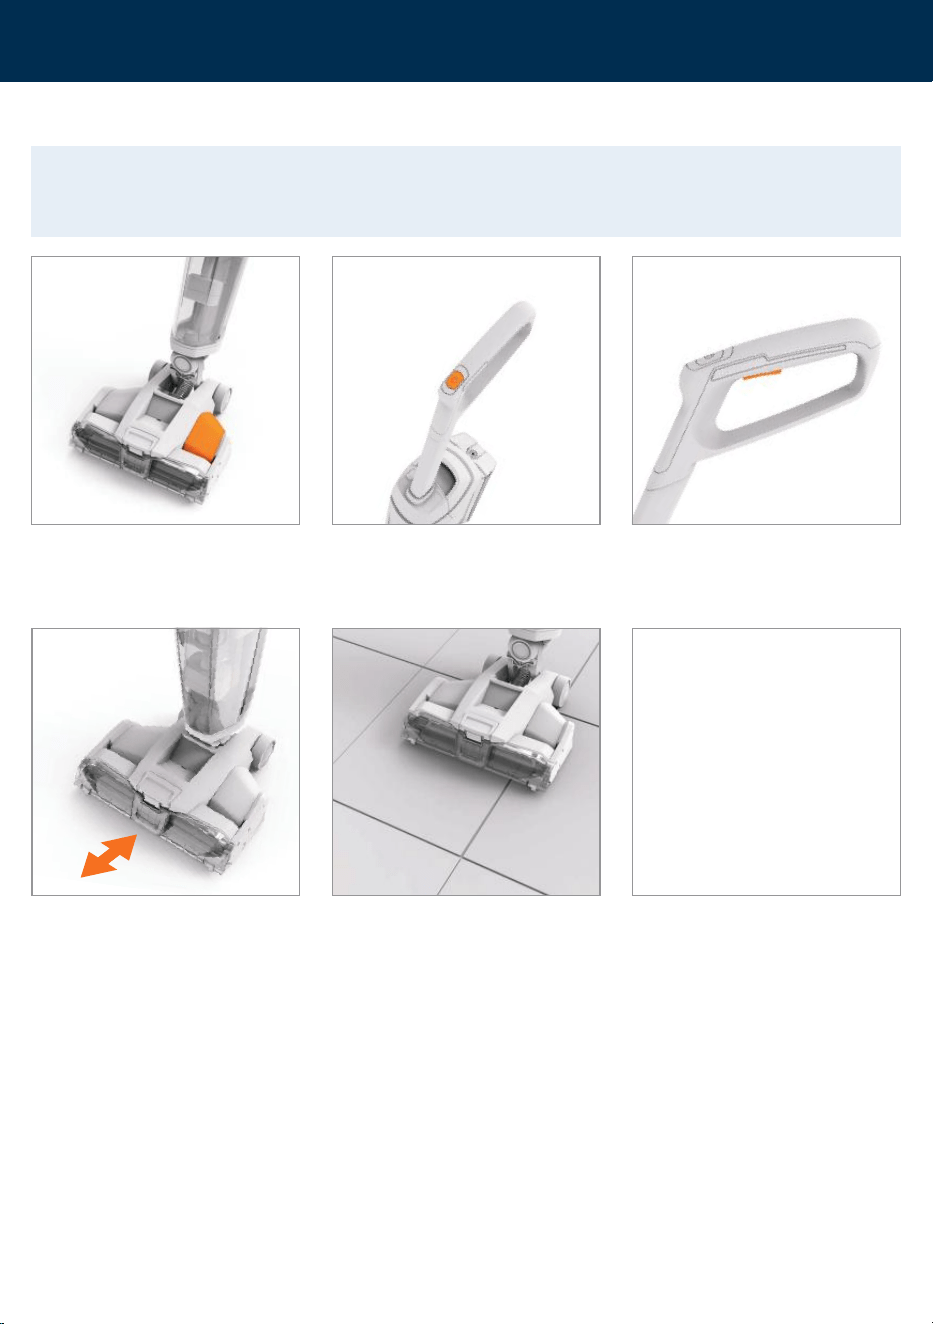
Place your foot on the base and pull the
handle backwards to recline.
Press the on/off button to switch the
machine on.
For best results apply water/solution
on the forward stroke and release the
trigger on the backward stroke to pick
up water/ solution. For a dryer finish,
follow with an additional dry stroke with
no trigger pressed.
Press the trigger on the handle to release
water and solution. The headlight on the
floorhead will change to blue. Release the
trigger to recover the water and solution.
For optimum pick up on deep grout lines,
position the brushrolls over the grout
and follow the line.
For optimum edge cleaning run the
machine parallel to the edge.
9
Getting started
Operation
When the dirty water tank is full, the light
will illuminate and flash. You will hear a
change in sound. Once the float and light
are activated the machine will run for 5
seconds before switching off.
The machine will automatically go
into DRY ROLLER mode and the DRY
ROLLER light will flash for 5 seconds
before switching the machine off.
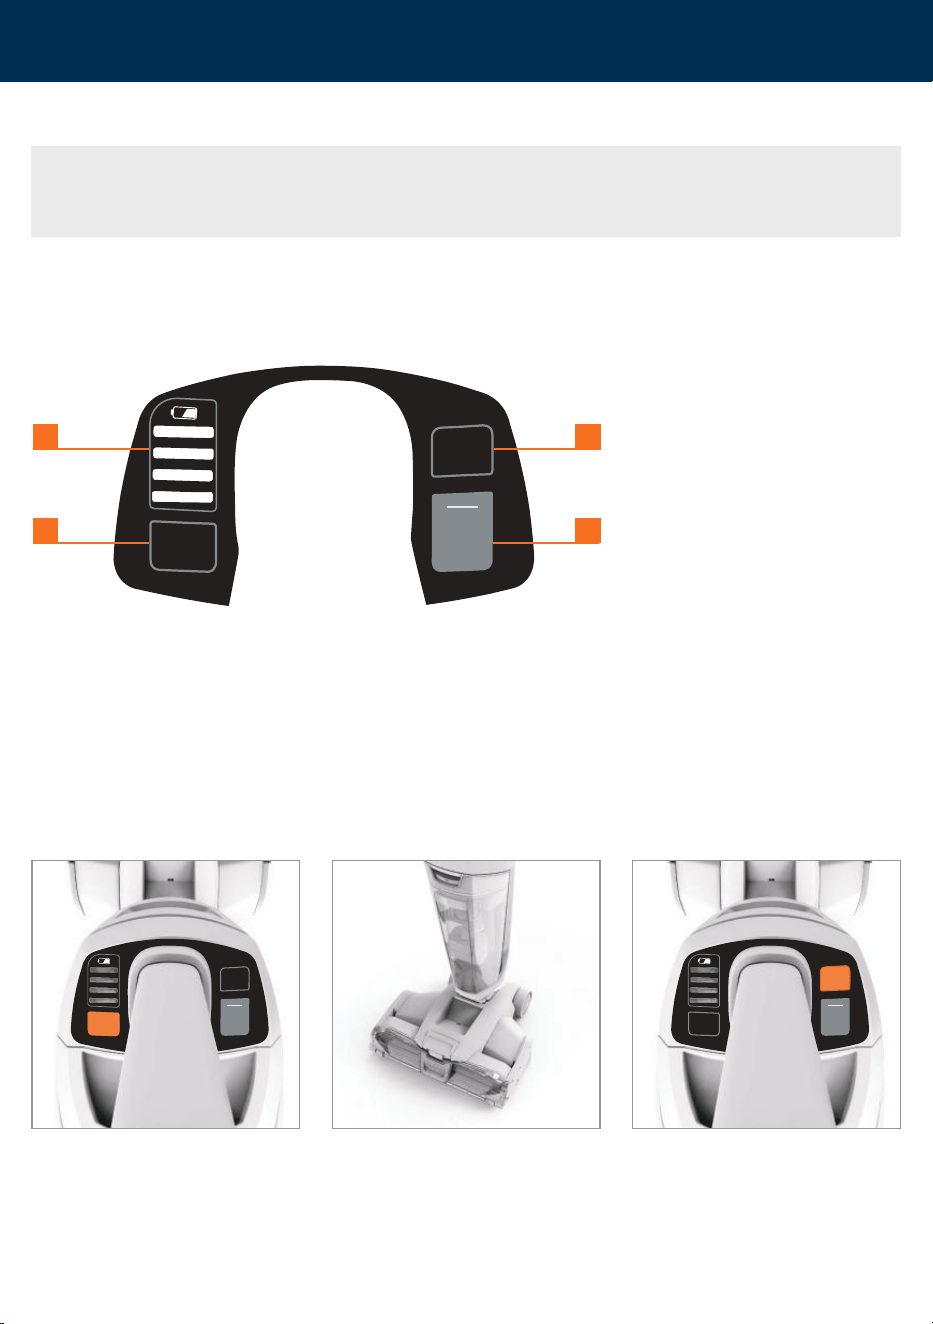
1. Battery Level Indicators
The battery level indicator lights will
illuminate indicating how much charge
is remaining during use. When less
than 20% charge is remaining the
bottom light will flash red indicating the
battery is running low and
charging is required.
2. Dirty Tank Full Indicator
Illuminates and flashes when the dirty
water tank is full and needs emptying.
3. Dry Roller
Dry roller mode will activate when the
machine is stood in the upright position.
This will remove any residual water left
on the brushrolls, in the floorhead or
hose. The dry roller light will illuminate
and flash when active.
4. Self Clean
Once activated, the self clean mode
automatically runs through a cleaning
cycle to remove any remaining dirt and
debris from brushrolls, in the floorhead
or hose.
At the end of the clean, leave the
machine switched ON in the upright
position.
NOTE: During use, when the machine is left ON whilst locked in the upright position, the machine will
go into dry roller mode. After 5 seconds the machine will automatically switch off. Press the ON/OFF
button to switch back on.
SELF
CLEAN
DIRTY
TANK
FULL
DRY
ROLLER
1 3
2 4
SELF
CLEAN
DIRTY
TANK
FULL
DRY
ROLLER
SELF
CLEAN
DIRTY
TANK
FULL
DRY
ROLLER
10
support.vax.co.uk
Cleaning and maintenance
Emptying the dirty water tank
ALWAYS SWITCH OFF THE MACHINE AND REMOVE THE BATTERY BEFORE CARRYING OUT ANY
MAINTENANCE OR TROUBLESHOOTING.
IMPORTANT: When the dirty water tank is full, the tank full light will illuminate and flash.
Once the light is activated the machine will run for 5 seconds before switching off.
After use and before storing, empty and rinse out the tanks, and leave to air dry before refitting.
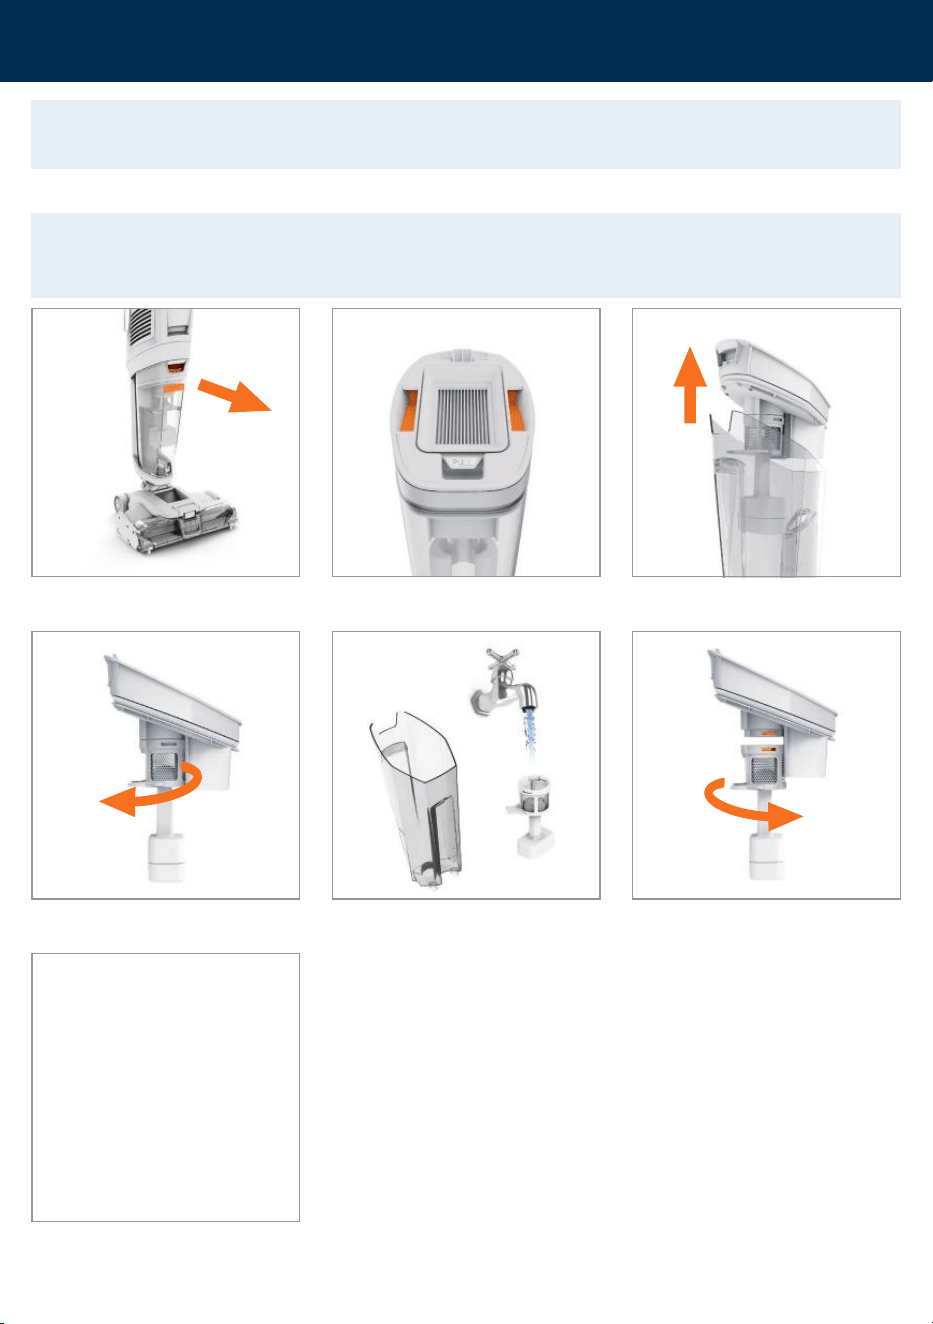
Press down the dirty water tank release
button and pull the tank to remove.
Hold the top of the dirty water tank lid and pull upwards to remove.
Twist the separator clockwise to release
from the lid.
To re-fit, tilt the dirty water tank and line the front of the
tank up onto machine. Push back until it clicks into place.
Empty the tank into a sink or toilet. Rinse
the tank and separator under water
(max 40°C) to remove dirt/debris.
40°C
MAX
To refit, line up the separator tab with the
lid tab and twist anticlockwise to lock.
11
Cleaning and maintenance
Cleaning the separator
IMPORTANT: Every 5-6 uses wash the filter with warm water (40°C max) and leave for 24 hours or
until fully dry before refitting onto the machine. For prolonged storage the filter should be removed,
cleaned and stored in the rinse/storage tray. For best cleaning results filters should be replaced every 6
months (depending on the level of use). Ensure all filters are dry and in place before using the machine.
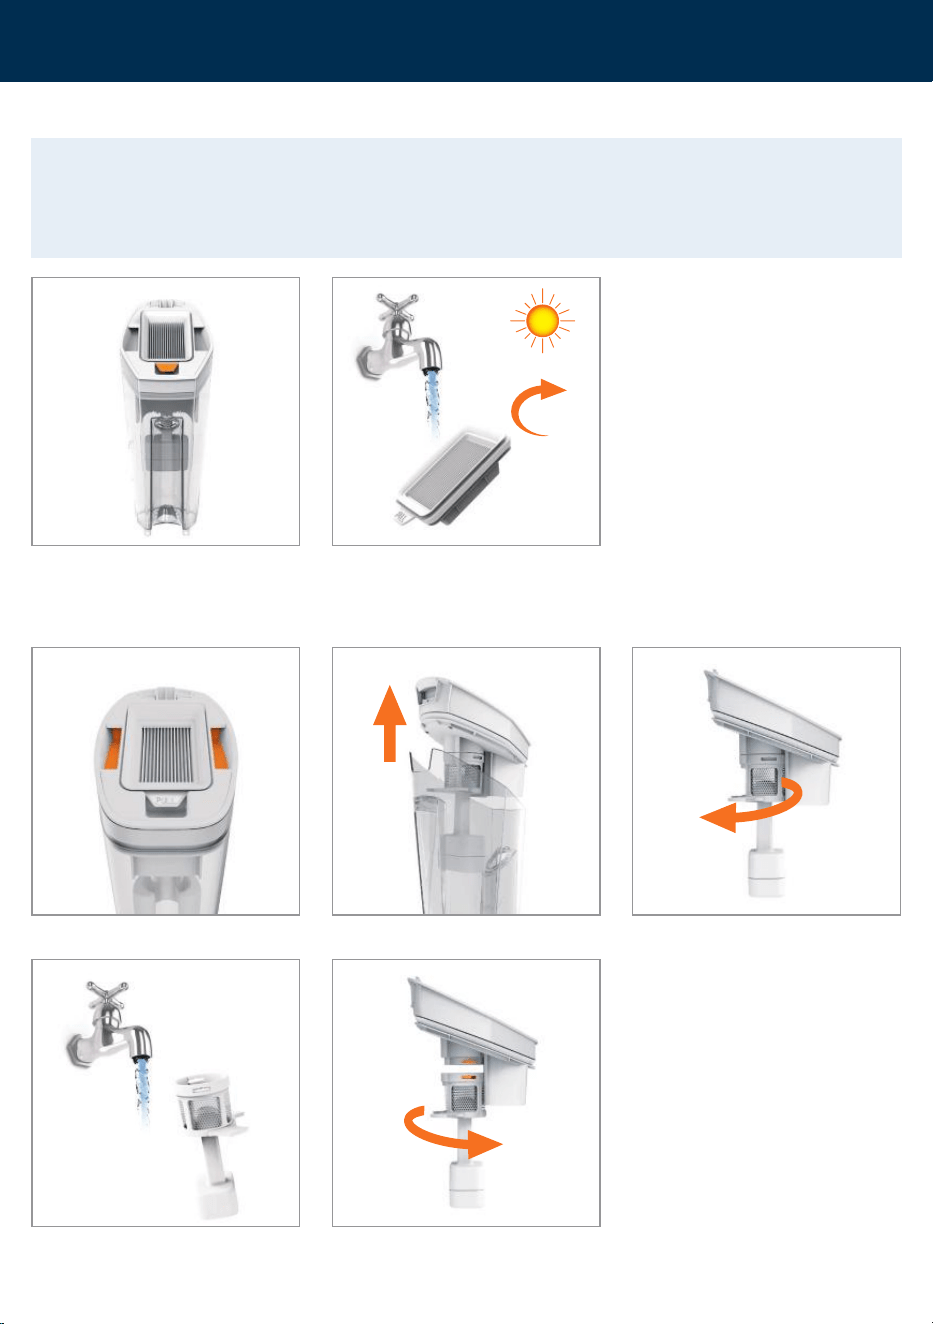
Pull the tab on the bottom of the filter
to remove.
Wash the separator mesh under running
water (40˚C max) to remove any
dirt and debris.
40°C
MAX
Twist the separator clockwise to release
from the lid.
To refit, line up the separator tab with the
lid tab and twist anticlockwise to lock.
Wash the lter under running water (40°C max).
Leave for at least 24hrs or until fully dry before retting.
40°C
MAX
24hr
Hold the top of the dirty water tank lid and pull upwards to remove.
Cleaning the filter
12
support.vax.co.uk
Cleaning and maintenance
Machine rinse and brushroll quick clean (recommended after every use)
Empty the tank into a sink or toilet.
Empty the dirty water tank and any
remaining water left in the water/
solution tank into a sink or toilet.
Replace the cap tightly and push the tank
down on to the machine.
Place the machine upright in the rinse/
storage tray.
Press the on/off button to switch the
machine on. Do not recline the machine.
Press the SELF CLEAN button within 5
seconds of pressing the ON/OFF button
to activate. The self clean button
will flash.
The brushrolls will spin and water will
automatically be released. The self
clean cycle takes 25 seconds and will
automatically change to DRY ROLLER
mode before finishing and switching off.
To stop the self clean mid cycle press
the SELF CLEAN or ON/OFF button.
25
sec
Rinse the tank and separator under
water (max 40°C) to remove dirt/debris.
40°C
MAX
Unscrew the cap and fill to the small
area clean marker with warm water
(max 40˚C).
SELF
CLEAN
DIRTY
TANK
FULL
DRY
ROLLER
13
Cleaning and maintenance
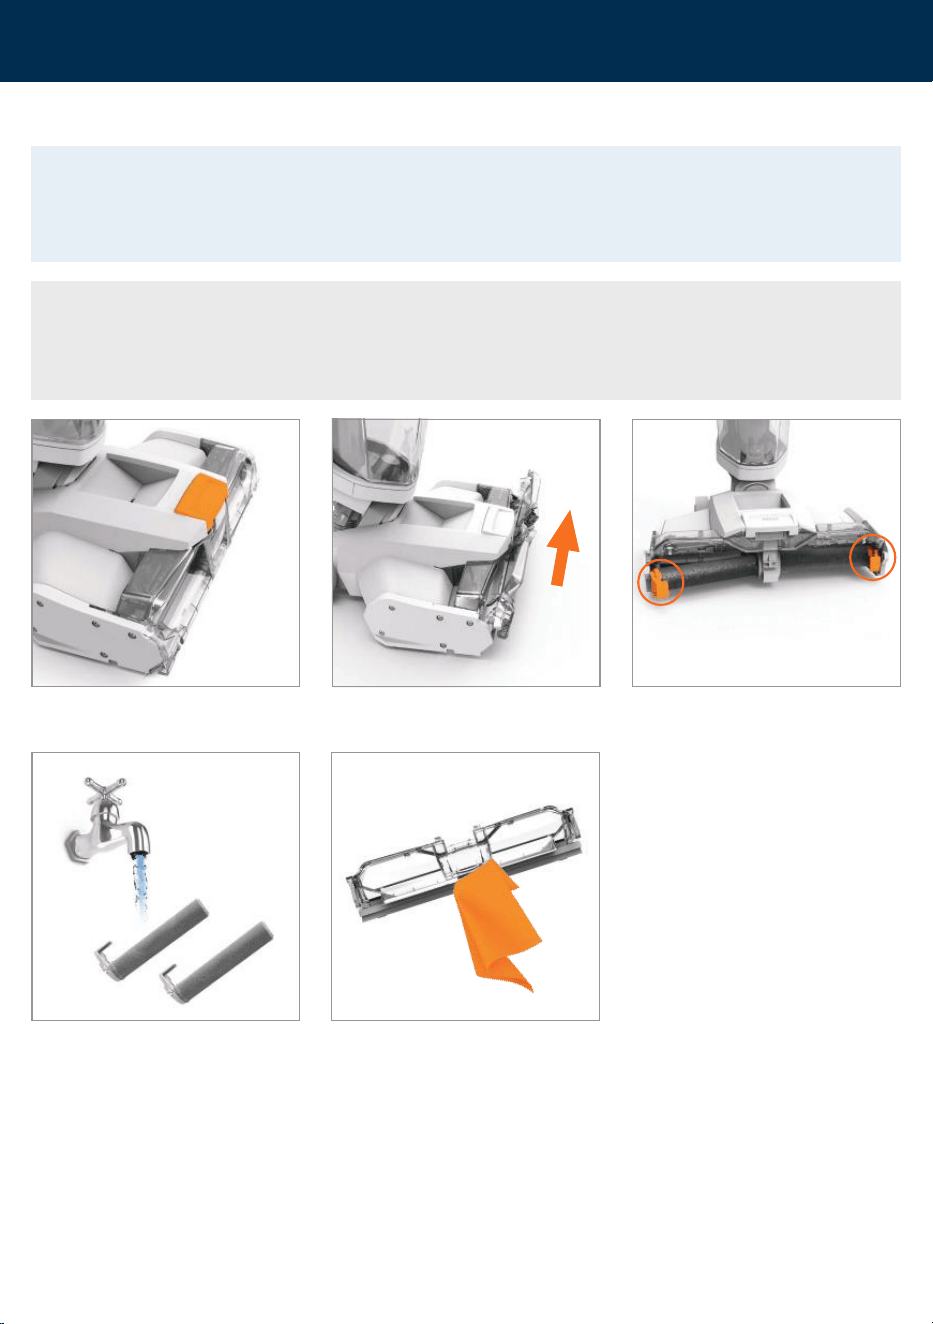
Removing and advanced cleaning of the brushrolls
IMPORTANT: Make sure both the brushrolls and brushroll cover are fitted correctly. If fitted incorrectly
this may cause poor water pick up. For best cleaning results, advanced cleaning of the brushrolls
should be done every 5-6 uses. For prolonged storage, the brushrolls should be removed, cleaned and
stored in the rinse/storage tray.
CAUTION: If the brushrolls have been obstructed, the brushroll motor protection sensor may activate.
The brushrolls will stop, the on/off button will flash for 5 seconds and the machine will cut off.
To reset, remove the brushrolls and clear any obstruction. Wait 1 minute before refitting the
brushrolls, switch the machine on and recline.
Press the brushroll cover button. Rotate and lift the brushroll cover up
to remove.
Lift and pull the tab on the outer side
of each brushroll and pull to remove.
Rinse the brushrolls and brushroll
cover in water (40˚C max). Allow
brushrolls to dry in tray storage
before refitting.
40°C
MAX
Wipe the cover, squeegee and side
wipers to remove any dried on dirt
and debris.
14
support.vax.co.uk
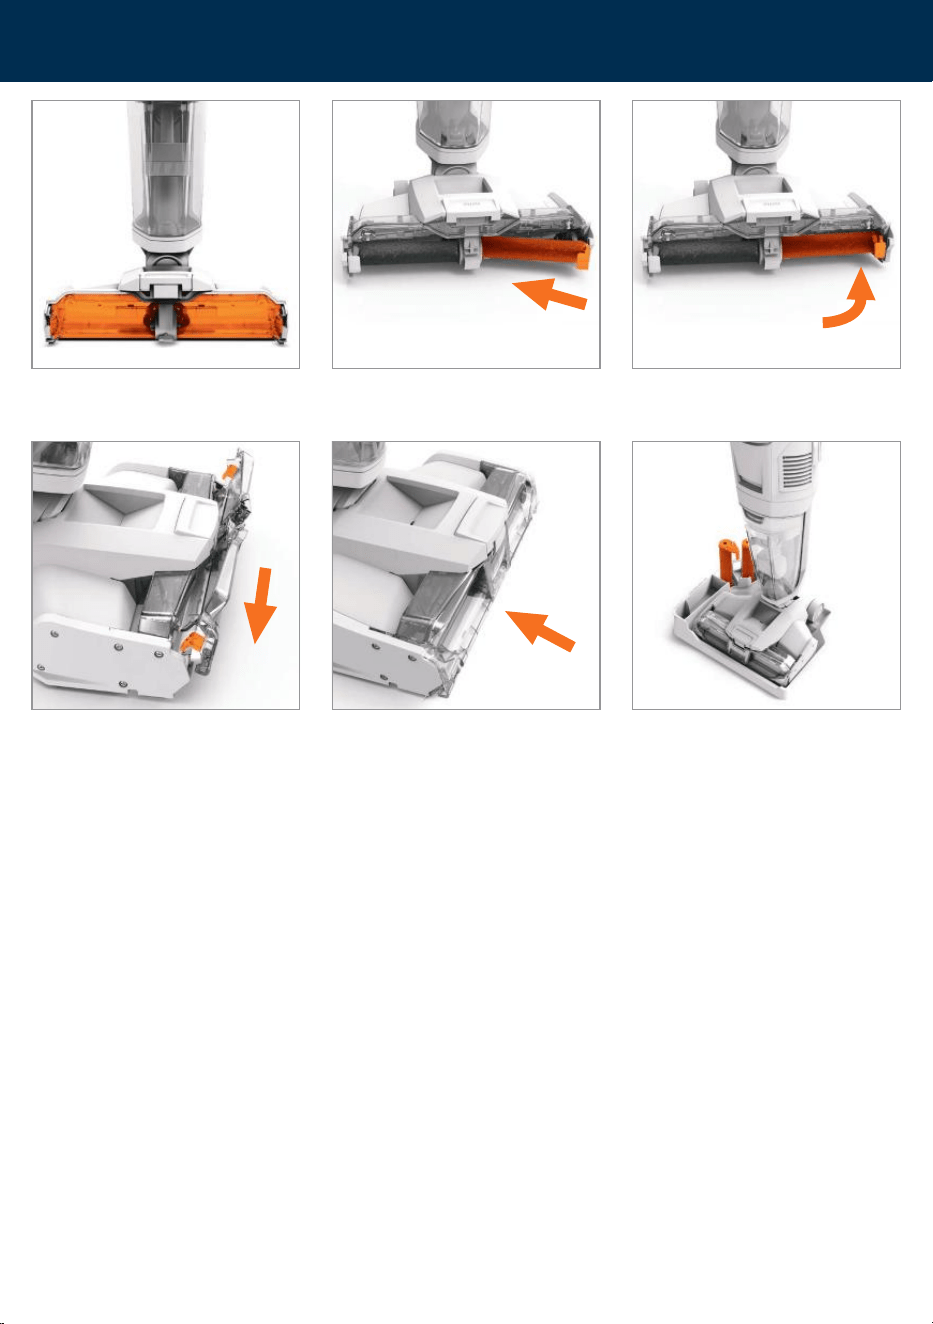
Cleaning and maintenance
To refit the brushrolls slide the end of the brushroll without the tab on to the
spindle and then push the outer side in until it clicks.
Slide the brushroll cover tabs behind the tabs on the base.
Rotate and push closed until it clicks.
Clean the brushroll housing of any dirt
and debris.
Between uses the brushrolls can be
dried and stored in the
rinse/storage tray.
15
Cleaning and maintenance
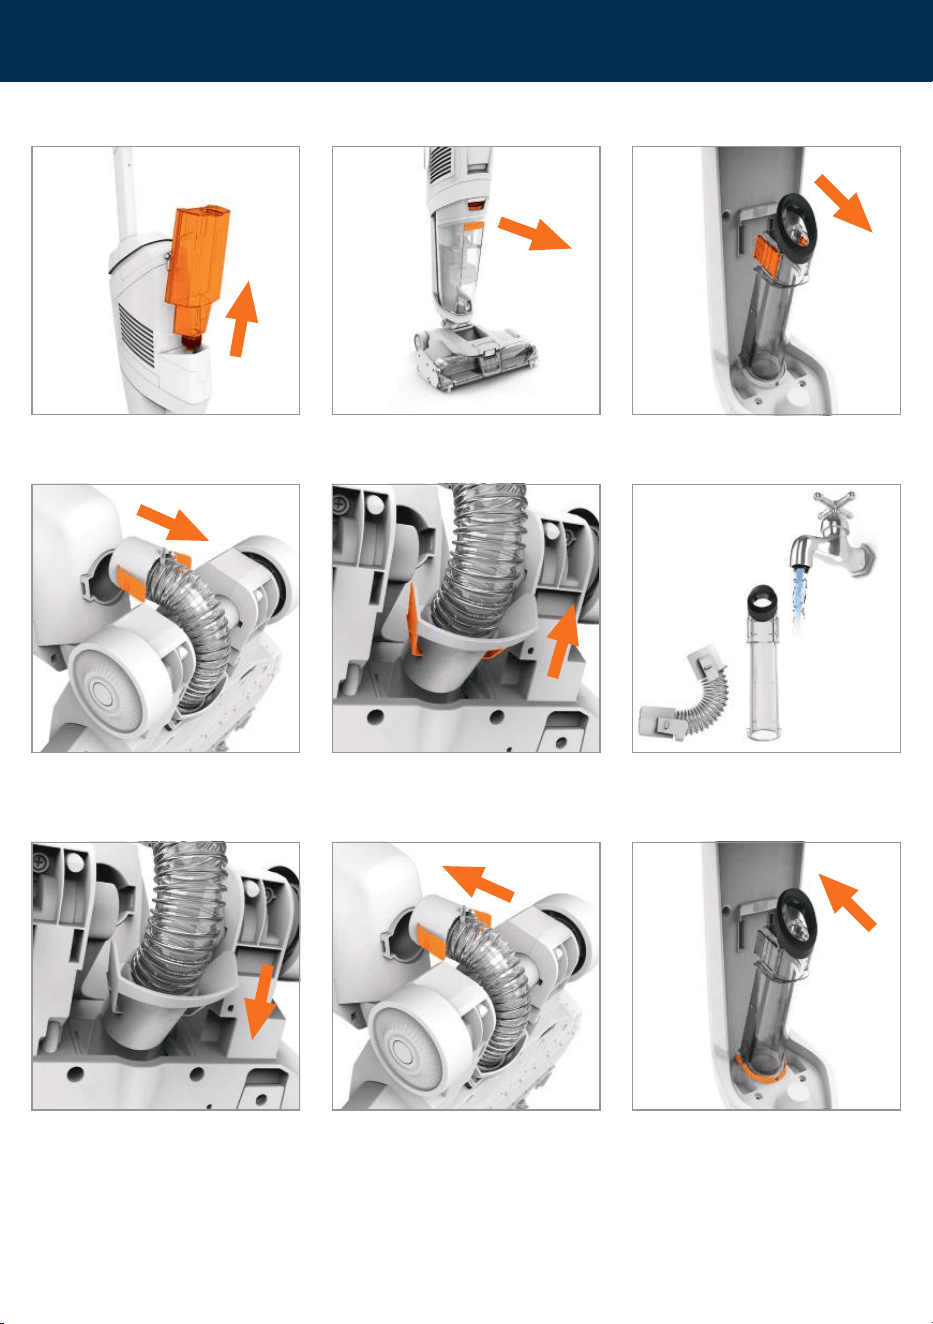
Checking for blockages and advanced cleaning
Lift to remove the water/solution tank
from the back of the machine.
Press down the dirty water tank release
button and pull the tank to remove.
Squeeze the inlet tube release clips and
pull to remove.
Lie the machine on its front. Squeeze and pull to release the hose from the top and
floorhead of the machine.
40°C
MAX
Rinse the hose and inlet tube in water
(40˚C max) to remove any dirt
and debris.
To refit the tube line up the base of the
tube to the machine and push back until
it clicks into place.
With the machine on its front, clip the bottom part of the hose into the floorhead and
the top of the hose into the machine until it clicks into place.

16
support.vax.co.uk
Cleaning and maintenance
Removing and cleaning the squeegee assembly
Using a crosshead screwdriver, remove
the 4 screws.
To refit the squeegee assembly, fit
the top tabs on the assembly into the
machine and push the screw tabs into
place.
Lift the screw tabs and pull the assembly
to remove.
Refit and tighten the 4 screws.
Rinse the assembly under water
(40˚C max). Wipe the felt strip and
squeegee to remove any dried on dirt
and debris.
Lift to remove the water/solution tank
from the back of the machine.
Press down the dirty water tank release
button and pull the tank to remove.
Lie the machine on its back.
40°C
MAX

17
Troubleshooting
There is an accessory missing
• Check the contents on the box to make sure the part is definitely included with your machine.
Why does the machine have no power?
• The battery is not fitted correctly. See Assembly page 6.
• The battery has no charge. See Charging the battery page 5.
• The motor thermostat may have tripped. Empty the dirt water tank and check for blockages. Clean the filters and allow the
machine to rest for approximately 1 hour. If you have washed the filters, wait 24 hours to fully dry before placing back on the
machine. See Emptying the dirty water tank page 10 and Cleaning the filter and separator page 11.
• The brushroll motor sensor may have been activated. To reset, remove the brushrolls and clear any obstruction. Wait 1 minute
before refitting the brushrolls. Switch the machine on and recline. See Removing and advanced cleaning of the brushrolls page 13.
• The dirty water tank is full. See Emptying the dirty water tank page 10.
• If the machine is left ON whilst locked in the upright position, the machine will go into dry roller mode. After 5 seconds the
machine will automatically switch off. Press the ON/OFF button to switch back on. See Operation page 9.
Why won’t the machine pick up?
• The float in the dirty water tank may have been activated. Empty the dirty water tank and wait for the float to settle before
re-starting the machine. See Emptying the dirty water tank page 10.
• The brushroll cover may not be correctly fitted. See Removing and advanced cleaning of the brushrolls page 13.
• The dirty water tank may not be assembled correctly or the lid may not pushed down securely. See Emptying the dirty
water tank page 10.
• Check the filter located on the dirty water tank lid for dirt and debris. Filter should be washed after every 5-6 uses, dried before
refitting and replaced every 6 months. See Cleaning the filter page 11.
• Filter is wet. Allow to dry before refitting. See Cleaning the filter page 11.
• Check for blockages and clear. See Checking for blockages and advanced cleaning page 15 and Removing and advanced cleaning
of the brushrolls page 13.
• Check separator for dirt and debris. Clean and retry. See Cleaning the separator page 11.
• Check the squeegee assembly and brushroll cover for dirt and debris. See Removing and Cleaning the squeegee assembly
page 17 and See Removing and advanced cleaning of the brushrolls page 13.
• The inlet tube is not correctly fitted. See Checking for blockages and advanced cleaning page 15.
Why won’t the solution/clean water dispense?
• Squeeze the trigger on the handle to release solution and water mix.
• The water/solution tank is empty. Refill the tank. See Filling the water/solution tank page 7.
• Make sure the solution/water tank is fitted securely. See Filling the water/solution tank page 7.
• The solution/water tank valve may be stuck, hold the water/solution tank over the sink and press the valve on the cap to release.
Why won’t the brushrolls turn?
• The machine is not reclined. Place your foot on the base and pull the handle backwards to recline. See Operation page 8.
• The brushrolls may not be correctly fitted. See Removing and advanced cleaning of the brushrolls page 13.
• The brushrolls may be obstructed. See Removing and advanced cleaning of the brushrolls page 13.
Why is the floorhead light flashing?
• The brushroll motor sensor may have been activated. To reset remove the brushrolls and clear any obstruction. Wait 1 minute
before refitting the brushrolls. Switch the machine on and recline. See Removing and advanced cleaning of the brushrolls page 13.
WARNING: Always switch off the machine and remove the battery before performing any checks
or maintenance.

18
support.vax.co.uk
Notes

19
Notes

Vax Ltd, Artillery House, Heritage Way, Droitwich, WR9 8YB, UK.
info@vax.co.uk vax.co.uk
For how-to videos and
warranty registration visit
www.vax.co.uk