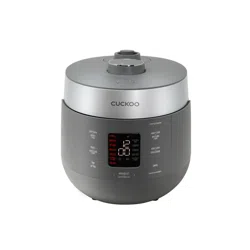
MULTI-FUNCTION ELECTRIC
TWIN PRESSURE
RICE COOKER
OPERATING INSTRUCTIONS
CRP-ST06 TOOL
1.08L(1~ 6Persons)

2
CONTENTS
ConTEnTS
BEfoRE uSInG
IMPoRTAnT SAfEGuARDS · · · · · · · · · · · · · · · · · · · · · · · · · · · · · · · · · · · · · · · · · · · · · · · · · · · 3
SPECIfICATIonS · · · · · · · · · · · · · · · · · · · · · · · · · · · · · · · · · · · · · · · · · · · · · · · · · · · · · · · · · · · · · · · · · · · · · 5
SAfETY PRECAuTIonS · · · · · · · · · · · · · · · · · · · · · · · · · · · · · · · · · · · · · · · · · · · · · · · · · · · · · · 6~7
PART IDEnTIfICATIon · · · · · · · · · · · · · · · · · · · · · · · · · · · · · · · · · · · · · · · · · · · · · · · · · · · · · · · · · · 14
HoW To CLEAn · · · · · · · · · · · · · · · · · · · · · · · · · · · · · · · · · · · · · · · · · · · · · · · · · · · · · · · · · · · · · · · 15~19
HoW To oPERATE · · · · · · · · · · · · · · · · · · · · · · · · · · · · · · · · · · · · · · · · · · · · · · · · · · · · · · · · · · · · · · · · 20
ERRoR CoDES · · · · · · · · · · · · · · · · · · · · · · · · · · · · · · · · · · · · · · · · · · · · · · · · · · · · · · · · · · · · · · · · · · · · · · 20
WHEn uSInG
HIGH PRESSuRE MoDE & non PRESSuRE MoDE
· · · · · · · · · · · · · · · · · · · · · · · · · · · · · · 21
HoW To SET oR CAnCEL VoICE GuIDE funCTIon · · · · · 22
BEfoRE CooKInG RICE · · · · · · · · · · · · · · · · · · · · · · · · · · · · · · · · · · · · · · · · · · · · · · · · · · · · · · 23
HoW To CooK · · · · · · · · · · · · · · · · · · · · · · · · · · · · · · · · · · · · · · · · · · · · · · · · · · · · · · · · · · · · · · · · 24~25
HoW To uSE “CuSToMIZED CooKInG funCTIon” · · · · · · · 26
HoW To uSE “GABA RICE (BRoWn RICE)” · · · · · · · · · · · · · · · · · 27~28
HoW To CooK HIGH PRESSuRE STEAM · · · · · · · · · · · · · · · · · · · · · · · · 29
HoW To oPEn CooK · · · · · · · · · · · · · · · · · · · · · · · · · · · · · · · · · · · · · · · · · · · · · · · · · · · · · · · · · · 30
HoW To CooK non PRESSuRE STEAM · · · · · · · · · · · · · · · · · · · · · · · · · 31
HoW To CooK BABY fooD · · · · · · · · · · · · · · · · · · · · · · · · · · · · · · · · · · · · · · · · · · · · · · · 32
HoW To CooK fRoZEn SToRED RICE · · · · · · · · · · · · · · · · · · · · · · · · · · · ·33
HoW To uSE PRESET funCTIon · · · · · · · · · · · · · · · · · · · · · · · · · · · · · · · 34~35
KEEP WARM · · · · · · · · · · · · · · · · · · · · · · · · · · · · · · · · · · · · · · · · · · · · · · · · · · · · · · · · · · · · · · · · · · · · · 36~37
BEfoRE ASKInG foR SERVICE
TRouBLESHooTInG · · · · · · · · · · · · · · · · · · · · · · · · · · · · · · · · · · · · · · · · · · · · · · · · · · · · · · 38~40
CooKInG GuIDE
CooKInG GuIDE · · · · · · · · · · · · · · · · · · · · · · · · · · · · · · · · · · · · · · · · · · · · · · · · · · · · · · · · · · · · · 41~56
목차
한국어 사용설명서
IMPORTANT SAFEGUARDS
· · · · · · · · · · · · · · · · · · · · · · · · · · · · · · · · · · · · · · · · · · · 3
제품규격
· · · · · · · · · · · · · · · · · · · · · · · · · · · · · · · · · · · · · · · · · · · · · · · · · · · · · · · · · · · · · · · · · · · · · · · · · · · · · · · · · · · 5
안전상의 경고
· · · · · · · · · · · · · · · · · · · · · · · · · · · · · · · · · · · · · · · · · · · · · · · · · · · · · · · · · · · · · · · · · · · · · 8~9
각 부분의 이름
· · · · · · · · · · · · · · · · · · · · · · · · · · · · · · · · · · · · · · · · · · · · · · · · · · · · · · · · · · · · · · · · · · · · · 57
기능 조작부의 이름과 역할
· · · · · · · · · · · · · · · · · · · · · · · · · · · · · · · · · · · · · · · · · · · · · · 58
기능 표시부의 이상점검 기능
· · · · · · · · · · · · · · · · · · · · · · · · · · · · · · · · · · · · · · · · · · 58
고압모드 또는 무압모드 선택 방법
· · · · · · · · · · · · · · · · · · · · · · · · · · · · · · · · 59
취사는 이렇게 하십시오
· · · · · · · · · · · · · · · · · · · · · · · · · · · · · · · · · · · · · · · · · · · · · · · · · · · · 60
취사/자동세척은 이렇게 하십시오
· · · · · · · · · · · · · · · · · · · · · · · · · · · · · · · · · 61
오픈 쿠킹은 이렇게 하십시오
· · · · · · · · · · · · · · · · · · · · · · · · · · · · · · · · · · · · · · · · · · 62
예약 취사는 이렇게 하십시오
· · · · · · · · · · · · · · · · · · · · · · · · · · · · · · · · · · · · 63~64
目录
中文使用说明书
IMPORTANT SAFEGUARDS
· · · · · · · · · · · · · · · · · · · · · · · · · · · · · · · · · · · · · · · · · · · · · · · · · · 3
规格
· · · · · · · · · · · · · · · · · · · · · · · · · · · · · · · · · · · · · · · · · · · · · · · · · · · · · · · · · · · · · · · · · · · · · · · · · · · · · · · · · · · · · · · · · · · · 5
安全警告
· · · · · · · · · · · · · · · · · · · · · · · · · · · · · · · · · · · · · · · · · · · · · · · · · · · · · · · · · · · · · · · · · · · · · · · · · · · 10~11
产品部件名称
· · · · · · · · · · · · · · · · · · · · · · · · · · · · · · · · · · · · · · · · · · · · · · · · · · · · · · · · · · · · · · · · · · · · · · · · · 65
功能操作部名称及作用
· · · · · · · · · · · · · · · · · · · · · · · · · · · · · · · · · · · · · · · · · · · · · · · · · · · · · · · · 66
功能显示部异常检测功能
· · · · · · · · · · · · · · · · · · · · · · · · · · · · · · · · · · · · · · · · · · · · · · · · · · · · 66
高压模式或无压模式选择方法
· · · · · · · · · · · · · · · · · · · · · · · · · · · · · · · · · · · · · · · · · · · · 67
煮饭方法
· · · · · · · · · · · · · · · · · · · · · · · · · · · · · · · · · · · · · · · · · · · · · · · · · · · · · · · · · · · · · · · · · · · · · · · · · · · · · · · · · 68
煮饭/自动洗涤方法
· · · · · · · · · · · · · · · · · · · · · · · · · · · · · · · · · · · · · · · · · · · · · · · · · · · · · · · · · · · · · · · 69
中途加料请这样操作
· · · · · · · · · · · · · · · · · · · · · · · · · · · · · · · · · · · · · · · · · · · · · · · · · · · · · · · · · · · · 70
预约煮饭的方法
· · · · · · · · · · · · · · · · · · · · · · · · · · · · · · · · · · · · · · · · · · · · · · · · · · · · · · · · · · · · · · 71~72
TABLE DES MATIÈRES
MAnuEL D'uTILISATIon fRAnçAIS
MESuRES DE PRoTECTIon IMPoRTAnTES · · · · · · · · · · · · · · · · · · · · · 4
SPÉCIfICATIonS · · · · · · · · · · · · · · · · · · · · · · · · · · · · · · · · · · · · · · · · · · · · · · · · · · · · · · · · · · · · · · · · · · · · · 5
MESuRES DE SÉCuRITÉ · · · · · · · · · · · · · · · · · · · · · · · · · · · · · · · · · · · · · · · · · · · · · · · 12~13

3
www.cuckooamerica.com
IMPORTANT SAFEGUARDS
ADDITIONAL IMPORTANT SAFEGUARDS
SAVE THESE INSTRUCTIONS
THIS APPLIANCE IS FOR HOUSEHOLD USE ONLY
1. Read all instructions before using this appliance.
2. Do not touch hot surfaces. Use handles or knobs.
3. To protect against fire, electric shock and / or injury to persons do not immerse cord, plugs, or Pressure
Cooker Body in water or any other liquid.
4. Close supervision is necessary when this appliance is used by or near children. This appliance is not
intended for use by young children without supervision.
5. Unplug cord from outlet when not in use and before cleaning.
Allow appliance to cool before putting on or taking off parts, and before cleaning the appliance.
6. Do not operate any appliance with a damaged cord or plug, after the appliance malfunctions, or has
been damaged in any manner. Return the appliance to the nearest authorized service facility for
examination, repair or adjustment.
7. The use of accessory attachments not recommended by the appliance manufacturer may result in fire,
electric shock, and / or injury to persons.
8. If the supply cord is damaged, it must be replaced by a special cord or assembly available from the
manufacturer or your service agent.
9. Do not use outdoors.
10. Do not let the cord hang over the edge of a table or counter, or touch hot surfaces.
11. Do not place on or near a hot gas, electric burner, or in a heated oven.
12. Always attach the plug to the appliance first, then plug the cord into the wall outlet. To disconnect, or
set all control to “off”, then remove the plug from the wall outlet.
13. Do not use this appliance for other than its intended use.
14. Extreme caution must be used when moving an appliance containing hot oil or any hot liquids.
15. Oversized foods, metal foil packages, or utensils must not be inserted into the appliance as they are a
risk of fire or electric shock.
16. Fire may occur if the appliance is covered or touching flammable material, including curtains, draperies,
walls, etc while in operation.
17. To reduce the risk of electric shock, cook only in the provided removable container.
18. This appliance cooks under pressure. Improper use may result in scalding injury.
Before operating the unit, properly secure and close the unit. See “Operating Instructions.”
19. Do not cook foods such as applesauce, cranberries, cereals, macaroni, spaghetti, or other foods.
These foods tend to foam, froth, and sputter, and may block the pressure releasing device
20. Before use always check the pressure releasing device for clogging.
21. Do not open the pressure cooker until the unit has cooled and internal pressure has been reduced.
See “Operating Instructions.”
22. Do not use this pressure cooker to fry in oil.
WARNING : This appliance generates heat and releases steam during use. Use proper precaution to
prevent risk of burns, fires, other injuries, or damage to property.
1. Keep hands and face away from the Pressure Release Valve when releasing pressure.
2. Take extreme caution when opening the Lid after cooking. Severe burns can result from steam inside.
3. Never open the Lid while the unit is in operation.
4. Do not use without the inner Pot in place.
5. Do not cover the Pressure Valve with anything as an explosion may occur.
6. Do not touch the inner pot nor any heating parts, immediately after use.
Allow the unit to cool down completely first.
This appliance is intended to be used in household and similar applications such as :
- staff kitchen areas in shops, offices and other working environments;
- farm houses;
- by clients in hotels, motels and other residential type environments;
- bed and breakfast type environments.

4
MESURES DE PROTECTION IMPORTANTES
MESURES DE PROTECTION SUPPLÉMENTAIRES
CONSERVEZ CES INSTRUCTIONS
CET APPAREIL EST DESTInÉ À un uSAGE DoMESTIQuE unIQuEMEnT
1. Lisez toutes les instructions avant d'utiliser cet appareil.
2. Ne touchez pas les surfaces chaudes. Utilisez les poignées ou les boutons.
3. Pour prévenir les risques d'incendie, les chocs électriques et/ou les blessures, ne plongez pas le cordon, les prises ou
le corps autocuiseur dans l'eau ou tout autre liquide.
4. Une surveillance étroite est nécessaire quand cet appareil est utilisé par des enfants ou qu'il se situe à leur portée.
Cet appareil n'est pas prévu pour être utilisé par de jeunes enfants sans surveillance.
5. Débranchez le cordon de la prise lorsque vous ne vous servez pas de l'appareil et avant de le nettoyer. Laissez
l'appareil refroidir avant de remettre en place ou de retirer des pièces, et avant de le nettoyer.
6. N'utilisez aucun appareil si le cordon ou la fiche est endommagé, s'il ne fonctionne pas correctement ou s'il est
endommagé de quelque façon que ce soit. Renvoyez l'appareil à un centre technique agréé le plus proche pour le
faire examiner, réparer ou régler.
7. L'utilisation d'accessoires non recommandés par le fabricant peut causer un incendie, un choc électrique et/ou des
blessures.
8. Si le cordon d'alimentation est endommagé, il doit être remplacé par un cordon ou ensemble prévu à cet effet,
disponible auprès du fabricant ou de réparateurs agréés.
9. N'utilisez pas l'appareil à l'extérieur.
10. Ne laissez pas le cordon pendre d'une table ou d'un comptoir. Ne le laissez pas non plus en contact avec une
surface chaude.
11. Ne placez pas l'appareil au-dessus ou près d'un brûleur à gaz, sur une plaque électrique ou dans un four chaud.
12. Branchez toujours la fiche sur l'appareil en premier, puis branchez le cordon dans la prise murale. Pour débrancher,
ou désactiver toutes les commandes, retirez la fiche de la prise murale.
13. N'utilisez pas cet appareil à des fins autres que celles pour lesquelles il a été conçu.
14. Une prudence extrême est requise lorsque vous déplacez l'appareil contenant de l'huile chaude ou tout autre liquide chaud.
15. Des denrées alimentaires de taille excessive, les emballages sous feuille métallique, ou les ustensiles ne doivent pas
être insérés dans l'appareil car ils constituent un risque d'incendie ou de choc électrique.
16. Un incendie peut se déclarer si l'appareil est couvert ou en contact avec des matériaux inflammables, y compris des
rideaux ou des draperies, des murs, etc durant son fonctionnement.
17. Afin de réduire le risque de choc électrique, faites cuire uniquement dans le récipient amovible fourni.
18. Cet appareil cuit sous pression. Un mauvais usage peut entraîner des brûlures. Avant d'utiliser l'appareil, mettez
l'appareil bien en place et fermez-le. Reportez-vous à la section « Instructions d'utilisation ».
19. Ne cuisinez pas des aliments tels que compotes de pommes, canneberges, céréales, macaronis, spaghettis ou
autres. Ces aliments ont tendance à mousser, écumer et à crépiter et peuvent obstruer le dispositif de relâchement
de la pression.
20. Avant toute utilisation, vérifiez toujours si le dispositif de relâchement de la pression est obstrué.
21. N'ouvrez pas l'autocuiseur jusqu'à ce que l'appareil ait refroidi et que la pression interne ait diminué. Reportez-vous à
la section « Instructions d'utilisation ».
22. N'utilisez pas cet autocuiseur pour faire frire dans de l'huile.
AVERTISSEMENT :
Cet appareil génère de la chaleur et libère de la vapeur durant son fonctionnement. Utilisez les protections
appropriées pour prévenir le risque de brûlures, d'incendies, de blessures ou de dégâts matériels.
1. Gardez vos mains et votre visage à l'écart de la soupape de décharge lors du relâchement de la pression.
2. Faites extrêmement attention lors de l'ouverture du couvercle après la cuisson. La vapeur à l'intérieur peut
provoquer des brûlures graves.
3. N'ouvrez jamais le couvercle lorsque l'appareil est en fonctionnement.
4. N'utilisez pas l'appareil sans la cuve de cuisson à sa place.
5. Ne recouvrez pas la soupape de pression par un objet quelconque, une explosion pourrait survenir.
6. Ne touchez pas la cuve de cuisson ni les éléments chauffants immédiatement après utilisation. Laissez tout d'abord
l'appareil refroidir complètement. Cet appareil est prévu pour être utilisé à la maison à des fins telles que :
- la cuisine pour le personnel dans des magasins, des bureaux et d'autres environnements de travail;
- les fermes;
- par des clients dans des hôtels, des motels et autres environnements de type résidentiel;
- des environnements de type chambres d'hôtes.

5
www.cuckooamerica.com
HOW TO USE EXTENSION CORD / COMMENT UTILISER UNE RALLONGE
SPECIFICATIONS / 제품규격/ 规格/ SPÉCIFICATIONS
HOW SERVICE IS HANDLED / MISE EN OEUVRE DU SERVICE
Note:
A. A short power-supply cord (or detachable power-supply cord) is provided to reduce the risk resulting from becoming
entangled in or tripping over a longer cord.
B. Longer detachable power-supply cords or extension cords are available and may be used if care is exercised in their use.
C. If a longer detachable power-supply cord or extension cord is used:
(1) The marked electrical rating of the cord set or extension cord should be at least as great as the electrical rating of the appliance;
(2) The cord should be arranged so that it will not drape over the countertop or tabletop where it can be pulled on by
children or tripped over unintentionally; and
(3) If the appliance is of the grounded type, the cord set or extension cord should be a grounding-type 3-wire cord
This appliance has a polarized plug : (one blade is wider than the other).
As a safety feature, this plug will fit in a polarized outlet only one way.
If the plug does not properly fit in the outlet, turn the plug over.
If it still does not fit, contact a qualified electrician. Do not attempt to modify the plug in any way
Please, keep this safety feature.
Remarque:
A.
Uncordond'alimentation court(ou détachable)vousest fourni pour réduire le risque de blessure personnelle en
vousempêtrantouen trébuchant dansun cordon plus long.
B. Des rallonges ou cordons détachables sont disponibles et peuvent être utilisés si manipulé avec précaution.
C. En cas d’utilisation d’un cordon détachable ou d’une rallonge:
(1) La puissance électrique indiquée sur la rallonge doit être au moins aussi élevée que la puissance de l'appareil
(2) La rallonge doit être disposée de manière à ne pas reposer sur le comptoir ou sur la table lorsqu'elle peut être tirée par un enfant.
(3)Sil'appareil estun modèle avecprisedeterre,larallonge doitêtreà troisconducteurs avec neutre.
Cet appareil est muni d'une prise polarisée (une lame est plus large que l'autre).
Par mesure de sécurité, ce cordon ne se branche dans une prise polarisée que d'une seule manière.
Sil’embout de l’appareil n'entrepas correctement danslaprise, inversez saposition.
Si le branchement de l'appareil n'est toujours pas possible,veuillez contacter un électricien qualifié. Ne tentez en
AUCUNE façon de modifier l'embout électrique (la fiche) de l'appareil.
Veuillez respecter cette mesure de sécurité.
Model name/型号名称/모델명
CRP-ST06 TOOL
Power supply/电源/전원
AC120V, 60Hz
Power consumption/功耗/소비전력
880W
Cooking capacity
White Rice
1~6cups (0.18 ~ 1.08L)
High Heat White Rice
Super Turbo White Rice
1~4cups (0.18~0.72L)Mixed Rice
High Heat Mixed Rice
GABA Rice
1~4cups (0.18~0.72L)
High Heat GABA Rice
non Pressure White Rice, Veggie Rice
1~4cups (0.18~0.72L)
frozen Stored Rice
Power cord length/电源线长度/전원코드길이
4.3ft (1.3m)
Pressure/压力/사용압력
78.4KPa(0.8kgf/㎠)
Weight/重量/중량
12.8lbs (5.8kg)
Dimension/尺寸/치수
Width/宽度/폭
10.3inch (261mm)
Length/长度/길이
13.9inch (354mm)
Height/高度/높이
10.4inch (265mm)
The East and the Central Districts
Tel. No. 718 888 9144
The West and the Central Districts
Tel. No. 323 780 8808
USA
TORONTO
Tel. No. 905 707 8224
VANCOUVER
Tel. No. 604 540 1004
Canada
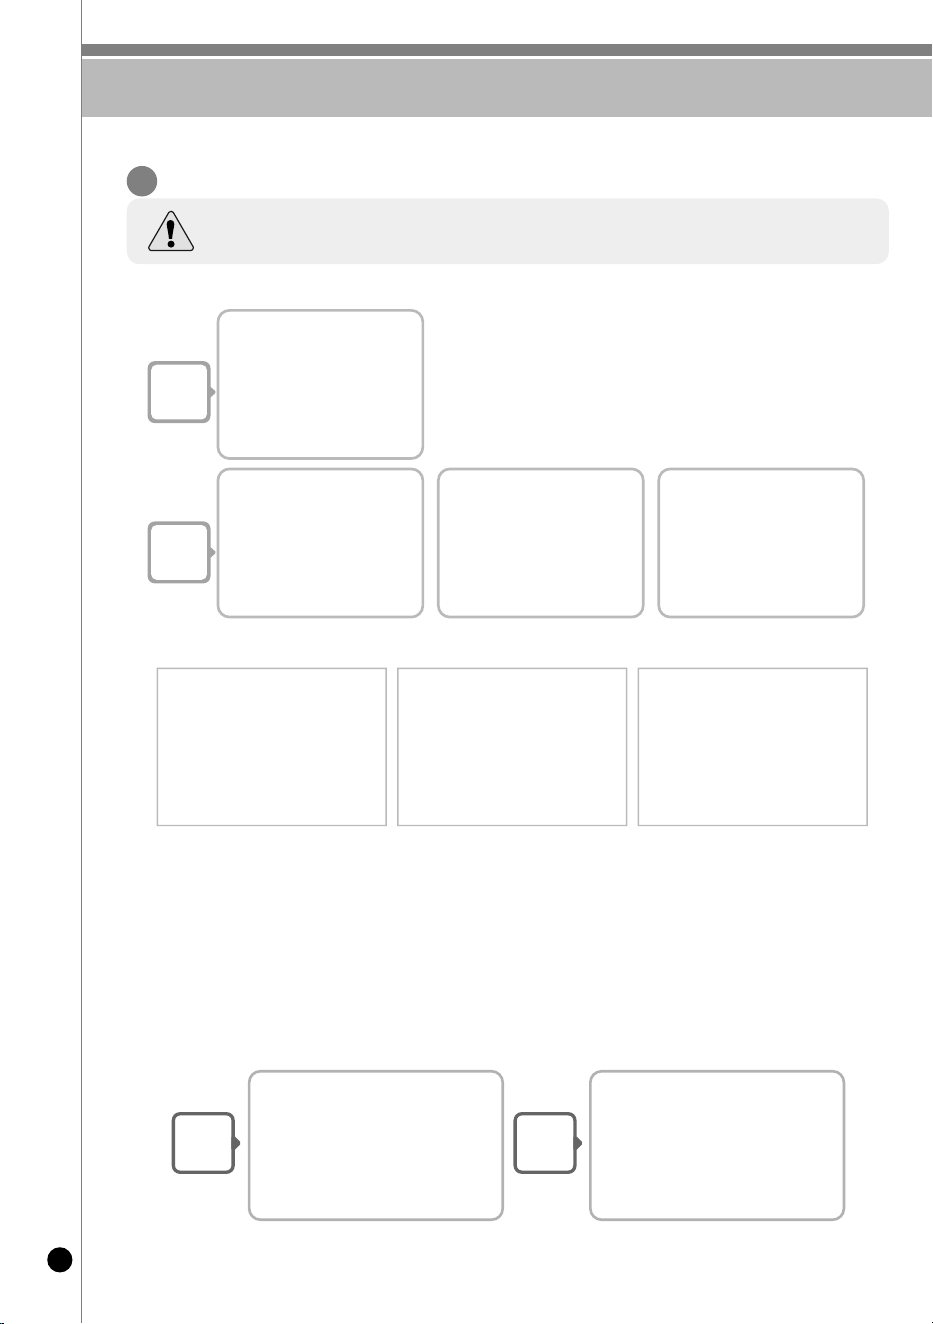
SAFETY PRECAUTIONS
6
●
Read the following product safety guide carefully to prevent any accidents and/or serious danger.
●
‘Warning’ and ‘Caution’ are different as follows.
Do not cover the automatic steam outlet or pressure
weight with your hand or face.
•It can cause burns.
•Especially be careful to keep it out of children’s reach.
Do not use the cooker near hot places such as stove,
and avoid direct sunlight.
•It can cause an electric shock, fire, deformation,
malfunction, or discoloration. Please check the power cord
and plug frequently.
Do not alter, reassemble, disassemble or repair.
•It can cause fire, electricshock or injury.
•For repair, contact dealeror the service center.
use a single socket with the rated current above 15A.
•Using several lines in one socket can cause overheating or
fire. Please check the power cord and plug frequently.
•Use an extension cord with the rated current above 15A.
Please pay careful attention against water and chemicals.
•It can cause an electric shock or fire.
Do not use a rice cooker at a place where dust is
trapped or chemical material is located.
•Do not use any combustible gas or flammable materials
nearby a product.
•It can cause explosion or fire.
Do not use damaged power cord, plug, or loose socket
.
•Please check the power cord frequently for damage.
•Serious damage can cause electric shock or fire.
•If the plug is damaged, contact the dealer or a service center.
Do not clean the product with water or any liquid types.
•It can cause an electric shock or fire.
•If it contacts water, please separate power cord and
contact dealer and service center.
Do not cover the automatic steam outlet or pressure
weight with a duster, a towel, or apron, etc.
•It can cause deformation or a breakdown.
•It can cause an explosion by pressure.
Do not use pots that are not designed for the cooker.
Do not use other pots and do not use without inner pot.
•It can cause an electric shock or fire.
Do not use the cooker without inner pot.
•It can cause electric shock or malfunction.
•Do not pour rice or water without the inner pot.
•If rice or water gets inside the body then do not turn the product
over or shake it please contact to dealer or service center.
Do not press the clamp knob button or turn the
lock/unlock handle to “non PRESSuRE” while cooking.
•If the appliance is opened by force, it can cause burns and
an explosion.
•
Use the lock/unlock handle after the steam is completely exhausted.
Turn the Lock/unlock handle to “HIGH PRESSuRE” position
and do not close the lid with the inner pot inside the machine.
•
Deformation or damage of the lock and inner pot can cause
steam leakage or explosion.
Do not insert metal objects such as pins and wires or
any other external substances in the automatic
steam exhaust outlet or any other slot.
•It can cause an electric shock or fire.
•Especially be careful to keep it out of reach of children.
Keep the cooker out of reach of children.
•It can cause burns, electric shock or injury.
Don’t spray or put any insecticides or chemicals.
•It can cause an electric shock or fire.
•If cockroaches or any insects get inside the cooker, please
call a dealer or a service center.
Do not put any needle, cleaning pin etc in the
ventilator or any gap of the cooker.
•Do not insert cleaning pins to other parts except to the valve
hole of the pressure weight.
•It can cause an electric shock or fire.
Do not open the LID during heating and cooking.
•It can cause burns.
•If you need to open the lid while cooking, keep pressing the
cancel button for 2 seconds and confirm internal steam is
released, completely turning the pressure weight over.
Do not bend, tie or pull the power cord.
•It can cause an electric shock or short circuit resulting in fire.
Please check the power cord and plug frequently.
Do not over unplug and plug the power cord excessively.
•It can cause fire, electric shock or injury.
Be careful that both the plug and power cord are not to
be bit by animals, or pierced by sharp metal materials.
•Damages by impact can cause an electric shock or fire.
Please check the power cord and plug frequently.
Remove external substances on plug with a clean cloth.
•It can cause fire.
Please check the power cord and plug frequently.
Warning Do not
This means that the action it describes
may result in death or severe injury.
Warning
•
This sign is intended to remind and alert that something may
cause problems under the certain situation.
• Please read and follow the instruction to avoid any harmful situation.
• Indicates a prohibition
• Indicates an instruction
This means that the action it describes
may result in injury or property damage.
Caution
SAFETY PRECAUTIONS
7
www.cuckooamerica.com
english
Do not use on a rice container or a shelf.
•
Do not place the power cord between furnitures. It can cause an electric shock resulting in fire.
•
When the rice cooker is on the furniture, be cautious of steam release. It can damage the
furniture, cause fire, and/or electric shock
Do not place heavy things on the power cord.
•
It can cause an electric shock or fire.
•
Please check the power cord and plug frequently
Do not change, extend or connect the power cord without the advice of a technical expert.
•
It can cause an electric shock or fire.
Clean any dust or external substances off
the temperature sensor and inner pot.
•
It can cause a system malfunction or fire.
Do not plug or pull the power cord with wet hands.
•
It can cause an electric shock.
Do not move the product by pulling or using the power cord.
•
Electric short might cause fire.
Don't use the inner pot for various purposes.
•It can cause deformation of the inner pot.
•The content of the inner pot might be spilled.
Please call customer service if the inner pot coating peels off.
•Inner pot coating may wear away after long use.
•When cleaning the inner pot, do not use tough scrubber,
metallic scrubber, brush, abrasive metallic etc.
Recommended type of scrubber to clean the inner pot (inside, outside)
•
If you use the unavailable scrubber, the coating of the inner
pot may wear away.
•
If the coating of the inner pot gets scratched or wears away by customers’
mistake, you have to pay for the repair even during the free repair service period.
Do not place on rough top or tilted top.
•
It can cause burns or breakdowns.
•
Be careful to install the power cord to pass without disruption.
Please contact a dealer or service center when there is
a strange smell or smoke.
•
First pull out the power cord. And contact dealer or the service center
Do not use over the maximum capacity.
•It can cause product malfunction.
•
Do not cook over capacity stated for cooking of chicken soup and congee.
Do not use the cooker near magnetic field.
•It can cause burns or breakdown.
Do not drop the cooker.
•It can cause a safety problem.
After cooking, do not try to open the lid until the steam is fully released.
•
The hot steam or any hot content within the cooker can cause burns.
•
Cautiously open the lid after cooking is done to avoid dangerous steam and burns.
Do not put rice on a plate using metallic spoon or rice
scoop instead of plastic or wooden rice scoop.
•
It can cause damage to the surface of the inner pot and the coating can wear away.
•
If the coating of the inner pot gets scratched or wears away by customers’
mistake, you have to pay for the repair even during the free repair service period.
Do not touch the inner pot, inside of the cooker, heat plate
and pressure weight during or after cooking or warming.
•
It can cause burns or scalding.
•
If the pressure weight gets tilted, released steam can cause burns.
Do not hold the cooker by the inner pot handle.
•It can cause problems and danger. There are portable
handles on the bottom right and left side of the cooker.
Hold the handles with both hands and move it carefully.
use AC 120V only.
•
It can cause electric shock and fire.
•
It can cause malfunctions.
use the product on flat surfaces. Do not use on a cushion.
Please avoid using it on an unstable location prone to falling down.
•
It can cause malfunction or a fire. Please check the power cord and plug frequently.
Do not exceed the designated amount while cooking.
•
If you exceed the amount of food that is designated in the recipe,
it can cause overflow because of pressure weight and soft steam cap
Please use the cooker for original purposes.
•It can cause the malfunction or smell.
Please pull out the plug when not in use.
•It can cause electric shocks or fire.
Available Unavailable
Cotton scrubber, sponge, scrubber, extra-fine type, net scrubber
Blue, green scrubber (abrasive type), steel, stainless scrubber, other metallic scrubber
Warning
Remember
Caution
Remember
Caution
Do not
Turn the lock/unlock handle to “HIGH PRESSuRE”
when the appliance is unplugged.
•
The internal pressure due to heated rice or Inner Pot can cause deformation
or damage, if the lock/unlock handle is not in “Locked” position.
•
Make sure to lock the lock/unlock handle during cooking and warming with high pressure.
Wipe off any excessive water on the cooker after cooking.
•
It can cause odor and discoloration.
•
Wipe off water that is left behind from dew.
Please contact the dealer or service center when the unit is not working properly.
In case of a blackout during cooking, steam from a rice cooker will be
released automatically. Thus, the quality of rice is lower than normal.
•Please start cooking rice using the indicated amount of water.
•Water can overflow if the amount of water in a pot exceeds
the indicated level of water usage.
•
Please start cooking in a status that steam control cap is installed ompletely.
When cooking food with bones, such as braised short ribs, please
season the meet on a different plate.
•The coating of the Inner Pot may wear away.
•If the coating of the inner pot gets scratched or wears away by
customers’ mistake, you have to pay for the repair even during the
free repair service period.
Please clean the body and other parts after cooking.
•
After cooking chicken soup or, multi cook dishes, etc., the smell may be absorbed.
•
Clean the oven packing, top heater plate and inner pot every time you cook any of those.
•
Use dry kitchen cleaner or sponge to clean the inner pot, since rough scrub or
metallic ones are abrasive to the coating.
•
Depending on the using methods or user's circumstances inner pot
coating might rise. Please call the customer service for those cases.
Be cautious when steam is being released.
•
When the steam is released don't be surprised.
•
Please keep the cooker out of reach of children.
If it is possible, use warming function for white rice onLY.
When you pull out the power plug, don’t pull the power cord
by force. Please, safely pull out the power plug.
•
If you inflict impact on power cord, it can cause an electric shock or fire.
Please rinse rice and place it in another plate and do not knock
on the inner pot to brush off the remaining rice in the plate.
•
If the coating of the inner pot gets scratched or wears away by
customers’ mistake, you have to pay for the repair even during the
free repair service period.

안전상의 경고
8
●
‘안전상의 경고’는 제품을 안전하고 올바르게 사용하여 사고나 위험을 미리 막기 위한 것이므로 반드시 지켜 주십시오.
●
‘안전상의 경고’는 ‘경고’와 ‘주의’의 두가지로 구분되어 있으며 ‘경고’와 ‘주의’의 의미는 다음과 같습니다.
피하지 않을 경우 사망이나 중상을
초래할 수 있는 잠재적인 위험상황
경고
주의
•
이 기호는 특정조건하에서 위험을 끼칠 우려가 있는 사항에
초래할 수 있는 잠재적인 위험상황 대하여 주의를 환기시키는 표시입니다.
•
위험 발생을 피하기 위해 주의깊게 읽고 지시에 따라 사용하십시오.
•
이 기호는 어떤 행위를 ‘금지’하는 표시입니다.
•
이 기호는 어떤 행위를 ‘지시’하는 표시입니다.
피하지 않을 경우 경상을 초래할 수
있는 잠재적인 위험상황
사용중 압력추 및 자동증기 배출구에는 손과 얼굴을 가까이 하지
마십시오.
•
화상의 우려가 있습니다. 취사중 나오는 증기는 매우 뜨거우므로 손이나 얼굴을 가까이 하지 마십시오.
•
특히 어린이의 접근을 막아 주십시오.
제품을 직사광선이 쬐는 곳, 가스레인지, 라이터, 전열기구 풍로 등의
가까이에서 사용하지 마십시오.
•
전기누전, 감전, 변형, 변색 및 화재의 원인이 됩니다.
•
전원코드를 열기구 가까이 두지 마십시오. 코드피복이 녹아 화재, 감전의 원인이
됩니다. 수시로 전원코드의 상태를 꼭 확인하십시오.
제품을 분해하거나 개조하지 마십시오.
•
화재 및 감전의 원인이 됩니다.
•
서비스기사 이외의 사람이 분해하거나 수리하지 마십시오. 수리 및 고장 상담은
고객상담실로 문의하여 주십시오.
반드시 정격 15A 이상의 접지 단자가 있는 교류 120V 전용 콘센트에서만
사용해 주시고 한 콘센트에 여러 제품의 전원플러그를 동시에 꽂아 사용
하지 마십시오.
•
여러 제품과 함께 사용하거나, 다른 기구에 사용하면 발열 및 발화, 감전의 원인이
됩니다. 수시로 콘센트 상태를 꼭 확인하십시오.
•
전원플러그에 이물질이나 물기가 묻어 있는 경우에는 잘 닦은 다음 사용하십시오.
•
연장코드도 15A이상의 것을 사용하여 주십시오.
싱크대, 목욕탕 등 제품에 물이 들어 갈 수 있는 곳이나, 눈을맞을 수
있는 실외에서 사용하지 마십시오.
•
전기 누전 및 감전의 위험이 있습니다.
•
제품에 물이 들어 갔을 경우에는 고객상담실로 꼭 문의 하십시오.
먼지가 많은 곳이나 화학성 물질이 있는 곳에서는 사용하지 마십시오.
•
제품 근처에서 가연성 가스나 인화성 물질 등을 사용하지 마십시오.
•
폭발 및 화재의 원인이 됩니다.
전원코드나 전원플러그가 파손되었거나 콘센트가 흔들릴 때는 사용을
중지하고, 고객상담실로 문의바랍니다.
•
제품 사용 중 사용상의 부주의로 전원 코드의 피복이 벗겨지거나 찍힐 경우 화재
및 감전의 원인이 될 수 있으니, 수시로 전원코드와 전원플러그, 콘센트의 상태를
꼭 확인하십시오.
•
전원코드나 전원플러그가 파손된 경우에는 위험이 생기지 않도록 하기 위하여 제조자나
그 판매점 또는 유자격 기술자(서비스 기사)에 의해 코드 교환을 하십시오.
•
반드시 지정된 서비스 센터에서 수리하시기 바랍니다.
제품을 싱크대에 넣고 닦거나 제품 내부에 물을 넣지 마십시오.
•
전기 누전 및 감전, 화재의 원인이 됩니다.
•
제품에 물이 들어간 경우에는 사용을 중지하고 전원플러그를 뽑은 다음 고객
상담실로 문의하여 주십시오.
압력추 및 자동증기배출구를 막거나 증기구에 행주나 장식용 덮개, 기타
물건을 올린 채 사용하지 마십시오.
•
압력에 의한 폭발의 위험이 있습니다.
•
본체의 변형, 변색 및 고장의 원인이 됩니다.
변형된 내솥이나 전용 내솥이 아닌것은 사용하지 마십시오.
•
내솥이 가열되어 이상작동 및 화재의 원인이 됩니다.
•
내솥을 떨어뜨렸거나 변형된 경우에는 고객상담실로 문의해 주십시오.
내솥 없이 사용을 하지 마십시오.
•
감전 및 고장의 원인이 됩니다.
•
내솥이 없는 상태에서 쌀이나 물을 넣지 마십시오.
•
쌀이나 물이 들어갔을 경우에는 제품을 뒤집거나 흔들지 마시고 고객
상담실로 꼭 문의 하십시오.
취사나 요리가 진행 중일 때 뚜껑 열림 버튼을 누르거나, 뚜껑 결합 손잡
이를 절대 “ 무압”으로 돌리지 마십시오.
•
강제로 열 경우 압력으로 인해 화상 및 폭발의 위험이 있습니다.
•
취사나 요리 완료 후 증기가 완전히 배출된 상태에서 뚜껑 결합 손잡이를
작동시키십시오.
뚜껑 결합 손잡이를 “고압 ”위치에 놓고 내솥을 넣고 뚜껑을
닫지 마십시오.
•
잠금장치 및 내솥의 파손, 변형으로 증기누설이나 폭발의 위험이 있습니다.
내솥 없이 분리형 커버, 찜판, 금속성물질 등을 넣거나, 넣어서 사용하지
마십시오. (특히, 어린이 주의)
•
감전 및 화재의 원인이 됩니다.
어린이 혼자 사용하거나 어린이가 만질 수 있는 장소에 제품을 두지
마십시오.
•
고열에 화상을 입거나 감전이 될 수 있습니다.
제품내에 살충제나 화학물질 등을 뿌리거나 투입하지 마십시오.
•
화재 발생의 우려가 있습니다.
•
제품내 바퀴벌레나 벌레 등이 들어갔을 경우는 고객상담실로 문의해 주십시오.
흡·배기구 또는 틈 사이에 바늘, 청소용 핀, 금속물 등 이물질이 들어가거나
막히지 않도록 하십시오.
•
감전 및 화재의 원인이 됩니다.
•
청소용 핀을 증기배출구 청소외에 제품의 틈새나 구멍에 넣지 마십시오.
취사나 요리가 진행 중일 때 절대로 뚜껑을 열지 마십시오.
•
요리 중 끓어 넘치거나 증기가 누설되더라도 절대로 먼저 뚜껑을 열지 마십시오.
•강제로 뚜껑을 열면 내용물 비산으로 화상의 우려가 있습니다.
•취사 또는 요리가 진행 중일때 부득이하게 뚜껑을 열어야 할 경우 취소 버튼을
누른 후(내솥 온도가 높으면 2초간) 내부 압력이 완전히 제거되었는지 확인을
하고 열어 주십시오.
•필요 시 제품의 사용을 중지하고 전원플러그를 뽑은 다음 고객상담실로 문의
하여 주십시오.
전원코드를 무리하게 구부리거나, 묶거나, 잡아당기지 마십시오.
•
감전이나 쇼트로 인해 화재의 원인이 될 수 있습니다.
수시로 전원코드 상태를 꼭 확인하십시오.
전원플러그를 반복하여 뺐다 꽂았다 하지 마십시오.
•
감전 및 화재의 위험이 있습니다.
플러그 및 전원 코드부를 반려동물이 물어 뜯거나 못과 같이 날카로운 금속
물체로부터 충격을 받지 않도록 주의하여 주십시오.
•
충격으로 인한 파손은 합선, 감전, 화재 등의 원인이 됩니다.
수시로 전원코드와 전원 플러그 상태를 꼭 확인하십시오.
전원플러그에 묻은 이물질은 물기가 없는 천으로 깨끗이 제거하여 주십시오.
•
화재의 원인이 됩니다. 수시로 전원 플러그 상태를 꼭 확인하십시오.
경고(금지)
안전상의 경고
9
www.cuckooamerica.com
KOReAn
경고(지시)
주의(지시)
주의(금지)
쌀통 및 다용도 선반 등에 제품을 놓고 사용하지 마십시오.
•
전원코드가 틈새에 눌러져 화재 및 감전의 원인이 됩니다. 수시로 전원코드 상태를 꼭 확인하십시오.
•
취사 또는 요리중 증기가 배출될 때 쌀통 및 다용도 선반에 의해 제품의 손상, 화재, 감전의 원인이 됩니다.
전원코드 위에 무거운 물건을 올려 놓거나 코드가 제품바닥에 눌러지지않도록 주의해 주십시오.
•
화재 및 감전의 원인이 됩니다. 수시로 전원코드 상태를 꼭 확인하십시오.
전원코드를 임의로 연장하거나 연결하는 등 가공하여 사용하지 마십시오.
•
감전 및 화재의 위험이 있습니다.
온도감지기, 밥솥 내부 및 열판 또는 내솥 바깥 부위의 이물질(밥알,기타음식물 등)은 반드시 제거 후 사용하십시오.
•
제품 사용 전 반드시 이물질 제거 상태 확인 후 사용하십시오.
•
온도감지를 정확히 못하게 되므로 내솥이 가열되어 이상작동 및 화재의 원인이 됩니다.
전원플러그를 콘센트에서 꽂거나 뺄때는 손의 물기를 반드시 제거한 후 전원플러그를 잡고 꽂거나 빼어 주십시오.
•
젖은 손으로 전원플러그를 뽑으면 감전의 원인이 될 수 있습니다.
•
무리하게 당겨 뽑으면 전원코드에 이상이 발생되어 누전 및 감전이 될 수 있습니다.
제품 이동시 전원코드를 이용하여 들어올리거나 잡아당겨서 이동하지 마십시오.
•
쇼트로 인한 화재의 원인이 될 수 있습니다.
전원플러그를 뽑더라도 뚜껑 결합 손잡이를 항상 “고압 ”위치로 돌려 주십시오.
•
취사나 요리 완료 후 내솥이 뜨겁거나 뜨거운 밥이 남아 있을 경우 전원플러그를
뽑더라도 뚜껑을 닫고 뚜껑 결합 손잡이를“고압”위치로 돌리지 않으면 내부압
력에 의해 제품의 변형이나 손상의 원인이 됩니다.
•
고압 메뉴 취사, 요리 및 보온 중에도 반드시 뚜껑 결합 손잡이를 “고압 ”방향
으로 돌려서 놓고 사용해 주십시오.
취사나 요리가 끝난 뒤에는 반드시 본체에 고인물을 닦아 주십시오.
•
냄새 및 변색의 원인이 됩니다.
•
본체의 물받이에 고인 물을 닦아 주십시오.
사용 전 후 버튼이 눌러지지 않거나 작동이 되지 않을 경우 고객상담실로 문의해 주십시오.
취사 또는 요리 진행 중 정전이 되면 자동증기 배출 장치가 작동하여내용물 비산의 우려가 있습니다.
•
정해진 쌀 및 물의 양으로 취사해 주십시오.
•
특히, 물의 양이 규정보다 많으면 내용물 넘침의 원인이 됩니다.
•
증기조절캡이 장착된 상태에서 취반을 하십시오.
갈비찜과 같이 뼈가 있는 음식을 조리 시 별도 용기에서 양념하여 옮겨 담아 주십시오.
•
내솥 코팅이 손상되어 벗겨질 수 있습니다.
•
고객 과실에 의한 내솥 코팅의 스크래치 및 벗겨짐이 발생할 경우에는 무상 서비스 기간 내라도 유상 처리됩니다.
요리 후에는 반드시 청소해 주십시오.
•
닭찜, 갈비찜 등의 요리 후 취사 및 보온을 하게되면 밥에 냄새가 배어들 수도 있습니다.
•
내솥뚜껑 세척시 거친 수세미나 금속성 수세미를 사용할 경우 코팅이 벗겨질 수
있으니 반드시 스폰지 또는 물기를 제거한 행주로 닦아주십시오.
•
내솥, 내솥뚜껑, 패킹 등을 깨끗이 닦아낸 후 사용하십시오.
•
제품의 사용환경이나 방법에 따라 내솥뚜껑의 코팅이 벗겨질 수 있습니다.
이런경우
고객상담실
로 문의해 주십시오.
취사 또는 요리 진행 중 자동증기 배출시 주의하십시오.
•
증기가 고속으로 배출되면서‘취익’하는 소리가 나므로 놀라지 않도록 주의하십시오.
•
특히 어린이의 접근을 막아 주십시오. 화상의 원인이 됩니다.
흰밥 이외의 식품에는 변질하기 쉬운 것(팥밥, 혼식, 크로켓, 그라탱 등)
이 있으므로 가능하면 보온하지 마십시오.
전원플러그를 뽑을때는 전원코드를 잡지마시고 꼭 전원플러그를 잡고 뽑아주십시오.
•
전원코드에 충격이 가면 감전 및 화재의 원인이 될 수 있습니다.
쌀은 별도의 용기에서 씻어서 옮겨 담아 주시고, 용기에 남은 쌀을 털어내기
위해 내솥에 두드리지 마십시오.
•
고객 과실에 의한 내솥 코팅의 스크래치 및 벗겨짐이 발생할 경우에는 무상 서비스
기간 내라도 유상 처리됩니다.
내솥을 다른 용도로 사용하거나 불위에 올리지 마십시오.
•
내솥의 변형 및 코팅이 벗겨져 제품에 이상이 발생할 수 있습니다.
내솥 코팅이 벗겨질 경우 고객상담실로 문의해 주십시오.
•
제품을 장기간 사용할 경우 내솥 코팅이 벗겨질 수 있습니다.
•
거친 수세미나 금속성 수세미로 내솥을 씻을 경우 코팅이 벗겨질 수 있으니 반드시
주방용 중성세제와 스폰지로 씻어 주십시오.
•
날카로운 식기류(포크, 숟가락, 젓가락 등)를 내솥에 넣은 채 씻을 경우 내솥 코팅이 벗겨질 수 있습니다.
•
고객 과실에 의한 내솥 코팅의 스크래치 및 벗겨짐이 발생할 경우에는 무상 서비스
기간 내라도 유상 처리됩니다.
내솥 세척용 권장 수세미(내측, 외측)
•
사용 불가능 수세미를 사용하실 경우 내솥 코팅이 손상되어 벗겨질 수 있습니다.
•
고객 과실에 의한 내솥 코팅의 스크래치 및 벗겨짐이 발생할 경우에는 무상 서비스
기간 내라도 유상 처리됩니다.
경사진 곳이나 울퉁불퉁한 곳에서는 사용하지 마십시오.
•
화상 및 제품 고장의 원인이 됩니다.
•
전원코드에 손이나 발, 기타 물체가 걸려 제품이 떨어지지 않도록 주의 하십시오.
사용 중에 이상한 소리나 냄새 또는 연기가 나면 즉시 전원플러그를
뽑고 내부 압력을 완전히 제거후 고객상담실로 문의해 주십시오.
최대 용량 이상으로 내용물을 넣고 사용하지 마십시오.
•
밥물 넘침이나 취사 불량 등 고장의 원인이 됩니다.
•
죽은 지정된 용량 이상은 사용하지 마십시오.
뚜껑 위에 자성을 지닌 물체를 올려 놓거나 자성이 강한 물체 근처에서 사용하지 마십시오.
•
제품 고장 및 기능이 정상적으로 작동되지 않을 수 있습니다.
제품에 심한 충격을 주거나 떨어뜨리지 마십시오.
•
제품 고장 및 안전상의 문제가 발생할 수 있습니다.
•
고객 과실에 의한 내솥 코팅의 스크래치 및 벗겨짐이 발생할 경우에는 무상 서비스 기간 내라도 유상 처리됩니다.
고압 메뉴 취사나 요리 완료 후 또는 보온 시 뚜껑 결합 손잡이가 잘
돌려지지 않을 때 강제로 돌리지 마십시오.
•
화상 및 제품손상의 원인이 됩니다.
•
압력추를 젖혀 증기가 완전히 배출되었는지 확인 후 뚜껑 결합 손잡이를 돌려주십시오.
•
취사나 요리 완료후 뚜껑을 열때 증기에 의한 화상의 우려가 있으므로 주의하십시오.
플라스틱이나 나무 소재의 주걱 이외에 금속성 소재의 주걱이나 숟가락으로 밥을 푸지 마십
시오. 또한, 칼, 가위 등의 날카로운 금속성 주방도구를 내솥에 넣어 보관하지 마십시오.
•
내솥 코팅이 손상되어 벗겨질 수 있습니다.
•
고객 과실에 의한 내솥 코팅의 스크래치 및 벗겨짐이 발생할 경우에는 무상 서비스 기간 내라도 유상 처리됩니다.
사용 중이거나 사용직후에는 내솥, 내부, 열판 및 압력추 등은 뜨거우므로만지지 마십시오.
•
고열에 의해 화상을 입을 수 있습니다.
•
압력추가 젖혀져 증기에 의해 화상을 입을 수 있습니다.
뚜껑 결합 손잡이나 내솥 손잡이를 잡고 제품을 들어 올리지 마십시오.
•
뚜껑 결합 손잡이나 내솥 손잡이를 잡고 들어 올릴 경우 뚜껑이 열릴 우려가 있어 위험합니다.
•
제품 바닥 좌우측에 있는 홈을 양손으로 들어올려 안전하게 사용하십시오.
교류 120V 이외에는 사용하지 마십시오.
•
감전, 화재의 원인이 될 수 있습니다.
•
제품이 정상적으로 작동을 하지 않습니다.
제품 밑에 깔판, 방석, 전기장판 등을 놓고 사용하지 마십시오.
•
화재 및 변형의 원인이 됩니다. 수시로 제품 상태를 꼭 확인하십시오.
취사나 요리시에는 지정된 용량을 초과하여 요리하지 마십시오
•
요리안내에 지정된 용량을 초과할 경우 압력추와 소프트 스팀캡으로 내용물 넘침의 원인이 됩니다.
취사, 보온, 지정된 메뉴 이외의 식혜, 미역국, 카레, 기름으로 튀기는 요리 등 다른 용도로 사용하지 마십시오.
•
고장 및 냄새의 원인이 됩니다.
사용하지 않을 때는 전원플러그를 콘센트에서 뽑아 주십시오.
•
절연 성능 저하로 인해 감전, 누전, 화재의 원인이 될 수 있습니다.
사용 가능사용 불가능
면 수세미, 스폰지 수세미, 극세사, 망사 수세미
청색, 녹색 수세미(연마제 재질), 철, 스텐 수세미, 기타 금속 재질 수세미
安全警告
10
●
“安全警告”是为了预防事故的发生,请正确使用产品,并遵守安全警告事项。
●
“安全警告”有“警告”和“注意”两种区分,“警告”和 “注意”有下列意义。
未遵守警告事项时,
可能会发生严重人身伤害。
警告
注意
•
此标记是指在特定条件下,对可能发生危险事故的符号。
•为避免发生危险,请详细阅读使用说明书并按照指示使用。
•此符号表示“禁止”某种行为。
•此符号表示“指示”某种行为。
未遵守注意事项时,
可能会有轻伤或产品受损。
使用中切勿触摸或把脸 靠近压力锥和蒸汽排出孔。
・会导致烫伤,特别注意勿让儿童靠近。
・高温蒸汽很烫,切勿将手或脸直接靠近。
本产品要避免阳光直射, 严禁靠近煤气炉, 电热器具等。
・有漏电, 触电的危险及有变形或 变色的可能。
・严禁电源线靠近热器具, 避免电源线熔化造成 火灾或触
电的危险。
严禁私自拆卸或改装。
・发生火灾或触电的可能。
・ 除专业修理人员外, 请勿自行拆卸或改装。
・修理时请先与指定锥修中心联系。
必须使用额定电流15A以上 120V交流电专用插
座, 不宜与其他电器共用 一个插座。
・会产生发热, 火灾, 触电的可能。
・电源插头上有异物时, 请先清洁干净后使用。
・插座的延长线必须使用额定电流15A以上的。
严禁在有水的地方或户外使用。
・有漏电或触电的危险。
・如水渗入机体内部时, 请拨打 服务热线咨询。
严禁在灰尘多或有化学物品的 地方使用。
・严禁在产品周围使用可燃性气体或易燃物品。
・发生火灾或爆炸的可能。
电源线破损或插头松动时, 请停止使用并及时更换
。
・
产品使用中, 因使用不当电源线表皮有破损时会产生触电或发
生火灾, 请及时确认电源线及插座的完整状态
。
・电源线有破损时, 为避免发生危险, 请停止使用并与产品
销售店或指定锥修中心联系更换。
严禁用水冲洗机体或避免内部进水。
・会有漏电, 触电, 火灾的可能。
・产品内渗入水时, 切断电源, 停止使用,请拨打服务热线咨询
严禁将抹布等异物放在 压力谁和蒸汽排出口上。
・变形或变色的可能。
・产品故障及火灾的可能。
切勿使用变形内锅或 其他非专用内锅。
・内锅发热时会产生异常现象或 引起火灾。
・若不小心碰撞内锅或内锅变形时, 请拨打服务热线。
无内锅状态下请勿使用。
・触电及故障的可能。
・ 严禁无内锅时放米和水。
・ 机体内进入水或米粒时, 请拨打服务热线。
煮饭或料理进行时按锅盖开启按钮,锅盖结合手把调成绝对”无压”不要转动
。
・强制开始的情况因压力导致烧伤及爆炸的危险
。
・煮饭或料理完成后完全排出蒸汽的状态启用结合手把
。
把锅盖结合手把调成”高压”位置后放入内锅不要关闭。
・
以关闭装置及内锅的破损,变形导致蒸汽漏失或爆炸的危险
。
无内锅的情况下请将蒸盘, 金属性物质等其它物质
放进产 品里使用。(特别注意儿童)
・发生火灾或触电的可能。
本产品严禁儿童独自使用。 请放置在儿童触及不到的地方。
・烫伤或触电的可能
。
产品内请勿喷洒或投入 化学物品。
・烫伤或火灾的可能。
・
当产品内进入蟑螂或其他昆虫时, 请咨询代理店或服务中心。
严禁用针或金属物质堵塞排气口或产品 缝隙。
・烫伤或触电的可能。
・清洁用针除了清理蒸汽排出孔外, 不得插入
产品缝隙或其它孔里。
电源线不宜强行弯曲, 捆绑 或拉伸。
・触电或因短路发生火灾的可能。
注意不要让动物把插头及 电源线咬断或避免受到锋
利 金属物体的冲击。
・短路, 触电或发生火灾的可能。
电源插头有异物时, 请用干抹布擦净后使用。
・短路或发生火灾的可能。
煮饭或料理进行中时不要打开锅盖。
・就算料理中煮沸或蒸汽漏失也不要先开始锅盖
。
・强制开始锅盖的话因内物飞散会导致烧伤
。
・煮饭或料理进行时不得已把锅盖开始的情况的话按取消
按钮后(内锅温度高的话2秒)确认一下内部压力完全消失后开启
。
・必要时终止产品使用拔掉电源插头后询问顾客咨询室
。
不要把电源插头拔来拔去。
・触电及火灾的危险
。
警告
(禁止)
安全警告
11
www.cuckooamerica.com
Chinese
警告指示
注意指示
注意(禁止)
禁止将产品放在米桶及 多层柜上使用。
・电源线夹在缝隙里, 可能会引起触电或发生火灾。
・在米桶及多层柜上使用可能会导致产品损坏或引起火灾。
请勿将重物放在电源线上面或避免被压到产品 底部。
・有可能会发生火灾或触电, 请随时确认电源线放置状态。
勿将电源线进行加工或随意连接延长线使用。
・有触电或发生火灾的危险。
温度感应器, 电热盘及内锅 底部要保持清洁。
・温度感应器受损, 可能会发生故障及火灾。
擦干手, 再插, 拔插头。
・用湿手插, 拔插头时会发生触电。
・电源插头拨出时, 切勿直接拽电源线拨出。
移动产品时, 请勿拽电源线移动产品。
・会因断路有发生火灾的可能。
要是拔掉电源插头的话把锅盖结合手把一直转到”高压”位置
。
・煮饭或料理完成后内锅发烫或剩余热饭情况的话拔掉电
源插头要是内锅结合手把没转到”高压”位置的话因内部
压力导致产品的变形和损伤的原因
。
・高压菜单煮饭,料理及保温中也必须把锅盖结合手把转
到”高压”方向后使用
。
煮饭完成后, 请擦净积水部的水。
・会产生异味或变色。
・请擦去产品积水部的水。
使用前后, 按键无法按动或 产品不能动作时, 请拨打
售 后服务电话咨询。
煮饭或料理中当发生停电时, 自动蒸汽排
出装置会自动启动, 可能会有汤汁溢出现象。
・请在安装蒸汽帽的状态下进行煮饭。
・添加的水量超出规定容量时, 会有溢出现象。
・请按使用说明书的煮饭方法正确煮饭。
使用完毕后产品要清洁干净。
・料理结束后, 未清理干净时,会出现异味。
・
使用硬刷子, 钢丝球清洗内锅时, 内锅涂层会脱落,请用中性洗涤剂 和海绵清洗。
・
根据产品的使用环境和方法的不同, 内锅涂层会有脱落现象。
蒸汽自动排出时,请注意。
・蒸汽高速排出时, 伴有较大的排气声, 注意不要受到惊吓。
・严禁儿童靠近, 会烫伤。
除白米饭外容易变质的 (杂谷, 豆类饭, 油炸丸子等)尽量不要进行保温。
拔插头时, 必须抓住插头拔出, 请勿强行 搜拔电源线拨出。
・可能会发生触电, 漏电或火灾的危险。
跟炖牛排骨一样调理有骨头的食物时用别的容器调料完后盛装
。
・损伤内锅涂层会抹掉
。
・因顾客过失发生内锅涂层刮伤及抹掉的情况免费服务期
间也是有偿处理
。
米饭在别的容器洗完盛装后,为了移除剩余容器里的米不要敲内锅
。
・因顾客过失内锅涂层刮伤及抹掉的情况免费服务期间也
是有偿处理
。
勿将内锅放在火源上或用于其他用途。
・内锅变形或涂层会脱落。
内锅涂层脱落时,请与售后服务中心联系。
・长时间使用产品时,内锅涂层因老化有轻微脱落 请及
时拨打服务热线进行更换。
・用硬刷子,钢丝球清洗内锅时,涂层会脱落,要用中性洗
涤剂和海绵清。
・请勿将餐具(叉子、勺子、筷子等)放入内锅中清洗, 会导
致涂层脱落。
清洗内锅建议用清洁球(内侧、外侧)。
・
用不可使用的清洁球清洗时,可能会出现内锅涂层损坏、 脱落现象。
本产品不宜在倾斜或凹凸面上使用。
・
会有烫伤或发生故障的可能。
・
产品工作中,切勿碰电源线。
使用时如有异常响声或有异味时,请立刻切断电源,推动
压力锥,待蒸汽完全排出后,咨询代理店或售后服务中心。
使用时不要超出限定容量。
・
会有米汤溢出或出现故障。
切勿靠近磁性强的物体。
・
可能会产生安全上的问题
。
・
可能会导致故障
。
勿使产品跌落或受冲击。
・
会发生故障及安全性问题。
煮饭完成后,结合手柄不易拧开时,不要强行拧开。
・
会烫伤或会有产品受损现象。
・
推动压力锥,等蒸汽完全排除后再打开。
・
煮饭完成后打开锅盖时,注意避免被蒸汽烫伤。
除了塑料或木材的饭勺不要用金属性材质饭勺或勺盛米饭
。
而
且,刀,剪刀等锋利的金属性厨房工具不要在内锅里保管
。
・内锅涂层损伤会导致抹掉
。
・
因顾客过失内锅涂层刮伤及抹掉的情况免费服务期间也是有偿处理
。
使用中或使用后锅体温度很高,切勿触摸内锅,加热盘,
产品内部及压力锥。
・
会有烫伤的危险。
・
产品工作中若压力锥倾斜,会被喷出的蒸汽烫伤。
请勿用锅盖结合手柄或内锅把手移动产品。
・
会产生危险,请利用产品底部的移动凹槽移动产品。
本产品只限使用120V交流电源。
・
可能会导致触电或发生火灾。
・
产品不能正常动作。
本产品要放置于较阔的水平台面上,切勿放在坐垫或电
热毯上使用。
・
可能会导致变形或发生火灾。
煮饭或料理时不要超过指定的容量。
・
超过料理内指定的容量的话压力锤和软蒸汽帽内物溢出的原因
。
本产品只适用于做饭,保温及指定用途,严禁他用。
・
会产生异味或变色。
不使用时,请拔掉插头。
・
以避免发生触电及火灾。
可使用可不可使用
棉质清洁球、海绵、
超细纤维、网纱清洁球
蓝色、绿色清洁球(研磨剂材质)、铁制、
钢制清洁球、其他金属材质清洁球
MESURES DE SÉCURITÉ
12
●
Lisez attentivement le guide de sécurité du produit qui suit afin d'éviter les accidents et/ou les dangers graves.
●
« Avertissement » et « Attention » diffèrent comme suit :
ne recouvrez pas la sortie de vapeur automatique
ou le poids de pression avec votre main ou votre visage.
•Cela peut entraîner des brûlures.
•
Faites particulièrement attention à le mettre hors de portée des enfants.
n'utilisez pas le cuiseur près de ce qui est chaud
comme une cuisinière, une cuisinière à gaz ou la
lumière directe du soleil.
•Cela peut causer un choc électrique, un incendie, une
déformation, un dysfonctionnement ou une décoloration.
Veuillez vérifier régulièrement le cordon d'alimentation et la prise.
ne modifiez pas, ne remontez pas, ne démontez
pas ou ne réparez pas cet appareil.
•
Cela peut entraîner un incendie, un choc électrique ou des blessures.
•
Pour le faire réparer, contactez le revendeur ou le centre technique.
utilisez une prise individuelle avec un courant
nominal supérieur à 15A.
•L'utilisation de plusieurs lignes sur une seule prise peut
provoquer une surchauffe ou un incendie.
•Veuillez vérifier fréquemment le cordon d'alimentation et la prise.
•Utilisez une rallonge avec un courant nominal supérieur à 15A.
Soyez particulièrement attentifs à l'eau ou aux
produits chimiques.
•Cela peut causer un choc électrique ou un incendie.
n'utilisez pas le cuiseur à riz dans un endroit qui retient
la poussière ou en présence de produits chimiques
•
N'utilisez aucun gaz inflammable ou produit inflammable près du produit.
•Cela peut entraîner une explosion ou un incendie.
n'utilisez pas un cordon d'alimentation endommagé,
une fiche ou une prise mal fixée.
•
Veuillez vérifier régulièrement si le cordon d'alimentation est endommagé.
•
Des dégâts importants peuvent entraîner un choc électrique ou un incendie.
•
Si la fiche est endommagée, contactez le revendeur ou un centre technique.
ne nettoyez pas le produit avec de l'eau ni ne versez
de l'eau dans le produit.
•Cela peut entraîner un choc électrique ou un incendie.
•
Si le produit est en contact avec de l'eau, veuillez séparer le cordon
d'alimentation et contactez le revendeur et le centre technique
ne recouvrez pas la sortie de vapeur automatique ou
le poids de pression de pression avec un chiffon, une
serviette ou un tablier etc.
•Cela peut entraîner une déformation ou une panne.
•Cela peut entraîner une explosion due à la pression.
n'utilisez pas de cuves de cuisson qui ne sont pas
conçues pour le cuiseur.
n'utilisez pas une cuve de cuisson anormale et
n'utilisez pas l'appareil sans la cuve de cuisson.
•Cela peut entraîner un choc électrique ou un incendie.
n'utilisez pas l'appareil sans la cuve de cuisson
•Cela peut provoquer un choc électrique ou un dysfonctionnement.
•Ne mettez pas de riz ni d'eau sans la cuve de cuisson à l'intérieur.
•
Si du riz ou de l'eau s'infiltre, ne retournez pas le produit et ne le secouez
pas, veuillez contacter le revendeur ou le centre centre technique
ne pas appuyer sur le bouton de serrage ou ne pas
tourner la poignée de verrouillage/déverrouillage en
mode «Aucune pression» pendant la cuisson.
•
Si l'appareil est ouvert de force, il peut provoquer des brûlures et une explosion.
•
Utiliser la poignée de verrouillage/déverrouillage une fois que la vapeur est
complètemet épuisée.
Tournez la poignée de verrouillage/déverrouillage en
position «haute pression» et ne fermez pas le couvercle
avec la casserole interne à l'intérieur de la machine.
•
La déformation ou l'endommagement de la serrure et de la casserole
interne peut provoquer des fuites de vapeur ou une explosion.
n'insérez pas d'objets en métal tels que des épingles et des
fils ou toute autre substance extérieure dans la sortie
d'évacuation de vapeur automatique ou toute autre ouverture.
•Cela peut entraîner un choc électrique ou un incendie.
•
Faites tout particulièrement attention de garder l'appareil hors de portée des enfants.
Gardez le cuiseur hors de portée des enfants.
•
Cela peut provoquer des brûlures, un choc électrique ou des blessures.
ne vaporisez pas et n'utilisez pas d'insecticides ou de produits chimiques.
•Cela peut entraîner un choc électrique ou un incendie.
•Si des cafards ou d'autres insectes pénètrent dans le cuiseur,
veuillez contacter un revendeur ou un centre technique
ne laissez pas des substances étrangères telles qu'une
aiguille, une épingle de nettoyage, ou du métal entrer et ne
bloquez pas le conduit d'arrivée/d'évacuation ou l'ouverture.
•Cela peut entraîner un choc électrique ou un incendie.
•Ne mettez pas une épingle de nettoyage dans l'ouverture ou le
trou du produit sauf pour nettoyer la sortie de vapeur.
n'ouvrez pas le couvercle supérieur lors de la phase de
chauffage et de la cuisson.
•Cela peut entraîner des brûlures.
•
Si vous avez besoin d'ouvrir le couvercle lors de la cuisson, maintenez appuyé
le bouton cancel (annuler) pendant deux secondes et vérifiez que la vapeur
interne s'est complètement évacuée en retournant le poids de pression.
ne pliez pas, n'attachez pas et ne tirez pas le cordon
d'alimentation de force
•
Cela peut provoquer un choc électrique ou un courtcircuit entraînant un
incendie. Veuillez vérifier fréquemment le cordon d'alimentation et la prise.
ne débranchez pas ni ne branchez sans arrêt le
cordon d'alimentation.
•Cela peut entraîner un choc électrique ou un incendie
faites attention à ce que la fiche et le cordon d'alimentation
ne soient pas entrechoqués par des attaques d'animaux
ou par des matériaux métalliques tranchants.
•
Les dégâts dûs à des impacts peuvent provoquer un choc électrique ou un
incendie. Veuillez vérifier fréquemment le cordon d'alimentation et la prise.
Retirez une substance étrangère sur le cordon et la
fiche à l'aide d'un chiffon propre.
•Cela peut provoquer un incendie. Veuillez vérifier fréquemment le
cordon d'alimentation et la fiche.
Avertissement Ne pas
•
Ce symbole vise à rappeler et à alerter que quelque chose
peut entraîner des problèmes dans la situation donnée.
•
Veuillez lire et respecter l'instruction afin d'éviter toute
situation dangereuse
• Indique une interdiction
• Indique une instruction.
Cela signifie que l'action qui est décrite peut entraîner la mort
ou une blessure grave.
Avertissement
Cela signifie que l'action décrite peut entraîner des blessures
ou des dégâts matériels.
Attention
MESURES DE SÉCURITÉ
13
www.cuckooamerica.com
FRenCh
Avertissement Se rappeler
n'utilisez pas l'appareil sur un coffre à riz ou une étagère
•
Ne placez pas le cordon d'alimentation entre des meubles. Cela
peut provoquer un choc électrique entraînant un incendie.
•
En cas d'utilisation sur du mobilier, faites attention à l'évacuation de la vapeur
car cela peut provoquer des dégâts, un incendie et/ou un choc électrique.
ne placez pas de choses lourdes sur le cordon d'alimentation
•
Cela peut entraîner un choc électrique ou un incendie.
•
Veuillez vérifier fréquemment le cordon d'alimentation et la fiche.
ne changez pas, ne rallongez pas ni ne branchez le cordon
d'alimentation sans l'avis d'un expert technique
•
Cela peut entraîner un choc électrique ou un incendie.
nettoyez la poussière ou toute substance étrangère sur le
capteur de température et la cuve de cuisson.
•
Cela peut provoquer un dysfonctionnement du système ou un incendie
ne branchez pas et ne retirez pas le cordon d'alimentation
avec les mains mouillées.
•
Cela peut provoquer un choc électrique
ne déplacez pas le produit en tirant ou en utilisant le cordon
d'alimentation.
•
Un court-circuit électrique pourrait provoquer un incendie.
ne pas utiliser la casserole interne à des fins diverses. Et ne pas
chauffer la casserole interne sur une cuisinière à gaz.
•
Cela peut entraîner une déformation de la casserole interne.
•
Cela peut entraîner le déversement du revêtement intérieur.
Veuillez contacter le service client si le revêtement de la cuve de cuisson s'enlève.
•
Il se peut que le revêtement s'use après une longue utilisation.
•
Lors du nettoyage de la cuve de cuisson, n'utilisez pas de tampon à
récurer dur ou métallique, de brosse, d'abrasifs métalliques etc.
Type de laveur recommandé pour nettoyer la casserole interne (intérieur, extérieur)
•
Si vous utilisez une éponge non mentionnée, le revêtement de la casserole interne peut s'user.
•
Si le revêtement de la casserole interne s'égratigne ou s'use à cause d'une erreur du client,
vous devrez payer la réparation même pendant la période de service de réparation gratuite.
ne placez pas l'appareil sur une surface irrégulière ou inclinée.
•
Cela peut provoquer des brûlures ou des pannes.
•
Faites attention à installer le cordon d'alimentation de façon à ce
qu'il passe sans interruption.
Veuillez contacter un revendeur ou un centre technique
en cas d'odeur ou de fumée inhabituelle.
•
Débranchez tout d'abord le cordon d'alimentation.
Puis contactez le revendeur ou le centre technique.
n'utilisez pas l'appareil au-delà de la capacité maximum.
•
Cela peut provoquer un débordement ou une panne.
•
Ne faites pas cuire au-delà de la capacité mentionnée pour
la cuisson d'une soupe au poulet et d'un congee
n'utilisez pas le cuiseur près d'un champ magnétique.
•
Cela peut provoquer des brûlures ou une panne
ne laissez pas tomber le cuiseur et ne le soumettez pas à des chocs.
•
Cela peut entraîner un problème de sécurité
Après avoir fini la cuisson, n'essayez pas d'ouvrir le cuiseur
de force avant que la vapeur ne soit complètement évacuée.
•
La vapeur chaude ou tout autre élément chaud à l'intérieur du
cuiseur peut provoquer des brûlures.
•
Ouvrez le couvercle supérieur avec prudence après la cuisson
afin d'éviter la vapeur et des brûlures présentant un danger.
ne mettez pas le riz dans une assiette en utilisant une cuillère métallique
ou une cuillère à riz au lieu d'une cuillère à riz en plastique ou en bois.
•
Cela peut endommager la surface de la casserole interne et le revêtement peut s'user.
•
Si le revêtement de la casserole interne s'égratigne ou s'use à cause d'une erreur du client,
vous devrez payer la réparation même pendant la période de service de réparation gratuite.
ne touchez pas la surface métallique de la cuve de cuisson et
le poids de pression après la cuisson et la phase de chauffage.
•
Cela peut entraîner des brûlures.
•
La vapeur chaude restante peut provoquer des brûlures quand vous
appuyez sur le poids de pression durant et juste après la cuisson.
ne tenez pas le cuiseur par la poignée de la cuve de cuisson
•
Cela peut entraîner des problèmes ou être dangereux. Des poignées
amovibles sont disposées en bas à droite et sur le côté gauche du
cuiseur. Tenez les poignées à deux mains et déplacez-le avec précaution.
utilisez seulement une tension alternative de 120 V.
•
Autrement, cela peut provoquer un choc électrique ou un incendie.
•
Cela peut provoquer des dysfonctionnements.
utilisez le produit sur une surface plane. n'utilisez pas le produit sur un coussin. Veuillez
éviter d'utiliser le produit dans un endroit qui n'est pas stable où il risquerait de tomber
•
Cela peut entraîner un dysfonctionnement ou un incendie.
Veuillez vérifier fréquemment le cordon d'alimentation et la prise.
ne pas dépasser la quantité indiquée pendant la cuisson.
•
Si vous dépassez la quantité d'aliment indiquée dans la recette, cela peut
causer un débordement en raison du poids de pression et du couvercle léger.
Veuillez utiliser le cuiseur dans le but dans lequel il a été conçu.
•
Cela peut provoquer un dysfonctionnement ou une odeur.
Veuillez débrancher la prise lorsque vous n'utilisez pas le produit
•
Cela peut provoquer des chocs électriques ou un incendie.
Disponible Non disponible
Éponge en coton, éponge, récureur, récureur à filet, de type extra fin
Laveur bleu, vert (de type abrasif), éponge en acier inoxydable, autre récureur métallique
Attention
Se rappeler
Attention
Ne pas
Tournez la poignée de verrouillage/déverrouillage à la position
«Haute pression» lorsque l'appareil est débranché.
•
La pression interne dû à la cuisson du riz ou à la casserole interne
peut provoquer des déformations ou des dommages, si la poignée
de verrouillage/déverrouillage n'est pas en position «verrouillée».
•
Assurez-vous de verrouiller la poignée de verrouillage/déverrouillage
pendant la cuisson et le réchauffement à haute pression.
Essuyez toute l'eau en excès sur le cuiseur après la cuisson.
•
Cela peut entraîner des odeurs ou une décoloration. Essuyez l'eau
résultant de la condensation.
Veuillez contacter un revendeur ou un centre technique lorsqu'un bouton
du produit ou le produit lui-même ne fonctionne pas correctement.
En cas de coupure de courant durant la cuisson, la vapeur du cuiseur à riz est évacuée
automatiquement. La qualité du riz est par conséquent inférieure à la normale.
•
Veuillez démarrer la cuisson avec la quantité d'eau et de riz indiquée.
•
L'eau peut déborder si la quantité d'eau dans la cuve de cuisson dépasse le niveau d'eau recommandé.
•
Veuillez démarrer la cuisson avec le capot de régulation de la vapeur.
complètement mis en place.
Lorsque vous cuisinez des aliments avec des os, comme des côtes
levées braisées, veuillez assaisonner la viande dans une autre assiette.
•
Le revêtement de la casserole interne peut s'user.
•
Si le revêtement de la casserole interne s'égratigne ou s'use à cause d'une erreur du client,
vous devrez payer la réparation même pendant la période de service de réparation gratuite.
Veuillez nettoyer le corps ainsi que les autres parties après la cuisson.
•
Après avoir fait cuire de la soupe au poulet, différents plats etc. il se
peut que l'odeur soit imprégnée.
•
Nettoyez le compartiment du four, la plaque supérieure de chauffage et la
cuve de cuisson à chaque fois que vous faites cuire avec l'un d'entre eux.
•
Cela peut entraîner une altération ou des odeurs.
•
Utilisez un essuie-tout sec ou une éponge pour nettoyer la cuve de cuisson, car les
surfaces dures rugueuses ou celles en métal sont abrasives pour le revêtement.
•
En fonction des méthodes d'utilisation ou des circonstances propres à
l'utilisateur, le revêtement de la cuve de cuisson peut se détacher.
•
Veuillez contacter le service client dans ces cas de figure. Veuillez ne
pas tirer de force l'évent à vapeur propre.
faites attention lorsque la vapeur est évacuée
•
Ne soyez pas surpris lorsque la vapeur est évacuée.
•
Veuillez conserver le cuiseur hors de portée des enfants.
n'utilisez si possible la fonction de chauffage que pour la cuisson
de riz blanc. Les autres aliments se décolorent facilement
Lorsque vous retirez la fiche d'alimentation, ne tirez pas sur le cordon
d'alimentation. Veuillez retirer en toute sécurité la fiche d'alimentation
•
Si vous faites prendre un impact au cordon d'alimentation, cela peut
entraîner un choc électrique ou un incendie.
Veuillez rincer le riz et le placer dans une autre assiette et ne frappez
pas sur la casserole interne pour retirer le reste de riz dans l'assiette.
•
Si le revêtement de la casserole interne s'égratigne ou s'use à cause
d'une erreur du client, vous devrez payer la réparation même pendant
la période de service de réparation gratuite.
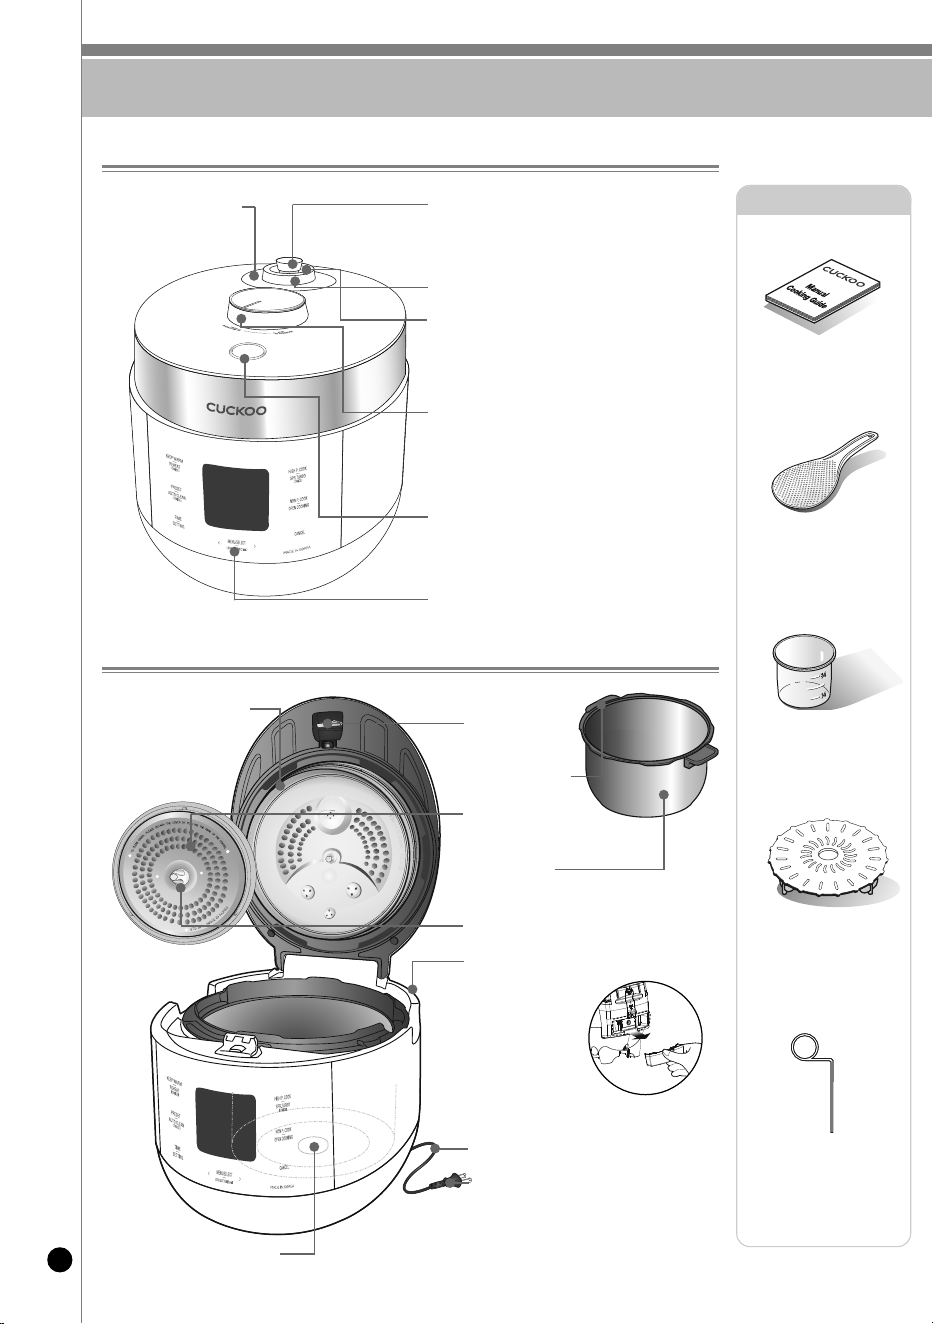
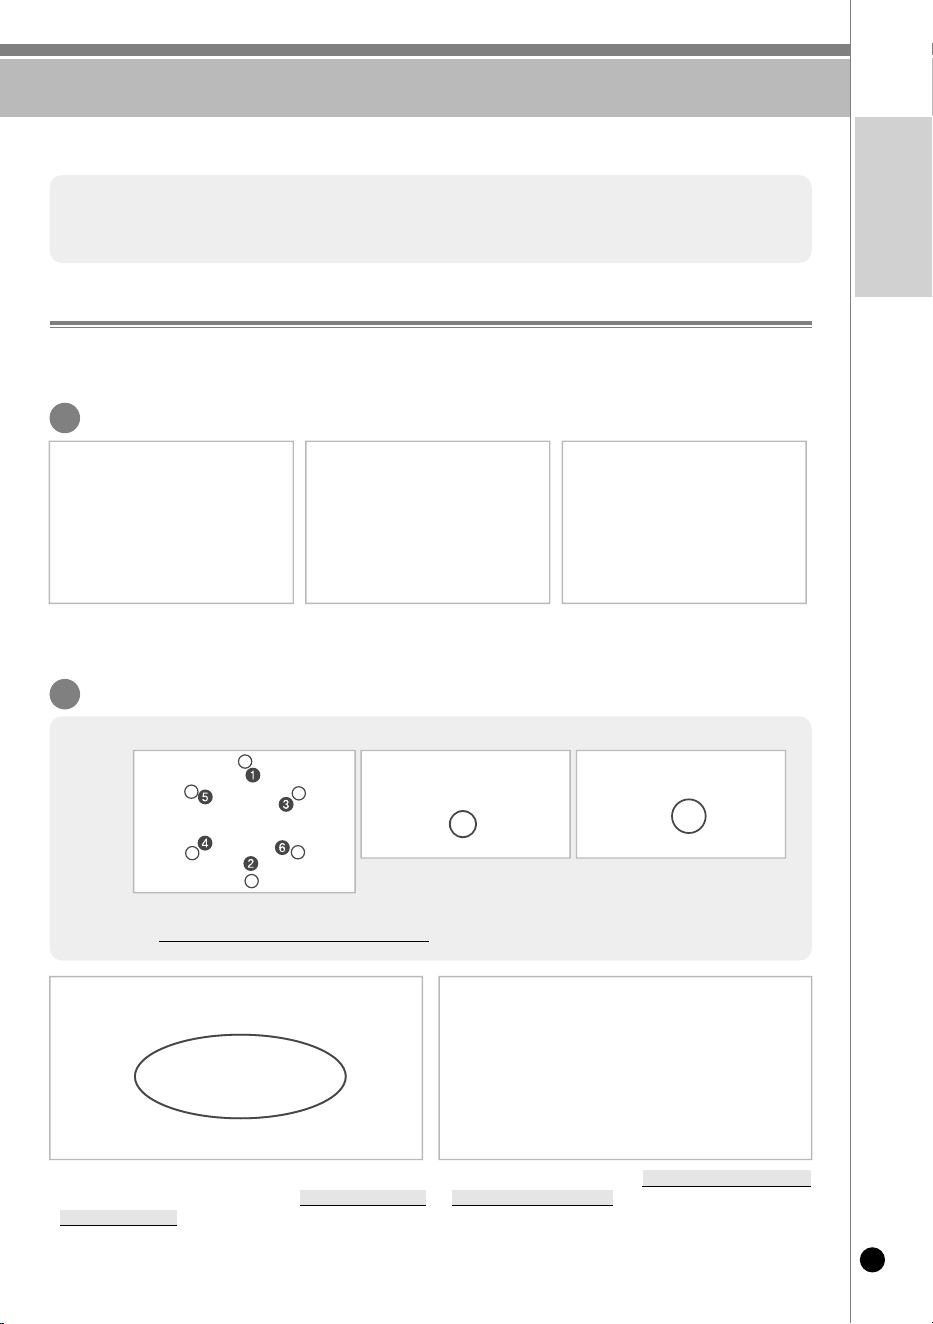
Lid Assy
Power Cord
Power Plug
The plug type may vary in
appearance.
(u.S. 120V)
DET. cover
Pressure Packing
Inner Pot
Condensation Collector
Empty the
water out of a
drain dish after
cooking or
warming.
Leaving water in
the drain dish will
result in unpleasant odors.
Pot Handle
DET.Cover Holder
PARTS IDENITIFICATION
14
Soft Steam Cap
TWIn PRESSuRE
Automatic Steam Exhaust outlet
(Solenoid Valve)
When finished cooking or during warming,
steam is automatically released.
Lock/unlock Handle
If the Lock/unlock Handle is turned to “high
pressure” position, you can cook with high
pressure, and if the handle is turned to “non
pressure
” position, you can cook with non pressure.
Clamp Knob
To open the lid, turn the Clamp Knob from
“high pressure” to “non pressure” and then
press the Clamp Knob.
Control Panel
Pressure Weight
Always keep it horizontal. It stabilizes
steam inside of the oven. If the pressure
weight is twisted, it will release steam.
Temperature Sensor
Accessories
Manual&Cooking Guide
Rice Scoop
Rice Measuring Cup
Steam Plate
(Steam plate can be
purchased separately
at Cuckoo service
center.)
Cleaning Pin
(Attached on the
bottom of the unit)
HOW TO CLEAN
15
www.cuckooamerica.com
english
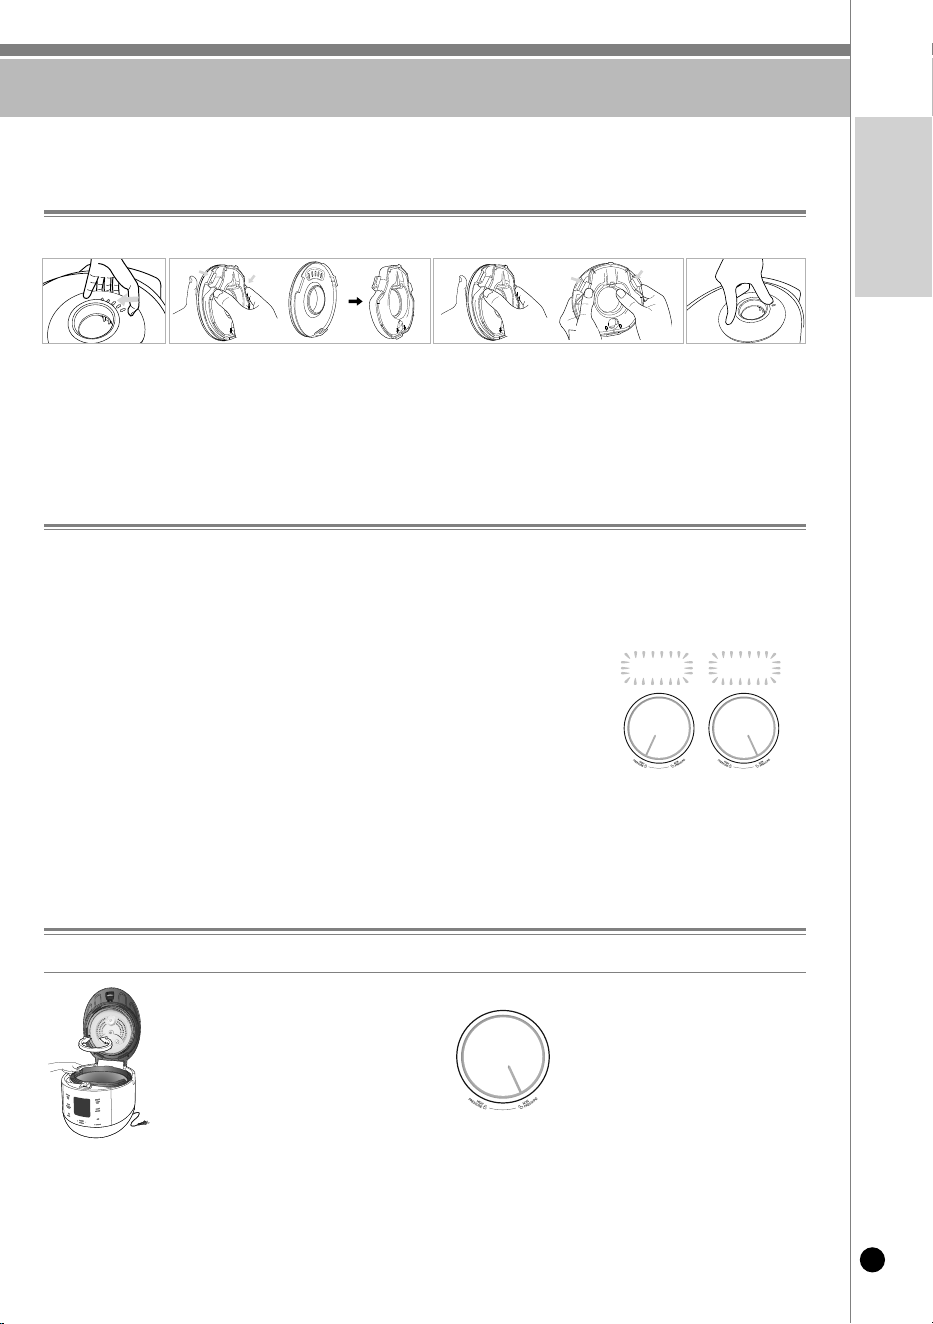
Detachable Inner Lid & Pressure Packing
After cleaning the inner lid, secure it back onto the lid.
Unless detachable cover is mounted, preset cooking cannot be done. (Alarm may sound while keeping warm.)
- Clean the detachable cover often with regular use to prevent unpleasant odor and product damage over time.
- Wipe the body and cover clean with a dry towel. Do not use harsh chemicals or detergents while
cleaning the cooker.
Starch may be remain, however there is no health risks.
- Do not put materials like screws into holes on the detachable cover. Check the back cover and front cover.
①Pull the detachable cover out toward
you while gripping onto the edges.
③Clean the lid with a soft sponge and
warm, soapy water.
② When cleaning the detachable cover,
hold and pull out the both sides
of the cover, then separate the handle
and the rubber packing.
⑤To replace the silicone ring back onto
the inner lid, stretch the silicone ring
slightly and place the inner lid inside of
the ring.
④Please put the detachable cover.
⑥Put back the pressure cover by
pressing the cover handle after fitting
the handle into the groove indicated.
Correct example
※ Do not put any other objects like screws into hole of detachable cover.
※ Check the back cover and front cover.
the back side
the front side
the back side of
cover packing
Lid of the inner
pot
A groove
the front of seal
the front of holder
projection
presenting
the front
no projection
the back of holder
the back of seal
HOW TO CLEAN
16
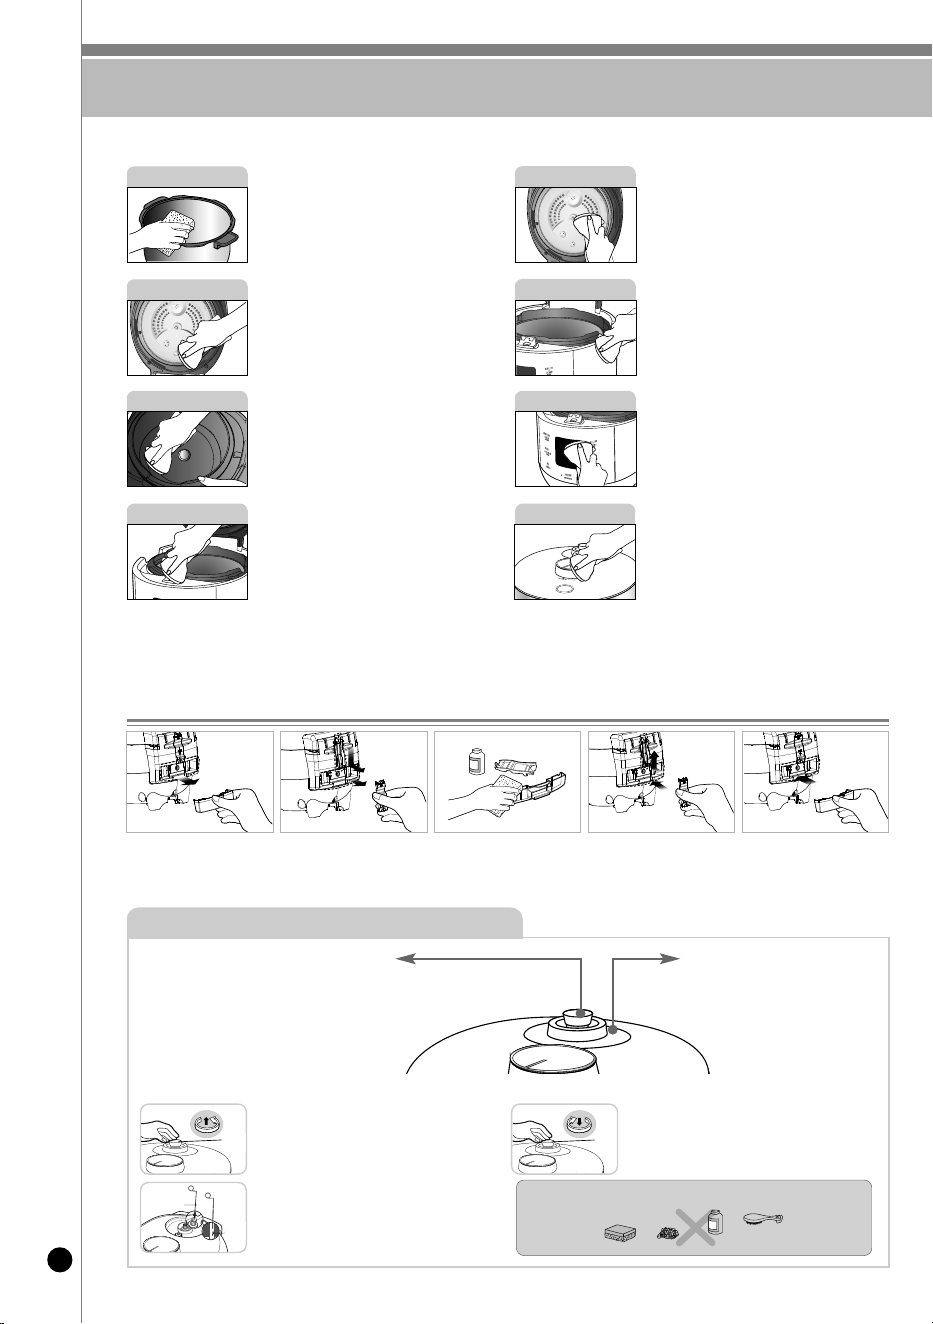
INNER POT
OVEN PACKING
INNER BODY
MAIN UNIT
L I D
DRAIN DISH
CONTROL
LID OPEN BUTTON
Wash the inner pot using a soft sponge and
warm, soapy water. Be sure to clean all
surfaces to rid of any food residue.
Wipe the inner lid clean with a damp cloth,
using caution to avoid any and all electrical
parts.
Wipe the temperature sensor clean with a dry
cloth.
Wipe the main unit with a damp cloth.
※Caution
Do not clean the inner pot with any sharp cutlery inside (fork, spoon, chopsticks, etc.).
- The coating of the inner pot may peel off.
Cleaning the Condensation Collector
❶ Remove the
condensation collector
from the cooker.
❷Separate the
condensation collector
cap by pushing it down.
❸Wash the condensation
collector and cap with a
neutral detergent.
❹Replace the
condensation collector
cap into the cooker.
❺Insert the condensation
collector by firmly
pressing it into the
cooker as shown in the
image above.
Cleaning the Pressure Weight Nozzle
Pressure Weight/ Double motion valve
< How to clean the Pressure Weight and Steam Valve >
The cooker might not function properly if the steam valve and the double motion valve are
clogged, be sure to remove any foreign substances in the valve with the cleaning pin before
and after cooking. In order to remove any foreign substances in the double motion valve,
please regularity use the Automatic Sterilization. (refer to 25P)
Please regularly check if the hole of steam exhaust outlet is clogged or not.
※The appearance of the Pressure Weight may differ from the picture.
❶
Turn the Lock/Unlock Handle to “high pressure”
and turn the Pressure Weight counter-clockwise
while pulling it up until it comes out.
❷Puncture the clogged valve hole with the
cleaning pin (Attached on the bottom on the unit).
❸Reassemble the Pressure Weight by turning
it clockwise.
❹When the Pressure Weight is properly
reassembled, it will revolve freely.
Wash the Inner Pot and accessories with neutral detergent and a sponge.
※Never use the cleaning pin for any other uses and
do not attempt to poke any other holes of the cooker
with the cleaning pin. They are safety device.
Cleaning Soft Steam Cap
Separate the cap and wash it
with a sponge and neutral
detergent. Wipe out any
remaining water or moisture on
the lid with a cloth.
Metallic
scrubber
Abrasive
Material
Brush
Tough
scrubber
neutral detergen
Pressure
Weight
Pressure
Weight
Cleaning Pin
Alien
substance
If there is water or food residue on the lid, wipe
clean with a damp cloth, using caution around
electrical parts.
Pour out any excess water or liquids from the
condensation collector then wipe clean with a
damp cloth.
If food or liquid has spilled on the control panel
or digital display, wipe clean with a cloth.
Wipe around the lid release button with a
damp cloth to remove any spilled foods or
liquids.
HOW TO CLEAN
17
www.cuckooamerica.com
english
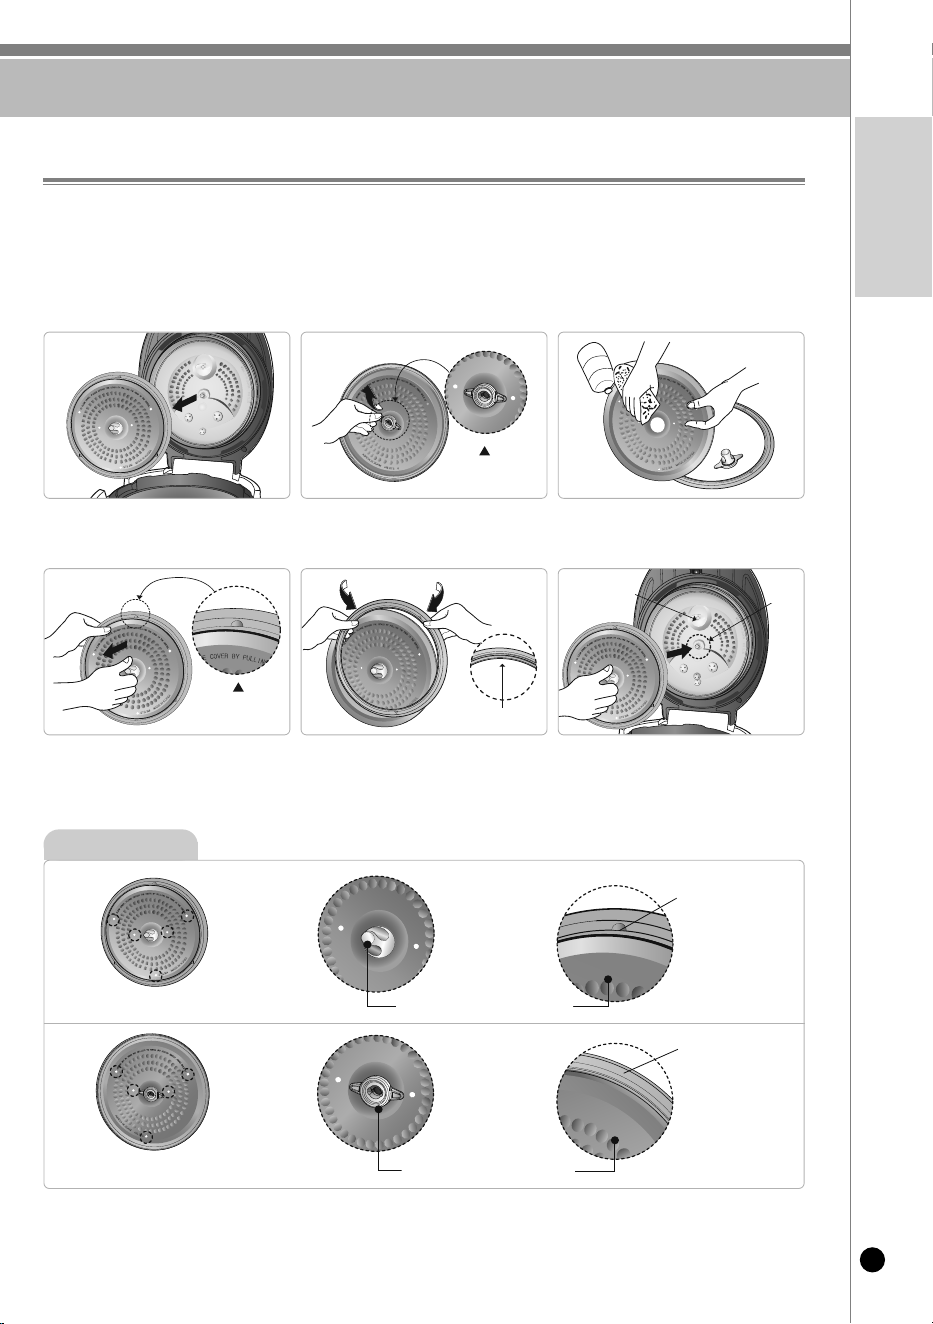
How to install the Double Motion Packing (Pressure Packing)
How to remove and clean the pressure packing
• Proper maintenance of the pressure packing helps keep high airtightness, adds durability to packing and ensures the taste of the food.
• Read the directions below carefully to install your packing properly.
①unplug the power cord and wait until the
pot cools down before opening the lid.
▶Figure.1
②To remove the pressure packing, hold it as
shown in the picture above and pull it out.
③After hand washing it with a neutral
cleaning liquid and a sponge, wipe
it clean with a well wrung dish cloth.
The all-stainless cover is not only delamination-free and easy to clean, but it also lasts long,
In addition, CuCKoo’s special stainless CSV-a CuCKoo’s patented technology, improves the
product’s durability and makes it easier to clean.
1
How to Reassemble Pressure Packing
2
• first match the standard notches on the Inner Pot lid with the standard points on the pressure packing following the numerical order (1, 2, 3, 4, 5, 6).
Then, press the outer rim of the packing to insert it into the groove. To reassemble the pressure packing follow the order described below:
②
After matching the standard points 1 to 6, press the rest of the packing into the
groove by pushing on its outer rim.
①As the figure 1 shows, put the point #1 on the pressure packing with the standard
notch #1 on the Inner Pot lid together before pressing the outer rim of the packing
to insert it into the groove. Repeat with points #2 to # 6.
Standard notches
on the Inner Pot lid.
Standard points
on the pressure packing.
HOW TO CLEAN
18
How to double check whether the packing is well assembled
3
Since a badly assembled packing can cause the rice to be half-cooked or burned by steam leakage, double check
the packing thoroughly as described below.
(look for parts sticking out of the inner) (look for parts sticking out of outer rim)
(look for parts sticking out of damaged parts)
①
Visual inspection
normal
assembly
Abnormal
assembly
②
Physical inspection
③
Water boiling test
•
check the entire circumference carefully for any crack or damage
between the Inner Pot lid and the pressure packing.
•
Check if the pressure packing is thoroughly
put into the groove by rubbing the inside
rime of the packing with a finger around the
entire circumference as shown in the
picture above.
•
Pour water in the Inner Pot up to water level 2 (for “Rice”) and press the Menu/Selection button to select the self-cleaning mode.
Then push the HIGH P CooK/TuRBo button.
•
Within 10 minutes, the pressure regulator weight will start rattling and hissing while emitting stream. If there is no steam coming out from the
pot other than through the pressure regulator weight the packing has been properly installed.
•
If steam comes out from other parts, stop the test and pull out the power cord. Wait until the pot cools down before removing the pressure
packing from the lid. once reinstalled repeat the boiling test.
•
for a more precise water boiling test, you can wrap plastic around the circumference of the closed lid. By doing so, you can easily
check where the steam leakage is.
•
If you still have a problem with reassembling the packing, please contact our Customer Service.
•
Check if the pressure packing is properly
put into the groove of the Inner Pot lid by
pushing the outer rim with a finger around
the entire circumference as shown in the
picture.
•
Check if the pressure packing is thoroughly
put into the groove by pushing the inside of
the rim packing with a finger around the
entire circumference as shown in the
picture.
normal
assembly
Abnormal
assembly
HOW TO CLEAN
19
www.cuckooamerica.com
english
1. Make sure to close the lid and turn the Lock/unlock handle to “non PRESSuRE” or “HIGH PRESSuRE” while cooking.
• You can select cooking with high pressure when you turn the handle to “HIGH PRESSURE”. This is the function of
safety device which indicates that the cooker is properly locked, and cooking with high pressure is available.
• If you turn the handle to “NON PRESSURE” you can choose to cook without pressure or select cooking.
Then “NON PRESSURE” signal is displayed on the Display.
• If “HIGH PRESSURE” or “NON PRESSURE” does not appear on the Display,
Preset/Auto Clean button does not work.
2. When cooking with high pressure is done, turn the Lock/unlock handle from
“HIGH PRESSuRE” to “non PRESSuRE,” and then open up the lid with
“unlock” button.
• If steam is not completely exhausted after cooking, the handle might not be easily
turned from “HIGH PRESSURE” to “NON PRESSURE.”In such a case, allow remaining
steam to escape by tilting the Pressure weight.
3. Make sure that the Lock/unlock handle is completely turned to “non PRESSuRE” when opening and closing the lid.
❶ Pull off the soft steam cap
as shown in the image
above by grasping the
dented part with your
fingers and pulling to the
side while lifting gently.
❹ When installing the soft
steam cap, insert the
cap firmly by pressing
it in the direction as
shown above.
1. Check to make sure the inner pot is placed
correctly inside the main body.
3. If there is excess steam inside the inner
pot it might be difficult to lock the handle.
Twist the pressure weight and allow the
excess steam to release. Then try to turn
the handle again.
2. To close the lid, turn the handle to unlock as
shown in the picture on the left.
❷ Disassemble the hook on the front by pressing in
the direction of the arrow and wash it with a sponge
and neutral detergent. After cleaning, please
assemble the parts in order.
※ Be sure that the inserted side of the Packing is the
correct side of it.
❸ To reassemble the Soft Steam Cap, fit the cap to
the bump part, and then press the hook in the
direction of the arrow.
How to Clean the Soft Steam Cap
How to Use the Dial
How to Use the Handle
※ Do not touch the surface of the soft steam cap right after cooking. You can get burned.
Do not try to close the LID by force. It can damage your cooker and cause problems.
high pressure
non pressure
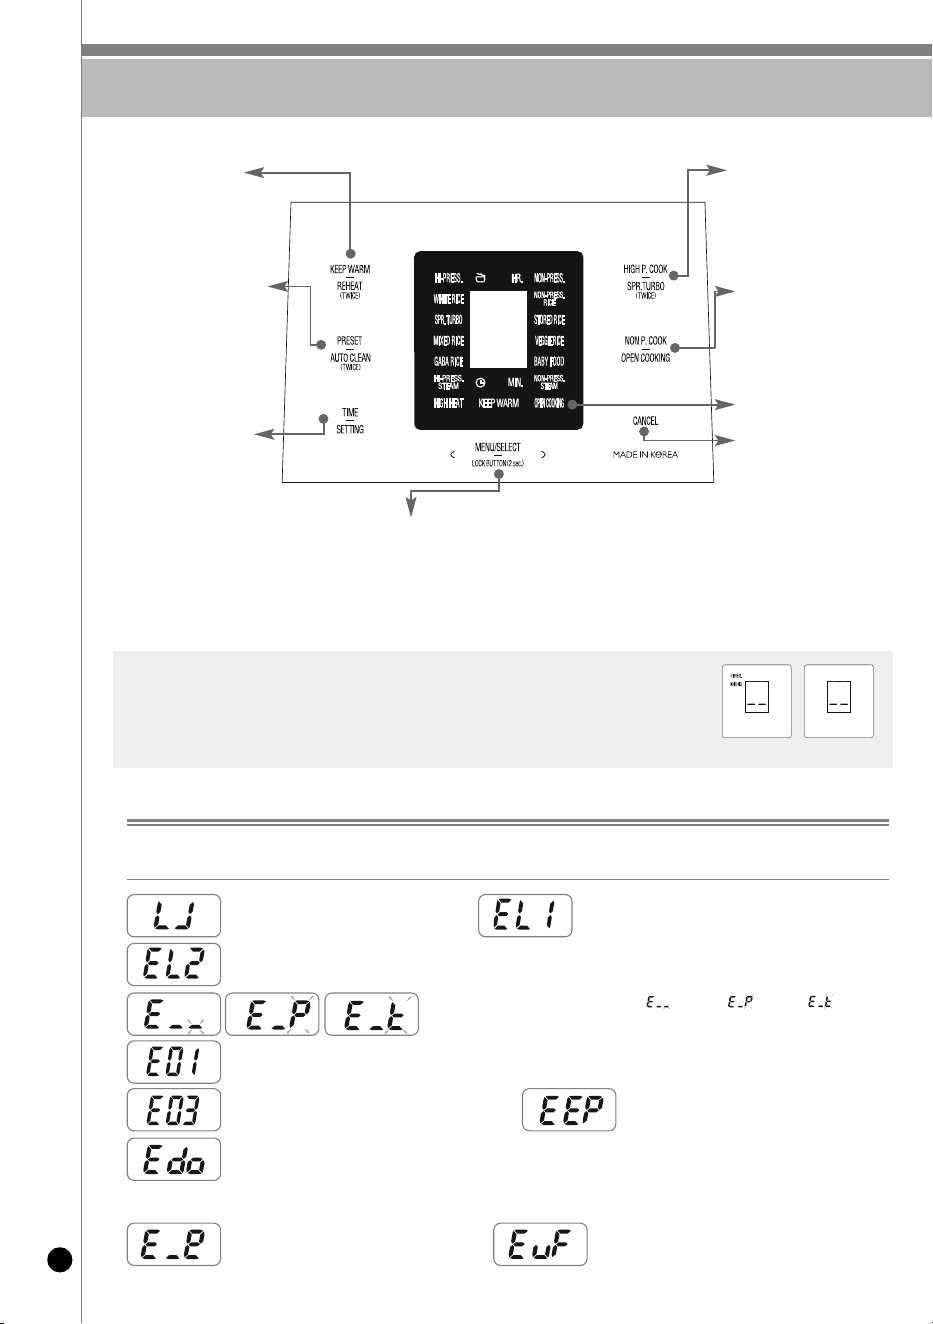
FUNCTION OPERATING PART / ERROR CODE AND POSSIBLE CAUSE
20
Keep Warm/
Reheat button
use for warming or
reheating the cooked rice
before eating.
HIGH Pressure Cook/
Super Turbo button
used to start high-pressure
cooking and high-pressure
cooking
NON Pressure Cook/
Open Cooking button
used to start non-pressure
cooking and non-pressure
cooking
Cancel button
This function is used to
cancel a selection or
release remaining steam
in the inner pot. (Keep
pressing the Cancel
button for 2 seconds for
safety reason if you want
to cancel while cooking.)
Display
Preset/Auto Clean
button
use it to preset the cooking
time you want.
When you use automatic
steam cleaning function.
Time/
Setting
button
used to set GABA Rice,
High Pressure Steam, Baby food,
non Pressure Steam cooking time.
used to modify the Preset time.
used to set voice volume and voice setting.
used to set keep warm temperature,
customize individual keep warm
preference, customize individual cooking
preference.
Menu/Select button
used to select White rice, Super Turbo White Rice, High heat White rice, Mixed
Rice, High Heat Mixed Rice, GABA Rice, High Heat GABA Rice, High
Pressure Steam, non Pressure White Rice, frozen Stored Rice, Veggie Rice,
Baby food, non Pressure Steam, used to Change the function selected by the
Time/Setting button.
Error Code and Possible Cause
When the product has any problems or used it inappropriately, you can follow the below marks.
If error persistently shows up even in normal using conditions or after taking measure, inquire with customer service.
※ If no operation is done while power cord is plugged, the system while be on standby mode as shown in the figure.
(The menu on standby screen, time, voice and customized rice taste stage may differ depending on user configuration.)
※ If cancel button is pressed during cook, the rice cooker will go on standby mode.
※ Press the button until the buzzer sounds. Picture may vary depending on model.
※ It switches to power save mode after 1 minute from standby(Lid handle light is off)
▶ How to cancel power save mode : Power save mode is canceled by pressing the button, turning the lid coupling
handle, or opening or closing the lid.
When the inner pot is not placed into
the unit.
This error code is displayed when the smart
locking system has failed. Please contact
Service center for service inquiry.
This error code is displayed when the smart locking system has failed. Please do not open the lid until
cooking is completely finished. If error occurs during warming or stand by mode, please open the lid after
turn off the power. Please contact Service center for service inquiry.
When pressing the ‘High Pressure Cook/Super Turbo’ and ‘Keep Warm/Reheat’ and ‘Preset/Auto Clean’ and ‘Menu/Select’
button, while the lid handle is on incorrect pressure mode. Turn the lid handle “High Pressure” or “non Pressure”.
Problem on environment sensor. Please
contact Customer Service center.
Problem on micom memory. Please contact
Customer Service center.
It is appears on the display when you press ‘High Pressure Cook’ or ‘Preset/Auto Clean’ button again,
or if the high pressure cooking has finished and you've never ever turned the handle to “non Pressure”,
It can be solved by turning handle to “non Pressure” and then turn to “High Pressure”. If the problem
persists, contact the customer service center.
When boiling only water and When the product fails.
Please contact Customer Service center.
Problem on micom memory. Please contact
Customer Service center.
Problem on temperature sensor.
( “”
mark,
“”
mark,
“”
mark
blink.) Inquire with customer service.
< Screen on standby >
<Screen on Power
save mode>
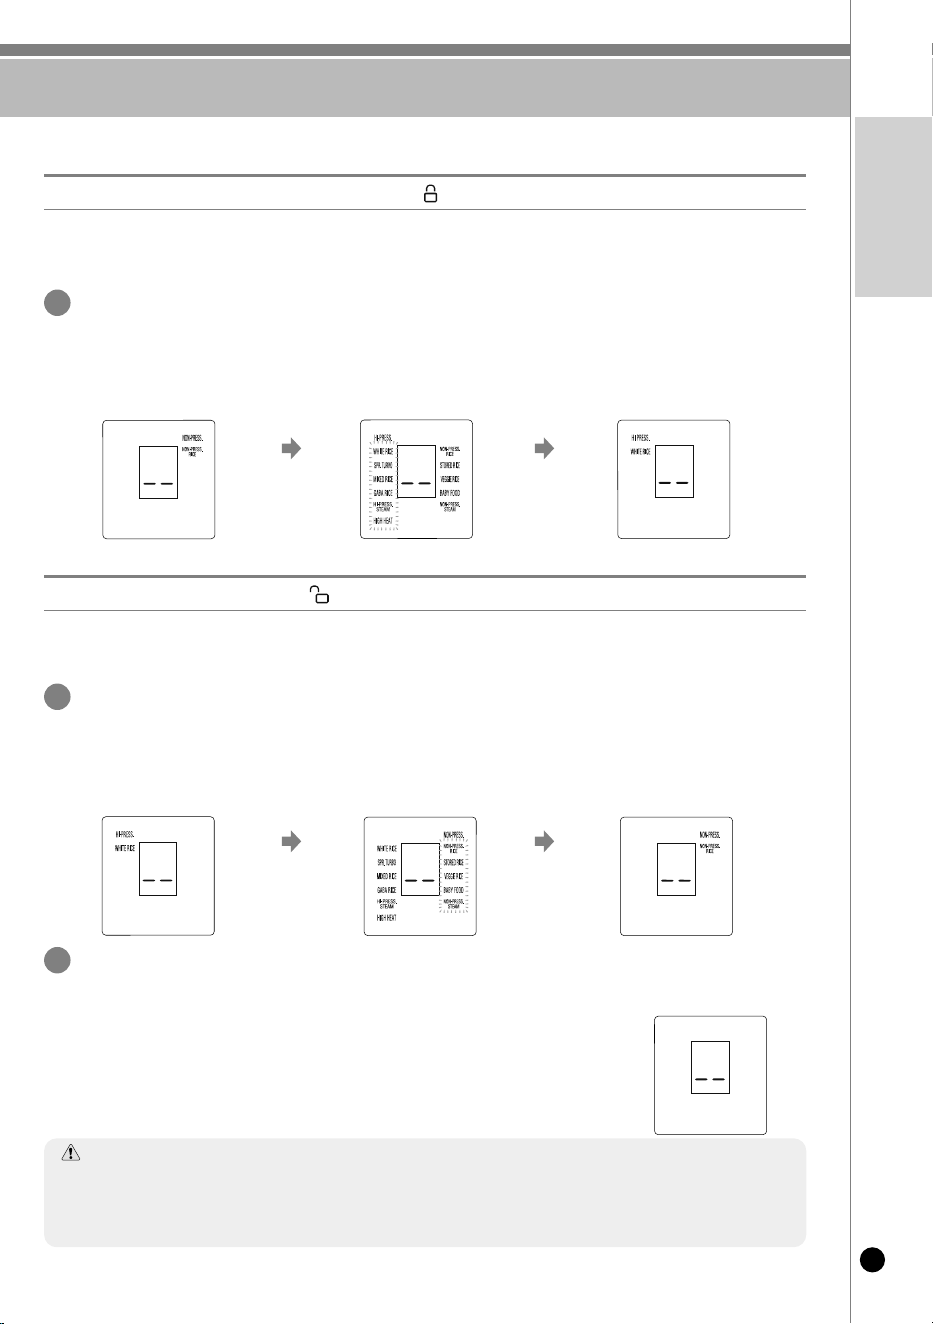
HOW TO SELECT HIGH PRESSURE MODE OR NON PRESSURE MODE
21
www.cuckooamerica.com
english
1
Select high pressure mode
Turn the Lock/unlock Handle to “High pressure ”.
Select non pressure mode
Turn the Lock/unlock Handle to “ non Pressure”.
Please turn Lock/Unlock handle from “Non pressure” to “High pressure” if you want
to change from non pressure mode to high pressure mode.
▶
When the Lock/unlock handle turns into orange color, and “High Pressure” is displayed on the Display, high pressure mode is turned on.
▶
You can only select high pressure menu in high pressure mode.
▶
High Pressure menu: White Rice, High Heat White Rice, Super Turbo White Rice, Mixed Rice, High Heat Mixed Rice, GABA Rice,
High Heat GABA Rice, High Pressure Steam
▶
When the Lock/unlock handle turns into White color, and “non Pressure” is displayed on the Display, non pressure mode is turned on.
▶
You can only select non pressure menu in non pressure mode.
▶
non Pressure menu: non Pressure Rice, frozen Stored Rice, Veggie Rice, Baby food, non Pressure Steam
▶
If it is changed to high pressure mode, only high pressure mode flickers for 3 seconds, and then the saved high pressure menu is turned on.
▶
Voice, saying “This is High Pressure mode. Select High Pressure menu.” comes out.
▶
Light of the Lock/unlock handle is changed into orange color.
1
Please turn Lock/Unlock handle from “High pressure” to “Non pressure” if you want to
change from high pressure mode to non pressure mode.
▶
If it is changed to non pressure mode, only non pressure mode flickers for 3 seconds, and then the saved non pressure menu is turned on.
▶
Voice, saying “This is non Pressure mode. Select non Pressure menu.” comes out.
▶
Light of the Lock/unlock handle is changed into White color.
2
Make sure to close the lid and turn the Lock/Unlock handle to “high pressure” or “non pressure”
while cooking. You cannot select menu if the pressure mode is not correctly selected.
▶
At the time of button input, the voice “Turn the handle to the desired pressure
position.” is output.
▶
When the Menu / Select button is input, a voice comes out saying “Turn the Cover Handle
to High Pressure mode or non Pressure mode, and select the menu.”
▶
Please turn the handle in a correct way, and select high pressure mode or non
pressure mode.
< Screen on standby (non pressure mode) > < Screen on standby (High pressure mode) >
< Screen on standby (High pressure mode) >
< Mid position of the Lock/unlock handle>
< Screen on standby (non pressure mode) >
When changing
into high pressure
mode
flickering for
3 seconds
When changing
into non pressure
mode
flickering for
3 seconds
When cooking in non pressure mode, please cook the designated capacity of food.
When cooking, please do not exceed the designated capacity of food.
-
If you exceed the capacity designated in the cooking guide, the Pressure Weight and Cleaning Soft Steam Cap lead to the overflow of food.
- Please follow the designated cooking guide.
Cautions
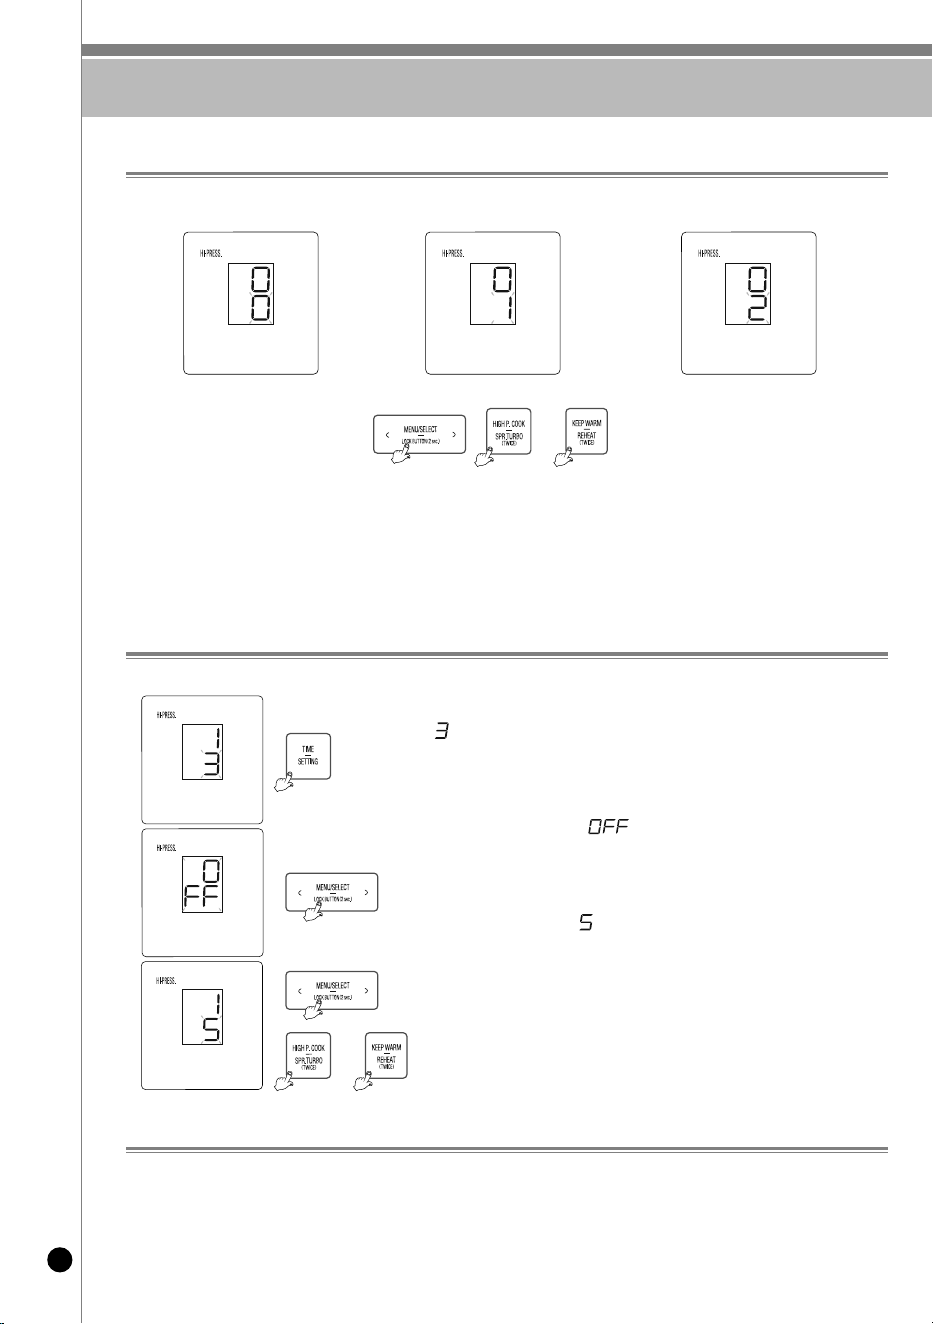
HOW TO SET OR CANCEL VOICE GUIDE FUNCTION
22
‘ ’
sign is displayed when entered volume control mode by
pressing ‘Time/Setting’ button 2 times.
If set value became ‘ ’ by pressing Menu / Select button,
voice guide function is off.
Press button to set ‘ ’, that is the maximum volume sound.
▶After setting desired volume, press ‘High P Cook’ or ‘Keep
Warm’ button to store.
Voice Setting
Voice guide volume control (The function which can control volume and cancel)
You may select your preferred voice among, ‘Korean, English and Chinese.’
▶ The default is English.
‘Time/Setting’ button needs to be pressed for over 2 second at the first time.
What is Power Outage Function
▶ This product memorizes the current condition before the power outage even if there is a power outage, so if the power
comes back on within about 2 minutes after the power outage, it will operate normally. (There may be a slight difference
depending on the product.)
▶ If cooking rice or cooking is canceled due to the power outage, you must press the ‘High Pressure Cook’ or ‘non Pressure
Cook’ button again to cooking rice or cook.
▶ If there is a power outage while cooking rice or cooking, the cooking rice or cooking time will be delayed as much as the
power outage time, and the cooking rice or cooking status may be slightly different depending on the power outage time.
1. Press ‘Time/Setting’ button once. ‘Time/Setting’ button needs to be pressed for over 2 second at the
first time. (If you press ‘CAnCEL’ or do not operate for 7 seconds, setting will be cancelled and you will go
back to the standby mode.)
2. After setting voice with ‘Menu / Select’ button, Korean, English or Chinese, and press ‘High P Cook’ or
‘Keep Warm’ button.
Example) When set to Korean voice
oR
oR
Example) When set to Chinese voice Example) When set to English voice
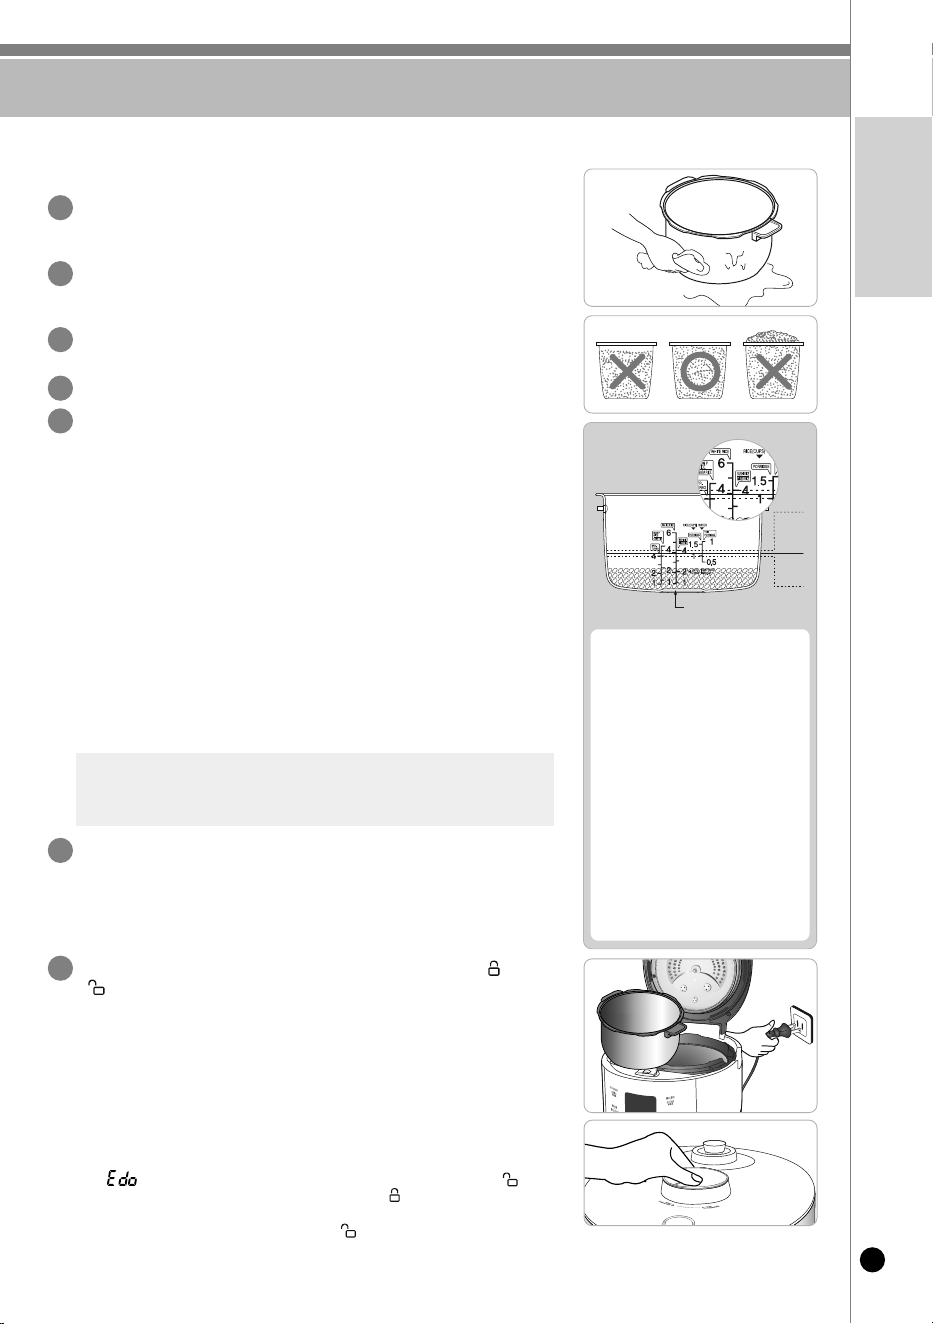
BEFORE COOKING RICE
23
www.cuckooamerica.com
english
※ Please, Cook hard grains such as beans and red beans by soaking or boiling
them in the mixed rice menu.
※ Please, refer to the cooking menu time for the each menu.(Refer to page 24)
※ This model does not support Susuhi rice, Porridge(Thick/Thin) menu.
Clean the inner pot and remove any moisture.
▶ Clean the inner pot with a dishcloth.
▶ using a rough sponge may cause damage to the inner pot.
Measure the rice with a measuring cup.
▶ A full cup of rice of measuring cup is equal to one person serving.
(Example: 3 persons for 3 cups, 6 persons for 6 cups)
Wash the rice with another container until the water becomes clear.
(We recommend not to use inner pot for washing grains)
Put rinsed rice into the inner pot.
According to menu, adjust the water amount.
▶ for measuring, place the inner pot on a leveled surface and adjust
the amount of water.
▶ The marked line of the inner pot indicates water level when putting
the rice and water into inner pot together.
▶ About water scale
• White Rice, High heat White Rice, frozen Stored Rice : Adjust water level to the
water scale for ‘WHITE RICE’. White Rice and High heat White Rice can be cooked
to max 6 servings. frozen Stored Rice to max 4 servings.
• Super Turbo White Rice : Adjust water level to the water scale for ‘SPR. TuRBo.
Super Turbo White Rice can be cooked to max 4 servings.
• Mixed Rice, High heat Mixed Rice : Adjust water level to the water scale for ‘MIXED
RICE’. Mixed Rice and High heat Mixed Rice can be cooked to max 4 servings.
• non Pressure White Rice, Veggie Rice : Adjust water level to the water scale for
‘non P RICE’ non Pressure White Rice, Veggie Rice can be cooked to max 4
servings.
• GABA Rice, High heat GABA Rice : Adjust water level to the water scale for ‘GABA
RICE’. GABA Rice and High heat GABA Rice can be cooked to max 4 servings.
Please plug the power cord before inserting inner pot in the rice cooker.
Put the inner pot correctly.
▶
If there is any external substance on the temperature sensor or the bottom
of the inner pot, wipe it off before putting the pot into the main unit.
▶
Lid will not close if the inner pot is not placed correctly in the main body
(Place the inner pot to the corresponding parts of the main body)
Close the lid and turn the lock/unlock handle to the “High pressure ” or
“ non pressure” position.
▶When the Lock/unlock handle turns into orange color, and “High Pressure” is
displayed on the Display, high pressure mode is turned on.
When the Lock/unlock handle turns into White color, and “non Pressure” is
displayed on the Display, no pressure mode is turned on.
▶When you press ‘non P CooK’ button in high pressure mode and when you
press ‘HIGH P CooK’ button in no pressure mode, the warning sound rings
and “E01” signal is displayed, and cooking is not available.
▶
Cooking is available only when you press ‘HIGH P CooK’ button in high pressure
mode and when you press ‘non P CooK’ button in no pressure mode.
※
During warming, please cancel warming by pressing ‘cancel’ button, and then select the function.
▶
If “ ” appears on the display, please turn the Lock/unlock handle to “ non
pressure,” and turn the button again to “high pressure .” Then the machine will work
properly. (function to check whether the lid is completely and properly being closed.
※ If you turned the Lock/unlock handle to “ non pressure” for more than one
time after cooking, that is not the case.
1
2
3
4
5
6
7
❶
To cook sticky rice or old rice:
Pour more water than the required
water level
❷
White Rice for 4 persons (4 cups) :
Set the water to scale 4 of
“White Rice”
❸
The rice is fully soaked or to over
cooked rice: Pour less water than
the measured scale.
❹
When rice is half-cooked or firm:It
happens because of the kind of the
rice or the degree of dryness.
In this case, please add 1-10% of
the water.
❶
❷
❸
Rice for 4 persons (4 cups)

HOW TO COOK
24
1 2
Turn the handle to the desired pressure position.
• Please mount detachable cover.
• Please keep “Pressure weight” horizontal.
•
You cannot select menu if the pressure mode is not correctly selected.
•
If the Lock/unlock handle is on high pressure mode, only high pressure menu is
selected, and if it is on non pressure mode, only non pressure menu is selected.
<High Pressure mode>
•
Each time Select button is pressed, the selection switches in the sequential order,
White Rice →High Heat White Rice →Super Turbo White Rice →Mixed Rice →High
Heat Mixed Rice →GABA Rice →High Heat GABA Rice →High Pressure Steam.
<non Pressure mode>
•
Each time Select button is pressed, the selection switches in the sequential order,
non Pressure White Rice →frozen Stored Rice →Veggie Rice →Baby food →
non Pressure Steam.
• If the button is pressed, repeatedly, the menu switches continuously in sequential order.
•
In the cases of White Rice, High Heat White Rice, Mixed Rice, High Heat Mixed Rice, GABA
Rice, High Heat GABA Rice and non Pressure White Rice, the menu remains memorized
once each cooking is completed, so for continuous use of the same menu, no selection of
menu is required.
Start cooking by pressing ‘High Pressure
Cook/Super Turbo’ or ‘non Pressure Cook’ button.
• Before cooking, if you want to select high pressure menu, please turn the
Lock/unlock handle to “High pressure” and press “High Pressure Cook/Super
Turbo” button. If you want to select no pressure menu, please turn the
Lock/unlock handle to “non pressure” and press “non Pressure Cook” button.
• If you select high pressure menu and press “non Pressure Cook” button,
warning sound rings, E01 signal appears on the display, and voice, saying “This
is High pressure menu. Press ‘High Pressure Cook’ button,” comes out. If you
select non pressure menu and press “High Pressure Cook/Super Turbo” button,
warning sound rings, E01 signal appears on the display, and voice, saying “This
is non pressure menu. Press ‘non Pressure Cook’ button,” comes out.
• Then press the ‘HIGH Pressure Cook/Super Turbo’ button, and sound “White Rice.
Cuckoo start cooking”
• If you did not turn the Lock/unlock handle to “High pressure” or “non pressure”
and if you pressed “High pressure cook/Super Turbo” button or “non Pressure
Cook” button, warning sound rings and E01 signal appears on the display, and
then voice, saying “Turn the handle to the desire pressure position” comes out
and the machine does not work.
• Time for cooking may vary according to cooking capacity, temperature of water
and cooking conditions.
3 4
Steaming (ex: White Rice)
• The cooktime remaining on the display is shown from
cooking thoroughly. The cook time is different according
to the menu.
• Be careful not to burn yourself from the automatic steam
outlet.
The end of cooking
• When cooking is completed, warming will start with the
voice “White Rice has been completed.”
• If you want to stop warming, Push ‘Cancel’ button.
• When cooking ends, stir rice equally and immediately.
If you don't stir rice at once and keep it stagnant, rice will
go bad and smell bad.
• If the lid handle is not working well, take out the steam
completely out of inner pot by turning over pressure
weight.
• While cooking, do not press cancel button.
ex) In case of 14minutes left.
ex) In case of selecting White Rice.
▶You can hear a voice, White Rice.
ex) When cooking White Rice in high pressure mode.
※ After cooking multi cook etc, the smell may permeate into the unit, use the unit after cleaning the rubber packing and lid part .
※ Cooking time by menus may vary to some degree depending on the using environment of the product.
Cooking time for each menu
Menu
Class
White Rice
(main menu)
High Heat
White Rice
Super Turbo
White Rice
Mixed Rice
High Heat
Mixed Rice
GABA Rice
High Heat
GABA Rice
Non Pressure
White Rice
Veggie Rice
Frozen
Stored Rice
Baby food
Non Pressure
Steam
High
Pressure
Steam
Auto Clean
Serving
1 ~ 6 1 ~ 6 1 ~ 4 1 ~ 4 1 ~ 4 1 ~ 4 1 ~ 4 1 ~ 4 1 ~ 4 1 ~ 4
See detailed guide to
cooking by the menus.
Pour water up
to the line Auto
Clean
Cooking
time
24 ~ 36min 26~37min 14~21min 38~46min 44~50min 45~56min 52~67min 38~49min 42~55min 23~32min 24min
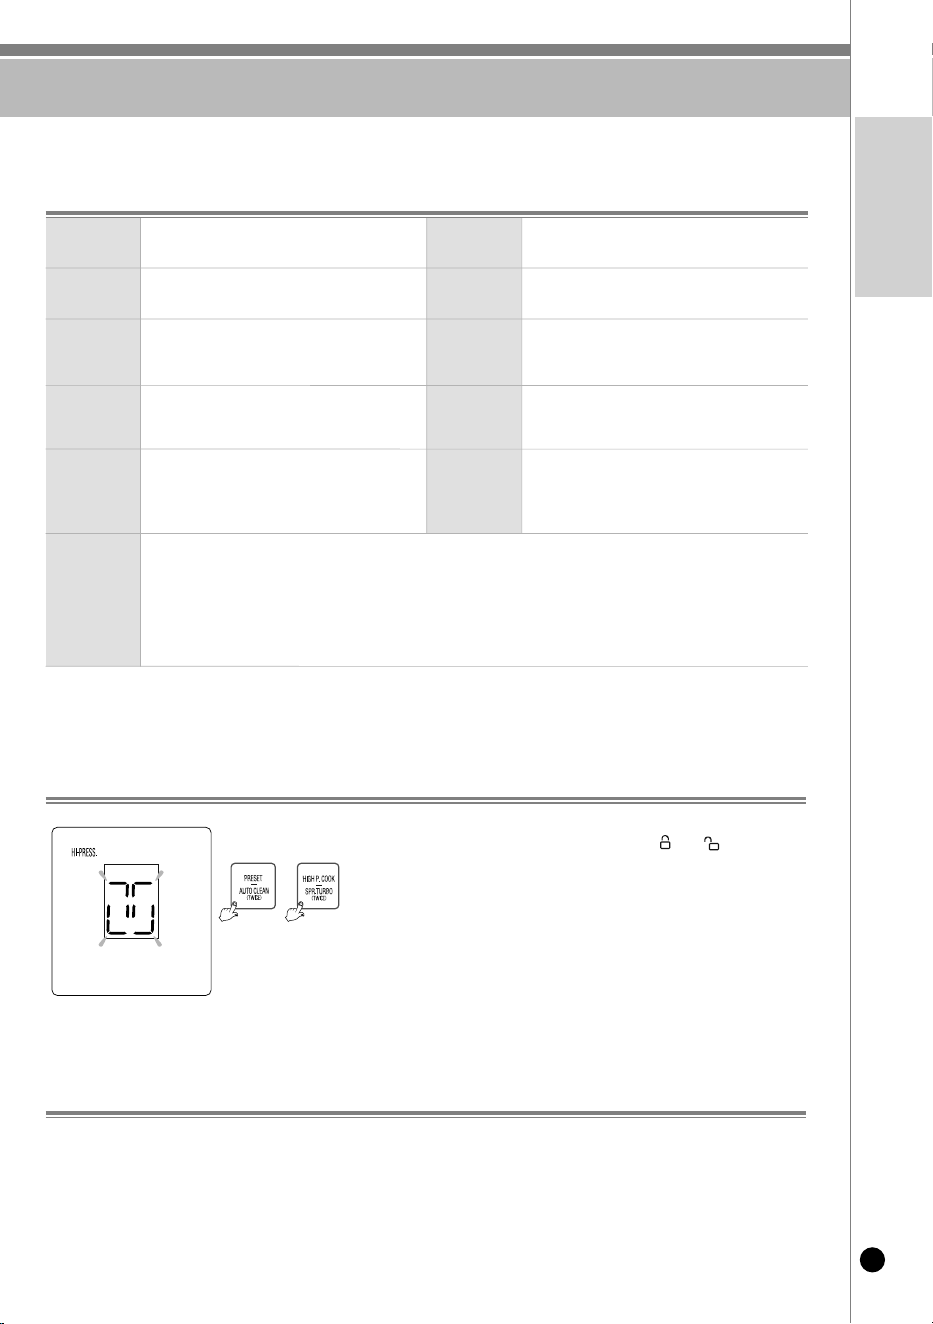
HOW TO COOK
25
www.cuckooamerica.com
english
White rice
When you want to have sticky and
nutritious white rice.
Mixed Rice
This menu is used to cook a variation of
brown rice. mixed rice.
GABA Rice
used to cook germinated of brown rice.
Baby Food
used to cook baby food by
setting a time manually.
High pressure
Steam,
Non pressure
Steam
Manually set cooking time and cook with
high pressure(1.8kgf/
㎠
) and non
pressure(1kgf/
㎠
).
Frozen
Stored Rice
This menu is used to keep rice frozen.
Auto Clean
(Steam
Cleaning)
This menu is used to eliminate small
soaked after cooking or warming.
Non Pressure
White Rice
use when you want to eat soft rice.
High Heat
(White rice,
Mixed Rice,
GABA Rice)
use when cooking more sticky and soothing
Cooked Rice.
(Melanozing effect could be increased.)
Veggie Rice
used this function to cook rice mixed with
vegetables.
Super Turbo
White Rice
• When cooking Super Turbo White Rice, the cooking time is reduced compared to white rice menu.
• How to cook Super Turbo White Rice 1: HIGH Pressure Cook/Super Turbo button twice.
• How to cook Super Turbo White Rice 2: After selecting the Super Turbo White Rice menu, Press the HIGH
Pressure Cook/Super Turbo. (It takes about 14 minutes for one serving of Super White Rice)
• The mode of Super Turbo White Rice does not produce cooked rice as good as normal cooking mode.
use Super Turbo White Rice mode only for 4 servings or less.
• for better taste of cooked rice, cook rice in Super Turbo White Rice mode after macerating rice for 20 minutes
or so before cooking
※ After cooking in White Rice Super Turbo mode or cooking of small serving, discard water.
※ Please, refer to the detailed cooking methods for the each menu.(Refer to page 41~56)
How to use the cooking menu
Pour water according to the water scales for Auto Clean mode, close the lid
and turn the Lock/unlock handle to “High pressure ” or “ non pressure.”
After selecting Auto Clean button by pressing the ‘Preset/Auto Clean’ button
for two times, press ‘High Pressure Cook/Super Turbo’ buttons in high
pressure mode, and press ‘non pressure cook’ button in no pressure mode.
※ If you regularly do the automated cleaning, you can maintain the cleanliness
of valve.
The cooked rice can be light yellow at the bottom of the oven, because this product is designed to improve pleasant
flavor and taste. Especially, melanoizing is more serious at the “Preset cooking” than just “Cooking”. It does not
mean malfunction.
※ When mixing other rice with White rice, Melanoizing effect could increase more than “White rice cook” setting.
How to use AUTO CLEAN (Steam Cleaning)
Melanoizing phenomenon
ex) Auto clean in high
pressure mode
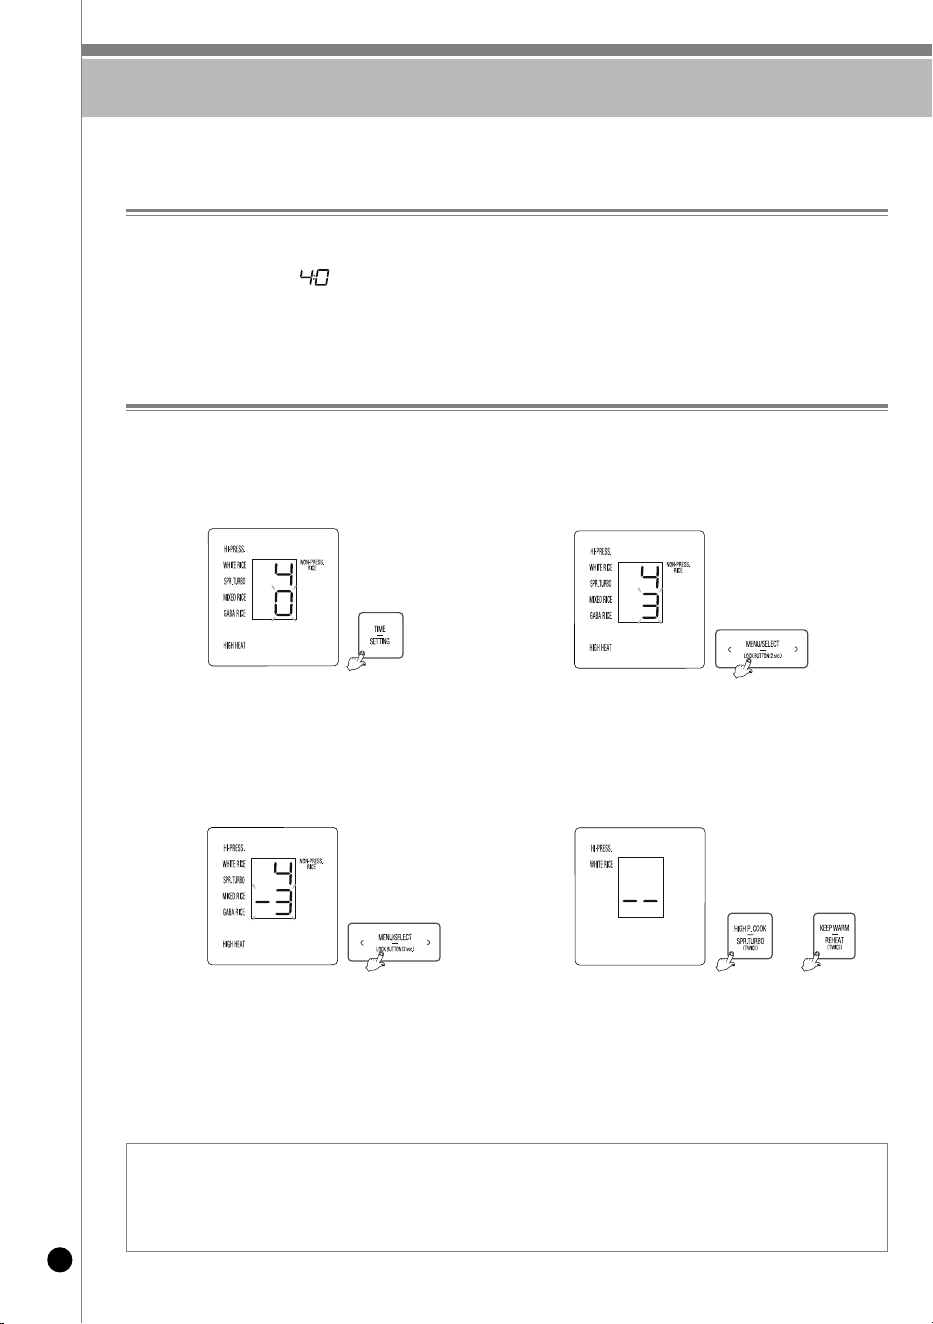
HOW TO USE “CUSTOMIZED COOKING FUNCTION”
26
CUCKOO “Customized Taste Function”
This function allows you to select your preferred temperature level when cooking. Compare to previous model,
the temperature level has been fixed, and consumers are able to set the temperature with their preferences.
The initial value is set to . Please select the level depending on your preferences.
- High level : Select high level if you are cooking grains or want sticky rice.
- Low level : Select low level if you are cooking freshly harvested rice or don't want sticky rice.
❶ CuCKoo customized taste setting display
Press the “TIME/SETTInG” button for 2 seconds to
enter Voice Setting mode. Press “TIME/SETTInG”
button 4 more times to go to customized taste setting
display. Please refer to the display for the initial
values.
Press the “MEnu/SELECT” button to change display as
shown in the image above.
Press the “MEnu/SELECT” button to change display
as shown in the image above.
Press “HIGH Pressure Cook/Super Turbo” or “Keep
Warm/Reheat” button to save the set value and return to
standby mode. (If you press ‘CAnCEL’ or do not operate
for 7 seconds, setting will be cancelled and you will go
back to the standby mode.) (When you press the
“TIME/SETTInG” button, setting will be cancelled and
you will go back to the standby mode.)
❷ High level adjusting mode
❸ Low level adjusting mode ❹ Setting complete display
How to use CUCKOO “Customized Taste Function”
Press the “TIME/SETTInG” button at standby mode for 2 seconds to go to voice setting mode.
Press “TIME/ SETTInG” button 4 times to enter the customized taste setting mode.
All options supported by ‘CuCKoo Customizes Taste’ will be displayed.
1. “CuCKoo Customized Taste” function is applied to the following options:
White rice, High Heat White rice, Mixed Rice, High Heat Mixed Rice, GABA Rice, High Heat GABA Rice, Super Turbo White Rice, non Pressure White
Rice.
2. Set up the step of customized cooking function to taste. The scorch can occur when cooking in high level mode.
3. After setting each stage, cooking status may vary according to rice status in cooking status and water content percentage.
oR
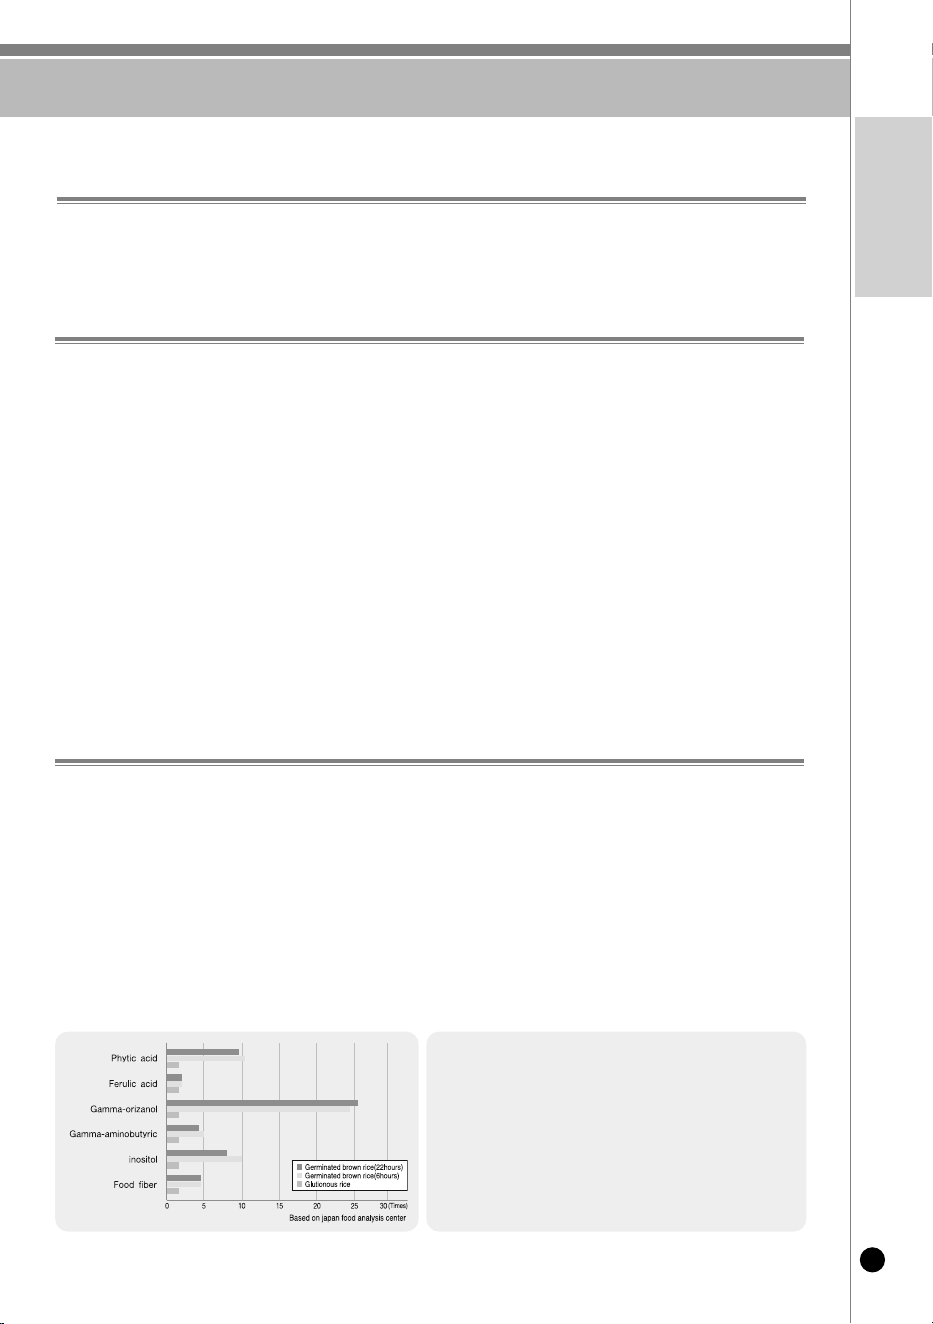
HOW TO USE “GABA RICE (BROWN RICE)”
27
www.cuckooamerica.com
english
What is Germinated Brown rice?
▶Brown rice has richer nutrients than polished rice. However, brown rice is rather tough and harder to be
digested. By germination, the enzymes in the brown rice are activated, generating nutrients and become
more digestible.
Tips to Buy Quality Brown Rice?
Features of Germinated Brown rice
❶ Check the dates of harvest and pounding.
▶The dates should be within 1year from harvest, 3 months from pounding.
❷ Inspect rice with your eyes.
• Check that embryo is alive
• Rice surface should be light yellow and glazing. Whitely stirred up surface, or darkish colored Brown rice is not
suitable for germination
• Avoid fractured, not fully corned, or empty ear’s. Empty ear’s may generate odors during germination and
bluish- nor corned Brown rice cannot be germinated.
(Regular brown rice)
(Poor brown rice
- Empty ear and nit fully corned brown rice)
Germinated Brown rice increases nutrients and enhances taste which is a weak point of brown rice.
Germinated Brown rice also improves digestion.
▶Taste will be greatly enhanced.
▶ Digestive and rich in nutrients.
• Diabetic hormone is generated improving digestion.
▶ Good as a health food for children or students.
• Rich with dietary fiber.
▶ Germinated brown rice has rich GABA Rice (Gamma Amino Butryc Acid)
• GABA promotes metabolism in liver and kidneys, suppresses neutral fat, lowers blood pressure,
promotes metabolism in brain cells - these effects have been proven by medical science.
< Comparison of Germinated brown rice’ s nutrition
and White rice’s (6 hours) nutrition. >
▶ Phytic acid 10.3Times
▶ Ferulic acid 1.4Times
▶ Gamma-orizanol 23.9Times
▶ Gammma-aminobutyric 5Times
▶ Inositol 10Times
▶ Food fiber 4.3Times
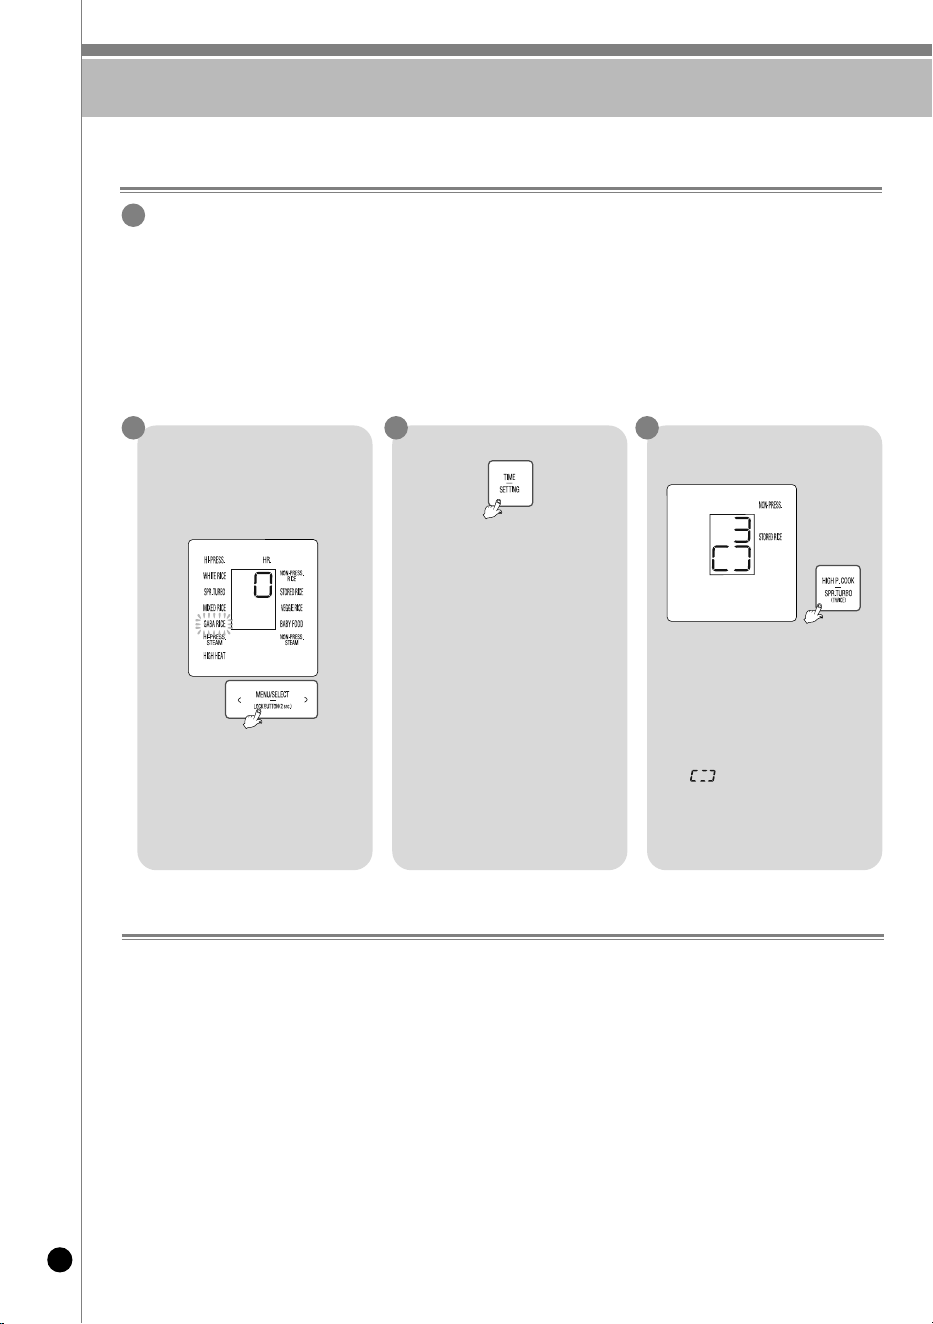
HOW TO USE “GABA RICE (BROWN RICE)”
28
In order to promote germination, soak brown rice for 16 hours in water.
Method of Pre-germination
▶ Put washed brown rice in an appropriate container, pour sufficient water to soak the rice.
▶ Pre-germination shall not exceed 16 hours. Make sure to wash rice clean with flowing water before using
‘Brown GABA’ menu. Be careful that hard washing may take off embryos which generate the germination.
▶ unique smell may be generated according to the soaking time of pre-germination.
▶ When pre-germination has been completed, wash the rice and put it into inner pot. Pour appropriate amount
of water and use ‘GABA Rice’ menu.
▶ In summer or hot temperature environment, odor may be generated. Reduce germination time and wash
clean when cooking.
Using ‘Brown GABA’ Menu
❶If smaller germ is preferred, omit pre-germination process. Select ‘Brown GABA’ menu, set-up appropriate
germination time, and start cooking(nutrient ingredients do not vary significantly by the size of germ).
❷During hot seasons, longer germination time may generate odor. Reduce germination time.
❸GABA Rice cooking is allowed up to 4 persons.
❹Tap water can be used for germination. However, spring water is recommended. Germination may not be
properly performed in hot or boiled water even after cooling.
❺Germination rate, germ growth may differ by the Brown rice type, condition or period of storing, etc.
- Germinated brown rice is sprouted brown rice. Germination rate and growth may differ by the Brown rice type.
The brown rice should be within 1 year from harvest, and not long since pounded.
❻In GABA mode, preset on 3H may not be possible.
❼The taste of rice could be different as depending on a kind of brown rice. use customized taste function or
control the amount of water for your taste.
❽Depending on the state of the surrounding environment or the condition/type of rice, the sprouts of rice may not
be visible or appeared.
Precautions for ‘Brown GABA’ Cooking
1
2 3 4
Set the Locked/Open
handle at ‘High pressure’,
press “MENU/SELECT”
button to select ‘Brown
GABA’.
※
first setting time 0H(0 Hours)
※
3 more hours for germination
▶When the “GABA Rice” is
selected, “0H” is indicated in
the display.
Press “High Pressure
Cook/Turbo” button
▶ Press “HIGH Pressure
Cook/Super Turbo” button to
start the ‘Brown GABA’
process. Cooking will begin
immediately.
▶ During ‘Brown GABA’ mode,
“ ”
indicator will show the
remaining time and will be
displayed in minutes with the
“3H”mark going around
clockwise.
1.Pressing “TIME” button
changes Germination time.
2.‘Brown GABA’ time can be
set up by 0,3 hours.
☞If GABA time is set at ‘0’
hour, press “HIGH Pressure
Cook/Super Turbo” button
and it will start cooking
immediately. To cook
without germination or
cooking germinated Brown
Rice, set at ‘0’ hour.
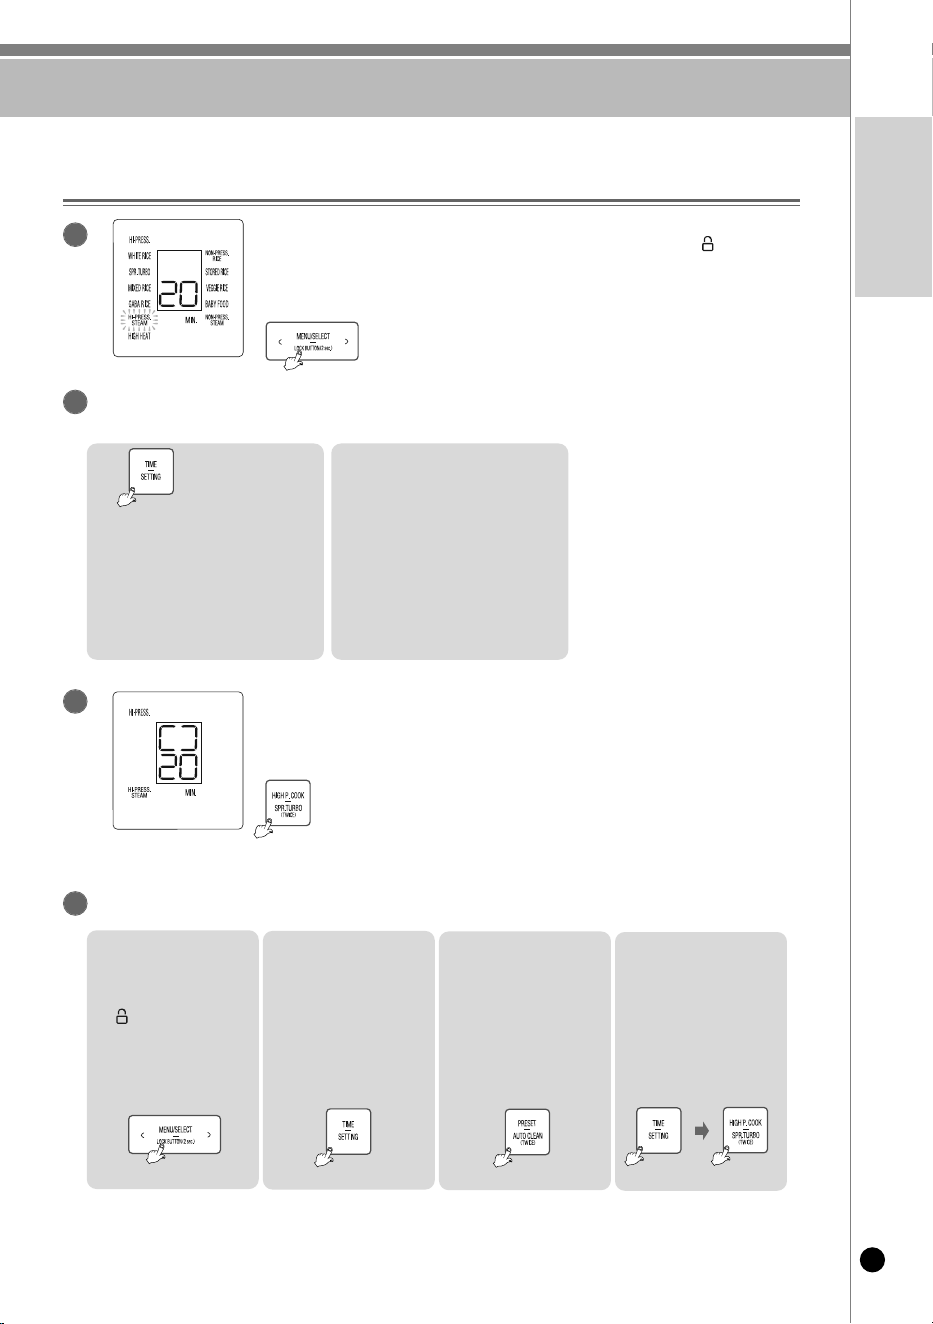
HOW TO COOK HIGH PRESSURE STEAM
29
www.cuckooamerica.com
english
2
4
1
3
HOW TO USE HIGH PRESSURE STEAM MENU AND RESERVATION
The cover handle toward “high PRessURe ”, and
press the Menu/select button to select high PRessURe
sTeAM
▶When the High-Pressure Steaming menu is selected, the time is
displayed on the Display.
set the cooking time with the TiMe/seTTing button.
▶
Please, refer to the detailed cooking times for the each menu.(Refer to page 49~56)
how to Reserve high-Pressure steaming
Press the TiMe/seTTing
button, and the time for
high-pressure steaming
will be increased by five
minutes.
▶If you keep pressing it, the time
turns into Nonstop.
1.
2. The time for high
PRessURe steaming is
adjustable from 10 to 90
minutes.
Press the high Pressure Cook/super Turbo button.
▶Press the High Pressure Cook/Super Turbo button to start high pressure
steaming.
When the high pressure steam cooking starts, the remaining time is
displayed.
1. Turn the Cover
handle toward
“high PRessURe
”, and press the
MenU/seleCT
button to select
high PRessURe
sTeAM.
2. set the cooking
time with the
TiMe/seTTing
button
3. Press the
PReseT/AUTO
CleAn button.
4.
Press the Time/setting
button, adjust the
preset time, and
press the high
Pressure Cook/super
Turbo button.
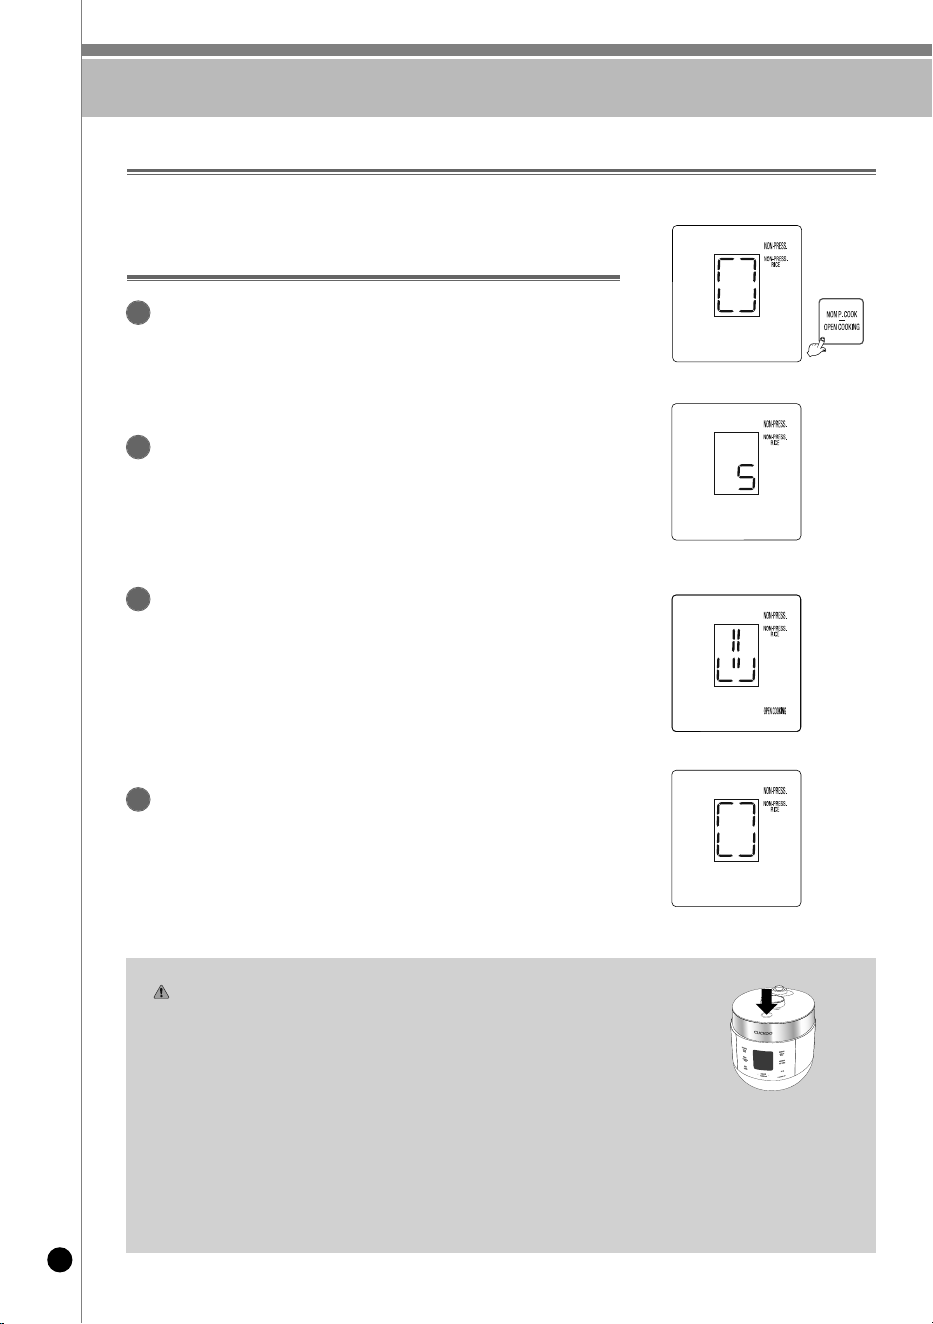
HOW TO OPEN COOK
30
During a non pressure menu cooking, select the
non P. Cook/Open Cooking button.
1
Wait until the smart locking device is released.
▶It takes 5 to 60 seconds for the smart locking device to be released.
2
After opening the lid, close the lid within 3 minutes.
▶Cooking will be canceled if the lid is kept open for more than 3 minutes.
4
Once the display on the right appears, open the lid and add
ingredients or stir the contents.
▶An audible instruction of "Please open the lid" is provided.
▶Please, refer to the detailed cooking for the each menu.(Refer to page 41~56)
▶Do not press the Open Lid button when the smart locking device remaining time
is displayed or during cooking.
Only press the Open Lid button when the Add Ingredients Indicator is activated.
3
open cooking is a function that allows the user to release the smart locking device, during a non pressure cooking
process, and add ingredients or stir the contents in the pot.
What is open cooking?
How to use open cooking function.
Cautions for open cooking
- Do not exceed the designated capacity.
- If the designated capacity is exceeded, the appliance may
overflow due to boiling.
- While the lid is open, the inner pot will not be heated.
- Burn Hazard! Do not remove the detachable cover.
- Close the lid only when the inner pot and detachable cover are
properly assembled.
- Pressing lid clamp knob when the smart locking device is
activated may cause damage to the appliance. Only press the Open Lid button when the Add
Ingredients Indicator is activated.
Contact Cuckoo Customer Service center when the appliance does not properly work.
- When the lid does not open after open cooking or non pressure cooking is completed.
Press the cover as shown on the right to unlock the smart locking device, and then push the
clamp knob to open.
- When "EL1" error code occurs, please contact with Customer Service for service inquiry.
- When "EL2" error code occurs, please do not open the lid until cooking is completely finished.
If error occurs during warming or stand by mode, please open the lid after turn off the power.
Please contact Service center for service inquiry.
CAUTION
< Cooking process indication >
< Remaining Time under
released locking device >
< Button Indication >
< Add ingredient indication >
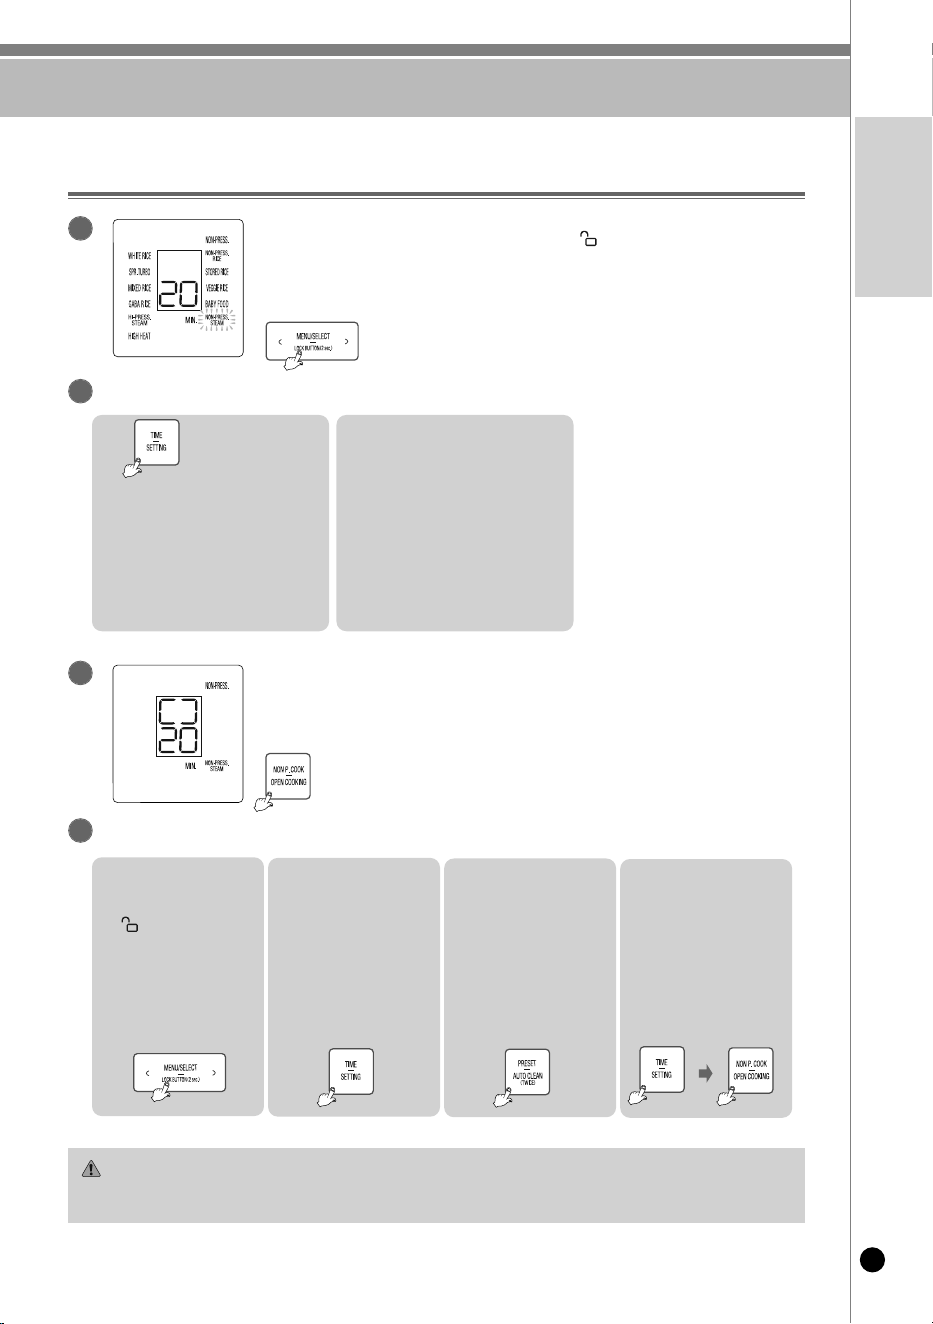
HOW TO COOK NON PRESSURE STEAM
31
www.cuckooamerica.com
english
2
4
1
3
HOW TO USE NON PRESSURE STEAM MENU AND RESERVATION
The cover handle toward “ nOn PRessURe ”, and press
the Menu/select button to select nOn PRessURe sTeAM.
▶When the Non-Pressure Steaming menu is selected, the time is
displayed on the Display.
set the cooking time with the TiMe/seTTing button.
how to Reserve non-Pressure steaming
Press the TiMe/seTTing
button, and the time for
non-pressure steaming
will be increased by five
minutes.
▶If you keep pressing it, the time
turns into Nonstop.
1.
2.The time for nOn
PRessURe steaming is
adjustable from 10 to 90
minutes.
Press the non Pressure Cook button.
▶Press the Non Pressure Cook button to start Non pressure steaming.
When the Non-Pressure steaming begins, the remaining time is
displayed
1. Turn the Cover
handle toward
“ nOn PRessURe ”,
and press the
MenU/seleCT
button to select
nOn PRessURe
sTeAM.
2.set the cooking time
with the TiMe/seTTing
button
3. Press the
PReseT/AUTO
CleAn button.
4. Press the Time/setting
button, adjust the
preset time, and
press the non
Pressure Cook/Open
Cooking button.
Precautions when using NON PRESSURE STEAM.
- Do not cook over the specified capacity.
- If the specified capacity is exceeded, it will overflow.
Precautions
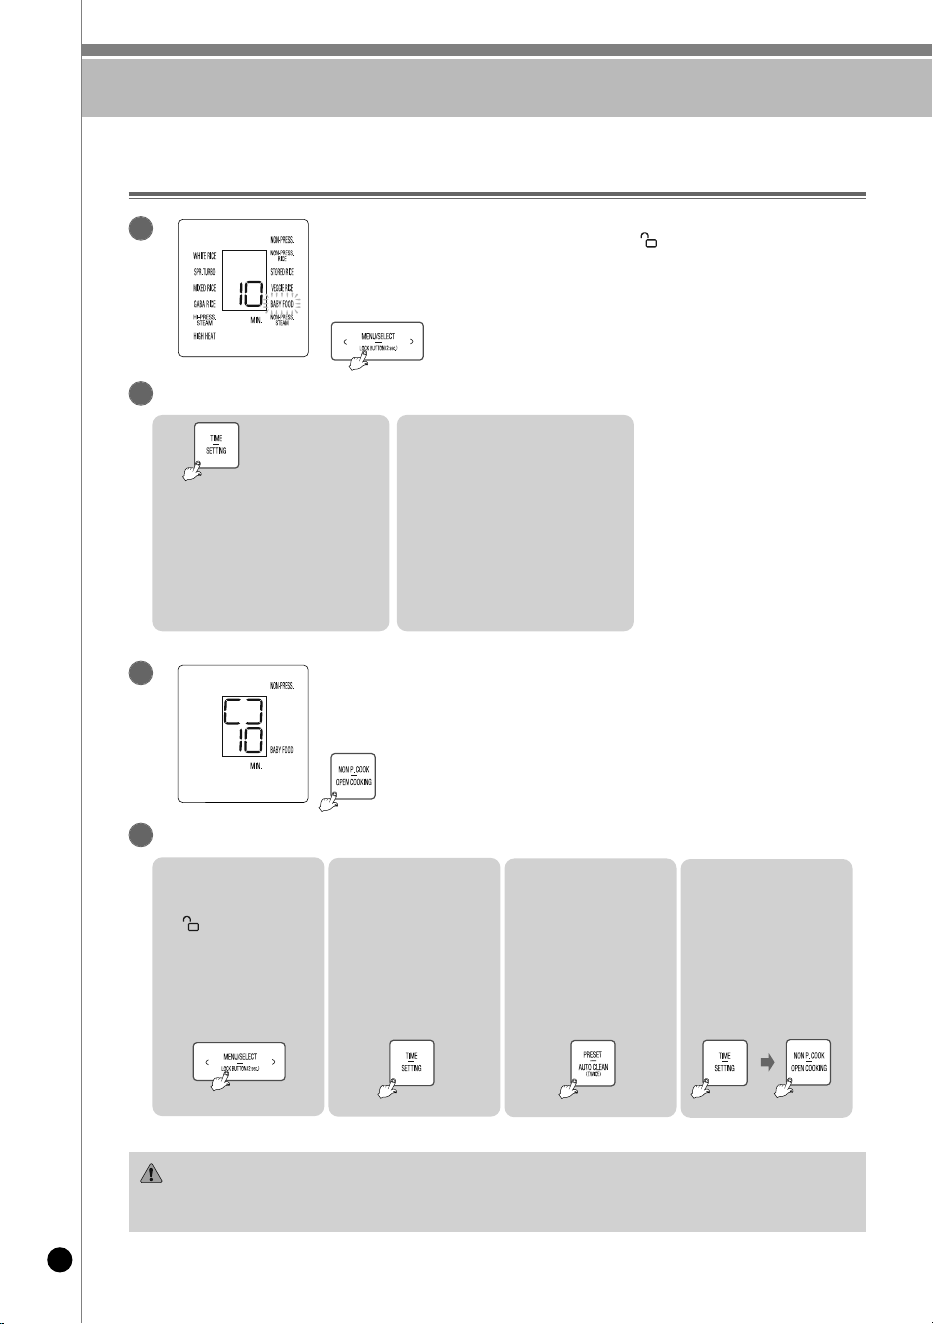
HOW TO COOK BABY FOOD
32
2
4
1
3
HOW TO USE BABY FOOD MENU AND RESERVATION
The cover handle toward “ nOn PRessURe ”, and press
the Menu/select button to select BABY FOOD.
▶When the Baby Food menu is selected, the time is displayed on
the Display.
set the cooking time with the TiMe/seTTing button.
how to Reserve Baby Food
Press the TiMe/seTTing
button, and the time for
Baby Food will be increased
by five minutes.
▶If you keep pressing it, the time
turns into Nonstop.
1.
2. The time for baby food is
adjustable from 10 to 50
minutes.
Press the non Pressure Cook button.
▶ Press the Non Pressure Cook button to start Baby Food.
When the Baby Food cooking starts, the remaining time is displayed.
1. Turn the Cover
handle toward
“ nOn PRessURe ”,
and press the
MenU/seleCT
button to select
BABY FOOD.
2.set the cooking time
with the TiMe/seTTing
button
3. Press the
PReseT/AUTO
CleAn button.
4. Press the Time/setting
button, adjust the
preset time, and
press the non
Pressure Cook
/Open Cooking
button.
Precautions when using BABY FOOD.
- Do not cook over the specified capacity.
- If the specified capacity is exceeded, it will overflow.
Precautions

HOW TO COOK FROZEN STORED RICE
33
www.cuckooamerica.com
english
Precautions when using the Frozen Stored Rice:
- Do not cook beyond the recommended amount.
- Cooking beyond the recommended may result in overflowing.
- Do not remove the detachable cover as it may cause burns.
Precautions
This function is used to make rice that will taste freshly cooked after being frozen and thawed.
What is Frozen Stored Rice?
How to use Frozen Stored Rice menu
Precautions when cooking frozen stored rice
1
2
3
Turn the lid handle to the
“ Non Pressure” position
and Press Menu/Select
button to select the Frozen
Stored Rice.
Press Non pressure
Cook/Open cooking button
to start cooking.
When cooking is complete,
open the lid and stir the
cooked rice thoroughly.
Next, move the cooked rice
into a microwavable
container and place it in a
freezer to preserve.
1
2
3
4
5
When using the Frozen stored Rice menu, refer to the water level used when cooking white
rice. The maximum cooking capacity for Frozen stored Rice is 4 servings.
When the rice has been completely cooked, open the lid and stir the rice thoroughly.
Move the cooked rice into microwavable containers in single serving portions (210g), and
place them into the freezer for preservation.
When microwaving your Frozen stored Rice, open the lid of the microwavable container
slightly and heat for 3 min 30 sec (per serving).
(heating time may differ due to amount of rice, size of container, microwave output, etc.)
Please note that the quality of your rice may be affected as the storage period increases.
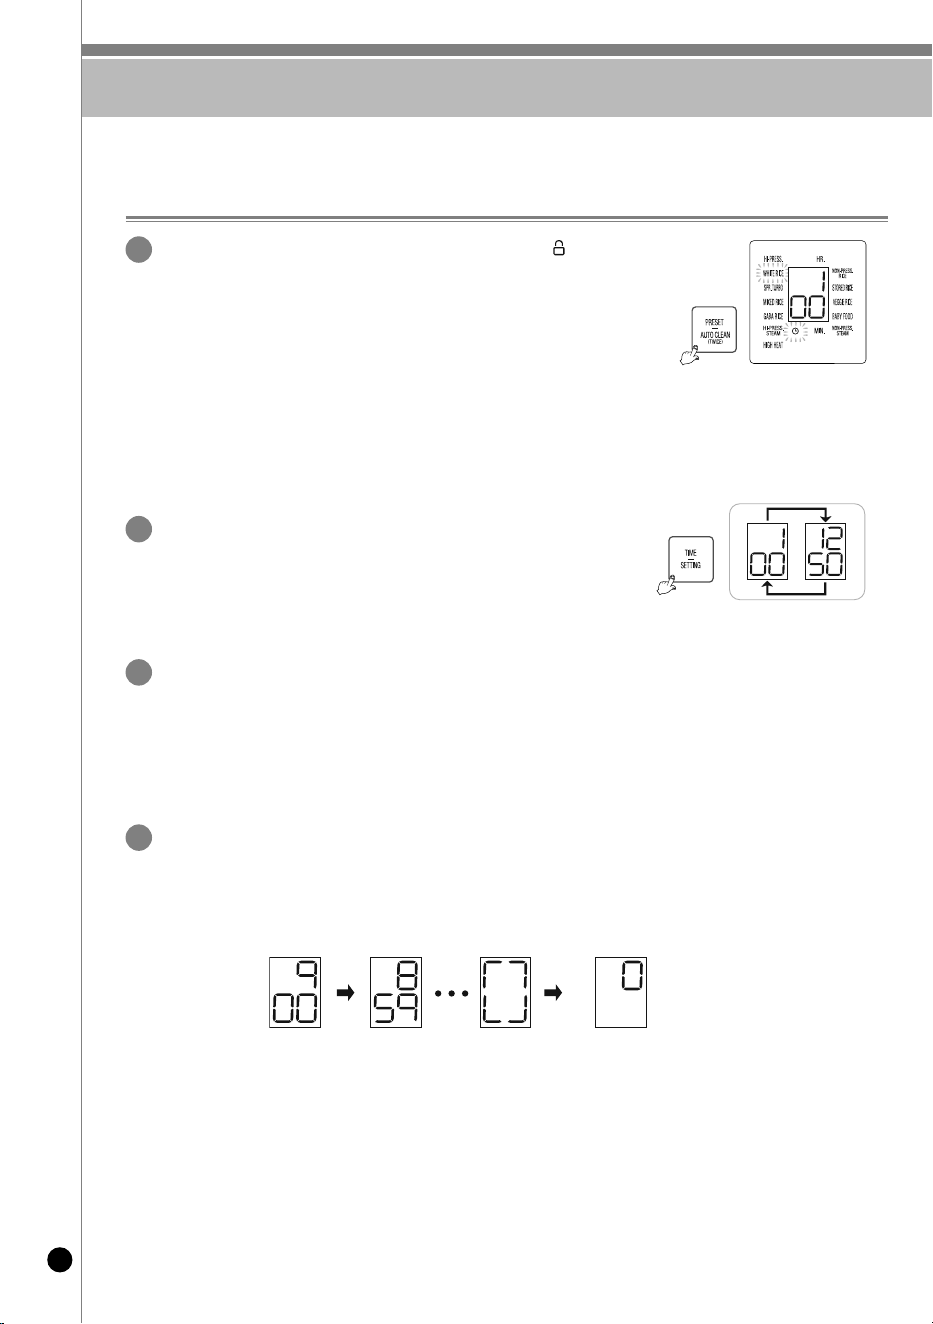
HOW TO USE PRESET FUNCTION
34
How to preset timer for cooking (How to use high pressure menu)
1
Turn the Lock/Unlock handle to “high pressure ” and
press Preset/Auto Clean button when orange light is on.
▶
If you press Preset/Auto Clean button, voice, saying “Set preset time with
Time button, then press High pressure cook button,” comes out, the setting
time is displayed on the Display, and the preset icon blinks.
▶
To set the preset time during the warming mode, stop the warming mode by
pressing the Cancel button prior to setting the preset time.
2
Press the Time/Setting button to set the preset time.
▶
Each time you press the Time/Setting button, 10 minutes are
added to the preset time.
If you keep pressing the button, the time will change continuously.
▶
Preset time ranges from 1 hour to 12 hours and 50minutes
3
Press the Menu/Select button to select the menu.
▶
GABA rice option cannot be preset with 3H setting.
If you want to preset, select the 0H option.
▶
High pressure cook option can be preset after setting the time for the option.
When the set time is longer than 60minutes, the preset time will be set as 2 hours.
4
Press the High pressure cook/Super Turbo button.
▶
A voice comes up saying “White Rice has been reserved.”
▶
When the preset mode begins, the preset light will stop blinking and the preset time will go down by minute until it starts
the preset cooking.
▶
The preset time displayed on the screen is the remaining time until completed cooking.
(The completion time may vary depending on either the use condition or the cooking capacity)
< Preset mode disply >
< Preset Cooking > < Cooking > < Cooking Complete/
Keep Warm >
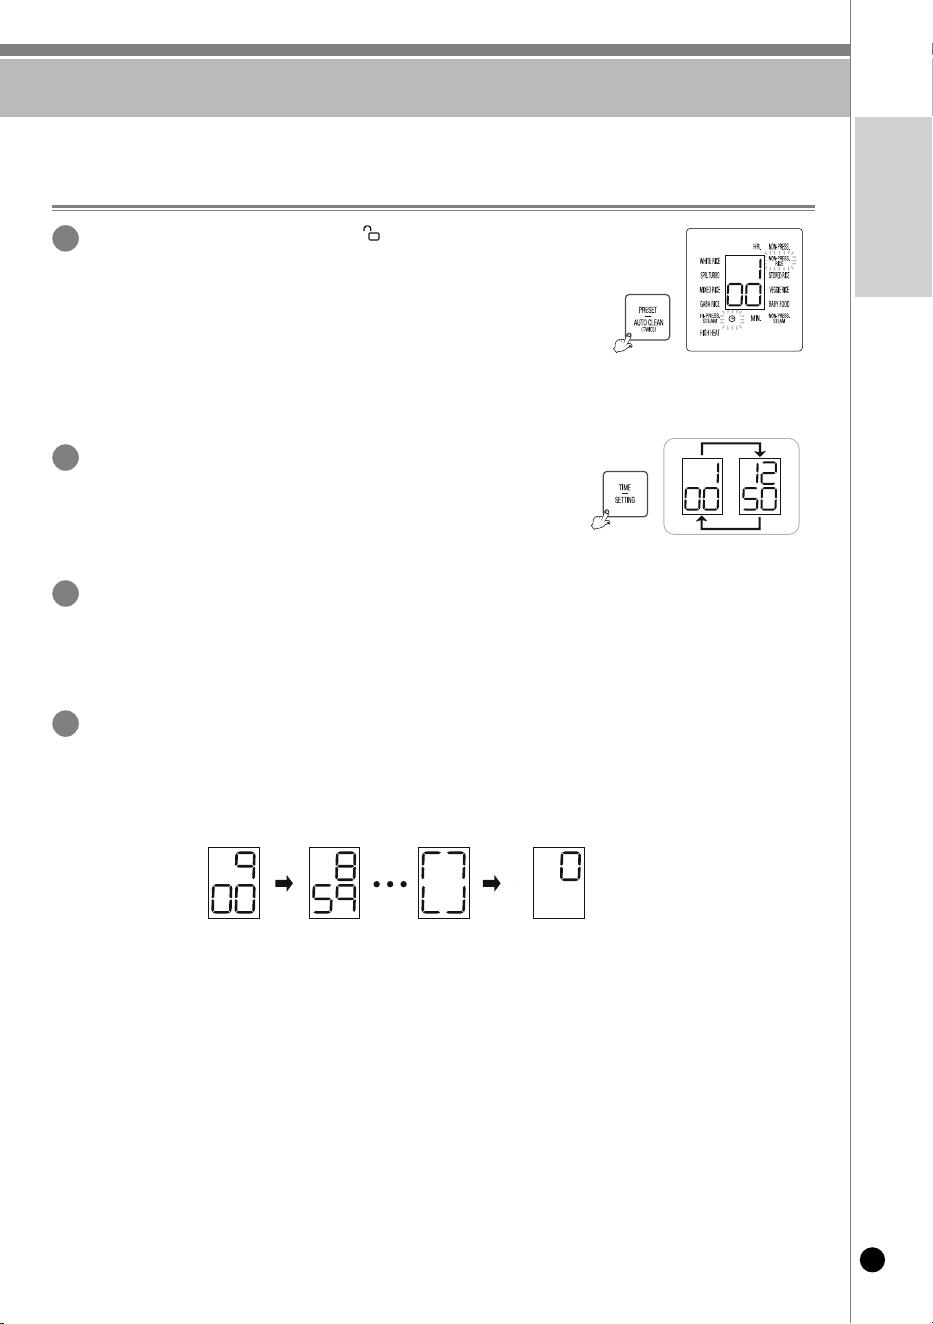
HOW TO USE PRESET FUNCTION
35
www.cuckooamerica.com
english
How to preset timer for cooking (How to use non pressure menu)
1
Turn the Lock/Unlock handle to “ non pressure” and
press Preset/Auto Clean button when White light is on.
▶
If you press Preset/Auto Clean button, voice, saying “Set preset time with
Time button, then press non pressure cook button,” comes out, the setting
time is displayed on the Display, and the preset icon blinks.
▶
To set the preset time during the warming mode, stop the warming mode by
pressing the Cancel button prior to setting the preset time.
2
Press the Time button to set the preset time.
▶
Each time you press the Time/Setting button, 10 minutes are added to the
preset time. If you keep pressing the button, the time changes continuously.
▶
Preset time ranges from 1 hour to 12 hours and 50minutes
3
Press the Menu/Select button to select the menu.
▶
Baby food, non pressure steam cook option can be preset after setting the time for the option.
When the set time is longer than 60minutes, the preset time will be set as 2 hours.
▶
If you do not set a specific option, the default will preset as non Pressure White Rice
4
Press the Non pressure cook button.
▶
Preset cooking proceeds with a voice comes up saying "non pressure White Rice(setting menu) has been reserved"
▶
When the preset mode begins, the preset light will stop blinking and the preset time will go down by minute until it
starts the preset cooking.
▶
The preset time displayed on the screen is the remaining time until completed cooking.
(The completion time may vary depending on either the use condition or the cooking capacity)
< Preset Cooking > < Cooking > < Cooking Complete/
Keep Warm >
< Preset mode display >
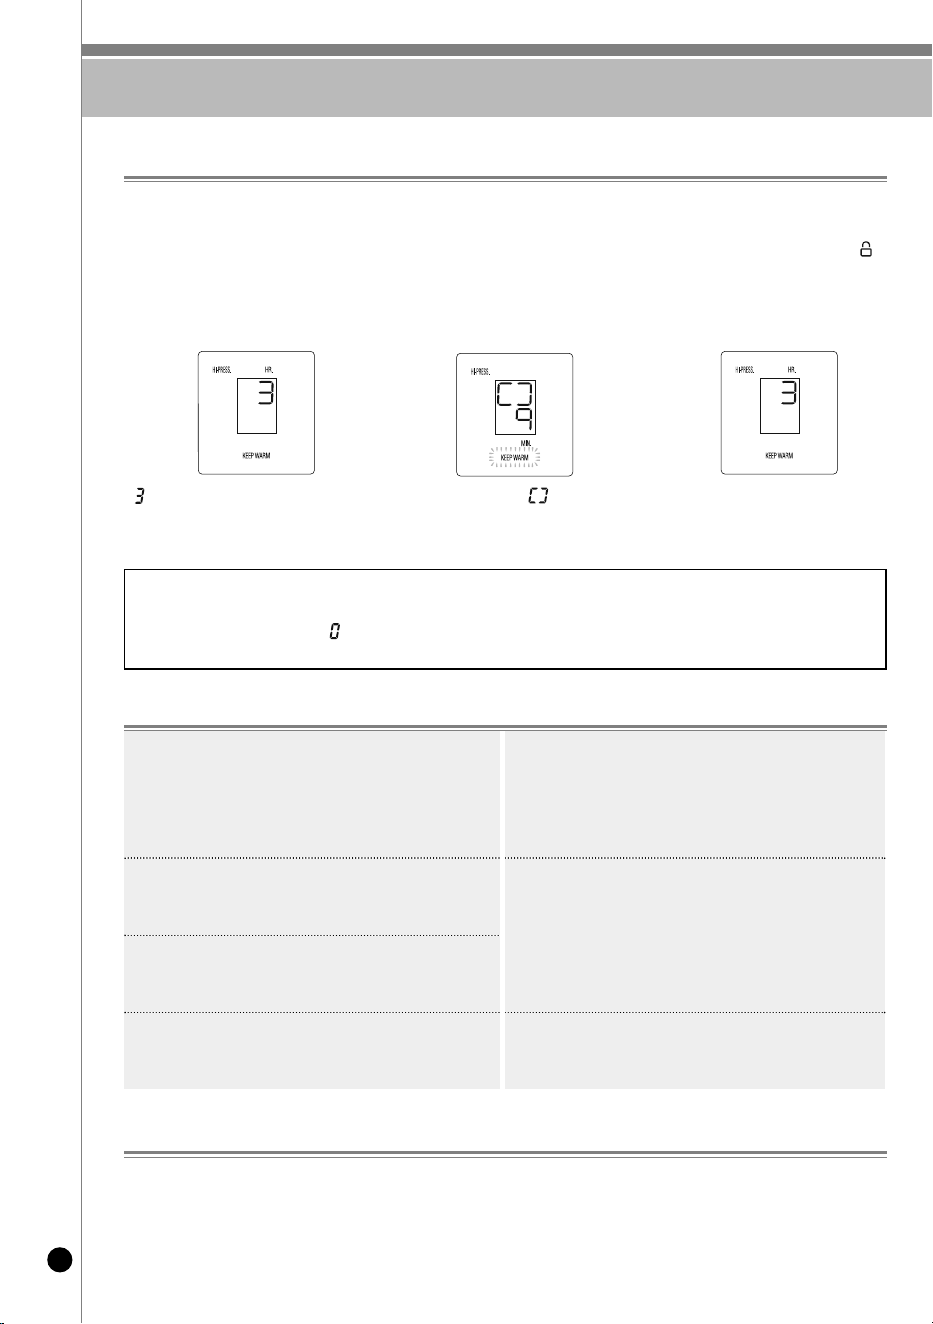
TO KEEP COOKED RICE WARM AND TASTY
36
It will be hard to open the lid during warming, or right after it has
finished cooking, So push the pressure weight to the side and
allow the steam to release.
Make sure the handle is in the ‘High pressure’ position during
warming or reheating.
It would be better to warm the rice for less than 12 hours
because of odors and color change.
The cooked rice, which cooked by pressure cooker is more
prone to changing color than the rice cooked by general cooker.
During warm mode, the rice can arise and turn white and rise.
In this case, mix the rice.
It is recommended to evenly stir the cooked rice after cooking.
The rice taste is improved.(for a small quantity of rice, pile up
the rice on the center area of the inner pot to keep warm)
The mixed and brown rice cannot be in such good condition as
white rice while in warm function due to their characteristics.
Therefore do not keep mixed and brown rice in function for a
long period of time.
Do not keep the scoop inside the pot while warming the rice.
When using a wooden scoop it can create serious bacteria
and odors.
If the inner pot is empty during warming, or after it has finished
cooking, please press the CAnCEL button and unplug the
power.
Do not mix small amount of rice or leftovers with the rice under
keeping warm. Doing so may cause an odor. (use a microwave
oven for the cold rice.)
Having a meal
▶
If you want to have warm rice, press the “KEEP WARM/REHEAT” button. Then “Reheat” function will be started
and you can eat fresh rice in 9 minutes.
▶ To use reheating in standby mode after power is applied, turn the Lock/unlock handle to “high pressure ”.
Press “Keep Warm/Reheat” button, and the cooker will convert to Heat Preservation mode. Then press “Keep
Warm/Reheat” button once more time.
When Odors are Rising During the Warming Mode
▶
Clean the lid frequently. It can cause growth of bacteria and odors.
▶
Even though exterior looks clean, there might be germs and it can cause odor so please be sure to use automatic
sterilization (steam cleaning) menu for cleaning. Clean the inner pot completely after automatic cleaning function
is done. (Refer to page 25)
▶
Clean the inner pot properly to prevent rice from smelling after you cook soups and steamed dishes.
Cautions for Keeping Warm
▶ The frequent use of the “Reheat” function may cause the cooked rice to be discolored or dried. use it once or twice per day.
▶ If a separate heating appliance or gas burner is used to cook rice, put the cooked rice into the cooker and press the “Keep Warm/Reheat” button
to keep the rice warm. At this time, “ ” is shown on the display. (Like this, transferring hot rice to a cold cooker may cause the rice to be discolored
or develop an odor)
< Keep warming >
Indicates the time elapsed
as warming time.
< Reheating > < finishing reheat >
The signal blinks and “ ” indicator
will show the reheat remaining time
displayed in minutes with the mark
going around clockwise.
When the reheat finishes with the
beep sound, keep warming function
will be operated and show the time
elapsed.
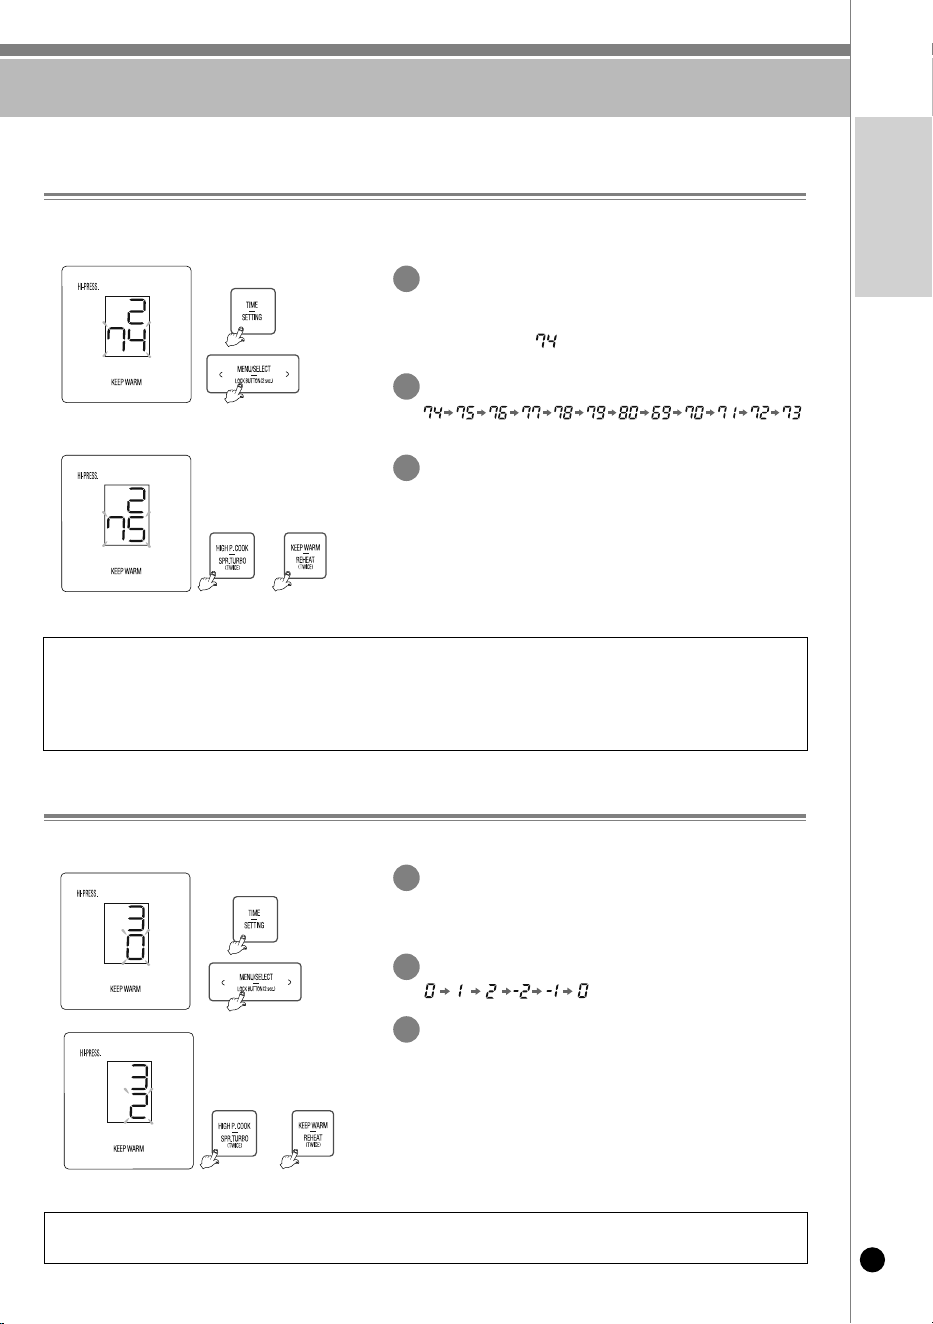
TO KEEP COOKED RICE WARM AND TASTY
37
www.cuckooamerica.com
english
Controlling Method of Warming Temperature
If the temperature in the rice cooker is not set properly, an odor or the color of the rice may change even
though it is cleaned frequently and boiled up. Temperature needs to be set.
How to Customize Flavor & Texture
use it while opening the lid when there is too much water or rice becomes too soft.
Press “TIME/SETTInG” button for 2 seconds at standby mode to
enter voice setting mode. Press “TIME/SETTInG” 2 time to enter
the warming temperature setting mode. The display will show as
seen in the image. current keep warm temperature will show.
Press “MEnu/SELECT” button so that the display shifts.
After setting the desired temperature, press “HIGH Pressure
Cook/Super Turbo” or “Keep Warm/Reheat” button to automati-
cally input the selected temperature and enter the standby mode
(if you press “CAnCEL” button or do not operate for 7 seconds,
setting will be cancelled and you will go back to standby mode.)
(When you press “TIME/SETTInG” button, you will enter the cus-
tomized taste setting mode without saving the changed value.)
Press “TIME/SETTInG” button for 2 seconds at standby mode
to go to voice setting mode. Press “TIME/SETTInG” 3 times
to enter the customized Keep Warm setting mode.
Press the “MEnu/SELECT” button so that the display shifts.
After setting the desired temperature, press “HIGH Pressure
Cook/Super Turbo” or “Keep Warm/Reheat” button to automati-
cally input the selected temperature and enter the standby mode
(if you press “CAnCEL” button or do not operate for 7 seconds,
setting will be cancelled and you will go back to standby mode.)
(When you press “TIME/SETTInG” button, you will enter the cus-
tomized taste setting mode without saving the changed value.)
Device Temperature Control
1. When you smell bad odors and the rice is too watery : The keep warm temperature is too low. In this case, increase
the “Keep Warm” temperature by 2-3℃.
2. When the rice has a yellowish color or is too dry : The Keep Warm temp is too high. In this case decrease the “Keep
Warm” temperature by 2-3℃.
1. If too much water is spilled out when you open the lid : Press “MEnu/SELECT” button to raise the setting mode.
2. If the edge of rice is too soft : Press “MEnu/SELECT” button to reduce the setting mode.
oR
oR
1
2
3
1
2
3
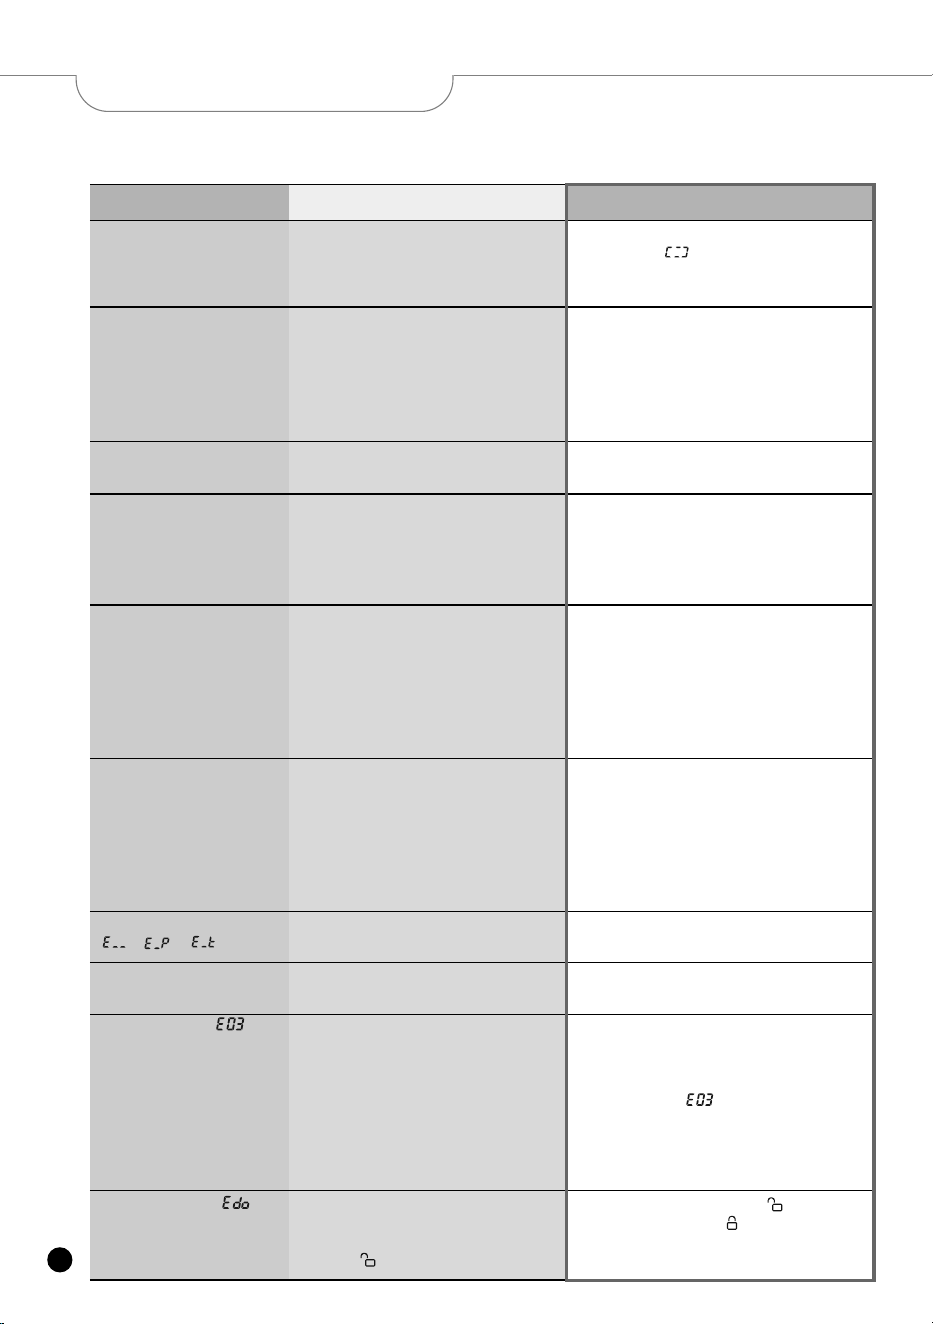
38
▼Before reaching out to CuCKoo Customer Service, check the following troubleshooting chart to remedy
the issue.
Case Possible Causes Corrections
The rice is undercooked
•
Is the HIGH Pressure Cook/Super Turbo button
pressed?
•
Was the power compromised during the cooking
process?
•
Press the HIGH Pressure Cook/Super Turbo button once.
And check that " " is shown on the display.
•
Refer to page 22.
The rice is over cooked.
•
Did you use the rice measuring cup to measure your
ingredients?
•
Did you measure the proper water amount?
•
Did you rinse the rice before cooking?
•
Did you soak the rice for too long before cooking?
•
Is the rice expired or old?
•
Refer to page 23.
•
Add water about half the notch and then cook.
Mixed Rice is not fully
cooked.
Is the rice dry?•
Soak the pea in water before cooking them.
Rice is too watery or stiff.
•
Was the correct function entered to match the type
of rice or grain being cooked?
•
Did you measure the proper water amount?
•
Did you open the lid often during the cooking
process?
•
Selected the correct menu.
•
Measure the proper water.
•
Open the lid after cooking finished.
Water or food residue is
overflowing from the inner
pot.
•
Did you use the rice measuring cup to measure
ingredients?
•
Did you measure the proper water amount?
•
Did you open the lid often during the cooking
process?
•
Was the correct function entered to match the type
of rice or grain being cooked?
•
Refer to page 23.
When you smell odors while
warming.
•
Was the lid properly closed before beginning to
warm?
•
Is the power cord securely plugged into an
appropriate wall outlet?
•
Was the cooker set to warm for more than 12 hours?
•
Is there any other substance in the rice cooker such
as the rice scoop?
•
Close the lid properly and securely.
•
The maximum amount of time warm mode should be
activated is 12 hours.
The display shows
“ ”, “ ”, “ ”
•
The temperature sensor is damaged or not working
properly.
•
Contact CUCKOO Customer Service Center.
Keep Warm Alarm
•
24 hours has not passed yet after keeping
warm
•
This function alarms if the rice remained warm
for more than 24 hours.
The display shows
“ ”
•
Did you use 220V power plug?
•
It represents the product is malfunction(heater is
damaged or heating volume is low ), rice is undercooked
for a long time, please turn off the
power and contact Customer Service center.
•
It is normal to show “ ” signal after boiling
water only for a long time.
•
It is Product applicable for 120V only.
Please use the power supply properly.
The display shows “ ”
•
It shows on the display when pressing HIGH
Pressure Cook/Super Turbo button again, or when
the cooking has finished and you’ve never turned the
handle to ‘ non pressure’.
•
It can be solved by turning handle to ‘ non pressure’.
and then turn to ‘high pressure ’.
TROUBLESHOOTING
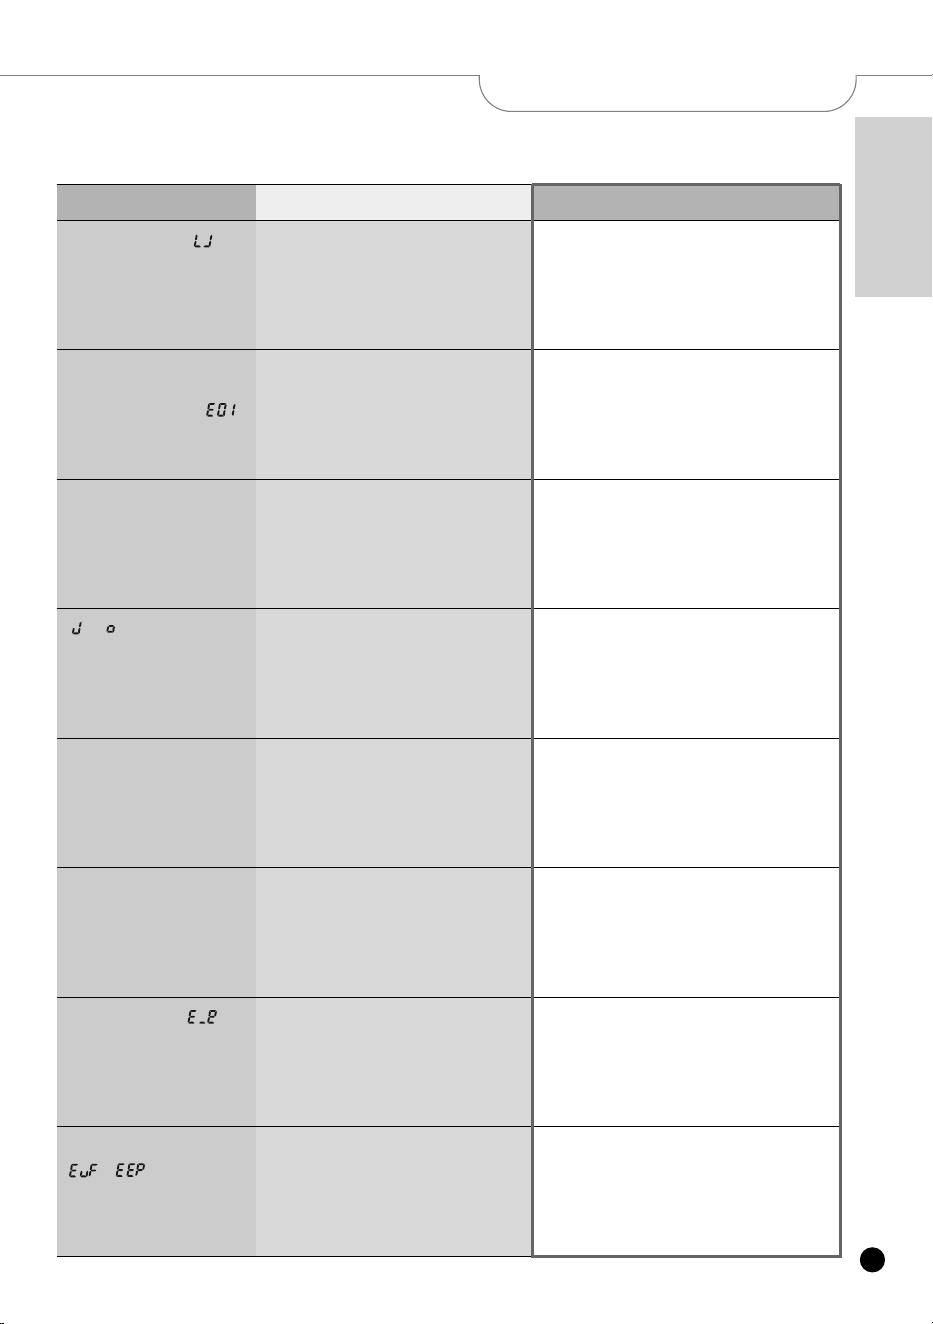
39
www.cuckooamerica.com
english
TROUBLESHOOTING
▼Before reaching out to CuCKoo Customer Service, check the following troubleshooting chart to remedy
the issue.
Case Possible Causes Corrections
The display shows ‘ ’.
•
Is the inner pot inserted?
•
Is it used in 220V (Power supply)?
•
Please insert inner pot.
•
This product is AC 120V only.
When the HIGH Pressure
Cook/Super Turbo button
does not operate with ‘ ’
•
Did you turn the Lock/Unlock handle to “high
pressure” or “non pressure” direction?
•
Is “high pressure” or “non pressure” signal
light on?
•
Make sure to close the lid and turn the Lock/Unlock handle
to “high pressure” or “non pressure” while cooking. You
cannot select menu if the pressure mode is not correctly
selected.
The cooked rice is very sticky
and/or mushy.
•
Is there any rice or any other alien substance on the
temperature sensor or the bottom surface of the
inner pot?
•
Did you set “Customized Cooking Function”?
•
Clean all the alien substance on the temperature sensor or
the bottom surface of the inner pot.
•
Stop cooking or set “Customized Cooking function" for
cooking according to needs.
“ ->
”
mark and
“unlock” mark are flashing
•
Is the lid open?
•
When cooking, keeping warm, or making reservations,
please close the lid and proceed.
•
If you do not close the lid during cooking, there is a risk of
burns due to hot steam.
There is a slight odor being
emitted after the cooking or
warming process.
•
Did you clean it after cooking?
•
Please follow Operating Instruction on how to clean
detachable cover and pressure packing.
The lid will not close.
•
Is the Lock/Unlock handle on the LID set to ‘non
pressure’?
•
Is there hot food in the inner pot?
•
Is the inner pot correctly inserted in the main body?
•
Please turn Lock/Unlock handle to ‘non pressure’.
•
Make the pressure weight tilted and then close the cover
•
Insert the inner pot properly.
The display shows “ ”
•
Problem on environment sensor
•
Unplug power and contact to Customer Service center.
The display shows
“ ”, “ ”
•
Problem on micom memory
•
Unplug power and contact to Customer Service center.

40
▼Before reaching out to CuCKoo Customer Service, check the following troubleshooting chart to remedy
the issue.
Case Possible Causes Corrections
The cooker is unable to turn
to "non pressure" mode.
•
Did you turn the Lock/Unlock handle before
exhausting steam thoroughly?
•
Don’t open the lid while cooking. If you want to open the lid
while cooking, press “CANCEL” button more than 2
seconds and release the steam.
•
Pull the pressure handle to aside once until the steam is
fully released.
The lid will not open when set
to "non pressure" mode.
•
Pressure is still remaining in the cooker
•
Pull the pressure handle to aside once until the steam is
fully exhausted.
There is excess steam being
released from the lid.
•
Is there an external substance on the packing?
•
Is packing too old?
•
Clean the packing thoroughly.
•
If the steam is released through the lid, please power off
and contact Customer Service center.
•
Cover packing life cycle is 12 – 36 months.
The CAnCEL button is not
functioning while cooking.
•
Is the inner pot hot?
•
Keep pressing the “CANCEL” button for 2 seconds for
safety reason if you want to cancel while cooking.
•
Be careful of hot steam emission or hot contents spattered
from the automatic steam outlet during cancellation.
Beans or grains are not fully
cooked.
•
Are they too dry?
•
Soak or steam beans and other grains before cooking in
the pressure cooker in order to avoid partially cooked
beans or grains. Beans should be soaked for-2-minutes or
steamed for-2-minutes prior to cooking, depending on your
taste.
Brown rice is not properly
germinated.
•
Is your germination amount more than brown rice
limit?
•
Did you use old brown rice?
•
Please put the advisable brown rice amount.
•
If you use old or dirty brown rice, it will affect the
germination.
The display shows “ ”
•
Problem on smart locking system
•
Unplug power and contact to Customer Service center.
The display shows “ ”
•
Problem on smart locking system
•
Please do not open the lid until cooking is completely
finished.
•
Error occurs during warming or stand by mode, please
open the lid after turn off the power.
•
Please contact Service center for service inquiry.
TROUBLESHOOTING
COOKING GUIDE
41
www.cuckooamerica.com
english
Ingredients
Recipe
Rice 6 cups(900g)
*
1 cup (180ml) is for one person.
Reference
According to gradation on the inside of inner pot, when cooking with newly harvested rice the amount
of water should be less than the gradation, and when cooking with old rice the amount of water
should be more than gradation.(Control the amount of water according to preference of each family)
❶ Put clean-washed rice in the inner pot and pour water by water inner pot level line WHITE RICE 6.
❷Firstly, lock the cover, and select [
WHITE RICE
] in the menu, and then push the [HIGH Pressure
Cook/Super Turbo] button.
❸Fluff the rice to loosen and serve.
Boiled Rice
Ingredients
Recipe
3 cups of rice(450g), 1/2 cup of pea(75g), 1 tablespoonful of sake, 1.5 teaspoonful of salt
*
Boil pea before cooking.
Store peas as follows
If peas and kidney beans etc are stored in the refrigerator, they change in color and decrease in
freshness fast. Therefore, immediately after retting the materials from the market, blanch them slightly,
place them in the refrigerator, and whenever they are needed, take them out to use them in natural color
and freshness.
❶ As for peas, add salt into them, wash them clean and extract water from them.
❷Put cleanly washed rice into inner pot, season them with sake and salt, and pour water up to
WHITE RICE water graduation 3.
❸Place peas on top of them, press menu button after locking the lid, select [
WHITE RICE
], and press
[HIGH Pressure Cook/Super Turbo] button.
❹When the cooker comes to Heat Preservation mode, mix the cooked grains properly.
Pea Rice
WHITE RICE(High Pressure Menu) - All cups referenced are using the provided rice measuring cup. (Water:180ml, Rice:150g)
Ingredients
Recipe
2 cups of white rice(300g), a cup of barley(150g)
❶ Prepare boiled barley with a cup of barley.
❷Wash rice clean, and after putting it in the pot along with boiled barley, pour water up to MIXED
RICE water graduation 3.
❸Lock the lid, press menu button, and after selecting [
MIXED RICE
],
press [HIGH Pressure Cook/Super Turbo].
❹Once the cooker comes to Heat Preservation mode, mix the cooked grains properly.
Boiled Barley
Ingredients
Recipe
Rice 2 1/3 cup(350g), millet 1/3cup(50g), White Rice 2/3cup(100g), red beans 1/3cup(50g),
sorghum 1/3cup(50g) and salt 1 teaspoon
Reference
Oriental medicine calls red beans as Jeoksodu which holds moisture, removes steam and discharges
accumulated pus as well as relieving edema by making thirst and diarrhea stopped and bladder empty.
❶ Wash rice, White Rice, millet and sorghum clean and scoop them with a landing net.
❷Boil red beans on high heat, and then put only water in which red beans were boiled in another bowl.
❸Put rice, White Rice, millet and sorghum on a landing net into the inner pot and pour water in which
red beans were boiled and water by MIXED RICE water gradation 4.
❹Put the boiled red beans, and then lock the cover. After select [
MIXED RICE
],
press [HIGH Pressure Cook/Super Turbo].
❺Mix rice when cooking is finished.
five-grain Rice
MIXED RICE(High Pressure Menu) -All cups referenced are using the provided rice measuring cup. (Water:180ml, Rice:150g)

COOKING GUIDE
42
Ingredients
Recipe
Rice 420g, Millet 180g
❶ Wash rice and Millet clean, put them in the Inner pot, and pour water up to MIXED RICE water
gradation 4.
❷Lock the lid, press menu button, and after selecting
[MIXED RICE]
,
press
[HIGH Pressure Cook/Super Turbo]
.
❸Mix rice when cooking is finished.
Millet
Ingredients
Recipe
Rice 420g, Pearld Farro 180g
❶ Wash rice and Pearld Farro clean, put them in the Inner pot, and pour water up to MIXED RICE
water gradation 4.
❷Lock the lid, press menu button, and after selecting
[MIXED RICE]
,
press
[HIGH Pressure Cook/Super Turbo]
.
❸Mix rice when cooking is finished.
Pearld farro
MIXED RICE(High Pressure Menu) -All cups referenced are using the provided rice measuring cup. (Water:180ml, Rice:150g)
Ingredients
Recipe
Rice 420g, Hulled Barley 180g
❶ Wash rice and Hulled Barley clean, put them in the Inner pot, and pour water up to MIXED RICE
water gradation 4.
❷Lock the lid, press menu button, and after selecting
[MIXED RICE]
,
press
[HIGH Pressure Cook/Super Turbo]
.
❸Mix rice when cooking is finished.
Hulled Barley
Ingredients
Recipe
Rice 480g, Kamut 120g
❶ Wash rice and Kamut clean, put them in the Inner pot, and pour water up to MIXED RICE water
gradation 4.
❷Lock the lid, press menu button, and after selecting
[MIXED RICE]
,
press
[HIGH Pressure Cook/Super Turbo]
.
❸Mix rice when cooking is finished.
Kamut
COOKING GUIDE
43
www.cuckooamerica.com
english
Ingredients
Recipe
Brown rice 4 cups(600g)
Reference
· Control the time of germinated brown rice according to each preference.
· When cooking with germinated brown rice, set up germinating time for 0 hour if you want to have
100% boiled brown rice without germination.
❶ Put washed brown rice into the inner pot, and then put it into the inner pot and pour water by GABA
RICE water gradation 4.
❷After locking the cover and choosing [
GABA RICE
] in the menu, push the button of [HIGH Pressure
Cook/Super Turbo] button after setting up the time of germinated brown rice for 3 hours.
❸Mix rice when cooking is finished.
fresh Germinated Brown Rice
Ingredients
Recipe
Brown rice 1 cup(150g), rice 2 cups(300g) and red beans 1/3 cup(50g)
❶ Boil red beans until it become soft, but not to break the shape of red beans and separate it from
water.
❷ Wash brown rice clean and put it in the inner pot. Put the boiled red beans after pouring water by
germinated GABA RICE water scale 3.
❸ After locking the cover and choosing [
GABA RICE
] in the menu, push the button of [HIGH
Pressure Cook/Super Turbo] button after setting up the time of germinated brown rice for 3 hours.
❹ Mix rice when cooking is finished.
Boiled Brown Rice with Red Beans
GABA RICE(High Pressure Menu)- All cups referenced are using the provided rice measuring cup. (Water: 180ml, Rice:150g)
Ingredients
Recipe
2 cups of brown rice(300g), 3g of green tea leaf, 10g of green tea powder, 4 nuggets of Chicken breast flesh,
a little bit of olive oil, a little bit of salt, a little bit of pepper, 5g of celery, a little bit of lime, a little bit of rosemary
10 Long Points of Green Tea
Anticarcinogenic property, anti-aging effect, prevention of lifestyle disease, prevention of obesity and
diet, detoxication of heavy metals and nicotine, recovery from fatigue and removal of hangover,
treatment of constipation, prevention of caries, prevention of acidification of constitution, inhibition of
inflammation and bacterial contagion.
❶ Wash brown rice clean, put the brown rice into My Caldron along with 10g of green tea powder and
3g of green tea leaf, and pour water up to GABA RICE water graduation 2.
❷Lock the lid, press menu button, and after selecting [
GABA RICE
] and setting Germinated Brown
Rice Time to 3 hours, press [HIGH Pressure Cook/Super Turbo] button.
❸Pickle chicken chest flesh in salt and pepper for 1 hour or so, put olive oil in the pan, and after frying
the flesh in the pan, slice it thin.
❹Prepare lime by slicing it in half moon shape, and prepare shredded celery.
❺Mix the cooked rice and chicken in a large bowl. Add lime and celery on top.
Green Tea Rice with Chicken Breast
Ingredients
Recipe
2 cups of brown rice(300g) and some sprouts and vegetables
Seasoning red pepper paste : Red pepper paste 1/2cup(75g), beef (crushed) 40g, sesame oil
1 tablespoon, honey 1 tablespoon and sugar 1 tablespoon, water 1/3cup(60ml)
■Broccoli sprout : Prevention of cancer
■Chinese cabbage sprout : Good at stomach
and improve constipation
■Turnip sprout : improve hepatitis and jaundice
■Cabbage sprout : include selenium
preventing aging and cancer
■Daikon sprout : Lower heat and make the
swelling subside
■Wheat sprout : purify blood
❶ Wash brown rice clean, put it into the inner pot and pour water by germinated GABA RICE water graduation 2.
❷ After locking the cover and choosing[
GABA RICE
] in the menu, push[HIGH Pressure Cook/Super
Turbo] button after setting up the time of germinated brown rice for 3 hours.
❸ Pour sesame oil in a pot and stir-fry the crushed beef. Stir-fry it a little more after stirring up it with
red pepper paste and 1/3cup of water in order to be thick put sugar, honey and sesame oil.
❹ Stir the rice when it’s done cooking, put the prepared sprouts and vegetables on germinated brown rice.
❺ Add the seasoning to your liking on top of the rice. Do not over stir the rice it may damage the form
of the sprouted grain.
Saessak Bibimbap
(rice with sprout and vegetables)
Ingredients
Recipe
Millet 4cups (600g)
(Millet 1 cup: 150g)
❶ Wash Millet clean, put them in the Inner pot, and pour water up to GABA RICE water gradation 4.
❷Lock the lid, press menu button, and after selecting
[GABA RICE]
,
press
[HIGH Pressure Cook/Super Turbo]
.
❸Mix rice when cooking is finished.
Millet 100%
Ingredients
Recipe
Pearld Farro 4cups (560g)
(Pearld Farro 1 cup: 140g)
❶ Wash Pearld Farro clean, put them in the Inner pot, and pour water up to GABA RICE water
gradation 4.
❷Lock the lid, press menu button, and after selecting
[GABA RICE]
and setting Germinated Brown
Rice Time to 3 hours, press
[HIGH Pressure Cook/Super Turbo]
.
❸Mix rice when cooking is finished.
Pearld farro 100%
Ingredients
Recipe
Hulled Barley 4cups (560g)
(Hulled Barley 1 cup: 140g)
❶ Wash Hulled Barley clean, put them in the Inner pot, and pour water up to GABA RICE water
gradation 4
❷Lock the lid, press menu button, and after selecting
[GABA RICE]
,
press
[HIGH Pressure Cook/Super Turbo]
.
❸Mix rice when cooking is finished.
Hulled Barley 100%
Ingredients
Recipe
Kamut 4cups (600g)
(Kamut 1 cup: 150g)
❶ Wash Kamut clean, put them in the Inner pot, and pour water up to GABA RICE water gradation 4.
❷Lock the lid, press menu button, and after selecting
[GABA RICE]
,
press
[HIGH Pressure Cook/Super Turbo]
.
❸Mix rice when cooking is finished.
Kamut 100%
COOKING GUIDE
44
GABA RICE(High Pressure Menu) - All cups referenced are using the provided rice measuring cup. (Water:180ml, Rice:150g)
COOKING GUIDE
45
www.cuckooamerica.com
english
Ingredients
Recipe
2 cups of brown rice(300g), 20g of brown gravy sauce, a little bit of salt, 2 sheets of sesame
leaves, 1/3 pieces of pumpkin, a pack of shimeji mushroom
※Mushroom may be chosen as preferred in the family.
❶
Wash brown rice clean, put it in the inner pot, and pour water up to germinated GABA RICE water graduation 2.
❷Lock the lid, press menu button, select [
GABA RICE
], and after setting germinated brown rice time
to 3 hours, press [HIGH Pressure Cook/Super Turbo] button.
❸Chop pumpkin small, and fry them slightly after adding salt.
❹Mix mushroom with brown gravy sauce slightly.
❺When the rice cooker comes to Keep Warm mode, mix the cooked grains properly.
❻Put germinated brown rice in the mold, add fried pumpkin, and then after putting germinated brown
rice again and evening it, take out from the mold.
❼Heap up mushroom mixed with brown gravy sauce, and place shredded sesame leaf.
Mushroom Tian
Ingredients
Recipe
Rice 4cups(600g)
*
1 cup (180ml) is for one person.
❶ Put clean-washed rice in the inner pot and pour water by water inner pot level line NON P RICE 4.
❷Close the lid and turn the handle to ‘Non Pressure’ mode.
❸After selecting [
non PRESSuRE RICE
], press [
non PRESSuRE CooK
] button.
❹Mix rice when cooking is finished.
Reference
· Control the time of germinated brown rice according to each preference.
· When cooking with germinated brown rice, set up germinating time for 0 hour if you want to have
100% boiled brown rice without germination.
Boiled Rice
GABA RICE(High Pressure Menu) - All cups referenced are using the provided rice measuring cup. (Water:180ml, Rice:150g)
NON PRESSURE WHITE RICE(Non Pressure Menu)
- All cups referenced are using the provided rice measuring cup. (Water: 180ml, Rice: 150g)
- Do not exceed the cooker's capacity. If exceeded, there is a risk of overflow and potential
product damage. This may cause the overflow.
non pressure Rice Cautions
Ingredients
Recipe
3 cups of rice(450g), 1 piece of kelp (4cmx4cm), suitable amount of sashimi for sushi, 1T of wasabi
Rice vinegar : 100g of vinegar, 60g of sugar, 10g of salt, 1/2 of lemon
❶ Put rinsed rice into an inner pot, pour water to the scale 3 of white rice, put 1 piece of kelp.
❷Close the lid and turn the handle to “Non Pressure” mode.
❸After choosing [
non PRESSuRE RICE
] with menu button, and press [
non PRESSuRE CooK
] button.
❹After cooking, remove the kelp, stir the rice, and put it to the bowl.
❺Put ingredients for white vinegar in the pot, boil it until sugar and salt are melted, and cool it down.
❻Put lemon on the white vinegar. (Lemon helps yield flavor, so it is optional.)
❼Mix the rice with white vinegar.
Hold the rice scooper straightly when mixing, so that rice is not crushed. (The amount of white vinegar is optional).
❽Put a cloth for a moment, so that rice and white vinegar can be mixed.
❾Dip your fingers into cold water, ball the right amount of rice together in your hand, and then put wasabi on it.
❿Lay fish fillets on top of it and shape it as sushi with hand.
Put hand-made sushi on the plate.
Reference
· Put white vinegar on hot rice and mix it. When the rice is cooled down, the white vinegar may not be mixed with rice grains.
Sushi
COOKING GUIDE
46
VEGGIE RICE(Non Pressure Menu)
VEGGIE RICE Cautions
- All cups referenced are using the provided rice measuring cup. (Water: 180ml, Rice: 150g)
- Do not exceed the cooker's capacity. If exceeded, there is a risk of overflow and potential
product damage. This may cause the overflow.
Ingredients
Recipe
3 cups of rice(450g), bean sprouts(150g)
Sauce:4 tablespoons of soy sauce, 1/2 tablespoons of red chili powder, 2 teaspoon of sesame salt,
2 tablespoons of chopped green onion, 1/2 tablespoons of minced garlic, 1 teaspoon of sesame oil
❶ Boil the bean sprouts.
❷Put the rinsed rice in an inner pot, pour water to the scale 3 of NON P RICE, and put bean sprouts.
❸Close the lid and turn the handle to ‘Non Pressure’ mode.
❹After selecting [VEGGIE RICE], press [
non PRESSuRE CooK
] button.
❺After cooking, eat it with sauce.
*
Remove the bean pod, and then start cooking.
Rice cooked with bean sprouts
Ingredients
Recipe
3 cups of rice(450g), radish(200g)
Sauce:4 tablespoons of soy sauce, 1/2 tablespoons of red chili powder, 2 teaspoon of sesame salt,
2 tablespoons of chopped green onion, 1/2 tablespoons of minced garlic, 1 teaspoon of sesame oil
❶ Cut white radish into strips.
❷Put rinsed rice into an inner pot, pour water to the scale 3 of NON P RICE, and put the slices of white
radish.
❸Close the lid and turn the handle to ‘Non Pressure’ mode.
❹After selecting [VEGGIE RICE], press [
non PRESSuRE CooK
] button.
❺After cooking, eat it with sauce.
Rice with white radish
Ingredients
Recipe
Rice 420g, Quinoa 180g
❶ Wash Rice and Quinoa clean, put them in the Inner pot, and pour water up to NON P GLUTIN water
gradation 4.
❷
Close the lid and turn the handle to ‘Non Pressure’ mode.
❸Press menu button, and after selecting
[VEGGIE RICE]
, press
[non PRESSuRE CooK]
.
❹Mix rice when cooking is finished.
Quinoa
Ingredients
Recipe
Quinoa 4cups (540g)
(Quinoa 1 cup: 135g)
❶ Wash Quinoa clean, put them in the Inner pot, and pour water up to NON P GLUTIN water
gradation 4.
❷ Close the lid and turn the handle to ‘Non Pressure’ mode.
❸ Press menu button, and after selecting
[VEGGIE RICE]
, press
[non PRESSuRE CooK]
.
❹ Mix rice when cooking is finished.
Quinoa 100%

COOKING GUIDE
47
www.cuckooamerica.com
english
Ingredients
Recipe
Sweet pumpkin 100g, bread crumbs 1 tablespoons, water 1/3cup(60ml), some salt and some milk
❶
After selecting well-ripened yellow sweet pumpkin, peel its skin and remove its seeds, then cut it into thin slices and rinse them with water.
❷
Place the recipe no. 1 with bread crumbs, 1 tablespoons of bread crumbs and 1/3cup(60ml) of water in the inner pot.
❸Close the lid and turn the handle to ‘Non Pressure’ mode.
❹Choose [
BABY fooD
] in the menu button, push [non PRESSuRE CooK] button after setting up
the time of BABY FOOD for 40minutes.
❺After cooking is completed, mash up it with a rice paddle. When it is hot, mix it with milk.
Sweet Pumpkin Soup
※End period of baby food(after 9~12 months)
Ingredients
Recipe
Sweet potato 70g, apple 70g, water 1/3cup(60ml) and some honey
❶ Peel the skins of apple and sweet potato and cut them into thin slices.
❷Place the recipe no.1 and with 1/3cup(60ml) of water in the inner pot
❸Close the lid and turn the handle to ‘Non Pressure’ mode.
❹Choose [
BABY fooD
] in the menu button, push [non PRESSuRE CooK] button after setting up
the time of baby food for 50 minutes.
❺After cooking is completed, mash up it with a rice paddle and mix it with some honey.
Sweet Potato & Apple Porridge
※End period of baby food(after 9~12 months)
BABY FOOD(Non Pressure Menu)
BABY fooD Cautions
Ingredients
Recipe
50g of rice, 30g of tofu, 10g of carrot, 10g of young pumpkin, 1/2 egg, 4 tablespoons of milk
❶ Mash tofu after removing water from it, chop carrot and young pumpkin into fine pieces.
❷Mix egg and milk together.
❸Put rice, tofu, carrot, young pumpkin into the inner pot, pour the mixture of milk and egg, then mix it well.
❹Close the lid and turn the handle to ‘Non Pressure’ mode.
❺Select [
BABY fooD
] in the menu button, push [non PRESSuRE CooK] button after setting up the
time of baby food for 30 minutes.
❻Mix it well with a spatula after Baby food is completed.
Steamed rice and tofu with vegetable
※
Soft rice with tuna and vegetable
Ingredients
Recipe
50g of rice, 30g of tuna(can), 10g of bell pepper, 10g of carrot, 1/2 cup of water, butter, little bit of laver powder
❶ Pour out oil from tuna, tear it up into little pieces with chopsticks.
❷Finely chop bell pepper and carrot.
❸Mix rice, tuna, bell pepper, and carrot.
❹Spread butter on the bottom of inner pot, put ingredients of ❸, and pour water.
❺Close the lid and turn the handle to ‘Non Pressure’ mode.
❻Select [
BABY fooD
] in the menu button, push [non PRESSuRE CooK] button after setting up the
time of baby food for 35 minutes.
❼Mix it well with a spatula after Baby food is completed.
Soft rice with tuna and vegetable
※
End period of baby food(after 12 months)
Ingredients
Recipe
Rice 0.5cup(75g), broccoli 30g, water 1.5cup(270ml) and some salt
❶ After washing the rice clean and soaking the rice in water for 30 minutes, grind it with broccoli.
❷Put step no.1 and 1.5cup of water in the inner pot.
❸Close the lid and turn the handle to ‘Non Pressure’ mode.
❹Choose [
BABY fooD
] in menu button, push [non PRESSuRE CooK] button after setting up the
time of Baby food to 40 minutes.
References
The latter period of eating baby food (9~12 months old) : As the period when a baby can eat soft solid food, please feed the baby three times a day in designated time.
End of eating baby food (older than 12 months) : As the baby is in the middle of transition period, please feed the baby various kinds of food to eat everything he/she is served.
※ Please feed the baby shellfish, shrimp, raw milk, honey, tomato or corn when he/she is older the 12 months because they might cause allergy.
※ Please feed the baby with extra attention because allergic ingredients of baby food or period of eating might be different depending on the baby
Vegetable Rice Gruel
※
End period of baby food(after 12 months)
- All cups referenced are using the provided rice measuring cup. (Water: 180ml, Rice: 150g)
- Do not exceed the cooker's capacity. If exceeded, there is a risk of overflow and potential
product damage. This may cause the overflow.

COOKING GUIDE
48
Ingredients
(using Rice Measuring Cup)
1 person 2 person
Steel Cut Oatmeal 1cup(65g) 2cups(130g)
Water 1+1/2cups(270ml) 2+3/4cups(495ml)
Cooking Time 10min 10min
Ingredients
(using Rice Measuring Cup)
1 person 2 person
Steel Cut Oatmeal
1cup(65g)
2cups(130g)
Milk 1+3/4cups(315ml) 3cups(540ml)
Cooking Time 15min 20min
▶Serving size and cooking time can be selected according to taste.
OATMEAL(Non Pressure Menu)
oATMEAL Cautions
- All cups referenced are using the provided rice measuring cup. (Water: 180ml, Rice: 150g)
- Do not exceed the cooker's capacity. If exceeded, there is a risk of overflow and potential
product damage. This may cause the overflow.
Recipe
❶ Add steel cut oatmeal and water/milk into the inner pot. For precise measurement, please refer to
the table below.
❷Close the lid and turn the handle to ‘Non Pressure’ mode.
❸Choose
[BABY fooD]
menu , and press
[non PRESSuRE CooK]
button.
❹After cooking has been completed, stir well and enjoy.
oatmeal
COOKING GUIDE
49
www.cuckooamerica.com
english
non P Steam time
55min
High P Steam time
45min
Recipe
❶ Put 1.5 tablespoonful of water into 2.5 cups of nonWhite Rice, and after mixing properly and sieving them
once, mix with 1.5 tablespoonful of sugar.
❷ As for red beans, add salt(0.5 tablespoonful) and sugar(1 tablespoonful) while pounding them roughly by
boiling free of water content.
❸ Put steaming plate after pouring 2 cups of water(360ml) into the inner pot, spread cloth of proper size by cutting it.
❹
Spread 0.5 cup of red bean crumbs, put steaming plate evenly, and create layers by adding 0.5 cup of red bean crumbs again.
❺ Close the lid, turn the handle to high pressure mode, press Menu button and select
[HIGH PRESSuRE
STEAM]
. Then set the cooking time and press Cooking with
[HIGH Pressure Cook/Super Turbo]
button.
Close the lid, turn the handle to no pressure mode, press Menu button and select
[non PRESSuRE
STEAM]
. Then set the cooking time and press
[non PRESSuRE CooK]
button.
Steamed Rice Cake
Ingredients
2.5 cups of nonWhite Rice(375g), 1 cups of red beans(150g), 0.5 tablespoonful of salt, 2.5 tablespoonful of
sugar and 1.5 tablespoonful of water
non P Steam time
45min
High P Steam time
35min
Recipe
❶ Remove fat and tendons from chopped rib and remove blood by putting it in cold water.
❷ Remove water by scooping it with a basket and keep the rib smooth by marinating it in sake and pear juice.
❸ Peel the skins of chestnuts and divide large chestnuts into two pieces. Stir-fry gingko nuts with oil and
peel the skins of gingko nuts. Cut carrots into chestnut-size pieces.
❹ Mix all the prepared ingredients with seasoning and marinate them for one hour. After that, put them in the
inner caldron (It is not necessary to pour additional water since it is cooked with moisture from ribs and marinade)
❺ Close the lid, turn the handle to high pressure mode, press Menu button and select
[HIGH PRESSuRE
STEAM]
. Then set the cooking time and press Cooking with
[HIGH Pressure Cook/Super Turbo]
button.
Close the lid, turn the handle to no pressure mode, press Menu button and select
[non PRESSuRE
STEAM]
. Then set the cooking time and press
[non PRESSuRE CooK]
button.
❻ After cooking is completed, scatter ground pine nuts on the steamed rib.
Steamed Rib
Ingredients
Beef rib port rib 700g, sake 2 tablespoons, nicely aged soy sauce 3tablespoons, crushed garlic 1/2 tablespoon,
sesame oil 1/2 teaspoon, onion juice 1 tablespoons, pear juice 1 tablespoons, sugar 1 tablespoons, chopped
scallion 3 tablespoons, ground sesame mixed with salt 1/2 tablespoon, ground pepper 1/2 teaspoon, carrot 1/2
unit, chestnut 3 units, ginkgo nut 6 units and ground pine nuts 1/2 tablespoon
NON P STEAM/HIGH P STEAM(Non P Menu/High P Menu)
Steam Cautions
non P Steam time
45min
High P Steam time
35min
Recipe
❶ Wash a chicken, clean and remove feathers and internal organs and cut the fat in the tail.
❷
After cutting the chicken into a suitable eating size, make cuts in the chicken to make it well seasoned and to roast quickly.
❸ After putting carrots, potatoes and sliced chicken in a large bowl and mixing them with prepared seasning, marinate.
❹ Put enough marinated chicken, potatoes and carrots in the inner caldron.
❺ Close the lid, turn the handle to high pressure mode, press Menu button and select
[HIGH PRESSuRE STEAM]
.
Then set the cooking time and press Cooking with
[HIGH Pressure Cook/Super Turbo]
button.
Close the lid, turn the handle to no pressure mode, press Menu button and select
[non PRESSuRE
STEAM]
. Then set the cooking time and press
[non PRESSuRE CooK]
button.
Steamed Chicken
Ingredients
1 chicken (700g), potato50g, carrot50g, sugar 1 tablespoon, chopped scallion 1 teaspoon, crushed garlic 1
teaspoon, nicely aged soy sauce 3 tablespoons, ginger juice 1teaspoon, ground pepper 1/2teaspoon, ground
sesame mixed with salt 1 tablespoon and sesame oil 1 tablespoons.
non P Steam time
50min
High P Steam time
40min
Recipe
❶ Put 1.5 cups of water(270ml) in the inner caldron and put the steam plate above it.
❷ Cut pork into 2~3 pieces and put them on the steam plate with 2~3 pieces of ginger cut into thin slices.
❸ Close the lid, turn the handle to high pressure mode, press Menu button and select
[HIGH PRESSuRE STEAM]
.
Then set the cooking time and press Cooking with
[HIGH Pressure Cook/Super Turbo]
button.
Close the lid, turn the handle to no pressure mode, press Menu button and select
[non PRESSuRE STEAM]
.
Then set the cooking time and press
[non PRESSuRE CooK]
button.
❹ After cooking is completed, put the pork on a plate with onion, garlic, scallion and kimchi.
Boiled Pork
Ingredients
Pork (shank or pork belly) 400g, ginger 1EA, some garlic, onion 1EA, scallion 1EA and some kimchi
- All cups referenced are using the provided rice measuring cup. (Water: 180ml, Rice: 150g)
- Do not exceed the cooker's capacity. If exceeded, there is a risk of overflow and potential
product damage. This may cause the overflow.
COOKING GUIDE
50
non P Steam time
40min
High P Steam time
30min
Recipe
❶ Bind pork with silk yarn tightly so that it may be cooked properly.
❷ Put the bound pork in the container, and soak it by adding soy sauce, salt and the five flavors.
❸ Put the materials of ❷ into the inner pot, and pour 1/2 cups of water(90ml).
❹ Close the lid, turn the handle to high pressure mode, press Menu button and select
[HIGH PRESSuRE STEAM]
.
Then set the cooking time and press Cooking with
[HIGH Pressure Cook/Super Turbo]
button.
Close the lid, turn the handle to no pressure mode, press Menu button and select
[non PRESSuRE STEAM]
.
Then set the cooking time and press
[non PRESSuRE CooK]
button.
❺ Once the cooking is completed, take out the pork and release silk yarn by cutting it with scissors.
Cool down five-flavor pork, and put it on the plate by slicing it to 0.2cm thickness.
five-flavor Pork
Ingredients
400g of pork, 1/3 cup of soy sauce, 2 tablespoonful of sugar, a little bit of silk yarn
Five flavors : 4 grains of black pepper, 5cm of cinnamon, 2 pieces of star anise
non P Steam time
25min
High P Steam time
20min
Recipe
❶ Divide squid-fish half, remove intestines, and after washing clean by peeling it off, make cuts both to lengths
and breadths inside.
❷
Put a little bit of salt in boiling water, blanch the body of the cut squid-fish, and blanch the legs as well by trimming them.
❸ Wash spinach clean by trimming it, blanch it slightly after adding salt, remove water content by rinsing it in
cold water, blanch carrot in boiling water by shredding it, and mix both of them with salt and sesame oil.
❹ Loosen up egg by adding salt in it, and paste it throughout the squid-fish area.
❺ Wipe water content off the blanched squid-fish, put a little bit of wheat powder inside, and after rolling
spinach, carrot and squid-fish legs, fix them with skewer.
❻ Put the rolled squid-fish, seasoning sauce and half cup water in My Caldron.
❼ Close the lid, turn the handle to high pressure mode, press Menu button and select
[HIGH PRESSuRE
STEAM]
. Then set the cooking time and press Cooking with
[HIGH Pressure Cook/Super Turbo]
button.
Close the lid, turn the handle to no pressure mode, press Menu button and select
[non PRESSuRE STEAM]
.
Then set the cooking time and press
[non PRESSuRE CooK]
button.
Hard-boiled Cuttlefish
Ingredients
1 squid fish, 70g of spinach, 80g of carrot, 1 egg, a little bit of salt, a little bit of sesame oil, a little bit of wheat powder, 1/2cup of water(90ml)
Seasoning Sauces: 1 tablespoonful of red pepper paste, 1 tablespoonful of soy sauce, 1 tablespoonful of sugar, 1 tablespoonful of refined
rice wine, 1 refined rice wine, 1/2 teaspoonful of sesame oil, 1/2 teaspoonful of red pepper powder
NON P STEAM/HIGH P STEAM(Non P Menu/High P Menu)
Steam Cautions
non P Steam time
25min
High P Steam time
20min
Recipe
❶ After scattering ground pepper and salt on beef to suit its taste, put the beef in the inner caldron and pour
1 cup of water(180ml).
❷ Close the lid, turn the handle to high pressure mode, press Menu button and select
[HIGH PRESSuRE STEAM]
.
Then set the cooking time and press Cooking with
[HIGH Pressure Cook/Super Turbo]
button.
Close the lid, turn the handle to no pressure mode, press Menu button and select
[non PRESSuRE STEAM]
.
Then set the cooking time and press
[non PRESSuRE CooK]
button.
❸ After cooking is completed, pour some steak sauce on the steak.
Steak
Ingredients
Beef (for steak) 200g, some steak sauce, some salt and some ground pepper
non P Steam time
40min
High P Steam time
30min
Recipe
❶ Wash the blue crab clean and separate its body.
❷ Crush meat of the separated body into thin slices.
❸ After crushing beef and tofu into thin slices, mix them with the crushed crab meat.
❹ After crushing red/green pepper into thin slices, mix them with yolk.
❺ After scattering flour on the crab skin and filling up step no.❸ in the crab skin, cover it with step no. ❹.
❻ Pour one measuring cup of water(180ml) in the inner caldron.
Close the lid, turn the handle to high pressure mode, press Menu button and select
[HIGH PRESSuRE STEAM]
.
Then set the cooking time and press Cooking with
[HIGH Pressure Cook/Super Turbo]
button.
Close the lid, turn the handle to no pressure mode, press Menu button and select
[non PRESSuRE STEAM]
.
Then set the cooking time and press
[non PRESSuRE CooK]
button.
Steamed Blue Crab
Ingredients
Blue crab 1EA, beef 150g, tofu 1/4 block, red/green pepper each 1/2EA, yolk 1/2EA and some flour
- All cups referenced are using the provided rice measuring cup. (Water: 180ml, Rice: 150g)
- Do not exceed the cooker's capacity. If exceeded, there is a risk of overflow and potential
product damage. This may cause the overflow.
COOKING GUIDE
51
www.cuckooamerica.com
english
non P Steam time
30min
High P Steam time
30min
Recipe
❶ Make cuts on the well-trimmed snapper at intervals of 2cm.
❷ Season crushed beef with soy sauce, scallion, ground sesame mixed with salt, garlic and ground pepper.
❸ Pour the prepared seasoning on the snapper.
❹ After pouring 1.5 cups of water(270ml) into the inner pot, place the steam plate on it.
❺ Put the prepared snapper on the steam plate.
❻ Close the lid, turn the handle to high pressure mode, press Menu button and select
[HIGH PRESSuRE STEAM]
.
Then set the cooking time and press Cooking with
[HIGH Pressure Cook/Super Turbo]
button.
Close the lid, turn the handle to no pressure mode, press Menu button and select
[non PRESSuRE STEAM]
.
Then set the cooking time and press
[non PRESSuRE CooK]
button.
❼ After cooking is completed, decorate it with the remaining garnish.
Steamed fish
Ingredients
Snapper 1EA, beef 50g, shiitake 3EA, stone mushroom 2EA, red pepper 1EA, egg1EA, some scallion,
some garlic, some soy sauce, some ground sesame mixed with salt, some cooking oil, some sesame
oil, some salt and some ground pepper
NON P STEAM/HIGH P STEAM(Non P Menu/High P Menu)
Steam Cautions
non P Steam time
35min
High P Steam time
35min
Recipe
Steamed Clam
Ingredients
2 clams, 15g of beef, egg white 1/2EA, egg 1/2EA, 1 teaspoonful of minced Welsh onion,
1/2 teaspoonful of minced garlic, 1/4 teaspoonful of salt, a little bit of pepper grounds
non P Steam time
45min
High P Steam time
35min
Recipe
❶ Wash White Rice clean, and soak it in water sufficiently for 1 hour or longer.
❷ Prepare chestnuts and dates by cutting them to proper size. (However, remove the husks and seeds of chestnuts
and dates.)
❸ Add black sugar, sesame oil, cinnamon powder and a little bit of salt into the previously soaked White Rice and
mix them properly.
❹ Put all the ingredients including ❸ into the inner pot, and then stir all evenly after pouring water into the pot until
the level 4.
❺ Close the lid, turn the handle to high pressure mode, press Menu button and select
[HIGH PRESSuRE STEAM]
.
Then set the cooking time and press Cooking with
[HIGH Pressure Cook/Super Turbo]
button.
Close the lid, turn the handle to no pressure mode, press Menu button and select
[non PRESSuRE STEAM]
.
Then set the cooking time and press
[non PRESSuRE CooK]
button.
Multi-flavor lutinous Rice
Ingredients
3 cups of White Rice(450g), 60g of raisin, 15 chestnuts, 10 dates, 1tablespoonful of pine nut,
100g black sugar, 1 tablespoonful of thick soy, 3 tablespoonful of sesame oil, a little bit of salt,
1/2 tablespoonful of cinnamon powder
❶ Mince beef neatly.
❷ Cut cleanly rinsed clam half, and mince it neatly by taking out flesh attached to shell with knife.
❸ Put minced beef and clam flesh in the container, and mix evenly by seasoning with minced Welsh onion,
minced garlic, salt and pepper grounds.
❹ Since 4 shells can be contained in the container, put seasoned substances tightly to a degree of 1/2EA per shell.
❺ As the material may grow sticky, apply egg white evenly on top of clam flesh so that the shape may not
be deformed even after steaming.
❻ Pour 1.5 cups of water(270ml) into inner pot, and place steaming plate.
❼ Put the prepared clam on the steaming plate.
❽ Close the lid, turn the handle to high pressure mode, press Menu button and select
[HIGH PRESSuRE STEAM]
.
Then set the cooking time and press Cooking with
[HIGH Pressure Cook/Super Turbo]
button.
Close the lid, turn the handle to no pressure mode, press Menu button and select
[non PRESSuRE STEAM]
.
Then set the cooking time and press
[non PRESSuRE CooK]
button.
❾ Divide fully boiled egg into white and yolk, and after mincing the white neatly and crushing and putting the
yolk on the sieve, put the egg yolk and white on the clam half each.
- All cups referenced are using the provided rice measuring cup. (Water: 180ml, Rice: 150g)
- Do not exceed the cooker's capacity. If exceeded, there is a risk of overflow and potential
product damage. This may cause the overflow.
COOKING GUIDE
52
non P Steam time
25min
High P Steam time
15min
Recipe
❶ Divide bean curd set into two, slice them to 1cm thickness, and by scattering salt, remove water content.
❷ Shred Welsh onion thin, and prepare seasoning sauce by mixing minced garlic, thick soy, red pepper powder,
ground sesame mixed with salt, sesame oil and shredded red pepper.
❸Pour 1.5 cup of water(270ml) into My Caldron, place steaming plate, and put the sliced bean curds on top of
it evenly.
❹ Close the lid, turn the handle to high pressure mode, press Menu button and select
[HIGH PRESSuRE STEAM]
.
Then set the cooking time and press Cooking with
[HIGH Pressure Cook/Super Turbo]
button.
Close the lid, turn the handle to no pressure mode, press Menu button and select
[non PRESSuRE STEAM]
.
Then set the cooking time and press
[non PRESSuRE CooK]
button.
❺ Once cooking is completed, take out bean curd, and apply seasoning sauce evenly on top of the bean curd.
Steamed Bean Curd
Ingredients
1 set of bean curd, a little bit of salt Seasoning Sauces: 1 tablespoonful of red pepper powder,
1 tablespoonful of minced garlic, a root of Welsh onion, a little bit of sesame oil, a little bit of ground
sesame mixed with salt, a little bit of shredded red pepper, 3 tablespoonful of thick soy
NON P STEAM/HIGH P STEAM(Non P Menu/High P Menu)
Steam Cautions
non P Steam time
20min
High P Steam time
20min
Recipe
Japchae
(stir-fried vegetables,
and shredded meat)
Ingredients
Cellophane 150g, paprika (green, red) each 1EA, carrot 70g, onion 70g, some spinach, enoki
mushroom 70g, fishcake 70g and cooking oil 1 tablespoons
non P Steam time
15min
High P Steam time
15min
Recipe
❶ Chop eggplant to 4cm length, and after erecting it, make crosswise cuts.
❷ Slice red peppers and green peppers small, mince Welsh onions and garlic, and make filling by adding
thick soy, ground sesame mixed with salt, red pepper powder, sugar and vinegar.
❸ Pour 1.5 cups of water(270ml) into My Caldron, and after adding steaming plate, place sliced eggplant on
top of it evenly.
❹
Close the lid, turn the handle to high pressure mode, press Menu button and select
[HIGH PRESSuRE STEAM]
.
Then set the cooking time and press Cooking with
[HIGH Pressure Cook/Super Turbo]
button.
Close the lid, turn the handle to no pressure mode, press Menu button and select
[non PRESSuRE STEAM]
.
Then set the cooking time and press
[non PRESSuRE CooK]
button.
❺ Once cooking is completed, put the filling prepared on the eggplant evenly.
Steamed Eggplant
Ingredients
2 pieces of eggplants
Seasoning Sauces: 2 tablespoonful of thick soy, 1 red pepper, 1 green chilli, 1/2 tablespoonful of red
pepper powder, 1 tablespoonful of vinegar, a little bit of ground sesame mixed with salt, 1/2 pieces of
Welsh onion, 4 pieces of garlic, 2 teaspoonful of sugar
❶ After cutting paprika, onion, carrot and fish cake into thin slices, wash enoki mushroom clean, and blanch
spinach in boiling water. Cut it after removing from water. (paprika and carrot: 2~3mm, onion and fish
cake: 5mm)
❷ After soaking cellophane in lukewarm water for 30 minutes, wash it with cold water (When cellophane is
soaked for a long time, cellophane may be too soft or agglomerated. According to preference, soak
cellophane for 10 minutes~30 minutes.)
❸ After putting two tablespoons of cooking oil, 1/2 cup of water(90ml) and cellophane in the inner caldron,
put the prepared fish cake, carrot, onion and paprika together.
❹ Close the lid, turn the handle to high pressure mode, press Menu button and select
[HIGH PRESSuRE STEAM]
.
Then set the cooking time and press Cooking with
[HIGH Pressure Cook/Super Turbo]
button.
Close the lid, turn the handle to no pressure mode, press Menu button and select
[non PRESSuRE STEAM]
.
Then set the cooking time and press
[non PRESSuRE CooK]
button.
❺ After cooking is completed, put spinach blanched in boiled water and mix with soy sauce, sesame oil and
sugar according to your preference. Scatter sesame seeds or ground sesame mixed with salt on the
seasoned Japchae.
- All cups referenced are using the provided rice measuring cup. (Water: 180ml, Rice: 150g)
- Do not exceed the cooker's capacity. If exceeded, there is a risk of overflow and potential
product damage. This may cause the overflow.

COOKING GUIDE
53
www.cuckooamerica.com
english
non P Steam time
25min
High P Steam time
20min
Recipe
❶ Pour 1.5 cups of water(270ml) into the inner pot.
❷ Put steam pot on the inner caldron and put dumplings on the steam plate.
❸ Close the lid, turn the handle to high pressure mode, press Menu button and select
[HIGH PRESSuRE
STEAM]
. Then set the cooking time and press Cooking with
[HIGH Pressure Cook/Super Turbo]
button.
Close the lid, turn the handle to no pressure mode, press Menu button and select
[non PRESSuRE
STEAM]
. Then set the cooking time and press
[non PRESSuRE CooK]
button.
Steamed Dumpling
Ingredients
Dumplings 10EA
non P Steam time
15min
High P Steam time
15min
Recipe
❶ Slice pumpkin thin.
❷ Make seasoning sauce by mixing minced Welsh onion, minced garlic, thick soy, shredded red pepper,
red pepper powder, sesame oil, ground sesame mixed with salt, and sugar.
❸ Pour 1.5 cups of water(270ml) into My Caldron, put steaming plate in it, and after placing the sliced pumpkin
on top of it, scatter seasoning sauce of ❷ evenly.
❹ Close the lid, turn the handle to high pressure mode, press Menu button and select
[HIGH PRESSuRE STEAM]
.
Then set the cooking time and press Cooking with
[HIGH Pressure Cook/Super Turbo]
button.
Close the lid, turn the handle to no pressure mode, press Menu button and select
[non PRESSuRE STEAM]
.
Then set the cooking time and press
[non PRESSuRE CooK]
button.
Steamed Pumpkin
Ingredients
1/2 pumpkin
Seasoning Sauces: 1 tablespoonful of thick soy, 1 tablespoonful of mined Welsh onion, 1/2 tablespoonful of
sesame oil, 1/2 table tablespoonful of red pepper powder, a little bit of shredded red pepper, 1 teaspoonful of
sugar, 1 tablespoonful of minced garlic, 1/2 tablespoonful of ground sesame mixed with salt
NON P STEAM/HIGH P STEAM(Non P Menu/High P Menu)
Steam Cautions
non P Steam time
35min
High P Steam time
25min
Recipe
❶ Pour 1.5 cups of water(270ml) in the inner pot.
❷ Put steam pot in the inner pot and put sweet potatoes on the steam plate.
❸ Close the lid, turn the handle to high pressure mode, press Menu button and select
[HIGH PRESSuRE STEAM]
.
Then set the cooking time and press Cooking with
[HIGH Pressure Cook/Super Turbo]
button.
Close the lid, turn the handle to no pressure mode, press Menu button and select
[non PRESSuRE STEAM]
.
Then set the cooking time and press
[non PRESSuRE CooK]
button.
❹ When cooking is completed, be careful with the hot sweet potatoes.
References
■ Steamed sweet potato for constipation : When you take steamed sweet potato with its skin, it is good for
constipation.
■ Fresh sweet potato for weak person : Sweet potato includes a lot of vitamin B, mineral and carotene.
Therefore, it is food with high nutrition. Especially, when taking ground fresh sweet potato, it is good for
your health. Many kinds of enzymes are included in the fluid flown out from sweet potatoes.
Sweet Potato
Ingredients
Sweet potato 3EA
※When sweet potato is large (more than 150g), cut it into two pieces.
non P Steam time
20min
High P Steam time
20min
Recipe
❶ Put egg, water, and vinegar into the inner pot.
❷ Close the lid, turn the handle to high pressure mode, press Menu button and select
[HIGH PRESSuRE STEAM]
.
Then set the cooking time and press Cooking with
[HIGH Pressure Cook/Super Turbo]
button.
Close the lid, turn the handle to no pressure mode, press Menu button and select
[non PRESSuRE STEAM]
.
Then set the cooking time and press
[non PRESSuRE CooK]
button.
Boiled egg
Ingredients
6 eggs, 2 cups of water(360ml), 1~2 drops of vinegar
- All cups referenced are using the provided rice measuring cup. (Water: 180ml, Rice: 150g)
- Do not exceed the cooker's capacity. If exceeded, there is a risk of overflow and potential
product damage. This may cause the overflow.
COOKING GUIDE
54
non P Steam time
25min
High P Steam time
20min
Recipe
❶ Pour 1.5 cups of water(270ml) into the inner pot.
❷ Put steam pot on the inner caldron and put chestnuts on the steam plate (peel partial skin of chestnut to
prevent bursting)
❸ Close the lid, turn the handle to high pressure mode, press Menu button and select
[HIGH PRESSuRE STEAM]
.
Then set the cooking time and press Cooking with
[HIGH Pressure Cook/Super Turbo]
button.
Close the lid, turn the handle to no pressure mode, press Menu button and select
[non PRESSuRE STEAM]
.
Then set the cooking time and press
[non PRESSuRE CooK]
button.
❹ When cooking is completed, be careful with the hot chestnuts.
Steamed Chestnut
Ingredients
Chestnut 15EA
non P Steam time
45min
High P Steam time
35min
Recipe
❶ Pour 1.5 cups of water(270ml) into the inner pot.
❷ Put steam pot on the inner pot and put potatoes on the steam plate.
❸ Close the lid, turn the handle to high pressure mode, press Menu button and select
[HIGH PRESSuRE
STEAM]
. Then set the cooking time and press Cooking with
[HIGH Pressure Cook/Super Turbo]
button.
Close the lid, turn the handle to no pressure mode, press Menu button and select
[non PRESSuRE STEAM]
.
Then set the cooking time and press
[non PRESSuRE CooK]
button.
❹ When cooking is completed, be careful with the hot potatoes.
How to keep potato
When potatoes are kept at normal temperature in the summer, it sprouts right away. Therefore, it is good to
keep them in the refrigerator. If there is a great amount, put potatoes in an bag and keep it in a opened carton
box. At this time, putting one or two apples together with potatoes will be helpful to prevent sprouting because
of the effect of enzymes in apple.
Potato
Ingredients
Potato (less than 200g) 3EA
NON P STEAM/HIGH P STEAM(Non P Menu/High P Menu)
Steam Cautions
non P Steam time
45min
High P Steam time
35min
Recipe
❶ Pour 1.5 cups of water(270ml) into the inner pot.
❷ Put steam pot in the inner caldron and put corn on the steam plate.
❸ Close the lid, turn the handle to high pressure mode, press Menu button and select
[HIGH PRESSuRE STEAM]
.
Then set the cooking time and press Cooking with
[HIGH Pressure Cook/Super Turbo]
button.
Close the lid, turn the handle to no pressure mode, press Menu button and select
[non PRESSuRE STEAM]
.
Then set the cooking time and press
[non PRESSuRE CooK]
button.
❹ When cooking is completed, be careful with the hot corn.
Sweet Corn
Ingredients
2 Corn
non P Steam time
20min
High P Steam time
20min
Recipe
❶ Wash the sweet potato with peel and cut it in a circular shape.
❷ Cut the boiled egg with a cutter, steep rice cake in warm water.
❸ Spread olive oil on the inner pot evenly, pile up sweet potato, egg, and rice cake.
❹ Spread white sauce on ❸, put mozzarella cheese on top, cut cheddar cheese slice into 8 pieces and
place it on top, and sprinkle parsley powder.
❺Close the lid, turn the handle to high pressure mode, press Menu button and select
[HIGH PRESSuRE STEAM]
.
Then set the cooking time and press Cooking with
[HIGH Pressure Cook/Super Turbo]
button.
Close the lid, turn the handle to no pressure mode, press Menu button and select
[non PRESSuRE STEAM]
.
Then set the cooking time and press
[non PRESSuRE CooK]
button.
Rice cake gratin
Ingredients
50g of rice cake for tteokguk, 1 boiled egg, 1 sweet potato, 40g of mozzarella cheese, 1 slice of cheddar
cheese, little bit of olive oil, 1/2 cup of white sauce(75g), little bit of parsley powder
White sauce : Flour, 10g of butter, 100g of milk, pinch of salt and white pepper (Melt butter, add flour and stir it,
add milk and boil it until it gets thick, and apply salt and white pepper for seasoning)
- All cups referenced are using the provided rice measuring cup. (Water: 180ml, Rice: 150g)
- Do not exceed the cooker's capacity. If exceeded, there is a risk of overflow and potential
product damage. This may cause the overflow.
COOKING GUIDE
55
www.cuckooamerica.com
english
non P Steam time
15min
High P Steam time
15min
Recipe
❶ Place egg and water or kelp water together and mix it well.
❷ Finely chop carrot and the green part of green onion and it with ❶.
❸ Mince salted shrimps with little bit of water to make it soupy, mix it with ❷, and season it with salt.
❹ Close the lid, turn the handle to high pressure mode, press Menu button and select
[HIGH PRESSuRE
STEAM]
. Then set the cooking time and press Cooking with
[HIGH Pressure Cook/Super Turbo]
button.
Close the lid, turn the handle to no pressure mode, press Menu button and select
[non PRESSuRE
STEAM]
. Then set the cooking time and press
[non PRESSuRE CooK]
button.
Steamed egg
Ingredients
2 eggs, 1 cups of water or kelp water(180ml), 1 teaspoon of salted shrimps, pinch of salt, 10g of carrot,
10g of green onion
NON P STEAM/HIGH P STEAM(Non P Menu/High P Menu)
Steam Cautions
non P Steam time
50min
High P Steam time
40min
Recipe
Sponge cake
Ingredients
Flour (weak flour) 1cup(150g), egg 4EA, 1/2 tablespoon of butter , 1/2tablespoon of milk, vanilla
perfume 10g, 1/2cup of sugar and some salt
non P Steam time
15min
High P Steam time
15min
Recipe
❶ Remove head and internal orans of shrimps, leave one joint at tail side and tail, peel off the skin, and
wash it out with salt water.
❷ Slice green onion obliquely, and chop onion in a size that is smaller than shrimps.
❸ Place shrimp, green onion, and onion with ketchup sauce, and mix it well.
❹ Close the lid, turn the handle to high pressure mode, press Menu button and select
[HIGH PRESSuRE
STEAM]
. Then set the cooking time and press Cooking with
[HIGH Pressure Cook/Super Turbo]
button.
Close the lid, turn the handle to no pressure mode, press Menu button and select
[non PRESSuRE
STEAM].
Then set the cooking time and press
[non PRESSuRE CooK]
button.
❺ Mix it well with a spatula after multipurpose steam is completed.
Shrimp ketchup fried rice
Ingredients
10 medium size shrimps, 1/4 green onion, 20g of onion, 10g of carrot
* Ketchup sauce : 3 tablespoons of ketchup, 1 tablespoon of sugar, 1 tablespoon of starch powder,
1 tablespoon of water, pinch of salt, soy sauce, and pepper powder
❶ Put salt in flour and sieve it.
❷ Separate the yolk from an egg.
❸ Put the white of an egg in a vessel and stir it in a fixed direction. When bubbles take place, put sugar by
dividing it in several times. Stir up bubbles until they don’t flow down when the vessel caves over.
❹ Continue to stir while putting the yolk in ❸ little by little and put some vanilla perfume.
❺ When ❹ becomes cream, mix with flour.
❻ Mix boiled butter with milk.
❼ After putting butter on the bottom and the side of the inner caldron, pour cake dough into the inner caldron.
❽ Close the lid, turn the handle to high pressure mode, press Menu button and select
[HIGH
PRESSuRE STEAM]
. Then set the cooking time and press Cooking with
[HIGH Pressure
Cook/Super Turbo]
button.
Close the lid, turn the handle to no pressure mode, press Menu button and select
[non PRESSuRE
STEAM]
. Then set the cooking time and press
[non PRESSuRE CooK]
button.
❾ Cool down the cooked sponge cake.
❿After pouring whipped cream in a vessel and making bubbles to be regarded to be thick, put
powdered sugar (put sugar in a cutter and grind it)
Apply cream on the cooled sponge cake.
Decorate it with different kinds of prepared fruit.
- All cups referenced are using the provided rice measuring cup. (Water: 180ml, Rice: 150g)
- Do not exceed the cooker's capacity. If exceeded, there is a risk of overflow and potential
product damage. This may cause the overflow.

COOKING GUIDE
56
non P Steam time
20min
High P Steam time
20min
Recipe
❶ Peel off the skin of button mushroom and cut it in its shape, and tear a crabmeat stick into pieces.
❷ Cut sliced hams into squares, and remove water from the canned corn.
❸ Place rice on the bottom of inner pot flatly.
❹ Spread pizza sauce on the rice flatly using a spoon, and place topping ingredients on the top.
❺ Place mozzarella cheese on ❹, close the lid, turn the handle to high pressure mode, press Menu
button and select
[HIGH PRESSuRE STEAM]
. Then set the cooking time and press Cooking with
[HIGH Pressure Cook/Super Turbo]
button.
Close the lid, turn the handle to no pressure mode, press Menu button and select
[non
PRESSuRE STEAM]
. Then set the cooking time and press
[non PRESSuRE CooK]
button.
Rice pizza
Ingredients
* Dough ingredients : 100g of rice
* Topping ingredients : 2 slices of ham, 2 button mushrooms, 2 tablespoons of canned corn, 1 stick of
crabmeat, 40g of mozzarella cheese, 4 tablespoons of pizza sauce
NON P STEAM/HIGH P STEAM(Non P Menu/High P Menu)
Steam Cautions
non P Steam time
45min
High P Steam time
45min
Recipe
❶ Allow the butter to come to room temperature then mix with the sugar in a large bowl.
❷ Add eggs to the butter mixture then whisk until beaten.
❸ Pour in the pancake batter and chocolate chips and mix.
❹ Spread melted butter or spray nonstick cooking spray into the inside of the inner pot then pour in
the cake batter and close the lid.
❺ Turn the handle to high pressure mode, press the Menu button and select
[HIGH PRESSuRE
STEAM]
. Set the cooking time and press Cooking with
[HIGH Pressure Cook/Super Turbo]
button.
Turn the handle to no pressure mode, press the Menu button and select
[non PRESSuRE
STEAM]
. Set the cooking time and press
[non PRESSuRE CooK]
button.
Chocolate Cake
Ingredients
100g of butter, 45g of sugar, 2 eggs, 55g of pancake batter, 35g of chocolate
non P Steam time
20min
High P Steam time
15min
Recipe
❶ Rinse the rice cakes with cold water then cut them into bite-sized pieces.
❷ Cut the fish cake into 4 equal sections, julienne the carrot and onion, and slice the green onion into
bite-sized pieces.
❸ Mix together all of the marinade ingredients in the inner pot.
❹ Place the rice cakes, fish cakes, and chopped vegetables into the marinade and mix well.
❺ Close the lid, turn the handle to high pressure mode, then press Menu button and select
[HIGH
PRESSuRE STEAM]
. Set the cooking time and press Cooking with
[HIGH Pressure Cook/Super
Turbo]
button.
Close the lid, turn the handle to no pressure mode, then press Menu button and select
[non
PRESSuRE STEAM]
. Set the cooking time and press
[non PRESSuRE CooK]
button.
Tteokbokki
(spicy and sweet rice cake)
Ingredients
200g of rice cake bars (soft), 2 pieces of fish cake, 1/4 onion, 1/4 green onion, 40g of carrot
* marinade : 2 tablespoons of red pepper paste, tablespoon of starch syrup, 1 tablespoon of sugar,
1 teaspoon of sesame salt, 1 teaspoon of soy sauce, 1/3 of anchovy water(60ml)
- All cups referenced are using the provided rice measuring cup. (Water: 180ml, Rice: 150g)
- Do not exceed the cooker's capacity. If exceeded, there is a risk of overflow and potential
product damage. This may cause the overflow.
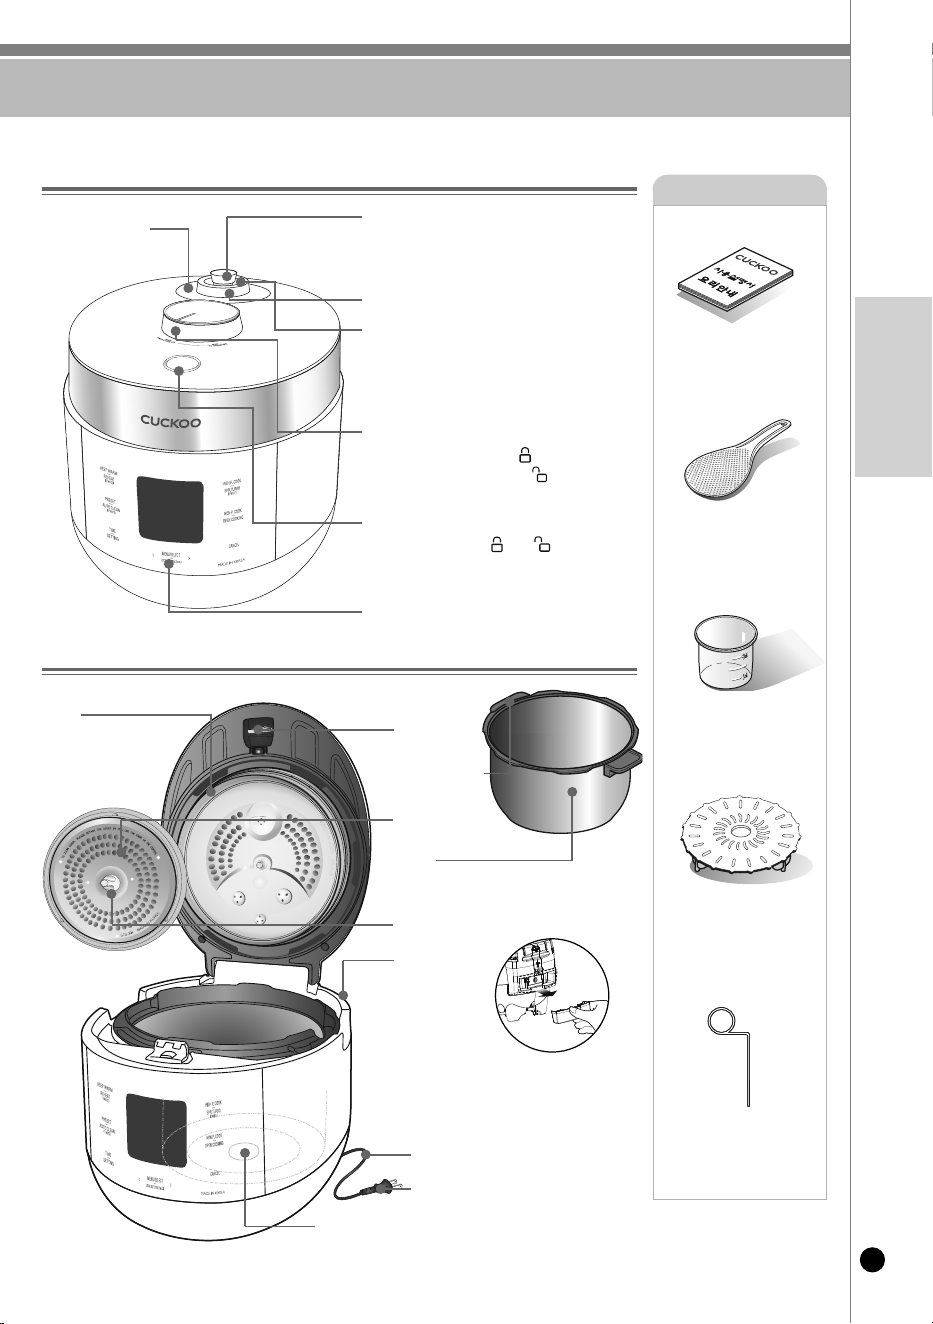
각 부분의 이름
57
www.cuckooamerica.com
KOReAn
각 부 명칭(외부)
각 부 명칭(내부)
2중모션밸브 (TWIN PRESSURE)
자동 증기 배출구
취사나 요리가 끝나거나 보온시 자동으로 증기를
배출시켜 줍니다.
필요할 경우 취소 버튼을 눌러(2초) 증기를
배출 시킬 수도 있습니다.
압력추
취사나 요리 전 압력추를 수평으로 맞추어 주십시오.
내부의 압력이 일정하도록 조절하며, 젖히면 수동으로
증기배출이됩니다.
소프트스팀캡
뚜껑 결합 손잡이
뚜껑 결합 손잡이를 회전시켜 “고압 ”에 위치하면
고압모드 조리 선택이 가능하고, “ 무압”에
위치
하면 무압모드 조리 선택이 가능합니다.
뚜껑 열림 버튼
뚜껑 결합 손잡이를 “고압 ”에서 “ 무압”으로
돌린 후 뚜껑 열림 버튼을 누르면 뚜껑이 열립니다.
(취사나 요리 중에는 뚜껑 열림 버튼을 누르지 마십시오.)
기능조작부 및 표시부
보온이나 취사
조리후에는 항상
물받이에 있는
물을 버려주세요.
물받이에 밥물이
고여 있을 경우 냄새의 원인이 됩니다.
물받이
(제품후면)
전원코드
전원플러그
온도감지기
분리형 커버
분리형 커버 손잡이
뚜껑
부속품 안내
사용설명서 및 요리안내
주 걱
계량컵
찜판(별매품)
청소용 핀
(실물은 본체바닥면에 부
착되어 있습니다.)
패킹은 사용방법 및 횟수
에 따라 1년~3년 정도 사
용 후 교환
하여 주십시오.
패킹
내솥을 본체에 똑바로 넣습니다.
내솥
내솥 손잡이
※ 쿠쿠몰이나 전문점에서
구매가능 합니다.
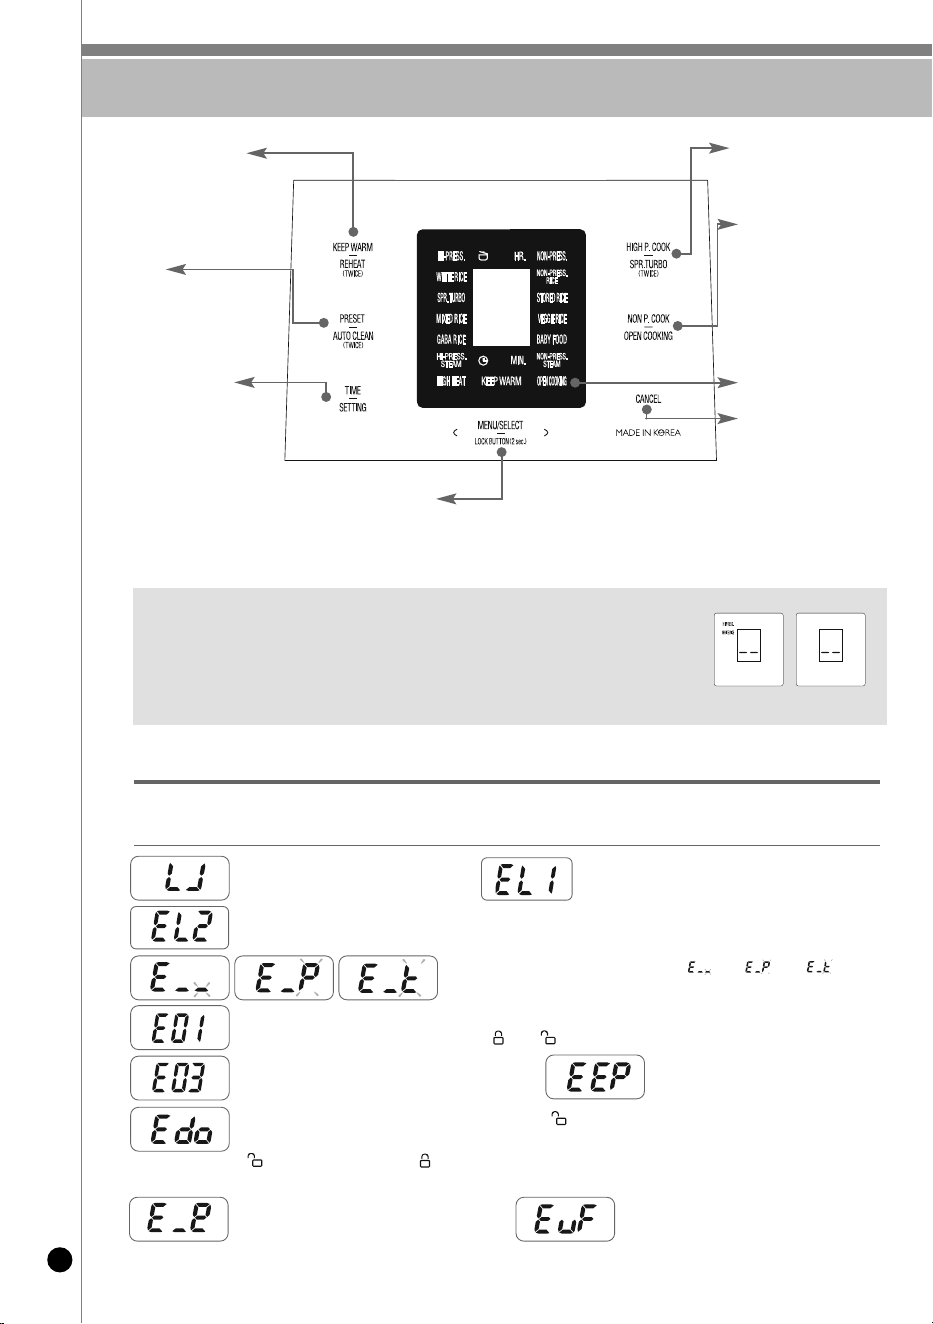
기능 조작부의 이름과 역할 / 기능 표시부의 이상점검 기능
58
내솥이 없을 때
나타납니다.
온도 감지기에 이상이 있을 때 나타납니다. (“ ”표시,“ ”표시,“ ”표시가
깜박거립니다.) 고객상담실로 문의하십시오.
뚜껑 결합 손잡이를 정확한 압력모드로 돌리지 않은 상태에서 취사 또는 보온/재가열, 예약/자동세척, 메뉴/선택
버튼을 눌렀을 때 나타납니다. 손잡이를 “고압 ”또는 “ 무압”방향으로 확실하게 돌려 주십시오.
사용방법이 올바르지 않거나 제품에 이상이 생겼을 때 아래와 같은 표시가 나타나 경보를 하여 줍니다.
정상적인 사용 조건에서나 혹은 조치 이후에도 지속적으로 표시가 나타날 경우에는 고객상담실로 문의하십시오.
기능 표시부의 이상점검 기능
고압취사 완료 후 보온 상태에서 한번도 뚜껑 결합 손잡이를“ 무압”방향으로 하지않고, 대기 상태가 된 후 재차
취사 또는 예약/자동세척 버튼을 눌렀을 때 나타납니다. 뚜껑 체결 감지장치의 동작 확인 기능입니다. 뚜껑 결합 손잡이를
“ 무압”쪽으로 한 후 다시 “고압 ”방향으로 돌려 주시면 됩니다.
그래도 문제가 계속 해결되지 않으면 고객상담실로 문의하여 주십시오.
보온/재가열 버튼
보온을 할 경우나 식사 직전
밥을 따뜻하게 데울 경우 사용
고압취사/슈퍼쾌속 버튼
고압취사 및 고압요리를 시작할 경우 사용
무압취사/
오픈쿠킹버튼
무압취사 및 무압요리를
시작할 경우 사용
오픈쿠킹을 할 경우 사용
취소 버튼
선택한 기능을 취소 할 경우
사용하거나 자동으로 증기를
배출시킬때 사용 (취사 또는
요리중에 취소 시킬 경우 2초간
눌러주십시오.)
예약/자동세척
버튼
예약취사를 할 경우 사용
자동세척을 할 경우 사용
시간/설정 버튼
현미발아 시간을 설정하거나
고압찜, 이유식, 무압찜
시간을 설정할 경우 사용
예약시간을 변경 할 경우 사용
음성 설정, 음성 볼륨 설정
보온온도 설정 , 맞춤보온 설정
맞춤취사 설정
메뉴/선택 버튼
백미, 백미슈퍼쾌속, 백미고화력, 잡곡, 잡곡고화력, 현미/발아, 현미/발아고화력,
고압찜, 무압백미, 냉동보관밥, 나물밥, 이유식, 무압찜을 선택할 경우 사용
시간/설정 버튼으로 선택된 기능을 변경할 경우 사용
기능표시부
마이컴 내부 메모리에 이상이 있을때 나타납니다.
고객상담실로 문의하십시오.
마이컴 외부 메모리에 이상이 있을때 나타납니다.
고객상담실로 문의하십시오.
물만 계속 끓일 경우나 제품이상 발생시 나타납니다.
고객상담실로 문의하십시오.
환경센서에 이상이 있을때 나타납니다.
고객상담실로 문의하십시오.
※ 전원플러그를 꽂고 아무 동작을 하지 않은 경우, 그림과 같이 화면상태가 나타날 때가 대기 상태입니다.
(대기 상태 화면의 메뉴, 음성 유무는 사용자의 설정에 따라 다릅니다.)
※ 기능 조작 시 취소 버튼을 누르면 대기 상태로 전환됩니다.
※ 버튼은 부저음이 날 때까지 확실히 눌러 주시고 본 명판의 디자인은 실물과 다를 수 있습니다.
※ 대기 상태에서 1분 경과 시 절전 모드로 전환됩니다. (뚜껑결합손잡이 불빛 소등됨.)
▶ 절전모드 해제 방법 : 버튼을 누르거나, 뚜껑결합손잡이를 돌리거나, 뚜껑을 여닫으면 절전모드가 해제됩니다
< 대기 상태 화면 >< 절전 모드 화면 >
스마트 잠금 장치에 이상이 있을 때 나타납니다.
고객상담실로 문의하십시오.
스마트 잠금 장치에 이상이 있을 때 나타납니다. 취사가 완료될 때 까지 뚜껑을 열지 마세요. 보온 및 대기 상태에서
뚜껑을 열고자 할 경우 전원을 차단하고 뚜껑을 열어주세요. 고객상담실로 문의 하십시오.
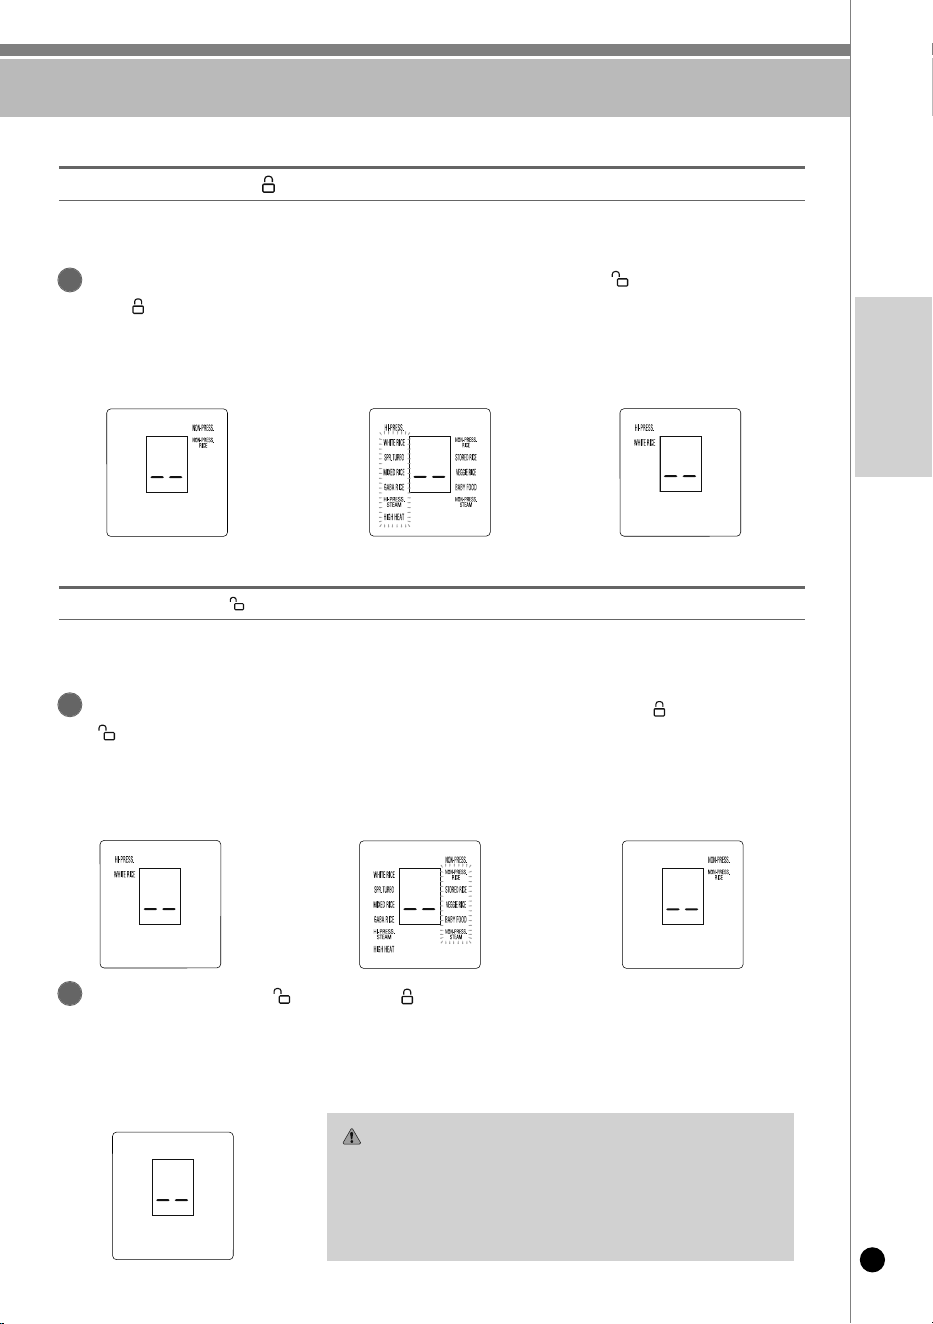
고압모드 또는 무압모드 선택 방법
59
www.cuckooamerica.com
KOReAn
압력모드를 무압모드에서 고압모드로 변경을 원하실 경우 뚜껑결합손잡이를“ 무압 ”에서
“ 고압 ”으로 돌려주세요.
▶ 압력모드가 무압모드에서 고압모드로 변경이 되면 전체 고압메뉴만 3초간 점멸 후 저장된 고압메뉴가 점등합니다.
▶ “고압모드입니다. 고압메뉴를 선택해주세요”하는 음성이 나옵니다.
▶ 뚜껑결합손잡이의 램프의 불빛이 주황색으로 변경됩니다.
▶뚜껑 결합 손잡이의 LED가 주황색으로 점등되고, 기능표시부에 “고압 ”표시가 나타나면 고압모드입니다.
▶고압모드에서는 고압메뉴만 선택이 가능합니다.
▶고압메뉴 : 백미, 백미슈퍼쾌속, 백미고화력, 잡곡, 잡곡고화력, 현미/발아, 현미/발아고화력, 고압찜
1
뚜껑결합손잡이 방향을 “고압 ”으로 해주세요.
고압모드 선택
<대기상태(무압모드)>
3초간
점멸 후
3초간
점멸 후
무압모드
변경 시
고압모드
변경 시
<대기상태(고압모드)>
압력모드를 고압모드에서 무압모드로 변경을 원하실 경우 뚜껑결합손잡이를 “ 고압 ”에서
“ 무압”으로 돌려주세요.
▶ 압력모드가 고압모드에서 무압모드로 변경이 되면 전체 무압메뉴만 3초간 점멸 후 저장된 무압메뉴가 점등합니다.
▶ “무압모드입니다. 무압메뉴를 선택해주세요” 하는 음성이 나옵니다.
▶ 뚜껑결합손잡이의 램프의 불빛이 흰색으로 변경됩니다.
▶ 뚜껑 결합 손잡이의 LED가 흰색으로 점등되고, 기능표시부에 “무압”표시가 나타나면 무압모드입니다.
▶ 무압모드에서는 무압메뉴만 선택이 가능합니다.
▶ 무압메뉴 : 무압백미, 냉동보관밥, 나물밥, 이유식, 무압찜
1
뚜껑결합손잡이 방향을 “ 무압 ”으로 해주세요.
무압모드 선택
<대기상태(고압모드)><대기상태(무압모드)>
뚜껑결합손잡이의 방향을 “ 무압”또는 “고압 ”으로 정확하게 하지 않을 경우(중립위치) 메뉴선택 및
취사를 할 수 없습니다.
▶ 고압취사/슈퍼쾌속, 무압취사, 예약/자동세척 버튼 입력 시“뚜껑결합손잡이를 원하는 압력위치로 돌려주세요”하는 음성이 나옵니다.
▶ 메뉴/선택 버튼 입력 시“뚜껑결합손잡이를 고압모드 또는 무압모드로 돌린 후 메뉴를 선택해주세요.”하는 음성이 나옵니다.
▶ 뚜껑결합손잡이를 정확하게 돌려 고압모드 또는 무압모드를 선택해주세요.
2
<뚜껑결합 손잡이 중립위치 상태>
주의사항
무압 메뉴 취사/요리시 지정된 용량으로 조리하십시오.
취사나 요리시에는 지정된 용량을 초과하여 요리하지 마십시오.
- 요리안내에 지정된 용량을 초과할 경우 압력추와 소프트 스팀캡으로 내용물
넘침의 원인이 됩니다.
- 반드시 지정된 설명서의 요리안내를 준수 바랍니다.
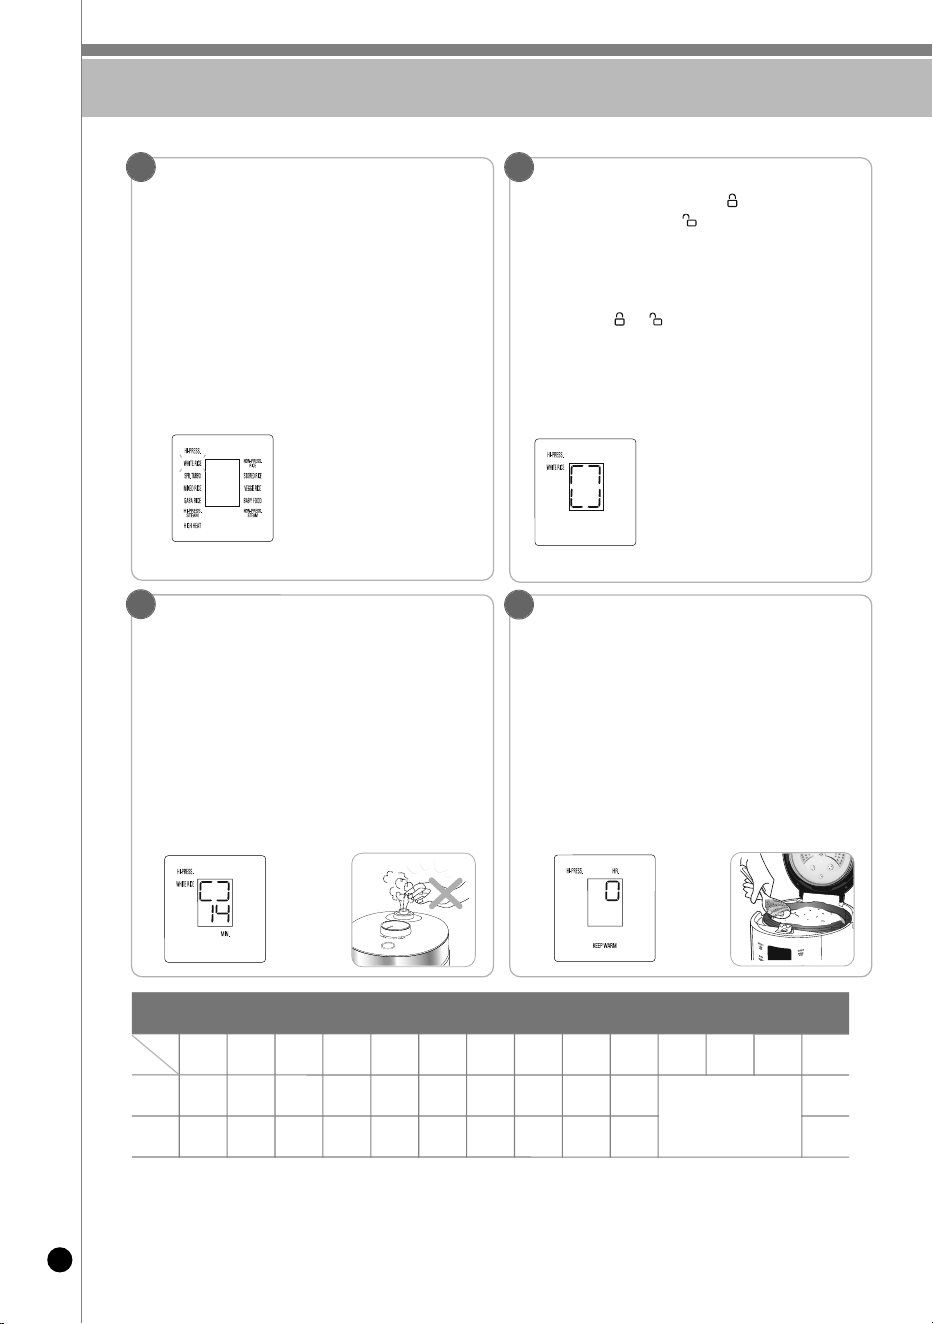
취사는 이렇게 하십시오
60
뚜껑결합손잡이로 원하는 압력모드를 선택합니다.
•분리형 커버가 장착되어 있는지 확인하여 주십시오.
•취사 전 압력추를 수평으로 맞추어 주십시오.
•정확한 압력모드가 선택되지 않으면 메뉴를 선택할 수 없습니다.
•
뚜껑결합손잡이가 고압모드일 경우 고압메뉴만 선택되고 무압모드일 경우 무압메뉴만 선택이 됩니다.
<고압모드>
•메뉴/선택 버튼을 누를 때마다 백미 → 백미고화력 → 백미슈퍼쾌속 → 잡곡 → 잡곡고화력 →
현미/발아→ 현미/발아고화력 → 고압찜 순으로 반복 선택됩니다.
<무압모드>
•
메뉴/선택 버튼을 누를 때마다 무압백미 → 냉동보관밥 → 나물밥 → 이유식 → 무압찜 순으로 반복 선택됩니다.
•
백미, 백미고화력, 잡곡, 잡곡고화력, 현미/발아, 현미/발아고화력, 무압백미는 한번 취사가 완료되고
나면 메뉴가 기억되므로 동일 메뉴를 연속 사용할 경우는 메뉴 선택을 하지 않아도 됩니다.
고압취사/슈퍼쾌속 또는 무압취사 버튼을 눌러 취사를 시작합니다.
•취사를 하기전에 고압메뉴의 경우 뚜껑결합손잡이를 “고압”으로 돌리고 고압취사/슈퍼쾌속
버튼을, 무압 메뉴의 경우 뚜껑결합손잡이를 “무압”으로 돌리고 무압취사 버튼을 눌러주세요.
•고압메뉴를 선택 후 무압취사 버튼을 누르면 경고음과 함께 E01이 나타난 후 “고압메뉴입니다.
고압취사 버튼을 눌러주세요.”, 무압메뉴를 선택 후 고압취사/슈퍼쾌속 버튼을 누르면 경고음과
함께 E01이 나타난 후 “무압메뉴입니다. 무압취사 버튼을 눌러주세요.”하는 음성이 나옵니다.
•고압취사/슈퍼쾌속 버튼을 누르면 취사가 시작합니다.
•뚜껑결합손잡이를 “고압”또는 “무압”방향으로 하지 않고 고압취사/슈퍼쾌속 또는 무압취사
버튼을 누른 경우 경고음과 함께 “E01”이 나타난 후 “뚜껑결합손잡이를 원하는 압력위치로 돌려
주세요.” 하는 음성이 나오고 작동되지 않습니다.
•취사 용량이나 수온, 취사 조건에 따라 실제 취사 시간은 차이가 있을 수 있습니다.
1 2
취사완료
•취사가 끝날때 완료음(쿠~쿠~, 쿠쿠하세요, 새소리)이 울리고
“쿠쿠가 맛있는 백미밥을 완성하였습니다. 밥을 잘 저어 주세요”
하는 음성과 함께 보온 기능을 시작합니다.
•보온을 원하지 않을 경우 취소 버튼을 눌러 보온을 취소하여
주십시오.
•취사가 끝나면 즉시 밥을 골고루 잘 섞어 주십시오.
섞지 않고 그냥두면 밥이 굳고 변색되어 냄새가 발생합니다.
•뚜껑 결합 손잡이가 잘 돌아가지 않는 경우는 압력추를 젖힌 다음
내부 증기를 완전히 빼낸 후 뚜껑 결합 손잡이를 돌려주십시오.
•취사중에는 취소 버튼을 누르지 마십시오. 취사가 취소됩니다.
4
예) 백미를 선택 할 경우
▶ “백미” 라는 음성이 나옵니다.
예) 고압모드에서 백미를 취사 할 경우
뜸들이기
(예 : 백미)
•뜸 진행부터는 “뜸들이기를 시작합니다.” 하는 음성과 함께
표시부에 남은 취사시간을 표시합니다.
메뉴에 따라 남은 시간은 차이가 있습니다.
•뜸 완료 1~4분 전에 증기배출효과음(기차소리)이 나오고
“증기배출이 시작됩니다.”하는 음성과 함께 증기가 자동배출
되므로 놀라거나 화상을 입지 않도록 주의하십시오.
3
예) 14분 남은 경우
※고압찜, 무압찜, 이유식 등의 요리 후 취사하게 되면 냄새가 배어들 수도 있습니다.
(61쪽을 참조하여 자동살균세척 기능을 사용하여 세척해 주십시오.)
※메뉴별 취사 시간은 전압, 물량, 수온 등 사용환경에 따라 다소 차이가 날 수 있습니다.
메뉴별 취사시간
백미
(기본메뉴)
백미고화력
백미슈퍼쾌속
잡곡
잡곡고화력
현미/발아
현미/발아
고화력
무압백미
나물밥
냉동
보관밥
이유식
무압찜
고압찜
자동세척
취사량
1인분~
6인분
1인분~
6인분
1인분~
4인분
1인분~
4인분
1인분~
4인분
1인분~
4인분
1인분~
4인분
1인분~
4인분
1인분~
4인분
1인분~
4인분
메뉴별 상세 요리안내를
참조하여 주십시오.
자동세척
물눈금
취사시간
약24분~
약36분
약26분~
약37분
약14분~
약21분
약38분~
약46분
약44분~
약50분
약45분~
약56분
약52분~
약67분
약38분~
약49분
약42분~
약55분
약23분~
약32분
약24분
메뉴
구분
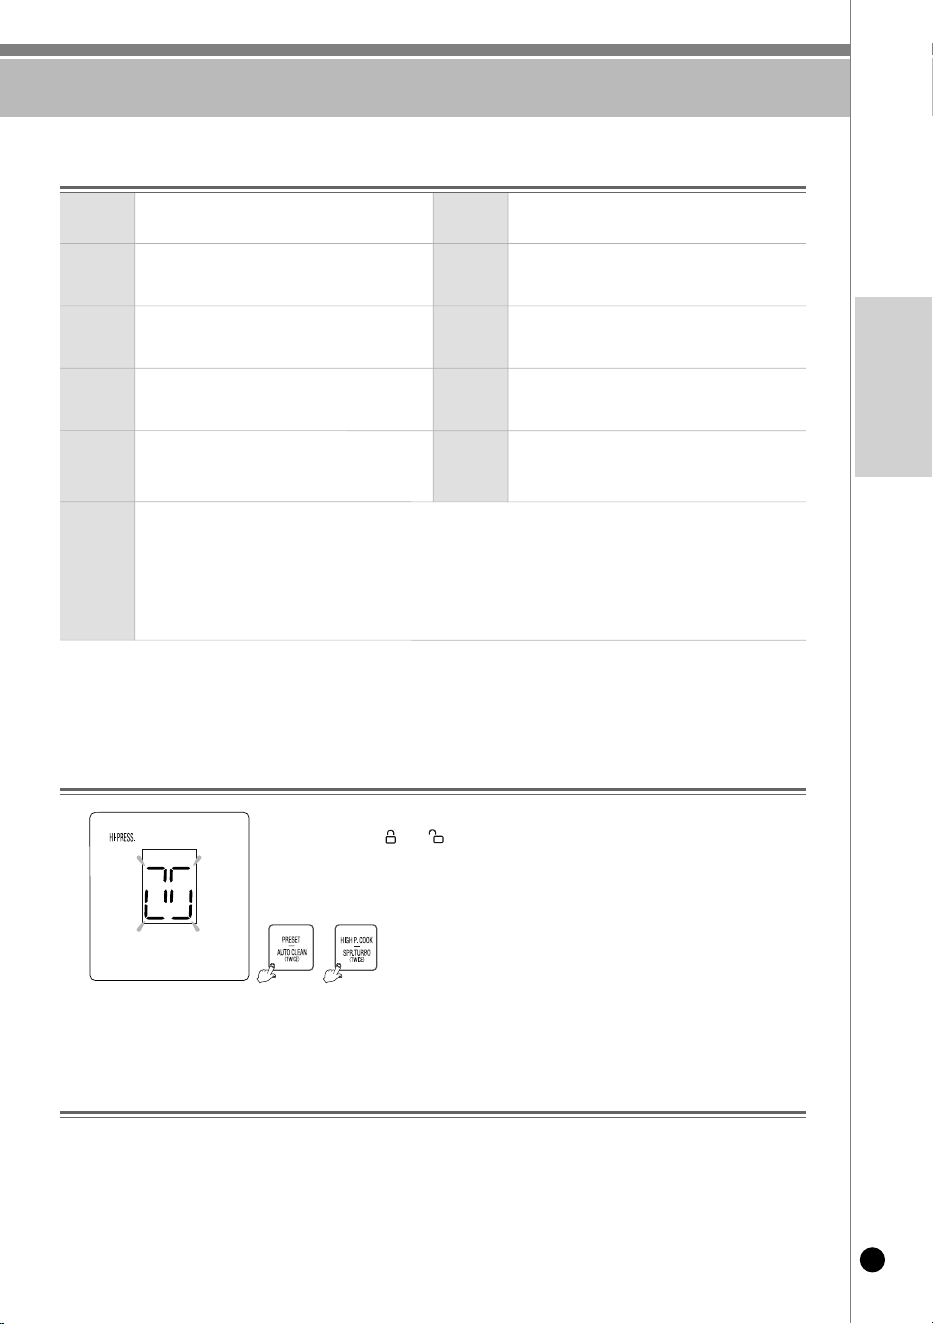
취사/자동세척은 이렇게 하십시오
61
www.cuckooamerica.com
KOReAn
백 미
백미를 차지게 취사할 때 사용합니다
잡곡
백미에 곡류를 섞어서 취사할 경우 사용합니다.
현미/발아
현미밥을 드시거나, 현미를 발아시켜 발아현미밥을
드시고자 할 때 사용합니다.
이유식
수동으로 이유식 시간을 설정하여 요리합니다.
고압찜,
무압찜
수동으로 찜 시간을 설정하여 고압(1.8기압)
및 무압(1기압)에서 요리합니다.
냉동보관밥
밥을 냉동으로 보관하여 드시고자 할 때 사용
합니다.
자동세척
(자동살균세척)
취사
•
보온 또는 요리후 배어든 냄새를 세척 할 때
사용합니다.
무압백미
찰기없이 부드러운 밥을 드시고자 할 때 사용합니다.
고화력
(백미,잡곡,현미/발아)
일반취사와 차별되는 구수하고, 차진밥을 드시고자
할 때 사용합니다.
(멜라노이징 현상이 발생할 수 있습니다.)
나물밥
백미에 나물을 섞어서 취사할 때 사용합니다.
백미
슈퍼
쾌속
• 백미슈퍼쾌속 취사 시 일반 백미 메뉴보다 밥짓는 시간이 단축됩니다.
• 백미슈퍼쾌속 진입방법1: 백미 메뉴를 선택한 후 고압취사/슈퍼쾌속 버튼을 2회 눌러 주십시오.
진입방법2: 백미슈퍼쾌속 메뉴를 선택한 후 고압취사/슈퍼쾌속 버튼을 눌러 주십시오.
(백미슈퍼쾌속 1인분 기준 약 14분 정도 걸림)
• 백미슈퍼쾌속 취사는 정상 취사보다 밥 상태가 좋지 않으므로 4인분 이하에서만 사용하여 주십시오.
• 취사전 쌀을 20분 정도 불린 다음 백미슈퍼쾌속으로 취사하시면 밥맛이 더욱 좋아집니다
※ 백미슈퍼쾌속 및 저인분을 취사할 경우 물받이에 있는 물이 많을 수 있으므로 취사 후 물을 버려 주십시오.
이 압력밥솥은 밥의 밑면에 엷은 누런 빛깔이 나타나는데, 이는 밥이 잔여수분을 밥 내부로 흡수시켜 밥 특유의 구수한 향기와 맛을 내는 멜라노이징
현상을 일으켜 맛있는 밥이 되도록 설계되어 있기 때문입니다. 특히 예약 취사와 같이 쌀알이 오랜 시간 침전되면 내솥 바닥에 미세전분이 가라앉아
일반 취사보다 멜라노이징(미세 밥 눌음)현상이 심하게 나타날 수도 있습니다.
※ 백미에 곡류를 섞어서 잡곡을 취사할 경우 백미만으로 취사할 때 보다 멜라노이징(미세 밥 눌음)현상이 증가할 수 있습니다.
멜라노이징(미세 밥 눌음) 현상
취사메뉴 사용법
내솥에 표시된 자동세척 물눈금까지 물을 붓고, 뚜껑을 덮어 뚜껑 결합 손잡이를
“ 고압 ”또는“ 무압 ”쪽으로 돌려 주십시오.
방법. 대기상태에서 예약/자동세척 버튼을 2회 눌러 자동세척을 선택한 후 고압모드에서는
고압취사/슈퍼쾌속 버튼을, 무압모드에서는 무압취사 버튼을 눌러 주십시오.
※ 자동세척을 정기적으로 하시면 2중모션 벨브를 청결히 유지할 수 있습니다.
자동세척은 이렇게 하십시오.
예) 고압모드 시 자동세척
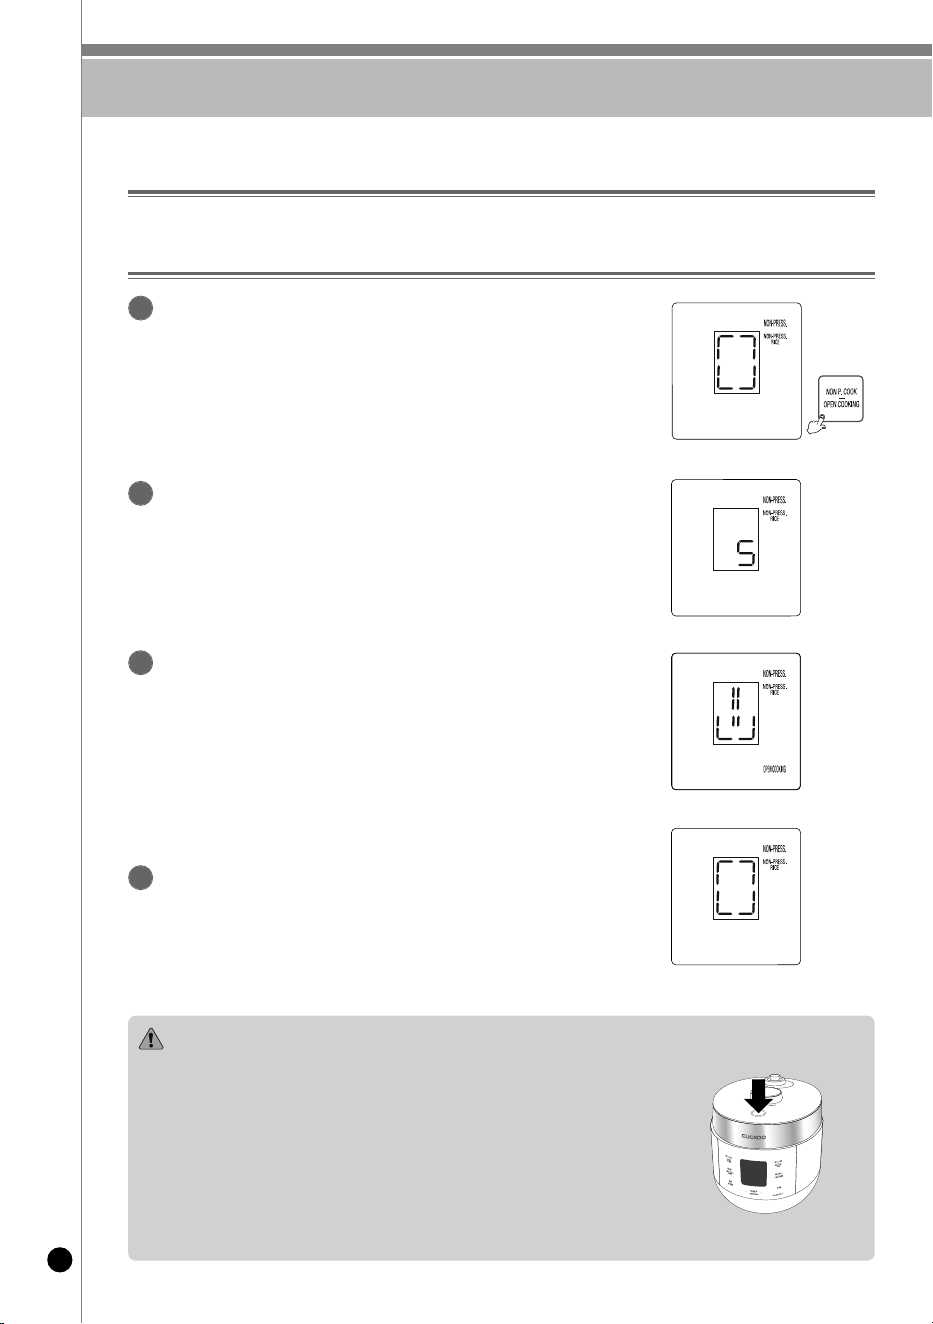
오픈 쿠킹은 이렇게 하십시오
62
< 취사 진행 표시 >
< 해제 잔여시간 표시 >
< 버튼 표시 >
무압 메뉴 취사 중 스마트 잠금장치를 해제시켜 뚜껑을 열고 재료를 투입하거나 내용물을 뒤집을 수 있는 기능입니다.
오픈 쿠킹이란?
오픈 쿠킹 사용 방법
먼저, 무압 메뉴 취사 중 무압취사/오픈쿠킹버튼을
눌러주세요.
1
그리고 스마트 잠금장치가 해제될 때까지 기다려주세요.
▶ 스마트 잠금장치는 5초 ~ 1분 후 해제됩니다.
2
우측 그림이 표시되면, 뚜껑을 열고 재료를 투입하거나
내용물을 뒤집어주세요.
▶ "뚜껑을 열어주세요"하는 음성이 나옵니다.
▶ 스마트 잠금장치 해제 잔여시간이 표시 중이거나 취사 중에는
뚜껑 열림 버튼을 누르지 마십시오.
반드시 재료 투입 표시가 나타나면 뚜껑 열림 버튼을 눌러주세요.
3
뚜껑을 열고난 후 3분 이내에 뚜껑을 닫아주세요.
▶ 3분 이상 뚜껑이 열려 있을 경우 취사가 취소됩니다.
4
주의사항
오픈 쿠킹 시 주의 사항
- 지정된 용량을 초과하여 조리하지 마십시오.
- 지정된 용량을 초과할 경우 끓어 넘침이 발생할 수 있습니다.
- 뚜껑이 열려 있을 경우, 내솥이 가열되지 않습니다.
- 화상의 우려가 있으므로 분리형 커버를 분리하지 마십시오.
- 내솥과 분리형 커버가 제대로 장착된 상태에서 뚜껑을 닫아주십시오.
- 스마트 잠금 장치가 동작 중일 때 뚜껑 열림 버튼을 누르면 파손이나 고장의 원인이 됩니다.
반드시 재료 투입 표시가 나타나면 뚜껑 열림 버튼을 눌러주세요.
만약, 제품이 정상적으로 동작되지 않을 시 고객상담실로 문의 바랍니다.
- 오픈쿠킹 사용 및 무압모드 취사 완료 후 뚜껑이 열리지 않을 경우
우측 그림처럼 뚜껑을 눌러 스마트 잠금장치가 해제 되도록 한 후 뚜껑 열림 버튼을 눌러 주십시오.
- “EL1” 표시가 나타날 경우 고객상담실로 문의 하십시오.
- “EL2” 표시가 나타날 경우 취사가 완료될 때 까지 뚜껑을 열지 마세요.
보온 및 대기 상태에서 뚜껑을 열고자 할 경우 전원을 차단하고 뚜껑을 열어주세요. 고객상담실로 문의 하십시오.
< 재료 투입 표시 >
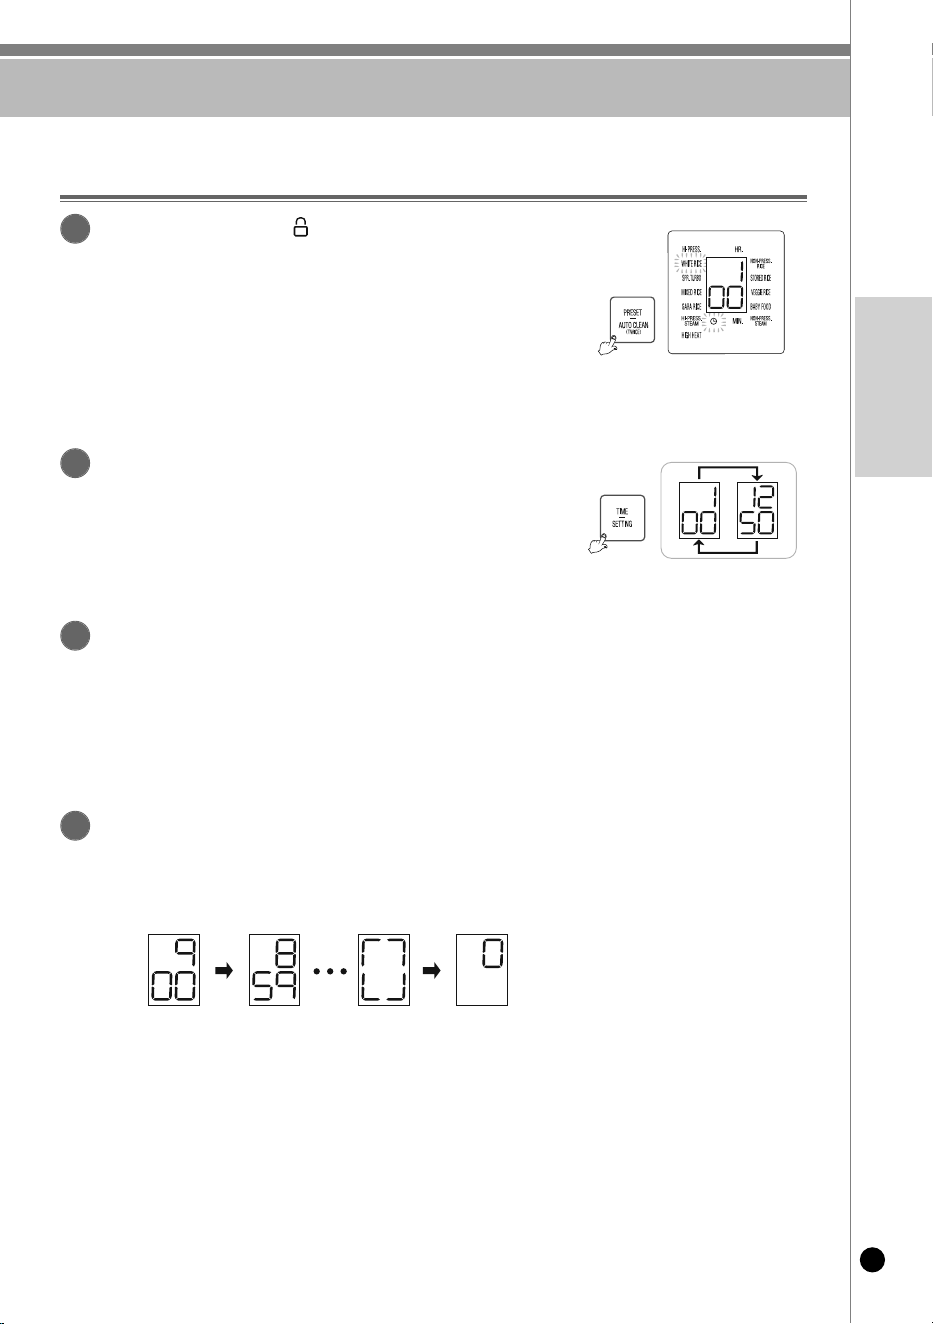
예약 취사는 이렇게 하십시오
63
www.cuckooamerica.com
KOReAn
뚜껑 결합 손잡이를“고압 ”위치로 돌려 핸들램프에
주황색 불이 들어오면 예약/자동세척 버튼을 누릅니다.
▶ 예약/자동세척 버튼을 누르면 “예약, 시간 버튼으로 예약 시간을 맞춘 후, 고압
취사 버튼을 눌러주세요.”하는 음성과 함께 표시창에 설정시간이 나타나고, 예
약 표시가 깜박거립니다.
▶ 보온 중일 때 예약 취사를 설정 하실 경우 취소 버튼을 눌러 보온을 취소한 후
예약 시간을 설정 해주십시오.
<예약 취사 설정 모드 진입 화면>
1
시간/설정 버튼을 눌러 예약 시각을 설정합니다.
▶ 시간/설정 버튼을 누를 때마다 예약 설정 시간이 10분씩 증가합니다.
계속 누르고 있으면 예약 설정 시간이 연속으로 증가합니다.
▶ 예약 시간은 1시간부터 12시간 50분까지 설정이 가능합니다.
▶ 현미발아 메뉴의 경우 3H설정시에는 예약이 되지 않습니다.
예약을 원하실 경우에는“0H”로 설정하신 후 예약해 주십시오.
▶ 고압찜 메뉴의 경우 고압찜 시간 설정 후 예약이 가능합니다.
설정 시간이 60분이상일 경우, 취사 예약 시간이 2시간으로 설정됩니다.
2
고압취사/슈퍼쾌속 버튼을 누릅니다.
▶ 이때,“백미(설정메뉴), 맛있는 취사가 예약 되었습니다.”하는 음성과 함께 예약 취사가 진행됩니다.
▶ 예약 취사 진입 시 예약 표시등의 깜박거림이 멈추고 예약 시간이 1분씩 감소하면서 예약 취사가 진행됩니다.
▶ 예약 설정된 시각은 예약 취사 완료까지 남은 시간입니다.
(취사량 및 사용조건에 따라 완료 시간이 다소 차이가 날 수도 있습니다.)
<예약취사 진행중><취사진행><취사완료/보온진행>
4
메뉴/선택 버튼을 눌러 원하는 메뉴를 선택합니다.
3
예약 취사하는 방법 (고압메뉴를 하고 싶을 때 이렇게 하세요)
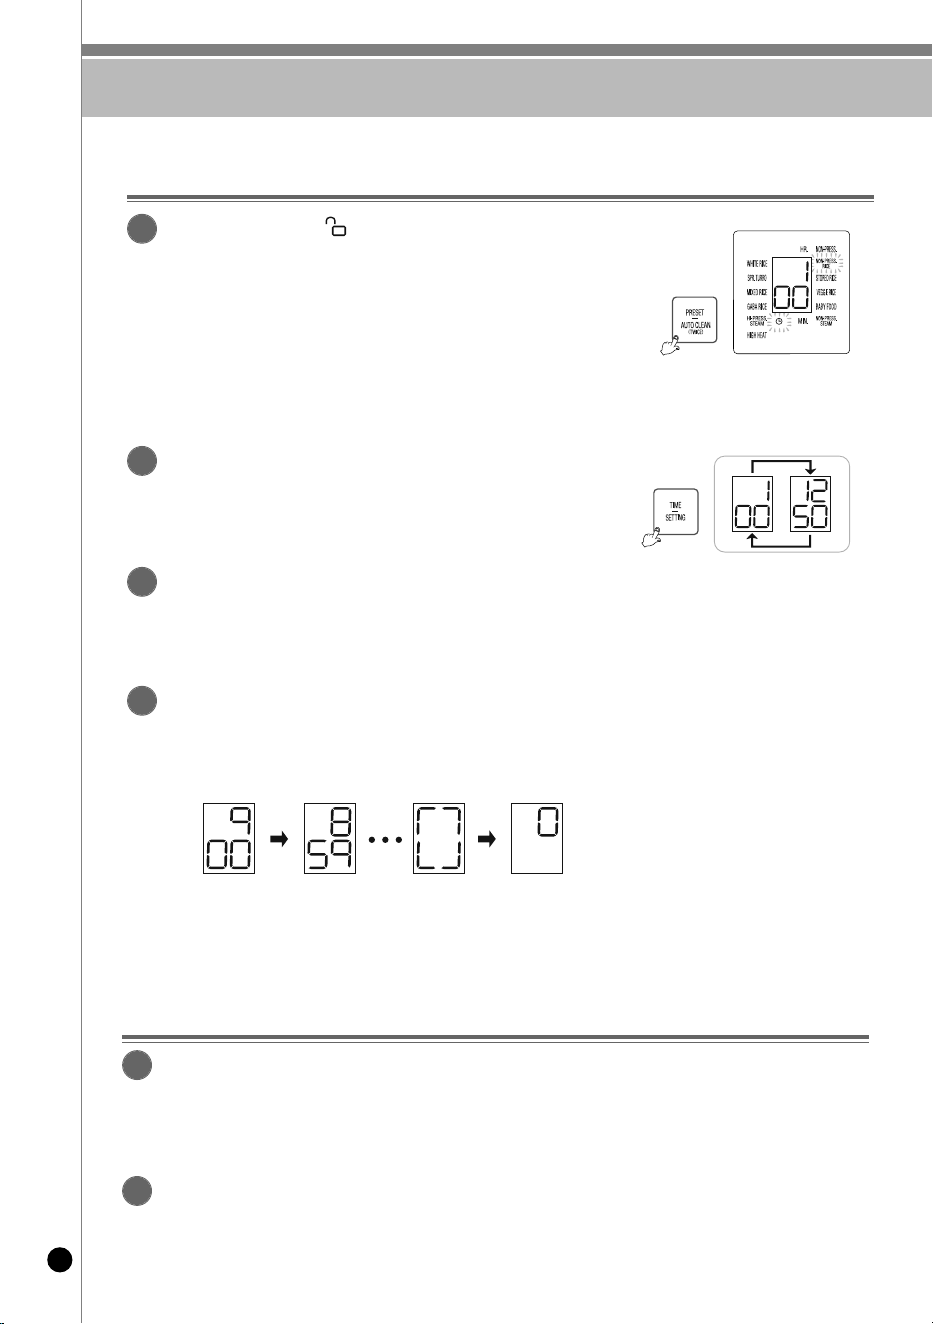
예약 취사는 이렇게 하십시오
64
<예약취사 진행중><취사진행><취사완료/보온진행>
<예약 취사 설정 모드 진입 화면>
뚜껑 결합 손잡이를“ 무압”위치로 돌려 핸들램프에
흰색 불이 들어오면 예약/자동세척 버튼을 누릅니다.
▶ 예약/자동세척 버튼을 누르면 “예약, 시간 버튼으로 예약 시간을 맞춘 후,
무압취사 버튼을 눌러주세요.”하는 음성과 함께 표시창에 설정시간이
나타나고, 예약 표시가 깜박거립니다.
▶ 보온 중일 때 예약 취사를 설정 하실 경우 취소 버튼을 눌러 보온을 취소한
후 예약 시간을 설정 해주십시오.
1
시간/설정 버튼을 눌러 예약 시각을 설정합니다.
▶ 시간/설정 버튼을 누를 때마다 예약 설정 시간이 10분씩 증가합니다.
계속 누르고 있으면 예약 설정 시간이 연속으로 증가합니다.
▶ 예약 시간은 1시간부터 12시간 50분까지 설정이 가능합니다.
▶ 이유식, 무압찜 메뉴의 경우 요리시간 설정 후 예약이 가능합니다.
설정 시간이 60분이상일 경우, 취사 예약 시간이 2시간으로 설정됩니다.
2
무압취사 버튼을 누릅니다.
▶ 이때,“무압백미(설정메뉴), 맛있는 취사가 예약 되었습니다.”하는 음성과 함께 예약 취사가 진행됩니다.
▶ 예약 취사 진입 시 예약 표시등의 깜박거림이 멈추고 예약 시간이 1분씩 감소하면서 예약 취사가 진행됩니다.
▶ 예약 설정된 시각은 예약 취사 완료까지 남은 시간입니다.
(취사량 및 사용조건에 따라 완료 시간이 다소 차이가 날 수도 있습니다.)
4
메뉴/선택 버튼을 눌러 원하는 메뉴를 선택합니다.
3
예약 취사하는 방법 (무압메뉴를 하고 싶을 때 이렇게 하세요)
예약 취사시 유의사항
예약 취사를 할 경우
▶ 쌀이 개봉된 지 오래되어 매우 말라버린 경우에는 층밥이 되는 수도 있습니다.
▶ 예약 취사 설정시간 또는 주변 환경조건에 따라서 밥이 되거나 질어질 수 있으므로 내솥표시의 물(水)눈금 기준에서
가감하여 물량을 조절해 주십시오.
▶ 예약 취사 용량이 많거나 장시간 예약 취사를 설정하실 경우 멜라노이징(미세 밥 눌음)현상이 증가할 수 있습니다.
1
예약 시각 변경
▶ 예약 시각을 변경할 경우는 취소 버튼을 눌러 취소시킨 후 다시 시작하십시오.
2
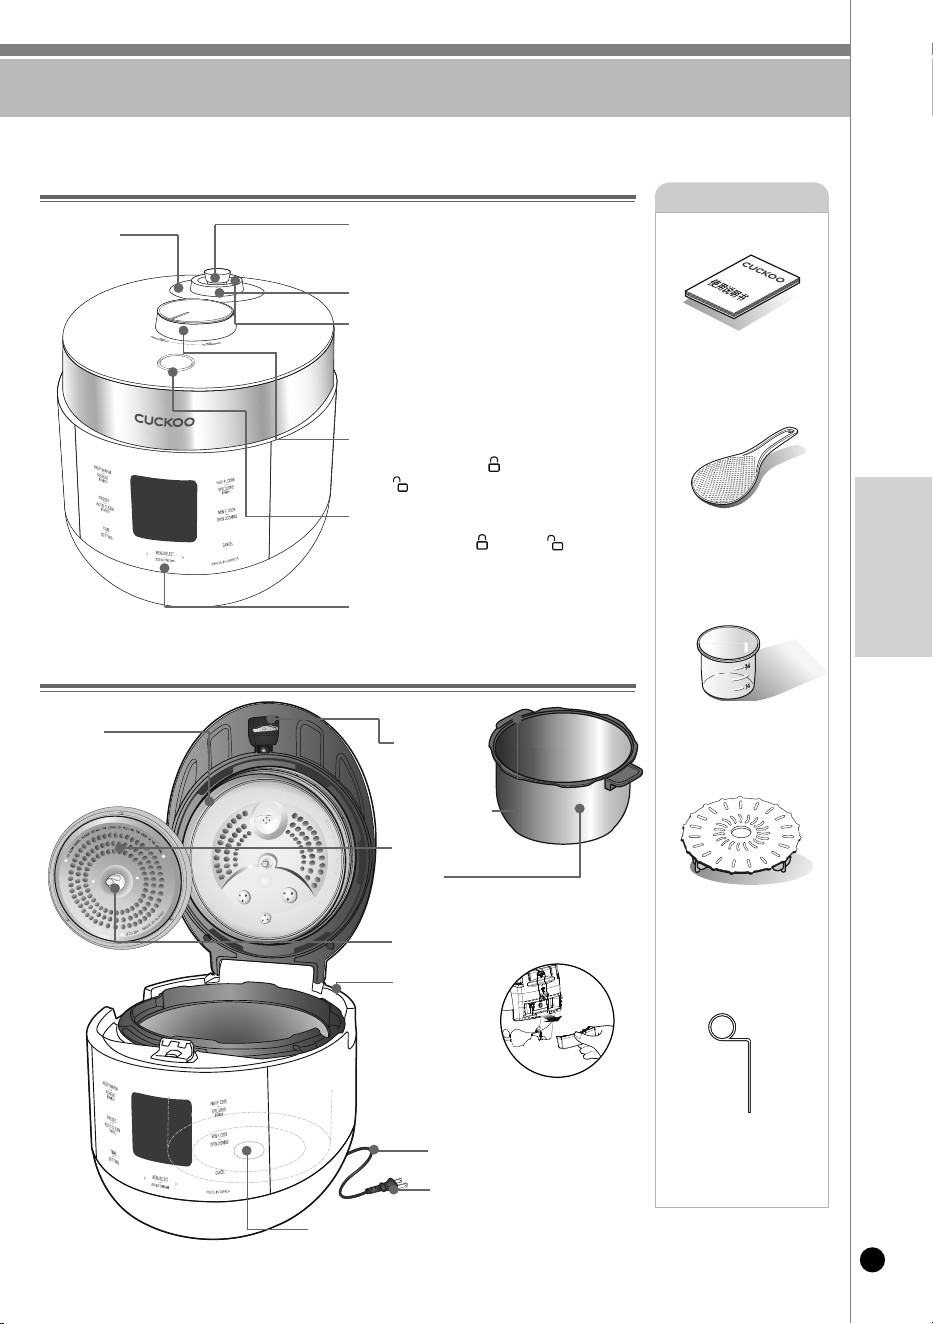
产品部件名称
65
www.cuckooamerica.com
Chinese
内锅把手
内锅
(内锅正确放入机体内)
产品部件名称(外部)
产品部件名称(内部)
蒸汽帽
煮饭或料理前、压力锥要水平放置、
若压力 锥倾斜、会使蒸汽排出。
压力锥
双重压力转换阀
煮饭结束或保温时会自动排出蒸汽、
若要强行取消时、按住取消键、
会自动排出蒸汽。
自动蒸汽排出口
将结合手柄转至“高压 ”时选择高压模式料理,
转至“ 无压”时选择无压模式料理。
结合手柄
将结合手柄由 “高压 ” 转至 “ 无压”位置后,
按开盖按钮即可开盖。
开盖按钮
功能操作部及显示部
根据使用方法及使用
次数、使用寿约1~3年、
请定期更换。
密封圈
锅盖
分离式内锅盖
煮饭或料理结
束后,请及时
清理接水盒里
的水,若接水盒
里有水会产生异
味。
接水盒
(产品背部)
分离式内锅盖把手
电源插头
电源线
温度感应器
使用说明书
料理指导
饭 勺
量 杯
蒸盘(非附带品)
可在福库官方网站购买
透气针
(实物附着于产品底部)
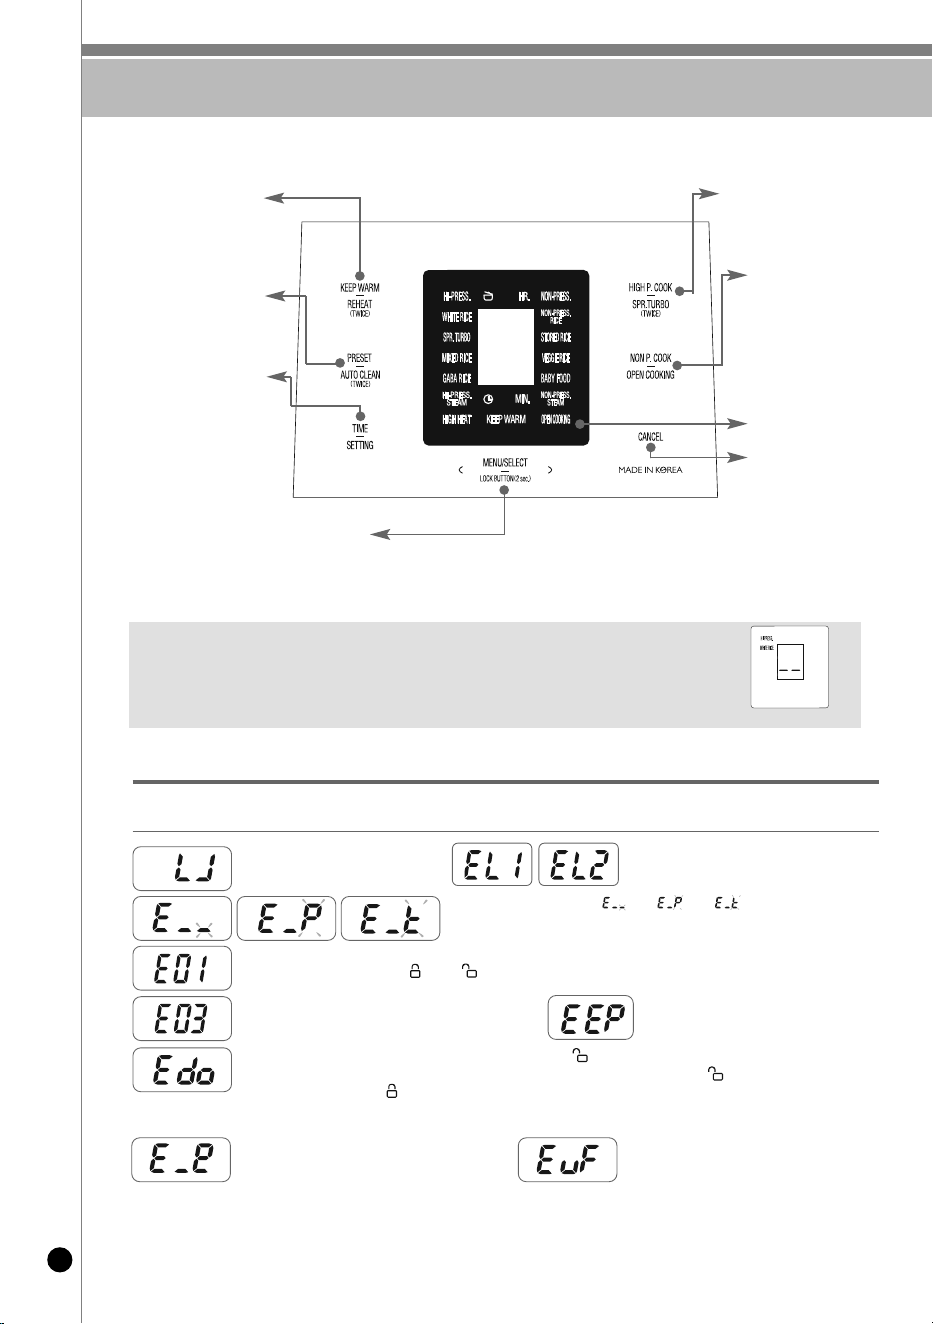
功能操作部名称及作用/功能显示部异常检测功能
66
保温/再加热键
保温或者餐前热饭时使用
高压煮饭/Super快速
高压煮饭及高压料理开始时使用
功能显示部
取消键
取消已选择的功能时使用或
自动排出蒸汽时使用(煮饭
或料理中取消时长按2秒)
无压煮饭/
中途加料按键
无压煮饭及无压料理开始时
使用
中途加料时使用
预约/自动洗涤键
预约煮饭或自动洗涤时使用
时间/设定键
糙米/发芽, 高压蒸/炖,
宝宝食品, 无压蒸/炖,
时间设定, 预约时间设定,
语音设定, 语音音量设定,
保温温度设定,
调节保温设定调节饭味设定
菜单/选择键
选择白米、白米Super快速、白米高火力、杂谷、杂谷高火力、糙米/发芽、糙米/发芽高火力、
高压蒸/炖、无压白米、 冷冻保管饭、 什锦饭、宝宝食品、无压蒸/炖 时使用
通过时间/设定键设定已选择功能时使用
※接通电源后无任何操作时,出现如图所示画面时,为待机状态。
(待机画面下菜单、语音有无,根据用户设定会有所差异。)
※功能操作时,按取消键会返回待机状态。
※按键力度以听到声响为准,本产品的标签设计可能和实物有所差异。
功能显示部异常检测功能
使用方法错误或者产品出现异常时,会出现以下标识给予警告。
正常使用或者处理后,仍不能排除故障时,请咨询售后服务中心。
无内锅时显示。智能锁定装置有异常时出现.
请联系客服中心).
温度感应器异常时显示。(“ ”,“ ”,“ ”闪烁。)
请咨询售后服务中心。
未正确转动锅盖结合手柄状态下,按煮饭或保温再加热、预约、选择键时显示
请将锅盖结合手柄转至“高压 ”或“ 无压 ”位置。
高压煮饭完成后,在保温状态下,未将锅盖结合手柄转至 “ 无压 ”位置而在待机状态下再次按煮饭
键,或按预约键时显示。此功能是确认结合手柄的感应装置,将锅盖结合手柄转至“ 无压 ”位
位置后,再次转至“高压 ”位置即可。如仍无法解决问题,请咨询售后服务中心。
内存储器异常时显示,
请咨询售后服务中心。
外存储器异常时显示,
请咨询售后服务中心。
持续煮水或产品异常时显示。
请咨询售后服务中心。
环境感应器异常时显示,
请咨询售后服务中心。
< 待机状态画面 >
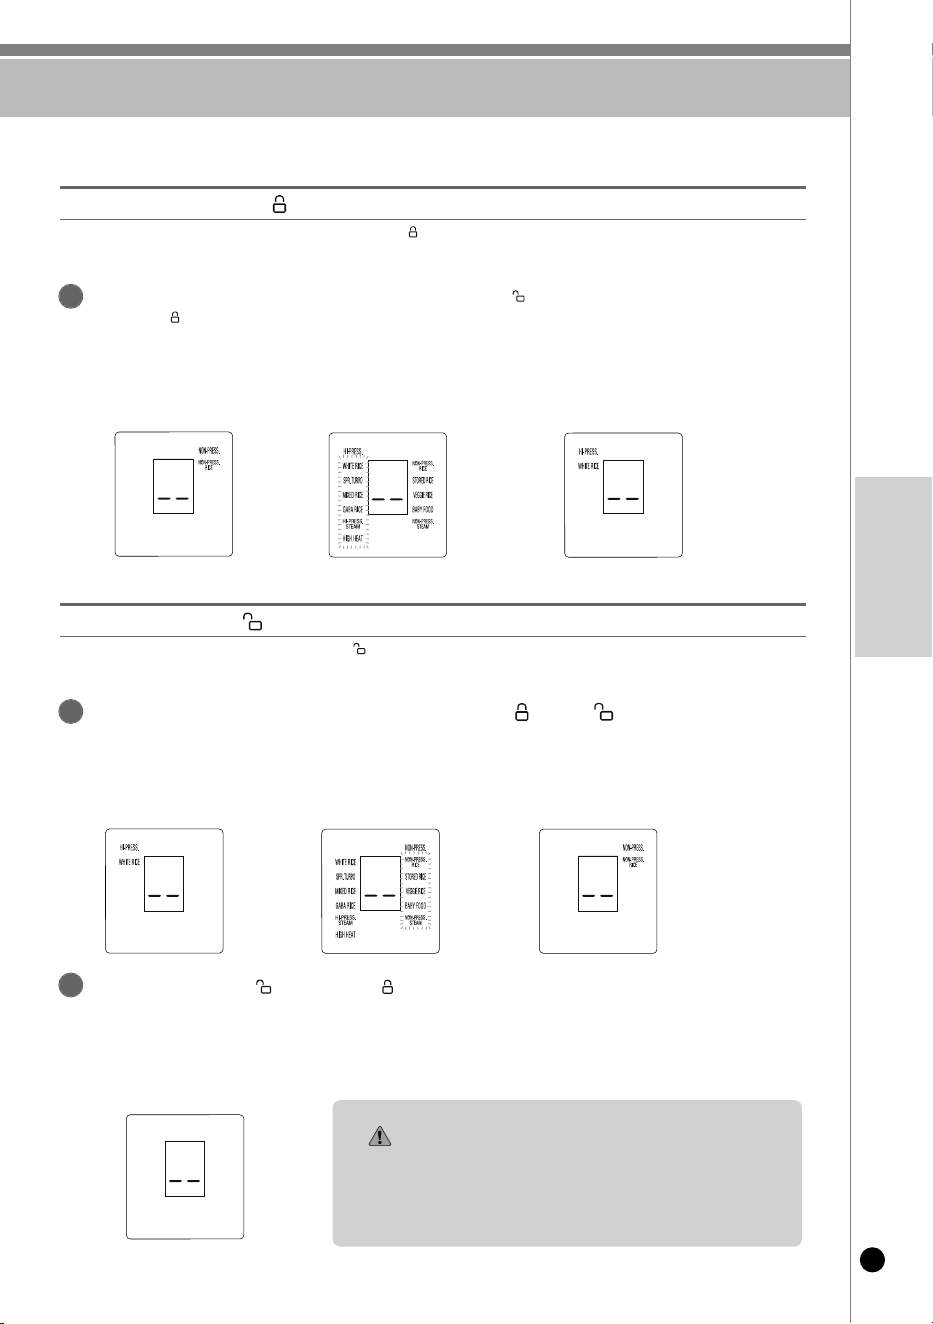
高压模式或无压模式选择方法
67
www.cuckooamerica.com
Chinese
压力模式由无压模式调节为高压模式时,请将锅盖结合手柄由“无压”
转至“ 高压”
压力模式从无压模式变为高压模式后,只有全部高压菜单闪烁3秒后,所保存的高压菜单开启。
▶
语音提示“高压模式,请选择高压菜单”
▶
锅盖结合手柄灯变为橘黄色。
▶
高压模式下只能选择高压菜单功能。
▶
锅盖结合手柄的LED灯亮起橘黄色,功能显示部显示“ 高压”即为高压模式。
▶
高压模式下只能选择高压菜单。
▶
高压菜单:白米, 白米高火力, 杂谷, 杂谷高火力, 糙米/发芽, 糙米/发芽高火力, 白米Super快速, 高压蒸/炖
1
将锅盖结合手柄方向转至“高压”。
高压模式的选择
<
待机状态(无压模式)
>
闪烁
3秒后
闪烁
3秒后
无压
模式
变更时
高压
模式
变更时
<
待机装填(高压模式)
>
压力模式下高压模式变为无压模式时,将锅盖结合手柄从“高压”转至“无压”
▶
压力模式由高压模式变更为无压模式后,只有全部无压菜单闪烁3秒后,所保存的菜单开启。
▶
语音提示“无压模式,请选择无压菜单”。
▶
锅盖结合手柄的灯变为白色。
▶
无压模式下只能选择无压菜单。
▶
锅盖结合手柄的LED等亮起白色,功能显示部显示即为无压模式。
▶
无压模式下只能选择无压菜单功能。
▶
无压菜单:无压白米、 冷冻保管饭、 什锦饭、宝宝食品、无压蒸/炖
1
将锅盖结合手柄方向转至“无压”
无压模式的选择
<
待机状态(高压模式)
><
待机状态(无压模式)
>
锅盖结合手柄方向转至“无压”或“高压”(中立位置)时,无法进行菜单选择及
取煮饭。
▶
按高压煮饭,无压煮饭,预约键时语音提示“请将锅盖结合手柄转至所需压力位置”。
▶
按菜单选择键时语音提示“请将锅盖结合手柄转至高压模式或无压模式后再选择菜单”。
▶
请将锅盖结合手柄正确转至高压模式或无压模式。
2
<
锅盖结合手柄中立位置状态
>
注意事项
无压菜单煮饭/料理时请按指定用量进行料理。
煮饭或料理时请不要超过指定用量进行料理。
- 超过料理指南的指定用量时内容物可能会通过压力锥与蒸汽帽溢出。
- 请务必遵守说明书指定的料理指南。
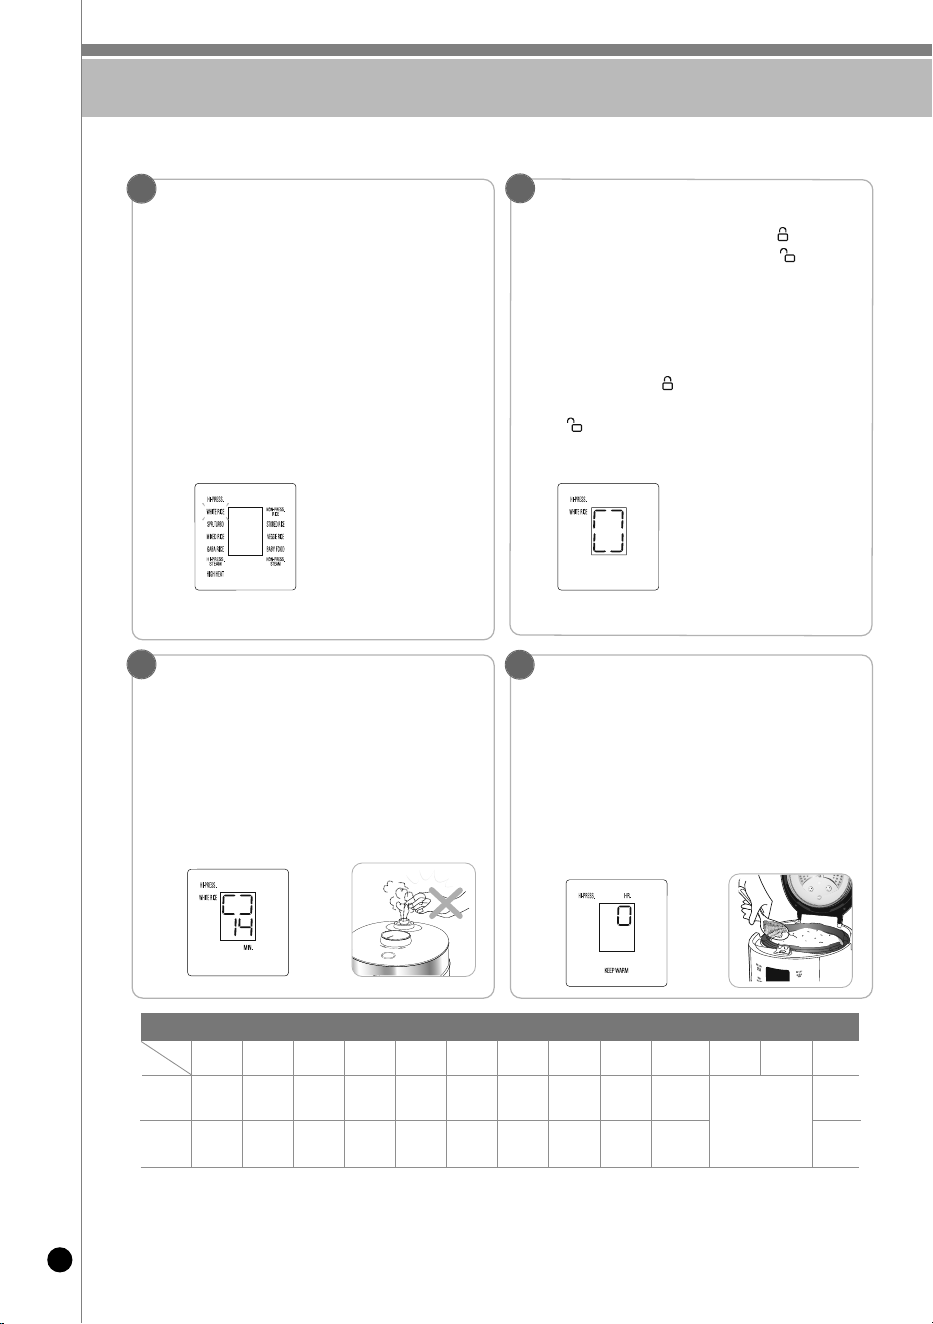
煮饭方法
68
1
2
43
用锅盖结合手柄选择所需压力模式
・ 确认是否安装了分离型内锅盖。
・ 煮饭前请将压力锥放置水平。
・ 未正确选择压力模式时无法选择菜单。
・ 锅盖结合手柄为高压模式时只能选择高压菜单,无压模式时
只能选择无压菜单。
<高压模式>
・ 每按一次选择键以白米→白米高火力→白米Super快速→杂
谷→杂谷高火力→糙米/发芽→糙米/发芽高火力→高压蒸/
炖的顺序依次变更。
<无压模式>
・
每按一次选择键以无压白米→冷冻保管饭→什锦饭→宝宝食品→无压蒸/炖的顺
序依次变更。
・白米、白米高火力、杂谷、杂谷高火力、糙米/发芽、糙米/
发芽高火力, 无压白米煮饭完成后,菜单会自动记忆,
再次做同一菜单时,无需重新选择。
例)剩余14分钟时
按高压煮饭/Super快速或无压煮饭键开始煮饭
・ 煮饭前,高压菜单时将锅盖结合手柄转至“高压”位置,再按
高 压煮饭键,无压菜单时将锅盖结合手柄转至“无压”位置,
再按 无压煮饭键。
・
选择高压菜单后按无压煮饭键时警示音响起,同时显示E01后语音提 示
“高压菜单,请按高压煮饭键”,选择无压菜单后按高压煮饭键 时警示
音响起,同时显示E01后语音提示,“无压菜单,请按无压煮 饭键”。
・
按煮饭键后,语音提示“开始进行白米煮饭”并开始煮饭。
・
未将锅盖结合手柄转至“高压”位置按高压煮饭/Super快速键或未将锅盖结合
手柄
转至“无压”位置按无压煮饭键时,警示音响起, 同时显示“E01”标
识后,语音提示“请将锅盖结合手柄转至所需压力位置”并无法进行煮饭。
・
根据煮饭用量、水温、煮饭条件的不同,实际煮饭完成时间可能略有差异。
焖饭(例:白米)
・ 开始焖饭时,语音提示“开始焖饭”,同时显示部显示剩
余煮饭时间。
根据所选菜单不同,剩余时间有差异。
・ 焖饭完成前1~4分钟发出蒸汽排出效果音(火车声音)
并伴有语音提示“开始排出蒸汽”,
同时自动排出蒸汽,请不要受到惊吓或烫伤。
※宝宝食品, 无压蒸/炖, 高压蒸/炖等料理后煮饭会有味道渗入。
(将密封圈与锅盖周围清理干净后, 使用自动洗涤功能清洗。)
※各菜单煮饭时间根据电压、水量、水温等使用环境的不同而略有差异。
煮饭完成
・ 煮饭完成时,完成音响起 (CUCKOO,请用CUCKOO,
鸟鸣声)语音提示“CUCKOO做好了美味的白米饭。
请搅匀米饭”同时开启保温功能
・ 如不想保温,请按取消键,取消保温。
・ 煮饭完成后请搅匀米饭。
如未搅匀,直接放置,米饭会变硬、变色、产生异味
・ 锅盖结合手柄不易转动的情况下,请推动压力锥,
等内部蒸汽完全排出后再操作。
・ 煮饭时请不要按取消键,煮饭会被取消。
例)在高压模式下白米煮饭时
例)选择白米时 ▶语音提示“白米”
各菜单煮饭时间
区分
白米
(基本菜单)
白米
高火力
白米Super
快速
杂谷
杂谷高火力
糙米/发芽
糙米/发芽
高火力
宝宝食品
高压蒸/炖
无压蒸/炖
容量
1人份~
6人份
1人份~
6人份
1人份~
4人份
1人份~
4人份
1人份~
4人份
1人份~
4人份
1人份~
4人份
时间
无压白米
1 人份~
4人份
1人份~
4人份
1人份~
4人份
冷冻保管饭什锦饭
自动洗涤
自动洗涤
水位刻度
约24分钟
按照菜单
请参考详
细料理案内
菜单
約24分钟
~
約36分钟
約26分钟
~
約37分钟
約14分钟
~
約21分钟
約38分钟
~
約46分钟
約44分钟
~
約50分钟
約45分钟
~
約56分钟
約52分钟
~
約67分钟
約38分钟
~
約49分钟
約42分钟
~
約55分钟
約23分钟
~
約32分钟
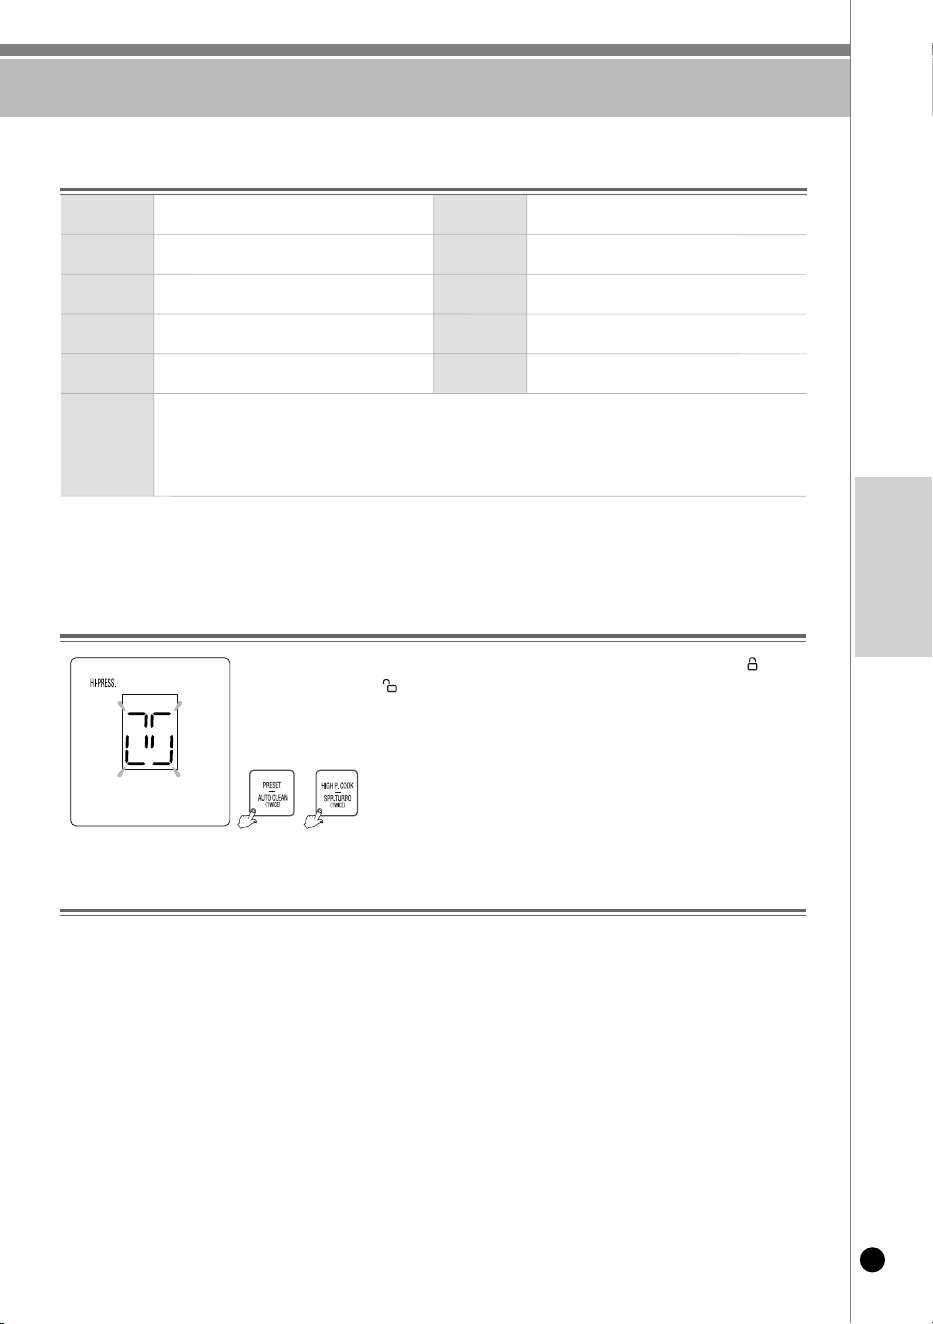
煮饭/自动洗涤方法
69
www.cuckooamerica.com
Chinese
白米
煮较黏的米饭时使用。
杂谷
在白米里掺入谷物煮饭时使用。
糙米/发芽
想吃糙米饭或者将糙米发芽做糙米发芽饭时
使用。
宝宝食品
可手动设置宝宝食品时间,有熬煮功能。
冷冻保管饭
将米饭冷冻保管后食用时使用。
什锦饭
在白米中加入什锦混合煮饭时使用。
高压蒸/炖,
无压蒸/炖
手动设置蒸饭时间,
在高压(1.8气压)低压(1.0气压)下做饭
无压白米
想吃没有粘性,柔软的饭时使用。
自动洗涤
(自动杀菌洗涤)
煮饭、保温或料理结束后清除异味时使用。
高火力
(白米、杂谷、糙米/发芽)
区别于普通煮饭,做香黏米饭时使用。
(可能会出现糊化现象。)
白米
Super
快速
・ 白米Super快速进入方法1:选择白米菜单后,请按2回 高压煮饭/Super快速 按键。
・ 白米Super快速进入方法2:选择 白米super快速 菜单后,请按 高压煮饭/Super快速 按键。
・ 白米Super快速煮饭时,比一般白米菜单煮饭时间短。(以白米Super快速1 人份为基准约需要14分钟)
・ 使用白米Super快速煮饭,米饭效果不如正常煮饭效果好,因此请做4人份以下饭时使用。
・ 煮饭前将米浸泡20分钟,然后用白米Super快速煮饭,饭味会更好。
※ 白米Super快速及煮少人份米饭时,接水盒里会有较多积水,煮饭后请清理。
※ 该款式不提供紫菜寿司, 稠粥, 稀粥功能。
自动洗涤 使用方法
锅底米饭出现淡黄色现象
此现象为米中淀粉沉淀锅底所致,是本产品的特色,属正常现象。此淡黄色米饭的口感更加清香美味。
本产品为高温,高压下煮饭,米饭出现焦黄现象,属正常现象,请放心食用。
做杂谷饭或使用预约功能做出的米饭锅底出现焦黄现象更明显
※白米内掺入谷物煮杂谷饭时,与煮白米饭相比,淡黄色现象会有所增加。
煮饭菜单使用方法
将水倒至自动洗涤水位,盖上锅盖,将锅盖结合手柄转至“高压”或
“无压”位置。
方法. 待机状态下按两次预约/自动洗涤键选择自动洗涤后,
在高压模式下按高压煮饭/Super快速键,在无压模式下按无压煮饭键。
※
定期使用自动洗涤能维持双重压力转换阀的清洁。
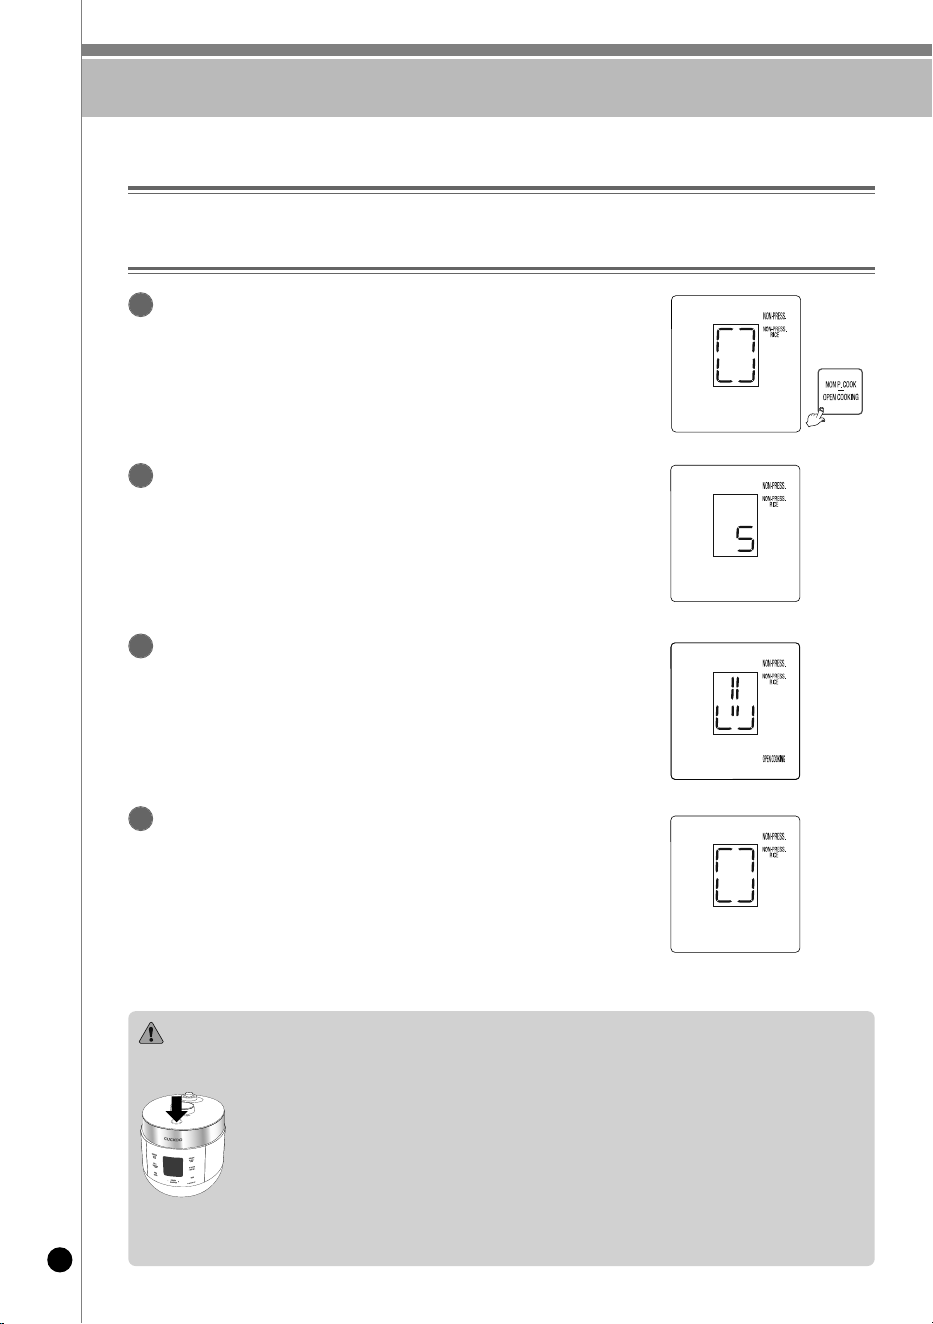
中途加料请这样操作
70
< 煮饭进行标示>
< 食材投入标示>
< 解除剩余时间标示>
< 按键标示 >
无压菜单煮饭中解除智能锁定装置打开锅盖投入食材或翻转内锅的食材功能.
中途加料 是?
中途加料 使用方法
首先,无压力菜单煮饭中 ,请按无压煮饭/中途加料按键.
1
然后请等待,直至智能锁定装置解除.
▶智能锁定装置5秒~1分钟后解除.
2
显示右侧图片后,请打开锅盖投入食材或把内锅的食
材翻过来.
▶语音提示“请打开锅盖” .
3
锅盖打开后3分钟以内请关闭锅盖.
▶打开锅盖后超过3分钟时煮饭会被取消.
4
注意事项
中途加料时注意事项
- 请勿超出指定的容量烹饪.
- 超出指定容量时可能会沸腾溢出.
- 锅盖打开时,内锅不会加热.
- 可能会导致烫伤,请勿拆卸分离式内锅盖.
- 内锅和分离式内锅盖安装好后盖好锅盖.
- 智能锁定装置工作时,按开启锅盖按键可能会导致破损或故障. 必须显示材料投入标志时,请按开启锅盖按键.
如果,产品无法正常工作时,请咨询福库客服热线.
- 使用中途加料及完成无压模式煮饭后无法开启锅盖时如左图所示请按锅盖解除智能锁定装置后按开启锅盖按键.
- 显示“EL1”时,请咨询售后服务中心。
- 显示 “EL2”时,煮饭完成之前请勿打开锅盖。
保温及待机状态下需要打开锅盖时,请切断电源后打开锅盖。
请咨询售后服务中心
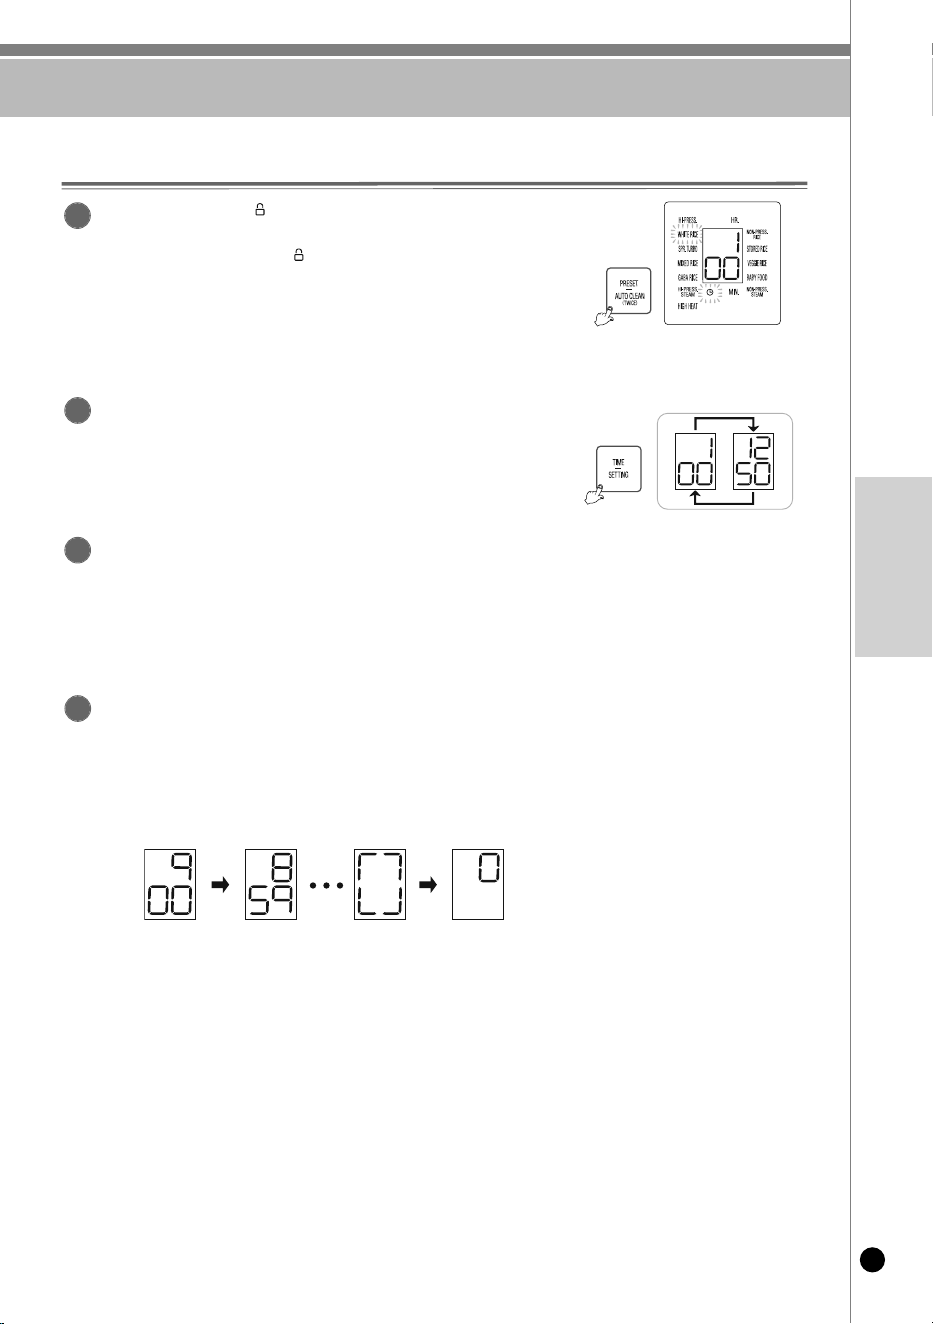
预约煮饭的方法
71
www.cuckooamerica.com
Chinese
预约煮饭的方法(使用高压菜单时)
锅盖结合手柄转至“高压”位置后,关闭指示灯亮起黄色再按预约/
自动洗涤键。
▶未将锅盖结合手柄转至“高压”方向按预约/自动洗涤键,无法预约。
▶按预约/ 自动洗涤键,语音提示 “用时间键设定预约时间后,高压煮饭键”
同时显示部显示设定时间,预约标识闪烁。
▶保温中设定预约煮饭的情况,请按取消键取消保温后,
设定预约时间。
按时间/设定键设定预约时间
▶每按一次时间/设定键,预约设定时间增加10分钟。
持续按键,预约设定时间连续增加。
▶预约时间可设定为1小时~12小时50分钟。
按菜单/选择键选择想要的菜单。
▶糙米发芽菜单的情况,在3H设定时间下,无法进行预约。
想要预约时请设定成“OH”后再预约。
▶高压蒸/炖菜单的情况下,设定高压蒸/炖时间后,可以预约。
设定时间为60分钟以上时,煮饭时间设定为2小时。
按压力煮饭/Super快速键。
▶此时,语音提示“白米(设定菜单), 煮饭已预约。”同时进行预约煮饭。
▶进入预约煮饭时,预约标识灯闪烁停止,预约时间以1分钟为单位减少,同时进行预约煮饭。
<预约煮饭进行中>
<煮饭进行>
<煮饭完成/保温进行>
2
4
1
3
<进入预约煮饭设定模式画面>
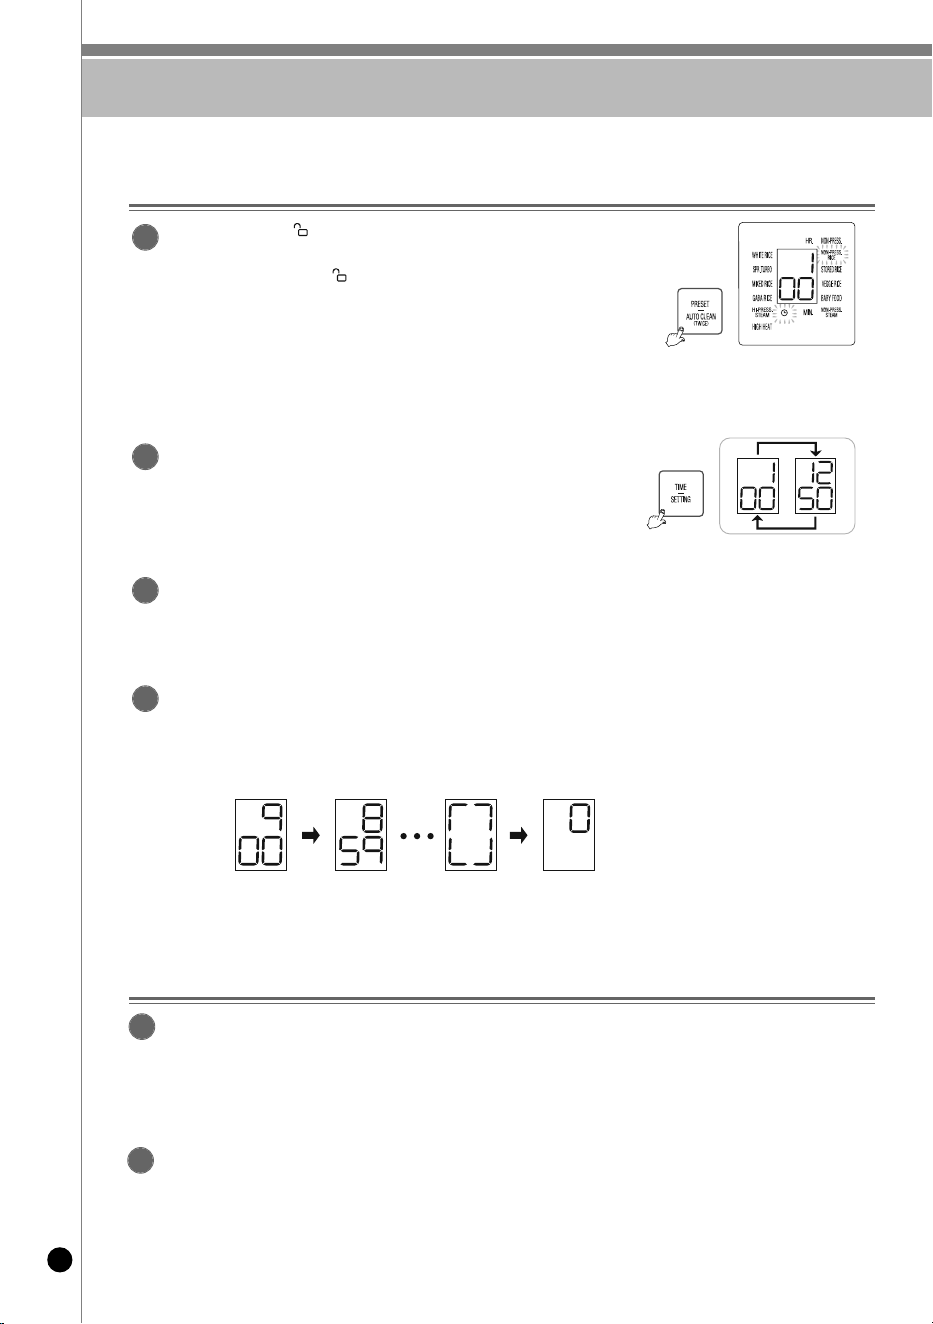
预约煮饭的方法
72
预约煮饭的方法(使用无压菜单时)
锅盖结合手柄转至“无压”位置后,关闭指示灯亮起白色再按预约/
自动洗涤键。
▶未将锅盖结合手柄转至“无压”方向按预约/自动洗涤键,无法预约。
▶按预约/ 自动洗涤键,语音提示 “用时间键设定预约时间后,请按无压者饭键”
同时显示部显示设定时间,预约标识闪烁。
▶保温中设定预约煮饭的情况,请按取消键取消保温后,
设定预约时间。
预约煮饭注意事项
预约煮饭时
▶大米开封时间长较干硬时,米饭可能会夹生。
▶根据预约煮饭设定时间和周边环境条件的不同,米饭可能会发硬或发软,请根据内锅水位
为基准加减水量进行调整。
▶预约煮饭容量过多或者设定预约煮饭时间过长时,会增加米饭底部出现淡黄色现象。
变更预约时间
▶变更预约时间时,按取消键取消预约后重新设定。
按时间/设定键设定预约时间
▶每按一次时间/设定键,预约设定时间增加10分钟。
持续按键,预约设定时间连续增加。
▶预约时间可设定为1小时~12小时50分钟。
按菜单/选择键选择所需菜单。
▶健康粥, 宝宝食品, 无压蒸/炖菜单的情况下,设定蒸炖时间后,可以预约。
设定时间为60分钟以上时,煮饭时间设定为2小时。
按无压煮饭键。
▶此时,语音提示“无压白米(设定菜单), 煮饭已预约。”同时进行预约煮饭。
▶进入预约煮饭时,预约标识灯闪烁停止,预约时间以1分钟为单位减少,同时进行预约煮饭。
2
2
4
1
3
1
<进入预约煮饭设定模式画面>
<预约煮饭进行中>
<煮饭进行>
<煮饭完成/保温进行>

MEMO
73
www.cuckooamerica.com

74
MEMO

75
www.cuckooamerica.com
MEMO

00383-0579B0 Rev.0
CUCKOO ELECTRIC RICE COOKER/WARMER
LIMITED WARRANTY
KEY Company, P&K uSA TRADInG CoRP and Cuckoo Trading Canada will repair at its option replace,
without charge, your product which proves to be defective in material or workmanship under normal use,
during the warranty period listed below from the date of original purchase. This warranty is good only to the
original purchaser of the product during the warranty period. P&K uSA TRADInG CoRP. covers the east and
the central districts, KEY Company covers the west and the central districts, Cuckoo Trading Canada covers
the whole Canada.
WARRANTY PERIOD
MODEL# #LABOR PARTS HOW SERVICE IS HANDLED
CRP-ST06 1YEAR 1YEAR The East and the Central Districts
Call : 718-888-9143, 718-888-9144
Address : 5-48 46th Rd. Long Island City, nY 11101, uSA
The West and the Central Districts.
Call : 323 780 8808
Address : 1137 E. 1st Street, L.A, CA 90033, uSA
Canada (ToRonTo)
Call : 905 707 8224
Address : #D8-7398 Yonge Street Thornhill ontario Canada L4J 8J2
Canada (VAnCouVER)
Call : 604 540 1004
Address : 945 Lougheed Hwy Coquitlam BC Canada V3K 3T4
no other express warranty is applicable to this product. THE DURATION OF ANY IMPLIED WARRANTIES,
INCLUDING THE IMPLIED WARRANTY OF MERCHANTABILITY, IS LIMITED TO THE DURATION OF THE
EXPRESS WARRANTY HEREIN. CUCKOO ELECTRONICS CO.,LTD, SHALL NOT BE LIABLE FOR THE
LOSS, THE USE OF THE PRODUCT, INCONVENIENCE, LOSS OR ANY OTHER DAMAGES, DIRECT OR
CONSEQUENTIAL, ARISING OUT OF THE USE OF, OR INABILITY TO USE, THIS PRODUCT OR FOR ANY
BREACH OF ANY EXPRESS OR IMPLIED WARRANTY, INCLUDING THE IMPLIED WARRANTY OF
MERCHANTABILITY APPLICABLE TO THIS PRODUCT.
Some states do not allow the exclusion or limitation of incidental or consequential damages or limitations on how
long an implied warranty lasts : so these limitations or exclusions may apply to you. This warranty gives you
specific legal rights and you may also have other rights which vary from state to state.
THE ABOVE WARRANTY DOES NOT APPLY IN THESE CASES:
✽ To damages problems which result from delivery or improper installation.
✽ To damages problems which result from misuse, abuse, accident, alteration,
or incorrect electrical current or voltage.
✽ To serve call which do not involve defective workmanship or material and explaining the operation of the unit.
Therefore, these costs are paid by the consumer. Customer assistance numbers :
To Prove warranty Coverage : ▶Retain your Sales Receipt to prove date of purchase
▶ Copy of your Sales Receipt must submitted at the time
warranty service is provided.
To Obtain Product, Customer, or Service Assistance and Nearest Authorized service center,
Parts Distributor or Sales Dealer:
The East and the Central Districts
Call : 718 888 9144
Address : 5-48 46th Rd.
Long Island City, nY 11101, uSA
The West and the Central Districts.
Call : 323 780 8808
Address : 1137 E. 1st Street, L.A,
CA 90033, uSA
Canada (Toronto)
Call : 905 707 8224
Address : #D8-7398 Yonge Street
Thornhill ontario Canada
L4J 8J2
Canada (Vancouver)
Call : 604 540 1004
Address : 103-4501 north Road
Burnaby BC Canada
V3R 4R7
100% Recycled paper