APPROACH
®
R50
Owner’s Manual

© 2024 Garmin Ltd. or its subsidiaries
All rights reserved. Under the copyright laws, this manual may not be copied, in whole or in part, without the written consent of Garmin. Garmin reserves the right to change
or improve its products and to make changes in the content of this manual without obligation to notify any person or organization of such changes or improvements. Go to
www.garmin.com for current updates and supplemental information concerning the use of this product.
Garmin
®
, the Garmin logo, and Approach
®
are trademarks of Garmin Ltd. or its subsidiaries, registered in the USA and other countries. Garmin Connect
™
, Garmin Express
™
, and
Garmin Golf
™
are trademarks of Garmin Ltd. or its subsidiaries. These trademarks may not be used without the express permission of Garmin.
The BLUETOOTH
®
word mark and logos are owned by Bluetooth SIG, Inc. and any use of such marks by Garmin is under license. HDMI
®
is a registered trademark of HDMI
Licensing, LLC. USB-C
®
is a registered trademark of USB Implementers Forum. Wi‑Fi
®
is a registered mark of Wi-Fi Alliance Corporation. Other trademarks and trade names are
those of their respective owners.

Table of Contents
Introduction......................................1
Device Overview...................................... 1
Turning On the Launch Monitor............. 1
Adding Users....................................... 2
Deleting Users......................................2
Setting Your Device Passcode........... 2
Garmin Golf Membership..................2
Preparing for a Shot......................... 3
Launch Monitor Placement
Considerations........................................ 4
Using the Golf Simulator Features.... 4
Golf Simulator Settings........................... 5
Changing the View.................................. 5
Home Tee Hero....................................... 6
Virtual Round Scoring......................... 6
Viewing Your Scorecard...................... 7
Picking Up Your Ball............................ 7
Ending the Round................................ 7
Viewing Saved Scorecards................. 7
Practice.................................................... 7
Applying the Club Stickers.................. 9
Adjusting the Target Alignment..........9
Viewing Your Practice Session
Statistics............................................ 10
Viewing Saved Practice Sessions.... 10
Ending Your Practice Session.......... 10
Weekly Tournament.............................. 10
Connecting to a Third-Party
Simulator............................................... 10
Wi‑Fi® Connectivity Features......... 10
Connecting to a Wireless Network.......11
Customizing Your Device................11
Customizing Your Golf Club List.......... 11
Settings.................................................. 11
Profile Settings.................................. 12
External Display Settings.................. 12
Battery and Power Settings.............. 12
Restoring All Default Settings...........12
Device Information......................... 13
Charging the Device.............................. 13
Connecting to an External Display....... 13
Garmin Golf App.................................... 13
Updating Software with Garmin
Express™................................................ 14
Specifications........................................14
Getting More Information..................... 14
Device Care............................................15
Cleaning the Device...........................15
Long-Term Storage............................... 15
Troubleshooting............................. 15
Tips for Improving the Launch Monitor's
Accuracy................................................ 15
My speaker will not connect to the
device..................................................... 15
The launch monitor won't turn on........ 16
Resetting the Device............................. 16
Table of Contents i

Introduction
WARNING
See the Important Safety and Product Information guide in the product box for product warnings and other
important information.
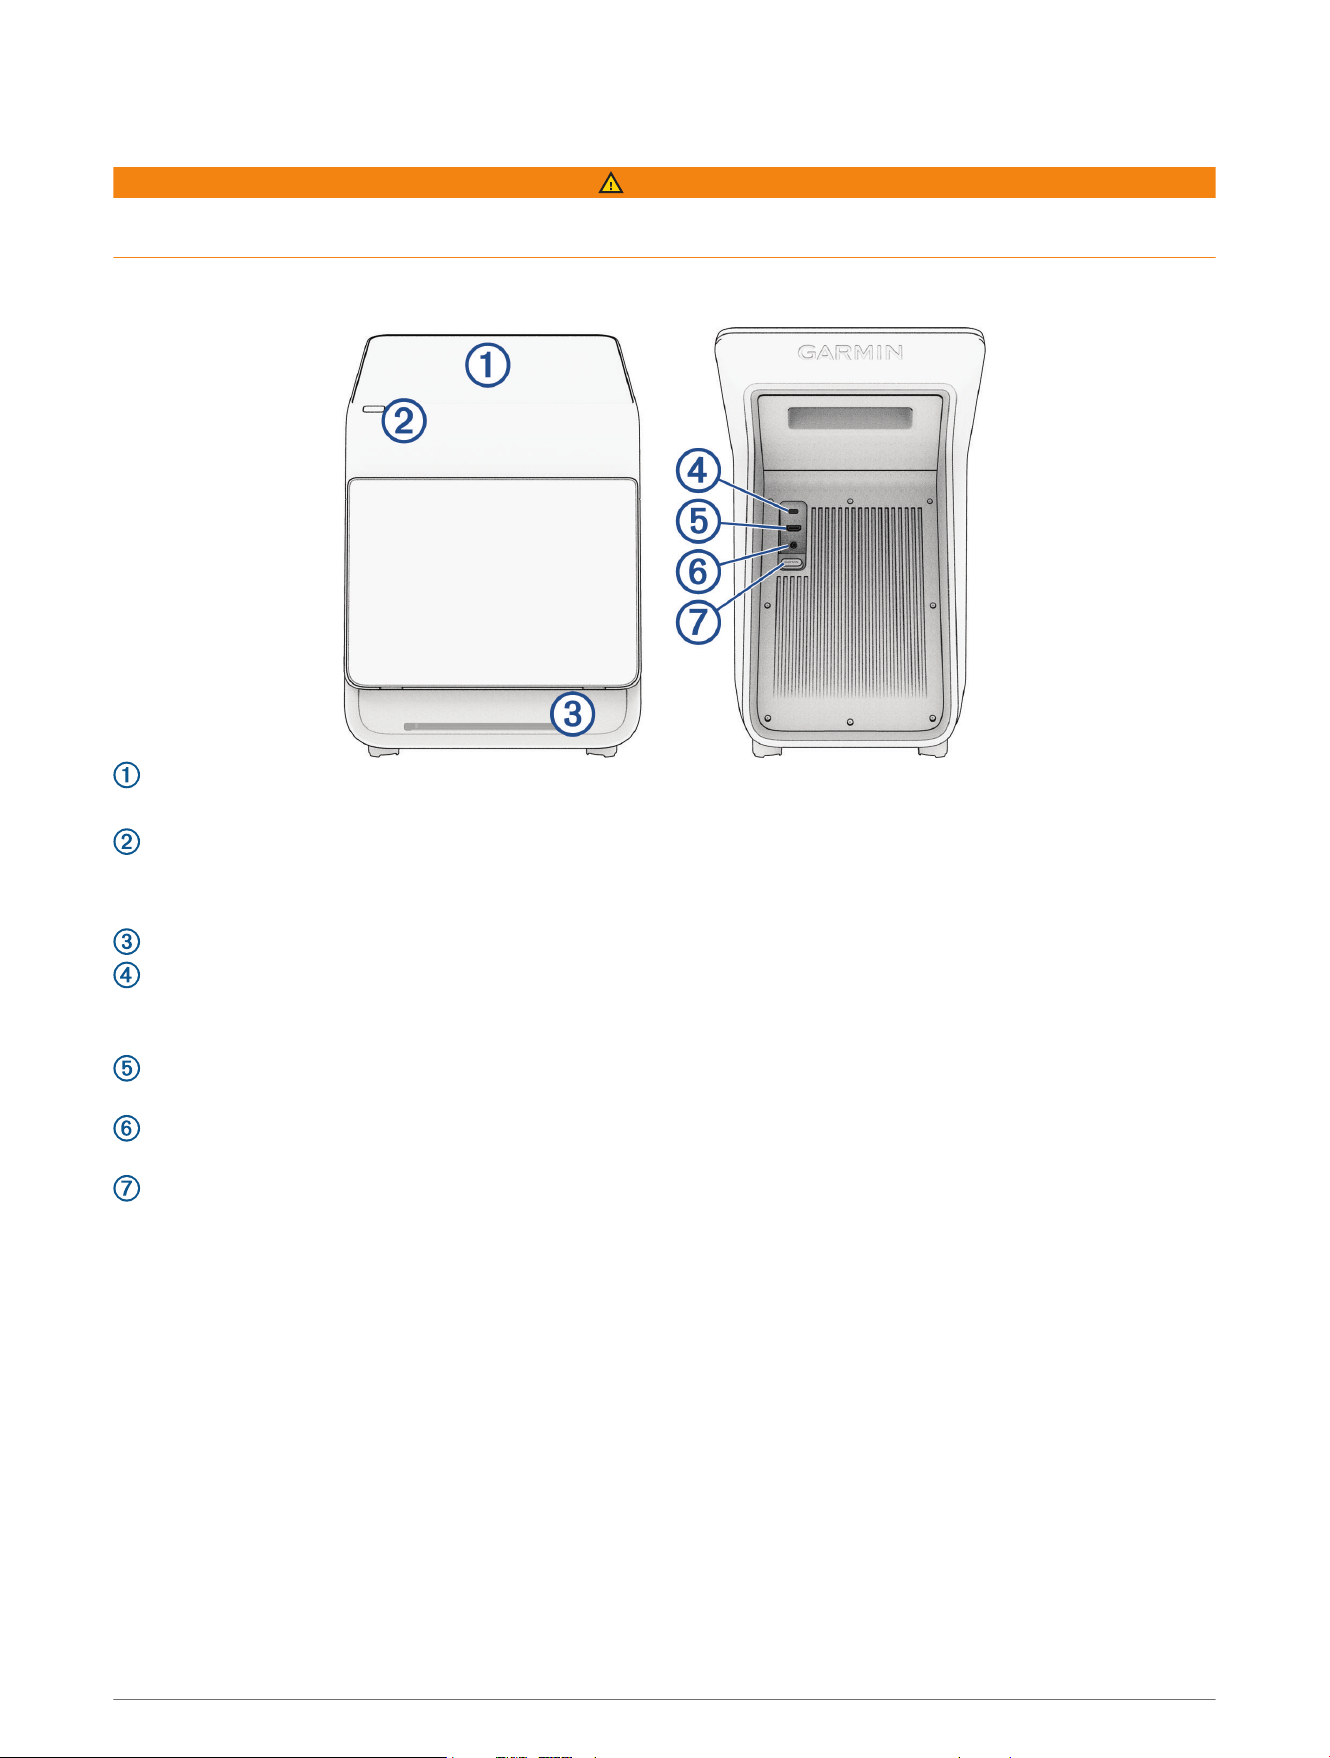
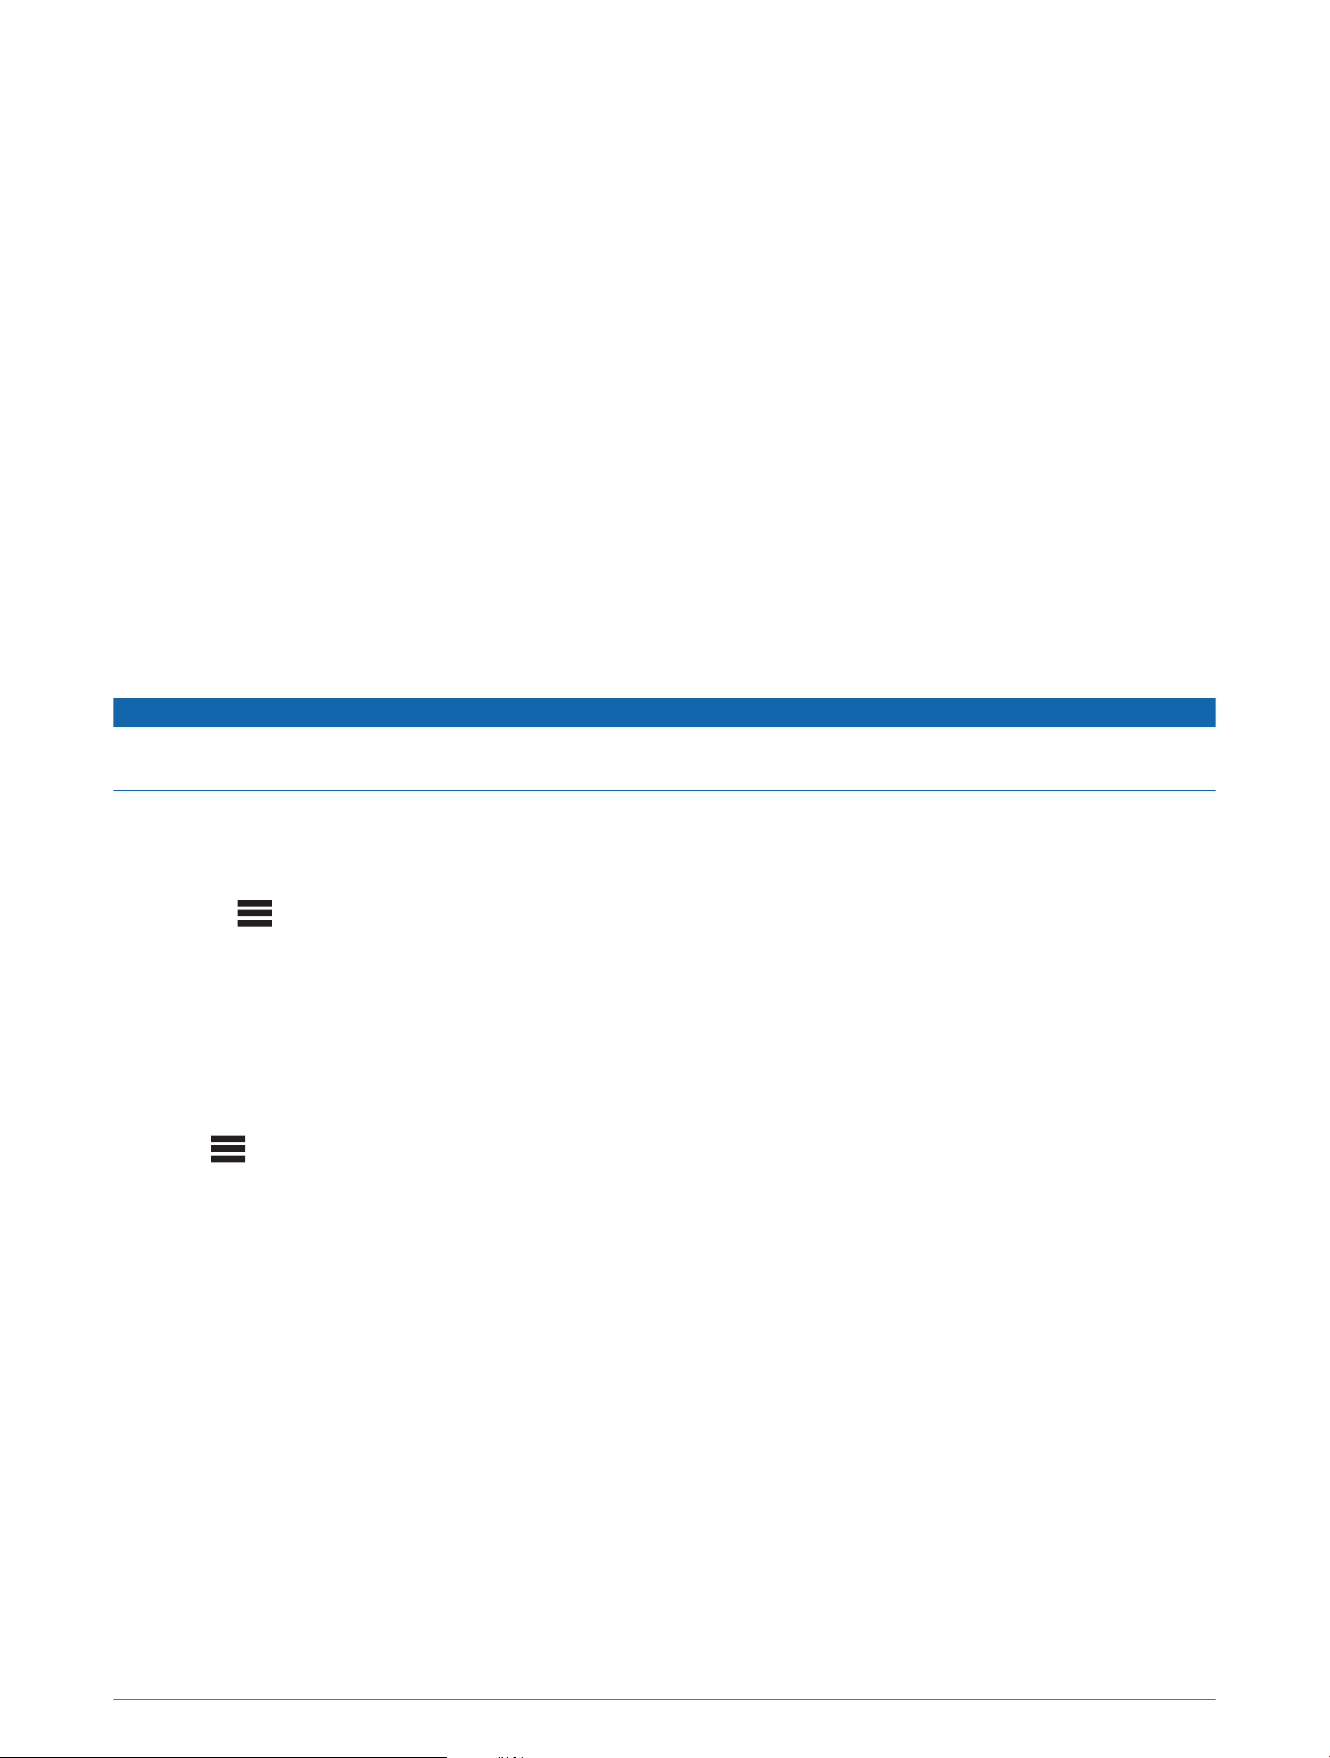
Device Overview
Display: Swipe to scroll through menu options.
Tap to choose an option in a menu.
Button: Press to turn the launch monitor on.
Press to put the launch monitor into sleep mode.
Hold for one second to turn the launch monitor off.
Status LED: Indicates when the launch monitor is ready to record a shot.
USB-C
®
port: Connect a compatible USB-C cable to update your device software using your computer
(Updating Software with Garmin Express
™
, page14).
NOTE: You cannot charge the launch monitor with a USB-C cable.
A/V port: Connect a compatible HDMI
®
cable to output audio and video to an external display (Connecting to
an External Display, page13).
Power port: Connect the included power cable to charge the launch monitor or operate it without using the
battery (Charging the Device, page13).
Cable door: Pull down to access the cable ports.
Turning On the Launch Monitor
The first time you use the launch monitor, you are prompted to choose a language, connect to a wireless
network, and set up your Garmin
®
account. For more information, go to garmin.com/videos/approachR50setup.
1 Press the button.
2 Follow the on-screen instructions.
Introduction 1
Adding Users
The launch monitor is registered to a single profile, but you can add more profiles that can use the launch
monitor features and compete against each other in virtual rounds.
NOTE: Your Garmin account is associated with the Garmin Golf
™
app (Garmin Golf App, page13).
1 From the profile screen, select Add User.
2 Select an option:
• To sign into an existing Garmin account, select Sign In.
• To create and sign into a new Garmin account, select Create New Garmin Account.
• To create a profile that is not linked to a Garmin account, select Create Guest Profile.
NOTE: Data recorded for guest profiles will only be stored locally.
3 Follow the on-screen instructions.
Deleting Users
1 From the profile screen, select Edit Users.
2 Select the user profiles you want to delete.
3 Select Remove.
Setting Your Device Passcode
NOTICE
If you enter your passcode incorrectly five times, the launch monitor locks. To unlock the launch monitor, you
must perform a factory reset.
You can set up a device passcode to prevent unauthorized users from logging into your launch monitor.
1 Select an option:
• During the initial setup, select Create Passcode when prompted.
• Select > Settings > Device Passcode > Create Passcode.
2 Enter a four-digit passcode.
3 Re-enter the passcode.
The next time you turn on the launch monitor, you must enter the passcode before you can log in.
Changing Your Device Passcode
You must know your existing device passcode to change it. If you forget your passcode or make too many
incorrect passcode attempts, you must perform a factory reset.
1 Select > Settings > Device Passcode > Edit Passcode.
2 Enter your existing four-digit passcode.
3 Enter a new four-digit passcode.
4 Re-enter the new passcode.
The next time you turn on the launch monitor, you must enter the passcode before you can log in.
Garmin Golf Membership
With a Garmin Golf membership, golfers can compete with each other at over 43,000 virtual courses and
participate in a weekly virtual tournament. The membership can be purchased through your profile settings
(Profile Settings, page12).
2 Garmin Golf Membership
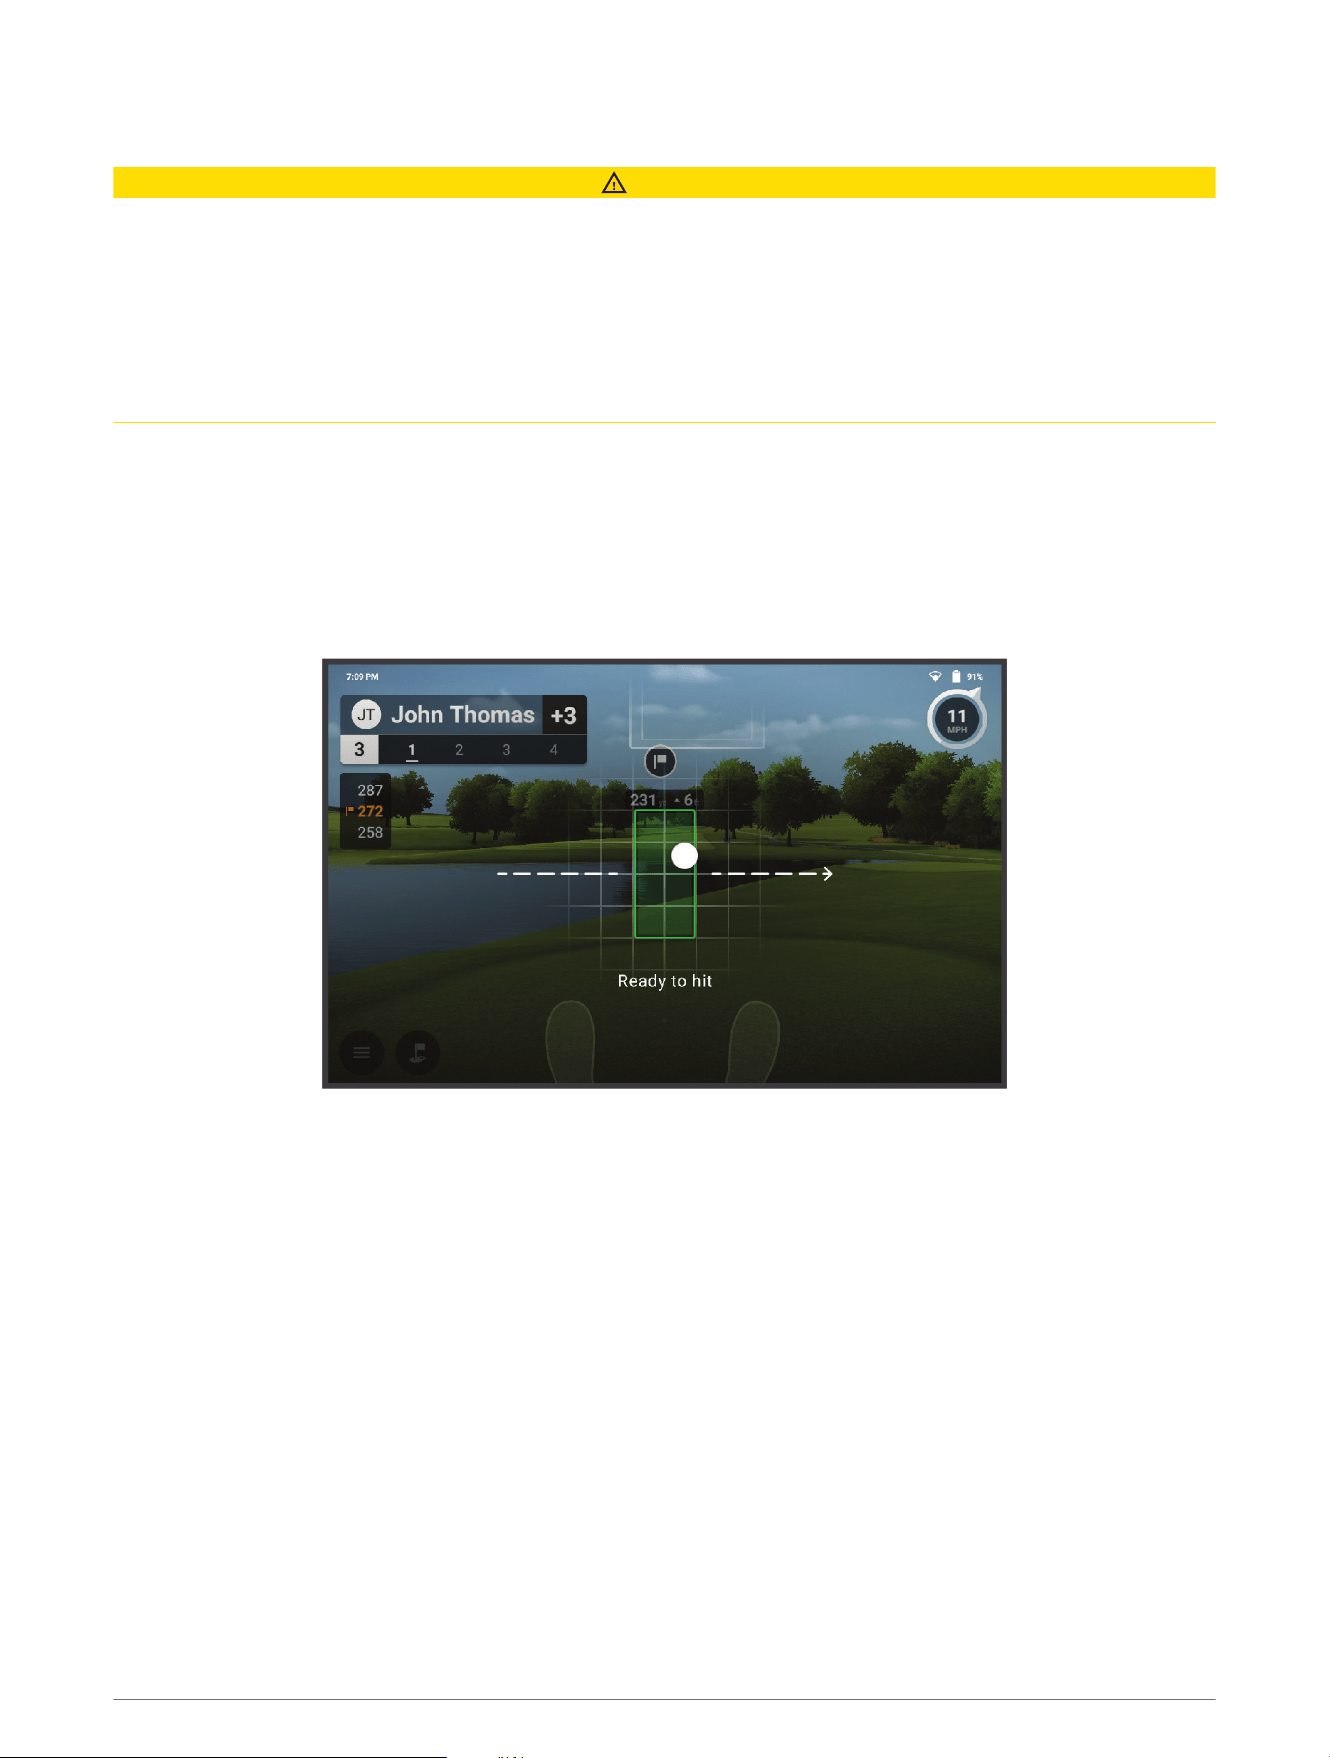
Preparing for a Shot
CAUTION
Failing to take one or more of the following actions could result in possible property damage or personal injury
while using the device indoors:
• Ensure there is adequate ceiling height and that no objects can obstruct your backswing or follow through.
• Ensure that any net or impact screen is set up with adequate free space behind the net or screen.
• Ensure that any net or impact screen is high enough and extended enough to account for high-lofted shots or
any errant shots.
• Ensure that any net or enclosure frame is padded to help reduce ball ricochet.
1 Place the launch monitor approximately 1.5 ft. (0.5 m) to the side of the desired tee location (Launch Monitor
Placement Considerations, page4).
2 Press the button to turn on the launch monitor.
3 Start a golf simulator game mode (Using the Golf Simulator Features, page4).
4 Place the ball at the desired tee location.
5 If necessary, adjust the position of the ball so it appears within the hitting area on the launch monitor's
display.
TIP: You can move the ball to any location within the hitting area. It may be helpful to move it during your
session if the current location becomes worn.
NOTE: The shape of the hitting area varies depending on whether club data is enabled.
6 If necessary, adjust the target alignment (Adjusting the Target Alignment, page9).
NOTE: The target line is parallel to the front of the device by default. The ball and club angles are measured
parallel to the target line.
7 Wait for the status LED to become solid green, and take a shot.
Preparing for a Shot 3
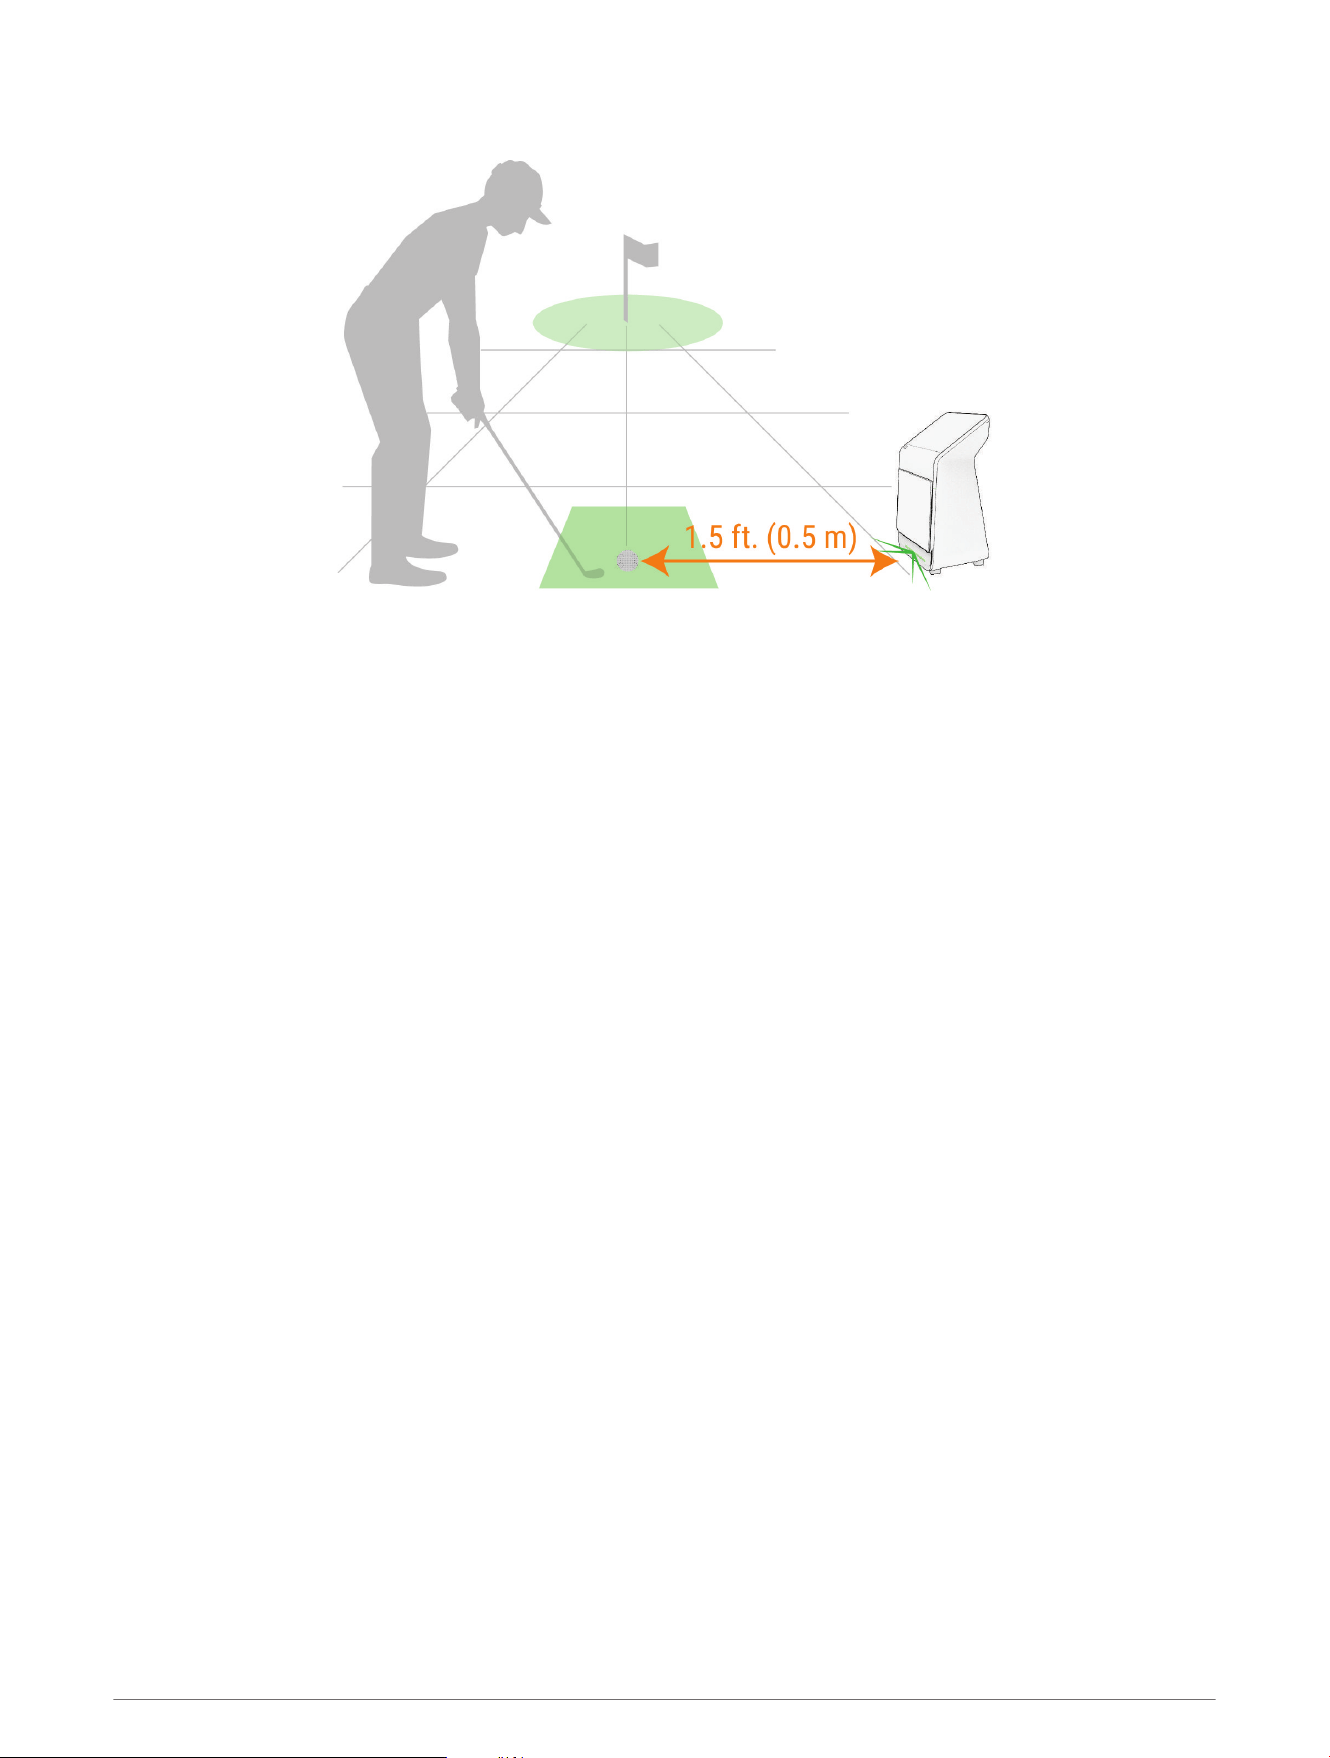
Launch Monitor Placement Considerations
When selecting a location for the launch monitor for a virtual round or practice mode session, you should
observe these considerations.
• You must place the launch monitor approximately 1.5 ft. (0.5 m) to the side of the tee location.
• The launch monitor must face the tee location.
• For best results, you should place the launch monitor at approximately the same height as the tee location.
• You can place the launch monitor on an uneven surface. The launch monitor compensates for uneven
surfaces, so leveling is not required.
Using the Golf Simulator Features
You can use the golf simulator features on your launch monitor to test your skills and help you have fun on the
driving range. These features use internal cameras to record measurements that help you analyze your practice.
1 From the home screen, select an option:
• To start a practice session, select Practice.
• To play a virtual round of golf, select Play.
NOTE: To play a virtual round, you need a Garmin Golf membership (Garmin Golf Membership, page2).
2 Follow the on-screen instructions.
4 Using the Golf Simulator Features

Golf Simulator Settings
During a virtual round or practice session, select > Round Settings or > Session Settings.
NOTE: Some settings are available only during a virtual round.
NOTE: You can set the ball flight conditions manually, or to match the course location. The ball flight conditions
affect the carry distances. If the carry distances during your virtual round or practice session are shorter or
longer than expected, it could be due to the ball flight condition settings.
Order of Play: Sets the order of play for virtual rounds with multiple players.
Putting: Enables or disables putting.
Gimme Distance: Sets how close the ball must be to the hole for the next shot to be automatically recorded as
made.
Green Speed: Sets how fast the ball rolls on the green.
Tracking Mode: Sets what data is tracked.
In Game Sounds: Enables or disables in-game sound effects.
NOTE: To hear the in-game sound effects, you must connect to a compatible speaker using Bluetooth
®
technology (Settings, page11) or to an external display (Connecting to an External Display, page13).
Ball Flight Conditions
Elevation: Sets the course's elevation.
Relative Humidity: Sets the course's relative humidity.
Temperature: Sets the course's temperature.
Wind: Sets the course's wind speed.
Changing the View
During a virtual round or practice session, the map view appears by default. You can change the view for both
the launch monitor's display and a connected external display (Connecting to an External Display, page13) at
any time, or change what data appears on the map view.
NOTE: During a virtual round, you must be connected to an external display to change the view. When
connected to an external display, the map view appears on the external display, and you can select another
view to appear on the launch monitor display.
1 Select > R50 Display or > External Display.
2 If necessary, select Split Screen to change to a split screen view.
3 If necessary, select View Settings.
4 Select an option:
• To view a map of the current hole, select Map.
NOTE: You can customize which metrics appear, and set whether the average and accuracy of each
metric appears. When you connect an external display, shot data is turned off for the map view by default.
• To view the full list of club metrics, select Data Fields.
NOTE: You can customize which metrics appear, and set whether the average and accuracy of each
metric appears.
• To view the ball impact metrics with club graphs, select Ball Impact.
• To view an impact video for the current shot, select Impact Video.
5 If necessary, select Mirror R50 Display to mirror the launch monitor's display to the external display.
Using the Golf Simulator Features 5
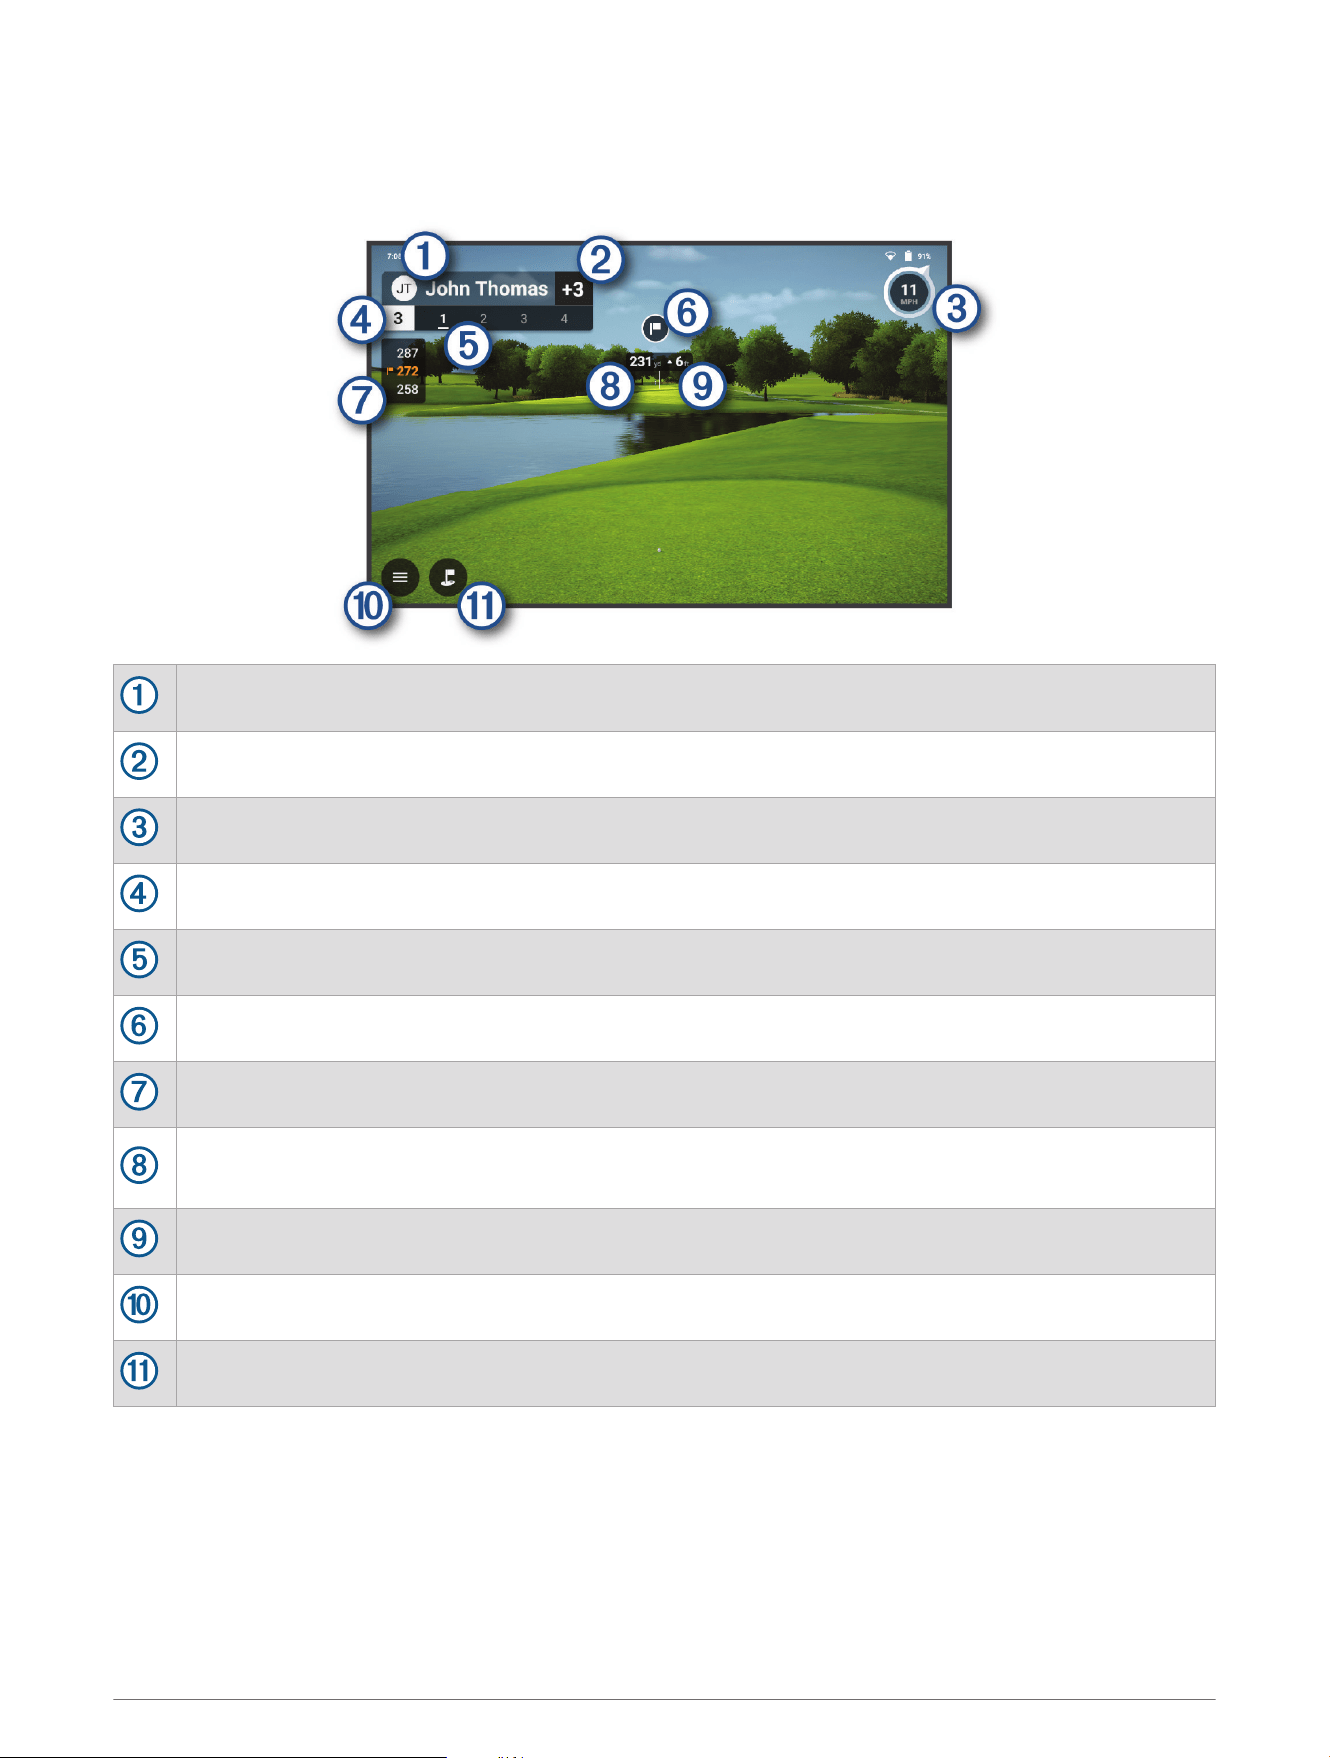
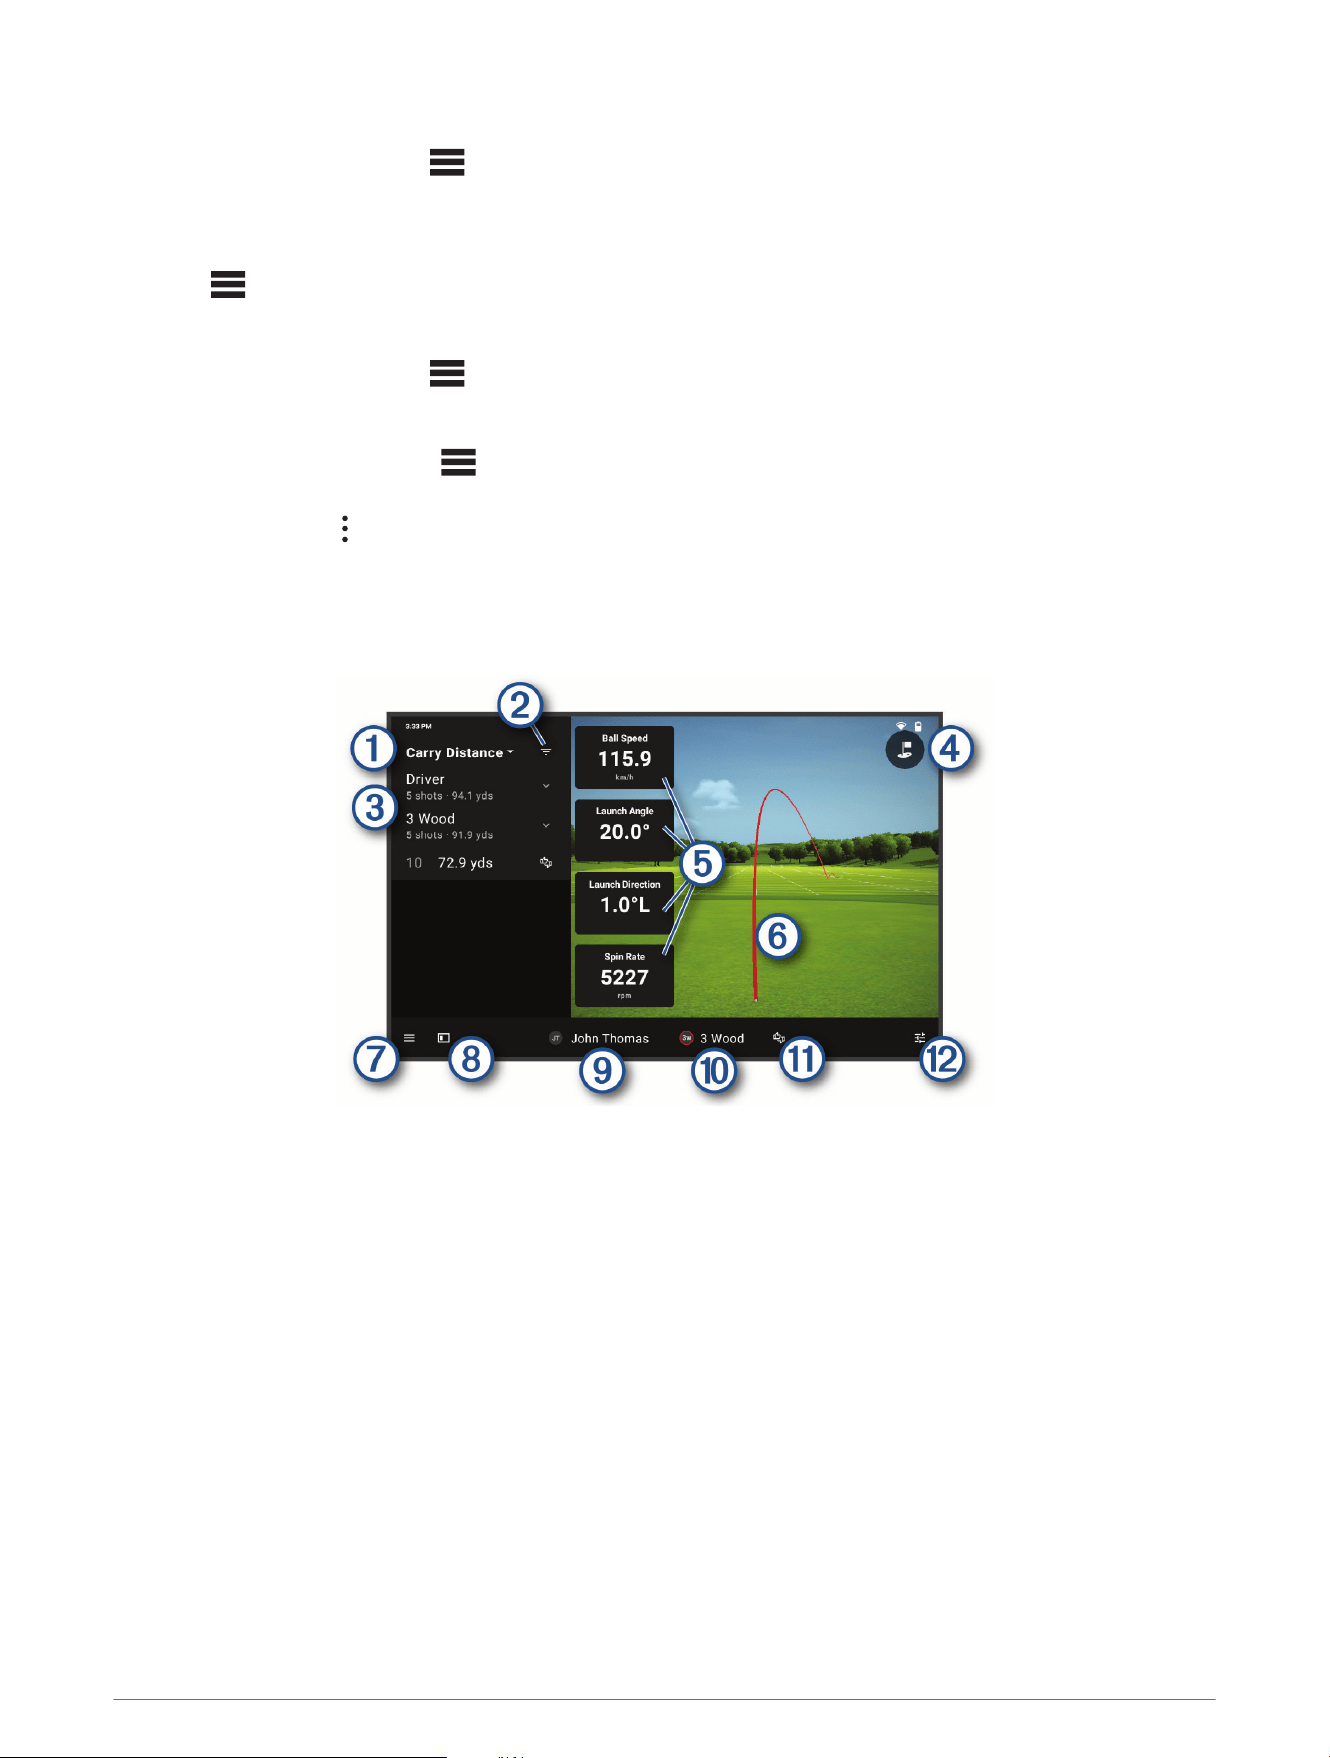
Home Tee Hero
With a Garmin Golf membership (Garmin Golf Membership, page2), you can play a virtual round of golf at a
course rendered with 3D technology on your Approach launch monitor. There are over 43,000 courses available.
The profile name for the current player.
The current player's score for the round.
The wind speed and direction.
The hole number.
The shot number for the current hole.
The direction of the pin.
The distance to the front and back of the green, and to the pin.
The distance to the shot target.
TIP: You can move the shot target by dragging it to the desired location on the course.
The elevation difference between the location of the ball and the shot target.
Select to open the menu.
Select to change to an overhead camera view.
Virtual Round Scoring
During a virtual round, the launch monitor calculates your score using the stroke play scoring method. Each shot
you take counts as one stroke. Hitting the ball into the water or out of bounds adds a penalty stroke. If putting is
disabled, additional strokes are added based on how accurate you are with your approach shot. You can receive
0 to 3 additional strokes depending on how close your approach shot is to the hole.
6 Using the Golf Simulator Features
Viewing Your Scorecard
During a virtual round, select > Scorecard.
Picking Up Your Ball
During a virtual round, you can receive a score of 10 on the current hole and skip to the next hole.
Select > Pick Up Ball > Pick Up Ball.
Ending the Round
During a virtual round, select > End Round.
Viewing Saved Scorecards
1 From the home screen, select > Scorecards.
2 Select a scorecard.
3 If necessary, select > Delete Scorecard > Delete to delete the scorecard.
Practice
The practice mode allows you to practice on a virtual driving range, and provides detailed metrics and ball
impact videos for every shot.
Using the Golf Simulator Features 7
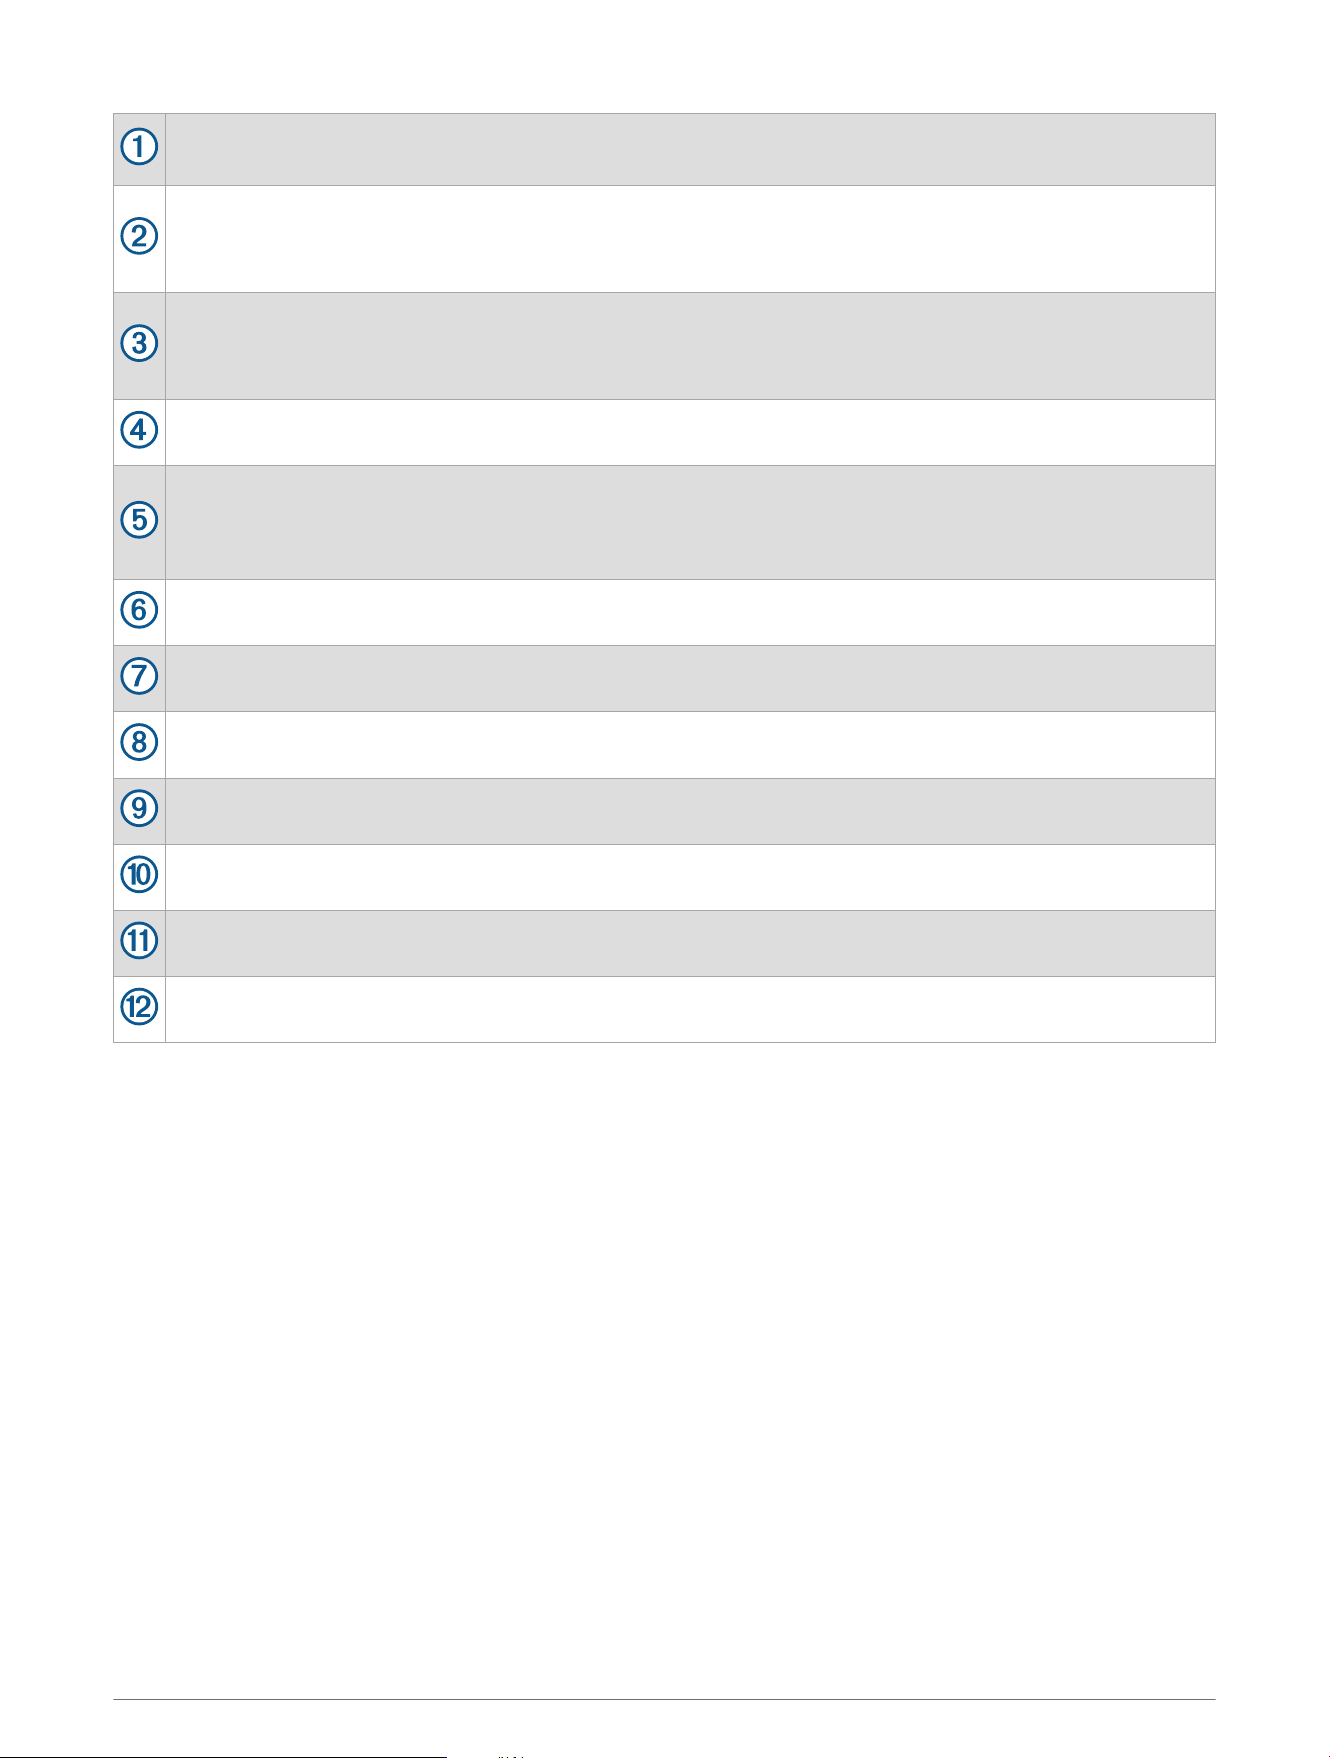
A swing metric for the list of shots from the session. Select the drop-down arrow to display a different
metric.
Select to filter which clubs are viewable in your list of shots, or to remove the club grouping from the list
of shots.
TIP: You can select Hide All to see only your most recent shot in the list of shots.
The list of shots taken during the session, grouped by club by default. Select the drop-down arrow next to
each club to see every shot taken with that club during the session.
TIP: You can edit or delete a shot from the list by swiping left on it.
Select to change to an overhead camera view with distance markers.
Swing metrics for the selected shot. Swipe up to scroll through the full list of metrics.
TIP: You can select a swing metric to display a different metric in that field.
TIP: You can tap and hold a swing metric to view a definition of the metric.
The trajectory of the shot.
Select to open the menu.
Select to change to a full screen view.
Select to change the user for the current shot.
Select to change the club for the shot.
Select to tag the shot and write a note about it.
Select to open the display settings (Changing the View, page5).
8 Using the Golf Simulator Features
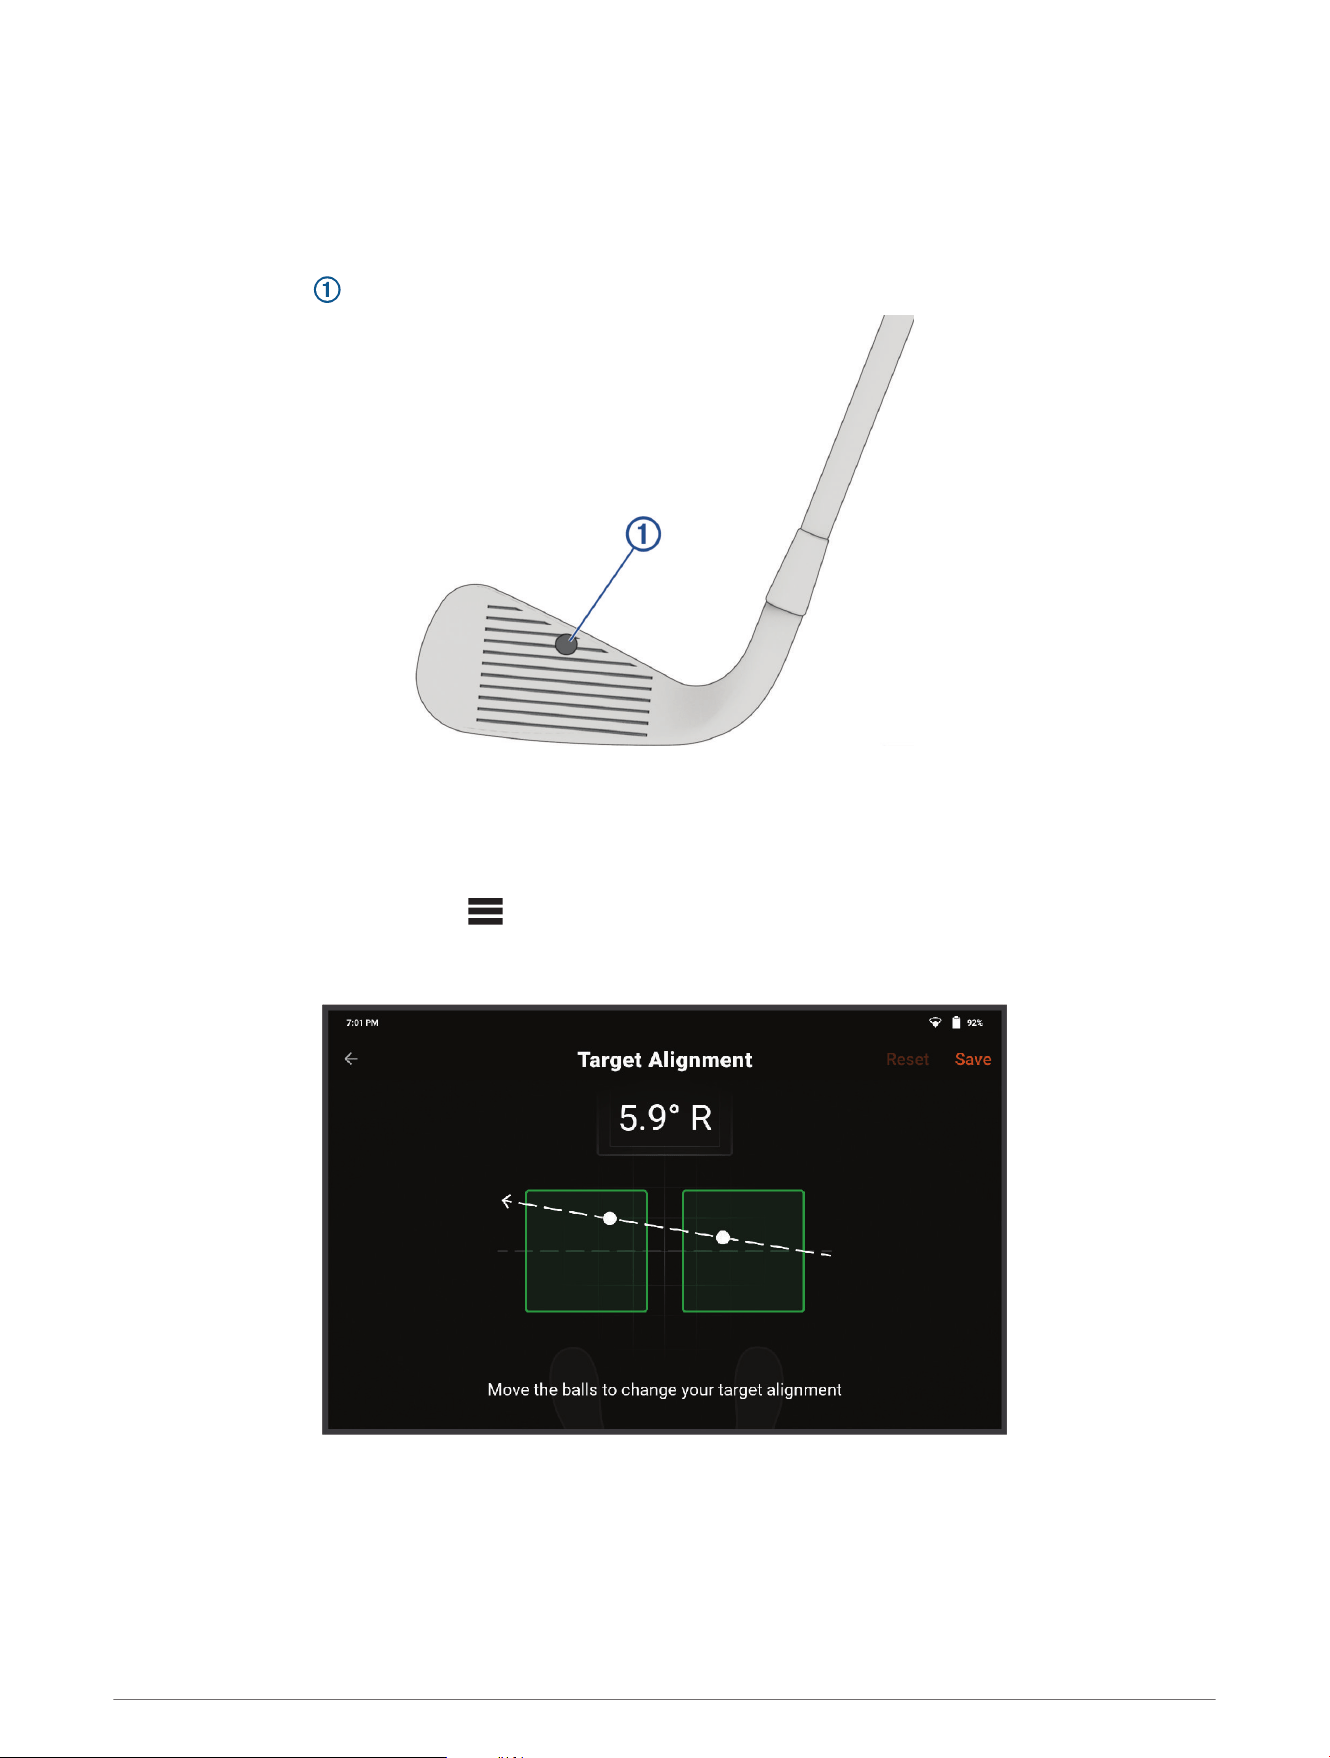
Applying the Club Stickers
In order to track club data, you need to apply one of the included club stickers to the face of the club you are
using.
NOTE: You should replace the club sticker once it becomes worn or dirty.
NOTE: Club data is not recorded for putting, so you do not need to apply a sticker to your putter.
Apply the sticker to the top-center of the club face.
Adjusting the Target Alignment
During a practice session, the target alignment is set to 0 degrees by default. You can adjust the target
alignment up to 10 degrees to the left or right. This allows you to aim at targets diagonal from the tee without
having to physically realign the launch monitor.
1 During a practice session, select > Target Alignment.
2 If necessary, select Reset to set the target alignment back to 0 degrees.
3 Place a golf ball within each of the two areas pictured on the launch monitor's display.
4 Move the golf balls to adjust your target alignment.
5 Select Save.
Using the Golf Simulator Features 9

Viewing Your Practice Session Statistics
1 During a practice session, select > Session Summary.
Statistics for each shot appear.
TIP: You can group the shots by club by selecting > Group by Club.
TIP: You can add, remove, or change the order of the metrics in the table by selecting > Customize Table.
2 If necessary, select multiple shots from the list to see average metrics for those shots.
Viewing Saved Practice Sessions
1 From the home screen, select > Practice Sessions.
2 Select a practice session.
Deleting Saved Practice Sessions
1 From the home screen, select > Practice Sessions.
2 Select an option:
• To select one or more practice sessions, tap and hold a session, then select additional sessions, if
necessary.
• To select all of the practice sessions, select > Edit Sessions > Select All.
3 Select > Delete.
Ending Your Practice Session
1 During a practice session, select > End Session.
2 Select an option:
• To save the session, select Save.
• To delete the session, select Delete.
Weekly Tournament
With a Garmin Golf membership, you can compete in a virtual tournament against other golfers around the
world on different courses each week. You can play in each weekly tournament as many times as you want. All
scores are posted on the leaderboard.
NOTE: Putting is disabled in weekly tournaments.
Connecting to a Third-Party Simulator
While connected to a wireless network (Connecting to a Wireless Network, page11), you can view all of your
recorded shots in detailed, high-definition graphics on your compatible third-party simulator software.
1 From the home screen, select Connect.
2 Select a simulator app.
3 Follow the on-screen instructions.
Wi‑Fi
®
Connectivity Features
NOTE: Some features require a Garmin Golf membership (Garmin Golf Membership, page2).
Data uploads to your Garmin Golf account: Automatically sends your practice data and virtual round scorecards
to your Garmin Golf account as soon as you end your session.
Weekly tournament leaderboards: Automatically posts your weekly tournament scores to the online
leaderboards.
Software updates: Automatically downloads and installs the latest software.
Download courses: Select and download courses to play virtual rounds on.
Third-party simulators: Connect to third-party simulator software to view your recorded shots with more
detailed graphics.
10 Wi‑Fi
®
Connectivity Features

Connecting to a Wireless Network
1 From the home screen, select > Settings > Wi-Fi.
2 If necessary, select Wi-Fi to enable Wi‑Fi technology.
3 Select a wireless network from the list.
4 If necessary, enter the password.
The launch monitor stores the network information and connects automatically when you return to this location.
Customizing Your Device
Customizing Your Golf Club List
You can customize the list of golf clubs available during a practice session.
1 From the home screen, select > My Bag.
2 Select an option:
• To edit a club, select a club from the active or inactive list, and select an option to change.
• To add a club, select .
Settings
From the home screen, select > Settings.
Profile: Configures the preferences for the current profile (Profile Settings, page12).
Wi-Fi: Connect to a wireless network (Wi‑Fi
®
Connectivity Features, page10).
Bluetooth: Connect to a compatible speaker using Bluetooth technology so you can hear in-game sounds during
a virtual round of golf.
Display & Brightness: Sets the display theme and brightness, the size of text, and the amount of time before the
screen turns off.
External Display: Configures the display preferences for the external display (External Display Settings,
page12).
NOTE: This setting only appears when the launch monitor is connected to an external display (Connecting to
an External Display, page13).
Battery & Power: Configures your battery and power saver preferences, and displays the battery power
percentage (Battery and Power Settings, page12).
Language & Input: Sets the device language.
Date & Time: Sets the date, time, and time format.
Device Registration: Displays the profile the launch monitor is registered to, and provides information on how to
register it to a different user.
Downloaded Courses: Displays the list of courses downloaded to the launch monitor, and adds or removes
courses.
Software Update: Update the device software.
Storage: Manages the device storage and displays how much of the storage space has been used.
Factory Reset: Reset all network settings, or delete all user data and reset all settings to factory default values
(Restoring All Default Settings, page12).
About: Displays device information, such as the unit ID and software version.
Legal: Displays regulatory information and the license agreements.
Help & Support: Enables screenshots and sends a diagnostic report to Garmin product support.
Customizing Your Device 11

Profile Settings
From the home screen, select > Settings > Profile.
Edit Name: Edits the name for the profile.
Handedness: Sets the profile to left-handed or right-handed.
System of Measurement: Sets the units of measure preferences.
Garmin Golf Membership: Displays the Garmin Golf membership status for the profile, and allows you to
purchase a membership (Garmin Golf Membership, page2).
Share Scorecard: Sets whether your virtual round scorecards can be viewed publicly on your Garmin Connect
™
website profile.
Storage & Processing: Opts out of data storage and processing, which results in the deletion of all your
personal data from the Garmin servers.
Device Upload: Sets whether the data from your launch monitor is uploaded to the Garmin servers and is
viewable in the Garmin Golf app.
Manage or Delete Garmin Account: Displays information about how to manage or delete your Garmin account.
Switch User: Sign in to a different profile.
Sign Out: Sign out of your Garmin account. To log back into this profile, you will need to re-enter your Garmin
account email and password.
Remove from Device: Removes the profile from the device and deletes all profile data.
External Display Settings
From the home screen, select > Settings > External Display.
Mirror R50 Display: Mirrors the launch monitor's display to the external display.
Aspect Ratio: Sets the aspect ratio for the external display.
Center Line Offset: Sets how far off-center the image on the external display is shifted.
Battery and Power Settings
Select a profile, and select > Settings > Battery & Power.
Battery Percentage: Displays the battery life as a percentage next to the battery life icon.
Power Saver: Sets how long the launch monitor needs to be idle before it turns off automatically when plugged
into an outlet.
Battery Saver: Sets how long the launch monitor needs to be idle before it turns off automatically when
unplugged.
Restoring All Default Settings
You can restore all of the launch monitor settings back to the factory default values.
1 From the home screen, select > Settings > Factory Reset.
2 Select an option:
• To reset all network settings, select Reset Wi-Fi & Bluetooth.
• To reset all of the launch monitor settings to the factory default values and erase all user data, select
Erase all data (factory reset).
3 Follow the on-screen instructions.
12 Customizing Your Device
Device Information
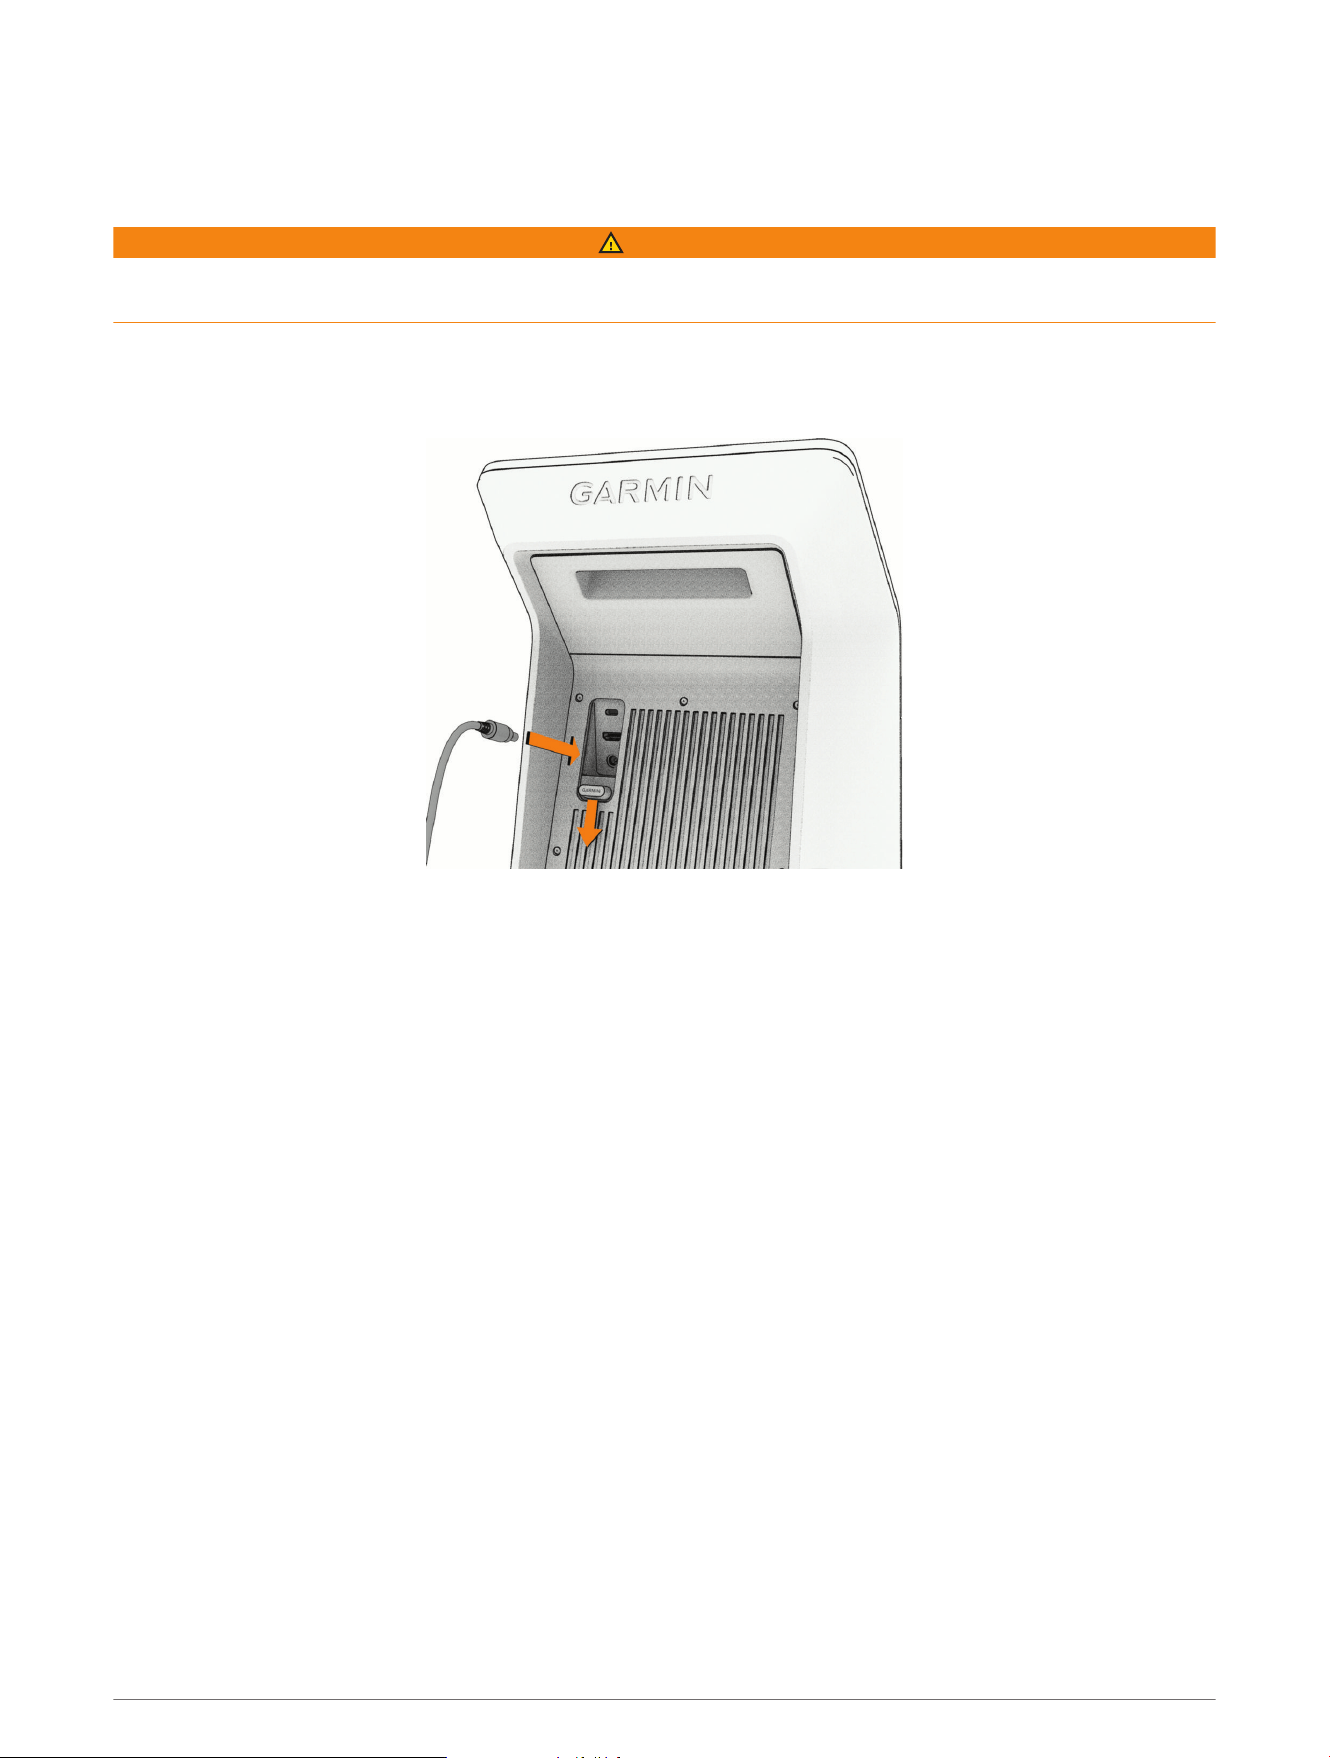
Charging the Device
WARNING
This device contains a lithium-ion battery. See the Important Safety and Product Information guide in the product
box for product warnings and other important information.
NOTE: You can use the launch monitor while it is charging.
1 Open the cable door on the back of the launch monitor.
2 Connect the AC adapter to the power port.
3 Connect the opposite end of the AC adapter to the power cable.
4 Connect the power cable to a wall outlet.
Connecting to an External Display
You can connect your launch monitor to an external display using a standard HDMI cable (not included). During
a virtual round or practice session, you can configure what view and data appears on the external display
(Changing the View, page5).
NOTE: The maximum output resolution for the launch monitor is 1080p.
1 Open the cable door on the back of the launch monitor.
2 Connect a minimum 1080p-capable HDMI cable to the A/V port.
3 Connect the opposite end of the cable to an available HDMI port on the external display.
Garmin Golf App
The Garmin Golf app allows you to view detailed statistics and shot analyses that are recorded on your
Approach launch monitor. The Garmin Golf app syncs your data with your Garmin Connect account. You can
download the Garmin Golf app from the app store on your phone (garmin.com/golfapp).
Device Information 13

Updating Software with Garmin Express
™
You can use the Garmin Express application to download and install the latest software updates for your launch
monitor.
1 If you do not have the Garmin Express application installed on your computer, go to garmin.com/express and
follow the on-screen instructions to install it.
2 Open the Garmin Express application.
3 Connect your launch monitor to your computer using a USB-Ccable.
4 In the Garmin Express application, select Add a Device.
The Garmin Express application searches for your launch monitor and displays the device name and serial
number.
5 Select Add Device, and follow the on-screen instructions to add your launch monitor to the Garmin Express
application.
When setup is complete, the Garmin Express application displays the updates available for your launch
monitor.
6 Select an option:
• To install all available updates, click Install All.
• To install a specific update, click View Details, and click Install next to the update you want.
The Garmin Express application downloads and installs the updates onto your launch monitor.
7 Follow the on-screen instructions during the update process to finish installing updates.
For example, during the update process, the Garmin Express application may instruct you to disconnect and
reconnect your device.
Specifications
Battery type Rechargeable, built-in lithium-ion battery
Battery life Up to 4 hr.
Standby mode power consumption
0.1 W
After 20 min. of inactivity, the device goes into standby mode.
Operating temperature range From -10º to 55ºC (from 14º to 131ºF)
Charging temperature range From 3º to 47ºC (from 37º to 117ºF)
Wireless frequencies/protocols 2.4 GHz @ 19.7 dBm maximum
Water rating IEC 60529 IPX3
1
Getting More Information
You can find more information about this product on the Garmin website.
• Go to support.garmin.com for additional manuals, articles, and software updates.
• Go to buy.garmin.com, or contact your Garmin dealer for information about optional accessories and
replacement parts.
1
The device withstands spraying water when tilted up to 60º vertically.
14 Device Information

Device Care
NOTICE
Do not store the device where prolonged exposure to extreme temperatures can occur, because it can cause
permanent damage.
Never use a hard or sharp object to operate the touchscreen, or damage may result.
Avoid chemical cleaners, solvents, sunscreen, and insect repellents that can damage plastic components and
finishes.
Avoid extreme shock and harsh treatment, because it can degrade the life of the product.
Cleaning the Device
1 Dampen a soft, clean, lint-free cloth with fresh water.
2 Gently wipe the device.
Long-Term Storage
When you do not plan to use the device for several months, you should charge the battery to at least 50% before
you store the device. You should store the device in a cool, dry place with temperatures around the typical
household level. After storage, you should fully recharge the device before using it.
Troubleshooting
Tips for Improving the Launch Monitor's Accuracy
If your swing metrics seem to be inaccurate, you can try these tips.
• When prompted after starting a virtual round or practice session, set the ball flight conditions to match where
you typically play (Golf Simulator Settings, page5).
• Adjust the target alignment on the launch monitor (Adjusting the Target Alignment, page9).
• Minimize the amount of direct sunlight hitting the front of the launch monitor. If the sun is low on the horizon
and the launch monitor is facing it, it can cause misreads.
• Minimize the amount of direct sunlight hitting the club face. Sunlight can reduce the visibility of the club
sticker, which can cause no club metrics to be detected.
• Do not apply the club sticker on or near white decorations on the club face.
• Replace the club sticker if it has become dirty or worn.
• Place the golf ball so its logos or markings are facing the launch monitor, especially if the ball has a matte
surface.
• Avoid having reflective surfaces within view of the launch monitor camera.
• If possible, avoid hitting the ball from tall grass or grass divots. The grass can obstruct the launch monitor's
view of the ball, resulting in misreads.
• Place the launch monitor at the same level as the hitting mat.
My speaker will not connect to the device
If your speaker will not connect to the launch monitor using Bluetooth technology, you can try these tips.
• Bring the launch monitor within range of your speaker.
• Turn off your speaker and launch monitor, and turn them back on again.
• Make sure Bluetooth technology is enabled on your launch monitor (Settings, page11).
• Turn Bluetooth technology off on your launch monitor, and turn it back on.
• Remove your speaker from the Bluetooth settings on your launch monitor to retry the pairing process.
Troubleshooting 15

The launch monitor won't turn on
The operating temperature range for the launch monitor is from -10º to 55ºC (from 14º to 131ºF). If the launch
monitor is operated or stored in a temperature above the listed operating temperature, it may overheat and fail
to turn on (Specifications, page14). If the launch monitor overheats, you should move it to a cooler location, and
wait for it to resume normal operation.
Resetting the Device
If the launch monitor stops responding, you may need to reset it. This does not erase any of your saved data
or settings. If you reset the launch monitor during a virtual round or practice session, you may lose the data for
that round or session.
1 Hold the button for six seconds.
The launch monitor turns off.
2 Press the button to turn on the launch monitor.


support.garmin.com
GUID-D31AA1A2-C026-46EB-9699-FA94F1E8AF0B v3June 2025