USER MANUAL
STAND MIXER
Warning notices: Before using this product, please read this manual carefully and keep it for future reference.
The design and specifications are subject to change without prior notice for product improvement.
Consult with your dealer or manufacturer for details.
The diagram above is just for reference. Please take the appearance of the actual product as the standard.
MKM30130BPK/MKM30130BPW/MKM30130BPG
MKM30130BPR/MKM30130BPB/MKM30130BPY

0
02
1
THANK YOU LETTER
Thank you for choosing Midea! Before using your new Midea product, please read
this manual thoroughly to ensure that you know how to operate the features and
06
07
1 3
CONTENTS
THANK YOU LETTER
SAFETY INSTRUCTIONS
SPECIFICATIONS
PRODUCT OVERVIEW
OPERATION INSTRUCTIONS
CLEANING AND MAINTENANCE
01
1 4
1 5
1 6
TRADEMARKS, COPYRIGHTS AND LEGAL STATEMENT
DATA PROTECTION NOTICE
TROUBLESHOOTING
1 YEAR LIMITED WARRANTY
05
1 2
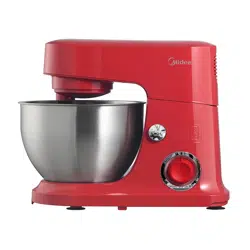
Danger
This symbol indicates that there are dangers to the life and health of
persons due to extremely flammable gas.
Warning of electrical voltage
This symbol indicates that there is a danger to life and health of
persons due to voltage.
Warning
The signal word indicates a hazard with a medium level of risk which, if
not avoided, may result in death or serious injury.
Caution
The signal word indicates a hazard with a low degree of risk which, if
not avoided, may result in minor or moderate injury.
Attention
The signal word indicates important information (e.g. damage to
property), but not danger.
Observe instructions
This symbol indicates that a service technician should only operate and
maintain this appliance in accordance with the operating instructions.
The following safety guidelines are intended to prevent unforeseen risks or damage from
unsafe or incorrect operation of the appliance. Please check the packaging and appliance
on arrival to make sure everything is intact to ensure safe operation. If you find any
damage, please contact the retailer or dealer. Please note modifications or alterations to
the appliance are not allowed for your safety concern. Unintended use may cause
hazards and loss of warranty claims.
Read these operating instructions carefully and attentively before using/commissioning the
unit and keep them in the immediate vicinity of the installation site or unit for later use!
Intended Use
Explanation of Symbols
SAFETY INSTRUCTIONS
02

03
• To protect against risk of electrical shock do not
submerge the machine
in water or other liquid.
• This appliance is not intended for use by persons
(including children) with reduced physical, sensory,
or mental capabilities, or lack of experience and
knowledge, unless they are closely supervised and
instructed concerning use of the appliance by a
person responsible for their safety. Close supervision
is necessary when any appliance is used by or near
children. Children should be supervised to ensure
that they do not play with the appliance.
• Turn the appliance OFF, then unplug from the outlet
when not in use, before assembling or disassembling
parts and before cleaning. To unplug, grasp the plug
and pull from the outlet. Never pull from the power
cord.
• Avoid contacting moving parts. Do not attempt to
defeat any safety interlock mechanisms. Keep
hands,
hair, clothing, as well as spatulas and other utensils
away from attachments
during operation to reduce
the risk of injury to persons, or damage to the mixer.
CAUTION
●
READ ALL INSTRUCTIONS
When using electrical appliances, basic safety precautions
should always be followed including the following:
IMPORTANT SAFEGUARDS

04
SAVE THESE INSTRUCTIONS
• Do not operate any appliance with a damaged cord
or plug or after the appliance malfunctions, or is
dropped or damaged in any manner. Contact the
manufacturer at their customer service telephone
number for information on examination, repair, or
adjustment.
• The use of attachments not recommended or sold
by the manufacturer may cause fire, electric shock
or injury.
• Household Use Only. Do not use outdoors.
• Do not let cord hang over edge of table or counter.
• Unplug before assembling or removing parts
• Remove beaters from mixer before washing
• This appliance has a polarized plug (one blade is
wider than the other). To reduce the risk of electric
shock, this plug will fit in a polarized outlet only one
way. If the plug does not fit fully in the outlet,
reverse the plug. If it still does not fit, contact a
qualified electrician. Do not modify the plug in any
way.
• The normal working altitude range of the product is
0 meters to 2000 meters;
• Warning about the risk of placing the product too
close to the stove. Remind to regularly clean and
remove oil stains when placing the product on the
table.
• Tips: The optimal distance between the product and
other products should be at least 30cm.

SPECIFICATIONS
05
Product Model
Rated Voltage 120V~
60Hz
300W
MKM30130BPK/MKM30130BPW/MKM30130BPG
MKM30130BPR/MKM30130BPB/MKM30130BPY
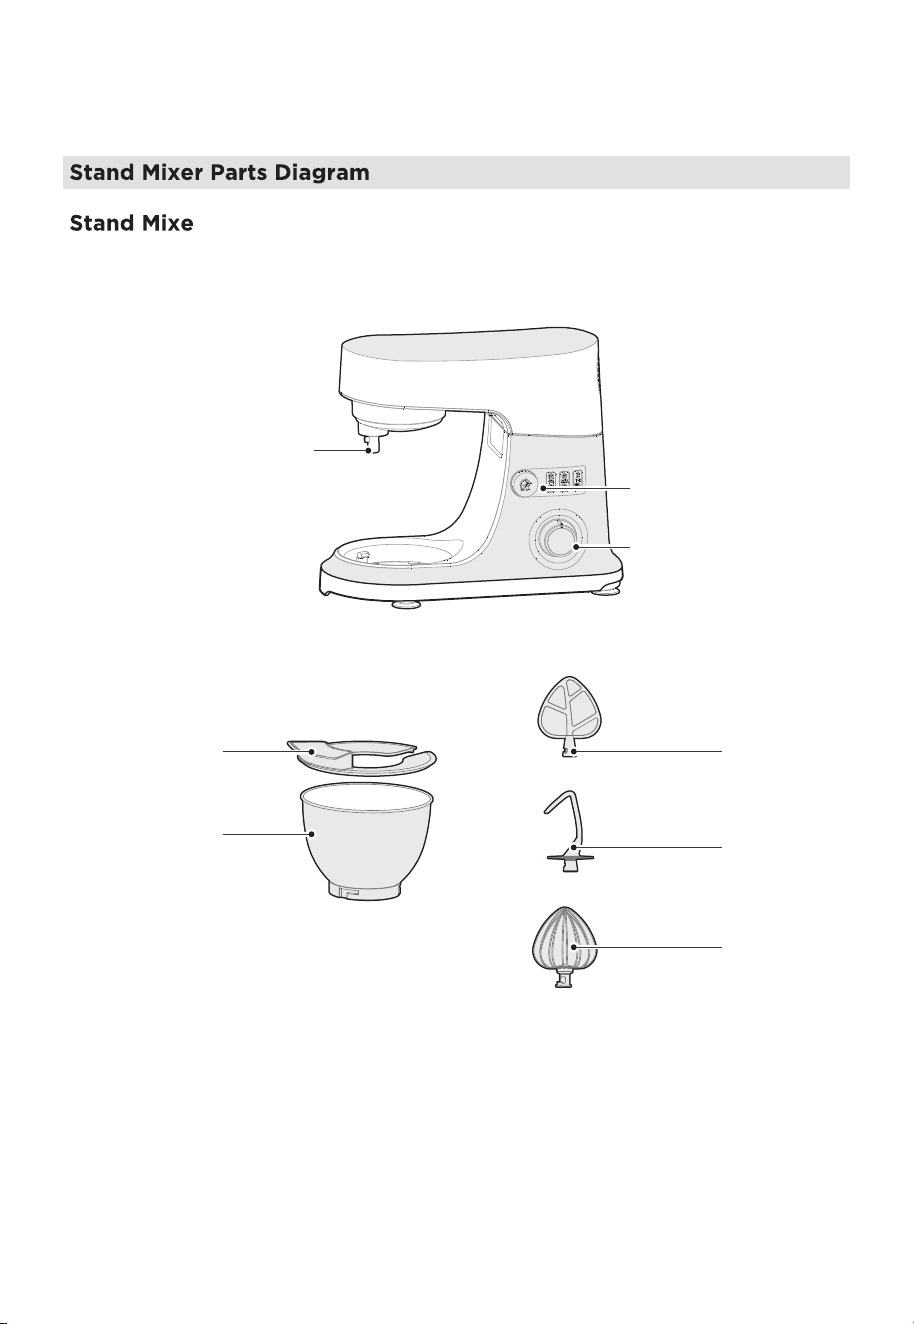
Splatter Shield
Beater
Bowl
(5.0±10%QT)
Dough hook
Whisk
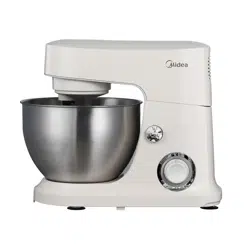
PRODUCT OVERVIEW
06
r
Output Shaft for
Attachment Connection
Arm release
button
Speed selector
(Rotary knob)
OPERATION INSTRUCTIONS
Kitchen Machine
07
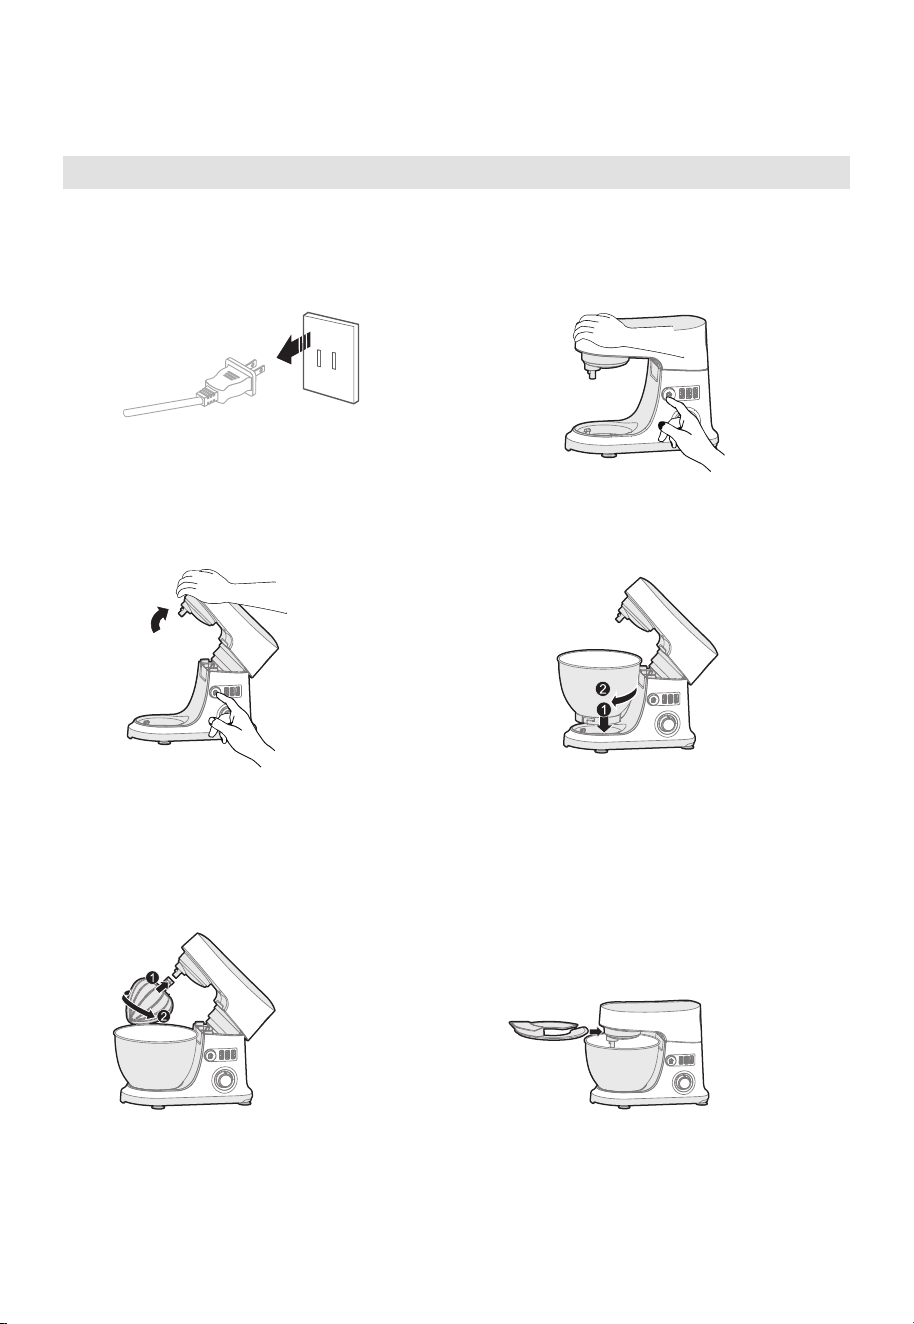
1
Always make sure mixer is unplugged
and setting control is set to OFF(0).
2
Press up on mixer release button.
3
Tilt mixer head up.
4
Place bowl in bowl base and turn
clockwise until bowl locks into place.
5
Insert attachment onto output shaft
and press upward as far as possible.
Turn the attachment counterclockwise,
hooking attachment over pin on shaft.
6
Slide the bowl lid.
08
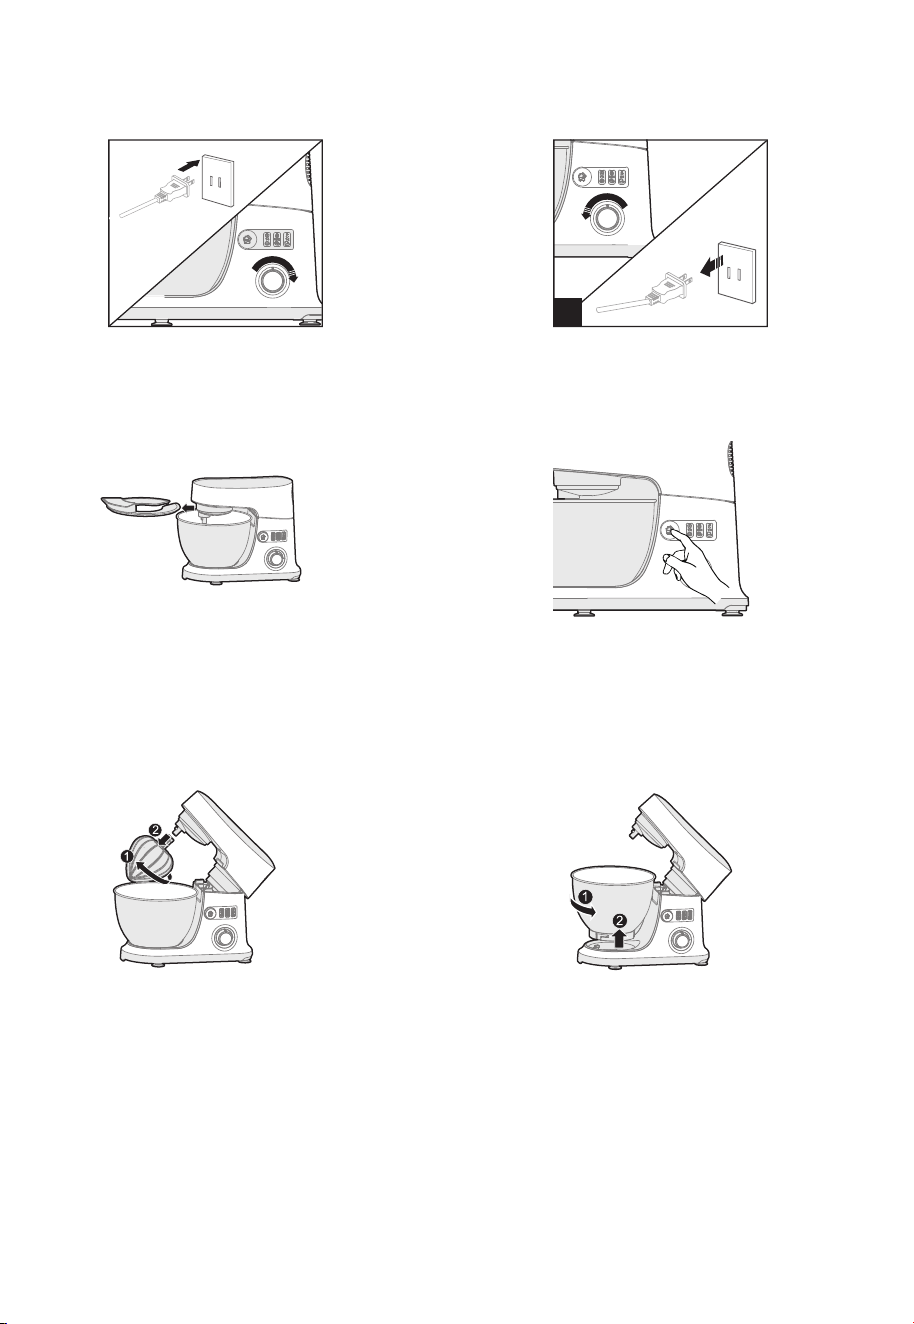
7
Plug mixer into wall outlet. Select
desired speed.
8
When finished, rotate speed control
to Off(O). Unplug from outlet.
9
Slide out the bowl lid.
10
Press up on mixer release button.
Tilt mixer head up.
11
Remove attachment by pressing
attachment upward as far as possible.
Turn the attachment clockwise and
pull to remove.
12
Remove attachment by turnning the
attachment counterclockwise and pull
to remove.
7
7

Before First Use
• Before you use the kitchen machine and accessories for the first time, thoroughly clean
the parts that come into contact with food. You should
only plug in and switch on the
appliance after you correctly assemble the accessories.
Auto Stop
• Your kitchen machine will be automatically turned off after 15 minutes of continuous
operation. This can avoid potential safety problems due to prolonged usage.
Mixing Bowl Attachments
• ls sd slo s s o o d ulu h u o h o
o
• s o o h s ous o lou h h us d
• Follow the recommended quantities, processing time and speed as indicated in user
manual. Do not exceed the suggested processing speed to avoid damage to the machine.
• Before you start , make sure that you pick the desired attachment from the owing and
assemble according to user manual.
• o od slsh ls s sd dull
• ou d o dus h ou o lud o o h douh od o h hud
d u odo
NOTE:
Name Purpose
ugh
Beater
Whisk
• r use hen rearing recies a thicer
cnsistenc such as east ugh that cntains
guten r brea an ia
• Suggested processing speed: 2.
• te u ant t renea the ugh ith
ur tan ier ress the ugh n t
the bttm the b t ai the ugh
raing n the t ae sure that u re
nea the ugh ithin the recmmene
see
• r use hen rearing recies a thinner
cnsistenc such as cae batter mashe
tates cutting c butter an ugh r ies
astries asta an gutenree brea
•Suggested processing speed:1-4.
• r use hen rearing recies that reuire
aeratin such as hiing egg hites r hea
cream meringue musse an sue
• Suggested processing speed:6.
• te ere hising egg hites r cream
mae sure that the b an the his are r
an ree rm grease
09

10
1. Add all the dry ingredients to the bowl and turn the rotary knob to speed 1.
2. Pour in the water and then the oil.
3. Switch to speed 2 and continue kneading until one smooth dough ball is formed.
4. Grease a bowl with vegetable oil.
5. Put the dough ball to this bowl and cover it with cling film.
6. Let it rise for 1 hour until it is doubled in size.
7. Remove the air from the raised dough.
8. Fold it into a log shape and fit it into a loaf pan.
9. Cover it and let it rise in the tray for 1 hour.
10. Bake at 180°C for 40 minutes.
Recipes
Recipes: Bread dough (Hook)
Ingredient:
• 500g flour • 50g olive oil • 1 teaspoon salt
• 1 teaspoon sugar • 7g yeast • 260mL warm water
1. Cut the butter into cubes of 2 cm.
2. Put the cubes with sugar in the bowl and mix them with speed 1.
3. Gradually increase the speed from 1 to 4.
4. Add the eggs one by one and keep mixing with speed 4 until you receive consistency.
5. Fold in baking powder and flour to the mixture and mix with speed 4 until allthe
ingredients are well mixed.
6. Put the batter into a 30 cm long aluminum tin.
7. Place it in the middle of the oven.
8. Bake it for 30-40 minutes at the temperature of 180°C.
Recipe: Cake Batter (Beater)
Ingredient:
• 3 eggs • 150g butter • 150 g castor sugar
• 150 g flour • 3g baking powder

Pie pastry (Beater)
Ingredient:
• 340g cups all-purpose flour, plus extra for rolling
• 227g cold unsalted butter, cut into 2 cm cubes
• 1 teaspoon salt • 1 teaspoon sugar • 6 to 8 tablespoon ice water
1 . Put all the dry ingredients to the bowl and turn the rotary knob to speed
2. Add the cold butter into the dry ingredients and gradually increase the speed from 1
to 3.
3. Add 1 tablespoon iced water at a time to the mixture until it forms crumbly dough. If
the dough doesn't hold together, add a little more water and mix it for a longer time.
Do not add too much water. Otherwise, it will make the crust tough.
4. Form the dough into the shape you want and wrap it with plastic wrap.
5. Keep it in the refrigerator for at least 1 hour and up to 2 days.
6. Rest the dough in the room temperature for a few minutes before rolling and baking.
7. Bake it for 25-30 minutes at the temperature of 180°C.
1 . Whisk the egg whites with speed 6 until soft peaks are formed.
2. Gradually add the sugar while processing with speed 4 until firm peaks are formed.
3. Spoon the meringue onto a baking tray which is covered with baking paper.
4. Preheat your oven to 105°C and place the tray with the meringue in the center of the
oven.
5. Bake the meringues for approximately 1-1.5 hours until they are dry and crisp.
6. Turn off the oven and dry the meringues in the oven for 1.5 hours.
Recipes: Meringue (Whisk)
Ingredient:
• 4 egg whites • 1 cup (200 grams) superfine or caster sugar
11
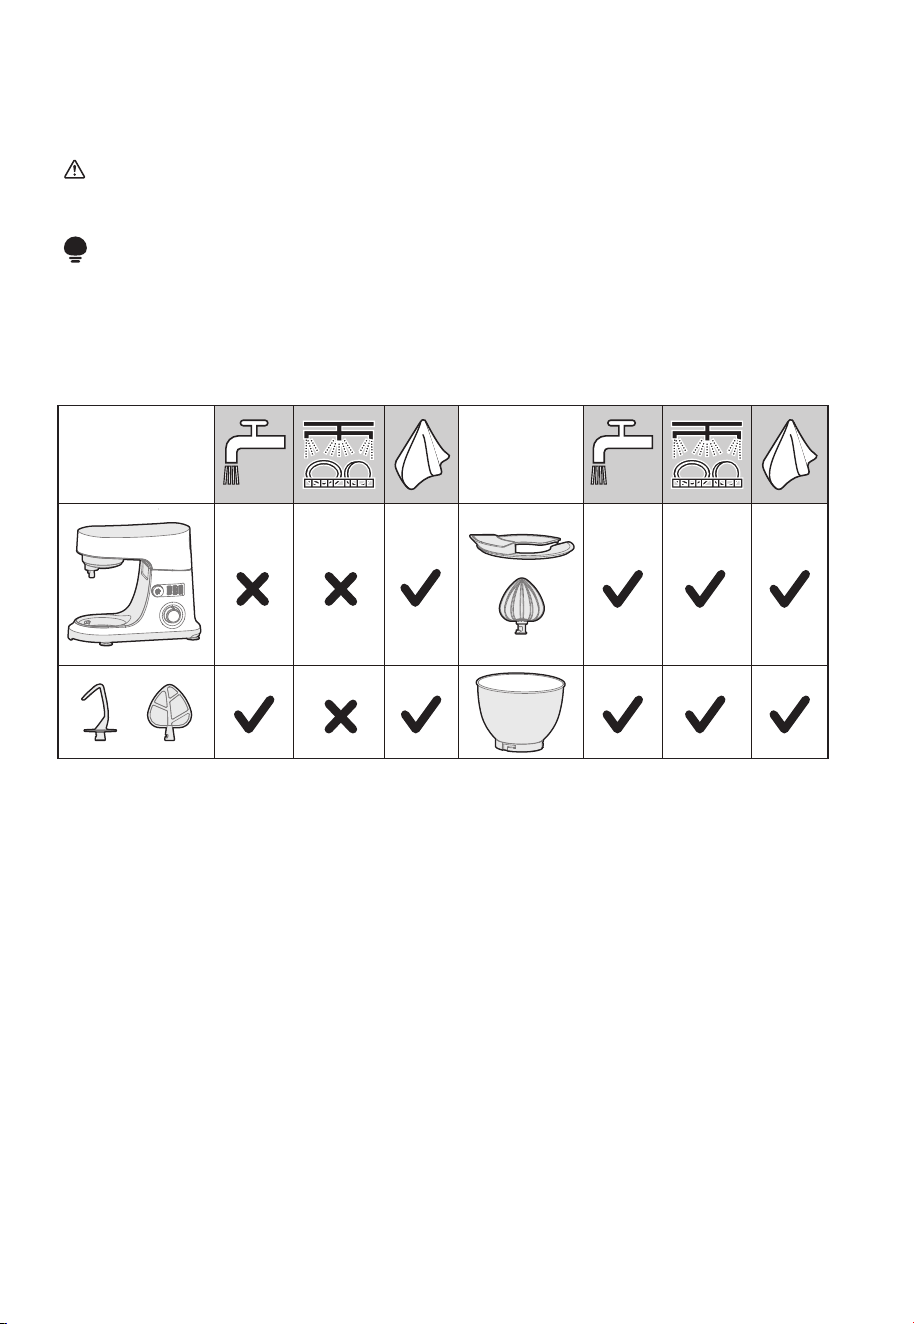
CLEANING AND MAINTENANCE
Caution
• Before you clean the appliance, unplug it.
1 . h hous h d loh ol o o s .
l h oh s ho h douh hoo d hs
should ol hdshd h o dshshs h ol o d
hs ld dshsh
Store the appliance and accessories in a dry place after cleaning.
12
NOTE:

13
TROUBLESHOOTING
Abnormality Handling
r ur saet unug the machine immeiate an
st using it hen cntact ur custmer serice team
at r emai t
custmersericeusamieacm r assistance
ur machine
maes an unusua
nise emits a
burning
sme r
ruces sme
ere are sme uic checs t get ur mier
ring again
• hec the er ae sure the mier is
ugge
secure int a ring eectrica utet
• hec the ur utet has a
run aut ircuit nterruter buttn mae sure
it hasnt trie
• hec the ccessr er nsure the
accessr
cer here accessries cnnect is secure
astene in ace
• hec the ier rm eri the mier arm is u
ce in the n sitin
ue trie these stes an ur mier sti nt
turn n ease cntact custmer serice r urther
assistance
ier nt urn n
utmatic era
rtectin
ur aiance is euie ith an aance
micrrcessr that cntinuus mnitrs its erating
er cnsumtin his inteigent sstem
autmatica shuts n the aiance i the a n
the mtr ecees a sae imit his saet eature
rtects the aiances interna cmnents an
ensures tima errmance
estarting ater era
rtectin ctiatin
• urn the iance tate the rtar nb
t the
sitin
• euce ngreient a r smther eratin
cnsier reucing the amunt
ingreients being
rcesse ternatie u ma chse t a
ingreients in stages
• ing n brie cing eri
as
the mtr t recer e recmmen aiting r a
e minutes bere restarting
• esume eratin nce ce seect the esire
see setting t cntinue ur recie

14
logo, word marks, trade name, trade dress and all versions there of are
trademarks, copyrights and other intellectual property rights, and all goodwill derived
from using any part of an Midea trademark. Use of Midea trademark for commercial
purposes without the prior written consent of Midea may constitute trademark
infringement or unfair competition in violation of relevant laws.
This manual is created by Midea and Midea reserves all copyrights thereof. No entity or
individual may use, duplicate, modify, distribute in whole or in part this manual, or
bundle or sell with other products without the prior written consent of Midea.
All the described functions and instructions were up to date at the time of printing this
manual. However, the actual product may vary due to improved functions and designs.
TRADEMARKS, COPYRIGHTS
AND LEGAL STATEMENT

15
DATA PROTECTION NOTICE
For the provision of the services agreed with the customer,
we agree to comply without restriction with all stipulations of applicable data protection
law, in line with agreed countries within which services to the customer will be delivered,
as well as, where applicable, the EU General Data Protection Regulation (GDPR).
Generally, our data processing is to fulfil our obligation under contract with you and for
product safety reasons, to safeguard your rights in connection with warranty and
product registration questions. In some cases, but only if appropriate data protection is
ensured, personal data might be transferred to recipients located outside of the
European Economic Area.
Further information are provided on request. You can contact our Data Protection
[email protected]. To exercise your rights such as right to object your
personal date being processed for direct marketing purposes, please contact us via
[email protected]. To find further information, please follow the QR Code.

1 YEAR LIMITED WARRANTY
hs s h ol ss o hs odu d s lu o oh o
odo hs odu s d o o h d o ol uhs
During this period, your exclusive remedy is repair or replacement of this product or any
oo oud o d ou oo ho ou sosl o ll
oss ssod h u h odu o us d ou u h odu o
oo ud hs o ou h odu o oo s o lo
ll ll l h sl o o ul o lu hs dos
o o o ol us d ds o h odu sul o d
lo us o sus hs ds ol o h ol osu
uhs o h ol sls hs s od odus s
usd o oh h sl l houshold us o sud o ol d
o lud ll ls o sl dl d osul ds
h o ss o ld ll ll s ld o ou o h uhs
ld lud suo o odo o
hl ohd l hh s suh o odo s ld o
h duo o hs l hs h dd o h ou l
o ss o os do o llo los o ld s o sl
incidental consequential damages, so the foregoing limitations may not apply to you.
ls o h lu o ol d su hs o dos o dsh ou
h o od l uso os o s s ud o
this product, please contact the Customer Service Center:
1-866-646-4332
16