EN
Graphics Calculator
fx-CG100
fx-1AU GRAPH
Hardware User’s Guide
Please read and adhere to the “Safety Precautions” (page 3) before use.
CASIO Worldwide Education Website
https://edu.casio.com
Manuals are available in multi languages at
https://world.casio.com/manual/calc/
SA2501-A
Published: 1/2025
© 2025 CASIO COMPUTER CO., LTD.
2
• The contents of this manual are subject to change without notice.
• The contents of this manual have been checked at each step along the production process. Feel free to
contact us if you notice anything that is questionable, erroneous, etc.
• No part of this manual may be reproduced in any form without the express written consent of the
manufacturer.
• The displays and illustrations (such as key markings) shown in this manual are for illustrative purposes
only, and may differ somewhat from the actual items they represent.
• Company and product names used in this manual may be registered trademarks or trademarks of their
respective owners.
• In no event shall CASIO Computer Co., Ltd. be liable to anyone for special, collateral, incidental, or
consequential damages in connection with or arising out of the purchase or use of this product and
items that come with it. Moreover, CASIO Computer Co., Ltd. shall not be liable for any claim of any kind
whatsoever by any other party arising out of the use of this product and the items that come with it.
• CASIO Computer Co., Ltd. shall not be held liable for any loss or lost profits due to loss of data caused by
battery replacement, malfunction or maintenance of this product, or any other reason.
Contents
Precautions ............................................................................................................. 3
Safety Precautions ........................................................................................................................................3
Handling Precautions
....................................................................................................................................4
Precautions when Using this Calculator
........................................................................................................ 5
Getting Started ........................................................................................................ 6
Attaching and Removing the Front Cover .....................................................................................................6
Before Using the Calculator for the First Time
..............................................................................................7
Power Supply ........................................................................................................ 10
Battery Level Icon ........................................................................................................................................10
Low Battery Warning
...................................................................................................................................10
Replacing Batteries
..................................................................................................................................... 11
Auto Power Off Function
.............................................................................................................................13
Before Assuming Malfunction ............................................................................. 14
Reset and Restart .......................................................................................................................................14
Specifications ....................................................................................................... 15
Main Specifications .....................................................................................................................................15
Battery Life
..................................................................................................................................................15
3
Precautions
Safety Precautions
Thank you for purchasing this CASIO product.
Be sure to read the “Safety Precautions” before using this product to ensure that you use it correctly. Be sure
to keep all user documentation handy for future reference.
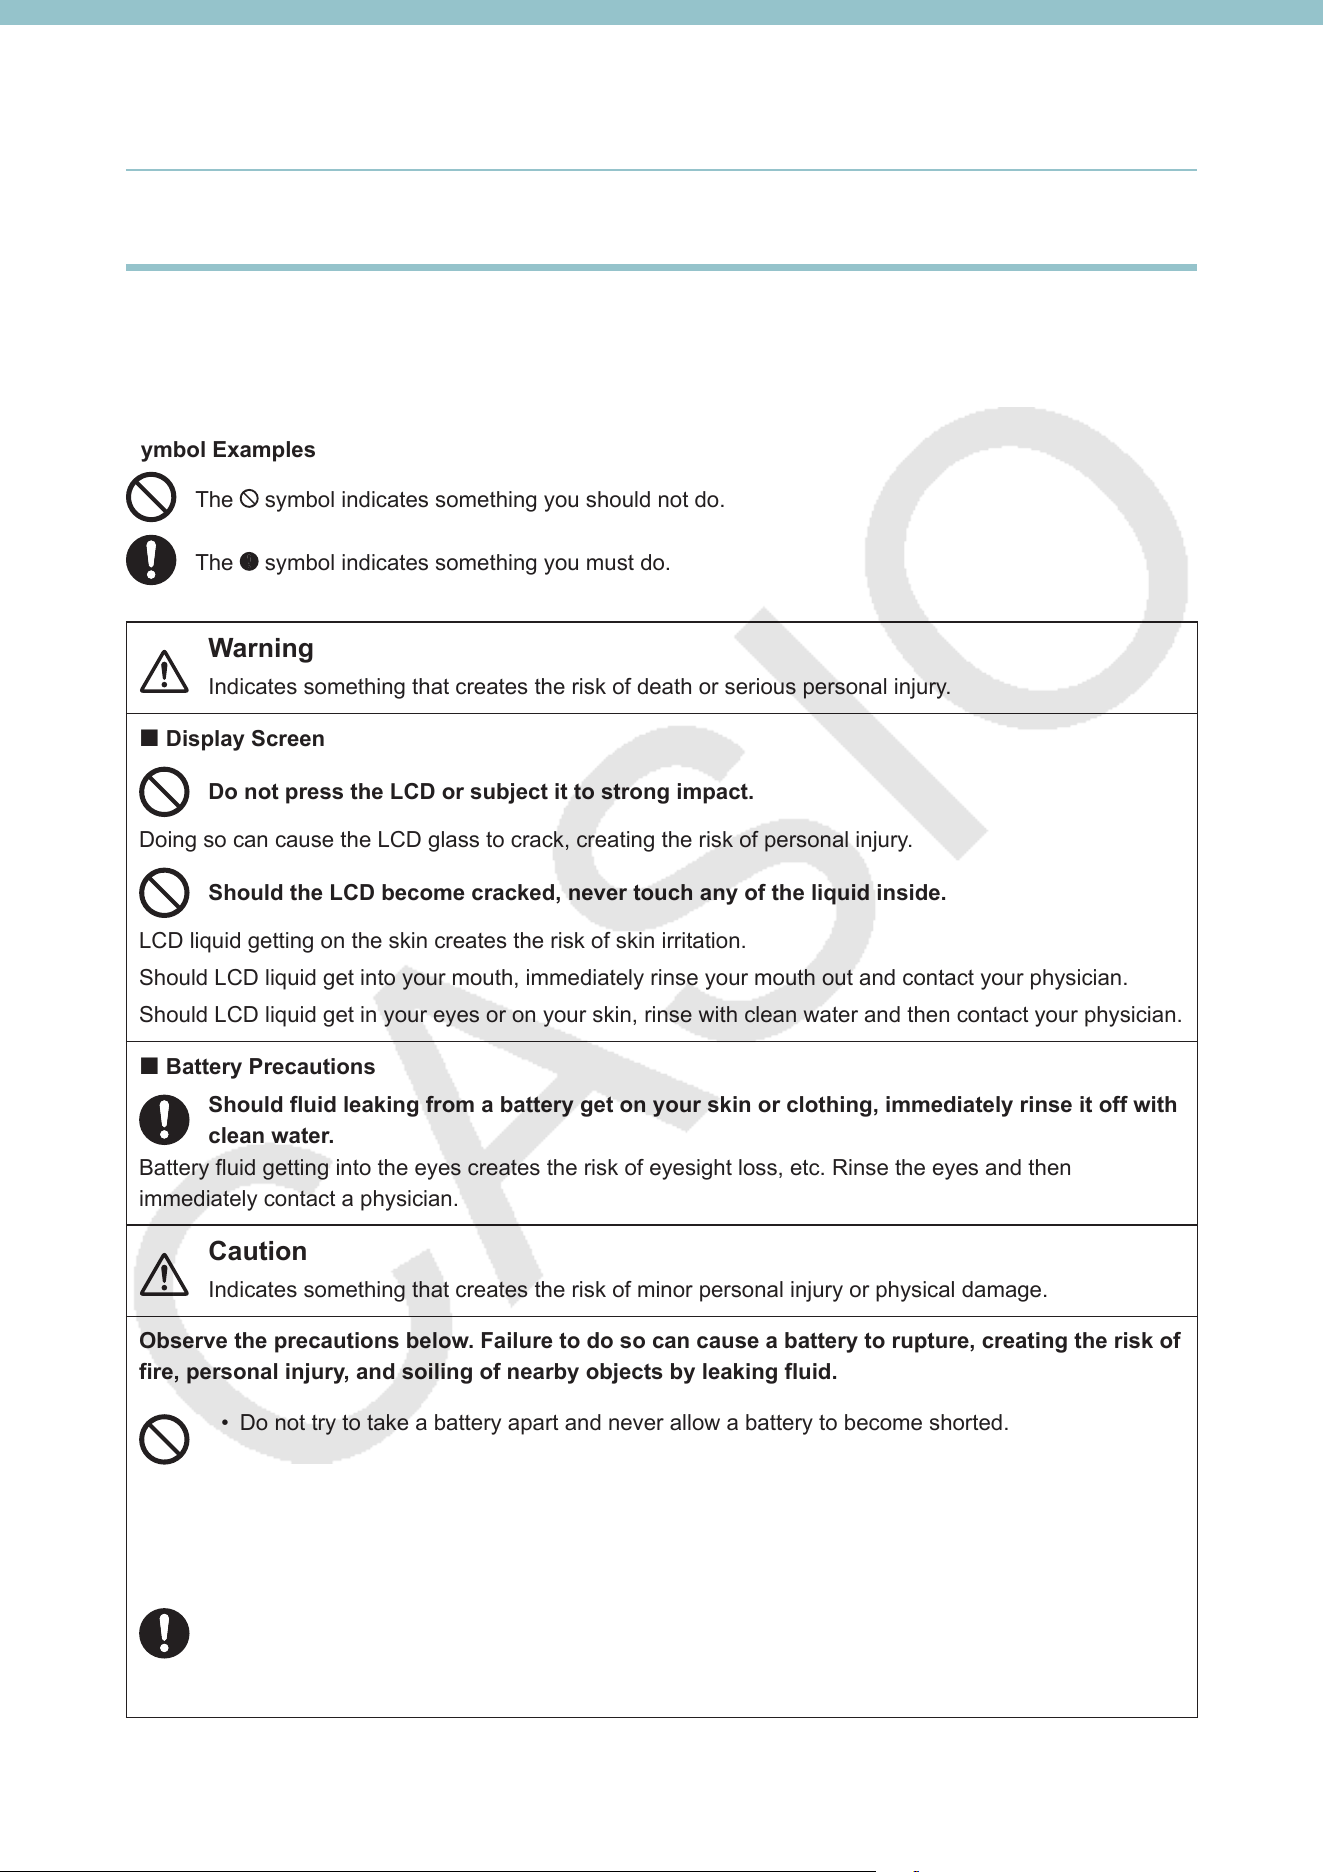
Symbol Examples
The
symbol indicates something you should not do.
The symbol indicates something you must do.
Warning
Indicates something that creates the risk of death or serious personal injury.
k
Display Screen
Do not press the LCD or subject it to strong impact.
Doing so can cause the LCD glass to crack, creating the risk of personal injury.
Should the LCD become cracked, never touch any of the liquid inside.
LCD liquid getting on the skin creates the risk of skin irritation.
Should LCD liquid get into your mouth, immediately rinse your mouth out and contact your physician.
Should LCD liquid get in your eyes or on your skin, rinse with clean water and then contact your physician.
k
Battery Precautions
Should fluid leaking from a battery get on your skin or clothing, immediately rinse it off with
clean water.
Battery fluid getting into the eyes creates the risk of eyesight loss, etc. Rinse the eyes and then
immediately contact a physician.
Caution
Indicates something that creates the risk of minor personal injury or physical damage.
Observe the precautions below. Failure to do so can cause a battery to rupture, creating the risk of
fire, personal injury, and soiling of nearby objects by leaking fluid.
• Do not try to take a battery apart and never allow a battery to become shorted.
• Do not charge a non-rechargeable battery.
• Do not mix old and new batteries.
• Do not mix different battery types.
• Do not expose a battery to heat or throw it into fire.
• Use only the specified type of battery.
• Load a battery with its poles (plus (+) and minus (–)) facing correctly.
• Replace the batteries as soon as possible after they go dead.
4
Battery Precautions
u
Observe the precautions below. Failure to do so can cause the battery to explode or leak flammable
liquid or gas.
• Use only the type of battery that is specified for this product.
• Do not burn a battery or dispose of it in an incinerator, or by mechanical crushing or cutting.
• Do not subject a battery to excessively high or low temperatures during use, storage, or transport.
• Do not subject a battery to excessively low barometric pressure during use, storage, or transport.
Handling Precautions
• Your calculator supports use of both alkaline batteries and rechargeable nickel-metal hydride batteries.
Note that the amount of operation between charges provided by nickel-metal hydride batteries is shorter
than the life of alkaline batteries. Use only batteries that are specifically recommended for this calculator.
• Replace the batteries at least once a year regardless of how much the calculator is used during that period.
Never leave dead batteries in the battery compartment. They can leak and damage the unit. Immediately
remove nickel-metal hydride batteries from the calculator after their charge is used up. Leaving uncharged
nickel-metal hydride batteries in the calculator can cause them to deteriorate.
• You will be charged for malfunction or damage due to battery leakage, which is not covered by the
warranty.
• Your calculator includes precision electronic components. Failure to follow the precautions described below
can cause data storage failure and calculator malfunction.
- Do not subject the calculator to excessive impact, pressure, or bending.
- Do not operate keys with a pen or other sharp, pointed object.
- Do not apply strong force to the LCD screen or poke the screen with a pen or other sharp object. To
protect the LCD screen against scratching or other damage, be sure to attach the front cover properly to
the calculator when carrying it. See “Attaching and Removing the Front Cover” (page 6).
- Never try to take the calculator apart. Product malfunction caused by disassembly is not covered by the
warranty, so you will be charged for repair even if your calculator is still within its warranty period.
- Do not use the calculator in locations where it can be subjected to electrostatic charge.
• Do not use or store the calculator under extreme temperature conditions. Low temperatures can slow the
response speed of the display, cause the display to remain blank, or shorten the battery life. Do not leave
the calculator in direct sunlight, near a window or a heater, or in any other location where temperatures are
extremely high. Doing so can cause discoloration or deformation of the calculator case or malfunction of its
electronic circuitry.
• Do not use or store the calculator in a location where there is high humidity or excessive dust. Avoid using
the calculator where it is directly exposed to water, and also avoid moisture and dust. Such conditions can
cause malfunction of the electronic circuitry.
• Do not use this calculator in areas where the use of electronic devices is prohibited.
• Using the calculator near a television or radio can cause interference with TV or radio reception.
5
• The liquid crystal panel used for the calculator’s LCD incorporates high-precision technology for an
effective pixel yield of at least 99.99%. Even at this level, some pixels may fail to light or may remain lit at
all times. This is normal and does not indicate malfunction.
• Due to limitations of the LCD equipped in this calculator, graphic images may not appear as they do on
your computer display in terms of color, etc.
• Use a soft, dry cloth to clean your calculator. The display is particularly vulnerable to scratches, so use light
pressure when wiping it. In the case of extreme soiling, wipe with a cloth soaked in a solution of a neutral
detergent and water. Wring as much water as possible from the cloth before wiping. Do not use volatile
agents such as thinner, benzene or alcohol for cleaning. Doing so can remove key markings or may
discolor the case.
• Never dispose of batteries, the liquid crystal panel, or other components by burning them.
• Whenever discarding the calculator or batteries, be sure to do so in accordance with the laws and
regulations in your particular area.
Precautions when Using this Calculator
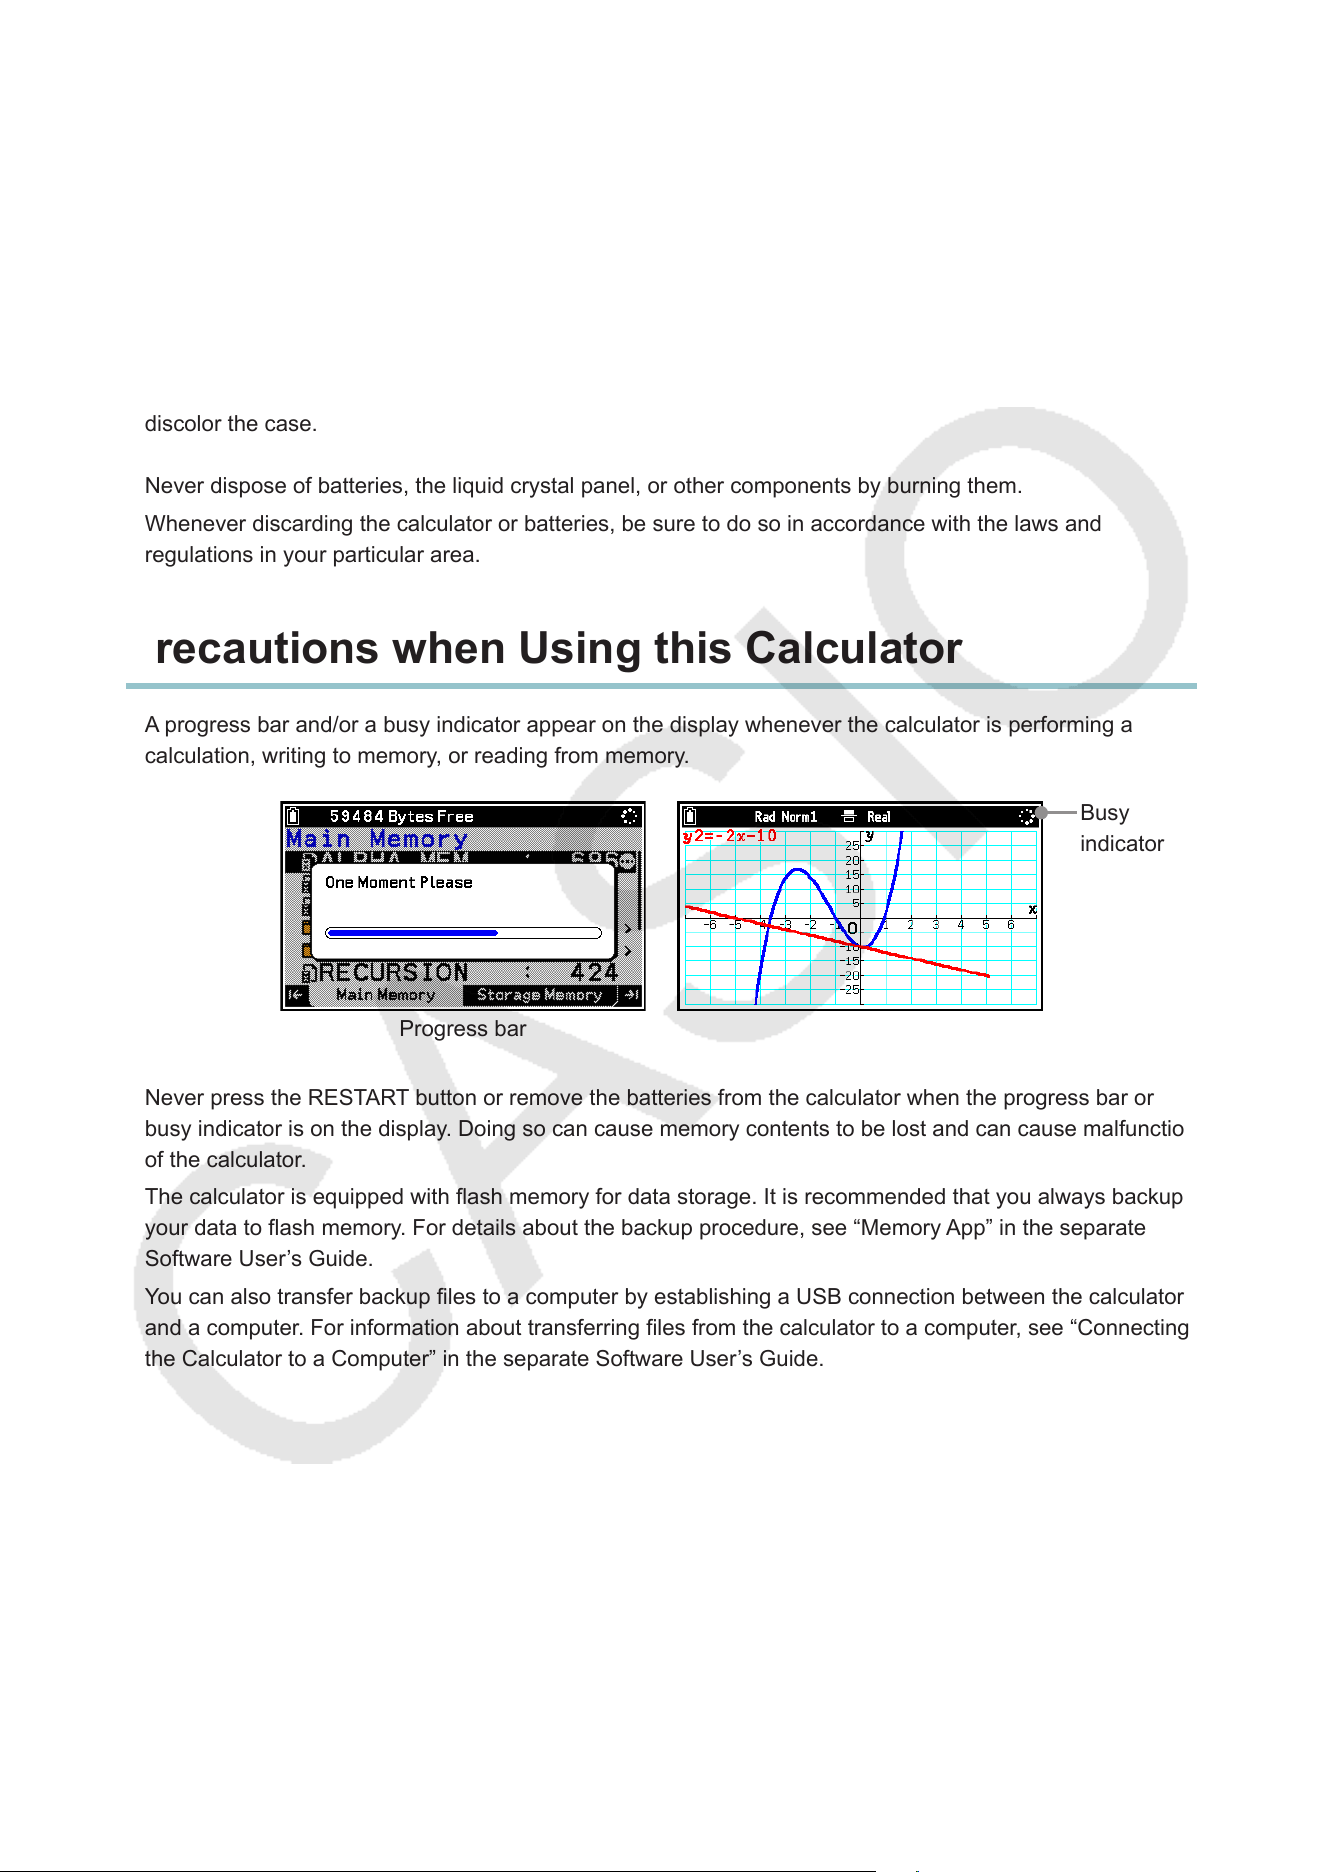
• A progress bar and/or a busy indicator appear on the display whenever the calculator is performing a
calculation, writing to memory, or reading from memory.
Busy
indicator
Progress bar
Never press the RESTART button or remove the batteries from the calculator when the progress bar or
busy indicator is on the display. Doing so can cause memory contents to be lost and can cause malfunction
of the calculator.
• The calculator is equipped with flash memory for data storage. It is recommended that you always backup
your data to flash memory. For details about the backup procedure, see “Memory App” in the separate
Software User’s Guide.
• You can also transfer backup files to a computer by establishing a USB connection between the calculator
and a computer. For information about transferring files from the calculator to a computer, see “Connecting
the Calculator to a Computer” in the separate Software User’s Guide.
6
Getting Started
Attaching and Removing the Front Cover
To remove the front cover
Before using the calculator, remove the front cover (1) and attach it to the back (2).
1 2
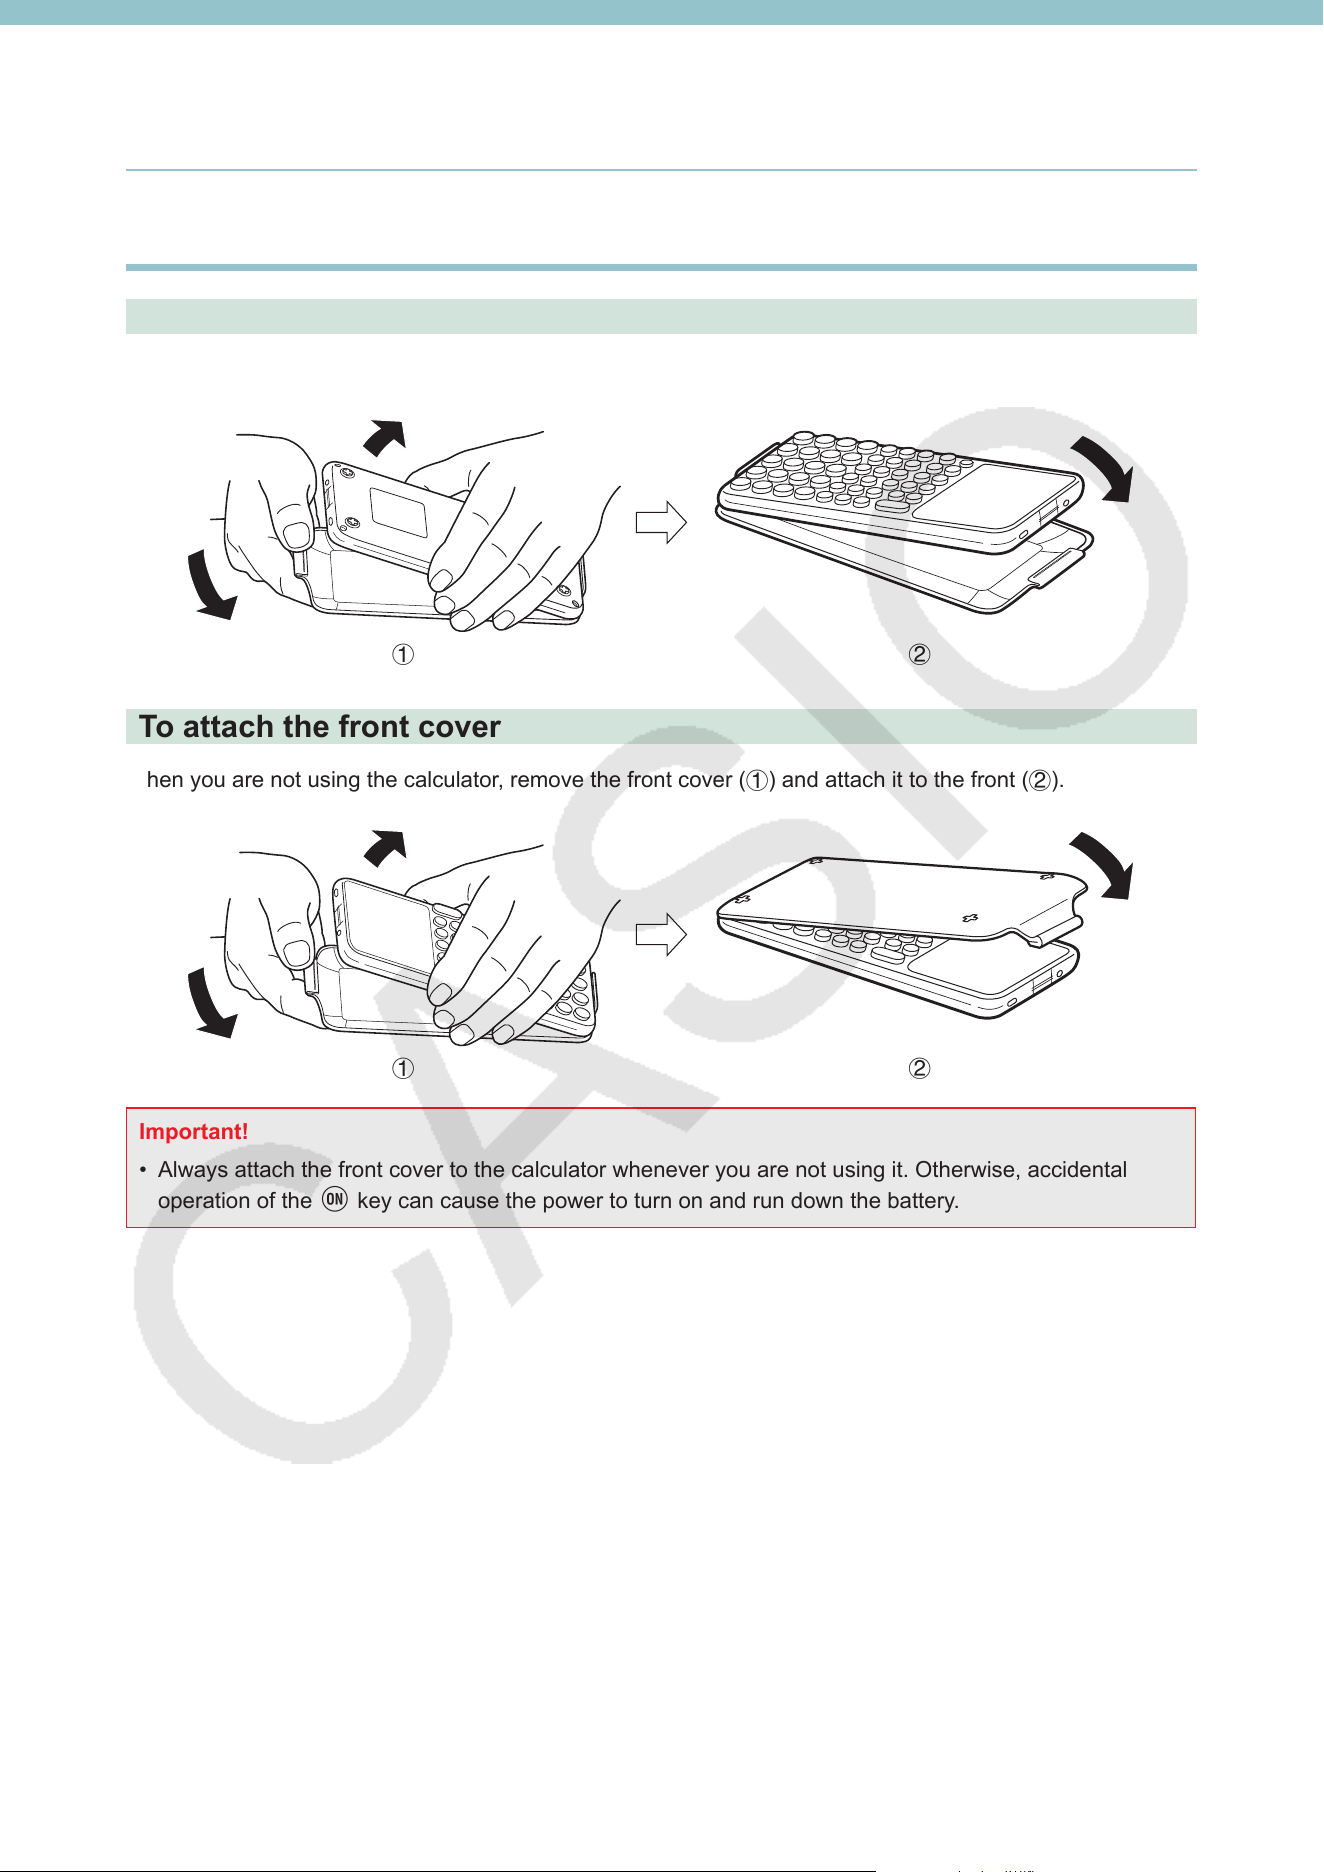
To attach the front cover
When you are not using the calculator, remove the front cover (1) and attach it to the front (2).
1 2
Important!
• Always attach the front cover to the calculator whenever you are not using it. Otherwise, accidental
operation of the o key can cause the power to turn on and run down the battery.
7
Before Using the Calculator for the First Time
Batteries are not loaded in your calculator at the factory. Be sure to follow the procedure below to load
batteries and adjust the display brightness before trying to use the calculator for the first time.
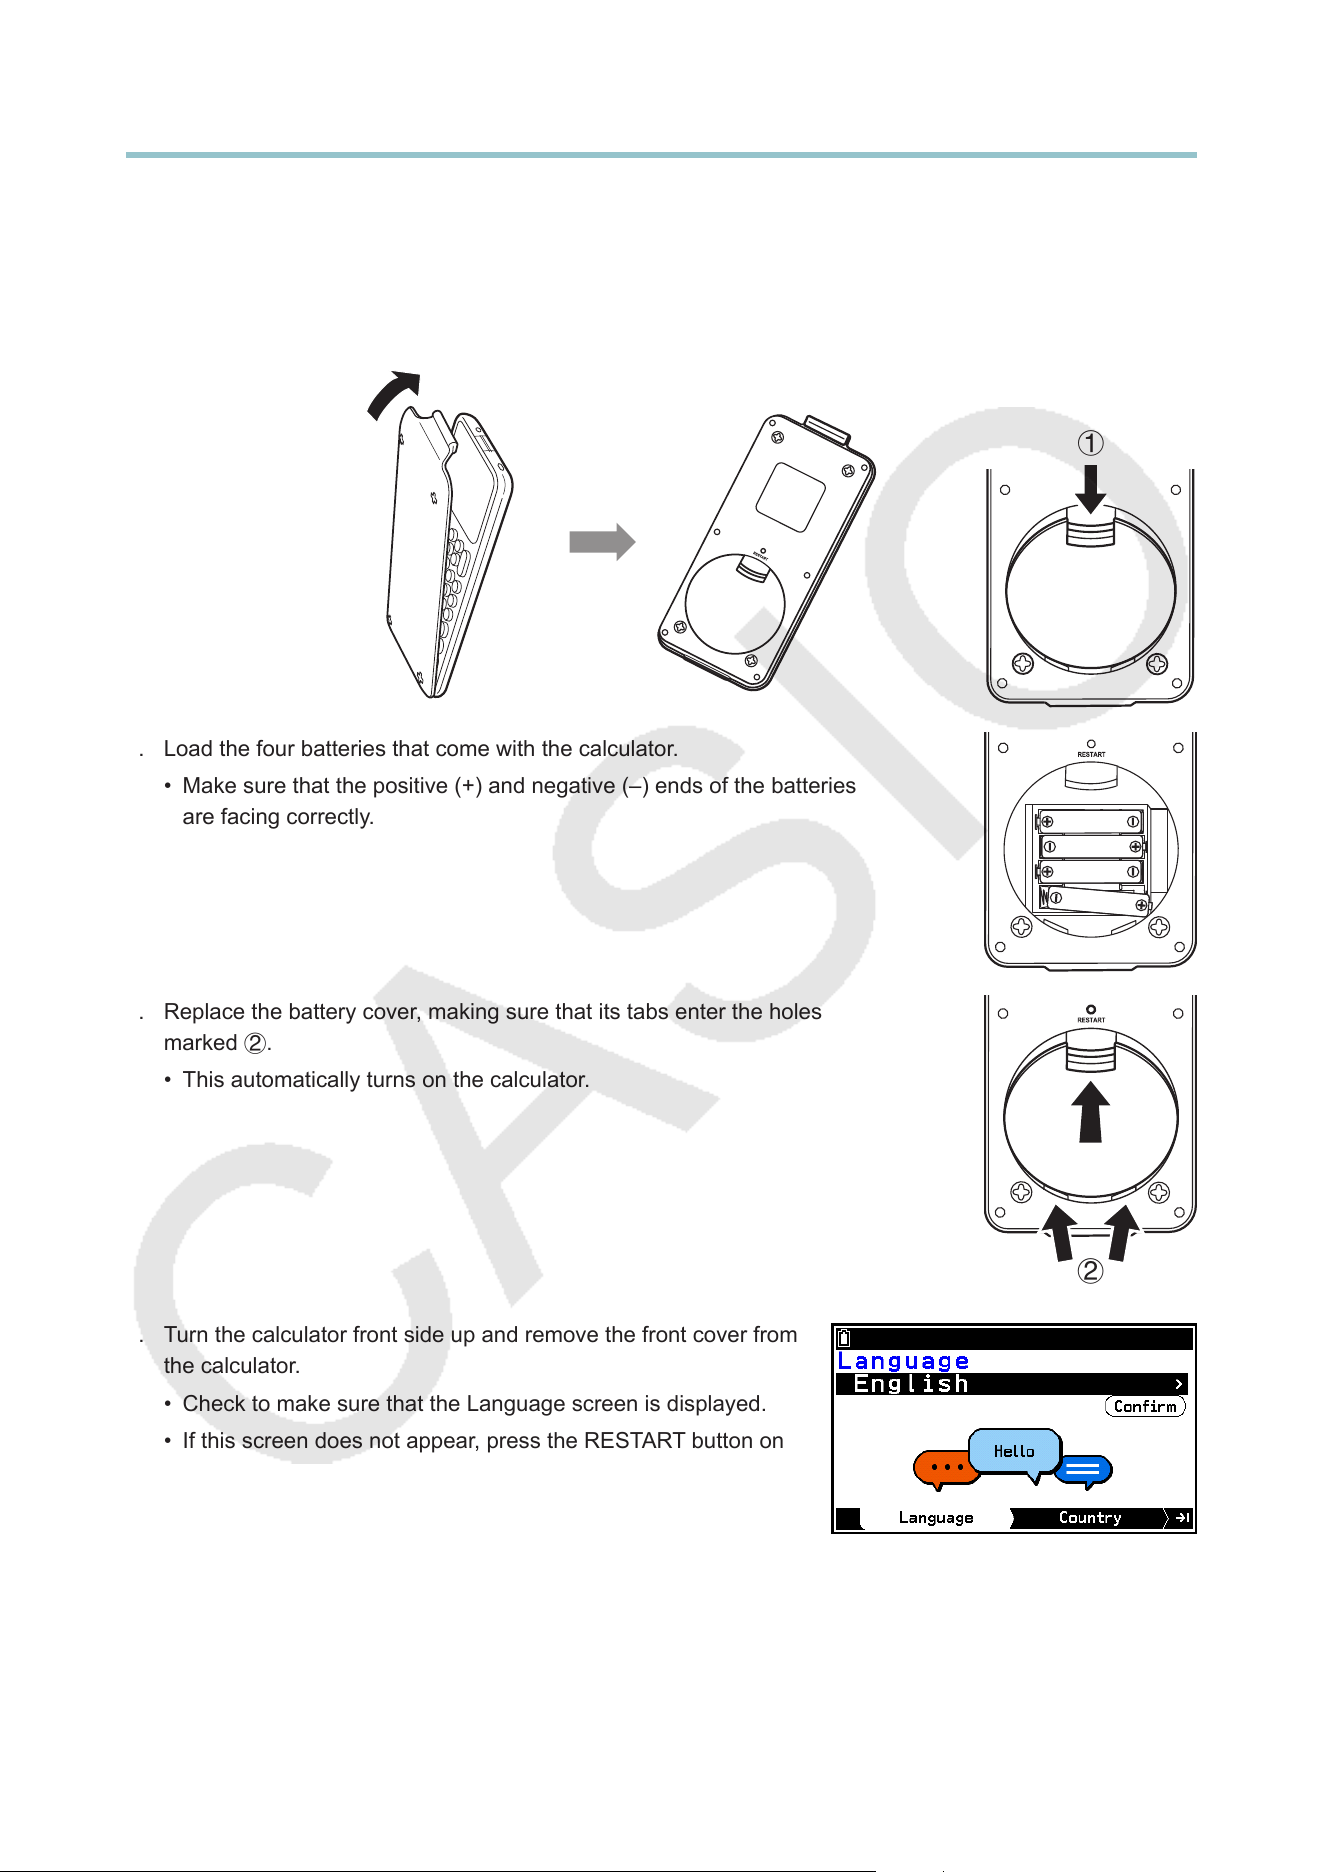
1. Making sure that you do not accidentally press the o key, attach the front cover to the front of the
calculator and then turn the calculator over. Remove the battery cover from the calculator by pulling with
your finger at the point marked 1.
1
2. Load the four batteries that come with the calculator.
• Make sure that the positive (+) and negative (–) ends of the batteries
are facing correctly.
3. Replace the battery cover, making sure that its tabs enter the holes
marked 2.
• This automatically turns on the calculator.
2
4. Turn the calculator front side up and remove the front cover from
the calculator.
• Check to make sure that the Language screen is displayed.
• If this screen does not appear, press the RESTART button on
the back of the calculator.
Important: It may take a little time for your calculator to start
up after you press the RESTART button.
8
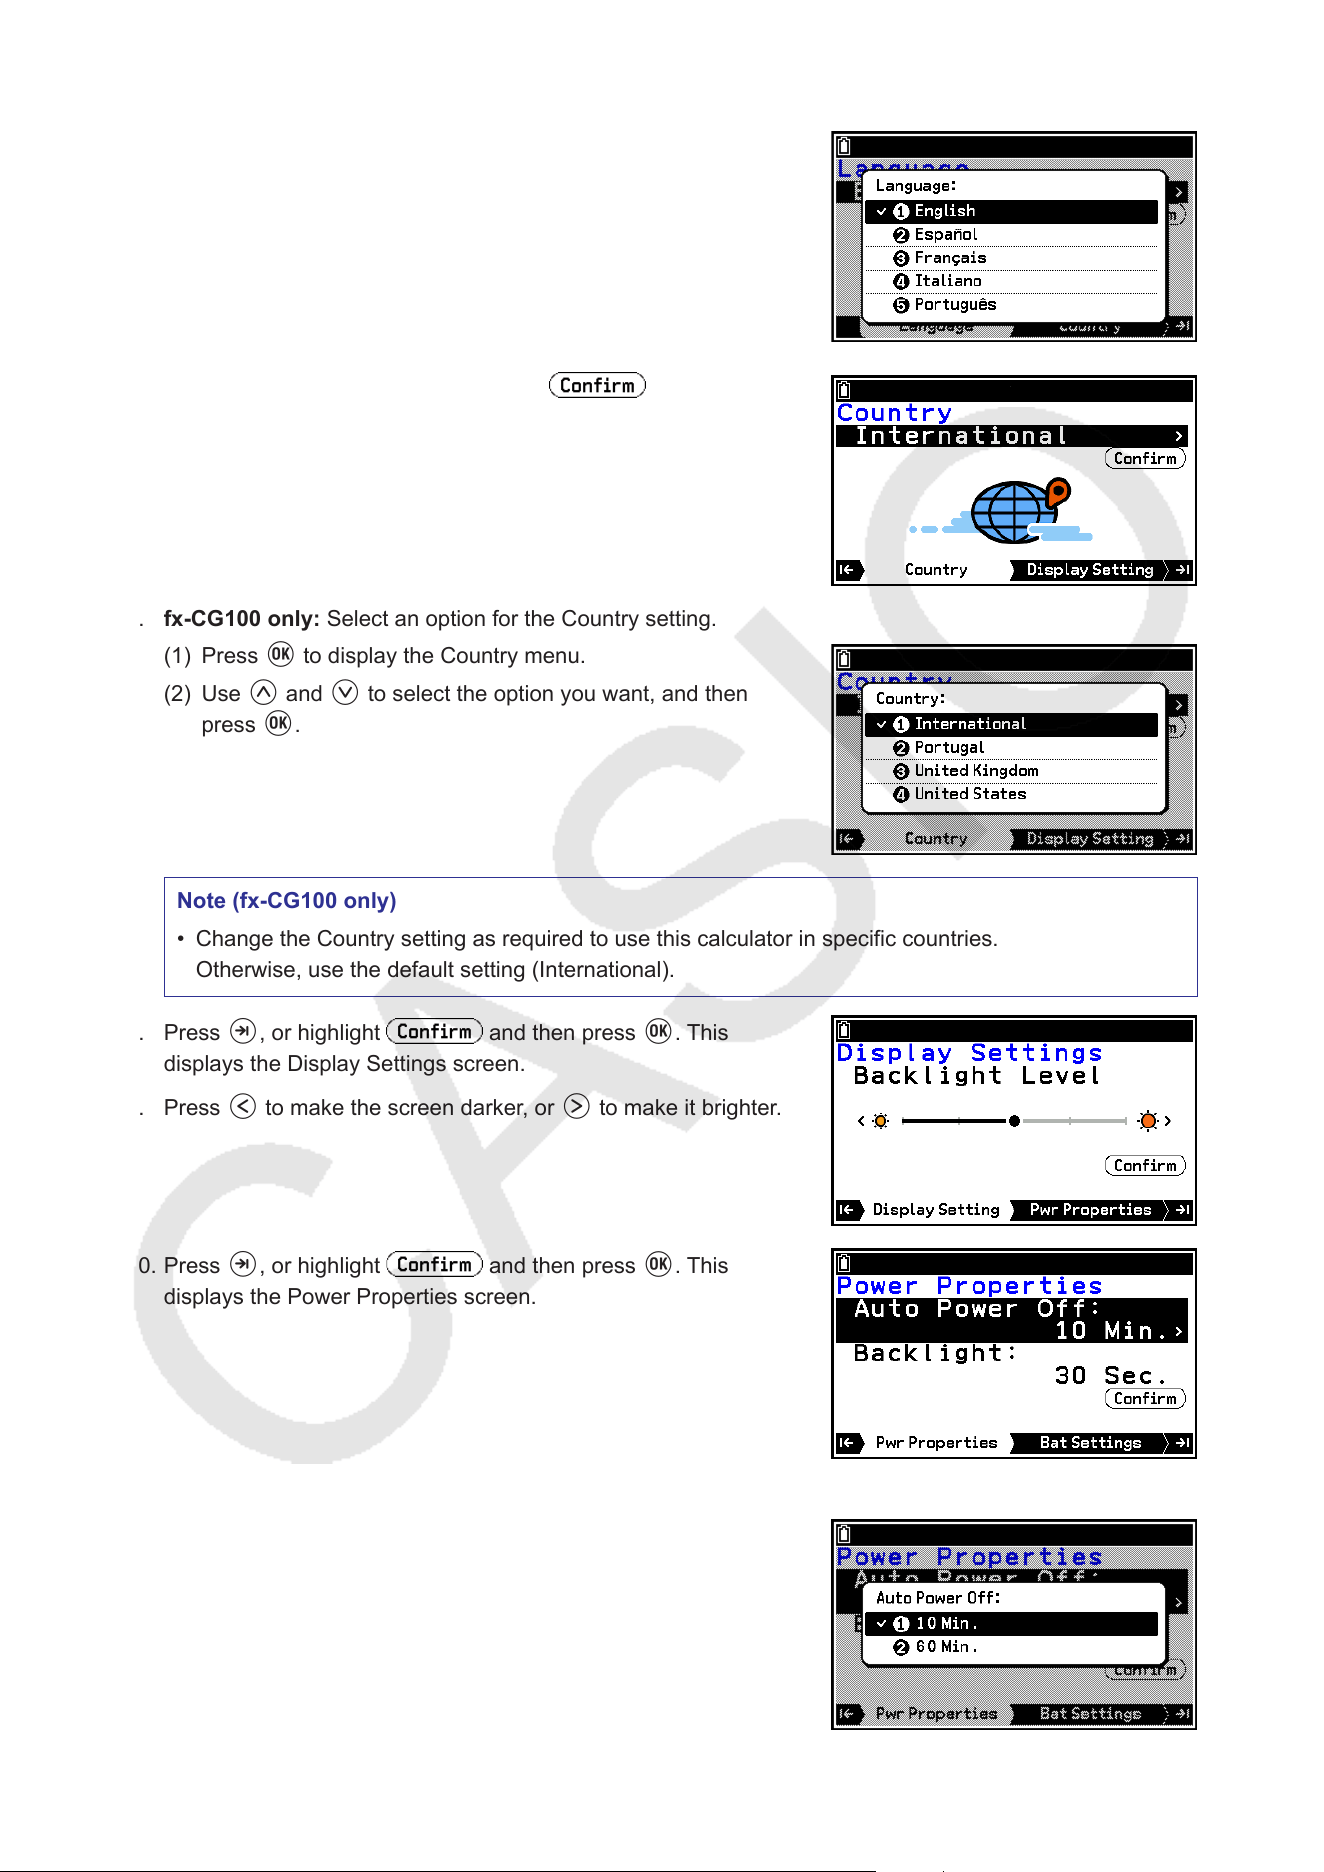
5. Select the language.
(1) Press O to display the language selection menu.
(2) Use u and d to select the language you want, and then
press O.
6. fx-CG100 only: Press >, or highlight and then press
O. This displays the Country screen.
7. fx-CG100 only: Select an option for the Country setting.
(1) Press O to display the Country menu.
(2) Use u and d to select the option you want, and then
press O.
Note (fx-CG100 only)
• Change the Country setting as required to use this calculator in specific countries.
Otherwise, use the default setting (International).
8. Press >, or highlight and then press O. This
displays the Display Settings screen.
9. Press l to make the screen darker, or r to make it brighter.
10. Press >, or highlight and then press O. This
displays the Power Properties screen.
11. Specify the auto power off trigger time.
(1) Press O to display the Auto Power Off menu.
(2) Use u and d to select 10 Min. to specify approximately
10 minutes or 60 Min. to specify approximately 60 minutes,
and then press O.
9
12. Specify the backlight duration time.
(1) Use u and d to select Backlight and then press O. This
displays the Backlight menu.
(2) Use u and d to select 30 Sec., 1 Min., or 3 Min., and
then press O.
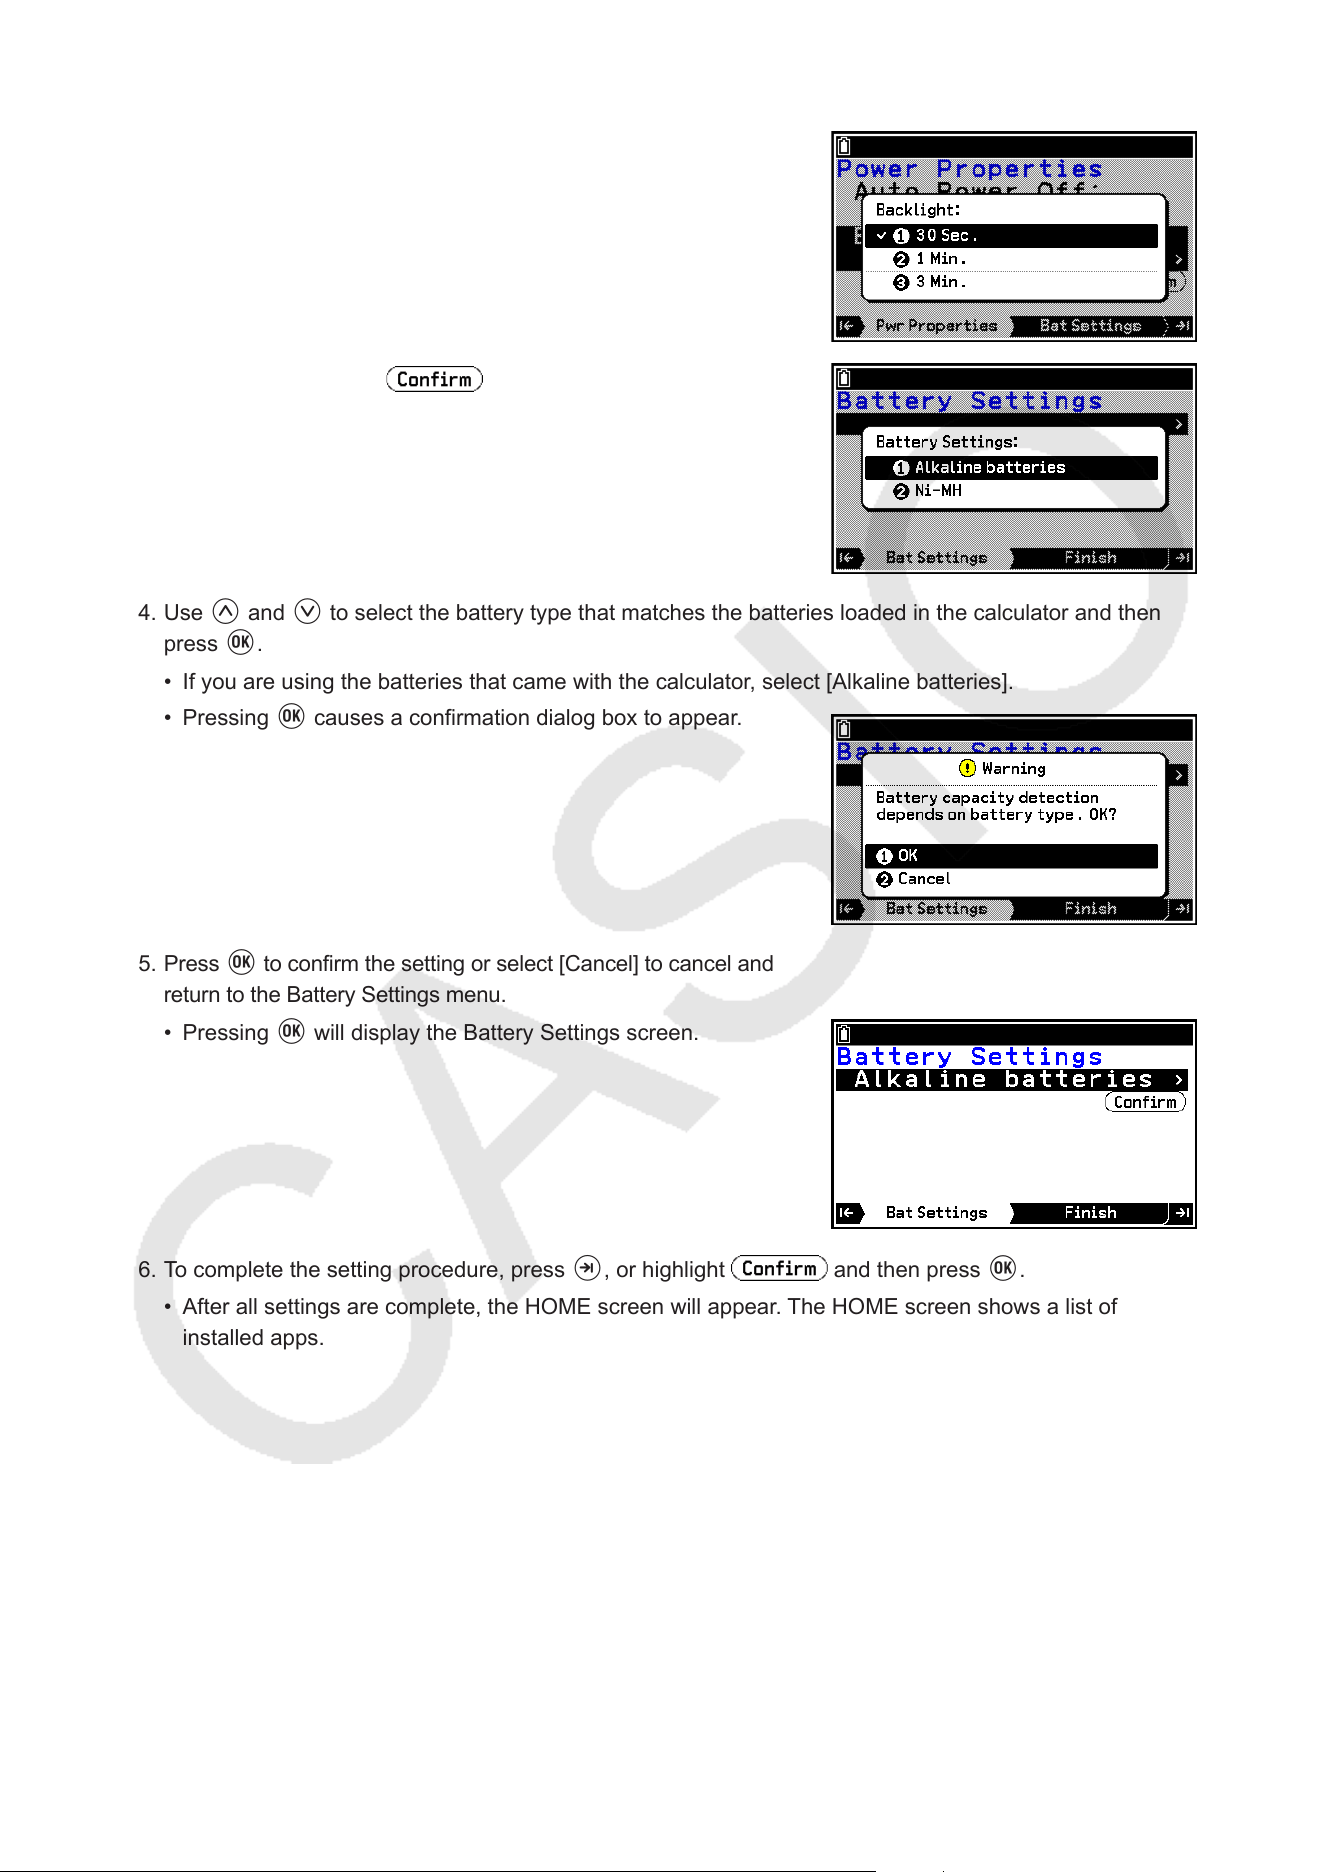
13. Press >, or highlight and then press O. This
displays the Battery Settings menu.
14. Use u and d to select the battery type that matches the batteries loaded in the calculator and then
press O.
• If you are using the batteries that came with the calculator, select [Alkaline batteries].
• Pressing O causes a confirmation dialog box to appear.
15. Press O to confirm the setting or select [Cancel] to cancel and
return to the Battery Settings menu.
• Pressing O will display the Battery Settings screen.
16. To complete the setting procedure, press >, or highlight and then press O.
• After all settings are complete, the HOME screen will appear. The HOME screen shows a list of
installed apps.
10
Power Supply
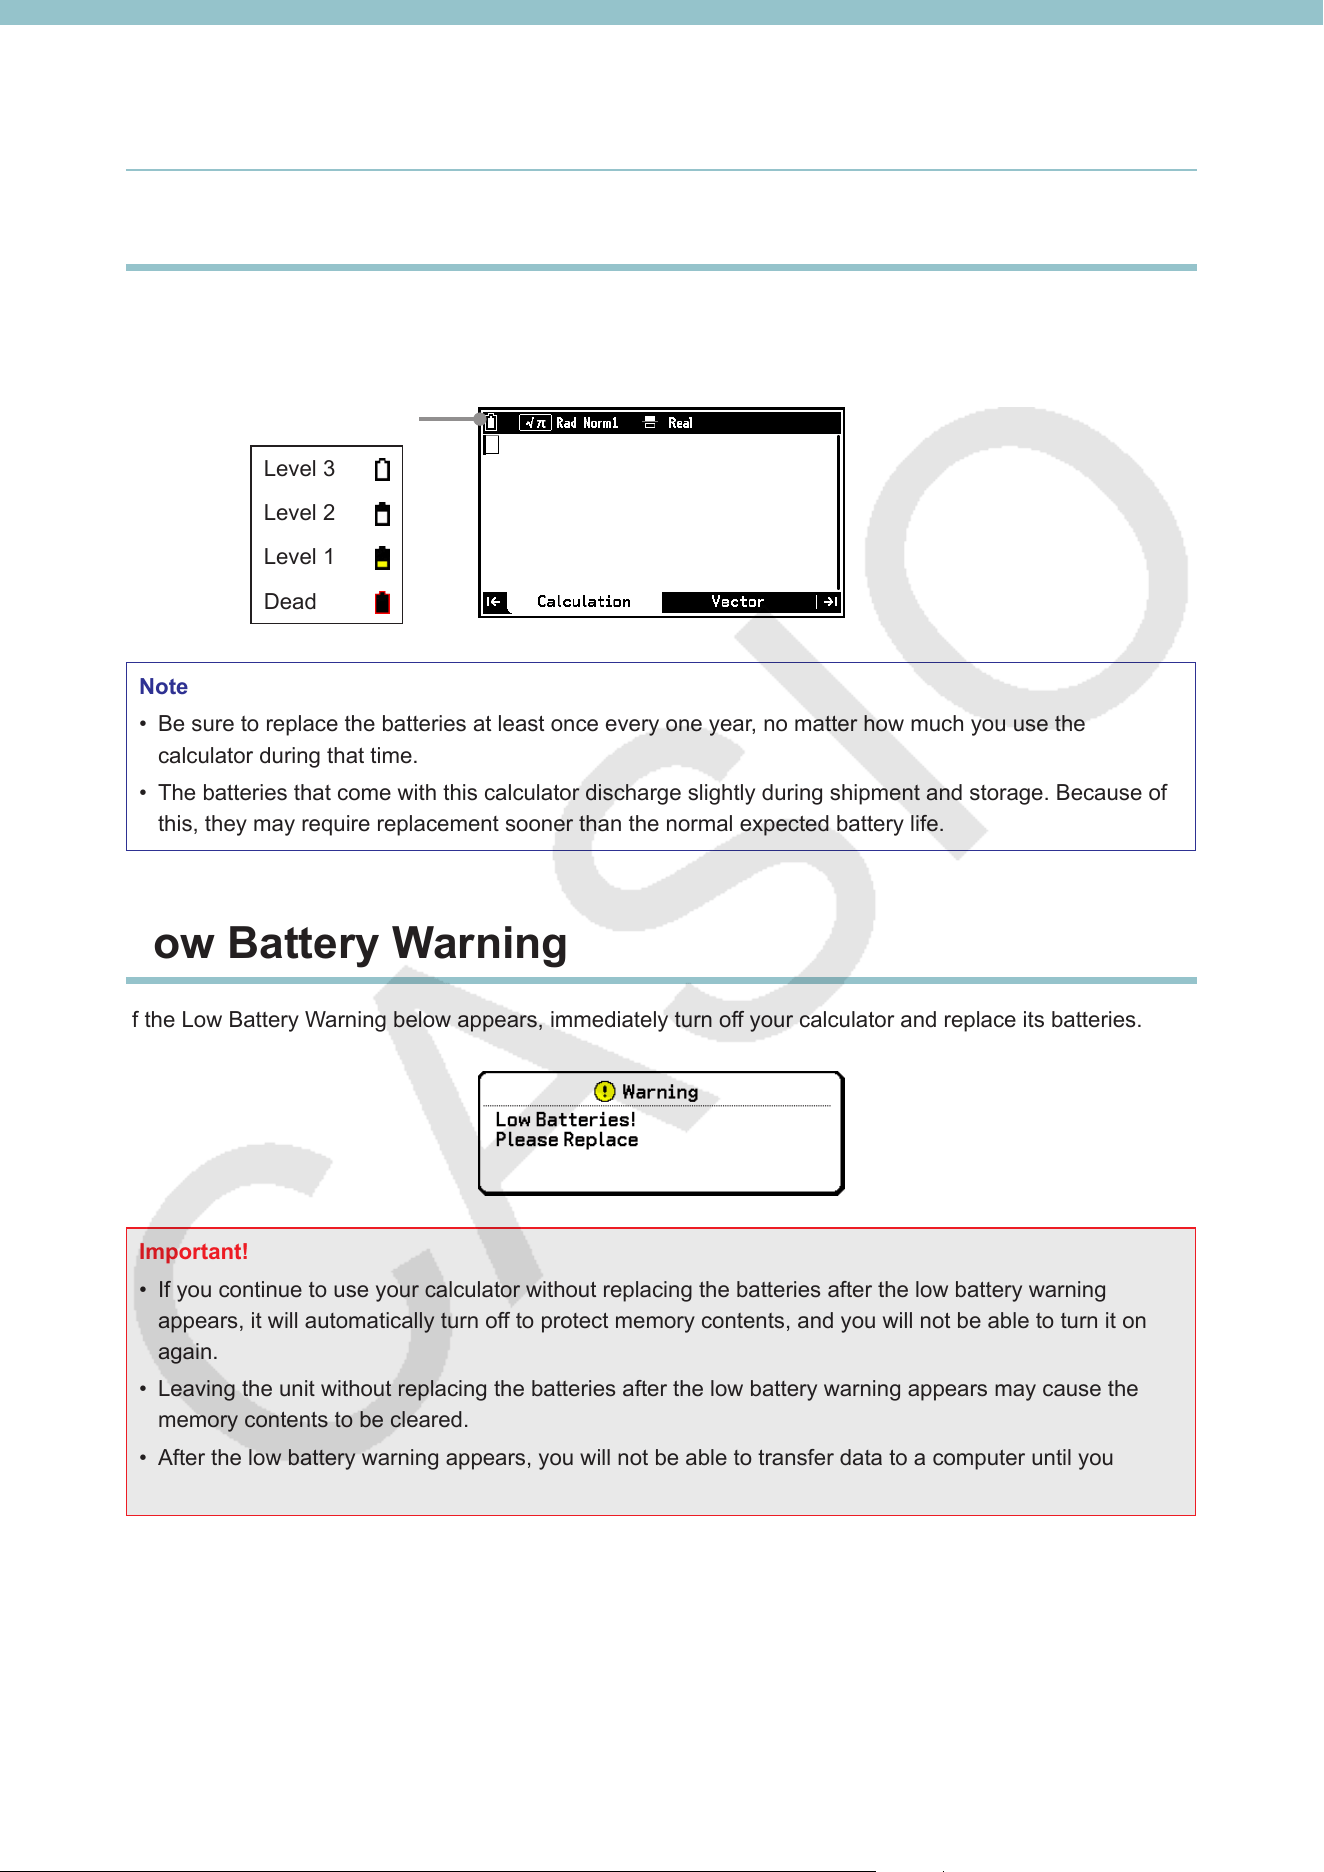
Battery Level Icon
This calculator is powered by four AAA-size alkaline batteries LR03 (AM4), or four nickel-metal hydride
batteries. An icon in the upper left corner of the screen indicates the current battery level.
Battery level icon
Level 3
Level 2
Level 1
Dead
Note
• Be sure to replace the batteries at least once every one year, no matter how much you use the
calculator during that time.
• The batteries that come with this calculator discharge slightly during shipment and storage. Because of
this, they may require replacement sooner than the normal expected battery life.
Low Battery Warning
If the Low Battery Warning below appears, immediately turn off your calculator and replace its batteries.
Important!
• If you continue to use your calculator without replacing the batteries after the low battery warning
appears, it will automatically turn off to protect memory contents, and you will not be able to turn it on
again.
• Leaving the unit without replacing the batteries after the low battery warning appears may cause the
memory contents to be cleared.
• After the low battery warning appears, you will not be able to transfer data to a computer until you
replace the batteries.
11
Replacing Batteries
Precautions
Incorrectly using batteries can cause them to burst or leak, possibly damaging the interior of the calculator.
Note the following precautions:
• Use only the batteries that are specifically listed in “Recommended Batteries” (page 11). Never use any
other type of batteries.
• Be sure that the positive (+) and negative (–) poles of each battery are facing in the proper directions.
• Never mix batteries of different brands or models.
• When using nickel-metal hydride batteries, make sure to fully charge the batteries before use.
• For details about how to charge nickel-metal hydride batteries, see the user documentation that comes
with the batteries.
• Note that the amount of operation between charges provided by nickel-metal hydride batteries may be
shorter than the life of alkaline batteries.
• Never mix batteries of different types.
• Never mix old batteries and new ones.
• Never leave dead batteries in the battery compartment.
• Remove the batteries if you do not plan to use the calculator for long periods.
• Never try to recharge the batteries supplied with the calculator.
• Do not expose batteries to direct heat, let them become shorted, or try to take them apart.
• For details about how to use batteries, see the user documentation that comes with the batteries.
(Should a battery leak, clean out the battery compartment of the calculator immediately, taking care to avoid
letting the battery fluid come into direct contact with your skin.)
Keep batteries out of the reach of small children. If swallowed, consult with a physician
immediately.
Recommended Batteries
AAA-size alkaline batteries:
LR03 (AM4)
AAA-size nickel-metal hydride batteries:
Duracell rechargeable
Energizer rechargeable
Panasonic eneloop
Important!
• Use only the specified charger to charge batteries.
• Rechargeable batteries must be removed from the calculator for charging.
• For information about using rechargeable batteries or their specified charger, be sure to read the user
documentation and precautions that come with each item, and use them only as directed.
12
To replace the batteries
Important!
• Never turn on the calculator while the batteries are removed or not loaded correctly. Doing so can cause
memory data to be deleted and malfunction of the calculator. If mishandling of batteries causes such
problems, correctly load batteries and then perform the restart operation to resume normal operation.
• Be sure to replace all four batteries with new ones.
• After replacing batteries, check to make sure that battery settings are configured correctly.
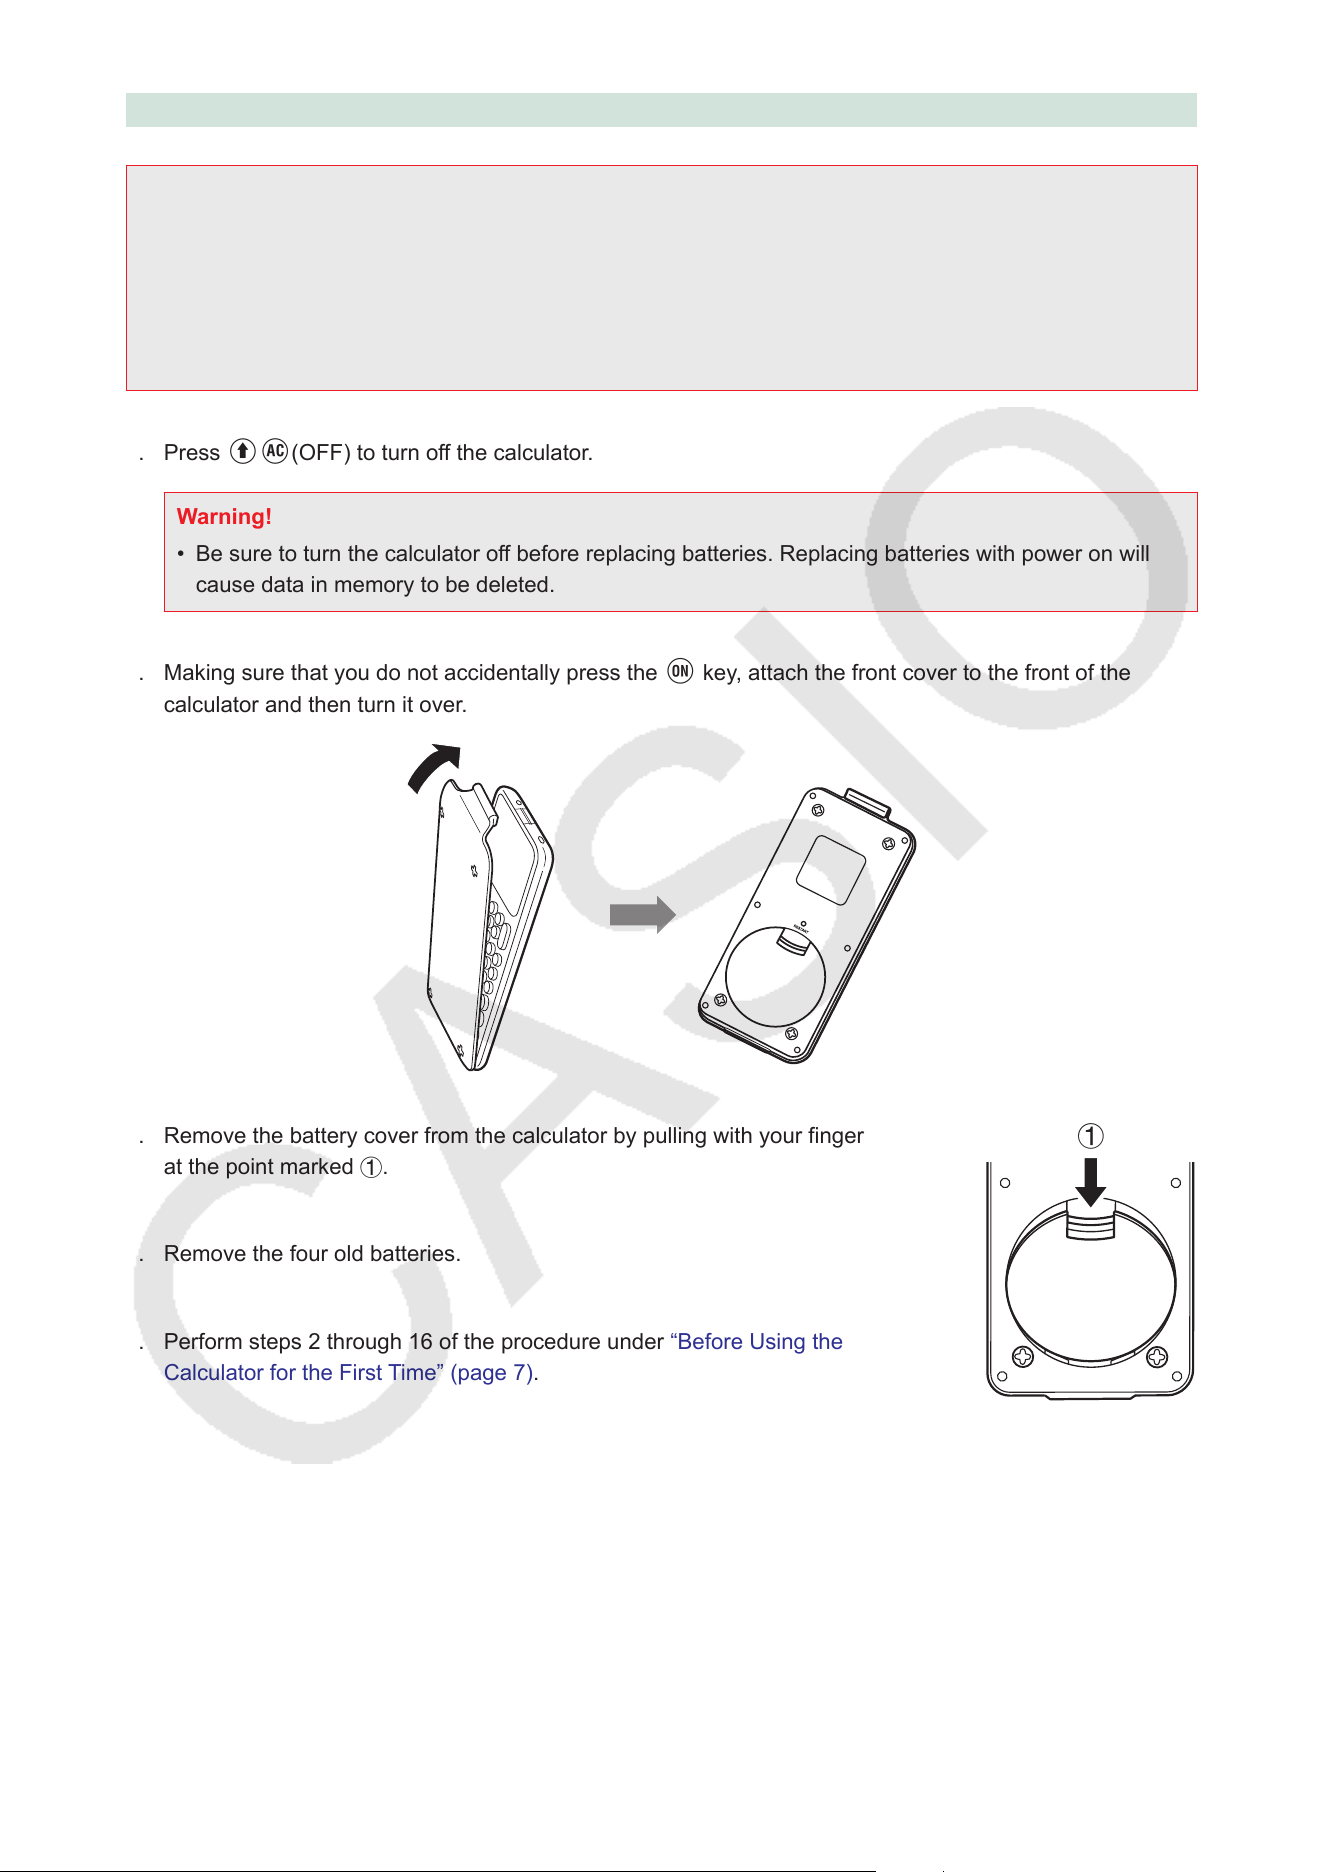
1. Press sa(OFF) to turn off the calculator.
Warning!
• Be sure to turn the calculator off before replacing batteries. Replacing batteries with power on will
cause data in memory to be deleted.
2. Making sure that you do not accidentally press the o key, attach the front cover to the front of the
calculator and then turn it over.
3. Remove the battery cover from the calculator by pulling with your finger
at the point marked 1.
4. Remove the four old batteries.
5. Perform steps 2 through 16 of the procedure under “Before Using the
Calculator for the First Time” (page 7).
1
13
Auto Power Off Function
Calculator power turns off automatically if you do not perform any operation within the Auto Power Off trigger
time you specify. You can specify either approximately 10 minutes or approximately 60 minutes as the trigger
time (see “Configuring Auto Power Off and Backlight Duration Settings (Power Properties)” in the separate
Software User’s Guide). To restore power, press o.
Note
• Any data in calculator main memory (ongoing calculation operation, ongoing graphing operation data,
etc.) is retained for approximately 60 minutes when power is turned off manually or by Auto Power Off.
This means the data will be restored if you turn the calculator back on within about 60 minutes after
it is turned off. If you turn the calculator back on after 60 minutes, main memory data is cleared and
the initial screen of the app you were in when you turned off the calculator will appear on the display.
Storage memory contents are unchanged.
14
Before Assuming Malfunction
Reset and Restart
If a problem continues to occur, try performing the steps below starting from 1.
1
Reset your calculator’s settings.
(1) h > System
(2) Select [Reset] > [Settings].
(3) On the dialog that appears, select [OK].
If this does not resolve the problem, try step 2.
2
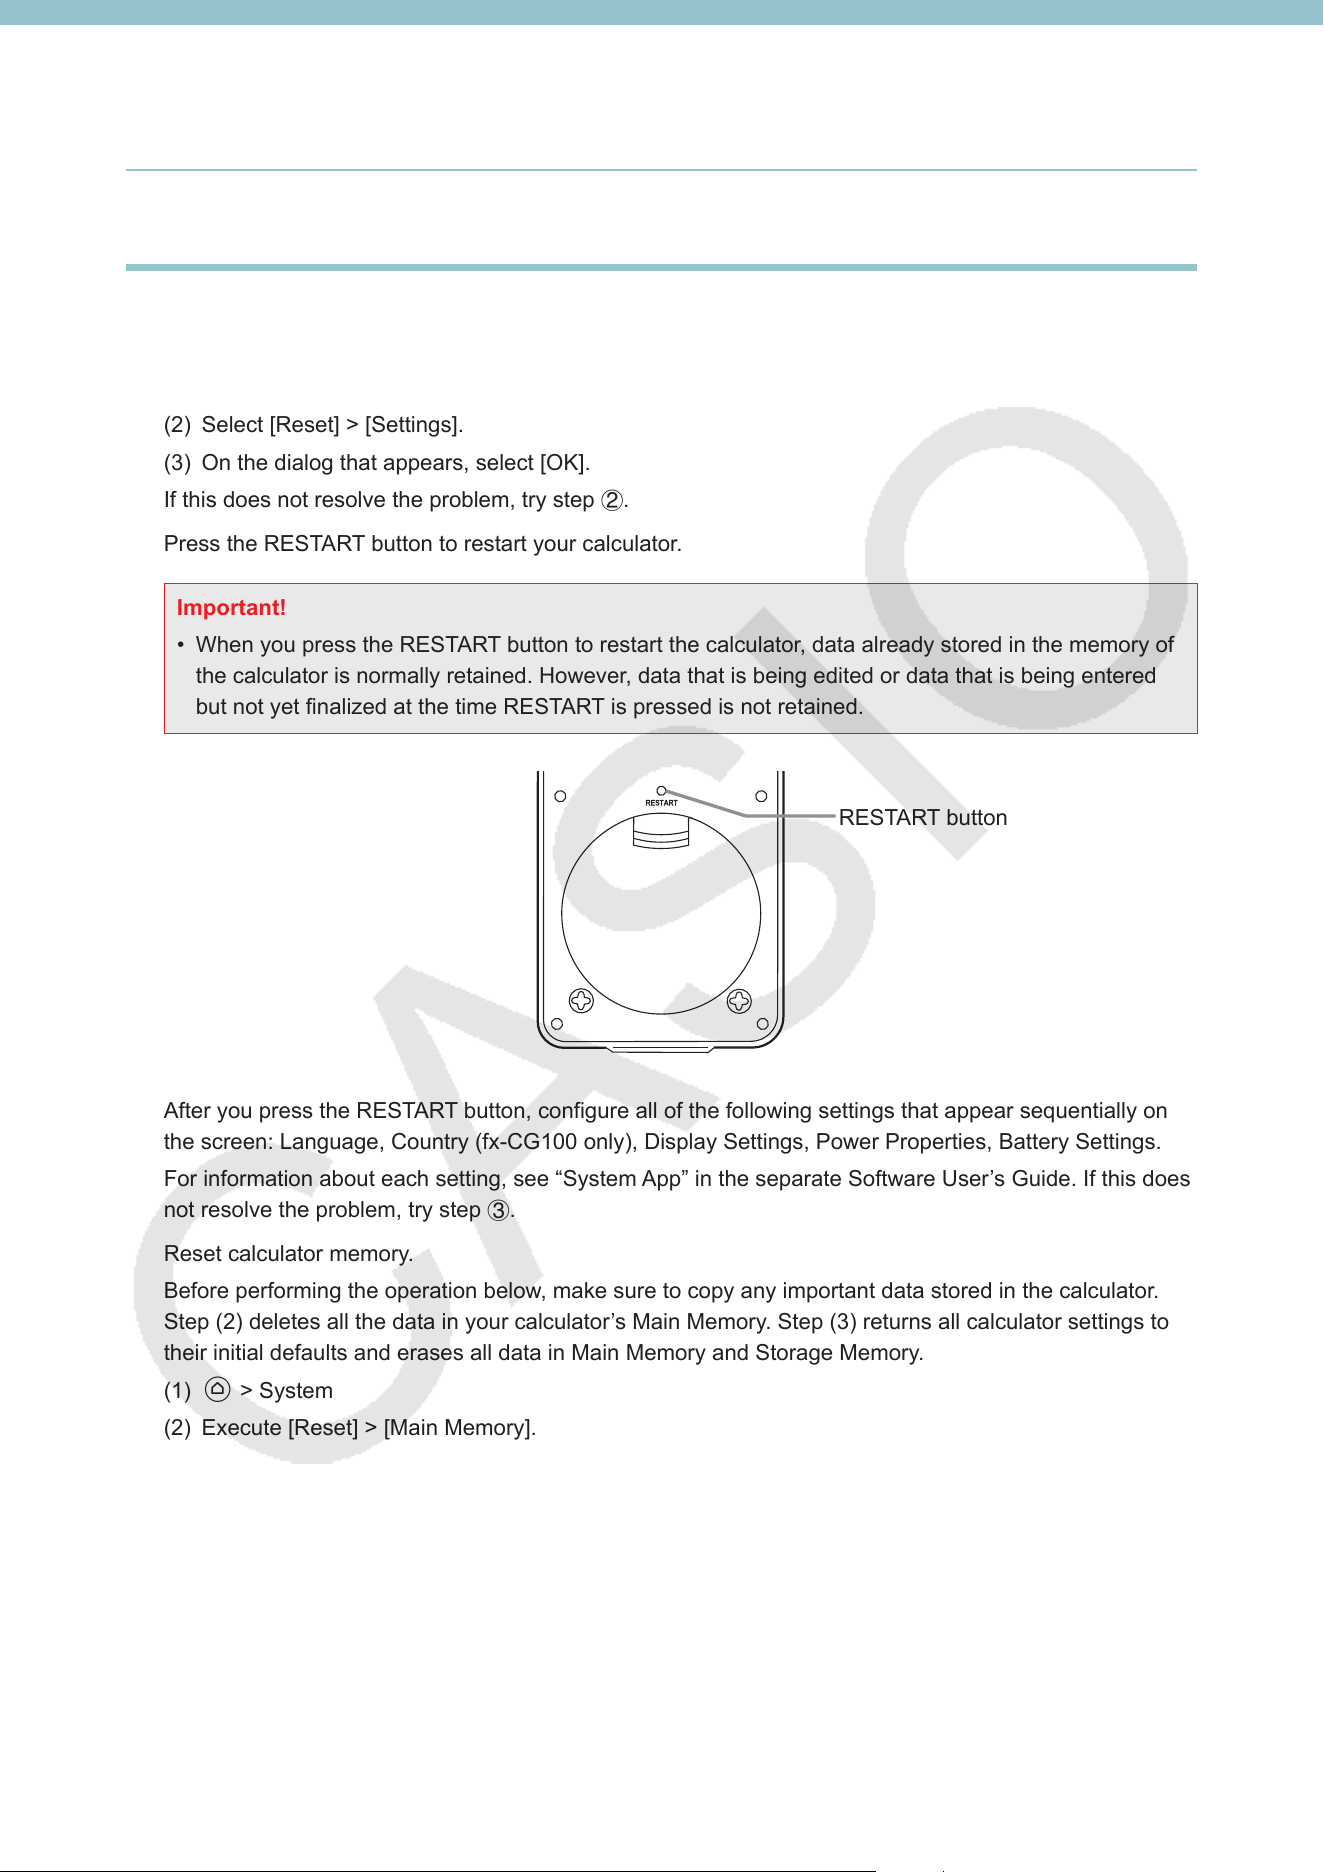
Press the RESTART button to restart your calculator.
Important!
• When you press the RESTART button to restart the calculator, data already stored in the memory of
the calculator is normally retained. However, data that is being edited or data that is being entered
but not yet finalized at the time RESTART is pressed is not retained.
RESTART button
After you press the RESTART button, configure all of the following settings that appear sequentially on
the screen: Language, Country (fx-CG100 only), Display Settings, Power Properties, Battery Settings.
For information about each setting, see “System App” in the separate Software User’s Guide. If this does
not resolve the problem, try step 3.
3
Reset calculator memory.
Before performing the operation below, make sure to copy any important data stored in the calculator.
Step (2) deletes all the data in your calculator’s Main Memory. Step (3) returns all calculator settings to
their initial defaults and erases all data in Main Memory and Storage Memory.
(1) h > System
(2) Execute [Reset] > [Main Memory].
(3) If the operation does not improve, execute [Reset] > [Initialize All].
For information about the reset operation, see “Resetting the Calculator (Reset)” in the separate
Software User’s Guide.
15
Specifications
Main Specifications
Variables 28
Calculation range
±1 × 10
–99
to ±9.999999999 × 10
99
and 0. Internal operations use 15-digit
mantissa.
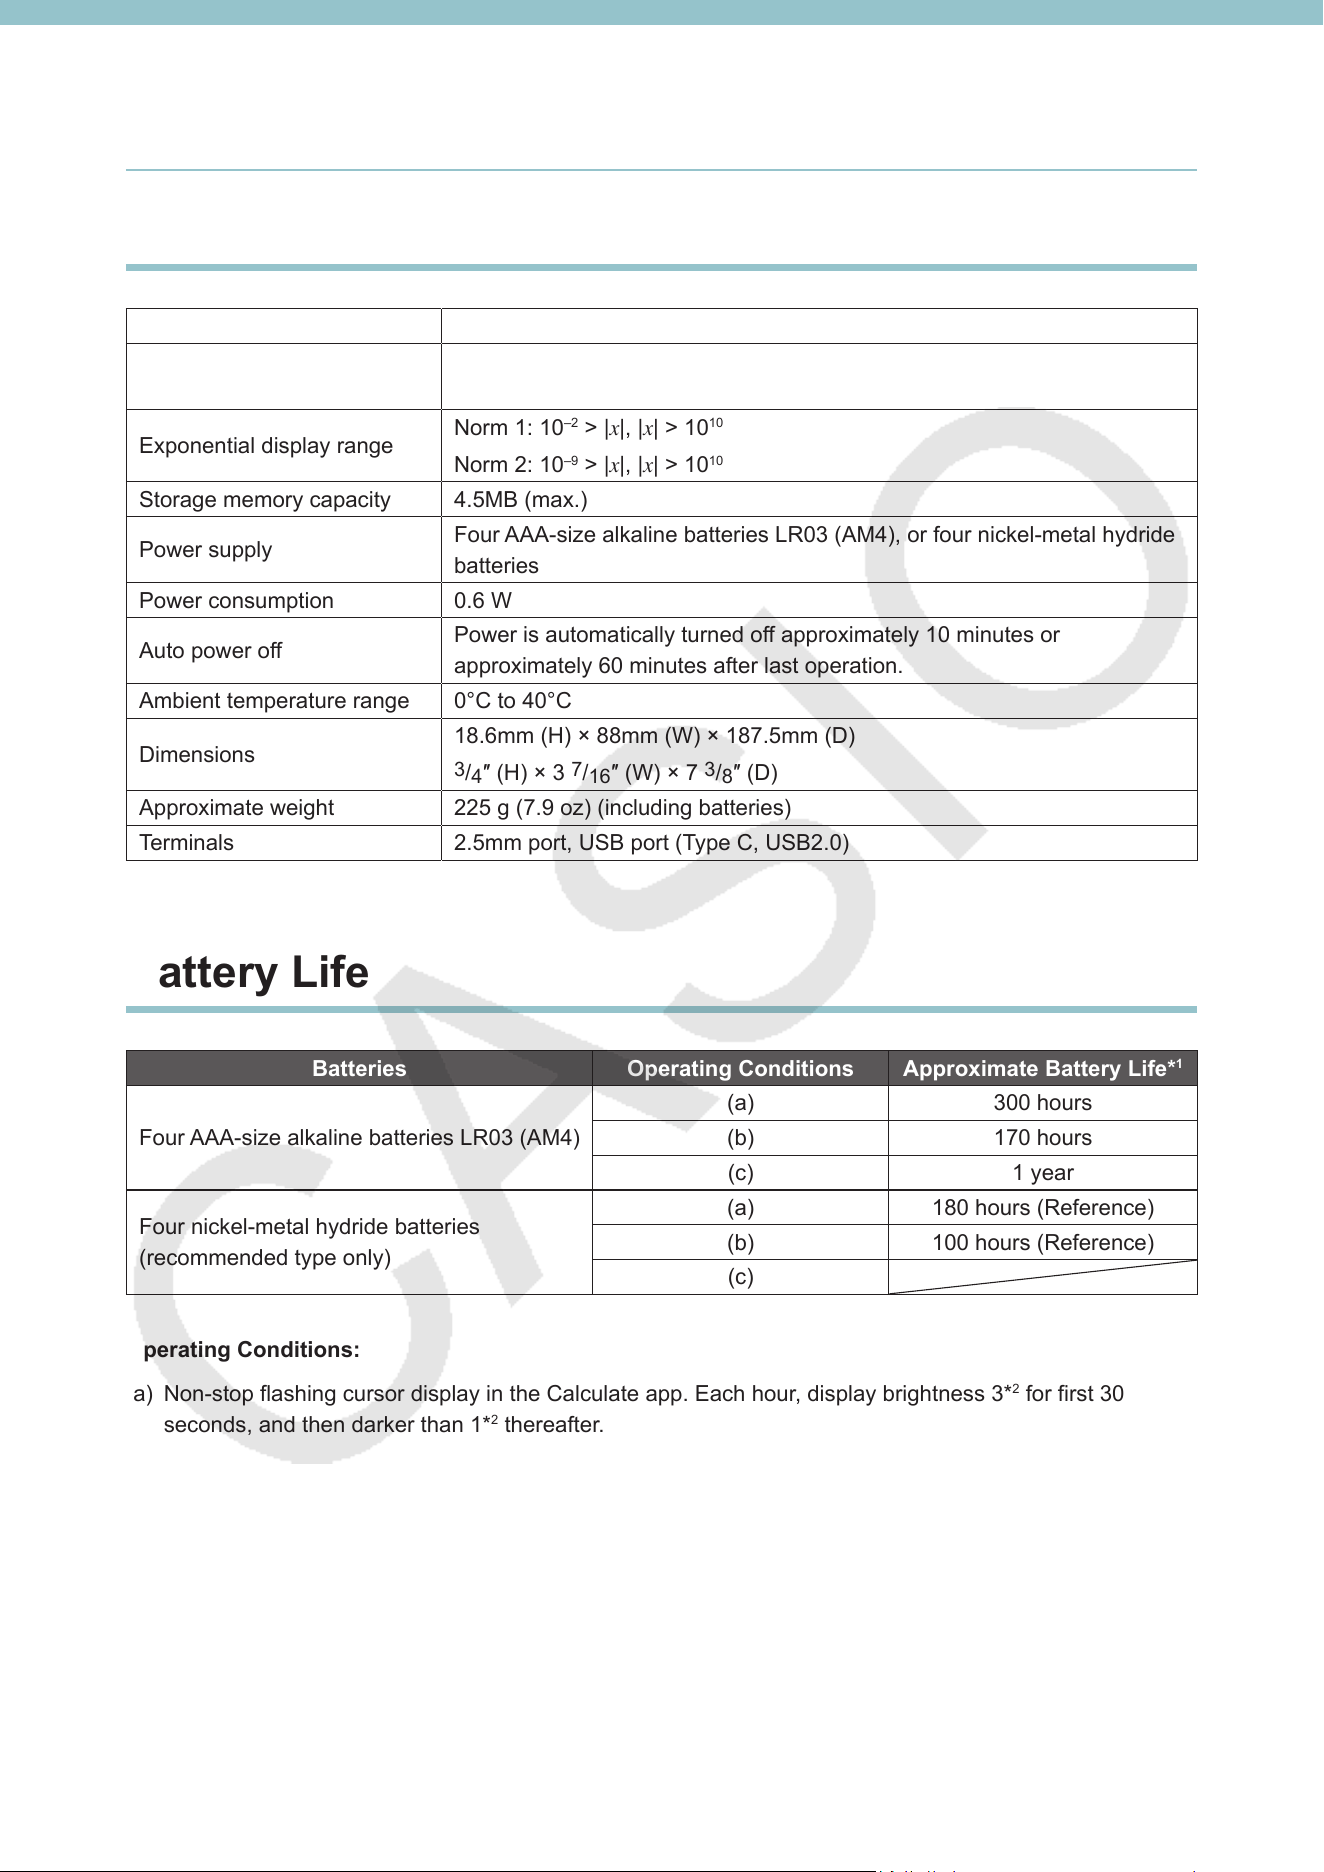
Exponential display range
Norm 1: 10
–2
> |x|, |x| > 10
10
Norm 2: 10
–9
> |x|, |x| > 10
10
Storage memory capacity 4.5MB (max.)
Power supply
Four AAA-size alkaline batteries LR03 (AM4), or four nickel-metal hydride
batteries
Power consumption 0.6 W
Auto power off
Power is automatically turned off approximately 10 minutes or
approximately 60 minutes after last operation.
Ambient temperature range 0°C to 40°C
Dimensions
18.6mm (H) × 88mm (W) × 187.5mm (D)
3
/
4
″ (H) × 3
7
/
16
″ (W) × 7
3
/
8
″ (D)
Approximate weight 225 g (7.9 oz) (including batteries)
Terminals 2.5mm port, USB port (Type C, USB2.0)
Battery Life
Batteries Operating Conditions Approximate Battery Life*
1
Four AAA-size alkaline batteries LR03 (AM4)
(a) 300 hours
(b) 170 hours
(c) 1 year
Four nickel-metal hydride batteries
(recommended type only)
(a) 180 hours (Reference)
(b) 100 hours (Reference)
(c)
Operating Conditions:
(a) Non-stop flashing cursor display in the Calculate app. Each hour, display brightness 3*
2
for first 30
seconds, and then darker than 1*
2
thereafter.
(b) Repeat of one-hour cycle of (1), (2), and (3) below.
(1) HOME screen display for 5 minutes (The display brightness setting is 3*
2
for first 30 seconds, and
then darker than 1*
2
thereafter.)
(2) Calculation operations in the Calculate app for 5 minutes (display brightness 3*
2
)
(3) Flashing cursor in the Calculate app for 50 minutes (The display brightness setting is 3*
2
for first 30
seconds, and then darker than 1*
2
thereafter.)
(c) Power off
16
*1 New alkaline batteries or fully-charged new nickel-metal hydride batteries used in an ambient
temperature of 25°C. Battery life values are approximate and are intended for reference only.
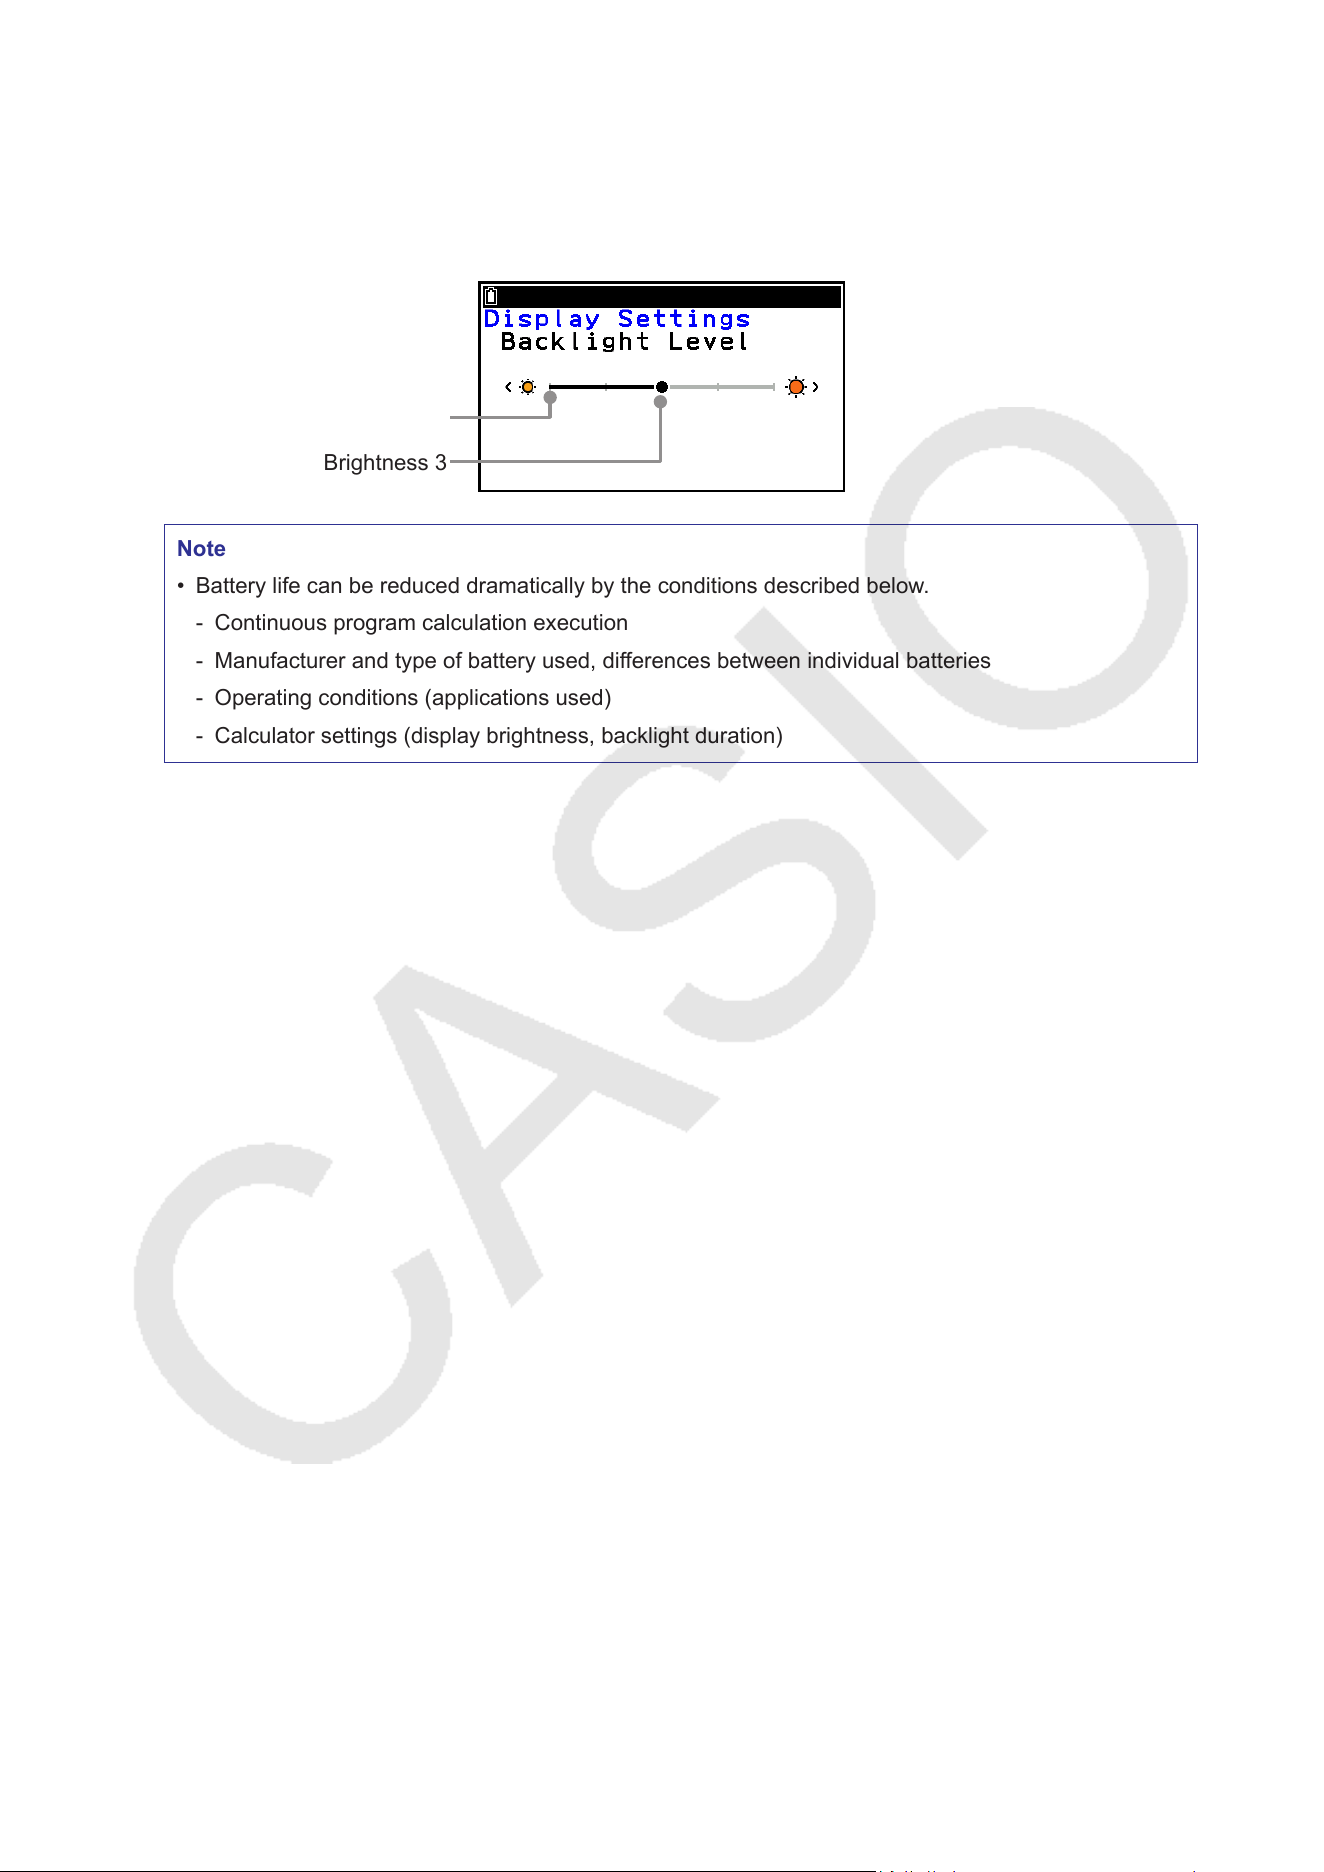
*2 “3” and “1” for display brightness represent settings on the Display Settings screen (see figure below).
For information about how to adjust display brightness, see “System App” in the separate Software
User’s Guide.
Brightness 1
Brightness 3
Note
• Battery life can be reduced dramatically by the conditions described below.
- Continuous program calculation execution
- Manufacturer and type of battery used, differences between individual batteries
- Operating conditions (applications used)
- Calculator settings (display brightness, backlight duration)

CASIO COMPUTER CO., LTD.
6-2, Hon-machi 1-chome
Shibuya-ku, Tokyo 151-8543, Japan

