Technical Support and E-Warranty Certificate
www.vevor.com/support
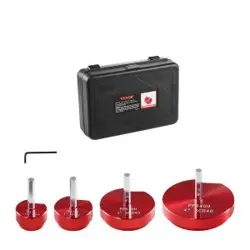
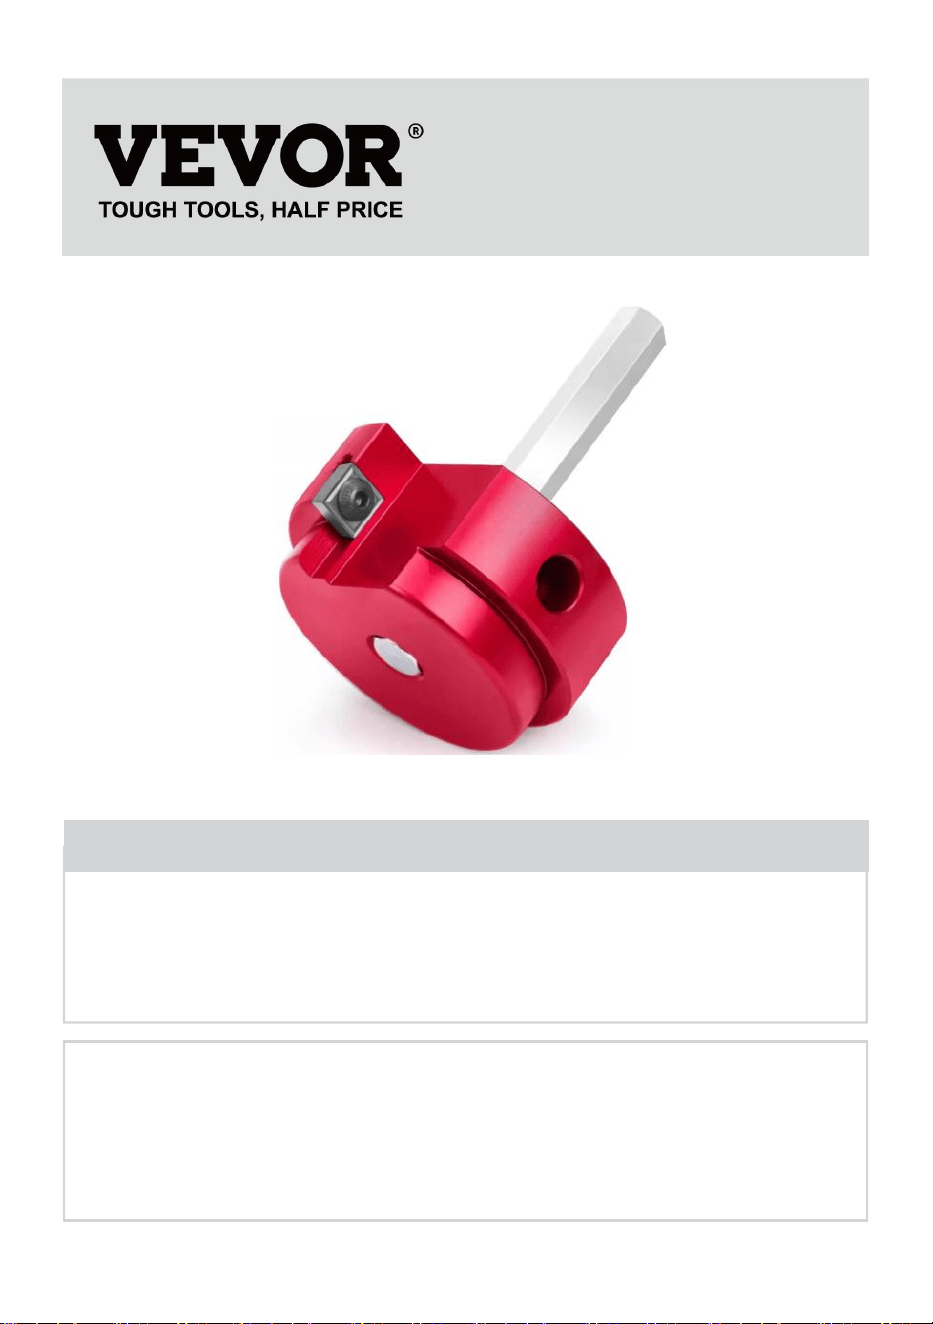
PVC PIPE REAMER KIT
USER MANUAL
MODEL:04525 / PPK4 / PPK6 / PPK7 / PPK8
We continue to be committed to provide you tools with competitive price.
"Save Half", "Half Price" or any other similar expressions used by us only
represents an estimate of savings you might benefit from buying certain tools
with us compared to the major top brands and does not necessarily mean to cover
all categories of tools offered by us. You are kindly reminded to verify carefully
when you are placing an order with us if you are actually Saving
Half in comparison with the top major brands.
MODEL:04525 / PPK4 / PPK6 / PPK7 / PPK8
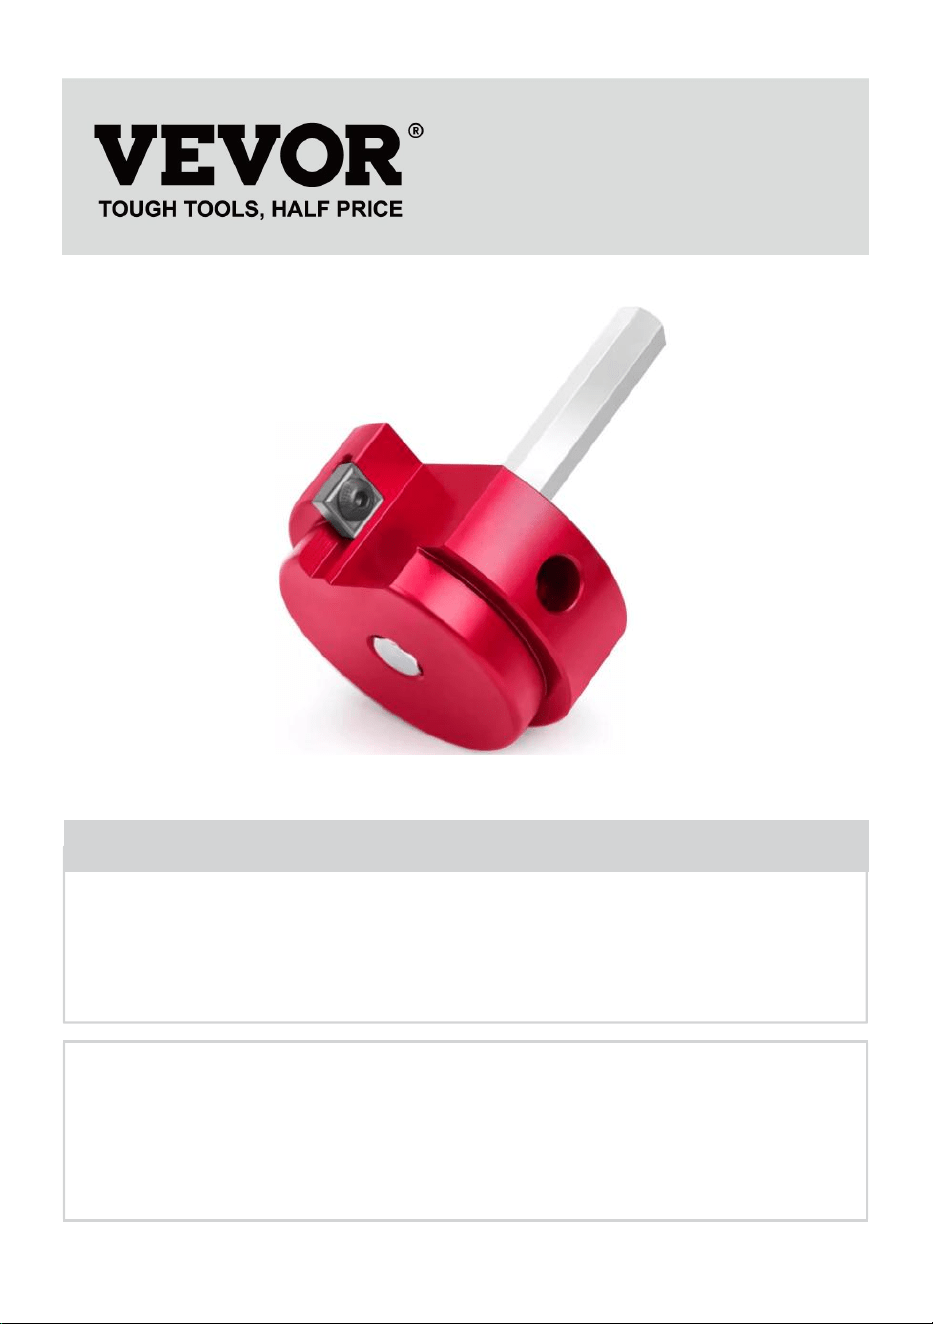
(The picture is for reference only, please refer to the actual object)
Have product questions? Need technical support? Please feel free to
contact us:
Technical Support and E-Warranty Certificate
www.vevor.com/support
NEED HELP? CONTACT US!
This is the original instruction, please read all manual instructions
carefully before operating. VEVOR reserves a clear interpretation of our
user manual. The appearance of the product shall be subject to the
product you received. Please forgive us that we won't inform you again if
there are any technology or software updates on our product.
PVC Pipe Reamer Kit

Warning-To reduce the risk of injury, user must read instructions
manual carefully.
WARNING:
1
、
3” and 4” fitting reamers create a large reaction torque that can cause
injury to operator, therefore a standard 1/2” right angle drill is
recommended. Use caution when using these tools. For reaming 3” or 4”, a
lower RPM is recommended to reduce heat and possible distortion of the
fitting.
NOTE:
1
、
These reamers can be used with standard or cordless drills. For most
effective use, run the drill at a low or medium RPM. Do not use impact
drills.
2、Not recommended for high pressure supply systems or for vent side of
gas burning appliance piping systems.
3、Suggest using a 1.5 inch or larger reamer and an electric drill with a
power of no less than 1.2KW.
4、Tip for use: During rotary cutting, it is necessary to lift the drill bit at
regular intervals to remove residue before cutting again.
5、The inner diameter of the residual/waste pipeline size that needs to be
removed is the size of the purchased reamer.
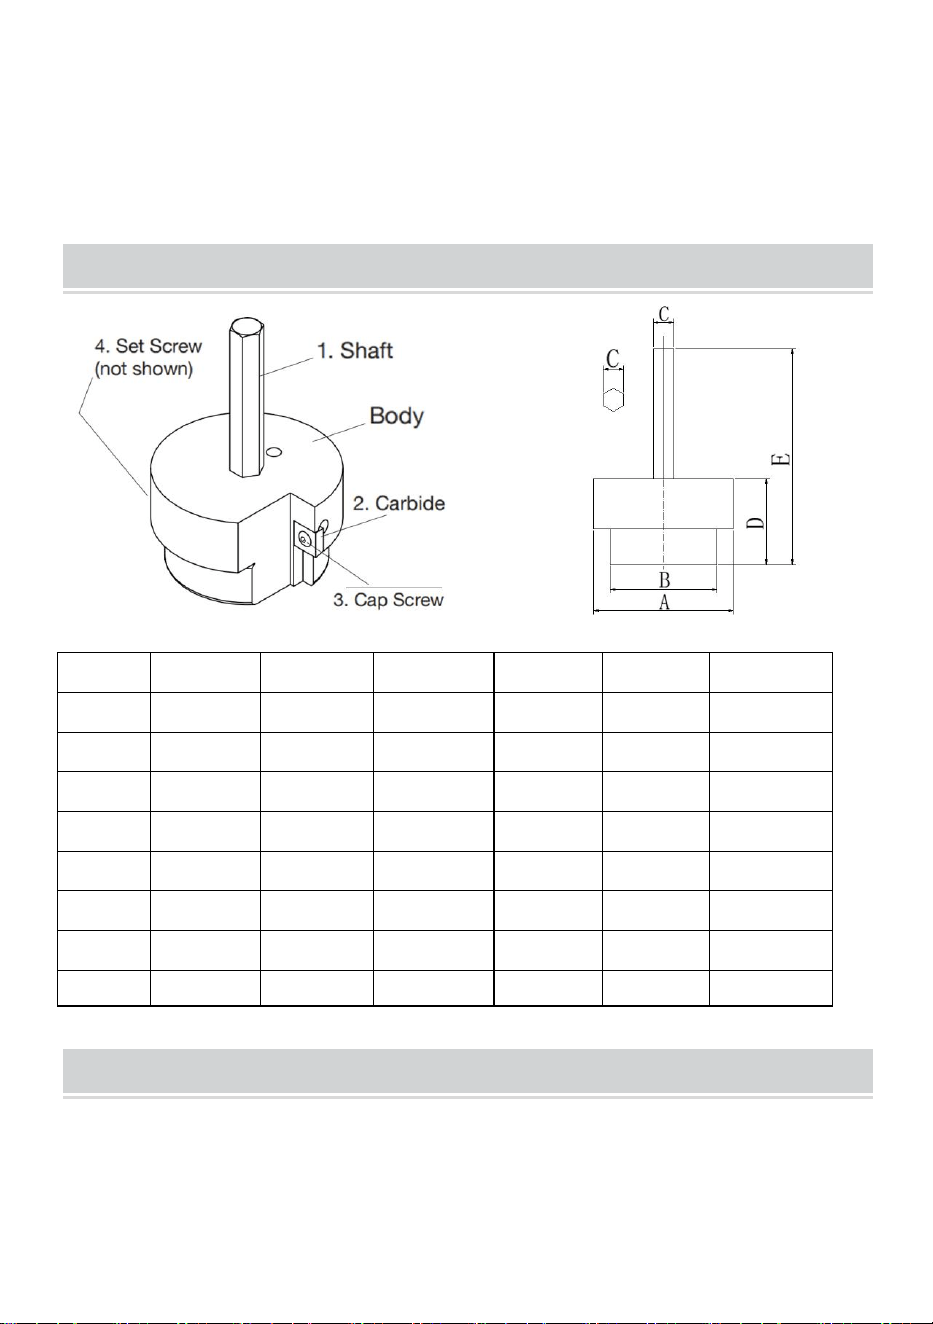
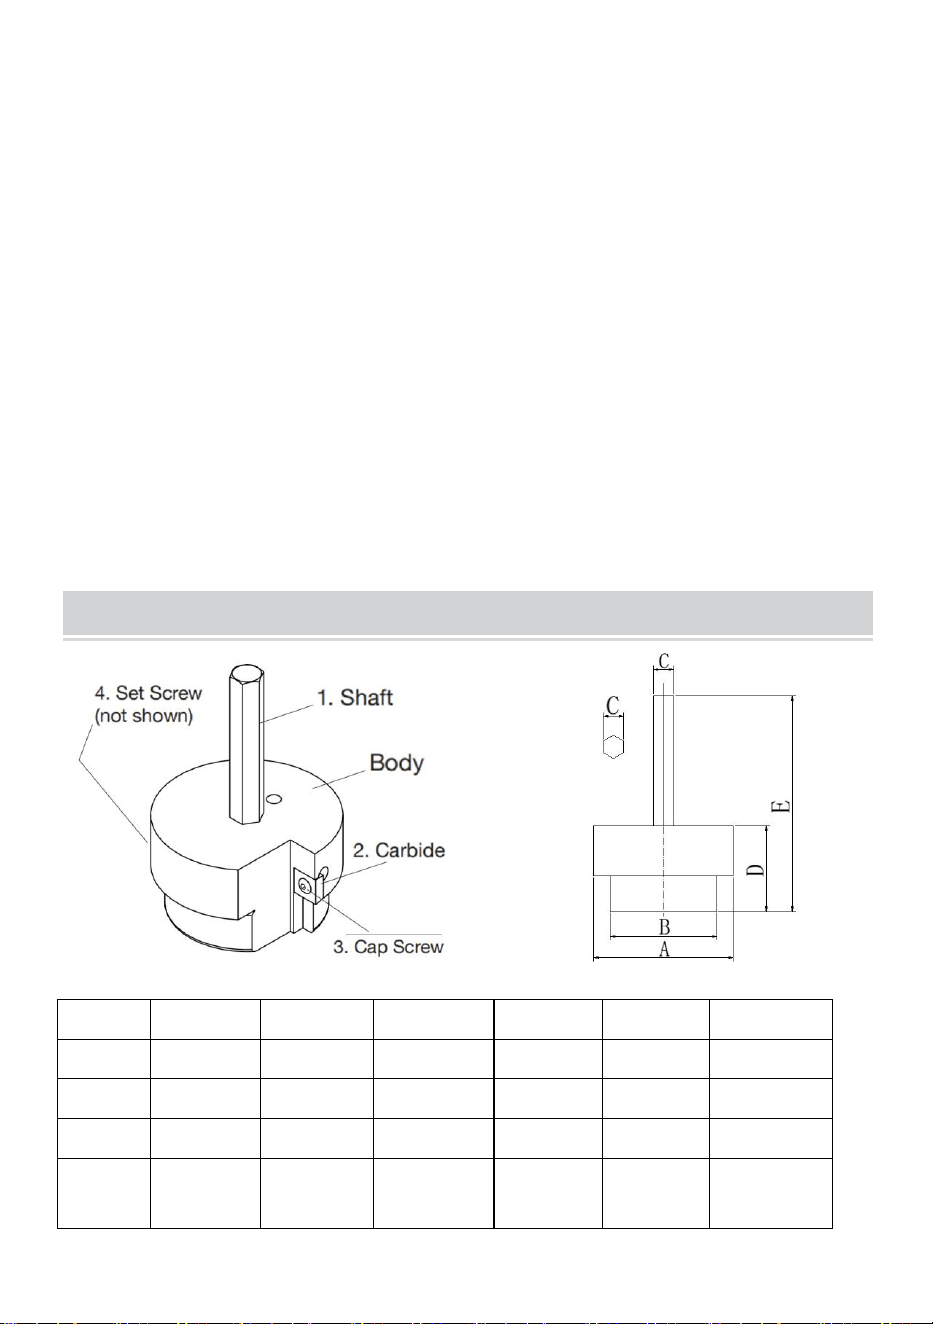
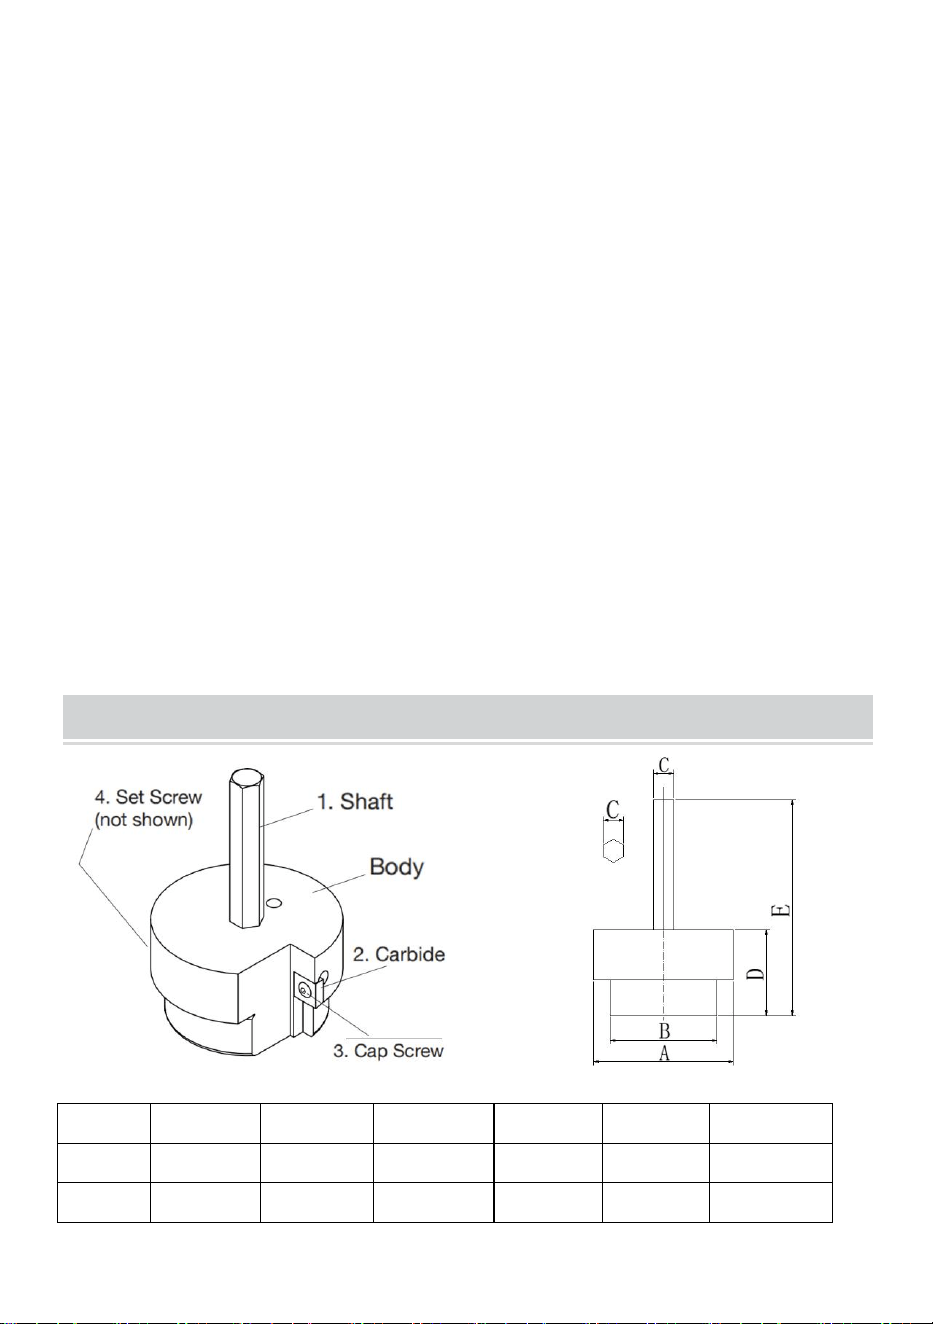
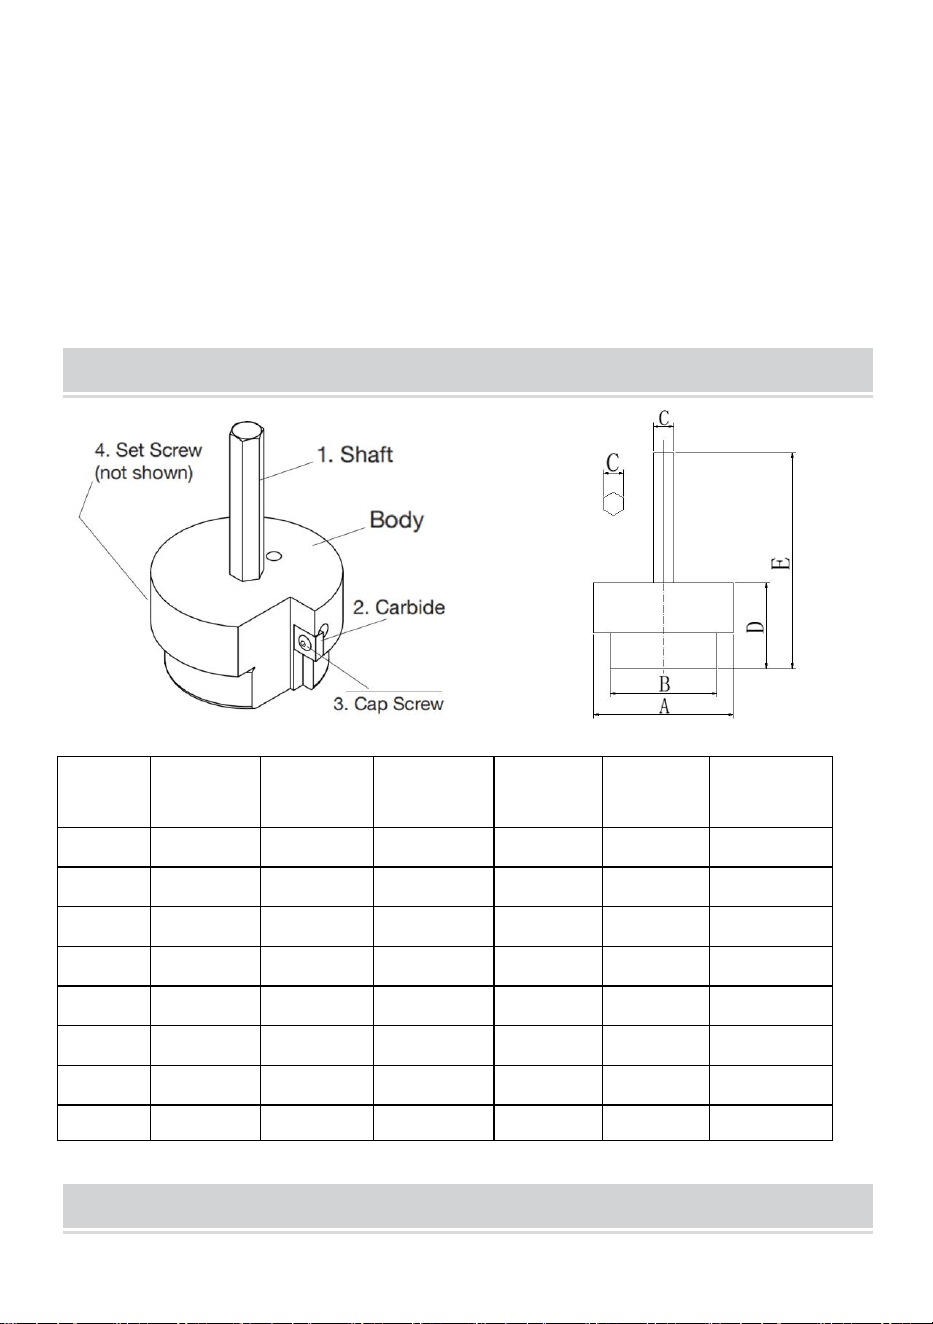
INSTRUCTIONS
1
、
Insert Shaft into Body Make sure shaft is all the way through and flush
with the bottom of the reamer.
2
、
Using Allen wrench, tighten set screw.
3
、
Carbide insert has two or four cutting edges. When the cutting edge
wears out
,
Change cutting edge by removing the cap screw and rotating
the carbide 90° or 180° then reinsert cap screw and tighten,1/2 "to 1"
reamer has two cutting edges
,
1-1/4 "to 4" reamer has four cutting edges.
4
、
Cut damaged pipe as close to fitting as possible.
5
、
Select proper size fitting reamer, put it in drill chuck, and tighten.
6
、
Insert fitting reamer into pipe, ensure tool stays on center to prevent
binding. If no chips are being made, remove tool and check.
7、 Ream old pipe until proper depth is attained. Proper depth is when old
pipe has been completely removed from fitting. Do not ream beyond end of
the pipe or into the seat of the fitting. When close to end of ream, stop
several times and remove reamer and visually check depth.
8、 Remove drill and clean out chips from fitting.
SIZE DESCRIPTION
Model
Size A
Size B
Size C
Size D
Size E
weight
1/2 ”
0.83 ”
0.58 ”
0.2 ”
0.98 ”
3.01 ”
28.5g
3/4 ”
1.03 ”
0.8 ”
0.26 ”
0.98 ”
3.01 ”
45.5g
1 ”
1.3 ”
1.02 ”
0.26 ”
0.98 ”
3.01 ”
65.5g
1-1/4 ”
1.66 ”
1.36 ”
0.37 ”
1.12 ”
3.25 ”
132g
1-1/2 ”
1.9 ”
1.56 ”
0.37 ”
1.12 ”
3.25 ”
157g
2 ”
2.37 ”
2 ”
0.37 ”
1.12 ”
3.25 ”
227.5g
3 ”
3.5 ”
3 ”
0.37 ”
1.12 ”
3.25 ”
457.5g
4 ”
4.5 ”
3.96 ”
0.37 ”
1.12 ”
3.25 ”
746g
ACCESSORIES LIST
1. Allen wrench*1 2.User Manual *1

Technique Certificat d'assistance et de garantie électronique
www.vevor.com/support
KIT D'ALÉSOIR POUR TUYAUX EN PVC
MANUEL D'UTILISATION
MODÈLE : 04525 / PPK4 / PPK6 / PPK7 / PPK8
Nous continuons à nous engager à vous fournir des outils à des prix compétitifs.
« Économisez la moitié », « Moitié prix » ou toute autre expression similaire utilisée par
nous uniquement
représente une estimation des économies dont vous pourriez bénéficier en achetant
certains outils
avec nous par rapport aux grandes marques et ne signifie pas nécessairement couverture
toutes les catégories d'outils que nous proposons. Nous vous rappelons de bien vouloir
vérifier soigneusement
lorsque vous passez une commande chez nous si vous êtes réellement Économie
Moitié par rapport aux plus grandes marques.


MODÈLE : 04525 / PPK4 / PPK6 / PPK7 / PPK8
(L'image est à titre de référence uniquement, veuillez vous référer à l'objet
réel)
Have product questions? Need technical support? Please feel free to
contact us:
Technical Support and E-Warranty Certificate
www.vevor.com/support
NEED HELP? CONTACT US!
This is the original instruction, please read all manual instructions
carefully before operating. VEVOR reserves a clear interpretation of our
user manual. The appearance of the product shall be subject to the
product you received. Please forgive us that we won't inform you again if
there are any technology or software updates on our product.
PVC Pipe Reamer Kit

Avertissement - Pour réduire le risque de blessure, l'utilisateur
doit lire attentivement le manuel d'instructions.
AVERTISSEMENT:
1. Les alésoirs de montage de 3" et 4" créent un couple de réaction
important qui peut provoquer blessure à l'opérateur, par conséquent une
perceuse à angle droit standard de 1/2" est recommandé. Soyez prudent
lorsque vous utilisez ces outils. Pour aléser 3" ou 4", un un régime inférieur
est recommandé pour réduire la chaleur et la déformation possible du
raccord.
NOTE:
1. Ces alésoirs peuvent être utilisés avec des perceuses standard ou sans
fil. Pour la plupart
Pour une utilisation efficace, faites tourner la perceuse à un régime faible
ou moyen. N'utilisez pas de perceuses à percussion.
6、Non recommandé pour les systèmes d'alimentation à haute pression
ou pour le côté évent des systèmes de tuyauterie des appareils à gaz.
7、Nous vous suggérons d'utiliser un alésoir de 1,5 pouce ou plus et une
perceuse électrique d'une puissance d'au moins 1,2 kW .
8、Conseil d'utilisation : Lors de la découpe rotative, il est nécessaire de
soulever le foret à intervalles réguliers pour éliminer les résidus avant de
découper à nouveau.
9、Le diamètre intérieur de la canalisation résiduelle/déchet à retirer
correspond à la taille de l'alésoir acheté.
INSTRUCTIONS
1. Insérer l'arbre dans le corps Assurez-vous que l’arbre est complètement
traversant et qu’il affleure le bas de l’alésoir.
2. À l
’
aide d’une clé Allen, serrez la vis de réglage.
3. L'insert en carbure possède deux ou quatre arêtes de coupe. Lorsque
l'arête de coupe est usée , remplacez l'arête de coupe en retirant la vis à
tête cylindrique et en faisant tourner le carbure de 90° ou 180°, puis
réinsérez la vis à tête cylindrique et serrez . L'alésoir de 1/2" à 1" possède
deux arêtes de coupe, l'alésoir de 1-1/4" à 4" possède quatre arêtes de
coupe .
4. Coupez le tuyau endommagé aussi près que possible du raccord.
5. Sélectionnez un alésoir de taille appropriée, placez-le dans le mandrin
de perçage et serrez.
6. Insérez l'alésoir de montage dans le tuyau, assurez-vous que l'outil
reste au centre pour éviter
Si aucun copeau n'est produit, retirez l'outil et vérifiez.
7. Alésez le vieux tuyau jusqu'à ce que la profondeur appropriée soit
atteinte. La profondeur appropriée est atteinte lorsque le vieux tuyau a été
complètement retiré du raccord. Ne pas aléser au-delà de la fin de
le tuyau ou dans le siège du raccord. Lorsque vous êtes proche de la fin de
l'alésage, arrêtez-vous plusieurs fois, retirez l'alésoir et vérifiez
visuellement la profondeur.
8. Retirez la perceuse et nettoyez les copeaux du raccord.
SIZE DESCRIPTION
Modèle
Taille A
Taille B
Taille C
Taille D
Taille E
poids
1/2 ”
0,83 ”
0,58 ”
0,2 ”
0,9 8 ”
3,01 "
28,5 g
3/4 ”
1,0 3 "
0,8 ”
0,2 6 ”
0,9 8 ”
3,01 "
45,5 g
1 "
1,3 ”
1,02 ”
0,2 6 ”
0,9 8 ”
3,01 "
65,5 g
1 -1/4 ”
1,6 6 ”
1,36 ”
0,37 ”
1,12 "
3,25
pouces
132 g

1 -1/2 ”
1,9 ”
1,56 ”
0,37 ”
1,12 "
3,25
pouces
157 g
2 "
2,37
pouces
2 "
0,37 ”
1,12 "
3,25
pouces
227,5 g
3 "
3,5
pouces
3 "
0,37 ”
1,12 "
3,25
pouces
457,5 g
4 "
4,5
pouces
3,9 6 ”
0,37 ”
1,12 "
3,25
pouces
746 g
ACCESSORIES LIST
1. Clé Allen * 1 2. Manuel d'utilisation * 1

Technisch Support und E-Garantie-Zertifikat
www.vevor.com/support
PVC-ROHR-REIBAHLEN-SET
BENUTZERHANDBUCH
MODELL: 04525 / PPK4 / PPK6 / PPK7 / PPK8
Wir sind weiterhin bestrebt, Ihnen Werkzeuge zu wettbewerbsfähigen Preisen
anzubieten.
"Sparen Sie die Hälfte", "Halber Preis" oder andere ähnliche Ausdrücke, die wir nur
verwenden
stellt eine Schätzung der Einsparungen dar, die Sie durch den Kauf bestimmter Werkzeuge
erzielen können
mit uns im Vergleich zu den großen Top-Marken und bedeutet nicht unbedingt, Abdeckung
alle von uns angebotenen Werkzeugkategorien. Wir möchten Sie bitten, zu überprüfen
sorgfältig
wenn Sie bei uns eine Bestellung aufgeben, wenn Sie tatsächlich Speichern
Hälfte im Vergleich mit den Top-Großmarken.


MODELL: 04525 / PPK4 / PPK6 / PPK7 / PPK8
(Das Bild dient nur als Referenz, bitte beziehen Sie sich auf das
tatsächliche Objekt)
Have product questions? Need technical support? Please feel free to
contact us:
Technical Support and E-Warranty Certificate
www.vevor.com/support
NEED HELP? CONTACT US!
This is the original instruction, please read all manual instructions
carefully before operating. VEVOR reserves a clear interpretation of our
user manual. The appearance of the product shall be subject to the
product you received. Please forgive us that we won't inform you again if
there are any technology or software updates on our product.
PVC Pipe Reamer Kit

Warnung: Um das Verletzungsrisiko zu verringern, muss der
Benutzer die Bedienungsanleitung sorgfältig lesen.
WARNUNG:
1
、
3" und 4" Passungsreibahlen erzeugen ein großes
Reaktionsdrehmoment, das dazu führen kann Verletzungen des Bedieners,
daher ist ein Standard-1/2-Zoll-Winkelbohrer empfohlen. Gehen Sie bei
der Verwendung dieser Werkzeuge vorsichtig vor. Zum Reiben von 3" oder
4" Um die Hitze und eine mögliche Verformung der Armatur zu verringern,
wird eine niedrigere Drehzahl empfohlen.
NOTIZ:
1
、
Diese Reibahlen können mit Standard- oder Akku-Bohrmaschinen
verwendet werden. Für die meisten
Um eine effektive Nutzung zu gewährleisten, lassen Sie den Bohrer mit
niedriger oder mittlerer Drehzahl laufen. Verwenden Sie keine
Schlagbohrmaschinen.
10、Nicht empfohlen für Hochdruckversorgungssysteme oder für die
Entlüftungsseite von Rohrleitungssystemen gasbetriebener Geräte.
11、Wir empfehlen die Verwendung einer Reibahle mit 1,5 Zoll oder mehr
und einer elektrischen Bohrmaschine mit einer Leistung von mindestens
1,2 kW .
12、Anwendungstipp: Beim Rotationsschneiden ist es notwendig, den
Bohrer in regelmäßigen Abständen anzuheben, um Rückstände zu
entfernen, bevor erneut geschnitten wird.
13、Der Innendurchmesser der zu entfernenden Rest-/Abfallleitungsgröße
entspricht der Größe des gekauften Aufräumers.
INSTRUCTIONS
1. Welle in den Körper einsetzen Stellen Sie sicher, dass der Schaft
vollständig durch ist und bündig mit der Unterseite der Reibahle abschließt.
2. Ziehen Sie die Stellschraube mit einem Inbusschlüssel fest .
3. Hartmetalleinsätze haben zwei oder vier Schneidkanten. Wenn die
Schneidkante abgenutzt ist , wechseln Sie die Schneidkante, indem Sie
die Kopfschraube entfernen und das Hartmetall um 90° oder 180° drehen.
Setzen Sie dann die Kopfschraube wieder ein und ziehen Sie sie fest . 1/2"
bis 1" Reibahle hat zwei Schneidkanten, 1-1/4" bis 4" Reibahle hat vier
Schneidkanten .
4. Schneiden Sie das beschädigte Rohr so nah wie möglich an der Armatur
ab.
5. Wählen Sie eine passende Reibahle in der richtigen Größe, setzen Sie
sie in das Bohrfutter ein und ziehen Sie sie fest.
6. Den Fitting-Reibahlen in das Rohr einsetzen und darauf achten, dass
das Werkzeug in der Mitte bleibt, um
Wenn keine Späne entstehen, entfernen Sie das Werkzeug und
überprüfen Sie es.
7. Altes Rohr aufbohren, bis die richtige Tiefe erreicht ist. Die richtige Tiefe
ist erreicht, wenn altes Rohr vollständig aus der Armatur entfernt wurde.
Nicht über das Ende der Armatur hinaus bohren.
Die Rohr oder in den Sitz des Fittings. Wenn Sie sich dem Ende der Riese
nähern, stoppen Sie mehrere Mal, entfernen Sie die Reibahle und
überprüfen Sie die Tiefe visuell.
8. Bohrer entfernen und Späne aus der Fassung entfernen.
SIZE DESCRIPTION
Modell
Größe A
Größe B
Größe C
Größe D
Größe E
Gewicht
1/2 Zoll
0,83 Zoll
0,58 Zoll
0,2 Zoll
0,9 8 ”
3,01 ”
28,5 g
3/4 Zoll
1,0 3 ”
0,8 Zoll
0,2 6 ”
0,9 8 ”
3,01 ”
45,5 g

1 ”
1,3 "
1,02 ”
0,2 6 ”
0,9 8 ”
3,01 ”
65,5 g
1 -1/4
Zoll
1,6 6 ”
1,36 "
0,37 Zoll
1,12 ”
3,25 Zoll
132 g
1 -1/2
Zoll
1,9 "
1,56 Zoll
0,37 Zoll
1,12 ”
3,25 Zoll
157 g
2 ”
2,37 ”
2 ”
0,37 Zoll
1,12 ”
3,25 Zoll
227,5 g
3 ”
3,5 Zoll
3 ”
0,37 Zoll
1,12 ”
3,25 Zoll
457,5 g
4 ”
4,5
Zoll
3,9 6 ”
0,37 Zoll
1,12 ”
3,25 Zoll
746 g
ACCESSORIES LIST
1. Inbusschlüssel *1 2. Benutzerhandbuch *1

Tecnico Supporto e certificato di garanzia elettronica
www.vevor.com/support
KIT ALESATORE PER TUBI IN PVC
MANUALE D'USO
MODELLO: 04525 / PPK4 / PPK6 / PPK7 / PPK8
Continuiamo a impegnarci per fornirvi strumenti a prezzi competitivi.
"Risparmia la metà", "Metà prezzo" o altre espressioni simili utilizzate solo da noi
rappresenta una stima dei risparmi che potresti ottenere acquistando determinati strumenti
con noi rispetto ai principali marchi top e non significa necessariamente copertina
tutte le categorie di strumenti da noi offerti. Ti ricordiamo cortesemente di verificare
accuratamente
quando effettui un ordine con noi se sei effettivamente Risparmio
Metà rispetto ai marchi più importanti.


MODELLO: 04525 / PPK4 / PPK6 / PPK7 / PPK8
(L'immagine è solo di riferimento, fare riferimento all'oggetto reale)
Have product questions? Need technical support? Please feel free to
contact us:
Technical Support and E-Warranty Certificate
www.vevor.com/support
NEED HELP? CONTACT US!
This is the original instruction, please read all manual instructions
carefully before operating. VEVOR reserves a clear interpretation of our
user manual. The appearance of the product shall be subject to the
product you received. Please forgive us that we won't inform you again if
there are any technology or software updates on our product.
PVC Pipe Reamer Kit

Attenzione: per ridurre il rischio di lesioni, l'utente deve leggere
attentamente il manuale di istruzioni.
AVVERTIMENTO:
1. Gli alesatori da 3" e 4" creano una coppia di reazione elevata che può
causare lesioni all'operatore, pertanto è necessario un trapano ad angolo
retto standard da 1/2" consigliato. Prestare attenzione quando si utilizzano
questi utensili. Per alesare 3" o 4", un si consiglia di utilizzare un numero di
giri inferiore per ridurre il calore e la possibile deformazione del raccordo.
NOTA:
1
、
Questi alesatori possono essere utilizzati con trapani standard o
cordless. Per la maggior parte
uso efficace, far funzionare il trapano a un numero di giri basso o medio.
Non usare trapani a percussione.
14、Non consigliato per sistemi di alimentazione ad alta pressione o per il
lato di sfiato dei sistemi di tubazioni degli apparecchi a gas.
15、Si consiglia di utilizzare un alesatore da 1,5 pollici o più grande e un
trapano elettrico con una potenza non inferiore a 1,2 kW .
16、Consiglio per l'uso: durante il taglio rotativo, è necessario sollevare la
punta del trapano a intervalli regolari per rimuovere i residui prima di
tagliare nuovamente.
17、Il diametro interno della tubazione residua/di scarico che deve essere
rimossa è la dimensione dell'alesatore acquistato.
INSTRUCTIONS
1. Inserire l'albero nel corpo Assicurarsi che l'albero sia completamente
inserito e a filo con la parte inferiore dell'alesatore.
2. Utilizzando la chiave a brugola, serrare la vite di fissaggio.
3. L'inserto in carburo ha due o quattro taglienti. Quando il tagliente si
consuma , sostituire il tagliente rimuovendo la vite a testa cilindrica e
ruotando il carburo di 90° o 180°, quindi reinserire la vite a testa cilindrica e
stringere . L'alesatore da 1/2 "a 1" ha due taglienti, l'alesatore da 1-1/4 "a
4" ha quattro taglienti .
4. Tagliare il tubo danneggiato il più vicino possibile al raccordo.
5. Selezionare l'alesatore della misura corretta, inserirlo nel mandrino del
trapano e serrarlo.
6、 Inserire l'alesatore di raccordo nel tubo, assicurarsi che l'utensile
rimanga al centro per evitare
legatura. Se non si verificano scheggiature, rimuovere l'utensile e
controllare.
7、 Alesare il vecchio tubo fino a raggiungere la profondità corretta. La
profondità corretta è quando il vecchio tubo è stato completamente
rimosso dal raccordo. Non alesare oltre la fine di
IL tubo o nella sede del raccordo. Quando si è vicini alla fine della risma,
arrestare diversi volte e rimuovere l'alesatore e controllare visivamente la
profondità.
8. Rimuovere il trapano e pulire i trucioli dal raccordo.
SIZE DESCRIPTION
Modell
o
Taglia A
Taglia B
Taglia C
Taglia D
Taglia E
peso
1/2 ”
0,83 ”
0,58 ”
0,2 ”
0,9 8 ”
3.01 ”
28,5 g
3/4 ”
1.0 3 ”
0,8 ”
0,2 6 ”
0,9 8 ”
3.01 ”
45 .5g
1 ”
1,3 ”
1,02 ”
0,2 6 ”
0,9 8 ”
3.01 ”
65,5 g
1 -1/4 "
1.6 6 ”
1,36 ”
0,37 ”
1,12 ”
3,25 ”
132
grammi
1-1 /2 ”
1,9 ”
1,56 ”
0,37 ”
1,12 ”
3,25 ”
157

grammi
2 ”
2,37 ”
2 ”
0,37 ”
1,12 ”
3,25 ”
227,5
grammi
3 ”
3,5 ”
3 ”
0,37 ”
1,12 ”
3,25 ”
457,5
grammi
4 ”
4,5 ”
3,9 6 ”
0,37 ”
1,12 ”
3,25 ”
746
grammi
ACCESSORIES LIST
1. Chiave a brugola *1 2. Manuale utente *1

Técnico Certificado de soporte y garantía electrónica
www.vevor.com/support
KIT DE ESCARIADOR DE TUBERÍAS DE
PVC
MANUAL DEL USUARIO
MODELO: 04525 / PPK4 / PPK6 / PPK7 / PPK8
Seguimos comprometidos a brindarle herramientas a precios competitivos.
"Ahorra la mitad", "mitad de precio" o cualquier otra expresión similar utilizada únicamente
por nosotros
Representa una estimación de los ahorros que podría obtener al comprar ciertas
herramientas.
con nosotros en comparación con las principales marcas líderes y no significa
necesariamente cubrir
Todas las categorías de herramientas que ofrecemos. Le recordamos que debe verificar
con cuidado
Cuando realiza un pedido con nosotros, si realmente está Ahorro

Medio en comparación con las principales marcas líderes.

MODELO: 04525 / PPK4 / PPK6 / PPK7 / PPK8
(La imagen es solo de referencia, consulte el objeto real)
Have product questions? Need technical support? Please feel free to
contact us:
Technical Support and E-Warranty Certificate
www.vevor.com/support
NEED HELP? CONTACT US!
This is the original instruction, please read all manual instructions
carefully before operating. VEVOR reserves a clear interpretation of our
user manual. The appearance of the product shall be subject to the
product you received. Please forgive us that we won't inform you again if
there are any technology or software updates on our product.
PVC Pipe Reamer Kit

Advertencia: Para reducir el riesgo de lesiones, el usuario debe
leer atentamente el manual de instrucciones.
ADVERTENCIA:
1
、
Los escariadores de ajuste de 3” y 4” crean un gran torque de reacción
que puede causar lesiones al operador, por lo tanto, un taladro de ángulo
recto estándar de 1/2” es recomendado. Tenga cuidado al utilizar estas
herramientas. Para escariar 3” o 4”, se Se recomiendan RPM más bajas
para reducir el calor y la posible distorsión del accesorio.
NOTA:
1
、
Estos escariadores se pueden utilizar con taladros estándar o
inalámbricos. Para la mayoría
Para un uso eficaz, utilice el taladro a bajas o medias revoluciones por
minuto. No utilice taladros de percusión.
18、No recomendado para sistemas de suministro de alta presión o Para
el lado de ventilación de los sistemas de tuberías de aparatos que queman
gas.
19、Se recomienda utilizar un escariador de 1,5 pulgadas o más grande y
un taladro eléctrico con una potencia de no menos de 1,2KW .
20、Consejo de uso: Durante el corte rotatorio, es necesario levantar la
broca a intervalos regulares para eliminar los residuos antes de volver a
cortar.
21、El diámetro interior de la tubería residual/desecho que se necesita
eliminar es el tamaño del escariador adquirido.
INSTRUCTIONS
1. Inserte el eje en el cuerpo Asegúrese de que el eje esté completamente
perforado y al ras con la parte inferior del escariador.
2
、
Utilice una llave Allen para apretar el tornillo de fijación.
3. El inserto de carburo tiene dos o cuatro filos de corte. Cuando el filo de
corte se desgasta , cambie el filo de corte quitando el tornillo de tapa y
girando el carburo 90° o 180°, luego vuelva a insertar el tornillo de tapa y
ajuste . El escariador de 1/2 "a 1" tiene dos filos de corte, el escariador de
1-1/4 "a 4" tiene cuatro filos de corte .
4、 Corte la tubería dañada lo más cerca posible del ajuste.
5、 Seleccione el tamaño adecuado de escariador, colóquelo en el
portabrocas y apriételo.
6、 Inserte el escariador de ajuste en la tubería, asegúrese de que la
herramienta permanezca en el centro para evitar
vinculante. Si no se producen virutas, retire la herramienta y verifique.
7. Escariar la tubería vieja hasta alcanzar la profundidad adecuada. La
profundidad adecuada es cuando la tubería vieja Se ha quitado
completamente del accesorio. No escariar más allá del final.
el tubo o en el asiento del accesorio. Cuando esté cerca del final del
escariador, deténgase varias veces. veces y retire el escariador y verifique
visualmente la profundidad.
8、 Retire el taladro y limpie las virutas del accesorio.
SIZE DESCRIPTION
Modelo
Talla A
Talla B
Talla C
Talla D
Talla E
peso
1/2 ”
0,83 ”
0,58 ”
0,2 ”
0,9 8 ”
3.01 ”
28,5 g
3/4 ”
1.0 3 ”
0,8 ”
0,2 6 ”
0,9 8 ”
3.01 ”
45,5 g
1”
1.3 ”
1.02 ”
0,2 6 ”
0,9 8 ”
3.01 ”
65,5 g
1-1 /
4 ”
1.6 6 ”
1,36 ”
0,37 ”
1,12 ”
3,25 ”
132
gramos
1-1 /2 ”
1.9 ”
1,56 ”
0,37 ”
1,12 ”
3,25 ”
157
gramos

2”
2,37 ”
2 ”
0,37 ”
1,12 ”
3,25 ”
227,5
gramos
3”
3,5 ”
3 ”
0,37 ”
1,12 ”
3,25 ”
457,5
gramos
4”
4. 5 ”
3.9 6 ”
0,37 ”
1,12 ”
3,25 ”
746
gramos
ACCESSORIES LIST
1. Llave Allen *1 2. Manual del usuario *1

Techniczny Wsparcie i certyfikat e-gwarancji
www.vevor.com/support
ZESTAW ROZWIERTAKÓW DO RUR PVC
INSTRUKCJA OBSŁUGI
MODELE: 04525 / PPK4 / PPK6 / PPK7 / PPK8
Nadal staramy się oferować Państwu narzędzia w konkurencyjnych cenach.
„Oszczędź połowę”, „Połowa ceny” lub jakiekolwiek inne podobne wyrażenia używane
wyłącznie przez nas
przedstawia szacunkowe oszczędności, jakie możesz uzyskać kupując określone
narzędzia
z nami w porównaniu do głównych, najlepszych marek i niekoniecznie oznacza to okładka
wszystkie kategorie narzędzi oferowanych przez nas. Przypominamy o sprawdzeniu
ostrożnie
gdy składasz u nas zamówienie, jeśli faktycznie Oszczędność
Połowa w porównaniu z wiodącymi markami.


MODELE: 04525 / PPK4 / PPK6 / PPK7 / PPK8
(Zdjęcie ma charakter poglądowy, proszę odnieść się do rzeczywistego
obiektu)
Have product questions? Need technical support? Please feel free to
contact us:
Technical Support and E-Warranty Certificate
www.vevor.com/support
NEED HELP? CONTACT US!
This is the original instruction, please read all manual instructions
carefully before operating. VEVOR reserves a clear interpretation of our
user manual. The appearance of the product shall be subject to the
product you received. Please forgive us that we won't inform you again if
there are any technology or software updates on our product.
PVC Pipe Reamer Kit

Ostrzeżenie: Aby zminimalizować ryzyko obrażeń, użytkownik
powinien uważnie przeczytać instrukcję obsługi.
OSTRZEŻENIE:
1
、
Rozwiertaki 3” i 4” tworzą duży moment reakcji, który może powodować
obrażenia operatora, dlatego standardowa wiertarka kątowa 1/2” jest
zalecane. Należy zachować ostrożność podczas korzystania z tych
narzędzi. Do rozwiercania otworów o średnicy 3” lub 4”, Zaleca się
stosowanie niższych obrotów na minutę w celu zmniejszenia nagrzewania
i ewentualnego odkształcenia złączki.
NOTATKA:
1
、
Te rozwiertaki można stosować ze standardowymi lub
bezprzewodowymi wiertarkami. W przypadku większości
skuteczne wykorzystanie, uruchom wiertarkę przy niskich lub średnich
obrotach na minutę. Nie używaj wiertarek udarowych.
22、Nie zaleca się stosowania w układach zasilania wysokociśnieniowego
lub do strony odpowietrzającej systemów rurowych urządzeń spalających
gaz.
23、Zalecamy użycie rozwiertaka o średnicy 1,5 cala lub większego oraz
wiertarki elektrycznej o mocy nie mniejszej niż 1,2 kW .
24、Wskazówka dotycząca użytkowania: Podczas cięcia obrotowego
konieczne jest regularne podnoszenie wiertła w celu usunięcia
pozostałości przed kolejnym cięciem.
25、Średnica wewnętrzna przewodu resztkowego/odpadowego, którą
należy usunąć, jest równa rozmiarowi zakupionego rozwiertaka.
INSTRUCTIONS
1. Włóż wał do korpusu Upewnij się, że wałek jest przepuszczony przez
całą długość rozwiertaka i równo z jego dnem.
2
、
Używając klucza imbusowego, dokręć śrubę ustalającą.
3. Wkładka węglikowa ma dwie lub cztery krawędzie tnące. Gdy krawędź
tnąca się zużyje , wymień krawędź tnącą, wyjmując śrubę z łbem
sześciokątnym i obracając węglik o 90° lub 180°, a następnie ponownie

włóż śrubę z łbem sześciokątnym i dokręć , rozwiertak 1/2 "do 1" ma dwie
krawędzie tnące, rozwiertak 1-1/4 "do 4" ma cztery krawędzie tnące .
4、 Uszkodzoną rurę odetnij jak najbliżej złącza.
5、 Wybierz odpowiedni rozmiar rozwiertaka, umieść go w uchwycie
wiertarskim i dokręć.
6、Włóż rozwiertak do rury, upewnij się, że narzędzie pozostaje na środku,
aby zapobiec
wiążące. Jeżeli nie powstają żadne odpryski, usuń narzędzie i sprawdź.
7、 Rozwierć starą rurę, aż osiągniesz odpowiednią głębokość.
Prawidłowa głębokość to taka, gdy stara rura został całkowicie usunięty z
mocowania. Nie rozwiercać poza koniec
ten rurę lub do gniazda złączki. Gdy będziesz blisko końca rozety,
zatrzymaj kilka razy, wyjmij rozwiertak i wizualnie sprawdź głębokość.
8. Wyjmij wiertło i usuń wióry z mocowania.
SIZE DESCRIPTION
Model
Rozmiar
A
Rozmiar
B
Rozmiar
C
Rozmiar
D
Rozmiar
E
waga
1/2 ”
0,83 cala
0,58 cala
0,2
cala
0,9 8 ”
3,01 ”
28,5 g
3/4 ”
1,0 3 ”
0,8 cala
0,2 6 ”
0,9 8 ”
3,01 ”
45,5g
1 ”
1,3 ”
1,02 ”
0,2 6 ”
0,9 8 ”
3,01 ”
65,5g
1 -1/4 ”
1,6 6 ”
1,36 cala
0,37 cala
1,12 ”
3,25
cala
132
gramy

1 -1/2 ”
1,9 cala
1,56 cala
0,37 cala
1,12 ”
3,25
cala
157
gramów
2”
2,37 cala
2 ”
0,37 cala
1,12 ”
3,25
cala
227,5
grama
3”
3,5 cala
3 ”
0,37 cala
1,12 ”
3,25
cala
457,5
grama
4”
4,5
cala
3,9 6 ”
0,37 cala
1,12 ”
3,25
cala
746
gramów
ACCESSORIES LIST
1. Klucz imbusowy *1 2. Instrukcja obsługi *1

Technisch Ondersteuning en E-garantiecertificaat
www.vevor.com/support
PVC-BUISRUIMERSET
GEBRUIKERSHANDLEIDING
MODEL: 04525 / PPK4 / PPK6 / PPK7 / PPK8
Wij streven er voortdurend naar om u gereedschappen tegen concurrerende prijzen te
leveren.
"Bespaar de helft", "halve prijs" of andere soortgelijke uitdrukkingen die alleen door ons
worden gebruikt
geeft een schatting van de besparingen die u kunt behalen door bepaalde gereedschappen
te kopen
bij ons vergeleken met de grote topmerken en betekent niet per se dat omslag
alle categorieën van tools die wij aanbieden. U wordt vriendelijk verzocht om te verifiëren
voorzichtig
wanneer u een bestelling bij ons plaatst, als u daadwerkelijk Besparing
Half in vergelijking met de grote topmerken.


MODEL: 04525 / PPK4 / PPK6 / PPK7 / PPK8
(De afbeelding is alleen ter referentie, kijk naar het daadwerkelijke object)
Have product questions? Need technical support? Please feel free to
contact us:
Technical Support and E-Warranty Certificate
www.vevor.com/support
NEED HELP? CONTACT US!
This is the original instruction, please read all manual instructions
carefully before operating. VEVOR reserves a clear interpretation of our
user manual. The appearance of the product shall be subject to the
product you received. Please forgive us that we won't inform you again if
there are any technology or software updates on our product.
PVC Pipe Reamer Kit

Waarschuwing: om het risico op letsel te verkleinen, moet de
gebruiker de gebruiksaanwijzing zorgvuldig lezen.
WAARSCHUWING:
1
、
3” en 4” fittingruimers creëren een groot reactiemoment dat kan leiden
tot letsel bij de gebruiker, daarom is een standaard 1/2” haakse
boormachine aanbevolen. Wees voorzichtig bij het gebruik van deze
gereedschappen. Voor het ruimen van 3” of 4”, een Een lager toerental
wordt aanbevolen om hitte en mogelijke vervorming van de fitting te
verminderen.
OPMERKING:
1
、
Deze ruimers kunnen worden gebruikt met standaard- of snoerloze
boormachines. Voor de meeste
effectief gebruik, laat de boor draaien op een laag of gemiddeld toerental.
Gebruik geen slagboren.
26、Niet aanbevolen voor hogedruktoevoersystemen of voor de
ontluchtingszijde van leidingsystemen van gasgestookte apparaten.
27、Wij raden aan om een ruimer van 1,5 inch of groter te gebruiken en
een elektrische boormachine met een vermogen van minimaal 1,2 kW .
28、Gebruikstip: Tijdens het roterend zagen is het noodzakelijk om de
boor regelmatig op te tillen om resten te verwijderen voordat u opnieuw
gaat zagen.
29、De binnendiameter van de rest-/afvalleiding die verwijderd moet
worden, is de maat van de aangeschafte ruimer.
INSTRUCTIONS
1. Plaats de as in het lichaam Zorg ervoor dat de schacht er helemaal
doorheen zit en gelijk ligt met de onderkant van de ruimer.
2. Draai de stelschroef vast met een inbussleutel .
3. Carbide-inzetstuk heeft twee of vier snijkanten. Wanneer de snijkant
versleten is , vervangt u de snijkant door de dopschroef te verwijderen en
het hardmetaal 90° of 180° te draaien. Plaats vervolgens de dopschroef
terug en draai deze vast . De ruimer van 1/2 "tot 1" heeft twee snijkanten.
De ruimer van 1-1/4 "tot 4" heeft vier snijkanten .
4. Snijd de beschadigde pijp zo dicht mogelijk bij de fitting af.
5. Selecteer een ruimer met de juiste maat, plaats deze in de boorkop en
draai deze vast.
6. Plaats de ruimer in de buis en zorg ervoor dat het gereedschap in het
midden blijft om te voorkomen dat de ruimer losraakt.
binding. Als er geen chips worden gemaakt, verwijder dan het
gereedschap en controleer.
7. Ruim de oude pijp op tot de juiste diepte is bereikt. De juiste diepte is
wanneer de oude pijp is volledig verwijderd van de fitting. Ruim niet verder
dan het einde van
de pijp of in de zitting van de fitting. Wanneer u dicht bij het einde van de
riem bent, stop dan enkele keer en verwijder de ruimer en controleer de
diepte visueel.
8. Verwijder de boor en verwijder de spanen uit de fitting.
SIZE DESCRIPTION
Model
Maat A
Maat B
Maat C
Maat D
Maat E
gewicht
1/2 ”
0,83 ”
0,58 ”
0,2 ”
0,9 8 ”
3.01 ”
28,5 gram
3/4 ”
1.0 3 ”
0,8 ”
0,2 6 ”
0,9 8 ”
3.01 ”
45,5 gram
1”
1,3 ”
1,02 ”
0,2 6 ”
0,9 8 ”
3.01 ”
65,5 gram
1 -1/4 ”
1,6 6 ”
1,36 ”
0,37 ”
1.12 ”
3,25 ”
132 gram
1 -1/2 ”
1,9 ”
1,56 ”
0,37 ”
1.12 ”
3,25 ”
157 gram
2”
2,37 ”
2 ”
0,37 ”
1.12 ”
3,25 ”
227,5

gram
3”
3,5 ”
3 ”
0,37 ”
1.12 ”
3,25 ”
457,5
gram
4”
4,5 ”
3,9 6 ”
0,37 ”
1.12 ”
3,25 ”
746 gram
ACCESSORIES LIST
1. Inbussleutel *1 2. Gebruikershandleiding *1

Teknisk Support och e-garanticertifikat
www.vevor.com/support
PVC-RÖRBROTTSSATS
ANVÄNDARMANUAL
MODELL: 04525 / PPK4 / PPK6 / PPK7 / PPK8
Vi fortsätter att vara engagerade i att ge dig verktyg till konkurrenskraftiga priser.
"Spara hälften", "Halva priset" eller andra liknande uttryck som endast används av oss
representerar en uppskattning av besparingar du kan dra nytta av att köpa vissa verktyg
med oss jämfört med de stora toppmärkena och betyder inte nödvändigtvis att täcka
alla kategorier av verktyg som erbjuds av oss. Du påminns vänligen om att verifiera
försiktigt
när du gör en beställning hos oss om du faktiskt gör det Sparande
Halv i jämförelse med de främsta varumärkena.

MODELL: 04525 / PPK4 / PPK6 / PPK7 / PPK8
(Bilden är endast för referens, se det faktiska objektet)
Have product questions? Need technical support? Please feel free to
contact us:
Technical Support and E-Warranty Certificate
www.vevor.com/support
NEED HELP? CONTACT US!
This is the original instruction, please read all manual instructions
carefully before operating. VEVOR reserves a clear interpretation of our
user manual. The appearance of the product shall be subject to the
product you received. Please forgive us that we won't inform you again if
there are any technology or software updates on our product.
PVC Pipe Reamer Kit

Varning - För att minska risken för skada måste användaren
läsa instruktionerna noggrant.
VARNING:
1, 3” och 4” passande brotschar skapar ett stort reaktionsvridmoment som
kan orsaka skada på operatören, därför är en standard 1/2” rätvinkelborr
rekommenderad. Var försiktig när du använder dessa verktyg. För
brotschning 3” eller 4”, a lägre varvtal rekommenderas för att minska
värmen och eventuell snedvridning av beslaget.
NOTERA:
1
、
Dessa brotschar kan användas med vanliga eller sladdlösa borrar. För
de flesta
effektiv användning, kör borren med lågt eller medelhögt varvtal. Använd
inte slagborrmaskiner.
30、Rekommenderas inte för högtrycksförsörjningssystem eller för
ventilationssidan av gasförbränningsapparatens rörsystem.
31、Föreslå att du använder en 1,5 tum eller större brotsch och en
elektrisk borrmaskin med en effekt på inte mindre än 1,2KW .
32、Tips för användning: Vid roterande skärning är det nödvändigt att lyfta
borrkronan med jämna mellanrum för att avlägsna rester innan du skär
igen.
33、Den inre diametern på rest-/avfallsrörledningens storlek som måste
tas bort är storleken på den köpta brotschen.
INSTRUCTIONS
1
、
Sätt in skaftet i kroppen Se till att skaftet är hela vägen igenom och i
jämnhöjd med botten av brotschen.
2
、
Dra åt ställskruven med en insexnyckel.
3
、
Hårdmetallskär har två eller fyra skäreggar. När skäreggen slits ut
,
Byt skäregg genom att ta bort skruven och rotera hårdmetallen 90° eller
180°, sätt sedan tillbaka skruven och dra åt ,1/2 "till 1" brotschen har två
skäreggar, 1-1/4 " till 4" brotsch har fyra skäreggar .
4
、
Skär skadat rör så nära kopplingen som möjligt.
5
、
Välj rätt storlek på en brotsch, lägg den i borrchucken och dra åt.
6、 Sätt in kopplingsbrottaren i röret, se till att verktyget stannar i mitten för
att förhindra
bindande. Om inga spån görs, ta bort verktyget och kontrollera.
7、 Bortja gamla rör tills rätt djup har uppnåtts. Rätt djup är när gammalt rör
har tagits bort helt från beslaget. Bredda inte längre än till slutet av
de rör eller in i beslagets säte. När du är nära slutet av packen, stoppa flera
gånger och ta bort brotschen och kontrollera visuellt djupet.
8、 Ta bort borren och rensa spån från kopplingen.
SIZE DESCRIPTION
Modell
Storlek A
Storlek B
Storlek C
Storlek
D
Storlek
E
vikt
1/2 ”
0,83 ”
0,58 ”
0,2 ”
0,9 8 ”
3,01 ”
28,5 g
3/4 ”
1,0 3 ”
0,8 ”
0,2 6 ”
0,9 8 ”
3,01 ”
45,5 g
1”
1,3 ”
1,02 ”
0,2 6 ”
0,9 8 ”
3,01 ”
65,5 g
1 -1/4 ”
1,6 6 ”
1,36 ”
0,37 ”
1,12 ”
3,25 ”
132 g
1 -1/2 ”
1,9 ”
1,56 ”
0,37 ”
1,12 ”
3,25 ”
157 g
2”
2,37 ”
2 ”
0,37 ”
1,12 ”
3,25 ”
227,5 g
3”
3,5 ”
3 ”
0,37 ”
1,12 ”
3,25 ”
457,5 g
4”
4,5 ”
3,9 6 ”
0,37 ”
1,12 ”
3,25 ”
746 g
ACCESSORIES LIST

1. Insexnyckel *1 2. Användarmanual *1