
ASSEMBLY MANUAL / OWNER’S MANUAL
™

2
Important Safety Instructions 3
Safety Warning Labels / Serial Number 4
6SHFL¿FDWLRQV
%HIRUH$VVHPEO\
Parts 6
Hardware 7
Tools 7
Assembly 8
Leveling the Bike 14
Moving the Bike 14
)HDWXUHV
Console Features 16
Bluetooth
®
Connectivity 19
Virtual Reality Experience on
Your Fitness Machine 19
Remote Heart Rate Monitor 20
Operations 22
Adjustments 22
Initial Setup 22
Quick Start / Manual Program 23
8VHU3UR¿OHV
3UR¿OH3URJUDPV
Pausing or Stopping 28
Results 28
GOAL TRACK Statistics 29
Console Setup Mode 30
Maintenance 31
Troubleshooting 33
TABLE OF CONTENTS
1DXWLOXV,QF&HQWHUSRLQW3DUNZD\*URYHSRUW2+86$ZZZ1DXWLOXV,QFFRP&XVWRPHU6HUYLFH1RUWK$PHULFD
FVQOV#QDXWLOXVFRP_1DXWLOXV6KDQJKDL)LWQHVV(TXLSPHQWV&R/WG5RRP&KDQJQLQJ5RDG&KDQJQLQJ'LVWULFW6KDQJKDL
&KLQDZZZQDXWLOXVFQ_RXWVLGH86ZZZQDXWLOXVLQWHUQDWLRQDOFRP_3ULQWHGLQ&KLQD_1DXWLOXV,QF_6FKZLQQ
WKH6FKZLQQ4XDOLW\ORJR'XDO7UDFN6FKZLQQ8-51<%RZÀH[DQG1DXWLOXVDUHWUDGHPDUNVRZQHGE\RUOLFHQVHGWR1DXWLOXV,QFZKLFKDUH
registered or otherwise protected by common law in the United States and other countries. Other trademarks are the property of their respective
owners. The Bluetooth® word mark and logos are registered trademarks owned by Bluetooth SIG, Inc., and any use of such marks by Nautilus, Inc. is
under license.
25,*,1$/0$18$/(1*/,6+9(56,2121/<
7RYDOLGDWHZDUUDQW\VXSSRUWNHHSWKHRULJLQDOSURRIRISXUFKDVHDQGUHFRUGWKHIROORZLQJLQIRUPDWLRQ
Serial Number __________________________
Date of Purchase ____________________
If purchased in US/Canada:7RUHJLVWHU\RXUSURGXFWZDUUDQW\JRWRZZZ6FKZLQQ)LWQHVVFRPUHJLVWHU
RUFDOO±
If purchased outside US/Canada: To register your product warranty, contact your local distributor.
)RUGHWDLOVUHJDUGLQJSURGXFWZDUUDQW\RULI\RXKDYHTXHVWLRQVRUSUREOHPVZLWK\RXUSURGXFWSOHDVHFRQWDFW\RXUORFDO
GLVWULEXWRU7R¿QG\RXUORFDOGLVWULEXWRUJRWRJOREDOVFKZLQQ¿WQHVVFRP

3
!
This icon means a potentially hazardous situation which, if not avoided, could result in death or serious
injury.
Obey the following warnings:
!
Read and understand all warnings on this machine.
Carefully read and understand the Assembly instructions.
• Keep bystanders and children away from the product you are assembling at all times.
'RQRWFRQQHFWSRZHUVXSSO\WRWKHPDFKLQHXQWLOLQVWUXFWHGWRGRVR
'RQRWDVVHPEOHWKLVPDFKLQHRXWGRRUVRULQDZHWRUPRLVWORFDWLRQ
0DNHVXUHDVVHPEO\LVGRQHLQDQDSSURSULDWHZRUNVSDFHDZD\IURPIRRWWUDႈFDQGH[SRVXUHWRE\VWDQGHUV
• Some components of the machine can be heavy or awkward. Use a second person when doing the assembly
VWHSVLQYROYLQJWKHVHSDUWV'RQRWGRVWHSVWKDWLQYROYHKHDY\OLIWLQJRUDZNZDUGPRYHPHQWVRQ\RXURZQ
• Set up this machine on a solid, level, horizontal surface.
'RQRWWU\WRFKDQJHWKHGHVLJQRUIXQFWLRQDOLW\RIWKLVPDFKLQH7KLVFRXOGFRPSURPLVHWKHVDIHW\RIWKLVPDFKLQH
and will void the warranty.
• If replacement parts are necessary, use only genuine Nautilus replacement parts and hardware. Failure to use
genuine replacement parts can cause a risk to users, keep the machine from operating correctly and void the
warranty.
'RQRWXVHXQWLOWKHPDFKLQHKDVEHHQIXOO\DVVHPEOHGDQGLQVSHFWHGIRUFRUUHFWSHUIRUPDQFHLQDFFRUGDQFHZLWK
the Manual.
5HDGDQGXQGHUVWDQGWKHFRPSOHWH0DQXDOVXSSOLHGZLWKWKLVPDFKLQHEHIRUH¿UVWXVH.HHSWKH0DQXDOIRUIXWXUH
reference.
'RDOODVVHPEO\VWHSVLQWKHVHTXHQFHJLYHQ,QFRUUHFWDVVHPEO\FDQOHDGWRLQMXU\RULQFRUUHFWIXQFWLRQ
• SAVE THESE INSTRUCTIONS.
Before using this equipment, obey the following warnings:
!
Read and understand the complete Manual. Keep the Manual for future reference.
Read and understand all warnings on this machine. If at any time the Warning labels become loose,
unreadable or dislodged, replace the labels. If purchased in US/Canada, contact Customer Service for
replacement labels. If purchased outside US/Canada, contact your local distributor for them.
• Children must not be let on or near to this machine. Moving parts and other features of the machine can be
dangerous to children.
• Not intended for use by anyone under 14 years of age. Individuals between 14 and 17 years of age must be su
pervised when using this machine.
• Consult a physician before you start an exercise program. Stop exercising if you feel pain or tightness in your
chest, become short of breath, or feel faint. Contact your doctor before you use the machine again. Use the
values calculated or measured by the machine’s computer for reference purposes only.
%HIRUHHDFKXVHH[DPLQHWKLVPDFKLQHIRUORRVHSDUWVRUVLJQVRIZHDU'RQRWXVHLIIRXQGLQWKLVFRQGLWLRQ
Monitor the Seat, Pedals, and Crank Arms closely. If purchased in US/Canada, contact Customer Service for
repair information. If purchased outside US/Canada, contact your local distributor for repair information.
• This appliance should only be used with the power supply unit provided, or a replacement power supply unit
supplied from Nautilus, Inc.
0D[LPXPXVHUZHLJKWOLPLWNJOEV'RQRWXVHLI\RXDUHRYHUWKLVZHLJKW
• This machine is for home use only.
IMPORTANT SAFETY INSTRUCTIONS
4
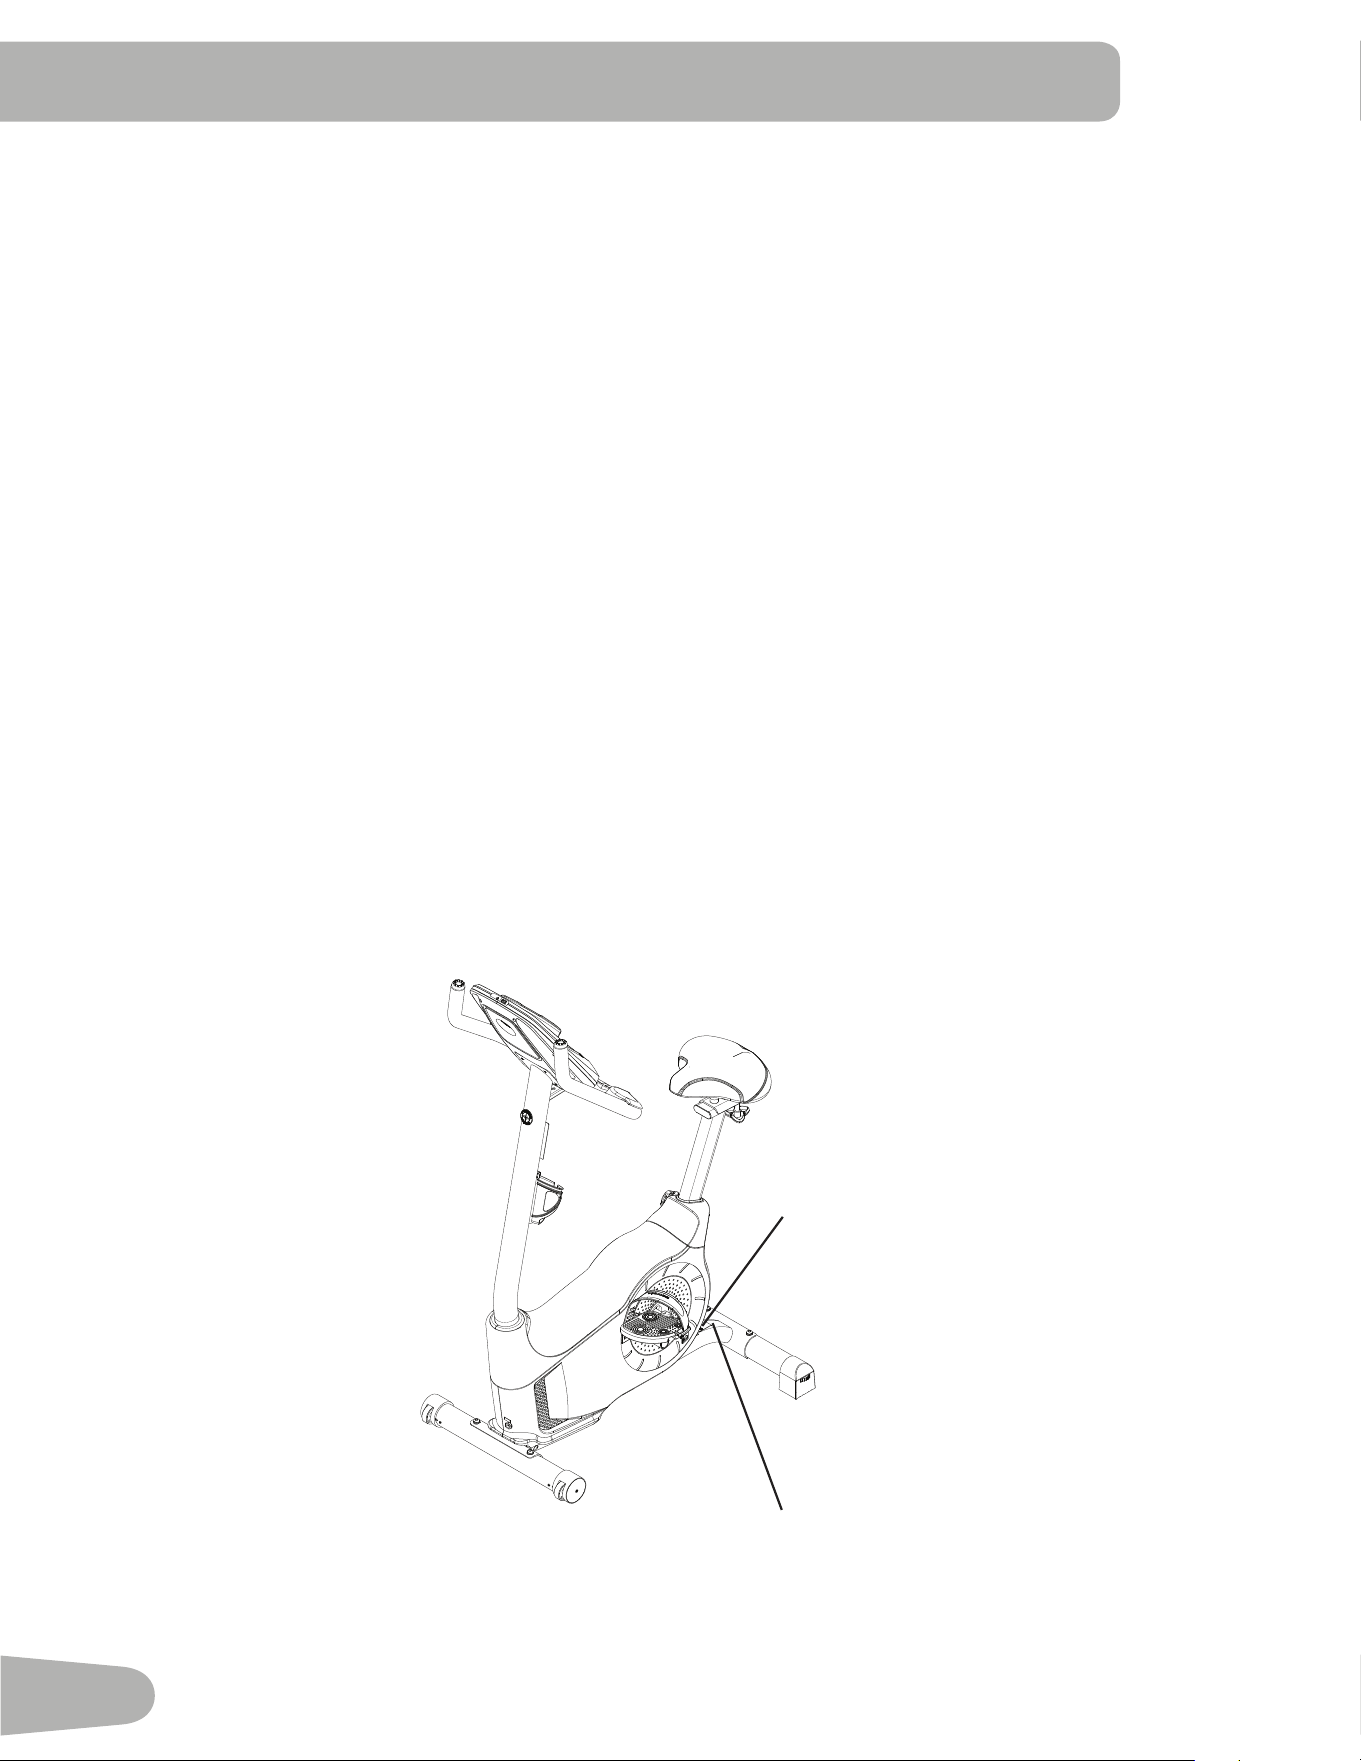
SAFETY WARNING LABELS AND SERIAL NUMBER
'RQRWZHDUORRVHFORWKLQJRUMHZHOU\7KLVPDFKLQHFRQWDLQVPRYLQJSDUWV'RQRWSXW¿QJHUVRURWKHUREMHFWV
LQWRPRYLQJSDUWVRIWKHH[HUFLVHHTXLSPHQW
• Set up and operate this machine on a solid, level, horizontal surface.
0DNHWKH3HGDOVVWDEOHEHIRUH\RXVWHSRQWKHP8VHFDXWLRQZKHQ\RXVWHSRQDQGRႇWKHPDFKLQH
'LVFRQQHFWDOOSRZHUEHIRUHVHUYLFLQJWKLVPDFKLQH
'RQRWRSHUDWHWKLVPDFKLQHRXWGRRUVRULQPRLVWRUZHWORFDWLRQV.HHSWKHIRRWSHGDOVFOHDQDQGGU\
• .HHSDWOHDVWPLQDORQJWKHVLGHXVHGWRDFFHVVWKHPDFKLQHDQGWRWKHUHDURIWKHPDFKLQHFOHDU7KLV
is the recommended safe distance for access, passage and emergency dismounts from the machine. Keep third
parties out of this space when machine is in use.
'RQRWRYHUH[HUW\RXUVHOIGXULQJH[HUFLVH2SHUDWHWKHPDFKLQHLQWKHPDQQHUGHVFULEHGLQWKLVPDQXDO
&RUUHFWO\DGMXVWDQGVDIHO\HQJDJHDOO3RVLWLRQDO$GMXVWPHQW'HYLFHV0DNHVXUHWKDWWKH$GMXVWPHQW'HYLFHVGR
not hit the user.
'RQRWEDFNRUUHYHUVHSHGDO'RLQJVRPD\ORRVHQWKH3HGDOVZKLFKFRXOGUHVXOWLQGDPDJHWRWKHPDFKLQH
and/or injury to the user. Never operate this machine with loose Pedals.
([HUFLVHRQWKLVPDFKLQHUHTXLUHVFRRUGLQDWLRQDQGEDODQFH%HVXUHWRDQWLFLSDWHWKDWFKDQJHVLQVSHHGDQG
resistance level can occur during workouts, and be attentive in order to avoid loss of balance and possible injury.
7KLVDSSOLDQFHLVQRWLQWHQGHGIRUXVHE\SHUVRQVLQFOXGLQJFKLOGUHQZLWKUHGXFHGSK\VLFDOVHQVRU\RUPHQWDO
capabilities, or lack of experience and knowledge, unless they have been given supervision or instruction
concerning use of the appliance by a person responsible for their safety.
• Children should be supervised to ensure that they do not play with the appliance.
• SAVE THESE INSTRUCTIONS.
Serial number
Product
VSHFL¿FDWLRQ
Safety Warning Labels and Serial Number
This product complies with the European Radio Equipment Directive 2014/53/EU.
5
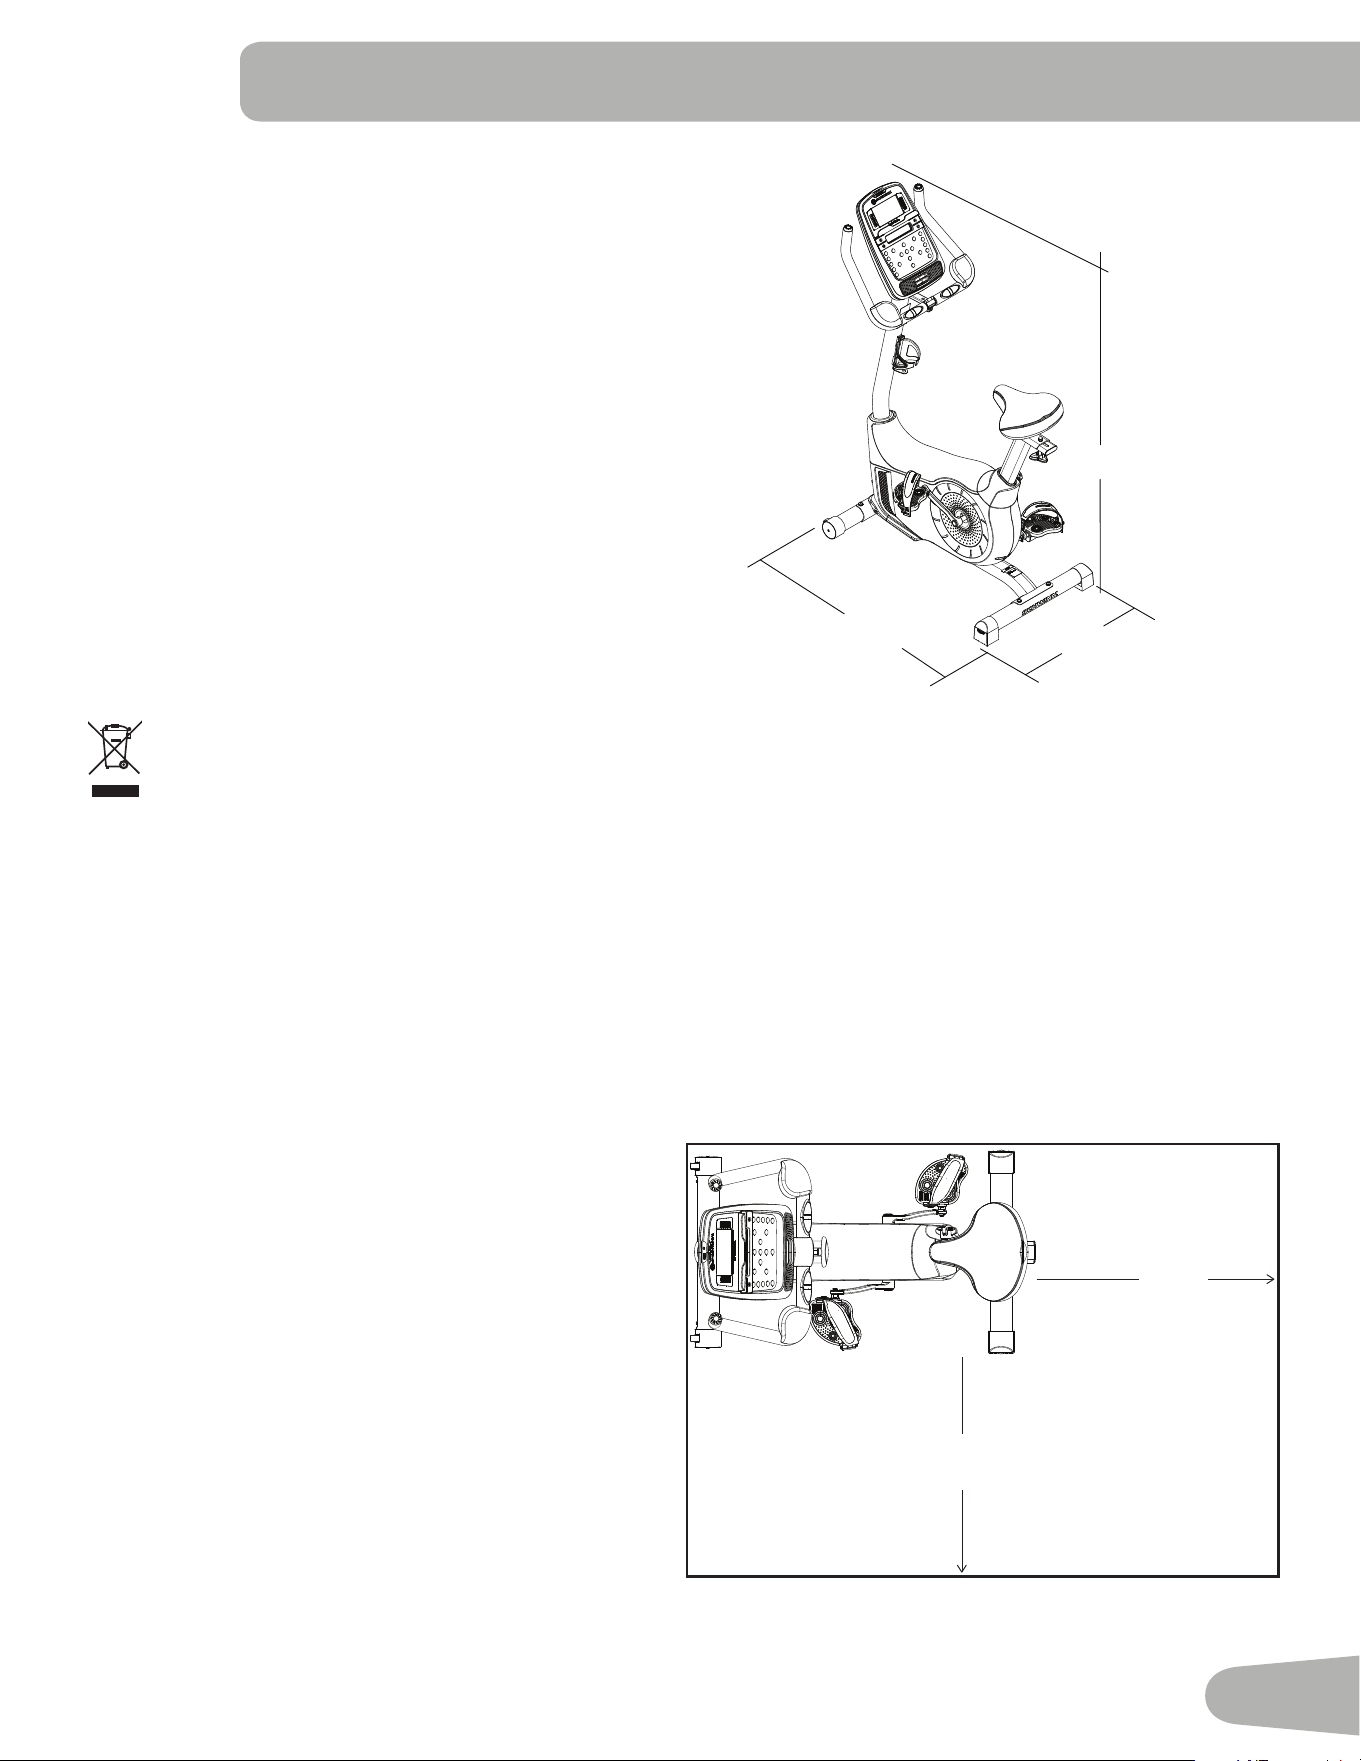
SPECIFICATIONS
105cm (41.3”)
54cm (21.4”)
141cm (55.6”)
Before Assembly
Select the area where you are going to set up and operate your machine. For safe operation, the location must be
RQDKDUGOHYHOVXUIDFH$OORZDZRUNRXWDUHDRIDPLQLPXPP[PLQ[LQ.HHSDWOHDVWPLQ
along the side used to access the machine and to the rear of the machine clear.
Basic Assembly Tips
)ROORZWKHVHEDVLFSRLQWVZKHQ\RXDVVHPEOH\RXUPDFKLQH
1. Read and understand the “Important Safety
Instructions” before assembly.
2. Collect all the pieces necessary for each
assembly step.
3. Using the recommended wrenches, turn the
EROWVDQGQXWVWRWKHULJKWFORFNZLVHWRWLJKWHQ
DQGWKHOHIWFRXQWHUFORFNZLVHWRORRVHQXQOHVV
instructed otherwise.
4. When attaching 2 pieces, gently lift and look
through the bolt holes to help insert the bolt
through the holes.
7KHDVVHPEO\FDQUHTXLUHSHRSOH
Maximum User Weight: NJOEV
Total Surface Area (footprint) of equipment:FP
2
Machine Weight: NJOEV
Power Requirements (AC Adapter):
,QSXW9ROWDJH 9$&+]$
2XWSXW9ROWDJH 9'&$
'2127GLVSRVHRIWKLVSURGXFWDVUHIXVH7KLVSURGXFWLVWREHUHF\FOHG)RUSURSHUGLVSRVDORIWKLVSURGXFW
please follow the prescribed methods at an approved waste center.
1.2 m
46 in
1.7 m
66 in
0.6m
24 in
0.6m
24 in
6
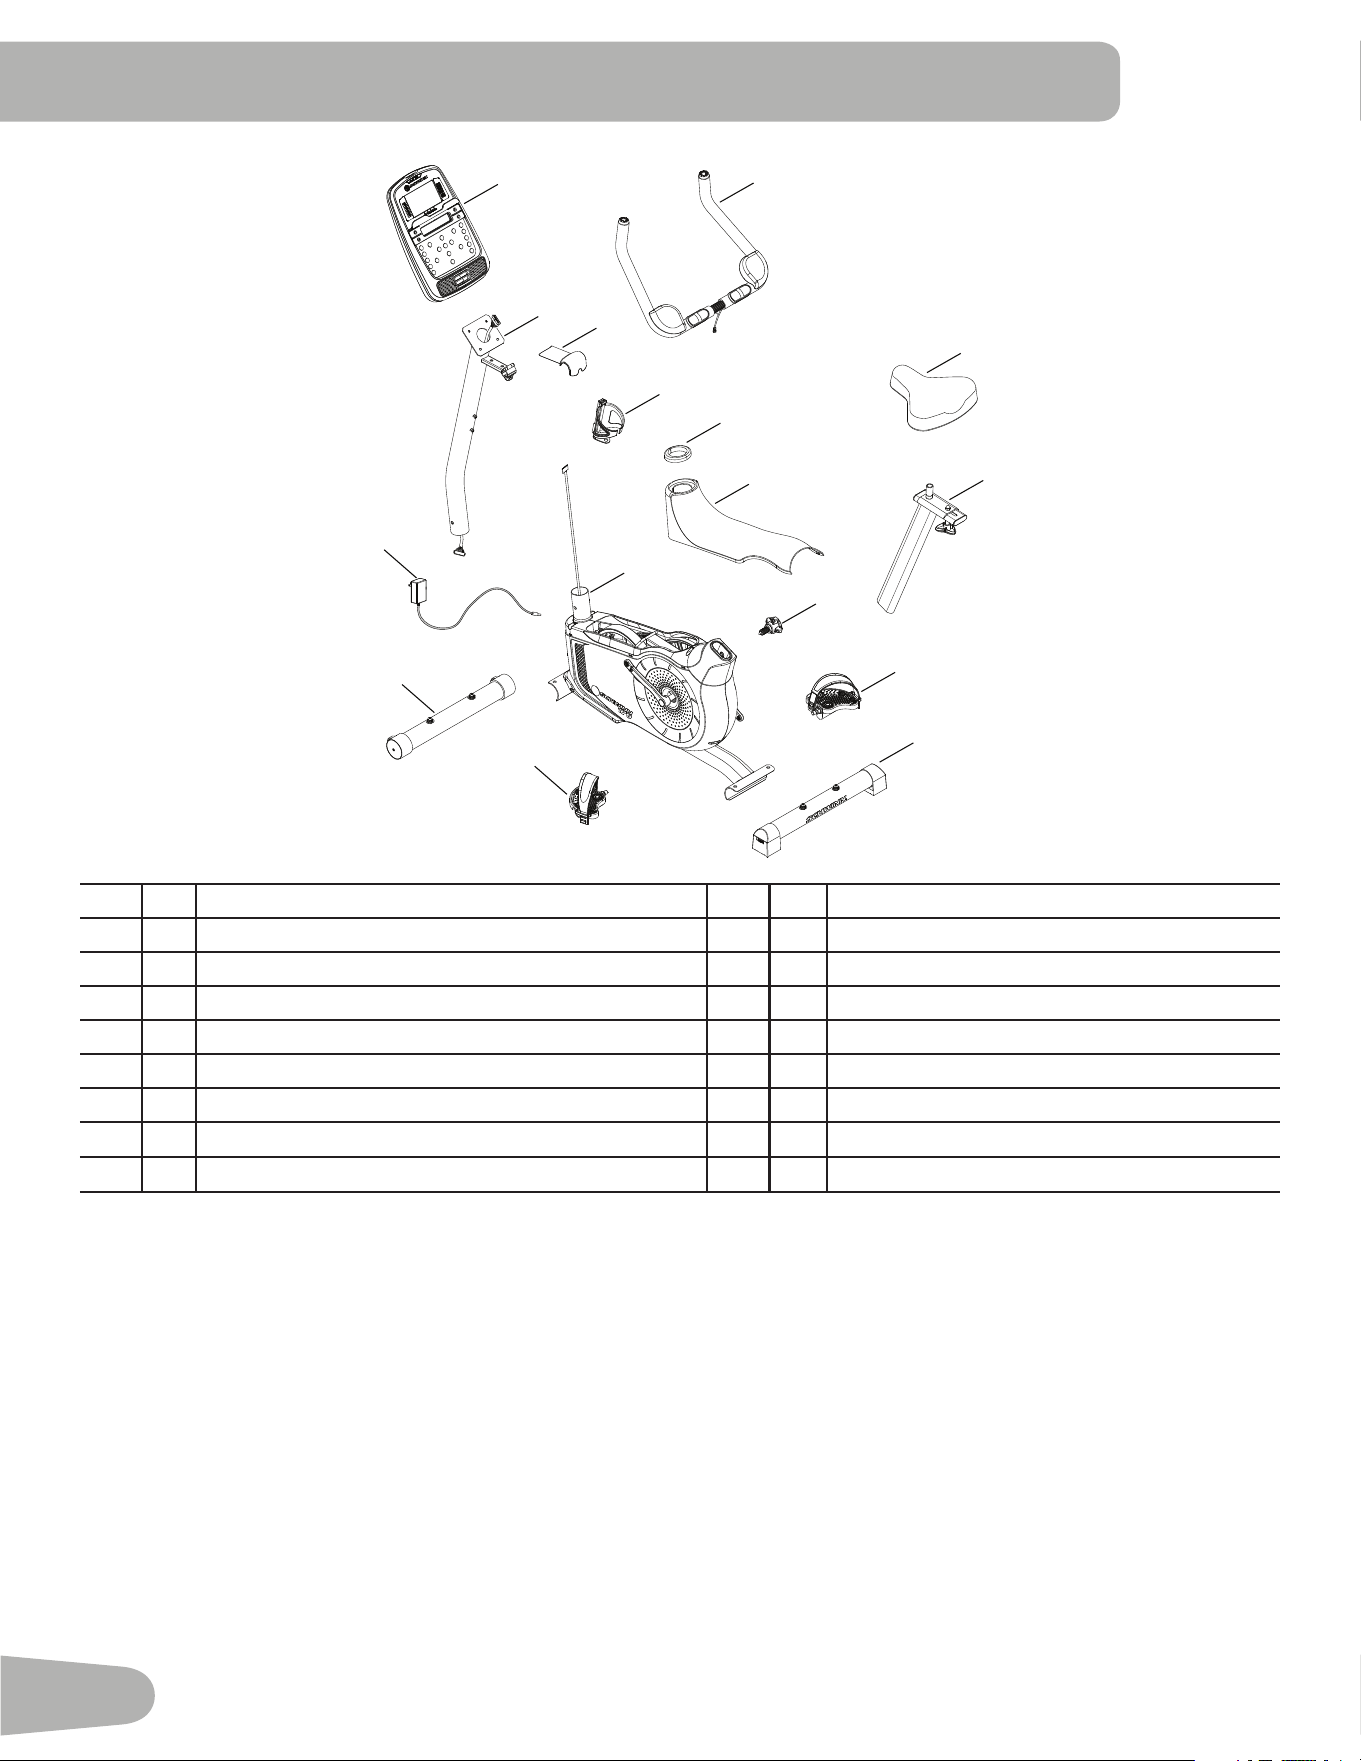
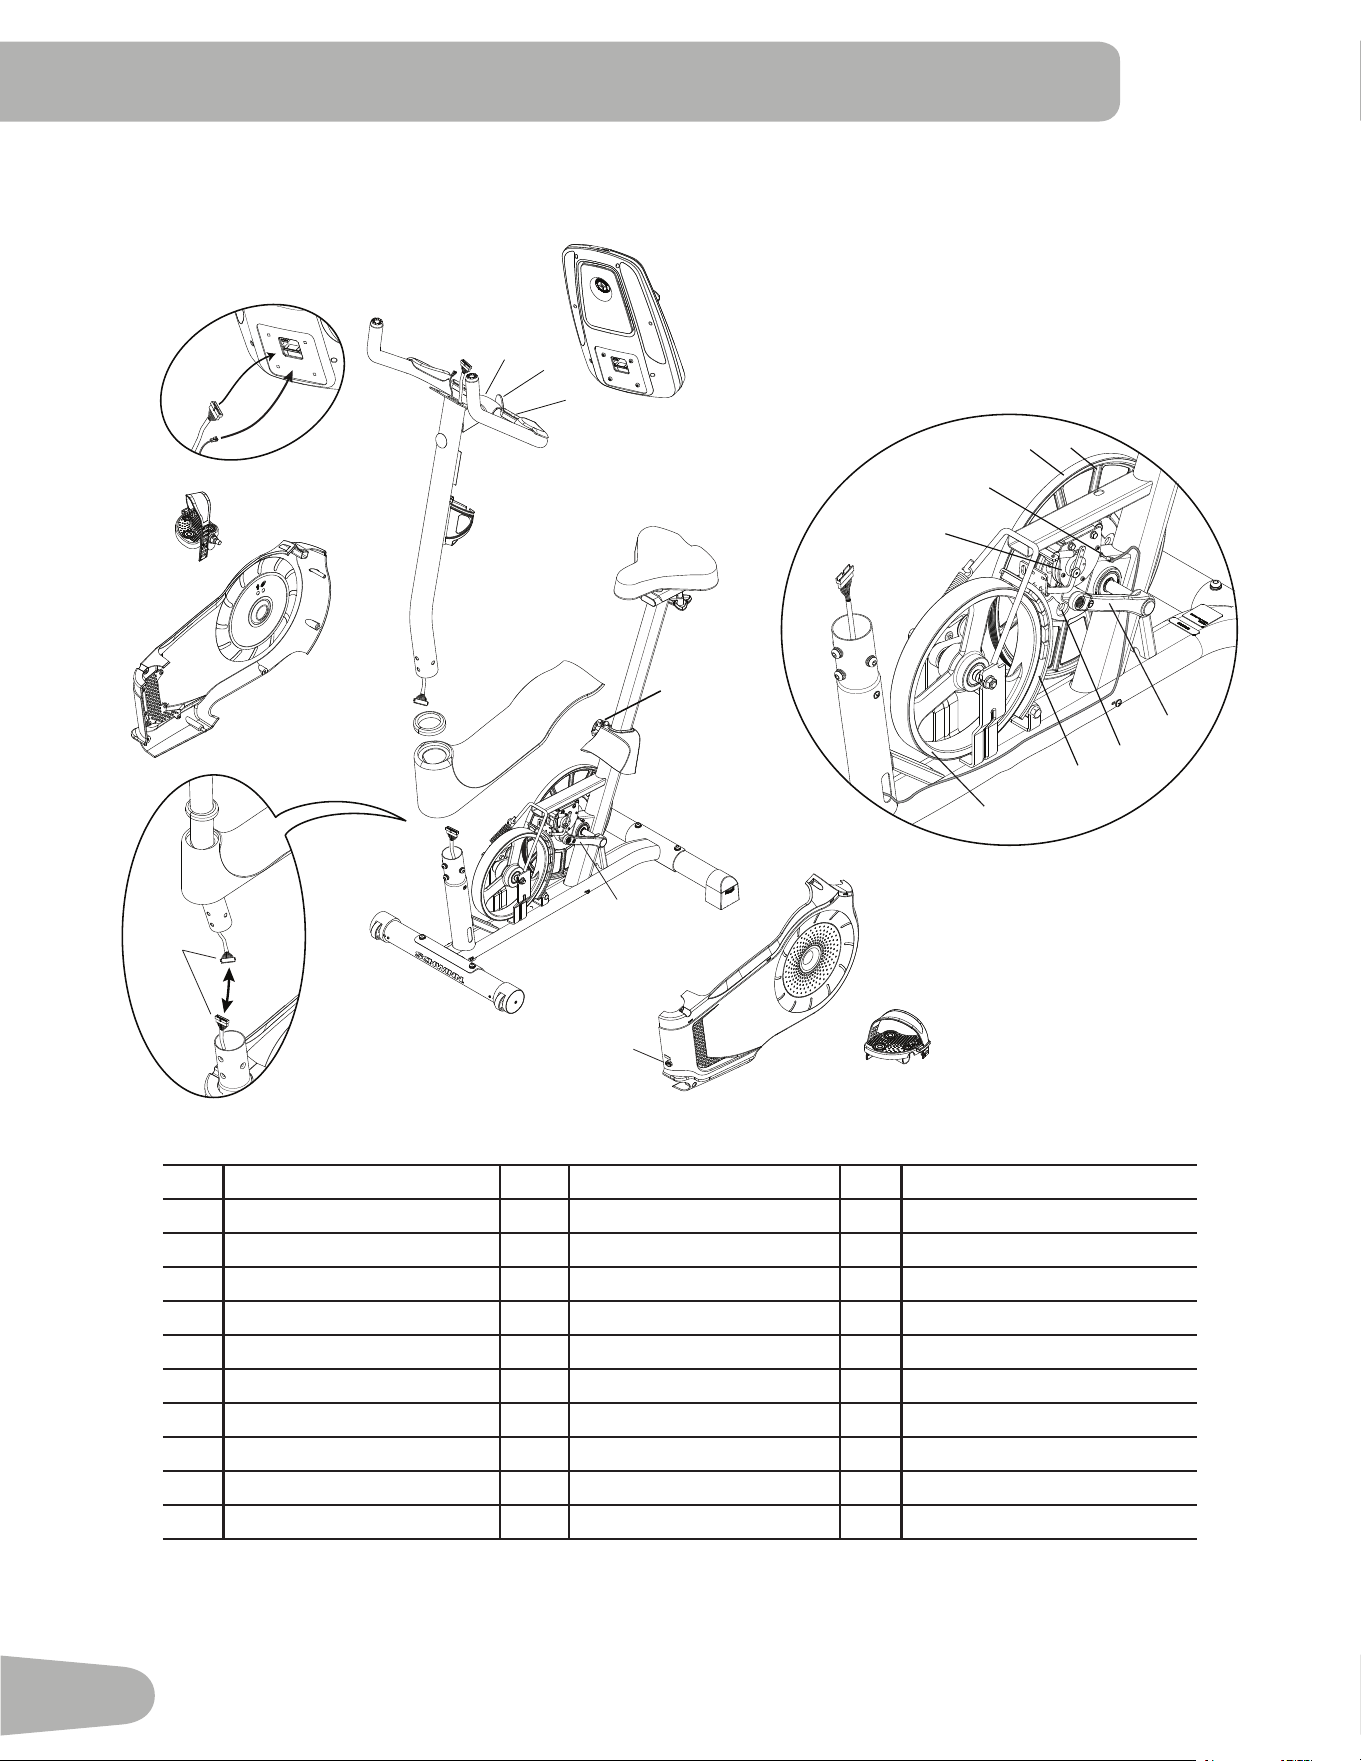
PARTS
Item Qty Description Item Qty Description
1 1 Main Assembly 9 1 Seat Post
2 1 Front Stabilizer 10 1 Adjustment Knob
3 1 Rear Stabilizer 11 1 Seat
4 1 Top Shroud 12 1 /HIW3HGDO/
1 Mast Gasket 13 1 5LJKW3HGDO5
6 1 Console 0DVWZLWK+DQGOHEDU0RXQW 14 1 Water Bottle Holder
7 1 Handlebars 1 AC Adapter
8 1 Console 16 1 Handlebar Mount Cover
Note: Media Cable is in a bag.
12 (L)
13 (R)
11
7
1
2
4
8
5
14
3
9
15
10
6
16
7
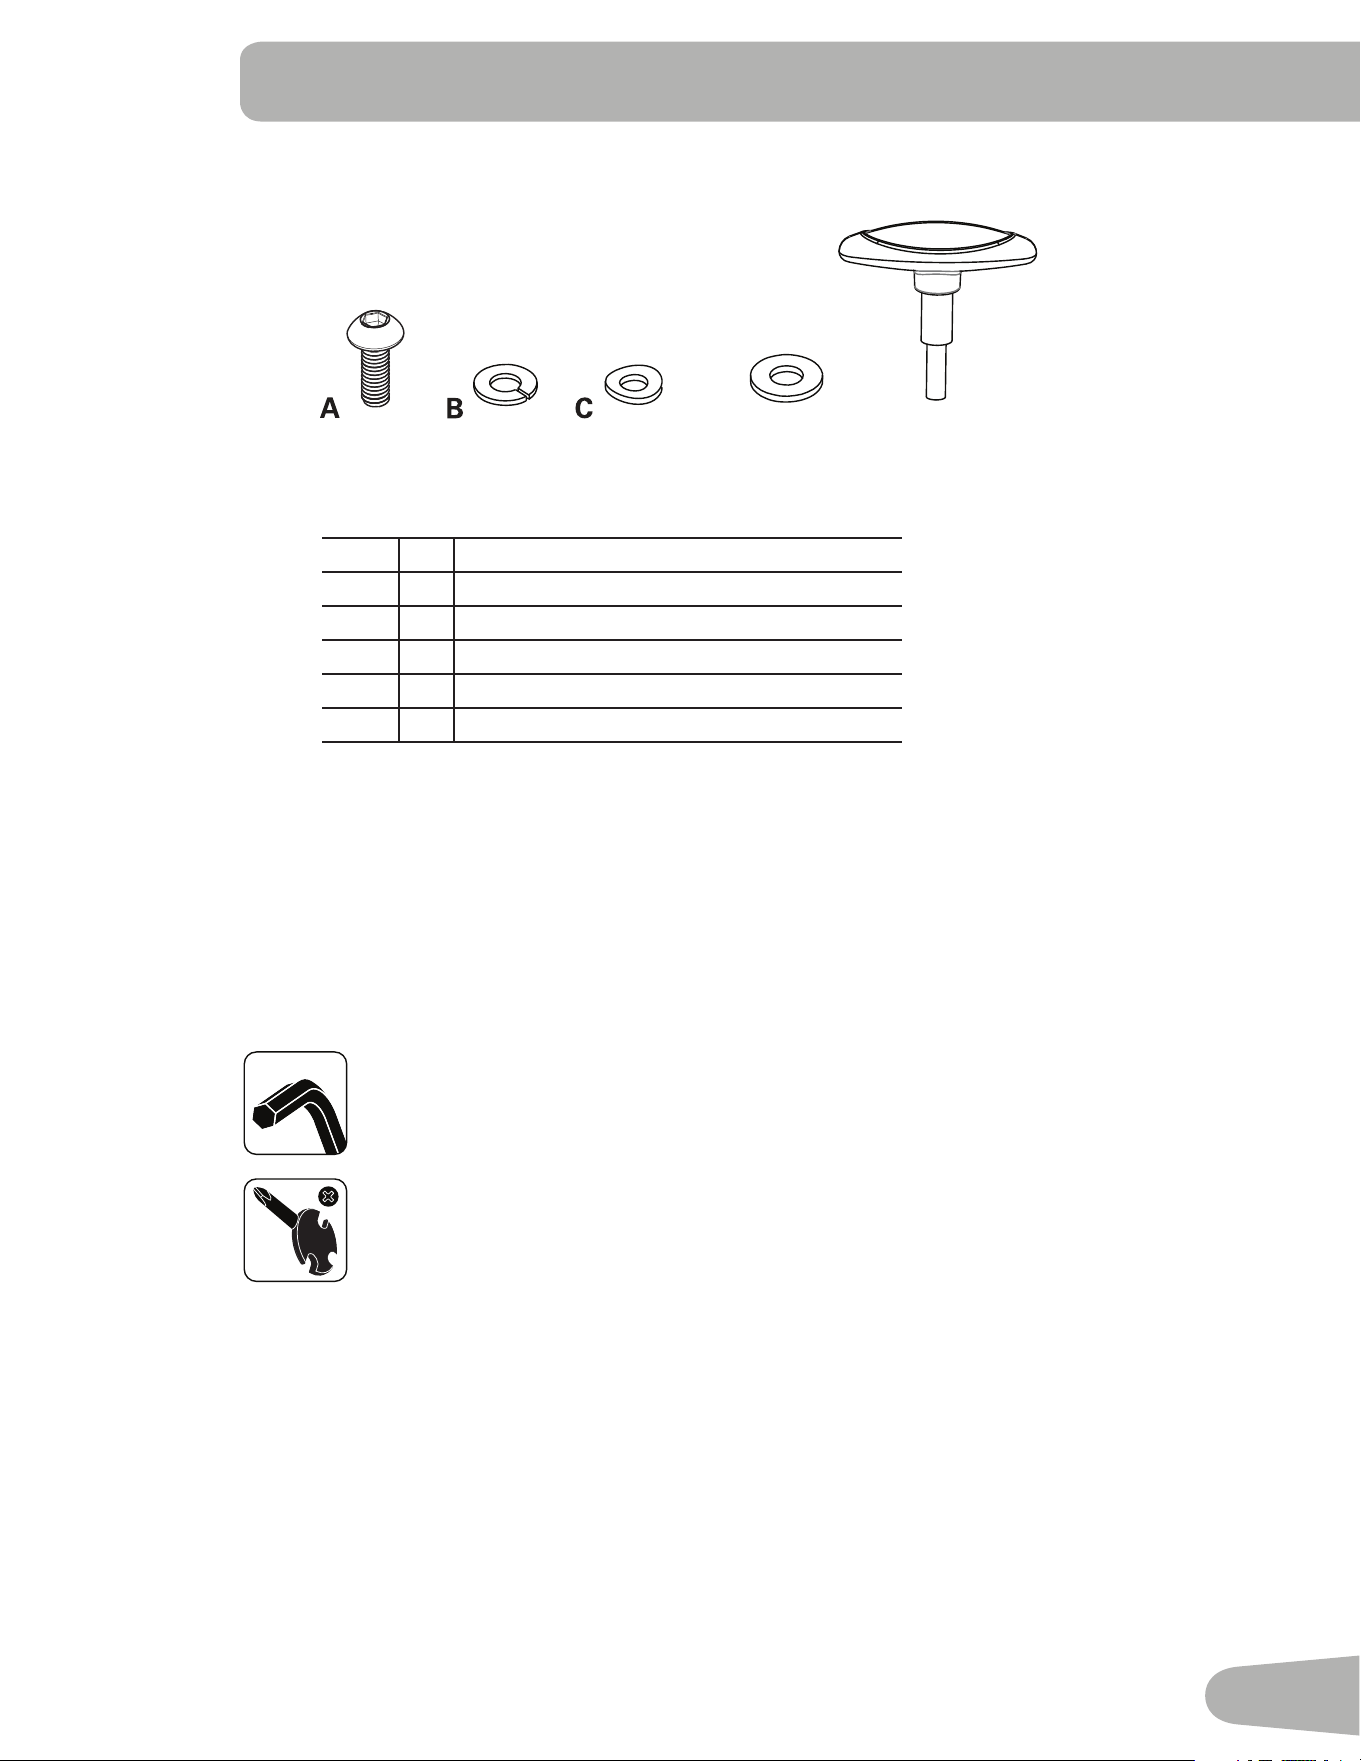
HARDWARE / TOOLS
Tools
Included
6 mm
Item Qty Description
A4%XWWRQ+HDG+H[6FUHZ0[
B Lock Washer M8
C 4 Curved Washer M8
' 1 Flat Washer M8
E17KDQGOH
Note: Select pieces of Hardware have been provided as spares on the Hardware Card.
Be aware that there may be remaining Hardware after the proper assembly of
your machine.
D
E
8
ASSEMBLY
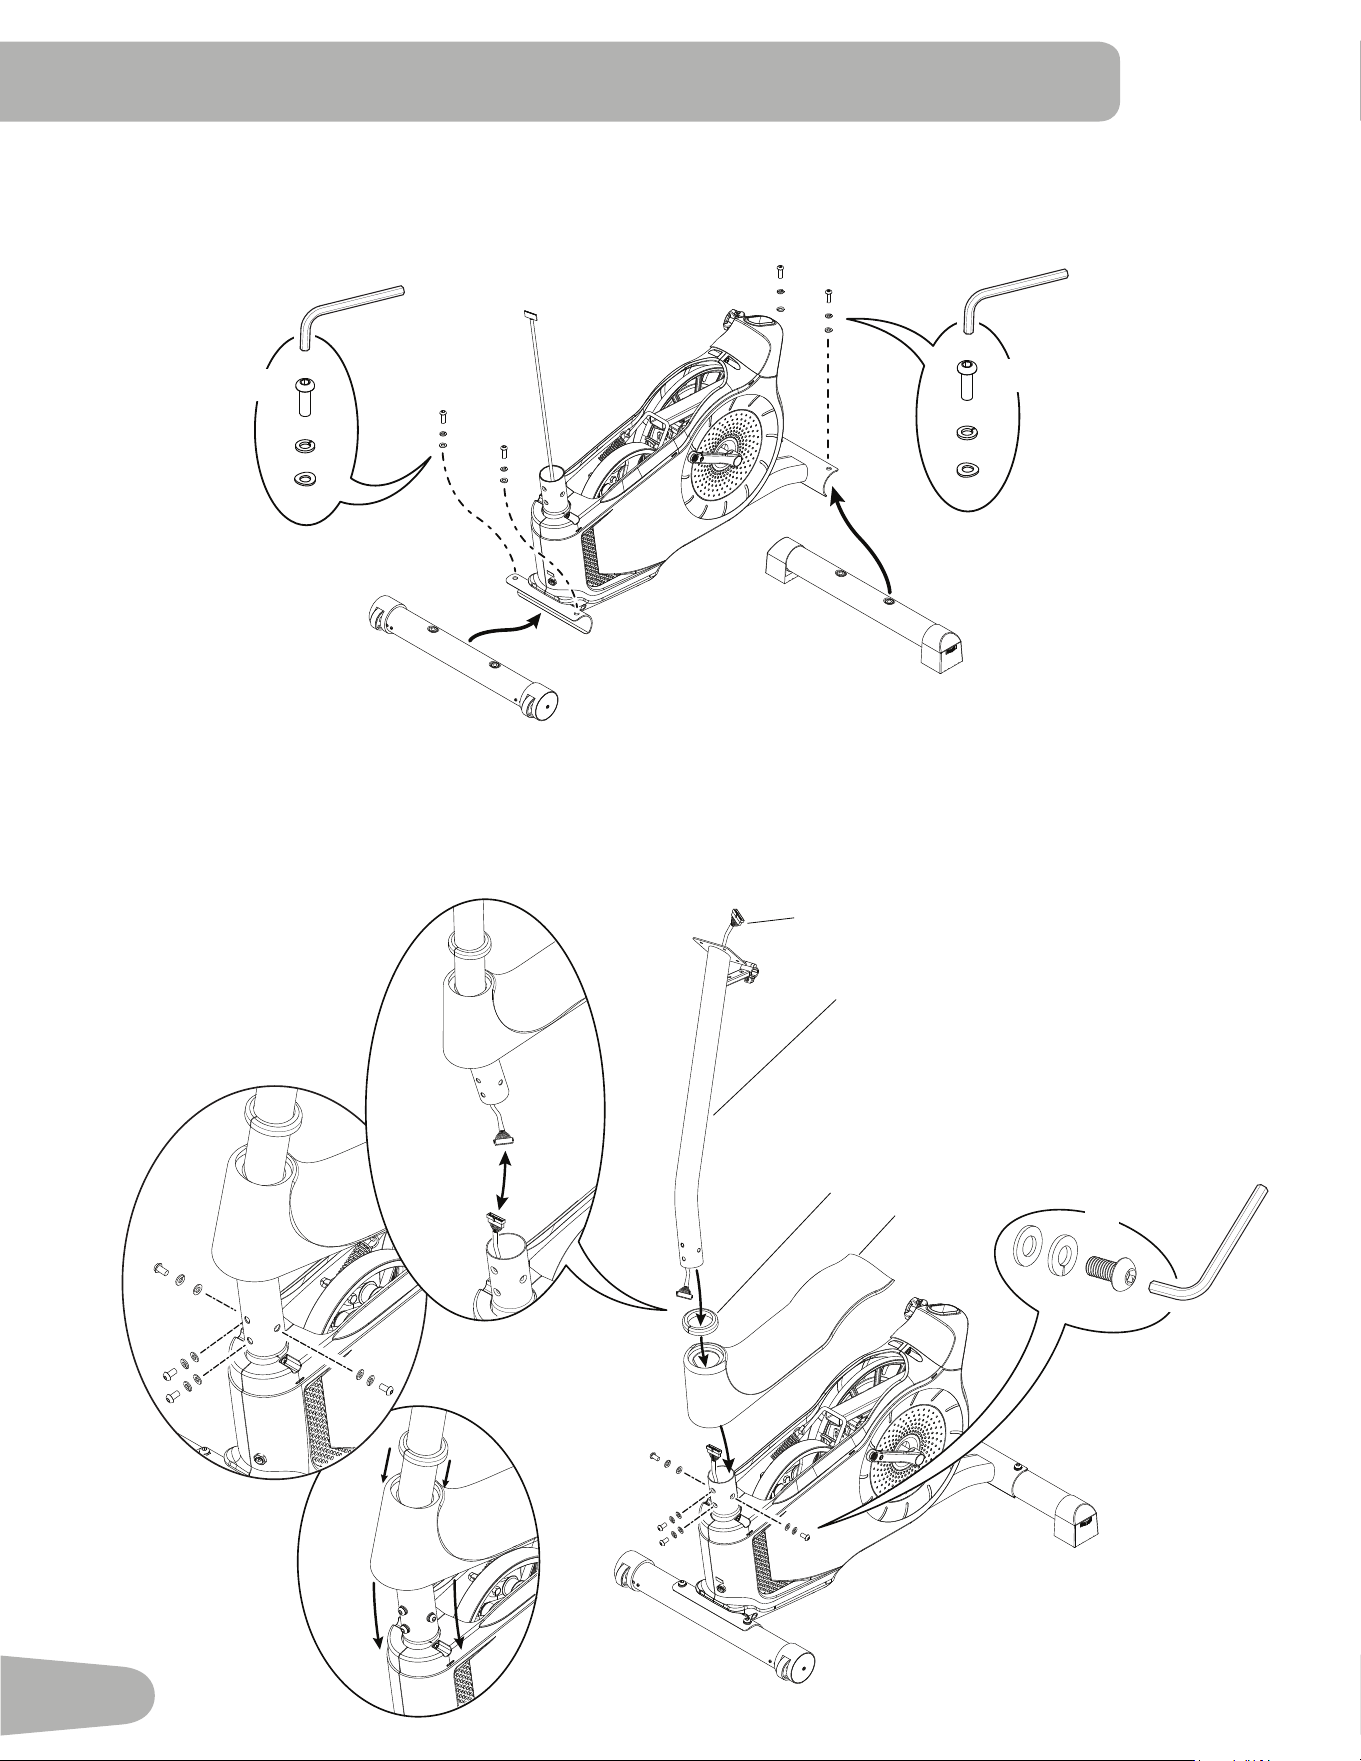
1. Attach Stabilizers to Main Frame
Note:+DUGZDUHLVSUHLQVWDOOHGRQWKHVWDELOL]HUVDQGQRWRQ+DUGZDUH&DUG0DNHVXUHWUDQVSRUWZKHHOVRQWKH
front stabilizer point forward, and the Schwinn
®
decal on the rear stabilizer faces outward from the machine.
2. Install Console Mast, Mast Gasket and Top Shroud on Main Assembly
NOTICE:0DNHVXUHWKH&RQVROH&DEOHFRQQHFWRUDGRHVQRWIDOOLQWRWKH&RQVROH0DVW$OLJQWKHFOLSVRQWKHFDEOH
FRQQHFWRUVDQGPDNHVXUHWKHFRQQHFWRUVORFN'RQRWFULPS&RQVROH&DEOH%HVXUHWKHWDEVRQWKH7RS
Shroud snap into the Main Assembly.
X2
X2
6 mm
6 mm
*
*
*
*
*
*
6
5
4
A
6 mm
C
B
X4
a
9
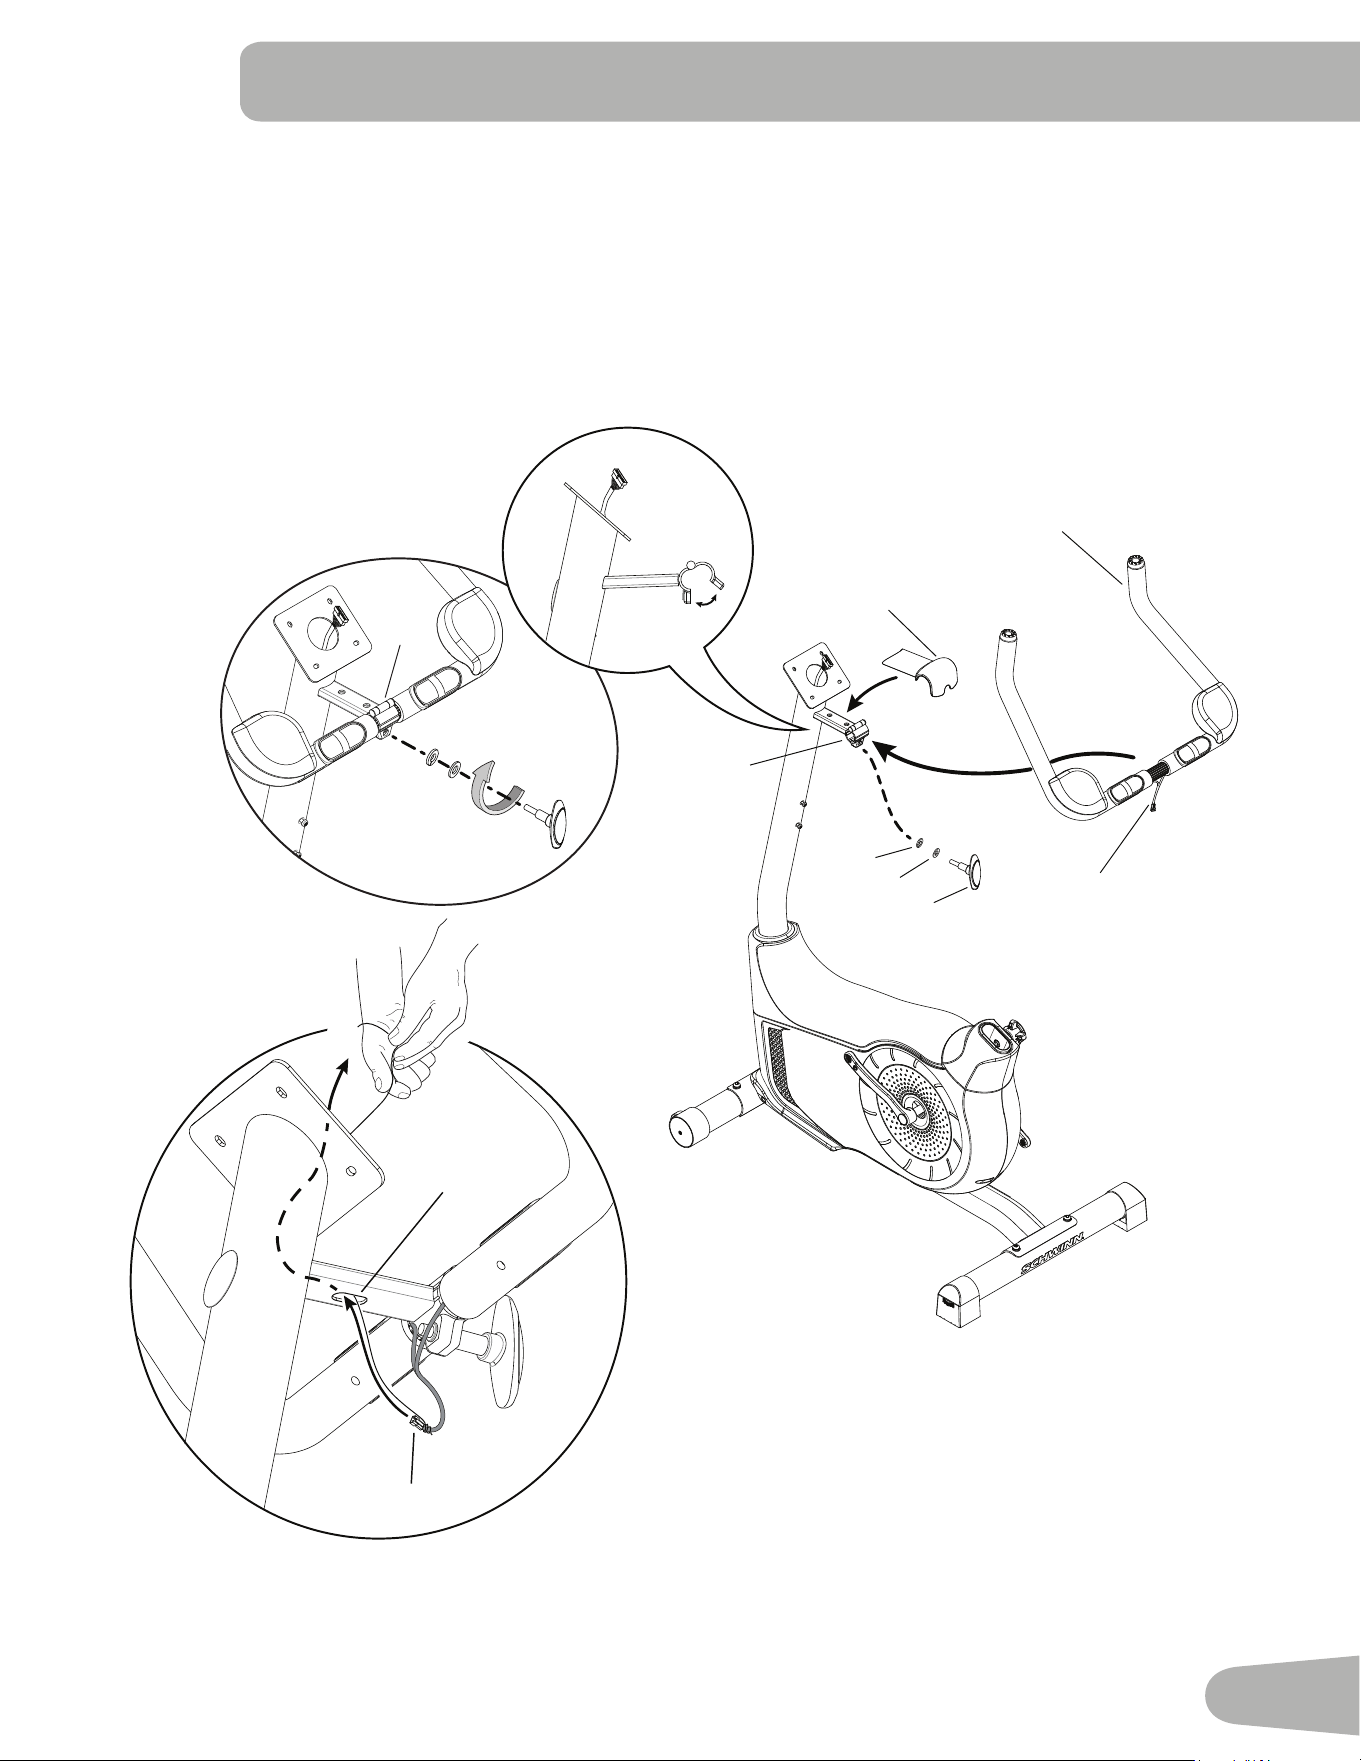
3. Install Handlebars on Console Mast
NOTICE:'RQRWFULPSWKHFDEOHV3XWWKH+DQGOHEDULQWKHEUDFNHWDDGMXVWWKH+DQGOHEDUWRWKHGHVLUHG
DQJOHDQGLQVWDOOWKH7KDQGOH(WKURXJKWKHKROHV8VHWKHSXOOFDEOHLQWKH+DQGOHEDU0RXQWWRURXWH
WKH+5FDEOHDWKURXJKWKHVORWFXQGHUWKH+DQGOHEDU0RXQWWRWKHWRSRIWKHPDVW)XOO\WLJKWHQ
WKH7KDQGOHWRNHHSWKH+DQGOHEDULQSRVLWLRQ3XVKWKHFRYHULQWRSRVLWLRQRQWKH+DQGOHEDU0RXQW
7
6a
16
E
6a
E
D
B
7
6a
D
B
7a
E
7a
7
6c
10
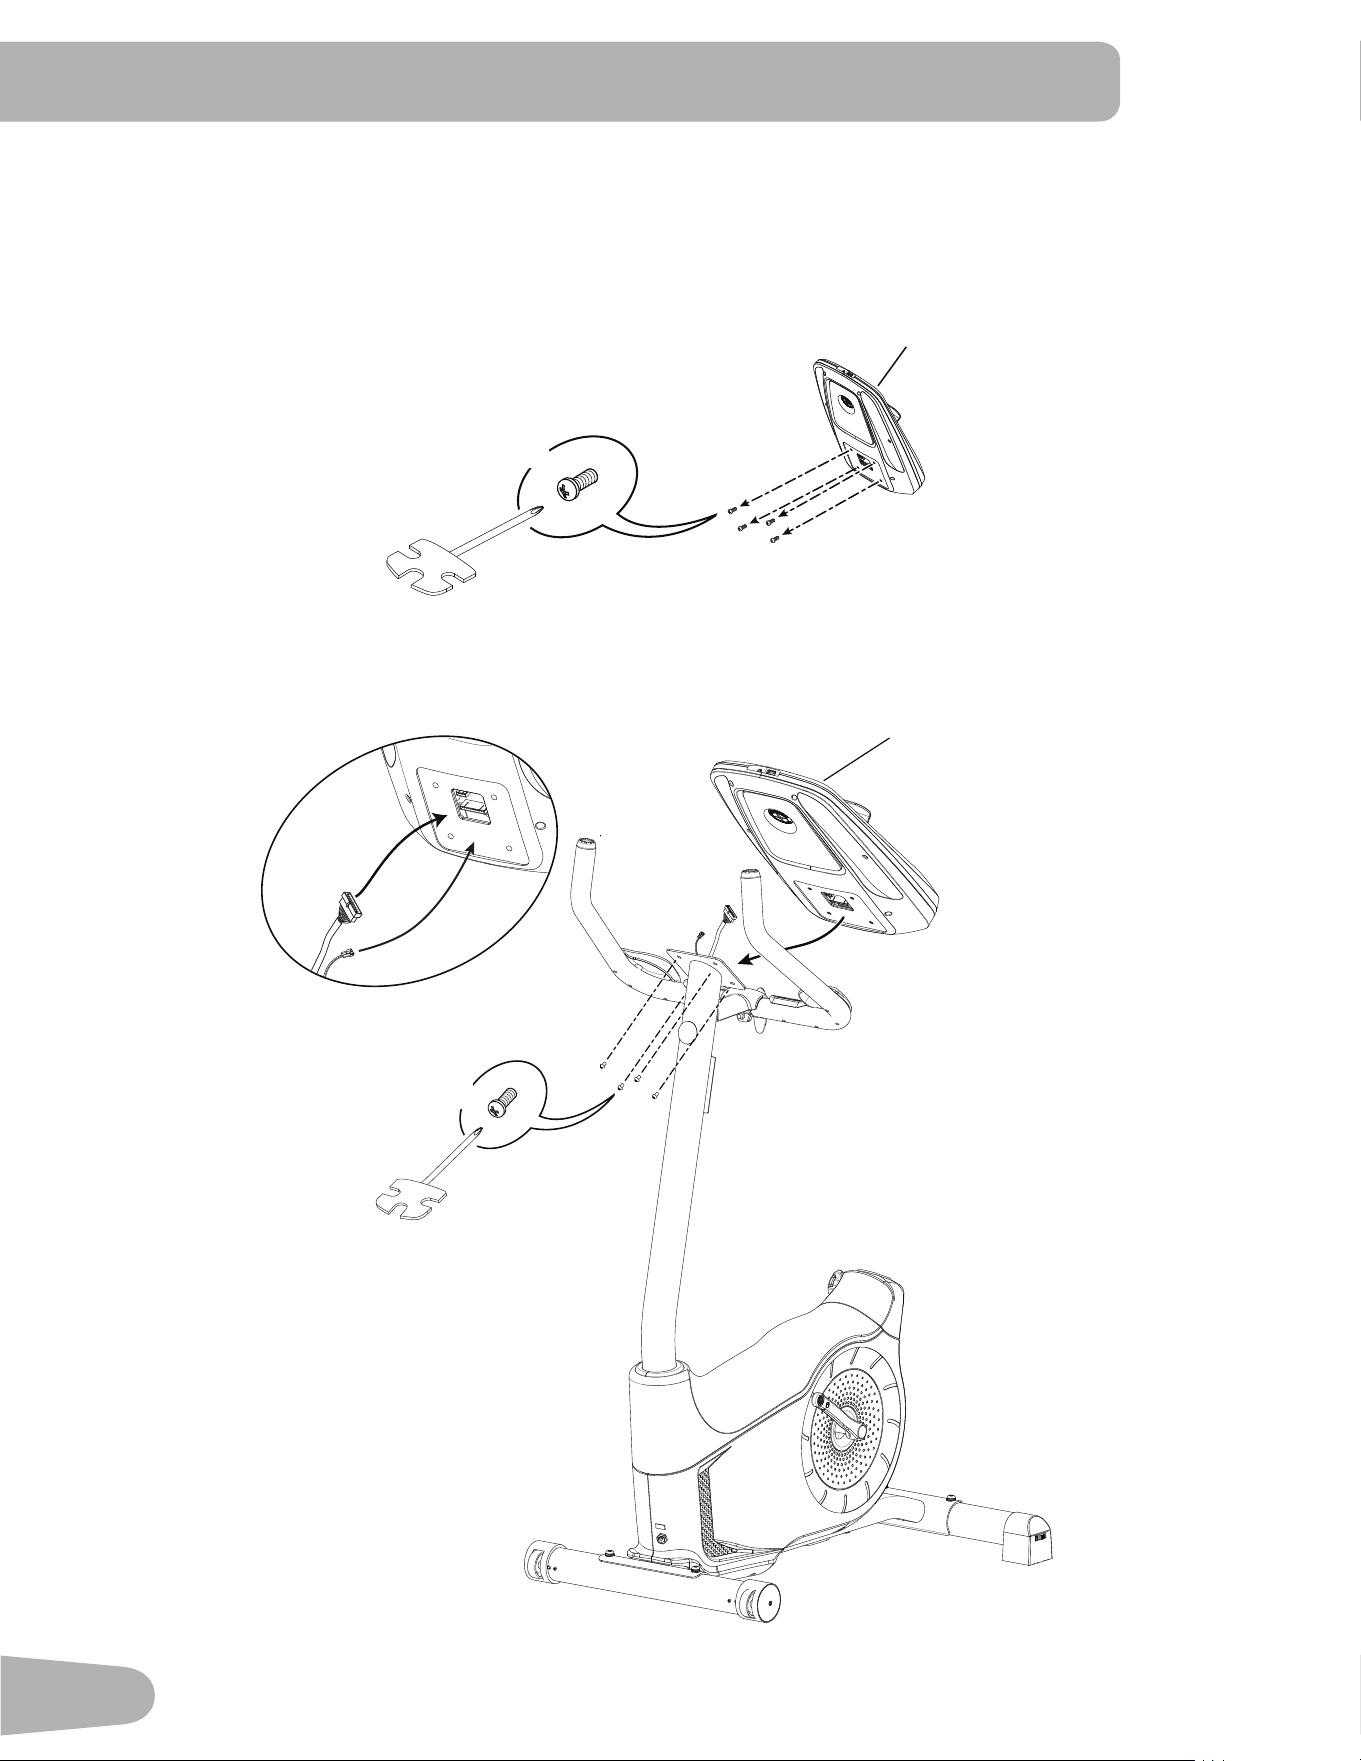
4. Install Console on Console Mast
Note: 5HPRYHWKHSUHLQVWDOOHGVFUHZVIURPWKHEDFNRIWKH&RQVROHEHIRUH\RXFRQQHFWWKHFDEOHV
NOTICE: 'RQRWFULPSWKHFDEOHV
8
*
X4
#2
X4
#2
8
*
11
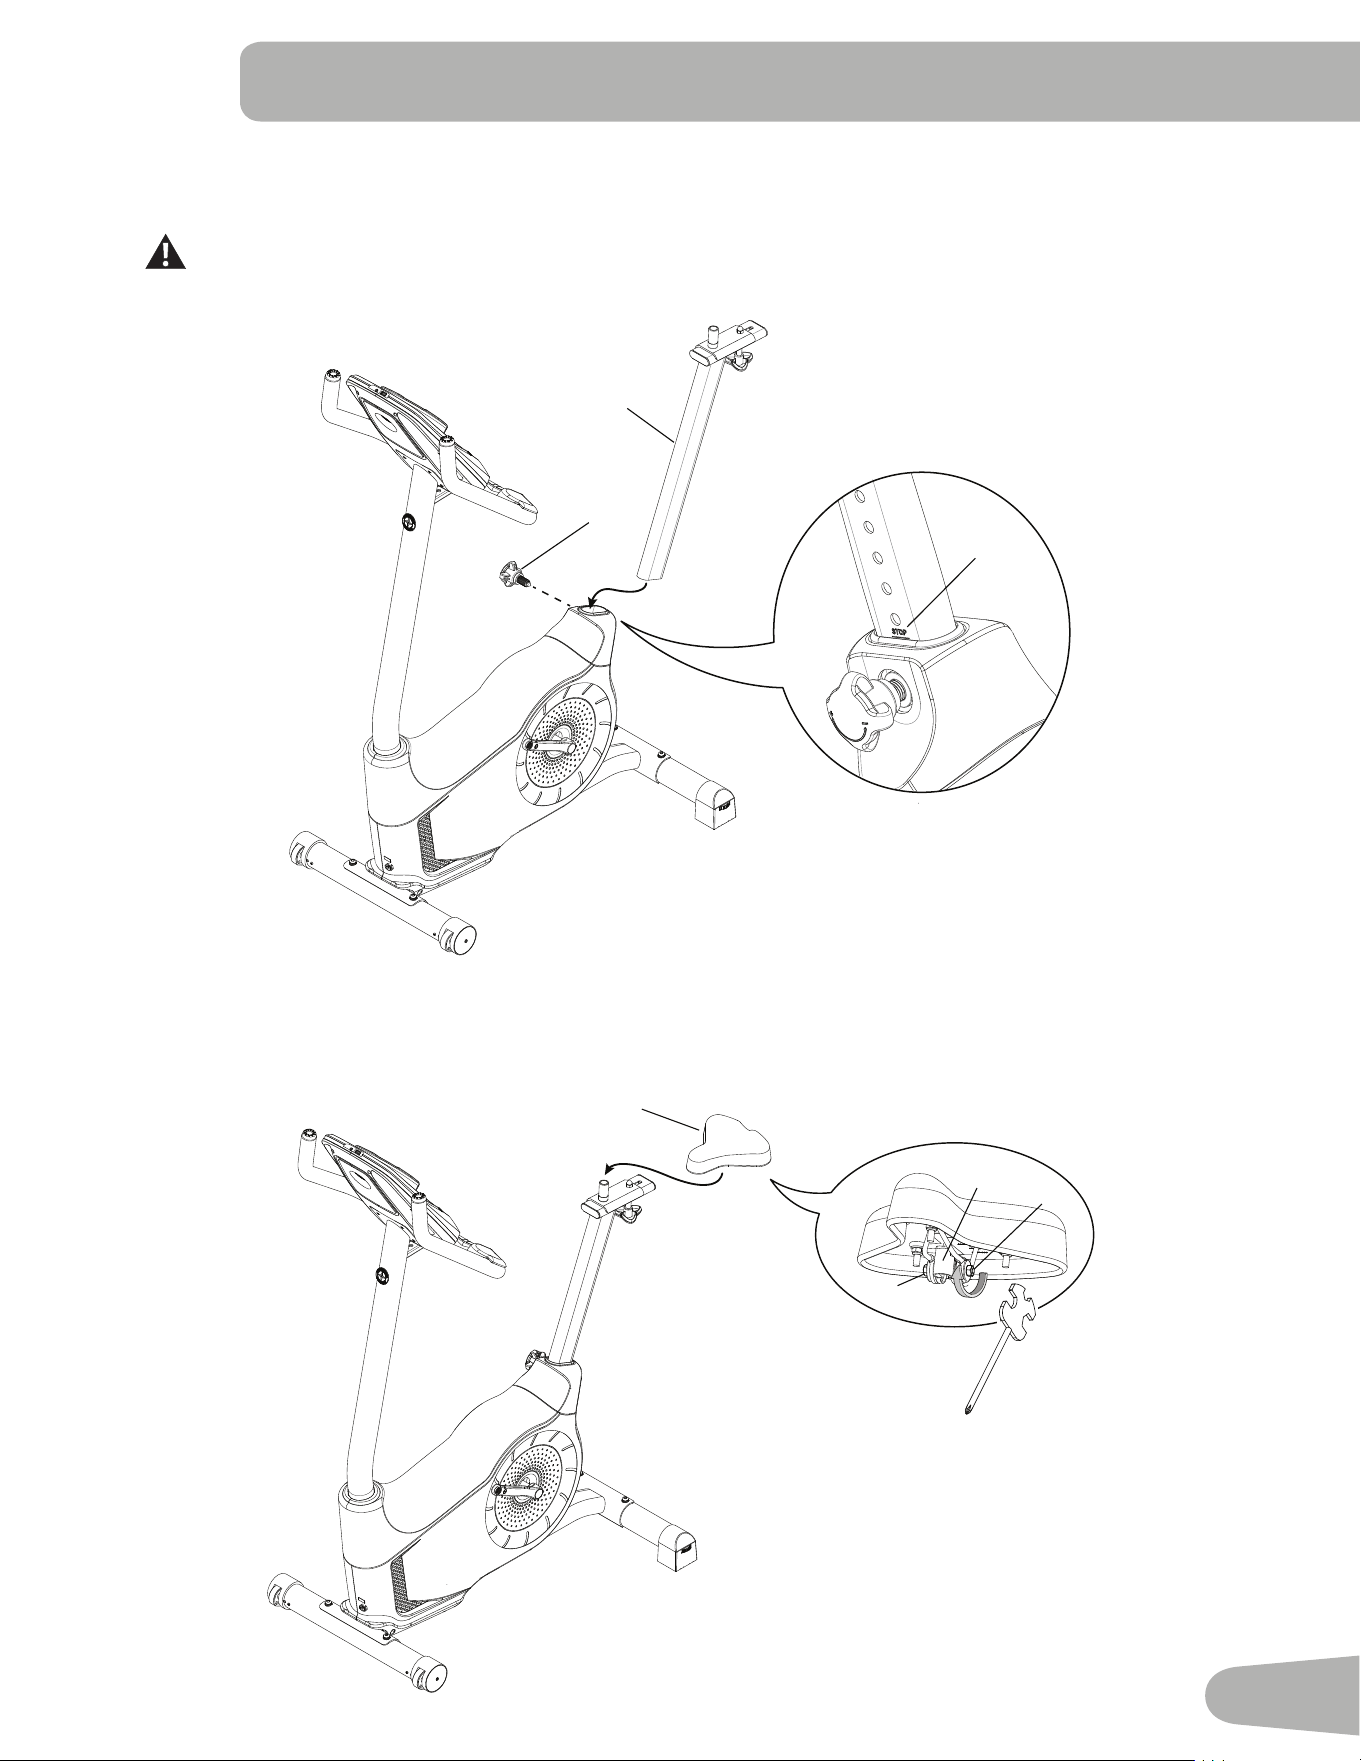
5. Install Seat Post on Frame
NOTICE: Make sure the Adjustment Knob engages the Seat Post.
Do not set the Seat Post position higher than the stop mark (STOP) on the tube.
6. Attach Seat to Seat Post
NOTICE:%HVXUHWKH6HDWLVVWUDLJKW7LJKWHQERWKQXWVERQWKH6HDWEUDFNHWDWRKROGWKH6HDWLQSRVLWLRQ
9
10
STOP
10
11
11a
11b
11b
12
7. Install Pedals
If the threads strip due to improper installation, then the Pedals can disengage from the bike
and/or break while under usage, which can result in serious injury to the user.
Note: The Left Pedal is reverse-threaded. Be sure to attach Pedals on the proper side of the Bike. Orientation
is based from a seated p osition on the bike. The Left Pedal has an “ L”, the Ri ght Pedal an “ R”. Star t the Pedals by hand,
and then fully tighten them with the Pedal Wrench. The Pedals must be fully tightened.
12 (L)
13 (R)
13
8. Install Water Bottle Holder
Note:7KHKDUGZDUHLVSUHLQVWDOOHGRQWKH&RQVROH0DVWDQGQRWRQ+DUGZDUH&DUG
14
X2
*
9. Connect AC Adapter
10. Final Inspection
Inspect your machine to ensure that all hardware is tight and components are properly assembled.
Be sure to record the serial number in the field provided at the front of this manual.
!
Do not use or put the machine into service until the machine has been fully assembled and inspected for
correct performance in accordance with the Owner’s Manual.
15
14
Leveling Your Bike
Levelers are found on each side of the Rear Stabilizer. Turn the knob to adjust the stabilizer foot.
Do not adjust the levelers to such a height that they detach or unscrew from the machine. Injury to you
or damage to the machine can occur.
Make sure the bike is level and stable
before you exercise.
Moving Your Bike
To move the upright bike, carefully tilt the Handlebars toward you while pushing the front of the bike downward. Push the
bike to the desired location.
NOTICE:%HFDUHIXOZKHQ\RXPRYHWKHELNH$EUXSWPRWLRQVFDQDႇHFWWKHFRPSXWHURSHUDWLRQ
BEFORE YOU START

15
FEATURES
A Console L Water Bottle Holder
B Handlebars with Elbow Pads M MP3 Input
C Adjustable Seat N USB Port
' Seat Slider Adjustment Knob O &RQWDFW+HDUW5DWH&+56HQVRUV
E Seat Post Adjustment Knob P Speakers
F Pedals Q Fan
G Stabilizers R Media Tray
H Levelers S 7HOHPHWU\+HDUW5DWH+55HFHLYHU
I Fully Shrouded Flywheel T Bluetooth
®
&RQQHFWLYLW\QRWVKRZQ
- Transport Rollers U Media Cable
K Power Connector
O
P
Q
R
U
A
C
B
E
F
G
H
I
G
J
K
L
M
N
D
A
B
S
WARNING! Use the values calculated or measured by the machine’s computer for reference purposes only. The
heart rate displayed is an approximation and should be used for reference only. Over exercising may
result in serious injury or death. If you feel faint stop exercising immediately.
16
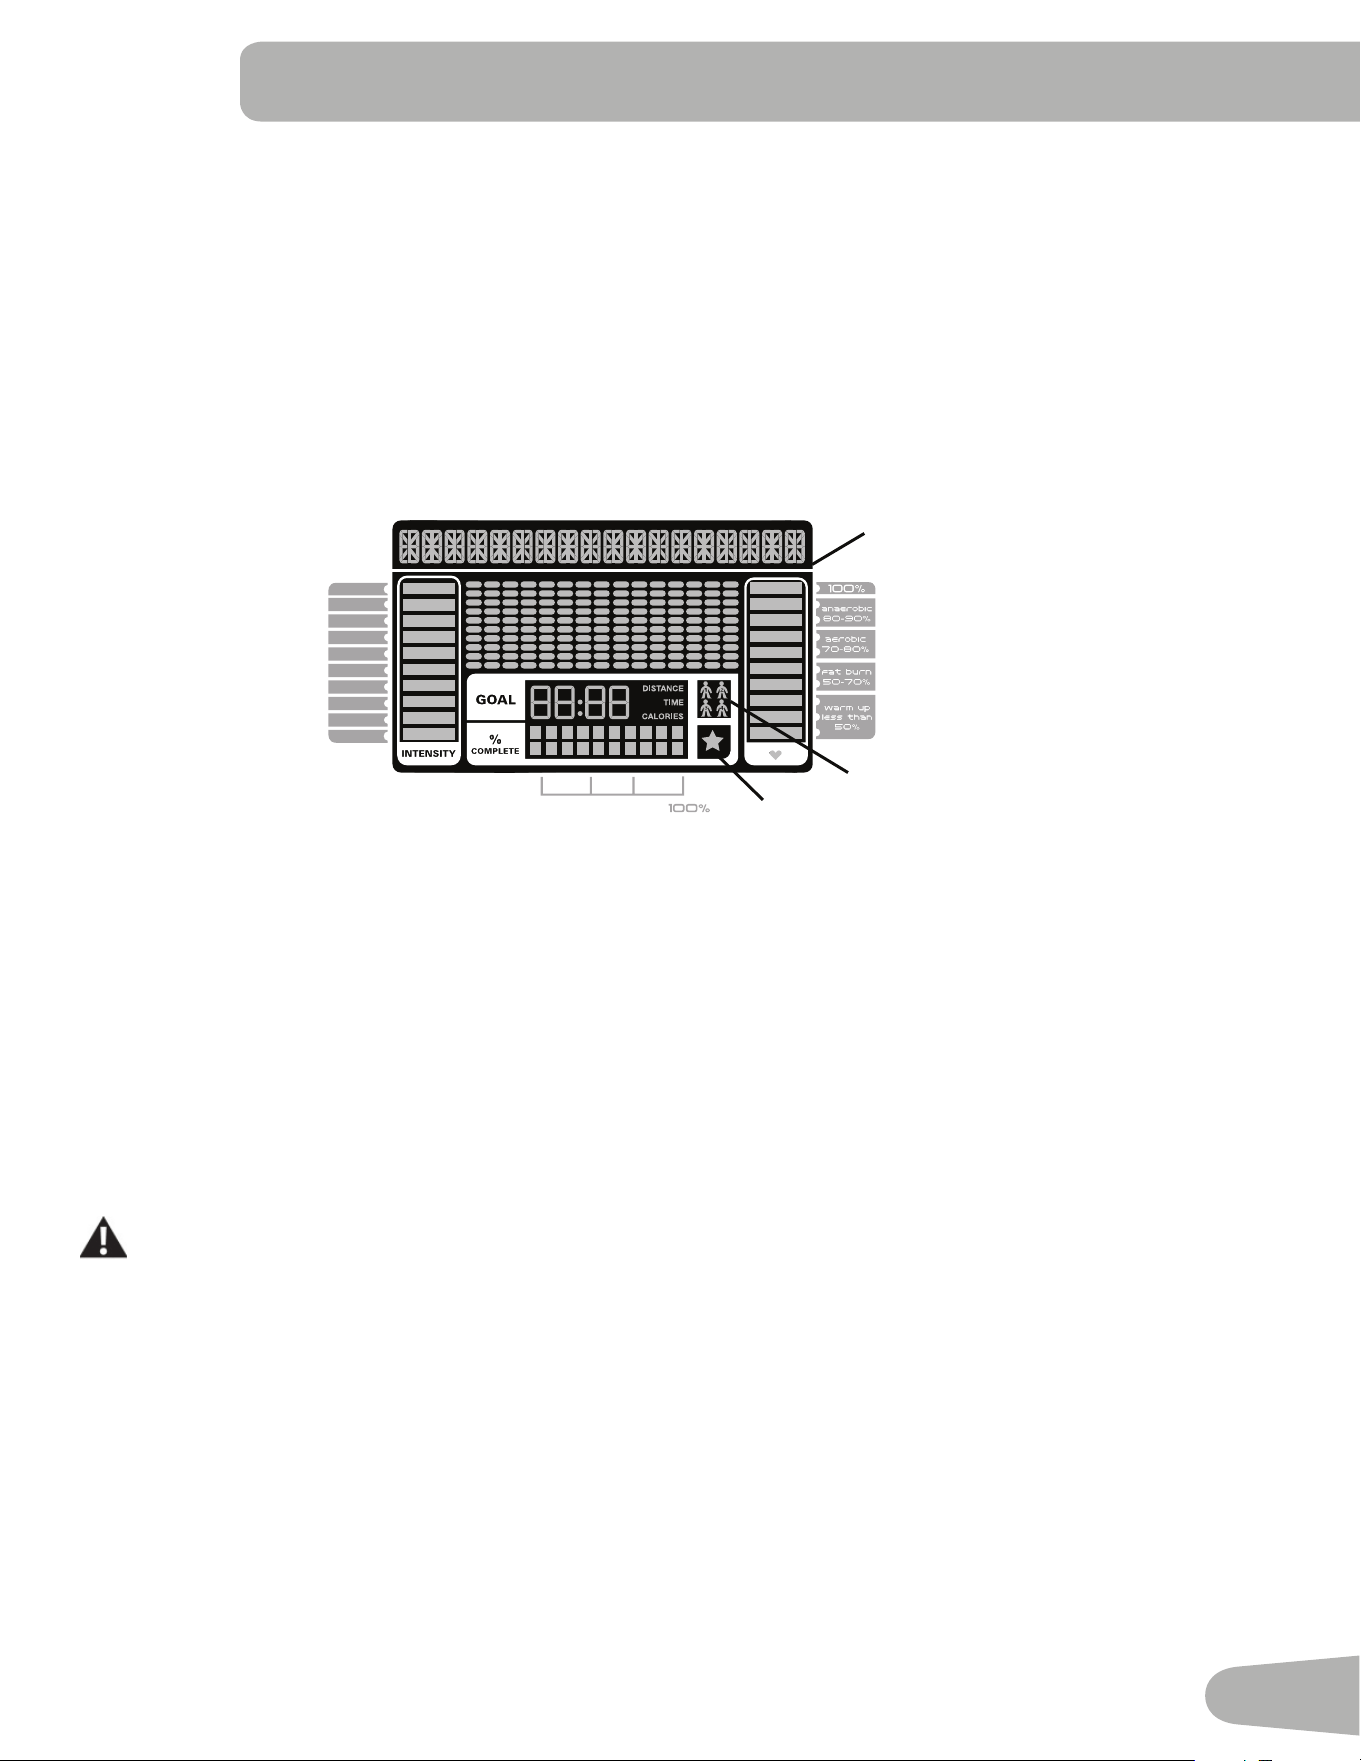
Console Features
The Console provides important information about your workout and lets you control the resistance levels while you
H[HUFLVH7KH&RQVROHIHDWXUHVWKH6FKZLQQ'XDO7UDFN
™
display with touch control buttons to navigate you through the
exercise programs.
Note: Though your machine is Bluetooth
®
HQDEOHGLWLVXQDEOHWRUHFHLYHLQSXWSRVVLEO\IURPD%OXHWRRWK
®
enabled
FKHVWVWUDSRUSOD\DXGLRDFURVVWKH%OXHWRRWK
®
connection. The Console uses the Bluetooth
®
connectivity to export
\RXUZRUNRXWGDWDWR¿WQHVVDSSVRQO\
Keypad Functions
5HVLVWDQFH,QFUHDVHcEXWWRQ,QFUHDVHVWKHZRUNRXWUHVLVWDQFHOHYHO
5HVLVWDQFH'HFUHDVHdEXWWRQ'HFUHDVHVWKHZRUNRXWUHVLVWDQFHOHYHO
48,&.67$57EXWWRQ%HJLQVD4XLFN6WDUWZRUNRXW
86(5EXWWRQ6HOHFWVD8VHUSUR¿OH
352*5$06EXWWRQ6HOHFWVDFDWHJRU\DQGZRUNRXWSURJUDP
3$86((1'EXWWRQ3DXVHVDQDFWLYHZRUNRXWHQGVDSDXVHGZRUNRXWRUgoes back to the previous screen
*2$/75$&.EXWWRQ'LVSOD\VWKH:RUNRXW7RWDOVDQG$FKLHYHPHQWVIRUWKHVHOHFWHG8VHU3UR¿OH
,QFUHDVHcEXWWRQ,QFUHDVHVDYDOXHDJHWLPHGLVWDQFHRUFDORULHVRUPRYHVWKURXJKRSWLRQV
/HIWeEXWWRQ'LVSOD\VGLႇHUHQWZRUNRXWYDOXHVGXULQJDZRUNRXWDQGPRYHVWKURXJKRSWLRQV
2.EXWWRQ6WDUWVD3URJUDPZRUNRXWFRQ¿UPVLQIRUPDWLRQRUUHVXPHVDSDXVHGZRUNRXW
5LJKWfEXWWRQ'LVSOD\VGLႇHUHQWZRUNRXWYDOXHVGXULQJDZRUNRXWDQGPRYHVWKURXJKRSWLRQV
Hr
8SSHU'LVSOD\
/RZHU'LVSOD\
Resistance Level Quick Buttons
Resistance Level Quick Buttons
Achievement Indicator Lights
Fan
17
'HFUHDVH d EXWWRQ 'HFUHDVHV D YDOXH DJH WLPH GLVWDQFH RU FDORULHV RU PRYHV WKURXJK RSWLRQV
)$1 EXWWRQ &RQWUROV VSHHG IDQ
5HVLVWDQFH /HYHO 4XLFN %XWWRQV 6KLIWV WKH UHVLVWDQFH OHYHOV WR WKH VHWWLQJ TXLFNO\ GXULQJ D ZRUNRXW
$FKLHYHPHQW ,QGLFDWRU /LJKWV ZKHQ DQ DFKLHYHPHQW OHYHO LV UHDFKHG RU D UHVXOW LV UHYLHZHG WKH DFKLHYHPHQW LQGLFDWRU
light will activate.
Schwinn DualTrack
™
Display
Upper Display Data
Program Display
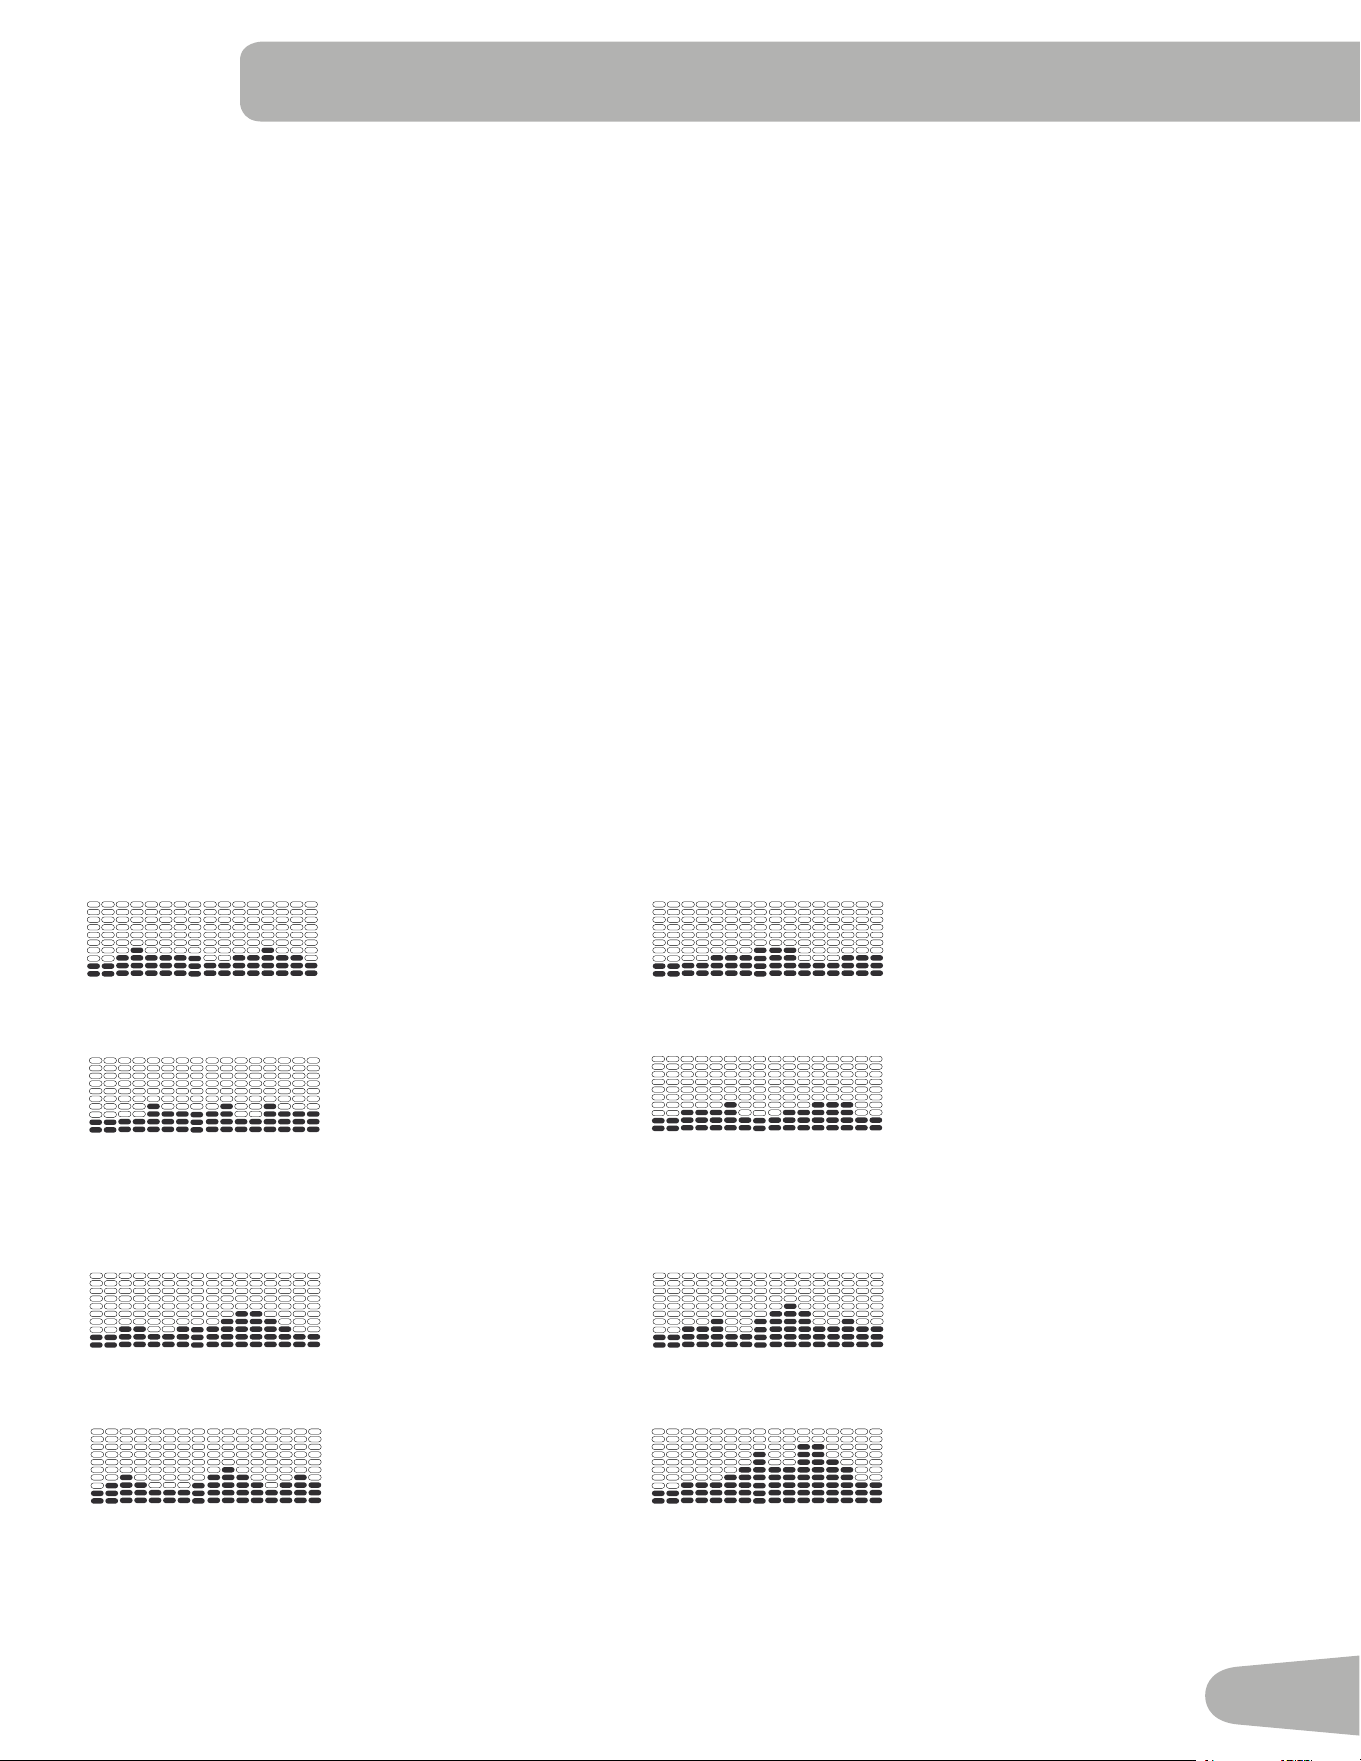
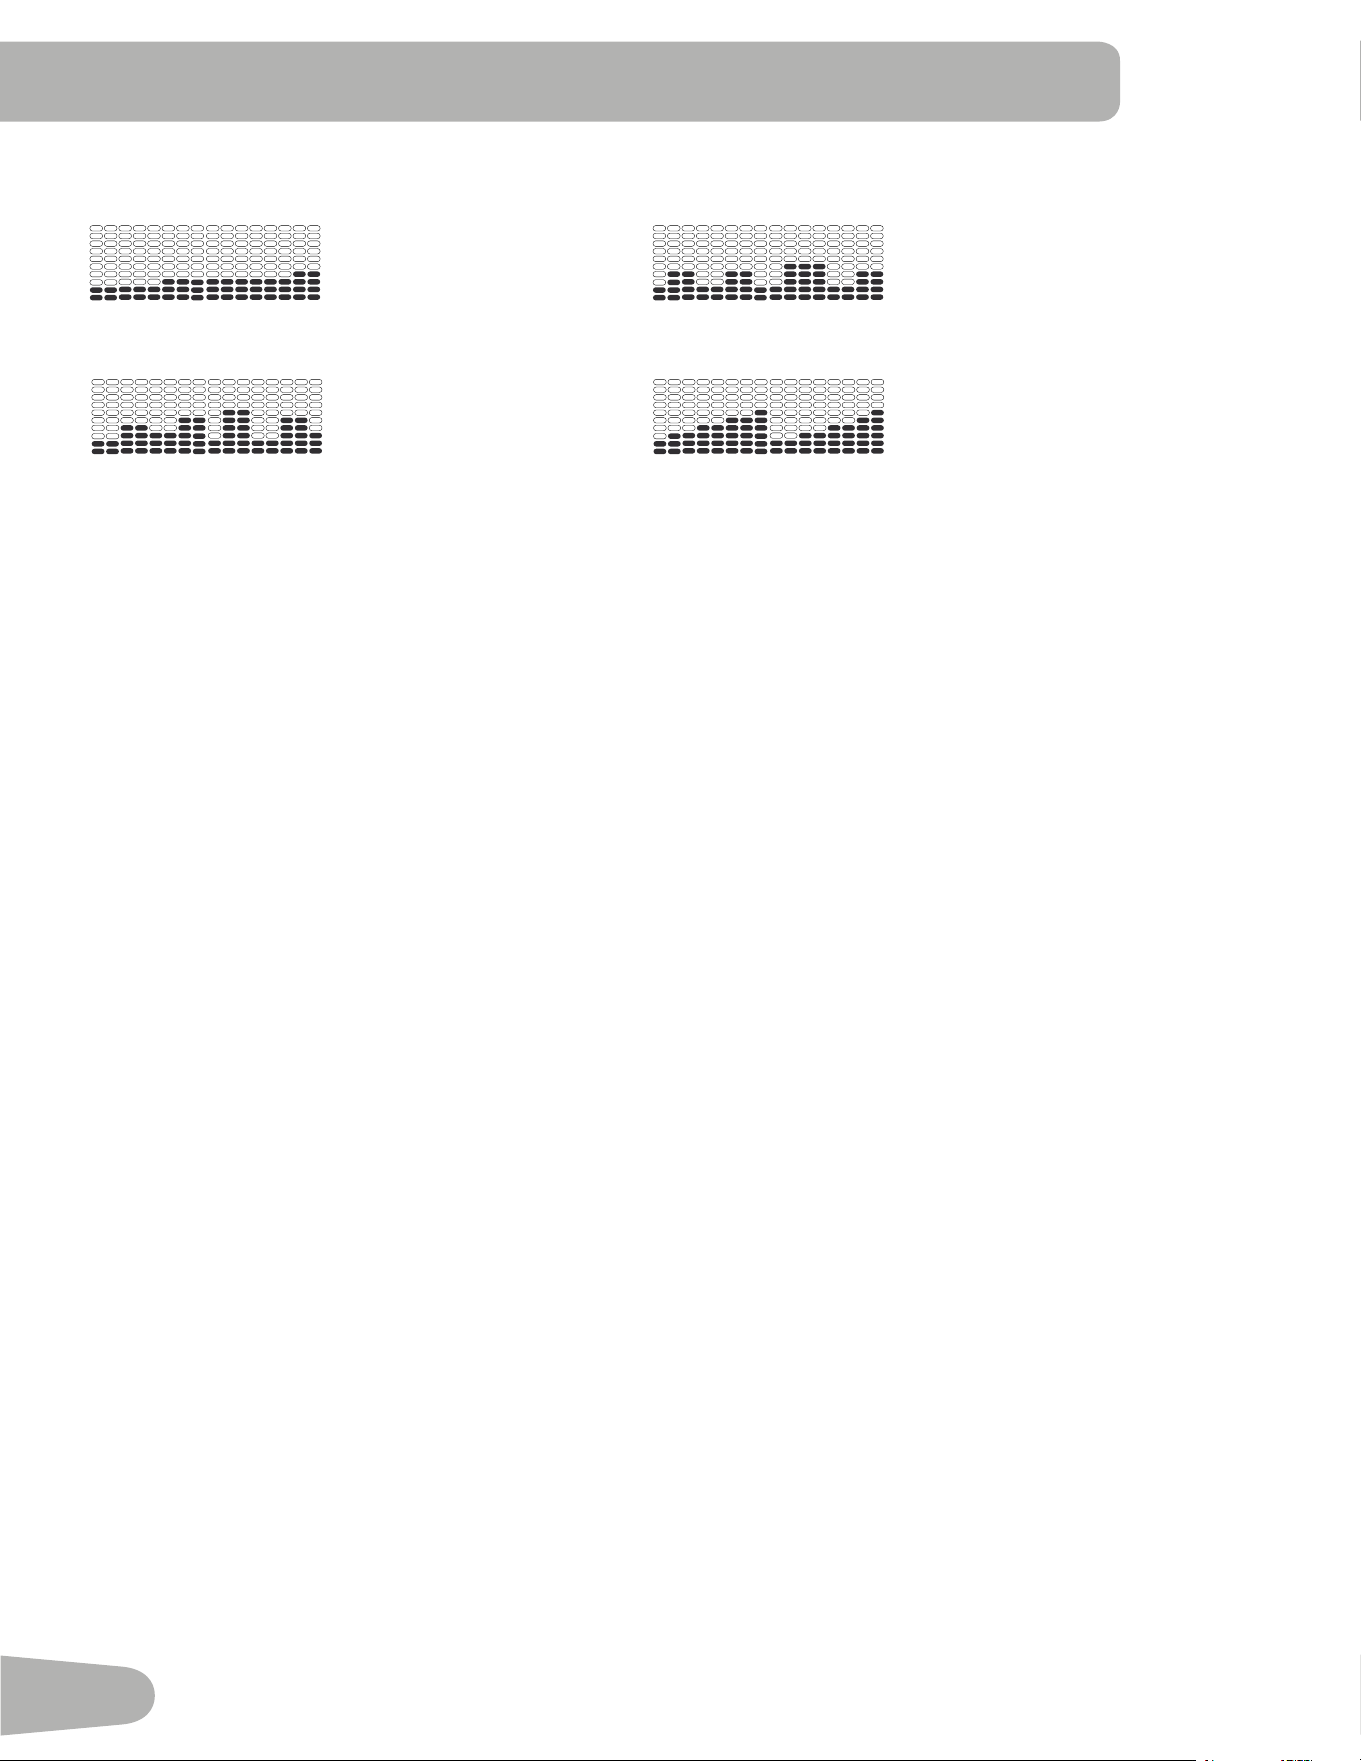
7KH 3URJUDP 'LVSOD\ VKRZV LQIRUPDWLRQ WR WKH 8VHU DQG WKH JULG GLVSOD\ DUHD VKRZV WKH FRXUVH SUR¿OH IRU WKH SURJUDP
(DFK FROXPQ LQ WKH SUR¿OH VKRZV RQH LQWHUYDO ZRUNRXW VHJPHQW 7KH KLJKHU WKH FROXPQ WKH KLJKHU WKH UHVLVWDQFH OHYHO
7KH ÀDVKLQJ FROXPQ VKRZV \RXU FXUUHQW LQWHUYDO
Intensity Display
7KH ,QWHQVLW\ 'LVSOD\ VKRZV WKH OHYHO RI ZRUN DW WKDW PRPHQW EDVHG RQ WKH FXUUHQW UHVLVWDQFH OHYHO
Heart Rate Zone Display
The Heart Rate Zone shows which zone the current heart rate value falls into for the current User. These Heart Rate
=RQHV FDQ EH XVHG DV D ZRUNRXW JXLGH IRU D FHUWDLQ WDUJHW ]RQH DQDHURELF DHURELF RU IDW EXUQ
Consult a physician before you start an exercise program. Stop exercising if you feel pain or tightness in
your chest, become short of breath, or feel faint. Contact your doctor before you use the machine again.
The heart rate displayed is an approximation and should be used for reference only.
Note: If no heart rate is detected, the display will be blank.
NOTICE: To prevent interference with the telemetry HR receiver, do not place any personal electronic devices in the left
side of the media tray.
Goal Display
7KH *RDO 'LVSOD\ VKRZV WKH FXUUHQWO\ VHOHFWHG W\SH RI JRDO 'LVWDQFH 7LPH RU &DORULHV WKH FXUUHQW YDOXH WR DFKLHYH WKH
goal, and the percent completed toward the goal.
User Display
7KH 8VHU 'LVSOD\ VKRZV ZKLFK 8VHU 3UR¿OH LV FXUUHQWO\ VHOHFWHG
10%
40%
70%
1
2
3
4
5
6
7
8
9
10
8VHU 'LVSOD\
$FKLHYHPHQW 'LVSOD\
3URJUDP 'LVSOD\
18
Achievement Display
7KH $FKLHYHPHQW 'LVSOD\ DFWLYDWHV ZKHQ D ZRUNRXW JRDO LV UHDFKHG RU D ZRUNRXW PLOHVWRQH LV VXUSDVVHG IURP SDVW
workouts. The Console display will congratulate and inform the User of their achievement, along with a celebratory sound.
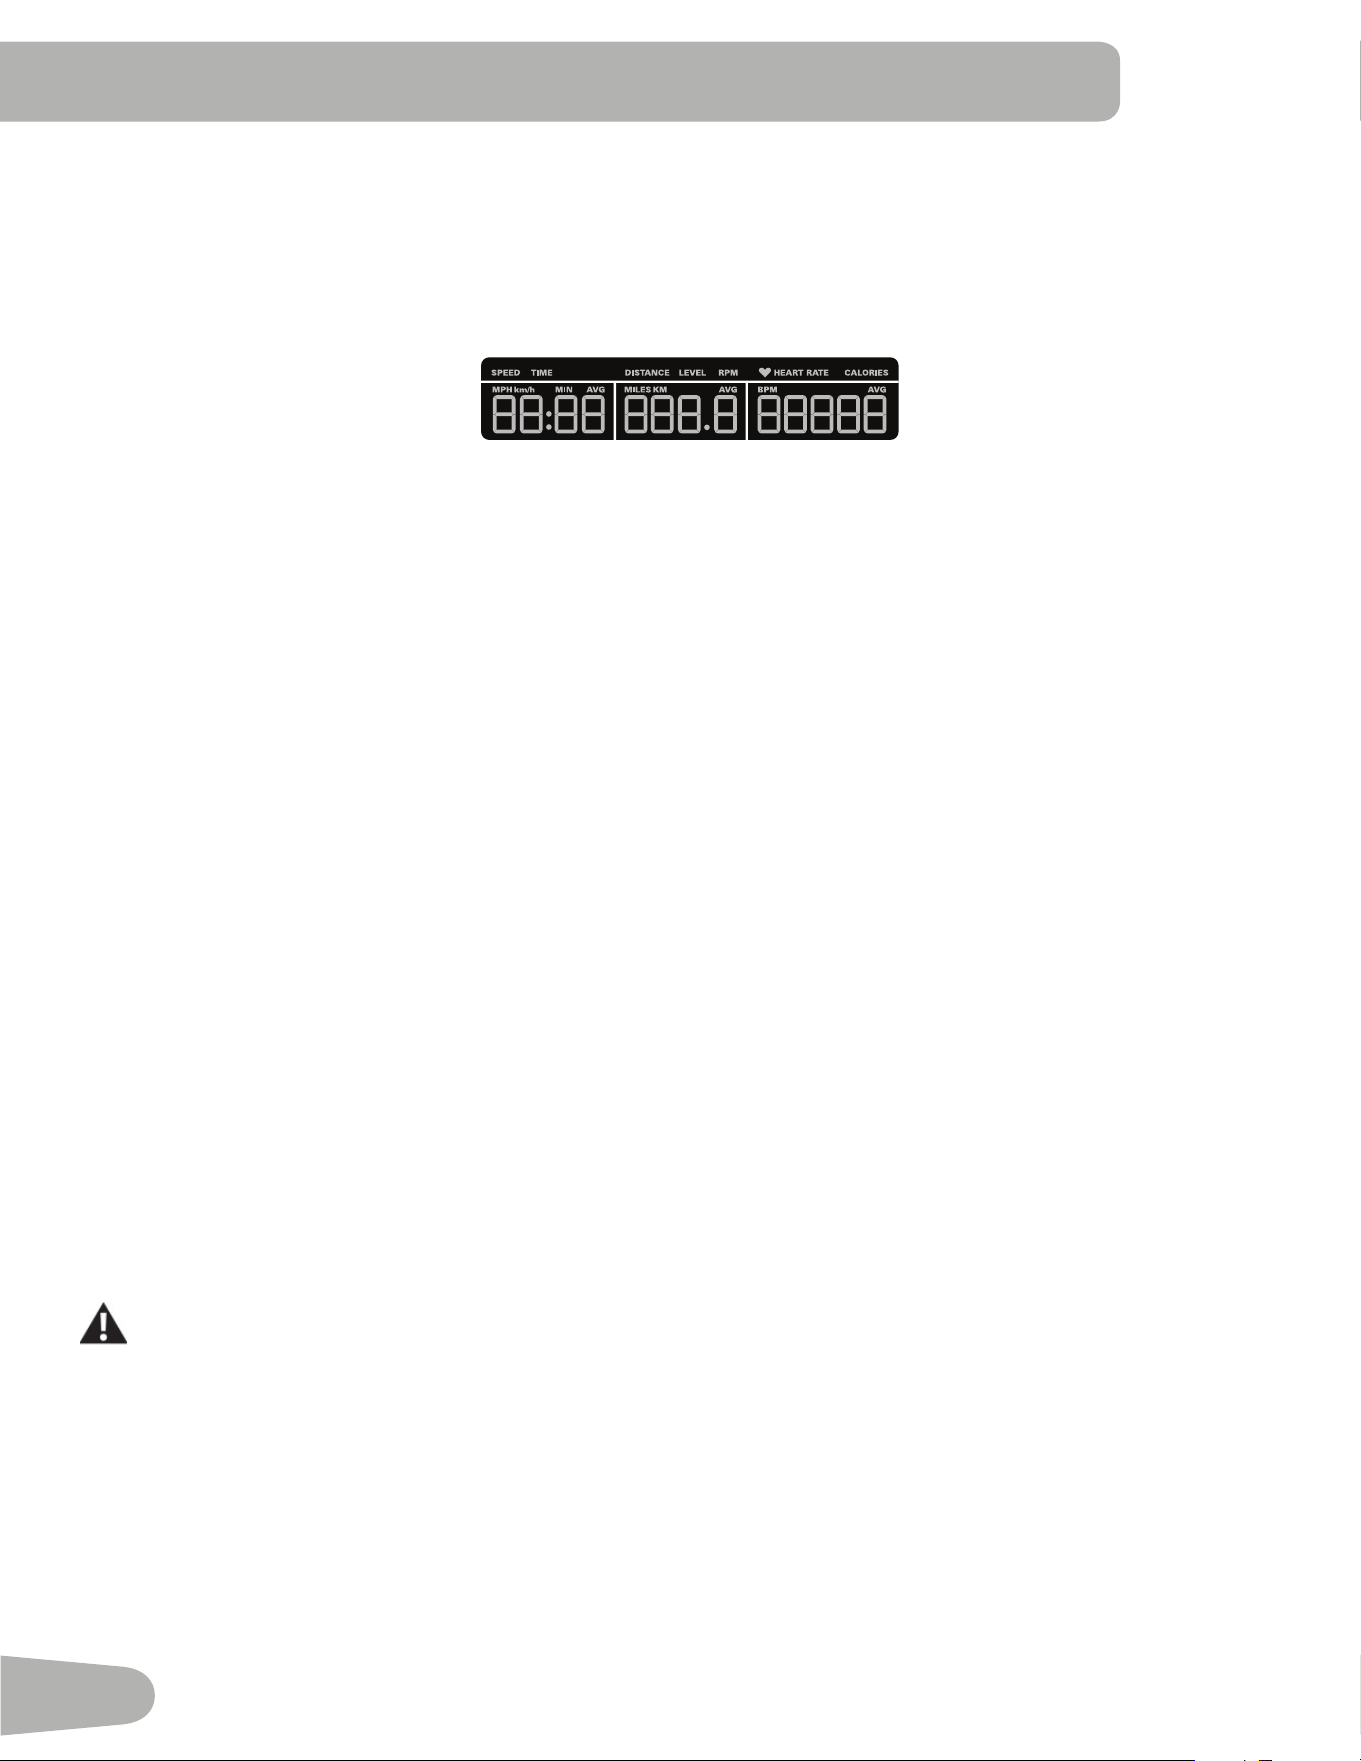
Lower Display Data
7KH /RZHU 'LVSOD\ VKRZV WKH :RUNRXW 9DOXHV DQG FDQ EH FXVWRPL]HG IRU HDFK 8VHU &RQVXOW WKH ³(GLW 8VHU 3UR¿OH´
VHFWLRQ RI WKLV PDQXDO
Speed
7KH 6SHHG GLVSOD\ ¿HOG VKRZV WKH PDFKLQH VSHHG LQ PLOHV SHU KRXU PSK RU NLORPHWHUV SHU KRXU NPK
Time
7KH 7,0( GLVSOD\ ¿HOG VKRZV WKH WRWDO WLPH FRXQW RI WKH ZRUNRXW WKH DYHUDJH 7LPH IRU WKH 8VHU 3UR¿OH RU WKH WRWDO RSHUD
tional time of the machine.
Note: ,I D 4XLFN 6WDUW ZRUNRXW LV SHUIRUPHG IRU PRUH WKDQ PLQXWHV DQG VHFRQGV WKHXQLWVIRU7LPHZLOOVKLIW
WRKRXUVDQGPLQXWHVKRXUPLQXWHV
Distance
7KH 'LVWDQFH GLVSOD\ VKRZV WKH GLVWDQFH FRXQW PLOHV RU NP LQ WKH ZRUNRXW
Note: To change the measurement units to English Imperial or metric, refer to the “Console Setup Mode” section in this
manual.
Level
The LEVEL display shows the current resistance level in the workout.
RPM
7KH 530 GLVSOD\ ¿HOG VKRZV WKH SHGDO UHYROXWLRQV SHU PLQXWH 530
Heart Rate (Pulse)
7KH +HDUW 5DWH GLVSOD\ VKRZV WKH EHDWV SHU PLQXWH %30 IURP WKH KHDUW UDWH PRQLWRU :KHQ D KHDUW UDWH VLJQDO LV UH
FHLYHG E\ WKH &RQVROH WKH LFRQ ZLOO ÀDVK
Consult a physician before you start an exercise program. Stop exercising if you feel pain or tightness in
your chest, become short of breath, or feel faint. Contact your doctor before you use the machine again.
The heart rate displayed is an approximation and should be used for reference only.
Calories
7KH &DORULHV GLVSOD\ ¿HOG VKRZV WKH HVWLPDWHG FDORULHV WKDW \RX KDYH EXUQHG GXULQJ WKH H[HUFLVH
Hr

19
Workout with Other Fitness Apps
7KLV¿WQHVVPDFKLQHKDVLQWHJUDWHG%OXHWRRWK
®
FRQQHFWLYLW\ZKLFKDOORZVLWWRZRUNZLWKDQXPEHURI¿WQHVVDSSV)RURXU
ODWHVWOLVWRIVXSSRUWHGDSSVSOHDVHYLVLWJOREDOVFKZLQQ¿WQHVVFRP
USB Charging
,ID86%'HYLFHLVDWWDFKHGWRWKH86%3RUWWKH3RUWZLOODWWHPSWWRFKDUJHWKH'HYLFH
Note:'HSHQGLQJRQWKHDPSHUDJHRIGHYLFHWKHSRZHUVXSSOLHGIURPWKH86%3RUWPD\QRWEHHQRXJKWRRSHUDWHWKH
'HYLFHDQGFKDUJHLWDWWKHVDPHWLPH
9LUWXDO5HDOLW\H[SHULHQFHRQ\RXU¿WQHVVPDFKLQH
7KLV¿WQHVVPDFKLQHLVHTXLSSHGWRVXSSRUWD9LUWXDO5HDOLW\95H[SHULHQFHRQVXSSRUWHGGHYLFHV
Review, understand, and follow all warning instructions and the correct operation as supplied with your
Virtual Reality equipment.
No one under the age of 13 should use this exercise equipment or the Virtual Reality experience.
Before starting a workout with the Virtual Reality experience, be sure the workout area is and will be clear
throughout the workout, and that all persons or pets are restricted from the workout area. If necessary, a
second person should be used to help secure the area.
The VR experience produces an immersive virtual reality experience that distracts and blocks the view of
WKHDFWXDOVXUURXQGLQJV)RUWKHVDIHVWH[SHULHQFHRQO\XVHWKH95H[SHULHQFHZKHQRSHUDWLQJWKH¿WQHVV
equipment in the seated position. Do not start the VR experience until seated and ready to start a workout.
Be sure the area is secure and that the workout area is safe from potential harm and clear of all obstacles
within reach. Damage to you or items in the workout area could result during a VR workout. Stay seated on
the exercise equipment until the VR gear has been removed and the actual surroundings are viewable.
If dizziness or motion sickness is experienced from the Virtual Reality experience, safely balance yourself
and stop the Virtual Reality experience as soon as possible. Coordination and balance is required when
using the VR experience with the exercise machine.
&RQVXOWZLWKDGRFWRUEHIRUHXVLQJWKH95H[SHULHQFHLI\RXKDYHDQ\FRQGLWLRQVZKLFKPD\EHDႇHFWHGE\
an immersive Virtual Reality experience, such as epilepsy, pregnant, elderly, psychotic disorders, vision
abnormalities, heart conditions, or any other medical condition.

20
Remote Heart Rate Monitor
Monitoring your Heart Rate is one of the best procedures to control the intensity of your exercise. Contact Heart Rate
&+5VHQVRUVDUHLQVWDOOHGWRVHQG\RXUKHDUWUDWHVLJQDOVWRWKH&RQVROH7KH&RQVROHFDQDOVRUHDGWHOHPHWU\+5
VLJQDOVIURPD+HDUW5DWH&KHVW6WUDS7UDQVPLWWHUWKDWRSHUDWHVLQWKHN+]N+]UDQJH
Note: The heart rate chest strap must be an uncoded heart rate strap
from Polar Electro or an uncoded POLAR
®
compatible model.
&RGHG32/$5
®
heart rate straps such as POLAR
®
OwnCode
®
FKHVWVWUDSVZLOOQRWZRUNZLWKWKLVHTXLSPHQWThough your
machine is Bluetooth
®
enabled, it is unable to receive input from a
Bluetooth
®
enabled strap or other device.
If you have a pacemaker or other implanted electronic device,
consult your doctor before using a wireless chest strap or other
telemetric heart rate monitor.
NOTICE: To prevent interference with the telemetry HR receiver, do not
place any personal electronic devices in the left side of the
PHGLDWUD\
Contact Heart Rate Sensors
&RQWDFW+HDUW5DWH&+5VHQVRUVVHQG\RXUKHDUWUDWHVLJQDOVWRWKH&RQVROH7KH&+5VHQVRUVDUHWKHVWDLQOHVVVWHHO
parts of the Handlebars. To use, put your hands comfortably around the sensors. Be sure that your hands touch both the
WRSDQGWKHERWWRPRIWKHVHQVRUV+ROG¿UPEXWQRWWRRWLJKWRUORRVH%RWKKDQGVPXVWPDNHFRQWDFWZLWKWKHVHQVRUVIRU
the Console to detect a pulse. After the Console detects four stable pulse signals, your initial pulse rate will be shown.
2QFHWKH&RQVROHKDV\RXULQLWLDOKHDUWUDWHGRQRWPRYHRUVKLIW\RXUKDQGVIRUWRVHFRQGV7KH&RQVROHZLOOQRZ
YDOLGDWHWKHKHDUWUDWH0DQ\IDFWRUVLQÀXHQFHWKHDELOLW\RIWKHVHQVRUVWRGHWHFW\RXUKHDUWUDWHVLJQDO
• 0RYHPHQWRIWKHXSSHUERG\PXVFOHVLQFOXGLQJDUPVSURGXFHVDQHOHFWULFDOVLJQDOPXVFOHDUWLIDFWWKDWFDQLQWHUIHUH
with pulse detection. Slight hand movement while in contact with the sensors can also produce interference.
• Calluses and hand lotion may act as an insulating layer to reduce the signal strength.
• 6RPH(OHFWURFDUGLRJUDP(.*VLJQDOVJHQHUDWHGE\LQGLYLGXDOVDUHQRWVWURQJHQRXJKWREHGHWHFWHGE\WKHVHQVRUV
• The proximity of other electronic machines can generate interference.
,I\RXUKHDUWUDWHVLJQDOHYHUVHHPVHUUDWLFDIWHUYDOLGDWLRQZLSHRႇ\RXUKDQGVDQGWKHVHQVRUVDQGWU\DJDLQ
Heart Rate Calculations
<RXUPD[LPXPKHDUWUDWHXVXDOO\GHFUHDVHVIURP%HDWV3HU0LQXWH%30LQFKLOGKRRGWRDSSUR[LPDWHO\%30E\
age 60. This fall in heart rate is usually linear, decreasing by approximately one BPM for each year. There is no indication
WKDWWUDLQLQJLQÀXHQFHVWKHGHFUHDVHLQPD[LPXPKHDUWUDWH,QGLYLGXDOVRIWKHVDPHDJHFRXOGKDYHGLႇHUHQWPD[LPXP
KHDUWUDWHV,WLVPRUHDFFXUDWHWR¿QGWKLVYDOXHE\FRPSOHWLQJDVWUHVVWHVWWKDQE\XVLQJDQDJHUHODWHGIRUPXOD
<RXUDWUHVWKHDUWUDWHLVLQÀXHQFHGE\HQGXUDQFHWUDLQLQJ7KHW\SLFDODGXOWKDVDQDWUHVWKHDUWUDWHRIDSSUR[LPDWHO\
BPM, whereas highly trained runners may have readings of 40 BPM or lower.
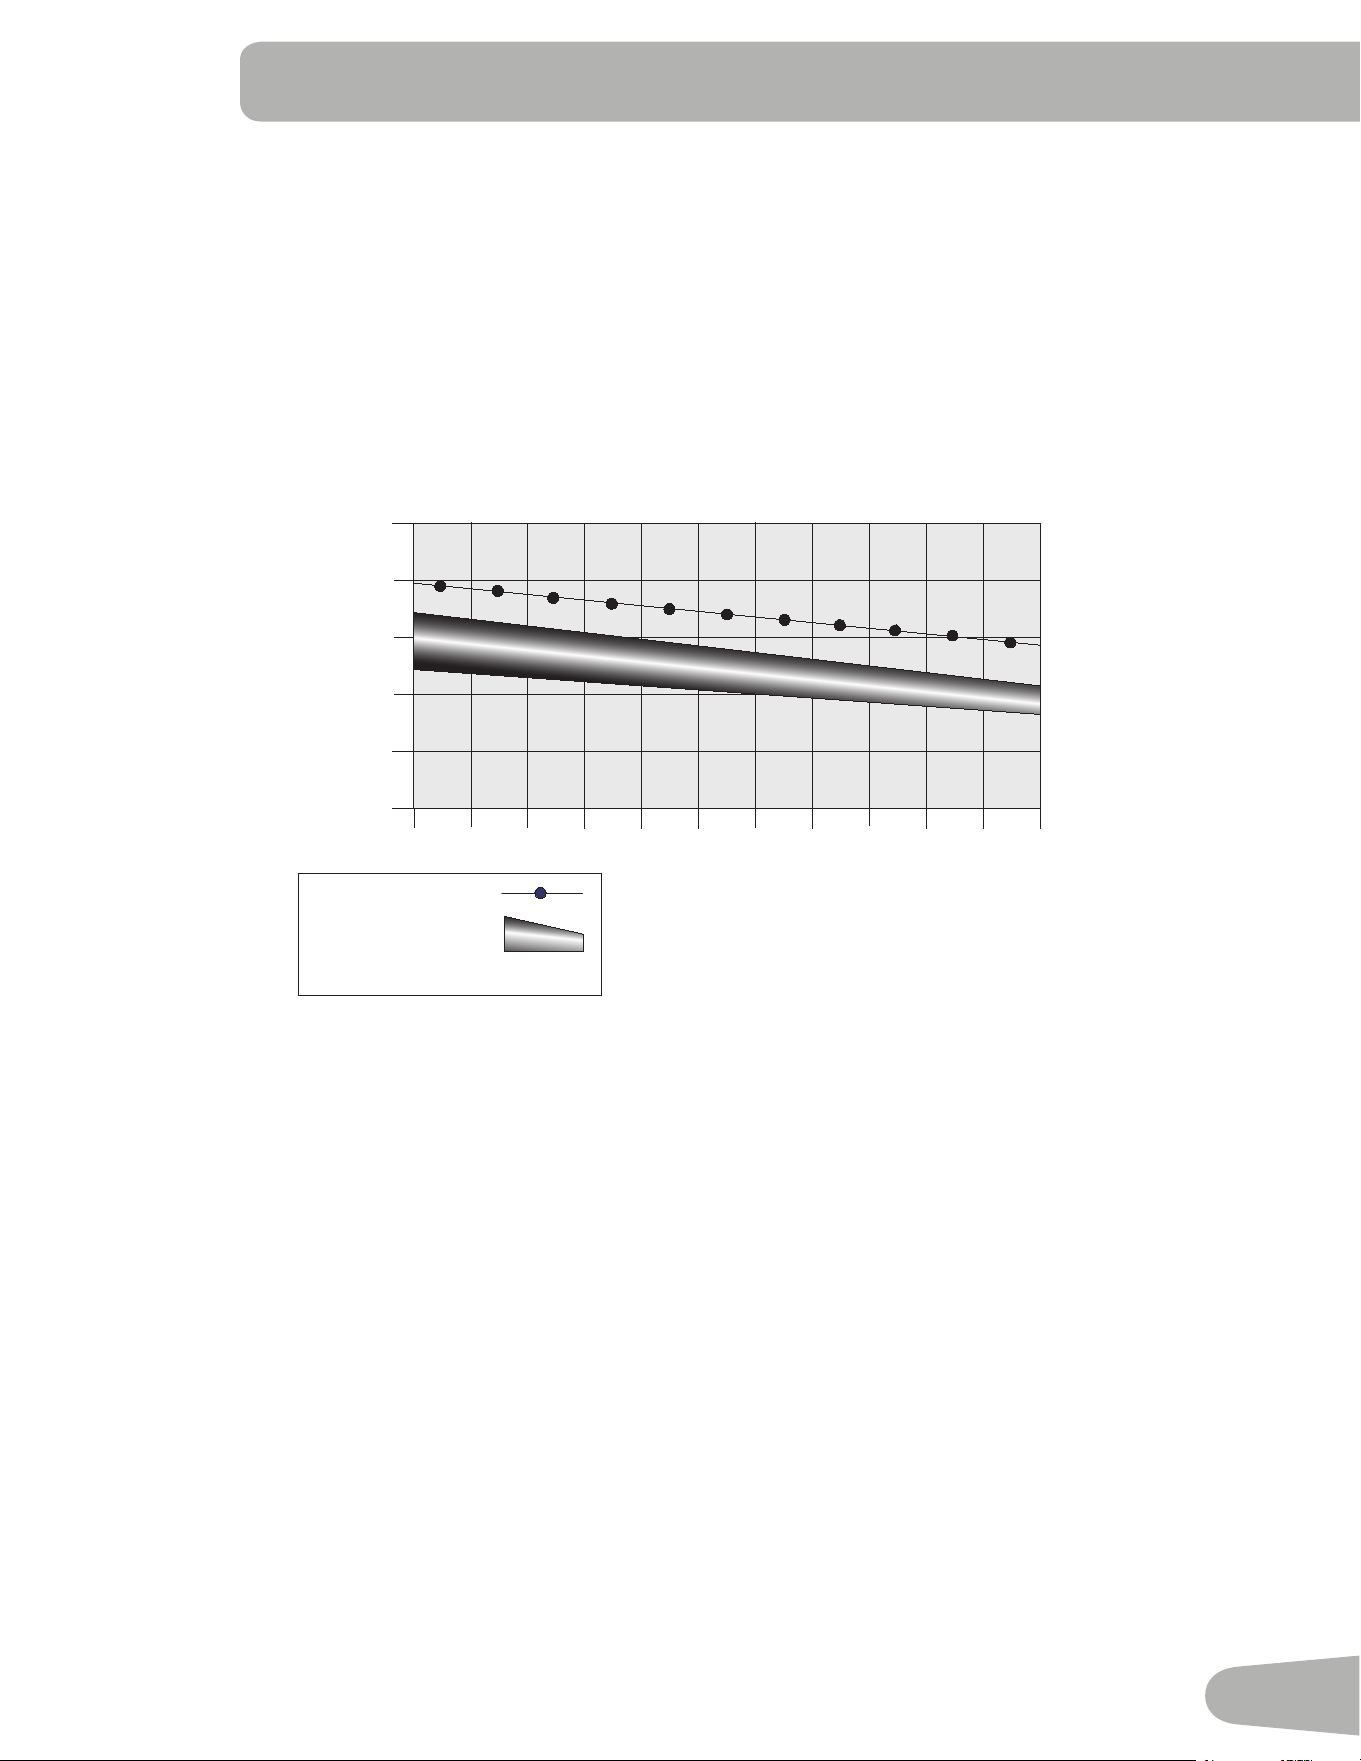
7KH+HDUW5DWHWDEOHLVDQHVWLPDWHRIZKDW+HDUW5DWH=RQH+5=LVHႇHFWLYHWREXUQIDWDQGLPSURYH\RXUFDUGLRYDV
cular system. Physical conditions vary, therefore your individual HRZ could be several beats higher or lower than what is
shown.
*
21
7KHPRVWHႈFLHQWSURFHGXUHWREXUQIDWGXULQJH[HUFLVHLVWRVWDUWDWDVORZSDFHDQGJUDGXDOO\LQFUHDVH\RXULQWHQVLW\XQ
WLO\RXUKHDUWUDWHUHDFKHVEHWZHHQ±RI\RXUPD[LPXPKHDUWUDWH&RQWLQXHDWWKDWSDFHNHHSLQJ\RXUKHDUWUDWH
in that target zone for over 20 minutes. The longer you maintain your target heart rate, the more fat your body will burn.
The graph is a brief guideline, describing the generally suggested target heart rates based on age. As noted above, your
optimal target rate may be higher or lower. Consult your physician for your individual target heart rate zone.
Note:$VZLWKDOOH[HUFLVHVDQG¿WQHVVUHJLPHQVDOZD\VXVH\RXUEHVWMXGJPHQWZKHQ\RXLQFUHDVH\RXUH[HUFLVHWLPH
or intensity.
&!4"52.).'4!2'%4(%!242!4%
(EART2ATE"0-
BEATSPERMINUTE
!GE
-AXIMUM(EART2ATE
4ARGET(EART2ATE:ONE
KEEPWITHINTHISRANGE
FOROPTIMUMFATBURNING
Speakers and Audio Cable
To play audio through the speakers on your machine, attach the Audio Cable to your device and to the Audio Cable Port
on the Console. With the Console turned on, you can play audio from your device through the speakers. Volume is con
trolled from your device.
Note: Though your machine is Bluetooth
®
enabled, it is unable to receive and play audio across a Bluetooth
®
connection.
22
OPERATIONS
What to Wear
:HDUUXEEHUVROHGDWKOHWLFVKRHV<RXZLOOQHHGWKHDSSURSULDWHFORWKHVIRUH[HUFLVHWKDWDOORZ\RXWRPRYHIUHHO\
How Often Should You Exercise
Consult a physician before you start an exercise program. Stop exercising if you feel pain or tightness in
your chest, become short of breath, or feel faint. Contact your doctor before you use the machine again.
Use the values calculated or measured by the machine’s computer for reference purposes only. The heart
rate displayed on the console is an approximation and should be used for reference only.
• 3 times a week for 30 minutes each day.
• Schedule workouts in advance and try to follow the schedule.
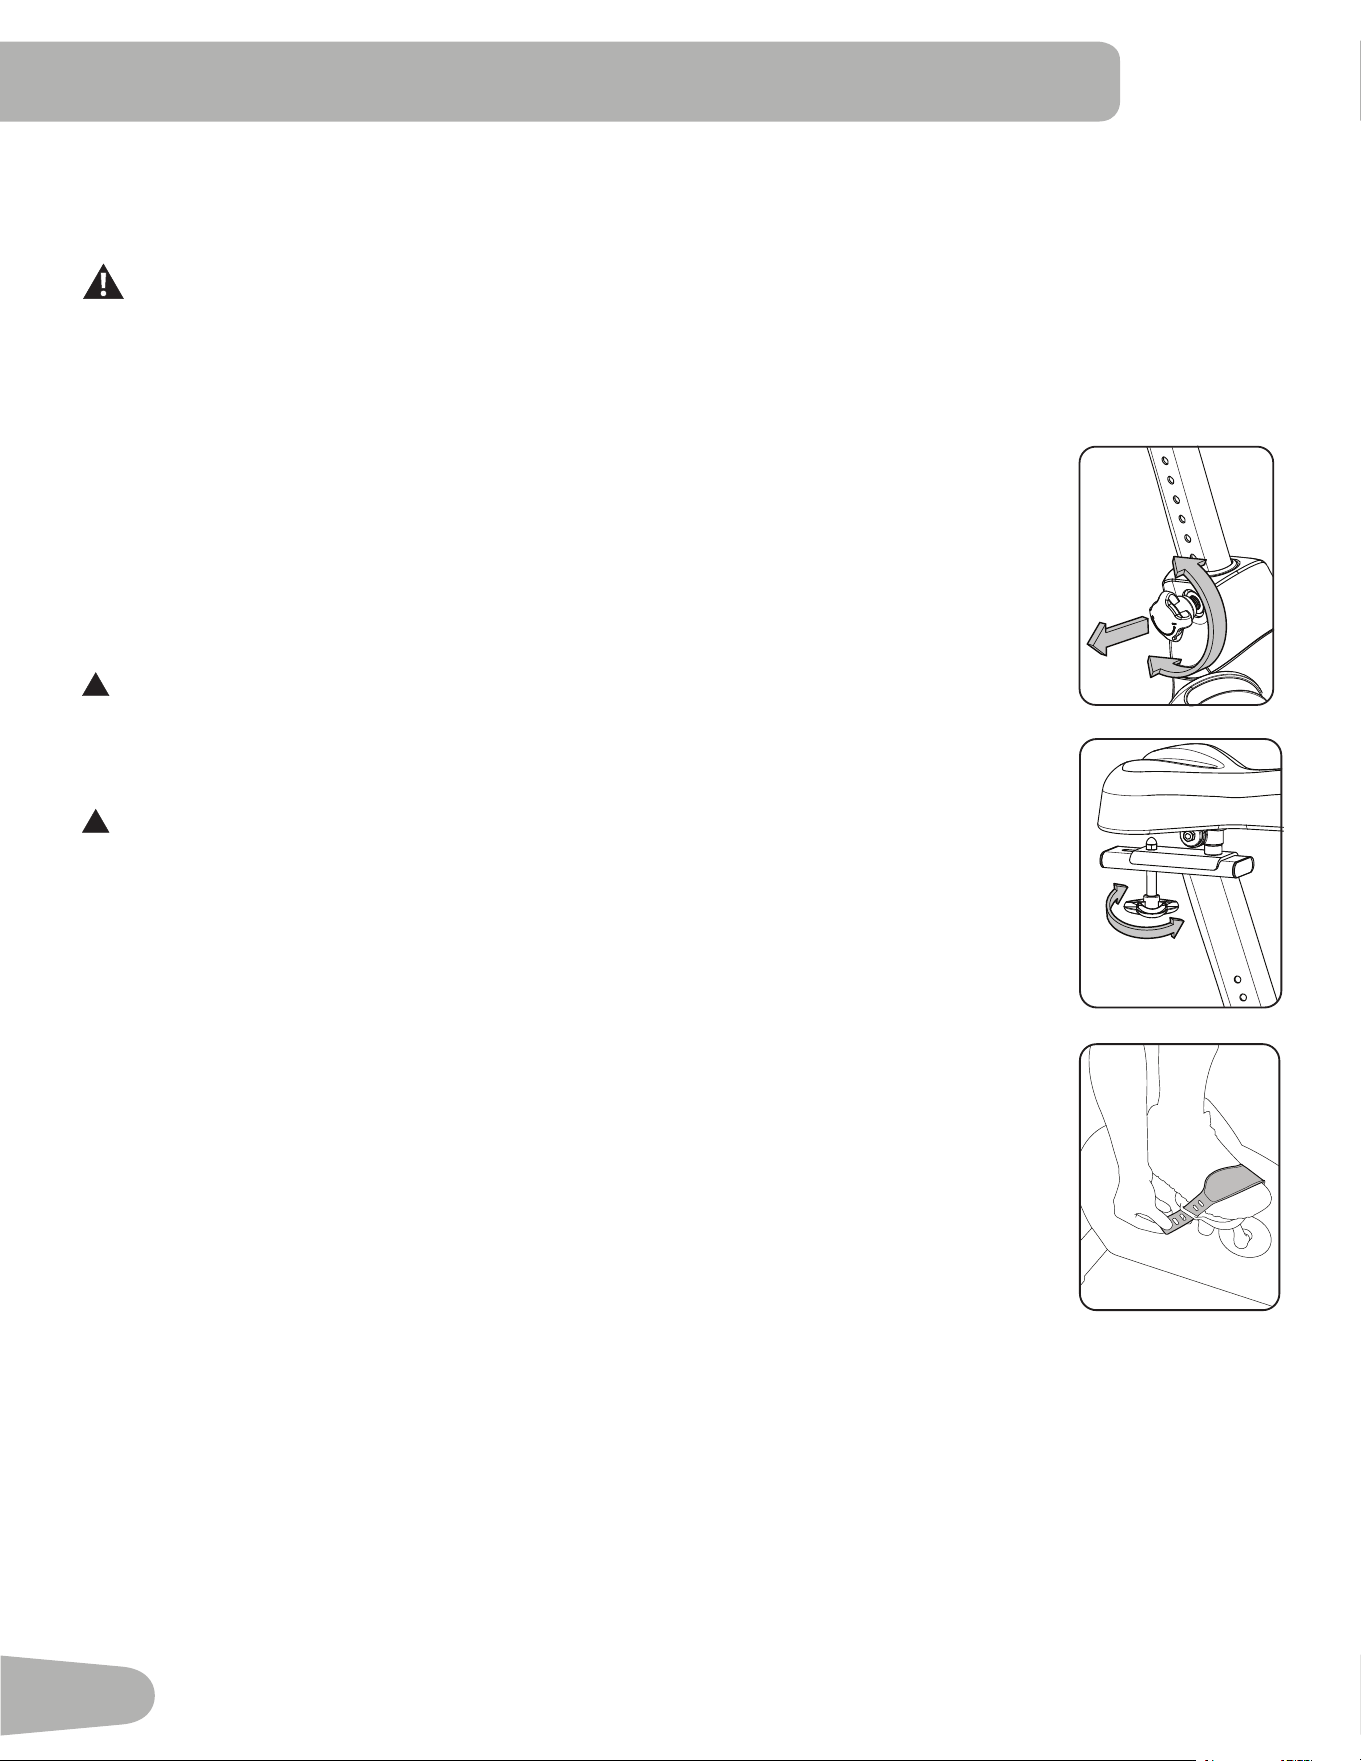
Seat Adjustment
&RUUHFWVHDWSODFHPHQWHQFRXUDJHVH[HUFLVHHႈFLHQF\DQGFRPIRUWZKLOHUHGXFLQJWKHULVNRI
injury.
1. With a Pedal in the forward position, center the ball of your foot over the center of it. Your leg
should be bent slightly at the knee.
2. If your leg is too straight or your foot cannot touch the Pedal, move the seat down on the upright
bike. If your leg is bent too much, move the seat up.
!
6WHSRႇWKHELNHEHIRUH\RXDGMXVWWKHVHDW
Loosen and pull the adjustment knob on the seat tube. Adjust the seat to the desired height.
Release the adjustment knob to engage the locking pin. Be sure that the pin is fully engaged and
fully tighten the knob.
!
Do not set the Seat Post position higher than the stop mark (STOP) on the tube.
To move the seat closer to, or away from the console, loosen the seat slider adjustment knob. Slide
the seat forward or rearward to the desired position and tighten the knob.
Foot Position / Pedal Strap Adjustment
Foot pedals with straps provide secure footing to the exercise bike.
1. Put the ball of each foot on the Pedals.
2. Rotate the Pedals until one can be reached.
3. Fasten the strap over the shoe.
4. Repeat for the other foot.
%HVXUHWRHVDQGNQHHVSRLQWGLUHFWO\IRUZDUGWRHQVXUHPD[LPXP3HGDOHႈFLHQF\3HGDOVWUDSV
FDQEHOHIWLQSRVLWLRQIRUVXEVHTXHQWZRUNRXWV
Power-Up / Idle Mode
The Console will enter 3RZHU8S / Idle Mode if it is plugged into a power source, any button is
pushed, or if it receives a signal from the RPM sensor as a result of pedaling the machine.
$XWR6KXW2ႇ6OHHS0RGH
,IWKH&RQVROHGRHVQRWUHFHLYHDQ\LQSXWLQDSSUR[LPDWHO\PLQXWHVLWZLOODXWRPDWLFDOO\VKXWRႇ7KH/&'GLVSOD\LVRႇ
while in Sleep Mode.
Note: The Console does not have an On/Off switch.
Initial Setup
'XULQJWKH¿UVWSRZHUXSWKH&RQVROHVKRXOGEHVHWXSZLWKWKHGDWHWLPHDQG\RXUSUHIHUUHGPHDVXUHPHQWXQLWV
'DWH3XVKWKH,QFUHDVH'HFUHDVHEXWWRQVWRDGMXVWWKHFXUUHQWO\DFWLYHYDOXHÀDVKLQJ3XVKWKH/HIW5LJKWEXWWRQV
WRFKDQJHZKLFKVHJPHQWLVWKHFXUUHQWO\DFWLYHYDOXHPRQWKGD\\HDU
2. Push OK to set.

23
7LPH3XVKWKH,QFUHDVH'HFUHDVHEXWWRQVWRDGMXVWWKHFXUUHQWO\DFWLYHYDOXHÀDVKLQJ3XVKWKH/HIW5LJKWEXWWRQV
WRFKDQJHZKLFKVHJPHQWLVWKHFXUUHQWO\DFWLYHYDOXHKRXUPLQXWH$0RU30
4. Push OK to set.
8QLWVRI0HDVXUHPHQW3XVKWKH,QFUHDVH'HFUHDVHEXWWRQVWRDGMXVWEHWZHHQ³0,/(6´,PSHULDO(QJOLVKRU³.0´
PHWULF
3XVK2.WRVHW7KH&RQVROHJRHVEDFNWRWKH3RZHU8S,GOH0RGHVFUHHQ
Note: 7RDGMXVWWKHVHVHOHFWLRQVFRQVXOWWKH³&RQVROH6HW8S0RGH´VHFWLRQ
Quick Start ( Manual ) Program
7KH4XLFN6WDUW0DQXDOSURJUDPOHWV\RXVWDUWDZRUNRXWZLWKRXWHQWHULQJDQ\LQIRUPDWLRQ
'XULQJDManual Workout, each column represents a 2 minute time period. The active column will advance across the
VFUHHQHYHU\PLQXWHV,IWKHZRUNRXWODVWVIRUPRUHWKDQPLQXWHVWKHDFWLYHFROXPQLV¿[HGRQWKHIDUWKHVWFROXPQRQ
WKHULJKWDQGSXVKHVWKHSUHYLRXVFROXPQVRႇWKHGLVSOD\
1. Sit on the machine.
3XVKWKH,QFUHDVH'HFUHDVHEXWWRQWRVHOHFWWKHFRUUHFW8VHUSUR¿OH,I\RXGRQRWKDYHD8VHUSUR¿OHVHWXS\RXFDQ
VHOHFWD8VHUSUR¿OHWKDWKDVQRFXVWRPL]HGGDWDGHIDXOWYDOXHVRQO\
3. Push the QUICK START button to start the Manual program.
7RFKDQJHWKHUHVLVWDQFHOHYHOSXVKWKH5HVLVWDQFH,QFUHDVH'HFUHDVHEXWWRQV7KHFXUUHQWLQWHUYDODQGIXWXUH
LQWHUYDOVDUHVHWWRWKHQHZOHYHO7KHGHIDXOW0DQXDOUHVLVWDQFHOHYHOLV7KHWLPHZLOOFRXQWXSIURP
Note: ,ID0DQXDOZRUNRXWLVSHUIRUPHGIRUPRUHWKDQPLQXWHVDQGVHFRQGVWKHXQLWVIRU7LPHZLOOVKLIWWR
KRXUVDQGPLQXWHVKRXUPLQXWHV
:KHQGRQHZLWK\RXUZRUNRXWVWRSSHGDOLQJDQGSXVK3$86((1'WRSDXVHWKHZRUNRXW3XVK3$86((1'DJDLQ
to end the workout.
Note: The workout results are recorded to the current User Profile.
User Profiles
The Console lets you store and use 4 User profiles. The User profiles automatically record the workout results for each
workout, and allow the workout data to be reviewed.
7KH8VHUSURILOHVWRUHVWKHIROORZLQJGDWD
• Name—up to 10 characters
• Age
• Weight
• Height
• Gender
• Preferred Workout Values
Select a User Profile
(YHU\ZRUNRXWLVVDYHGWRD8VHU3UR¿OH%HVXUHWRVHOHFWWKHSURSHU8VHU3UR¿OHEHIRUHVWDUWLQJDZRUNRXW7KHODVW8VHU
that completed a workout will be the default user.
8VHU3UR¿OHVDUHDVVLJQHGWKHGHIDXOWYDOXHVXQWLOWKH\DUHFXVWRPL]HGE\HGLWLQJ%HVXUHWRHGLWWKH8VHU3UR¿OHIRUPRUH
accurate calorie and heart rate information.
)URPWKH3RZHU8S0RGHVFUHHQSXVKWKH86(5EXWWRQWRVHOHFWRQHRIWKH8VHU3UR¿OHV7KH&RQVROHZLOOGLVSOD\WKH
QDPHRIWKH8VHU3UR¿OHDQGWKH8VHU3UR¿OH,FRQ

24
Edit User Profile
)URPWKH3RZHU8S0RGHVFUHHQSXVKWKH86(5EXWWRQWRVHOHFWRQHRIWKH8VHU3UR¿OHV
2. Push the OK button to select the User Profile.
7KH&RQVROHGLVSOD\VKRZVWKH(',7SURPSWDQGWKHFXUUHQW8VHU3URILOHQDPH3XVK2.WRVWDUWWKH(GLW8VHU3UR¿OH
option.
7RH[LWWKH(GLW8VHU3UR¿OHRSWLRQSXVKWKH3$86((1'EXWWRQDQGWKHFRQVROHZLOOJREDFNWRWKH3RZHU8S0RGH
screen.
4. The Console display shows the NAME prompt and the current User Profile name.
Note: The User name will be blank if this is the first edit. The name of a User Profile is limited to 10 characters.
7KHFXUUHQWO\DFWLYHVHJPHQWZLOOIODVK8VHWKH,QFUHDVH'HFUHDVHEXWWRQVWRPRYHWKURXJKWKHDOSKDEHWDQGEODQN
VSDFHIRXQGEHWZHHQ$DQG=7RVHWHDFKVHJPHQWXVHWKH/HIWeRU5LJKWfEXWWRQVWRVKLIWEHWZHHQVHJPHQWV.
Push the OK button to accept the displayed User name.
7RHGLWWKHRWKHU8VHUGDWD(',7$*((',7:(,*+7(',7+(,*+7(',7*(1'(5XVHWKH,QFUHDVH'HFUHDVH
buttons to adjust, and push OK to set each entry.
6. The Console display shows the SCAN prompt. This option controls how the workout values are displayed during a
ZRUNRXW7KH³2))´VHWWLQJDOORZVWKHXVHUWRSXVKWKH5LJKWfRU/HIWeEXWWRQVWRYLHZWKHRWKHUZRUNRXWYDOXH
channels when desired. The “ON” setting allows the Console to automatically display the workout value channels
every 6 seconds.
The default is “OFF”.
Push the OK button to set how the workout values are displayed.
7. The Console display shows the WIRELESS HR prompt. If you are using the Console speakers at their higher settings
and / or using a larger sized personal electronic device, the Console may show Heart Rate interference. This option
allows the Telemetry Heart Rate Receiver to be deactivated blocking the interference.
7KH8SSHU'LVSOD\VKRZVWKHFXUUHQWYDOXHVHWWLQJ³21´RU³2))´3XVKWKH,QFUHDVHcRU'HFUHDVHdEXWWRQVWR
change the value.
The default is “ON”.
Push the OK button to set the Telemetry Heart Rate Receiver to active.
7KH&RQVROHGLVSOD\VKRZVWKH(',7/2:(5',63/$<SURPSW7KLVRSWLRQDOORZV\RXWRFXVWRPL]Hwhich Workout
Values are displayed during a workout.
7KH/RZHU'LVSOD\ZLOOVKRZDOORIWKHZRUNRXWYDOXHVZLWKWKHDFWLYH:RUNRXW9DOXHIODVKLQJ7KH8SSHU'LVSOD\VKRZV
WKHDFWLYHYDOXHVHWWLQJ³21´RU³2))´3XVKWKH,QFUHDVHcRU'HFUHDVHdEXWWRQVWRKLGHWKHDFWLYHZRUNRXW
value, and push the /HIWeRU5LJKWfEXWWRQVWRVKLIWWKHDFWLYHYDOXH.
Note:7RVKRZDKLGGHQZRUNRXWYDOXHUHSHDWSURFHGXUHDQGFKDQJH8SSHU'LVSOD\YDOXHWR³21´IRUWKDWYDOXH
:KHQGRQHZLWKFXVWRPL]LQJWKH/RZHU'LVSOD\SXVKWKH2.EXWWRQWRVHWLW
Hr
7KH&RQVROHZLOOJRWRWKH3RZHU8S0RGHVFUHHQZLWKWKHXVHUVHOHFWHG
Reset a User Profile
)URPWKH3RZHU8S0RGHVFUHHQSXVKWKH86(5EXWWRQWRVHOHFWRQHRIWKH8VHU3UR¿OHV
2. Push the OK button to select the User Profile.
25
7KH&RQVROHGLVSOD\VKRZVWKHFXUUHQW8VHU3URILOHQDPHDQGWKH(',7SURPSW3XVKWKH,QFUHDVHcRU'HFUHDVHd
buttons to change the prompt.
Note: 7RH[LWWKH(GLW8VHU3UR¿OHRSWLRQSXVKWKH3$86((1'EXWWRQDQGWKHFRQVROHZLOOJREDFNWRWKH3RZHU8S
Mode screen.
4. The Console display shows the RESET prompt and the current User Profile name. Push OK to start the Reset User
3UR¿OHRSWLRQ
7KH&RQVROHZLOOQRZFRQILUPWKHUHTXHVWWRUHVHWWKH8VHUSURILOHWKHGHIDXOWVHOHFWLRQLVµ12¶3XVKWKH,QFUHDVHc
RU'HFUHDVHdEXWWRQVWRDGMXVWWKHVHOHFWLRQ
6. Push OK to make your selection.
7KH&RQVROHZLOOJRWRWKH3RZHU8S0RGHVFUHHQ
Changing Resistance Levels
3XVKWKH5HVLVWDQFH/HYHO,QFUHDVHcRU'HFUHDVHdEXWWRQVWRFKDQJHWKHUHVLVWDQFHOHYHODWDQ\WLPHLQDZRUNRXW
program. To rapidly change the resistance level, push the desired Resistance Level Quick Button. The Console will adjust
WRWKHVHOHFWHGUHVLVWDQFHOHYHORIWKHTXLFNEXWWRQ
3UR¿OH3URJUDPV
7KHVHSURJUDPVDXWRPDWHGLႇHUHQWUHVLVWDQFHDQGZRUNRXWOHYHOV7KH3UR¿OH3URJUDPVDUHRUJDQL]HGLQWR&DWHJRULHV
)XQ5LGHV0RXQWDLQVDQG&KDOOHQJHV
Note: Once a User views all the Categories, they will be expanded to display the Programs within each of the
Categories.
FUN RIDES
Rolling Hills Ride in the Park
Easy Tour Stream Crossing
MOUNTAINS
Pike’s Peak Mount Hood
Pyramids Summit Pass
26
CHALLENGES
8SKLOO)LQLVK &URVV7UDLQLQJ
Interval Stairs
:RUNRXW3UR¿OHDQG*RDO3URJUDP
7KH&RQVROHOHWV\RXVHOHFWWKH3UR¿OH3URJUDPDQGW\SHRI*RDOIRU\RXUZRUNRXW'LVWDQFH7LPHRU&DORULHVDQGVHW
the Goal value.
1. Sit on the machine.
2. Push the USER buttonWRVHOHFWWKHFRUUHFW8VHUSUR¿OH
3. Push the Programs button.
4. Push the /HIWeRU5LJKWfEXWWRQVWRVelect a Category of Workout.
3XVKWKH,QFUHDVHcRU'HFUHDVHdEXWWRQVWRVelect a Profile Workout, and push OK.
6. Use WKH,QFUHDVHcRU'HFUHDVHdEXWWRQV to select a W\SHRI*RDO'LVWDQFH7LPHRU&DORULHV, and push OK.
7. Use WKH,QFUHDVHcRU'HFUHDVHdEXWWRQV to adjust the workout value.
8. 3XVK2.WREHJLQWKHJRDORULHQWHGZRUNRXWThe GOAL value will count down as the value for percent completed
increases.
Note:'XULQJD&DORULHV*RDOHDFKFROXPQLVIRU a 2 minute time period. The active column will advance across the
VFUHHQHYHU\PLQXWHV,IWKHZRUNRXWODVWVIRUPRUHWKDQPLQXWHVWKHDFWLYHFROXPQZLOO¿[WRWKHODVWULJKW
FROXPQDQGSXVKWKHSUHYLRXVFROXPQVRႇWKHGLVSOD\
Fitness Test Program
7KH)LWQHVV7HVWPHDVXUHVWKHLPSURYHPHQWVRI\RXUSK\VLFDO¿WQHVVOHYHO7KHWHVWFRPSDUHV\RXUSRZHURXWSXWLQ
:DWWVWR\RXUKHDUWUDWH$V\RXU¿WQHVVOHYHOLPSURYHV\RXUSRZHURXWSXWZLOOLQFUHDVHDWDJLYHQKHDUWUDWH
Note:7KH&RQVROHPXVWEHDEOHWRUHDGWKHKHDUWUDWHLQIRUPDWLRQIURPWKH&RQWDFW+HDUW5DWH&+5VHQVRUVRU+HDUW
5DWH0RQLWRU+50WRZRUNFRUUHFWO\
<RXFDQVWDUWWKH)LWQHVV7HVWIURPWKH)(('%$&.FDWHJRU\7KH)LWQHVV7HVWSURJUDP¿UVWSURPSWV\RXWRVHOHFW\RXU
¿WQHVVOHYHO²%HJLQQHU³%(*´RU$GYDQFHG³$'9´7KH&RQVROHZLOOXVHWKH$JHDQG:HLJKWYDOXHVIRUWKHVHOHFWHG
8VHU3UR¿OHWRFDOFXODWHWKH)LWQHVV6FRUH
Start to workout and hold the Heart Rate Sensors. When the test starts, the intensity of the workout slowly increases. This
means you will work harder, and as a result, your heart rate increases. The intensity continues to increase automatically
XQWLO\RXUKHDUWUDWHUHDFKHVWKH³7HVW=RQH´7KLV]RQHLVLQGLYLGXDOO\FRPSXWHGWREHQHDUSHUFHQWRIWKHPD[LPXP
KHDUWUDWHRI\RXU8VHU3UR¿OH:KHQ\RXUHDFKWKH7HVW=RQHWKHPDFKLQHKROGVWKHLQWHQVLW\VWHDG\IRUPLQXWHV
7KLVOHWV\RXUHDFKDVWDEOHFRQGLWLRQZKHUH\RXUKHDUWUDWHEHFRPHVVWHDG\$WWKHHQGRIWKHPLQXWHVWKH&RQVROH
measures your heart rate and the power output. These numbers, along with information about your age and weight, are
computed to produce a “Fitness Score”.
Note: Fitness Test scores should only be compared to your previous scores and not to other User Profiles.
Compare your Fitness Scores to see your improvement.

27
Recovery Test Program
5HFRYHU\7HVWVKRZVKRZTXLFNO\\RXUKHDUWUHFRYHUVIURPDQH[HUFLVHVWDWHWRDPRUHUHVWIXOVWDWH,PSURYHGUHFRYHU\LV
DQLQGLFDWRURILQFUHDVLQJ¿WQHVV
Note:7KH&RQVROHPXVWEHDEOHWRUHDGWKHKHDUWUDWHLQIRUPDWLRQIURPWKH&RQWDFW+HDUW5DWH&+5VHQVRUVRU+HDUW
5DWH0RQLWRU+50WRZRUNFRUUHFWO\
From an elevated heart rate, select the Recovery Test Program. The Console will show “STOP EXERCISING” and the
JRDOZLOOEHJLQWRFRXQWGRZQ6WRSH[HUFLVLQJEXWFRQWLQXHWRJULSWKHFRQWDFWKHDUWUDWHVHQVRUV$IWHUVHFRQGVWKH
GLVSOD\ZLOOVKRZ³5(/$;´DQGZLOOFRQWLQXHWRFRXQWGRZQWR)RUWKHHQWLUHPLQXWHWKHFRQVROHZLOODOVRVKRZ\RXU
heart rate. You must grip the heart rate sensors for the duration of the test if not using a Remote Heart Rate Monitor.
7KHGLVSOD\ZLOOFRQWLQXHWRVKRZ³5(/$;´DQG\RXUKHDUWUDWHXQWLOWKHJRDOUHDFKHV7KHFRQVROHZLOOWKHQFDOFX
late your recovery score.
5HFRYHU\6FRUH <RXUKHDUWUDWHDWWKHEHJLQQLQJRIWKHWHVWPLQXV\RXUKHDUWUDWHDWWKHHQGRIWKHWHVW
7KHKLJKHUWKH5HFRYHU\7HVWVFRUHYDOXHWKHTXLFNHU\RXUKHDUWUDWHLVUHWXUQLQJWRDPRUHUHVWIXOVWDWHDQGLVDQLQGLFD
WLRQRILPSURYLQJ¿WQHVV%\UHFRUGLQJWKHVHYDOXHVRYHUWLPH\RXFDQVHHWKHWUHQGWRZDUGEHWWHUKHDOWK
:KHQ\RXVHOHFWWKH5HFRYHU\7HVW3URJUDPDQGWKHUHLVQRKHDUWUDWHVLJQDORUGLVSOD\WKH&RQVROHZLOOVKRZ³1(('
+($575$7(´7KLVPHVVDJHZLOOVKRZIRUVHFRQGV,IQRVLJQDOLVGHWHFWHGWKHSURJUDPZLOOHQG
+HOSIXO7LS)RUDPRUHUHOHYDQWVFRUHWU\WRREWDLQDVWHDG\KHDUWUDWHIRUPLQXWHVEHIRUHVWDUWLQJWKH5HFRYHU\3UR
gram. This will be easier to achieve, and obtain the best result, in the Manual program so you can control the levels of
resistance.
Heart Rate Control (HRC) Workout Programs
7KH+HDUW5DWH&RQWURO+5&SURJUDPVOHW\RXVHWDKHDUWUDWHJRDOIRU\RXUZRUNRXW7KHSURJUDPPRQLWRUV\RXUKHDUW
UDWHLQEHDWVSHUPLQXWH%30IURPWKH&RQWDFW+HDUW5DWH&+5VHQVRUVRQWKHPDFKLQHRUIURPD+HDUW5DWH0RQLWRU
+50FKHVWVWUDSDQGDGMXVWVWKHZRUNRXWWRNHHS\RXUKHDUWUDWHLQWKHVHOHFWHG]RQH
Note: The console must be able to read the heart rate information from the CHR sensors or HRM for the HRC program
to work correctly.
The Target Heart Rate programs use your age and other User information to set the Heart Rate Zone values for your
ZRUNRXW7KHFRQVROHGLVSOD\WKHQJLYHVSURPSWVIRU\RXWRVHWXS\RXUZRUNRXW
6HOHFWWKH+HDUW5DWH&RQWUROZRUNRXWOHYHO%(*,11(5³%(*´RU$'9$1&('³$'9´DQGSXVK2..
2. Push the ,QFUHDVHcRU'HFUHDVHdEXWWRQVWRVHOHFWWKHSHUFHQWDJHRIPD[LPXPKHDUWUDWH±±
±±
Consult a physician before you start an exercise program. Stop exercising if you feel pain or tightness in
your chest, become short of breath, or feel faint. Contact your doctor before you use the machine again.
Use the values calculated or measured by the machine’s computer for reference purposes only. The heart
rate displayed on the console is an approximation and should be used for reference only.
3. Push the ,QFUHDVHcRU'HFUHDVHdEXWWRQVWRVHOHFWWKH*RDOW\SHDQGSXVK2.
4. Push the ,QFUHDVHcRU'HFUHDVHdEXWWRQVWRVHWWKHJRDOYDOXHIRUWKHZRUNRXW
Note: Be sure to allow time for your heart rate to reach the desired heart rate zone when setting the goal.
3XVK2.WRVWDUWWKHZRUNRXW
$8VHUFDQVHWD+HDUW5DWH]RQHLQVWHDGRIDYDOXHE\VHOHFWLQJWKH+HDUW5DWH&RQWURO8VHUSURJUDP7KH&RQVROHZLOO
adjust the workout to keep the User in the desired Heart Rate zone.
6HOHFW+($575$7(&21752/86(5and push OK.
2. Push the ,QFUHDVHcRU'HFUHDVHdEXWWRQVWRVet the Heart Rate zone for the workout, and push OK. The Console
VKRZVWKH+HDUW5DWH]RQHSHUFHQWRQWKHOHIWDQGWKH+HDUW5DWHUDQJHIRUWKH8VHURQWKHULJKWVLGHRIWKHGLVSOD\
3. Push the ,QFUHDVHcRU'HFUHDVHdEXWWRQVWRVHOHFWWKH*RDOW\SHDQGSXVK2.

28
4. Push the ,QFUHDVHcRU'HFUHDVHdEXWWRQVWRVHWWKHYDOXHIRUWKHZRUNRXW
3XVK2.WRVWDUWWKHZRUNRXW
Custom Program
7KH&XVWRP3URJUDPOHWV\RXVHWWKHUHVLVWDQFHOHYHOIRUHDFKLQWHUYDODQGVHOHFWW\SHRI*RDO'LVWDQFH7LPHRU&DOR
ULHVWRFUHDWHDSHUVRQDOL]HGZRUNRXW2QHFXVWRPZRUNRXWLVDYDLODEOHIRUHDFK8VHU3UR¿OH
1. Sit on the machine.
3XVKWKH8VHUEXWWRQWRVHOHFWWKHFRUUHFW8VHUSUR¿OH
3. Push the Programs button.
4. Push the ,QFUHDVHcRU'HFUHDVHdEXWWRQVWRVHOHFW&XVWRP3URJUDP&86720DQGSXVK2.
7KH&RQVROHVKRZV+HDUW5DWH&RQWURO7RVHOHFW+HDUW5DWH&RQWUROSXVK2.
To continue in the Custom Program, push the Lefte button and the Console shows Custom Program again. Push OK.
6. To edit the Custom Program, use the 5LJKWfEXWWRQWRPRYHWRWKHQH[WLQWHUYDODQGXVHWKH,QFUHDVHcRU
'HFUHDVHdEXWWRQV to adjust the resistance values. Push the OK button to accept the displayed values.
7. Use WKH,QFUHDVHcRU'HFUHDVHdEXWWRQV to select a W\SHRI*RDO'LVWDQFH7LPHRU&DORULHV, and push OK.
8. Use WKH,QFUHDVHcRU'HFUHDVHdEXWWRQV to adjust the workout value.
9. Push OK to start the workout. The GOAL value will count down as the value for percent completed increases.
Changing a Workout Program During a Workout
7KH&RQVROHDOORZVDGLႇHUHQW:RUNRXW3URJUDPWREHVWDUWHGIURPDQDFWLYHZRUNRXW
1. From an active workout, push PROGRAMS.
2. Push the ,QFUHDVHcRU'HFUHDVHdEXWWRQVWRVHOHFWWKHGHVLUHGZRUNRXWSURJUDPDQGSXVK2.
3. Push the ,QFUHDVHcRU'HFUHDVHdEXWWRQVWRVHOHFWWKH*RDOW\SHDQGSXVK2.
4. Push the ,QFUHDVHcRU'HFUHDVHdEXWWRQVWRVHWWKHYDOXHIRUWKHZRUNRXW
3XVK2.WRVWRSWKHDFWLYHZRUNRXWDQGVWDUWWKHQHZZRUNRXW
7KHSUHYLRXVZRUNRXWYDOXHVDUHVDYHGWRWKH8VHU3UR¿OH
Pausing or Stopping
7KH&RQVROHZLOOJRLQWR3DXVH0RGHLIWKHXVHUVWRSVSHGDOLQJDQGSXVKHV3$86((1'GXULQJDZRUNRXWRUWKHUHLVQR
530VLJQDOIRUVHFRQGVXVHUQRWSHGDOLQJ7KH&RQVROHZLOOF\FOHWKURXJKDVHULHVRIPHVVDJHVWKDWFKDQJHHYHU\
VHFRQGV
:25.2873$86('
3('$/72&217,18(LIDELNH675,'(72&217,18(LIDQHOOLSWLFDO
386+(1'726723
'XULQJDSDXVHGZRUNRXW\RXFDQXVHWKH,QFUHDVH'HFUHDVHEXWWRQVWRPRYHWKURXJKWKHUHVXOWFKDQQHOVPDQXDOO\
6WRSSHGDOLQJDQGSXVKWKH3$86((1'EXWWRQWRSDXVH\RXUZRUNRXW
2. To continue your workout, push OK or start pedaling.
7RVWRSWKHZRUNRXWSXVKWKH3$86((1'EXWWRQ7KH&RQVROHZLOOJRLQWR5HVXOWV&RRO'RZQPRGH
Results / Cool Down Mode
$IWHUDZRUNRXWWKH*2$/GLVSOD\VKRZVDQGWKHQVWDUWVWRFRXQWGRZQ'XULQJWKLV&RRO'RZQSHULRGWKH&RQVROH
VKRZVWKH:RUNRXW5HVXOWV$OOZRUNRXWVH[FHSW4XLFN6WDUWKDYHDPLQXWH&RRO'RZQSHULRG
7KH/&'GLVSOD\VKRZVWKH&XUUHQW:RUNRXWYDOXHVLQWKUHHFKDQQHOV
D 7,0(WRWDO',67$1&(WRWDODQG&$/25,(6WRWDO

29
E 63(('DYHUDJH530DYHUDJHDQG+($575$7(DYHUDJH
F 7,0(DYHUDJH/(9(/DYHUDJHDQG&$/25,(6DYHUDJH
3XVKWKH/HIWeRU5LJKWfEXWWRQVWRPRYHWKURXJKWKHUHVXOWFKDQQHOVPDQXDOO\
'XULQJWKH&RRO'RZQSHULRGWKH5HVLVWDQFH/HYHOZLOODGMXVWWRDWKLUGRIWKHDYHUDJH/HYHORIWKHZRUNRXW7KH&RRO
'RZQUHVLVWDQFHOHYHOFDQEHDGMXVWHGZLWKWKH5HVLVWDQFH,QFUHDVHDQG'HFUHDVHEXWWRQVEXWWKH&RQVROHZLOOQRWGLV
play the value.
<RXFDQSXVK3$86((1'WRVWRSWKH5HVXOWV&RRO'RZQSHULRGDQGJREDFNWR3RZHU8S0RGH,IWKHUHLVQR530RU
HR signal, the Console automatically goes into Sleep Mode.
*2$/75$&.6WDWLVWLFVDQG$FKLHYHPHQWV
7KHVWDWLVWLFVIURPHYHU\ZRUNRXWDUHUHFRUGHGWRD8VHU3UR¿OH
7KH'XDO7UDFN
™
&RQVROHVKRZVWKH*RDO7UDFNZRUNRXW6WDWLVWLFVRQWKH/RZHU'LVSOD\LQWKUHHFKDQQHOV
D 7,0(WRWDO',67$1&(WRWDODQG&$/25,(6WRWDO
E 63(('DYHUDJH530DYHUDJHDQG+($575$7(DYHUDJH
F 7,0(DYHUDJH',67$1&(DYHUDJHRU/(9(/DYHUDJH*DQG&$/25,(6DYHUDJH
*,IWKH*RDO7UDFN6WDWLVWLFLVDVLQJOHZRUNRXW/(9(/DYHUDJHLVGLVSOD\HG,IWKH*RDO7UDFN6WDWLVWLFLVD
FRPELQDWLRQRIPXOWLSOHZRUNRXWV',67$1&(DYHUDJHLVGLVSOD\HGLQVWHDGRI/(9(/DYHUDJH
7RYLHZWKH*2$/75$&.VWDWLVWLFVRID8VHU3UR¿OH
)URPWKH3RZHU8SVFUHHQSXVKWKHUSER button to select a User Profile.
2. Push the GOAL TRACK button. The Console will display the LAST WORKOUT values and activate the corresponding
Achievement light.
Note: Goal Track statistics can be viewed even during a workout. Push GOAL TRACK and the LAST WORKOUT
values will be displayed. The workout values for the current workout will be hidden except for the GOAL display. Push
*2$/75$&.DJDLQWRUHWXUQWRWKH3RZHU8SVFUHHQ
3. Push the,QFUHDVHcEXWWRQWRPRYHWRWKHQH[W*2$/75$&.VWDWLVWLF³/$67'$<6´7KH&RQVROHZLOOGLVSOD\WKH
FDORULHVEXUQWRQWKHGLVSOD\FDORULHVSHUVHJPHQWIRUWKHSUHYLRXVVHYHQGD\VDORQJZLWKWKHZRUNRXWYDOXHWRWDOV
Use the /HIWeRU5LJKWfEXWWRQVWRPRYHWKURXJKDOOWKHZRUNRXWVWDWLVWLFFKDQQHOV
4. Push the,QFUHDVHcEXWWRQWRPRYHWR³/$67'$<6´7KH&RQVROHZLOOGLVSOD\WKHWRWDOYDOXHVIRUWKHSUHYLRXV
thirty days. Use the /HIWeRU5LJKWfEXWWRQVWRPRYHWKURXJKDOOWKHZRUNRXWVWDWLVWLFFKDQQHOV
3XVKWKH,QFUHDVHcEXWWRQ to move to the “LONGEST WORKOUT”. The Console will display the workout values with
the most Time value. Use the /HIWeRU5LJKWfEXWWRQVWRPRYHWKURXJKDOOWKHZRUNRXWVWDWLVWLFFKDQQHOV
6. Push the,QFUHDVHcEXWWRQWRPRYHWRWKH³&$/25,(5(&25'´7KH&RQVROHZLOOGLVSOD\WKHZRUNRXWYDOXHVZLWKWKH
most Calories value. Use the /HIWeRU5LJKWfEXWWRQVWRPRYHWKURXJKDOOWKHZRUNRXWVWDWLVWLFFKDQQHOV
7. Push the,QFUHDVHcEXWWRQ to move to “BMI”, or Body Mass Index. The Console will display the BMI value based on
the User settings. %HVXUHWKHKHLJKWYDOXHLVFRUUHFWIRU\RXU8VHU3UR¿OHDQGWKHZHLJKWYDOXHLVFXUUHQW
The BMI Measurement is a useful tool that shows the relationship between weight and height that is associated with body
IDWDQGKHDOWKULVN7KHWDEOHEHORZJLYHVDJHQHUDOUDWLQJIRUWKH%0,VFRUH
Underweight %HORZ
Normal ±
Overweight ±
Obesity 30.0 and above
Note: The rating may overestimate body fat in athletes and others who have a muscular build. It may also underesti
mate body fat in older persons and others who have lost muscle mass.
Contact your doctor for more information about Body Mass Index (BMI) and the weight that is appropriate
for you. Use the values calculated or measured by the machine’s computer for reference purposes only.

30
8. Push the,QFUHDVHcEXWWRQWRPRYHWRWKH³6$9(7286%2."´SURPSW3XVK2.DQGWKH³$5(<28685("
12´SURPSWZLOOGLVSOD\3XVKthe ,QFUHDVHcEXWWRQWRFKDQJHLWWR\HVDQGSXVK2.7KH&RQVROHZLOOGLVSOD\WKH
“INSERT USB” prompt. IQVHUWD86%)ODVK'ULYHLQWRWKH86%3RUW. The Console will record the Statistics to the USB
)ODVK'ULYH
7KH&RQVROHZLOOGLVSOD\³6$9,1*´DQGWKHQ³5(029(86%´ZKHQLWLVVDIHWRUHPRYHWKH86%)ODVK'ULYH
Note:3XVKWKH3$86((1'EXWWRQWRIRUFHDQH[LWIURPWKH³6$9,1*´SURPSW
9. Push the,QFUHDVHcEXWWRQWRPRYHWRWKH³&/($5:25.287'$7$2."´3XVK2.DQGWKH³$5(<28685("
12´SURPSWZLOOGLVSOD\3XVKWKH,QFUHDVHcEXWWRQWRFKDQJHWRWKH³$5(<28685("<(6´GLVSOD\DQGSXVK
OK. The user workouts have been reset.
3XVK*2$/75$&.WRUHWXUQWRWKH3RZHU8SVFUHHQ
When a User performs a workout that surpasses the “LONGEST WORKOUT” or ³&$/25,(5(&25'´ of the previous
workouts, the Console will congratulate with an audible sound and tell the User the new achievement. The corresponding
Achievement Indicator Light will also be active.
Console Setup Mode
The Console Setup Mode lets you input the date and time, set the units of measurement to either English or Metric,
FRQWUROWKHVRXQGVHWWLQJVRQRႇRUVHHPDLQWHQDQFHVWDWLVWLFV(UURU/RJDQG5XQ+RXUV±IRUVHUYLFHWHFKQLFLDQXVH
RQO\
+ROGGRZQWKH3$86((1'EXWWRQDQG5LJKWEXWWRQWRJHWKHUIRUVHFRQGVZKLOHLQWKH3RZHU8S0RGHWRJRLQWR
the Console Setup Mode.
Note: 3XVK3$86((1'WRH[LWWKH&RQVROH6HWXS0RGHDQGUHWXUQWRWKH3RZHU8S0RGHVFUHHQ
7KH&RQVROHGLVSOD\VKRZVWKH'DWHSURPSWZLWKWKHFXUUHQWVHWWLQJ7RFKDQJHWKH,QFUHDVH'HFUHDVHEXWWRQVWR
DGMXVWWKHFXUUHQWO\DFWLYHYDOXHÀDVKLQJ3XVKWKH/HIW5LJKWEXWWRQVWRFKDQJHZKLFKVHJPHQWLVWKHFXUUHQWO\DF
WLYHYDOXHPRQWKGD\\HDU
3. Push OK to set.
7KH&RQVROHGLVSOD\VKRZVWKH7LPHSURPSWZLWKWKHFXUUHQWVHWWLQJ3XVKWKH,QFUHDVH'HFUHDVHEXWWRQVWRDGMXVW
WKHFXUUHQWO\DFWLYHYDOXHÀDVKLQJ3XVKWKH/HIW5LJKWEXWWRQVWRFKDQJHZKLFKVHJPHQWLVWKHFXUUHQWO\DFWLYHYDOXH
KRXUPLQXWH$0RU30
3XVK2.WRVHW
6. The Console display shows the Units prompt with the current setting. To change, push OK to start the Units option.
3XVKWKH,QFUHDVH'HFUHDVHEXWWRQVWRFKDQJHEHWZHHQ³0,/(6´,PSHULDO(QJOLVKXQLWVDQG³.0´PHWULFXQLWV
Note: If the units change when there is data in User Statistics, the statistics convert to the new units.
7. Push OK to set.
7KH&RQVROHGLVSOD\VKRZVWKH6RXQG6HWWLQJVSURPSWZLWKWKHFXUUHQWVHWWLQJ3XVKWKH,QFUHDVH'HFUHDVHEXWWRQV
to change between “ON” and “OFF”.
9. Push OK to set.
10. The Console display shows the TOTAL RUN HOURS for the machine.
11. For the next prompt, push the OK button.
12. The Console display shows the Software Version prompt.
13. For the next prompt, push the OK button.
7KH&RQVROHZLOOGLVSOD\WKH3RZHU8S0RGHVFUHHQ
CONSOLE SETUP MODE
31
MAINTENANCE
Read all maintenance instructions fully before you start any repair work. In some conditions, an assistant is necessary to
do the necessary tasks.
!
Equipment must be regularly examined for damage and repairs. The owner is responsible to make sure that
regular maintenance is done. Worn, damaged or loose components must be repaired or replaced immedi-
ately. Only manufacturer supplied components can be used to maintain and repair the equipment.
If at any time the Warning labels become loose, unreadable or dislodged, replace the labels. If purchased
in US/Canada, contact Customer Service for replacement labels. If purchased outside US/Canada, contact
your local distributor for them.
Disconnect all power to the machine before you service it.
'DLO\ Before each use, examine the exercise machine for loose, broken, damaged, or worn parts.
'RQRWXVHLIIRXQGLQWKLVFRQGLWLRQ5HSDLURUUHSODFHDOOSDUWVDWWKH¿UVWVLJQRIZHDURU
damage. Check Pedals and tighten as needed. After each workout, use a damp cloth to wipe
your machine and Console free of moisture.
Note: Avoid excessive moisture on the Console.
NOTICE:,IQHFHVVDU\RQO\XVHDPLOGGLVKVRDSZLWKDVRIWFORWKWRFOHDQWKH&RQVROH'RQRW
clean with a petroleum based solvent, automotive cleaner, or any product that contains
DPPRQLD'RQRWFOHDQWKH&RQVROHLQGLUHFWVXQOLJKWRUDWKLJKWHPSHUDWXUHV%HVXUH
to keep the Console free of moisture.
:HHNO\ Check pedals and crank arms and tighten as necessary.
Do not back, or reverse, pedal. Doing so may loosen the Pedals, which could result
in damage to the machine and/or injury to the user. Never operate this machine with
loose Pedals
Clean the machine to remove any dust, dirt, or grime from the surfaces. Check for smooth
VHDWVOLGHURSHUDWLRQ,IQHHGHGDSSO\DYHU\WKLQFRDWLQJRIVLOLFRQHOXEULFDQWWRHDVH
operation.
Silicone lubricant is not intended for human consumption. Keep out of reach of
children. Store in a safe place.
Note:'RQRWXVHSHWUROHXPEDVHGSURGXFWV
Monthly
RUDIWHUKRXUV
Make sure all bolts and screws are tight. Tighten as necessary.
32
A
B
C
C
D
E
F
G
H
J
K
I
M
R
Q
N
O
P
S
T
U
V
J
D
X
W
AA
Y
Z
CC
BB
DD
EE
A
J
L
A Console L HR Cables W Flywheel
B Console Mast M CHR Sensors X Brake Assembly
C Pedals N Seat Y RPM Sensor
' Crank Arms O Seat Post w/ Slider Z 6SHHG6HQVRU0DJQHWV
E Left Shroud P Adjustment Knob AA Servo Motor
F Power Inlet Q Seat Post Shroud BB 'ULYH%HOW
G Right Shroud R Water Bottle Holder CC 'ULYH3XOOH\
H Top Shroud S Rear Stabilizer '' Handlebar Mount Cover
I Mast Gasket T Levelers EE 7KDQGOH
- 'DWD&DEOH U Front Stabilizer
K Handlebars V Transport Wheels
Maintenance Parts

33
TROUBLESHOOTING
Condition/Problem Things to Check Solution
No display/partial display/
unit will not turn on
&KHFNHOHFWULFDOZDOO
outlet
Make sure unit is plugged into a functioning wall outlet.
Check connection on
console
Connection should be secure and undamaged. Replace
adapter or connection at unit if either are damaged.
Check data cable integrity All wires in cable should be intact. If any are visibly crimped or
cut, replace cable.
Check data cable
connections/orientation
Be sure cable is connected securely and oriented properly.
Small latch on connector should line up and snap into place.
Check console display for
damage
Check for visual sign that console display is cracked or other
wise damaged. Replace Console if damaged.
&RQVROH'LVSOD\ ,I&RQVROHRQO\KDVSDUWLDOGLVSOD\DQGDOOFRQQHFWLRQVDUH¿QH
replace the Console.
If the above steps do not resolve the problem, contact Cus
WRPHU6HUYLFHLILQVLGH86&DQDGDRU\RXUORFDOGLVWULEXWRULI
RXWVLGH86&DQDGD
Unit operates but Contact
HR not displayed
HR cable connection at
Console
Be sure cable is connected securely to Console.
Sensor grip Be sure hands are centered on HR sensors. Hands must be
NHSWVWLOOZLWKUHODWLYHO\HTXDOSUHVVXUHDSSOLHGWRHDFKVLGH
'U\RUFDOORXVHGKDQGV 6HQVRUVPD\KDYHGLႈFXOW\ZLWKGULHGRXWRUFDOORXVHGKDQGV
$FRQGXFWLYHHOHFWURGHFUHDPKHDUWUDWHFUHDPFDQKHOS
make better conduct. These are available on the web or at
PHGLFDORUVRPHODUJHU¿WQHVVVWRUHV
Handlebar If tests reveal no other issues, Handlebars should be replaced.
Unit operates but
Telemetric HR not
displayed
&KHVW6WUDSRSWLRQDO Strap should be “POLAR®” compatible and uncoded. Make
sure strap is directly against skin and contact area is wet.
Chest Strap Batteries If strap has replaceable batteries, install new batteries.
&KHFN8VHU3UR¿OH 6HOHFWWKH(GLW8VHU3UR¿OHRSWLRQIRUWKH8VHU3UR¿OH*RWR
the WIRELESS HR setting and make sure that the current
value is set to ON.
Interference 7U\PRYLQJXQLWDZD\IURPVRXUFHVRILQWHUIHUHQFH790LFUR
ZDYHHWF
Replace Chest Strap If interference is eliminated and HR does not function, replace
strap.
Replace Console If HR still does not function, replace Console.
Unit operates but
Telemetric HR displayed
incorrectly
Interference Make sure that the HR receiver is not blocked by a personal
electronic device in the left side of the media tray.
Console displays “E2”
error code
Check data cable integrity All wires in cable should be intact. If any are cut or crimped,
replace cable.
Check data cable
connections/orientation
Be sure cable is connected securely and oriented properly.
Small latch on connector should line up and snap into place.
Console Electronics If tests reveal no other issues, contact your local distributor for
further assistance.

34
Condition/Problem Things to Check Solution
No speed/RPM reading,
Console displays “Please
Pedal” error code
Check data cable integrity All wires in cable should be intact. If any are cut or crimped,
replace cable.
Check data cable
connections/orientation
Be sure cable is connected securely and oriented properly.
Small latch on connector should line up and snap into place.
Check magnet position
UHTXLUHVVKURXGUHPRYDO
Magnets should be in place on pulley.
Check Speed Sensor
UHTXLUHVVKURXGUHPRYDO
Speed sensor should be aligned with magnet and connected to
data cable. Realign sensor if necessary. Replace if there is any
damage to the sensor or the connecting wire.
Resistance does not
FKDQJHPDFKLQHWXUQVRQ
DQGRSHUDWHV
%DWWHULHVLIHTXLSSHG Replace batteries and check for proper operation.
Check Console Check for visual sign that Console is damaged. Replace Con
sole if damaged.
Check data cable integrity All wires in cable should be intact. If any are visibly crimped or
cut, replace cable.
Check data cable
connections/orientation
Be sure cable is connected securely and oriented properly.
Reseat all connections. Small latch on connector should line up
and snap into place.
Check Servo Motor
UHTXLUHVVKURXGUHPRYDO
If magnets move, adjust until they are within the proper range.
Replace Servo Motor if not functioning properly.
If the above steps do not resolve the problem, contact Cus
WRPHU6HUYLFHLILQVLGH86&DQDGDRU\RXUORFDOGLVWULEXWRULI
RXWVLGH86&DQDGD
&RQVROHVKXWVRႇHQWHUV
VOHHSPRGHZKLOHLQXVH
&KHFNHOHFWULFDOZDOO
outlet
Make sure unit is plugged into a functioning wall outlet.
Check connection on
console
Connection should be secure and undamaged. Replace
adapter or connection at unit if either are damaged.
Check data cable integrity All wires in the cable should be intact. If any are cut or crimped,
replace cable.
Check data cable
connections/orientation
Be sure cable is connected securely and oriented properly.
Small latch on connector should line up and snap into place.
Reset Machine Unplug unit from electrical outlet for 3 minutes. Reconnect to
outlet.
Check magnet position
UHTXLUHVVKURXGUHPRYDO
Magnets should be in place on pulley.
Check Speed Sensor
UHTXLUHVVKURXGUHPRYDO
Speed sensor should be aligned with magnet and connected to
data cable. Realign sensor if necessary. Replace if there is any
damage to the sensor or the connecting wire.
Fan will not turn on or will
QRWWXUQRႇ
Check data cable integrity All wires in cable should be intact. If any are cut or crimped,
replace cable.
Check data cable
connections/orientation
Be sure cable is connected securely and oriented properly.
Small latch on connector should line up and snap into place.
Reset machine Unplug unit from electrical outlet for 3 minutes. Reconnect to
outlet.

35
Condition/Problem Things to Check Solution
Fan will not turn on, but
Console operates
Check for blockage of fan 8QSOXJXQLWIURPHOHFWULFDORXWOHWIRUPLQXWHV5HPRYHPDWH
rial from fan. If necessary, detach the Console to help with
removal. Replace the Console if unable to remove blockage.
Unit rocks/does not sit
level
Check leveler adjustment Adjust levelers until bike is level.
Check surface under unit Adjustment may not be able to compensate for extremely un
even surfaces. Move bike to level area.
3HGDOVORRVHXQLWGLႈFXOW
to pedal
Check pedal to crank arm
connection
Pedal should be tightened securely to crank. Insure connection
LVQRWFURVVWKUHDGHG
Check crank arm to axle
connection
Crank should be tightened securely to axle. Be sure cranks are
connected at 180 degrees from each other.
Clicking sound when
pedaling
Check pedal to crank arm
connection
Remove pedals. Make sure there is no debris on threads, and
reinstall the pedals
Seat post movement Check locking pin Be sure adjustment pin is locked into one of the seat post
adjustment holes.
Check adjustment knob Be sure knob is securely tightened.
Workout results will not
sync with Bluetooth
®
enabled device
Current console mode 0DFKLQHPXVWEHLQ,GOH0RGHWRV\QF3XVKWKH3$86((1'
EXWWRQXQWLOWKH3RZHU8S0RGHVFUHHQLVGLVSOD\HG
Total time of workout A workout must be longer than 1 minute to be saved and
posted by the Console.
Fitness machine 8QSOXJXQLWIURPHOHFWULFDORXWOHWIRUPLQXWHV5HFRQQHFWWR
outlet.
Bluetooth
®
enabled device Consult your device to be sure that the Bluetooth
®
wireless
feature has been enabled on it.
Fitness App 5HYLHZ6SHFL¿FDWLRQVRI)LWQHVV$SSDQGFRQ¿UP\RXUGHYLFH
is compatible.
&RQWDFWDSSVXSSRUW#QDXWLOXVFRPLILQVLGH86&DQDGDRU
\RXUORFDOGLVWULEXWRULIRXWVLGH86&DQDGDIRUIXUWKHUDVVLV
tance.

™
™
™
™
™
'
EN
™