
A5P | 01
3500181
Please read all instructions carefully before use and
retain for future reference
CAUTION Do not immerse in water
Protect your eyes
Protect your ears
Protect your hands
Wear a dust mask
Protective clothing must be worn.
DO NOT allow two people to use the sander at the
same time. Remeber that when the sanding belt and
disc are in operation they both are turning.
Always ensure the Sanding Belt is correctly tracked
before operation see (Tracking Section)
CAUTION Potential nger trap/pinchment points.

A5P | 01
EN
Please read all instructions carefully before use and retain
for future reference.
INTENDED USE Only operate the power tool/machine
for its intended purpose and within the parameters spec-
ied in this manual.
This power tool/machine is for domestic use only. Do not
use outdoors or on wet surfaces.
This power tool/machine is not intended for use by per-
sons with reduced physical, sensory or mental capabil-
ities, or lack of experience and knowledge, unless su-
pervised or given appropriate instruction concerning the
product’s use by a person responsible for their safety.
GENERAL PRECAUTION Do not allow to be used as a
toy. Children should be supervised to ensure they do not
play with the power tool/machine.
If the power tool/machine is not functioning properly,
has been dropped, damaged, left outdoors, or immersed
in liquid, do not use, contact DOMU Brands Customer
Services.
Do not use the power tool/machine if any parts appear to
be faulty, missing or damaged.
Ensure all parts are securely attached before use.
RISK OF PERSONAL INJURY Avoid body contact with
earthed or grounded surfaces such as pipes, radiators,
ranges and refrigerators. There is an increased risk of
electric shock if your body is earthed or grounded.
Prevent unintentional starting. Ensure the switch is in the
o position before connecting to the power source and/
or battery pack, picking up or carrying the tool. Carrying
power tools with your nger on the switch, or energising
power tools that are switched on, invites accidents.
Do not operate power tools in explosive atmospheres
such as in the presence of ammable liquids, gases or
dust. Power tools create sparks which may ignite the
dust or fumes.
Always wear eye protection. Any power tool can throw
foreign objects into your eyes and cause permanent
eye damage. Always wear safety goggles (not glasses)
that comply with ANSI safety standard Z87.1. Every day
glasses have only impact resistant lenses.
Do not expose power tools to rain or wet conditions.
Water entering the power tools will increase the risk of
electric shock.
Stay alert, watch what you are doing and use common
sense when operating a power tool/machine. Do not use
a power tool/machine while you are tired or under the
inuence of drugs, alcohol or medication. A moment of
inattention while operating power tool/machine may re-
sult in serious personal injury.
Use personal protective equipment. Always wear eye
protection. Protective equipment such as dust mask,
non-skid safety shoes, hard hat, or hearing
protection used for appropriate conditions will reduce
personal injuries.
Remove any adjusting key or spanner before turning the
power tool/machine on. A spanner or a key left attached
to a rotating part of the power tool/machine may result in
personal injury.
Do not overreach. Keep proper footing and balance at
all times. This enables better control of the power tool/
machine in unexpected situations.
Dress appropriately. Do not wear loose clothing or jew-
ellery.
Keep your hair, clothing and gloves away from moving
parts. Loose clothes, jewellery or long hair can be caught
in moving parts.
If devices are provided for the connection of dust extrac-
tion and collection facilities, ensure these are connected
and properly used. Use of dust collection can reduce
dust-related hazards.
WORK AREA SAFETY Keep work area clean and well lit.
Cluttered or dark areas invite accidents.
Do not operate power tool/machine in explosive atmos-
pheres, such as in the presence of ammable liquids,
gases or dust.
Power tool/machine create sparks which may ignite the
dust or fumes.
Keep children and bystanders away while operating a
power tool/machine. Distractions can cause you to lose
control.
GENERAL POWER TOOL USE AND CARE Do not force
the power tool/machine. Use the correct power tool/ma-
chine for your application. The correct power tool/ma-
chine will do the job better and safer at the rate for which
it was designed.
Do not use the power tool/machine if the switch does not
turn it on and o. Any power tool/machine that cannot
be controlled with the switch is dangerous and must be
repaired.
Disconnect the plug from the power source and/or the
battery pack from the power tool/machine before making
any adjustments, changing accessories, or storing pow-
er tool/machine tools. Such preventive safety measures
reduce the risk of starting the power tool/machine ac-
cidentally.
Store idle power tool/machine out of the reach of children
and do not allow persons unfamiliar with the power tool/
machine or these instructions to operate the power tool/
machine.
Power tool/machines are dangerous in the hands of un-
trained users.
Maintain power tool/machines. Check for misalignment
or binding of moving parts, breakage of parts and any
other condition that may aect the power tool/machines
operation. If damaged, have the power tool/machines re-
paired before use. Many accidents are caused by poorly
maintained power tool/machines.
Keep cutting tools sharp and clean.
Properly maintained cutting tools with sharp cutting edg-
es are less likely to bind and are easier to control.
Use the power tool/machine accessories and tool bits in
accordance with these instructions, take into account the
working conditions and the work to be performed.
Use of the power tool/machine for operations dierent
from those intended could result in a hazardous situation.
CLEANING & MAINTENANCE Never soak or immerse
electrical components and or a component that has a
plug attached.
Disconnect the plug from the power source before mak-
ing any adjustments, changing accessories, or storing.
Such preventive safety measures reduce the risk of start-
ing the power tool accidentally.
Ensure the motor has fully stopped before cleaning,
clearing a blockage, checking, or carrying out any main-
tenance on the tool.
Maintain your power tool. Check for misalignment or
binding of moving parts, breakage of parts and any oth-
er condition that may aect the power tool’s operation.
If damaged, have the power tool repaired by a qualied
repair person before use. Many accidents are caused by
poorly maintained power tools.
Keep cutting tools sharp and clean. Properly maintained
cutting tools with sharp cutting edges are less likely to
bind and are easier to control.
Regularly check external nuts and xings to ensure vibra-
tion caused by normal use has not begun to loosen them.
Store idle power tools out of reach of children and do
not allow persons unfamiliar with the power tool or these
instructions to operate the Breaker.
Locate the power tool out of reach of children, in a dry,

A5P | 01
locked unit.
Make sure that the cord is located so that it will not be
stepped on, tripped over, or otherwise subjected to dam-
age or stress.
Remove the plug from the mains socket / battery (where
applicable) before carrying out any adjustment or main-
tenance.
Always store the power tool/machine in a dry place.
If the power cord is damaged, it must be replaced by a
qualied service technician.
Keep the ventilation slots and motor housing as free of
dirt and dust as possible (where applicable).
Clean the power tool/machine by rubbing it with a clean
cloth and blow it clean using low-pressure compressed
air is recommended.
Ensure you have all the pieces listed. If you are missing
any components, contact our customer services depart-
ment at
[email protected] (UK/EU)
[email protected] (US). DO NOT proceed
with assembly if any components are missing.
HAND HELD SANDERS & POLISHERS
For Belt Sanders, Drum Sanders and polishers, the
direction of rotation shall be indicated on the tool by an
arrow, raised or sunk, or by any other means no less
visible and indelible. Hold the Power Tool by insulated
gripping surfaces when performing an operation where
the fastener may contact hidden wiring or its own cord.
Fasteners contacting a ‘live’ wire may make exposed
metal parts of the power tool ‘live’ and could deliver an
electric shock.
TECHNICAL SPECIFICATION
Rated Voltage 230-240V~
Rated Power 370W
Rated Frequency 50Hz
No Load Speed 2980/min
0mm
10mm
10mm
20mm
20mm
M8 X1.25MM
A5P | 01
DECLARATION OF CONFORMITY
We:
DOMU Brands Ltd
5th Floor The Tower
Deva City Oce Park
Manchester
M3 7BF
Declare under our sole responsibility the product:
SKU
3500181
Description
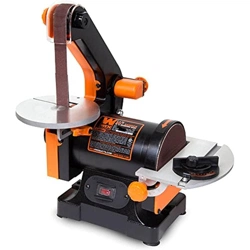
100 x 915mm Benchtop Belt & Disc Sander
Complies with the essential requirements of the following directives:
2006/42/EC
2014/30/EU
2011/65/EU
And the Standards:
EN62841-1:2015, EN ISO 12100:2010, EN 55014-1:2006+A1+A2, EN 55014-2:2015, EN 61000-3-2:2014, EN 61000-
3-3:2013
Authorised Signatory on behalf of DOMU Brands Ltd.
A5P | 01
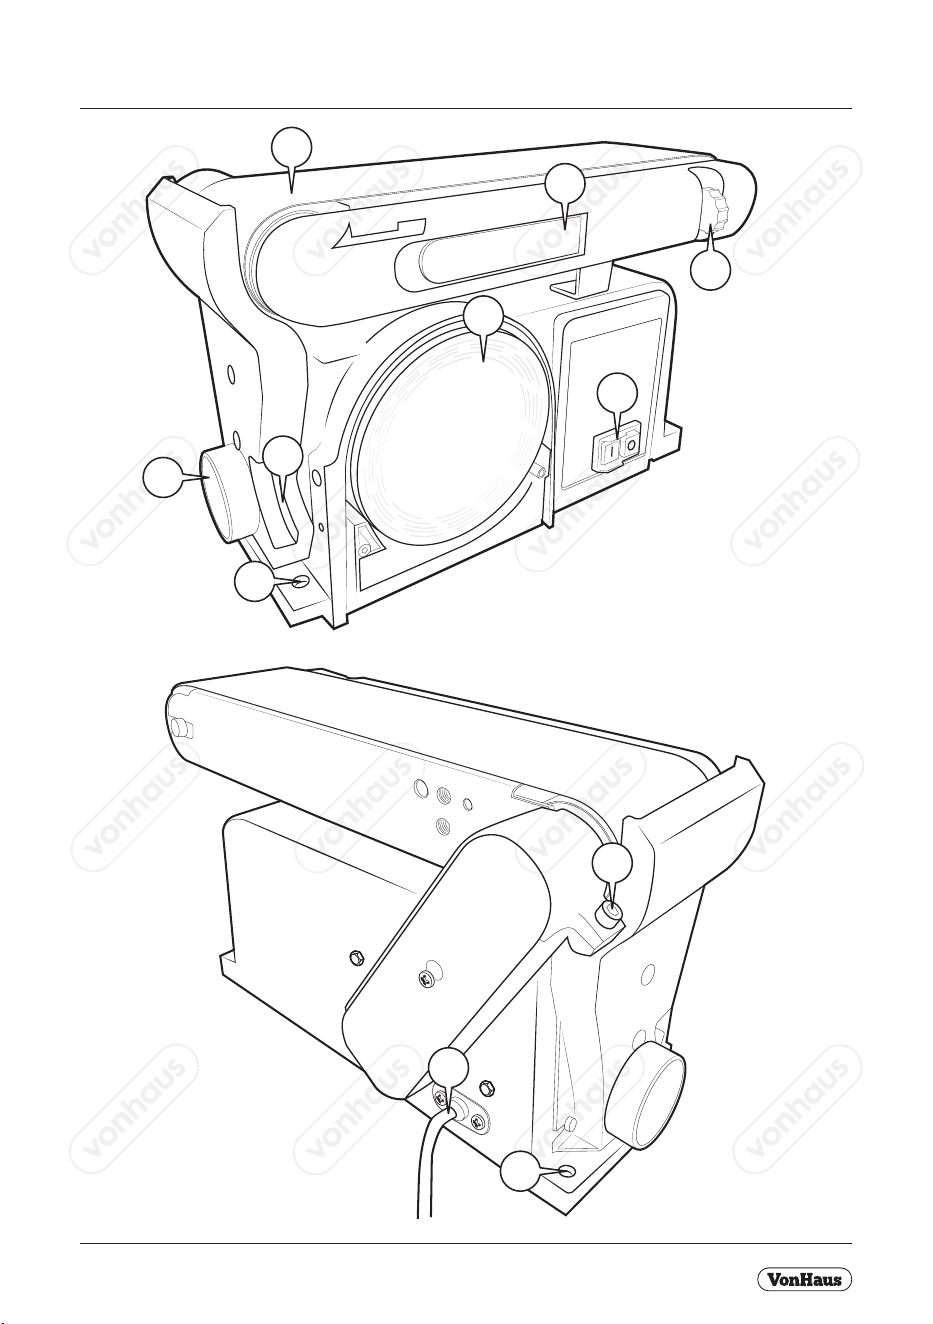
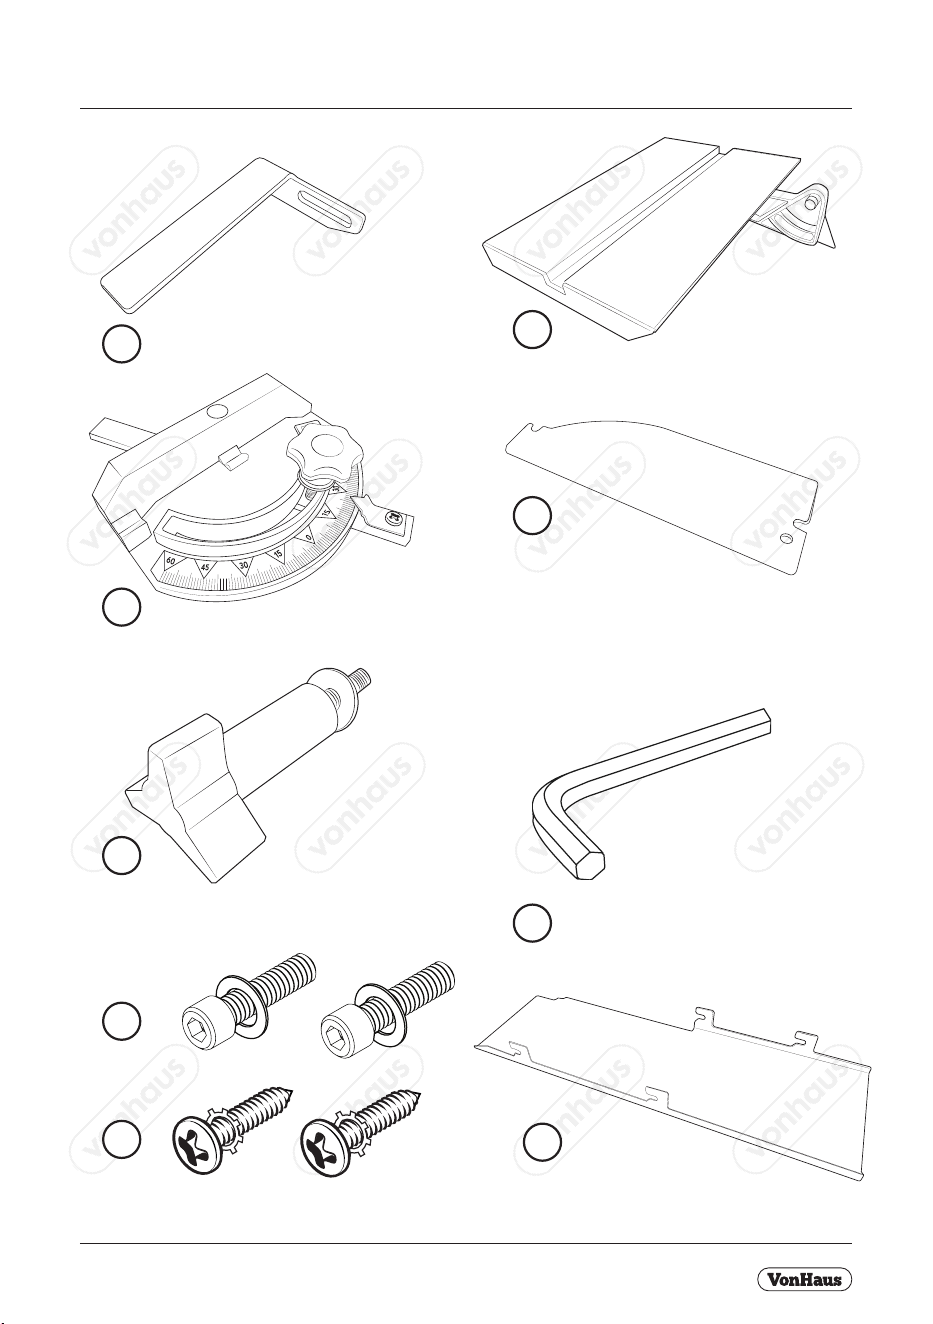
COMPONENTS
7
8
9
4
2
1
6
10
10
5
3
A5P | 01
COMPONENTS
11
13
15
17
18
19
12
14
16

A5P | 01
SECURING THE SANDER
WORKBENCH: If the Belt and Disc Sander is to be used
in a permanent location, it should be fastened securely
to a rm supporting surface such as a workbench.
NOTE: Moutning Bolts not supplied.
• Place the Bench and Disc Sander in the location you
require and mark the 3 holes on the base.
• Drill the holes using a 3/8” Drill Bit.
• Place the Bench and Disc Sander back into the
choosen location and align up holes.
• Using the Hex Bolts (Not Supplied) secure the Belt and
Disc Sander.
NOTE: Bolt length should be 1.1/2” plus the
thickness of the bench top.
CLAMPING: If your Belt and Disc Sander is to be
used as a portable tool, it is recommended you fasten
it permanently to a mounting board that can easily be
clamped to a workbench or other stable surface.
The mounting board should be of sucient size to
avoid tipping while Belt and Disc Sander is in use. Any
good grade plywood or chipboard with a 3/4 in. (19
mm) thickness is recommended.
CONTENT LIST
1. Sanding Belt
2. Belt Tension Release
3. Sanding Belt Tensioning Screw
4. Grinding/Sanding Disk
5. Bevel Scale
6. Vacuum Outlet
7. On/O Switch
8. Sanding Belt Angle Adjustment Screw
9. Power Cable
10. Mounting Screws x 3
11. Edge Stop
12. Sanding Table
13. Mitre Guide
14. Sanding Disc Face Plate
15. Locking Screw
16. 6mm Hex Key
17. Face Plate Screws with Anti Vibration Washer x 2
18. Hex Bolts with Washers x 2
19. Face Plate
A5P | 01
ASSEMBLY / ASSEMBLÉE / VERSAMMLUNG / MONTAJE / MONTAGGIO / EL MONTAJE
6
8
19
A5P | 01
TRACKING ADJUSTMENT
Always ensure the Sanding Belt is correctly tracked
before operation.
Ensure the sanding belt runs central to the rollers.
3
3
A5P | 01
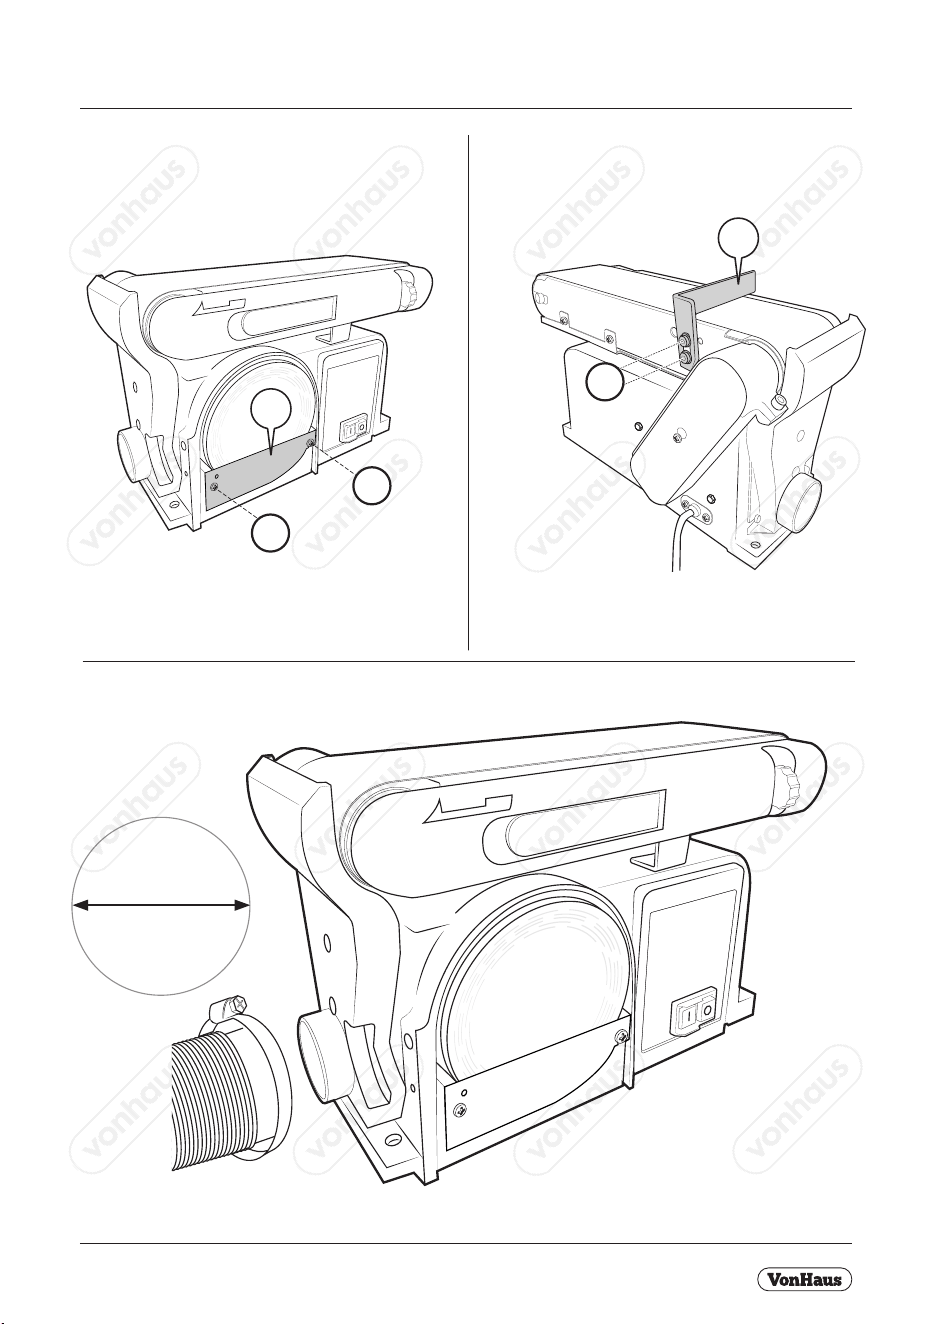
ASSEMBLY
VACUUM OUTLET
14
11
18
18
19
2
1/2”
(60mm)
* Not Supplied
A5P | 01
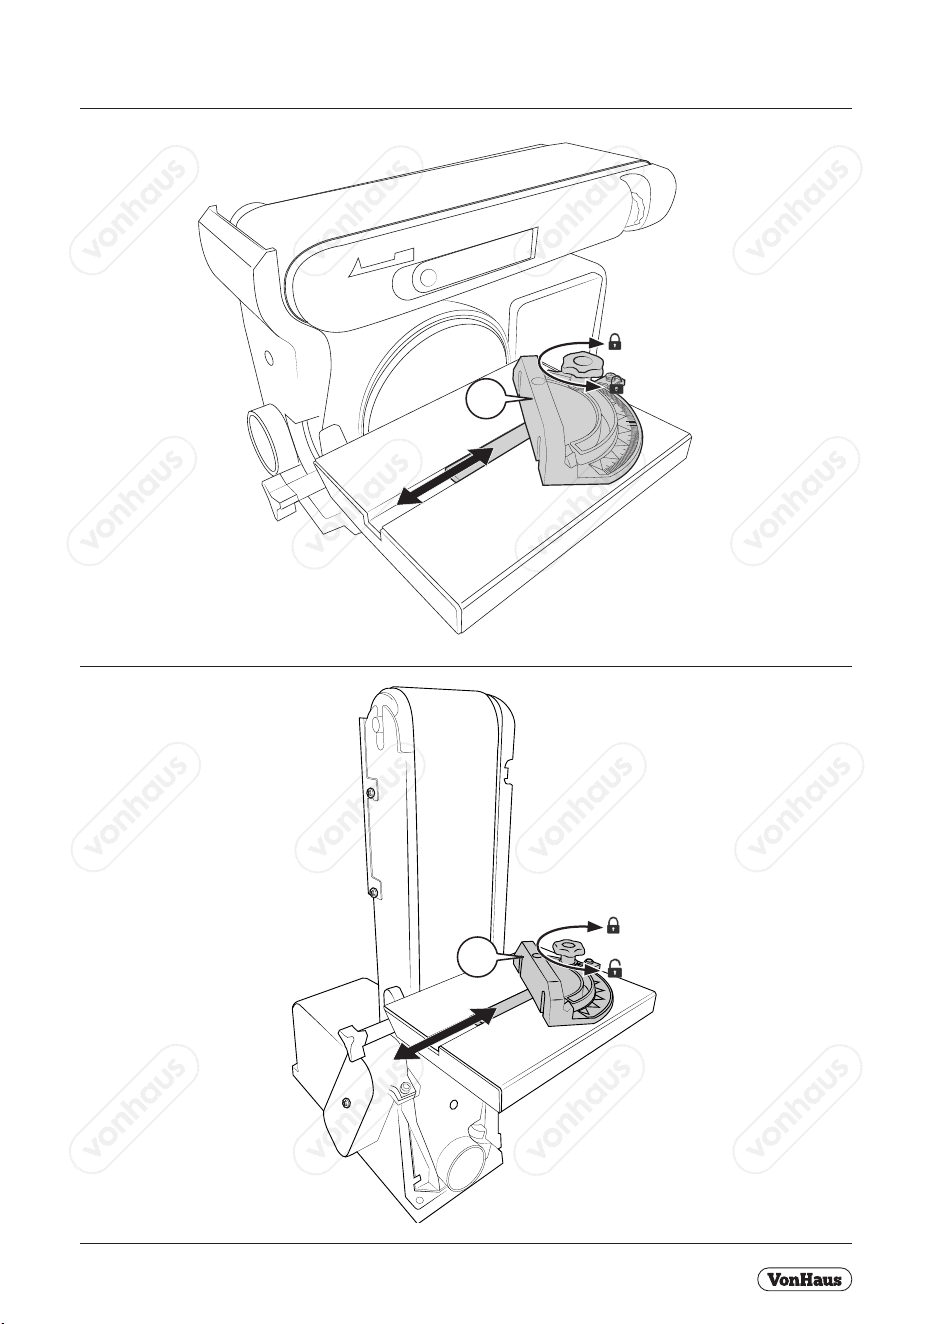
TABLE ADJUSTMENTS
A5P | 01
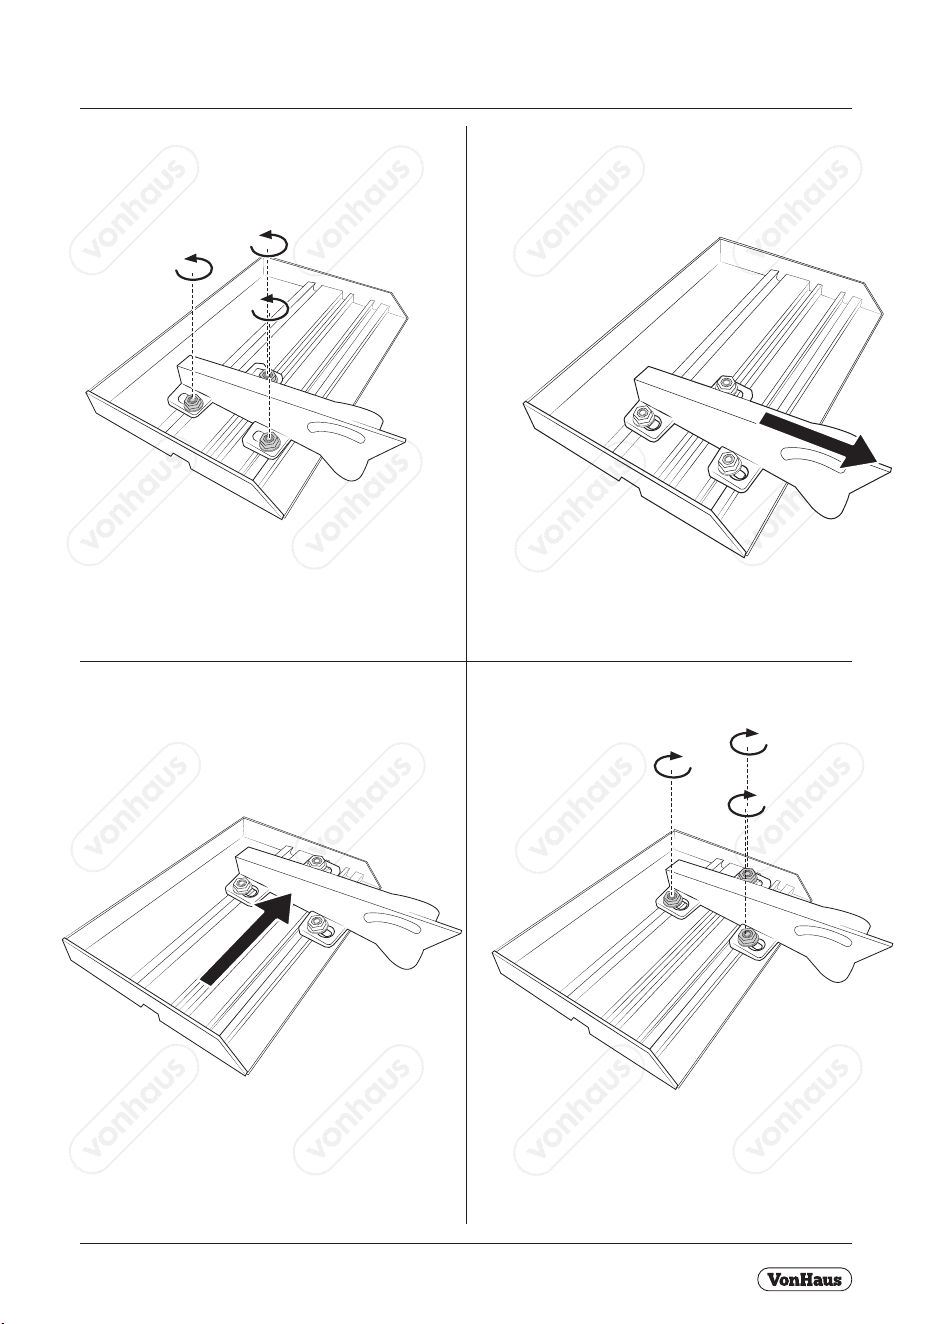
INSTALLING THE TABLE (DISC)
12
15
1.5mm Max
15
5
A5P | 01
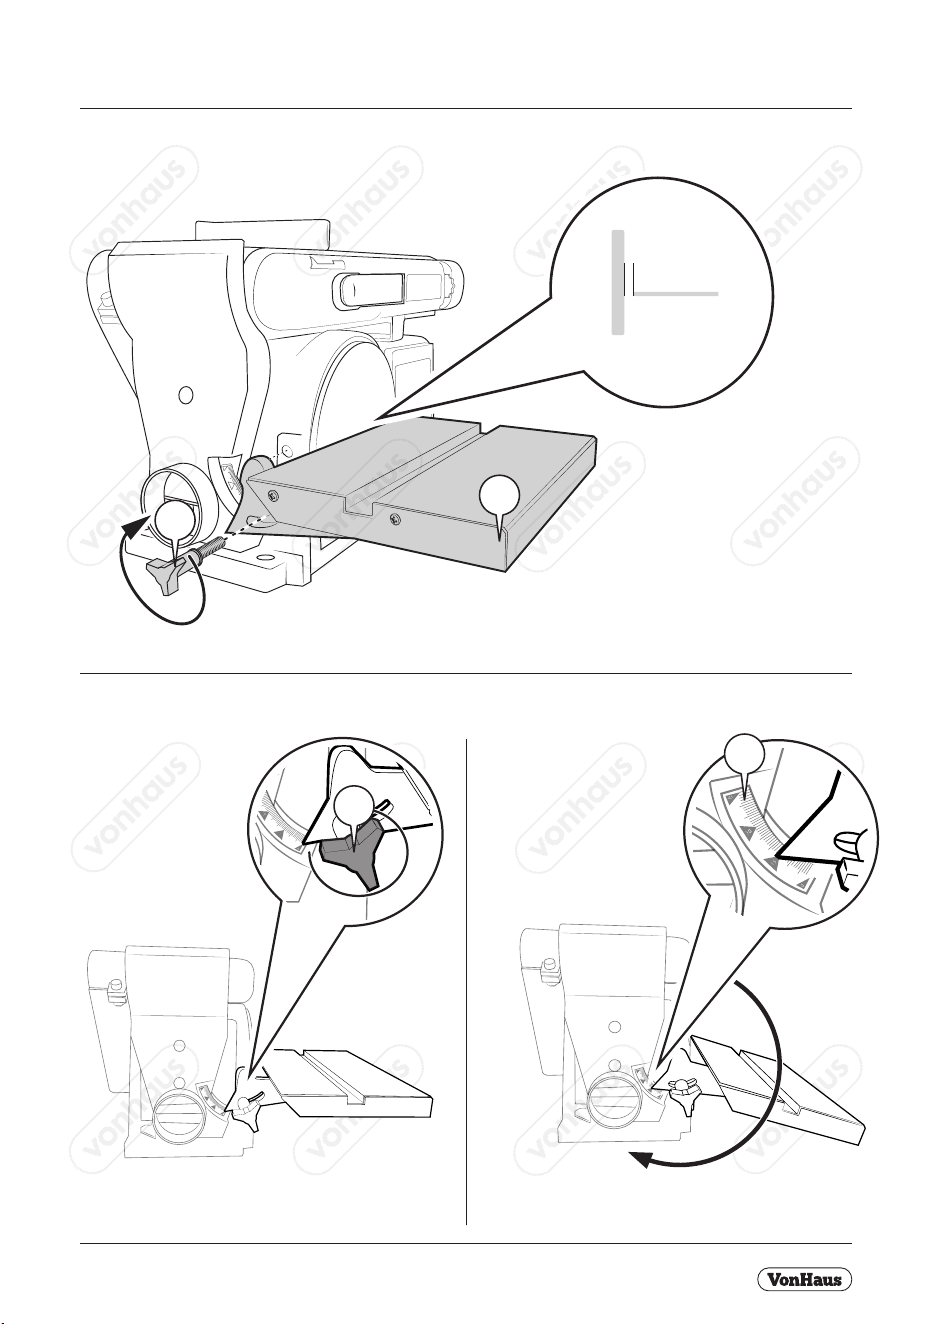
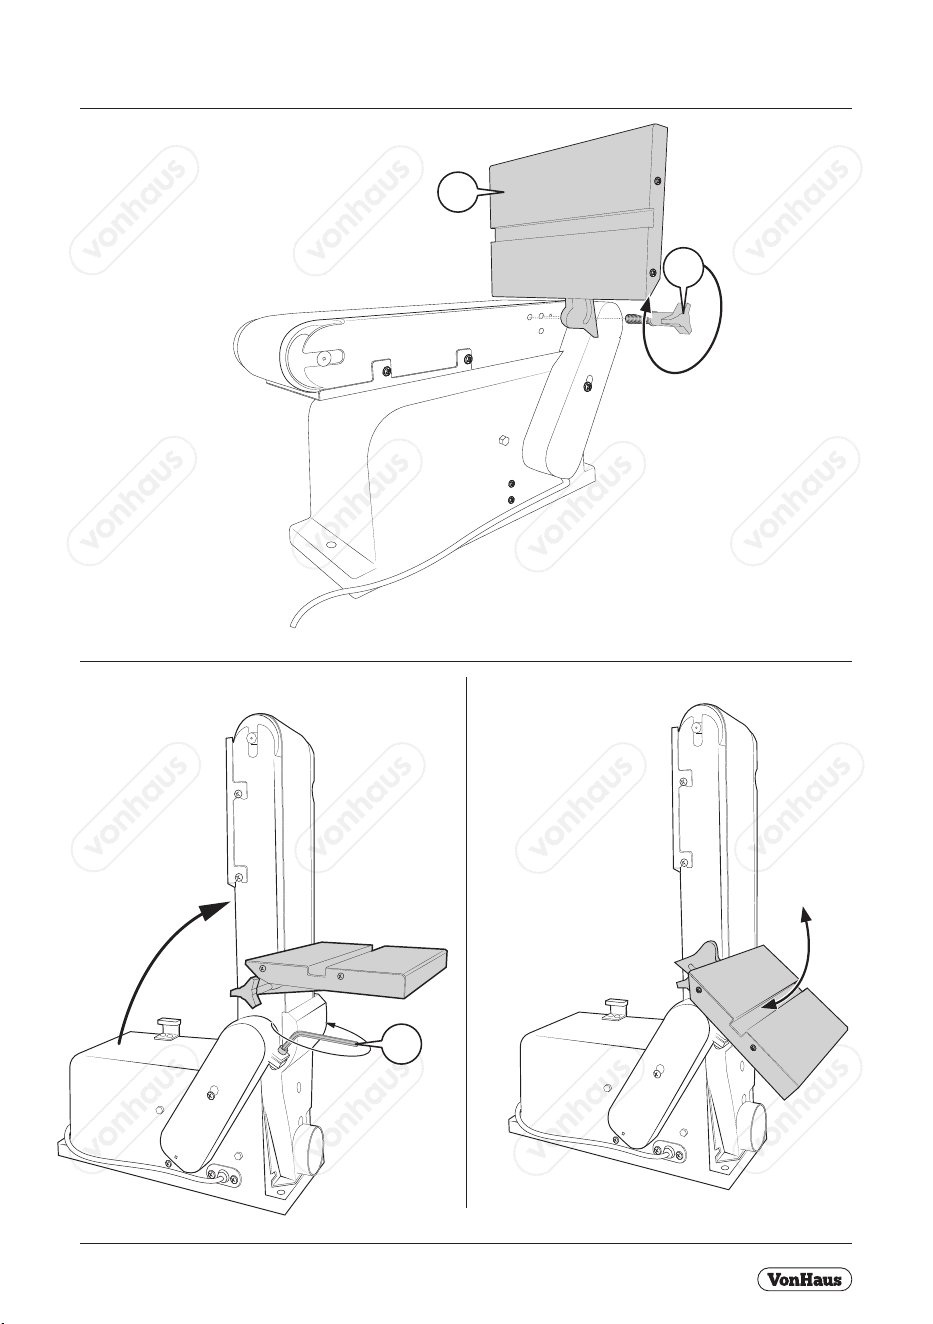
INSTALLING THE TABLE (BELT)
15
12
16
A5P | 01
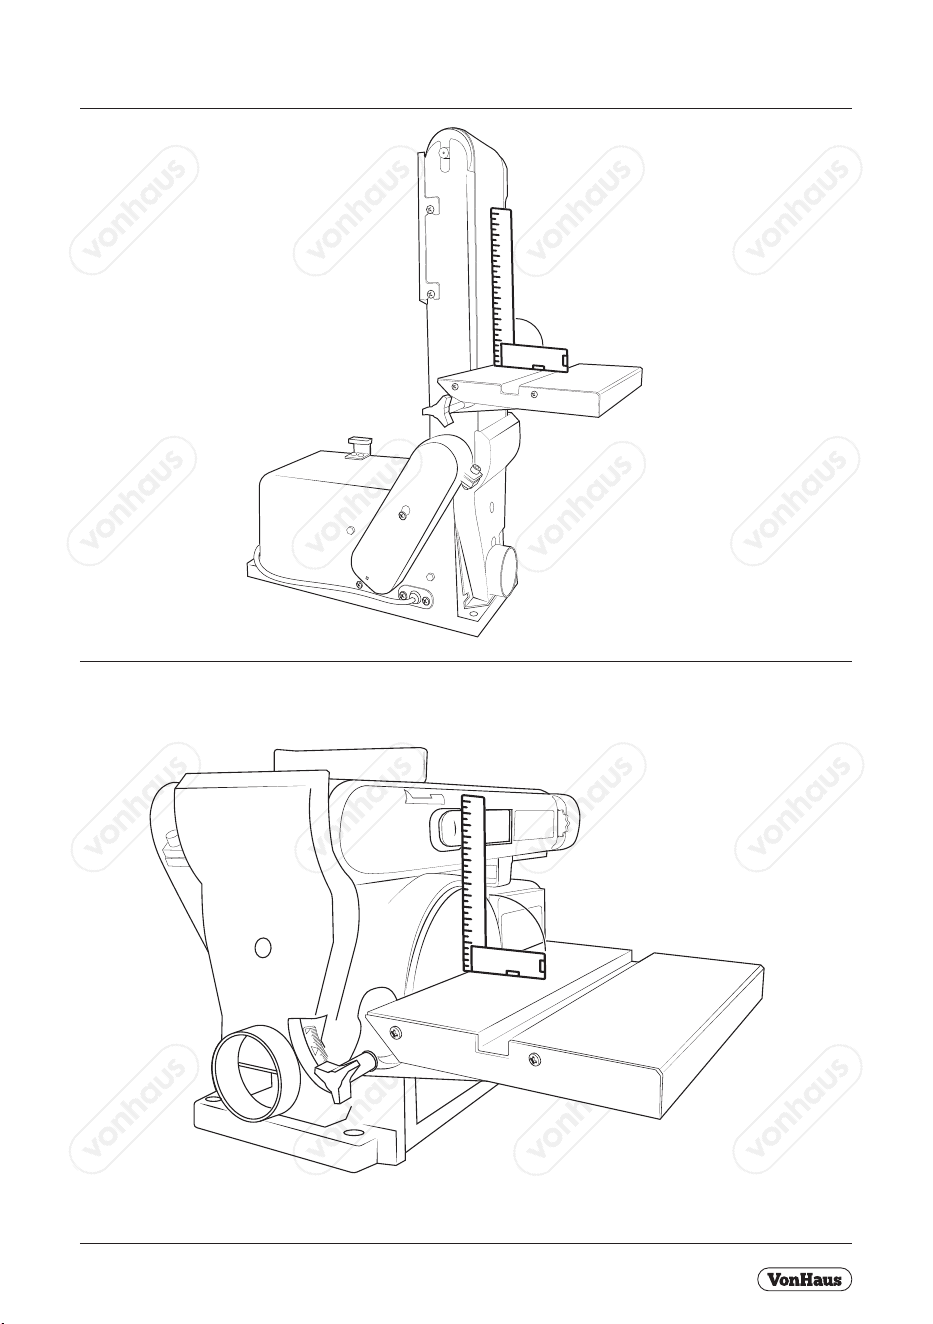
SET THE TABLE TO 90º
90º
90º
A5P | 01
MITRE GUIDE
13
13
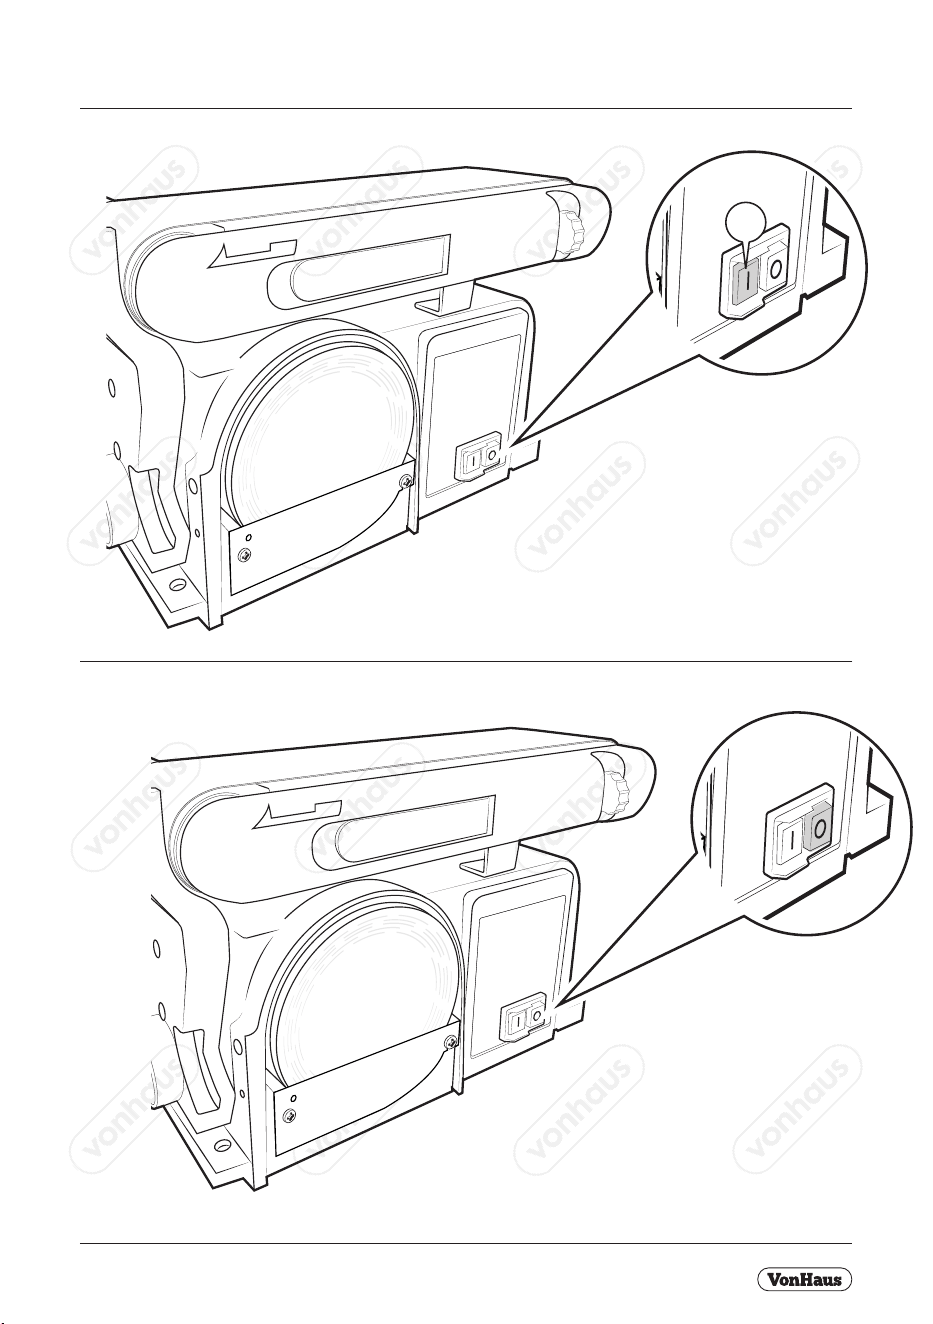
A5P | 01
OPERATION
7
A5P | 01
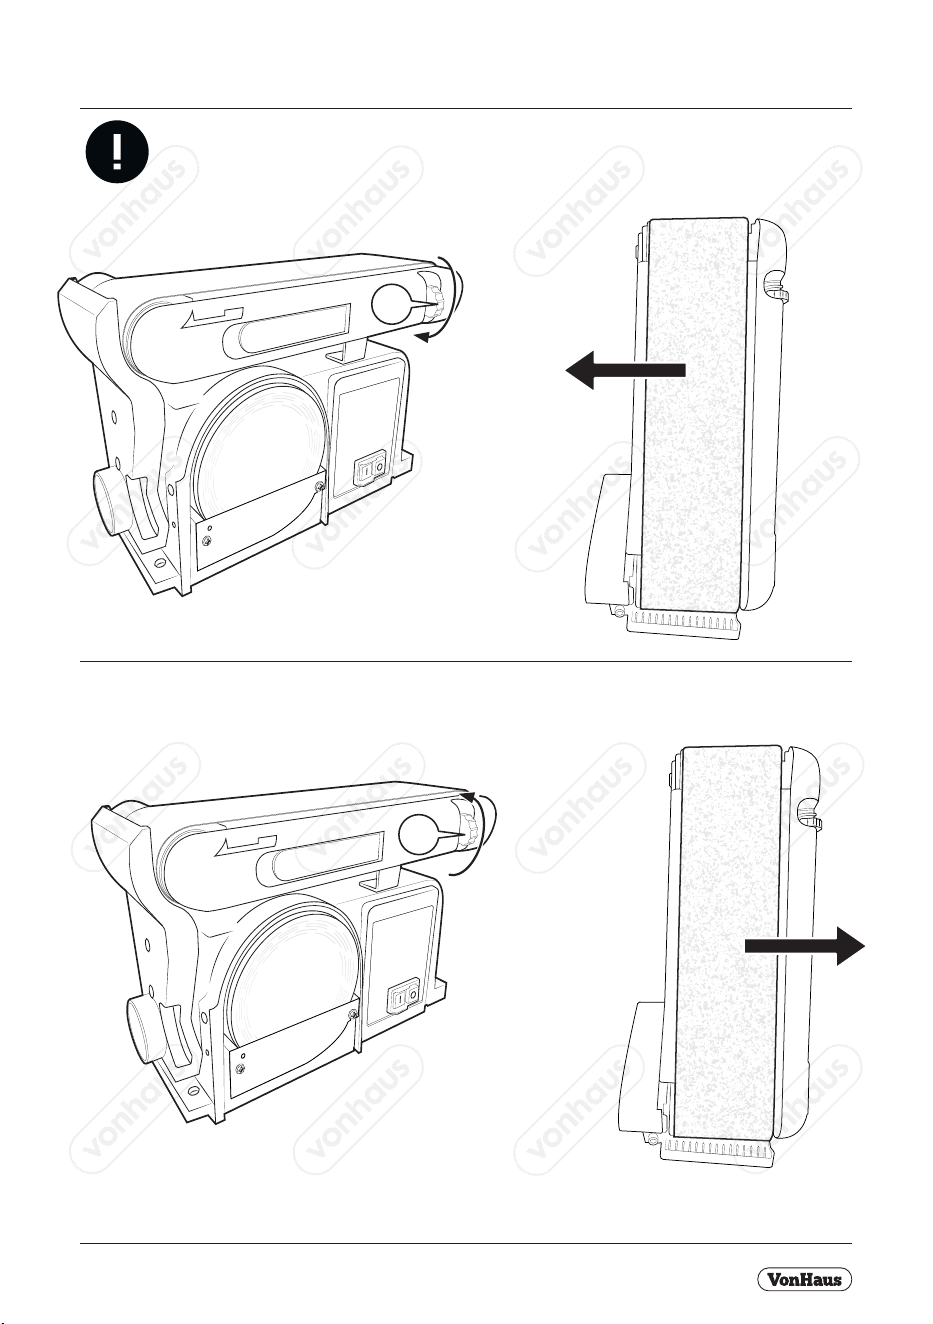
CHANGING THE SANDING BELT
(BELT SIZE 100MM X 915MM)
CAUTION Potential nger
trap/pinchment points
16
2
19
1
A5P | 01
CHANGING THE SANDING BELT
(BELT SIZE 100MM X 915MM)
CAUTION Potential nger
trap/pinchment points
16
2
19
A5P | 01
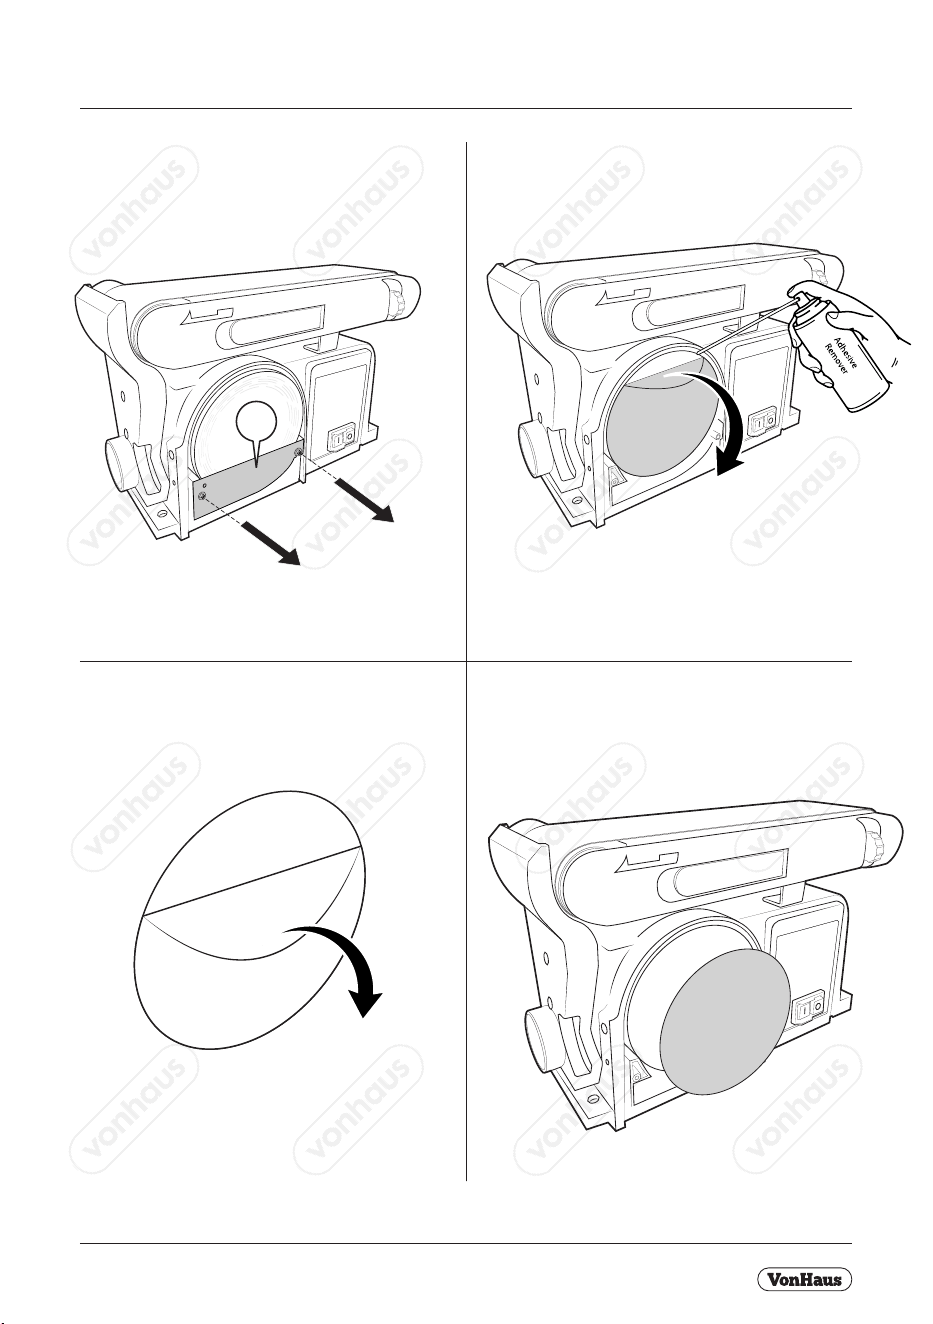
CHANGING THE SANDING DISC
(DISC 150MM)
Peel backing o the new sandpaper disc.
Remove the existing sanding disc with adhesive
remover and thorough clean the disc of excess residue.
14
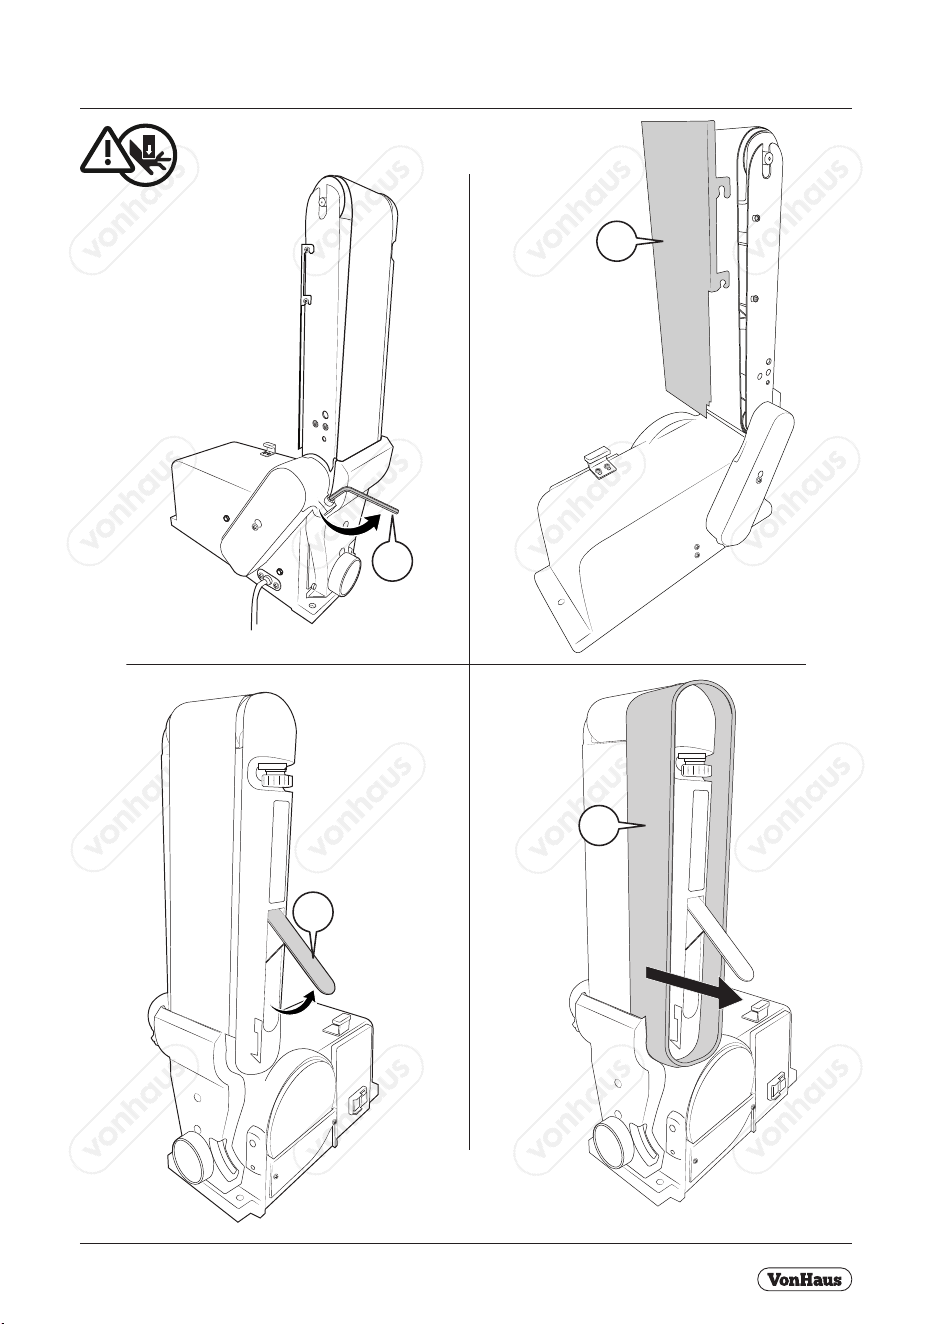
A5P | 01
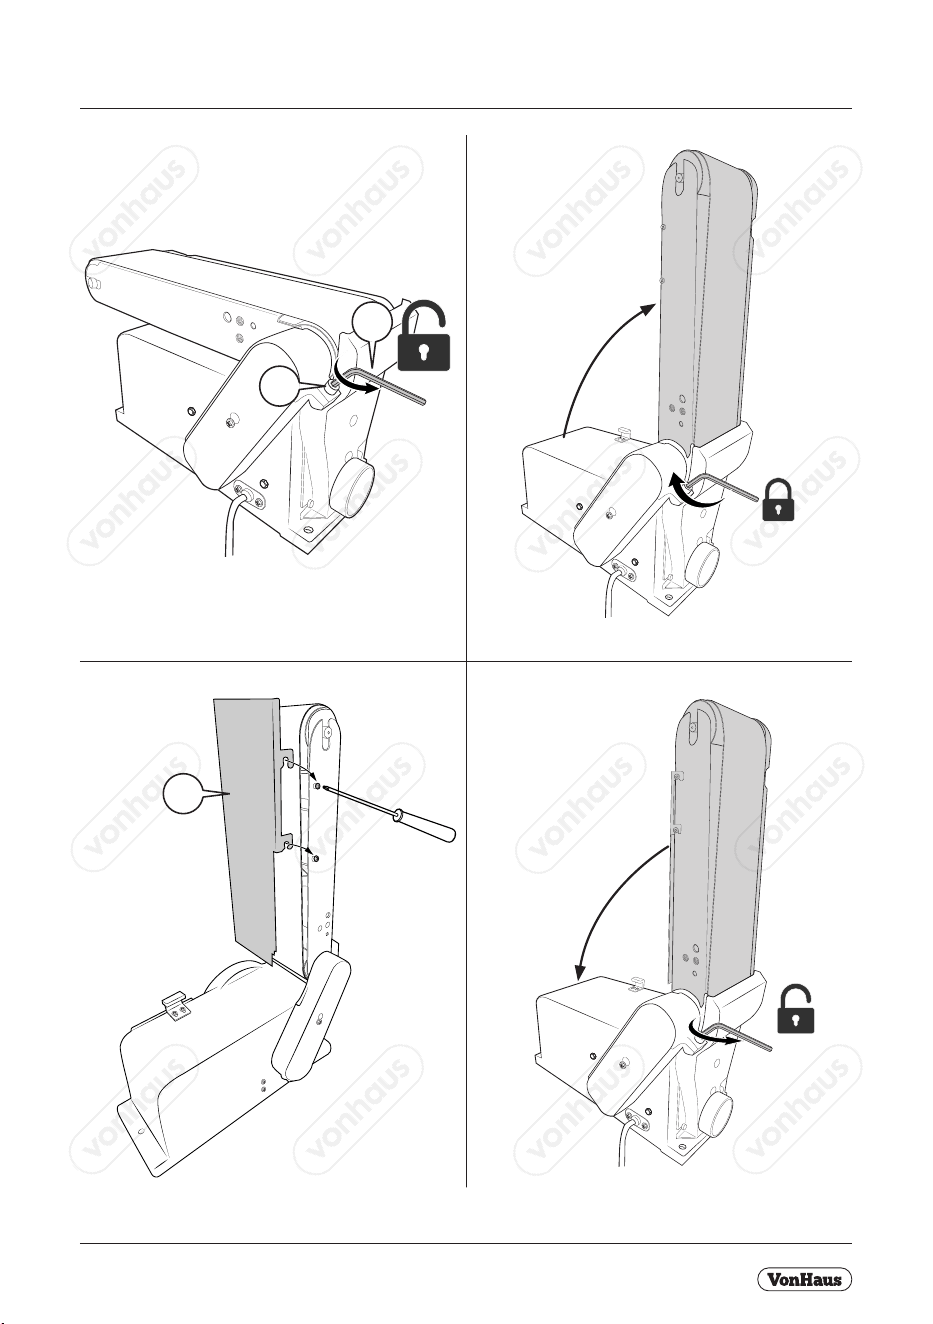
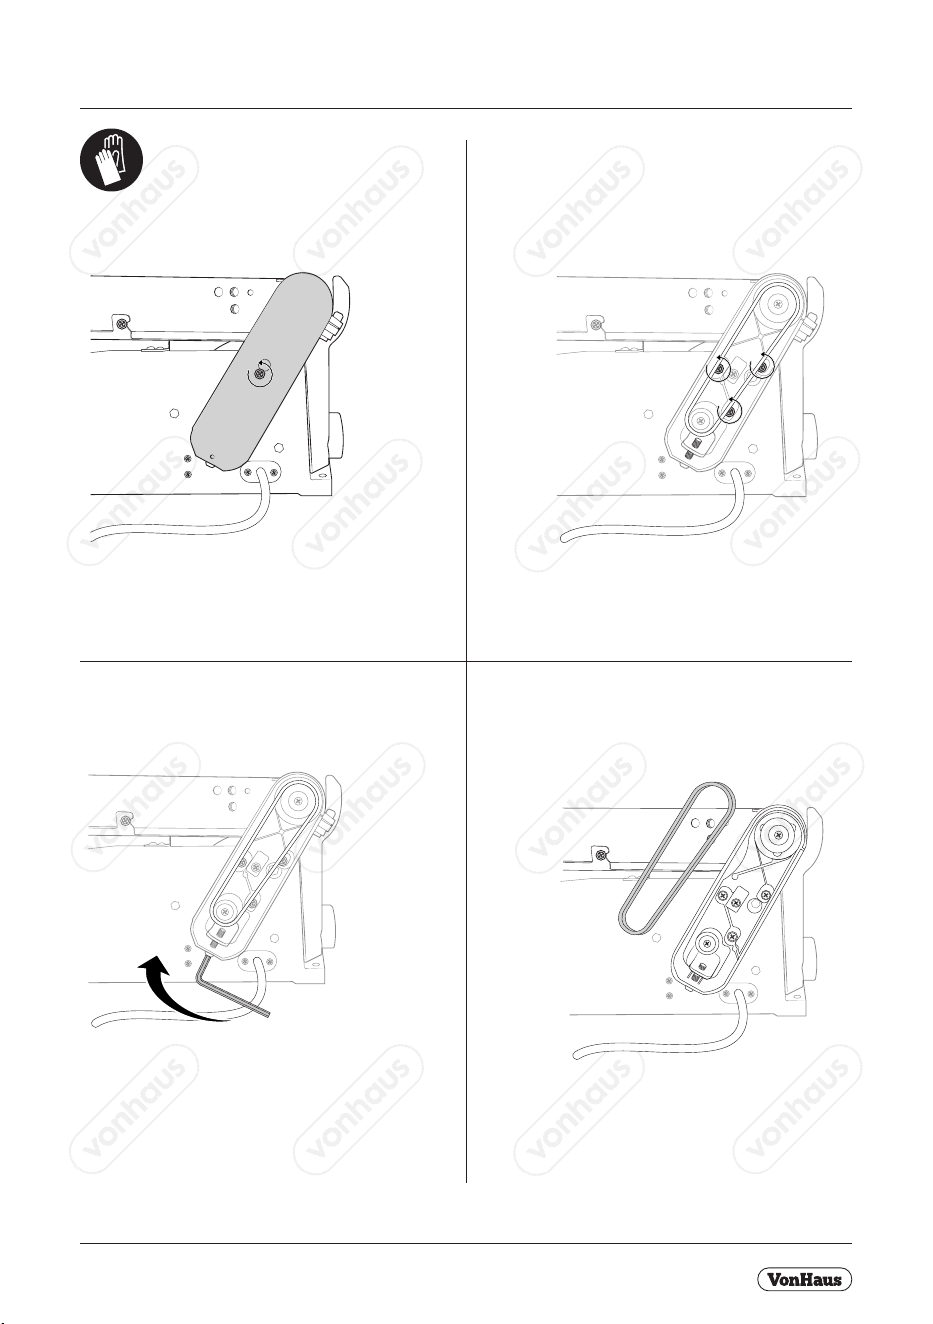
REPLACING THE DRIVE BELT
Remove and discard the damaged belt.
Unscrew and remove backing plate. Loosen the 3 indicated screws.
Loosen the Tension Bolt.
Belt Type: 4 Rib 155J Belt.
Replacement Drive Belt not supplied.
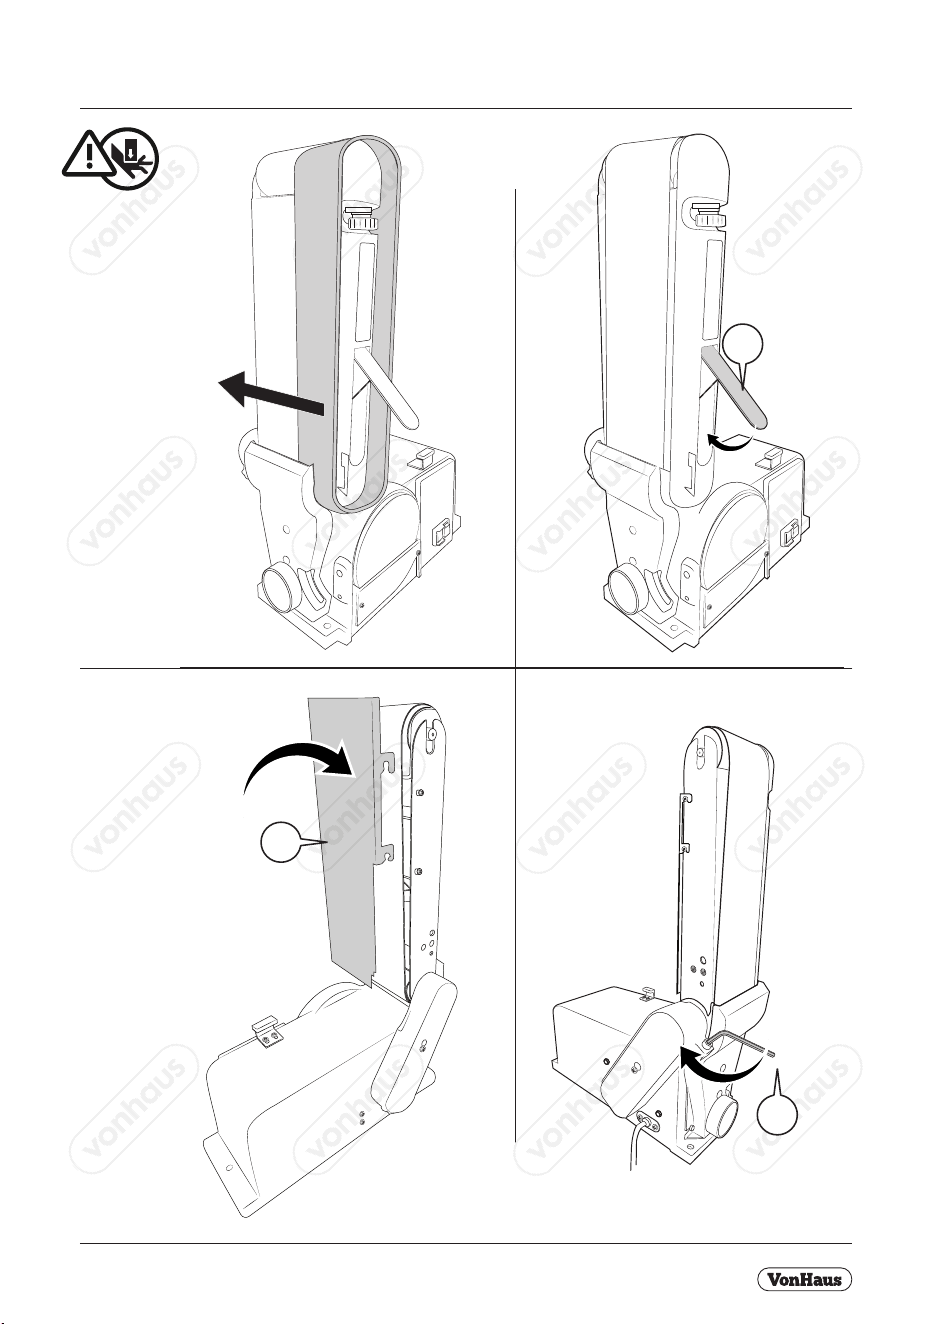
A5P | 01
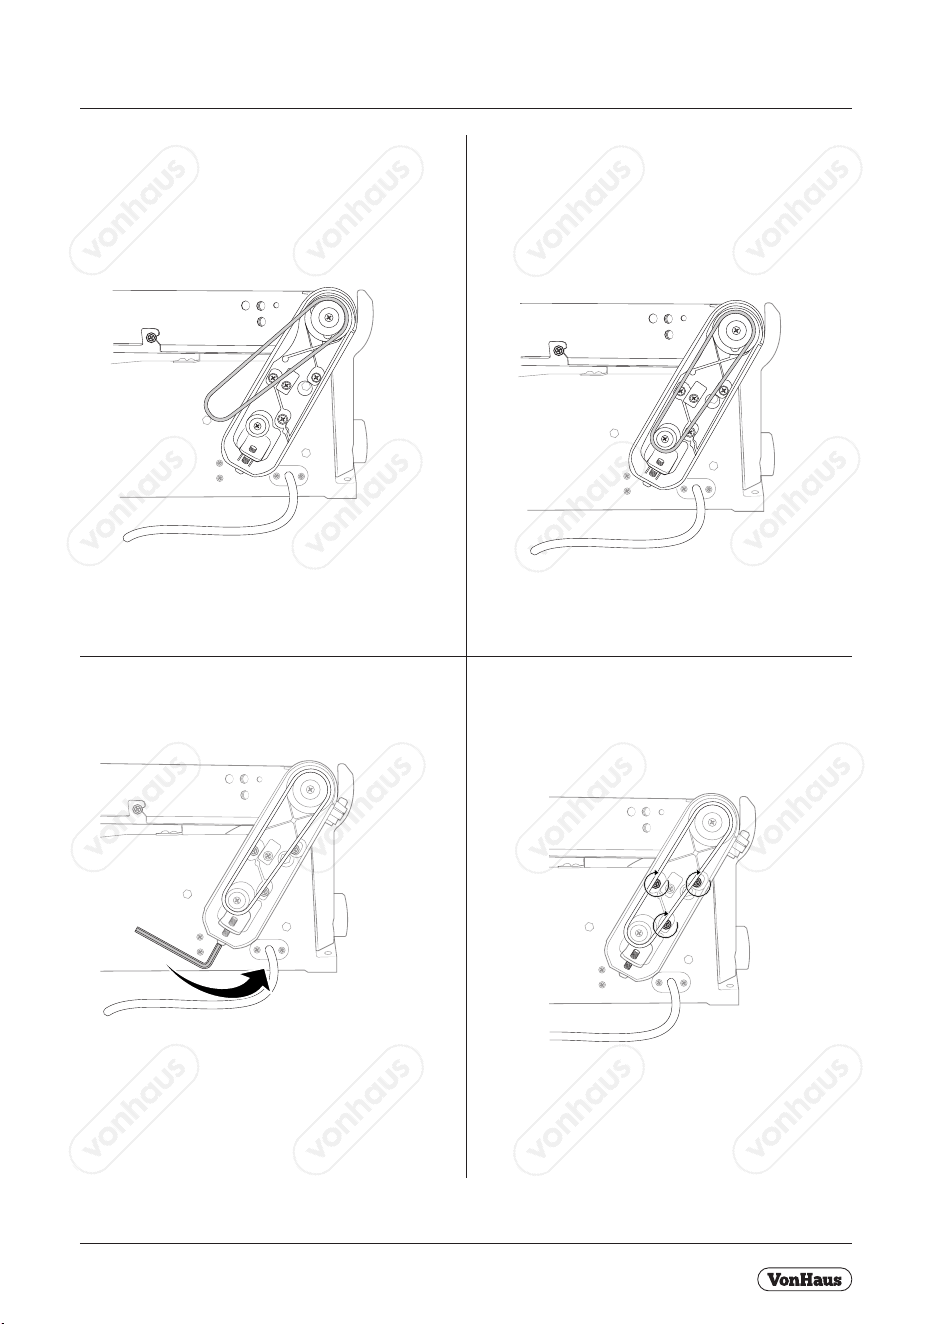
REPLACING THE DRIVE BELT
Place the new belt over top of the upper drum.
Re-tighten the 3 screws and install the backing plate.
Re-tighten the Tension Bolt
Place the new belt over top of the lower drum.

A5P | 01
PROBLEM CAUSE SOLUTION
Deep sanding grooves or scars in
the workpiece.
1. Sanding belt/disc grit is too coarse
for the desired nish.
1. Use a ner-grit sanding accessory.
2. Workpiece sanded across the
grain.
2. Sand with the grain of the wood.
3. Too much sanding force on the
workpiece.
3. Reduce pressure on workpiece
while sanding.
4. Workpiece held still against the
belt-disc for too long.
4. Keep workpiece moving while
sanding on the sanding accessory.
Sanding surface clogs quickly.
1. Too much pressure against belt/
disc.
1. Reduce pressure on workpiece
while sanding.
2. Sanding softwood. 2. Use dierent stock, dierent
sanding accessories, If you are
certain of using softwood this will
occur frequently. Plan on cleaning or
replacing belts/discs frequently.
Burns on workpiece.
1. Using a sanding grit that is too
ne.
1. Use a coarser-grit sanding
accessory.
2. Using too much pressure. 2. Reduce pressure on workpiece
while sanding.
3. Work held still for too long. 3. Do not keep workpiece in one
place for too long.
Motor will not start - Fuses
or circuit breakers tripping or
blowing.
1. Short circuit in line, cord or plug. 1. Inspect cord or plug for damaged
insulation and shorted wires.
2. Short circuit in motor or loose
connections.
2. Inspect all connections on motor
for loose or shorted terminals and/or
worn insulation.
3. Incorrect fuses or circuit breakers
in power line.
3. Install correct fuses or circuit
breakers or switch tool to an appro-
priately sized circuit.
Motor overheats.
1. Motor overloaded. 1. Reduce load on motor (pressure on
object being sanded).
2. Extension cord too long and of
insucient gauge
2. Utilize an extension cord of appro-
priate gauge and length or plug tool
directly into outlet.
Motor stalls (resulting in blown
fuses or tripped circuit)
1. Low voltage. 1. Correct low voltage conditions (for
example: improper extension cord
length and/or gauge).
2. Incorrect fuses or circuit breakers
in power line.
2. Install correct fuses or circuit
breakers or plug tool into an
appropriate circuit, matched to an
appropriate fuse or breaker.
3. Excessive sanding pressure over-
loads motor.
3. Reduce the load on the motor.

A5P | 01
Machine slows when operating.
1. Feed rate too great. 1. Reduce the rate at which the
workpiece is fed onto
belt or disc.
2. Undersized circuit or use of under-
sized extension
cord.
2. Ensure circuit wires or extension
cords are proper
gauge, or eliminate use of extension
cords.
Machine vibrates excessively.
1. Incorrect motor mounting. 1. Tighten/strengthen motor mount-
ings
2. Incorrect sanding-belt tension. 2. Adjust tension adjustment knob.
Follow
belt-tensioning/tracking instructions
in this manual.
3. Weak or broken tension spring. 3. Have tension spring replaced by
service technician.
4. Broken/defective sanding accesso-
ries.
4. Replace sanding belt/disc.
Workpiece frequently gets pulled
out or operators hand.
1. Not supporting the workpiece
against the stop.
1. Use the platen (backstop) or mitre
gauge to support
the workpiece.
2. Attempting to sand (unaided) a
workpiece that is too small.
2. Use another hand tool or jig to
grasp or hold the workpiece.
Workpiece lifts up from the
sanding disc/table.
1. Sanding on the “up” side of the
wheel.
1. Sand on left hand side of sanding
disc (as operator
faces the disc).
PROBLEM CAUSE SOLUTION

A5P | 01
EN
DISPOSAL INFORMATION Please recycle where
facilities exist. Check with your local authority for
recycling advice.
CUSTOMER SERVICE If you are having diculty using
this product and require support, please contact
[email protected] (US)
WARRANTY To register your product and nd out if you
qualify for a free extended warranty please go to
www.vonhaus.com/warranty. Please retain a proof of
purchase receipt or statement as proof of the purchase
date. The warranty only applies if the product is used
solely in the manner indicated in the warnings page of
this manual, and all other instructions have been followed
accurately. Any abuse of the product or the manner in
which it is used will invalidate the warranty. Returned
goods will not be accepted unless re-packaged in its
original packaging and accompanied by a relevant and
completed returns form. This does not aect your stat-
utory rights. No rights are given under this warranty to a
person acquiring the appliance second-hand or for com-
mercial or communal use.
COPYRIGHT All material in this instruction manual are
copyrighted by DOMU Brands.Any unauthorised use
may violate worldwide copyright, trademark, and other
laws.
C
THANK YOU
Thank you for purchasing your product/appliance.
Should you require further assistance with your pur-
chase, you can contact us at
[email protected] (UK/EU)
[email protected] (US)
VonHaus is a registered trademark of DOMU Brands
Ltd. Made in China for DOMU Brands. M24 2RW.