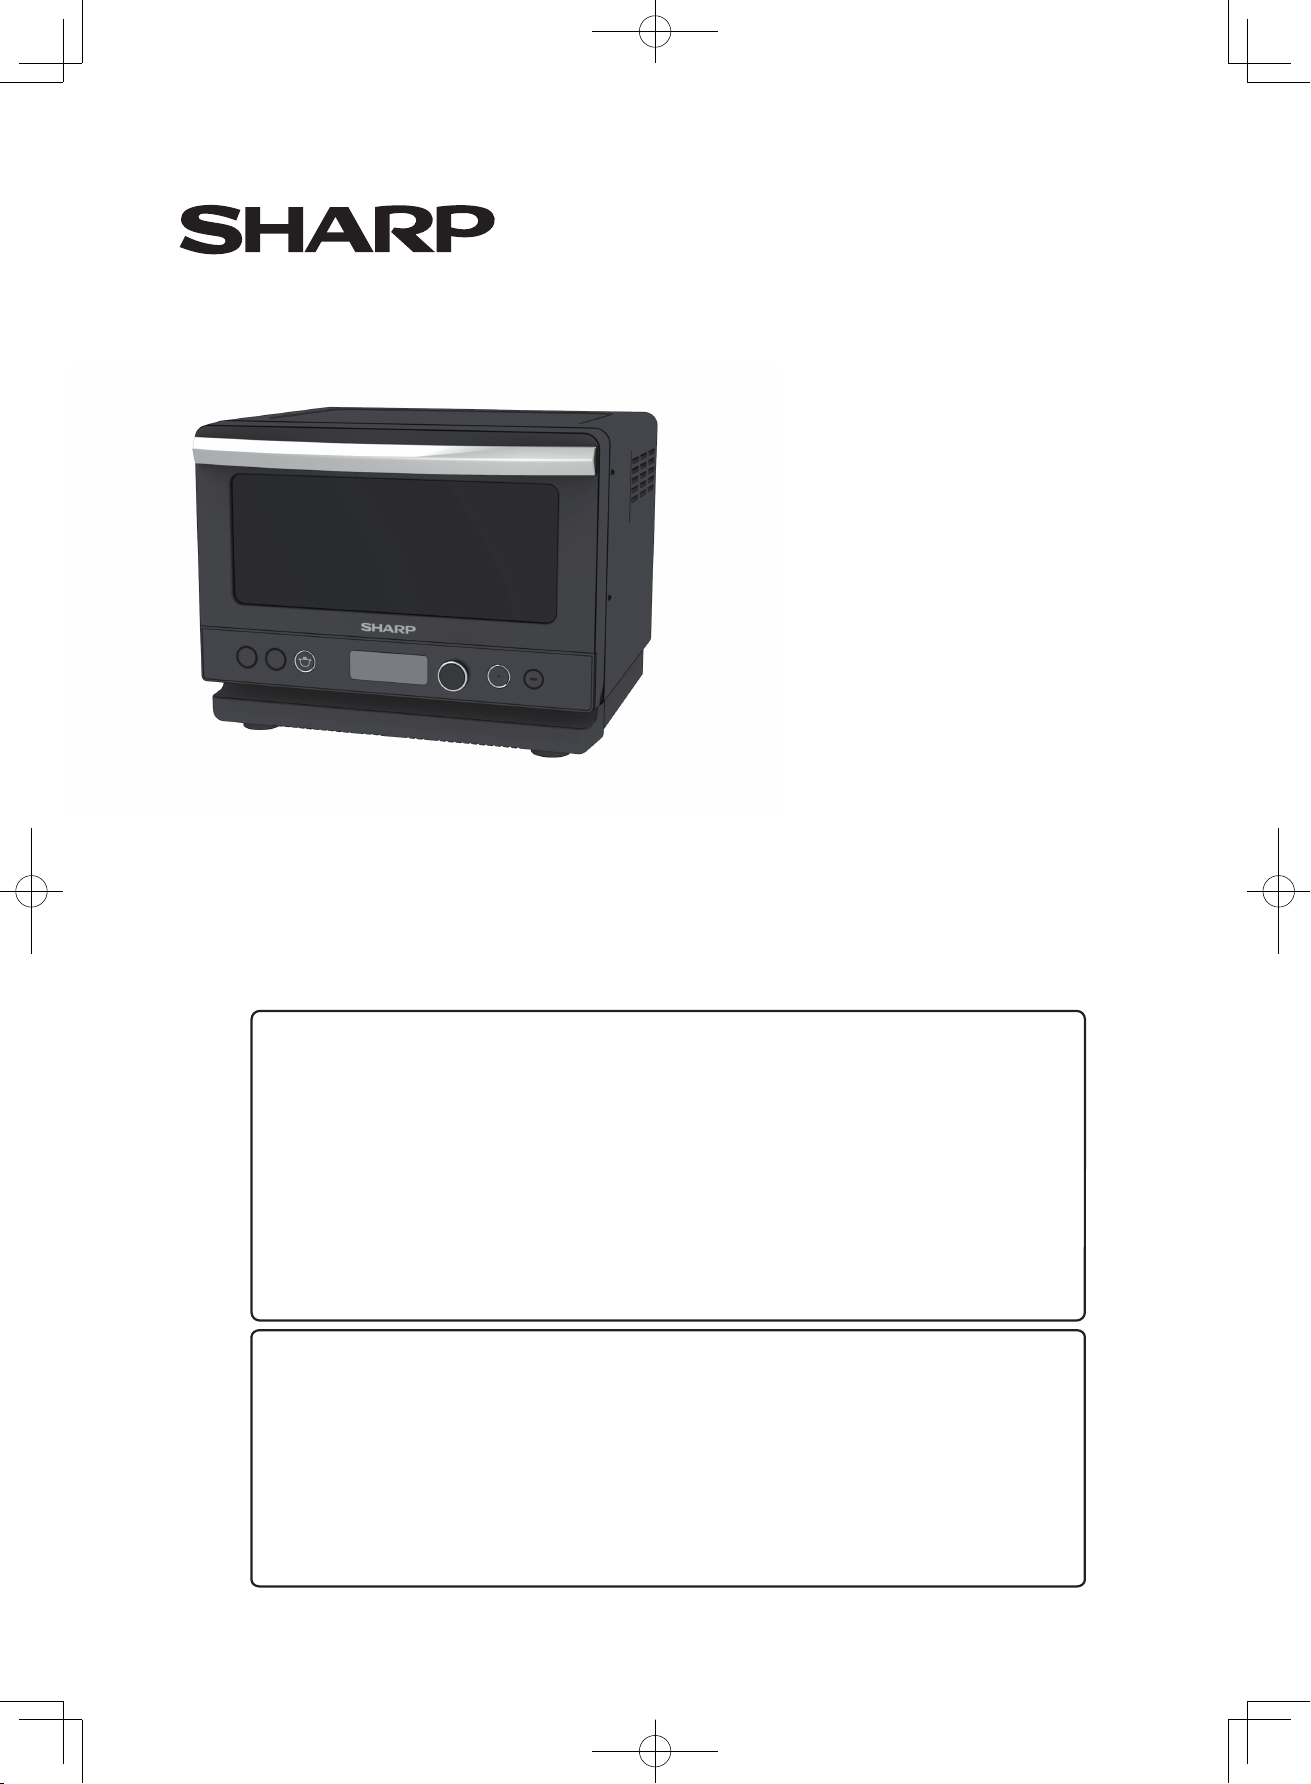
R-D219G
R-D219G(K)
Contents
Page
Important Safety Instructions......................................E-1
Installation Instructions ................................................. E-3
Oven Diagram..................................................................... E-4
Control Panel....................................................................... E-5
Before operating ............................................................... E-6
Automatic Cooking.......................................................... E-6
Manual Cooking................................................................E-10
Other Convenient Features.......................................E-11
Trouble Shooting..............................................................E-12
Care and Cleaning............................................................E-13
Service Call Check........................................................... E-13
Specifications..................................................................... E-13
Cooking Guides................................................................. E-14
微波炉
M
ICROWAVE OVEN
使用说明书
OPERATION MANUAL
内容
页码
重要安全说明..........................C-1
安装说明..............................C-3
微波炉构造............................C-4
控制面板..............................C-5
操作前须知 ...........................C-6
自动烹饪..............................C-6
手动烹饪.............................C-10
其他便利功能.........................C-11
常见问题与解答.......................C-12
保养与清洁...........................C-13
拨打服务电话前检查...................C-13
规格.................................C-13
烹饪指南.............................C-14

C-1
重要安全说明
重要安全说明:请仔细阅读并保留以备将来参考。
1.
此微波炉只适合台面上使用。它不适于嵌装在墙或橱柜上,也不适合置于橱柜内。关于安装方式,请参看
C-
3
页。
2.
确保微波炉上方留有至少
20
公分高的空间。
3.
此电器主要是供家庭和类似场地使用,如
:
•
商店、办公室和其他工作场所的员工厨房;
•
农舍;
•
酒店、汽车旅馆和其他住宅式场所;
•
提供住宿加早餐类型的场所
它不适合作商业和实验室用途。
此微波炉是为加热食物和饮料而设计。干燥食物或衣物、加热暖袋、治疗用袋(如小麦袋)、拖鞋、海绵、湿布
等类似物件,将可能带来受伤、着火或火灾的风险。
4.
5.
此电器不适合身体、感官或精神能力较弱,或缺乏经验和知识的人(包括孩童)使用,除非有能负责安全的人
在旁给予关于此电器使用的监督和指导。
6.
必须注意让孩童远离此电器。
7.
警告:要让孩童在没有监督的情况下使用微波炉,必须先确保孩童接收到足够的指示,以便他们懂得如何安全
使用和了解不当使用的后果。
8.
警告:如果炉门或门上封条损坏了,切勿使用微波炉,直至夏普培训的合格维修技师将损坏处确实修好为止。
9.
警告:切勿擅自调整、修理或改装微波炉。除夏普培训的合格维修技师之外的任何人,如果把防止微波能量外
射的保护外壳移除了来进行任何维修,将有可能带来危险。
10.
如果此电器的电源线损坏,切记须由夏普培训的合格维修技师来进行替换,以避免危险发生。
11.
警告:切勿把液体和其他食物放在密封的容器中加热,否则将可能发生爆炸。
12.
用微波加热饮料后停下的数秒种将有可能发生喷发式沸腾,因此在取出容器时必须小心。
13.
带壳的鸡蛋和水煮蛋不应用微波炉加热,因为鸡蛋有可能会爆开,即使是在微波已停止操作后。要弄熟或加热
未捣烂或混合的鸡蛋,先在蛋黄和蛋白上刺洞,以避免鸡蛋爆开。
14.
厨具使用前必须先确认它们适合用于微波炉。请参看
C-15
页。微波模式下只能使用微波炉适用的容器和厨具。
15.
切勿在微波模式下使用金属容器来盛装食物和饮料。用于电磁炉的砂锅也不能使用。
16.
奶瓶里的奶和罐装宝宝食品在食用前应先搅拌或摇晃并检查温度,以避免发生烫伤。
17.
用塑料或纸质容器加热食物时,视线不要离开微波炉,因为有可能会发生着火的状况。
18.
如果发现烟雾冒出,即刻关掉电源或拔下插头,不要打开炉门,以避免激起火焰。
19.
应该定时清理微波炉,将食物残留清除。
20.
清洁和维护不应该由无人监督的孩童进行。
21.
未能保持微波炉清洁将有可能造成炉表面变质,继而影响电器的使用寿命,也可能造成危险发生。
22.
切勿使用摩擦力强的清洁刷或尖锐的金属刮具来清理炉门玻璃,因为表面一旦被刮花,将有可能发生玻璃碎裂。
23.
切勿使用蒸汽清洁设备。
24.
关于炉门封条、空间和相邻部件的清理,请参看
C- 13
页。

C-2
重要安全说明
其他警告
1.
为降低微波炉内部着火的风险,要注意:
a.
切勿过度加热食物
b.
把装有食物的纸袋或塑料袋放入微波炉前先取下绑在上面的扎线带。
c.
切勿加热油或脂肪来油炸食物,因为您无法控制油温。
d.
不要用微波炉来储存食物或其他物品。
2.
为降低爆炸或喷发式沸腾带来的危险,取出容器时应格外小心。微波炉能够非常快速地加热食物和饮料,因此根据
食物种类和数量选择合适的烹饪时长和功率非常重要。如果无法确定所需的烹饪时长和功率,可先用较长的时间和
较低的功率为开始,直至把食物煮至完全均匀熟透。
此外还需注意:
a.
切勿使用密封的容器。拴上盖子或奶嘴的奶瓶也算是密封容器。
b.
不要增加不必要的烹饪时间。
c.
煮沸液体时,使用阔口的容器。
d.
液体煮沸后静置至少
20
秒才取出,以避免发生喷发式沸腾。
e.
液体在加热前和过程中需要搅拌。触碰容器或放入汤匙或其他厨具以搅拌时要极度小心。
3.
此微波炉仅供家庭准备食物之用,并应只用于食物和饮料的加热、烹饪和解冻。
它不适合作商业和实验室用途,也不适合用于加热治疗用袋,如小麦袋。
4.
如果有任何物件卡在微波炉身和炉门之间,切勿操作微波炉。
5.
从微波炉里取出食物时要注意避免让厨具、衣服或饰品勾到门闩。
6.
微波炉操作时,切勿用硬物,尤其是金属硬物捅进格网或微波炉与炉门之间的缝隙。
7.
切勿破坏门闩。
8.
拿取装有热食的厨具时务必使用厚的隔热手套,以避免烫伤。食物的热将能通过容器传导至皮肤而造成灼伤。
9.
如果微波炉的灯失灵,请咨询代理商或夏普培训的合格维修技师。
10.
避免让蒸汽碰到脸部和手部,以免烫伤。从离您最远的盖子边缘处开始把盖子掀开,塑料包装袋等也是如此。打
开爆米花袋和烹饪袋时要注意远离脸部。
11.
确定电源线没有损坏,没有被压到微波炉底下,或碰到任何热的表面或尖角。
12.
不要在放置微波炉的橱柜外围放置任何物件,因为它在操作时将会变得很热。
13.
为避免烫伤,食用前切记先试一下食物和容器的温度,并加以搅拌。尤其在让宝宝、孩童和年长者食用前,更要
特别注意食物和饮料的温度。喝饮料或汤前,先检查容器的温度。由于容器会变得很热,拿取时要格外小心。
14.
操作时要确保厨具没有触碰到微波炉的内壁。
15.
切勿直接触碰微波炉灯的周围部分。当灯开启时,此部分的温度会变得很高。
16.
当微波炉在操作时,让房间保持通风,如打开窗户或开启厨房抽风机。从微波炉通风口冒出的蒸汽可能会把
邻近的墙面或家具弄湿。
17.
切勿把手指或物件插入孔洞里(蒸汽排出孔或通风口),以免造成微波炉损坏、触电或危险。
18.
切勿在手湿的情况下触碰插头。确保插头已完全插入电源插座中。拔下插头时,抓住插头,不要拉电源线,以免造
成电源线和插头里的管线损坏。
19.
如果微波炉倒下或掉到地上,立刻停止使用。拔下插头,联系夏普的合格维修技师。
20.
切勿在打开的炉门上放置任何物件,以避免微波炉倒下或造成炉门和折叶损坏。不要紧拉把手,也不要挂重物在上
面。
21.
除了夏普的日式砂锅,不要使用其他任何砂锅。

C-3
安装说明
1.
取下微波炉内部所有包装材料,以及炉门外侧上的贴纸(如果有)。
检查微波炉是否有任何损坏,如门不对称、门封条损坏、炉内部或门上有凹痕。如果有任何损坏,请勿操作微波炉,直至微波炉
由夏普认可的服务中心进行检查和维修(如有需要)后为止。
2.
附带的配件包括
1)
Donabe (
日式砂锅
) 2)
使用说明书
3.
此微波炉只适合在台面上使用。它不应放置在会有大量热气和蒸汽产生的地方,例如,烤箱旁边。切勿将它放置在
易燃物品附近,如窗帘。注意不可挡住微波炉的通风口,放置时上方和右方需分别保留至少
20
公分和
10
公分的空
间。即使通风的空间足够,微波炉也不应放置在五面都被包围住的地方。它的设计也不适合嵌装在墙或橱柜上。
4.
不要使用电插座适配器,将其他电器连接到同一个电源插座上。
5.
制造商和分销商均不对任何因不正确电源衔接程序而导致的电器损坏或人身伤害承担责任。所使用的交流电压
和频率必须与标签上所列的对应。
6.
此电器必须接地。微波炉插头必须与标准接地家用电源插座安全衔接。
C-4
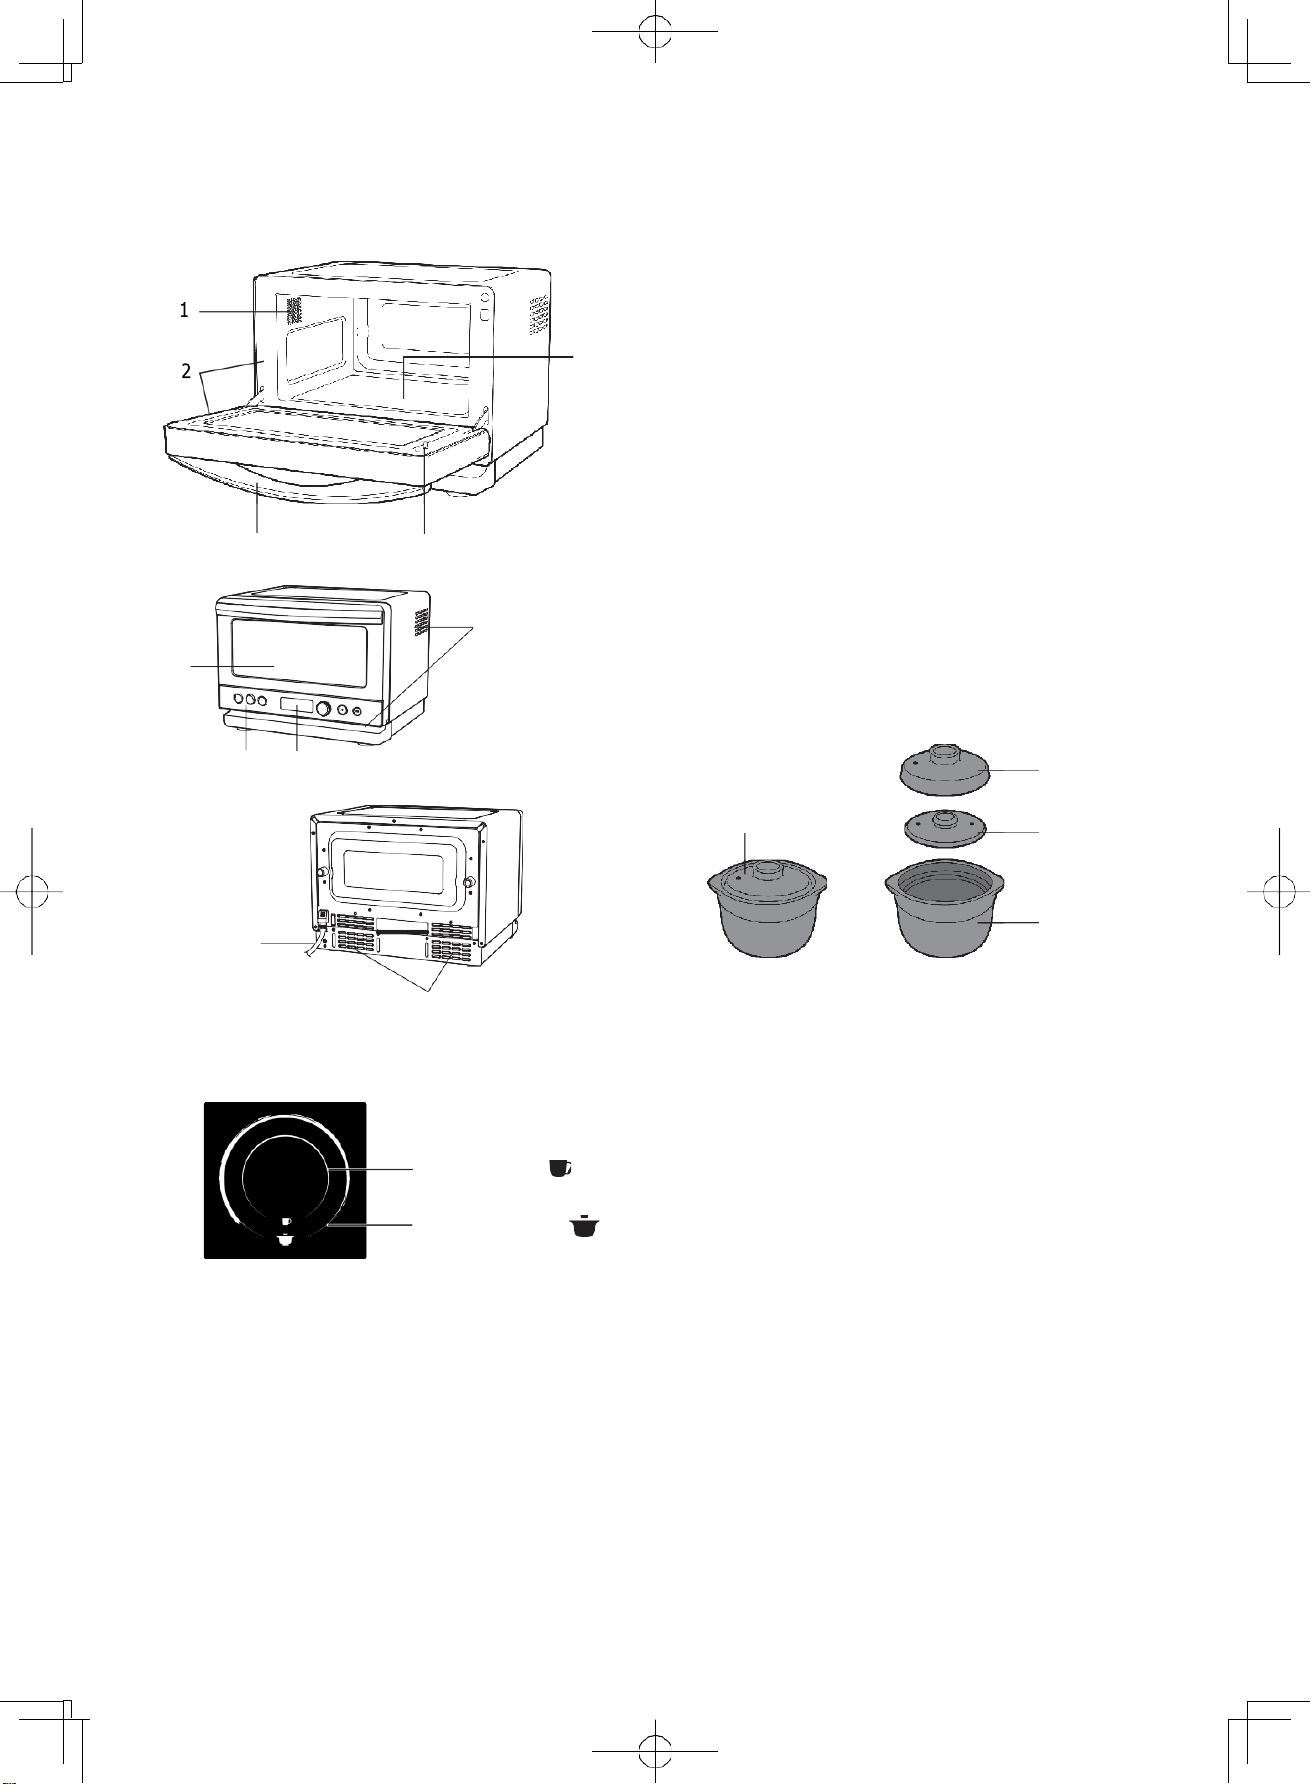
微波炉构造
5
1
灯
2
门封条和密封面
3
门把
4
门闩
5
炉内底部
6
排气口
7
液晶显示屏
8
控制面板
9
玻璃门
10
电源线
11
通风口
3
4
配件
12
12-1
6
12-2
9
12-3
Donabe (
日式砂锅
)
外锅盖
内锅盖
锅体
*
详情请参看
C-7
页。
8
7
10
炉内底部
11
12-1
12
12-2
12-3
可根据两道标准线来放置厨具。厨具应置于圆形标准线的中心位置。
)
杯和小碗适用
(
砂
锅和大碗适用
(
)
日式砂锅的烹饪选项编号
转动旋钮,选择以下所要的选项。选项编号将出现在显示屏上。
砂
锅
(
饭
)
砂锅
(
菜
)
1-1,
白饭(泰国米)
1-2
2-1,
白饭(日本米)
2-2
03
快速煮饭(泰国米)
04
五谷米
05
糙米饭
06
粥
07
砂锅饭
21
煮蔬菜
(
软
)
22
煮南瓜、马铃薯
23
煮蔬菜
(
硬
)
24
炖菜
25
快熟面
26
意大利面
C-5
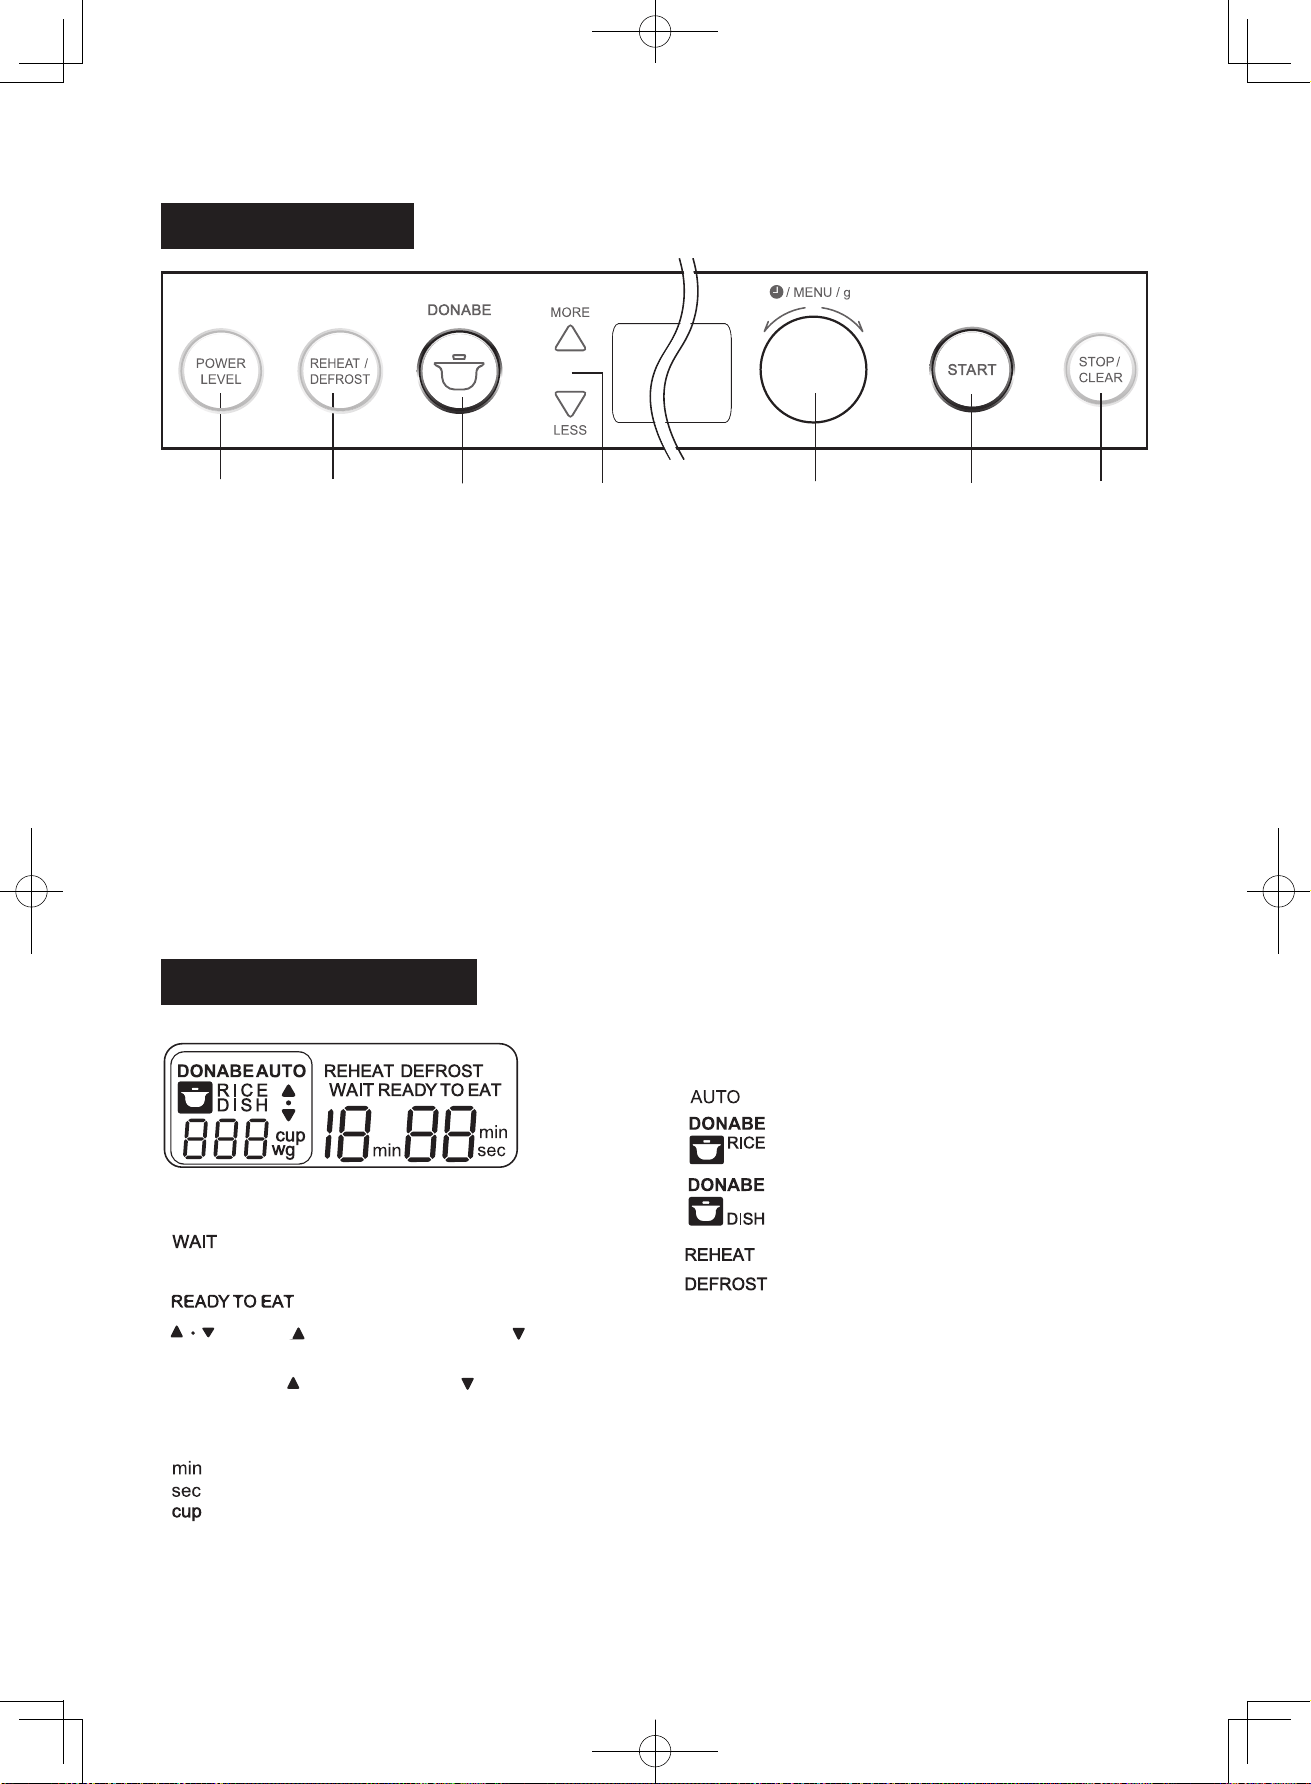
控制面板
操作键
1 2 3 4 5 6 7
1. POWER LEVEL
键
按键以选择微波功率等级。
2. REHEAT/DEFROST
键
按键以选择“加热”和“解冻”菜单。
3.
DONABE
键
按键以选择“砂锅烹饪”菜单
.
4.
MORE/LESS
键
按键以调整自动操作程式的成果
:
“自动
(
加
热
)
”和“解冻”。
按键以调整“砂锅菜”第
21
选项的食物分量
。
5.
转动
转动以选择所要选项。
转动以选择所要数量。
转动以输入烹饪时长。
6. START
键
按键以自动加热食物。参看
C-6
页。
选好设定后按此键以启动微波炉。
按键以确定您的选择。
7.
STOP / CLEAR
键
设定程式时按此键以进行清除。烹
饪时按此键一次以停止操作;按两
次以取消烹饪程序。
显示讯息
显示屏上显示各种需知讯息,包括烹饪的时长和程式。
微波状态显示:
:
砂锅饭即将开始蒸煮。
:
砂锅饭煮好了
: MORE(
) / STANDARD( • ) / LESS(
)
自动烹饪的状态。
300g ( ) / 200g ( • ) / 100g ( )
“砂锅菜”第
21
选项的状态。
时间
/
数量的状态显示:
:
分钟
:
秒
:
杯
烹饪程式的状态显示:
:
自动(加热)正在进行中。
:
选定“砂锅饭”。
:
选定“砂锅菜”。
:
选定“加热”程式。
:
选定“解冻”程式。
C-6
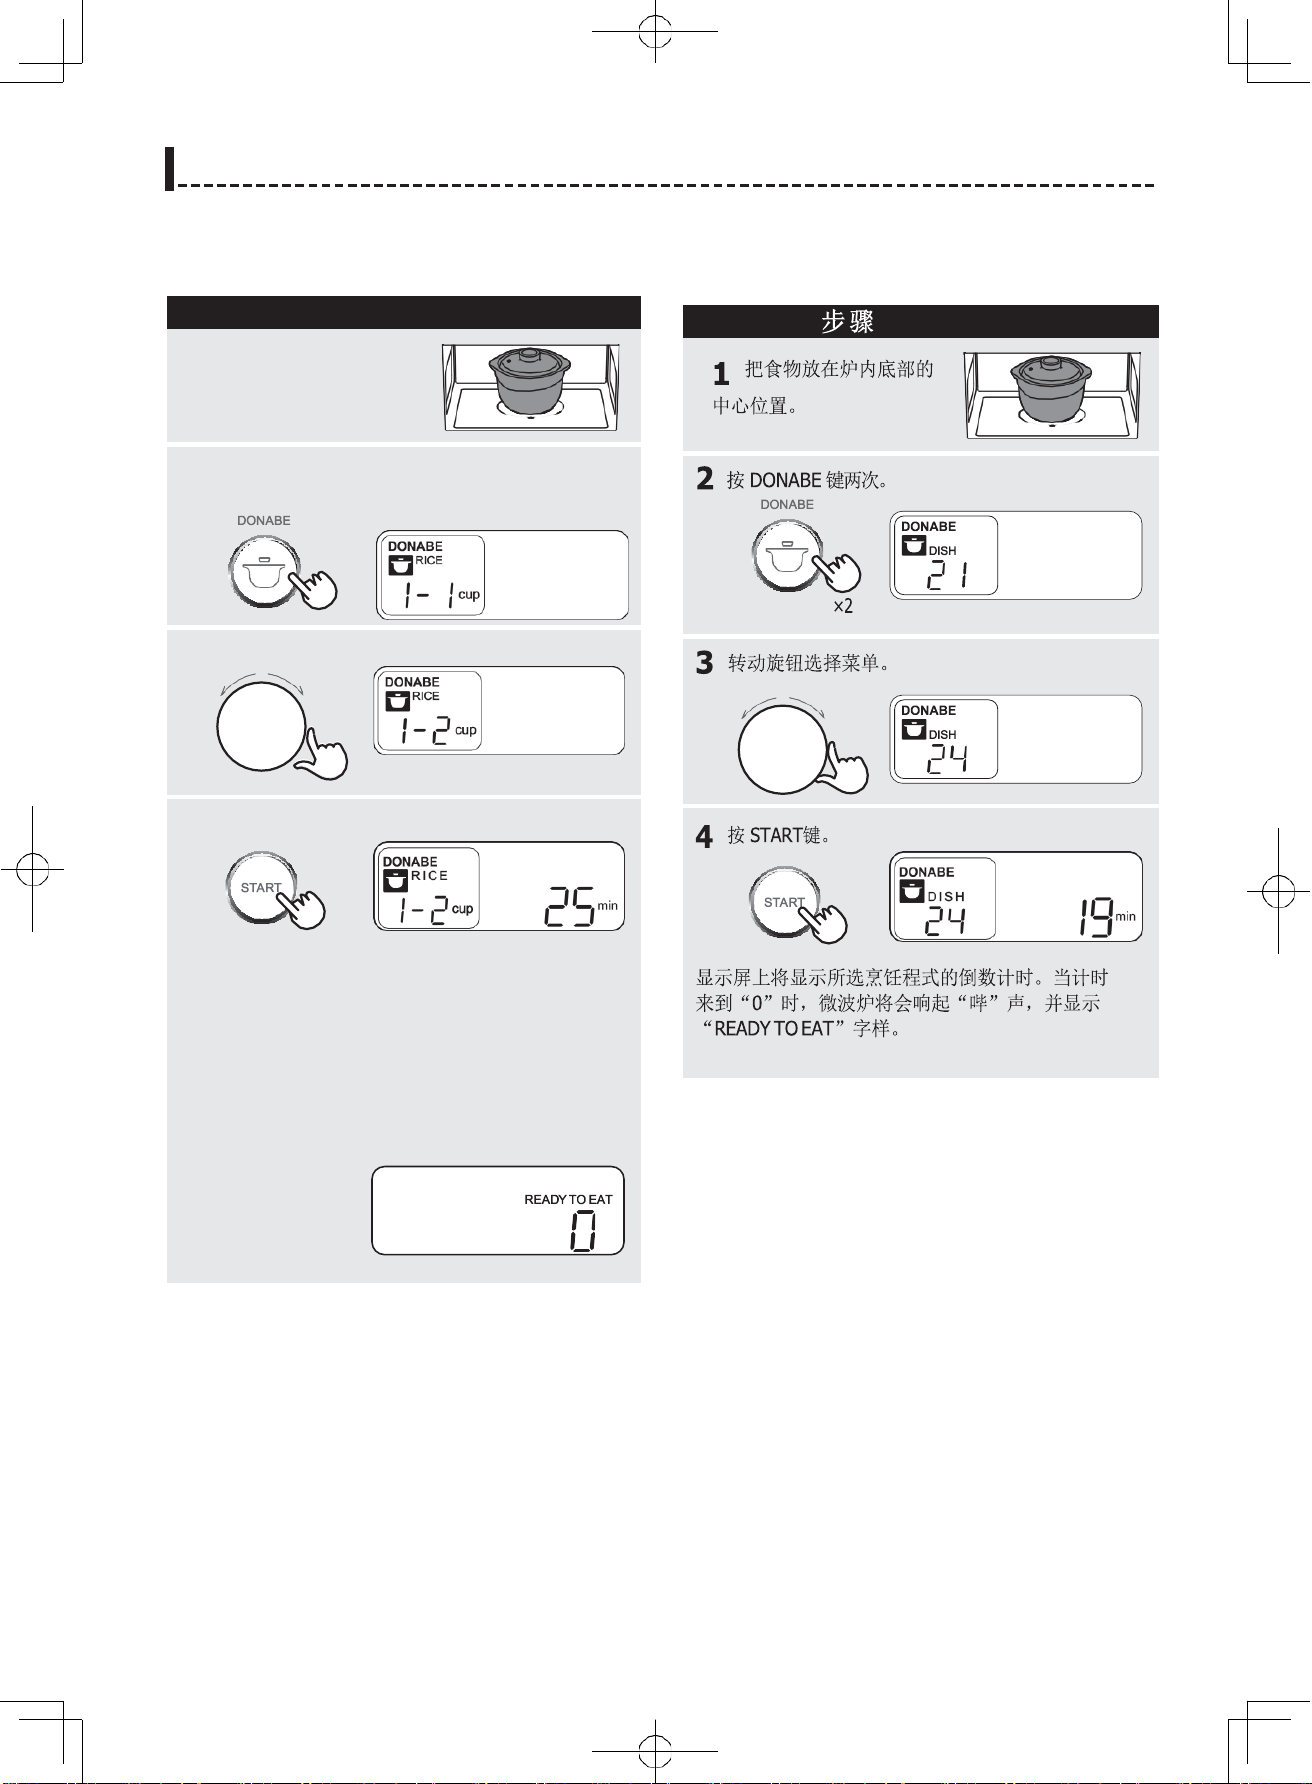
操作前须知 自动烹饪
•
开始操作微波炉前,请确定您已阅读并完全理解此使
用说明书的内容。
准备开始
步骤
注意:
微波炉设有自动断电程式。在以下三种情况下,若您
5
分
钟或更长时间内没有输入指示,显示屏将转为空白。这
时您需要把炉门打开再关上:
1.
屏幕上显示“
0
”
时
2.
您在设定任何烹饪程序时
3.
“自动(加热)”或“微波设时烹饪”程式暂
停时
打开炉门,以重新启动电源。
停止/清除
按
STOP/CLEAR
键一次,以便
:
1.
暂停烹饪程序
2.
清除程序设定中的错误
注意:
若微波炉门在烹饪过程种被打开,微波炉将会暂停
操作。
自动烹饪需知
1.
使用自动功能时,仔细遵照每项菜单指南中的指示来
进行,以达到最佳烹饪成果。
若没有遵照指示,食物很可能会煮过头或煮不熟。
2.
如果食物的分量比菜单指南中所列来得更多或更
少,请选择手动烹饪。
3.
最终的烹饪成果将因食物本身的状态(如初始温
度、形状、数量)而有所不同。请务必在烹饪完
成后查看食物的情况。
4.
您可以按
MORE
或
LESS
键随意调整“自动(加热)”
和“解冻”的成果。请参看
C-11
页。
自动(加热)
AUTO (
加热
)
可自动加热所有
C-17
页所列自动(加
热)菜单指南上的食物。
自动(加热)特别提醒:
1.
食物应放在炉内底部的中心位置。
2.
切勿使用“自动(加热)”程式来加热任何饮
料,以免发生喷发式沸腾。若要加热饮料,请选
择“加热”程式。参看
C-9
页。
*
假设您要加热一份米饭。
步骤
按
STOP/CLEAR
键两次。
注意:
1.
不要使用砂锅。
2.
不要加热任何未解冻的食物。冷冻食物应使用手动加
热。请参看
C-10
页。
3.
如果微波炉内部温度过高,不可使用“自动(加
热)” 程式。显示屏上将出现“
U 04
”。
烹饪中途取消程序
C-7
自动烹饪
日式砂锅烹饪
日式砂锅烹饪有两个类别共
15
份菜单。请参看
C-18
页的砂锅食谱。
类别
菜单
显示编
号
RICE
(饭)
1.
白饭(泰国米
:
长米)
1-1, 1-2
2.
白饭(日本米:短米)
2-1, 2-2
3.
快速煮饭(泰国米:长米)
03
4.
五谷米
04
5.
糙米饭
05
6.
粥
06
7.
砂锅饭
07
DISH
(菜)
8.
煮蔬菜(软)
21
9.
煮南瓜
/
马铃薯
22
10.
煮蔬菜(硬)
23
11.
炖菜
24
12.
快熟面
25
13.
意大利面
26
关于日式砂锅:
此微波炉配备的日式砂锅是供煮饭和炖煮食物之用。
不要使用此夏普日式砂锅以外的其他砂锅。
关于砂锅的特别提醒:
日式砂锅
1.
不要拿空的砂锅去加热。
2.
不要在炉内底部拖动砂锅,以防底部被刮花。
3.
不要使用有裂痕或缺口的砂锅。
4.
不要挡住砂锅的排气小孔。
取出砂锅时应使用厚的隔热手套,以避免烫伤。
5.
除了本说明书中所列的用途,不要把砂锅用作其他用
途。
6.
使用砂锅烹饪时,请仔细遵循日式砂锅食谱中的指示以取
得最佳烹饪成果。若没有仔细遵循指示,食物将可能过度
沸腾并溢出。请参看
C-10
页。
砂锅第一次使用前
紧盖砂锅以避免出现污渍和裂痕。
1.
小心清洗砂锅。
2.
在砂锅中倒入
600
毫升水,再倒入
120
克薯粉(或面
粉)。
3.
把砂锅放进微波炉内底部的中心位置(无需盖
子)。
4.
用
600W
微波加热砂锅
10
分钟。请参看
C-10
页。
5.
加热后取出砂锅,静置
20-30
分钟以降温。再彻底清
洗一遍并擦干。
8.
切勿把砂锅放在煤气炉或明火上加热。
9.
不要使用其他微波炉或厨房电器的砂锅。
外锅
盖
内锅
盖
锅体
自动烹饪
C-8
残時間表示確認中
Donabe
RICE
(砂锅饭)
*
假设您要煮
2
杯白米(泰国米)。
注意
:
1.
第
6
选项“粥”没有静置(蒸煮)倒数计时的设定。
2.
您可以依据软绵度,在
“
READY TO EAT
”倒数
计时中途选择停止蒸煮程序。
Donabe DISH
(砂锅菜)
*
假设您要炖煮食物。
步骤
1
把食物放在炉内底部的中
心位置。
2
按
DONABE
键一次。
×1
3
转动旋钮选择菜单。
4
按
START
键。
显示屏上将显示所选烹饪程式的倒数计时。当计时
来到“
0
”时,微波炉将会响起“哔”声。
接下来,将进入静置(蒸煮)程序的倒数计时。
倒数至“
0
”时,“
READY TO EAT
”的字样将会显现。
自动烹饪
C-9
加热
加热有
2
个选项。
参看
C-17
页的加热菜单指南。
显示屏将显示菜单编号和数
量:
数量
解冻
解冻功能每次可自动解冻
100-500
克的肉类和鱼。
每次增加单位为
50
克。请参看
C-17
页的解冻贴士。
*
假设您要解冻
300
克肉类。
步骤
菜单编号
*
假设您要加热
2
杯牛奶。
步骤
注意:
1.
不要使用砂锅。
注意:
1.
切勿使用“自动(加热)”程式来加热任何饮料,
以避免发生喷发式沸腾。
2.
不要使用砂锅。
2.
若微波炉内部的温度过高,切勿使用“解冻”功
能。显示屏上将出现“
U 04
”。
1
把食物放在炉内底部的中
心位置。
3
转动旋钮选择菜单和数量。
1
把食物放在炉内底部的
中心位置。
3
转动旋钮选择数量(300克)。
菜单
显示
数量
1.
蒸饭
1-1
杯
, 1-2
杯
1-2
人份
2.
饮料
2-1
杯
, 2-2
杯
1-2
杯
C-10
手动烹饪
微波设时烹饪
使用手动微波烹饪时,先输入微波功率等级,再输入
烹饪时长。
注意:
1.
不要使用砂锅(除了本使用说明书中的指示)。
2.
若只是要加热很小量的食物,可设定较短的烹饪时
间,以避免发生冒烟或着火。建议设定
20-30
秒,
并全程留意炉内的变化。
3.
不要加热分量很小且切成细碎的根类食物(如
红萝卜)及类似食物。小量食物在微波操作时
将可能引起火花、造成烧焦和着火。
贴士
1.
80 - 500
克的食物可以一起煮。
微波功率等级
微波功率共有
4
个等级。
默认功率等级设置为
600W
。
要调整功率等级,请按
POWER LEVEL
键直至所要的等
级出现。
需时
依功率等级而定,微波炉可设定最长的烹饪时间为
60
分
钟。
顺时针或逆时针转动旋钮以增加或减少烹饪时
长。
若设定在
0 - 20
分钟之间,每次增加
/
减少的时间单位为
10
秒;若设定在
20-60
分钟之间,每次增加
/
减少的时间单位为
1
分钟。
假设您要以
500W
加热食物
5
分钟。
2.
使用与食物分量匹配的容器。
1
把食物放在炉内底部的
中心位置。
步骤
微波功率等级
需时
例子
850W
高
0 - 20
分钟
快速加热食物
600W
中
0 - 20
分钟
加热食物、加热精
细的食物
500W
200W
低
0 - 60
分钟
解冻、炖煮

C-11
其他便利功能
自动烹饪时间
调整
(
增加或减少烹饪时长
)
您可随意调整“自动(加热)”和“解冻”下想要达
到的成果。
如果您要让自动设定的时间长一些,可在按下
START
键的
10
秒内按
MORE
键一次来加长时间。
显示屏上将显示
“
”
。
如果您要让自动设定的时间短一些,可在按下
START
键的
10
秒内按
LESS
键一次以缩短时间。
当
“ ”
开始闪烁时,您即可更改设定。
如果
10
秒之内没有任何指示输入,将自动回到标准设
定。
烹饪结束提醒
烹饪结束后,微波炉将发出提醒,并在提醒后
1
、
2
和
3
分钟重复提醒,除非炉门被打开或有人按下
STOP/
CLEAR
键。
设定
静音
要将微波炉设为静音模式,需在回到初始显示后按住
DONABE
键
4
秒,直至
2
声短“哔”声响起。然后,再
按下
STOP/CLEAR
键。
注意:
1.
即使电源中断,微波炉的设定不会消失。
2.
即使处在静音状态,微波炉仍会发出以下
2
道信号
声。
-
错误信号声
-
微波炉操作被取消的信号声
3.
要取消静音模式,需按住
DONABE
键
4
秒,直至一声
短“哔”声响起。
然后,按下
STOP/CLEAR
键。
显示屏上将显示
“
”
。
C-12
常见问题与解答
如果显示屏上出现“C”加一个数字,您认为微波炉可能操作异常,在咨询夏普授权的服务中心之前,可以先查阅以下
常见问题列表。由此,您将可减少不必要的电话联系。
•
维修和改装:若微波炉操作出现异常,切勿再尝试操作它。
•
外层橱柜和灯源:不要将外层橱柜移除,以避免触电或灼烧的风险。
出错提醒
/
讯息提醒
显示
行动
U 04
微波炉温度太高,不宜使用“自动(加热)”和“解冻”程式。
把食物从微波炉取出以降温,直至显示字样消失。
C
数字
若是技术错误,请联系夏普授权的服务中心。
常见问与答
以下所列均为正常情况,并非微波炉功能异常的表现。
问题
/
情况
答案
控制面板
/
电源
显示屏转为黑色
/
空白一片。
*
把炉门打开再关闭。
*
检查插头与墙上电源插座是否完好衔接。
*
检查墙上插座和保险丝是否损坏。
注意
:
在以下情况,显示屏将在
5
分钟内转为空白:
1.
“
0
”
显示时。
2.
当您在设定任何烹饪程序时
3.
“自动(加热)”或“微波设时烹饪”程式暂停时。
按任何键都没有反应。
按
STOP/CLEAR
键后再尝试操作。
烹饪中途电源中断。
*
之前设定的烹饪时间和程序将消失。
*
食物将继续以手动程式加热。
烹饪时长有所改变。
这在砂锅饭程式中属正常现象。开始时,显示屏将显示
烹饪时间的倒数计时。计时来到“
0
”时,微波炉会响起
“哔”声。
接着,静置(蒸煮)程式的倒数计时将会开始。请参
看
C-8
页。
水汽
微波炉打开后内部有水汽。 这是蒸汽在微波炉内部凝结的结果。待降温后,以软质抹
布或海绵擦干即可。
杂声
/
声响
烹饪过程中有杂声。
*
冷却扇在烹饪过程中操作。
*
微波炉在控制输出功率。
烹饪结束后有杂声。
冷却扇会继续操作直至微波炉冷却。可能会操作约
1
分钟
30
秒。
3
声短”哔“声。
这是提醒声。微波炉在烹饪结束后每
1
分钟会响
3
声,除非
有人打开炉门或按下
STOP/CLEAR
键。
按任何键都没有发出声响。
微波炉正处在静音状态。参看
C-11
页。
烟
/
异味
微波炉内部使用后有异味。
检查炉内是否清洁,没有任何食物残留。注意在每次使用
后清理微波炉内部。
其他
使用既定菜单程式煮出来的食物成
果欠佳。
*
检查食物是否放在炉内底部的中心位置。
*
检查食物分量是否正确。

C-13
保养与清洁
- 清洁之前切记要关闭电源。
定期清洁微波炉
-
保持微波炉清洁,清除所有食物残留,否则将可能造成微波炉表面腐蚀。这不但会缩短微
波炉的使用寿命,还可能造成危险。
外部:
用中性清洁剂和温水清洁外部,再用湿布擦干净。避免使用质地粗硬的清洁工具。确保通风口没有被灰尘阻
塞。
炉门:
经常用湿布擦拭炉门和两边的通风口、门封条和相邻部份,以清除溅出或溢出的食物残留。不要使用质地粗硬的清
洁工具或尖锐的金属刮具来清洁炉门玻璃,以免刮花表面,造成玻璃碎裂。
控制面板
:
只能用微湿的抹布稍微擦拭。
不要刷或使用任何化学清洁剂。注意避免沾到太多水。
炉内壁
:
用软质抹布和温水擦拭炉内壁。每次使用后以软质抹布清洁炉内底部,以去除所有食物残留。食物残留积累将可能引起过
热、冒烟或着火。
切勿使用市售的微波炉清洁剂、质地粗硬的清洁工具和擦洗海绵来清洁微波炉的任何部分。切勿在微波炉任何部分直接喷
洒微波炉清洁剂。
避免微波炉沾到太多水。清洁后,务必用软质抹布将多余水分抹干。
日式砂锅
:
用中性肥皂水清洗并彻底抹干。切勿使用擦洗海绵。为防日式砂锅破裂,不要在使用后迅速让它降温。
拨打服务电话前先检查
在您拨电寻求协助前,请先进行以下测试:
取一玻璃杯装水(约
250
毫升),放进微波炉并关紧炉门。以
850W
开始操作
1
分钟。
A.
微波炉灯是否有亮起? 是
否
B.
冷却扇是否有操作?(可把手放在后方的通风口测试) 是
否
C.
1
分钟后,信号声是否有响起? 是
否
D.
杯里的水是否有变热? 是
否
若以上任何一项的答案为“否”,请检查您的墙上插座和电表箱里的保险丝是否操作正常。
若两者都没有异常,请联系最靠近您的夏普授权服务中心。
注意:
1.
若您以
850W
加热食物超过
3
分钟,输出功率将自动降低以避免发生过热现象。
2.
若显示屏上的字样不断变换,表示微波炉正处在示范模式。按下
STOP/CLEAR
后按
LESS
键
3
次,微波炉会响起
“哔”声,显示屏上将出现“
0
”。
规格
交流线路电压
交流电源要求
输出功率
微波频率
外型尺寸
内部尺寸
微波炉容量
重量
Donabe
(
日式砂锅
)
: 230V, 50Hz
: 1,350 W
: 850 W* (IEC
测试程序
)
: 2,450 MHz (B
类
/
第
2
组
)**
、
: 410
厘米
(W) x 360
厘米
(H) x 317
厘
(D)
: 330
厘米
(W) x 170
厘米
(H) x 285
厘米
(D)***
: 19
公升
****
:
约
10
公斤
: 193
厘米
(W) x 147
厘米
(H) x 169
厘米
(D),
约
1.3
公斤
*
根据国际电工委员会(
IEC
)的输出功率标准测量方式测量。
**
此为国际标准
CISPR11下ISM(工业、科学和医药)设备的分类。
***
深度的计算不包括门把。
****
内部尺寸是从测量最大宽度、深度和高度而得出。确实可容纳食物的空间会较小。
为持续改进产品功能,我们保留更改设计和规格的权力,恕不通知。
C-14
烹饪指南
微波烹饪技巧
注意烹饪时长
先将烹饪时长设定为指示中所建议的最短时间,之后若有需要,才加长
时间。
食物煮过头将可能引起冒烟或着火。
盖好食物再加热
查阅食谱中的建议遮盖方式:如用厨房纸巾、保鲜膜或盖子。
盖子可预防食物溅出,同时让食物均匀煮熟。(也助维
持微波炉的清洁)
稍微遮盖食物
用一小片铝箔遮住肉类或家禽较薄的部分,以避免煮过头。
搅动食物
可以的话,在烹饪过程中由外往中间方向搅动食物一或两次。
把食物翻面
鸡肉、汉堡肉或牛扒之类的食物,在烹饪过程中应翻面一次。
改变食物摆放的位置
例如一盘肉丸,您可在烹饪过程中把上面的肉丸移到底下,把中间的
肉丸移到旁边。
给予静置时间
确保烹饪结束后食物有足够的时间静置。把
食物从微波炉取出并搅拌。
静置时间能让食物煮熟,但不会煮过头。
查看熟度
留意预设的烹饪温度是否已达到。若达到表示食物可能已煮熟,可查
看:
–
食物是否已整个熟透,不是只有边缘熟。
–
家禽关节部的肉是否一动就松开。
–
猪肉和家禽每个部位都不再呈粉红色。
–
鱼肉不再透明,用叉子轻轻一动就能弄散。
水汽凝结
这是微波烹饪中常见的现象。食物中的湿气和水分会影响微波炉内部
的湿度。一般上,食物盖住来煮会比不盖住产生较少水汽。确保通风
口没有被挡住。
煎盘
使用煎盘或自动加热材质的容器时,切记在底下放一个耐热的垫子,
如瓷盘,以避免热压力损坏底部的转盘、旋转支架和耦合。留意菜单
中所指示的预热时间,不可超时。
微波炉用塑料膜
由于塑料膜可能会融化,加热油脂含量多的食物时要避免让塑料膜接
触到食物。
微波炉用塑料厨具
一些微波炉用塑料厨具不适合用来加热油脂和糖分多的食物。

烹饪指南
C-15
关于
容器和盖子
从以下图表了解每种烹饪程式适用的容器和盖子。
耐高温的玻璃容
器、陶器和瓷器
耐
140°C
及以上高温的
塑料和硅
胶容器,以及保鲜膜。
●
快速加热或降温将可能造成裂痕。
●
不可使用彩色或有裂痕的容器,以及带金边或银边装饰的器
皿,以免造成损坏或引起火花。
●
糖和油脂含量多的菜肴不可用这类容器来加热,因为
糖和油脂遇高温会变形或融化。
Wraps
●
仅适用于可用微波炉加热的食物。
●
加热前把盖子取走。
不可耐高温的玻
璃杯
不可使用
●
强化玻璃、切割玻璃和水晶玻璃也都不可使用。
漆器、竹制和纸
制容器
●
这类容器可能会掉屑、裂开,也有着火的风险。
●
可以使用包装上有列明微波炉适用、可耐高温的烘焙
纸。
金属容器,如铝、
不锈钢和搪瓷,以
及铝箔纸
耐热度低于
140°C
的塑料容器(如保
丽龙)
●
这类容器会引起火花,造成损坏。
●
苯乙烯(
Styrene
)、聚乙烯(
polyethylene
)、
三聚氰胺
(
melamine
)(如婴幼儿餐具)、酚(
pheno
)和脲醛树脂
(
urea resin
)在无线电波作用下会
产生变化。
如果要使用以上所述之外其他材质的容器,请咨询容器的零售商或制造商。
烹饪指南
C-16
特别注意事项
可做
不可做
鸡蛋、水果、坚果、
籽、蔬菜、香肠和蚝
*
加热前先在蛋黄、蛋白和蚝上刺孔,以避
免发生“爆炸”。
*
先刺破马铃薯、苹果、南瓜、热狗、香
肠和蚝的表皮再加热,以让蒸汽释放。
*
煮带壳的鸡蛋。这样做将可能造成“爆
炸”,导致微波炉损坏或人受伤。
*
煮全熟
/
半熟蛋。
*
让蚝煮过头。
*
放带壳的坚果或籽进去烘干。
爆米花
*
选择专为微波炉设计的袋装爆米花。
*
留意听爆米花爆开的声音。速度将逐渐慢
下来。
*
直接把玉米和黄糖放在玻璃碗里来做
爆米花。
*
整个爆开过程的时长不可超过包装
上所述时间。
婴儿食品
*
把婴儿食品从瓶子移到小盘子后小心加
热,过程中不时搅拌。确认温度是否合
适,以避免烫伤。
*
加热奶瓶前先摘下瓶盖和奶嘴。加热后摇
晃奶瓶以让液体均匀。确认温度是否合
适。
*
加热一次性使用的瓶子。
*
过度加热奶瓶。
*
连同奶嘴一起加热。
*
把婴儿食品留在原本的瓶子里加热。
一般食物
*
带馅料的食物在加热后应切开,以让蒸汽
释放,避免烫伤。
*
加热液体或麦片时使用较深的碗,以防
食物沸腾时溢出。
*
加热少量切细碎的根类食物时,需把它们浸
泡在水里。加热少于
100
克的食物将可能引起
火花,造成烧焦和着火。
*
用有盖玻璃容器或密封容器来加热
或煮食物。
*
油炸食物。
*
加热和烘干木材、药材、湿纸巾、衣
服或花。
*
在没有“吸收性”材料(如食物或水)的
状态下操作微波
.
液体
(
饮料
)
*
煮水或液体请参看
C-1-2
页的重要安
全说明,以避免发生爆炸和迟发型喷发
式沸腾。
*
加热超过建议的时长。
罐头食品
“可煮袋”食品
*
把袋装和罐头食品放进容器后再加热。若
用铝和其他金属容器,将可能引起火花,
造成损坏。
*
把食物留在罐里或袋里加热。
香肠卷、派、圣诞
布丁
*
依照建议的时长来加热。(这类食物含高糖
分和
/
或油脂)
*
煮过头,以免引起着火。
自动(加热)菜单指南
把食物放在炉内底部的中心位置。
菜单
贴士
饭
•
室温和冷藏的饭都适用。
•
加热较硬的饭时,洒一点水。
面
•
煮好后,搅拌一下。
咖喱
•
盖一层保险膜。
配菜
•
煮好后,搅拌一下。
*
为防“爆炸”发生,不要加热以下食物:
-
生的和熟的鸡蛋(带
/
不带壳都不行)
-
炒蛋
注意
:
1.
冷冻食品请使用手动烹饪。
2.
不要用“自动(加热)”程式加热少于
100
克的食物。
加热菜单指南
×1
把食物放在炉内底部的中心位置。
解冻指南
×2
重量范围
: 100 - 500
克
把盖了一层保鲜膜的食物放进炉内底部的中心位置。
•
只能解冻刚从冷冻柜取出的食物。
•
若食物已经开始自行解冻,请使用微波
200W
的手动加热,留意过程。
•
用铝箔遮盖食物较薄的部分,以防止脱色或过熟。注意不可让铝箔触及微波炉内壁任何一处或炉门,以免引
起火花或造成玻璃门碎裂。
菜单
分量
贴士
1-1, 1-2
蒸饭
(
初始温度
- 18°C)
1-1
: 1
人份
1-2
: 2
人份
(1
份
: 150
克
)
•
把2-3公分厚的“冷冻饭砖”用保险膜包好。
•
把保鲜膜交叠的一面朝下放进炉内底部。
(1人份)
(2
人份
)
2-1, 2-2
饮料
牛奶
(
初始温度
8° C)
咖啡
(
初始温度
20°C )
2-1
: 1
杯
2-2
: 2
杯
(1
杯
: 200
毫升
)
•
使用阔口的容器。
•
不要盖盖子。
•
加热前搅拌一下液体。
•
加热好后,再搅拌。
(1
杯
)
(2
杯
)
C-17
C-18
自动烹饪指南
自动(砂锅饭烹饪)指南
饭
1
白饭
(
泰国米:长米
)
饭
2
白饭
(
日本米
:
短米
)
饭
3
快速煮饭
(
泰国米:长米
)
步骤
3
AUTO
菜单
时长
1杯
1-1 (TH)
2-1 (JP)
19分钟
30
分钟
30
秒
2杯
1-2 (TH)
2-2 (JP)
32
分钟
30
秒
35
分钟
30
秒
配件
砂锅 内锅盖 外锅盖
材料
饭
1 (
泰国米
)
1杯
米 150克
水
200
毫升
2杯
米 300克
水
360
毫升
饭
2 (
日本米
)
1杯
米 150克
水
300
毫升
2杯
米 300克
水
460
毫升
步骤
1
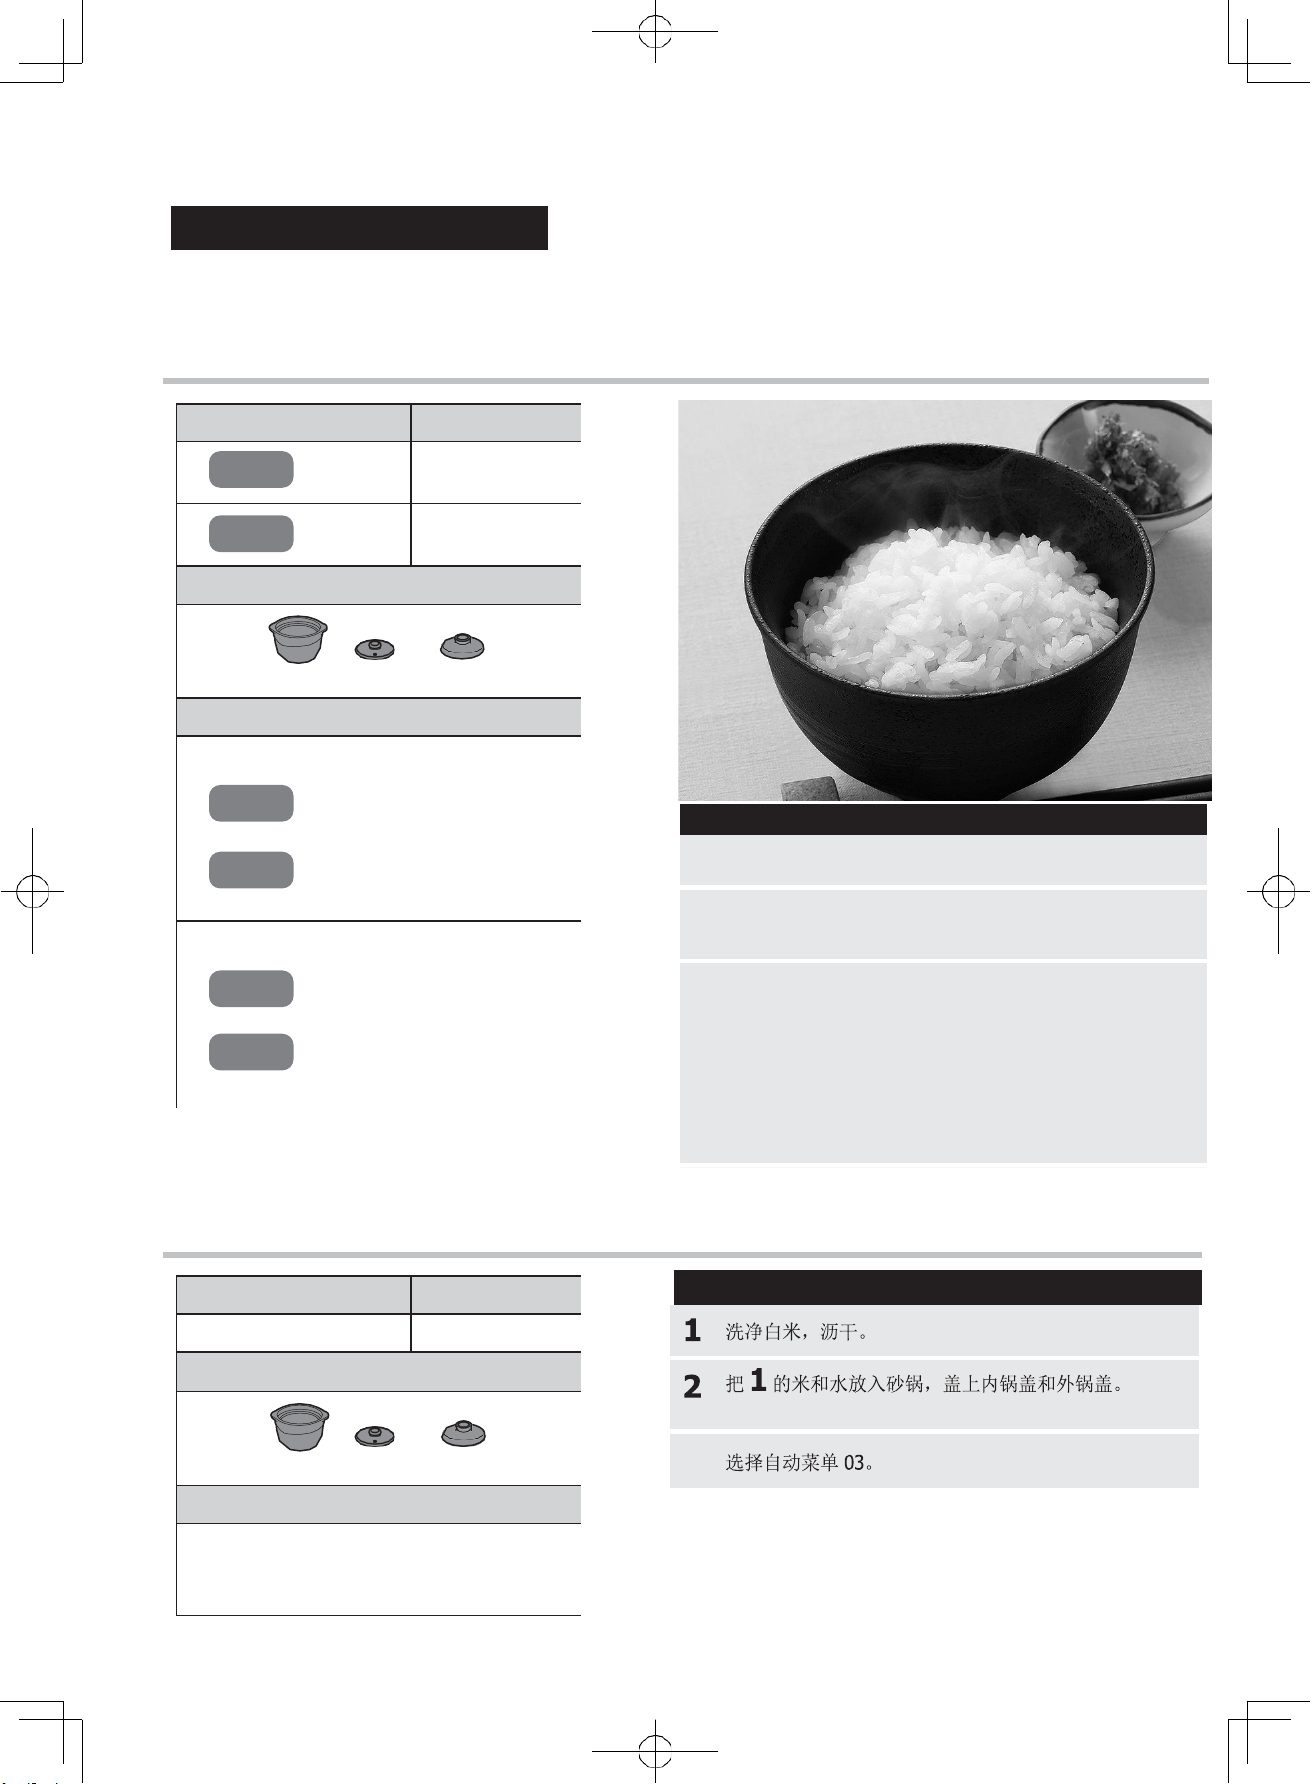
洗净白米,沥干。
2
把
1
的米和水放入砂锅,盖上内锅盖和外锅盖。
-
泰国米:
3
1
杯米,选择自动菜单
1-1
。
2
杯
米,选
择自动菜单
1-2
。
-
日本米:
3
1
杯米,选择自动菜单
2-1
。
2
杯米,选
择自动菜单
2-2
。
AUTO
菜单
时长
03 (TH)
18
分钟
配件
砂锅 内锅盖 外锅盖
材料
饭
1 (
泰国米
)
米 150克
水 240毫升
C-19
饭
4 (
五谷饭
)
饭
5 (
糙米饭
)
饭
6 (
粥
)
步骤
1
洗净白米,沥干。
2
把
1
的米和水放入砂锅,盖上外锅盖。
3
选择自动菜单
06
。
AUTO
菜单
时长
04 37分钟
05
37
分钟
配件
砂锅 内锅盖 外锅盖
材料
饭
4 (
五谷米
)
米 150克
水 320毫升
饭
5 (
糙米
)
米 150克
水 320毫升
步骤
1
洗净白米,浸泡
3
小时。沥干。
2
把
1
的米和水放入砂锅,盖上内锅盖和外锅盖。
-
五谷米:
3
选择自动菜单
04
。
-
糙米:
3
选择自动菜单
05
。
AUTO
菜单
时长
06 35分钟
配件
砂锅 外锅盖
材料
饭
4 (
五谷米
)
米 75克
水 350毫升

C-20
饭
7 (
砂锅饭
)
自动烹饪指南
自动(砂锅菜烹饪)指南
菜
21 (
煮蔬菜
(
软
))
步骤
例如
,
尝试您喜爱的蒸蔬菜
芦笋
西兰花
萝卜
白菜
包菜
菠菜
3
3
AUTO
菜单
时长
07 28分钟30秒
配件
砂锅 内锅盖 外锅盖
材料
米 150克
A)
洋葱
(
切碎
)
50克
红萝卜
(
切碎
)
50克
玉米
50克
虾 50克
B)
水 160毫升
C)
鸡汤
2
茶匙
少许盐和胡椒粉
月桂叶
1片
青豆
50克
牛油或油
5
克
步骤
1
将虾去壳。
2
洗净白米,沥干。
3
把
A,
、
B
、
C
的材料和
2
的米放入砂锅。
然后,盖上内锅盖和外锅盖。
4
选择自动菜单
07
。
5
*
煮好后,加入牛油(或油)和青豆,搅拌均匀。
AUTO
菜单
时长
21 + ▲
21
+
•
21 + ▼
3
分钟
30
秒
3
分钟
00
秒
2
分钟
40
秒
配件
砂锅 内锅盖 外锅盖
材料
蔬菜 300-320克
水 50毫升
菜
22 (
煮南瓜
/
马铃薯
)
C-21
菜
23 (
煮蔬菜
(
硬
))
菜
24 (
炖菜
)
**相较于自动菜单22,您可选此菜单以加热较大块的马铃薯
和南瓜,或达到更软绵的效果。
AUTO
菜单
时长
22
12
分钟
配件
砂锅 内锅盖 外锅盖
材料
蔬菜 300-320克
水 50毫升
步骤
1
把南瓜或马铃薯切成小块
(
约
3
公分大小)。
2
把
1
放入锅里,加水,盖上内锅盖和外锅盖。
3
选择自动菜单
22
。
步骤
1
把菜切成
3-4
公分的小段。
2
把
1
放入锅里,加水,盖上内锅盖和外锅盖。
3
选择自动菜单
23
。
AUTO
菜单
时长
23
16
分钟
配件
砂锅 内锅盖 外锅盖
材料
蔬菜 300-320克
水 50毫升
AUTO
菜单
时长
24 19分钟
配件
砂锅
材料
A )
块状培根
(1
公分大小
)
50克
番茄
(1
公分块状
)
100
克
洋葱
(1
公分块状
)
20克
红萝卜
(1
公分块状
)
20克
马铃薯
(1
公分块状
)
30克
B )
水 300毫升
C )
鸡汤(粉)
1
茶匙
喼汁
1
茶匙
番茄酱
1.5
汤匙
橄榄油
1
茶匙
月桂叶
1
片
步骤
1
把
A
、
B
和
C
的材料放入砂锅里。
2
选择自动菜单
24
(
无需盖子
)
。
3
*
煮好后,搅拌均匀。
菜
25 (
快熟面
)
C-22
菜
26 (
意大利面
)
步骤
1
把干的意大利面条折半,放进砂锅。加水、盐,盖
上内锅盖。
2
选择自动菜单
26
。
3
煮好后,沥干。
AUTO
菜单
时长
25
5
分钟
30
秒
配件
砂锅 内锅盖 外锅盖
材料
快熟面
1
包
(
圆形
)
水
*
特定分量的水
注意
•
使用
3
分钟就能煮熟的面。
•
如果煮超过
3
分钟,面条可能会变硬
。
步骤
1
把干的面块和水放入砂锅,盖上内锅盖和外锅盖。
2
选择自动菜单
25-
快熟面。
3
煮好后,加入附带的汤料(粉或酱料包)。
AUTO
菜单
时长
26 13分钟
配件
砂锅 内锅盖 外锅盖
材料
意大利面
(
干
)
100克
水 350毫升
盐

R-D219G
E-1
E-2
IMPORTANT SAFETY INSTRUCTIONS
Other warnings
1. To reduce the risk of fire in the oven cavity:
a. Do not overcook food.
b. Remove wire twist-ties from paper or plastic bags before placing bag in the oven.
c. Do not heat oil or fat for deep frying. The temperature of the oil cannot be controlled.
d. Do not store food or any other items inside the oven.
2. To reduce the risk of an explosion or delayed eruptive boiling, care should be taken when handling the container.
Your oven is capable of heating food and beverages very quickly with microwave, therefore it is very important that
you select the appropriate cooking time and power level for the type and quantity of food to be heated. If you are
unsure of the cooking time and power level required, begin with low cooking times and power levels until the food
is sufficiently heated evenly throughout.
Additionally:
a. Do not place sealed containers in the oven. Babies bottles fitted with a screw cap or teat are considered to be
sealed containers.
b. Do not use excessive amount of time.
c. When boiling liquids in the oven, use a wide-mouthed container.
d. Stand at least for 20 seconds at the end of cooking to avoid delayed eruptive boiling of liquids.
e. Stir the liquid before and during cooking. Use extreme care when handling the container or inserting a spoon
or other utensil into the container.
3. This oven is for home food preparation only and should only be used for heating, cooking and defrosting food and
beverage.
It is not suitable for commercial, laboratory use, or heating therapeutic devices eg. Wheat bags.
4. Never operate the oven whilst any object is caught or jammed between the door and the oven.
5. Handle with care when removing items from the oven so that the utensil, your clothes or accessories do not touch
the latches.
6. Never poke an object, particularly a metal object, through a grille or between the door and the oven while the oven
is operating.
7. Never tamper with or deactivate the latches.
8. Always use thick oven gloves to prevent burns when handling utensils that are in contact with hot food. Enough
heat from the food can transfer through utensils to cause skin burns.
9. If the oven lamp fails please consult your dealer or a qualified service technician trained by SHARP.
10. Avoid steam burns by directing steam away from the face and hands. Slowly lift the furthest edge of a dish's cover
including microwave plastic wrap etc., and carefully open popcorn and oven cooking bags away from the face.
11. Make sure that the power supply cord is undamaged, and that it does not run under the oven or over any hot
surfaces or sharp edges.
12. Do not place anything on the outer cabinet because the oven will become very hot during operation.
13. To avoid burns, always test the food and container temperature and stir before serving. Pay special attention to the
temperature of food and drink given to babies, children and the elderly. Do not drink beverages or soup without
checking the container's temperature. Take extra caution when handling the container because it becomes very
hot.
14. Make sure the utensil does not touch the interior walls during cooking.
15. Do not touch around the oven lamps directly. This part will become hot when the oven lamp is on.
16. When the oven is in use, ventilate a room where the oven is installed. e.g. open a window or switch a kitchen
ventilation fan on. Steam from the ventilation cover may wet nearby wall or furniture.
17. Do not insert fingers or objects in the holes (the steam outlets or air-vent openings) as this may damage the oven
and cause an electric shock or a hazard.
18. Do not touch the electric plug with wet hand. Plug into the electric wall socket securely. When removing the plug
from the socket always grip the plug, never pull the power supply cord as this may damage the power supply cord
and the connections inside the plug.
19. If the oven falls down or drops on the floor, do not use the oven. Unplug the unit and contact a SERVICE CENTRE
APPROVED BY SHARP.
20. Do not place any things on the door opened to prevent that the oven may fall down or could damage the door and
hinges. Do not cling onto the handle and do not hang heavy objects from it.
21. Do not use any clay pots except for the one provided by SHARP.
IMPORTANT SAFETY INSTRUCTIONS
IMPORTANT SAFETY INSTRUCTIONS: READ CAREFULLY AND KEEP FOR FUTURE REFERENCE
1. This oven is designed to be used on a countertop only. It is not designed to be built-in to a wall or cabinet.
Do not place the oven in a cabinet. See page E-3 for the installation.
2. Ensure there is a minimum of free space above the oven of 20 cm.
3. This appliance is intended to be used in household and similar applications such as:
• sta kitchen areas in shops, oices and other working environments;
• farm houses;
• by clients in hotels, motels and other residential environments;
•bed and breakfast type environments
It is not suitable for commercial, laboratory use.
4. The microwave oven is intended for heating food and beverages.
Drying of food or clothing and heating of warming pads, therapeutic devices (eg. wheat bags), slippers, sponges,
damp cloth and similar may lead to risk of injury, ignition or fire.
5. This appliance is not intended for use by persons (including children) with reduced physical, sensory or mental
capabilities, or lack of experience and knowledge, unless they have been given supervision or instruction concer-
ing use of the appliance by a person responsible for their safety.
6. Children should be supervised to ensure that they do not play with the appliance.
7.
WARNING: Only allow children to use the oven without supervision when adequate instructions have been given
so that the child is able to use the oven in a safe way and understands the hazards of improper use.
8.
WARNING: If the door or door seals are damaged, the oven must not be operated until it has been repaired by a
qualified service technician trained by SHARP.
9. WARNING: Never adjust, repair or modify the oven by yourself. It is hazardous for anyone other than a qualified
service technician trained by SHARP to carry out any service or repair operation that involves the removal of a
cover which gives protection against exposure to microwave energy.
10. If the power supply cord of this appliance is damaged, it must be replaced by a qualified service technician trained
by SHARP in order to avoid a hazard.
11.
WARNING: Liquids and other foods must not be heated in sealed containers since they are liable to explode.
12.
Microwave heating of beverages can result in delayed eruptive boiling, therefore care must be taken when handling
the container.
13. Eggs in their shell and whole hard-boiled eggs should not be heated in microwave ovens since they may explode,
even aer microwave heating has ended. To cook or reheat eggs which have not been scrambled or mixed, pierce
the yolks and the whites, or the eggs may explode.
14. Utensils should be checked to ensure that they are suitable for use in the oven. See Page E-15. Use only microwave
safe containers and utensils on microwave modes.
15. Metallic containers for food and beverages are not allowed during microwave modes. Clay pots for inductio
cookers must not be used.
16. The contents of feeding bottles and baby food jars shall be stirred or shaken and the temperature checked before
consumption, in order to avoid burns.
17.
When heating food in plastic or paper containers, keep an eye on the oven due to the possibility of ignition.
18.
If smoke is observed, switch o or unplug the appliance and keep the door closed in order to stifle any flames.
19.
The oven should be cleaned regularly and any food deposits removed.
20. Cleaning and user maintenance shall not be performed by children without supervision.
21. Failure to maintain the oven in a clean condition could lead to deterioration of the surface that could adversely
aect the life of the appliance and possibly result in a hazardous situation.
22. Do not use harsh abrasive cleaners or sharp metal scrapers to clean the oven door glass since they can scratc the
surface, which may result in shattering of the glass.
23. Steam cleaner is not to be used.
24. See instructions for cleaning door seals, cavities and adjacent parts on page E-13

R-D219G
E-3
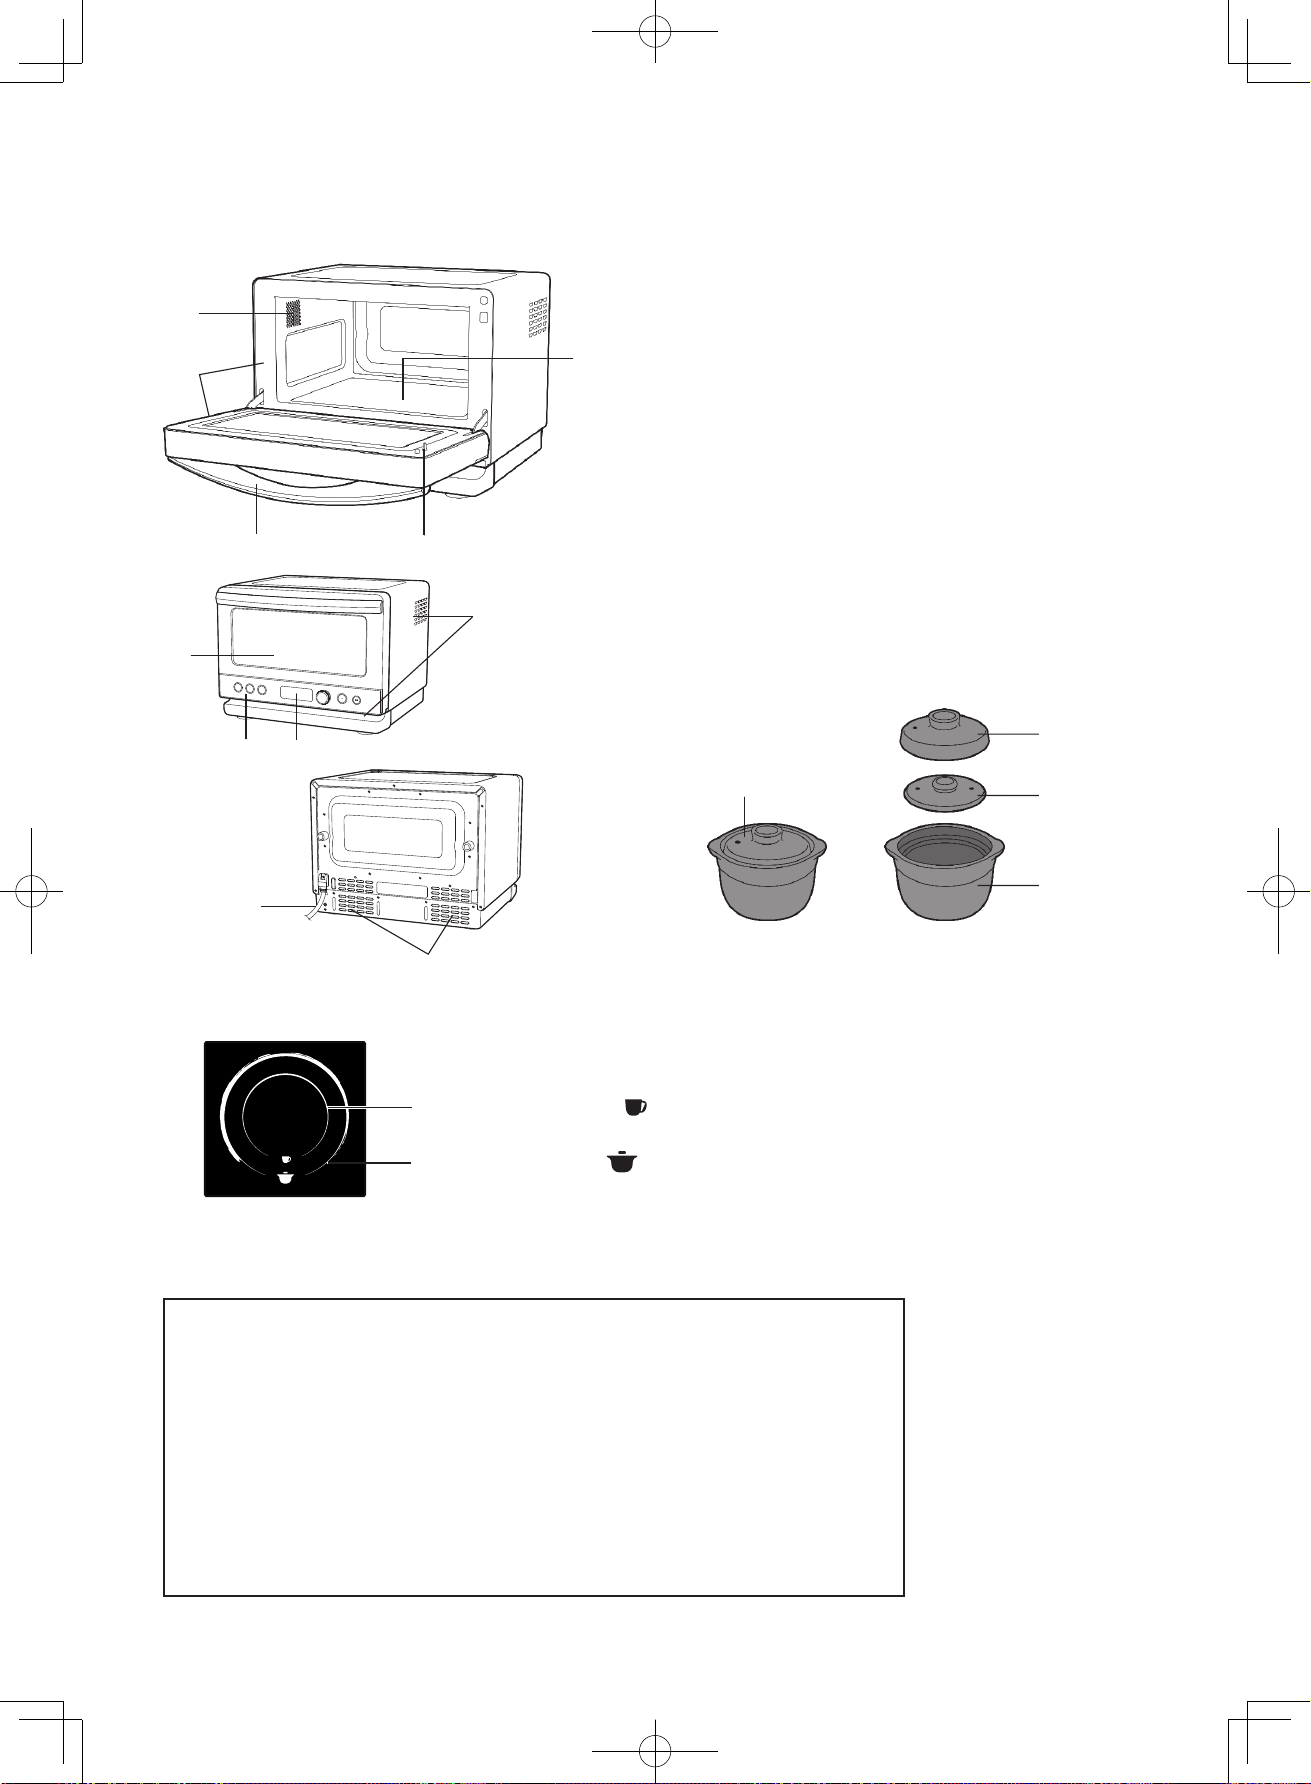
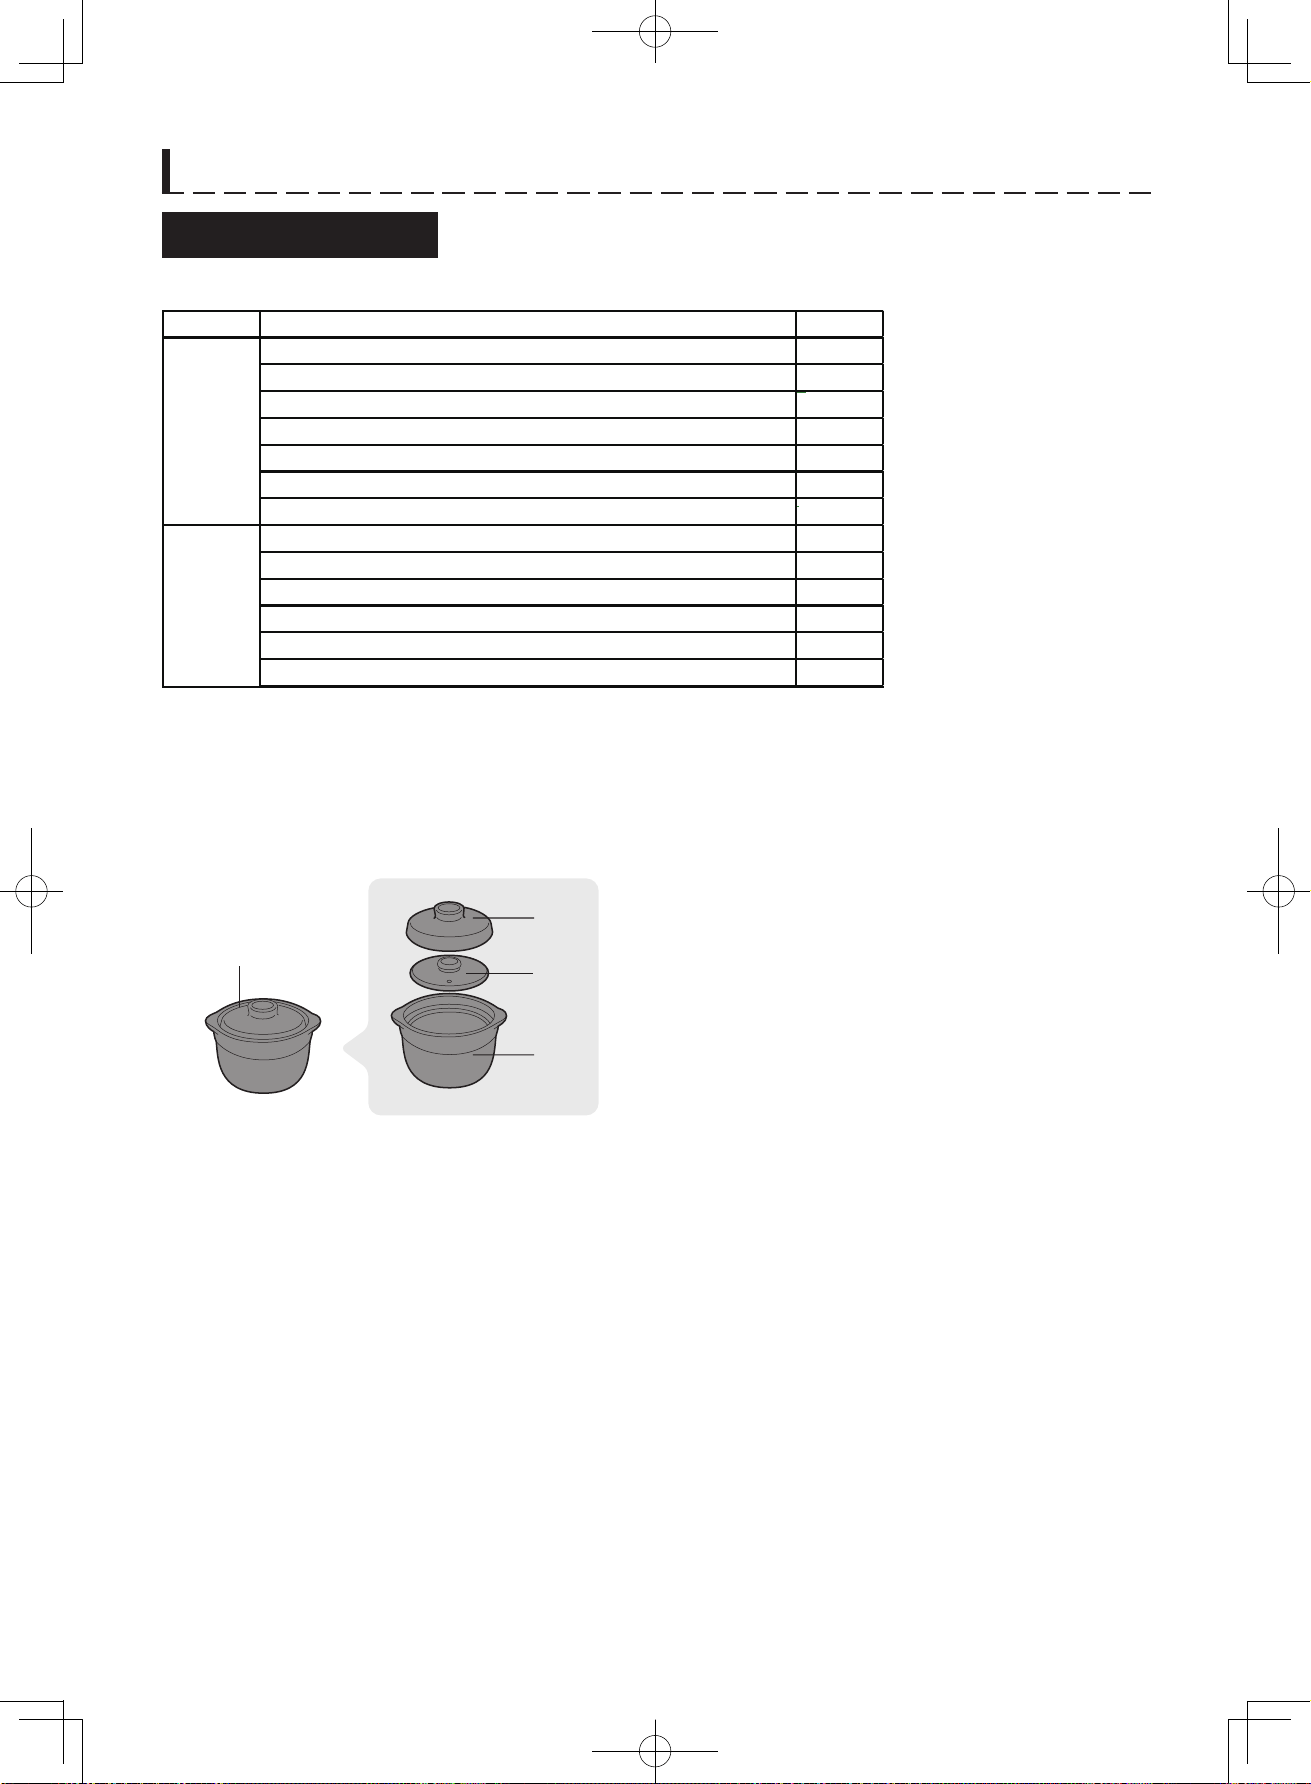
E-4
For cup and small bowl ( )
1
Exhaust openings
2
Door open handle3
LCD display
4
Control panel
5
Oven lamp
6
7
8
9
10
Door seals and sealing surfaces
12
Latche
12-1
Oven floor
12-2
12-3
Door (glass)
ACCESSORIES
*See note for donabe on page E-7 for details.
OVEN DIAGRAM
Power supply cord
Donabe (Clay pot)
Outer lid
Inner lid
Pot
DONABE (RICE) DONABE (DISH)
OPTION NUMBER for DONABE COOKING
The following options are selected by turning the knob. Each option number will be shown on the display.
OVEN FLOOR
There are two kinds of guidelines for putting utensils. Place the utensil in the centre of each circle.
For donabe and bowl ( )
8
11
1
2
3
4
12
6
7
10
5
9
12-1
12-2
12-3
1-1, White rice (Thai rice)
1-2
2-1, White rice (Japan rice)
2-2
03 Quick cooking (Thai rice)
04 Multi grain rice
05 Brown rice
06 Porridge
07 Claypot rice
21 Boil vegetable (so)
22 Boil pumpkin/potato
23 Boil vegetable (hard)
24 Stew
25 Instant noodle
26 Pasta
Air intake openings
11
INSTALLATION INSTRUCTIONS
1. Remove all packing materials from the oven cavity, and the feature sticker from the outside of the door, if there is
one.
Check the unit for any damage, such as a misaligned door, damaged door seals around the door or dents inside
the oven cavity or on the door. If there is any damage, please do not operate the oven until it has been checked
by
a SERVICE CENTRE APPROVED BY SHARP and repaired, if necessary.
2. Accessories provided
1) Donabe (Clay pot) 2) Operation manual
3. This oven is designed to be used on a countertop only. It should not be installed in any area where excessive heat
and steam are generated, for example, next to a conventional oven unit. It should not be installed near combusti-
ble
materials, for example, curtains. The oven should be installed so as not to block ventilation openings. For air
ventilation allow space of at least 20 cm from the top and 10cm on the right side of the oven. Even if there is
sufficient distance for air ventilation, the oven must not be placed where five sides are blocked.
This oven is not designed to be built-in to a wall or cabinet.
4. Do not connect other appliances to the same socket using an adaptor plug.
5. Neither the manufacturer nor the distributors can accept any liability for damage to the machine or personal
injury for failure to observe the correct electrical connecting procedure. The A.C. voltage and frequency must
correspond to the one indicated on the rating label.
6. This appliance must be earthed. Securely connect the plug of the oven to a standard earthed (grounded) house-
hold electrical outlet.
R-D219G
E-3
E-4
For cup and small bowl ( )
1
Exhaust openings
2
Door open handle3
LCD display
4
Control panel
5
Oven lamp
6
7
8
9
10
Door seals and sealing surfaces
12
Latche
12-1
Oven floor
12-2
12-3
Door (glass)
ACCESSORIES
*See note for donabe on page E-7 for details.
OVEN DIAGRAM
Power supply cord
Donabe (Clay pot)
Outer lid
Inner lid
Pot
DONABE (RICE) DONABE (DISH)
OPTION NUMBER for DONABE COOKING
The following options are selected by turning the knob. Each option number will be shown on the display.
OVEN FLOOR
There are two kinds of guidelines for putting utensils. Place the utensil in the centre of each circle.
For donabe and bowl ( )
8
11
1
2
3
4
12
6
7
10
5
9
12-1
12-2
12-3
1-1, White rice (Thai rice)
1-2
2-1, White rice (Japan rice)
2-2
03 Quick cooking (Thai rice)
04 Multi grain rice
05 Brown rice
06 Porridge
07 Claypot rice
21 Boil vegetable (so)
22 Boil pumpkin/potato
23 Boil vegetable (hard)
24 Stew
25 Instant noodle
26 Pasta
Air intake openings
11
INSTALLATION INSTRUCTIONS
1. Remove all packing materials from the oven cavity, and the feature sticker from the outside of the door, if there is
one.
Check the unit for any damage, such as a misaligned door, damaged door seals around the door or dents inside
the oven cavity or on the door. If there is any damage, please do not operate the oven until it has been checked
by
a SERVICE CENTRE APPROVED BY SHARP and repaired, if necessary.
2. Accessories provided
1) Donabe (Clay pot) 2) Operation manual
3. This oven is designed to be used on a countertop only. It should not be installed in any area where excessive heat
and steam are generated, for example, next to a conventional oven unit. It should not be installed near combusti-
ble
materials, for example, curtains. The oven should be installed so as not to block ventilation openings. For air
ventilation allow space of at least 20 cm from the top and 10cm on the right side of the oven. Even if there is
sufficient distance for air ventilation, the oven must not be placed where five sides are blocked.
This oven is not designed to be built-in to a wall or cabinet.
4. Do not connect other appliances to the same socket using an adaptor plug.
5. Neither the manufacturer nor the distributors can accept any liability for damage to the machine or personal
injury for failure to observe the correct electrical connecting procedure. The A.C. voltage and frequency must
correspond to the one indicated on the rating label.
6. This appliance must be earthed. Securely connect the plug of the oven to a standard earthed (grounded) house-
hold electrical outlet.
R-D219G
E-5
E-6
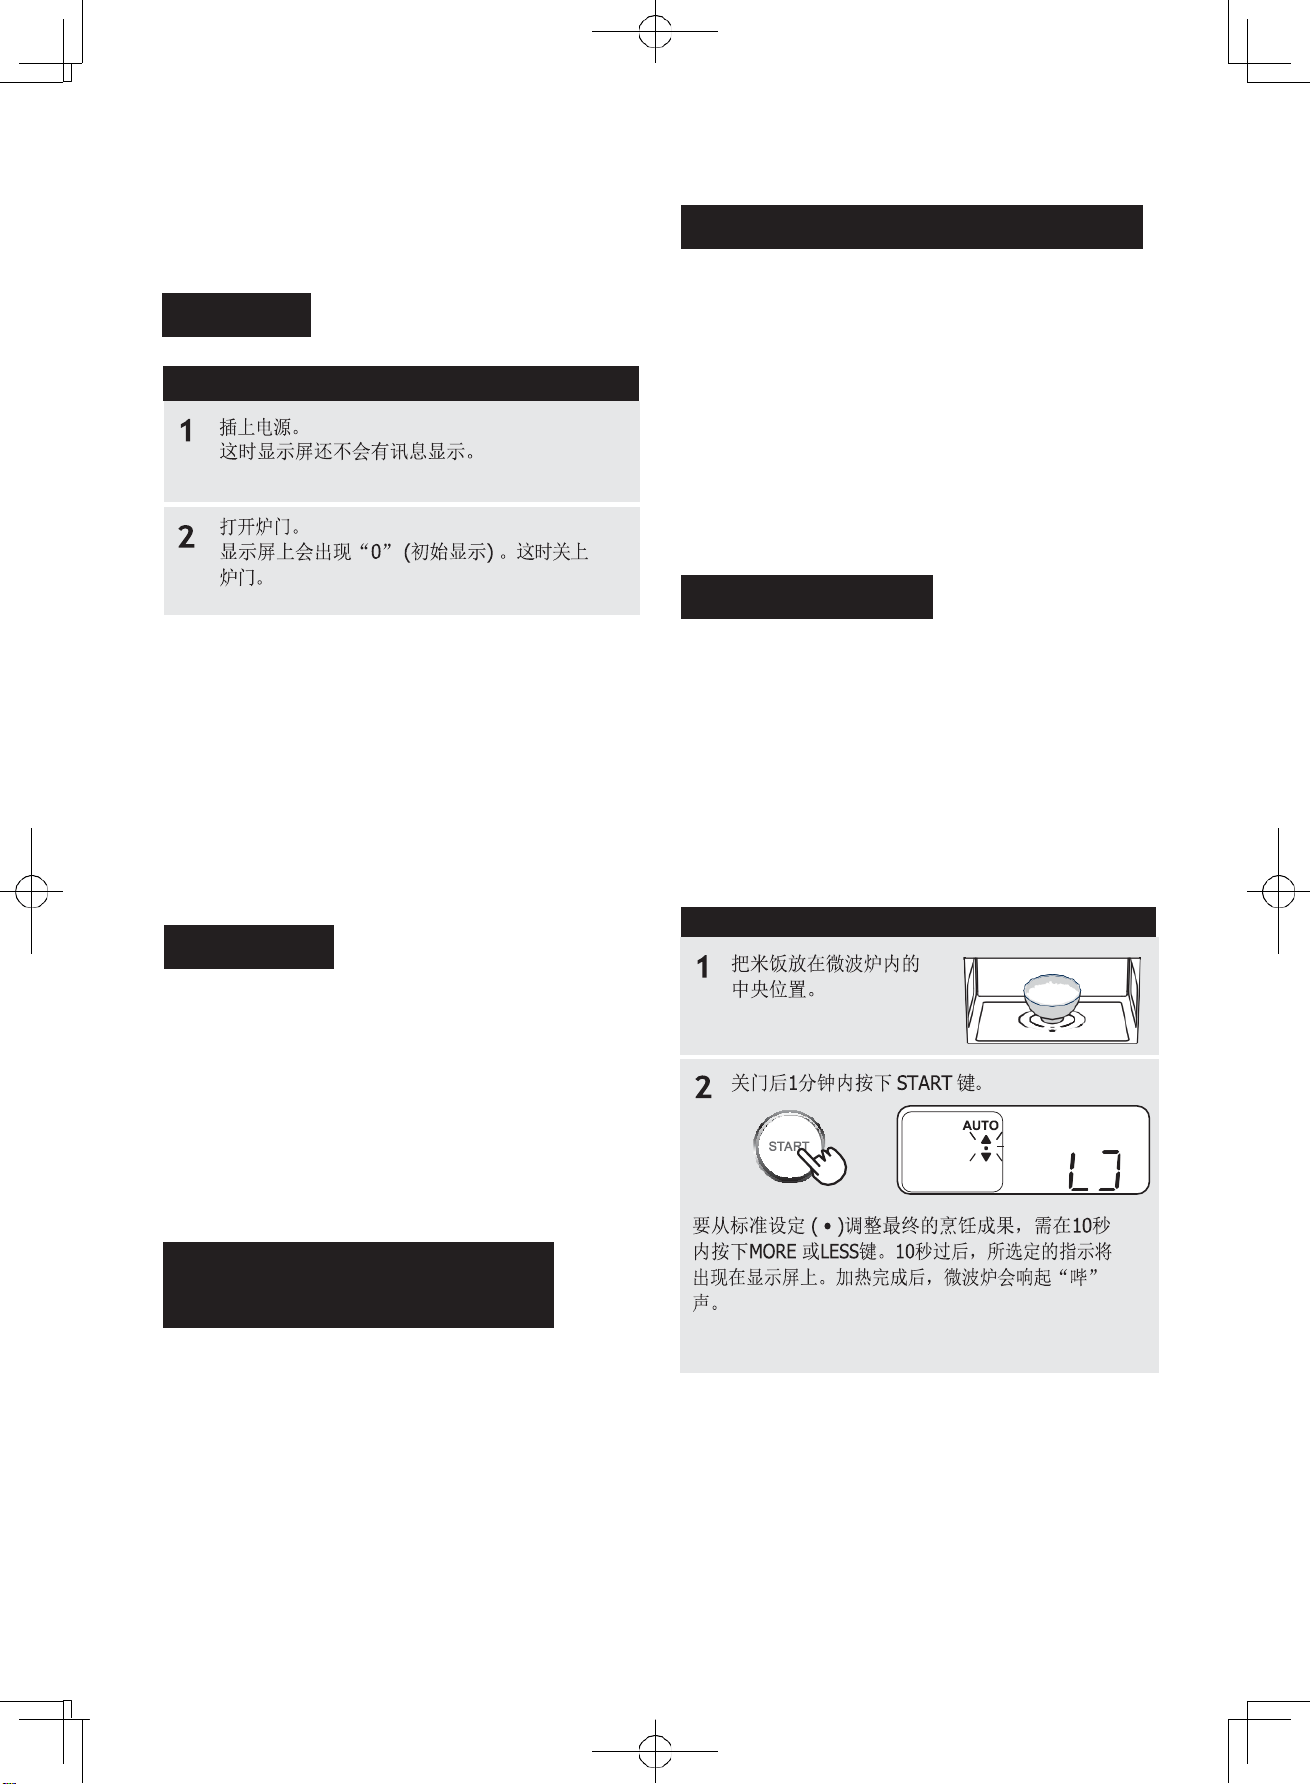
BEFORE OPERATING
AUTOMATIC COOKING
PROCEDURE
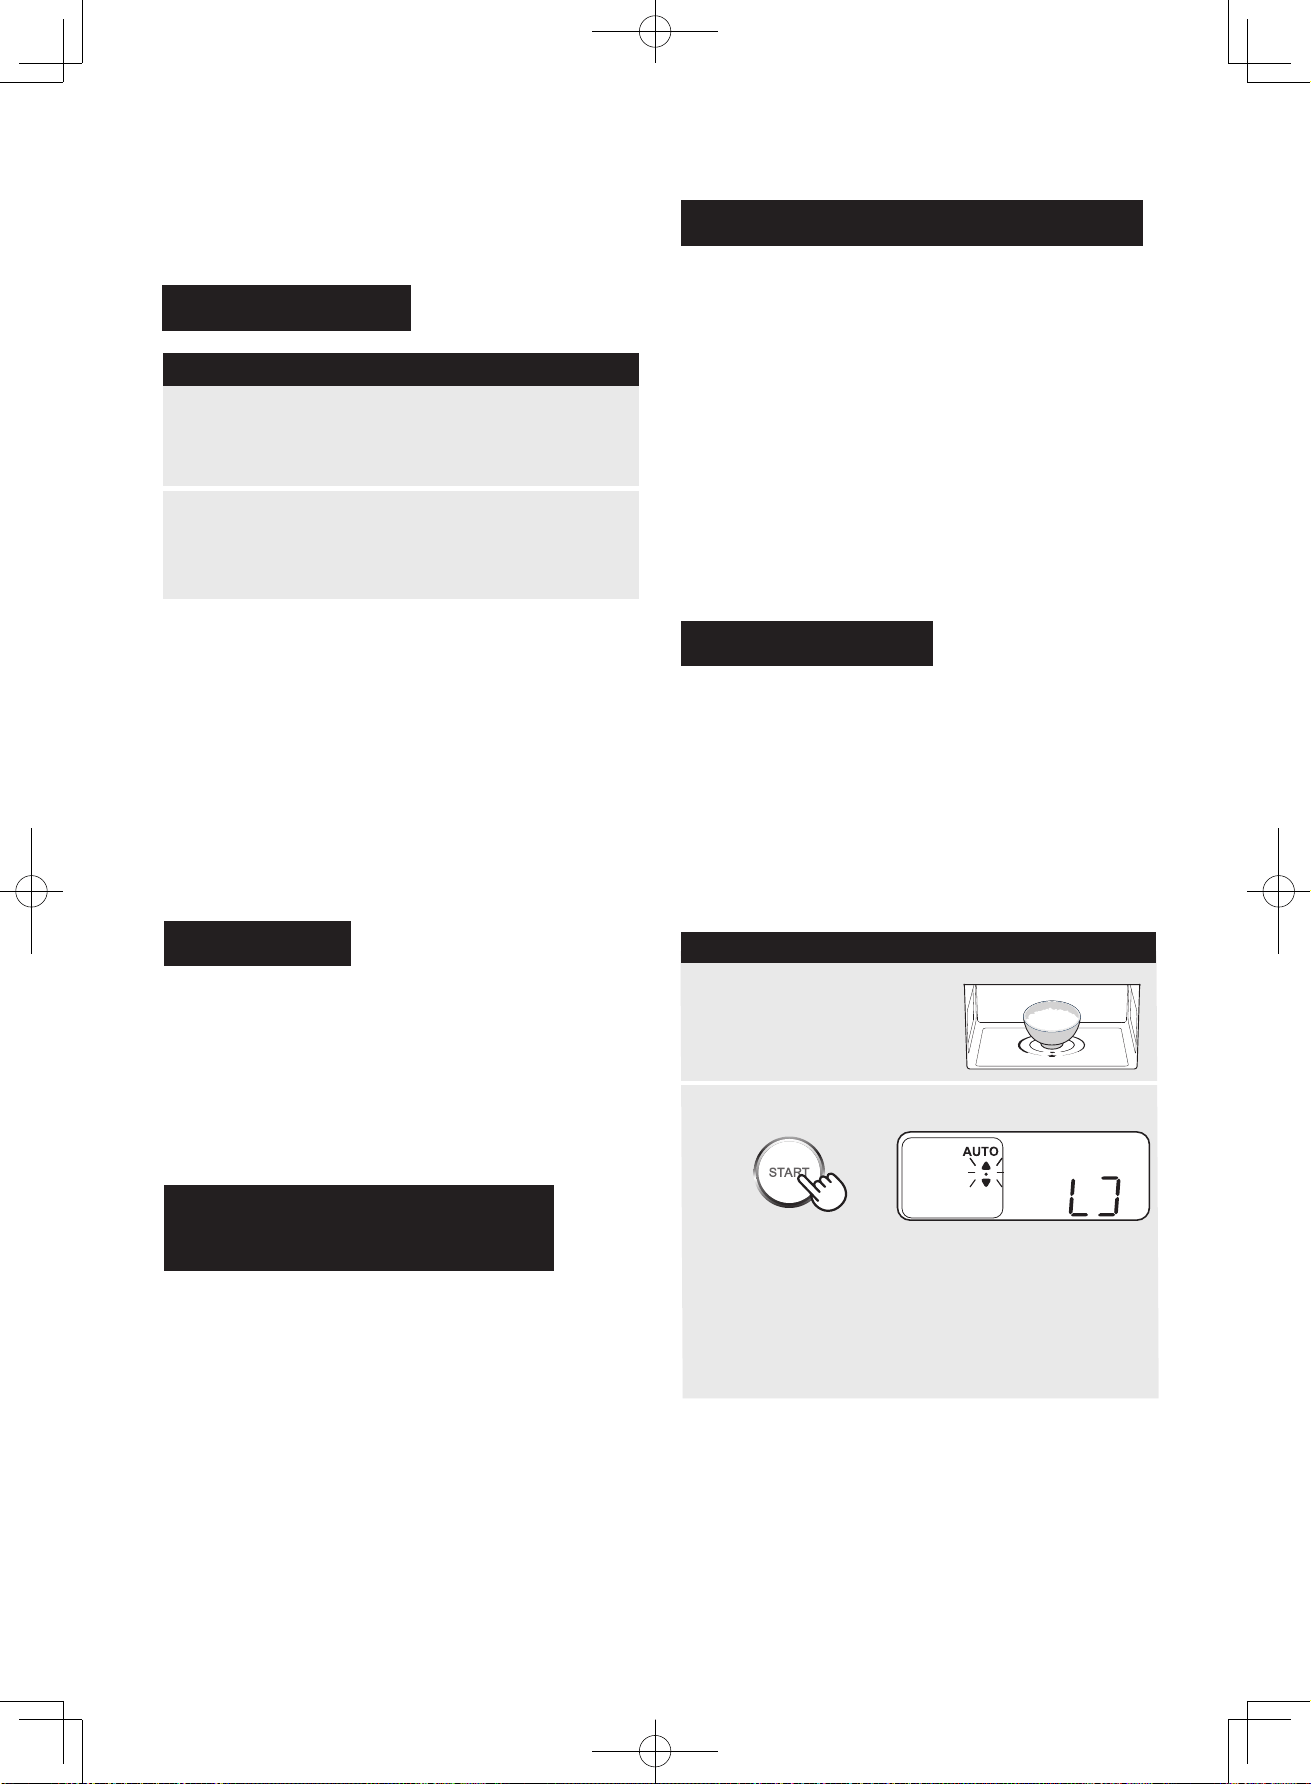
1
Press STOP/CLEAR twice.
PROCEDURE
1
Press START within 1 minute of closing the door.
2
Place food in the centre
of the oven floor.
To change the final cooking result from the standard
setting ( • ), press MORE or LESS within 10 seconds.
Aer about 10 seconds, the indicator selected will
remain in the display. The segments will change in
shape during cooking. Aer cooking, the oven will
“beep”.
Getting Started
Stop/Clear
2
To Cancel a Programme
During Cooking
AUTO (Reheat)
* Suppose you want to reheat 1 serve of rice.
Notes for Automatic Cooking
• BeforeBefore operating your Oven, make sure you read
and understand this operation manual completely.
Plug the oven into a power point.
Nothing will appear on the display at this time.
Open the door.
“0” (initial display) will appear on the display.
Then close the door.
CAUTION:
Your oven has an Auto Power O mode. If you do not
operate the oven for 5 minutes or more under any of
the following 3 states, the display will be blank until you
open and close the oven door.
1. “0” is shown on the display.
2. While you set any cooking programme.
3. Pause in AUTO (Reheat) or in Microwave Time
Cooking.
To turn on the power, open the door.
Press STOP/CLEAR once to:
1. Stop the oven temporarily during cooking.
2. Clear if you make a mistake during programming.
NOTE:
The oven will stop temporarily by opening the door
during the cooking.
1. When using the automatic features, carefully follow
the instructions provided in each Menu Guide to
achieve the best result.
If the instructions are not followed carefully, the food
may be overcooked or undercooked.
2. Food weighing more or less than the quantity or
weight listed in each Menu Guide, cook manually.
3. The final cooking result will vary according to the
food condition (e.g. initial temperature, shape,
quality). Check the food aer cooking.
4. You can adjust cooking results for AUTO (Reheat) and
Defrost as you like using MORE or LESS pad. See page
E-11.
AUTO (Reheat) automatically reheats all the food
shown in the AUTO (Reheat) Menu Guide on page E-17.
SPECIAL NOTE for AUTO (Reheat):
1. Place food in the centre of the oven floor.
2. Never use AUTO (Reheat) to heat any beverages to
prevent the eruptive boiling. REHEAT is suitable for
heating the beverages. See page E-9.
NOTES:
1. Do not use the donabe.
2. Do not reheat any frozen food. Frozen food should be
reheated manually. See page E-10.
3. While the oven cavity temperature is too high, you
cannot use AUTO (Reheat). The display will show “U 04” .
4 5 6 71 2 3
Operating Pads
CONTROL PANEL
1. POWER LEVEL pad
Press to select microwave power setting.
2. REHEAT/DEFROST pad
Press to select Reheat and Defrost menu.
3. DONABE pad
Press to select Donabe Cooking menu.
4. MORE/LESS pads
Press to alter the cooking result for automatic
operations: AUTO (Reheat) and Defrost.
5. Dial
Turn to select desired option.
Turn to select desired quantity.
Turn to enter cooking time.
6 . START pad
Press to reheat food automatically. See page E-6.
Press to start oven aer setting programmes.
Press to confirm your choice.
7. STOP / CLEAR pad
Press to clear during programming.
Press once to stop operation of oven during cooking;
press twice to cancel cooking programme.
The display shows useful information including cooking time and
cooking mode.
: AUTO (Reheat) is in progress.
COOKING MODE INDICATORS:
TIME / AMOUNT INDICATORS:
: Minute
: Second
OVEN CONDTION INDICATORS:
: The steaming for Donabe RICE cooking
will begin soon.
: Donabe Cooking is complete.
: MORE( ) / STANDARD( • ) / LESS( )
indicators for automatic cooking.
: Cup
: Donabe RICE cooking is selected.
: Donabe DISH cooking is selected.
:
Reheat mode is selected.
:
Defrost mode is selected.
Display Information
300g ( ) / 200g ( • ) / 100g ( )
indicators for Donabe DISH menu no. 21.
Press to alter the food weight for Donabe DISH
menu no. 21.
R-D219G
E-5
E-6
BEFORE OPERATING
AUTOMATIC COOKING
PROCEDURE
1
Press STOP/CLEAR twice.
PROCEDURE
1
Press START within 1 minute of closing the door.
2
Place food in the centre
of the oven floor.
To change the final cooking result from the standard
setting ( • ), press MORE or LESS within 10 seconds.
Aer about 10 seconds, the indicator selected will
remain in the display. The segments will change in
shape during cooking. Aer cooking, the oven will
“beep”.
Getting Started
Stop/Clear
2
To Cancel a Programme
During Cooking
AUTO (Reheat)
* Suppose you want to reheat 1 serve of rice.
Notes for Automatic Cooking
• BeforeBefore operating your Oven, make sure you read
and understand this operation manual completely.
Plug the oven into a power point.
Nothing will appear on the display at this time.
Open the door.
“0” (initial display) will appear on the display.
Then close the door.
CAUTION:
Your oven has an Auto Power O mode. If you do not
operate the oven for 5 minutes or more under any of
the following 3 states, the display will be blank until you
open and close the oven door.
1. “0” is shown on the display.
2. While you set any cooking programme.
3. Pause in AUTO (Reheat) or in Microwave Time
Cooking.
To turn on the power, open the door.
Press STOP/CLEAR once to:
1. Stop the oven temporarily during cooking.
2. Clear if you make a mistake during programming.
NOTE:
The oven will stop temporarily by opening the door
during the cooking.
1. When using the automatic features, carefully follow
the instructions provided in each Menu Guide to
achieve the best result.
If the instructions are not followed carefully, the food
may be overcooked or undercooked.
2. Food weighing more or less than the quantity or
weight listed in each Menu Guide, cook manually.
3. The final cooking result will vary according to the
food condition (e.g. initial temperature, shape,
quality). Check the food aer cooking.
4. You can adjust cooking results for AUTO (Reheat) and
Defrost as you like using MORE or LESS pad. See page
E-11.
AUTO (Reheat) automatically reheats all the food
shown in the AUTO (Reheat) Menu Guide on page E-17.
SPECIAL NOTE for AUTO (Reheat):
1. Place food in the centre of the oven floor.
2. Never use AUTO (Reheat) to heat any beverages to
prevent the eruptive boiling. REHEAT is suitable for
heating the beverages. See page E-9.
NOTES:
1. Do not use the donabe.
2. Do not reheat any frozen food. Frozen food should be
reheated manually. See page E-10.
3. While the oven cavity temperature is too high, you
cannot use AUTO (Reheat). The display will show “U 04” .
4 5 6 71 2 3
Operating Pads
CONTROL PANEL
1. POWER LEVEL pad
Press to select microwave power setting.
2. REHEAT/DEFROST pad
Press to select Reheat and Defrost menu.
3. DONABE pad
Press to select Donabe Cooking menu.
4. MORE/LESS pads
Press to alter the cooking result for automatic
operations: AUTO (Reheat) and Defrost.
5. Dial
Turn to select desired option.
Turn to select desired quantity.
Turn to enter cooking time.
6 . START pad
Press to reheat food automatically. See page E-6.
Press to start oven aer setting programmes.
Press to confirm your choice.
7. STOP / CLEAR pad
Press to clear during programming.
Press once to stop operation of oven during cooking;
press twice to cancel cooking programme.
The display shows useful information including cooking time and
cooking mode.
: AUTO (Reheat) is in progress.
COOKING MODE INDICATORS:
TIME / AMOUNT INDICATORS:
: Minute
: Second
OVEN CONDTION INDICATORS:
: The steaming for Donabe RICE cooking
will begin soon.
: Donabe Cooking is complete.
: MORE( ) / STANDARD( • ) / LESS( )
indicators for automatic cooking.
: Cup
: Donabe RICE cooking is selected.
: Donabe DISH cooking is selected.
:
Reheat mode is selected.
:
Defrost mode is selected.
Display Information
300g ( ) / 200g ( • ) / 100g ( )
indicators for Donabe DISH menu no. 21.
Press to alter the food weight for Donabe DISH
menu no. 21.
R-D219G
E-7
E-8
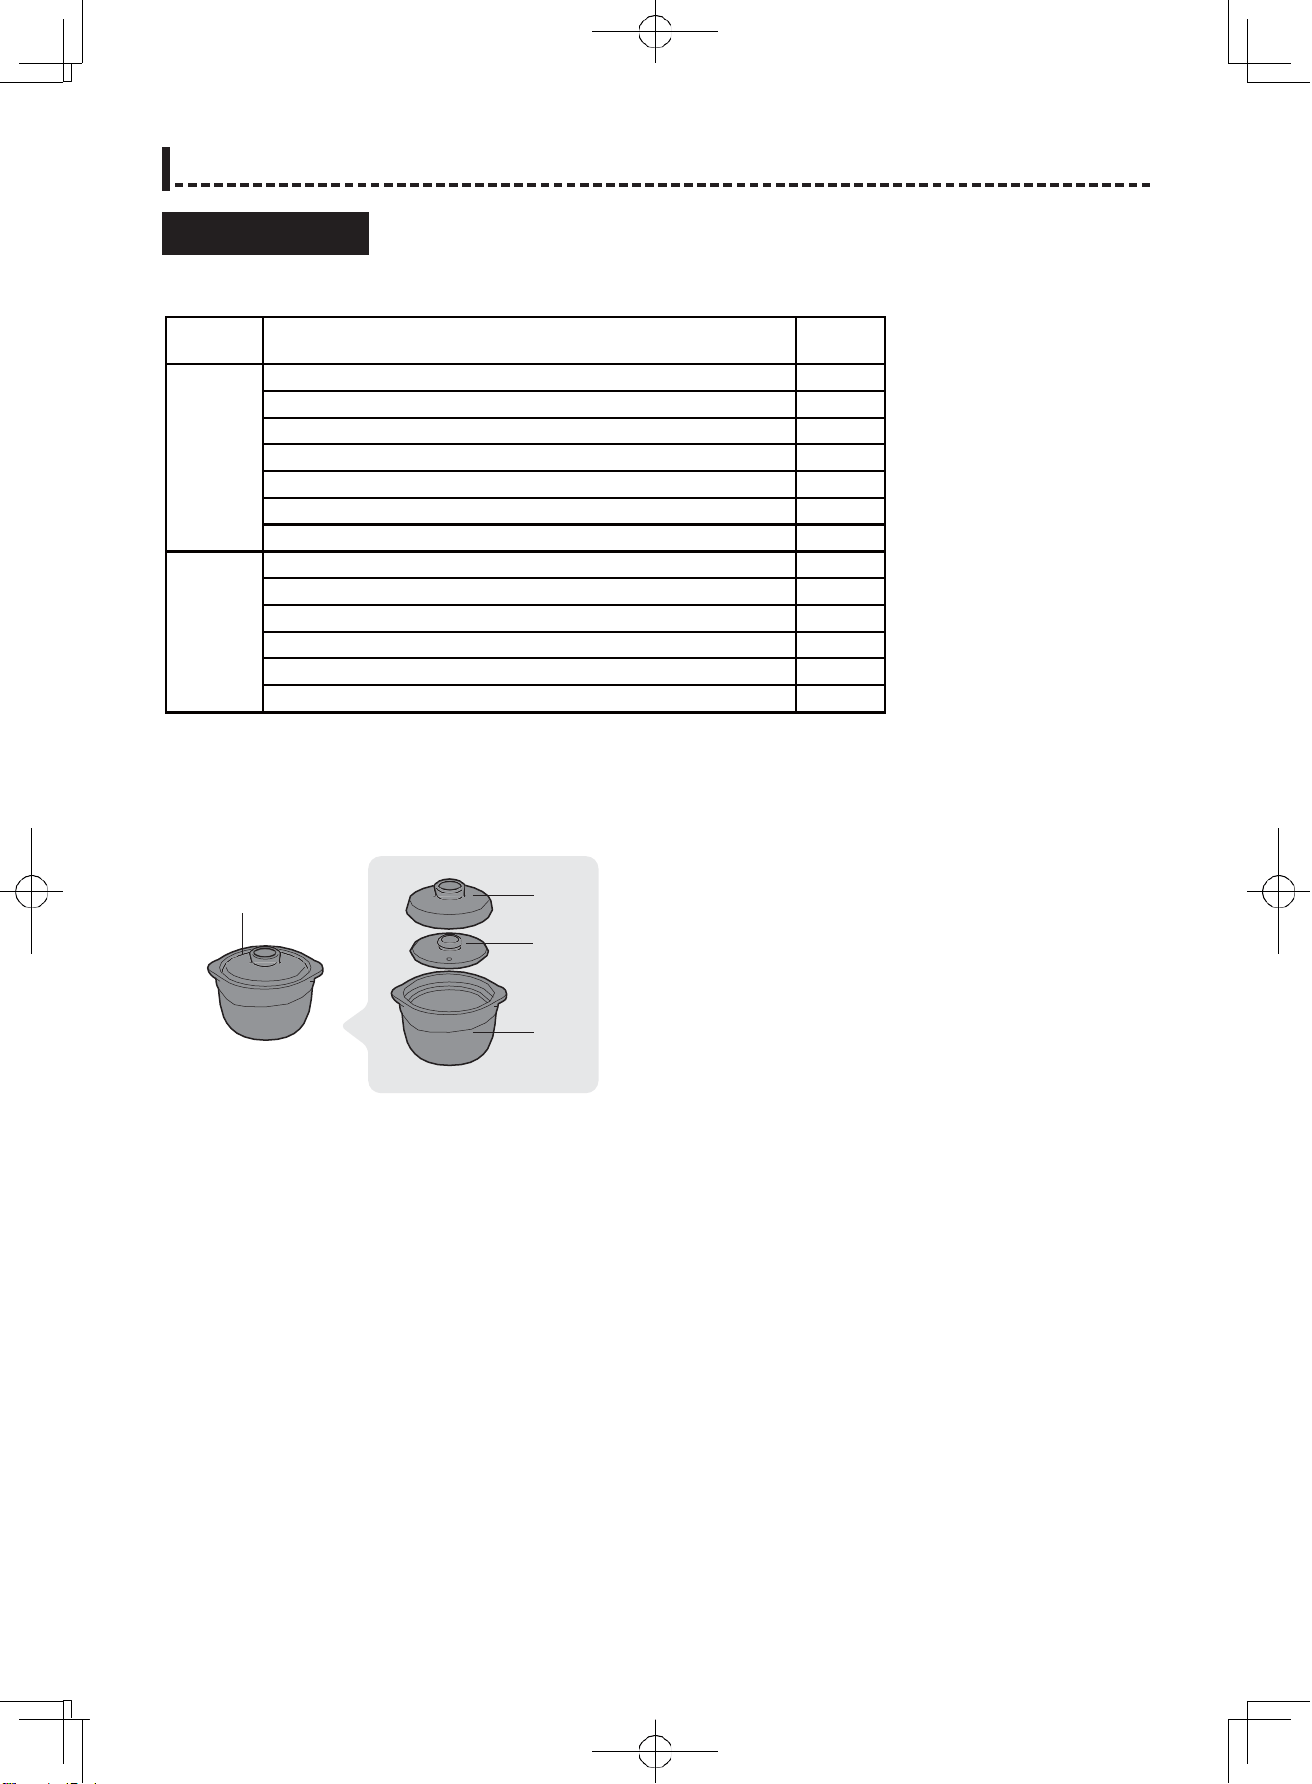
Donabe
Outer
lid
Inner
lid
Pot
AUTOMATIC COOKING
Donabe Cooking has 2 categories and 15 menus as below. See the Donabe Recipes on page E-18.
Donabe Cooking
About Donabe (Clay pot):
Category Menu Display
1. White rice (Thai rice: long grain rice)
1-1, 1-2
2. White rice (Japan rice: short grain rice)
2-1, 2-2
3. Quick cooking (Thai rice: long grain rice)
03
4. Multi grain rice
04
5. Brown rice
05
6. Porridge
06
7. Claypot rice
07
8. Boiled vegetables (so)
21
9. Boiled pumpkin / potato
22
10. Boiled vegetables (hard)
23
11. Stew
24
12. Instant noodle
25
13. Pasta
26
RICE
DISH
SPECIAL NOTE for Donabe:
Before the First Use of Donabe
The donabe designed for this appliance is available
for boiling rice and stewing dishes.
Do not use any clay pots except for the one provided
by SHARP.
Seal the donabe to prevent stains and cracks.
Rinse the donabe carefully.
1.
2. Pour 600mL of water in the donabe, then dissolve
120g of potato starch (or flour) in it.
3. Put the donabe in the centre of the oven floor
(no need the lids).
5. Aer heating, remove the donabe and leave it cool
for 20-30 minues. Then rinse and dry througly.
Do not heat the donabe with empty.
1.
Do not drag the donabe on the oven floor to prevent
from scratching the floor.
2.
Do not use the donabe with any cracks or chips.
3.
Do not block the steam vent hole.
4.
4. Heat the donabe for about 10 minutes on microwave
600W. See page E-10.
Do not use the donabe for any purposes except for
what instructed in this operation manual.
6.
When cooking using the donabe, carefully follow the
instructions provided in the Donabe Recipes to achieve
the best result. If the instructions are not followed
carefully, the food may boil and spill over.
7.
Use oven gloves to take the donabe out aer cooking
to prevent burns.
5.
Do not heat the donabe on a gas stove or open fire.
8.
Do not use the donabe in the other microwave ovens
or the other cooking appliances.
9.
残時間表示確認中
AUTOMATIC COOKING
NOTES:
PROCEDURE
1
Place food in the centre
of the oven floor.
2
3
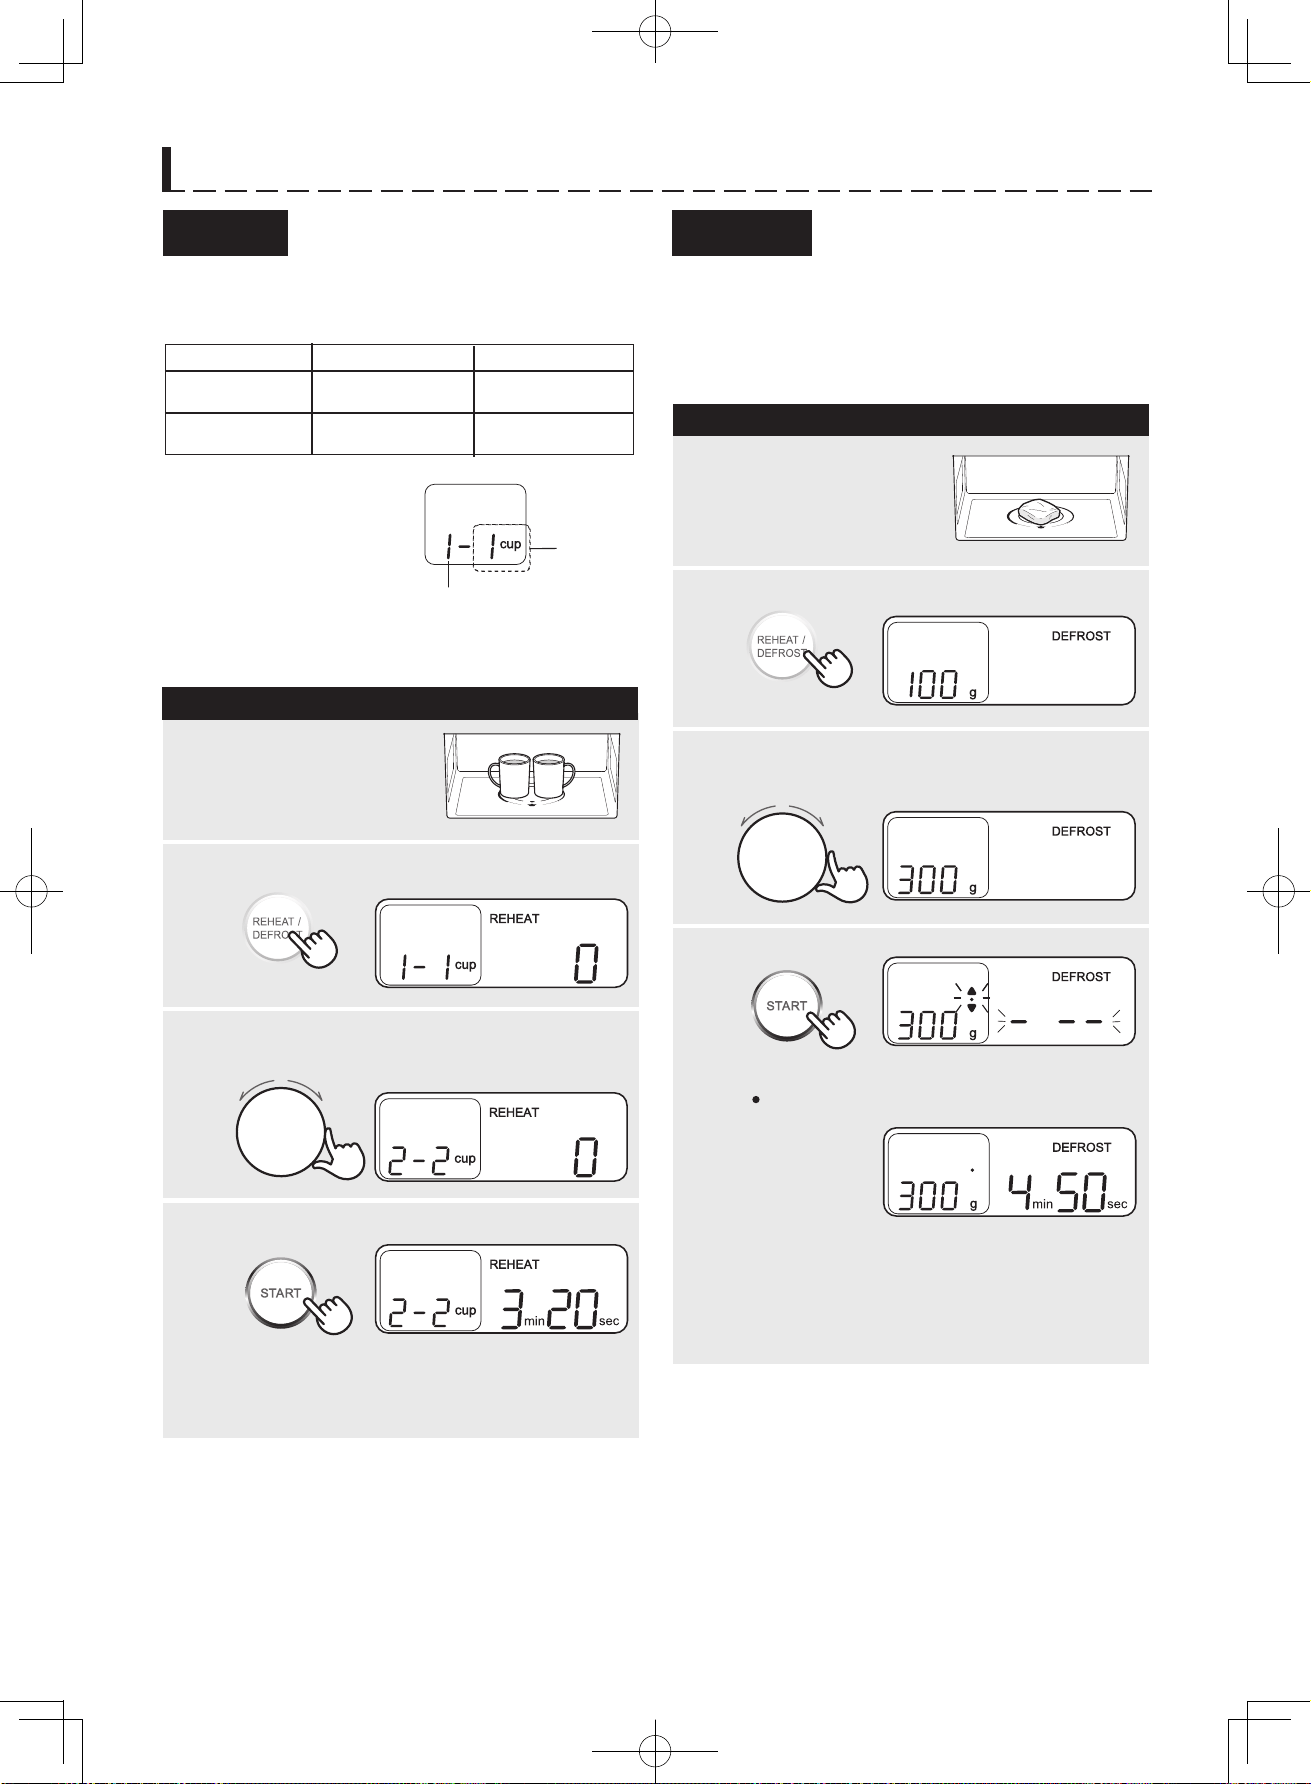
* Suppose you want to cook 2 cups of white rice
(Thai rice).
Press DONABE once.
4
Turn the dial to select
the desired menu.
Press START.
The display will count down through the cooking
time. When the cooking time reaches zero, the oven
will “beep”.
Continuously, the display will count down the
standing time for steaming.
The oven will stop when the timer reaches zero, and
"READY TO EAT" will be still shown on the display.
×1
Item 6 “Porridge” has no standing time.
You can cancel the steaming during the timer is
counting down with “READY TO EAT”, though the
doneness may be changed.
PROCEDURE
1
Place food in the centre
of the oven floor.
3
* Suppose you want to cook stew.
Press DONABE twice.
4
Turn the dial to select
the desired menu.
Press START.
×2
For Donabe DISHFor Donabe RICE
1.
2.
2
The display will count down through the cooking
time. When the cooking time reaches zero, the oven
will “beep” and show "READY TO EAT" on the display.
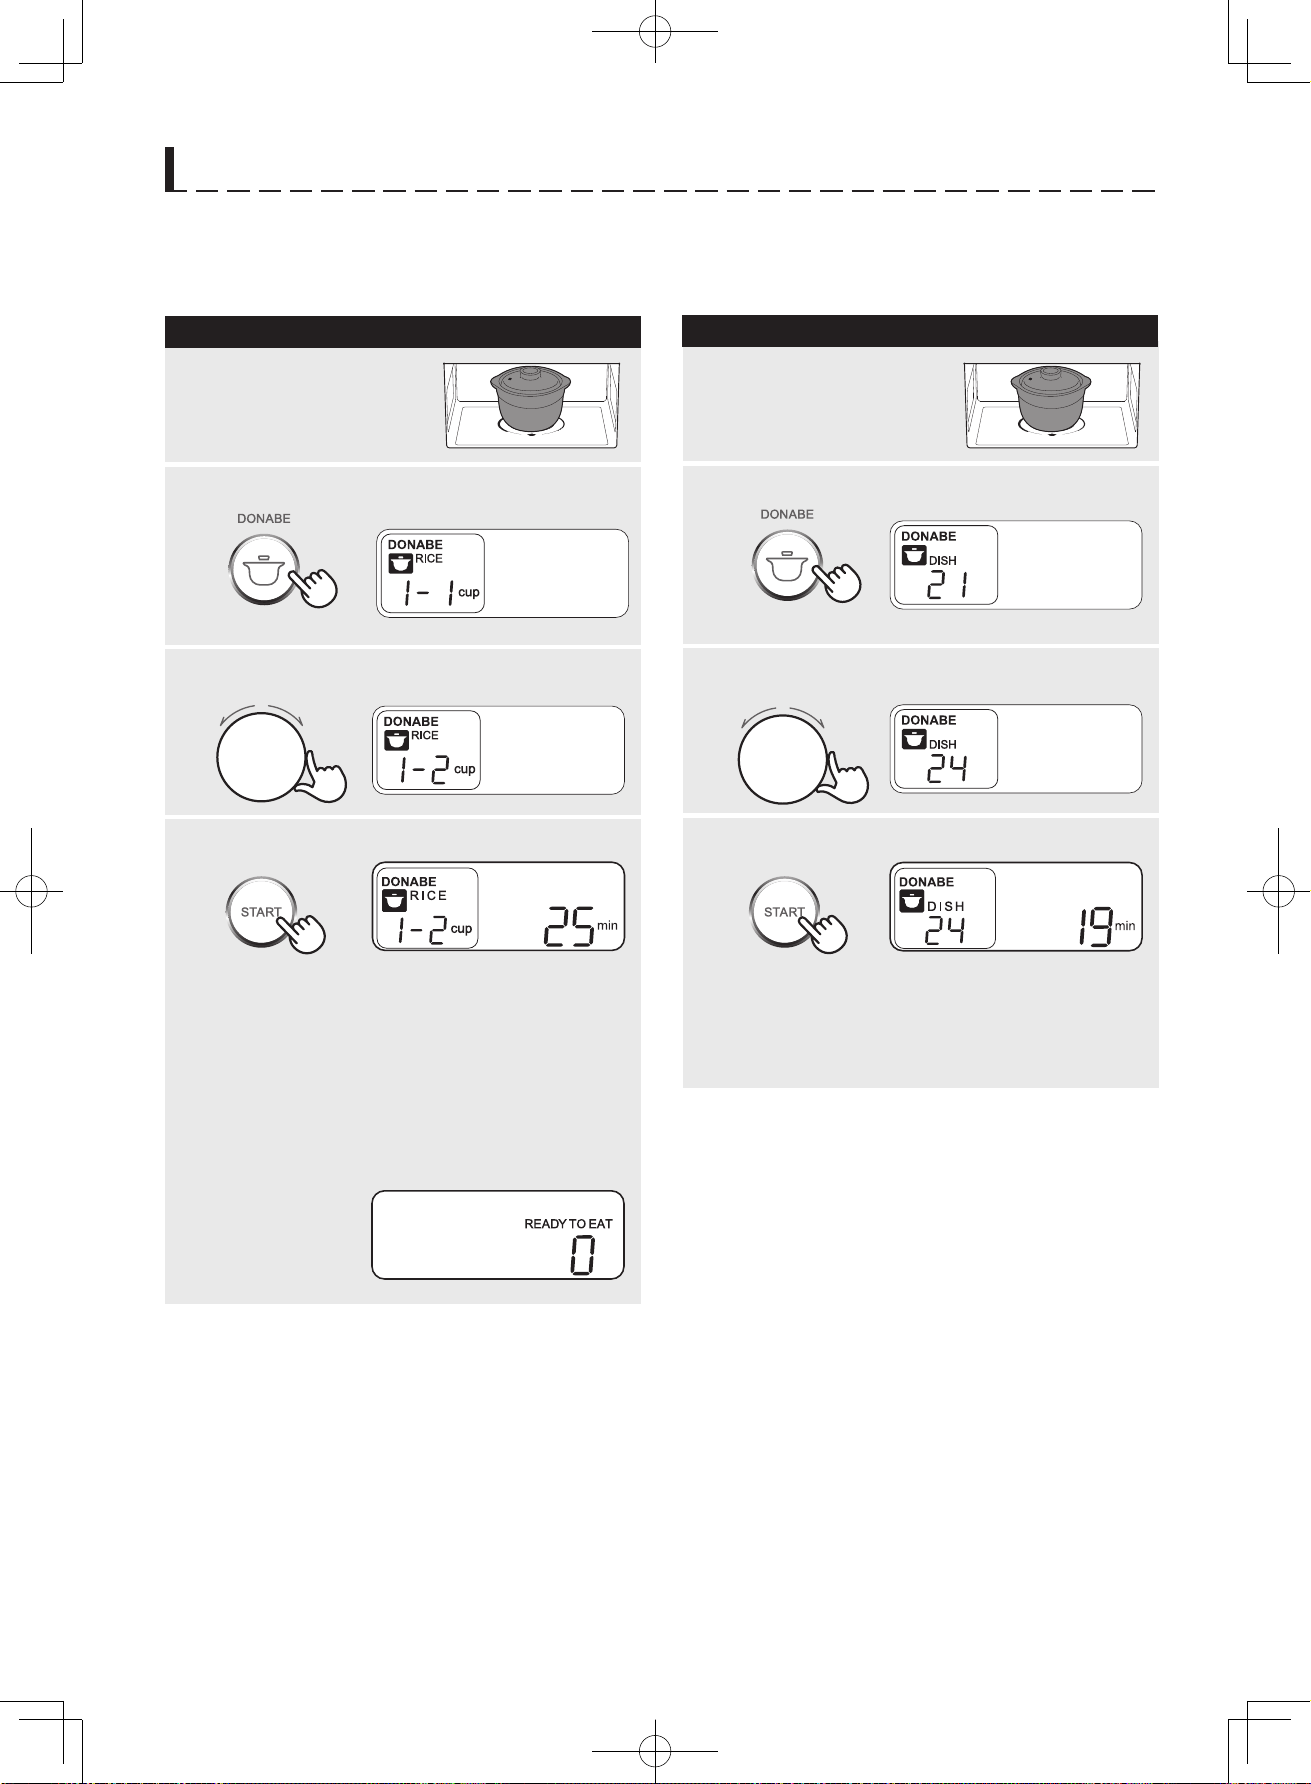
R-D219G
E-7
E-8
Donabe
Outer
lid
Inner
lid
Pot
AUTOMATIC COOKING
Donabe Cooking has 2 categories and 15 menus as below. See the Donabe Recipes on page E-18.
Donabe Cooking
About Donabe (Clay pot):
Category Menu Display
1. White rice (Thai rice: long grain rice)
1-1, 1-2
2. White rice (Japan rice: short grain rice)
2-1, 2-2
3. Quick cooking (Thai rice: long grain rice)
03
4. Multi grain rice
04
5. Brown rice
05
6. Porridge
06
7. Claypot rice
07
8. Boiled vegetables (so)
21
9. Boiled pumpkin / potato
22
10. Boiled vegetables (hard)
23
11. Stew
24
12. Instant noodle
25
13. Pasta
26
RICE
DISH
SPECIAL NOTE for Donabe:
Before the First Use of Donabe
The donabe designed for this appliance is available
for boiling rice and stewing dishes.
Do not use any clay pots except for the one provided
by SHARP.
Seal the donabe to prevent stains and cracks.
Rinse the donabe carefully.
1.
2. Pour 600mL of water in the donabe, then dissolve
120g of potato starch (or flour) in it.
3. Put the donabe in the centre of the oven floor
(no need the lids).
5. Aer heating, remove the donabe and leave it cool
for 20-30 minues. Then rinse and dry througly.
Do not heat the donabe with empty.
1.
Do not drag the donabe on the oven floor to prevent
from scratching the floor.
2.
Do not use the donabe with any cracks or chips.
3.
Do not block the steam vent hole.
4.
4. Heat the donabe for about 10 minutes on microwave
600W. See page E-10.
Do not use the donabe for any purposes except for
what instructed in this operation manual.
6.
When cooking using the donabe, carefully follow the
instructions provided in the Donabe Recipes to achieve
the best result. If the instructions are not followed
carefully, the food may boil and spill over.
7.
Use oven gloves to take the donabe out aer cooking
to prevent burns.
5.
Do not heat the donabe on a gas stove or open fire.
8.
Do not use the donabe in the other microwave ovens
or the other cooking appliances.
9.
残時間表示確認中
AUTOMATIC COOKING
NOTES:
PROCEDURE
1
Place food in the centre
of the oven floor.
2
3
* Suppose you want to cook 2 cups of white rice
(Thai rice).
Press DONABE once.
4
Turn the dial to select
the desired menu.
Press START.
The display will count down through the cooking
time. When the cooking time reaches zero, the oven
will “beep”.
Continuously, the display will count down the
standing time for steaming.
The oven will stop when the timer reaches zero, and
"READY TO EAT" will be still shown on the display.
×1
Item 6 “Porridge” has no standing time.
You can cancel the steaming during the timer is
counting down with “READY TO EAT”, though the
doneness may be changed.
PROCEDURE
1
Place food in the centre
of the oven floor.
3
* Suppose you want to cook stew.
Press DONABE twice.
4
Turn the dial to select
the desired menu.
Press START.
×2
For Donabe DISHFor Donabe RICE
1.
2.
2
The display will count down through the cooking
time. When the cooking time reaches zero, the oven
will “beep” and show "READY TO EAT" on the display.
R-D219G
E-9
E-10
AUTOMATIC COOKING
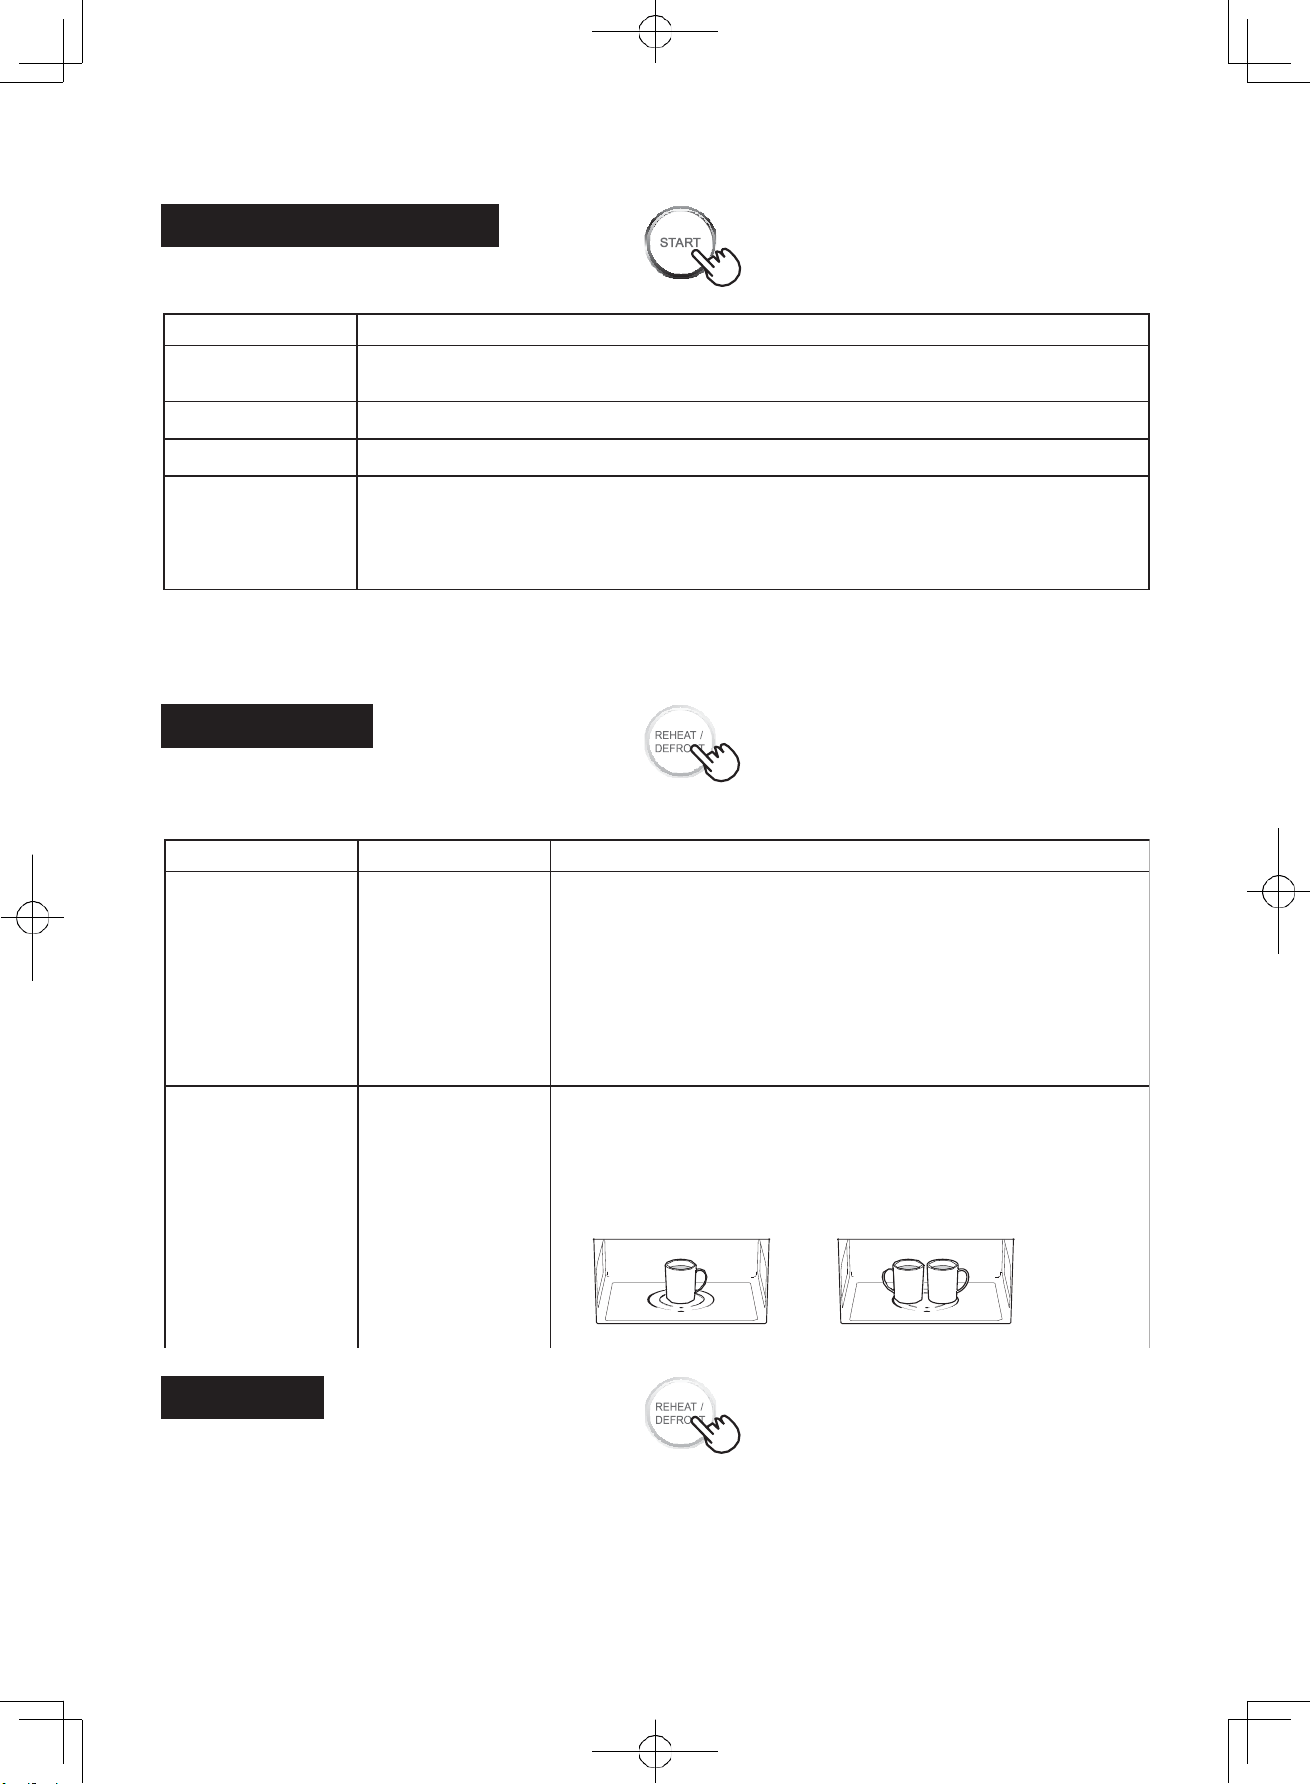
Reheat has 2 options.
See the Reheat Menu Guide on page E-17.
PROCEDURE
1
Place food in the centre
of the oven floor.
2
3
NOTES:
1. Never use AUTO (Reheat) to heat any beverages to
prevent the eruptive boiling.
Reheat
* Suppose you want to reheat 2 cups of milk.
Press REHEAT/DEFROST once.
4
Defrost automatically defrosts m eat and fish with
100 - 500 g in each time. The increasing unit is 50g.
See Defrost Tips on page E-17.
PROCEDURE
1
2
3
NOTES:
1.
2.
While the oven cavity temperature is too high, you
cannot use Defrost. The display will show “U 04” .
Defrost
* Suppose you want to defrost 300 g of meat.
Turn the dial to select
the desired meny number and quantity.
Press START.
The display will count down through the cooking
time. When it reaches zero, the oven will “beep”.
Menu
1. Steamed rice
1-2 servings
2. Beverage
Quantity
1-2 cups
Place food in the centre
of the oven floor.
Press REHEAT/DEFROST twice.
Turn the dial to select
the desired amount (300 g).
4
Press START.
To change the final cooking result from the standard
setting ( ), press MORE or LESS within 10 seconds.
Do not use the donabe.
Aer about 10 seconds, the indicator selected will
remain on the display and the defrosting time will
begin counting down.
When it reaches zero, the oven will “beep”.
Display
1-1 cup, 1-2 cup
2-1 cup, 2-2 cup
The display shows menu
number and quantity:
Menu number
Quantity
2. Do not use the donabe.
×1
×2
MANUAL COOKING
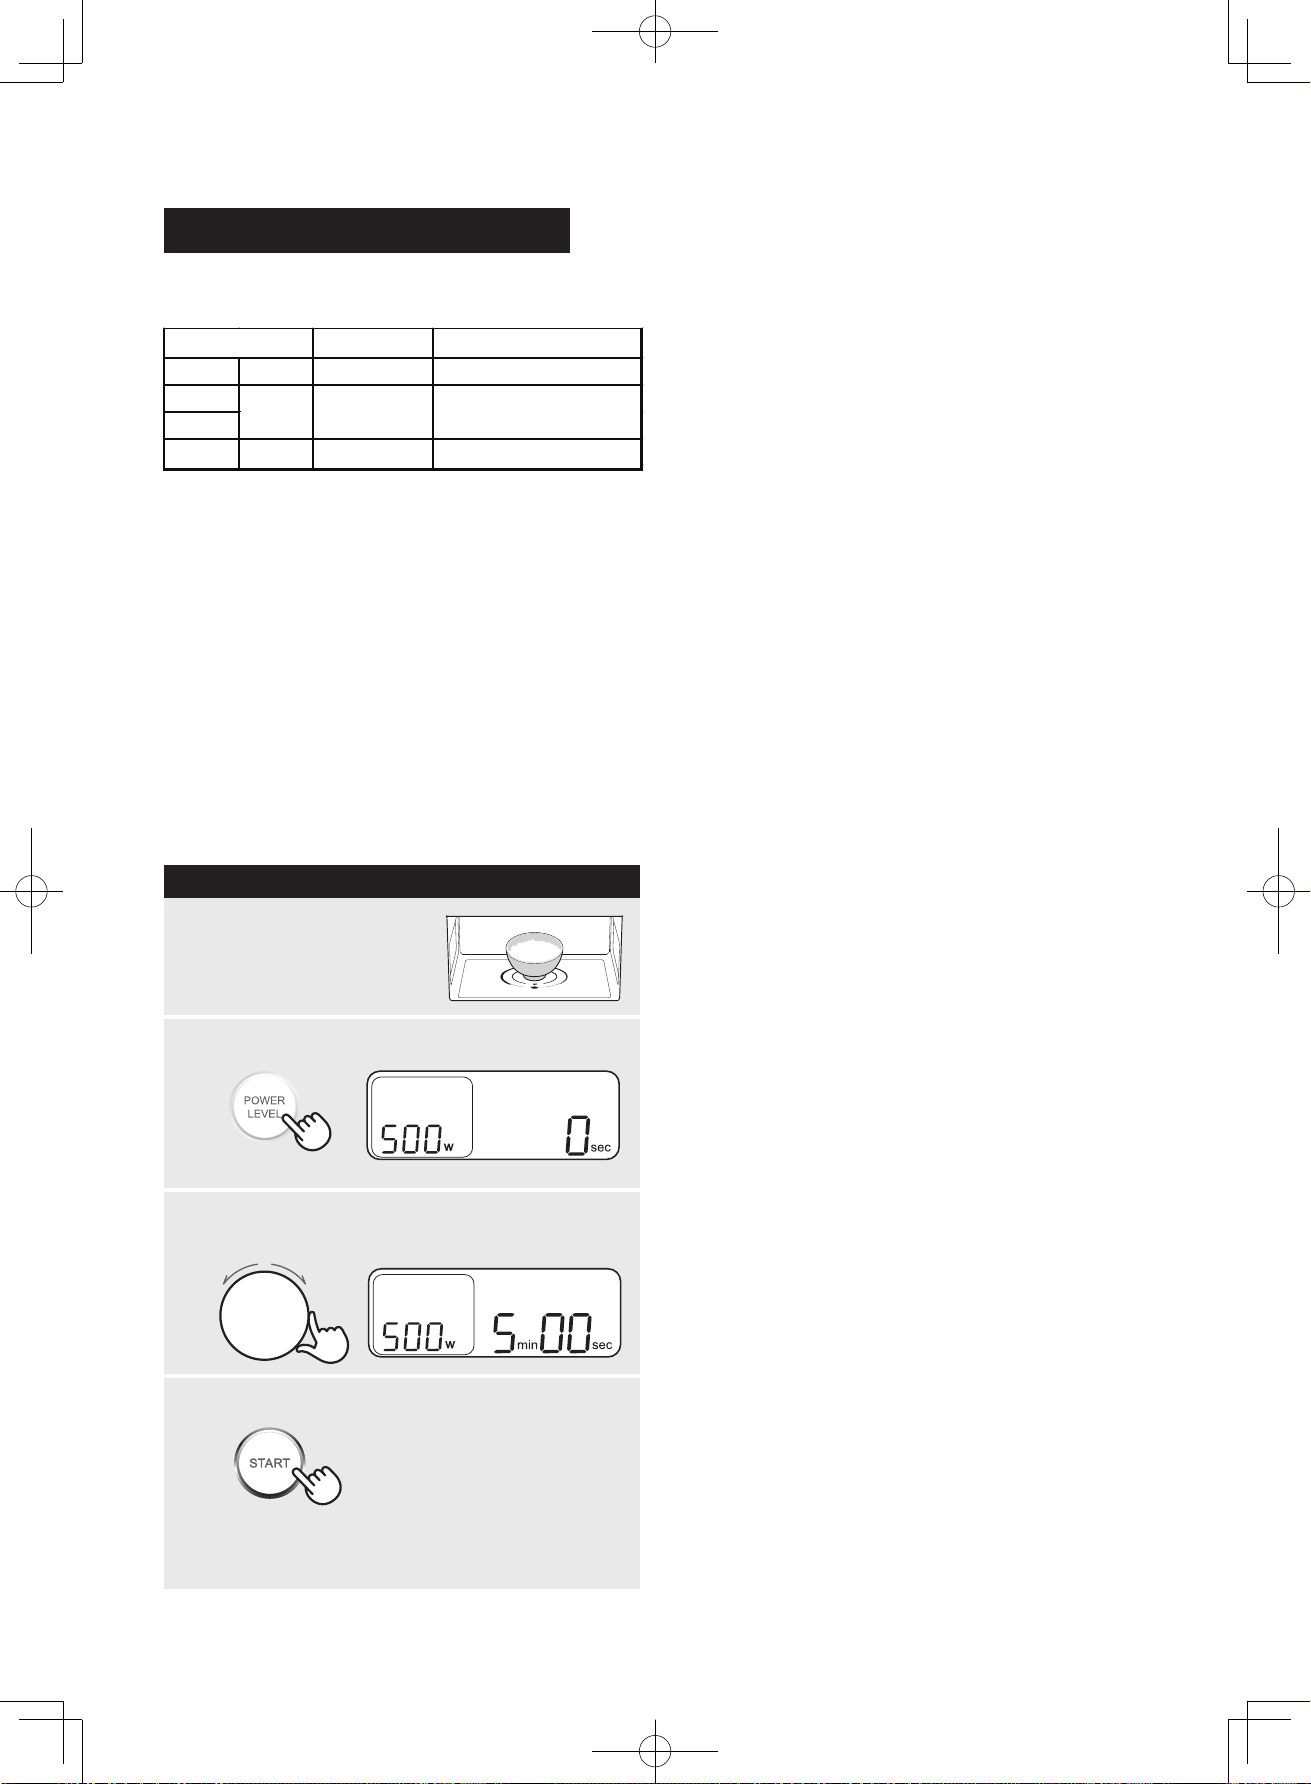
PROCEDURE
1
Press POWER LEVEL to select power level.
2
Place food in the centre
of the oven floor.
NOTES:
1. Do not use the donabe (except the instruction in
this operation manual)
2. To cook a little quantity of food, set shorter
amount of time to prevent smoking or ignition.
Set the cooking time for 20 - 30 seconds, and keep
an eye during the cooking.
* Suppose you want to cook for 5 minutes on 500W.
Microwave Time Cooking
When cook under microwave manually, first enter the
power level, then the cooking time.
×2
3
Turn the dial to enter desired cooking time.
Use a container appropriate for the food quantity.
Time range Examples
850W High 0 - 20 min. Heat foods quickly
600W
500W
200W
Power level
0 - 20 min.
0 - 60 min.
Medium
Low
Heat up foods,
Heat delicate foods
Defrost, Stew
Power Level
There are four different power levels.
The default power level setting is 600W.
To change the power press POWER LEVEL until desired
power level is displayed.
Time Range
Your oven can be programmed for up to 60 minutes
depending on the power level.
Turn the dial clockwise or counter-clockwise to
decrease or increase cooking time.
The input unit for 0 - 20 minutes is 10 seconds, and for
20- 60 minutes is 1 minute.
The display will count down through the cooking
time. When the cooking time reaches zero, the oven
will “beep”.
TIPS:
1.
2.
3. Do not cook small quantity of finely cut roots
(e.g. carrot) and the like. Cooking small amount
can cause sparks, burnt food and combustion.
Press START.
4
80 - 500g of food can be cooked at a time.
R-D219G
E-9
E-10
AUTOMATIC COOKING
Reheat has 2 options.
See the Reheat Menu Guide on page E-17.
PROCEDURE
1
Place food in the centre
of the oven floor.
2
3
NOTES:
1. Never use AUTO (Reheat) to heat any beverages to
prevent the eruptive boiling.
Reheat
* Suppose you want to reheat 2 cups of milk.
Press REHEAT/DEFROST once.
4
Defrost automatically defrosts m eat and fish with
100 - 500 g in each time. The increasing unit is 50g.
See Defrost Tips on page E-17.
PROCEDURE
1
2
3
NOTES:
1.
2.
While the oven cavity temperature is too high, you
cannot use Defrost. The display will show “U 04” .
Defrost
* Suppose you want to defrost 300 g of meat.
Turn the dial to select
the desired meny number and quantity.
Press START.
The display will count down through the cooking
time. When it reaches zero, the oven will “beep”.
Menu
1. Steamed rice
1-2 servings
2. Beverage
Quantity
1-2 cups
Place food in the centre
of the oven floor.
Press REHEAT/DEFROST twice.
Turn the dial to select
the desired amount (300 g).
4
Press START.
To change the final cooking result from the standard
setting ( ), press MORE or LESS within 10 seconds.
Do not use the donabe.
Aer about 10 seconds, the indicator selected will
remain on the display and the defrosting time will
begin counting down.
When it reaches zero, the oven will “beep”.
Display
1-1 cup, 1-2 cup
2-1 cup, 2-2 cup
The display shows menu
number and quantity:
Menu number
Quantity
2. Do not use the donabe.
×1
×2
MANUAL COOKING
PROCEDURE
1
Press POWER LEVEL to select power level.
2
Place food in the centre
of the oven floor.
NOTES:
1. Do not use the donabe (except the instruction in
this operation manual)
2. To cook a little quantity of food, set shorter
amount of time to prevent smoking or ignition.
Set the cooking time for 20 - 30 seconds, and keep
an eye during the cooking.
* Suppose you want to cook for 5 minutes on 500W.
Microwave Time Cooking
When cook under microwave manually, first enter the
power level, then the cooking time.
×2
3
Turn the dial to enter desired cooking time.
Use a container appropriate for the food quantity.
Time range Examples
850W High 0 - 20 min. Heat foods quickly
600W
500W
200W
Power level
0 - 20 min.
0 - 60 min.
Medium
Low
Heat up foods,
Heat delicate foods
Defrost, Stew
Power Level
There are four different power levels.
The default power level setting is 600W.
To change the power press POWER LEVEL until desired
power level is displayed.
Time Range
Your oven can be programmed for up to 60 minutes
depending on the power level.
Turn the dial clockwise or counter-clockwise to
decrease or increase cooking time.
The input unit for 0 - 20 minutes is 10 seconds, and for
20- 60 minutes is 1 minute.
The display will count down through the cooking
time. When the cooking time reaches zero, the oven
will “beep”.
TIPS:
1.
2.
3. Do not cook small quantity of finely cut roots
(e.g. carrot) and the like. Cooking small amount
can cause sparks, burnt food and combustion.
Press START.
4
80 - 500g of food can be cooked at a time.

R-D219G
E-11
E-12
OTHER CONVENIENT FEATURES
You can adjust cooking results for AUTO (Reheat) and
Defrost as you like.
Should you discover that you like the automatic
settings slightly more done, press MORE once within
10 sec. aer pressing START.
The display will show “ ”.
Should you discover that you like any automatic
settings slightly less done, press LESS once within
10 sec. aer pressing START.
While “ ” is flashing, you can change the setting.
Automatic Cooking Time Adjustment
(More or Less Time Adjustment)
End of Cooking Reminder
At end of cooking, the oven will signal and repeat aer
1, 2 and 3 minutes unless door is opened or STOP/
CLEAR is pressed.
Mute the Oven
To mute the oven, make sure the initial display is
shown and press DONABE for 4 sec. until the 2 short
beeps sound. Then press STOP/CLEAR.
NOTES:
1. The oven will hold the setting even if the power is
interrupted.
2. The following 2 signals will sound even if the oven
is in the mute setting.
- Error sound
- Cancelation sound during oven operation
3. To restore the sound, press DONABE for 4 sec. until
a short beep sounds. Then press STOP/CLEAR.
The display will show “ ”.
If no pad is pressed within 10 sec, the standard
setting will be selected automatically.
TROUBLESHOOTING
If “C with number” is displayed or you think the oven is not working properly, check the chart below before
consulting a SERVICE CENTRE APPROVED BY SHARP. This will help to prevent unnecessary service calls.
• Repairs and Modifications: Do not attempt to operate the oven if it is not working properly.
• Outer cabinet & Lamp Access: Never remove the outer cabinet to avoid the possibility of electric shock or burns.
Error Message/Information Message
DISPLAY ACTION
U 04
The oven is too hot to use AUTO (Reheat) and Defrost.
Remove food from oven and allow to cool until the message clears.
C
number
Due to technical error, contact a SERVICE CENTRE APPROVED BY SHARP.
Troubleshooting Chart
The following situations are normal and are not signs that the oven is malfunctioning.
QUESTION / SITUATION ANSWER
Control panel /
power supply
The display is black / blank. *
Open the door and close.
* Check the power plug is properly connected to a
suitable wall outlet.
* Check the wall socket and fuse are functioning properly.
Electrical power supply is
interrupted during cooking.
* The programmed cooking time and mode will be
cancelled.
* Continue to cook manually.
The remaining time has
changed.
It is normal for Donabe RICE cooking. It is the standing
time for steaming. At first, the display counts down the
cooking time When it reaches zero, the oven will “beep”.
Continuously, the display will show and count down
its steaming time. See page E-8.
NOTE: In the following situations, the display will be blank
in approx. 5 minutes.
1. “0” is appeared on the display.
2. While you set any cooking programme.
3. Pause in AUTO (Reheat) or in Microwave Time Cooking.
Steam Water is found inside the oven
when the door is opened.
Steam has condensed inside the oven. Wipe dry with a
so cloth or a sponge aer cooling.
Noise / Sound
Noise during cooking. * The cooling fan will operate during cooking.
* The oven will control the output power.
Noise aer cooking. The cooling fan will operate until the oven is cool.
The fan may continue to operate for 1 minute
30 seconds.
3 short beeps sound.
Smoke / Aroma
The oven cavity smells aer
cooking.
Check the oven cavity is clean without any food spatters.
It is important to clean the oven interior aer every use.
The menu does not have a good
result.
* Check the food is put in the centre of the oven floor.
* Check the food quantity is correct.
Others
No sound when pressing any pads.
The oven is in mute. See page E-11.
It is the reminder sound. It will sound 3 times every 1
minute aer cooking unless door is opened or
STOP/CLEAR is pressed.
Any pads do not activate. Retry aer pressing STOP/CLEAR.

R-D219G
E-13
E-14
CARE AND CLEANING
- Disconnect the power supply cord before cleaning.
CLEAN THE OVEN AT REGULAR INTERVALS - Keep the oven clean and remove any food deposits, or it could
lead to deterioration of the surface. This could adversely affect the life of the appliance and possibly result in a
hazardous situation.
Exterior:
The outside may be cleaned with mild soap and warm water, wipe clean with a damp cloth. Avoid the use of harsh
abrasive cleaners. Keep the ventilation openings free of dust.
Door:
Wipe the door and window on both sides, the door seals and adjacent parts frequently with a damp cloth to
remove any spills or spatters. Do not use harsh abrasive cleaners or sharp metal scrapers to clean the oven
door glass since they can scratch the surface, which may result in shattering of the glass.
Control Panel:
Wipe the panel with a cloth dampened slightly with water only.
Do not scrub or use any sort of chemical cleaners. Avoid the use of excess water.
Interior walls:
To clean the interior surfaces, wipe with a so cloth and warm water. Aer use wipe the oven floor with a so damp
cloth to remove any food splashes. Built-up splashes may overheat and begin to smoke or catch fire.
DO NOT USE A COMMERCIAL OVEN CLEANER, ABRASIVE OR HARSH CLEANERS AND SCOURING PADS ON ANY PART
OF YOUR MICROWAVE OVEN. NEVER SPRAY OVEN CLEANERS DIRECTLY ONTO ANY PART OF YOUR OVEN.
Avoid using excess water. Aer cleaning the oven, ensure any water is removed with a so cloth.
Donabe:
Wash with mild soapy water and dry thoroughly. DO NOT USE SCOURING PADS. To prevent the donabe from
breaking, do not get it cool rapidly aer use.
SERVICE CALL CHECK
Please check the following before calling for service:
Place one cup of water (approx. 250 ml) in a glass measure in the oven and close the door securely.
Start
to operate the oven for 1 minute at power 850W.
A. Does the oven lamp come on?
YES _________ NO _________
B. Does the cooling fan work? (Put your hand over the rear ventilation openings) YES _________ NO _________
C. Aer one minute, did audible signals sound?
YES _________ NO _________
D. Is the water inside the oven hot? YES _________ NO _________
If “NO” is the answer to any of the above questions, please check your wall socket and the fuse in your meter box.
If both the wall socket and the fuse are functioning properly, CONTACT YOUR NEAREST SERVICE CENTRE APPROVED
BY SHARP.
SPECIFICATIONS
AC Line Voltage : 230V, 50Hz
AC Power Required : 1,350 W
Output Power : 850 W* (IEC test procedure)
Microwave Frequency : 2,450 MHz (Class B/Group 2)**
Outside Dimensions : 410 mm(W) x 360 mm(H) x 317 mm(D)
Cavity Dimensions : 330 mm(W) x 170 mm(H) x 285 mm(D)***
Oven Capacity : 19 litre****
Weight : Approx. 10 kg
* This measurement is based on the International Electrotechnical Commission’s standardised method for
measuring output power.
** This is the classifi cation of ISM (Industrial, Scientific and Medical) equipment described in the International Standard
CISPR11.
**** Internal capacity is calculated by measuring maximum width, depth and height. Actual capacity for holding
food is less.
Donabe (clay pot) : 193 mm(W) x 147 mm(H) x 169 mm(D), Approx. 1.3 kg
NOTE:
1. If you cook the food over 3 minutes on 850 W power level, output power will be reduced to avoid overheating.
As part of a policy of continuous improvement, we reserve the right to alter design and specification without notice.
*** The depth does not include the door opening handle.
2. If indicators on the display change rapidly, the oven is set in the demonstration mode. Press LESS 3 times under
pressing STOP/CLEAR, the oven will “beep” and “0” will appear on the display.
COOKING GUIDES
Microwave Cooking Techniques
Watch cooking time
Cook for the shortest amount of time indicated and add more time as
needed.
Food severely over-cooked can smoke or ignite.
Cover foods before cooking
Check recipe for suggestions: paper towels, microwave plastic wrap
or a lid.
Covers prevent spattering and help foods to cook evenly.
(Helps keep oven clean)
Shield foods
Use small pieces of aluminium foil to cover thin areas of meats or
poultry in order to avoid overcooking.
Stir foods
From outside to center of dish once or twice during cooking, if possible.
Turn foods
Foods such as chicken, hamburgers or steaks should be turned over
once during cooking.
Rearrange foods
Like meatballs halfway through cooking both from top to bottom and
from the center of the dish to the outside.
Allow standing time
Aer cooking ensure adequate standing time.
Remove food from oven and stir if possible.
Cover for standing time which allows the food to finish cooking without
overcooking.
Check for doneness
Look for signs indicating that cooking temperature has been reached.
Doneness signs include:
– Food steams throughout, not just at edge.
– Poultry thigh joints move easily.
– Pork and poultry show no pinkness.
– Fish is opaque and fl akes easily with a fork.
Condensation
A normal part of microwave cooking. The humidity and moisture
in food will influence the amount of
moisture in the oven. Generally,
covered foods will not cause as much condensation as uncovered
foods. Ensure that the ventilation openings are not blocked.
Browning dish
When using a browning dish or self-heating material, always place a
heat-resistant insulator such as a porcelain plate under it to prevent
damage to the turntable, roller stay and coupling due to heat stress.
The preheating time specifi ed in the dish’s instructions must not be
exceeded.
Microwave safe plastic wrap
For cooking food with high fat content, do not bring the wrap in contact
with the food as it may melt.
Microwave safe plastic
cookware
Some microwave safe plastic cookware are not suitable for cooking
foods with high fat and sugar content.
R-D219G
E-13
E-14
CARE AND CLEANING
- Disconnect the power supply cord before cleaning.
CLEAN THE OVEN AT REGULAR INTERVALS - Keep the oven clean and remove any food deposits, or it could
lead to deterioration of the surface. This could adversely aect the life of the appliance and possibly result in a
hazardous situation.
Exterior:
The outside may be cleaned with mild soap and warm water, wipe clean with a damp cloth. Avoid the use of harsh
abrasive cleaners. Keep the ventilation openings free of dust.
Door:
Wipe the door and window on both sides, the door seals and adjacent parts frequently with a damp cloth to
remove any spills or spatters. Do not use harsh abrasive cleaners or sharp metal scrapers to clean the oven
door glass since they can scratch the surface, which may result in shattering of the glass.
Control Panel:
Wipe the panel with a cloth dampened slightly with water only.
Do not scrub or use any sort of chemical cleaners. Avoid the use of excess water.
Interior walls:
To clean the interior surfaces, wipe with a so cloth and warm water. Aer use wipe the oven floor with a so damp
cloth to remove any food splashes. Built-up splashes may overheat and begin to smoke or catch fire.
DO NOT USE A COMMERCIAL OVEN CLEANER, ABRASIVE OR HARSH CLEANERS AND SCOURING PADS ON ANY PART
OF YOUR MICROWAVE OVEN. NEVER SPRAY OVEN CLEANERS DIRECTLY ONTO ANY PART OF YOUR OVEN.
Avoid using excess water. Aer cleaning the oven, ensure any water is removed with a so cloth.
Donabe:
Wash with mild soapy water and dry thoroughly. DO NOT USE SCOURING PADS. To prevent the donabe from
breaking, do not get it cool rapidly aer use.
SERVICE CALL CHECK
Please check the following before calling for service:
Place one cup of water (approx. 250 ml) in a glass measure in the oven and close the door securely.
S
tart to operate the oven for 1 minute at power 850W.
A. Does the oven lamp come on?
YES _________ NO _________
B. Does the cooling fan work? (Put your hand over the rear ventilation openings) YES _________ NO _________
C. Aer one minute, did audible signals sound?
YES _________ NO _________
D. Is the water inside the oven hot? YES _________ NO _________
If “NO” is the answer to any of the above questions, please check your wall socket and the fuse in your meter box.
If both the wall socket and the fuse are functioning properly, CONTACT YOUR NEAREST SERVICE CENTRE APPROVED
BY SHARP.
SPECIFICATIONS
AC Line Voltage : 230V, 50Hz
AC Power Required : 1,350 W
Output Power : 850 W* (IEC test procedure)
Microwave Frequency : 2,450 MHz (Class B/Group 2)**
Outside Dimensions : 410 mm(W) x 360 mm(H) x 317 mm(D)
Cavity Dimensions : 330 mm(W) x 190 mm(H) x 298 mm(D)***
Oven Capacity : 19 litre****
Weight : Approx. 10 kg
* This measurement is based on the International Electrotechnical Commission’s standardised method for
measuring output power.
** This is the classifi cation of ISM (Industrial, Scientific and Medical) equipment described in the International Standard
CISPR11.
**** Internal capacity is calculated by measuring maximum width, depth and height. Actual capacity for holding
food is less.
Donabe (clay pot) : 192 mm(W) x 143 mm(H) x 168 mm(D), Approx. 1.3 kg
NOTE:
1. If you cook the food over 3 minutes on 850 W power level, output power will be reduced to avoid overheating.
As part of a policy of continuous improvement, we reserve the right to alter design and specification without notice.
*** The depth does not include the door opening handle.
2. If indicators on the display change rapidly, the oven is set in the demonstration mode. Press LESS 3 times under
pressing STOP/CLEAR, the oven will “beep” and “0” will appear on the display.
COOKING GUIDES
Microwave Cooking Techniques
Watch cooking time
Cook for the shortest amount of time indicated and add more time as
needed.
Food severely over-cooked can smoke or ignite.
Cover foods before cooking
Check recipe for suggestions: paper towels, microwave plastic wrap
or a lid.
Covers prevent spattering and help foods to cook evenly.
(Helps keep oven clean)
Shield foods
Use small pieces of aluminium foil to cover thin areas of meats or
poultry in order to avoid overcooking.
Stir foods
From outside to center of dish once or twice during cooking, if possible.
Turn foods
Foods such as chicken, hamburgers or steaks should be turned over
once during cooking.
Rearrange foods
Like meatballs halfway through cooking both from top to bottom and
from the center of the dish to the outside.
Allow standing time
Aer cooking ensure adequate standing time.
Remove food from oven and stir if possible.
Cover for standing time which allows the food to finish cooking without
overcooking.
Check for doneness
Look for signs indicating that cooking temperature has been reached.
Doneness signs include:
– Food steams throughout, not just at edge.
– Poultry thigh joints move easily.
– Pork and poultry show no pinkness.
– Fish is opaque and fl akes easily with a fork.
Condensation
A normal part of microwave cooking. The humidity and moisture
in food will influence the amount of moisture in the oven. Generally,
covered foods will not cause as much condensation as uncovered
foods. Ensure that the ventilation openings are not blocked.
Browning dish
When using a browning dish or self-heating material, always place a
heat-resistant insulator such as a porcelain plate under it to prevent
damage to the turntable, roller stay and coupling due to heat stress.
The preheating time specifi ed in the dish’s instructions must not be
exceeded.
Microwave safe plastic wrap
For cooking food with high fat content, do not bring the wrap in contact
with the food as it may melt.
Microwave safe plastic
cookware
Some microwave safe plastic cookware are not suitable for cooking
foods with high fat and sugar content.
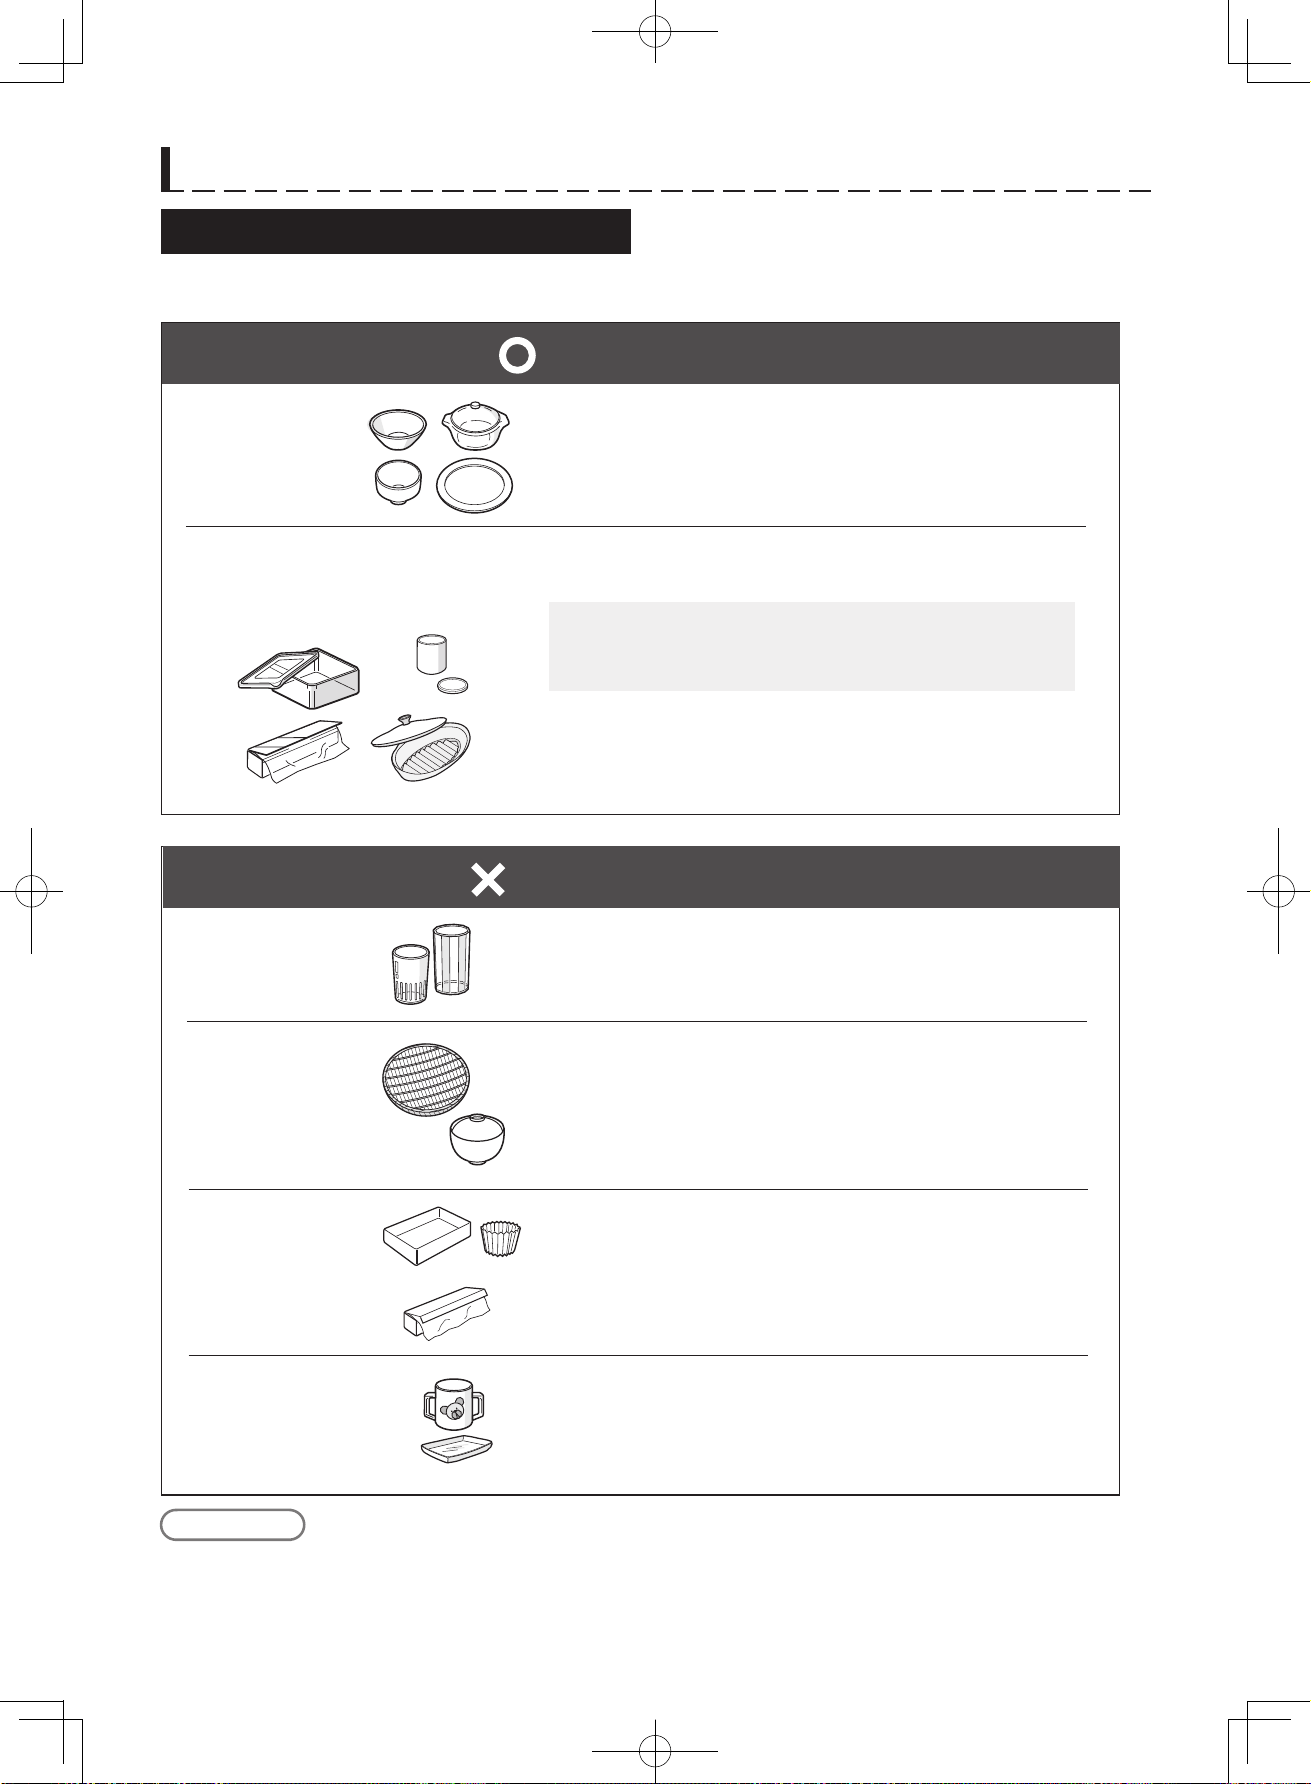
R-D219G
E-15
E-16
COOKING GUIDES
About Utensils and Coverings
The chart below will help you decide what utensils and coverings should be used in each mode.
Heat resistant
glass containers,
ceramics and
china ware
Plastic and silicon containers,
and wraps with heat resistance
of 140°C or more
● However, breakage can occur on rapid heating or cooling.
● Vessels with colored designs or cracks, or with gold or silver
inlay patterns cannot be used, as they may be damaged or
emit sparks.
●
However, cuisine with high sugar or oil content cannot
be used, as they deform or melt at high temperatures.
● When using sealed containers, please remove the lids.
Overheating may lead to smoke, fire or rapid boiling
(in the case of soups).
●
Please use those foods designated for use with electric
oven heating.
● Remove the lids before heating.
Can be used
Metallic containers
such as aluminum,
stainless steel and
enameled ware,
and aluminum foil
Lacquer ware,
bamboo and
paper products
Plastic containers
with less than 140°C
heat resistance
(Styrofoam trays etc.)
Glass containers
lacking heat
resistance
● These containers will peel, crack or burn.
● Heat-resistant baking sheets with instructions for use on
the packaging can be used.
●
Styrene, polyethylene, melamine (for infant utensils etc.),
phenol and urea resin will alter with radio waves.
●
Reinforced glass, cut glass and crystal glass also cannot
be used.
●
Sparks will be emitted, damaging the product.
When wishing to use containers other than those above, please consult with the retail
source or manufacturer of the container.
Please note
Cannot be used
al
Wraps
COOKING GUIDES
Special Notes
DO DON'T
Eggs, fruits, nuts,
seeds, vegetables,
sausages and oysters
*
Puncture egg yolks and whites and oysters
before cooking to prevent “explosion”.
* Pierce skins of potatoes, apples, squash,
hot dogs, sausages and oysters so that
steam escapes.
*
Cook eggs in shells. This prevents “explosion”,
which may damage the oven or injure yourself.
* Cook hard / so boiled eggs.
* Overcook oysters.
* Dry nuts or seeds in shells.
Popcorn * Use specially bagged popcorn for the
microwave oven.
* Listen while popping corn for the popping
to slow to 1-2 seconds.
* Pop popcorn in regular brown bags or
glass bowls.
* Exceed maximum time on popcorn
package.
Baby food * Transfer baby food to small dish and heat
carefully, stirring oen. Check for suitable
temperature to prevent burns.
* Remove the screw cap and teat before
warming baby bottles. Aer warming shake
thoroughly. Check for suitable t
emperature.
* Heat disposable bottles.
* Overheat baby bottles.
* Heat bottles with nipples on.
* Heat baby food in original jars.
General * Food with filling should be cut aer heating,
to release steam and avoid burns.
* Use a deep bowl when cooking liquids or
cereals to prevent boiling over.
*
When cooking small amounts of finely cut roots
and the like, always soak them in an adequate
amount of water. Cooking small amounts of
less than 100g can cause accidents due to
sparks, burnt food, and combustion.
* Heat or cook in closed glass jars or
airtight containers.
* Deep fat fry.
* Heat or dry wood, herbs, wet papers,
clothes or flowers.
* Operate the oven without a load (i.e. an
absorbing material such as food or water)
in the oven cavity.
Liquids
(Beverages)
* For boiling or cooking liquids see
IMPORTANT SAFETY INSTRUCTIONS
on page E-1-2 to prevent explosion and
delayed eruptive boiling.
* Heat for longer than recommended time.
Canned foods
”Boil-in-the-bag” food
* Put bagged and canned food in a
container before cooking. Cooking food in
aluminum and other metal containers can
cause damage due to sparks.
* Heat or cook food while in cans or bags.
Sausage rolls, Pies,
Christmas pudding
* Cook for the recommended time. (These
foods have high sugar and / or fat contents)
* Overcook as they may catch fire.
R-D219G
E-15
E-16
COOKING GUIDES
About Utensils and Coverings
The chart below will help you decide what utensils and coverings should be used in each mode.
Heat resistant
glass containers,
ceramics and
china ware
Plastic and silicon containers,
and wraps with heat resistance
of 140°C or more
● However, breakage can occur on rapid heating or cooling.
● Vessels with colored designs or cracks, or with gold or silver
inlay patterns cannot be used, as they may be damaged or
emit sparks.
●
However, cuisine with high sugar or oil content cannot
be used, as they deform or melt at high temperatures.
● When using sealed containers, please remove the lids.
Overheating may lead to smoke, fire or rapid boiling
(in the case of soups).
●
Please use those foods designated for use with electric
oven heating.
● Remove the lids before heating.
Can be used
Metallic containers
such as aluminum,
stainless steel and
enameled ware,
and aluminum foil
Lacquer ware,
bamboo and
paper products
Plastic containers
with less than 140°C
heat resistance
(Styrofoam trays etc.)
Glass containers
lacking heat
resistance
● These containers will peel, crack or burn.
● Heat-resistant baking sheets with instructions for use on
the packaging can be used.
●
Styrene, polyethylene, melamine (for infant utensils etc.),
phenol and urea resin will alter with radio waves.
●
Reinforced glass, cut glass and crystal glass also cannot
be used.
●
Sparks will be emitted, damaging the product.
When wishing to use containers other than those above, please consult with the retail
source or manufacturer of the container.
Please note
Cannot be used
al
Wraps
COOKING GUIDES
Special Notes
DO DON'T
Eggs, fruits, nuts,
seeds, vegetables,
sausages and oysters
*
Puncture egg yolks and whites and oysters
before cooking to prevent “explosion”.
* Pierce skins of potatoes, apples, squash,
hot dogs, sausages and oysters so that
steam escapes.
*
Cook eggs in shells. This prevents “explosion”,
which may damage the oven or injure yourself.
* Cook hard / so boiled eggs.
* Overcook oysters.
* Dry nuts or seeds in shells.
Popcorn * Use specially bagged popcorn for the
microwave oven.
* Listen while popping corn for the popping
to slow to 1-2 seconds.
* Pop popcorn in regular brown bags or
glass bowls.
* Exceed maximum time on popcorn
package.
Baby food * Transfer baby food to small dish and heat
carefully, stirring oen. Check for suitable
temperature to prevent burns.
* Remove the screw cap and teat before
warming baby bottles. Aer warming shake
thoroughly. Check for suitable tem
perature.
* Heat disposable bottles.
* Overheat baby bottles.
* Heat bottles with nipples on.
* Heat baby food in original jars.
General * Food with filling should be cut aer heating,
to release steam and avoid burns.
* Use a deep bowl when cooking liquids or
cereals to prevent boiling over.
*
When cooking small amounts of finely cut roots
and the like, always soak them in an adequate
amount of water. Cooking small amounts of
less than 100g can cause accidents due to
sparks, burnt food, and combustion.
* Heat or cook in closed glass jars or
airtight containers.
* Deep fat fry.
* Heat or dry wood, herbs, wet papers,
clothes or flowers.
* Operate the oven without a load (i.e. an
absorbing material such as food or water)
in the oven cavity.
Liquids
(Beverages)
* For boiling or cooking liquids see
IMPORTANT SAFETY INSTRUCTIONS
on page E-1-2 to prevent explosion and
delayed eruptive boiling.
* Heat for longer than recommended time.
C
anned foods
”Boil-in-the-bag” food
* Put bagged and canned food in a
container before cooking. Cooking food in
aluminum and other metal containers can
cause damage due to sparks.
* Heat or cook food while in cans or bags.
Sausage rolls, Pies,
Christmas pudding
* Cook for the recommended time. (These
foods have high sugar and / or fat contents)
* Overcook as they may catch fire.
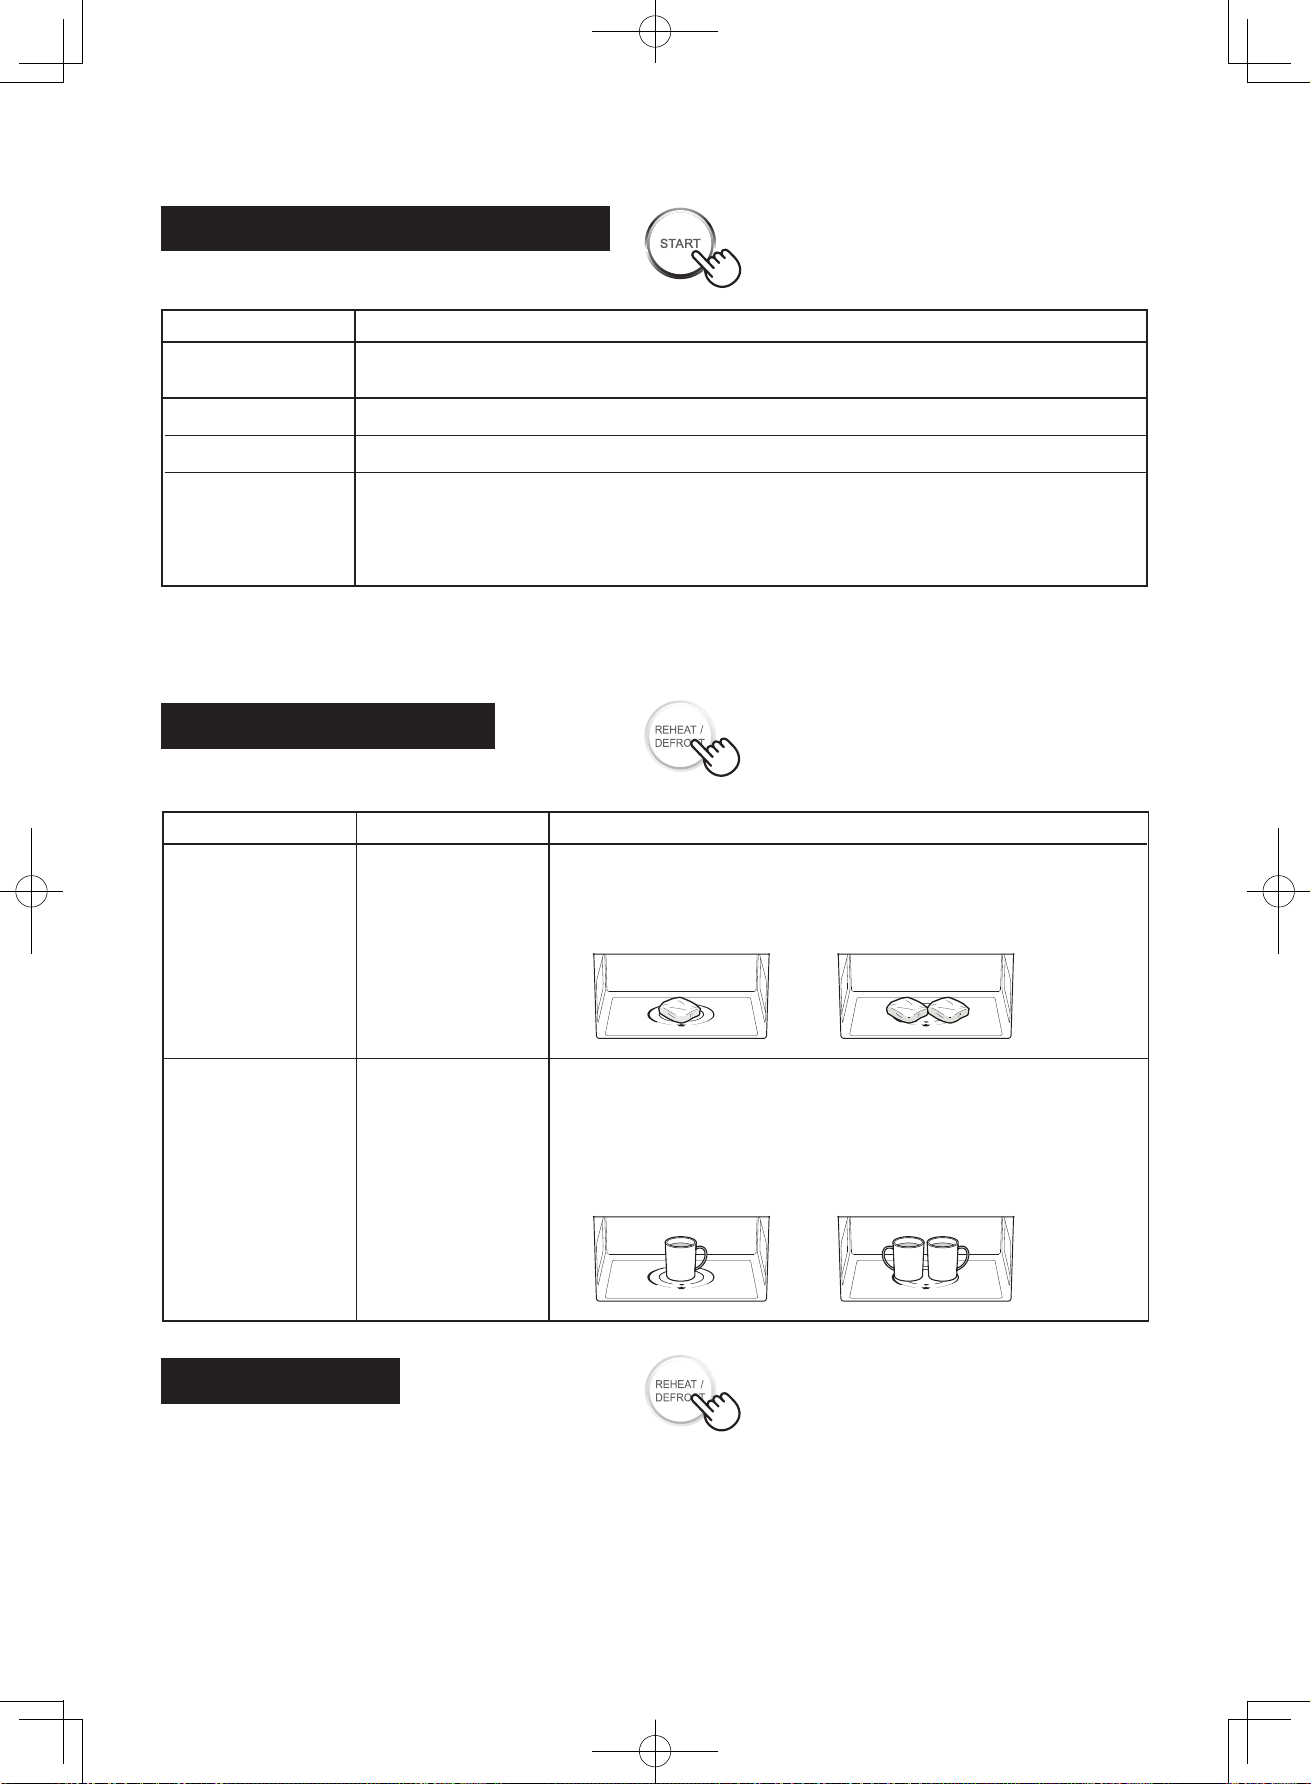
R-D219G
E-17
E-18
AUTOMATIC COOKING CHART
AUTO (Reheat) Menu Guide
AUTOMATIC COOKING CHART
AUTO (Donabe RICE cooking) Guide
Place the food in the centre of the oven floor.
Menu Name Tips
Rice • For room temperature and refrigerated.
• When reheating the hard texture rice, sprinkle water.
* Do not cook the following items to prevent “explosion”.
- Raw and boiled eggs ( both of in/without shells)
- Fried eggs
• Aer cooking, stir.
Curry • Cover with plastic wrap.
Noodles
• Aer cooking, stir.Side dish
Reheat Menu Guide
NOTES:
1. For frozen foods, cook manually.
2. Do not cood weighing less than 100 g with AUTO (Reheat).
×1
Menu Name Tips
1-1, 1-2
Steamed rice
(initial temp - 18°C)
• Put the overlapped wrapping side down on the oven floor.
• Use the flat frozen rice of 2-3 cm thick covered with plastic wrap.
•
Do not cover.
•
Use wide-mouthed container.
•
Aer cooking, stir.
2-1, 2-2
Beverage
Quantity
1-1: 1 serving
1-2: 2 servings
(1 serve: 150g)
2-1: 1 cup
2-2: 2 cups
(1 cup: 200mL)
•
Stir the liquid before cooking.
Place the food in the centre of the oven floor.
(1 cup) (2 cup)
Defrost Guide
×2
Milk
(initial temp 8° C)
Coffee
(initial temp 20°C )
• Defrost foods that just before take out from a freezer room.
• If foods already starts defrosted, use manual reheating on microwave 200W with attention.
• Prevent discolor or be boiled by cover the thin area of foods with aluminium foil. Be careful not to make the
foil touched a wall inside the oven cavity or the door, to prevent sparks or broken of glass door.
Weight Range: 100 - 500g
Place the food covered with plastic wrap in the centre of the oven floor.
(1serving) (2 servings)
AUTO Menu Time
Donabe Inner lid Outer lid
Rice 150g
Water 200ml
Rice 300g
Water 360ml
Rice 150g
Water 300ml
Rice 300g
Water 460ml
Rice 1 White rice (Thai rice: long grain rice)
Rice 2 White rice (Japanese rice: short grain rice)
Accessories
Ingredient
Rice 1 (Thai rice)
Rice 2 (Japan rice)
1-1 (TH)
2-1 (JP)
1-2 (TH)
2-2 (JP)
19min
30min30sec.
32min30sec.
35min30sec.
1cup
2cup
1cup
2cup
1cup
2cup
PROCEDURE
1
2
Wash the rice well and drain it with a colander.
Put
1 and water in a Donabe, and cover with the
Inner lid and Outer lid.
3
for 1 cup, heat with “Auto menu 1-1”.
for 2 cup, heat with “Auto menu 1-2”.
-for Thai rice
3
for 1 cup, heat with “Auto menu 2-1”.
for 2 cup, heat with “Auto menu 2-2”.
-for Japan rice
AUTO Menu Time
Donabe Inner lid Outer lid
Rice 150g
Water 240ml
Rice 3 Quick cooking (Thai rice: long grain rice)
Accessories
Ingredient
Rice 1 (Thai rice)
03 (TH) 18min
PROCEDURE
1
2
Wash the rice well and drain it with a colander.
3
Heat with “Auto menu 03”.
Put
1
and water in a Donabe, and cover with the Inner
lid and Outer lid.
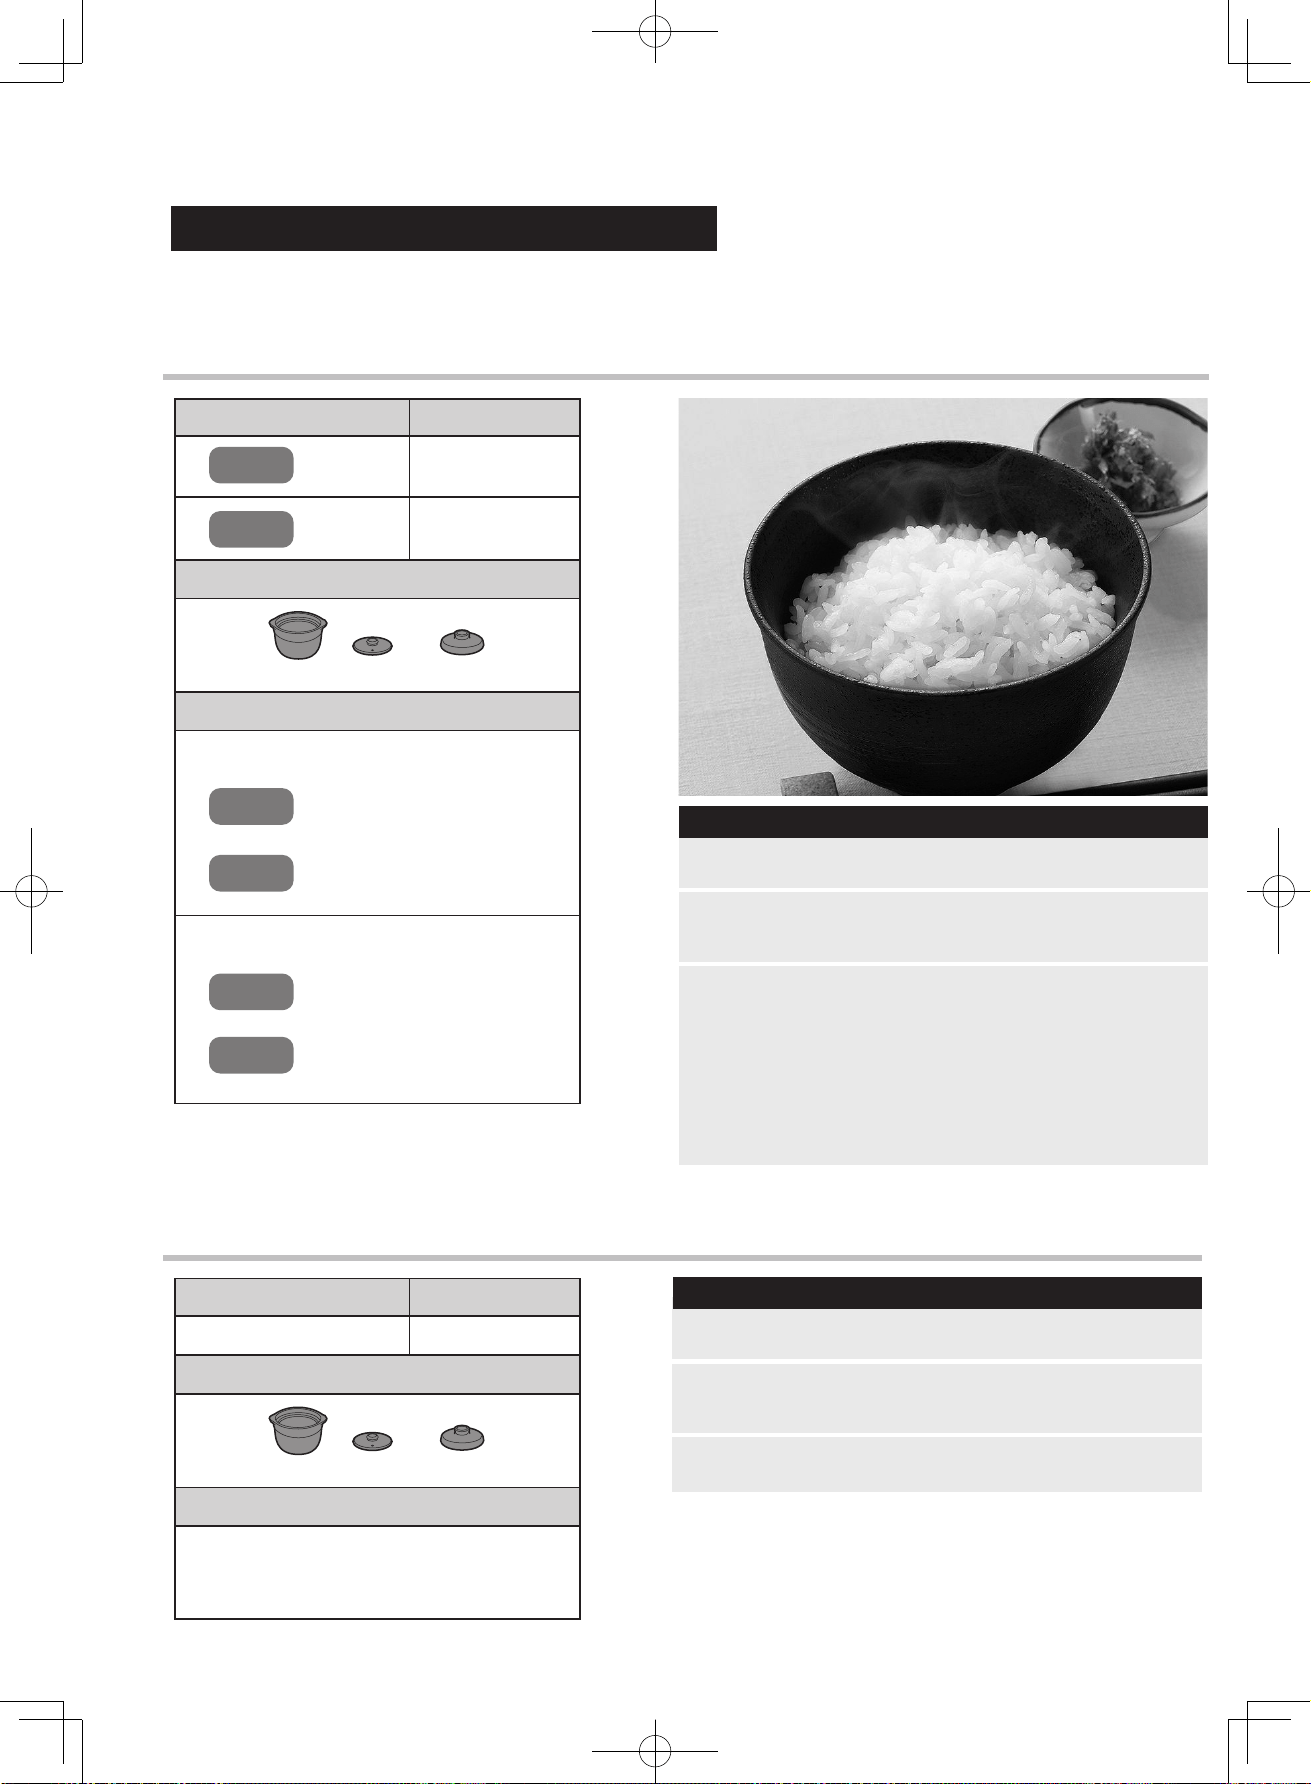
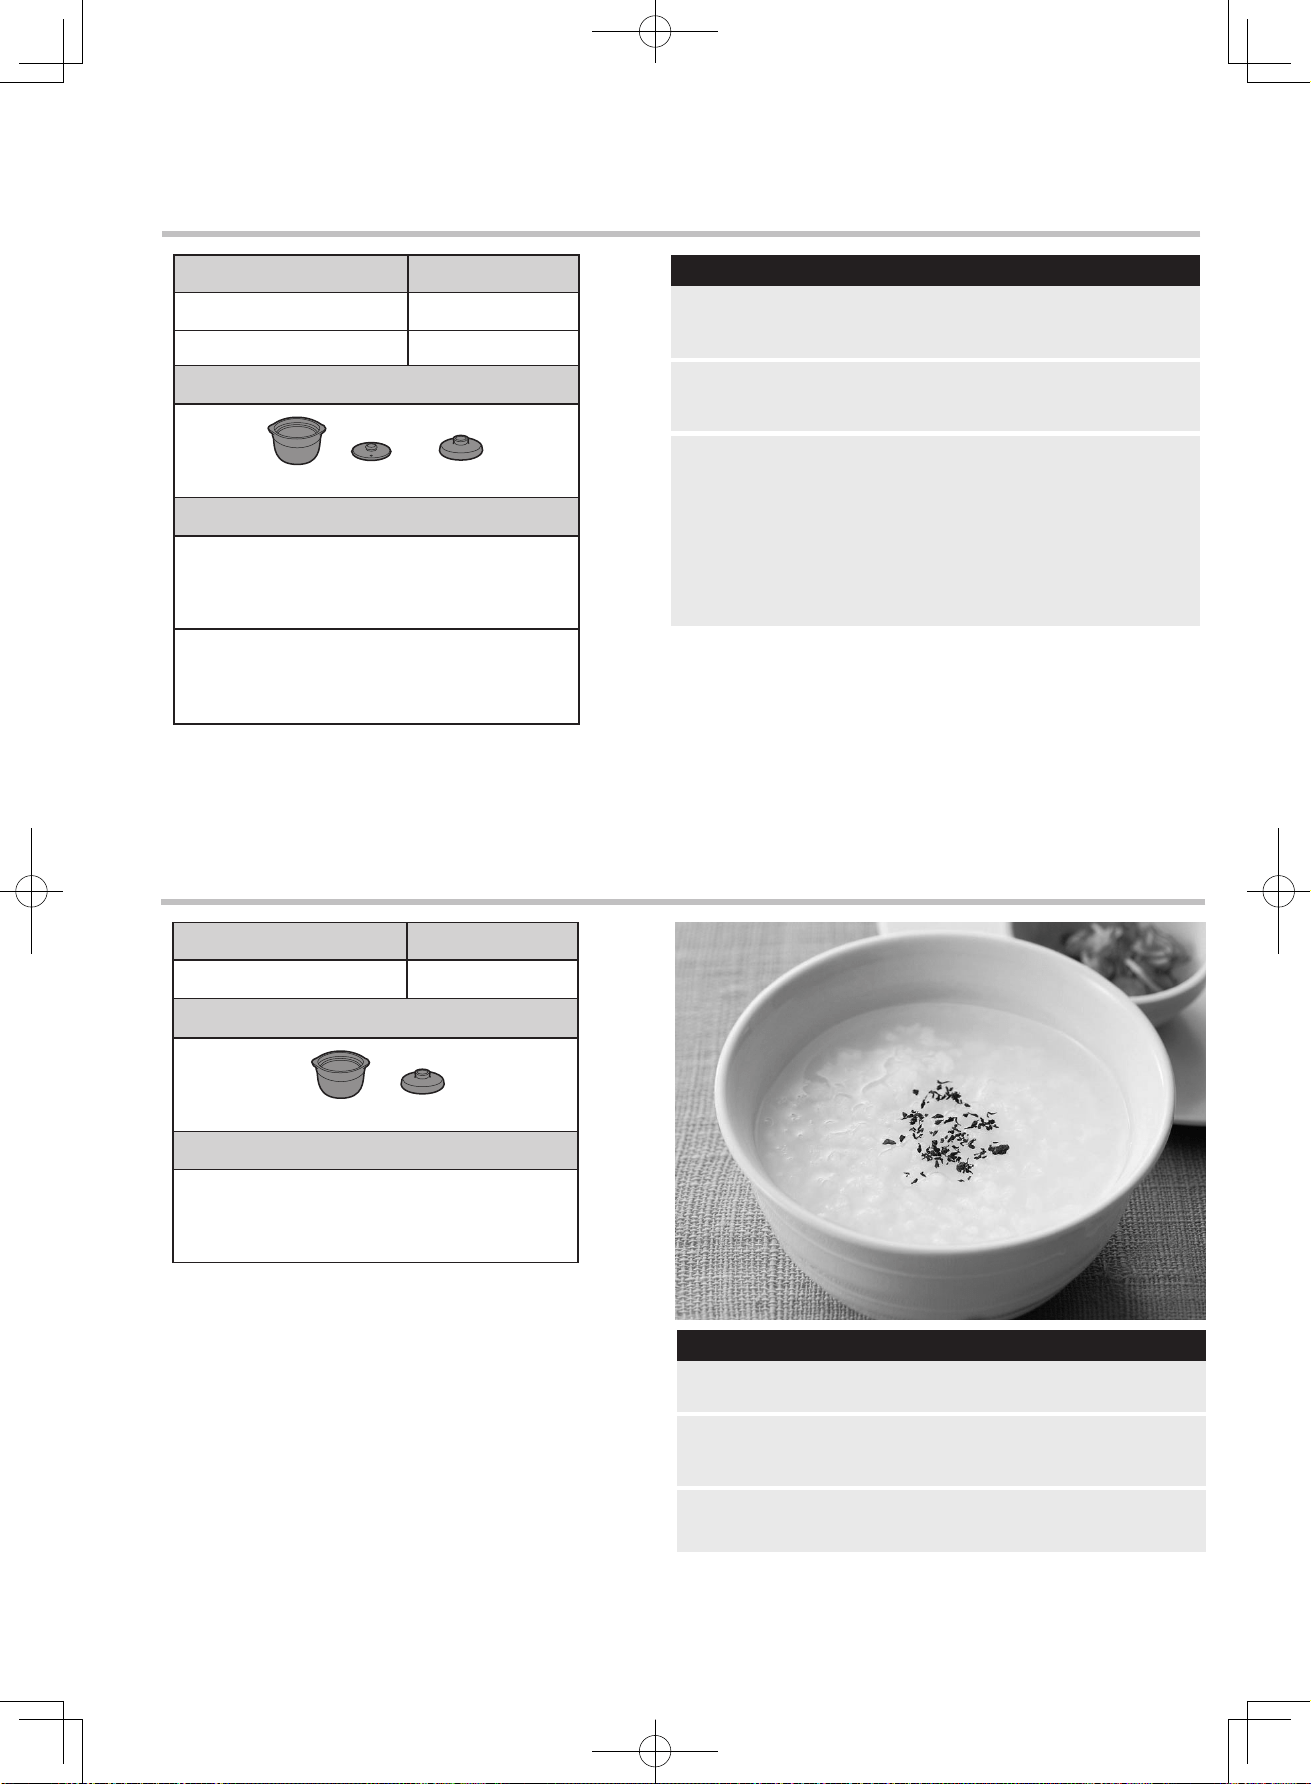
R-D219G
E-19
E-20
AUTO Menu Time
Donabe Inner lid Outer lid
Accessories
Ingredient
04 37min
05 37min
Donabe Outer lid
PROCEDURE
1
2
Wash the rice well and soak it in water for 3 hours.
then, drain it with a colander.
Put
1
and water in a Donabe, and cover with the
Inner lid and Outer lid.
3
Heat with “Auto menu 04”.
-for Multi grain rice
3
Heat with “Auto menu 05”.
-for Brown rice
Rice 150g
Water 320ml
Rice 5 (Brown rice)
Rice 150g
Water 320ml
Rice 4 (Multi grain rice)
Rice 75g
Water 350ml
Rice 4 (Multi grain rice)
AUTO Menu Time
Rice 6 (Porridge)
Accessories
Ingredient
06 35min
PROCEDURE
1
2
Wash the rice well and drain it with a colander.
3
Heat with “Auto menu 06”.
Put
1
and water in a Donabe, and cover with the
Outer lid.
Donabe Inner lid Outer lid
AUTO Menu Time
Rice 7 (Craypot rice)
Accessories
Ingredient
07 28min30sec.
PROCEDURE
1
2
Remove shells from shrimp.
Heat with “Auto menu 07”.
4
*Aer heating.
Add butter (or Oil) and Green peas and stir them.
5
3
Put “A, B, C and
2
” in the Donabe.
Then, cover with the Inner lid and Outer lid.
Wash the rice well and drain it with a colander.
Rice 150g
Chicken bouillon (powder) 2tsp
a pinch of salt, pepper
bay leaf 1pc
Green peas 50g
butter or oil 5g
Water 160ml
Onions (chopped) 50g
carrots (chopped) 50g
Corn kernels 50g
Shrimps 50g
A)
B)
C)
Rice 4 (Multi grain rice)
Rice 5 (Brown rice)
AUTOMATIC COOKING CHART
AUTO (Donabe DISH cooking) Guide
Donabe Inner lid Outer lid
AUTO Menu Time
Dish 21 (Boiled vegetables (so))
Accessories
Ingredient
21 + ▲ 3min30sec.
21 +・ 3min00sec.
21 + ▼ 2min40sec.
Vegetables 300-320g
Water 50ml
PROCEDURE
1
2
Cut the vegetables into 3-4 cm pieces.
Put
1
in a pan and add water and cover with the
Inner lid and Outer lid.
3
Heat with “Auto menu 21”.
3
Heat with “Auto menu 21 and ▲”.
-more hard
3
Heat with “Auto menu 21 and ▼”.
-more so
Asparagus
Broccoli
Carrot
Chinese cabbage
Cabbage
Spinach
ex, Try your favorite steamed vegetables
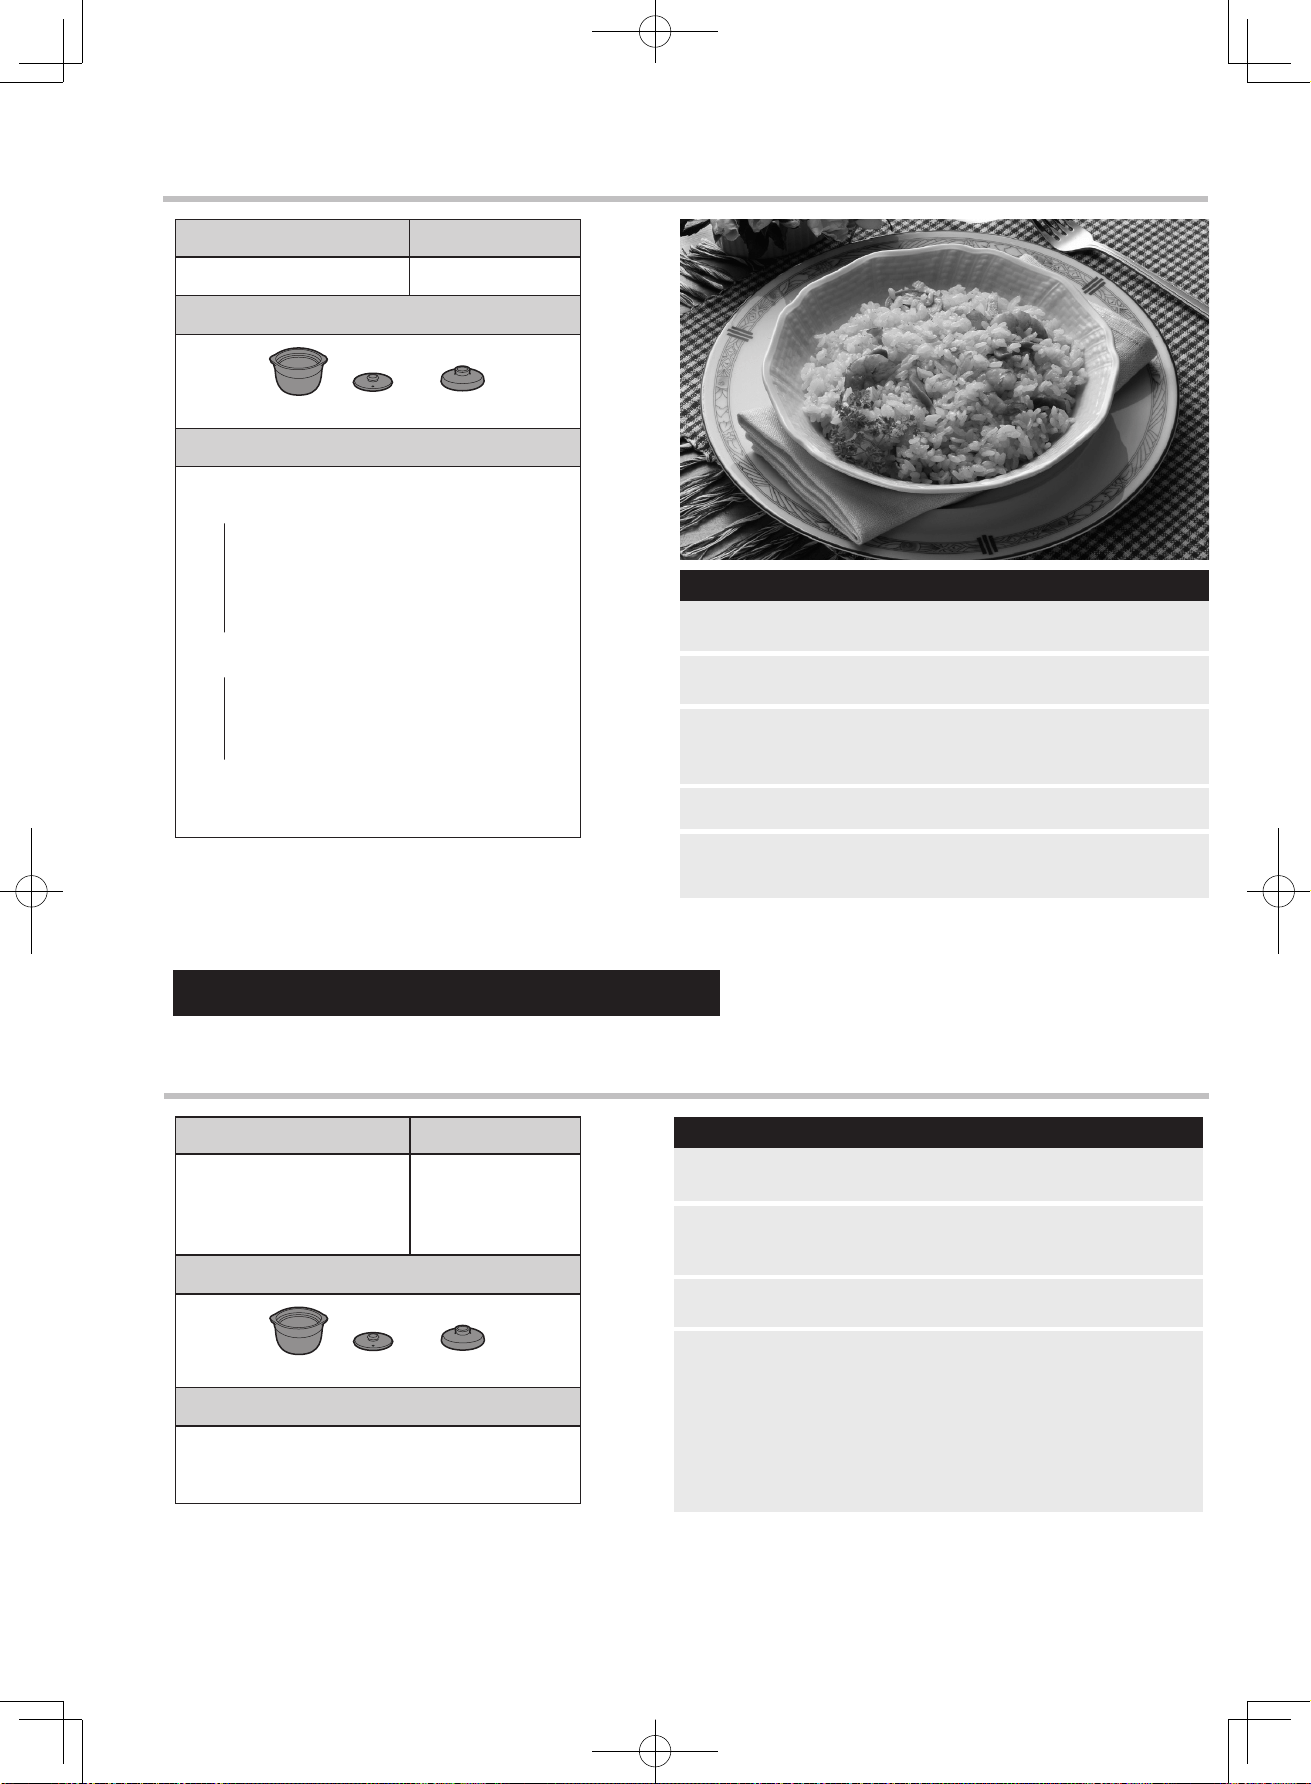
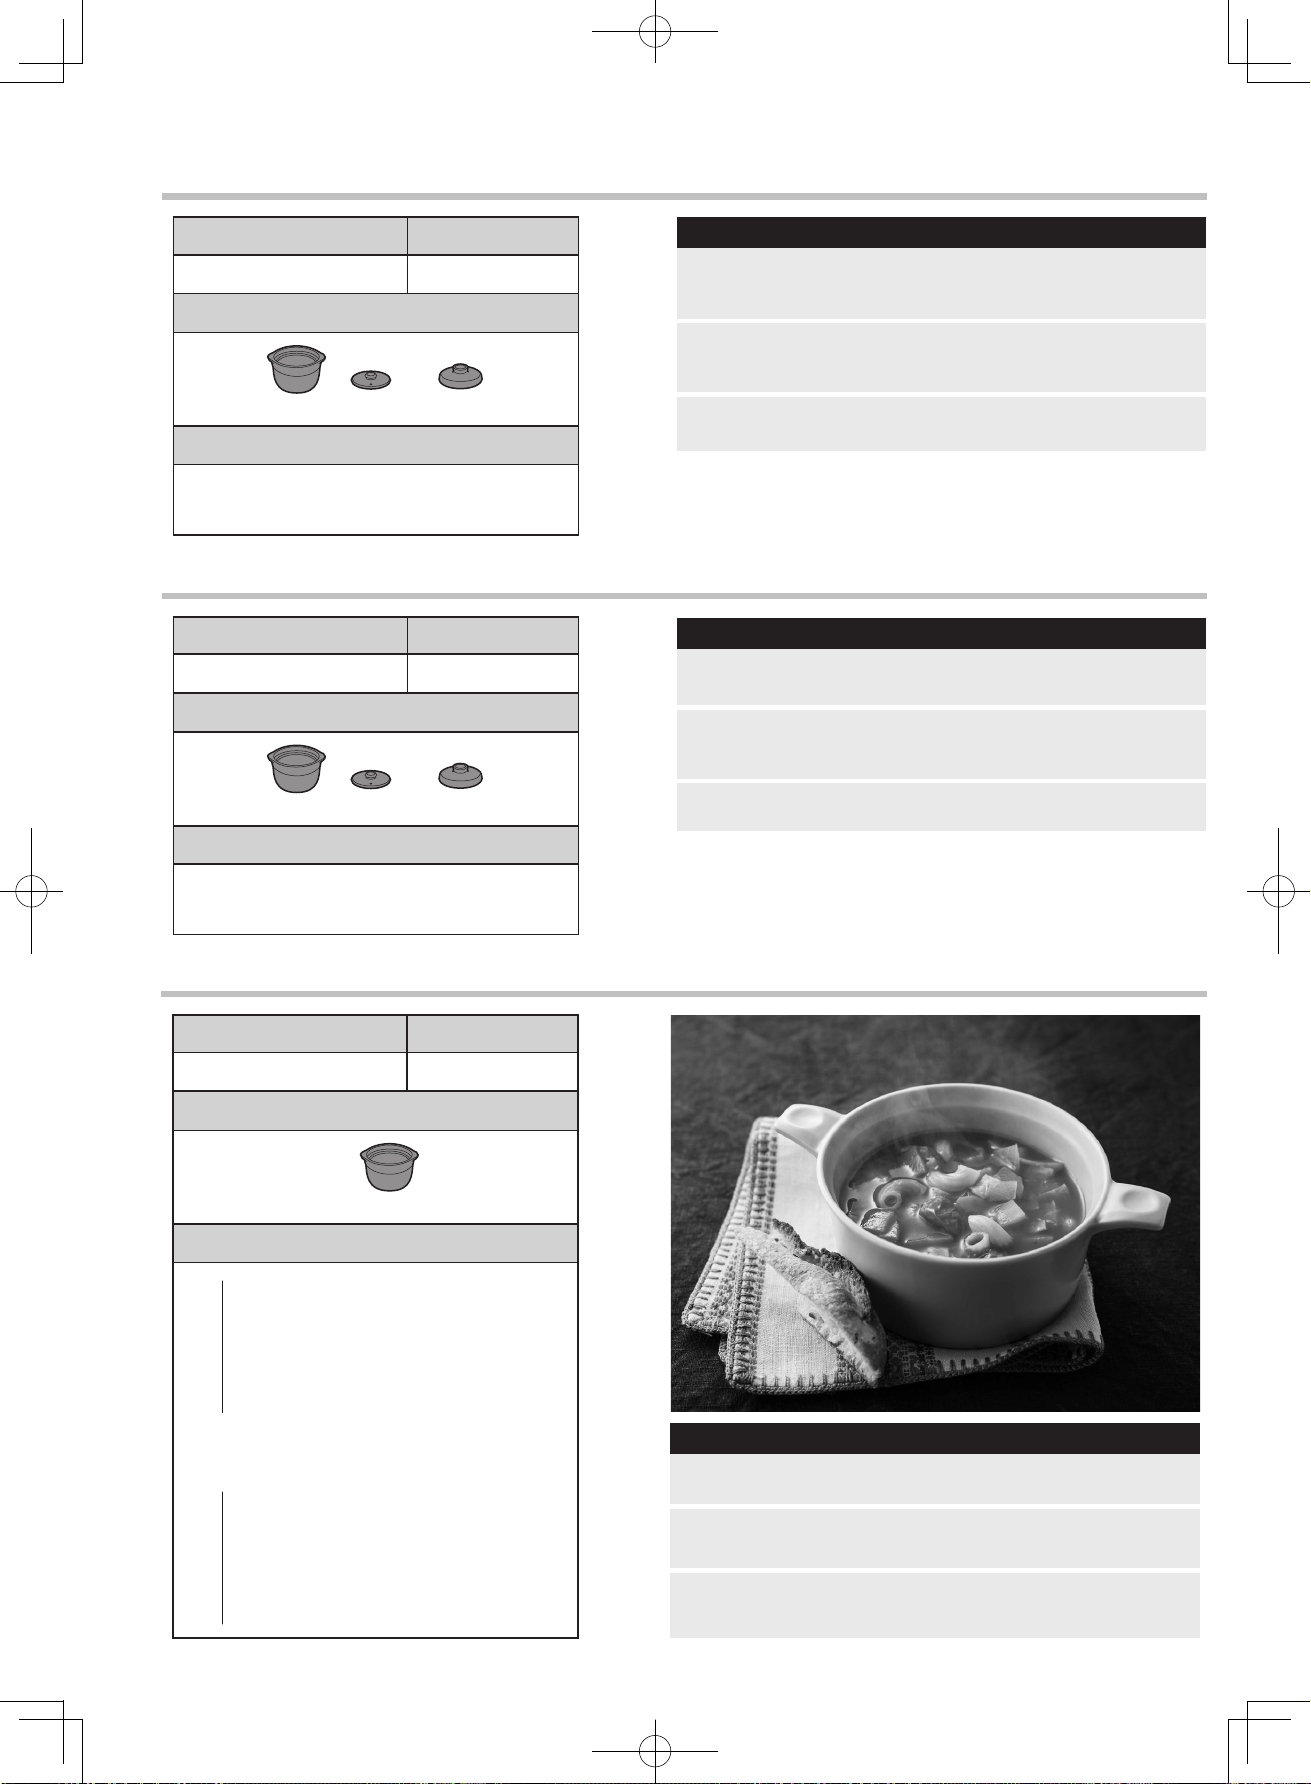
R-D219G
E-21
E-22
PROCEDURE
1
2
Cut the vegetables into 3-4 cm pieces.
Put
1
in a pan and add water and cover with the
Inner lid and Outer lid.
3
Heat with “Auto menu 23”.
AUTO Menu Time
Donabe Inner lid Outer lid
Dish 22 (Boiled pumpkin / potato)
Accessories
Ingredient
22 12min
PROCEDURE
1
2
Cut pumpkin or potatoes into bite-sized pieces
(Approximately about 3cm cube)
3
Heat with “Auto menu 22”.
Put
1
in a pot and add water and cover with the
Inner lid and Outer lid.
Dish 23 (Boiled vegetables (hard))
Vegetables 300-320g
Water 50ml
AUTO Menu Time
Donabe Inner lid Outer lid
Accessories
Ingredient
23 16min
Vegetables 300-320g
Water 50ml
** About potatoes and pumpkins.
as Compared to “Auto menu 22”.
Try this Auto menu if you want to heat more or
cook a large pieces.
Donabe
AUTO Menu Time
Dish 24 (Stew)
Accessories
Ingredient
24 19min
PROCEDURE
1
2
Put “A, B and C” in the Donabe.
3
*Aer heating. Stir them well.
Heat with “Auto menu 24 (without any lid.)”
Chicken bouillon (powder) 1 tsp
Worcestershire sauce 1 tsp
Ketchup 1.5 tbsp
Olive oil 1 tsp
Bay leaves 1 pc
Water 300ml
Block bacon (1cm cube) 50g
Tomato (1cm cube) 100g
Onion (1cm cube) 20g
Carrot (1cm cube) 20g
Potato (1cm cube) 30g
A )
B )
C )
Dish 25 (Instant noodle)
AUTO Menu Time
Donabe Inner lid Outer lid
Accessories
Ingredient
25 5min30sec.
PROCEDURE
1
2
Put dried noodles and water in a clay pot, and cover
the inner lid and outer lid.
3
Aer heating, add the included soup base (powder or
sauce).
Heat with “Auto menu 25, Instant noodles”.
Instant noodles 1 bag, (round type)
*Specified amount of water
Water
Notification
・ Use noodles that have been boiled for 3 minutes.
・ If the noodles are longer than 3 minutes, the finish
of the noodles may become hard.
Dish 26 (Pasta)
AUTO Menu Time
Donabe Inner lid Outer lid
Accessories
Ingredient
26 13min
PROCEDURE
1
2
Fold the dried pasta in half and put it in a Donabe.
Add water, salt and cover with the inner lid.
3
Once heating done, put it in a colander and drain the
water.
Heat with “Auto menu 26”.
Pasta (dried) 100g
water 350ml
salt
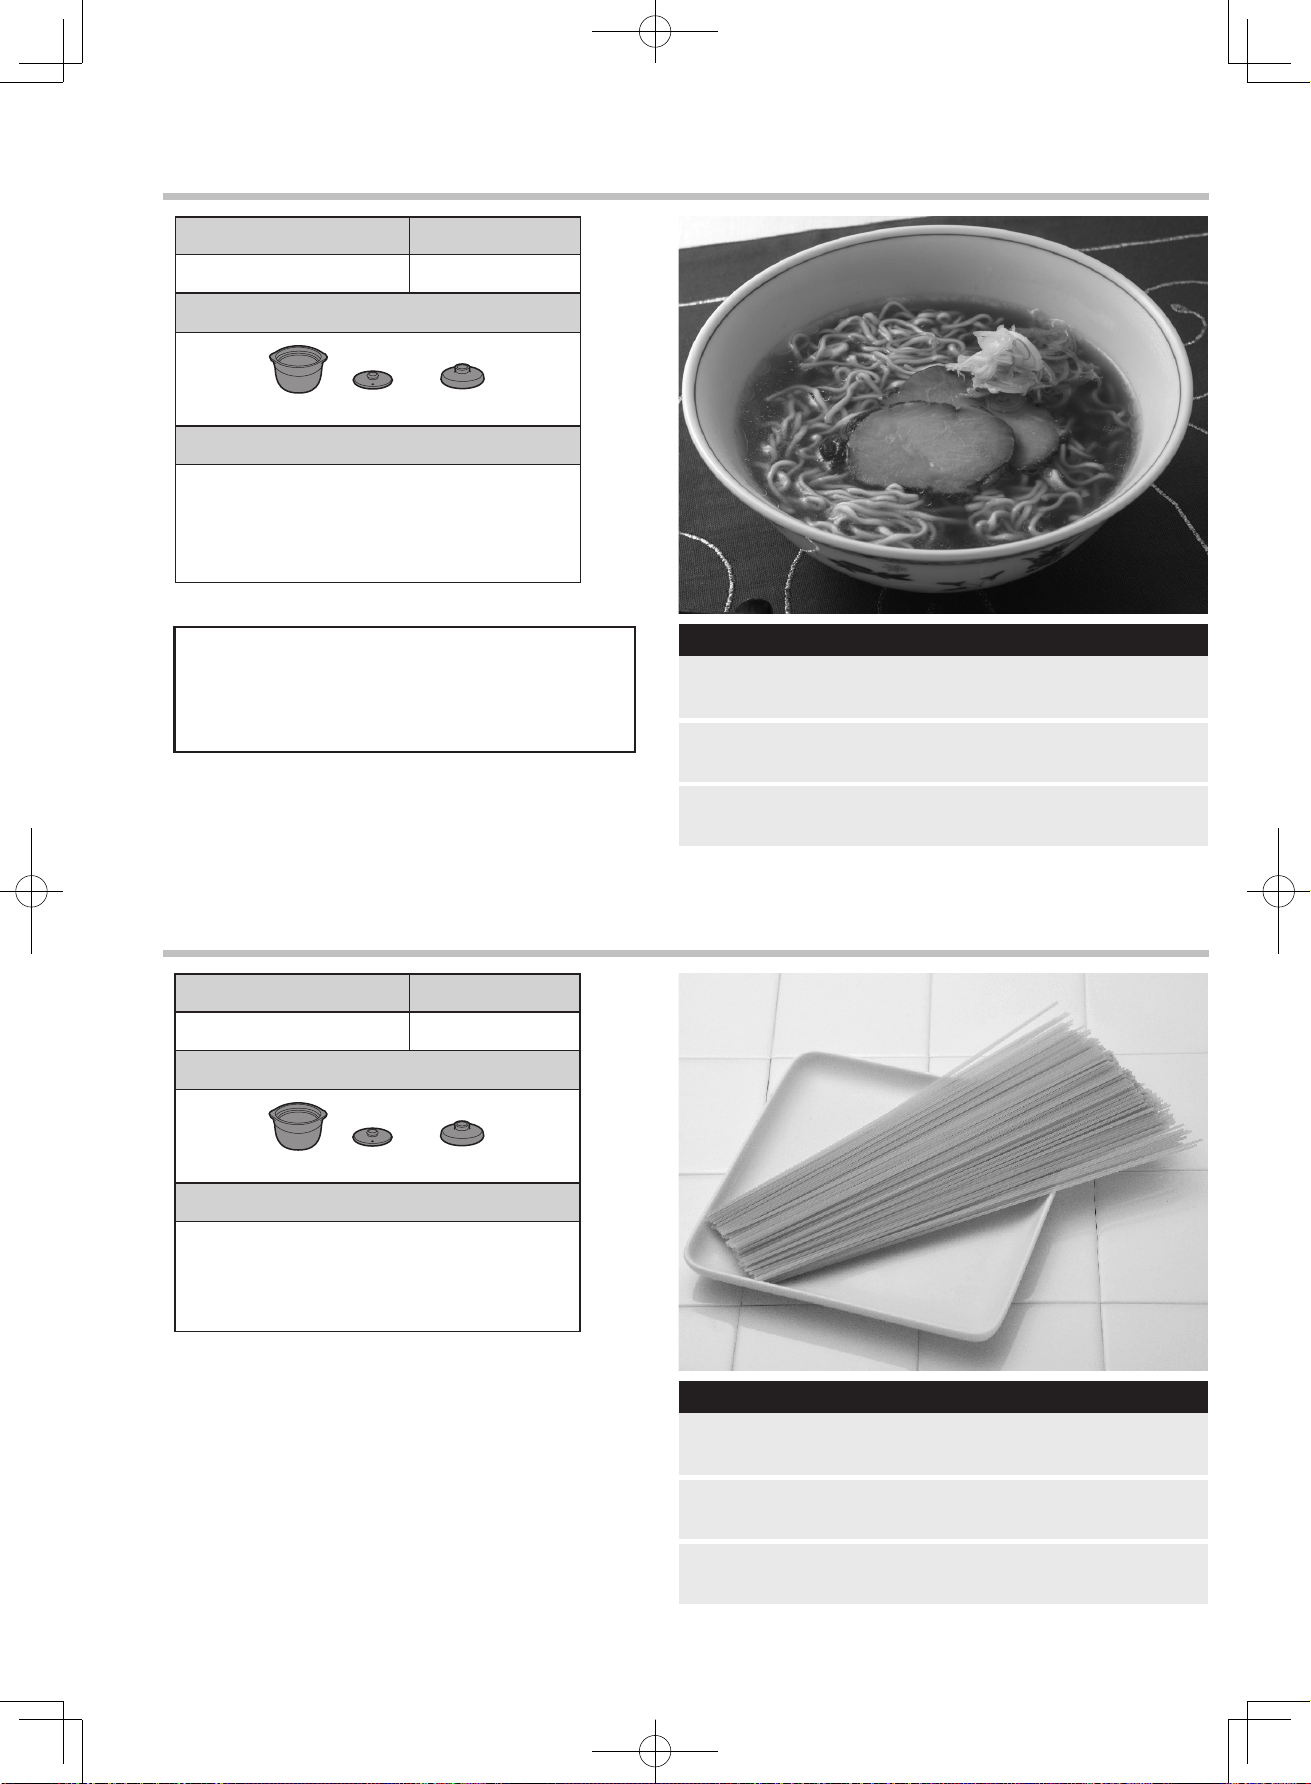

MEMO

MEMO

R-D219G
R-D219G(K)
MICROVAWE OVEN
OPERATION MANUAL
Contents
Page
Important Safety Instructions......................................E-1
Installation Instructions ................................................. E-3
Oven Diagram..................................................................... E-4
Control Panel....................................................................... E-5
Before operating ............................................................... E-6
Automatic Cooking.......................................................... E-6
Manual Cooking................................................................E-10
Other Convenient Features....................................... E-11
Trouble Shooting..............................................................E-12
Care and Cleaning............................................................E-13
Service Call Check........................................................... E-13
Specifications..................................................................... E-13
Cooking Guides.................................................................E-14