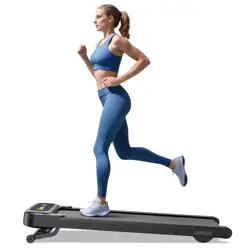
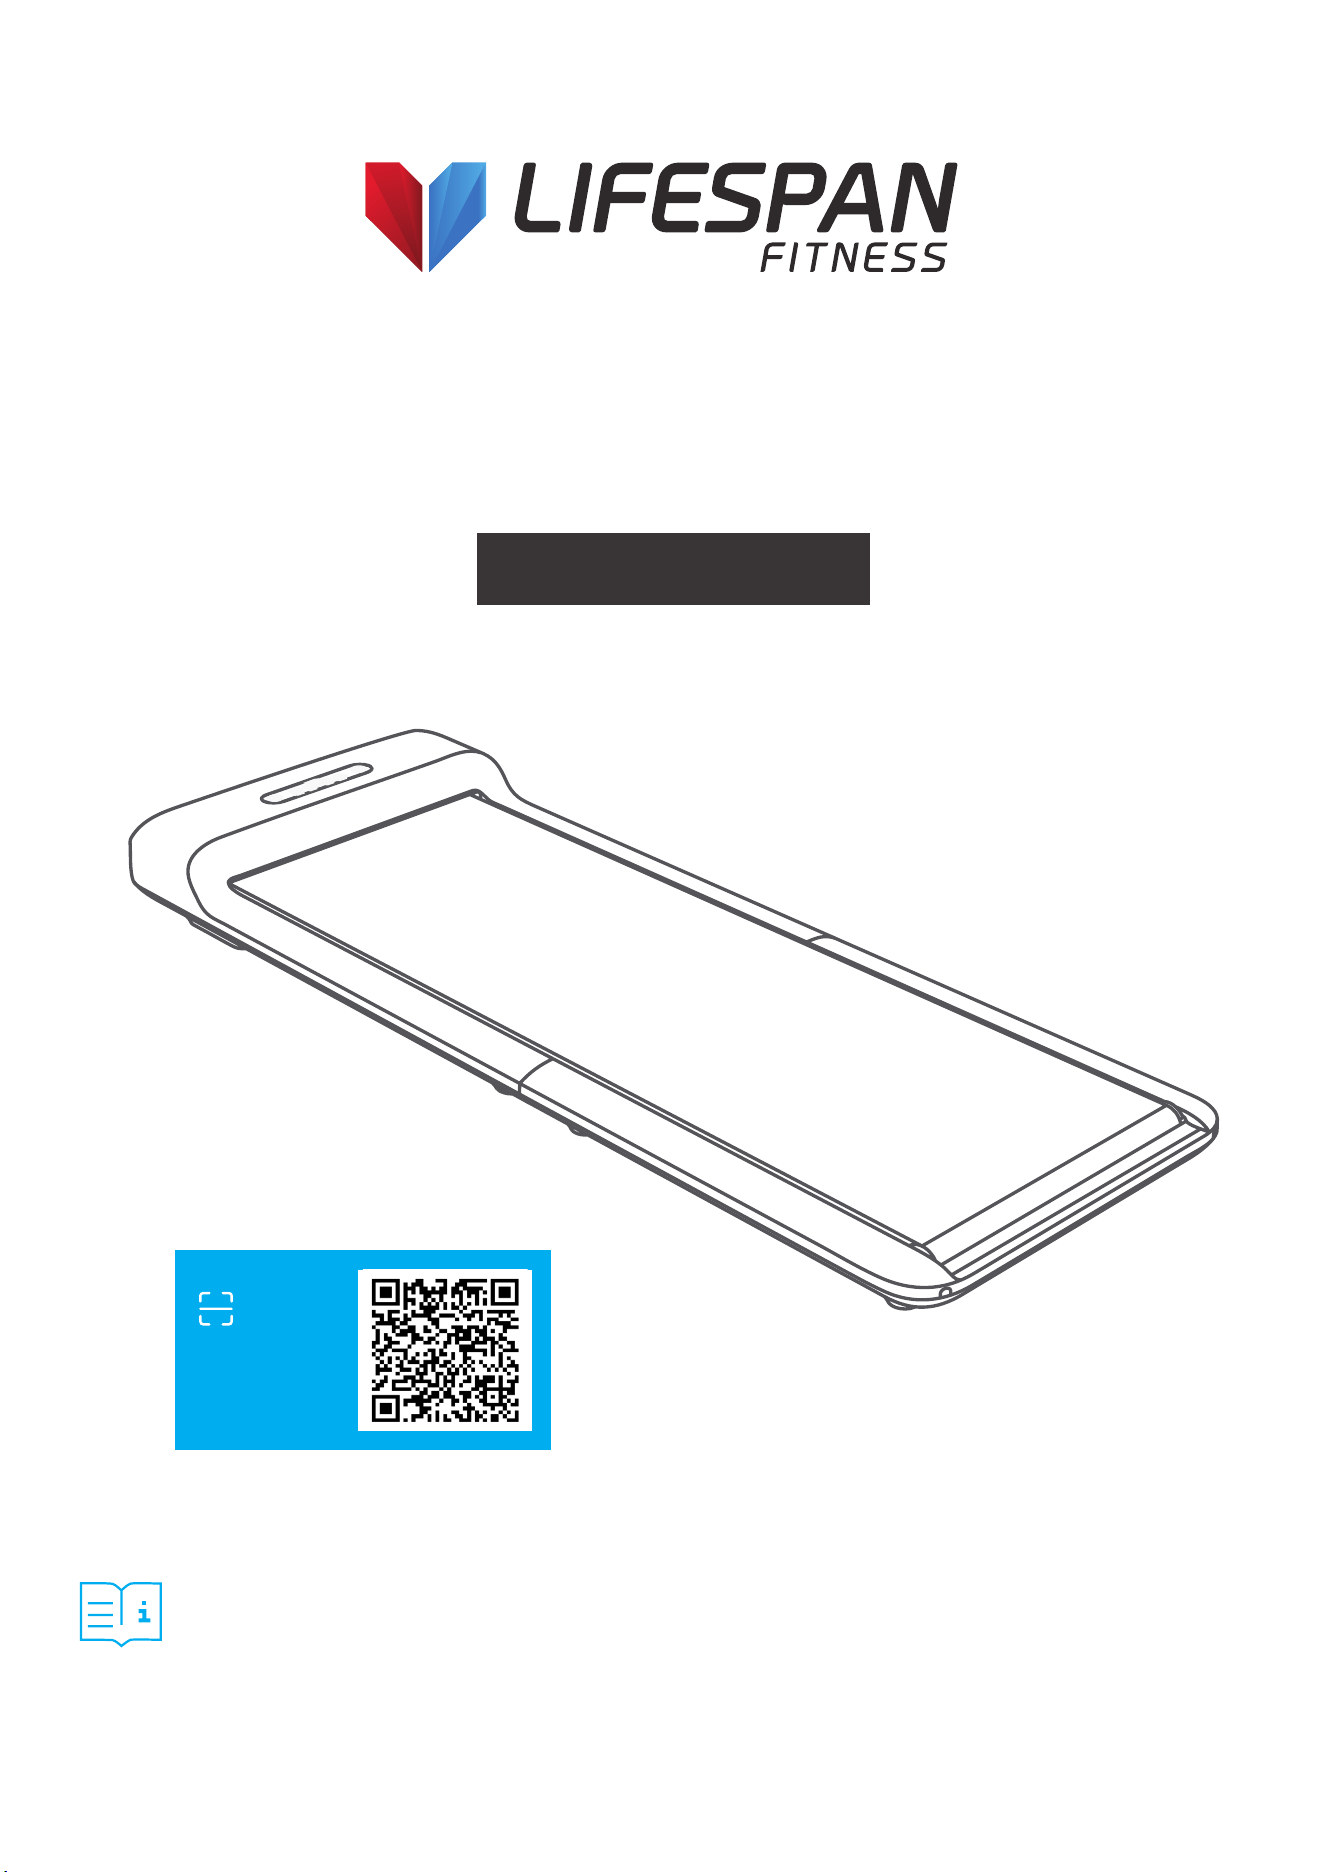
LFT 05 WalkingPad
TM
M2 Treadmill
USER MANUAL
Product may vary slightly from the item pictured due to model upgrades.
Read all instructions carefully before using this product.
Retain this owner’s manual for future reference.
NOTE:
This manual should not be used to guide your purchasing decision. Your product, and the contents inside its carton, may vary
from what is listed in this manual. This manual may also be subject to updates or changes. Updated manuals are available
through our website at www.lifespanfitness.com.au
Find the
Digital Manual
Online

2
TABLE OF
CONTENTS
| TABLE OF CONTENTS
I. Important Safety Instructions . . . . . . . . . . . . . . . . . . . . . . . . . . . . . . . 03
II. Welcome . . . . . . . . . . . . . . . . . . . . . . . . . . . . . . . . . . . . . . . . . . . . . . . . . . . . . . 05
III. Product and Accessories . . . . . . . . . . . . . . . . . . . . . . . . . . . . . . . . . . . . 06
IV. Function Diagram . . . . . . . . . . . . . . . . . . . . . . . . . . . . . . . . . . . . . . . . . . . 07
V. Set-Up Guide . . . . . . . . . . . . . . . . . . . . . . . . . . . . . . . . . . . . . . . . . . . . . . . . . 10
VI. Learn to Use the Treadmill . . . . . . . . . . . . . . . . . . . . . . . . . . . . . . . . . . . 12
VII. Safety Instructions . . . . . . . . . . . . . . . . . . . . . . . . . . . . . . . . . . . . . . . . . . . 15
VIII. Maintenance and Adjustments . . . . . . . . . . . . . . . . . . . . . . . . . . . . . 21
IX. Replacement and Disposal . . . . . . . . . . . . . . . . . . . . . . . . . . . . . . . . . 23
X. KS Fit App Instructions . . . . . . . . . . . . . . . . . . . . . . . . . . . . . . . . . . . . . . . 24
XI. Exercise Guide . . . . . . . . . . . . . . . . . . . . . . . . . . . . . . . . . . . . . . . . . . . . . . . 28
XII. Warranty . . . . . . . . . . . . . . . . . . . . . . . . . . . . . . . . . . . . . . . . . . . . . . . . . . . . . 30

3IMPORTANT SAFETY INSTRUCTIONS |
I. IMPORTANT SAFETY
INSTRUCTIONS
DANGER
To reduce the risk of electric shock: Always unplug this appliance from the electrical outlet
immediately after using and before cleaning.
WARNING
To reduce the risk of burns, fire, electric shock, or injury to persons:
1. An appliance should never be left unattended when plugged in. Unplug from outlet when not in use,
and before putting on or taking off parts.
2. Close supervision is necessary when this appliance is used by, or near children, invalids, or disabled
persons.
3. Use this appliance only for its intended use as described in this manual. Do not use attachments not
recommended by the manufacturer.
4. Never operate this appliance if it has a damaged cord or plug, if it is not working properly, if it has
been dropped or damaged, or dropped into water. Return the appliance to a service center for
examination and repair.
5. Do not carry this appliance by the supply cord or use the cord as a handle.
6. Keep the cord away from heated surfaces.
7. Never drop or insert any object into any opening.
8. Do not use outdoors.
9. Do not operate where aerosol (spray) products are being used or where oxygen is being administered.
10. To disconnect, turn all controls to the off position, then remove the plug from the outlet.
The appliance is intended for residential use.
4 | IMPORTANT SAFETY INSTRUCTIONS
WARNING
1. This appliance can be used by children aged from 8 years and above and persons with reduced
physical, sensory or mental capabilities or lack of experience and knowledge if they have been given
supervision or instruction concerning use of the appliance in a safe way and understand the hazards
involved. Children shall not play with the appliance. Cleaning and user maintenance shall not be
completed by children without supervision.
2. Correct disposal of this product. This marking indicates that this product shall not be disposed
with other household wastes throughout the EU. To prevent possible harm to the environment or
human health from uncontrolled waste disposal, recycle it responsibly to promote the sustainable
reuse of material resources. To return your device, please use the return collection systems or
contact the retailer where the product was purchased. They can take this product for environmental
safe recycling.
This appliance is not intended for use by persons (including children) with reduced physical,
sensory or mental capabilities, or lack of experience and knowledge, unless they have been given
supervision or instructions concerning the use of the appliance by a person responsible for
their safety.
Children should be supervised to ensure they do not play with the appliance.
WARNING: Keep young children away from this machine at all times. Contact with the moving
surface may result in severe friction burns.
Battery Safety
If suspected of swallowing the battery or otherwise placed inside any part of the body, please contact
Australian Poison Centre immediately on 13 11 26.
Hotline is open 24/7.
Call triple zero (000) immediately if you or someone you know stops breathing, slips into a coma, or
has a seizure or a severe allergic reaction to suspected poisoning.
The battery can cause severe or fatal injuries in 2 hours or less if
it is swallowed or placed inside any part of the body. Seek medical
attention immediately if this occurs.
WARNING
THIS PRODUCT CONTAINS A BUTTON BATTERY THAT IS
HAZARDOUS AND IS TO BE KEPT AWAY FROM CHILDREN

5
Performance & Indicators Detailed Parameter
Expansion Dimensions
1445 x 518 x 125mm
56.9" x 20.4" x 4.9"
Folding Dimensions
825 x 518 x 136mm
32.5" x 20.4" 5.4"
Walking Area
1200 x 400mm
47" x 15.7"
Net Weight 25kg / 55lbs
Maximum Load 100kg / 220lbs
Applicable Age 14-60 years old
Applicable Height Unlimited
Minimum Speed 0.5km/hr 0.5 mi/hr
Maximum Speed 6km/hr 3.7 mi/hr
Power Input 735W
Rated Voltage
Sport Mode
220 - 240v ~
Standby mode/ Manual mode/
Automatic mode
II. WELCOME TO USE
Thank you for choosing Lifespan Fitness WalkingPad Walking device, hereinafter referred to as a
WalkingPad, which possess various advantages including exquisite, foldable, innovative integral
design. From now on, enjoy the quality life of walking at home.
WELCOME TO USE |
6
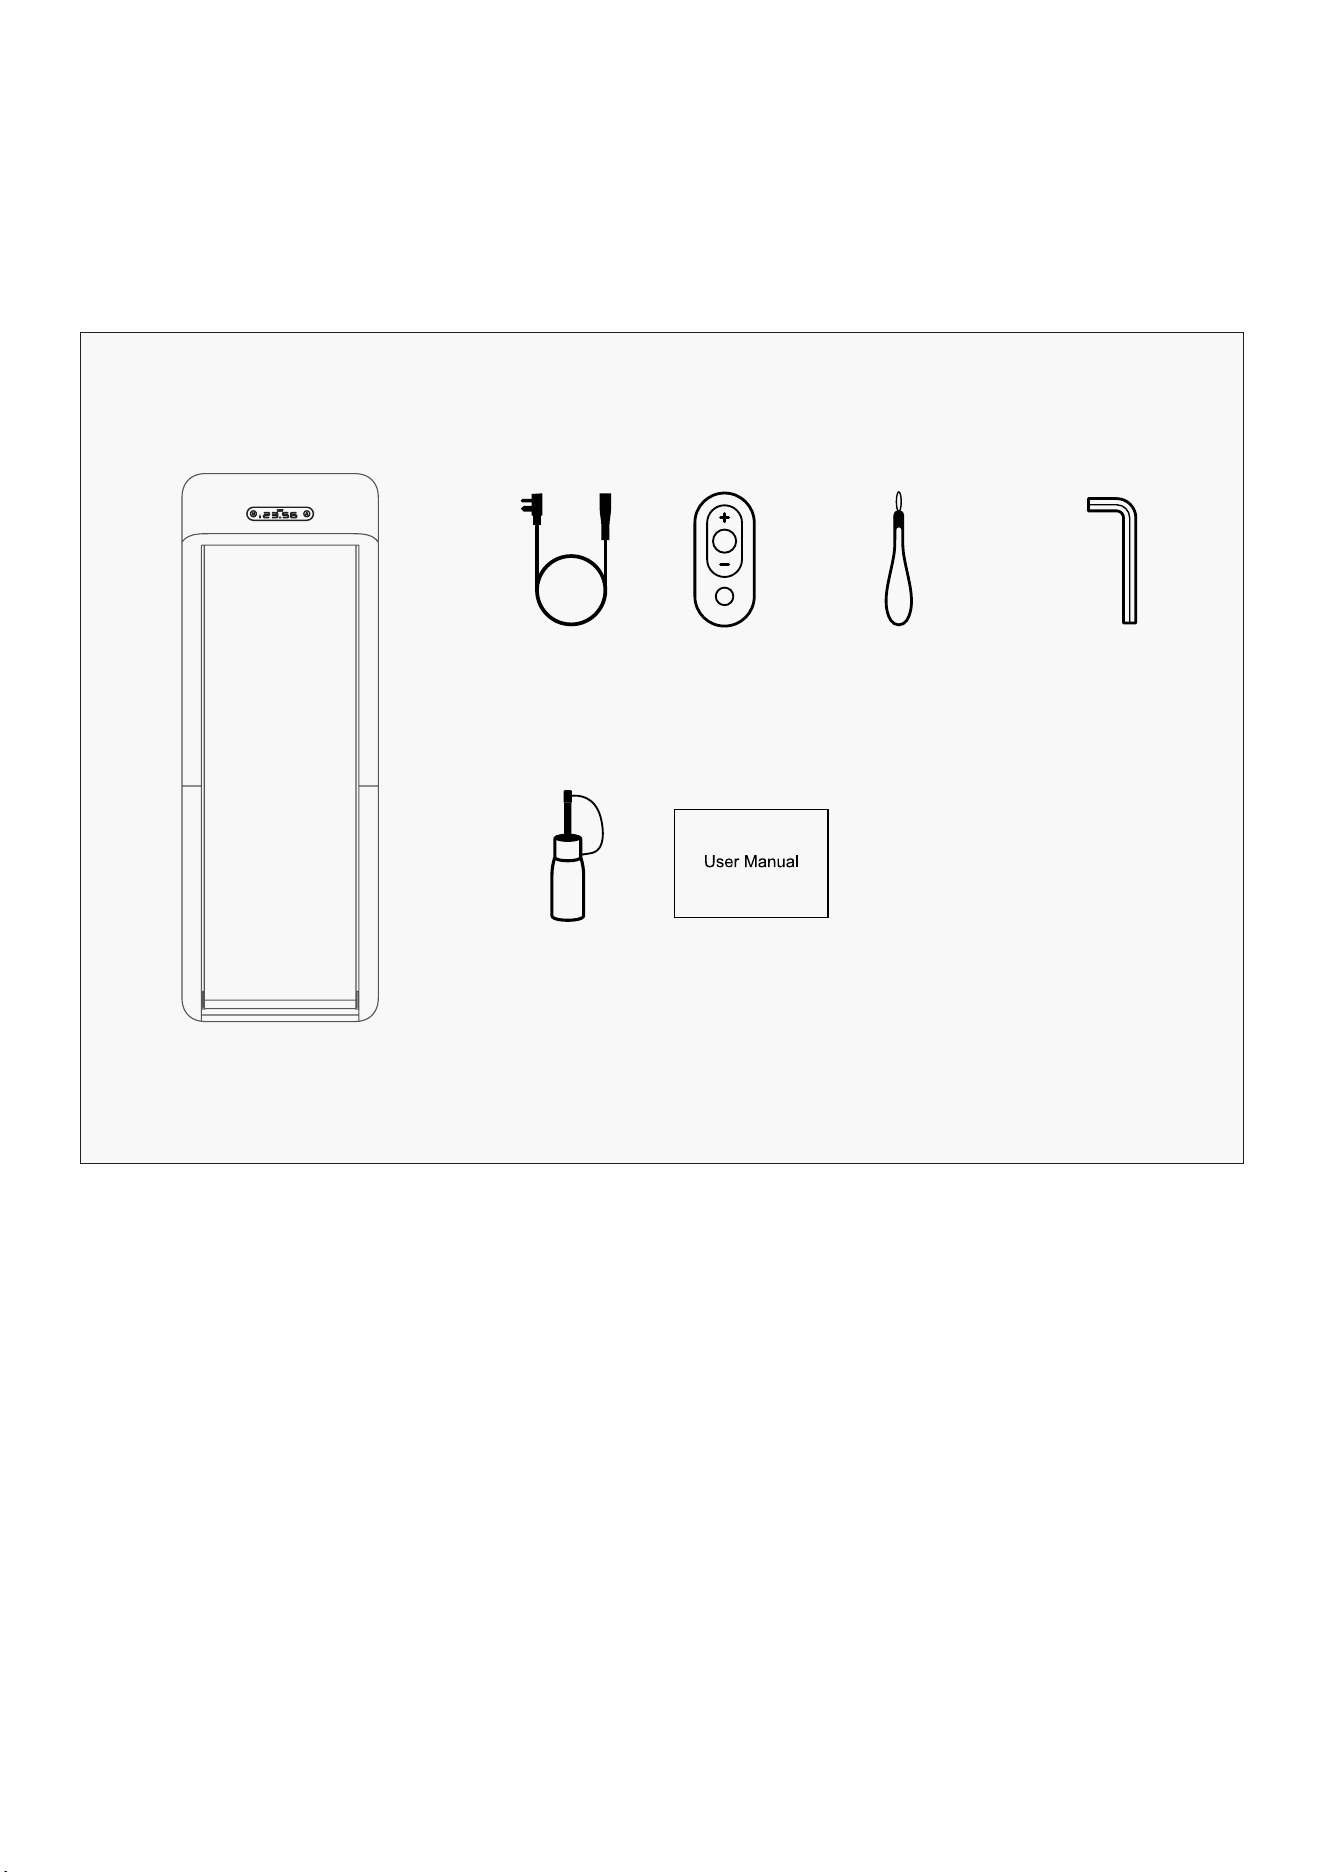
III. PRODUCT AND ACCESSORIES
Please check if the items inside the packaging are complete and intact. In case of any item missing or
broken, please contact the seller.
Main Product
ACCESSORIES
Power Line Remote
Control
Remote Control
Lanyard
Hex L
Shaped Wrench
Silicon Oil User Manual
| PRODUCT AND ACCESSORIES
7
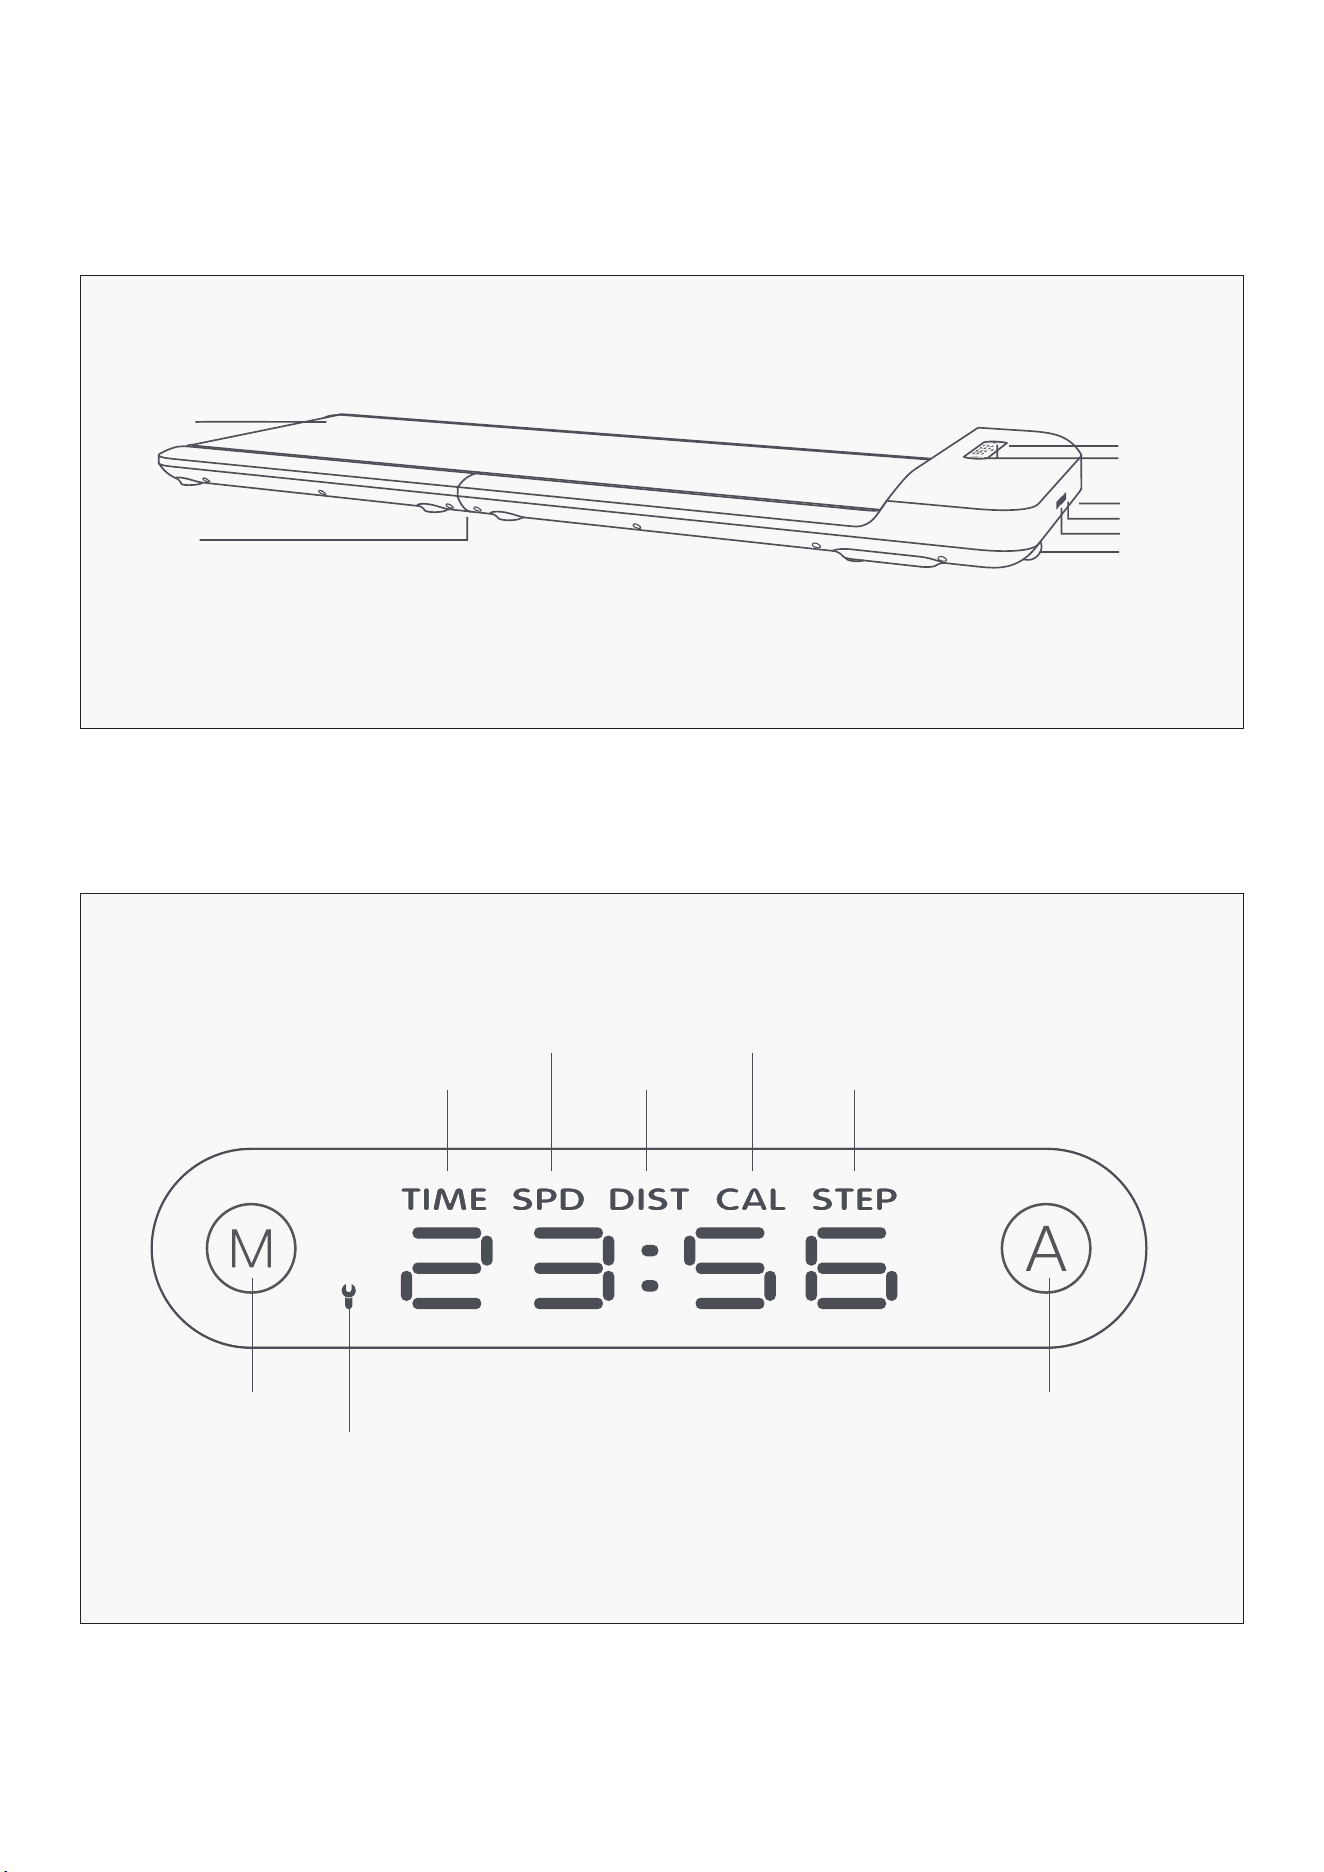
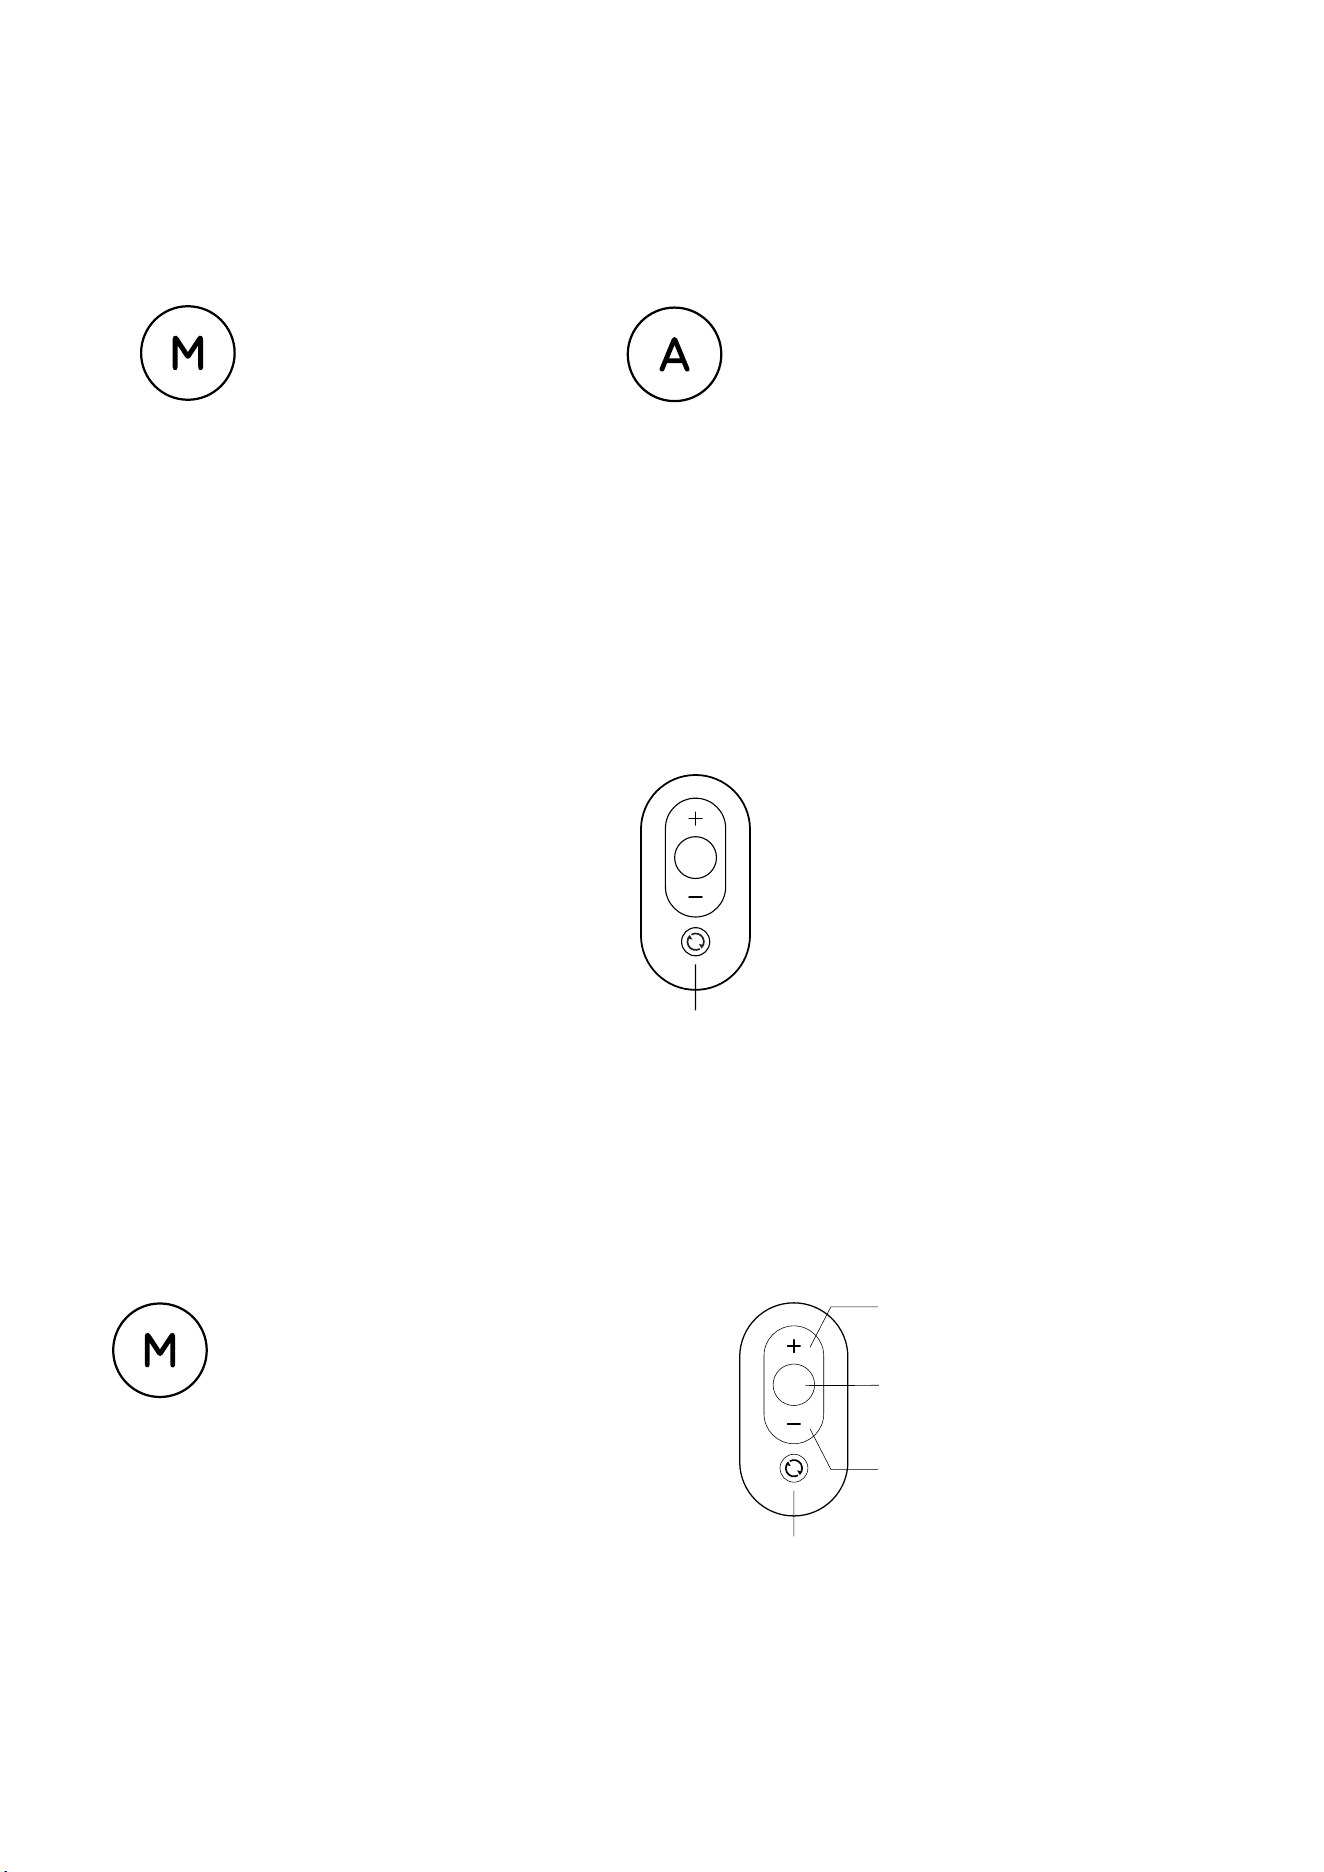
IV. FUNCTION DIAGRAM
1. Product Main Body
2. Introduction of the Function of the Indicator Panel
FUNCTION DIAGRAM |
Manual Mode
Display Time Display Steps
Display Speed
Display Distance
Display Calories
Display Panel
Walking Belt
Fold Hinge
Touch
Roller
Roller
Power Switch
Power Plug
Fault Warning
Light
Automatic Mode
8
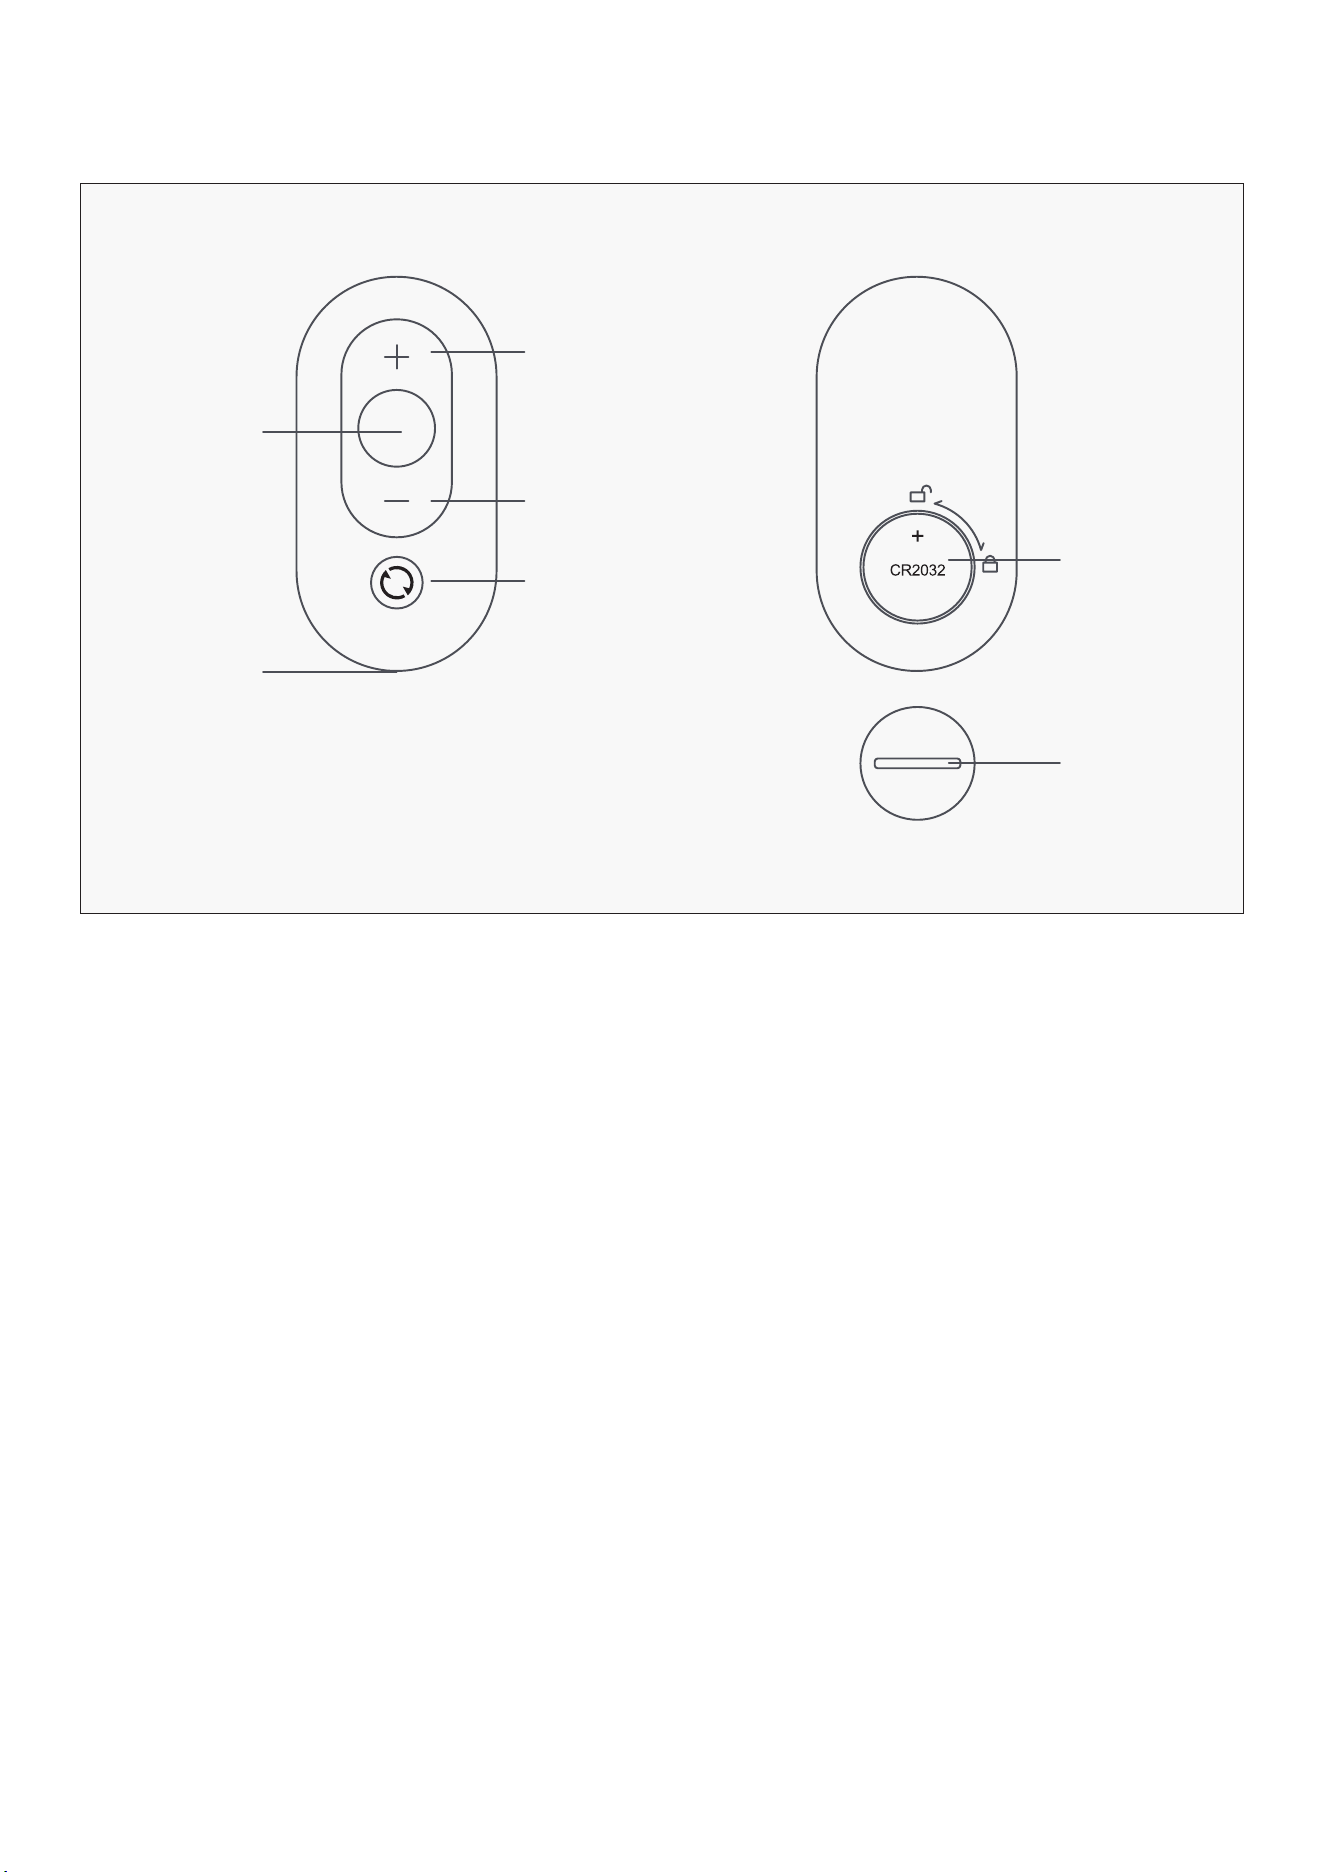
3. WalkingPad Remote Control
Acceleration
Battery Type
(1** CR2032*)
Battery Cover
Deceleration
Mode Switch
Start/Stop
Lanyard
| FUNCTION DIAGRAM
9
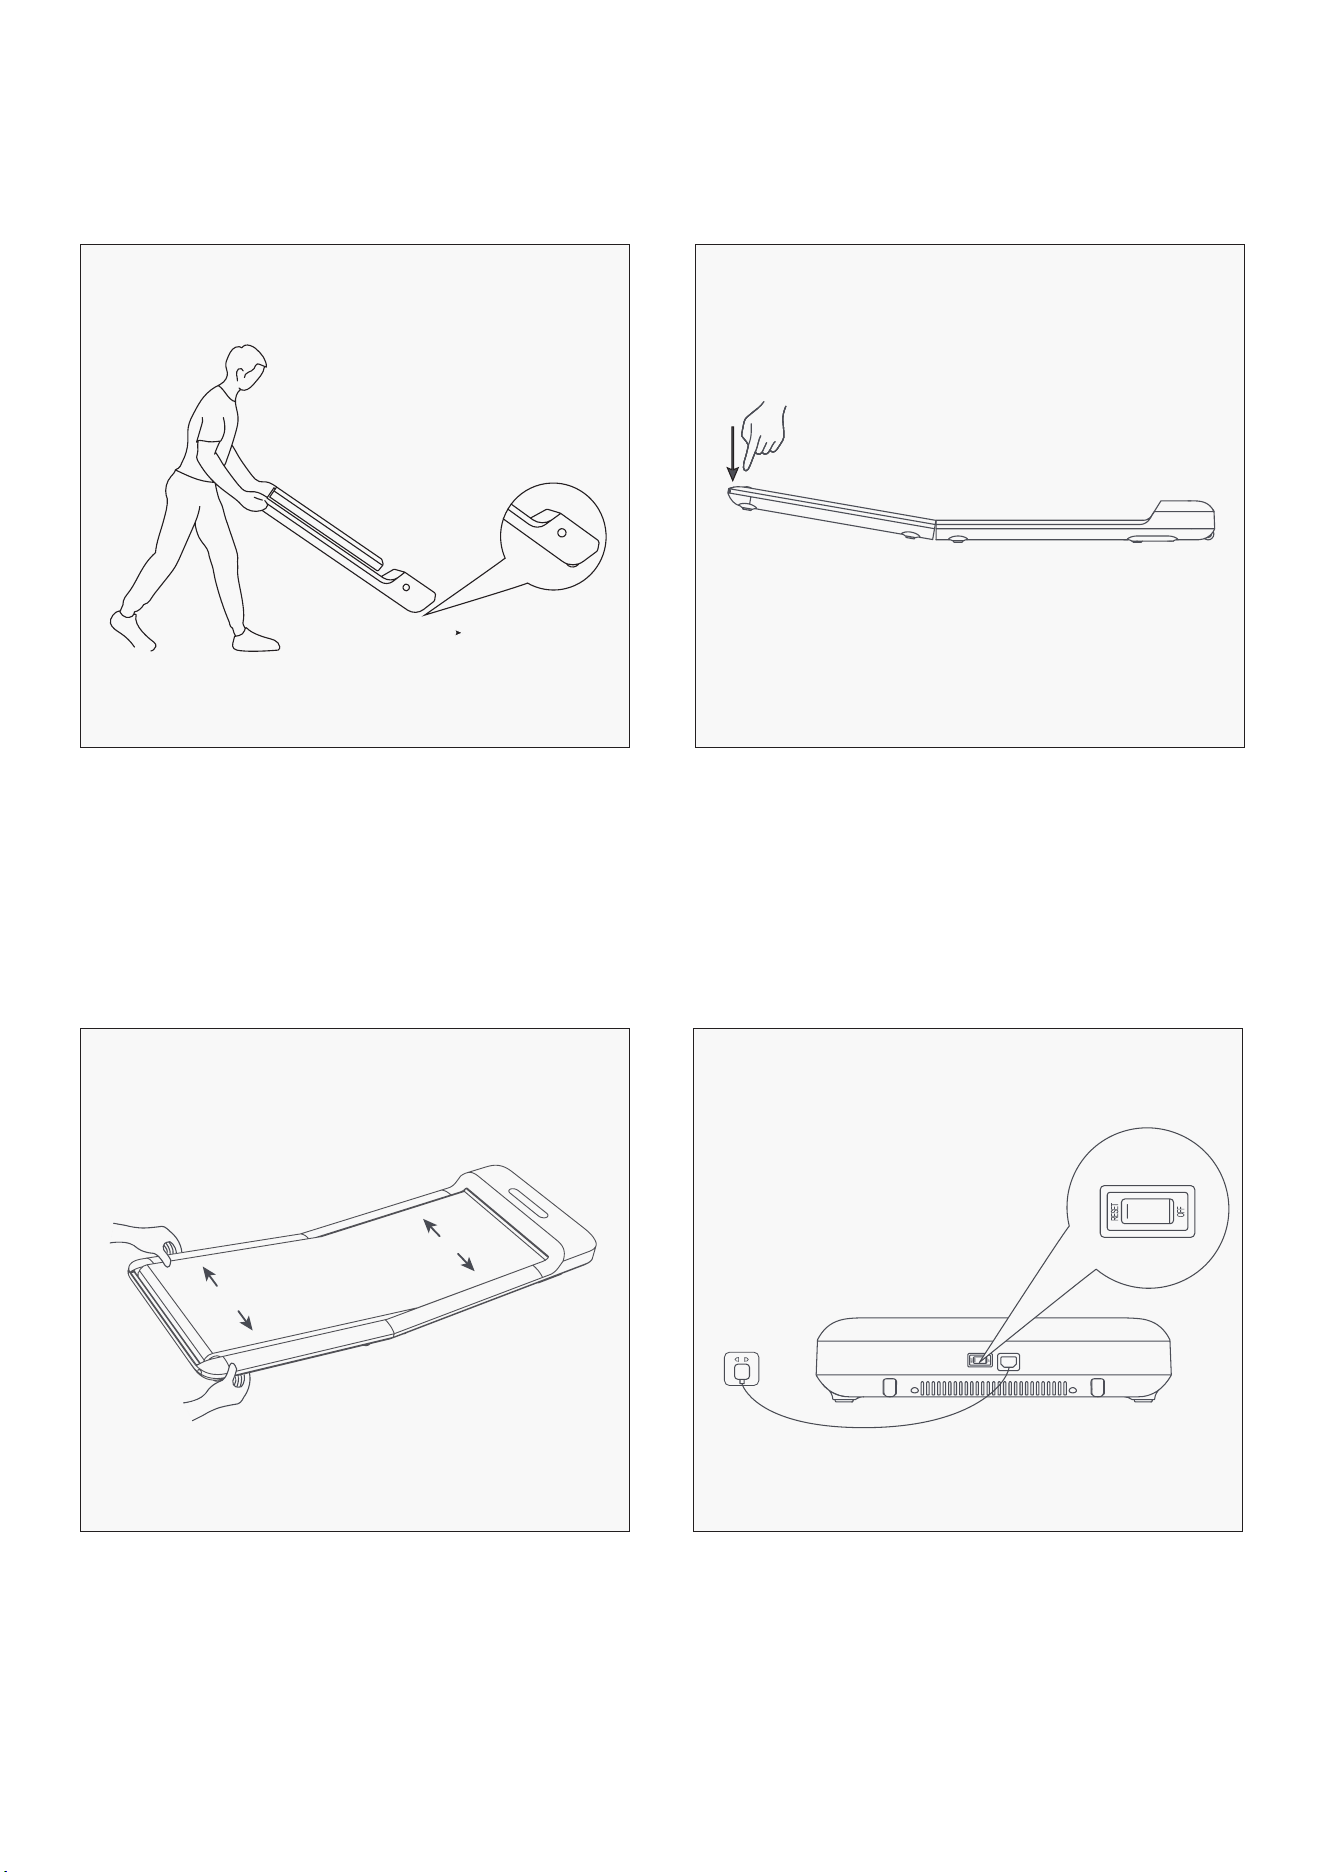
V. SET-UP GUIDE
Unfold the WalkingPad slowly and press it
down to completely flat.
Connect the power cord and press the
button to switch on.
Choose flat ground to place the WalkingPad. It is
not recommended to place it on thick and soft
cushion. Please Note: Don’t connect the power
before the WalkingPad is fully unfolded.
Check and adjust the walking belt to make sure
it’s centered.
1
3
2
4
SET-UP GUIDE |
10
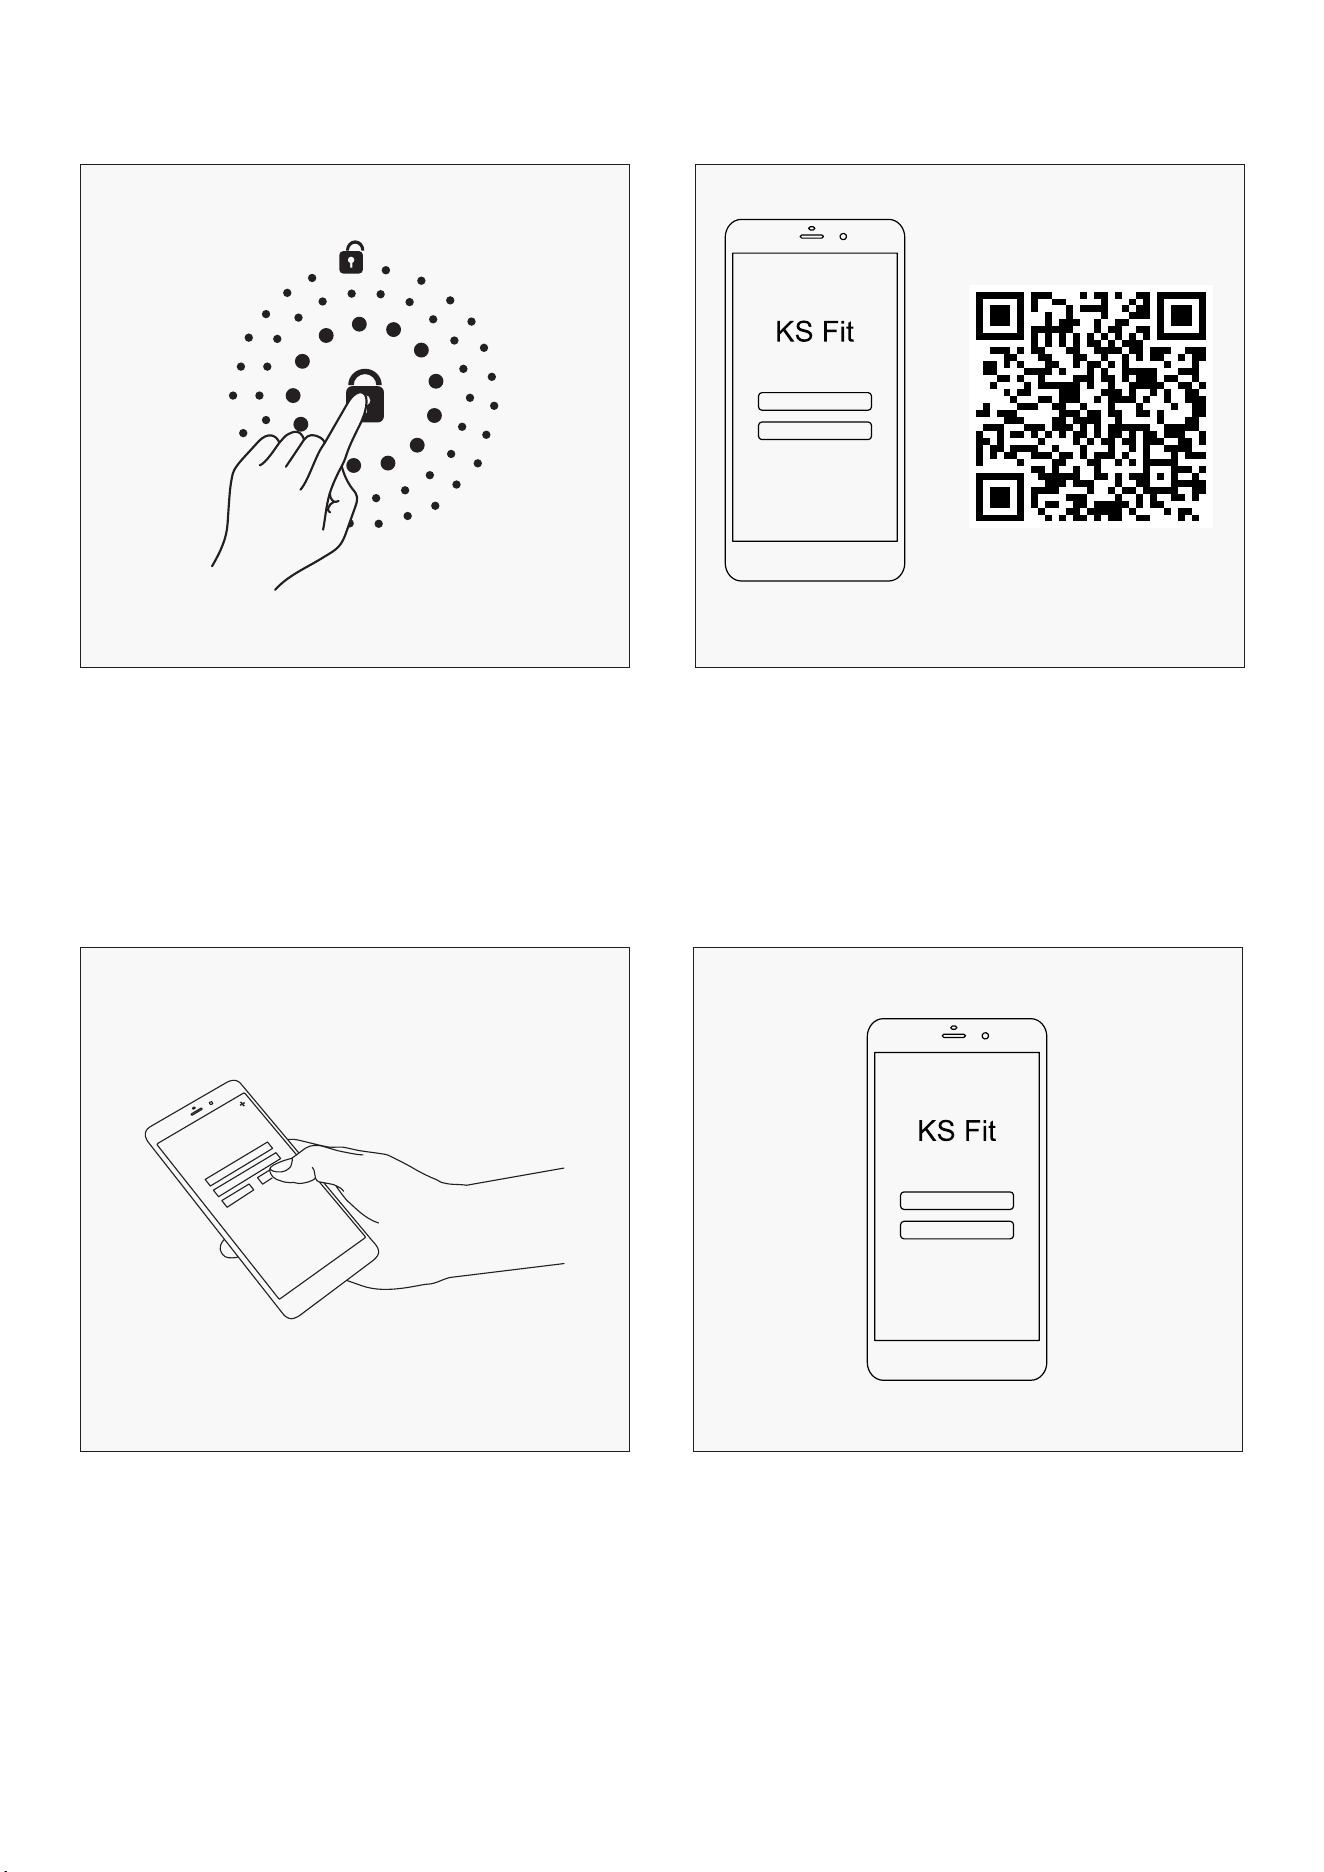
Download "KS Fit" APP from the Apple
Store or Google Play Store and complete
installation.
Enter Novice guide to unlock all functions.
Unlock all functions by by completing the two
steps, otherwise the speed limit remains at
3km/hr:
A. Walk 2km on device first, reboot to unlock all
functions.
B. Complete Novice Guide by WalkingPad App to
unlock all functions.
Open the App, follow the prompts to set up the
device.
5
7
6
8
| SET-UP GUIDE
11
If the belt deviates from the orbit in use,
please adjust properly.
SEE: 06 Maintenance and service
Start to use the WalkingPad.9 10
SET-UP GUIDE |
12
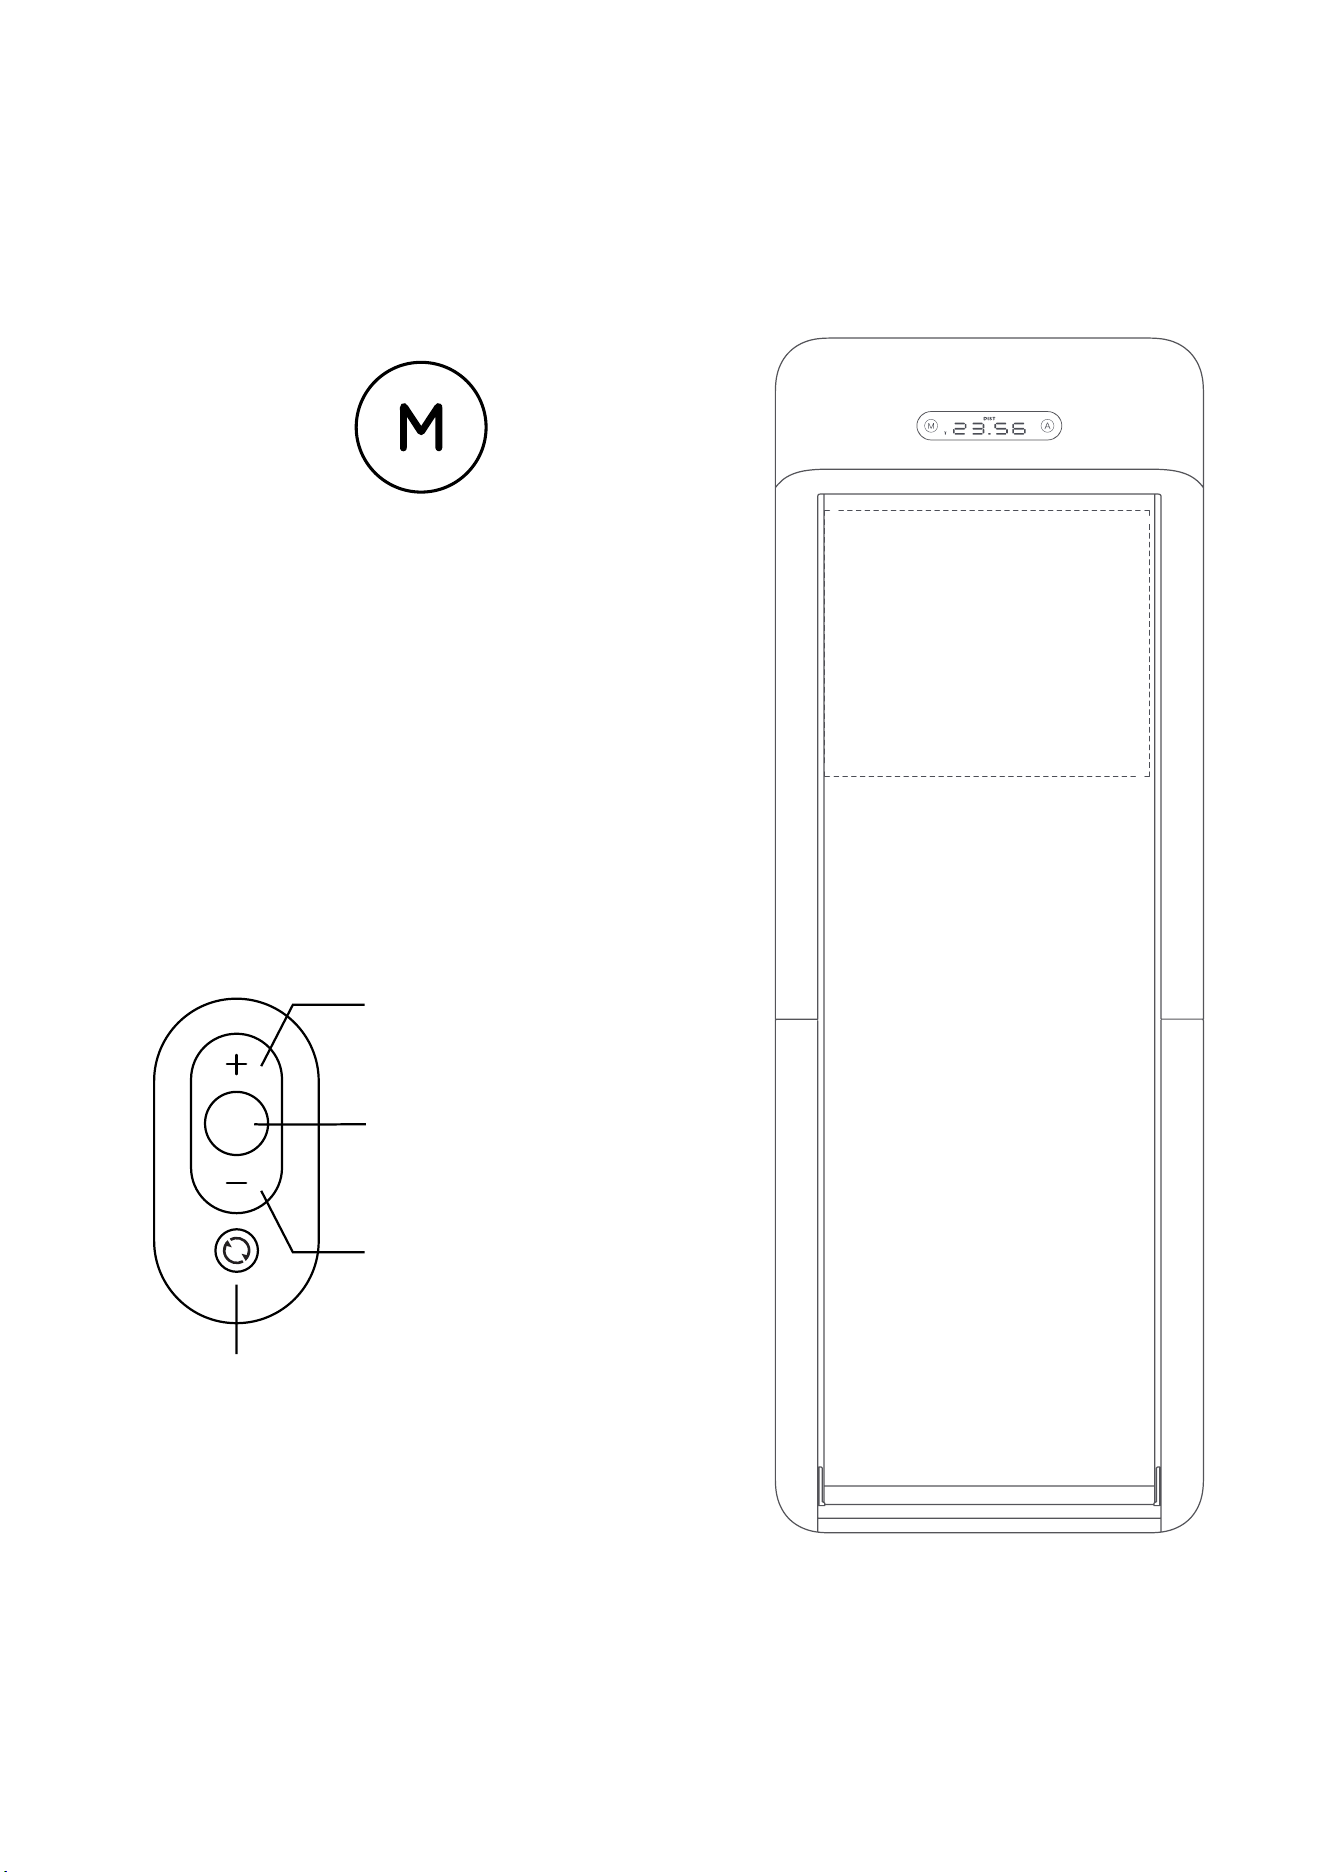
VI. LEARN TO USE THE TREADMILL
1. MODE DESCRIPTION
Manual Mode
Light of the manual mode is
on; Control the speed through
the remote control or APP.
Automatic Mode
Light of the automatic mode is on;
Speed is automatically controlled
by intelligent algorithm. It follows
the speed of walking.
2. Instructions of the Standby Mode Control
The motor and sensor stop responding in this
mode to prevent non-users from accidentally
triggering the WalkingPad.
Mode Switch
Short Press: Return to the previous mode.
3. MANUAL MODE CONTROL DESCRIPTION (PRIMARY MODE)
Manual Mode
In this mode, users can use the remote control
to control the treadmill. Beginners are advised
to use the manual mode first, and then use the
automatic mode once skills have increased.
Mode Button
Short press: Switches mode
Long press: Switch to standy mode
(not in use)
Speed Increase Button
Short press: Speed increase by
0.5km/h (0.5mi/h)
Function Button
Short press: Starts or stops the
treadmill
Speed Decrease Button
Short press: Speed decrease by
0.5km/h (0.5mi/h)
| LEARN TO USE THE TREADMILL
13
4. INSTRUCTIONS OF MANUAL MODE CONTROL (PRIMARY MODE)
Manual Mode
In this mode, the speed of the WalkingPad
can be controlled by the remote control. It is
recommended that beginners use the manual
mode first and then use the automatic mode after
being skilled in using the WalkingPad. The manual
mode is controlled by remote control by default,
that is, the START / STOP button of the remote
control is used to start or stop the WalkingPad,
which can be modified in the client "Personalized".
In the manual mode, set as
the intelligent start and stop,
the WalkingPad will start
automatically to the target
speed (default is 3km/h)
while entering this area.
Acceleration
Short press: increase speed by
0.5 km/h.
START / STOP
Short press: start or stop the
WalkingPad.
MODE SWITCH
Short press: switch to automatic mode.
Long press: switch to standby mode.
DECELERATION
Short press: reduce speed by
0.5 km/h.
LEARN TO USE THE TREADMILL |
14
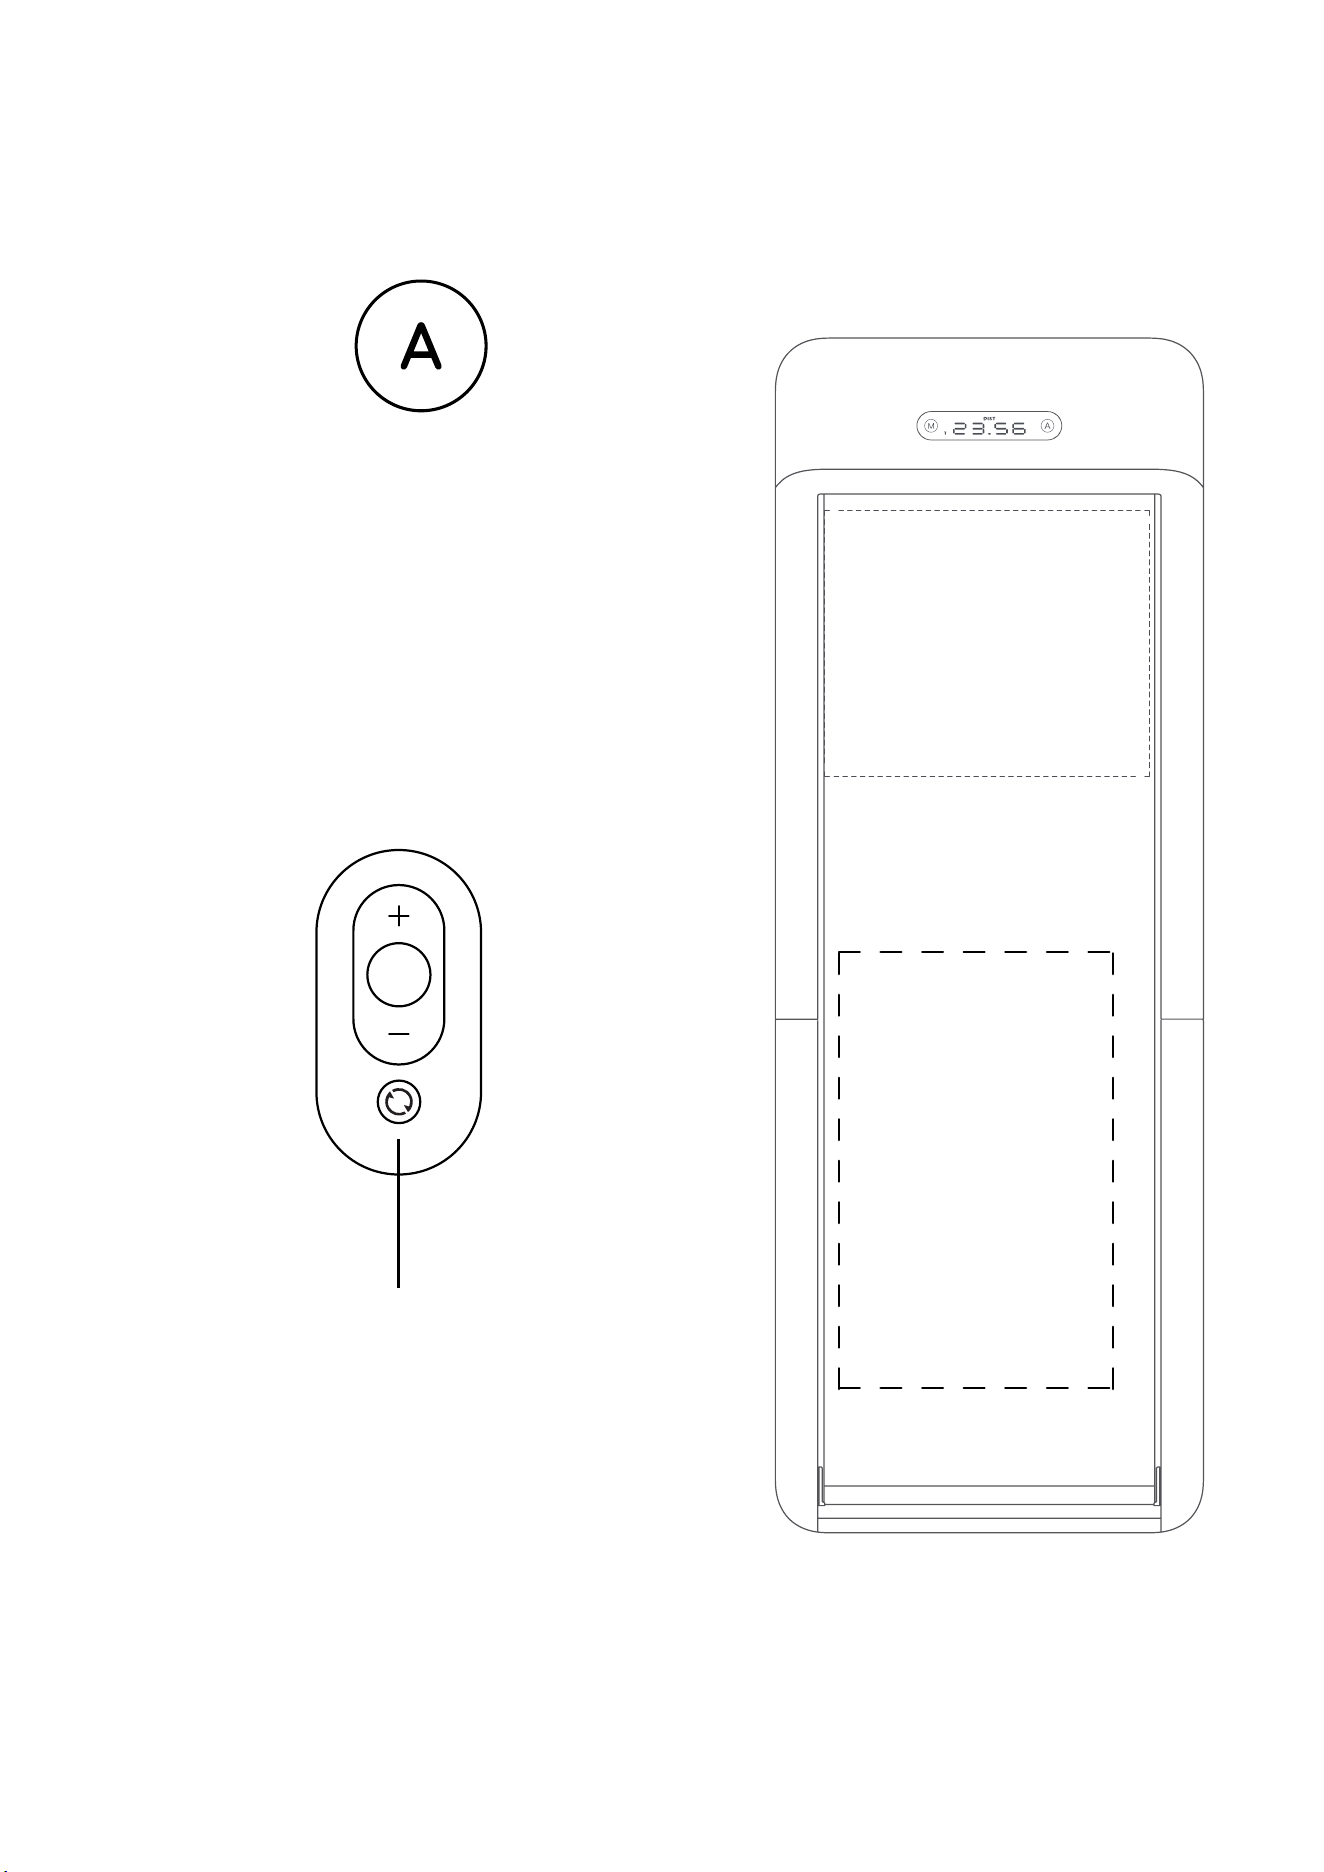
5. DESCRIPTION OF AUTOMATIC MODE CONTROL (ADVANCED MODE)
Automatic Mode
Mode Switch
This is a challenging and higher-class mode,
User can walk on the WalkingPad completely out
of remote controller. We only recommend those
who have good sports skills or walking-device
experience to take the challenge.
Entering this area, the
WalkingPad will start
or accelerate under the
automatic mode.
Entering this area, the
WalkingPad will slow down
automatically under the
automatic mode.
Short press: switch to manual mode.
Long press: switch to standby mode.
| LEARN TO USE THE TREADMILL

15
6. REMOTE CONTROLL NOTICE
7. ERROR WARNING LIGHT
If the remote controll has no responce or you change a new one, the remote controller and walking
device need to re-establish communication.
Remote control pairing method:
Restart the WalkingPad, press and hold down the mode switch button on the remote control
immediately, hearing the sound of "Beep" indicates the success of pairing.
NOTE: During the operation, the remote control should be close to the LED display panel of WalkingPad.
Error Warning Light on the display panel is off when WalkingPad works works well. When error occurs,
error warning light turns on and shows its error code.
E01
Upper control receives lower control data abnormally
E02
Hall fault
E03
Software overcurrent protection
E04
Locked rotor protection
E05
The data received by the lower control is abnormal
E06
Hardware overcurrent protection
E07
Motor undervoltage protection
E08
Motor overvoltage protection
E09
Motor phase loss protection
E10
Motor overload protection
E20
Abnormal Communication
E21
Sensor Failure
LEARN TO USE THE TREADMILL |
16
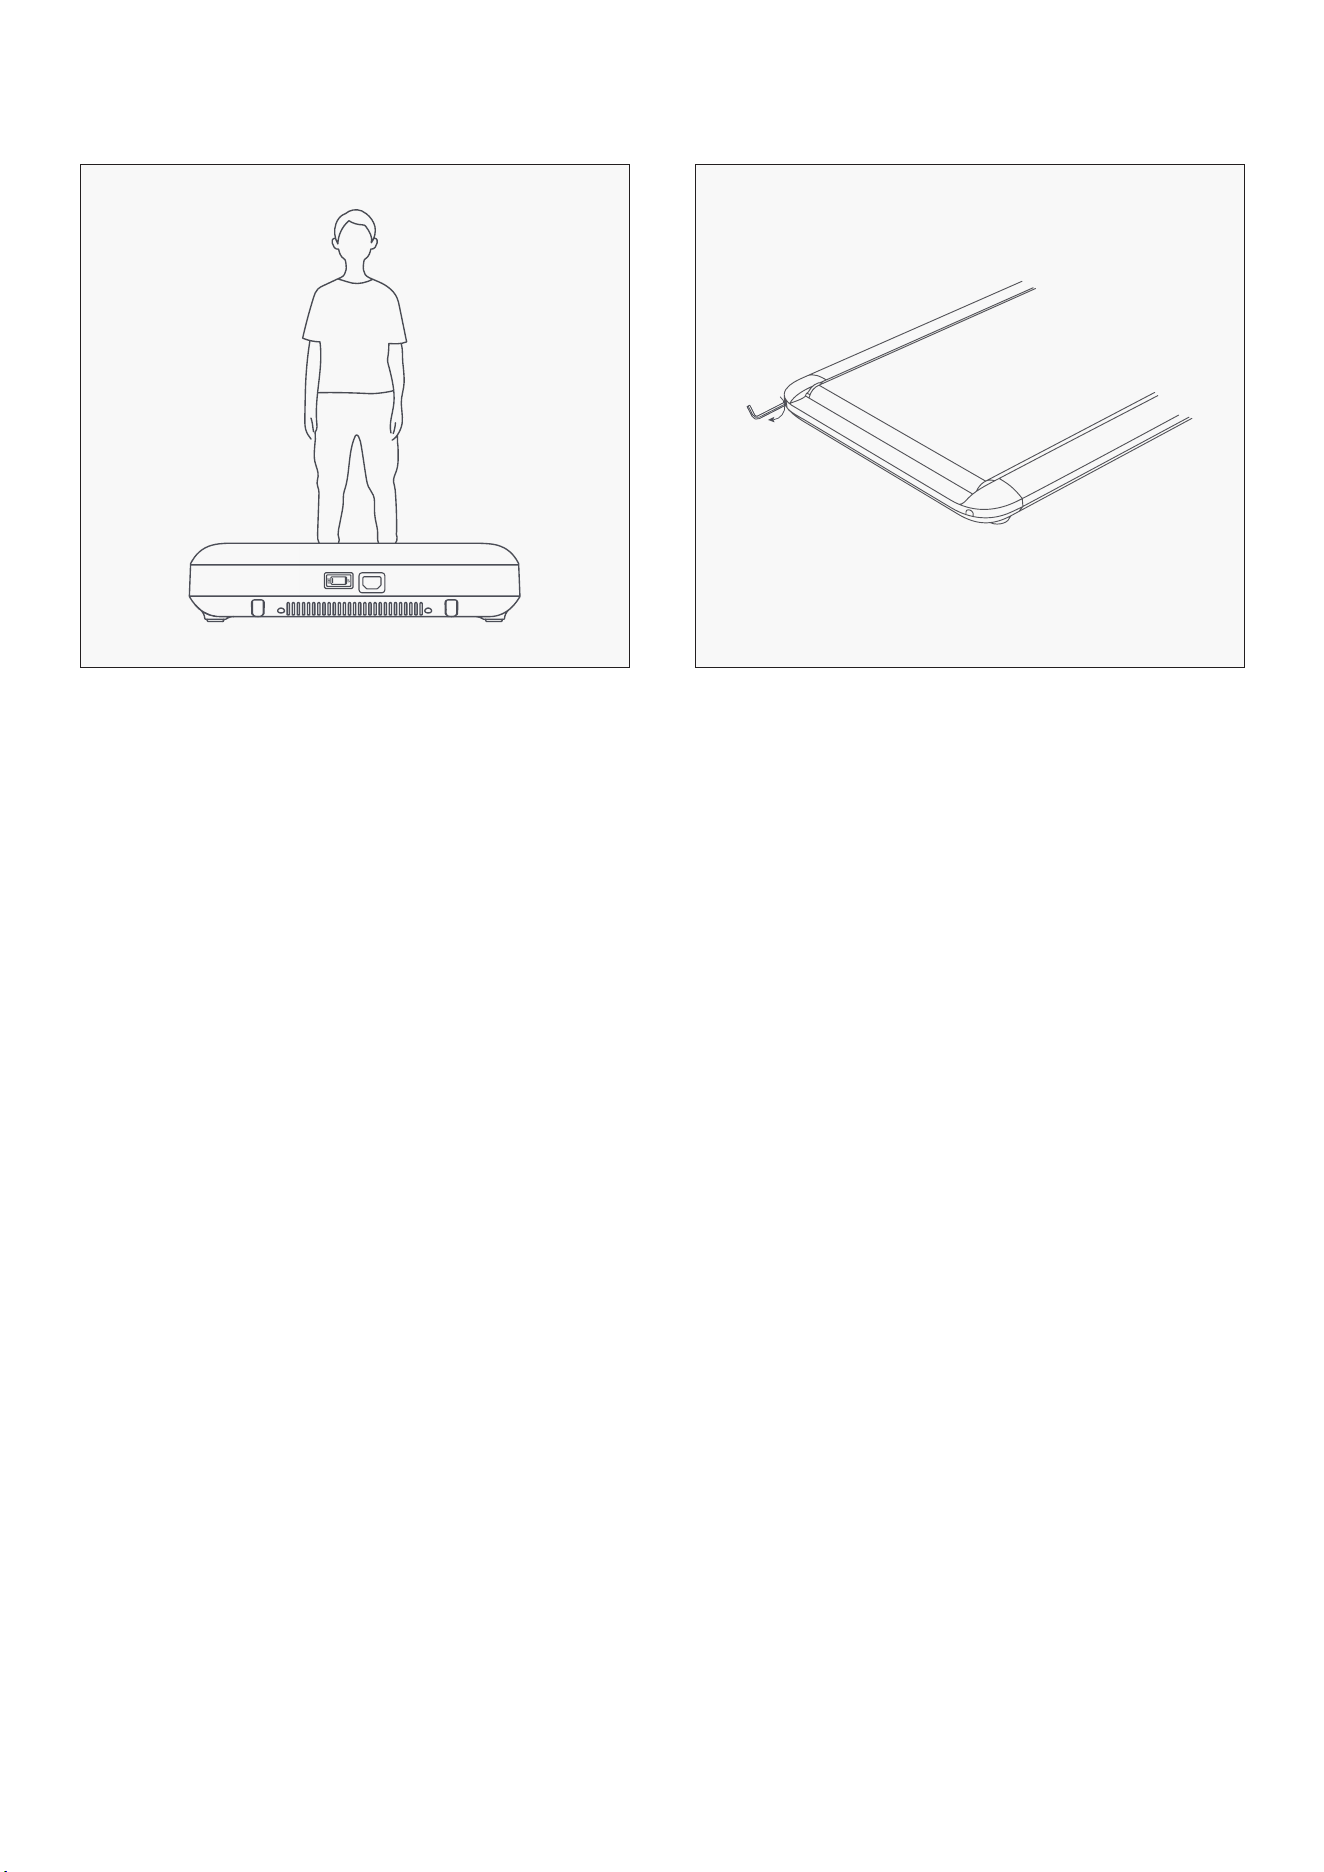
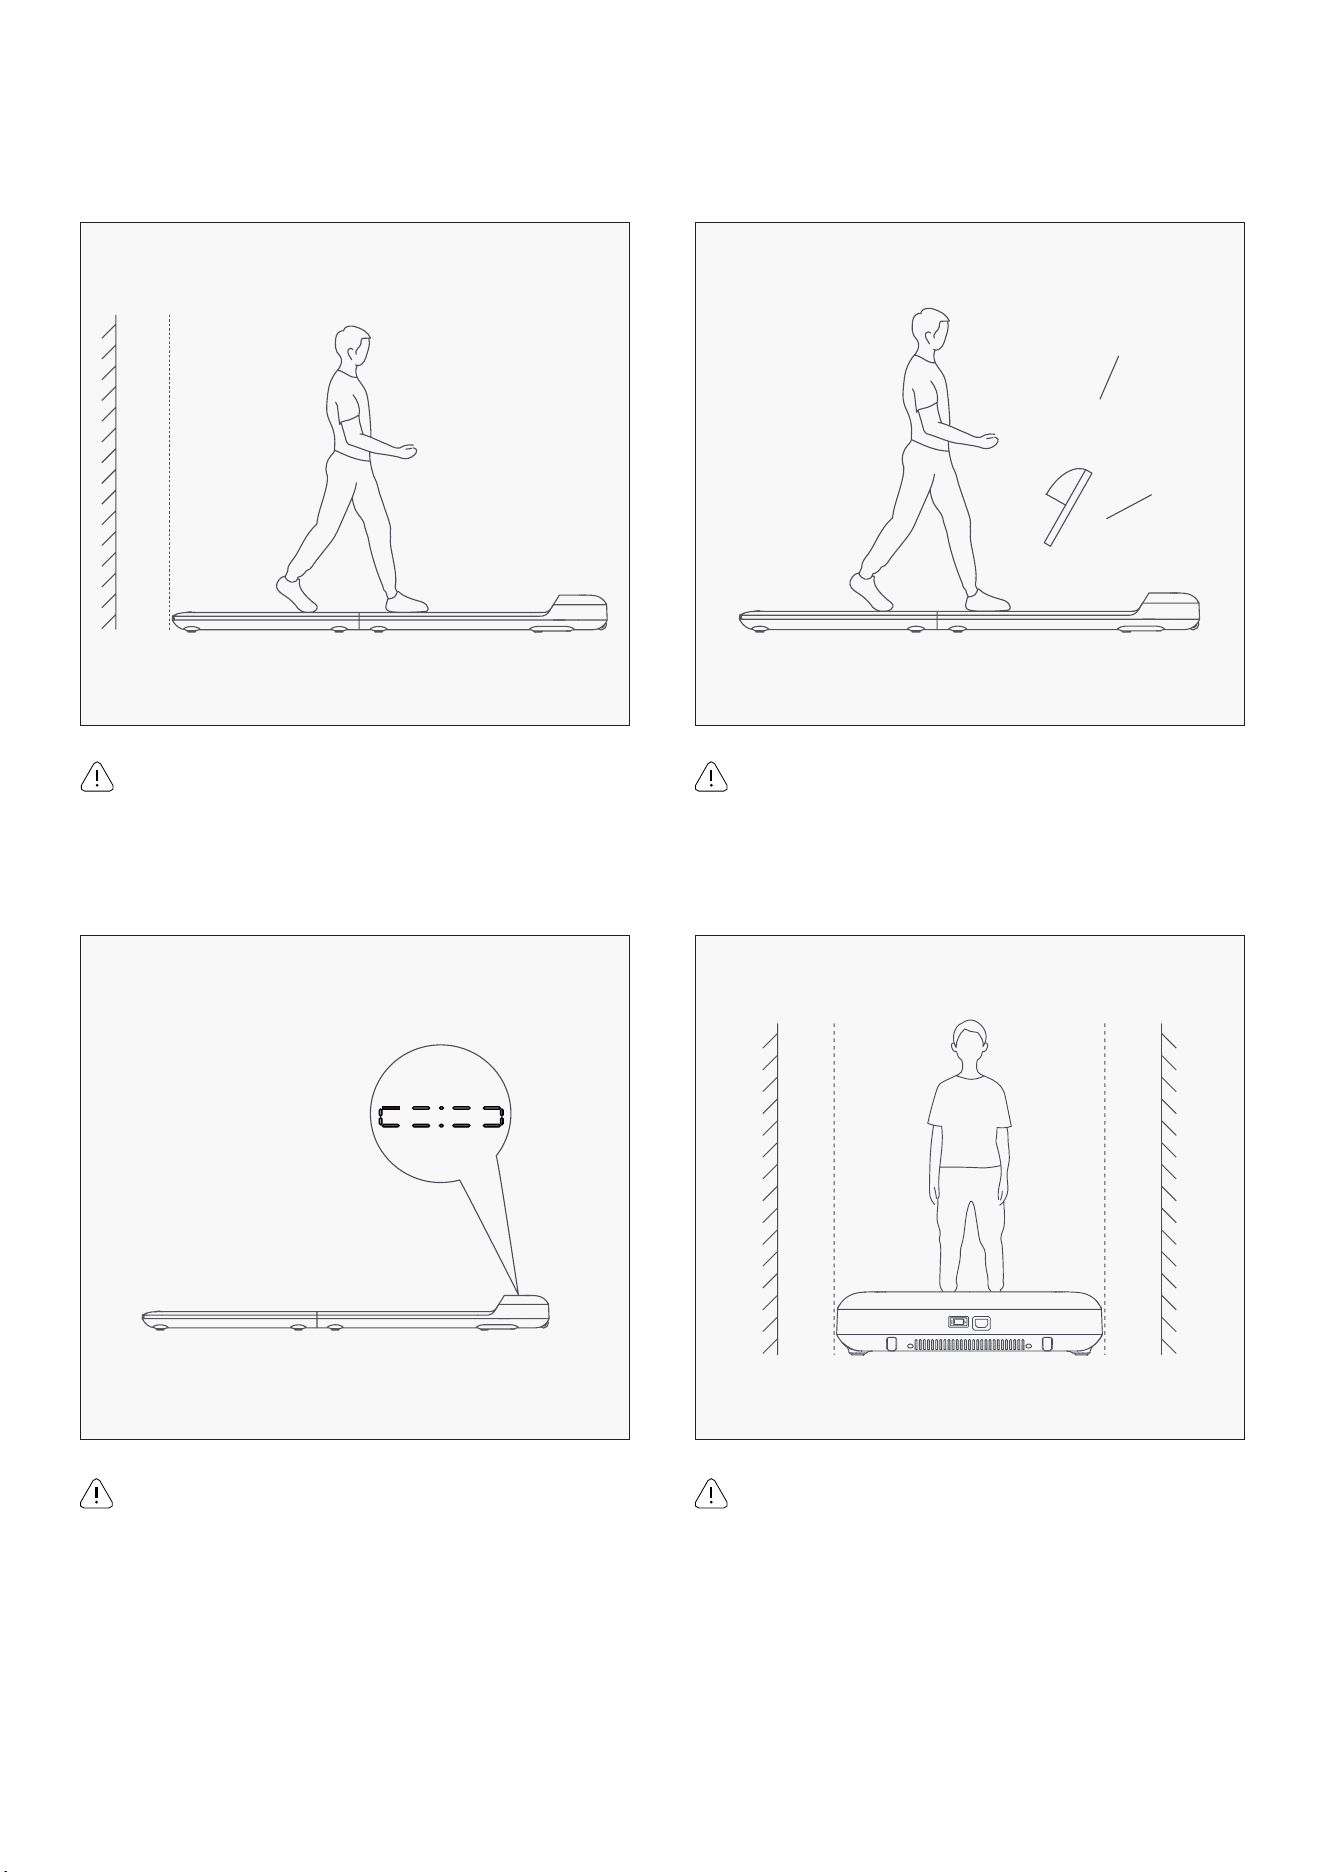
Please keep a rear distance of 1000mm or more.
Please keep a distance of 500mm or more for
both sides.
Please choose sports shoes.
Please do not stand up on the walking machine
when it is under auto calibration situation.
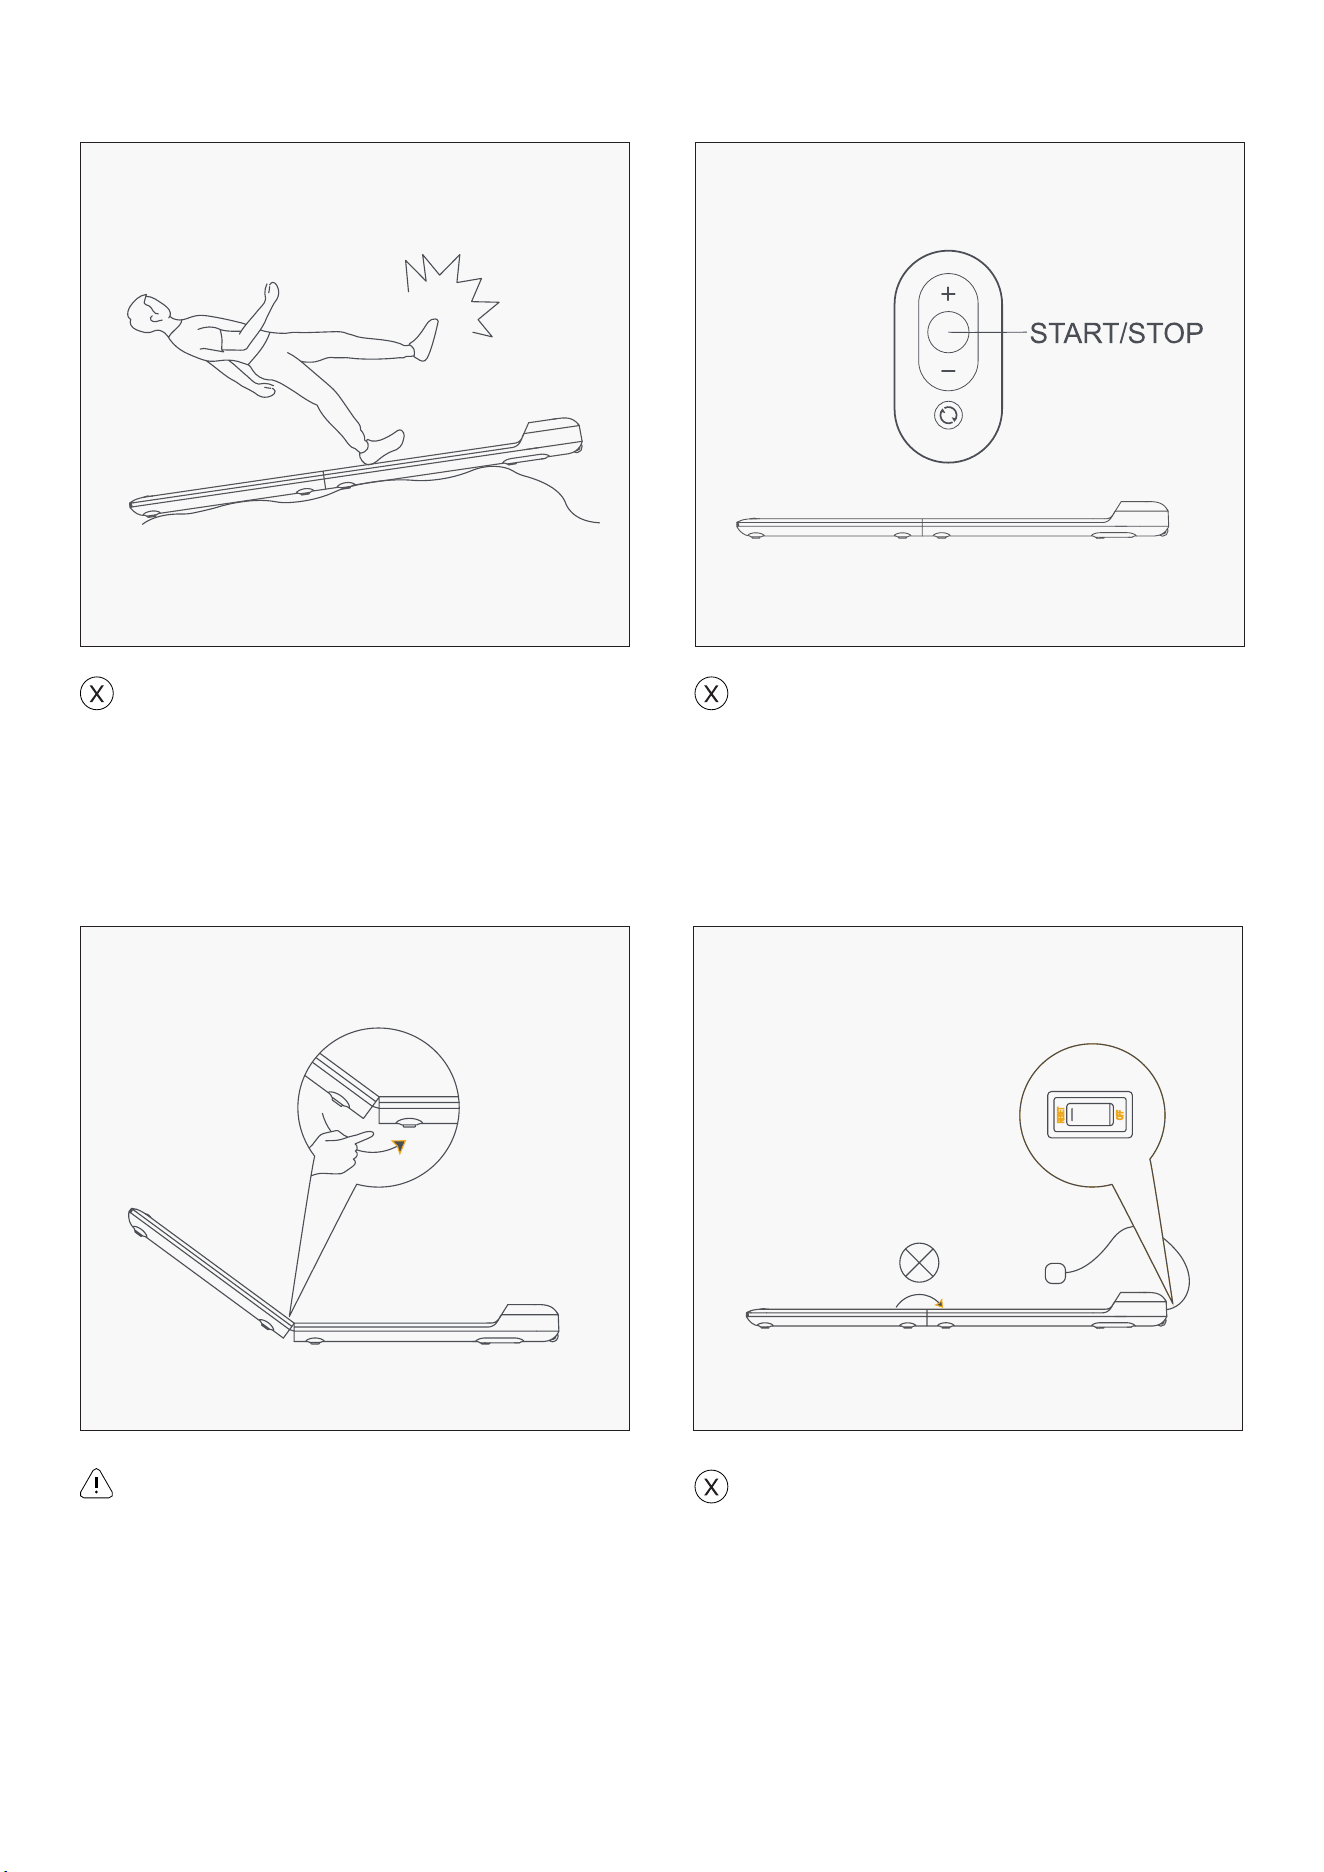
VII. SAFETY INSTRUCTION
| SAFETY NOTICE
17
It is strictly forbidden to walk up and down
the walking pad while walking. When an
emergency occurs, please press the remote
control START/STOP and step away from the
walking pad from one side.
Turn the power OFF before folding up the
WalkingPad.
Using on uneven ground is prohibited.
Anti-pinch.
SAFETY NOTICE |
18
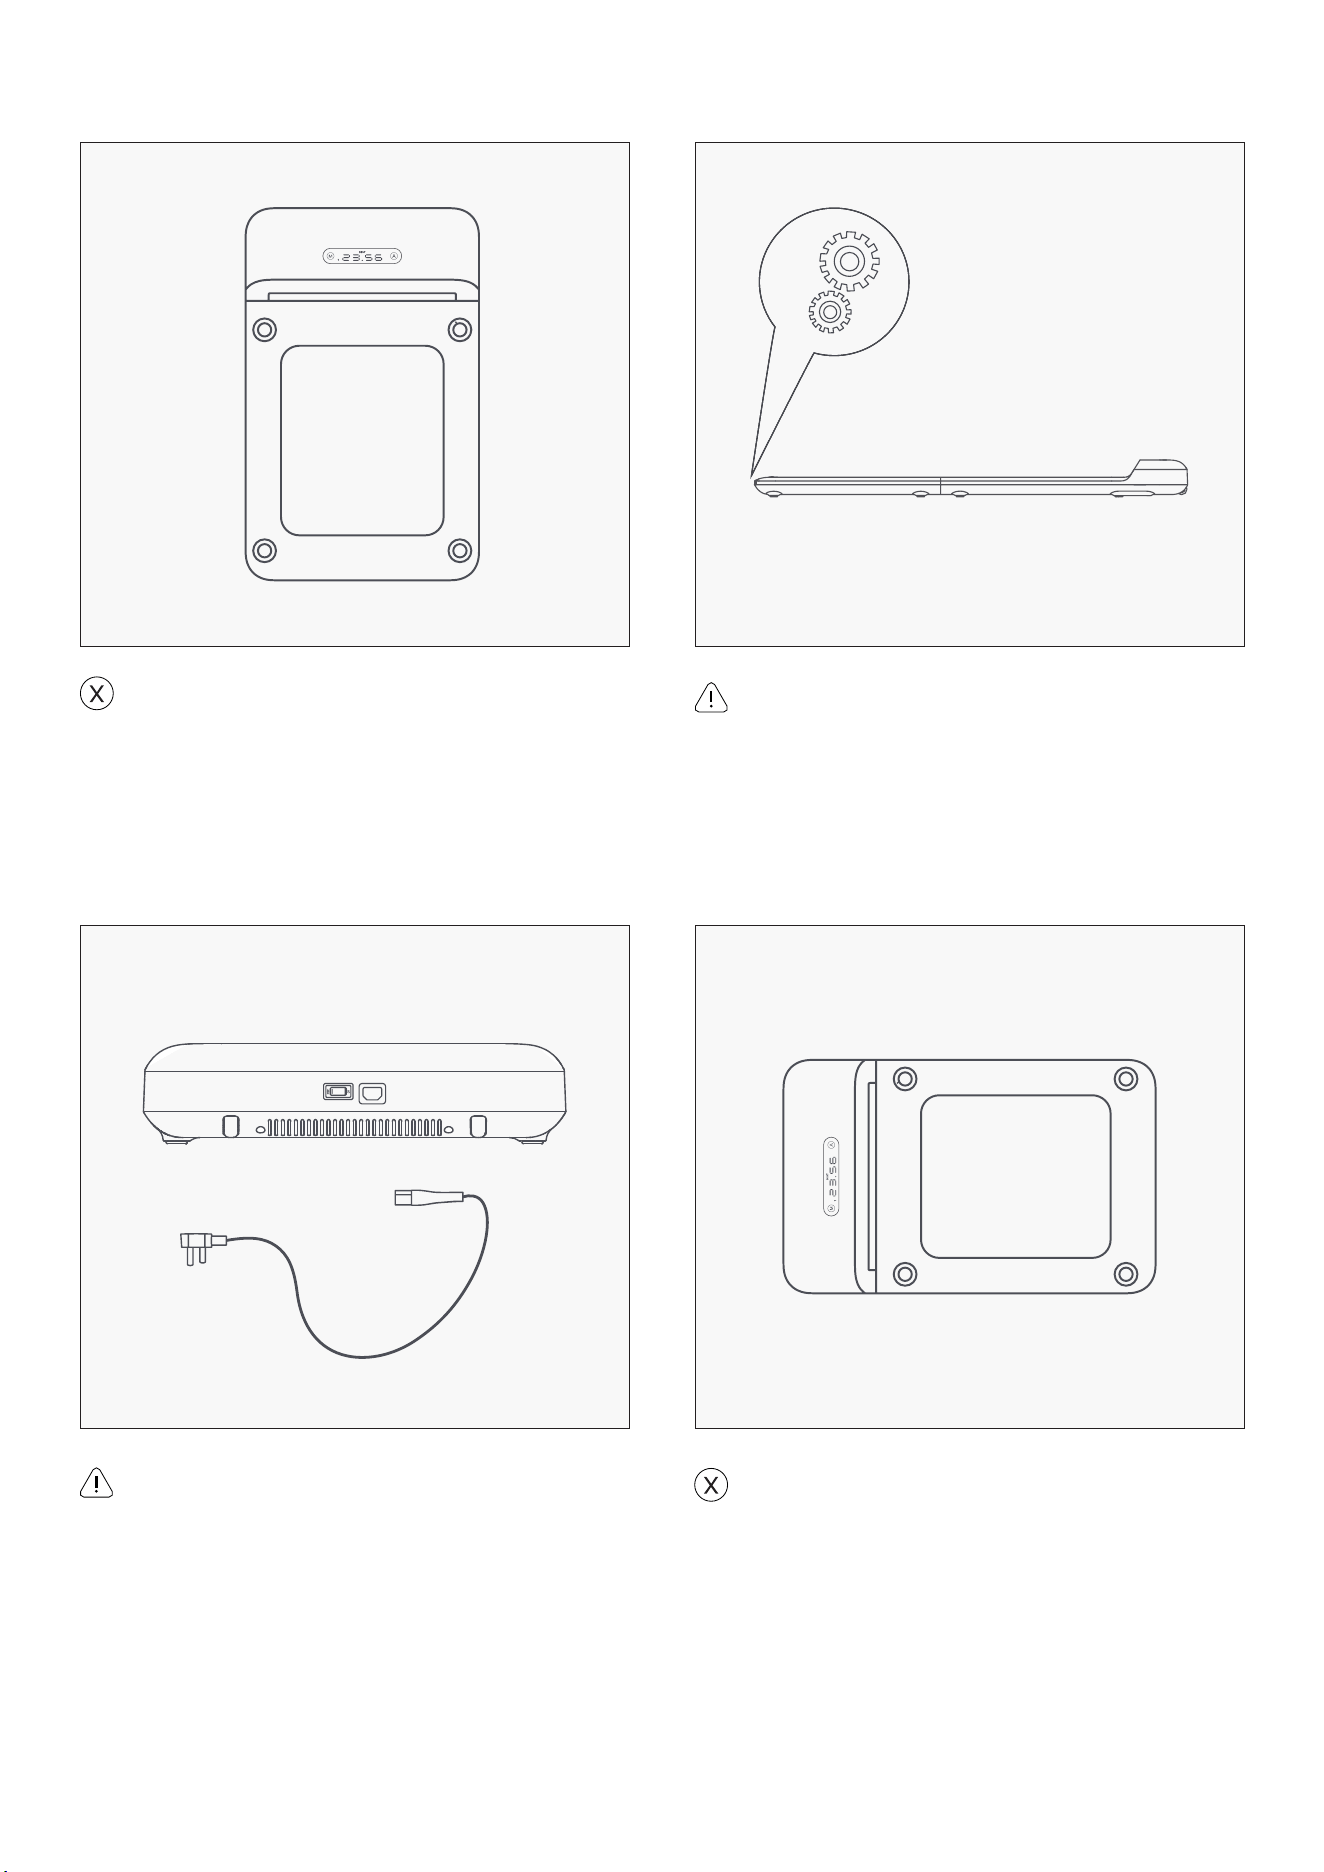
Prohibition of vertical placement.
Prohibition of lateral placement.
Anti-involved, please do not trample.
Please pull out the plug when you are not
using it.
| SAFETY NOTICE
19
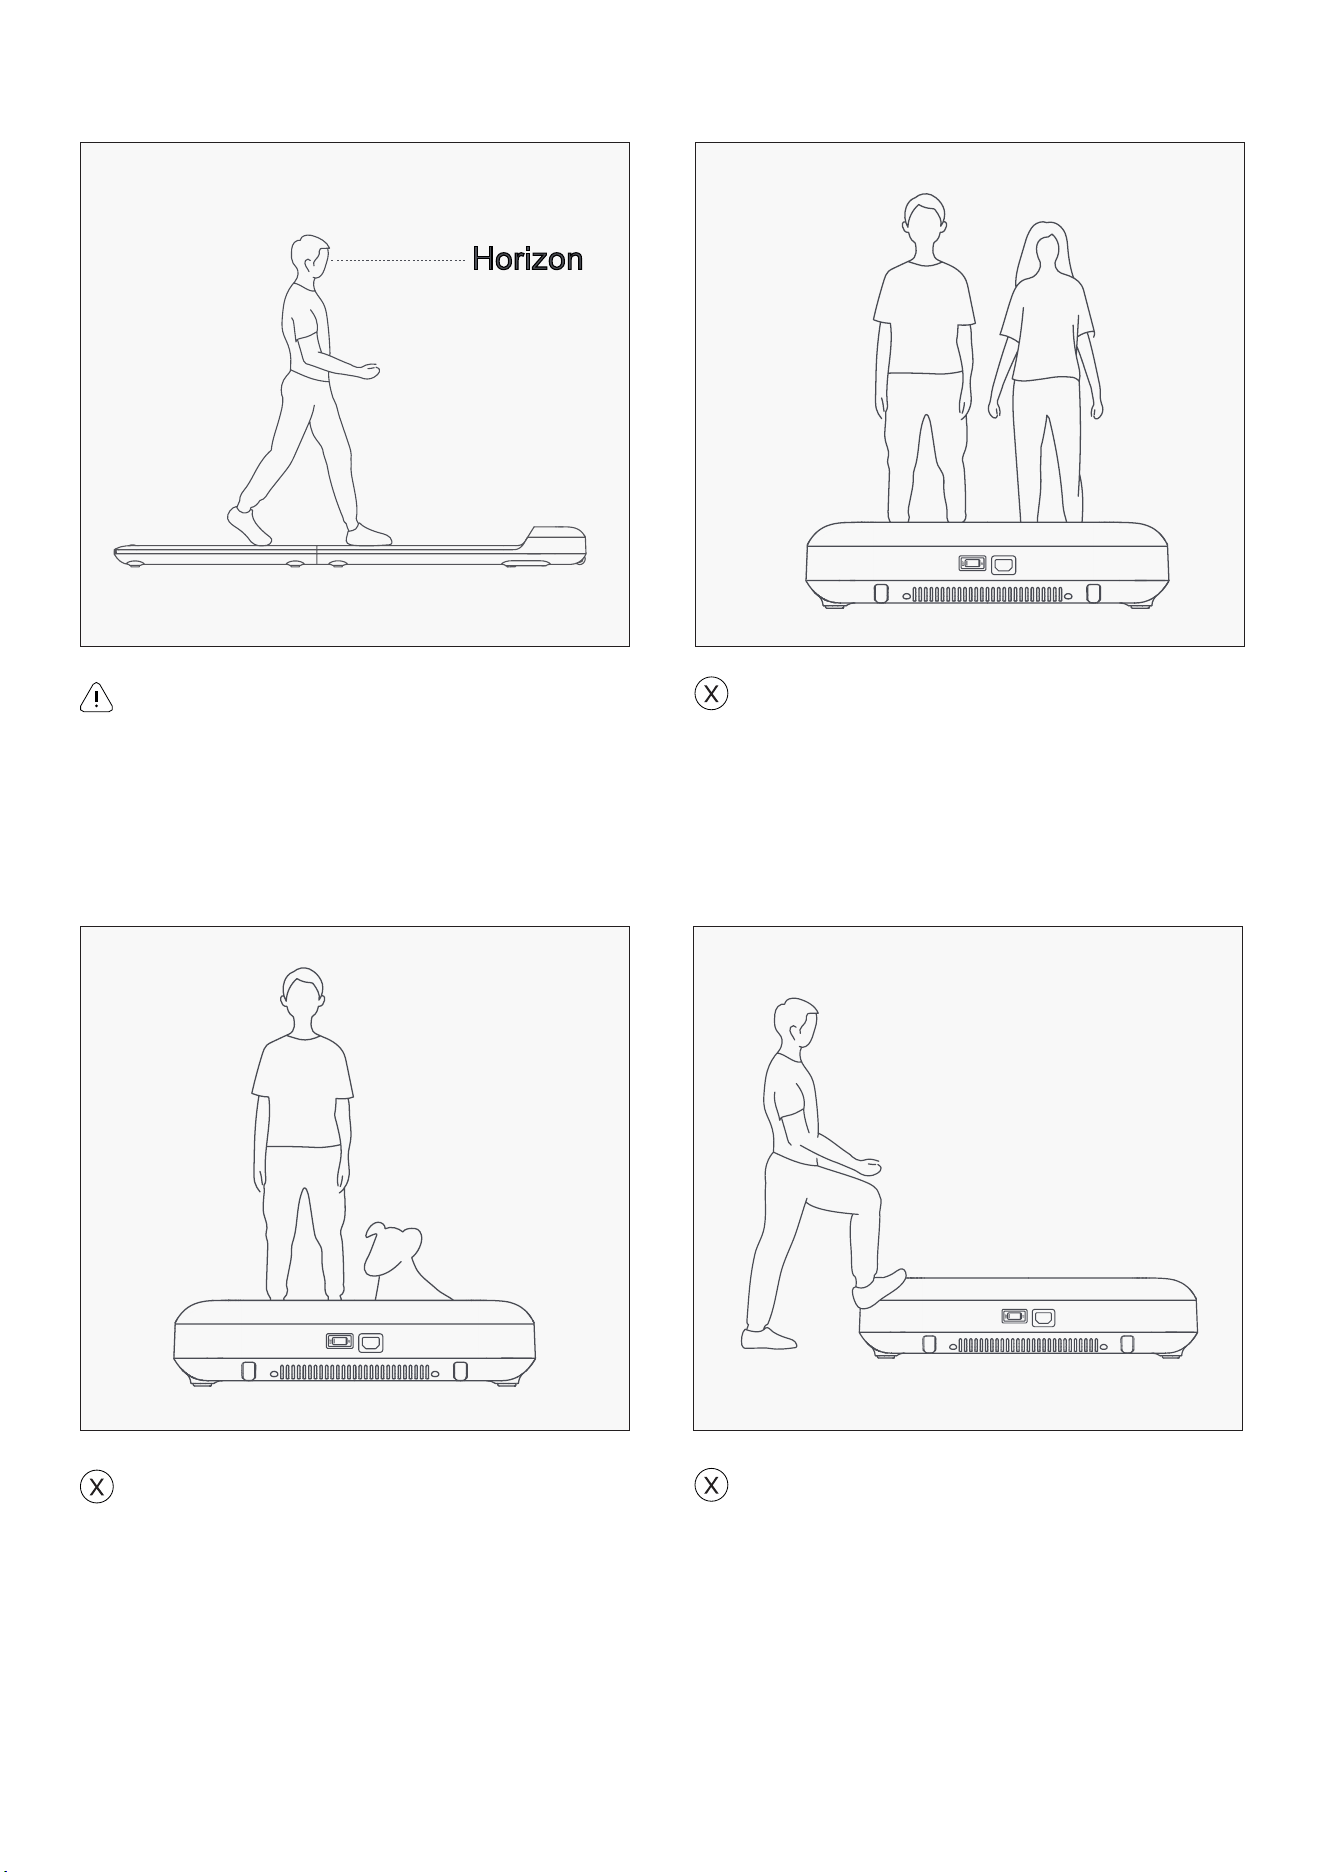
More than one person on the WalkingPad is
prohibited.
Please keep your sight horizontal to avoid
dizziness.
Using machine with pet is prohibited.
Trampling the machine head is prohibited.
SAFETY NOTICE |
20
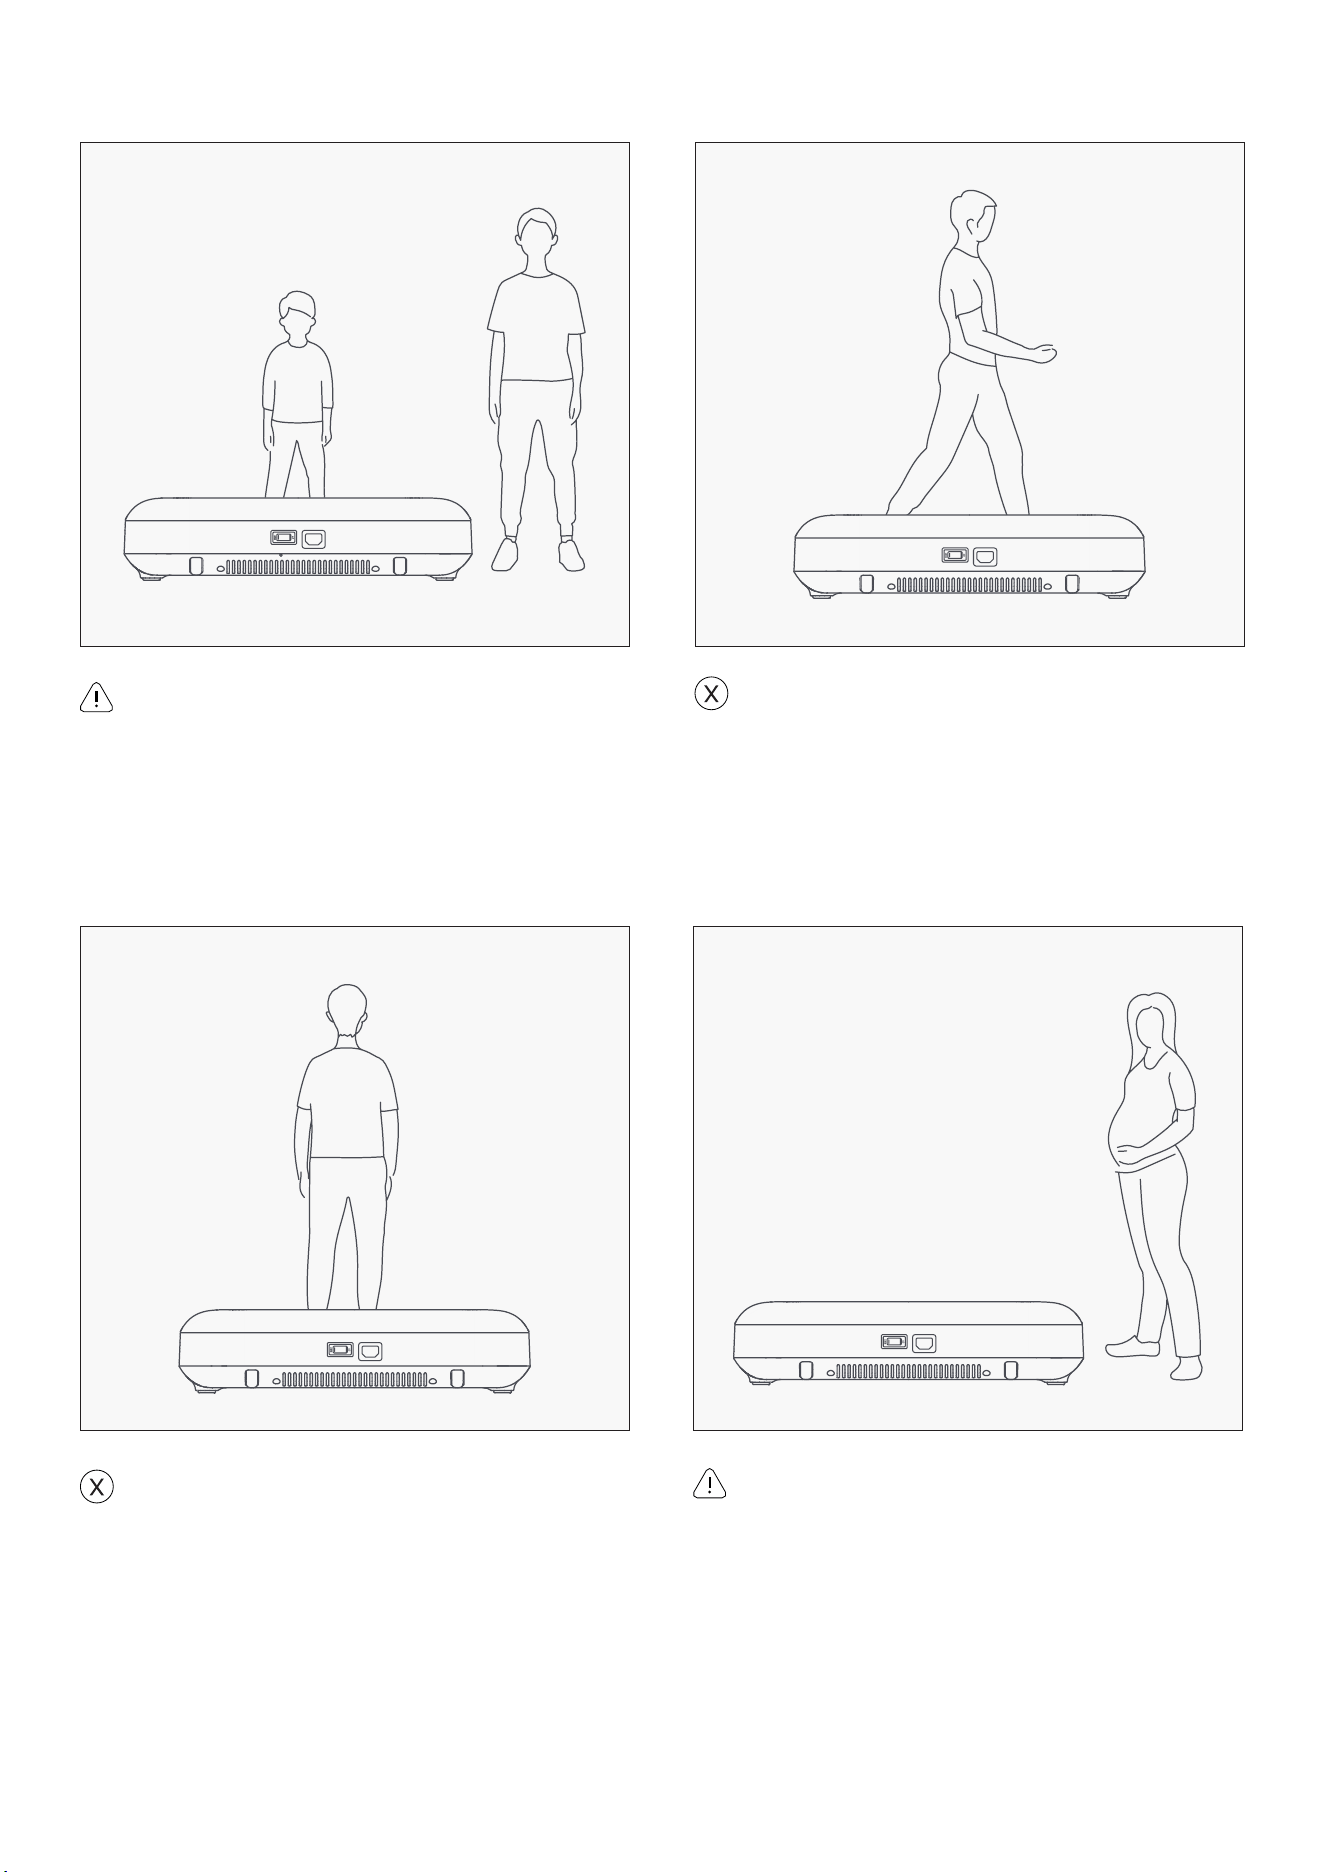
Walking sideways on the machine is
prohibited.
Please use this product reasonably
according to your physical condition
(the elderly and pregnant women should
use it cautiously). If you feel unwell, stop
exercising immediately. If necessary, please
seek medical attention.
Children should be supervised to ensure that
they do not play with the WalkingPad.
Walking backwards on the machine is
prohibited.
| SAFETY NOTICE
21
VIII. MAINTENANCE AND
ADJUSTMENTS
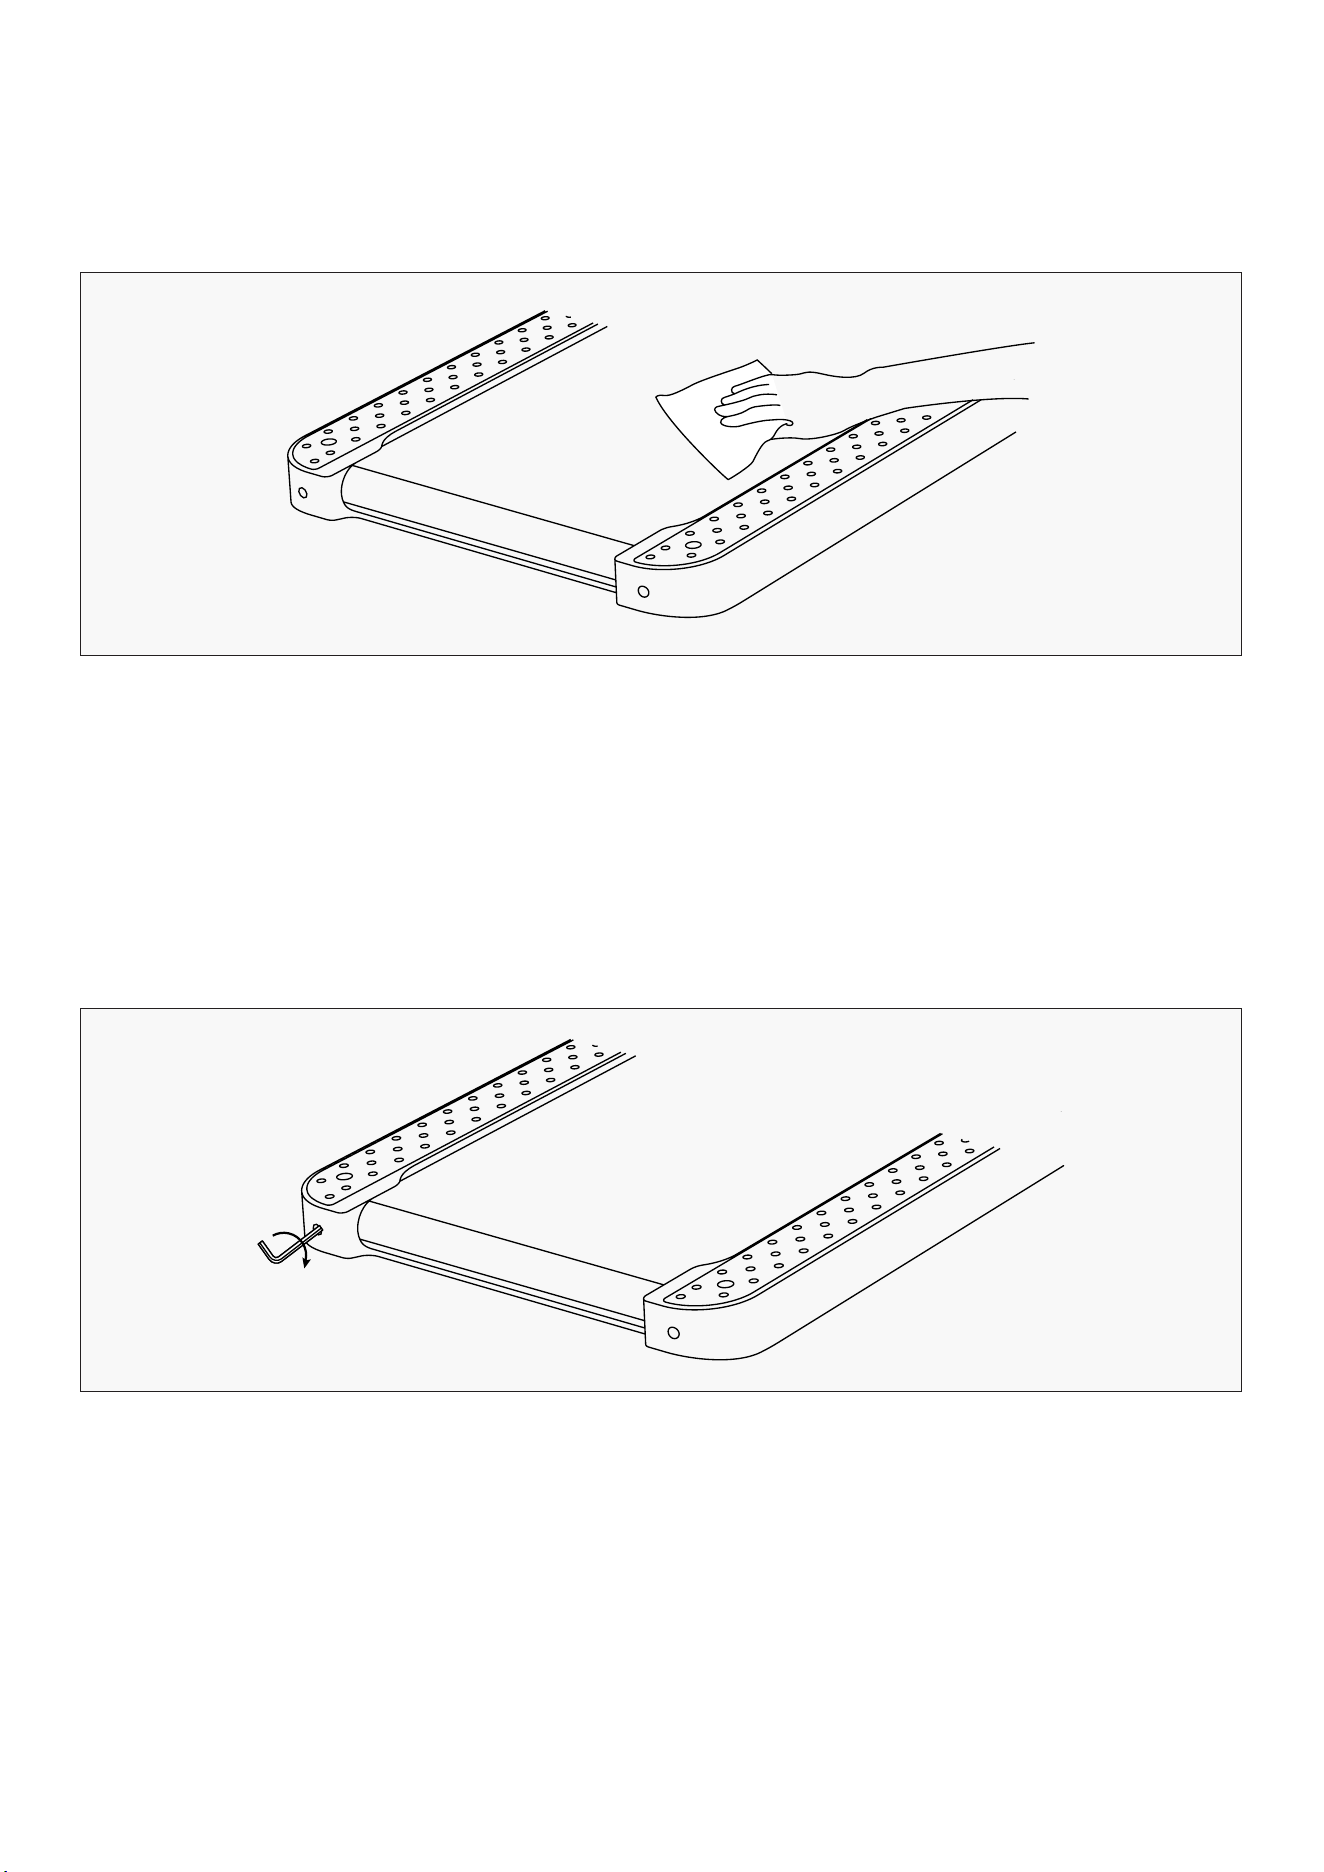
• Disconnect all sources of power before cleaning the treadmill.
• Add a small quantity of mild cleaner to a 100% cotton cloth. Do not spray the cleaner directly on the
walking belt or use acidic and corrosive cleaner.
• Do not wipe under the walking belt.
• After a period of exercise, dust and stains may appear on the rear floor. This is normal and can be
simply wiped.
1. Clean the treadmill
• Simultaneously press and hold both Mode Button and Speed Increase Button on the remote control
for over 3 seconds until device start.
• Front panel will show "CALI" and keep running with speed 3km/h (2mi/h).
• Walking belt goes to the left: Turn the left adjusting hole screw clockwise by 1/4 turn.
• Walking belt goes to the right: Turn the right adjusting hole screw clockwise by 1/4 turn.
• Walking belt is slipping: Turn the left and right adjusting screws clockwise for 1/2 turn at the
2. Walking Belt Slipping and Correction
MAINTENANCE AND ADJUSTMENTS |
22
same time.
• After each adjustment, the treadmill needs to run for 1-2 minutes to verify the adjustments.
Please adjust again if necessary.
• Press the function key to stop treadmill.
CAUTION: DO NOT OVERTIGHTEN THE BELT. PLEASE MAINTAIN ORIGINAL FACTORY BELT TENSION.
EXCESSIVE BELT TENSION WILL CAUSE DAMAGE TO MOTOR.
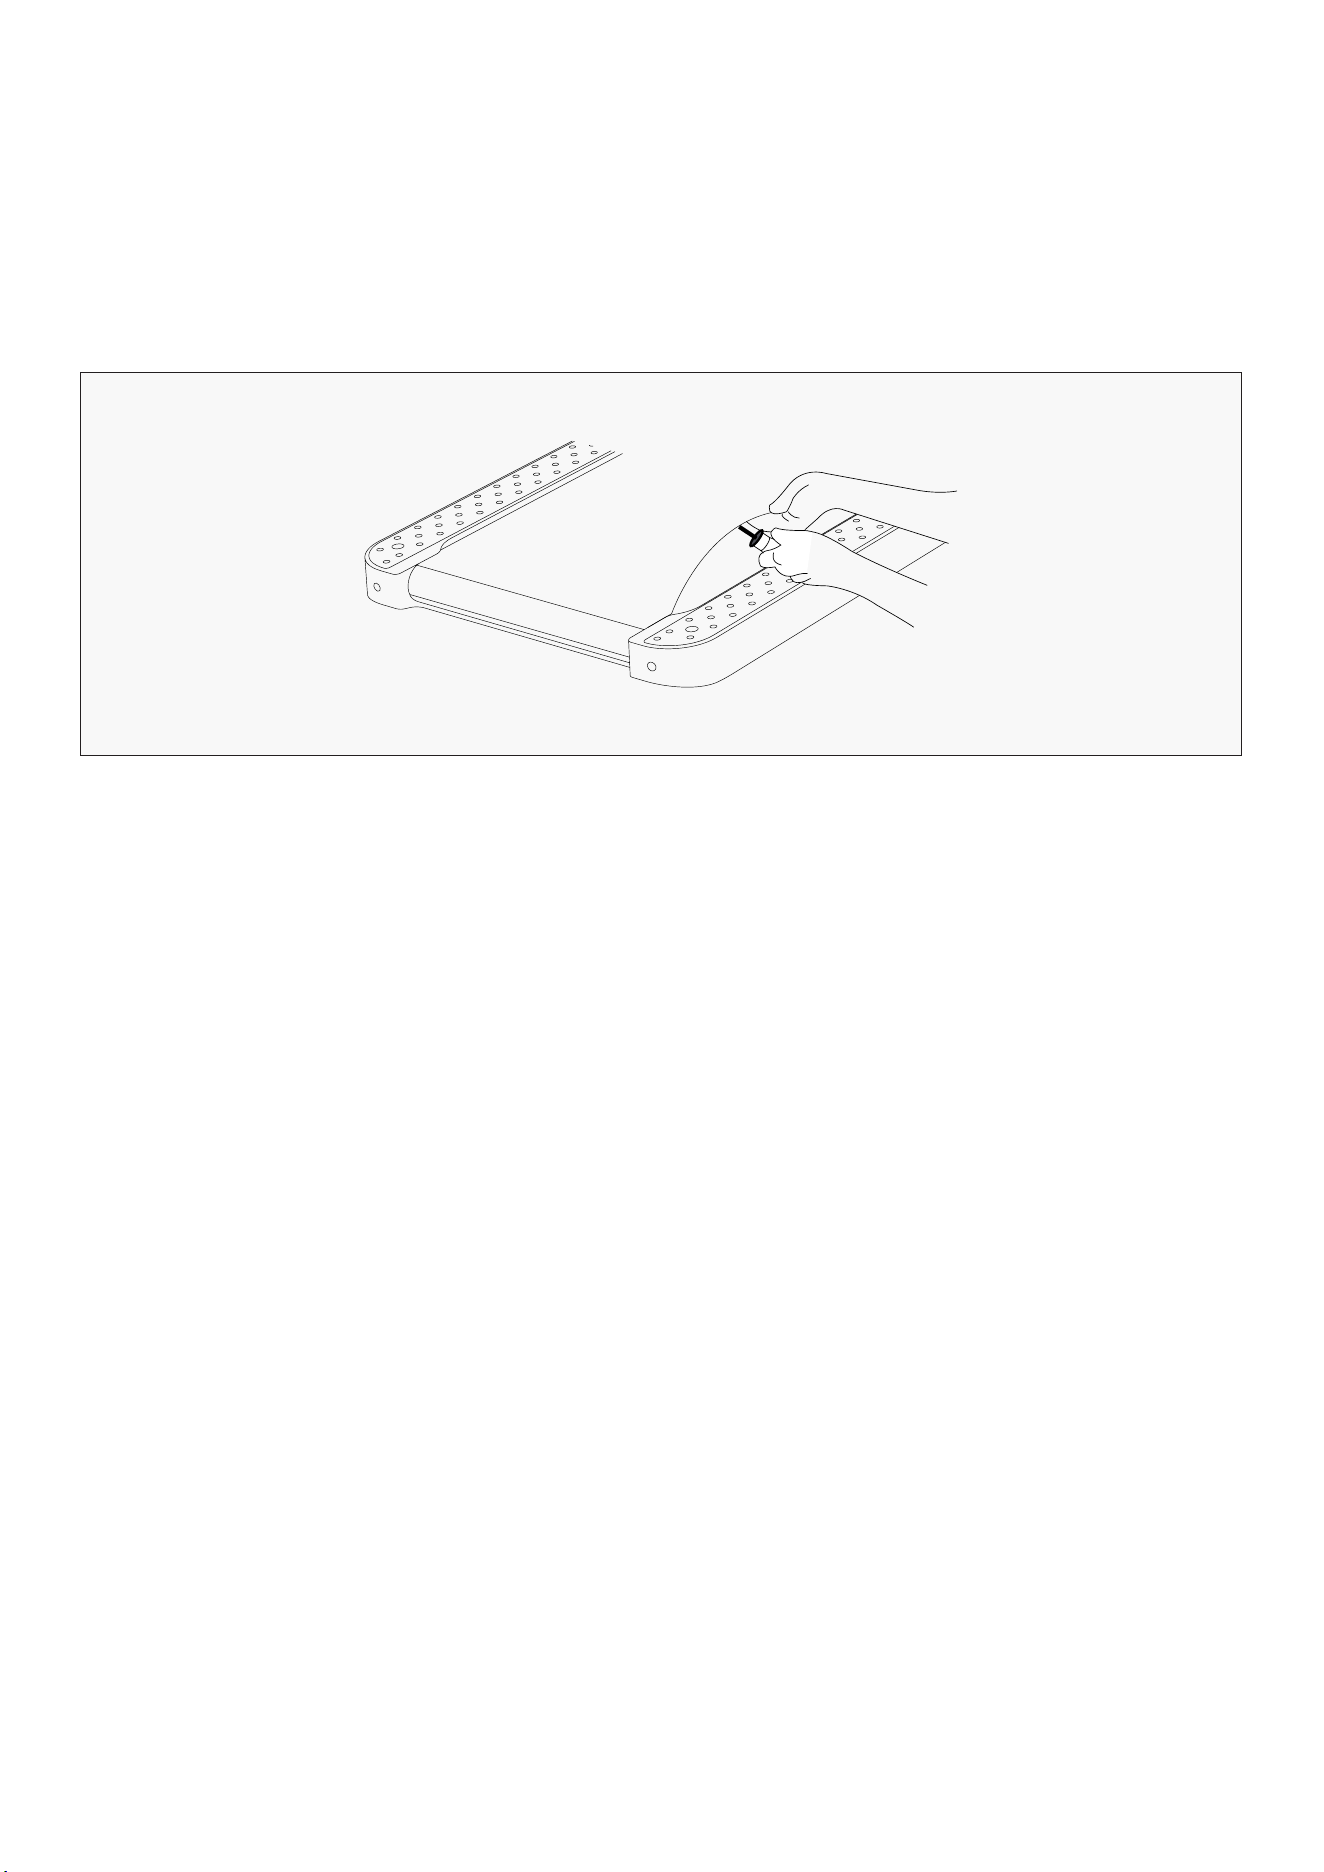
• Power off the treadmill and unplug the power cord.
• Lift the edge of the walking belt and smear the inner surface with silicone oil.
• Start the treadmill to run at a speed of 3km/h (2mi/h) for 10-20 seconds.
• 5-10ml of silicone oil is required for each lubrication. Excessive silicone oil may cause slipping and
affect normal use.
• Lubricate the walking belt every three months.
3. Walking Belt Lubrication
| MAINTENANCE AND ADJUSTMENTS

23
IX. REPLACEMENT AND DISPOSAL
The battery contained in this appliance must be removed for disposal.
When replacing the battery, use only battery with the same specifications. There
should be a battery model number printed on the battery. Battery can be purchased
from your local electronics store or some supermarkets.
The battery compartment may be in the back of the appliance or appliance remote.
Open the compartment by removing the screw in the cover using a suitable
screwdriver, and the press the lower end of the locking catch on the connectors. In
that way, both sides of the connection can be separated by pulling them apart.
When inserting a new battery, push together the two connectors and ensure that the
catch looks over the stop.
Never dispose of old battery in domestic garbage, but only through the proper public
collection points. This also applies to the battery of defective appliances.
Devices marked with this symbol must be disposed of separately from your
household waste, as they contain valuable materials that can be recycled. Proper
disposal protects the environment and human health. Your local authority or
retailer can provide information on the matter.
REPLACEMENT AND DISPOSAL |
24
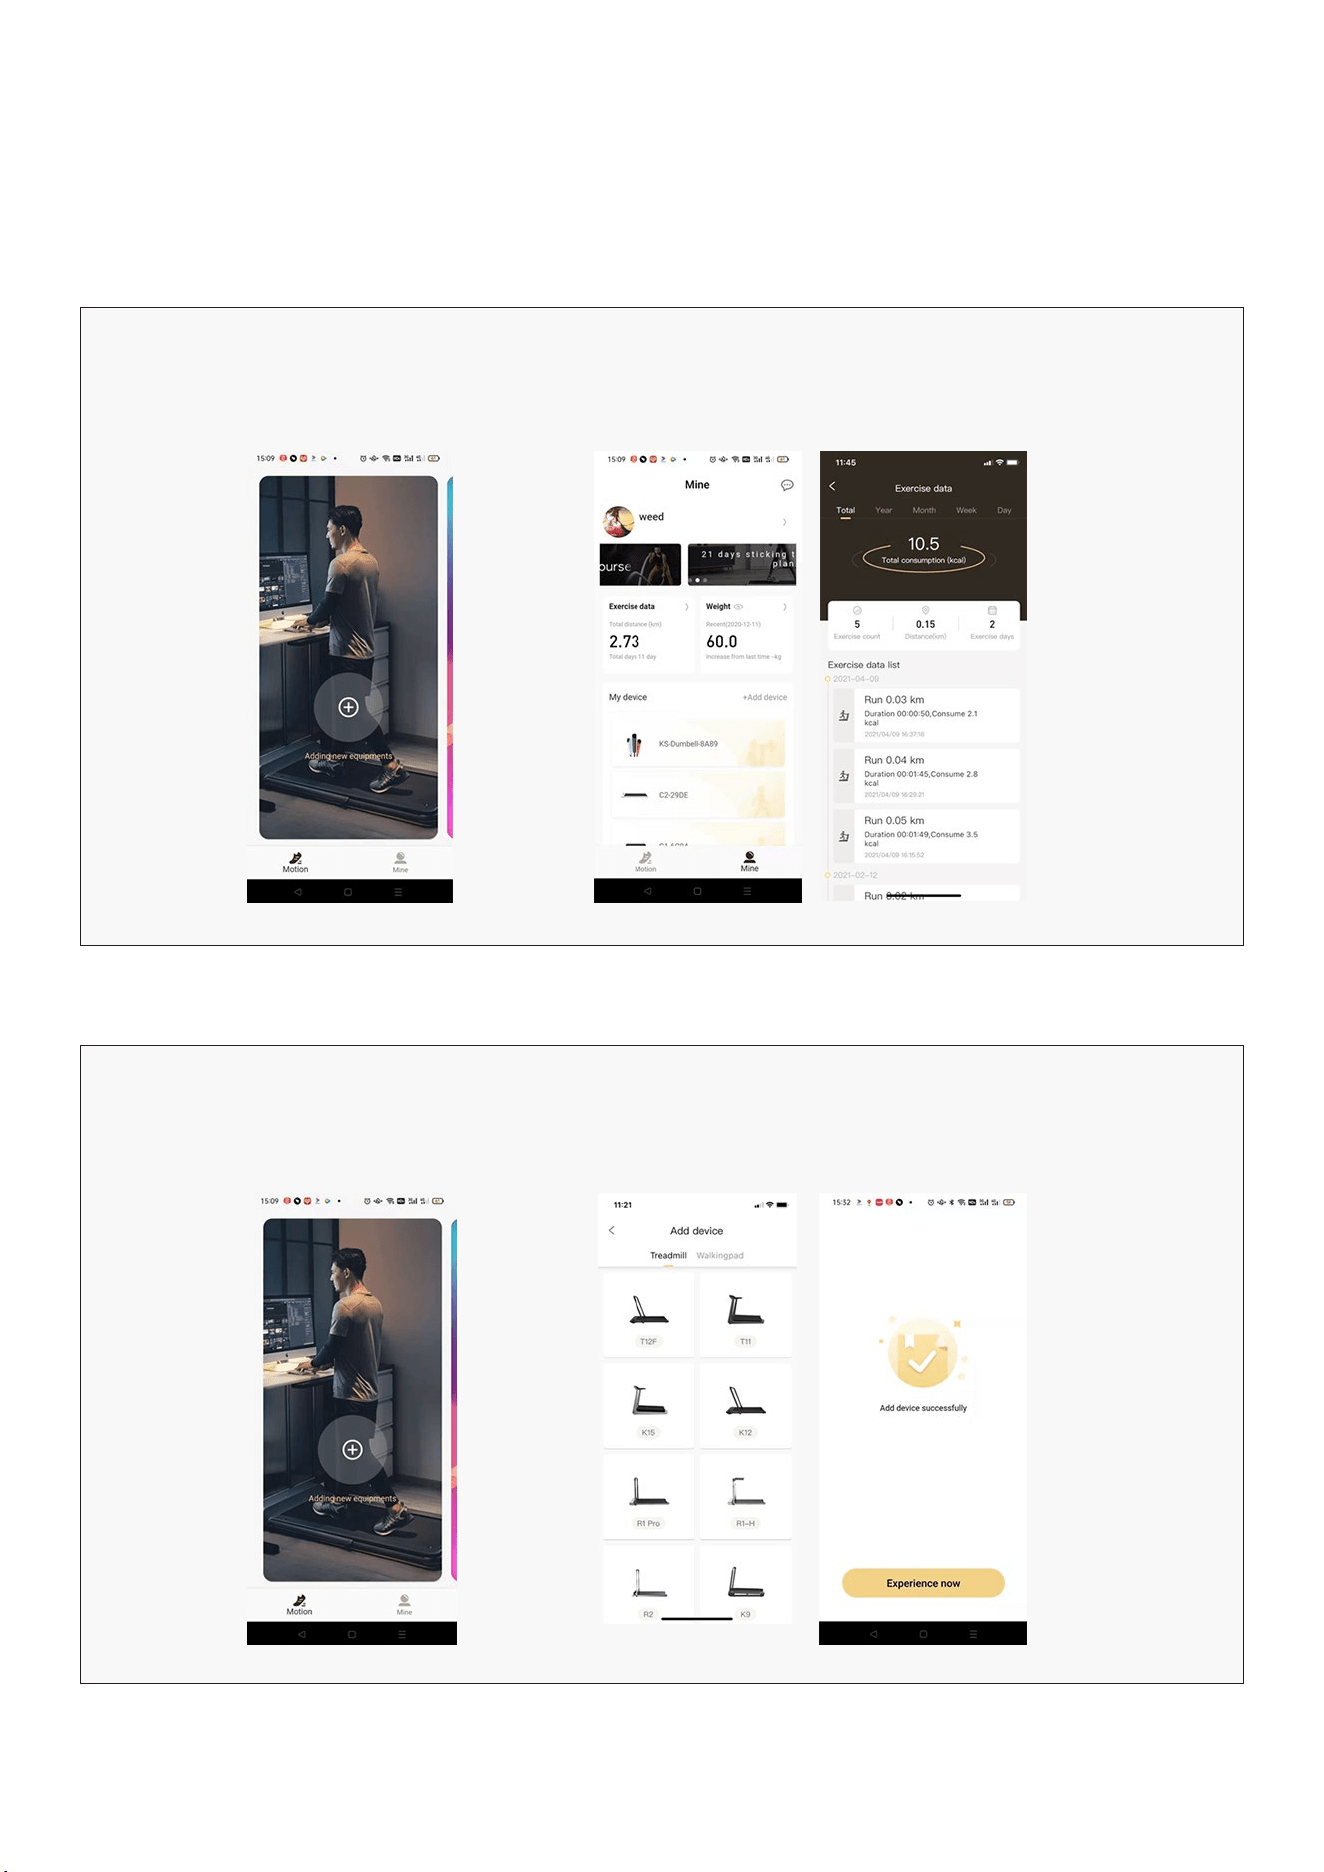
X. KS FIT APP INSTRUCTIONS
NOTE: App views may differ for Android or iOS users.
Screen View
Screen View Motion
Main screen to choose your
device to connect to.
Mine
Shows your previous workout data and user settings.
Adding Device
Press the + sign Choose the model that matches your treadmill.
Treadmills without handlebars will be in the
Walkingpad section.
| KS FIT APP INSTRUCTIONS
25KS FIT APP INSTRUCTIONS |
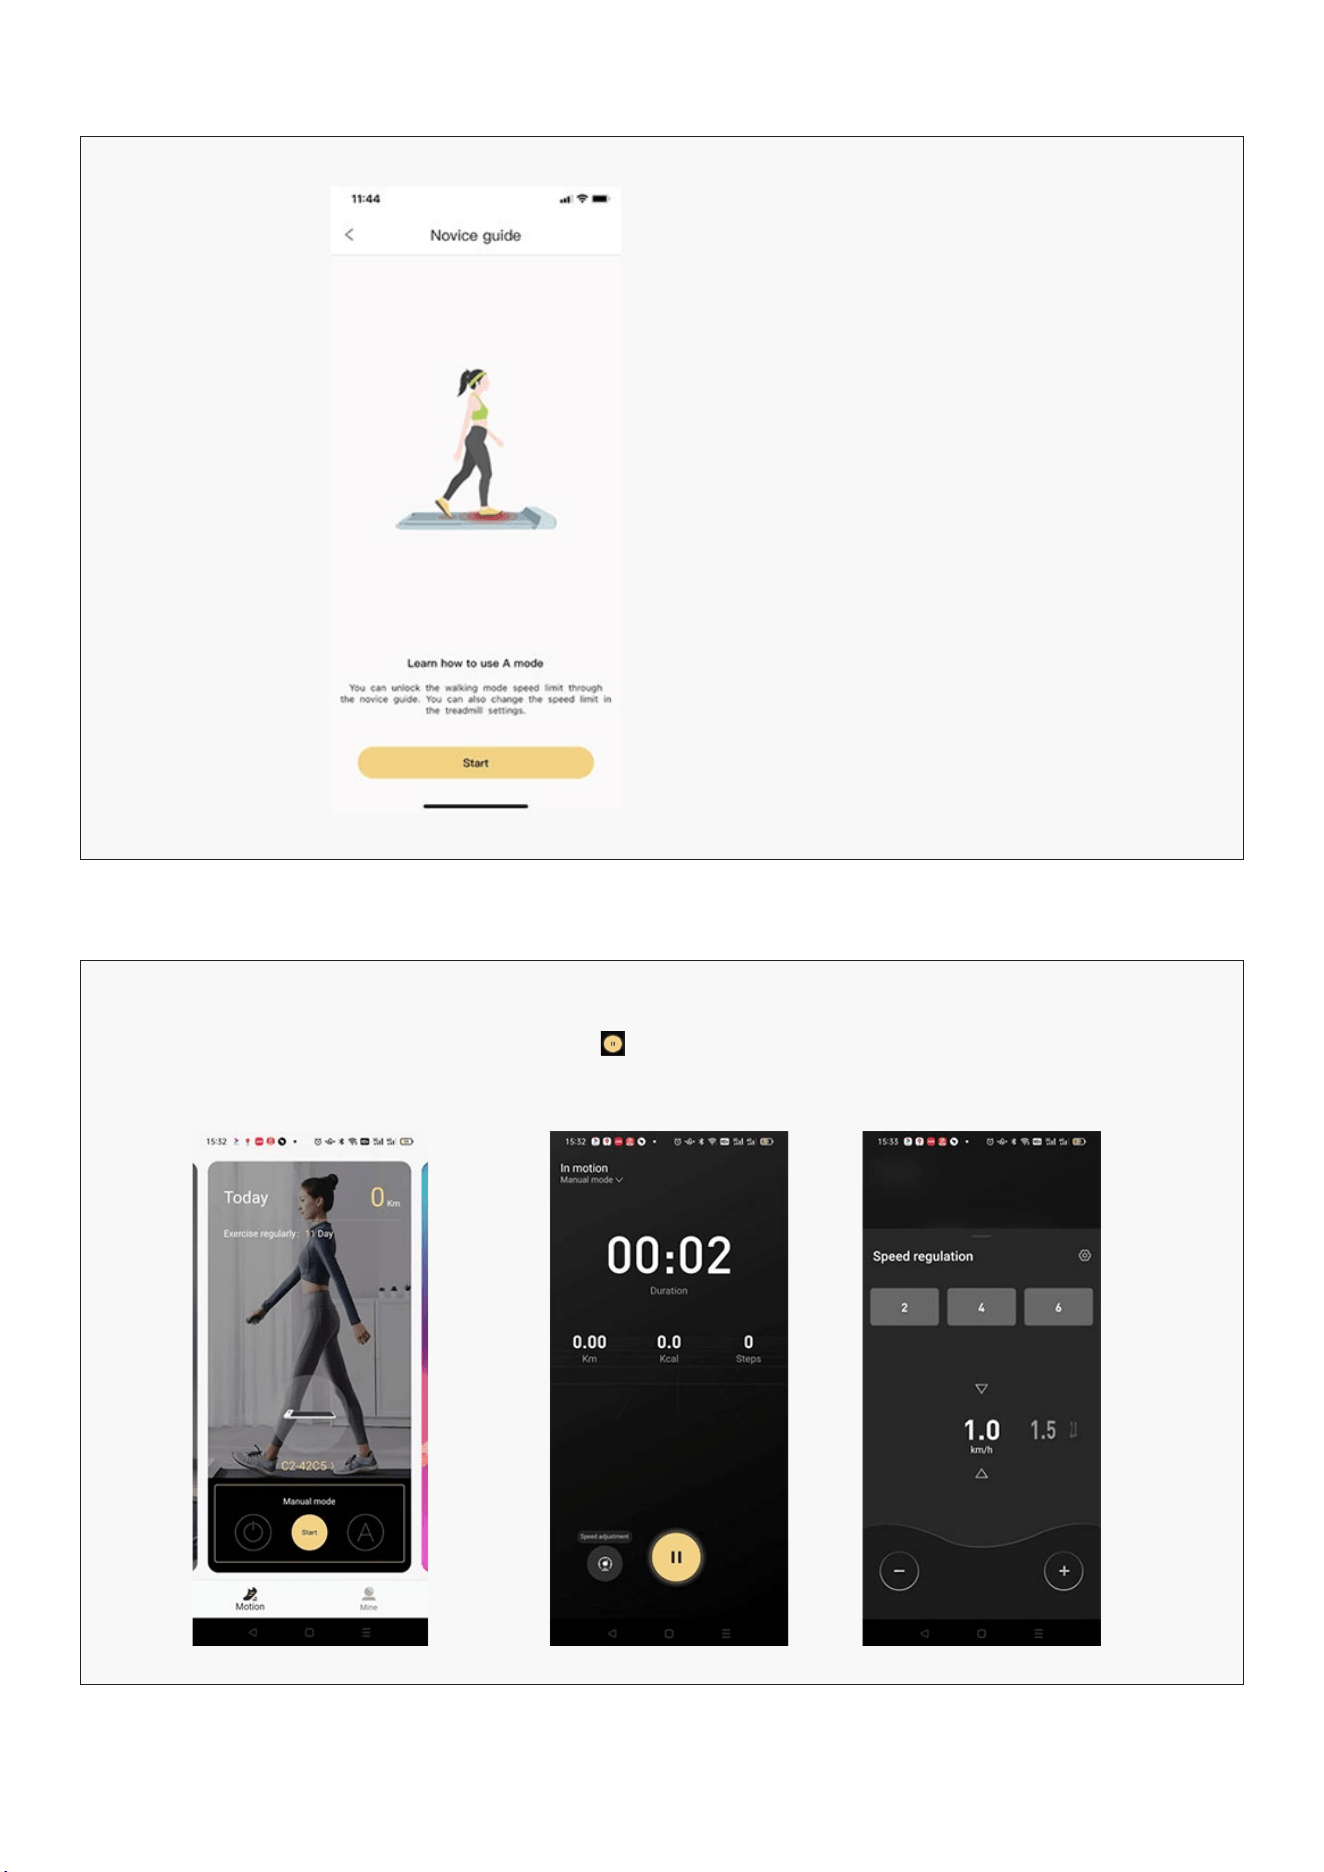
Novice Guide
Use the Novice Guide to instruct you on
how to use the app and the machine.
Manual Mode
Click start for Manual mode Click to stop or start
workout.
Click Speed adjustment to
change speed. You can select
the digit, swipe to the speed
press the – or + buttons.
26
Quick Speed Buttons
| KS FIT APP INSTRUCTIONS
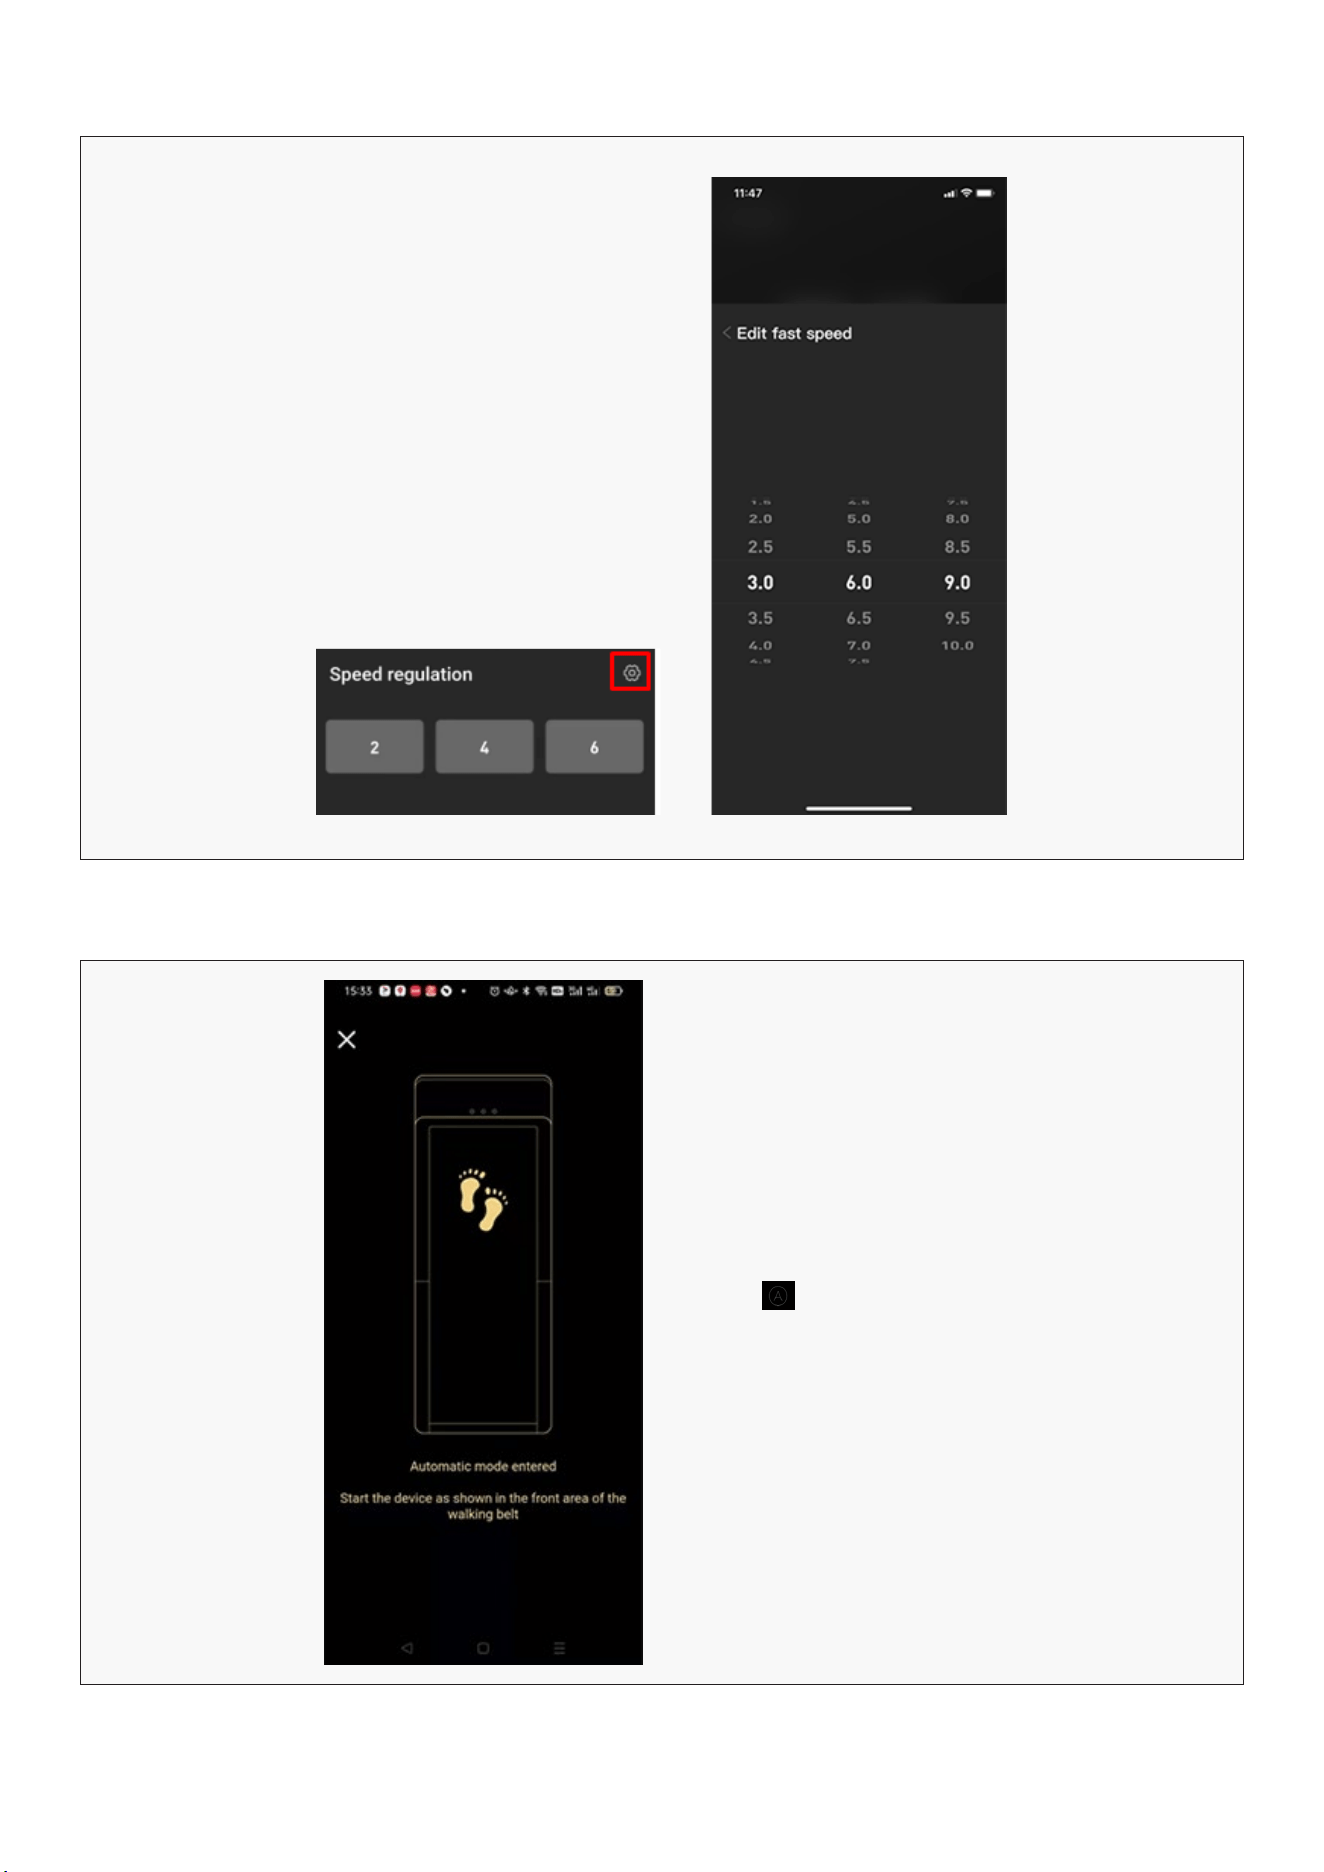
Automatic Mode
You can edit the quick speed
buttons by clicking on the
setting sign.
Press the to start Automatic mode.
The belt will sense your walking pace and
increase or decrease.
27
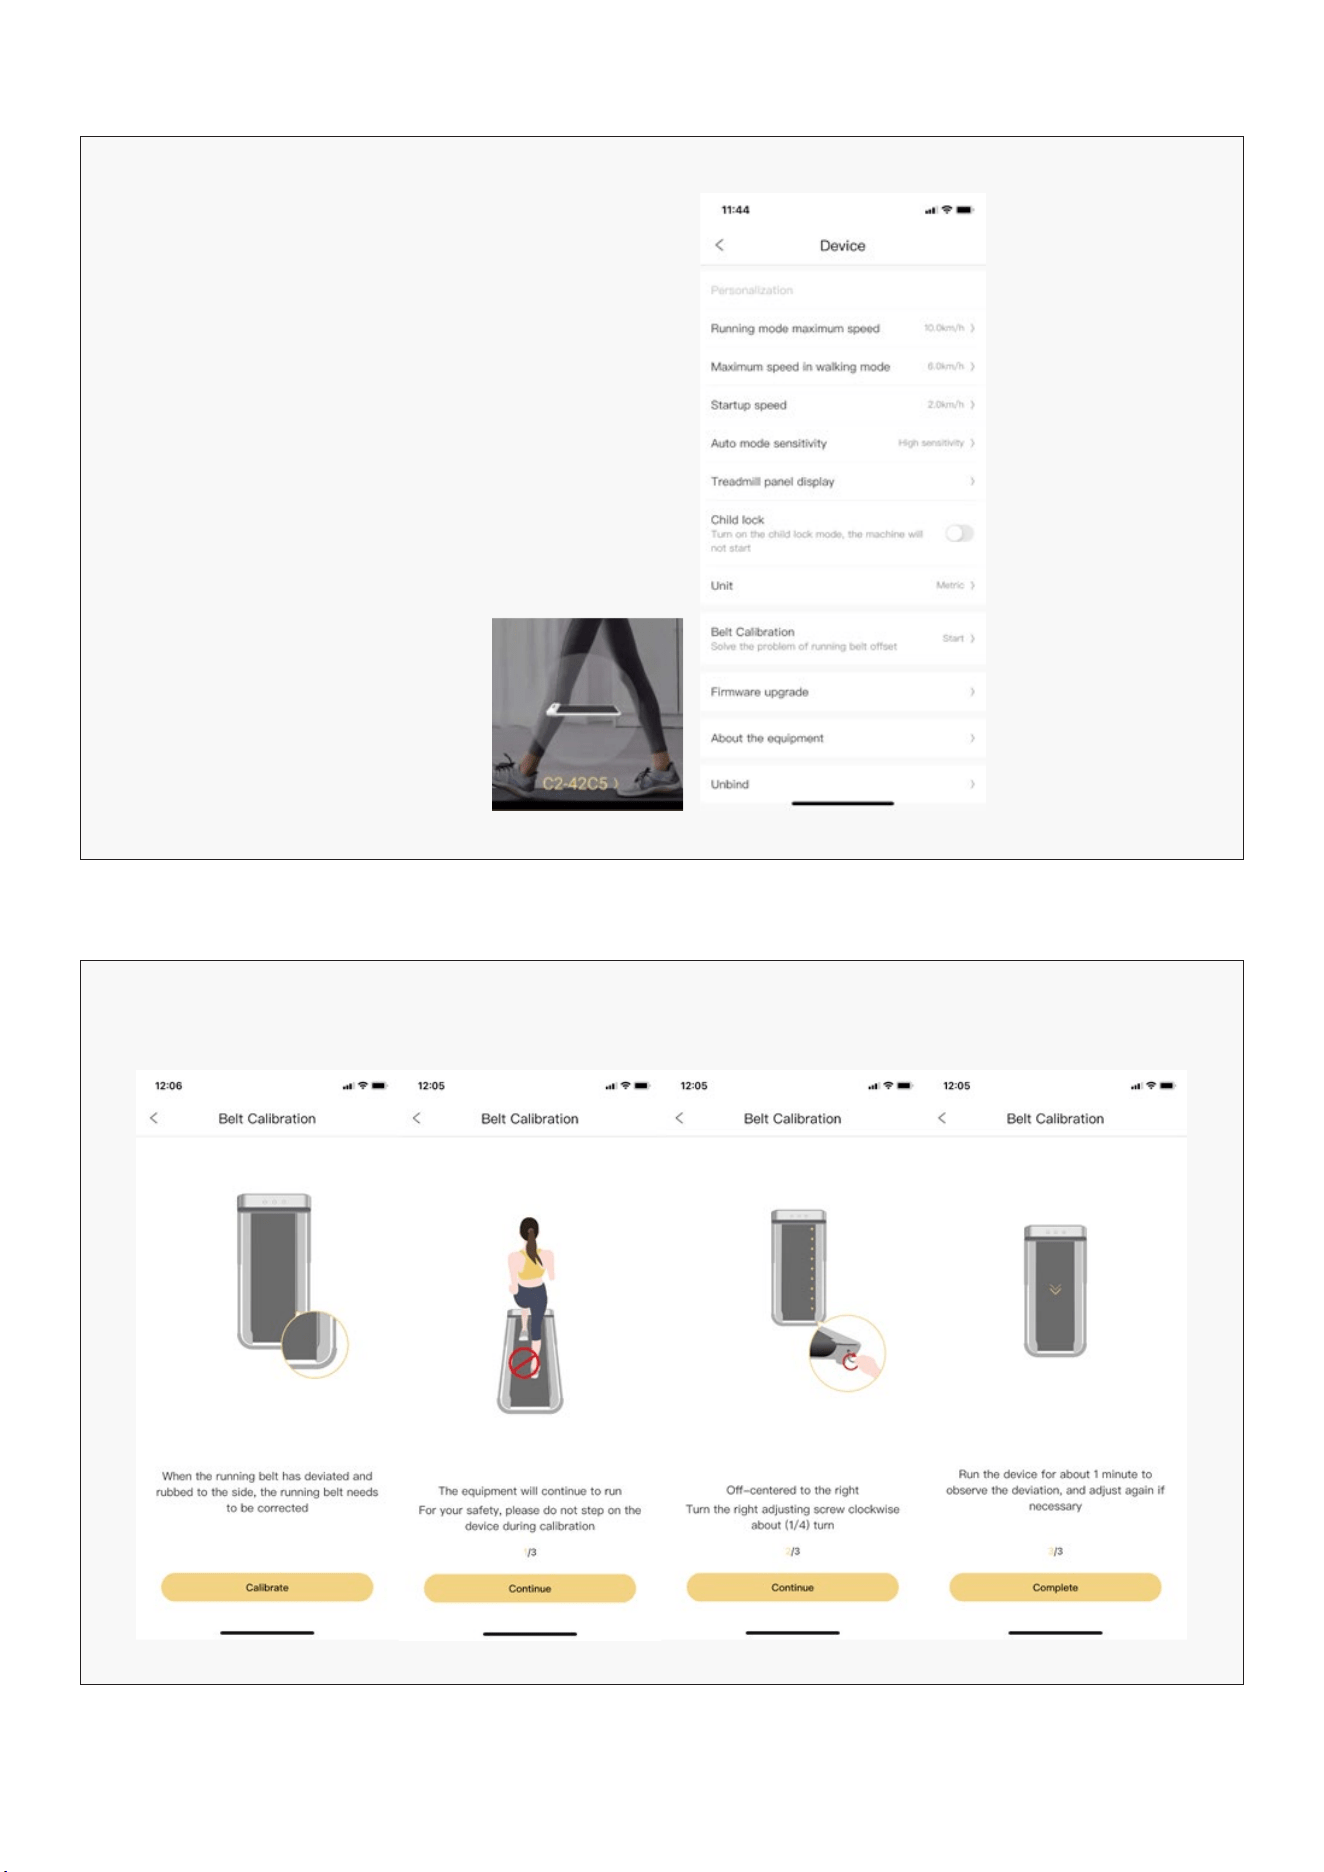
Device Settings
Belt Calibration
Click on the device image (on Motion
View) to access more settings for the
treadmill.
You can change the default speeds for
running and walking, start up speed and
sensitivity setting for Automatic Mode.
There is also a Child Lock to prevent
unauthorised use.
If belt is shifted it will need to be recentred. Click on Belt Calibration and follow steps to adjust it to centre.
KS FIT APP INSTRUCTIONS |
28
XI. EXERCISE GUIDE
PLEASE NOTE:
Before beginning any exercise program, consult your physician. This is important especially if you are
over the age of 45 or individuals with pre-existing health problems.
The pulse sensors are not medical devices. Various factors, including the user’s movement, may
affect the accuracy of heart rate readings. The pulse sensors are intended only as an exercise aid in
determining heart rate trends in general.
Exercising is great way to control your weight, improving your fitness and reduce the effect of aging and
stress. The key to success is to make exercise a regular and enjoyable part of your everyday life.
The condition of your heart and lungs and how efficient they are in delivering oxygen via your blood to
your muscles is an important factor to your fitness. Your muscles use this oxygen to provide enough
energy for daily activity. This is called aerobic activity. When you are fit, your heart will not have to work
so hard. It will pump a lot fewer times per minute, reducing the wear and tear of your heart.
So as you can see, the fitter you are, the healthier and greater you will feel.
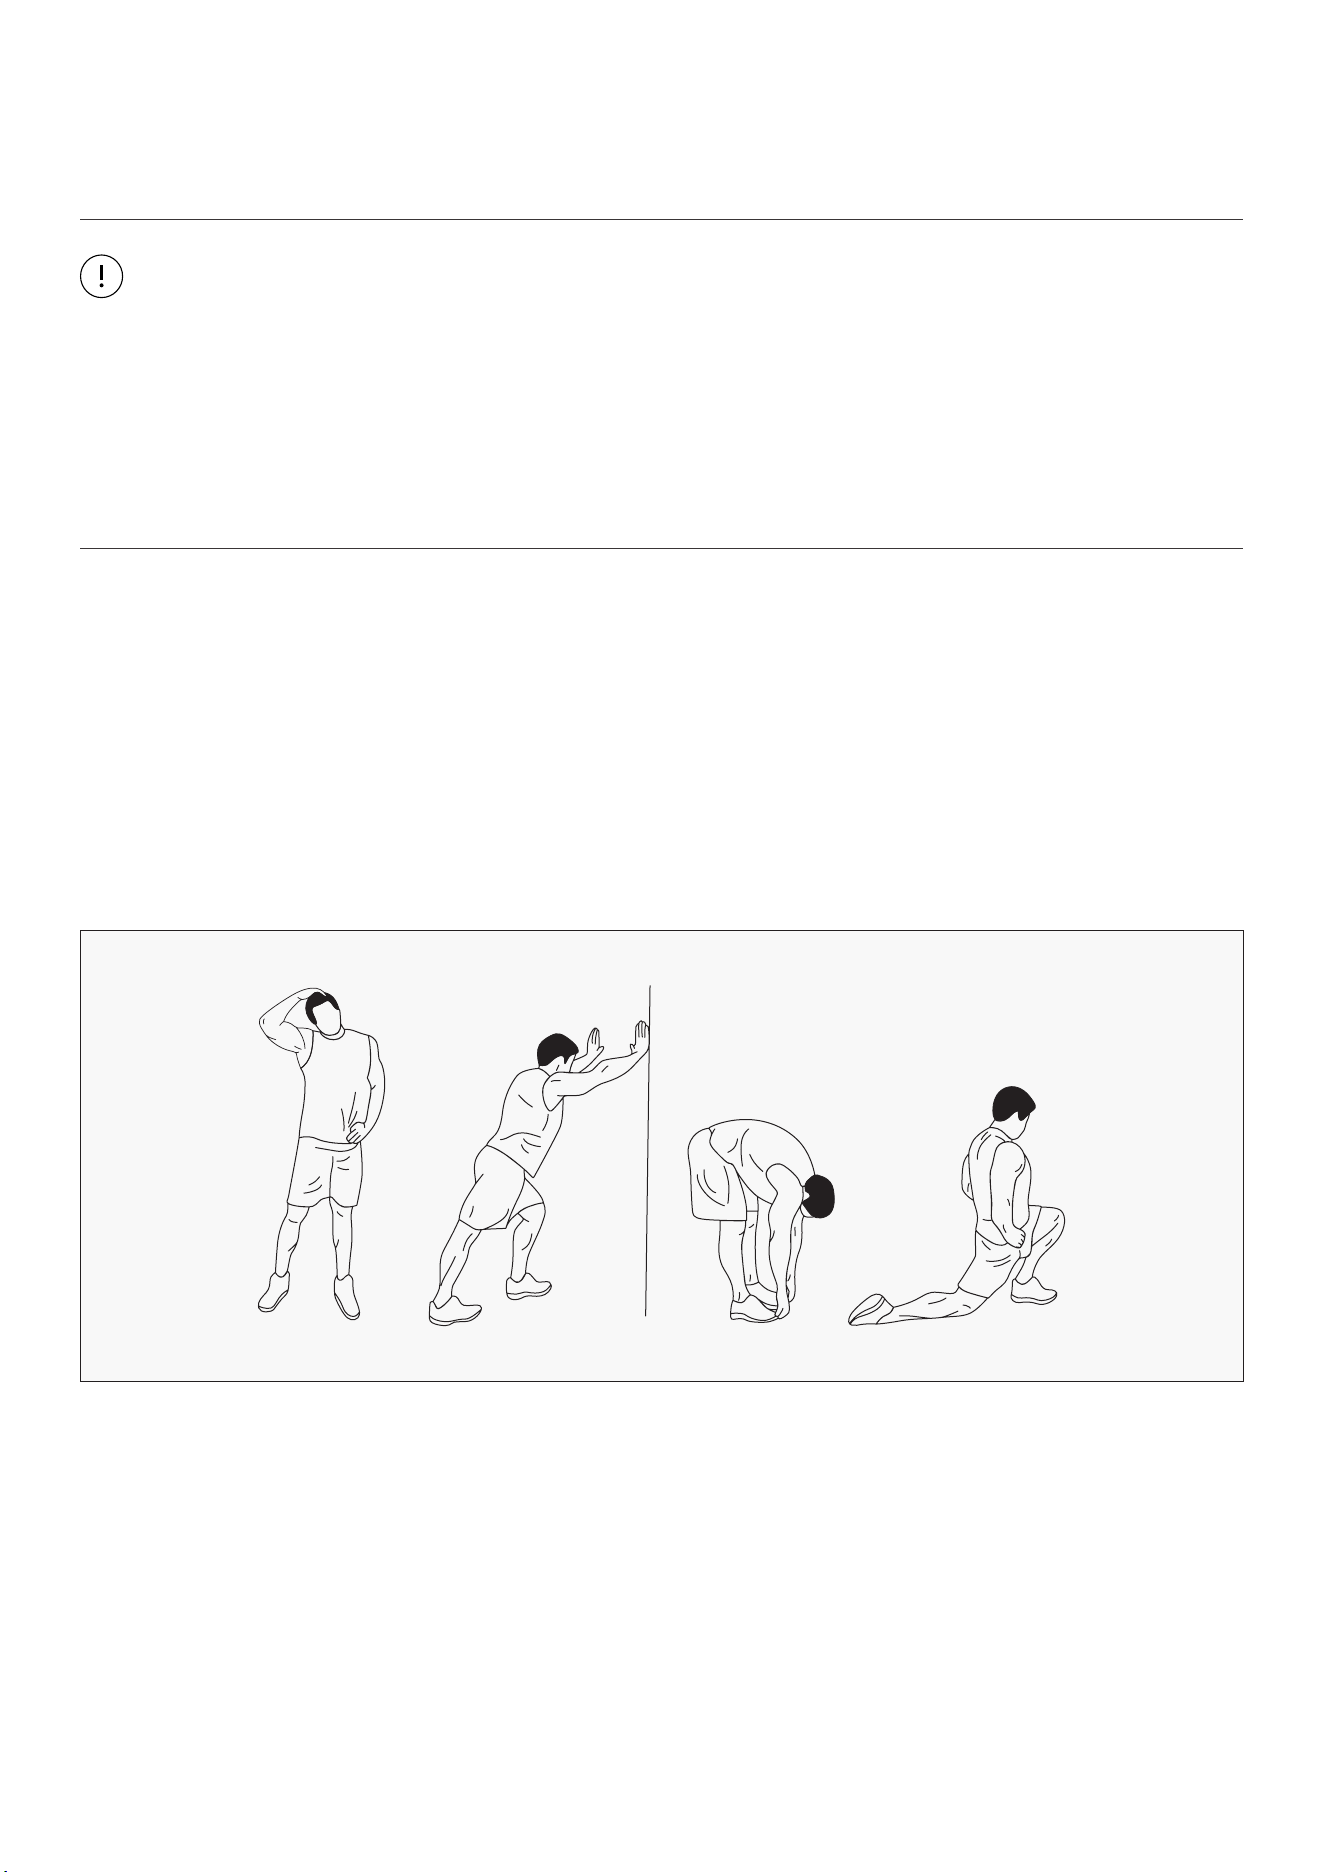
WARM UP
Start each workout with 5 to 10 minutes of stretching and some light exercises. A proper warm-up
increases your body temperature, heart rate and circulation in preparation for exercise. Ease into your
exercise.
| EXERCISE GUIDE
29
COOL DOWN
Finish each workout with a light jog or walk for at least 1 minute. Then complete 5 to 10 minutes of
stretching to cool down. This will increase the flexibility of your muscles and will help prevent post-
exercise problems.
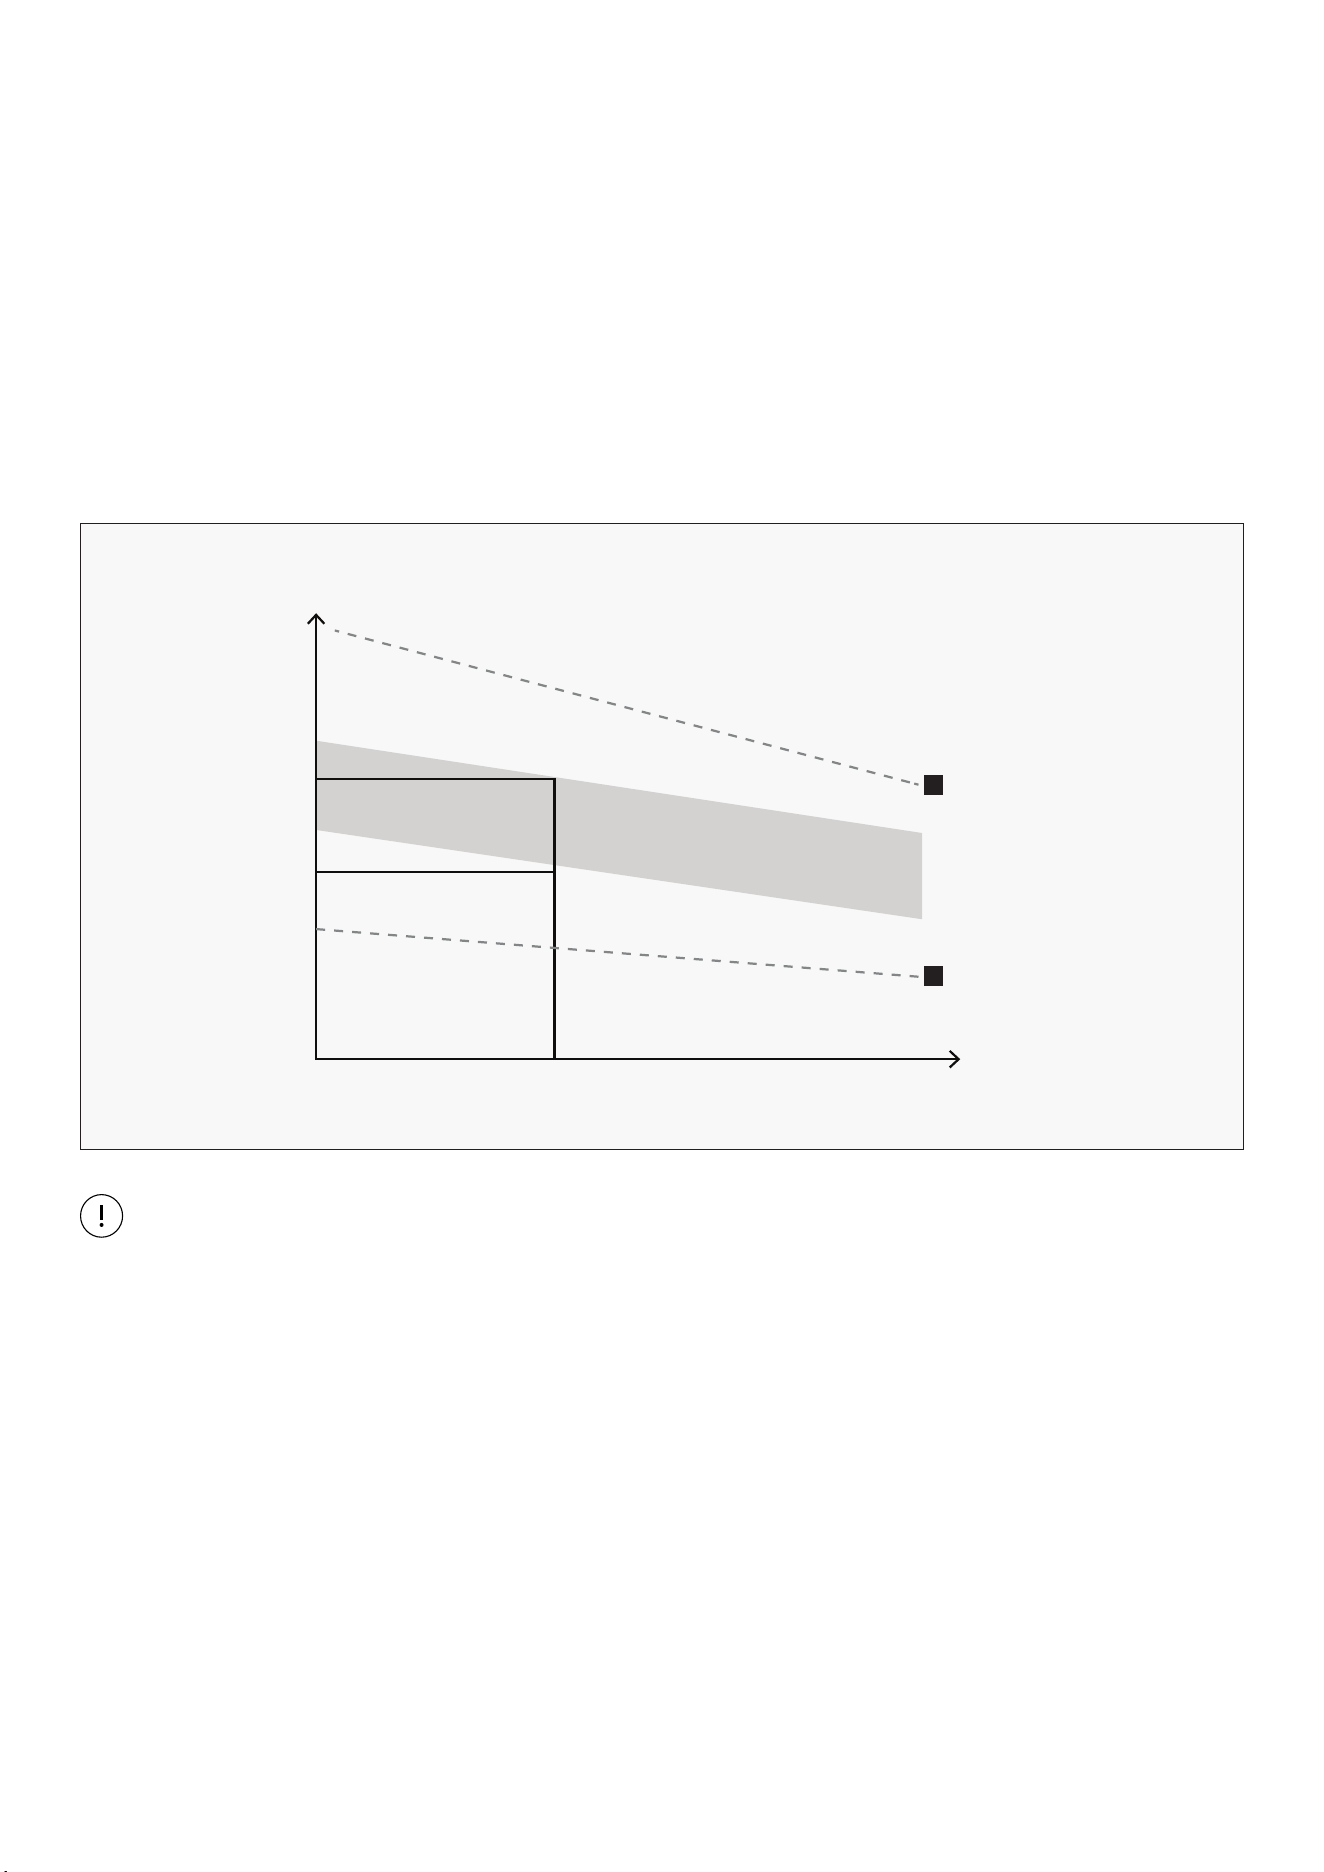
WORKOUT GUIDELINES
This is how your pulse should behave during general fitness exercise. Remember to warm up and
cool down for a few minutes.
TARGET ZONE
MAXIMUM
85%
70%
COOL DOWN
AGE
HEART RATE
200
180
160
140
120
100
80
20 25 30 35 40 45 50 55 60 65 70 75
The most important factor here is the amount of effort you put in. The harder and longer you work, the
more calories you will burn.
TRAINING ZONE EXERCISE
After warming up, increase the intensity to your desired exercise program. Be sure to maintain your
intensity for maximum performance. Breathe regularly and deeply as you exercise.
EXERCISE GUIDE |

30
XII. WARRANTY
AUSTRALIAN CONSUMER LAW
Many of our products come with a guarantee or warranty from the manufacturer. In addition, they come
with guarantees that cannot be excluded under the Australian Consumer Law. You are entitled to a
replacement or refund for a major failure and compensation for any other reasonably foreseeable loss
or damage.
You are entitled to have the goods repaired or replaced if the goods fail to be of acceptable quality and
the failure does not amount to a major failure. Full details of your consumer rights may be found at
www.consumerlaw.gov.au.
Please visit our website to view our full warranty terms and conditions:
http://www.lifespanfitness.com.au/warranty-repairs
WARRANTY AND SUPPORT
Any claim against this warranty must be made through your original place of purchase.
Proof of purchase is required before a warranty claim may be processed.
If you have purchased this product from the Official Lifespan Fitness website, please visit
https://lifespanfitness.com.au/warranty-form
For support outside of warranty, if you wish to purchase replacement parts or request a repair or
service, please visit https://lifespanfitness.com.au/warranty-form and fill in our Repair/Service
Request Form or Parts Purchase Form.
Scan this QR code with your device to go to lifespanfitness.com.au/warranty-form
| WARRANTY

31

WWW.LIFESPANFITNESS.COM.AU