
Setup Instructions
Product No. 3519007
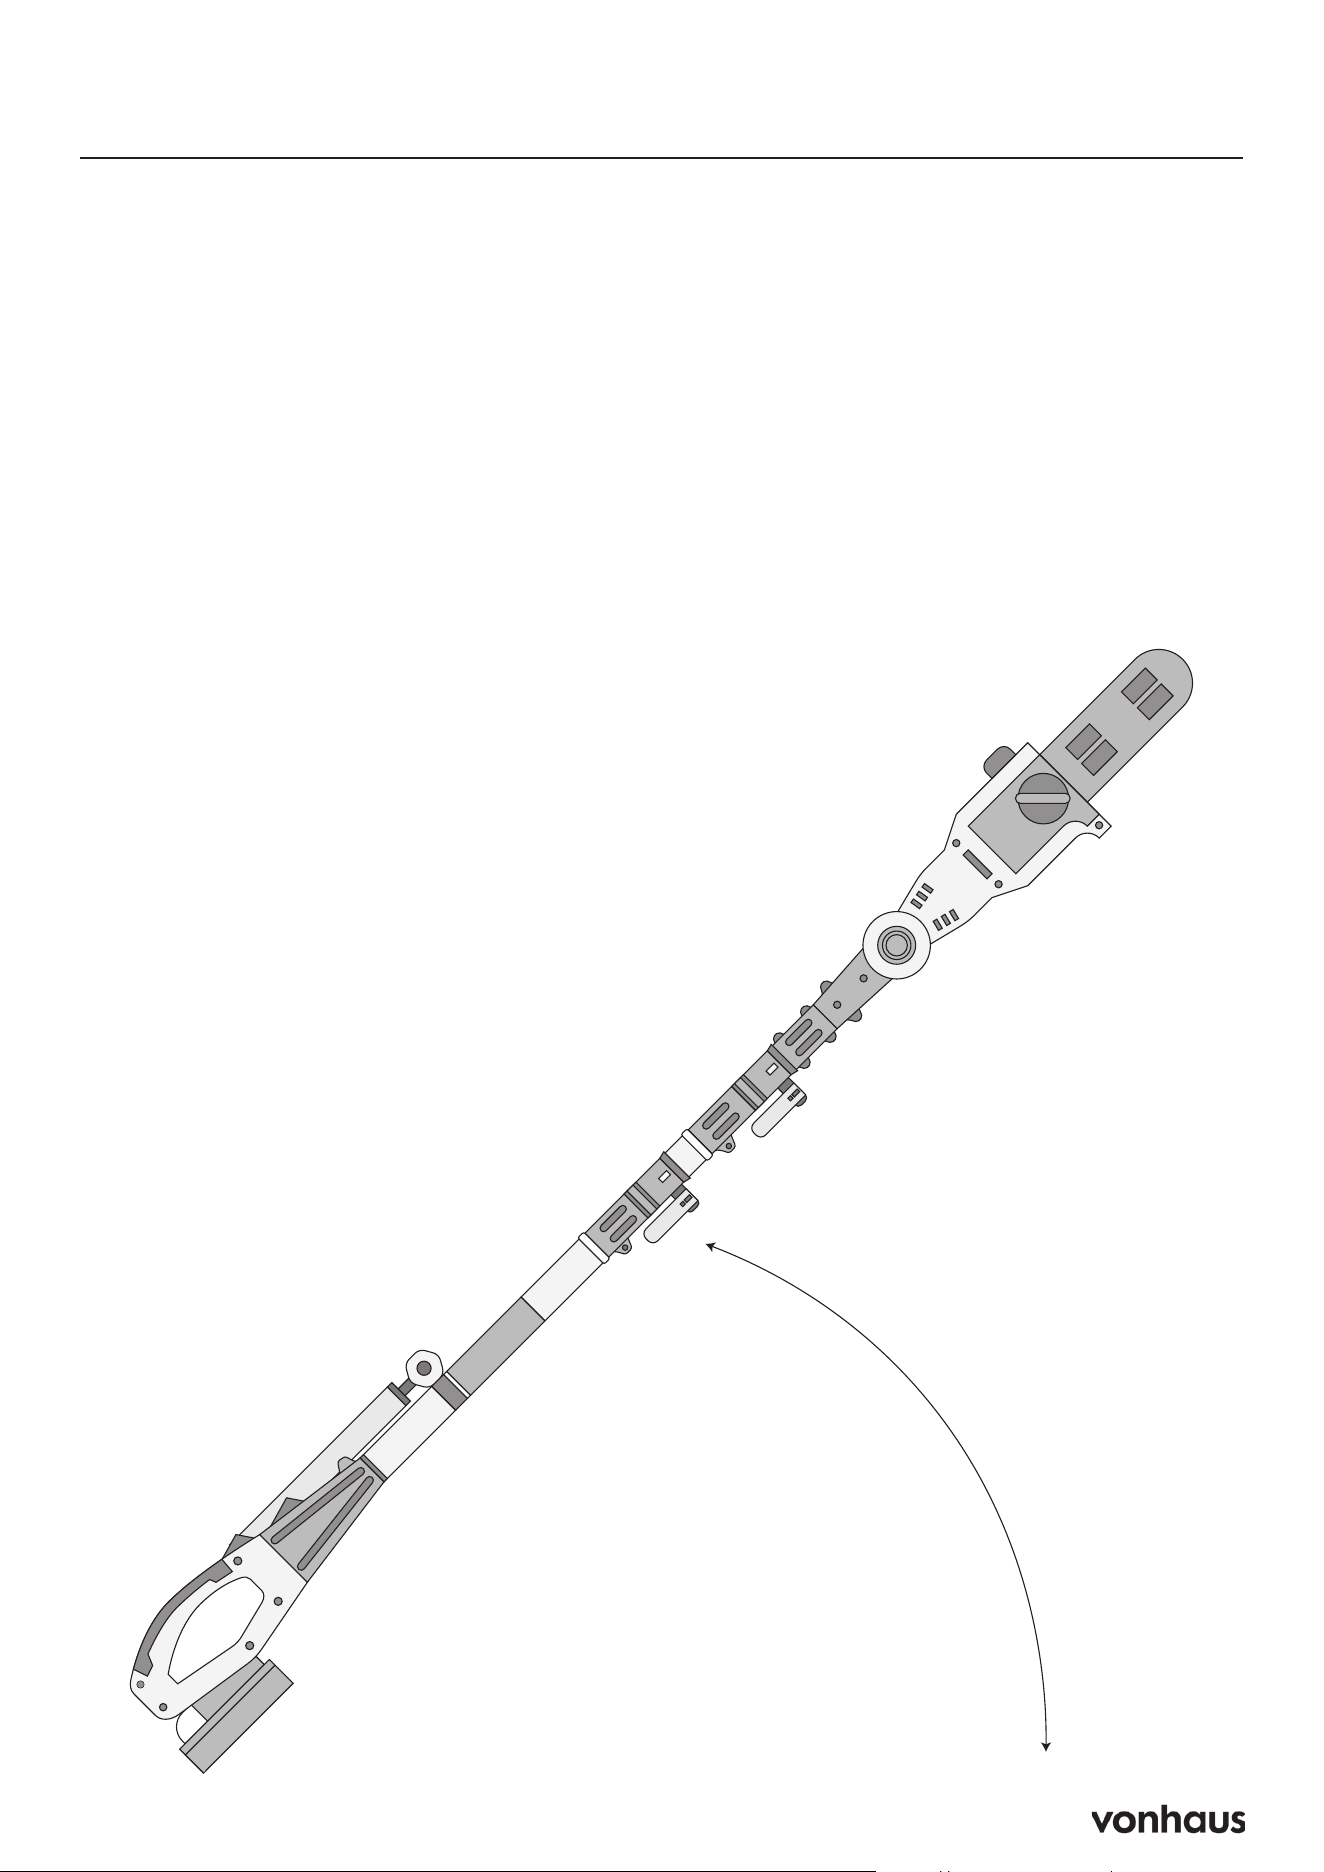
POLE
CHAINSAW

2
Need further help?
suppor[email protected]
See our full range at
www.vonhaus.com
Besoin d’aide supplémentaire ?
suppor[email protected]
Découvrez notre gamme complète sur
www.vonhaus.com
Benötigen Sie weitere Hilfe?
suppor[email protected]
Entdecken Sie unser gesamtes
Sortiment auf
www.vonhaus.com
Necesita más ayuda?
suppor[email protected]
Descubra toda nuestra gama en
www.vonhaus.com
Hai bisogno di ulteriore assistenza?
suppor[email protected]
Scopri tutta la nostra gamma su
www.vonhaus.com
3
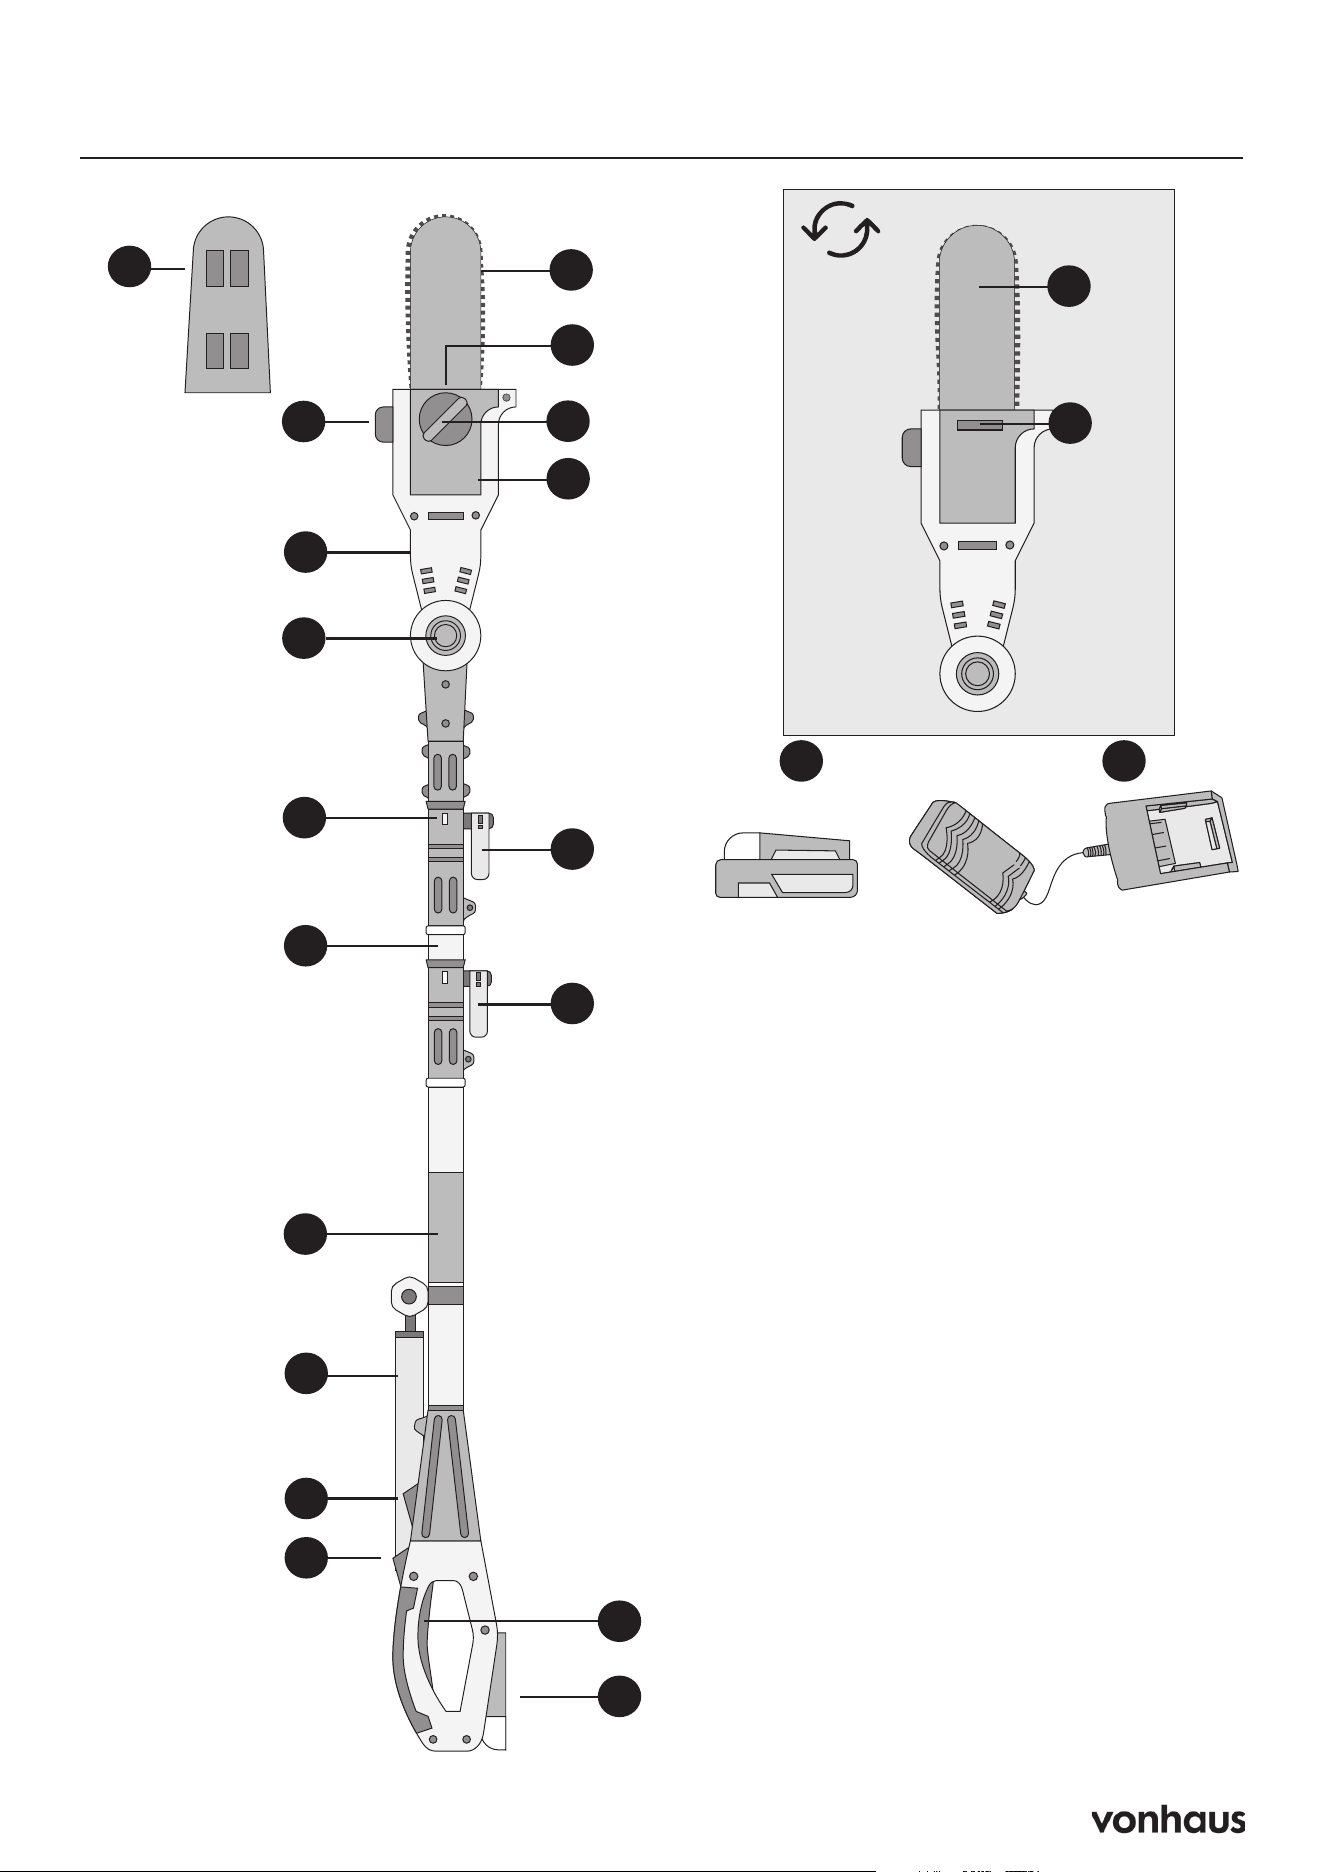
Parts & Components
A
B
C
L
I
H
M
G
D
E
A. Cutting Bar Sheath
B. Oil Tank Cap
C. Chain Saw Head
D. Multi-Angle Head Adjustment Dial
E. Lock Tab
F. Telescoping Pole
G. Soft Grip
H. Shoulder Strap
I. Handle Rotating Switch
J. Safety Lock Switch
K. Trigger Switch
L. Battery Socket
M. Telescoping Lock
N. Assembly Lock
O. Chain/Sprocket End Cover
P. Chain/Sprocket End Cover Knob
Q. Chain Tensioner Ring
R. Chain E50-SL-33 (8”)
S. Guide Bar AM08-33 (8”)
T. Oil Level Indicator Window
U. Charger
V. Battery
F
J
K
N
O
P
Q
R
S
T
UV
4
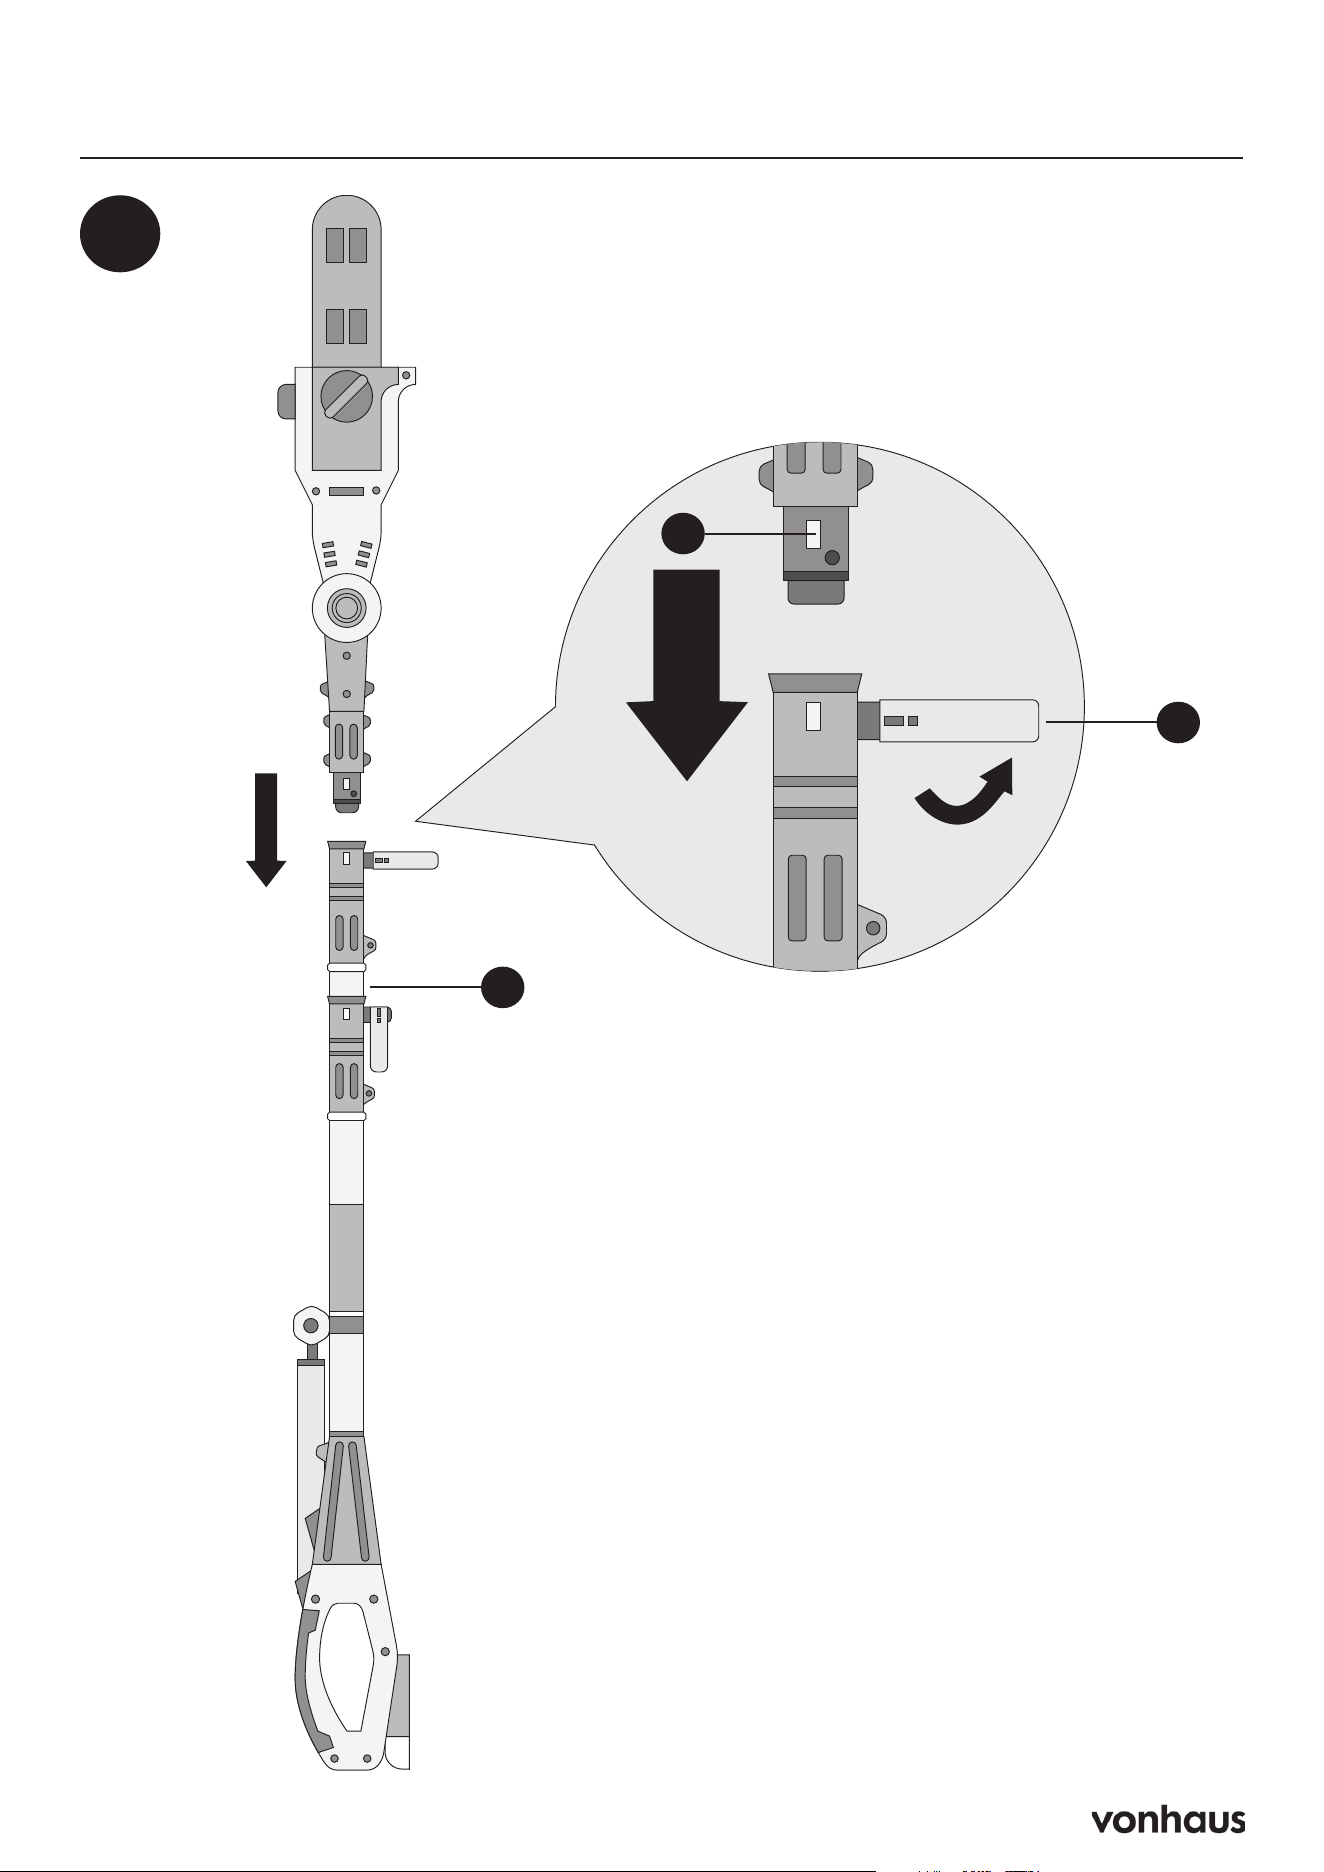
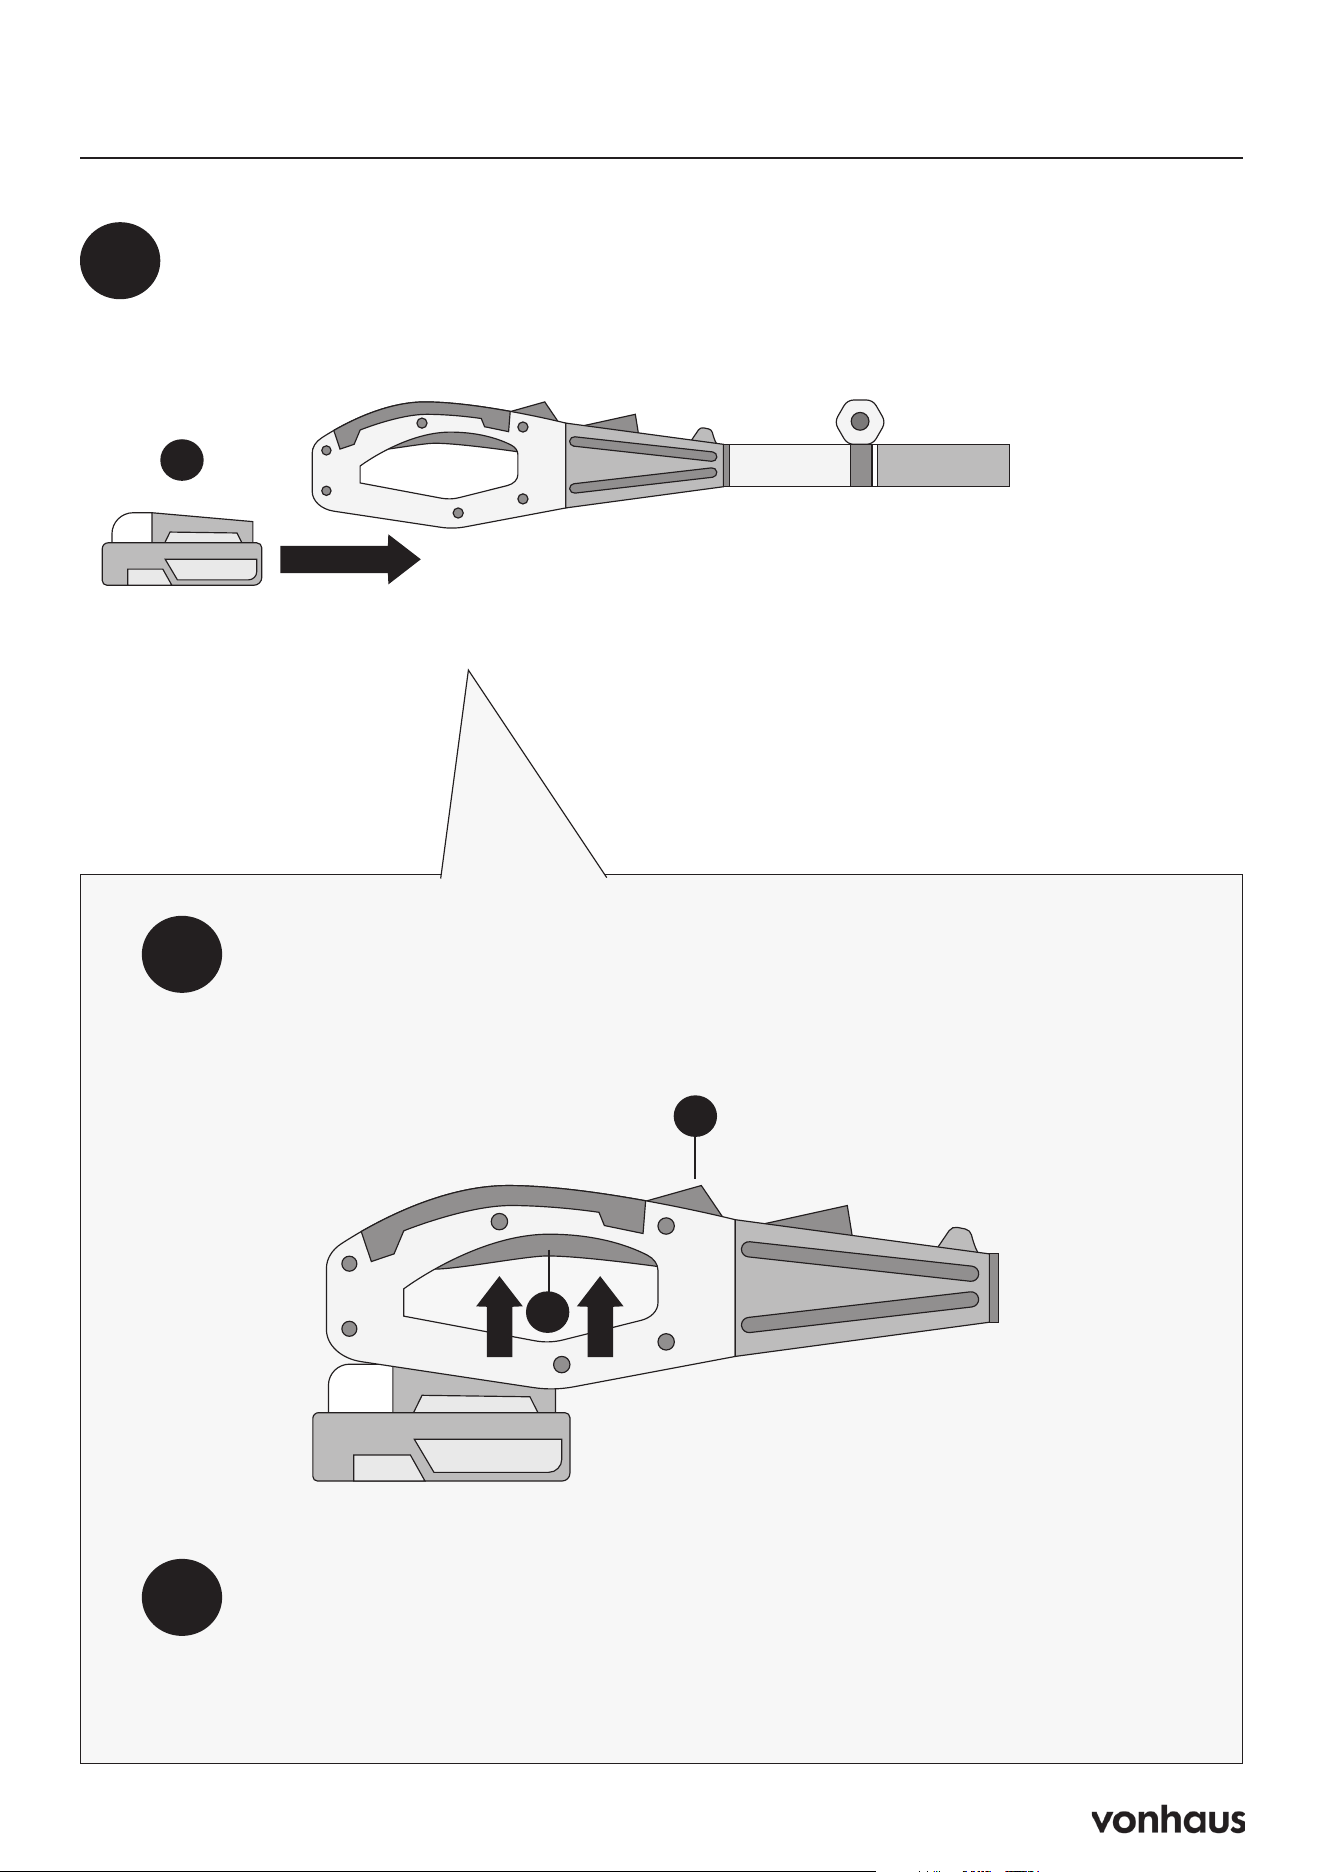
Assembly
Open the assembly lock (N) on the
telescoping pole (F) and push the
chain saw head (C) into the open-
ing at the end of the pole.
1
E
N
F
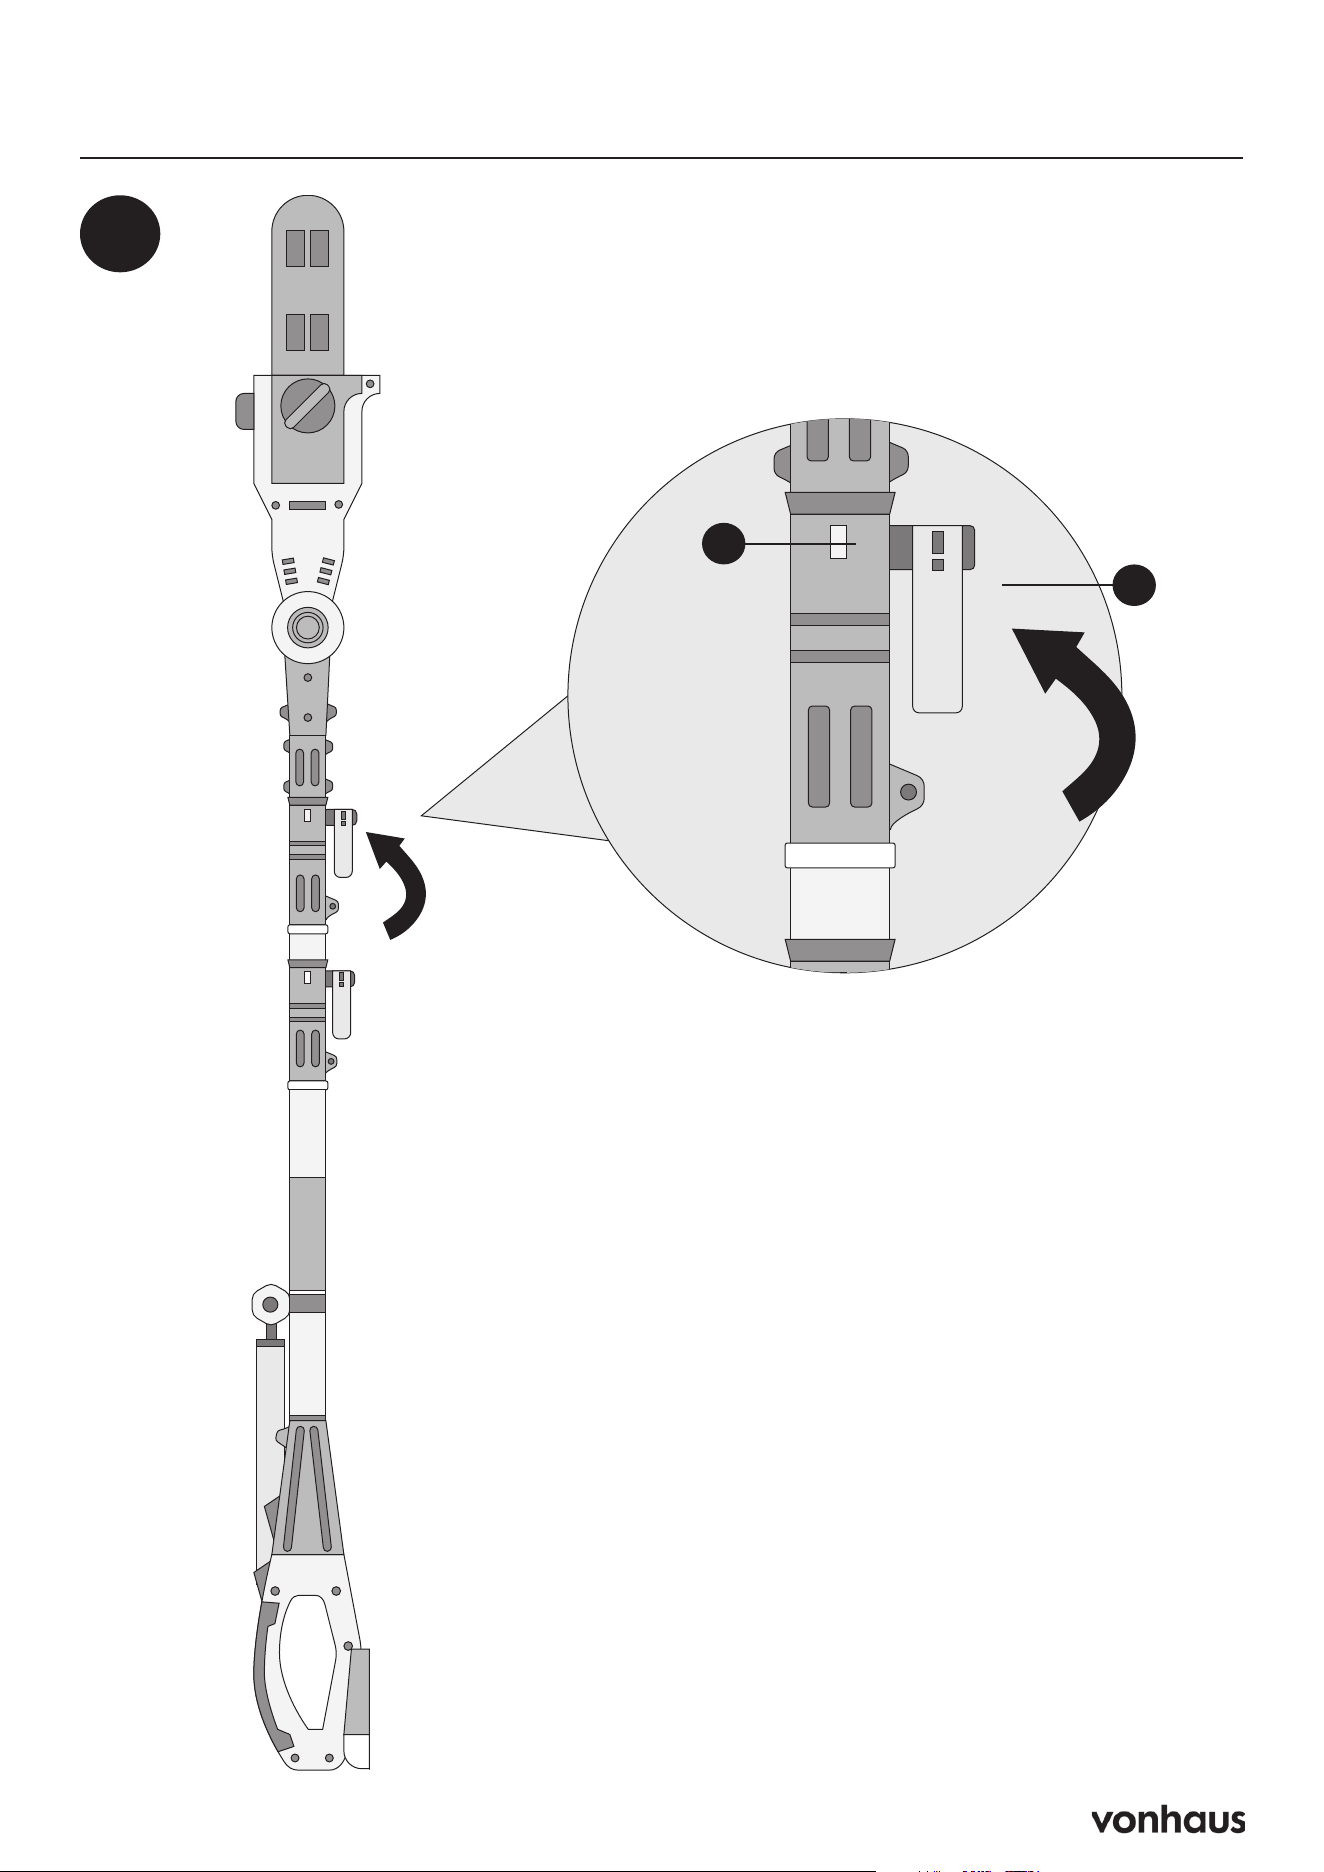
5
Assembly
When the lock tabs (E) snap in,
lock the assembly lock (N) back.
The pole chain saw will be ready
to use.
2
E
N
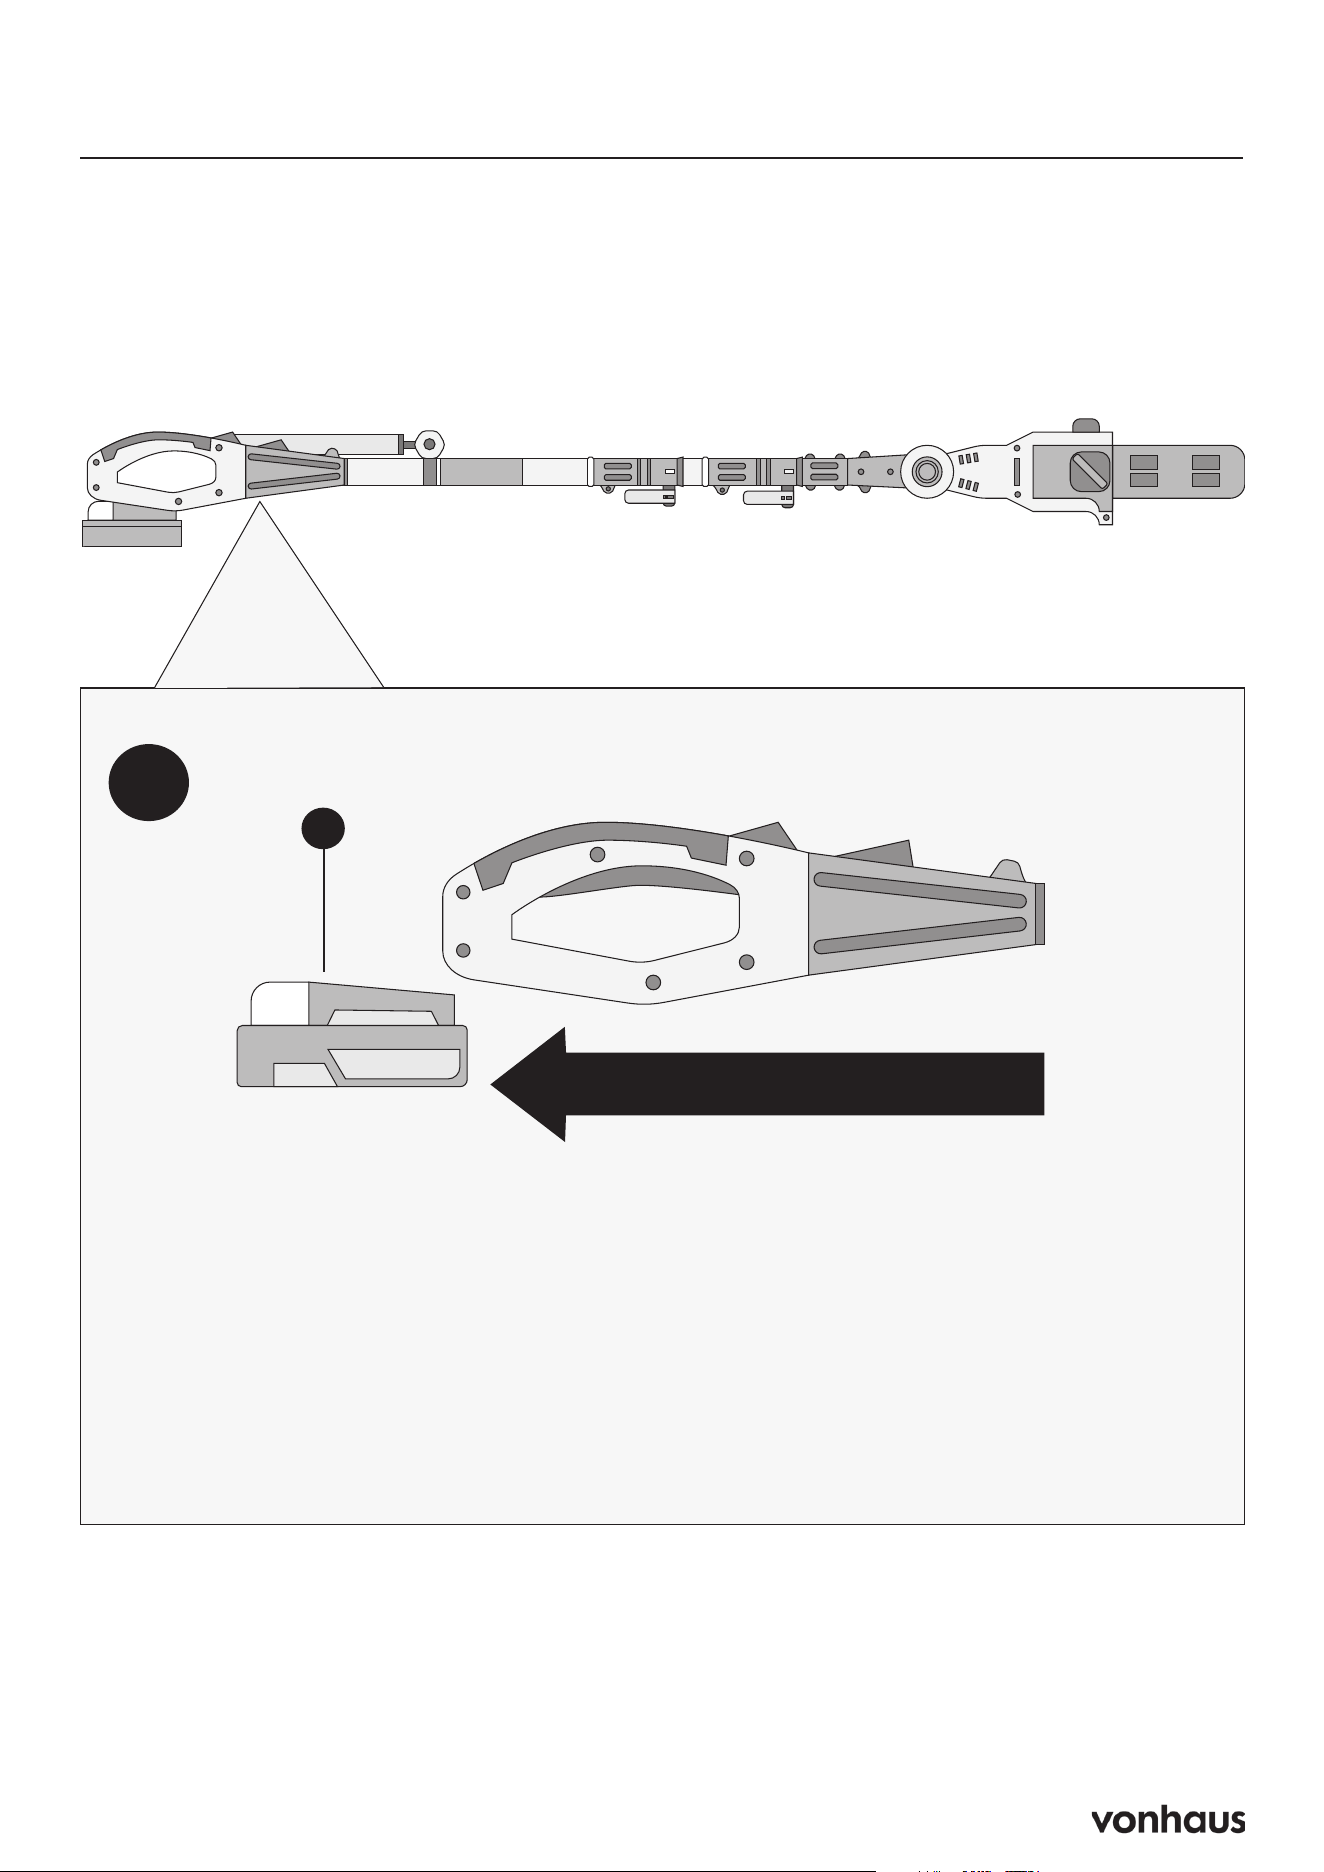
6
Operation
V
Slide the battery (V) into the battery compartment until it clicks to lock into
position.
1
2
To turn the pole chain saw ON, push and hold the safety lock switch
(J) located on the handle forward with your thumb, then squeeze
the trigger switch (K) with your fingers. Once the tool is running, you
can release the safety lock switch.
To turn the tool OFF, release the trigger switch (K)
3
J
K

7
Adjusting the Shoulder Strap
H
The shoulder strap (H) connection point
is adjustable along the pole’s length. This
allows users to optimise the weight distri-
bution of the tool.
• For operation at minimum height, posi-
tion the clip closer to the handle.
• When using the pole at full extension,
move the clip higher up the pole for im-
proved balance and comfort.
8
Adjusting the Telescoping Pole
1
Disconnect the saw from the power supply by removing the battery
(K) from the compartment.
K
This machine is equipped with a telescoping pole (F), providing up to 14 ft (4.3 m) of
overhead reach. To adjust the telescoping pole, follow these instructions:
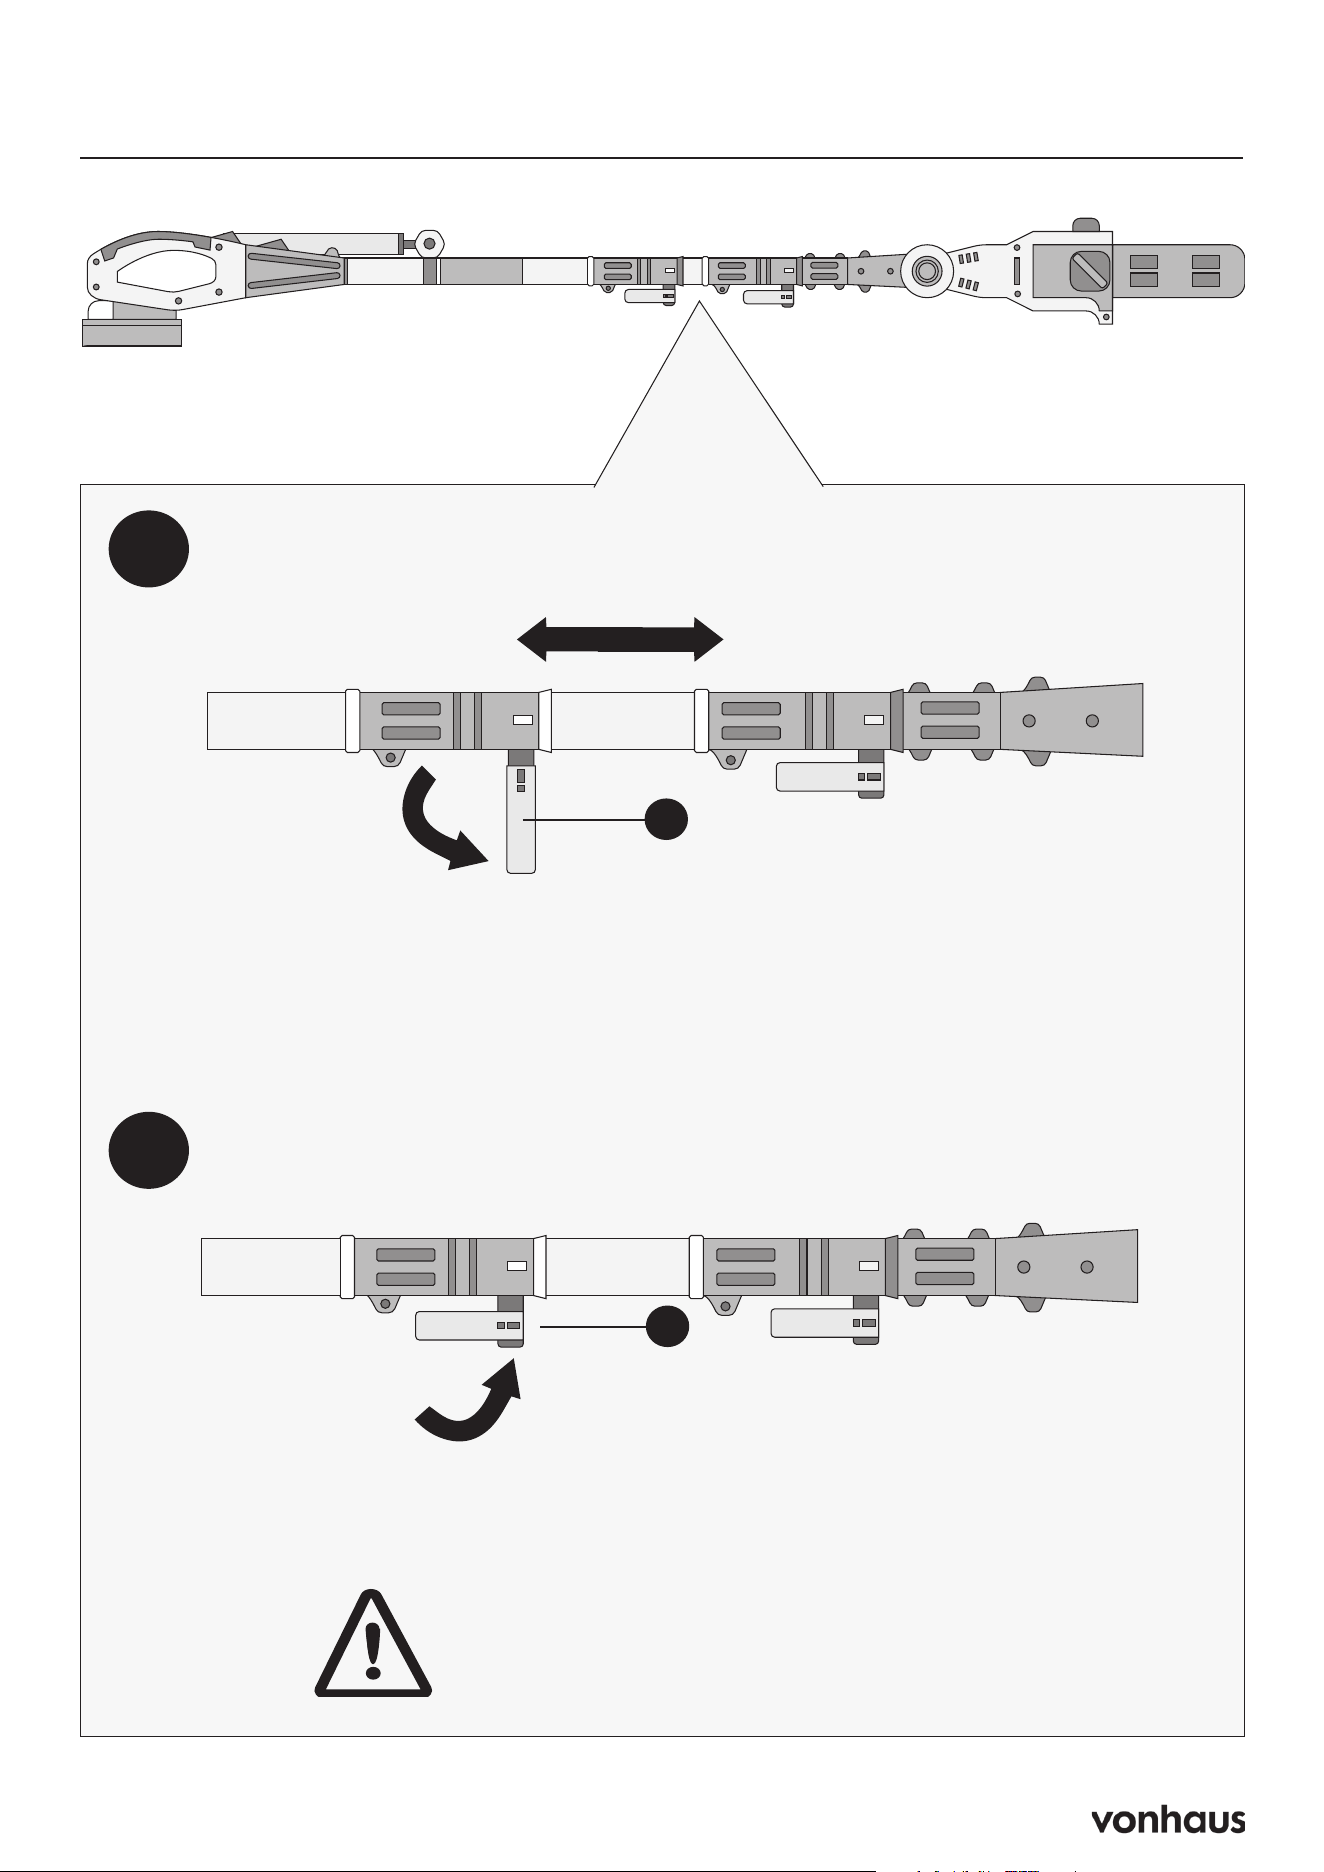
9
Adjusting the Telescoping Pole
2
M
3
M
Unclip the telescoping lock (M) to release the pole. Extend the pole
to the desired length.
Note: Push the poles toward each other to shorten, or pull them
away to lengthen.
Lock the pole in position by closing the telescoping lock (M), ensuring
the pole is secured.
WARNING: Failure to lock the telescoping
lock properly could result in personal injury.
10
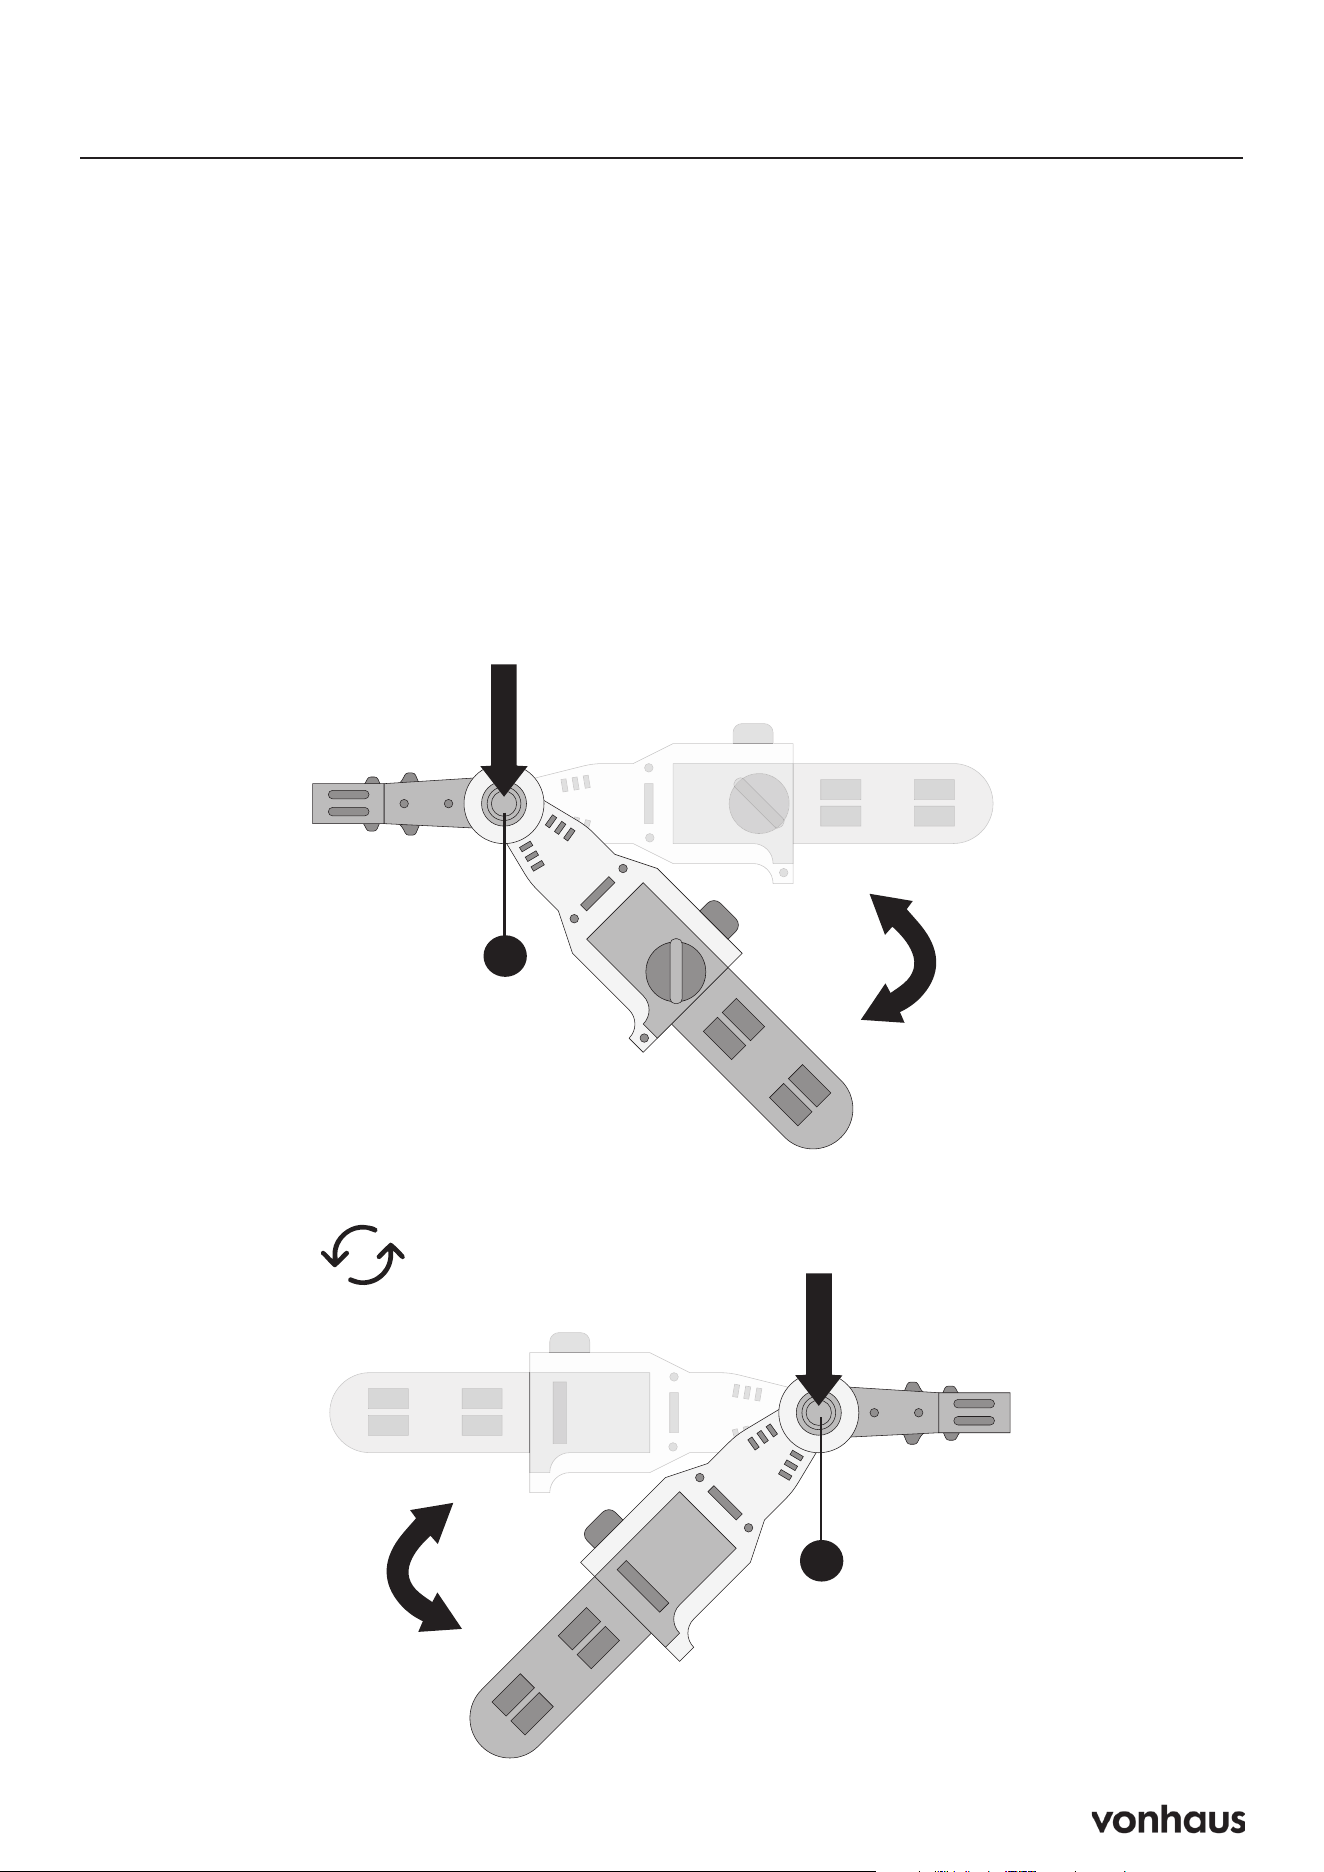
Adjusting the Multi-Angle Head
The pole chain saw head can rotate to
cutting angles of 0º, 15º, and 30º.
1. While pressing the rotating buttons (D)
on both sides, rotate the chain saw
head to the desired angle
2. Release the buttons (D) once the head
is set at the desired angle.
WARNING: Ensure the chain saw head
is securely locked to avoid injury or dam-
age. Never use the saw with the head un-
locked or in an incorrect position.
D
D
11
Proper Cutting Stance
Stance
• Stand with both feet firmly on the
ground.
• Keep your body to the left of the chain
line.
• Position the saw at an angle of 60° or
less, depending on the situation. Great-
er angles make cutting more difficult.
Cutting Guidelines
• The saw is designed for trimming
branches up to 6.5 inches (16.5 cm)
in diameter, with a maximum cut of 7.5
inches (19 cm).
• Practice on small branches to get com-
fortable with the saw.
Operation Tips
• Let the chain reach full speed before
cutting.
• Apply light downward pressure; let the
chain do the work.
• Be aware of the push and pull forces:
• Control the pull with the bottom
edge of the bar.
• Control the push with the top
edge.
60°
Max
12
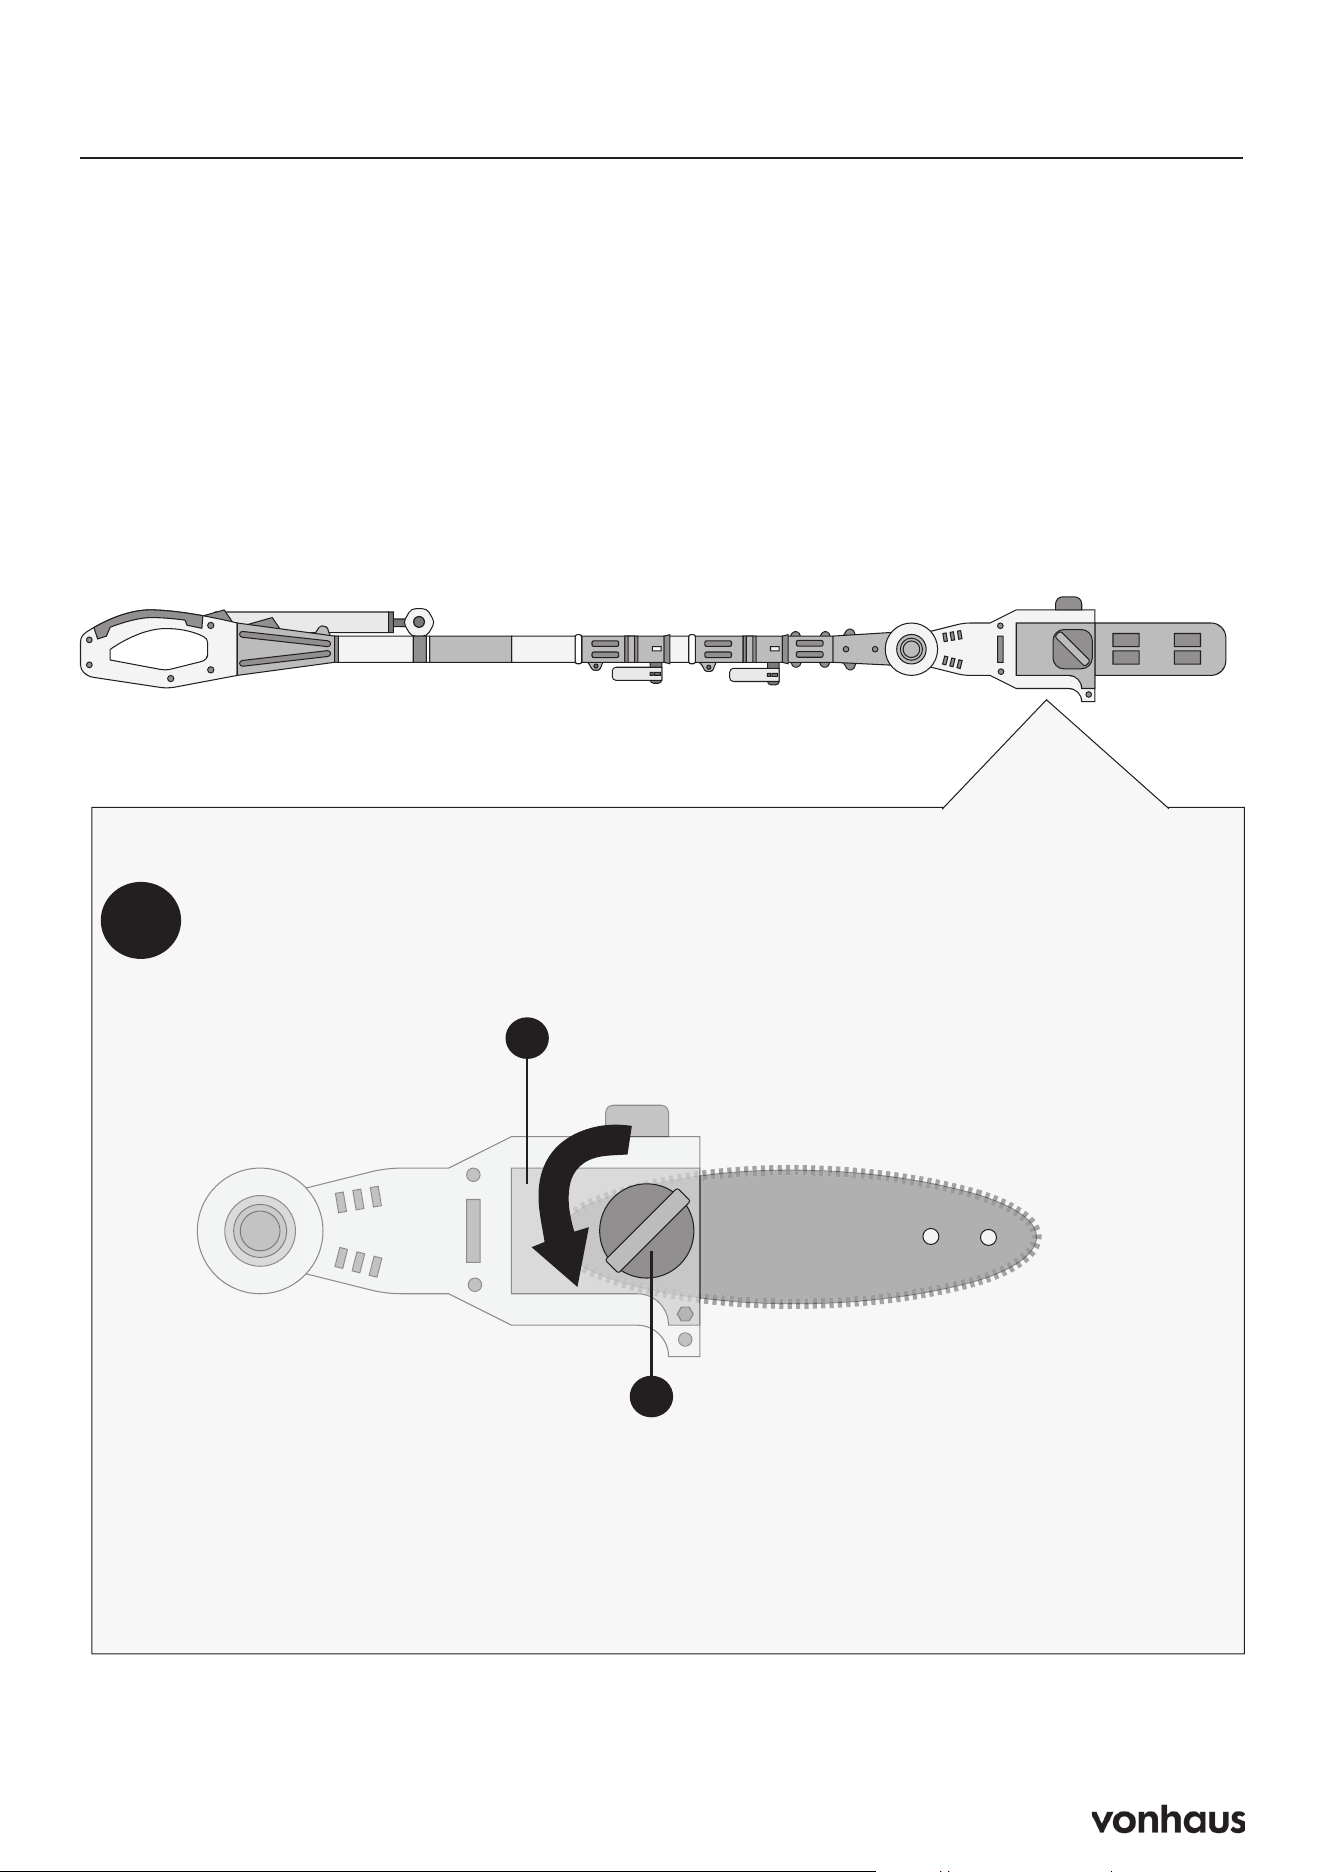
Installing/Replacing Guide Bar + Cutting Chain
Warning!
Always install guide bar, chain, and
chain/sprocket cover before starting mo-
tor to prevent serious injury from clutch
failure.
Required Tools
• Hex key wrench (included)
• Heavy-duty work gloves
Disconnect battery before installation
P
1
Release chain/sprocket cover (O) by
turning knob (P) counterclockwise
O
13
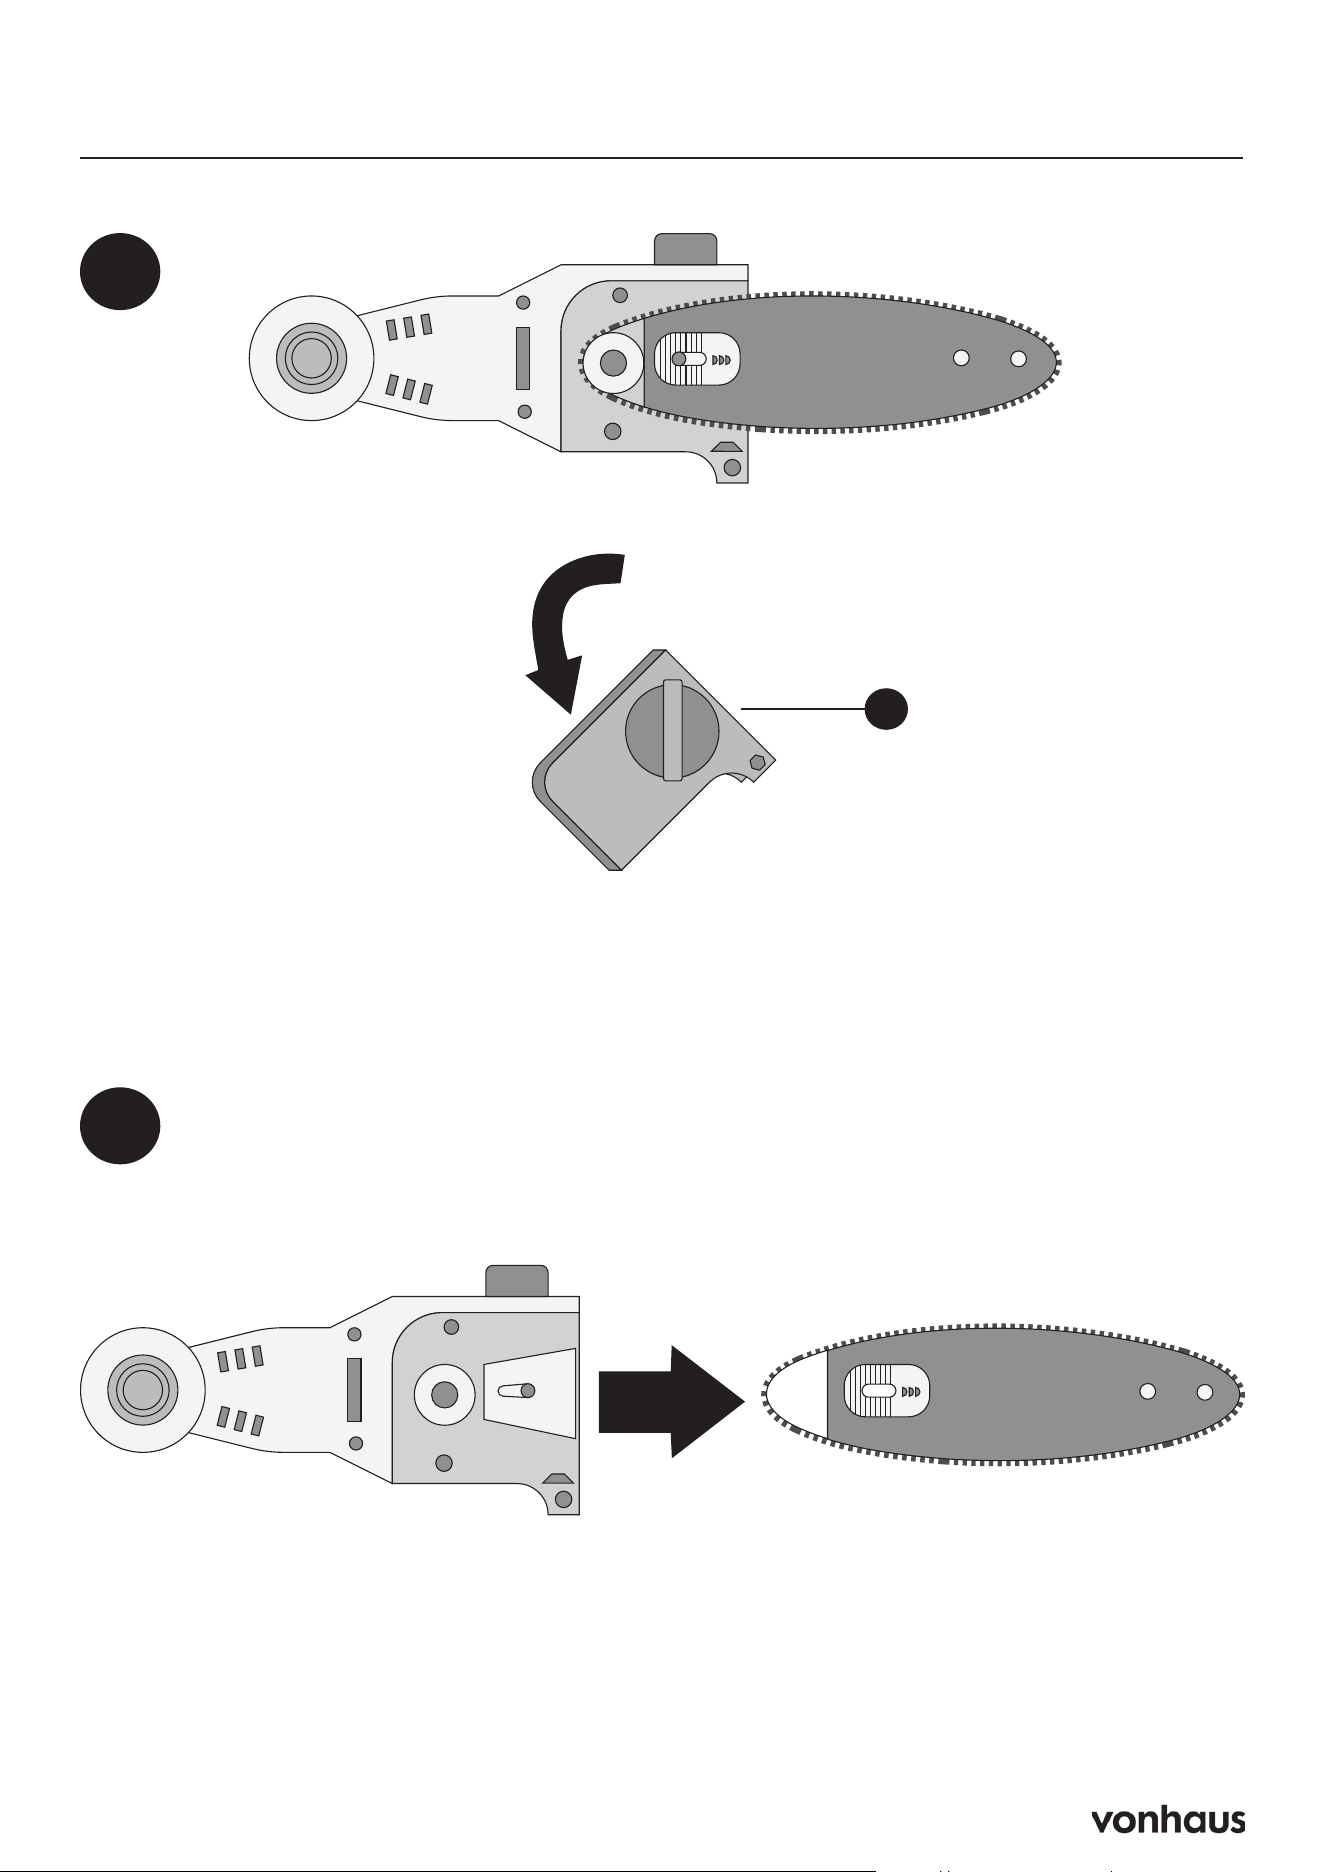
Installing/Replacing Guide Bar + Cutting Chain
2
3
Remove existing
bar and chain
O
14
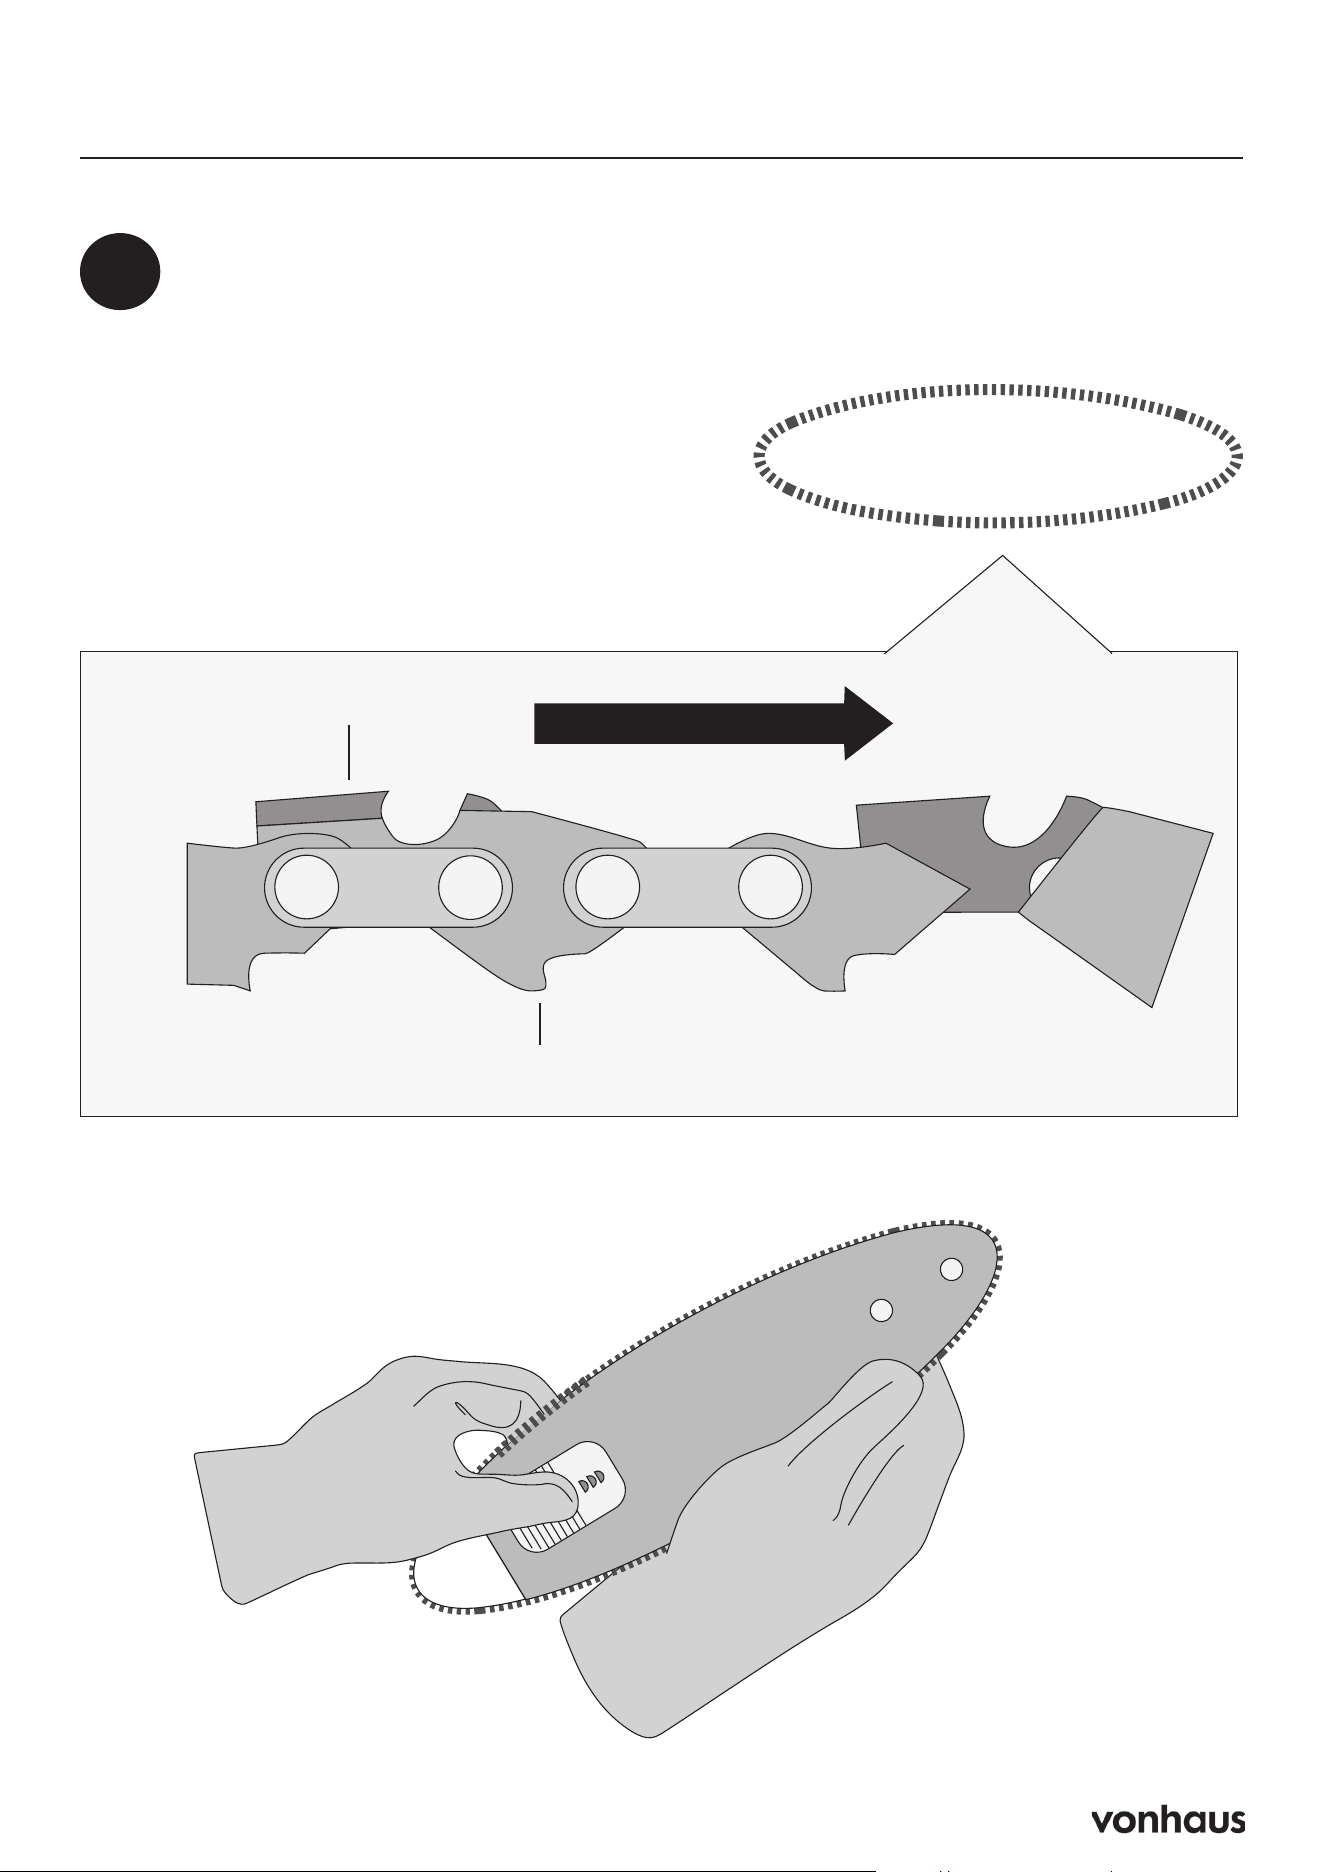
Installing/Replacing Guide Bar + Cutting Chain
4
Place new chain around bar, ensuring:
• Sharp edges face direction of rotation
• Drive links fit into bar groove
• Chain forms loop at bar’s back
Chain Rotation
Sharp Cutting side
Chain Drive Link
15
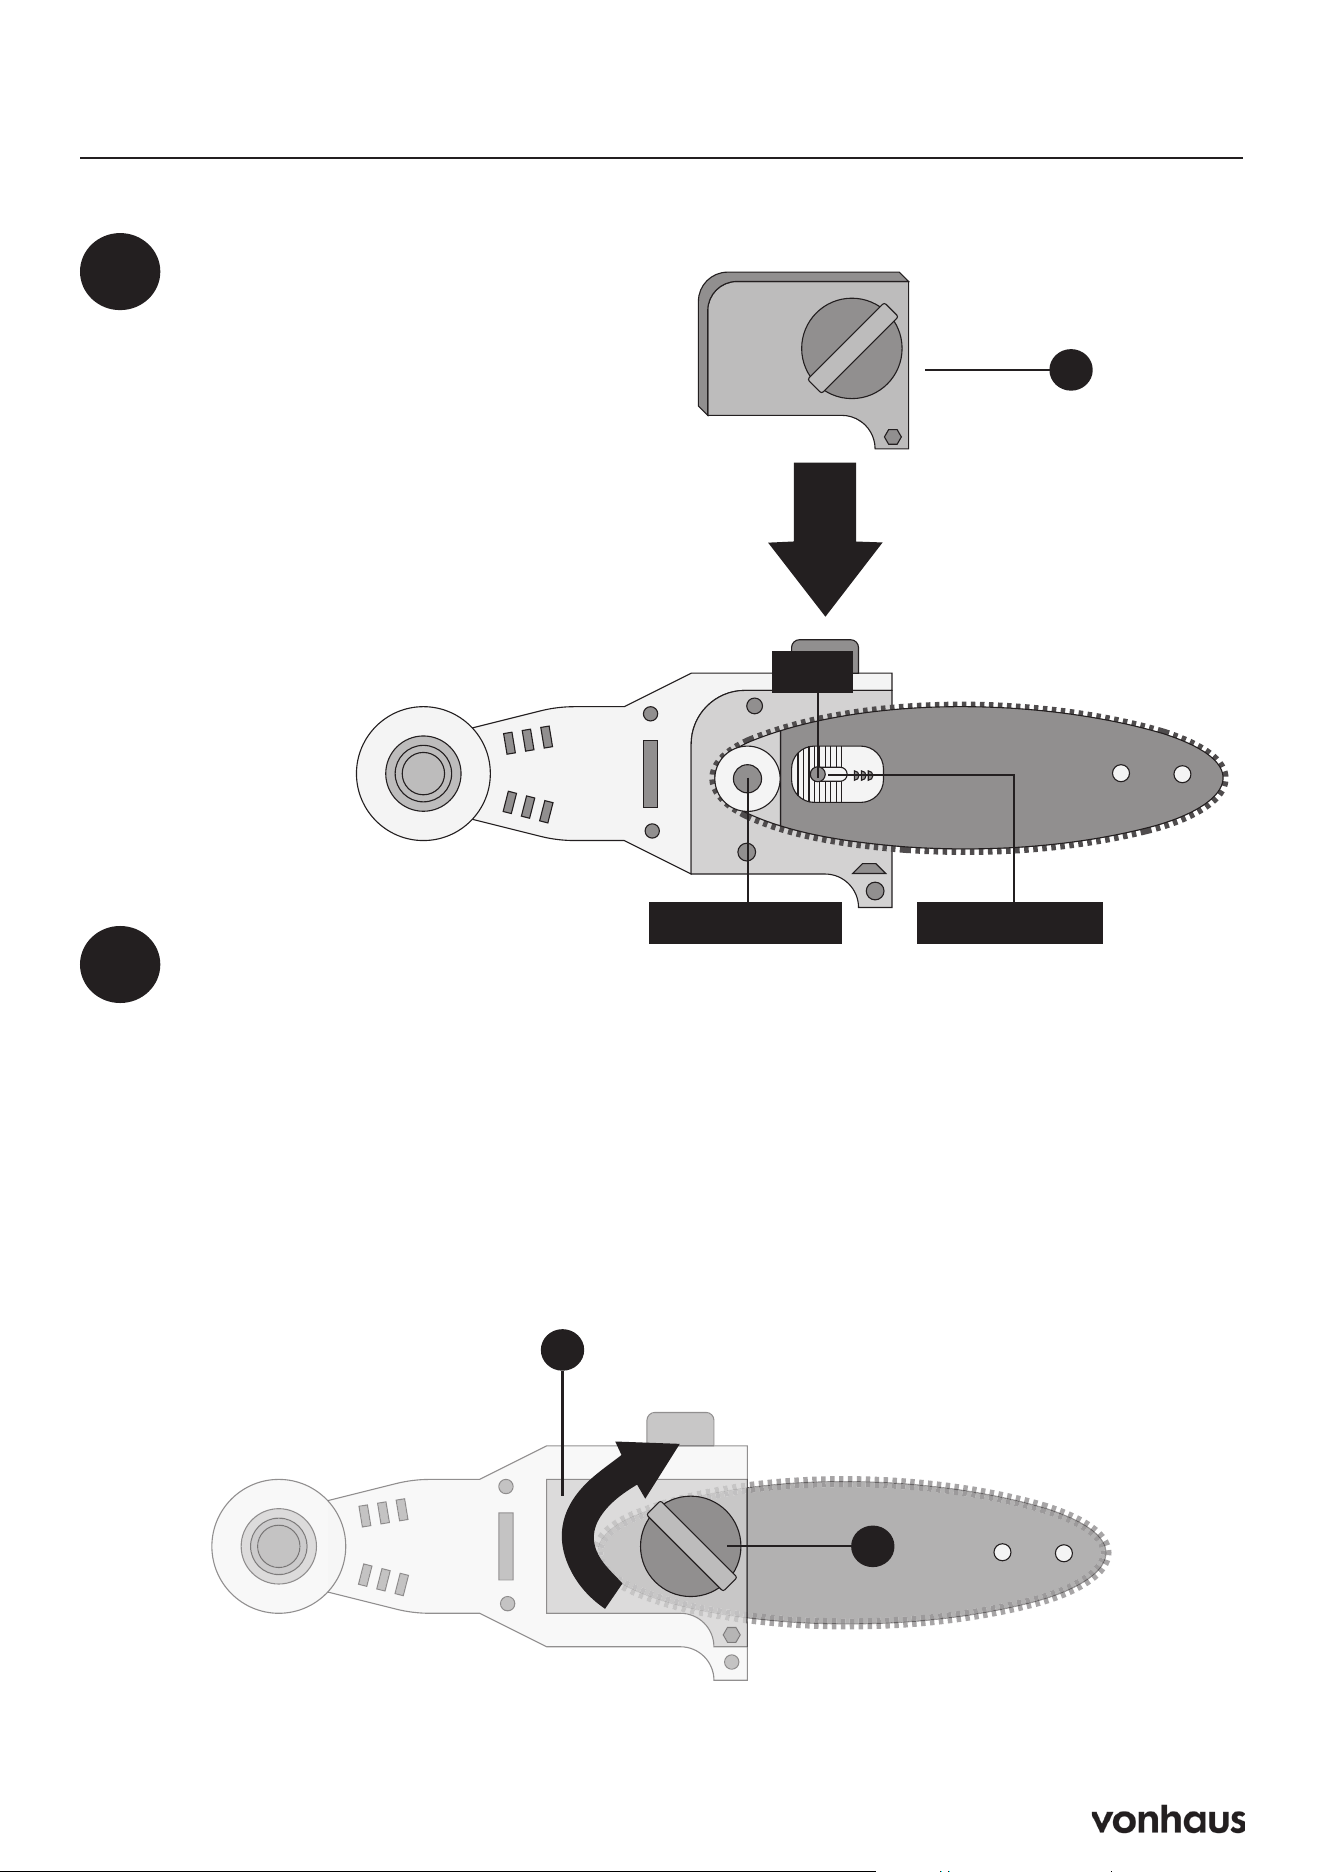
Installing/Replacing Guide Bar + Cutting Chain
5
Position assembly onto saw head:
• Loop chain around sprocket
• Align bar studs with slot
• Place adjusting pin in tension hole
Replace cover (O) and loosely tighten
• Adjust chain tension by turning knob
(P) clockwise until snug
• Final check: Chain should be snug but
manually rotatable
Proper Tension Test
Chain is correctly tensioned when:
• No sag on guide bar’s underside
• Chain moves freely by hand without
binding
6
P
O
Sprocket
Pin
Tension Hole
O
16
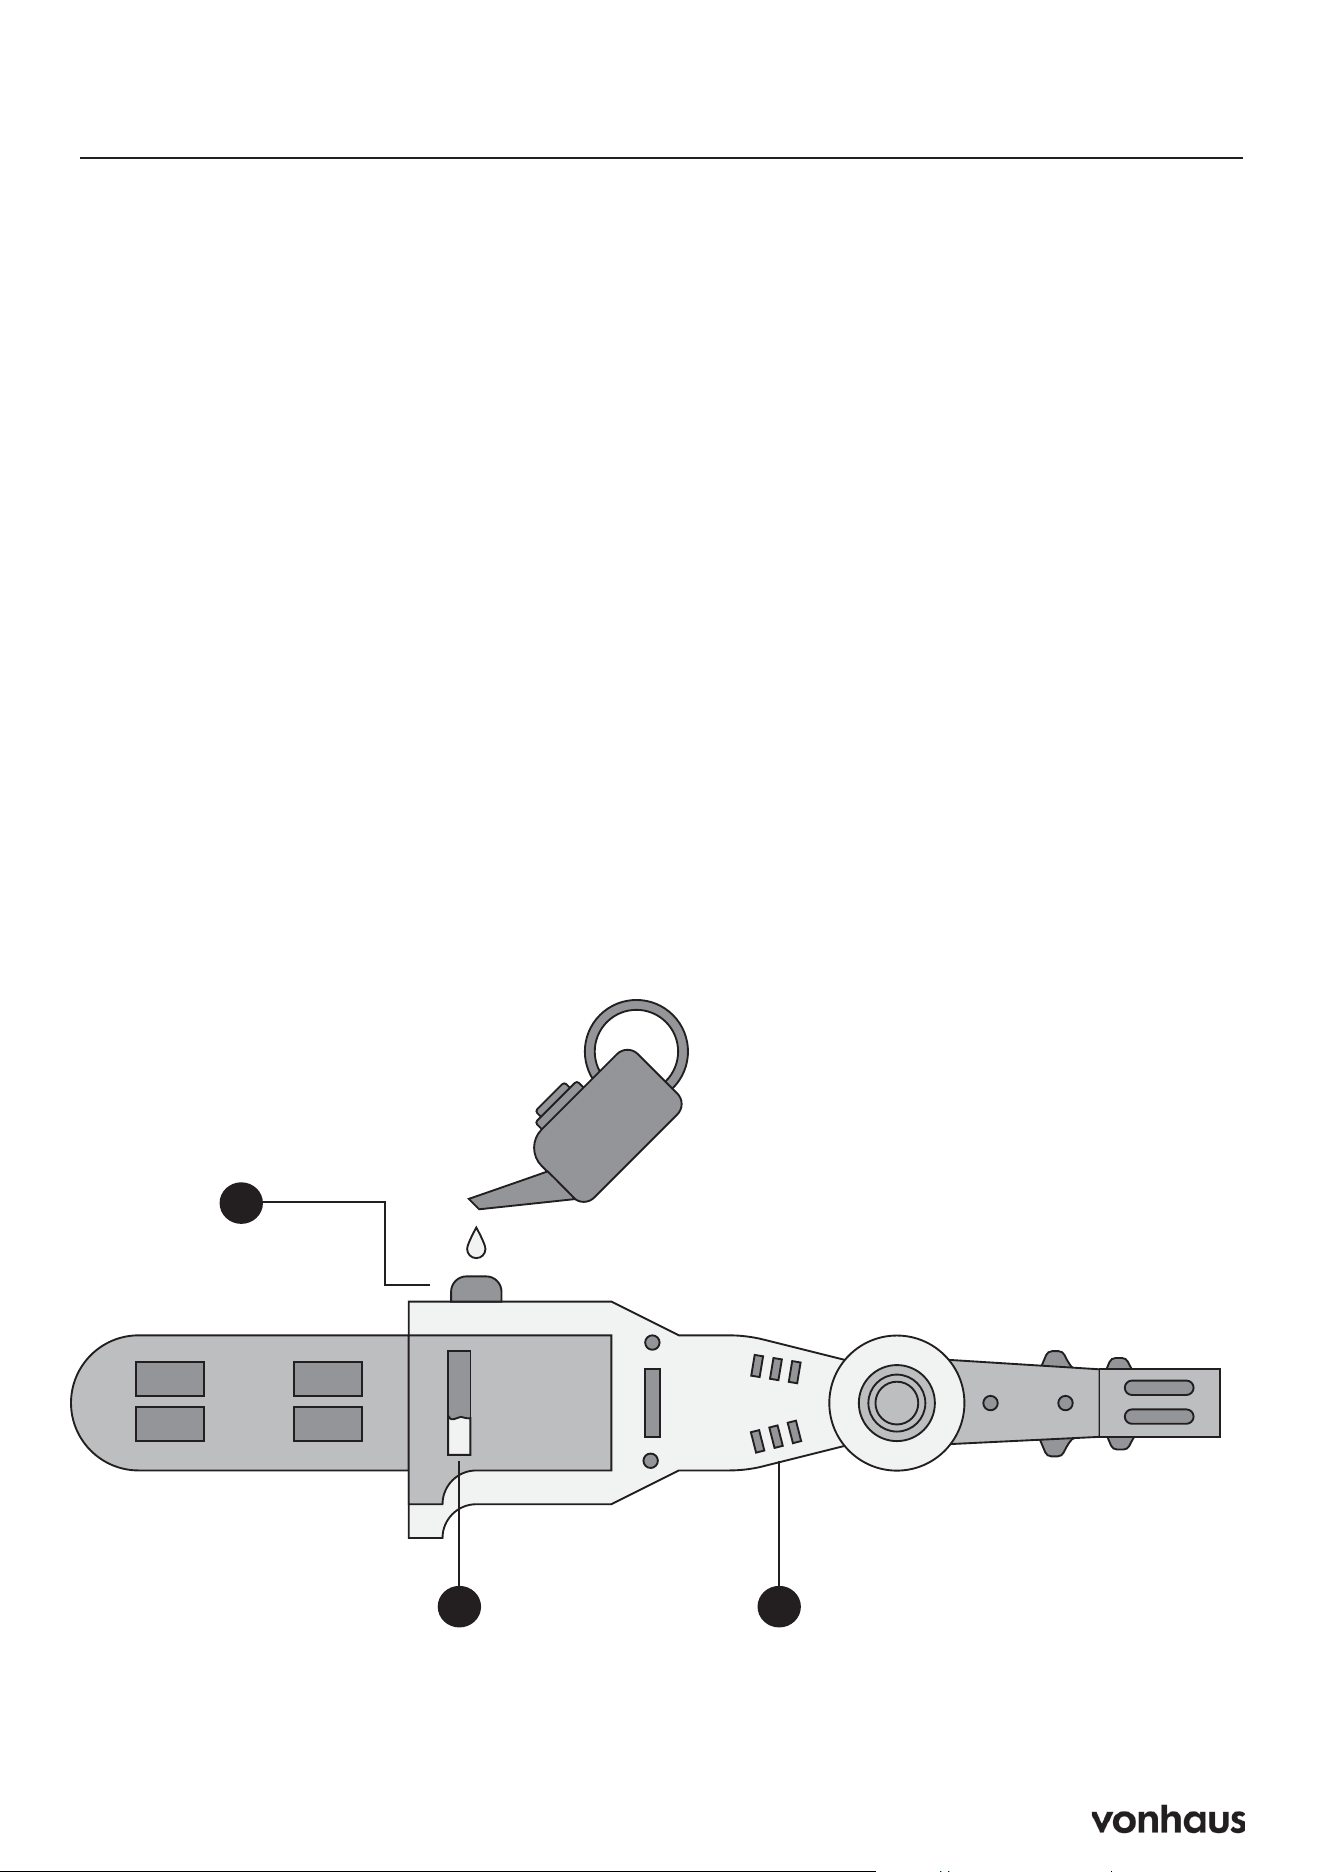
Oil Tank Instructions
Steps
• Before Starting: Remove the oil tank
cap (B) and add bar and chain oil to
the top of the oil level indicator win-
dow (T).
• Oil Consumption: The saw uses about
0.15 fl oz (4 ml) of oil per minute. Refill
when the oil level drops to 1/4 of a
tank.
• Automatic Oiling: The chain saw
head (C) has an automatic oil pump.
Use only good quality bar and chain
oil.
Important Notes
• Lubricate the chain to prevent damage.
• It’s normal for oil to seep when not in
use. To prevent this, empty the oil tank
after each use.
• For long-term storage (3 months or
more), lightly lubricate the chain to
prevent rust.
B
T C

17
Nuts and Screws
• Regularly check and tighten all nuts and
screws.
• Ensure the telescoping lock (M) and assem-
bly lock (N) are secure.
Chain Tension
• Cold Chain Check: Ensure there is no slack
on the underside of the guide bar (S). The
chain should be snug but able to rotate by
hand.
• Warm Chain Adjustment: During use,
the chain will warm up, and the drive links
should hang about 0.050 in. (1.25 mm) out
of the bar groove.
• Important: Re-check the “cold tension”
before the next use, as chains may tighten
when cooled. Re-tension if the flats on the
drive links are visible.
Chain Sharpening
• Sharpen when sawdust looks like dust,
cutting is difficult, cuts are not straight, or
vibrations increase.
• Use the correct tools or consult an expert
for sharpening.
Replacement Chain
Use an 8” Oregon Chain.
Guide Bar Maintenance
• Turn the bar to distribute wear.
• Smooth any burrs with a file.
• Replace the bar if it’s worn, bent, or has
damaged rails.
Chain Sprocket
Check regularly and replace if wear exceeds
0.5 mm.’
Troubleshooting
Most issues are easy to resolve. Refer to the
troubleshooting table for common problems
and solutions. For further assistance, contact
suppor[email protected]
WARNING! Always remove the battery (V)
before performing any adjustments or mainte-
nance.
Saw Motor Fails to Start
• Ensure the battery (V) is properly inserted
and charged.
• Fully depress the safety lock switch (J) be-
fore squeezing the trigger switch (K).
Saw Runs, but Chain Speed is Low
• The chain is too tight; adjust it to the correct
tension.
Bar and Chain Running Hot and Smoking
• Chain tension is too tight; re-tension.
• Oil tank (T) is empty; refill.
• Clean the lubrication holes.
Saw Motor Runs, but Chain is Not Turning
• The chain is too tight; adjust it to the correct
tension.
• Inspect and replace any damaged guide
bar (S) or chain (R).
Information

18
Safety Instructions
• Environment: Avoid wet areas and rain; use
indoors and store dry.
• Safety Gear: Wear snug clothing, gloves,
and eye protection.
• Usage: Use as intended; don’t force or
overreach.
• Awareness: Operate when alert; avoid if
under the influence.
• Storage: Keep tools away from children.
• Maintenance: Follow instructions and in-
spect for damage.
• Battery Safety: Use specified chargers and
batteries. Avoid heat, fire, and metal con-
tacts.
• Repairs: Only use qualified technicians for
repairs.
• Electrical Safety: Keep away from power
lines.
Battery Safety Instructions
• Handling & Storage: Do not disassemble,
expose to heat, or drop the battery. Keep
it away from metals like keys to prevent
short-circuits. Store safely out of children’s
reach.
• Charging: Use only the specified charger,
charge before use, and avoid overcharg-
ing. Operate between 59°F - 77°F (15°C
- 25°C).
• Maintenance: Keep clean and dry. Wipe
terminals with a dry cloth if dirty.
• In Case of Leak: Avoid contact with skin or
eyes; wash and seek medical help if need-
ed.
• Disposal: Follow proper disposal guide-
lines and keep instructions for reference.
Additional Safety for Battery
Charger
• Usage: Read instructions, use indoors, and
ensure proper voltage. Do not charge leak-
ing batteries.
• Care: Keep dry and protect from moisture.
Do not short-circuit or leave unattended.
• Compatibility: Charge only compatible
models and maintain correct polarity.
• Environment: Charge in well-ventilated are-
as within 64.4°F - 75.2°F (18°C - 24°C).
Daily Checklist
• Check for Damage: Inspect the chain,
guide bar, and motor housing.
• Clean: Remove debris from the oil port and
guide bar rails.
• Tension & Sharpness: Ensure the chain is
tight and teeth are sharp.
• Oil Level: Fill with new chain oil if neces-
sary.
Note: Turn off immediately if you notice vibra-
tions or odd sounds.
Technical Data
• Guide Bar Length: 8 in.
• Cutting Thickness Max: 7 in.
• Telescopic Pole Length: 7.7 ft to 10 ft
• Max. Reach: Up to 14 ft
• Multi-Angle Head: 0º to 30º
• Battery Pack: 20V d.c. 1.5Ah Lithium-Ion
• Weight: 9.2 lbs (including battery)
Information

19
Caution
• Remove the battery and let the saw cool for
five minutes before servicing.
• Do not use if the tool is damaged.
Disposal
• Recycling: Use designated facilities and
follow local regulations.
• Packaging: Recycle or store packaging for
future use.
Battery Caution and Disposal
• Dispose Properly: Follow federal, state,
and local guidelines. Cover terminals with
tape.
• Warnings: Never burn batteries; they may
emit toxic fumes.
• Battery Use: Install only same-type new
batteries, maintain correct polarity, don’t
mix old and new, and avoid mixing types.
Always check with local authorities for specific
recycling regulations.
Thank You
Thank you for purchasing your product/appli-
ance.
Should you require assistance with your pur-
chase, please contact us at support@domu.
co.uk
VonHaus is a registered trademark of DOMU
Brands Ltd.
Made in China for DOMU Brands.
Authorised Representative
Authorised Representative Service
77 Camden Street Lower
Dublin, D02 XE80, Ireland
Information
Grass Sweeper No. 350036120
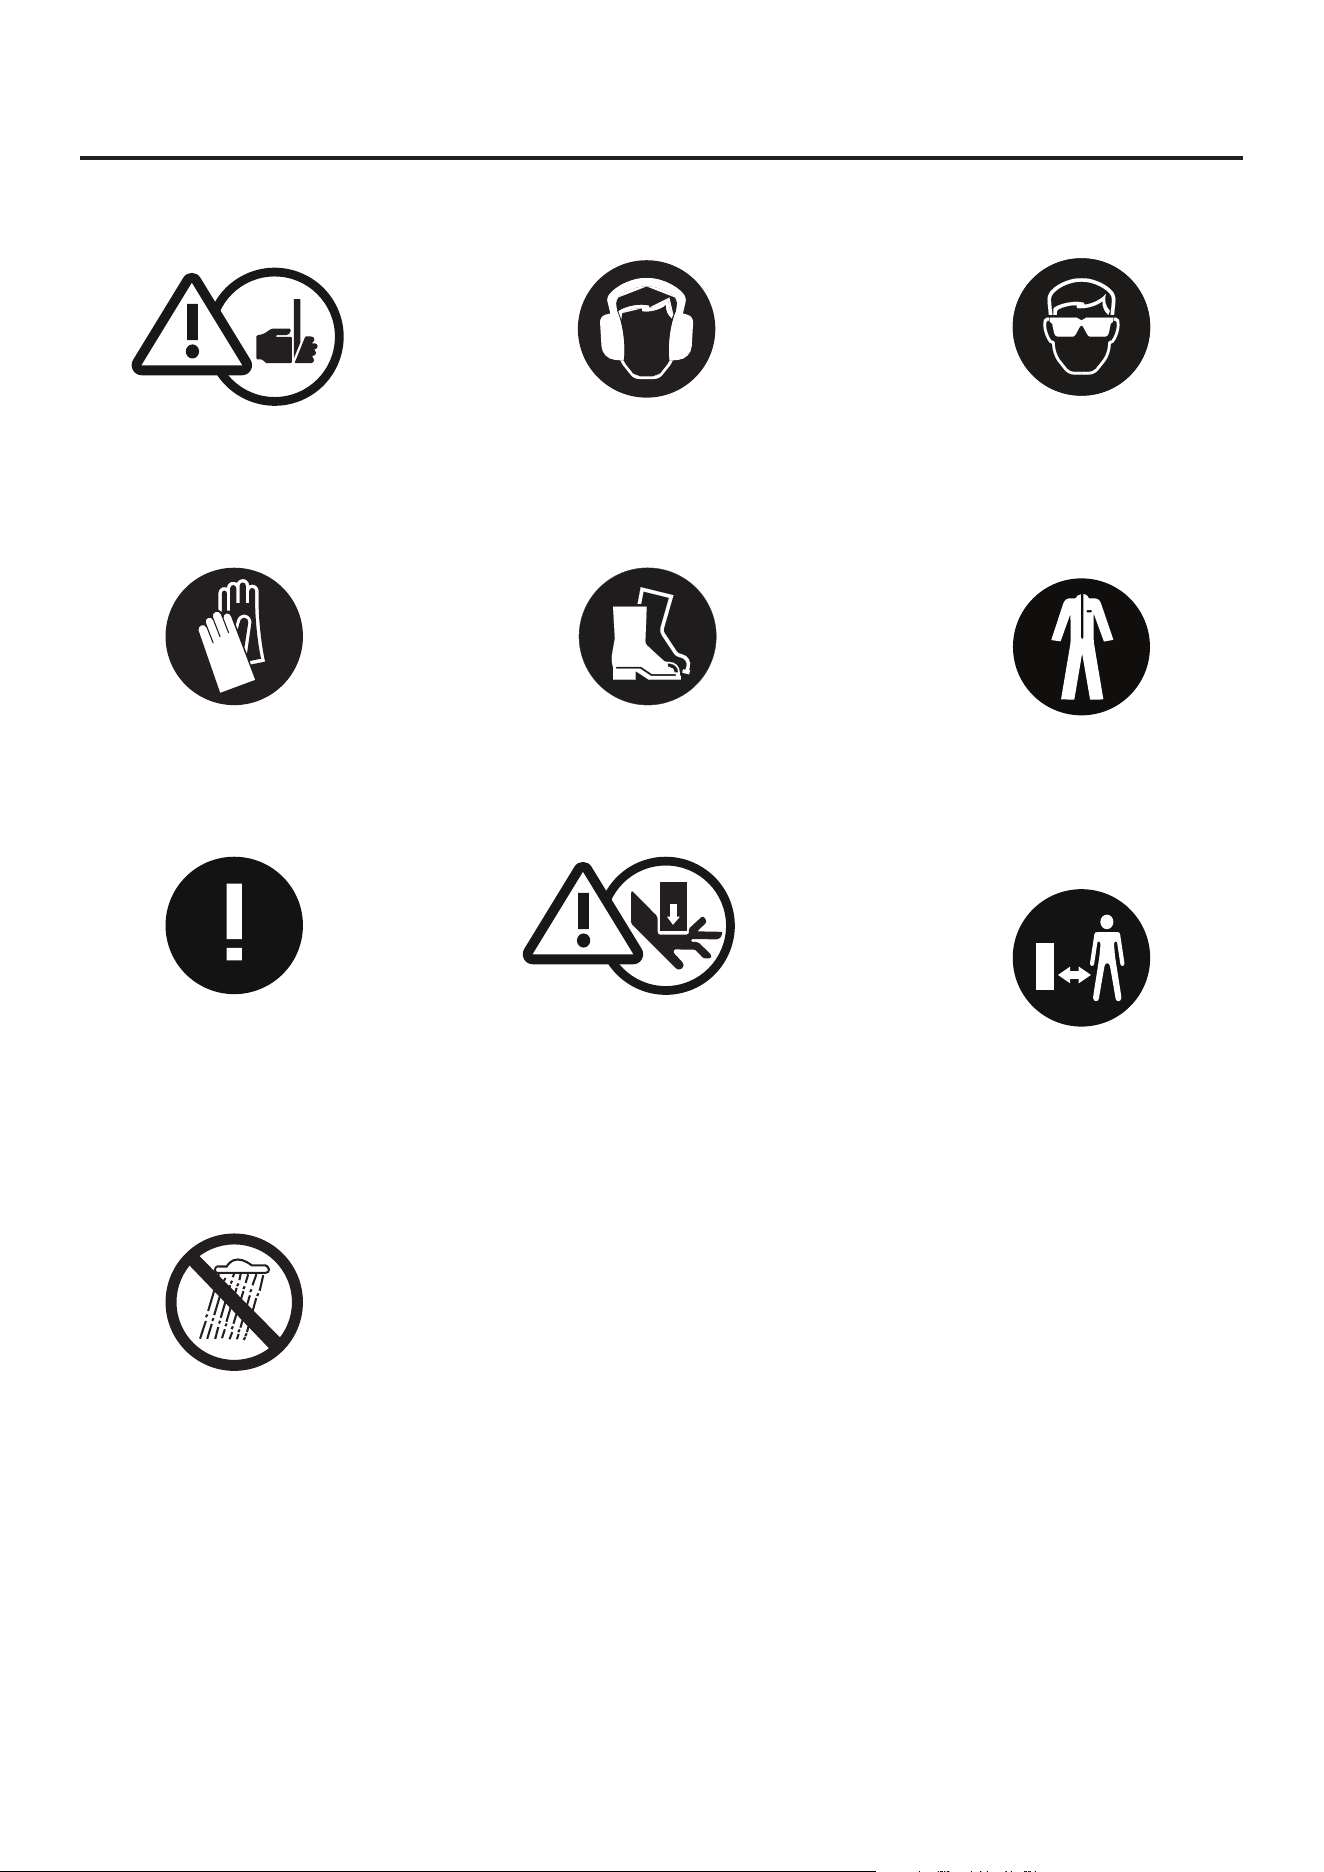
Usage & Safety
Maintain a safe distance
from bystanders
Do not use in
wet conditions
Protect your ears
Protect your eyes
Wear suitable footwear
Protect your hands
Protective clothing
must be worn
Beware of
kickback
Sharp edges
Potential finger
trap points

21
Legal
DISPOSAL INFORMATION
Please recycle where facilities exist. Check with
your local authority for recycling advice.
CUSTOMER SERVICE
If you are having difficulty using this product
and require support, please contact support@
vonhaus.com
WARRANTY
To register your product and find out if you
qualify for a free extended warranty please go
to www.vonhaus.com/warranty.
Please retain a proof of purchase receipt or
statement as proof of the purchase date.
The warranty only applies if the product is used
solely in the manner indicated in the warnings
page of this manual, and all other instructions
have been followed accurately.
Any abuse of the product or the manner in which
it is used will invalidate the warranty.
RETURNS
Returned goods will not be accepted unless
re-packaged in its original packaging and ac-
companied by a relevant and completed returns
form. This does not affect your statutory rights.
No rights are given under this warranty to a
person acquiring the appliance second-hand
or for commercial or communal use.
COPYRIGHT
All material in this instruction manual are copy-
righted by DOMU Brands.
Any unauthorised use may violate worldwide
copyright, trademark, and other laws.

Product No. 3519007