please take a
moment now
register your product at
www.Homedics.ca/register
Your valuable input regarding this
product will help us create
the products you will want
in the future.
2-year limited warranty
INSTRUCTION MANUAL AND WARRANTY INFORMATION
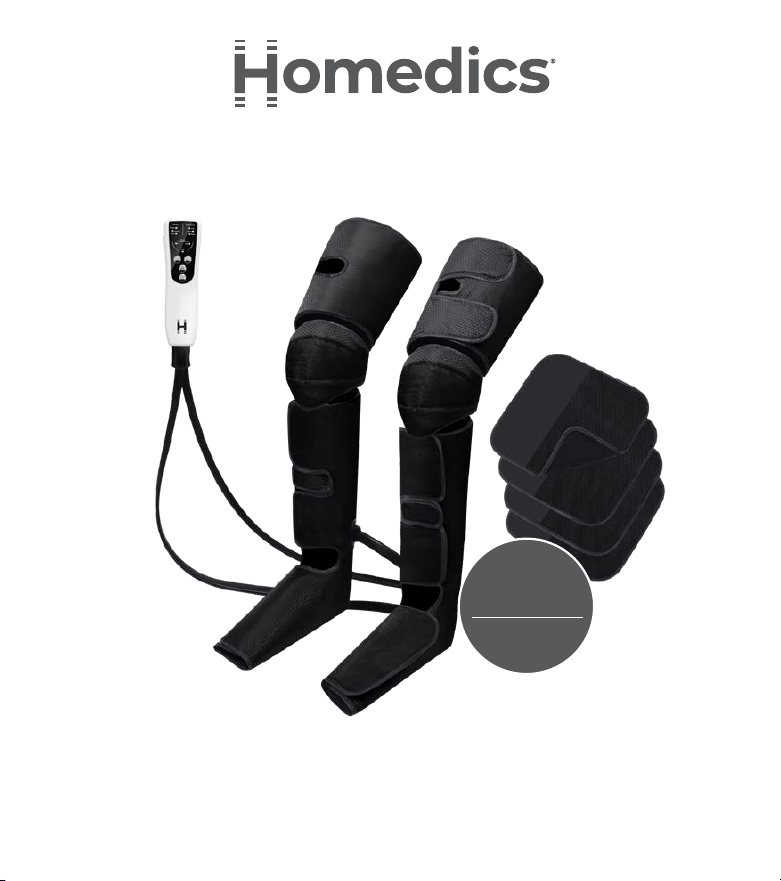
real relief full leg air
compression massager
SR-160HJ | L-04192, Rev. 2

2
IMPORTANT SAFETY INSTRUCTIONS
WHEN USING ELECTRICAL PRODUCTS, ESPECIALLY WHEN CHILDREN
ARE PRESENT, BASIC SAFETY PRECAUTIONS SHOULD ALWAYS BE
FOLLOWED, INCLUDING THE FOLLOWING:
READ ALL INSTRUCTIONS BEFORE USING.
DANGER
– TO REDUCE THE RISK OF ELECTRIC SHOCK:
• Always unplug this appliance from the electrical outlet immediately after
using and before cleaning.
• DO NOT reach for a unit that has fallen into water. Unplug it immediately.
• NEVER use pins or other metallic fasteners with this appliance.
WARNING
– TO REDUCE THE RISK OF BURNS, FIRE, ELECTRIC
SHOCK, OR INJURY TO PERSONS:
• An appliance should never be left unattended when plugged in. Unplug
from outlet when not in use, and before putting on or taking off parts or
attachments.
• DO NOT use outdoors.
• Close supervision is necessary when this appliance is used by, on, or near
children, invalids, or disabled persons.
• Use this appliance only for its intended use as described in this manual. DO
NOT use attachments not recommended by Homedics; specifically, any
attachments not provided with the unit.
• DO NOT carry this appliance by the supply cord or use cord as a handle.
• NEVER operate this appliance if it has a damaged cord or plug, if it is not
working properly, if it has been dropped or damaged, or if it has been
dropped into water. Return the appliance to the Homedics Service Center
for examination and repair.
• Keep the cord away from heated surfaces.
• NEVER operate the appliance with the air openings blocked. Keep the air
openings free of lint, hair, and the like.

3
• NEVER drop or insert any object into any opening.
• DO NOT operate where aerosol (spray) products are being used or where
oxygen is being administered.
• DO NOT operate under a blanket or pillow. Excessive heating can occur
and cause fire, electric shock, or injury to persons.
• To disconnect, turn all controls to the off position, then remove plug from
outlet.
• DO NOT use massager in close proximity to loose clothing or jewelry.
• Keep long hair away from massager while in use.
• DO NOT use any other AC adapter than what is supplied with the product.
Use of any other AC adapter may damage the product and may increase
risk of harm to user or property. Only AC adapter bearing the Part#: PP-
SR160HJADP should be used.

4
SAVE THESE INSTRUCTIONS
CAUTION
– PLEASE READ ALL INSTRUCTIONS CAREFULLY BEFORE
OPERATING.
• Consult your doctor prior to using this product, if:
– You are pregnant
– You have a pacemaker
– You have any concerns regarding your health
• NOT recommended for use by diabetics.
• NEVER leave the unit unattended, especially if children are present.
• NEVER cover the unit when it is in operation.
• DO NOT use this product for more than 15 minutes at a time.
• Extensive use could lead to the product’s excessive heating and shorter
life. Should this occur, discontinue use and allow the unit to cool before
operating.
• NEVER use this product directly on swollen or inflamed areas or skin
eruptions.
• DO NOT use this product as a substitute for medical attention.
• This product should never be used by any individual suffering from
any physical ailment that would limit the user’s capacity to operate the
controls.
• NOT for use by children.
• This unit should not be used by people with disabilities without
supervision.
• This appliance is intended for household use only.
• This product should NEVER be used by any individual suffering from any
physical ailment that would limit the user’s capacity to operate the controls
or who has sensory deficiencies.
NOTE: This unit will shut off automatically after 15 minutes of use. If your
unit overheats, turn off the unit and let cool for 30 minutes before turning on
again and continuing use.
5
Mode
Heat
Pressing Weak
Kneading Medium
Shiatsu
Low
Power
Mode
High
Strong
Pressure
Heat
ON/OFF
Pressure
Mode
Heat
Pressing Weak
Kneading Medium
Shiatsu
Low
Power
Mode
High
Strong
Pressure
Heat
ON/OFF
Pressure
Air Hose
Socket
Power Input
Port
Groove
L R
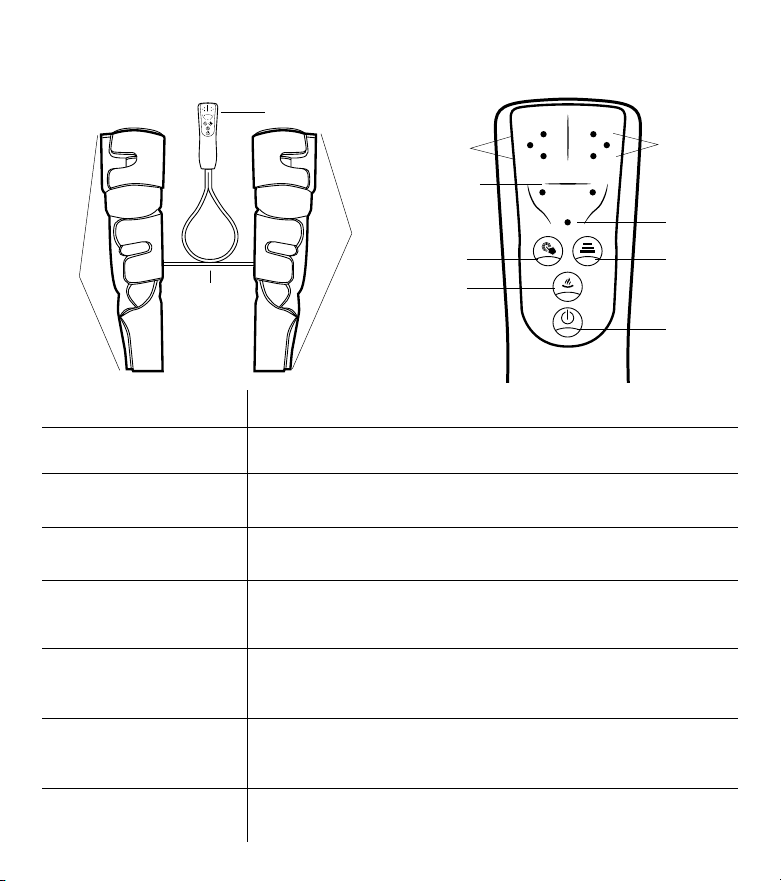
Name
On/O Button
Power Indicator
Mode Button
Description
The device includes 3 modes: Pulsing mode, kneading mode,
sequential mode.
Intensity Button
Heat Button
LED Light of Mode
LED Light of Pressure
Low Intensity: 165mmHg | Medium Intensity: 180mmHg
High Intensity: 225mmHg
The device includes Low and High heat settings. Press the
heat button and the indicator will light up. Press the heat
button to switch between settings LOW/HIGH/HEAT OFF
The corresponding mode name is marked next to each LED
lamp. During treatment, the LED corresponding to the
selected mode will light up.
The corresponding pressure level name is marked next to
each LED lamp. During treatment, the LED corresponding to
the selected pressure level with light up.
The indicator will light up if the device is turned on.
Turning on or turn o the main unit.
Controller
(Main unit)
Air Hose
Sleeve
Sleeve
Mode
Heat
Pressing Weak
Kneading Medium
Shiatsu
Low
Power
Mode
High
Strong
Pressure
Heat
ON/OFF
Pressure
Mode
Heat
Pressing Weak
Kneading Medium
Shiatsu
Low
Power
Mode
High
Strong
Pressure
Heat
ON/OFF
Pressure
Air Hose
Socket
Power Input
Port
Groove
L R
Name
On/O Button
Power Indicator
Mode Button
Description
The device includes 3 modes: Pulsing mode, kneading mode,
sequential mode.
Intensity Button
Heat Button
LED Light of Mode
LED Light of Pressure
Low Intensity: 165mmHg | Medium Intensity: 180mmHg
High Intensity: 225mmHg
The device includes Low and High heat settings. Press the
heat button and the indicator will light up. Press the heat
button to switch between settings LOW/HIGH/HEAT OFF
The corresponding mode name is marked next to each LED
lamp. During treatment, the LED corresponding to the
selected mode will light up.
The corresponding pressure level name is marked next to
each LED lamp. During treatment, the LED corresponding to
the selected pressure level with light up.
The indicator will light up if the device is turned on.
Turning on or turn o the main unit.
Controller panel of main unit
Intensity
Settings
Power
Indicator
Power Button
Intensity
Button
Mode Settings
Mode Button
Heat Button
Heat Settings
Name Description
On/O Button Turning on or turn o the main unit.
Mode Button
The device includes 3 modes: Pressing mode, kneading mode,
shiatsu mode.
Intensity Button
Low Intensity: 165mmHg | Medium Intensity: 180mmHg High
Intensity: 225mmHg
Heat Button
The device includes Low and High heat settings. Press the heat
button and the indicator will light up. Press the heat button to
switch between settings LOW/HIGH/HEAT OFF.
LED Light of Mode
The corresponding mode name is marked next to each LED lamp.
During treatment, the LED corresponding to the selected mode
will light up.
LED Light of Pressure
The corresponding pressure level name is marked next to each
LED lamp. During treatment, the LED corresponding to the
selected pressure level will light up.
Power Indicator The indicator will light up if the device is turned on.
6
INSTRUCTIONS FOR USE
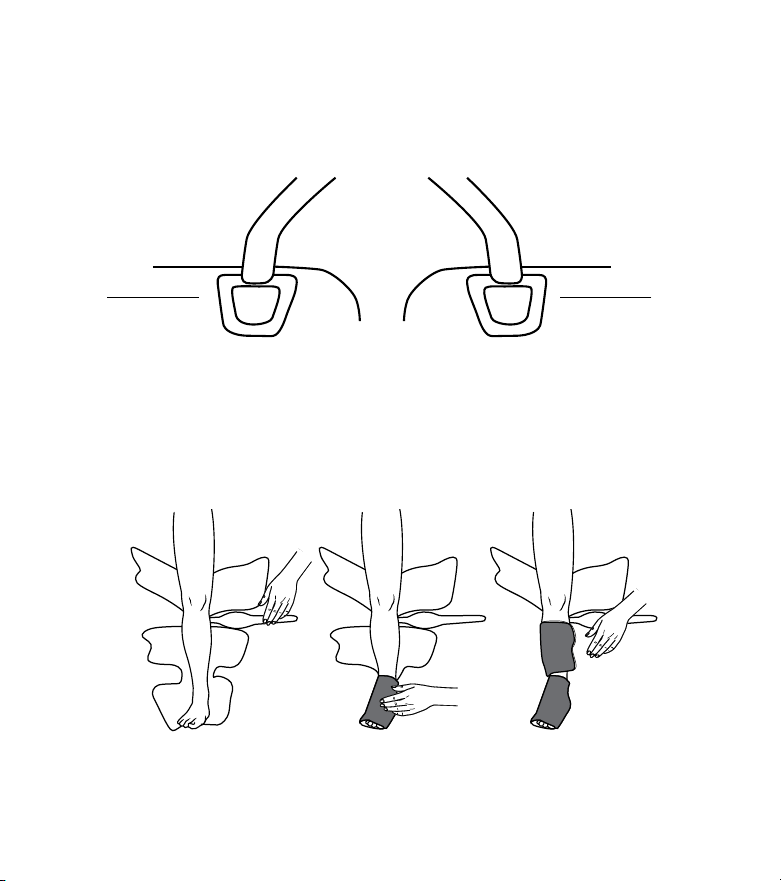
FITTING YOUR REAL RELIEF FULL LEG AIR COMPRESSION MASSAGER
1. Please note the left (L) and right (R) leg wrap according to the symbol marked at the
base of the air hose on both legs.
2. To fit the wraps around your legs, unfold the leg wraps and lay them flat. Place your
leg into the opened wraps one at a time (Fig. 1).
3. Fit the foot wrap around your foot and fasten it with the strap (Fig. 2).
4. Fit the calf wrap around your calf and fasten it with the strap (Fig. 3).
Mode
Heat
Pressing Weak
Kneading Medium
Shiatsu
Low
Power
Mode
High
Strong
Pressure
Heat
ON/OFF
Pressure
Mode
Heat
Pressing Weak
Kneading Medium
Shiatsu
Low
Power
Mode
High
Strong
Pressure
Heat
ON/OFF
Pressure
Air Hose
Socket
Power Input
Port
Groove
L R
Name
On/O Button
Power Indicator
Mode Button
Description
The device includes 3 modes: Pulsing mode, kneading mode,
sequential mode.
Intensity Button
Heat Button
LED Light of Mode
LED Light of Pressure
Low Intensity: 165mmHg | Medium Intensity: 180mmHg
High Intensity: 225mmHg
The device includes Low and High heat settings. Press the
heat button and the indicator will light up. Press the heat
button to switch between settings LOW/HIGH/HEAT OFF
The corresponding mode name is marked next to each LED
lamp. During treatment, the LED corresponding to the
selected mode will light up.
The corresponding pressure level name is marked next to
each LED lamp. During treatment, the LED corresponding to
the selected pressure level with light up.
The indicator will light up if the device is turned on.
Turning on or turn o the main unit.
Mode
Heat
Pressing Weak
Kneading Medium
Shiatsu
Low
Power
Mode
High
Strong
Pressure
Heat
ON/OFF
Pressure
Mode
Heat
Pressing Weak
Kneading Medium
Shiatsu
Low
Power
Mode
High
Strong
Pressure
Heat
ON/OFF
Pressure
Air Hose
Socket
Power Input
Port
Groove
L R
Name
On/O Button
Power Indicator
Mode Button
Description
The device includes 3 modes: Pulsing mode, kneading mode,
sequential mode.
Intensity Button
Heat Button
LED Light of Mode
LED Light of Pressure
Low Intensity: 165mmHg | Medium Intensity: 180mmHg
High Intensity: 225mmHg
The device includes Low and High heat settings. Press the
heat button and the indicator will light up. Press the heat
button to switch between settings LOW/HIGH/HEAT OFF
The corresponding mode name is marked next to each LED
lamp. During treatment, the LED corresponding to the
selected mode will light up.
The corresponding pressure level name is marked next to
each LED lamp. During treatment, the LED corresponding to
the selected pressure level with light up.
The indicator will light up if the device is turned on.
Turning on or turn o the main unit.
Left Right
Fig. 1 Fig. 2 Fig. 3
7
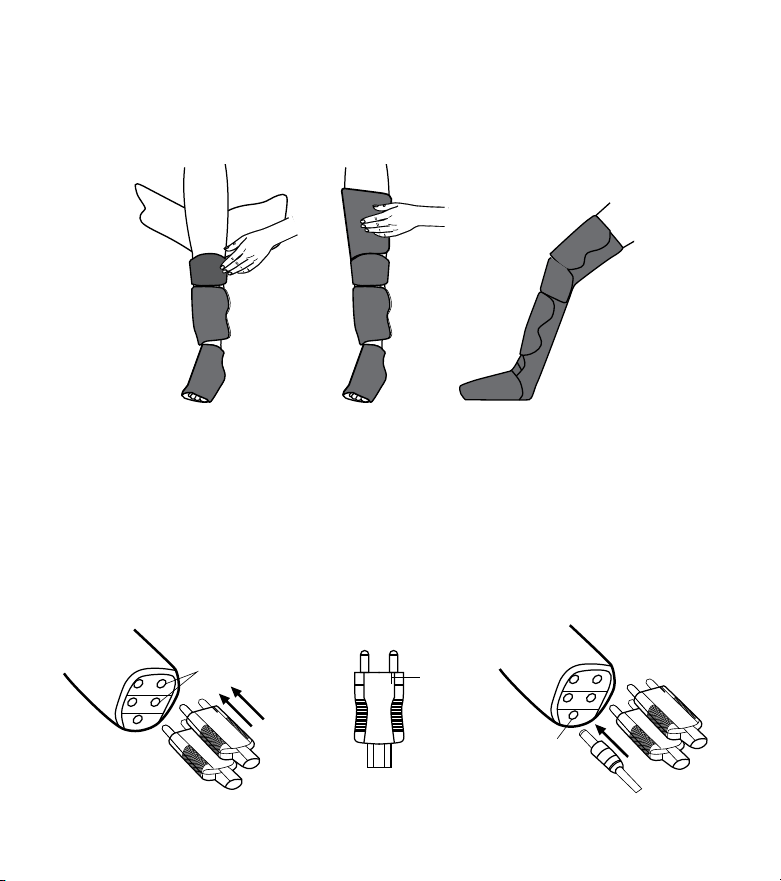
5. Fit the knee wrap around your knee and fasten it with the strap (Fig. 4).
6. Fit the thigh wrap around your thigh and fasten it with the strap (Fig. 5).
7. Check the position and tightness and adjust if needed. The wraps should be snug
but not overtight (Fig. 6).
Right
Mode
Heat
Pressing Weak
Kneading Medium
Shiatsu
Low
Power
Mode
High
Strong
Pressure
Heat
ON/OFF
Pressure
Mode
Heat
Pressing Weak
Kneading Medium
Shiatsu
Low
Power
Mode
High
Strong
Pressure
Heat
ON/OFF
Pressure
Air Hose
Socket
Power Input
Port
Groove
L R
Name
On/O Button
Power Indicator
Mode Button
Description
The device includes 3 modes: Pulsing mode, kneading mode,
sequential mode.
Intensity Button
Heat Button
LED Light of Mode
LED Light of Pressure
Low Intensity: 165mmHg | Medium Intensity: 180mmHg
High Intensity: 225mmHg
The device includes Low and High heat settings. Press the
heat button and the indicator will light up. Press the heat
button to switch between settings LOW/HIGH/HEAT OFF
The corresponding mode name is marked next to each LED
lamp. During treatment, the LED corresponding to the
selected mode will light up.
The corresponding pressure level name is marked next to
each LED lamp. During treatment, the LED corresponding to
the selected pressure level with light up.
The indicator will light up if the device is turned on.
Turning on or turn o the main unit.
Fig. 7 Fig. 8 Fig. 9
Mode
Heat
Pressing Weak
Kneading Medium
Shiatsu
Low
Power
Mode
High
Strong
Pressure
Heat
ON/OFF
Pressure
Mode
Heat
Pressing Weak
Kneading Medium
Shiatsu
Low
Power
Mode
High
Strong
Pressure
Heat
ON/OFF
Pressure
Air Hose
Socket
Power Input
Port
Groove
L R
Name
On/O Button
Power Indicator
Mode Button
Description
The device includes 3 modes: Pulsing mode, kneading mode,
sequential mode.
Intensity Button
Heat Button
LED Light of Mode
LED Light of Pressure
Low Intensity: 165mmHg | Medium Intensity: 180mmHg
High Intensity: 225mmHg
The device includes Low and High heat settings. Press the
heat button and the indicator will light up. Press the heat
button to switch between settings LOW/HIGH/HEAT OFF
The corresponding mode name is marked next to each LED
lamp. During treatment, the LED corresponding to the
selected mode will light up.
The corresponding pressure level name is marked next to
each LED lamp. During treatment, the LED corresponding to
the selected pressure level with light up.
The indicator will light up if the device is turned on.
Turning on or turn o the main unit.
Fig. 4 Fig. 5 Fig. 6
8. Insert the 2 air hose connectors into the air hose socket located at the bottom of the
controller (Fig. 7).
Please note that the air hose connectors have a groove in the connector (see Fig. 8) that allows
them to only be inserted one way to ensure proper connection and inflation.
9. Insert the output end of the power adapter into the power input port located at the
bottom of the controller (Fig. 9), and then plug the adapter into the wall outlet. The
Power LED indicator will begin flashing to indicate that the device is plugged in.

8
USING YOUR REAL RELIEF FULL LEG AIR COMPRESSION MASSAGER
1. Press the Power button to turn on the device.
NOTE: The device will always turn on in its default settings:
• The default treatment mode is PULSE mode
• The default pressure level is LOW
• The default treatment time is 15 minutes
The power LED will turn on as well as the LED indicators for the current treatment
mode and intensity.
2. Press the MODE button to select desired mode.
NOTE: Adjusting the mode during operation will not make the timing restart.
3. Press the Intensity button to adjust the pressure level from Low, Medium and High.
The LED corresponding to selected pressure level will light up.
NOTE: The pressure levels are as follows:
• Low: 165 mmHg
• Medium level: 180 mmHg
• High level: 225 mmHg
NOTE: Adjusting air pressure level during operation will not make the timing restart.
4. The device will automatically turn OFF after 15 minutes and the Power LED indicator
will begin to flash again.
If less time is desired, press the Power button to turn the device OFF.
If more time is desired (we suggest 15 minutes of use), press the Power button to
turn the device back on. Adjust the settings as desired.
AFTER USE
1. Remove the power adapter from the wall socket.
2. Remove the air hoses from the bottom of the controller by pulling them. Pull from
the connector, not the hose.
3. Remove the wraps from your legs by unstrapping each section. Carefully fold each
sleeve.
4. Store wraps and power adapter in the included storage bag.

9
MAINTENANCE
TO CLEAN THE MASSAGER
Allow it to cool before cleaning. Clean only with a soft, slightly damp sponge.
Never allow water or any other liquids to come into contact with the unit. DO
NOT clean the unit while charging.
• DO NOT immerse in any liquid to clean.
• NEVER use abrasive cleaners, brushes, or strong chemicals that may or
may not be flammable and/or damaging to the product to clean.
• DO NOT attempt to repair the massager. There are no user-serviceable
parts. For service, contact Consumer Relations at the number listed in the
Warranty section.
TO STORE
Place massager in its box or in a cool, dry place. Avoid contact with sharp
edges or pointed objects which might cut or puncture the fabric surface. To
avoid breakage, do not wrap the charging cable around the unit. DO NOT hang
the unit by the charging cable.
CAUTION: All servicing of this massager must be performed by authorized
Homedics service personnel only.

10
SUPPLIER’S DECLARATION OF CONFORMITY
Product Description: REAL RELIEF FULL LEG AIR COMPRESSION MASSAGER
Model Number: SR-160HJ
Trade Name: Homedics
FCC Compliance Statement
This device complies with Part 15 of the FCC Rules. Operation is subject to the
following two conditions: (1) This device may not cause harmful interference, and (2)
This device must accept any interference received, including interference that may
cause undesired operation.
U.S. Contact Information
Company: Homedics, LLC.
Address: 3000 N Pontiac Trail, Commerce Township, MI 48390
8:30am-7:00pm EST Monday-Friday 1-800-466-3342
Homedics is not responsible for any radio or TV interference caused by unauthorized
modifications to this equipment. Such modifications could void the user authority to
operate the equipment.
This equipment has been tested and found to comply with the limits for a Class
B digital device, pursuant to Part 15 of the FCC Rules. These limits are designed
to provide reasonable protection against harmful interference in a residential
installation. This equipment generates, uses, and can radiate radio frequency
energy and, if not installed and used in accordance with the instructions, may cause
harmful interference to radio communications. However, there is no guarantee that
interference will not occur in a particular installation. If this equipment does cause
harmful interference to radio or television reception, which can be determined
by turning the equipment off and on, the user is encouraged to try to correct the
interference by one or more of the following measures:
• Reorient or relocate the receiving antenna.
• Increase the separation between the equipment and receiver.
• Connect the equipment to an outlet on a circuit different from that to which the
receiver is connected.
• Consult the dealer or an experienced radio/TV technician for help.
CAN ICES-003(B)/NMB-003(B)

©2023 Homedics, LLC. All rights reserved.
Homedics is a registered trademark of Homedics, LLC.
Distributed by Homedics, LLC, 3000 N Pontiac Trail, Commerce Township, MI 48390
IB-SR160HJA
Homedics sells its products with the intent that they are free of defects in manufacture and workmanship for a period
of 2 years from the date of original purchase, except as noted below. Homedics warrants that its products will be free
of defects in material and workmanship under normal use and service. This warranty extends only to consumers and
does not extend to Retailers.
To obtain warranty service on your Homedics product, contact a Consumer Relations representative for assistance.
Please make sure to have the model number of the product available.
Homedics does not authorize anyone, including, but not limited to, Retailers, the subsequent consumer purchaser of
the product from a Retailer or remote purchasers, to obligate Homedics in any way beyond the terms set forth herein.
This warranty does not cover damage caused by misuse or abuse; accident; the attachment of any unauthorized
accessory; alteration to the product; improper installation; unauthorized repairs or modifications; improper use of
electrical/power supply; loss of power; dropped product; malfunction or damage of an operating part from failure
to provide manufacturer’s recommended maintenance; transportation damage; theft; neglect; vandalism; or
environmental conditions; loss of use during the period the product is at a repair facility or otherwise awaiting parts or
repair; or any other conditions whatsoever that are beyond the control of Homedics.
This warranty is effective only if the product is purchased and operated in the country in which the product is
purchased. A product that requires modifications or adoption to enable it to operate in any other country than the
country for which it was designed, manufactured, approved and/or authorized, or repair of products damaged by
these modifications is not covered under this warranty.
THE WARRANTY PROVIDED HEREIN SHALL BE THE SOLE AND EXCLUSIVE WARRANTY. THERE SHALL BE NO
OTHER WARRANTIES EXPRESS OR IMPLIED INCLUDING ANY IMPLIED WARRANTY OF MERCHANTABILITY
OR FITNESS OR ANY OTHER OBLIGATION ON THE PART OF THE COMPANY WITH RESPECT TO
PRODUCTS COVERED BY THIS WARRANTY. HOMEDICS SHALL HAVE NO LIABILITY FOR ANY INCIDENTAL,
CONSEQUENTIAL, OR SPECIAL DAMAGES. IN NO EVENT SHALL THIS WARRANTY REQUIRE MORE THAN
THE REPAIR OR REPLACEMENT OF ANY PART OR PARTS WHICH ARE FOUND TO BE DEFECTIVE WITHIN
THE EFFECTIVE PERIOD OF THE WARRANTY. NO REFUNDS WILL BE GIVEN. IF REPLACEMENT PARTS FOR
DEFECTIVE MATERIALS ARE NOT AVAILABLE, HOMEDICS RESERVES THE RIGHT TO MAKE PRODUCT
SUBSTITUTIONS IN LIEU OF REPAIR OR REPLACEMENT.
This warranty does not extend to the purchase of opened, used, repaired, repackaged and/or resealed products,
including but not limited to sale of such products on internet auction sites and/or sales of such products by surplus
or bulk resellers. Any and all warranties or guarantees shall immediately cease and terminate as to any products or
parts thereof which are repaired, replaced, altered, or modified, without the prior express and written consent of
Homedics.
This warranty provides you with specific legal rights. You may have additional rights which may vary from state to
state and country to country. Because of individual state and country regulations, some of the above limitations and
exclusions may not apply to you.
For more information regarding our product line in the USA, please visit www.Homedics.com. For Canada, please visit
www.Homedics.ca.
FOR SERVICE IN THE USA
CSERVICE@HOMEDICS.COM
8:30AM-7:00PM EST MONDAY-FRIDAY
1-800-466-3342
2-YEAR LIMITED WARRANTY
FOR SERVICE IN CANADA
CSERVICE@HOMEDICSGROUP.CA
8:30AM-5:00PM EST MONDAY-FRIDAY
1-888-225-7378