
Technical Support and E-Warranty Certificate
www.vevor.com/support
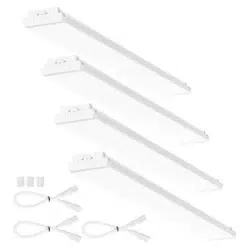
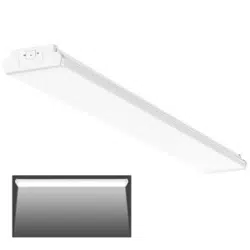
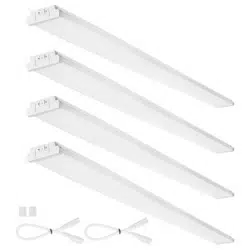
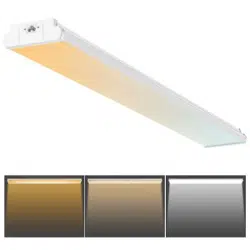
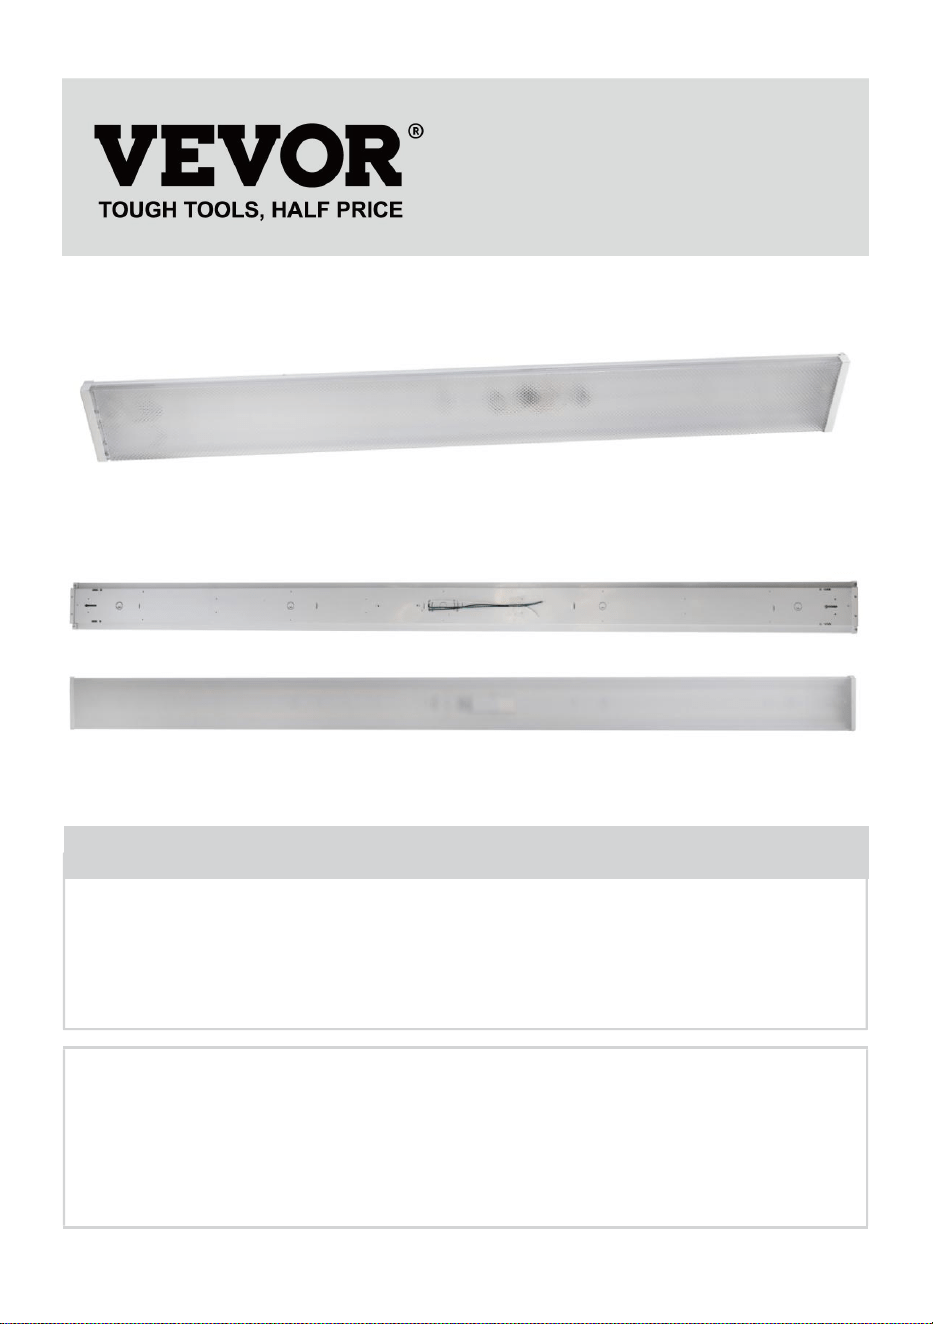
LED WRAPAROUND LIGHT
MODEL: GT-WR50W-1, GT-WR40W-1,
GT-WR50W-4, GT-WR120W-4
We continue to be committed to provide you tools with competitive price.
"Save Half", "Half Price" or any other similar expressions used by us only represents an
estimate of savings you might benefit from buying certain tools with us compared to the major
top brands and does not necessarily mean to cover all categories of tools offered by us. You
are kindly reminded to verify carefully when you are placing an order with us if you are
actually saving half in comparison with the top major brands.
- 1 -
Model: GT-WR50W-1, GT-WR40W-1, GT-WR50W-4, GT-WR120W-4
Have product questions? Need technical support? Please feel free to
contact us:
Technical Support and E-Warranty Certificate
www.vevor.com/support
NEED HELP? CONTACT US!
This is the original instruction, please read all manual instructions
carefully before operating. VEVOR reserves a clear interpretation of our
user manual. The appearance of the product shall be subject to the
product you received. Please forgive us that we won't inform you again if
there are any technology or software updates on our product.
LED WRAPAROUND LIGHT
- 2 -
SAFETY INFORMATION
IMPORTANT: Please read all safety precautions and installation
instructions carefully before installing.
◆Do not handle any energized fixture or attempt to energize any fixture
with wet hand or while standing on a wet or damp surface or in water.
◆Assure that the fixture is mounted onto a sound structurally surface that
will support the fixture.
◆The fixture is designed for use in 120VAC,60Hz fused circuit. Do not use
in a dimming circuit.
◆Do not install on radiant-heating type ceiling.
◆Product can be used in garages, basements, work areas, utility rooms
and recreation rooms.
WARNING:IF NOT FOLLOW THESE INSTRUCTIONS MAY LEAD TO A
POTENTIALLY FATAL ELECTRICAL SHOCK OR PROPERTY DAMAGE.
This device complies with Part 15 of the FCC Rules. Operation is subject
to the following two conditions:
(1)This device may not cause harmful interference, and (2)this device
must accept any interference received, including interference that may
cause undesired operation.
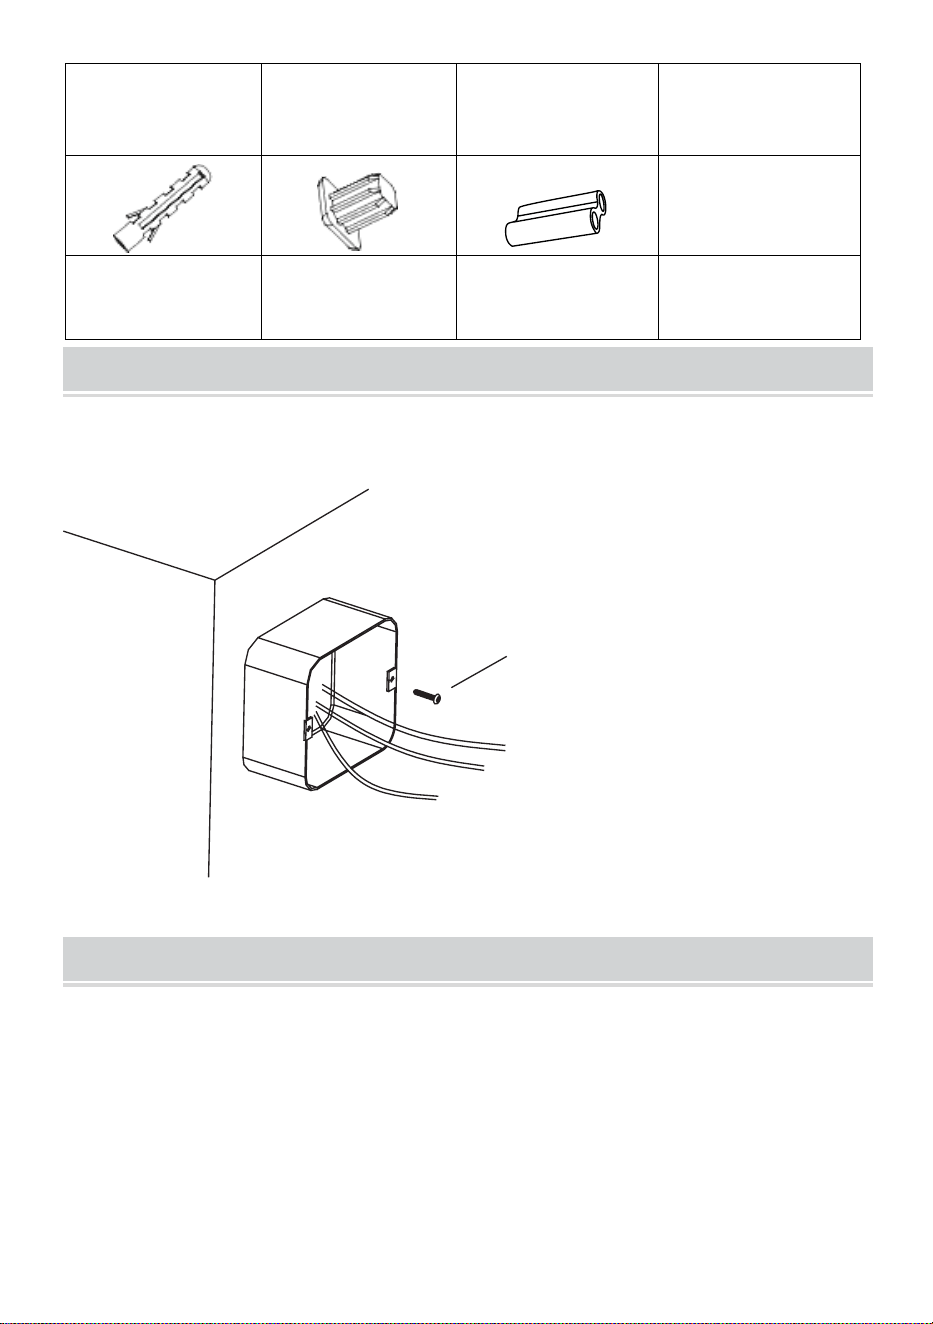
PRE-INSTALLATION
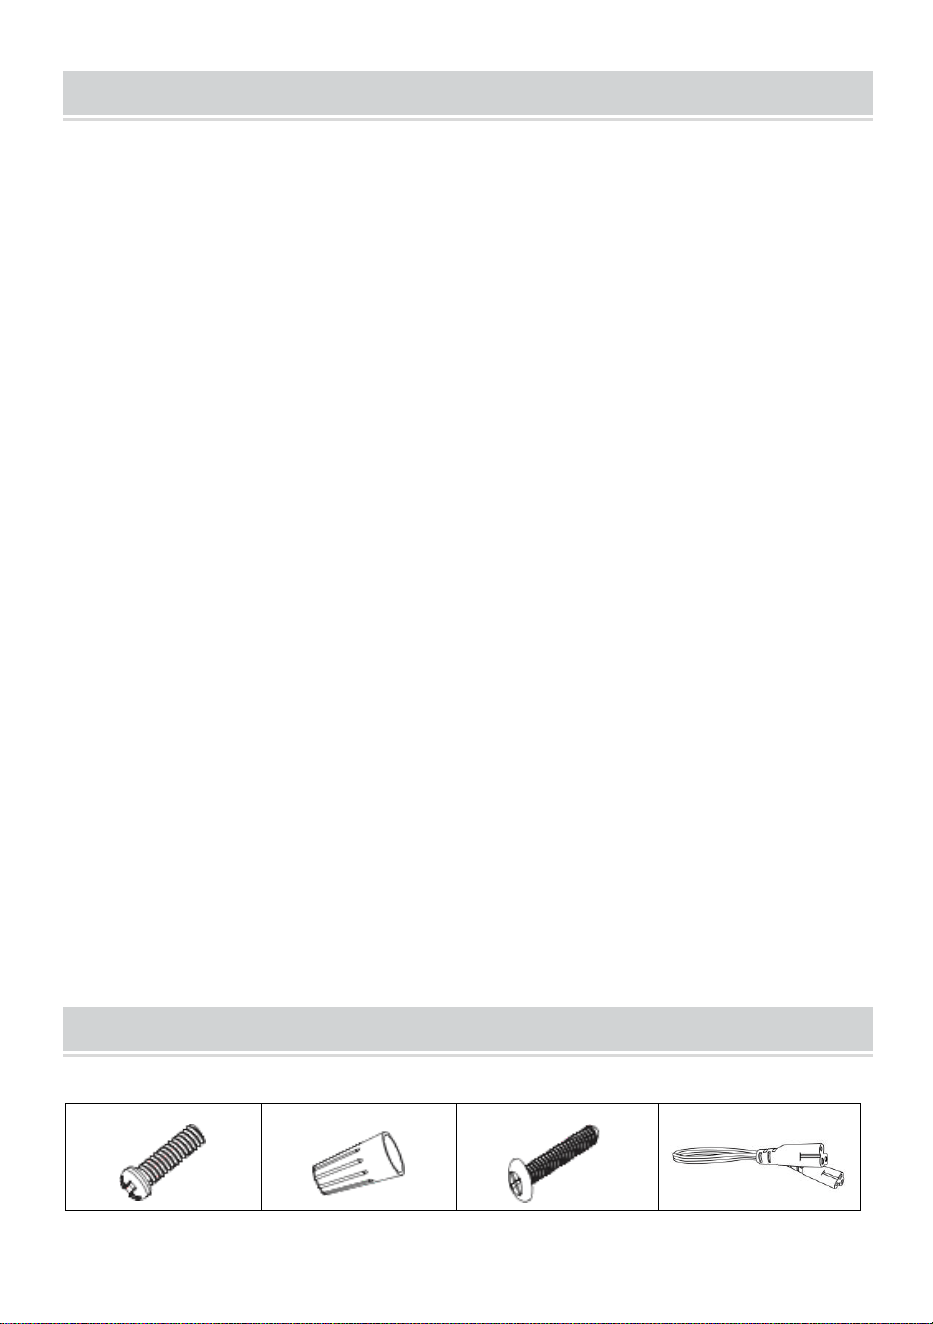
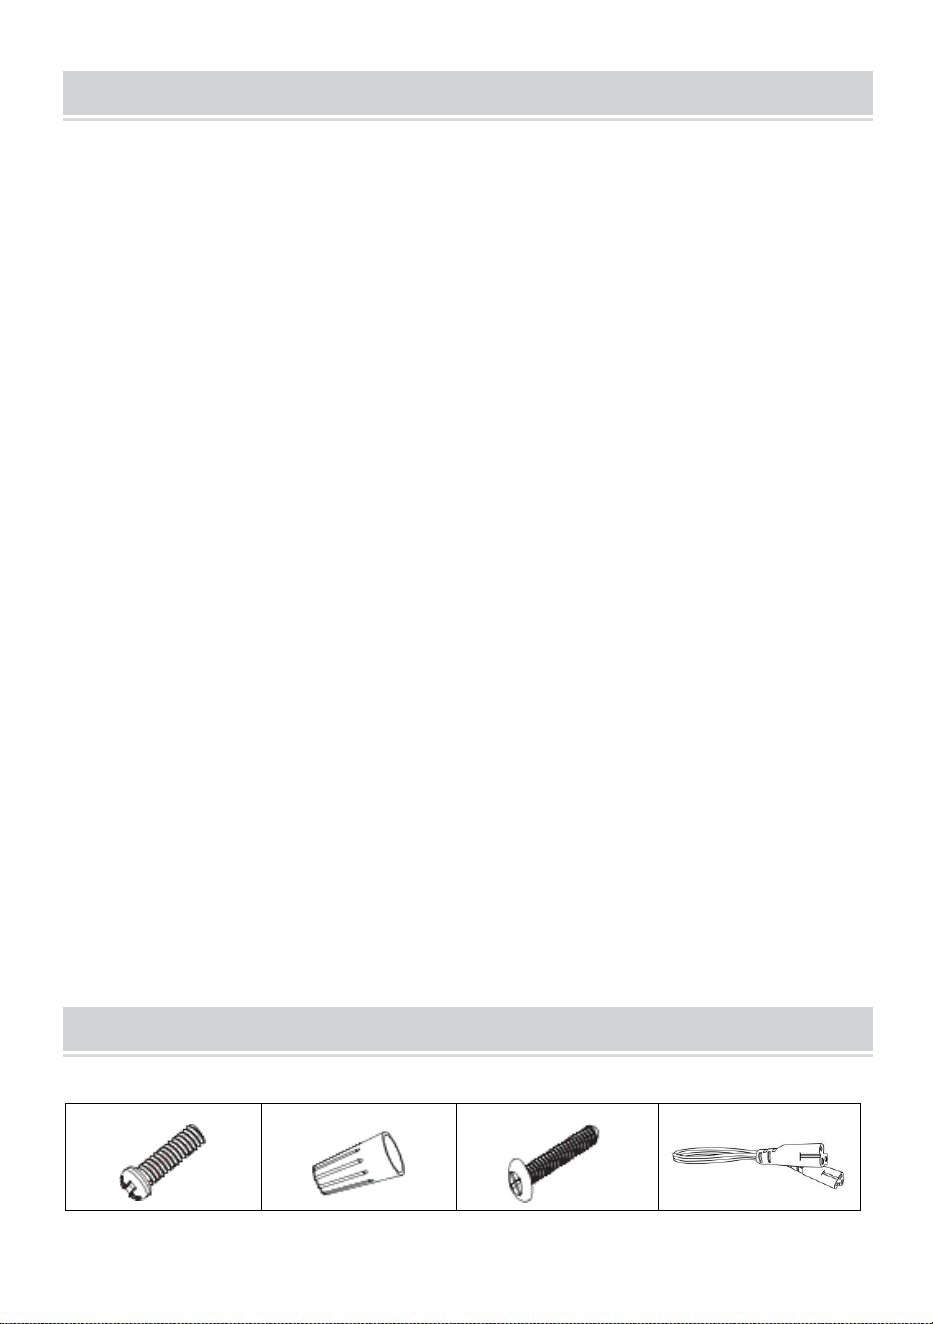
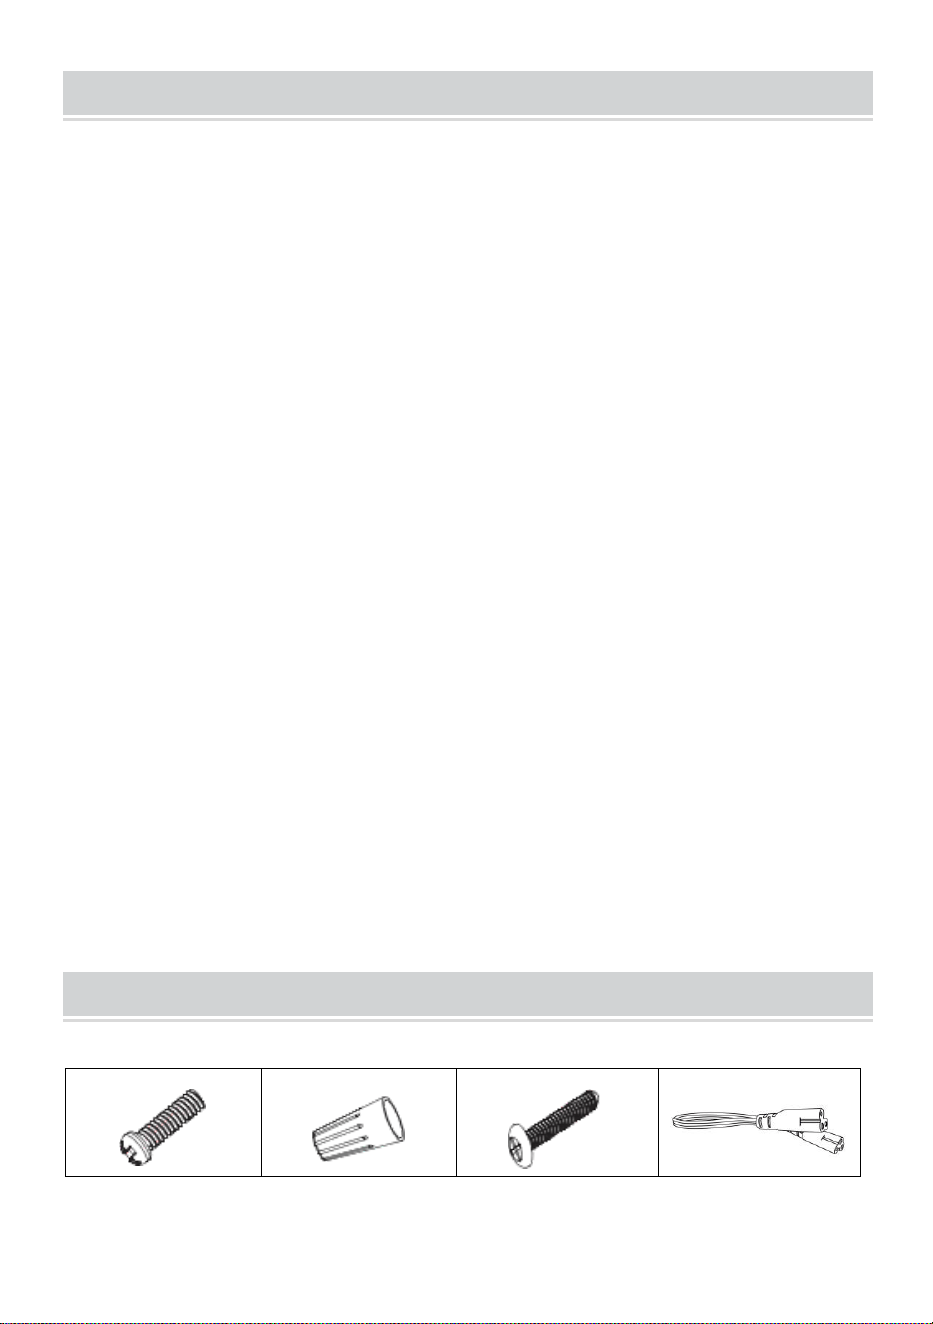
HARDWARE INCLUDED
AA:Small pin Cross
Machine
Screws*2PCS
BB:Wire Nut*3PCS
CC:large Pointed
Pin Cross Wood
Screws*4PCS
Adapter cable
(300mm)*3PCS
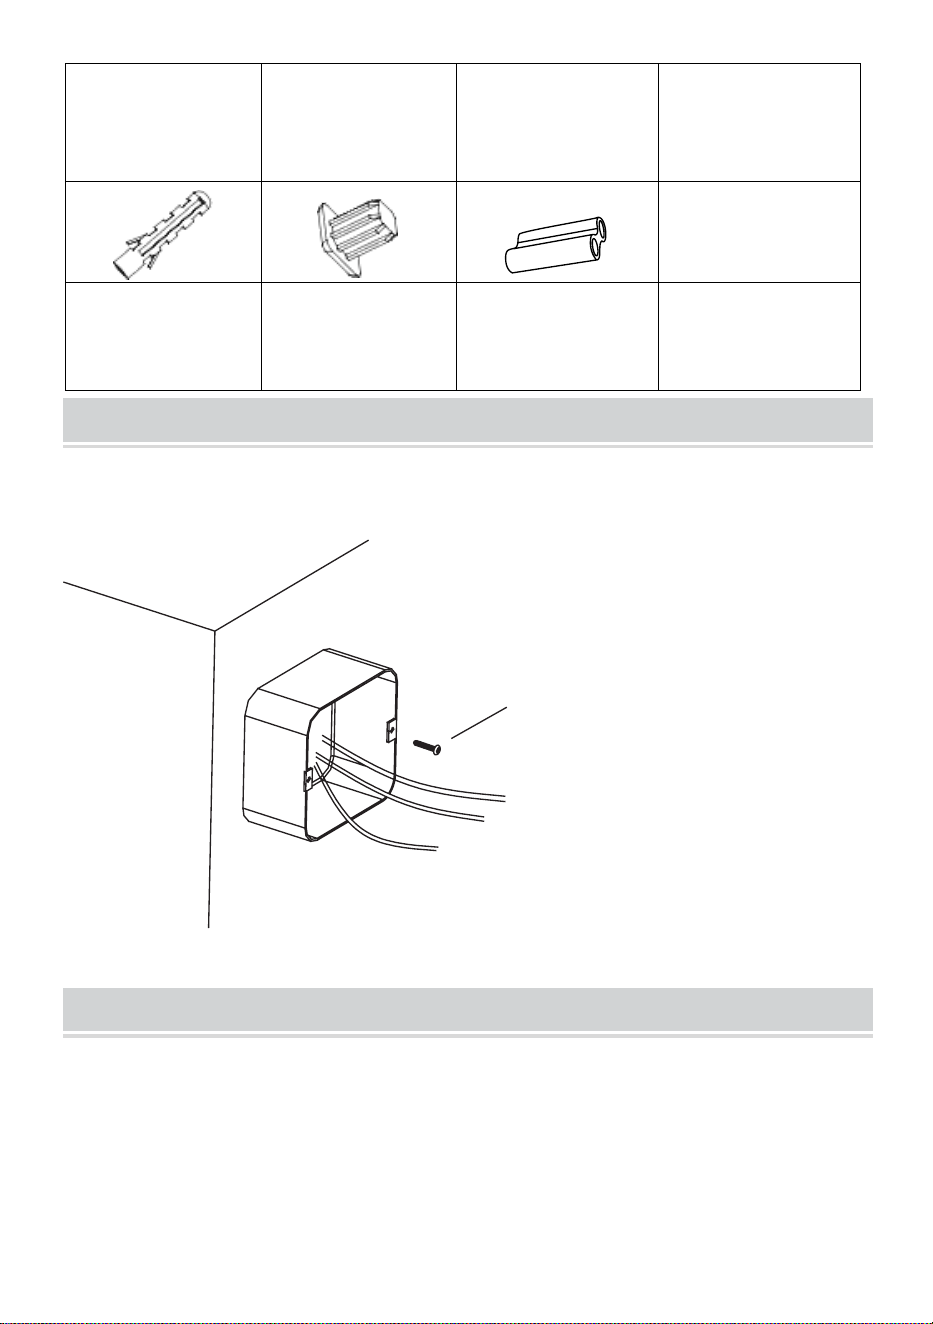
- 3 -
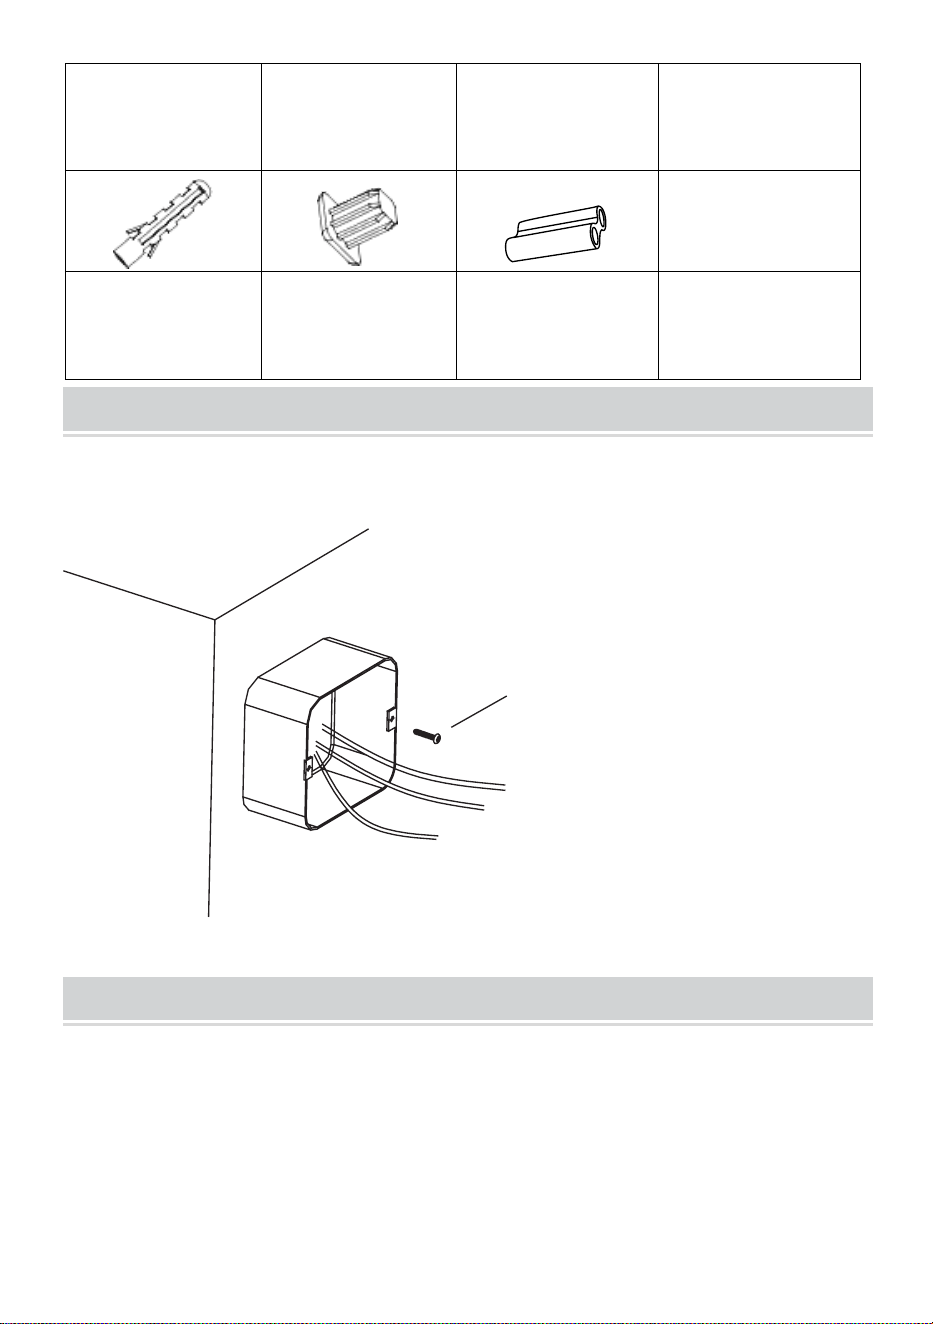
DD:Wall
Anchors*4PCS
EE: Rubber
stopper*4PCS
seamless butt
joints*3pcs
INSTALLATION(CONTINUED)
CONNECTING THE WIRES
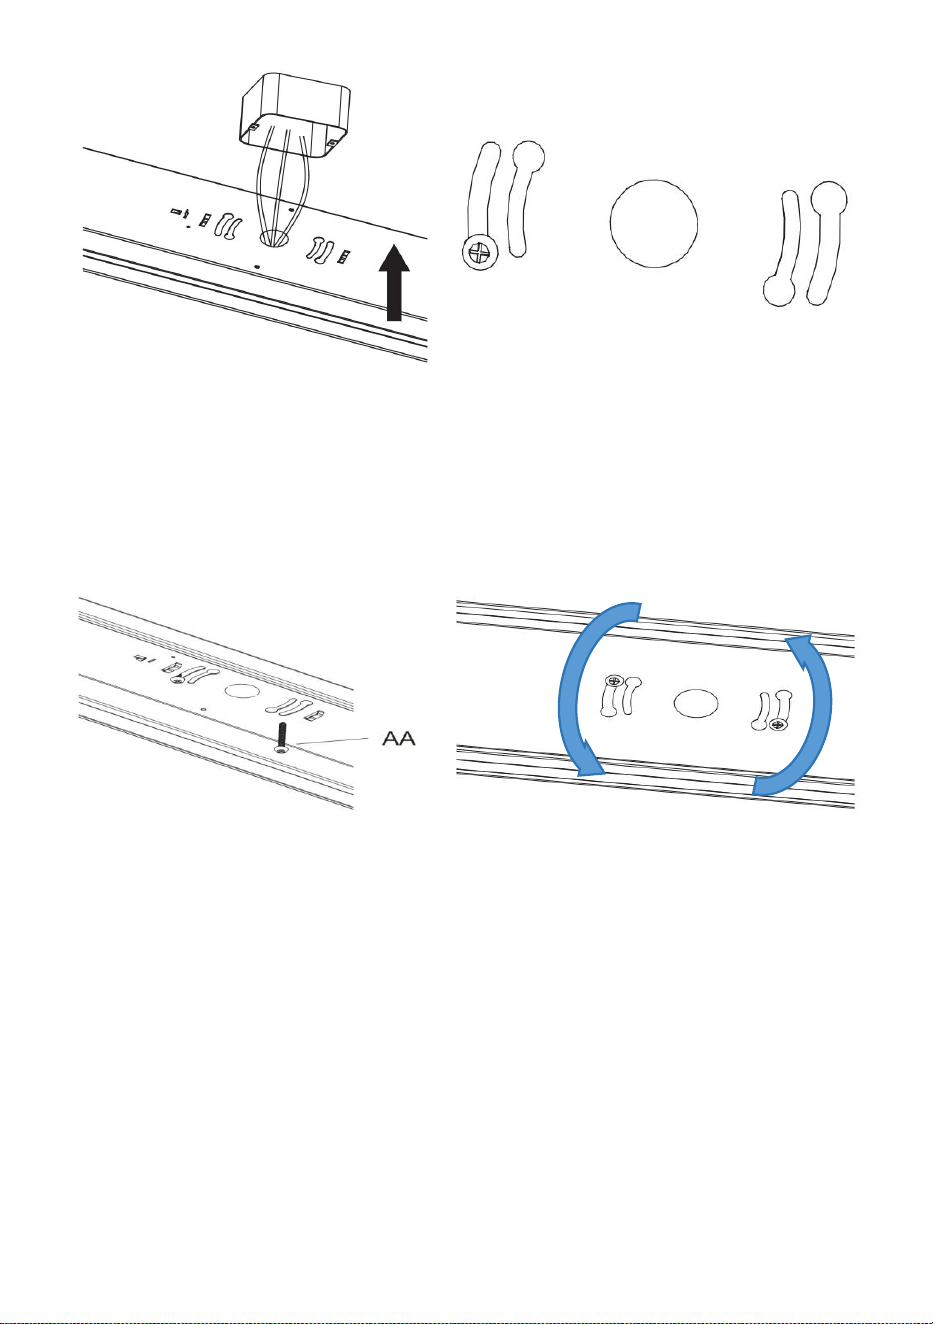
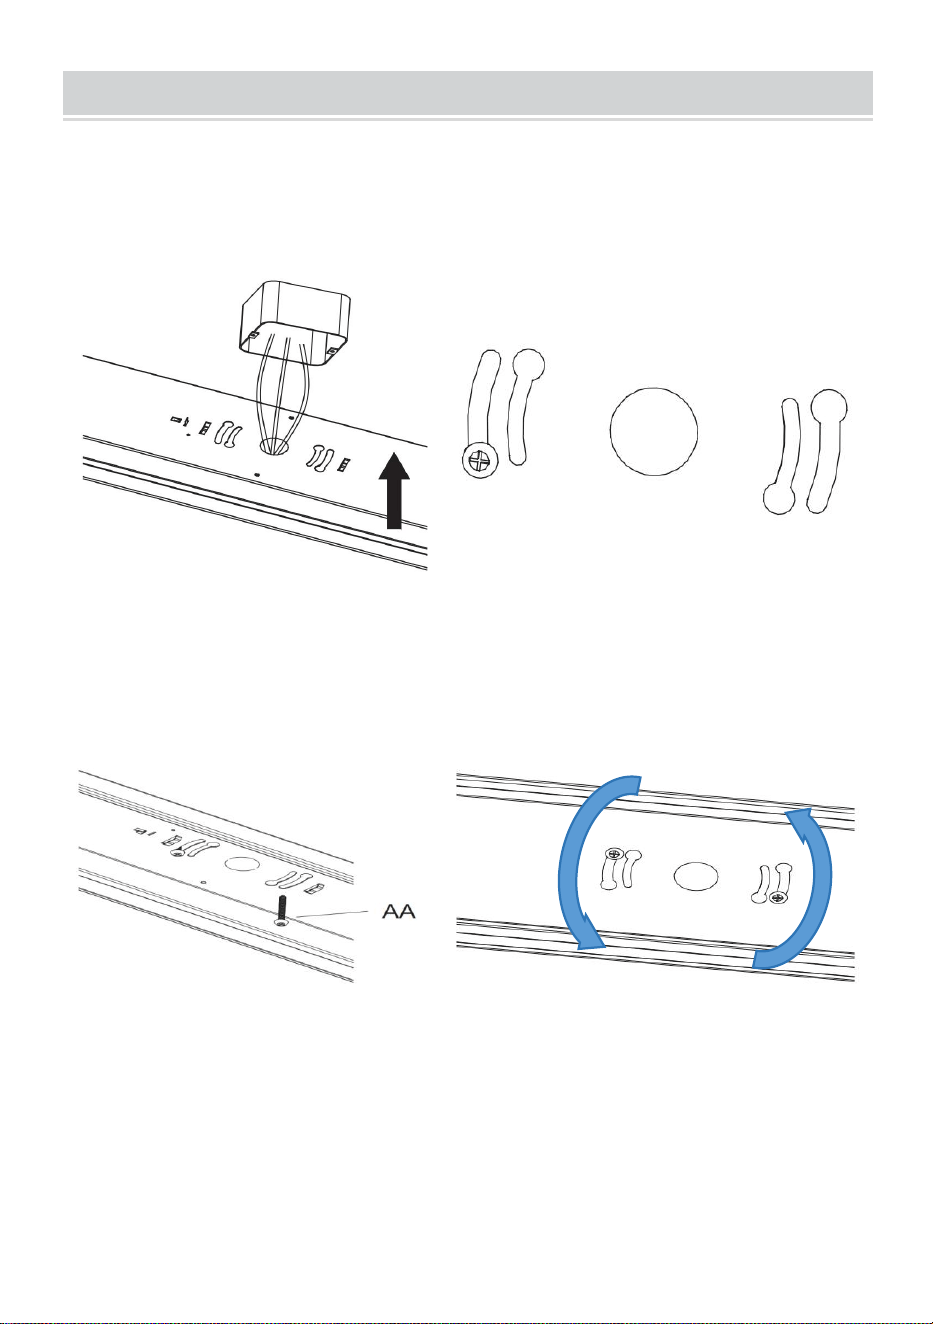
1. Install one screws(AA) into the junction box. (Figure2)
Figure2
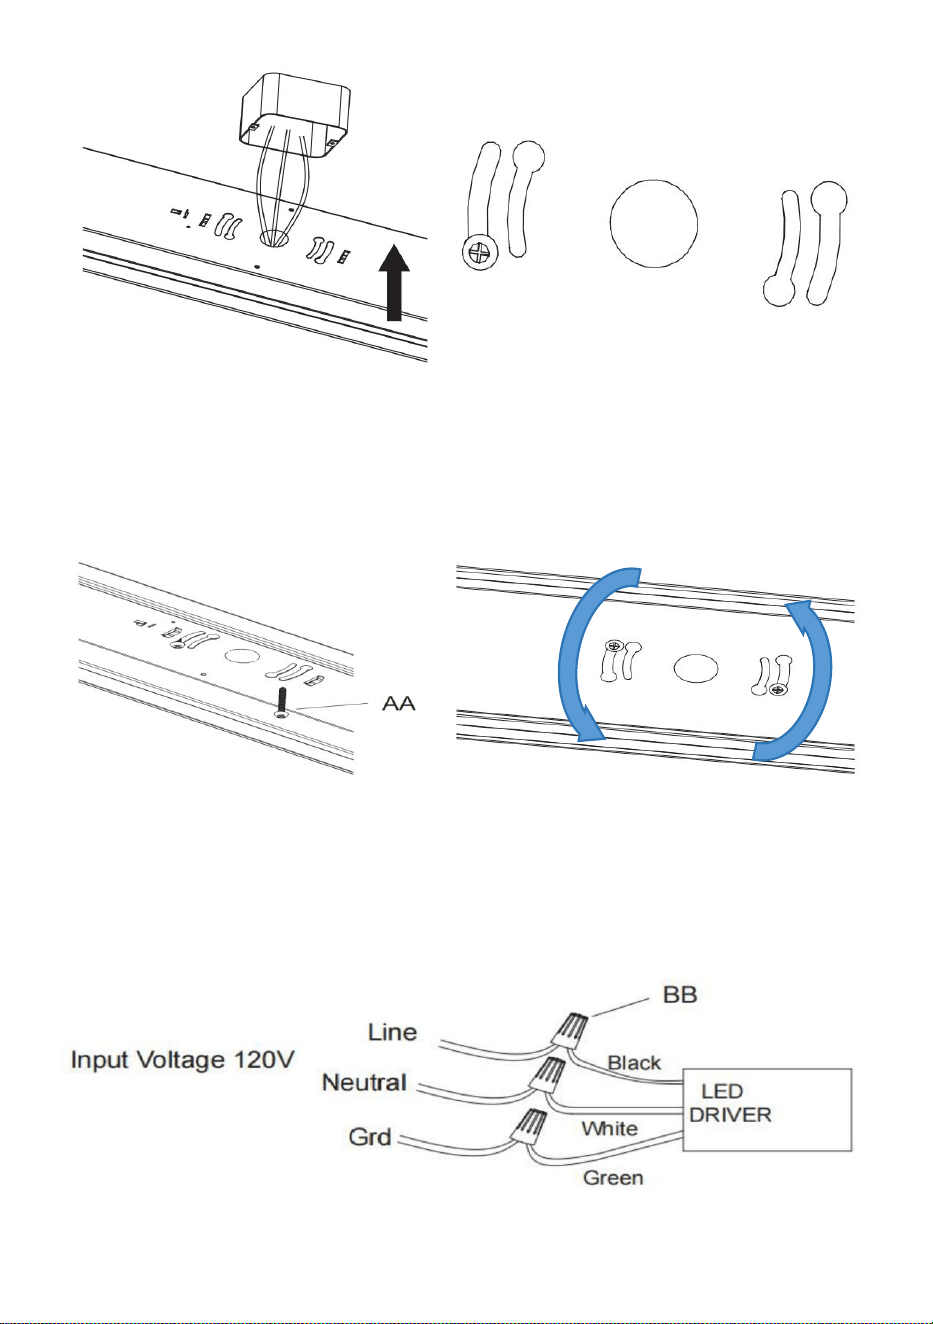
ATTACHING THE HOUSING(1)
1. Attach the Metal Housing to the junction box by aligning the holes
on the Metal Housing (Part A) with the screws on the junction
box.(Figure3.1&Figure3.2)
AA
- 4 -
Figure3.1
Figure3.2
2. Lock the lamp with a screw (AA), turn the lamp clockwise then
tighten the screw to ensure the lamp is stable and not movable.
(Figure3.3&Figure3.4)
Figure3.3
Figure3.4
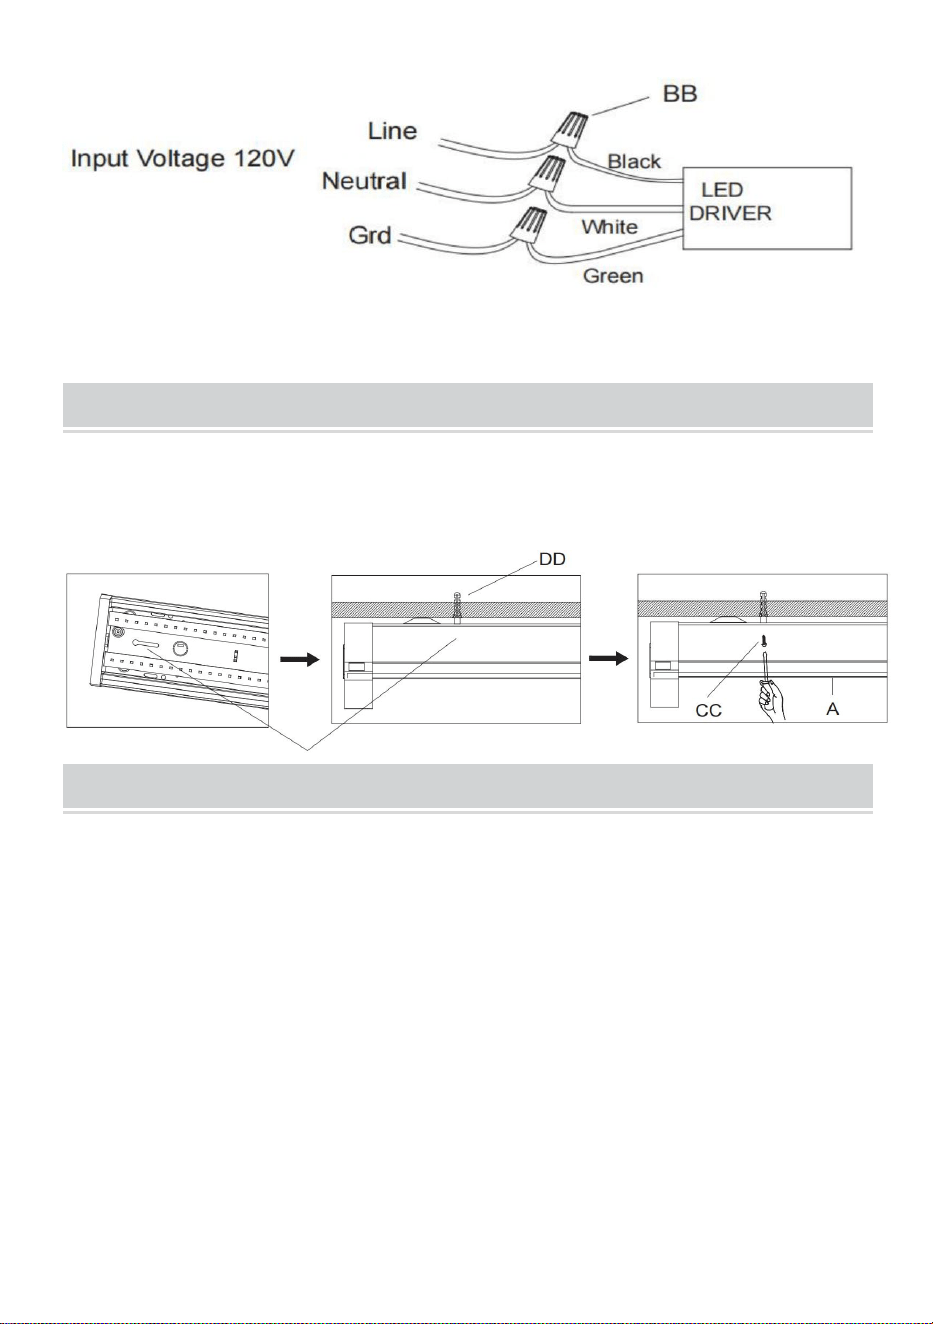
3. Using the wires nuts(BB) to connect the housing wires.(Figure 4)
OPTIONAL: Wrap connected wire nuts with electrical tape.
Attention:Connect the wires correctly according to the colors and
markings on the wiring diagram
- 5 -
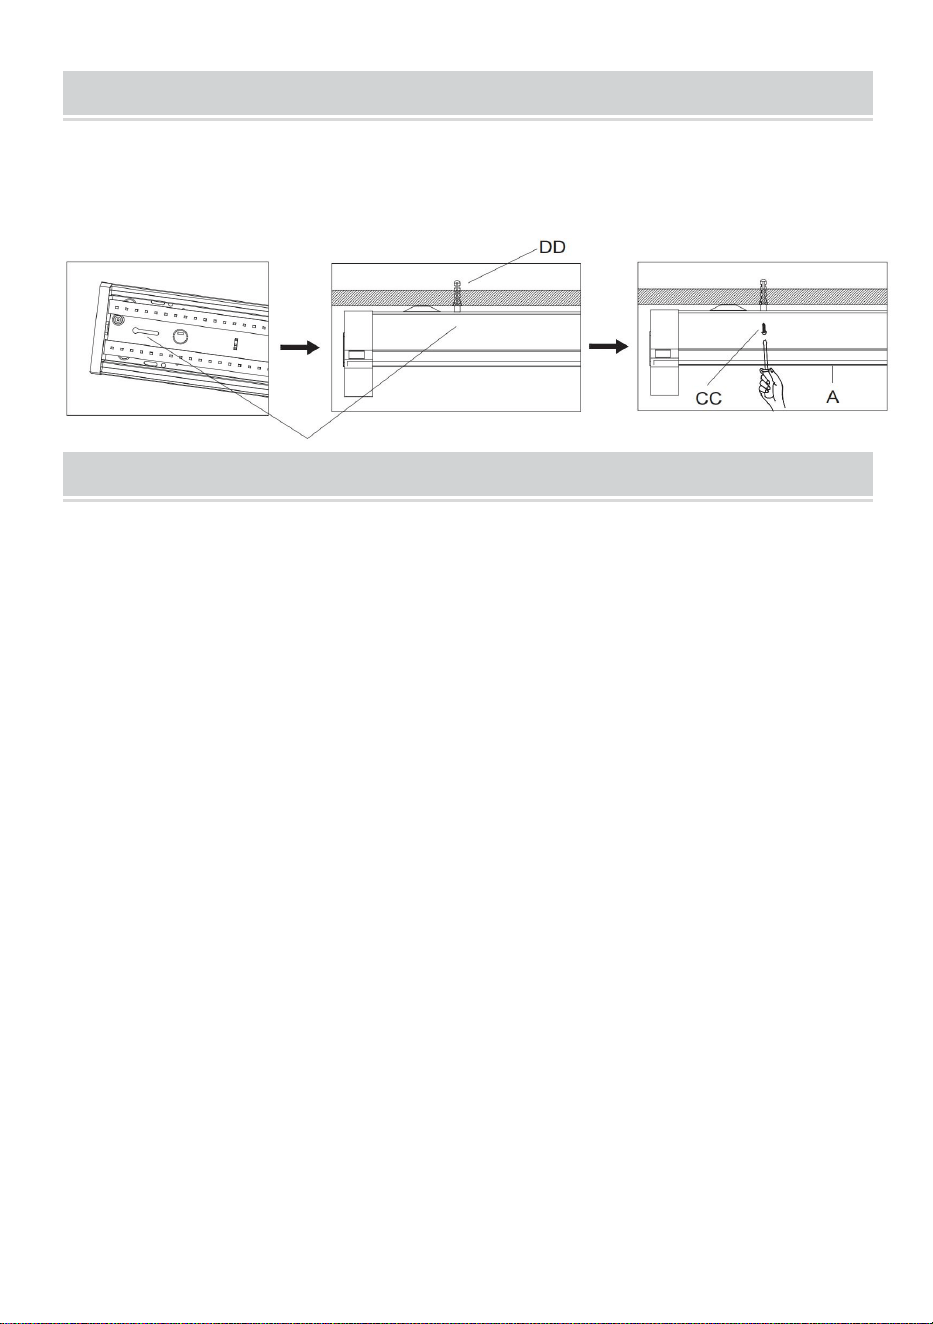
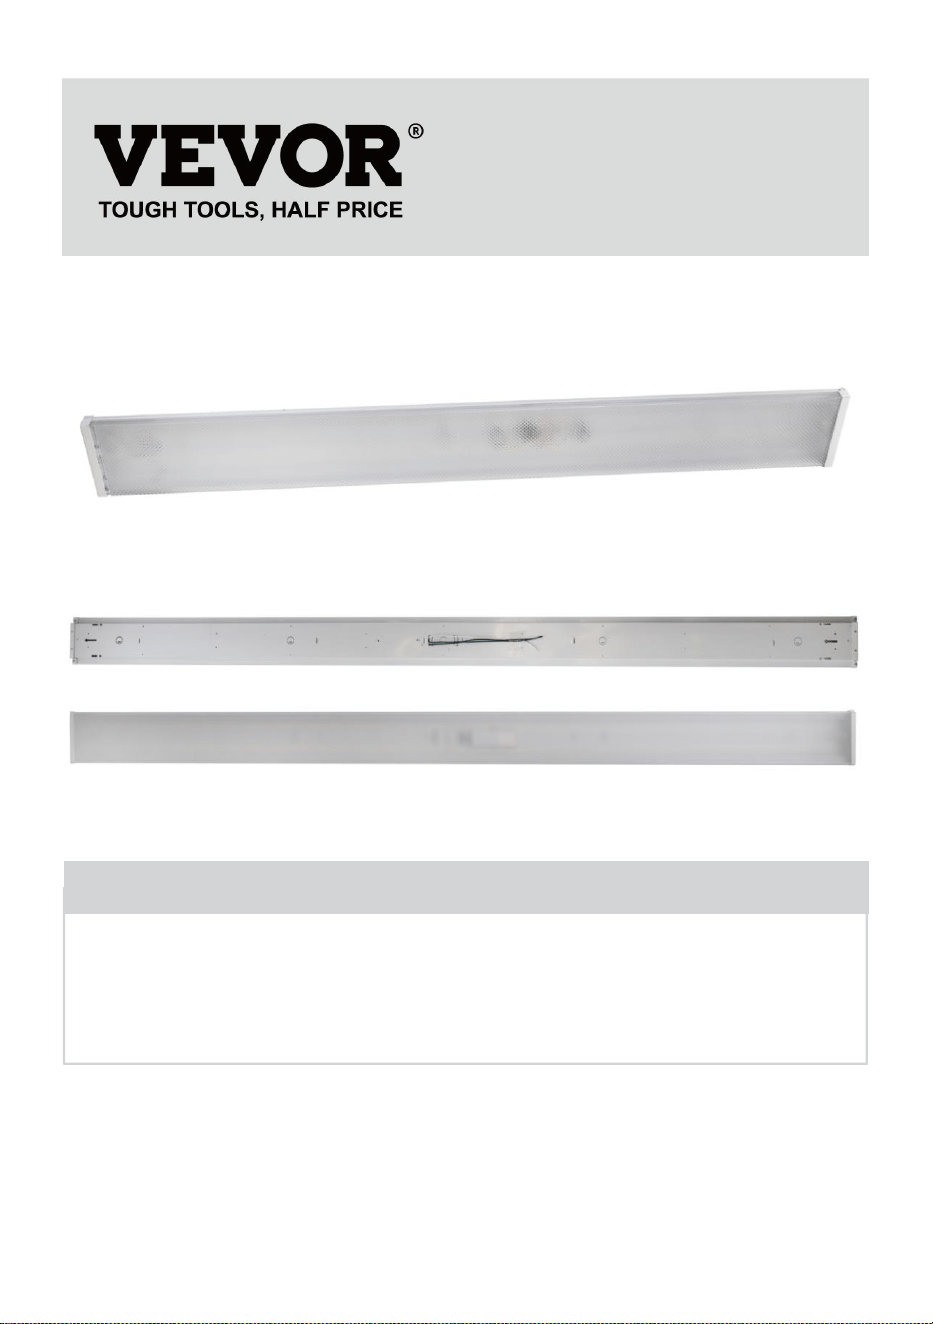
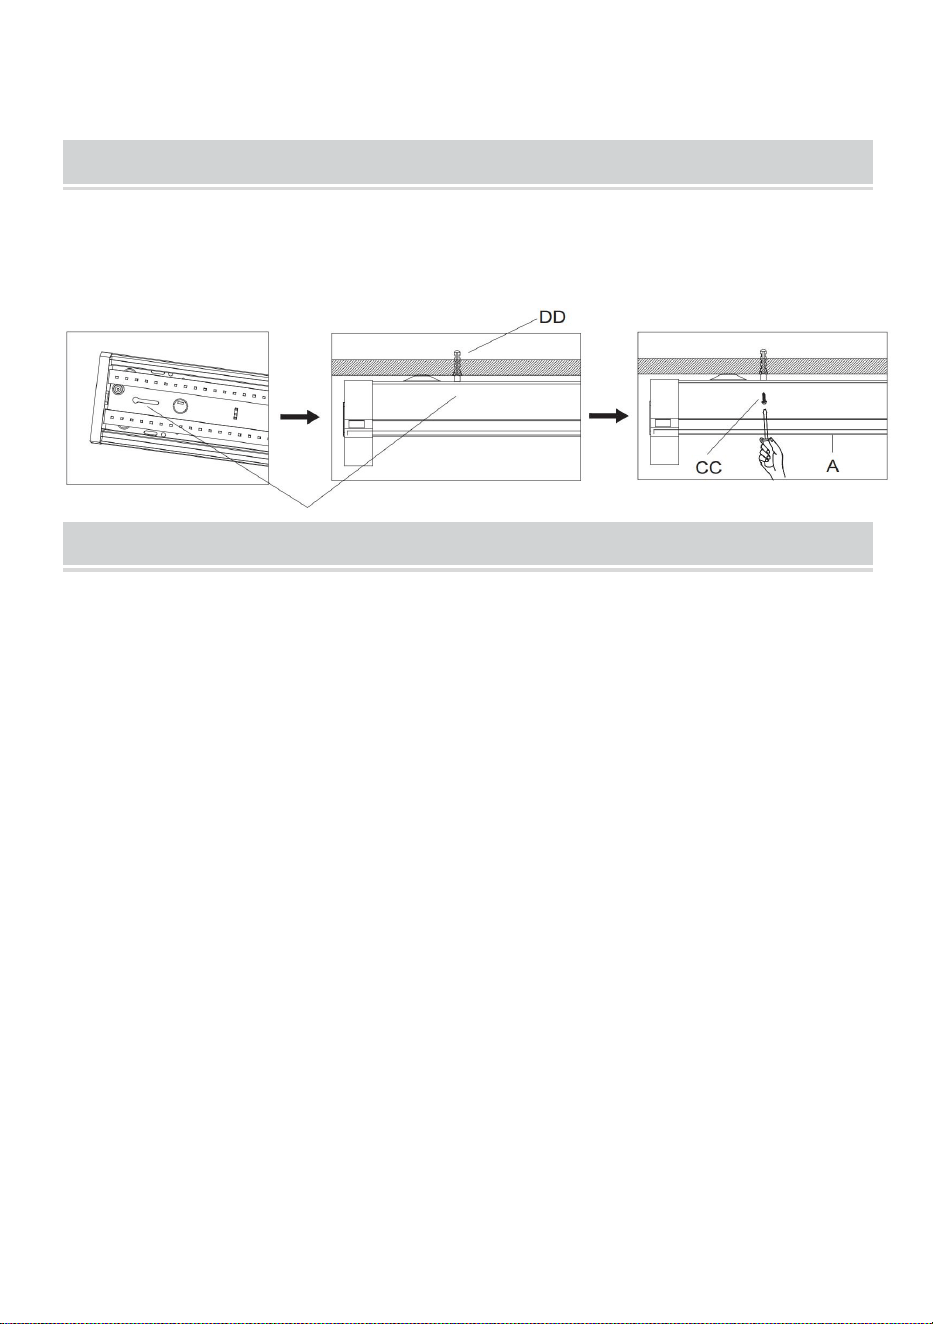
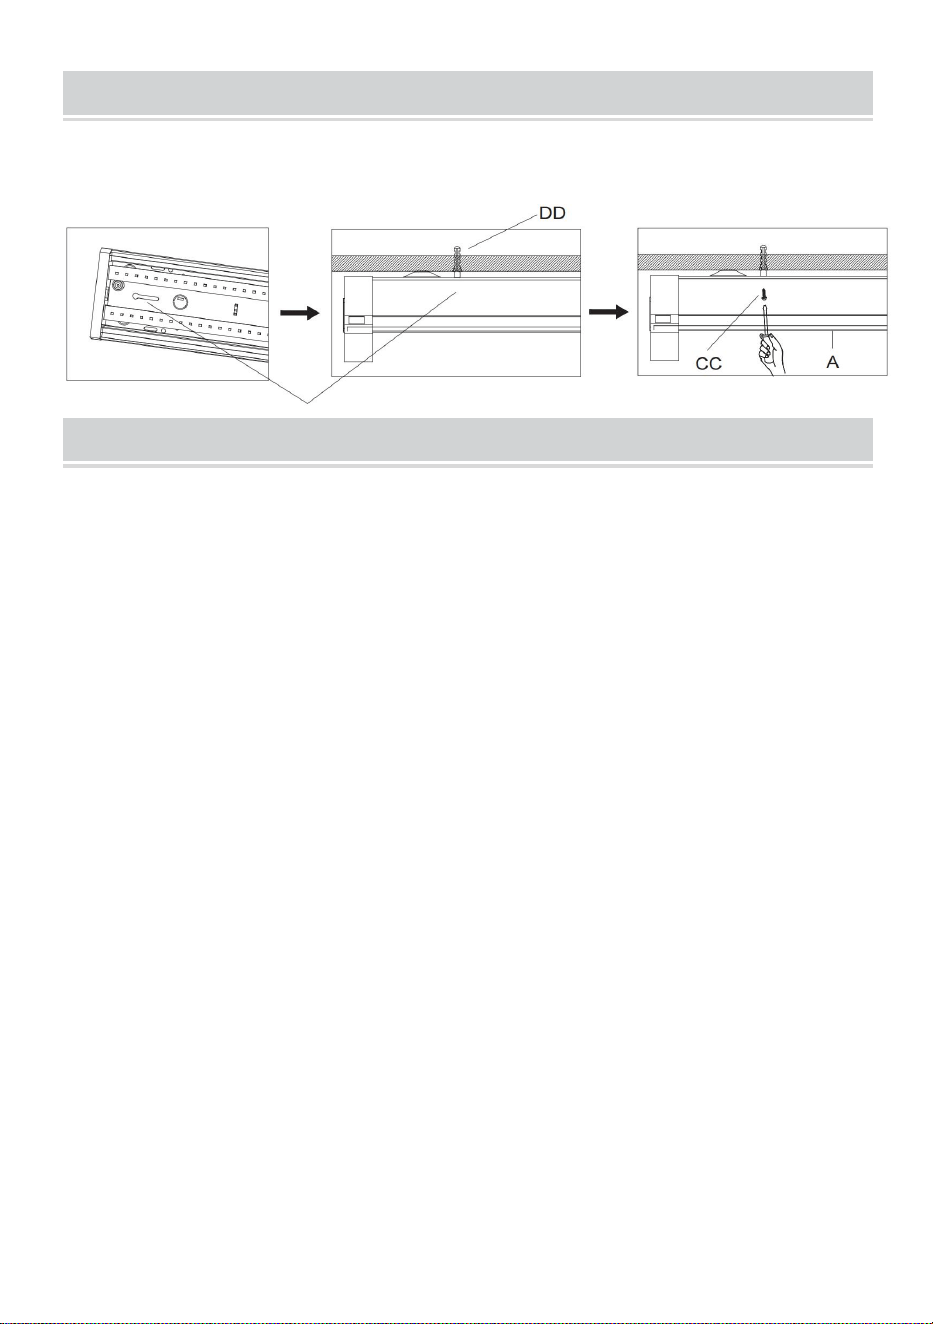
ATTACHING THE HOUSING(2)
1. Installation I : Put the Wall Anchors(DD) through the Metal Housing
(Part A), attaching it in the ceiling. Fasten all the screws(CC) with
screwdriver.
ATTACHING THE DIFFUSER
1. Start by removing the four rubber plugs on top of the Iight.
Insert the N-side of the diffuser (part E) into one side of the
channel on the metal shell , and then install the H-side of the
diffuser (Figure 4).
2. Push the diffusion cover to the left(Figure5).
3. Push the diffuser cap to the right so that it is in the center of the
light and install all four rubber plugs when there is no gap at the F,G
end (Figure6).
- 6 -
- 1 -
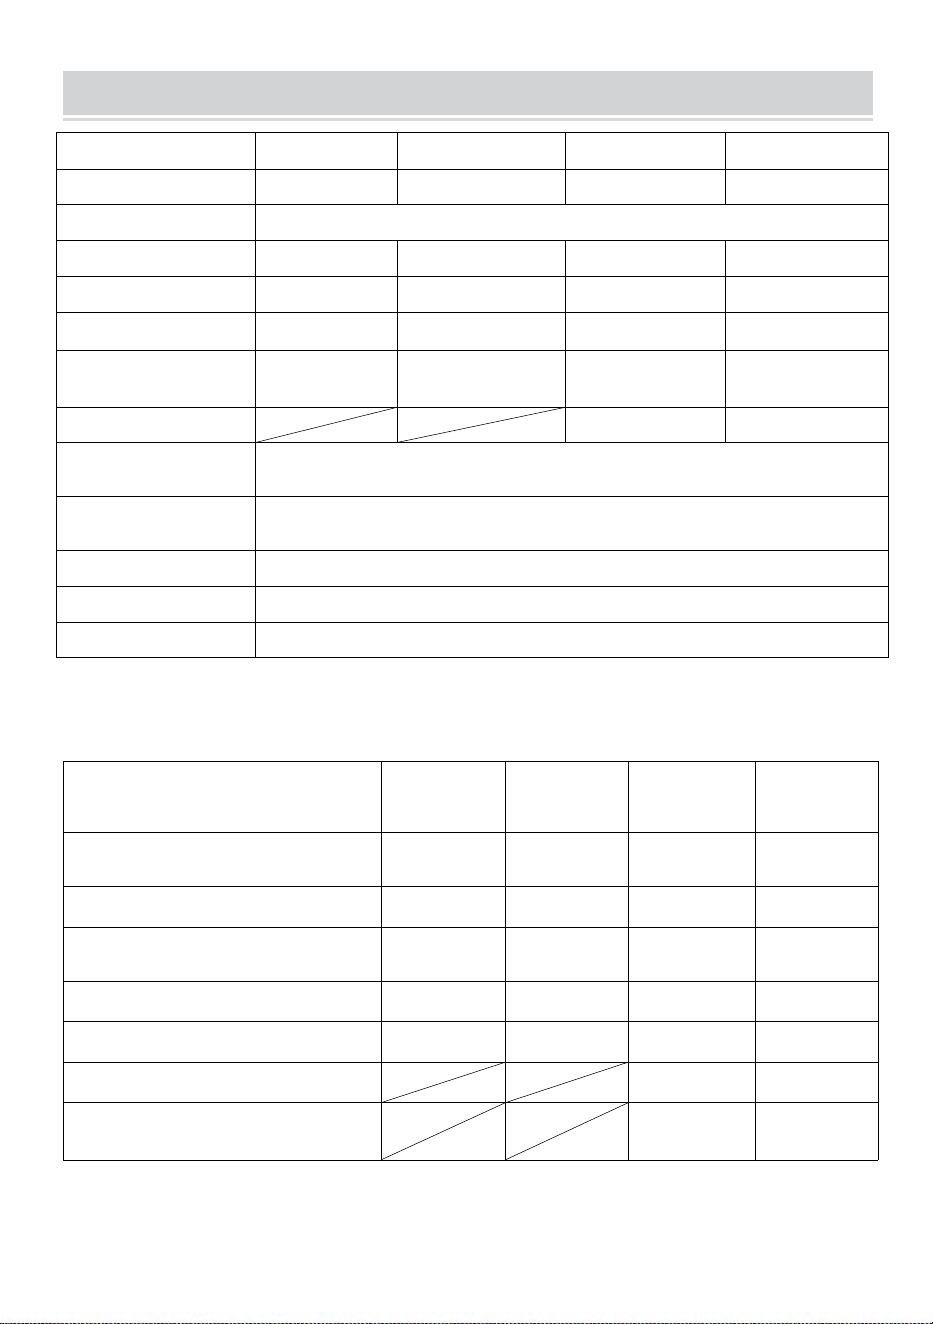
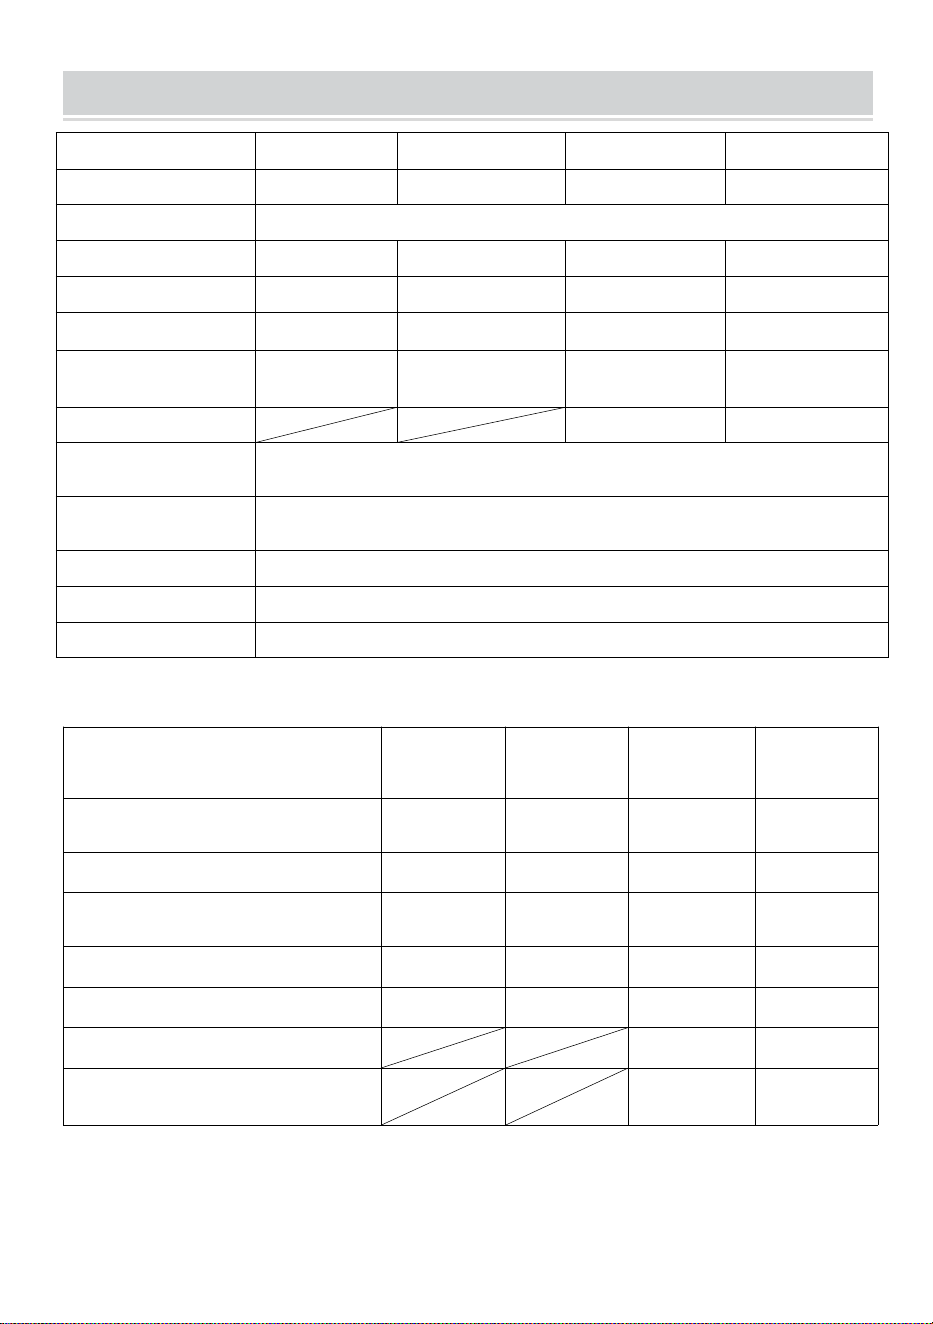
TECHNICAL PARAMETER
Model
GT-WR50W-1
GT-WR40W-1
GT-WR50W-4
GT-WR120W-4
Number of kits
1
1
4
4
Voltage
AC120V,60Hz
Lamp size
4ft*5.5"
4ft*5.5"
4ft*5.5"
8ft*5.5"
Power
50W
40W
50W
110W
Lumen (brightness)
5500LM
4500LM
5500LM
10000LM
Color temperature
3000K/4000K/
5000K
6500K
6500K
6500K
Linkability
Up to 4
Up to 2
Ambient
temperature
-25-45℃
Lamp bead lifespan
>50000H
Light angle
120°
Energy efficiency
>90LM/W
Main materials
Q235+PC
List of accessories corresponding to different specifications:
Accessory
GT-WR50
W-1
GT-WR40
W-1
GT-WR50
W-4
GT-WR12
0W-4
Small pin cross Machine
screws
2PCS
2PCS
8PCS
8PCS
Wire Nut
3PCS
3PCS
12PCS
24PCS
Large Pointed Pin Cross Wood
Screws
4PCS
4PCS
16PCS
32PCS
Wall Anchors
4PCS
4PCS
16PCS
32PCS
Rubber stopper
4PCS
4PCS
16PCS
16PCS
Seamless butt joints
3PCS
2PCS
Adapter cable
(300mm)
3PCS
2PCS


- 3 -
Technique Certificat d'assistance et de garantie électronique
www.vevor.com/support
ÉCLAIRAGE ENVELOPPANT À LED
MODÈLE: GT-WR50W-1 , GT-WR40W-1,
GT-WR50W-4 , GT-WR120W-4
We continue to be committed to provide you tools with competitive price.
"Save Half", "Half Price" or any other similar expressions used by us only represents an
estimate of savings you might benefit from buying certain tools with us compared to the major
top brands and does not necessarily mean to cover all categories of tools offered by us. You
are kindly reminded to verify carefully when you are placing an order with us if you are
actually saving half in comparison with the top major brands.
- 1 -
Modèle : GT-WR50W-1, GT-WR40W-1, GT-WR50W-4, GT-WR120W-4
Have product questions? Need technical support? Please feel free to
contact us:
Technical Support and E-Warranty Certificate
www.vevor.com/support
NEED HELP? CONTACT US!
This is the original instruction, please read all manual instructions
carefully before operating. VEVOR reserves a clear interpretation of our
user manual. The appearance of the product shall be subject to the
product you received. Please forgive us that we won't inform you again if
there are any technology or software updates on our product.
LED WRAPAROUND LIGHT
- 2 -
SAFETY INFORMATION
IMPORTANT : Veuillez lire attentivement toutes les précautions de
sécurité et les instructions d'installation avant l'installation.
◆Ne manipulez aucun appareil sous tension et n'essayez pas de mettre
sous tension un appareil avec les mains mouillées ou en vous tenant
debout sur une surface plane. surface mouillée ou humide ou dans l'eau.
◆ Assurez-vous que le luminaire est monté sur une surface
structurellement solide qui supportera le luminaire.
◆Le luminaire est conçu pour être utilisé dans un circuit à fusible de 120
VCA, 60 Hz. Ne pas utiliser dans un circuit à gradation.
◆Ne pas installer sur un plafond de type chauffage radiant.
◆Le produit peut être utilisé dans les garages, les sous-sols, les zones de
travail, les buanderies et les salles de loisirs.
AVERTISSEMENT : LE NON-RESPECT DE CES INSTRUCTIONS PEUT
ENTRAÎNER UNE MORT POTENTIELLEMENT MORTELLE CHOC
ÉLECTRIQUE OU DOMMAGES MATÉRIELS.
Cet appareil est conforme à la partie 15 des règles de la FCC. Son
fonctionnement est soumis aux deux conditions suivantes :
(1)Cet appareil ne doit pas provoquer d'interférences nuisibles et (2)il doit
accepter toute interférence reçue, y compris les interférences pouvant
provoquer un fonctionnement indésirable.
PRE-INSTALLATION
MATÉRIEL INCLUS

- 3 -
AA : Petite broche en
croix Vis à métaux * 2
pièces
BB : écrou de fil * 3
pièces
CC : grandes vis à
bois cruciformes à
pointe pointue * 4
pièces
Câble adaptateur
(300 mm ) * 3
PIÈCES
DD : Ancrages
muraux * 4 pièces
EE : Bouchon en
caoutchouc * 4PCS
sans couture
bout
articulations
*
3 pièces
INSTALLATION(CONTINUED)
CONNEXION DES FILS
1. Installez une vis (AA) dans la boîte de jonction. (Figure 2)
Figure 2
ATTACHING THE HOUSING(1)
1. Fixez le boîtier métallique à la boîte de jonction en alignant les
trous du boîtier métallique (partie A) avec les vis de la boîte de
jonction. (Figure 3.1 et Figure 3.2)
AA

- 4 -
Figure 3.1
Figure 3.2
2. Verrouillez la lampe avec une vis (AA), tournez la lampe dans le
sens des aiguilles d'une montre, puis serrez la vis pour vous assurer
que la lampe est stable et non mobile. (Figure 3.3 et Figure 3.4)
Figure 3.3
Figure 3.4
3. Utilisez les écrous de fils (BB) pour connecter les fils du boîtier.
(Figure 4)
OPTIONNEL : Enveloppez les écrous des fils connectés avec du
ruban isolant.

- 5 -
Attention : connectez les fils correctement en fonction des couleurs
et des marquages sur le schéma de câblage
ATTACHING THE HOUSING(2)
1. Installation I : Placez les chevilles murales (DD) à travers le boîtier
métallique (partie A) et fixez-le au plafond. Serrez toutes les vis (CC)
à l'aide d'un tournevis.
ATTACHING THE DIFFUSER
1. Commencez par retirer les quatre bouchons en caoutchouc
situés sur le dessus de la lampe.
Insérez le côté N du diffuseur (partie E) dans un côté du
canal sur la coque métallique, puis installez le côté H du
diffuseur (Figure 4) .
2. Poussez le diffusion couverture à la gauche (Figure 5) .
3. Poussez le diffuseur casquette à droite donc que c'est dans le
centre de la lumière et installer tous quatre caoutchouc
bouchons quand il y a Non écart à le F, G fin (Figure6).

- 6 -
- 1 -
TECHNICAL PARAMETER
Modèle
GT-WR50W-1
GT-WR40W-1
GT-WR50W-4
GT-WR120W-4
Nombre de kits
1
1
4
4
Tension
CA 120 V, 60 Hz
Taille de la lampe
4 pieds x 5,5
pouces
4 pieds x 5,5
pouces
4 pieds x 5,5
pouces
8 pieds x 5,5
pouces
Pouvoir
50 W
40 W
50 W
110 W
Lumen (luminosité)
5500LM
4500LM
5500LM
10000LM
Température de
couleur
3000K/4000K/
5000K
6500K
6500K
6500K
Liaison
Jusqu'à 4
Jusqu'à 2
Température
ambiante
-25-45℃
Durée de vie des
perles de lampe
>50000H
Angle de lumière
120°
Efficacité
énergétique
>90LM/W
Matériaux
principaux
Q235 + PC
Liste des accessoires correspondant à différentes
spécifications :
Accessoire
GT-WR50
W-1
GT-WR40
W-1
GT-WR50
W-4
GT-WR12
0W-4
Petite machine à broches
croisées
vis
2 pièces
2 pièces
8 pièces
8 pièces
Écrou de fil
3 pièces
3 pièces
12 pièces
24 pièces
Grande épingle pointue Vis à
bois cruciformes
4 pièces
4 pièces
16 pièces
32 pièces
Ancrages muraux
4 pièces
4 pièces
16 pièces
32 pièces
Bouchon en caoutchouc
4 pièces
4 pièces
16 pièces
16 pièces
Sans couture bout articulations
3 pièces
2 pièces

- 2 -
Adaptateur câble
(300 mm)
3 pièces
2 pièces


- 4 -
Technisch Support und E-Garantie-Zertifikat
www.vevor.com/support
LED-RUNDUMLEUCHTE
MODELL: GT-WR50W-1 , GT-WR40W-1,
GT-WR50W-4 , GT-WR120W-4
We continue to be committed to provide you tools with competitive price.
"Save Half", "Half Price" or any other similar expressions used by us only represents an
estimate of savings you might benefit from buying certain tools with us compared to the major
top brands and does not necessarily mean to cover all categories of tools offered by us. You
are kindly reminded to verify carefully when you are placing an order with us if you are
actually saving half in comparison with the top major brands.

- 1 -
Modell : GT-WR50W-1, GT-WR40W-1, GT-WR50W-4, GT-WR120W-4
Have product questions? Need technical support? Please feel free to
contact us:
Technical Support and E-Warranty Certificate
www.vevor.com/support
NEED HELP? CONTACT US!
This is the original instruction, please read all manual instructions
carefully before operating. VEVOR reserves a clear interpretation of our
user manual. The appearance of the product shall be subject to the
product you received. Please forgive us that we won't inform you again if
there are any technology or software updates on our product.
LED WRAPAROUND LIGHT

- 2 -
SAFETY INFORMATION
WICHTIG: Bitte lesen Sie vor der Installation alle
Sicherheitsvorkehrungen und Installationsanweisungen sorgfältig durch.
◆Berühren Sie keine unter Spannung stehenden Geräte und versuchen
Sie nicht, Geräte mit nassen Händen oder auf einem nassen oder
feuchten Oberflächen oder im Wasser.
◆ Stellen Sie sicher, dass die Vorrichtung auf einer strukturell stabilen
Oberfläche montiert ist, die die Vorrichtung trägt.
◆Die Leuchte ist für den Einsatz in einem abgesicherten Stromkreis mit
120 V Wechselstrom und 60 Hz ausgelegt. Nicht in einem
Dimmstromkreis verwenden.
◆Nicht an einer Decke mit Strahlungsheizung installieren.
◆ Das Produkt kann in Garagen, Kellern, Arbeitsbereichen,
Hauswirtschaftsräumen und Freizeiträumen verwendet werden.
ACHTUNG: WENN DIESE ANWEISUNGEN NICHT BEFOLGT WERDEN,
KANN DIES ZU EINEM MÖGLICHEN TÖDLICHEN UNFALL FÜHREN
STROMSCHLAG ODER SACHSCHÄDEN.
Dieses Gerät entspricht Teil 15 der FCC-Bestimmungen. Der Betrieb
unterliegt den folgenden zwei Bedingungen:
(1) Dieses Gerät darf keine schädlichen Störungen verursachen und (2)
dieses Gerät muss alle empfangenen Störungen tolerieren können, auch
solche, die einen unerwünschten Betrieb verursachen können.
PRE-INSTALLATION
HARDWARE INKLUSIVE
- 3 -
AA: Kleines
Stecknadelkreuz
Maschinenschrauben
* 2 Stück
BB: Drahtmutter * 3
STK
CC: große spitze
Stiftkreuz-Holzschr
auben * 4 Stück
Adapterkabel
(300 mm ) * 3 STK
DD: Wandanker * 4
STK
EE: Gummistopfen *
4 STK
nahtlos Hintern
Gelenke
*
3Stk
INSTALLATION(CONTINUED)
ANSCHLUSS DER KABEL
1. Setzen Sie eine Schraube (AA) in die Anschlussdose ein. (Abbildung 2)
Abbildung 2
ATTACHING THE HOUSING(1)
1. Befestigen Sie das Metallgehäuse an der Anschlussdose, indem
Sie die Löcher am Metallgehäuse (Teil A) mit den Schrauben an der
Anschlussdose ausrichten. (Abbildung 3.1 und Abbildung 3.2)
AA
- 4 -
Abbildung 3.1
Abbildung 3.2
2. Fixieren Sie die Lampe mit einer Schraube (AA), drehen Sie die
Lampe im Uhrzeigersinn und ziehen Sie die Schraube fest, um
sicherzustellen, dass die Lampe stabil ist und sich nicht bewegt.
(Abbildung 3.3 und Abbildung 3.4)
Abbildung 3.3
Abbildung 3.4
3. Verwenden Sie die Kabelmuttern (BB), um die Gehäusekabel
anzuschließen. (Abbildung 4)
OPTIONAL: Umwickeln Sie angeschlossene Drahtmuttern mit
Isolierband.
- 5 -
Achtung: Schließen Sie die Drähte entsprechend den Farben und
Markierungen im Schaltplan richtig an
ATTACHING THE HOUSING(2)
1. Installation I: Führen Sie die Wandanker (DD) durch das
Metallgehäuse (Teil A) und befestigen Sie es an der Decke. Ziehen
Sie alle Schrauben (CC) mit einem Schraubendreher fest.
ATTACHING THE DIFFUSER
1. Beginnen Sie mit dem Entfernen der vier Gummistopfen oben auf
der Leuchte.
Stecken Sie die N-Seite des Diffusors (Teil E) in eine Seite des
Kanal auf der Metallschale, und installieren Sie dann die H-Seite
der
Diffusor (Abbildung 4) .
2. Drücken Die Diffusion Abdeckung Zu links (Abbildung 5) .
3. Drücken Die Diffusor Kappe nach rechts Also Das es ist in Die
Zentrum von das Licht und installieren alle vier Gummi Stecker
Wann Es gibt NEIN Lücke bei Die F,G Ende (Abbildung 6).

- 6 -

- 1 -
TECHNICAL PARAMETER
Modell
GT-WR50W-1
GT-WR40W-1
GT-WR50W-4
GT-WR120W-4
Anzahl der Kits
1
1
4
4
Stromspannung
Wechselstrom 120 V, 60 Hz
Lampengröße
4 Fuß x 5,5 Zoll
4 Fuß x 5,5 Zoll
4 Fuß x 5,5 Zoll
8 Fuß*5,5 Zoll
Leistung
50 W
40 W
50 W
110 W
Lumen (Helligkeit)
5500 Lumen
4500 Lumen
5500 Lumen
10000 Lumen
Farbtemperatur
3000K/4000K/
5000K
6500K
6500K
6500K
Verlinkbarkeit
BIS ZU 4
Bis zu 2
Umgebungstempera
tur
-25-45℃
Lebensdauer der
Lampenperlen
>50000H
Lichtwinkel
120°
Energieeffizienz
>90 lm/W
Hauptmaterialien
Q235+PC
Zubehörliste entsprechend den verschiedenen Spezifikationen:
Zubehör
GT-WR50
W-1
GT-WR40
W-1
GT-WR50
W-4
GT-WR12
0W-4
Kleine Nadelkreuzmaschine
Schrauben
2 STK
2 STK
8 STÜCKE
8 STÜCKE
Drahtmutter
3 STK
3 STK
12 STÜCKE
24 STÜCKE
Große spitze Nadel
Kreuz-Holzschrauben
4 STK
4 STK
16 Stück
32 STÜCKE
W andanker
4 STK
4 STK
16 STK
32 Stück
Gummistopfen
4 STK
4 STK
16 STK
16 STK
Nahtlos Hintern Gelenke
3 STK
2 STK
Adapter Kabel
(300 mm)
3 STK
2 STK


- 3 -
Tecnico Supporto e certificato di garanzia elettronica
www.vevor.com/support
LUCE AVVOLGENTE A LED
MODELLO: MODELLO GT-WR50W-1 , MODELLO GT-WR40W-1,
MODELLO GT-WR50W-4 , MODELLO GT-WR120W-4
We continue to be committed to provide you tools with competitive price.
"Save Half", "Half Price" or any other similar expressions used by us only represents an
estimate of savings you might benefit from buying certain tools with us compared to the major
top brands and does not necessarily mean to cover all categories of tools offered by us. You
are kindly reminded to verify carefully when you are placing an order with us if you are
actually saving half in comparison with the top major brands.
- 1 -
Modello : GT-WR50W-1, Modello GT-WR40W-1, Modello GT-WR50W-4,
Modello GT-WR120W-4
Have product questions? Need technical support? Please feel free to
contact us:
Technical Support and E-Warranty Certificate
www.vevor.com/support
NEED HELP? CONTACT US!
LED WRAPAROUND LIGHT

- 2 -
This is the original instruction, please read all manual instructions
carefully before operating. VEVOR reserves a clear interpretation of our
user manual. The appearance of the product shall be subject to the
product you received. Please forgive us that we won't inform you again if
there are any technology or software updates on our product.
SAFETY INFORMATION
IMPORTANTE: leggere attentamente tutte le precauzioni di sicurezza e le
istruzioni di installazione prima di procedere all'installazione.
◆Non maneggiare apparecchi sotto tensione o tentare di dare tensione
ad apparecchi con le mani bagnate o mentre si è in piedi su un superficie
bagnata o umida oppure in acqua.
◆ Assicurarsi che l'apparecchio sia montato su una superficie
strutturalmente solida che possa sostenerlo.
◆L'apparecchio è progettato per l'uso in un circuito con fusibile da 120 V
CA, 60 Hz. Non utilizzare in un circuito di oscuramento.
◆Non installare su soffitti con riscaldamento radiante.
◆ Il prodotto può essere utilizzato in garage, scantinati, aree di lavoro,
ripostigli e sale ricreative.
ATTENZIONE: SE NON SI SEGUONO QUESTE ISTRUZIONI SI PUÒ
VERIFICARE UN RISCHIO POTENZIALMENTE MORTALE SCOSSE
ELETTRICHE O DANNI ALLA PROPRIETÀ.
Questo dispositivo è conforme alla Parte 15 delle Norme FCC. Il
funzionamento è soggetto alle seguenti due condizioni:
(1) Questo dispositivo non deve causare interferenze dannose e (2) deve
accettare qualsiasi interferenza ricevuta, comprese le interferenze che
possono causare un funzionamento indesiderato.
- 3 -
PRE-INSTALLATION
HARDWARE INCLUSO
AA:Piccola croce a
spillo Viti per
macchine*2PZ
BB: Dado per
cavi*3 PZ
CC: viti per legno a
croce con perno
appuntito grande*4
pezzi
Cavo adattatore
(300 mm ) * 3 PZ
DD: Ancoraggi a
parete*4PZ
EE: Tappo di
gomma*4 PZ
senza soluzione
di continuità
culo
giunti*3
pezzi
INSTALLATION(CONTINUED)
COLLEGAMENTO DEI FILI
1. Installare una vite (AA) nella scatola di giunzione. (Figura 2)
Figura 2
AA
- 4 -
ATTACHING THE HOUSING(1)
1. Fissare l'alloggiamento metallico alla scatola di giunzione
allineando i fori sull'alloggiamento metallico (parte A) con le viti sulla
scatola di giunzione. (Figura 3.1 e Figura 3.2)
Figura 3.1
Figura 3.2
2. Bloccare la lampada con una vite (AA), ruotare la lampada in
senso orario, quindi stringere la vite per garantire che la lampada
sia stabile e non si muova. (Figura 3.3 e Figura 3.4)
Figura 3.3
Figura 3.4
3. Utilizzare i dadi per cavi (BB) per collegare i cavi
dell'alloggiamento. (Figura 4)
FACOLTATIVO: avvolgere i terminali dei cavi collegati con nastro
isolante.

- 5 -
Attenzione: collegare i fili correttamente in base ai colori e alle
marcature sullo schema elettrico
ATTACHING THE HOUSING(2)
1. Installazione I: Inserire gli ancoraggi a parete (DD) attraverso
l'alloggiamento metallico (parte A), fissandolo al soffitto. Fissare
tutte le viti (CC) con il cacciavite.
ATTACHING THE DIFFUSER
1. Per iniziare , rimuovere i quattro tappi di gomma dalla parte
superiore della lampada.
Inserire il lato N del diffusore (parte E) in un lato del
canale sul guscio metallico, quindi installare il lato H del
diffusore (Figura 4) .
2. Spingere IL diffusione copertina A la sinistra (Figura 5) .
3. Spingere IL diffusore tappo a destra COSÌ Quello è dentro IL
centesimo Di la luce e installare Tutto quattro gomma spine
Quando c'è NO spacco A IL F,G fine (Figura6).

- 6 -
- 1 -
TECHNICAL PARAMETER
Modello
Modello
GT-WR50W-1
Modello
GT-WR40W-1
Modello
GT-WR50W-4
Modello
GT-WR120W-4
Numero di kit
1
1
4
4
Voltaggio
CA 120 V, 60 Hz
Dimensioni della
lampada
4 piedi*5,5"
4 piedi*5,5"
4 piedi*5,5"
8 piedi*5,5"
Energia
50W
40W
50W
110W
Lumen (luminosità)
5500LM
4500LM
5500LM
10000LM
Temperatura del
colore
Colore:
5000K
6500K
6500K
6500K
Collegabilità
Fino a 4
Fino a 2
Temperatura
ambiente
-25-45℃
Durata della
lampada
>50000H
Angolo di luce
120°
Efficienza energetica
>90LM/W
Materiali principali
Q235+PC
Elenco degli accessori corrispondenti alle diverse specifiche:
Accessorio
MODELLO
GT-WR50
W-1
MODELLO
GT-WR40
W-1
MODELLO
GT-WR50
W-4
MODELLO
GT-WR12
0W-4
Piccola macchina a croce con
perno
viti
2 PZ
2 PZ
8 PZ
8 PZ
per filo metallico
3 PZ
3 PZ
12 PZ
24 PZ
grande appuntito Viti per legno a
croce
4 PZ
4 PZ
16 PZ
32 PZ
Ancoraggi a muro
4 PZ
4 PZ
16 PZ
32 PZ
Tappo di gomma
4 PZ
4 PZ
16 PZ
16 PZ
Senza soluzione di continuità
culo giunti
3 PZ
2 PZ

- 2 -
Adattatore cavo
(300mm)
3 PZ
2 PZ


- 4 -
Técnico Certificado de soporte y garantía electrónica
www.vevor.com/support
LUZ LED ENVOLVENTE
MODELO: GT-WR50W-1 , GT-WR40W-1,
GT-WR50W-4 , GT-WR120W-4
We continue to be committed to provide you tools with competitive price.
"Save Half", "Half Price" or any other similar expressions used by us only represents an
estimate of savings you might benefit from buying certain tools with us compared to the major
top brands and does not necessarily mean to cover all categories of tools offered by us. You
are kindly reminded to verify carefully when you are placing an order with us if you are
actually saving half in comparison with the top major brands.

- 1 -
Modelo : GT-WR50W-1, GT-WR40W-1, GT-WR50W-4, GT-WR120W-4
Have product questions? Need technical support? Please feel free to
contact us:
Technical Support and E-Warranty Certificate
www.vevor.com/support
NEED HELP? CONTACT US!
This is the original instruction, please read all manual instructions
carefully before operating. VEVOR reserves a clear interpretation of our
user manual. The appearance of the product shall be subject to the
product you received. Please forgive us that we won't inform you again if
there are any technology or software updates on our product.
LED WRAPAROUND LIGHT

- 2 -
SAFETY INFORMATION
IMPORTANTE: Lea atentamente todas las precauciones de seguridad e
instrucciones de instalación antes de realizar la instalación.
◆ No manipule ningún artefacto eléctrico ni intente energizar ningún
artefacto eléctrico con las manos mojadas o mientras está parado sobre
una superficie. superficie mojada o húmeda o en agua.
◆ Asegúrese de que el accesorio esté montado sobre una superficie
estructuralmente sólida que pueda sostenerlo.
◆El dispositivo está diseñado para usarse en un circuito con fusibles de
120 V CA y 60 Hz. No lo use en un circuito de atenuación.
◆No lo instale en techos con calefacción radiante.
◆ El producto se puede utilizar en garajes, sótanos, áreas de trabajo,
cuartos de servicio y salas de recreación.
ADVERTENCIA: SI NO SE SIGUEN ESTAS INSTRUCCIONES PUEDE
RESULTAR EN UN ACCIDENTE POTENCIALMENTE FATAL.
DESCARGA ELÉCTRICA O DAÑOS A LA PROPIEDAD.
Este dispositivo cumple con la Parte 15 de las Normas de la FCC. Su
funcionamiento está sujeto a las dos condiciones siguientes:
(1) Este dispositivo no puede causar interferencias dañinas y (2) este
dispositivo debe aceptar cualquier interferencia recibida, incluida aquella
que pueda causar un funcionamiento no deseado.
PRE-INSTALLATION
HARDWARE INCLUIDO

- 3 -
AA:Cruz de alfiler
pequeño Tornillos
para máquina*2
piezas
BB: Tuerca para
cable x 3 piezas
CC: tornillos para
madera con punta
grande y cruz, 4
unidades
Cable adaptador
(300 mm ) * 3 piezas
DD:Anclajes de
pared*4 piezas
EE: tapón de goma
x 4 piezas
sin costura
culata
articulaciones
*
3 piezas
INSTALLATION(CONTINUED)
CONECTANDO LOS CABLES
1. Coloque un tornillo (AA) en la caja de conexiones. (Figura 2)
Figura 2
ATTACHING THE HOUSING(1)
1. Conecte la carcasa de metal a la caja de conexiones alineando
los orificios de la carcasa de metal (parte A) con los tornillos de la
caja de conexiones. (Figura 3.1 y Figura 3.2)
AA

- 4 -
Figura 3.1
Figura 3.2
2. Fije la lámpara con un tornillo (AA), gire la lámpara en el sentido
de las agujas del reloj y luego ajuste el tornillo para asegurarse de
que la lámpara esté estable y no se mueva. (Figura 3.3 y Figura 3.4)
Figura 3.3
Figura 3.4
3. Utilice las tuercas para cables (BB) para conectar los cables de la
carcasa. (Figura 4)
OPCIONAL: Envuelva las tuercas de cables conectadas con cinta
aisladora.
- 5 -
Atención: Conecte los cables correctamente de acuerdo con los
colores y marcas del diagrama de cableado.
ATTACHING THE HOUSING(2)
1. Instalación I : Coloque los anclajes de pared (DD) a través de la
carcasa metálica (parte A) y fíjela al techo. Ajuste todos los tornillos
(CC) con un destornillador.
ATTACHING THE DIFFUSER
1. Comience quitando los cuatro tapones de goma en la parte
superior de la luz.
Inserte el lado N del difusor (parte E) en un lado del
canal en la carcasa metálica y luego instale el lado H de la
difusor (Figura 4) .
2. Empujar el difusión cubrir a la izquierda(Figura5) .
3. Empujar el difusor tapa a la derecha entonces eso Esta en el
centro de La luz e instalar todo cuatro goma enchufes cuando
hay No brecha en el F,G final (Figura 6).

- 6 -
- 1 -
TECHNICAL PARAMETER
Modelo
GT-WR50W-1
GT-WR40W-1
GT-WR50W-4
GT-WR120W-4
Número de kits
1
1
4
4
Voltaje
CA 120 V, 60 Hz
Tamaño de la
lámpara
4 pies x 5,5
pulgadas
4 pies x 5,5
pulgadas
4 pies x 5,5
pulgadas
8 pies x 5,5
pulgadas
Fuerza
50 W
40 W
50 W
110 W
Lumen (brillo)
5500LM
4500LM
5500LM
10000LM
Temperatura del
color
3000K/4000K/
5000K
6500K
6500K
6500K
Vinculabilidad
Hasta 4
Hasta 2
Temperatura
ambiente
-25-45℃
Vida útil de las
perlas de la lámpara
>50000H
Ángulo de luz
120°
Eficiencia energética
>90LM/W
Materiales
principales
Q235 + PC
Lista de accesorios correspondientes a diferentes
especificaciones:
Accesorio
GT-WR50
W-1
GT-WR40
W-1
GT-WR50
W-4
GT-WR12
0W-4
Máquina de cruz de pasador
pequeño
tornillos
2 piezas
2 piezas
8 piezas
8 piezas
Tuerca para cable
3 piezas
3 piezas
12 piezas
24 piezas
Alfiler puntiagudo grande
Tornillos para madera en cruz
4 piezas
4 piezas
16 piezas
32 piezas
Anclajes de pared
4 piezas
4 piezas
16 piezas
32 piezas
Tapón de goma
4 piezas
4 piezas
16 piezas
16 piezas
Sin costura culata articulaciones
3 piezas
2 piezas
Adaptador cable
(300 mm)
3 piezas
2 piezas


- 3 -
Techniczny Wsparcie i certyfikat e-gwarancji
www.vevor.com/support
OŚWIETLENIE LED TYPU WRAPAROUND
MODEL: GT-WR50W-1 , GT-WR40W-1,
GT-WR50W-4 , GT-WR120W-4
We continue to be committed to provide you tools with competitive price.
"Save Half", "Half Price" or any other similar expressions used by us only represents an
estimate of savings you might benefit from buying certain tools with us compared to the major
top brands and does not necessarily mean to cover all categories of tools offered by us. You
are kindly reminded to verify carefully when you are placing an order with us if you are
actually saving half in comparison with the top major brands.

- 1 -
Modele : GT-WR50W-1, GT-WR40W-1, GT-WR50W-4, GT-WR120W-4
Have product questions? Need technical support? Please feel free to
contact us:
Technical Support and E-Warranty Certificate
www.vevor.com/support
NEED HELP? CONTACT US!
This is the original instruction, please read all manual instructions
carefully before operating. VEVOR reserves a clear interpretation of our
user manual. The appearance of the product shall be subject to the
product you received. Please forgive us that we won't inform you again if
there are any technology or software updates on our product.
LED WRAPAROUND LIGHT

- 2 -
SAFETY INFORMATION
WAŻNE: Przed instalacją należy uważnie przeczytać wszystkie środki
ostrożności oraz instrukcję instalacji.
◆ Nie dotykaj żadnego urządzenia pod napięciem ani nie próbuj go
zasilać mokrymi rękami lub stojąc na nim. na mokrej lub wilgotnej
powierzchni lub w wodzie.
◆ Upewnij się, że oprawa jest zamontowana na solidnej powierzchni,
która będzie w stanie ją utrzymać.
◆Oprawa jest przeznaczona do stosowania w obwodzie 120VAC, 60Hz z
bezpiecznikiem. Nie należy używać w obwodzie ściemniacza.
◆Nie montować na suficie z ogrzewaniem promiennikowym.
◆ Produkt można stosować w garażach, piwnicach, miejscach pracy,
pomieszczeniach gospodarczych i pomieszczeniach rekreacyjnych.
OSTRZEŻENIE: NIEPRZESTRZEGANIE TYCH INSTRUKCJI MOŻE
DOPROWADZIĆ DO POTENCJALNIE ŚMIERTELNEGO URAZU
PORAŻENIE PRĄDEM ELEKTRYCZNYM LUB USZKODZENIE MIENIA.
To urządzenie jest zgodne z częścią 15 przepisów FCC. Jego działanie
podlega następującym dwóm warunkom:
(1) Urządzenie to nie może powodować szkodliwych zakłóceń oraz (2)
musi akceptować wszelkie odbierane zakłócenia, w tym zakłócenia
mogące powodować niepożądane działanie.
PRE-INSTALLATION
SPRZĘT W ZESTAWIE

- 3 -
AA: Mały szpilka
Krzyż Śruby
maszynowe*2szt
BB:Nakrętka
druciana*3szt
CC: duże wkręty
do drewna z
szpiczastym
trzpieniem i
krzyżakiem*4 szt.
Kabel adaptera
(300mm ) * 3 SZT .
DD:Kotwy
ścienne*4szt.
EE: Gumowy
korek*4szt.
bezszwowy
krupon
stawy
*
3szt
INSTALLATION(CONTINUED)
PODŁĄCZANIE PRZEWODÓW
1. Wkręć jedną śrubę (AA) do puszki przyłączeniowej. (Rysunek 2)
Rysunek 2
ATTACHING THE HOUSING(1)
1. Przymocuj obudowę metalową do puszki przyłączeniowej,
dopasowując otwory w obudowie metalowej (część A) do śrub w
puszce przyłączeniowej. (Rysunek 3.1 i Rysunek 3.2)
AA

- 4 -
Rysunek 3.1
Rysunek 3.2
2. Zablokuj lampę śrubą (AA), obróć lampę zgodnie z ruchem
wskazówek zegara, a następnie dokręć śrubę, aby upewnić się, że
lampa jest stabilna i nieruchoma. (Rysunek 3.3 i Rysunek 3.4)
Rysunek 3.3
Rysunek 3.4
3. Za pomocą nakrętek przewodów (BB) podłącz przewody
obudowy. (Rysunek 4)
OPCJONALNIE: Owiń podłączone nakrętki przewodów taśmą
izolacyjną.

- 5 -
Uwaga: Podłącz przewody prawidłowo, zgodnie z kolorami i
oznaczeniami na schemacie elektrycznym.
ATTACHING THE HOUSING(2)
1. Instalacja I: Przełóż kotwy ścienne (DD) przez obudowę metalową
(część A), mocując ją do sufitu. Przykręć wszystkie śruby (CC)
śrubokrętem.
ATTACHING THE DIFFUSER
1. Zacznij od wyjęcia czterech gumowych zatyczek znajdujących
się na górze światła.
Włóż stronę N dyfuzora (część E) do jednej strony
kanał na metalowej obudowie, a następnie zamontuj stronę H
dyfuzor (rysunek 4) .
2. Pchnij ten dyfuzja okładka Do lewy (Rysunek 5) .
3. Pchnij ten dyfuzor czapka w prawo Więc To to jest w ten cent e
r z światło i zainstaluj Wszystko cztery guma buble Kiedy jest NIE
luka Na ten F,G koniec (Rysunek 6).

- 6 -
- 1 -
TECHNICAL PARAMETER
Model
GT-WR50W-1
GT-WR40W-1
GT-WR50W-4
GT-WR120W-4
Liczba zestawów
1
1
4
4
Woltaż
Prąd zmienny 120 V, 60 Hz
Rozmiar lampy
4 stopy*5,5"
4 stopy*5,5"
4 stopy*5,5"
8 stóp*5,5"
Moc
50 W
40 W
50 W
110 W
Lumen (jasność)
5500LM
4500LM
5500LM
10000LM
Temperatura
barwowa
3000K/4000K/
5000 tys.
6500 tys.
6500 tys.
6500 tys.
Możliwość łączenia
Do 4
Do 2
Temperatura
otoczenia
-25-45℃
Żywotność
koralików
lampowych
>50000 godz.
Kąt światła
120°
Efektywność
energetyczna
>90LM/szer.
Główne materiały
Q235+Komputer
Lista akcesoriów odpowiadających różnym specyfikacjom:
Akcesorium
GT-WR50
W-1
GT-WR40
W-1
GT-WR50
W-4
GT-WR12
0W-4
Mała maszyna do krzyżowania
pinów
śruby
2 SZT.
2 SZT.
8 SZTUK
8 SZTUK
Nakrętka druciana
3 SZT.
3 SZT.
12 SZTUK
24 SZT.
Duża szpilka spiczasta Wkręty do
drewna krzyżowe
4 SZT.
4 SZT.
16 SZT.
32 SZT.
Kotwy ścienne
4 SZT.
4 SZT.
16 SZTUK
32 szt.
Korek gumowy
4 SZT.
4 SZT.
16 SZTUK
16 SZTUK
Bezszwowy krupon stawy
3 SZT.
2 SZT.
Adapter kabel
(300 mm)
3 SZT.
2 SZT.


- 3 -
Technisch Ondersteuning en E-garantiecertificaat
www.vevor.com/support
LED-OMHULLENDE LAMP
MODEL: GT-WR50W-1 , GT-WR40W-1,
GT-WR50W-4 , GT-WR120W-4
We continue to be committed to provide you tools with competitive price.
"Save Half", "Half Price" or any other similar expressions used by us only represents an
estimate of savings you might benefit from buying certain tools with us compared to the major
top brands and does not necessarily mean to cover all categories of tools offered by us. You
are kindly reminded to verify carefully when you are placing an order with us if you are
actually saving half in comparison with the top major brands.

- 1 -
Model : GT-WR50W-1, GT-WR40W-1, GT-WR50W-4, GT-WR120W-4
Have product questions? Need technical support? Please feel free to
contact us:
Technical Support and E-Warranty Certificate
www.vevor.com/support
NEED HELP? CONTACT US!
This is the original instruction, please read all manual instructions
carefully before operating. VEVOR reserves a clear interpretation of our
user manual. The appearance of the product shall be subject to the
product you received. Please forgive us that we won't inform you again if
there are any technology or software updates on our product.
LED WRAPAROUND LIGHT
- 2 -
SAFETY INFORMATION
BELANGRIJK: Lees alle veiligheidsmaatregelen en installatie-instructies
zorgvuldig door voordat u met de installatie begint.
◆ Raak geen onder spanning staande armaturen aan en probeer geen
armaturen onder spanning te zetten met natte handen of terwijl u op een
tafel staat. nat of vochtig oppervlak of in water.
◆Zorg ervoor dat het armatuur op een stevig structureel oppervlak wordt
gemonteerd dat het armatuur kan dragen.
◆De armatuur is ontworpen voor gebruik in een 120VAC,60Hz gezekerd
circuit. Niet gebruiken in een dimcircuit.
◆Niet installeren op een plafond met stralingsverwarming.
◆ Product kan worden gebruikt in garages, kelders, werkruimtes,
bijkeukens en recreatieruimtes.
WAARSCHUWING: ALS DEZE INSTRUCTIES NIET WORDEN
OPGEVOLGD, KAN DIT LEIDEN TOT EEN POTENTIEEL FATALE
ELEKTRISCHE SCHOK OF SCHADE AAN EIGENDOMMEN.
Dit apparaat voldoet aan Deel 15 van de FCC-regels. De werking is
onderworpen aan de volgende twee voorwaarden:
(1) Dit apparaat mag geen schadelijke interferentie veroorzaken en (2) dit
apparaat moet alle ontvangen interferentie accepteren, inclusief
interferentie die ongewenste werking kan veroorzaken.
PRE-INSTALLATION
INBEGREPEN HARDWARE
- 3 -
AA: Klein pinkruis
Machineschroeven *
2 stuks
BB: Draadmoer *
3PCS
CC:grote puntige
penkruis
houtschroeven*4P
CS
Adapterkabel
(300 mm ) * 3 STUKS
DD:Muurankers*4PC
S
EE: Rubberen stop *
4PCS
naadloos kont
gewrichten
*
3st
INSTALLATION(CONTINUED)
DE DRADEN AANSLUITEN
1. Plaats één schroef (AA) in de aansluitdoos. (Figuur 2)
Figuur 2
ATTACHING THE HOUSING(1)
1. Bevestig de metalen behuizing aan de aansluitdoos door de
gaten in de metalen behuizing (onderdeel A) uit te lijnen met de
schroeven op de aansluitdoos. (Figuur 3.1 en Figuur 3.2)
AA
- 4 -
Figuur 3.1
Figuur 3.2
2. Zet de lamp vast met een schroef (AA), draai de lamp met de klok
mee en draai de schroef vervolgens vast om ervoor te zorgen dat de
lamp stabiel staat en niet kan bewegen. (Figuur 3.3 en Figuur 3.4)
Figuur 3.3
Figuur 3.4
3. Gebruik de draadmoeren (BB) om de behuizingsdraden aan te
sluiten. (Figuur 4)
OPTIONEEL: Wikkel de aangesloten draadmoeren in isolatietape.

- 5 -
Let op: Sluit de draden correct aan volgens de kleuren en
markeringen op het bedradingsschema
ATTACHING THE HOUSING(2)
1. Installatie I: Steek de muurankers (DD) door de metalen behuizing
(onderdeel A) en bevestig deze in het plafond. Draai alle schroeven
(CC) vast met een schroevendraaier.
ATTACHING THE DIFFUSER
1. Begin met het verwijderen van de vier rubberen stoppen bovenop
de lamp.
Plaats de N-zijde van de diffuser (onderdeel E) in één zijde van de
kanaal op de metalen behuizing en installeer vervolgens de
H-zijde van de
diffusor (Figuur 4) .
2. Duwen de diffusie omslag naar links (Figuur 5) .
3. Duwen de diffusor pet naar rechts Dus Dat het is in de cent e r
van het licht en installeren alle vier rubber stekkers wanneer er is
Nee gat bij de V,G einde (Figuur 6).

- 6 -
- 1 -
TECHNICAL PARAMETER
Model
GT-WR50W-1
GT-WR40W-1
GT-WR50W-4
GT-WR120W-4
Aantal sets
1
1
4
4
Spanning
AC120V,60Hz
Lampgrootte
4ft*5.5"
4ft*5.5"
4ft*5.5"
8ft*5.5"
Stroom
50W
40W
50W
110W
Lumen (helderheid)
5500LM
4500LM
5500LM
10000LM
Kleurtemperatuur
3000K/4000K/
5000K
6500K
6500K
6500K
Koppelbaarheid
Tot 4
Tot 2
Omgevingstemperat
uur
-25-45℃
Levensduur van de
lampkraal
>50000H
Lichthoek
120°
Energie-efficiëntie
>90LM/W
Hoofdmaterialen
Q235+PC
Lijst met accessoires die overeenkomen met verschillende
specificaties:
Accessoire
GT-WR50
W-1
GT-WR40
W-1
GT-WR50
W-4
GT-WR12
0W-4
Kleine pinkruismachine
schroeven
2 STUKS
2 STUKS
8STUKS
8STUKS
Draadmoer
3 STUKS
3 STUKS
12 STUKS
24PCS
Grote puntige speld Kruis
houtschroeven
4 STUKS
4 STUKS
16 STUKS
32STUKS
Muurankers
4 STUKS
4 STUKS
16STUKS
32 STUKS
Rubberen stop
4 STUKS
4 STUKS
16STUKS
16STUKS
Naadloos kont gewrichten
3 STUKS
2 STUKS
Adapter kabel
(300mm)
3 STUKS
2 STUKS


- 3 -
Teknisk Support och e-garanticertifikat
www.vevor.com/support
LED-OMSLAGSLJUS
MODELL: GT-WR50W-1 , GT-WR40W-1,
GT-WR50W-4 , GT-WR120W-4
We continue to be committed to provide you tools with competitive price.
"Save Half", "Half Price" or any other similar expressions used by us only represents an
estimate of savings you might benefit from buying certain tools with us compared to the major
top brands and does not necessarily mean to cover all categories of tools offered by us. You
are kindly reminded to verify carefully when you are placing an order with us if you are
actually saving half in comparison with the top major brands.
- 1 -
Modell : GT-WR50W-1, GT-WR40W-1, GT-WR50W-4, GT-WR120W-4
Have product questions? Need technical support? Please feel free to
contact us:
Technical Support and E-Warranty Certificate
www.vevor.com/support
NEED HELP? CONTACT US!
This is the original instruction, please read all manual instructions
carefully before operating. VEVOR reserves a clear interpretation of our
user manual. The appearance of the product shall be subject to the
product you received. Please forgive us that we won't inform you again if
there are any technology or software updates on our product.
LED WRAPAROUND LIGHT
- 2 -
SAFETY INFORMATION
VIKTIGT: Läs alla säkerhetsföreskrifter och installationsinstruktioner
noggrant innan du installerar.
◆ Hantera inte någon strömsatt fixtur eller försök att strömsätta någon
fixtur med våta händer eller när du står på en våt eller fuktig yta eller i
vatten.
◆Se till att fixturen är monterad på en sund strukturell yta som kommer att
stödja fixturen.
◆ Armaturen är designad för användning i 120VAC, 60Hz säkrade kretsar.
Använd inte i en dimkrets.
◆ Installera inte i tak med strålningsvärmetyp.
◆ Produkten kan användas i garage, källare, arbetsytor, grovkök och
rekreationsrum.
VARNING: OM INTE FÖLJS KAN DESSA INSTRUKTIONER LEDA TILL
ETT DÖDLIGT ELEKTRISK STÖT ELLER EGENDOMSSKADA.
Denna enhet uppfyller del 15 av FCC-reglerna. Driften är föremål för
följande två villkor:
(1)Denna enhet får inte orsaka skadliga störningar, och (2)denna enhet
måste acceptera alla mottagna störningar, inklusive störningar som kan
orsaka oönskad funktion.
PRE-INSTALLATION
HÅRDVARA INGÅR
- 3 -
AA: Liten pin Cross
Maskinskruvar*2st
BB:Trådmutter*3st
CC:stora spetsiga
stift kors
träskruvar*4st
Adapterkabel
(300 mm ) * 3 st
DD:Väggankare*4st
EE:
Gummipropp*4st
sömlös stånga
skarvar
*
3 st
INSTALLATION(CONTINUED)
ANSLUTNING AV LEDNINGARNA
1. Sätt i en skruv (AA) i kopplingsdosan. (Figur 2)
Figur 2
ATTACHING THE HOUSING(1)
1. Fäst metallhöljet till kopplingsdosan genom att rikta in hålen på
metallhöljet (del A) med skruvarna på kopplingsdosan.(Figur
3.1&Figur 3.2)
AA

- 4 -
Figur 3.1
Figur 3.2
2. Lås lampan med en skruv (AA), vrid lampan medurs och dra
sedan åt skruven för att säkerställa att lampan är stabil och inte
rörlig. (Figur 3.3 & Figur 3.4)
Figur 3.3
Figur 3.4
3. Använd trådmuttrarna (BB) för att ansluta husets kablar. (Figur 4)
TILLVAL: Linda in anslutna trådmuttrar med eltejp.
Observera: Anslut ledningarna korrekt enligt färgerna och
markeringarna på kopplingsschemat
- 5 -
ATTACHING THE HOUSING(2)
1. Installation I: Sätt väggankarna (DD) genom metallhöljet (del A), fäst
det i taket. Fäst alla skruvar (CC) med en skruvmejsel.
ATTACHING THE DIFFUSER
1. Börja med att ta bort de fyra gummipluggarna ovanpå Iighten.
Sätt in N-sidan av diffusorn (del E) i ena sidan av
kanal på metallskalet och installera sedan H-sidan av
diffusor (Figur 4) .
2. Tryck de diffusion täcka till vänster (Figur 5) .
3. Tryck de diffusor locket till höger så att den är inne de cent e r
av ljuset och installera alla fyra gummi pluggar när det finns inga
gap på de F,G slutet (Figur 6).

- 6 -
TECHNICAL PARAMETER
Modell
GT-WR50W-1
GT-WR40W-1
GT-WR50W-4
GT-WR120W-4
Antal kit
1
1
4
4
Spänning
AC120V, 60Hz
Lampstorlek
4 fot*5,5"
4 fot*5,5"
4 fot*5,5"
8 fot*5,5"
Driva
50W
40W
50W
110W
Lumen (ljusstyrka)
5500LM
4500LM
5500LM
10 000 LM
Färgtemperatur
3000K/4000K/
5000K
6500K
6500K
6500K
Länkbarhet
Upp till 4
Upp till 2
Omgivningstempera
tur
-25-45℃
Lamppärlans
livslängd
~50000H
Ljusvinkel
120°
Energieffektivitet
>90LM/W
Huvudmaterial
Q235+PC
Lista över tillbehör som motsvarar olika specifikationer:
Åtföljande
GT-WR50
W-1
GT-WR40
W-1
GT-WR50
W-4
GT-WR12
0W-4
Liten stiftkorsmaskin
skruvar
2 st
2 st
8 st
8 st
Trådmutter
3 st
3 st
12 st
24 st
L arge spetsig stift Cross Wood
skruvar
4 st
4 st
16 st
32 st
W alla Ankare
4 st
4 st
16 st
32 st
Gummipropp
4 st
4 st
16 st
16 st
Sömlös stånga leder
3 st
2 st
Adapter kabel
(300 mm)
3 st
2 st