Instruction
Booklet
Espresso & Coffee Conical
Burr Grinder
CBM-22 Series
For your safety and continued
enjoyment of this product, always
read the instruction book carefully
before using.

2
Important Safeguards
When using electrical appliances, basic safety precautions
should always be taken, including the following:
1. Read all instructions.
2. Turn the appliance OFF, then unplug from the outlet when not
in use, before assembling or disassembling parts and before
cleaning. To unplug, grasp the plug and pull from the outlet.
Never pull from the power cord.
3. To protect against risk of electrical shock, do not immerse
cord, plug, or grinder in water or other liquids.
4. This appliance is not intended for use by children or by
persons with reduced physical, sensory, or mental capabilities,
or lack of experience and knowledge. Close supervision is
necessary when any appliance is used near children. Children
should be supervised to ensure that they do not play with
the appliance.
5. Avoid contact with moving parts. Do not attempt to defeat
any safety interlock mechanisms
6. Do not operate any appliance with a damaged cord or plug, or
after the appliance malfunctions or is dropped or damaged in
any manner. Return appliance to the nearest authorized
Cuisinart service facility for examination, repair, or mechanical
or electrical adjustment.
7. The use of attachments not recommended or sold by
Cuisinart may cause re, electrical shock, or risk of injury.
8. Do not use outdoors.
9. Do not let cord hang over edge of table or counter, or touch
hot surfaces.
10. Before using, check hopper for the presence of
foreign objects.
11. Use this appliance to grind roasted coee beans only.
Grinding other substances, such as nuts, spices, or unroasted
beans, may dull the blade and cause poor grinding or injury.
12. Do not use appliance for other than its intended use.
13. Do not place this appliance on or near a hot gas or electric
burner, or in a heated oven.
14. Do not operate your appliance in an appliance garage or under
a wall cabinet. When storing in an appliance garage, always
unplug the unit from the electrical outlet. Not doing so could
create a risk of re, especially if the appliance touches the
walls of the garage or the door touches the unit as it closes.

3
Save These
Instructions
For Household Use
Only
Notice
This appliance has a polarized plug (one blade is wider than
the other). To reduce the risk of electric shock, this plug will t
in a polarized outlet only one way. If the plug does not t fully in
the outlet, reverse the plug. If it still does not t, contact a
qualied electrician. Do not modify the plug in any way.
Contents
Important Safeguards ................................. 2
Features and Benefits ................................. 4
Getting Started ...................................... 5
Operating Instructions ................................ 5
Cleaning and Maintenance ............................. 7
Troubleshooting...................................... 8
Warranty . . . . . . . . . . . . . . . . . . . . . . . . . . . . . . . . . . . . . . . . . . . 10
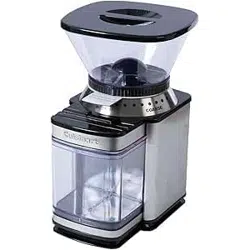
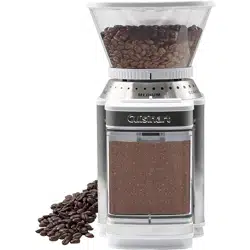
Introduction
The next generation of coee grinders has arrived to deliver the
new standard in home-ground coee! In this unit, the conical
burr grinds coee beans with precise uniformity while
maintaining the full avor of the bean. Whether you’re using a
French press, auto drip, or espresso machine, you’ll always start
with the best, most precise grind. This grinder is fully automated
– just choose your number of cups and the grind setting, push
Start/Stop and soon you’ll have perfectly
ground coee!
4
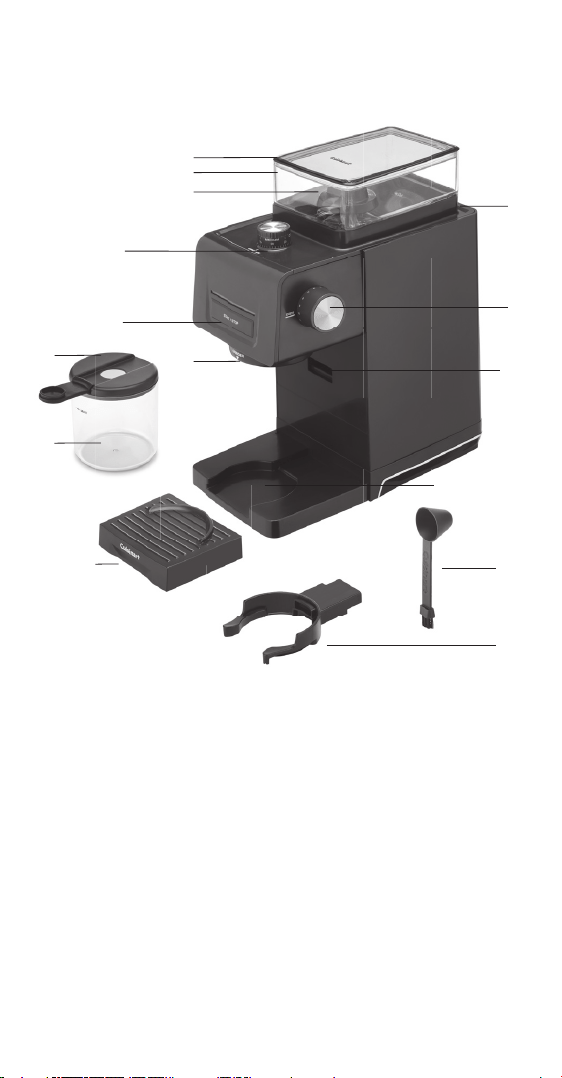
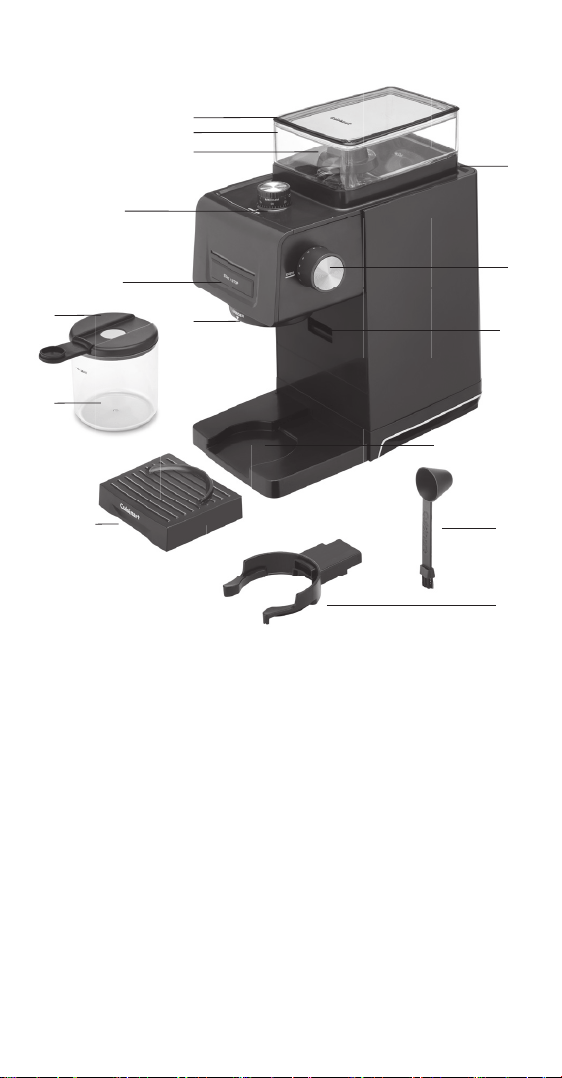
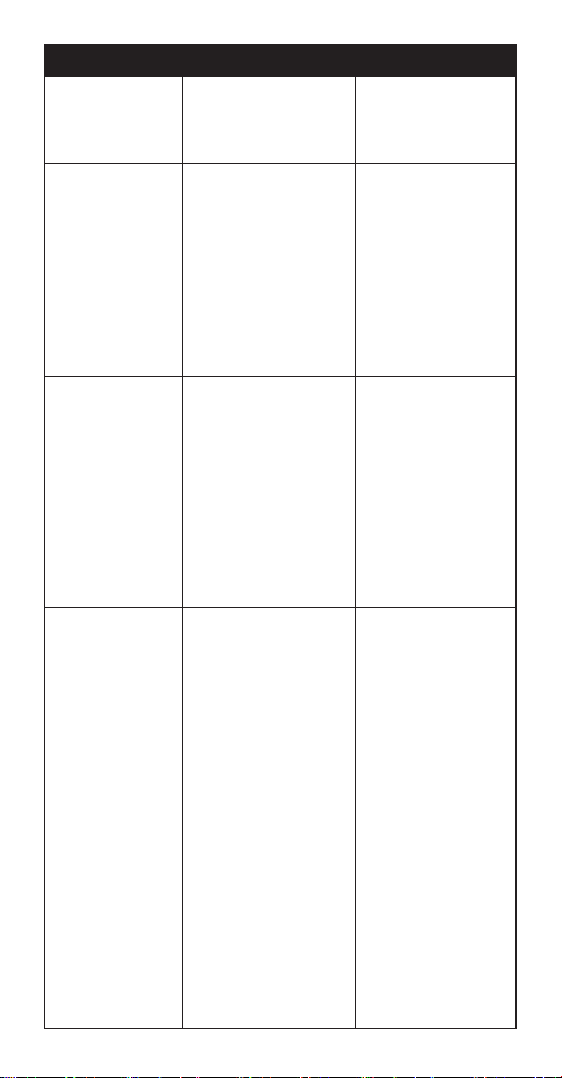
1. Bean Hopper Lid
2. Bean Hopper
2a. Bean Hopper
Release Knob
3. Grind Size Knob
4. Start/Stop Button
5. Grinder Outlet
6. Grind Chamber Lid
7. Grind Chamber
8. Removable Tray
9. Conical Burr Mill
(not shown)
10. Cup Size/Manual
Selector Knob
11. Porta lter Holder
Accessory
11a. Porta lter Holder
Outlet
11b. Porta lter Holder
Storage
12. Scoop Brush
13. Cord Storage
(not shown)
14. Scoop Brush Holder
(on back, not shown)
Features & Benefits
2.
1.
3.
4.
9.
5.
7.
8.
6.
12.
11.
11a.
11b.
2a
10.

5
Getting Started
Take all the parts out of the box and remove plastic and
packaging.
1. Place grind chamber lid on grind chamber and insert
into unit.
2. Insert scoop brush into holder on the back of the unit. Your
unit is now ready to use.
Operating Instructions
1. Remove bean hopper lid.
2. Fill the bean hopper, and then replace the lid, making sure
that the lid closes securely. Maximum capacity is 8 oz.; be
sure you have enough beans to grind your desired amount
of co ee.
3. Plug cord into outlet.
4. The light bar above the Start/Stop Button will illuminate and
remain solid, indicating the unit is ready for operation.
If the light bar above the Start/Stop Button is ashing, the
unit is not ready for operation.
Note: The unit will go into standby mode after 30 minutes of
no use.
5. To choose the grind setting, rotate the grind size knob. The
higher the number, the coarser the grind. Use 1-14 for
espresso, 15-25 drip/pour-over, and 26-35 for French press.
Note: Use coarse grind for percolator/French press, medium
grind for automatic drip, and ne grind for espresso.
6. Use the cup size knob to select the desired number of cups:
from 1-14 cups or single or double espresso shot. Take into
account that based on personal preference, you can make
your co ee stronger or weaker by adjusting cup selection.
For a customized amount of grounds, turn the knob to
Manual. See the Manual Grind section for speci c
instructions.
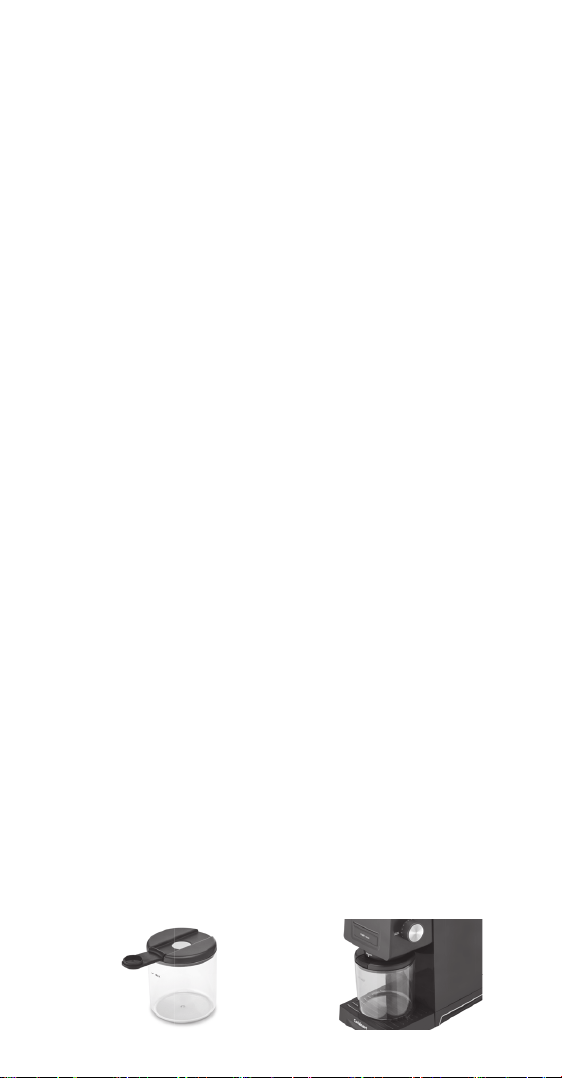
7. Place your preferred grounds container under grinder outlet.
When using the included grind chamber, make sure the
lid tab is open, and slide the into place under the
grinder outlet.

6
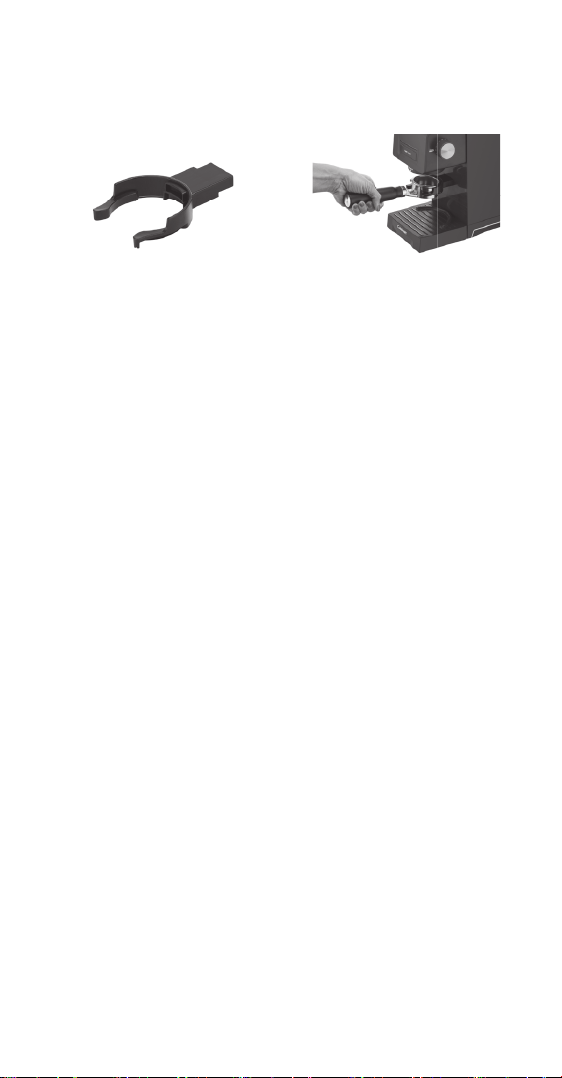
When grinding for one or two espresso shots, use the
porta lter holder by sliding the accessory into the slot below
the grinder outlet, and then secure porta lter in holder,
making sure it’s below the grinder outlet.
8. Press the Start/Stop button to begin grinding. A safety
interlock system prevents the unit from operating unless
the hopper is properly in place.
Note: If the grind chamber is over lled, the chute can get
clogged and the unit will not work. To unclog, use the scoop
brush to clear out the chute of excess grounds. Should the
grinder stop at any point, the motor has likely overheated.
Wait for your grinder to cool o (up to 30 minutes), then
resume use.
9. Grinding will automatically stop upon completion.
Note: To cancel operation during use, press the
Start/Stop button.
10. Pull the grind chamber or porta lter toward you to remove
from unit.
11. After 30 minutes of no use, the unit will go into standby
mode and Start/Stop will no longer illuminate. To wake the
unit back up, press the Start/Stop one time.
Manual Grind
If you prefer, after selecting your grind setting, you have the
option of manually controlling how much co ee the unit will
grind. To do so, follow steps 1–5 on previous page. Make sure
the cup size knob is turned to Manual, then press and hold
the Start/Stop button until the desired amount of co ee has
been ground.
NOTE: To avoid over ow when using the Manual feature,
the grinder will turn o automatically after approximately
30 seconds.
Grinding Settings
When selecting your grind setting, remember that the higher
the number, the coarser the grind. Use 1-14 for espresso ( ne),
15-25 for drip/pour-over (medium), and 26-35 for French
Press (coarse).
7
NOTE: If you meet resistance when going from coarse to ne,
a bean may be stuck. Re-insert grind chamber or porta lter
then simply turn the cup size knob to Manual, and press and
hold the Start/Stop button, while turning the grind size knob
towards a ner grind.
NOTE: If your unit stops grinding, the chute may be clogged. To
unclog, rst unplug your grinder and then use the brush with
hard bristles on the measuring scoop to clear out the chute of
excess grounds.
Cleaning and Maintenance
HOPPER
1. Unplug unit.
2. Beans can be removed from the hopper by lifting o
the lid and rotating the knob to the “unlock” position.
Once unlocked, the hopper can be removed to pour out
remaining beans.
BURR GRINDER
1. If some beans remain in the grinder, put the hopper back on,
re-insert the grind chamber, and run a grind cycle for 8 cups
on any grind setting. Once nished, you can continue
cleaning as instructed.
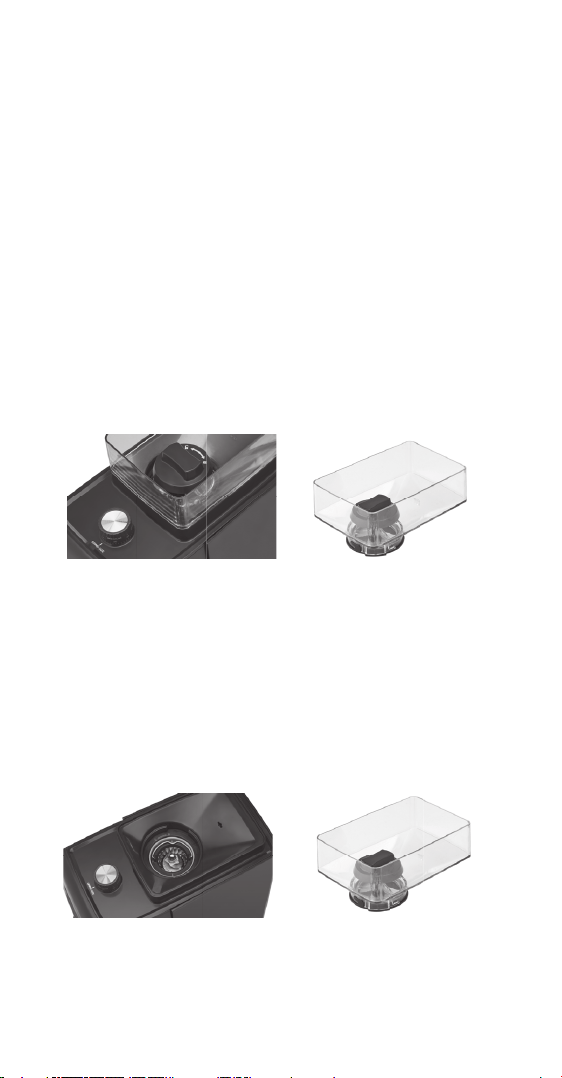
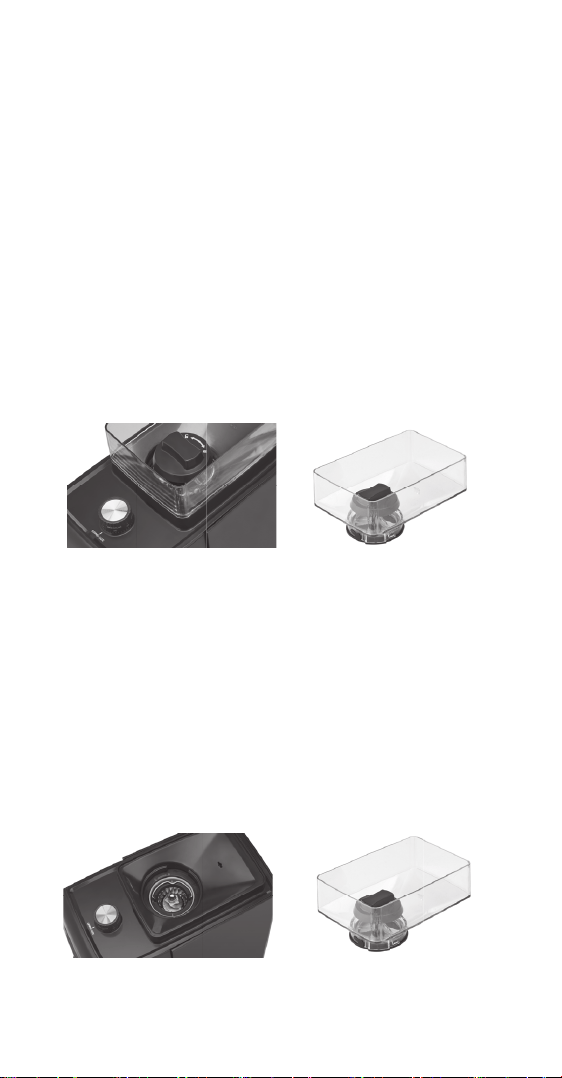
2. Rotate the grind size knob counterclockwise until dial stops.
3. Unplug unit.
4. Remove the bean hopper lid and turn the lock/unlock knob
counterclockwise to release the bean hopper.
NOTE: You will notice the release arrow and arrow on the
burr on the inside of unit are now aligned. They must be
aligned in order to re-insert the hopper.
8
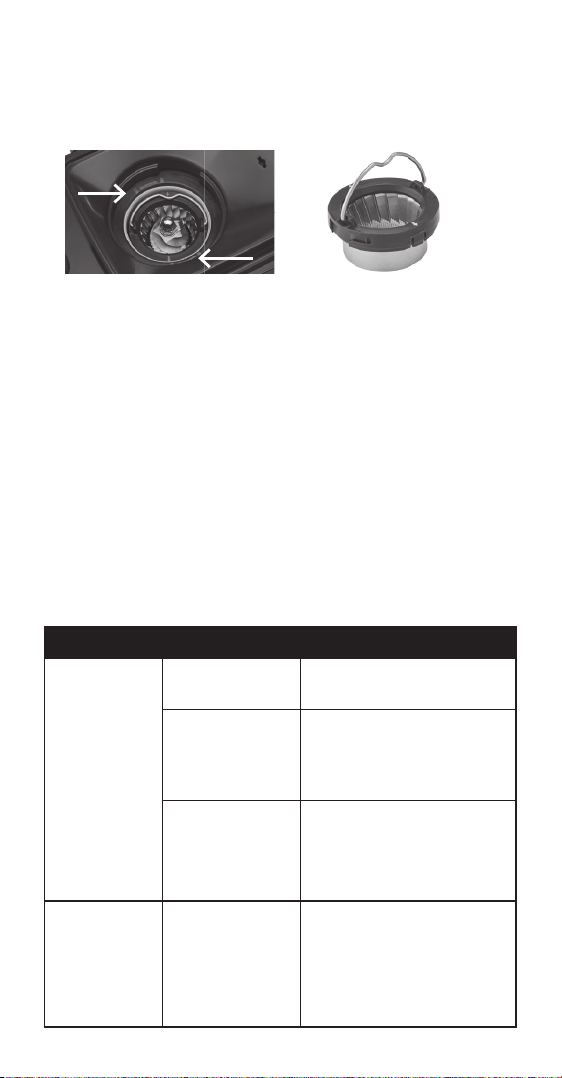
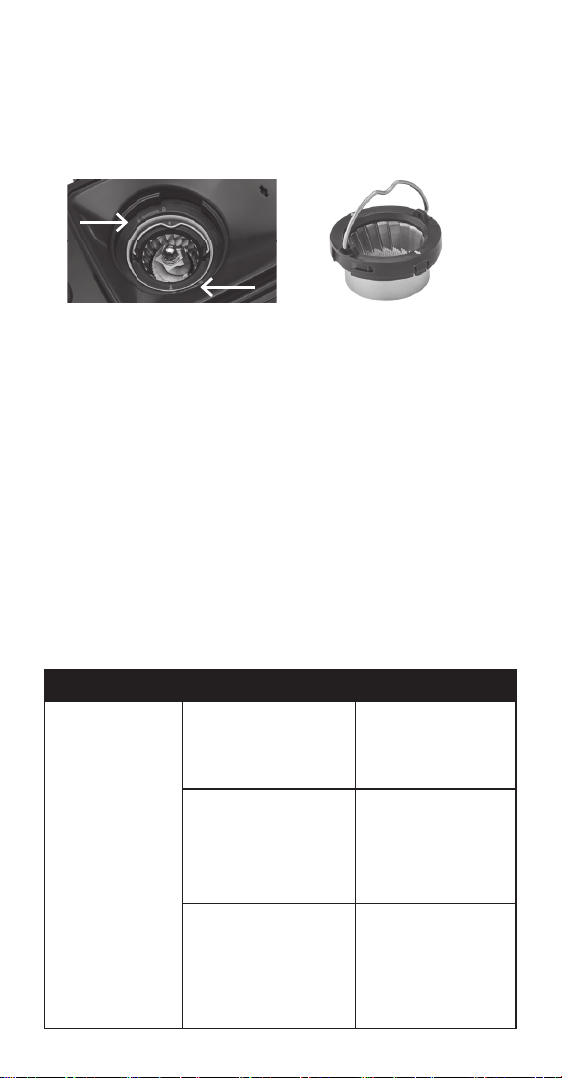
5. After the bean hopper has been removed, remove the burr
grinder by grasping the metal handle and lifting up. Use the
brush to remove grounds or wash by hand. Replace the burr
grinder on the unit and rotate until the piece is fully inserted.
Push handle down, replace, and lock hopper.
NOTE: The hopper will not attach to the unit if the grinder
has not been fully inserted. The brush on the measuring
scoop is only for cleaning purposes.
6. Wipe body of grinder with a damp cloth.
NOTE: The bean hopper, bean hopper lid, grind chamber, and
grind chamber lid can be washed by hand with hot, soapy
water. Dry thoroughly.
Maintenance
Any other servicing or maintenance should be performed by an
authorized service representative.
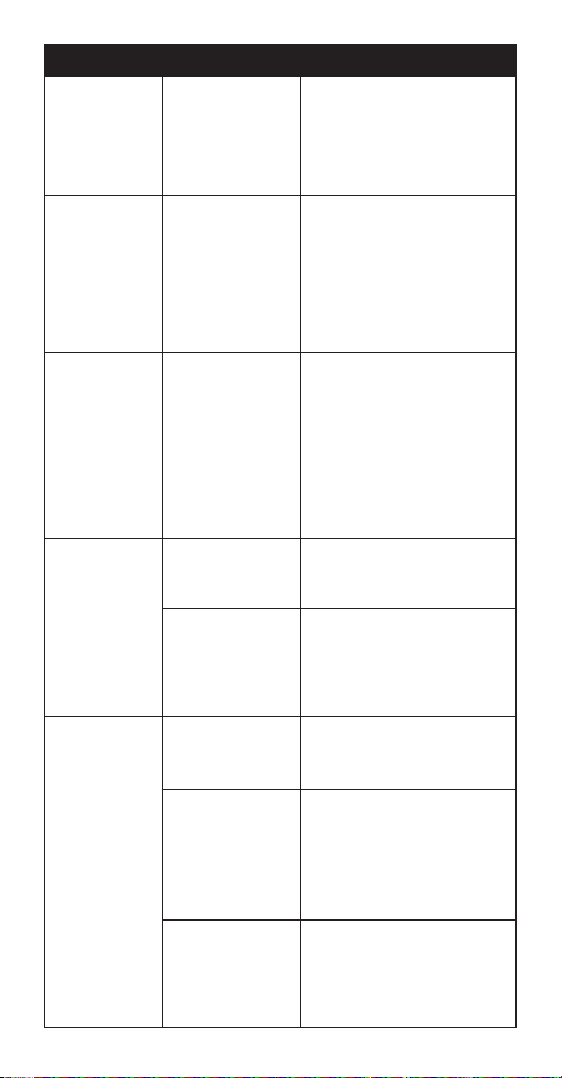
Troubleshooting
Problem Possible causes Solution
The
appliance
does not
work.
Plug not
connected.
Connect the plug.
The bean
hopper is
not inserted
correctly.
Check that the bean
hopper is correctly
inserted on the main unit.
The motor
thermal
protection is
activated.
Wait (approx. 30 minutes)
for the thermal protection
to reset.
The light bar
does not
illuminate
In sleep mode
because the
appliance was
not used after
30 minutes.
Press the Start/Stop
button once to wake up
the appliance.
9
Problem Possible causes Solution
The light
bar blinks
continuously
The appliance
is not ready for
operation.
Check that the cup size
knob is set at 1-14 or MAN.
If using portalter holder,
check the cup size knob is
set to SIN or DBL.
The light
bar blinks
3 times
and then
illuminate
in solid.
The chute is
clogged.
Unplug and clean the
chute with the brush
on the scoop. Clean the
grinder with the grind size
knob rotated to 35 before
removing the upper part of
the grinder.
The light
bar blinks
continuously
during
operation.
The motor
thermal
protection
activated
automatically
because
the chute is
clogged.
Unplug and clean the
chute with the brush
on the scoop. Clean the
grinder with the grind size
knob rotated to 35 before
removing the upper part
of the grinder and wait 30
minutes for the thermal
protection to reset.
The
appliance
works but
no ground
coee
comes out.
No coee beans
in the bean
hopper.
Load the coee beans.
The grinder is
blocked.
Remove the grinder and
check there are no objects
blocking rotation. Clean
the grinder with brush on
the scoop if needded.
The set
grinding level
is incorrect
or dicult.
The upper part
of the grinder is
missing.
Insert and secure the
upper grinder in its seat.
If meeting
resistance when
going from
coarse to ne,
a bean may be
stuck.
Turn the cup size knob
to Manual, and press and
hold the Start/Stop button
while turning the grind
size knob towards a ner
grind.
Grinders are
worn.
Reach out to our toll-
free consumer service
department at 1-800-
726-0190 to speak with
a representative.

10
Limited Warranty
Subject to the exclusions and limitations contained herein, Conair
LLC dba Cuisinart (“Cuisinart”) warrants that the Cuisinart
Espresso & Coee Conical Burr Grinder ("Product")
will be free from material defects in materials and workmanship
under normal home use conditions for a period of THREE (3) years
beginning on the date the Product was purchased in its original,
sealed packaging, unless otherwise specied in this Limited
Warranty. This Limited Warranty is only for U.S. consumers
(dened herein as purchasers at retail for personal, family, or
household use) who originally purchase the Product from
Cuisinart or an authorized Cuisinart
®
reseller (if you are unsure
whether a retailer or other point of sale is an authorized or
unauthorized Cuisinart reseller, contact Cuisinart).
This Limited Warranty does NOT cover:
• Normal wear and tear;
• Any Product purchased by commercial purchasers or for
commercial or non-household uses;
• Accessories, parts, or software added to
the Product after the system is shipped
from Cuisinart;
• Any costs associated with the replacement or
repair of the Product, including labor, installation, or other
costs incurred by you without prior Cuisinart approval;
• Damage to the Product, defective conditions, or
nonconformities due to: (1) external causes, including
shipping, accidents, problems with electrical power (Product
designed only for use with 120-volt outlets), abnormal
conditions (such as mechanical or environmental); (2) usage
not in accordance with Product instructions; (3) misuse,
neglect, unauthorized alteration, unauthorized repair; and (4)
acts of god or other events beyond Cuisinart’s control;
• Though necessary repairs and maintenance might be
performed by any company, damage caused by you or any
nonauthorized third party, may void, this Limited Warranty;
• Damage caused by accessories or replacement parts not
specically authorized by Cuisinart, may void, this Limited
Warranty; and
• Any Product where the original Product identication
markings (trademark or serial number) have been removed,
altered, or obliterated from the Product.
It is recommended that you visit the website, https://cuisinart.

11
registria.com, for a fast, ecient way to complete your product
registration. However, product registration does not eliminate the
need for the consumer to maintain the original proof of purchase
in order to obtain the warranty benets. In the event that you do
not have proof of purchase date, the purchase date for purposes
of this Limited Warranty will be the date of manufacture.
Hassle-free warranty
If the Product that is the subject of this Limited Warranty fails
during the warranty period for reasons covered by this Limited
Warranty, Cuisinart will, at its option, repair the Product, replace
the Product with another identical or reasonably equivalent
product, or if Cuisinart is unable to repair or replace the Product,
refund the purchase price, less the amount directly attributable
to the consumer’s prior usage of the Product. To obtain a return
shipping label, email us at https://www.cuisinart.com/customer-
care/product-assistance/product-inquiry/, or call our Consumer
Service Center toll-free at 1-800-726-0190 to speak with a
representative.
Upon receipt of the Product, Cuisinart will inspect the Product
and, if required under this Limited Warranty, attempt to repair,
replace, or refund the Product within thirty (30) days. However,
there may be delays beyond Cuisinart’s control, in which case that
time period may be extended as reasonably necessary.
IMPORTANT: If the nonconforming Product is to be serviced by
someone other than Cuisinart’s Authorized Service Center, please
remind the servicer to call our Consumer Service Center at
1-800-726-0190 to ensure that the problem is properly diagnosed,
the Product is serviced with the correct parts, and the product is
still under warranty.
California Residents Only
The three (3) year Limited Warranty period begins on the date the
Product was delivered, which may be dierent than the date the
Product was purchased. California residents also have the option
of obtaining the benets of this Limited Warranty by bringing the
Product to (A) the store where it was purchased or (B) another
retail store that sells Cuisinart products of the same type. The
retail store shall then, according to its preference, either repair
the Product, refer the consumer to an independent repair facility,
replace the Product with another identical or reasonably
equivalent product, or refund the purchase price less the amount
directly attributable to the consumer’s prior usage of the Product.
California residents may also, according to their preference, return
nonconforming products directly to Cuisinart for repair or, if
necessary, replacement with another identical or reasonably
equivalent product by calling our Consumer Service Center

©2025 Cuisinart
Glendale, AZ 85307
Printed in China
24ce93065
IB-18558-ESP-B
toll-free at 1-800-726-0190. Cuisinart will be responsible for the
cost of such repair, replacement, and/or shipping and handling for
such nonconforming products under warranty.
THIS LIMITED WARRANTY GIVES YOU SPECIFIC LEGAL RIGHTS,
AND YOU MAY ALSO HAVE OTHER RIGHTS THAT VARY FROM
STATE TO STATE OR BY JURISDICTION. IN THE EVENT THIS
LIMITED WARRANTY IS BREACHED, YOU MAY HAVE CLAIMS FOR
REPLACEMENT, DAMAGES, OR OTHER PENALTIES
LIMITATIONS OF LIABILITY/ADDITIONAL LIMITATIONS
AND EXCLUSIONS
ALL EXPRESS AND IMPLIED WARRANTIES ARE LIMITED IN
DURATION TO THE LIMITED WARRANTY PERIOD. NO
WARRANTIES APPLY AFTER THAT PERIOD. SOME STATES DO
NOT ALLOW LIMITATIONS ON HOW LONG AN IMPLIED
WARRANTY LASTS, SO THIS LIMITATION MAY NOT APPLY TO
YOU. CUISINART’S RESPONSIBILITY UNDER THIS OR ANY OTHER
WARRANTY, IMPLIED OR EXPRESS, IS LIMITED TO REPAIR,
REPLACEMENT, OR REFUND, AS SET FORTH ABOVE. THESE
REMEDIES ARE THE SOLE AND EXCLUSIVE REMEDIES FOR ANY
BREACH OF WARRANTY. TO THE MAXIMUM EXTENT PERMITTED
BY LAW, CUISINART IS NOT RESPONSIBLE FOR ANY DIRECT,
INDIRECT, SPECIAL, INCIDENTAL, OR CONSEQUENTIAL
DAMAGES RESULTING FROM ANY BREACH OF WARRANTY OR
UNDER ANY OTHER LEGAL THEORY (INCLUDING, BUT NOT
LIMITED TO, LOST PROFITS, DOWNTIME, GOODWILL, DAMAGE
TO OR REPLACEMENT OF EQUIPMENT AND PROPERTY, AND ANY
COSTS OF RECOVERING, REPROGRAMMING, OR REPRODUCING
ANY PROGRAM OR DATA STORED IN OR USED WITH A SYSTEM
CONTAINING THE PRODUCT), EVEN IF CUISINART HAS BEEN
ADVISED OF THE POSSIBILITY OF SUCH DAMAGES. SOME
STATES DO NOT ALLOW THE EXCLUSION OR LIMITATION OF
INCIDENTAL OR CONSEQUENTIAL DAMAGES, SO THE ABOVE
LIMITATIONS OR EXCLUSIONS MAY NOT APPLY TO YOU. ALL
EXPRESS AND IMPLIED WARRANTIES ARE LIMITED IN DURATION
TO THE LIMITED WARRANTY PERIOD. NO WARRANTIES APPLY
AFTER THAT PERIOD. SOME STATES (OR JURISDICTIONS) DO
NOT ALLOW LIMITATIONS ON HOW LONG AN IMPLIED
WARRANTY LASTS, SO THIS LIMITATION MAY NOT APPLY
TO YOU.
This Limited Warranty is issued by:
Conair LLC
1 Cummings Point Road
Stamford, CT 06902
1-800-726-0190
Manual de
instrucciones
Molinillo de muelas
para café/expreso
Serie CBM-22
Para su seguridad y para disfrutar
plenamente de este producto,
siempre lea atentamente
las instrucciones antes del uso.

2
Medidas de Seguridad
Importantes
Al usar aparatos eléctricos, siempre se deben tomar
precauciones básicas de seguridad, entre ellas las siguientes:
1. Lea todas las instrucciones.
2. Apague y desenchufe el aparato cuando no esté en uso,
antes de instalar/sacar piezas y antes de limpiarlo. Para
desenchufar, agarre el enchufe y jálelo de la toma de
corriente. Nunca jale el cable.
3. Para reducir el riesgo de descarga eléctrica, no sumerja el
cable, el enchufe ni ninguna otra parte del aparato en agua u
otros líquidos.
4. Los niños o las personas que carezcan de la experiencia o
de los conocimientos necesarios para manipular el aparato,
o aquellas cuyas capacidades físicas, sensoriales o mentales
estén limitadas, no deben usar este aparato. Supervise el
uso del aparato con cuidado cuando sea usado cerca de
niños. No deje que los niños jueguen con este aparato.
5. Evite el contacto con las piezas móviles. No intente forzar/
modicar los mecanismos de enclavamiento/bloqueo de
seguridad.
6. No use este aparato si el cable o el enchufe están dañados,
si no funciona correctamente, si está dañado, o después de
una caída; devuélvalo a un centro de servicio autorizado
para su revisión, reparación o ajuste (mecánico o eléctrico).
7. El uso de accesorios/aditamentos no recomendados o
vendidos por Cuisinart presenta un riesgo de incendio,
descarga eléctrica o lesiones personales.
8. No lo use en exteriores.
9. No deje que el cable cuelgue de la encimera o de la mesa,
ni que tenga contacto con supercies calientes.
10. Compruebe que no haya objetos extraños en la tolva/el
depósito antes del uso.
11. Use este aparato solamente para moler granos de café
tostados. No lo use para moler nueces, especias o café
crudo; esto puede dañar la cuchilla/muela y perjudicar el
rendimiento del aparato, o causar lesiones.
12. Solo use este aparato para el uso previsto.
13. No coloque el aparato sobre o cerca de un quemador a gas o
de un hornillo eléctrico caliente, ni en un horno caliente.
14. No haga funcionar el aparato debajo o dentro de un armario/
gabinete. Siempre desenchufe el aparato antes de
almacenarlo en un armario/gabinete. Dejar el aparato
enchufado representa un riesgo de incendio, especialmente
si este toca las paredes o la puerta del armario/gabinete
cuando se cierra.

3
Guarde estas
instrucciones
Para uso doméstico
solamente.
AVISO
El cable de este aparato cuenta con un enchufe polarizado
(una pata es más ancha que otra). Como medida de seguridad,
aquel enchufe se podrá enchufar de una sola manera en las
tomas de corriente polarizadas. Si no entra en la toma de
corriente, inviértalo. Si aun así no entra completamente,
comuníquese con un electricista. No intente modicarlo.
Índice
Medidas de seguridad importantes.......................2
Piezas y características ...............................4
Preparación........................................5
Instrucciones de uso ................................. 5
Limpieza y mantenimiento ............................. 7
Resolución de problemas ..............................8
Garantía . . . . . . . . . . . . . . . . . . . . . . . . . . . . . . . . . . . . . . . . . . 10
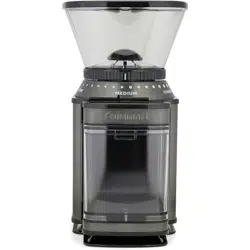
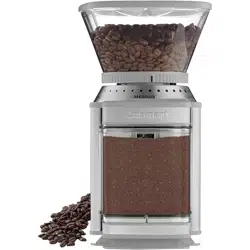
Introducción
¡Ha llegado la nueva generación de molinillos de café, jando
nuevos estándares de calidad en materia de café molido! El
molinillo de muelas muele los granos de manera precisa y
uniforme, conservando el sabor y el aroma del café. Ya sea que
use una prensa francesa, una cafetera automática o una
máquina expreso, siempre empezará con los mejores y más
frescos ingredientes. Este molinillo es completamente
automático. ¡Simplemente elija la cantidad de tazas y el grado
de molienda, presione el botón de encendido y pronto
obtendrá café molido a la perfección!
4
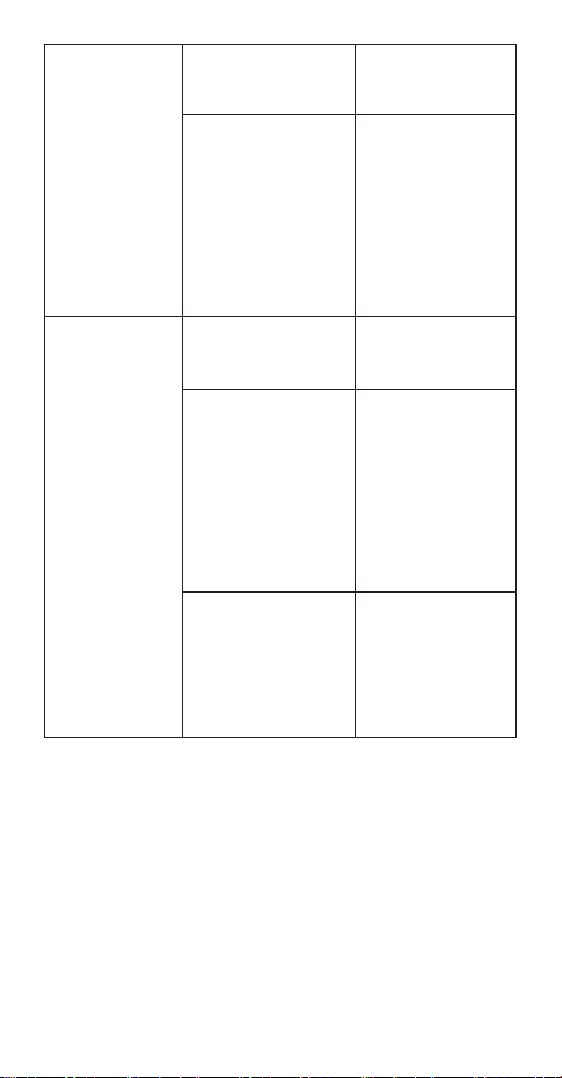
1. Tapa del depósito de café
en grano
2. Depósito de café en grano
2a. Perilla de liberación/
bloqueo del depósito de
café en grano
3. Selector de molienda
4. Botón START/STOP
(encendido/apagado)
5. Boca de salida del café
molido
6. Tapa del depósito de
café molido
7. Depósito de café molido
8. Bandeja removible
9. Muelas cónicas
(no ilustradas)
10. Selector de tazas
11. Soporte para porta ltros
11a. Ranura de sujeción
del soporte para
porta ltros
11b. Espacio de
almacenamiento
del soporte para
porta ltros
12. Cuchara medidora/Cepillo
de limpieza
13. Espacio para guardar el
cable (no ilustrado)
14. Soporte de la cuchara
medidora/cepillo de
limpieza (en la parte
trasera, no ilustrado)
Características
2.
1.
3.
4.
9.
5.
7.
8.
6.
12.
11.
11a.
11b.
2a
10.
5
Preparación
Retire todas las piezas de la caja y quite el embalaje
de plástico.
1. Coloque la tapa del depósito de café molido sobre este y
colóquelo en su puesto.
2. Coloque la cuchara medidora/el cepillo de limpieza en su
soporte, en la parte trasera del aparato. El aparato está
listo para su uso.
Instrucciones de uso
1. Retire la tapa del depósito de café en grano.
2. Llene el depósito de café en grano y vuelva a colocar la
tapa, comprobando que esté bien cerrada. La capacidad
máxima del depósito de café en grano es de 8 oz (225 g).
Cerciórese de añadir la cantidad de café en grano
su ciente, según la cantidad deseada de tazas.
3. Enchufe el cable en una toma de corriente.
4. La barra luminosa arriba del botón START/STOP se
iluminará, lo que indica que el aparato está listo para su
uso.
Nota: Si la barra luminosa parpadea, esto signi ca que el
aparato aún no está listo.
Nota: El aparato se apagará automáticamente después de
30 minutos sin usar.
5. Elija el grado de molienda, girando el selector de molienda.
Cuanto más alto sea el número, más gruesa será la
molienda. Use los ajustes 1-14 ( no) para uso con cafetera
expreso, 15-25 (medio) para uso con cafetera automática y
26-35 (grueso) para uso con percolador/prensa francesa.
Nota: Use molienda gruesa si usa un percolador/prensa
francesa, molienda media si usa una cafetera automática, o
molienda na si usa una cafetera expreso.
6. Elija la cantidad de café deseada, poniendo el selector de
tazas en “SIN” (expreso simple), “DBL” (expreso doble), o la
cantidad de tazas exacta, de 1 a 14. Nota: Puede preparar
café más claro o más fuerte, ajustando la cantidad de
tazas al gusto. Para controlar manualmente la cantidad de
café molido, ponga el selector en “MAN” (véase la sección
“Modo manual”).
7. Coloque el envase deseado bajo la boca de salida del
café molido Si usa el depósito de café molido, abra el
tapón primero.
6
Para moler café directamente en el porta ltros de su
cafetera expreso, inserta el soporte para porta ltros en la
ranura de sujeción debajo del cabezal e inserta el
porta ltros en el soporte, cerciorándose que esté debajo de
la boca de salida del café molido.
8. Presione el botón START/STOP para empezar a moler. El
aparato cuenta con un mecanismo de seguridad que impide
que se encienda a menos que el depósito de café en grano
esté correctamente instalado.
Nota: Si el depósito de café molido está demasiado lleno, la
de salida del café molido puede obstruirse, y el aparato no
funcionará. Para desobstruir la boca de salida, límpiela con
el cepillo de limpieza provisto. Si el molinillo se apaga antes
del nal del ciclo de molienda, esto signi ca que el motor
se ha sobrecalentado.
Deje que el aparato se enfríe por hasta 30 minutos antes de
continuar.
9. El molinillo se apagará automáticamente después de haber
molido la cantidad elegida de café en grano.
Nota: Para cancelar el ciclo de molienda, presione el botón
START/STOP.
10. Jale el depósito de café molido o el porta ltros hacia fuera
para retirarlo.
11. Después de 30 minutos sin usar, el aparato ingresará al
modo de espera y el botón START/STOP se apagará. Para
despertar el aparato, presione el botón START/STOP.
Modo manual
Su molinillo le da la opción de controlar manualmente la
cantidad de café molido después de haber elegido el grado de
molienda. Siga los pasos 1-5 en la página anterior. Ponga el
selector de tazas en “MAN” y mantenga presionado el botón
START/STOP hasta conseguir la cantidad deseada de café
molido.
NOTA: Para evitar moler demasiado café, el molinillo se
detendrá automáticamente después de aprox. 30 minuto.
Grado de molienda
Cuanto más alto sea el número, más gruesa será la molienda.
Use los ajustes 1-14 ( no) para uso con cafetera expreso, 15-25
(medio) para uso con cafetera automática y 26-35 (grueso) para
uso con percolador prensa francesa.
7
NOTA: Si encuentra resistencia al moler café después de pasar
de una molienda gruesa a una molienda na, puede ser porque
un grano de café está atascado en las muelas. Vuelva a colocar
el depósito de café molido o insertar el porta ltros, ponga el
selector de tazas en “MAN” y presione repetidamente el botón
START/STOP mientras gira el selector de molienda hacia un
ajuste más no.
NOTA: El aparato se apagará si la boca de salida del café
molido está obstruida. Para desobstruir la boca de salida,
desenchufe el aparato y limpie la boca con el cepillo provisto.
Limpieza y mantenimiento
DEPÓSITO DE CAFÉ EN GRANO
1. Desenchufe el aparato.
2. Retire la tapa del depósito de café en grano, ponga la perilla
de liberación/bloqueo del depósito en el candado abierto
para poder retirar el depósito y vacíe los granos de café
restantes.
MUELAS
1. Si granos de café quedaron atrapados en el molinillo, vuelva
a colocar el depósito de café en grano en su sitio y haga
funcionar el aparato, poniendo el selector de tazas en “8” y
eligiendo cualquier grado de molienda. Finalizado el ciclo, el
molinillo estará vacío. Entonces, termine de limpiarlo de
acuerdo con las instrucciones.
2. Gire el selector de molienda en sentido antihorario hasta
que se detenga.
3. Desenchufe el aparato.
4. Quite la tapa del depósito de café en grano y gire la perilla
de bloqueo/liberación del depósito en sentido antihorario
(hacia el candado abierto) para liberar el depósito.
NOTA: Las fl echas en el molinillo deben estar alineadas
para poder volver a instalar el depósito de café en grano.
8
5. Después de quitar el depósito de café en grano, agarre el
molinillo por el asa de metal y levántelo. Elimine los posos
de café con el cepillo provisto o lave el molinillo a mano.
Vuelva a colocar el molinillo en el aparato, girando hasta
que quede en su lugar. Presione el asa hacia abajo y vuelva
a colocar el depósito de café en grano en su sitio,
bloqueándolo (candado cerrado).
NOTA: No se podrá instalar el depósito de café en grano a
menos que el molinillo de muelas esté correctamente
instalado. El cepillo de la cuchilla medidora solamente debe
servir para limpiar.
6. Limpie la carcasa del aparato con un paño húmedo.
NOTA: Lave el depósito de café en grano, el depósito de
café molido, y las dos tapas en agua tibia con jabón, o en
la bandeja superior del lavavajillas. Seque bien todas
las piezas.
Mantenimiento
Cualquier otro servicio debe ser realizado por un
técnico autorizado.
Resolución de problemas
Problema Posible causa Solución
El aparato no
se enciende
El aparato no está
enchufado.
Enchufe el cable
en una toma de
corriente.
El depósito de café
en grano no está
instalado
correctamente.
Compruebe que el
depósito de café
en grano esté bien
instalado.
El dispositivo de
protección contra
sobrecalentamiento
del motor se ha
activado.
Espere aprox. 30
minutos para que
el aparato se
reinicie.
9
Problema Posible causa Solución
La barra
luminosa no se
ilumina
El aparato ha
ingresado el modo
de espera.
Presione el botón
START/STOP para
despertarlo.
La barra
luminosa
parpadea de
forma continua
El aparato aún no
está listo para su
uso.
Compruebe que el
selector de tazas
esté en la cantidad
deseada de tazas
o “MAN” Si usa el
portaltros,
compruebe que el
selector de tazas
esté en “SIN” o
“DBL”.
La barra
luminosa
parpadea 3
veces, y luego
se queda
encendida
El conducto de
salida está
obstruido.
Desenchufe el
aparato y limpie el
conducto de salida
con el cepillo.
Antes de quitar la
parte superior del
molinillo, limpie el
sistema interno
poniendo el
selector de
molienda en “35”.
La barra
luminosa
parpadea de
forma continua
durante el uso
El dispositivo de
protección contra
sobrecalentamiento
del motor se ha
activado porque el
conducto de salida
está obstruido.
Desenchufe el
aparato y limpie el
conducto de salida
con el cepillo.
Espere aprox. 30
minutos para que
el aparato se
reinicie. Antes de
quitar la parte
superior del
molinillo, limpie el
sistema interno
poniendo el
selector de
molienda en “35”.
10
El aparato se
enciende, pero
café molida no
sale
No hay café en el
depósito de café en
grano.
Agregue granos
de café.
Las muelas están
bloqueadas.
Quite el
mecanismo
de molienda y
compruebe que
no haya objetos
bloqueando la
rotación. De ser
necesario, limpie
las muelas con
el cepillo.
El grado de
molienda es
incorrecto o
difícil.
Falta la parte
superior del
molinillo.
Inserta la parte
superior del
molinillo.
Si encuentra
resistencia al moler
café después
de pasar de una
molienda gruesa a
una molienda na,
puede ser porque
un grano de café
está atascado en
las muelas.
Ponga el selector
de tazas en
“MAN” y mantenga
presionado el
botón START/
STOP mientras
gira el selector de
molienda hacia un
ajuste más no.
Las muelas están
desgastadas.
Llame sin cargo a
nuestro servicio
de atención al
cliente, al 1-800-
726-0190, para
hablar con un
representante.
Garantía limitada
Sujeto a las exclusiones y limitaciones contenidas en este
documento, Conair LLC/Cuisinart (“Cuisinart”) garantiza que
este Producto Cuisinart
®
estará libre de defectos de materiales
y fabricación en condiciones normales de uso doméstico
durante un período de TRES (3) años a partir de la fecha de
compra del Producto en su embalaje original sellado, a menos
que se especique lo contrario en esta Garantía Limitada. Esta
Garantía Limitada es solo para consumidores de Estados
Unidos (denidos aquí como compradores al por menor para
uso personal, familiar o doméstico) que compren originalmente
el Producto a Cuisinart o a un revendedor autorizado de
Cuisinart. Si no está seguro de si un minorista u otro punto de

11
venta es un revendedor autorizado de Cuisinart, póngase en
contacto con Cuisinart.
Esta Garantía Limitada NO cubre:
• El desgaste normal;
• Cualquier Producto adquirido por compradores comerciales
o para usos comerciales o no domésticos;
• Accesorios, piezas o programas añadidos al Producto
después de que Cuisinart lo haya enviado;
• Cualquier costo asociado con el reemplazo o reparación del
Producto, incluyendo mano de obra, instalación u otros
costos incurridos por usted sin previa aprobación de
Cuisinart;
• Daños, defectos y fallas debidos a: (1) causas externas,
incluyendo el envío, accidentes, problemas con el
suministro eléctrico (el Producto está diseñado para su uso
exclusivo con enchufes de 120 V), condiciones anormales
(como mecánicas o medioambientales); (2) uso no
conforme a las instrucciones del Producto; (3) uso
indebido, negligencia, alteración no autorizada, reparación
no autorizada; y (4) casos fortuitos u otros acontecimientos
fuera del control de Cuisinart;
• Aunque cualquier empresa puede realizar las reparaciones
y el mantenimiento necesarios, los daños causados por
usted o por terceros no autorizados pueden anular esta
Garantía Limitada;
• Los daños causados por accesorios o repuestos no
autorizados especícamente por Cuisinart pueden anular
esta Garantía Limitada; y
• Cualquier Producto cuyas marcas de identicación
originales (marca comercial o número de serie) hayan sido
retiradas, alteradas o borradas del Producto.
Se recomienda llenar el formulario de registro disponible en
https://cuisinart.registria.com a n de facilitar la vericación de
la fecha de compra original de este producto. Sin embargo, no
es necesario registrar el producto para recibir servicio bajo esta
garantía. En ausencia de prueba de la fecha de compra, el
período de garantía será calculado a partir de la fecha de
fabricación del producto.
GARANTÍA DE SIN DIFICULTADES
Si el Producto objeto de esta Garantía Limitada falla durante el
período de garantía por razones cubiertas por esta Garantía
Limitada, Cuisinart, a su elección, reparará el Producto,
sustituirá el Producto por otro idéntico o razonablemente
equivalente, o si Conair no puede reparar o sustituir el
Producto, reembolsará al consumidor el precio de compra,
menos la cantidad directamente atribuible al uso anterior del
Producto por parte del consumidor.

12
Para obtener una etiqueta de devolución, contáctenos,
visitando https://www.cuisinart.com/customer-care/product-
assistance/product-inquiry/ o llamando a nuestro servicio de
atención al cliente, al1-800-726-0190, para hablar con un
representante.
Tras la recepción del Producto, Conair inspeccionará el
Producto y, si lo requiere esta Garantía Limitada, intentará
reparar, reemplazar o reembolsar el Producto en un plazo de
treinta (30) días. No obstante, pueden producirse retrasos fuera
del control de Cuisinart, en cuyo caso dicho plazo podrá
ampliarse en la medida en que sea razonablemente necesario.
IMPORTANTE: Si debe llevar el producto defectuoso a un
centro de servicio no autorizado, por favor informe al personal
del centro de servicio que deben llamar al servicio de atención
al cliente Cuisinart, al 1-800-726-0190, a n de diagnosticar el
problema correctamente, usar las piezas correctas para
repararlo y comprobar que el producto aún esté bajo garantía.
Residentes de California Solamente
El período de Garantía Limitada de TRES (3) años comienza en
la fecha de entrega del Producto, que puede ser diferente de la
fecha de compra del Producto. Los residentes en California
también tienen la opción de obtener los benecios de esta
Garantía Limitada devolviendo el producto defectuoso (A) a la
tienda donde lo compraron, o (B) a otra tienda que venda
productos Cuisinart
®
del mismo tipo. La tienda podrá, a su
elección, reparar el producto, referir al consumidor a un centro
de servicio independiente, sustituir el producto por uno
idéntico o razonablemente equivalente, o reembolsar al
consumidor el precio de compra menos la cantidad
directamente atribuible al uso anterior del producto por el
consumidor. Los residentes de California también pueden, si lo
desean, enviar el producto defectuoso directamente a Cuisinart
para que sea reparado o sustituido por uno idéntico o
razonablemente equivalente. Para esto, deben llamar a nuestro
servicio de atención al cliente al 1-800-726-0190. Cuisinart
será responsable por los gastos de reparación, reemplazo,
manejo y envío de los productos defectuosos durante el
período de garantía.
ESTA GARANTÍA LIMITADA LE OTORGA DERECHOS LEGALES
ESPECÍFICOS, Y TAMBIÉN PUEDE TENER OTROS DERECHOS
QUE VARÍAN DE UN ESTADO A OTRO O EN FUNCIÓN DE LA
JURISDICCIÓN. EN CASO DE INCUMPLIMIENTO DE ESTA
GARANTÍA LIMITADA, USTED PUEDE RECLAMAR LA
SUSTITUCIÓN, UNA INDEMNIZACIÓN POR DAÑOS Y PERJUICIOS
U OTRAS SANCIONES.
LIMITACIONES DE RESPONSABILIDAD/LIMITACIONES Y
EXCLUSIONES ADICIONALES
TODAS LAS GARANTÍAS EXPRESAS E IMPLÍCITAS TIENEN UNA
DURACIÓN LIMITADA AL PERÍODO DE GARANTÍA LIMITADA. NO
SE APLICARÁ NINGUNA GARANTÍA DESPUÉS DE ESTE PERÍODO.
ALGUNOS ESTADOS NO PERMITEN LIMITACIONES EN LA

13
DURACIÓN DE UNA GARANTÍA IMPLÍCITA, DE MODO QUE LAS
LIMITACIONES MENCIONADAS PUEDEN NO REGIR PARA USTED.
LA RESPONSABILIDAD DE CUISINART BAJO ESTA O CUALQUIER
OTRA GARANTÍA, IMPLÍCITA O EXPRESA, SE LIMITA A LA
REPARACIÓN, SUSTITUCIÓN O REEMBOLSO, SEGÚN LO
ESTABLECIDO ANTERIORMENTE. ESTOS RECURSOS SON LOS
ÚNICOS Y EXCLUSIVOS EN CASO DE INCUMPLIMIENTO DE LA
GARANTÍA. EN LA MEDIDA MÁXIMA PERMITIDA POR LA LEY,
CUISINART NO SE HACE RESPONSABLE DE NINGÚN DAÑO
DIRECTO, INDIRECTO, ESPECIAL, INCIDENTAL O CONSECUENTE
RESULTANTE DE CUALQUIER INCUMPLIMIENTO DE LA
GARANTÍA O BAJO CUALQUIER OTRA TEORÍA LEGAL
(INCLUYENDO, PERO NO LIMITADO A, LUCRO CESANTE,
TIEMPO DE INACTIVIDAD, PÉRDIDA DEL FONDO DE COMERCIO,
DAÑOS O SUSTITUCIÓN DE EQUIPOS Y BIENES, Y CUALQUIER
COSTE DE RECUPERACIÓN, REPROGRAMACIÓN O
REPRODUCCIÓN DE CUALQUIER PROGRAMA O DATOS
ALMACENADOS EN O UTILIZADOS CON UN SISTEMA QUE
CONTENGA EL PRODUCTO), INCLUSO SI CUISINAART HA SIDO
ADVERTIDO DE LA POSIBILIDAD DE TALES DAÑOS. ALGUNOS
ESTADOS NO PERMITEN LA EXCLUSIÓN O LIMITACIÓN DE
DAÑOS ESPECIALES, INCIDENTALES O CONSECUENTES, DE
MODO QUE LAS LIMITACIONES MENCIONADAS PUEDEN NO
REGIR PARA USTED. TODAS LAS GARANTÍAS EXPRESAS E
IMPLÍCITAS TIENEN UNA DURACIÓN LIMITADA AL PERÍODO DE
GARANTÍA LIMITADA. NO SE APLICARÁ NINGUNA GARANTÍA
DESPUÉS DE ESTE PERÍODO. ALGUNOS ESTADOS (O
JURISDICCIONES) NO PERMITEN LIMITACIONES EN LA
DURACIÓN DE UNA GARANTÍA IMPLÍCITA, DE MODO QUE LAS
LIMITACIONES MENCIONADAS PUEDEN NO REGIR PARA USTED.
Esta Garantía Limitada es emitida por:
Conair LLC
1 Cummings Point Road
Stamford, CT 06902
1-800-726-0190
14
Notas

15
Notas

©2025 Cuisinart
Glendale, AZ 85307
Impreso en China
24ce93065
IB-18558-ESP-B