
Technical Support and E-Warranty Certificate https://www.vevor.com/support
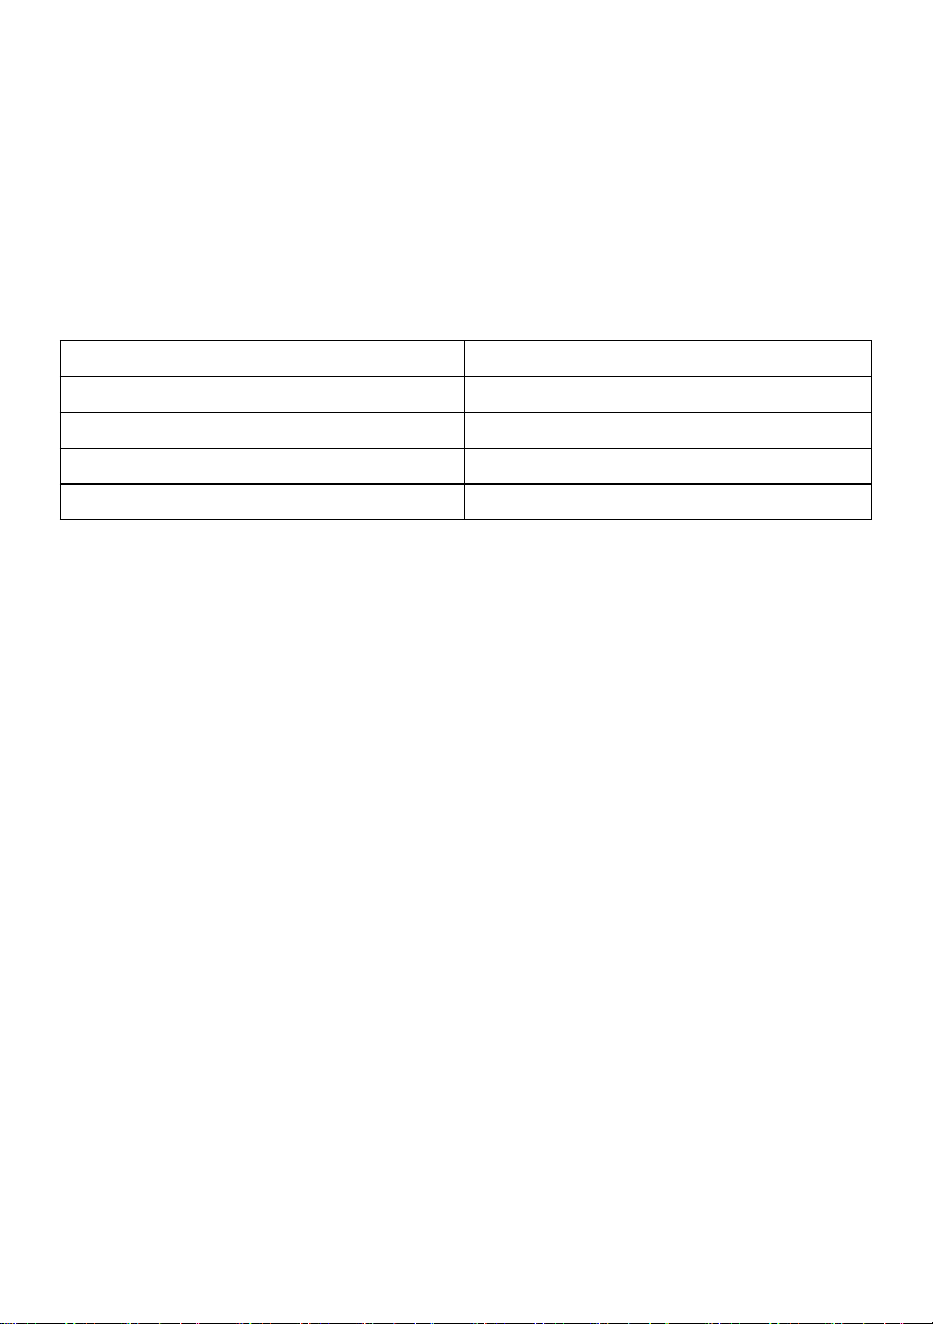
TRADE SHOW COUNTER
USER MANUAL
MODEL NO.: ZG-CXT02
We continue to be committed to provide you tools with competitive price.
"Save Half", "Half Price" or any other similar expressions used by us only represents an
estimate of savings you might benefit from buying certain tools with us compared to the major
top brands and does not necessarily mean to cover all categories of tools offered by us. You
are kindly reminded to verify carefully when you are placing an order with us if you are
actually saving half in comparison with the top major brands.

- 1 -
MODEL NO.: ZG-CXT02
Have product questions? Need technical support? Please feel free to
contact us:
Technical Support and E-Warranty Certificate
www.vevor.com/support
NEED HELP? CONTACT US!
This is the original instruction, please read all manual instructions
carefully before operating. VEVOR reserves a clear interpretation of our
user manual. The appearance of the product shall be subject to the
product you received. Please forgive us that we won't inform you again if
there are any technology or software updates on our product.
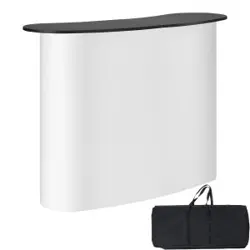
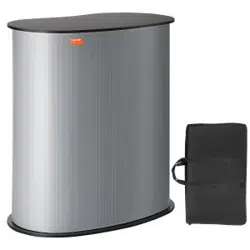
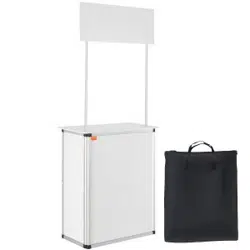
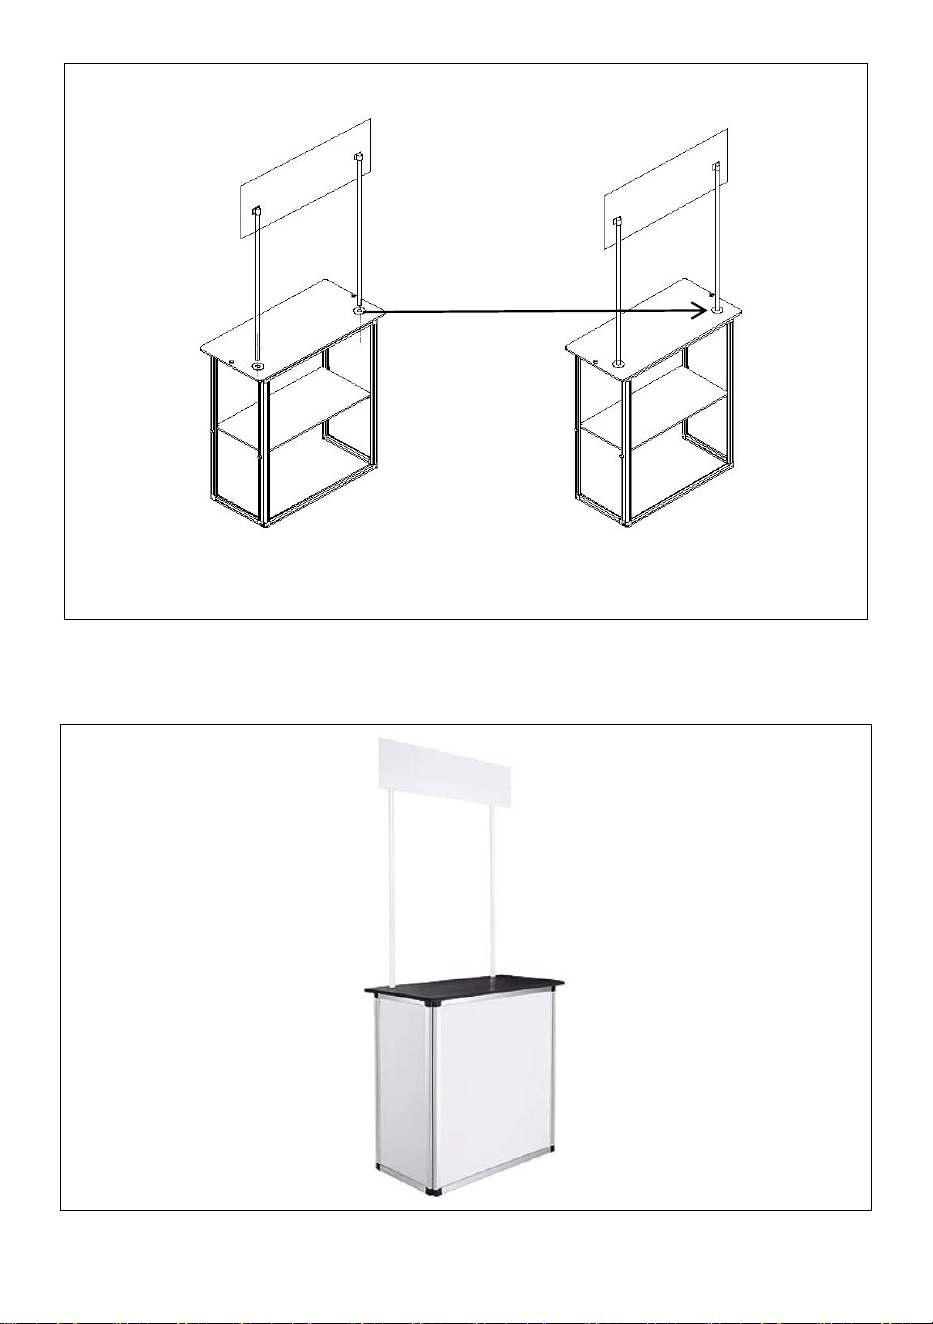
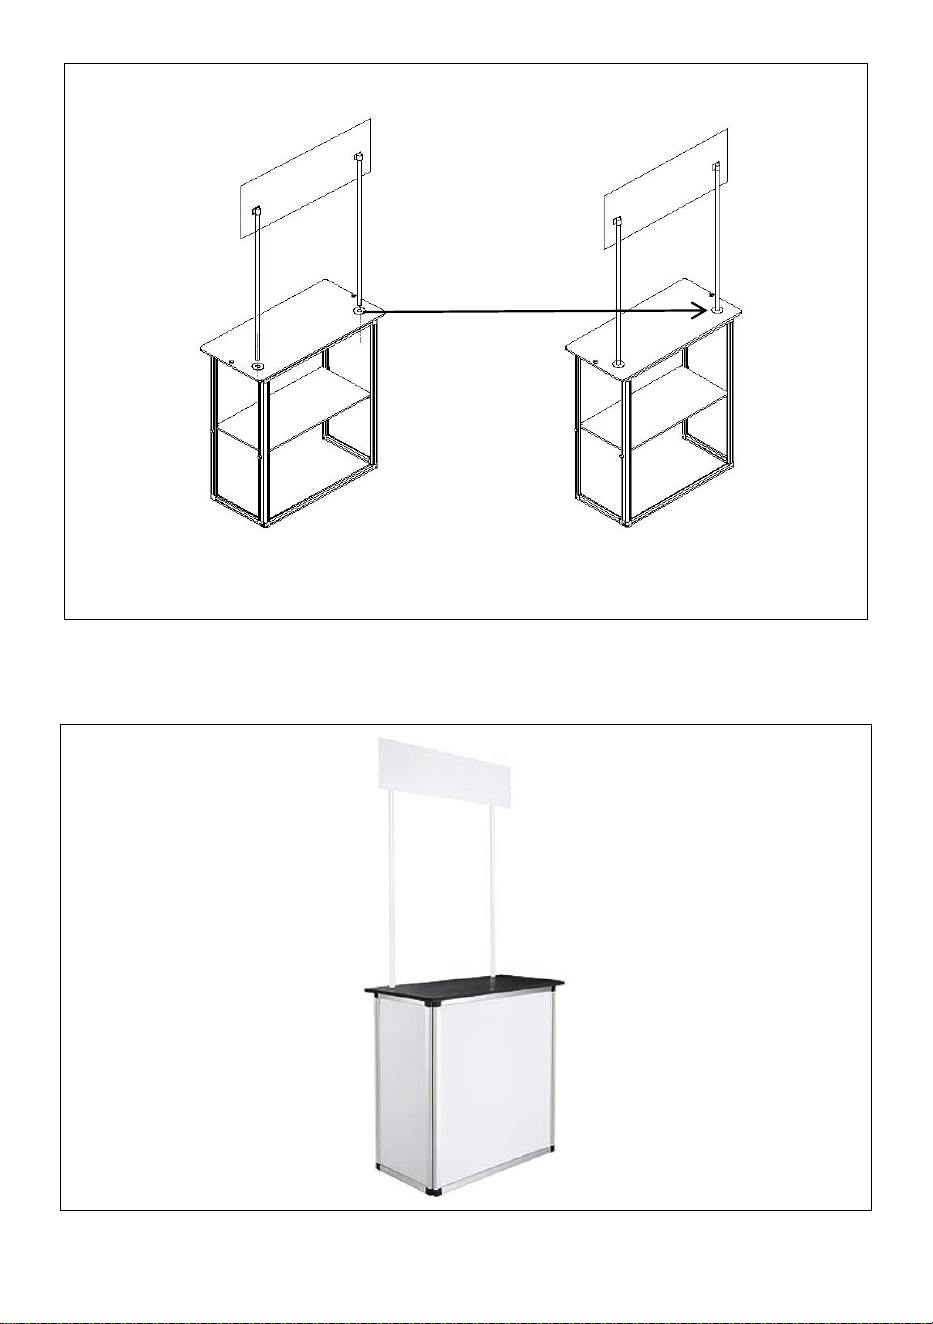
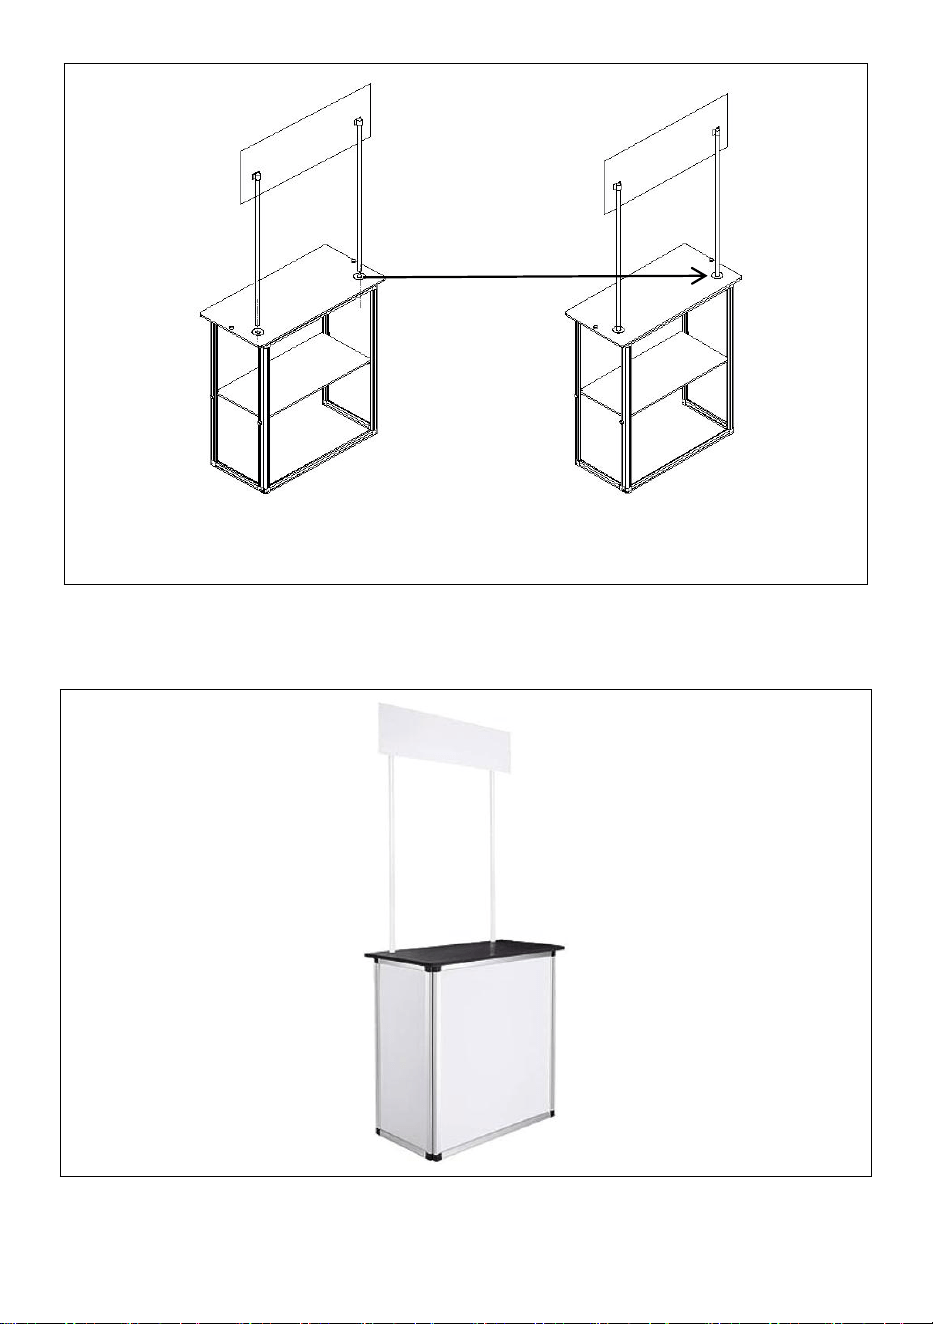
Trade Show Counter

- 2 -
WARNING:
Please read this manual carefully before using the product. Failure to
do so may result in serious injury. SAVE THIS MANUAL
ASSEMBLY PRECAUTIONS
1. Assemble only according to these instructions. Improper assembly can
create hazards.
2. Wear ANSI-approved safety goggles and heavy-duty work gloves
during assembly.
3. Keep the assembly area clean and well-lit.
4. Keep bystanders out of the area during assembly.
5. Do not assemble when tired or under the influence of alcohol, drugs or
medication.
6. The product capabilities apply to properly and completely assembled
products only.
7. Assemble on a flat, level, hard and smooth surface capable of safely
supporting the Trade Show Counter.
8. For additional information regarding the parts listed in the following
pages, please refer to the Assembly Diagram of this manual. Unwrap
and separate all parts in a clean work area.
USE PRECAUTIONS
TO PREVENT SERIOUS INJURY AND DEATH FROM TIPPING:
1. DO NOT SIT OR STAND ON THIS ITEM.
2. This product is not a toy. Do not allow children to play with or near this
item.
3. Do not exceed weight capacities. Please empty Platform Beds before
moving.
4. Use only on a flat, level, hard and smooth surface capable of safely
supporting a fully loaded Trade Show Counter.
- 3 -
5. Use as intended only.
Inspect before every use. Do not use it if parts are loose or damaged.
TECHNICAL SPECIFICATIONS
Model
ZG-CXT02
Product Dimensions(L*W*H)
785*380*1815mm
Packing Size(L*W*H)
730*105*915mm
Net Weight (kg)
8.05
Gross Weight (kg)
10.4
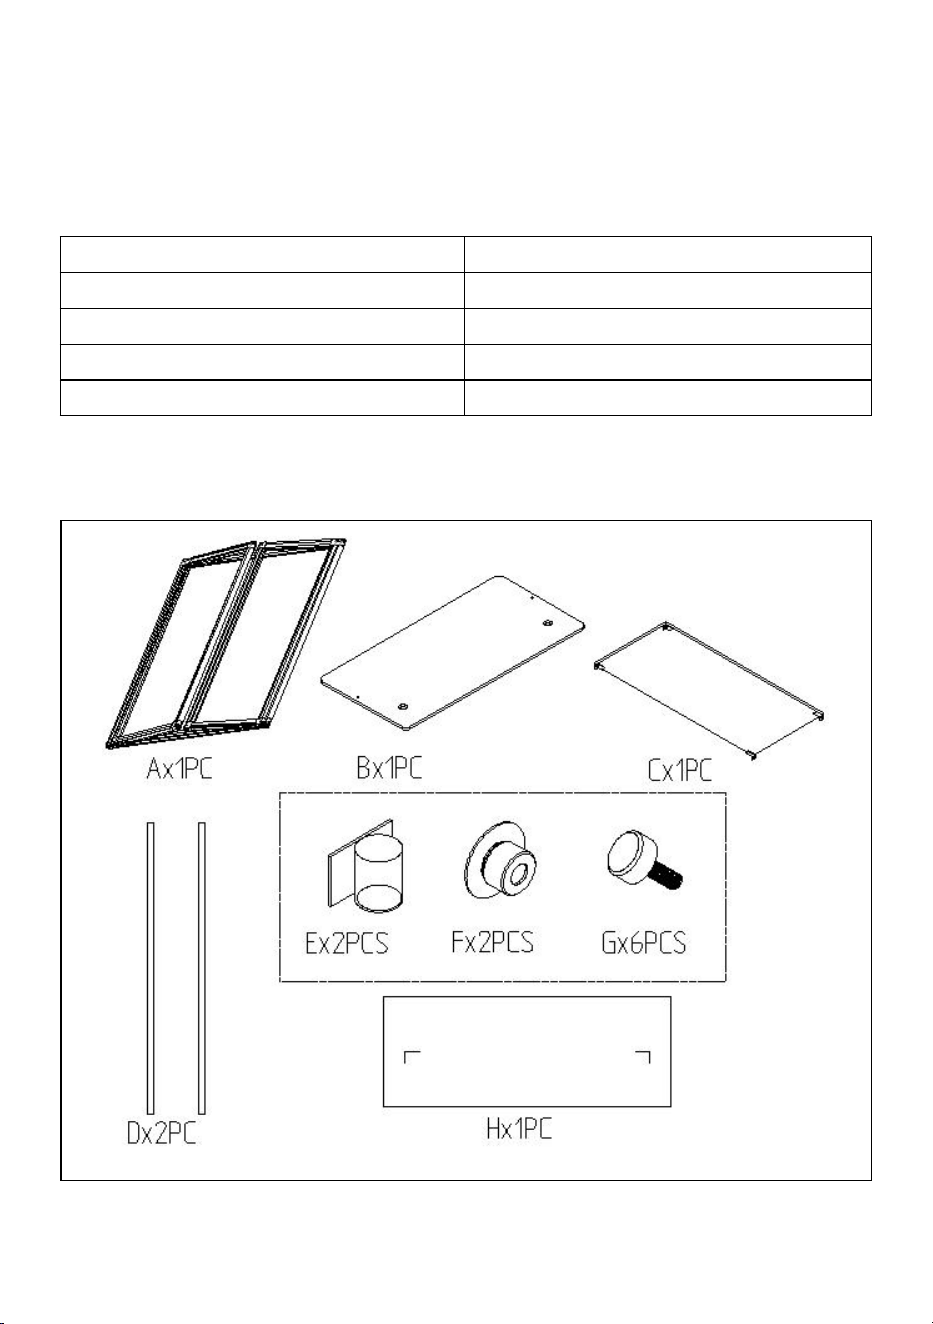
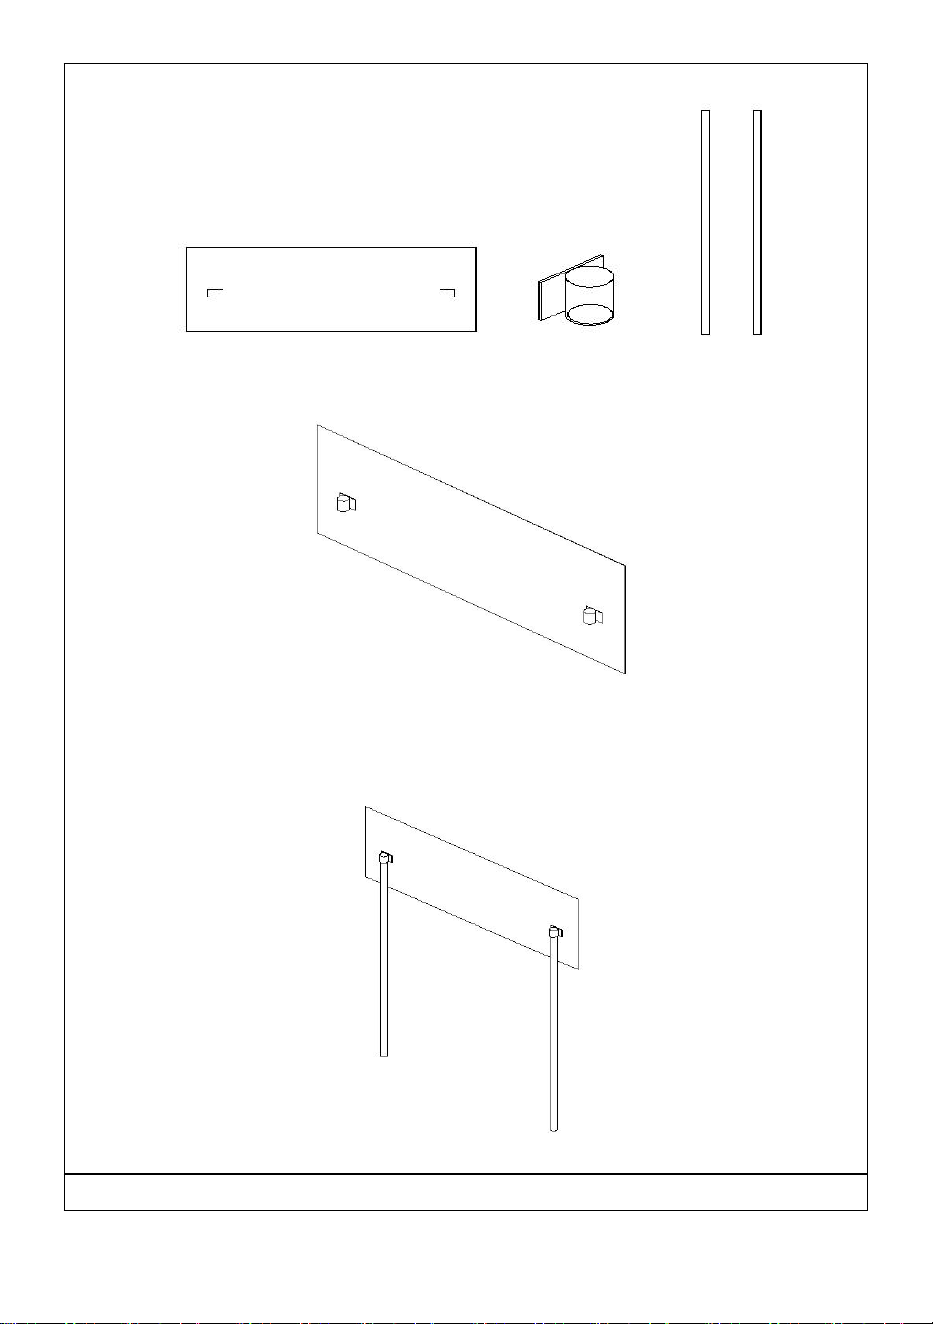
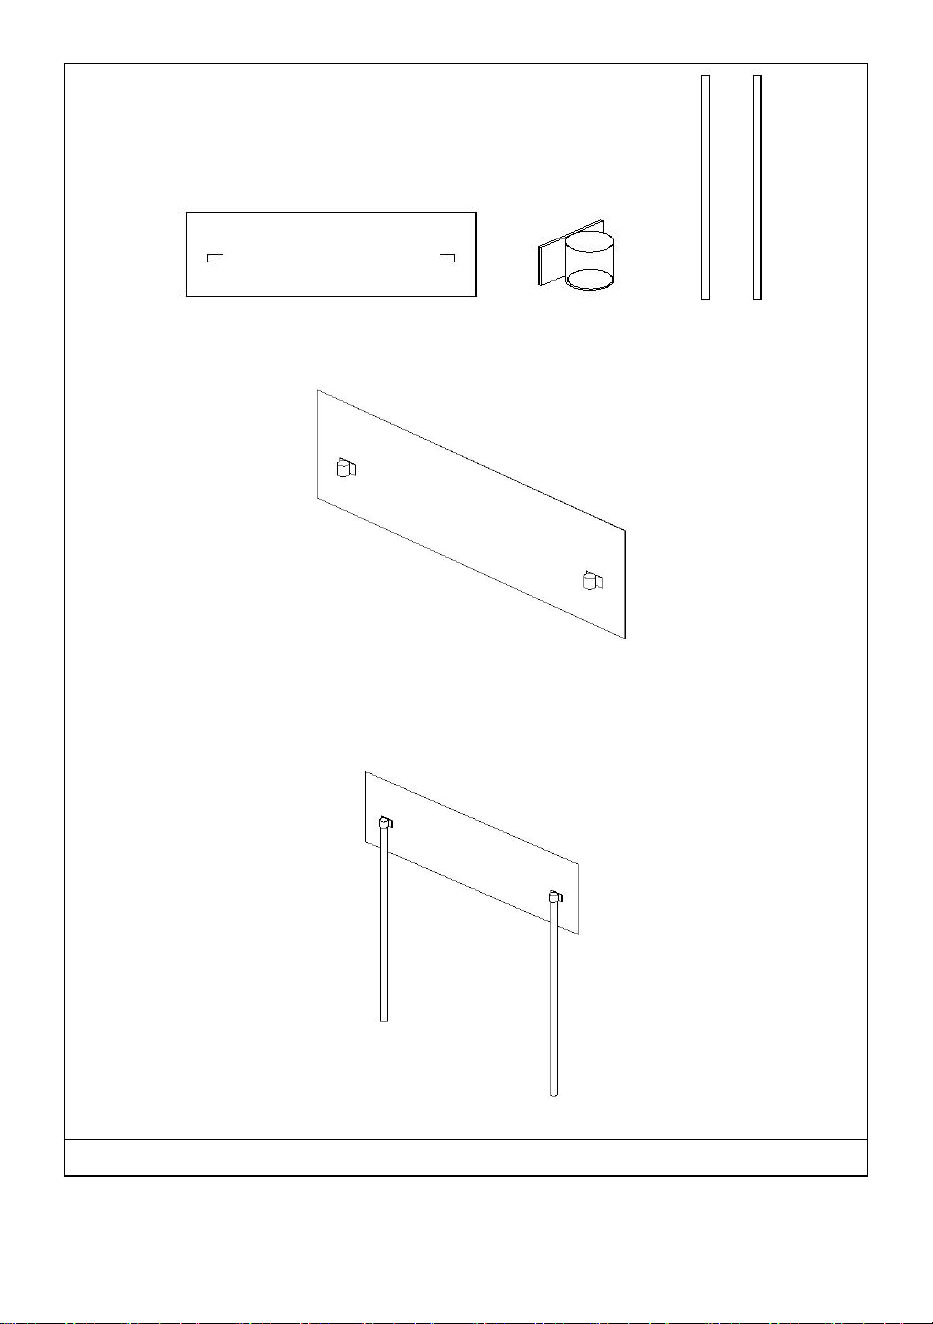
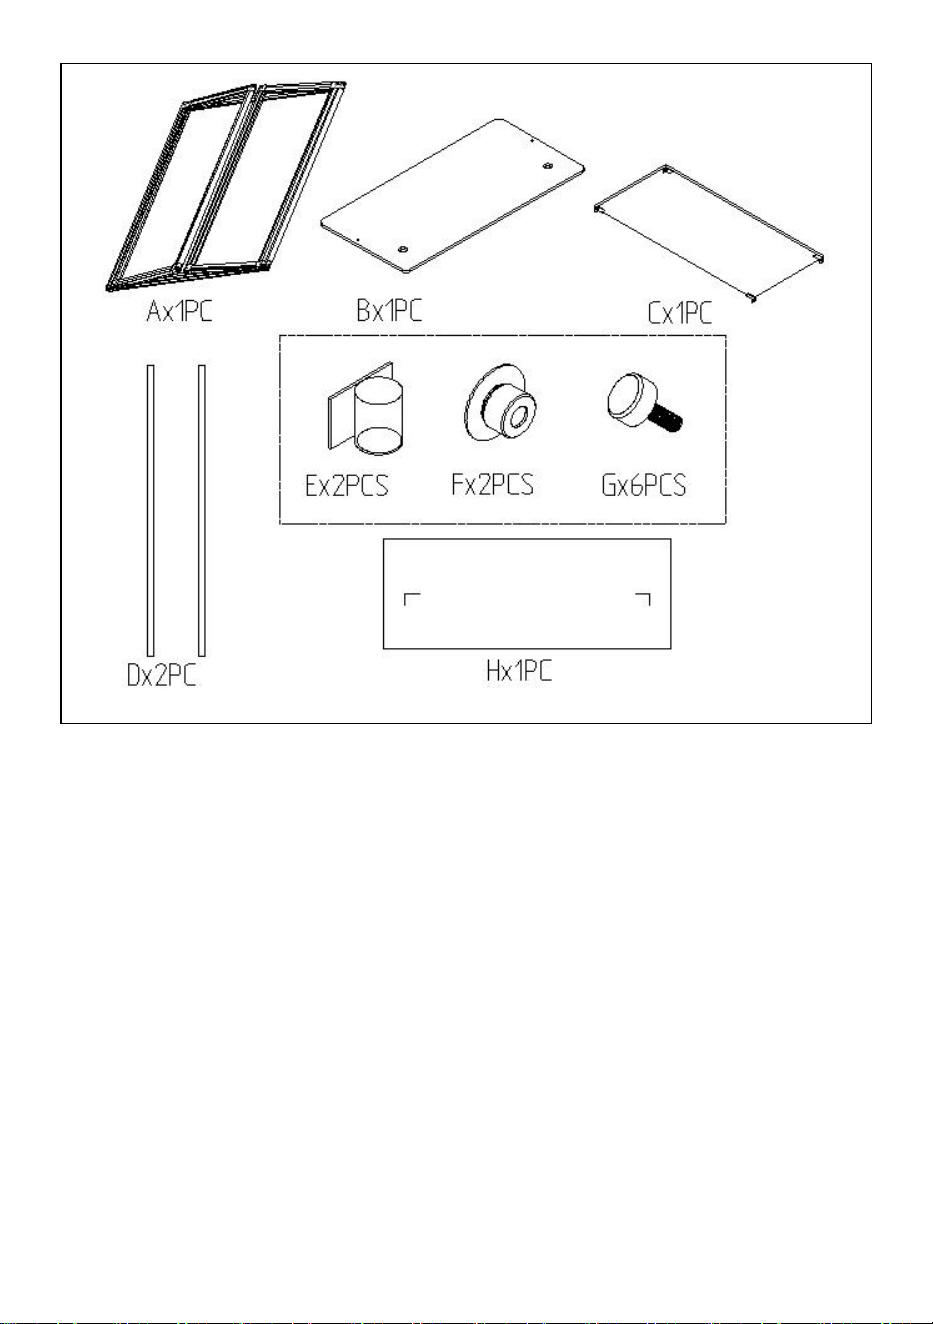
PACKAGE CONTENTS
- 4 -
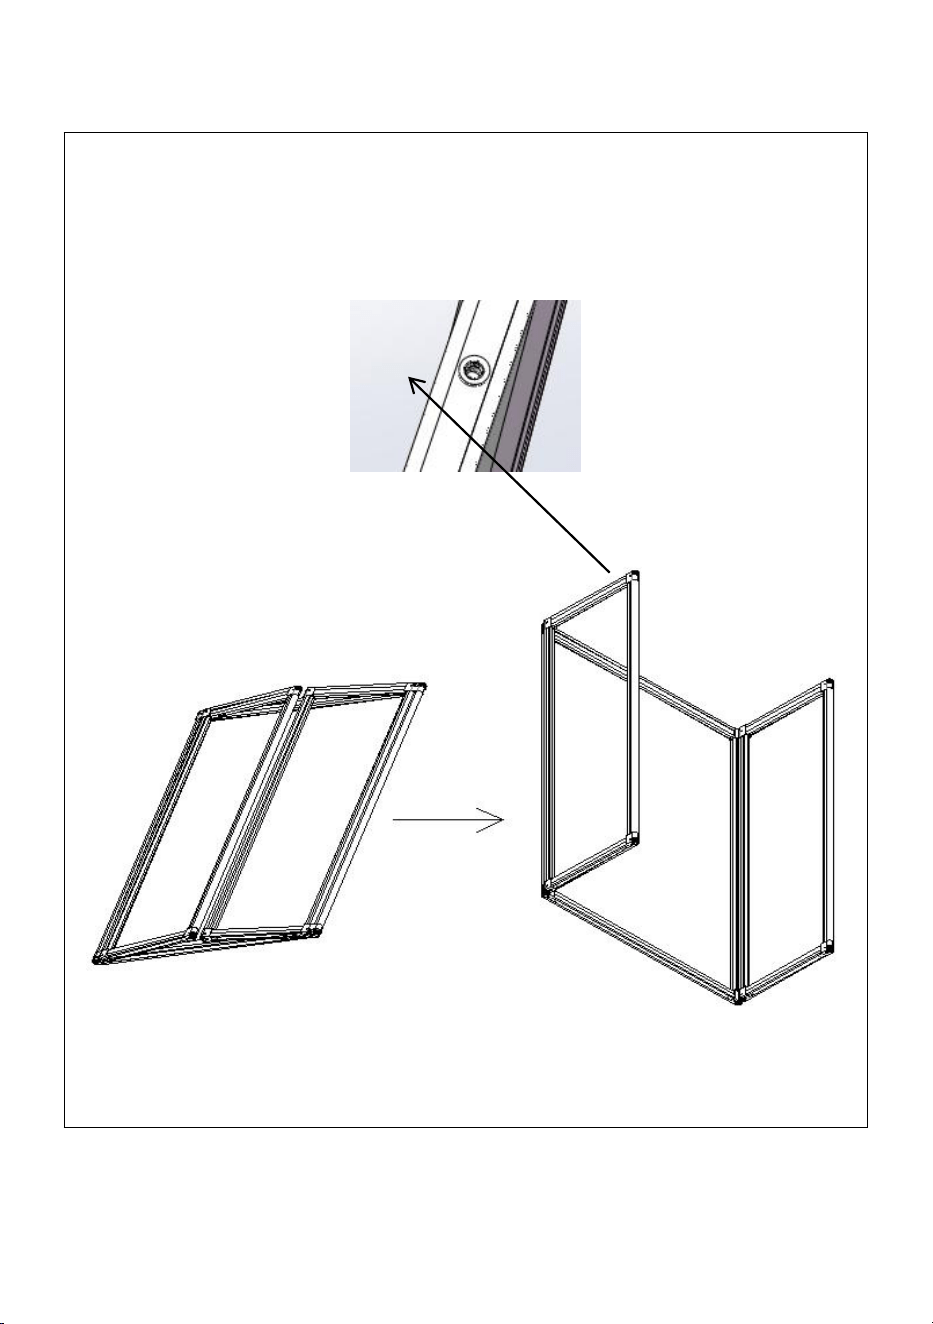
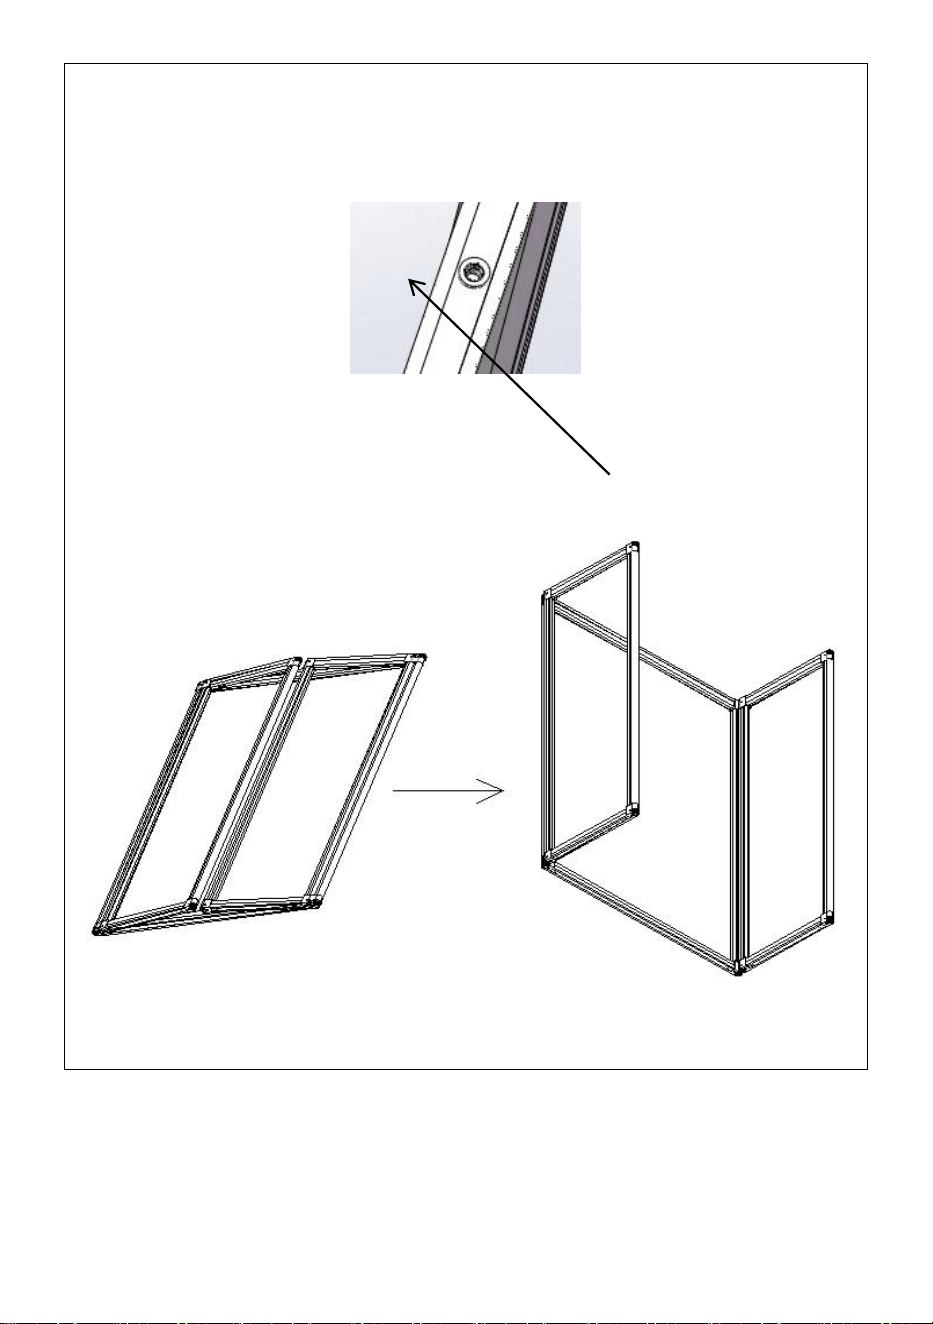
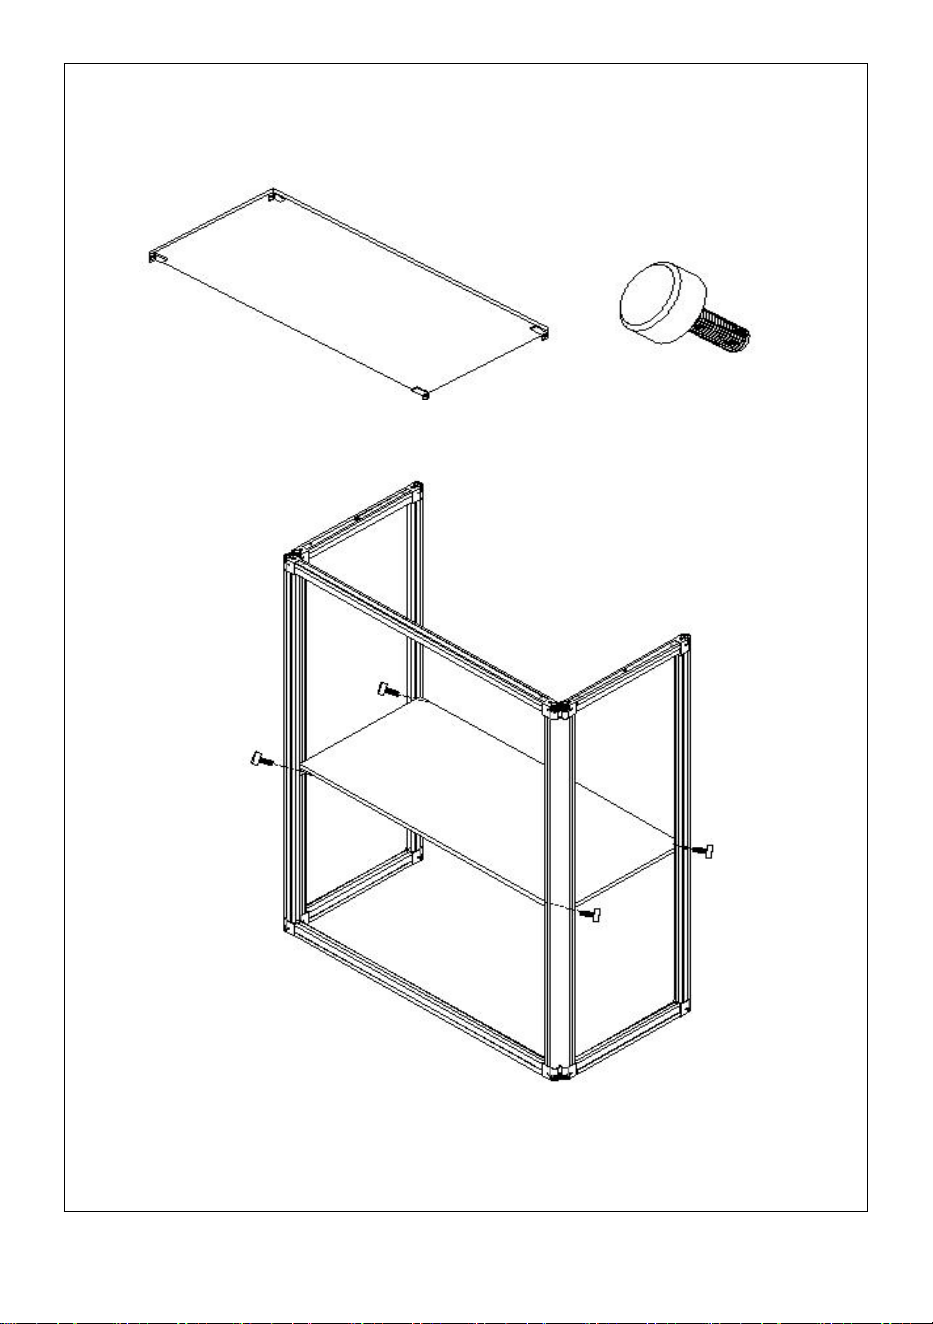
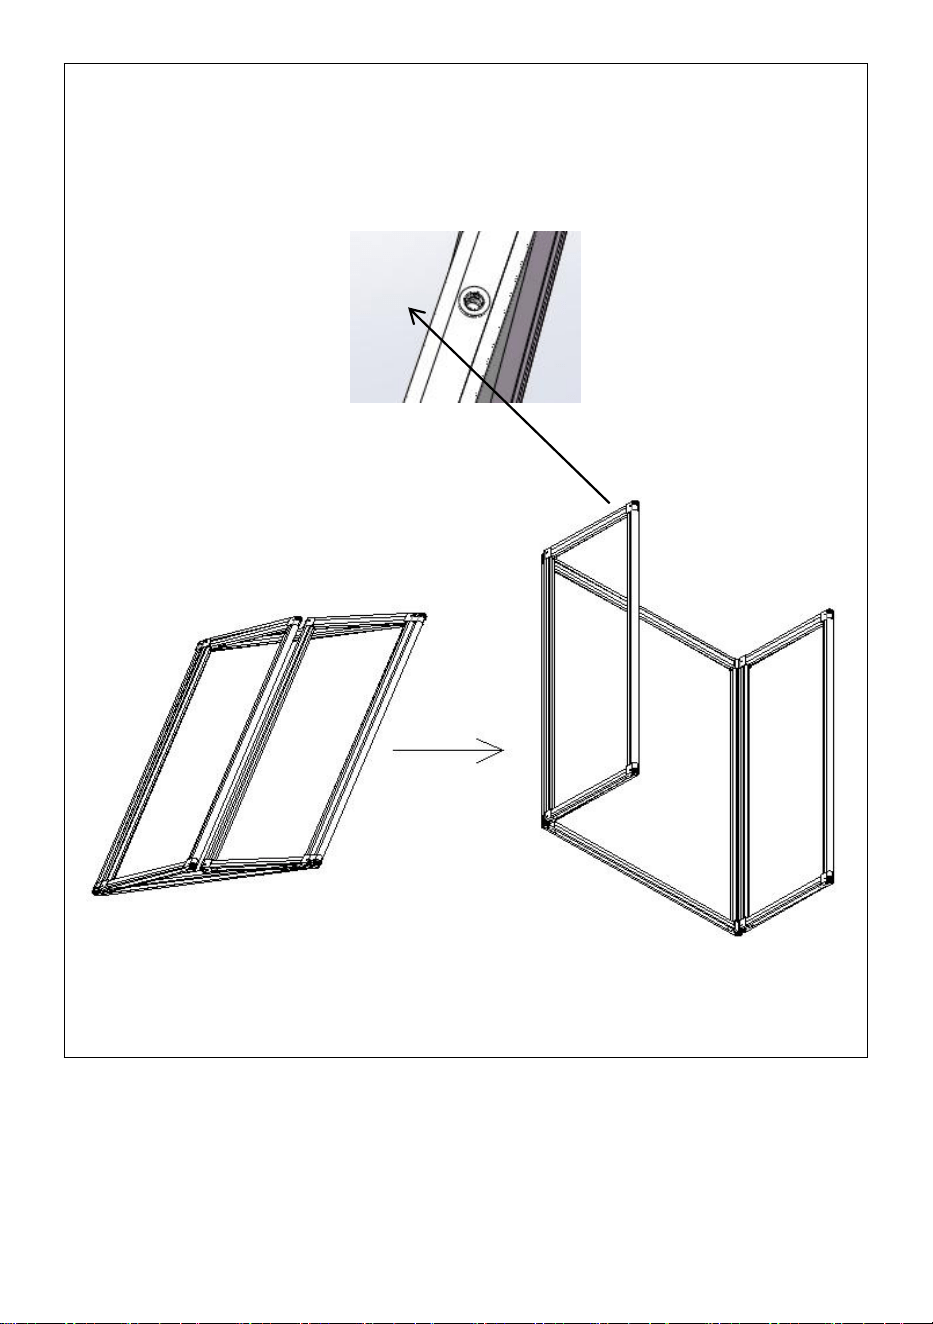
ASSEMBLY STEPS
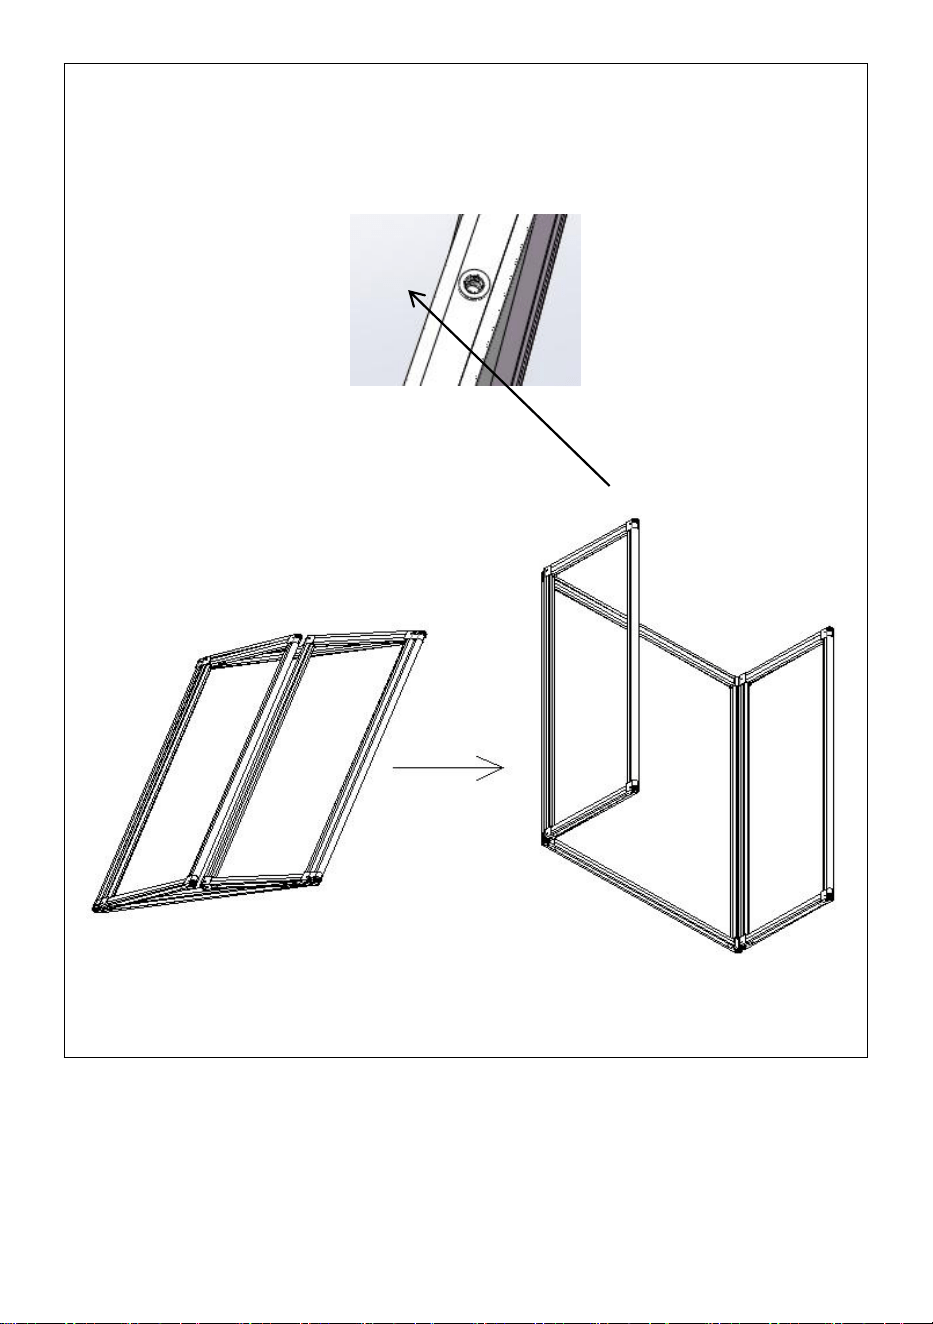
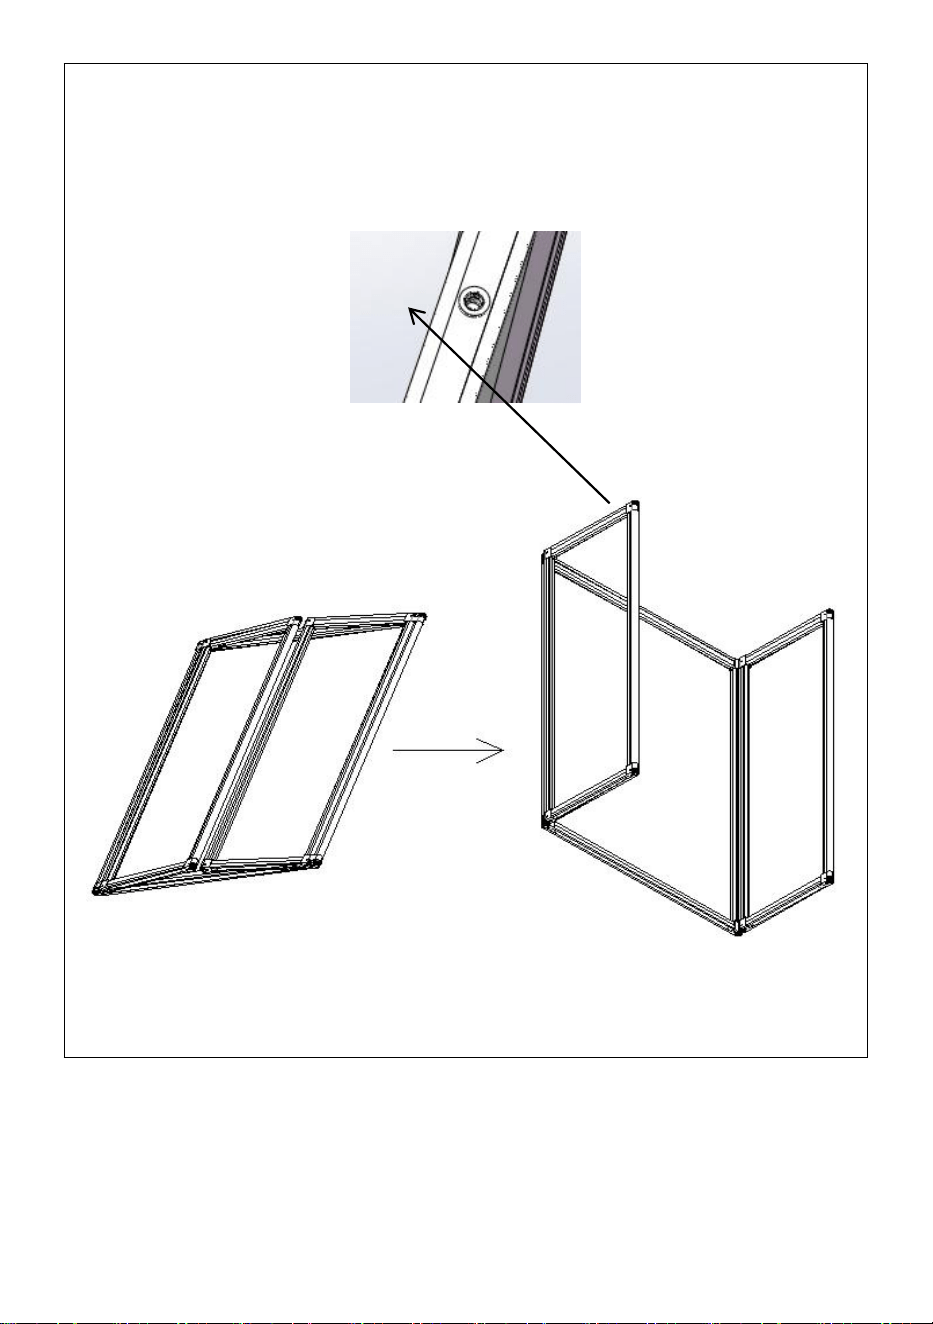
STEP1
The profiles at both ends
are upward with threaded holes.
Take out the folding shelf A, unfold it and put it on the ground.

- 5 -
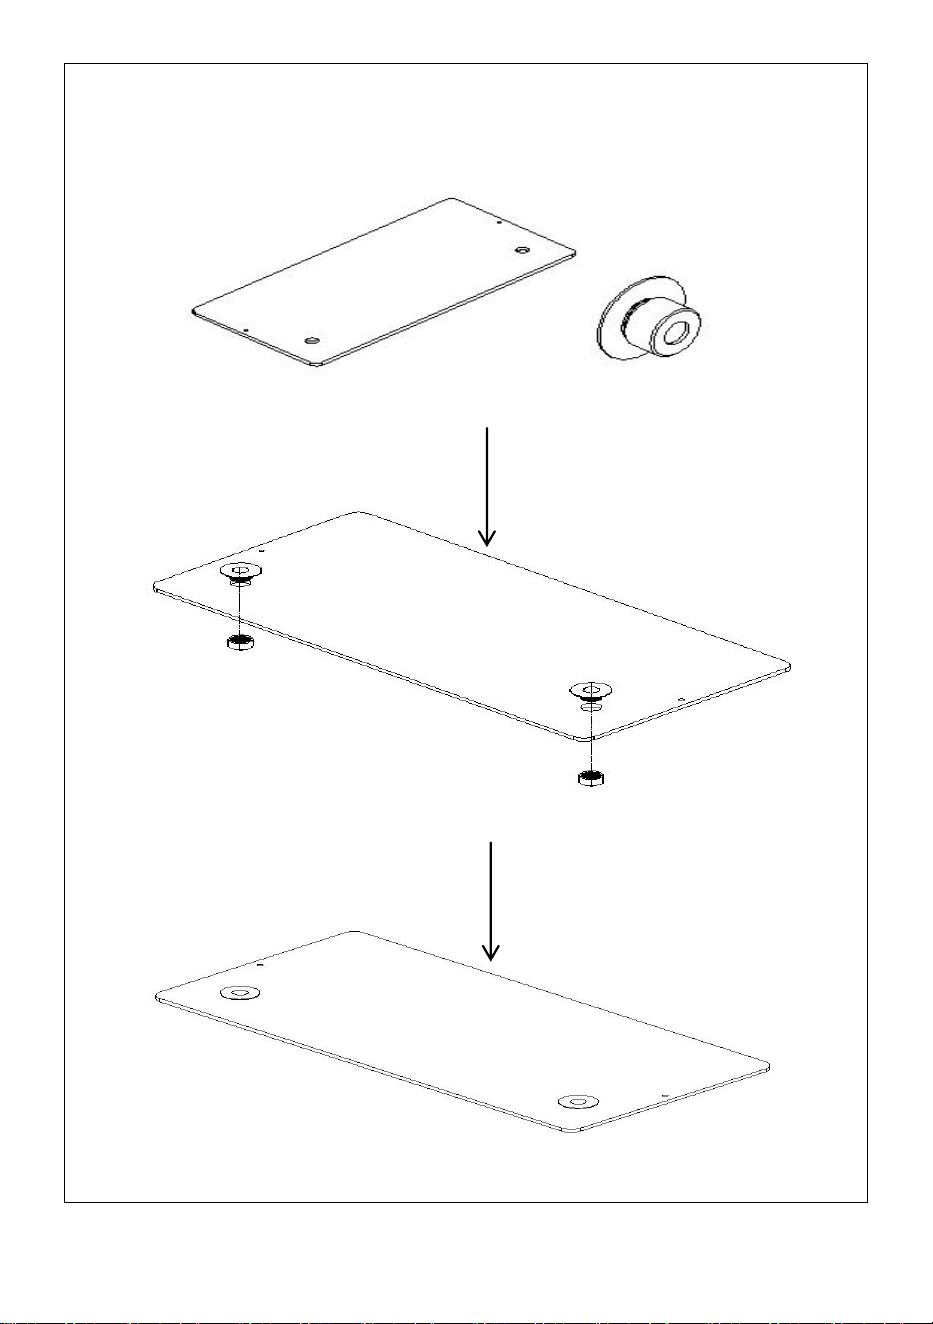
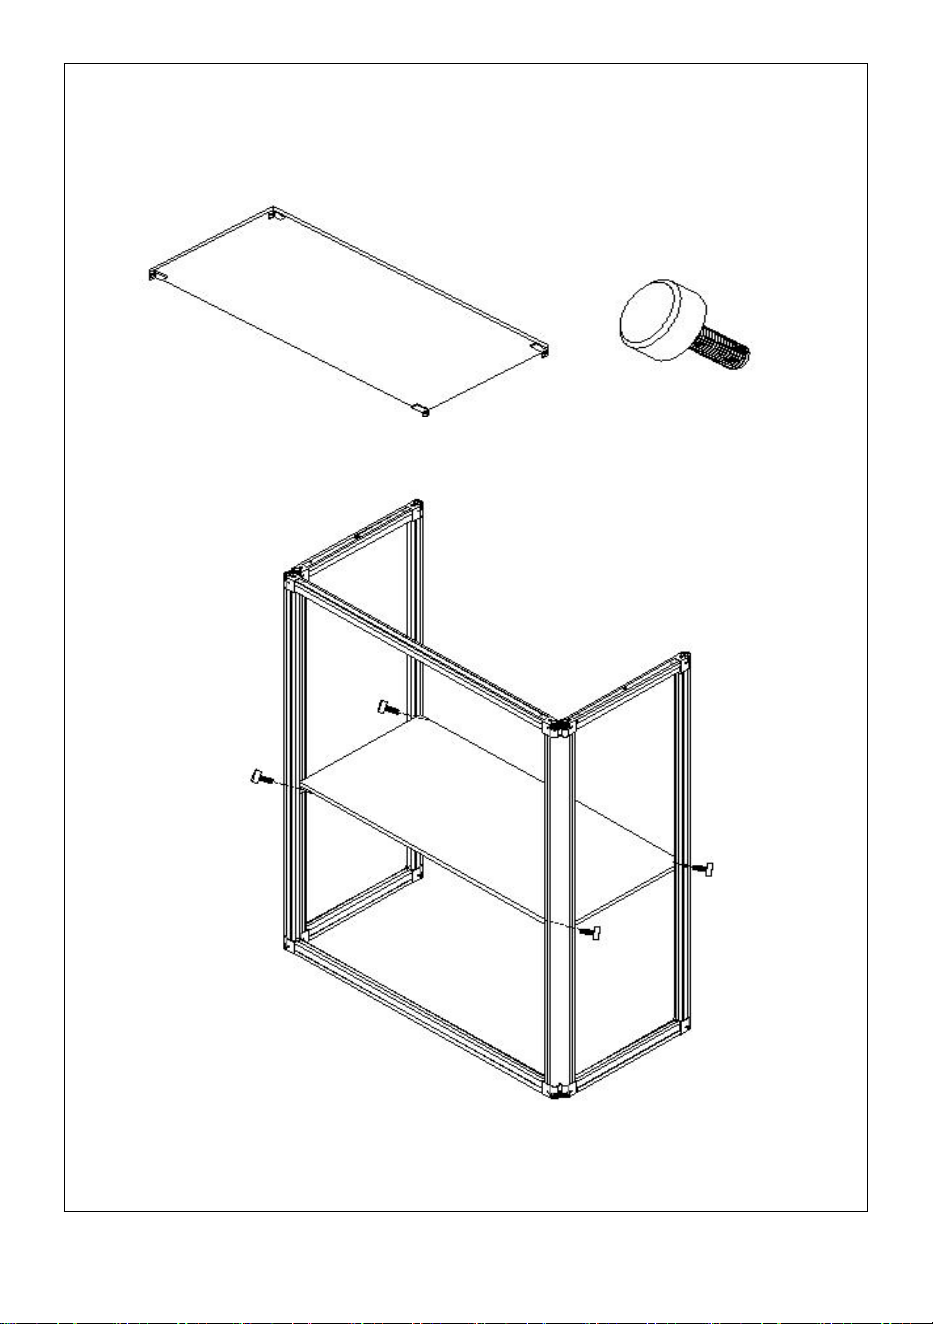
STEP2
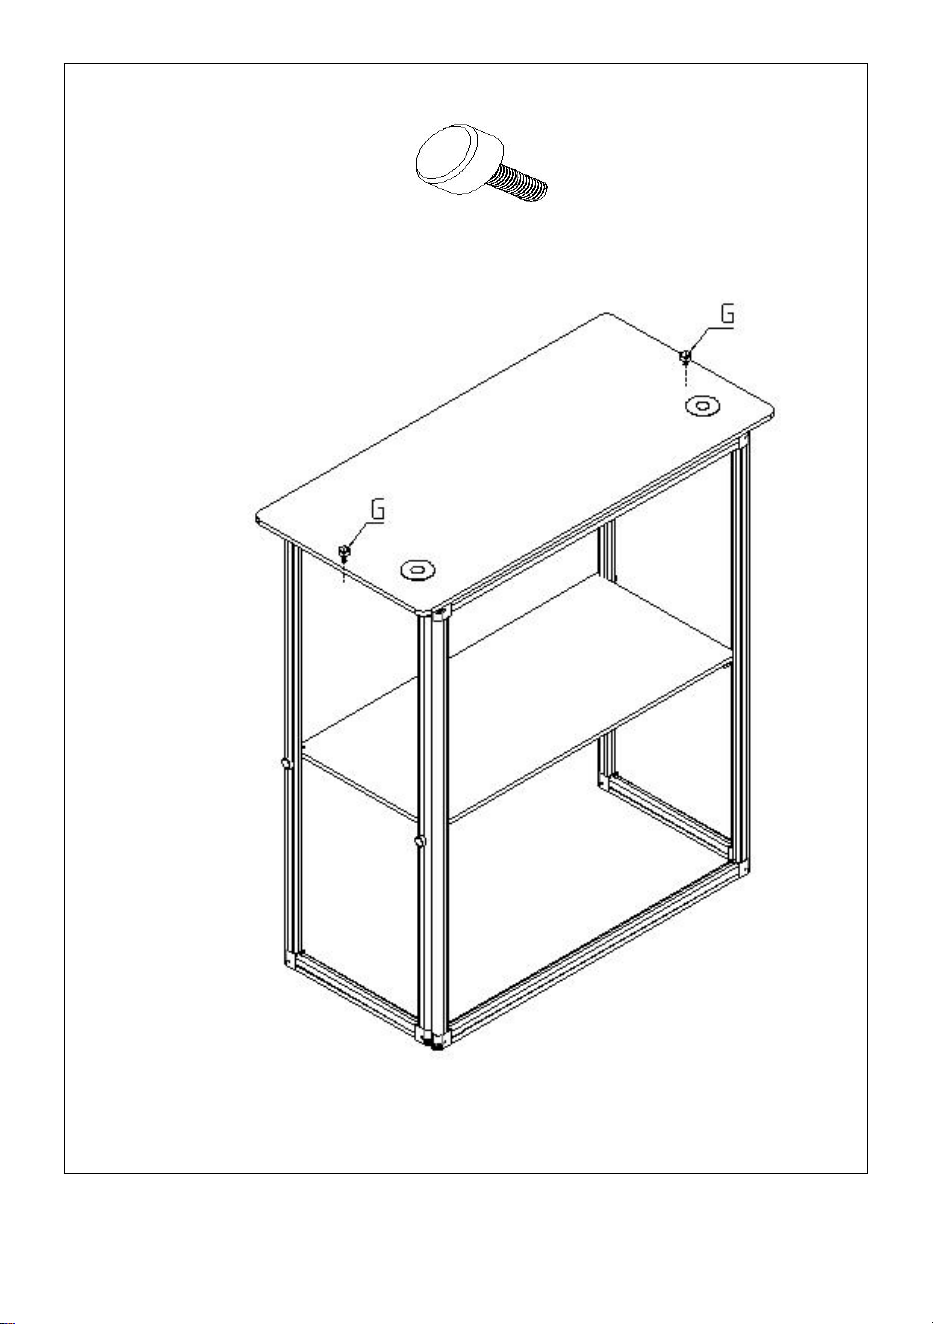
Take out the board C and 4 screws G.
Connect the board C with step1 by screwing the screw G by hand.

- 6 -
STEP3
Take out B and F
Combination of plastic part F and panel B
Combination complete

- 7 -
STEP4
Take out the remaining 2 screws G.
STEP3 and STEP2 are combined together by the screw G to complete the
assembly.

- 8 -
STEP 5
Take out fittings H, E and D.
Tear off the double-sided adhesive film on the E fitting and stick it on the
marked part of the H fitting.
Insert the fitting D into the round hole of the fitting E, and complete the
assembly.

- 9 -
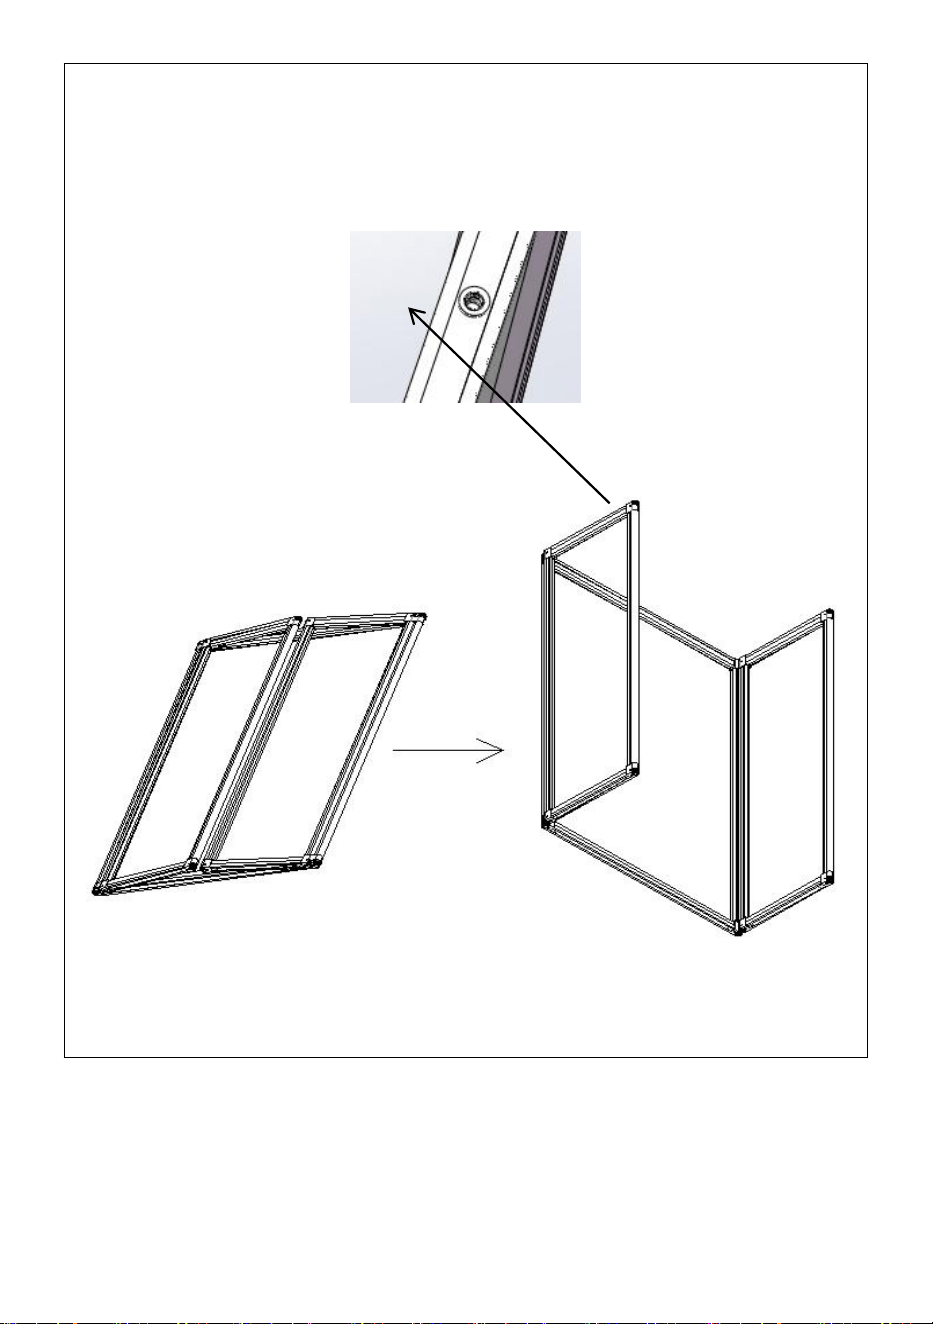
STEP 6
STEP 5 fitting D is inserted into the round hole of STEP 4 fitting F to complete
the assembly.
COMPLETION

- 10 -
Manufacturer: Shanghaimuxinmuyeyouxiangongsi
Address: Shuangchenglu 803nong11hao1602A-1609shi, baoshanqu,
shanghai 200000 CN.
Imported to AUS: SIHAO PTY LTD. 1 ROKEVA STREETEASTWOOD
NSW 2122 Australia
Imported to USA: Sanven Technology Ltd. Suite 250, 9166 Anaheim
Place, Rancho Cucamonga, CA 91730
REP
UK
YH CONSULTING LIMITED. C/O YH Consulting
Limited Office 147, Centurion House, London
Road, Staines-upon-Thames, Surrey, TW18 4AX
REP
EC
E-CrossStu GmbH
Mainzer Landstr.69,
60329 Frankfurt am Main.

- 11 -


Techniczny Wsparcie i certyfikat gwarancji elektronicznej
https://www.vevor.com/support
STANOWISKO TARGOWE
INSTRUKCJA OBSŁUGI
NR MODELU: ZG-CXT02
We continue to be committed to provide you tools with competitive price.
"Save Half", "Half Price" or any other similar expressions used by us only represents an
estimate of savings you might benefit from buying certain tools with us compared to the major
top brands and does not necessarily mean to cover all categories of tools offered by us. You
are kindly reminded to verify carefully when you are placing an order with us if you are
actually saving half in comparison with the top major brands.
- 1 -
NR MODELU: ZG-CXT02
Have product questions? Need technical support? Please feel free to
contact us:
Technical Support and E-Warranty Certificate
www.vevor.com/support
NEED HELP? CONTACT US!
This is the original instruction, please read all manual instructions
carefully before operating. VEVOR reserves a clear interpretation of our
user manual. The appearance of the product shall be subject to the
product you received. Please forgive us that we won't inform you again if
there are any technology or software updates on our product.
Trade Show Counter

- 2 -
OSTRZEŻENIE:
Przed użyciem produktu należy uważnie przeczytać tę instrukcję.
Nieprzestrzeganie jej może spowodować poważne obrażenia.
ZACHOWAJ TĘ INSTRUKCJĘ
ŚRODKI OSTROŻNOŚCI PODCZAS MONTAŻU
1. Montaż należy wykonywać wyłącznie zgodnie z niniejszą instrukcją.
Nieprawidłowy montaż może stwarzać zagrożenia.
2. Podczas montażu należy nosić okulary ochronne z atestem ANSI oraz
wytrzymałe rękawice robocze.
3. Utrzymuj miejsce zgromadzenia w czystości i zapewnij dobre
oświetlenie.
4. Nie dopuszczać osób postronnych na teren montażu podczas jego
trwania.
5. Nie przychodź na spotkania, jeśli jesteś zmęczony lub pod wpływem
alkoholu, narkotyków lub leków.
6. Możliwości produktu odnoszą się wyłącznie do produktów prawidłowo i
kompletnie zmontowanych.
7. Montaż należy wykonać na płaskiej, równej, twardej i gładkiej
powierzchni, która będzie w stanie bezpiecznie utrzymać ladę targową.
8. Aby uzyskać dodatkowe informacje dotyczące części wymienionych na
kolejnych stronach, zapoznaj się ze schematem montażu w tym
podręczniku. Rozpakuj i oddziel wszystkie części w czystym miejscu
pracy.
ŚRODKI OSTROŻNOŚCI
ABY ZAPOBIEC POWAŻNYM OBRAŻENIOM I ŚMIERCI
SPOWODOWANEJ PRZEWRÓCENIEM:
1. NIE SIADAĆ ANI NIE STAWAĆ NA TYM PRZEDMIOCIE.
2. Ten produkt nie jest zabawką. Nie pozwalaj dzieciom bawić się tym

- 3 -
przedmiotem ani przebywać w jego pobliżu.
3. Nie przekraczać dopuszczalnego obciążenia . Przed przeniesieniem
należy opróżnić łóżka platformowe.
4. Stosować wyłącznie na płaskiej, równej, twardej i gładkiej powierzchni,
która może bezpiecznie utrzymać w pełni załadowane stoisko targowe.
5. Stosować wyłącznie zgodnie z przeznaczeniem.
Sprawdź przed każdym użyciem. Nie używaj, jeśli części są luźne lub
uszkodzone.
DANE TECHNICZNE
Model
ZG-CXT02
Wymiary produktu (dł.*szer.*wys.)
Wymiary 785*380*1815 mm
Rozmiar opakowania
(dł.*szer.*wys.)
730*105*915mm
Masa netto (kg)
8.05
Masa brutto (kg)
10.4
ZAWARTOŚĆ OPAKOWANIA

- 4 -
KROKI MONTAŻU
- 5 -
KROK 1
Profile na obu ko
ń
cach
skierowane ku górze i wyposażone w gwintowane
otwory.
Wyjmij składaną półkę A, rozłóż ją i połóż na podłodze.

- 6 -
KROK 2
Wyjmij płytkę C i 4 śruby G.
Podłącz płytkę C zgodnie z krokiem 1, wkręcając śrubę G ręcznie.

- 7 -
KROK 3
Wyjmij B i F
Połączenie części plastikowej F i panelu B
Kombinacja kompletna
- 8 -
KROK 4
Wyjmij pozostałe 2 śruby G.
KROK 3 i KROK 2 należy połączyć ze sobą za pomocą śruby G, aby zakoń
czyć montaż.
- 9 -
KROK 5
Wyjmij złączki H, E i D.
Oderwij dwustronną folię samoprzylepną z okucia E i przyklej ją do
oznaczonej części okucia H.
- 10 -
Włóż złączkę D do okrągłego otworu złączki E i zakończ montaż.
KROK 6
Złączkę D z KROKU 5 należy wsunąć w okrągły otwór złączki F z KROKU 4,
aby zakończyć montaż.
UKOŃCZENIE

- 11 -
Producent: Shanghaimuxinmuyeyouxiangongsi
Adres: Shuangchenglu 803nong11hao1602A-1609shi, baoshanqu,
Szanghaj 200000 CN.
Importowane do AUS: SIHAO PTY LTD. 1 ROKEVA
STREETEASTWOOD
NSW 2122 Australia
Importowane do USA: Sanven Technology Ltd. Suite 250, 9166 Anaheim
Miejsce, Rancho Cucamonga, CA 91730
REP
UK
YH CONSULTING LIMITED. C/O YH Consulting
Limited Office 147, Centurion House, London
Road, Staines-upon-Thames, Surrey, TW18 4AX
REP
EC
E-CrossStu GmbH
Mainzer Landstr.69,
60329 Frankfurt am Main.

- 12 -


Technisch Support und E-Garantie-Zertifikat https://www.vevor.com/support
MESSETHEKE
BENUTZERHANDBUCH
MODELL NR.: ZG-CXT02
We continue to be committed to provide you tools with competitive price.
"Save Half", "Half Price" or any other similar expressions used by us only represents an
estimate of savings you might benefit from buying certain tools with us compared to the major
top brands and does not necessarily mean to cover all categories of tools offered by us. You
are kindly reminded to verify carefully when you are placing an order with us if you are
actually saving half in comparison with the top major brands.

- 1 -
MODELL NR.: ZG-CXT02
Have product questions? Need technical support? Please feel free to
contact us:
Technical Support and E-Warranty Certificate
www.vevor.com/support
NEED HELP? CONTACT US!
This is the original instruction, please read all manual instructions
carefully before operating. VEVOR reserves a clear interpretation of our
user manual. The appearance of the product shall be subject to the
product you received. Please forgive us that we won't inform you again if
there are any technology or software updates on our product.
Trade Show Counter

- 2 -
WARNUNG:
Bitte lesen Sie dieses Handbuch sorgfältig durch, bevor Sie das
Produkt verwenden. Andernfalls kann es zu schweren Verletzungen
kommen. BEWAHREN SIE DIESES HANDBUCH AUF
VORSICHTSMASSNAHMEN BEI DER MONTAGE
1. Führen Sie die Montage nur gemäß dieser Anleitung durch. Eine
unsachgemäße Montage kann zu Gefahren führen.
2. Tragen Sie während der Montage eine ANSI-geprüfte Schutzbrille und
robuste Arbeitshandschuhe.
3. Halten Sie den Versammlungsbereich sauber und gut beleuchtet.
4. Halten Sie während der Montage unbeteiligte Zuschauer vom Bereich
fern.
5. Nicht zusammenbauen, wenn Sie müde sind oder unter Einfluss von
Alkohol, Drogen oder Medikamenten stehen.
6. Die Produktfunktionen gelten nur für ordnungsgemäß und vollständig
montierte Produkte.
7. Bauen Sie den Messestand auf einer flachen, ebenen, harten und
glatten Oberfläche auf, die ihn sicher tragen kann.
8. Weitere Informationen zu den auf den folgenden Seiten aufgeführten
Teilen finden Sie im Montagediagramm dieses Handbuchs. Packen Sie
alle Teile in einem sauberen Arbeitsbereich aus und trennen Sie sie.
VORSICHTSMASSNAHMEN BEIM GEBRAUCH
UM SCHWERE VERLETZUNGEN UND TOD DURCH KIPPEN ZU
VERMEIDEN:
1. Setzen oder stellen Sie sich nicht auf diesen Gegenstand.
2. Dieses Produkt ist kein Spielzeug. Erlauben Sie Kindern nicht, mit
diesem Produkt zu spielen oder in dessen Nähe zu kommen.
3. Überschreiten Sie nicht die Gewichtskapazität . Bitte leeren Sie
- 3 -
Plattformbetten, bevor Sie sie bewegen.
4. Nur auf einer flachen, ebenen, harten und glatten Oberfläche
verwenden, die einen voll beladenen Messestand sicher tragen kann.
5. Nur bestimmungsgemäß verwenden.
Vor jedem Gebrauch überprüfen. Nicht verwenden, wenn Teile lose oder
beschädigt sind.
TECHNISCHE DATEN
Modell
ZG-CXT02
Produktabmessungen (L x B x H)
785*380*1815 mm
Verpackungsgröße (L x B x H)
730*105*915 mm
Nettogewicht (kg)
8. 0 5
Bruttogewicht (kg)
10.4
PACKUNGSINHALT

- 4 -
MONTAGEANLEITUNG
- 5 -
SCHRITT 1
Die Profile an beiden Enden
sind nach oben mit Gewindebohrungen versehen.
Nehmen Sie das Klappregal A heraus, klappen Sie es auf und legen Sie es
auf den Boden.
- 6 -
SCHRITT2
Nehmen Sie die Platine C und die 4 Schrauben G heraus.
Verbinden Sie die Platine C mit Schritt 1, indem Sie die Schraube G von
Hand einschrauben.

- 7 -
SCHRITT3
Nehmen Sie B und F heraus
Kombination aus Kunststoffteil F und Platte B
Kombination komplett

- 8 -
SCHRITT4
Entfernen Sie die restlichen 2 Schrauben G.
SCHRITT 3 und SCHRITT 2 werden durch die Schraube G miteinander
verbunden, um die Montage abzuschließen.

- 9 -
SCHRITT 5
Nehmen Sie die Armaturen H, E und D heraus.
Doppelseitige Klebefolie am E-Fitting abziehen und auf die markierte Stelle
am H-Fitting kleben.
Stecken Sie die Armatur D in das runde Loch der Armatur E und schließen
Sie die Montage ab.
- 10 -
SCHRITT 6
Um die Montage abzuschließen, wird in SCHRITT 5 Armatur D in das runde
Loch von SCHRITT 4 Armatur F eingesetzt.
FERTIGSTELLUNG

- 11 -
Hersteller: Shanghaimuxinmuyeyouxiangongsi
Adresse: Shuangchenglu 803nong11hao1602A-1609shi, baoshanqu,
Shanghai, 200.000 CN.
Nach AUS importiert: SIHAO PTY LTD. 1 ROKEVA
STREETEASTWOOD
NSW 2122 Australien
Importiert in die USA: Sanven Technology Ltd. Suite 250, 9166 Anaheim
Ort, Rancho Cucamonga, CA 91730
REP
UK
YH CONSULTING LIMITED. C/O YH Consulting
Limited Office 147, Centurion House, London
Road, Staines-upon-Thames, Surrey, TW18 4AX
REP
EC
E-CrossStu GmbH
Mainzer Landstr.69,
60329 Frankfurt am Main.

- 12 -


Technique Certificat d'assistance et de garantie électronique
https://www.vevor.com/support
COMPTOIR D'EXPOSITION
MANUEL D'UTILISATION
MODÈLE N° : ZG-CXT02
We continue to be committed to provide you tools with competitive price.
"Save Half", "Half Price" or any other similar expressions used by us only represents an
estimate of savings you might benefit from buying certain tools with us compared to the major
top brands and does not necessarily mean to cover all categories of tools offered by us. You
are kindly reminded to verify carefully when you are placing an order with us if you are
actually saving half in comparison with the top major brands.

- 1 -
MODÈLE N° : ZG-CXT02
Have product questions? Need technical support? Please feel free to
contact us:
Technical Support and E-Warranty Certificate
www.vevor.com/support
NEED HELP? CONTACT US!
This is the original instruction, please read all manual instructions
carefully before operating. VEVOR reserves a clear interpretation of our
user manual. The appearance of the product shall be subject to the
product you received. Please forgive us that we won't inform you again if
there are any technology or software updates on our product.
Trade Show Counter

- 2 -
AVERTISSEMENT:
Veuillez lire attentivement ce manuel avant d'utiliser le produit. Le
non-respect de ces instructions peut entraîner des blessures graves.
CONSERVEZ CE MANUEL
PRÉCAUTIONS D'ASSEMBLAGE
1. Assembler uniquement selon ces instructions. Un assemblage incorrect
peut créer des dangers.
2. Portez des lunettes de sécurité approuvées ANSI et des gants de travail
robustes pendant l’assemblage.
3. Gardez la zone de montage propre et bien éclairée.
4. Gardez les spectateurs hors de la zone pendant le montage.
5. Ne pas monter si vous êtes fatigué ou sous l'influence de l'alcool, de
drogues ou de médicaments.
6. Les capacités du produit s'appliquent uniquement aux produits
correctement et entièrement assemblés.
7. Assembler sur une surface plane, de niveau, dure et lisse capable de
supporter en toute sécurité le comptoir d'exposition.
8. Pour plus d'informations sur les pièces répertoriées dans les pages
suivantes, reportez-vous au schéma d'assemblage de ce manuel.
Déballez et séparez toutes les pièces dans un espace de travail propre.
PRÉCAUTIONS D'EMPLOI
POUR ÉVITER LES BLESSURES GRAVES ET LA MORT RÉSULTANT
DU BASCULEMENT :
1. NE PAS S'ASSEOIR OU SE TENIR DEBOUT SUR CET ARTICLE.
2. Ce produit n'est pas un jouet. Ne laissez pas les enfants jouer avec ou à
proximité de cet article.
3. Ne pas dépasser les capacités de poids . Veuillez vider les lits

- 3 -
plateformes avant de les déplacer.
4. Utiliser uniquement sur une surface plane, plane, dure et lisse capable
de supporter en toute sécurité un comptoir d'exposition entièrement
chargé.
5. Utiliser uniquement comme prévu.
Inspectez l'appareil avant chaque utilisation. Ne l'utilisez pas si des pièces
sont desserrées ou endommagées.
CARACTÉRISTIQUES TECHNIQUES
Modèle
ZG-CXT02
Dimensions du produit (L x l x H)
785*380*1815 mm
Taille de l'emballage (L * l * H)
730*105*915mm
Poids net (kg)
8. 0 5
Poids brut (kg)
10.4
CONTENU DU COLIS

- 4 -
ÉTAPES D'ASSEMBLAGE

- 5 -
ÉTAPE 1
Les profils aux deux extrémités
sont vers le haut avec des trous filetés.
Retirez la tablette pliante A, dépliez-la et posez-la au sol.

- 6 -
ÉTAPE 2
Retirez la carte C et les 4 vis G.
Connectez la carte C avec l'étape 1 en vissant la vis G à la main.

- 7 -
ÉTAPE 3
Retirer B et F
Combinaison de la pièce en plastique F et du panneau B
Combinaison complète

- 8 -
ÉTAPE 4
Retirez les 2 vis restantes G.
Les étapes 3 et 2 sont combinées ensemble par la vis G pour terminer
l'assemblage.
- 9 -
ÉTAPE 5
Retirer les raccords H, E et D.
Déchirez le film adhésif double face du raccord E et collez-le sur la partie
marquée du raccord H.
Insérez le raccord D dans le trou rond du raccord E et terminez
l'assemblage.
- 10 -
ÉTAPE 6
Le raccord D de l'ÉTAPE 5 est inséré dans le trou rond du raccord F de l'ÉTAPE
4 pour terminer l'assemblage.
ACHÈVEMENT
- 11 -
Fabricant : Shanghaimuxinmuyeyouxiangongsi
Adresse : Shuangchenglu 803nong11hao1602A-1609shi, baoshanqu,
Shanghai 200 000 CN.
Importé en Australie : SIHAO PTY LTD. 1 ROKEVA
STREETEASTWOOD
NSW 2122 Australie
Importé aux États-Unis : Sanven Technology Ltd. Suite 250, 9166
Anaheim
Lieu, Rancho Cucamonga, CA 91730
REP
UK
YH CONSULTING LIMITED. C/O YH Consulting
Limited Office 147, Centurion House, London
Road, Staines-upon-Thames, Surrey, TW18 4AX
REP
EC
E-CrossStu GmbH
Mainzer Landstr.69,
60329 Frankfurt am Main.

- 12 -


Technisch Ondersteuning en E-garantiecertificaat https://www.vevor.com/support
BEURSBALIE
GEBRUIKERSHANDLEIDING
MODELNUMMER: ZG-CXT02
We continue to be committed to provide you tools with competitive price.
"Save Half", "Half Price" or any other similar expressions used by us only represents an
estimate of savings you might benefit from buying certain tools with us compared to the major
top brands and does not necessarily mean to cover all categories of tools offered by us. You
are kindly reminded to verify carefully when you are placing an order with us if you are
actually saving half in comparison with the top major brands.

- 1 -
MODELNUMMER: ZG-CXT02
Have product questions? Need technical support? Please feel free to
contact us:
Technical Support and E-Warranty Certificate
www.vevor.com/support
NEED HELP? CONTACT US!
This is the original instruction, please read all manual instructions
carefully before operating. VEVOR reserves a clear interpretation of our
user manual. The appearance of the product shall be subject to the
product you received. Please forgive us that we won't inform you again if
there are any technology or software updates on our product.
Trade Show Counter

- 2 -
WAARSCHUWING:
Lees deze handleiding zorgvuldig door voordat u het product
gebruikt. Als u dit niet doet, kan dit leiden tot ernstig letsel. BEWAAR
DEZE HANDLEIDING
MONTAGEVOORZORGSMAATREGELEN
1. Monteer alleen volgens deze instructies. Onjuiste montage kan gevaren
opleveren.
2. Draag tijdens de montage een ANSI-goedgekeurde veiligheidsbril en
stevige werkhandschoenen.
3. Zorg ervoor dat de verzamelplaats schoon en goed verlicht is.
4. Houd omstanders uit de buurt tijdens de montage.
5. Kom niet in actie als u moe bent of onder invloed van alcohol, drugs of
medicijnen.
6. De producteigenschappen gelden uitsluitend voor correct en volledig
gemonteerde producten.
7. Monteer de opstelling op een vlak, egaal, hard en glad oppervlak dat de
beursbalie veilig kan dragen.
8. Voor aanvullende informatie over de onderdelen die op de volgende
pagina's worden vermeld, raadpleegt u het montageschema van deze
handleiding. Pak alle onderdelen uit en scheid ze in een schone
werkruimte.
GEBRUIK VOORZORGSMAATREGELEN
OM ERNSTIG LETSEL EN DE DOOD DOOR KANTELEN TE
VOORKOMEN:
1. NIET OP DIT ARTIKEL ZITTEN OF STAAN.
2. Dit product is geen speelgoed. Laat kinderen niet met of in de buurt van
dit item spelen.
3. Overschrijd het maximale gewicht niet . Maak de platformbedden leeg

- 3 -
voordat u ze verplaatst.
4. Alleen gebruiken op een vlak, egaal, hard en glad oppervlak dat een
volledig beladen beursbalie veilig kan dragen.
5. Alleen gebruiken zoals bedoeld.
Inspecteer voor elk gebruik. Gebruik het niet als onderdelen los of
beschadigd zijn.
TECHNISCHE SPECIFICATIES
Model
ZG-CXT02
Productafmetingen (L*B*H)
785*380* 1815mm
Verpakkingsgrootte (L*B*H)
730*105*915mm
Nettogewicht (kg)
8.05
Brutogewicht (kg)
10.4
INHOUD VAN HET PAKKET

- 4 -
MONTAGESTAPPEN
- 5 -
STAP 1
De profielen aan beide uiteinden
zijn naar boven gericht en voorzien van
schroefdraadgaten.
Haal de opvouwbare plank A eruit, vouw hem uit en leg hem op de grond.

- 6 -
STAP 2
Verwijder bord C en de 4 schroeven G.
Verbind bord C met stap 1 door schroef G met de hand vast te draaien.
- 7 -
STAP 3
Haal B en F eruit
Combinatie van kunststofdeel F en paneel B
Combinatie compleet

- 8 -
STAP 4
Verwijder de resterende 2 schroeven G.
STEP3 en STEP2 worden met elkaar verbonden door schroef G om de
montage te voltooien.
- 9 -
STAP 5
Haal de fittingen H, E en D eruit.
Scheur de dubbelzijdige kleeffolie van de E-fitting af en plak deze op het
gemarkeerde deel van de H-fitting.
Plaats de fitting D in het ronde gat van de fitting E en voltooi de montage.
STAP 6
- 10 -
STAP 5 fitting D wordt in het ronde gat van STAP 4 fitting F gestoken om de
montage te voltooien.
VOLTOOIING

- 11 -
Fabrikant: Shanghaimuxinmuyeyouxiangongsi
Adres: Shuangchenglu 803nong11hao1602A-1609shi, baoshanqu,
Sjanghai 200000 CN.
Geïmporteerd naar AUS: SIHAO PTY LTD. 1 ROKEVA
STREETEASTWOOD
NSW 2122 Australië
Geïmporteerd naar de VS: Sanven Technology Ltd. Suite 250, 9166
Anaheim
Plaats, Rancho Cucamonga, CA 91730
REP
UK
YH CONSULTING LIMITED. C/O YH Consulting
Limited Office 147, Centurion House, London
Road, Staines-upon-Thames, Surrey, TW18 4AX
REP
EC
E-CrossStu GmbH
Mainzer Landstr.69,
60329 Frankfurt am Main.

- 12 -


Teknisk Support och e-garanticertifikat https://www.vevor.com/support
MÄSSDISK
ANVÄNDARMANUAL
MODELLNR: ZG-CXT02
We continue to be committed to provide you tools with competitive price.
"Save Half", "Half Price" or any other similar expressions used by us only represents an
estimate of savings you might benefit from buying certain tools with us compared to the major
top brands and does not necessarily mean to cover all categories of tools offered by us. You
are kindly reminded to verify carefully when you are placing an order with us if you are
actually saving half in comparison with the top major brands.

- 1 -
MODELLNR: ZG-CXT02
Have product questions? Need technical support? Please feel free to
contact us:
Technical Support and E-Warranty Certificate
www.vevor.com/support
NEED HELP? CONTACT US!
This is the original instruction, please read all manual instructions
carefully before operating. VEVOR reserves a clear interpretation of our
user manual. The appearance of the product shall be subject to the
product you received. Please forgive us that we won't inform you again if
there are any technology or software updates on our product.
Trade Show Counter

- 2 -
VARNING:
Läs denna bruksanvisning noggrant innan du använder produkten.
Underlåtenhet att göra det kan leda till allvarliga skador. SPARA
DENNA MANUAL
FÖRSIKTIGHETSÅTGÄRDER FÖR MONTERING
1. Montera endast enligt dessa instruktioner. Felaktig montering kan skapa
faror.
2. Använd ANSI-godkända skyddsglasögon och kraftiga arbetshandskar
vid montering.
3. Håll monteringsområdet rent och väl upplyst.
4. Håll åskådare borta från området under monteringen.
5. Sätt dig inte ihop när du är trött eller påverkad av alkohol, droger eller
mediciner.
6. Produktegenskaperna gäller endast för korrekt och färdigmonterade
produkter.
7. Montera på en plan, jämn, hård och slät yta som säkert kan stödja
mässdisken.
8. För ytterligare information om delarna som listas på följande sidor, se
monteringsdiagrammet i denna manual. Packa upp och separera alla
delar på ett rent arbetsområde.
ANVÄND FÖRSIKTIGHETSÅTGÄRDER
FÖR ATT FÖRHINDRA ALLVARLIGA SKADA OCH DÖDSFALL VID
VÄLLNING:
1. SIT ELLER STÅ INTE PÅ DETTA FÖREMÅL.
2. Denna produkt är inte en leksak. Låt inte barn leka med eller nära detta
föremål.
3. Överskrid inte viktkapaciteten . Vänligen töm Plattformssängar innan du
flyttar.
- 3 -
4. Använd endast på en plan, jämn, hård och slät yta som säkert kan
stödja en fulladdad mässdisk.
5. Använd endast som avsett.
Inspektera före varje användning. Använd den inte om delar är lösa eller
skadade.
TEKNISKA SPECIFIKATIONER
Modell
ZG-CXT02
Produktmått (L*B*H)
785*380*1815 mm
Förpackningsstorlek (L*B*H)
730*105*915mm
Nettovikt (kg)
8. 0 5
Bruttovikt (kg)
10.4
PAKETETS INNEHÅLL

- 4 -
MONTERINGSSEG
- 5 -
STEG1
Profilerna i båda ändar
är uppåtriktade med gängade hål.
Ta ut den fällbara hyllan A, fäll ut den och lägg den på marken.

- 6 -
STEG 2
Ta ut brädan C och 4 skruvar G.
Anslut kortet C med steg 1 genom att skruva på skruven G för hand.

- 7 -
STEG 3
Ta ut B och F
Kombination av plastdel F och panel B
Kombinationen klar

- 8 -
STEG 4
Ta ut de återstående 2 skruvarna G.
STEP3 och STEP2 kombineras med skruven G för att slutföra monteringen.
STEG 5
- 9 -
Ta ut beslag H, E och D.
Riv av den dubbelhäftande filmen på E-beslaget och fäst den på den
markerade delen av H-beslaget.
Sätt in beslaget D i det runda hålet på beslaget E och slutför monteringen.
STEG 6

- 10 -
STEG 5-koppling D sätts in i det runda hålet på STEG 4-koppling F för att
slutföra monteringen.
KOMPLETTERING
- 11 -
Tillverkare: Shanghaimuxinmuyeyouxiangongsi
Adress: Shuangchenglu 803nong11hao1602A-1609shi, baoshanqu,
shanghai 200 000 CN.
Importerad till AUS: SIHAO PTY LTD. 1 ROKEVA STREETEASTWOOD
NSW 2122 Australien
Importerad till USA: Sanven Technology Ltd. Suite 250, 9166 Anaheim
Place, Rancho Cucamonga, CA 91730
REP
UK
YH CONSULTING LIMITED. C/O YH Consulting
Limited Office 147, Centurion House, London
Road, Staines-upon-Thames, Surrey, TW18 4AX
REP
EC
E-CrossStu GmbH
Mainzer Landstr.69,
60329 Frankfurt am Main.

- 12 -


Técnico Certificado de soporte y garantía electrónica
https://www.vevor.com/support
MOSTRADOR DE FERIA COMERCIAL
MANUAL DEL USUARIO
N.º DE MODELO: ZG-CXT02
We continue to be committed to provide you tools with competitive price.
"Save Half", "Half Price" or any other similar expressions used by us only represents an
estimate of savings you might benefit from buying certain tools with us compared to the major
top brands and does not necessarily mean to cover all categories of tools offered by us. You
are kindly reminded to verify carefully when you are placing an order with us if you are
actually saving half in comparison with the top major brands.

- 1 -
N.º DE MODELO: ZG-CXT02
Have product questions? Need technical support? Please feel free to
contact us:
Technical Support and E-Warranty Certificate
www.vevor.com/support
NEED HELP? CONTACT US!
This is the original instruction, please read all manual instructions
carefully before operating. VEVOR reserves a clear interpretation of our
user manual. The appearance of the product shall be subject to the
product you received. Please forgive us that we won't inform you again if
there are any technology or software updates on our product.
Trade Show Counter

- 2 -
ADVERTENCIA:
Lea atentamente este manual antes de utilizar el producto. De lo
contrario, podría sufrir lesiones graves. GUARDE ESTE MANUAL
PRECAUCIONES DE MONTAJE
1. Realice el montaje únicamente de acuerdo con estas instrucciones. Un
montaje inadecuado puede generar peligros.
2. Use gafas de seguridad aprobadas por ANSI y guantes de trabajo
resistentes durante el montaje.
3. Mantenga el área de reunión limpia y bien iluminada.
4. Mantenga a los transeúntes fuera del área durante el montaje.
5. No se reúna cuando esté cansado o bajo la influencia del alcohol,
drogas o medicamentos.
6. Las capacidades del producto se aplican únicamente a productos
ensamblados de forma correcta y completa.
7. Montar sobre una superficie plana, nivelada, dura y lisa capaz de
soportar de forma segura el mostrador de feria.
8. Para obtener información adicional sobre las piezas que se enumeran
en las páginas siguientes, consulte el diagrama de ensamblaje de este
manual. Desembale y separe todas las piezas en un área de trabajo
limpia.
PRECAUCIONES DE USO
PARA EVITAR LESIONES GRAVES Y LA MUERTE POR VUELCO:
1. NO SE SIENTA NI SE PARE SOBRE ESTE ARTÍCULO.
2. Este producto no es un juguete. No permita que los niños jueguen con
este artículo ni cerca de él.
3. No exceda las capacidades de peso . Vacíe las plataformas antes de
moverlas.
4. Úselo únicamente sobre una superficie plana, nivelada, dura y lisa
- 3 -
capaz de soportar de forma segura un mostrador de feria comercial
completamente cargado.
5. Úselo únicamente según lo previsto.
Inspeccione el producto antes de cada uso. No lo use si hay piezas sueltas
o dañadas.
ESPECIFICACIONES TÉCNICAS
Modelo
ZG-CXT02
Dimensiones del producto
(L*An*Al)
785*380*1815 milímetros
Tamaño del embalaje (L*An*Al)
730*105*915 mm
Peso neto (kg)
8. 0 5
Peso bruto (kg)
10.4
CONTENIDO DEL PAQUETE

- 4 -
PASOS DE MONTAJE
- 5 -
PASO 1
Los perfiles en ambos extremos
Estan hacia arriba con agujeros roscados.
Saque el estante plegable A, despliéguelo y colóquelo en el suelo.

- 6 -
PASO 2
Saque la placa C y los 4 tornillos G.
Conecte la placa C con el paso 1 atornillando el tornillo G con la mano.

- 7 -
PASO 3
Sacar B y F
Combinación de la pieza de plástico F y el panel B
Combinación completa

- 8 -
PASO 4
Retire los 2 tornillos restantes G.
STEP3 y STEP2 se combinan entre sí mediante el tornillo G para completar
el ensamblaje.

- 9 -
PASO 5
Retire los accesorios H, E y D.
Retire la película adhesiva de doble cara del accesorio E y péguela en la
parte marcada del accesorio H.
Inserte el accesorio D en el orificio redondo del accesorio E y complete el
montaje.

- 10 -
PASO 6
El accesorio D del PASO 5 se inserta en el orificio redondo del accesorio F del
PASO 4 para completar el ensamblaje.
TERMINACIÓN
- 11 -
Fabricante: Shanghaimuxinmuyeyouxiangongsi
Dirección: Shuangchenglu 803nong11hao1602A-1609shi, baoshanqu,
Shangai 200000 CN.
Importado a Australia: SIHAO PTY LTD. 1 ROKEVA
STREETEASTWOOD
Nueva Gales del Sur 2122 Australia
Importado a EE. UU.: Sanven Technology Ltd. Suite 250, 9166 Anaheim
Lugar, Rancho Cucamonga, CA 91730
REP
UK
YH CONSULTING LIMITED. C/O YH Consulting
Limited Office 147, Centurion House, London
Road, Staines-upon-Thames, Surrey, TW18 4AX
REP
EC
E-CrossStu GmbH
Mainzer Landstr.69,
60329 Frankfurt am Main.

- 12 -


Tecnico Supporto e certificato di garanzia elettronica
https://www.vevor.com/support
BANCONE DELLA FIERA
MANUALE D'USO
MODELLO NUMERO: ZG-CXT02
We continue to be committed to provide you tools with competitive price.
"Save Half", "Half Price" or any other similar expressions used by us only represents an
estimate of savings you might benefit from buying certain tools with us compared to the major
top brands and does not necessarily mean to cover all categories of tools offered by us. You
are kindly reminded to verify carefully when you are placing an order with us if you are
actually saving half in comparison with the top major brands.

- 1 -
MODELLO NUMERO: ZG-CXT02
Have product questions? Need technical support? Please feel free to
contact us:
Technical Support and E-Warranty Certificate
www.vevor.com/support
NEED HELP? CONTACT US!
This is the original instruction, please read all manual instructions
carefully before operating. VEVOR reserves a clear interpretation of our
user manual. The appearance of the product shall be subject to the
product you received. Please forgive us that we won't inform you again if
there are any technology or software updates on our product.
Trade Show Counter

- 2 -
AVVERTIMENTO:
Si prega di leggere attentamente questo manuale prima di utilizzare il
prodotto. La mancata osservanza di questa precauzione potrebbe
causare gravi lesioni. CONSERVARE QUESTO MANUALE
PRECAUZIONI DI MONTAGGIO
1. Montare solo secondo queste istruzioni. Un montaggio improprio può
creare pericoli.
2. Durante il montaggio, indossare occhiali di sicurezza omologati ANSI e
guanti da lavoro resistenti.
3. Mantenere l'area di riunione pulita e ben illuminata.
4. Durante l'assemblea, tenere gli astanti lontani dall'area.
5. Non riunirsi quando si è stanchi o sotto l'effetto di alcol, droghe o
farmaci.
6. Le capacità del prodotto si applicano solo ai prodotti correttamente e
completamente assemblati.
7. Montare su una superficie piana, livellata, dura e liscia, in grado di
sostenere in modo sicuro il bancone fieristico.
8. Per ulteriori informazioni sulle parti elencate nelle pagine seguenti, fare
riferimento allo schema di montaggio di questo manuale. Disimballare e
separare tutte le parti in un'area di lavoro pulita.
PRECAUZIONI D'USO
PER PREVENIRE LESIONI GRAVI E MORTALI DOVUTE AL
RIBALTAMENTO:
1. NON SEDERSI O STARE IN PIEDI SU QUESTO OGGETTO.
2. Questo prodotto non è un giocattolo. Non permettere ai bambini di
giocare con o vicino a questo articolo.
3. Non superare la capacità di peso . Si prega di svuotare i letti a
piattaforma prima dello spostamento.
- 3 -
4. Utilizzare solo su una superficie piana, livellata, dura e liscia, in grado di
sostenere in modo sicuro un bancone fieristico completamente carico.
5. Utilizzare solo come previsto.
Ispezionare prima di ogni utilizzo. Non utilizzarlo se le parti sono allentate o
danneggiate.
SPECIFICHE TECNICHE
Modello
Modello ZG-CXT02
Dimensioni del prodotto (L*W*H)
785*380*1815 millimetri
Dimensioni dell'imballaggio
(L*W*H)
730*105*915mm
Peso netto (kg)
8.0 5
Peso lordo (kg)
10.4
CONTENUTO DELLA CONFEZIONE
- 4 -
FASI DI MONTAGGIO
- 5 -
PASSO 1
I profili ad entrambe le estremità
sono rivolte verso l'alto con fori filettati.
Estrarre il ripiano pieghevole A, aprirlo e appoggiarlo a terra.
- 6 -
PASSO 2
Togliere la scheda C e le 4 viti G.
Collegare la scheda C al punto 1 avvitando manualmente la vite G.

- 7 -
PASSO 3
Togliere B e F
Combinazione della parte in plastica F e del pannello B
Combinazione completa

- 8 -
PASSO4
Togliere le restanti 2 viti G.
STEP3 e STEP2 vengono uniti insieme tramite la vite G per completare
l'assemblaggio.
- 9 -
PASSO 5
Estrarre i raccordi H, E e D.
Strappare la pellicola biadesiva dal raccordo E e attaccarla sulla parte
contrassegnata del raccordo H.
Inserire il raccordo D nel foro rotondo del raccordo E e completare il
montaggio.

- 10 -
PASSO 6
FASE 5 il raccordo D viene inserito nel foro rotondo del raccordo F FASE 4 per
completare il montaggio.
COMPLETAMENTO
- 11 -
Produttore: Shanghaimuxinmuyeyouxiangongsi
Indirizzo: Shuangchenglu 803nong11hao1602A-1609shi, baoshanqu,
shanghai 200000 CN.
Importato in AUS: SIHAO PTY LTD. 1 ROKEVA STREETEASTWOOD
Nuovo Galles del Sud 2122 Australia
Importato negli USA: Sanven Technology Ltd. Suite 250, 9166 Anaheim
Luogo, Rancho Cucamonga, CA 91730
REP
UK
YH CONSULTING LIMITED. C/O YH Consulting
Limited Office 147, Centurion House, London
Road, Staines-upon-Thames, Surrey, TW18 4AX
REP
EC
E-CrossStu GmbH
Mainzer Landstr.69,
60329 Frankfurt am Main.

- 12 -