Installation
Instructions
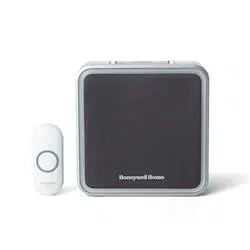
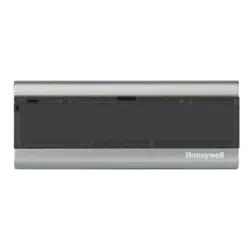
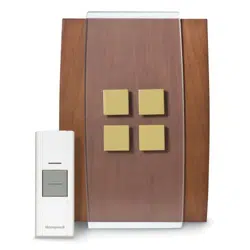
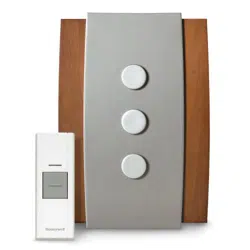
RCWL200A and RCWL210A
Portable Chime (51375SL; 51376SL) With Push (51381SL)
69-2112EFS-07
69-2112EFS_D.indd 1 12/10/2009 12:05:44 PM
Installation Instructions
69-2112EFS—07 ii
M27177
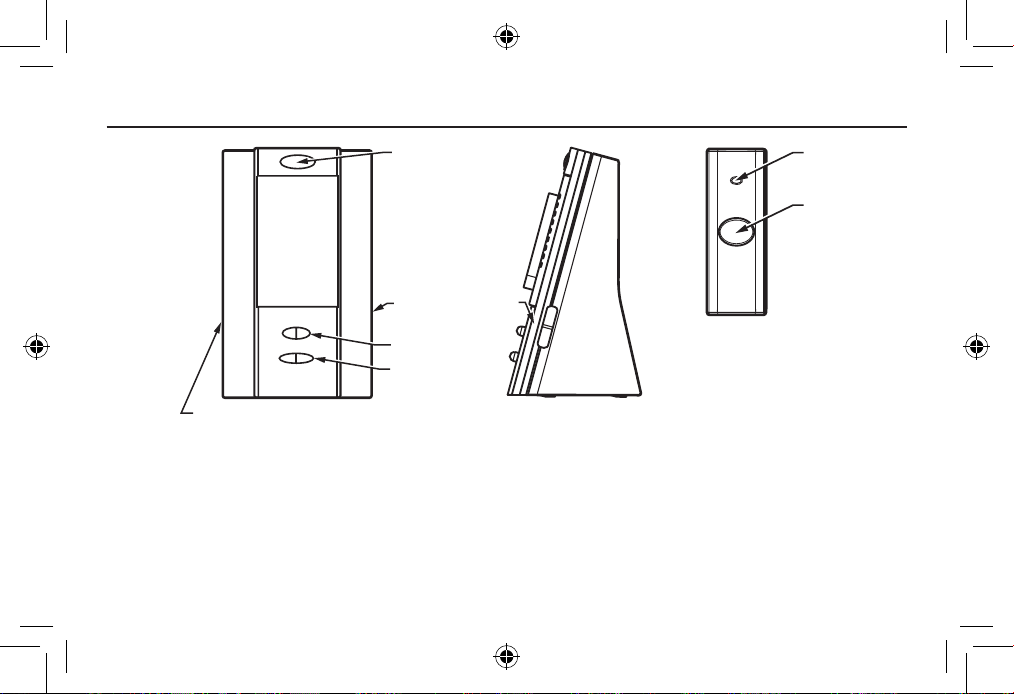
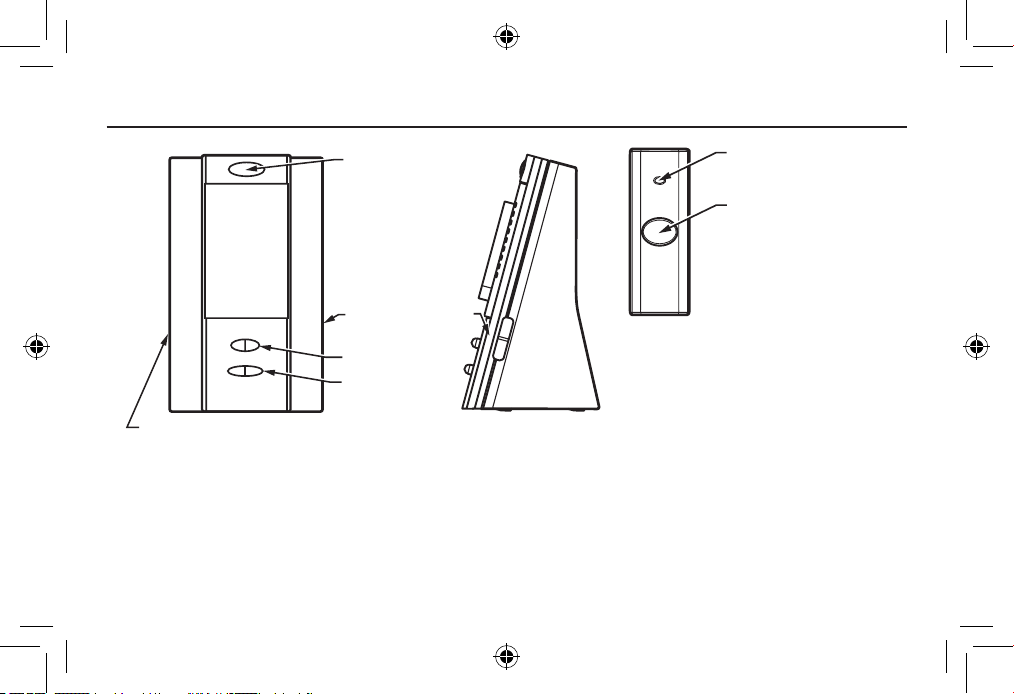
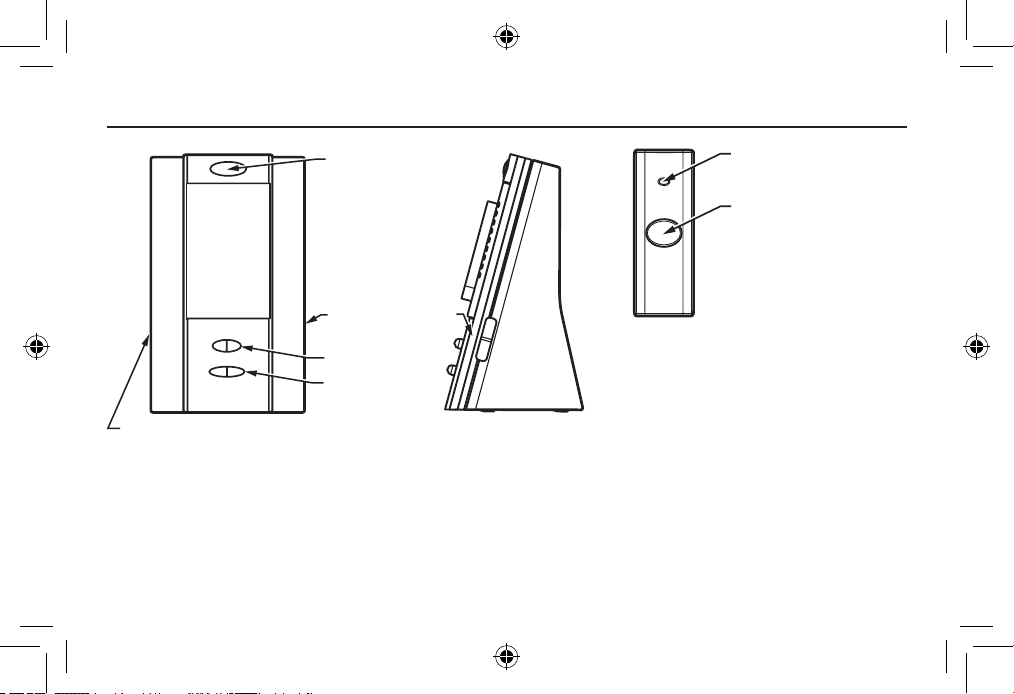
FLASHING LIGHT (FOR
RCWL210A ONLY)
VOLUME CONTROL
SWITCH
LED
PROGRAMMING
BUTTON
FLASHING LIGHT AND SOUND
SELECTION SWITCH (FOR
RCWL210A ONLY)
LED INDICATES
TRANSMITION
PUSH BUTTON
M27176
69-2112EFS_D.indd 2 12/10/2009 12:05:44 PM

RCWL200A and RCWL210A
1 69-2112EFS—07
• Chime
• Bellpush
• CR2032batteryforbellpush
• 2xscrewsforpush
• 2xwallplugs
• Adhesivepad
Youwillneed:
• 3XLR14Csize1.5VAlkaline
batteries
• A#1Philips-headscrewdriver
• Asmallflatbladedscrewdriver
• A1/4-in.(6mm)drillbit
Safety
Beforeproceedingwiththeinstallation,pleasenotethefollowingsafetywarnings:
• Alwaysfollowthemanufacturer’sadvicewhenusingpowertoolsandwear
suitableprotectiveequipment(e.g.safetygoggles)whendrillingholes,etc.
• Beforedrillingholesinwalls,checkforhiddenelectricitycablesandwaterpipes.
Theuseofacable/pipelocatorisadvisableifindoubt.
Batteries(batterypackorbatteriesinstalled)shallnotbeexposedtoexcessiveheat
suchassunshine,fireorthelike;dangerofdamageifbatteryisincorrectlyreplaced.
Replaceonlywiththesameorequivalenttype.
1. Checking Pack Contents
69-2112EFS_D.indd 1 12/10/2009 12:05:44 PM

Installation Instructions
69-2112EFS—07 2
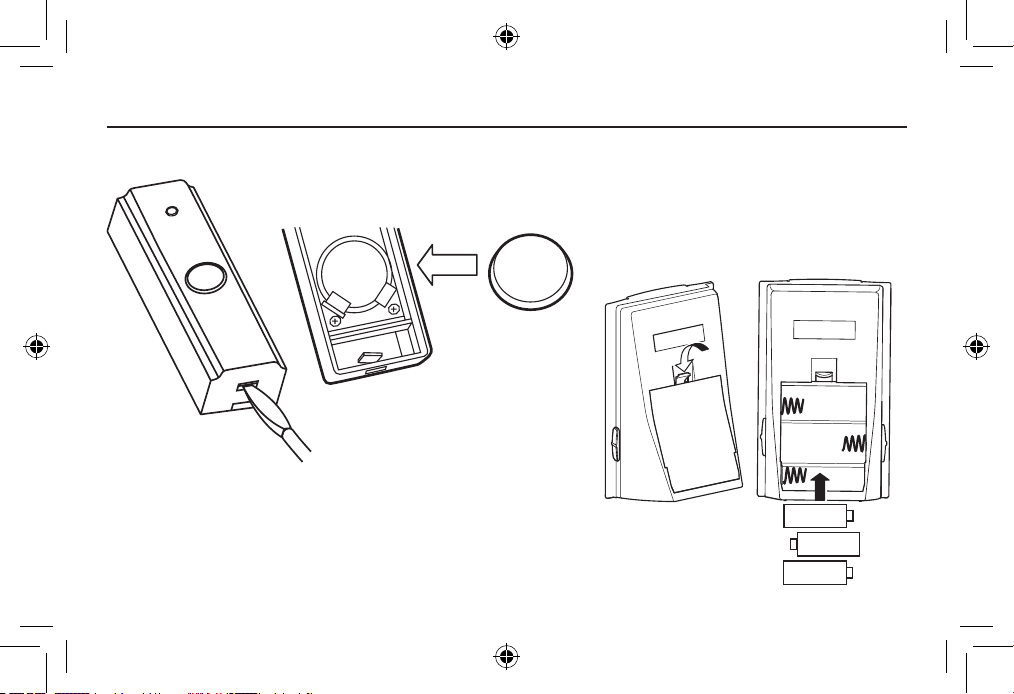
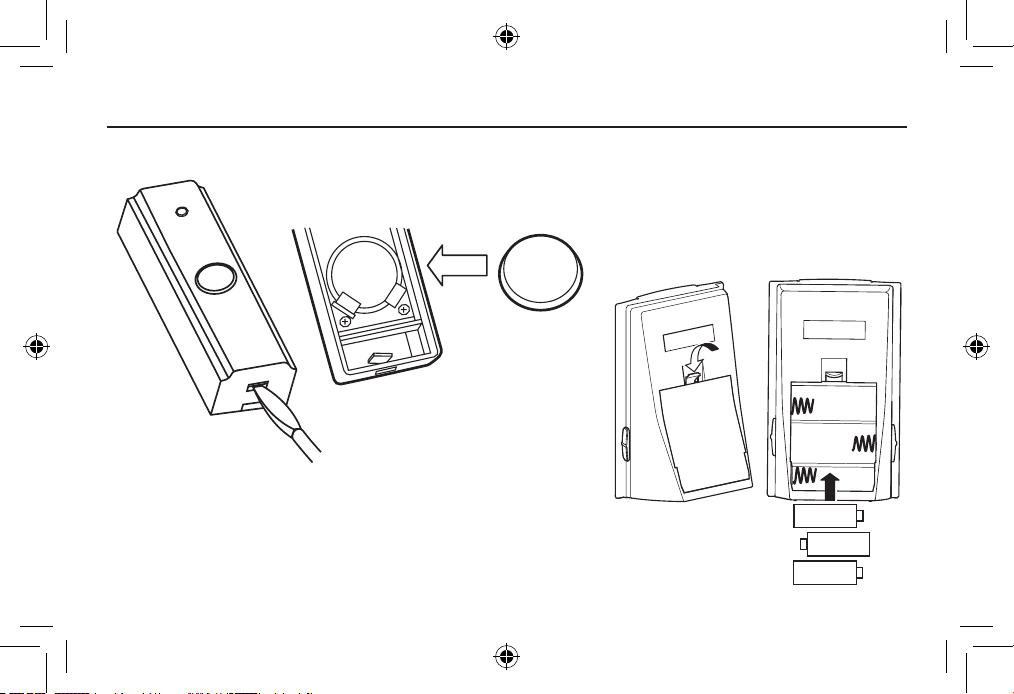
2. Installing Batteries
+
–
+
–
M27178
+
–
LR14 C SIZE
M27182
CR2032
+
CR2032
+
69-2112EFS_D.indd 2 12/10/2009 12:05:44 PM
RCWL200A and RCWL210A
3 69-2112EFS—07
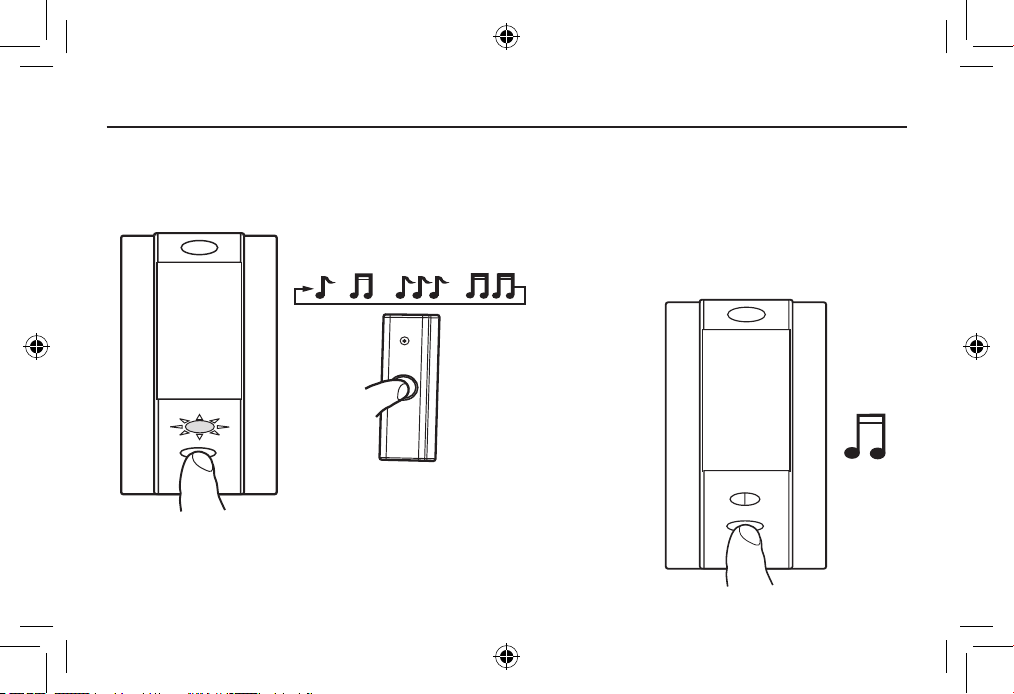
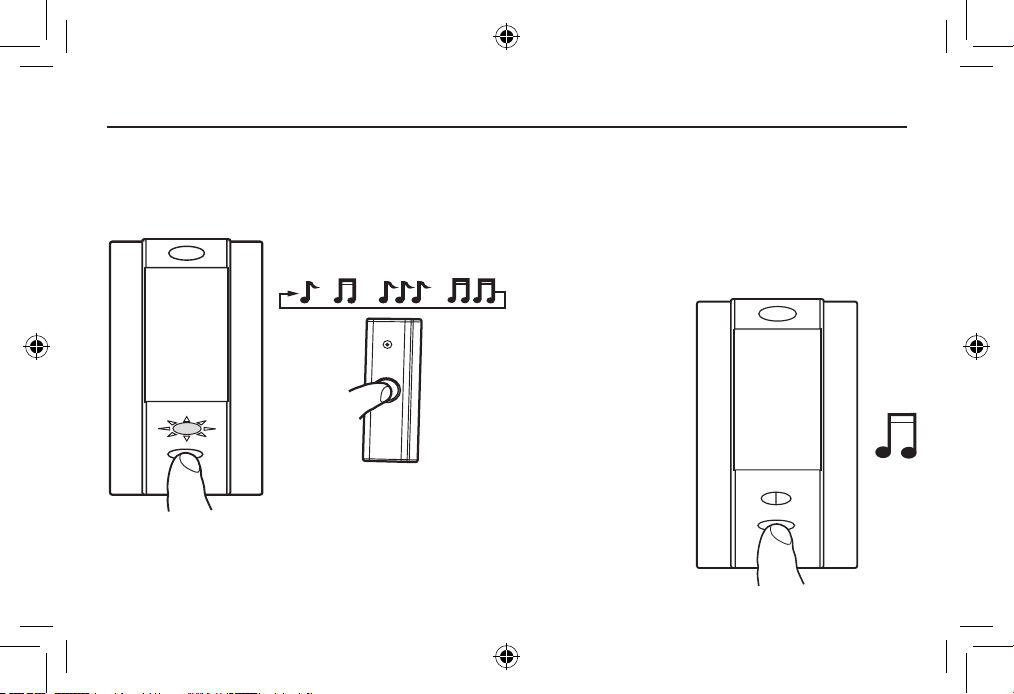
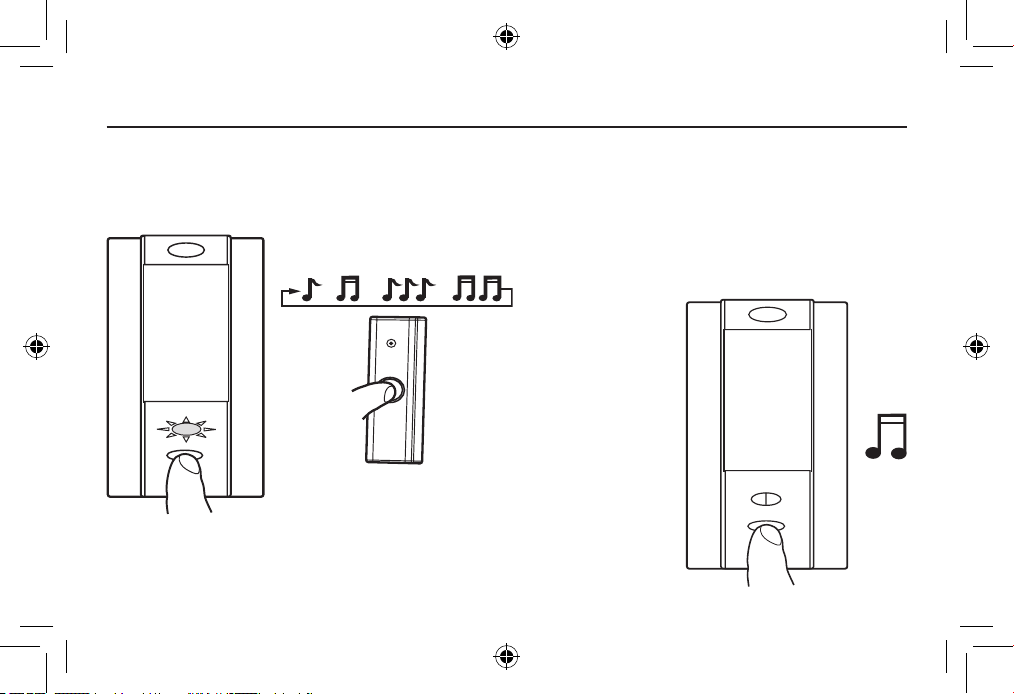
3. Change Tune or Program New Push
Pressandreleaseprogrammingbutton,LEDwillilluminate,presspushbuttontohear
thetune.Presspushbuttonagaintohearanothertune.
Tosavethetuneselected,press
andreleaseprogrammingbutton.
Note:Pressingtheprogrambuttonformorethan15sec
willeraseallmemory.Followstep3tore-program.
M27145
M27183
69-2112EFS_D.indd 3 12/10/2009 12:05:44 PM
Installation Instructions
69-2112EFS—07 4
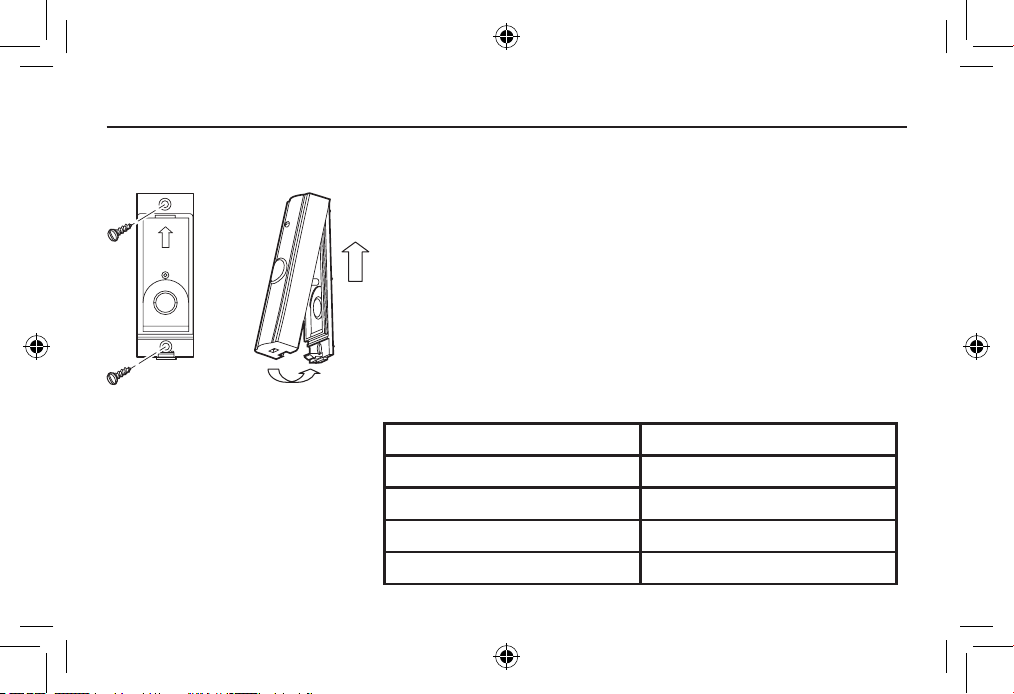
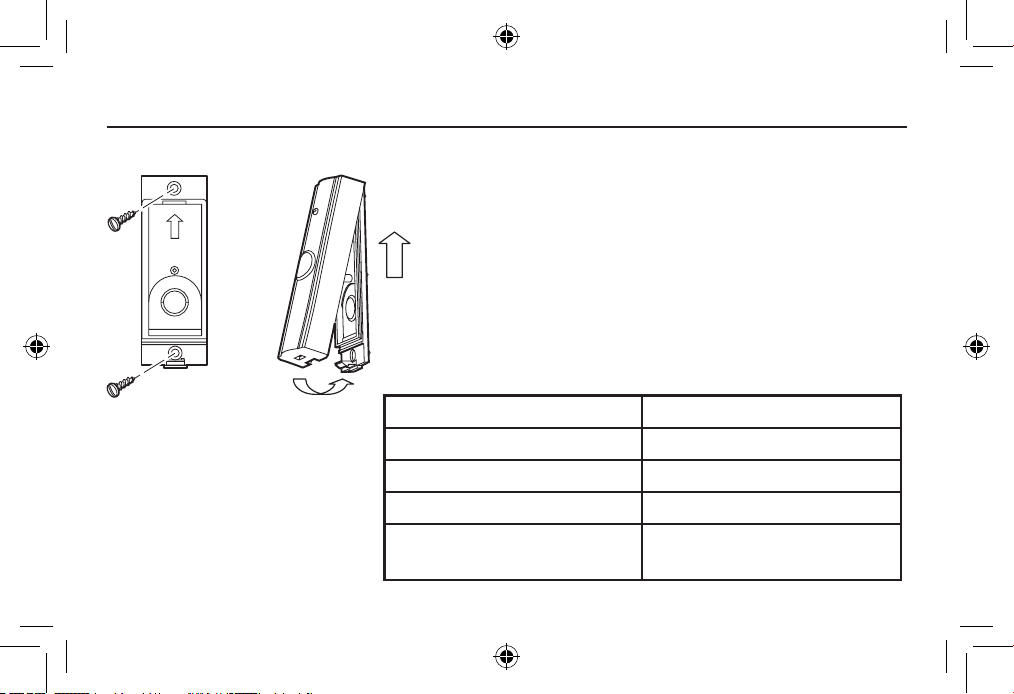
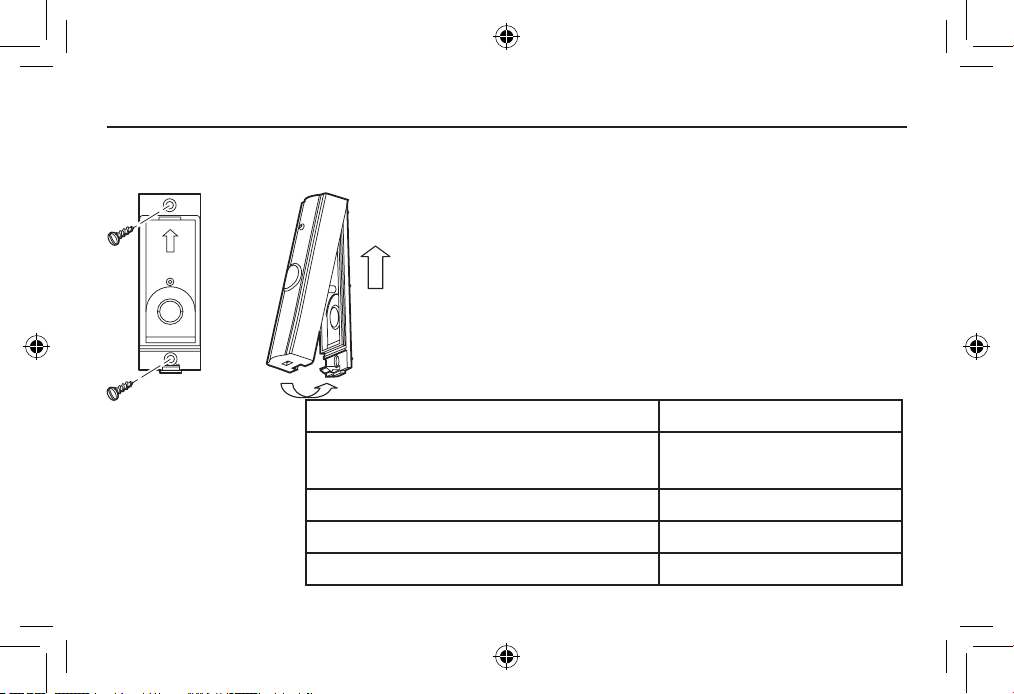
4. Install Back Cover Using Screws or Adhesive Pad Provided
TOP
TOP
M27184
Note:Beforefinalinstallationadjustdistanceandposi-
tionbetweenpushandchimetooptimizethechime
withinyourenvironment.Densewallsandmetalcan
reducerange.
Wall Type Range Reduction
Dry-linedpartitionwall 10–30%
Single-layerbrickwall 20–40%
Double-layerbrickwall 30–70%
Metalpanel/radiator 90–100%
69-2112EFS_D.indd 4 12/10/2009 12:05:44 PM

RCWL200A and RCWL210A
5 69-2112EFS—07
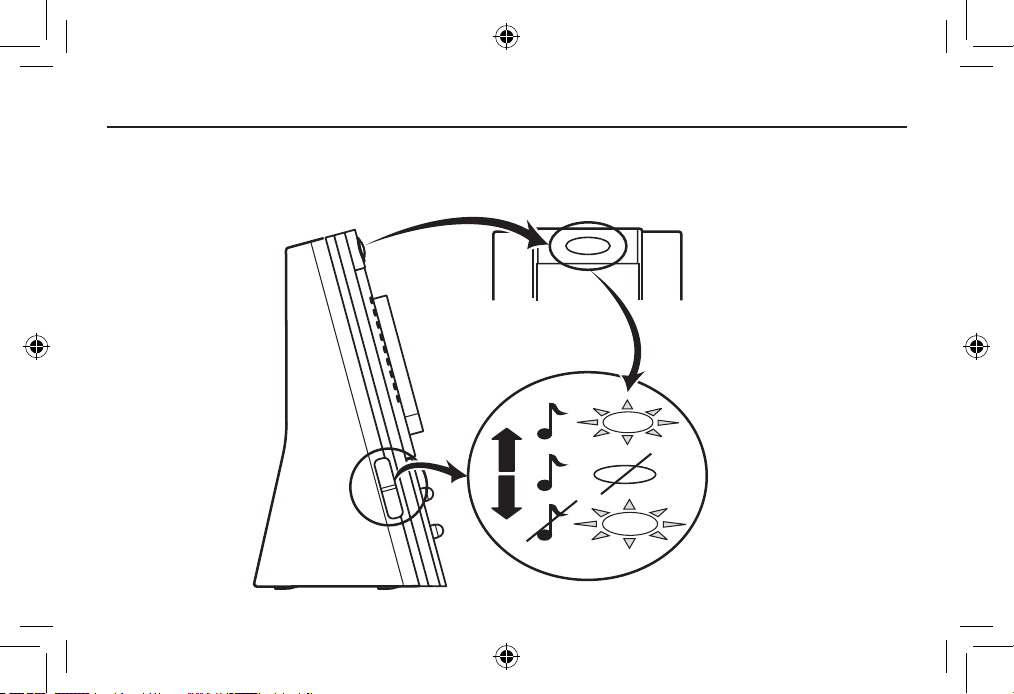
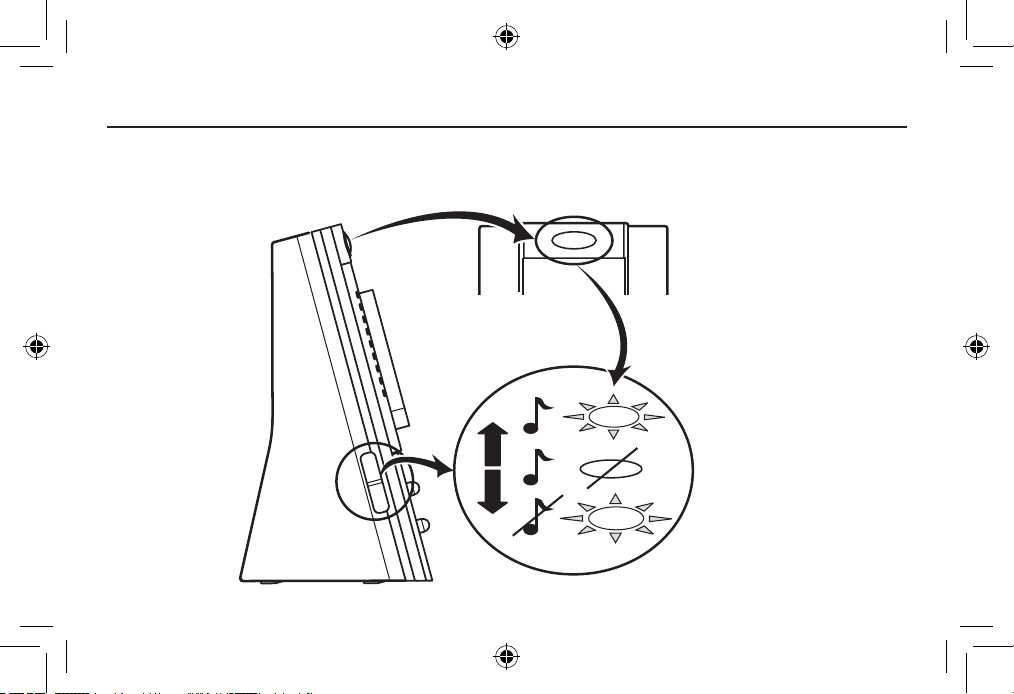
5. Volume Adjustment
69-2112EFS_D.indd 5 12/10/2009 12:05:45 PM
Installation Instructions
69-2112EFS—07 6
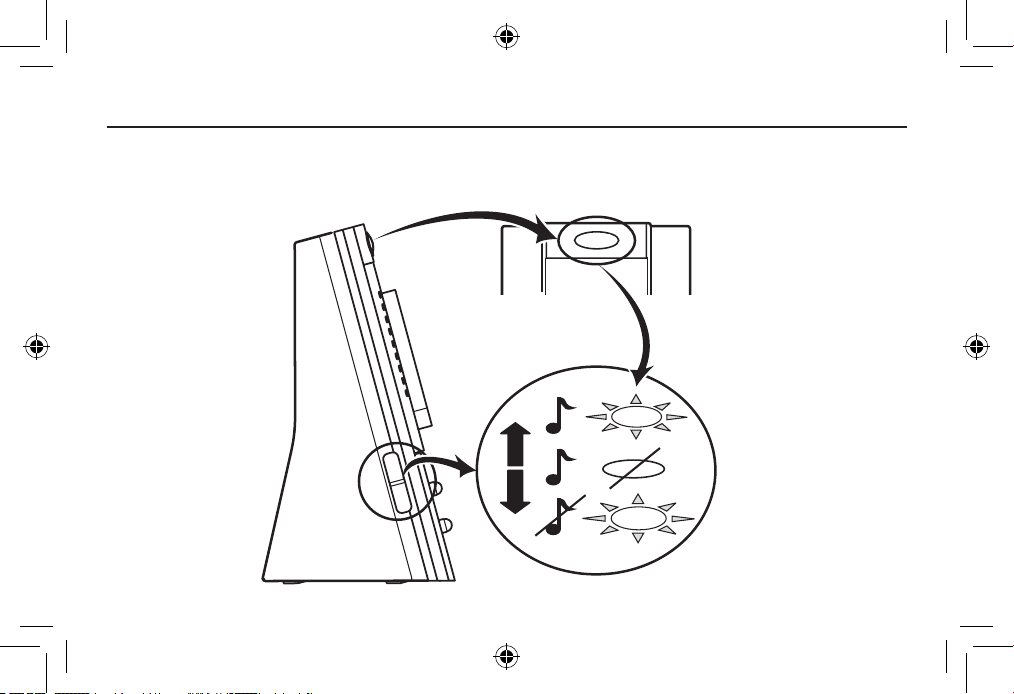
6. Strobe and Sound Selections
Lightandsoundselection(applicabletoRCWL210Aonly).
M27180
69-2112EFS_D.indd 6 12/10/2009 12:05:45 PM
RCWL200A and RCWL210A
7 69-2112EFS—07
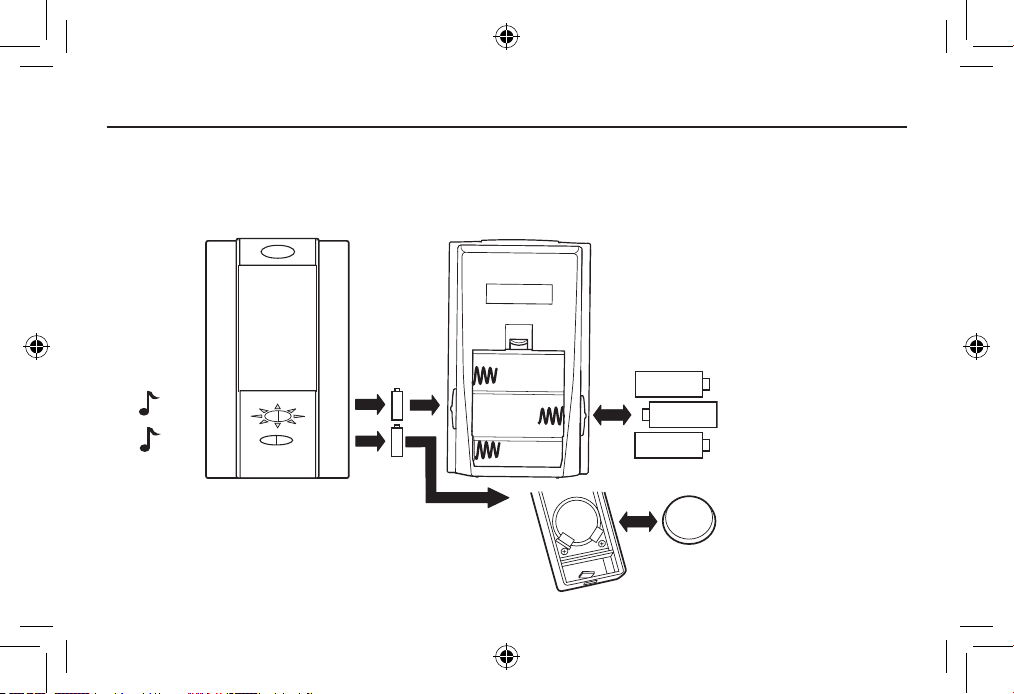
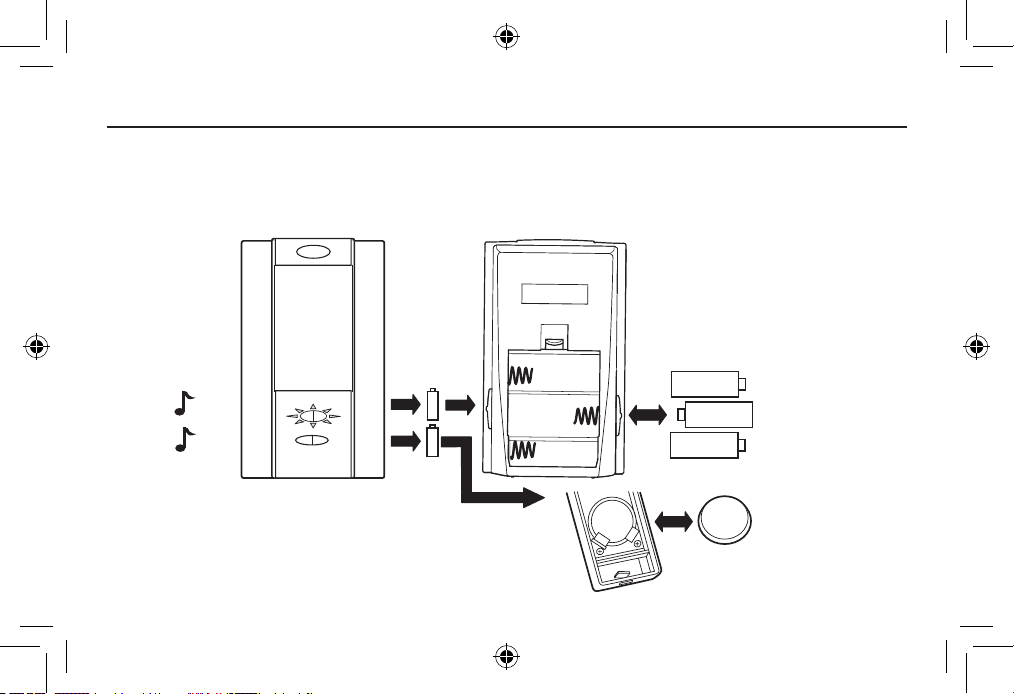
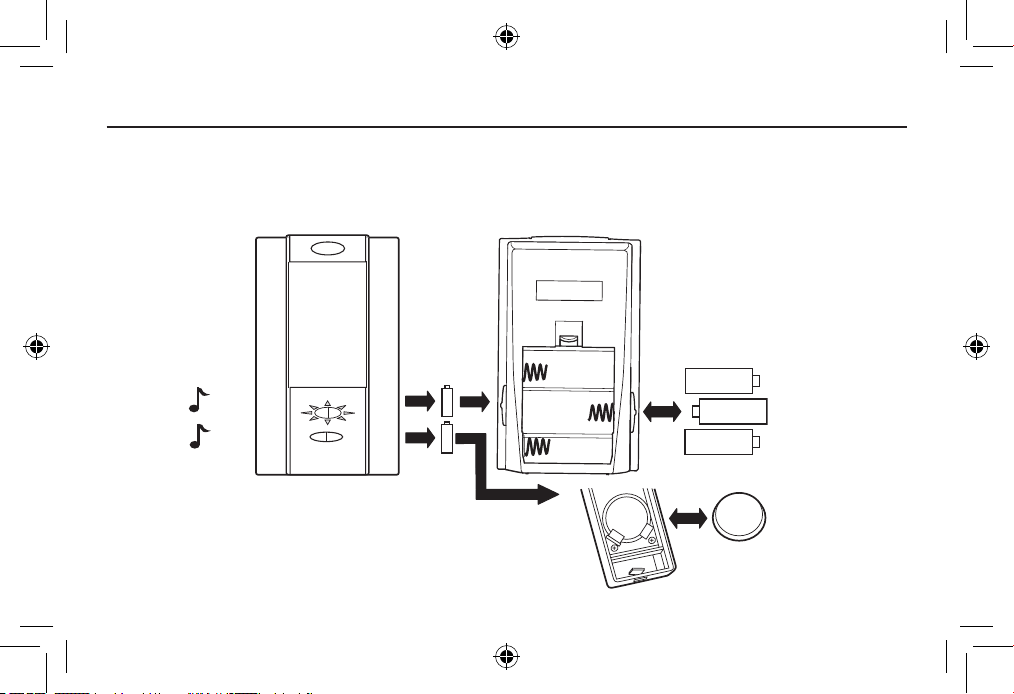
7. Low Battery Indication
Tune+2beeps+2LEDflashes=changebatteriesinchime.
Tune+3beeps+3LEDflashes=changebatteryinpush.
M27181
+
–
+
–
+
–
+
BEEP
2
+
BEEP
3
+
+
x 2
x 3
CR2032
+
CR2032
+
69-2112EFS_D.indd 7 12/10/2009 12:05:45 PM
Installation Instructions
69-2112EFS—07 8
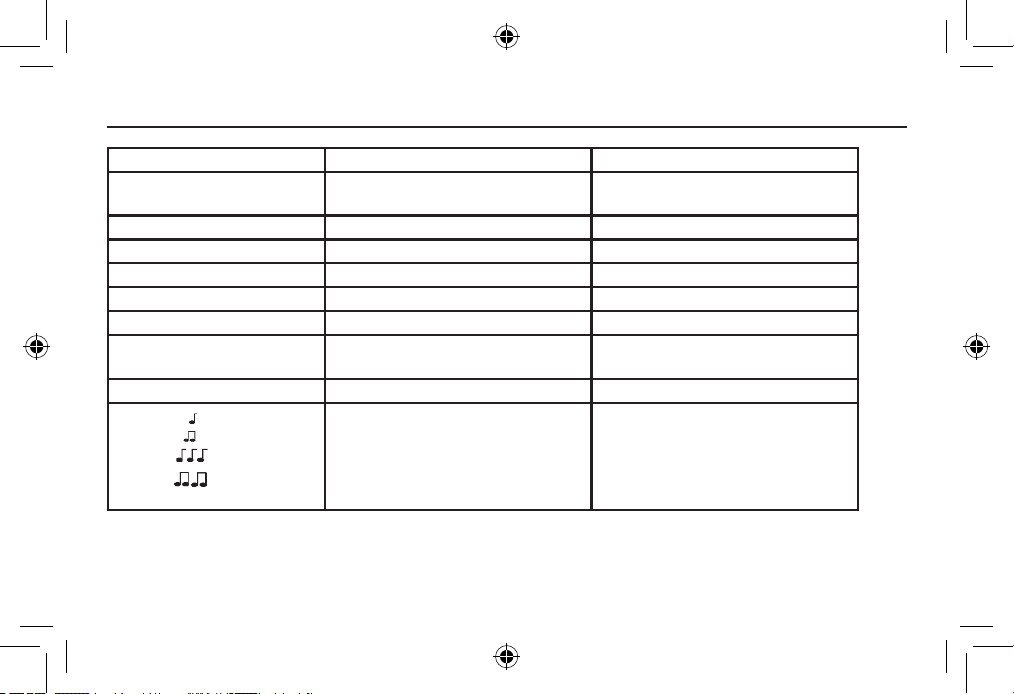
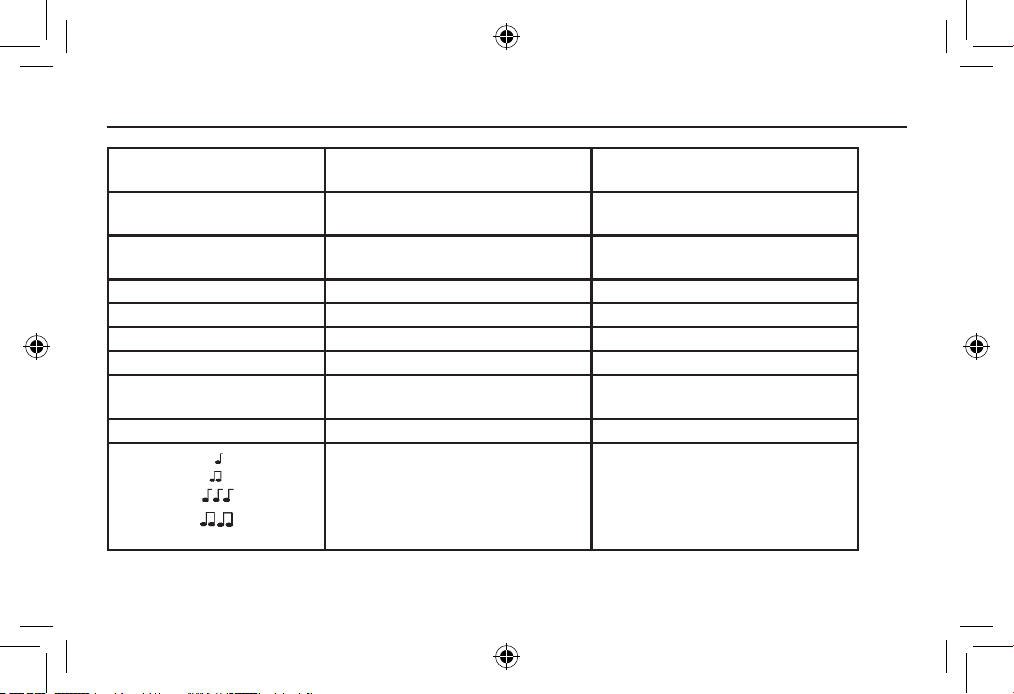
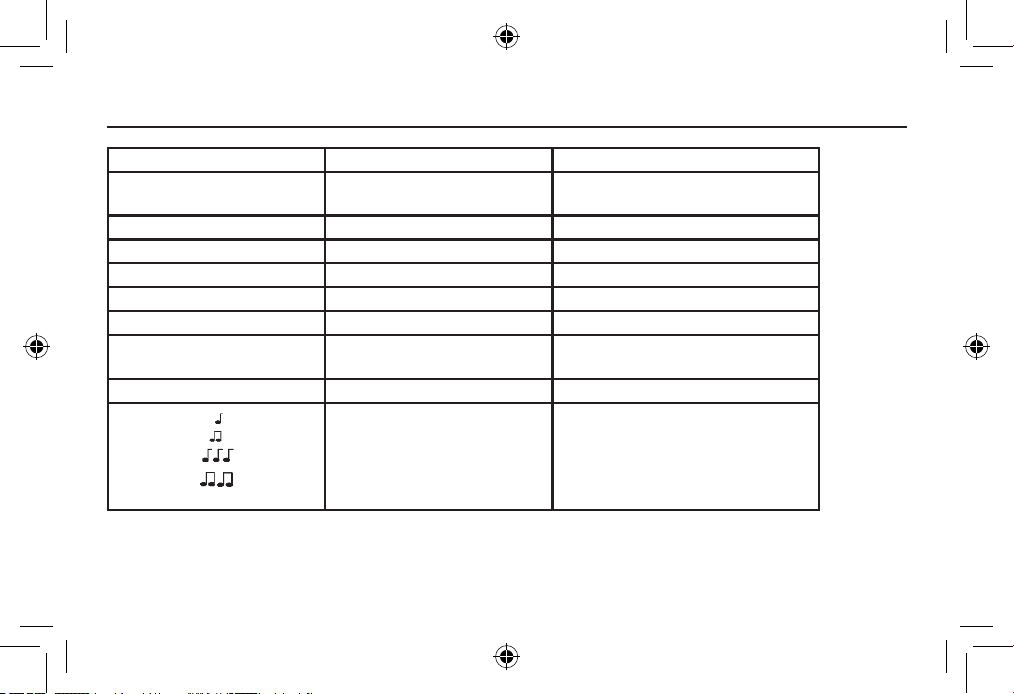
Specification Chime Bell Push
OperatingTemperature 32°Fto104°F
0°Cto+40°C
14°Fto104°F
-10°Cto+40°C
RFFrequency–US 345MHz 345MHz
Range(openfield) 200ft(61m)
SoundLevel(typical) 82dBA@3ft(1m)
RFPower <1mW
BatteryType LR14Csize CR2032
BatteryLife
(5operations/day)
12months 18months
WaterProof PassULraintest
Tunes
DingDong
4notesModern
8notesWestminster
SaxophoneSound
69-2112EFS_D.indd 8 12/10/2009 12:05:45 PM

RCWL200A and RCWL210A
9 69-2112EFS—07
Troubleshooting
Two ‘beep’ sounds are heard and LED flashes twice after the normal chime sound…
Thisindicatesalowbatteryinthechime.Installnewbatteries,typeLR14Csizealkalinebatteries.
Three ‘beep’ sounds are heard and LED flashes three times after the normal chime
sound…
Thisindicatesalowbatteryinthebellpushthatactivatedthechime.Installanewbattery,type
CR2032.
When the bell push is operated, the red confidence light does not turn on, or is only on
for a short time…
Lowbattery.Installanewbattery,typeCR2032.
The chime does not work…
• Checkthatthebatteriesarethecorrecttype.
Onlyusealkalinebatteriesforchime.
• Checkthatthebatteriesarefittedcorrectly(nowrongpolarity).
• Checkthatbatteriesarenotloose.
• Thechimecouldbeoutofrangeofthebellpush.Trythechimeinadifferentlocation.
• Thechimemightnothavelearnedtheidentityofthebellpush.Followtheprogramming
procedureinstep3.
Note:Donotpressprogrambuttonformorethan15seconds,thiswilldeleteallthememory!
Repeatprogrammingprocedureinstep3torestoreoperation.
69-2112EFS_D.indd 9 12/10/2009 12:05:45 PM

Installation Instructions
69-2112EFS—07 10
Troubleshooting
The chime does not sound…
• Checkthechimeswitchposition.
• Checkthatthevolumecontrolisnotattheminimumsetting.
Chime does not play tune selected…
Chimemightnothavelearnedthetuneselected.Followprogrammingsequenceasinstep3.
The range is reduced…
• Metalstructures,includinguPVCdoorframescanreducetherangeoftheproduct.Avoid
mountingthepushorchimeonornearmetalstructures.
• Otherequipmentcancauseradiointerferencethataffectsyourchime.
• Wallsandceilingswillreducetherange.
• Weakbatterieswillreducerange.Replaceevery12–18months.Incoldconditions,(below
41°F/5ºC),batteriesmayneedtobereplacedmoreoften.
Disposal & Recycling
Batteriesandwasteelectricalproductsshouldnotbedisposedofwithhouseholdwaste.Please
recyclewherethesefacilitiesexist.Checkwithyourlocalauthorityorretailerforrecyclingadvice.
69-2112EFS_D.indd 10 12/10/2009 12:05:45 PM

RCWL200A and RCWL210A
11 69-2112EFS—07
Guarantee
Honeywellguaranteesthisproductfor1yearfromthedateofpurchase.Proofofpurchaseis
required;thisdoesnotaffectyourstatutoryrights.Ifyourequirefurtherinformationaboutyour
product,calltheHoneywellhelplineat1-800-468-1502.
Declaration
HoneywellherebydeclaresthatthisproductcomplieswithPart15oftheFCCrulesand
IndustrialCanadastandards.Thisdeviceoperationissubjecttothefollowingtwoconditions:
(1)Thisdevicemaynotcauseharmfulinterference,and
(2)Thisdevicemustacceptanyinterferencereceived,includinginterferencethatmaycause
undesiredoperation.
Caution:
Changesormodificationnotexpresslyapprovedbythepartyresponsibleforregulatorycompli-
ancecouldvoidtheuser’sauthoritytooperatetheequipment.
69-2112EFS_D.indd 11 12/10/2009 12:05:45 PM
Honeywell International Inc.
ACS,EnvironmentalandCombustionControls
1985DouglasDrive,GoldenValley,MN55422
www.honeywell.com
®U.S.RegisteredTrademark.
©2009HoneywellInternationalInc.
69-2112EFS—07M.S.Rev.12-09
PrintedinU.S.A.onrecycled
papercontainingatleast10%
post-consumerpaperfibers.
69-2112EFS_D.indd 12 12/10/2009 12:05:45 PM

Directives
d’installation
RCWL200A et RCWL210A
Carillonportatif(51375SL;51376SL)etsonnette(51381SL)
69-2112EFS_C.indd 13 8/15/2008 7:50:59 AM
69-2112EFS—07 14
Directives d’installation
MF27177
BOUTON DE
PROGRAMMATION
BOUTON DE RÉGLAGE
DU VOLUME
VOYANT
STROBOSCOPE
(RCWL210A SEULEMENT)
BOUTON DE SÉLECTION
DU SON ET DU
STROBOSCOPE
(RCWL210 SEULEMENT)
MF27176
VOYANT – CONFIRME LA
TRANSMISSION DU SIGNAL
SONNETTE
69-2112EFS_D.indd 14 12/10/2009 12:05:46 PM

RCWL200A and RCWL210A
15 69-2112EFS—07
• Carillon
• Sonnette
• PileCR2032poursonnette
• 2pilespoursonnette
• 2chevillesd’ancrage
• Tamponadhésif
Outils:
• 3pilesalcalinesLR14,tailleC,1,5V
• Untourneviscruciformen
o
1
• Unpetittournevisàlameplate
• Unforetdemaçonneriede6mm
(1/4po)
Sécurité
Avantdecommencerl’installation,veuillezrespecterlesconsignesdesécurité
suivantes:
• Toujourssuivrelesrecommandationsdufabricantlorsqu’onutilisedesappareils
électriquesettoujoursseservird’unéquipementprotecteur(parex.deslunettes
deprotection)lorsqu’onpercedestrous,etc.
• Avantdeperceruntroudansunmur,vérifierqu’iln’yapasdecanalisationsou
decâblesélectriquesencastrés.Encasdedoute,ilestconseilléd’utiliserun
appareilpermettantdedétecterlescâbles/tuyaux.
Lespilesnedoiventpasêtreexposéesàunechaleurexcessivecommelesrayonsdu
soleil,lefeuoutoutautresourcedechaleursemblable;risqued’endommagementsi
lespilesnesontpasinstalléescorrectement.Àremplaceraveclemêmetypedepiles
oudespileséquivalentesseulement.
1. Vérification du contenu de l’emballage
69-2112EFS_D.indd 15 12/10/2009 12:05:46 PM
69-2112EFS—07 16
Directives d’installation
2. Insertion des piles
+
–
+
–
M27178
+
–
LR14 C SIZE
M27182
CR2032
+
CR2032
+
69-2112EFS_D.indd 16 12/10/2009 12:05:46 PM
RCWL200A and RCWL210A
17 69-2112EFS—07
3. Modifier la mélodie ou programmer une nouvelle sonnette
Appuyersurleboutondeprogrammationetlerelâcher;levoyants’allumera,et
ilfaudraensuiteappuyersurleboutondelasonnettepourentendrelamélodie.
Appuyerànouveausurleboutondelasonnettepourentendreuneautremélodie.
Poursauvegarderlamélodiesélectionnée
appuyersurleboutondeprogrammation
etlerelâcher.
Remarque :Lefaitd’appuyersurleboutondeprogrammation
pendantplusde15secondesaurapoureffetd’effacertoutela
mémoire.Suivrel’étape3pourreprogrammer.
M27145
M27183
69-2112EFS_D.indd 17 12/10/2009 12:05:46 PM
69-2112EFS—07 18
Directives d’installation
4. Installation de la plaque arrière à l’aide de vis ou du tampon adhésif fourni
Remarque :Avantd’installerlasonnette,
ajustersapositionetvérifierladistanceentre
lasonnetteetlecarillonpouroptimiserlefonc-
tionnementdusystème.
Type de mur Réduction de la portée
Murdepartitionengypse 10–30%
Murdebriques,unrang 20–40%
Murdebriques2rangs 30–70%
Panneaumétallique/
Radiateur
90–100%
HAUT
HAUT
MF27184
69-2112EFS_D.indd 18 12/10/2009 12:05:46 PM

RCWL200A and RCWL210A
19 69-2112EFS—07
5. Réglage du volume
69-2112EFS_D.indd 19 12/10/2009 12:05:46 PM
69-2112EFS—07 20
Directives d’installation
6. Sélection du stroboscope et du son
Sélectiondustroboscopeetduson(RCWL210Aseulement.
M27180
69-2112EFS_D.indd 20 12/10/2009 12:05:46 PM
RCWL200A and RCWL210A
21 69-2112EFS—07
7. Indicateur de piles faibles
Mélodie+2bips+voyantquiclignote2fois=remplacerlespilesducarillon.
Mélodie+3bips+voyantquiclignote3fois=remplacerlespilesdelasonnette.
M27181
+
–
+
–
+
–
+
BEEP
2
+
BEEP
3
+
+
x 2
x 3
CR2032
+
CR2032
+
69-2112EFS_D.indd 21 12/10/2009 12:05:46 PM
69-2112EFS—07 22
Directives d’installation
Caractéristiques
techniques
Carillon Sonnette
Températuredeservice 0°Cto+40°C
32°Fto104°F
-10°Cto+40°C
14°Fto104°F
FréquenceRF-États-
Unis
345MHz 345MHz
Portée(àcielouvert) 61m(200pi)
Niveausonore(type) 82dBA@1m(3pi)
Puissanceémise <1mW
Typedepile LR14tailleC CR2032
Duréedeviedelapile
(5déclenchements/jour)
12mois 18 mois
Infiltrationd’eau ÉpreuvedepluieUL
Mélodies
Dingdong
4notesmodernes
8notesWestminster
Saxophone
69-2112EFS_D.indd 22 12/10/2009 12:05:46 PM

RCWL200A and RCWL210A
23 69-2112EFS—07
Dépannage
Deux bips retentissent et le voyant clignote deux fois après le carillon normal…
Cesignalindiquequelespilesducarillonsontfaibles.Installerdespilesalcalinesneuvesde
typeLR14,detailleC.
Trois bips retentissent et le voyant clignote trois fois après le carillon normal…
Celasignifiequelapiledelasonnettequiadéclenchélecarillonestfaible.Installerunenou-
vellepiledetypeCR2032.
Lorsque la sonnette est utilisée, la lampe témoin rouge ne s’allume pas ou ne s’allume
qu’un court moment…
Pilefaible.InstallerunenouvellepiledetypeCR2032.
Le carillon ne fonctionne pas…
• Vérifierquelespilessontbiendubontype.
N’utiliserquedespilesalcalines
• Vérifierquelespilessontcorrectementinstallées(etquelapolaritéestrespectée).
• Vérifierquelespilesnesontpaslâches.
• Ilestpossiblequelecarillonsoithorsdeportéedelasonnette.Essayerlecarillonàunautre
emplacement.
• Lecarillonn’apeut-êtrepasenregistrél’identitédelasonnette.Suivrelaprocédurede
programmationàl’étape3.
Remarque :Sil’onappuiesurleboutondeprogrammationplusde15secondes,toutela
mémoires’effacera.Répéterlesétapesdeprogrammationdécritesaunuméro3pourrétablirle
fonctionnement.
69-2112EFS_D.indd 23 12/10/2009 12:05:46 PM

69-2112EFS—07 24
Directives d’installation
Le carillon ne sonne pas…
• Vérifierlapositiondel’interrupteurducarillon.
• Vérifierquelevolumen’estpasrégléauminimum.
Le carillon ne fait pas entendre la mélodie sélectionnée…
Lecarillonn’apasapprislamélodiesélectionnée.Suivrelesétapesdeprogrammationdécrites
aunuméro3.
La portée est réduite…
• Lesstructuresmétalliques,notammentlescadresdefenêtreetdeporteenPVC-U,peuvent
réduirelaportéeduproduit.Éviterdemonterlasonnetteoulecarillonsurdesstructures
métalliquesouàproximité.
• D’autresappareilsengendrentdesinterférencesradioquiaffectentlecarillon.
• Lesmursetlesplafondsréduisentlaportéedel’appareil.
• Despilesfaiblesréduisentégalementlaportée.Remplacerlespilestousles12à18
mois.Danslesrégionsfroides(endessousde+5°C/41ºF),lespilesaurontbesoind’être
remplacéesplussouvent.
Dépannage
69-2112EFS_D.indd 24 12/10/2009 12:05:47 PM

RCWL200A and RCWL210A
25 69-2112EFS—07
Mise au rebut et recyclage
Miseaurebutetrecyclage.Prièrederecyclerpartoutoùlesservicesadéquatsexistent.
Communiqueraveclamunicipalitéouledétaillantpourobtenirdesconseilsenmatièrederecy-
clage.
Déclaration
Parlaprésente,Honeywelldéclarequececarillonsansfilestconformeauxexigen-cesdela
partie15desrèglesdelaFCCetauxnormesd’IndustrieCanada.Lefonctionnementdecesys-
tèmeestassortiauxdeuxconditionssuivantes:
(1)L’appareilnepeutcauserd’interférencesnuisibles,et
(2)L’appareildoitaccepterlesinterférencesreçues,ycompriscellesquipourraientnuireàson
fonctionnement.
Miseengarde:Toutemodificationquin’estpasautoriséeexpressémentparlapartierespon-
sabledelaconformitédel’appareilauxrèglesenvigueurpourraitrendrel’utilisateurinapteà
fairefonctionnerlematériel.
69-2112EFS_D.indd 25 12/10/2009 12:05:47 PM

Honeywell International Inc.
SRA,Régulateursd’ambianceetdecombustion
1985DouglasDrive,GoldenValley,MN55422
www.honeywell.com
®MarqueenregistréedesÉ.-U.
Copyright©2009HoneywellInternationalInc.
69-2112EFS—07M.S.Rev.12-09
ImpriméauxÉ.-U.surdupapierrecyclé
contenantaumoins10%defibresde
papierrecycléesaprèsconsommation.
Garantie
Honeywellgarantitceproduitpendantuneduréedeunanàpartirdeladated’achat.Lapreuve
d’achatseraexigéesansquecelan’affectelesdroitsquivoussontaccordésparlaloi.Pour
obtenirdeplusamplesinformationsconcernantnotreproduit,prièredecommuniqueravecles
ServicesàlaclientèledeHoneywellencomposantle1-800-468-1502.
69-2112EFS_D.indd 26 12/10/2009 12:05:47 PM
Instrucciones de
Instalación
RCWL200A y RCWL210A
Campanillaportátil(51375SL;51376SL)conpulsador(51381SL)
69-2112EFS_C.indd 27 8/15/2008 7:51:01 AM
69-2112EFS—07 28
Instrucciones de Instalación
MS27177
BOTÓN DE
PROGRAMACIÓN
INTERRUPTOR DE
CONTROL DE VOLUMEN
LED
LUZ ESTROBOSC
Ó
PICA
(PARA RCWL210A
ÚNICAMENTE)
LUZ ESTROBOSCÓPICA E
INTERRUPTOR DE SELECCIÓN
DE SONIDO
(PARA RCWL210 ÚNICAMENTE)
MS27176
BOTÓN PULSADOR
LED – INDICA ACTIVACI
ÓN
DE TRANSMISIÓN
69-2112EFS_D.indd 28 12/10/2009 12:05:47 PM

29 69-2112EFS—07
RCWL200A y RCWL210A
• Campanilla
• Pulsadordeltimbre
• CR2032bateríaparaelpulsadordel
timbre
• 2tornillosdefijaciónporpulsador
• 2enchufesdepared
• Almohadillaadhesiva
Necesitará:
• 3bateríasalcalinasLR14tamañoC
de1,5V
• UndestornilladorPhilipsNº1
• Destornilladorpequeñodehojaplana
• Unabrocaparataladrode1/4in
1. Verificación del contenido del empaque
Seguridad
Antesdeprocederconlainstalación,porfavorobservelassiguientesadvertencias
sobreseguridad:
• Siempresigalasrecomendacionesdelfabricantecuandoutiliceherramientas
eléctricasyutiliceequipoprotectoradecuado(porej.:gafasdeseguridad)
cuandotaladreagujeros,etc.
• Antesdetaladraragujerosenlasparedes,revisesiexistencablesde
electricidadotuberíasdeaguaocultos.Elusodeunlocalizadordecables/
tuberíaspuedeseraconsejablesitienedudas.
Lasbaterías(elpaquetedebateríasolasbateríasinstaladas)nodebenexponerse
alcalorexcesivotalcomoeldelaluzsolar,elfuegoosemejante;Peligrodedaños
silabateríasereemplazaincorrectamente.Reemplazosóloconelmismotipouotro
equivalente.
69-2112EFS_D.indd 29 12/10/2009 12:05:47 PM
69-2112EFS—07 30
Instrucciones de Instalación
2. Instalación de baterías
+
–
+
–
M27178
+
–
LR14 C SIZE
M27182
CR2032
+
CR2032
+
69-2112EFS_D.indd 30 12/10/2009 12:05:47 PM
31 69-2112EFS—07
RCWL200A y RCWL210A
3. Cambie la melodía o programe el pulsador nuevo
Presioneysuelteelbotóndeprogramación,elLEDseiluminará,presioneelpulsador
paraescucharlamelodía.Presioneelbotónpulsadornuevamenteparaescucharotra
melodía.
Paraguardarlamelodía
seleccionadapresioneysuelte
elbotóndeprogramación.
Nota:Presionarelbotóndeprogramacióndurantemásde
15segundosborrarátodalamemoria.Sigaelpaso3para
reprogramar.
M27145
M27183
69-2112EFS_D.indd 31 12/10/2009 12:05:48 PM
69-2112EFS—07 32
Instrucciones de Instalación
4. Instale la cubierta posterior utilizando tornillos o la almohadilla adhesiva que
se suministra
Nota:Antesdelainstalaciónfinalreguleladistancia
ylaposiciónentreelpulsadorylacampanillapara
optimizarlacampanillaensuambiente.Lasparedes
gruesasyelmetalpuedendisminuirelalcance.
Tipo de pared Disminución del rango
Pareddetabiquesdivisorioscon
revestimientoseco
10–30%
Paredconhilerasencilladeladrillos 20–40%
Paredconhileradobledeladrillos 30–70%
Paneldemetal/radiador 90–100%
PA RTE
SUPERIOR
PARTE
SUPERIOR
MS27184
69-2112EFS_D.indd 32 12/10/2009 12:05:48 PM

33 69-2112EFS—07
RCWL200A y RCWL210A
5. Regulación de volumen
69-2112EFS_D.indd 33 12/10/2009 12:05:48 PM
69-2112EFS—07 34
Instrucciones de Instalación
6. Luz estroboscópica y surtido de sonidos
Luzysurtidodesonidos(aplicaaRCWL210Aúnicamente).
M27180
69-2112EFS_D.indd 34 12/10/2009 12:05:48 PM
35 69-2112EFS—07
RCWL200A y RCWL210A
7. Indicación de batería baja
Melodía+2pitidos+2destellosdelLED=cambiodebateríasenlacampanilla.
Melodía+3tonos+3destellosdelLED=cambielasbateríasdelacampanilla.
M27181
+
–
+
–
+
–
+
BEEP
2
+
BEEP
3
+
+
x 2
x 3
CR2032
+
CR2032
+
69-2112EFS_D.indd 35 12/10/2009 12:05:48 PM
69-2112EFS—07 36
Instrucciones de Instalación
Especificación Campanilla Pulsador del timbre
Temperaturade
funcionamiento
32°Fa104°F
0°Ca+40°C
14°Fa104°F
-10°Ca+40°C
FrecuenciaRF–US 345MHz 345MHz
Alcance(campo abierto) 200ft(61m)
Niveldesonido(promedio) 82dBAa3ft(1m)
PotenciaRF <1mW
Tipodebatería LR14tamañoC CR2032
Vidadelabatería
(5activacionespordía)
12meses 18 meses
Apruebadelluvia PasalapruebadelluviaUL
Melodías
DingDong
4notasModerna
8notasWestminster
Sonidodesaxofón
69-2112EFS_D.indd 36 12/10/2009 12:05:48 PM

37 69-2112EFS—07
RCWL200A y RCWL210A
Localización y solución de problemas
Se escuchan dos “tonos” y el LED destella dos veces después del sonido normal de la
campanilla...
Estoindicabateríabajaenlacampanilla.Instalenuevasbaterías,tipoLR14tamañoCalcalinas.
Se escuchan tres “tonos” y el LED destella tres veces después del sonido normal de la
campanilla...
Estoindicaquelabateríadelpulsadordeltimbrequeactivalacampanillaestábaja.Coloque
unanuevabateríatipoCR2032.
Cuando se acciona el pulsador del timbre, la luz roja de confirmación no se enciende, o
se enciende únicamente por poco tiempo...
Bateríabaja.ColoqueunanuevabateríatipoCR2032.
La campanilla no funciona...
• Verifiquequelasbateríasseandeltipoadecuado.Utiliceúnicamentebateríasalcalinasparala
campanilla.
• Compruebequelasbateríasesténcolocadascorrectamente(noconlapolaridaderrónea).
• Verifiquequelasbateríasnoesténflojas.
• Lacampanillapodríaestarfueradelalcancedelpulsadordeltimbre.Pruebelacampanillaen
unlugardiferente.
• Lacampanillapodríanohabermemorizadolaidentidaddelpulsadordeltimbre.Sigael
procedimientodeprogramaciónenelpaso3.
Nota:¡Nopresioneelbotóndeprogramacióndurantemásde15segundosporqueborrarátoda
lamemoria!Repitaelprocedimientodeprogramacióndelpaso3pararestablecerelfunciona-
miento.
69-2112EFS_D.indd 37 12/10/2009 12:05:48 PM
69-2112EFS—07 38
Instrucciones de Instalación
Localización y solución de problemas
La campanilla no suena...
• Verifiquelaposicióndelinterruptordelacampanilla.
• Verifiquequeelcontroldevolumennoestéenlaposiciónmínima.
La campanilla no reproduce la melodía seleccionada…
Lacampanillapodríanohabermemorizadolamelodíaseleccionada.Sigalasecuenciadepro-
gramacióncomoenelpaso3.
Se ha reducido el alcance...
• Lasestructurasmetálicas,incluyendolosmarcosdepuertauPVCpuedendisminuirelalcancedel
producto.Evitemontarelpulsadorolacampanillaenestructurasmetálicasocercadeellas.
• Otrosequipospuedenocasionarinterferenciaderadioqueafectesucampanilla.
• Lasparedesylostechosdisminuyenelalcance.
• Lasbateríasconpocacargadisminuyenelalcance.Cambiecada12–18meses.En
temperaturasfrías(inferioresa5ºC/41ºF),lasbateríaspodríannecesitarreemplazarsecon
mayorfrecuencia.
Desecho y reciclaje
Lasbateríasylosdesechosprocedentesdeproductoseléctricosnodebencolocarseconlos
residuosdomésticos.Porfavorrecicledondehayatalesinstalaciones.Verifiqueconlasautori-
dadeslocalesoeldistribuidorladisponibilidaddelserviciodereciclaje.
69-2112EFS_D.indd 38 12/10/2009 12:05:48 PM

39 69-2112EFS—07
RCWL200A y RCWL210A
Garantía
Honeywellgarantizaesteproductoporellapsode1añoapartirdelafechadecompra.La
pruebadecompraesnecesaria;estonoafectasusderechoslegales.Sinecesitamayorinfor-
maciónsobresuproducto,llamealalíneadeayudadeHoneywellal1-800-468-1502.
Declaración
HoneywellporlapresentedeclaraqueesteproductocumpleconlaParte15delasregulaciones
FCCylasnormasindustrialesdeCanadá.Elfuncionamientodeestedispositivoestásujetoa
lassiguientesdoscondiciones:
(1)Estedispositivonodebecausarinterferencianociva,y
(2)Estedispositivodeberáaceptarcualquierinterferenciaquesereciba,incluyendolainterfer-
enciaquepudiesecausarelfuncionamientonodeseado.
Precaución:
Loscambiosomodificacionesquenohayansidoexpresamenteaprobadosporlaparterespon-
sabledelacatamientoalasregulacionespodríananularlaautoridaddelusuarioparaoperarel
equipo.
69-2112EFS_D.indd 39 12/10/2009 12:05:48 PM

69-2112EFS—07 40
Instrucciones de Instalación
69-2112EFS_D.indd 40 12/10/2009 12:05:48 PM

41 69-2112EFS—07
RCWL200A y RCWL210A
69-2112EFS_D.indd 41 12/10/2009 12:05:48 PM
Honeywell International Inc.
ACS,EnvironmentalandCombustionControls
1985DouglasDrive,GoldenValley,MN55422
www.honeywell.com
ImpresoenlosEE.UU.,enpapel
recicladoquecontieneporlomenos
un10%defibrasdepapelreciclable.
®MarcaregistradadelosEE.UU.
©2009HoneywellInternationalInc.
69-2112EFS—07M.S.Rev.12-09
69-2112EFS_D.indd 42 12/10/2009 12:05:48 PM